gentle yoga for beginners - stress -...
TRANSCRIPT

GENTLE YOGA FOR BEGINNERS
Volume 1
Version date: July 2003

i
Disclaimer
This document was prepared by Courtney Amo for students participating in the Gentle Yoga for Beginners
class offered at the Sandy Hill Community Health Centre.
It is meant to provide students with additional guidance on postures practiced during the class, so that they may
be practiced at home.
It is not meant to be stand-alone tool for Yoga instruction, or to replace the guidance of a qualified Yoga
teacher.
This document is based on knowledge and information obtained through formal instruction, key Yoga texts, as well as reputable websites on Yoga. It does not however claim to be flawless and should not be interpreted as such; comments
and suggestions for improvements are welcomed and encouraged ([email protected]).
Acknowledgements
I would like to personally thank the Sandy Hill Community Health Centre for allowing me to share
Yoga with its wonderful clientele.
I would also like to thank the beautiful models who have graciously volunteered their time and energy
to the photos contained within this document.
The models are:
Sylva Broulik Amiee Ippersiel
Dominique Lamarre Audrey Vermette
and Tara Vicckies
ii
Table of Contents
Disclaimer .................................................................................. i
Acknowledgements ...................................................................... i
Course Objectives....................................................................... 1
What is Yoga? ............................................................................ 2
Stretches and Warm-up............................................................... 3
Breathing................................................................................... 3
Postures .................................................................................... 4 Mountain Pose (Tadasana).............................................................................4 Tree Pose (Vrksasana)...................................................................................5 Standing Forward Bend (Uttanasana) .............................................................6 Chair Pose (Utkatasana) ................................................................................7 Half-Moon Pose (Ardha Chandrasana) .............................................................8 Mini Sun Salutation (Mini Surya Namaskar)....................................................9 Table Pose (Svanasana) ...............................................................................10 Cat Pose (Marjariasana) ..............................................................................11 Cobra Pose (Bhujangasana)..........................................................................12 Child’s Pose (Balasana) ...............................................................................13 Head-to-Knee Forward Bend (Janu Sirsasana) ...............................................14 Seated Forward Bend (Paschimottanasana)...................................................15 Easy Pose (Sukhasana)................................................................................16 Crossed-Legs Twist (Parivrtta Siddhasana)....................................................17 Corpse Pose (Savasana)...............................................................................18
Appendix ..................................................................................19 References ................................................................................................19 Online Resources .......................................................................................20 Videos/DVDs .............................................................................................20 Yoga in Ottawa ..........................................................................................21
1
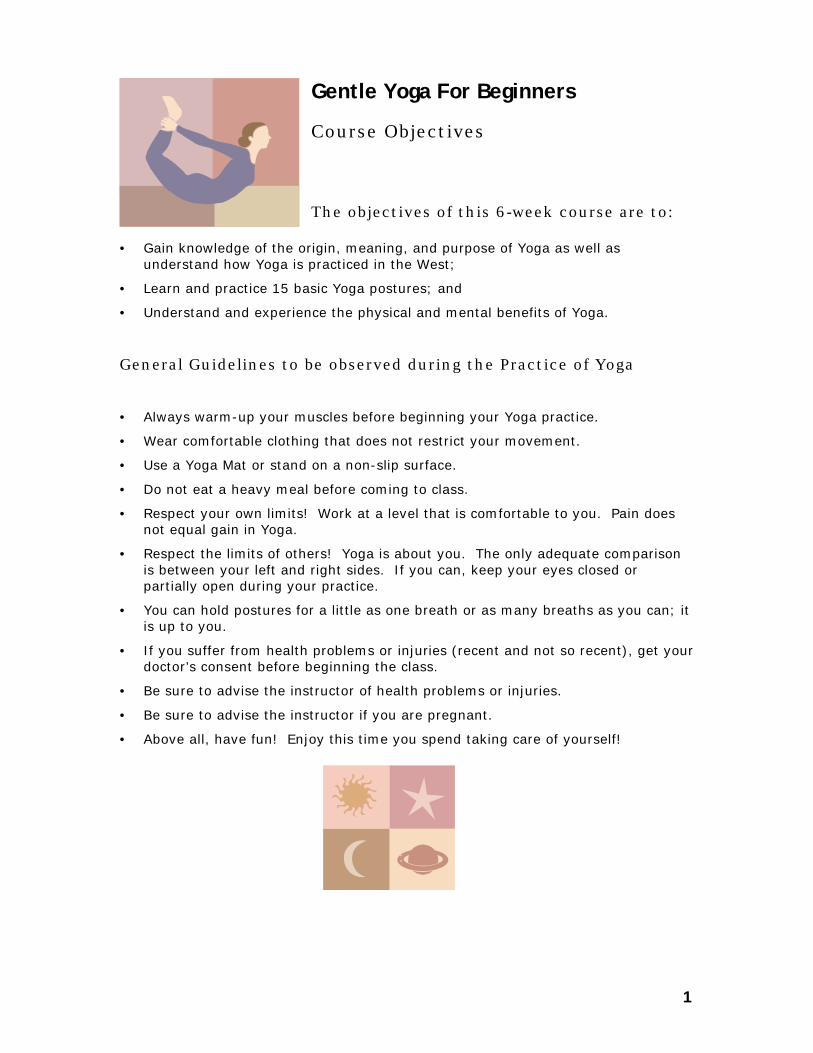
Gentle Yoga For Beginners
Course Objectives
The objectives of this 6-week course are to:
• Gain knowledge of the origin, meaning, and purpose of Yoga as well as understand how Yoga is practiced in the West;
• Learn and practice 15 basic Yoga postures; and
• Understand and experience the physical and mental benefits of Yoga.
General Guidelines to be observed during the Practice of Yoga • Always warm-up your muscles before beginning your Yoga practice.
• Wear comfortable clothing that does not restrict your movement.
• Use a Yoga Mat or stand on a non-slip surface.
• Do not eat a heavy meal before coming to class.
• Respect your own limits! Work at a level that is comfortable to you. Pain does not equal gain in Yoga.
• Respect the limits of others! Yoga is about you. The only adequate comparison is between your left and right sides. If you can, keep your eyes closed or partially open during your practice.
• You can hold postures for a little as one breath or as many breaths as you can; it is up to you.
• If you suffer from health problems or injuries (recent and not so recent), get your doctor’s consent before beginning the class.
• Be sure to advise the instructor of health problems or injuries.
• Be sure to advise the instructor if you are pregnant.
• Above all, have fun! Enjoy this time you spend taking care of yourself!
2
What is Yoga? During each of the six Yoga sessions, an explanation of Yoga was introduced and discussed. Here are the six explanations presented in class:
“Yoga is a technology for arriving in the present moment. It is a means of waking up from our spiritual amnesia, so that we can remember all that we already know. It is a way of remembering our true nature, which is essentially joyful and peaceful. Developed as a pragmatic science by ancient seers centuries ago, yoga is a practice that any person, regardless of age, sex, race, or religious belief, can use to realize her full potential.” Donna Farhi, Yoga Mind, Body & Spirit, p.5
“(…) Man is faced by many problems like stern, anxiety, hypertension, fatigue, etc. that can throw him off the balance in life. This is why there is an increasing quest for methods to instill/master a lifestyle that can bring peace, contentment and reduce the adverse effects of modern day problems. (…) Yoga, which dates back to nearly 5000 years, was fist inculcated and mastered by the Rishis or sages of India. They used yoga as a tool for mental, physical and spiritual upliftment. The word ‘Yoga’ is derived from the Sanskrit mode that means ‘yoke’ or ‘union’. (…) The aim in Yoga is to concentrate on self-knowledge as you tone the body, mind and soul.” Taken from www.ayurjeeva.com/Yoga/Yoga_what.htm
“A further meaning of the word yoga is “to attain what was previously unattainable”. The starting point for this thought is that there is something that we are today unable to do; when we find the means for bringing that desire into action, that step is yoga. In fact, every change is yoga.” T.K.V. Desikachar, The Heart of Yoga: Developing a Personal Practice, p. 5-6
“Yoga means “to yoke”, “to unite”, or “to be whole”. Yoga is an ancient philosophical discipline, harmonizing the mind, body, and spirit. On a physical level, it enhances well-being and brings balance, strength, and vitality. For the mind, it improves memory and concentration, sharpens the intellect, and steadies the emotions to achieve a richer and more fulfilled life. On a deeper level, the practice of yoga leads to self-awareness and moksha, or “liberation”.” Nita Patel, Total Yoga, p.6
“The word Yoga is derived from the Sanskrit language and means to unite or to harmonize. In other words, Yoga means working towards a level where the activities of the mind and body function together harmoniously. Yoga also refers to the union between the individual and something greater, whether it is called God, the Divine or anything else. Yoga does not represent or promote any particular religions; it is a system that aims to help people achieve their full potential and a heightened consciousness. (…) Hatha Yoga works through the mastery of the body and breath. This is the most practical of the branches of Yoga, and is the best known Yoga in the West. It involved a system of exercises that trains through physical postures, breathing and relaxation techniques. These techniques benefit the nervous system, glands, and vital organs. The aim is to promote vibrant health and to tap into the body’s latent energy reserves.” Noa Belling, The Yoga Handbook, p.10
“The word Yoga is derived from the Sanskirt root yuj meaning to bind, join, attach and yoke, to direct and concentrate one’s attention on, to use and apply. (…) Yoga is the method by which the restless mind is calmed and the energy directed into constructive channels. As a mighty river which when properly harnessed by dams and canals, creates a vast reservoir of water, prevents famine and provides abundant power for industry; so also the mind, when controlled, provides a reservoir of peace and generates abundant energy for human uplift.” B.K.S. Iyengar, Light on Yoga, p. 19-20.
3
Stretches and Warm-up
Before beginning any exercise, it is important to make sure your muscles are stretched and warmed-up; this prevents injuries and ensures a better experience of the exercise.
Make sure to stretch/warm-up the following parts of the body:
• Neck
• Shoulders
• Arms
• Wrists
• Hands
• Fingers
• Torso/Waist
• Hips
• Legs
• Ankles
• Feet
• Toes
If you are particularly tense in one area, spend more time stretching that area.
Breathing
Controlling the breath is a central part of Yoga. A calm and controlled breath helps to calm the nervous system, focus the mind, and bring the attention inward. It also helps the body to move in a coordinated and fluid fashion. The majority of breathing in Yoga is done through the nose. On occasion, you may be instructed to inhale and/or exhale through the mouth. Ujjayi breath (victorious breath) is a breathing technique which can be used throughout your Yoga practice. It is a strong, complete breath that strengthens the nervous system, relieves tiredness, and calms the mind (among other benefits). To perform Ujjayi breath, on the inhale, contract the back of the throat and feel the breath pass through the tighter space, producing a faint “ssss” sound. Fill the lungs with air, expanding the rib cage outward, feeling the collarbones float up towards the ceiling, and feeling the diaphragm pushing down into the belly; causing the belly to come out slightly. On the exhale, empty the lungs slowly and completely, again, contracting the back of the throat and feeling the breath leave the body, producing a faint “hmmm” sound. Feel the rib cage contract, the collarbones retract, and the diaphragm pulling back up into the mid-chest, the belly coming back to it normal position. Maintain this level of breathing, and the awareness of your breath throughout your Yoga practice.
4
Postures Note : The Sanskrit names of the postures are in parentheses
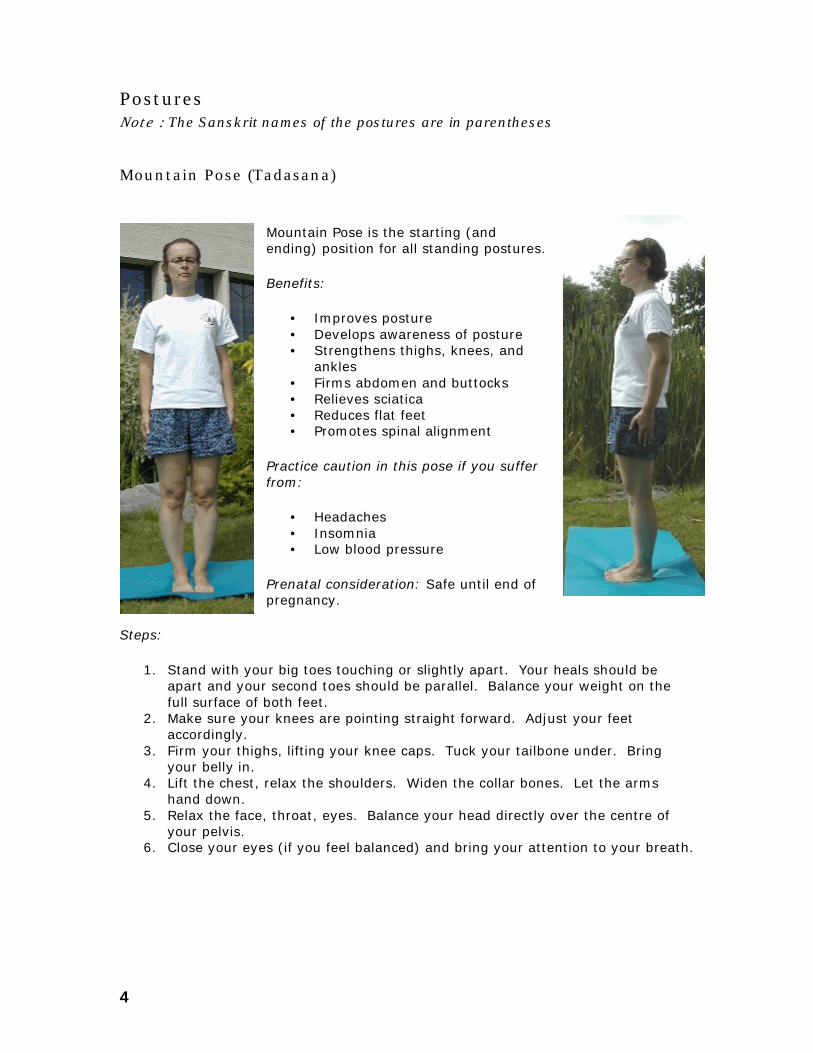
Mountain Pose (Tadasana)
Mountain Pose is the starting (and ending) position for all standing postures.
Benefits:
• Improves posture • Develops awareness of posture • Strengthens thighs, knees, and
ankles • Firms abdomen and buttocks • Relieves sciatica • Reduces flat feet • Promotes spinal alignment
Practice caution in this pose if you suffer from:
• Headaches • Insomnia • Low blood pressure
Prenatal consideration: Safe until end of pregnancy.
Steps:
1. Stand with your big toes touching or slightly apart. Your heals should be apart and your second toes should be parallel. Balance your weight on the full surface of both feet.
2. Make sure your knees are pointing straight forward. Adjust your feet accordingly.
3. Firm your thighs, lifting your knee caps. Tuck your tailbone under. Bring your belly in.
4. Lift the chest, relax the shoulders. Widen the collar bones. Let the arms hand down.
5. Relax the face, throat, eyes. Balance your head directly over the centre of your pelvis.
6. Close your eyes (if you feel balanced) and bring your attention to your breath.
5
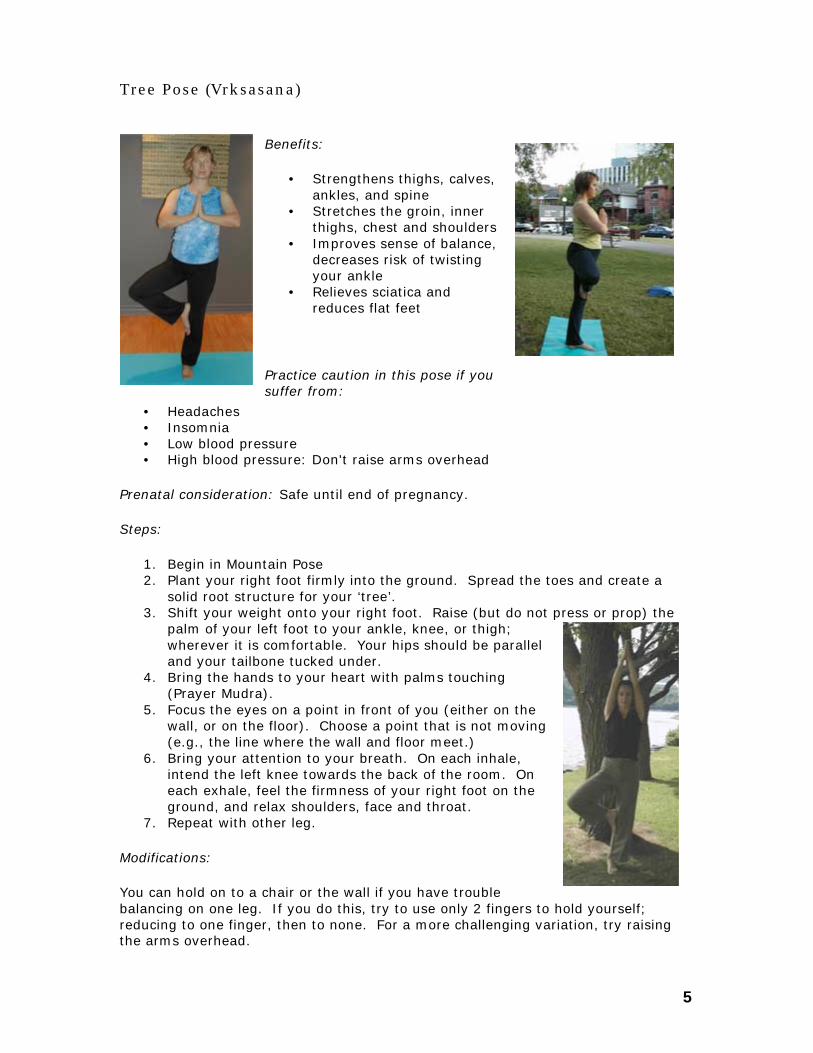
Tree Pose (Vrksasana)
Benefits:
• Strengthens thighs, calves, ankles, and spine
• Stretches the groin, inner thighs, chest and shoulders
• Improves sense of balance, decreases risk of twisting your ankle
• Relieves sciatica and reduces flat feet
Practice caution in this pose if you suffer from:
• Headaches • Insomnia • Low blood pressure • High blood pressure: Don't raise arms overhead
Prenatal consideration: Safe until end of pregnancy.
Steps:
1. Begin in Mountain Pose 2. Plant your right foot firmly into the ground. Spread the toes and create a
solid root structure for your ‘tree’. 3. Shift your weight onto your right foot. Raise (but do not press or prop) the
palm of your left foot to your ankle, knee, or thigh; wherever it is comfortable. Your hips should be parallel and your tailbone tucked under.
4. Bring the hands to your heart with palms touching (Prayer Mudra).
5. Focus the eyes on a point in front of you (either on the wall, or on the floor). Choose a point that is not moving (e.g., the line where the wall and floor meet.)
6. Bring your attention to your breath. On each inhale, intend the left knee towards the back of the room. On each exhale, feel the firmness of your right foot on the ground, and relax shoulders, face and throat.
7. Repeat with other leg.
Modifications:
You can hold on to a chair or the wall if you have trouble balancing on one leg. If you do this, try to use only 2 fingers to hold yourself; reducing to one finger, then to none. For a more challenging variation, try raising the arms overhead.
6
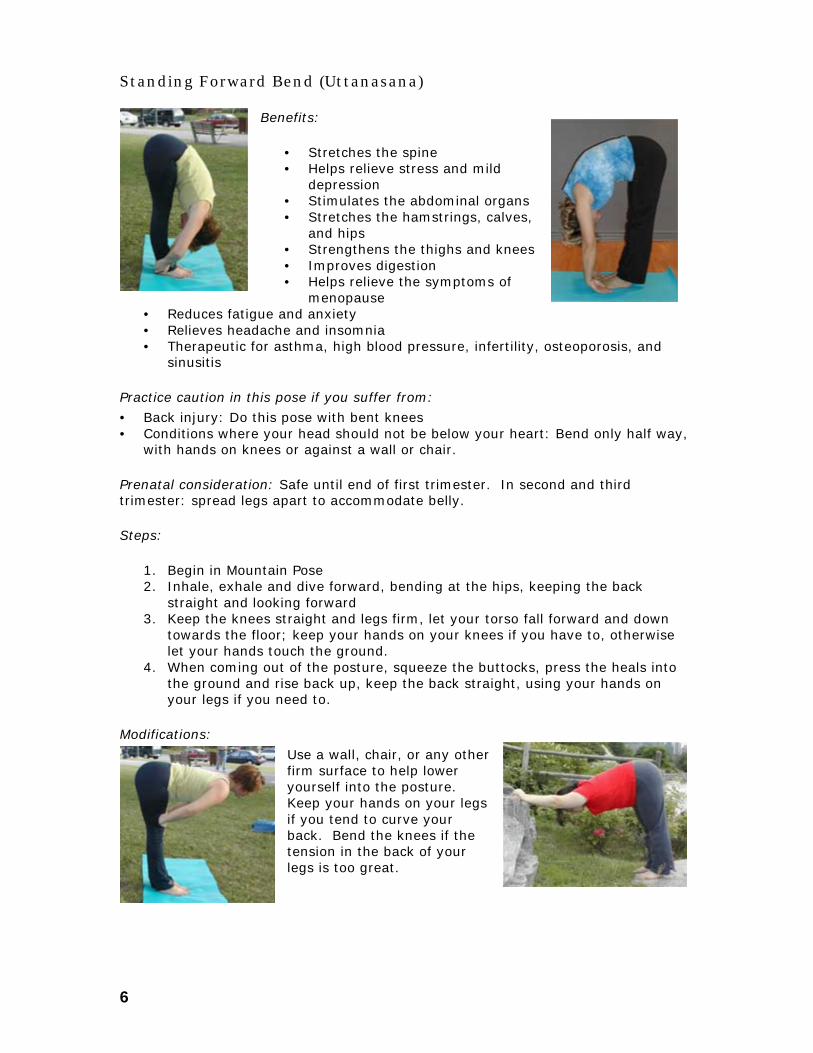
Standing Forward Bend (Uttanasana)
Benefits:
• Stretches the spine • Helps relieve stress and mild
depression • Stimulates the abdominal organs • Stretches the hamstrings, calves,
and hips • Strengthens the thighs and knees • Improves digestion • Helps relieve the symptoms of
menopause • Reduces fatigue and anxiety • Relieves headache and insomnia • Therapeutic for asthma, high blood pressure, infertility, osteoporosis, and
sinusitis
Practice caution in this pose if you suffer from:
• Back injury: Do this pose with bent knees • Conditions where your head should not be below your heart: Bend only half way,
with hands on knees or against a wall or chair.
Prenatal consideration: Safe until end of first trimester. In second and third trimester: spread legs apart to accommodate belly.
Steps:
1. Begin in Mountain Pose 2. Inhale, exhale and dive forward, bending at the hips, keeping the back
straight and looking forward 3. Keep the knees straight and legs firm, let your torso fall forward and down
towards the floor; keep your hands on your knees if you have to, otherwise let your hands touch the ground.
4. When coming out of the posture, squeeze the buttocks, press the heals into the ground and rise back up, keep the back straight, using your hands on your legs if you need to.
Modifications:
Use a wall, chair, or any other firm surface to help lower yourself into the posture. Keep your hands on your legs if you tend to curve your back. Bend the knees if the tension in the back of your legs is too great.
7
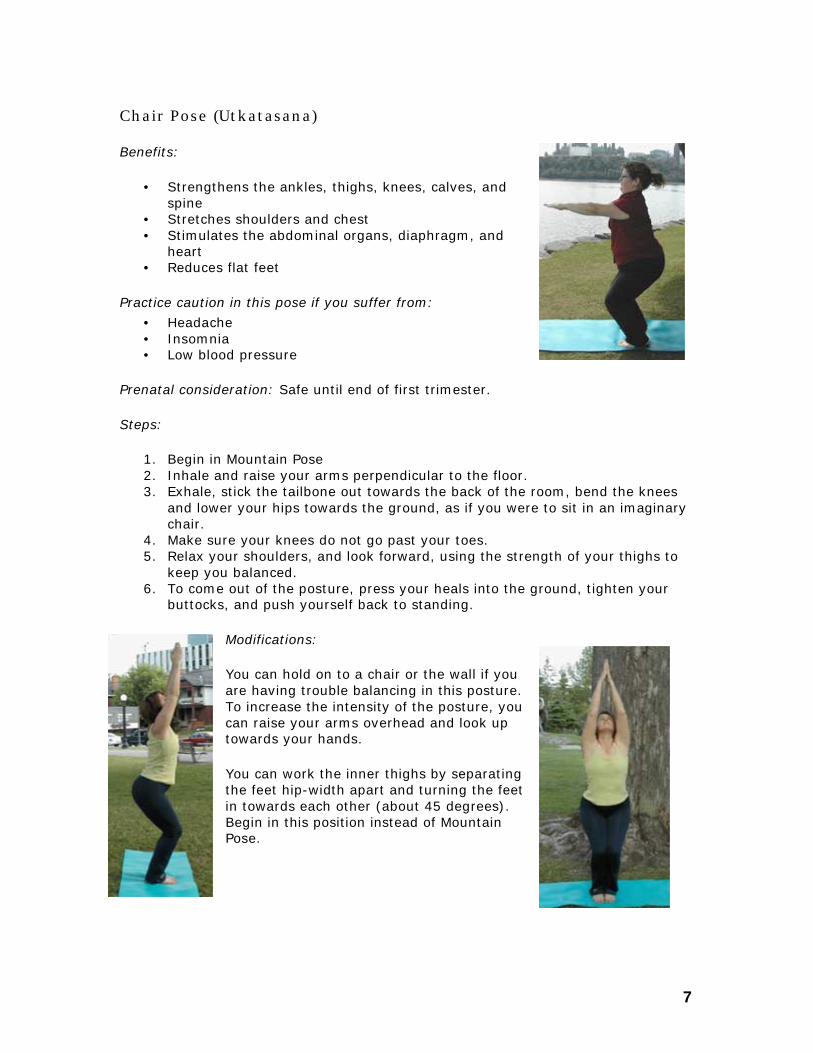
Chair Pose (Utkatasana)
Benefits:
• Strengthens the ankles, thighs, knees, calves, and spine
• Stretches shoulders and chest • Stimulates the abdominal organs, diaphragm, and
heart • Reduces flat feet
Practice caution in this pose if you suffer from:
• Headache • Insomnia • Low blood pressure
Prenatal consideration: Safe until end of first trimester.
Steps:
1. Begin in Mountain Pose 2. Inhale and raise your arms perpendicular to the floor. 3. Exhale, stick the tailbone out towards the back of the room, bend the knees
and lower your hips towards the ground, as if you were to sit in an imaginary chair.
4. Make sure your knees do not go past your toes. 5. Relax your shoulders, and look forward, using the strength of your thighs to
keep you balanced. 6. To come out of the posture, press your heals into the ground, tighten your
buttocks, and push yourself back to standing.
Modifications:
You can hold on to a chair or the wall if you are having trouble balancing in this posture. To increase the intensity of the posture, you can raise your arms overhead and look up towards your hands.
You can work the inner thighs by separating the feet hip-width apart and turning the feet in towards each other (about 45 degrees). Begin in this position instead of Mountain Pose.
8
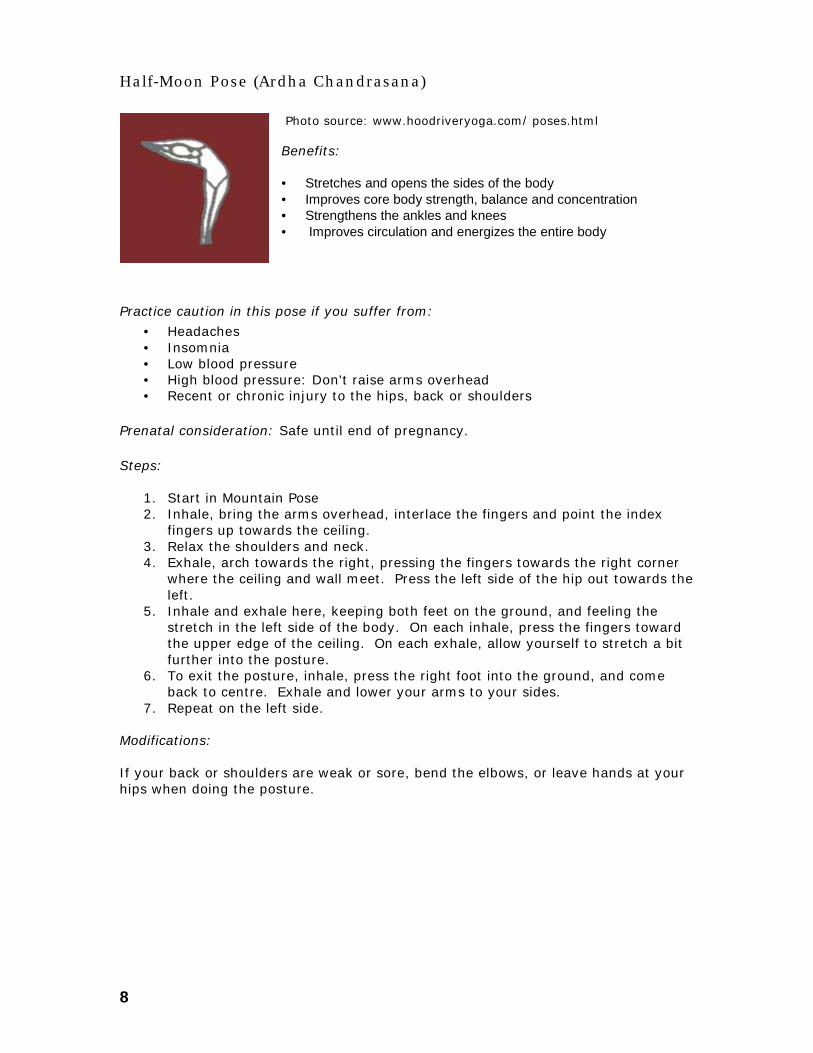
Half-Moon Pose (Ardha Chandrasana)
Photo source: www.hoodriveryoga.com/ poses.html Benefits: • Stretches and opens the sides of the body • Improves core body strength, balance and concentration • Strengthens the ankles and knees • Improves circulation and energizes the entire body
Practice caution in this pose if you suffer from:
• Headaches • Insomnia • Low blood pressure • High blood pressure: Don't raise arms overhead • Recent or chronic injury to the hips, back or shoulders
Prenatal consideration: Safe until end of pregnancy.
Steps:
1. Start in Mountain Pose 2. Inhale, bring the arms overhead, interlace the fingers and point the index
fingers up towards the ceiling. 3. Relax the shoulders and neck. 4. Exhale, arch towards the right, pressing the fingers towards the right corner
where the ceiling and wall meet. Press the left side of the hip out towards the left.
5. Inhale and exhale here, keeping both feet on the ground, and feeling the stretch in the left side of the body. On each inhale, press the fingers toward the upper edge of the ceiling. On each exhale, allow yourself to stretch a bit further into the posture.
6. To exit the posture, inhale, press the right foot into the ground, and come back to centre. Exhale and lower your arms to your sides.
7. Repeat on the left side.
Modifications: If your back or shoulders are weak or sore, bend the elbows, or leave hands at your hips when doing the posture.
9
Mini Sun Salutation (Mini Surya Namaskar) This is a modified version of a more complex series of postures called Sun Salutation. It came be done on its own or as a flowing way to get down to the ground. Steps:
1. Begin in Mountain Pose 2. Inhale, bring the arms overhead 3. Exhale, dive forward, leading with the chest, looking forward (placing hands
on ground or on legs; depending where you can reach) 4. Inhale, put your hands on your knees, bring your torso up half way and look
forward 5. Exhale, bend the knees, crouch down towards the floor, place your hands on
the ground, and come onto all fours.
Prenatal consideration: Safe until end of first trimester. In second and third trimester: spread legs apart to accommodate belly.
Modification: Is this proves too difficult, try using a chair or the wall to help lower yourself onto the floor.

10
Table Pose (Svanasana)
Table pose is the starting, transition, and ending point for floor postures in which you are on all fours. Benefits: • Helps lengthen and align the spine • Strengthens arms and shoulders
Practice caution in this pose if you suffer from:
• Carpal tunnel syndrome
Prenatal consideration: Safe until end of pregnancy.
Steps:
1. Come to the floor on hands and knees 2. Bring the knees hip width apart, and hands shoulder width apart 3. Your hands should be directly under your shoulders, and knees directly under
your hips 4. Spread your fingers open, with middle fingers pointed forward 5. Press the tailbone towards the back of the room, and crown of the head
towards the front; extending and lengthening your spine Modifications: If your knees hurt, place a folded blanket under them. If your wrists hurt, roll the edge of your mat (or use a rolled up towel) and place the heal of your hands on top, with fingers on the ground.
11
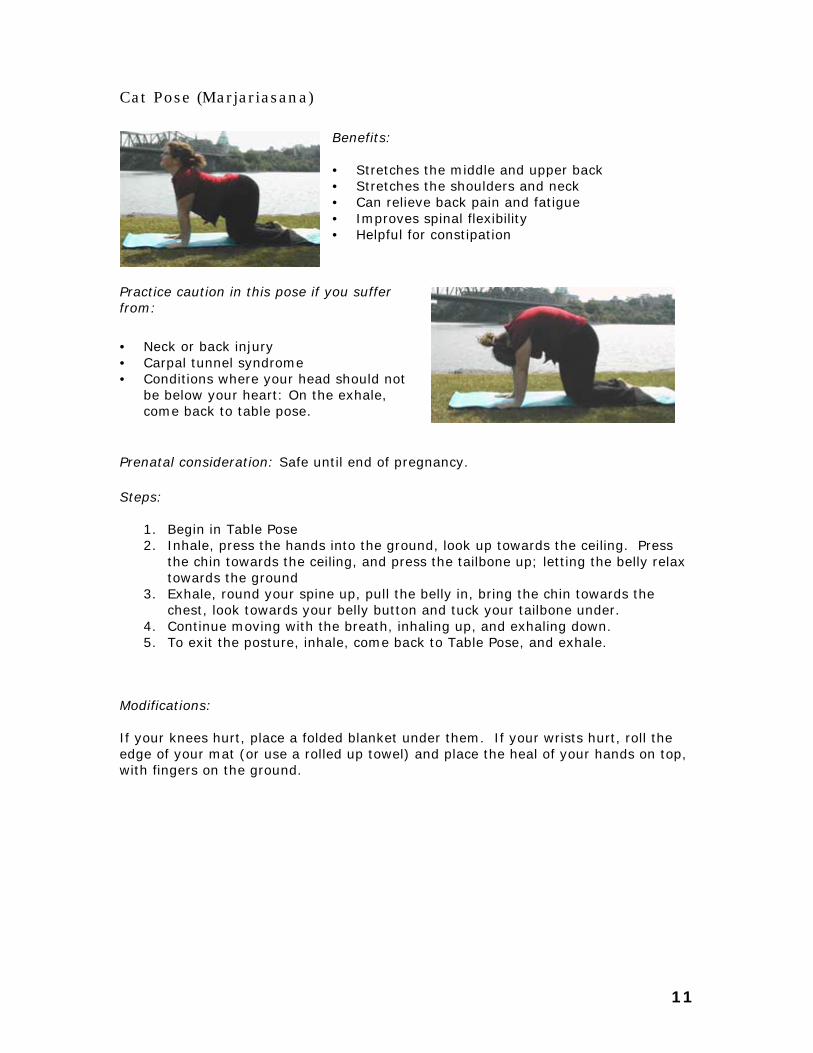
Cat Pose (Marjariasana)
Benefits: • Stretches the middle and upper back • Stretches the shoulders and neck • Can relieve back pain and fatigue • Improves spinal flexibility • Helpful for constipation
Practice caution in this pose if you suffer from:
• Neck or back injury • Carpal tunnel syndrome • Conditions where your head should not
be below your heart: On the exhale, come back to table pose.
Prenatal consideration: Safe until end of pregnancy.
Steps:
1. Begin in Table Pose 2. Inhale, press the hands into the ground, look up towards the ceiling. Press
the chin towards the ceiling, and press the tailbone up; letting the belly relax towards the ground
3. Exhale, round your spine up, pull the belly in, bring the chin towards the chest, look towards your belly button and tuck your tailbone under.
4. Continue moving with the breath, inhaling up, and exhaling down. 5. To exit the posture, inhale, come back to Table Pose, and exhale.
Modifications: If your knees hurt, place a folded blanket under them. If your wrists hurt, roll the edge of your mat (or use a rolled up towel) and place the heal of your hands on top, with fingers on the ground.

12
Cobra Pose (Bhujangasana)
Benefits:
• Strengthens the spine and back muscles
• Stretches chest, lungs, shoulders, and abdomen
• Firms the buttocks • Stimulates abdominal
organs • Helps relieve stress and
fatigue
Practice caution in this pose if you suffer from:
• Back or neck injury • Carpal tunnel syndrome • Headache
Prenatal consideration: Safe until end of first trimester (only if comfortable).
Steps:
1. Begin laying flat on your stomach.
2. Stretch your legs back, with the tops of your feet on the floor
3. Place your hands under your shoulders, and tuck your elbows in towards your body
4. On the inhale, tighten your buttocks, press your pelvis into the floor, and gently raise your chest off the ground, using your back and abdominal muscles to pull yourself up, not pushing yourself up with
your arms 5. Exhale, gently lower yourself back to the floor, using your hands for support.
Modifications:
If your spine is not very flexible, place the forearms on the ground instead of hands under shoulders.
13
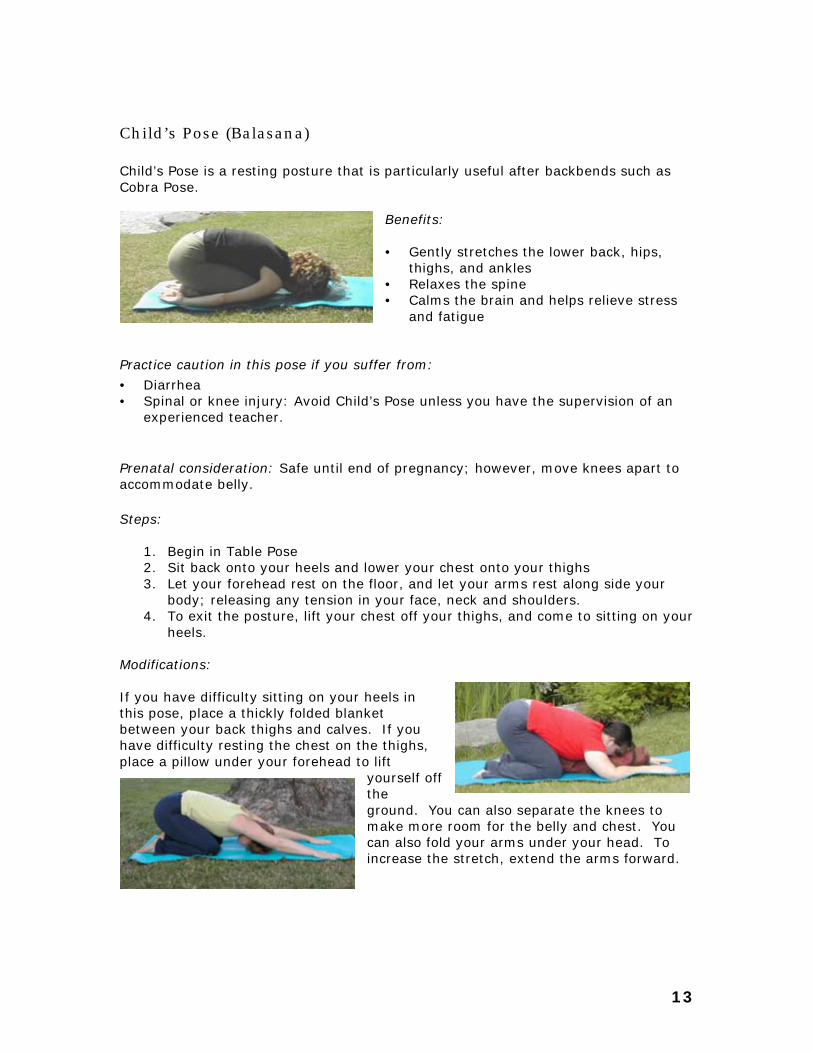
Child’s Pose (Balasana) Child’s Pose is a resting posture that is particularly useful after backbends such as Cobra Pose.
Benefits: • Gently stretches the lower back, hips,
thighs, and ankles • Relaxes the spine • Calms the brain and helps relieve stress
and fatigue
Practice caution in this pose if you suffer from:
• Diarrhea • Spinal or knee injury: Avoid Child’s Pose unless you have the supervision of an
experienced teacher.
Prenatal consideration: Safe until end of pregnancy; however, move knees apart to accommodate belly.
Steps:
1. Begin in Table Pose 2. Sit back onto your heels and lower your chest onto your thighs 3. Let your forehead rest on the floor, and let your arms rest along side your
body; releasing any tension in your face, neck and shoulders. 4. To exit the posture, lift your chest off your thighs, and come to sitting on your
heels.
Modifications: If you have difficulty sitting on your heels in this pose, place a thickly folded blanket between your back thighs and calves. If you have difficulty resting the chest on the thighs, place a pillow under your forehead to lift
yourself off the ground. You can also separate the knees to make more room for the belly and chest. You can also fold your arms under your head. To increase the stretch, extend the arms forward.

14
Head-to-Knee Forward Bend (Janu Sirsasana) Benefits: • Stretches the spine, shoulders,
hamstrings, and groin area • Stretches and strengthens the
back, particularly lower back • Stimulates the liver and kidneys • Improves digestion and
elimination • Helps relieve the symptoms of menopause • Relieves anxiety, fatigue, headache, menstrual discomfort • Therapeutic for high blood pressure, insomnia, and sinusitis
Practice caution in this pose if you suffer from:
• Asthma • Diarrhea • Knee injury: Don't flex the injured knee completely and support it on cushion • Back injury: keep the spine extended and straight; do not force the head to the
knee.
Prenatal consideration: Safe until end of pregnancy; however, do not compress belly against thigh.
Steps:
1. Sit on the floor with both legs extended in front of you. 2. Bend the right knee, and place the palm of the right foot against the inner
part of your left thigh 3. Your left leg should be extended straight forward, with toes pointed towards
you and heal pointed away front you, and touching the ground. 4. Inhale, bring both arms overhead, stretching your upper body towards the
ceiling. 5. Exhale, relax the shoulders, align your torso with your left leg and begin
extending forward and down, leading with the chest, keeping the back straight. The eventual goal is to bring your belly and chest to rest on your left thigh
6. Continue inhaling and exhaling here, either keeping the arms extended forward, resting them down along side the left leg, or placing the hands on the left leg, calf, or foot. If your chest is resting on your left thigh, relax your forehead down towards your left knee. Do not pull yourself forward or down; let gravity do the work.
7. To exit the posture, on an inhale, extend the arms forward, squeeze the buttocks, and use the strength of your back and abdominal muscles to lift the torso up. You may also use your hands to help yourself back up.
8. Repeat on the other side. Modifications: If your hips or lower back are tight, try sitting on a cushion or a few books.
15
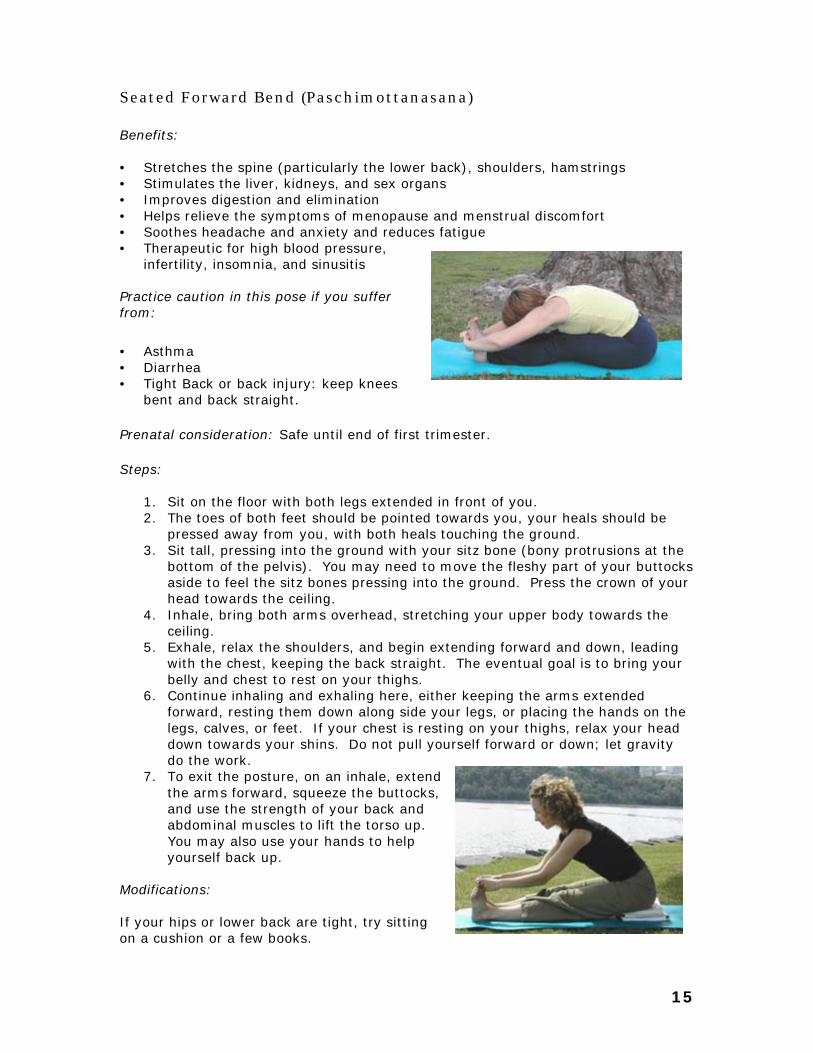
Seated Forward Bend (Paschimottanasana) Benefits: • Stretches the spine (particularly the lower back), shoulders, hamstrings • Stimulates the liver, kidneys, and sex organs • Improves digestion and elimination • Helps relieve the symptoms of menopause and menstrual discomfort • Soothes headache and anxiety and reduces fatigue • Therapeutic for high blood pressure,
infertility, insomnia, and sinusitis
Practice caution in this pose if you suffer from:
• Asthma • Diarrhea • Tight Back or back injury: keep knees
bent and back straight.
Prenatal consideration: Safe until end of first trimester.
Steps:
1. Sit on the floor with both legs extended in front of you. 2. The toes of both feet should be pointed towards you, your heals should be
pressed away from you, with both heals touching the ground. 3. Sit tall, pressing into the ground with your sitz bone (bony protrusions at the
bottom of the pelvis). You may need to move the fleshy part of your buttocks aside to feel the sitz bones pressing into the ground. Press the crown of your head towards the ceiling.
4. Inhale, bring both arms overhead, stretching your upper body towards the ceiling.
5. Exhale, relax the shoulders, and begin extending forward and down, leading with the chest, keeping the back straight. The eventual goal is to bring your belly and chest to rest on your thighs.
6. Continue inhaling and exhaling here, either keeping the arms extended forward, resting them down along side your legs, or placing the hands on the legs, calves, or feet. If your chest is resting on your thighs, relax your head down towards your shins. Do not pull yourself forward or down; let gravity do the work.
7. To exit the posture, on an inhale, extend the arms forward, squeeze the buttocks, and use the strength of your back and abdominal muscles to lift the torso up. You may also use your hands to help yourself back up.
Modifications: If your hips or lower back are tight, try sitting on a cushion or a few books.
16
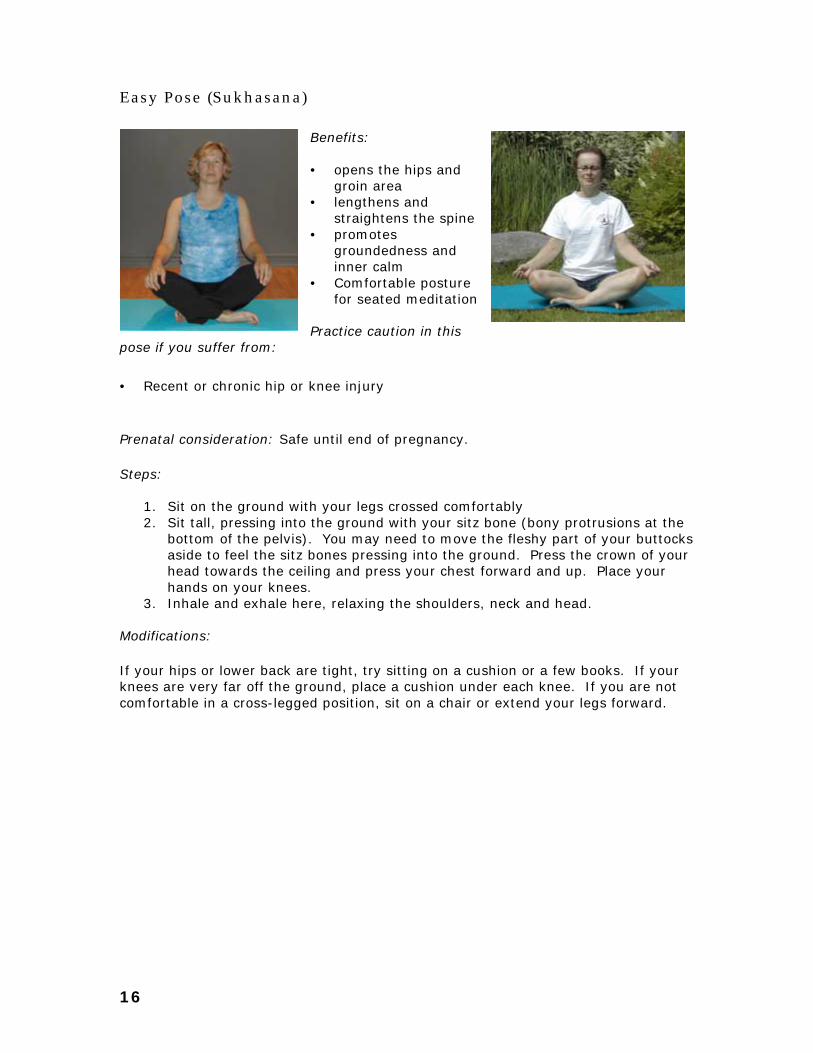
Easy Pose (Sukhasana) Benefits: • opens the hips and
groin area • lengthens and
straightens the spine • promotes
groundedness and inner calm
• Comfortable posture for seated meditation
Practice caution in this pose if you suffer from:
• Recent or chronic hip or knee injury
Prenatal consideration: Safe until end of pregnancy.
Steps:
1. Sit on the ground with your legs crossed comfortably 2. Sit tall, pressing into the ground with your sitz bone (bony protrusions at the
bottom of the pelvis). You may need to move the fleshy part of your buttocks aside to feel the sitz bones pressing into the ground. Press the crown of your head towards the ceiling and press your chest forward and up. Place your hands on your knees.
3. Inhale and exhale here, relaxing the shoulders, neck and head. Modifications: If your hips or lower back are tight, try sitting on a cushion or a few books. If your knees are very far off the ground, place a cushion under each knee. If you are not comfortable in a cross-legged position, sit on a chair or extend your legs forward.
17
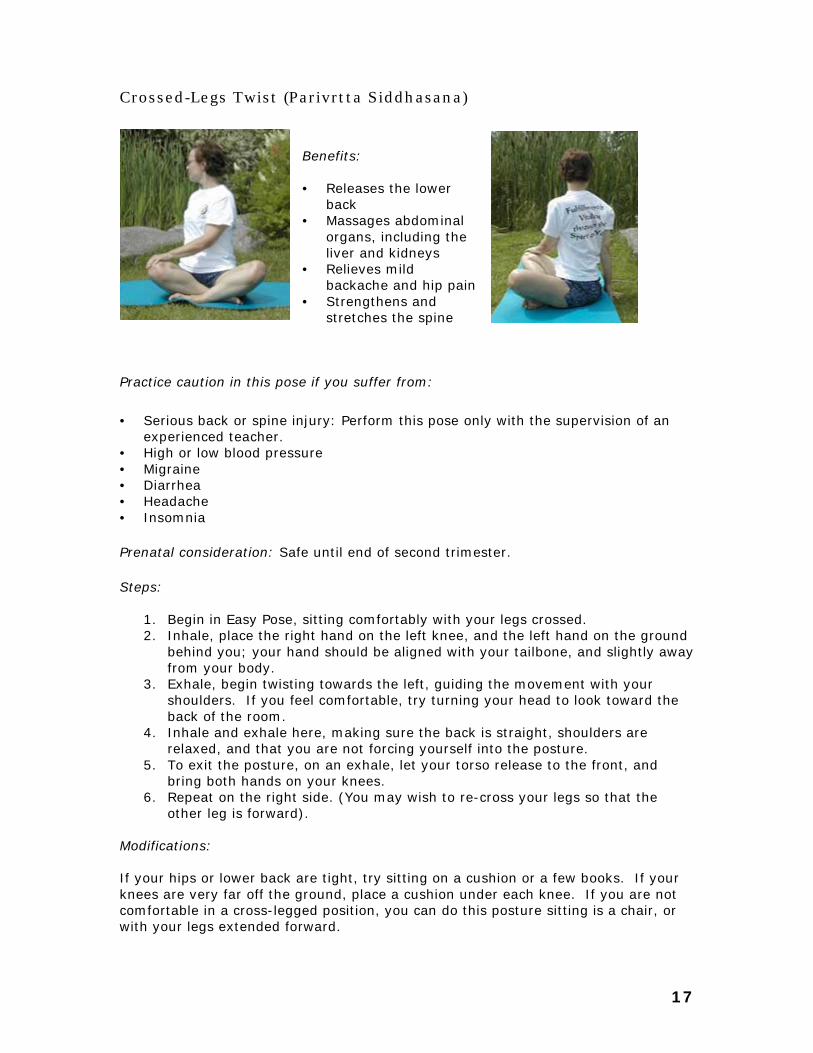
Crossed-Legs Twist (Parivrtta Siddhasana) Benefits: • Releases the lower
back • Massages abdominal
organs, including the liver and kidneys
• Relieves mild backache and hip pain
• Strengthens and stretches the spine
Practice caution in this pose if you suffer from:
• Serious back or spine injury: Perform this pose only with the supervision of an
experienced teacher. • High or low blood pressure • Migraine • Diarrhea • Headache • Insomnia
Prenatal consideration: Safe until end of second trimester.
Steps:
1. Begin in Easy Pose, sitting comfortably with your legs crossed. 2. Inhale, place the right hand on the left knee, and the left hand on the ground
behind you; your hand should be aligned with your tailbone, and slightly away from your body.
3. Exhale, begin twisting towards the left, guiding the movement with your shoulders. If you feel comfortable, try turning your head to look toward the back of the room.
4. Inhale and exhale here, making sure the back is straight, shoulders are relaxed, and that you are not forcing yourself into the posture.
5. To exit the posture, on an exhale, let your torso release to the front, and bring both hands on your knees.
6. Repeat on the right side. (You may wish to re-cross your legs so that the other leg is forward).
Modifications: If your hips or lower back are tight, try sitting on a cushion or a few books. If your knees are very far off the ground, place a cushion under each knee. If you are not comfortable in a cross-legged position, you can do this posture sitting is a chair, or with your legs extended forward.
18
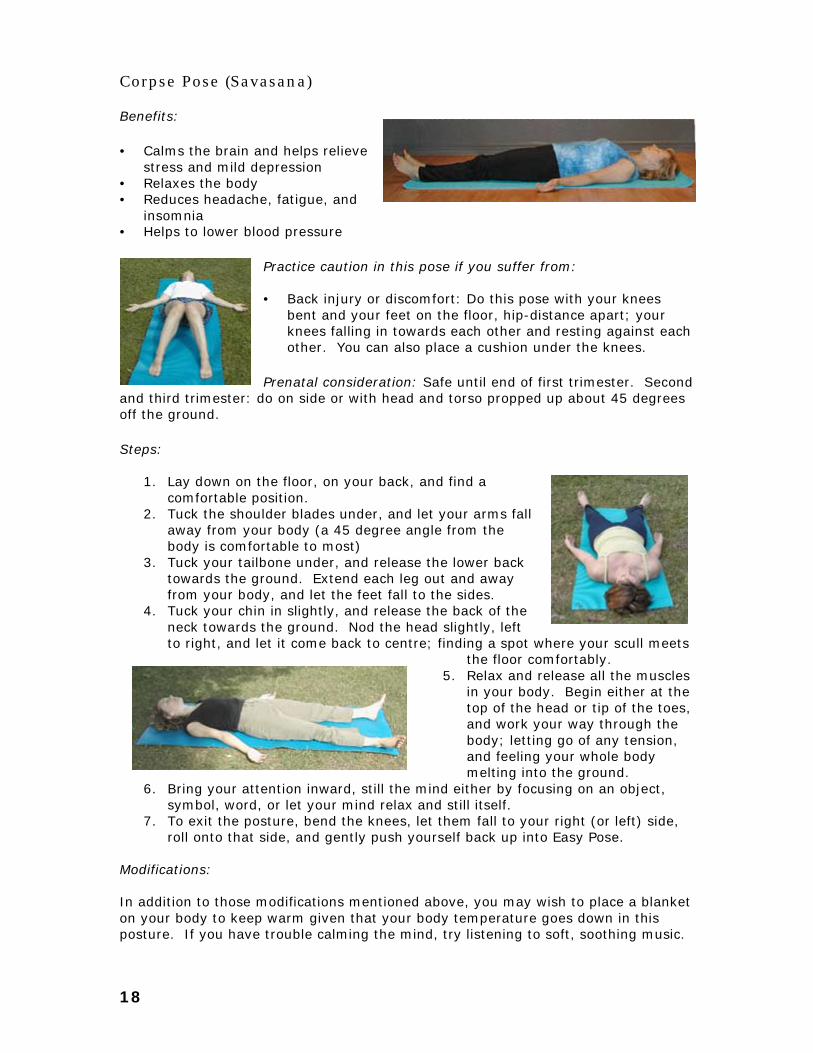
Corpse Pose (Savasana) Benefits:
• Calms the brain and helps relieve stress and mild depression
• Relaxes the body • Reduces headache, fatigue, and
insomnia • Helps to lower blood pressure
Practice caution in this pose if you suffer from: • Back injury or discomfort: Do this pose with your knees
bent and your feet on the floor, hip-distance apart; your knees falling in towards each other and resting against each other. You can also place a cushion under the knees.
Prenatal consideration: Safe until end of first trimester. Second and third trimester: do on side or with head and torso propped up about 45 degrees off the ground.
Steps:
1. Lay down on the floor, on your back, and find a comfortable position.
2. Tuck the shoulder blades under, and let your arms fall away from your body (a 45 degree angle from the body is comfortable to most)
3. Tuck your tailbone under, and release the lower back towards the ground. Extend each leg out and away from your body, and let the feet fall to the sides.
4. Tuck your chin in slightly, and release the back of the neck towards the ground. Nod the head slightly, left to right, and let it come back to centre; finding a spot where your scull meets
the floor comfortably. 5. Relax and release all the muscles
in your body. Begin either at the top of the head or tip of the toes, and work your way through the body; letting go of any tension, and feeling your whole body melting into the ground.
6. Bring your attention inward, still the mind either by focusing on an object, symbol, word, or let your mind relax and still itself.
7. To exit the posture, bend the knees, let them fall to your right (or left) side, roll onto that side, and gently push yourself back up into Easy Pose.
Modifications: In addition to those modifications mentioned above, you may wish to place a blanket on your body to keep warm given that your body temperature goes down in this posture. If you have trouble calming the mind, try listening to soft, soothing music.
19
Appendix References (*=recommended for beginners)
*Belling, Noa (2001). The Yoga Handbook. New Holland Publishers Ltd. London, England.
Desikachar, T.K.V. (1995). The Heart of Yoga. Inner Traditions International, Rochester, Vermont.
Farhi, Donna (2000). Yoga Mind, Body & Spirit. Henry Holt and Company, New York.
Iyengar, B.K.S. (1966). Light on Yoga. Schocken Books, New York.
*Patel, Nita (2003). Total Yoga. MQ Publications, London, England.
20
Online Resources Ascent (magazine and website) www.ascentmagazine.com Yoga Basics (website) www.yogabasics.com Yoga Journal (magazine and website) www.yogajournal.com
Videos/DVDs
Yoga Zone Series Very good place to start. Very nice Corpse Pose / Final Relaxation. www.yogazone.com
Gaiam Series More intermediate level (even though they are often labeled as ‘beginner’). Good instruction; a lot of detail given for each posture. www.gaiam.com
Basic Yoga Workout for Dummies. Good beginner series, and introduces Sun Salutations very nicely. Only problem is popup messages throughout that you cannot turn off. http://www.anchorbayentertainment.com/fitness/catalog/dummies/default.asp?p=1&n=15
21
Yoga in Ottawa Note : Please call or check websites for types of classes, schedules and prices. Rama Lotus Yoga Centre 340 Gladstone Ave. Ottawa 613-234-7974 www.ottawayoga.com Upward Dog Yoga Centre 413 MacKay Street Ottawa 613-748-YOGA (9642) www.upwarddogyoga.com Santosha Yoga 205 Catherine St. Ottawa 613- 235-5378 http://www.cyberus.ca/~sycottawa Bikram's Yoga College Of India 164 Laurier Avenue West Ottawa 613-230-9642 http://www.bikramyogaottawa.com Essential Yoga Centre (Essential Services Yoga & Meditation) 298 Elgin Street, Suite 105 Ottawa 613- 567-7522 http://www.praan.com