geometer’s skethchpad 6th grade guide to learning geometry
TRANSCRIPT

Geometer’s Skethchpad6th Grade Guide toLearning Geometry
This Guide Belongs to:
__________________
Date:______________

2 -- Learning with Geometer’s Sketchpad
Table of Contents
• Using Sketchpad - - - - - - - - - - - - - - - - - - - - - - - - - - - - - - - - - - - - - - - - - 4
• Investigating Points and Lines - - - - - - - - - - - - - - - - - - - - - - - - - - - - - - - - - - 6
• Activity 1: Warm-up exercises of the basics - - - - - - - - - - - - - - - - - - - - - - - - -7
• Investigating Angles - - - - - - - - - - - - - - - - - - - - - - - - - - - - - - - - - - - - - - - -10
• Activity 2: SOL 6.16: - - - - - - - - - - - - - - - - - - - - - - - - - -- - - - - - - - - - - - - - - - - -11 The student will construct the perpendicular bisector of a line segment and an angle bisector, using a compass and straightedge.
• Investigating Special Lines and Angles:- - - - - - -- - - - - - - - - - - - - - - - - - - - - - - - - -12
• Activity 3: SOL 6.16:- - - - - -- - - - - - - - - - - - - - - - - - - - - - - - - - - - - - - - - - - - -13 (Stated Above)
• Activity 4: SOL 6.13:- - - - - - - - - - - - - - - - - - - - - - - - - - - - - - - - - - - - - - - - - - -14 The student will estimate angle measures using 45°, 90°, and 180° as referents and use the appropriate tools to measure the given angles.
• Activity 5: SOL 6.14: - - - - - - - - - - - - - - - - - - - - - - - - - - - - - - - - - - - - - - - - - - 15 The student will identify, classify, and describe the characteristics of figures including similarities and differences.
• Activity 6: SOL 6.11: - - - - - - - - - - - - - - - - - - - - - - - - - - - - - - - - - - - - - - - - 16 The student will determine if a problem situation involving polygons of four sides or less represents the application of perimeter or area and apply the appropriate formula.

Learning with Geometer’s Sketchpad -- 3
• Activity 7: SOL 6.11: - - - - - - - - - - - - - - - - - - - - - - - - - - - - - - - - - - - - - - 18 (Stated Above)
• How to Measure the Height of a Triangle- - - - - - - - - - - - - - - - - - - - - - - - - - - -19
• Activity 8: SOL 6.11 - - -- - - - - - - - - - - - - - - - - - - - - - - - - - - - - - - - - - - - - - 20 (Stated Above)
• Activity 9: SOL 6.11 -- - - - - - - - - - - - - - - - - - - - - - - - - - - - - - - - - - - - - - - 21 (Stated Above)
• Activity 10: SOL 6.15- - - - - - - - - - - - - - - - - - - - - - - - - - - - - - - - - - - - - - -24 The student will determine congruence of segments, angles, and polygons by direct comparison, given their attributes. Examples of noncongruent and congruent figures will be included.
• Investigating Circles - - - - - - - - - - - - - - - - - - - - - - - - - - - - - - - - - - - - - - - - - - - - 26
• Activity 11: SOL 6.12 - - - - - - - - - - - - - - - - - - - - - - - - - - - - - - - - - - - - - - - - - - -29 The student will create and solve problems by finding the circumference and/or area of a circle when given the diameter or radius. Using concrete materials or computer models, the student will derive approximations for pi from measurements for circumference and diameter.
• Activity 12: SOL 6.12- - - - - - - - - - - - - - - - - - - - - - - - - - - - - - - - - - - - - - - - - - 31 (Stated Above)
• Activity 15: SOL 6.12 - - - - - - - - - - - - - - - - - - - - - - - - - - - - - - - - - - - - - - - - - -32 (Stated Above)

4 -- Learning with Geometer’s Sketchpad
**a story can be added or one could choose to use the activities alone and add
their own fun and games to make it interesting!
Getting Started with Sketchpad
What is Sketchpad?Sketchpad is a computer program specially designed for drawing
and manipulating geometric figures. Using Sketchpad is a fun way tolearn about and experiment with geometry.
Activities in this bookletThere are 14 activities in this booklet covering a wide-range of
geometric concepts. You will work with a partner to complete eachactivity. You and your partner will share unique jobs throughout theseactivities. For each activity you will be either a Mouse Operator or anActivity Recorder. At the end of each activity you will change jobs withyour partner.
A lot of geometry terms are not described in this booklet. Whenyou see words with which you are not familiar, you should look in yourtextbook to find out more about the subject. Words that you see in boldmay be new words for you.
IMPORTANT: Beforebeginning, turn on Auto ShowLabels for points and circles.To do this, click on the Displaymenu and select preferences.Click on the boxes besidePoints and Circles if they arenot already selected. Also,while in the Preferences dialogbox, change the Distance Unitpreference to centimeters (cm)and set the precisions to tenths.
Using SketchpadIn this section, you will learn some of the basics of using Sketchpad.
You will find other information about using Sketchpad in other sections ofthis booklet. All the information about Sketchpad you need to do theactivities can be found in this booklet.
Creating a new sketchCreate a new sketch by clicking on the File menu and selecting
New Sketch. A blank sketchpad will appear.
Saving a sketchDuring these activities, you may want to save your work to a disk.
To save a sketch, click on the File menu and select Save. You will beasked to type in a name for your file. (The name must be 8 characters orless.)

Learning with Geometer’s Sketchpad -- 5
The toolbar
• Selection arrow—use this tool to click on objects to move themor resize them. Also use this tool to select (or highlight) objects.
Important: To select one or more objects at the same time, holddown the Shift key and click on all of the objects you want selected.
• Point tool—use to place points on your sketch.
• Compass tool—use to draw circles.
• Straightedge tool—use to draw segments, rays, and lines (youwill learn more about these in Activity 1). Click and hold down theStraightedge tool to see the options for segments, rays, or lines.
• Text tool—use to change object labels. Click on an object todisplay or hide its label. Double click on a label to change it.
Clicking and draggingSomething you will be doing a lot in Sketchpad is “clicking and
dragging” objects. Click means to position the pointer over an objectand press the mouse button (and not let go) to select it. Drag means tothen move the mouse to move the object on the sketchpad.

6 -- Learning with Geometer’s Sketchpad
Investigating Points & LinesHow to draw a point1. Select the Point tool by clicking on it in the toolbar.2. Position the cursor where you want to place the point. Click. The
point appears on your sketchpad.
How to draw a line segment1. Select the Segment tool by clicking on it in the toolbar.
2. Click and drag the mouse across the page to draw a line segment.
How to draw a ray1. Click and hold the Segment tool on the toolbar. Select the Ray tool.
2. Click and drag the mouse across the page to draw a ray.
Notice how the ray starts at point A, passes through point B andextends off the sketchpad on one side.
How to draw a line1. Click and hold the Segment tool on the toolba. Select the Line tool.
2. Click and drag the mouse across the page to draw a line.
Notice that the line extends off the page on both sides.

Learning with Geometer’s Sketchpad -- 7
ACTIVITY 1Determine who will be the mouse operator and who will be therecorder for this activity. Remember, you will rotate jobs.
1. Create a new sketch. To do this, click on the File menu andselect New Sketch.
2. Place three points on the sketchpad. (Look back to page 3 if youneed a reminder.) How many points do you think you coulddraw on a sketch if you tried? Explain your answer.
_________________________________________________
_________________________________________________
3. If someone were to plan a trip, they may want to plot a flight course.To do this, you need to begin by drawing the two airports that willserve as your endpoints. Open a new sketch and place two pointswherever you want.
Now let’s name the points. Click on the arrow tool, then doubleclick on the letter A (next to point A). Now type in the name of theairport you will be arriving at in the place of A. Then change point Bto the airport that you will leave from in the same way.
Now that you have your points, chose the line segment tool andconnect these lines together. This line segment represents thepath that your plane will fly on when going from your home airport toyour final destination.
Now that you have drawn the segment, how many endpointsdoes it have?
__________________________________________________
How would you describe a line segment to someone that maynot know what it is?
__________________________________________________
__________________________________________________
Check out your book for moreinformation on points andendpoints.
*REVIEWFROM 5TH
GRADEBOOKLET

8 -- Learning with Geometer’s Sketchpad
5. Now, draw a ray anywhere on your sketchpad. (Look back topage 3 if you need a reminder.)
How many endpoints are on this ray? Explain your answer.
_______________________________________________
_______________________________________________
How many points are on this ray? Explain your answer.
__________________________________________________
__________________________________________________
*The labels on your sketchshould be different.
How many points are on this segment that you drew? Explain.
__________________________________________________
__________________________________________________
4. Using the same sketch, place a point anywhere on the segment.Your sketch should look similar to this one:*
Now, how many segments do you see? What are the labels(names) of the segments? Explain your answer.
_________________________________________________
_________________________________________________
*Go to the File Menu and Open the file named “Activ1.gps”
This Map represents the path that a metro train would take from one stop to the next. In this case the train is traveling from Washington National to the Metro Center stop. If the train tracks represent segments, what do you think the stations represent?
__________________________________________________
To learn more about rays,look in your textbook!
j C BA

Learning with Geometer’s Sketchpad -- 9
How many points are on this line? Explain your answer.
________________________________________________
________________________________________________
Do you see a segment on the line? Explain.
________________________________________________
________________________________________________
Save this sketch as “sketch1.gsp””
To learn more about linescheck out you textbook
again.
You know, we see examples of rays in real life everyday! Think of a flashlight. The bulb, where the light comes from is like an endpoint. Suppose we shine our flashlights into the night sky. What would the shining light be like?
_________________________________________________
6. Draw a line anywhere on your sketchpad.
How many endpoints are on this line?
________________________________________________
________________________________________________
You are doing an excellent job so far. Keep up the good work!
Do you see a segment on the ray? Explain.
__________________________________________________
__________________________________________________
10 -- Learning with Geometer’s Sketchpad
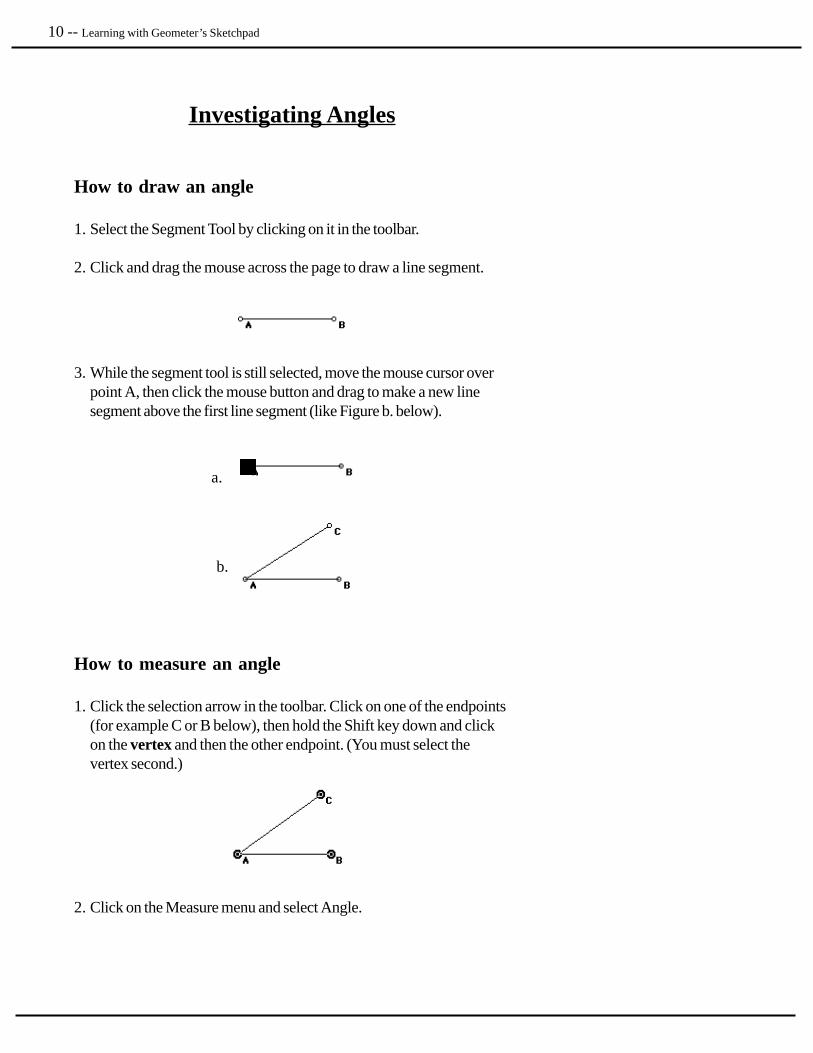
Investigating Angles
How to draw an angle
1. Select the Segment Tool by clicking on it in the toolbar.
2. Click and drag the mouse across the page to draw a line segment.
3. While the segment tool is still selected, move the mouse cursor overpoint A, then click the mouse button and drag to make a new linesegment above the first line segment (like Figure b. below).
a.
b.
How to measure an angle
1. Click the selection arrow in the toolbar. Click on one of the endpoints(for example C or B below), then hold the Shift key down and clickon the vertex and then the other endpoint. (You must select thevertex second.)
2. Click on the Measure menu and select Angle.

Learning with Geometer’s Sketchpad -- 11
You should now see the measure of the angle in the upper left-handcorner of your sketch. Notice the way the angle is labeled. The lettersshould be in the same order as you selected them.
Swap jobs with your partner. Create a new sketch.
1. Construct a 45 degree angle. Be sure to measure the angle.
2. Click on the three points ( the angle side, the vertex, and the otherangle side) just like you are measuring the angle.
3. Click on the Construct menu and select Angle Bisector.
4. Place and label a point on the ray.
Your sketch should look similar to this:
A B
C
D
m CAB = 45°
5. Measure each of the new smaller angles.
What is the measure or each angle?
_____________________________________________
Sum the two small angles. What do they add up to?
_____________________________________________
Activity 2
Meets SOL 6.16

12 -- Learning with Geometer’s Sketchpad
Investigating Special Lines and Angles
How to construct a perpendicular line
1. Construct a segment.
2. Place a point on the line.
a. Click the Point tool on the toolbar.b. Move the mouse over the line segment and click where you wouldlike to place the point.
3. Click the selection arrow in the toolbar. Select the new point and theline segment by holding down the shift key and clicking both the pointand the line segment.
4. Click on the Construct Menu and select Perpendicular Line.
You should now see a new line running through the point on the linesegment. This new line is a perpendicular line.
6. Drag the endpoint of segment CA to the left.
Sum the two smaller angles again. What do they add up to?
_____________________________________________
Ray AD bisects CAB. What do you think is a good definition of anangle bisector?
_____________________________________________
_____________________________________________

Learning with Geometer’s Sketchpad -- 13
Swap jobs with your partner.
1. Construct a line segment.
Label the line segment j. To do this, click on the Text tool and clickonce on the line segment. Then double click on the label. Enter theletter j and press return.
2. Place a point on segment j. (Point C in the sketch below.Remember, your labels may be different.)
Construct a line perpendicular to segment j that runs through thepoint.
3. Your sketch should look similar to this one:
4. How many angles do you see?
_______________________________________________________________
5. What kind of angles do you see?
______________________________________________________________
6. Measure one of the angles using the Measure menu. Write themeasure below. (You will have to place more points on the line to beable to mneasure the angles.)
_______________________________________________________________
j C BA
Activity 3Meets SOL 6.16
14 -- Learning with Geometer’s Sketchpad
Swap jobs with your partner.
1. Open the sketch named “Activ4.gsp.”
2. In this activity you are going to be reading clocks! From the time onthe clock (represented by the angles of the hands) you can predictwhether angles are acute, right, or obtuse.
3. Look at the clock in Figure 1. What time does the clock read?How big do you think the angle is? (Give approximate value as wellas the name of the angle: acute, obtuse, right, or straight.)
__________________________________________________________________
4. Now look at the clock in Figure 2. What time does this clock read?What do you predict the angle to be now that time has passed?
_________________________________________________________________
5. Look at Figure 3. What time is it now? What do you predict theangle to be at this given time?
____________________________________________________
Activity 4
7. Measure another angle. What is it’s measurement?
________________________________________________
8. What do you would be a good definition for Perpendicular Lines?
__________________________________________________________________
__________________________________________________________________
__________________________________________________________________
Meets SOL 6.13

Learning with Geometer’s Sketchpad -- 15
Telling time can take on awhole new meaning whenusing angles!
6. In order for the clock hands to form a straight angle, what time doesit have to be?
__________________________________________________________________
Change jobs with your partner.
Open a new sketch and draw all of the polygons using the line segmenttool. When finished, save the sketch as “Sketch2.gsp”
• Triangle• Quadrilateral• Pentagon• Hexagon• Septagon• Octagon
Washington D.C. is a city full of polygons. Open “Activ7.gsp” andlook at the pictures of the Washington D.C. area. Can you identifyexamples of the above polygons? Please record the names of thepolygons and number of sides below.
NAME: # of sides:
A)__________________________ ________
B)__________________________ ________
To learn more about each ofthese polygons, look in yourtextbook.
Meets SOL 6.14
REVIEWFROM 5THGRADEBOOKLET
Activity 5

16 -- Learning with Geometer’s Sketchpad
C)__________________________ ________
D)__________________________ ________
E)__________________________ ________
F)___________________________ ________
Congratulations!! You have now completed Activity 5! You areon your way to becoming an expert in Geometry!
Meets SOL 6.11
REVIEWFROM 5THGRADEBOOKLET
Activity 6
Don’t forget to swap jobs with your partner.
The reflecting pool, located in Washington, D.C., is foundbetween the Lincoln Memorial and the Washington Monument.Open “Activ6.gsp”. This sketch will be used to solve thefollowing questions.
1. Measure the length of each side of the rectangle (representing thereflecting pool) and record your answers below. (Look back topage 3 if you need a reminder.)
w = ___________________________x = ___________________________y = ___________________________z = ___________________________
2. What is the perimeter of this figure?
_________________________________________
3. Drag point B to resize the figure. Write your new lengths for thesides.
w = ___________________________x = ___________________________y = ___________________________
z = ___________________________

Learning with Geometer’s Sketchpad -- 17
To find out more about perim-eter, look in your book.
4. What is the new perimeter?
________________________________________
6. What do you think would be a good definition of perimeter?Record your answer below.
________________________________________________________________
________________________________________________________________
________________________________________________________________
7. Think of a situation in your home, school, or community, where youwould use perimeter to solve a problem. Record your thoughtsbelow:
_________________________________________________________________
_________________________________________________________________
_________________________________________________________________
Save the sketch as “sketch3.gsp”
5. Check your answers by using the measure menu to measure theperimeter. Select all four points of the figure (hold down theShift key and click on all four). Click on the Construct menuand select Polygon Interior. Click on the Measure menu andselect Perimeter.
Does Sketchpad give you the same answers you came up with? Ifnot, list the answers Sketchpad gave you.
________________________________________________________________
SUPER JOB!

18 -- Learning with Geometer’s Sketchpad
Open up “Activ7_2.gsp” and you will once again see the reflectingpool.
What is the area of the rectangle?
_____________________________________________________________________
If you didn’t know the length of one of the sides of the rectanglecould you still solve the problem? (*Hint)
__________________________________________________
__________________________________________________
Congratulations! You are doing great!!!
*Hint: information given:
2. What is the approximate area of the Washington D.C., given thateach side of the polygon is 6 miles?
_________________________________________________________________
If you didn’t know the length of one of the sides of the square,could you still solve the problem? (*hint)
_____________________________________________________________________
_____________________________________________________________________
To find out more about arealook in your textbook.
*HINT: Information given--
Activity 7
Swap jobs with your partner.
1. In “Activ7.gsp” you see a map of Virginia and Maryland. Locatedbetween the two is Washington DC. What do you notice about theshape of DC? Is it simialar to any polygons you know?
_________________________________________________
Meets SOL 6.11
REVIEWFROM 5THGRADEBOOKLET
2cm
2cm
2cm
4cm
4cm
2cm

Learning with Geometer’s Sketchpad -- 19
How to measure the height of a triangle
1. Select the base of the angle and the vertex opposite the base.
2. Construct a perpendicular line by clicking on the construct menu andchoosing perpendicular line.
3. Place a point at the intersection of the base and the perpendicular line.
4. Click on the perpendicular line and choose Hide Line from the Displaymenu.
5. Select the new point on the base and the vertex opposite the base.(Remember to hold down the shift key and click on both points.)
6. Click on the Construct menu and select Segment.
7. While the new line segment is still selected (as shown above) click onthe Measure menu and select Length. The length of that segment isalso the height of the triangle.

20 -- Learning with Geometer’s Sketchpad
5. What is the area of the triangle?
___________________________________________
**Take the following steps to check your answers using theMeasure Menu:
6. Select all of the vertices of the triangle in Figure 1. Click on theConstruct Menu and select Polygon Interior.
3. What is the area of the Triangle?
________________________________________________
What unit of measure did you use to state you answer? Why?
___________________________________________________________________
___________________________________________________________________
4. Measure the base and height of the triangle in Figure 2.
Base = ______________________________________
Height = ____________________________________
Activity 8
Swap jobs with your partner.
1. Open the sketch named “Activ10.gsp” and check out the triangles.
2. Measure the base and height of the Triangle in Figure 1 and record itbelow:
Base = __________________________________________
Height = ________________________________________
Meets SOL 6.11
REVIEWFROM 5THGRADEBOOKLET

Learning with Geometer’s Sketchpad -- 21
7. Click on the Measure Menu and select Area.
What is the measure?
__________________________________________
8. Select the 3 vertices of the triangle in Figure 2. Click on theConstruct menu and select Polygon Interior.
9. Click on the Measure menu and select Area.
What is the measure?
______________________________________________
10. What is your definition of the area of a triangle?
__________________________________________________
__________________________________________________
_________________________________________________
Activity 9
1. Open the sketch called “Activ9.gsp”
2. Measure the area of the green triangle using the Measure Menu.Remember to construct the Polygon Interior first.
What is the area?
______________________________________________________________
Meets SOL 6.11
REVIEWFROM 5THGRADEBOOKLET

22 -- Learning with Geometer’s Sketchpad
3. Drag point I back and forth.
Does the area of the triangle change?
_______________________________________________________________
4. Measure the area of the rectangle using the Measure Menu.
What is the area?
_______________________________________________________________
5. Drag the H point back and forth ?
Does the area of the rectangle change?
_______________________________________________________________
6. What do you notice about the relationship between the area ofthe green triangle and the area of the rectangle?
_________________________________________________________________
_________________________________________________________________
_________________________________________________________________
What do you think the area of the yellow triangle would be?What about thearea of the yellow traingle and the area of theblue triangle combined?
__________________________________________________________________
7. Measure the other triangle using the Measure menu to test you theory.
Did you get the results you expected? Why or why not?
_____________________________________________
_____________________________________________
_____________________________________________

Learning with Geometer’s Sketchpad -- 23
8. Why do you think the formula for finding the area of a triangle is A =1/2bh?
__________________________________________________________________
__________________________________________________________________
__________________________________________________________________
9. The following list contains real-life situations in which either area orperimeter would be used to solve the problem. Next to each ofthe examples write either P for perimeter or A for area.
_________Susie Sailor wants to carpet her living room with groovygreen shag carpet.
_________George Jungle just planted a garden for his mother. Inorder to keep the rabbits from eating the carrots he needs to build afence.
_________Bo Beavers is buying a cover for his pool. He needs tofind out what size is needed.
________Kennedy Swoper is chalking the outside lines for thefootball field. He needs to know the distance around the field.
________Cole Riple is waxing the basketball court and needs toknow how much wax to use.

24 -- Learning with Geometer’s Sketchpad
Activity 10
Switch jobs with your partner.
In this activity we are going to explore Congruent and Noncongruentfigures. Here are a some examples:
1. What do you think a good definition of congruent would be?
________________________________________________
________________________________________________
If so, what would be a good definition of noncongruent?
______________________________________________
_______________________________________________
Meets SOL 6.15
Noncongruent Triangles
Congruent Polygons
Congruent Angles
Noncongruent SegmentsCongruent Segments
Noncongruent angles
Noncongruent Polygons
Congruent Triangles

Learning with Geometer’s Sketchpad -- 25
4. Look at the following sketches and label each one either “C” forCongruent or “N” for Noncongruent:
______
______
______
______
______
Answers:
Give yourself a big pat on the back. You are doing anexcellent job.
2. Open a new sketch and draw two congruent angles. Measure theangles and write their measurements below:
_________________________________________________________________
3. Now draw two congruent squares. Measure one side of the eachsquare and write the measurements below.
____________________________________________________________________

26 -- Learning with Geometer’s Sketchpad
Investigating Circles
How to draw a circle
1. Click the circle tool on the toolbar.
2. Click anywhere on the sketchpad and drag the mouse. You will see acircle expand around the circle tool.
Let go of the mouse when the circle is the size you want.
Notice the two points that you can see when you draw a circle. Thepoint in the middle, point A above, is called the center.
Point B, in Sketchpad, is called the control point. Click and drag thecontrol point to resize a circle.

Learning with Geometer’s Sketchpad -- 27
Using the Construct menu to draw a circle
1. Select two points. The first point you highlight will be the center ofyour circle. The second point will be your control point.
2. Choose Circle by Center + Point from the Construct menu. A circlewill be constructed.
Constructing a circle's radius
1. Select the circle’s center point and the control point.
2. Click on the Construct menu and select Segment.
The new line segment is the radius of the circle.

28 -- Learning with Geometer’s Sketchpad
Constructing a chord of a circle
1. Place two points anywhere on the circle (not inside) and select them.
2. Click on the Construct menu and select Segment.
The new line segment is one chord of the circle.
Measuring the length of a line segment
1. Click on the line segment you want to measure.
Line segment j is selected in the example above.
2. Click on the Measure menu and select Length. The length will appearon the sketchpad.

Learning with Geometer’s Sketchpad -- 29
Activity 11
Part 1: Swap jobs with your partner and create a new sketch.
1. Construct a small circle.
2. Construct the circle’s radius by drawing a segment from thecenter point to the control point. Your sketch should look likethis:
3. Add another point on the circle, away from the control point.
4. Construct another segment to connect this new point with thecenter point. Your sketch should look similar to this:
Try to drag the new point. What happens?
__________________________________________________________________
In Sketchpad, you can only drag the center point or control pointto change the size of a circle.
To learn more about Radiuslook in your text book.
Meets SOl 6.12
REVIEWFROM 5THGRADEBOOKLET
c1
B
A
c1
C
B
A

30 -- Learning with Geometer’s Sketchpad
Is the second segment you created also a radius? Why or whynot?
____________________________________________________________________
____________________________________________________________________
Give your definition of a radius of a circle.
_____________________________________________________________________
_____________________________________________________________________
_____________________________________________________________________
7. Construct a chord on your circle (but do not use the controlpoint as one of the endpoints).
8. Click on one endpoint of the chord and drag it. Move the pointto different places along the circle.
What happens when you drag the point of the chord?
__________________________________________________________________
When you move the endpoint, does the segment remain a chord?Why or why not?
___________________________________________________________________
___________________________________________________________________
Leave your sketch open for the next activity...
5. Measure the length of each segment.
What do you notice about the measures?
___________________________________________________________________
___________________________________________________________________
6. Drag the control point to change the size of the circle.
What happened to the measures?
___________________________________________________________________
To learn more about coolchords look in your text-book.

Learning with Geometer’s Sketchpad -- 31
Activity 12
We all know that the radius is an important part of a circle. Whenyou know the radius of a circle, you can also determine its diameterand circumference. Next you will measure a circle’s radius andthen use formulas to find the circle’s diameter and circumference.
Swap jobs with your partner. Make sure you have the sketch frommission 4 open.
1. Click and drag the central point so that the radius of your circleis 2 cm. Using the measure of the radius in your circle and theappropriate formulas, find the following:
Radius = ______________________________
Diameter = ____________________________
Circumference = ________________________
2. Click and drag the control point sto change the radius of your circle to3 cm.. Determine the following:
Radius = __________________________________
Diameter = ____________________________
Circumference = ________________________
Use the Measure menu to check your answers.
1. Click anywhere along the circle except on a point.
2. Click on the Construct menu and select Circle Interior.
3. While the interior of the circle is highlighted, click on theMeasure menu and select Radius.
4. Click the Measure menu again and select Circumference.
To find out more about diam-eter and circumference lookin your textbook.
Formulas:
d = 2r
c = 2πr
Meets SOl 6.12
REVIEWFROM 5THGRADEBOOKLET

32 -- Learning with Geometer’s Sketchpad
5. To double-check the diameter, just multiply the radius measure by 2.
6. What measures did Sketchpad come up with?
Radius = __________________________________
Diameter = ____________________________
Circumference = ________________________
Circumference Diameter Circumference/Diameter
1. Draw 5 circles, each a different size.
2. Using the measure function, measure the circumference of each circle, and place your answer in the chart above under Circumference.
3. Now measure the diameter, and put that in the chart under Diameter.
4. Using the calculator found under the Measure menu (click on Calculate), divide the circumference by the diameter. What do you notice about the answers? ________________________________________________
________________________________________________
5. With the information that you get, what can you say about the relationship between Circumference and Diameter? _______________________________________________
_______________________________________________
Activity 12 Meets SOL 6.12

Learning with Geometer’s Sketchpad -- 33
Congratulations! You have completed theentire booklet! Your hard work payed of--now you can all yourself a geometery wiz!