georeference maps in arc gis 10.1
TRANSCRIPT
Created by YOH KAWANOUpdated 2013
E. SULLIVAN
UCLA DIGITAL HUMANITIES
HOW TO
GEOREFERENCE MAPSIN ARC GIS 10.1

PAGE 1
INTRODUCTION The following manual has been created to serve as a working guide for anybody who wants to add a base-map to their ESRI ArcGIS Map. A basemap is usually defined as a historic map that has been scanned from a library archive, but it can also refer to any geo-spatial rendering, plan or photograph in raster format that represents a geographic landscape accurately. Here are some examples of basemaps:
• City and County map of New York 1849
• US Department of Surveyor’s Map of Los Angeles County 1881
• An archaeological plan of a cemetery site
The ultimate goal of this tutorial is to georeference a scanned or drawn image. To georeference something is to define its existence in physical space, on a cartographically accurate reference system. By doing so, it will enable the scanned image to be used in a Geographic Information System (GIS).
WHAT YOU NEED - A raster file of the image you want to georeference.
o No spaces or special characters are allowed in the file name
- ArcMap 10.1 and ArcCatalog 10.1
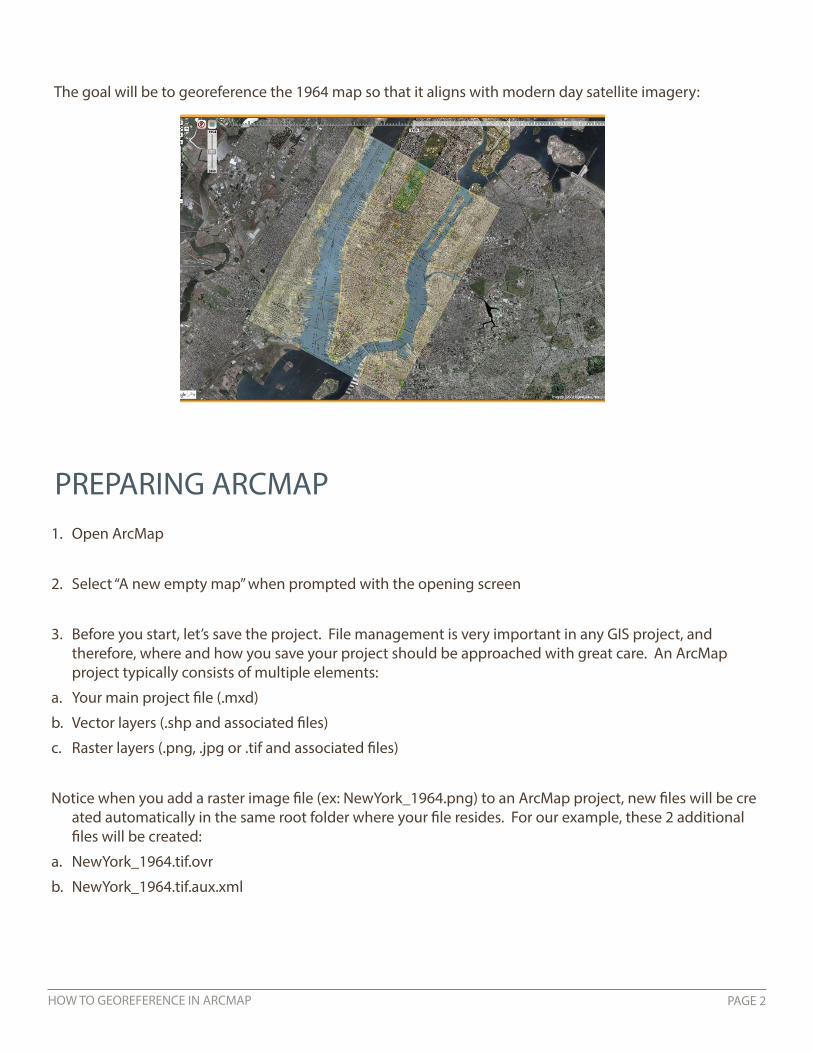
THE MAP Begin with a map image saved as a .tif, .png or .jpeg file. For this tutorial, we will be using a 1964 New
York map as the basemap to be georeferenced.
New York 1964 Google Satellite
HOW TO GEOREFERENCE IN ARCMAP
PAGE 2
The goal will be to georeference the 1964 map so that it aligns with modern day satellite imagery:
PREPARING ARCMAP 1. Open ArcMap
2. Select “A new empty map” when prompted with the opening screen
3. Before you start, let’s save the project. File management is very important in any GIS project, and therefore, where and how you save your project should be approached with great care. An ArcMap project typically consists of multiple elements:
a. Your main project file (.mxd)
b. Vector layers (.shp and associated files)
c. Raster layers (.png, .jpg or .tif and associated files)
Notice when you add a raster image file (ex: NewYork_1964.png) to an ArcMap project, new files will be cre ated automatically in the same root folder where your file resides. For our example, these 2 additional files will be created:
a. NewYork_1964.tif.ovr
b. NewYork_1964.tif.aux.xml
HOW TO GEOREFERENCE IN ARCMAP
PAGE 3
4. Therefore, it is recommended that you put all files in your project in a single folder. Once you have determined the location for your project, go to File, Save and save your project.
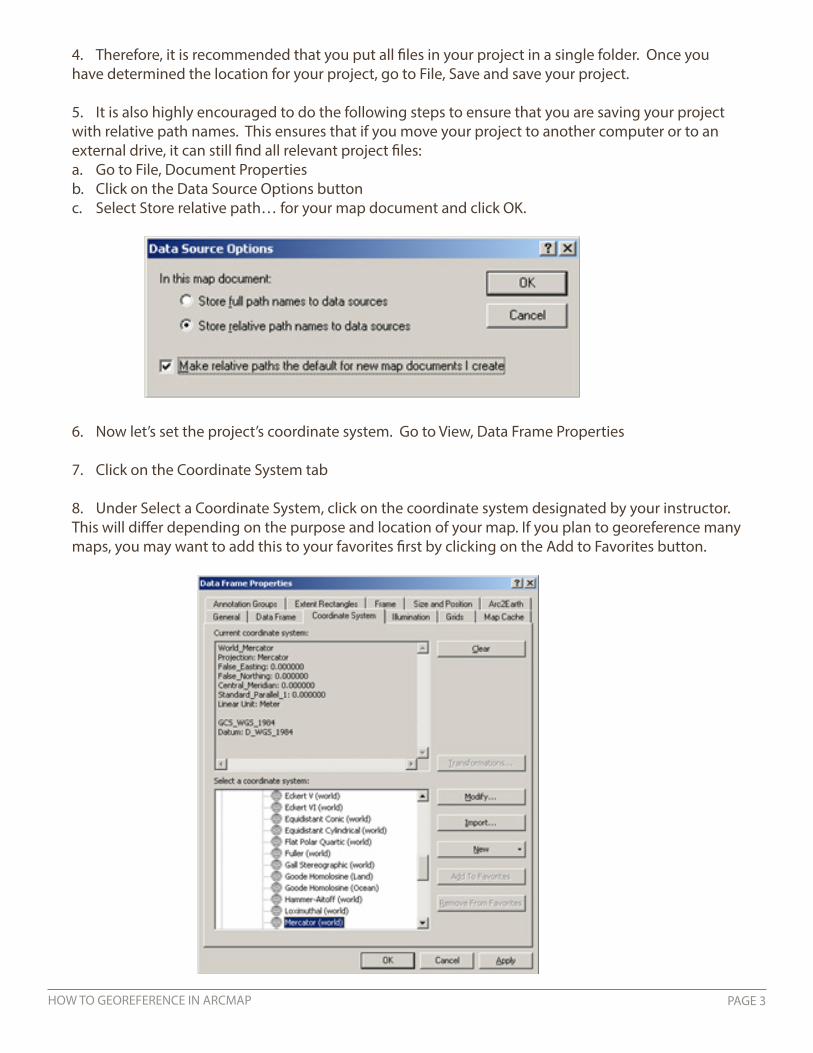
5. It is also highly encouraged to do the following steps to ensure that you are saving your project with relative path names. This ensures that if you move your project to another computer or to an external drive, it can still find all relevant project files:a. Go to File, Document Propertiesb. Click on the Data Source Options buttonc. Select Store relative path… for your map document and click OK.
6. Now let’s set the project’s coordinate system. Go to View, Data Frame Properties
7. Click on the Coordinate System tab
8. Under Select a Coordinate System, click on the coordinate system designated by your instructor. This will differ depending on the purpose and location of your map. If you plan to georeference many maps, you may want to add this to your favorites first by clicking on the Add to Favorites button.
HOW TO GEOREFERENCE IN ARCMAP
PAGE 4
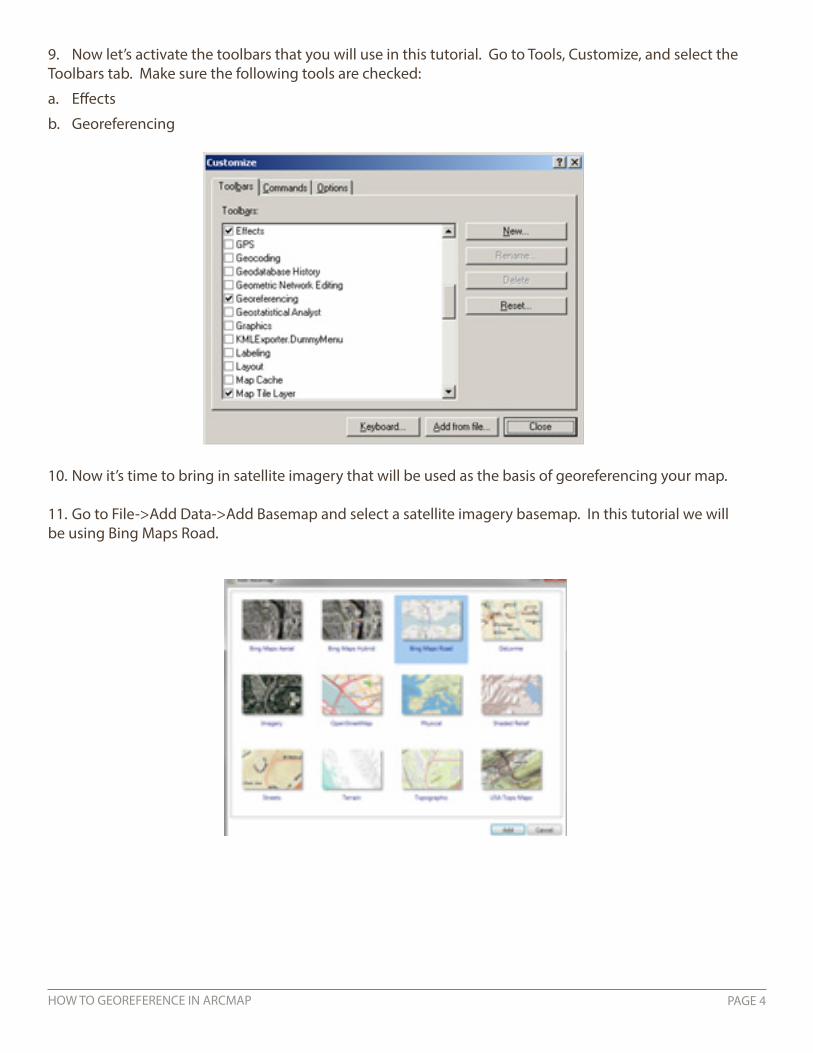
9. Now let’s activate the toolbars that you will use in this tutorial. Go to Tools, Customize, and select the Toolbars tab. Make sure the following tools are checked:
a. Effects
b. Georeferencing
10. Now it’s time to bring in satellite imagery that will be used as the basis of georeferencing your map.
11. Go to File->Add Data->Add Basemap and select a satellite imagery basemap. In this tutorial we will be using Bing Maps Road.
HOW TO GEOREFERENCE IN ARCMAP
HOW TO GEOREFERENCE IN ARCMAP PAGE 5
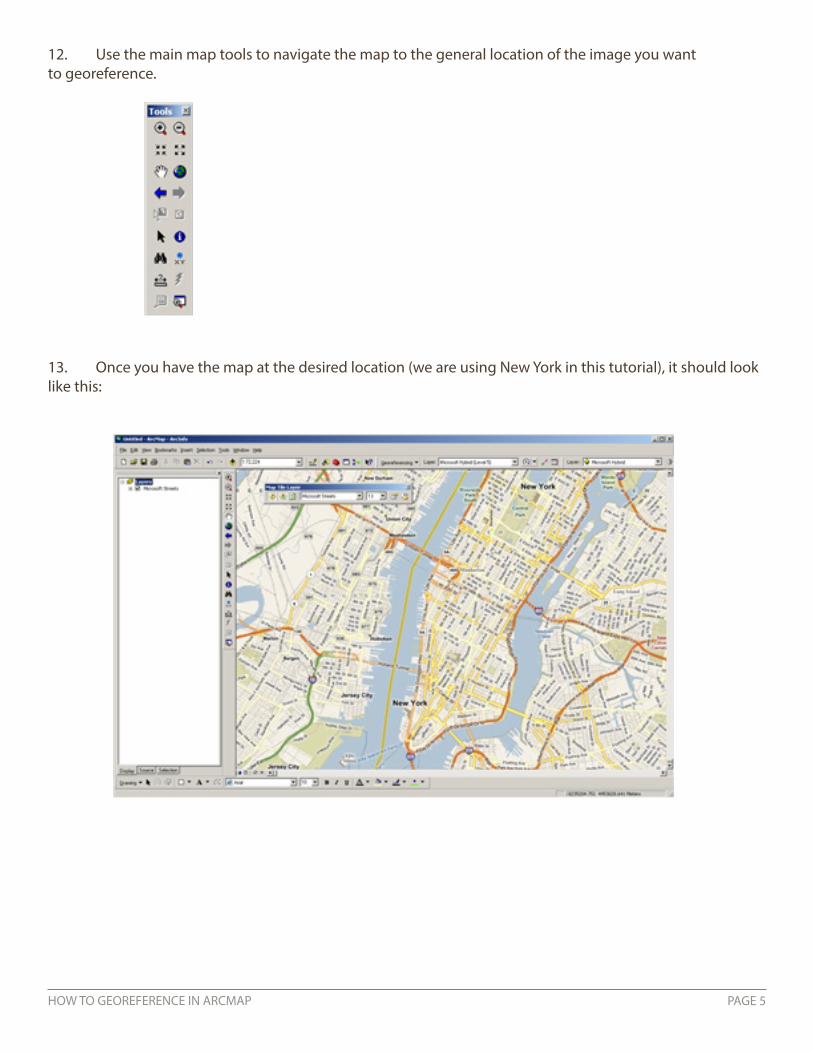
12. Use the main map tools to navigate the map to the general location of the image you want to georeference.
13. Once you have the map at the desired location (we are using New York in this tutorial), it should look like this:
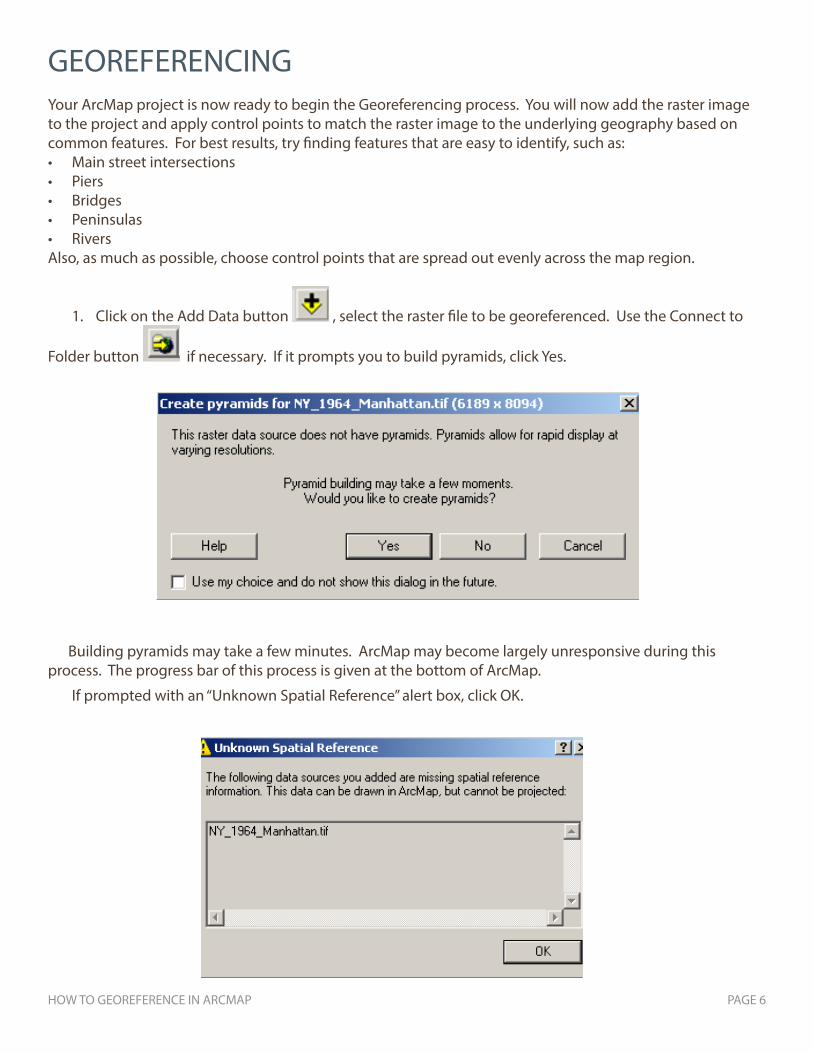
GEOREFERENCING Your ArcMap project is now ready to begin the Georeferencing process. You will now add the raster image to the project and apply control points to match the raster image to the underlying geography based on common features. For best results, try finding features that are easy to identify, such as:• Main street intersections• Piers• Bridges• Peninsulas• RiversAlso, as much as possible, choose control points that are spread out evenly across the map region.
1. Click on the Add Data button , select the raster file to be georeferenced. Use the Connect to
Folder button if necessary. If it prompts you to build pyramids, click Yes.
Building pyramids may take a few minutes. ArcMap may become largely unresponsive during this process. The progress bar of this process is given at the bottom of ArcMap.
If prompted with an “Unknown Spatial Reference” alert box, click OK.
HOW TO GEOREFERENCE IN ARCMAP PAGE 6
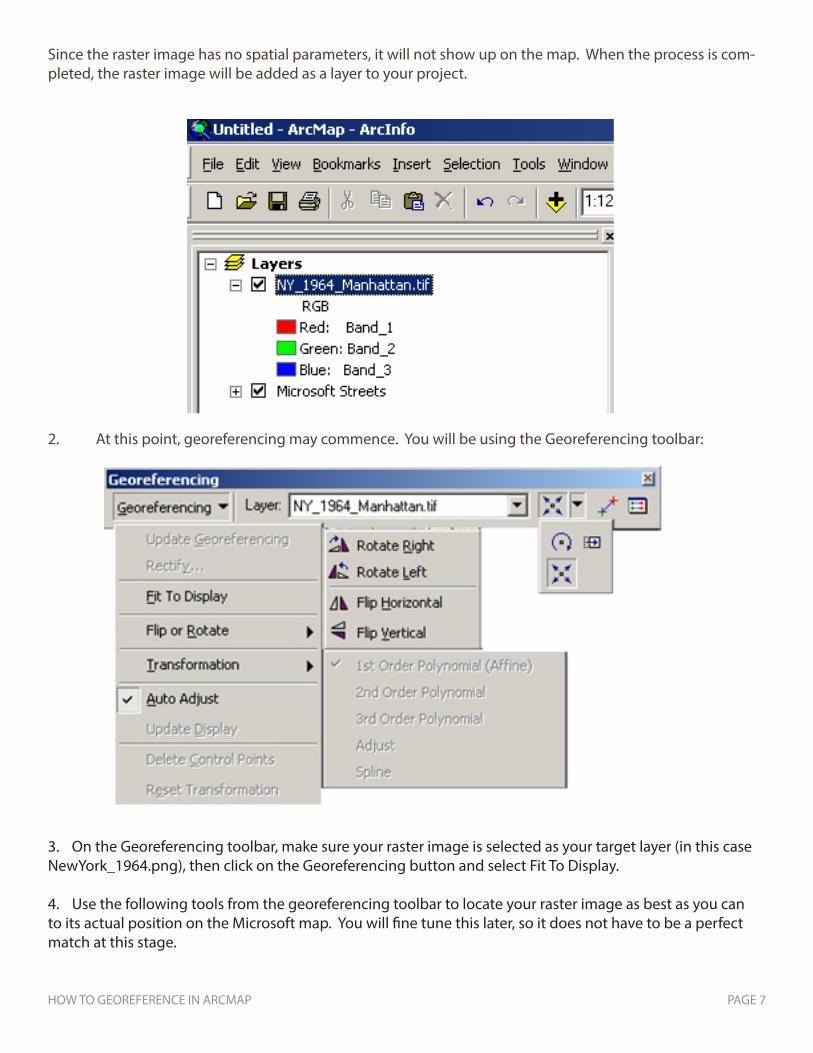
Since the raster image has no spatial parameters, it will not show up on the map. When the process is com-pleted, the raster image will be added as a layer to your project.
2. At this point, georeferencing may commence. You will be using the Georeferencing toolbar:
3. On the Georeferencing toolbar, make sure your raster image is selected as your target layer (in this case NewYork_1964.png), then click on the Georeferencing button and select Fit To Display.
4. Use the following tools from the georeferencing toolbar to locate your raster image as best as you can to its actual position on the Microsoft map. You will fine tune this later, so it does not have to be a perfect match at this stage.
HOW TO GEOREFERENCE IN ARCMAP PAGE 7
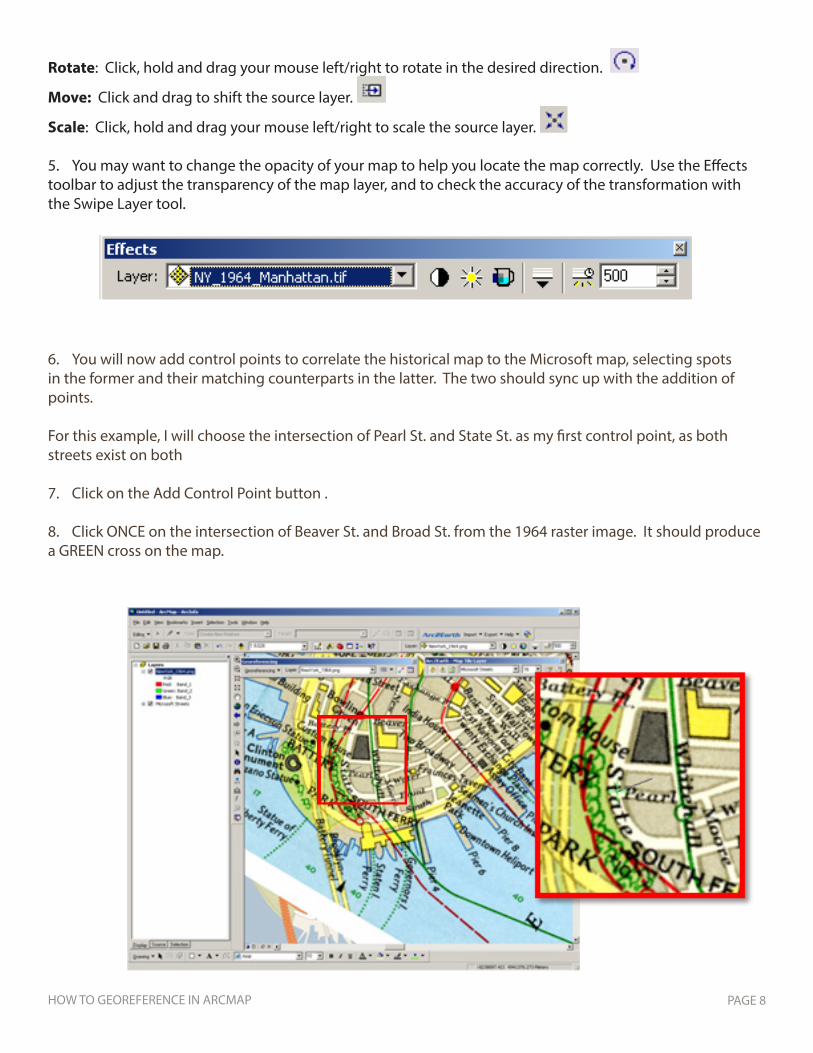
6. You will now add control points to correlate the historical map to the Microsoft map, selecting spots in the former and their matching counterparts in the latter. The two should sync up with the addition of points.
For this example, I will choose the intersection of Pearl St. and State St. as my first control point, as both streets exist on both
7. Click on the Add Control Point button .
8. Click ONCE on the intersection of Beaver St. and Broad St. from the 1964 raster image. It should produce a GREEN cross on the map.
Rotate: Click, hold and drag your mouse left/right to rotate in the desired direction.
Move: Click and drag to shift the source layer.
Scale: Click, hold and drag your mouse left/right to scale the source layer.
5. You may want to change the opacity of your map to help you locate the map correctly. Use the Effects toolbar to adjust the transparency of the map layer, and to check the accuracy of the transformation with the Swipe Layer tool.
HOW TO GEOREFERENCE IN ARCMAP PAGE 8
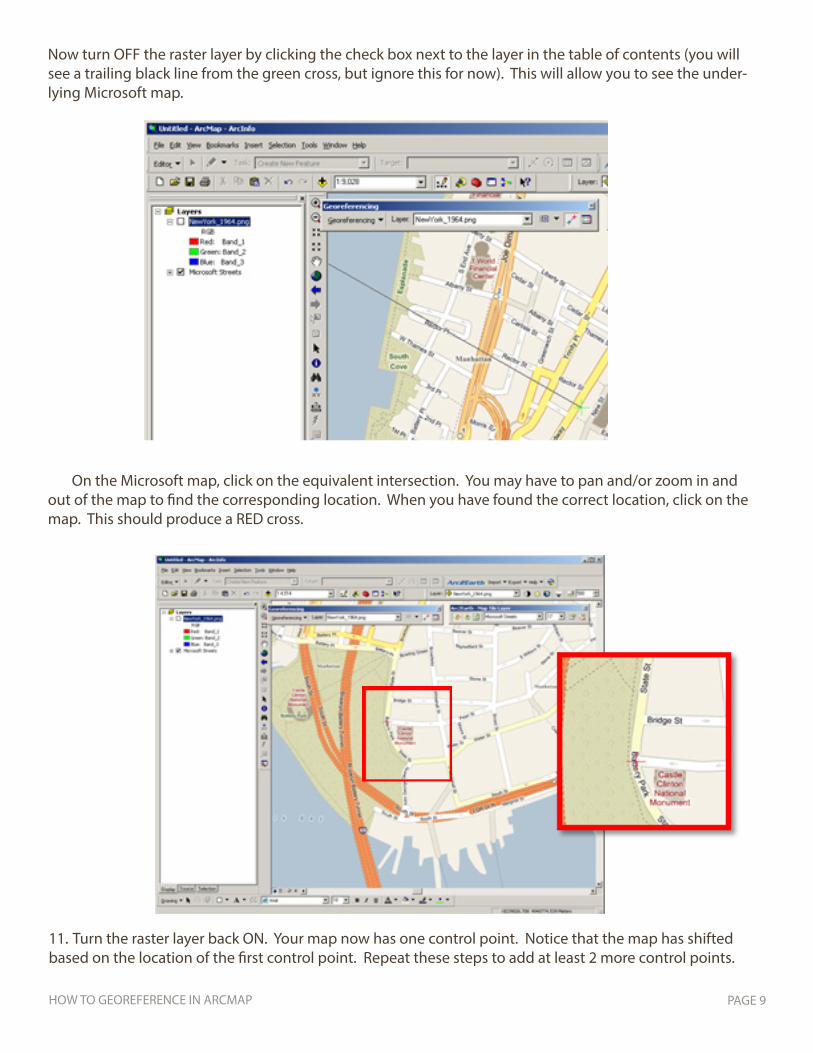
Now turn OFF the raster layer by clicking the check box next to the layer in the table of contents (you will see a trailing black line from the green cross, but ignore this for now). This will allow you to see the under-lying Microsoft map.
On the Microsoft map, click on the equivalent intersection. You may have to pan and/or zoom in and out of the map to find the corresponding location. When you have found the correct location, click on the map. This should produce a RED cross.
11. Turn the raster layer back ON. Your map now has one control point. Notice that the map has shifted based on the location of the first control point. Repeat these steps to add at least 2 more control points.
HOW TO GEOREFERENCE IN ARCMAP PAGE 9
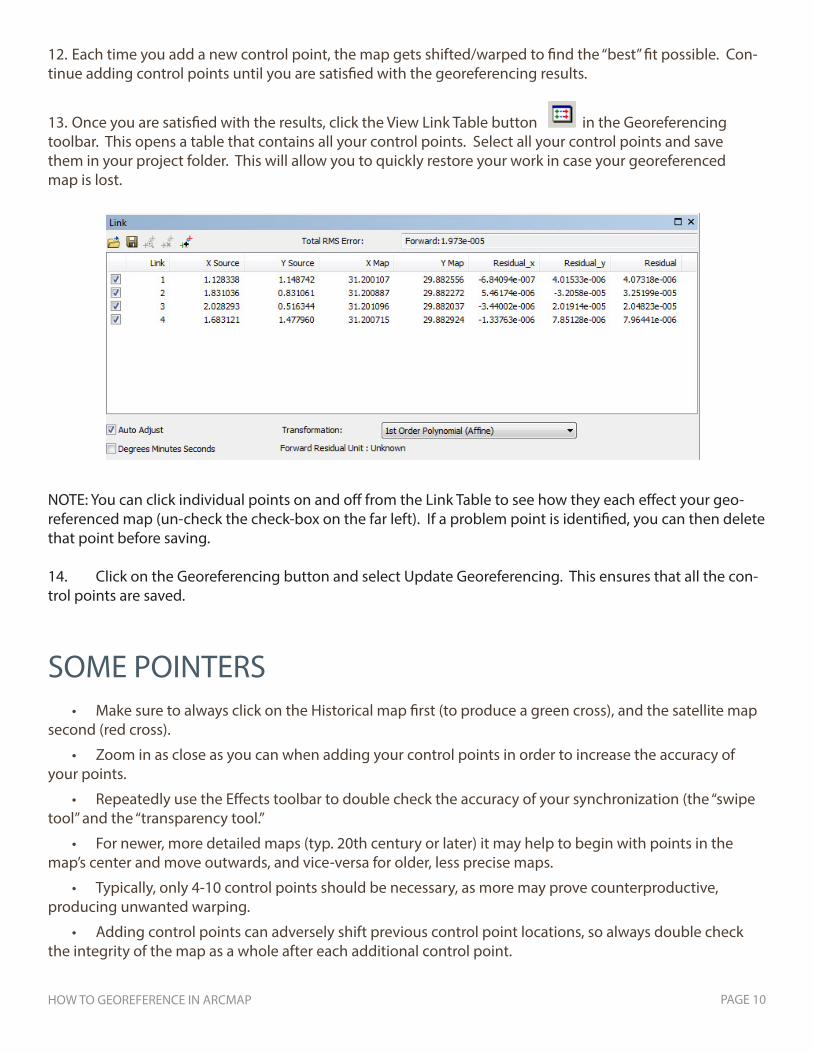
12. Each time you add a new control point, the map gets shifted/warped to find the “best” fit possible. Con-tinue adding control points until you are satisfied with the georeferencing results.
13. Once you are satisfied with the results, click the View Link Table button in the Georeferencing toolbar. This opens a table that contains all your control points. Select all your control points and save them in your project folder. This will allow you to quickly restore your work in case your georeferenced map is lost.
NOTE: You can click individual points on and off from the Link Table to see how they each effect your geo-referenced map (un-check the check-box on the far left). If a problem point is identified, you can then delete that point before saving.
14. Click on the Georeferencing button and select Update Georeferencing. This ensures that all the con-trol points are saved.
SOME POINTERS
• Make sure to always click on the Historical map first (to produce a green cross), and the satellite map second (red cross).
• Zoom in as close as you can when adding your control points in order to increase the accuracy of your points.
• Repeatedly use the Effects toolbar to double check the accuracy of your synchronization (the “swipe tool” and the “transparency tool.”
• For newer, more detailed maps (typ. 20th century or later) it may help to begin with points in the map’s center and move outwards, and vice-versa for older, less precise maps.
• Typically, only 4-10 control points should be necessary, as more may prove counterproductive, producing unwanted warping.
• Adding control points can adversely shift previous control point locations, so always double check the integrity of the map as a whole after each additional control point.
HOW TO GEOREFERENCE IN ARCMAP PAGE 10
METADATA Now that you have geo-referenced your map, you want to label it with information about what you have done. Here, we will add “metadata” (ie. data about data) to the map file itself, so when you share it or use it later, all the necessary information about the map production is available.
1. Open ArcCatalog.
2. Navigate to the folder containing the georeferenced image file and select it. If you do not see your folder, use the Connect to Folder button to map it.
3. Click on the map file in the Catalog Tree. In the viewer, click on the Description tab. Click EDIT and add data about your map. This will include Tags, a Summary of your map, a Description of your map, Credits, and Use Limitations. Fill this out to the best of your ability. Be sure to include bibliographic information on the original map, as well as who geo-referenced the map. Now save your edits.
HOW TO GEOREFERENCE IN ARCMAP PAGE 11