george s coffin's great 88 - houston card schoolhoustoncardschool.com/coffin/george s...
TRANSCRIPT
♠♥♦♣ Houston Card School
George S. Coffin’s Great 88
Page 1 ©1995 Houston Card School All rights reserved.
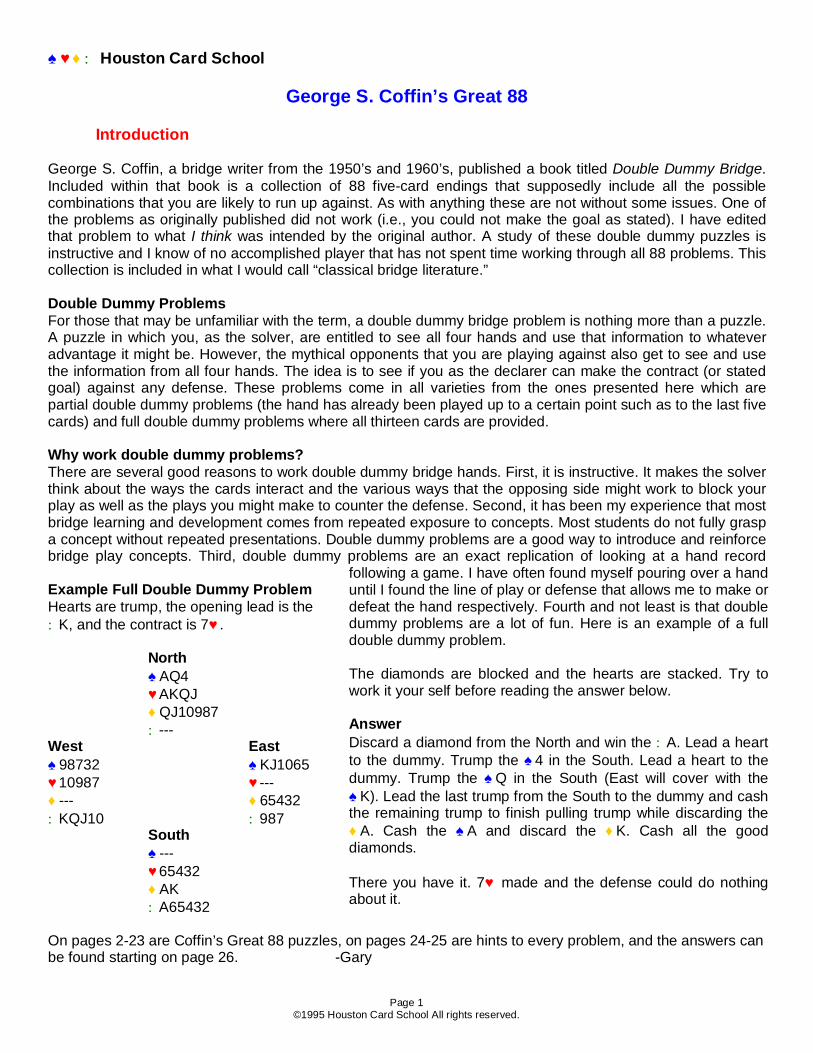
Introduction George S. Coffin, a bridge writer from the 1950’s and 1960’s, published a book titled Double Dummy Bridge. Included within that book is a collection of 88 five-card endings that supposedly include all the possible combinations that you are likely to run up against. As with anything these are not without some issues. One of the problems as originally published did not work (i.e., you could not make the goal as stated). I have edited that problem to what I think was intended by the original author. A study of these double dummy puzzles is instructive and I know of no accomplished player that has not spent time working through all 88 problems. This collection is included in what I would call “classical bridge literature.” Double Dummy Problems For those that may be unfamiliar with the term, a double dummy bridge problem is nothing more than a puzzle. A puzzle in which you, as the solver, are entitled to see all four hands and use that information to whatever advantage it might be. However, the mythical opponents that you are playing against also get to see and use the information from all four hands. The idea is to see if you as the declarer can make the contract (or stated goal) against any defense. These problems come in all varieties from the ones presented here which are partial double dummy problems (the hand has already been played up to a certain point such as to the last five cards) and full double dummy problems where all thirteen cards are provided. Why work double dummy problems? There are several good reasons to work double dummy bridge hands. First, it is instructive. It makes the solver think about the ways the cards interact and the various ways that the opposing side might work to block your play as well as the plays you might make to counter the defense. Second, it has been my experience that most bridge learning and development comes from repeated exposure to concepts. Most students do not fully grasp a concept without repeated presentations. Double dummy problems are a good way to introduce and reinforce bridge play concepts. Third, double dummy problems are an exact replication of looking at a hand record Example Full Double Dummy Problem Hearts are trump, the opening lead is the ♣K, and the contract is 7♥. North ♠AQ4 ♥AKQJ ♦QJ10987 ♣--- West East ♠98732 ♠KJ1065 ♥10987 ♥--- ♦--- ♦65432 ♣KQJ10 ♣987 South ♠--- ♥65432 ♦AK ♣A65432
following a game. I have often found myself pouring over a hand until I found the line of play or defense that allows me to make or defeat the hand respectively. Fourth and not least is that double dummy problems are a lot of fun. Here is an example of a full double dummy problem. The diamonds are blocked and the hearts are stacked. Try to work it your self before reading the answer below. Answer Discard a diamond from the North and win the ♣A. Lead a heart to the dummy. Trump the ♠4 in the South. Lead a heart to the dummy. Trump the ♠Q in the South (East will cover with the ♠K). Lead the last trump from the South to the dummy and cash the remaining trump to finish pulling trump while discarding the ♦A. Cash the ♠A and discard the ♦K. Cash all the good diamonds. There you have it. 7♥ made and the defense could do nothing about it.
On pages 2-23 are Coffin’s Great 88 puzzles, on pages 24-25 are hints to every problem, and the answers can be found starting on page 26. -Gary
♠♥♦♣ Houston Card School
George S. Coffin’s Great 88
Page 2 ©1995 Houston Card School All rights reserved.
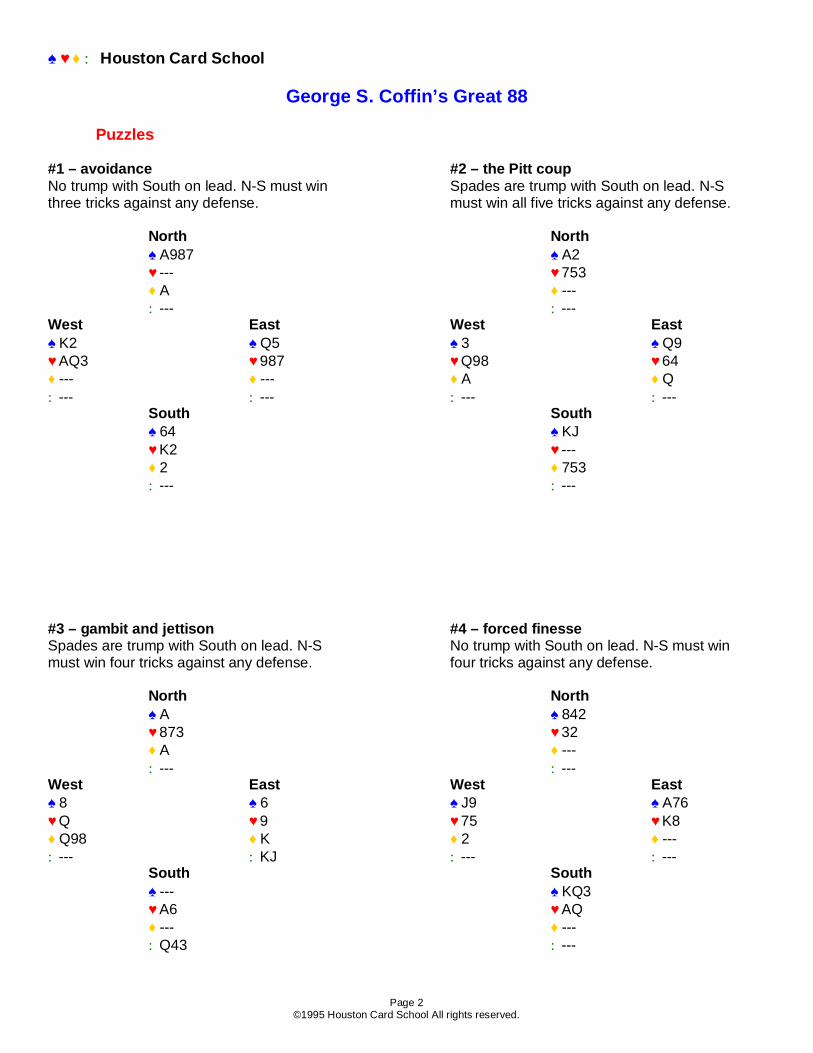
Puzzles #1 – avoidance #2 – the Pitt coup No trump with South on lead. N-S must win three tricks against any defense.
Spades are trump with South on lead. N-S must win all five tricks against any defense.
North North ♠A987 ♠A2 ♥--- ♥753 ♦A ♦--- ♣--- ♣--- West East West East ♠K2 ♠Q5 ♠3 ♠Q9 ♥AQ3 ♥987 ♥Q98 ♥64 ♦--- ♦--- ♦A ♦Q ♣--- ♣--- ♣--- ♣--- South South ♠64 ♠KJ ♥K2 ♥--- ♦2 ♦753 ♣--- ♣--- #3 – gambit and jettison #4 – forced finesse Spades are trump with South on lead. N-S must win four tricks against any defense.
No trump with South on lead. N-S must win four tricks against any defense.
North North ♠A ♠842 ♥873 ♥32 ♦A ♦--- ♣--- ♣--- West East West East ♠8 ♠6 ♠J9 ♠A76 ♥Q ♥9 ♥75 ♥K8 ♦Q98 ♦K ♦2 ♦--- ♣--- ♣KJ ♣--- ♣--- South South ♠--- ♠KQ3 ♥A6 ♥AQ ♦--- ♦--- ♣Q43 ♣---
♠♥♦♣ Houston Card School
George S. Coffin’s Great 88
Page 3 ©1995 Houston Card School All rights reserved.
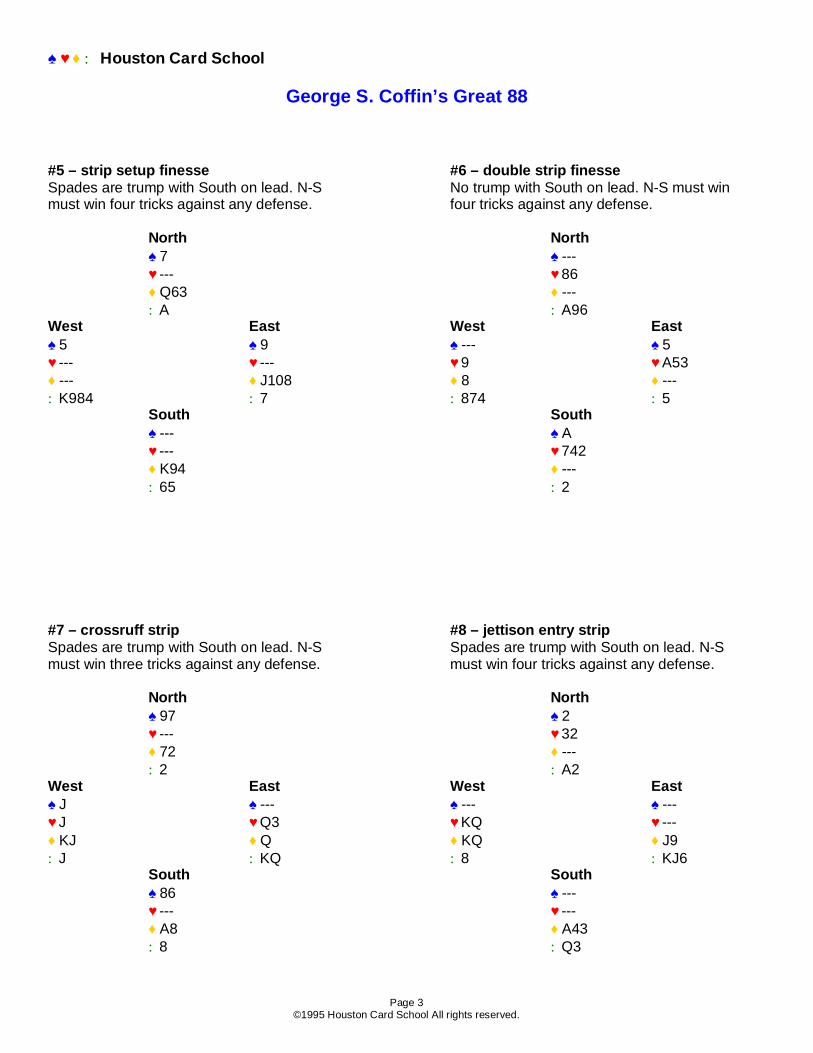
#5 – strip setup finesse #6 – double strip finesse Spades are trump with South on lead. N-S must win four tricks against any defense.
No trump with South on lead. N-S must win four tricks against any defense.
North North ♠7 ♠--- ♥--- ♥86 ♦Q63 ♦--- ♣A ♣A96 West East West East ♠5 ♠9 ♠--- ♠5 ♥--- ♥--- ♥9 ♥A53 ♦--- ♦J108 ♦8 ♦--- ♣K984 ♣7 ♣874 ♣5 South South ♠--- ♠A ♥--- ♥742 ♦K94 ♦--- ♣65 ♣2 #7 – crossruff strip #8 – jettison entry strip Spades are trump with South on lead. N-S must win three tricks against any defense.
Spades are trump with South on lead. N-S must win four tricks against any defense.
North North ♠97 ♠2 ♥--- ♥32 ♦72 ♦--- ♣2 ♣A2 West East West East ♠J ♠--- ♠--- ♠--- ♥J ♥Q3 ♥KQ ♥--- ♦KJ ♦Q ♦KQ ♦J9 ♣J ♣KQ ♣8 ♣KJ6 South South ♠86 ♠--- ♥--- ♥--- ♦A8 ♦A43 ♣8 ♣Q3
♠♥♦♣ Houston Card School
George S. Coffin’s Great 88
Page 4 ©1995 Houston Card School All rights reserved.
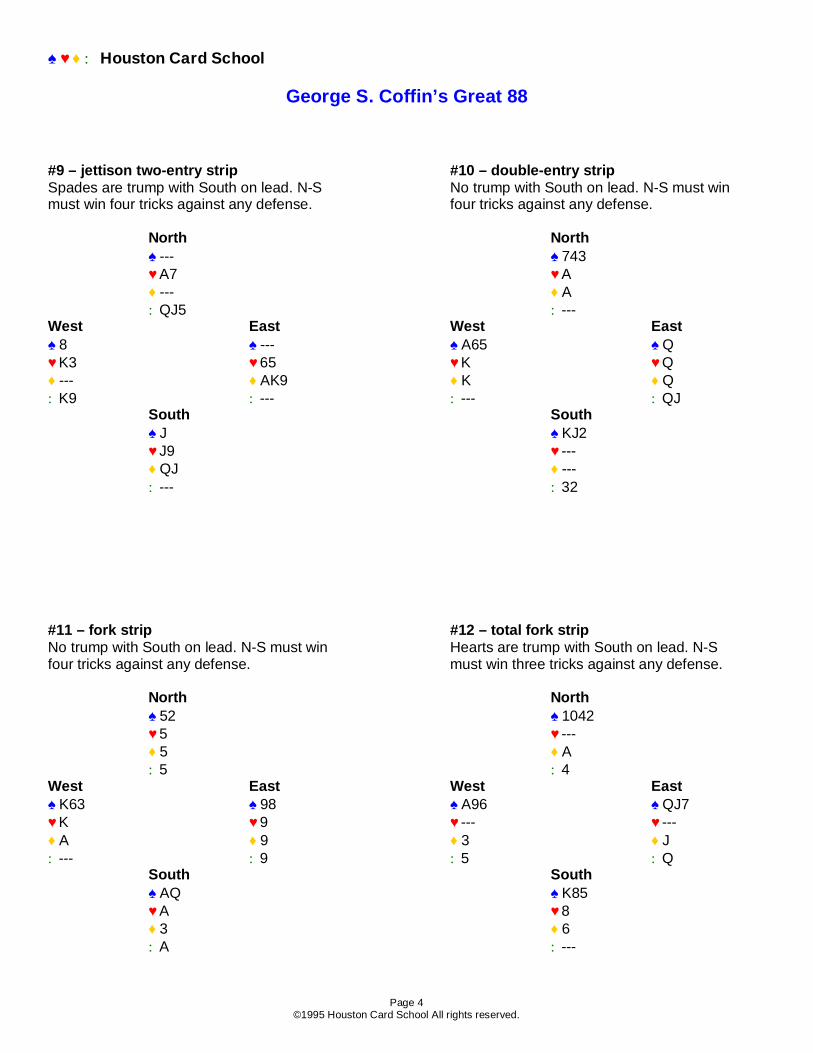
#9 – jettison two-entry strip #10 – double-entry strip Spades are trump with South on lead. N-S must win four tricks against any defense.
No trump with South on lead. N-S must win four tricks against any defense.
North North ♠--- ♠743 ♥A7 ♥A ♦--- ♦A ♣QJ5 ♣--- West East West East ♠8 ♠--- ♠A65 ♠Q ♥K3 ♥65 ♥K ♥Q ♦--- ♦AK9 ♦K ♦Q ♣K9 ♣--- ♣--- ♣QJ South South ♠J ♠KJ2 ♥J9 ♥--- ♦QJ ♦--- ♣--- ♣32 #11 – fork strip #12 – total fork strip No trump with South on lead. N-S must win four tricks against any defense.
Hearts are trump with South on lead. N-S must win three tricks against any defense.
North North ♠52 ♠1042 ♥5 ♥--- ♦5 ♦A ♣5 ♣4 West East West East ♠K63 ♠98 ♠A96 ♠QJ7 ♥K ♥9 ♥--- ♥--- ♦A ♦9 ♦3 ♦J ♣--- ♣9 ♣5 ♣Q South South ♠AQ ♠K85 ♥A ♥8 ♦3 ♦6 ♣A ♣---

♠♥♦♣ Houston Card School
George S. Coffin’s Great 88
Page 5 ©1995 Houston Card School All rights reserved.
#13 – progressive fork strip #14 – transfer fork strip No trump with South on lead. N-S must win four tricks against any defense.
Spade trump with South on lead. N-S must win four tricks against any defense.
North North ♠Q3 ♠6 ♥--- ♥4 ♦--- ♦--- ♣KQJ ♣AJ5 West East West East ♠8654 ♠K102 ♠--- ♠--- ♥A ♥--- ♥Q ♥--- ♦--- ♦--- ♦K4 ♦65 ♣--- ♣64 ♣92 ♣Q84 South South ♠AJ97 ♠--- ♥J ♥--- ♦--- ♦72 ♣--- ♣K63 #15 – jettison double fork strip #16 – repeat-jettison fork strip Spades are trump with South on lead. N-S must win three tricks against any defense.
Spade trump with South on lead. N-S must win four tricks against any defense.
North North ♠--- ♠--- ♥--- ♥A ♦J ♦A ♣10862 ♣KJ7 West East West East ♠9 ♠7 ♠J ♠5 ♥953 ♥8 ♥3 ♥--- ♦8 ♦--- ♦764 ♦Q9 ♣--- ♣A97 ♣--- ♣AQ South South ♠J ♠Q ♥642 ♥2 ♦5 ♦KJ8 ♣--- ♣---
♠♥♦♣ Houston Card School
George S. Coffin’s Great 88
Page 6 ©1995 Houston Card School All rights reserved.
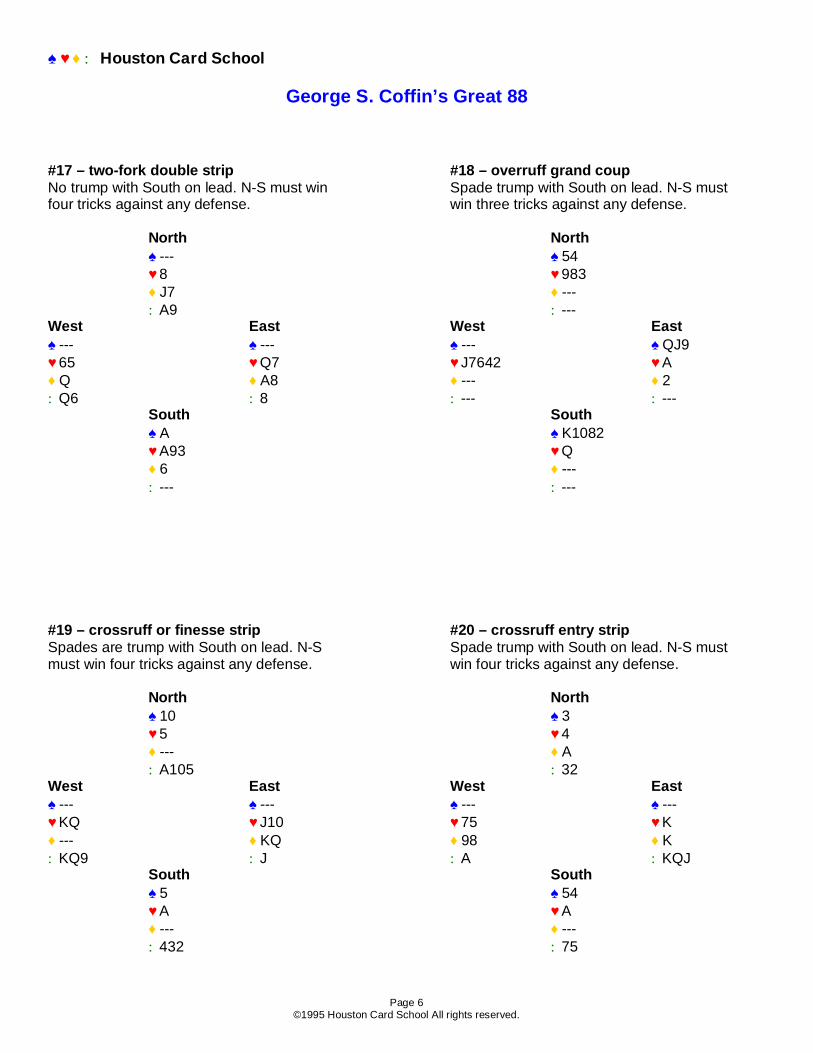
#17 – two-fork double strip #18 – overruff grand coup No trump with South on lead. N-S must win four tricks against any defense.
Spade trump with South on lead. N-S must win three tricks against any defense.
North North ♠--- ♠54 ♥8 ♥983 ♦J7 ♦--- ♣A9 ♣--- West East West East ♠--- ♠--- ♠--- ♠QJ9 ♥65 ♥Q7 ♥J7642 ♥A ♦Q ♦A8 ♦--- ♦2 ♣Q6 ♣8 ♣--- ♣--- South South ♠A ♠K1082 ♥A93 ♥Q ♦6 ♦--- ♣--- ♣--- #19 – crossruff or finesse strip #20 – crossruff entry strip Spades are trump with South on lead. N-S must win four tricks against any defense.
Spade trump with South on lead. N-S must win four tricks against any defense.
North North ♠10 ♠3 ♥5 ♥4 ♦--- ♦A ♣A105 ♣32 West East West East ♠--- ♠--- ♠--- ♠--- ♥KQ ♥J10 ♥75 ♥K ♦--- ♦KQ ♦98 ♦K ♣KQ9 ♣J ♣A ♣KQJ South South ♠5 ♠54 ♥A ♥A ♦--- ♦--- ♣432 ♣75

♠♥♦♣ Houston Card School
George S. Coffin’s Great 88
Page 7 ©1995 Houston Card School All rights reserved.
#21 – crossruff fork strip #22 – crossruff split-fork strip Spades are trump with South on lead. N-S must win four tricks against any defense.
Spade trump with South on lead. N-S must win four tricks against any defense.
North North ♠A ♠3 ♥AQ ♥Q ♦Q ♦--- ♣A ♣K103 West East West East ♠--- ♠--- ♠--- ♠--- ♥J9 ♥K5 ♥K ♥A9 ♦J ♦K ♦A ♦--- ♣J9 ♣KQ ♣J86 ♣Q75 South South ♠3 ♠4 ♥32 ♥6 ♦3 ♦--- ♣3 ♣A94 #23 – entry or fork strip #24 – jettison-entry fork strip No trump with South on lead. N-S must win four tricks against any defense.
No trump with South on lead. N-S must win three tricks against any defense.
North North ♠3 ♠K984 ♥72 ♥--- ♦Q2 ♦K ♣--- ♣--- West East West East ♠--- ♠2 ♠--- ♠AJ ♥Q98 ♥J54 ♥98 ♥--- ♦K9 ♦J ♦A65 ♦--- ♣--- ♣--- ♣--- ♣876 South South ♠--- ♠--- ♥AK3 ♥Q65 ♦A7 ♦72 ♣--- ♣---

♠♥♦♣ Houston Card School
George S. Coffin’s Great 88
Page 8 ©1995 Houston Card School All rights reserved.
#25 – blocked fork strip or entry strip #26 – crossruff entry fork strip No trump with South on lead. N-S must win four tricks against any defense.
Spade trump with South on lead. N-S must win four tricks against any defense.
North North ♠KJ3 ♠3 ♥--- ♥32 ♦K ♦--- ♣8 ♣53 West East West East ♠--- ♠Q7 ♠--- ♠--- ♥9 ♥--- ♥64 ♥--- ♦9 ♦QJ ♦6 ♦98754 ♣Q72 ♣9 ♣64 ♣--- South South ♠--- ♠75 ♥J ♥75 ♦84 ♦--- ♣J6 ♣2 #27 – en passant #28 – grand coup Spades are trump with South on lead. N-S must win four tricks against any defense.
Spade trump with South on lead. N-S must win all five tricks against any defense.
North North ♠A54 ♠--- ♥2 ♥42 ♦--- ♦AK ♣2 ♣A West East West East ♠98 ♠7 ♠J9 ♠K4 ♥9 ♥--- ♥--- ♥--- ♦9 ♦A7 ♦J9 ♦43 ♣9 ♣87 ♣J ♣4 South South ♠--- ♠AQ2 ♥3 ♥--- ♦32 ♦2 ♣A3 ♣2

♠♥♦♣ Houston Card School
George S. Coffin’s Great 88
Page 9 ©1995 Houston Card School All rights reserved.
#29 – grand coup fork strip #30 – overruff grand coup Spades are trump with South on lead. N-S must win four tricks against any defense.
Spade trump with South on lead. N-S must win four tricks against any defense.
North North ♠876 ♠Q972 ♥A ♥--- ♦--- ♦--- ♣9 ♣Q West East West East ♠KQ9 ♠3 ♠J108 ♠--- ♥9 ♥K ♥32 ♥--- ♦9 ♦K ♦--- ♦K6 ♣--- ♣KQ ♣--- ♣K62 South South ♠AJ102 ♠54 ♥--- ♥4 ♦A ♦5 ♣--- ♣4 #31 – repeating grand coup #32 – undercut Spades are trump with South on lead. N-S must win all five tricks against any defense.
Spade trump with South on lead. N-S must win four tricks against any defense.
North North ♠AK ♠--- ♥--- ♥4 ♦--- ♦A65 ♣Q108 ♣A West East West East ♠432 ♠J9765 ♠--- ♠KQ10 ♥8 ♥--- ♥A ♥--- ♦8 ♦--- ♦QJ98 ♦K ♣--- ♣--- ♣--- ♣4 South South ♠Q108 ♠AJ2 ♥A ♥6 ♦A ♦4 ♣--- ♣---

♠♥♦♣ Houston Card School
George S. Coffin’s Great 88
Page 10 ©1995 Houston Card School All rights reserved.
#33 – uppercut #34 – smother play Spades are trump with South on lead. N-S must win two tricks against any defense.
Spade trump with South on lead. N-S must win four tricks against any defense.
North North ♠Q7 ♠A42 ♥8 ♥2 ♦J ♦--- ♣A ♣2 West East West East ♠983 ♠A65 ♠K653 ♠109 ♥A ♥--- ♥3 ♥109 ♦9 ♦2 ♦--- ♦10 ♣--- ♣8 ♣--- ♣--- South South ♠42 ♠QJ87 ♥42 ♥7 ♦4 ♦--- ♣--- ♣--- #35 – double smother #36 – double squeeze Spades are trump with South on lead. N-S must win all five tricks against any defense.
No trump with South on lead. N-S must win all five tricks against any defense.
North North ♠A103 ♠A2 ♥--- ♥2 ♦AK ♦--- ♣--- ♣KQ West East West East ♠Q85 ♠J6 ♠Q9 ♠KJ ♥5 ♥6 ♥A ♥--- ♦5 ♦6 ♦--- ♦A ♣--- ♣6 ♣J9 ♣86 South South ♠K92 ♠3 ♥A ♥--- ♦--- ♦2 ♣4 ♣A72

♠♥♦♣ Houston Card School
George S. Coffin’s Great 88
Page 11 ©1995 Houston Card School All rights reserved.
#37 – double squeeze #38 – double automatic squeeze Spades are trump with South on lead. N-S must win four tricks against any defense.
No trump with South on lead. N-S must win all five tricks against any defense.
North North ♠94 ♠AQ3 ♥--- ♥--- ♦2 ♦--- ♣K3 ♣K4 West East West East ♠J ♠A5 ♠K96 ♠J87 ♥--- ♥Q ♥--- ♥A ♦8 ♦--- ♦A ♦--- ♣972 ♣J8 ♣9 ♣7 South South ♠Q63 ♠2 ♥2 ♥2 ♦--- ♦2 ♣6 ♣A2 #39 – split squeeze #40 – overtake squeeze No trump with South on lead. N-S must win all five tricks against any defense.
No trump with South on lead. N-S must win four tricks against any defense.
North North ♠K3 ♠A964 ♥--- ♥--- ♦74 ♦--- ♣A ♣K West East West East ♠Q ♠J ♠3 ♠108752 ♥--- ♥--- ♥A2 ♥--- ♦--- ♦QJ ♦A ♦--- ♣J876 ♣K9 ♣A ♣--- South South ♠A2 ♠KQJ ♥--- ♥K ♦A ♦K ♣Q2 ♣---

♠♥♦♣ Houston Card School
George S. Coffin’s Great 88
Page 12 ©1995 Houston Card School All rights reserved.
#41 – progressive squeeze #42 – transfer repeat squeeze No trump with South on lead. N-S must win all five tricks against any defense.
No trump with South on lead. N-S must win all five tricks against any defense.
North North ♠3 ♠A7 ♥A3 ♥4 ♦Q ♦6 ♣4 ♣7 West East West East ♠K9 ♠Q82 ♠K654 ♠J9 ♥K9 ♥--- ♥--- ♥--- ♦9 ♦J ♦Q ♦98 ♣--- ♣A ♣--- ♣Q South South ♠A7 ♠Q8 ♥7 ♥--- ♦K8 ♦A54 ♣--- ♣--- #43 – 3-2 squeeze #44 – finesse jettison squeeze No trump with South on lead. N-S must win all five tricks against any defense.
No trump with South on lead. N-S must win four tricks against any defense.
North North ♠--- ♠K8 ♥A4 ♥--- ♦4 ♦953 ♣42 ♣--- West East West East ♠--- ♠--- ♠Q764 ♠--- ♥K6 ♥--- ♥--- ♥J ♦K ♦A3 ♦K ♦J107 ♣J9 ♣863 ♣--- ♣9 South South ♠7 ♠--- ♥7 ♥9 ♦--- ♦Q8 ♣AQ7 ♣63
♠♥♦♣ Houston Card School
George S. Coffin’s Great 88
Page 13 ©1995 Houston Card School All rights reserved.
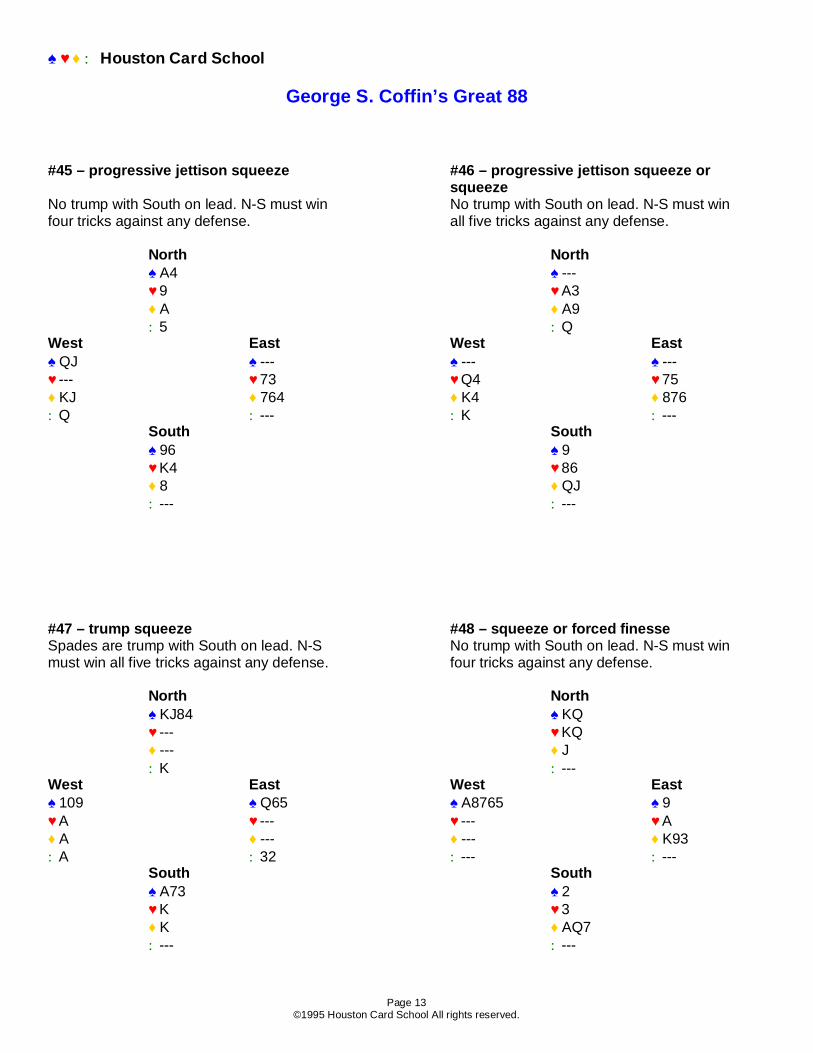
#45 – progressive jettison squeeze #46 – progressive jettison squeeze or
squeeze No trump with South on lead. N-S must win four tricks against any defense.
No trump with South on lead. N-S must win all five tricks against any defense.
North North ♠A4 ♠--- ♥9 ♥A3 ♦A ♦A9 ♣5 ♣Q West East West East ♠QJ ♠--- ♠--- ♠--- ♥--- ♥73 ♥Q4 ♥75 ♦KJ ♦764 ♦K4 ♦876 ♣Q ♣--- ♣K ♣--- South South ♠96 ♠9 ♥K4 ♥86 ♦8 ♦QJ ♣--- ♣--- #47 – trump squeeze #48 – squeeze or forced finesse Spades are trump with South on lead. N-S must win all five tricks against any defense.
No trump with South on lead. N-S must win four tricks against any defense.
North North ♠KJ84 ♠KQ ♥--- ♥KQ ♦--- ♦J ♣K ♣--- West East West East ♠109 ♠Q65 ♠A8765 ♠9 ♥A ♥--- ♥--- ♥A ♦A ♦--- ♦--- ♦K93 ♣A ♣32 ♣--- ♣--- South South ♠A73 ♠2 ♥K ♥3 ♦K ♦AQ7 ♣--- ♣---

♠♥♦♣ Houston Card School
George S. Coffin’s Great 88
Page 14 ©1995 Houston Card School All rights reserved.
#49 – finesse squeeze #50 – one-way finesse or fork strip Spades are trump with South on lead. N-S must win all five tricks against any defense.
No trump with South on lead. N-S must win three tricks against any defense.
North North ♠82 ♠KJ ♥--- ♥--- ♦A9 ♦--- ♣2 ♣A62 West East West East ♠--- ♠--- ♠--- ♠AQ9 ♥73 ♥62 ♥--- ♥--- ♦KJ ♦8 ♦Q5 ♦J7 ♣9 ♣74 ♣QJ5 ♣--- South South ♠--- ♠853 ♥54 ♥--- ♦Q ♦K4 ♣A6 ♣--- #51 – forced jettison strip-squeeze #52 – crossruff strip triple squeeze Spades are trump with South on lead. N-S must win three tricks against any defense.
Spades are trump with South on lead. N-S must win three tricks against any defense.
North North ♠--- ♠6 ♥A ♥76 ♦AJ64 ♦--- ♣--- ♣76 West East West East ♠J ♠8 ♠--- ♠9 ♥J1086 ♥--- ♥--- ♥QJ ♦--- ♦Q98 ♦KJ876 ♦--- ♣--- ♣K ♣--- ♣QJ South South ♠9 ♠7 ♥Q97 ♥K8 ♦--- ♦Q ♣7 ♣8
♠♥♦♣ Houston Card School
George S. Coffin’s Great 88
Page 15 ©1995 Houston Card School All rights reserved.
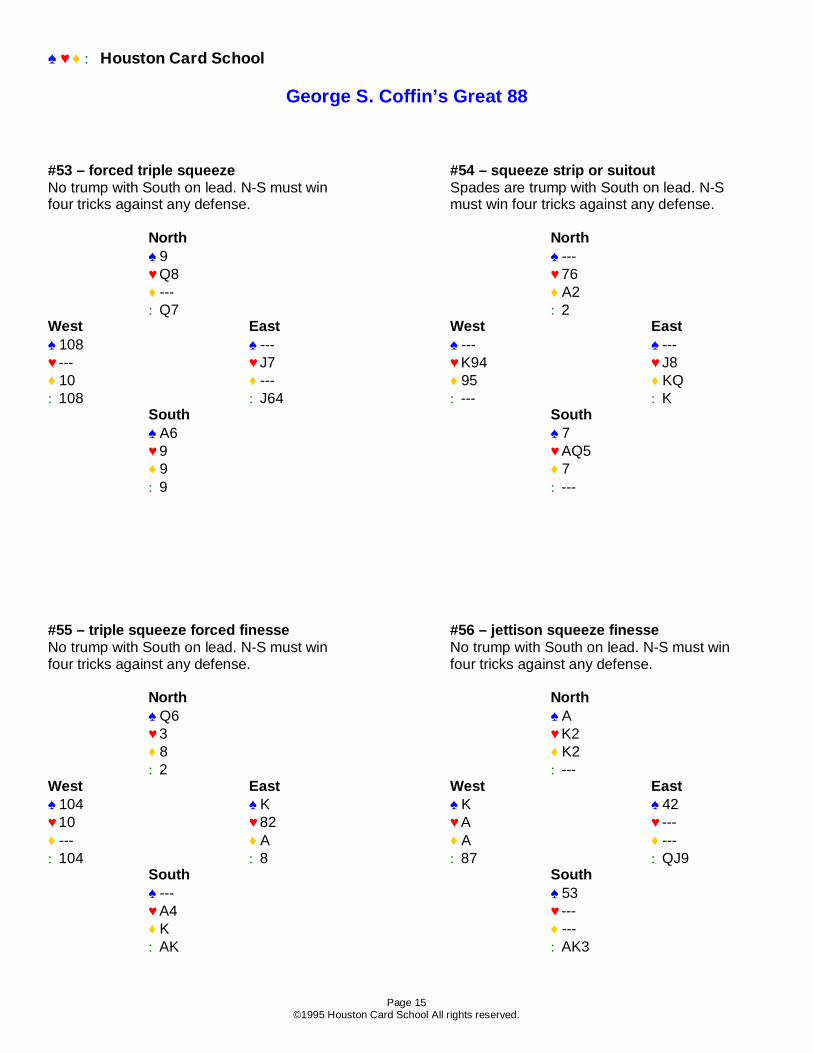
#53 – forced triple squeeze #54 – squeeze strip or suitout No trump with South on lead. N-S must win four tricks against any defense.
Spades are trump with South on lead. N-S must win four tricks against any defense.
North North ♠9 ♠--- ♥Q8 ♥76 ♦--- ♦A2 ♣Q7 ♣2 West East West East ♠108 ♠--- ♠--- ♠--- ♥--- ♥J7 ♥K94 ♥J8 ♦10 ♦--- ♦95 ♦KQ ♣108 ♣J64 ♣--- ♣K South South ♠A6 ♠7 ♥9 ♥AQ5 ♦9 ♦7 ♣9 ♣--- #55 – triple squeeze forced finesse #56 – jettison squeeze finesse No trump with South on lead. N-S must win four tricks against any defense.
No trump with South on lead. N-S must win four tricks against any defense.
North North ♠Q6 ♠A ♥3 ♥K2 ♦8 ♦K2 ♣2 ♣--- West East West East ♠104 ♠K ♠K ♠42 ♥10 ♥82 ♥A ♥--- ♦--- ♦A ♦A ♦--- ♣104 ♣8 ♣87 ♣QJ9 South South ♠--- ♠53 ♥A4 ♥--- ♦K ♦--- ♣AK ♣AK3

♠♥♦♣ Houston Card School
George S. Coffin’s Great 88
Page 16 ©1995 Houston Card School All rights reserved.
#57 – squeeze or squeeze strip #58 – triple squeeze scoop strip Spades are trump with South on lead. N-S must win four tricks against any defense.
No trump with South on lead. N-S must win four tricks against any defense.
North North ♠--- ♠K874 ♥AQ9 ♥--- ♦KQ ♦--- ♣--- ♣2 West East West East ♠4 ♠7 ♠QJ ♠A65 ♥--- ♥KJ ♥Q ♥--- ♦--- ♦AJ ♦Q ♦--- ♣Q654 ♣--- ♣Q ♣98 South South ♠K ♠2 ♥2 ♥9 ♦2 ♦9 ♣J10 ♣AK #59 – triple squeeze entry strip #60 – jettison triple squeeze entry strip No trump with South on lead. N-S must win four tricks against any defense.
No trump with South on lead. N-S must win four tricks against any defense.
North North ♠A654 ♠43 ♥K ♥2 ♦--- ♦J ♣--- ♣A West East West East ♠32 ♠10987 ♠95 ♠K ♥A ♥--- ♥9 ♥--- ♦A ♦--- ♦--- ♦98 ♣A ♣K ♣K9 ♣54 South South ♠KQJ ♠A ♥--- ♥--- ♦K ♦432 ♣2 ♣6

♠♥♦♣ Houston Card School
George S. Coffin’s Great 88
Page 17 ©1995 Houston Card School All rights reserved.
#61 – fork-squeeze entry strip #62 – squeeze finesse No trump with South on lead. N-S must win four tricks against any defense.
No trump with South on lead. N-S must win all five tricks against any defense.
North North ♠--- ♠K2 ♥A52 ♥9 ♦--- ♦9 ♣A9 ♣K West East West East ♠--- ♠--- ♠Q3 ♠J864 ♥Q86 ♥J ♥A ♥--- ♦--- ♦K9 ♦A ♦--- ♣64 ♣K8 ♣Q ♣J South South ♠--- ♠A95 ♥K73 ♥--- ♦Q7 ♦--- ♣--- ♣A2 #63 – finesse-threat 3-2 squeeze #64 – hexagon squeeze finesse Spades are trump with South on lead. N-S must win all five tricks against any defense.
No trump with South on lead. N-S must win all five tricks against any defense.
North North ♠2 ♠2 ♥--- ♥A9 ♦K5 ♦2 ♣A7 ♣2 West East West East ♠--- ♠--- ♠A ♠K ♥9 ♥J8 ♥K4 ♥Q ♦Q8 ♦J97 ♦K ♦Q4 ♣J9 ♣--- ♣Q ♣J South South ♠--- ♠--- ♥2 ♥2 ♦A1043 ♦A9 ♣--- ♣AK

♠♥♦♣ Houston Card School
George S. Coffin’s Great 88
Page 18 ©1995 Houston Card School All rights reserved.
#65 – one-way squeeze scoop finesse #66 – automatic squeeze scoop finesse No trump with South on lead. N-S must win all five tricks against any defense.
No trump with South on lead. N-S must win all five tricks against any defense.
North North ♠KJ2 ♠--- ♥K ♥--- ♦--- ♦105 ♣2 ♣A52 West East West East ♠987 ♠Q54 ♠--- ♠98 ♥A ♥3 ♥--- ♥--- ♦--- ♦--- ♦93 ♦Q76 ♣3 ♣4 ♣1086 ♣--- South South ♠A63 ♠--- ♥--- ♥9 ♦--- ♦K8 ♣AK ♣K9 #67 – squeeze ruffout #68 – squeeze overruff Spades are trump with South on lead. N-S must win all five tricks against any defense.
Clubs are trump with South on lead. N-S must win all five tricks against any defense.
North North ♠A5 ♠Q5 ♥--- ♥5 ♦K98 ♦--- ♣--- ♣KQ West East West East ♠--- ♠7 ♠--- ♠K ♥KQ ♥--- ♥J64 ♥K10 ♦QJ10 ♦--- ♦J ♦87 ♣--- ♣QJ87 ♣5 ♣--- South South ♠92 ♠--- ♥1095 ♥A87 ♦--- ♦10 ♣--- ♣9

♠♥♦♣ Houston Card School
George S. Coffin’s Great 88
Page 19 ©1995 Houston Card School All rights reserved.
#69 – squeezeable entry strip #70 – forced unblock triple-squeeze
scoop No trump with South on lead. N-S must win two tricks against any defense.
No trump with South on lead. N-S must win two tricks against any defense.
North North ♠2 ♠QJ8 ♥K4 ♥7 ♦K ♦7 ♣K ♣--- West East West East ♠8 ♠AK97 ♠AK7 ♠--- ♥A2 ♥9 ♥--- ♥9 ♦Q ♦--- ♦--- ♦J ♣Q ♣--- ♣K7 ♣J94 South South ♠QJ64 ♠964 ♥8 ♥--- ♦--- ♦--- ♣--- ♣Q8 #71 – squeeze unblock finesse #72 – blocked fork strip No trump with South on lead. N-S must win three tricks against any defense.
Spades are trump with South on lead. N-S must win three tricks against any defense.
North North ♠Q5 ♠--- ♥32 ♥Q7 ♦--- ♦J92 ♣J ♣--- West East West East ♠J0197 ♠A64 ♠3 ♠--- ♥--- ♥K9 ♥J ♥K952 ♦--- ♦--- ♦K85 ♦Q ♣A ♣--- ♣--- ♣--- South South ♠K8 ♠J ♥AJ ♥8 ♦--- ♦A73 ♣9 ♣---
♠♥♦♣ Houston Card School
George S. Coffin’s Great 88
Page 20 ©1995 Houston Card School All rights reserved.
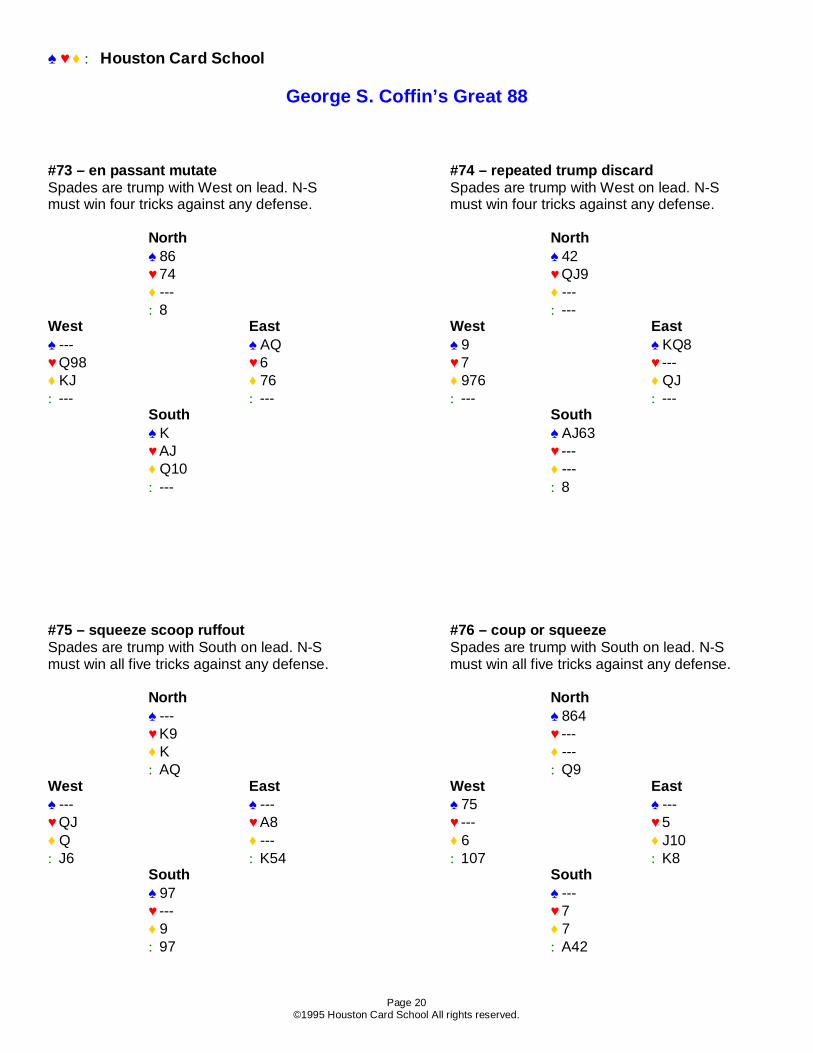
#73 – en passant mutate #74 – repeated trump discard Spades are trump with West on lead. N-S must win four tricks against any defense.
Spades are trump with West on lead. N-S must win four tricks against any defense.
North North ♠86 ♠42 ♥74 ♥QJ9 ♦--- ♦--- ♣8 ♣--- West East West East ♠--- ♠AQ ♠9 ♠KQ8 ♥Q98 ♥6 ♥7 ♥--- ♦KJ ♦76 ♦976 ♦QJ ♣--- ♣--- ♣--- ♣--- South South ♠K ♠AJ63 ♥AJ ♥--- ♦Q10 ♦--- ♣--- ♣8 #75 – squeeze scoop ruffout #76 – coup or squeeze Spades are trump with South on lead. N-S must win all five tricks against any defense.
Spades are trump with South on lead. N-S must win all five tricks against any defense.
North North ♠--- ♠864 ♥K9 ♥--- ♦K ♦--- ♣AQ ♣Q9 West East West East ♠--- ♠--- ♠75 ♠--- ♥QJ ♥A8 ♥--- ♥5 ♦Q ♦--- ♦6 ♦J10 ♣J6 ♣K54 ♣107 ♣K8 South South ♠97 ♠--- ♥--- ♥7 ♦9 ♦7 ♣97 ♣A42

♠♥♦♣ Houston Card School
George S. Coffin’s Great 88
Page 21 ©1995 Houston Card School All rights reserved.
#77 – triple-squeeze ruffout #78 – progressive squeeze jettison
scoop Spades are trump with South on lead. N-S must win four tricks against any defense.
No trump with South on lead. N-S must win four tricks against any defense.
North North ♠52 ♠5 ♥--- ♥95 ♦98 ♦--- ♣9 ♣A7 West East West East ♠--- ♠J ♠9 ♠--- ♥KQ975 ♥2 ♥A10 ♥Q8 ♦--- ♦KQ ♦--- ♦--- ♣--- ♣Q ♣K8 ♣J109 South South ♠A4 ♠--- ♥--- ♥J ♦74 ♦76 ♣7 ♣Q3 #79 – double squeeze strip #80 – one-way squeeze or ditto No trump with South on lead. N-S must win four tricks against any defense.
No trump with South on lead. N-S must win four tricks against any defense.
North North ♠--- ♠7 ♥A97 ♥Q7 ♦83 ♦7 ♣--- ♣7 West East West East ♠K5 ♠--- ♠A ♠--- ♥K54 ♥1086 ♥986 ♥--- ♦--- ♦109 ♦5 ♦A6 ♣--- ♣--- ♣--- ♣864 South South ♠8 ♠--- ♥QJ3 ♥J ♦--- ♦J4 ♣Q ♣J5

♠♥♦♣ Houston Card School
George S. Coffin’s Great 88
Page 22 ©1995 Houston Card School All rights reserved.
#81 – en passant or double squeeze #82 – squeeze entry strip Spades are trump with South on lead. N-S must win four tricks against any defense.
No trump with South on lead. N-S must win four tricks against any defense.
North North ♠J5 ♠5 ♥6 ♥Q6 ♦--- ♦AJ ♣J8 ♣--- West East West East ♠Q9 ♠--- ♠Q6 ♠9 ♥Q ♥--- ♥--- ♥J9 ♦--- ♦98 ♦976 ♦K ♣96 ♣Q74 ♣--- ♣K South South ♠64 ♠8 ♥K2 ♥--- ♦2 ♦Q54 ♣--- ♣8 Note to #83 - This problem differs slightly form the originally published version. The originally published version (the 9 and 10 interchanged from that shown) could not be solved for the intended outcome. It is MY GUESS that this arrangement is what Mr. Coffin intended. -Gary #83 – double-squeeze scoop #84 – jettison strip mutate No trump with South on lead. N-S must win four tricks against any defense.
Spades are trump with South on lead. N-S must win four tricks against any defense.
North North ♠--- ♠--- ♥--- ♥A ♦86 ♦A ♣AQ6 ♣K92 West East West East ♠--- ♠--- ♠--- ♠3 ♥--- ♥98 ♥K ♥J5 ♦J10 ♦--- ♦973 ♦--- ♣J97 ♣K84 ♣Q ♣A10 South South ♠J ♠5 ♥J ♥Q6 ♦--- ♦108 ♣1053 ♣---

♠♥♦♣ Houston Card School
George S. Coffin’s Great 88
Page 23 ©1995 Houston Card School All rights reserved.
#85 – split squeeze entry strip #86 – hexagon squeeze finesse No trump with South on lead. N-S must win three tricks against any defense.
No trump with South on lead. N-S must win four tricks against any defense.
North North ♠J53 ♠--- ♥--- ♥9 ♦AQ ♦A9 ♣--- ♣75 West East West East ♠--- ♠KQ9 ♠--- ♠--- ♥964 ♥--- ♥J ♥Q7 ♦42 ♦KJ ♦J6 ♦Q7 ♣--- ♣--- ♣J6 ♣Q South South ♠82 ♠8 ♥Q73 ♥K8 ♦--- ♦8 ♣--- ♣8 #87 – endplays in series #88 – contra squeeze No trump with South on lead. N-S must win four tricks against any defense.
No trump with South on lead. N-S must win three tricks against any defense.
North North ♠9 ♠--- ♥A8 ♥A ♦--- ♦1043 ♣87 ♣A West East West East ♠K ♠10 ♠--- ♠A2 ♥K765 ♥--- ♥--- ♥K ♦--- ♦109 ♦AQ765 ♦J ♣--- ♣109 ♣--- ♣K South South ♠--- ♠KQJ ♥92 ♥--- ♦5 ♦K2 ♣A4 ♣---
♠♥♦♣ Houston Card School
George S. Coffin’s Great 88
Page 24 ©1995 Houston Card School All rights reserved.
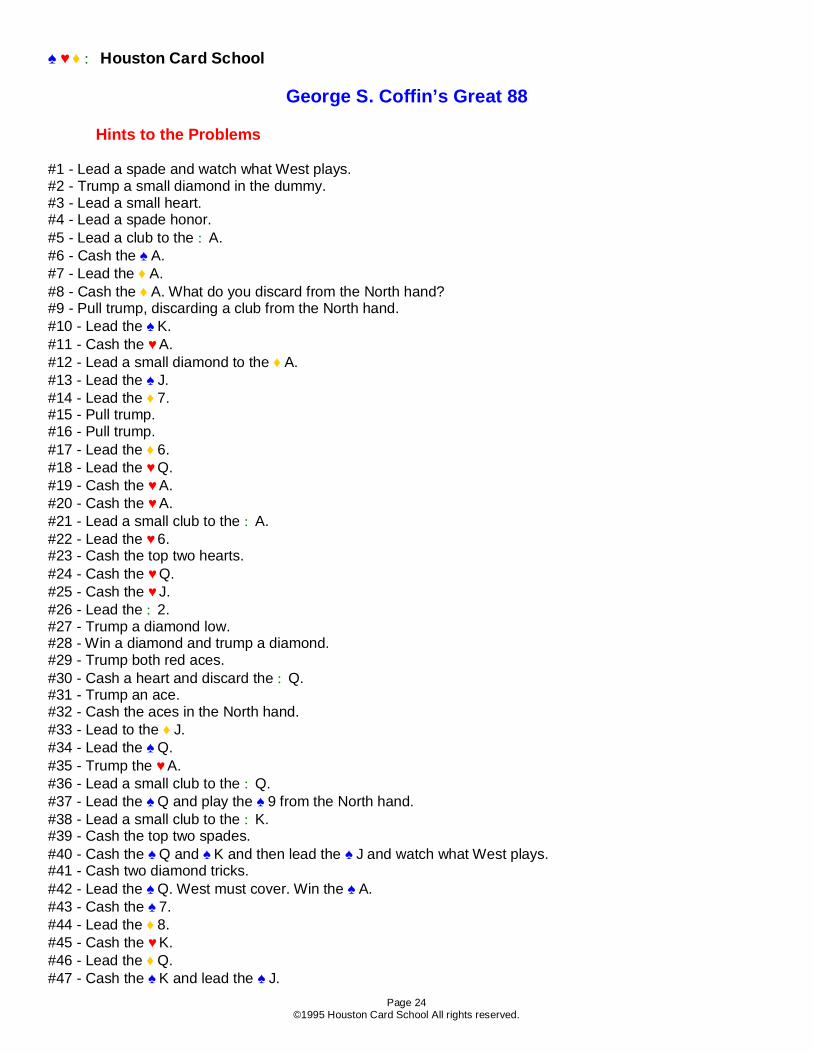
Hints to the Problems #1 - Lead a spade and watch what West plays. #2 - Trump a small diamond in the dummy. #3 - Lead a small heart. #4 - Lead a spade honor. #5 - Lead a club to the ♣A. #6 - Cash the ♠A. #7 - Lead the ♦A. #8 - Cash the ♦A. What do you discard from the North hand? #9 - Pull trump, discarding a club from the North hand. #10 - Lead the ♠K. #11 - Cash the ♥A. #12 - Lead a small diamond to the ♦A. #13 - Lead the ♠J. #14 - Lead the ♦7. #15 - Pull trump. #16 - Pull trump. #17 - Lead the ♦6. #18 - Lead the ♥Q. #19 - Cash the ♥A. #20 - Cash the ♥A. #21 - Lead a small club to the ♣A. #22 - Lead the ♥6. #23 - Cash the top two hearts. #24 - Cash the ♥Q. #25 - Cash the ♥J. #26 - Lead the ♣2. #27 - Trump a diamond low. #28 - Win a diamond and trump a diamond. #29 - Trump both red aces. #30 - Cash a heart and discard the ♣Q. #31 - Trump an ace. #32 - Cash the aces in the North hand. #33 - Lead to the ♦J. #34 - Lead the ♠Q. #35 - Trump the ♥A. #36 - Lead a small club to the ♣Q. #37 - Lead the ♠Q and play the ♠9 from the North hand. #38 - Lead a small club to the ♣K. #39 - Cash the top two spades. #40 - Cash the ♠Q and ♠K and then lead the ♠J and watch what West plays. #41 - Cash two diamond tricks. #42 - Lead the ♠Q. West must cover. Win the ♠A. #43 - Cash the ♠7. #44 - Lead the ♦8. #45 - Cash the ♥K. #46 - Lead the ♦Q. #47 - Cash the ♠K and lead the ♠J.

♠♥♦♣ Houston Card School
George S. Coffin’s Great 88
Page 25 ©1995 Houston Card School All rights reserved.
#48 - Lead a spade. #49 - Trump a heart and cash the last trump. #50 - Cash the ♦K. #51 - Lead a spade which West must win. #52 - Lead a small heart to the ♥K. #53 - Lead a small heart to the ♥Q #54 - Lead the ♠7. #55 - Cash the top two club tricks. #56 - Cash the top two club tricks. #57 - Cash the ♠K and discard the ♥9. #58 - Cash the top two club tricks. #59 - Cash the ♠K and ♠Q. Lead the third spade and see what West discards. #60 - Lead a diamond to the ♦J. #61 - Lead the ♥7 to the ♥A. #62 - Cash two club tricks. #63 - Cash the ♦K and lead a spade. #64 - Cash two club tricks. #65 - Cash the top two club tricks. #66 - Cash the ♥9 and discard the ♦5. #67 - Lead the ♠9. #68 - Cash the ♥A and trump a heart low. #69 - Lead the ♠Q. #70 - Lead a spade which West must win. #71 - Lead a club. #72 - Cash the ♠J and discard the ♦J. #73 - West can do no right. #74 - If West leads a diamond, trump with the ♠4 and undertrump with the ♠3. #75 - Cash a spade and discard the ♣Q. #76 - Cash the ♥7. #77 - On the first lead discard a diamond from North and a club from South. #78 - Lead a diamond and discard a spade. #79 - Cash the ♣Q and discard a diamond. #80 - Lead a low diamond. #81 - Lead the ♦J. #82 - Lead the ♦4 to the ♦A. #83 - Cash the ♠J. #84 - Lead the ♠5. #85 - Cash the ♥Q and discard the ♠3. #86 - Cash the ♠8. #87 - Take the heart finesse and lead a spade. #88 - Lead the ♦K.
♠♥♦♣ Houston Card School
George S. Coffin’s Great 88
Page 26 ©1995 Houston Card School All rights reserved.
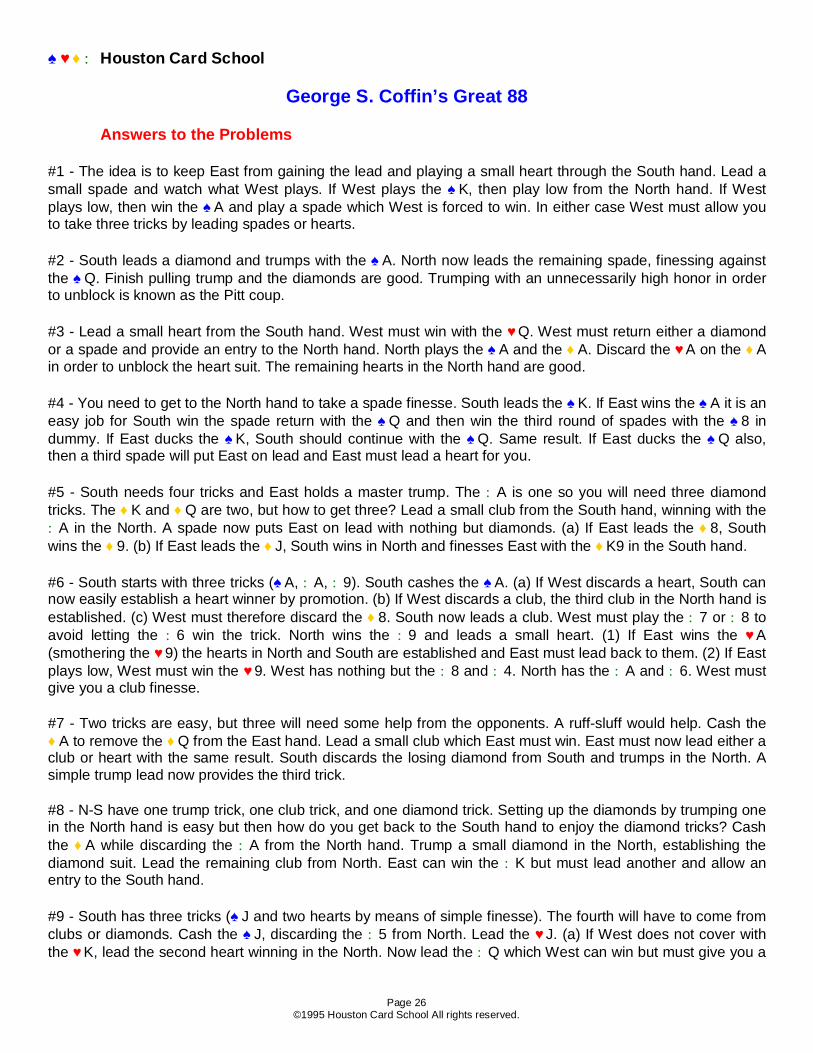
Answers to the Problems
#1 - The idea is to keep East from gaining the lead and playing a small heart through the South hand. Lead a small spade and watch what West plays. If West plays the ♠K, then play low from the North hand. If West plays low, then win the ♠A and play a spade which West is forced to win. In either case West must allow you to take three tricks by leading spades or hearts.
#2 - South leads a diamond and trumps with the ♠A. North now leads the remaining spade, finessing against the ♠Q. Finish pulling trump and the diamonds are good. Trumping with an unnecessarily high honor in order to unblock is known as the Pitt coup.
#3 - Lead a small heart from the South hand. West must win with the ♥Q. West must return either a diamond or a spade and provide an entry to the North hand. North plays the ♠A and the ♦A. Discard the ♥A on the ♦A in order to unblock the heart suit. The remaining hearts in the North hand are good.
#4 - You need to get to the North hand to take a spade finesse. South leads the ♠K. If East wins the ♠A it is an easy job for South win the spade return with the ♠Q and then win the third round of spades with the ♠8 in dummy. If East ducks the ♠K, South should continue with the ♠Q. Same result. If East ducks the ♠Q also, then a third spade will put East on lead and East must lead a heart for you.
#5 - South needs four tricks and East holds a master trump. The ♣A is one so you will need three diamond tricks. The ♦K and ♦Q are two, but how to get three? Lead a small club from the South hand, winning with the ♣A in the North. A spade now puts East on lead with nothing but diamonds. (a) If East leads the ♦8, South wins the ♦9. (b) If East leads the ♦J, South wins in North and finesses East with the ♦K9 in the South hand.
#6 - South starts with three tricks (♠A, ♣A, ♣9). South cashes the ♠A. (a) If West discards a heart, South can now easily establish a heart winner by promotion. (b) If West discards a club, the third club in the North hand is established. (c) West must therefore discard the ♦8. South now leads a club. West must play the ♣7 or ♣8 to avoid letting the ♣6 win the trick. North wins the ♣9 and leads a small heart. (1) If East wins the ♥A (smothering the ♥9) the hearts in North and South are established and East must lead back to them. (2) If East plays low, West must win the ♥9. West has nothing but the ♣8 and ♣4. North has the ♣A and ♣6. West must give you a club finesse.
#7 - Two tricks are easy, but three will need some help from the opponents. A ruff-sluff would help. Cash the ♦A to remove the ♦Q from the East hand. Lead a small club which East must win. East must now lead either a club or heart with the same result. South discards the losing diamond from South and trumps in the North. A simple trump lead now provides the third trick.
#8 - N-S have one trump trick, one club trick, and one diamond trick. Setting up the diamonds by trumping one in the North hand is easy but then how do you get back to the South hand to enjoy the diamond tricks? Cash the ♦A while discarding the ♣A from the North hand. Trump a small diamond in the North, establishing the diamond suit. Lead the remaining club from North. East can win the ♣K but must lead another and allow an entry to the South hand.
#9 - South has three tricks (♠J and two hearts by means of simple finesse). The fourth will have to come from clubs or diamonds. Cash the ♠J, discarding the ♣5 from North. Lead the ♥J. (a) If West does not cover with the ♥K, lead the second heart winning in the North. Now lead the ♣Q which West can win but must give you a
♠♥♦♣ Houston Card School
George S. Coffin’s Great 88
Page 27 ©1995 Houston Card School All rights reserved.
trick with the ♣J. (b) If West covers the ♥J with the ♥K, win the ♥A and lead the ♣Q while discarding the ♥9 from South. Again, West can win but must lead back to either the good ♥7 or the good ♣J.
#10 - South must keep East off lead as he/she has two good clubs to cash. South leads the ♠K, smothering the ♠Q in the East hand. (a) If West wins the ♠A, South has two good spades and an entry to the North hand and the two red aces. (b) If West ducks the ♠K, South continues with the ♠J with the same result. (c) If West refuses the ♠J also, a third spade forces the ♠A and now West must now lead to the red aces.
#11 - South has three tricks and needs four. South cashes the ♥A to remove the ♥K from West. South now leads a diamond which West must win. West must now lead a spade into the ♠AQ and give South the needed extra trick. Trap: If South cashes the ♥A and the ♣A, West will discard the ♦A on the ♣A and create an entry to the East hand. East can then lead a spade through South and hold South to only three tricks.
#12 - South has two tricks and needs one more and it will have to come from spades. South leads a diamond to the ♦A and trumps the ♣4. If South now leads the ♠K, E-W can cash three spade tricks. If South now leads the ♠5, East can win the ♠7 (if North does not play the ♠10) or the ♠J (if North does play the ♠10). Either way E-W can win three spade tricks. South must lead the ♠8 and play small from the North hand. (a) If West wins the ♠9 he/she remain on lead and must give South a trick with the ♠K. (b) If East wins the ♠J (or ♠Q), South can develop a trick by covering any honor that East leads or by playing low (using the ♠10 in North) if East does not lead a spade honor.
#13 - Four tricks are no problem if South can get to the North hand. Perhaps East can be persuaded to provide an entry to North. East must prevent the ♠Q from being an entry and also must not win the third spade (upon winning the third spade he/she must concede the rest of the tricks to North's club suit. If South starts with the ♠A, East can do both jobs. East discards the ♠10 and keeps the ♠2 (a sure exit card). East then wins the second spade and exits with the ♠2. South wins and must concede a trick to the ♥A. South must start with the ♠J. If East wins the ♠K then the entry to North is provided with the ♠Q, so East must play low. Once again if he follows with the ♠2, then the ♠A and another will find him on lead with nothing but clubs. On the ♠J he/she must play the ♠10. On the ♠A East discards the ♠K. Now it looks like West has a sure entry, but South now leads the heart which West wins but must lead a spade from the ♠86 into the ♠97. Interesting ending, thrust-parry-thrust-parry-thrust!
#14 - South leads the ♦7. West must cover with the ♦K or South has the needed four tricks. Trump the ♦K. Lead a club to the ♣K and play the ♦2 which East must win. East is forced to lead from the ♣Q8 into the ♣AJ in the North.
#15 - South has two tricks and needs three. South cashes the ♠J (playing the ♣2 from North) and leads the ♥2. (a) If West plays low, North discards the ♣6 and East wins but can, at best, cash one club trick before surrendering the rest of the tricks to North. (b) If West plays the ♥9 (smothering the ♥8 with East) North discards the good ♦J. West can now cash the ♦8 but must then lead from the ♥53 into the ♥64. If you do not discard the ♦J, West will let you win it at trick three and you must concede the rest of the tricks to East's club suit.
#16 - South has the needed four tricks but no way to cash them directly because of entry problems. South cashes the ♠Q while discarding the ♥A from the North hand. South now leads the ♥2 and discards the ♦A from the North hand. West is forced to win the ♥3 and must lead a diamond into your ♦KJ8, finessing his/her partner out of the ♦Q. Another interesting ending. The only way to win four tricks is to throw away your aces.
♠♥♦♣ Houston Card School
George S. Coffin’s Great 88
Page 28 ©1995 Houston Card School All rights reserved.
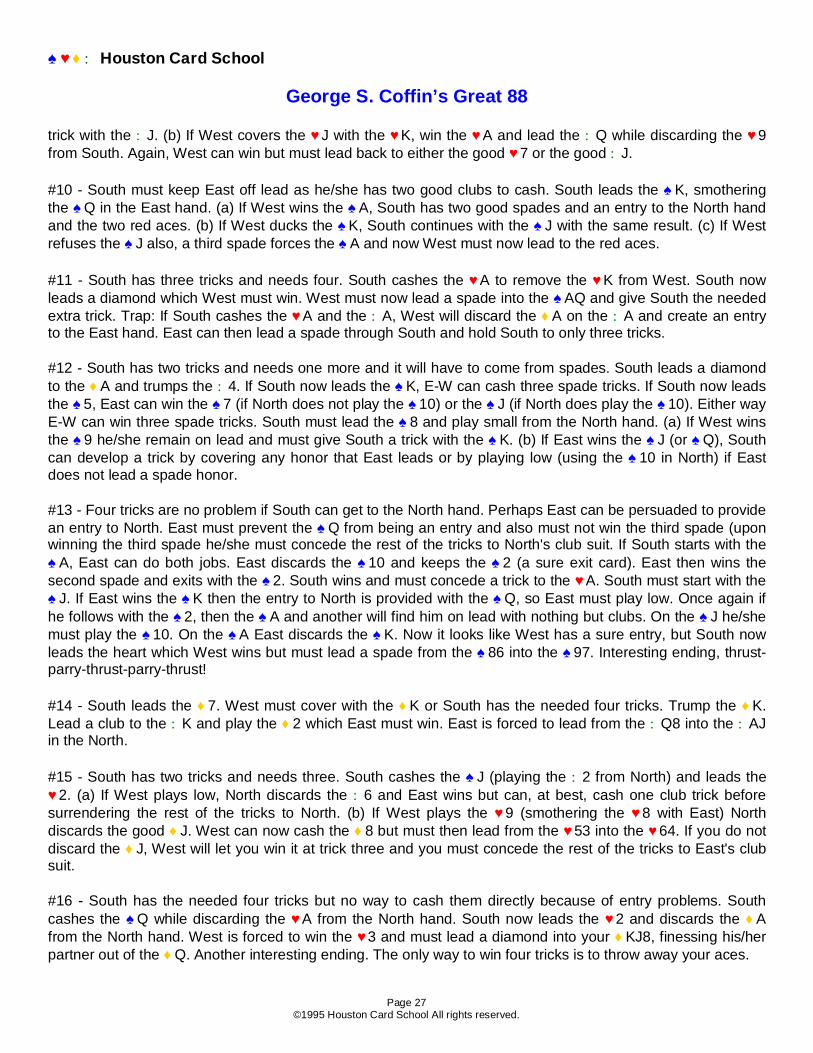
#17 - South leads the ♦6 and plays the ♦7 from North. (a) If West wins the ♦Q, he/she must lead a heart which allows South to win three hearts and a spade, or lead a club which allows N-S to win two clubs and two major suit aces. (b) If West overtakes and wins the ♦A, he/she must (1) lead a diamond which allows N-S to win one diamond and three aces, (2) lead a heart which allows N-S to win three hearts and the ♠A, or (3) lead a club which allows N-S to win two clubs and two major suit aces. Trap: If South cashes the ♠A early, West will discard the ♦Q.
#18 - South leads the ♥Q and East is forced to win. (a) If East returns the ♦2 South must trump with the ♠2 and overtrump with the ♠4 in the North hand. North now leads a spade from the North. (1) If East does not split (i.e., he/she plays the ♠9) South wins the ♠10 and can cash the ♠K for the needed three tricks. (2) If East splits (plays the ♠Q or ♠J) South must not win, but must play the ♠8. East remains on lead and must allow South to win with both the ♠K and ♠10. (b) If East returns a spade honor at trick two, South must duck and play the ♠8. This will allow you to trump and overtrump if a diamond is played to trick three.
#19 - South has three tricks and needs one more. South cashes the ♥A and leads a small club from South while playing the ♣5 from North. (a) If West wins (the ♣K or ♣Q will smother the ♣J) he/she must lead a heart which gives N-S a ruff-sluff (North trumps while South discards a club) or lead another club which allows N-S to take two clubs, one heart, and one spade. (b) If East wins the club ♣J he/she must lead either a heart or a diamond which gives N-S a ruff-sluff as above.
#20 - South has the needed four tricks. The lacking element is an entry. South cashes the ♥A and leads a club. West must win the ♣A and either: (a) Lead a diamond and provide N-S with an entry to the ♦A, or (b) Lead a heart and give N-S a ruff-sluff. North trumps while South discards the losing club.
#21 - South has three tricks and needs four. This can be accomplished by winning the ♥Q or by winning the trumps separately. South leads a club to the ♣A, then leads the ♦Q. East must win the ♦K. (a) If East leads a heart, North will win a trick with the ♥Q. (b) If East leads a club, South discards a heart while trumping in the North.
#22 - The club holding is a particularly powerful one if the opponents lead the suit. With the honors (♣J and ♣Q) split between the two hands, if one opponent leads a small club, N-S can capture one honor and finesse against the other simply by playing low and winning the trick fourth hand. South leads a small heart. (a) If West wins he/she must lead a club (giving N-S three club tricks) or a diamond allowing North to trump and South to discard a small club. (b) If East wins he/she must lead a club (giving N-S three club tricks) or another heart allowing North to trump and South to discard a small club.
#23 - South cashes the ♥A and ♥K. (a) If West has retained the ♥Q, South now leads a third heart which West must win. West must now lead a diamond which allows N-S to win two diamond tricks. (b) If West unblocks the ♥Q by playing it under the ♥A or ♥K, South then cashes the ♦A and leads a third heart which East must win. East must now lead the ♠2 to the ♠3 in dummy.
#24 - South must keep East and North off of the lead. South cashes the ♥Q discarding a small spade from North. South leads a second heart while discarding the ♦K from North. West is forced to win and must allow an entry to the South hand with the ♦7. South can then cash the good heart.
#25 - South has three tricks and needs four. South cashes the ♥J, discarding the ♠3 from North. South plays the ♦4 and wins the ♦K in the North hand. (a) If East discarded a diamond on the first heart play, North leads the ♣8 and plays the ♣6 from South. (1) If East wins the ♣9, then he/she must lead a spade from the ♠Q7 into

♠♥♦♣ Houston Card School
George S. Coffin’s Great 88
Page 29 ©1995 Houston Card School All rights reserved.
the ♠KJ giving N-S four tricks. (2) If West overtakes the ♣9 with the ♣Q, then he/she must lead another club and South takes the last two tricks with the ♦8 and ♣J. (b) If East discarded a club on the first heart play, North cashes the ♠K and leads the ♣8 and establishes the ♣J.
#26 - South has one good heart trick (the ♥7) and three trumps. South leads the ♣2. West must win the ♣6 or give North a trick with the ♣5. West's position is now hopeless. (a) A club lead gives N-S four tricks (♣5, ♥7, and two spades). (b) A heart lead gives N-S four tricks (two hearts and two spades). (c) A diamond lead allows North to trump and South to discard the ♥5. This gives N-S four tricks (♥7 and three spades).
#27 - South leads the ♦2 and trumps in the North. The ♠A is cashed and the ♣2 played to the ♣A. That is three tricks with one more needed. South now leads either the diamond or club with the same result. If West trumps, then the losing heart is discarded from North. If West discards a heart, then North trumps.
#28 - South needs to finesse against the ♠K but no trump is available to lead from dummy. South leads the ♦2 and wins the ♦A. The ♦K is trumped in the South with the ♠2. The ♣2 is played and won with the ♣A in dummy. Either heart is played from the North hand. East must trump low or high and South can play the ♠Q or ♠A respectively.
#29 - South must avoid losing two spade tricks. South trumps the ♦A and then trumps the ♥A with the ♠2. South now leads the ♠10. (a) If West wins he/she must lead a spade into the ♠AJ. (B) If West refuses to win, then South cashes the ♠A and leads a third spade.
#30 - South must avoid losing a trump trick and a club trick. South leads the ♥4 and discards the ♣Q from the North hand. South now leads the ♠4. West must split (play either the ♠10 or ♠J) or N-S have an easy road to four tricks. N-S must refuse this trick and play the ♠7 from the North hand. (a) If West leads another spade, then the spades are all good with a simple finesse. (b) If West leads his/her last heart North can trump with the ♠2 and South can overtrump with the ♠5. A club or diamond by South now allows North to take the last two tricks with spades.
#31 - South is missing too many trumps to pull trump. A cross-ruff. South trumps the ♦A with the ♠K in the North. A club is played from North and trumped only as high as necessary in the South hand. South trumps the ♥A with the ♠A in the North. A club is played from North and trumped only as high as necessary in the South hand. The last spade in the South hand wins the fifth trick.
#32 - South leads the ♦4 and wins the ♦A in the North. The ♣A is played and the ♥6 discarded from the South hand. Any card is now played from the North hand. (a) If East trumps with the ♠10, South overtrumps with the ♠J and wins four tricks. (b) If East trumps with the ♠Q or ♠K, South under trumps with the ♠2 and leaves East on lead. East must lead another spade and allow South to win tricks with the ♠J and ♠A.
#33 - South only needs two tricks and has one (the ♦J). South leads the ♦4 and wins the ♦J in the North hand. The ♣A is played and trumped with the ♠4. West must overtrump with the ♠8 or ♠9. (a) If West leads the ♥A East is forced to trump and yield a trick to the ♠Q. (b) If East leads a spade, North should just cover and will always get one spade trick.
#34 - South leads the ♠Q. West cannot cover. To cover with the ♠K would give South four spade tricks. After winning the first trick, South leads the ♠J. West, again, cannot cover. South now leads a spade to the ♠A and cashes the ♣2 for the fourth trick.
♠♥♦♣ Houston Card School
George S. Coffin’s Great 88
Page 30 ©1995 Houston Card School All rights reserved.
#35 - South leads the ♥A and trumps with the ♠3 in the North hand. The ♦A is played and trumped with the ♠2 in the South hand. The ♣4 is played and West must play a trump. (a) If West trumps with the ♠Q, North overtrumps with the ♠A and takes the last two tricks by finessing against the ♠J in the East hand. (b) If West trumps low, North overtrumps with the ♠10 and takes the last two tricks with the top two trumps.
#36 - South leads a small club to the ♣K. The ♣Q is played from North and captured with the ♣A in the South hand. South now cashes the third club trick. West is the first to be placed in jeopardy. If West discards the ♥A, then North will discard the ♠2 and take the last two tricks in the North. Therefore West must discard a spade. After a spade discard, North discards the ♥2 and East is placed in jeopardy. (a) If East discards the ♦A, then N-S takes the last two tricks with the ♦2 and the ♠A. (b) If East discards a spade, then N-S take the last two tricks with the ♠A and ♠2 in the North hand.
#37 - South can only lose one trick and is missing the ♠A. South leads the ♠Q which smothers the ♠J with West. The ♠9 is unblocked from the North hand. East must win the ♠A and lead another spade or N-S can easily take four tricks by trumping a heart in the North. South wins the ♠6 (this is why the ♠9 was unblocked) and West must let go of a small club (discarding the ♦8 would give N-S four tricks). South now cashes the ♠3. West takes the required action. A diamond discard allows N-S to win four tricks so West discards a second club. North no longer needs the ♦2 and discards it. East is now placed in jeopardy. (a) If East discards the ♥Q, then the last two tricks will be the ♥2 and ♣K for N-S. (b) If East discards a club, then the last two tricks will be the ♣K and ♣3 in the North hand.
#38 - South has four tricks by way of a simple spade finesse, but needs five. South leads to the ♣K. The small club is played from the North hand. East must discard a spade. To discard the ♥A would establish the ♥2 with South. After the spade discard from East, South discards the ♥2 and West is pinched. (a) If West discards the ♦A the last three tricks go to N-S (two spades by a simple finesse and the ♦2). (b) If West discards a spade, the last three tricks are taken in the North by means of a simple finesse and length.
#39 - South has four top tricks and needs five. South leads a small spade won by the ♠K in the North hand. North leads a small spade won by the ♠A in the South hand. N-S now cashes the ace of the suit discarded by East on the second spade. (a) If East discards a diamond, then South cashes the ♦A and leads a club to the ♣A and the good ♦7. (b) If East discards a club, then South cashes the ♣A and leads a diamond back to the ♦A and good ♣Q. Note that it also works if you cash the ♠A first and the ♠K second.
#40 - South has the four top spades but cannot cash them without a side entry to the North hand. South leads and wins the ♠K. South leads and wins the ♠Q. West has no difficulty discarding the ♥2. South now leads the ♠J and West must choose a discard from the three aces. (a) If West discards the ♣A, then South overtakes the ♠J with the ♠A and cashes the ♣K as the fourth trick. (b) If West discards the ♦A, then North plays low and South cashes the ♦K as the fourth trick. (c) If West discards the ♥A, then North plays low and South cashes the ♥K as the fourth trick.
#41 - South starts with four tricks (two diamonds, one heart, and one spade). South cashes the ♦K and cashes the ♦8. West must discard either a heart or a spade on this second diamond trick. A heart discard immediately gives N-S the fifth trick in hearts. West discards the ♠9. After the spade discard from West, North discards the useless heart. East must also discard a spade or give N-S the fifth trick in clubs. South now leads the ♥7, winning the ♥A in the North hand. East is squeezed. (a) If East discards the ♣A, South gets the fifth trick with the ♣4. (b) If East discards a spade, South gets the fifth trick with the ♠7.

♠♥♦♣ Houston Card School
George S. Coffin’s Great 88
Page 31 ©1995 Houston Card School All rights reserved.
#42 - South has three sure tricks and requires five. South leads the ♠Q. West covers with the ♠K and North plays the ♠A. East now holds the master spade, the master club, and is guarding the diamond suit. North cashes the ♥4 while discarding the ♠7 from South. East is squeezed. (a) If East discards a spade, North will now cash the good spade and East is again squeezed in diamonds and clubs. Either discard gives N-S the fifth trick. (b) If East discards a club, North will now cash the good club and East is again squeezed in diamonds and spades. Either discard gives N-S the fifth trick. (c) If East discards a diamond, all the diamonds in the South hand are good.
#43 - South has four sure tricks (one spade, one heart, and two clubs) and needs five. South cashes the ♣A with everyone following low. South now cashes the ♠7. The play by West is forced. A heart discard would give N-S the fifth trick immediately. A club discard would give N-S the fifth trick be way of a simple club finesse. West must discard the ♦K. After the diamond discard by West, North discards the ♥4. It is no longer needed as a threat. East must also discard a diamond. A club discard would give N-S the fifth trick in clubs. South now leads the ♥7, winning with the ♥A in the North hand. East is squeezed. (a) If East discards the ♦A, N-S will win get the fifth trick with the ♦4. (b) If East discards a club, N-S will get the fifth trick with the ♣7.
#44 - South has only one sure trick and no way to enter the dummy without the help of E-W. South leads the ♦8, won by West with the ♦K and all others following low. West must lead a spade giving N-S two spade tricks, North simply covers the spade played by West. One this first spade trick East must discard. Either a heart or a club gives N-S a fourth trick immediately. East must discard a diamond. The diamonds with North will now be good (after cashing the ♦Q) but N-S will have no entry to them. South discards a small club. On the second spade trick East is squeezed again. (a) If East discards the ♥J, South will discard the last club and take the last two tricks with the ♦Q and ♥9. (b) If East discards the ♣9, South will discard the ♥9 and take the last two tricks with the ♦Q and the ♣6. (c) If East discards the ♦J, South will discard the ♦Q and take the last two tricks with the ♦9 and ♦5 in the North hand.
#45 - South has three tricks and needs four. South cashes the ♥K. West must discard a diamond. A club or spade discard would give N-S the fourth trick immediately. South leads the ♥4 losing to East and the ♥7. West must discard the last diamond. A club or spade discard would give N-S the fourth trick immediately. After a second diamond discard by West, North discards the ♦A. East must return a diamond after winning the heart trick. South wins with the ♦8. West must now discard a club or spade and give N-S the fourth trick.
#46 - South has four sure tricks (one spade, one heart, and two diamonds) and needs five. South leads the ♦Q. (a) If West covers with the ♦K, North wins the ♦A and South wins the second diamond trick with the ♦J in the South hand. South cashes the ♠9. (1) If West discards the ♣K, North discards the ♥3 and takes the last two tricks with the ♥A and the ♣Q. (2) If West discards a heart, North discards the ♣Q and takes the last two tricks with the ♥A and ♥3. (b) If West does not cover with the ♦K, North plays low and South wins the first diamond trick. South now cashes the ♠9. (1) If West discards the ♣K, North discards the ♥3 and takes the last three tricks with the ♥A, ♣Q, and ♦A. (2) If West discards a heart, North discards the ♣Q and takes the last three tricks with the ♥A, ♥3, and ♦A. (3) If West discards the ♦K, North discards the ♦A. South now cashes the ♦J and West is squeezed. (i) If West discards the ♣K, North discards the ♥3 and takes the last two tricks with the ♥A and the ♣Q. (ii) If West discards a heart, North discards the ♣Q and takes the last two tricks with the ♥A and ♥3.
#47 - South has four trump tricks but need five tricks. South leads a small spade to the ♠K in the North hand. The ♠J is played from North to trap the ♠Q and smother the ♠10 with West. East may cover or not, South arranges to win the third spade in the South hand. On this third spade trick West is squeezed. If West discards

♠♥♦♣ Houston Card School
George S. Coffin’s Great 88
Page 32 ©1995 Houston Card School All rights reserved.
a red ace, South simply cashes the appropriate red king for the fifth trick. If West discards the ♣A, South trumps a red king in the North to cash the good ♣K.
#48 - South has two tricks by a simple diamond finesse but needs four tricks. South leads a spade. (a) If West wins the ♠A he/she must lead a second spade and allow North to win. On this second spade East is squeezed. (1) A heart discard gives N-S the last three tricks with the ♥K, ♥Q, and the ♦A. (2) A diamond discard gives N-S the last three tricks (using a simple finesse) with the ♦A, ♦Q, and ♦7. (b) If West refuses the ♠A, North wins the first spade trick. The ♦J is played from dummy. East may cover or not. (1) If the ♦J is allowed to win, then North plays a heart which East must win and is forced to lead a diamond and give N-S the last two diamond tricks. (2) If the diamond is covered, South wins the ♦A and leads a heart to the same outcome.
#49 - South has four tricks and needs five. South trumps a heart in the North and cashes the last trump. East must keep both clubs and a heart so must discard the ♦8. South discards the ♦Q. West cannot discard a diamond (N-S could then cash two diamond tricks by length) or a club (N-S could then cash two club tricks by a simple finesse). West discards his/her last heart (this is why East could not afford to discard a heart). The ♦A is now played from North and East is squeezed. (a) If East discards the ♥6, South discards the ♣6 and N-S will take the last two tricks with the ♣A and ♥5. (b) If East discards a club, South discards the ♥5 and N-S will take the last two tricks with the ♣A and ♣6.
#50 - South has two tricks (even though the ♣A is not immediately accessible) and needs three. South leads the ♦K. (a) If West plays the ♦5 (and will therefore have to win the second diamond), North discards the ♠J. South now leads the small diamond and West must win. North discards the ♠K. West will return a club honor which is ducked. North will now win the last two club tricks. (b) If West plays the ♦Q (and East will therefore have to win the second diamond), North discards a small club. South now leads the small diamond and East must win. North discards the last small club (leaving only the ♣A). West must leads spades and allow North to win a spade trick and the ♣A.
#51 - South has three sure tricks with no way to cash them. South leads the ♠9 which West is forced to win. North discards the ♥A. West returns the ♥J to avoid giving South a free heart trick. North discards a small diamond. (a) If East discards the ♣K, South plays low and allows West to retain the lead. The forced heart continuation lets South win the last three tricks. (b) If East discards a small diamond, South wins the ♥Q and leads the ♣7 forcing East to win. East must now lead from the ♦Q9 into the ♦AJ and let N-S win the last two tricks.
#52 - South has one sure trick and needs three. North leads the ♥6 won by the ♥K in the South hand. South leads the ♦Q and discards the ♥7 from the North hand. (a) If West does not cover the ♦Q, East can trump the ♦Q but N-S will take the two remaining trumps separately. If East does not trump, then South wins the ♦Q and can trump a heart in the North to guarantee a third trick. (b) If West covers with the ♦K, then East must discard a club (a heart discard gives N-S an easy road to three tricks with the forced ruff-sluff coming at trick two). On the second diamond lead, North discards a club and East has the master card in spades, hearts, and clubs. (1) If East plays the ♠9 (trump), the N-S take the last two tricks on a cross ruff. (2) If East plays the ♥Q, then South trumps and plays the good heart discarding the last club from North. N-S will win either the good heart (if East refuses to trump) or the trump in North (if East trumps). (3) If East plays the ♣Q, then South trumps and plays the good club. N-S will win either the good club (if East refuses to trump) or the trump in North (if East trumps).

♠♥♦♣ Houston Card School
George S. Coffin’s Great 88
Page 33 ©1995 Houston Card School All rights reserved.
#53 - South has three tricks (one spade, one heart, and one club) and needs four. South leads the ♥9 and wins the ♥Q in the North. West cannot discard a diamond or spade without giving N-S the fourth trick immediately. Therefore West discards a club. North leads a second heart which East is forced to win (and will be forced to lead a club to the next trick). South discards the ♣9 and West is squeezed. (a) If West discards a spade, N-S will win the last three tricks with the ♣Q, ♠A, and ♠6. (b) If West discards a diamond, N-S will win the last three tricks with the ♣Q, ♠A, and ♦9. (c) If West discards a club, N-S will win the last three tricks with the ♣Q, ♣7, and ♠A.
#54 - South has three sure tricks (one spade, one heart, and one diamond) and needs four. South leads the ♠7. (a) If West discards a heart, then North discards a club. South continues with the ♥Q (the ♥5 allows East to win and cash a good club and the ♥A and another cuts the transportation to the good heart). N-S will now take the last three tricks with the ♥A, ♥5, and ♦A. (b) If West discards a diamond, then North discards a heart. East must also discard a heart or give up the fourth trick immediately. South now leads a diamond to the ♦A in the north and plays the remaining heart, playing the ♥Q from the South hand. N-S will now take two of the last three heart tricks.
#55 - South has three sure tricks (one heart and two clubs) and needs four. South cashes the ♣A and ♣K discarding the ♦8 from the North hand. East must discard the ♠K. A red suit discard gives N-S the fourth trick immediately. South now leads the ♥4 and West is forced to win the ♥10. North takes the last two tricks when West must lead a spade from the ♠104 into the ♠Q6.
#56 - South has three sure tricks (one spade and two clubs) and needs four. South cashes the top clubs discarding the ♦2 and ♥2 from the North hand. South now leads the ♣3 which East is forced to win and return a spade. West must discard on the third club. (a) If West discards the ♠K, then North discards the ♠A and South wins the last two tricks when East must lead from the ♠42 into the ♠53. (b) If West discards the ♥A, then North discards the ♦K and wins the last two tricks with the ♠A and ♥K. (c) If West discards the ♦A, then North discards the ♥K and wins the last two tricks with the ♠A and ♦K.
#57 - South has two sure tricks (one spade and one heart) and needs four. South cashes the ♠K and discards the ♥9 from North. South leads the ♣J and discards the ♦Q from the North hand. (a) If West wins the ♣Q, then East must discard the ♦J. A heart discard would give N-S four tricks immediately. West must return a club and North discards the ♦K. East is squeezed. East must now discard a heart and make the ♥Q good or discard a diamond and make the ♦2 good. (b) If West does not win the ♣Q, then East must discard the ♦J. A heart discard would give N-S four tricks immediately. South leads a diamond and East is forced to win. East must now give N-S the fourth trick by leading from the ♥KJ into the ♥AQ.
#58 - South has two sure tricks (two clubs) and needs four. South cashes the ♣A and the ♣K. North discards the ♠4 on the second round. (a) If West discards a red queen, then South cashes the good red winner while North discards a spade. West is squeezed again and must either discard the other red queen or a spade. If West discards a spade then South leads the ♠2 and plays the ♠K from the North hand. East can win or duck and N-S can always win a spade trick. (b) If West discards a spade then South leads the ♠2 and plays the ♠K from the North hand. East can win or duck and N-S can always win two spade tricks.
#59 - South has four tricks (four spades) with no way to cash them. South leads three rounds of spades. On the third round West must discard. If West discards a red ace then the spade is won in the appropriate hand in order to cash the good red king. If West discards the ♣A, then South wins the trick and leads a club. East is forced to win and lead a spade to North's ♠A.

♠♥♦♣ Houston Card School
George S. Coffin’s Great 88
Page 34 ©1995 Houston Card School All rights reserved.
#60 - South has three sure tricks (one spade, one diamond, and one club) and needs four. South leads a small diamond won by the ♦J in the North hand. West cannot discard a spade or a heart without giving N-S the fourth trick immediately, so West must discard a club. A small spade is played from North and won by the ♠A in the South hand. South leads another small diamond which East is forced to win. East must return a club. West must again discard on the second diamond and again cannot discard a spade or heart without giving up the fourth trick. West must discard the ♣K. After the ♣K discard from West, North discards the ♣A which allows South to win the club return and cash the good ♦4.
#61 - South has three sure tricks (two hearts and one club) and needs four. South leads the ♥7 won by the ♥A in the North hand. North leads a small heart won by the ♥K in the South hand. East must discard on the second heart. (a) If East discards a club, South leads a third heart which West is forced to win. West must then lead a club and allow North to win the last two tricks with the ♣A and ♣9. (b) If East discards a diamond, South leads a diamond which East is forced to win. East must then lead a club from the ♣K8 into the ♣A9 in the North hand. Note that if South starts with the ♥3 then West can play the ♥Q and North must win the ♥A. Now when North leads a heart to the ♥K, West can unblock the ♥8 leaving South with three heart tricks but two diamond losers.
#62 - South has four sure tricks (two spades and two clubs) and needs five. South cashes the ♣A. South cashes the ♣2. West must discard a spade. A red ace discard would give N-S the fifth trick immediately. After a spade discard from West, North discards either red nine. East must discard a small spade. South leads a spade to the ♠K in the North hand (capturing West's now singleton ♠Q). N-S can now take the last two tricks by means of a simple spade finesse.
#63 - South has four sure tricks (one spade, two diamonds, and one club) and needs five. South leads a small diamond won by the ♦K in the North hand. North now cashes the ♠2 while discarding a diamond from the South hand. East must discard a heart. A diamond discard would establish the diamond suit. West must also discard a heart. A club discard would establish the club suit in the North hand and a diamond discard would let N-S establish the diamond suit by means of a simple finesse. North now cashes the ♣A and East is squeezed. (a) If East discards a heart, then South discards a diamond and takes the last two tricks with the ♦A and ♥2. (b) If East discards a diamond, then South discards the ♥2 and takes the last two tricks with the ♦A and ♦10.
#64 - South has four sure tricks (one heart, one diamond, and two clubs) and needs five. South cashes the ♣A and ♣K. On the second club West must discard a spade. A heart discard would establish the heart suit in the North hand and a diamond discard would let N-S take two diamond tricks by means of a finesse. After a spade discard from West, North discards the now useless ♦2 and East is squeezed. (a) If East discards a spade, then N-S will take the fifth trick with the ♠2. (b) If East discards a heart, then N-S will take the fifth trick with a simple heart finesse. (c) If East discards a diamond, then N-S will take the fifth trick with the ♦9.
#65 - South has four sure tricks (two spades and two clubs) and needs five. South cashes the ♣A and ♣K. On the second club West must discard a spade. A heart discard would give N-S the fifth trick immediately. After a spade discard from West, North discards the ♥K. East discards the ♥3. South leads a spade to the ♠K. North leads the ♠J smothering the ♠9 with West. East may cover or not, but N-S will take three spade tricks.
#66 - South has four sure tricks (one heart, one diamond, and two clubs) and needs five. South cashes the ♥9 and West must discard. (a) If West discards a club, then North discards a small diamond and takes the last four tricks with the ♦K, ♣K, ♣A, and the last club in the North hand. (b) If West discards a diamond, then North discards a small club. North now leads a club to the North hand and leads the ♦10 to take two diamond tricks. The ♣K is the fifth trick.

♠♥♦♣ Houston Card School
George S. Coffin’s Great 88
Page 35 ©1995 Houston Card School All rights reserved.
#67 - South has four sure tricks (three spades and one diamond) and needs five. South leads the ♠9. (a) If West discards a heart, then North plays low allowing South to win. South now trumps a heart to establish the suit. (b) If West discards a diamond, then North wins the ♠A and trumps a diamond to establish the suit.
#68 - South has three sure tricks (one heart and two clubs) and needs five. South cashes the ♥A and trumps a small heart in the North hand. North plays a spade and trumps in the South hand with the ♣9. West must discard on trick three. (a) If West under trumps, then N-S take five tricks (♥A, ♠Q, and three clubs). (b) If West discards the ♥J, then South leads the good heart. North discards if West discards and trumps if West trumps. (c) If West discards the ♦J, then South leads the good ♦10. North discards if West discards and trumps if West trumps.
#69 - South has two sure tricks but no way to get to them. South leads the ♠Q. East must win or South will shift to a heart and win three tricks. East must cash the second top spade. To lead a heart would again give N-S three tricks. West and North must discard. North simply matches the discard from West. (a) A third spade from East would let South win two spade tricks. (b) A heart from East allows East to win the ♥A, but West must then concede the last two tricks to the North hand. Trap: If South starts with the small heart, West will win the ♥A and return a spade to the ♠K with East. East now leads the ♠7 which South must win. East now wins the last two spades holding N-S to one trick.
#70 - South has no sure tricks and needs two. South leads the ♠5. West must win the ♠A and cash the ♠K. If he/she does not then North will win a spade trick and West will be on lead with the third round of spades and be forced to give South a trick with the ♣Q. North unblocks the ♠J under the ♠A. East must discard a small club. A red suit discard would allow North to win a spade and a red seven. North unblocks the ♠Q under the ♠K. East is squeezed. (a) If East discards the ♥9, then South follows with the ♠9. North wins the third spade with the ♠8 and is able to cash the ♥7. (b) If East discards the ♦J, then South follows with the ♠9. North wins the third spade with the ♠8 and is able to cash the ♦7. (c) If East discards a club, the South follows with the ♠6. South wins the third spade with the ♠9 and can force a club trick by leading the ♣Q.
#71 - South has two sure tricks if an entry to the North could be found (♥A and ♥J) and needs three. South leads the club and West wins the ♣A. East must discard a small spade. A heart discard would give N-S three tricks immediately (one spade and two hearts). West leads a spade and North plays low. (a) If East wins the ♠A, then South unblocks the ♠K. With an established entry to the North hand, three tricks are assured. (b) If East does not win the ♠A, then South wins the ♠K and plays another spade which East is forced to win. East must now lead a heart and provide N-S with two heart tricks.
#72 - South has two sure tricks (one spade and one diamond) and needs three. South cashes the ♠J while North discards the ♦J and East discards a small heart. South leads the ♦3. If East wins the ♦Q he/she will have to concede a heart to ♥Q in the North hand for the third trick. West must play the ♦K the prevent this. North unblocks the ♦9. West now leads the ♥J and North plays the ♥7. East cannot play the ♥K and must allow West to win the trick. West must now lead a diamond from the ♦85 into the ♦A7 in the South hand.
#73 - West cannot prevail. (a) If West leads a diamond, North trumps with the ♠6. North leads to the ♥A in the South hand. The second diamond is trumped in the North hand with the ♠8. With three tricks in North leads the ♣8. (1) If East trumps high, South pitches the heart and takes the fourth trick with the ♠K. (2) If east trumps low, South overtrumps with the ♠K for the fourth trick. (b) If West leads a heart, South wins as high as necessary. South leads a diamond and trumps in the North hand. With two tricks in North leads the ♣8. (1) If West discards the diamond, then North wins the ♣8 as South discards the diamond. Now a diamond from North with three tricks in guarantees a fourth trick as described above. (2) If East trumps with the ♠A, then

♠♥♦♣ Houston Card School
George S. Coffin’s Great 88
Page 36 ©1995 Houston Card School All rights reserved.
South discards the diamond. If East returns the ♠Q then the South hand is good. If East returns a diamond, it is trumped in the North hand and the ♠K takes the fourth trick. (3) If East trumps with the ♠Q, then South overtrumps. South now trumps the second diamond in the North hand for the fourth trick.
#74 – (a) If West leads a diamond, then North trumps with the ♠4 and South under trumps with the ♠3. North leads a heart. East must trump with a high honor and South under trumps again with the ♠6. (1) If East returns a spade, then South takes the last three tricks. (2) If East returns a diamond, then South discards the club and trumps in the North hand. South now sits over East with the ♠AJ (East holds ♠K8). (b) If West leads a heart and East discards, then South discards the club and wins the heart in the North hand. North now leads the ♠2 and East must split honors (or four tricks for N-S are easy). South plays the ♠6. (1) If East returns a spade, then South takes the last three tricks. (2) If East returns a diamond, then South trumps with the ♠3 and overtrumps in the North hand with the ♠4. South now sits over East with the ♠AJ (East holds the ♠K8). (c) If West leads a spade and East must split honors (or four tricks for N-S are easy) and South plays the ♠6. (1) If East returns a spade, then South takes the last three tricks. (2) If East returns a diamond, then South trumps with the ♠3 and overtrumps in the North hand with the ♠4. South now sits over East with the ♠AJ (East holds the ♠K8).
#75 - South has four sure tricks (two spades, one diamond, and one club) and needs five. South leads a spade while discarding the ♣Q from the North hand. West discards the useless diamond queen and East is forced to discard club. A heart discard from East would allow N-S to trump a heart and set up the ♥K. South now leads a diamond winning the ♦K in the North hand. (a) If West discards a heart, then North leads the ♥K and establishes a heart as the fifth trick. The ♣A provides the entry. (b) If West discards a club, then East is squeezed. (1) If East discards a heart, then North leads a heart, trumped in South and the ♥K is good. (2) If East discards a club, then North cashes the ♣A and takes the fifth trick with the ♣Q.
#76 - South has four sure tricks (two spades, one heart, and one club) and needs five. South leads the good ♥7. (a) If West discards a diamond or club, then North discards a small club. South now trumps a diamond with the ♠4 and returns to hand with the ♣A. North now sits with the ♠86 of spades behind the ♠75 of spades with West and the lead is in South. The last two tricks are won by North. (b) If West trumps, then North overtrumps and cashes two more top spades with East discarding a diamond on the first round. On the last spade East is squeezed. A diamond discard allows South to discard a club and take the last two tricks with the ♣A and ♦7. A club discard allows South to discard a diamond and cash the ♣A (capturing the ♣K) and then take the ♣Q for the fifth trick.
#77 - West leads a heart and North discards the ♦8 and South discards the ♣7. West leads another heart and North discards the ♦7. East is squeezed. (a) If East trumps, then South overtrumps and N-S take three more tricks on a cross ruff. (b) If East discards a diamond, then South trumps low, trumps a diamond in the North and leads a spade. South wins the last two tricks with the ♠A and ♦7. (c) If East discards a club, then South trumps low, cashes the ♠A and then trumps a diamond in the North hand. North will take the last two tricks with the ♠5 and ♣9.
#78 - South has three sure tricks (two diamonds and one club) and needs four. South cashes the good ♦7. A spade or club discard by West gives N-S a fourth trick immediately, so West discards a heart. North discards a spade and East a club (a heart discard would let N-S establish a heart trick). South cashes the good ♦6. (a) If West discards the spade, then North discards a heart. South now leads a heart which West must win. N-S now takes the last two tricks with the ♣A and ♣Q. (b) If West discards a heart, then North discards the ♣7. South leads the ♥J and N-S get the fourth trick in hearts. (c) If West discards a club, then North discards the heart and N-S take two club tricks.

♠♥♦♣ Houston Card School
George S. Coffin’s Great 88
Page 37 ©1995 Houston Card School All rights reserved.
#79 - South has three sure tricks (two hearts with a simple finesse and one club) and needs four. South cashes the ♣Q and everyone keeps three hearts. If either East or West discards a heart, then N-S can come to three heart tricks. South leads the ♥Q. (a) If West covers with the ♥K, then North wins the ♥A and plays a diamond. East must win the diamond and give N-S the last two tricks in hearts. (b) If West does not cover with the ♥K, then North plays low. South now leads a spade. West must win the spade and give N-S the last two tricks in hearts.
#80 - South has three sure tricks (two hearts and one club) and needs four. South leads a low diamond to the ♦7 in the North hand. (a) If East wins the ♦A, he/she must return a club or a diamond. In either case, South cashes the minor suit jacks and West is squeezed. (1) If West discards a heart, then North discards the spade and takes two heart tricks. (2) If West discards the spade, then North discards the ♥7 and wins the ♥Q and ♠7. (b) If East allows North to win the ♦7, then North leads the ♠7 and discards the heart from South. North wins the forced heart return which squeezes East. (1) If East discards a club, then South discards a diamond and wins the last two tricks with the ♣J and ♣5. (2) If East discards the ♦A, then South discards a club and wins the last two tricks with the ♣J and ♦J.
#81 - South has three sure tricks (one spade, one diamond, and one club) and needs four. South leads the ♦J. (a) If West discards a club, North trumps with the ♠5. North leads a heart, which is trumped by South. South cashes the ♣K. South leads the ♦3. If West trumps high then the ♠J is good. If West trumps low, then the ♠J wins by overtrumping. (b) If West trumps high, then North discards a club. West returns a spade (to keep N-S from scoring the ♠3). North wins the spade return with East discarding a club. North cashes the ♠5. East and West are squeezed in that order. (1) East must discard a club. A diamond discard would give N-S the fourth trick with the ♦3. After a club discard, South discards the ♦3. (2) West is now squeezed. A heart discard gives N-S the fourth trick with the ♥6. A club discard gives N-S the fourth trick with the ♣3.
#82 - South has four sure tricks (one heart and three diamonds) with no way to cash them. South leads a low diamond to the ♦A in the North hand (capturing the ♦K). North cashes the ♥Q while discarding the ♠8 from the South hand. West must discard the ♠Q. A diamond discard allows N-S to cash two more diamond tricks. A small spade discard allows North to cash the ♦J and lead a spade to West. West is then forced to lead a diamond to the ♦Q in the South hand. North cashes the ♦J. East is squeezed. (a) If East discards the ♠9, then South plays low and North wins the ♦J. North now plays a spade to the ♠6 in the West hand and West must concede the fourth trick to the ♦Q. (b) If East discards the ♥J, then South plays low and North wins the ♦J. North now cashes the good ♥6 for the fourth trick. (c) If East discards the ♣K, then South wins the ♦Q. South now cashes the good ♣8 for the fourth trick.
#83 - South has three sure tricks (one spade, one heart, and one club) and needs four. South cashes the ♠J. West must discard a diamond. A club discard would allow N-S to play the ♣A and then ♣Q and promote the ♣10 for the fourth trick. North discards a diamond. East must discard a heart. A club discard would allow N-S to play ♣A and then ♣6 and promote the ♣Q for the fourth trick. Trap: If East discards a club on the ♠J and then unblocks the ♣K under the ♣A, then East is put on lead with a diamond and must concede two more club tricks. South now cashes the ♥J. West must discard a club. A diamond discard would give N-S the fourth trick with the ♦8. After a club discard by West, North discards the useless ♦8. East follows with a heart. N-S now plays the ♣A and then ♣Q to establish the fourth trick.
#84 - South has three sure tricks (one spade, one heart, and one diamond) and needs four. South cashes the ♠5. (a) If West discards the ♣Q, the North discards the ♥A. South now leads the ♥6 which West is forced to win with the ♥K. North discards the ♦A. West must now lead a diamond into the ♦108. The ♥Q is the fourth trick. (b) If West discards a small diamond, then North discards a low club. North now wins the two red aces

♠♥♦♣ Houston Card School
George S. Coffin’s Great 88
Page 38 ©1995 Houston Card School All rights reserved.
and leads the ♣9. If East kept the heart, then South wins the ♥Q. If East kept the clubs and plays high, the fourth trick is taken by the ♣K. If East kept the clubs and plays low, then West wins the ♣Q and must concede the fourth trick to the ♦10. (c) If West discards the ♥K, then North discards the ♥A. South now leads a diamond to the ♦A and North returns the ♣9. The play develops as in (b) above.
#85 - South has two sure tricks (one heart and one diamond) and needs three. South cashes the ♥Q. North discards a small spade. East must discard a diamond. A spade discard would allow South to lead spades and force East to lead diamond from the ♦KJ into the ♦AQ. South continues with hearts which allows West to win two heart tricks. West must then lead diamond and allow North to win two diamond tricks.
#86 - South has three sure tricks (one spade, one heart, and one diamond) and needs four. South cashes the ♠8. West must keep clubs or allow N-S to establish a club trick as the fourth trick. (a) If West discards a heart, then North discards a heart and East a diamond (any other gives N-S an easy road to four tricks). North now wins the ♦A and leads a club which East is forced to win. East must then lead a heart and give South two heart tricks. (b) If West discards a diamond, then North discards a heart and East a club (any other gives N-S an easy road to four tricks). South cashes the ♥K and leads a club. N-S must now win one club and the ♦A.
#87 - South has three sure tricks (two hearts by a simple finesse and one club) and needs four. South leads the ♥2 and finesses against the ♥K. East may discard a spade or a diamond. North now leads the ♠9 which West must win. South discards the ♥9. East either follows suit or discards a diamond. West must return a heart which North wins. East is squeezed. (a) If East discards the diamond, then South discards the ♣4 and takes the last two tricks with the ♣A and ♦5. (b) If East discards a club, the South discards the diamond and takes the last two tricks with the club suit.
#88 - South has two sure tricks (one heart and one club) without an entry and needs three tricks. South leads the ♦K. (a) If West wins, he/she can cash another diamond but must surrender a diamond to dummy which has the two aces. (b) If West does not win, then South shifts to the ♠K. East can win or duck, but will have to give N-S either two spade tricks or two aces. Trap- If South starts with the low diamond, East wins and plays the ♠A and another spade. N-S is held to two spade tricks. Trap- If South starts with a spade honor, then any North discard will give E-W additional tricks. A diamond allows four diamond tricks, a club allows one club trick, and a heart allows on heart trick. E-W will end up with all five tricks.