get started with cloudcheckr for azure
TRANSCRIPT
Get Started with CloudCheckr for AzureSet Up for Success: Configuring Accounts and Utilizing Key
Features
2
Get Started with CloudCheckr for Azure 2
Contents
Initial Setup 3Step 1: Log-On to CloudCheckr 4
Step 2: Adding an Account in CloudCheckr 4
Step 3: Configuring an Azure Subscription in CloudCheckr 5
Step 4: Access Management 6
Step 5: Customize Your CloudCheckr Experience 7
Step 6: Get a Platform Deep Dive from a CloudCheckr Technical Expert 8
Step 7: Get Access to CloudCheckr’s Learning Management System 8
Utilizing Key Features 10Security 11
Best Practice Checks: Fix Security 11
Setup Security Alerts 12
Monitor Changes 12
Cost 16
Cleanup Idle, Unused, Misprovisioned, & Previous Generation Resources 16
Setup Cost Alerts 17
Setup Billing & Invoicing 18
Manage Custom Charges and Credits 19
Review Right Sizing Recommendations 19
Review Virtual Machine Reservation Purchase Recommendations 20
Availability and Usage 21
Best Practice Checks: Fix Availability 21
Best Practice Checks: Fix Usage 22

Get Started
Initial Setup
3
Get Started with CloudCheckr for Azure 3
4
Get Started with CloudCheckr for Azure 4
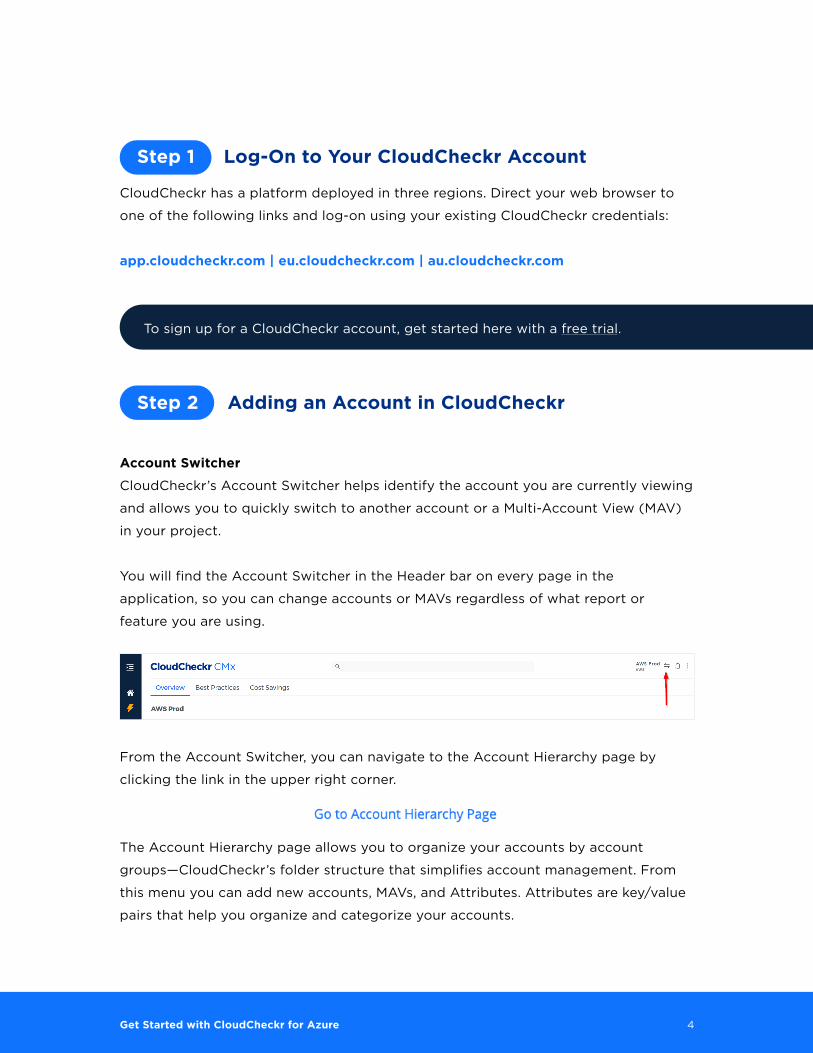
Step 1 Log-On to Your CloudCheckr Account
CloudCheckr has a platform deployed in three regions. Direct your web browser to
one of the following links and log-on using your existing CloudCheckr credentials:
app.cloudcheckr.com | eu.cloudcheckr.com | au.cloudcheckr.com
To sign up for a CloudCheckr account, get started here with a free trial.
Step 2 Adding an Account in CloudCheckr
Account Switcher
CloudCheckr’s Account Switcher helps identify the account you are currently viewing
and allows you to quickly switch to another account or a Multi-Account View (MAV)
in your project.
You will find the Account Switcher in the Header bar on every page in the
application, so you can change accounts or MAVs regardless of what report or
feature you are using.
From the Account Switcher, you can navigate to the Account Hierarchy page by
clicking the link in the upper right corner.
The Account Hierarchy page allows you to organize your accounts by account
groups—CloudCheckr’s folder structure that simplifies account management. From
this menu you can add new accounts, MAVs, and Attributes. Attributes are key/value
pairs that help you organize and categorize your accounts.
5
Get Started with CloudCheckr for Azure 5
Adding an Account
When you log-in to CloudCheckr for the first time your Account Hierarchy page
will be pre-populated with a sample account. You can use this to look through the
various CloudCheckr reports and functionality. You will want to add your own Azure
accounts to get a full analysis of your environment.
Step A: Click ‘+ CREATE’ and select ‘Account’ [SCREENSHOT 3 -
Step B: This will pop out a drawer on the right hand side of the UI.
Step C: Name the account and select Azure as the Cloud Provider. If applicable,
select the appropriate Location for the new account in your account groups folder
structure. Add any relevant Attributes for the account.
Step D: Click ‘Save.’
Step E: Click ‘Manage Credentials’ and complete the steps as directed in Step 3.
Adding Multi-Account Views
To configure a Multi-Account View (MAV), click ‘+ NEW MAV’ on the Account
Hierarchy page on the ‘MAVs’ tab. Enter the name and cloud provider for the MAV
in question. When creating the MAV, you will be prompted to add the accounts that
should be included in the view. You have the option to add all accounts, or to filter by
an Attribute, which allows you to add an entire subset of accounts at the same time.
Step 3 Configuring an Azure Subscription in CloudCheckr
Overview
Step A: Make sure you have full access to your billing source.
Step B: Determine your subscription types.
Step C: Connect the Azure Billing subscriptions first.
Step D: Configure and credential any subscriptions you want to optimize with
CloudCheckr.
Section One: Direct Customers
If you are receiving Azure services directly from Microsoft, you are a Direct Customer.
Adding your subscriptions is straightforward.
The person configuring the subscriptions in CloudCheckr will need full access to the

6
Get Started with CloudCheckr for Azure 6
Enterprise Agreement (EA) billing and subscription accounts.
Below are the instructions for configuring the various account types:
• EA Subscription
• Inventory Subscription
• Active Directory/Office 365
Section Two: Partners with Direct Billing Access
If you are a Cloud Solution Provider (CSP) partner, Managed Service Provider (MSP),
reseller, ISV, distributor, or other type of partner, without having customers going to
any other CSP, you are a Direct CSP. CloudCheckr supports both the Azure Plan and
the Classic Plan.
Adding a subscription as a Direct CSP is straightforward too, but you will need to
work with a CloudCheckr Customer Success resource to ensure that you set up your
customers correctly.
To complete this process, you will need direct access to your billing data and full
access to the EA billing and subscription accounts. You will also want to confirm
what type of Azure CSP Plan you have.
Below are the instructions for configuring the various account types:
• CSP Subscription
• EA Subscription
• Inventory Subscription
• Active Directory/Office 365
Section Three: Partners with Indirect Billing Access
If you help customers, but they are getting Azure billing or other services through
another provider, you are an Indirect CSP. You will be able to configure customer
subscriptions, but without access to the billing data, your billing and cost
optimizations are limited.

7
Get Started with CloudCheckr for Azure 7
If you do not have access to the billing information you have two options: you can
ask the billing partner or you can add the subscriptions without billing data. If you
can get access to the data from the billing partner, please share that with your
CloudCheckr team.
Below are the instructions for configuring the various account types:
• CSP Subscription
• EA Subscription
• Inventory Subscription
• Active Directory/Office 365
Section Four: Indirect Customers
If you are getting your billing data from a Provider partner but want to use
CloudCheckr, you are an Indirect Customer. You will be able to configure your
subscriptions but may have a limited view into your billing data since your Provider
partner manages your billing data.
If you do not have access to the billing information you have two options: you can
ask the billing partner or you can add the subscriptions without billing data. If you
can get access to the data from the billing partner, please share that with your
CloudCheckr team.
Below are the instructions for configuring the various account types:
• EA Subscription
• Inventory Subscription
• Active Directory/Office 365
Depending on the size of your Azure deployment, the initial reports update could take
anywhere from a few minutes to a few hours. As soon as your initial report update finishes,
CloudCheckr will send you an Inventory Summary and Best Practices Report email (if
you entered an email address when configuring your account). Once your initial report
update finishes, you can begin reviewing the data within your account. For more in-app
information about CloudCheckr updates and other Account Notifications, navigate to the
‘Notifications’ icon ( ) in the upper right hand corner of the screen.

8
Get Started with CloudCheckr for Azure 8
Fully Customized Domain
Step 4 Access Management
CloudCheckr customers have full control over provisioning and managing user access
within their account(s). User access can be configured with specific permissions,
rights, and visibility based on the needs and role of the user.
To configure users & permissions and create their associated policies,
reference the following detailed walkthrough: CloudCheckr Success Center:
Access Management
Step 5 Customize Your CloudCheckr Experience
After the initial report update is completed, your account will be populated with
detailed information about your deployment, organized into many pre-built (and
any custom created) reports. Each time a report update completes, CloudCheckr
will create new reports that reflect the most recent state of your accounts. Since
CloudCheckr retains a history of your deployment with SnapBack, you can drill into
historical information up to seven years back in time.
Step A: Start by configuring CloudCheckr email notifications
by navigating to the upper right of the UI and selecting
the stacked dots icon ( ) and then navigating to Account
Configuration > Email Settings. There are a number of pre-
built options for daily, weekly, and monthly emails, including
Daily Bill Fluctuation Alerts, Best Practice Check summaries,
and Change Monitoring reports.

9
Get Started with CloudCheckr for Azure 9
Step B: Second, navigate to the upper right of the UI
and select the stacked dots icon ( ) and then to System
Management > Customization to access the CloudCheckr
basic whitelabeling options. Users can add their own logo
and page icon, change the colors of the navigation menus,
and change the support site link to an internal site, if desired.
Step 6 Get a Platform Deep Dive from a CloudCheckr
Technical Expert
To help you get up and running quickly, CloudCheckr can advise on how you can make
the most of the recommendations in your initial report update. The goal of this deep
dive is to have one of our subject matter experts provide you some initial suggestions
on what features to leverage based on your use cases, help get any specific questions
answered and ensure you have a primary point of contact here at CloudCheckr.
Step 7 Get Access to CloudCheckr’s Learning
Management System
CloudCheckr provides our customers and partners with access to an online, on-
demand course called CloudCheckr 101. To get access to our courseware, navigate to
the CloudCheckr Success Center and click on ‘Training and Certification.’
To get started with CloudCheckr’s learning management system, simply fill out the
form linked on the ‘Training and Certification’ page. Our learning team will reach out
with more details.

10
Get Started with CloudCheckr for Azure 10
Get Started
Utilizing Key Features

11
Get Started with CloudCheckr for Azure 11
Security
Best Practice Checks: Fix Security
CloudCheckr has over 600 Best Practice Checks (BPCs), and most of those are
focused on security. Because CloudCheckr Best Practice Checks run at least once a
day, by Day 2, you should be able to begin analyzing configuration vulnerabilities.
Each check will be marked in Red, Orange, Yellow, or Green, based on severity, and
Blue, if the check is informational in nature.
12
Get Started with CloudCheckr for Azure 12
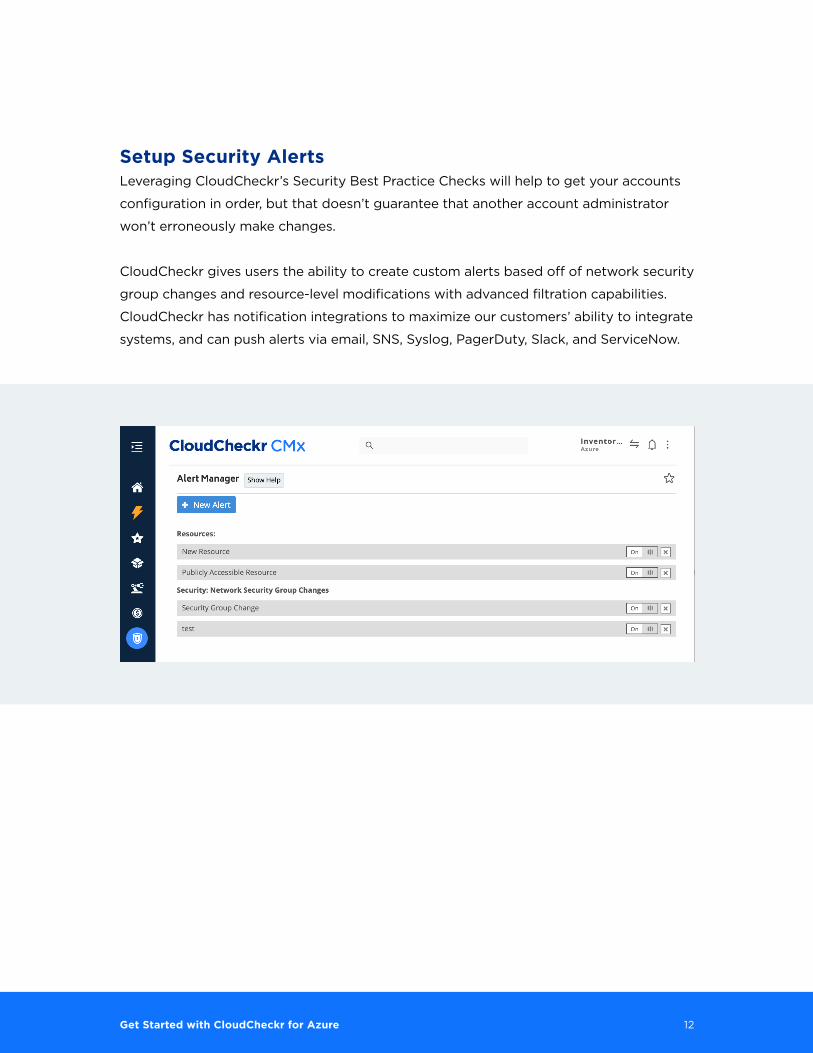
Setup Security AlertsLeveraging CloudCheckr’s Security Best Practice Checks will help to get your accounts
configuration in order, but that doesn’t guarantee that another account administrator
won’t erroneously make changes.
CloudCheckr gives users the ability to create custom alerts based off of network security
group changes and resource-level modifications with advanced filtration capabilities.
CloudCheckr has notification integrations to maximize our customers’ ability to integrate
systems, and can push alerts via email, SNS, Syslog, PagerDuty, Slack, and ServiceNow.
13
Get Started with CloudCheckr for Azure 13
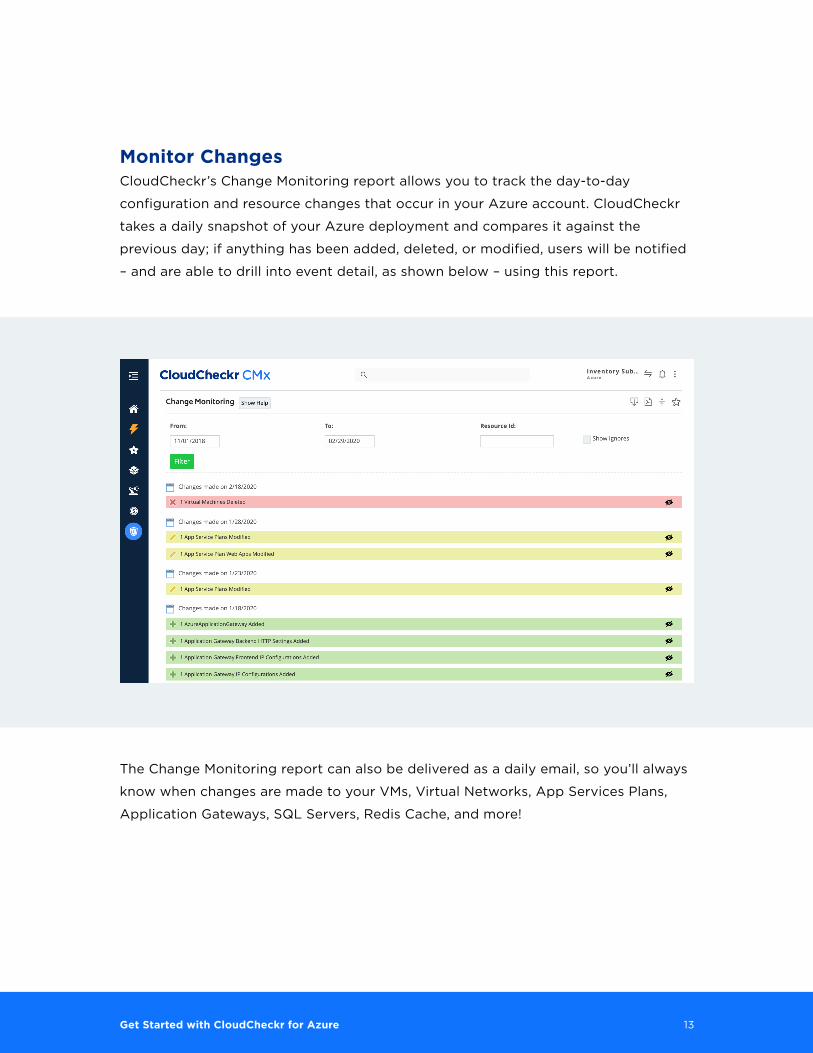
Monitor Changes CloudCheckr’s Change Monitoring report allows you to track the day-to-day
configuration and resource changes that occur in your Azure account. CloudCheckr
takes a daily snapshot of your Azure deployment and compares it against the
previous day; if anything has been added, deleted, or modified, users will be notified
– and are able to drill into event detail, as shown below – using this report.
The Change Monitoring report can also be delivered as a daily email, so you’ll always
know when changes are made to your VMs, Virtual Networks, App Services Plans,
Application Gateways, SQL Servers, Redis Cache, and more!
14
Get Started with CloudCheckr for Azure 14
Cost
Cleanup Idle, Unused, Misprovisioned, & Previous
Generation Resources
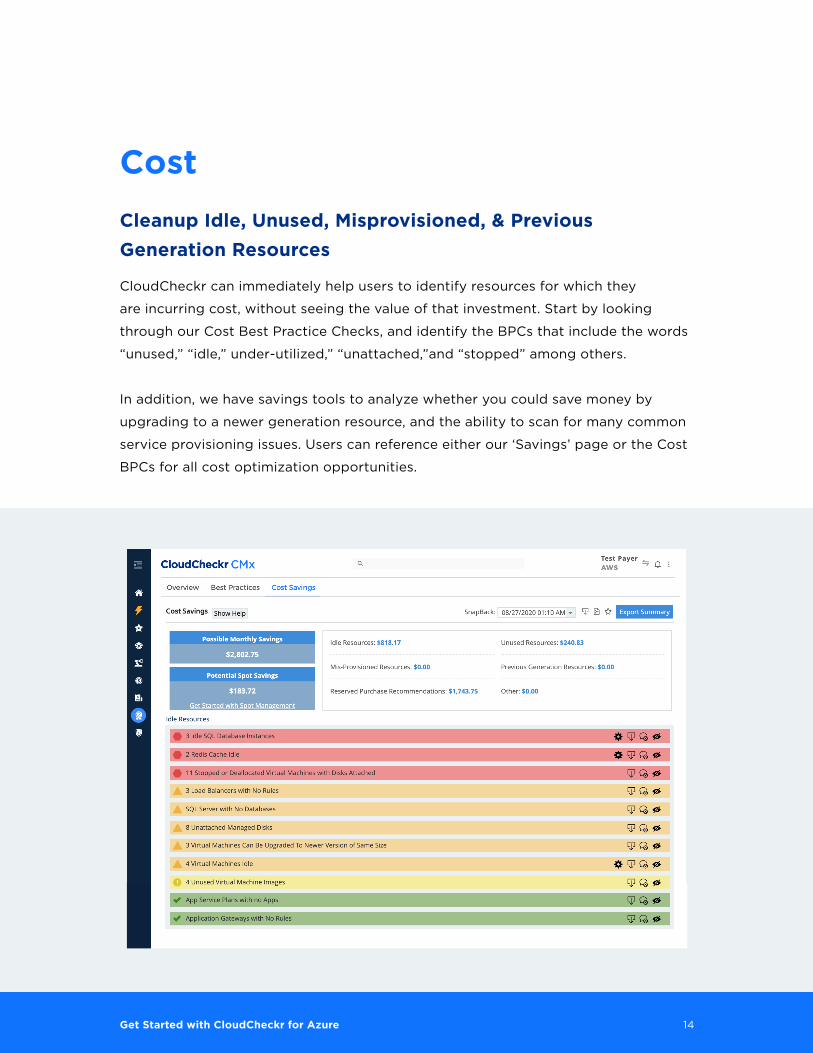
CloudCheckr can immediately help users to identify resources for which they
are incurring cost, without seeing the value of that investment. Start by looking
through our Cost Best Practice Checks, and identify the BPCs that include the words
“unused,” “idle,” under-utilized,” “unattached,”and “stopped” among others.
In addition, we have savings tools to analyze whether you could save money by
upgrading to a newer generation resource, and the ability to scan for many common
service provisioning issues. Users can reference either our ‘Savings’ page or the Cost
BPCs for all cost optimization opportunities.
15
Get Started with CloudCheckr for Azure 15
Setup Cost Alerts
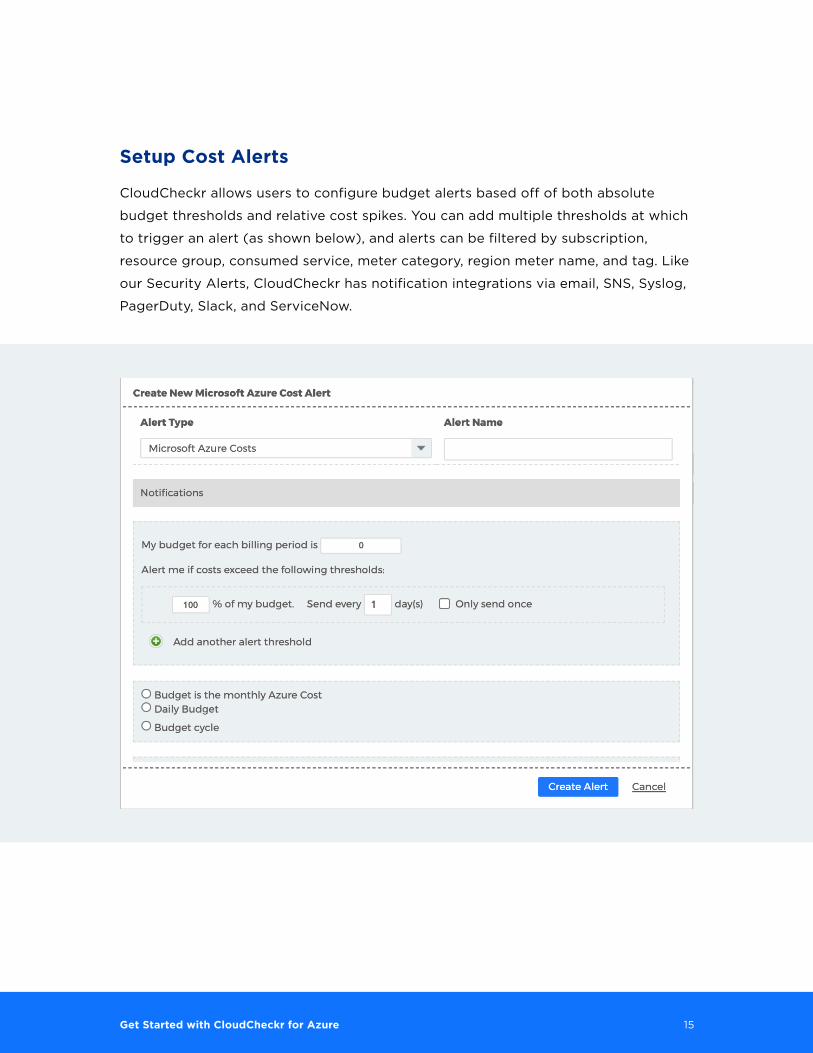
CloudCheckr allows users to configure budget alerts based off of both absolute
budget thresholds and relative cost spikes. You can add multiple thresholds at which
to trigger an alert (as shown below), and alerts can be filtered by subscription,
resource group, consumed service, meter category, region meter name, and tag. Like
our Security Alerts, CloudCheckr has notification integrations via email, SNS, Syslog,
PagerDuty, Slack, and ServiceNow.
16
Get Started with CloudCheckr for Azure 16
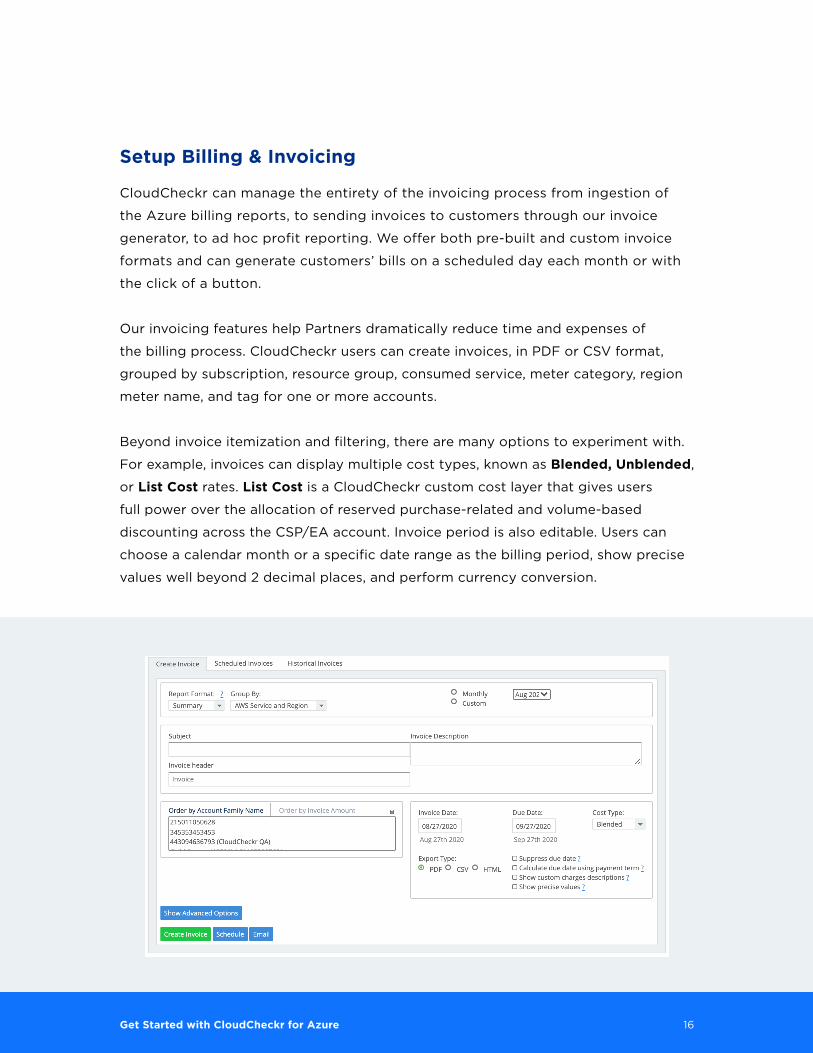
Setup Billing & Invoicing
CloudCheckr can manage the entirety of the invoicing process from ingestion of
the Azure billing reports, to sending invoices to customers through our invoice
generator, to ad hoc profit reporting. We offer both pre-built and custom invoice
formats and can generate customers’ bills on a scheduled day each month or with
the click of a button.
Our invoicing features help Partners dramatically reduce time and expenses of
the billing process. CloudCheckr users can create invoices, in PDF or CSV format,
grouped by subscription, resource group, consumed service, meter category, region
meter name, and tag for one or more accounts.
Beyond invoice itemization and filtering, there are many options to experiment with.
For example, invoices can display multiple cost types, known as Blended, Unblended,
or List Cost rates. List Cost is a CloudCheckr custom cost layer that gives users
full power over the allocation of reserved purchase-related and volume-based
discounting across the CSP/EA account. Invoice period is also editable. Users can
choose a calendar month or a specific date range as the billing period, show precise
values well beyond 2 decimal places, and perform currency conversion.
17
Get Started with CloudCheckr for Azure 17
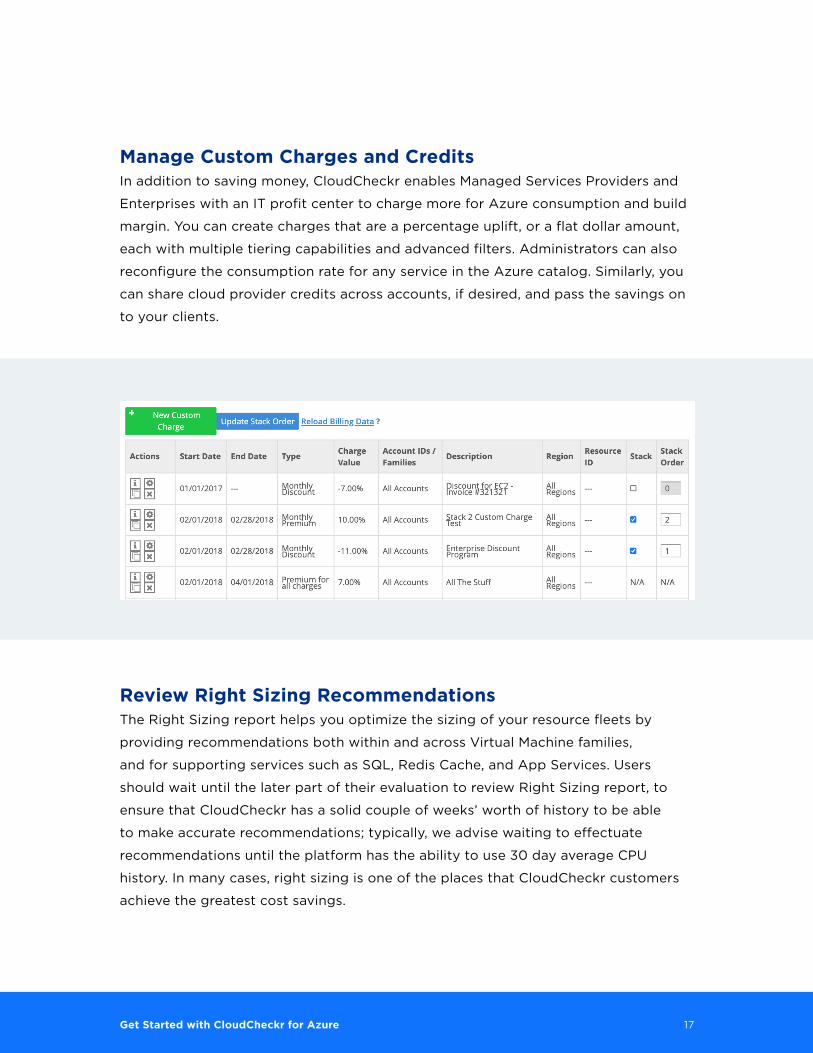
Manage Custom Charges and CreditsIn addition to saving money, CloudCheckr enables Managed Services Providers and
Enterprises with an IT profit center to charge more for Azure consumption and build
margin. You can create charges that are a percentage uplift, or a flat dollar amount,
each with multiple tiering capabilities and advanced filters. Administrators can also
reconfigure the consumption rate for any service in the Azure catalog. Similarly, you
can share cloud provider credits across accounts, if desired, and pass the savings on
to your clients.
Review Right Sizing Recommendations
The Right Sizing report helps you optimize the sizing of your resource fleets by
providing recommendations both within and across Virtual Machine families,
and for supporting services such as SQL, Redis Cache, and App Services. Users
should wait until the later part of their evaluation to review Right Sizing report, to
ensure that CloudCheckr has a solid couple of weeks’ worth of history to be able
to make accurate recommendations; typically, we advise waiting to effectuate
recommendations until the platform has the ability to use 30 day average CPU
history. In many cases, right sizing is one of the places that CloudCheckr customers
achieve the greatest cost savings.
18
Get Started with CloudCheckr for Azure 18
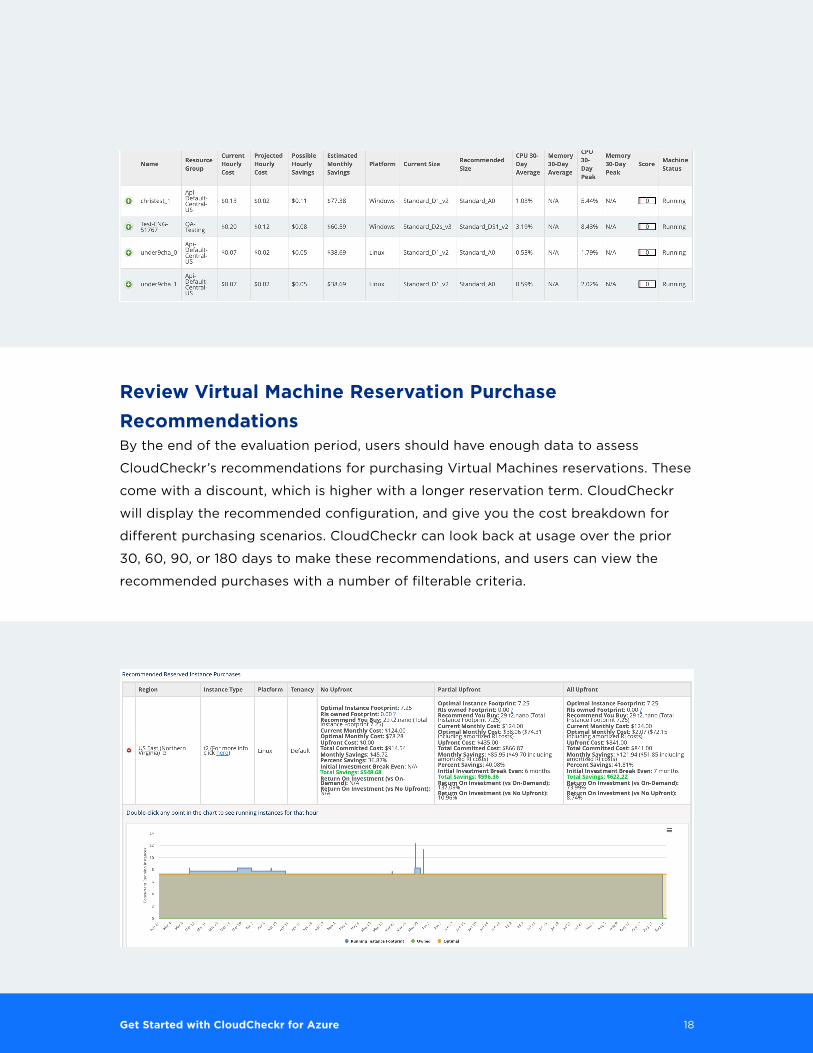
Review Virtual Machine Reservation Purchase
Recommendations By the end of the evaluation period, users should have enough data to assess
CloudCheckr’s recommendations for purchasing Virtual Machines reservations. These
come with a discount, which is higher with a longer reservation term. CloudCheckr
will display the recommended configuration, and give you the cost breakdown for
different purchasing scenarios. CloudCheckr can look back at usage over the prior
30, 60, 90, or 180 days to make these recommendations, and users can view the
recommended purchases with a number of filterable criteria.
Availability and Usage
19
Get Started with CloudCheckr for Azure 19
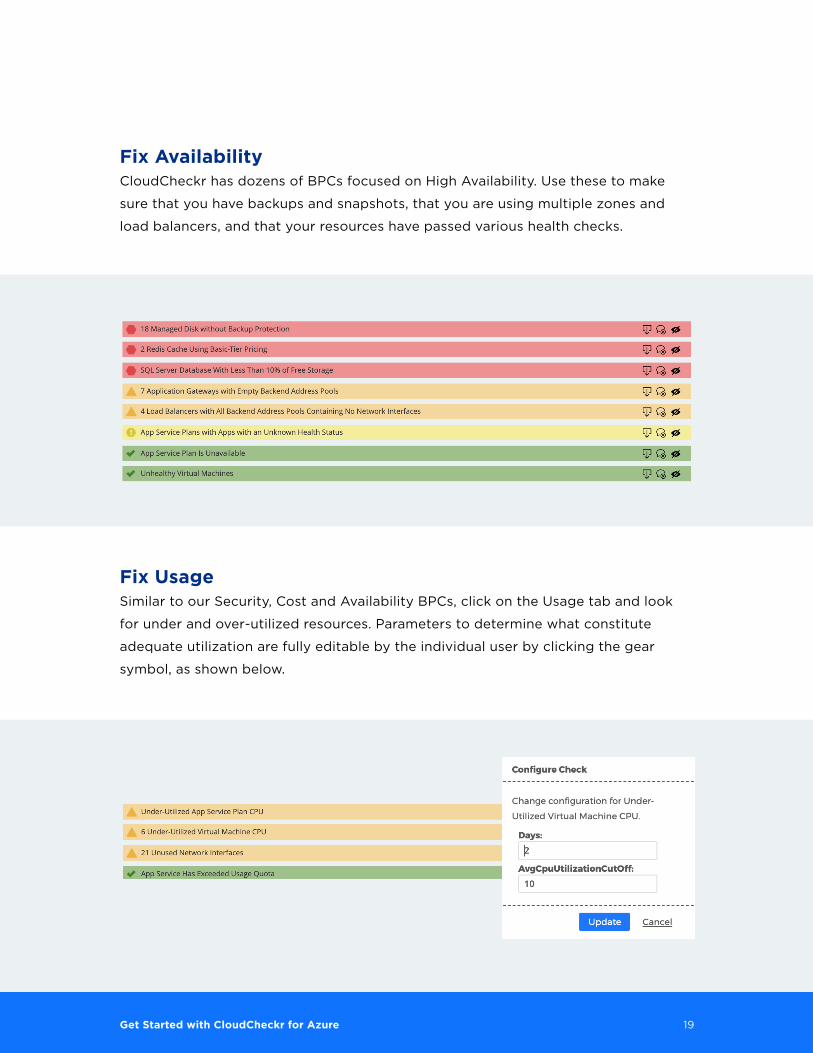
Fix Availability CloudCheckr has dozens of BPCs focused on High Availability. Use these to make
sure that you have backups and snapshots, that you are using multiple zones and
load balancers, and that your resources have passed various health checks.
Fix Usage Similar to our Security, Cost and Availability BPCs, click on the Usage tab and look
for under and over-utilized resources. Parameters to determine what constitute
adequate utilization are fully editable by the individual user by clicking the gear
symbol, as shown below.

About CloudCheckr
We deliver total visibility—across multiple public clouds and hybrid
workloads—making the most complex cloud infrastructures easy to manage.
From government agencies to large enterprise and managed service
providers, CloudCheckr customers deploy our SaaS solution to secure,
manage, and govern the most sensitive environments in the world. Our
industry-leading cloud management includes cost savings, billing & invoicing,
cloud security & compliance, resource optimization, and automation available
in CloudCheckr CMx, CMx High Security for regulated industries, CMx Federal
for FedRAMP Ready procurement, and CloudCheckr Finance Manager for IT
cost management across hybrid cloud.
© CloudCheckr. All Rights Reserved.