get the advantages of an on-premises cloud and use familiar tools · 2020-07-14 · deploying a...
TRANSCRIPT

Get the advantages of an on-premises cloud and use familiar tools February 2018
Get the advantages of an on-premises cloud and use familiar toolsDell EMC PowerEdge FC640 servers and VMware software make choosing private cloud management a worthwhile alternative to moving to a public cloudThe type of cloud you choose now will affect your datacenter administration for years to come. So, let’s look at a few reasons why choosing an on-premises cloud over a public cloud makes good business sense. First, building and implementing your own private cloud can make it easier to address security, compliance, and performance concerns for critical applications. Second, while some people believe that public clouds are easier to manage than on-premises clouds and are a sure-fire way to cut admin costs, when you use Dell EMC™ PowerEdge™ FX2 architecture and familiar tools, that’s not necessarily true in all situations. In fact, in certain cases, on-premises deployments can also yield total cost of ownership (TCO) savings.
We found that managing an on-premises private cloud solution running on Dell EMC PowerEdge FC640 servers powered by the Intel® Xeon® processor Scalable family required similar time but with an average of 34 percent fewer steps compared to an Amazon Web Services™ (AWS) public cloud. Plus, you get the built-in benefit of using VMware® software you’re already familiar with.
Dell EMC PowerEdge FC640 servers bring the latest technology
to your private cloud
*compared to an AWS public cloud
Gain the advantages of an on-premises cloud
Complete tasks quicklySimilar cloud management time but with an average of
34% fewer steps*
A Principled Technologies report: Hands-on testing. Real-world results.

Get the advantages of an on-premises cloud and use familiar tools February 2018 | 2
Gain the advantages of an on-premises cloudIn today’s competitive business environment, moving to the cloud is inevitable. Choosing between public and private cloud options is a little like buying or leasing a car. When you choose a public cloud, such as the AWS option we looked at, you’re locking yourself into a monthly or yearly contract and betting on how much data storage and access you’ll need now and in the foreseeable future. Much like when you lease a car, exceeding your subscription allotments can cost you. With an on-premises private cloud, such as the Dell EMC PowerEdge FX2 solution we looked at, you pay up front and get a flexible, modular server platform that you can slice and fully allocate based on current needs and reconfigure as those needs change over time. Building and implementing your own private cloud also provides a host of other benefits:
Security and complianceKeeping sensitive data safe is an ongoing battle. Choosing an on-premises cloud solution means you always know exactly where your data is and retain oversight over the security strategies implemented to protect your business and its customers. This is particularly important if your company handles medical or financial information or needs to meet regulatory requirements. Storing this type of information on a public cloud can get increasingly complex as your organization grows.
Performance and continuitySwitching to new technologies can be disruptive for IT staff, who might need retraining. Choosing an on-premises cloud solution means you can continue using your existing VMware vSphere® environment and create and control your cloud through VMware vRealize® Suite cloud management platforms—making it easier for IT already familiar with these tools to update, secure, and fine-tune critical applications. You can also keep existing company IT strategies and policies in place when you choose an on-premises Dell EMC PowerEdge FX2 private cloud solution.
Customization and understandingYou understand better than anyone which customers, users, and applications need priority. It is unrealistic to expect a public cloud service to provide the granularity to ensure uptime for what’s most important to you. Choosing an on-premises cloud solution means you can tailor resource management to your specific needs—you don’t have to conform to a one-size-fits-all public cloud option.
About the Dell EMC PowerEdge FX2 solutionThe Dell EMC PowerEdge FX2 is a modular server platform that can combine servers, storage, and networking in a single 2U chassis.
New two-socket, half-height Dell EMC PowerEdge FC640 servers feature the new Intel Xeon processor Scalable family, up to 2 TB of memory, and a range of storage media, including SSDs with capacities of up to 240 GB.
Dell EMC PowerEdge FC640 servers are also designed to provide built-in end-to-end security precautions, such as silicon-based root of trust for firmware updates, added protection from hardware intrusion, policy-based USB control, and secure encrypted drive options.
To learn more about the Dell EMC PowerEdge FX architecture, visit www.dell.com/en-us/work/shop/cty/pdp/spd/poweredge-fx.
Get the advantages of an on-premises cloud and use familiar tools February 2018 | 3
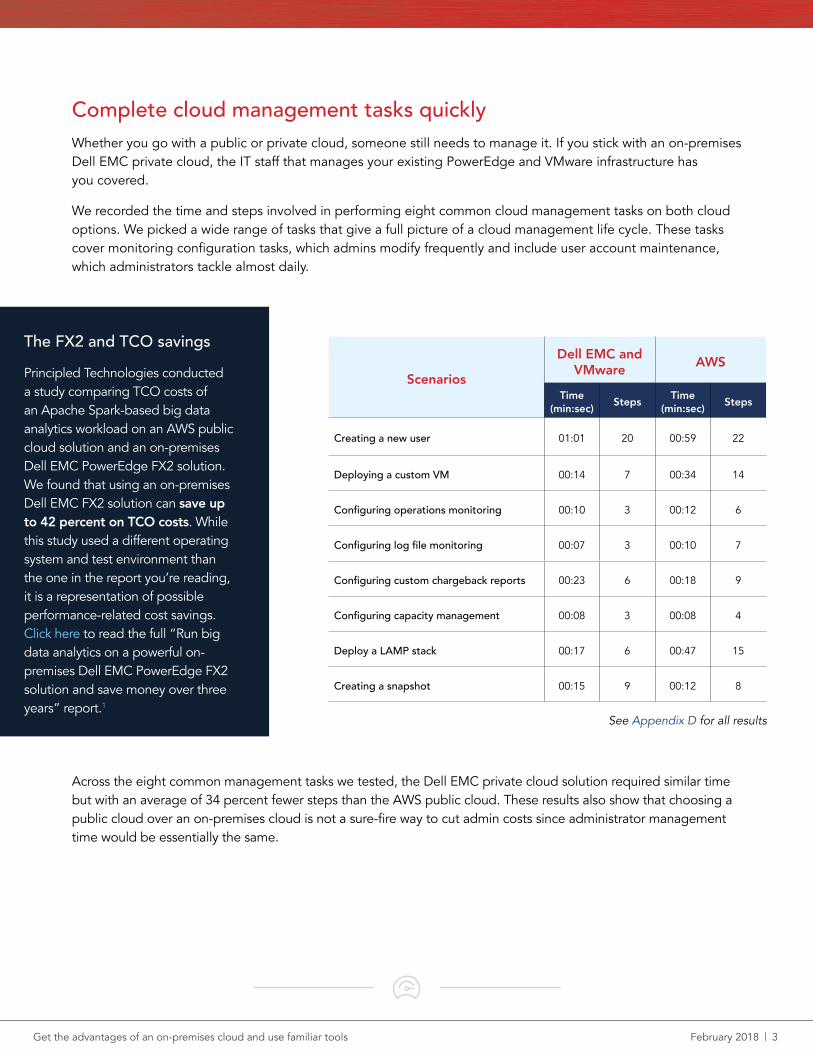
Complete cloud management tasks quicklyWhether you go with a public or private cloud, someone still needs to manage it. If you stick with an on-premises Dell EMC private cloud, the IT staff that manages your existing PowerEdge and VMware infrastructure has you covered.
We recorded the time and steps involved in performing eight common cloud management tasks on both cloud options. We picked a wide range of tasks that give a full picture of a cloud management life cycle. These tasks cover monitoring configuration tasks, which admins modify frequently and include user account maintenance, which administrators tackle almost daily.
Across the eight common management tasks we tested, the Dell EMC private cloud solution required similar time but with an average of 34 percent fewer steps than the AWS public cloud. These results also show that choosing a public cloud over an on-premises cloud is not a sure-fire way to cut admin costs since administrator management time would be essentially the same.
Scenarios
Dell EMC and VMware AWS
Time (min:sec) Steps Time
(min:sec) Steps
Creating a new user 01:01 20 00:59 22
Deploying a custom VM 00:14 7 00:34 14
Configuring operations monitoring 00:10 3 00:12 6
Configuring log file monitoring 00:07 3 00:10 7
Configuring custom chargeback reports 00:23 6 00:18 9
Configuring capacity management 00:08 3 00:08 4
Deploy a LAMP stack 00:17 6 00:47 15
Creating a snapshot 00:15 9 00:12 8
See Appendix D for all results
The FX2 and TCO savingsPrincipled Technologies conducted a study comparing TCO costs of an Apache Spark-based big data analytics workload on an AWS public cloud solution and an on-premises Dell EMC PowerEdge FX2 solution. We found that using an on-premises Dell EMC FX2 solution can save up to 42 percent on TCO costs. While this study used a different operating system and test environment than the one in the report you’re reading, it is a representation of possible performance-related cost savings. Click here to read the full “Run big data analytics on a powerful on-premises Dell EMC PowerEdge FX2 solution and save money over three years” report.1
Get the advantages of an on-premises cloud and use familiar tools February 2018 | 4
ConclusionOur admins found that choosing an on-premises private cloud solution running on Dell EMC PowerEdge FX2 architecture and FC640 servers, powered by the Intel Xeon processor Scalable family, over an AWS public cloud solution makes good business sense in some cases and situations. This is, in part, because using VMware software to complete a variety of common cloud management tasks on an on-premises private cloud required similar management time but with an average of 34% fewer steps compared to the AWS public cloud option. Another key benefit is that datacenter administrators retain precise control over how they implement their security strategies and can adjust private cloud resources for performance reasons —without worrying over exceeding subscription allotments—and helping your datacenter adapt well to ever-changing business needs.
1 Principled Technologies: Run big data analytics on a powerful on-premises Dell EMC PowerEdge FX2 solution and save money over three years
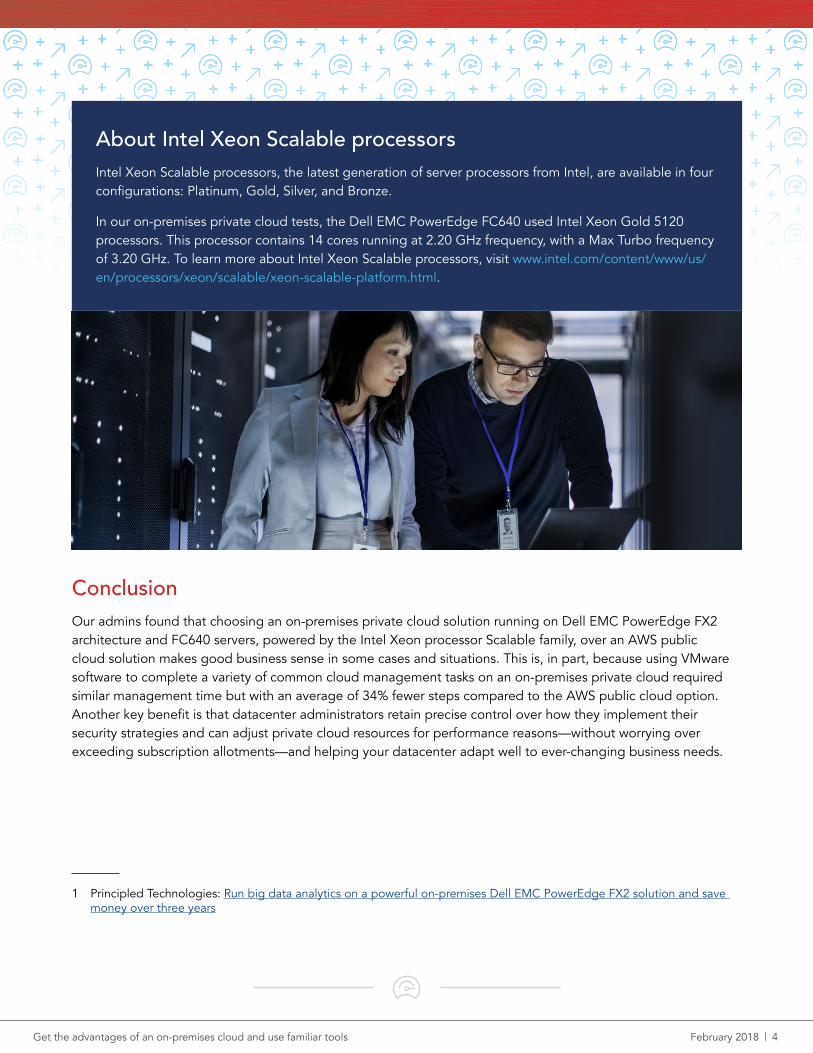
About Intel Xeon Scalable processorsIntel Xeon Scalable processors, the latest generation of server processors from Intel, are available in four configurations: Platinum, Gold, Silver, and Bronze.
In our on-premises private cloud tests, the Dell EMC PowerEdge FC640 used Intel Xeon Gold 5120 processors. This processor contains 14 cores running at 2.20 GHz frequency, with a Max Turbo frequency of 3.20 GHz. To learn more about Intel Xeon Scalable processors, visit www.intel.com/content/www/us/en/processors/xeon/scalable/xeon-scalable-platform.html.

Get the advantages of an on-premises cloud and use familiar tools February 2018 | 5
On November 5, 2017, we finalized the hardware and software configurations we tested. Updates for current and recently released hardware and software appear often, so unavoidably these configurations may not represent the latest versions available when this report appears. We concluded hands-on testing on November 30, 2017.
Appendix A: System configuration informationServer configuration information 4 x Dell EMC PowerEdge FC640
BIOS name and version Dell 1.0.1
Operating system name and version/build number VMware ESXi, 6.5.0, 5969303
Date of last OS updates/patches applied 10/30/2017
Power management policy Performance
Processor
Number of processors 2
Vendor and model Intel Xeon Gold 5120
Core count (per processor) 14
Core frequency (GHz) 2.20
Stepping 1
Memory module(s)
Total memory in system (GB) 192
Number of memory modules 12
Vendor and model Hynix HMA82GR7AFR8N-VK
Size (GB) 16
Type PC4-21300R
Speed (MHz) 2666
Speed running in the server (MHz) 2444
Storage controller
Vendor and model Dell PERC H330 Mini
Firmware version 25.3.0004
Driver version 4.27
Get the advantages of an on-premises cloud and use familiar tools February 2018 | 6
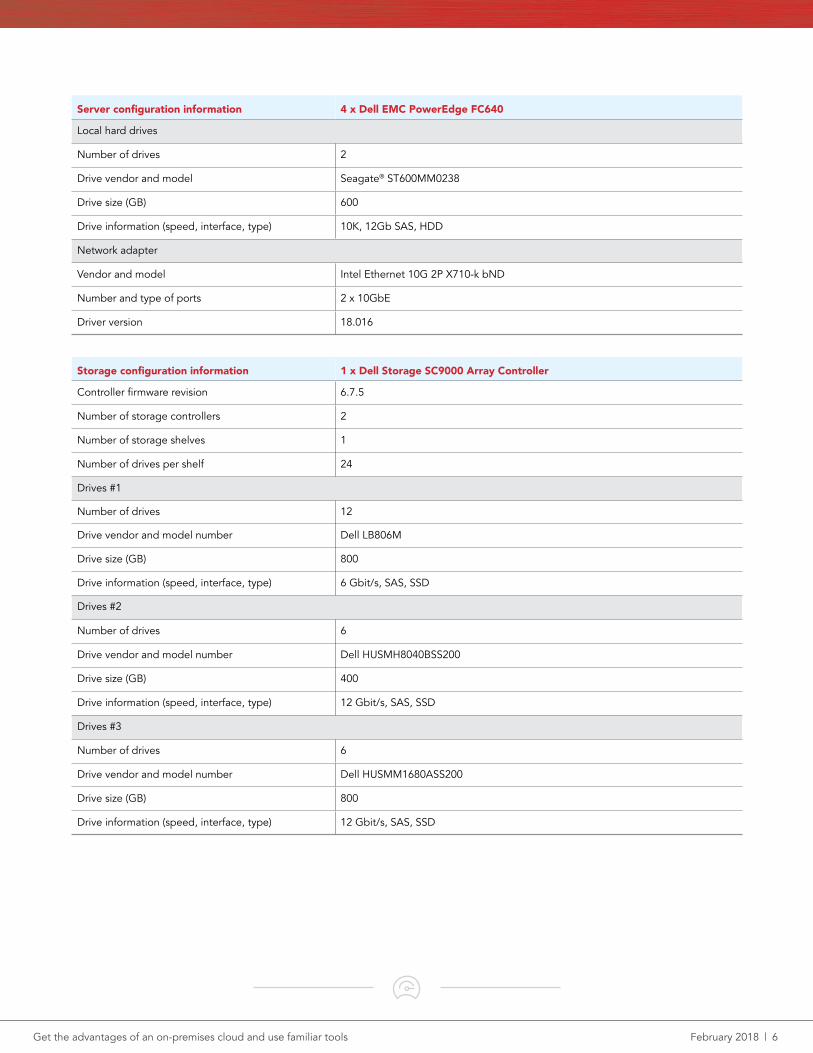
Server configuration information 4 x Dell EMC PowerEdge FC640
Local hard drives
Number of drives 2
Drive vendor and model Seagate® ST600MM0238
Drive size (GB) 600
Drive information (speed, interface, type) 10K, 12Gb SAS, HDD
Network adapter
Vendor and model Intel Ethernet 10G 2P X710-k bND
Number and type of ports 2 x 10GbE
Driver version 18.016
Storage configuration information 1 x Dell Storage SC9000 Array Controller
Controller firmware revision 6.7.5
Number of storage controllers 2
Number of storage shelves 1
Number of drives per shelf 24
Drives #1
Number of drives 12
Drive vendor and model number Dell LB806M
Drive size (GB) 800
Drive information (speed, interface, type) 6 Gbit/s, SAS, SSD
Drives #2
Number of drives 6
Drive vendor and model number Dell HUSMH8040BSS200
Drive size (GB) 400
Drive information (speed, interface, type) 12 Gbit/s, SAS, SSD
Drives #3
Number of drives 6
Drive vendor and model number Dell HUSMM1680ASS200
Drive size (GB) 800
Drive information (speed, interface, type) 12 Gbit/s, SAS, SSD

Get the advantages of an on-premises cloud and use familiar tools February 2018 | 7
Server enclosure configuration information Dell EMC PowerEdge FX2s
Number of management modules 2
Management module firmware revision 2.0
CMC module firmware 2.00
Midplane version 1.0
First type of I/O module
Vendor and model number Dell 1GBE Pass-through module
I/O module firmware revision X03
Number of modules 1
Occupied slots A2
Power supplies
Vendor and model number Dell 0W1R7VA00
Number of power supplies 2
Wattage of each (W) 2000
Cooling fans
Number of fans 8

Get the advantages of an on-premises cloud and use familiar tools February 2018 | 8
Appendix B: How we set up the test environmentThis appendix discloses our initial setup process for both the Dell EMC private cloud and AWS public cloud environments. Our use cases used in testing assume pre-existing environments in each case, and these steps are not part of our comparison.
Deploying a Dell EMC and VMware on-premises cloud
We configured each Dell EMC PowerEdge FC640 server with a virtual drive using two physical drives in RAID 10 configuration for local storage and hypervisor install. We created four volumes (one for each server) on the Dell Storage SC9000 Array to be targeted as non-local storage.
Installing VMware ESXi 6.51. Attach the installation media to the server.2. Boot the server.3. At the VMware Installer screen, press Enter.4. At the EULA screen, to Accept and Continue, press F11.5. Under Storage Devices, select the appropriate disk, and press Enter.6. Select US as the keyboard layout, and press Enter.7. Enter a root password twice, and press Enter.8. To start the installation, press F11.9. To reboot the server, remove the installation media, and press Enter.10. After the server reboots, press F2, and enter root credentials.11. Select Configure Management Network, and press Enter.12. Select IPv4 Configuration, and enter the desired configuration details. Press Enter.13. Select DNS Configuration, and enter the Primary DNS Server. Press Enter.14. Press Esc, and press Y to accept changes.
Deploying the VMware vCenter Server 6.5 Appliance1. Open the installation media folder.2. Select vcsa-ui-installer, and right-click on the installer application.3. Click Run as Administrator.4. Click Yes.5. In the Appliance 6.5 Installer window, click Install.6. At the Introduction, click Next.7. Accept the terms of the license agreement, and click Next.8. Select vCenter Server with an Embedded Platform Services Controller, and click Next.9. Enter the IP address for the ESXi target server, the username, and the password, and click Next.10. Click Yes to accept the certificate.11. Enter and confirm a root password for the appliance, and click Next.12. Select the deployment size (we selected Tiny and the default storage size), and click Next.13. Check the box to enable thin disk mode, and click Next.14. Enter the desired network information (IP address of the application, subnet, gateway, and DNS), and click Next.15. Review the stage 1 information, and click Finish.16. Click Continue to move to stage 2 of deployment.17. At the introduction, click Next.18. Enter the NTP servers for synchronization, enable SSH, and click Next.19. Enter a domain name, password, site name, and click Next.20. Click Next for CEIP.21. Review the stage 2 settings, and click Finish.22. After setup completes, click Close.
Get the advantages of an on-premises cloud and use familiar tools February 2018 | 9
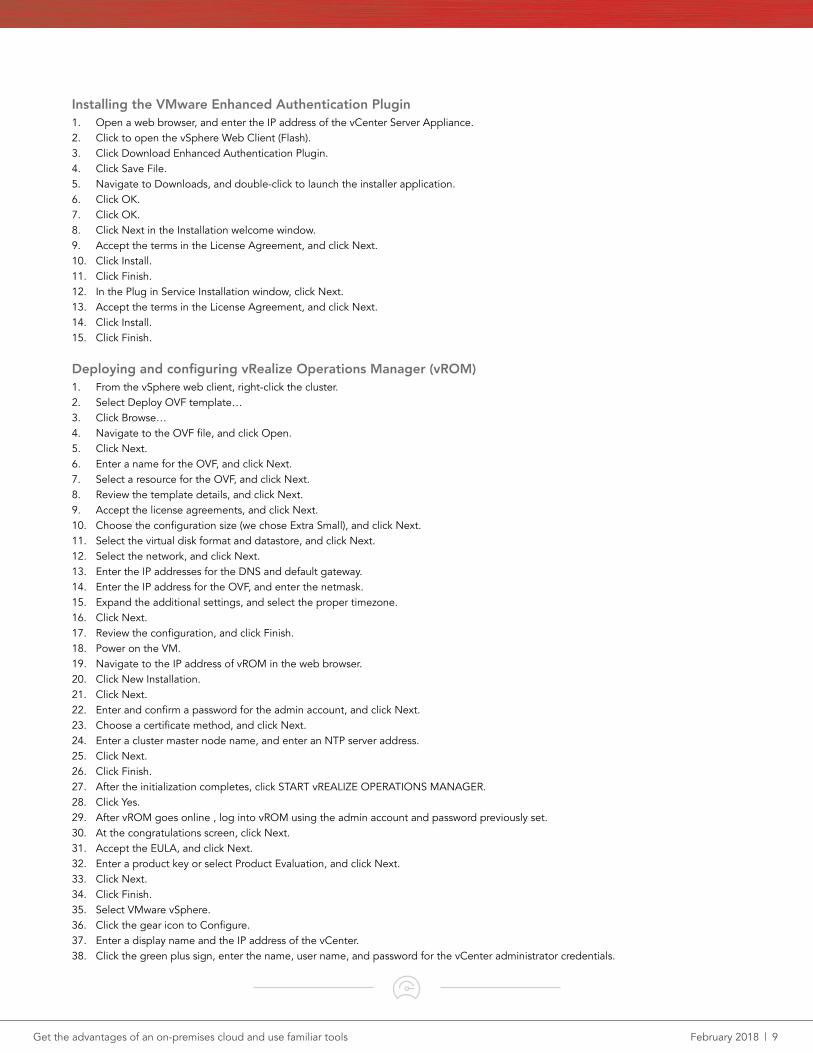
Installing the VMware Enhanced Authentication Plugin1. Open a web browser, and enter the IP address of the vCenter Server Appliance.2. Click to open the vSphere Web Client (Flash).3. Click Download Enhanced Authentication Plugin.4. Click Save File.5. Navigate to Downloads, and double-click to launch the installer application.6. Click OK.7. Click OK.8. Click Next in the Installation welcome window.9. Accept the terms in the License Agreement, and click Next.10. Click Install.11. Click Finish.12. In the Plug in Service Installation window, click Next.13. Accept the terms in the License Agreement, and click Next.14. Click Install.15. Click Finish.
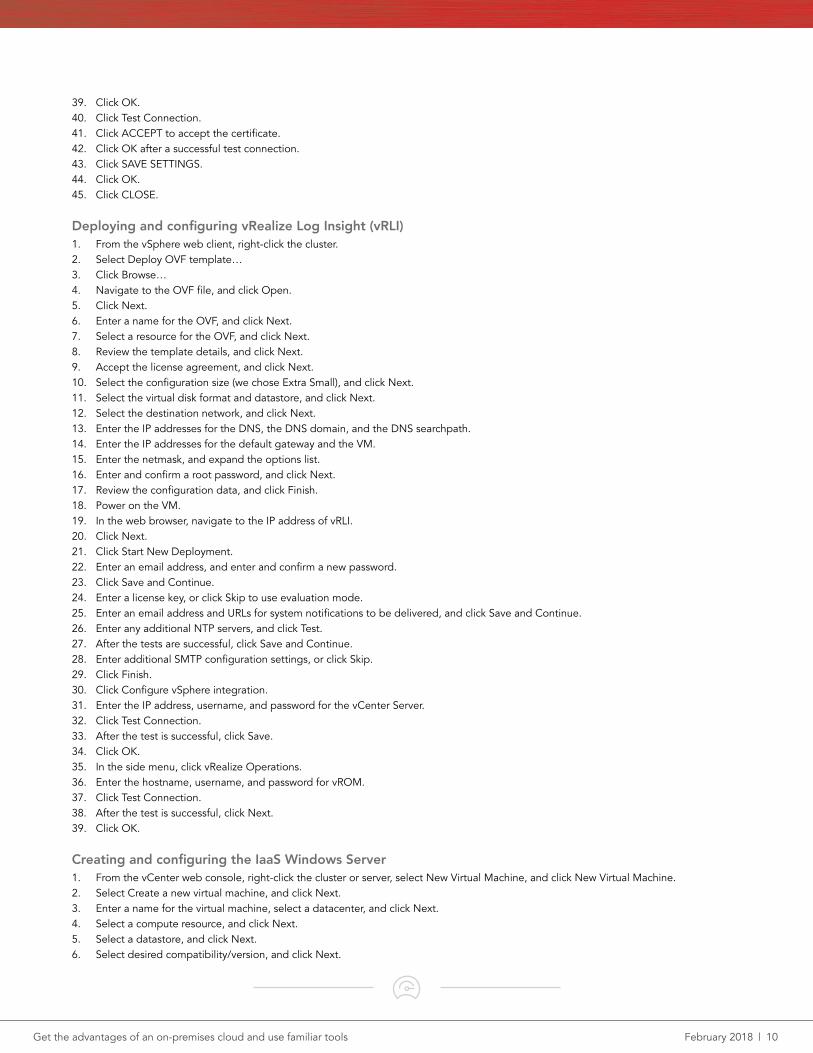
Deploying and configuring vRealize Operations Manager (vROM)1. From the vSphere web client, right-click the cluster.2. Select Deploy OVF template…3. Click Browse…4. Navigate to the OVF file, and click Open.5. Click Next.6. Enter a name for the OVF, and click Next.7. Select a resource for the OVF, and click Next.8. Review the template details, and click Next.9. Accept the license agreements, and click Next.10. Choose the configuration size (we chose Extra Small), and click Next.11. Select the virtual disk format and datastore, and click Next.12. Select the network, and click Next.13. Enter the IP addresses for the DNS and default gateway.14. Enter the IP address for the OVF, and enter the netmask.15. Expand the additional settings, and select the proper timezone.16. Click Next.17. Review the configuration, and click Finish.18. Power on the VM.19. Navigate to the IP address of vROM in the web browser.20. Click New Installation.21. Click Next.22. Enter and confirm a password for the admin account, and click Next.23. Choose a certificate method, and click Next.24. Enter a cluster master node name, and enter an NTP server address.25. Click Next.26. Click Finish.27. After the initialization completes, click START vREALIZE OPERATIONS MANAGER.28. Click Yes.29. After vROM goes online , log into vROM using the admin account and password previously set.30. At the congratulations screen, click Next.31. Accept the EULA, and click Next.32. Enter a product key or select Product Evaluation, and click Next.33. Click Next.34. Click Finish.35. Select VMware vSphere.36. Click the gear icon to Configure.37. Enter a display name and the IP address of the vCenter.38. Click the green plus sign, enter the name, user name, and password for the vCenter administrator credentials.
Get the advantages of an on-premises cloud and use familiar tools February 2018 | 10
39. Click OK.40. Click Test Connection.41. Click ACCEPT to accept the certificate.42. Click OK after a successful test connection.43. Click SAVE SETTINGS.44. Click OK.45. Click CLOSE.
Deploying and configuring vRealize Log Insight (vRLI)1. From the vSphere web client, right-click the cluster.2. Select Deploy OVF template…3. Click Browse…4. Navigate to the OVF file, and click Open.5. Click Next.6. Enter a name for the OVF, and click Next.7. Select a resource for the OVF, and click Next.8. Review the template details, and click Next.9. Accept the license agreement, and click Next.10. Select the configuration size (we chose Extra Small), and click Next.11. Select the virtual disk format and datastore, and click Next.12. Select the destination network, and click Next.13. Enter the IP addresses for the DNS, the DNS domain, and the DNS searchpath.14. Enter the IP addresses for the default gateway and the VM.15. Enter the netmask, and expand the options list.16. Enter and confirm a root password, and click Next.17. Review the configuration data, and click Finish.18. Power on the VM.19. In the web browser, navigate to the IP address of vRLI.20. Click Next.21. Click Start New Deployment.22. Enter an email address, and enter and confirm a new password.23. Click Save and Continue.24. Enter a license key, or click Skip to use evaluation mode.25. Enter an email address and URLs for system notifications to be delivered, and click Save and Continue.26. Enter any additional NTP servers, and click Test.27. After the tests are successful, click Save and Continue.28. Enter additional SMTP configuration settings, or click Skip.29. Click Finish.30. Click Configure vSphere integration.31. Enter the IP address, username, and password for the vCenter Server.32. Click Test Connection.33. After the test is successful, click Save.34. Click OK.35. In the side menu, click vRealize Operations.36. Enter the hostname, username, and password for vROM.37. Click Test Connection.38. After the test is successful, click Next.39. Click OK.
Creating and configuring the IaaS Windows Server1. From the vCenter web console, right-click the cluster or server, select New Virtual Machine, and click New Virtual Machine.2. Select Create a new virtual machine, and click Next.3. Enter a name for the virtual machine, select a datacenter, and click Next.4. Select a compute resource, and click Next.5. Select a datastore, and click Next.6. Select desired compatibility/version, and click Next.

Get the advantages of an on-premises cloud and use familiar tools February 2018 | 11
7. Select the Guest OS family (Windows) and the Guest OS version (Windows Server 2016), and click Next.8. Customize the hardware as needed (we chose 2 vCPU and 8192 MB Memory), and click Next.9. Review the configuration, and click Finish.10. Connect to the virtual console either by using the web console or VRMC.11. Attach the Windows Server 2016 installation media.12. Power on the VM.13. At the language selection screen, click Next.14. Click Install Now.15. Enter the product key, and click Next.16. Select the Desktop Experience, and click Next.17. Accept the license terms, and click Next.18. Select Custom install.19. Click Next.20. Enter the desired password for the administrator, and click Finish.21. Return to the vCenter web console.22. Right-click the VM, select Guest OS, and select Install VMware Tools…23. Return to the VM, double-click the VMware tools setup executable, and follow the instructions to install VMware tools.24. Run Windows Update, and restart the VM as necessary.25. Add the server to the domain.26. After adding the server to the domain, from the server manager window, click Add Roles and Features.27. Add the following features: .NET 3.5 (HTTP and non-HTTP authentication), .NET 4.6 (HTTP and non-HTTP authentication), and IIS.
Restart as necessary.28. Open a web browser, and navigate to http://java.com/en/download/29. Click Free Java Download.30. Open the installation media, and follow the instructions to install Java.31. After the installation is complete, locate the Java installation using the command line or File Explorer (example location, C:\Program
Files\Java\jre 1.8.version).32. From the Control Panel, go to Advanced system settings.33. Click Environment Variables.34. Click New.35. Enter JAVA_HOME for the variable name and the path to the Java folder as the value.36. Click OK.37. Attach the Microsoft SQL Server 2016 installation media to the VM.38. Launch the Microsoft SQL Server Installation executable.39. Click Installation, and select New installation or add features to an existing installation.40. Enter the product key, and click Next.41. Check Use Microsoft Update, and click Next.42. To install the setup support files, click Install.43. Choose SQL Server Feature Installation, and click Next.44. Select the Database Engine Services, Full-Text Search, Client Tools Connectivity, Client Tools Backwards Compatibility, and Management
Tools Basic and Complete. Click Next.45. Accept defaults for instance configuration, and click Next.46. Accept defaults for server configuration, and click Next.47. Select Mixed Mode, and enter a password for the SA account. Click Add Current User, and click Next.48. Review installation configuration rules check, and click Install.49. At completion screen, click Close.50. Open a web browser, and navigate to http://docs.microsoft.com/en-us/sql/ssms/download-sql-server-management-
studio-ssms 51. Download Microsoft SQL Server Management Studio, and follow the installation instructions to install SSMS.
Deploying and configuring vRealize Automation (vRA)1. From the vSphere web client, right-click the cluster.2. Select Deploy OVF template…3. Click Browse…4. Navigate to the OVF file, and click Open.5. Click Next.6. Enter a name for the OVF, and click Next.7. Select a resource for the OVF, and click Next.

Get the advantages of an on-premises cloud and use familiar tools February 2018 | 12
8. Review the template details, and click Next.9. Accept the license agreement, and click Next.10. Select the virtual disk format and datastore, and click Next.11. Select the destination network, and click Next.12. Check the box to enable SSH.13. Enter a hostname and a password, and click to expand the Networking Properties.14. Enter the IP address of the default gateway and DNS, and enter the IP address of the VM.15. Enter the netmask, and click Next.16. Click Finish.17. Power on the VM.18. In the web browser, navigate to the IP address of vRA.19. Log in using root and the password entered in the setup phase.20. In the Installation Wizard, click Next.21. Accept the End User License Agreement, and click Next.22. Select the deployment size (we chose Minimal deployment), keep the default installation of IaaS, and click Next.23. Select Use Time Server.24. Click the green plus sign to add an NTP server.25. Open a remote console session to the IaaS Windows Server.
Installing the Management Agent on the IaaS Windows Server1. From the IaaS Windows server, open a web browser, and navigate to the vRA IP address.2. Log in using root and the password entered in the setup phase.3. In the Installation Wizard, click Next.4. Click to download the IaaS Management Agent.5. Click Save.6. Click Open.7. In the vRealize Automation Management Agent Setup window, click Next.8. Accept the EULA, and click Next.9. Accept the default destination folder, and click Next.10. Enter the IP information for the vRA appliance, the root username, and the password.11. To load the management site service certificate, click Load.12. Check the box to confirm the fingerprint matches.13. Click Next.14. Enter the password for the IaaS Windows VM Administrator account, and click Next.15. Click Install.16. Click Finish.17. Return to the web browser to complete vRA configuration.
Finishing vRA configuration1. From the vRA Installation wizard, ensure the IaaS Host appears in the list, and click Next.2. Click Run to execute the prerequisite checker.3. Click Fix if there are any failed prerequisites.4. After the prerequisite check completes with the status OK, click Next.5. Enter the DNS alias or FQDN for the vRA appliance, and click Next.6. Enter and confirm a password for the administrator account, and click Next.7. Enter the DNS alias or FQDN for the IaaS Web server.8. Enter the username and password for the IaaS Web server.9. Enter a database security passphrase, confirm the passphrase, and click Validate.10. After successful validation, click Next.11. Enter the server name of an existing SQL instance, and select Use existing empty database.12. Click Next.13. Review the DEM information, and click Next.14. Review the agents information, and click Next.15. Select Generate Certificate, and enter an Organization, Organizational Unit, and Country Code.16. Click Save Generated Certificate.17. Click Next.

Get the advantages of an on-premises cloud and use familiar tools February 2018 | 13
18. Select Generate Certificate, and enter an Organization, Organizational Unit, and Country Code.19. Click Save Generated Certificate.20. Click Next.21. Click Validate.22. After the validation completes, click Next.23. Create any desired snapshots of the VMs or appliances, and click Next.24. Click Install.25. After installation completes, click Next.26. Enter the license key, and click Next.27. Uncheck the box to opt out of joining the Customer Experience Improvement Program, and click Next.28. Select Configure Initial Content, and click Next.29. Enter and confirm a password for the configurationadmin account, and click Create Initial Content.30. After the initial content configuration is complete, click Next.31. Click Finish.
Deploying and configuring vRealize Business for Cloud (vRBC)1. From the vSphere web client, right-click the cluster.2. Select Deploy OVF template…3. Click Browse…4. Navigate to the OVF file, and click Open.5. Click Next.6. Enter a name for the OVF, and click Next.7. Select a resource for the OVF, and click Next.8. Review the template details, and click Next.9. Accept the license agreement, and click Next.10. Select the virtual disk format and datastore, and click Next.11. Select the destination network, and click Next.12. Leave the default currency at USD, and check the box to enable SSH.13. Enter and confirm a root user password.14. Click to expand the Networking Properties.15. Enter a default gateway, domain, and DNS.16. Enter the IP address for the VM, the netmask, and click Next.17. Review the configuration data, and click Finish.18. Power on the VM.19. Open a web browser, and navigate to https://vRBC-IP:548020. Enter root and the password created during deployment, and click Log in.21. Enter the hostname of vRA, the default tenant, the admin user, and the password.22. Check the box to accept the certificate, and click Register.
Beginning configuration of the default tenant with the initial setup catalog entry1. Open a web browser, and navigate to https://vra-ip/vcac/2. Log in as configurationadmin using the password previously created.3. Select Administration.4. Select Users and Groups.5. Select Directory Users and Groups.6. Search for configurationadmin.7. Select configurationadmin.8. Check all boxes to add all roles to the user.9. Click Finish.10. Click Logout.11. Click Go back to login page.12. Log into vRA as configurationadmin.13. Select Catalog.14. Click vSphere Initial Setup.15. Click Request.
Get the advantages of an on-premises cloud and use familiar tools February 2018 | 14
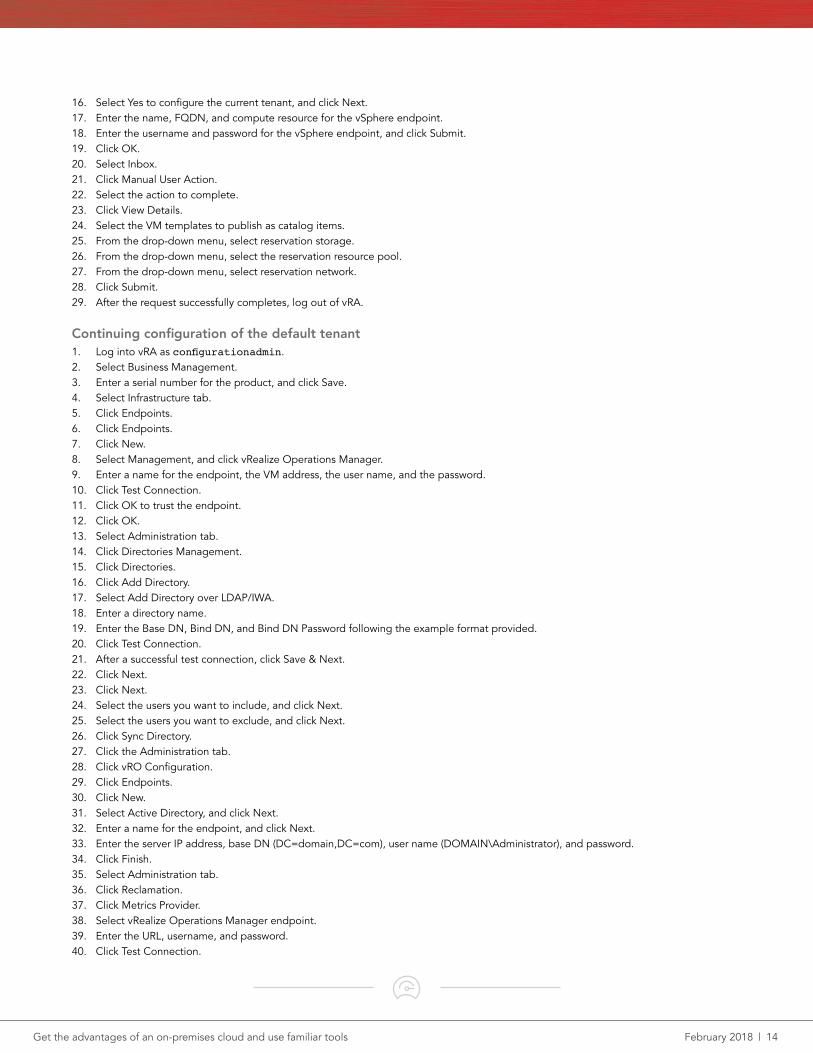
16. Select Yes to configure the current tenant, and click Next.17. Enter the name, FQDN, and compute resource for the vSphere endpoint.18. Enter the username and password for the vSphere endpoint, and click Submit.19. Click OK.20. Select Inbox.21. Click Manual User Action.22. Select the action to complete.23. Click View Details.24. Select the VM templates to publish as catalog items.25. From the drop-down menu, select reservation storage.26. From the drop-down menu, select the reservation resource pool.27. From the drop-down menu, select reservation network.28. Click Submit.29. After the request successfully completes, log out of vRA.
Continuing configuration of the default tenant1. Log into vRA as configurationadmin.2. Select Business Management.3. Enter a serial number for the product, and click Save.4. Select Infrastructure tab.5. Click Endpoints.6. Click Endpoints.7. Click New.8. Select Management, and click vRealize Operations Manager.9. Enter a name for the endpoint, the VM address, the user name, and the password.10. Click Test Connection.11. Click OK to trust the endpoint.12. Click OK.13. Select Administration tab.14. Click Directories Management.15. Click Directories.16. Click Add Directory.17. Select Add Directory over LDAP/IWA.18. Enter a directory name.19. Enter the Base DN, Bind DN, and Bind DN Password following the example format provided.20. Click Test Connection.21. After a successful test connection, click Save & Next.22. Click Next.23. Click Next.24. Select the users you want to include, and click Next.25. Select the users you want to exclude, and click Next.26. Click Sync Directory.27. Click the Administration tab.28. Click vRO Configuration.29. Click Endpoints.30. Click New.31. Select Active Directory, and click Next.32. Enter a name for the endpoint, and click Next.33. Enter the server IP address, base DN (DC=domain,DC=com), user name (DOMAIN\Administrator), and password.34. Click Finish.35. Select Administration tab.36. Click Reclamation.37. Click Metrics Provider.38. Select vRealize Operations Manager endpoint.39. Enter the URL, username, and password.40. Click Test Connection.
Get the advantages of an on-premises cloud and use familiar tools February 2018 | 15
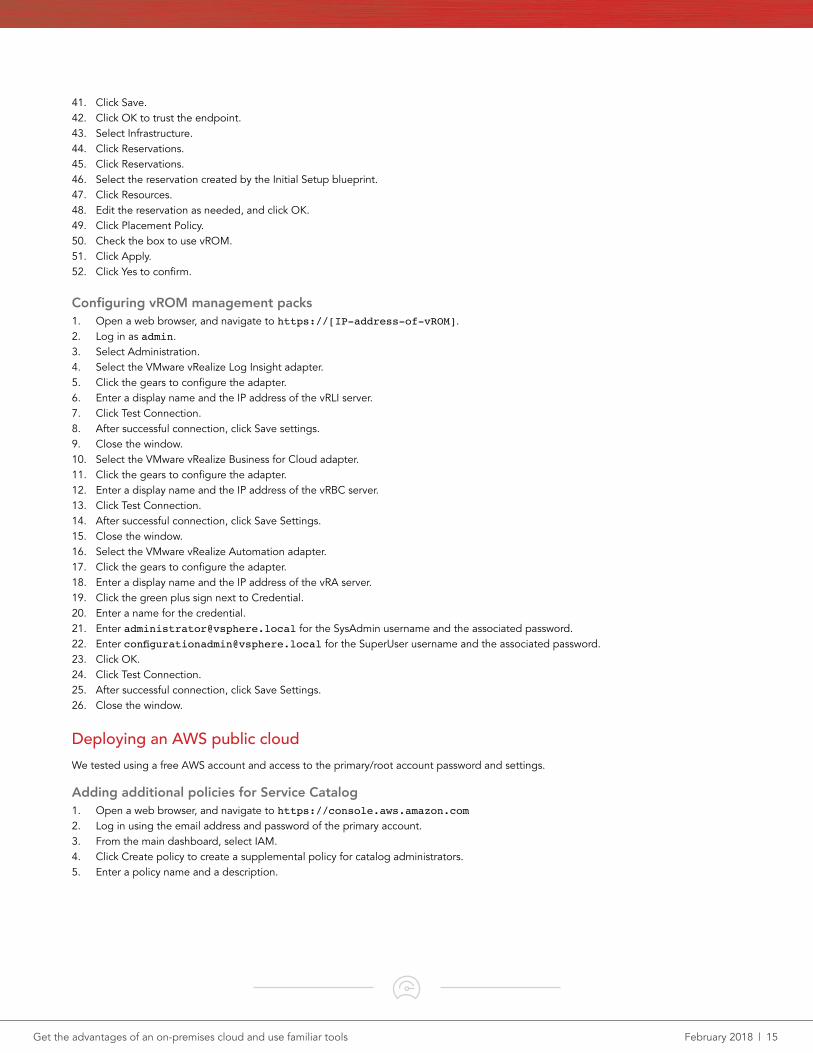
41. Click Save.42. Click OK to trust the endpoint.43. Select Infrastructure.44. Click Reservations.45. Click Reservations.46. Select the reservation created by the Initial Setup blueprint.47. Click Resources.48. Edit the reservation as needed, and click OK.49. Click Placement Policy.50. Check the box to use vROM.51. Click Apply.52. Click Yes to confirm.
Configuring vROM management packs1. Open a web browser, and navigate to https://[IP-address-of-vROM].2. Log in as admin.3. Select Administration.4. Select the VMware vRealize Log Insight adapter.5. Click the gears to configure the adapter.6. Enter a display name and the IP address of the vRLI server.7. Click Test Connection.8. After successful connection, click Save settings.9. Close the window.10. Select the VMware vRealize Business for Cloud adapter.11. Click the gears to configure the adapter.12. Enter a display name and the IP address of the vRBC server.13. Click Test Connection.14. After successful connection, click Save Settings.15. Close the window.16. Select the VMware vRealize Automation adapter.17. Click the gears to configure the adapter.18. Enter a display name and the IP address of the vRA server.19. Click the green plus sign next to Credential.20. Enter a name for the credential.21. Enter [email protected] for the SysAdmin username and the associated password.22. Enter [email protected] for the SuperUser username and the associated password.23. Click OK.24. Click Test Connection.25. After successful connection, click Save Settings.26. Close the window.
Deploying an AWS public cloud We tested using a free AWS account and access to the primary/root account password and settings.
Adding additional policies for Service Catalog1. Open a web browser, and navigate to https://console.aws.amazon.com2. Log in using the email address and password of the primary account.3. From the main dashboard, select IAM.4. Click Create policy to create a supplemental policy for catalog administrators.5. Enter a policy name and a description.
Get the advantages of an on-premises cloud and use familiar tools February 2018 | 16
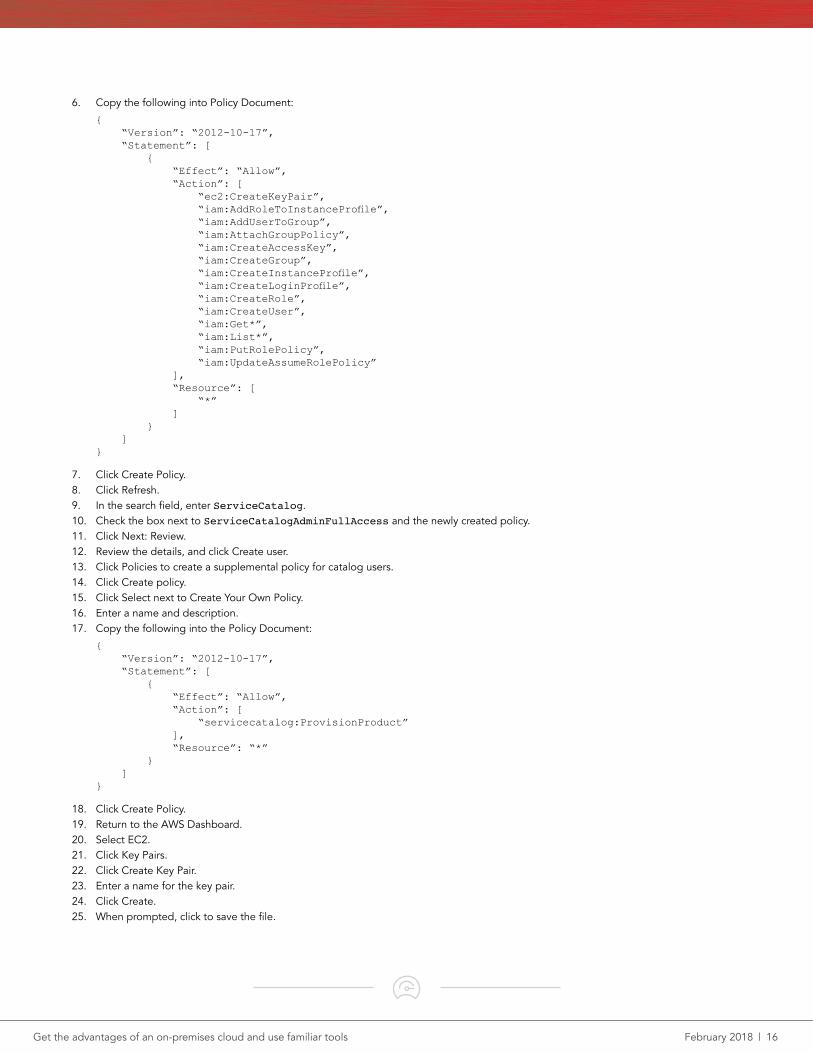
6. Copy the following into Policy Document:
{ “Version”: “2012-10-17”, “Statement”: [ { “Effect”: “Allow”, “Action”: [ “ec2:CreateKeyPair”, “iam:AddRoleToInstanceProfile”, “iam:AddUserToGroup”, “iam:AttachGroupPolicy”, “iam:CreateAccessKey”, “iam:CreateGroup”, “iam:CreateInstanceProfile”, “iam:CreateLoginProfile”, “iam:CreateRole”, “iam:CreateUser”, “iam:Get*”, “iam:List*”, “iam:PutRolePolicy”, “iam:UpdateAssumeRolePolicy” ], “Resource”: [ “*” ] } ]}
7. Click Create Policy.8. Click Refresh.9. In the search field, enter ServiceCatalog.10. Check the box next to ServiceCatalogAdminFullAccess and the newly created policy.11. Click Next: Review.12. Review the details, and click Create user.13. Click Policies to create a supplemental policy for catalog users.14. Click Create policy.15. Click Select next to Create Your Own Policy.16. Enter a name and description.17. Copy the following into the Policy Document:
{ “Version”: “2012-10-17”, “Statement”: [ { “Effect”: “Allow”, “Action”: [ “servicecatalog:ProvisionProduct” ], “Resource”: “*” } ]}
18. Click Create Policy.19. Return to the AWS Dashboard.20. Select EC2.21. Click Key Pairs.22. Click Create Key Pair.23. Enter a name for the key pair.24. Click Create.25. When prompted, click to save the file.
Get the advantages of an on-premises cloud and use familiar tools February 2018 | 17
26. Return to the AWS Dashboard.27. Select Service Catalog.28. Click Create portfolio.29. Enter a name, description, and owner.30. Click Create.31. Click Upload new product.32. Enter a product name, description, and a name for Provided by.33. Click Next.34. Enter desired support details, and click Next.35. Browse for the desired template, or enter an S3 URL for the template.36. Enter a version title and description.37. Click Next.38. Review the details, and click Create.
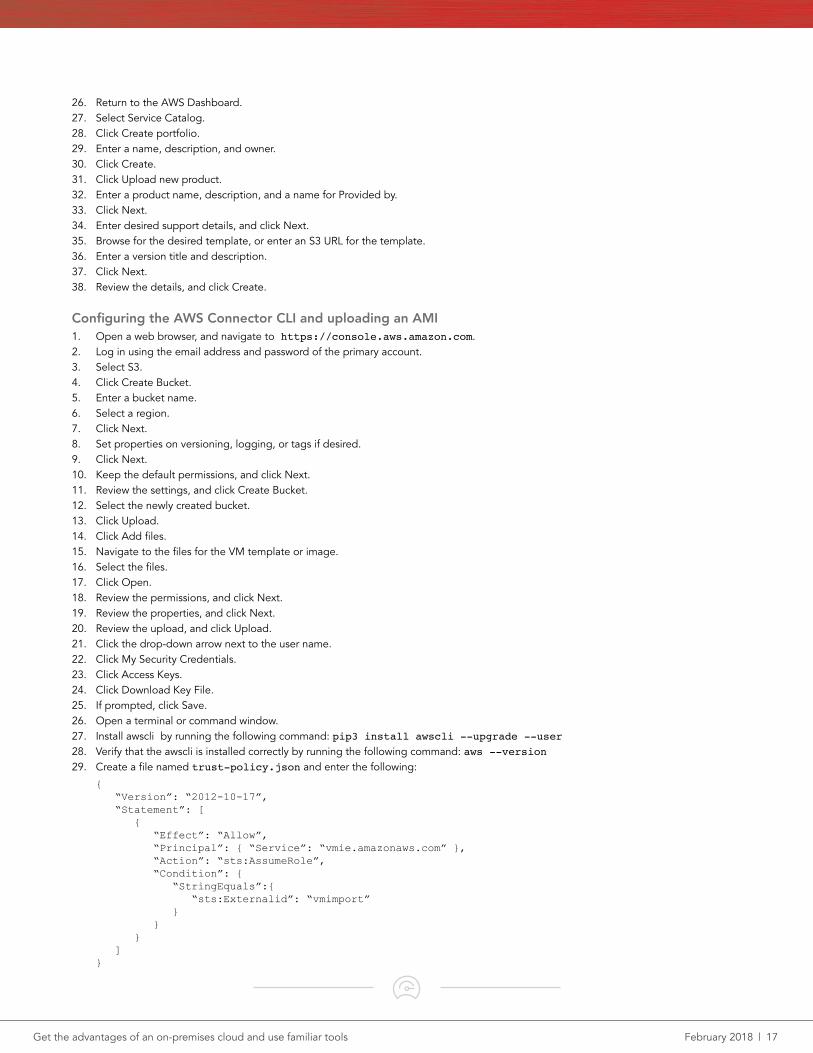
Configuring the AWS Connector CLI and uploading an AMI1. Open a web browser, and navigate to https://console.aws.amazon.com.2. Log in using the email address and password of the primary account.3. Select S3.4. Click Create Bucket.5. Enter a bucket name.6. Select a region.7. Click Next.8. Set properties on versioning, logging, or tags if desired.9. Click Next.10. Keep the default permissions, and click Next.11. Review the settings, and click Create Bucket.12. Select the newly created bucket.13. Click Upload.14. Click Add files.15. Navigate to the files for the VM template or image.16. Select the files.17. Click Open.18. Review the permissions, and click Next.19. Review the properties, and click Next.20. Review the upload, and click Upload.21. Click the drop-down arrow next to the user name.22. Click My Security Credentials.23. Click Access Keys.24. Click Download Key File.25. If prompted, click Save.26. Open a terminal or command window.27. Install awscli by running the following command: pip3 install awscli --upgrade --user 28. Verify that the awscli is installed correctly by running the following command: aws --version 29. Create a file named trust-policy.json and enter the following:
{ “Version”: “2012-10-17”, “Statement”: [ { “Effect”: “Allow”, “Principal”: { “Service”: “vmie.amazonaws.com” }, “Action”: “sts:AssumeRole”, “Condition”: { “StringEquals”:{ “sts:Externalid”: “vmimport” } } } ] }
Get the advantages of an on-premises cloud and use familiar tools February 2018 | 18
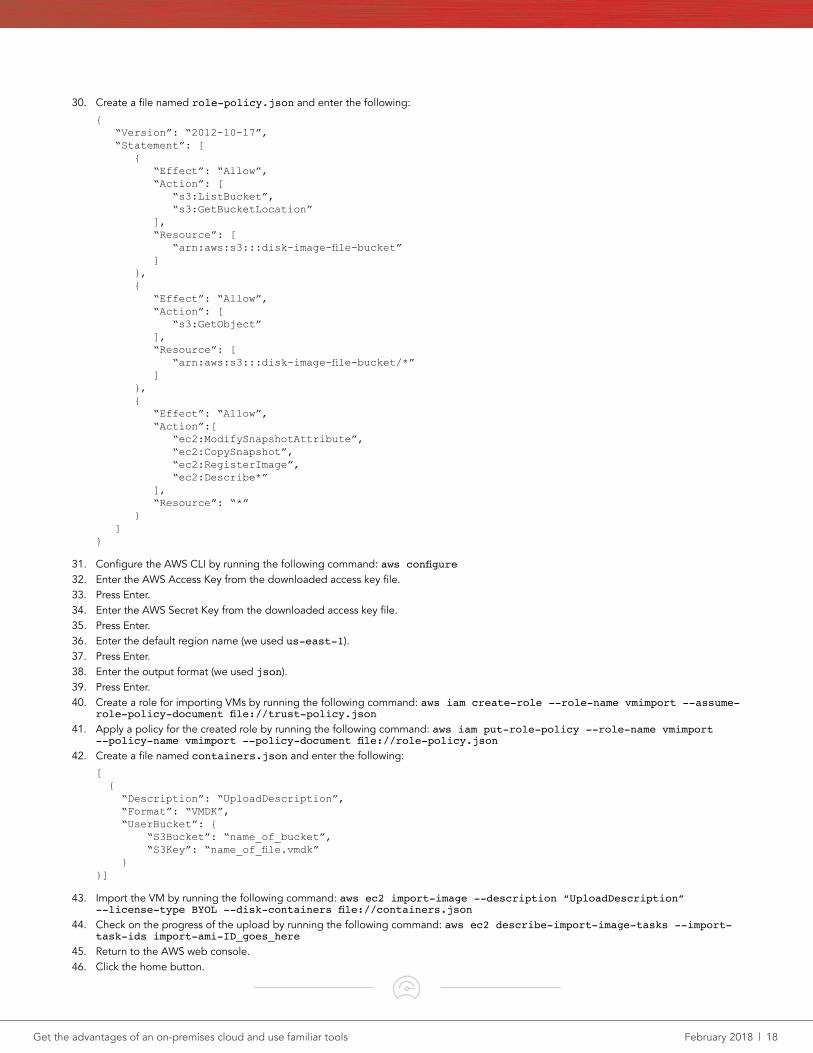
30. Create a file named role-policy.json and enter the following:
{ “Version”: “2012-10-17”, “Statement”: [ { “Effect”: “Allow”, “Action”: [ “s3:ListBucket”, “s3:GetBucketLocation” ], “Resource”: [ “arn:aws:s3:::disk-image-file-bucket” ] }, { “Effect”: “Allow”, “Action”: [ “s3:GetObject” ], “Resource”: [ “arn:aws:s3:::disk-image-file-bucket/*” ] }, { “Effect”: “Allow”, “Action”:[ “ec2:ModifySnapshotAttribute”, “ec2:CopySnapshot”, “ec2:RegisterImage”, “ec2:Describe*” ], “Resource”: “*” } ] }
31. Configure the AWS CLI by running the following command: aws configure 32. Enter the AWS Access Key from the downloaded access key file. 33. Press Enter. 34. Enter the AWS Secret Key from the downloaded access key file. 35. Press Enter. 36. Enter the default region name (we used us-east-1). 37. Press Enter. 38. Enter the output format (we used json). 39. Press Enter. 40. Create a role for importing VMs by running the following command: aws iam create-role --role-name vmimport --assume-
role-policy-document file://trust-policy.json 41. Apply a policy for the created role by running the following command: aws iam put-role-policy --role-name vmimport
--policy-name vmimport --policy-document file://role-policy.json 42. Create a file named containers.json and enter the following:
[ { “Description”: “UploadDescription”, “Format”: “VMDK”, “UserBucket”: { “S3Bucket”: “name_of_bucket”, “S3Key”: “name_of_file.vmdk” } }]
43. Import the VM by running the following command: aws ec2 import-image --description “UploadDescription” --license-type BYOL --disk-containers file://containers.json
44. Check on the progress of the upload by running the following command: aws ec2 describe-import-image-tasks --import-task-ids import-ami-ID_goes_here
45. Return to the AWS web console. 46. Click the home button.

Get the advantages of an on-premises cloud and use familiar tools February 2018 | 19
Creating a Windows 2012 R2 VM and templateCreating the Windows 2012 R2 VM1. Navigate to the vSphere web client.2. Log in as [email protected] 3. Select Create a new virtual machine. 4. Choose Custom, and click Next. 5. Name the virtual machine, and click Next. 6. Select the host, and click Next. 7. Select the appropriate storage, and click Next. 8. Choose Windows, choose Microsoft Windows Server 2012 (64-bit), and click Next. 9. For CPUs, select two virtual processor sockets and one core per virtual socket, and click Next. 10. Choose 8 GB RAM, and click Next. 11. For the number of NICs, click 1. Select VMXNET 3, connect to the VM network, and click Next. 12. Leave the default virtual storage controller, and click Next. 13. Choose to create a new virtual disk, and click Next. 14. Make the OS virtual disk size 50 GB, choose thin-provisioned, specify storage, and click Next. 15. Keep the default virtual device node (0:0), and click Next. 16. Click Finish. 17. Connect the VM virtual CD-ROM to the Microsoft Windows Server 2012 R2 installation disk. 18. Start the VM. 19. Right-click the VM, and select Open Console. 20. At the Windows Language Selection screen, click Next. 21. Click Install Now. 22. Enter the product key, then click Next. 23. Select Windows Server 2012 R2 Datacenter (Server with a GUI), and click Next. 24. Click the I accept the license terms check box, and click Next. 25. Click Custom. 26. Click Next. 27. Enter the desired password for the administrator in both fields, and click Finish. 28. Log into the VM, and install VMware tools. 29. Set a static IP address for the VM. 30. Connect to the internet, and install all available Windows updates. Restart as necessary. 31. Enable remote desktop access, disable firewalls, and disable IE security as necessary. 32. Change the hostname, join the appropriate domain, and reboot when prompted. 33. In the new VM, navigate to https://IP-of-vra/software/index.html, and click to download the appropriate Windows guest
agent version.34. Click Save, and save the guest agent to the C: drive.35. Navigate to the guest agent file, right-click the file, and select Properties.36. Click Unblock.37. Click Apply, and click OK.38. To extract the file, double-click it.39. Click the Start menu, and enter RUN.40. Type sysprep, and press Enter.41. Right-click sysprep, and select Run as Administrator.42. Check the Generalize box. In Shutdown Options, select Reboot.43. After the VM shuts down, return to the vCenter web console, and select the VM.44. Right-click the VM, select Clone, and click Clone to Template.45. In the vSphere client, navigate to Home, and click Customization Specifications Manager.46. Click New to create a new customization template.47. Choose Windows, name the guest customization, and click Next.48. Enter an owner name and organization, and click Next.49. Select Use the virtual machine name, and click Next.50. Enter a product key if necessary, or leave blank. Click Next.51. Enter and confirm a password for the Administrator account, and click Next.52. Choose the correct time zone, and click Next.
Get the advantages of an on-premises cloud and use familiar tools February 2018 | 20
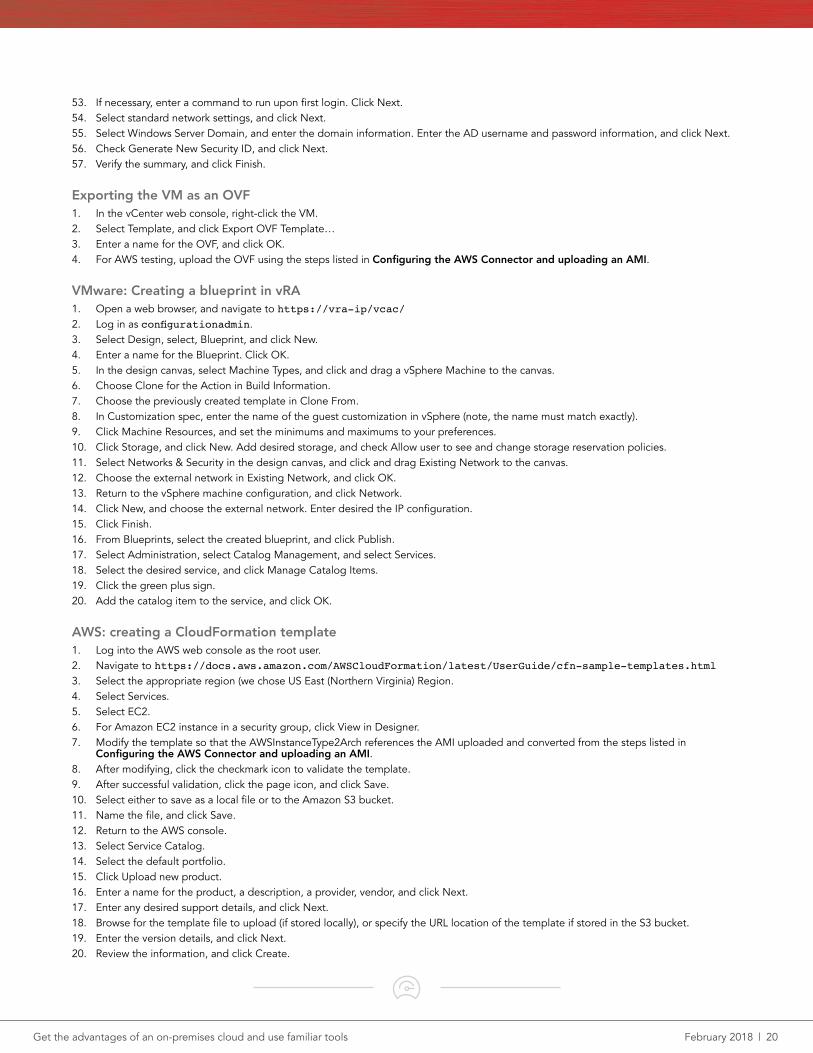
53. If necessary, enter a command to run upon first login. Click Next.54. Select standard network settings, and click Next.55. Select Windows Server Domain, and enter the domain information. Enter the AD username and password information, and click Next.56. Check Generate New Security ID, and click Next.57. Verify the summary, and click Finish.
Exporting the VM as an OVF1. In the vCenter web console, right-click the VM.2. Select Template, and click Export OVF Template…3. Enter a name for the OVF, and click OK.4. For AWS testing, upload the OVF using the steps listed in Configuring the AWS Connector and uploading an AMI.
VMware: Creating a blueprint in vRA1. Open a web browser, and navigate to https://vra-ip/vcac/2. Log in as configurationadmin.3. Select Design, select, Blueprint, and click New.4. Enter a name for the Blueprint. Click OK.5. In the design canvas, select Machine Types, and click and drag a vSphere Machine to the canvas.6. Choose Clone for the Action in Build Information.7. Choose the previously created template in Clone From.8. In Customization spec, enter the name of the guest customization in vSphere (note, the name must match exactly).9. Click Machine Resources, and set the minimums and maximums to your preferences.10. Click Storage, and click New. Add desired storage, and check Allow user to see and change storage reservation policies.11. Select Networks & Security in the design canvas, and click and drag Existing Network to the canvas.12. Choose the external network in Existing Network, and click OK.13. Return to the vSphere machine configuration, and click Network.14. Click New, and choose the external network. Enter desired the IP configuration.15. Click Finish.16. From Blueprints, select the created blueprint, and click Publish.17. Select Administration, select Catalog Management, and select Services.18. Select the desired service, and click Manage Catalog Items.19. Click the green plus sign.20. Add the catalog item to the service, and click OK.
AWS: creating a CloudFormation template1. Log into the AWS web console as the root user.2. Navigate to https://docs.aws.amazon.com/AWSCloudFormation/latest/UserGuide/cfn-sample-templates.html 3. Select the appropriate region (we chose US East (Northern Virginia) Region.4. Select Services.5. Select EC2.6. For Amazon EC2 instance in a security group, click View in Designer.7. Modify the template so that the AWSInstanceType2Arch references the AMI uploaded and converted from the steps listed in
Configuring the AWS Connector and uploading an AMI.8. After modifying, click the checkmark icon to validate the template.9. After successful validation, click the page icon, and click Save.10. Select either to save as a local file or to the Amazon S3 bucket.11. Name the file, and click Save.12. Return to the AWS console.13. Select Service Catalog.14. Select the default portfolio.15. Click Upload new product.16. Enter a name for the product, a description, a provider, vendor, and click Next.17. Enter any desired support details, and click Next.18. Browse for the template file to upload (if stored locally), or specify the URL location of the template if stored in the S3 bucket. 19. Enter the version details, and click Next.20. Review the information, and click Create.
Get the advantages of an on-premises cloud and use familiar tools February 2018 | 21
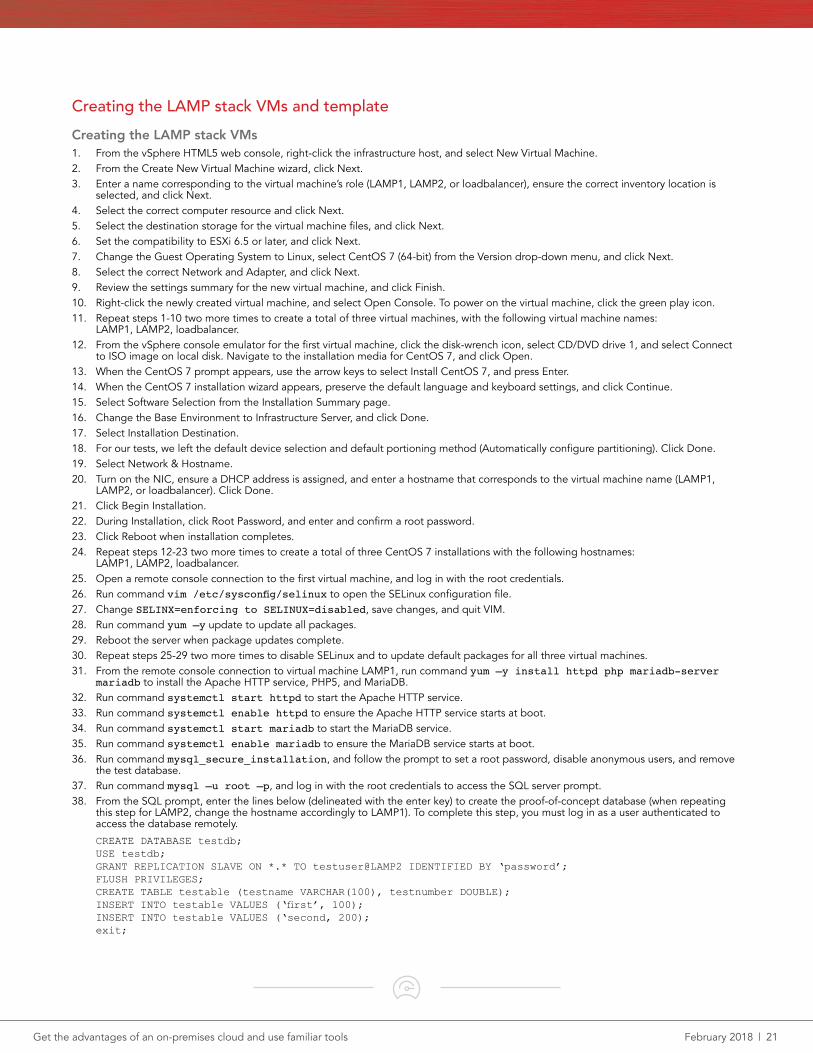
Creating the LAMP stack VMs and templateCreating the LAMP stack VMs1. From the vSphere HTML5 web console, right-click the infrastructure host, and select New Virtual Machine.2. From the Create New Virtual Machine wizard, click Next.3. Enter a name corresponding to the virtual machine’s role (LAMP1, LAMP2, or loadbalancer), ensure the correct inventory location is
selected, and click Next.4. Select the correct computer resource and click Next.5. Select the destination storage for the virtual machine files, and click Next.6. Set the compatibility to ESXi 6.5 or later, and click Next. 7. Change the Guest Operating System to Linux, select CentOS 7 (64-bit) from the Version drop-down menu, and click Next.8. Select the correct Network and Adapter, and click Next.9. Review the settings summary for the new virtual machine, and click Finish.10. Right-click the newly created virtual machine, and select Open Console. To power on the virtual machine, click the green play icon. 11. Repeat steps 1-10 two more times to create a total of three virtual machines, with the following virtual machine names:
LAMP1, LAMP2, loadbalancer. 12. From the vSphere console emulator for the first virtual machine, click the disk-wrench icon, select CD/DVD drive 1, and select Connect
to ISO image on local disk. Navigate to the installation media for CentOS 7, and click Open. 13. When the CentOS 7 prompt appears, use the arrow keys to select Install CentOS 7, and press Enter.14. When the CentOS 7 installation wizard appears, preserve the default language and keyboard settings, and click Continue. 15. Select Software Selection from the Installation Summary page.16. Change the Base Environment to Infrastructure Server, and click Done.17. Select Installation Destination. 18. For our tests, we left the default device selection and default portioning method (Automatically configure partitioning). Click Done.19. Select Network & Hostname.20. Turn on the NIC, ensure a DHCP address is assigned, and enter a hostname that corresponds to the virtual machine name (LAMP1,
LAMP2, or loadbalancer). Click Done.21. Click Begin Installation. 22. During Installation, click Root Password, and enter and confirm a root password.23. Click Reboot when installation completes. 24. Repeat steps 12-23 two more times to create a total of three CentOS 7 installations with the following hostnames:
LAMP1, LAMP2, loadbalancer. 25. Open a remote console connection to the first virtual machine, and log in with the root credentials.26. Run command vim /etc/sysconfig/selinux to open the SELinux configuration file.27. Change SELINX=enforcing to SELINUX=disabled, save changes, and quit VIM. 28. Run command yum –y update to update all packages. 29. Reboot the server when package updates complete.30. Repeat steps 25-29 two more times to disable SELinux and to update default packages for all three virtual machines. 31. From the remote console connection to virtual machine LAMP1, run command yum –y install httpd php mariadb-server
mariadb to install the Apache HTTP service, PHP5, and MariaDB. 32. Run command systemctl start httpd to start the Apache HTTP service. 33. Run command systemctl enable httpd to ensure the Apache HTTP service starts at boot. 34. Run command systemctl start mariadb to start the MariaDB service. 35. Run command systemctl enable mariadb to ensure the MariaDB service starts at boot. 36. Run command mysql_secure_installation, and follow the prompt to set a root password, disable anonymous users, and remove
the test database. 37. Run command mysql –u root –p, and log in with the root credentials to access the SQL server prompt. 38. From the SQL prompt, enter the lines below (delineated with the enter key) to create the proof-of-concept database (when repeating
this step for LAMP2, change the hostname accordingly to LAMP1). To complete this step, you must log in as a user authenticated to access the database remotely.
CREATE DATABASE testdb;USE testdb;GRANT REPLICATION SLAVE ON *.* TO testuser@LAMP2 IDENTIFIED BY ‘password’;FLUSH PRIVILEGES;CREATE TABLE testable (testname VARCHAR(100), testnumber DOUBLE);INSERT INTO testable VALUES (‘first’, 100);INSERT INTO testable VALUES (‘second, 200);exit;

Get the advantages of an on-premises cloud and use familiar tools February 2018 | 22
39. Run command vim /etc/my.cnf to open the MariaDB configuration file.40. Append the following lines to the beginning of the file (when repeating this step for LAMP2, change server-id to ‘2’):
server-id = 1 log_bin = /var/log/mariadb/mariad.log binlog_do_db = testdb
41. Append the following lines to the end of the file (when repeating this step for LAMP2, change auto-increment-offset to ‘2’ and master-host to ‘LAMP2’):
replicate-same-server-id = 0 auto-increment-increment = 2 auto-increment-offset = 1 master-host = LAMP1 master-user = testuser master-password = password master-connect-retry = 60 replicate-do-db = testdb
42. Save changes, and quit VIM.43. Run command systemctl restart mariadb to restart MariaDB.44. Run command mysql –u root –p, and log in with the root credentials to access the SQL server prompt. 45. From the SQL prompt, enter the following lines (delineated with the enter key) to enable master-master replication (when repeating this
step for LAMP2, change MASTER_HOST to ‘LAMP1’):
CHANGE MASTER TO MASTER_HOST=’LAMP2’, MASTER_USER=’testuser’, MASTER_PASSWORD=’password’, MASTER_LOG_FILE=’mariadb.log’;START SLAVE;exit;
46. Repeat steps 31-45 one more time to configure the LAMP stack for virtual machines LAMP1 and LAMP2. 47. From the remote console connection to the loadbalancer virtual machine, run command yum –y install httpd php to install the
Apache HTTP service and PHP. 48. By default, the mod_proxy_balancer module should be installed and enabled. Run command vim /etc/httpd/conf/httpd.conf
to add configuration settings for this module.49. Add the following information to the file:
Allow from all
BalancerMember LAMP1 BalancerMember LAMP2
ProxyPass / balancer://mycluster
50. Run command systemctl restart httpd to restart the Apache HTTP service.51. Shut down all VMs. 52. Right-click the VM, select Template, and click Convert to Template.53. Repeat step 52 for each of the LAMP stack VMs.
Creating the blueprint in vRealize Automation1. Log into vRealize Automation as the infrastructure administrator, and select the Design tab.2. Under Blueprints, cick New.3. Under the General tab, enter the Name, ID, Description, Archive days, Lease days, and click OK. 4. Under catagories, select Network and Security.5. Drag and drop the Existing Network icon onto the canvas.6. Under the General tab, select External Network as the Existing Network, and click OK.7. Under Catagories, select Machine Types.8. Drag and drop a vSphere Machine onto the canvas.9. Under the General tab, enter the ID, Machine prefix, and number of instances.10. Click the Build Information tab, and choose Server as the Blueprint type, Clone as the Action, CloneWorkflow as the provisioning
workflow, and the appropriate template for Clone from.

Get the advantages of an on-premises cloud and use familiar tools February 2018 | 23
11. Select the Network Tab, and click New. 12. From the drop-down menu, select the External Network.13. Select the appropriate Assignment Type, and click OK.14. Repeat steps 8 through 13 two more times to create two more vSphere Machines on the canvas.15. Click Finish.16. Highlight the blueprint, and Click Publish.17. Add the blueprint to an Entitlement and to a service to add it to the catalog.

Get the advantages of an on-premises cloud and use familiar tools February 2018 | 24
Appendix C: How we testedWe began comparison at this stage with all other components configured, as they would be one-time non-repeatable actions. We deployed paid, subscription-based services as needed for the AWS public cloud to achieve as-equivalent-as-possible configurations.
Creating a new user in an existing tenantVMware1. Open a web browser, and navigate to https://vra-ip/vcac/2. Log in as administrator.3. Select the tenant in which the new user will be added.4. Click Local users.5. Click New.6. Enter a first name and last name for the new user.7. Enter an email address and user name for the new user.8. Enter and confirm a password for the new user.9. Click OK.10. Click Finish.11. Click Logout.12. Click Go back to login page.13. Log in as configurationadmin.14. Select Administration.15. Click Users & Groups.16. Click Business Groups.17. Select the business group to edit.18. Click Members.19. Add the new member to the appropriate role or roles.20. Click Finish.
AWS1. Open a web browser, and navigate to https://console.aws.amazon.com.2. Log in using the email address and password of the primary account.3. Select IAM.4. Click Users.5. Click Add user.6. Enter a user name.7. Select AWS Management Console access.8. Select Custom password.9. Enter a password.10. Select whether or not the user must create a new password at next sign-in, and click Next: Permissions.11. Click Copy permissions from existing user.12. Select the user from which to copy permissions.13. Click Next: Review.14. Click Create User.15. Return to the main console.16. Select Service Catalog.17. Select the portfolio to which the new user will be added.18. Click Users, groups and roles.19. Click Add user, group or role.20. Click Users.21. Select the newly created user.22. Click Add Access.
Get the advantages of an on-premises cloud and use familiar tools February 2018 | 25
Deploying a custom VM from a catalogVMware1. Open a web browser, and navigate to https://vra-ip/vcac/org/[tenant]2. Log in as a catalog user.3. Select Catalog.4. Click the desired catalog entry.5. Click Request.6. Click Submit.7. Click OK.
AWS Option 1: Using Service Catalog1. Open a web browser, and navigate to https://[service-catalog-user-IP].2. Log in as a catalog user.3. Select Service Catalog.4. Click the Service Catalog drop-down menu, and click Dashboard.5. Select the product to launch.6. Click Launch product.7. Enter a name for the provisioned product, and select a version.8. Click Next.9. Select the name of an existing EC2 KeyPair, and modify the SSHLocation or InstanceType if needed.10. Click Next.11. Enter the key and value for an existing tag.12. Click Next.13. Do not enable SNS topic streaming, and click Next.14. Review the configuration, and click Launch.
AWS Option 2: Using EC2 Directly1. Open a web browser, and navigate to https://[service-catalog-user-IP].2. Log in as an EC2 user.3. Select EC2.4. Click Launch Instance.5. Click My AMIs.6. Choose the AMI, and click Select.7. Select an instance type, and click Next: Configure Instance Details.8. Modify any desired parameters, or accept defaults by clicking Next: Add Storage.9. Modify the provisioned root volume, add a new volume, or accept defaults by clicking Next: Add Tags.10. Click Add Tag.11. Enter a key and a value, and click Next: Security Group.12. Modify any desired parameters, or accept defaults by clicking Review and Launch.13. Review the details, and click Launch.14. Choose an existing key pair, or create a new pair, and click Launch Instance.
Configuring and maintaining cloud operations monitoringVMware1. Open a web browser, and navigate to https://[IP-address-of-vROM].2. Log in as admin.3. Review the health status, worst health, and suggested fixes for the systems.

Get the advantages of an on-premises cloud and use familiar tools February 2018 | 26
AWS1. Open a web browser, and navigate to https://console.aws.amazon.com.2. Log in using the email address and password of the primary account.3. Select CloudWatch.4. Click Dashboards.5. Select the desired dashboard.6. Review the dashboard information.
Configuring and maintaining log file monitoringVMware1. Open a web browser, and navigate to https://[IP-address-of-vRLI].2. Log in as admin.3. Review the events, errors, and notifications in the dashboard.
AWS1. Open a web browser, and navigate to https://console.aws.amazon.com.2. Log in using the email address and password of the primary account.3. Select CloudWatch.4. Click Logs.5. Select the desired Log Group.6. Select the desired Log Stream.7. Review the events found in the log stream.
Configuring custom chargeback reportsVMware1. Open a web browser, and navigate to https://vra-ip/vcac/2. Log in as configurationadmin.3. Select Business Management.4. Click Reports.5. Select the desired preconfigured or custom report.6. Click Export.
AWS1. Open a web browser, and navigate to https://console.aws.amazon.com.2. Log in using the email address and password of the primary account.3. Click the drop-down arrow next to the account name.4. Click My Billing Dashboard.5. Click Cost Explorer.6. Click Launch Cost Explorer.7. Click Reports.8. Select the desired preconfigured or custom report.9. Click Download CSV.
Configuring capacity management for detecting, predicting, and optimizing over-provisioned VMsVMware1. Open a web browser, and navigate to https://[IP-address-of-vROM].2. Log in as admin.3. Review the suggested actions in the dashboard.
Get the advantages of an on-premises cloud and use familiar tools February 2018 | 27
AWS1. Open a web browser, and navigate to https://console.aws.amazon.com.2. Log in using the email address and password of the primary account.3. Select Trusted Advisor4. Review the cost optimization, performance, security, and fault tolerance suggestions.
Deploying a multi-VM LAMP stack VMware1. Open a web browser, and navigate to https://vra-ip/vcac/org/[tenant]2. Log into vRealize Automation as a catalog user.3. Select the Catalog tab. 4. Select All Services.5. Locate the blueprint and click Request.6. Review all the blueprint components, and click Submit.
AWS Option 1: Using Service Catalog1. Open a web browser, and navigate to https://[service-catalog-user-IP].2. Log in as a catalog user.3. Select Service Catalog.4. Click the Service Catalog drop-down menu, and click Dashboard.5. Select the product to launch.6. Click Launch product.7. Enter a name for the provisioned product, and select a version.8. Click Next.9. Select the name of an existing EC2 KeyPair, select the desired subnets, and enter a database password.10. Select the VPC ID, and enter a database username. 11. Modify any desired default values, and click Next.12. Enter the key and value for an existing tag.13. Click Next.14. Do not enable SNS topic streaming, and click Next.15. Review the configuration, and click Launch.
AWS Option 2: Using EC2 directly 1. Open a web browser, and navigate to https://[service-catalog-user-IP].2. Log in as an EC2 user.3. Select EC2.4. Click Launch Instance.5. Click AWS Marketplace.6. Search for LEMP 7 Optimized in the search box.7. Choose the AMI, and click Select.8. Review the pricing details, and click Continue.9. Select an instance type, and click Next: Configure Instance Details.10. Modify any desired parameters, or accept defaults by clicking Next: Add Storage.11. Modify the provisioned root volume, add a new volume, or accept defaults by clicking Next: Add Tags.12. Click Add Tag.13. Enter a key and a value, and click Next: Security Group.14. Modify any desired parameters, or accept defaults by clicking Review and Launch.15. Review the details, and click Launch.16. Choose an existing key pair, or create a new pair, and click Launch Instance.

Get the advantages of an on-premises cloud and use familiar tools February 2018 | 28
Creating a snapshot of a managed VMVMware1. Open a web browser, and navigate to https://vra-ip/vcac/org/[tenant].2. Log in as a catalog user.3. Select Items.4. Click Machines.5. Select the desired VM.6. Click Actions.7. Click Create snapshot.8. If needed, rename the snapshot, enter a description, and choose whether to include memory. Otherwise, click Submit.9. Click OK.
AWS1. Open a web browser, and navigate to https://[service-catalog-user-IP].2. Log in as an EC2 user.3. Select EC2.4. In the side bar, select Volumes.5. Select the desired volume.6. Click Actions, and select Create Snapshot.7. Enter a name and description for the snapshot.8. Click Create.

Get the advantages of an on-premises cloud and use familiar tools February 2018 | 29
Principled Technologies is a registered trademark of Principled Technologies, Inc.All other product names are the trademarks of their respective owners.
DISCLAIMER OF WARRANTIES; LIMITATION OF LIABILITY:Principled Technologies, Inc. has made reasonable efforts to ensure the accuracy and validity of its testing, however, Principled Technologies, Inc. specifically disclaims any warranty, expressed or implied, relating to the test results and analysis, their accuracy, completeness or quality, including any implied warranty of fitness for any particular purpose. All persons or entities relying on the results of any testing do so at their own risk, and agree that Principled Technologies, Inc., its employees and its subcontractors shall have no liability whatsoever from any claim of loss or damage on account of any alleged error or defect in any testing procedure or result.
In no event shall Principled Technologies, Inc. be liable for indirect, special, incidental, or consequential damages in connection with its testing, even if advised of the possibility of such damages. In no event shall Principled Technologies, Inc.’s liability, including for direct damages, exceed the amounts paid in connection with Principled Technologies, Inc.’s testing. Customer’s sole and exclusive remedies are as set forth herein.
This project was commissioned by Dell EMC.
PrincipledTechnologies®
Facts matter.®PrincipledTechnologies®
Facts matter.®
Appendix D: ResultsWe recorded the median times of three consecutive runs and the number of steps as counted from Appendix C. As our testing with AWS utilized public networks, all times may vary slightly based on network traffic. Two of the scenarios resulted in two similar methods of performing the tasks in AWS, so we captured the time and steps for each method.
We calculated the percent difference between the number of steps each cloud solution required for each of the eight management tasks we tested. Then, we averaged those percentage differences across all eight tasks, using the lowest step count possible to perform said task. This average determined the overall percent win.
Dell EMC and VMware AWS AWS (using EC2)Percent win/lossTime
(min:sec)Steps Time
(min:sec)Steps Time
(min:sec)Steps
Creating a new user 1:01 20 0:59 22 N/A N/A 9.09%
Deploying a custom VM 0:14 7 0:34 14 0:34 14 50.00%
Configuring operations monitoring 0:10 3 0:12 6 N/A N/A 50.00%
Configuring log file monitoring 0:07 3 0:10 7 N/A N/A 57.14%
Configuring custom chargeback reports 0:23 6 0:18 9 N/A N/A 33.33%
Configuring capacity management 0:08 3 0:08 4 N/A N/A 25.00%
Deploying a LAMP stack 0:17 6 0:47 15 0:37 16 60.00%
Creating a snapshot 0:15 9 0:12 8 N/A N/A -12.50%
Average percent win
34.01%