getting around in quickbooks - qb winery solutions · lesson 1 — getting started getting around...
TRANSCRIPT

Lesson 1 — Getting Started Getting Around in QuickBooks
QuickBooks 2015 Student Guide 8
Getting Around in QuickBooks
The QuickBooks Learning Center provides access to information to help you get started.
Manage your open windows — QuickBooks displays one window at a time
Using the menu bar — You can find all commands on the menu bar
Using the icon bar — The icon bar allows you to manage your business more quickly and provides quick access
to the Centers
Using the left side navigation — The left side navigation acts like the icon bar, allowing you quick and easy
shortcuts
QuickBooks Centers — For Customers, Vendors, Employees, Reports and Bank Feeds give quick access to
common tasks
© 2015 Intuit Inc. excerpt used by QB Winery Solutions with permission. Full document available at QBWinerySolutions.com/intuit2015studentguide

Lesson 1 — Getting Started Getting Around in QuickBooks
QuickBooks 2015 Student Guide 9
Making the Home page your starting point — The Home page provides a graphical representation of the
workflow, organized into logical groups
Getting an overview of your company — The Insights tab of the home screen gives you real-time information
about how your company is doing and provides a location where you can keep track of the tasks you need to
perform. You can also get more detailed information from the Company Snapshot found in the reports dropdown
menu.
© 2015 Intuit Inc. excerpt used by QB Winery Solutions with permission. Full document available at QBWinerySolutions.com/intuit2015studentguide

Lesson 1 — Getting Started Using Forms
QuickBooks 2015 Student Guide 5
Using Forms
You record most of your daily business transactions on a QuickBooks form, which looks just like a paper form.
Here’s an example of the form you use when you want to record a bill from and one of your vendors.
NOTES
© 2015 Intuit Inc. excerpt used by QB Winery Solutions with permission. Full document available at QBWinerySolutions.com/intuit2015studentguide

Lesson 1 — Getting Started Using Lists
QuickBooks 2015 Student Guide 6
Using Lists
The list is another basic QuickBooks feature. You fill out most QuickBooks forms by selecting entries from a list.
Notice in the Enter Bills window above the information in the Vendor, Terms, Account, and Customer/Job fields is
pulled from lists.
QuickBooks has lists where you can store information about customers, vendors, employees, items or services you
sell and so on. Lists save you time and help you enter information consistently and correctly.
When you’re filling out an invoice form and you select a customer name from the Customer/Job list, QuickBooks not
only fills in the name but also fills in the address, the payment terms and the customer’s sales tax, based on the
information previously entered about that customer.
Here’s an example of the Customers & Jobs list in the Customer Center. You can customize columns in the list by
right clicking on a column header and choosing Customize Columns.
NOTES
© 2015 Intuit Inc. excerpt used by QB Winery Solutions with permission. Full document available at QBWinerySolutions.com/intuit2015studentguide

Lesson 1 — Getting Started Using Registers
QuickBooks 2015 Student Guide 7
Using Registers
In addition to forms and lists you’ll also work with registers in QuickBooks. Just as you use your paper checkbook
register to see a record of all the transactions in your checking account — checks you’ve written, other withdrawals
you’ve made from your account and deposits — a QuickBooks register contains a record of all the activity in one
account. Almost every QuickBooks account (on the balance sheet: assets, liabilities and equity. See the next section,
All the Accounting You Need to Know) has its own register.
Accounts receivable is the record of money owed to a business, that is, the outstanding invoices for which a
business has not received payment from customers.
Here’s an example of the register for an Accounts Receivable account.
NOTES
© 2015 Intuit Inc. excerpt used by QB Winery Solutions with permission. Full document available at QBWinerySolutions.com/intuit2015studentguide

Lesson 1 — Getting Started All the Accounting You Need to Know
QuickBooks 2015 Student Guide 10
All the Accounting You Need to Know
About the chart of accounts:
Chart of Accounts
The Chart of Accounts is a complete list of your business’ accounts and their balances
An account is a tracking category for your businesses assets, liabilities, income and expenses
When you keep books for a company, you want to track
Where the income comes from
Where you put it
What the expenses are for
And what you use to pay them
You track this flow of money through the Chart of Accounts
© 2015 Intuit Inc. excerpt used by QB Winery Solutions with permission. Full document available at QBWinerySolutions.com/intuit2015studentguide

Lesson 1 — Getting Started All the Accounting You Need to Know
QuickBooks 2015 Student Guide 11
About assets, liabilities and equity:
Assets
Include both what you have and what other people owe you
The money people owe you from outstanding invoices is called your Accounts Receivable or A/R for short.
QuickBooks uses an Accounts Receivable account to track the money owed you from invoices and you may
have additional Notes Receivable if the business has issued loans that are due for repayment.
The rest of your company’s assets may include checking accounts, savings accounts, petty cash, fixed
assets (such as equipment or trucks), inventory and undeposited funds (money you’ve received from
customers but haven’t yet deposited in the bank).
Liabilities
What your company owes to other people
The money you owe for unpaid bills is your Accounts Payable or A/P for short. QuickBooks uses an
Accounts Payable account to track the money you owe different people for bills.
A liability can be a formal loan, an unpaid bill, or sales and payroll taxes you owe to the government. When
setting up your company file in QuickBooks note even though unpaid bills are liabilities, they will be set up as
Accounts Payable type accounts in QuickBooks.
Equity
Equity is the difference between what you have (your assets) and what you owe (your liabilities):
Equity = Assets – Liabilities
Cash versus accrual bookkeeping:
Cash basis
Income is recorded when money (sales) is received and expenses when money (bills) is paid
Accrual basis
Income is recorded at the time of the sale and expenses when you receive the bill
NOTE: When you create reports in QuickBooks you can switch between cash and accrual reports at any time,
regardless of which bookkeeping method you have chosen for tax purposes.
© 2015 Intuit Inc. excerpt used by QB Winery Solutions with permission. Full document available at QBWinerySolutions.com/intuit2015studentguide

Lesson 1 — Getting Started All the Accounting You Need to Know
QuickBooks 2015 Student Guide 12
Measuring business profitability:
The Balance Sheet — a snapshot of your company on one date. It shows
What your business has (assets)
What people owe your business (accounts receivable)
What your business owes (liabilities and accounts payable)
The net worth of your business (equity)
The profit and loss statement
A Profit and Loss statement or Income Statement shows income, expenses and net profit or loss
Statement of cash flows
Shows receipts and payments during a specific accounting period
General Journal transactions:
Traditional accounting method
Known as double-entry accounting
Total amount in the Debit column equals the total amount in the Credit column
Each amount is assigned to an account in the Chart of Accounts
To view the journal entry for a transaction select the transaction and press Ctrl-Y or from the Reports tab in the
Transaction window click on Transaction Journal
Modify the report and choose to display the Credit and Debit columns
© 2015 Intuit Inc. excerpt used by QB Winery Solutions with permission. Full document available at QBWinerySolutions.com/intuit2015studentguide

Lesson 1 — Getting Started Exiting QuickBooks
QuickBooks 2015 Student Guide 16
Exiting QuickBooks
Unlike most other Windows programs, QuickBooks doesn’t require you to save your data before exiting. It does an
automatic save while you’re working with QuickBooks (after every transaction is created, changed or deleted) and
every time you leave the program.
To exit QuickBooks, from the File menu choose Exit
To prevent or minimize data loss, you should make regular backup copies of your QuickBooks company data. In the
event of a data loss you can restore your data from the backup copy.
To make a backup copy, from the File menu choose Back Up Company. A copy is a complete copy of your data
file that is intended to be restored in the case that you’re working file is compromised. It is best practice to store
your backups on a different drive than your working file.
NOTES
© 2015 Intuit Inc. excerpt used by QB Winery Solutions with permission. Full document available at QBWinerySolutions.com/intuit2015studentguide

Lesson 2 — Setting Up Adding Customers
QuickBooks 2015 Student Guide 24
Adding Customers
Your Customer list is the list that will display sales forms (sales orders, estimates, invoices, sales receipts) and
Accounts Receivable.
To add a customer:
There are multiple ways to do almost anything in QuickBooks. To access the Customer Center you have four 1.
options:
Click Customers from the left hand or top icon bar (depending on your view settings)
Choose Customer Center from the Customers drop-down menu
From the Home Screen click on the blue Customers tab in the customers section
Press CTRL+J
Click the New Customer & Job menu button then choose New Customer. 2.
In the Customer Name field enter the name of the customer as you'd like it to appear on your Customers & Jobs 3.
list.
Press Tab in the Opening Balance field to leave this field blank. 4.
The Opening Balance field tells you how much each customer owes you on your start date so that when you
enter the rest of your transactions from your start date to today, all balances since your start date will be
accurate.
It is generally recommend entering outstanding invoices one by one whenever possible.
Complete the customer contact information appropriately. 5.
© 2015 Intuit Inc. excerpt used by QB Winery Solutions with permission. Full document available at QBWinerySolutions.com/intuit2015studentguide

Lesson 2 — Setting Up Adding Customers
QuickBooks 2015 Student Guide 25
You can have and use more than one Ship To address per customer or job. Add them with the Ship to drop-down or
by clicking the + sign in the bottom right corner.
Click OK to add this customer. 6.
The Customer Center appears with the Customers & Jobs list along the left side.
NOTE: The Customers & Jobs list is the same list as the Customer/Job list. It is called Customers & Jobs on the
Customer Center and called Customer/Job on forms. It is sometimes also referred to as simply the Customer list.
NOTES
© 2015 Intuit Inc. excerpt used by QB Winery Solutions with permission. Full document available at QBWinerySolutions.com/intuit2015studentguide

Lesson 2 — Setting Up Adding a Job
QuickBooks 2015 Student Guide 26
Adding a Job
You do not need to add jobs to the Customers & Jobs list if your company never does more than one job or project
per customer. Jobs in QuickBooks are optional. If you often perform multiple jobs for the same customer you can use
jobs in QuickBooks to track the activity for each job separately.
The Customer:Job hierarchy can be customized to meet many different needs and is commonly used in
construction. This feature enables you to use the Customer as a parent to group multiple jobs under.
To add a job for a customer:
In the Customers & Jobs list right-click on the customer name that you would like to add a job to and choose 1.
Add Job.
Name the job in the Job Name field. 2.
For Opening Balances refer to the information in Adding a Customer in the previous chapter. 3.
Click OK. 4.
If you see a message about a past or future transaction click Yes to save the transaction. 5.
The job will now appear under the Customer (also referred to as parent) in the Customer list.
NOTE: Notice that there are more tabs with information that you can add for Customer/Job setup. These features
include payment information, sales rep and job statuses. It is important to understand your tracking and reporting
goals to ensure that these features are set up and utilized properly.
© 2015 Intuit Inc. excerpt used by QB Winery Solutions with permission. Full document available at QBWinerySolutions.com/intuit2015studentguide

Lesson 2 — Setting Up Adding Vendors
QuickBooks 2015 Student Guide 27
Adding Vendors
In order to pay your bills with QuickBooks you need to add your vendors. Nearly everyone you pay, other than
employees, is a vendor. Your vendor list supplies the names available on purchase forms like purchase orders,
vendor credits, sales tax payments, payroll tax payments and bills.
To add a vendor:
Just like the Customer Center, there are multiple ways to access the Vendor Center in QuickBooks. 1.
Click on Vendors from the left side or top icon bar (depending on your preference
From the Vendors dropdown click Vendor Center
From the home screen click on the Vendors tab in the Vendor section
Click the New Vendor button then choose New Vendor. 2.
In the Vendor Name field enter the name of the vendor as you'd like it to appear on your Vendor list. 3.
In the Opening Balance field this is treated the same as the Customer Center entries. You can enter a balance 4.
owed to the vendor as of the start date of the file, but it is best practice to enter open bills when you can.
Enter the remaining vendor information appropriately. 5.
Click OK to add this vendor. 6.
The new vendor appears on the Vendor list.
Close the Vendor Center. 7.
NOTE: Notice that there are additional tabs in the vendor setup window. Feel free to utilize these features as they
apply to your business. Pay special attention to the Tax Settings tab if you would like to run 1099 reports from
QuickBooks.
© 2015 Intuit Inc. excerpt used by QB Winery Solutions with permission. Full document available at QBWinerySolutions.com/intuit2015studentguide

Lesson 2 — Setting Up Setting Up Additional Accounts
QuickBooks 2015 Student Guide 28
Setting Up Additional Accounts
During the EasyStep Interview you added your bank accounts.
There are two basic types of accounts.
Balance sheet accounts, such as savings or checking
Accounts used to group transactions for reporting purposes, such as income and expense accounts
Income and expense accounts track the sources of your income and the purpose of each expense. When you record
transactions you usually assign the amount of the transaction to one or more income or expense accounts.
Accounts are the core of QuickBooks. Every posting transaction (which is a transaction that affects a report) is
mapped from one account to another. For example, when you purchase paper for your office printer you are taking
money from the bank account and recording it against an office supplies expense account. Your Chart of Accounts is
home to all of the accounts (also referred to as categories) that show on your financial reports.
To add an account:
From the Lists menu choose Chart of Accounts (or press CTRL+A). 1.
Click the Account menu button (at the bottom left of the window) and choose New (or press CTRL+N from the 2.
Chart Accounts window).
In the Add New Account window choose the appropriate account type then click Continue. 3.
Click in the Account Name field name the account appropriately. 4.
From the Tax Line Mapping drop-down list choose the appropriate mapping according to the business structure 5.
(or leave blank if you are unsure).
© 2015 Intuit Inc. excerpt used by QB Winery Solutions with permission. Full document available at QBWinerySolutions.com/intuit2015studentguide

Lesson 2 — Setting Up Setting Up Additional Accounts
QuickBooks 2015 Student Guide 29
Click Save & Close. 6.
NOTES
© 2015 Intuit Inc. excerpt used by QB Winery Solutions with permission. Full document available at QBWinerySolutions.com/intuit2015studentguide

Lesson 2 — Setting Up Adding Items
QuickBooks 2015 Student Guide 30
Adding Items
Items are what we use on sales forms like Estimates, Sales Orders, Invoices and Sales Receipts. Items show the
products/services that are sold and each item is mapped to one or more account in QuickBooks. Items can be
mapped to one, two or three accounts in QuickBooks.
One-Sided Items — These are items we only use on either a sale or purchase form, but not both. For example, if
you sell consulting services you may have an item named Consulting for use on your invoices. This item will be
mapped to an income account for you to view on your Profit & Loss report. If this item were used on a purchase
transaction it would post a negative transaction to your income account.
Two-Sided Items — These are items we use on both a sale and a purchase form. The setup for these items
allows you to post to an income account when used on a sales form and post to an expense account when the
item is used on a purchase form.
Three-Sided Items — Three sided items are used for inventory. The setup of these items allows you to purchase
the item and receive it into your Inventory Asset account (part 1). When you sell the inventory the item posts to
your Income account (part 2) and also makes a Cost of Goods Sold entry (part 3).
In this section we are going to look at one-sided item entry.
To add a One-Sided item:
From the Lists menu choose Item List. 1.
Click the Item menu button at the bottom left of window and choose New. 2.
© 2015 Intuit Inc. excerpt used by QB Winery Solutions with permission. Full document available at QBWinerySolutions.com/intuit2015studentguide

Lesson 2 — Setting Up Adding Items
QuickBooks 2015 Student Guide 31
In the New Item window choose an item type from the Type drop-down list. 3.
NOTE: When you select an item type a description of how that item should be used will appear to the right of the
drop-down box.
Assign an item name or number in the Item Name/Number field. 4.
In the Description field enter the information that you would like to come up by default when this item is used on 5.
a form.
You can assign a standard rate in the Rate field. 6.
In the Tax Code field assign a standard taxable or non-taxable code. 7.
NOTE: Items marked as Non-Taxable in the setup will not accrue sales tax on sales forms. See the Sales Tax training
section for additional information.
In the Account field choose the appropriate account for income to post to when this item is used on sales forms. 8.
Click OK to add the new item to the Item List. 9.
Close the Item List. 10.
NOTES
© 2015 Intuit Inc. excerpt used by QB Winery Solutions with permission. Full document available at QBWinerySolutions.com/intuit2015studentguide

Lesson 3 — Working with Lists Adding Custom Fields
QuickBooks 2015 Student Guide 19
Adding Custom Fields
QuickBooks lets you add even more custom fields to the Customers & Jobs, Vendor, Employee and Item lists.
Custom fields give you a way to track additional information specific to your business.
To add custom fields:
Click Customers in the icon bar (or navigate there with another preferred method). 1.
In the Customers & Jobs list choose any customer. 2.
Click the Edit button. 3.
Click the Additional Info tab. 4.
Click Define Fields. This opens up the Custom Fields window which corresponds to your Customer, Vendor and 5.
Employee lists.
Use the Label column to name your custom field. 6.
© 2015 Intuit Inc. excerpt used by QB Winery Solutions with permission. Full document available at QBWinerySolutions.com/intuit2015studentguide

Lesson 3 — Working with Lists Adding Custom Fields
QuickBooks 2015 Student Guide 20
Place a check mark in the column for each name list that you would like the custom field to apply to. 7.
Click OK. 8.
If you see an informational message click OK. 9.
Click OK to close the Edit Customer window. 10.
Close the Customer Center. 11.
NOTES
© 2015 Intuit Inc. excerpt used by QB Winery Solutions with permission. Full document available at QBWinerySolutions.com/intuit2015studentguide

Lesson 3 — Working with Lists Adding Custom Fields
QuickBooks 2015 Student Guide 21
To add custom fields for items:
From the Lists menu choose Item List. 1.
In the Item list select the item you wish to edit. 2.
Right-click on the item and choose Edit Item or click the Item menu button then choose Edit Item. 3.
Click Custom Fields. 4.
Click Define Fields. 5.
Enter the custom field name that you would like to use in the Label column. 6.
Place a checkmark in the Use column for the field to show in the item setup. 7.
Click OK to close the window. 8.
© 2015 Intuit Inc. excerpt used by QB Winery Solutions with permission. Full document available at QBWinerySolutions.com/intuit2015studentguide

Lesson 3 — Working with Lists Adding Custom Fields
QuickBooks 2015 Student Guide 22
In the Custom window you can now enter information in to your custom field. 9.
Click OK to close the Custom Fields window then click OK to close the Edit Item window. 10.
Close the Item list. 11.
NOTES
© 2015 Intuit Inc. excerpt used by QB Winery Solutions with permission. Full document available at QBWinerySolutions.com/intuit2015studentguide

Lesson 3 — Working with Lists Managing Lists
QuickBooks 2015 Student Guide 23
Managing Lists
Sometimes you may want to re-order the way that your accounts appear in the different sections of your financial
reports. You can re-order each section of your Chart of Accounts (within its account type) by following the
instructions below.
To sort a list manually:
From the Lists menu choose Chart of Accounts. Scroll to the account you would like to move. 1.
Click the diamond to the left of the account name. 2.
Click and hold the mouse button and drag the pointer upward until you see a dotted line directly below the 3.
account name.
© 2015 Intuit Inc. excerpt used by QB Winery Solutions with permission. Full document available at QBWinerySolutions.com/intuit2015studentguide

Lesson 3 — Working with Lists Managing Lists
QuickBooks 2015 Student Guide 24
Release the left mouse button to drop the account in the new position. 4.
To re-sort the list alphabetically click the Account menu button in the bottom left corner of the Chart of Accounts 5.
screen and select Re-sort List.
Click OK. 6.
Close the Chart of Accounts. 7.
You can sort lists in QuickBooks by clicking on column headers like the Name and Balance Total. The example below
uses the Customer Center, but this also applies in the Vendor Center, Item list and Chart of Accounts.
To sort a list in descending order:
Click Customers on the icon bar to display the Customer Center and Customers & Jobs list. 1.
Click the arrow to the right of the View drop-down list to expand the Customers & Jobs list. 2.
© 2015 Intuit Inc. excerpt used by QB Winery Solutions with permission. Full document available at QBWinerySolutions.com/intuit2015studentguide

Lesson 3 — Working with Lists Managing Lists
QuickBooks 2015 Student Guide 25
Click the Balance Total column heading. 3.
Click the column heading again. 4.
To return to the order you started with, click the large diamond to the left of the Name column heading. 5.
Click the collapse arrow to the right of the window to collapse the Customers & Jobs list. 6.
Close the Customer Center. 7.
NOTES
© 2015 Intuit Inc. excerpt used by QB Winery Solutions with permission. Full document available at QBWinerySolutions.com/intuit2015studentguide

Lesson 3 — Working with Lists Managing Lists
QuickBooks 2015 Student Guide 26
In most lists you can combine two list names into one. For example, you may find that you’ve been using two
customers (because of different spellings) when you really need only one on your Customers & Jobs list. You can
merge list items in the Chart of Accounts, Item, Customers & Jobs, Vendor, Employee and Other Names lists. This
example uses the Vendor list, but the concept is the same regardless of list type.
To merge items on a list:
From the Vendors menu choose Vendor Center. 1.
Double-click the entry you wish to merge (this entry will be merged into the other entry). 2.
In the Vendor Name field change the name to exactly match the name of the record you wish to merge with. 3.
Click OK. 4.
You will get a warning dialogue telling you there is another record with this name and asking if you would like to 5.
merge. Click Yes.
Close the Vendor Center. 6.
NOTE: You cannot merge two names from different lists such as a Vendor and Customer record or Other Names list
record.
© 2015 Intuit Inc. excerpt used by QB Winery Solutions with permission. Full document available at QBWinerySolutions.com/intuit2015studentguide

Lesson 3 — Working with Lists Managing Lists
QuickBooks 2015 Student Guide 27
To rename a list item:
You can rename any list item. When you make the change QuickBooks automatically modifies all existing
transactions containing the item. This example demonstrates renaming in the Chart of Accounts.
To rename a list item in the Chart of Accounts:
From the Lists menu choose Chart of Accounts to display the Chart of Accounts for Rock Castle Construction. 1.
In the Chart of Accounts select the account you would like to rename. 2.
Right-click on the account and click Edit Account or click the Account menu button and choose Edit Account. 3.
Make your changes in the Account Name field. 4.
Click Save & Close. 5.
Close the Chart of Accounts. 6.
NOTES
© 2015 Intuit Inc. excerpt used by QB Winery Solutions with permission. Full document available at QBWinerySolutions.com/intuit2015studentguide

Lesson 3 — Working with Lists Managing Lists
QuickBooks 2015 Student Guide 28
You can delete list items if you have not used them in any transactions. If you try to delete a list item that is used in a
transaction QuickBooks displays a warning that the item can’t be deleted. If you don’t want to use a list item but you
can’t delete it, you can make it inactive. Here is an example from the customer center.
To make a list item inactive:
Navigate to the Customer Center (from icon bar, drop-down or home screen). 1.
Select the Customer/Job from the list that you wish to make inactive. 2.
Right-click the name and choose Make Customer/Job Inactive. 3.
To see inactive list items choose All Customers from the View drop-down list. 4.
Close Customer Center. 5.
NOTES
© 2015 Intuit Inc. excerpt used by QB Winery Solutions with permission. Full document available at QBWinerySolutions.com/intuit2015studentguide

Lesson 4 — Working with Bank Accounts Writing a QuickBooks Check
QuickBooks 2015 Student Guide 5
Writing a QuickBooks Check
To write a check:
In the Banking area of the Home page click Write Checks (or press CTRL+W). 1.
In the Pay to the Order of field choose the name of the vendor you wish to pay. 2.
If the Open Bills Exist window pops up, you may choose to select bills to pay with the check. 3.
Complete the remaining information on the check. 4.
Click Save & Close. 5.
NOTES
© 2015 Intuit Inc. excerpt used by QB Winery Solutions with permission. Full document available at QBWinerySolutions.com/intuit2015studentguide

Lesson 4 — Working with Bank Accounts Using Bank Account Registers
QuickBooks 2015 Student Guide 6
Using Bank Account Registers
To open a register (when no form is open):
From the Lists menu choose Chart of Accounts. 1.
© 2015 Intuit Inc. excerpt used by QB Winery Solutions with permission. Full document available at QBWinerySolutions.com/intuit2015studentguide

Lesson 4 — Working with Bank Accounts Using Bank Account Registers
QuickBooks 2015 Student Guide 7
In the Chart of Accounts double-click the account you wish to view. 2.
Review features common to all registers: 3.
The register shows every transaction that affects an account’s balance and lists them in chronological order
(unless another order is chosen in the Sort by drop-down box in the lower left corner of the register window)
The columns in the register give specific information about the transaction
On every transaction line QuickBooks shows the account’s running balance
Close the register window. 4.
Close the Chart of Accounts. 5.
NOTES
© 2015 Intuit Inc. excerpt used by QB Winery Solutions with permission. Full document available at QBWinerySolutions.com/intuit2015studentguide

Lesson 4 — Working with Bank Accounts Reconciling Checking Accounts
QuickBooks 2015 Student Guide 10
Reconciling Checking Accounts
Your bank sends you a statement for each of your accounts each month. The statement shows all the activity in your
account since the previous statement:
Opening balance
Ending balance
Amount of interest earned
Service charges
Checks that have cleared the bank
Deposits made
Other transactions affecting the balance of the account
To reconcile a checking or savings account statement:
From the Banking drop-down choose Reconcile. 1.
In the Account drop-down choose the appropriate bank account from the list. 2.
In the Statement Date field enter the closing date of the statement you wish to reconcile. 3.
In the Ending Balance field enter the ending balance on the statement you wish to reconcile. 4.
© 2015 Intuit Inc. excerpt used by QB Winery Solutions with permission. Full document available at QBWinerySolutions.com/intuit2015studentguide

Lesson 4 — Working with Bank Accounts Reconciling Checking Accounts
QuickBooks 2015 Student Guide 11
Click Continue. Proceed to next exercise. 5.
Notes
© 2015 Intuit Inc. excerpt used by QB Winery Solutions with permission. Full document available at QBWinerySolutions.com/intuit2015studentguide

Lesson 4 — Working with Bank Accounts Marking Cleared Transactions
QuickBooks 2015 Student Guide 12
Marking Cleared Transactions
To mark the transactions as cleared:
In the Checks and Payments section of the window match the transactions with the checks and payments on 1.
your statement. Click on each transaction in QuickBooks that appears on your statement. This marks the
transaction as cleared in your QuickBooks register.
In the Deposits and Other Credits section of the window click on each transaction that matches your statement 2.
to mark the deposits as cleared in the register.
Click Continue. 3.
Place a check mark in the Hide transactions after statement’s end date to only show transactions dated prior to 4.
the statement end date.
When you are done with this process, the Difference in the bottom right corner should be zero. Click Reconcile 5.
Now.
© 2015 Intuit Inc. excerpt used by QB Winery Solutions with permission. Full document available at QBWinerySolutions.com/intuit2015studentguide

Lesson 4 — Working with Bank Accounts Marking Cleared Transactions
QuickBooks 2015 Student Guide 13
In the Select Reconciliation Report window you can choose to display or print your reconciliation reports. 6.
Notes
© 2015 Intuit Inc. excerpt used by QB Winery Solutions with permission. Full document available at QBWinerySolutions.com/intuit2015studentguide

Lesson 4 — Working with Bank Accounts Viewing Cleared Checks in the Register
QuickBooks 2015 Student Guide 14
Viewing Cleared Checks in the Register
To view cleared checks in the register:
From the Banking menu choose Use Register. 1.
Choose the account register you wish to view from the list. 2.
Scroll through the register to view the cleared items: 3.
Check mark = cleared on a completed reconciliation
Asterisk = cleared on a pending reconciliation
No mark = not cleared
WARNING: You are able to change the reconciliation status of a transaction from within the register. Do not Do it!
Manually changing reconciliation status in the register has a negative impact on future reconciliations.
© 2015 Intuit Inc. excerpt used by QB Winery Solutions with permission. Full document available at QBWinerySolutions.com/intuit2015studentguide

Lesson 4 — Working with Bank Accounts Viewing Cleared Checks in the Register
QuickBooks 2015 Student Guide 15
Close the account register. 4.
NOTES
© 2015 Intuit Inc. excerpt used by QB Winery Solutions with permission. Full document available at QBWinerySolutions.com/intuit2015studentguide

Lesson 4 — Working with Bank Accounts Locating Specific Transactions
QuickBooks 2015 Student Guide 16
Locating Specific Transactions
You can use the QuickBooks Find command to search for specific checks you’ve written. For example, suppose you
want to find all checks greater than or equal to $500.00 that you’ve written during the current year.
To use the Find feature:
From the Edit menu choose Find then select the Advanced tab (or press CTRL+F). 1.
Choose the filter you would like to use (this example shows the Amount filter). You can choose multiple filters by 2.
setting one then choosing another from the list.
Click the blue Find button to search. To clear your filters and start fresh click the Reset button. 3.
From the grid double-click on the transaction you would like to view to open the transaction. 4.
Close the Find window. 5.
NOTES
© 2015 Intuit Inc. excerpt used by QB Winery Solutions with permission. Full document available at QBWinerySolutions.com/intuit2015studentguide

Lesson 5 — Using Other Accounts in QuickBooks Entering Credit Card Charges
QuickBooks 2015 Student Guide 6
Entering Credit Card Charges
QuickBooks lets you choose when you enter your credit card charges. You can enter credit card charges when you
charge an item or when you receive the bill. Your choice depends on whether you like to enter information into
QuickBooks incrementally or all at once. The advantage to entering charges when you charge an item is that you can
keep close track of how much you owe. In addition, if the charge is for a particular job, you can keep track of how
much you’re spending on that job.
To enter a credit card charge:
From the Banking menu or Home screen choose Enter Credit Card Charges. 1.
In the Credit Card field select the appropriate credit card account. 2.
In the Purchased From field enter the vendor name that you purchased from. 3.
Enter the remaining information about the charge (date, reference number, amount, memo, etc.). 4.
© 2015 Intuit Inc. excerpt used by QB Winery Solutions with permission. Full document available at QBWinerySolutions.com/intuit2015studentguide

Lesson 5 — Using Other Accounts in QuickBooks Entering Credit Card Charges
QuickBooks 2015 Student Guide 7
In the detail area click the Account column and assign the charge to the corresponding expense account. 5.
Click Save & Close to record the transaction and close the window. 6.
NOTES
© 2015 Intuit Inc. excerpt used by QB Winery Solutions with permission. Full document available at QBWinerySolutions.com/intuit2015studentguide

Lesson 5 — Using Other Accounts in QuickBooks Reconciling a Credit Card Statement
QuickBooks 2015 Student Guide 8
Reconciling a Credit Card Statement
To reconcile a credit card statement:
From the Banking drop-down choose Reconcile or Reconcile Credit Card. 1.
In the Account drop-down choose the appropriate credit card from the list. 2.
In the Statement Date field enter the closing date of the statement you wish to reconcile. 3.
In the Ending Balance field enter the ending balance of the statement you wish to reconcile. 4.
Click Continue. Proceed to next exercise. 5.
© 2015 Intuit Inc. excerpt used by QB Winery Solutions with permission. Full document available at QBWinerySolutions.com/intuit2015studentguide

Lesson 5 — Using Other Accounts in QuickBooks Marking Cleared Transactions
QuickBooks 2015 Student Guide 9
Marking Cleared Transactions
To mark the transactions as cleared:
In the Charges and Cash Advances section of the window match the transactions with the charges on your 1.
statement. Click on each transaction in QuickBooks that appears on your statement. This marks the transaction
as cleared in your QuickBooks register.
In the Payments and Credits section of the window click on each transaction that matches your statement to 2.
mark the payments as cleared in the register.
When you are done with this process the Difference in the bottom right corner should be zero. Click Reconcile 3.
Now.
QuickBooks will ask you if you would like to enter a bill or write a check for the remaining balance on your credit 4.
card. You can choose one of these options or click Cancel if you would rather not do either one.
© 2015 Intuit Inc. excerpt used by QB Winery Solutions with permission. Full document available at QBWinerySolutions.com/intuit2015studentguide

Lesson 5 — Using Other Accounts in QuickBooks Marking Cleared Transactions
QuickBooks 2015 Student Guide 10
In the Select Reconciliation Report window you can choose to display or print your reconciliation reports. 5.
NOTES
© 2015 Intuit Inc. excerpt used by QB Winery Solutions with permission. Full document available at QBWinerySolutions.com/intuit2015studentguide

Lesson 5 — Using Other Accounts in QuickBooks Paying a Credit Card Bill
QuickBooks 2015 Student Guide 11
Paying a Credit Card Bill
To write a check for the bill now (continued from the reconciliation above):
After reconciling, when you select Write a check for payment now, the Write Checks window will open. Make 1.
sure Checking is listed as the bank account.
Click in the Pay to the Order of field and select the name of the credit card company. 2.
Notice the account is prefilled with the CalOil Card account (a credit card account). 3.
Click Save & Close to record the transaction. 4.
NOTES
© 2015 Intuit Inc. excerpt used by QB Winery Solutions with permission. Full document available at QBWinerySolutions.com/intuit2015studentguide

Lesson 6 — Entering Sales Information Using Sales Forms for Payment in the Future
QuickBooks 2015 Student Guide 6
Using Sales Forms for Payment in the Future
Any time you make a sale in your business, you record it in QuickBooks on a sales form. A sales form can be an
invoice (when you expect payment to come later), a sales receipt (when you receive payment at the time you make
the sale), or a credit memo (when you issue a credit on your customer’s account or a customer refund).
The type of sales form you use (invoice or sales receipt) depends on whether you expect payment in the future or at
the time of the sale. If you expect to receive payment at some future date, you enter an invoice.
To display a completed invoice form in QuickBooks:
Open the Customer Center from the Customers drop-down menu. 1.
Click on the name of the customer whose invoice you would like to view. 2.
From the Transactions list, double-click on the invoice to open the invoice form. 3.
Close the invoice. 4.
NOTES
© 2015 Intuit Inc. excerpt used by QB Winery Solutions with permission. Full document available at QBWinerySolutions.com/intuit2015studentguide

Lesson 6 — Entering Sales Information Using Sales Forms for Payment at the Time of Sale
QuickBooks 2015 Student Guide 7
Using Sales Forms for Payment at the Time of Sale
If you receive full payment at the time you make a sale — either by cash, check, or credit card — you fill out a sales
receipt instead of an invoice. Like the invoice, the QuickBooks sales receipt includes information about the items or
services purchased, but it also includes information about how payment was made.
To display a completed sales receipt in QuickBooks:
Open the Customer Center from the Customers drop-down menu. 1.
Click on the name of the customer whose Sales Receipt you would like to view. 2.
From the Transactions list, double-click on the sales receipt to open the sales receipt form. 3.
Close the Enter Sales Receipts window. 4.
NOTES
© 2015 Intuit Inc. excerpt used by QB Winery Solutions with permission. Full document available at QBWinerySolutions.com/intuit2015studentguide

Lesson 6 — Entering Sales Information Filling in a Sales Form
QuickBooks 2015 Student Guide 8
Filling in a Sales Form
Filling in an invoice is just like filling in a paper form; enter the customer information first followed by a description of
the charges.
To enter customer information on an invoice:
On the Home page, click Create Invoices. 1.
If you have custom templates, choose the template you would like to use from the drop-down list. 2.
In the Customer:Job field, enter the name of the customer/job you wish to create an invoice for. 3.
When the Billable Time/Costs window pops up, choose to add billable time or expenses. 4.
Proceed to next exercise.
NOTES
© 2015 Intuit Inc. excerpt used by QB Winery Solutions with permission. Full document available at QBWinerySolutions.com/intuit2015studentguide

Lesson 6 — Entering Sales Information Filling in the Line Item Area
QuickBooks 2015 Student Guide 9
Filling in the Line Item Area
On the bottom half of the invoice, you list each service or product you’re selling on its own line, along with the
amount the customer owes for that item. Because information about individual items is on separate lines, the lines
are called line items.
But items are not just products you sell or services you provide to clients. Line items can be anything you might want
to put in the detail area of an invoice, like a discount, a subtotal line, a markup, or a sales tax calculation.
To complete the line item area of an invoice:
In the Item field, choose the item you would like to add to the invoice. If you chose to add billable expenses from 1.
the last exercise, these items will already show in this section.
Press Tab. 2.
Enter the quantity you wish to invoice for in the Quantity column. 3.
Press Tab to have QuickBooks update the invoice total. If you set this item up with a default rate, it will 4.
automatically show on the line.
Proceed to next exercise.
NOTES
© 2015 Intuit Inc. excerpt used by QB Winery Solutions with permission. Full document available at QBWinerySolutions.com/intuit2015studentguide

Lesson 6 — Entering Sales Information Completing the Sales Form
QuickBooks 2015 Student Guide 10
Completing the Sales Form
To complete and record the invoice:
Click the Print Preview button near the top of the screen. 1.
Click Zoom In and use the scroll bars to see the invoice items at greater magnification. 2.
Click Close. 3.
In the Create Invoices window, record the sale by clicking Save & Close. 4.
© 2015 Intuit Inc. excerpt used by QB Winery Solutions with permission. Full document available at QBWinerySolutions.com/intuit2015studentguide
Lesson 6 — Entering Sales Information Generating Reminder Statements
QuickBooks 2015 Student Guide 24
Generating Reminder Statements
Reminder statements summarize a customer's account by listing recent invoices, credit memos, and payments
received. You can use reminder statements when you bill through invoices but want to remind your customers about
delinquent payments.
Reminder statements are different from other forms in QuickBooks such as invoices, sales receipts, or checks in that
they are not transactions. Furthermore, because QuickBooks already has all the information you need to create
reminder statements, you don't have to fill them out. Instead, you review the information that will appear on each
statement, decide whether to add finance charges, and print them.
To generate reminder statements:
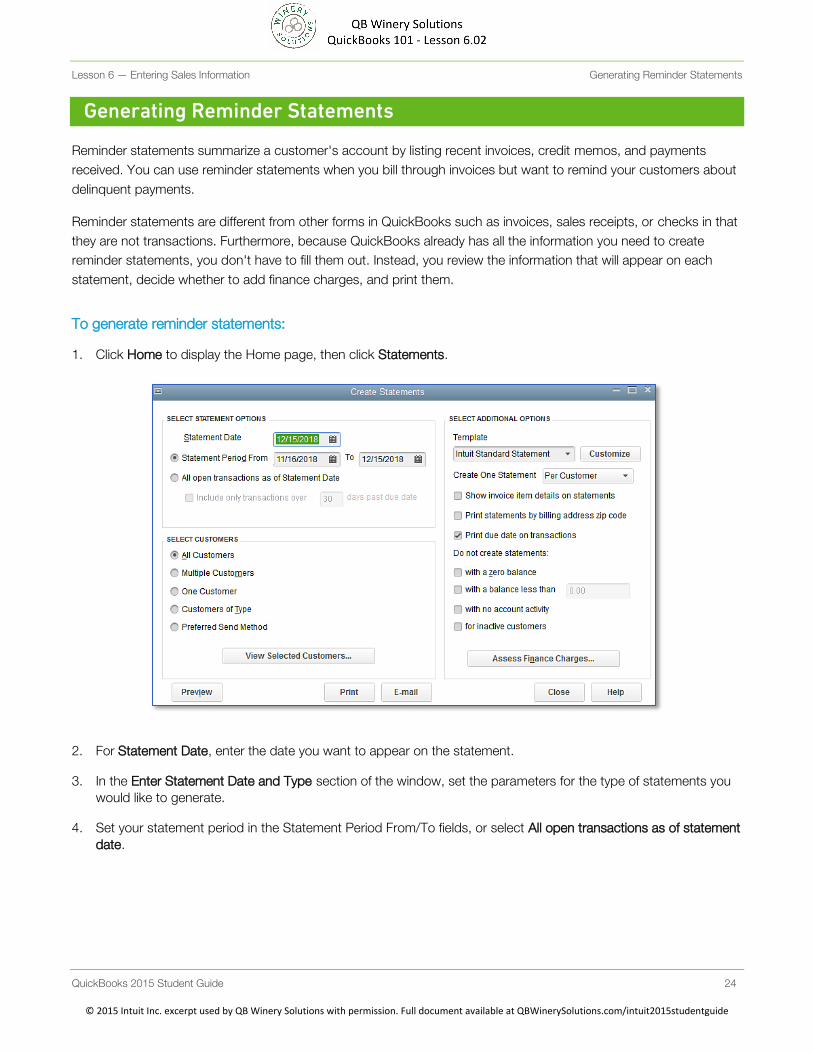
Click Home to display the Home page, then click Statements. 1.
For Statement Date, enter the date you want to appear on the statement. 2.
In the Enter Statement Date and Type section of the window, set the parameters for the type of statements you 3.
would like to generate.
Set your statement period in the Statement Period From/To fields, or select All open transactions as of statement 4.
date.
© 2015 Intuit Inc. excerpt used by QB Winery Solutions with permission. Full document available at QBWinerySolutions.com/intuit2015studentguide

Lesson 6 — Entering Sales Information Generating Reminder Statements
QuickBooks 2015 Student Guide 25
In the Select Customers section, choose how you would like to create the statements. 5.
Select additional options as they apply. 6.
Click Assess Finance Charges if you would like to add finance charges to the statements. Enter an assessment 7.
date if applicable.
© 2015 Intuit Inc. excerpt used by QB Winery Solutions with permission. Full document available at QBWinerySolutions.com/intuit2015studentguide

Lesson 6 — Entering Sales Information Generating Reminder Statements
QuickBooks 2015 Student Guide 26
Click Assess Charges. 8.
Click Preview. 9.
Click Close. 10.
Close the Create Statements window. 11.
NOTES
© 2015 Intuit Inc. excerpt used by QB Winery Solutions with permission. Full document available at QBWinerySolutions.com/intuit2015studentguide

Lesson 7 — Receiving Payments & Making Deposits Recording Payment in Full for a Single Job
QuickBooks 2015 Student Guide 5
Recording Payment in Full for a Single Job
If you’re receiving payment at the time of a sale and you fill out a sales receipt, QuickBooks records a customer
payment. When you invoice a customer and you receive payment later, you enter the payment in the QuickBooks
Receive Payments window.
To record a payment in full:
From the Customers menu, choose Receive Payments. 1.
If the QuickBooks Payment Interview window displays, close it. 2.
In the Received From field, select the customer:job that you are receiving payment from.
Press Tab to move to the Amount field. 3.
In the Amount field, type in the amount of the payment. 4.
Select the payment method from the payment icons then press Tab. 5.
Enter the reference number for the payment, if applicable. 6.
Place a check mark next to the invoices in the grid that you are applying the payment to. 7.
Click Save & Close. 8.
NOTES
© 2015 Intuit Inc. excerpt used by QB Winery Solutions with permission. Full document available at QBWinerySolutions.com/intuit2015studentguide

Lesson 7 — Receiving Payments & Making Deposits Entering a Partial Payment
QuickBooks 2015 Student Guide 6
Entering a Partial Payment
To enter a partial payment:
From the Customers menu, choose Receive Payments. 1.
In the Received From field, select the customer:job that you are receiving payment from. 2.
In the Amount field, type in the amount of the payment. 3.
Select the payment method from the payment icons then press Tab. 4.
Enter the reference number for the payment, if applicable. 5.
Place a check mark next to the invoices in the grid that you are applying the payment to. 6.
Leave the Leave this as an underpayment option selected. 7.
Click Save & Close to record the partial payment. 8.
NOTES
© 2015 Intuit Inc. excerpt used by QB Winery Solutions with permission. Full document available at QBWinerySolutions.com/intuit2015studentguide

Lesson 7 — Receiving Payments & Making Deposits Applying One Payment to Multiple Jobs
QuickBooks 2015 Student Guide 7
Applying One Payment to Multiple Jobs
To apply one payment to multiple jobs:
In the Receive Payments window, select the parent customer name for the jobs you are receiving payment 1.
against. This will enable QuickBooks to show all open invoices for the parent customer and jobs.
In the Amount field, type in the amount of the payment. 2.
Select the payment method from the payment icons then press Tab. 3.
Enter the reference number for the payment, if applicable. 4.
Place a check mark next to the invoices in the grid that you are applying the payment to. 5.
Click Save & Close. 6.
NOTES
© 2015 Intuit Inc. excerpt used by QB Winery Solutions with permission. Full document available at QBWinerySolutions.com/intuit2015studentguide

Lesson 7 — Receiving Payments & Making Deposits Entering Overpayments
QuickBooks 2015 Student Guide 8
Entering Overpayments
If a customer sends you an overpayment, you simply enter the amount in the Receive Payments window and
QuickBooks keeps track of the additional payment. When the customer has future invoices, you can apply the
overpayment to those amounts — you can even apply the credit directly to the invoice.
To enter the payment:
In the Received From field, select the customer:job that you are receiving payment from. 1.
In the Amount field, type in the amount of the payment. 2.
Select the payment method from the payment icons then press Tab. 3.
Enter the reference number for the payment, if applicable. 4.
Place a check mark next to the invoices in the grid that you are applying the payment to. 5.
You may choose Leave the credit to be used later to leave the overpayment on the customer account or Refund 6.
the amount to customer to issue a refund.
Click Save & Close. 7.
a. If you chose to refund the amount to your customer, the Issue a Refund window will appear. Complete the
form appropriately.
b. Click OK.
© 2015 Intuit Inc. excerpt used by QB Winery Solutions with permission. Full document available at QBWinerySolutions.com/intuit2015studentguide

Lesson 7 — Receiving Payments & Making Deposits Handling Down Payments & Prepayments
QuickBooks 2015 Student Guide 9
Handling Down Payments & Prepayments
If a customer makes a payment before you’ve invoiced him for services (for example, he may be making a down
payment or paying a retainer fee), you can still record the payment in the Receive Payments window. However,
because you don’t have any invoices to apply the payment to, QuickBooks records the payment as an unused
payment (just like an overpayment).
QuickBooks holds the unapplied amount with the customer’s name. The next time you enter that customer in the
Receive Payments window, QuickBooks displays the credit amount in the Unused Credits area. The customer’s
balance also reflects the credit amount.
To enter the down payment:
In the Received From field, select the customer:job that you are receiving payment from. 1.
In the Amount field, type in the amount of the payment. 2.
Select the payment method from the payment icons then press Tab. 3.
Enter the reference number for the payment, if applicable. 4.
Ensure that no invoices are selected to apply the payment to. 5.
© 2015 Intuit Inc. excerpt used by QB Winery Solutions with permission. Full document available at QBWinerySolutions.com/intuit2015studentguide

Lesson 7 — Receiving Payments & Making Deposits Handling Down Payments & Prepayments
QuickBooks 2015 Student Guide 10
Leave the Leave the credit to be used later option selected. 6.
Click Save & Close. 7.
Click OK. 8.
To create an invoice for a customer who made a down payment:
From the Customers menu, choose Create Invoices. 1.
In the Customer:Job field, select the customer you are creating the invoice for. 2.
Add any billable time/costs, if applicable. 3.
If you use custom invoice templates, select the appropriate template from the Template drop-down. 4.
Complete the invoice form appropriately. 5.
Click Apply Credits to apply the down payment amount toward this invoice. 6.
© 2015 Intuit Inc. excerpt used by QB Winery Solutions with permission. Full document available at QBWinerySolutions.com/intuit2015studentguide

Lesson 7 — Receiving Payments & Making Deposits Handling Down Payments & Prepayments
QuickBooks 2015 Student Guide 11
Choose the credits you wish to apply to the invoice and click Done. 7.
Click Save & Close to record the transaction. 8.
NOTES
© 2015 Intuit Inc. excerpt used by QB Winery Solutions with permission. Full document available at QBWinerySolutions.com/intuit2015studentguide

Lesson 7 — Receiving Payments & Making Deposits Making Deposits
QuickBooks 2015 Student Guide 12
Making Deposits
When you use the Enter Sales Receipt window (for a sales receipt where you receive payment on the spot), the
Receive Payments window (for payments on invoices), or a payment item on an invoice, QuickBooks keeps track of
the money you’ve received until you deposit it in the bank. When you receive payments from customers, you can
either deposit each payment directly into a QuickBooks bank account or you can group payments together into an
account called Undeposited Funds to be moved to that bank account at a later time. QuickBooks allows you to
choose the method you prefer for depositing payments.
To select payments to deposit:
From the Banking menu, choose Make Deposits. 1.
© 2015 Intuit Inc. excerpt used by QB Winery Solutions with permission. Full document available at QBWinerySolutions.com/intuit2015studentguide

Lesson 7 — Receiving Payments & Making Deposits Making Deposits
QuickBooks 2015 Student Guide 13
Click to select the payments you want to bring to the bank. 2.
Click OK. 3.
QuickBooks displays the Make Deposits window, which shows the payments you just selected.
© 2015 Intuit Inc. excerpt used by QB Winery Solutions with permission. Full document available at QBWinerySolutions.com/intuit2015studentguide

Lesson 7 — Receiving Payments & Making Deposits Making Deposits
QuickBooks 2015 Student Guide 14
In the Deposit To field, make sure the proper bank account is selected. 4.
If you have money to deposit that is not the result of a payment you received for a sale, you can enter it in the detail
area of the window. For example, if you received a premium refund from your insurance vendor you would enter it
here.
Click Save & Close to record the deposit. 5.
NOTES
© 2015 Intuit Inc. excerpt used by QB Winery Solutions with permission. Full document available at QBWinerySolutions.com/intuit2015studentguide

Lesson 7 — Receiving Payments & Making Deposits Entering a Partial Payment
QuickBooks 2015 Student Guide 6
Entering a Partial Payment
To enter a partial payment:
From the Customers menu, choose Receive Payments. 1.
In the Received From field, select the customer:job that you are receiving payment from. 2.
In the Amount field, type in the amount of the payment. 3.
Select the payment method from the payment icons then press Tab. 4.
Enter the reference number for the payment, if applicable. 5.
Place a check mark next to the invoices in the grid that you are applying the payment to. 6.
Leave the Leave this as an underpayment option selected. 7.
Click Save & Close to record the partial payment. 8.
NOTES
© 2015 Intuit Inc. excerpt used by QB Winery Solutions with permission. Full document available at QBWinerySolutions.com/intuit2015studentguide

Lesson 7 — Receiving Payments & Making Deposits How to Handle a Customer Bounced Check
QuickBooks 2015 Student Guide 16
How to Handle a Customer Bounced Check
When a Customer Payment check is returned by the bank:
Open the Customer Center from the Customer drop-down menu (or press CTRL+J) 1.
Highlight the Customer:Job from the list, then double-click on the payment transaction from the transaction list to 2.
open it.
Select the Record Bounced Check icon . 3.
Enter any bank fees charged by your bank for the NSF transaction. 4.
© 2015 Intuit Inc. excerpt used by QB Winery Solutions with permission. Full document available at QBWinerySolutions.com/intuit2015studentguide

Lesson 7 — Receiving Payments & Making Deposits How to Handle a Customer Bounced Check
QuickBooks 2015 Student Guide 17
If you have a fee you charge your customer you can enter that as well. 5.
Click Next. 6.
In the Bounced Check Summary, select Finish. 7.
© 2015 Intuit Inc. excerpt used by QB Winery Solutions with permission. Full document available at QBWinerySolutions.com/intuit2015studentguide

Lesson 7 — Receiving Payments & Making Deposits How to Handle a Customer Bounced Check
QuickBooks 2015 Student Guide 18
Notice the Customer Payment screen indicates this check bounced. 8.
Save & Close. 9.
To see the effect of the bounced check, open the bank register by double-clicking the bank account from your 10.
Chart of Accounts (CTRL+A).
NOTES
© 2015 Intuit Inc. excerpt used by QB Winery Solutions with permission. Full document available at QBWinerySolutions.com/intuit2015studentguide

Lesson 8 — Entering and Paying Bills Entering Bills
QuickBooks 2015 Student Guide 6
Entering Bills
When you receive a bill from a vendor, you should enter it into QuickBooks as soon as you can. This keeps your cash
flow forecast reports up to date and doesn’t give you the chance to set the bill aside and forget it.
To enter a bill:
From the Vendors menu, choose Enter Bills (or choose Enter Bills from the Home screen). 1.
In the Vendor field, enter the vendor name. 2.
In the Amount Due field, type 1500. 3.
Enter the appropriate date, terms and reference information in the top section of the bill. 4.
© 2015 Intuit Inc. excerpt used by QB Winery Solutions with permission. Full document available at QBWinerySolutions.com/intuit2015studentguide

Lesson 8 — Entering and Paying Bills Entering Bills
QuickBooks 2015 Student Guide 7
Use the Expenses tab to enter expenses from the bill and post them directly to expense accounts. You can use 5.
more than one line to separate different types of expenses included on the bill.
Click Save & Close to record the bill. 6.
NOTES
© 2015 Intuit Inc. excerpt used by QB Winery Solutions with permission. Full document available at QBWinerySolutions.com/intuit2015studentguide

Lesson 8 — Entering and Paying Bills Paying Bills
QuickBooks 2015 Student Guide 8
Paying Bills
When you start QuickBooks or open a QuickBooks company file, a Reminders window appears to tell you whether
you have transactions to complete, such as bills to pay or money to deposit. (If you don’t see the Reminders window,
turn it on by choosing Preferences from the Edit menu.)
When QuickBooks tells you you have bills due, you can display the Pay Bills window and select the bills you want
to pay.
To pay a bill:
From the Vendors menu, choose Pay Bills (or click on Pay Bills from the Home screen). 1.
Check the boxes next to the bills you wish to pay. 2.
Ensure that you have the proper payment method settings selected, as well as the checking account you want 3.
the payments posted to.
Click Pay Selected Bills. 4.
In the next window you can choose to pay more bills, print checks for the selected bills, or click Done to exit the 5.
module and print checks later.
NOTE: Click the Print Checks icon from the Home screen to access your checks marked Print Later.
© 2015 Intuit Inc. excerpt used by QB Winery Solutions with permission. Full document available at QBWinerySolutions.com/intuit2015studentguide

Lesson 8 — Entering and Paying Bills How QuickBooks Records Your Bill Payment
QuickBooks 2015 Student Guide 10
To see the entry:
In the Chart of Accounts, double-click 10100 Master Checking Account. 1.
Select the transaction you wish to view. 2.
On the toolbar, click Edit Transaction. 3.
© 2015 Intuit Inc. excerpt used by QB Winery Solutions with permission. Full document available at QBWinerySolutions.com/intuit2015studentguide

Lesson 8 — Entering and Paying Bills How QuickBooks Records Your Bill Payment
QuickBooks 2015 Student Guide 11
You can edit the transaction or click Save & Close. 4.
NOTES
© 2015 Intuit Inc. excerpt used by QB Winery Solutions with permission. Full document available at QBWinerySolutions.com/intuit2015studentguide

Lesson 9 — Analyzing Financial Data Creating QuickReports
QuickBooks 2015 Student Guide 6
Creating QuickReports
One of the fastest ways to see a report on your QuickBooks data is to create a QuickReport. QuickReports are
predesigned reports that give you information about the list name you’re currently viewing on screen. Whenever you
have a list, a register, or a form displayed, you can click a button to have QuickBooks create a QuickReport.
To see what you owe a vendor:
Click Vendor Center on the icon bar. 1.
Right-click on the vendor name you wish to run a report for and select QuickReport or click on the QuickReport 2.
hyperlink in the vendor information section.
© 2015 Intuit Inc. excerpt used by QB Winery Solutions with permission. Full document available at QBWinerySolutions.com/intuit2015studentguide

Lesson 9 — Analyzing Financial Data Creating QuickReports
QuickBooks 2015 Student Guide 7
NOTES
© 2015 Intuit Inc. excerpt used by QB Winery Solutions with permission. Full document available at QBWinerySolutions.com/intuit2015studentguide

Lesson 9 — Analyzing Financial Data Zooming in on a QuickReport
QuickBooks 2015 Student Guide 8
Zooming in on a QuickReport
All QuickReports contain a summary of individual transactions. To help you better understand the information
presented in reports, QuickBooks lets you trace report data to the individual transaction level using QuickZoom.
When you position the mouse pointer over a number in a report and see the QuickZoom symbol (a magnifying glass
with a Z in it), you can double-click the number to display the original transaction in QuickBooks.
To see more detail about a transaction:
From any financial report, hold your cursor over the dollar amount/transaction you wish to view in more detail. 1.
When your cursor turns into the QuickZoom icon, double-click your mouse to zoom in. This will open the 2.
transaction.
Press Esc to close the window. 3.
NOTES
© 2015 Intuit Inc. excerpt used by QB Winery Solutions with permission. Full document available at QBWinerySolutions.com/intuit2015studentguide

Lesson 9 — Analyzing Financial Data Using QuickZoom in a Preset Report
QuickBooks 2015 Student Guide 18
Using QuickZoom in a Preset Report
To QuickZoom on a report item:
Position the mouse pointer over the dollar amount you wish to view in detail. 1.
Double-click the amount to zoom. 2.
What you see when you QuickZoom in a report depends on the type of report displayed:
If the report shows summary figures (like the sales by customer summary report we just displayed) and you
QuickZoom an amount, QuickBooks displays a transaction report that includes the transactions which contribute
to that amount
If the report shows transactions and you QuickZoom a transaction, QuickBooks displays the invoice, bill or other
form for the requested transaction
NOTES
© 2015 Intuit Inc. excerpt used by QB Winery Solutions with permission. Full document available at QBWinerySolutions.com/intuit2015studentguide

Lesson 9 — Analyzing Financial Data Customizing QuickReports
QuickBooks 2015 Student Guide 9
Customizing QuickReports
Each QuickReport window has a button bar at the top of the report for customizing report content and layout.
To add a column to a report:
In the QuickReport window, click Customize Report. 1.
© 2015 Intuit Inc. excerpt used by QB Winery Solutions with permission. Full document available at QBWinerySolutions.com/intuit2015studentguide

Lesson 9 — Analyzing Financial Data Customizing QuickReports
QuickBooks 2015 Student Guide 10
In the Columns list, select the additional columns you would like to add to the report (in this example we marked 2.
the Transaction # column).
Click OK to accept the change. 3.
Notice the additional columns in your report.
To move a report column:
Position your mouse pointer over the column you wish to move (the mouse becomes a hand). 1.
Hold down the left mouse button and drag the column header/name to the position you would prefer. When a 2.
red arrow appears, release your mouse button.
© 2015 Intuit Inc. excerpt used by QB Winery Solutions with permission. Full document available at QBWinerySolutions.com/intuit2015studentguide

Lesson 9 — Analyzing Financial Data Customizing QuickReports
QuickBooks 2015 Student Guide 11
To change information in the report heading:
In the report window, click Customize Report then click the Header/Footer tab. 1.
On the Header/Footer tab, you can change the company name, report title, subtitle, and date and time
prepared. You can also specify whether to print the header on all pages or just the first page. The
Header/Footer tab is the same for all QuickBooks reports.
Highlight the text in the Report Title field and replace it with the title you would like to give your report. 2.
Click OK to close the Modify Report window. 3.
Close the report. 4.
NOTE: To save this report for future use, click the Memorize button on the report tool bar before closing the report.
This allows you to save the custom settings and run the report at a later date from the Reports drop-down menu.
NOTES
© 2015 Intuit Inc. excerpt used by QB Winery Solutions with permission. Full document available at QBWinerySolutions.com/intuit2015studentguide

Lesson 9 — Analyzing Financial Data Filtering Reports
QuickBooks 2015 Student Guide 16
Filtering Reports
You can customize preset reports the same way you customize QuickReports. In this exercise you’ll customize the
balance sheet comparison report and filter it to include only the transactions you specify.
Report filters let you set custom criteria for the transactions you want included in a report. When you filter a report,
QuickBooks includes only those transactions that match the rules you create.
To filter a preset report:
With the balance sheet comparison report displayed, click Customize Report on the Report button bar. 1.
Click the Filters tab. 2.
In the Filter scroll box, choose the filters you wish to assign parameters for and set your specifications. 3.
To remove or modify a filter, highlight it in the Current Filter Choices section and either modify the filter or click 4.
Remove Selected Filter.
Click OK. 5.
NOTES
© 2015 Intuit Inc. excerpt used by QB Winery Solutions with permission. Full document available at QBWinerySolutions.com/intuit2015studentguide

Lesson 9 — Analyzing Financial Data Printing Reports
QuickBooks 2015 Student Guide 21
Printing Reports
To print a report:
With the report open, click the Print button from the tool bar. 1.
Click Preview to see how the report will look when you print it. 2.
QuickBooks displays a preview of your report onscreen.
Click Print. 3.
Close the report. 4.
NOTES
© 2015 Intuit Inc. excerpt used by QB Winery Solutions with permission. Full document available at QBWinerySolutions.com/intuit2015studentguide
Lesson 9 — Analyzing Financial Data Sending a Report to Microsoft Excel
QuickBooks 2015 Student Guide 23
Sending a Report to Microsoft Excel®
Occasionally you may want to change a report’s appearance or contents in ways that aren’t available in QuickBooks,
filter report data in ways you can’t in QuickBooks or run “what-if” scenarios on your QuickBooks data.
You can send reports from QuickBooks to Microsoft Excel. Since the changes you make in Excel don’t affect your
QuickBooks data, you’re free to customize reports as needed and even change data to run what-if scenarios.
To send a report to Microsoft Excel:
From the Reports menu, open the report you would like to convert to Excel. 1.
On the Report button bar, set the date parameters for your report. You can use the Customize button to set 2.
additional filters and add additional customization.
Click OK. 3.
On the Report button bar, click Excel and Create New Worksheet (or you could select Update Existing 4.
Worksheet).
Click the Advanced tab to add custom export options. 5.
Click OK then Export.6.
© 2015 Intuit Inc. excerpt used by QB Winery Solutions with permission. Full document available at QBWinerySolutions.com/intuit2015studentguide

Lesson 9 — Analyzing Financial Data Saving Reports as a PDF
QuickBooks 2015 Student Guide 17
Saving Reports as a PDF
To keep a record of the information in the report as it exists today, you can save the report in portable document
format (PDF).
To save a report as a PDF file:
With the report open, choose Save as PDF from the File menu. (You can also click on Print > Save as PDF or 1.
Email > Send Report as PDF.)
Navigate to the folder in which you want to store the file and enter a file name. 2.
Click Save. 3.
Close the report window. 4.
NOTES
© 2015 Intuit Inc. excerpt used by QB Winery Solutions with permission. Full document available at QBWinerySolutions.com/intuit2015studentguide

Lesson 10 — Setting Up Inventory Turning on the Inventory Feature
QuickBooks 2015 Student Guide 5
Turning on the Inventory Feature
If you need to track inventory for your company, you can turn the feature on while completing the EasyStep Interview.
If you want to turn on the inventory feature after you’ve completed the EasyStep Interview, follow this procedure.
To turn on the inventory feature:
From the Edit menu, choose Preferences. 1.
Select Items & Inventory from the menu on the left-hand side. 2.
Click the Company Preferences tab. 3.
Click the Inventory and purchase orders are active checkbox to select it. 4.
Click OK. 5.
NOTES
© 2015 Intuit Inc. excerpt used by QB Winery Solutions with permission. Full document available at QBWinerySolutions.com/intuit2015studentguide
Lesson 10 — Setting Up Inventory Entering Products into Inventory
QuickBooks 2015 Student Guide 6
Entering Products into Inventory
Many small businesses that stock inventory don’t know the number of units they have on hand or on order at any
given time and have no way of getting that information quickly. Using QuickBooks to manage your inventory, you’ll be
able to track the number of items in stock and the value of your inventory after every purchase and sale.
As you order inventory items, receive the items, and later sell the items from inventory, QuickBooks tracks each
inventory-related transaction. You will know the status of your inventory and will have a more accurate picture of your
business’s assets.
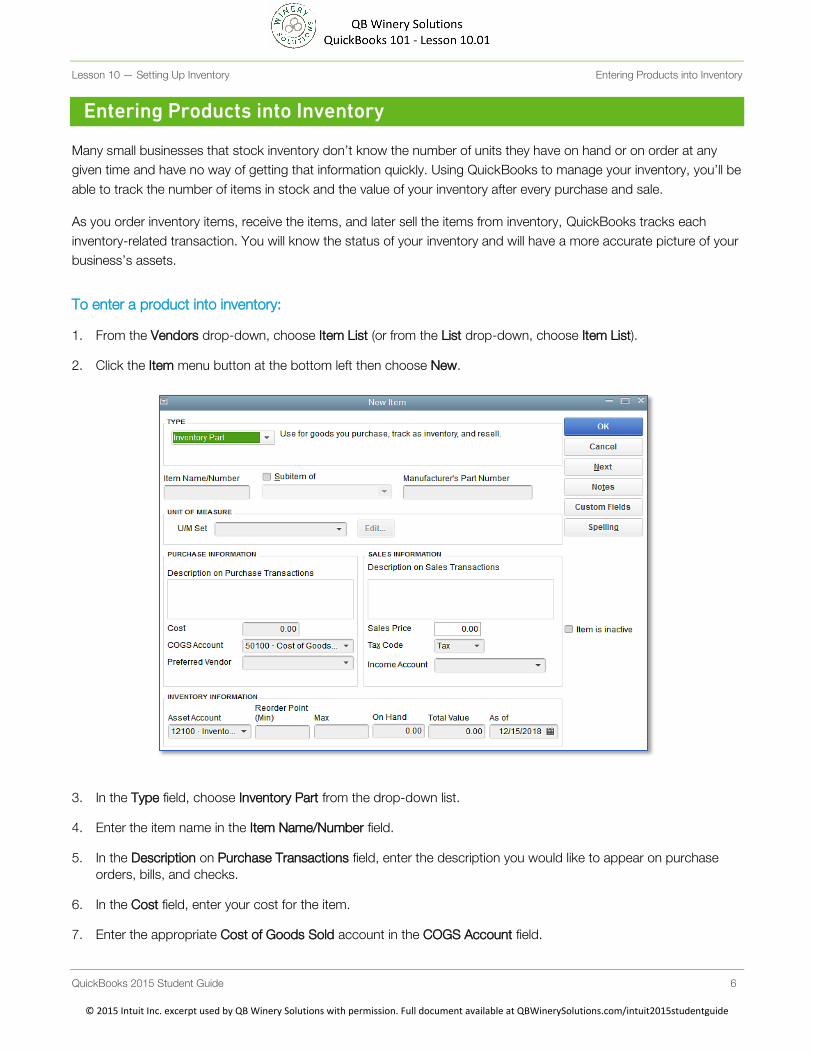
To enter a product into inventory:
From the Vendors drop-down, choose Item List (or from the List drop-down, choose Item List). 1.
Click the Item menu button at the bottom left then choose New. 2.
In the Type field, choose Inventory Part from the drop-down list. 3.
Enter the item name in the Item Name/Number field. 4.
In the Description on Purchase Transactions field, enter the description you would like to appear on purchase 5.
orders, bills, and checks.
In the Cost field, enter your cost for the item. 6.
Enter the appropriate Cost of Goods Sold account in the COGS Account field. 7.
© 2015 Intuit Inc. excerpt used by QB Winery Solutions with permission. Full document available at QBWinerySolutions.com/intuit2015studentguide

Lesson 10 — Setting Up Inventory Entering Products into Inventory
QuickBooks 2015 Student Guide 7
In the Preferred Vendor field, choose a preferred vendor, if applicable. 8.
In the Sales Price field, enter the price you would like to appear on sales orders, sales receipts, estimates, and 9.
invoices.
Assign a tax code, taxable or non-taxable. 10.
In the Income Account field, assign the appropriate income account for when the item is sold. 11.
Enter the appropriate asset account in the Asset Account field. 12.
In the Reorder Point field, enter the point at which you would like QuickBooks to remind you to reorder the item. 13.
Click OK to close the New Item window. 14.
Close the Item list. 15.
NOTES
© 2015 Intuit Inc. excerpt used by QB Winery Solutions with permission. Full document available at QBWinerySolutions.com/intuit2015studentguide

Lesson 11 — Tracking and Paying Sales Tax Overview of Sales Tax in QuickBooks
QuickBooks 2015 Student Guide 5
Overview of Sales Tax in QuickBooks
To use QuickBooks to track and pay your sales tax:
Set up your tax rates and agencies 1.
Indicate who and what gets taxed 2.
Apply tax to each sale 3.
Find out what you owe 4.
Pay your tax agencies 5.
NOTES
© 2015 Intuit Inc. excerpt used by QB Winery Solutions with permission. Full document available at QBWinerySolutions.com/intuit2015studentguide

Lesson 11 — Tracking and Paying Sales Tax Setting Up your Tax Rates and Agencies
QuickBooks 2015 Student Guide 6
Setting Up your Tax Rates and Agencies
Some businesses need to apply more than one sales tax to their sales; for example, they may collect state sales tax
as well as several county sales taxes. You need to create a separate sales tax item for each tax amount you must
report (not necessarily for each tax you collect — some states want you to report state sales tax and county sales tax
as separate items, while others let you report them as one item).
Even if you’re paying more than one type of tax, you usually want your customers to see one overall tax amount, not
separate taxes for the state and county. You’ll learn how to do that in this lesson.
To add a sales tax item:
From the Lists menu, choose Item List. 1.
Click the Item menu button then choose New. 2.
In the Type field, choose Sales Tax Item. 3.
In the Sales Tax Name field, type the appropriate name for the tax (e.g., Seattle City Tax, King County Tax, 4.
Washington State Tax, etc.)
In the Description field, enter an appropriate description for the tax. 5.
In the Tax Rate (%) field, enter the sales tax rate as a percentage. 6.
In the Tax Agency field, type the name of the department you issue payments to. 7.
Click OK 8.
NOTES:
© 2015 Intuit Inc. excerpt used by QB Winery Solutions with permission. Full document available at QBWinerySolutions.com/intuit2015studentguide

Lesson 11 — Tracking and Paying Sales Tax Grouping Single Taxes Together
QuickBooks 2015 Student Guide 7
Grouping Single Taxes Together
Even if you collect a combination of sales taxes (for example, city tax and county tax) which you report separately,
you probably don’t want to confuse customers by showing separate taxes on your invoices or sales forms.
QuickBooks lets you group some or all of your tax items so customers see a single tax amount. Instead of a sales tax
item you’ll be creating a sales tax group.
To create a sales tax group:
With the Item List displayed, click the Item menu button then choose New. 1.
In the Type field, choose Sales Tax Group. 2.
In the Group Name/Number field, enter an appropriate name for the group. 3.
In the Description field, enter an appropriate description for the group. 4.
Click in the Tax Item column then choose the taxes you wish to group together. 5.
Click OK. 6.
NOTES
© 2015 Intuit Inc. excerpt used by QB Winery Solutions with permission. Full document available at QBWinerySolutions.com/intuit2015studentguide

Lesson 11 — Tracking and Paying Sales Tax Identifying Your Most Common Tax
QuickBooks 2015 Student Guide 8
Identifying Your Most Common Tax
If you want QuickBooks to apply sales tax to your invoices and sales receipts, you have to tell it which sales tax item
or group is the one you use most often. Once you do that, QuickBooks applies that sales tax when you fill out an
invoice or a sales receipt. (You can choose a different sales tax from the sales form if you don’t want the default tax.)
To set up a default sales tax:
From the Edit menu, choose Preferences.1.
In the Preferences window, click the Sales Tax icon in the left panel then click the Company Preferences tab.2.
In the Most common sales tax field, choose the sales tax rate you want to be the default.3.
Click OK.4.
NOTES
© 2015 Intuit Inc. excerpt used by QB Winery Solutions with permission. Full document available at QBWinerySolutions.com/intuit2015studentguide

Lesson 11 — Tracking and Paying Sales Tax Indicating Who and What Gets Taxed
QuickBooks 2015 Student Guide 9
Indicating Who and What Gets Taxed
The next step in setting up sales tax is to indicate who and what gets taxed. You have to tell QuickBooks whether or
not a customer is taxable and assign a default tax item or tax group to that customer.
You must also distinguish between taxable and non-taxable items on the Item list. When you add an item to the Item
list, there’s a place in the window to indicate whether you charge tax for the item. QuickBooks remembers this
information and shows whether or not an item is taxable when you enter the item on a sales form.
To indicate a taxable item:
In the Item list, right-click the item you wish to check taxable status on then click Edit Item. 1.
Click the Item menu button then choose Edit Item.2.
The code in the Tax Code field is a taxable code which tells you this item is taxable. When you choose the item
to be included on a sales form, QuickBooks knows the item is taxable and automatically applies the default
sales tax.
Click OK to close the Edit Item window.3.
Close the Item list.4.
NOTE: Customer taxability will override item taxability. For example, if you have taxable items on an invoice to a
customer marked as a non-taxable customer, sale tax will not be calculated on the invoice. See next section re:
taxable/non-taxable customers.
NOTES
© 2015 Intuit Inc. excerpt used by QB Winery Solutions with permission. Full document available at QBWinerySolutions.com/intuit2015studentguide
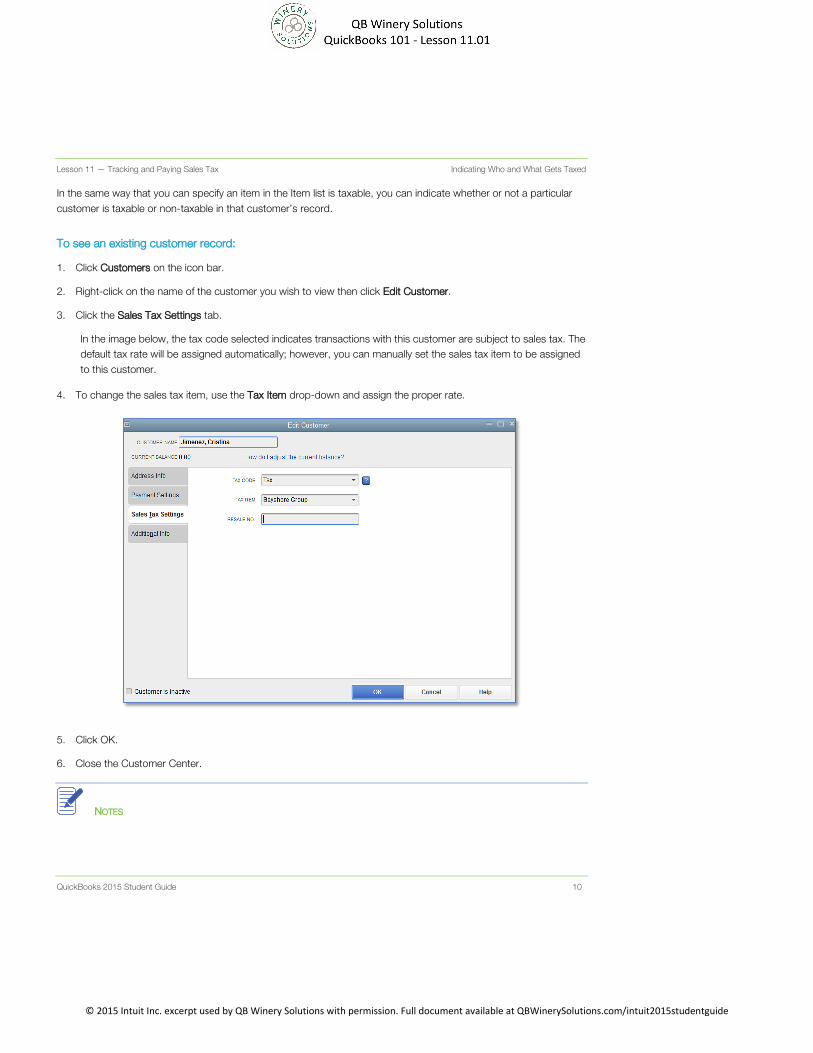
Lesson 11 — Tracking and Paying Sales Tax Indicating Who and What Gets Taxed
QuickBooks 2015 Student Guide 10
In the same way that you can specify an item in the Item list is taxable, you can indicate whether or not a particular
customer is taxable or non-taxable in that customer’s record.
To see an existing customer record:
Click Customers on the icon bar. 1.
Right-click on the name of the customer you wish to view then click Edit Customer.2.
Click the Sales Tax Settings tab.3.
In the image below, the tax code selected indicates transactions with this customer are subject to sales tax. The
default tax rate will be assigned automatically; however, you can manually set the sales tax item to be assigned
to this customer.
To change the sales tax item, use the Tax Item drop-down and assign the proper rate.4.
Click OK.5.
Close the Customer Center.6.
NOTES
© 2015 Intuit Inc. excerpt used by QB Winery Solutions with permission. Full document available at QBWinerySolutions.com/intuit2015studentguide

Lesson 11 — Tracking and Paying Sales Tax Determining What You Owe
QuickBooks 2015 Student Guide 13
If you’d like to see where your sales tax revenue is coming from, you can run the Sales Tax Revenue Summary
report, which shows you the sources of all taxable and non-taxable sales transactions broken down by individual
sales tax codes. This report is especially helpful if you are using sales tax groups.
To run the Sales Tax Revenue Summary report:
Click on the Manage Sales Tax icon from the home screen then click on the Sales Tax Revenue Summary 1.
hyperlink (or from the Reports menu, choose Vendors & Payables then choose Sales Tax Revenue Summary).
Close the report. 2.
© 2015 Intuit Inc. excerpt used by QB Winery Solutions with permission. Full document available at QBWinerySolutions.com/intuit2015studentguide

Lesson 15 — Customizing Forms and Writing QuickBooks Letters Creating New Templates
QuickBooks 2015 Student Guide 5
Creating New Templates
QuickBooks lets you customize an invoice form to suit the needs of your business, but there may be times when you
want to design a completely different invoice form. QuickBooks lets you do that too. You can use the Layout
Designer to create a new form design for your business. In the Layout Designer you can move, resize, or change the
width of columns, turn on or off borders around fields, and control font type and size for each field.
To create a new invoice template:
From the Lists menu, choose Templates. 1.
Click the Templates menu button then choose New. 2.
Choose the type of form template you want to create. 3.
Click the Manage Templates button to give the template a name then click OK. 4.
Use the features in the Basic Customization window to customize the general look of your form. 5.
Click OK to close the Basic Customization window. 6.
NOTES
© 2015 Intuit Inc. excerpt used by QB Winery Solutions with permission. Full document available at QBWinerySolutions.com/intuit2015studentguide

Lesson 15 — Customizing Forms and Writing QuickBooks Letters Customizing Fields on Forms
QuickBooks 2015 Student Guide 6
Customizing Fields on Forms
To customize fields on a template:
Click the Additional Customization button at the bottom of the window. 1.
To have the Due Date field display both onscreen and on the printed form, click the Screen checkbox for Due 2.
Date to select it.
Click the Print checkbox for Due Date. 3.
Clear the Screen and Print checkboxes for the P.O. No. field to remove the field from the form. 4.
Continue customizing your form fields as needed for your business. 5.
NOTES
© 2015 Intuit Inc. excerpt used by QB Winery Solutions with permission. Full document available at QBWinerySolutions.com/intuit2015studentguide

Lesson 15 — Customizing Forms and Writing QuickBooks Letters Changing Field Order on Forms
QuickBooks 2015 Student Guide 7
Changing Field Order on Forms
The lower half of the standard QuickBooks invoice form is where you enter details about the items or services
purchased by the customer. You can change the order of these fields as they appear on your invoices.
The Order column shows you how fields display from left to right on the invoice form. Currently Item is the first
column and Amount is the last column. Suppose you want the Qty field to appear after the Item field and before the
Description field.
To change the order of fields on a form:
Click the Columns tab. 1.
Double-click the Order column to select it. 2.
Manually enter the number that represents the order you want the column to be displayed on your form. 3.
Continue working through the tabs to customize your form. 4.
Click OK to record the changes. 5.
Click OK again then close the Templates window. 6.
© 2015 Intuit Inc. excerpt used by QB Winery Solutions with permission. Full document available at QBWinerySolutions.com/intuit2015studentguide

Lesson 15 — Customizing Forms and Writing QuickBooks Letters Displaying your Customized Form
QuickBooks 2015 Student Guide 8
Displaying your Customized Form
This walkthrough shows you how to view a template using the Invoice form. If you have other custom forms, you can
access them by opening the form window in QuickBooks then choosing your template from the Template drop-
down.
To display a custom invoice form:
From the Customers menu, choose Create Invoices. 1.
© 2015 Intuit Inc. excerpt used by QB Winery Solutions with permission. Full document available at QBWinerySolutions.com/intuit2015studentguide

Lesson 15 — Customizing Forms and Writing QuickBooks Letters Displaying your Customized Form
QuickBooks 2015 Student Guide 9
In the Template field, choose your template from the drop-down list. 2.
Click the arrow on the Print icon and select Print Preview to see what your invoice will look like printed. 3.
Exit the invoice. 4.
NOTES
© 2015 Intuit Inc. excerpt used by QB Winery Solutions with permission. Full document available at QBWinerySolutions.com/intuit2015studentguide

Lesson 15 — Customizing Forms and Writing QuickBooks Letters Designing Custom Layouts for Forms
QuickBooks 2015 Student Guide 10
Designing Custom Layouts for Forms
Here are a few examples of what you can do with a custom layout:
Give your company name, address, and logo special treatment on the form
For example, you could center your logo at the top of the form and put your company name and address in a
special font immediately below the logo.
Enlarge a custom field so it can display more information
Position the customer’s billing address so it coincides with the address window in the envelopes you use
Change the borders on fields, add background colors, and add extra text fields
Add multiple graphics to a form
NOTES
© 2015 Intuit Inc. excerpt used by QB Winery Solutions with permission. Full document available at QBWinerySolutions.com/intuit2015studentguide

Lesson 15 — Customizing Forms and Writing QuickBooks Letters Changing the Position of Fields on Forms
QuickBooks 2015 Student Guide 11
Changing the Position of Fields on Forms
To move fields on forms:
From the Lists menu, choose Templates. 1.
Right-click on My Invoice then select Edit Template. 2.
Click Layout Designer. 3.
Click on the fields you wish to move, hold your mouse button down to drag/drop the fields. 4.
© 2015 Intuit Inc. excerpt used by QB Winery Solutions with permission. Full document available at QBWinerySolutions.com/intuit2015studentguide

Lesson 15 — Customizing Forms and Writing QuickBooks Letters Changing the Position of Fields on Forms
QuickBooks 2015 Student Guide 12
NOTES
© 2015 Intuit Inc. excerpt used by QB Winery Solutions with permission. Full document available at QBWinerySolutions.com/intuit2015studentguide

Lesson 15 — Customizing Forms and Writing QuickBooks Letters Changing Field Widths
QuickBooks 2015 Student Guide 13
Changing Field Widths
To change the width of a field:
Select the field you want to resize. Click on the black boxes in the field border, hold your mouse button down 1.
and drag the black box to resize the field. Let go of your mouse button to release and resize the field.
Use the ruler to keep field sizes uniform and field edges in alignment. 2.
NOTES
© 2015 Intuit Inc. excerpt used by QB Winery Solutions with permission. Full document available at QBWinerySolutions.com/intuit2015studentguide

Lesson 15 — Customizing Forms and Writing QuickBooks Letters Changing Fonts, Borders and Colors
QuickBooks 2015 Student Guide 14
Changing Fonts, Borders and Colors
Using the Properties window in the Layout Designer, you can change font size and style, and text justification. You
can also add, remove, or change the borders around fields.
To change fonts, borders and colors:
Select the field you wish to edit, right-click to select Properties. 1.
On the Text tab, select the justification you wish to use. 2.
Click Font to select your font, font size, and color. Click OK when you are finished. 3.
Click the Border tab. Use these settings to create/remove/edit field borders on your form. 4.
Click on the Background tab to give your form a colored background. 5.
Click OK to save the changes in the Layout Designer. 6.
Click OK to close the Additional Customization window. 7.
NOTES
© 2015 Intuit Inc. excerpt used by QB Winery Solutions with permission. Full document available at QBWinerySolutions.com/intuit2015studentguide

Lesson 15 — Customizing Forms and Writing QuickBooks Letters Previewing New Forms
QuickBooks 2015 Student Guide 15
Previewing New Forms
Notice that the invoice form displayed by QuickBooks doesn’t show the changes you just made in the Layout
Designer. This is because changes made in the Layout Designer only affect the printed invoice and not the invoice
QuickBooks displays onscreen for data entry.
To preview the invoice:
To see how the printed invoice form will look, click the Print Preview button (above the Template drop-down list). 1.
When you are finished looking at the preview, click Close. 2.
NOTES
© 2015 Intuit Inc. excerpt used by QB Winery Solutions with permission. Full document available at QBWinerySolutions.com/intuit2015studentguide