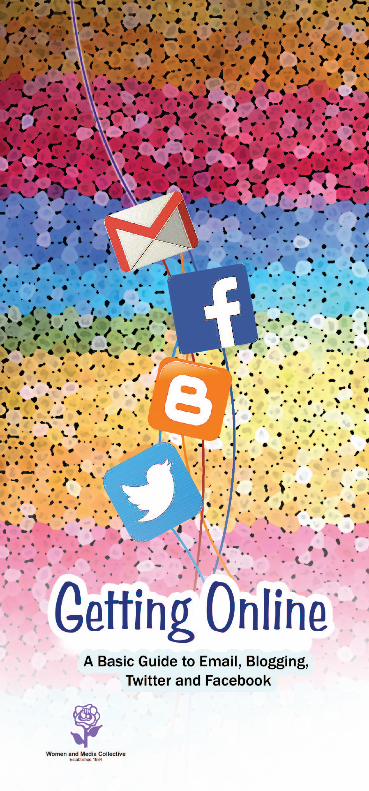
getting online: a basic guide to email, blogging, twitter and facebook
DESCRIPTION
This handbook was designed to support women with a keen interest to get online. Appropriate for beginners, this book introduces you to the very basics of the most commonly used web platforms that are available on the internet for free. It is our intention to encourage women to make their voices heard at a global level which will result in creating a more gender balanced perspective online. This guide provides step by step descriptions, with images, on how to set up a free website or blog, conveniently correspond by Email with people from the world over and build a network through Social Media sites. We hope that this book will come in handy in all of your endeavours. All the very best!TRANSCRIPT
41

43
1
This handbook was designed to support women with a keen interest to get online. Appropriate for beginners, this book introduces you to the very basics of the most commonly used web platforms that are available on the internet for free. It is our intention to encourage women to make their voices heard at a global level which will result in creating a more gender balanced perspective online. This guide provides step by step descriptions, with images, on how to set up a free website or blog, conveniently correspond by Email with people from the world over and build a network through Social Media sites. We hope that this book will come in handy in all of your endeavours. All the very best!
Women and Media Collective
For more information: www.womenandmedia.org
Email: [email protected]/womenandmediacollective
twitter.com/womenandmediawww.youtube.com/user/wmcsrilanka
Why New Media?
This publication was supported by Prince Claus Fund, 2014
ISBN 978-955-1770-23-5

2
Women and Media Collective (WMC)
aims to create a just society that does not discriminate on the basis of gender.
Formed in 1984 by a group of Sri Lankan feminists WMC works towards developing a feminist perspective on contemporary social, economic, political and cultural issues with
the aim of changing the situation of Sri Lankan women in a positive and progressive manner.
3
Index1. Email Pg
I. Create a Gmail account 5II. Quick tips 7
III. Securing your account 8
2. BloggingI. What is a blog? 11
II. Why blog? 12III. How to open a blog on WordPress 13IV. Protect your identity online 15V. Understanding your Dashboard 15
VI. Posts vs Pages 19VII. Your first Post 19
VIII. Tags and Categories 20IX. What do I blog about? 21X. Copyright issues to keep in mind 22
XI. How to create a page 22XII. Other terms you should know 24
XIII. Tag and Category clouds 25XIV. Twitter timeline 25XV. Pingback 25
3. Twitter I. What is Twitter? 27
II. Setting up your Twitter account 28III. Protect your privacy on Twitter! 29IV. Pick the right username 29V. Finding people on Twitter 30
VI. Your Twitter dashboard 30VII. Construct your first Tweet 31
VIII. Twitter terms you need to know 32IX. Tools for Twitter 33
4. FacebookI. Why get on Facebook? 35
II. Creating your Facebook account 35III. Pages vs. Groups 36IV. Create a page 37V. Create a group 37
VI. Using Facebook insights 38VII. Some things to watch out for 38
VIII. Protect your privacy on Facebook 39

4
5
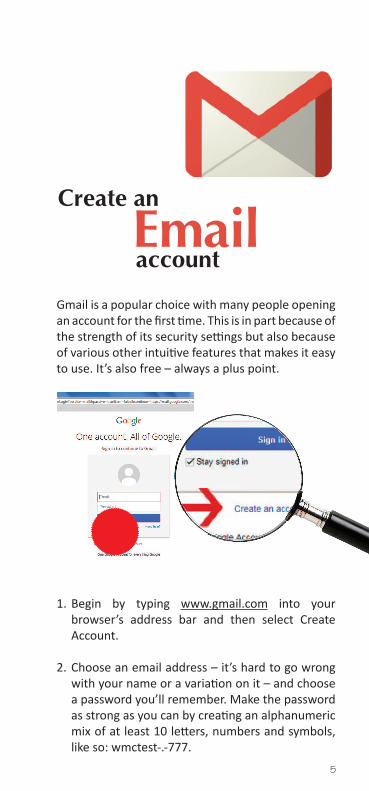
Gmail is a popular choice with many people opening an account for the first time. This is in part because of the strength of its security settings but also because of various other intuitive features that makes it easy to use. It’s also free – always a plus point.
Create an
Email account
1. Begin by typing www.gmail.com into your browser’s address bar and then select Create Account.
2. Choose an email address – it’s hard to go wrong with your name or a variation on it – and choose a password you’ll remember. Make the password as strong as you can by creating an alphanumeric mix of at least 10 letters, numbers and symbols, like so: wmctest-.-777.

6
3. Provide the details requested and finish by typing in the figures or numbers shown in the picture under the section ‘Prove you are not a robot.’
4. As soon as you sign in, take Gmail’s inbox tour – it will show you where to start and how to customise your account.
Click on the cogwheel on the upper right hand corner and select Settings. From here you can change your password and link another email account to this one (Settings > Accounts and Imports) or install useful features like ‘Undo Send’ (Settings > Labs).
7
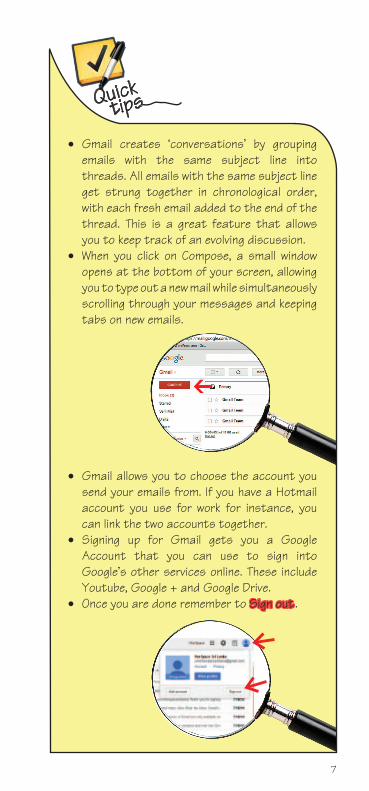
• Gmail creates ‘conversations’ by grouping emails with the same subject line into threads. All emails with the same subject line get strung together in chronological order, with each fresh email added to the end of the thread. This is a great feature that allows you to keep track of an evolving discussion.
• When you click on Compose, a small window opens at the bottom of your screen, allowing you to type out a new mail while simultaneously scrolling through your messages and keeping tabs on new emails.
• Gmail allows you to choose the account you send your emails from. If you have a Hotmail account you use for work for instance, you can link the two accounts together.
• Signing up for Gmail gets you a Google Account that you can use to sign into Google’s other services online. These include Youtube, Google + and Google Drive.
• Once you are done remember to Sign out .
Quick tips

8
Securing your Account
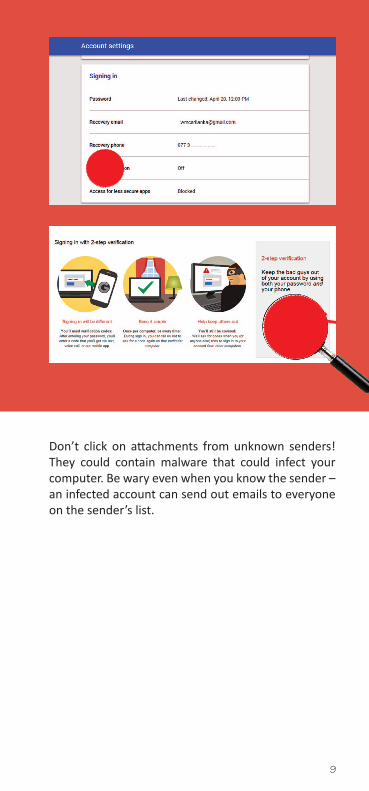
2-Step Verification allows you to protect your account from hackers. Enable it by clicking on your email address on the top right hand corner of the screen and choosing Account > Security > 2-Step Verification.
Every time you sign in to a new computer, you’ll get an SMS with a new verification code. Read the instructions carefully and remember to keep spare codes handy if you think you won’t be able to receive an SMS, such as when you’re travelling and don’t have roaming.
9
Don’t click on attachments from unknown senders! They could contain malware that could infect your computer. Be wary even when you know the sender – an infected account can send out emails to everyone on the sender’s list.

10
Blogging

11
A blog – short for ‘Web log’ - is a type of website consisting of multiple posts. Many personal blogs are modelled on a journal or diary like format.
While your organisation might already have a website, you can incorporate a blog into it or start a separate blog that allows you to communicate in a much more informal and direct way. While most of the content of a website remains the same, blogs are updated much more frequently.
What is a Blog?
12
The most recent post appears first. Older entries are archived and collected on the blog.
Blogs allow the blogger and reader to carry on the conversation within a comment thread.
A blog post can consist of text - but also of photographs, video, audio or links.
Millions of blogs make up the blogosphere. People follow their favourite blogs by subscribing to a feed. A blog’s blog roll is a list of a particular bloggers favourites – you can construct your own once you start to explore.
Why blog?Here are some reasons you might want to start blogging:
• Take charge of your own story. Don’t wait for mainstream media or rely on the competence of journalists.
• Report directly to your supporters and your partners. Drum up sponsorship, get support for campaigns and recruit volunteers.
• Reach ever wider audiences as the online community in Sri Lanka grows. Right now, Sri Lanka has thousands of bloggers in all three languages – from young students to research institutions, from corporates to individual journalists, everyone is online.
• Communicate in the language you’re most comfortable in. While a working knowledge of English is still required to set up and operate a blog, you can post in Sinhala or Tamil too.
• Do all this using blogging platforms that are free and really simple to work on!
13
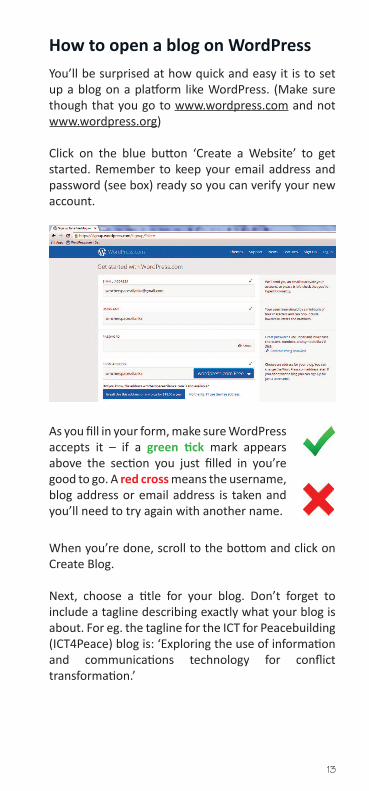
How to open a blog on WordPressYou’ll be surprised at how quick and easy it is to set up a blog on a platform like WordPress. (Make sure though that you go to www.wordpress.com and not www.wordpress.org)
Click on the blue button ‘Create a Website’ to get started. Remember to keep your email address and password (see box) ready so you can verify your new account.
When you’re done, scroll to the bottom and click on Create Blog.
Next, choose a title for your blog. Don’t forget to include a tagline describing exactly what your blog is about. For eg. the tagline for the ICT for Peacebuilding (ICT4Peace) blog is: ‘Exploring the use of information and communications technology for conflict transformation.’
As you fill in your form, make sure WordPress accepts it – if a green tick mark appears above the section you just filled in you’re good to go. A red cross means the username, blog address or email address is taken and you’ll need to try again with another name.
14
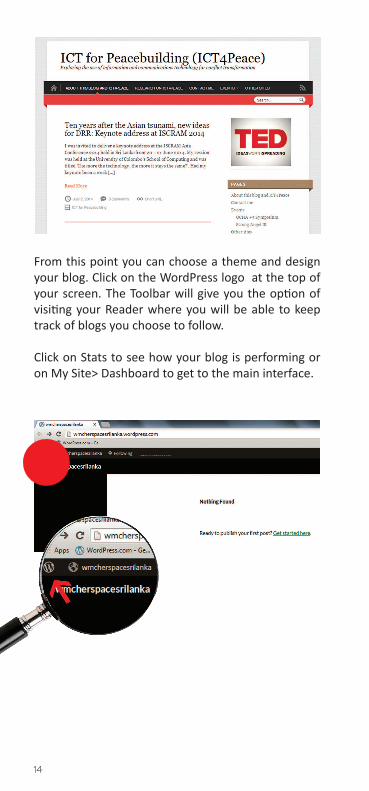
From this point you can choose a theme and design your blog. Click on the WordPress logo at the top of your screen. The Toolbar will give you the option of visiting your Reader where you will be able to keep track of blogs you choose to follow.
Click on Stats to see how your blog is performing or on My Site> Dashboard to get to the main interface.
15
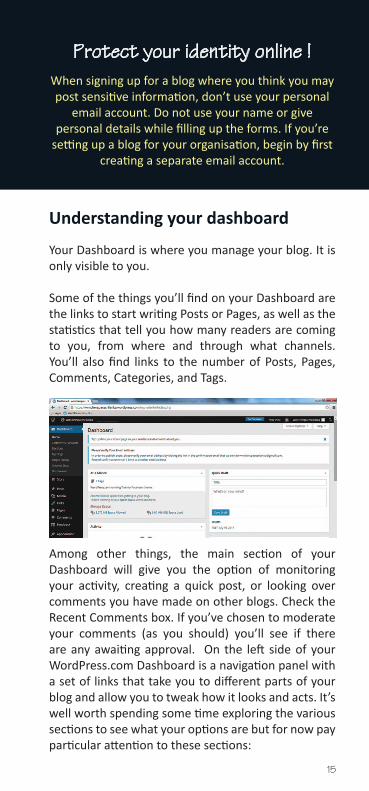
Among other things, the main section of your Dashboard will give you the option of monitoring your activity, creating a quick post, or looking over comments you have made on other blogs. Check the Recent Comments box. If you’ve chosen to moderate your comments (as you should) you’ll see if there are any awaiting approval. On the left side of your WordPress.com Dashboard is a navigation panel with a set of links that take you to different parts of your blog and allow you to tweak how it looks and acts. It’s well worth spending some time exploring the various sections to see what your options are but for now pay particular attention to these sections:
Protect your identity online !When signing up for a blog where you think you may post sensitive information, don’t use your personal
email account. Do not use your name or give personal details while filling up the forms. If you’re
setting up a blog for your organisation, begin by first creating a separate email account.
Understanding your dashboard
Your Dashboard is where you manage your blog. It is only visible to you.
Some of the things you’ll find on your Dashboard are the links to start writing Posts or Pages, as well as the statistics that tell you how many readers are coming to you, from where and through what channels. You’ll also find links to the number of Posts, Pages, Comments, Categories, and Tags.
16
1. Appearance
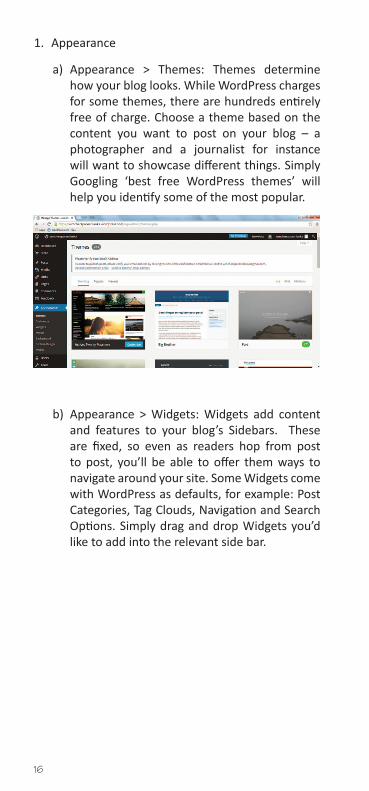
a) Appearance > Themes: Themes determine how your blog looks. While WordPress charges for some themes, there are hundreds entirely free of charge. Choose a theme based on the content you want to post on your blog – a photographer and a journalist for instance will want to showcase different things. Simply Googling ‘best free WordPress themes’ will help you identify some of the most popular.
b) Appearance > Widgets: Widgets add content and features to your blog’s Sidebars. These are fixed, so even as readers hop from post to post, you’ll be able to offer them ways to navigate around your site. Some Widgets come with WordPress as defaults, for example: Post Categories, Tag Clouds, Navigation and Search Options. Simply drag and drop Widgets you’d like to add into the relevant side bar.

17
2. Settings
c) Settings > General: Here you can enter/change your site’s title and edit your tagline. If you can’t think of a site tagline right away, just remember to delete the text that’s there, at least. While you’re here, set your timezone.
d) Settings > Reading: Here you can decide how your blog will appear to a visitor. Choose whether you want your front page to display your most recent post or a standard ‘static’ page about your organisation or yourself.
Another critical element in the same section is Site Visibility. Ideally you will allow search engines to index your site, but if you want to keep your blog private for a while, choose that option. It’s also a good idea to allow the blog to display related posts, so a reader can find everything you’ve written on a particular subject with ease.
Last but not least, remember to rewrite the text WordPress sends out when someone signs up to follow your blog or to follow a comment thread. Attention to such details is key to creating a professional blog.
e) Settings > Discussion: Here is where you go to manage how comments can be made as well as displayed on your blog. It’s a good idea to make sure that you approve a comment before it appears. To ensure that you do so as quickly as possible, enable email alerts. You might also want to ask commenters to leave a name and email address to ensure not just quality but help you get in touch with one of them if you need to.

18
f) Settings > Sharing: Drag and drop various services listed under the Sharing Buttons to allow your readers to share your content on various platforms like Twitter, Facebook and Email. Make sure they can also re-blog posts and like posts and comments as well.
3. Stats
Simply click on the bar graph on the upper left of your Dashboard to access your visitor statistics. You’ll be able to see where in the world you readers are, what your most popular posts are as well as your best performing tags and categories among others.
Email verificationThis is also a good time to verify your email address.
If you check your inbox, you’ll find an email from WordPress waiting for you. Just click on the link
provided and you’re ready to begin posting.
19
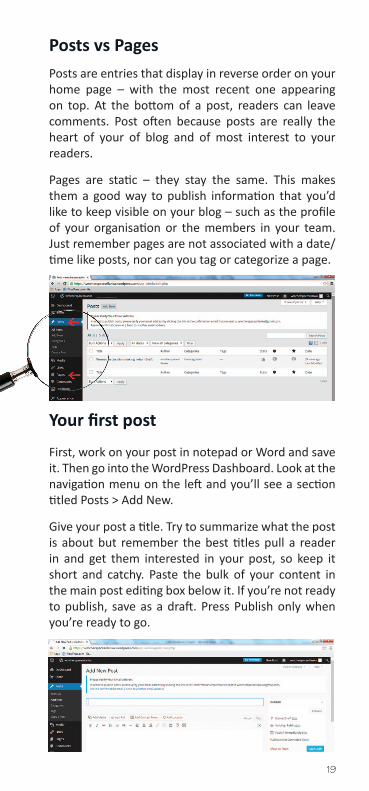
Posts vs Pages Posts are entries that display in reverse order on your home page – with the most recent one appearing on top. At the bottom of a post, readers can leave comments. Post often because posts are really the heart of your of blog and of most interest to your readers.
Pages are static – they stay the same. This makes them a good way to publish information that you’d like to keep visible on your blog – such as the profile of your organisation or the members in your team. Just remember pages are not associated with a date/time like posts, nor can you tag or categorize a page.
Your first post
First, work on your post in notepad or Word and save it. Then go into the WordPress Dashboard. Look at the navigation menu on the left and you’ll see a section titled Posts > Add New.
Give your post a title. Try to summarize what the post is about but remember the best titles pull a reader in and get them interested in your post, so keep it short and catchy. Paste the bulk of your content in the main post editing box below it. If you’re not ready to publish, save as a draft. Press Publish only when you’re ready to go.

20
From here you can also Add Media, embed a Poll, include a Contact Form or flag your Location. While it is possible to simply copy and paste an image into a post, by going through the Add Media button you can also caption your image and choose the right placement. The photograph then gets added to your Media Library for easy access.
Remember to Tag and Categorize all your posts. This is important because it helps readers navigate your site. It also helps search engines direct new readers to your blog.
Go to Posts > All Posts to work on more than one post at a time. Here you can delete or edit posts as a group by using the Bulk Edit feature.
Tags and categories
Categories allow the classification of your posts into groups and subgroups. Examples of categories can be topics like Gender and Politics or media, the names of countries or specific programmes. Think about your blog posts in advance and plan your categories based on your organisation’s projects or focus areas. You can file a post under more than one category.
Tags are the keywords you might assign to each post. They are usually more specific than categories. For instance, while your main categories may be Gender or Media your tags could be documents on Gender and activities on gender or Television, Newspapers and Radio respectively. Like categories, think of tags as another way for your readers to find what they’re interested in your blog.

21
What do I blog about?
Your blog can be about anything you want it to be. Some bloggers jot down personal notes, but it’s also a great way to get a message out. You could be an activist blogger, writing about issues pertaining to women’s rights, human rights, gender equality and women’s empowerment. You can share your blog with your readers not only through your Twitter and Facebook accounts but also by sending it to other organisations like ‘HerSpace Sri Lanka’ and ‘Groundviews’, who might in turn choose to share it with their readers.
Here are some other ways you can create content for your blog:
• Create a record of your organisation’s work.
• Invite members of your team to write about their work.
• Generate photo essays.
• Build blogs around themes such as World Days, conferences or the issues your organisation is focusing on.
• Interview the people your organisation works with.
• Write commentary on current events.

22
That having been said, short quotations will usually be considered fair use and not copyright infringement. Take care though to attribute your quote properly and where possible provide a link to the source.
When looking for photographs online, never simply take one off a Google image search. If you don’t have your own image, sites like http://search.creativecommons.org/ are your friends. On here you’ll find photographs filed under Creative Commons licenses that allow anyone to use these images for free. Read the license carefully to see what rights the photographer has reserved. In many cases, photographers only ask that the work be attributed to them. Images in the Public Domain are also free to use.
You’ll find more details on Creative Commons licenses here: http://creativecommons.org/licenses/
How to create a page Look at the navigation menu on the left and you’ll see a section titled Pages > Add New. Under Page Attributes, you have the option of choosing a Parent for your page. So for instance, if you wanted to create a page about your team, you could add it under the About Me page. You could do the same while providing the contact details of your organisation or the various projects you are currently working on.
Copyright issues to keep in mindCopyright infringement could get your blog taken down. You could be accused of this if you take a copyrighted work and reproduce it, distribute or
pass it off as your own work. If you want to republish content – either text or photographs - make sure you get written permission from the owners of
that content who might be individual authors and photographs or organisations.

23
The About page is often one of the most visited pages on a blog. It’s where people go if they like your posts. So make sure your About page provides all the details you’d like your readers to know about you or your organisation. If you are also on Facebook or Twitter, this is a great place to invite them to like or follow you on those sites as well. Whenever possible, include a call to action – inviting your reader to engage with you in a specific way.

24
PluginsWordPress automatically includes all the most popular plugins such as Site Stats, Facebook Integration, Contact Forms and Tag Clouds. As you can see plugins simply expand what you can do with your blog.
GravatarGravatar - i.e Globally Recognized Avatar – is the photo or image you choose to associate with your WordPress account. This will appear next to any comment or post you upload on the site.
The idea is to choose a link that directs your reader to another site that will give them more details on
that subject. Hyperlinks can help search engines get a better handle on the content of your blog and also
add to your reader’s experience.
Other terms you should know
Hyperlink: These are words or phrases in your post that you can format so that they serve as links that
allow your reader to jump to another page. You could make the words ‘Sri Lanka Constitution’ into a hyperlink by selecting the text and then clicking on
the ‘Insert Link’ button.
25
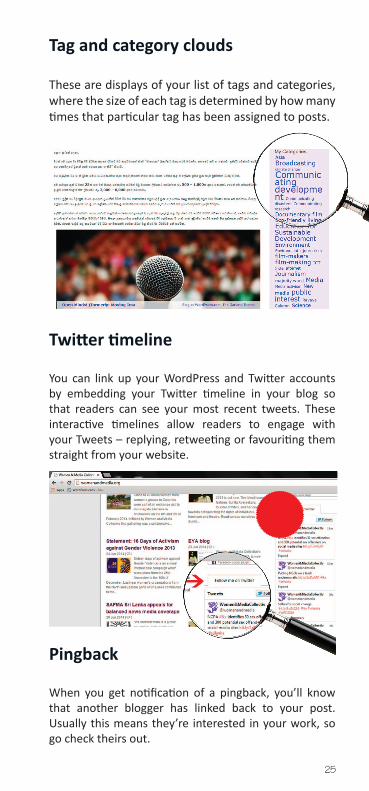
Twitter timeline
You can link up your WordPress and Twitter accounts by embedding your Twitter timeline in your blog so that readers can see your most recent tweets. These interactive timelines allow readers to engage with your Tweets – replying, retweeting or favouriting them straight from your website.
Pingback
When you get notification of a pingback, you’ll know that another blogger has linked back to your post. Usually this means they’re interested in your work, so go check theirs out.
Tag and category clouds
These are displays of your list of tags and categories, where the size of each tag is determined by how many times that particular tag has been assigned to posts.

26
27
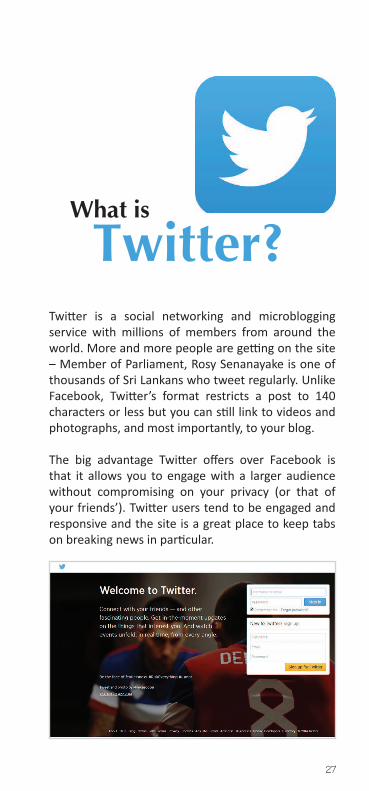
Twitter is a social networking and microblogging service with millions of members from around the world. More and more people are getting on the site – Member of Parliament, Rosy Senanayake is one of thousands of Sri Lankans who tweet regularly. Unlike Facebook, Twitter’s format restricts a post to 140 characters or less but you can still link to videos and photographs, and most importantly, to your blog.
The big advantage Twitter offers over Facebook is that it allows you to engage with a larger audience without compromising on your privacy (or that of your friends’). Twitter users tend to be engaged and responsive and the site is a great place to keep tabs on breaking news in particular.
What is Twitter?

28
Setting up your Twitter account
Go to http://twitter.com and choose the Sign Up option. Alternately, you can go directly to https://twitter.com/signup.
1. You will be asked to provide your full name, email address and password. If you want to use this account on behalf of your organisation, fill in these sections with the appropriate details. Remember that an email address can only be associated with one Twitter account at a time.
2. Click Sign Up for Twitter.
3. On the next page, you can select a username (usernames are unique identifiers on Twitter). Choose a username based on your organisation’s title. If this is a personal account, you have more leeway to pick a quirky username or to use your own name. Twitter will tell you if the username is available or not. If not, keep trying your luck.
4. Double-check your name, email address, password, and username.
5. Click Create my Account. Type in the numbers and letters you see to confirm your identity.
6. Twitter will send a confirmation email to the address you entered on sign up, click the link in that email to confirm your email address and account.
7. After signing up, Twitter will show you accounts of people you could follow. Following them means they will be added to your Homepage, and you’ll see their most recent tweets. You can Unfollow anyone at any time. If you want to go straight to your timeline, close the page and log in to Twitter again.
29
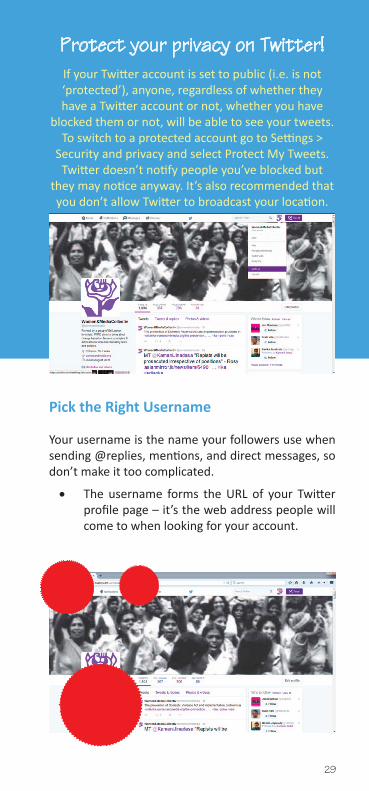
Protect your privacy on Twitter! If your Twitter account is set to public (i.e. is not ‘protected’), anyone, regardless of whether they have a Twitter account or not, whether you have
blocked them or not, will be able to see your tweets. To switch to a protected account go to Settings >
Security and privacy and select Protect My Tweets. Twitter doesn’t notify people you’ve blocked but
they may notice anyway. It’s also recommended that you don’t allow Twitter to broadcast your location.
Pick the Right Username
Your username is the name your followers use when sending @replies, mentions, and direct messages, so don’t make it too complicated.
• The username forms the URL of your Twitter profile page – it’s the web address people will come to when looking for your account.

30
• You can change your username in your account settings at any time, as long as the new username is not already in use.
• Twitter recommends that usernames must be fewer than 15 characters in length. You cannot choose a username that includes the words “admin” or “Twitter.”
Finding people on Twitter
Type the person's name into the search box at the top of your Twitter homepage. Your results will show a combination of people and Tweets related to your search.
Once you’ve found a few people, take a look through their list of Followers and Following. You might find more accounts that interest you.
Your Twitter ‘dashboard’
Home: a real-time, constantly updated list of tweets from those you follow.
Notifications: this tab allows you to view interactions, mentions, recent follows and re-tweets.
Discover: find top tweets, new tweeters to follow, find friends and browse categories.
31
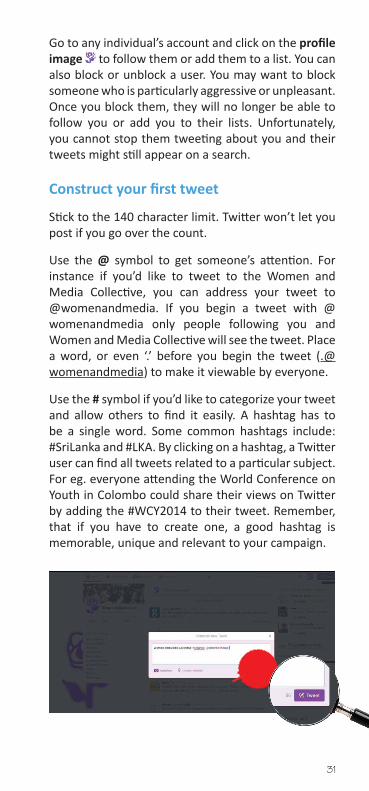
Go to any individual’s account and click on the profile image to follow them or add them to a list. You can also block or unblock a user. You may want to block someone who is particularly aggressive or unpleasant. Once you block them, they will no longer be able to follow you or add you to their lists. Unfortunately, you cannot stop them tweeting about you and their tweets might still appear on a search.
Construct your first tweet
Stick to the 140 character limit. Twitter won’t let you post if you go over the count.
Use the @ symbol to get someone’s attention. For instance if you’d like to tweet to the Women and Media Collective, you can address your tweet to @womenandmedia. If you begin a tweet with @womenandmedia only people following you and Women and Media Collective will see the tweet. Place a word, or even ‘.’ before you begin the tweet (.@womenandmedia) to make it viewable by everyone.
Use the # symbol if you’d like to categorize your tweet and allow others to find it easily. A hashtag has to be a single word. Some common hashtags include: #SriLanka and #LKA. By clicking on a hashtag, a Twitter user can find all tweets related to a particular subject. For eg. everyone attending the World Conference on Youth in Colombo could share their views on Twitter by adding the #WCY2014 to their tweet. Remember, that if you have to create one, a good hashtag is memorable, unique and relevant to your campaign.

32
Twitter terms you need to know
Messages from those you follow will show up in a stream on your Twitter homepage in your Timeline. Follow a few people, news outlets, organizations, or accounts you’re interested in and your homepage will have something new for you every time you log in.
Follow an account you’re interested in.
RT if you’d like to retweet someone’s tweet exactly as is.
MT if you’d like to add your comment to theirs.
DM when you’d like to send someone a direct message.
Favourite a tweet you particularly liked.
A list is a curated group of Twitter users. Create your own list or subscribe to lists created by others. It’s a great way to break the people you’re following into groups, such as Media or Activists or even Friends. Viewing a list timeline will show you a stream of tweets from only the users on that list.
33
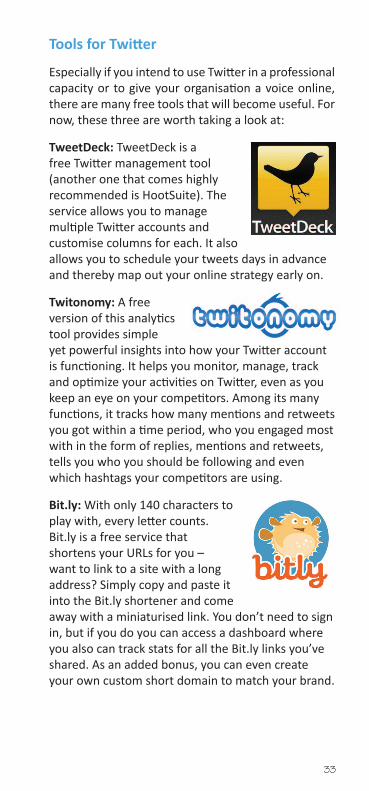
Tools for Twitter
Especially if you intend to use Twitter in a professional capacity or to give your organisation a voice online, there are many free tools that will become useful. For now, these three are worth taking a look at:
TweetDeck: TweetDeck is a free Twitter management tool (another one that comes highly recommended is HootSuite). The service allows you to manage multiple Twitter accounts and customise columns for each. It also allows you to schedule your tweets days in advance and thereby map out your online strategy early on.
Twitonomy: A free version of this analytics tool provides simple yet powerful insights into how your Twitter account is functioning. It helps you monitor, manage, track and optimize your activities on Twitter, even as you keep an eye on your competitors. Among its many functions, it tracks how many mentions and retweets you got within a time period, who you engaged most with in the form of replies, mentions and retweets, tells you who you should be following and even which hashtags your competitors are using.
Bit.ly: With only 140 characters to play with, every letter counts. Bit.ly is a free service that shortens your URLs for you – want to link to a site with a long address? Simply copy and paste it into the Bit.ly shortener and come away with a miniaturised link. You don’t need to sign in, but if you do you can access a dashboard where you also can track stats for all the Bit.ly links you’ve shared. As an added bonus, you can even create your own custom short domain to match your brand.

34
Fa
cebo
ok

35
The chances are if you’re not already on Facebook, many of your friends are. One of the most ubiquitous of all social networks, the site has become more than just a way to stay in touch with friends and share photographs. Everyone from small businesses to multi-billion dollar conglomerates have a presence on FB, and it might be a good thing for your organisation to have one too. Once again, it’s free.
Create Your Facebook account
Signing up for Facebook is a simple, quick process.
1. Go to www.Facebook.com.
2. Fill in your name, birthday, gender and email address in the provided Sign Up form. If you don’t see the form, click Sign Up and it will come up.
3. Pick a password. Keep in mind the guidelines and create a strong, alphanumeric password.
Why get on
Facebook?
36
Facebook will offer to help you find friends by adding people whom you are in touch with over email. You can always skip this process and add friends individually later. Filling out your profile, including where you live and work, speeds up this process, allowing colleagues and friends to find you.
Pages vs. Groups
Facebook pages enable public figures, businesses, organizations and other entities to have their own presence on Facebook. These pages are public by default and are usually visible to everyone. People can become fans of a particular page by liking it. Fans will see updates in their timeline and can post comments on the page.
On the other hand, Facebook groups allow for smaller groups to communicate freely with each other. (Your organisation could have a Facebook group for employees for instance.) Groups are often created around a common cause or issue, sometimes they organise activities or simply post content and photographs related to a particular subject. Groups can be either public and open to anyone who wants to join, or private and by invitation only. Like with pages, new posts by a group are included in the News Feeds of its members and members can interact and share with one another from the group.
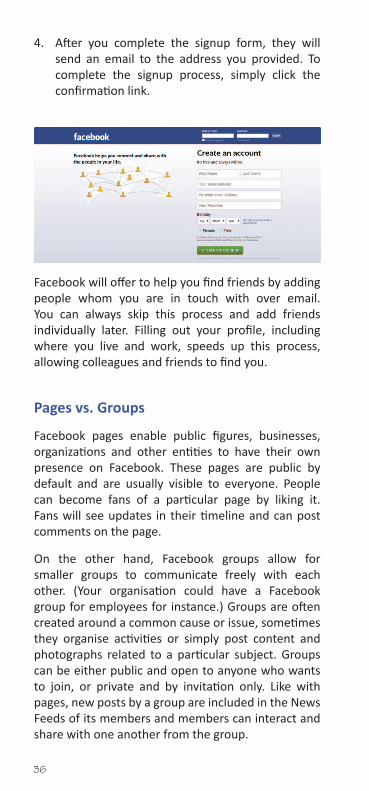
4. After you complete the signup form, they will send an email to the address you provided. To complete the signup process, simply click the confirmation link.

37
Create a page
1. Go to Facebook.com/pages/create
2. Choose the Page category that best suits you.
3. Select a more specific category from the dropdown menu and fill out the required information.
4. Click to check the box next to ‘I agree to Facebook Pages Terms.’
5. Click ‘Get Started.’
Create a group
1. Go to your Facebook Homepage and look at the section on the left – under Groups you’ll find an option to Create Group. Click on that.
2. A window will appear, where you'll be able to enter a group name, add members and select the privacy settings for your group.
3. Click Create and you're done.
Once the group is created, you’ll be taken to the group page. Begin by clicking at the top right of the group and selecting Edit Group Settings. From here you can add a group description, tags, set a group email address and add a group picture.
38
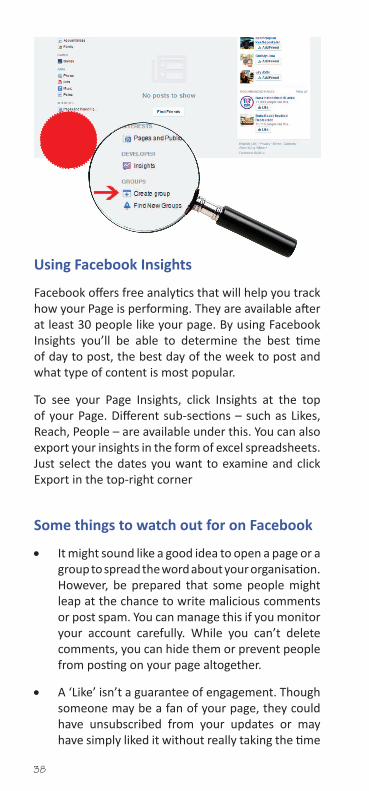
Using Facebook Insights
Facebook offers free analytics that will help you track how your Page is performing. They are available after at least 30 people like your page. By using Facebook Insights you’ll be able to determine the best time of day to post, the best day of the week to post and what type of content is most popular.
To see your Page Insights, click Insights at the top of your Page. Different sub-sections – such as Likes, Reach, People – are available under this. You can also export your insights in the form of excel spreadsheets. Just select the dates you want to examine and click Export in the top-right corner
Some things to watch out for on Facebook
• It might sound like a good idea to open a page or a group to spread the word about your organisation. However, be prepared that some people might leap at the chance to write malicious comments or post spam. You can manage this if you monitor your account carefully. While you can’t delete comments, you can hide them or prevent people from posting on your page altogether.
• A ‘Like’ isn’t a guarantee of engagement. Though someone may be a fan of your page, they could have unsubscribed from your updates or may have simply liked it without really taking the time
39
to understand your work. Comments and sharing are considered deeper forms of engagement on Facebook than likes alone.
• Facebook taps your personal data to provide information to advertisers. Be aware of this when sharing information about yourself. Also pay attention to the permissions that apps request when you install them. Only download apps from trusted sources and remember you don’t have to accept every request that comes along. Many of these are automatically generated by the app itself.
Many organisations purchase advertising on Facebook to promote their business. The pros are that Facebook ads can be customised to a high degree and tailored to target a specific audience. You are billed either by a cost per click (CPC) or cost per impressions (CPI) system. However, Facebook’s bidding system can put those with smaller budgets at a disadvantage. You can find out more at https://www.facebook.com/advertising
Protect your privacy! How to stay safe on FB
Pay close attention to your privacy settingsWhen it comes to your private account, make sure that you are sharing your photographs and updates only with friends. You may want to use Facebook lists to allow some friends access to your pictures, while others can only see your basic data. You can do so by clicking on the lock symbol at the top right hand corner of the page. You'll also find an audience selector tool in most places where you share status updates or photos. Simply click on it and select who you want to share with.

40
Be discreet about what you share An error in your privacy settings or the indiscretion of someone you thought you could trust may lead to personal information being shared far and wide on Facebook. Don’t post anything you may regret. Some people prefer to be extra careful about their details and don’t even share where they live or work on Facebook.
Be careful who you accept as a friendThis is only common sense, but add only people you know yourself and know well. Avoid adding friends of friends or people you’ve only met once or twice. Remember that it’s not just you, in some cases you may also be giving them access to your friends’ data.
Monitor who’s tagging you in which photographsYou can see the tagged pictures of you by going to your profile and clicking on Photos > Photos of You. Un-tag any pictures you would rather not be in. Simply click ‘Report/Remove Tag’ under the ‘Options’ on the bottom of the picture. If you feel the picture is particularly compromising, ask the person who posted it to take it down.
Avoid broadcasting your movementsDon’t share your address or other personal details online, including when and where you intend to go on vacation. Wait till you get back to share photographs and the details of your trip.
Change your password every few monthsAlways remember to log out after you're finished with Facebook, especially on a shared computer.
Check Facebook linksBe careful about what links you click on, even in emails that appear to be from Facebook. Don’t click on anything that looks out of the ordinary. If you’re concerned, log on to Facebook itself and if there’s an issue the site will notify you.

44

42