getting spirometry right it matters! performance, quality assessment, and...
TRANSCRIPT

Getting Spirometry Right
It Matters!
Performance, Quality
Assessment, and
Interpretation
Susan Blonshine RRT, RPFT, AE-C, FAARC

Sample Title
• Recognize acceptable spirometry that
meets the “start of test” and “end of test
criteria”.
• Recognize an obstructive pattern
consistent with COPD or asthma.
Objectives

Sample TitleSpirometry: a 3-Step Process
1. Pre-test
2. Test
3. Post-test
a. Acceptability and
Repeatability
b. Report generation

Sample TitleSpirometer Preparation
(Equipment-dependent) Warm up
spirometer before patient arrives
Verify that the room is between
17º - 40º C (63º - 104º F)
Record room’s relative humidity and
barometric pressure

Sample TitleEquipment Function and Calibration
Each day of patient testing, use a 3-liter
syringe to verify proper equipment
function
Remember acceptable variance
105 ml
Range: 2.90 to 3.10

Sample Title
Never test patients on a system
that cannot pass calibration
checks

Patient Preparation

Sample TitleIntroductions and Information
Introduce yourself to the patient
Check patient identification
Briefly explain the procedure
Encourage questions, and answer them
in easily understood terms
Avoid using technical terms and
acronyms

Sample Title
Measure patient’s height to the nearest
centimeter or ½ inch
Patient should be measured in stocking
or bare feet
Gathering Demographic and Patient Information

Patient Training

Sample TitleSpirometry is effort-dependent
Understand testing needs
Be cooperative during the testing
process
The patient must:

Sample TitleSpirometry is effort-dependent
Good coaching can increase volume
10% to 15%

Sample TitleSpirometry is effort-dependent
Good technologist – patient
interaction is key to testing
success

Sample Title
The patient should be sitting during
testing (current ATS/ERS)
Patient may be standing with a chair
behind for occupational testing
Both feet should be on the floor
Testing Position

Sample Title
Tight clothing that may restrict
breathing should be loosened

Sample Title
1. The patient breathes in as deeply as possible, to Total Lung Capacity
2. The patient inserts the mouthpiece between teeth and presses the lips together
3. The patient blows out as fast and hard as possible to Residual Volume
Open-circuit Testing

Sample Title
1. The patient positions the mouthpiece
in his/her mouth and breathes normally
through the mouthpiece
2. The patient inhales as deeply as
possible to Total Lung Capacity
3. The patient blows out as fast and hard
as possible, completely to Residual
Volume
Closed-circuit Testing

Sample TitleTesting Position
Seated
Looking forward
Both feet on the floor
Instruct and demonstrate proper
posture during testing

Sample TitleHead Position
The head should be slightly elevated
The chin should be pointed forward

Sample TitlePlacement of the Mouthpiece
The patient places the mouthpiece in his/her mouth
The patient’s tongue goes under the mouthpiece
The patient’s lips should wrap tightly around the mouthpiece
The patient should not bite the mouthpiece

Sample Title
Patients wearing dentures should
remove them prior to testing

Sample TitleNoseclips
Explain how noseclips will be used
during testing, to force all breathing
through the mouthpiece

Sample Title
1. Place the mouthpiece in your mouth
2. Breathe in and out nice and easy
3. Breathe in as deep as possible
4. Blow out hard and fast
5. Keep squeezing all the air out for about six seconds or until you are told to breathe in deeply again
6. Take the mouthpiece out of your mouth and relax
Go Over Each Step

Sample TitleTesting Demonstration
Always demonstrate the test
procedure with animation and the
same level of effort that is expected
of the patient
Most patients should be able to
achieve an acceptable peak flow

Sample TitleInstruct Patient to
Sit up straight
Place the mouthpiece in his/her mouth
Breathe in as deeply as possible

Sample Title
Observe the patient’s effort and
accessory muscles

Sample Title
Instruct the patient to blow out hard
and fast
Watch the system’s graphic displays
as the patient blows out
The patient should not hold his/her
breath at Total Lung Capacity

Sample Title
Instruct the patient to continue to
squeeze all the air out for at least 6
seconds, or the volume-time curve
shows a 1-second plateau

Sample Title
When a flow-volume “loop” is being
performed, tell the patient to breathe
back in as rapidly as possible, to
Total Lung Capacity

Sample TitleBetween Trials
Instruct the patient to remove
mouthpiece and rest between trials
Use rest time between trials to re-
instruct, as needed

Maneuver Performance
• Three acceptable maneuvers
• Practical upper limit of 8-clinical judgement

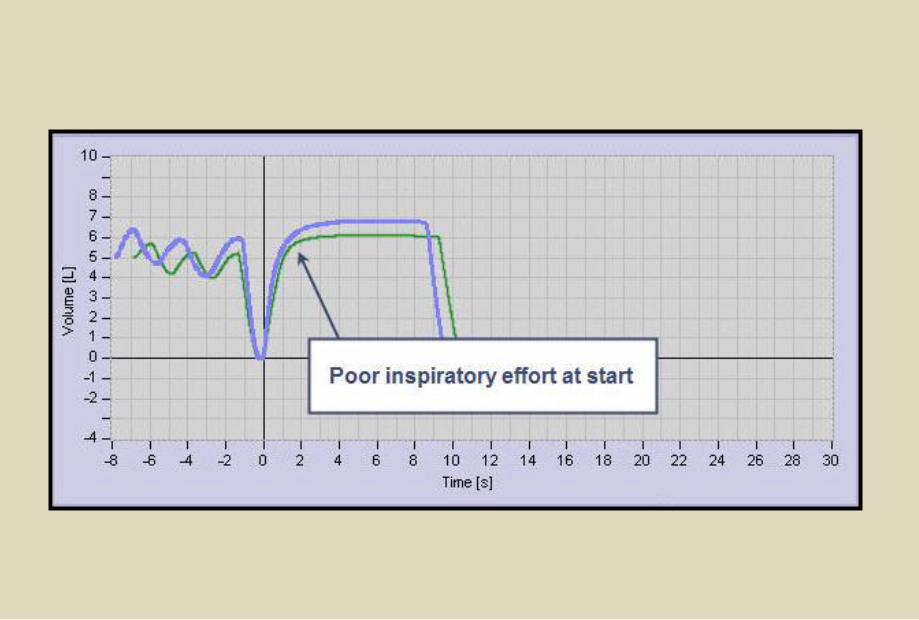
Satisfactory start of test
• Back extrapolated volume
less than 5% or 150 ml
• Pause at TLC greater than
4-6 seconds decreases PEF
and FEV1

End of test criteria
• Obvious plateau of 1 second
• Minimum exhalation time
• Six seconds

Volume-Time Curve
Asthma Initiative of Michigan, 2005.

Acceptability Criteria
• Was end of test criteria met? ( 1 second
plateau)
• Was there a minimum exhalation time of 6
seconds?
• Was the start of test satisfactory? (Less than
5% back-extrapolation)
• Did the subject understand the instructions?

Acceptability Criteria
• Was inspiration performed with maximum effort?
• Was exhalation smooth and continuous?
• Was effort maximal on expiration?
• Are there at least 3 acceptable maneuvers?
(all 7 criteria must be met)

Repeatability
• Is the variance less than .15 L between the
largest and second largest FVC
• Is the variance less than .15 L between the
largest and second largest FEV1
• Is there documentation for lack of
repeatability?

Sample Title
Have 3 acceptable tests been
performed?
Has repeatability criteria been met?
Have 8 or more tests been performed?
Can/should the patient continue
testing?
Are the inspiratory flow patterns
repeatable with maximal effort?
Deciding when Testing is Complete

Error Recognition and Correction
A skilled technologist can
recognize the following common
errors and take necessary
corrective measures


Nonconsistent

Spirometry Flow Chart
Miller MR, Hankinson J, Brusasco V, et al. Standardisation of spirometry.
Eur Respir J. 2005;26:319-338.


Reference Values
• Height must be accurate
• Match to patient population
– NHANESIII (8-80)
– Wang (<8)
• Use LLN
– 95% confidence interval

Reference Values
• Using .70 as a fixed lower limit for
FEV1/FVC ratio increase false positive
results
– Males >40 and females >50
• Reference author should be noted on report
– Author’s last name and date of
publication

ATS/ERS Interpretation - Obstruction
•For identification of obstruction
Use LLN for FEV1/VC
NOT a fixed ratio of 0.70 (GOLD and ATS COPD
recommendation)
•Roberts SD, et. al. FEV1/FVC Ratio of 70% Misclassifies Patients With
Obstruction at the Extremes of Age. Chest 2006;130;200-206
*Also see Falling Ratio Working Group at:
http://www.spirxpert.com/controversies/controversy.html

ATS/ERS 2005

Barreiro and Perillo, 2004.
National Asthma Council, 2005.

Normal

Obstruction

Restriction

Sarah, respiratory therapist
• Age: 52 years
• Her roommate has been complaining about Sarah’s
chronic cough and expectoration
• Patient has had a productive cough most mornings
for >5 years and occasional sinus headaches
• Otherwise, she reports “perfect health”
– Does not exercise much
– Denies dyspnea

Finding Pre-Value (L) %Pred
Postbronchodilator %Pred
FVC 2.7 63 3.3 77
FEV1 1.3 38 1.6 47
FEV1/FVC 48% 48%
Petty and Enright, 2005.

Example 1
Pred Actual %Pred
FVC 5.00 6.00 120%
FEV1 3.96 4.80 121%
FEV1/FVC 79% 80% 101%
A. Normal
B. Obstruction
C. Restriction
A. Normal
B. Obstruction
C. Restriction

Example 2
Pred Actual %Pred
FVC 5.00 3.00 60%
FEV1 3.96 3.00 76%
FEV1/FVC 79% 100% 127%
A. Normal
B. Obstruction
C. Restriction
D. Unacceptable

Example 3
Pred Actual %Pred
FVC 5.00 5.00 100%
FEV1 3.96 3.47 88%
FEV1/FVC 79% 69% 87%
A. Normal
B. Obstruction
C. Restriction
D. Unacceptable
A. Normal
B. Obstruction
C. Restriction
D. Unacceptable (Cough)

Example 4
Pred Actual %Pred
FVC 5.00 1.80 36%
FEV1 3.96 1.78 45%
FEV1/FVC 79% 99% 125%
A. Normal
B. Obstruction
C. Severe Restriction
D. Unacceptable

SPIROMETRY INTERPRETATION
1. Check graph for maneuver
ACCEPTABILITY and REPEATABILITY
2. Low FEV1/FVC ratio = obstruction
3. Low FVC, high FEV1/FVC = suggests
restriction

Any Questions
Susan Blonshine BS, RRT, RPFT, FAARC, AE-C
TechEd Consultants, Inc.
www.techedconsultants.com
?