getting started guide - virginia techgep.frec.vt.edu/vccs/materials/2011/day3/handouts/3.10-gps...
TRANSCRIPT

GETTING STARTED GUIDE
Trimble GPS Analystextension
™

www.trimble.com
NORTH & SOUTH AMERICA
Trimble Navigation Limited
10355 Westmoor Drive
Suite #100
Westminster, CO 80021
USA
EUROPE, AFRICA &
MIddlE EAST
Trimble GmbH
Am Prime Parc 11
65479 Raunheim
GERMANY
ASIA-PACIFIC
Trimble Navigation
Singapore PTE Limited
80 Marine Parade Road
#22-06 Parkway Parade
Singapore, 449269
SINGAPORE

Version 2.10Revision APart Number 52653-04April 2007 F
GETTING STARTED GUIDE
Trimble GPS Analyst™extension

Trimble Navigation Limited10355 Westmoor DriveSuite #100Westminster, CO 80021USAwww.trimble.com
Legal Notices
Copyright and Trademarks© 2004-2007, Trimble Navigation Limited. All rights reserved. For STL support, the software uses the Moscow Center for SPARC Technology adaptation of the SGI Standard Template Library. Copyright © 1994 Hewlett-Packard Company, Copyright © 1996, 97 Silicon Graphics Computer Systems, Inc., Copyright © 1997 Moscow Center for SPARC Technology. Trimble, the Globe & Triangle logo, GeoExplorer, and GPS Pathfinder are trademarks of Trimble Navigation Limited, registered in the United States and in other countries. GeoXM, GeoXT, GeoXH, GPS Analyst, GPScorrect, H-Star, Juno, ProXH, ProXT, and TerraSync are trademarks of Trimble Navigation Limited.Recon is a registered trademark of Tripod Data Systems, Inc.Microsoft, ActiveSync, Windows, and Windows Mobile are either registered trademarks or trademarks of Microsoft Corporation in the United States and/or other countries.The Bluetooth word mark and logos are owned by the Bluetooth SIG, Inc. and any use of such marks by Trimble Navigation Limited is under license. All other trademarks are the property of their respective owners.This product is covered by the following patents: 5,928,306; 6,144,335; and 6,377,891.
Release NoticeThis is the April 2007 release (Revision A) of the Trimble GPS Analyst Extension Getting Started Guide, part number 52653-04. It applies to version 2.10 of the Trimble GPS Analyst extension for ESRI ArcGIS software.
End User License Agreement
Trimble GPS Analyst extension for ESRI ArcGIS softwareIMPORTANT, READ CAREFULLY. THIS END USER LICENSE AGREEMENT (“AGREEMENT”) IS A LEGAL AGREEMENT BETWEEN YOU AND TRIMBLE NAVIGATION LIMITED and applies to the GPS Analyst extension for ESRI ArcGIS software, and includes any accompanying written materials, such as a user's guide or product manual, as well as any “online” or electronic documentation (collectively, “Software”). This Agreement will also apply to any Software error corrections, updates and upgrades subsequently furnished by Trimble, unless such are accompanied by different license terms and conditions which will govern their use. BY CLICKING “YES” OR “I ACCEPT” IN THE ACCEPTANCE BOX, OR BY INSTALLING, COPYING OR OTHERWISE USING THE SOFTWARE, YOU AGREE TO BE BOUND BY THE TERMS OF THIS AGREEMENT. IF YOU DO NOT AGREE TO THE TERMS OF THIS AGREEMENT, PROMPTLY
RETURN THE UNUSED SOFTWARE AND ANY ACCOMPANYING TRIMBLE PRODUCT TO THE PLACE FROM WHICH YOU OBTAINED THEM FOR A REFUND.This Software is protected by copyright laws and international copyright treaties, as well as other intellectual property laws and treaties. The Software is licensed, not sold.1SOFTWARE PRODUCT LICENSE1.1License Grant. Subject to the terms and conditions of this Agreement and your pre-payment of the applicable license fee(s), Trimble grants you a non-exclusive, nontransferable (except as expressly provided below), non-sublicensable license to install and use the Software (in machine-readable form only) for your internal business needs, as hereinafter provided:Stand-Alone, Single Use Seat License: If you have acquired such license for the stand-alone, single use version of the Software, you are permitted to install and use one copy of the Software on one computer as permitted herein. Such use is limited to use with Trimble products or other vendor hardware on any computer hardware and operating system for which it was intended. You may use the Software only on one dedicated computer, but you may move the Software from one computer to another, provided that you first uninstall the Software from the original computer and then reinstall it on the new computer. No concurrent use is permitted. You may also store or install a copy of the Software on a storage device, such as a network server, used only to install the Software on your other computers over an internal network; but in such case you must acquire and dedicate a license for each separate computer on which the Software is installed from the storage device. A license for the Software may not be shared or used concurrently on different computers.Floating Seat License(s): If you have acquired such license for the floating seat version of the Software, you are permitted to install and use the Software on multiple computers as permitted herein. Such use is limited to use with Trimble products or other vendor hardware on any computer hardware and operating system for which it was intended. Concurrent use of the Software by multiple individuals is permitted, but is strictly limited to the total number of floating seat licenses purchased by you for such purpose.You may use the Software to develop customized tools and applications as permitted by the Software documentation (“Customized Applications”), but such Customized Applications may only be used in connection with the Software.1.2Other Rights and Limitations. (1) You may not copy, modify, make derivative works (except for Customized Applications) of, rent, lease, sell, distribute or transfer the Software, in whole or in part, except as otherwise expressly authorized under this Agreement, and you agree to use all commercially reasonable efforts to prevent its unauthorized use and disclosure. (2) The Software contains valuable trade secrets proprietary to Trimble and its suppliers. To the extent permitted by relevant law, you shall not, nor allow any third party to copy, decompile, disassemble or otherwise reverse engineer the Software, or attempt to do so,
2 Trimble GPS Analyst Extension Getting Started Guide
provided, however, that to the extent any applicable mandatory laws give you the right to perform any of the aforementioned activities without Trimble's consent in order to gain certain information about the Software for purposes specified in the respective statutes (e.g., interoperability), you hereby agree that, before exercising any such rights, you shall first request such information from Trimble in writing detailing the purpose for which you need the information. Only if and after Trimble, at its sole discretion, partly or completely denies your request, may you exercise such statutory rights. (3) The Software is licensed as a single product. You may not separate its component parts for use on more than one computer except as specifically authorized in this Agreement. (4) You may not rent, lease or lend the Software unless you are a reseller of Trimble products under separate written agreement with Trimble and authorized by Trimble to do so. (5) No service bureau work is permitted. For purposes of this Agreement "service bureau work" shall be deemed to include, without limitation, use of the Software to process or to generate output data for the benefit of, or for purposes of rendering services to any third party over the Internet or other communications network. (6) You may permanently transfer all of your rights under this Agreement, provided you retain no copies, you transfer all of the Software (including all component parts, the media and printed materials, any upgrades, and this Agreement) and the recipient agrees to the terms of this Agreement. If the Software portion is an upgrade, any transfer must include all prior versions of the Software. (7) You may not use the Software for performance, benchmark or comparison testing or analysis, or disclose to any third party or release any results thereof (all of which information shall be considered Trimble confidential information) without Trimble's prior written consent.(8) You may not directly or indirectly export or re-export, or knowingly permit the export or re-export of the Software (or portions thereof) to any country, or to any person or entity subject to United States or foreign export restrictions in contravention of such laws and without first obtaining appropriate license; and(9) You agree to cooperate with Trimble to track the number of server computers, computers and other devices with access to the Software at your site(s) to ensure compliance with the license grant and installation restrictions in this Agreement. In the event the compliance check reveals that the number of installations or concurrent users at your site exceeds the actual number of licenses obtained by you, you agree to promptly reimburse Trimble three (3) times the then current applicable list price for the extra licenses that are required to be compliant, but that were not obtained, as liquidated damages and as a reasonable penalty. The foregoing remedy is not exclusive. 1.3Termination. The license is effective until terminated as provided herein. You may terminate this Agreement by ceasing all use of the Software and destroying or returning all copies. Without prejudice as to any other rights, Trimble may terminate this Agreement without notice if
you fail to comply with the terms and conditions of this Agreement. In such event, you must cease its use destroy all copies of the Software and of its component parts.1.4Copyright. All title and copyrights in and to the Software (including but not limited to any images, photographs, animations, video, audio, music, and text incorporated into the Software), the accompanying printed materials, and any copies of the Software are owned by Trimble and its suppliers. You shall not remove, cover or alter any of Trimble's patent, copyright or trademark notices placed upon, embedded in or displayed by the Software or on its packaging and related materials. 1.5U.S. Government Restricted Rights. The Software is provided with "RESTRICTED RIGHTS." Use, duplication, or disclosure by the United States Government is subject to restrictions as set forth in this Agreement, and as provided in DFARS 227.7202-1(a) and 227.7202-3(a) (1995), DFARS 252.227-7013(c)(1)(ii) (OCT 1988), FAR 12.212(a) (1995), FAR 52.227-19, or FAR 52.227-14(ALT III), as applicable. 2TIME LIMITED SOFTWARE. In the event that the Software provided to you is a time limited version ("Time Limited Software"), then the following terms shall apply, and supersede anything else to the contrary (including, without limitation, the limited warranty of Section 3):2.1Use and Limited Term; Disabling Mechanism. You may only use the Time Limited Software as expressly permitted hereunder and only to internally evaluate the Software for the limited duration of the term specified by Trimble, or, if no such term is specified, then for thirty (30) days from the date of initial installation of the Time Limited Software. The Time Limited Software contains a disabling mechanism, which will prevent the Time Limited Software from functioning after the end of such term. In the event that you subsequently acquire a paid license to the Software, then your use of the Software will also be governed by the terms of this Agreement (except for this Section 2).2.2No Warranties. YOU EXPRESSLY ACKNOWLEDGE AND AGREE THAT THE TIME LIMITED SOFTWARE IS PROVIDED TO YOU "AS-IS" WITHOUT WARRANTY OF ANY KIND, EITHER EXPRESS OR IMPLIED, INCLUDING, BUT NOT LIMITED TO, THE IMPLIED WARRANTIES OF MERCHANTABILITY, FITNESS FOR A PARTICULAR PURPOSE, NONINTERFERENCE, TITLE AND NONINFRINGEMENT. YOU ASSUME ALL RISK AS TO THE QUALITY AND PERFORMANCE OF THE TIME LIMITED SOFTWARE. 3LIMITED WARRANTY. 3.1Limited Warranty. Trimble warrants that the Software will perform substantially in accordance with the accompanying written materials (i.e., applicable user's guide or product manual) for a period of one (1) year from the date of purchase. This limited warranty gives you specific legal rights, you may have others, which vary from state/jurisdiction to state/jurisdiction. The above limited warranty does not apply to error corrections, updates or upgrades of the Software after expiration of the limited warranty period, which are provided “AS IS” and without warranty unless otherwise specified in writing by Trimble. ADDITIONALLY, TRIMBLE MAKES
Trimble GPS Analyst Extension Getting Started Guide 3

NO WARRANTIES, EITHER EXPRESS OR IMPLIED, REGARDING THE CUSTOMIZED APPLICATIONS OR USE OF THE SOFTWARE WITH ANY THIRD PARTY HARDWARE OR EQUIPMENT. Because the Software is inherently complex and may not be completely free of nonconformities, defects or errors, you are advised to verify your work. Trimble does not warrant that the Software will operate error free or uninterrupted, will meet your needs or expectations, or that all nonconformities can or will be corrected.3.2Customer Remedies. Trimble's and its suppliers' entire liability, and your sole remedy, with respect to the Software shall be either, at Trimble's option, (a) repair or replacement of the Software, or (b) return of the license fee paid for any Software that does not meet Trimble's limited warranty. The foregoing limited warranty is void if failure of the Software has resulted from (1) accident, misuse, abuse, or misapplication; (2) alteration or modification of the Software without Trimble's authorization; (3) interaction with software or hardware not supplied or supported by Trimble; (4) your improper, inadequate or unauthorized installation, maintenance or storage; or ( f ) if you violate the terms of this Agreement. Any replacement Software will be warranted for the remainder of the original warranty period or thirty (30) days, whichever is longer.3.3NO OTHER WARRANTIES. TO THE MAXIMUM EXTENT PERMITTED BY APPLICABLE LAW, TRIMBLE AND ITS SUPPLIERS DISCLAIM ALL OTHER WARRANTIES, TERMS, AND CONDITIONS, EITHER EXPRESS OR IMPLIED, BY STATUTE, COMMON LAW OR OTHERWISE, INCLUDING BUT NOT LIMITED TO, IMPLIED WARRANTIES, TERMS, AND CONDITIONS OF MERCHANTABILITY AND FITNESS FOR A PARTICULAR PURPOSE, TITLE, AND NONINFRINGEMENT WITH REGARD TO THE SOFTWARE, ITS SATISFACTORY QUALITY, AND THE PROVISION OF OR FAILURE TO PROVIDE SUPPORT SERVICES. TO THE EXTENT ALLOWED BY APPLICABLE LAW, IMPLIED WARRANTIES, TERMS AND CONDITIONS ON THE SOFTWARE ARE LIMITED TO ONE (1) YEAR. Y0U MAY HAVE OTHER LEGAL RIGHTS WHICH VARY FROM STATE/JURISDICTION TO STATE/JURISDICTION. 3.4LIMITATION OF LIABILITY. TO THE MAXIMUM EXTENT PERMITTED BY APPLICABLE LAW, IN NO EVENT SHALL TRIMBLE OR ITS SUPPLIERS BE LIABLE FOR ANY SPECIAL, INCIDENTAL, INDIRECT OR CONSEQUENTIAL OR PUNITIVE DAMAGES, HOWEVER CAUSED AND REGARDLESS OF THE THEORY OF LIABILITY (INCLUDING, WITHOUT LIMITATION, DAMAGES FOR LOSS OF BUSINESS PROFITS, BUSINESS INTERRUPTION, LOSS OF BUSINESS INFORMATION, OR ANY OTHER PECUNIARY LOSS), ARISING OUT OF THE USE OR INABILITY TO USE THE SOFTWARE, OR THE PROVISION OF OR FAILURE TO PROVIDE SUPPORT SERVICES, EVEN IF TRIMBLE HAS BEEN ADVISED OF THE POSSIBILITY OF SUCH DAMAGES, AND NOTWITHSTANDING ANY FAILURE OF ESSENTIAL PURPOSE OF ANY EXCLUSIVE REMEDY PROVIDED IN THIS AGREEMENT.
IN NO EVENT SHALL TRIMBLE'S TOTAL LIABILITY IN CONNECTION WITH THIS AGREEMENT OR THE SOFTWARE, WHETHER BASED ON CONTRACT, WARRANTY, TORT (INCLUDING NEGLIGENCE), STRICT LIABILITY OR OTHERWISE, EXCEED THE ACTUAL AMOUNT PAID TO TRIMBLE FOR USE OF THE SOFTWARE GIVING RISE TO THE CLAIM. BECAUSE SOME STATES AND JURISDICTIONS DO NOT ALLOW THE EXCLUSION OR LIMITATION OF LIABILITY FOR CONSEQUENTIAL OR INCIDENTAL DAMAGES, THE ABOVE LIMITATION MAY NOT APPLY TO YOU.3.5PLEASE NOTE: THE ABOVE TRIMBLE LIMITED WARRANTY PROVISIONS MAY NOT APPLY TO SOFTWARE PRODUCTS PURCHASED IN THOSE JURISDICTIONS (SUCH AS COUNTRIES OF THE EUROPEAN ECONOMIC COMMUNITY) IN WHICH PRODUCT WARRANTIES ARE OBTAINED FROM THE LOCAL DISTRIBUTOR. IN SUCH CASE, PLEASE CONTACT YOUR TRIMBLE DEALER FOR APPLICABLE WARRANTY INFORMATION.4GENERAL. 4.1This Agreement shall be governed by the laws of the State of California and applicable United States Federal law without reference to "conflict of laws" principles or provisions. The United Nations Convention on Contracts for the International Sale of Goods will not apply to this Agreement. Jurisdiction and venue of any dispute or court action arising from or related to this Agreement or the Software shall lie exclusively in or be transferred to the courts the County of Santa Clara, California, and/or the United States District Court for the Northern District of California. You hereby consent and agree not to contest, such jurisdiction, venue and governing law. 4.2Section 4.1 notwithstanding, if you acquired this product in Canada, this Agreement is governed by the laws of the Province of Ontario, Canada. In such case each of the parties to this Agreement irrevocably attorns to the jurisdiction of the courts of the Province of Ontario and further agrees to commence any litigation that may arise under this Agreement in the courts located in the Judicial District of York, Province of Ontario. If you acquired this product in the European Union, this Agreement is governed by the laws of The Netherlands, excluding its rules governing conflicts of laws and excluding the United Nations Convention on the International Sale of Goods. In such case each of the parties to this Agreement irrevocably attorns to the jurisdiction of the courts of The Netherlands and further agrees to commence any litigation that may arise under this Agreement in the courts of The Hague, The Netherlands.4.3Reservation of Rights. Trimble reserves all rights not expressly granted by this Agreement. 4.4Official Language. The official language of this Agreement is English. For purposes of interpretation, or in the event of a conflict between English and versions of this Agreement in any other language, the English language version shall be controlling.
4 Trimble GPS Analyst Extension Getting Started Guide

Mapping & GIS License Manager softwareIMPORTANT, READ CAREFULLY. THIS END USER LICENSE AGREEMENT ("AGREEMENT") IS A LEGAL AGREEMENT BETWEEN YOU AND TRIMBLE NAVIGATION LIMITED and applies to the Mapping & GIS License Manager software, and includes any accompanying written materials, such as a user's guide or product manual, as well as any "online" or electronic documentation (collectively, "Software"). This Agreement will also apply to any Software error corrections, updates and upgrades subsequently furnished by Trimble, unless such are accompanied by different license terms and conditions which will govern their use. BY CLICKING "YES" OR "I ACCEPT" IN THE ACCEPTANCE BOX, OR BY INSTALLING, COPYING OR OTHERWISE USING THE SOFTWARE, YOU AGREE TO BE BOUND BY THE TERMS OF THIS AGREEMENT. IF YOU DO NOT AGREE TO THE TERMS OF THIS AGREEMENT, PROMPTLY RETURN THE UNUSED SOFTWARE AND ANY ACCOMPANYING TRIMBLE PRODUCT TO THE PLACE FROM WHICH YOU OBTAINED THEM FOR A REFUND.This Software is protected by copyright laws and international copyright treaties, as well as other intellectual property laws and treaties. The Software is licensed, not sold.1 SOFTWARE PRODUCT LICENSE1.1 License Grant. Subject to the terms and conditions of this Agreement and your pre-payment of the applicable license fee(s), Trimble grants you a non-exclusive, non-transferable (except as expressly provided below), non-sublicensable license to install and use the License Manager component of the Software (in machine-readable form only) on any number of personal computers or network servers, but solely for your internal business needs in connection with your use of Trimble products.1.2 Other Rights and Limitations. (1) You may not copy, modify, make derivative works of, rent, lease, sell, distribute or transfer the Software, in whole or in part, except as otherwise expressly authorized under this Agreement, and you agree to use all commercially reasonable efforts to prevent its unauthorized use and disclosure. Disabling any licensing control features is prohibited. (2) The Software contains valuable trade secrets proprietary to Trimble and its suppliers. To the extent permitted by relevant law, you shall not, nor allow any third party to copy, decompile, disassemble or otherwise reverse engineer the Software, or attempt to do so, provided, however, that to the extent any applicable mandatory laws give you the right to perform any of the aforementioned activities without Trimble's consent in order to gain certain information about the Software for purposes specified in the respective statutes (e.g., interoperability), you hereby agree that, before exercising any such rights, you shall first request such information from Trimble in writing detailing the purpose for which you need the information. Only if and after Trimble, at its sole discretion, partly or completely denies your request, may you exercise such statutory rights.
(3) The Software is licensed as a single product. You may not separate its component parts for use on more than one computer except as specifically authorized in this Agreement. (4) You may not rent, lease or lend the Software unless you are a reseller of Trimble products under separate written agreement with Trimble and authorized by Trimble to do so. (5) No service bureau work, is permitted. For purposes of this Agreement "service bureau work" shall be deemed to include, without limitation, use of the Software to process or to generate output data for the benefit of, or for purposes of rendering services to any third party over the Internet or other communications network. (6) You may permanently transfer all of your rights under this Agreement, provided you retain no copies, you transfer all of the Software (including all component parts, the media and printed materials, any upgrades, and this Agreement) and the recipient agrees to the terms of this Agreement. If the Software portion is an upgrade, any transfer must include all prior versions of the Software. (7) You may not use the Software for performance, benchmark or comparison testing or analysis, or disclose to any third party or release any results thereof (all of which information shall be considered Trimble confidential information) without Trimble's prior written consent; and(8) You may not directly or indirectly export or re-export, or knowingly permit the export or re-export of the Software (or portions thereof) to any country, or to any person or entity subject to United States or foreign export restrictions in contravention of such laws and without first obtaining appropriate license. 1.3 Termination. The license is effective until terminated as provided herein. You may terminate this Agreement by ceasing all use of the Software and destroying or returning all copies. Without prejudice as to any other rights, Trimble may terminate this Agreement without notice if you fail to comply with the terms and conditions of this Agreement. In such event, you must cease its use destroy all copies of the Software and of its component parts.1.4 Copyright. All title and copyrights in and to the Software (including but not limited to any images, photographs, animations, video, audio, music, and text incorporated into the Software), the accompanying printed materials, and any copies of the Software are owned by Trimble and its suppliers. You shall not remove, cover or alter any of Trimble's patent, copyright or trademark notices placed upon, embedded in or displayed by the Software or on its packaging and related materials. 1.5 U.S. Government Restricted Rights. The Software is provided with "RESTRICTED RIGHTS." Use, duplication, or disclosure by the United States Government is subject to restrictions as set forth in this Agreement, and as provided in DFARS 227.7202-1(a) and 227.7202-3(a) (1995), DFARS 252.227-7013(c)(1)(ii) (OCT 1988), FAR 12.212(a) (1995), FAR 52.227-19, or FAR 52.227-14(ALT III), as applicable. 2 LIMITED WARRANTY.
Trimble GPS Analyst Extension Getting Started Guide 5

2.1 Limited Warranty. Trimble warrants that the Software will perform substantially in accordance with the accompanying written materials (i.e., applicable user's guide or product manual) for a period of one (1) year from the date of purchase. This limited warranty gives you specific legal rights, you may have others, which vary from state/jurisdiction to state/jurisdiction. The above limited warranty does not apply to error corrections, updates or upgrades of the Software after expiration of the limited warranty period, which are provided "AS IS" and without warranty unless otherwise specified in writing by Trimble. Because the Software is inherently complex and may not be completely free of nonconformities, defects or errors, you are advised to verify your work. Trimble does not warrant that the Software will operate error free or uninterrupted, will meet your needs or expectations, or that all nonconformities can or will be corrected.2.2 Customer Remedies. Trimble's and its suppliers' entire liability, and your sole remedy, with respect to the Software shall be either, at Trimble's option, (a) repair or replacement of the Software, or (b) return of the license fee paid for any Software that does not meet Trimble's limited warranty. The foregoing limited warranty is void if failure of the Software has resulted from (1) accident, misuse, abuse, or misapplication; (2) alteration or modification of the Software without Trimble's authorization; (3) interaction with software or hardware not supplied or supported by Trimble; (4) your improper, inadequate or unauthorized installation, maintenance or storage; or ( f ) if you violate the terms of this Agreement. Any replacement Software will be warranted for the remainder of the original warranty period or thirty (30) days, whichever is longer.
2.3 NO OTHER WARRANTIES. TO THE MAXIMUM EXTENT PERMITTED BY APPLICABLE LAW, TRIMBLE AND ITS SUPPLIERS DISCLAIM ALL OTHER WARRANTIES, TERMS, AND CONDITIONS, EITHER EXPRESS OR IMPLIED, BY STATUTE, COMMON LAW OR OTHERWISE, INCLUDING BUT NOT LIMITED TO, IMPLIED WARRANTIES, TERMS, AND CONDITIONS OF MERCHANTABILITY AND FITNESS FOR A PARTICULAR PURPOSE, TITLE, AND NONINFRINGEMENT WITH REGARD TO THE SOFTWARE, ITS SATISFACTORY QUALITY, AND THE PROVISION OF OR FAILURE TO PROVIDE SUPPORT SERVICES. TO THE EXTENT ALLOWED BY APPLICABLE LAW, IMPLIED WARRANTIES, TERMS AND CONDITIONS ON THE SOFTWARE ARE LIMITED TO ONE (1) YEAR. Y0U MAY HAVE OTHER LEGAL RIGHTS WHICH VARY FROM STATE/JURISDICTION TO STATE/JURISDICTION.
2.4 LIMITATION OF LIABILITY. TO THE MAXIMUM EXTENT PERMITTED BY APPLICABLE LAW, IN NO EVENT SHALL TRIMBLE OR ITS SUPPLIERS BE LIABLE FOR ANY SPECIAL, INCIDENTAL, INDIRECT OR CONSEQUENTIAL OR PUNITIVE DAMAGES, HOWEVER CAUSED AND REGARDLESS OF THE THEORY OF LIABILITY (INCLUDING, WITHOUT LIMITATION, DAMAGES FOR LOSS OF BUSINESS PROFITS, BUSINESS INTERRUPTION, LOSS OF BUSINESS INFORMATION, OR ANY OTHER PECUNIARY LOSS), ARISING OUT OF THE USE OR
INABILITY TO USE THE SOFTWARE, OR THE PROVISION OF OR FAILURE TO PROVIDE SUPPORT SERVICES, EVEN IF TRIMBLE HAS BEEN ADVISED OF THE POSSIBILITY OF SUCH DAMAGES, AND NOTWITHSTANDING ANY FAILURE OF ESSENTIAL PURPOSE OF ANY EXCLUSIVE REMEDY PROVIDED IN THIS AGREEMENT.
IN NO EVENT SHALL TRIMBLE'S TOTAL LIABILITY IN CONNECTION WITH THIS AGREEMENT OR THE SOFTWARE, WHETHER BASED ON CONTRACT, WARRANTY, TORT (INCLUDING NEGLIGENCE), STRICT LIABILITY OR OTHERWISE, EXCEED THE ACTUAL AMOUNT PAID TO TRIMBLE FOR USE OF THE SOFTWARE GIVING RISE TO THE CLAIM. BECAUSE SOME STATES AND JURISDICTIONS DO NOT ALLOW THE EXCLUSION OR LIMITATION OF LIABILITY FOR CONSEQUENTIAL OR INCIDENTAL DAMAGES, THE ABOVE LIMITATION MAY NOT APPLY TO YOU.
2.5 PLEASE NOTE: THE ABOVE TRIMBLE LIMITED WARRANTY PROVISIONS MAY NOT APPLY TO SOFTWARE PRODUCTS PURCHASED IN THOSE JURISDICTIONS (SUCH AS COUNTRIES OF THE EUROPEAN ECONOMIC COMMUNITY) IN WHICH PRODUCT WARRANTIES ARE OBTAINED FROM THE LOCAL DISTRIBUTOR. IN SUCH CASE, PLEASE CONTACT YOUR TRIMBLE DEALER FOR APPLICABLE WARRANTY INFORMATION.
3 GENERAL.
3.1 This Agreement shall be governed by the laws of the State of California and applicable United States Federal law without reference to "conflict of laws" principles or provisions. The United Nations Convention on Contracts for the International Sale of Goods will not apply to this Agreement. Jurisdiction and venue of any dispute or court action arising from or related to this Agreement or the Software shall lie exclusively in or be transferred to the courts the County of Santa Clara, California, and/or the United States District Court for the Northern District of California. You hereby consent and agree not to contest, such jurisdiction, venue and governing law. 3.2 Section 3.1 notwithstanding, if you acquired this product in Canada, this Agreement is governed by the laws of the Province of Ontario, Canada. In such case each of the parties to this Agreement irrevocably attorns to the jurisdiction of the courts of the Province of Ontario and further agrees to commence any litigation that may arise under this Agreement in the courts located in the Judicial District of York, Province of Ontario. If you acquired this product in the European Union, this Agreement is governed by the laws of Netherlands, excluding its rules governing conflicts of laws and excluding the United Nations Convention on the International Sale of Goods. In such case each of the parties to this Agreement irrevocably attorns to the jurisdiction of the courts of Netherlands and further agrees to commence any litigation that may arise under this Agreement in the courts of Eindhoven, Netherlands.3.3 Reservation of Rights. Trimble reserves all rights not expressly granted by this Agreement.
6 Trimble GPS Analyst Extension Getting Started Guide

3.4 Official Language. The official language of this Agreement is English. For purposes of interpretation, or in the event of a conflict between English and versions of this Agreement in any other language, the English language version shall be controlling.
Trimble GPS Analyst Extension Getting Started Guide 7

8 Trimble GPS Analyst Extension Getting Started Guide
ContentsSECTION I: INTRODUCING THE TRIMBLE GPS ANALYST EXTENSION
1 Introduction . . . . . . . . . . . . . . . . . . . . . . . . . . . . . 17What you can do with the Trimble GPS Analyst extension . . . . . . . . . . . . . 18
Storing GPS data in a geodatabase . . . . . . . . . . . . . . . . . . . . . . . . 18
Working with SSF files. . . . . . . . . . . . . . . . . . . . . . . . . . . . . . . . 19
Working with ArcPad and GPScorrect data . . . . . . . . . . . . . . . . . . 19
Differentially correcting GPS data . . . . . . . . . . . . . . . . . . . . . . . . 20
Validating the accuracy of GPS-derived features . . . . . . . . . . . . . . . 20
Finding additional information . . . . . . . . . . . . . . . . . . . . . . . . . . . . . . 20
Technical assistance . . . . . . . . . . . . . . . . . . . . . . . . . . . . . . . . . . . . . 21
Technical support . . . . . . . . . . . . . . . . . . . . . . . . . . . . . . . . . . 21
Windows error reporting . . . . . . . . . . . . . . . . . . . . . . . . . . . . . . 22
Your comments . . . . . . . . . . . . . . . . . . . . . . . . . . . . . . . . . . . . . . . . 22
2 Installation . . . . . . . . . . . . . . . . . . . . . . . . . . . . . 23System requirements . . . . . . . . . . . . . . . . . . . . . . . . . . . . . . . . . . . . . 24
Supported GPS receivers . . . . . . . . . . . . . . . . . . . . . . . . . . . . . . 25
Registering the Trimble GPS Analyst extension . . . . . . . . . . . . . . . . . . . . 26
Obtaining your installation code after registration. . . . . . . . . . . . . . 33
Installing the Trimble GPS Analyst extension . . . . . . . . . . . . . . . . . . . . . 36
Before you begin . . . . . . . . . . . . . . . . . . . . . . . . . . . . . . . . . . . 36
Running the installation program . . . . . . . . . . . . . . . . . . . . . . . . 37
Installing the Data Transfer utility . . . . . . . . . . . . . . . . . . . . . . . . 44
Enabling the Trimble GPS Analyst extension. . . . . . . . . . . . . . . . . . . . . . 45
In ArcCatalog . . . . . . . . . . . . . . . . . . . . . . . . . . . . . . . . . . . . . 45
In ArcMap . . . . . . . . . . . . . . . . . . . . . . . . . . . . . . . . . . . . . . . 46
Trimble GPS Analyst Extension Getting Started Guide 9
Contents
Updating the Trimble GPS Analyst extension . . . . . . . . . . . . . . . . . . . . . 47
Managing licenses for the Trimble GPS Analyst extension . . . . . . . . . . . . . 47
Installing the Mapping and GIS License Manager software . . . . . . . . 48
Mapping and GIS License Manager Help . . . . . . . . . . . . . . . . . . . . 48
Trimble GPS Analyst License Administrator software . . . . . . . . . . . . 49
SECTION II: WORKING WITH GPS DATA IN THE TRIMBLE GPS ANALYST EXTENSION
3 The User Interface . . . . . . . . . . . . . . . . . . . . . . . . . 53In ArcCatalog . . . . . . . . . . . . . . . . . . . . . . . . . . . . . . . . . . . . . . . . . 54
In ArcMap. . . . . . . . . . . . . . . . . . . . . . . . . . . . . . . . . . . . . . . . . . . . 55
The Trimble GPS Analyst toolbar . . . . . . . . . . . . . . . . . . . . . . . . . 55
The GPS group layer . . . . . . . . . . . . . . . . . . . . . . . . . . . . . . . . . 59
Trimble GPS Analyst toolbox. . . . . . . . . . . . . . . . . . . . . . . . . . . . . . . . 60
Measurement units . . . . . . . . . . . . . . . . . . . . . . . . . . . . . . . . . . . . . . 61
Exiting the Trimble GPS Analyst extension . . . . . . . . . . . . . . . . . . . . . . . 63
4 Typical GPS Analyst Tasks . . . . . . . . . . . . . . . . . . . . . 65Overview: Importing and processing GPS data . . . . . . . . . . . . . . . . . . . . 66
Typical workflow . . . . . . . . . . . . . . . . . . . . . . . . . . . . . . . . . . . . . . . 66
Step 1: Prepare the geodatabase for GPS data . . . . . . . . . . . . . . . . . 67
Step 2: Extract data from the geodatabase for updating . . . . . . . . . . 69
Step 3: Add GPS and GIS data to the geodatabase . . . . . . . . . . . . . . 70
Step 4: Process and analyze the GPS Data . . . . . . . . . . . . . . . . . . . 72
5 Tutorial 1: Checking Out and Checking In ArcPad and GPScorrect Data . 73Before you begin. . . . . . . . . . . . . . . . . . . . . . . . . . . . . . . . . . . . . . . . 74
Loading the tutorial sample files . . . . . . . . . . . . . . . . . . . . . . . . . 74
Returning the contents of the tutorial folder to its original state . . . . . 75
Scenario . . . . . . . . . . . . . . . . . . . . . . . . . . . . . . . . . . . . . . . . . . . . . 76
Connecting to your data. . . . . . . . . . . . . . . . . . . . . . . . . . . . . . . . . . . 76
Make a connection to the tutorial data . . . . . . . . . . . . . . . . . . . . . 76
Exercise 1: Preparing feature classes for GPS data . . . . . . . . . . . . . . . . . . 79
10 Trimble GPS Analyst Extension Getting Started Guide
Contents
GPS data in the geodatabase. . . . . . . . . . . . . . . . . . . . . . . . . . . . 80
GPS-enabling the geodatabase and feature classes. . . . . . . . . . . . . . 80
Estimated accuracy values . . . . . . . . . . . . . . . . . . . . . . . . . . . . . 83
Required accuracy for validation . . . . . . . . . . . . . . . . . . . . . . . . . 83
Specifying the required accuracy for features . . . . . . . . . . . . . . . . . 84
Exercise 2: Checking out data to ArcPad . . . . . . . . . . . . . . . . . . . . . . . . 88
GPS layers in ArcMap . . . . . . . . . . . . . . . . . . . . . . . . . . . . . . . . 88
Opening a map document that contains GPS-enabled feature classes . 89
Checking out GPS-enabled feature classes to ArcPad . . . . . . . . . . . . 90
Exercise 3: Checking in ArcPad shapefiles and the GPScorrect SSF file . . . . . 93
Transferring files from the field computer to the office computer . . . . 93
GPS edit sessions . . . . . . . . . . . . . . . . . . . . . . . . . . . . . . . . . . . 94
About checking in ArcPad and GPScorrect data . . . . . . . . . . . . . . . 95
Checking in the ArcPad shapefiles and the GPScorrect SSF file . . . . . . 95
6 Tutorial 2: Importing Trimble SSF Files . . . . . . . . . . . . . . . . . . . . 99Before you begin. . . . . . . . . . . . . . . . . . . . . . . . . . . . . . . . . . . . . . . .100
Loading the tutorial sample files . . . . . . . . . . . . . . . . . . . . . . . . .100
Returning the contents of the tutorial folder to its original state . . . . .101
Scenario . . . . . . . . . . . . . . . . . . . . . . . . . . . . . . . . . . . . . . . . . . . . .102
Connecting to your data. . . . . . . . . . . . . . . . . . . . . . . . . . . . . . . . . . .102
Make a connection to the tutorial data . . . . . . . . . . . . . . . . . . . . .102
Exercise 1: Creating and GPS-enabling a geodatabase . . . . . . . . . . . . . . . .104
Creating a new geodatabase . . . . . . . . . . . . . . . . . . . . . . . . . . . .104
GPS data in the geodatabase . . . . . . . . . . . . . . . . . . . . . . . . . . .105
GPS-enabling the geodatabase . . . . . . . . . . . . . . . . . . . . . . . . . .106
Exercise 2: Importing data from an SSF file . . . . . . . . . . . . . . . . . . . . . . .112
Creating a feature dataset . . . . . . . . . . . . . . . . . . . . . . . . . . . . .112
Importing data from an SSF file . . . . . . . . . . . . . . . . . . . . . . . . . .117
Exercise 3: Specifying global feature class properties. . . . . . . . . . . . . . . . .120
Estimated accuracy values . . . . . . . . . . . . . . . . . . . . . . . . . . . . .120
Required accuracy for validation . . . . . . . . . . . . . . . . . . . . . . . . .121
Specifying properties for all feature classes . . . . . . . . . . . . . . . . . .121
Exercise 4: Adding GPS data to the map. . . . . . . . . . . . . . . . . . . . . . . . .123
Trimble GPS Analyst Extension Getting Started Guide 11

Contents
GPS layers in ArcMap . . . . . . . . . . . . . . . . . . . . . . . . . . . . . . . .123
Adding GPS-enabled feature classes to a map document. . . . . . . . . .123
7 Tutorial 3: Processing GPS Data . . . . . . . . . . . . . . . . . . . . . . . 129Before you begin. . . . . . . . . . . . . . . . . . . . . . . . . . . . . . . . . . . . . . . .130
Loading the tutorial sample files . . . . . . . . . . . . . . . . . . . . . . . . .130
Returning the contents of the tutorial folder to its original state . . . . .131
Scenario . . . . . . . . . . . . . . . . . . . . . . . . . . . . . . . . . . . . . . . . . . . . .132
Connecting to your data. . . . . . . . . . . . . . . . . . . . . . . . . . . . . . . . . . .132
Make a connection to the tutorial data . . . . . . . . . . . . . . . . . . . . .132
Exercise 1: Differentially correcting GPS sessions . . . . . . . . . . . . . . . . . . .135
Postprocessed differential correction . . . . . . . . . . . . . . . . . . . . . .135
Base data . . . . . . . . . . . . . . . . . . . . . . . . . . . . . . . . . . . . . . . .135
Rebuild . . . . . . . . . . . . . . . . . . . . . . . . . . . . . . . . . . . . . . . . .136
Opening the map document . . . . . . . . . . . . . . . . . . . . . . . . . . . .136
Differentially correcting GPS sessions . . . . . . . . . . . . . . . . . . . . . .138
Exercise 2: Analyzing GPS positions on the map . . . . . . . . . . . . . . . . . . .148
Displaying GPS positions on the map . . . . . . . . . . . . . . . . . . . . . .148
Viewing GPS position properties . . . . . . . . . . . . . . . . . . . . . . . . .149
Exercise 3: Validating features . . . . . . . . . . . . . . . . . . . . . . . . . . . . . . .151
GPS feature validation. . . . . . . . . . . . . . . . . . . . . . . . . . . . . . . .151
Processing invalid features . . . . . . . . . . . . . . . . . . . . . . . . . . . . .152
Validating features with GPS-derived geometry. . . . . . . . . . . . . . . .152
Rebuilding selected features . . . . . . . . . . . . . . . . . . . . . . . . . . . .154
SECTION III: USING THE TRIMBLE GPS ANALYST EXTENSION IN THE FIELD
8 The Field User Interface . . . . . . . . . . . . . . . . . . . . . 159The Trimble GPS Analyst extension Field toolset . . . . . . . . . . . . . . . . . . .160
Field Settings drop-down menu. . . . . . . . . . . . . . . . . . . . . . . . . .161
Field toolset buttons . . . . . . . . . . . . . . . . . . . . . . . . . . . . . . . . .161
GPS status panel . . . . . . . . . . . . . . . . . . . . . . . . . . . . . . . . . . .162
Dockable windows . . . . . . . . . . . . . . . . . . . . . . . . . . . . . . . . . . . . . .162
GPS Data Collection window . . . . . . . . . . . . . . . . . . . . . . . . . . .163
12 Trimble GPS Analyst Extension Getting Started Guide
Contents
GPS Status window . . . . . . . . . . . . . . . . . . . . . . . . . . . . . . . . .164
Navigation window. . . . . . . . . . . . . . . . . . . . . . . . . . . . . . . . . .165
GPS receiver layers . . . . . . . . . . . . . . . . . . . . . . . . . . . . . . . . . . . . . .166
GPS Cursor and Trail layer . . . . . . . . . . . . . . . . . . . . . . . . . . . . .166
Navigation layer. . . . . . . . . . . . . . . . . . . . . . . . . . . . . . . . . . . .166
9 Typical Data Collection Tasks . . . . . . . . . . . . . . . . . . 167Overview: Collecting GPS data . . . . . . . . . . . . . . . . . . . . . . . . . . . . . .168
Supported GPS receivers for data collection . . . . . . . . . . . . . . . . . . . . . .169
Connection options . . . . . . . . . . . . . . . . . . . . . . . . . . . . . . . . .170
Powered connections . . . . . . . . . . . . . . . . . . . . . . . . . . . . . . . .171
Connecting to external real-time correction devices . . . . . . . . . . . .171
Typical workflow . . . . . . . . . . . . . . . . . . . . . . . . . . . . . . . . . . . . . . .172
Step 1: Prepare the geodatabase for GPS data . . . . . . . . . . . . . . . . .172
Step 2: Connect to a GPS receiver . . . . . . . . . . . . . . . . . . . . . . . .173
Step 3: Configure GPS receiver and data collection settings . . . . . . . .173
Step 4: Collect features . . . . . . . . . . . . . . . . . . . . . . . . . . . . . . .174
Step 5: Process and analyze the GPS data . . . . . . . . . . . . . . . . . . .174
10 Tutorial 4: Collecting GPS Data . . . . . . . . . . . . . . . . . . . . . . . 175Before you begin. . . . . . . . . . . . . . . . . . . . . . . . . . . . . . . . . . . . . . . .176
Loading the tutorial sample files . . . . . . . . . . . . . . . . . . . . . . . . .176
Returning the contents of the tutorial folder to its original state . . . . .177
Scenario . . . . . . . . . . . . . . . . . . . . . . . . . . . . . . . . . . . . . . . . . . . . .178
Connecting to your data. . . . . . . . . . . . . . . . . . . . . . . . . . . . . . . . . . .178
Make a connection to the tutorial data . . . . . . . . . . . . . . . . . . . . .178
Exercise 1: Preparing feature classes for GPS data . . . . . . . . . . . . . . . . . .181
GPS data in the geodatabase. . . . . . . . . . . . . . . . . . . . . . . . . . . .182
GPS-enabling the geodatabase and feature classes. . . . . . . . . . . . . .182
Estimated accuracy values . . . . . . . . . . . . . . . . . . . . . . . . . . . . .185
Required accuracy for validation . . . . . . . . . . . . . . . . . . . . . . . . .185
Specifying the required accuracy for features . . . . . . . . . . . . . . . . .186
Constructions . . . . . . . . . . . . . . . . . . . . . . . . . . . . . . . . . . . . .189
Viewing default construction properties . . . . . . . . . . . . . . . . . . . .190
Trimble GPS Analyst Extension Getting Started Guide 13

Contents
Exercise 2: Configuring the GPS receiver . . . . . . . . . . . . . . . . . . . . . . . .192
GPS layers in ArcMap . . . . . . . . . . . . . . . . . . . . . . . . . . . . . . . .192
Opening a map document that contains GPS-enabled feature classes .193
Using GPS receivers and log files . . . . . . . . . . . . . . . . . . . . . . . . .195
Selecting the GPS receiver . . . . . . . . . . . . . . . . . . . . . . . . . . . . .195
Exercise 3: Collecting features using the Trimble GPS Analyst extension . . . .196
Connecting to a GPS Receiver . . . . . . . . . . . . . . . . . . . . . . . . . . .197
Checking the GPS Status . . . . . . . . . . . . . . . . . . . . . . . . . . . . . .197
GPS edit sessions . . . . . . . . . . . . . . . . . . . . . . . . . . . . . . . . . . .198
Logging now or later . . . . . . . . . . . . . . . . . . . . . . . . . . . . . . . . .199
Point features . . . . . . . . . . . . . . . . . . . . . . . . . . . . . . . . . . . . .199
Line features . . . . . . . . . . . . . . . . . . . . . . . . . . . . . . . . . . . . . .199
Connecting to the GPS receiver and logging GPS positions . . . . . . . .200
Collecting a line feature using Log Now . . . . . . . . . . . . . . . . . . . .202
Collecting a point feature using Log Later . . . . . . . . . . . . . . . . . . .205
Ending the GPS edit session . . . . . . . . . . . . . . . . . . . . . . . . . . . .207
Glossary . . . . . . . . . . . . . . . . . . . . . . . . . . . . . . 209
Index . . . . . . . . . . . . . . . . . . . . . . . . . . . . . . . . 221
14 Trimble GPS Analyst Extension Getting Started Guide

S E C T I O N
I
INTRODUCING THE TRIMBLE GPS ANALYST EXTENSION IIn this section:
Chapter 1, Introduction
Chapter 2, Installation
Trimble GPS Analyst Extension Getting Started Guide 15

16 Trimble GPS Analyst Extension Getting Started Guide

C H A P T E R
1
Introduction 1In this chapter:
What you can do with the Trimble GPS Analyst extension
Finding additional information
Technical assistance
Your comments
Welcome to the Trimble GPS Analyst Extension Getting Started Guide. This guide describes how to set up and use the Trimble®
GPS Analyst™ extension for ESRI ArcGIS software.
Even if you have used other Global Positioning System (GPS) products before, Trimble recommends that you spend some time reading this manual to learn about the special features of this product. If you are not familiar with GPS, go to the Trimble website (www.trimble.com) for an interactive look at Trimble and GPS.
This guide assumes that you know how to use ArcGIS Desktop software and the Microsoft® Windows®
operating system.
Trimble GPS Analyst Extension Getting Started Guide 17

1 Introduction
What you can do with the Trimble GPS Analyst extension
The Trimble GPS Analyst extension enables you to store and work with Global Positioning System (GPS) data directly within the ArcGIS Desktop software environment.
The GPS Analyst extension enables you to import GPS data collected with other field applications, such as the Trimble TerraSync™ field software, or ESRI ArcPad software with the Trimble GPScorrect™ extension for ArcPad.
Once the GPS data is stored in the geodatabase, you can improve the accuracy of the collected or imported GPS data using postprocessed differential correction. The GPS Analyst extension also allows you to analyze the GPS data, and validate any GIS features that use GPS data to ensure that they meet your accuracy requirements.
You can use the Trimble GPS Analyst extension to:
• store GPS data linked to GIS features in a geodatabase
• import GIS and GPS data that is in the Trimble SSF file format
• import GIS and GPS data collected using ESRI ArcPad software and the Trimble GPScorrect extension for ArcPad
• differentially correct GPS data within ArcGIS Desktop
• validate the estimated accuracy of GPS-derived features
Storing GPS data in a geodatabase
The Trimble GPS Analyst extension extends the geodatabase data model to include support for GPS data. Use the GPS Analyst extension to GPS-enable your personal geodatabase, which allows raw GPS data to reside directly within the geodatabase. GPS data is stored in the form of GPS sessions within the geodatabase.
18 Trimble GPS Analyst Extension Getting Started Guide

Introduction 1
Working with SSF files
The Trimble GPS Analyst extension enables you to import and export Trimble Standard Storage Format (SSF) files. SSF files are used by Trimble data collection software products.
You can export GIS data from a personal geodatabase to an SSF file, which can then be used by Trimble data collection software products such as the TerraSync field software.
You can import SSF files into feature datasets in a GPS-enabled geodatabase. During the import process, SSF features are added to GPS-enabled feature classes in the geodatabase and GPS positions are stored in new GPS sessions. Once the data has been imported, you can use the GPS Analyst extension to differentially correct the GPS data and to validate the estimated accuracy of the features that are constructed using GPS data.
Working with ArcPad and GPScorrect data
You can check out data from a geodatabase as shapefiles for collecting new features or updating existing features using ESRI ArcPad software and the GPScorrect extension for ArcPad. When you check in an ArcPad Shapefile, features are checked back into feature classes in the geodatabase and the GPS data from the corresponding SSF file is stored in new GPS sessions.
The GPS Analyst extension also enables you to import data collected in the field using ArcPad and the GPScorrect extension into a GPS-enabled geodatabase. During the import process, features are added to GPS-enabled feature classes in the geodatabase and GPS positions are stored in new GPS sessions. Once the data has been imported or checked in, you can use the GPS Analyst extension to differentially correct the GPS data and validate the estimated accuracy of the features that are constructed using GPS data.
Trimble GPS Analyst Extension Getting Started Guide 19

1 Introduction
Differentially correcting GPS data
The Trimble GPS Analyst extension enables you to differentially correct GPS field data. Differential correction reduces errors in GPS data by using an additional receiver at a fixed location, whose position is accurately known. This receiver is called a base station, and the GPS data collected by the base station is used to remove errors in data collected by other GPS receivers, called roving receivers.
GPS positions collected at the base station are compared against the known position of the base station, and errors are calculated for each satellite. These error calculations are used to correct the errors in the data collected by roving receivers. You need to know your base station position very accurately as the differential correction position accuracy depends on the accuracy of the coordinates of the base station.
Validating the accuracy of GPS-derived features
When you GPS-enable a feature class, you can specify the required accuracy for features in that feature class. During data analysis, you can use the GPS feature validation process to check that features constructed from GPS positions meet your accuracy requirements. Any feature that does not meet the required accuracy can be selected for further processing, deleted, or marked as an exception.
Finding additional informationSources of additional information include the following:
• Trimble GPS Analyst Extension Help – the extension has built-in user help that provides detailed explanations of concepts and tasks you can perform using the GPS Analyst extension. To view the Help, do one of the following:
– In ArcMap, select Trimble GPS Analyst Help from the Trimble GPS Analyst drop-down menu.
– From the Windows Start menu, select All Programs / Trimble / GPS Analyst / GPS Analyst Extension Help.
20 Trimble GPS Analyst Extension Getting Started Guide

Introduction 1
• What’s This? Help – the extension has built-in, context-sensitive help that lets you quickly find the information you need. To access it, click the question mark in the top right corner of a dialog, then click the field or control you want to view Help on. Alternatively, click a control and press [Shift] + [F1]. For dockable windows, click a tab and press [F1].
• Release notes – the release notes provide information not included in the documentation, and describe any changes to the documentation. They are provided as a PDF file on the Trimble GPS Analyst Extension CD and are installed in the program directory (typically C:/Program Files/Trimble/GPS Analyst) when you install the software. To view the PDF, select All Programs / Trimble / GPS Analyst / Release Notes from the Windows Start menu.
• For more information about GIS, refer to Getting Started with ArcGIS and Building and Editing Geodatabases, which you received from ESRI in your ArcGIS package.
Technical assistanceIf you have a problem and cannot find the information you need in the product documentation, contact your Trimble reseller.
Technical support
Go to the GPS Analyst extension technical support page (www.trimble.com/gpsanalyst_ts.asp) on the Trimble website for the latest support information about the software, including:
• FAQs
• support notes detailing the latest support issues
• documentation
• the latest files available for download
Trimble GPS Analyst Extension Getting Started Guide 21

1 Introduction
Windows error reporting
If for any reason a Microsoft Windows Error Reporting dialog appears, indicating that the Trimble GPS Analyst extension has encountered a problem and needs to close, you are asked whether you wish to send an error report to Microsoft.
Trimble recommends that you click Send and then click any subsequent links that are used to obtain additional information.
Trimble can access the report that is sent to Microsoft and use it to improve the GPS Analyst extension.
Your commentsYour feedback about the supporting documentation helps us to improve it with each revision. Email your comments to [email protected].
22 Trimble GPS Analyst Extension Getting Started Guide

C H A P T E R
2
Installation 2In this chapter:
System requirements
Registering the Trimble GPS Analyst extension
Installing the Trimble GPS Analyst extension
Enabling the Trimble GPS Analyst extension
Updating the Trimble GPS Analyst extension
Managing licenses for the Trimble GPS Analyst extension
This chapter describes how to install version 2.10 of the Trimble GPS Analyst extension for ESRI ArcGIS software onto a Windows PC for the first time.
To install the Trimble GPS Analyst extension, you must:
1. Make sure your field or office computer meets the minimum platform requirements for successful operation of the Trimble GPS Analyst extension.
2. Register your copy of the Trimble GPS Analyst extension and obtain an installation code.
3. Install the extension using the Trimble GPS Analyst Extension CD and the installation code you obtained when you registered your copy of the extension.
Trimble GPS Analyst Extension Getting Started Guide 23
2 Installation
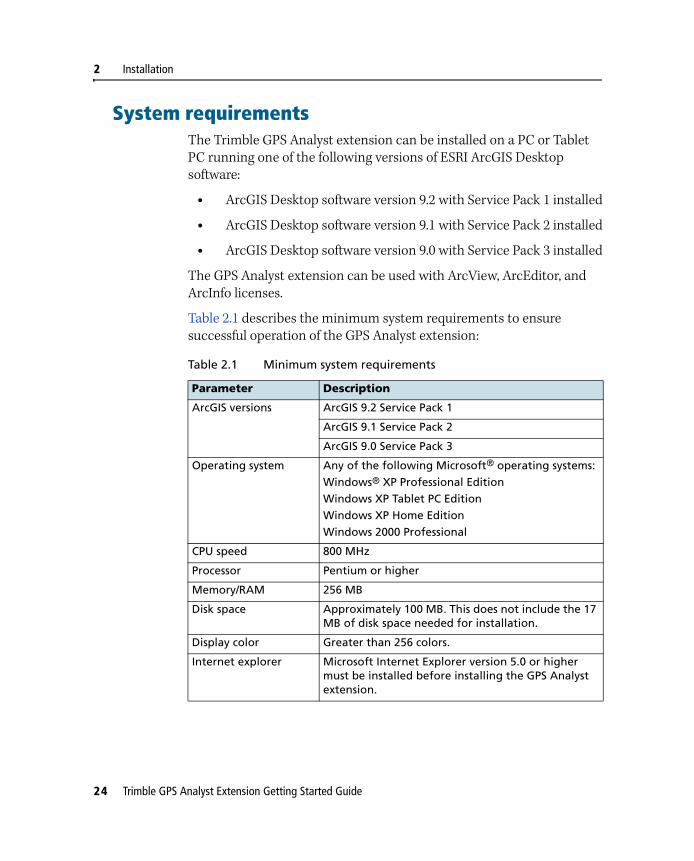
System requirementsThe Trimble GPS Analyst extension can be installed on a PC or Tablet PC running one of the following versions of ESRI ArcGIS Desktop software:
• ArcGIS Desktop software version 9.2 with Service Pack 1 installed
• ArcGIS Desktop software version 9.1 with Service Pack 2 installed
• ArcGIS Desktop software version 9.0 with Service Pack 3 installed
The GPS Analyst extension can be used with ArcView, ArcEditor, and ArcInfo licenses.
Table 2.1 describes the minimum system requirements to ensure successful operation of the GPS Analyst extension:
Table 2.1 Minimum system requirements
Parameter Description
ArcGIS versions ArcGIS 9.2 Service Pack 1
ArcGIS 9.1 Service Pack 2
ArcGIS 9.0 Service Pack 3
Operating system Any of the following Microsoft® operating systems:
Windows® XP Professional EditionWindows XP Tablet PC EditionWindows XP Home Edition
Windows 2000 Professional
CPU speed 800 MHz
Processor Pentium or higher
Memory/RAM 256 MB
Disk space Approximately 100 MB. This does not include the 17 MB of disk space needed for installation.
Display color Greater than 256 colors.
Internet explorer Microsoft Internet Explorer version 5.0 or higher must be installed before installing the GPS Analyst extension.
24 Trimble GPS Analyst Extension Getting Started Guide
Installation 2
Note – To transfer files to (or from) a device powered by Microsoft Windows Mobile® software you must also have the appropriate version of the Microsoft ActiveSync® technology installed.
Supported GPS receivers
You can use GPS data from any of the following receivers in the Trimble GPS Analyst extension:
• Trimble Mapping and GIS receivers:
– GeoExplorer® series handhelds:
– GeoXH™
– GeoXM™
– GeoXT™
– Juno™ ST handheld
– GPS Pathfinder® ProXH™
– GPS Pathfinder ProXT™
– GPS Pathfinder Pro XRS
– GPS Pathfinder XB receiver
– GPS Pathfinder XC receiver
– Trimble Recon® GPS XB edition
– Trimble Recon GPS XC edition
• NMEA GPS receiver
• any GPS receiver with a supported driver that enables the receiver to work with the Trimble GPS Analyst extension
Note – The GPS Analyst extension supports import and differential correction of data collected with the Juno ST handheld with ArcPad version 7.0 and later and GPScorrect extension version 2.20, or with TerraSync software version 3.01 and later. For more information about connecting to a GPS receiver to collect data, see Chapter 9, Typical Data Collection Tasks.
Trimble GPS Analyst Extension Getting Started Guide 25
2 Installation
Registering the Trimble GPS Analyst extensionBefore you can install the Trimble GPS Analyst extension, you must register your copy of the extension to obtain an installation code that you enter during the installation process.
You can only register your copy of the Trimble GPS Analyst extension once. For information about obtaining your installation code when the extension has already been registered, see Obtaining your installation code after registration, page 33.
Trimble recommends that you register before beginning installation.
To register, you need:
• the Proof-of-Purchase Number (POPN) from the Trimble GPS Analyst extension packaging
The Proof-of-Purchase Number (POPN) is labelled “POPN” and is located on the product label inside the software folder, below the software CD.
• Internet access (including a valid e-mail address)
Note – If you do not have Internet access, contact your local Trimble reseller for assistance.
To register your copy of the Trimble GPS Analyst extension:
1. Go to the My Trimble account login page.
To do this, open your Web browser and go to www.trimble.com/register.
Alternatively:
a. Insert the Trimble GPS Analyst Extension CD in the CD drive of the office computer.
26 Trimble GPS Analyst Extension Getting Started Guide

Installation 2
The Setup screen appears:
Note – If this screen does not appear, select Autorun.exe from the CD drive folder.
b. Click Register.
Trimble GPS Analyst Extension Getting Started Guide 27

2 Installation
Your default Web browser opens and displays the My Trimble account login page:
2. If you already have an account, skip this step and go to step 4 to log in.
To create your My Trimble account, click Create an account. Enter your contact details and then click Save. Your account is created and you are returned to the My Trimble account login page.
3. Enter your e-mail address and password, and then click Login.
28 Trimble GPS Analyst Extension Getting Started Guide

Installation 2
The My Trimble page for your account appears. It will look similar to the one shown below:
4. To register the Trimble GPS Analyst extension, scroll to the My Products section and then click Add.
Trimble GPS Analyst Extension Getting Started Guide 29

2 Installation
The Registration Method page appears:
5. Select the Add a Proof-of-Purchase Number (POPN) option and then click Next.
30 Trimble GPS Analyst Extension Getting Started Guide

Installation 2
The Proof-of-Purchase Number (POPN) Details page appears:
6. Enter the Proof-of-Purchase Number (POPN) provided on the Trimble GPS Analyst extension packaging. The POPN is located on the product label inside the software folder, below the software CD.
7. If you want to enter your own reference code, for example a sales order number or an asset/inventory number, enter it in the Your Reference field.
8. Click Next.
Trimble GPS Analyst Extension Getting Started Guide 31

2 Installation
Note – If a message warns that the POPN you entered has already been registered, click Cancel to cancel the registration process. Then obtain the installation code for your copy of the extension and install the extension. For more information, see Obtaining your installation code after registration, page 33.
9. If this is the first time that you have registered a Trimble Mapping and GIS product, the Mapping & GIS Industry Details page appears. From the drop-down lists, select your organization type and most common market segment and then click Save.
10. You are returned to your My Trimble page, where the extension you have just registered now appears in the My Products section:
Installationcode
32 Trimble GPS Analyst Extension Getting Started Guide

Installation 2
11. If the two lines below the Trimble GPS Analyst extension do not appear, click the + beside the copy of the Trimble GPS Analyst extension that you have just registered.
The Installation Code field shows the installation code for your copy of the Trimble GPS Analyst extension. Make a note of this code. You will need to enter this code when you install or reinstall the extension.
Note – If you are entitled to an upgrade from a previous version of the Trimble GPS Analyst extension, you can install version 2.10 of the extension using the installation code that you obtained when you first registered the product. If you are not entitled to an upgrade, the installation program will not accept your installation code. Contact your local Trimble reseller to purchase a software maintenance option.
Obtaining your installation code after registration
To reinstall the Trimble GPS Analyst extension, for example if you have uninstalled it from one computer and wish to reinstall it to another, you must use the same installation code that you received when you registered the extension before installing it for the first time.
If you do not know the installation code, do one of the following:
• If someone else at your company registered the extension ask them for the installation code.
If you cannot find out who registered the extension, send an e-mail containing the Proof-of-Purchase Number (POPN) for your copy of the extension to [email protected].
• If you registered your copy of the extension yourself, you can check your installation code from the My Trimble page of the Trimble website.
Trimble GPS Analyst Extension Getting Started Guide 33

2 Installation
To do this:
a. Open your Web browser and go to www.trimble.com/register.
Your default Web browser opens and displays the My Trimble account login page:
Enter your e-mail address and password, and then click Login.
The My Trimble page for your account appears.
34 Trimble GPS Analyst Extension Getting Started Guide
Installation 2
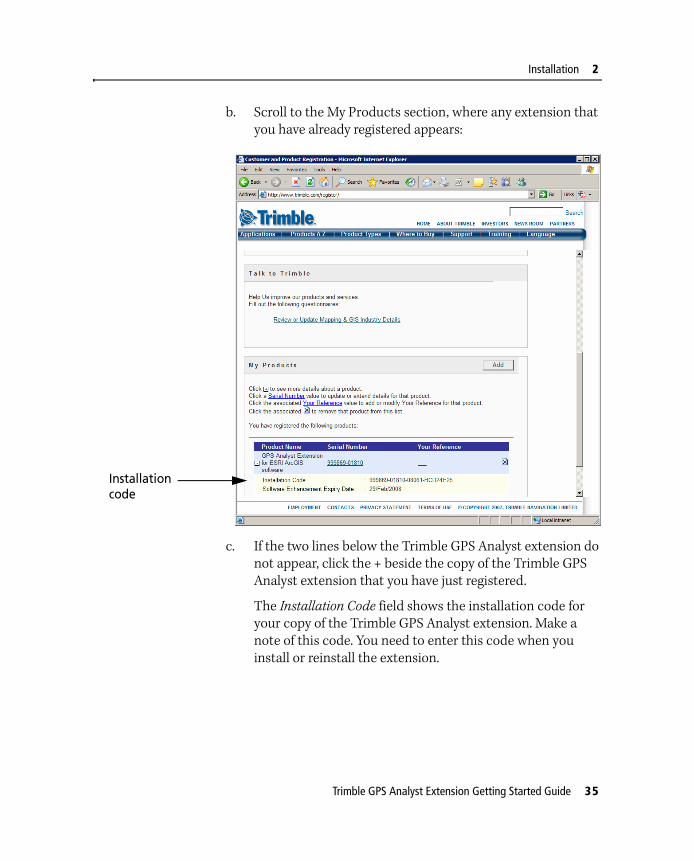
b. Scroll to the My Products section, where any extension that you have already registered appears:
c. If the two lines below the Trimble GPS Analyst extension do not appear, click the + beside the copy of the Trimble GPS Analyst extension that you have just registered.
The Installation Code field shows the installation code for your copy of the Trimble GPS Analyst extension. Make a note of this code. You need to enter this code when you install or reinstall the extension.
Installationcode
Trimble GPS Analyst Extension Getting Started Guide 35
2 Installation
Installing the Trimble GPS Analyst extensionTo install the Trimble GPS Analyst extension for ESRI ArcGIS software, the computer must have a CD-ROM drive, or have access to a CD-ROM drive over a network.
Before you begin
Before you begin the installation process, make sure that:
• The computer meets the minimum requirements for installing the Trimble GPS Analyst extension. For more information, see System requirements, page 24.
• You have registered your copy of the extension and have made a note of the installation code that you must enter during installation. For more information, see Registering the Trimble GPS Analyst extension, page 26.
• You have uninstalled any existing copy of the extension from your computer.
36 Trimble GPS Analyst Extension Getting Started Guide

Installation 2
Running the installation program
To install the Trimble GPS Analyst extension:
1. Insert the Trimble GPS Analyst Extension CD in the CD drive of the office computer.
The Setup screen appears:
Note – If this screen does not appear, select Autorun.exe from the CD drive folder.
2. Click Install.
Trimble GPS Analyst Extension Getting Started Guide 37
2 Installation
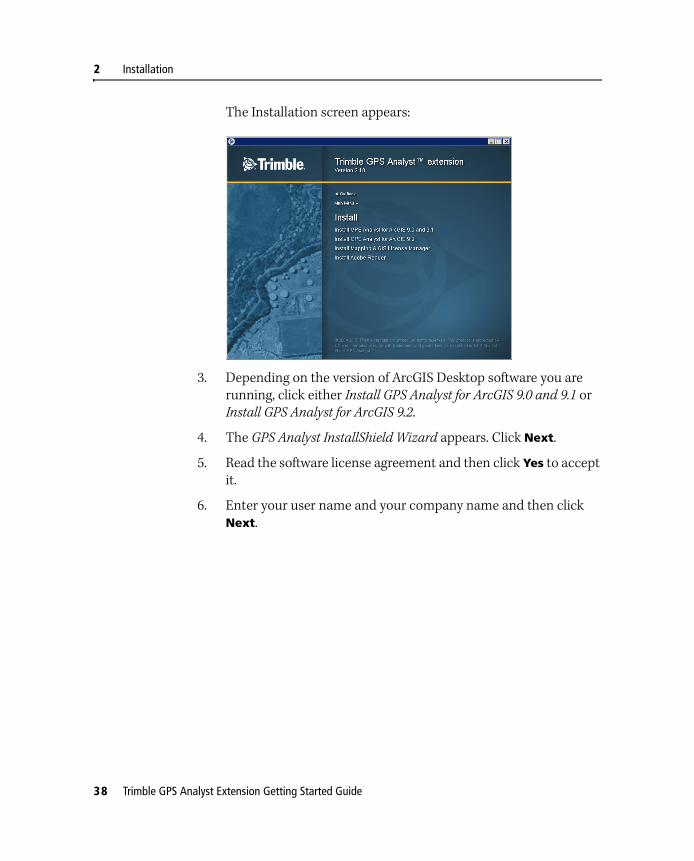
The Installation screen appears:
3. Depending on the version of ArcGIS Desktop software you are running, click either Install GPS Analyst for ArcGIS 9.0 and 9.1 or Install GPS Analyst for ArcGIS 9.2.
4. The GPS Analyst InstallShield Wizard appears. Click Next.
5. Read the software license agreement and then click Yes to accept it.
6. Enter your user name and your company name and then click Next.
38 Trimble GPS Analyst Extension Getting Started Guide
Installation 2
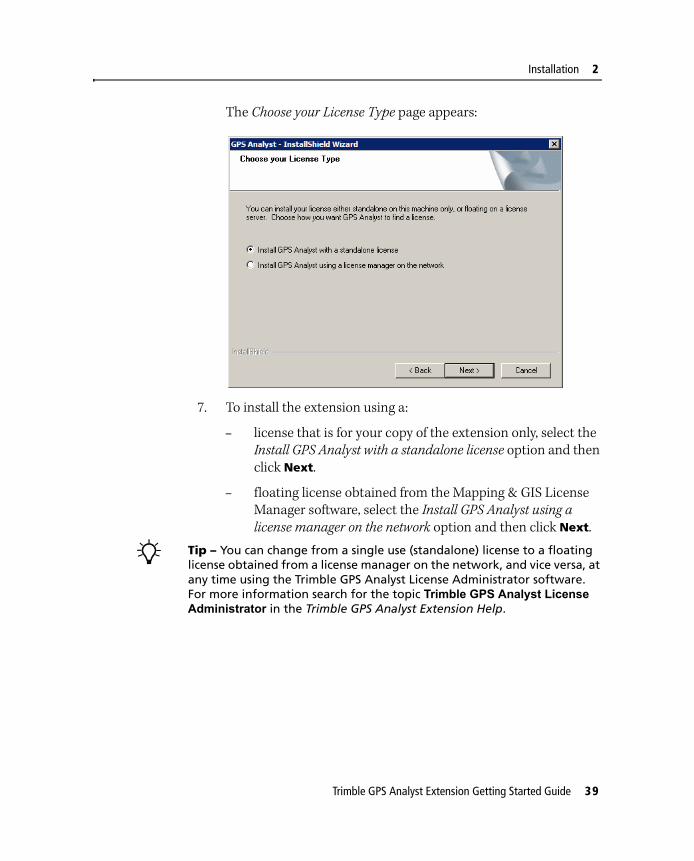
The Choose your License Type page appears:
7. To install the extension using a:
– license that is for your copy of the extension only, select the Install GPS Analyst with a standalone license option and then click Next.
– floating license obtained from the Mapping & GIS License Manager software, select the Install GPS Analyst using a license manager on the network option and then click Next.
B Tip – You can change from a single use (standalone) license to a floating license obtained from a license manager on the network, and vice versa, at any time using the Trimble GPS Analyst License Administrator software. For more information search for the topic Trimble GPS Analyst License Administrator in the Trimble GPS Analyst Extension Help.
Trimble GPS Analyst Extension Getting Started Guide 39
2 Installation
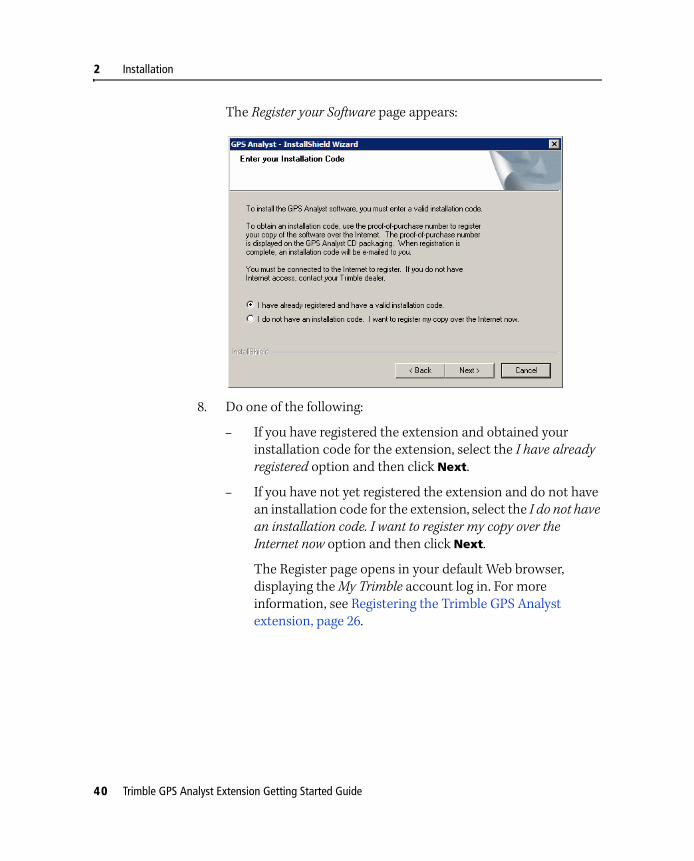
The Register your Software page appears:
8. Do one of the following:
– If you have registered the extension and obtained your installation code for the extension, select the I have already registered option and then click Next.
– If you have not yet registered the extension and do not have an installation code for the extension, select the I do not have an installation code. I want to register my copy over the Internet now option and then click Next.
The Register page opens in your default Web browser, displaying the My Trimble account log in. For more information, see Registering the Trimble GPS Analyst extension, page 26.
40 Trimble GPS Analyst Extension Getting Started Guide
Installation 2
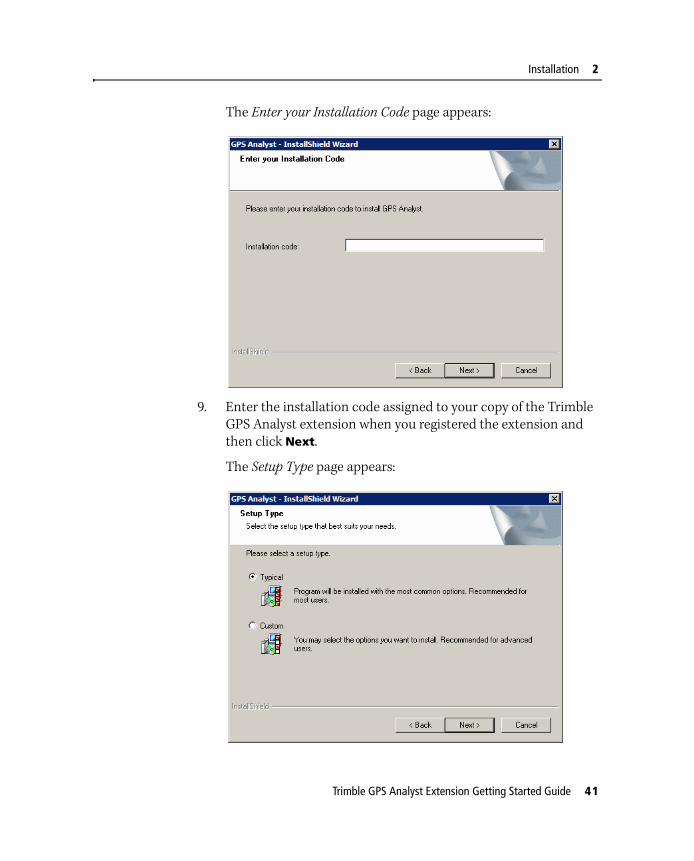
The Enter your Installation Code page appears:
9. Enter the installation code assigned to your copy of the Trimble GPS Analyst extension when you registered the extension and then click Next.
The Setup Type page appears:
Trimble GPS Analyst Extension Getting Started Guide 41

2 Installation
10. Select how you want to set up the extension. To install:
– the default setup of the extension, select Typical and then click Next.
– a custom setup of the extension, select Custom and then click Next. Then do the following:
a. In the Choose Destination Location page, select the folder where the setup will install the program files and then click Next.
b. In the Choose Sample Data Destination Folder page, select the folder where the setup will install sample data files used by the Trimble GPS Analyst extension ( for example, for tutorials) and then click Next.
c. In the Select Features page, select the features you want to install, and deselect the features that you do not want to install:
42 Trimble GPS Analyst Extension Getting Started Guide

Installation 2
In the list of components, clear the check box beside any components you do not want to install. For more information about any component, highlight it in the list. The Description field beside the list provides a brief description of the highlighted component.
To install the GPS Analyst extension documentation for developers, select the Developer Documentation and Samples check box.
d. Click Next.
11. The Start Copying Files page appears. Click Next.
The final page of the installation wizard shows InstallShield Wizard Complete:
12. Trimble recommends that you click the Yes, check for program updates option and then click Finish.
The GPS Analyst Extension Updater utility appears. Use the utility to download the latest extension updates and documentation from the Trimble website.
Trimble GPS Analyst Extension Getting Started Guide 43
2 Installation
Once you have downloaded files, you can install them immediately, or you can run the Updater utility later and select the downloaded files that you want to install (see Updating the Trimble GPS Analyst extension, page 47).
Note – You must enable the Trimble GPS Analyst extension in both ArcCatalog and ArcMap before you can use it. For more information, see Enabling the Trimble GPS Analyst extension, page 45.
Installing the Data Transfer utility
Use the Trimble Data Transfer utility to transfer files to GIS devices, such as a data collector running the TerraSync field software.
To install the Data Transfer utility:
1. Insert the Trimble GPS Analyst Extension CD in the CD drive of the office computer.
The Setup screen appears.
If this screen does not appear, select Autorun.exe from the CD drive folder.
2. Click Install.
The Installation screen appears.
3. Click Install Data Transfer.
4. The Data Transfer installation wizard appears.
Follow the instructions on the screen to install the Data Transfer utility.
For more information, refer to the Data Transfer Utility Help.
44 Trimble GPS Analyst Extension Getting Started Guide
Installation 2
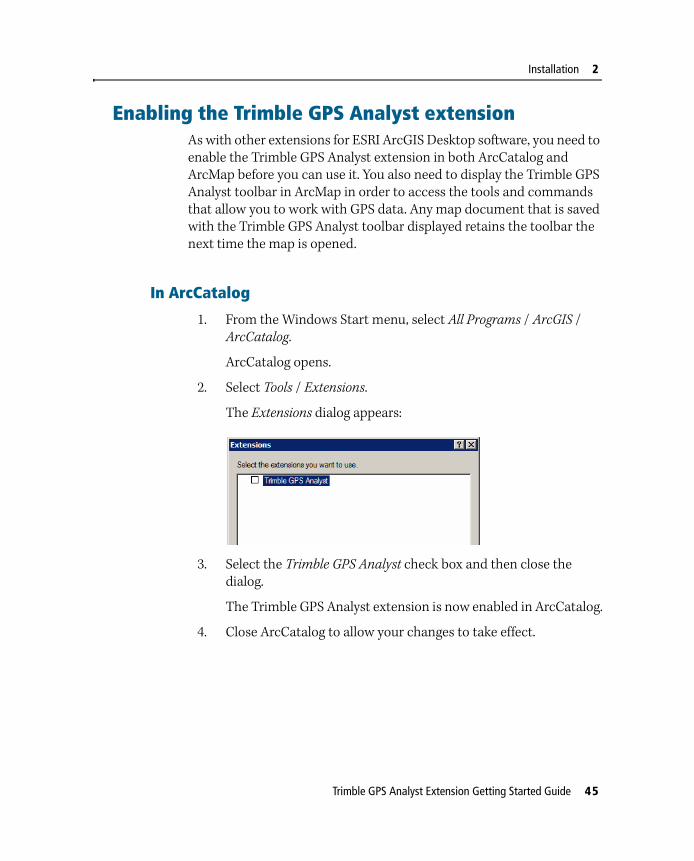
Enabling the Trimble GPS Analyst extensionAs with other extensions for ESRI ArcGIS Desktop software, you need to enable the Trimble GPS Analyst extension in both ArcCatalog and ArcMap before you can use it. You also need to display the Trimble GPS Analyst toolbar in ArcMap in order to access the tools and commands that allow you to work with GPS data. Any map document that is saved with the Trimble GPS Analyst toolbar displayed retains the toolbar the next time the map is opened.
In ArcCatalog
1. From the Windows Start menu, select All Programs / ArcGIS / ArcCatalog.
ArcCatalog opens.
2. Select Tools / Extensions.
The Extensions dialog appears:
3. Select the Trimble GPS Analyst check box and then close the dialog.
The Trimble GPS Analyst extension is now enabled in ArcCatalog.
4. Close ArcCatalog to allow your changes to take effect.
Trimble GPS Analyst Extension Getting Started Guide 45

2 Installation
In ArcMap
1. From the Windows Start menu, select All Programs / ArcGIS / ArcMap.
ArcMap opens, displaying a dialog asking whether you want to want to start using ArcMap with a new map, a template, or an existing map.
2. Select A new empty map.
3. Select Tools / Extensions.
The Extensions dialog appears:
4. Select the Trimble GPS Analyst check box and then close the dialog.
The Trimble GPS Analyst extension is now enabled in ArcMap.
5. Close ArcMap to allow your changes to take effect.
46 Trimble GPS Analyst Extension Getting Started Guide
Installation 2
Updating the Trimble GPS Analyst extensionTrimble recommends that you check for updates for the extension during the installation process (see Step 12, page 43).
To check for software updates at any other time, do one of the following:
• From the Trimble GPS Analyst drop-down menu in ArcMap, select Check for new updates now.
• From the Windows Start menu, select All Programs / Trimble / GPS Analyst / GPS Analyst Updater
For more information, search for the topic Updating GPS Analyst in the Trimble GPS Analyst Extension Help.
Managing licenses for the Trimble GPS Analyst extension
The Trimble Mapping & GIS License Manager software enables you to manage floating licenses for Trimble Mapping and GIS software products. Use the Mapping & GIS License Manager software to:
• View floating license information
• Add new or updated licenses
The Mapping & GIS License Manager is installed on a network computer and communicates with the client machine where the License Administrator software is installed (see Trimble GPS Analyst License Administrator software, page 49).
You can install the Mapping and GIS License Manager software onto a network computer running any of the following Microsoft operating systems:
• Windows XP Professional Edition
• Windows 2000 Professional (SP3)
Trimble GPS Analyst Extension Getting Started Guide 47

2 Installation
Installing the Mapping and GIS License Manager software
1. Insert the Trimble GPS Analyst Extension CD in the CD drive of the network server computer.
The Setup screen appears.
If this screen does not appear, select Autorun.exe from the CD drive folder.
2. Click Install.
The Installation screen appears.
3. Click Mapping & GIS License Manager.
4. The Mapping & GIS License Manager installation wizard appears.
Follow the instructions on the screen to install the Mapping & GIS License Manager software.
Mapping and GIS License Manager Help
The Mapping & GIS License Manager Help is installed on the server machine with the Mapping & GIS License Manager software. It provides detailed information about using the software.
To view the Help, do one of the following:
• in the Mapping & GIS License Manager window, click the Help button
• from the Windows Start menu, select All Programs / Trimble / Mapping & GIS License Manager / License Manager Help.
48 Trimble GPS Analyst Extension Getting Started Guide

Installation 2
Trimble GPS Analyst License Administrator software
The Trimble GPS Analyst License Administrator software is installed on the client machine when you install the Trimble GPS Analyst extension.
The Trimble GPS Analyst License Administrator displays information about the type of license used by your copy of the Trimble GPS Analyst extension. It also enables you to:
• Change the license manager that the Trimble GPS Analyst extension obtains its license from.
For example, the license manager may be reinstalled on a different computer.
• Change from a single use license to a floating license, and vice versa.
For example, if you take your PC to a site office for several days of field work, the Trimble GPS Analyst extension will not be able to communicate with the License Manager to obtain a floating license. To avoid this, change to a single use license. You can change it back once you return to the office.
For more information, search for the topic Trimble GPS Analyst License Administrator in the Trimble GPS Analyst Extension Help.
Trimble GPS Analyst Extension Getting Started Guide 49

2 Installation
50 Trimble GPS Analyst Extension Getting Started Guide

S E C T I O N
II
WORKING WITH GPS DATA IN THE TRIMBLE GPS ANALYST EXTENSION IIIn this section:
Chapter 3, The User Interface
Chapter 4, Typical GPS Analyst Tasks
Chapter 5, Tutorial 1: Checking Out and Checking In ArcPad and GPScorrect Data
Chapter 6, Tutorial 2: Importing Trimble SSF Files
Chapter 7, Tutorial 3: Processing GPS Data
Trimble GPS Analyst Extension Getting Started Guide 51

52 Trimble GPS Analyst Extension Getting Started Guide

C H A P T E R
3
The User Interface 3In this chapter:
In ArcCatalog
In ArcMap
Trimble GPS Analyst toolbox
Measurement units
Exiting the Trimble GPS Analyst extension
This chapter describes the toolsets and menu commands that comprise the Trimble GPS Analyst extension interface in ArcCatalog and ArcMap.
Whether you are using ArcView, ArcEditor, or ArcInfo, the same tools are available for you to work on your GPS data.
Trimble GPS Analyst Extension Getting Started Guide 53
3 The User Interface
In ArcCatalogIn ArcCatalog, the Trimble GPS Analyst extension interface is a set of right-click menu commands. Depending on the item you right-click, different options appear.
Note – You must enable the Trimble GPS Analyst extension in ArcCatalog (see page 45) and GPS-enable a geodatabase (see page 67) before you can view the GPS Analyst extension interface .
To access menu items provided with the GPS Analyst extension, right-click items in a GPS-enabled geodatabase in ArcCatalog.
Table 3.1 on the following page describes each menu item, and how to access it.
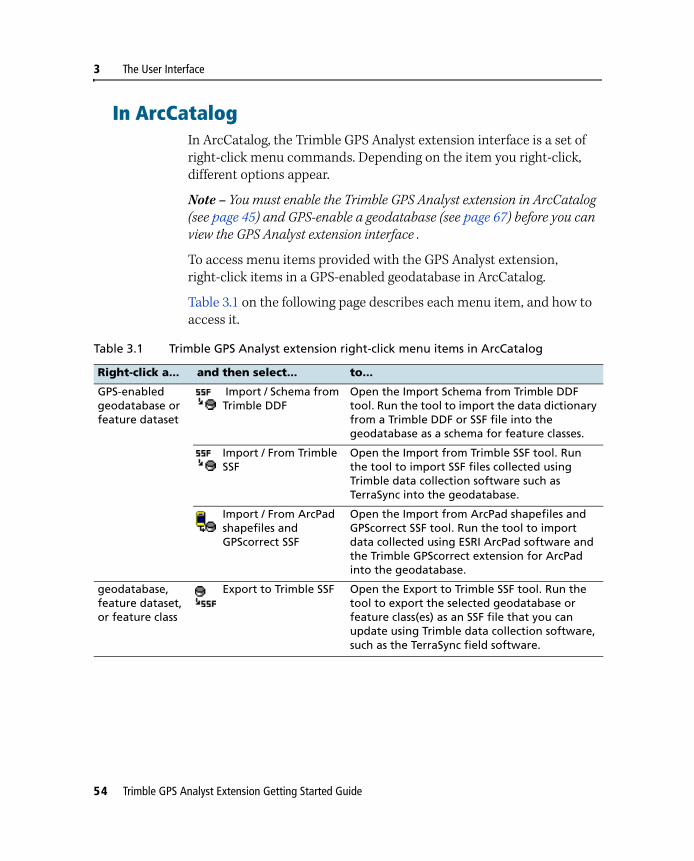
Table 3.1 Trimble GPS Analyst extension right-click menu items in ArcCatalog
Right-click a... and then select... to...
GPS-enabled geodatabase or feature dataset
Import / Schema from Trimble DDF
Open the Import Schema from Trimble DDF tool. Run the tool to import the data dictionary from a Trimble DDF or SSF file into the geodatabase as a schema for feature classes.
Import / From Trimble SSF
Open the Import from Trimble SSF tool. Run the tool to import SSF files collected using Trimble data collection software such as TerraSync into the geodatabase.
Import / From ArcPad shapefiles and GPScorrect SSF
Open the Import from ArcPad shapefiles and GPScorrect SSF tool. Run the tool to import data collected using ESRI ArcPad software and the Trimble GPScorrect extension for ArcPad into the geodatabase.
geodatabase, feature dataset, or feature class
Export to Trimble SSF Open the Export to Trimble SSF tool. Run the tool to export the selected geodatabase or feature class(es) as an SSF file that you can update using Trimble data collection software, such as the TerraSync field software.
54 Trimble GPS Analyst Extension Getting Started Guide

The User Interface 3
In ArcMapIn ArcMap, the Trimble GPS Analyst extension interface consists of the Trimble GPS Analyst toolbar, and several dockable windows. Use the Trimble GPS Analyst toolbar to access tools and commands that enable you to work with GPS data. Use the standard ArcMap Tools toolbar to select features, and to change the map extent displayed.
Note – You must enable the Trimble GPS Analyst extension in ArcMap (see page 46) before you can view the Trimble GPS Analyst extension interface.
The Trimble GPS Analyst toolbar
To display the Trimble GPS Analyst toolbar in ArcMap:
1. In ArcMap, select View / Toolbars.
2. Select Trimble GPS Analyst.
3. The Trimble GPS Analyst toolbar appears.
You can dock the toolbar above the map, or leave the toolbar “floating” on the map.
GPS session Differential Correction Start the Differential Correction wizard with the selected session preselected in the Selected Sessions list of the wizard.
View audit log Open the audit log file for the selected GPS session (corrected GPS sessions only).
Edit Antenna Settings Edit the height of the antenna used to collect GPS data during the GPS session.
Rename Rename the selected GPS session.
Table 3.1 Trimble GPS Analyst extension right-click menu items in ArcCatalog
Right-click a... and then select... to...
Trimble GPS Analyst Extension Getting Started Guide 55

3 The User Interface
The Trimble GPS Analyst toolbar consists of:
• the Trimble GPS Analyst drop-down menu
• GPS position tools
• Office toolset
Trimble GPS Analyst drop-down menu
Use the commands on the Trimble GPS Analyst drop-down menu to:
• start and stop a GPS edit session, or save your edits
• access rebuild and correction settings
• set measurement units
• display or hide a toolset on the Trimble GPS Analyst toolbar
• check for software and documentation updates for the GPS Analyst extension from the Trimble website
• access the Trimble GPS Analyst Extension Help
Office toolset
GPS position tools
Trimble GPS Analyst
drop-down menu
56 Trimble GPS Analyst Extension Getting Started Guide

The User Interface 3
GPS Analyst toolsets and toolbar buttons
Note – Most buttons on the Trimble GPS Analyst toolbar are not enabled until you start a GPS edit session. For more information, see GPS edit sessions, page 72 or search for the topic GPS edit sessions in the Trimble GPS Analyst Extension Help.
The GPS position tools enable you to select and display GPS positions on the map.
The Office toolset provides editing and analysis tools, and tools for working with ArcPad and GPScorrect data.
Table 3.2 describes the function of each button on the Trimble GPS Analyst toolbar.
Table 3.2 Trimble GPS Analyst toolbar buttons
Item Button Name Function
GPS Position tools
Select GPS Positions for Selected Features
Selects and displays GPS positions used in the selected features on the map.
Select All GPS Positions for Selected Features
Selects and displays all GPS positions (original and corrected) for the selected features on the map.
Select GPS Positions Selects GPS positions from the map.
GPS Position Properties Opens the GPS Position Properties dialog.
Office toolset Differential Correction
Opens the Differential Correction wizard. Use the wizard to reduce errors in collected GPS data.
RebuildOpens the Rebuild GPS-enabled Features tool. Run the tool to rebuild the geometry of features derived from GPS positions.
GPS Feature Validation Opens the GPS Validation dialog.
Get Data for ArcPadOpens the Get Data for ArcPad wizard. Use the wizard to check out files for updating using ArcPad software.
Trimble GPS Analyst Extension Getting Started Guide 57

3 The User Interface
Additional tools
The Field toolset provides tools for collecting GPS data in ArcMap (see page 160). By default, the Field toolset is not displayed.
B Tip – You can display both toolsets on the Trimble GPS Analyst toolbar, or only the toolset for the tasks you are performing. To display or hide a toolset, select the appropriate command from the Trimble GPS Analyst drop-down menu. A check mark next to a toolset command indicates that the toolset is displayed.
Get Data for ArcPad 7Opens the Get Data for ArcPad wizard. Use the wizard to check out files for updating using ArcPad software version 7.0 and later.
Check In ArcPad shapefiles and GPScorrect SSF
Opens the Check In ArcPad shapefiles and GPScorrect SSF tool. Run the tool to check in data collected using ArcPad and the GPScorrect extension.
Undo Check Out for Editing
Undoes check out of data checked out for editing in ArcPad.
Item Button Name Function
58 Trimble GPS Analyst Extension Getting Started Guide

The User Interface 3
The GPS group layer
When you add GPS-enabled feature classes to the map in ArcMap, the GPS group layer is automatically added as the top layer in the Table of Contents window. The GPS group layer contains the Features In Progress layer and GPS Positions layer.
Features In Progress layer
The Features In Progress layer shows the pending geometry for the line or polygon feature currently being created or edited using the GPS Analyst extension.
GPS Positions layer
The GPS Positions layer shows the GPS positions stored in the geodatabase. By default, the GPS Positions layer is enabled, but no GPS positions are selected for display. You can control how and which GPS positions are displayed on the map using the Layer Properties dialog.
To display the GPS positions for a feature:
1. Make sure you have added GPS data to your map.
2. Use the Select Features tool on the ArcMap Tools toolbar to select a feature.
3. Do one of the following:
– To select all GPS positions for the selected feature, click the Select All GPS Positions for Selected Features button on the Trimble GPS Analyst toolbar.
Trimble GPS Analyst Extension Getting Started Guide 59

3 The User Interface
– To select the GPS positions that are used to construct the selected feature, click the Select GPS Positions for Selected Features button on the Trimble GPS Analyst toolbar.
The GPS positions are shown even if the GPS Positions layer is set to display no GPS positions.
Trimble GPS Analyst toolbox The Trimble GPS Analyst toolbox groups together the geoprocessing tools provided with the Trimble GPS Analyst extension.
The following tools are provided in the Trimble GPS Analyst toolbox:
• Rebuild GPS-enabled Features
• Check In ArcPad shapefiles and GPScorrect SSF
• Export to Trimble SSF
• Import From ArcPad shapefiles and GPScorrect SSF
• Import from Trimble DDF
• Import from Trimble SSF
The Check In ArcPad shapefiles and GPScorrect SSF tool only works in ArcMap. The rest of the tools are available when you open ArcToolbox in either ArcCatalog or ArcMap. Depending on the tool, they can also be accessed from either the right-click menu in ArcCatalog or from the Trimble GPS Analyst toolbar in ArcMap.
60 Trimble GPS Analyst Extension Getting Started Guide

The User Interface 3
Measurement unitsTo select the units used to display or enter numeric values used by the Trimble GPS Analyst extension, select Units from the Trimble GPS Analyst drop-down menu on the Trimble GPS Analyst toolbar. The Units dialog appears:
Use the Units dialog to choose units for distance, velocity, and angle, as well as the formats for bearings.
The units you select are used by the Trimble GPS Analyst extension for all GPS data in both ArcMap and ArcCatalog, except for geoprocessing tools and x and y values. The x and y values always use the units specified for the coordinate system of the data frame.
Note – The units you select do not change units used elsewhere in ArcMap and ArcCatalog.
Trimble GPS Analyst Extension Getting Started Guide 61

3 The User Interface
Table 3.3 lists the measurements used in the Trimble GPS Analyst extension, and the available units.
B Tip – To convert data into the configured units, simply enter the value followed by the abbreviation for the units it is in. For example, if Meters is the configured unit, and you enter 10 ft, the value is converted to 3.048 m. Automatic conversion applies only to fields that contain distances, offsets, heights, or coordinates.
Table 3.4 lists the available distance units and their abbreviations.
Table 3.3 Available measurement units for the Trimble GPS Analyst extension
Measurement Default Units Avaliable Units
Distance Meters Inches, Feet, Yards, Miles, Nautical Miles, Millimeters, Centimeters, Meters, Kilometers
Velocity Kilometers per Hour Feet per Second, Meters per Second, Kilometers per Hour, Miles per Hour, Knots
Angle Degrees Degrees, Gradians, Mils
North Reference True True, Magnetic
Magnetic Declination Auto Auto, User Specifiable in angle units
Table 3.4 Distance unit abbreviations in the Trimble GPS Analyst extension
Unit Abbreviation
Inches in
Feet ft
Yards yd
Miles mi
Nautical Miles nm
Millimeters mm
Centimeters cm
Meters m
Kilometers km
62 Trimble GPS Analyst Extension Getting Started Guide

The User Interface 3
Exiting the Trimble GPS Analyst extensionFrom ArcCatalog, you do not need to save changes or exit the Trimble GPS Analyst extension. Changes are saved when the GPS Analyst function ( for example, importing a Trimble SSF file) finishes processing.
From ArcMap, exit the Trimble GPS Analyst extension as follows:
1. If you have started a GPS edit session, select Stop GPS Editing from the Trimble GPS Analyst drop-down menu.
2. Do one of the following:
– Click Yes to save the edits. The modified features as well as the GPS data that the features are linked to are saved in the geodatabase.
– Click No to discard the edits.
If you also want to exit ArcMap:
1. Select File / Save. The map document is saved.
2. Select File / Exit. ArcMap is closed.
If the Trimble GPS Analyst toolbar is displayed when you save a map document, it is displayed the next time you open that document.
Trimble GPS Analyst Extension Getting Started Guide 63

3 The User Interface
64 Trimble GPS Analyst Extension Getting Started Guide

C H A P T E R
4
Typical GPS Analyst Tasks 4In this chapter:
Overview: Importing and processing GPS data
Typical workflow
This chapter outlines the tasks you will typically perform when working with GPS data using the Trimble GPS Analyst extension in ArcCatalog and in ArcMap.
For step-by-step instructions and more detailed information about these tasks, refer to the tutorials provided in Chapters 5, 6, and 7.
Trimble GPS Analyst Extension Getting Started Guide 65

4 Typical GPS Analyst Tasks
Overview: Importing and processing GPS dataThe Trimble GPS Analyst extension enables you to store and work with GPS-based data directly within the ESRI ArcGIS Desktop software environment.
The GPS Analyst extension supports GIS and GPS data in the Trimble SSF file format. You can import GPS data collected using either ESRI ArcPad software and the Trimble GPScorrect extension for ArcPad, or other Trimble data collection software, such as the TerraSync field software, into a GPS-enabled geodatabase.
You can import data from the following versions of data collection software:
• ESRI ArcPad software version 6.0.1 with the Trimble GPScorrect extension version 1.01 and later
• ESRI ArcPad software version 7.0 and later with the Trimble GPScorrect extension version 2.00 and later
• TerraSync software version 2.40 and later
Usually when you use the GPS Analyst extension, you will add collected GPS and GIS data to a GPS-enabled geodatabase and then process the data. If you want to update existing data, you will first need to extract the data from the geodatabase and then update it using your data collection software.
Typical workflowWhen you import and process GPS data using the Trimble GPS Analyst extension, you will typically complete some or all of the following steps:
1. Prepare the geodatabase for GPS data.
2. If you want to update existing features with GPS data, extract the data from the geodatabase.
3. Add the new and updated data back to the geodatabase.
4. Process and analyze the GPS data.
66 Trimble GPS Analyst Extension Getting Started Guide
Typical GPS Analyst Tasks 4
More information about each step is provided below. These steps assume that you will use the GPS Analyst user interface provided in ArcCatalog and ArcMap. You can also complete some steps using geoprocessing tools provided in the Trimble GPS Analyst toolbox, available when you open ArcToolbox. For more information, see Trimble GPS Analyst toolbox, page 60.
Step 1: Prepare the geodatabase for GPS data
Note – To work with GPS data using the Trimble GPS Analyst extension, you must use a personal geodatabase.
In ArcCatalog, open the Database Properties dialog and prepare the geodatabase for GPS data by doing the following:
1. GPS-enable the geodatabase and the feature classes that will contain the GPS-derived features.
2. Specify the spatial reference for the geodatabase.
3. Select a geographic transformation for the GPS data.
GPS-enabling a geodatabase
Before you can store or work with GPS data in the geodatabase, you need to GPS-enable it. GPS-enabling a geodatabase creates records in the geodatabase where GPS data is stored, and creates the GPS Sessions folder.
Note – You can only GPS-enable a personal geodatabase.
For more information, see Exercise 1 in Tutorial 1 or 2 or search for the topic GPS-enabling the geodatabase in the Trimble GPS Analyst Extension Help.
When GPS-enabling a geodatabase, you must specify its spatial reference. GPS positions stored in the geodatabase use the WGS-84 geographic coordinate system. If you select a spatial reference for the geodatabase that is not WGS-84, or if you GPS-enable feature classes
Trimble GPS Analyst Extension Getting Started Guide 67

4 Typical GPS Analyst Tasks
that use a different coordinate system to WGS-84, you need to select a geographic transformation to correctly convert the GPS positions from WGS-84 to the nominated coordinate system.
As part of the GPS-enabling process, you must also GPS-enable the feature classes in the geodatabase that you want to associate with GPS data and define the accuracy required for validation. All GPS-enabled feature classes must use the same coordinate system as the geodatabase.
Setting a spatial reference
The spatial reference for the geodatabase describes its coordinate system ( for example, WGS-84, or UTM), its spatial domain, and its precision. The spatial domain is the allowable coordinate range for x, y, and z coordinates. All GPS-enabled feature classes in a GPS-enabled geodatabase must use the same coordinate system, and the spatial domain of each feature class must be within the bounds of the spatial domain defined for the GPS-enabled geodatabase.
When working with GPS data, you should specify a negative z domain value, especially if you are working in low-lying coastal areas, or if any features are likely to be underground, such as cables.
The spatial domain that you specify for the geodatabase affects the degree of precision that the feature geometries stored in the geodatabase will have. Precision defines the level of detail that is maintained when feature geometries are stored in the geodatabase. The smaller the spatial domain used, the greater the precision of the feature geometries in the geodatabase.
GPS positions are not affected by the resolution of the spatial domain for the geodatabase. They are always represented precisely in the geodatabase. If the spatial domain is too large, GIS features will be stored with less precision than their underlying GPS positions. This does not affect the quality of your data, but it can cause inaccuracies in the ArcMap display.
68 Trimble GPS Analyst Extension Getting Started Guide
Typical GPS Analyst Tasks 4
To minimize map display discrepancies between GPS positions and GIS features, choose an appropriate spatial domain for the geodatabase. You cannot change the spatial reference for a GPS-enabled geodatabase without deleting all its GPS data, so you need to define carefully the area to be mapped at the start of a project.
For more information, search for the topic Setting the spatial reference for the geodatabase in the Trimble GPS Analyst Extension Help.
Selecting a geographic transformation
Because GPS data always uses the WGS-84 coordinate system, you need to specify a geographic transformation if the geodatabase is using any coordinate system except WGS-84. This enables the ArcGIS Desktop software to project the GPS data into the correct coordinate system.
ArcGIS often provides different transformations for different areas in the same coordinate system. For example, there are separate NAD-83 to WGS-84 transformations for the continental US, Hawaii, and Alaska. There may also be several transformations for the same location, for example if the transformation has been revised over time.
Step 2: Extract data from the geodatabase for updating
There are two ways to extract existing data from a GPS-enabled geodatabase for updating in the field. The method you select depends on the type of data collection software that your field crews will be using to update the data.
For ArcPad and the GPScorrect extension
If your field crews will be using ESRI ArcPad software and the Trimble GPScorrect extension for ArcPad to update the data, use ArcMap to open a map document containing the feature classes you want to update. Use the Get Data for ArcPad button on the Trimble GPS Analyst toolbar in ArcMap to check out the feature classes from the
Trimble GPS Analyst Extension Getting Started Guide 69

4 Typical GPS Analyst Tasks
geodatabase to ArcPad. Then, use Microsoft ActiveSync technology to
transfer the shapefiles to a field computer running ArcPad software and the GPScorrect extension.
For Trimble data collection software
If your field crews will be using Trimble data collection software such as the TerraSync software to update the data, export feature classes from the geodatabase as SSF files using the Export to Trimble SSF command in ArcCatalog. Then, use the Trimble Data Transfer utility provided with the GPS Analyst extension to transfer the SSF files to a field computer running the Trimble data collection software.
B Tip – For information about how to install the Data Transfer utility, see Installing the Data Transfer utility, page 44. For more information about using the Data Transfer utility, refer to the Data Transfer Utility Help.
Step 3: Add GPS and GIS data to the geodatabase
The method you use to add GPS data to the geodatabase depends on the type of data collection software that your field crews used to collect the data.
If your field crews used ESRI ArcPad software and the Trimble GPScorrect extension for ArcPad to collect the data, there are two ways to add the data to the geodatabase:
• If the field crews were updating data that you checked out of the geodatabase using the Get Data for ArcPad button on the Trimble GPS Analyst toolbar in ArcMap, you must check in the data using the Check In ArcPad shapefiles and GPScorrect SSF button in ArcMap.
• If the field crews were collecting new data that has not yet been added to the geodatabase, you must import the data using ArcCatalog.
70 Trimble GPS Analyst Extension Getting Started Guide

Typical GPS Analyst Tasks 4
Each method for adding GPS data to the geodatabase is described below.
Checking in ArcPad and GPScorrect data
Use ActiveSync technology to transfer the field data from the field computer to the office PC.
Once the data is transferred, open ArcMap and start a GPS edit session (see page 72) from the Trimble GPS Analyst drop-down menu. Use the Check In ArcPad shapefiles and GPScorrect SSF button on the Trimble GPS Analyst toolbar to check the updated shapefiles into the geodatabase. The shapefiles are checked in with their corresponding SSF file, which contains the GPS data associated with the shapefiles.
Importing ArcPad and GPScorrect data
Use ActiveSync technology to transfer the field data from the field computer to the office PC.
Once the data is transferred, open ArcCatalog and then use the Import / From ArcPad shapefiles and GPScorrect SSF command to import the shapefiles into the geodatabase. The shapefiles are imported with their corresponding SSF file, which contains the GPS data associated with the shapefiles.
Importing data collected using Trimble data collection software
If your field crews used Trimble data collection software such as the TerraSync software to collect the data, use the Trimble Data Transfer utility provided with the GPS Analyst extension to transfer the SSF files from the field computer to the office PC where the GPS Analyst extension is installed. Then, import the SSF files into the geodatabase using the Import From Trimble SSF command in ArcCatalog.
B Tip – For information about how to install the Data Transfer utility, see Installing the Data Transfer utility, page 44. For more information about using the Data Transfer utility, refer to the Data Transfer Utility Help.
Trimble GPS Analyst Extension Getting Started Guide 71

4 Typical GPS Analyst Tasks
Step 4: Process and analyze the GPS Data
Once you have added GPS data to the geodatabase, you can use the GPS Analyst Office toolset in ArcMap to differentially correct, rebuild, and validate collected GPS positions. You will need to start a GPS edit
session before you can edit GPS data.
Alternatively, you can use the Differential Correction command in ArcCatalog to differentially correct the collected data, and just use the GPS Analyst Office toolset in ArcMap to view, rebuild, and validate features.
GPS edit sessions
A GPS edit session enables you to collect or edit any feature that is linked to GPS data.
Note – To edit a feature that uses GPS data, start a GPS edit session, not a standard ArcMap edit session. A feature that is edited in a standard ArcMap edit session becomes unlinked from its GPS-derived geometry.
B Tip – If you do unlink a feature from its GPS data, make sure that the Replace manually edited geometry with GPS-derived geometry check box in the Position Selection tab of the Rebuild Settings dialog is selected and then use the Rebuild command on the Trimble GPS Analyst toolbar to rebuild features and restore the link.
You cannot start a GPS edit session if an ArcMap edit session is already open.
For more information, search for the topic GPS edit sessions in the Trimble GPS Analyst Extension Help.
72 Trimble GPS Analyst Extension Getting Started Guide

C H A P T E R
5
Tutorial 1: Checking Out and Checking In ArcPad and GPScorrect Data 5In this chapter:
Before you begin
Scenario
Connecting to your data
Exercise 1: Preparing feature classes for GPS data
Exercise 2: Checking out data to ArcPad
Exercise 3: Checking in ArcPad shapefiles and the GPScorrect SSF file
This tutorial explains how to:
• GPS-enable the geodatabase
• check out data from a personal geodatabase for updating in the field using GPS data
• check data into the geodatabase that has been updated in the field using ESRI ArcPad software and the Trimble GPScorrect extension for ArcPad
The tutorial contains step-by-step instructions for the main tasks involved.
This tutorial will take between 30 and 45 minutes to complete.
Trimble GPS Analyst Extension Getting Started Guide 73
5 Tutorial 1: Checking Out and Checking In ArcPad and GPScorrect Data
Before you beginBefore beginning this tutorial, you will need to:
• Install the ESRI ArcGIS Desktop software. For more information, refer to the documentation provided by ESRI.
• Install the Trimble GPS Analyst extension. For more information, see Installing the Trimble GPS Analyst extension, page 36.
• Locate where the tutorial sample files are stored on your computer and, if required, reinstall them (see Loading the tutorial sample files below).
• Enable the Trimble GPS Analyst extension in both ArcCatalog and ArcMap (see page 45).
• Display the Trimble GPS Analyst toolbar in ArcMap (see page 55).
Note – The tutorials assume that the default settings for the Trimble GPS Analyst extension are unchanged. If they have been changed, the extension may behave differently from the behaviour described in the tutorials.
This tutorial assumes that you are familiar with GIS concepts and the ArcGIS software environment. For information on GIS concepts and the ArcGIS Desktop software environment, refer to Getting Started with ArcGIS and Building and Editing Geodatabases, which you received from ESRI in your ArcGIS package.
The exercises in this tutorial are designed to be completed in sequence.
Loading the tutorial sample files
The exercises use sample files supplied with the Trimble GPS Analyst extension. These sample files are located in the folder you specified at installation. The default location is C:\ArcGIS\ArcTutor\GPS Analyst.
If they have been deleted, reload them from the Trimble GPS Analyst Extension CD.
74 Trimble GPS Analyst Extension Getting Started Guide
Tutorial 1: Checking Out and Checking In ArcPad and GPScorrect Data 5
To reload the sample files:
1. Insert the Trimble GPS Analyst Extension CD in the CD drive of the computer.
2. Select Install.
3. Depending on the version of ArcGIS Desktop software you are running, click either Install GPS Analyst for ArcGIS 9.0 and 9.1 or Install GPS Analyst for ArcGIS 9.2.
4. Select Modify.
5. Select the Sample Data check box.
6. Follow the instructions on the screen to install the sample files.
For more information, refer to Installing the Trimble GPS Analyst extension, page 36.
Returning the contents of the tutorial folder to its original state
Each tutorial folder contains a zip file to return the contents of the tutorial geodatabase to its original state.
Note – You must return the contents of the tutorial folder to its original state before you do the tutorial. You will need to do this if you have done the tutorial before, even if you have uninstalled and then reinstalled the Trimble GPS Analyst extension.
To return the contents of any GPS Analyst tutorial folder to its original state:
1. In Windows Explorer, delete all files inside the tutorial folder except the .zip folder.
2. Right-click the .zip folder and select WinZip. Extract the contents to the tutorial folder.
Trimble GPS Analyst Extension Getting Started Guide 75
5 Tutorial 1: Checking Out and Checking In ArcPad and GPScorrect Data
ScenarioThe City of Westminster, Colorado, maintains a geodatabase of assets in an Open Space park. The geodatabase contains features such as access ways, sewers, building footprints, vehicle parking areas, and road centerlines. The City of Westminster wants to send field crews to the park to map new features and update existing ones. They will use field computers running ESRI ArcPad software and the Trimble GPScorrect extension for ArcPad to map features using GPS data.
Your task is to prepare the feature classes in the geodatabase for use with GPS data. You will also check the data out of the geodatabase, so that the field crews can use ArcPad and the GPScorrect extension to update it.
Later, when the field crews return to the office, you will transfer the data from the field computers to the office computer, and check in the updated data.
Connecting to your dataThe Catalog tree in ArcCatalog has a branch for each local hard drive. You can also create new branches in the Catalog tree to make it easier to navigate to your data. These branches are called connections.
Now you will add a connection to the folder that contains the tutorial data. This new branch remains in the Catalog tree until you delete it.
Make a connection to the tutorial data
1. In ArcCatalog, click the Connect to Folder button .
2. Navigate to the folder on the drive where the tutorial data is installed. The default location is C:\ArcGIS\ArcTutor\GPS Analyst\Tutorial1. Click OK.
76 Trimble GPS Analyst Extension Getting Started Guide
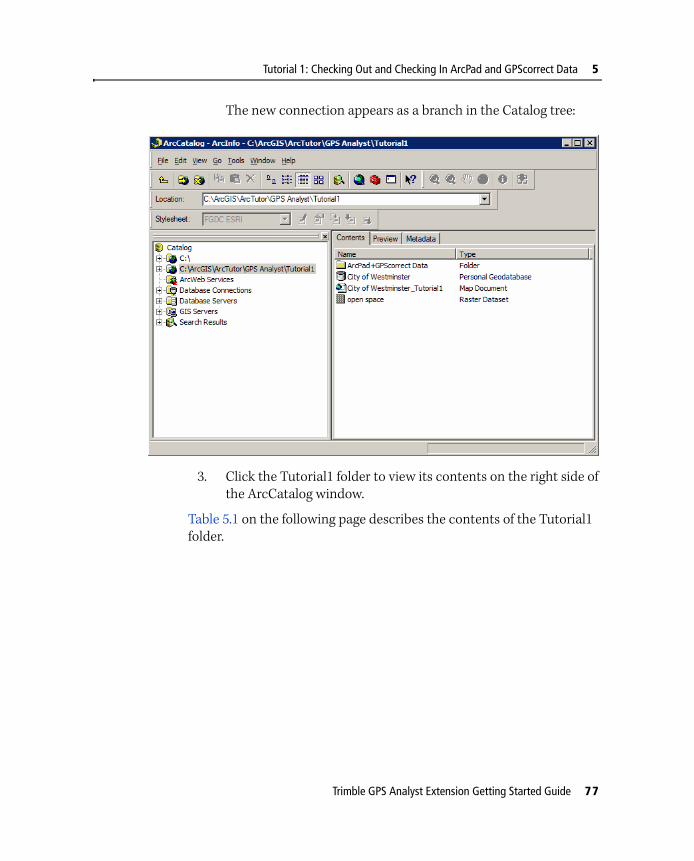
Tutorial 1: Checking Out and Checking In ArcPad and GPScorrect Data 5
The new connection appears as a branch in the Catalog tree:
3. Click the Tutorial1 folder to view its contents on the right side of the ArcCatalog window.
Table 5.1 on the following page describes the contents of the Tutorial1 folder.
Trimble GPS Analyst Extension Getting Started Guide 77

5 Tutorial 1: Checking Out and Checking In ArcPad and GPScorrect Data
Table 5.1 Contents of the Tutorial1 folder
Folder or filename File type Path Description
Tutorial1 Folder This is the main project folder where the City of Westminster geodatabase and map document are stored.
City of Westminster Geodatabase Tutorial1 The geodatabase containing the data for this tutorial.
City of Westminster_Tutorial1
Map document Tutorial1 A map document of the Open Space park maintained by the City of Westminster.
Open Space Raster dataset Tutorial1 A raster dataset of images of the Open Space park, which provides the background image for the map.
ArcPad+GPScorrect Data
Folder Tutorial1\ArcPad+GPScorrect Data
A special folder for this tutorial.This is the folder where the ArcPad shapefiles and the GPScorrect SSF file that have been updated in the field are stored.
You will check this data into the geodatabase.
78 Trimble GPS Analyst Extension Getting Started Guide

Tutorial 1: Checking Out and Checking In ArcPad and GPScorrect Data 5
Exercise 1: Preparing feature classes for GPS dataThe field crew will travel to the Open Space Park to collect the new features. The City of Westminster has indicated that the features that need to be mapped or updated are:
• access ways
• storm drain access covers
• water points
Your task is to prepare the City of Westminster geodatabase for use with GPS data, and to GPS-enable the feature classes that contain the new features.
This exercise introduces you to the concepts of:
• GPS data in the geodatabase
• geographic transformations
• estimated accuracy
• required accuracy for validation
It shows you how to:
• GPS-enable a geodatabase and selected feature classes
• add estimated accuracy attributes to GPS-enabled feature classes
• specify the required accuracy for features in the same feature class to pass validation
For this exercise, you will be working with ArcCatalog, which is the ArcGIS Desktop data management application.
Trimble GPS Analyst Extension Getting Started Guide 79

5 Tutorial 1: Checking Out and Checking In ArcPad and GPScorrect Data
GPS data in the geodatabase
The Trimble GPS Analyst extension enables you to store GPS data directly in the geodatabase as a GPS session. GPS sessions are contained in the GPS Sessions folder. GPS positions are always stored in the geodatabase using the WGS-84 coordinate system.
Before you can store GPS sessions in the geodatabase, you need to:
• GPS-enable the geodatabase
• specify the spatial reference for GPS-enabled feature classes
• GPS-enable the feature classes that you want to use with GPS data
You also need to select a geographic transformation, because the feature classes in the geodatabase are not referenced to the WGS-84 coordinate system. The geographic transformation will ensure that the GPS Analyst extension can correctly convert GPS data from WGS-84 coordinates to coordinates in the same coordinate system as the feature classes.
To complete these tasks, use the Trimble GPS Analyst tab of the Database Properties dialog. You can GPS-enable a geodatabase at the same time that you create the geodatabase, or later, once it contains GIS features.
GPS-enabling the geodatabase and feature classes
1. Open ArcCatalog, if it is not already open. To do this, select All Programs / ArcGIS / ArcCatalog from the Windows Start menu.
2. Browse to the tutorial dataset folder connection you created for Tutorial 1.
3. Right-click the City of Westminster geodatabase and select Properties.
The Database Properties dialog appears.
80 Trimble GPS Analyst Extension Getting Started Guide
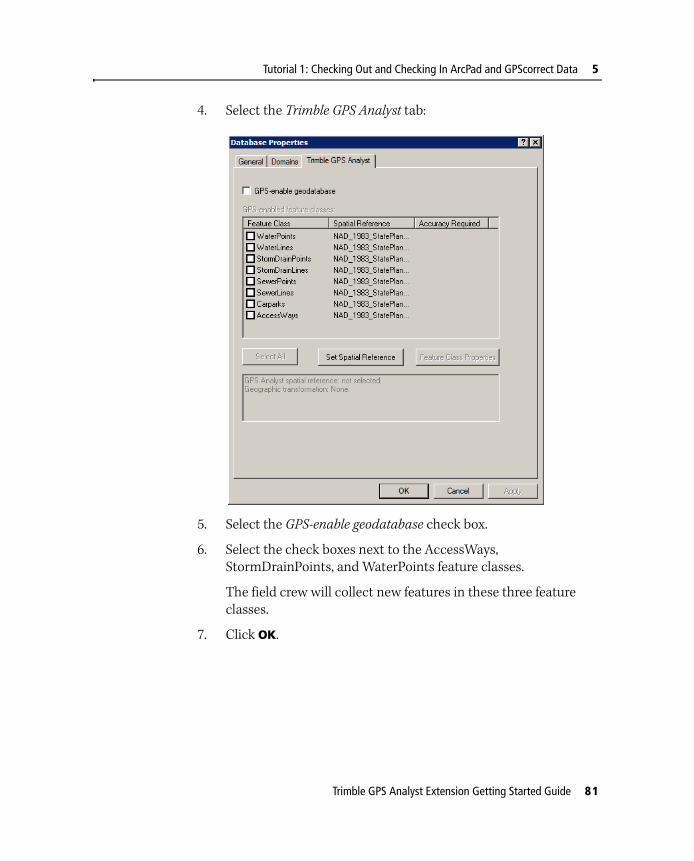
Tutorial 1: Checking Out and Checking In ArcPad and GPScorrect Data 5
4. Select the Trimble GPS Analyst tab:
5. Select the GPS-enable geodatabase check box.
6. Select the check boxes next to the AccessWays, StormDrainPoints, and WaterPoints feature classes.
The field crew will collect new features in these three feature classes.
7. Click OK.
Trimble GPS Analyst Extension Getting Started Guide 81
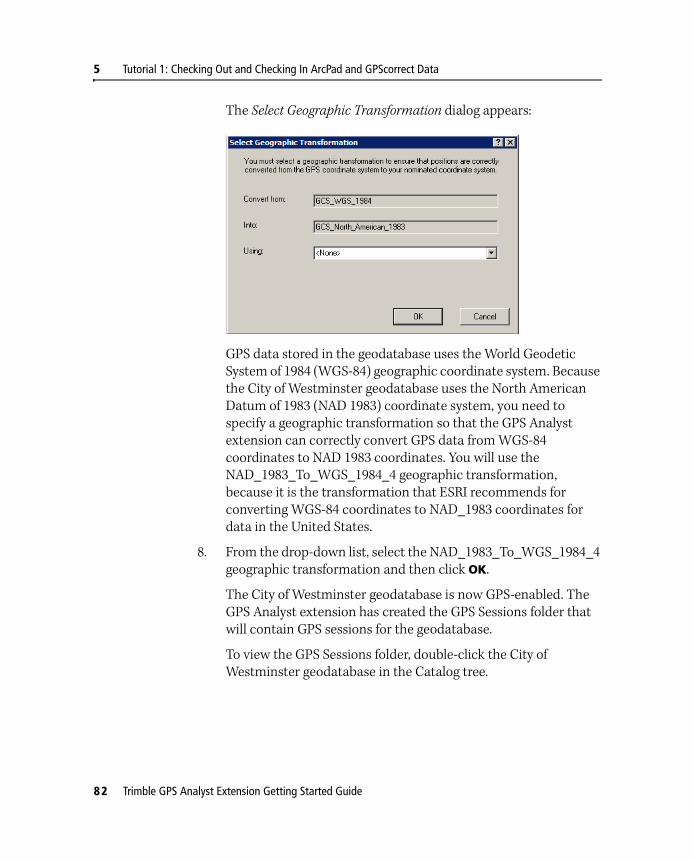
5 Tutorial 1: Checking Out and Checking In ArcPad and GPScorrect Data
The Select Geographic Transformation dialog appears:
GPS data stored in the geodatabase uses the World Geodetic System of 1984 (WGS-84) geographic coordinate system. Because the City of Westminster geodatabase uses the North American Datum of 1983 (NAD 1983) coordinate system, you need to specify a geographic transformation so that the GPS Analyst extension can correctly convert GPS data from WGS-84 coordinates to NAD 1983 coordinates. You will use the NAD_1983_To_WGS_1984_4 geographic transformation, because it is the transformation that ESRI recommends for converting WGS-84 coordinates to NAD_1983 coordinates for data in the United States.
8. From the drop-down list, select the NAD_1983_To_WGS_1984_4 geographic transformation and then click OK.
The City of Westminster geodatabase is now GPS-enabled. The GPS Analyst extension has created the GPS Sessions folder that will contain GPS sessions for the geodatabase.
To view the GPS Sessions folder, double-click the City of Westminster geodatabase in the Catalog tree.
82 Trimble GPS Analyst Extension Getting Started Guide

Tutorial 1: Checking Out and Checking In ArcPad and GPScorrect Data 5
Estimated accuracy values
When a feature is created using GPS data, the GPS Analyst extension calculates estimated accuracy values for the feature, and for the constructions that are used to build the feature.
For features that are made up of several vertices, the estimated accuracy is represented in two ways: the average estimated accuracy, which is the average for all the vertices in the feature, and the worst estimated
accuracy, which is the estimated accuracy of the vertex that has the largest estimated accuracy of all the vertices in the feature. For a point feature, which always consists of only one averaged vertex, the worst estimated accuracy is always the same as the average estimated accuracy.
The average estimated accuracy and the worst estimated accuracy values for a feature are stored as part of the GPS data used to construct the feature. You can choose to map the average and worst estimated accuracy values to attributes in the feature classes that you have GPS-enabled. If you do so, and if you later unlink a feature from its GPS data or GPS-disable the geodatabase, the estimated accuracy values for the feature will be retained as attributes.
Required accuracy for validation
The worst estimated accuracy value is used as part of the validation process. During GPS feature validation, the GPS Analyst extension checks whether the worst estimated accuracy of the feature is within the required accuracy specified for its feature class. The degree of accuracy you require depends on the type of feature collected and the purpose of the information. For example, underground cable features that maintenance crews will need to locate and repair require better accuracy than signpost features that are clearly identifiable.
You can specify or change the accuracy required for a feature class at any time, using the Trimble GPS Analyst tab of the Feature Class Properties dialog. You can learn more about validation by completing Tutorial 3: Processing GPS Data, beginning on page 129.
Trimble GPS Analyst Extension Getting Started Guide 83

5 Tutorial 1: Checking Out and Checking In ArcPad and GPScorrect Data
For this tutorial, you will specify the required accuracy before you check out the data to ArcPad.
Specifying the required accuracy for features
1. In ArcCatalog, expand the Open Space feature dataset:
2. Right-click the AccessWays feature class and then click Properties.
The Feature Class Properties dialog appears.
84 Trimble GPS Analyst Extension Getting Started Guide
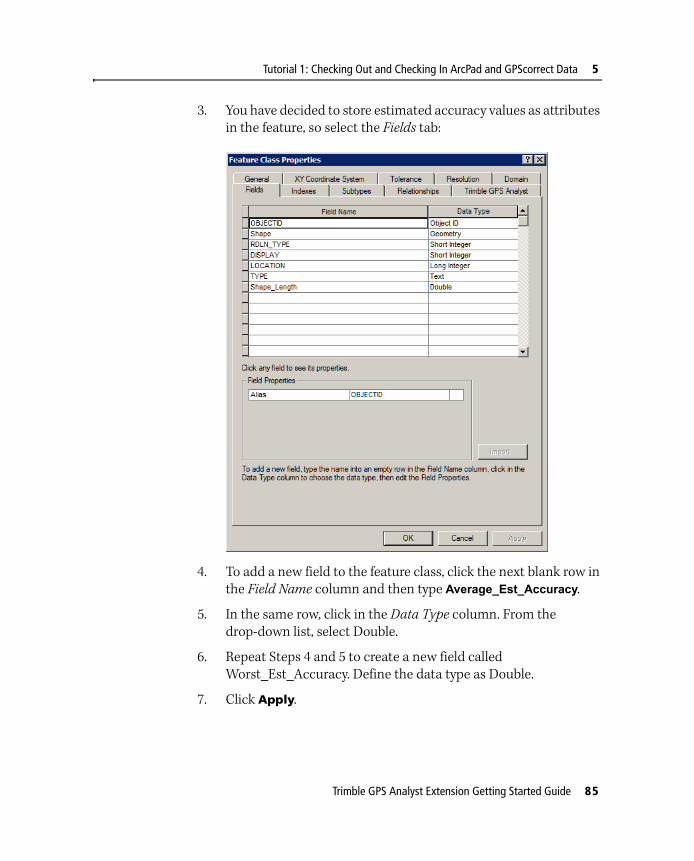
Tutorial 1: Checking Out and Checking In ArcPad and GPScorrect Data 5
3. You have decided to store estimated accuracy values as attributes in the feature, so select the Fields tab:
4. To add a new field to the feature class, click the next blank row in the Field Name column and then type Average_Est_Accuracy.
5. In the same row, click in the Data Type column. From the drop-down list, select Double.
6. Repeat Steps 4 and 5 to create a new field called Worst_Est_Accuracy. Define the data type as Double.
7. Click Apply.
Trimble GPS Analyst Extension Getting Started Guide 85

5 Tutorial 1: Checking Out and Checking In ArcPad and GPScorrect Data
8. Select the Trimble GPS Analyst tab:
The GPS-enable feature class check box is selected, because you enabled the feature class from the Database Properties dialog.
9. From the drop-down list next to Store average estimated accuracy in, select Average_Est_Accuracy.
10. From the drop-down list next to Store worst estimated accuracy in, select Worst_Est_Accuracy.
The City of Westminster map document uses meters to measure distance, so you will specify the accuracy required for validation in meters.
11. In the Accuracy required for validation field, enter 0.4 m.
86 Trimble GPS Analyst Extension Getting Started Guide

Tutorial 1: Checking Out and Checking In ArcPad and GPScorrect Data 5
All features in the AccessWays feature class now need to be accurate to within 40 centimeters in order to pass validation.
12. Click OK.
13. Repeat steps 2 through 12 above for the other GPS-enabled feature classes in the City of Westminster geodatabase:
– StormDrainPoints
– WaterPoints
Trimble GPS Analyst Extension Getting Started Guide 87
5 Tutorial 1: Checking Out and Checking In ArcPad and GPScorrect Data
Exercise 2: Checking out data to ArcPadNow that you have prepared the City of Westminster geodatabase for GPS data, you need to check the GPS-enabled feature classes out of the geodatabase for use in ArcPad. All feature data is automatically converted into Shapefile format for ArcPad. The shapefiles will be transferred to the field computers used by the field crews.
This lesson introduces the concepts of:
• GPS layers in ArcMap
It shows you how to:
• check out GPS-enabled feature classes to ArcPad
GPS layers in ArcMap
Maps that contain GPS-enabled feature classes contain a GPS group layer. The GPS group layer is added as the top layer in the map when GPS-enabled feature classes are added to the map, or when you GPS-enable feature classes that are contained in the map document.
The GPS group layer in the City of Westminster map document contains two layers:
• Features in Progress
• GPS Positions
These layers are used for analyzing and editing features that are linked to a GPS-derived geometry. You will use these layers if you complete Tutorial 3: GPS Data Processing.
88 Trimble GPS Analyst Extension Getting Started Guide

Tutorial 1: Checking Out and Checking In ArcPad and GPScorrect Data 5
Opening a map document that contains GPS-enabled feature classes
• In ArcCatalog, browse to the tutorial folder and double-click City of Westminster_Tutorial1.mxd. The default location is C:\ArcGIS\ArcTutor\GPS Analyst\Tutorial1.
ArcMap starts and displays a map of the Open Space park maintained by the City of Westminster:
Because you GPS-enabled three of the feature classes that are contained in the map document, two GPS layers are added to the map: the Features in Progress layer and the GPS positions layer. These appear in the GPS group layer, which is the first layer in the Display tab of the ArcMap table of contents.
Trimble GPS Analyst Extension Getting Started Guide 89

5 Tutorial 1: Checking Out and Checking In ArcPad and GPScorrect Data
Checking out GPS-enabled feature classes to ArcPad
1. Click the Get Data for ArcPad button on the Trimble GPS Analyst toolbar.
The first page of the Get Data for ArcPad wizard appears:
2. Click Select All to select all layers in the map.
3. Click the check box next to Open Space.sid to deselect the background layer and then click Next.
90 Trimble GPS Analyst Extension Getting Started Guide
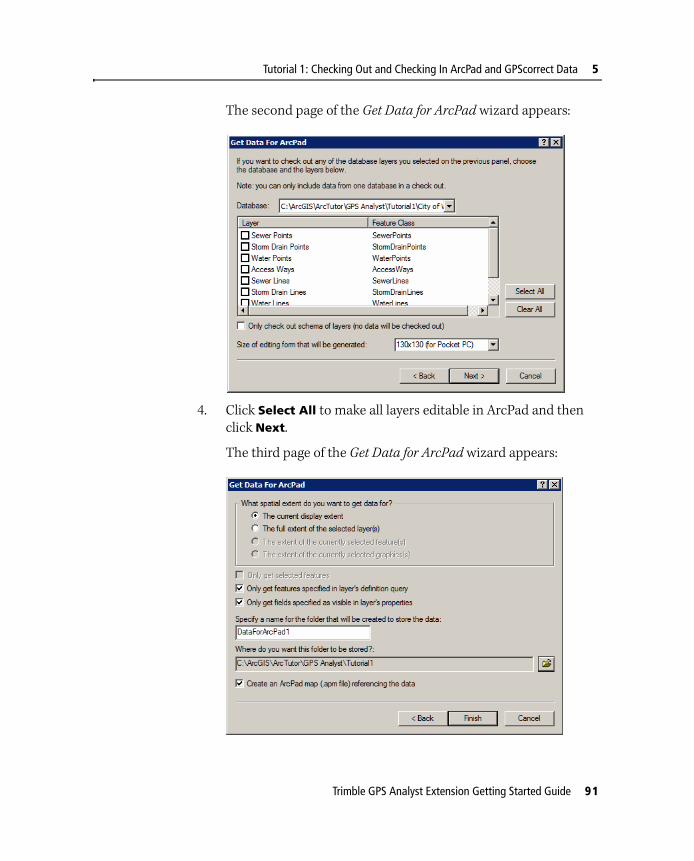
Tutorial 1: Checking Out and Checking In ArcPad and GPScorrect Data 5
The second page of the Get Data for ArcPad wizard appears:
4. Click Select All to make all layers editable in ArcPad and then click Next.
The third page of the Get Data for ArcPad wizard appears:
Trimble GPS Analyst Extension Getting Started Guide 91

5 Tutorial 1: Checking Out and Checking In ArcPad and GPScorrect Data
5. In the spatial extent options group, make sure that The current display extent option is selected.
6. Type field_data as the name for the folder that will be created to store the data.
7. Click and navigate to the Tutorial1 folder where the City of Westminster geodatabase is stored. The default location is C:\ArcGIS\ArcTutor\GPS Analyst\Tutorial1.
The field data folder will be stored in this folder.
8. Click Finish. The check out process starts.
9. When the check out process is complete, the Get Data for ArcPad summary dialog appears. Click OK to close the dialog.
The feature classes you selected are now checked out as shapefiles.
To view the contents of the field_data folder:
1. In ArcCatalog, select the Tutorial1 folder, then select View / Refresh.
2. Double-click the field_data folder.
A Shapefile has been created for each feature class.
Usually, you would now use Microsoft software such as ActiveSync technology to transfer the shapefiles to a field computer that is running ESRI ArcPad software and the Trimble GPScorrect extension for ArcPad. This step is not necessary for this tutorial.
Once the files have been transferred to the field computers, the field crews travel to the Open Park to collect features using GPS data. They connect the field computer to a GPS receiver, and use the GPScorrect extension to configure receiver settings and obtain detailed status for the GPS receiver. The field crews use the ArcPad software to collect or update features and attribute information. As features are created or updated, the GPScorrect extension records GPS positions for the feature in a Trimble SSF file. There is one SSF file, named GPScorrect.ssf, for each set of modified shapefiles.
92 Trimble GPS Analyst Extension Getting Started Guide

Tutorial 1: Checking Out and Checking In ArcPad and GPScorrect Data 5
Exercise 3: Checking in ArcPad shapefiles and the GPScorrect SSF file
The field crews have now returned to the office with the modified data stored in their field computers. They have collected new access way, storm drain access cover, and water point features.
Your task is to transfer the modified shapefiles and the corresponding SSF file from the field computer to the office computer. Then, you will check the new data into the geodatabase.
This exercise introduces the following concepts:
• GPS edit sessions
• checking in ArcPad and GPScorrect data
It shows you how to:
• check in ArcPad shapefiles and the GPScorrect SSF file to the geodatabase
Transferring files from the field computer to the office computer
Normally, you would use Microsoft software such as ActiveSync technology to transfer modified field data from the field computer to the office computer. For this tutorial, you will simulate the data transfer by copying the files using Microsoft Windows Explorer.
To transfer files:
1. From the Windows Start menu, select All Programs / Accessories / Windows Explorer.
Windows Explorer opens.
2. Navigate to the Tutorial1 folder. The default location is C:\ArcGIS\ArcTutor\GPS Analyst\Tutorial1.
3. Double-click the ArcPad+GPScorrect Data folder to view its contents.
Trimble GPS Analyst Extension Getting Started Guide 93

5 Tutorial 1: Checking Out and Checking In ArcPad and GPScorrect Data
4. Press [Ctrl] + [A] to select all files in the folder and then press [Ctrl] + [C] to copy them.
5. Open the field_data folder that you created when you checked out the data from the geodatabase.
6. Click anywhere inside the field_data folder and then press [Ctrl] + [V] to paste the ArcPad shapefiles and the GPScorrect SSF file into the folder.
A dialog appears, asking if you want to overwrite the files.
7. Click Yes to All.
The field_data folder now contains the data that has been modified by the field crew.
8. Close Windows Explorer.
GPS edit sessions
A GPS edit session enables you to edit any feature that is linked to GPS data.
Note – To edit a feature that uses GPS data, start a GPS edit session, not an ordinary ArcMap edit session. A feature that is edited in an ordinary ArcMap edit session becomes unlinked from its GPS-derived geometry.
You cannot start a GPS edit session if an ArcMap edit session is already open.
For more information, see GPS edit sessions, page 72 or search for the topic GPS edit sessions in the Trimble GPS Analyst Extension Help.
94 Trimble GPS Analyst Extension Getting Started Guide

Tutorial 1: Checking Out and Checking In ArcPad and GPScorrect Data 5
About checking in ArcPad and GPScorrect data
Always use the Check In ArcPad shapefiles and GPScorrect SSF button on the Trimble GPS Analyst toolbar when you check in features
that were collected with ESRI ArcPad software and the Trimble GPScorrect extension for ArcPad. This button opens the Check In ArcPad shapefiles and GPScorrect SSF dialog. Any shapefile checked in using this dialog is automatically checked in with the GPScorrect SSF file, if an SSF file exists.
C CAUTION – If you use the standard Check In Edits from ArcPad button on the ArcPad toolbar to check in shapefiles, the SSF file is not imported with the shapefile, and the GPS data is lost.
The features in the shapfiles are imported into the GPS-enabled feature classes that they were checked out from. The GPS positions and other GPS data contained in the SSF file are stored in an imported GPS session in the GPS Sessions folder of the geodatabase.
Checking in the ArcPad shapefiles and the GPScorrect SSF file
The next step is to check the modified field data into the geodatabase.
1. Return to the City of Westminster map document in ArcMap.
2. From the Trimble GPS Analyst drop-down menu, select Start GPS Editing.
This starts a GPS edit session and enables most of the buttons on the Trimble GPS Analyst toolbar.
Because you have already checked out feature classes from this map document, the Check In ArcPad shapefiles and GPScorrect SSF button is also enabled.
3. Click the Check In ArcPad shapefiles and GPScorrect SSF button on the Trimble GPS Analyst toolbar.
Trimble GPS Analyst Extension Getting Started Guide 95
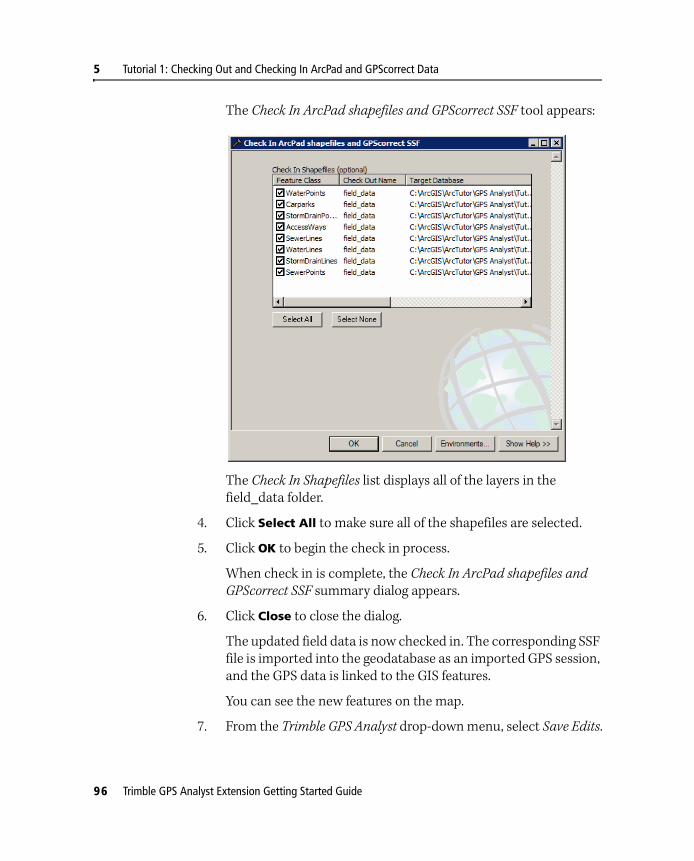
5 Tutorial 1: Checking Out and Checking In ArcPad and GPScorrect Data
The Check In ArcPad shapefiles and GPScorrect SSF tool appears:
The Check In Shapefiles list displays all of the layers in the field_data folder.
4. Click Select All to make sure all of the shapefiles are selected.
5. Click OK to begin the check in process.
When check in is complete, the Check In ArcPad shapefiles and GPScorrect SSF summary dialog appears.
6. Click Close to close the dialog.
The updated field data is now checked in. The corresponding SSF file is imported into the geodatabase as an imported GPS session, and the GPS data is linked to the GIS features.
You can see the new features on the map.
7. From the Trimble GPS Analyst drop-down menu, select Save Edits.
96 Trimble GPS Analyst Extension Getting Started Guide

Tutorial 1: Checking Out and Checking In ArcPad and GPScorrect Data 5
The modified features, and the GPS-derived geometries that they are linked to, are saved in the geodatabase.
8. From the Trimble GPS Analyst drop-down menu, select Stop GPS Editing.
9. Select File / Save to save the map document.
10. Exit ArcMap and exit ArcCatalog.
You have now finished this tutorial. In ArcCatalog, you have GPS-enabled the geodatabase, specified accuracy requirements for GPS-derived features, and checked out feature classes for updating using ESRI ArcPad software and the Trimble GPScorrect extension for ArcPad. In ArcMap, you have started a GPS edit session and checked in the features and GPS data that were updated using ArcPad and the GPScorrect extension. Understanding how to perform these basic tasks is the key to incorporating GPS data collected using ArcPad and the GPScorrect extension into a GPS-enabled geodatabase. For more information about using ArcPad and GPScorrect data with the GPS Analyst extension, refer to the Trimble GPS Analyst Extension Help.
Now that you have added GPS data to the geodatabase, you can learn more about analyzing the data using the Trimble GPS Analyst extension by completing Tutorial 3: Processing GPS Data, beginning on page 129.
Trimble GPS Analyst Extension Getting Started Guide 97

5 Tutorial 1: Checking Out and Checking In ArcPad and GPScorrect Data
98 Trimble GPS Analyst Extension Getting Started Guide

C H A P T E R
6
Tutorial 2: Importing Trimble SSF Files 6In this chapter:
Before you begin
Scenario
Connecting to your data
Exercise 1: Creating and GPS-enabling a geodatabase
Exercise 2: Importing data from an SSF file
Exercise 3: Specifying global feature class properties
Exercise 4: Adding GPS data to the map
This tutorial explains how to:
• create and GPS-enable a geodatabase
• create a feature dataset
• import data from a Trimble SSF file into the feature dataset
• set global feature class properties for all features in the geodatabase
• add the imported features to a map document
The tutorial contains step-by-step instructions for the main tasks involved.
This tutorial will take between 30 and 45 minutes to complete.
Trimble GPS Analyst Extension Getting Started Guide 99
6 Tutorial 2: Importing Trimble SSF Files
Before you beginBefore beginning this tutorial, you will need to:
• Install the ESRI ArcGIS Desktop software. For more information, refer to the documentation provided by ESRI.
• Install the Trimble GPS Analyst extension. For more information, see Installing the Trimble GPS Analyst extension, page 36.
• Locate where the tutorial sample files are stored on your computer and, if required, reinstall them (see Loading the tutorial sample files below).
• Enable the Trimble GPS Analyst extension in both ArcCatalog and ArcMap (see page 45).
• Display the Trimble GPS Analyst toolbar in ArcMap (see page 55).
Note – The tutorials assume that the default settings for the Trimble GPS Analyst extension are unchanged. If they have been changed, the extension may behave differently from the behaviour described in the tutorials.
Note – This tutorial assumes that you are running ArcGIS Desktop version 9.2 with Service Pack 1. If you are using ArcGIS Desktop version 9.0 or 9.1, notes have been added to document any differences.
This tutorial assumes that you are familiar with GIS concepts and the ArcGIS software environment. For information on GIS concepts and the ArcGIS Desktop software environment, refer to Getting Started with ArcGIS and Building and Editing Geodatabases, which you received from ESRI in your ArcGIS package.
The exercises in this tutorial are designed to be completed in sequence.
Loading the tutorial sample files
The exercises use sample files supplied with the Trimble GPS Analyst extension. These sample files are located in the folder you specified at installation. The default location is C:\ArcGIS\ArcTutor\GPS Analyst.
100 Trimble GPS Analyst Extension Getting Started Guide

Tutorial 2: Importing Trimble SSF Files 6
If they have been deleted, reload them from the Trimble GPS Analyst Extension CD.
To reload the sample files:
1. Insert the Trimble GPS Analyst Extension CD in the CD drive of the computer.
2. Select Install.
3. Depending on the version of ArcGIS Desktop software you are running, click either Install GPS Analyst for ArcGIS 9.0 and 9.1 or Install GPS Analyst for ArcGIS 9.2.
4. Select Modify.
5. Select the Sample Data check box.
6. Follow the instructions on the screen to install the sample files.
For more information, see Installing the Trimble GPS Analyst extension, page 36.
Returning the contents of the tutorial folder to its original state
Each tutorial folder contains a zip file to return the contents of the tutorial geodatabase to its original state.
Note – You must return the contents of the tutorial folder to its original state before you do the tutorial. You will need to do this if you have done the tutorial before, even if you have uninstalled and then reinstalled the Trimble GPS Analyst extension.
To return the contents of any GPS Analyst tutorial folder to its original state:
1. In Windows Explorer, delete all files inside the tutorial folder except the .zip folder.
2. Right-click the .zip folder and select WinZip. Extract the contents to the tutorial folder.
Trimble GPS Analyst Extension Getting Started Guide 101

6 Tutorial 2: Importing Trimble SSF Files
ScenarioThe Baylands County Parks and Recreation Department, California, is creating a geodatabase of assets in a new park, the Baylands County Park. The geodatabase will contain features such as a parking lot, benches, signs, and other park amenities. The Parks and Recreation Department has sent field crews to the park to map the features using GPS data. They used field computers running Trimble TerraSync software to map features using GPS data. When they returned to the office they transfered the Trimble SSF files containing the updated data from the field computers to the office computer.
Your task is to prepare the feature classes in the geodatabase for use with GPS data, and import the SSF files into the geodatabase.
Connecting to your dataThe Catalog tree in ArcCatalog has a branch for each local hard drive. You can also create new branches in the Catalog tree to make it easier to navigate to your data. These branches are called connections.
Now you will add a connection to the folder that contains the tutorial data. This new branch remains in the Catalog tree until you delete it.
Make a connection to the tutorial data
1. In ArcCatalog, click the Connect to Folder button .
2. Navigate to the folder on the drive where the tutorial data is installed. The default location is C:\ArcGIS\ArcTutor\GPS Analyst\Tutorial2. Click OK.
102 Trimble GPS Analyst Extension Getting Started Guide

Tutorial 2: Importing Trimble SSF Files 6
The new connection appears as a branch in the Catalog tree:
3. Click the Tutorial2 folder to view its contents on the right side of the ArcCatalog window.
Table 6.1 describes the contents of the Tutorial2 folder.
Table 6.1 Contents of the Tutorial2 folder
Folder or filename File type Path Description
Tutorial2 Folder This is the main project folder where the Baylands Park map document is stored.
baylands_park Map document Tutorial2 A map document of the Baylands County Park and surrounding areas.
BaseMap_Data Folder Tutorial2\BaseMap_Data
A folder containing layers used in the map document.
ImportSSF_file Folder Tutorial2\ImportSSF_file
A folder containing the Trimble SSF data file you will import into the geodatabase.
Trimble GPS Analyst Extension Getting Started Guide 103
6 Tutorial 2: Importing Trimble SSF Files
Exercise 1: Creating and GPS-enabling a geodatabaseThe field crew has returned from their trip to the Baylands County Park, and has transferred all Trimble SSF data files from their field computers to the office computer.
Your task is to create a new geodatabase for the Baylands County Park and to prepare the geodatabase for use with GPS data.
This exercise introduces you to the concepts of:
• GPS data in the geodatabase
• spatial references for geodatabases
• geographic transformations
It shows you how to:
• create a folder connection to the tutorial data
• create a new geodatabase
• GPS-enable a geodatabase
For this exercise, you will be working with ArcCatalog, which is the ArcGIS Desktop data management application.
Creating a new geodatabase
1. Open ArcCatalog, if it is not already open. To do this, select All Programs / ArcGIS / ArcCatalog from the Windows Start menu.
2. Browse to the tutorial dataset folder connection you created for Tutorial 2.
3. In the right pane of the ArcCatalog window, right-click anywhere in the Contents tab and select New / Personal Geodatabase.
The new geodatabase appears and is already selected in the Contents tab.
4. Name the geodatabase Baylands Park.
104 Trimble GPS Analyst Extension Getting Started Guide

Tutorial 2: Importing Trimble SSF Files 6
GPS data in the geodatabase
The Trimble GPS Analyst extension enables you to store GPS data directly in the geodatabase as a GPS session. GPS sessions are contained in the GPS Sessions folder. GPS positions are always stored in the geodatabase using the WGS-84 coordinate system.
Before you can store GPS sessions in the geodatabase, you need to GPS-enable the geodatabase. As part of the GPS-enabling process, you need to specify the spatial reference for the geodatabase. The spatial reference for the geodatabase describes its coordinate system ( for example, WGS-84, or UTM), its spatial domain, and its precision. The spatial domain is the allowable coordinate range for x, y, and z coordinates. All GPS-enabled feature classes in a GPS-enabled geodatabase must use the same coordinate system, and the spatial domain of each feature class must be within the bounds of the spatial domain defined for the GPS-enabled geodatabase.
If the coordinate system for the geodatabase is not WGS-84, you will also need to select a geographic transformation. The geographic transformation ensures that the GPS Analyst extension correctly converts GPS data from WGS-84 coordinates to coordinates in the same coordinate system as the geodatabase.
To complete these tasks, use the Trimble GPS Analyst tab of the Database Properties dialog. You can GPS-enable a geodatabase at the same time that you create the geodatabase, or later, once it contains GIS features. Because you will add features to the geodatabase at the same time as you import the GPS data, you need to GPS-enable the geodatabase now.
Trimble GPS Analyst Extension Getting Started Guide 105
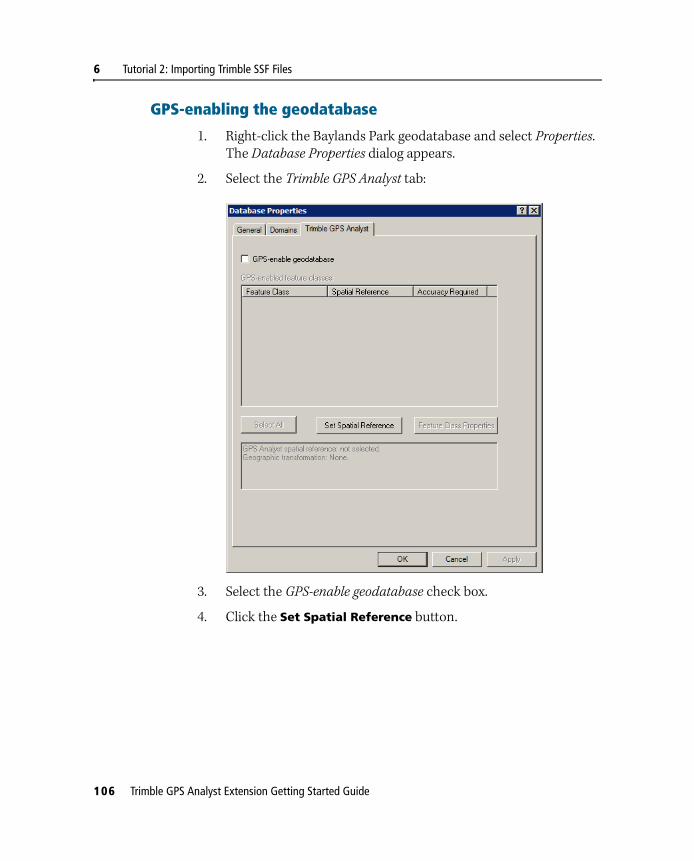
6 Tutorial 2: Importing Trimble SSF Files
GPS-enabling the geodatabase
1. Right-click the Baylands Park geodatabase and select Properties. The Database Properties dialog appears.
2. Select the Trimble GPS Analyst tab:
3. Select the GPS-enable geodatabase check box.
4. Click the Set Spatial Reference button.
106 Trimble GPS Analyst Extension Getting Started Guide
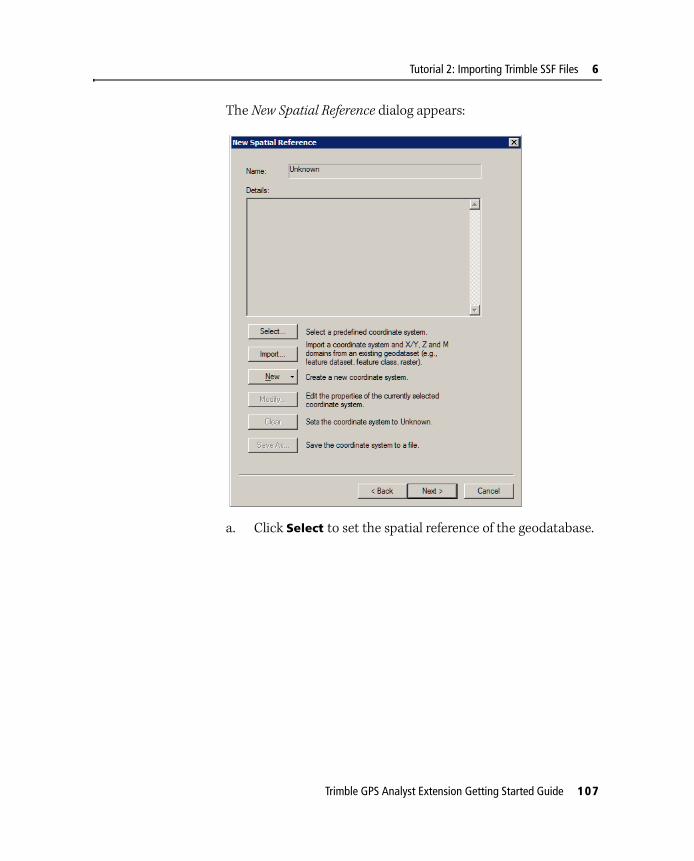
Tutorial 2: Importing Trimble SSF Files 6
The New Spatial Reference dialog appears:
a. Click Select to set the spatial reference of the geodatabase.
Trimble GPS Analyst Extension Getting Started Guide 107

6 Tutorial 2: Importing Trimble SSF Files
The Browse for Coordinate System dialog appears:
Since we know the data was collected in the Baylands County area, we will use the NAD 1983 StatePlane California III projection.
b. Navigate to Projected Coordinate Systems\State Plane\Nad 1983 and select the NAD 1983 StatePlane California III FIPS 0403.prj file.
c. Click Add to return to the New Spatial Reference dialog.
Details for the coordinate system you selected are now displayed in the dialog.
108 Trimble GPS Analyst Extension Getting Started Guide
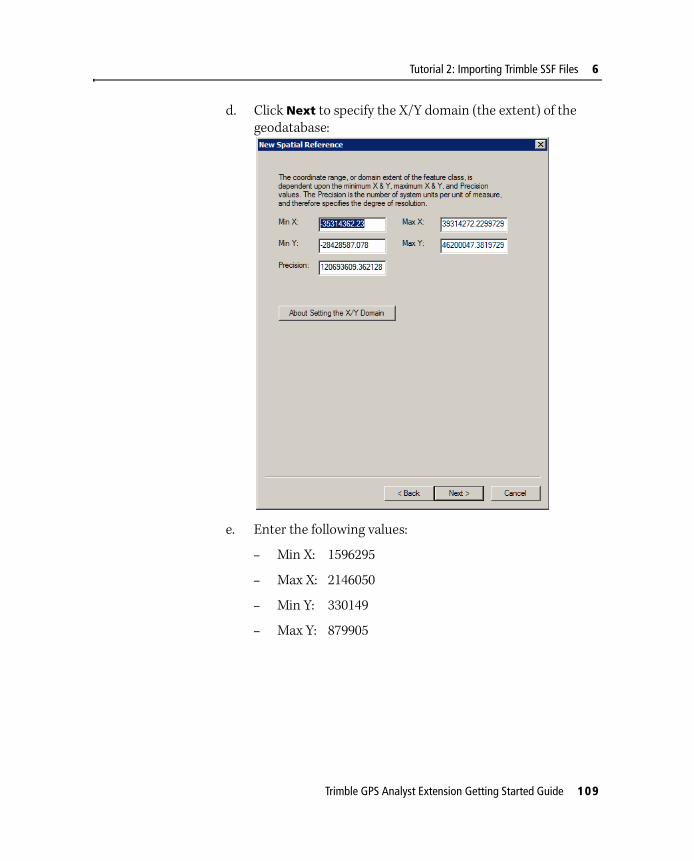
Tutorial 2: Importing Trimble SSF Files 6
d. Click Next to specify the X/Y domain (the extent) of the geodatabase:
e. Enter the following values:
– Min X: 1596295
– Max X: 2146050
– Min Y: 330149
– Max Y: 879905
Trimble GPS Analyst Extension Getting Started Guide 109
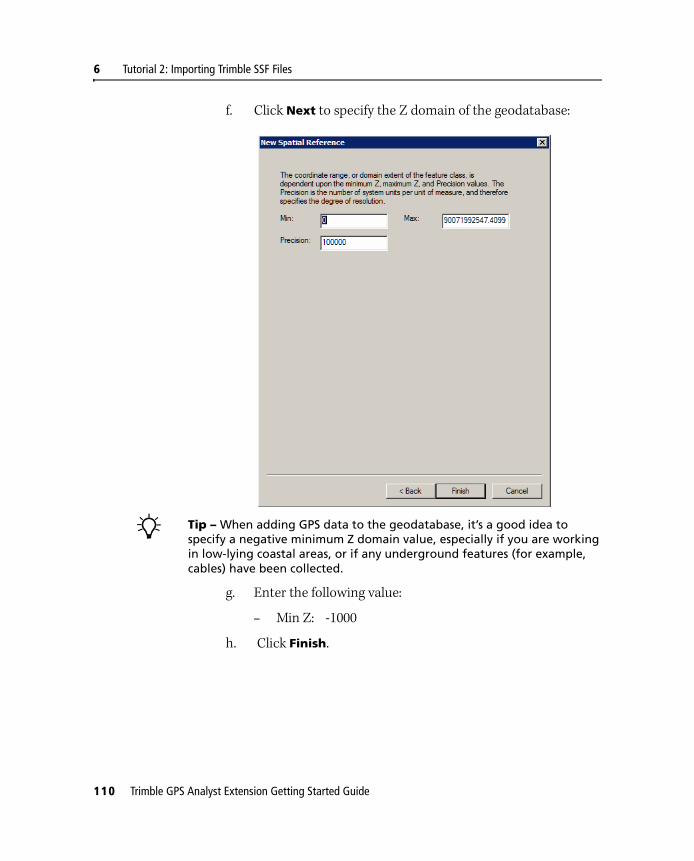
6 Tutorial 2: Importing Trimble SSF Files
f. Click Next to specify the Z domain of the geodatabase:
B Tip – When adding GPS data to the geodatabase, it’s a good idea to specify a negative minimum Z domain value, especially if you are working in low-lying coastal areas, or if any underground features (for example, cables) have been collected.
g. Enter the following value:
– Min Z: -1000
h. Click Finish.
110 Trimble GPS Analyst Extension Getting Started Guide
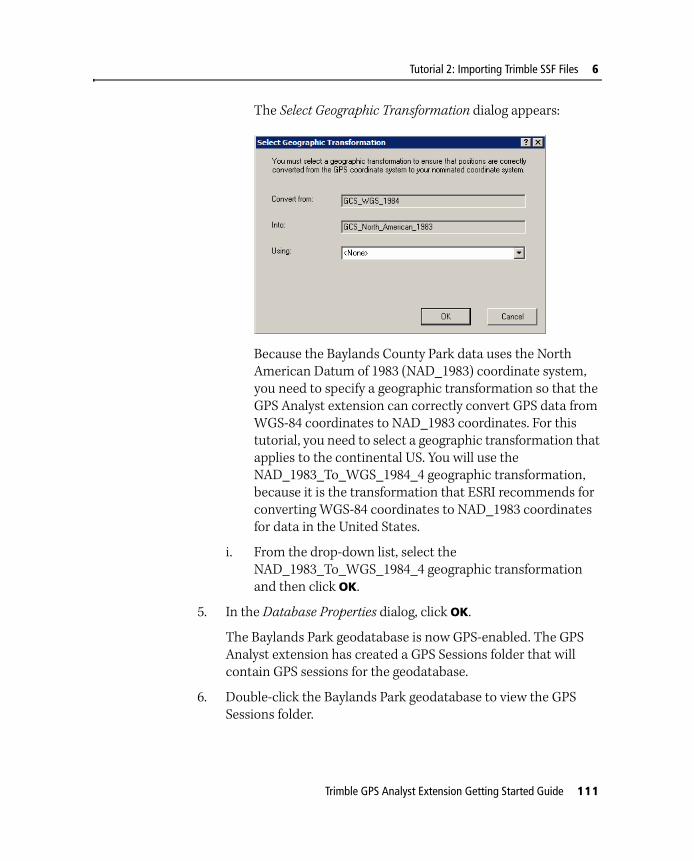
Tutorial 2: Importing Trimble SSF Files 6
The Select Geographic Transformation dialog appears:
Because the Baylands County Park data uses the North American Datum of 1983 (NAD_1983) coordinate system, you need to specify a geographic transformation so that the GPS Analyst extension can correctly convert GPS data from WGS-84 coordinates to NAD_1983 coordinates. For this tutorial, you need to select a geographic transformation that applies to the continental US. You will use the NAD_1983_To_WGS_1984_4 geographic transformation, because it is the transformation that ESRI recommends for converting WGS-84 coordinates to NAD_1983 coordinates for data in the United States.
i. From the drop-down list, select the NAD_1983_To_WGS_1984_4 geographic transformation and then click OK.
5. In the Database Properties dialog, click OK.
The Baylands Park geodatabase is now GPS-enabled. The GPS Analyst extension has created a GPS Sessions folder that will contain GPS sessions for the geodatabase.
6. Double-click the Baylands Park geodatabase to view the GPS Sessions folder.
Trimble GPS Analyst Extension Getting Started Guide 111

6 Tutorial 2: Importing Trimble SSF Files
Exercise 2: Importing data from an SSF fileNow that the Baylands Park geodatabase is ready for GPS data, you will create a feature dataset that you will import the Trimble SSF data into.
This exercise shows you how to:
• create a new feature dataset
• import data from a Trimble SSF file into a feature dataset
Creating a feature dataset
1. Right-click the Baylands Park geodatabase and select New / Feature Dataset.
The New Feature Dataset dialog appears:
112 Trimble GPS Analyst Extension Getting Started Guide

Tutorial 2: Importing Trimble SSF Files 6
If you are using ESRI ArcGIS Desktop software version 9.2 or later, go to Step 2 on page 114.
If you are using ESRI ArcGIS Desktop software version 9.0 or 9.1, the New Feature Dataset dialog looks slightly different to the dialog shown above. Complete the following steps:
a. Click the Edit button below the Spatial Reference Description area. The Spatial Reference Properties dialog appears.
b. Click Select to set the spatial reference of the geodatabase.
c. In the Browse for Coordinate System dialog, navigate to Projected Coordinate Systems\State Plan\Nad 1983 and select the NAD 1983 StatePlane California III FIPS 0403.prj file. Then click Add to return to the Spatial Reference Properties dialog.
d. Select the X/Y Domain tab to specify the extent of the feature dataset, and enter the following values:
– Min X: 1596295
– Max X: 2146050
– Min Y: 330149
– Max Y: 879905
e. Select the Z Domain tab and enter the following value:
– Min Z: -1000
f. Click OK to close the Spatial Reference Properties dialog.
g. Click OK to close the New Feature Dataset dialog and create the new feature dataset.
The park_data1 feature dataset appears listed in the Contents tab of the Baylands Park geodatabase, above the GPS Sessions folder.
Now, skip steps 2 through 5 and go to Importing data from an SSF file on page 117.
Trimble GPS Analyst Extension Getting Started Guide 113

6 Tutorial 2: Importing Trimble SSF Files
2. In the Name field, enter park_data1 and then click Next.
The coordinate system page for x/y coordinates appears:
3. Expand the tree of folders and navigate to Projected Coordinate Systems\State Plane\Nad 1983. Select NAD 1983 StatePlane California III FIPS 0403 and then click Next.
114 Trimble GPS Analyst Extension Getting Started Guide

Tutorial 2: Importing Trimble SSF Files 6
The coordinate system page for z coordinates appears:
Since the data you are importing does not use a vertical coordinate system, the feature dataset should not use a vertical coordinate system.
4. Make sure that <None> is selected and then click Next.
Trimble GPS Analyst Extension Getting Started Guide 115
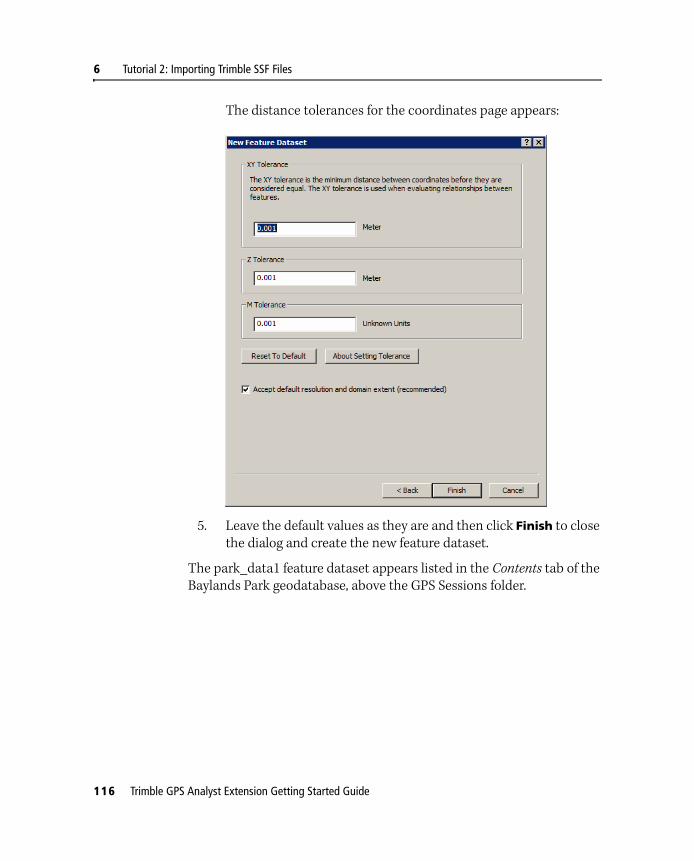
6 Tutorial 2: Importing Trimble SSF Files
The distance tolerances for the coordinates page appears:
5. Leave the default values as they are and then click Finish to close the dialog and create the new feature dataset.
The park_data1 feature dataset appears listed in the Contents tab of the Baylands Park geodatabase, above the GPS Sessions folder.
116 Trimble GPS Analyst Extension Getting Started Guide
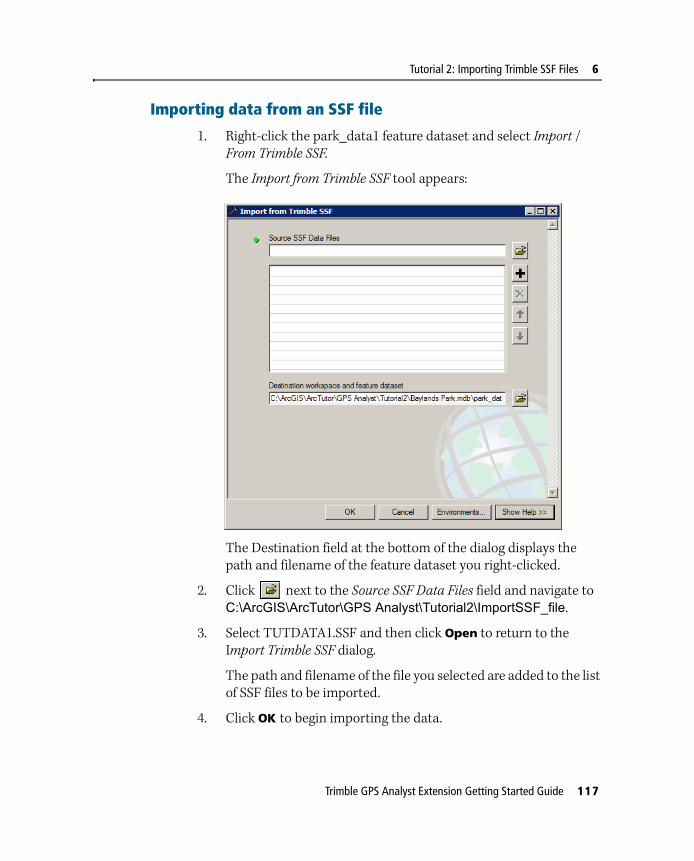
Tutorial 2: Importing Trimble SSF Files 6
Importing data from an SSF file
1. Right-click the park_data1 feature dataset and select Import / From Trimble SSF.
The Import from Trimble SSF tool appears:
The Destination field at the bottom of the dialog displays the path and filename of the feature dataset you right-clicked.
2. Click next to the Source SSF Data Files field and navigate to C:\ArcGIS\ArcTutor\GPS Analyst\Tutorial2\ImportSSF_file.
3. Select TUTDATA1.SSF and then click Open to return to the Import Trimble SSF dialog.
The path and filename of the file you selected are added to the list of SSF files to be imported.
4. Click OK to begin importing the data.
Trimble GPS Analyst Extension Getting Started Guide 117

6 Tutorial 2: Importing Trimble SSF Files
The Import from Trimble SSF dialog appears showing the progress of the import process. When import is complete, the dialog shows the number of files, GPS positions, and GIS features that were imported into the geodatabase:
5. Click Close to close the summary dialog.
B Tip – To view the imported feature classes, double-click the park_data1 feature data set. The imported feature classes appear in the Contents tab of the Baylands Park geodatabase.
6. In the Catalog tree, select the GPS Sessions folder for the Baylands Park geodatabase.
118 Trimble GPS Analyst Extension Getting Started Guide
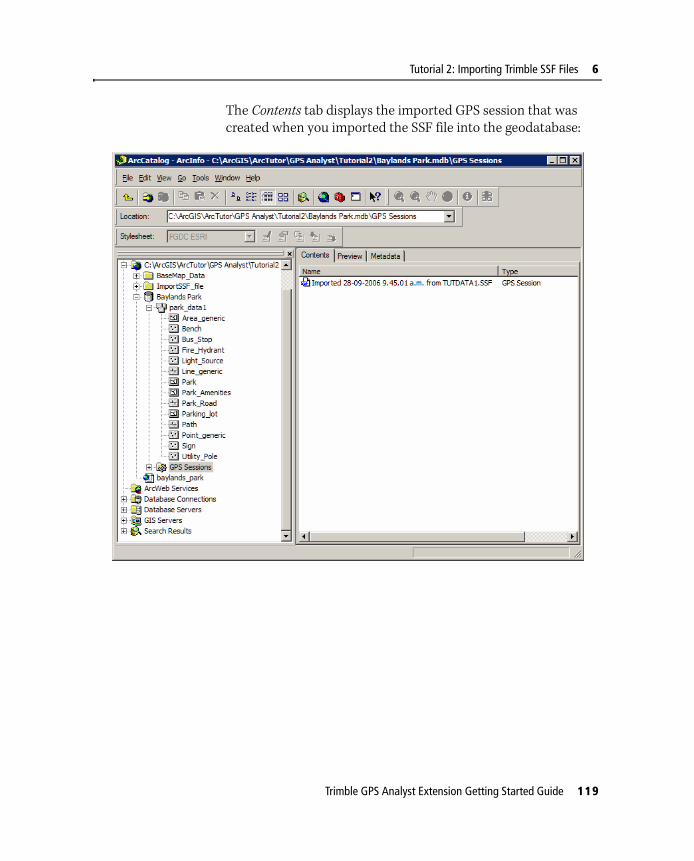
Tutorial 2: Importing Trimble SSF Files 6
The Contents tab displays the imported GPS session that was created when you imported the SSF file into the geodatabase:
Trimble GPS Analyst Extension Getting Started Guide 119

6 Tutorial 2: Importing Trimble SSF Files
Exercise 3: Specifying global feature class propertiesNow that you have imported GPS data into the geodatabase, you need to specify the required accuracy for features that are constructed from GPS positions. Specifying a required accuracy value will enable you to analyze and postprocess the data you have imported.
This exercise introduces you to the concepts of:
• estimated accuracy
• required accuracy for validation
It shows you how to:
• set global feature class properties for all feature classes in the geodatabase
Estimated accuracy values
When a feature is created using GPS data, the GPS Analyst extension calculates estimated accuracy values for the feature, and for the constructions that are used to build the feature.
For features that are made up of several vertices, the estimated accuracy is represented in two ways: the average estimated accuracy, which is the average of the estimated accuracy for each of the vertices in the feature, and the worst estimated accuracy, which is the estimated accuracy of the vertex that has the largest estimated accuracy of all the vertices in the feature. For a point feature, which always consists of only one averaged vertex, the worst estimated accuracy is always the same as the average estimated accuracy.
The average estimated accuracy and the worst estimated accuracy values for a feature are stored as part of the GPS data used to construct the feature. You can choose to map the average and worst estimated accuracy values to attributes in the feature classes that you have GPS-enabled. If you do so, and if you later unlink a feature from its GPS data or if you GPS-disable the geodatabase, the estimated accuracy values for the feature will be retained as attributes.
120 Trimble GPS Analyst Extension Getting Started Guide

Tutorial 2: Importing Trimble SSF Files 6
Required accuracy for validation
The worst estimated accuracy value is used as part of the validation process. During validation, the GPS Analyst extension checks whether the worst estimated accuracy of the feature is within the required accuracy specified for its feature class. The degree of accuracy you require depends on the type of feature collected and the purpose of the information. For example, underground cable features that maintenance crews will need to locate and repair require better accuracy than signpost features that are clearly identifiable.
You can specify or change the accuracy required for a feature class at any time, using the Trimble GPS Analyst tab of the Feature Class Properties dialog. You can learn more about validation by completing Tutorial 3: Processing GPS Data, beginning on page 129.
Specifying properties for all feature classes
1. Right-click the Baylands Park geodatabase and select Properties.
The Database Properties dialog appears, displaying the Trimble GPS Analyst tab.
2. Click the Feature Class Properties button.
The Global Feature Class Properties dialog appears:
Trimble GPS Analyst Extension Getting Started Guide 121

6 Tutorial 2: Importing Trimble SSF Files
3. In the Store average estimated accuracy in field, enter Average_Est_Accuracy.
4. In the Store worst estimated accuracy in field, enter Worst_Est_Accuracy.
5. In the Accuracy required for validation field, enter 0.4 m.
All features in the Baylands Park geodatabase now need to be accurate to within 40 centimeters in order to pass validation.
6. Click OK to close the Global Feature Class Properties dialog.
7. Click OK to close the Database Properties dialog.
122 Trimble GPS Analyst Extension Getting Started Guide

Tutorial 2: Importing Trimble SSF Files 6
Exercise 4: Adding GPS data to the mapFor this exercise, you will add the imported features to the map in ArcMap.
This exercise introduces you to the concepts of:
• GPS layers in ArcMap
It shows you how to:
• add GPS-enabled feature classes to the map
• select the geographic transformation you want to use to convert GPS data to the spatial reference used by the map data frame
GPS layers in ArcMap
Maps that contain GPS-enabled feature classes contain a GPS group layer. The GPS group layer is added as the top layer in the map when GPS-enabled feature classes are added to the map, or when you GPS-enable feature classes that are contained in the map document.
The GPS group layer that will be added to the baylands_park.mxd will contain two layers:
• Features in Progress
• GPS Positions
These layers are used for analyzing and editing features that are linked to a GPS-derived geometry.
Adding GPS-enabled feature classes to a map document
1. In ArcCatalog, double-click baylands_park.mxd to launch ArcMap.
The Baylands Park map opens in ArcMap, displaying the state of California, USA.
2. Select View / Bookmarks / Region Overview.
Trimble GPS Analyst Extension Getting Started Guide 123

6 Tutorial 2: Importing Trimble SSF Files
The map zooms to the bookmarked view, showing an overview of the region you will be working in:
At this scale, there are seven layers being rendered on the map: CA cities, CA roads, CA counties, CA rivers, CA zipcodes, CA state, and San Jose Orthophoto.
3. To zoom to the Baylands County Park area, select View / Bookmarks / GPS Editing.
4. To add the GIS features that you imported from the Trimble SSF file, click the Add Data button on the ArcMap toolbar.
124 Trimble GPS Analyst Extension Getting Started Guide

Tutorial 2: Importing Trimble SSF Files 6
5. The Add Data dialog appears:
6. Browse to Baylands Park.mdb\park_data1. From the list of feature classes, hold down [Ctrl] and select the following feature classes:
– Park
– Parking_lot
– Park_Amenities
– Bench
– Sign
7. Click Add.
Trimble GPS Analyst Extension Getting Started Guide 125

6 Tutorial 2: Importing Trimble SSF Files
The Select Geographic Transformation dialog appears:
Because the map data frame uses the North American Datum of 1983 (NAD_1983) coordinate system, you need to specify a geographic transformation so that the GPS Analyst extension can correctly convert GPS data from WGS-84 coordinates to NAD_1983 coordinates.
8. From the drop-down list, select the NAD_1983_To_WGS_1984_4 geographic transformation and then click OK.
The feature classes are added to the map as layers. The layers are listed in the ArcMap table of contents, below the GPS layers that were also added to the map. The GPS layers indicate that GPS data is included in the map document.
The park layer has been added on top of the other layers you added. You need to move the park layer underneath the other layers, so that you can see the other features.
9. In the ArcMap table of contents, drag the park layer to the end of the list of GPS layers, so that it is just above the Basemap Data layer.
126 Trimble GPS Analyst Extension Getting Started Guide

Tutorial 2: Importing Trimble SSF Files 6
The park is now displayed on the map behind the other GPS feature layers:
10. Select File / Save to save the map document.
11. Exit ArcMap and exit ArcCatalog.
You have now finished this tutorial. In ArcCatalog, you have created a new geodatabase and GPS-enabled it, created a new feature dataset and imported Trimble SSF data files into the dataset. In ArcMap, you added the new features that were imported from the SSF files to the map, and you can see that they contain GPS data.
Trimble GPS Analyst Extension Getting Started Guide 127

6 Tutorial 2: Importing Trimble SSF Files
Understanding how to perform these basic tasks is the key to incorporating GPS data from Trimble SSF files into a GPS-enabled geodatabase. For more information about using SSF files with the GPS Analyst extension, refer to the Trimble GPS Analyst Extension Help.
Now that you have added GPS data to the geodatabase, you can learn more about analyzing the data using the Trimble GPS Analyst extension by completing Tutorial 3: Processing GPS Data, beginning on page 129.
128 Trimble GPS Analyst Extension Getting Started Guide

C H A P T E R
7
Tutorial 3: Processing GPS Data 7In this chapter:
Before you begin
Scenario
Connecting to your data
Exercise 1: Differentially correcting GPS sessions
Exercise 2: Analyzing GPS positions on the map
Exercise 3: Validating features
This tutorial explains how to:
• process and analyze GPS data inside the ArcGIS software environment
• differentially correct the GPS data you have checked into the geodatabase, in order to improve the accuracy of the imported GPS positions
• rebuild features after differential correction
• validate those features to ensure they meet your accuracy requirements
The tutorial contains step-by-step instructions for the main tasks involved.
This tutorial will take between 30 and 45 minutes to complete.
Trimble GPS Analyst Extension Getting Started Guide 129

7 Tutorial 3: Processing GPS Data
Before you beginBefore beginning this tutorial, you will need to:
• Install the ESRI ArcGIS Desktop software. For more information, refer to the documentation provided by ESRI.
• Install the Trimble GPS Analyst extension. For more information, see Installing the Trimble GPS Analyst extension, page 36.
• Locate where the tutorial sample files are stored on your computer and, if required, reinstall them (see Loading the tutorial sample files below).
• Enable the Trimble GPS Analyst extension in both ArcCatalog and ArcMap (see page 45).
• Display the Trimble GPS Analyst toolbar in ArcMap (see page 55).
Note – The tutorials assume that the default settings for the Trimble GPS Analyst extension are unchanged. If they have been changed, the extension may behave differently from the behaviour described in the tutorials.
This tutorial assumes that you are familiar with GIS concepts and the ArcGIS software environment. For information on GIS concepts and the ArcGIS Desktop software environment, refer to Getting Started with ArcGIS and Building and Editing Geodatabases, which you received from ESRI in your ArcGIS package.
The exercises in this tutorial are designed to be completed in sequence.
Loading the tutorial sample files
The exercises use sample files supplied with the Trimble GPS Analyst extension. These sample files are located in the folder you specified at installation. The default location is C:\ArcGIS\ArcTutor\GPS Analyst.
If they have been deleted, reload them from the Trimble GPS Analyst Extension CD.
130 Trimble GPS Analyst Extension Getting Started Guide

Tutorial 3: Processing GPS Data 7
To reload the sample files:
1. Insert the Trimble GPS Analyst Extension CD in the CD drive of the computer.
2. Select Install.
3. Depending on the version of ArcGIS Desktop software you are running, click either Install GPS Analyst for ArcGIS 9.0 and 9.1 or Install GPS Analyst for ArcGIS 9.2.
4. Select Modify.
5. Select the Sample Data check box.
6. Follow the instructions on the screen to install the sample files.
For more information, see Installing the Trimble GPS Analyst extension, page 36.
Returning the contents of the tutorial folder to its original state
Each tutorial folder contains a zip file to return the contents of the tutorial geodatabase to its original state.
Note – You must return the contents of the tutorial folder to its original state before you do the tutorial. You will need to do this if you have done the tutorial before, even if you have uninstalled and then reinstalled the Trimble GPS Analyst extension.
To return the contents of any GPS Analyst tutorial folder to its original state:
1. In Windows Explorer, delete all files inside the tutorial folder except the .zip folder.
2. Right-click the .zip folder and select WinZip. Extract the contents to the tutorial folder.
Trimble GPS Analyst Extension Getting Started Guide 131

7 Tutorial 3: Processing GPS Data
ScenarioThe City of Westminster, Colorado, maintains a geodatabase of assets in an Open Space park. The geodatabase contains features such as access ways, sewers, building footprints, vehicle parking areas, and road centerlines. Field crews have been sent to the park to map new features using ESRI ArcPad software and the Trimble GPScorrect extension for ArcPad. Upon their return to the office, the data from the field computers was transferred to the office computer, and the new GPS data was checked into the geodatabase.
You task is to process the data collected at the Open Space park, using the Differential Correction wizard to improve the accuracy of the imported GPS positions and then rebuild the updated features using the corrected GPS positions. You will view GPS positions on the map, and examine the properties of some GPS positions. Finally, you will validate the accuracy of features that have a GPS-derived geometry against the required accuracy for the feature class.
Connecting to your dataThe Catalog tree in ArcCatalog has a branch for each local hard drive. You can also create new branches in the Catalog tree to make it easier to navigate to your data. These branches are called connections.
Now you will add a connection to the folder that contains the tutorial data. This new branch remains in the Catalog tree until you delete it.
Make a connection to the tutorial data
1. In ArcCatalog, click the Connect to Folder button .
2. Navigate to the folder on the drive where the tutorial data is installed. The default location is C:\ArcGIS\ArcTutor\GPS Analyst\Tutorial3. Click OK.
132 Trimble GPS Analyst Extension Getting Started Guide
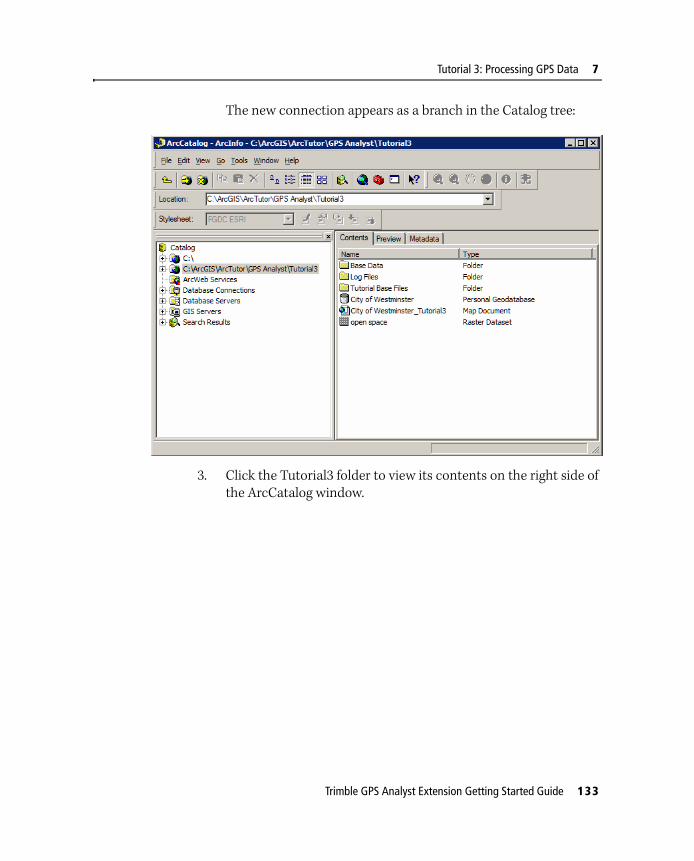
Tutorial 3: Processing GPS Data 7
The new connection appears as a branch in the Catalog tree:
3. Click the Tutorial3 folder to view its contents on the right side of the ArcCatalog window.
Trimble GPS Analyst Extension Getting Started Guide 133
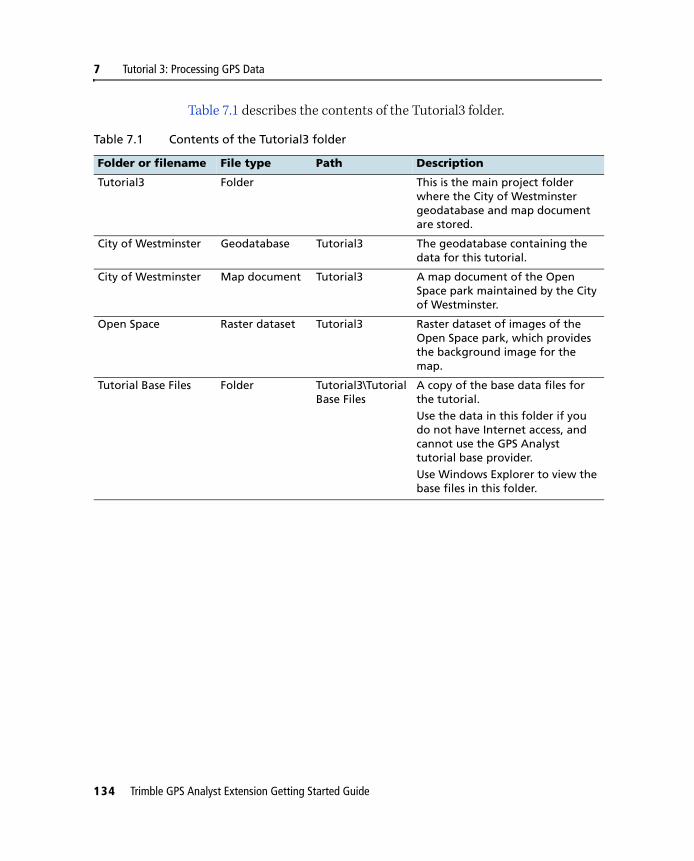
7 Tutorial 3: Processing GPS Data
Table 7.1 describes the contents of the Tutorial3 folder.
Table 7.1 Contents of the Tutorial3 folder
Folder or filename File type Path Description
Tutorial3 Folder This is the main project folder where the City of Westminster geodatabase and map document are stored.
City of Westminster Geodatabase Tutorial3 The geodatabase containing the data for this tutorial.
City of Westminster Map document Tutorial3 A map document of the Open Space park maintained by the City of Westminster.
Open Space Raster dataset Tutorial3 Raster dataset of images of the Open Space park, which provides the background image for the map.
Tutorial Base Files Folder Tutorial3\Tutorial Base Files
A copy of the base data files for the tutorial.Use the data in this folder if you do not have Internet access, and cannot use the GPS Analyst tutorial base provider.
Use Windows Explorer to view the base files in this folder.
134 Trimble GPS Analyst Extension Getting Started Guide
Tutorial 3: Processing GPS Data 7
Exercise 1: Differentially correcting GPS sessionsYour task is to differentially correct the imported GPS sessions that were created when the GPS data was checked into the geodatabase.
This exercise introduces you to the concepts of:
• postprocessed differential correction
• base data
• rebuilding feature geometries with GPS data
It shows you how to:
• differentially correct GPS sessions
Postprocessed differential correction
Postprocessed differential correction can significantly improve the accuracy of GPS positions collected in the field. The Differential Correction wizard compares the collected GPS data with base data collected at a known location at the same time that the field data was collected. The process produces a new set of GPS positions that are stored in a corrected GPS session.
Each GPS position in a corrected GPS session corresponds to a GPS position in the original GPS session. Both GPS positions represent the same physical location at the same time, but the corrected position is generally a more accurate representation.
Base data
Many regions have reference stations that can supply the base data required for differential correction. The Trimble GPS Analyst extension provides a list of some stations that you can use to obtain base data. You can access this list in the Select Base Provider dialog.
The base data for the tutorial is on the Trimble FTP site and is available by selecting the GPS Analyst tutorial base files provider from the list in the Select Base Provider dialog.
Trimble GPS Analyst Extension Getting Started Guide 135

7 Tutorial 3: Processing GPS Data
Rebuild
Out of all the GPS positions in the geodatabase that represent the same point in space and time, only one GPS position is selected for use in feature geometries. This selected position is called the location.
Once differential correction is complete, the Trimble GPS Analyst extension rebuilds the features using the new, corrected set of GPS positions. For each location, the GPS Analyst extension selects the corrected GPS position, rather than the imported GPS position, as the location. The GPS Analyst extension uses the new locations to rebuild the constructions used in each feature, and to rebuild the GPS-derived geometry of every feature that is linked to GPS data.
Opening the map document
1. If ArcMap is not open, start ArcMap and open the City of Westminster map document.
The default location of the City of Westminster.mxd is C:\ArcGIS\ArcTutor\GPS Analyst\Tutorial3.
2. Select View / Bookmarks / Features from GPS.
136 Trimble GPS Analyst Extension Getting Started Guide
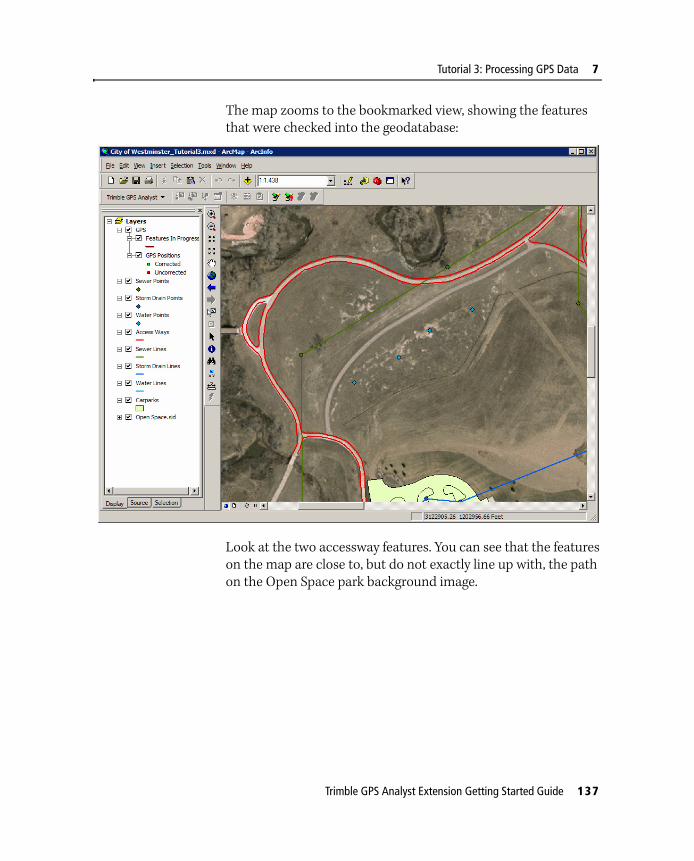
Tutorial 3: Processing GPS Data 7
The map zooms to the bookmarked view, showing the features that were checked into the geodatabase:
Look at the two accessway features. You can see that the features on the map are close to, but do not exactly line up with, the path on the Open Space park background image.
Trimble GPS Analyst Extension Getting Started Guide 137

7 Tutorial 3: Processing GPS Data
Differentially correcting GPS sessions
1. From the Trimble GPS Analyst drop-down menu, select Start GPS Editing.
This starts a GPS edit session, and enables most of the buttons on the Trimble GPS Analyst toolbar.
2. Click the Differential Correction button on the Trimble GPS Analyst toolbar.
The first page of the Differential Correction wizard appears:
The Select GPS sessions to correct list is either empty, or it displays the imported GPS session(s) that were created the last time you imported GPS data into the geodatabase.
3. Remove any sessions that are listed by selecting them and clicking the Remove Sessions button .
138 Trimble GPS Analyst Extension Getting Started Guide

Tutorial 3: Processing GPS Data 7
To select the GPS session that was created when GPS data was imported into this map:
a. Click the Add GPS Sessions button .
The Select GPS sessions to correct dialog appears:
b. Browse to the GPS Sessions folder for the City of Westminster geodatabase in the Tutorial3 folder. The default location is C:\ArcGIS\ArcTutor\GPS Analyst\Tutorial3\City of Westminster.mdb\GPS Sessions.
c. Select the imported GPS session that was created when the GPScorrect SSF file was checked into the City of Westminster geodatabase in the Tutorial3 folder.
d. Click Add. This confirms the selection and closes the dialog.
The selected GPS session appears in the Select GPS sessions to correct list in the Differential Correction wizard.
The fields below the selection list display information about the selected session. The Collected with H-Star receiver field indicates whether the GPS session contains data collected using a receiver with H-Star technology. The options
Trimble GPS Analyst Extension Getting Started Guide 139

7 Tutorial 3: Processing GPS Data
displayed in the rest of the Differential Correction wizard are dynamic; H-Star processing options are only displayed if the value for this field is Yes.
4. Click Next.
The Processing Type page of the wizard appears:
It displays the processing options available for processing the GPS data in the selected GPS sessions. The selected GPS session does not contain data collected using a receiver with H-Star technology, and so the only available option is Code Processing using base data from a single base station.
B Tip – To learn more about H-Star processing options, search for the topic Specifying the processing type in the Trimble GPS Analyst Extension Help.
5. Click Next.
140 Trimble GPS Analyst Extension Getting Started Guide
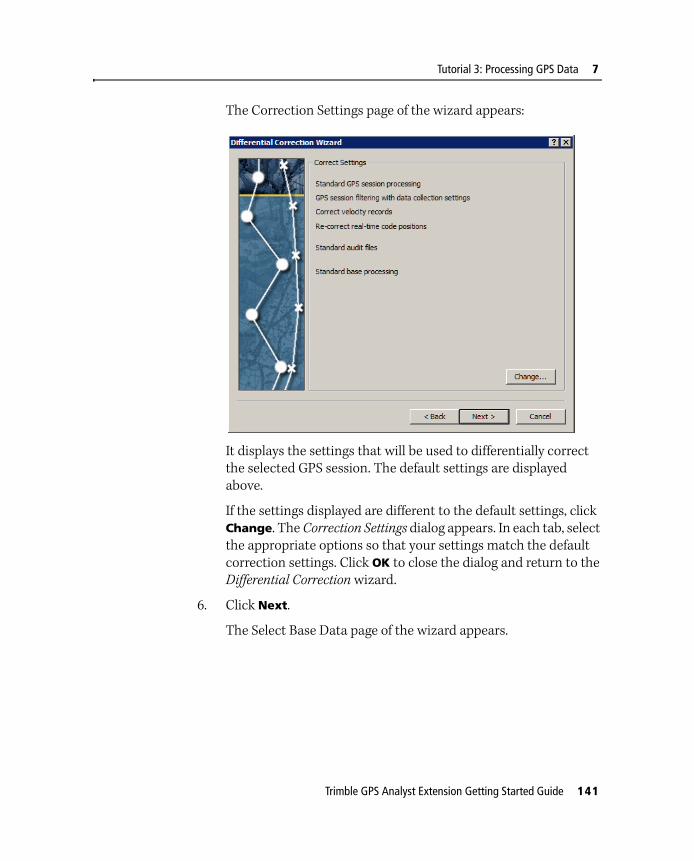
Tutorial 3: Processing GPS Data 7
The Correction Settings page of the wizard appears:
It displays the settings that will be used to differentially correct the selected GPS session. The default settings are displayed above.
If the settings displayed are different to the default settings, click Change. The Correction Settings dialog appears. In each tab, select the appropriate options so that your settings match the default correction settings. Click OK to close the dialog and return to the Differential Correction wizard.
6. Click Next.
The Select Base Data page of the wizard appears.
Trimble GPS Analyst Extension Getting Started Guide 141

7 Tutorial 3: Processing GPS Data
If you have access to the Internet, download base data files from the tutorial base provider:
a. In the Base Data group, select Base Provider Search:
a. Click the Select button next to the Base Provider Search text box.
The Select Base Provider dialog appears. The dialog displays a list of available base providers. The list is arranged by distance from the location where the field data was collected, so that base stations closest to the location where the data was collected are at the top of the list.
For this tutorial, we have set up an FTP site for the tutorial base data and named it “GPS Analyst tutorial base files”.
142 Trimble GPS Analyst Extension Getting Started Guide
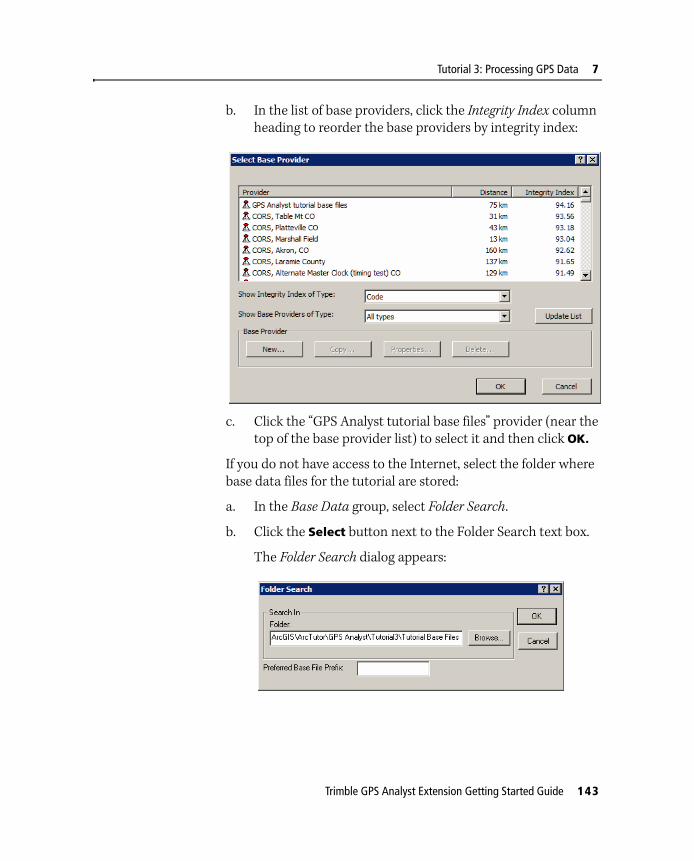
Tutorial 3: Processing GPS Data 7
b. In the list of base providers, click the Integrity Index column heading to reorder the base providers by integrity index:
c. Click the “GPS Analyst tutorial base files” provider (near the top of the base provider list) to select it and then click OK.
If you do not have access to the Internet, select the folder where base data files for the tutorial are stored:
a. In the Base Data group, select Folder Search.
b. Click the Select button next to the Folder Search text box.
The Folder Search dialog appears:
Trimble GPS Analyst Extension Getting Started Guide 143

7 Tutorial 3: Processing GPS Data
c. Click Browse to navigate to the tutorial base files folder. The default location is C:\ArcGIS\ArcTutor\GPS Analyst\Tutorial3\Tutorial Base Files.
d. Click OK.
The dialog closes and you are returned to the Base Data page of the wizard. The text box below the Base Data option you selected displays the selected base provider or path and folder name:
7. In the Reference Position group, select Use reference position from base files.
8. Click Next.
144 Trimble GPS Analyst Extension Getting Started Guide
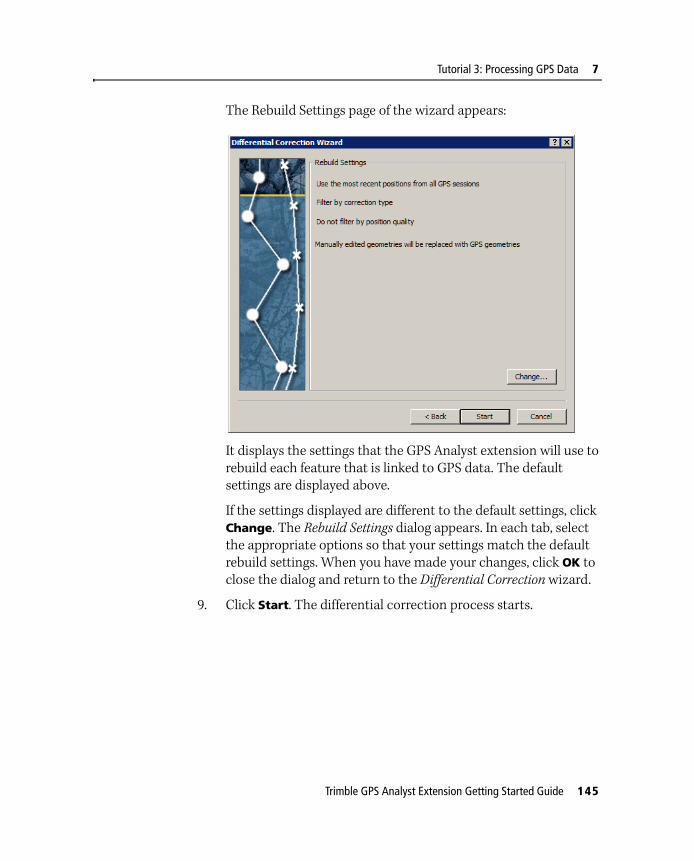
Tutorial 3: Processing GPS Data 7
The Rebuild Settings page of the wizard appears:
It displays the settings that the GPS Analyst extension will use to rebuild each feature that is linked to GPS data. The default settings are displayed above.
If the settings displayed are different to the default settings, click Change. The Rebuild Settings dialog appears. In each tab, select the appropriate options so that your settings match the default rebuild settings. When you have made your changes, click OK to close the dialog and return to the Differential Correction wizard.
9. Click Start. The differential correction process starts.
Trimble GPS Analyst Extension Getting Started Guide 145
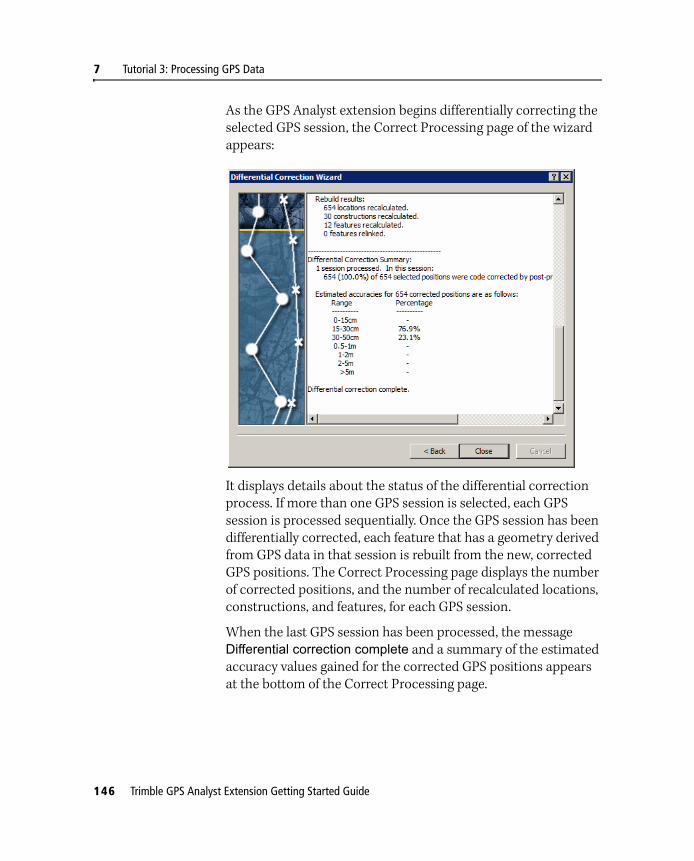
7 Tutorial 3: Processing GPS Data
As the GPS Analyst extension begins differentially correcting the selected GPS session, the Correct Processing page of the wizard appears:
It displays details about the status of the differential correction process. If more than one GPS session is selected, each GPS session is processed sequentially. Once the GPS session has been differentially corrected, each feature that has a geometry derived from GPS data in that session is rebuilt from the new, corrected GPS positions. The Correct Processing page displays the number of corrected positions, and the number of recalculated locations, constructions, and features, for each GPS session.
When the last GPS session has been processed, the message Differential correction complete and a summary of the estimated accuracy values gained for the corrected GPS positions appears at the bottom of the Correct Processing page.
146 Trimble GPS Analyst Extension Getting Started Guide

Tutorial 3: Processing GPS Data 7
This summary provides immediate feedback as to the quality of the corrected GPS positions. For example, if too few base providers have been selected for multi-base processing, the results will indicate this by showing large estimated accuracy values.
10. Click Close.
The contents of the Correct Processing page are saved as the Differential Correction report. The report is stored in the Log Files folder in the same folder as the open geodatabase.
11. Look at the two accessway features in the centre of the map. You can see that the features on the map now line up with the path on the Open Space park background image.
Trimble GPS Analyst Extension Getting Started Guide 147

7 Tutorial 3: Processing GPS Data
Exercise 2: Analyzing GPS positions on the mapNow that you have created a new set of corrected GPS positions, and used those GPS positions to rebuild features, you need to visually check the features on the map to verify the data is acceptable.
This exercise shows you how to:
• display GPS positions on the map
• view GPS position properties
Displaying GPS positions on the map
The GPS Positions layer shows the GPS positions that are stored in the geodatabase. By default, the GPS Positions layer is enabled, but no GPS positions are selected for display. You can change the properties of the GPS Positions layer so that certain types of GPS positions are displayed. For more information, search for the topic Displaying GPS positions on the map in the Trimble GPS Analyst Extension Help.
Alternatively, you can select features and then click one of the GPS positions buttons on the Trimble GPS Analyst toolbar to display GPS positions for those features.
To display the GPS positions used to construct features on the map:
1. On the ArcMap Tools toolbar, click the Select Features button .
The cursor changes to the Select Features tool .
2. Use the Select Features tool to select the two accessway features in the centre of the map.
3. Returning to the Trimble GPS Analyst toolbar, click the Select GPS Positions for Selected Features button .
The GPS positions used to construct the selected features appear on the map.
148 Trimble GPS Analyst Extension Getting Started Guide

Tutorial 3: Processing GPS Data 7
Viewing GPS position properties
You can select GPS positions from the map and view detailed information about them, such as coordinate or quality information, in the GPS Position Properties dialog.
To view GPS position properties:
1. Ensure that the GPS positions are still displayed. Click the GPS Position Properties button on the Trimble GPS Analyst toolbar.
The GPS Position Properties dialog appears:
The left pane lists the GPS positions that are used in the selected features. The right pane displays the properties of the GPS position that is selected in the left pane.
2. In the left pane, click any GPS position.
In the right pane, the GPS Session field shows the name of the corrected GPS session that you have just created.
The Solution Time field shows “Postprocessed”, indicating that postprocessed differential correction has been applied to the GPS position.
Trimble GPS Analyst Extension Getting Started Guide 149

7 Tutorial 3: Processing GPS Data
3. To close the GPS Position Properties dialog, click the in the top right corner.
4. To deselect the GPS positions, click the Select GPS Positions button on the Trimble GPS Analyst toolbar and click an empty point on the map.
5. To clear the GPS positions from the map, first select Clear Selected Features from the ArcMap Selection menu. Then click the Select GPS Positions for Selected Features button on the Trimble GPS Analyst toolbar.
150 Trimble GPS Analyst Extension Getting Started Guide

Tutorial 3: Processing GPS Data 7
Exercise 3: Validating featuresYou have seen that the features on the map are now constructed using corrected GPS positions, and that the features seem to be accurate. The final step is to check whether the features meet your accuracy requirements. You will validate all features on the map that are built using GPS data, and process any invalid features so that they pass validation.
This exercise introduces you to the concepts of:
• GPS feature validation
• processing invalid features
It shows you how to:
• validate features built using GPS data
• rebuild selected features to ensure they pass validation
GPS feature validation
GPS feature validation provides an indication of the quality of GPS-derived features, in terms of their estimated accuracy. During the validation process, the worst estimated accuracy of a GPS-derived feature is compared to the required accuracy specified for the feature classes in the geodatabase. If the worst estimated accuracy is larger than the required accuracy, the feature is invalid due to insufficient accuracy.
Once the features have been validated, the GPS Feature Validation window displays a table showing the results of the validation process. The validation results provide a summary that enables you to make decisions about the quality of your GPS data. Each feature is listed in the table, along with its status. The status of any feature that fails validation is either:
• Insufficient Accuracy, where the worst estimated accuracy value for the feature is larger than the required accuracy specified for the feature class.
Trimble GPS Analyst Extension Getting Started Guide 151

7 Tutorial 3: Processing GPS Data
• No GPS positions, where the feature is linked to a GPS-derived geometry that does not contain any GPS positions. This can happen if the rebuild criteria is too strict.
The required accuracy column displays the estimated accuracy required for the feature to pass validation. This is the value entered in the Accuracy required for validation field in the Global Feature Class Properties dialog in ArcCatalog.
Processing invalid features
You can select any feature from the GPS Feature Validation window for further processing. You can choose to edit, rebuild, or delete features, zoom to the feature on the map, or mark an invalid feature as an exception. In this tutorial, you will rebuild the invalid features. Changing the different rebuild settings can improve the accuracy of a feature by eliminating GPS positions that have poor quality.
The list of features in the GPS Feature Validation window is dynamic: it is updated with new information as you process features selected from the list. As features change and become valid, their status is updated.
Validating features with GPS-derived geometry
To validate all features with GPS-derived geometry:
1. Click the GPS Feature Validation button on the Trimble GPS Analyst toolbar.
The GPS Validation dialog appears:
152 Trimble GPS Analyst Extension Getting Started Guide
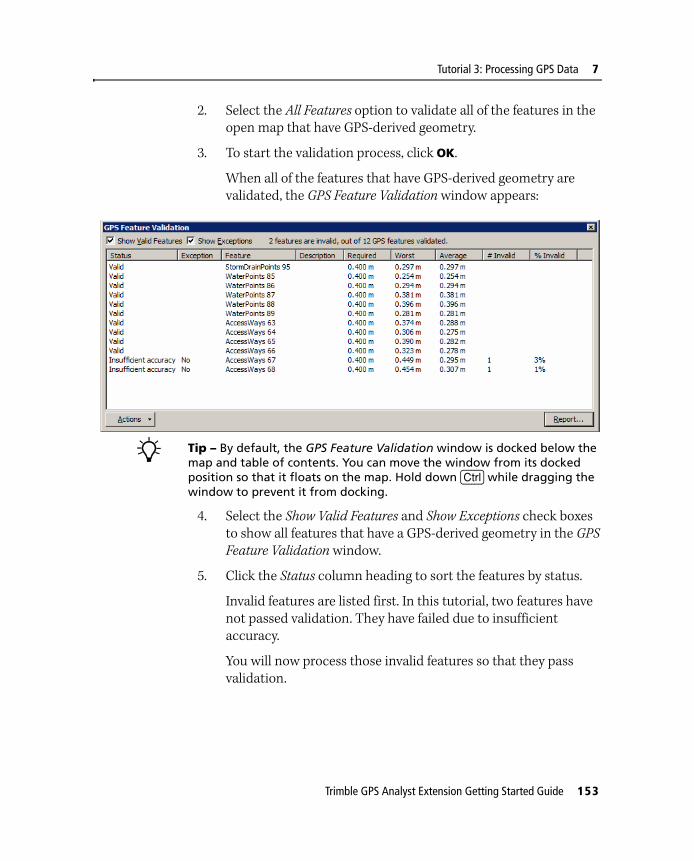
Tutorial 3: Processing GPS Data 7
2. Select the All Features option to validate all of the features in the open map that have GPS-derived geometry.
3. To start the validation process, click OK.
When all of the features that have GPS-derived geometry are validated, the GPS Feature Validation window appears:
B Tip – By default, the GPS Feature Validation window is docked below the map and table of contents. You can move the window from its docked position so that it floats on the map. Hold down [Ctrl] while dragging the window to prevent it from docking.
4. Select the Show Valid Features and Show Exceptions check boxes to show all features that have a GPS-derived geometry in the GPS Feature Validation window.
5. Click the Status column heading to sort the features by status.
Invalid features are listed first. In this tutorial, two features have not passed validation. They have failed due to insufficient accuracy.
You will now process those invalid features so that they pass validation.
Trimble GPS Analyst Extension Getting Started Guide 153

7 Tutorial 3: Processing GPS Data
Rebuilding selected features
Two line features, AccessWays 67 and AccessWays 68, both have a good average estimated accuracy, but they have failed validation because they both contain one invalid vertex. You will rebuild the features in order to exclude any invalid GPS positions from the features. By specifying an appropriate GPS filter, you can ensure that only valid GPS positions are used to calculate constructions, so that the rebuilt features will pass validation.
To rebuild selected features:
1. Press the [Ctrl] key and select the two invalid features from the features table: AccessWays 67, and AccessWays 68.
The selected features are highlighted on the map.
2. From the Actions drop-down menu, select Rebuild.
The Rebuild GPS-enabled Features tool appears:
154 Trimble GPS Analyst Extension Getting Started Guide

Tutorial 3: Processing GPS Data 7
Because you have already identified the features you want to rebuild in the GPS Feature Validation window, Selected features is already selected.
3. From the Use GPS Positions drop-down list, select Best quality.
4. Select the Filter by Minimum Estimated Accuracy check box.
5. In the Minimum Estimated Accuracy Filter field, enter 0.4 and make sure the selected units are Meters.
6. Click OK.
Once the selected features are rebuilt, the Rebuild Summary dialog appears:
The summary shows that in this example 173 locations and four constructions were recalculated. As a result of these recalculations, two features were rebuilt.
7. Click Close to close the dialog.
In the GPS Feature Validation window, the rebuilt features have passed validation and their status has been updated to Valid.
AccessWays 67 and AccessWays 68 no longer contain invalid positions in their GPS geometries. Because you filtered out all GPS positions that would not meet the required accuracy for the feature, all of the constructed positions used in the features have an estimated accuracy that is within the required accuracy.
Trimble GPS Analyst Extension Getting Started Guide 155
7 Tutorial 3: Processing GPS Data
8. Click the at the top of the window to close the GPS Feature Validation window.
9. From the Trimble GPS Analyst drop-down menu on the Trimble GPS Analyst toolbar, select Save Edits.
The modified features and the GPS data that the features are linked to are saved in the geodatabase.
10. From the Trimble GPS Analyst drop-down menu, select Stop GPS Editing.
11. Select File / Save to save the map document.
12. Exit ArcMap.
You have now finished the tutorial. In ArcMap, you have differentially corrected your imported GPS data, analyzed the corrected GPS positions on the map, validated the accuracy of features linked to GPS data, and rebuilt some features to ensure the estimated accuracy of the features.
Understanding how to perform these basic tasks is the key to using GPS data in your map. For more information about differentially correcting GPS data and analyzing features derived from GPS data, refer to the Trimble GPS Analyst Extension Help.
156 Trimble GPS Analyst Extension Getting Started Guide

S E C T I O N
III
USING THE TRIMBLE GPS ANALYST EXTENSION IN THE FIELD IIINote – The information in this section is helpful only if you have installed the ESRI ArcGIS software and the Trimble GPS Analyst extension onto a field computer and intend to use the Trimble GPS Analyst extension within ArcMap to collect features in the field.
In this section:
Chapter 8, The Field User Interface
Chapter 9, Typical Data Collection Tasks
Chapter 10, Tutorial 4: Collecting GPS Data
Trimble GPS Analyst Extension Getting Started Guide 157

158 Trimble GPS Analyst Extension Getting Started Guide

C H A P T E R
8
The Field User Interface 8In this chapter:
The Trimble GPS Analyst extension Field toolset
Dockable windows
GPS receiver layers
This chapter describes the toolsets and menu commands that comprise the Field toolset provided with the Trimble GPS Analyst extension in ArcMap.
Whether you are using ArcView, ArcEditor, or ArcInfo, the same tools are available for you to work on your GPS data.
Trimble GPS Analyst Extension Getting Started Guide 159
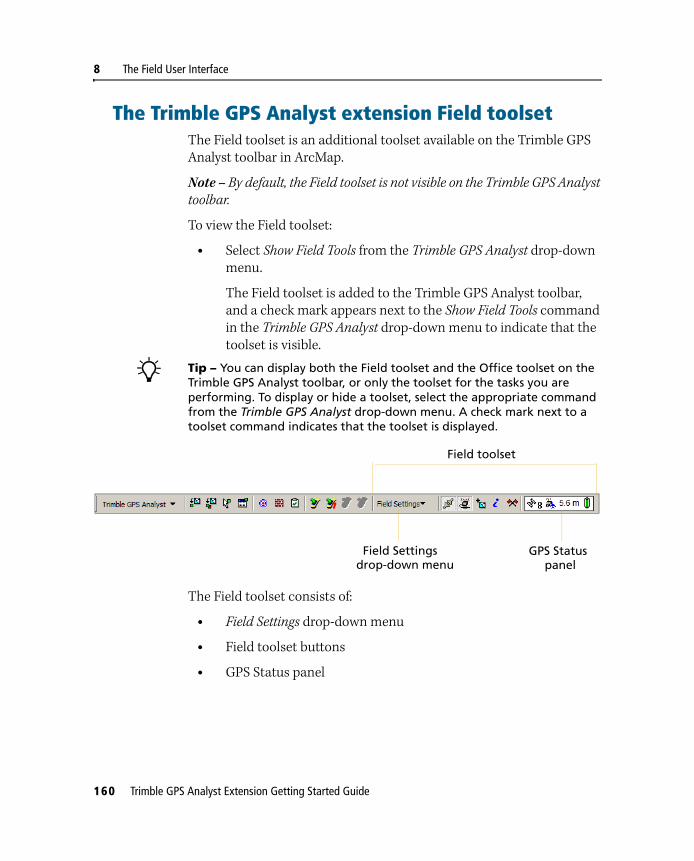
8 The Field User Interface
The Trimble GPS Analyst extension Field toolsetThe Field toolset is an additional toolset available on the Trimble GPS Analyst toolbar in ArcMap.
Note – By default, the Field toolset is not visible on the Trimble GPS Analyst toolbar.
To view the Field toolset:
• Select Show Field Tools from the Trimble GPS Analyst drop-down menu.
The Field toolset is added to the Trimble GPS Analyst toolbar, and a check mark appears next to the Show Field Tools command in the Trimble GPS Analyst drop-down menu to indicate that the toolset is visible.
B Tip – You can display both the Field toolset and the Office toolset on the Trimble GPS Analyst toolbar, or only the toolset for the tasks you are performing. To display or hide a toolset, select the appropriate command from the Trimble GPS Analyst drop-down menu. A check mark next to a toolset command indicates that the toolset is displayed.
The Field toolset consists of:
• Field Settings drop-down menu
• Field toolset buttons
• GPS Status panel
Field toolset
Field Settings
drop-down menu
GPS Status
panel
160 Trimble GPS Analyst Extension Getting Started Guide
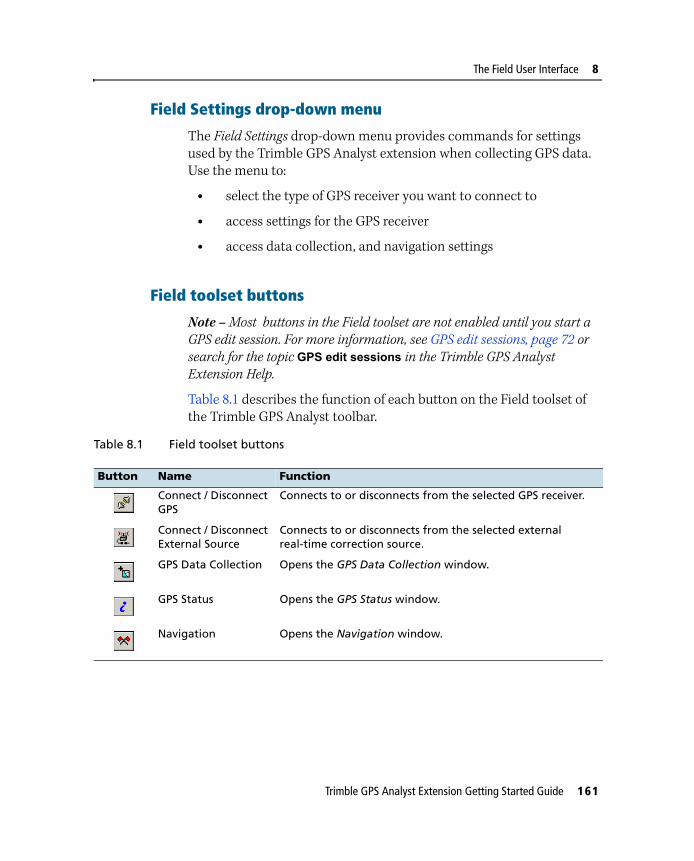
The Field User Interface 8
Field Settings drop-down menu
The Field Settings drop-down menu provides commands for settings used by the Trimble GPS Analyst extension when collecting GPS data. Use the menu to:
• select the type of GPS receiver you want to connect to
• access settings for the GPS receiver
• access data collection, and navigation settings
Field toolset buttons
Note – Most buttons in the Field toolset are not enabled until you start a GPS edit session. For more information, see GPS edit sessions, page 72 or search for the topic GPS edit sessions in the Trimble GPS Analyst Extension Help.
Table 8.1 describes the function of each button on the Field toolset of the Trimble GPS Analyst toolbar.
Table 8.1 Field toolset buttons
Button Name Function
Connect / Disconnect GPS
Connects to or disconnects from the selected GPS receiver.
Connect / Disconnect External Source
Connects to or disconnects from the selected external real-time correction source.
GPS Data Collection Opens the GPS Data Collection window.
GPS Status Opens the GPS Status window.
Navigation Opens the Navigation window.
Trimble GPS Analyst Extension Getting Started Guide 161

8 The Field User Interface
GPS status panel
The GPS status panel provides basic information about the status of the connected GPS receiver. It also displays the Current Estimated Accuracy (CEA) value for the feature currently being logged, and if you are collecting data with a Trimble receiver using H-Star technology, the Predicted Postprocessed Accuracy (PPA) of the GPS position currently being logged is shown below the CEA value. The GPS status panel appears in the Trimble GPS Analyst toolbar. It is always visible when the Field toolset is enabled, but the icons displayed depend on the current status of the GPS receiver. For a description of the icons displayed in the GPS status panel, search for the topic Trimble GPS Analyst toolbar in the Trimble GPS Analyst Extension Help.
Dockable windowsYou can open several dockable windows from the Field toolset of the Trimble GPS Analyst toolbar. These are:
• GPS Data Collection
• GPS Status
• Navigation
You can dock any of these windows above, below, or beside the map, or you can leave the windows “floating” on the map. If you dock a window, the window appears in the docked position the next time you open it.
These windows provide information and additional tools to help you collect and edit GPS data. Each dockable window is described below.
162 Trimble GPS Analyst Extension Getting Started Guide

The Field User Interface 8
GPS Data Collection window
Use the GPS Data Collection window to collect features or update the geometry of existing features using GPS data while connected to a GPS receiver.
Note – You must connect to a GPS receiver before you can collect a feature or update an existing feature.
To open this window, click the GPS Data Collection button on the Trimble GPS Analyst toolbar.
When you click Create in the Create tab, or click Replace in the Update tab, the GPS Data Collection panel appears:
Use the buttons on the panel to log GPS positions, record feature attributes, or to change construction properties for the open feature.
For more information, search for the topic Data collection techniques in the Trimble GPS Analyst Extension Help.
Trimble GPS Analyst Extension Getting Started Guide 163

8 The Field User Interface
GPS Status window
The GPS Status window provides information about the satellites currently being tracked, the connected receiver, and any connected real-time differential correction source. For example, the Receiver tab shows status information about the connected receiver, including the GPS status, the current level of charge in the GPS receiver battery, and the date of the current almanac.
Note – Information may not be displayed in all fields in the GPS Status window if you are using a GPS receiver that is not a Trimble GPS receiver.
To open the GPS Status window, click the GPS Status button on the Trimble GPS Analyst toolbar.
The skyplot provides a graphical display of the satellites being tracked by the receiver. It shows which satellites are being tracked. The green satellites represent the satellites that the receiver is using to compute its current GPS position. The red satellites represent satellites that the receiver is receiving signals from but is not using because the signals are too weak.
Your current GPS position is displayed at the bottom of the Skyplot tab, as well as the PPA value for any open feature, if you are collecting data with a Trimble receiver using H-Star technology.
For more information, search for the topic About the GPS Status window in the Trimble GPS Analyst Extension Help.
164 Trimble GPS Analyst Extension Getting Started Guide

The Field User Interface 8
Navigation window
Use the Navigation window to find existing features, or to make sure that you follow a direct course to a target location using the lightbar or direction dial. The Navigation window also provides useful information such as your current heading, or the distance from your current position to the navigation target.
To open this window, click the Navigation button on the Trimble GPS Analyst toolbar. The figure to the right shows the direction dial and lightbar displayed in the Navigation window.
You can use real-time differential GPS to optimize navigation and provide in-field differential accuracy. When connected to a Trimble GPS receiver, the GPS Analyst extension supports a range of real-time correction sources.
For more information, search for the topic About navigation in the Trimble GPS Analyst Extension Help.
Trimble GPS Analyst Extension Getting Started Guide 165

8 The Field User Interface
GPS receiver layersWhen you add GPS-enabled feature classes to the map in ArcMap, the GPS group layer is automatically added as the top layer in the Table of Contents window. The GPS group layer contains the Features In Progress layer and GPS Positions layer.
When you connect to a GPS receiver, the GPS Cursor and Trail layer and the Navigation layer are also added to the GPS group layer.
GPS Cursor and Trail layer
The GPS Cursor and Trail layer tracks the movement of the GPS receiver. The GPS cursor shows the current GPS position, and indicates the current heading with the direction of the arrow. The GPS trail shows the path you have taken recently.
To automatically pan the map so that the GPS cursor is always visible, select Auto Pan to GPS from the Field Settings drop-down menu on the Trimble GPS Analyst toolbar.
Navigation layer
The Navigation layer shows icons indicating the features or map locations that are currently selected as the start and the target for navigation. When a start and target are selected, they are joined by the navigation line, which shows the most direct path from the start to the target. Use the Navigation window to navigate to the location of the selected target.
166 Trimble GPS Analyst Extension Getting Started Guide
C H A P T E R
9
Typical Data Collection Tasks 9In this chapter:
Overview: Collecting GPS data
Supported GPS receivers for data collection
Typical workflow
The Trimble GPS Analyst extension enables you to collect GPS-based data directly within the ESRI ArcMap software. Use the Field toolset provided with the Trimble GPS Analyst extension to collect GPS and GIS data within ArcMap. For more information about the Field toolset, see Chapter 8, The Field User Interface.
This chapter outlines the tasks you will typically perform when collecting data using the Trimble GPS Analyst extension.
For step-by-step instructions and more detailed information about these tasks, see Chapter 10, Tutorial 4: Collecting GPS Data.
Trimble GPS Analyst Extension Getting Started Guide 167

9 Typical Data Collection Tasks
Overview: Collecting GPS dataTo collect GPS data using the Trimble GPS Analyst extension, install the ESRI ArcGIS software and the Trimble GPS Analyst extension for ESRI the ArcGIS software onto a laptop or Tablet PC, and then connect the computer to a supported GPS receiver. You can then use the GPS Analyst Field toolset provided in ArcMap to collect features with GPS data. When updating features you have previously collected using the Trimble GPS Analyst extension, you can use the GPS positions from the GPS receiver to navigate back to the selected feature.
Figure 9.1 shows the components required to collect GPS data using the Trimble GPS Analyst extension.
Figure 9.1 Collecting GPS data using the Trimble GPS Analyst extension
Differential correctionsource (optional)
GPSsatellites
Collect GPS data using a
computer with ArcGISDesktop software and the
GPSreceiver
Process the data either in
Trimble GPS Analyst
Tablet PC or laptop
the field or back in theoffice
extension
168 Trimble GPS Analyst Extension Getting Started Guide

Typical Data Collection Tasks 9
Supported GPS receivers for data collectionTo collect GPS data, you can connect a computer running ESRI ArcGIS Desktop software and the Trimble GPS Analyst extension to any of the following GPS receivers:
• Trimble Mapping and GIS receivers:
– GeoExplorer series handhelds:
– GeoXH
– GeoXM
– GeoXT
– GPS Pathfinder ProXH
– GPS Pathfinder ProXT
– GPS Pathfinder Pro XRS
– GPS Pathfinder XB receiver
– GPS Pathfinder XC receiver
– Trimble Recon GPS XB edition
– Trimble Recon GPS XC edition
• NMEA GPS receiver
• any GPS receiver with a supported driver that enables the receiver to work with the Trimble GPS Analyst extension
Note – The type of GPS receiver determines which receiver settings options are available in the Trimble GPS Analyst extension. Some options, such as configuring and connecting to a real-time correction source, are available only when you are connected to certain models of Trimble GPS receiver.
Trimble GPS Analyst Extension Getting Started Guide 169
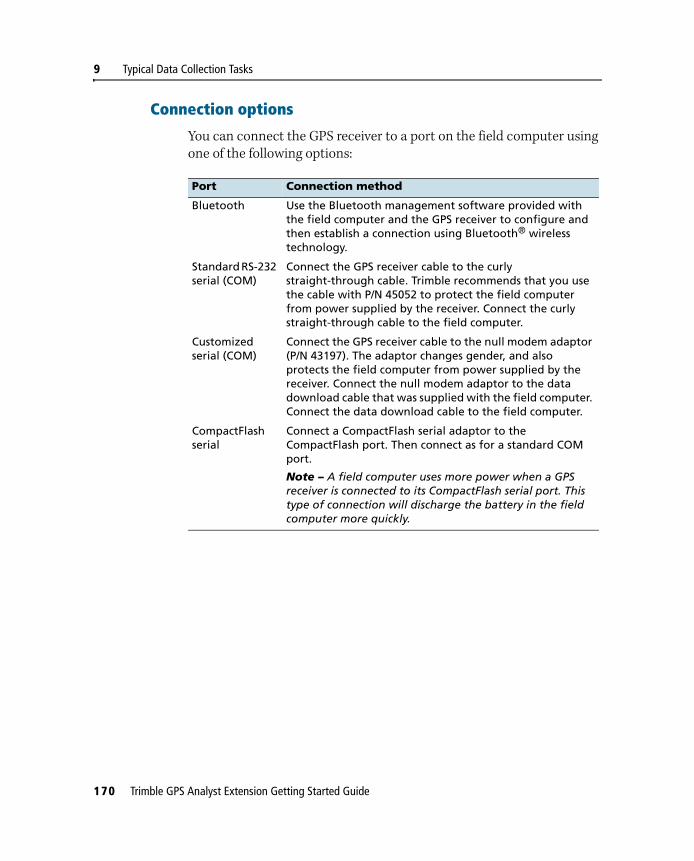
9 Typical Data Collection Tasks
Connection options
You can connect the GPS receiver to a port on the field computer using one of the following options:
Port Connection method
Bluetooth Use the Bluetooth management software provided with the field computer and the GPS receiver to configure and then establish a connection using Bluetooth® wireless technology.
Standard RS-232 serial (COM)
Connect the GPS receiver cable to the curly straight-through cable. Trimble recommends that you use the cable with P/N 45052 to protect the field computer from power supplied by the receiver. Connect the curly straight-through cable to the field computer.
Customized serial (COM)
Connect the GPS receiver cable to the null modem adaptor (P/N 43197). The adaptor changes gender, and also protects the field computer from power supplied by the receiver. Connect the null modem adaptor to the data download cable that was supplied with the field computer. Connect the data download cable to the field computer.
CompactFlash serial
Connect a CompactFlash serial adaptor to the CompactFlash port. Then connect as for a standard COM port.
Note – A field computer uses more power when a GPS receiver is connected to its CompactFlash serial port. This type of connection will discharge the battery in the field computer more quickly.
170 Trimble GPS Analyst Extension Getting Started Guide

Typical Data Collection Tasks 9
Powered connections
C CAUTION – Using COM port cabling that supplies power to the field computer can cause problems with, or even permanent damage to, the field computer. Some GPS receivers supply power, and some cables transfer power through one or more of their pins. Trimble strongly recommends that you protect the field computer by connecting either the null modem adaptor (P/N 43197) or the curly straight-through cable (P/N 45052) to the receiver cable. These two connectors do not supply power, so they will protect the field computer from power output by the receiver.
If a powered connection is acceptable or necessary, you can connect directly to the receiver, or you can use the curly straight-through cable P/N 30236 instead of cable P/N 45052. If you are unsure whether a powered connection will cause damage, refer to the documentation for the field computer or consult the manufacturer before using the cable P/N 30236.
Connecting to external real-time correction devices
To connect to a GPS receiver and an external real-time correction device such as a GeoBeacon receiver, use one of the following options:
• If you are using a serial cable connection to both receivers, use a splitter cable.
• If the field computer has two Bluetooth ports, you can connect to both the GPS receiver and the real-time correction device using Bluetooth wireless technology.
• If the field computer has only one Bluetooth port, use Bluetooth wireless technology to connect the real-time correction device to the GPS receiver, and then use Bluetooth wireless technology to connect the GPS receiver to the field computer. Alternatively you can use a combination of Bluetooth wireless technology and cabling.
For more information, refer to the documentation provided with the GPS receiver and the real-time correction device.
Trimble GPS Analyst Extension Getting Started Guide 171

9 Typical Data Collection Tasks
Typical workflowWhen you use the Trimble GPS Analyst extension to collect data, you will typically complete some or all of the following steps:
1. Prepare the geodatabase for GPS data, and configure default construction properties for features.
2. Connect the Tablet PC or laptop computer running ArcGIS Desktop software and the Trimble GPS Analyst extension to a GPS receiver.
3. Configure GPS receiver and data collection settings.
4. Use ArcMap and the GPS Analyst Field toolset to collect or update GPS data.
5. Process and analyze the GPS data.
More information about each step is provided below. These steps assume that you will use the GPS Analyst user interface provided in ArcCatalog and ArcMap. You can also complete some steps using geoprocessing tools provided in the Trimble GPS Analyst toolbox, available when you open ArcToolbox. For more information, see Trimble GPS Analyst toolbox, page 60.
Step 1: Prepare the geodatabase for GPS data
Note – To work with GPS data using the Trimble GPS Analyst extension, you must use a personal geodatabase.
In ArcCatalog, open the Database Properties dialog and prepare the geodatabase for GPS data by doing the following:
1. GPS-enable the geodatabase and the feature classes that will contain the GPS-derived features.
2. Specify the spatial reference for the geodatabase.
3. Select a geographic transformation for the GPS data.
4. Set default construction properties for each feature class that will contain GPS-derived features.
172 Trimble GPS Analyst Extension Getting Started Guide

Typical Data Collection Tasks 9
For more information about steps 1 through 3, see Chapter 4, Typical GPS Analyst Tasks.
To configure the construction properties for a feature class, use the Feature Class Properties dialog.
The construction properties of a feature define how the feature is constructed from GPS positions. When you use the Trimble GPS Analyst extension to collect features, the extension uses default construction properties for features in the same feature class. To change the geometry of any line or polygon feature constructed from GPS data, change the construction properties.
For more information, search for the topic Constructions in the Trimble GPS Analyst Extension Help.
Step 2: Connect to a GPS receiver
Connect the computer to the GPS receiver using a cable or Bluetooth wireless technology. For more information, refer to the documentation provided with the GPS receiver. To receive real-time differential corrections as you collect data, connect the GPS receiver to a real-time correction source.
In ArcMap, use the Connect to GPS button on the Trimble GPS Analyst toolbar to connect the GPS Analyst extension to the GPS receiver.
B Tip – To check the status of the GPS receiver, use the GPS status panel or the GPS Status window.
Step 3: Configure GPS receiver and data collection settings
In ArcMap, open a map document that contains GPS-enabled feature classes and make sure the Field toolset is displayed on the Trimble GPS Analyst toolbar (see page 160).
Use the Receiver Settings dialog to configure the GPS receiver, and the Data Collection Settings dialog to set up quality filters for GPS positions received during data collection.
Trimble GPS Analyst Extension Getting Started Guide 173

9 Typical Data Collection Tasks
Note – The type of GPS receiver determines which receiver settings options are available in the Trimble GPS Analyst extension. Some options, such as configuring and connecting to a real-time correction source, are available only when you are connected to certain models of Trimble GPS receiver.
Step 4: Collect features
In ArcMap, start a GPS edit session. Use the GPS Data Collection window to collect new features and GPS data for those features, or to update existing features. To navigate to an existing feature to update it, use the Navigation window.
GPS edit sessions
A GPS edit session enables you to collect or edit any feature that is linked to GPS data.
Note – To edit a feature that uses GPS data, start a GPS edit session, not a standard ArcMap edit session. A feature that is edited in a standard ArcMap edit session becomes unlinked from its GPS-derived geometry.
You cannot start a GPS edit session if an ArcMap edit session is already open.
For more information, see GPS edit sessions, page 94 or search for the topic GPS edit sessions in the Trimble GPS Analyst Extension Help.
Step 5: Process and analyze the GPS data
When you have collected the GPS data, either process the data in the field, or return to the office and use the Data Transfer utility to transfer the GPS and GIS data to an office computer for processing.
You can use the GPS Analyst Office toolset in ArcMap to differentially correct, rebuild, and validate collected GPS positions. To edit GPS data, you will need to start a GPS edit session.
174 Trimble GPS Analyst Extension Getting Started Guide
C H A P T E R
10
Tutorial 4: Collecting GPS Data 10In this chapter:
Before you begin
Scenario
Connecting to your data
Exercise 1: Preparing feature classes for GPS data
Exercise 2: Configuring the GPS receiver
Exercise 3: Collecting features using the Trimble GPS Analyst extension
This tutorial explains how to:
• GPS-enable the geodatabase
• set default construction parameters for features collected using ArcMap and the Trimble GPS Analyst extension
• connect the Trimble GPS Analyst extension to a GPS receiver
• check the GPS status of the receiver
• collect different types of features using the data collection functionality provided with the Trimble GPS Analyst extension
The tutorial contains step-by-step instructions for the main tasks involved.
This tutorial will take between 30 and 45 minutes to complete.
Trimble GPS Analyst Extension Getting Started Guide 175

10 Tutorial 4: Collecting GPS Data
Before you beginBefore beginning this tutorial, you will need to:
• Install the ESRI ArcGIS Desktop software. For more information, refer to the documentation provided by ESRI.
• Install the Trimble GPS Analyst extension. For more information, see Installing the Trimble GPS Analyst extension, page 36.
• Locate where the tutorial sample files are stored on your computer and, if required, reinstall them (see Loading the tutorial sample files below).
• Enable the Trimble GPS Analyst extension in both ArcCatalog and ArcMap (see page 45).
• Display the Trimble GPS Analyst toolbar in ArcMap (see page 55).
Note – The tutorials assume that the default settings for the Trimble GPS Analyst extension are unchanged. If they have been changed, the extension may behave differently from the behaviour described in the tutorials.
This tutorial assumes that you are familiar with GIS concepts and the ArcGIS software environment. For information on GIS concepts and the ArcGIS Desktop software environment, refer to Getting Started with ArcGIS and Building and Editing Geodatabases, which you received from ESRI in your ArcGIS package.
The exercises in this tutorial are designed to be completed in sequence.
Loading the tutorial sample files
The exercises use sample files supplied with the Trimble GPS Analyst extension. These sample files are located in the folder you specified at installation. The default location is C:\ArcGIS\ArcTutor\GPS Analyst.
If they have been deleted, reload them from the Trimble GPS Analyst Extension CD.
176 Trimble GPS Analyst Extension Getting Started Guide

Tutorial 4: Collecting GPS Data 10
To reload the sample files:
1. Insert the Trimble GPS Analyst Extension CD in the CD drive of the computer.
2. Select Install.
3. Depending on the version of ArcGIS Desktop software you are running, click either Install GPS Analyst for ArcGIS 9.0 and 9.1 or Install GPS Analyst for ArcGIS 9.2.
4. Select Modify.
5. Select the Sample Data check box.
6. Follow the instructions on the screen to install the sample files.
For more information, see Installing the Trimble GPS Analyst extension, page 36.
Returning the contents of the tutorial folder to its original state
Each tutorial folder contains a zip file to return the contents of the tutorial geodatabase to its original state.
Note – You must return the contents of the tutorial folder to its original state before you do the tutorial. You will need to do this if you have done the tutorial before, even if you have uninstalled and then reinstalled the Trimble GPS Analyst extension.
To return the contents of any GPS Analyst tutorial folder to its original state:
1. In Windows Explorer, delete all files inside the tutorial folder except the .zip folder.
2. Right-click the .zip folder and select WinZip. Extract the contents to the tutorial folder.
Trimble GPS Analyst Extension Getting Started Guide 177

10 Tutorial 4: Collecting GPS Data
ScenarioThe City of Westminster, Colorado, maintains a geodatabase of assets in an Open Space park. The geodatabase contains features such as access ways, sewers, building footprints, vehicle parking areas, and road centerlines. The City of Westminster wants to send a field crew to the park to map new features, and to update existing features. The field crews will use Tablet PCs running ESRI ArcGIS Desktop software and the Trimble GPS Analyst extension.
Your task is to prepare the feature classes in the geodatabase for use with GPS data, and to set default construction settings for GPS-enabled feature classes. Then you will travel to the Open Space park, connect to a GPS receiver, and collect new features and update existing features.
Connecting to your dataThe Catalog tree in ArcCatalog has a branch for each local hard drive. You can also create new branches in the Catalog tree to make it easier to navigate to your data. These branches are called connections.
Now you will add a connection to the folder that contains the tutorial data. This new branch remains in the Catalog tree until you delete it.
Make a connection to the tutorial data
1. In ArcCatalog, click the Connect to Folder button.
2. Navigate to the folder on the drive where the tutorial data is installed. The default location is C:\ArcGIS\ArcTutor\GPS Analyst\Tutorial4. Click OK.
178 Trimble GPS Analyst Extension Getting Started Guide

Tutorial 4: Collecting GPS Data 10
The new connection appears as a branch in the Catalog tree:
3. Click the Tutorial4 folder to view its contents on the right side of the ArcCatalog window.
Table 10.1 on the following page describes the contents of the Tutorial4 folder.
Trimble GPS Analyst Extension Getting Started Guide 179
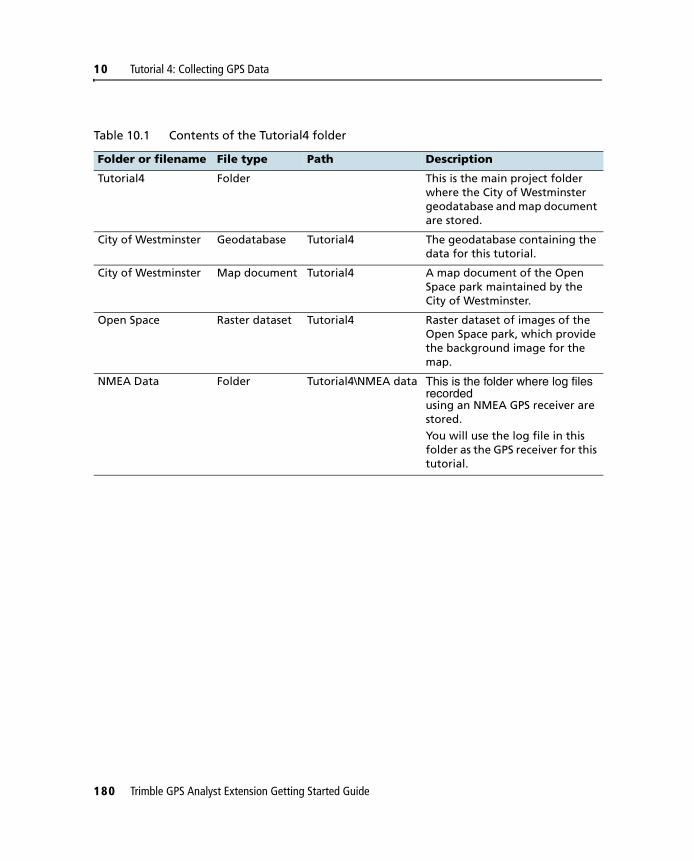
10 Tutorial 4: Collecting GPS Data
Table 10.1 Contents of the Tutorial4 folder
Folder or filename File type Path Description
Tutorial4 Folder This is the main project folder where the City of Westminster geodatabase and map document are stored.
City of Westminster Geodatabase Tutorial4 The geodatabase containing the data for this tutorial.
City of Westminster Map document Tutorial4 A map document of the Open Space park maintained by the City of Westminster.
Open Space Raster dataset Tutorial4 Raster dataset of images of the Open Space park, which provide the background image for the map.
NMEA Data Folder Tutorial4\NMEA data This is the folder where log files recordedusing an NMEA GPS receiver are stored.You will use the log file in this folder as the GPS receiver for this tutorial.
180 Trimble GPS Analyst Extension Getting Started Guide
Tutorial 4: Collecting GPS Data 10
Exercise 1: Preparing feature classes for GPS dataYou will travel to the Open Space Park to collect new features and update existing features. The City of Westminster has indicated that the new features are:
• access ways
• storm drain access covers
• water points
The features that need updating are access ways that have been extended.
Your task is to prepare the City of Westminster geodatabase for GPS data, and to GPS-enable the feature classes that contain the storm drain access cover, water point, and access way features.
This exercise introduces you to the concepts of:
• GPS data in the geodatabase
• estimated accuracy
• validation
• construction properties
It shows you how to:
• GPS-enable a geodatabase and selected feature classes
• add estimated accuracy data to GPS-enabled feature classes
• specify the required accuracy for features in the same feature class to pass validation
• set default construction properties for feature classes
Trimble GPS Analyst Extension Getting Started Guide 181
10 Tutorial 4: Collecting GPS Data
GPS data in the geodatabase
The Trimble GPS Analyst extension enables you to store GPS data directly in the geodatabase as a GPS session. GPS sessions are contained in the GPS Sessions folder. GPS positions are always stored in the geodatabase using the WGS-84 coordinate system.
Before you can store GPS sessions in the geodatabase, you need to:
• GPS-enable the geodatabase
• specify the spatial reference for GPS-enabled feature classes
• GPS-enable the feature classes that you want to use with GPS data
You also need to select a geographic transformation, because the feature classes in the geodatabase are not referenced to the WGS-84 coordinate system. The geographic transformation will ensure that the GPS Analyst extension can correctly convert GPS data from WGS-84 coordinates to coordinates in the same coordinate system as the feature classes.
To complete these tasks, use the Trimble GPS Analyst tab of the Database Properties dialog. You can GPS-enable a geodatabase at the same time that you create the geodatabase, or later, once it contains GIS features.
GPS-enabling the geodatabase and feature classes
1. Open ArcCatalog, if it is not already open. To do this, select All Programs / ArcGIS / ArcCatalog from the Windows Start menu.
2. Browse to the tutorial dataset folder connection you created for Tutorial 4.
3. Right-click the City of Westminster geodatabase and select Properties.
The Database Properties dialog appears.
182 Trimble GPS Analyst Extension Getting Started Guide

Tutorial 4: Collecting GPS Data 10
4. Select the Trimble GPS Analyst tab:
5. Select the GPS-enable geodatabase check box.
You will be collecting new features or updating features in three of the feature classes in the geodatabase.
6. Select the check boxes next to the AccessWays, StormDrainPoints, and WaterPoints feature classes to GPS-enable them.
7. Click OK.
Trimble GPS Analyst Extension Getting Started Guide 183

10 Tutorial 4: Collecting GPS Data
The Select Geographic Transformation dialog appears:
GPS data stored in the geodatabase uses the World Geodetic System of 1984 (WGS-84) geographic coordinate system. Because the City of Westminster geodatabase uses the North American Datum of 1983 (NAD 1983) coordinate system, you need to specify a geographic transformation so that the GPS Analyst extension can correctly convert GPS data from WGS-84 coordinates to NAD 1983 coordinates. You will use the NAD_1983_To_WGS_1984_4 geographic transformation, because it is the transformation that ESRI recommends for converting WGS-84 coordinates to NAD_1983 coordinates.
8. From the drop-down list, select the NAD_1983_To_WGS_1984_4 geographic transformation and then click OK.
The City of Westminster geodatabase is now GPS-enabled. The GPS Analyst extension has created the GPS Sessions folder that will contain GPS sessions for the geodatabase. The GPS Sessions folder appears below the feature dataset in the Contents tab for the City of Westminster geodatabase.
184 Trimble GPS Analyst Extension Getting Started Guide

Tutorial 4: Collecting GPS Data 10
Estimated accuracy values
When a feature is created using GPS data, the GPS Analyst extension calculates estimated accuracy values for the feature, and for the constructions that are used to build the feature.
For features that are made up of several vertices, the estimated accuracy is represented in two ways: the average estimated accuracy, which is the average of the estimated accuracy for each of the vertices in the feature, and the worst estimated accuracy, which is the estimated accuracy of the vertex that has the largest estimated accuracy of all the vertices in the feature. For a point feature, which always consists of only one averaged vertex, the worst estimated accuracy is always the same as the average estimated accuracy.
The average estimated accuracy and the worst estimated accuracy values for a feature are stored as part of the GPS data used to construct the feature. You can choose to map the average and worst estimated accuracy values to attributes in the feature classes that you have GPS-enabled. If you do so, and if you later unlink a feature from its GPS data or if you GPS-disable the geodatabase, the estimated accuracy values for the feature will be retained as attributes.
Required accuracy for validation
The worst estimated accuracy value is used as part of the validation process. During validation, the GPS Analyst extension checks whether the worst estimated accuracy of the feature is within the required accuracy specified for its feature class. The degree of accuracy you require depends on the type of feature collected and the purpose of the information. For example, underground cable features that maintenance crews will need to locate and repair require better accuracy than signpost features that are clearly identifiable.
You can specify or change the accuracy required for a feature class at any time, using the Trimble GPS Analyst tab of the Feature Class Properties dialog. You can learn more about validation by completing Tutorial 3: Processing GPS Data, beginning on page 129.
Trimble GPS Analyst Extension Getting Started Guide 185
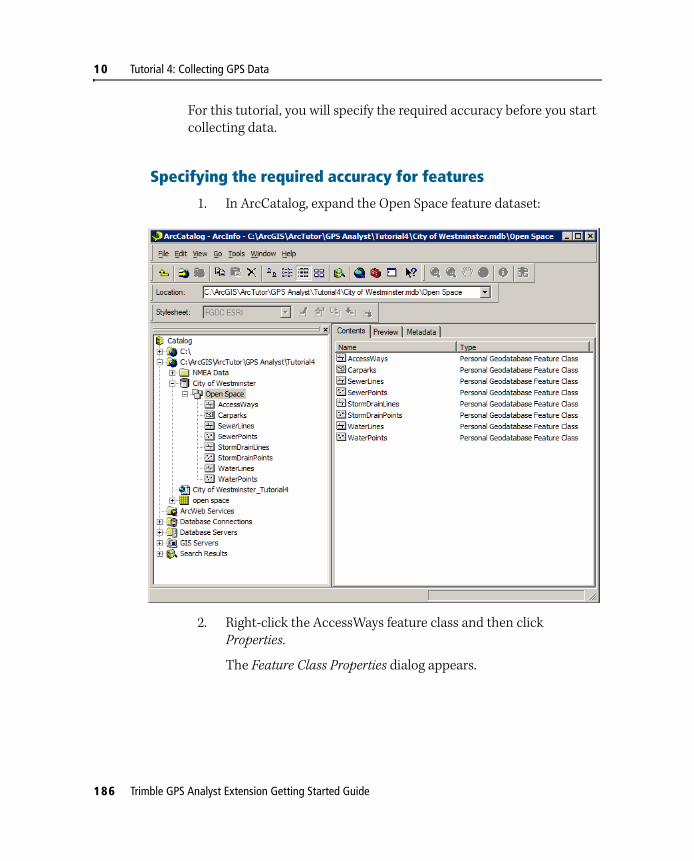
10 Tutorial 4: Collecting GPS Data
For this tutorial, you will specify the required accuracy before you start collecting data.
Specifying the required accuracy for features
1. In ArcCatalog, expand the Open Space feature dataset:
2. Right-click the AccessWays feature class and then click Properties.
The Feature Class Properties dialog appears.
186 Trimble GPS Analyst Extension Getting Started Guide

Tutorial 4: Collecting GPS Data 10
3. You have decided to store estimated accuracy values as attributes in the feature, so select the Fields tab:
4. To add a new field to the feature class, click the next blank row in the Field Name column and then type Average_Est_Accuracy.
5. In the same row, click in the Data Type column. From the drop-down list, select Double.
6. Repeat steps 4 and 5 to create a new field called Worst_Est_Accuracy. Define the data type as Double.
7. Click Apply.
Trimble GPS Analyst Extension Getting Started Guide 187
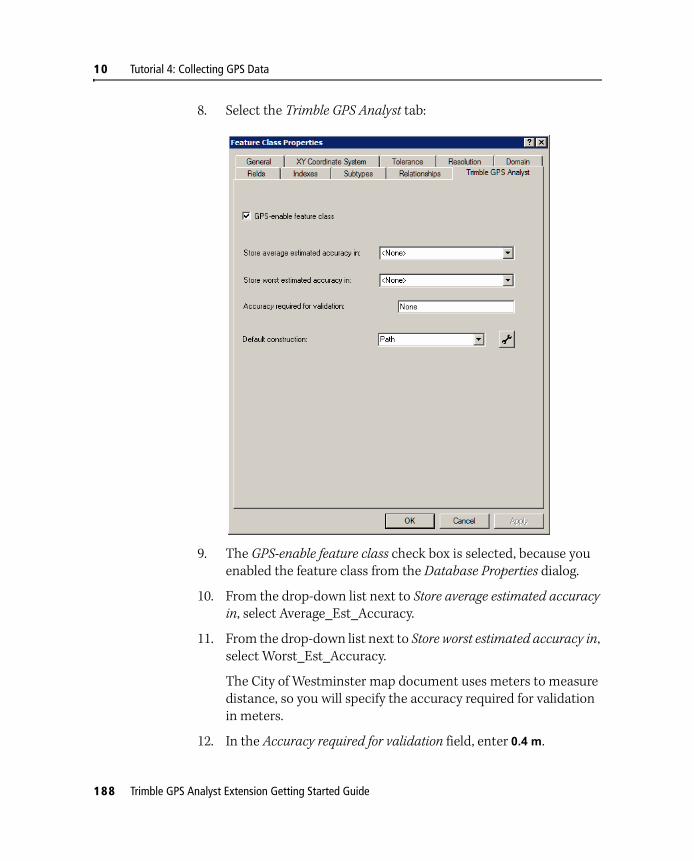
10 Tutorial 4: Collecting GPS Data
8. Select the Trimble GPS Analyst tab:
9. The GPS-enable feature class check box is selected, because you enabled the feature class from the Database Properties dialog.
10. From the drop-down list next to Store average estimated accuracy in, select Average_Est_Accuracy.
11. From the drop-down list next to Store worst estimated accuracy in, select Worst_Est_Accuracy.
The City of Westminster map document uses meters to measure distance, so you will specify the accuracy required for validation in meters.
12. In the Accuracy required for validation field, enter 0.4 m.
188 Trimble GPS Analyst Extension Getting Started Guide

Tutorial 4: Collecting GPS Data 10
All features in the AccessWays feature class now need to be accurate to within 40 centimeters in order to pass validation.
13. Click OK.
14. Repeat steps 2 through 12 above for the other GPS-enabled feature classes in the City of Westminster geodatabase:
– StormDrainPoints
– WaterPoints
Constructions
The Trimble GPS Analyst extension builds the geometry of a feature from GPS data using “building blocks” called constructions. A construction uses the GPS positions from locations or other constructions to calculate a vertex, which is used to construct the geometry of a feature.
By default, each feature type has a default type of construction: point features are constructed using averaged vertex constructions, line features use path constructions, and polygon features use ring constructions.
Default construction properties
For any line or polygon feature constructed from GPS data, you can change the construction properties to change the geometry of the feature. When you use the GPS Analyst extension to collect features, the GPS Analyst extension uses default construction properties for features in the same feature class.
The construction properties define which locations are used in the feature, or how constructed positions are calculated. For example, you can use the Construction Properties dialog to specify a minimum time between any two locations used in the feature.
Trimble GPS Analyst Extension Getting Started Guide 189

10 Tutorial 4: Collecting GPS Data
The construction interval does not determine the rate at which GPS positions are logged to the geodatabase; this is controlled by the GPS receiver. This means that if you change the construction interval during data analysis, you don’t have to return to the field to collect additional GPS positions for the feature.
Viewing default construction properties
1. In ArcCatalog, right-click the AccessWays feature class and click Properties.
The Feature Class Properties dialog appears.
2. Select the Trimble GPS Analyst tab:
190 Trimble GPS Analyst Extension Getting Started Guide

Tutorial 4: Collecting GPS Data 10
3. In the Default Construction field, Path is already selected. This is the default construction for all line feature classes collected using the GPS Analyst extension.
4. To view the default path construction properties, click the Settings button next to the default construction drop-down list.
The Construction Properties dialog appears:
The default construction interval for line features in the Access Way feature class is a distance interval of 1 meter. This means that there will be 1 meter between any two locations used in the feature, except for the first and last locations recorded for the feature, which are always included in the feature.
5. For this exercise, we will keep the default construction properties. Click Cancel to close the dialog.
6. Click Cancel to close the Feature Class Properties dialog.
Trimble GPS Analyst Extension Getting Started Guide 191

10 Tutorial 4: Collecting GPS Data
Exercise 2: Configuring the GPS receiverNow that you have prepared the City of Westminster geodatabase for GPS data, you need to prepare your City of Westminster map document for collecting GPS data. In ArcMap, you will check that the default receiver settings will help you to collect GPS data that meets your requirements.
This lesson introduces the concepts of:
• GPS layers in ArcMap
• Trimble GPS Analyst extension tools in ArcMap
• log files pre-recorded using a NMEA receiver
It shows you how to:
• select the type of GPS receiver you will use
• configure settings for the GPS receiver
GPS layers in ArcMap
Maps that contain GPS-enabled feature classes contain a GPS layer. The GPS layer is added as the top layer in the map when GPS-enabled feature classes are added to the map, or when you GPS-enable feature classes that are contained in the map document.
The GPS group layer in the City of Westminster map document already contains two layers:
• Features in Progress
• GPS Positions
These layers are used for analyzing and editing features that are linked to a GPS-derived geometry.
When you connect to a GPS receiver later in this tutorial, two other layers will be added to the map:
• GPS Cursor and Trail
• Navigation
192 Trimble GPS Analyst Extension Getting Started Guide
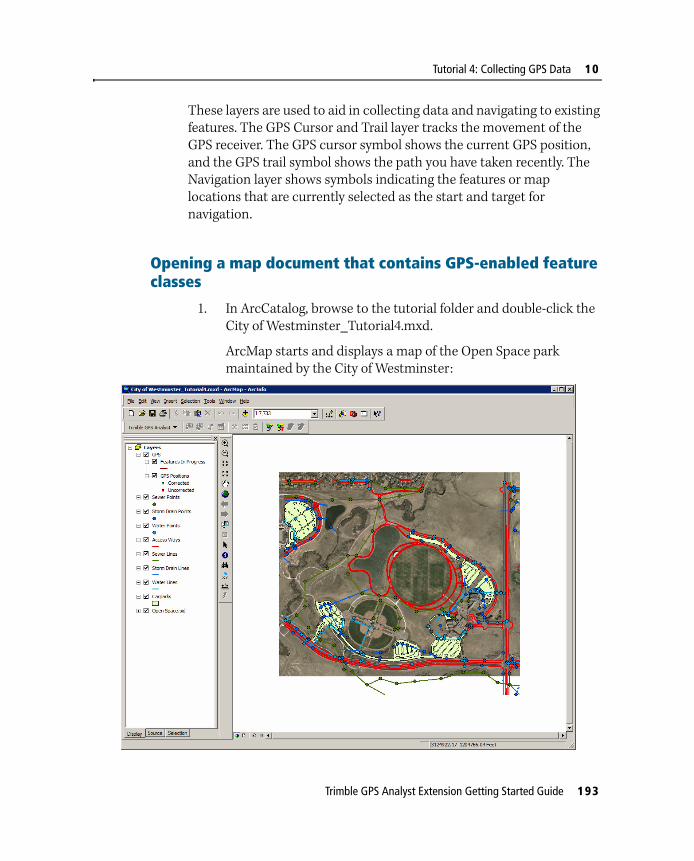
Tutorial 4: Collecting GPS Data 10
These layers are used to aid in collecting data and navigating to existing features. The GPS Cursor and Trail layer tracks the movement of the GPS receiver. The GPS cursor symbol shows the current GPS position, and the GPS trail symbol shows the path you have taken recently. The Navigation layer shows symbols indicating the features or map locations that are currently selected as the start and target for navigation.
Opening a map document that contains GPS-enabled feature classes
1. In ArcCatalog, browse to the tutorial folder and double-click the City of Westminster_Tutorial4.mxd.
ArcMap starts and displays a map of the Open Space park maintained by the City of Westminster:
Trimble GPS Analyst Extension Getting Started Guide 193
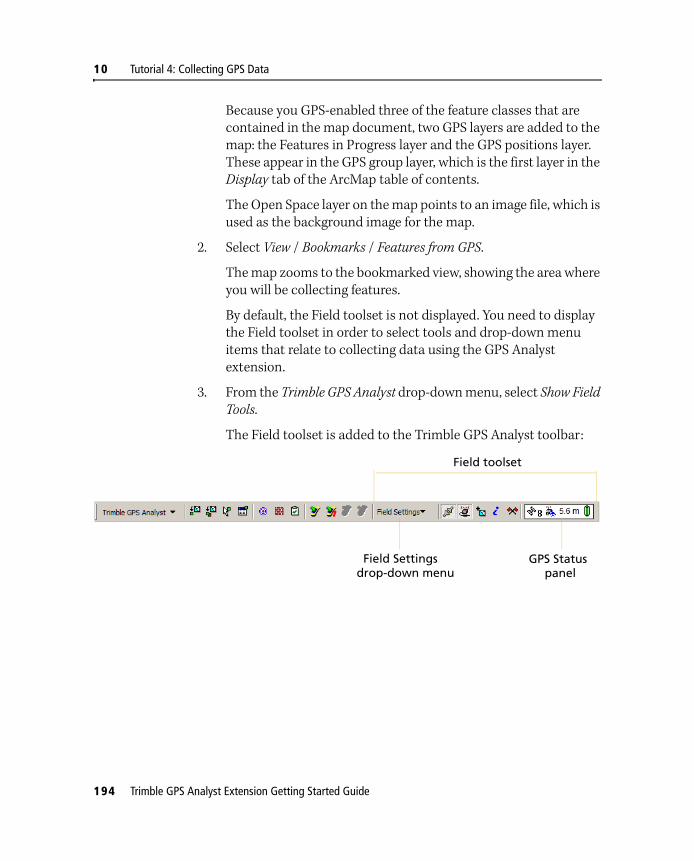
10 Tutorial 4: Collecting GPS Data
Because you GPS-enabled three of the feature classes that are contained in the map document, two GPS layers are added to the map: the Features in Progress layer and the GPS positions layer. These appear in the GPS group layer, which is the first layer in the Display tab of the ArcMap table of contents.
The Open Space layer on the map points to an image file, which is used as the background image for the map.
2. Select View / Bookmarks / Features from GPS.
The map zooms to the bookmarked view, showing the area where you will be collecting features.
By default, the Field toolset is not displayed. You need to display the Field toolset in order to select tools and drop-down menu items that relate to collecting data using the GPS Analyst extension.
3. From the Trimble GPS Analyst drop-down menu, select Show Field Tools.
The Field toolset is added to the Trimble GPS Analyst toolbar:
Field toolset
Field Settingsdrop-down menu
GPS Statuspanel
194 Trimble GPS Analyst Extension Getting Started Guide

Tutorial 4: Collecting GPS Data 10
Using GPS receivers and log files
With the Trimble GPS Analyst extension, you can connect a supported GPS receiver or, if you have a NMEA receiver, you can pre-record a log file with the receiver connected and replay the log file instead of connecting to a physical receiver.
For this tutorial, you will connect to a log file recorded at the Open Space park using a NMEA receiver. This means you can complete the data collection without going outside.
Selecting the GPS receiver
1. From the Field Settings drop-down menu, select GPS Receiver and then select NMEA GPS Receiver.
2. From the Field Settings drop-down menu, select Receiver Settings.
The Receiver Settings dialog appears:
Trimble GPS Analyst Extension Getting Started Guide 195

10 Tutorial 4: Collecting GPS Data
The dialog displays the available tabs for the type of GPS receiver you have selected.
3. In the GPS Settings tab, select the Replay NMEA File option.
4. Click Browse to navigate to the location of the NMEA log file. The default location is C:\ArcGIS\ArcTutor\GPS Analyst\Tutorial4\NMEA Data.
5. Select Tutorial Receiver.LOG and click Open to confirm your selection and close the dialog.
6. In the Receiver Settings dialog, click OK to close the dialog.
Exercise 3: Collecting features using the Trimble GPS Analyst extension
Now that you have configured your receiver, you are ready to travel to the Open Space park and collect features using GPS data.
When you collect real data, you will need to move to a location where you have a clear view of the sky. Satellite signals can be received from any direction, but they can be blocked by people, buildings, heavy tree cover, large vehicles, or powerful transmitters. Anything that blocks light also blocks signals. GPS signals can go through leaves, plastic, and glass, but these all weaken the signal.
Because you will be replaying a pre-recorded log file rather than connecting to a real GPS receiver, you won’t need to go outside to complete this tutorial.
At the Open Space park, you will collect new waterpoint and access way features.
This exercise introduces the following concepts:
• GPS receiver status
• GPS edit sessions
• static GPS positions
• streaming GPS positions
196 Trimble GPS Analyst Extension Getting Started Guide
Tutorial 4: Collecting GPS Data 10
It shows you how to:
• connect to the selected GPS receiver
• check the status of the GPS receiver
• start a GPS edit session
• collect a point feature
• collect a line feature
• disconnect from the receiver
• end the GPS edit session
Connecting to a GPS Receiver
You must connect the field computer to a GPS receiver before you can collect new data. Connect the GPS receiver and antenna to the Tablet PC or laptop according to the receiver manufacturer’s instructions.
You must also connect the GPS Analyst extension to the receiver, using the GPS Connect/Disconnect button on the Trimble GPS Analyst toolbar.
Once connected, the GPS Cursor and Trail layer and the Navigation layer are added to the map. The GPS Analyst extension begins to track visible satellites and to calculate its current position. When the current position is calculated (usually after a couple of seconds), the GPS cursor and trail symbols appear on the map, indicating the current position of the GPS receiver.
Checking the GPS Status
Click on the Trimble GPS Analyst toolbar and use the Status window to view the satellites being tracked and to check which satellites are being used to calculate the current position.
The skyplot shows which satellites are being tracked. The green satellites show the satellites that the receiver is using to compute its current GPS position. The red satellites represent satellites that
Trimble GPS Analyst Extension Getting Started Guide 197
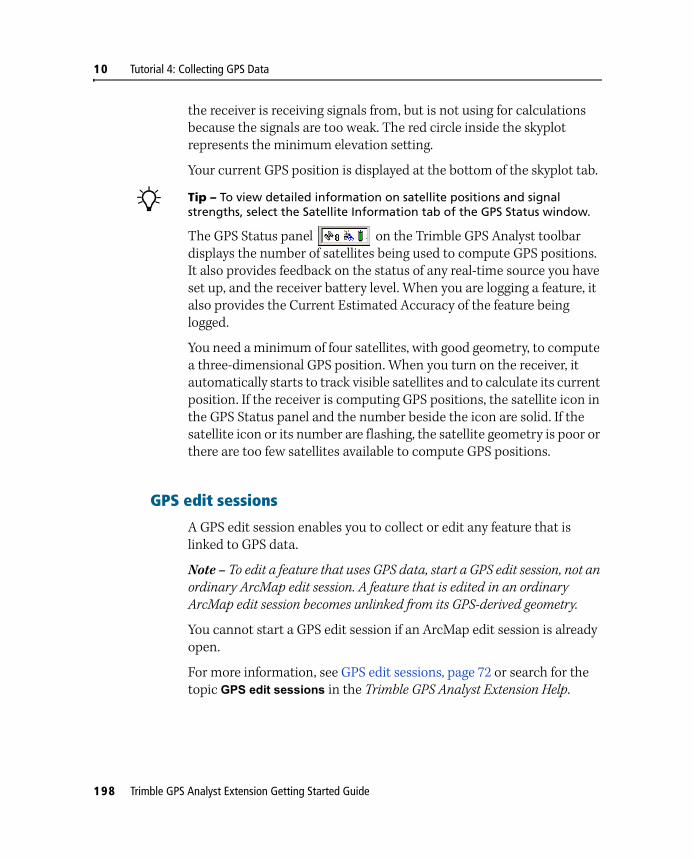
10 Tutorial 4: Collecting GPS Data
the receiver is receiving signals from, but is not using for calculations because the signals are too weak. The red circle inside the skyplot represents the minimum elevation setting.
Your current GPS position is displayed at the bottom of the skyplot tab.
B Tip – To view detailed information on satellite positions and signal strengths, select the Satellite Information tab of the GPS Status window.
The GPS Status panel on the Trimble GPS Analyst toolbar displays the number of satellites being used to compute GPS positions. It also provides feedback on the status of any real-time source you have set up, and the receiver battery level. When you are logging a feature, it also provides the Current Estimated Accuracy of the feature being logged.
You need a minimum of four satellites, with good geometry, to compute a three-dimensional GPS position. When you turn on the receiver, it automatically starts to track visible satellites and to calculate its current position. If the receiver is computing GPS positions, the satellite icon in the GPS Status panel and the number beside the icon are solid. If the satellite icon or its number are flashing, the satellite geometry is poor or there are too few satellites available to compute GPS positions.
GPS edit sessions
A GPS edit session enables you to collect or edit any feature that is linked to GPS data.
Note – To edit a feature that uses GPS data, start a GPS edit session, not an ordinary ArcMap edit session. A feature that is edited in an ordinary ArcMap edit session becomes unlinked from its GPS-derived geometry.
You cannot start a GPS edit session if an ArcMap edit session is already open.
For more information, see GPS edit sessions, page 72 or search for the topic GPS edit sessions in the Trimble GPS Analyst Extension Help.
198 Trimble GPS Analyst Extension Getting Started Guide

Tutorial 4: Collecting GPS Data 10
Logging now or later
When you collect features, you can choose to log GPS positions now or later. By default, the GPS Analyst extension does not begin logging features until you click the static GPS positions or streaming GPS positions buttons. This gives you time to enter the attributes for the feature, or to reach the start of the feature. Selecting the Log Now option means you can start logging GPS positions as soon as you open a new feature, so you can log GPS positions as the same time as you record the attributes.
Point features
To collect a point feature, remain stationary while the GPS Analyst extension logs static GPS positions. When you end static logging, the GPS Analyst extension uses smart averaging to calculate an averaged position. GPS positions with a better estimated accuracy are given more weight than GPS positions with a poorer estimated accuracy when calculating the constructed position.
While the GPS Analyst extension is logging GPS positions, the GPS positions counter indicates how many GPS positions have been logged for the feature. Generally, the more GPS positions you log for a point feature, the more accurate the constructed position for the feature will be.
Line features
To record a line feature, you need to travel along the feature. As you travel, the GPS Analyst extension records streaming GPS positions at the logging interval specified in the Construction Properties dialog. The GPS positions counter indicates how many GPS positions have been logged for the feature. Streaming GPS positions are used as a vertex in a line or area feature.
Trimble GPS Analyst Extension Getting Started Guide 199
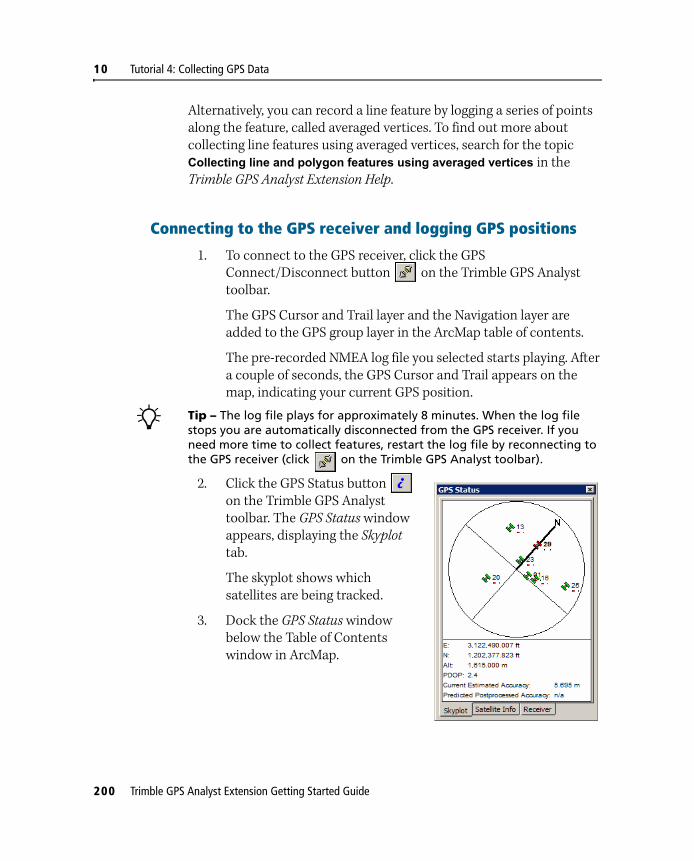
10 Tutorial 4: Collecting GPS Data
Alternatively, you can record a line feature by logging a series of points along the feature, called averaged vertices. To find out more about collecting line features using averaged vertices, search for the topic Collecting line and polygon features using averaged vertices in the Trimble GPS Analyst Extension Help.
Connecting to the GPS receiver and logging GPS positions
1. To connect to the GPS receiver, click the GPS Connect/Disconnect button on the Trimble GPS Analyst toolbar.
The GPS Cursor and Trail layer and the Navigation layer are added to the GPS group layer in the ArcMap table of contents.
The pre-recorded NMEA log file you selected starts playing. After a couple of seconds, the GPS Cursor and Trail appears on the map, indicating your current GPS position.
B Tip – The log file plays for approximately 8 minutes. When the log file stops you are automatically disconnected from the GPS receiver. If you need more time to collect features, restart the log file by reconnecting to the GPS receiver (click on the Trimble GPS Analyst toolbar).
2. Click the GPS Status button on the Trimble GPS Analyst toolbar. The GPS Status window appears, displaying the Skyplot tab.
The skyplot shows which satellites are being tracked.
3. Dock the GPS Status window below the Table of Contents window in ArcMap.
200 Trimble GPS Analyst Extension Getting Started Guide

Tutorial 4: Collecting GPS Data 10
4. From the Trimble GPS Analyst drop-down menu, select Start GPS Editing.
This starts a GPS edit session, and enables most of the buttons on the Trimble GPS Analyst toolbar. Now all GPS positions received from the GPS receiver are stored in the geodatabase in the open GPS session.
5. Click the GPS Data Collection button on the Trimble GPS Analyst toolbar.
The GPS Data Collection window appears, displaying the Create tab. The feature classes you GPS-enabled are listed:
You will use the GPS Data Collection window to collect new features that are linked to GPS geometries.
Trimble GPS Analyst Extension Getting Started Guide 201

10 Tutorial 4: Collecting GPS Data
Collecting a line feature using Log Now
1. In the feature class list, select the AccessWays feature class.
2. Select Log Now.
3. Click Create. The GPS Data Collection panel appears inside the GPS Data Collection window:
The icon on the Log Streaming GPS button is already moving , and the GPS position and feature vertex counters are
increasing, showing that the “AccessWays n” feature is being recorded as the GPS cursor moves along the accessway. The n denotes the feature ID, which is a sequential number allocated to each feature class. Each subsequent feature of the same type added to the geodatabase is allocated the next feature ID in the sequence.
You can see the accessway in the background map image, while the feature is being recorded on the map in the Features in Progress layer.
202 Trimble GPS Analyst Extension Getting Started Guide
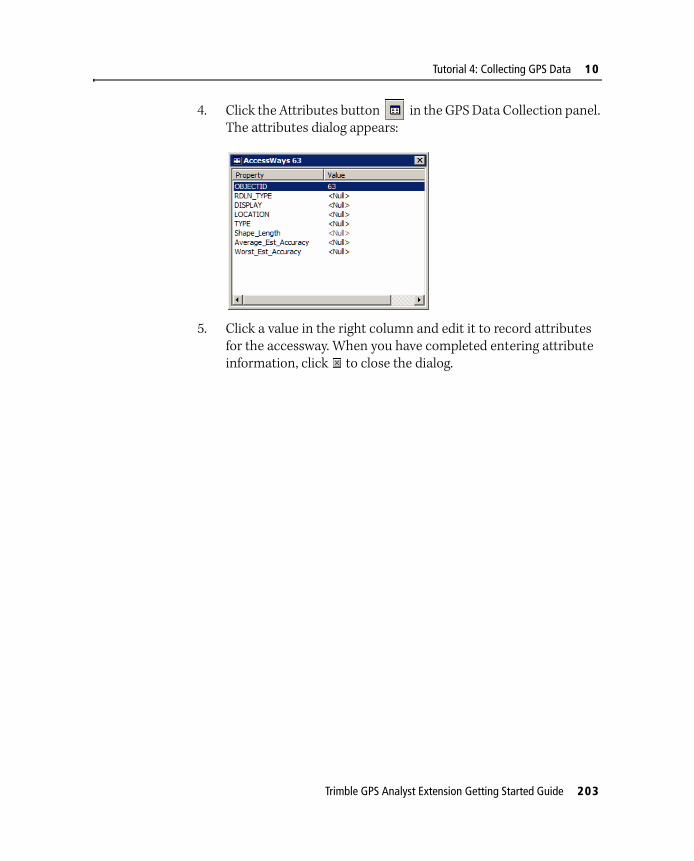
Tutorial 4: Collecting GPS Data 10
4. Click the Attributes button in the GPS Data Collection panel. The attributes dialog appears:
5. Click a value in the right column and edit it to record attributes for the accessway. When you have completed entering attribute information, click to close the dialog.
Trimble GPS Analyst Extension Getting Started Guide 203

10 Tutorial 4: Collecting GPS Data
6. When the GPS receiver reaches the end of the accessway, (where the receiver meets the other accessway,) the GPS cursor pauses, showing that the receiver is stationary:
7. Click the Accept button to stop logging the feature and add the new accessway feature to the map.
The log file continues playing, and after a brief pause the GPS cursor starts moving again. While the receiver is moving, start collecting a point feature using the steps on the following page.
204 Trimble GPS Analyst Extension Getting Started Guide

Tutorial 4: Collecting GPS Data 10
Collecting a point feature using Log Later
1. In the Create tab of the GPS Data Collection window, select WaterPoint from the feature class list.
2. Select Log Later. This means that the new feature will be created with logging paused.
3. Click Create to create a new WaterPoint feature.
The GPS Data Collection panel appears inside the GPS Data Collection window. The new feature is called “WaterPoint n”:
4. Click the Attributes button in the GPS Data Collection panel. The attributes dialog appears.
5. Click a value in the right column and edit it to record attributes for the water point. When you have completed entering attribute information, click to close the dialog.
Trimble GPS Analyst Extension Getting Started Guide 205
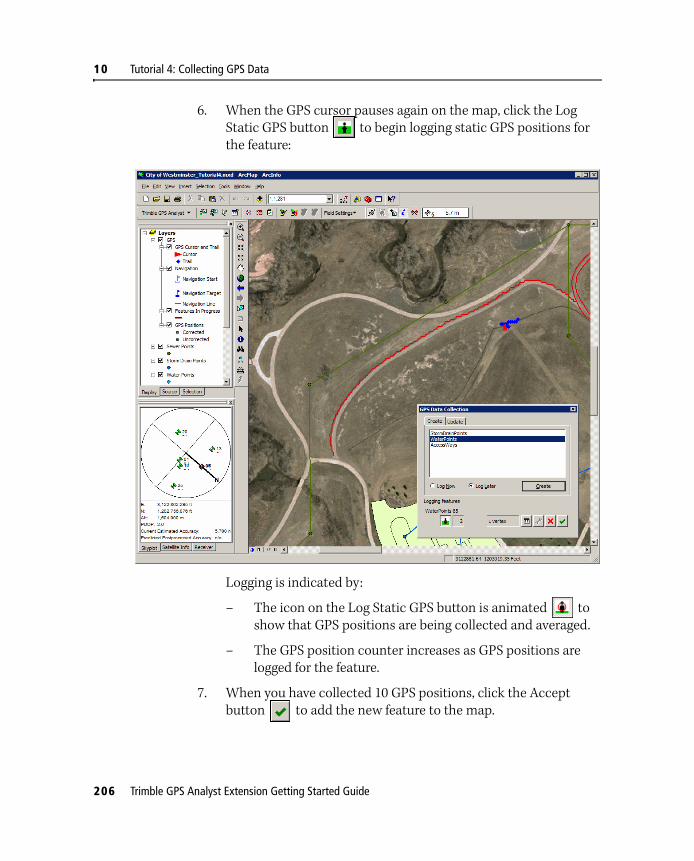
10 Tutorial 4: Collecting GPS Data
6. When the GPS cursor pauses again on the map, click the Log Static GPS button to begin logging static GPS positions for the feature:
Logging is indicated by:
– The icon on the Log Static GPS button is animated to show that GPS positions are being collected and averaged.
– The GPS position counter increases as GPS positions are logged for the feature.
7. When you have collected 10 GPS positions, click the Accept button to add the new feature to the map.
206 Trimble GPS Analyst Extension Getting Started Guide
Tutorial 4: Collecting GPS Data 10
The GPS Data Collection panel closes, and the new WaterPoint feature appears on the map.
Ending the GPS edit session
When you have finished collecting data, end the GPS session and close ArcMap:
1. Close the GPS Data Collection window by clicking the in the corner.
2. Click the GPS Connect/Disconnect button to disconnect from the GPS receiver.
3. From the Trimble GPS Analyst drop-down menu, select Save Edits.
The new features, and the GPS-derived geometries that they are linked to, are saved in the geodatabase.
4. From the Trimble GPS Analyst drop-down menu, select Stop GPS Editing.
5. Select File / Save to save the map document.
6. Exit ArcMap and exit ArcCatalog.
You have now finished this tutorial. In ArcCatalog, you have GPS-enabled the geodatabase, specified accuracy requirements for GPS-derived features, and checked the construction settings for GPS-enabled feature classes. In ArcMap, you have connected to a GPS receiver, checked the receiver status, and collected features using GPS data. Understanding how to perform these basic tasks is the key to collecting GPS data using the GPS Analyst extension. For more information about creating features derived from GPS data, refer to the Trimble GPS Analyst Extension Help.
If you have not already completed the data processing tutorial, you can learn more about analyzing GPS data using the Trimble GPS Analyst extension by completing Tutorial 3: Processing GPS Data, beginning on page 129.
Trimble GPS Analyst Extension Getting Started Guide 207

10 Tutorial 4: Collecting GPS Data
208 Trimble GPS Analyst Extension Getting Started Guide

GlossaryThis section explains some of the terms used in this manual.
almanac A file that contains orbit information on all GPS satellites, clock corrections, and atmospheric delay parameters. It is transmitted by a GPS satellite to a GPS receiver, where it facilitates rapid satellite acquisition. The orbit information is a subset of the ephemeris data, with reduced precision. See also ephemeris.
attribute Information about a geographic feature in a GIS, usually stored in a table and linked to the feature by a unique identifier. For example, attributes of a river might include its name, length, and average depth.
averaged vertex Also called a smart averaged vertex.
The vertex of a point, line or polygon feature produced by a smart average construction. See also smart average construction.
base station A GPS antenna and receiver positioned at a known location specifically to collect data for differentially correcting roving receiver data. The base station calculates the error for each satellite and, through differential correction, improves the accuracy of GPS positions collected at unknown locations by a roving GPS receiver. Base data needs to be collected at the same time as the roving receiver data is collected.
constellation A specific set of satellites used for calculating positions: for example, the four satellites used for fixing a 3D position. Alternatively, all the satellites visible to a GPS receiver at one time. The optimum constellation is the constellation with the lowest PDOP. See also Position Dilution of
Precision (PDOP).
construction A “building block” used in the GPS Analyst extension to construct features from locations. A construction uses the GPS positions from locations or other constructions to calculate a vertex. See also path construction, ring
construction, smart average construction and track construction.
Trimble GPS Analyst Extension Getting Started Guide 209

Glossary
coordinate
system
A fixed reference framework superimposed onto the surface of an area to designate the position of a point within it; a reference system consisting of a set of points, lines, and/or surfaces; and a set of rules, used to define the positions of points in space in either two or three dimensions. The Cartesian coordinate system and the geographic coordinate system used on the earth’s surface are common examples of coordinate systems.
Current
Estimated
Accuracy
The estimated accuracy of the feature currently being logged, in either meters or feet or, if the value is less than 1, in centimeters or inches. This value is shown in the GPS status panel and the Skyplot tab of the GPS Status window.
If a Trimble GPS receiver with H-Star technology is being used to collect the feature, the Predicted Postprocessed Accuracy (PPA) is also shown, below the Current Estimated Accuracy.
data dictionary A catalog containing information about the datasets stored in a GIS database, such as the full names of attributes, feature class type, and map projections used.
For Trimble data collection software, a data dictionary is a file that is created on a PC and then transferred to data collection software for use in the field.
datum A datum or geodetic datum is a geodetic coordinate system that is used for surveying and mapping purposes.
Before satellites were used for positioning on a global scale, different geodetic datums were developed for different regions. Each of these datums is a mathematical model based on the ellipsoid that most resembles the shape of the earth in a particular region. Each model is designed to fit part or all of the geoid. As a result, there are many distinct datums, each of which best fits a particular part of the earth’s surface.
A geodetic datum is defined by the relationship between an ellipsoid shape and the center of the earth. It takes into account the size and shape of the ellipsoid, and the location of the center of the ellipsoid with respect to the center of the earth (a point on the topographic surface established as the origin of the datum).
Various datums have been established that best suit particular regions. The datum chosen for use in a particular region is referred to as the local datum. For example, maps in the United States are often based on the North American Datum of 1927 or 1983 (NAD-27, NAD-83). All GPS coordinates are based on the WGS-84 datum surface.
210 Trimble GPS Analyst Extension Getting Started Guide
Glossary
datum
transformation
See geographic transformation.
differential
correction
(differential GPS,
DGPS)
The process of correcting GPS data collected with a roving receiver at an unknown location with data collected simultaneously at a known location, which is usually a base station. Because it is at a known location, any errors in data collected at the base station can be measured, and the necessary corrections applied to the roving receiver data.
Differential correction can be done in real time, or after the data has been collected by postprocessing.
Dilution of
Precision (DOP)
An indicator of satellite geometry for a constellation of satellites used to determine a position. A low DOP value indicates a higher probability of accuracy. Factors determining the total DOP for a set of satellites include PDOP (Positional DOP), HDOP (Horizontal DOP), VDOP (Vertical DOP), and TDOP (Time DOP).
elevation Vertical distance above (or below) the geoid or mean sea level. See also geoid, mean sea level (MSL).
ellipsoid A mathematical model of the earth formed by rotating an ellipse around its minor axis. For ellipsoids that model the earth, the minor axis is the polar axis, and the major axis is the equatorial axis. An ellipsoid is completely defined by specifying the lengths of both axes, or by specifying the length of the major axis and the flattening.
ephemeris A list of predicted (accurate) positions or locations of satellites as a function of time. A set of numerical parameters that can be used to determine the position of a satellite. Available as broadcast ephemeris or as postprocessed precise ephemeris.
feature A representation of a real-world object on a map. Features can be represented in a GIS as vector data (points, lines, or polygons) or as cells in a raster data format. To be displayed in a GIS, features must have geometry and locational information. Multipoint features consist of more than one point but only reference one set of attributes in the database. For example, a system of oil wells with a single set of attributes for multiple well holes.
Features with GPS-derived geometry are constructed using GPS data.
field computer A portable computer such as a handheld computer, laptop, or Tablet PC running data collection software such as the TerraSync software or ArcGIS Desktop and the GPS Analyst extension.
Trimble GPS Analyst Extension Getting Started Guide 211

Glossary
flattening A measure of the flattening of an ellipse. A circle has a flattening of 0. Flattening of the WGS-84 ellipsoid is approximately 1/298.257223563 = .00335281066474.
geodatabase An object-oriented data model introduced by ESRI that represents geographic features and attributes as objects and the relationships between objects, inside a database management system. A geodatabase can store objects, such as feature classes, feature datasets, nonspatial tables, and relationship classes.
The GPS Analyst extension allows you to GPS-enable a personal geodatabase so that it can store GPS data.
geodetic datum See datum.
geographic
information
system (GIS)
A computerized system used to input, manage, manipulate, analyze, and display geographic data in digital form.
geographic
transformation
A method of converting data between two geographic coordinate systems or datums.
In the GPS Analyst extension, geographic transformations typically convert data collected in the WGS-84 datum by GPS methods onto datums used for mapping in individual regions and countries.
212 Trimble GPS Analyst Extension Getting Started Guide
Glossary
geoid The surface of gravitational equipotential that closely approximates mean sea level. It is not a uniform mathematical shape but an irregular figure with an overall shape similar to an ellipsoid. Typically the elevations of points are measured with reference to the geoid. However, points fixed by GPS methods have heights established in the WGS-84 datum (a mathematical figure).
The relationship between the WGS-84 datum and the geoid must be determined by observation since there is no single mathematical definition that can describe the relationship. This requires observing the elevation above the geoid (using terrestrial survey methods such as spirit leveling), and the height above the WGS-84 ellipsoid, at the same point for comparison purposes. By gathering a large number of observations of the separation between the geoid and the WGS-84 datum (geoidal separation), grid files of the separation values can be established allowing the interpolation of the geoidal separation at intermediate positions. Files containing these grids of geoidal separations are referred to as geoid models. Given a WGS-84 position that falls within the extents of a geoid model, the model can return the interpolated geoidal separation at this position.
Global
Positioning
System (GPS)
A constellation of radio-emitting satellites deployed by the U.S. Department of Defense and used to determine location on the earth’s surface. The orbiting satellites transmit signals that allow a GPS receiver anywhere on earth to calculate its own location through trilateration. The system is used in navigation, mapping, surveying, and other applications in which precise positioning is necessary.
GPS data The collection of measurements, observations, settings, and other data associated with a GPS position.
GPS position A set of coordinates that gives the latitude, longitude, and altitude of a point, at a given instant in time.
GPS session A set of GPS positions and related GPS data stored inside a GPS-enabled geodatabase. Collected GPS sessions contain GPS positions collected using the GPS Analyst extension and a GPS receiver. Imported GPS sessions contain GPS positions imported from an SSF file. Corrected GPS sessions contain the same set of GPS positions as the collected or imported GPS session that the corrected session was derived from, but the GPS positions have different coordinates.
Trimble GPS Analyst Extension Getting Started Guide 213
Glossary
GPS time A measure of time used internally by the NAVSTAR system. GPS time is based on UTC, but does not add periodic “leap seconds” to correct for changes in the earth’s period of rotation. As of 1 January 1999, GPS time was 13 seconds ahead of UTC.
heading The current direction in which one is moving.
H-Star technology H-Star technology is a Trimble-patented technology allowing the collection of high accuracy GPS data. A GPS receiver with H-Star technology logs L1 data or, if used with an external dual-frequency antenna, logs L1 and L2 data. H-Star postprocessing uses base data from multiple base stations to obtain better postprocessed accuracy for the collected data.
ionosphere The band of charged particles 120 to 200 km above the earth’s surface.
latitude The angular distance, usually measured in degrees, along a meridian north or south of the equator. Lines of latitude are also referred to as parallels.
location For the GPS Analyst extension, a location is the GPS position that is selected to represent the location of a particular point, at a given instant of time. The GPS position used for the location may come from the original collected or imported GPS session, or the most recently corrected GPS session, or it may be the GPS position with the best quality.
log To store data in a receiver or on a computer.
longitude The angular distance, expressed in degrees, minutes and seconds, of a point on the earth’s surface east or west of an arbitrarily defined meridian (usually the Greenwich prime meridian). All lines of longitude are great circles that intersect the equator and pass through the north and south poles.
mean sea level
(MSL)
The mean height of the surface of the ocean for all stages of the tide. Used as a reference for elevations.
multipath error Interference similar to “ghosts” on a television screen, that occurs when GPS signals arrive at an antenna having traversed different paths. The signal traversing the longer path yields a larger pseudo-range estimate and increases the error. Multiple paths can arise from reflections off the ground or structures near the antenna.
214 Trimble GPS Analyst Extension Getting Started Guide

Glossary
NAD 1927 North American Datum of 1927. The primary local geodetic datum and geographic coordinate system used to map the United States during the middle part of the 20th century, referenced to the Clarke spheroid of 1866 and an initial point at Meades Ranch, Kansas. Features on USGS topographic maps, including the corners of 7.5-minute quadrangle maps, are referenced to NAD-27. It is gradually being replaced by the North American Datum of 1983.
NAD 1983 North American Datum of 1983. A geocentric datum and graphic coordinate system based on the Geodetic Reference System 1980 ellipsoid (GRS80). Mainly used in North America, its measurements are obtained from both terrestrial and satellite data.
NAVSTAR The name given to GPS satellites. NAVSTAR is an acronym formed from NAVigation Satellite Timing And Ranging.
NMEA Initial letters of National Marine Electronics Association. NMEA 0183 defines the standard for interfacing marine electronic navigational devices. This standard defines a number of “strings”, referred to as NMEA strings, that contain navigational details such as positions. Most GPS receivers can output positions as NMEA strings.
path construction A GPS Analyst extension construction used as the default construction for line features. A path construction is constructed from track and smart average constructions to form the line feature. The construction interval and offset settings for a path construction can be changed in the Construction Properties dialog.
Predicted
Postprocessed
Accuracy (PPA)
The Predicted Postprocessed Accuracy indicates the estimated accuracy that is likely to be achieved for the current feature after H-Star postprocessing all the positions collected since you locked onto the required number of satellites. The PPA only applies to data collected using a Trimble GPS receiver with H-Star technology.
The PPA for the current feature is displayed below the Current Estimated Accuracy value in the GPS status panel and the Skyplot tab of the GPS Status window. The PPA has a confidence level of 68%.
Trimble GPS Analyst Extension Getting Started Guide 215

Glossary
Position Dilution
of Precision
(PDOP)
A unitless figure that expresses the relationship between the error in user position and the error in satellite position. It indicates when the satellite geometry can provide the most accurate results. The best data collection time can be selected based on reports and graphs showing PDOP.
Geometrically, PDOP is proportional to one divided by the volume of the pyramid formed by lines running from the receiver to four satellites observed. It is the result of a calculation that considers the location of each satellite relative to the other satellites in the constellation.
Good values are small, less than three. Values greater than seven are poor. Thus, small PDOP is associated with widely separated satellites. A low DOP indicates a higher probability of accuracy. A high DOP indicates a lower probability of accuracy. PDOP is related to horizontal and vertical DOP by PDOP2 = HDOP2 + VDOP2. See also Dilution of Precision (DOP).
postprocess To differentially correct GPS data on a computer after it has been collected.
precision The closeness of a repeated set of observations of the same quantity to one another. It is a measure of the control over random error. Assessment of the quality of a surveyor’s work is based in part on the precision of their measured values.
projection A method by which the curved surface of the earth is portrayed on a flat surface. This generally requires a systematic mathematical transformation of the earth’s network of longitude and latitude lines onto a plane. It can be visualized as a transparent globe with a light at its center casting lines of latitude and longitude onto a sheet of paper. Generally, the paper is either flat and placed tangent to the globe (a planar or azimuthal projection), or formed into a cone or cylinder and placed over the globe (cylindrical and conical projections). Every map projection distorts distance, area, shape, direction, or some combination thereof.
propagation delay The delay in travel time of a GPS signal due to atmospheric interference.
When a satellite is at a low elevation and its signal must travel a great distance through the atmosphere, the signal has delayed reception by the GPS receiver. Since the distance to the satellite is calculated by the travel time, this slight delay in travel time can result in a large error in calculated distance. Signals are delayed at all elevation angles, but more so at lower elevation angles.
216 Trimble GPS Analyst Extension Getting Started Guide

Glossary
pseudo-random
noise /
pseudo-random
number (PRN)
Pseudo-random noise. A signal carrying a code that can be reproduced exactly, but that appears to be randomly distributed like noise. Each NAVSTAR satellite has a unique PRN code.
pseudo-range A measure of the apparent propagation time from the satellite to the receiver antenna expressed as a distance. Pseudo-range is obtained by multiplying the apparent signal-propagation time by the speed of light. Pseudo-range differs from the actual range by the amount that the satellite and user clocks are offset, by propagation delays, and by other errors.
The apparent propagation time is determined from the time shift required to align (correlate) a replica of the GPS code generated in the receiver with the received GPS code. The time shift is the difference between the time of signal reception (measured in the receiver time frame) and the time of emission (measured in the satellite time frame).
Pseudo-range is the distance from the satellite to the antenna plus the distance calculated from the clock offset. When the satellite sends the PRN code, the receiver aligns the received code with an internal replica of the code. The clock offset is the difference between the two codes.
real-time
differential
correction
Also called real-time differential GPS or real-time differential correction.
Real-time differential GPS is the process of correcting GPS data as you collect it. This is achieved by having corrections calculated at a base station sent to the roving receiver via a radio link. As the roving receiver receives the position, it applies the corrections to give you a very accurate position in the field.
rebuild The process of selecting the GPS position to be used as the location. When a location changes, any constructions that use the location are rebuilt using the new position. Any constructions based on these updated constructions are rebuilt, and the changes are propagated up to the GIS feature geometry.
ring construction A GPS Analyst extension construction used as the default construction for polygon features. A ring construction is constructed from track and smart average constructions, and is able to correctly offset the start and end points of the construction to form the perimeter of the polygon feature. The construction interval and offset settings for a ring construction can be changed in the Construction Properties dialog.
Trimble GPS Analyst Extension Getting Started Guide 217

Glossary
roving receiver Any mobile GPS receiver collecting data in the field. The position of a roving receiver can be differentially corrected relative to a stationary base GPS receiver.
satellite geometry Position and movement of GPS satellites during GPS data collection.
schema The structure or design of a database or database object such as a table. The schema defines the tables, the fields in each table, and the relationships between fields and tables. Schemas are generally stored in a data dictionary.
semimajor axis One-half of the major axis of an ellipse.
Shapefile A vector data storage format developed by ESRI for storing the location, shape, and attributes of geographic features. A Shapefile is stored in a set of related files and contains one feature class.
signal-to-noise
ratio (SNR)
Also called signal level or signal strength. Arbitrary strength units used to determine the strength of a satellite signal. SNR ranges from 0 (no signal) to around 35. Higher-elevation satellites have SNRs in the high teens to low 20s. An SNR lower than 5 is considered unusable.
smart average
construction
A GPS Analyst extension construction used for point features and vertices in line and polygon features. A smart average construction averages several locations to produce a single smart averaged vertex. The smart average construction takes into account the quality of the incoming GPS positions, and gives more weight to positions with better quality characteristics, such as PDOP and estimated accuracy. You cannot change the construction properties of a smart average construction.
SSF file The Trimble Standard Storage Format data file for GPS data from a Trimble Mapping and GIS receiver.
static GPS
position
A GPS position logged by the GPS Analyst extension when the GPS receiver antenna is stationary (static). When you are standing still at a point feature, or at a single vertex for a line or polygon feature, you log static GPS positions. During static logging, the GPS Analyst extension averages all GPS positions received from the GPS receiver to calculate a
single smart average for the point or vertex. See also smart average
construction.
218 Trimble GPS Analyst Extension Getting Started Guide
Glossary
streaming GPS
position
A GPS position logged by the GPS Analyst extension when the GPS receiver antenna is moving. When you are moving along a line feature, or around the perimeter of a polygon feature, you log streaming GPS positions. The GPS Analyst extension logs a new vertex for every GPS position received from the GPS receiver.
track To make a pseudo-range measurement from a GPS satellite with a GPS receiver.
track
construction
A construction in the GPS Analyst extension used in line and polygon features. A track construction is a series of locations selected from streaming GPS positions and other data that forms a segment used in a path or ring construction. You cannot change the properties of a track construction.
transformation Converting the coordinates of a map or an image from one system to another, typically by shifting, rotating, scaling, skewing, or projecting them. The conversion process requires resampling of values.
trilateration A method used in surveying and mapmaking to determine the relative positions of three or more points by treating these points as vertices of a triangle or triangles of, which the angles and sides can be measured.
Universal Time
Coordinated
(UTC)
Local solar mean time at Greenwich Meridian. A uniform atomic time system maintained by the U.S. Naval Observatory. GPS time is ahead of UTC, because it does not use leap seconds. As of 1 January 1999, GPS time was 13 seconds ahead of UTC.
validation, GPS
validation
The process of comparing the worst estimated accuracy of a feature that is linked to GPS data to the required accuracy you specified for the feature class. If the worst estimated accuracy is not within the required accuracy, the feature is invalid, and fails validation.
WGS-84 World Geodetic System of 1984. A geocentric datum and geographic coordinate system created by the United States military. WGS-84 is used for all GPS data.
Trimble GPS Analyst Extension Getting Started Guide 219

Glossary
220 Trimble GPS Analyst Extension Getting Started Guide

Index
Aaccount, My Trimble 28, 34ActiveSync technology 25, 70, 71almanaccurrent 164defined 209
antenna settings 55ArcCatalog
enabling the GPS Analyst extension in 45
exiting the GPS Analyst extension from 63
measurement units 61using the GPS Analyst extension in
54–55ArcMap
enabling the GPS Analyst extension in 46
exiting the GPS Analyst extension from 63
measurement units 61using the GPS Analyst extension in
55–60, 160–166ArcPad + GPScorrect Data folder 78, 103, 134ArcPad shapefiles and GPScorrect data
checking intutorial steps 95
overview 19ArcPad shapefiles, checking out
how to 69tutorial steps 90
ArcToolbox 60attributes
defined 209recording 163
Auto Pan to GPS command 166average estimated accuracy 83averaged vertex
defined 209estimated accuracy 83, 120, 185
Bbase data 135base station
defined 209for differential correction 20selecting a base provider 142
battery level 164
CCEA See Current Estimated AccuracyCheck In ArcPad shapefiles and GPScorrect
SSF tool 58checking in ArcPad shapefiles and GPScorrect
datatutorial steps 95
checking out data to ArcPadhow to 69tutorial steps 90
Trimble GPS Analyst Extension Getting Started Guide 221

Index
collecting featureshow to 163tutorial steps 202–206
Connect/Disconnect External Source tool 161
Connect/Disconnect GPS tool 161connecting to
a folder in ArcCatalog 76, 102, 132, 178an external real-time DGPS source
from the field computer 171from the GPS Analyst
extension 161the GPS receiver
from the field computer 168, 170, 173, 197
from the GPS Analyst extension 161, 197, 200
constellation, defined 209constructions
defined 209estimated accuracy of 83properties 163
coordinate systemand geographic transformation 80, 105,
182and spatial reference 68defined 210for geodatabase 68for GPS data 67, 69setting the 108, 114, 115vertical 115
Correction Settings dialog 141Current Estimated Accuracy (CEA) 162
Ddata collection 163, 202, 206data dictionary, defined 210
data transferfrom a field computer 71to a field computer 70
Data Transfer utility 44, 70, 71Database Properties dialog 80datum transformation See geographic
transformationdatum, defined 210developer documentation 43differential correction
defined 211overview 20postprocessed 135, 138–147settings 141
Differential Correction Report 147differential correction See also real-time DGPSDifferential Correction tool
in ArcCatalog 55in ArcMap 57
Differential Correction wizard 55, 138differentially correcting GPS sessions 138–
147disconnecting from the external real-time
DGPS source 161disconnecting from the GPS receiver 161displaying
a toolset on the toolbar 58, 160GPS positions for a feature 59GPS positions on the map 59, 148the Field toolset 160, 194Trimble GPS Analyst toolbar 55
dockable windows 162
EEdit Antenna Settings tool 55elevation, defined 211ellipsoid, defined 211
222 Trimble GPS Analyst Extension Getting Started Guide

Index
enabling the Trimble GPS Analyst extensionin ArcCatalog 45in ArcMap 46
enabling Trimble GPS Analyst toolbar buttons 57, 161
ephemeris, defined 211estimated accuracy
average 83of a construction 83of a feature 83, 185worst 83
exiting the Trimble GPS Analyst extensionfrom ArcCatalog 63from ArcMap 63
Export to Trimble SSF tool 54exporting to Trimble SSF
how to 70Extensions dialog
in ArcCatalog 45in ArcMap 46
Ffeature classes
GPS-enabling 68, 80required accuracy 83, 86
featuresdefined 211estimated accuracy of 83, 185invalid 152rebuilding 154unlinking from GPS data 72, 83validating 151, 152
Features in Progress layer 59, 88, 123field computer
connecting to GPS receiver 197defined 211
Field toolset 160flattening, defined 212floating license 39, 47, 49
folder connection, creating a 76, 102, 132, 178Folder Search dialog 143
Ggeodatabase
adding GPS data 70defined 212GPS-disabling 83GPS-enabling 67, 80storing GPS data in 67, 80
geodetic datum, defined 212GeoExplorer series handhelds 25, 169geographic transformation
about 69defined 212selecting a 82, 111, 184setting the 111
geoid, defined 213GeoXH handheld 25, 169GeoXM handheld 25, 169GeoXT handheld 25, 169Get Data for ArcPad tool 57, 58GIS, defined 212GPS cursor 166GPS Cursor and Trail layer
about 166, 192–193viewing 197, 200
GPS dataadding to geodatabase 70defined 213overview 80
GPS Data Collection tool 161GPS Data Collection window 163GPS edit sessions 94GPS editing
saving changes 156starting 95, 138stopping 97, 156, 207
GPS feature validation See validation
Trimble GPS Analyst Extension Getting Started Guide 223
Index
GPS Feature Validation tool 57GPS Feature Validation window 153GPS filter, rebuild 154GPS layers 88, 123
Features in Progress 88, 123GPS positions 88, 123overview 59
GPS Pathfinder receivers 25, 169GPS position
current 164, 166defined 213tools 57
GPS Position Properties dialog 149GPS Position Properties tool 57GPS positions
best quality 155converting from WGS-84 68displaying on map 59, 148properties 149selecting on map 148tools 56, 60
GPS Positions layer 59, 88, 123, 148GPS receiver layers
GPS Cursor and Trailabout 166, 192–193viewing 197, 200
Navigationabout 166, 192–193viewing 197, 200
overview 166GPS receivers
compatibility 25, 169connecting to, with GPS Analyst 168,
169status 164
GPS session, defined 213GPS sessions
imported 138selecting 138
GPS Sessions folder 82
creating 67GPS status icons 162GPS status panel 162GPS Status tool 161GPS Status window 164GPS time, defined 214GPS trail 166GPS Validation dialog 152GPS, defined 213GPS-enabling
a geodatabase 67, 80feature classes 68, 80
Hheading, defined 214Help
user help 20What’s This? Help 21
H-Starprocessing 140technology 139
Iicons, GPS status 162Import from ArcPad shapefiles and
GPScorrect SSF tool 54Import Schema from Trimble DDF tool 54Import Trimble SSF tool 54importing
ArcPad shapefiles and GPScorrect
data 71Trimble SSF files
how to 71tutorial steps 117
installation code 33, 35, 41installation, custom 42
224 Trimble GPS Analyst Extension Getting Started Guide
Index
installingdeveloper documentation 43Mapping & GIS License Manager
software 48Trimble Data Transfer utility 44Trimble GPS Analyst extension 36–44
ionosphere, defined 214
JJuno ST handheld 25
Llatitude, defined 214Layer Properties dialog 59License Administrator software 49License Manager software 48license type, selecting 39licenses, managing 47line features
collecting a 202logging 199
location, defined 214locations 136Log Files folder 147log, defined 214logging GPS positions 163longitude, defined 214
Mmap display, inaccuracies in 68map document
opening 89, 136saving 156
measurement units 61MSL, defined 214
multipath error, defined 214My Trimble account 28, 34
NNAD 1927, defined 215NAD 1983
converting GPS data to 82, 108, 184defined 215
navigationline 166start 166target 166
Navigation layerabout 166, 192–193viewing 197, 200
Navigation tool 161Navigation window 165NAVSTAR 215NMEA GPS receiver 25, 169NMEA, defined 215
OOffice toolset 57online help
user help 20What’s This? Help 21
opening a map document 89, 136
Ppanning the map 166path construction 215PDOP, defined 216point features
collecting a 205estimated accuracy of 83, 185
Trimble GPS Analyst Extension Getting Started Guide 225
Index
logging 199POPN 26, 31postprocess, defined 216PPA See Predicted Postprocessed Accuracyprecision
defined 216of feature geometries 68of GPS positions 68
Predicted Postprocessed Accuracy (PPA) 162PRN, defined 217Pro XRS receiver 25, 169projection, defined 216propagation delays, defined 216ProXH receiver 25, 169ProXT receiver 25, 169pseudo-range, defined 217
Rreal-time DGPS
connecting to devices 171defined 217for navigation 165
real-time differential GPS See real-time DGPSrebuild
defined 217settings 145
rebuild GPS filter 154Rebuild Settings dialog 145Rebuild tool 57rebuilding features 154Recon GPS XB edition 25, 169Recon GPS XC edition 25, 169reference position 144registration, software 26, 40release notes 21reloading sample files 75, 101, 131, 177Rename command 55ring construction 217
roving receiverdefined 218for data collection 20real-time differential correction 217
Ssample files, reloading 75, 101, 131, 177satellite geometry, defined 218saving
a map document 63, 156GPS edits 63, 156
schema, defined 218Select All GPS Positions for Selected Features
tool 57, 59Select Base Provider dialog 135, 142Select Features tool 59, 148Select GPS Positions for Selected Features
tool 57, 60, 148Select GPS Positions tool 57selecting
a base provider 142a feature on the map 59, 148a geographic transformation 68, 69all GPS positions for a feature 59base data 142GPS positions as locations 155GPS positions on map 148GPS positions used to construct a
feature 60, 148GPS sessions for correction 138
semimajor axis, defined 218sending error report 22setting the
coordinate system 108, 114, 115geographic transformation 111spatial reference 107
Shapefile, defined 218signal-to-noise ratio See SNRsingle use license 39, 49
226 Trimble GPS Analyst Extension Getting Started Guide
Index
skyplot 164smart average construction 218SNR, defined 218software upgrade 33spatial domain 68spatial reference 67
setting the 107specifying
a spatial reference for the geodatabase 67
accuracy required for validation 68measurement units 61
SSF filesdefined 218exporting to 70importing
how to 71tutorial steps 117
overview 19Standard Storage Format (SSF) files See SSF
filesstatic GPS position, defined 218streaming GPS position, defined 219support 21
Ttechnical support 21toolsets
Field 160Office 57
track construction 219tracking satellites 164tracking, defined 219transferring data
from a field computer 71to a field computer 70
transformation, defined 219trilateration, defined 219Trimble GPS Analyst drop-down menu 56
Trimble GPS Analyst extensionenabling in ArcCatalog 45enabling in ArcMap 46exiting 63installing 36–44interface
in ArcCatalog 54–55in ArcMap 55–60, 160–166in ArcToolbox 60
managing licenses for 47measurement units 61registering 26–33updating 47
Trimble GPS Analyst Extension Help 20Trimble GPS Analyst toolbar
buttons 57, 161displaying 45, 55enabling buttons 57, 161
Trimble GPS Analyst toolbox 60Trimble Recon GPS XB edition 25, 169Trimble Recon GPS XC edition 25, 169Trimble SSF files
defined 218exporting to 70importing
how to 71tutorial steps 117
overview 19Trimble website 17Tutorial folder 77, 103, 134, 179
UUndo Check Out for Editing tool 58Units dialog 61Universal Time Coordinated See UTCupdating features 163updating the software 43, 47upgrade, software 33UTC, defined 219
Trimble GPS Analyst Extension Getting Started Guide 227
Index
Vvalidating features 151validation
defined 219overview 20required accuracy 83, 86
vertexcalculating a 189, 209counter 202estimated accuracy 83, 120, 185in a line or area feature 199invalid 154logging a 219
View audit log tool 55
Wwebsite, Trimble 17WGS-84
converting GPS data from 80, 82, 111, 126, 184, 212
defined 219storing GPS positions 67
What’s This? Help 21Windows Error Reporting 22worst estimated accuracy 83
XXB receiver 25, 169XC receiver 25, 169
228 Trimble GPS Analyst Extension Getting Started Guide