getting started in accounts payable - finance division · pdf filegetting started in accounts...
TRANSCRIPT

Getting Started in Accounts Payable

Getting Started in Accounts Payable
Version: 14.0 Finance Training 13-Jul-16 2 of 39
Table of Contents
1. Purchase to Pay Process: An overview ........................................................................ 4
1.1 Overview ................................................................................................................. 4
1.2 Suppliers ................................................................................................................. 4
1.3 Invoice Entry ........................................................................................................... 5
1.4 Matching Purchase Invoices to Purchase Orders .................................................... 5
1.5 Approving Purchase Invoices .................................................................................. 5
1.6 Entering and Approving Expenses .......................................................................... 5
2. Payment Runs ................................................................................................................. 6
2.1 Payment Run Days ...................................................................................................... 6
2.2 Pay Groups ................................................................................................................. 6
3. Searching the Supplier Database .................................................................................. 8
3.1 Search Only ................................................................................................................. 8
3.2 Search, amend, reactivate, request new ...................................................................... 8
3.3 Accessing the Supplier Database ................................................................................ 8
4. University Account Codes ............................................................................................ 11
4.1 General Ledger Account Structure Overview ............................................................. 11
4.2 Research Grants and Projects Structure Overview .................................................... 11
5. VAT Guidance ............................................................................................................... 13
Reclaims of VAT by the University ................................................................................... 13
Zero Tax Lines ................................................................................................................ 14
6. Processing an external supplier’s invoice (no purchase order) ........................ 15
Step 1: Create a batch ..................................................................................................... 15
Step 2: Enter the invoice header...................................................................................... 16
Step 3 Input the account information ............................................................................... 18
Primary validate the invoice ............................................................................................. 21
7. Amending Non-Matched Invoices ................................................................................ 23
What about using Discard Line? ...................................................................................... 23
8. Other Invoice Scenarios ............................................................................................... 24
8.1 Processing invoices that contain other taxes as well as VAT ................................ 24
8.2 High Value Sterling, Euro and Dollar Invoices ....................................................... 24
9. Entering Staff Expenses ............................................................................................... 25
What if the employee address details are incorrect? ........................................................ 26
Processing the expense claim ......................................................................................... 27
Bank Account Numbers not matching .............................................................................. 30

Getting Started in Accounts Payable
Version: 14.0 Finance Training 13-Jul-16 3 of 39
Claims including invoices................................................................................................. 30
Mileage claims for staff with CAMbens Cars .................................................................... 31
10. Finding Invoices and Balance Owed ......................................................................... 32
10.1 Finding Invoices ....................................................................................................... 32
10.2 Invoice Overview ..................................................................................................... 33
10.3 How to calculate the amount that your department currently owes to a supplier ...... 34
11. Cancelling Invoices ..................................................................................................... 35
12. Standalone Credit Notes ............................................................................................. 36
Appendix A: Viewing and exporting AP distribution lines ............................................. 39
Viewing the distribution lines ........................................................................................... 39
Exporting all the distribution lines .................................................................................... 39
Manual Icons
More information
Look at in more detail
Be aware of
Refer to a colleague or helpdesk.
Accounts Payable helpdesk:
Telephone: 66888
Email: [email protected]

Getting Started in Accounts Payable
Version: 14.0 Finance Training 13-Jul-16 4 of 39
1. Purchase to Pay Process: An overview
Receiving a supplier invoice is the last stage in the purchase to pay process, and in order for this to be completed smoothly the previous processes need to be completed correctly.
The diagram below shows the previous stages of the purchase to pay process.
1.1 Overview
The Accounts Payable module of UFS deals with the payment of all suppliers, both internally and externally, as well as payments to staff for expenses.
Departments are responsible for recording details of invoices received from suppliers onto the system and matching them to purchase orders when appropriate. The Accounts Payable Team based in the Finance Division at Greenwich House will process the payment runs.
Invoices and credit notes entered onto the system can be matched where appropriate to purchase orders, approved on line and will automatically reverse out the commitment originally generated by the purchase order. The main processes involved
in Accounts Payable are discussed below.
1.2 Suppliers
Invoices can only be processed if they relate to a supplier already set up on CUFS. Supplier set up is undertaken centrally.

Getting Started in Accounts Payable
Version: 14.0 Finance Training 13-Jul-16 5 of 39
1.3 Invoice Entry
All invoices are entered onto CUFS using a batching system, with different batches for different invoice types, e.g. external and internal suppliers. The header allows you to set control totals and if these control figures do not correspond with the actual
amounts inputted the system will highlight this. 1.4 Matching Purchase Invoices to Purchase Orders
All invoices relating to approved purchase orders must be matched successfully before invoice approval and payment is possible. CUFS is set to 3-way match i.e. the invoice is matched with a system receipt and the purchase order. The system will place a hold on invoices that fail the invoice matching tolerances and this will require action by accounts and/or buying staff before the invoice can be approved for payment.
1.5 Approving Purchase Invoices
All invoices must go through two levels of approval before payment is possible. This involves on screen checking by an individual who is set up with approval responsibilities. To approve invoices you must have AP Invoice Manager responsibility and in order to have this responsibility on LIVE you must have completed the on-line Secondary Invoice Approval training or attended the AP4 Advanced processes course.
1.6 Entering and Approving Expenses
Staff expense claims will require a manually completed form. The details from this form will then be entered on to the system and approved through the standard invoice entry route.

Getting Started in Accounts Payable
Version: 14.0 Finance Training 13-Jul-16 6 of 39
2. Payment Runs
The Central Accounts Payable Team consolidates where possible amounts for individual invoices into a single payment to a supplier, which is then processed on set dates each week: the ‘payment runs’. When paying an invoice/expense claim the invoice payment run applied is determined by the pay group and also the payment method selected.
2.1 Payment Run Days
Day Start Time
Pay Group Payment Method
Distribution Method Currency
Monday None
Tuesday 9am Supplier Electronic Build Supplier BACS
Selects invoices with due
date up to Wednesday
following the Monday
payment date
Payment date -the following Monday
GBP
Wednesday
9am Supplier Cheque
Royal Mail - 2nd Class
(Except the cheques for invoices which have cheque destination “D” as for Department. They go back to dept.)
GBP
Confirm Supplier BACs
2pm Supplier Electronic Build Priority BACS
Selects only priority
suppliers’ invoices with
due date up to next
Monday.
Payment date -the following Monday
GBP
Thursday Confirm Priority BACs
Friday 9am
Pay Alone
Cheque Return to Dept.
GBP
Supplier GBP
Supplier Euro
USD
The cut of time for all invoices to be loaded and secondary approved for the BAC’s supplier run is 9am on the Tuesday. The central process doesn’t complete until the Wednesday. The same applies to the build of priority BAC’s on the Wednesday: cut off time is 2pm and the process completes on the Thursday.
2.2 Pay Groups
Supplier This is the main pay group for the standard weekly supplier payment run. It is split into two Payment methods; either cheque or BACS (Electronic).
Getting Started in Accounts Payable
Version: 14.0 Finance Training 13-Jul-16 7 of 39
BACS payments are sent directly to the supplier’s bank account. A remittance advice will be sent via e-mail to the supplier listing all the invoices the payment relates to. Payment Terms “End of Month + 30 days” and Payment Method of “Electronic” cannot be changed.
However, supplier invoices will be paid within 30 days from the date of the supplier invoice, without the need to change the payment terms if the invoice is processed in CUFS within 20 calendar days of the invoice date.
Where the payment method defaults in as “Check” (the American spelling) this means that we do not currently have the supplier’s bank account details on file and therefore they will be paid by cheque.
Internal This is for internal trading purposes and should only appear on screen when dealing with an invoice from another University department, e.g. Department of Plant Sciences.
Euro/US Dollar Use the Supplier pay group for Euro and USD cheques
If you wish to pay a supplier/expense in a currency other than sterling, USD, EUR then this is processed via an Internal Payment Order – details of this procedure are covered in the AP3-F course.
Getting Started in Accounts Payable
Version: 14.0 Finance Training 13-Jul-16 8 of 39
3. Searching the Supplier Database
In order for a purchase order to be raised and for a supplier to be paid, the supplier must be loaded on the University Supplier Database.
There are two levels of access, of which a couple of staff members will have full access and the remaining staff will only be able to search:
3.1 Search Only
You will need to be a CUFS user
You will need a raven ID and password
Enables you to find current University suppliers
You can search in a number of different ways
The system will prompt you with preferred supplier details. Preferred suppliers have been approved by Procurement Services and agreed to the University terms and conditions.
3.2 Search, amend, reactivate, request new
You will need a raven ID and password
You will need additional authorisation and set up from Accounts Payable (email [email protected])
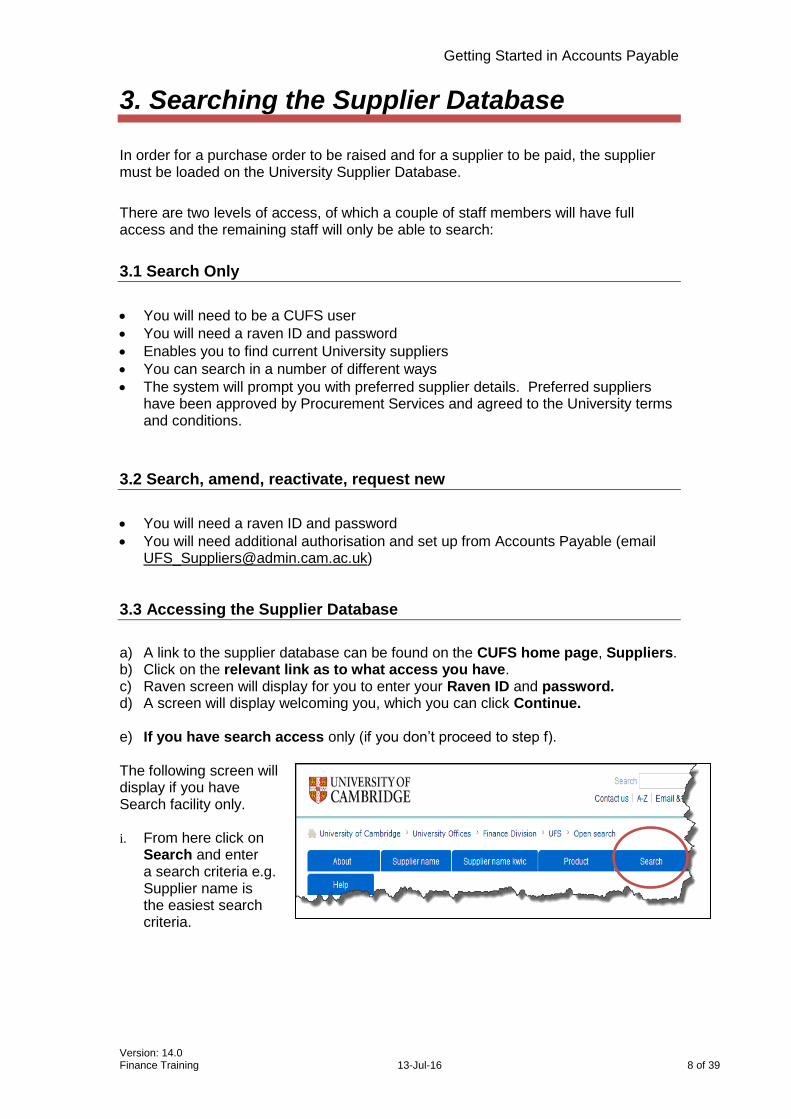
3.3 Accessing the Supplier Database
a) A link to the supplier database can be found on the CUFS home page, Suppliers. b) Click on the relevant link as to what access you have. c) Raven screen will display for you to enter your Raven ID and password. d) A screen will display welcoming you, which you can click Continue.
e) If you have search access only (if you don’t proceed to step f).
The following screen will display if you have Search facility only. i. From here click on
Search and enter a search criteria e.g. Supplier name is the easiest search criteria.

Getting Started in Accounts Payable
Version: 14.0 Finance Training 13-Jul-16 9 of 39
ii. Once you have entered the search criteria, click Go and a list matching your search criteria will display.
iii. From this screen you can easily see which suppliers are inactive.
iv. To view detailed information on a supplier click on the Supplier name.
v. Supplier details will display with information on site addresses, key words, payment terms, pay groups.
f) If you have full access
The following screen will display, where you can then search in a number of ways.
i. From here click on Search and enter in a search criteria e.g. Supplier name is the easiest search criteria. You also have the option of searching a type of supplier.
ii. Once you have entered the search criteria, click Go and a list matching your search criteria will display.
From this screen you can easily see which suppliers are inactive.

Getting Started in Accounts Payable
Version: 14.0 Finance Training 13-Jul-16 10 of 39
i. Click on Details for the relevant Supplier name.
ii. Supplier details will display with information on site addresses, key words, payment terms and pay groups.
iii. If your supplier is not listed then you will need to click on Add new supplier and complete the relevant fields.

Getting Started in Accounts Payable
Version: 14.0 Finance Training 13-Jul-16 11 of 39
4. University Account Codes
It is important that you have an understanding as to how the account codes work within the University to ensure that you use the correct code when coding supplier invoices.
When you pay an invoice the expenditure is allocated to your department’s Chart of Accounts. Many departments have two options: it can either be coded to the department’s budget/funds or to a Research Grant/Project.
4.1 General Ledger Account Structure Overview
General Ledger account codes are made up of six segments and are written in a string format e.g. U.XX.XXAA.AAAA.E???.0000 (XX being your dept code).
For detailed information on the individual segments, refer to the Financial Procedures Manual, Chapter 3.
4.2 Research Grants and Projects Structure Overview
A grant consists of two main parts:
The award - represents the sponsor who is providing the funding The project - describes the way in which the funds are to be spent.
In the main, a grant will have a single award and project. However it is worth being aware that one award may fund several projects and in turn one project may be funded by several
• Organisation field
•Will always be U for the Univeristy of CambridgeU
• Department Code
•Represented by two letters e.g PD is plant sciencesPD
• Dept. cost centre, therefore starts with dept code
•Reflects depts. income and expenditure activitiesPD??
• Source of funds code is univeristy wide
• Reflects where the money is coming from????
•Transaction code
•Details an item in more detail E???
•Spare field
•Will always be 4 zero's0000
Getting Started in Accounts Payable
Version: 14.0 Finance Training 13-Jul-16 12 of 39
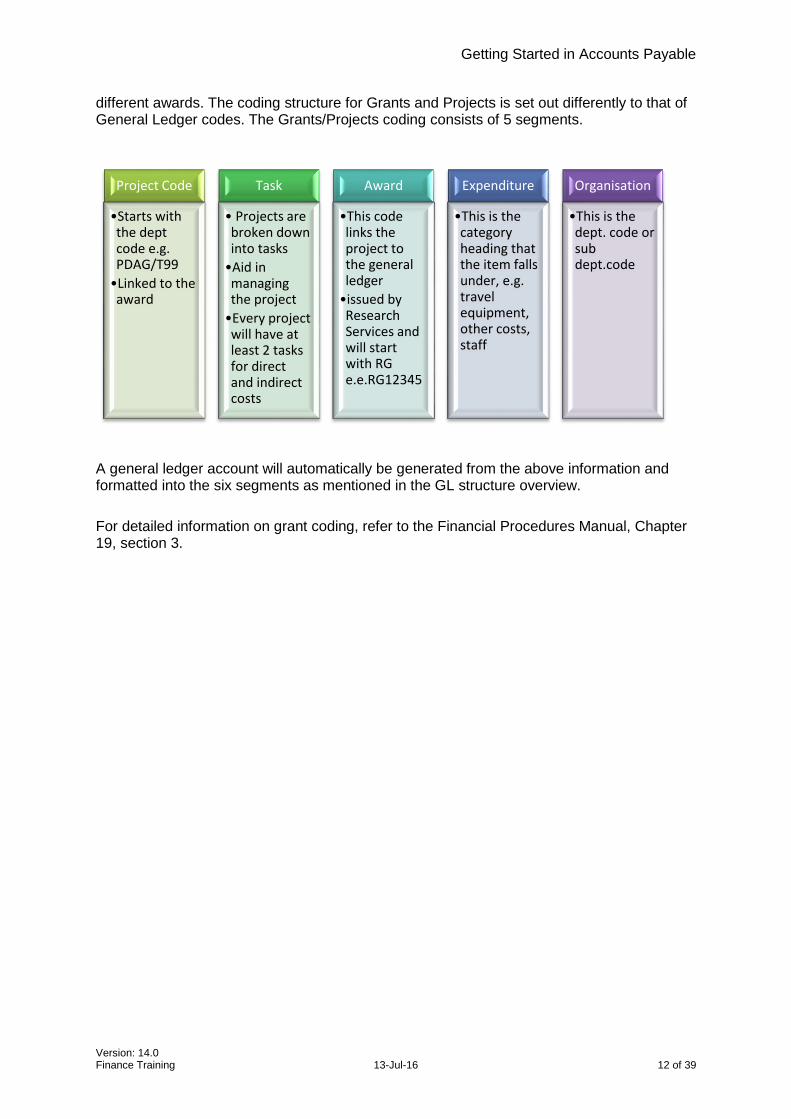
different awards. The coding structure for Grants and Projects is set out differently to that of General Ledger codes. The Grants/Projects coding consists of 5 segments.
A general ledger account will automatically be generated from the above information and formatted into the six segments as mentioned in the GL structure overview.
For detailed information on grant coding, refer to the Financial Procedures Manual, Chapter 19, section 3.
Project Code
•Starts with the dept code e.g. PDAG/T99
•Linked to the award
Task
• Projects are broken down into tasks
•Aid in managing the project
•Every project will have at least 2 tasks for direct and indirect costs
Award
•This code links the project to the general ledger
•issued by Research Services and will start with RG e.e.RG12345
Expenditure
•This is the category heading that the item falls under, e.g. travel equipment, other costs, staff
Organisation
•This is the dept. code or sub dept.code

Getting Started in Accounts Payable
Version: 14.0 Finance Training 13-Jul-16 13 of 39
5. VAT Guidance
You don’t have to be an expert in VAT to use the CUFS modules however, it is important that you have an understanding as to the various tax codes and the scenarios in which they would be used.
Tax Name Example of when to use
SR20% Standard Rate for most everyday items e.g.
Computer equipment
Stationery supplies
Clothes
Some foods/drinks
EC20% Same as SR20% however, use this code if you are buying Standard Rate goods from other countries in the EC.
NO-UK VAT This is a 0% VAT name e.g.
Hire of rooms
Travel tickets
Books
Invoices from small suppliers not registered for VAT
ME0% Medical exempt for equipment used in medical or veterinary research, diagnostics and teaching e.g.
Bandages
Scalpels
Test tubes
INTERNAL This 0% code is used when paying internal invoices as no VAT is charged between departments.
RR5.0% Reduced rate mainly used by Estate Management for fuel and power.
SERVICES TAX Used when buying services from overseas suppliers.
Reclaims of VAT by the University
Normally a business that is VAT registered can:
Reclaim from HM Revenue and Customs the VAT that it has been charged by its suppliers
the purchases it is making relate to the VATable supplies (or sales) that the business provides to its customers.
as long as as

Getting Started in Accounts Payable
Version: 14.0 Finance Training 13-Jul-16 14 of 39
Many of the services that the University supplies to its various customers are not VATable supplies (e.g. we make exempt supplies of education or provide research which is outside the scope of VAT) and therefore we are not able to reclaim much of the VAT that we have been charged by our suppliers.
In order to maximise the VAT we can reclaim, the Tax Team within the Finance Division have set up, on CUFS, various VAT tables and VAT recovery rules that are linked behind the scenes to every account code and research grant. Each of these rules specifies whether the University can reclaim from HM Revenue & Customs none, all, or a percentage of the VAT they have been charged.
Any VAT that cannot be reclaimed is absorbed by the department as an additional cost of purchasing the item and therefore the system automatically codes it to the same account as the item itself.
Therefore when looking at your distributions you will see one of three possibilities:
If the university cannot reclaim the VAT it will be coded back to the department, against the same code as the item line.
If the university can reclaim the VAT it will be coded to the VAT reclaim account U.00.0000.0000.VCBA.0000.
If the University can reclaim only part of the VAT it will be coded in part to the VAT reclaim account and in part to the same code as the item line.
NEVER TOUCH THE VAT RECLAIM ACCOUNT
Zero Tax Lines
Sometimes the percentage of VAT that can be reclaimed is so small that although the recoverable VAT line is displayed the amount to be recovered is less than 1p and hence not displayed on the screen. In this instance you will still get a second Tax line (the recoverable VAT line) but the monetary value will be zero. Do not delete this line as behind the scenes these tiny amounts are being collated.

Getting Started in Accounts Payable
Version: 14.0 Finance Training 13-Jul-16 15 of 39
6. Processing an external supplier’s invoice (no purchase order)
An over view of the invoice process is below.
Step 1: Create a batch
All invoices are entered onto the system in batches, even if it is only a batch of one invoice. Different batches should be used for different types of invoices, e.g. sterling, foreign invoices and credit notes. a) Complete unique Batch Name
~ in upper case ~ in following format:
DEPARTMENT CODE/YOUR INITIALS/ DD/MM/YY/UNIQUE NUMBER
This will appear on your reports and will help you and others locate batches.
c) Complete the Control Count - the physical number of invoices that you are going to enter in batch.
d) Complete the Control Amount - the total value inclusive of VAT of all the invoices you are going to enter in batch
e) Save and click on Invoices.
Create a batchEnter supplier
invoice
Calculate Tax and tracking fixed
assetsPrimary validation
Secondary Invoice Approval
Responsibility: AP Invoice Entry/ Manager
Navigate: Entry Invoice Batches
Control values are manually calculated before you start entering invoices into CUFS. As invoices are entered, the system will compare the running totals with what has been entered initially as a control. If there is a discrepancy, the system warns you when you exit a batch but it does not prevent Approval and payment of the individual invoices within the batch. Investigate and either make a correction immediately, or return to adjust the invoice batch later.
Getting Started in Accounts Payable
Version: 14.0 Finance Training 13-Jul-16 16 of 39
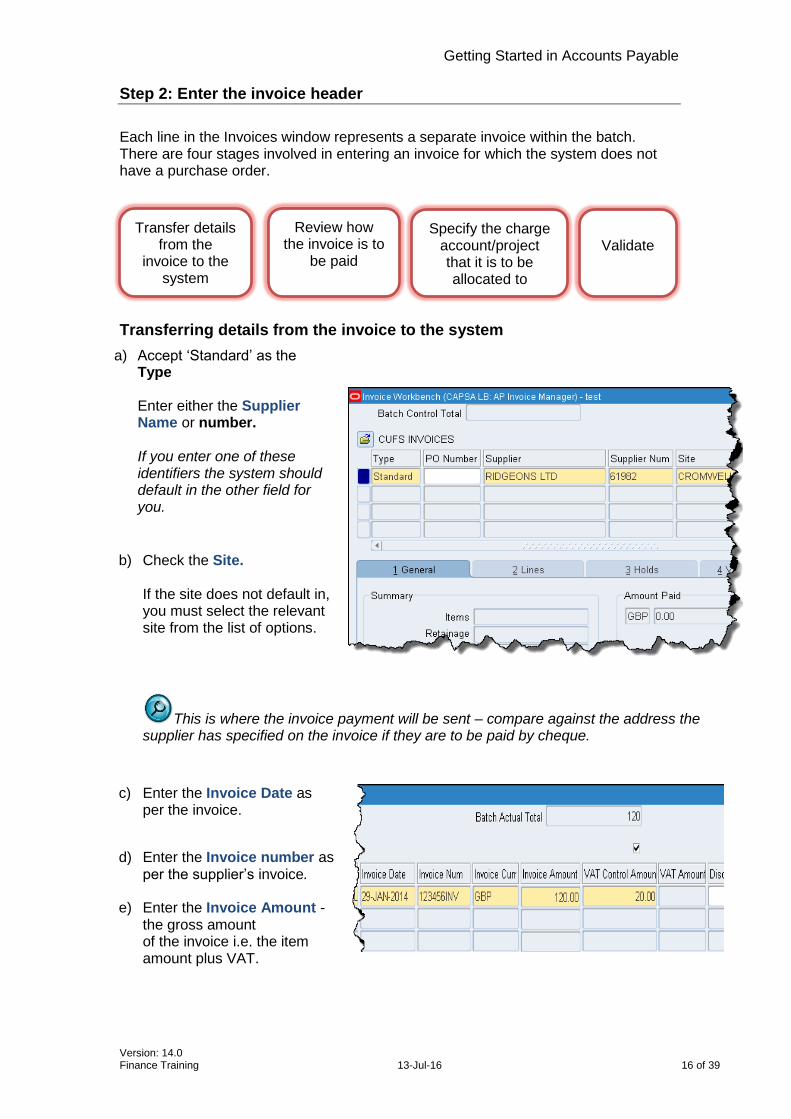
Step 2: Enter the invoice header
Each line in the Invoices window represents a separate invoice within the batch. There are four stages involved in entering an invoice for which the system does not have a purchase order.
Transferring details from the invoice to the system
a) Accept ‘Standard’ as the Type
Enter either the Supplier Name or number. If you enter one of these identifiers the system should default in the other field for you.
b) Check the Site. If the site does not default in, you must select the relevant site from the list of options.
This is where the invoice payment will be sent – compare against the address the supplier has specified on the invoice if they are to be paid by cheque.
c) Enter the Invoice Date as per the invoice.
d) Enter the Invoice number as per the supplier’s invoice.
e) Enter the Invoice Amount - the gross amount of the invoice i.e. the item amount plus VAT.
Transfer details from the
invoice to the system
Review how the invoice is to
be paid
Specify the charge account/project that it is to be allocated to
Validate

Getting Started in Accounts Payable
Version: 14.0 Finance Training 13-Jul-16 17 of 39
f) In the VAT Control Amount field enter the total VAT amount as shown on the invoice. If no VAT has been charged on the invoice you must enter zero in this box.
Do not include any amounts that are not UK VAT.
The system will warn you and will not accept duplicate invoice numbers for the same supplier.
Review how the invoice is to be paid
Continue on the same line but scroll along to the right.
a) Review the GL Date.
You may need to change this after month end if you need to post the expenditure back into the previous accounting period. You have three working days at the beginning of every month to do this. The date can be changed at the invoice header and lines tab but it does not pull through to the Distributions screen. Therefore you may need to reverse out the line and re-enter it with the correct GL date.
b) Review the Terms.
This defaults in from the supplier set up and is normally End + 30 days. If an invoice is processed within 20 calendar days of the invoice date, payment will be made to the supplier closer to 30 days. Payment terms do not need to be changed.
c) Review the Payment Method.
Payment method cannot be updated by departmental users from the default.
d) Review the Pay Group.

Getting Started in Accounts Payable
Version: 14.0 Finance Training 13-Jul-16 18 of 39
e) If you would like the cheque to come back to the dept, click in the Chq Dest field and amend to D.
f) Consider the Pay Alone tick box
g) Click on Lines tab
This field tells the system which payment run to include the invoice on. There are several types: for sterling supplier invoices the system default of ‘Supplier’ will normally default in. Only tick if you require a separate cheque for this particular invoice If you want the cheque returned to your department you will also need to change the Cheque destination field as mentioned previously.
Step 3 Input the account information
a) After clicking on the Lines tab the following window will display.
b) Complete the Net Amount Enter the amount before tax of each item that you want to charge to a particular account or project.
c) Complete the Tax Name field From the List of Values select the code
relevant for the item e.g. SR20%, EC20%, ME0%, NO-UK VAT, Services Tax.
d) Enter the correct accounting See the next pages for detailed steps on
how to code for these items in your department
Code to a GL account, Page 19 Code to a Project account, Page 20 Split expense over codes, Page 22

Getting Started in Accounts Payable
Version: 14.0 Finance Training 13-Jul-16 19 of 39
e) Amend the Description for each item line (this can be done before or after tax is calculated).
f) Tick the Track as Asset box if you are paying for an asset costing over £5000. Assets are items such as equipment, machinery, furniture, vehicles that the University is likely to keep for more than a year.
If you have ticked the Track As Asset box, ensure you scroll along and complete the mandatory CUFS Tag Number field with the number from the tag sticker that can be found in your dept.
g) Click Calculate Tax and the relevant tax lines will be created. The system will not enter the charge account for the Tax line. Please note! If you ticked the Track As Asset box but have not completed the CUFS Tag Number field, three prompt messages will display advising to complete the mandatory field.
h) If you would like to see all item and tax lines coding information click on All Distributions.
Where can I find these stickers? Based upon departments fixed asset tracking history, stickers have been distributed to the majority of department accounts offices. If you are unable to locate them then please contact the Fixed Asset help desk.

Getting Started in Accounts Payable
Version: 14.0 Finance Training 13-Jul-16 20 of 39
Within AP on a multi line transaction, looking at ‘All Distributions’ it can be difficult to establish which tax line/s belongs to which item line. To assist with the identification
of the associated lines, it is possible to display a new view of the distribution lines and then export the results.
Viewing and exporting these lines can be carried out from the invoice workbench screen within any AP responsibility as well as the Secondary Invoice Approval screen.
Refer to Appendix A on viewing and exporting distribution lines.
To code an item to a GL Charge Account
a. In the Charge Account field type U and then press the tab key.
b.
This will take you straight to the Accounting Flex field box. If you are unsure of any of the codes then click on the list of values for the relevant field and search for appropriate options
department code
Your two digit CUFS department code
the cost centre Often these will have been hand written on the invoice by whoever has manually authorized the invoice to say that the goods or services have been received. If you still have doubts as to which cost centre or source of funds code to use please speak to either your head of accounts or the person who ordered the items.
the source of funds

Getting Started in Accounts Payable
Version: 14.0 Finance Training 13-Jul-16 21 of 39
To code an item to a Research Grant/Project
a) Ensure that the Charge Account field is blank.
b) Scroll along to the right hand side of the line until you reach the Project field.
c) Enter the project number that you wish to allocate the cost to. This starts with your 2 letter dept code. Either type it straight into the field or select it from the list of values. If you have doubts as to which project to use please speak to either your head of accounts or the person who ordered the items.
d) Select the Task from the list of values. This is linked to the Project you have selected -select
the appropriate one.
e) Click on the list of values in the Award field. If there is only one award linked to that project it will default in, otherwise search the List of Values.
f) Complete the Expenditure Type. Select an appropriate category from the list of values.
g) Complete Expenditure Organization. Enter your 2-letter dept. code and press tab on the
keyboard.
A copy of this invoice maybe required as some sponsors request evidence of expenditure. If relevant, a pop up message will display advising that a copy of the invoice is required. Collate the invoices and send them weekly to your contact within the Research Operations Office. The RG number must be clearly highlighted on the invoice.
h) Enter Expenditure item date. This is the date of expenditure. If nearing the end of the
project ensure that you enter the date that the goods were delivered or services performed. In other cases the invoice date or today’s date will suffice.
i) Click on Save. The GL mapping code will now populate into the Charge Account field.
Primary validate the invoice
a) Click on Actions… 1. button
The Invoice actions screen display
b) Click in the box for Validate.
c) Click OK

Getting Started in Accounts Payable
Version: 14.0 Finance Training 13-Jul-16 22 of 39
Splitting cost over more than once code
a) Once on the Lines tab, you enter the net amount in the normal way, but instead of entering the GL code or project code information on the Lines tab, click on Distributions. The system may prompt you to save.
b) Once on the Distributions screen, enter the net amount that is being allocated to the first code.
I. If coding to a GL complete the Account field.
II. If coding to a project complete the Project fields.
c) Once the first line is completed, click in the next line down and repeat the process till all lines
equal the total net amount.
d) Save your work and then close out of the Distributions screen.
e) Calculate Tax and Validate in the usual way.
d) Invoice Status should be Needs Revalidation.
f. Click Holds tab It should state Awaiting Secondary Approval. Holds will be covered in AP2 course or refer to the CUFS home page: > Documentation and FAQs >Accounts Payable >Correcting Errors
If there is more than one rate of VAT e.g. one item is SR20% and another is NO-UK VAT?
Process the invoice and enter the total amount of VAT in the VAT Control Amount field. On the Lines tab, enter a line for the VATable item with the relevant tax code, and a line for the non-VATable item with the relevant tax code.
Delivery Charges
Add an additional line on the Lines tab by clicking on the List of Values and selecting Freight and code it accordingly.
You can Allocate the delivery charge against more than one line then, this will be covered in AP Part 2.

Getting Started in Accounts Payable
Version: 14.0 Finance Training 13-Jul-16 23 of 39
7. Amending Non-Matched Invoices
The following are the most common amendments made to invoices:
Account code
Tax code
Entering the gross amount on item lines and calculating tax
Forgetting to track an asset
It doesn’t matter whether tax has been calculated or not as you can :
1. Simply overtype what is incorrect, enter any remaining lines with the correct information.
2. Once all item lines amended/entered, Calculate Tax.
What about using Discard Line?
This can be used before or after tax has been calculated and provides a better audit trail on amendments made.
1. Simply ensure that you are in the relevant item line you wish to amend and click on Discard Line. This will reverse out the incorrect item line. Do not reverse out the tax line as the system will do the necessary calculations.
2. Re-enter the item line with the correct information and Calculate Tax. The system will then amend the tax amount if required.
Remember to Actions …1 and check the Holds tab.
If you forget to tick the Track As Asset contact the Fixed Asset Helpdesk on 66780.

Getting Started in Accounts Payable
Version: 14.0 Finance Training 13-Jul-16 24 of 39
8. Other Invoice Scenarios
8.1 Processing invoices that contain other taxes as well as VAT
Occasionally, an invoice may show another form of tax other than VAT such as Insurance Premium Tax (IPT), foreign taxes or Airport Tax. These taxes should not be included in the VAT Control Amount box and that should be entered as 0.00
Other invoices will be looked at in more detail on the AP2 course.
8.2 High Value Sterling, Euro and Dollar Invoices
Invoices of certain values must be sent on to either Accounts Payable or the Tax team or both dependant on currency type and value. The table below highlights the criteria of which invoices need to go where. Please remember that if the procedures are not followed it will result in a delay in payment to the supplier.
Invoice Type Additional Requirements
Sterling Invoice over £10,000 A copy of the invoice must be sent to the Accounts Payable team
EC Goods invoices All EC invoices regardless of value must be scanned and emailed on receipt (do not wait
for payment) to: [email protected]
Euro invoice of €5,000 or above A copy of the invoice must be sent to the Accounts Payable team and the Tax Team
Dollar invoice of $5,000 or above A copy of the invoice must be sent to the Accounts Payable team and the Tax Team
Should you have any queries contact the Accounts Payable helpdesk on (7)66888.
For example, if an invoice is received for insurance for £300 plus IPT of £15, in the 'Invoice Line' screen, the value of the invoice should be shown as £315, with 0.00 in the VAT Control Amount. On the Lines tab the Tax name should be shown as NO UK VAT and the VAT amount of zero entered into the VAT Control Amount box.

Getting Started in Accounts Payable
Version: 14.0 Finance Training 13-Jul-16 25 of 39
9. Entering Staff Expenses
Expenses claims are to be entered onto the system in the same way as external supplier invoices, as all members of staff should be set up in the supplier database.
Checking the employee address prior to entering the expense form
When entering an employee expense the site address for the individual will display as HOME. However, this is not necessarily the individuals ‘home’ address; it is more likely to be the address of the department that is on the employee’s HR record. You can check an address before entering the expense claim. 1. Once you have navigated via the above path, the Find Person screen displays. Enter either
the surname or the employee number and TAB. 2. A screen listing all employees with that surname will display.
The rates of travel and subsistence allowances are available on the Finance Division’s website and are sent out to all Departments on an annual basis. All claims for reimbursement of personal expenses must be supported as appropriate by receipts or other evidence and calculated in accordance with the University travel and subsistence rates approved by the Finance Committee. The Head of Department is responsible for ensuring the accuracy of claims and for complying with the University travel regulations. Claims for reimbursement must be made on the official University claim form (FD1C-01), available from the Finance Division web site (Raven log in will be required). http://www.finance.admin.cam.ac.uk/finance-staff/accounts-payable/expense-claims/expense-forms Full details on staff expenses can be found in the Financial Procedures Manual, Chapter 5
Responsibility AP Invoice Manager / Entry
Navigate Employee Address

Getting Started in Accounts Payable
Version: 14.0 Finance Training 13-Jul-16 26 of 39
3. Highlight and click OK for the correct line and the name. Full name, NI Number and
Employee Number fields will populate with the most up to date information on that employee. (Ensure Active Vendor shows ‘yes’. If it doesn’t show as yes, you will need to reactivate/setup the supplier via the web form).
4. Click on Find and the address details for the employee will display. If you wish to look at the address in full then you can click into the address field.
5. Close out of the screen.
Staff with a Raven ID and password can also check addresses via the search facility on the Supplier Database which is available from the UFS home page:
http://ufs.admin.cam.ac.uk/ssr/
What if the employee address details are incorrect?
An Amending Supplier Details form will need to be completed and submitted, which can be found via the UFS Home Page, under Suppliers, New Supplier, Reactivations and Supplier Amendments.
http://ufs.admin.cam.ac.uk/ssr/amending.pdf
Getting Started in Accounts Payable
Version: 14.0 Finance Training 13-Jul-16 27 of 39
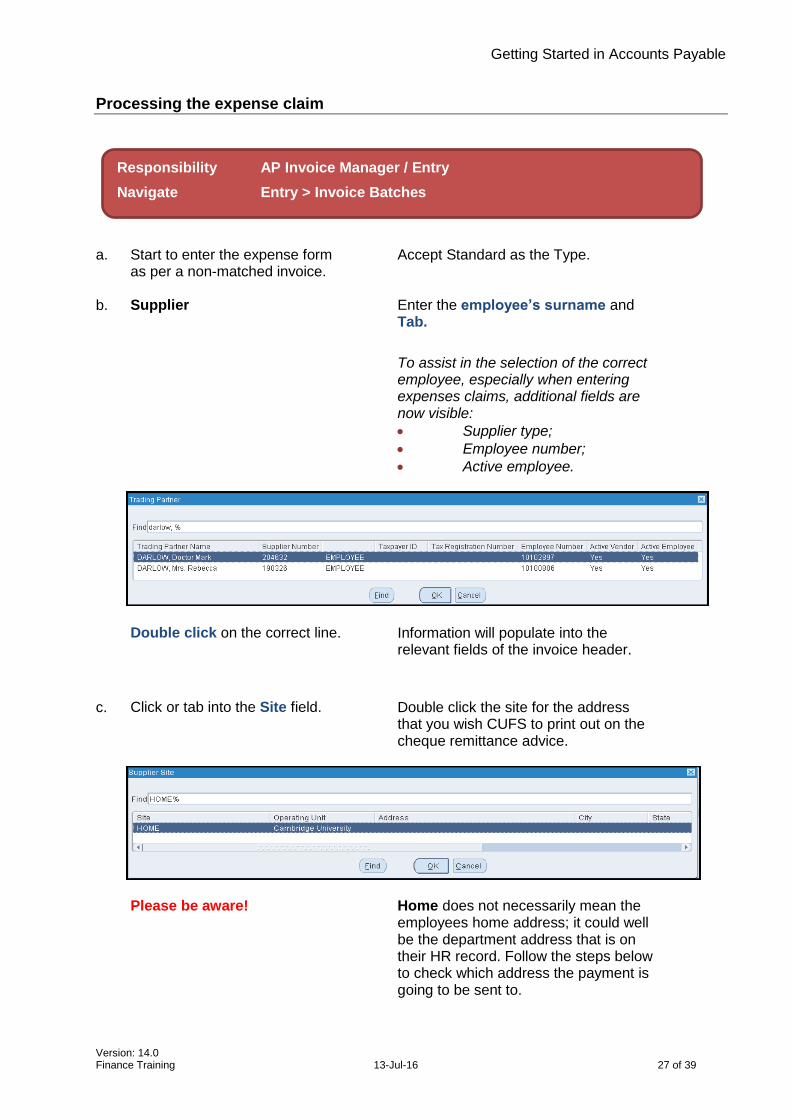
Processing the expense claim
a. Start to enter the expense form as per a non-matched invoice.
Accept Standard as the Type.
b. Supplier
Enter the employee’s surname and Tab.
To assist in the selection of the correct employee, especially when entering expenses claims, additional fields are now visible:
Supplier type;
Employee number;
Active employee.
Double click on the correct line. Information will populate into the relevant fields of the invoice header.
c.
Click or tab into the Site field.
Double click the site for the address that you wish CUFS to print out on the cheque remittance advice.
Please be aware! Home does not necessarily mean the employees home address; it could well be the department address that is on their HR record. Follow the steps below to check which address the payment is going to be sent to.
Responsibility AP Invoice Manager / Entry
Navigate Entry > Invoice Batches

Getting Started in Accounts Payable
Version: 14.0 Finance Training 13-Jul-16 28 of 39
Click OK. Home will have defaulted into the Site
field.
Navigate to Reports >View Employee Address.
Complete the relevant fields for
the employee you are entering the expenses for.
Click Find. A screen will display with the address,
if the details are incorrect see below .
If the dept. address is incorrect. An Amending Supplier Details form will need to
be completed and submitted, which can be found via the UFS Home Page, under Suppliers, New Supplier, Reactivations and Supplier Amendments.
http://ufs.admin.cam.ac.uk/ssr/#reactivations
If the address is correct. Close out of the screen and the invoice workbench will display.
d) Complete the following fields. Invoice Date Enter the expenses claim date. Tab into the next
field.
Invoice number
Accept the default (invoice date) by clicking on OK. NB. The system will not accept duplicate invoice numbers for the same supplier.
Invoice Currency

Getting Started in Accounts Payable
Version: 14.0 Finance Training 13-Jul-16 29 of 39
Invoice Amount
Enter the gross amount of the expense claim.
VAT Control Amount Enter amount of VAT. See below if the claim includes a VAT invoice made out to the University
Description Complete appropriately.
e) Pay Group
Ensure Pay Group is set as SUPPLIER
f) Upon completing the Invoice line. Navigate to the Scheduled Payments tab and ensure Remit to Bank Number matches the expense form (last four digits). If the last four digits do not match, please see notes at the end of this document.
g) Click on the Lines tab and complete the following fields Net Amount
The amount before tax.
Tax Name This will default in with NO UK VAT. If the expense claim includes an invoice made payable to the University then you will need to enter each individual expense line and the relevant tax name (refer to the section on claims including invoices).
Description
Important!
Enter a relevant description for that item line.
Coding the expense to a Grant? It is vital that for each line of the expense a detailed description is entered
e.g. name of the individual, what the expense relates to and why the expense was incurred. This detailed information has been requested
by our external sponsors to whom we have a duty to ensure that funds are spent in accordance
with the terms and conditions of the award.
What if I have calculated tax but forgot to enter a detailed description? Whilst you can still amend the description field on the Lines tab, it won’t pull the updated information through to the Distribution screen and therefore it will not display on the sponsors billing report.

Getting Started in Accounts Payable
Version: 14.0 Finance Training 13-Jul-16 30 of 39
Bank Account Numbers not matching
If the last four digits of the bank account number on the FD1C (expense) form do not match the details in the scheduled payments tab, you should not proceed with making the payment for the expense. You will need to contact the Accounts Payable team advising of the following details:
Supplier Name
Employee Number
Employees full university’s email address
The Accounts Payable team will then verify the details with the Payroll section. The details held by the Payroll section will be used to update CUFS. Should there be any other queries refer them to the AP team and these will be dealt with accordingly.
Email: [email protected]
Claims including invoices
You have an expense claim of £145.00 made up of mileage at £25 and a hotel bill of £100 plus £20 VAT that the employee has already paid (the hotel bill is a valid VAT invoice made out to University of Cambridge).
On the Invoice Header o enter £145.00 as the invoice amount o £20 in the VAT Control Amount
On the Lines Tab o Enter the line for the £25 mileage with a tax name of NO UK VAT, the relevant
code and a detailed description o Enter the next line for the hotel bill as an item line for £100.00, with the Tax Name
of SR20%, the relevant code and a detailed description.
Click on Calculate Tax.
If this happens then the description will need to be added via the Grants module, Expenditure Enquiry, and the Comment field for the relevant line. Please refer to separate Grant guidance notes titled ‘Expenditure Enquiry’.
Code the expense Enter either department code or scroll to the right to enter the grant code information.
h) Calculate Tax
i) If values agree click on Actions… 1
This will validate the invoice.
j) Click on the Holds tab It should be Awaiting Secondary Approval.

Getting Started in Accounts Payable
Version: 14.0 Finance Training 13-Jul-16 31 of 39
Visiting Lecturers/researchers
There are particular rules and potential tax implications that need to be considered when reimbursing the travel expenses of visitors if they can be regarded as being employed by the University by HMRC. If you have any queries regarding this contact the Tax Team within the Finance Division or refer to Financial Procedures Manual (chapter 5b).
Mileage claims for staff with CAMbens Cars
Standard mileage rate of 45p/mile does not apply. Please refer to the HMRC link for the correct rate to use. Rates are subject to change and the link should be used for each new claim.
http://www.hmrc.gov.uk/cars/advisory_fuel_current.htm

Getting Started in Accounts Payable
Version: 14.0 Finance Training 13-Jul-16 32 of 39
10. Finding Invoices and Balance Owed
10.1 Finding Invoices
a.
You can enter multiple search criteria by entering information in one or more fields
b.
Click on the Find button
The Invoice Workbench screen displays, where invoices that match your criteria are listed.

Getting Started in Accounts Payable
Version: 14.0 Finance Training 13-Jul-16 33 of 39
10.2 Invoice Overview
Once you have navigated and found an invoice, an overview is available.
From the Invoice Workbench screen, ensure you are in the relevant invoice line and navigate to Tools, View Invoice Overview. An overview of the transaction displays. It will detail information such as Batch Number, whether there are any Holds, PO Number (if it was matched), Due Date of payment and when the Actual Payment has been made.
Getting Started in Accounts Payable
Version: 14.0 Finance Training 13-Jul-16 34 of 39
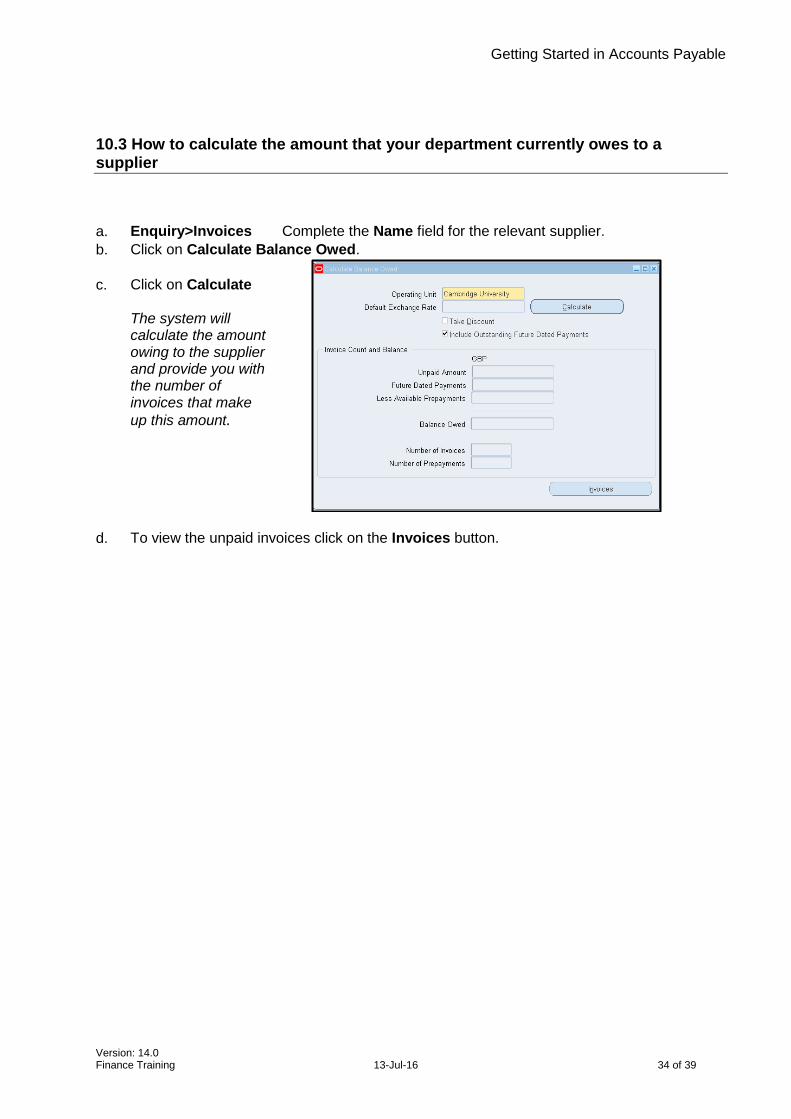
10.3 How to calculate the amount that your department currently owes to a supplier
a. Enquiry>Invoices Complete the Name field for the relevant supplier. b. Click on Calculate Balance Owed. c.
Click on Calculate The system will calculate the amount owing to the supplier and provide you with the number of invoices that make
up this amount.
d.
To view the unpaid invoices click on the Invoices button.
Getting Started in Accounts Payable
Version: 14.0 Finance Training 13-Jul-16 35 of 39
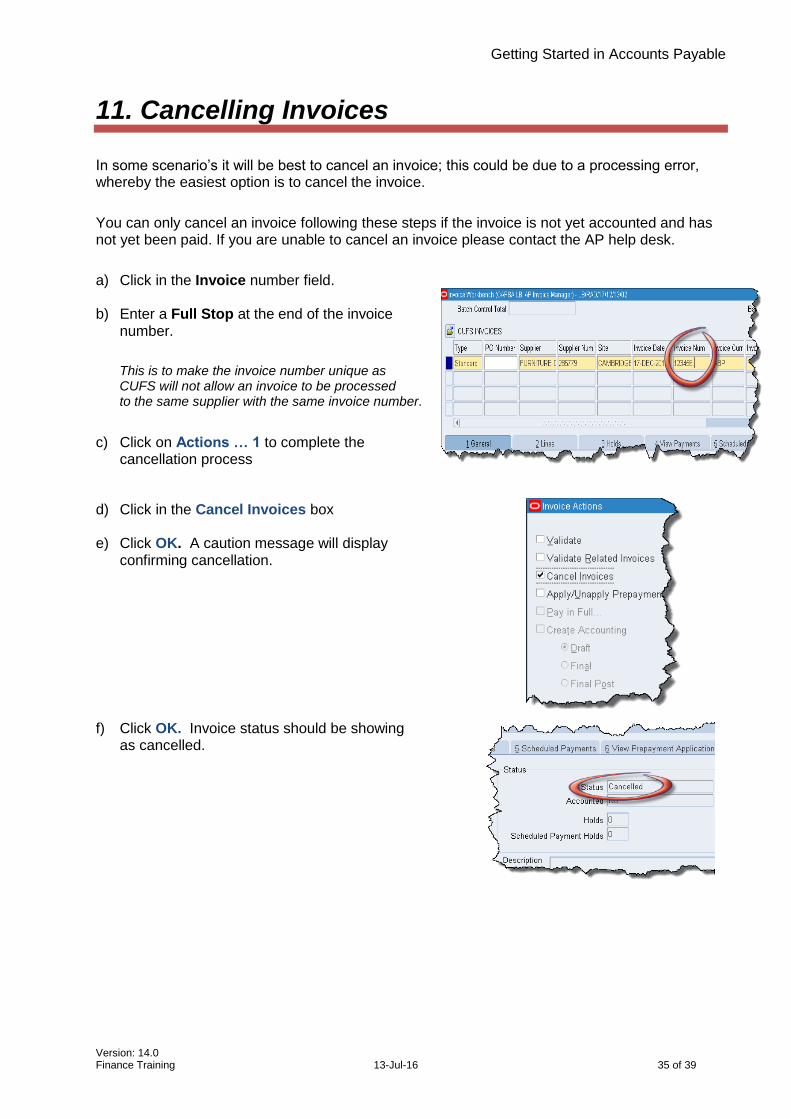
11. Cancelling Invoices
In some scenario’s it will be best to cancel an invoice; this could be due to a processing error, whereby the easiest option is to cancel the invoice.
You can only cancel an invoice following these steps if the invoice is not yet accounted and has not yet been paid. If you are unable to cancel an invoice please contact the AP help desk.
a) Click in the Invoice number field.
b) Enter a Full Stop at the end of the invoice number.
This is to make the invoice number unique as CUFS will not allow an invoice to be processed to the same supplier with the same invoice number.
c) Click on Actions … 1 to complete the
cancellation process
d) Click in the Cancel Invoices box
e) Click OK. A caution message will display confirming cancellation.
f) Click OK. Invoice status should be showing
as cancelled.
Getting Started in Accounts Payable
Version: 14.0 Finance Training 13-Jul-16 36 of 39
12. Standalone Credit Notes
What it enables you to do …
To be aware of …
This is when you do not want to link the credit note to the invoice but simply make reference to the original invoice in the description field.
Mainly used if the invoice was matched to the Purchase Order and you do not wish for the PO to re-open.
It does not link to the order and therefore will not re-open it
You must make note of the account codes from the original invoice
Pre-Requisite: Invoice Batch completed
Query the invoice the credit note relates to and make note of the relevant account codes for the item/service
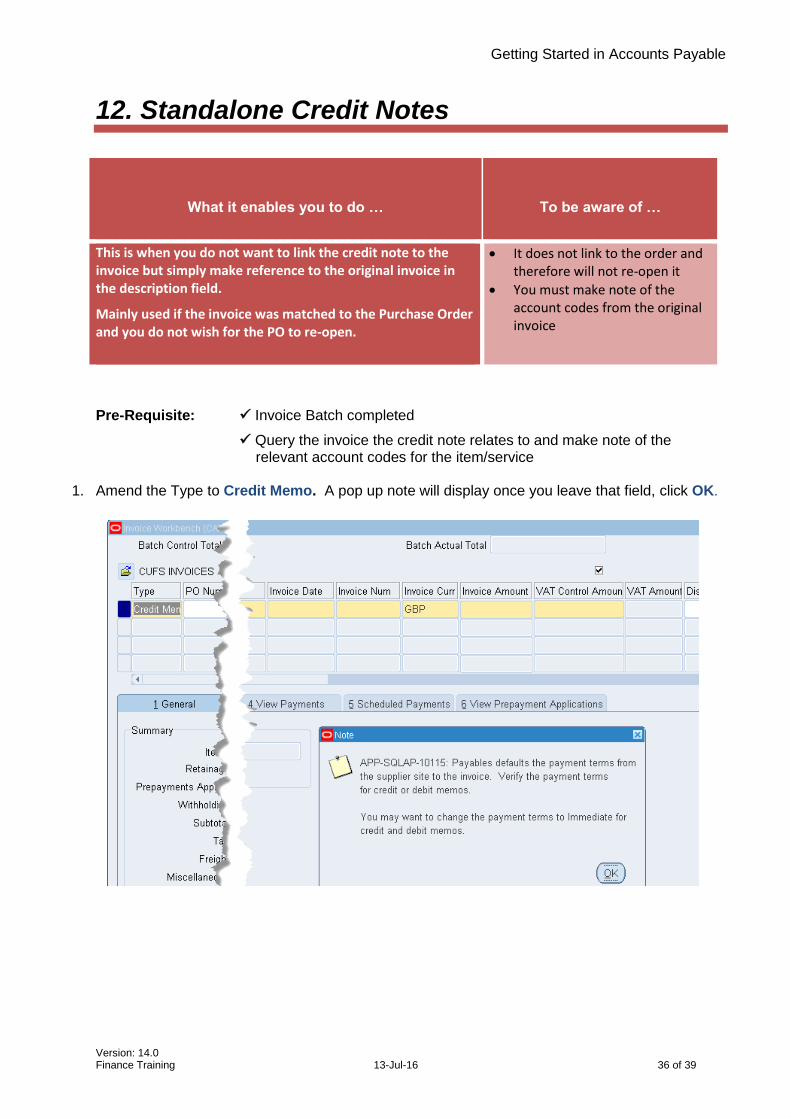
1. Amend the Type to Credit Memo. A pop up note will display once you leave that field, click OK.
Getting Started in Accounts Payable
Version: 14.0 Finance Training 13-Jul-16 37 of 39
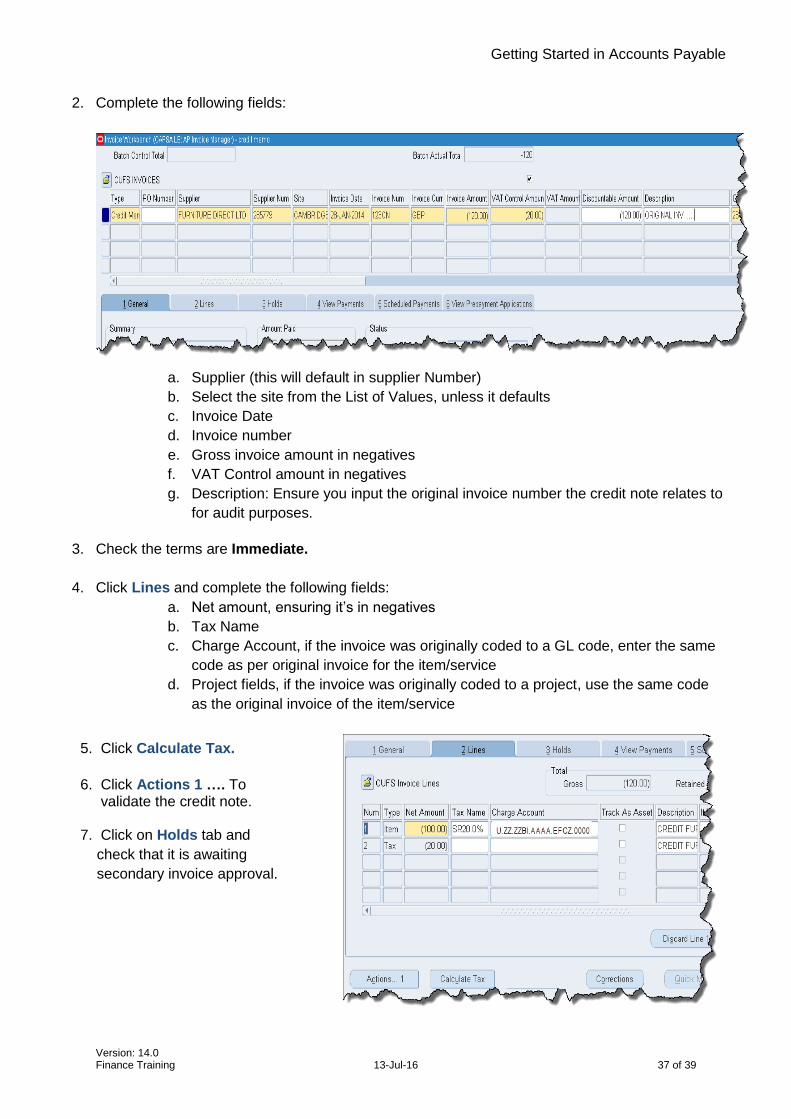
2. Complete the following fields:
a. Supplier (this will default in supplier Number)
b. Select the site from the List of Values, unless it defaults
c. Invoice Date
d. Invoice number
e. Gross invoice amount in negatives
f. VAT Control amount in negatives
g. Description: Ensure you input the original invoice number the credit note relates to
for audit purposes.
3. Check the terms are Immediate.
4. Click Lines and complete the following fields:
a. Net amount, ensuring it’s in negatives
b. Tax Name
c. Charge Account, if the invoice was originally coded to a GL code, enter the same
code as per original invoice for the item/service
d. Project fields, if the invoice was originally coded to a project, use the same code
as the original invoice of the item/service
1. 5. Click Calculate Tax.
2. 6. Click Actions 1 …. To 3. validate the credit note.
4. 7. Click on Holds tab and
5. check that it is awaiting
6. secondary invoice approval.

Getting Started in Accounts Payable
Version: 14.0 Finance Training 13-Jul-16 38 of 39
Getting Started in Accounts Payable
Version: 14.0 Finance Training 13-Jul-16 39 of 39
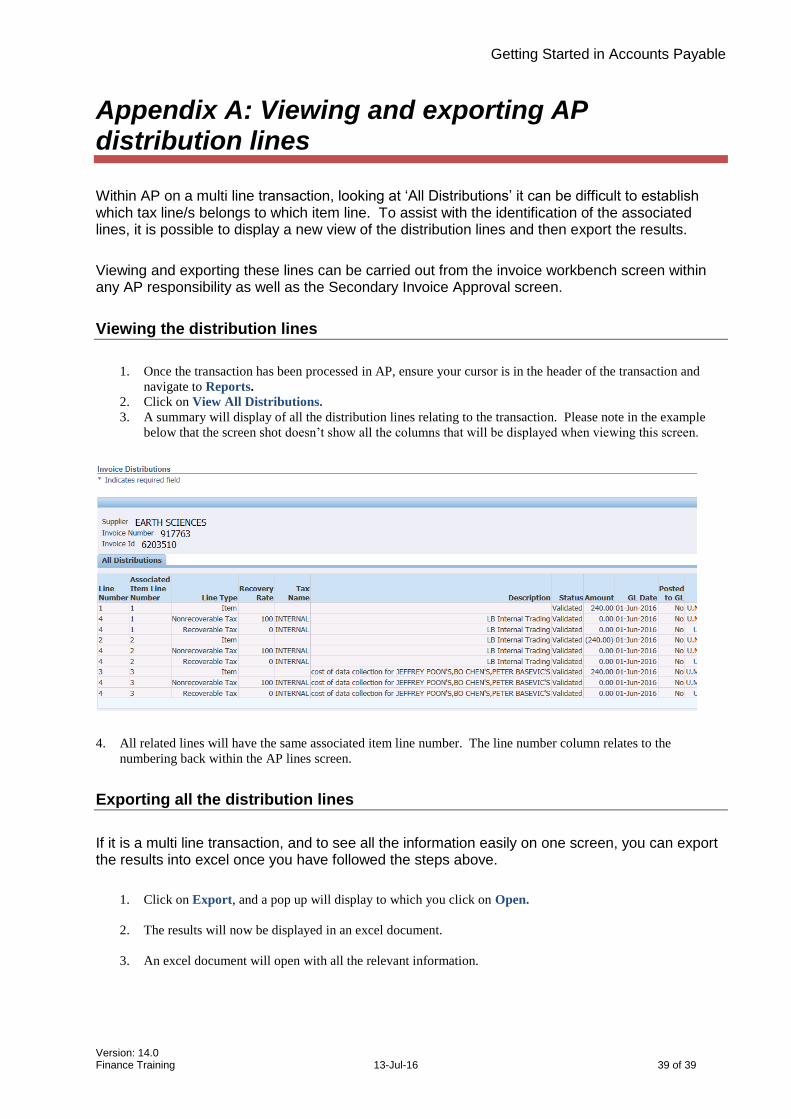
Appendix A: Viewing and exporting AP distribution lines
Within AP on a multi line transaction, looking at ‘All Distributions’ it can be difficult to establish which tax line/s belongs to which item line. To assist with the identification of the associated lines, it is possible to display a new view of the distribution lines and then export the results.
Viewing and exporting these lines can be carried out from the invoice workbench screen within any AP responsibility as well as the Secondary Invoice Approval screen.
Viewing the distribution lines
1. Once the transaction has been processed in AP, ensure your cursor is in the header of the transaction and
navigate to Reports.
2. Click on View All Distributions.
3. A summary will display of all the distribution lines relating to the transaction. Please note in the example
below that the screen shot doesn’t show all the columns that will be displayed when viewing this screen.
4. All related lines will have the same associated item line number. The line number column relates to the
numbering back within the AP lines screen.
Exporting all the distribution lines
If it is a multi line transaction, and to see all the information easily on one screen, you can export the results into excel once you have followed the steps above.
1. Click on Export, and a pop up will display to which you click on Open.
2. The results will now be displayed in an excel document.
3. An excel document will open with all the relevant information.