getting started progress with progress openedge in the ... · pdf file w h i t e p a p e r...
TRANSCRIPT

www.progress.com
w h i t e p a p e r
part iii: installing Openedge and Bundling a New aMi
> GettiNG Started with prOGreSS® OpeNedGe® iN the aMazON ClOud
Progress Actional® ®
®Progress OpenEdge ®
®Progress DataXtend®
®Progress ObjectStore ®
™
™
Progress Orbacus ®
®Progress Orbix ®
®Progress Artix ®
®Progress Sonic ®
Progress Fuse ®
®Progress Apama ®
®Progress Artix ®
DataServices
www.progress.com
taBle Of CONteNtS
introduction 1installing Openedge on a windows Machine 1
Creating Your Own Windows Amazon Machine Image 3installing Openedge on a linux Machine 5
Creating Your Own Linux Amazon Machine Image 8associating an elastic Block Storage (eBS) Volume 12
Create an EBS Volume 12Attach a Windows Volume 14Attach a Linux Volume 15
associating an elastic ip address 17Windows Verification 18Linux Verification 18
Next Steps 18

www.progress.com
1
iNtrOduCtiON
This is the third in a series of papers to help you understand how to work with Amazon Web Services to set up and run your Progress® OpenEdge™ application in Amazon EC2 If you have not done so already, please read the following to gain context and insight into cloud computing in general and the Amazon Web Services in particular:
> “An Introduction to Cloud Computing“
> “Getting Started with OpenEdge in the Amazon Cloud, Part I (Introduction to Amazon) “
> “Getting Started with OpenEdge in the Amazon Cloud, Part II (Your First AMI Instance) “
With this information, you will be ready to take the next steps outlined in this document: to install and configure OpenEdge in your own Amazon Machine Image (AMI) instance and to create your own AMIs that can include your OpenEdge applications
At this point we assume that you have already created your Amazon user account, have carried out all of the steps to select and configure your own AMI instance, and are able to remotely connect to your running instance If you have not already completed these steps, please refer to the earlier papers in this series for instructions
iNStalliNG OpeNedGe ON a wiNdOwS MaChiNe
Now that you are connected to your running Windows instance (e g , with Remote Desktop), you are ready to configure your instance This discussion includes installing OpenEdge in the instance You have several choices for how to carry out this installation:
> If you configured your Remote Desktop connection to map drives from your local machine to the remote instance (through Options>> on the Remote Desktop connection screen), you can now select Computer or Windows Explorer in your instance and access the drives mapped from your local machine Navigate to your mapped local drive with the OpenEdge installation DVD or DVD image that you may have

www.progress.com
2
stored on your local disk, and run the install just as you would on your local machine
> It may be faster to copy the DVD image from your local machine to your EC2 instance, and then install from there Once you copy the DVD image, you run the install on the remote machine just as you would on your local machine
Once the installation is complete:
> Check to be sure the OpenEdge AdminServer started
> Configure OpenEdge Explorer (or OpenEdge Management if installed)
> For security, you should change the OpenEdge Administrator password to something you can easily remember
> Add additional users as needed
Please refer to the OpenEdge Installation Guide if you need any assistance with these tasks

www.progress.com
3
Creating Your Own Windows Amazon Machine Image
Once you have OpenEdge installed and configured in your instance, you will want to preserve these changes for use in the future Recall that when you shut down a running Amazon instance, any changes that you have made to that image are lost unless you explicitly save them What you need to do is to create a brand new AMI that is a snapshot of the instance that you have been working with This new AMI will contain your OpenEdge installation and any other changes you have made
Before bundling your instance into a new AMI, follow these steps:
> Stop all of your OpenEdge databases (so they shutdown cleanly)
> Stop the OpenEdge AdminServer (so all of the OpenEdge processes are shut down)
Now you are ready to create a new AMI from your instance In the EC2 Console, select the instance (click the checkbox), drop down the “Instance Actions” and select Create Image (EBS AMI)
www.progress.com
4
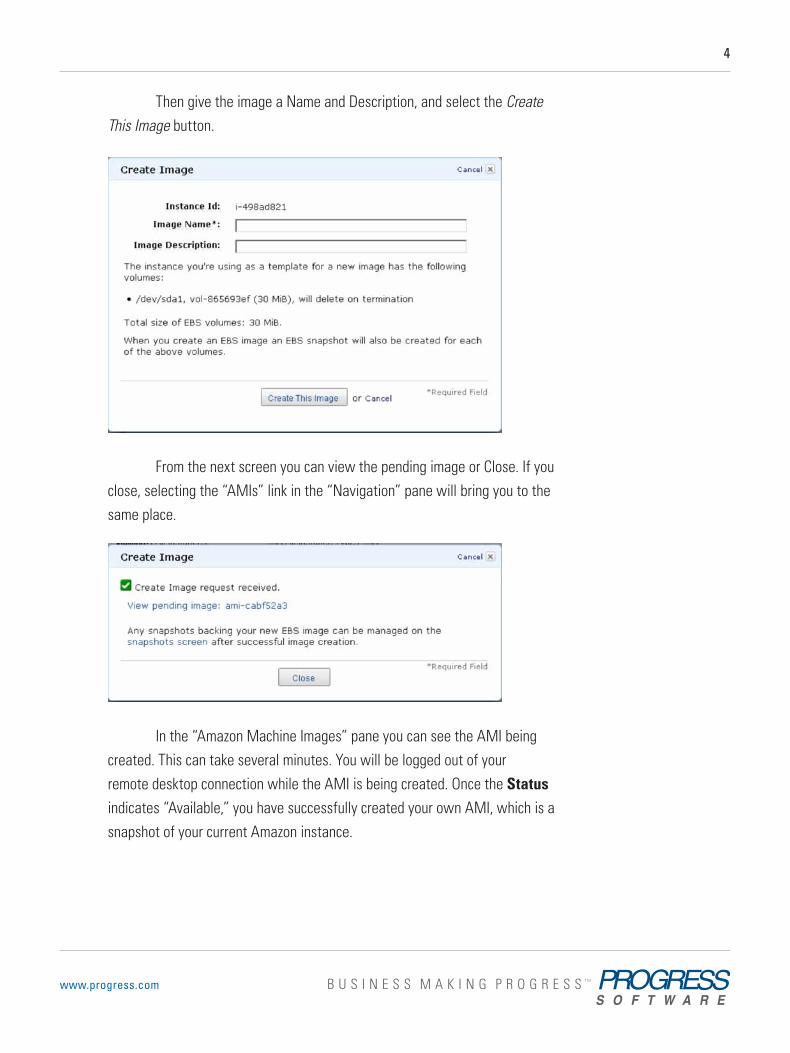
Then give the image a Name and Description, and select the Create This Image button
From the next screen you can view the pending image or Close If you close, selecting the “AMIs” link in the “Navigation” pane will bring you to the same place
In the “Amazon Machine Images” pane you can see the AMI being created This can take several minutes You will be logged out of your remote desktop connection while the AMI is being created Once the Status indicates “Available,” you have successfully created your own AMI, which is a snapshot of your current Amazon instance

www.progress.com
5
At this point you can, if you choose, log back into your instance Remember that the instance continues to run until such time as you terminate it, and the process of creating an AMI from your instance does not affect the running status of the instance
For the purposes of this paper, you should go ahead and shut down your instance By doing this, you will not continue to accrue charges from Amazon for running that instance In addition, you will be working with the AMI that you just created in the following section, rather than with your original Amazon instance
iNStalliNG OpeNedGe ON a liNux MaChiNe
Now that you are connected to your Linux instance (e g , with SSH), you are ready to install OpenEdge on the instance To accomplish this, you must copy the compressed files of the OpenEdge install from your local system to your running instance, and carry out the installation on the instance from there
1 The Linux 64 DVD image on your local machine is the starting point Use tar to create a single “linux tar” (or other file name of your choosing) file from the DVD image
2 Use Secure Copy (SCP) to copy the file from your local machine to the Linux instance, saving it as root to the /mnt directory Note that in order to be authenticated to complete the copy, you will need to supply your Key Pair “PEM” file
www.progress.com
6
�<localmachine>#�scp�-i�mykeypair.pem�linux.tar�
[email protected]:/mnt
You will get a status like the following during the copy operation (382 MB took less than 4 minutes):
�linux.tar����47%�|*************����|��182�MB��02:04�ETA
3 Now create a directory on your Amazon Linux instance (DVD image in the steps below) and unpack the linux tar file:
[root@ip-10-242-82-223:/mnt]�mkdir�cdimage
[root@ip-10-242-82-223:/mnt]�mv�linux.tar�cdimage
[root@ip-10-242-82-223:/mnt]�cd�cdimage
[root@ip-10-242-82-223:/mnt/cdimage]�tar�xvof�linux.tar
4 Next, decide where you want to install OpenEdge on your instance NOTE: the /mnt directory does NOT get saved when your new AMI is created from your instance, so select a directory like /usr/OpenEdge to ensure that your OpenEdge installation is preserved when you create a new AMI from your instance
[root@ip-10-242-82-223:/mnt/cdimage]�cd�/usr
[root@ip-10-242-82-223:/usr]�mkdir�OpenEdge
[root@ip-10-242-82-223:/usr]�cd�OpenEdge
[root@ip-10-242-82-223:/usr/OpenEdge]
[root@ip-10-242-82-223:/usr/OpenEdge]�/mnt/cdimage/proinst
5 Install OpenEdge in the instance as you would on any other machine
Note: – JavaHome Path = /usr/java/default – Web Server Script directory = /var/www/cgi-bin – static HTML to docroot
6 Once the install is complete, start the OpenEdge AdminServer, WebSpeed (wsbroker1), and the Apache Web Server on the Linux instance
proenv>��proadsv�–start
proenv>��wtbman�–name�wsbroker1�-start�
proenv>��/sbin/service�httpd�start

www.progress.com
7
Once everything has started, open a new tab in your browser and try to hit the Apache Web Server and then WebSpeed Workshop, using your Public DNS address of your instance
If you are successful in connecting to the Apache Web Server (e g , “http://ec2-174-129-115-138 compute-1 amazonaws com”) for your instance, you should see the following:
To access WebSpeed Workshop, append “/cgi-bin/wspd_cgi sh/workshop” to your Public DSN address, e g , “http://ec2-174-129-115-138 compute-1 amazonaws com/cgi-bin/wspd_cgi sh/workshop”

www.progress.com
8
If everything checks out, now would be a good time to add additional users (other than root)
> You don’t want to run OpenEdge processes as root if at all possible This is a security risk if anyone gets access to your machine or can upload files to your application
> With multiple users on the machine you can group processes by user for easier debugging of problems and for better security
> Having a user other than root makes copying files between instances in the EC2 environment easier using the scp tool
Creating Your Own Linux Amazon Machine Image
Shut all your processes down on the Linux instance, including all OpenEdge databases and the AdminServer
You need the X.509 Certificate and associated Private Key File Access Key Identifier that was generated when you created your Amazon account If you have not already created your Access Key Identifiers, please refer to “Getting Started with OpenEdge in the Amazon Cloud Part II: Your First AMI Instance ”
Copy the 2 PEM files from your local machine to the /mnt directory on your Linux instance to be used to encrypt and secure your AMI As an example:
�<localmachine>#�scp�–i�mykeypair.pem�pk-
HKZYKTAIG2ECMXYIBH3HXV4ZBZQ55CLO.pem�cert-
HKZYKTAIG2ECMXYIBH3HXV4ZBZQ55CLO.pem�root@ec2-174-
129-115-138.compute-1.amazonaws.com:/mnt
�cert-HKZYKTAIG2ECMXYIBH3H�100%�|******|��916��00:00
�pk-HKZYKTAIG2ECMXYIBH3H�100%�|******|��926��00:00
You are ready to create a new AMI, i e , “bundle ” The public AMI that you started with comes with the EC2 already installed on your Linux instance, so all you have to do is run the command to bundle Note that you can run “ec2-bundle-vol –h” for help with all of the parameters
�<Instance>#�ec2-bundle-vol�–d�/mnt�–k�/mnt/pk-
HKZYKTAIG2ECMXYIBH3HXV4ZBZQ55CLO.pem�–c�/mnt/cert-

www.progress.com
9
HKZYKTAIG2ECMXYIBH3HXV4ZBZQ55CLO.pem�–u�495219933132�
–r�x86_64�–p�progress102b
Copying�/�into�the�image�file�/mnt/progress102b...
Excluding:
� � /sys
� � /proc
� � /proc/sys/fs/binfmt_misc
� � /dev
� � /media
� � /mnt
� � /proc
� � /sys
� � /mnt/progress102b
� � /mnt/img-mnt
�/usr/lib64/site_ruby/ec2/platform/linux/image.
rb:242:�warning:�Insecure�world�writable�dir�/usr1/
OpenEdge/102b/dlc/bin,�mode�040777
1+0�records�in
1+0�records�out
�1048576�bytes�(1.0�MB)�copied,�0.001806�seconds,�581�MB/s
mke2fs�1.39�(29-May-2006)
Bundling�image�file...
Splitting�/mnt/progress102b.tar.gz.enc...
Created�progress102b.part.000
Created�progress102b.part.001
Created�progress102b.part.002
Created�progress102b.part.003
…
Created�progress102b.part.124

www.progress.com
10
Created�progress102b.part.125
Created�progress102b.part.126
Created�progress102b.part.127
Generating�digests�for�each�part...
Digests�generated.
Creating�bundle�manifest...
ec2-bundle-vol�complete.
This command may take several minutes to complete Once the bundling process is complete, the AMI, its associated manifest file, and image parts are in the /mnt directory You can confirm this using the command in the following example
<Instance>#�ls�-l�/mnt/progress102b*
�-rw-r--r--�1�root�root�10737418240�Dec�23�15:10�/mnt/
progress102b
�-rw-r--r--�1�root�root�������20364�Dec�23�15:19�/
mnt/progress102b.manifest.xml
�-rw-r--r--�1�root�root����10485760�Dec�23�15:19�/
mnt/progress102b.part.000
�-rw-r--r--�1�root�root����10485760�Dec�23�15:19�/
mnt/progress102b.part.001
�-rw-r--r--�1�root�root����10485760�Dec�23�15:19�/
mnt/progress102b.part.002
�-rw-r--r--�1�root�root����10485760�Dec�23�15:19�/
mnt/progress102b.part.003
�-rw-r--r--�1�root�root����10485760�Dec�23�15:19�/
mnt/progress102b.part.004
�-rw-r--r--�1�root�root����10485760�Dec�23�15:19�/
mnt/progress102b.part.005
�-rw-r--r--�1�root�root����10485760�Dec�23�15:19�/
mnt/progress102b.part.006

www.progress.com
11
�-rw-r--r--�1�root�root����10485760�Dec�23�15:19�/
mnt/progress102b.part.007
…
Now you need to upload the bundle files to the Amazon S3 storage area The command is ec2-upload-bundle and is already on your instance You will need to decide on a bucket-name (think directory name), and you will need your Access Key ID and Secret Access Key from when you created your Access Key Identifiers If you have not already created your Access Key Identifiers, please refer to “Getting Started with OpenEdge in the Amazon Cloud Part II: Your First AMI Instance ”
Running “ec2-upload-bundle –h” will give you detailed help on the upload process This upload will take some time, but the process gives regular updates
<Instance>#�ec2-upload-bundle�-b�<your-s3-bucket>�-m�/mnt/sampleimage.manifest.xml�-a�<aws-access-key-
id>�-s�<aws-secret-access-key>
Creating�bucket...
�Uploading�bundled�image�parts�to�the�S3�bucket�
progress102b-linux�...
Uploaded�progress102b.part.000
Uploaded�progress102b.part.001
Uploaded�progress102b.part.002
Uploaded�progress102b.part.003
…
Uploaded�progress102b.part.124
Uploaded�progress102b.part.125
Uploaded�progress102b.part.126
Uploaded�progress102b.part.127
Uploading�manifest�...
Uploaded�manifest.
Bundle�upload�completed.
www.progress.com
12
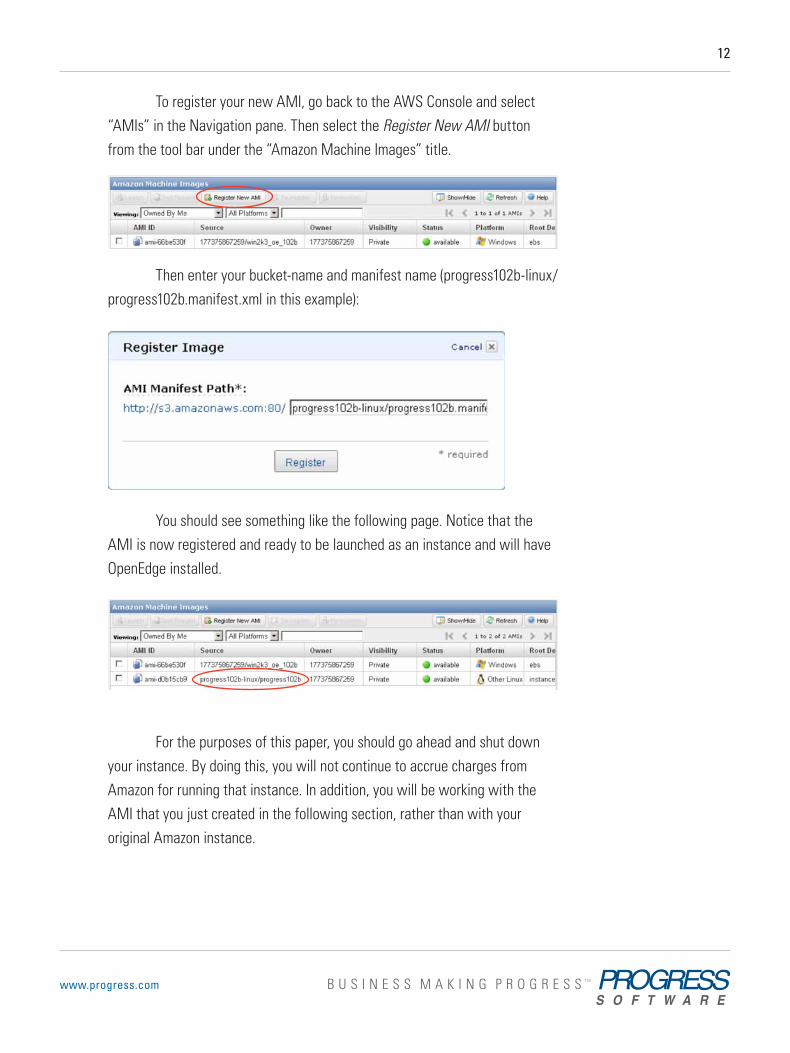
To register your new AMI, go back to the AWS Console and select “AMIs” in the Navigation pane Then select the Register New AMI button from the tool bar under the “Amazon Machine Images” title
Then enter your bucket-name and manifest name (progress102b-linux/progress102b manifest xml in this example):
You should see something like the following page Notice that the AMI is now registered and ready to be launched as an instance and will have OpenEdge installed
For the purposes of this paper, you should go ahead and shut down your instance By doing this, you will not continue to accrue charges from Amazon for running that instance In addition, you will be working with the AMI that you just created in the following section, rather than with your original Amazon instance
www.progress.com
13
aSSOCiatiNG aN elaStiC BlOCk StOraGe (eBS) VOluMe
Create an EBS Volume
Recall from earlier discussions that disk storage in a running Amazon instance is volatile Once the instance is shut down, any changes to that instance are lost (though they are not lost if the instance is restarted instead of being shut down) When you consider the OpenEdge Database, this is a problem: making updates to your database and then creating a new AMI each time to save those changes is extremely inconvenient and time consuming
The solution is Amazon EC2 Elastic Block Storage (EBS), which provides permanent and non-volatile data storage The following steps show how to create an EBS volume for your OpenEdge database and to attach it to your running instance
Let’s start a new instance from the AMI you created that contains your OpenEdge installation (Recall that you shut down your working instance in the last step )
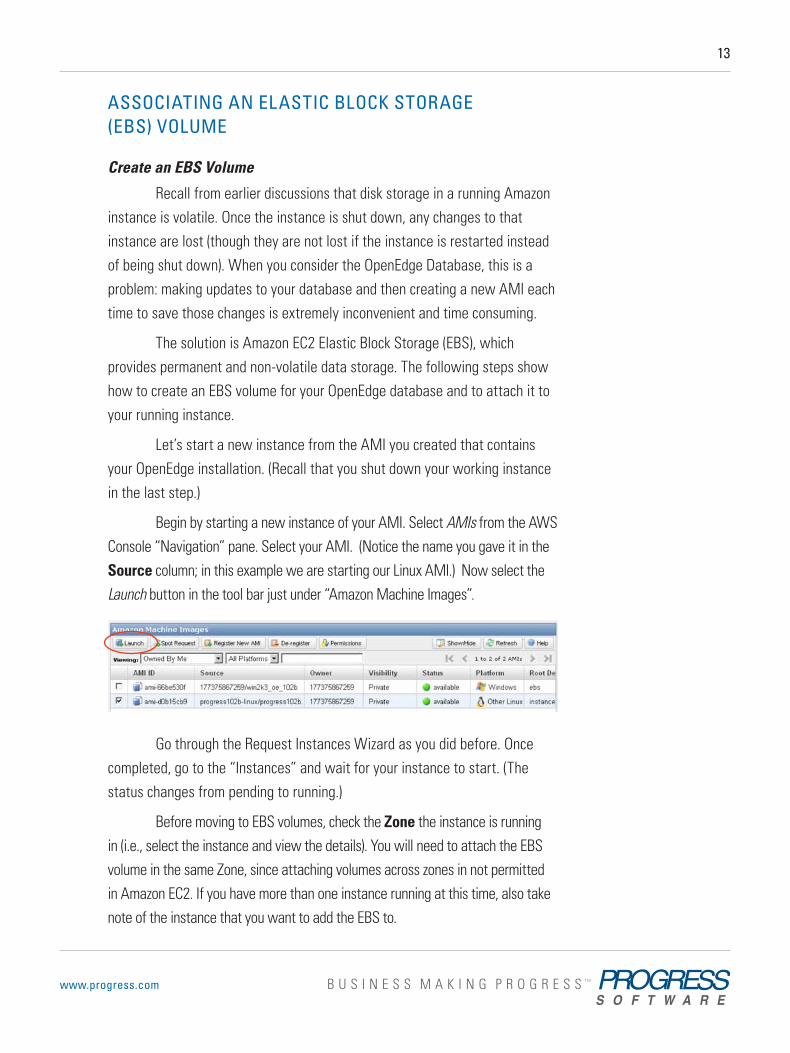
Begin by starting a new instance of your AMI Select AMIs from the AWS Console “Navigation” pane Select your AMI (Notice the name you gave it in the Source column; in this example we are starting our Linux AMI ) Now select the Launch button in the tool bar just under “Amazon Machine Images”
Go through the Request Instances Wizard as you did before Once completed, go to the “Instances” and wait for your instance to start (The status changes from pending to running )
Before moving to EBS volumes, check the Zone the instance is running in (i e , select the instance and view the details) You will need to attach the EBS volume in the same Zone, since attaching volumes across zones in not permitted in Amazon EC2 If you have more than one instance running at this time, also take note of the instance that you want to add the EBS to

www.progress.com
14
You are now ready to create a new EBS Volume From the “Navigation” pane select “Volumes” and select the Create Volume button in the tool bar just under “EBS Volumes” pane name
When the Create Volume box comes up, set a size (this example uses a volume size of 15 gigabytes), and make sure the Availability Zone is the same as the one in your running instance Then click on the Create button
The volume will take a few minutes to create depending on the size
Once the EBS volume Status indicates “Available,” you can then attach it to your Amazon instance, Select the volume (click the checkbox), and select the Attach Volume button

www.progress.com
15
Attach a Windows Volume
Select the correct instance (if more than one is running) and give it a Device mount point (one that is not already in the list, e g , /dev/sda1 is already mounted) Device names already in use will be listed in the detail page of the instance Select Instances, select your running instance, and scroll through details in bottom frame You will see something like Root Device: /dev/sda1
If you now select “Computer” from the start menu in your instance, you will notice there is no D: drive The volume you added is not yet seen by the instance—it needs to be initialized On the Amazon instance:
1 Select Start and click Run
2 Type diskmgmt.msc and click OK
3 Right click on the new EBS volume, select initialize, and follow the on-screen prompts Once the volume is formatted, you will see it in your Windows Explorer
You will only need to format this volume once If you disconnect this volume and reconnect it later, DO NOT REFORMAT IT AGAIN or you will lose all of your data
You can use your new D: drive (EBS volume) to store your databases and applications If the running instance ever fails or needs an emergency shutdown, the data will not be lost as it would when you have to terminate a running instance and revert back to the original AMI

www.progress.com
16
Attach a Linux Volume
Select the correct Instance (if more than one is running), select a Device that is not in use already (should not be in the drop down), and select the Attach button
In your terminal window on the Linux Instance, you will not see the attached EBS volume until you create a filesystem on the device See the example and output below:
<Instance>#�yes�|�mkfs�-t�ext3�/dev/sdf��
mke2fs�1.39�(29-May-2006)
/dev/sdf�is�entire�device,�not�just�one�partition!
Proceed�anyway?�(y,n)�Filesystem�label=
OS�type:�Linux
Block�size=4096�(log=2)
Fragment�size=4096�(log=2)
1966080�inodes,�3932160�blocks
196608�blocks�(5.00%)�reserved�for�the�super�user
First�data�block=0
Maximum�filesystem�blocks=4026531840
120�block�groups
32768�blocks�per�group,�32768�fragments�per�group
16384�inodes�per�group
Superblock�backups�stored�on�blocks:

www.progress.com
17
�32768,�98304,�163840,�229376,�294912,�819200,�884736,�
1605632,�2654208
Writing�inode�tables:�done
Creating�journal�(32768�blocks):�done
�Writing�superblocks�and�filesystem�accounting�
information:�done
�This�filesystem�will�be�automatically�checked�every�
24�mounts�or
�180�days,�whichever�comes�first.�Use�tune2fs�-c�or�
-i�to�override.
Now mount the new volume
<Instance>#�mkdir�/mnt/data-store
<Instance>#�mount�/dev/sdf�/mnt/data-store
You can now use this new volume as a non-volatile disk for you database (and other files) you want to persist Do NOT run “mfks” again when remounting this volume again later It only needs to be run the first time
aSSOCiatiNG aN elaStiC ip addreSS
Last, you will obtain an Elastic IP address and associate it with your running instance Having this will provide your users easy and consistent Web access to your running instance If you were to simply use the Public IP address supplied when you instantiated your instance, this would only work for your users as long as the instance never went down As soon as you take it down or it terminates abnormally, the next instantiated instance will in all likelihood have a different Public IP address
1 Select “Elastic IPs” from the AWS Console “Navigation” pane
2 Select the Allocate New Address button, and select Yes, Allocate to the pop-up box
3 Select the IP address (click the checkbox), and then select the Associate button from the tool bar just below “Addresses”

www.progress.com
18
Select the Associate button in the pop-up box
Windows Verification
Now connect to your running instance in EC2 (for example by using Remote Desktop) using the Elastic IP address to verify that it is set up properly
Linux Verification
If you are currently connected to the running instance with terminals connecting with the old Public DNS name, you will be disconnected and will have to reconnect with the Elastic IP address
<localmachine>#�ssh�-i�mykeypair�[email protected]�
If you restart the Apache Web Server, AdminServer, and WebSpeed broker again, you can use the new Elastic IP address to connect
proenv>�/sbin/service�httpd�start�(if�necessary)
proenv>�proadsv�–start
proenv>�wtbman�–name�wsbroker1�–start
You can verify that everything is working as expected with your Elastic IP address by connecting to:
> Apache Web Server (http://75 101 167 105/ in this example)
> WebSpeed Workshop (http://75 101 167 105/cgi-bin/wspd_cgi sh/workshop in this example)
www.progress.com
19
In both cases you should connect to the screens that are shown in section Installing�OpenEdge�on�a�Linux�Machine�earlier in this document
Next StepS
Congratulations! You have successfully installed OpenEdge into your Amazon instance, created a new AMI from your instance, created an Elastic Block Storage volume for your AMI, and associated an Elastic IP address to your AMI In working through this process, you should now have a solid foundation for how the Amazon EC2 operates
You are now ready to deploy your OpenEdge application to the Amazon EC2 The steps are very similar to how you installed OpenEdge into your instance and then saved that instance as a new AMI for future use
Please continue with the next paper in this series, “Getting Started with the Amazon Cloud: Part IV,” to learn some of the operational aspects of running your OpenEdge application in the Amazon EC2

prOGreSS SOftware
Progress Software Corporation (NASDAQ: PRGS) is a global software company that enables enterprises to be operationally responsive to changing conditions and customer interactions as they occur Our goal is to enable our customers to capitalize on new opportunities, drive greater efficiencies, and reduce risk Progress offers a comprehensive portfolio of best-in-class infrastructure software spanning event-driven visibility and real-time response, open integration, data access and integration, and application development and management—all supporting on-premises and SaaS/cloud deployments Progress maximizes the benefits of operational responsiveness while minimizing IT complexity and total cost of ownership
wOrldwide headquarterS
Progress Software Corporation, 14 Oak Park, Bedford, MA 01730 USA Tel: +1 781 280-4000 Fax: +1 781 280-4095 On the Web at: www.progress.com
For regional international office locations and contact information, please refer to the Web page below:www.progress.com/worldwide
Progress, OpenEdge, and Business Making Progress are trademarks or registered trademarks of Progress Software Corporation or one of its affiliates or subsidiaries in the U S and other countries Any other trademarks contained herein are the property of their respective owners Specifications subject to change without notice
© 2009-2010 Progress Software Corporation and/or its subsidiaries or affiliates All rights reserved
Rev 02/10 | 6525-129678