getting started with nosql database table java driver · contents preface conventions used in this...
TRANSCRIPT

Oracle® NoSQL DatabaseGetting Started with NoSQL Database TableJava Driver
Release 18.3E85378-05February 2019

Oracle NoSQL Database Getting Started with NoSQL Database Table Java Driver, Release 18.3
E85378-05
Copyright © 2011, 2019, Oracle and/or its affiliates. All rights reserved.
This software and related documentation are provided under a license agreement containing restrictions onuse and disclosure and are protected by intellectual property laws. Except as expressly permitted in yourlicense agreement or allowed by law, you may not use, copy, reproduce, translate, broadcast, modify,license, transmit, distribute, exhibit, perform, publish, or display any part, in any form, or by any means.Reverse engineering, disassembly, or decompilation of this software, unless required by law forinteroperability, is prohibited.
The information contained herein is subject to change without notice and is not warranted to be error-free. Ifyou find any errors, please report them to us in writing.
If this is software or related documentation that is delivered to the U.S. Government or anyone licensing it onbehalf of the U.S. Government, then the following notice is applicable:
U.S. GOVERNMENT END USERS: Oracle programs, including any operating system, integrated software,any programs installed on the hardware, and/or documentation, delivered to U.S. Government end users are"commercial computer software" pursuant to the applicable Federal Acquisition Regulation and agency-specific supplemental regulations. As such, use, duplication, disclosure, modification, and adaptation of theprograms, including any operating system, integrated software, any programs installed on the hardware,and/or documentation, shall be subject to license terms and license restrictions applicable to the programs.No other rights are granted to the U.S. Government.
This software or hardware is developed for general use in a variety of information management applications.It is not developed or intended for use in any inherently dangerous applications, including applications thatmay create a risk of personal injury. If you use this software or hardware in dangerous applications, then youshall be responsible to take all appropriate fail-safe, backup, redundancy, and other measures to ensure itssafe use. Oracle Corporation and its affiliates disclaim any liability for any damages caused by use of thissoftware or hardware in dangerous applications.
Oracle and Java are registered trademarks of Oracle and/or its affiliates. Other names may be trademarks oftheir respective owners.
Intel and Intel Xeon are trademarks or registered trademarks of Intel Corporation. All SPARC trademarks areused under license and are trademarks or registered trademarks of SPARC International, Inc. AMD, Opteron,the AMD logo, and the AMD Opteron logo are trademarks or registered trademarks of Advanced MicroDevices. UNIX is a registered trademark of The Open Group.
This software or hardware and documentation may provide access to or information about content, products,and services from third parties. Oracle Corporation and its affiliates are not responsible for and expresslydisclaim all warranties of any kind with respect to third-party content, products, and services unless otherwiseset forth in an applicable agreement between you and Oracle. Oracle Corporation and its affiliates will not beresponsible for any loss, costs, or damages incurred due to your access to or use of third-party content,products, or services, except as set forth in an applicable agreement between you and Oracle.

Contents
Preface
Conventions Used in This Book viii
1 Developing for Oracle NoSQL Database
Configuring Logging 1-2
Obtaining a KVStore Handle 1-2
Using the KVStoreConfig Class 1-3
Using the Authentication APIs 1-4
Configuring SSL 1-4
Identifying the Trust Store 1-4
Setting the SSL Transport Property 1-5
Authentication using a LoginCredentials Instance 1-5
Renewing Expired Login Credentials 1-7
Authentication using Kerberos 1-9
Authentication using Kerberos and JAAS 1-11
Unauthorized Access 1-13
2 Introduction to Oracle KVLite
Starting KVLite 2-1
Stopping and Restarting KVLite 2-2
Verifying the Installation 2-2
kvlite Utility Command Line Parameter Options 2-3
3 Introducing Oracle NoSQL Database Tables and Indexes
Defining Tables 3-1
Executing DDL Statements From the Admin CLI 3-3
Supported Table Data Types 3-4
Record Fields 3-4
Defining Child Tables 3-5
Table Evolution 3-6
iii

Defining Tables With an IDENTITY Column 3-6
Sequence Generator Attributes 3-7
Creating Tables With an IDENTITY Column 3-9
Adding an IDENTITY Column to an Existing Table 3-12
Altering or Dropping an IDENTITY Column 3-13
Inserting IDENTITY Values from the SQL CLI 3-15
Inserting IDENTITY Values Programmatically 3-18
Defining Tables using Existing Avro Schema 3-23
Tables Compatible with Key-Only Entries (-r2-compat) 3-25
Creating Indexes 3-25
4 Introducing Oracle NoSQL Database Namespaces
Creating Namespaces 4-2
Granting Authorization Access to Namespaces 4-3
Using and Setting Namespaces 4-4
Showing and Describing Namespaces 4-5
Dropping Namespaces 4-6
5 Primary and Shard Key Design
Primary Keys 5-1
Data Type Limitations 5-2
Partial Primary Keys 5-2
Shard Keys 5-3
Row Data 5-3
6 Writing and Deleting Table Rows
Write Exceptions 6-1
Writing Rows to a Table in the Store 6-1
Writing Rows to a Child Table 6-3
Other put Operations 6-4
Bulk Put Operations 6-4
Using Time to Live 6-7
Specifying a TTL Value 6-7
Updating a TTL Value 6-8
Deleting TTL Expiration 6-9
Setting Default Table TTL Values 6-10
Deleting Rows from the Store 6-10
iv

Using multiDelete() 6-11
7 Reading Table Rows
Read Exceptions 7-1
Retrieving a Single Row 7-2
Retrieve a Child Table 7-3
Using multiGet() 7-4
Iterating over Table Rows 7-6
Specifying Field Ranges 7-9
Iterating with Nested Tables 7-11
Reading Indexes 7-15
Parallel Scans 7-19
Bulk Get Operations 7-20
8 Using Data Types
Using Arrays 8-1
Using Binary 8-2
Using Enums 8-3
Using Fixed Binary 8-4
Using JSON 8-6
Using Maps 8-7
Using Embedded Records 8-8
9 Indexing Non-Scalar Data Types
Indexing Arrays 9-1
Indexing JSON Fields 9-2
Indexing Maps 9-4
Indexing by Map Keys 9-4
Indexing by Map Values 9-6
Indexing by a Specific Map Key Name 9-8
Indexing by Map Key and Value 9-9
Indexing Embedded Records 9-11
10
Using Row Versions
v

11
Consistency Guarantees
Specifying Consistency Policies 11-1
Using Simple Consistency 11-2
Using Time-Based Consistency 11-3
Using Version-Based Consistency 11-4
12
Durability Guarantees
Setting Acknowledgment-Based Durability Policies 12-2
Setting Synchronization-Based Durability Policies 12-3
Setting Durability Guarantees 12-3
13
Executing a Sequence of Operations
Sequence Errors 13-1
Creating a Sequence 13-1
Executing a Sequence 13-4
14
Introduction to SQL for Oracle NoSQL Database
Running a simple query 14-1
Using binding variables 14-2
Accessing metadata 14-3
Using a query to update data 14-3
A JSON By Example
Sample Data A-2
UpdateJSON A-5
UpdateJSON.run() A-6
UpdateJSON.defineTable() A-7
UpdateJSON.createIndex() A-8
UpdateJSON.runDDL() A-8
UpdateJSON.updateTableWithoutQuery() A-9
UpdateJSON.updateTableWithIndex() A-10
UpdateJSON.updateTableUsingSQLQuery() A-11
UpdateJSON.updateZipCode() A-12
UpdateJSON.loadTable() A-12
UpdateJSON.displayTable() A-14
UpdateJSON.displayResult() A-15
vi
UpdateJSON.parseArgs() A-16
B Table Data Definition Language Overview
Name Constraints B-1
DDL Comments B-2
CREATE TABLE B-2
Field Definitions B-3
Supported Data Types B-4
Field Constraints B-5
Integer Serialized Constraints B-5
COMMENT B-6
DEFAULT B-6
IDENTITY B-6
NOT NULL B-7
USING TTL B-7
Table Creation Examples B-8
Modify Table Definitions B-9
ALTER TABLE ADD field B-9
ALTER TABLE DROP Option B-10
ALTER TABLE USING TTL B-10
DROP TABLE B-11
CREATE INDEX B-12
Indexable Field Types B-12
Simple Indexes B-12
Multi-Key Indexes B-13
Multi-Key Index Restrictions B-14
JSON Indexes B-16
CREATE FULL TEXT INDEX B-16
DROP INDEX B-17
DESCRIBE AS JSON TABLE B-18
DESCRIBE AS JSON INDEX B-19
SHOW TABLES B-19
SHOW INDEXES B-19
C Third Party Licenses
vii

Preface
There are two different APIs that can be used to write Oracle NoSQL Databaseapplications: the original Key/Value API, and the Table API. In addition, the Key/ValueAPI is available in Java and C. The Table API is available in Java, C, node.js(Javascript), Python, and C#. This document describes how to write Oracle NoSQLDatabase applications using the Table API in Java.
Note:
Most application developers should use one of the Table drivers because theTable API offers important features not found in the Key/Value API. The Key/Value API will no longer be enhanced in future releases of Oracle NoSQLDatabase.
This document provides the concepts surrounding Oracle NoSQL Database, dataschema considerations, as well as introductory programming examples.
This document is aimed at the software engineer responsible for writing an OracleNoSQL Database application.
Conventions Used in This BookThe following typographical conventions are used within in this manual:
Class names are represented in monospaced font, as are method names. For example:"The KVStoreConfig() constructor returns a KVStoreConfig class object."
Variable or non-literal text is presented in italics. For example: "Go to your KVHOMEdirectory."
Program examples are displayed in a monospaced font on a shaded background. Forexample:
import oracle.kv.KVStore;import oracle.kv.KVStoreConfig;
...
KVStoreConfig kconfig = new KVStoreConfig("exampleStore", "node1.example.org:5088, node2.example.org:4129");KVStore kvstore = null;
Preface
viii

In some situations, programming examples are updated from one chapter to the next.When this occurs, the new code is presented in monospaced bold font. For example:
import oracle.kv.KVStore;import oracle.kv.KVStoreConfig; import oracle.kv.KVStoreFactory;
...
KVStoreConfig kconfig = new KVStoreConfig("exampleStore", "node1.example.org:5088, node2.example.org:4129");KVStore kvstore = null;
try { kvstore = KVStoreFactory.getStore(kconfig);} catch (FaultException fe) { // Some internal error occurred. Either abort your application // or retry the operation.}
Note:
Finally, notes of special interest are represented using a note block such asthis.
Preface
ix

1Developing for Oracle NoSQL Database
You access the data in the Oracle NoSQL Database KVStore using Java drivers thatare provided for the product. In addition to the Java drivers, several other drivers arealso available. They are:
1. Java Key/Value Driver
2. C Table Driver
3. C Key/Value Driver
4. Python Table Driver
5. node.js Table Driver
6. C# Table Driver
Note:
New users should use one of the Table drivers unless they require a featureonly available in the Key/Value API (such as Large Object support). The Key/Value API will no longer be enhanced in future releases of Oracle NoSQLDatabase.
The Java and C Key/Value driver provides access to store data using key/value pairs.All other drivers provide access using tables. Also, the Java Key/Value driver providesLarge Object (LOB) support that as of this release does not appear in the otherdrivers. However, users of the Java Tables driver can access the LOB API, eventhough the LOB API is accessed using the Key/Value interface.
Finally, the Java driver provides access to SQL for Oracle NoSQL Database, so youcan run queries. For more information see Introduction to SQL for Oracle NoSQLDatabase.
Users of the Table drivers are able to create and use secondary indexing. The Javaand C Key/Value drivers do not provide this support.
To work, the C Table, Python Table, node.js Table, and C# Table drivers require useof a proxy server which translates network activity between the driver and the OracleNoSQL Database store. The proxy is written in Java, and can run on any machine thatis network accessible by both your client code and the Oracle NoSQL Database store.However, for performance and security reasons, Oracle recommends that you run theproxy on the same local host as your driver, and that the proxy be used in a 1:1configuration with your drivers (that is, each instance of the proxy should be used withjust a single driver instance).
Regardless of the driver you decide to use, the provided classes and methods allowyou to write data to the store, retrieve it, and delete it. You use these APIs to defineconsistency and durability guarantees. It is also possible to execute a sequence ofstore operations atomically so that all the operations succeed, or none of them do.
1-1

The rest of this book introduces the Java APIs that you use to access the store, andthe concepts that go along with them.
Configuring LoggingThe Oracle NoSQL Database Java drivers use standard Java logging to capturedebugging output using loggers in the "oracle.kv" hierarchy. These loggers areconfigured to use a oracle.kv.util.ConsoleHandler class, and to ignore anyhandlers for loggers above oracle.kv in the logger hierarchy. As a result, logging willbe performed to the console at whatever logging levels are configured for the variousloggers and for the oracle.kv.util.ConsoleHandler class. You can adjust whatconsole output appears for these loggers by modifying the logging levels for theloggers and the logging handler in their application's logging configuration file.
You can also configure additional logging handlers for all loggers used by the Javadriver by specifying handlers for the oracle.kv logger.
For example, if you want to enable file output for Java driver logging at the INFO levelor above, add the following to your application's configuration file (that is, the file youidentify using the java.util.logging.config.file system property):
# Set the logging level for the FileHandler logging handler to INFOjava.util.logging.FileHandler.level=INFO
# Set the logging level for all Java driver loggers to INFOoracle.kv.level=INFO
# Specify that Java driver loggers should supply log output to the# standard file handleroracle.kv.handlers=java.util.logging.FileHandler
For information on managing logging in a Java application, see thejava.util.logging Javadoc.
Obtaining a KVStore HandleTo acccess the store for any reason, you must first obtain a KVStore handle, using theKVStoreFactory.getStore() method.
When you get a KVStore handle, provide a KVStoreConfig object to the handle. Theconfiguration object identifies important properties about the store that you areaccessing. This section describes the KVStoreConfig class. Minimally, use this classto identify the following information:
• The store name. The name you provide must be identical to the name used whenyou installed the store.
• The network contact information for one or more helper hosts. Such contactinformation consists of the network name and port information for hosts currentlybelonging to the store. Identify multiple hosts using an array of strings, from oneelement to several. We recommend using multiple hosts, since any host can bedown temporarily, and other hosts are then useful.
In addition to the KVStoreConfig class object, you can also provide aPasswordCredentials class object to KVStoreFactory.getStore(). Do this if you are
Chapter 1Configuring Logging
1-2

using a store configured to require authentication, which is recommended. See Usingthe Authentication APIs for more information.
For a store that does not require authentication, get a store handle like this:
package kvstore.basicExample;
import oracle.kv.KVStore;import oracle.kv.KVStoreConfig;import oracle.kv.KVStoreFactory;
...
String[] hhosts = {"n1.example.org:5088", "n2.example.org:4129"};KVStoreConfig kconfig = new KVStoreConfig("exampleStore", hhosts);KVStore kvstore = KVStoreFactory.getStore(kconfig);
Using the KVStoreConfig ClassUse the KVStoreConfig class to describe properties about a KVStore handle. Most ofthe properties are optional, and those that are required are provided when youconstruct a class instance.
The properties that you can provide using KVStoreConfig are as follows:
• Consistency
Consistency is a property describing how likely it is that a record read from areplica node is identical to the same record stored on a master node. For moreinformation, see Consistency Guarantees.
• Durability
Durability is a property describing how likely it is that a write operation performedon the master node will not be lost if the master node is lost or is shut downabnormally. For more information, see Durability Guarantees.
• Helper Hosts
Helper hosts are hostname and port pairs that identify how to contact helper nodeswithin the store. Use an array of strings to identify multiple helper hosts . Typically,you will obtain these hostname and port pairs from the store's deployer oradministrator. For example:
String[] hhosts = {"n1.example.org:3333", "n2.example.org:3333"};
• Request Timeout
Configures the amount of time the KVStore handle will wait for an operation tocomplete before it times out.
• Store name
Identifies the name of the store.
• Password credentials and optionally a reauthentication handler
See the next section on authentication.
Chapter 1Obtaining a KVStore Handle
1-3

Using the Authentication APIsYou can install Oracle NoSQL Database so that your client code does not have toauthenticate to the store. (For the sake of clarity, most of the examples in this book donot perform authentication.) However, if you want your store to operate securely, youcan require authentication. Requiring authentication incurs a performance cost, due tothe overhead of using SSL and authentication. While we recommend that yourproduction store requires authentication over SSL, some sites that are particularlyperformance sensitive can forgo that level of security.
Authentication involves sending username/password credentials to the store at thetime a store handle is acquired.
If you configure your store to support authentication, it is automatically configured tocommunicate with clients using SSL. The use of SSL ensures privacy of theauthentication and other sensitive information. To use SSL, you must install SSLcertificates on the machines where your client code runs, to validate that the storebeing accessed is trustworthy.
Be aware that you can authenticate to the store in several different ways. You can useKerberos, or you can specify a LoginCredentials implementation instance toKVStoreFactory.getStore(). (Oracle NoSQL Database provides thePasswordCredentials class as a LoginCredentials implementation.) If you useKerberos, you can either use security properties that Oracle NoSQL Databaseunderstands to provide necessary Kerberos information, or you can use the JavaAuthentication and Authorization Service (JAAS) programming framework.
For information on using LoginCredentials, see Authentication using aLoginCredentials Instance. For information on using Kerberos, see Authenticationusing Kerberos. For information on using JAAS with Kerberos, see Authenticationusing Kerberos and JAAS.
Configuring a store for authentication is described in the Oracle NoSQL DatabaseSecurity Guide.
Configuring SSLIf you are using a secure store, then all communications between your client code andthe store is transported over SSL, including authentication credentials. You musttherefore configure your client code to use SSL. To do this, you identify where the SSLcertificate data is, and you also separately indicate that the SSL transport is to beused.
Identifying the Trust StoreWhen an Oracle NoSQL Database store is configured to use the SSL transport, aseries of security files are generated using a security configuration tool. One of thesefiles is the client.trust file, which must be copied to any machine running OracleNoSQL Database client code.
For information on using the security configuration tool, see the Oracle NoSQLDatabase Security Guide.
Your code must be told where the client.trust file can be found because it containsthe certificates necessary to establish an SSL connection with the store. You indicate
Chapter 1Using the Authentication APIs
1-4
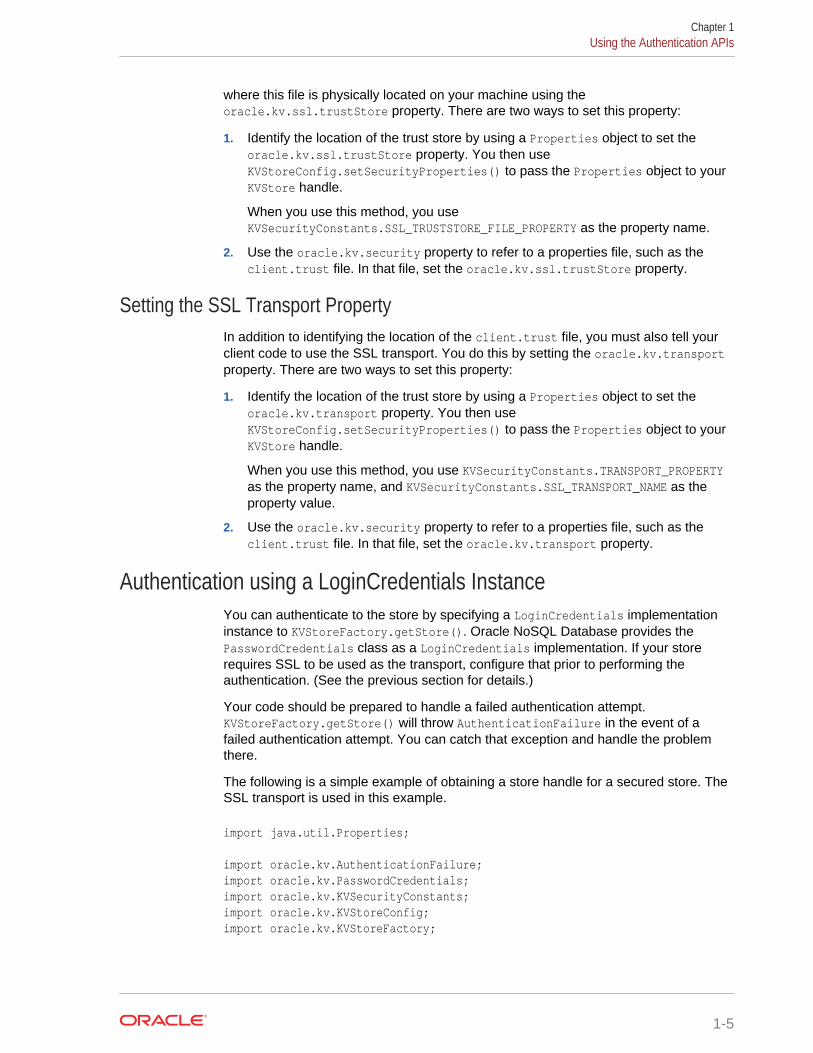
where this file is physically located on your machine using theoracle.kv.ssl.trustStore property. There are two ways to set this property:
1. Identify the location of the trust store by using a Properties object to set theoracle.kv.ssl.trustStore property. You then useKVStoreConfig.setSecurityProperties() to pass the Properties object to yourKVStore handle.
When you use this method, you useKVSecurityConstants.SSL_TRUSTSTORE_FILE_PROPERTY as the property name.
2. Use the oracle.kv.security property to refer to a properties file, such as theclient.trust file. In that file, set the oracle.kv.ssl.trustStore property.
Setting the SSL Transport PropertyIn addition to identifying the location of the client.trust file, you must also tell yourclient code to use the SSL transport. You do this by setting the oracle.kv.transportproperty. There are two ways to set this property:
1. Identify the location of the trust store by using a Properties object to set theoracle.kv.transport property. You then useKVStoreConfig.setSecurityProperties() to pass the Properties object to yourKVStore handle.
When you use this method, you use KVSecurityConstants.TRANSPORT_PROPERTYas the property name, and KVSecurityConstants.SSL_TRANSPORT_NAME as theproperty value.
2. Use the oracle.kv.security property to refer to a properties file, such as theclient.trust file. In that file, set the oracle.kv.transport property.
Authentication using a LoginCredentials InstanceYou can authenticate to the store by specifying a LoginCredentials implementationinstance to KVStoreFactory.getStore(). Oracle NoSQL Database provides thePasswordCredentials class as a LoginCredentials implementation. If your storerequires SSL to be used as the transport, configure that prior to performing theauthentication. (See the previous section for details.)
Your code should be prepared to handle a failed authentication attempt.KVStoreFactory.getStore() will throw AuthenticationFailure in the event of afailed authentication attempt. You can catch that exception and handle the problemthere.
The following is a simple example of obtaining a store handle for a secured store. TheSSL transport is used in this example.
import java.util.Properties;
import oracle.kv.AuthenticationFailure;import oracle.kv.PasswordCredentials;import oracle.kv.KVSecurityConstants;import oracle.kv.KVStoreConfig;import oracle.kv.KVStoreFactory;
Chapter 1Using the Authentication APIs
1-5

KVStore store = null;try { /* * storeName, hostName, port, username, and password are all * strings that would come from somewhere else in your * application. */ KVStoreConfig kconfig = new KVStoreConfig(storeName, hostName + ":" + port);
/* Set the required security properties */ Properties secProps = new Properties(); secProps.setProperty(KVSecurityConstants.TRANSPORT_PROPERTY, KVSecurityConstants.SSL_TRANSPORT_NAME); secProps.setProperty (KVSecurityConstants.SSL_TRUSTSTORE_FILE_PROPERTY, "/home/kv/client.trust"); kconfig.setSecurityProperties(secProps);
store = KVStoreFactory.getStore(kconfig, new PasswordCredentials(username, password.toCharArray(), null /* ReauthenticateHandler */));} catch (AuthenticationFailureException afe) { /* * Could potentially retry the login, possibly with different * credentials, but in this simple example, we just fail the * attempt. */ System.out.println("authentication failed!"); return;}
Another way to handle the login is to place your authentication credentials in a flat textfile that contains all the necessary properties for authentication. In order for this towork, a password store must have been configured for your Oracle NoSQL Databasestore. (See the Oracle NoSQL Database Security Guide for information on setting uppassword stores).
For example, suppose your store has been configured to use a password filepassword store and it is contained in a file called login.pwd. In that case, you mightcreate a login properties file called login.txt that looks like this:
oracle.kv.auth.username=clientUID1oracle.kv.auth.pwdfile.file=/home/nosql/login.pwdoracle.kv.transport=ssloracle.kv.ssl.trustStore=/home/nosql/client.trust
In this case, you can perform authentication in the following way:
import oracle.kv.AuthenticationFailure;import oracle.kv.PasswordCredentials;
Chapter 1Using the Authentication APIs
1-6
import oracle.kv.KVStoreConfig;import oracle.kv.KVStoreFactory;
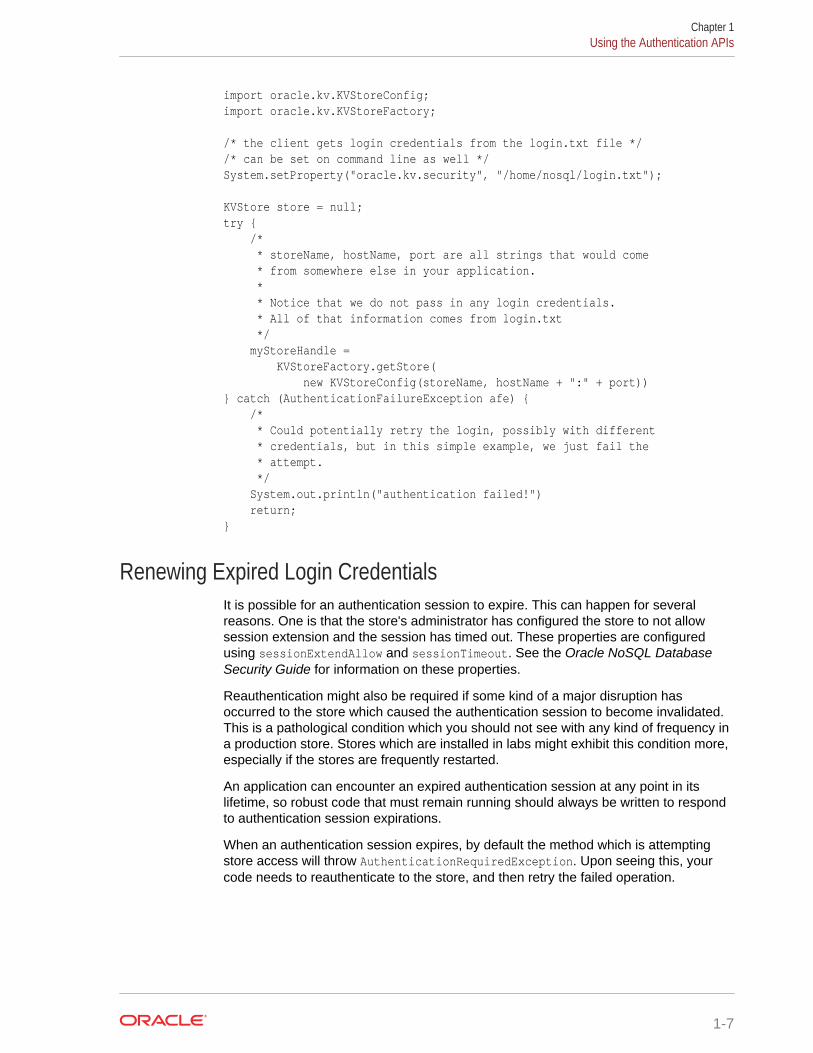
/* the client gets login credentials from the login.txt file *//* can be set on command line as well */System.setProperty("oracle.kv.security", "/home/nosql/login.txt");
KVStore store = null;try { /* * storeName, hostName, port are all strings that would come * from somewhere else in your application. * * Notice that we do not pass in any login credentials. * All of that information comes from login.txt */ myStoreHandle = KVStoreFactory.getStore( new KVStoreConfig(storeName, hostName + ":" + port)) } catch (AuthenticationFailureException afe) { /* * Could potentially retry the login, possibly with different * credentials, but in this simple example, we just fail the * attempt. */ System.out.println("authentication failed!") return;}
Renewing Expired Login CredentialsIt is possible for an authentication session to expire. This can happen for severalreasons. One is that the store's administrator has configured the store to not allowsession extension and the session has timed out. These properties are configuredusing sessionExtendAllow and sessionTimeout. See the Oracle NoSQL DatabaseSecurity Guide for information on these properties.
Reauthentication might also be required if some kind of a major disruption hasoccurred to the store which caused the authentication session to become invalidated.This is a pathological condition which you should not see with any kind of frequency ina production store. Stores which are installed in labs might exhibit this condition more,especially if the stores are frequently restarted.
An application can encounter an expired authentication session at any point in itslifetime, so robust code that must remain running should always be written to respondto authentication session expirations.
When an authentication session expires, by default the method which is attemptingstore access will throw AuthenticationRequiredException. Upon seeing this, yourcode needs to reauthenticate to the store, and then retry the failed operation.
Chapter 1Using the Authentication APIs
1-7

You can manually reauthenticate to the store by using the KVStore.login() method.This method requires you to provide the login credentials via a LoginCredentialsclass instance (such as PasswordCredentials):
try { ... /* Store access code happens here */ ...} catch (AuthenticationRequiredException are) { /* * myStoreHandle is a KVStore class instance. * * pwCreds is a PasswordCredentials class instance, obtained * from somewhere else in your code. */ myStoreHandle.login(pwCreds);}
Note that this is not required if you use the oracle.kv.auth.username andoracle.kv.auth.pwdfile.file properties, as shown in the previous section. In thatcase, your Oracle NoSQL Database client code will automatically and silentlyreauthenticate your client using the values specified by those properties.
A third option is to create a ReauthenticationHandler class implementation thatperforms your reauthentication for you. This option is only necessary if you provided aLoginCredentials implementation instance (that is, PasswordCredentials) in a call toKVStoreFactory.getStore(), and you want to avoid a subsequent need to retryoperations by catching AuthenticationRequiredException.
A truly robust example of a ReauthenticationHandler implementation is beyond thescope of this manual (it would be driven by highly unique requirements that areunlikely to be appropriate for your site). Still, in the interest of completeness, thefollowing shows a very simple and not very elegant implementation ofReauthenticationHandler:
package kvstore.basicExample
import oracle.kv.ReauthenticationHandler;import oracle.kv.PasswordCredentials;
public class MyReauthHandler implements ReauthenticationHandler { public void reauthenticate(KVStore reauthStore) { /* * The code to obtain the username and password strings would * go here. This should be consistent with the code to perform * simple authentication for your client. */ PasswordCredentials cred = new PasswordCredentials(username, password.toCharArray());
reauthStore.login(cred); }}
Chapter 1Using the Authentication APIs
1-8

You would then supply a MyReauthHandler instance when you obtain your storehandle:
import java.util.Properties;
import oracle.kv.AuthenticationFailure;import oracle.kv.PasswordCredentials;import oracle.kv.KVSecurityConstants;import oracle.kv.KVStoreConfig;import oracle.kv.KVStoreFactory;
import kvstore.basicExample.MyReauthHandler;
KVStore store = null;try { /* * storeName, hostName, port, username, and password are all * strings that would come from somewhere else in your * application. The code you use to obtain your username * and password should be consistent with the code used to * obtain that information in MyReauthHandler. */ KVStoreConfig kconfig = new KVStoreConfig(storeName, hostName + ":" + port);
/* Set the required security properties */ Properties secProps = new Properties(); secProps.setProperty(KVSecurityConstants.TRANSPORT_PROPERTY, KVSecurityConstants.SSL_TRANSPORT_NAME); secProps.setProperty (KVSecurityConstants.SSL_TRUSTSTORE_FILE_PROPERTY, "/home/kv/client.trust"); kconfig.setSecurityProperties(secProps);
store = KVStoreFactory.getStore(kconfig, new PasswordCredentials(username, password.toCharArray())); new MyReauthHandler());} catch (AuthenticationFailureException afe) { /* * Could potentially retry the login, possibly with different * credentials, but in this simple example, we just fail the * attempt. */ System.out.println("authentication failed!") return;}
Authentication using KerberosYou can authenticate to the store by using Kerberos. To do this, you must alreadyhave installed Kerberos and obtained the necessary login and service information. Seethe Oracle NoSQL Database Security Guide for details.
Chapter 1Using the Authentication APIs
1-9

The following is a simple example of obtaining a store handle for a secured store, andusing Kerberos to authenticate. Information specific to Kerberos, such as the Kerberosuser name, is specified using KVSecurityConstants that are set as properties to theKVStoreConfig instance which is used to create the store handle.
import java.util.Properties;
import oracle.kv.KVSecurityConstants;import oracle.kv.KVStore;import oracle.kv.KVStoreConfig;import oracle.kv.KVStoreFactory;
KVStore store = null;/* * storeName, hostName, port, username, and password are all * strings that would come from somewhere else in your * application. */KVStoreConfig kconfig = new KVStoreConfig(storeName, hostName + ":" + port);
/* Set the required security properties */Properties secProps = new Properties();
/* Set the user name */secProps.setProperty(KVSecurityConstants.AUTH_USERNAME_PROPERTY, "krbuser");
/* Use Kerberos */secProps.setProperty(KVSecurityConstants.AUTH_EXT_MECH_PROPERTY, "kerberos");
/* Set SSL for the wire level encryption */secProps.setProperty(KVSecurityConstants.TRANSPORT_PROPERTY, KVSecurityConstants.SSL_TRANSPORT_NAME);
/* Set the location of the public trust file for SSL */secProps.setProperty (KVSecurityConstants.SSL_TRUSTSTORE_FILE_PROPERTY, "/home/kv/client.trust");
/* Set the service principal associated with the helper host */final String servicesDesc = "localhost:oraclenosql/[email protected]";secProps.setProperty( KVSecurityConstants.AUTH_KRB_SERVICES_PROPERTY, servicesDesc);
/* * Set the default realm name to permit using a short name for the * user principal */secProps.setProperty(KVSecurityConstants.AUTH_KRB_REALM_PROPERTY, "EXAMPLE.COM");
Chapter 1Using the Authentication APIs
1-10

/* Specify the client keytab file location */secProps.setProperty(KVSecurityConstants.AUTH_KRB_KEYTAB_PROPERTY, "/tmp/krbuser.keytab");
kconfig.setSecurityProperties(secProps);
store = KVStoreFactory.getStore(kconfig);
Authentication using Kerberos and JAASYou can authenticate to the store by using Kerberos and the Java Authentication andAuthorization Service (JAAS) login API. To do this, you must already have installedKerberos and obtained the necessary login and service information. See the OracleNoSQL Database Security Guide for details.
The following is a simple example of obtaining a store handle for a secured store, andusing Kerberos with JAAS to authenticate.
To use JAAS, you create a configuration file that contains required Kerberosconfiguration information. For example, the following could be placed in the file namedjaas.config:
oraclenosql { com.sun.security.auth.module.Krb5LoginModule required principal="krbuser" useKeyTab="true" keyTab="/tmp/krbuser.keytab";};
To identify this file to your application, set the Java propertyjava.security.auth.login.config using the -D option when you run yourapplication.
Beyond that, you use KVSecurityConstants to specify necessary properties, such asthe SSL transport. You can also specify necessary Kerberos properties, such as theKerberos user name, using KVSecurityConstants, or you can use theKerberosCredentials class to do this.
import java.security.PrivilegedActionException;import java.security.PrivilegedExceptionAction;import java.util.Properties;
import javax.security.auth.Subject;import javax.security.auth.login.LoginContext;import javax.security.auth.login.LoginException;
import oracle.kv.KerberosCredentials;import oracle.kv.KVSecurityConstants;import oracle.kv.KVStore;import oracle.kv.KVStoreConfig;import oracle.kv.KVStoreFactory;
/* * storeName, hostName, port, username, and password are all
Chapter 1Using the Authentication APIs
1-11

* strings that would come from somewhere else in your * application. */final KVStoreConfig kconfig = new KVStoreConfig(storeName, hostName + ":" + port);
/* Set the required security properties */Properties secProps = new Properties();
/* Set SSL for the wire level encryption */secProps.setProperty(KVSecurityConstants.TRANSPORT_PROPERTY, KVSecurityConstants.SSL_TRANSPORT_NAME);
/* Set the location of the public trust file for SSL */secProps.setProperty (KVSecurityConstants.SSL_TRUSTSTORE_FILE_PROPERTY, "/home/kv/client.trust");
/* Use Kerberos */secProps.setProperty(KVSecurityConstants.AUTH_EXT_MECH_PROPERTY, "kerberos");
/* Set Kerberos properties */final Properties krbProperties = new Properties();
/* Set the service principal associated with the helper host */final String servicesPpal = "localhost:oraclenosql/[email protected]";krbProperties.setProperty(KVSecurityConstants.AUTH_KRB_SERVICES_PROPERTY, hostName + ":" + servicesPpal);
/* Set default realm name, because the short name * for the user principal is used. */krbProperties.setProperty(KVSecurityConstants.AUTH_KRB_REALM_PROPERTY, "EXAMPLE.COM");
/* Specify Kerberos principal */final KerberosCredentials krbCreds = new KerberosCredentials("krbuser", krbProperties);
try { /* Get a login context */ final Subject subj = new Subject(); final LoginContext lc = new LoginContext("oraclenosql", subj);
/* Attempt to log in */ lc.login();
/* Get the store using the credentials specified in the subject */ kconfig.setSecurityProperties(secProps);
store = Subject.doAs( subj, new PrivilegedExceptionAction<KVStore>() { @Override
Chapter 1Using the Authentication APIs
1-12

public KVStore run() throws Exception { return KVStoreFactory.getStore(kconfig, krbCreds, null); } });} catch (LoginException le) { // LoginException handling goes here} catch (PrivilegedActionException pae) { // PrivilegedActionException handling goes here} catch (Exception e) { // General Exception handling goes here}
Unauthorized AccessClients which must authenticate to a store are granted some amount of access to thestore. This could range from a limited set of privileges to full, complete access. Theamount of access is defined by the roles and privileges granted to the authenticatinguser. Therefore, a call to the Oracle NoSQL Database API could fail due to not havingthe authorization to perform the operation. When this happens,UnauthorizedException will be thrown.
See the Oracle NoSQL Database Security Guide for information on how to define rolesand privileges for users.
When UnauthorizedException is seen, the operation should not be retried. Instead,the operation should either be abandoned entirely, or your code could attempt toreauthenticate using different credentials that would have the required permissionsnecessary to perform the operation. Note that a client can log out of a store usingKVStore.logout(). How your code logs back in is determined by how your store isconfigured for access, as described in the previous sections.
// Open a store handle, and perform authentication as you do// as described earlier in this section.
...
try { // When you attempt some operation (such as a put or delete) // to a secure store, you should catch UnauthorizedException // in case the user credentials you are using do not have the // privileges necessary to perform the operation.} catch (UnauthorizedException ue) { /* * When you see this, either abandon the operation entirely, * or log out and log back in with credentials that might * have the proper permissions for the operation. */ System.out.println("authorization failed!") return;}
Chapter 1Using the Authentication APIs
1-13

2Introduction to Oracle KVLite
KVLite is a single-node, single shard store. It usually runs in a single process and isused to develop and test client applications. KVLite is installed when you install OracleNoSQL Database.
Starting KVLiteYou start KVLite by using the kvlite utility, which can be found in KVHOME/lib/kvstore.jar. If you use this utility without any command line options, then KVLite willrun with the following default values:
• The store name is kvstore.
• The hostname is the local machine.
• The registry port is 5000.
• The directory where Oracle NoSQL Database data is placed (known as KVROOT)is ./kvroot.
• The administration process is turned on.
• Security is turned on.
This means that any processes that you want to communicate with KVLite can onlyconnect to it on the local host (127.0.0.1) using port 5000. If you want to communicatewith KVLite from some machine other than the local machine, then you must start itusing non-default values. The command line options are described later in thischapter.
For example:
> java -Xmx64m -Xms64m -jar KVHOME/lib/kvstore.jar kvlite
Note:
To avoid using too much heap space, you should specify the -Xmx and -Xmsflags for Java when running administrative and utility commands.
When KVLite has started successfully, it writes one of two statements to stdout,depending on whether it created a new store or is opening an existing store (thefollowing assumes security is enabled):
Generated password for user admin: passwordUser login file: ./kvroot/security/user.securityCreated new kvlite store with args:
2-1

-root ./kvroot -store <kvstore> -host localhost -port 5000 -secure-config enable
Note:
The password is randomly generated.
or
Opened existing kvlite store with config:-root ./kvroot -store <kvstore name> -host <localhost> -port 5000 -secure-config enable
where <kvstore name> is the name of the store and <localhost> is the name of thelocal host. It takes about 10 - 60 seconds before this message is issued, depending onthe speed of your machine.
Note that you will not get the command line prompt back until you stop KVLite.
Stopping and Restarting KVLiteTo stop KVLite, use ^C from within the shell where KVLite is running.
To restart the process, simply run the kvlite utility without any command line options.Do this even if you provided non-standard options when you first started KVLite. Thisis because KVLite remembers information such as the port value and the store namein between run times. You cannot change these values by using the command lineoptions.
If you want to start over with different options than you initially specified, delete theKVROOT directory (./kvroot, by default), and then re-run the kvlite utility withwhatever options you desire. Alternatively, specify the -root command line option,making sure to specify a location other than your original KVROOT directory, as wellas any other command line options that you want to change.
Verifying the InstallationThere are several things you can do to verify your installation, and ensure that KVLiteis running:
• Start another shell and run:
jps -m
The output should show KVLite (and possibly other things as well, depending onwhat you have running on your machine).
• Run the kvclient test application:
1. cd KVHOME
2. java -Xmx64m -Xms64m -jar lib/kvclient.jar
Chapter 2Stopping and Restarting KVLite
2-2

This should write the release to stdout:
12cR1.M.N.O...
• Download the examples package and unpack it so that the examples directory isin KVHOME. You can obtain the examples package from the same place as youobtained your server download package.
• Compile and run the example program:
1. cd KVHOME
2. Compile the example:
javac -g -cp lib/kvclient.jar:examples examples/hello/*.java
3. Run the example using all default parameters:
java -Xmx64m -Xms64m \-Doracle.kv.security=<KVROOT>/security/user.security \-cp lib/kvclient.jar:examples hello.HelloBigDataWorld
Or run it using non-default parameters, if you started KVLite using non-defaultvalues:
java -Xmx64m -Xms64m \-cp lib/kvclient.jar:examples hello.HelloBigDataWorld \ -host <hostname> -port <hostport> -store <kvstore name>
kvlite Utility Command Line Parameter OptionsThis section describes the command line options that you can use with the kvliteutility.
Note that you can only specify these options the first time KVLite is started. Most of theparameter values specified here are recorded in the KVHOME directory, and will beused when you restart the KVLite process regardless of what you provide ascommand line options. If you want to change your initial values, either delete yourKVHOME directory before starting KVLite again, or specify the -root option (with adifferent KVHOME location than you initially used) when you provide the new values.
• -help
Print a brief usage message, and exit.
• -host <hostname>
Identifies the name of the host on which KVLite is running.
If you want to access this instance of KVLite from remote machines, supply thelocal host's real hostname. Otherwise, specify localhost for this option.
• -noadmin
If this option is not specified, the administration user interface is started.
• -port <port>
Chapter 2kvlite Utility Command Line Parameter Options
2-3

Identifies the port on which KVLite is listening for client connections. Use thisoption ONLY if you are creating a new store.
• -root <path>
Identifies the path to the Oracle NoSQL Database home directory. This is thelocation where the store's database files are contained. The directory identifiedhere must exist. If the appropriate database files do not exist at the locationidentified by the option, they are created for you.
• -secure-config <enable|disable>
If enabled, causes security to be enabled for the store. This means all clientsconnecting to the store must present security credentials. Security is enabled bydefault.
• -store <storename>
Identifies the name of a new store. Use this option ONLY if you are creating a newstore.
See Using the Authentication APIs for information on configuring your client codeto connect to a secure store.
Chapter 2kvlite Utility Command Line Parameter Options
2-4

3Introducing Oracle NoSQL DatabaseTables and Indexes
Using the Table API (in one of the supported languages) is the recommended methodof developing an Oracle NoSQL Database client application. Table APIs let youmanipulate data using a tables metaphor, in which data is organized in multiplecolumns of data. The table APIs support an unlimited number of subtables. You canalso create indexes to improve query performance against your tables.
If you have a mix of clients accessing your store using both Table and Key/Value APIs,a remote chance exists that keys from different clients could collide. To avoid anypossible conflict between keys, however unlikely, make sure that every KV key haseither only:
• A single component
• A single major component
Note:
Throughout this manual, examples call TableAPI.getTable(). The cost ofcalling this API is relatively high, because doing so requires a round trip tothe store to fulfill the request. For optimal performance, call this methodsparingly in your code.
Defining TablesBefore an Oracle NoSQL Database client can read or write to a table in the store, youmust first create the tables. There are several ways to do this, but this documentfocuses on using Table DDL statements. You can submit these statements to the storedirectly using both the Admin command line interface (CLI), with the executecommand), or the SQL CLI. However, the recommended approach is to submit DDLstatements to the store programmatically. This section describes both direct andprogrammatic methods.
The DDL language that you use to define tables is described in Table Data DefinitionLanguage Overview. This section provides a brief overview of how to use thatlanguage.
As an introductory example, suppose you want to create a table called myTable withfour columns: item, description, count, and percentage. To create your table, usethe following statement from the SQL CLI:
sql-> CREATE TABLE myTable ( item STRING, description STRING,
3-1

count INTEGER, percentage DOUBLE, PRIMARY KEY (item) // Every table must have a primary key); Statement completed successfully
Note:
Primary keys are a concept that have not yet been introduced. See Primaryand Shard Key Design for a complete explanation of what they are, and howyou should use them. For now, be sure a primary key exists for every tableyou create, just as the previous example illustrates.
Executing DDL Statements Programmatically
To add the table definition to the store programmatically use the KVStore.execute()or KVStore.executeSync() methods. (The latter method executes the statementsynchronously.)
To use these methods, you must first establish a connection to the store. This isdescribed in Obtaining a KVStore Handle.
For example:
package kvstore.basicExample;
import oracle.kv.FaultException;import oracle.kv.StatementResult;import oracle.kv.KVStore;import oracle.kv.table.TableAPI;...
// store handle creation and open omitted
...
StatementResult result = null;String statement = null;
public void createTable() { StatementResult result = null; String statement = null;
try {
/* * Add a table to the database. * Execute this statement asynchronously. */
statement = "CREATE TABLE myTable (" + "item STRING," +
Chapter 3Defining Tables
3-2

"description STRING," + "count INTEGER," + "percentage DOUBLE," + "PRIMARY KEY (item))"; // Required" result = store.executeSync(statement);
displayResult(result, statement);
} catch (IllegalArgumentException e) { System.out.println("Invalid statement:\n" + e.getMessage()); } catch (FaultException e) { System.out.println ("Statement couldn't be executed, please retry: " + e); }}
private void displayResult(StatementResult result, String statement) { System.out.println("==========================="); if (result.isSuccessful()) { System.out.println("Statement was successful:\n\t" + statement); System.out.println("Results:\n\t" + result.getInfo()); } else if (result.isCancelled()) { System.out.println("Statement was cancelled:\n\t" + statement); } else { /* * statement was not successful: may be in error, or may still * be in progress. */ if (result.isDone()) { System.out.println("Statement failed:\n\t" + statement); System.out.println("Problem:\n\t" + result.getErrorMessage()); } else { System.out.println("Statement in progress:\n\t" + statement); System.out.println("Status:\n\t" + result.getInfo()); } }}
Executing DDL Statements From the Admin CLIYou can execute DDL statements using the Admin CLI's execute command. Thisexecutes DDL statements synchronously. For example:
kv-> execute "CREATE TABLE myTable (> item STRING, > description STRING, > count INTEGER, > percentage DOUBLE, > PRIMARY KEY (item))"
Chapter 3Defining Tables
3-3

Statement completed successfullykv->
Supported Table Data TypesYou specify schema for each column in an Oracle NoSQL Database table. Thisschema can be a primitive data type, or complex data types that are handled asobjects.
Oracle NoSQL Database tables support the following data types:
Data Type Description
Array An array of values, all of the same type.
Binary Implemented as a byte array with no predetermined fixed size.
Boolean
Double
Enum An enumeration, represented as an array of strings.
Fixed Binary Implemented as a byte array with no predetermined fixed size.
Float
Integer
Json Any valid JSON data.
Long
Number A numeric type capable of handling any type of number or anyvalue or precision.
Map An unordered map type, where all entries are constrained bya single type.
Records See the following section.
String
Timestamp An absolute timestamp encapsulating a date and, optionally, atime value.
Record FieldsAs described in Defining Child Tables, you can create child tables to hold subordinateinformation, such as addresses in a contacts database, or vendor contact informationfor an inventory system. When you do this, you can create an unlimited number ofrows in the child table, and you can index the fields in the child table's rows.
However, you do not need to create child tables to organize subordinate data. If youhave simple requirements for subordinate data, you can use record fields, instead ofchild tables. In general, you can use record fields instead of child tables if you wantonly a fixed, small number of instances of the record for each parent table row. Foranything beyond trivial cases, use child tables.
Note:
There is no downside to using child tables for even trivial cases.
Chapter 3Defining Tables
3-4

The assumption when using record fields is that you have a fixed, known number ofrecords to manage (unless you organize them as arrays). For example, in a contactsdatabase, child tables let you have an unlimited number of addresses associated foreach user. By using records, rather than child tables, you can associate a fixednumber of addresses by creating a record field for each supported address (home andwork, for example).
For example:
CREATE TABLE myContactsTable ( uid STRING, surname STRING, familiarName STRING, homePhone STRING, workPhone STRING, homeAddress RECORD (street STRING, city STRING, state STRING, zip INTEGER), workAddress RECORD (street STRING, city STRING, state STRING, zip INTEGER), PRIMARY KEY(uid))
Alternatively, you can create an array of record fields. This lets you create an unlimitednumber of address records per field. In general, however, you should use child tablesin this case.
CREATE TABLE myContactsTable ( uid STRING, surname STRING, familiarName STRING, homePhone STRING, workPhone STRING, addresses ARRAY(RECORD (street STRING, city STRING, state STRING, zip INTEGER))), PRIMARY KEY(uid))
Defining Child TablesOracle NoSQL Database tables can be organized in a parent/child hierarchy. There isno limit to how many child tables you can create, nor is there a limit to how deep thechild table nesting can go.
By default, child tables are not retrieved when you retrieve a parent table, nor is theparent retrieved when you retrieve a child table.
To create a child table, you name the table using the format:<parentTableName>.<childTableName>. For example, suppose you had the trivialtable called myInventory:
CREATE TABLE myInventory ( itemCategory STRING, description STRING, PRIMARY KEY (itemCategory) )
Chapter 3Defining Tables
3-5

We can create a child table called itemDetails in the following way:
CREATE TABLE myInventory.itemDetails ( itemSKU STRING, itemDescription STRING, price FLOAT, inventoryCount INTEGER, PRIMARY KEY (itemSKU))
Note that when you do this, the child table inherits the parent table's primary key. Inthis trivial case, the child table's primary key is actually two fields: itemCategory anditemSKU. This has several ramifications, one of which is that the parent's primary keyfields are retrieved when you retrieve the child table. See Retrieve a Child Table formore information.
Table EvolutionAs your application is used over time, it's often necessary to update your tables toeither add new fields or remove existing fields that are no longer required. Tableevolution is the term used to update table definitions, adding or removing fields, orchanging field properties, such as a default value. You may even add a particular kindof column, like an IDENTITY column, to increment some value automatically. Onlytables that already exist in the store are candidates for table evolution.
Use the ALTER TABLE statement to perform table evolution. See Modify TableDefinitions for details on this statement.
Note:
You cannot remove a field if it is a primary key field, or if it participates in anindex. You also cannot add primary key fields during table evolution.
For example, the following statements evolve the table that was created in theprevious section. In this example, you would submit each statement to the storeconsecutively, using either the API or the CLI.
ALTER TABLE myInventory.itemDetails (ADD salePrice FLOAT)
ALTER TABLE myInventory.itemDetails (DROP inventoryCount)
Defining Tables With an IDENTITY ColumnYou can create an IDENTITY column to auto-increment a value each time you add arow. Each time you add a row to the table, an IDENTITY column automaticallyincrements its value.
You create an IDENTITY column as part of a CREATE TABLE name DDL statement, oradd an IDENTITY column to an existing table with an ALTER TABLE name DDLstatement.
Chapter 3Defining Tables With an IDENTITY Column
3-6

Only one IDENTITY column can exist per table. It must be an INTEGER, LONG, or NUMBERdatatype. An IDENTITY column automatically increments its value each time you adda row to the table.
Every IDENTITY column is part of a table, and cannot exist as an independent object.For more information about adding IDENTITY columns, see Altering or Dropping anIDENTITY Column.
An IDENTITY column requires an associated Sequence Generator (SG). The SG isthe table’s manager for tracking the IDENTITY column’s current, next, and totalnumber of values. An SG has several attributes that define its behavior, such as thestarting value for its IDENTITY column, or the number of values stored in cache. Youcan optionally define some SG attributes when you create an IDENTITY column, oruse all default values. For more information about the Sequence Generator attributes,see Sequence Generator Attributes.
Note:
Using an IDENTITY column in any table does not force uniqueness. If yourapplication requires unique values for every row of an IDENTITY column,you must create the column as GENERATED ALWAYS AS IDENTITY, andnever permit any use of the CYCLE SG attribute.
If more than one client accesses a table with an IDENTITY column defined for uniquevalues this way, each client is assigned contiguous value sets to its SG cache. Thesesets do not overlap with other client sets. For example, Client1 is assigned values0001 – 1000, while Client2 has 1001 – 2000, and so on. Thus, as each client addsrows to the table, the IDENTITY values can run as 0001, 1001, 0002, 1002, 1003, andso on, as both clients use their own cache when adding rows. The IDENTITY columnvalues are guaranteed to be unique, but not necessarily contiguous, because eachclient has its own set of cache values, and adds rows at different speeds and times.
You can add, remove, or change rows of an IDENTITY column, though certainlimitations exist on such updates, depending on how you create the IDENTITY column,and whether it is a Primary Key. These specifics are described later in this section.
You can also create an index on a table IDENTITY column.
Note:
Dropping a table that was created with an IDENTITY column also removesthe Sequence Generator.
Users require table privileges to create tables with an IDENTITY column. For adescription of user privileges, see KVStore Required Privileges.
Sequence Generator AttributesEvery IDENTITY column you add to a table requires its own Sequence Generator(SG). The SG is responsible for several tasks, including obtaining and supplyingvalues to the IDENTITY column as necessary.
Chapter 3Defining Tables With an IDENTITY Column
3-7

Each IDENTITY column requires an associated, dedicated Sequence Generator (SG).When you add an IDENTITY column, the system creates an SG that's runs on theclient with the application. Information about all attributes for every SG is added to asystem table, SYS$SGAttributesTable. You can see the contents of this system tableusing a simple query such as this:
SELECT * FROM SYS$SGAttributesTable
For other commands:
Differences in Commands Description
SHOW TABLES Returns a list of tables
DESCRIBE TABLE name1 Shows the schema of table name1
SELECT * FROM table_name Shows the data rows of table_name
The Sequence Generator for an IDENTITY field has several responsibilities. One ofthe first tasks for the SG when you create or add an IDENTITY to a table is to create acache of values on the client, and to set the Current_Value. From the cache, the SGassigns values to the IDENTITY field when new rows are added. By default, if you donot specify a value for the Cache attribute, the client stores 1000 values, starting at 1.You can increase or decrease this size when you create the IDENTITY, or after thetable exists if the cache value does not meet your requirements. By storing IDENTITYvalues at the client, the application does not need to access the server each time itrequires another value.
If you specify the Cycle attribute, all of the existing values for the IDENTITY columnare used again, potentially overwriting current values in place. Creating a column asGENERATED ALWAYS AS IDENTITY, and using the SG NO CYCLE attribute is the only wayto maintain unique IDENTITY column values.
Following are the SG attributes that you can optionally specify when you create anIDENTITY column, or change later using the ALTER TABLE statement.
Attribute Type Description
Start With Number Default: 1 The first value in the sequence. Zero (0) ispermitted as a Start With value, but not for anIncrement By setting.
Increment By Long Default: 1 The value to increment the current value, whichcan be a positive or a negative number. Zero (0) is notpermitted as an Increment By value. Specifying a negativenumber for Increment By decrements values from theStart With value.
MinValue Number Default: The minimum value of the field data type. Thelower bound of the IDENTITY values that the SG supplies.You can specify MinValue, or No MinValue, but not both.
No MinValue Number Default: Specifies the lower bound of the field values is thelowest value for the field data type. You can specify NoMinValue, or MinValue, but not both.
Chapter 3Defining Tables With an IDENTITY Column
3-8

Attribute Type Description
MaxValue Number Default: The maximum value of the field data type. Theupper bound of the IDENTITY values that the SG supplies. Ifyou do not specify this attribute, SG uses the maximumvalue of the field data type. You can specify MaxValue, orNo MaxValue, but not both.
No MaxValue Number Default: Specifies that there is no upper bound of theIDENTITY values that the SG supplies, other than themaximum value of the field data type. If you do not specifythis attribute, SG uses the maximum value of the field datatype. You can specify No MaxValue, or MaxValue, but notboth.
Cache Long Default: 1000 The number of values stored in local clientcache to use for the next IDENTITY value. When the set ofvalues is exhausted, the SG requests another set of valuesfrom the server to store in local cache.
Cycle | NoCycle Boolean Default: NoCycle determines whether to reuse the set of allpossible values for the datatype of the IDENTITY. The Cycleattribute is tied to the total number of values that can begenerated for an IDENTITY of a specific datatype(INTEGER, LONG, or NUMBER). unless you specifyMaxValue to set a different limit. If you do not specifyCycle, Oracle NoSQL Database guarantees that eachIDENTITY value in the column is unique, but not necessarilysequential. For example, if you set MaxValue as 10000, andmultiple clients add rows to the table, each client is assigneda certain amount of values to use.
Following are internal SG attributes. You cannot specify any of these when you createor add an IDENTITY column. Each is derived from how you create the IDENTITY field.For example, one internal attribute is SGName, which is the column name you give theIDENTITY field.
Attribute Type Description
SGType String [INTERNAL | EXTERNAL]. The IDENTITY column youcreate, or add to a table with a DDL statement. The defaultis INTERNAL.
SGName String Name of the IDENTITY field you create and with which theSG is associated.
Datatype String Sequence Generator datatype that you specified as part ofthe CREATE TABLE statement for the IDENTITY column.Each IDENTITY column can be any numeric type: INTEGER,LONG, or NUMBER.
SGAttrVersion Long This is an internal attribute that you cannot set. It is here forfuture usage.
Creating Tables With an IDENTITY ColumnYou can create an IDENTITY column when you create a table, or change an existingtable to add an IDENTITY column using ALTER TABLE...ADD. In either case, choose
Chapter 3Defining Tables With an IDENTITY Column
3-9

one of the IDENTITY statements described below. This section describes creating atable with an IDENTITY column.
Here is the formal syntax for creating a table with an IDENTITY column:
GENERATED (ALWAYS | (BY DEFAULT [ON NULL])) AS IDENTITY [sequence_options,...]
The optional sequence_options refer to all of the Sequence Generator attributes youcan supply, and are described here: Sequence Generator Attributes.
IDENTITY Column Statement Description
GENERATED ALWAYS AS IDENTITY The sequence generator always supplies anIDENTITY value. You cannot specify a valuefor the column.
GENERATED BY DEFAULT AS IDENTITY The sequence generator supplies anIDENTITY value any time you do not supply acolumn value.
GENERATED BY DEFAULT ON NULL ASIDENTITY
The sequence generator supplies the nextIDENTITY value if you specify a NULLcolumnn value.
To create a table with a column GENERATED ALWAYS AS IDENTITY from the SQL CLI:
sql-> CREATE TABLE IF NOT EXISTS tname1 (idValue INTEGER GENERATED ALWAYS AS IDENTITY, acctNumber INTEGER, name STRING, PRIMARY KEY (acctNumber));Statement completed successfullysql->
For this table, tname1, each time you add a row to the table, the Sequence Generator(SG) updates the idvalue from its cache. You cannot specify a value for idValue. Ifyou do not specify any sequence generator attributes, the SG uses its default values,as described here: Sequence Generator Attributes.
To create a table with a column GENERATED BY DEFAULT ON NULL AS IDENTITY:
sql-> CREATE TABLE IF NOT EXISTS tname2 (idvalue INTEGER GENERATED BY DEFAULT ON NULL AS IDENTITY, acctNumber INTEGER, name STRING, PRIMARY KEY (acctNumber));Statement completed successfullysql->
For this table, tname2, each time you add a row, the SG inserts the next availablevalue from its cache if no value is supplied for the idvalue column, the supplied valuefor the idvalue column is NULL.
Chapter 3Defining Tables With an IDENTITY Column
3-10

To create a table with a column GENERATED BY DEFAULT AS IDENTITY:
sql-> CREATE TABLE IF NOT EXISTS tname3 (idvalue INTEGER GENERATED BY DEFAULT AS IDENTITY, acctNumber INTEGER, name STRING, PRIMARY KEY (acctNumber));Statement completed successfullysql->
For this table, tname3, each time you add a row, the SG inserts the next availablevalue from its cache if no value is supplied for the idvalue column.
To create a new table, sg_atts, with several SG attributes:
sql-> CREATE Table sg_atts (id INTEGER GENERATED ALWAYS AS IDENTITY(START WITH 2 INCREMENT BY 2 MAXVALUE 200 NO CYCLE),name STRING,PRIMARY KEY (id));Statement completed successfullysql->
The table sg_atts specifies that the integer IDENTITY field (id) is generated always.
SG Attribute Description
start with 2 Start the sequence value at 2.
increment by 2 Increment the sequence value by 2 for each row.
maxvalue 200 Specifies the maximum IDENTITY value. What you specifyoverrides the default value maxvalue, which is the upper boundof the IDENTITY datatype in use. Once the IDENTITY columnreaches this value, 200, the SG will not generate any moreIDENTITY values. The maximum value has been reached andthe no cycle attribute is in use.
no cycle Do not restart from 2 or with any value at all, once the columnreaches the maxvalue.
To create another table, sg_some_atts, with some SG attributes:
sql-> CREATE Table sg_some_atts (id LONG GENERATED BY DEFAULT AS IDENTITY(START WITH 1INCREMENT BY 1 CYCLE CACHE 200),account_id INTEGER,
Chapter 3Defining Tables With an IDENTITY Column
3-11

name STRING,PRIMARY KEY (account_id));
For the sg_some_atts table, specify an id column GENERATED BY DEFAULT ASIDENTITY, but which is not the primary key.
SG Attribute or OtherDetail
Description
CYCLE Specifying CYCLE indicates that the SG should supplyIDENTITY values up to either the MAXVALUE attribute youspecify, or the default MAXVALUE. When the IDENTITY reachesthe MAXVALUE value, the SG restarts the values over, beginningwith MINVALUE, if it is specified, or with the default MINVALUEfor the data type. CYCLE is orthogonal to the CACHE attribute,which indicates only how many values to store in local cash forswift access. You can set CACHE value to closely reflect themaximum value of the datatype, but we do not recommend this,due to the client cache size.
CACHE 200 The number of values that each client stores in its cache for fastretrieval. When the IDENTITY reaches the last number in thecache, the SG gets another set of values from the serverautomatically.
START WITH 1 The SG generates values 1, 2, 3 and so on, until it reaches themaximum value for a LONG data type.
INCREMENT BY 1 The SG increments each new IDENTITY value for every newrow.
For a full list of all sequence generator attributes, see Sequence Generator Attributes.
Adding an IDENTITY Column to an Existing TableUse ALTER TABLE to add an IDENTITY column to an existing table.
Create a table, test_alter, without an IDENTITY column:
sql-> CREATE Table test_alter (id INTEGER, name STRING, PRIMARY KEY (id));Statement completed successfullysql->
Use ALTER TABLE to add an IDENTITY column to test_alter. Also specify severalSequence Generator (SG) attributes for the associated new_id IDENTITY column, butdo not use the IDENTITY column as a PRIMARY KEY:
sql-> ALTER Table Test_alter (ADD new_id INTEGER GENERATED ALWAYS AS IDENTITY (START WITH 1 INCREMENT BY 2 MAXVALUE 100
Chapter 3Defining Tables With an IDENTITY Column
3-12

CACHE 10 CYCLE));Statement completed successfullysql->
Note:
To add an IDENTITY column to a table, the table must be at a top level. Youcannot add an IDENTITY column as the column of a deeply embeddedstructured datatype. Adding a column does not affect the existing rows in thetable, which get populated with the new column’s default value (or NULL).
Altering or Dropping an IDENTITY ColumnUse the ALTER TABLE...MODIFY clause to change one or more attributes of a table'sIDENTITY column and its Sequence Generator (SG) options.
Each IDENTITY column is generated in one of the following ways:
IDENTITY Column Statement Description
GENERATED ALWAYS AS IDENTITY The sequence generator always supplies anIDENTITY value. You cannot specify a valuefor the column.
GENERATED BY DEFAULT AS IDENTITY The sequence generator supplies anIDENTITY value any time you do not supply acolumn value.
GENERATED BY DEFAULT ON NULL ASIDENTITY
The sequence generator supplies the nextIDENTITY value if you specify a NULLcolumnn value.
The IDENTITY column may have one or more attributes further defining its SequenceGenerator (SG) behavior.
This section presents ways to change or drop an IDENTITY column from a table. TheALTER TABLE statement lets you add, remove, or alter a field in any table definition.Use the ALTER TABLE statement to modify an IDENTITY field.
Note:
The MODIFY clause in an ALTER TABLE... statement is supported only onIDENTITY columns.
The next example adds an IDENTITY field to a new table, test_alter, created withoutan IDENTITY. The example also specifies several attributes for the associated SG fortest_alter:
CREATE Table Test_alter (id INTEGER, name STRING, PRIMARY KEY (id));
Chapter 3Defining Tables With an IDENTITY Column
3-13

ALTER Table Test_alter (ADD new_id INTEGER GENERATED ALWAYS AS IDENTITY (START WITH 1 INCREMENT BY 2 MAXVALUE 100 CACHE 10 CYCLE));
To remove the IDENTITY column, so no such field remains, use ALTER TABLE with aDROP id clause:
CREATE Table Test_alter (id INTEGER GENERATED ALWAYS AS IDENTITY(START WITH 1 INCREMENT BY 2 MAXVALUE 100 CACHE 10 CYCLE),name STRING,PRIMARY KEY (name));
ALTER TABLE Test_alter (DROP id);
To keep the id column, but remove its IDENTITY definition, use ALTER TABLE with aMODIFY id DROP IDENTITY clause:
CREATE Table Test_alter (id INTEGER GENERATED ALWAYS AS IDENTITY(START WITH 1 INCREMENT BY 2 MAXVALUE 100 CACHE 10 CYCLE),name STRING, PRIMARY KEY (id));
ALTER TABLE Test_alter (MODIFY id DROP IDENTITY);
You can change the SG attributes. The new values take effect on subsequent clientcalls to access the SG attributes. For example, this happens when the cache has nomore values, or when the attributes stored at the client have timed out.
To change the basic property of an IDENTITY column being GENERATED ALWAYS toGENERATED BY DEFAULT, see the next ALTER TABLE example. The example also showshow to change the SG attributes from their original definitions, START WITH, INCREMENTBY, MAXVALUE, CACHE and CYCLE.
CREATE Table Test_alter (id INTEGER GENERATED ALWAYS AS IDENTITY (START WITH 1
Chapter 3Defining Tables With an IDENTITY Column
3-14

INCREMENT BY 2 MAXVALUE 100 CACHE 10 CYCLE), name STRING, PRIMARY KEY (id));
ALTER TABLE Test_alter (MODIFY id GENERATED BY DEFAULT AS IDENTITY(START WITH 1000 INCREMENT BY 3 MAXVALUE 5000 CACHE 1 CYCLE));
Note:
The client has a time-based cache to store the SG Attributes. The clientconnects to the server to refresh this cache after it expires. The defaulttimeout is 5 minutes. Change this default by setting sgAttrsCacheTimeout inKVStoreConfig.
Inserting IDENTITY Values from the SQL CLIYou can insert values into IDENTITY fields, regardless of whether you specified it asGENERATED ALWAYS OR GENERATED BY DEFAULT, using DDL statements andAPI calls.
Each IDENTITY field you create uses one of these syntax choices:
• GENERATED ALWAYS AS IDENTITY
• GENERATED BY DEFAULT AS IDENTITY
• GENERATED BY DEFAULT ON NULL AS IDENTITY
How you create an IDENTITY field affects what happens when you INSERT values.You cannot change the IDENTITY value of a column that is a primary key.
As an example, you create the following table with an IDENTITY field as GENERATEDALWAYS. The IDENTITY field is not a primary key:
sql-> CREATE Table Test_SGSqlInsert2( id INTEGER, name STRING, deptId INTEGER GENERATED ALWAYS AS IDENTITY (CACHE 1), PRIMARY KEY(id));Statement completed successfully
Chapter 3Defining Tables With an IDENTITY Column
3-15

To successfully insert values into this table, always specify DEFAULT as the value of thedeptID IDENTITY field, so that the SG generates the next value.
sql->> INSERT INTO Test_SGSqlInsert2 VALUES (148, 'sally', DEFAULT);> INSERT INTO Test_SGSqlInsert2 VALUES (250, 'joe', DEFAULT);> INSERT INTO Test_SGSqlInsert2 VALUES (346, 'dave', DEFAULT);{"NumRowsInserted":1}1 row returned{"NumRowsInserted":1}1 row returned{"NumRowsInserted":1}1 row returned
The preceding INSERT statements add the following rows, with the SG getting the nextavailable IDENTITY value each time you specify DEFAULT.
sql-> select * from Test_SGSqlInsert2;{"id":148,"name":"sally","deptId":1}{"id":250,"name":"joe","deptId":2}{"id":346,"name":"dave","deptId":3}3 rows returned
To get the value of the generated deptId for future reference in one statement, use thereturning deptId clause as follows:
INSERT INTO Test_SGSqlInsert2 VALUES (600, 'jabba', DEFAULT) returning deptId;{"deptId":6} INSERT INTO Test_SGSqlInsert2 VALUES (700, 'bubba', DEFAULT) returning deptId;{"deptId":7}
Using the following INSERT statement, indicating a value rather than DEFAULT, causesan exception. You cannot specify any value for any IDENTITY field you define asGENERATED BY DEFAULT AS IDENTITY:
sql-> INSERT INTO Test_SGSqlInsert2 VALUES (1, 'joe', 200) ;Error handling command INSERT INTO Test_SGSqlInsert2 VALUES (1, 'joe', 200): Error: at (1, 48) Generated always identity column must use DEFAULT construct.
As another example, create a table with a DeptID integer field, GENERATED BY DEFAULTAS IDENTITY, and make it the primary and shard key:
sql-> CREATE TABLE Test_SGSqlInsert_Default (
Chapter 3Defining Tables With an IDENTITY Column
3-16

> ID INTEGER,> NAME STRING,> DeptID INTEGER GENERATED BY DEFAULT AS IDENTITY (> START WITH 1> INCREMENT BY 1> MAXVALUE 100),> PRIMARY KEY (SHARD(DeptID), ID));Statement completed successfully
The following statements show how to insert values into tableTest_SGSqlInsert_Default. In this case, since the column ID is not an IDENTITY, youcan assign integer values to the field:
sql->> INSERT INTO Test_SGSqlInsert_Default VALUES (100, 'tim', DEFAULT);> INSERT INTO Test_SGSqlInsert_Default VALUES (200, 'dave', 210);> INSERT INTO Test_SGSqlInsert_Default VALUES (300, 'sam', 310);> INSERT INTO Test_SGSqlInsert_Default VALUES (400, 'Jennifer', DEFAULT);> INSERT INTO Test_SGSqlInsert_Default VALUES (500, 'Barbara', 2);{"NumRowsInserted":1}1 row returned{"NumRowsInserted":1}1 row returned{"NumRowsInserted":1}1 row returned{"NumRowsInserted":1}1 row returned{"NumRowsInserted":1}1 row returned
These sample statements insert the following rows into the database.
sql-> select * from Test_SGSqlInsert_Default;{"ID":300,"NAME":"sam","DeptID":310}{"ID":100,"NAME":"tim","DeptID":1}{"ID":400,"NAME":"Jennifer","DeptID":2}{"ID":500,"NAME":"Barbara","DeptID":2}{"ID":200,"NAME":"dave","DeptID":210}5 rows returned
Since you specified two values as DEFAULT in your INSERT statements, the SG suppliesthem, as 1 and 2. The other values are inserted as you specify (210, 310, and 2). Eachvalue is acceptable, even though one results in two DeptID values the same (2supplied from a DEFAULT, and 2 as a value you supply).
Because you defined the IDENTITY column as GENERATED BY DEFAULT AS IDENTITY,the SG supplies a value only when you do not specify a value. Specifying values 210,310, or 2 is correct. The system neither checks for duplicates, nor enforces uniquenessfor GENERATED BY DEFAULT AS IDENTITY column values. It is the application’sresponsibility to ensure that there are no duplicate values if that is a requirement.
Chapter 3Defining Tables With an IDENTITY Column
3-17

Inserting IDENTITY Values ProgrammaticallySpecial considerations arise when you are inserting values into an IDENTITY columnprogrammatically. This section presents the issues that exist, and how to work aroundthem using put() and other methods.
You create each IDENTITY column in a table with one of these choices:
• GENERATED ALWAYS AS IDENTITY
• GENERATED BY DEFAULT AS IDENTITY
• GENERATED BY DEFAULT ON NULL AS IDENTITY
Additionally, an identity column can be a primary key, which prevents you fromchanging the IDENTITY value.
Each of the ways in which you create your identity column affects activities when youadd rows using the put function, with one of its variants:
• put (unconditional)
• put if absent (only if the row does not have values)
• put if present (only if the row has values)
This section describes the different effects of inserting and updating IDENTITYcolumns.
For example, create the following table with a column defined with GENERATEDALWAYS AS IDENTITY. The IDENTITY field is a primary key:
CREATE Table foo( idValue INTEGER GENERATED ALWAYS AS IDENTITY (START WITH 1 INCREMENT BY 1 MAXVALUE 2 NO CYCLE), name STRING, PRIMARY KEY(idValue));
Insert a row into the IDENTITY Column
To insert a row into the foo table, here's what to do in your application:
L1: TableAPI api = store.getTableAPI(); // Gets the TableAPI for the store L2: Table table = api.getTable("foo"); // Gets the Table foo instance L3: Row row = table.createRow(); // constructs an empty Row row for Table foo. L4: row.put("name", "joe"); // populates the values for the Row row L5: api.put(row, null /* previous-row */, null /* write-options */);
// The client driver recognizes that the system must generate the id values and \generates value 1 for the id field in the row before putting it in the DB.L6: System.out.println("Value of idValue: " + row.get("idValue")); // 1 L7: row.put("name", "smith"); L8: api.put(row, null /* previous-row */, null /* write-options */); // driver sets id field to 2
Chapter 3Defining Tables With an IDENTITY Column
3-18

L9: System.out.println("Value of id: " + row.get("idValue")); // 2
Note:
To get the value of a generated IDENTITY column, use a get() call to theIDENTITY column, as shown in L6 and L9.
Also, to return the idValue use the RETURNING idValue clause, as follows:
StatementResult sr = store.executeSync("INSERT INTO foo " + "(name) VALUES ('foe') RETURNING idValue"); int id = sr.iterator().next().get("idValue").asInteger().get();
Updating an IDENTITY ColumnWhen you define a column as GENERATED ALWAYS AS IDENTITY you cannot supply avalue for the IDENTITY column, because the SG must always supply the next value.
The following example illustrates what happens when you try to specify a value for theIDENTITY column. The first additions, joe and john are fine, and the SG supplies anidValue for both:
CREATE TABLE foo( idValue INTEGER GENERATED ALWAYS AS IDENTITY, name STRING, PRIMARY KEY (idValue)) api.put(‘joe’) api.put(‘john’) get(idValue, name) or select * from foo; 1, joe 2, john
Trying to update with any of the put() methods causes the following errors when acolumn is defined as GENERATED ALWAYS AS IDENTITY:
api.put(2,’dave’) // error –- cannot specify a value for \ a column defined as GENERATED ALWAYS AS IDENTITY
api.putIfPresent (2, ‘dave’) -- The following error occurs first in the code path, even though idValue = 2 is present // error – user cannot specify a value for \ IDENTITY column defined as GENERATED ALWAYS
api.putIfPresent (3,’cezar’) -- The following error occurs, first in the code path, even though idValue = 3 is NOT present
Chapter 3Defining Tables With an IDENTITY Column
3-19

// error - user cannot specify a value for \ IDENTITY column defined as GENERATED ALWAYS
api.putIfPresent (‘hema’) //error – a primary key is not provided to look up the record. putIfAbsent (10, joe) -– is an insert // error - user cannot specify a value for \IDENTITY column defined as GENERATED ALWAYS
To use UPDATE on a column defined as GENERATED ALWAYS AS IDENTITY:
Create table foo( idValue INTEGER GENERATED ALWAYS AS IDENTITY, name STRING, PRIMARY KEY (idValue))
UPDATE foo SET idValue = 10 WHERE name=joe// error - user cannot set a value for an IDENTITY column defined as GENERATED ALWAYS UPDATE foo SET name=hema WHERE idValue=2 // Success! By using the Primary Key value (idValue=2)to locate its name record, // you can update the value and hema replaces johnselect * from foo1, joe2, hema
To use put, putIfPresent, and putIfAbsent on an IDENTITY column that is not aPRIMARY KEY:
Create table Foo(idValue INTEGER GENERATED ALWAYS AS IDENTITY, acctNumber INTEGER, name STRING, PRIMARY KEY (acctNumber) )
//Put two acctNumber and name values. api.put(100, ‘joe’) api.put (200, ‘john’)
//SG increments the IDENTITY values, 1 and 2:api.get(idValue, acctNumber, name) 1, 100, joe 2, 200, john
//Attempt to put an idValueapi.put (2, 200, dave) // error – Cannot specify a value for IDENTITY column defined as GENERATED ALWAYS
api.putIfPresent(3, 200, cezar) //error – Cannot specify a value for IDENTITY column defined as GENERATED ALWAYS
Chapter 3Defining Tables With an IDENTITY Column
3-20

api.putIfPresent (400, cezar) // not IDENTITY column value error // error - Cannot specify a primary key (400) that is not present
api.putIFPresent (200, cezar) 1, 100, joe2, 200, cezar// Success! The IDENTITY value is updated. The system generates a value on putIfPresent as the API semantics are to update the entire record, and not update fields within the record selectively. api.putIfAbsent (300, hema) // Success! IDENTITY idValue was generated (3), and 300, hema were absentget(idValue, acctNumber, name)1, 100, joe2, 200, cezar3, 300, hema api.putIfAbsent (20, 300, hema)// error – user cannot specify a value for IDENTITY column defined as GENERATED ALWAYS api.putIfAbsent (300, hema)//error - no row with primary key = 300 is present api.putIfAbsent (3,400, hema)// error – user cannot specify a value for IDENTITY column defined as GENERATED ALWAYS
To use UPDATE on an IDENTITY column that is not a PRIMARY KEY:
Create table Foo(idValue INTEGER GENERATED ALWAYS AS IDENTITY, acctNumber INTEGER, name STRING, PRIMARY KEY (acctNumber)) select * from foo1, 100, joe2, 200, cezar3, 300, hema UPDATE foo set name= dave, where PRIMARY KEY = 200// replaces (2, 200, cezar) with (2, 200, dave) select * from foo;1, 100, joe2, 200, dave3, 300, hema UPDATE foo set name=george, where acctNumber=100 // acctNumber is the PRIMARY KEY// replaces (1, 100, joe) with (1, 100, george)
Chapter 3Defining Tables With an IDENTITY Column
3-21

select * from foo;1, 100, george2, 200, dave3, 300, hema UPDATE foo set idValue=10, where acctNumber=100 // acctNumber is the PRIMARY KEY// error - Cannot specify a value for IDENTITY column defined as GENERATED ALWAYS
To use put() on a column defined as GENERATED BY DEFAULT AS IDENTITY,which is a PRIMARY KEY, review the following examples. In this case, not specifyinga value for the IDENTITY column causes the SG to generate a value. Specifying avalue, the system uses what you supply.
Create table foo( idValue INTEGER GENERATED BY DEFAULT AS IDENTITY, name STRING, PRIMARY KEY (idValue))
api.put(‘joe’)api.put(‘john’) //Since you supplied no idValue, SG supplies them:get(idValue, name) 1, joe2, john
//You supply 4 as the idValue, so system uses itapi.put (4, george)
get(idValue, name) 1, joe2, john4, george api.put (2, sam) // replaces (2, john) with (2, sam)get(idValue, name) 1, joe2, sam4, george
To use UPDATE() on the column:
select * from foo;1, joe2, sam4, george UPDATE foo SET idValue=3 where name=sam // Updates idValue 2 (2, sam) with 3, so becomes 3, samselect * from foo 1, joe
Chapter 3Defining Tables With an IDENTITY Column
3-22

3, sam4, george
Deleting an IDENTITY ColumnDeleting a row with an IDENTITY column follows the existing delete logic in theproduct. There is no change.
Defining Tables using Existing Avro Schema
Note:
Avro support is deprecated. Using the oracle.kv.avro package isdeprecated, and interfaces using those classes are also affected. All Avrofeatures are available using the table API. Users should migrate to the tableAPI as soon as possible. The NoSQL database will include the interfacesand classes that support Avro for some time, but the APIs affected will notethat the feature is deprecated.
If you are a user of the key/value API, then you probably have been using Avroschema to describe your record values. You can create a table based on Avro schemawhich currently exists in your store, and in so doing overlay the existing store records.You can then operate on that data using both the tables API and the key/value API solong as you do not evolve (change) the table definitions. This is intended as amigration aid from the key/value API to the tables API.
For example, suppose you have the following Avro schema defined in your store:
kv-> show schema -name com.example.myItemRecord{ "type" : "record", "name" : "myItemRecord", "namespace" : "com.example", "fields" : [ { "name" : "itemType", "type" : "string", "default" : "" }, { "name" : "itemCategory", "type" : "string", "default" : "" }, { "name" : "itemClass", "type" : "string", "default" : "" }, { "name" : "itemColor", "type" : "string", "default" : "" }, { "name" : "itemSize", "type" : "string",
Chapter 3Defining Tables using Existing Avro Schema
3-23

"default" : "" }, { "name" : "price", "type" : "float", "default" : 0.0 }, { "name" : "inventoryCount", "type" : "int", "default" : 0 } ]}
Then you can define a table using this schema. Note that the table's name mustcorrespond directly to the first component of the key/value applications's keys.
kv-> table create -name myItemTablemyItemTable-> add-schema -name com.example.myItemRecordmyItemTable-> show{ "type" : "table", "name" : "myItemTable", "id" : "myItemTable", "r2compat" : true, "description" : null, "shardKey" : [ ], "primaryKey" : [ ], "fields" : [ { "name" : "itemType", "type" : "STRING" }, { "name" : "itemCategory", "type" : "STRING" }, { "name" : "itemClass", "type" : "STRING" }, { "name" : "itemColor", "type" : "STRING" }, { "name" : "itemSize", "type" : "STRING" }, { "name" : "price", "type" : "FLOAT", "default" : 0.0 }, { "name" : "inventoryCount", "type" : "INTEGER" } ]}myItemTable->
Chapter 3Defining Tables using Existing Avro Schema
3-24

At this point, you need to define your primary keys and, optionally, your shard keys inthe same way you would any table. You also need to add the table to the store in thesame way as always.
The primary keys must be of type STRING in this case, and must correspond to thekey components used by the key/value application.
myItemTable->primary-key -field itemType -field itemCategorymyItemTable->exitkv->plan add-table -name myItemTable -wait
Tables Compatible with Key-Only Entries (-r2-compat)If you are a user of the key/value API, you might have created store entries that haveonly keys. These entries have no schema. In fact, they have no data of any kind. Inthis case, you can create tables that are compatible with these legacy entries using thetable create command's -r2-compat flag.
For example, suppose you have key-only entries of the format:
/User/<id>
where <id> is a unique string ID. You can create a table to overlay this key space bydoing this:
kv-> table create -name User -r2-compatUser-> add-field -name id -type StringUser-> primary-key -field idUser-> exitTable User built.kv-> plan add-table -name User -wait
If you did not use the -r2-compat flag, the underlying keys generated for the table'sentries would start with something other than User.
Note that when you create tables using existing Avro schema, the -r2-compat flag isautomatically used.
Also note that as is the case when generating tables using Avro schema, the overlayonly works so long as you do not evolve the tables.
Creating IndexesIndexes represent an alternative way of retrieving table rows. Normally you retrievetable rows using the row's primary key. By creating an index, you can retrieve rowswith dissimilar primary key values, but which share some other characteristic.
You can create indexes on any field that has a data type capable of indexing, includingprimary key fields. You can index table IDENTITY fields. too. . See Indexable FieldTypes for information on the types of fields that can be indexed.
For example, if you had a table representing types of automobiles, the primary keys foreach row might be the automobile's manufacturer and model type. However, if you
Chapter 3Creating Indexes
3-25

wanted to be able to query for all red automobiles, regardless of the manufacturer ormodel type, you could create an index on the field containing color information.
Note:
Indexes can take a long time to create because Oracle NoSQL Databasemust examine all of the data contained in the relevant table in your store.The smaller the data contained in the table, the faster index creation willcomplete. Conversely, if a table contains a lot of data, then it can take a longtime to create indexes for it.
CREATE TABLE myInventory.itemDetails ( itemSKU STRING, itemDescription STRING, price FLOAT, inventoryCount INTEGER, PRIMARY KEY (itemSKU))
To create an index, use the CREATE INDEX statement. See CREATE INDEX for details.For example:
CREATE INDEX inventoryIdx on myInventory.itemDetails(inventoryCount)
Similarly, to remove an index, use the DROP INDEX statement. See DROP INDEX fordetails.
DROP INDEX inventoryIdx on myInventory.itemDetails
Be aware that adding and dropping indexes can be time consuming. You may want torun drop index operations asynchronously using the KVStore.execute() method.
package kvstore.basicExample;
import java.util.concurrent.ExecutionException;import java.util.concurrent.TimeUnit;import java.util.concurrent.TimeoutException;
import oracle.kv.ExecutionFuture;import oracle.kv.FaultException;import oracle.kv.StatementResult;import oracle.kv.KVStore;import oracle.kv.KVStoreConfig;import oracle.kv.KVStoreFactory;import oracle.kv.table.TableAPI;
...// Store open skipped...
Chapter 3Creating Indexes
3-26

public void createIndex() { TableAPI tableAPI = store.getTableAPI(); ExecutionFuture future = null; StatementResult result = null; String statement = null;
try {
statement = "CREATE INDEX inventoryIdx on " + "myInventory.itemDetails(inventoryCount)" future = store.execute(statement); displayResult(future.getLastStatus(), statement);
/* * Limit the amount of time to wait for the * operation to finish. */ result = future.get(3, TimeUnit.SECONDS); displayResult(result, statement);
} catch (IllegalArgumentException e) { System.out.println("Invalid statement:\n" + e.getMessage()); } catch (FaultException e) { System.out.println ("Statement couldn't be executed, please retry: " + e); cleanupOperation(future); } catch (ExecutionException e) { System.out.println ("Problem detected while waiting for a DDL statement: " + e.getCause()); cleanupOperation(future); } catch (InterruptedException e) { System.out.println ("Interrupted while waiting for a DDL statement: " + e); cleanupOperation(future); } catch (TimeoutException e) { System.out.println("Statement execution took too long: " + e); cleanupOperation(future); }}
private void cleanupOperation(ExecutionFuture future) { if (future == null) { /* nothing to do */ return; }
System.out.println("Statement:"); System.out.println(future.getStatement()); System.out.println("has status: "); System.out.println(future.getLastStatus());
if (!future.isDone()) { future.cancel(true); System.out.println("Statement is cancelled");
Chapter 3Creating Indexes
3-27

}}
private void displayResult(StatementResult result, String statement) { System.out.println("==========================="); if (result.isSuccessful()) { System.out.println("Statement was successful:\n\t" + statement); System.out.println("Results:\n\t" + result.getInfo()); } else if (result.isCancelled()) { System.out.println("Statement was cancelled:\n\t" + statement); } else { /* * statement wasn't successful: may be in error, or may still be * in progress. */ if (result.isDone()) { System.out.println("Statement failed:\n\t" + statement); System.out.println("Problem:\n\t" + result.getErrorMessage()); } else { System.out.println("Statement in progress:\n\t" + statement); System.out.println("Status:\n\t" + result.getInfo()); } }}
See Indexing Non-Scalar Data Types for examples of how to index supported non-scalar types.
Chapter 3Creating Indexes
3-28

4Introducing Oracle NoSQL DatabaseNamespaces
You can create one or more global namespaces to extend table identification.Namespaces permit tables with the same name to exist in your database store. Toaccess such tables from the command line, or with DDL commands, use a fully-qualified table name with the table preceded by its namespace, followed with a colon(:), such as ns1:table1.
As with tables, you grant authorization permissions to determine who can access boththe namespace and the tables within them. After your namespaces exist, you cancreate any number of parent and child tables within the namespace, such asns1:table1.child1.
There is a default Oracle NoSQL Database namespace, called sysdefault. For newinstallations, all tables are assigned to the default sysdefault namespace, until orunless you create other namespaces, and create new tables within them. Afterupgrading from an earlier Oracle NoSQL Database release, all existing tables becomepart of the default sysdefault namespace automatically. You cannot change anexisting table’s namespace.
Tables in the sysdefault namespace do not require further qualification for existingqueries. For example, using a basic SQL table query does not require the defaultnamespace prefix (sysdefault:tablename), for SQL access. Also, theTableAPI.getTable( ) method does not require any updates at existing sites, since itaccepts one argument for table name, or two when you are ready to use namespaces.For information see Using and Setting Namespaces.
select * from salesincome;
Referencing a table name without a namespace prefix (namespace:) implies that thetable is part of the default, sysdefault namespace. However, by creatingnamespaces, and then tables within them, you can have same name tables, such asthe following for a support_ticket table:
• support_ticket
• acme:support_ticket
• international_abc:support_ticket
• international_xyz:support_ticket
No additional permissions are required for tables in the default sysdefaultnamespace, so existing authentication remains. For example, if you grant user Joepermission to access tables t1, t3, and t4, but not t2, Joe can still access all tablesexcept t2 after they are subsumed into the sysdefault namespace.
4-1

Creating NamespacesYou can add and one or more namespaces to your store. Then, create tables withinthe namespaces, and grant various permissions to users to access namespaces andtables. For the security administrator, several new permissions are available fornamespaces, described in Granting Authorization Access to Namespaces .
You create a new namespace by using a CREATE NAMESPACE DDL statement, asfollows, with whatever name you choose.
sql-> CREATE NAMESPACE [IF NOT EXISTS] namespace_name;
All namespace names use standard identifiers, with the same restrictions as tablesand indexes:
• Names must begin with an alphabetic character (a-z, A-Z).
• Remaining characters are alphanumeric (a-z, A-Z, 0–9).
• Name characters can include period (.), and underscore (_) characters.
• The maximum name length for a namespace is 128 characters.
Note:
You cannot use the prefix sys for any namespaces. The sys prefix isreserved. No other keywords are restricted.
Following is the namespace syntax showing the identifier rules similar to a table name:
table_name : (namespace ':' )? id_path; -namespace : id_path ;
id_path : id (DOT id)* ; id : (... | ID ); ID : ALPHA (ALPHA | DIGIT | UNDER)* ;
Here are a couple of examples using DDL statements in the SQL CLI. The SHOWNAMESPACES directive in the SQL CLI lists the namespaces that currently exist:
sql-> CREATE NAMESPACE ns1;Statement completed successfully
sql-> CREATE NAMESPACE IF NOT EXISTS ns2;Statement completed successfully
sql-> SHOW NAMESPACESnamespaces ns1 sysdefault ns2
Chapter 4Creating Namespaces
4-2

Granting Authorization Access to NamespacesYou can add and one or more namespaces to your store, create tables within them,and grant permission for users to access namespaces and tables. These are theapplicable permissions to supply developers and other users:
Privilege Description
CREATE_ANY_NAMESPACE
DROP_ANY_NAMESPACE
Grant permission to a role to create or drop any namespace:
GRANT CREATE_ANY_NAMESPACE TO user_role;GRANT DROP_ANY_NAMESPACE TO user_role;
CREATE_TABLE_IN_NAMESPACE
DROP_TABLE_IN_NAMESPACE
EVOLVE_TABLE_IN_NAMESPACE
Grant permission to a role to create, drop, or evolve tables in aspecific namespace:
GRANT CREATE_TABLE_IN_NAMESPACE ON NAMESPACE namespace TO user_role; GRANT DROP_TABLE_IN_NAMESPACE ON NAMESPACE namespace TO user_role;GRANT EVOLVE_TABLE_IN_NAMESPACE ON NAMESPACE namespace TO user_role;
CREATE_INDEX_IN_NAMESPACE
DROP_INDEX_IN_NAMESPACE
Grant permission to a role to create or drop an index in a specificnamespace:
GRANT CREATE_INDEX_IN_NAMESPACE ON NAMESPACE namespace TO user_role; GRANT DROP_INDEX_IN_NAMESPACE ON NAMESPACE namespace TO user_role;
READ_IN_NAMESPACE
INSERT_IN_NAMESPACE
DELETE_IN_NAMESPACE
Grant permission to a role to read, insert, or delete items in aspecific namespace. Currently, this applies only to tables innamespaces, but could apply to other objects in future releases::
GRANT READ_IN_NAMESPACE ON NAMESPACE namespace TO user_role; GRANT INSERT_IN_NAMESPACE ON NAMESPACE namespace TO user_role;GRANT DELETE_IN_NAMESPACE ON NAMESPACE namespace TO user_role;
MODIFY_IN_NAMESPACE Grant or revoke permission to a role to all DDL privileges for aspecific namespace:
GRANT MODIFY_IN_NAMESPACE ON NAMESPACE namespace TO user_role; REVOKE MODIFY_IN_NAMESPACE ON NAMESPACE namespace TO user_role;
Chapter 4Granting Authorization Access to Namespaces
4-3

Using and Setting NamespacesOnce you have created one or more namespaces, and tables within them, you canfully qualify table names in any references. If your store has tables with the samename, the namespace differentiates them from each other.
Here is the syntax for specifying a fully qualified table, or child table name from theCLI:
namespace:tablenamenamespace:tablename.child1
To reference a table in a namespace in a SELECT statement:
SELECT * FROM ns1:table1;
Set Namespace for Method Execution
You can use the ExecuteOptions.setNamespace method to set a default namespacefor the duration of a KVStore.execute() method. While set, you do not need to qualifytable and other object references. If you do not use setNamespace, or fully qualify tablenames, the store uses sysdefault as the default namespace.
ExecuteOptions.setNamespace("ns1");SELECT * FROM table1;
Determine Table Namespace
To find out which namespace was set on an option object, use theExecuteOptions.getNamespace method.
Get a Table in a Specific Namespace
You can call TableAPI.getTable() with two arguments:
TableAPI.getTable(String namespace, String tableFullName);
Here, the first argument for TableAPI.getTable method, namespace, is thenamespace in which you created the table. If this argument is NULL, the method usesthe default sysdefault namespace. This case is equivalent to calling the function witha single argument, described next.
The second argument, tableFullName, is the full table name. This interface retrievesonly top-level tables, without parent tables. To retrieve child tables, useTableAPI.getChildTable().
Get a Fully-Qualified Table
You can call TableAPI.getTable() with one argument:
TableAPI.getTable(String fullNamespaceName);
Chapter 4Using and Setting Namespaces
4-4

The fullNamespaceName argument indicates the full name or namespace-qualifiedname of the target table. If you supply an unqualified name, the method uses thesysdefault namespace. If you supply a namespace that contains a table nameprefixed with a namespace followed with a colon (namespace:), this usage isequivalent to calling the function as getTable(String,String) with the namespace,and TableFullName described above.
Showing and Describing NamespacesYou can use the following ways to show namespaces and their tables from the SQLCLI:
• SHOW
• DESCRIBE
The next example shows creating a namespace (ns1), a table within that namespace(ns1:foo), and using SHOW namespaces and SHOW table ns1:foo to see the tablehierarchy (that the table was created in the ns1 namespace). Finally, using DESCRIBEtable ns1:foo to see more table details:
sql-> create namespace ns1;Statement completed successfully
sql-> create table ns1:foo (id integer, primary key (id));Statement completed successfully
sql-> show namespaces;namespaces ns1 sysdefault
sql-> show table ns1:foo;tableHierarchy(namespace ns1) foo
sql-> describe table ns1:foo; === Information === +-----------+------+-----+-------+----------+----------+--------+----------+---------+-------------+ | namespace | name | ttl | owner | sysTable | r2compat | parent | children | indexes | description | +-----------+------+-----+-------+----------+----------+--------+----------+---------+-------------+ | ns1 | foo | | | N | N | | | | | +-----------+------+-----+-------+----------+----------+--------+----------+---------+-------------+
=== Fields === +----+------+---------+----------+-----------+----------+------------+----------+ | id | name | type | nullable | default | shardKey | primaryKey | identity | +----+------+---------+----------+-----------+----------+------------
Chapter 4Showing and Describing Namespaces
4-5

+----------+ | 1 | id | Integer | N | NullValue | Y | Y | | +----+------+---------+----------+-----------+----------+------------+----------+
Dropping NamespacesYou can drop a namespace only if you have been granted theDROP_ANY_NAMESPACE privilege, and the namespace has no associated tables.Also, you must have the appropriate privileges.
To drop a namespace:
DROP NAMESPACE [IF EXISTS] namespace_name [CASCADE]
Using the CASCADE option with DROP NAMESPACE lets you extend the activity totables and other objects within the NAMESPACE.
Dropping a namespace is not an atomic operation, and completes the following steps:
• First check to make sure privileges to drop a namespace exist. Continue ifprivileges are in place.
• If no privileges exist, stop process with an error.
• If privileges are in place and CASCADE is not specified, check for tables, or otherobjects in the namespace. Drop the namespace if no objects exist.
• If tables or other objects exist in the namespace, stop process with an error.
• If privileges are in place to drop the namespace and CASCADE is specified, thestatement drops the namespace, removing all tables, indexes related to the tables,and table privileges.
Note:
You cannot drop the default namespace, sysdefault.
Chapter 4Dropping Namespaces
4-6

5Primary and Shard Key Design
Primary keys and shard keys are important concepts for your table design. What youuse for primary and shard keys has implications in terms of your ability to read multiplerows at a time. But beyond that, your key design has important performanceimplications.
Primary KeysEvery table must have one or more fields designated as the primary key. Thisdesignation occurs at the time that the table is created, and cannot be changed afterthe fact. A table's primary key uniquely identifies every row in the table. In the simplestcase, it is used to retrieve a specific row so that it can be examined and/or modified.
For example, a table might have five fields: productName, productType, color, size,and inventoryCount. To retrieve individual rows from the table, it might be enough tojust know the product's name. In this case, you would set the primary key field asproductName and then retrieve rows based on the product name that you want toexamine/manipulate.
In this case, the table statement you use to define this table is:
CREATE TABLE myProducts ( productName STRING, productType STRING, color ENUM (blue,green,red), size ENUM (small,medium,large), inventoryCount INTEGER, // Define the primary key. Every table must have one. PRIMARY KEY (productName))
However, you can use multiple fields for your primary keys. For example:
CREATE TABLE myProducts ( productName STRING, productType STRING, color ENUM (blue,green,red), size ENUM (small,medium,large), inventoryCount INTEGER, // Define the primary key. Every table must have one. PRIMARY KEY (productName, productType))
On a functional level, doing this allows you to delete multiple rows in your table in asingle atomic operation. In addition, multiple primary keys allows you to retrieve asubset of the rows in your table in a single atomic operation.
5-1

We describe how to retrieve multiple rows from your table in Reading Table Rows. Weshow how to delete multiple rows at a time in Using multiDelete() .
Note:
If the primary key field is an INTEGER data type, you can apply a serializedsize constraint to it. See Integer Serialized Constraints for details.
Data Type LimitationsFields can be designated as primary keys only if they are declared to be one of thefollowing types:
• Integer
• Long
• Number
• Float
• Double
• String
• Timestamp
• Enum
Partial Primary KeysSome of the methods you use to perform multi-row operations allow, or even require, apartial primary key. A partial primary key is, simply, a key where only some of thefields comprising the row's primary key are specified.
For example, the following example specifies three fields for the table's primary key:
CREATE TABLE myProducts ( productName STRING, productType STRING, productClass STRING, color ENUM (blue,green,red), size ENUM (small,medium,large), inventoryCount INTEGER, // Define the primary key. Every table must have one. PRIMARY KEY (productName, productType, productClass))
In this case, a full primary key would be one where you provide value for all threeprimary key fields: productName, productType, and productClass. A partial primarykey would be one where you provide values for only one or two of those fields.
Note that order matters when specifying a partial key. The partial key must be a subsetof the full key, starting with the first field specified and then adding fields in order. Sothe following partial keys are valid:
Chapter 5Primary Keys
5-2

• productName
• productName, productType
Shard KeysShard keys identify which primary key fields are meaningful in terms of shard storage.That is, rows which contain the same values for all the shard key fields are guaranteedto be stored on the same shard. This matters for some operations that promiseatomicity of the results. (See Executing a Sequence of Operations for moreinformation.)
For example, suppose you set the following primary keys:
PRIMARY KEY (productType, productName, productClass)
You can guarantee that rows are placed on the same shard using the values set forthe productType and productName fields like this:
PRIMARY KEY (SHARD(productType, productName), productClass)
Note that order matters when it comes to shard keys. The keys must be specified inthe order that they are defined as primary keys, with no gaps in the key list. In otherwords, given the above example, it is impossible to set productType andproductClass as shard keys without also specifying productName as a shard key.
Row DataThere are no restrictions on the size of your rows, or the amount of data that you storein a field. However, you should consider your store's performance when deciding howlarge you are willing to allow your individual tables and rows to become. As is the casewith any data storage scheme, the larger your rows, the longer it takes to read theinformation from storage, and to write the information to storage.
On the other hand, every table row carries with it some amount of overhead. Also, asthe number of your rows grows very large, search times may be adversely affected. Asa result, choosing to use a large number of tables, each of which use rows with just asmall handful of fields, can also harm your store's performance.
Therefore, when designing your tables' content, you must find the appropriate balancebetween a small number of tables, each of which uses very large rows; and a largenumber of tables, each of which uses very small rows. You should also consider howfrequently any given piece of information will be accessed.
For example, suppose your table contains information about users, where each user isidentified by their first and last names (surname and familiar name). There is a set ofinformation that you want to maintain about each user. Some of this information issmall in size, and some of it is large. Some of it you expect will be frequentlyaccessed, while other information is infrequently accessed.
Small properties are:
• name
• gender
Chapter 5Row Data
5-3

• address
• phone number
Large properties are:
• image file
• public key 1
• public key 2
• recorded voice greeting
There are several possible ways you can organize this data. How you should do itdepends on your data access patterns.
For example, suppose your application requires you to read and write all of theproperties identified above every time you access a row. (This is unlikely, but it doesrepresent the simplest case.) In that event, you might create a single table with rowscontaining fields for each of the properties you maintain for the users in yourapplication.
However, the chances are good that your application will not require you to access allof a user's properties every time you access his information. While it is possible thatyou will always need to read all of the properties every time you perform a user lookup, it is likely that on updates you will operate only on some properties.
Given this, it is useful to consider how frequently data will be accessed, and its size.Large, infrequently accessed properties should be placed in tables other than thatused by the frequently accessed properties.
For example, for the properties identified above, suppose the application requires:
• all of the small properties to always be used whenever the user's record isaccessed.
• all of the large properties to be read for simple user look ups.
• on user information updates, the public keys are always updated (written) at thesame time.
• The image file and recorded voice greeting can be updated independently ofeverything else.
In this case, you might store user properties using a table and a child table. The parenttable holds rows containing all the small properties, plus public keys. The child tablecontains the image file and voice greeting.
CREATE TABLE userInfo ( surname STRING, familiarName STRING, gender ENUM (male,female), street STRING, city STRING, state STRING, zipcode STRING, userPhone STRING, publickey1 BINARY, publickey2 BINARY,
Chapter 5Row Data
5-4

PRIMARY KEY (SHARD(surname), familiarName))
CREATE TABLE userInfo.largeProps ( propType STRING, voiceGreeting BINARY, imageFile BINARY, PRIMARY KEY (propType))
Because the parent table contains all the data that is accessed whenever user data isaccessed, you can update that data all at once using a single atomic operation. At thesame time, you avoid retrieving the big data values whenever you retrieve a row bysplitting the image data and voice greeting into a child table.
Note:
You might want to consider using the Key/Value API for the image data andvoice greeting. By doing that, you can use the Oracle NoSQL Database largeobject interface, which is optimized for large object support. See the OracleNoSQL Database Getting Started with the Key/Value API guide forinformation on working with large objects. Note that if you use the largeobject interface, you can store references to the large objects (which are juststrings) in your tables.
Chapter 5Row Data
5-5

6Writing and Deleting Table Rows
This chapter discusses two different write operations: putting table rows into the store,and then deleting them.
Write ExceptionsThere are many exceptions that you should handle whenever you perform a writeoperation to the store. Some of the more common exceptions are described here. Forsimple cases where you use default policies or are not using a secure store, you canprobably avoid explicitly handling these. However, as your code complexity increases,so too will the desirability of explicitly managing these exceptions.
The first of these is DurabilityException. This exception indicates that the operationcannot be completed because the durability policy cannot be met. For moreinformation, see Durability Guarantees.
The second is RequestTimeoutException. This simply means that the operation couldnot be completed within the amount of time provided by the store's timeout property.This probably indicates an overloaded system. Perhaps your network is experiencing aslowdown, or your store's nodes are overloaded with too many operations (especiallywrite operations) coming in too short of a period of time.
To handle a RequestTimeoutException, you could simply log the error and move on,or you could pause for a short period of time and then retry the operation. You couldalso retry the operation, but use a longer timeout value. (There is a version of theTableAPI.put() method that allows you to specify a timeout value for that specificoperation.)
You can also receive an IllegalArgumentException, which will be thrown if a Row thatyou are writing to the store does not have a primary key or is otherwise invalid.
You can also receive a general FaultException, which indicates that some exceptionoccurred which is neither a problem with durability nor a problem with the requesttimeout. Your only recourse here is to either log the error and move along, or retry theoperation.
Finally, if you are using a secure store that requires authentication, you can receiveAuthenticationFailureException or AuthenticationRequiredException if you donot provide the proper authentication credentials. When using a secure store, you canalso see UnauthorizedException, which means you are attempting an operation forwhich the authenticated user does not have the proper permissions.
Writing Rows to a Table in the StoreWriting a new row to a table in the data store, and updating an existing row are similaroperations. Later in this section, we describe methods that work only if a row is beingupdated, or only if you are creating a row. You can write data to a table only after ithas been added to the store. See Introducing Oracle NoSQL Database Tables andIndexes for details.
6-1

To write a row to a table in the store:
1. Construct a handle for the table to which are writing data. You do this by retrievinga TableAPI interface instance using KVStore.getTableAPI(). Use that instance toretrieve a handle for the table using the TableAPI.getTable(), which then returnsa Table interface instance.
Note:
The TableAPI.getTable() method is an expensive call requiring serverside access. For best performance, do not call this method each timeyou need a table handle. If possible, call this method for all relevanttables in the set up section of your code. Then, reuse the handlesthroughout your application.
2. Use the Table.createRow() method to create a Row interface instance, using theTable instance you retrieved in the previous step.
3. Using the Row.put() method, write to each field in the row.
To write a NULL value, use Row.putNull(), rather than Row.put().
4. Write the new row to the store using TableAPI.put().
Note:
If the table you are writing to contains an IDENTITY column, thegenerated value from the sequence generator will be available in therow. For more information, see Defining Tables With an IDENTITYColumn.
You can also load rows into the store using special purpose streams. For moreinformation, see Bulk Put Operations.
The following example shows how to write a row to the store, assuming that you havealready created the KVStore handle.
package kvstore.basicExample;
import oracle.kv.KVStore;import oracle.kv.table.Row;import oracle.kv.table.Table;import oracle.kv.table.TableAPI;
...
// KVStore handle creation is omitted for brevity
...
TableAPI tableH = kvstore.getTableAPI();
// The name you give getTable() must be identical// to the name of the table when you created it with
Chapter 6Writing Rows to a Table in the Store
6-2

// the CREATE TABLE DDL statement (myTable in this example).Table myTable = tableH.getTable("myTable");
// Get a Row instanceRow row = myTable.createRow();
// Use row.put to put all of the cells into the row. // This does NOT actually write the data to the store.
row.put("item", "Bolts");row.put("description", "Hex head, stainless");row.put("count", 5);row.put("percentage", 0.2173913);
// Now write the table to the store.// "item" is the row's primary key. If we had not set that key and its value, // this operation will result in an IllegalArgumentException.tableH.put(row, null, null);
Writing Rows to a Child TableTo write to a child table, complete the tasks that you do for a parent table, exceptusing the two-part table name, such as parent-table.child-table.
For example, in Defining Child Tables we showed how to create a child table. To writedata to that table, do this:
package kvstore.basicExample;
import oracle.kv.KVStore;import oracle.kv.table.Row;import oracle.kv.table.Table;import oracle.kv.table.TableAPI;
...
// KVStore handle creation is omitted for brevity
...
TableAPI tableH = kvstore.getTableAPI();
// Get the corresponding child table Table myChildTable = tableH.getTable("myInventory.itemDetails");
// Get a row instanceRow childRow = myChildTable.createRow();
// Populate the rows. Because the parent table's "itemCategory"// field is a primary key, this must be populated in addition// to all of the child table's rowschildRow.put("itemCategory", "Bolts");childRow.put("itemSKU", "1392610");
Chapter 6Writing Rows to a Table in the Store
6-3

childRow.put("itemDescription", "1/4-20 x 1/2 Grade 8 Hex");childRow.put("price", new Float(11.99));childRow.put("inventoryCount", 1457);
Other put OperationsBeyond the very simple usage of the TableAPI.put() method illustrated above, thereare three other put operations that you can use:
• TableAPI.putIfAbsent()
This method will only put the row if the row's primary key value DOES NOTcurrently exist in the table. That is, this method is successful only if it results in acreate operation.
• TableAPI.putIfPresent()
This method will only put the row if the row's primary key value already exists inthe table. That is, this method is only successful if it results in an update operation.
• TableAPI.putIfVersion()
This method will put the row only if the value matches the supplied versioninformation. For more information, see Using Row Versions .
Bulk Put OperationsBulk put operations allow you to load records supplied by special purpose streams intothe store.
The bulk loading of the entries is optimized to make efficient use of hardwareresources. As a result, this operation can achieve much higher throughput whencompared with single put APIs.
The behavior of the bulk put operation with respect to duplicate entries contained indifferent streams is thus undefined. If the duplicate entries are just present in a singlestream, then the first entry will be inserted (if it is not already present) and the secondentry and subsequent entries will result in the invocation ofEntryStream.keyExists(E) method. If duplicates exist across streams, then the firstentry to win the race is inserted and subsequent duplicates will result inEntryStream.keyExists(E) being invoked on them.
To use bulk put, use one of the TableAPI.put() methods that provide bulk put. Theseaccept a set of streams to bulk load data. The rows within each stream may beassociated with different tables.
When using these methods, you can also optionally specify a BulkWriteOptions classinstance which allows you to specify the durability, timeout, and timeout unit toconfigure the bulk put operation.
For example, suppose you are loading 1000 rows with 3 input streams:
import java.util.ArrayList; import java.util.List; import java.util.concurrent.atomic.AtomicLong; import oracle.kv.BulkWriteOptions; import oracle.kv.EntryStream;
Chapter 6Bulk Put Operations
6-4

import oracle.kv.FaultException; import oracle.kv.KVStore; import oracle.kv.KVStoreConfig; import oracle.kv.KVStoreFactory; import oracle.kv.table.Row; import oracle.kv.table.Table; import oracle.kv.table.TableAPI;
...
// KVStore handle creation is omitted for brevity
... Integer streamParallelism = 3; Integer perShardParallelism = 3; Integer heapPercent = 30; // In this case, sets the amount of 1000 rows to load int nLoad = 1000;
BulkWriteOptions bulkWriteOptions = new BulkWriteOptions(null, 0, null); // Set the number of streams. The default is 1 stream. bulkWriteOptions.setStreamParallelism(streamParallelism); // Set the number of writer threads per shard. // The default is 3 writer threads. bulkWriteOptions.setPerShardParallelism(perShardParallelism); // Set the percentage of max memory used for bulk put. // The default is 40 percent. bulkWriteOptions.setBulkHeapPercent(heapPercent);
System.err.println("Loading rows to " + TABLE_NAME + "...");
final List<EntryStream<Row>> streams = new ArrayList<EntryStream<Row>>(streamParallelism); final int num = (nLoad + (streamParallelism - 1)) / streamParallelism; for (int i = 0; i < streamParallelism; i++) { final int min = num * i; final int max = Math.min((min + num) , nLoad); streams.add(new LoadRowStream(i, min, max)); }
final TableAPI tableImpl = store.getTableAPI(); tableImpl.put(streams, bulkWriteOptions);
long total = 0; long keyExists = 0; for (EntryStream<Row> stream: streams) { total += ((LoadRowStream)stream).getCount(); keyExists += ((LoadRowStream)stream).getKeyExistsCount(); } final String fmt = "Loaded %,d rows to %s, %,d pre-existing."; System.err.println(String.format(fmt, total, TABLE_NAME, keyExists));
Chapter 6Bulk Put Operations
6-5

You should implement the stream interface that supplies the data to be batched andloaded into the store. Entries are supplied by a list of EntryStream instances. Eachstream is read sequentially, that is, each EntryStream.getNext() is allowed to finishbefore the next operation is issued. The load operation typically reads from thesestreams in parallel as determined by BulkWriteOptions.getStreamParallelism().
private class LoadRowStream implements EntryStream<Row> {
private final String name; private final long index; private final long max; private final long min; private long id; private long count; private final AtomicLong keyExistsCount;
LoadRowStream(String name, long index, long min, long max) { this.index = index; this.max = max; this.min = min; this.name = name; id = min; count = 0; keyExistsCount = new AtomicLong(); }
@Override public String name() { return name + "-" + index + ": " + min + "~" + max; }
@Override public Row getNext() { if (id++ == max) { return null; } final Row row = userTable.createRow(); row.put("id", id); row.put("name", "name" + id); row.put("age", 20 + id % 50); count++; return row; }
@Override public void completed() { System.err.println(name() + " completed, loaded: " + count); }
@Override public void keyExists(Row entry) { keyExistsCount.incrementAndGet(); }
@Override
Chapter 6Bulk Put Operations
6-6

public void catchException(RuntimeException exception, Row entry) { System.err.println(name() + " catch exception: " + exception.getMessage() + ": " + entry.toJsonString(false)); throw exception; }
public long getCount() { return count; }
public long getKeyExistsCount() { return keyExistsCount.get(); }}
Using Time to LiveTime to Live (TTL) is a mechanism that allows you to automatically expire table rows.TTL is expressed as the amount of time data is allowed to live in the store. Data whichhas reached its expiration timeout value can no longer be retrieved, and will notappear in any store statistics. Whether the data is physically removed from the store isdetermined by an internal mechanism that is not user-controllable.
TTL represents a minimum guaranteed time to live. Data expires on hour or dayboundaries. This means that with a one hour TTL, there can be as much as two hoursworth of unexpired data. For example (using a time format of hour:minute:second),given a one hour TTL, data written between 00:00:00.000 and 00:59:59.999 will expireat 02:00:00.000 because the data is guaranteed to expire no less than one hour fromwhen it is written.
Expired data is invisible to queries and store statistics, but even so it is using diskspace until it has been purged. The expired data is purged from disk at some point intime after its expiration date. The exact time when the data is purged is driven byinternal mechanisms and the workload on your store.
The TTL value for a table row can be updated at any time before the expiration valuehas been reached. Data that has expired can no longer be modified, and this includesits TTL value.
TTL is more efficient than manual user-deletion of the row because it avoids theoverhead of writing a database log entry for the data deletion. The deletion also doesnot appear in the replication stream.
Specifying a TTL ValueTTL values are specified on a row by row basis using Row.setTTL(). This methodaccepts a TimeToLive class instance, which allows you to identify the number of daysor hours the row will live in the store before expiring. A duration interval specified indays is recommended because this results in the least amount of storage consumed inthe store. However, if you want a TTL value that is not an even multiple of days, thenspecify the TTL value in hours.
Chapter 6Using Time to Live
6-7

The code example from Writing Rows to a Table in the Store can be extended tospecify a TTL value of 5 days like this:
package kvstore.basicExample;
import oracle.kv.KVStore;import oracle.kv.table.Row;import oracle.kv.table.Table;import oracle.kv.table.Table.TimeToLive;import oracle.kv.table.TableAPI;
...
// KVStore handle creation is omitted for brevity
...
TableAPI tableH = kvstore.getTableAPI();Table myTable = tableH.getTable("myTable");
// Get a Row instanceRow row = myTable.createRow();
// Add a TTL value to the rowrow.setTTL(TimeToLive.ofDays(5));
// Now put all of the cells in the row.row.put("item", "Bolts");row.put("description", "Hex head, stainless");row.put("count", 5);row.put("percentage", 0.2173913);
// Now write the table to the store.tableH.put(row, null, null);
Updating a TTL ValueTo update the expiration time for a table row, you write the row as normal, and at thesame time specify the new expiration time. However, you must also indicate that theexpiration time is to be updated. By default, you can modify the row data and theexpiration time will not be modified, even if you specify a new TTL value for the row.
To indicate that the the expiration time is to be updated, specify true to theWriteOptions.setUpdateTTL() method. For example, using the previous example, tochange the TTL value to 10 days, do the following:
package kvstore.basicExample;
import oracle.kv.KVStore;import oracle.kv.table.Row;import oracle.kv.table.Table;import oracle.kv.table.Table.TimeToLive;import oracle.kv.table.TableAPI;
Chapter 6Using Time to Live
6-8

import oracle.kv.table.WriteOptions;
...
// KVStore handle creation is omitted for brevity
...
TableAPI tableH = kvstore.getTableAPI();Table myTable = tableH.getTable("myTable");
// Get a Row instanceRow row = myTable.createRow();
// Change the TTL value for the row from 5 days to 10.row.setTTL(TimeToLive.ofDays(10));
// Now put all of the cells in the row.row.put("item", "Bolts");row.put("description", "Hex head, stainless");row.put("count", 5);row.put("percentage", 0.2173913);
// Now write the table to the store.tableH.put(row, null, new WriteOptions().setUpdateTTL(true));
Deleting TTL ExpirationIf you have set a TTL value for a row and you later decide you do not want it to everautomatically expire, you can turn off TTL by setting a TTL value ofTimeToLive.DO_NOT_EXPIRE:
package kvstore.basicExample;
import oracle.kv.KVStore;import oracle.kv.table.Row;import oracle.kv.table.Table;import oracle.kv.table.Table.TimeToLive;import oracle.kv.table.TableAPI;import oracle.kv.table.WriteOptions;
...
// KVStore handle creation is omitted for brevity
...
TableAPI tableH = kvstore.getTableAPI();Table myTable = tableH.getTable("myTable");
// Get a Row instanceRow row = myTable.createRow();
Chapter 6Using Time to Live
6-9

// Modify the row's TTL so that it will never expirerow.setTTL(TimeToLive.DO_NOT_EXPIRE);
// Now put all of the cells in the row.row.put("item", "Bolts");row.put("description", "Hex head, stainless");row.put("count", 5);row.put("percentage", 0.2173913);
// Now write the table to the store.tableH.put(row, null, new WriteOptions().setUpdateTTL(true));
Setting Default Table TTL ValuesYou can set a default TTL value for the table when you define the table using theUSING TTL DDL statement. It may be optionally applied when a table is created usingCREATE TABLE or when a table is modified using one of the ALTER TABLE statements.See USING TTL for details on this statement.
For example:
CREATE TABLE myTable ( item STRING, description STRING, count INTEGER, percentage DOUBLE, PRIMARY KEY (item) // Every table must have a primary key) USING TTL 5 days
At program run time, you can examine the default TTL value for a table using theTable.getDefaultTTL() method.
Deleting Rows from the StoreYou delete a single row from the store using the TableAPI.delete() method. Rowsare deleted based on a PrimaryKey, which you obtain using theTable.createPrimaryKey() method. You can also require a row to match a specifiedversion before it will be deleted. To do this, use the TableAPI.deleteIfVersion()method. Versions are described in Using Row Versions .
When you delete a row, you must handle the same exceptions as occur when youperform any write operation on the store. See Write Exceptions for a high-leveldescription of these exceptions.
package kvstore.basicExample;
import oracle.kv.KVStore;import oracle.kv.table.PrimaryKey;import oracle.kv.table.Table;import oracle.kv.table.TableAPI;
...
Chapter 6Deleting Rows from the Store
6-10

// KVStore handle creation is omitted for brevity
...
TableAPI tableH = kvstore.getTableAPI();
// The name you give to getTable() must be identical// to the name that you gave the table when you created// the table using the CREATE TABLE DDL statement.Table myTable = tableH.getTable("myTable");
// Get the primary key for the row that we want to deletePrimaryKey primaryKey = myTable.createPrimaryKey();primaryKey.put("item", "Bolts");
// Delete the row// This performs a store write operationtableH.delete(primaryKey, null, null);
Using multiDelete()You can delete multiple rows at once in a single atomic operation, as long as they allshare the shard key values. Recall that shard keys are at least a subset of yourprimary keys. This results in using a partial primary key, which is the shard key, toperform a multi-delete.
To delete multiple rows at once, use the TableAPI.multiDelete() method.
For example, suppose you create a table like this:
CREATE TABLE myTable ( itemType STRING, itemCategory STRING, itemClass STRING, itemColor STRING, itemSize STRING, price FLOAT, inventoryCount INTEGER, PRIMARY KEY (SHARD(itemType, itemCategory, itemClass), itemColor, itemSize))
With tables containing data like this:
• Row 1:
– itemType: Hats
– itemCategory: baseball
– itemClass: longbill
– itemColor: red
– itemSize: small
– price: 12.07
Chapter 6Deleting Rows from the Store
6-11

– inventoryCount: 127
• Row 2:
– itemType: Hats
– itemCategory: baseball
– itemClass: longbill
– itemColor: red
– itemSize: medium
– price: 13.07
– inventoryCount: 201
• Row 3:
– itemType: Hats
– itemCategory: baseball
– itemClass: longbill
– itemColor: red
– itemSize: large
– price: 14.07
– inventoryCount: 39
In this case, you can delete all the rows sharing the partial primary key Hats,baseball, longbill as follows:
package kvstore.basicExample;
import oracle.kv.KVStore;import oracle.kv.table.PrimaryKey;import oracle.kv.table.Table;import oracle.kv.table.TableAPI;
...
// KVStore handle creation is omitted for brevity
...
TableAPI tableH = kvstore.getTableAPI();
// The name you give to getTable() must be identical// to the name that you gave the table when you created// it using the CREATE TABLE DDL statement.Table myTable = tableH.getTable("myTable");
// Get the primary key for the row that we want to deletePrimaryKey primaryKey = myTable.createPrimaryKey();primaryKey.put("itemType", "Hats");primaryKey.put("itemCategory", "baseball");primaryKey.put("itemClass", "longbill");
Chapter 6Deleting Rows from the Store
6-12

// Exception handling omittedtableH.multiDelete(primaryKey, null, null);
Chapter 6Deleting Rows from the Store
6-13

7Reading Table Rows
There are several ways to retrieve table rows from the store. You can:
1. Retrieve a single row at a time using the TableAPI.get() method.
2. Retrieve rows associated with a shard key (which is based on at least part of yourprimary keys) using either the TableAPI.multiGet() orTableAPI.multiGetIterator() methods.
3. Retrieve table rows that share a shard key, or an index key, using theTableAPI.tableIterator() method.
4. Retrieve and process records from each shard in parallel using a single key as theretrieval criteria. Use one of the TableAPI.tableIterator() orTableAPI.tableKeysIterator() methods that provide parallel scans.
5. Retrieve and process records from each shard in parallel using a set of keys asthe retrieval criteria. Use one of the TableAPI.tableIterator() orTableAPI.tableKeysIterator() methods that provide bulk retrievals.
Each of these are described in the following sections.
Read ExceptionsSeveral exceptions can occur when you attempt a read operation in the store. The firstof these is ConsistencyException. This exception indicates that the operation cannotbe completed because the consistency policy cannot be met. For more information,see Consistency Guarantees.
The second exception is RequestTimeoutException. This means that the operationcould not be completed within the amount of time provided by the store's timeoutproperty. This probably indicates a store that is attempting to service too many readrequests all at once. Remember that your data is partitioned across the shards in yourstore, with the partitioning occurring based on your shard keys. If you designed yourkeys such that a large number of read requests are occurring against a single key, youcould see request timeouts even if some of the shards in your store are idle.
A request timeout could also be indicative of a network problem that is causing thenetwork to be slow or even completely unresponsive.
To handle a RequestTimeoutException, you could simply log the error and move on,or you could pause for a short period of time and then retry the operation. You couldalso retry the operation, but use a longer timeout value.
You can also receive an IllegalArgumentException, which will be thrown if a Row thatyou are writing to the store does not have a primary key or is otherwise invalid.
You can also receive a general FaultException, which indicates that some exceptionoccurred which is neither a problem with consistency nor a problem with the requesttimeout. Your only recourse here is to either log the error and move along, or retry theoperation.
7-1

You can also receive a MetadataNotFoundException, which indicates that a client'smetadata may be out of sync. It extends FaultException and can be caught byapplications to trigger the need for a refresh of their metadata, and in particular, Tablehandles obtained via TableAPI.getTable().
Finally, if you are using a secure store that requires authentication, you can receiveAuthenticationFailureException or AuthenticationRequiredException if you donot provide the proper authentication credentials. When using a secure store, you canalso see UnauthorizedException, which means you are attempting an operation forwhich the authenticated user does not have the proper permissions.
Retrieving a Single RowTo retrieve a single row from the store:
1. Construct a handle for the table from which you want to read. You do this byretrieving a TableAPI class instance using KVStore.getTableAPI(). You then usethat instance to retrieve the desired table handle using TableAPI.getTable(). Thisreturns a Table class instance.
Note:
TableAPI.getTable() is an expensive call that requires server sideaccess. From a performance point of view, it is a mistake to call thismethod whenever you need a table handle. Instead, call this method forall relevant tables in the set up section of your code, and then reusethose handles throughout your application.
2. Use the Table instance retrieved in the previous step to create a PrimaryKey classinstance. In this case, the key you create must be the entire primary key.
3. Retrieve the row using TableAPI.get(). This performs a store read operation.
4. Retrieve individual fields from the row using the Row.get() method.
For example, in Writing Rows to a Table in the Store we showed a trivial example ofstoring a table row to the store. The following trivial example shows how to retrievethat row.
package kvstore.basicExample;
import oracle.kv.KVStore;import oracle.kv.table.PrimaryKey;import oracle.kv.table.Row;import oracle.kv.table.Table;import oracle.kv.table.TableAPI;
...
// KVStore handle creation is omitted for brevity
...
TableAPI tableH = kvstore.getTableAPI();
Chapter 7Retrieving a Single Row
7-2

// The name you give to getTable() must be identical// to the name that you gave the table when you created// the table using the CREATE TABLE DDL statement.Table myTable = tableH.getTable("myTable");
// Construct the PrimaryKey. This is driven by your table// design, which designated one or more fields as// being part of the table's primary key. In this// case, we have a single field primary key, which is the// 'item' field. Specifically, we want to retrieve the// row where the 'item' field contains 'Bolts'.PrimaryKey key = myTable.createPrimaryKey();key.put("item", "Bolts");
// Retrieve the row. This performs a store read operation.// Exception handling is skipped for this trivial example.Row row = tableH.get(key, null);
// Now retrieve the individual fields from the row.String item = row.get("item").asString().get();String description = row.get("description").asString().get();Integer count = row.get("count").asInteger().get();Double percentage = row.get("percentage").asDouble().get();
Retrieve a Child TableIn Writing Rows to a Child Table we showed how to populate a child table with data.To retrieve that data, you must specify the primary key used for the parent table row,as well as the primary key for the child table row. For example:
package kvstore.basicExample;
import oracle.kv.KVStore;import oracle.kv.table.PrimaryKey;import oracle.kv.table.Row;import oracle.kv.table.Table;import oracle.kv.table.TableAPI;
...
// KVStore handle creation is omitted for brevity
...
TableAPI tableH = kvstore.getTableAPI();
// We omit retrieval of the parent table because it is not required.Table myChildTable = tableH.getTable("myInventory.itemDetails");
// Construct the PrimaryKey. This key must contain the primary key// from the parent table row, as well as the primary key from the// child table row that you want to retrieve.PrimaryKey key = myChildTable.createPrimaryKey();
Chapter 7Retrieving a Single Row
7-3

key.put("itemCategory", "Bolts");key.put("itemSKU", "1392610");
// Retrieve the row. This performs a store read operation.// Exception handling is skipped for this trivial example.Row row = tableH.get(key, null);
// Now retrieve the individual fields from the row.String description = row.get("itemDescription").asString().get();Float price = row.get("price").asFloat().get();Integer invCount = row.get("inventoryCount").asInteger().get();
For information on how to iterate over nested tables, see Iterating with Nested Tables.
Using multiGet()TableAPI.multiGet() allows you to retrieve multiple rows at once, so long as they allshare the same shard keys. You must specify a full set of shard keys to this method.
Use TableAPI.multiGet() only if your retrieval set will fit entirely in memory.
For example, suppose you have a table that stores information about products, whichis designed like this:
CREATE TABLE myTable ( itemType STRING, itemCategory STRING, itemClass STRING, itemColor STRING, itemSize STRING, price FLOAT, inventoryCount INTEGER, PRIMARY KEY (SHARD(itemType, itemCategory, itemClass), itemColor, itemSize))
With tables containing data like this:
• Row 1:
– itemType: Hats
– itemCategory: baseball
– itemClass: longbill
– itemColor: red
– itemSize: small
– price: 12.07
– inventoryCount: 127
• Row 2:
– itemType: Hats
– itemCategory: baseball
Chapter 7Using multiGet()
7-4

– itemClass: longbill
– itemColor: red
– itemSize: medium
– price: 13.07
– inventoryCount: 201
• Row 3:
– itemType: Hats
– itemCategory: baseball
– itemClass: longbill
– itemColor: red
– itemSize: large
– price: 14.07
– inventoryCount: 39
In this case, you can retrieve all of the rows with their itemType field set to Hats andtheir itemCategory field set to baseball. Notice that this represents a partial primarykey, because itemClass, itemColor and itemSize are not used for this query.
package kvstore.basicExample;
...
import java.util.List;import java.util.Iterator;import oracle.kv.ConsistencyException;import oracle.kv.KVStore;import oracle.kv.RequestTimeoutException;import oracle.kv.table.PrimaryKey;import oracle.kv.table.Row;import oracle.kv.table.Table;import oracle.kv.table.TableAPI;
...
// KVStore handle creation is omitted for brevity
...
TableAPI tableH = kvstore.getTableAPI();
// The name you give to getTable() must be identical// to the name that you gave the table when you created// the table using the CREATE TABLE DDL statement.Table myTable = tableH.getTable("myTable");
// Construct the PrimaryKey. In this case, we are// using a partial primary key.PrimaryKey key = myTable.createPrimaryKey();key.put("itemType", "Hats");
Chapter 7Using multiGet()
7-5

key.put("itemCategory", "baseball");key.put("itemClass", "longbill");
List<Row> myRows = null;
try { myRows = tableH.multiGet(key, null, null);} catch (ConsistencyException ce) { // The consistency guarantee was not met} catch (RequestTimeoutException re) { // The operation was not completed within the // timeout value}
You can then iterate over the resulting list as follows:
for (Row theRow: myRows) { String itemType = theRow.get("itemType").asString().get(); String itemCategory = theRow.get("itemCategory").asString().get(); String itemClass = theRow.get("itemClass").asString().get(); String itemColor = theRow.get("itemColor").asString().get(); String itemSize = theRow.get("itemSize").asString().get(); Float price = theRow.get("price").asFloat().get(); Integer price = theRow.get("itemCount").asInteger().get();}
Iterating over Table RowsTableAPI.tableIterator() provides non-atomic table iteration. Use this method toiterate over indexes. This method performs a parallel scan of your tables if you set aconcurrent request size other than 1.
TableAPI.tableIterator() does not return the entire set of rows all at once. Instead,it batches the fetching of rows in the iterator, to minimize the number of network roundtrips, while not monopolizing the available bandwidth. Also, the rows returned by thismethod are in unsorted order.
Note that this method does not result in a single atomic operation. Because theretrieval is batched, the return set can change over the course of the entire retrievaloperation. As a result, you lose the atomicity of the operation when you use thismethod.
This method provides for an unsorted traversal of rows in your table. If you do notprovide a key, then this method will iterate over all of the table's rows.
When using this method, you can optionally specify:
• A MultiRowOptions class instance. This class allows you to specify a field range,and the ancestor and parent tables you want to include in this iteration.
• A TableIteratorOptions class instance. This class allows you to identify thesuggested number of keys to fetch during each network round trip. If you provide avalue of 0, an internally determined default is used. You can also use this class tospecify the traversal order (FORWARD, REVERSE, and UNORDERED are supported).
Chapter 7Iterating over Table Rows
7-6

This class also allows you to control how many threads are used to perform thestore read. By default this method determines the degree of concurrency based onthe number of available processors. You can tune this concurrency by explicitlystating how many threads to use for table retrieval. See Parallel Scans for moreinformation.
Finally, you use this class to specify a consistency policy. See ConsistencyGuarantees for more information.
Note:
When using TableAPI.tableIterator(), it is important to callTableIterator.close() when you are done with the iterator to avoidresource leaks. This is especially true for long-running applications,especially if you do not iterate over the entire result set.
For example, suppose you have a table that stores information about products, whichis designed like this:
CREATE TABLE myTable ( itemType STRING, itemCategory STRING, itemClass STRING, itemColor STRING, itemSize STRING, price FLOAT, inventoryCount INTEGER, PRIMARY KEY (SHARD(itemType, itemCategory, itemClass), itemColor, itemSize))
With tables containing data like this:
• Row 1:
– itemType: Hats
– itemCategory: baseball
– itemClass: longbill
– itemColor: red
– itemSize: small
– price: 12.07
– inventoryCount: 127
• Row 2:
– itemType: Hats
– itemCategory: baseball
– itemClass: longbill
– itemColor: red
Chapter 7Iterating over Table Rows
7-7

– itemSize: medium
– price: 13.07
– inventoryCount: 201
• Row 3:
– itemType: Hats
– itemCategory: baseball
– itemClass: longbill
– itemColor: red
– itemSize: large
– price: 14.07
– inventoryCount: 39
• Row n:
– itemType: Coats
– itemCategory: Casual
– itemClass: Winter
– itemColor: red
– itemSize: large
– price: 247.99
– inventoryCount: 9
Then in the simplest case, you can retrieve all of the rows related to 'Hats' usingTableAPI.tableIterator() as follows. Note that this simple example can also beaccomplished using the TableAPI.multiGet() method. If you have a complete shardkey, and if the entire results set will fit in memory, then multiGet() will perform muchbetter than tableIterator(). However, if the results set cannot fit entirely in memory,or if you do not have a complete shard key, then tableIterator() is the better choice.Note that reads performed using tableIterator() are non-atomic, which may haveramifications if you are performing a long-running iteration over records that are beingupdated.
package kvstore.basicExample;
...
import oracle.kv.KVStore;import oracle.kv.table.PrimaryKey;import oracle.kv.table.Row;import oracle.kv.table.Table;import oracle.kv.table.TableAPI;import oracle.kv.table.TableIterator;
...
// KVStore handle creation is omitted for brevity
...
Chapter 7Iterating over Table Rows
7-8

TableAPI tableH = kvstore.getTableAPI();
// The name you give to getTable() must be identical// to the name that you gave the table when you created// the table using the CREATE TABLE DDL statement.Table myTable = tableH.getTable("myTable");
// Construct the PrimaryKey. In this case, we are// using a partial primary key.PrimaryKey key = myTable.createPrimaryKey();key.put("itemType", "Hats");
// Exception handling is omitted, but in production code// ConsistencyException, RequestTimeException, and FaultException// would have to be handled.TableIterator<Row> iter = tableH.tableIterator(key, null, null);try { while (iter.hasNext()) { Row row = iter.next(); // Examine your row's fields here }} finally { if (iter != null) { iter.close(); }}
Specifying Field RangesWhen performing multi-key operations in the store, you can specify a range of rows tooperate upon. You do this using the FieldRange class, which is accepted by any of themethods which perform bulk reads. This class is used to restrict the selected rows tothose matching a range of field values.
For example, suppose you defined a table like this:
CREATE TABLE myTable ( surname STRING, familiarName STRING, userID STRING, phonenumber STRING, address STRING, email STRING, dateOfBirth STRING, PRIMARY KEY (SHARD(surname, familiarName), userID))
The surname contains a person's family name, such as Smith. The familiarNamecontains their common name, such as Bob, Patricia, Robert, and so forth.
Given this, you could perform operations for all the rows related to users with asurname of Smith, but we can limit the result set to just those users with familiarnames that fall alphabetically between Bob and Patricia by specifying a field range.
Chapter 7Specifying Field Ranges
7-9

A FieldRange is created using Table.createFieldRange(). This method takes justone argument — the name of the primary key for which you want to set the range.
In this case, we will define the start of the key range using the string "Bob" and the endof the key range to be "Patricia". Both ends of the key range will be inclusive.
In this example, we use TableIterator, but we could just as easily use this range onany multi-row read operation, such as the TableAPI.multiGet() orTableAPI.multiGetKeys() methods. The FieldRange object is passed to thesemethods using a MultiRowOptions class instance, which we construct using theFieldRange.createMultiRowOptions() convenience method.
package kvstore.basicExample;
...
import oracle.kv.KVStore;import oracle.kv.table.FieldRange;import oracle.kv.table.MultiRowOptions;import oracle.kv.table.PrimaryKey;import oracle.kv.table.Row;import oracle.kv.table.Table;import oracle.kv.table.TableAPI;import oracle.kv.table.TableIterator;
...
// KVStore handle creation is omitted for brevity
...
TableAPI tableH = kvstore.getTableAPI();
// The name you give to getTable() must be identical// to the name that you gave the table when you created// the table using the CREATE TABLE DDL statement.Table myTable = tableH.getTable("myTable");
// Construct the PrimaryKey. In this case, we are// using a partial primary key.PrimaryKey key = myTable.createPrimaryKey();key.put("surname", "Smith");
// Create the field range.FieldRange fh = myTable.createFieldRange("familiarName");fh.setStart("Bob", true);fh.setEnd("Patricia", true);MultiRowOptions mro = fh.createMultiRowOptions();
// Exception handling is omitted, but in production code// ConsistencyException, RequestTimeException, and FaultException// would have to be handled.TableIterator<Row> iter = tableH.tableIterator(key, mro, null);try { while (iter.hasNext()) {
Chapter 7Specifying Field Ranges
7-10

Row row = iter.next(); // Examine your row's fields here }} finally { if (iter != null) { iter.close(); }}
Iterating with Nested TablesWhen you are iterating over a table, or performing a multi-get operation, by defaultonly rows are retrieved from the table on which you are operating. However, you canuse MultiRowOptions to specify that parent and child tables are to be retrieved aswell.
When you do this, parent tables are retrieved first, then the table you are operating on,then child tables. In other words, the tables' hierarchical order is observed.
The parent and child tables retrieved are identified by specifying a List of Tableobjects to the ancestors and children parameters on the class constructor. You canalso specify these using the MultiRowOptions.setIncludedChildTables() orMultiRowOptions.setIncludedParentTables() methods.
When operating on rows retrieved from multiple tables, it is your responsibility todetermine which table the row belongs to.
For example, suppose you create a table with a child and grandchild table like this:
CREATE TABLE prodTable ( prodType STRING, typeDescription STRING, PRIMARY KEY (prodType))
CREATE TABLE prodTable.prodCategory ( categoryName STRING, categoryDescription STRING, PRIMARY KEY (categoryName))
CREATE TABLE prodTable.prodCategory.item ( itemSKU STRING, itemDescription STRING, itemPrice FLOAT, vendorUID STRING, inventoryCount INTEGER, PRIMARY KEY (itemSKU))
With tables containing data like this:
• Row 1:
Chapter 7Iterating with Nested Tables
7-11

– prodType: Hardware
– typeDescription: Equipment, tools and parts
– Row 1.1:
* categoryName: Bolts
* categoryDescription: Metric & US Sizes
* Row 1.1.1:
* itemSKU: 1392610
* itemDescription: 1/4-20 x 1/2 Grade 8 Hex
* itemPrice: 11.99
* vendorUID: A8LN99
* inventoryCount: 1457
• Row 2:
– prodType: Tools
– typeDescription: Hand and power tools
– Row 2.1:
* categoryName: Handtools
* categoryDescription: Hammers, screwdrivers, saws
* Row 2.1.1:
* itemSKU: 1582178
* itemDescription: Acme 20 ounce claw hammer
* itemPrice: 24.98
* vendorUID: D6BQ27
* inventoryCount: 249
In this case, you can display all of the data contained in these tables in the followingway.
Start by getting all our table handles:
package kvstore.tableExample;
import java.util.Arrays;
import oracle.kv.KVStore;import oracle.kv.KVStoreConfig;import oracle.kv.KVStoreFactory;
import oracle.kv.table.PrimaryKey;import oracle.kv.table.Row;import oracle.kv.table.Table;import oracle.kv.table.TableAPI;
import oracle.kv.table.TableIterator;import oracle.kv.table.MultiRowOptions;
Chapter 7Iterating with Nested Tables
7-12

...
private static Table prodTable;private static Table categoryTable;private static Table itemTable;
private static TableAPI tableH;
...
// KVStore handle creation is omitted for brevity
...
tableH = kvstore.getTableAPI();prodTable = tableH.getTable("prodTable");categoryTable = tableH.getTable("prodTable.prodCategory");itemTable = tableH.getTable("prodTable.prodCategory.item");
Now we need the PrimaryKey and the MultiRowOptions that we will use to iterate overthe top-level table. Because we want all the rows in the top-level table, we create anempty PrimaryKey.
The MultiRowOptions identifies the two child tables in the constructor's childparameter. This causes the iteration to return all the rows from the top-level table, aswell as all the rows from the nested children tables.
// Construct a primary keyPrimaryKey key = prodTable.createPrimaryKey();
// Get a MultiRowOptions and tell it to look at both the child// tablesMultiRowOptions mro = new MultiRowOptions(null, null, Arrays.asList(categoryTable, itemTable));
Now we perform the iteration:
// Get the table iterator// Exception handling is omitted, but in production code// ConsistencyException, RequestTimeException, and FaultException// would have to be handled.TableIterator<Row> iter = tableH.tableIterator(key, mro, null);try { while (iter.hasNext()) { Row row = iter.next(); displayRow(row); }} finally { if (iter != null) { iter.close(); }}
Chapter 7Iterating with Nested Tables
7-13

Our displayRow() method is used to determine which table a row belongs to, and thendisplay it in the appropriate way.
private static void displayRow(Row row) { // Display the row depending on which table it belongs to if (row.getTable().equals(prodTable)) { displayProdTableRow(row); } else if (row.getTable().equals(categoryTable)) { displayCategoryTableRow(row); } else { displayItemTableRow(row); }}
Finally, we just need the methods used to display each row. These are trivial, but in amore sophisticated application they could be used to do more complex things, such asconstruct HTML pages or write XSL-FO for the purposes of generating PDF copies ofa report.
private static void displayProdTableRow(Row row) { System.out.println("\nType: " + row.get("prodType").asString().get()); System.out.println("Description: " + row.get("typeDescription").asString().get());}
private static void displayCategoryTableRow(Row row) { System.out.println("\tCategory: " + row.get("categoryName").asString().get()); System.out.println("\tDescription: " + row.get("categoryDescription").asString().get());}
private static void displayItemTableRow(Row row) { System.out.println("\t\tSKU: " + row.get("itemSKU").asString().get()); System.out.println("\t\tDescription: " + row.get("itemDescription").asString().get()); System.out.println("\t\tPrice: " + row.get("itemPrice").asFloat().get()); System.out.println("\t\tVendorUID: " + row.get("vendorUID").asString().get()); System.out.println("\t\tInventory count: " + row.get("inventoryCount").asInteger().get()); System.out.println("\n");}
Note that the retrieval order remains the top-most ancestor to the lowest child, even ifyou retrieve by lowest child. For example, you can retrieve all the Bolts, and all of theirparent tables, like this:
// Get all the table handlesprodTable = tableH.getTable("prodTable");
Chapter 7Iterating with Nested Tables
7-14

categoryTable = tableH.getTable("prodTable.prodCategory");itemTable = tableH.getTable("prodTable.prodCategory.item");
// Construct a primary keyPrimaryKey key = itemTable.createPrimaryKey();key.put("prodType", "Hardware");key.put("categoryName", "Bolts");
// Get a MultiRowOptions and tell it to look at both the ancestor// tablesMultiRowOptions mro = new MultiRowOptions(null, Arrays.asList(prodTable, categoryTable), null);
// Get the table iterator// Exception handling is omitted, but in production code// ConsistencyException, RequestTimeException, and FaultException// would have to be handled.TableIterator<Row> iter = tableH.tableIterator(key, mro, null);try { while (iter.hasNext()) { Row row = iter.next(); displayRow(row); }} finally { if (iter != null) { iter.close(); }}
Reading IndexesYou use TableIterator to retrieve table rows using a table's indexes. Just as whenyou use TableIterator to read table rows using a table's primary key(s), whenreading using indexes you can set options such as field ranges, traversal direction,and so forth. By default, index scans return entries in forward order.
In this case, rather than provide TableIterator with a PrimaryKey instance, you usean instance of IndexKey.
For example, suppose you defined a table like this:
CREATE TABLE myTable ( surname STRING, familiarName STRING, userID STRING, phonenumber STRING, address STRING, email STRING, dateOfBirth STRING, PRIMARY KEY (SHARD(surname, familiarName), userID))
CREATE INDEX DoB ON myTable (dateOfBirth)
Chapter 7Reading Indexes
7-15

This creates an index named DoB for table myTable based on the value of thedateOfBirth field. To read using that index, you use Table.getIndex() to retrieve theindex named Dob. You then create an IndexKey from the Index object. For example:
package kvstore.basicExample;
...
import oracle.kv.KVStore;import oracle.kv.table.Index;import oracle.kv.table.IndexKey;import oracle.kv.table.Row;import oracle.kv.table.Table;import oracle.kv.table.TableAPI;import oracle.kv.table.TableIterator;
...
// KVStore handle creation is omitted for brevity
...
TableAPI tableH = kvstore.getTableAPI();
Table myTable = tableH.getTable("myTable");
// Construct the IndexKey. The name we gave our index when// we created it was 'DoB'.Index dobIdx = myTable.getIndex("DoB");IndexKey dobIdxKey = dobIdx.createIndexKey();
// Exception handling is omitted, but in production code// ConsistencyException, RequestTimeException, and FaultException// would have to be handled.TableIterator<Row> iter = tableH.tableIterator(dobIdxKey, null, null);try { while (iter.hasNext()) { Row row = iter.next(); // Examine your row's fields here }} finally { if (iter != null) { iter.close(); }}
If you want to return entries that match a specific field name and field value, then usethe IndexKey.put() method:
// Construct the IndexKey. The name we gave our index when// we created it was 'DoB'.Index dobIdx = myTable.getIndex("DoB");IndexKey dobIdxKey = dobIdx.createIndexKey();// Return only those entries with a dateOfBirth equal to
Chapter 7Reading Indexes
7-16

// "1991-08-23"dobIdxKey.put("dateOfBirth", "1991-08-23");
// Exception handling is omitted, but in production code// ConsistencyException, RequestTimeException, and FaultException// would have to be handled.TableIterator<Row> iter = tableH.tableIterator(dobIdxKey, null, null);try { while (iter.hasNext()) { Row row = iter.next(); // Examine your row's fields here }} finally { if (iter != null) { iter.close(); }}
If you want to return all the entries with a null value for the field, use theIndexKey.putNull() method:
// Construct the IndexKey. The name we gave our index when// we created it was 'DoB'.Index dobIdx = myTable.getIndex("DoB");IndexKey dobIdxKey = dobIdx.createIndexKey();// Return only those entries with a NULL dateOfBirth// value.dobIdxKey.putNull("dateOfBirth");
// Exception handling is omitted, but in production code// ConsistencyException, RequestTimeException, and FaultException// would have to be handled.TableIterator<Row> iter = tableH.tableIterator(dobIdxKey, null, null);try { while (iter.hasNext()) { Row row = iter.next(); // Examine your row's fields here }} finally { if (iter != null) { iter.close(); }}
In the previous example, the code examines every row indexed by the DoB index. Amore likely, and useful, example in this case would be to limit the rows returnedthrough the use of a field range. You do that by using Index.createFieldRange() tocreate a FieldRange object. When you do this, you must specify the field to base therange on. Recall that an index can be based on more than one table field, so the fieldname you give the method must be one of the indexed fields.
For example, if the rows hold dates in the form of yyyy-mm-dd, you could retrieve allthe people born in the month of May, 1994 in the following way. This index only
Chapter 7Reading Indexes
7-17
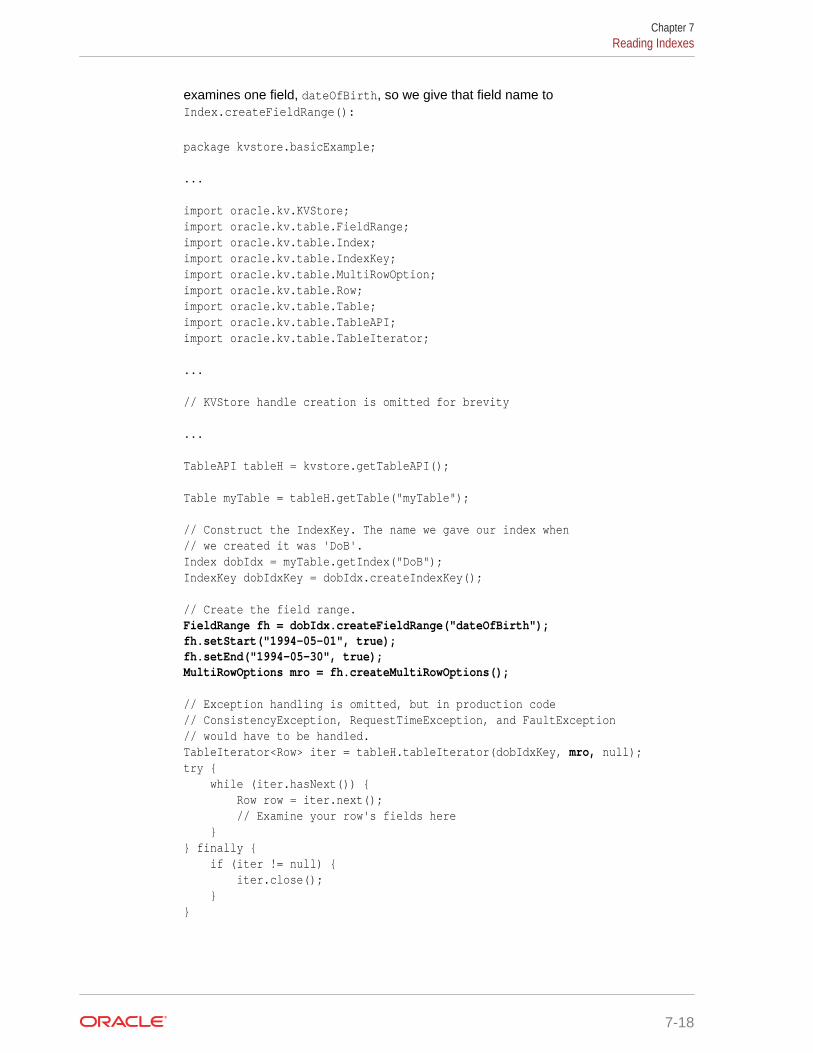
examines one field, dateOfBirth, so we give that field name toIndex.createFieldRange():
package kvstore.basicExample;
...
import oracle.kv.KVStore;import oracle.kv.table.FieldRange;import oracle.kv.table.Index;import oracle.kv.table.IndexKey;import oracle.kv.table.MultiRowOption;import oracle.kv.table.Row;import oracle.kv.table.Table;import oracle.kv.table.TableAPI;import oracle.kv.table.TableIterator;
...
// KVStore handle creation is omitted for brevity
...
TableAPI tableH = kvstore.getTableAPI();
Table myTable = tableH.getTable("myTable");
// Construct the IndexKey. The name we gave our index when// we created it was 'DoB'.Index dobIdx = myTable.getIndex("DoB");IndexKey dobIdxKey = dobIdx.createIndexKey();
// Create the field range.FieldRange fh = dobIdx.createFieldRange("dateOfBirth");fh.setStart("1994-05-01", true);fh.setEnd("1994-05-30", true);MultiRowOptions mro = fh.createMultiRowOptions();
// Exception handling is omitted, but in production code// ConsistencyException, RequestTimeException, and FaultException// would have to be handled.TableIterator<Row> iter = tableH.tableIterator(dobIdxKey, mro, null);try { while (iter.hasNext()) { Row row = iter.next(); // Examine your row's fields here }} finally { if (iter != null) { iter.close(); }}
Chapter 7Reading Indexes
7-18

Parallel ScansBy default, store reads are performed using multiple threads, the number of which ischosen by the number of cores available to your code. You can configure themaximum number of client-side threads to be used for the scan, as well as the numberof results per request and the maximum number of result batches that the OracleNoSQL Database client can hold before the scan pauses. To do this, use theTableIteratorOptions class. You pass this to TableAPI.tableIterator(). Thiscreates a TableIterator that uses the specified parallel scan configuration.
Note:
You cannot configure the number of scans you use for your reads if you areusing indexes.
For example, to retrieve all of the records in the store using 5 threads in parallel, youwould do this:
package kvstore.basicExample;
...
import oracle.kv.Consistency;import oracle.kv.Direction;import oracle.kv.KVStore;import oracle.kv.table.FieldRange;import oracle.kv.table.PrimaryKey;import oracle.kv.table.MultiRowOption;import oracle.kv.table.Row;import oracle.kv.table.Table;import oracle.kv.table.TableAPI;import oracle.kv.table.TableIterator;import oracle.kv.table.TableIteratorOptions;
...
// KVStore handle creation is omitted for brevity
...
TableAPI tableH = kvstore.getTableAPI();
Table myTable = tableH.getTable("myTable");
// Construct the PrimaryKey.PrimaryKey key = myTable.createPrimaryKey();key.put("itemType", "Hats");key.put("itemCategory", "baseball");
TableIteratorOptions tio =
Chapter 7Parallel Scans
7-19

new TableIteratorOptions(Direction.UNORDERED, Consistency.NONE_REQUIRED, 0, // timeout null, // timeout units 5, // number of concurrent // threads 0, // results per request 0); // max result sets// Exception handling is omitted, but in production code// ConsistencyException, RequestTimeException, and FaultException// would have to be handled.TableIterator<Row> iter = tableH.tableIterator(key, null, tio);try { while (iter.hasNext()) { Row row = iter.next(); // Examine your row's fields here }} finally { if (iter != null) { iter.close(); }}
Bulk Get OperationsBulk get operations allow you to retrieve and process records from each shard inparallel, like a parallel scan, but using a set of keys instead of a single key as retrievalcriteria.
A bulk get operation does not return the entire set of rows all at once. Instead, itbatches the fetching of rows in the iterator, to minimize the number of network roundtrips, while not monopolizing the available bandwidth. Batches are fetched in parallelacross multiple Replication Nodes. If more threads are specified on the client side,then the user can expect better retrieval performance – until processor or networkresources are saturated.
To use bulk get, use one of the TableAPI.tableIterator() orTableAPI.tableKeysIterator() methods that provide bulk retrievals. These accept aset of keys instead of a single key as the retrieval criteria. The set is provided usingeither an Iterator<Key> or List<Iterator<Key>> value.
The methods retrieve the rows or primary keys matching the keys supplied by theiterator(s).
Note:
If the iterator yields duplicate keys, the row associated with the duplicatekeys will be returned at least once and potentially multiple times.
The supplied keys should follow these rules:
Chapter 7Bulk Get Operations
7-20

1. All supplied primary keys should belong to the same table.
2. The input key must be a complete shard key.
3. If a field range is specified, then the partial primary keys should be uniform. Thatis, they should have the same number of components. Also, the field range mustbe the first unspecified field of the supplied key.
When using these methods, you can also optionally specify:
• A MultiRowOptions class instance which allows you to specify a field range, aswell as the ancestor and parent tables you want to include in the iteration.
• The number of keys to fetch during each network round trip using aTableIteratorOptions class instance. If you provide a value of 0, an internallydetermined default is used. You can also specify the traversal order (UNORDERED issupported).
You can control how many threads are used to perform the store read using theMaxConcurrentRequests parameter.
Finally, you can specify a consistency policy. See Consistency Guarantees formore information.
For example, suppose you have a table that stores information about products, whichis designed like this:
CREATE TABLE myTable ( itemType STRING, itemCategory STRING, itemClass STRING, itemColor STRING, itemSize STRING, price FLOAT, inventoryCount INTEGER, PRIMARY KEY (SHARD(itemType, itemCategory), itemClass, itemColor, itemSize))
With tables containing data like this:
• Row 1:
– itemType: Hats
– itemCategory: baseball
– itemClass: longbill
– itemColor: red
– itemSize: small
– price: 12.07
– inventoryCount: 127
• Row 2:
– itemType: Hats
– itemCategory: baseball
– itemClass: longbill
Chapter 7Bulk Get Operations
7-21

– itemColor: red
– itemSize: medium
– price: 13.07
– inventoryCount: 201
• Row 3:
– itemType: Pants
– itemCategory: baseball
– itemClass: Summer
– itemColor: red
– itemSize: large
– price: 14.07
– inventoryCount: 39
• Row 4:
– itemType: Pants
– itemCategory: baseball
– itemClass: Winter
– itemColor: white
– itemSize: large
– price: 16.99
– inventoryCount: 9
• Row n:
– itemType: Coats
– itemCategory: Casual
– itemClass: Winter
– itemColor: red
– itemSize: large
– price: 247.99
– inventoryCount: 13
If you want to locate all the Hats and Pants used for baseball, using nine threads inparallel, you can retrieve all of the records as follows:
package kvstore.basicExample;
...import java.util.ArrayList;import java.util.List;import oracle.kv.Consistency;import oracle.kv.Direction;import oracle.kv.table.PrimaryKey;import oracle.kv.table.Row;import oracle.kv.table.TableAPI;
Chapter 7Bulk Get Operations
7-22

import oracle.kv.table.TableIterator;import oracle.kv.table.TableIteratorOptions;
...
// KVStore handle creation is omitted for brevity
...
// Construct the Table HandleTableAPI tableH = store.getTableAPI();Table table = tableH.getTable("myTable");
// Use multi-threading for this store iteration and limit the number// of threads (degree of parallelism) to 9.final int maxConcurrentRequests = 9;final int batchResultsSize = 0;final TableIteratorOptions tio = new TableIteratorOptions(Direction.UNORDERED, Consistency.NONE_REQUIRED, 0, null, maxConcurrentRequests, batchResultsSize);
// Create retrieval keysPrimaryKey myKey = table.createPrimaryKey();myKey.put("itemType", "Hats");myKey.put("itemCategory", "baseball");PrimaryKey otherKey = table.createPrimaryKey();otherKey.put("itemType", "Pants");otherKey.put("itemCategory", "baseball");
List<PrimaryKey> searchKeys = new ArrayList<PrimaryKey>();
// Add the retrieval keys to the list.searchKeys.add(myKey);searchKeys.add(otherKey);
final TableIterator<Row> iterator = tableH.tableIterator( searchKeys.iterator(), null, tio);
// Now retrieve the records.try { while (iterator.hasNext()) { Row row = (Row) iterator.next(); // Do some work with the Row here }} finally { if (iterator != null) { iterator.close(); }}
Chapter 7Bulk Get Operations
7-23

8Using Data Types
Many of the types that Oracle NoSQL Database offers are easy to use. Examples oftheir usage has been scattered throughout this manual. However, some types are alittle more complicated to use because they use container methods. This chapterdescribes their usage.
The types described in this chapter are: Arrays, Maps, Records, Enums, and ByteArrays. This chapter shows how to read and write values of each of these types.
Using ArraysArrays are a sequence of values all of the same type.
When you declare a table field as an array, you use the ARRAY() statement.
To define a simple two-field table where the primary key is a UID and the second fieldcontains array of strings, you use the following DDL statement:
CREATE TABLE myTable ( uid INTEGER, myArray ARRAY(STRING), PRIMARY KEY(uid))
DEFAULT and NOT NULL constraints are not supported for arrays.
To write the array, use Row.putArray(), which returns an ArrayValue class instance.You then use ArrayValue.put() to write elements to the array:
TableAPI tableH = kvstore.getTableAPI();
Table myTable = tableH.getTable("myTable");
Row row = myTable.createRow();row.put("uid", 12345);
ArrayValue av = row.putArray("myArray");av.add("One");av.add("Two");av.add("Three");
tableH.put(row, null, null);
Note that ArrayValue has methods that allow you to add multiple values to the arrayby appending an array of values to the array. This assumes the array of values
8-1

matches the array's schema. For example, the previous example could be done in thefollowing way:
TableAPI tableH = kvstore.getTableAPI();
Table myTable = tableH.getTable("myTable");
Row row = myTable.createRow();row.put("uid", 12345);
ArrayValue av = row.putArray("myArray");String myStrings[] = {"One", "Two", "Three"};av.add(myStrings);
tableH.put(row, null, null);
To read the array, use Row.get().asArray(). This returns an ArrayValue classinstance. You can then use ArrayValue.get() to retrieve an element of the array froma specified index, or you can use ArrayValue.toList() to return the array as a JavaList. In either case, the retrieved values are returned as a FieldValue, which allowsyou to retrieve the encapsulated value using a cast method such asFieldValue.asString().
For example, to iterate over the array created in the previous example:
TableAPI tableH = kvstore.getTableAPI();
Table myTable = tableH.getTable("myTable");
/* Create a primary key for user id 12345 and get a row */PrimaryKey key = myTable.createPrimaryKey();key.put("uid", 12345);Row row = tableH.get(key, null);
/* Iterate over the array, displaying each element as a string */ArrayValue av = row.get("myArray").asArray();for (FieldValue fv: av.toList()) { System.out.println(fv.asString().get()); }
Using BinaryYou can declare a field as binary using the BINARY statement. You then read and writethe field value using a Java byte array.
If you want to store a large binary object, then you should use the LOB APIs ratherthan a binary field. For information on using the LOB APIs, see the Using the LargeObject API.
Note that fixed binary should be used over the binary datatype any time you know thatall the field values will be of the same size. Fixed binary is a more compact storageformat because it does not need to store the size of the array. See Using Fixed Binaryfor information on the fixed binary datatype.
Chapter 8Using Binary
8-2

To define a simple two-field table where the primary key is a UID and the second fieldcontains a binary field, you use the following statement:
CREATE TABLE myTable ( uid INTEGER, myByteArray BINARY, PRIMARY KEY(uid))
DEFAULT and NOT NULL constraints are not supported for binary values.
To write the byte array, use Row.put().
TableAPI tableH = kvstore.getTableAPI();
Table myTable = tableH.getTable("myTable");
Row row = myTable.createRow();row.put("uid", 12345);
String aString = "The quick brown fox.";try { row.put("myByteArray", aString.getBytes("UTF-8"));} catch (UnsupportedEncodingException uee) { uee.printStackTrace();}
tableH.put(row, null, null);
To read the binary field, use Row.get().asBinary(). This returns a BinaryValue classinstance. You can then use BinaryValue.get() to retrieve the stored byte array.
For example:
TableAPI tableH = kvstore.getTableAPI();
Table myTable = tableH.getTable("myTable");
/* Create a primary key for user id 12345 and get a row */PrimaryKey key = myTable.createPrimaryKey();key.put("uid", 12345);Row row = tableH.get(key, null);
byte[] b = row.get("myByteArray").asBinary().get();String aString = new String(b);System.out.println("aString: " + aString);
Using EnumsEnumerated types are declared using the ENUM() statement. You must declare theacceptable enumeration values when you use this statement.
Chapter 8Using Enums
8-3

To define a simple two-field table where the primary key is a UID and the second fieldcontains an enum, you use the following DDL statement:
CREATE TABLE myTable ( uid INTEGER, myEnum ENUM (Apple,Pears,Oranges), PRIMARY KEY (uid))
DEFAULT and NOT NULL constraints are supported for enumerated fields. See DEFAULTfor more information.
To write the enum, use Row.putEnum(). If the enumeration value that you use with thismethod does not match a value defined on the -enum-values parameter during tabledefinition, an IllegalArgumentException is thrown.
TableAPI tableH = kvstore.getTableAPI();
Table myTable = tableH.getTable("myTable");
Row row = myTable.createRow();row.put("uid", 12345);
row.putEnum("myEnum", "Pears");
tableH.put(row, null, null);
To read the enum, use Row.get().asEnum(). This returns a EnumValue class instance.You can then use EnumValue.get() to retrieve the stored enum value's name as astring. Alternatively, you can use EnumValue.getIndex() to retrieve the stored value'sindex position.
For example:
TableAPI tableH = kvstore.getTableAPI();
Table myTable = tableH.getTable("myTable");
/* Create a primary key for user id 12345 and get a row */PrimaryKey key = myTable.createPrimaryKey();key.put("uid", 12345);Row row = tableH.get(key, null);
EnumValue ev = row.get("testEnum").asEnum();System.out.println("enum as string: " + ev.get()); // returns "Pears"System.out.println("enum index: " + ev.getIndex()); // returns '1'
Using Fixed BinaryYou can declare a fixed binary field using the BINARY() statement. When you do this,you must also specify the field's size in bytes. You then read and write the field value
Chapter 8Using Fixed Binary
8-4

using Java byte arrays. However, if the byte array does not equal the specified size,then IllegalArgumentException is thrown when you attempt to write the field. Writethe field value using a Java byte array.
If you want to store a large binary object, then you should use the LOB APIs ratherthan a binary field. For information on using the LOB APIs, see the Using the LargeObject API.
Fixed binary should be used over the binary datatype any time you know that all thefield values will be of the same size. Fixed binary is a more compact storage formatbecause it does not need to store the size of the array. See Using Binary forinformation on the binary datatype.
To define a simple two-field table where the primary key is a UID and the second fieldcontains a fixed binary field, you use the following DDL statement:
CREATE TABLE myTable ( uid INTEGER, myByteArray BINARY(20), PRIMARY KEY (uid))
DEFAULT and NOT NULL constraints are not supported for binary values.
To write the byte array, use Row.putFixed(). Again, if the byte array does not matchthe size defined for this field, then IllegalArgumentException is thrown.
TableAPI tableH = kvstore.getTableAPI();
Table myTable = tableH.getTable("myTable");
Row row = myTable.createRow();row.put("uid", 12345);
String aString = "The quick brown fox.";try { row.putFixed("myByteArray", aString.getBytes("UTF-8"));} catch (UnsupportedEncodingException uee) { uee.printStackTrace();}
tableH.put(row, null, null);
To read the fixed binary field, use Row.get().asFixedBinary(). This returns aFixedBinaryValue class instance. You can then use FixedBinaryValue.get() toretrieve the stored byte array.
For example:
TableAPI tableH = kvstore.getTableAPI();
Table myTable = tableH.getTable("myTable");
/* Create a primary key for user id 12345 and get a row */PrimaryKey key = myTable.createPrimaryKey();
Chapter 8Using Fixed Binary
8-5

key.put("uid", 12345);Row row = tableH.get(key, null);
byte[] b = row.get("myByteArray").asFixedBinary().get();String aString = new String(b);System.out.println("aString: " + aString);
Using JSONThe JSON datatype cannot be used as part of a primary or shard key.
To define a simple two-field table where the primary key is a UID and the second fieldcontains a JSON data field, you use the following DDL statement:
CREATE TABLE myJsonTable ( uid INTEGER, myJSON JSON, PRIMARY KEY (uid))
The data that you write for this datatype can be any valid JSON stored as a string. Forexample, all of the following are valid:
final String jsonNumber = "2";final String jsonString = "\"a json string\"";final String jsonObject_null = "{}";final String jsonObject = "{\"a\": 1.006, \"b\": null," + "\"bool\" : true, \"map\": {\"m1\": 5}," + "\"ar\" : [1,2.7,3]}";final String jsonNull = "null";
To store a JSON value in the table that we defined, above:
TableAPI tableH = kvstore.getTableAPI();
Table myJsonTable = tableH.getTable("myJsonTable"); Row row = myTable.createRow(); row.put("uid", 12345); String jsonArray="[1,5,11.1,88]"; row.putJson("myJSON", jsonArray); tableH.put(row, null, null);
To retrieve it:
TableAPI tableH = kvstore.getTableAPI();
Table myTable = tableH.getTable("myJsonTable"); PrimaryKey pkey = myTable.createPrimaryKey(); pkey.put("uid", 12345);
Row row = tableH.get(pkey, null); int uid = row.get("uid").asInteger().get();
Chapter 8Using JSON
8-6

String jsonStr = row.get("myJSON").toString();
System.out.println("uid: " + uid + " JSON: " + jsonStr);
Be aware that a version of Row.putJson() exists that allows you to use Java Readersto stream JSON data from I/O locations (such as files on disk). For example, to streama small file from disk use java.io.FileReader:
TableAPI tableH = kvstore.getTableAPI();
Table myTable = tableH.getTable("myJsonTable");
Row row = myTable.createRow(); row.put("uid", 666);
try { FileReader fr = new FileReader("myJsonFile.txt"); row.putJson("myJson", fr); tableH.put(row, null, null); } catch (FileNotFoundException fnfe) { System.out.println("File not found: " + fnfe); }
For a more complete example of using JSON data fields, see JSON By Example.
Using MapsAll map entries must be of the same type. Regardless of the type of the map's values,its keys are always strings.
The string "[]" is reserved and must not be used for key names.
When you declare a table field as a map, you use the MAP() statement. You must alsodeclare the map element's data types.
To define a simple two-field table where the primary key is a UID and the second fieldcontains a map of integers, you use the following DDL statement:
CREATE TABLE myTable ( uid INTEGER, myMap MAP(INTEGER), PRIMARY KEY (uid))
DEFAULT and NOT NULL constraints are not supported for map fields.
To write the map, use Row.putMap(), which returns a MapValue class instance. Youthen use MapValue.put() to write elements to the map:
TableAPI tableH = kvstore.getTableAPI();
Table myTable = tableH.getTable("myTable");
Chapter 8Using Maps
8-7

Row row = myTable.createRow();row.put("uid", 12345);
MapValue mv = row.putMap("myMap");mv.put("field1", 1);mv.put("field2", 2);mv.put("field3", 3);
tableH.put(row, null, null);
To read the map, use Row.get().asMap(). This returns a MapValue class instance.You can then use MapValue.get() to retrieve an map value. The retrieved value isreturned as a FieldValue, which allows you to retrieve the encapsulated value using acast method such as FieldValue.asInteger().
For example, to retrieve elements from the map created in the previous example:
TableAPI tableH = kvstore.getTableAPI();
Table myTable = tableH.getTable("myTable");
/* Create a primary key for user id 12345 and get a row */PrimaryKey key = myTable.createPrimaryKey();key.put("uid", 12345);Row row = tableH.get(key, null);
MapValue mv = row.get("testMap").asMap();FieldValue fv = mv.get("field3");System.out.println("fv: " + fv.asInteger().get());
Using Embedded RecordsA record entry can contain fields of differing types. However, embedded recordsshould be used only when the data is relatively static. In general, child tables provide abetter solution over embedded records, especially if the child dataset is large or islikely to change in size.
Use the RECORD() statement to declare a table field as a record.
To define a simple two-field table where the primary key is a UID and the second fieldcontains a record, you use the following DDL statement:
CREATE TABLE myTable ( uid INTEGER, myRecord RECORD(firstField STRING, secondField INTEGER), PRIMARY KEY (uid))
DEFAULT and NOT NULL constraints are not supported for embedded record fields.However, these constraints can be applied to the individual fields in an embeddedrecord. See Field Constraints for more information.
Chapter 8Using Embedded Records
8-8

To write the record, use Row.putRecord(), which returns a RecordValue classinstance. You then use RecordValue.put() to write fields to the record:
TableAPI tableH = kvstore.getTableAPI();
Table myTable = tableH.getTable("myTable");
Row row = myTable.createRow();row.put("uid", 12345);
RecordValue rv = row.putRecord("myRecord");rv.put("firstField", "An embedded record STRING field");rv.put("secondField", 3388);
tableH.put(row, null, null);
To read the record, use Row.get().asRecord(). This returns a RecordValue classinstance. You can then use RecordValue.get() to retrieve a field from the record. Theretrieved value is returned as a FieldValue, which allows you to retrieve theencapsulated value using a cast method such as FieldValue.asInteger().
For example, to retrieve field values from the embedded record created in the previousexample:
TableAPI tableH = kvstore.getTableAPI();
Table myTable = tableH.getTable("myTable");
/* Create a primary key for user id 12345 and get a row */PrimaryKey key = myTable.createPrimaryKey();key.put("uid", 12345);Row row = tableH.get(key, null);
RecordValue rv = row.get("myRecord").asRecord();FieldValue fv = rv.get("firstField");System.out.println("firstField: " + fv.asString().get());fv = rv.get("secondField");System.out.println("secondField: " + fv.asInteger().get());
Chapter 8Using Embedded Records
8-9

9Indexing Non-Scalar Data Types
We describe how to index scalar data types in Creating Indexes, and we show how toread using indexes in Reading Indexes. However, non-scalar data types (Arrays, Mapsand Records) require more explanation, which we give here.
Index creation is accomplished using the CREATE INDEX statement. See CREATEINDEX for details on this statement.
Indexing ArraysYou can create an index on an array field so long as the array contains scalar data, orcontains a record with scalar fields.
Note:
You cannot index a map or array that is nested beneath another map orarray. This is not allowed because of the potential for an excessively largenumber of index entries.
Be aware that indexing an array potentially results in multiple index entries for eachrow, which can lead to very large indexes.
To create the index, first create the table:
CREATE TABLE myArrayTable ( uid INTEGER, testArray ARRAY(STRING), PRIMARY KEY(uid))
Once the table has been added to the store, create the index. Be sure to use [] withthe field name to indicate that it is an array:
CREATE INDEX arrayFieldIndex on myArrayTable (testArray[])
In the case of arrays, the field can be indexed only if the array contains values that areof one of the other indexable types. For example, you can create an index on an arrayof Integers. You can also create an index on a specific record in an array of records.Only one array should participate in an index, otherwise the size of the index can growexponentially because there is an index entry for each array entry.
9-1

To retrieve data using an index of arrays, you first retrieve the index using its name,and create an instance of IndexKey that you will use to perform the index lookup:
Index arrayIndex = myTable.getIndex("arrayFieldIndex");IndexKey indexKey = arrayIndex.createIndexKey();
Next you assign the array field name and its value to the IndexKey that you createdusing the IndexKey.put() method:
indexKey.put("testArray[]", "One");
When you perform the index lookup, the only records that will be returned will be thosewhich have an array with at least one item matching the value set for the IndexKeyobject. For example, if you have individual records that contain arrays like this:
Record 1: ["One," "Two", "Three"]Record 2: ["Two", "Three", "One"]Record 3: ["One", "Three", "One"]Record 4: ["Two", "Three", "Four"]
and you then perform an array lookup on the array value "One", then Records 1 - 3 willbe returned, but not 4.
After that, you retrieve the matching table rows, and iterate over them in the same wayyou would any other index type. For example:
TableIterator<Row> iter = tableH.tableIterator(indexKey, null, null);System.out.println("Results for Array value 'One' : ");try { while (iter.hasNext()) { Row rowRet = iter.next(); int uid = rowRet.get("uid").asInteger().get(); System.out.println("uid: " + uid); ArrayValue avRet = rowRet.get("testArray").asArray(); for (FieldValue fv: avRet.toList()) { System.out.println(fv.asString().get()); } }} finally { if (iter != null) { iter.close(); }}
Indexing JSON FieldsYou can create an index on a JSON field. To create the index, specify it as you wouldany other index, except that you must define the data type of the JSON field you areindexing.
Note that there are some restrictions on the data type of the JSON field that you canindex. See JSON Indexes for more information.
Chapter 9Indexing JSON Fields
9-2

To create the index, first create the table:
CREATE Table JSONPersons ( id INTEGER, person JSON, PRIMARY KEY (id))
To create the index, you must specify the JSON field to be indexed using dot notation.Suppose your table rows look like this:
"id":1, "person" : { "firstname":"David", "lastname":"Morrison", "age":25, "income":100000, "lastLogin" : "2016-10-29T18:43:59.8319", "address":{"street":"150 Route 2", "city":"Antioch", "state":"TN", "zipcode" : 37013, "phones":[{"type":"home", "areacode":423, "number":8634379}] }, "connections":[2, 3], "expenses":{"food":1000, "gas":180} }
Then once the table has been added to the store, you can create an index for one ofthe JSON fields like this:
CREATE INDEX idx_json_income on JSONPersons (person.income AS integer)
To retrieve data using a JSON index, you first retrieve the index using its name, andcreate an instance of IndexKey that you will use to perform the index lookup. Thefollowing is used to retrieve all table rows where the person.income field is 100000:
Index jsonIndex = myTable.getIndex("idx_json_income");IndexKey indexKey = jsonIndex.createIndexKey(); indexKey.put("person.income", 100000);
When you perform the index lookup, the only rows returned will be those which have aJSON field with the specified field value. You then retrieve the matching table rows,and iterate over them in the same way you would any other index type. For example:
TableIterator<Row> iter = tableH.tableIterator(indexKey, null, null);System.out.println("Results for person.income, value 100000: ");try { while (iter.hasNext()) { Row rowRet = iter.next(); int id = rowRet.get("id").asInteger().get();
Chapter 9Indexing JSON Fields
9-3

System.out.println("id: " + id); MapValue mapRet = rowRet.get("person").asMap(); System.out.println("person: " + mapRet.toString()); }} finally { if (iter != null) { iter.close(); }}
For a more complete example of using JSON data fields, including a JSON index, see JSON By Example.
Indexing MapsYou can create an index on a map field so long as the map contains scalar data, orcontains a record with scalar fields.
Note:
You cannot index a map or array that is nested beneath another map orarray. This is not allowed because of the potential for an excessively largenumber of index entries.
To create the index, define the map as normal. Once the map is defined for the table,there are several different ways to index it:
• Based on the map's keys without regard to the actual key values.
• Based on the map's values, without regard to the actual key used.
• By a specific map key. To do this, you specify the name of the map field and thename of a map key using dot notation. If the map key is ever created using yourclient code, then it will be indexed.
• Based on the map's key and value without identifying a specific value (such as isrequired by the previous option in this list).
Indexing by Map KeysYou can create indexes based on a map's keys without regard to the correspondingvalues.
Be aware that creating an index like this can potentially result in multiple index entriesfor each row, which can lead to very large indexes.
First create the table:
CREATE TABLE myMapTable ( uid INTEGER, testMap MAP(INTEGER), PRIMARY KEY(uid))
Chapter 9Indexing Maps
9-4

Once the table has been added to the store, create the index using the .keys() pathstep:
CREATE INDEX mapKeyIndex on myMapTable (testMap.keys())
Data is retrieved if the table row contains the identified map with the identified key. So,for example, if you create a series of table rows like this:
TableAPI tableH = kvstore.getTableAPI();
Table myTable = tableH.getTable("myMapTable");
Row row = myTable.createRow();row.put("uid", 12345);MapValue mv = row.putMap("testMap");mv.put("field1", 1);mv.put("field2", 2);mv.put("field3", 3);tableH.put(row, null, null);
row = myTable.createRow();row.put("uid", 12);mv = row.putMap("testMap");mv.put("field1", 1);mv.put("field2", 2);tableH.put(row, null, null);
row = myTable.createRow();row.put("uid", 666);mv = row.putMap("testMap");mv.put("field1", 1);mv.put("field3", 4);tableH.put(row, null, null);
then you can retrieve any table rows that contain the map with any key currently in useby the map. For example, "field3".
To retrieve data using a map index, you first retrieve the index using its name, andcreate an instance of IndexKey that you will use to perform the index lookup:
Index mapIndex = myTable.getIndex("mapKeyIndex");IndexKey indexKey = mapIndex.createIndexKey();
Next, you populate the IndexKey instance with the field name that you want to retrieve.Use the keys() path step to indicate that you want to retrieve using the field namewithout regard for the field value. When you perform the index lookup, the only recordsthat will be returned will be those which have a map with the specified key name:
indexKey.put("testMap.keys()", "field3");
Chapter 9Indexing Maps
9-5

After that, you retrieve the matching table rows, and iterate over them in the same wayyou would any other index type. For example:
TableIterator<Row> iter = tableH.tableIterator(indexKey, null, null);System.out.println("Results for testMap field3: ");try { while (iter.hasNext()) { Row rowRet = iter.next(); int uid = rowRet.get("uid").asInteger().get(); System.out.println("uid: " + uid); MapValue mapRet = rowRet.get("testMap").asMap(); System.out.println("testMap: " + mapRet.toString()); }} finally { if (iter != null) { iter.close(); }}
Indexing by Map ValuesYou can create indexes based on the values contained in a map without regard to thekeys in use.
Be aware that creating an index like this can potentially result in multiple index entriesfor each row, which can lead to very large indexes.
First create the table:
CREATE TABLE myMapTable ( uid INTEGER, testMap MAP(INTEGER), PRIMARY KEY(uid))
Once the table has been added to the store, create the index using the .values() pathstep:
CREATE INDEX mapElementIndex on myMapTable (testMap.values())
Data is retrieved if the table row contains the identified map with the identified value.So, for example, if you create a series of table rows like this:
TableAPI tableH = kvstore.getTableAPI();
Table myTable = tableH.getTable("myMapTable");
Row row = myTable.createRow();row.put("uid", 12345);MapValue mv = row.putMap("testMap");mv.put("field1", 1);mv.put("field2", 2);mv.put("field3", 3);
Chapter 9Indexing Maps
9-6
tableH.put(row, null, null);
row = myTable.createRow();row.put("uid", 12);mv = row.putMap("testMap");mv.put("field1", 1);mv.put("field2", 2);tableH.put(row, null, null);
row = myTable.createRow();row.put("uid", 666);mv = row.putMap("testMap");mv.put("field1", 1);mv.put("field3", 4);tableH.put(row, null, null);
then you can retrieve any table rows that contain the map with any value currently inuse by the map. For example, a value of "2".
To retrieve data using a map index, you first retrieve the index using its name, andcreate an instance of IndexKey that you will use to perform the index lookup:
Index mapIndex = myTable.getIndex("mapElementIndex");IndexKey indexKey = mapIndex.createIndexKey();
Next, you populate the IndexKey instance with the field value (2) that you want toretrieve. Use the values() path step with the field name to indicate that you want toretrieve entries based on the value only. When you perform the index lookup, the onlyrecords that will be returned will be those which have a map with a value of 2.
indexKey.put("testMap.values()", 2);
After that, you retrieve the matching table rows, and iterate over them in the same wayyou would any other index type. For example:
TableIterator<Row> iter = tableH.tableIterator(indexKey, null, null);System.out.println("Results for testMap value 2: ");try { while (iter.hasNext()) { Row rowRet = iter.next(); int uid = rowRet.get("uid").asInteger().get(); System.out.println("uid: " + uid); MapValue mapRet = rowRet.get("testMap").asMap(); System.out.println("testMap: " + mapRet.toString()); }} finally { if (iter != null) { iter.close(); }}
Chapter 9Indexing Maps
9-7

Indexing by a Specific Map Key NameYou can create an index based on a specified map key name. Any map entriescontaining the specified key name are indexed. This can create a small and veryefficient index because the index does not contain every key/value pair contained bythe map fields. Instead, it just contains those map entries using the identified key,which results in at most a single index entry per row.
To create the index, first create the table:
CREATE TABLE myMapTable ( uid INTEGER, testMap MAP(INTEGER), PRIMARY KEY(uid))
Once the table has been added to the store, create the index by specifying the keyname you want indexed using dot notation. In this example, we will index the keyname of "field3":
CREATE INDEX mapField3Index on myMapTable (testMap.field3)
Data is retrieved if the table row contains the identified map with the indexed key and aspecified value. So, for example, if you create a series of table rows like this:
TableAPI tableH = kvstore.getTableAPI();
Table myTable = tableH.getTable("myMapTable");
Row row = myTable.createRow();row.put("uid", 12345);MapValue mv = row.putMap("testMap");mv.put("field1", 1);mv.put("field2", 2);mv.put("field3", 3);tableH.put(row, null, null);
row = myTable.createRow();row.put("uid", 12);mv = row.putMap("testMap");mv.put("field1", 1);mv.put("field2", 2);tableH.put(row, null, null);
row = myTable.createRow();row.put("uid", 666);mv = row.putMap("testMap");mv.put("field1", 1);mv.put("field3", 4);tableH.put(row, null, null);
Chapter 9Indexing Maps
9-8

then you can retrieve any table rows that contain the map with key "field3" (becausethat is what you indexed) when "field3" maps to a specified value — such as "3". If youtry to do an index lookup on, for example, "field2" then that will fail because you did notindex "field2".
To retrieve data using a map index, you first retrieve the index using its name andcreate an instance of IndexKey that you will use to perform the index lookup:
Index mapIndex = myTable.getIndex("mapField3Index");IndexKey indexKey = mapIndex.createIndexKey();
Then you populate the map field name (using dot notation) and the desired valueusing IndexKey.put(). When you perform the index lookup, the only records that willbe returned will be those which have a map with the matching key name andcorresponding value.
indexKey.put("testMap.field3", 3);
After that, you retrieve the matching table rows, and iterate over them in the same wayyou would any other index type. For example:
TableIterator<Row> iter = tableH.tableIterator(indexKey, null, null);System.out.println("Results for testMap field3, value 3: ");try { while (iter.hasNext()) { Row rowRet = iter.next(); int uid = rowRet.get("uid").asInteger().get(); System.out.println("uid: " + uid); MapValue mapRet = rowRet.get("testMap").asMap(); System.out.println("testMap: " + mapRet.toString()); }} finally { if (iter != null) { iter.close(); }}
Indexing by Map Key and ValueIn the previous section, we showed how to create a map index by specifying a pre-determined key name. This allows you to perform map index look ups by providingboth key and value, but the index lookup will only be successful if the specified key isthe key that you indexed.
You can do the same thing in a generic way by indexing every key/value pair in yourmap. The result is a more flexible index, but also an index that is potentially muchlarger than the previously described method. It is likely to result in multiple indexentries per row.
Chapter 9Indexing Maps
9-9

To create an index based on every key/value pair used by the map field, first createthe table:
CREATE TABLE myMapTable ( uid INTEGER, testMap MAP(INTEGER), PRIMARY KEY(uid))
Once the table has been added to the store, create the index by using the .keys()and .values() path steps:
CREATE INDEX mapKeyValueIndex on myMapTable (testMap.keys(),testMap.values())
Data is retrieved if the table row contains the identified map with the identified key andthe identified value. So, for example, if you create a series of table rows like this:
TableAPI tableH = kvstore.getTableAPI();
Table myTable = tableH.getTable("myMapTable");
Row row = myTable.createRow();row.put("uid", 12345);MapValue mv = row.putMap("testMap");mv.put("field1", 1);mv.put("field2", 2);mv.put("field3", 3);tableH.put(row, null, null);
row = myTable.createRow();row.put("uid", 12);mv = row.putMap("testMap");mv.put("field1", 1);mv.put("field2", 2);tableH.put(row, null, null);
row = myTable.createRow();row.put("uid", 666);mv = row.putMap("testMap");mv.put("field1", 1);mv.put("field3", 4);tableH.put(row, null, null);
then you can retrieve any table rows that contain the map with specified key/valuepairs — for example, key "field3" and value "3".
To retrieve data using a map index, you first retrieve the index using its name andcreate an instance of IndexKey that you will use to perform the index lookup:
Index mapIndex = myTable.getIndex("mapKeyValueIndex");IndexKey indexKey = mapIndex.createIndexKey();
Chapter 9Indexing Maps
9-10

Next, you populate the IndexKey class instance with the field name and value youwant to retrieve. In this case, you must specify two sets of information, using two callsto IndexKey.put():
• The name of the field. Here, use the keys() path step with the field name.
• The field value you want to retrieve. Here, use the values() path step the fieldname.
For example:
indexKey.put("testMap.keys()", "field3");indexKey.put("testMap.values()", 3);
When you perform the index lookup, the only records that will be returned will be thosewhich have a map with the matching key/value pair. Once you have performed theindex lookup, you retrieve the matching table rows, and iterate over them in the sameway you would any other index type. For example:
TableIterator<Row> iter = tableH.tableIterator(indexKey, null, null);System.out.println("Results for testMap field3, value 3: ");try { while (iter.hasNext()) { Row rowRet = iter.next(); int uid = rowRet.get("uid").asInteger().get(); System.out.println("uid: " + uid); MapValue mapRet = rowRet.get("testMap").asMap(); System.out.println("testMap: " + mapRet.toString()); }} finally { if (iter != null) { iter.close(); }}
Indexing Embedded RecordsYou can create an index on an embedded record field so long as the record fieldcontains scalar data. To create the index, define the record as normal. To index thefield, you specify the name of the embedded record and the name of the field using dotnotation.
To create the index, first create the table:
CREATE Table myRecordTable ( uid INTEGER, myRecord RECORD (firstField STRING, secondField INTEGER), PRIMARY KEY (uid))
Once the table has been added to the store, create the index:
CREATE INDEX recordFieldIndex on myRecordTable (myRecord.secondField)
Chapter 9Indexing Embedded Records
9-11

Data is retrieved if the table row contains the identified record field with the specifiedvalue. So, for example, if you create a series of table rows like this:
TableAPI tableH = kvstore.getTableAPI();Table myTable = tableH.getTable("myRecordTable");
Row row = myTable.createRow();row.put("uid", 12345);RecordValue rv = row.putRecord("myRecord");rv.put("firstField", "String field for 12345");rv.put("secondField", 3388);tableH.put(row, null, null);
row = myTable.createRow();row.put("uid", 345);rv = row.putRecord("myRecord");rv.put("firstField", "String field for 345");rv.put("secondField", 3388);tableH.put(row, null, null);
row = myTable.createRow();row.put("uid", 111);rv = row.putRecord("myRecord");rv.put("firstField", "String field for 111");rv.put("secondField", 12);tableH.put(row, null, null);
then you can retrieve any table rows that contain the embedded record where"secondField" is set to a specified value. (The embedded record index that wespecified, above, indexed myRecord.secondField.)
To retrieve data using a record index, you first retrieve the index using its name, andcreate an instance of IndexKey that you will use to perform the index lookup:
Index recordIndex = myTable.getIndex("recordFieldIndex");IndexKey indexKey = recordIndex.createIndexKey(); indexKey.put(“myRecord.secondField", 3388);
When you perform the index lookup, the only records returned will be those whichhave an embedded record with the specified field and field value. You then retrieve thematching table rows, and iterate over them in the same way you would any other indextype. For example:
TableIterator<Row> iter = tableH.tableIterator(indexKey, null, null);System.out.println("Results for testRecord.secondField, value 3388: ");try { while (iter.hasNext()) { Row rowRet = iter.next(); int uid = rowRet.get("uid").asInteger().get(); System.out.println("uid: " + uid); RecordValue recordRet = rowRet.get("myRecord").asRecord(); System.out.println("myRecord: " + recordRet.toString()); }} finally {
Chapter 9Indexing Embedded Records
9-12

if (iter != null) { iter.close(); }}
Chapter 9Indexing Embedded Records
9-13

10Using Row Versions
When a row is initially inserted in the store, and each time it is updated, it is assigned aunique version token. The version is always returned by the method that wrote to thestore (for example, TableAPI.put()). The version information is also returned bymethods that retrieve rows from the store.
There are two reasons why versions might be important.
1. When an update or delete is to be performed, it may be important to perform theoperation only if the row's value has not changed. This is particularly interesting inan application where there can be multiple threads or processes simultaneouslyoperating on the row. In this case, read the row, examining its version when youdo so. You can then perform a put operation, but only allow the put to proceed ifthe version has not changed (this is often referred to as a Compare and Set (CAS)or Read, Modify, Write (RMW) operation). You use TableAPI.putIfVersion() orTableAPI.deleteIfVersion() to guarantee this.
2. When a client reads data that was previously written, it may be important to ensurethat the Oracle NoSQL Database node servicing the read operation has beenupdated with the information previously written. This can be accomplished bypassing the version of the previously written data as a consistency parameter tothe read operation. For more information on using consistency, see ConsistencyGuarantees.
Versions are managed using the Version class. In some situations, it is returned aspart of another encapsulating class, such as the Row class.
The following code fragment retrieves a row, and then writes that row back to the storeonly if the version has not changed:
package kvstore.basicExample;
...
import oracle.kv.Version;import oracle.kv.KVStore;import oracle.kv.table.Index;import oracle.kv.table.IndexKey;import oracle.kv.table.Row;import oracle.kv.table.Table;import oracle.kv.table.TableAPI;import oracle.kv.table.TableIterator;
...
// Retrieve the row. Note that we do not show the creation of // the kvstore handle here.
TableAPI tableH = kvstore.getTableAPI();Table myTable = tableH.getTable("myTable");
10-1

// Construct the IndexKey. The name we gave our index when// we created it was 'DoB'.Index dobIdx = myTable.getIndex("DoB");IndexKey dobIdxKey = dobIdx.createIndexKey();
TableIterator<Row> iter = tableH.tableIterator(dobIdxKey, null, null);
while (iter.hasNext()) { Row aRow = iter.next();
// Retrieve the row's version information Version rowVersion = aRow.getVersion();
////////////////////////// // Do work on the row here //////////////////////////
// Put if the version is correct. Notice that here we examine // the return code. If it is null, that means that the put was // unsuccessful, probably because the row was changed elsewhere.
Version newVersion = tableH.putIfVersion(row, rowVersion, null, null); if (newVersion == null) { // Unsuccessful. Someone else probably modified the record. } }
Chapter 10
10-2

11Consistency Guarantees
A Oracle NoSQL Database store is built from some number of computers (genericallyreferred to as nodes) that are working together using a network. All data in your storeis first written to a master node. The master node then copies that data to other nodesin the store. Nodes which are not master nodes are referred to as replicas.
Because of the nature of distributed systems, there is a possibility that, at any givenmoment, a write operation that was performed on the master node will not yet havebeen performed on some other node in the store.
Consistency, then, is the policy describing whether it is possible for a row on Node Ato be different from the same row on Node B.
When there is a high likelihood that a row stored on one node is identical to the samerow stored on another node, we say that we have a high consistency guarantee.Likewise, a low consistency guarantee means that there is a good possibility that arow on one node differs in some way from the same row stored on another node.
You can control how high you want your consistency guarantee to be. Note that thetrade-off in setting a high consistency guarantee is that your store's read performancemight not be as high as if you use a low consistency guarantee.
There are several different forms of consistency guarantees that you can use. Theyare described in the following sections.
Note that by default, Oracle NoSQL Database uses the lowest possible consistencypossible.
Specifying Consistency PoliciesTo specify a consistency policy, you use one of the static instances of the Consistencyclass, or one of its nested classes.
Once you have selected a consistency policy, you can put it to use in one of two ways.First, you can use it to define a default consistency policy using theKVStoreConfig.setConsistency() method. Specifying a consistency policy in this waymeans that all store operations will use that policy, unless they are overridden on anoperation by operation basis.
The second way to use a consistency policy is to override the default policy using aReadOption class instance you provide to the TableAPI method that you are using toperform the store read operation.
The following example shows how to set a default consistency policy for the store. Wewill show the per-operation method of specifying consistency policies in the followingsections.
package kvstore.basicExample;
import oracle.kv.Consistency;
11-1

import oracle.kv.KVStore;import oracle.kv.KVStoreConfig;import oracle.kv.KVStoreFactory;
...
KVStoreConfig kconfig = new KVStoreConfig("exampleStore", "node1.example.org:5088, node2.example.org:4129");
kconfig.setConsistency(Consistency.NONE_REQUIRED);
KVStore kvstore = KVStoreFactory.getStore(kconfig);
Using Simple ConsistencyYou can use static instances of the Consistency base class to specify certain rigidconsistency guarantees. There are three such instances that you can use:
1. Consistency.ABSOLUTE
Requires that the operation be serviced at the master node. In this way, the row(s)will always be consistent with the master.
This is the strongest possible consistency guarantee that you can require, but itcomes at the cost of servicing all read and write requests at the master node. Ifyou direct all your traffic to the master node (which is just one machine for eachpartition), then you will not be distributing your read operations across yourreplicas. You also will slow your write operations because your master will be busyservicing read requests. For this reason, you should use this consistencyguarantee sparingly.
2. Consistency.NONE_REQUIRED
Allows the store operation to proceed regardless of the state of the replica relativeto the master. This is the most relaxed consistency guarantee that you canrequire. It allows for the maximum possible store performance, but at the highpossibility that your application will be operating on stale or out-of-dateinformation.
3. Consistency.NONE_REQUIRED_NO_MASTER
Requires read operations to be serviced on a replica; never the Master. When thispolicy is used, the read operation will not be performed if the only node available isthe Master.
Where possible, this consistency policy should be avoided in favor of thesecondary zones feature.
For example, suppose you are performing a critical read operation that you know mustabsolutely have the most up-to-date data. Then do this:
package kvstore.basicExample;
import oracle.kv.Consistency;import oracle.kv.ConsistencyException;import oracle.kv.KVStore;import oracle.kv.table.PrimaryKey;import oracle.kv.table.ReadOptions;
Chapter 11Using Simple Consistency
11-2

import oracle.kv.table.Row;import oracle.kv.table.Table;import oracle.kv.table.TableAPI;
...
// KVStore handle creation is omitted for brevity
...
TableAPI tableH = kvstore.getTableAPI();
// The name you give to getTable() must be identical// to the name that you gave the table when you created// the table using the CREATE TABLE DDL statement.Table myTable = tableH.getTable("myTable");
// Construct the PrimaryKey. PrimaryKey key = myTable.createPrimaryKey();key.put("item", "Bolts");
// Create the ReadOption with our Consistency policyReadOptions ro = new ReadOptions(Consistency.ABSOLUTE, 0, // Timeout parameter. // 0 means use the default. null); // Timeout units. Null because // the Timeout is 0.
// Retrieve the row. This performs a store read operation.// Exception handling is skipped for this trivial example.try { Row row = tableH.get(key, ro);} catch (ConsistencyException ce) { // The consistency guarantee was not met}
Using Time-Based ConsistencyA time-based consistency policy describes the amount of time that a replica node isallowed to lag behind the master node. If the replica's data is more than the specifiedamount of time out-of-date relative to the master, then a ConsistencyException isthrown. In that event, you can either abandon the operation, retry it immediately, orpause and then retry it.
In order for this type of a consistency policy to be effective, the clocks on all the nodesin the store must be synchronized using a protocol such as NTP.
In order to specify a time-based consistency policy, you use the Consistency.Timeclass. The constructor for this class requires the following information:
• permissibleLag
A long that describes the number of TimeUnits the replica is allowed to lag behindthe master.
Chapter 11Using Time-Based Consistency
11-3

• permissibleLagUnits
A TimeUnit that identifies the units used by permissibleLag. For example:TimeUnit.MILLISECONDS.
• timeout
A long that describes how long the replica is permitted to wait in an attempt tomeet the permissible lag limit. That is, if the replica cannot immediately meet thepermissible lag requirement, then it will wait this amount of time to see if it isupdated with the required data from the master. If the replica cannot meet thepermissible lag requirement within the timeout period, a ConsistencyException isthrown.
• timeoutUnit
A TimeUnit that identifies the units used by timeout. For example:TimeUnit.SECONDS.
The following sets a default time-based consistency policy of 2 seconds. The timeoutis 4 seconds.
package kvstore.basicExample;
import oracle.kv.Consistency;import oracle.kv.KVStore;import oracle.kv.KVStoreConfig;import oracle.kv.KVStoreFactory;
import java.util.concurrent.TimeUnit;
...
KVStoreConfig kconfig = new KVStoreConfig("exampleStore", "node1.example.org:5088, node2.example.org:4129");
Consistency.Time cpolicy = new Consistency.Time(2, TimeUnit.SECONDS, 4, TimeUnit.SECONDS);kconfig.setConsistency(cpolicy);
KVStore kvstore = KVStoreFactory.getStore(kconfig);
Using Version-Based ConsistencyVersion-based consistency is used on a per-operation basis. It ensures that a readperformed on a replica is at least as current as some previous write performed on themaster.
An example of how this might be used is a web application that collects someinformation from a customer (such as her name). It then customizes all subsequentpages presented to the customer with her name. The storage of the customer's nameis a write operation that can only be performed by the master node, while subsequentpage creation is performed as a read-only operation that can occur at any node in thestore.
Chapter 11Using Version-Based Consistency
11-4

Use of this consistency policy might require that version information be transferredbetween processes in your application.
To create a version-based consistency policy, use the Consistency.Version class.When you do this, you must provide the following information:
• version
The Version that the read must match. The value returned is either equal or newerthan the version specified in the policy.
• timeout
A long that describes how long the replica is permitted to wait in an attempt tomeet the version requirement. That is, if the replica cannot immediately meet theversion requirement, then it will wait this amount of time to see if it is updated withthe required data from the master. If the replica cannot meet the requirementwithin the timeout period, a ConsistencyException is thrown.
• timeoutUnit
A TimeUnit that identifies the units used by timeout. For example:TimeUnit.SECONDS.
For example, the following code performs a store write, collects the versioninformation, then uses it to construct a version-based consistency policy.
package kvstore.basicExample;
import oracle.kv.KVStore;import oracle.kv.table.Row;import oracle.kv.table.Table;import oracle.kv.table.TableAPI;import oracle.kv.Version;
...
// KVStore handle creation is omitted for brevity
...
TableAPI tableH = kvstore.getTableAPI();Table myTable = tableH.getTable("myTable");
// Get a Row instanceRow row = myTable.createRow();
// Now put all of the cells in the row.
row.put("item", "Bolts");row.put("count1", 5);row.put("count2", 23);row.put("percentage", 0.2173913);
// Now write the table to the store, capturing the// Version information as we do.
Version matchVersion = tableH.put(row, null, null);
Chapter 11Using Version-Based Consistency
11-5

Version matchVersion = kvstore.put(myKey, myValue);
At some other point in this application's code, or perhaps in another applicationentirely, we use the matchVersion captured above to create a version-basedconsistency policy.
package kvstore.basicExample;
import oracle.kv.Consistency;import oracle.kv.ConsistencyException;import oracle.kv.KVStore;import oracle.kv.table.PrimaryKey;import oracle.kv.table.ReadOptions;import oracle.kv.table.Row;import oracle.kv.table.Table;import oracle.kv.table.TableAPI;
import java.util.concurrent.TimeUnit;
...
// KVStore handle creation is omitted for brevity
...
// Construct the PrimaryKey.
PrimaryKey key = myTable.createPrimaryKey();key.put("item", "Bolts");
// Create the consistency policy, using the // Version object we captured, above.Consistency.Version versionConsistency = new Consistency.Version(matchVersion, 200, TimeUnit.NANOSECONDS);
// Create a ReadOptions using our new consistency policy.ReadOptions ro = new ReadOptions(versionConsistency, 0, null);
// Now perform the read.try {
Row row = tableH.get(key, ro);
// Do work with the row here} catch (ConsistencyException ce) { // The consistency guarantee was not met}
Chapter 11Using Version-Based Consistency
11-6

12Durability Guarantees
Writes are performed in the Oracle NoSQL Database store by performing the writeoperation (be it a creation, update, or delete operation) on a master node. As a part ofperforming the write operation, the master node will usually make sure that theoperation has made it to stable storage before considering the operation complete.
The master node will also transmit the write operation to the replica nodes in its shard.It is possible to ask the master node to wait for acknowledgments from its replicasbefore considering the operation complete.
Note:
If your store is configured such that secondary zones are in use, then writeacknowledgements are never required for the replicas in the secondaryzones. That is, write acknowledgements are only returned by replicas inprimary zones. See the Oracle NoSQL Database Administrator's Guide formore information on zones.
The replicas, in turn, will not acknowledge the write operation until they have appliedthe operation to their own database.
A durability guarantee, then, is a policy which describes how strongly persistent yourdata is in the event of some kind of catastrophic failure within the store. (Examples of acatastrophic failure are power outages, disk crashes, physical memory corruption, oreven fatal application programming errors.)
A high durability guarantee means that there is a very high probability that the writeoperation will be retained in the event of a catastrophic failure. A low durabilityguarantee means that the write is very unlikely to be retained in the event of acatastrophic failure.
The higher your durability guarantee, the slower your write-throughput will be in thestore. This is because a high durability guarantee requires a great deal of disk andnetwork activity.
Usually you want some kind of a durability guarantee, although if you have highlytransient data that changes from run-time to run-time, you might want the lowestpossible durability guarantee for that data.
Durability guarantees include two types of information: acknowledgment guaranteesand synchronization guarantees. These two types of guarantees are described in thenext sections. We then show how to set a durability guarantee.
Note that by default, Oracle NoSQL Database uses a low durability guarantee.
12-1

Setting Acknowledgment-Based Durability PoliciesWhenever a master node performs a write operation (create, update or delete), it mustsend that operation to its various replica nodes. The replica nodes then apply the writeoperation(s) to their local databases so that the replicas are consistent relative to themaster node.
Upon successfully applying write operations to their local databases, replicas inprimary zones send an acknowledgment message back to the master node. Thismessage simply says that the write operation was received and successfully applied tothe replica's local database. Replicas in secondary zones do not send theseacknowledgement messages.
Note:
The exception to this are replicas in secondary zones, which will neveracknowledge write operations. See the Oracle NoSQL DatabaseAdministrator's Guide for more information on zones.
An acknowledgment-based durability policy describes whether the master node willwait for these acknowledgments before considering the write operation to havecompleted successfully. You can require the master node to not wait foracknowledgments, or to wait for acknowledgments from a simple majority of replicanodes in primary zones, or to wait for acknowledgments from all replica nodes inprimary zones.
The more acknowledgments the master requires, the slower its write performance willbe. Waiting for acknowledgments means waiting for a write message to travel from themaster to the replicas, then for the write operation to be performed at the replica (thismay mean disk I/O), then for an acknowledgment message to travel from the replicaback to the master. From a computer application's point of view, this can all take along time.
When setting an acknowledgment-based durability policy, you can requireacknowledgment from:
• All replicas. That is, all of the replica nodes in the shard that reside in a primaryzone. Remember that your store has more than one shard, so the master node isnot waiting for acknowledgments from every machine in the store.
• No replicas. In this case, the master returns with normal status from the writeoperation as soon as it has met its synchronization-based durability policy. Theseare described in the next section.
• A simple majority of replicas in primary zones. That is, if the shard has 5 replicanodes residing in primary zones, then the master will wait for acknowledgmentsfrom 3 nodes.
Chapter 12Setting Acknowledgment-Based Durability Policies
12-2

Setting Synchronization-Based Durability PoliciesWhenever a node performs a write operation, the node must know whether it shouldwait for the data to be written to stable storage before successfully returning from theoperation.
As a part of performing a write operation, the data modification is first made to an in-memory cache. It is then written to the filesystem's data buffers. And, finally, thecontents of the data buffers are synchronized to stable storage (typically, a hard drive).
You can control how much of this process the master node will wait to complete beforeit returns from the write operation with a normal status. There are three different levelsof synchronization durability that you can require:
• NO_SYNC
The data is written to the host's in-memory cache, but the master node does notwait for the data to be written to the file system's data buffers, or for the data to bephysically transferred to stable storage. This is the fastest, but least durable,synchronization policy.
• WRITE_NO_SYNC
The data is written to the in-memory cache, and then written to the file system'sdata buffers, but the data is not necessarily transferred to stable storage beforethe operation completes normally.
• SYNC
The data is written to the in-memory cache, then transferred to the file system'sdata buffers, and then synchronized to stable storage before the write operationcompletes normally. This is the slowest, but most durable, synchronization policy.
Notice that in all cases, the data is eventually written to stable storage (assumingsome failure does not occur to prevent it). The only question is, how much of thisprocess will be completed before the write operation returns and your application canproceed to its next operation.
See the next section for an example of setting durability policies.
Setting Durability GuaranteesTo set a durability guarantee, use the Durability class. When you do this, you mustprovide three pieces of information:
• The acknowledgment policy.
• A synchronization policy at the master node.
• A synchronization policy at the replica nodes.
The combination of policies that you use is driven by how sensitive your applicationmight be to potential data loss, and by your write performance requirements.
For example, the fastest possible write performance can be achieved through adurability policy that requires:
• No acknowledgments.
• NO_SYNC at the master.
Chapter 12Setting Synchronization-Based Durability Policies
12-3

• NO_SYNC at the replicas.
However, this durability policy also leaves your data with the greatest risk of loss dueto application or machine failure between the time the operation returns and the timewhen the data is written to stable storage.
On the other hand, if you want the highest possible durability guarantee, you can use:
• All replicas must acknowledge the write operation.
• SYNC at the master.
• SYNC at the replicas.
Of course, this also results in the slowest possible write performance.
Most commonly, durability policies attempt to strike a balance between writeperformance and data durability guarantees. For example:
• Simple majority (> 50%) of replicas must acknowledge the write.
• SYNC at the master.
• NO_SYNC at the replicas.
Note that you can set a default durability policy for your KVStore handle, but you canalso override the policy on a per-operation basis for those situations where some ofyour data need not be as durable (or needs to be MORE durable) than the default.
For example, suppose you want an intermediate durability policy for most of your data,but sometimes you have transient or easily re-created data whose durability really isnot very important. Then you would do something like this:
First, set the default durability policy for the KVStore handle:
package kvstore.basicExample;
import oracle.kv.Durability;import oracle.kv.KVStore;import oracle.kv.KVStoreConfig;import oracle.kv.KVStoreFactory;
...
KVStoreConfig kconfig = new KVStoreConfig("exampleStore", "node1.example.org:5088, node2.example.org:4129");
Durability defaultDurability = new Durability(Durability.SyncPolicy.SYNC, // Master sync Durability.SyncPolicy.NO_SYNC, // Replica sync Durability.ReplicaAckPolicy.SIMPLE_MAJORITY);kconfig.setDurability(defaultDurability);
KVStore kvstore = KVStoreFactory.getStore(kconfig);
Chapter 12Setting Durability Guarantees
12-4

In another part of your code, for some unusual write operations, you might then wantto relax the durability guarantee so as to speed up the write performance for thosespecific write operations:
package kvstore.basicExample;
...
import oracle.kv.Durability;import oracle.kv.DurabilityException;import oracle.kv.KVStore;import oracle.kv.table.Row;import oracle.kv.table.Table;import oracle.kv.table.TableAPI;
...
TableAPI tableH = kvstore.getTableAPI();
// The name you give to getTable() must be identical// to the name that you gave the table when you created// the table using the CREATE TABLE DDL statement.Table myTable = tableH.getTable("myTable");
// Get a Row instanceRow row = myTable.createRow();
// Now put all of the cells in the row.
row.put("item", "Bolts");row.put("description", "Hex head, stainless");row.put("count", 5);row.put("percentage", 0.2173913);
// Construct a durability policyDurability durability = new Durability(Durability.SyncPolicy.NO_SYNC, // Master sync Durability.SyncPolicy.NO_SYNC, // Replica sync Durability.ReplicaAckPolicy.NONE);
// Construct a WriteOptions object using the durability policy.WriteOptions wo = new WriteOptions(durability, 0, null);
// Now write the table to the store using the durability policy// defined, above.tableH.put(row, null, wo);
Chapter 12Setting Durability Guarantees
12-5
13Executing a Sequence of Operations
You can execute a sequence of write operations as a single atomic unit so long as allthe rows that you are operating upon share the same shard key. By atomic unit, wemean all of the operations will execute successfully, or none of them will.
Also, the sequence is performed in isolation. This means that if you have a threadrunning a particularly long sequence, then another thread cannot intrude on the data inuse by the sequence. The second thread will not be able to see any of themodifications made by the long-running sequence until the sequence is complete. Thesecond thread also will not be able to modify any of the data in use by the long-runningsequence.
Be aware that sequences only support write operations. You can perform puts anddeletes, but you cannot retrieve data when using sequences.
When using a sequence of operations:
• All of the keys in use by the sequence must share the same shard key.
• Operations are placed into a list, but the operations are not necessarily executedin the order that they appear in the list. Instead, they are executed in an internallydefined sequence that prevents deadlocks.
The rest of this chapter shows how to use TableOperationFactory andTableAPI.execute() to create and run a sequence of operations.
Sequence ErrorsIf any operation within the sequence experiences an error, then the entire operation isaborted. In this case, your data is left in the same state it would have been in if thesequence had never been run at all — no matter how much of the sequence was runbefore the error occurred.
Fundamentally, there are two reasons why a sequence might abort:
1. An internal operation results in an exception that is considered a fault. Forexample, the operation throws a DurabilityException. Also, if there is an internalfailure due to message delivery or a networking error.
2. An individual operation returns normally but is unsuccessful as defined by theparticular operation. (For example, you attempt to delete a row that does notexist). If this occurs AND you specified true for the abortIfUnsuccessfulparameter when the operation was created using TableOperationFactory, then anOperationExecutionException is thrown. This exception contains informationabout the failed operation.
Creating a SequenceYou create a sequence by using the TableOperationFactory class to createTableOperation class instances, each of which represents exactly one operation in
13-1

the store. You obtain an instance of TableOperationFactory by usingTableAPI.getTableOperationFactory().
For example, suppose you are using a table defined like this:
CREATE TABLE myTable ( itemType STRING, itemCategory STRING, itemClass STRING, itemColor STRING, itemSize STRING, price FLOAT, inventoryCount INTEGER, PRIMARY KEY (SHARD(itemType, itemCategory, itemClass), itemColor, itemSize))
With tables containing data like this:
• Row 1:
– itemType: Hats
– itemCategory: baseball
– itemClass: longbill
– itemColor: red
– itemSize: small
– price: 12.07
– inventoryCount: 127
• Row 2:
– itemType: Hats
– itemCategory: baseball
– itemClass: longbill
– itemColor: red
– itemSize: medium
– price: 13.07
– inventoryCount: 201
• Row 3:
– itemType: Hats
– itemCategory: baseball
– itemClass: longbill
– itemColor: red
– itemSize: large
– price: 14.07
– inventoryCount: 39
Chapter 13Creating a Sequence
13-2

And further suppose that this table has rows that require an update (such as a priceand inventory refresh), and you want the update to occur in such a fashion as toensure it is performed consistently for all the rows.
Then you can create a sequence in the following way:
package kvstore.basicExample;
import java.util.ArrayList;
import oracle.kv.KVStore;import oracle.kv.KVStoreConfig;import oracle.kv.KVStoreFactory;
import oracle.kv.DurabilityException;import oracle.kv.FaultException;import oracle.kv.OperationExecutionException;import oracle.kv.RequestTimeoutException;
import oracle.kv.table.PrimaryKey;import oracle.kv.table.Row;import oracle.kv.table.Table;import oracle.kv.table.TableAPI;import oracle.kv.table.TableOperationFactory;import oracle.kv.table.TableOperation;
...
// kvstore handle creation omitted.
...
TableAPI tableH = kvstore.getTableAPI();
Table myTable = tableH.getTable("myTable");
// We use TableOperationFactory to create items for our// sequence.TableOperationFactory tof = tableH.getTableOperationFactory();
// This ArrayList is used to contain each item in our sequence.ArrayList<TableOperation> opList = new ArrayList<TableOperation>();
// Update each row, adding each to the opList as we do.Row row = myTable.createRow();row.put("itemType", "Hats");row.put("itemCategory", "baseball");row.put("itemClass", "longbill");row.put("itemColor", "red");row.put("itemSize", "small");row.put("price", new Float(13.07));row.put("inventoryCount", 107);opList.add(tof.createPut(row, null, true));
row = myTable.createRow();
Chapter 13Creating a Sequence
13-3

row.put("itemType", "Hats");row.put("itemCategory", "baseball");row.put("itemClass", "longbill");row.put("itemColor", "red");row.put("itemSize", "medium");row.put("price", new Float(14.07));row.put("inventoryCount", 198);opList.add(tof.createPut(row, null, true));
row = myTable.createRow();row.put("itemType", "Hats");row.put("itemCategory", "baseball");row.put("itemClass", "longbill");row.put("itemColor", "red");row.put("itemSize", "large");row.put("price", new Float(15.07));row.put("inventoryCount", 139);opList.add(tof.createPut(row, null, true));
Note in the above example that we update only those rows that share the same shardkey. In this case, the shard key includes the itemType, itemCategory, and itemClassfields. If the value for any of those fields is different from the others, we could notsuccessfully execute the sequence.
Executing a SequenceTo execute the sequence we created in the previous section, use theTableAPI.execute() method:
package kvstore.basicExample;try { tableH.execute(opList, null);} catch (OperationExecutionException oee) { // Some error occurred that prevented the sequence // from executing successfully. Use // oee.getFailedOperationIndex() to determine which // operation failed. Use oee.getFailedOperationResult() // to obtain an OperationResult object, which you can // use to troubleshoot the cause of the execution // exception.} catch (IllegalArgumentException iae) { // An operation in the list was null or empty.
// Or at least one operation operates on a row // with a shard key that is different // than the others.
// Or more than one operation uses the same key.} catch (DurabilityException de) { // The durability guarantee could not be met.} catch (RequestTimeoutException rte) { // The operation was not completed inside of the // default request timeout limit.} catch (FaultException fe) {
Chapter 13Executing a Sequence
13-4

// A generic error occurred}
Note that if any of the above exceptions are thrown, then the entire sequence isaborted, and your data will be in the state it would have been in if you had neverexecuted the sequence at all.
TableAPI.execute() can optionally take a WriteOptions class instance. This classinstance allows you to specify:
• The durability guarantee that you want to use for this sequence. If you want to usethe default durability guarantee, pass null for this parameter.
• A timeout value that identifies the upper bound on the time interval allowed forprocessing the entire sequence. If you provide 0, the default request timeout valueis used.
• A TimeUnit that identifies the units used by the timeout value. For example:TimeUnit.MILLISECONDS.
For an example of using WriteOptions, see Durability Guarantees.
Chapter 13Executing a Sequence
13-5
14Introduction to SQL for Oracle NoSQLDatabase
SQL for Oracle NoSQL Database is an easy to use SQL-like language that supportsread-only queries and data definition (DDL) statements. This chapter focuses on thequery part of the language. For a more detailed description of the language (both DDLand query statements) see the SQL for Oracle NoSQL Database Specification.
To follow along query examples run with the interactive shell, see Getting Started withSQL for Oracle NoSQL Database.
This section talks about using SQL through the JAVA API.
Running a simple queryBefore running a query, perform store access as usual by obtaining a KVStore handleusing the KVStoreFactory.getStore() method and a KVStoreConfig object.
To create the query, use KVStore.executeSync() This returns a StatementResultinstance, which represents the result of an execution of a statement. There are twotypes of results, results of DDL statements and results of DML statements. DDLstatements modify the database schema. CREATE TABLE, ALTER TABLE, and DROPTABLE are examples of DDL statements. DDL statements do not return data records,so iterator() and next() will return as if there was an empty result.
DML statements are non-updating queries. SQL SELECT-FROM-WHERE(SFW)statements are an example of a DML statement. DML statements may contain a set ofrecords. Objects of StatementResult are not intended to be used across severalthreads.
For example, to run a simple query:
// Setup StoreString[] hhosts = {"n1.example.org:5088", "n2.example.org:4129"};KVStoreConfig kconfig = new KVStoreConfig("exampleStore", hhosts);KVStore store = KVStoreFactory.getStore(kconfig);
// Compile and Execute the SELECT statementStatementResult result = store.executeSync("SELECT firstName,age FROM Users");
// Get the resultsfor( RecordValue record : result ) { System.out.println("nameFirst: " + record.get("firstName").asString().get()); System.out.println("age: " + record.get("age").asInteger().get());}
14-1

where the query SELECTS the firstname and age from the table Users. Then, theresults are displayed.
Using binding variablesTo declare a binding variable, you need to create an instance of PreparedStatement.An instance of PreparedStatement can be created through the KVStore.prepare()method.
You can specify zero or more variable declarations. The syntax for a variable is:
DECLARE $varname vartype;
If the DML statement contains external variables, the PreparedStatement can beexecuted multiple times by creating an instance of BoundStatement. The externalvariables must be bound to specific values before the statement can be executed. Toallow for the potentially concurrent execution of the same PreparedStatement multipletimes with different bind values each time, binding of external variables must be donethrough one or more instances of BoundStatement. Such instances are created usingthe createBoundStatement() method.
This instance can then be executed multiple times using the KVStore.execute() orKVStore.executeSync() methods.
For example:
// store handle creation omitted.
...
// Compile the statement.PreparedStatement pStmt = store.prepare( "DECLARE $minAge integer; $maxAge integer; " + "SELECT id, firstName FROM Users WHERE age >= $minAge and age < $maxAge ");
// Iterate decadesfor( int age = 0; age <= 100; age = age + 10 ) {
int maxAge = age + ( age < 100 ? 10 : 1000 ); System.out.println("Persons with ages between " + age + " and " + maxAge + "."); // Bind variables, reuse the same pStmt BoundStatement bStmt = pStmt.createBoundStatement(); bStmt.setVariable("$minAge", age); bStmt.setVariable("$maxAge", maxAge);
// Execute the statement StatementResult result = store.executeSync(bStmt);
// Get the results in the current decade for( RecordValue record : result ) {
System.out.println("id: " +
Chapter 14Using binding variables
14-2

record.get("id").asInteger().get() ); System.out.println("firstName: " + record.get("firstName").asString().get()); }}
Accessing metadataYou can access the metadata of a BoundStatement, PreparedStatement orStatementResult by using the getResultDef() method.
Additionally, you can use the getFields().size(), getFieldsName(), and getField()RecordDef methods to obtain the number of fields, field name, and field typerespectively.
For example:
// store handle creation omitted.
...
// Access metadata on PreparedStatement or BoundStatementPreparedStatement pStmt = store.prepare( "DECLARE $minAge integer; $maxAge integer; " + "SELECT id, firstName FROM users WHERE age >= $minAge and age < $maxAge ");
RecordDef recodDef = pStmt.getResultDef();int noOfFields = recodDef.getFields().size();String fieldName = recodDef.getFieldName(0); // fieldName is "$minAge";FieldDef fieldType = recodDef.getField(0); // feldType is IntegerDef
// Access metadata on StatementResultStatementResult result = store.executeSync("SELECT * FROM Users WHERE(age > 18 and age < 30)");
recordDef = result.getResultDef();
Note:
DDL operations do not have metadata.
Using a query to update dataYou can form queries to UPDATE a row in an Oracle NoSQL Database table. TheWHERE clause must specify an exact primary key as only single row updates areallowed.
Chapter 14Accessing metadata
14-3

For example, to update a field using the UPDATE statement:
// store handle creation omitted.
...
TableAPI tableAPI = store.getTableAPI();Table table = tableAPI.getTable("Users");
// Updates the age for User with id=2StatementResult result = store.executeSync("UPDATE Users SET age=20WHERE id=2");
To update multiple rows, you must first form a query to SELECT records. You then usethe result of the SELECT query to update or insert data.
For example, to update a field using a result record from the SELECT statement:
// store handle creation omitted.
...
TableAPI tableAPI = store.getTableAPI();Table table = tableAPI.getTable("Users");
StatementResult result = store.executeSync("SELECT * FROM Users WHERE(age > 13 and age < 17)");
for( RecordValue record : result ) {
// Update a field record.put("age", record.get("age").asInteger().get() + 1 ); tableAPI.put(record.asRow(), null, null);}
Chapter 14Using a query to update data
14-4

AJSON By Example
This appendix contains a complete Java example of how to use JSON data in a OracleNoSQL Database store.
The example loads a series of table rows, using JSON objects to represent each row.The example then updates all table rows that contain a home address in Boston sothat the zip code for that address is updated from 02102 to 02102-1000.
Our sample data deliberately contains some table rows with null and missing fields soas to illustrate some (but by no means all) of the error handling that is required whenworking with JSON data. It is possible to be endlessly creative when providing brokenJSON to the store. Any production code would have to be a great deal more robustthan what is shown here.
The update operation is shown three different ways in the following example. While theactual update is always the same (see the UpdateJSON.updateZipCode() method),there are three different ways to seek out rows with a home address in Boston:
• No query.
This simply iterates over the entire table, examining each row in turn. See UpdateJSON.updateTableWithoutQuery().
• With an index.
This uses a JSON index to retrieve all table rows where the home address is inBoston. See UpdateJSON.updateTableWithIndex().
• With a SQL Query.
This uses a SQL statement with a executeSync() method to retrieve all relevanttable rows. See UpdateJSON.updateTableUsingSQLQuery().
The next section shows some of the sample data used by this example. Thedescription of the example itself begins with UpdateJSON.
If you want to follow along with the example, and see all of the sample data, you canfind this example in the Examples download from here. The example and its sampledata can be found in the Table folder.
When compiling the example, make sure that kvclient.jar is in your classpath. Forexample:
javac -d . -cp <KVHOME>/lib/kvclient.jar UpdateJSON.java
You can run this program against a store or a kvlite instance that does not havesecurity enabled.
java -cp .:<KVHOME>/lib/kvclient.jar table.UpdateJSON
By default, this example uses localhost:5000, but you can set the helper host andport at the command line using the -hostport parameter.
A-1

Sample DataOur sample data is contained in person_contacts.json. We use it create a simpletwo-column table to hold our JSON data.
The first column is an account ID, and it serves as the primary key. At a minimum,every table will always have a single non-JSON field that serves as the primary key. Ifyou wish to use compound primary keys, or one or more shard keys, then the numberof non-JSON fields will expand.
Our second field is a JSON field. Like all such fields, it can contain any valid JSONdata. This provides extreme flexibility for your table schema, which is particularlyuseful when it is necessary to evolve your data's schema. However, it comes at thecost of requiring more error checking to ensure that your JSON contains the data youexpect it to contain.
CREATE TABLE personContacts (account INTEGER, person JSON, PRIMARY KEY(account))
We load this table with 23 rows, some of which are deliberately incomplete. Each rowis represented as a single JSON object. We show a representative section of thesample data file, below, for your reference.
In the following listing, notice that Account 3 only provides a work address — there isno home address. Account 4 provides no address information at all. Account 5 fails toprovide any data at all for the person field. Account 22 explicitly sets the addressobject to null. Account 23 explicitly sets both the home and work addresses to null. Allof this is valid JSON and all of it should be handled by our code.
{"account" : 1,"person" : { "lastName" : "Jones", "firstName" : "Joe", "address" : { "home" : { "street" : "15 Elm", "city" : "Lakeville", "zip" : "12345" }, "work" : { "street" : "12 Main", "city" : "Lakeville", "zip" : "12345" } }, "phone" : { "home" : "800-555-1234", "work" : "877-123-4567" } }}
Appendix ASample Data
A-2

{"account" : 2,"person" : { "lastName" : "Anderson", "firstName" : "Nick", "address" : { "home" : { "street" : "4032 Kenwood Drive", "city" : "Boston", "zip" : "02102" }, "work" : { "street" : "541 Bronx Street", "city" : "Boston", "zip" : "02102" } }, "phone" : { "home" : "800-555-9201", "work" : "877-123-8811" } }}
{"account" : 3,"person" : { "lastName" : "Long", "firstName" : "Betty", "address" : { "work" : { "street" : "10 Circle Drive", "city" : "Minneapolis", "zip" : "55111" } }, "phone" : { "home" : "800-555-2701", "work" : "877-181-4912" } }}
{"account" : 4,"person" : { "lastName" : "Brown", "firstName" : "Harrison", "phone" : { "home" : "800-555-3838", "work" : "877-753-4110" } }}
Appendix ASample Data
A-3

{"account" : 5}
{"account" : 6,"person" : { "lastName" : "Abrams", "firstName" : "Cynthia", "address" : { "home" : { "street" : "2 Fairfield Drive", "city" : "San Jose", "zip" : "95054" } }, "phone" : { "home" : "800-528-4897", "work" : "877-180-5287" } }}
# ...# sample data removed for the book. See person_contact.json# in ..../examples/table for the complete data# file.# ...
{"account" : 21,"person" : { "lastName" : "Blase", "firstName" : "Lisa", "address" : { "home" : { "street" : "72 Rutland Circle", "city" : "Boston", "zip" : "02102" }, "work" : { "street" : "541 Bronx Street", "city" : "Boston", "zip" : "02102" } }, "phone" : { "home" : "800-555-4404", "work" : "877-123-2277" } }}
{
Appendix ASample Data
A-4

"account" : 22,"person" : { "address" : null, "phone" : { "home" : "800-555-1234", "work" : "877-123-4567" } }}
{"account" : 23,"person" : { "address" : { "home" : null, "work" : null }, "phone" : { "home" : "800-555-1234", "work" : "877-123-4567" } }}
UpdateJSONThe example program is called UpdateJSON. We deliberately avoid using Java JSONAPIs in this example so as to show how to perform these operations using OracleNoSQL Database APIs only. Our imports are therefore limited to oracle.kv,oracle.kv.table, java.io, and java.util.
package table;
import oracle.kv.FaultException;import oracle.kv.KVStore;import oracle.kv.KVStoreConfig;import oracle.kv.KVStoreFactory;import oracle.kv.StatementResult;
import oracle.kv.table.FieldValue;import oracle.kv.table.Index;import oracle.kv.table.IndexKey;import oracle.kv.table.MapValue;import oracle.kv.table.PrimaryKey;import oracle.kv.table.RecordValue;import oracle.kv.table.Row;import oracle.kv.table.Table;import oracle.kv.table.TableAPI;import oracle.kv.table.TableIterator;
import java.io.BufferedReader;import java.io.FileNotFoundException;import java.io.FileReader;
Appendix AUpdateJSON
A-5

import java.io.IOException;
import java.util.ArrayList;
public class UpdateJSON { private String dataFile = "person_contacts.json"; private String defaulthost = "localhost:5000"; private String helperhosts[]; private String storeName = "kvstore";
private static void usage() { String msg = "Creates a table and loads data into it from\n"; msg += "an external file containing one or more JSON\n"; msg += "objects. The objects must conform to the table\n"; msg += "schema. Table rows are then updated so that\n"; msg += "zipcodes for all home addresses in Boston are\n"; msg += "modified updated. Update is performed 3 different\n"; msg += "ways so as to illustrate the ways to query JSON\n"; msg += "data in Oracle NoSQL Database.\n"; msg += "\nCommand line options: \n"; msg += "-store <storename>\n"; msg += "\tName of the store. Defaults to 'kvstore'\n"; msg += "-hostport <hostname>:<port>\n"; msg += "\tStore location. Defaults to 'localhost:5000'\n"; msg += "-file <filename>\n"; msg += "\tFile containing row data. Defaults to "; msg += "person_contacts.json";
System.out.println(msg); System.exit(0); }
public static void main(String args[]) { UpdateJSON uj = new UpdateJSON();
uj.run(args); }
UpdateJSON.run()The UpdateJSON.run() method parses our command line arguments, sets up andopens our KVStore handle, and then calls each of the methods that provide individualsteps in this example.
Notice that there are three different updateTable... methods. Each provides thesame functionality as the next, but reads are performed in different ways. Once data isloaded into the table, they can be run independently of the others. The only other
Appendix AUpdateJSON.run()
A-6

dependency is that UpdateJSON.createIndex() must be run before UpdateJSON.updateTableWithIndex() is run.
private void run(String args[]) { parseArgs(args);
KVStoreConfig kconfig = new KVStoreConfig(storeName, helperhosts); KVStore kvstore = KVStoreFactory.getStore(kconfig);
defineTable(kvstore); loadTable(kvstore, dataFile); displayTable(kvstore); updateTableWithoutQuery(kvstore); createIndex(kvstore); updateTableWithIndex(kvstore); updateTableUsingSQLQuery(kvstore); displayTable(kvstore); }
UpdateJSON.defineTable()The defineTable() method drops (deletes) the personContacts table if it exists.Dropping a table deletes all of the table data from the store. The defineTable()method then creates the new table without data.
As always, we can write no data to the store until the table has been defined in thestore using the appropriate DDL statement.
This method relies on the UpdateJSON.runDDL() method, which we show later in thisappendix.
// Drops the example table if it exists. This removes all table // data and indexes. The table is then created in the store. // The loadTable() method is used to populate the newly created // table with data. private void defineTable(KVStore kvstore) { System.out.println("Dropping table...."); String statement = "DROP TABLE IF EXISTS personContacts"; boolean success = runDDL(kvstore, statement);
if (success) { statement = "CREATE TABLE personContacts (" + "account INTEGER," + "person JSON," + "PRIMARY KEY(account))"; System.out.println("Creating table...."); success = runDDL(kvstore, statement); if (!success) { System.out.println("Table creation failed."); System.exit(-1); }
Appendix AUpdateJSON.defineTable()
A-7

}
}
UpdateJSON.createIndex()The UpdateJSON.createIndex() method creates a JSON index in the store. It must berun before UpdateJSON.updateTableWithIndex() is run.
For information on JSON indexes, see JSON Indexes.
// Creates a JSON index. This method must be // run before updateTableWithIndex() is run. private void createIndex(KVStore kvstore) { System.out.println("Creating index...."); String statement = "CREATE INDEX IF NOT EXISTS "; statement += "idx_home_city on personContacts "; statement += "(person.address.home.city AS String)"; runDDL(kvstore, statement); }
UpdateJSON.runDDL()The UpdateJSON.runDDL() method is a utility that executes DDL statements againstthe store using KVStore.executeSync().
This method relies on the UpdateJSON.displayResult() method, which simply writesthe results of the DDL execution to the command line. It is shown later in this example.
// Executes DDL statements (such as are found in defineTable() // and createIndex()) in the store. private boolean runDDL(KVStore kvstore, String statement) { StatementResult result = null; boolean success = false;
try { result = kvstore.executeSync(statement); displayResult(result, statement); success = true; } catch (IllegalArgumentException e) { System.out.println("Invalid statement:\n" + e.getMessage()); } catch (FaultException e) { System.out.println ("Statement couldn't be executed, please retry: " + e); }
return success; }
Appendix AUpdateJSON.createIndex()
A-8

UpdateJSON.updateTableWithoutQuery()The UpdateJSON.updateTableWithoutQuery() method iterates over every row in ourtable looking for the proper rows to update.
This is by far the most complicated of the update methods due to the requirement tocontinually check for null fields. Notice that all of the following code is used to simplyretrieve table rows. The actual update operation is performed by UpdateJSON.updateZipCode().
// Utility method. Given a MapValue and a field name, // return the field as a MapValue. Used by // updateTableWithoutQuery() private MapValue getMV(MapValue mv, String field) { FieldValue fv = null; if ((fv = mv.get(field)) != null) return fv.asMap(); return null; }
// Update the zip code found on all Boston home addresses // to "02102-1000" // // Because we are not using an index, we must iterate over // every row in the table, modifying the rows with Boston home // addresses. private void updateTableWithoutQuery(KVStore kvstore) { TableAPI tableH = kvstore.getTableAPI(); Table myTable = tableH.getTable("personContacts");
PrimaryKey pkey = myTable.createPrimaryKey(); TableIterator<Row> iter = tableH.tableIterator(pkey, null, null); try { while (iter.hasNext()) { int account = 0; Row row = iter.next(); FieldValue fv = null; try { account = row.get("account").asInteger().get(); MapValue mv = row.get("person").asMap();
MapValue mvaddress = getMV(mv, "address"); if (mvaddress != null) { MapValue mvhome = getMV(mvaddress, "home"); if (mvhome != null) { fv = mvhome.get("city"); if (fv != null) { if (fv.toString() .equalsIgnoreCase("Boston")) updateZipCode(tableH, row, "home",
Appendix AUpdateJSON.updateTableWithoutQuery()
A-9

"02102-1000"); } } } } catch (ClassCastException cce) { System.out.println("Data error: "); System.out.println("Account " + account + "has a missing or incomplete person field"); // If this is thrown, then the "person" field // doesn't exist for the row. } } } finally { if (iter != null) { iter.close(); } }
System.out.println("Updated a table without using a query."); }
UpdateJSON.updateTableWithIndex()The UpdateJSON.updateTableWithIndex() method performs the update using anindex.
This read operation is considerably easier to implement than the previous methodbecause we do not need to perform all the error checking. This method is also moreefficient because only the table rows identified by the index are returned, resulting inless network traffic and fewer rows for our code to examine. However, if the requiredindex does not exist, then this method will fail.
// Update the zip code found on all Boston home addresses // to "02102-1000" // // Because we have an index available to us, we only have to look // at those rows which have person.address.home.city = Boston. // All other rows are skipped during the read operation. private void updateTableWithIndex(KVStore kvstore) { TableAPI tableH = kvstore.getTableAPI(); Table myTable = tableH.getTable("personContacts");
// Construct the IndexKey. Index homeCityIdx = myTable.getIndex("idx_home_city"); IndexKey homeCityIdxKey = null;
// If NullPointerException is thrown by createIndexKey(), // it means that the required index has not been created. // Run the createIndex() method before running this method. homeCityIdxKey = homeCityIdx.createIndexKey();
// Return only those entries with a home city of "Boston" homeCityIdxKey.put("person.address.home.city", "Boston");
Appendix AUpdateJSON.updateTableWithIndex()
A-10

// Iterate over the returned table rows. Because we're // using an index, we're guaranteed that // person.address.home.city exists and equals Boston // for every table row seen here. TableIterator<Row> iter = tableH.tableIterator(homeCityIdxKey, null, null); try { while (iter.hasNext()) { Row row = iter.next(); updateZipCode(tableH, row, "home", "02102-1000"); } } finally { if (iter != null) { iter.close(); } } System.out.println("Updated a table using an index."); }
UpdateJSON.updateTableUsingSQLQuery()The UpdateJSON.updateTableUsingSQLQuery() method uses a Oracle NoSQLDatabase SQL query to retrieve the required table rows.
This third and final query method is the easiest to implement, and it has the advantageof not requiring an index. If an appropriate index is available, it will be used — with allthe advantages that an index offers — but the index is not required as it was for theprevious method.
// Update the zip code found on all Boston home addresses // to "02102-1000" // // This query works with or without an index. If an index is // available, it is automatically used. For larger datasets, // the read operation will be faster with an index because only // the rows where person.address.home.city=Boston are returned // for the read. private void updateTableUsingSQLQuery(KVStore kvstore) { TableAPI tableH = kvstore.getTableAPI(); Table myTable = tableH.getTable("personContacts");
String query = "select * from personContacts p "; query += "where p.person.address.home.city=\"Boston\"";
StatementResult result = kvstore.executeSync(query);
for (RecordValue rv : result) { Row row = myTable.createRowFromJson(rv.toString(), false); updateZipCode(tableH, row, "home", "02102-1000"); } System.out.println("Updated a table using a SQL Query to " +
Appendix AUpdateJSON.updateTableUsingSQLQuery()
A-11

"read."); }
UpdateJSON.updateZipCode()The UpdateJSON.updateZipCode() method performs the actual update operation in thestore.
Because JSON can be returned as a MapValue, it is simple and efficient to update theJSON data field.
// Updates the zipcode for the proper address (either "home" // or "work" in this example). // // The calling method must guarantee that this row contains a // home address which refers to the correct city. private void updateZipCode(TableAPI tableH, Row row, String addrType, String newzip) {
MapValue homeaddr = row.get("person").asMap() .get("address").asMap() .get(addrType).asMap(); // If the zip field does not exist in the home address, // it is created with the newzip value. If it currently // exists, it is updated with the new value. homeaddr.put("zip", newzip);
// Write the updated row back to the store. // Note that if this was production code, we // should be using putIfVersion() when // performing this write to ensure that the row // has not been changed since it was originally read. tableH.put(row, null, null); }
UpdateJSON.loadTable()The UpdateJSON.loadTable() method loads our sample date into the Oracle NoSQLDatabase store.
As Sample Data shows, all of our table rows are represented as JSON data in a singletext file. Each row is a single JSON object in the file. Typically JSON files are expectedto contain one and only one JSON object. While there are third party libraries whichwill iterate over multiple JSON objects found in a stream, we do not want to rely onthem for this example. (In the interest of simplicity, we avoid adding a third partydependency.) Consequently, this method provides a primitive custom parser to loadthe example data into the store.
// Loads the contents of the sample data file into // the personContacts table. The defineTable() method // must have been run at least once (either in this // runtime, or in one before it) before this method // is run.
Appendix AUpdateJSON.updateZipCode()
A-12

// // JSON parsers ordinarily expect one JSON Object per file. // Our sample data contains multiple JSON Objects, each of // which represents a single table row. So this method // implements a simple, custom, not particularly robust // parser to read the input file, collect JSON Objects, // and load them into the table. private void loadTable(KVStore kvstore, String file2load) { TableAPI tableH = kvstore.getTableAPI(); Table myTable = tableH.getTable("personContacts");
BufferedReader br = null; FileReader fr = null;
try { String jObj = ""; String currLine; int pCount = 0; boolean buildObj = false; boolean beganParsing = false;
fr = new FileReader(file2load); br = new BufferedReader(fr);
// Parse the example data file, loading each JSON object // found there into the table. while ((currLine = br.readLine()) != null) { pCount += countParens(currLine, '{');
// Empty line in the data file if (currLine.length() == 0) continue;
// Comments must start at column 0 in the // data file. if (currLine.charAt(0) == '#') continue;
// If we've found at least one open paren, it's time to // start collecting data if (pCount > 0) { buildObj = true; beganParsing = true; }
if (buildObj) { jObj += currLine; }
// If our open and closing parens balance (the count // is zero) then we've collected an entire object pCount -= countParens(currLine, '}'); if (pCount < 1) buildObj = false; // If we started parsing data, but buildObj is false
Appendix AUpdateJSON.loadTable()
A-13

// then that means we've reached the end of a JSON // object in the input file. So write the object // to the table, which means it is written to the // store. if (beganParsing && !buildObj) { Row row = myTable.createRowFromJson(jObj, false); tableH.put(row, null, null); jObj = ""; }
}
System.out.println("Loaded sample data " + file2load);
} catch (FileNotFoundException fnfe) { System.out.println("File not found: " + fnfe); System.exit(-1); } catch (IOException ioe) { System.out.println("IOException: " + ioe); System.exit(-1); } finally { try { if (br != null) br.close(); if (fr != null) fr.close(); } catch (IOException iox) { System.out.println("IOException on close: " + iox); } } }
// Used by loadTable() to know when a JSON object // begins and ends in the input data file. private int countParens(String line, char p) { int c = 0; for( int i=0; i < line.length(); i++ ) { if( line.charAt(i) == p ) { c++; } }
return c; }
UpdateJSON.displayTable()The UpdateJSON.displayTable() method simply writes the entire table to thecommand line.
Appendix AUpdateJSON.displayTable()
A-14

This method does not format the table's contents in any significant way. It is simplyprovided as a convenience to allow the user to see that data has in fact been modifiedin the store.
// Dumps the entire table to the command line. // Output is unformatted. private void displayTable(KVStore kvstore) { TableAPI tableH = kvstore.getTableAPI(); Table myTable = tableH.getTable("personContacts");
PrimaryKey pkey = myTable.createPrimaryKey(); TableIterator<Row> iter = tableH.tableIterator(pkey, null, null); try { while (iter.hasNext()) { Row row = iter.next(); System.out.println("\nAccount: " + row.get("account").asInteger()); if (row.get("person").isNull()) { System.out.println("No person field"); } else { System.out.println(row.get("person").asMap()); } } } finally { if (iter != null) { iter.close(); } } }
UpdateJSON.displayResult()The UpdateJSON.displayResult() method shows the contents of a StatementResultobject returned by a KVStore.executeSync() method call. It is used by this exampleas a convenience to help the user see that a DDL statement has executed correctly inthe store.
// Displays the results of an executeSync() call. private void displayResult(StatementResult result, String statement) { System.out.println("==========================="); if (result.isSuccessful()) { System.out.println("Statement was successful:\n\t" + statement); System.out.println("Results:\n\t" + result.getInfo()); } else if (result.isCancelled()) { System.out.println("Statement was cancelled:\n\t" + statement); } else { // statement wasn't successful: may be in error, or may // still be in progress. if (result.isDone()) {
Appendix AUpdateJSON.displayResult()
A-15

System.out.println("Statement failed:\n\t" + statement); System.out.println("Problem:\n\t" + result.getErrorMessage()); } else { System.out.println("Statement in progress:\n\t" + statement); System.out.println("Status:\n\t" + result.getInfo()); } } }
UpdateJSON.parseArgs()The UpdateJSON.parseArgs() method is used to parse the command line argumentsused with this class at run time.
It is unlikely that this method holds any surprises for Java programmers. It is includedhere purely for the sake of completeness.
// Parse command line arguments private void parseArgs(String[] args) { final int nArgs = args.length; int argc = 0; ArrayList<String> hhosts = new ArrayList<String>();
while (argc < nArgs) { final String thisArg = args[argc++];
if (thisArg.equals("-store")) { if (argc < nArgs) { storeName = args[argc++]; } else { usage(); } } else if (thisArg.equals("-hostport")) { if (argc < nArgs) { hhosts.add(args[argc++]); } else { usage(); } } else if (thisArg.equals("-file")) { if (argc < nArgs) { dataFile = args[argc++]; } else { usage(); } } else if (thisArg.equals("?") || thisArg.equals("help")) { usage(); } else { usage();
Appendix AUpdateJSON.parseArgs()
A-16

} }
if (hhosts.isEmpty()) { helperhosts = new String [] {defaulthost}; } else { helperhosts = new String[hhosts.size()]; helperhosts = hhosts.toArray(helperhosts); } }}
Appendix AUpdateJSON.parseArgs()
A-17

BTable Data Definition Language Overview
Before you can write data to tables in the store, you must provide a definition of thetables you want to use. This definition includes information such as the table's name,the name of its various rows and the data type contained in those rows, identificationof the primary and (optional) shard keys, and so forth. To perform these definitions,Oracle NoSQL Database provides a Data Definition Language (DDL) that you use toform table and index statements. The best way to run DDL statements is from the SQLShell, as described in Running the SQL Shell.
From the SQL, you can use these statements:
• Define tables and sub-tables.
• Modify table definitions.
• Delete table definitions.
• Define indexes.
• Delete index definitions.
• Set and modify default Time-to-Live values for tables.
Table and index statements take the form of ordinary strings, which are thentransmitted to the Oracle NoSQL Database store using the appropriate method orfunction. For example, to define a simple user table, the table statement might look likethis:
SQL-> CREATE TABLE Users ( id INTEGER, firstName STRING, lastName STRING, contactInfo JSON, PRIMARY KEY (id))
For information on how to transmit these statements to the store, see IntroducingOracle NoSQL Database Tables and Indexes.
For overview information on primary and shard keys, see Primary and Shard KeyDesign.
For overview information on indexes, see Creating Indexes.
The remainder of this appendix describes in detail the DDL statements that you use tomanipulate table and index definitions in the store.
Name ConstraintsThroughout this document, and elsewhere in the documentation, using uppercase textsignifies DDL keywords (such as STRING, CREATE TABLE, and so on). Thesekeywords are actually case-insensitive and you can enter them in lowercase
B-1

characters. However, all DDL keywords shown here are reserved words. You cannotuse keywords as table, index, or field names.
Table, index, and field names are case-preserving, but case-insensitive. For example,you can create a field named MY_NAME, and later reference it as my_name without error.However, whenever you display the field name, it displays in the way you created it,MY_NAME, in this case.
Table names are limited to 256 characters. Namespace names, index names, andfield names are limited to 64 characters. All table, index, and field names must beginwith a letter (A-Z, a-z), and are restricted to alphanumeric characters (A-Z, a-z, 0–9),plus underscore (_) and a period (.) character.
DDL CommentsYou can include comments in your DDL statements using one of the followingconstructs:
id INTEGER, /* this is a comment */firstName STRING, // this is a commentlastName STRING, # this is a comment
CREATE TABLETo create a table definition, use a CREATE TABLE statement, as follows:
CREATE TABLE [IF NOT EXISTS] [namespace:]table-name [COMMENT "comment string"] (field-definition, field-definition-2 [,...] PRIMARY KEY (field-name, field-name-2 [,...] ),) [USING TTL ttl]
where:
• IF NOT EXISTS
Optional clause. If you use this clause and a table of the same name and definitionalready exists in the current namespace, the statement neither creates a newtable, nor returns an error. No action occurs.
If you do not use IF NOT EXISTS, and a table of the same name and definitionalready exists in the current namespace, the statement attempts to create thetable, and fails. You cannot have two tables with the same name in onenamespace.
• table-name
Required. Specifies the full table name, regardless of where it exists in the tablehierarchy. A table can be a top-level table created in the default namespace(sysdefault), a table in a non-default namespace, or a child or grandchild table ofa parent table. Specify a fully-qualified table name as follows:
– parent-table.child-table – Specifies a new child table of an existing parent.To create a child table, specify the parent table followed by a period (.) before
Appendix BDDL Comments
B-2

the child name. For example, if the parent table is Users, define a child tablenamed MailingAddress as Users.MailingAddress.
– parent-table.child-table.grandchild-table – Specifies a child table of anexisting table. You must also specify the parent table, for exampleUsers.MailingAddress.Zip.
– namespace-name:table-name – Identifies a new table in a specific namespace,either user-created or in the default namespace (sysdefault:). Use thenamespace followed by a colon (:) as a prefix to the new table name. For anew child table of a table in a namespace, or any further generation, use afully qualified table name such as Sales:Users.MailingAddress, orSales:Users.MailingAddress.Zip.
• COMMENT
Optional. Use a comment to provide a brief description of the table. The commentis not interpreted at runtime, but becomes part of the table's metadata.
• field-definition
Required. A comma-separated list of fields. One of the columns can be anIDENTITY, as described in Defining Tables With an IDENTITY Column. There areone or more field definitions for every table. Field definitions are described next inthis section.
• PRIMARY KEY
Required for every table. Identifies at least one field in the table that is the primarykey. For information on primary keys, see Primary Keys.
Note:
If the primary key field is an INTEGER data type, you can apply aserialized size constraint to it. See Integer Serialized Constraints fordetails.
To optionally define a shard key, use the SHARD keyword within the primary keystatement. For information on shard keys, see Shard Keys.
For example:
PRIMARY KEY (SHARD(id), lastName)
• USING TTL
Optional. Defines a default time-to-live value for the table's rows. See USING TTLfor information on this clause.
Field DefinitionsWhen defining a table, field definitions take the form:
field-name type [constraints] [COMMENT "comment-string"]
where:
Appendix BCREATE TABLE
B-3

• field-name is the name of the field. For example: id or familiarName. Every fieldmust have a name.
• type describes the field's data type. This can be a simple type such as INTEGERor STRING, or it can be a complex type such a RECORD. The list of allowabletypes is described in the next section.
• constraints describes any limits placed on the data contained in the field. That is,allowable ranges or default values. Ann IDENTITY field, to be created by asequence generator, is also permissable. This information is optional. See FieldConstraints for more information.
• COMMENT is optional. You can use this to provide a brief description of the field. Thecomment will not be interpreted but it is included in the table's metadata.
Supported Data TypesThe following data types are supported for table fields:
• ARRAY
An array of data. All elements of the array must be of the same data type, and thistype must be declared when you define the array field. For example, to define anarray of strings:
myArray ARRAY(STRING)
• BINARY
Binary data.
• BINARY(length)
Fixed-length binary field of size length (in bytes).
• BOOLEAN
A boolean data type.
• DOUBLE
A double.
• ENUM
An enumerated list. The field definition must provide the list of allowableenumerated values. For example:
fruitName ENUM(apple,pear,orange)
• FLOAT
A float.
• INTEGER
An integer.
• JSON
A JSON-formatted string.
• LONG
Appendix BCREATE TABLE
B-4

A long.
• MAP
A data map. All map keys are strings, but when defining these fields you mustdefine the data type of the data portion of the map. For example, if your keys mapto integer values, then you define the field like this:
myMap MAP(INTEGER)
• Number
A numeric type capable of handling any type of number of any value or precision.
• RECORD
An embedded record. This field definition must define all the fields contained in theembedded record. All of the same syntax rules apply as are used for defining anordinary table field. For example, a simple embedded record might be defined as:
myEmbeddedRecord RECORD(firstField STRING, secondField INTEGER)
Data constraints, default values, and so forth can also be used with the embeddedrecord's field definitions.
• STRING
A string.
• TIMESTAMP(<precision>)
Represents a point in time as a date and, optionally, a time value.
Timestamp values have a precision (0 - 9) which represents the fractional secondsto be held by the timestamp. A value of 0 means that no fractional seconds arestored, 3 means that the timestamp stores milliseconds, and 9 means a precisionof nanoseconds. When declaring a timestamp field, the precision is required.
Field ConstraintsField constraints define information about the field, such as whether the field can beNULL, or what a row's default value should be. Not all data types support constraints,and individual data types do not support all possible constraints.
Integer Serialized ConstraintsYou can put a serialized size constraint on an INTEGER data type, provided theINTEGER is used for a primary key field. Doing this can reduce the size the keys inyour store.
To do this, use (n) after the primary key field name, where n is the number of bytesallowed for the integer. The meaningful range for n is 1 - 4. For example:
create table myId (id integer, primary key(id(3)))
The number of bytes allowed defines how large the integer can be. The range is fromnegative to positive.
Appendix BCREATE TABLE
B-5

Note:
Specifying an integer constraint value for number of bytes on an IDENTITYfield is not permitted.
Number ofBytes
Allowed Integer Values
1 -63 to 63
2 -8191 to 8191
3 -1048575 to 1048575
4 -134217727 to 134217727
5 Any integer value
COMMENTAll data types can accept a COMMENT as part of their constraint. COMMENT stringsare not parsed, but do become part of the table's metadata. For example:
myRec RECORD(a STRING, b INTEGER) COMMENT "Comment string"
DEFAULTAll fields can accept a DEFAULT constraint, except for ARRAY, BINARY, MAP, andRECORD. The value specified by DEFAULT is used in the event that the field data isnot specified when the table is written to the store.
For example:
id INTEGER DEFAULT -1,description STRING DEFAULT "NONE",size ENUM(small,medium,large) DEFAULT medium,inStock BOOLEAN DEFAULT FALSE
IDENTITYYou can define one IDENTITY field per table. All IDENTITY fields must have anumeric type: INTEGER. LONG, or NUMBER. An IDENTITY field can optionally be aprimary key.
There are two ways to define an IDENTITY field. You can optionally specify one ormore Sequence Generator attributes for the Sequence Generator (SG) associatedwith the IDENTITY. These are the options:
• GENERATED ALWAYS AS IDENTITY
• GENERATED BY DEFAULT AS IDENTITY
These are the Sequence Generator attributes you can define:
Appendix BCREATE TABLE
B-6

Attribute Type Default Value and Description
StartWith Number Default: 1 The first value in the sequence. Zero (0) is notpermitted.
IncrementBy Long Default: 1 The value to increment the current value, whichcan be a positive or a negative number. Specifying anegative number for IncrementBy decrements values fromthe StartWith value.
MinValue Number Default: The minimum value of the field data type. Thelower bound of the IDENTITY values that the SG supplies.
MaxValue Number Default: The maximum value of the field data type. Theupper bound of the IDENTITY values that the SG supplies.If you do not specify this attribute, SG uses the maximumvalue of the field data type.
Cache Long Default: 1000 The number of values stored in cache on theclient to use for the next IDENTITY value. When the set ofvalues is exhausted, the SG requests another set to store inthe local cache (unless you specify the Cycle attribute).
Cycle | NoCycle Boolean Default: NoCycle Determines whether to reuse the set ofstored values in cache. For example, if the cache stores1024 integers for the IDENTITY column, and you specifyCycle, when the IDENTITY value reaches 1023, the nextrow value is 0001. If you do not specify Cycle, OracleNoSQL Database guarantees that each IDENTITY value inthe column is unique, but not necessarily sequential.
For example:
CREATE Table T (id INTEGER GENERATED ALWAYS AS IDENTITY (START WITH 2 INCREMENT BY 2 MAXVALUE 200), name STRING, PRIMARY KEY (id));
CREATE Table T_DEFAULT (id LONG GENERATED BY DEFAULT AS IDENTITY (START WITH 1 INCREMENT BY 1 CYCLE CACHE 200), account_id INTEGER,name STRING,PRIMARY KEY (account_id));
NOT NULLNOT NULL indicates that the field cannot be NULL. This constraint requires that youalso specify a DEFAULT value. Order is unimportant for these constraints. Forexample:
id INTEGER NOT NULL DEFAULT -1,description STRING DEFAULT "NONE" NOT NULL
USING TTLUSING TTL is an optional statement that defines a default time-to-live value for a table'srows. See Using Time to Live for information on TTL.
Appendix BCREATE TABLE
B-7

If specified, this statement must provide a ttl value, which is an integer greater than orequal to 0, followed by a space, followed by time unit designation which is either hoursor days. For example:
USING TTL 5 days
If 0 is specified, then either days or hours can be used. A value of 0 causes table rowsto have no expiration time. Note that 0 is the default if a default TTL has never beenapplied to a table schema. However, if you previously applied a default TTL to a tableschema, and then want to turn it off, use 0 days or 0 hours.
USING TTL 0 days
Be aware that if you altering an existing table, you can not both add/drop a field andalter the default TTL value for the field using the same ALTER TABLE statement. Thesetwo operations must be performed using separate statements.
Table Creation ExamplesThe following are provided to illustrate the concepts described above.
CREATE TABLE users COMMENT "This comment applies to the table itself" ( id INTEGER, firstName STRING, lastName STRING, age INTEGER, PRIMARY KEY (id),)
CREATE TABLE temporaryCOMMENT "These rows expire after 3 days" ( sku STRING, id STRING, price FLOAT, count INTEGER, PRIMARY KEY (sku),) USING TTL 3 days
CREATE TABLE usersNoId ( firstName STRING, lastName STRING COMMENT "This comment applies to this field only", age INTEGER, ssn STRING NOT NULL DEFAULT "xxx-yy-zzzz", PRIMARY KEY (SHARD(lastName), firstName))
CREATE TABLE users.address ( streetNumber INTEGER, streetName STRING, // this comment is ignored by the DDL parser
Appendix BCREATE TABLE
B-8

city STRING, /* this comment is ignored */ zip INTEGER, addrType ENUM (home, work, other), PRIMARY KEY (addrType))
CREATE TABLE complex COMMENT "this comment goes into the table metadata" ( id INTEGER, PRIMARY KEY (id), # this comment is just syntax nestedMap MAP(RECORD( m MAP(FLOAT), a ARRAY(RECORD(age INTEGER)))), address RECORD (street INTEGER, streetName STRING, city STRING, \ zip INTEGER COMMENT "zip comment"), friends MAP (STRING), floatArray ARRAY (FLOAT), aFixedBinary BINARY(5), days ENUM(mon, tue, wed, thur, fri, sat, sun) NOT NULL DEFAULT tue)
CREATE TABLE myJSON ( recordID INTEGER, jsonData JSON, PRIMARY KEY (recordID))
Modify Table DefinitionsUse ALTER TABLE statements to either add new fields to a table definition, or delete acurrently existing field definition. You can also use an ALTER TABLE statement tochange the default Time-to-Live (TTL) value for a table, and to add an IDENTITYcolumn to a table, as described in Defining Tables With an IDENTITY Column.
ALTER TABLE ADD fieldTo add a field to an existing table, use the ADD statement:
ALTER TABLE table-name (ADD field-definition)
See Field Definitions for a description of what should appear in field-definitions, above.For example:
ALTER TABLE Users (ADD age INTEGER)
Appendix BModify Table Definitions
B-9

You can also add fields to nested records. For example, if you have the following tabledefinition:
CREATE TABLE u (id INTEGER, info record(firstName String)), PRIMARY KEY(id))
then you can add a field to the nested record by using dot notation to identify thenested table, like this:
ALTER TABLE u(ADD info.lastName STRING)
ALTER TABLE DROP OptionTo delete a field from an existing table, use the DROP option:
ALTER TABLE table-name (DROP field-name)
For example, to drop the age field from the Users table:
ALTER TABLE Users (DROP age)
Note:
You cannot drop a field if it is the primary key, or if it participates in an index.
You can also us the ALTER TABLE MODIFY FIELD clause to add, drop, or modify anIDENTITY column in a table. For more information, see Defining Tables With anIDENTITY Column
ALTER TABLE USING TTLTo change the default Time-to-Live (TTL) value for an existing table, use the USINGTTL statement:
ALTER TABLE table-name USING TTL ttl
For example:
ALTER TABLE Users USING TTL 4 days
For more information on the USING TTL statement, see USING TTL.
Appendix BModify Table Definitions
B-10

DROP TABLETo delete a table definition, use the DROP TABLE statement:
DROP TABLE [IF EXISTS] table-name
where:
• IF EXISTS is optional. If you use this option and the specified table does not exist,the system returns a message:
sql-> drop table if exists foo;Statement did not require execution
If you do not specify IF EXISTS , and the table does not currently exist, the DROPstatement returns as follows:
sql-> drop table foo;Error handling command drop table foo: Error: User error in query: DROP TABLE failed for table foo: Table does not exist: foo
If the table exists with the IF EXISTS option:
sql-> create table foo (first string, second integer, primary key (second));Statement completed successfullysql-> drop table foo;Statement completed successfully
• table-name is the name of the table you want to drop.
As soon as you execute the DROP TABLE statement, users can no longer access thedeleted table or its data. Deleting all of the table data occurs asynchronously in thebackground after you execute the DROP TABLE statement.
If the table to drop has child tables, you must drop those first. For example, if you havethese tables:
• myTable
• myTable.childTable1
• myTable.childTable2
You must first drop myTable.childTable1 and myTable.childTable2 before you candrop the parent myTable. If you try to drop the parent, the statement returns an error.
Appendix BDROP TABLE
B-11

CREATE INDEXTo add an index definition to the store, use a CREATE INDEX statement. It can be usedto create simple indexes and multi-key indexes. It can also be used to create JSONindexes.
Indexable Field TypesFields can be indexed only if they are declared to be one of the following types. For allcomplex types (arrays, maps, and records), the field can be indexed if the ultimatetarget of the index is a scalar datatype. So a complex type that contains a nestedcomplex type (such as an array of records, for example) can be indexed if the index'starget is a scalar datatype contained by the embedded record.
• Integer
• Long
• Number
• Float
• Double
• Json
Note that there are some differences and restrictions on indexing Json data versusother data types. See JSON Indexes for more information.
• String
• Enum
• Array
In the case of arrays, the field can be indexed only if the array contains values thatare of one of the other indexable scalar types. For example, you can create anindex on an array of Integers. You can also create an index on a specific record inan array of records. Only one array can participate in an index, otherwise the sizeof the index can grow exponentially because there is an index entry for each arrayentry.
• Maps
As is the case with Arrays, you can index a map if the map contains scalar types,or if the map contains a record that contains scalar types.
• Records
Like Arrays and Maps, you can index fields in an embedded record if the fieldcontains scalar data.
Simple IndexesAn index is simple if it does not index any maps or arrays. To create a simple index:
CREATE INDEX [IF NOT EXISTS] index-name ON table-name (path_list)
where:
Appendix BCREATE INDEX
B-12

• IF NOT EXISTS is optional, and it causes the CREATE INDEX statement to beignored if an index by that name currently exists. If this phrase is not specified, andan index using the specified name does currently exist, then the CREATE INDEXstatement will fail with an error.
• index-name is the name of the index you want to create.
• table-name is the name of the table that you want to index.
• path_list is a comma-separated list of one or more name_paths. A name_pathrefers to an element of a table. Normally these are schema fields — that is, fieldnames that appear in the CREATE TABLE expression used to create theassociated table.
However, if the table contains a record, then the name_path may be record keysthat use dot-notation to identify a record field. For example:
CREATE TABLE example ( id INTEGER, myRecord RECORD(field_one STRING, field_two STRING), PRIMARY KEY (id) )
An index can then be created on field_one by using the name_path ofmyRecord.field_one. See Indexing Embedded Records for a more detailedexplanation of indexing records.
For example, if table Users has a field called lastName, then you can index that fieldwith the following statement:
CREATE INDEX surnameIndex ON Users (lastName)
Note that depending on the amount of data in your store, creating indexes can take along time. This is because index creation requires Oracle NoSQL Database toexamine all the data in the store.
Multi-Key IndexesMulti-key indexes are used to index all the elements of an array. They are also used toindex all of the elements and/or values of a map.
For each table row, a multi-key index contains as many entries as the number ofelements/entries in the array/map that is being indexed (although duplicate entries arenot represented in the index). To avoid an explosion in the number of index entries,only one array/map may be contained in a single multi-key index.
To create a multi-key index, use one of the following forms:
CREATE INDEX [IF NOT EXISTS] index-name ON table-name (name-path.keys())
or
CREATE INDEX [IF NOT EXISTS] index-name ON table-name (name-path.values())
Appendix BCREATE INDEX
B-13

or
CREATE INDEX [IF NOT EXISTS] index-name ON table-name \(name-path.keys(),name-path.values())
or
CREATE INDEX [IF NOT EXISTS] index-name ON table-name (name-path[])
The syntax shown, above, is identical to that described in Simple Indexes, with thefollowing additions:
• .keys()
The index is created on the keys in a map. If used, name-path must be a map.
• .values()
The index is created on the values in a map. If used, name-path must be a map.
• []
The index is created on an array. If used, name-path must be array.
For each of the previously identified forms, a comma-seperated list of name-paths maybe provided. Some restrictions apply.
Multi-Key Index RestrictionsThe following restrictions apply to multi-key indexes:
• There is at least one name-path that uses a multi-key step (.keys(), .values(),or []). Any such path is called a multi-key path, and the associated index field amulti-key field. The index definition may contain more than one multi-key path, butall multi-key paths must use the same name-path before their multi-key step.
• Any non-multi-key paths must be simple paths.
• The combined path specified for the index must contain at least one map and/orarray. These must contain indexable atomic items, or record items, or map items.That is, an index of an array of arrays is not supported, nor is an index of mapscontaining arrays.
For example, given the following table definition:
create table Foo (id INTEGER,complex1 RECORD(mapField MAP(ARRAY(MAP(INTEGER)))),complex2 RECORD(matrix ARRAY(ARRAY(RECORD(a LONG, b LONG))) primary key(id))
The path expression complex2.matrix[] is not valid, because the result of thispath expression is a sequence of arrays, not atomic items. Neither iscomplex2.matrix[][].a valid, because you cannot index arrays inside otherarrays (in fact this path will raise a syntax error, because the syntax allows at mostone [] per index path).
Appendix BCREATE INDEX
B-14

On the other hand, the path complex1.mapField.someKey[].someOtherKey isvalid. In this case, the path complex1.mapField.someKey specifies an arraycontaining maps, which is valid. Notice that in this index path, someKey andsomeOtherKey are map-entry keys. So, although we are indexing arrays that arecontained inside maps, and the arrays being indexed contain maps, the path isvalid, because it is selecting specific entries from the map, rather than indexing allthe map entries in addition to all the array entries.
• If the index is indexing an array-valued field:
– If the array contains indexable atomic items:
* There must be a single multi-key index path of the form M[] (without anyname_path following after the []). Again, this implies that you cannot indexmore than one array in the same index.
* For each table row (R), a number of index entries are created as follows:
The simple index paths (if any) are computed on R.
Then, M[] is computed (as if it were a query path expression), returningeither NULL, or EMPTY, or all the elements of the array returned by M.
Finally, for each value (V) returned by M[], an index entry is created whosefield values are V and the values of the simple paths.
* Any duplicate index entries (having equal field values and the sameprimary key) created by the above process are eliminated.
– If the array contains records or maps:
* All of the multi-key paths must be of the form M[].name_path. Eachname_path appearing after M[] in the multi-key index path must return atmost one indexable atomic item.
* For each table row (R), a number of index entries are created as follows:
The simple index paths (if any) are computed on R.
Then, M[] is computed (as if it were a query path expression), returningeither NULL, or EMPTY, or all the elements of the array returned by M.
Next, for each value (V) returned by M[], one index entry is created asfollows:
The elements contained in each V are computed. This returns a singleindexable atomic item (which may be the NULL or EMPTY item). An indexentry is created for each of these, whose field values are the values of thesimple index paths plus the values found for element contained in V.
* Any duplicate index entries (having equal field values and the sameprimary key) created by the above process are eliminated.
– If the index is indexing a map-valued field, the index may be indexing onlymap keys, or only map elements, or both keys and elements. In all cases, thedefinition of map indexes can be given in terms of array indexes, by viewingmaps as arrays containing records with 2 fields: a field with name “key” andvalue a map key, and a field named “element” and value the correspondingmap element (that is, MAP(T) is viewed as ARRAY(RECORD(key STRING,element T))). Then, the 2 valid kinds for map indexes are:
1. A single multi-key index path using a keys() step. Using the array view ofmaps, M.keys() is equivalent to M[].key.
Appendix BCREATE INDEX
B-15

2. One or more multi-key index paths, all using a .values() step. If Ri is anvalue contained in the map, then each of these has the formM.values().Ri. Using the array view of maps, each M.values().Ri path isequivalent to M[].element.Ri.
JSON IndexesAn index is a JSON index if it indexes at least one field that is contained inside JSONdata.
Because JSON is schema-less, it is possible for JSON data to differ in type acrosstable rows. However, when indexing JSON data, the data type must be consistentacross table rows or the index creation will fail. Further, once or more JSON indexeshave been created, any attempt to write data of an incorrect type will fail.
Indexing JSON data and working with JSON indexes is performed in much the sameway as indexing non-JSON data. To create the index, specify a path to the JSON fieldusing dot notation.
When creating JSON indexes, you must specify the data's type, using the AS keyword.The data type must be atomic, and cannot be a float. That is, only integer, long,double, number, string, and boolean are supported types for JSON indexes. Note thatarrays and maps can be indexed so long as they contain these atomic values.
CREATE INDEX [IF NOT EXISTS] index-name ON table-name \(JSONRow.JSONField AS data_type)
When creating a multi-key index on a JSON map, a type must not be given forthe .keys() expression because the type will always be String. However, a typedeclaration is required for the .values() expression. Beyond that, all the constraintsdescribed in Multi-Key Index Restrictions also apply to a JSON multi-keyed index.
CREATE INDEX [IF NOT EXISTS] index-name ON table-name \(JSONRow.JSONField.keys(),\JSONRow.JSONField.values() AS data_type)
For an example of using JSON indexes, see Indexing JSON Fields.
See the Indexing JSON Data section in the Getting Started with SQL for OracleNoSQL Database Manual for additional examples of using JSON indexes.
CREATE FULL TEXT INDEXTo create a text index on that table that indexes the category and txt columns, useCREATE FULLTEXT INDEX statement:
CREATE FULLTEXT INDEX [if not exists] <index-name> ON <table-name>(<field-name> [ <mapping-spec> ], ...)[ES_SHARDS = <n>] [ES_REPLICAS = <n>]
Appendix BCREATE FULL TEXT INDEX
B-16

For example:
kv-> execute 'CREATE FULLTEXT INDEX JokeIndexON Joke (category, txt)'Statement completed successfully
While creating index, CREATE FULLTEXT INDEX statement uses the OVERRIDE flag,which allows to delete any index existing in Elasticsearch by the same name as wouldbe created by the command.
CREATE FULLTEXT INDEX [IF NOT EXISTS] index_name ON table_name (field_name [{mapping_spec}] [, field_name [{mapping_spec}]]...) [ES_SHARDS = value] [ES_REPLICAS = value] [OVERRIDE] [COMMENT comment]
For example:
CREATE INDEX JokeIndex on Joke (category, txt) OVERRIDE
For more information, see the following in the Oracle NoSQL Database Full TextSearch guide:
• Creating Full Text Index
• Mapping Full Text Index Field to Elasticsearch Index Field
DROP INDEXTo delete an index definition from the store, use a DROP INDEX statement. Its formwhen deleting an index is:
DROP INDEX [IF EXISTS] index-name ON table-name
where:
• IF EXISTS is optional, and it causes the DROP INDEX statement to be ignored if anindex by that name does not exist. If this phrase is not specified, and an indexusing the specified name does not exist, then the DROP INDEX statement will failwith an error.
• index-name is the name of the index you want to drop.
• table-name is the name of the table containing the index you want to delete.
For example, if table Users has an index called surnameIndex, then you can delete itusing the following statement:
DROP INDEX IF EXISTS surnameIndex ON Users
Appendix BDROP INDEX
B-17

Use DROP INDEX on a text index to stop the population of the index from NoSQLDatabase shards, and removes the mapping and all related documents fromElasticsearch. See the following statement:
DROP INDEX [IF EXISTS] index_name ON table_name
For example:
kv-> execute 'DROP INDEX JokeIndex on Joke'Statement completed successfully
While deleting index, you can use the OVERRIDE flag. The DROP INDEX statement usesthe OVERRIDE flag to enable overriding of the default constraints:
DROP INDEX [IF EXISTS] index_name ON table_name [OVERRIDE]
For example:
DROP INDEX JokeIndex on Joke OVERRIDE
For more information, see the following sections in the Oracle NoSQL Database FullText Search guide:
• Drop Index
• Constraints in the Troubleshooting section
DESCRIBE AS JSON TABLEYou can retrieve a JSON representation of a table by using the DESCRIBE AS JSONTABLE statement:
DESCRIBE AS JSON TABLE table_name [(field-name, field-name2, ...)]
or
DESC AS JSON TABLE table_name [(field-name, field-name2, ...)]
where:
• table_name is the name of the table you want to describe.
• field-name is 0 or more fields defined for the table that you want described. Ifspecified, the output is limited to just the fields listed here.
For Map and Array fields, use [] to restrict the JSON representation to just themap or array element.
Appendix BDESCRIBE AS JSON TABLE
B-18

DESCRIBE AS JSON INDEXYou can retrieve a JSON representation of an index by using the DESCRIBE AS JSONINDEX statement:
DESCRIBE AS JSON INDEX index_name ON table_name
where:
• index_name is the name of the index you want to describe.
• table_name is the name of the table to which the index is applied.
SHOW TABLESYou can retrieve a list of all tables currently defined in the store using the SHOW TABLESstatement:
SHOW [AS JSON] TABLES
where AS JSON is optional and causes the resulting output to be JSON-formatted.
SHOW INDEXESYou can retrieve a list of all indexes currently defined for a table using the SHOWINDEXES statement:
SHOW [AS JSON] INDEXES ON table_name
where:
• AS JSON is optional and causes the resulting output to be JSON-formatted.
• table_name is the name of the table for which you want to list all the indexes.
Appendix BDESCRIBE AS JSON INDEX
B-19

CThird Party Licenses
All of the third party licenses used by Oracle NoSQL Database are described in the License document.
C-1