getting started with oracle data profiling and oracle data quality … · viii intended audience...
TRANSCRIPT
Oracle® Fusion Middleware
Getting Started with Oracle Data Profiling and Oracle Data Quality for Data Integrator
11g Release 1
October 2009
Part Number E15038-01
Oracle Data Profiling and Oracle Data Quality for Data Integrator Getting Started Guide, 11g Release1
Part Number E15038-01
Copyright © 2007-2009 Oracle Corporation or its licensors. All rights reserved.
The Programs (which include both the software and documentation) contain proprietary information of Oracle Corporation or its licensors; they are provided under a license agreement containing restrictions on use and disclosure and are also protected by copyright, patent and other intellectual and industrial property laws. Reverse engineering, disassembly or decompilation of the Programs, except to the extent required to obtain interoperability with other independently created software or as specified by law, is prohibited.
The information contained in this document is subject to change without notice. If you find any problems in the documentation, please report them to us in writing. Oracle Corporation does not warrant that this document is error-free. Except as may be expressly permitted in your license agreement for these Programs, no part of these Programs may be reproduced or transmitted in any form or by any means, electronic or mechanical, for any purpose, without the express written permission of Oracle Corporation.
If the Programs are delivered to the U.S. Government or anyone licensing or using the programs on behalf of the U.S. Government, the following notice is applicable:
Restricted Rights Notice Programs delivered subject to the DOD FAR Supplement are "commercial computer software" and use, duplication, and disclosure of the Programs, including documentation, shall be subject to the licensing restrictions set forth in the applicable Oracle license agreement. Otherwise, Programs delivered subject to the Federal Acquisition Regulations are "restricted computer software" and use, duplication, and disclosure of the Programs shall be subject to the restrictions in FAR 52.227-19, Commercial Computer Software - Restricted Rights (June, 1987). Oracle Corporation, 500 Oracle Parkway, Redwood City, CA 94065.
The Programs are not intended for use in any nuclear, aviation, mass transit, medical, or other inherently dangerous applications. It shall be the licensee's responsibility to take all appropriate fail-safe, backup, redundancy, and other measures to ensure the safe use of such applications if the Programs are used for such purposes, and Oracle Corporation disclaims liability for any damages caused by such use of the Programs.
Oracle is a registered trademark, and OracleMetaLink, Oracle Store, Oracle9i, Oracle9iAS Discoverer, SQL*Plus, and PL/SQL are trademarks or registered trademarks of Oracle Corporation. Trillium Software and Trillium Software System are registered trademarks of Harte-Hanks, Inc. Other names may be trademarks of their respective owners.
Contents
Preface............................................................................................................................................................. v
Intended Audience ................................................................................................................................ viRelated Documentation ........................................................................................................................ vi
1 Introducing the Oracle Data Quality Products
Introduction ......................................................................................................................................... 1-2Oracle Data Profiling and Oracle Data Quality for Data Integrator Architecture................. 1-2Three Feature Sets - Two Products - One Interface ...................................................................... 1-4
Oracle Data Profiling.................................................................................................................... 1-4Time Series..................................................................................................................................... 1-4Quality............................................................................................................................................ 1-5
Methodology........................................................................................................................................ 1-9Getting Started with Oracle Data Profiling and Quality.......................................................... 1-10
Step 1: Verify Your Metabase and Connection Setup ........................................................... 1-10Step 2: Log on to Oracle Data Profiling and Quality............................................................. 1-11Step 3: Prepare for Data Import................................................................................................ 1-11Step 4: Create an Entity.............................................................................................................. 1-11Step 5: Create a Project............................................................................................................... 1-12Step 6: Open a Project and Start to Work................................................................................ 1-12
Logging on to the Oracle Data Profiling and Quality User Interface..................................... 1-12Before You Begin ........................................................................................................................ 1-12Opening the Oracle Data Profiling and Quality User Interface .......................................... 1-13Exiting the Oracle Data Profiling and Quality User Interface ............................................. 1-13
Next Step ............................................................................................................................................ 1-13
iii
2 Touring the Oracle Data Profiling and Quality User Interface
Oracle Data Quality User Interface ................................................................................................. 2-2Main Menu..................................................................................................................................... 2-4Main Toolbar ................................................................................................................................. 2-4Metabase Explorer ........................................................................................................................ 2-4About Metabases........................................................................................................................... 2-6
Entities..................................................................................................................................... 2-6Attributes ................................................................................................................................ 2-7Rows ........................................................................................................................................ 2-7
About List Views .......................................................................................................................... 2-8About Project Views ..................................................................................................................... 2-8
Navigating the Explorer................................................................................................................... 2-10Opening and Closing the Explorer........................................................................................... 2-10Viewing Metabase Objects in the Explorer ............................................................................. 2-10
Using the Explorer Tabs ................................................................................................................... 2-11Projects Tab.................................................................................................................................. 2-11
Oracle Data Profiling Projects............................................................................................ 2-12Time Series Projects............................................................................................................. 2-13Quality Projects.................................................................................................................... 2-13
Entities Tab .................................................................................................................................. 2-14Library Tab .................................................................................................................................. 2-15
Library Rules ........................................................................................................................ 2-15Library Attributes................................................................................................................ 2-15
Analysis Tab ................................................................................................................................ 2-16Dependencies ....................................................................................................................... 2-16Keys ....................................................................................................................................... 2-17Joins ....................................................................................................................................... 2-17
Findings Tab ................................................................................................................................ 2-17Project Notes......................................................................................................................... 2-18Private and Public Bookmarks .......................................................................................... 2-18Event Logs ............................................................................................................................ 2-18
Navigating List Views ...................................................................................................................... 2-19Opening Multiple List Views.................................................................................................... 2-19Organizing List Views................................................................................................................ 2-19Filtering Information in List Views.......................................................................................... 2-20
iv
Refreshing the Oracle Data Profiling and Quality User Interface.......................................... 2-20Monitoring Metabase Activities .................................................................................................... 2-21
Viewing Background Tasks ...................................................................................................... 2-21Viewing Event Logs ................................................................................................................... 2-21Viewing Messages ...................................................................................................................... 2-22Printing......................................................................................................................................... 2-22
Next Step ............................................................................................................................................ 2-22
3 Importing Data and Creating Entities
Types of Sources for Entity Creation .............................................................................................. 3-2Before You Begin................................................................................................................................. 3-2
About Importing Sample Data Files .......................................................................................... 3-3Customizing Data During Entity Creation .................................................................................... 3-4
Selecting a Subset of Fields (Columns) to Import.................................................................... 3-4Creating an Entity ............................................................................................................................... 3-4
Using the Create Entity Wizard ................................................................................................. 3-4Monitoring the Entity Creation Process ....................................................................................... 3-18About Verifying New Entities........................................................................................................ 3-18About DSD Failures ......................................................................................................................... 3-19About Overflow ................................................................................................................................ 3-20About Metabase Clean-Up Tasks .................................................................................................. 3-22Next Steps........................................................................................................................................... 3-23
4 Setting Up Projects
About Oracle Data Profiling and Quality Project Types ............................................................ 4-2Viewing Projects in the Explorer ..................................................................................................... 4-3About Oracle Data Profiling Projects ............................................................................................. 4-3
About Setting Up Oracle Data Profiling Projects..................................................................... 4-3Creating an Oracle Data Profiling Project................................................................................. 4-4
About Time Series Projects ............................................................................................................... 4-5Creating a Time Series Project .................................................................................................... 4-5
About Quality Projects ...................................................................................................................... 4-7Selecting a Process Workflow..................................................................................................... 4-8Creating a Quality Project ........................................................................................................... 4-9Opening a Quality Project ......................................................................................................... 4-11
v
Modifying Process Workflow......................................................................................................... 4-12About Quality Project Workflows............................................................................................ 4-12Adding Quality Processes ......................................................................................................... 4-16Deleting Quality Processes........................................................................................................ 4-17
Managing Projects ............................................................................................................................ 4-18Editing Projects ........................................................................................................................... 4-18Deleting Projects ......................................................................................................................... 4-18Adding Notes to a Project.......................................................................................................... 4-19Managing Quality Projects ........................................................................................................ 4-19Running a Quality Project Job................................................................................................... 4-20
Next Steps ........................................................................................................................................... 4-21
A Menu and Toolbar
Main Menu ........................................................................................................................................... A-1Toolbar .................................................................................................................................................. A-4
Index
vi
Preface
This Preface contains these topics:
■ Intended Audience
■ Related Documentation
vii
Intended AudienceThis guide is a resource for anyone who wants to learn about the Oracle Data Quality products. It contains essential information about Oracle Data Profiling and Quality user interface elements and provides instructions for how to identify and import data as Entities and set up Projects.
Both Administrators and Users will find the information in this guide essential to understanding fundamental tasks and concepts required for getting started with the Oracle Data Quality products.
Related DocumentationFor more information, see this resource:
■ Oracle Fusion Middleware Installation Guide for Oracle Data Integrator
■ Oracle Data Profiling and Oracle Data Quality for Data Integrator online help
■
viii
Introducing the Oracle Data Quality Pro
1
Introducing the Oracle Data QualityProducts
This chapter provides an overview of the data quality and data profiling products from Oracle, the architecture of these products and methodology for analyzing data and enhancing data quality. It also describes steps to getting started and logging on to the Oracle Data Profiling and Quality Control Center.
For more information about the Oracle Data Profiling and Quality Control Center and tasks, go to Online Help by selecting Help > Manuals from the main menu bar.
This chapter includes the following topics:
■ Introduction
■ Oracle Data Profiling and Oracle Data Quality for Data Integrator Architecture
■ Three Feature Sets - Two Products - One Interface
■ Methodology
■ Getting Started with Oracle Data Profiling and Quality
■ Logging on to the Oracle Data Profiling and Quality Control Center
■ Next Step
ducts 1-1
Introduction
IntroductionOracle Data Profiling and Oracle Data Quality for Data Integrator provide a single data quality management interface from which you can evaluate and manage the data assets and operations critical to your business. When integrated with your business strategy for data governance, the Oracle Data Quality products allow you to monitor and improve data quality throughout your enterprise, regardless of where it is located, and track your data quality improvements over time.
Oracle Data Profiling and Oracle Data Quality for Data Integrator let you:
■ Identify mismatches and inconsistencies between metadata and actual data content.
■ Create a centralized repository of data, metadata, statistics, and documentation.
■ Analyze and report on data values, statistics, frequencies, and ranges.
■ Detect poor data conditions and anomalies with proactive “no assumption” analysis of an entire data set.
■ Continually monitor data conditions.
■ Export reports to formats such as HTML, XML, and CSV, or copy them into any Windows application such as Word or Excel for presentation to business decision makers.
■ E-mail notification of tasks and conditions to key Data Management personnel for fast response and resolution.
■ Create and validate data rules and user-defined business rules.
■ Track and monitor trends in data over time.
Oracle Data Profiling and Oracle Data Quality for Data Integrator Architecture
Oracle Data Profiling and Quality is an extensible system of total data quality applications that can be configured to work independently or in tandem with the existing data management applications used by your business.
Oracle Data Profiling and Quality is an integrated solution that enables you to discover, monitor, repair, and manage the enterprise data stored in relational databases and data files on your network. It can also be configured to communicate with external Customer Relationship Management (CRM) and Enterprise Risk Management (ERM) applications to ensure data accuracy and reliability.
1-2 Oracle Data Profiling and Oracle Data Quality for Data Integrator Getting Started Guide
Oracle Data Profiling and Oracle Data Quality for Data Integrator Architecture
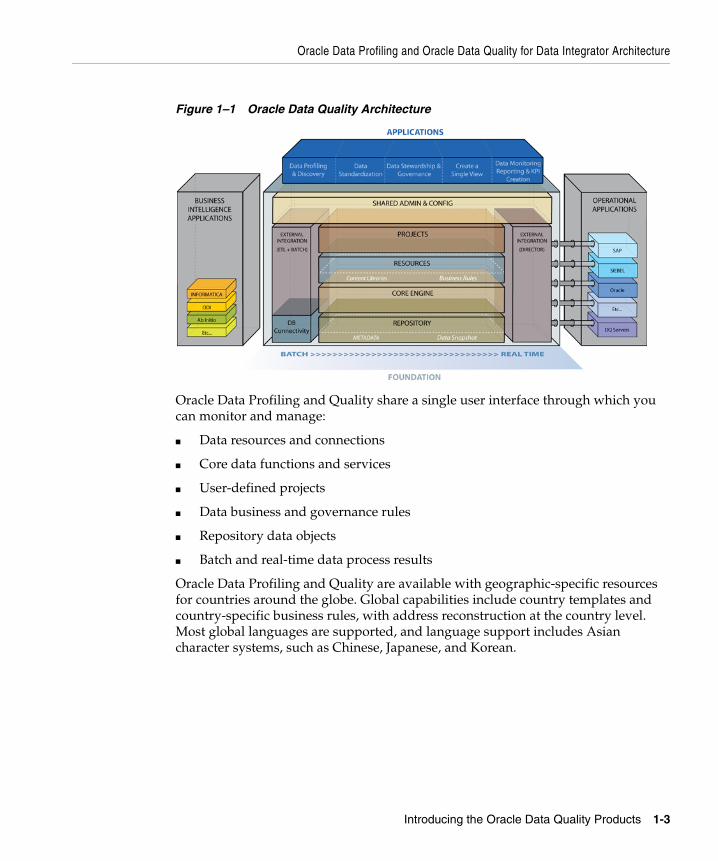
Figure 1–1 Oracle Data Quality Architecture
Oracle Data Profiling and Quality share a single user interface through which you can monitor and manage:
■ Data resources and connections
■ Core data functions and services
■ User-defined projects
■ Data business and governance rules
■ Repository data objects
■ Batch and real-time data process results
Oracle Data Profiling and Quality are available with geographic-specific resources for countries around the globe. Global capabilities include country templates and country-specific business rules, with address reconstruction at the country level. Most global languages are supported, and language support includes Asian character systems, such as Chinese, Japanese, and Korean.
Introducing the Oracle Data Quality Products 1-3
Three Feature Sets - Two Products - One Interface
Three Feature Sets - Two Products - One InterfaceThe Oracle Data Quality products provide three key feature sets - Profiling, Time Series, and Quality. Profiling and Time Series are sold together as a single product, Oracle Data Profiling, while the Quality feature set is delivered as Oracle Data Quality for Data Integrator. These data quality products together share a single user interface, called the Control Center. Each application is able to access data sources and any Metabases you create. Using the common Oracle Data Profiling and Quality Control Center, you apply, view, monitor, and control the multiple data quality and governance tasks you select to manage and report your data, and gradually develop a process that ensures the reliability and improvement of data assets across all your data sources.
Oracle Data ProfilingOracle Data Profiling is an automated profiling application that lets you evaluate and understand the current structure and properties of your data assets. It discovers the structure and relationships inherent in your data and analyzes your data to reveal statistics and other information that otherwise might remain hidden to you.
By using Oracle Data Profiling, you can increase your data profiling efficiency by 90% or more over manual methods, and eliminate the need to design data samples or build queries and run analyses on production systems.
Oracle Data Profiling assesses data without the assumptions inherent in query-based profiling and can show you detailed information about data content, non-compliance, and other statistics that manual profiling can miss. If you choose, you can connect directly to a database by creating a Dynamic Entity and analyze your data in real time, or you can import a copy of your data to a Metabase and create an Entity, also referred to as a ’real’ Entity. By creating an Oracle Data Profiling Project, you can then view and analyze the Entities you create.
Time SeriesThe Time Series feature set is delivered as part of Oracle Data Profiling. Time Series is a monitoring application that lets you evaluate and monitor changes to your data over a period of time. It utilizes the Profiling data analysis features and compares snapshots of your data over successive inquiries. Time Series Projects enable you to see trends in your data usage and identify anomalies, as well as areas for improvement. When you create a Time Series Project, you identify the Entities you want to track and set the parameters for monitoring changes within these Entities.
1-4 Oracle Data Profiling and Oracle Data Quality for Data Integrator Getting Started Guide
Three Feature Sets - Two Products - One Interface
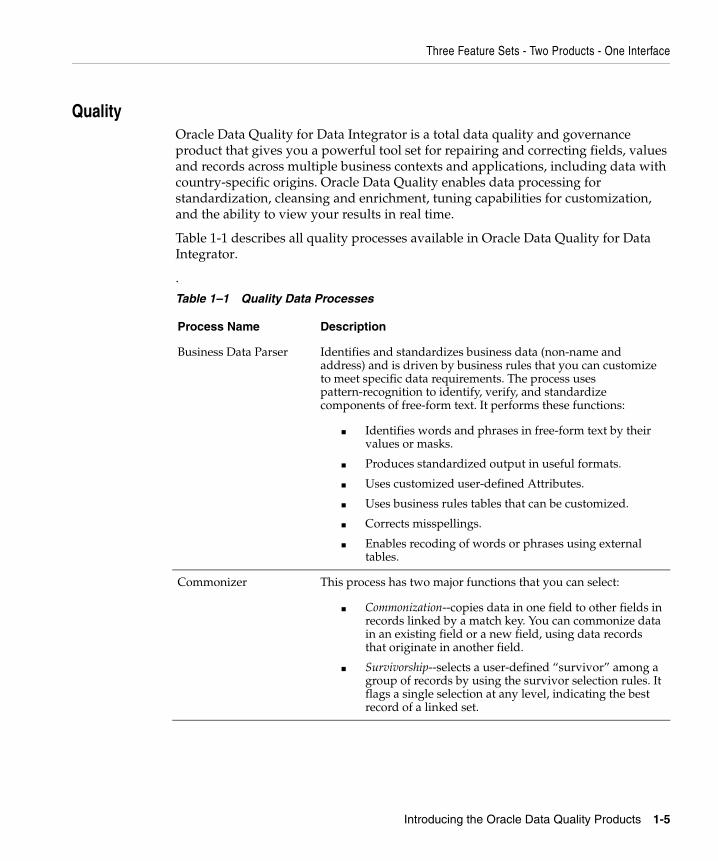
QualityOracle Data Quality for Data Integrator is a total data quality and governance product that gives you a powerful tool set for repairing and correcting fields, values and records across multiple business contexts and applications, including data with country-specific origins. Oracle Data Quality enables data processing for standardization, cleansing and enrichment, tuning capabilities for customization, and the ability to view your results in real time.
Table 1-1 describes all quality processes available in Oracle Data Quality for Data Integrator.
.
Table 1–1 Quality Data Processes
Process Name Description
Business Data Parser Identifies and standardizes business data (non-name and address) and is driven by business rules that you can customize to meet specific data requirements. The process uses pattern-recognition to identify, verify, and standardize components of free-form text. It performs these functions:
■ Identifies words and phrases in free-form text by their values or masks.
■ Produces standardized output in useful formats.
■ Uses customized user-defined Attributes.
■ Uses business rules tables that can be customized.
■ Corrects misspellings.
■ Enables recoding of words or phrases using external tables.
Commonizer This process has two major functions that you can select:
■ Commonization--copies data in one field to other fields in records linked by a match key. You can commonize data in an existing field or a new field, using data records that originate in another field.
■ Survivorship--selects a user-defined “survivor” among a group of records by using the survivor selection rules. It flags a single selection at any level, indicating the best record of a linked set.
Introducing the Oracle Data Quality Products 1-5
Three Feature Sets - Two Products - One Interface
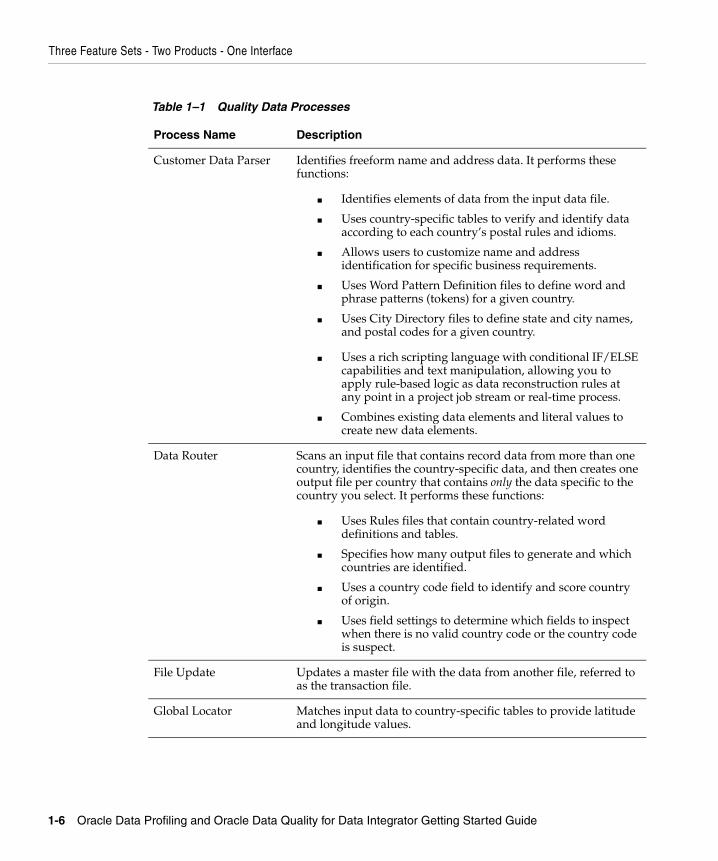
Customer Data Parser Identifies freeform name and address data. It performs these functions:
■ Identifies elements of data from the input data file.
■ Uses country-specific tables to verify and identify data according to each country’s postal rules and idioms.
■ Allows users to customize name and address identification for specific business requirements.
■ Uses Word Pattern Definition files to define word and phrase patterns (tokens) for a given country.
■ Uses City Directory files to define state and city names, and postal codes for a given country.
■ Uses a rich scripting language with conditional IF/ELSE capabilities and text manipulation, allowing you to apply rule-based logic as data reconstruction rules at any point in a project job stream or real-time process.
■ Combines existing data elements and literal values to create new data elements.
Data Router Scans an input file that contains record data from more than one country, identifies the country-specific data, and then creates one output file per country that contains only the data specific to the country you select. It performs these functions:
■ Uses Rules files that contain country-related word definitions and tables.
■ Specifies how many output files to generate and which countries are identified.
■ Uses a country code field to identify and score country of origin.
■ Uses field settings to determine which fields to inspect when there is no valid country code or the country code is suspect.
File Update Updates a master file with the data from another file, referred to as the transaction file.
Global Locator Matches input data to country-specific tables to provide latitude and longitude values.
Table 1–1 Quality Data Processes
Process Name Description
1-6 Oracle Data Profiling and Oracle Data Quality for Data Integrator Getting Started Guide
Three Feature Sets - Two Products - One Interface
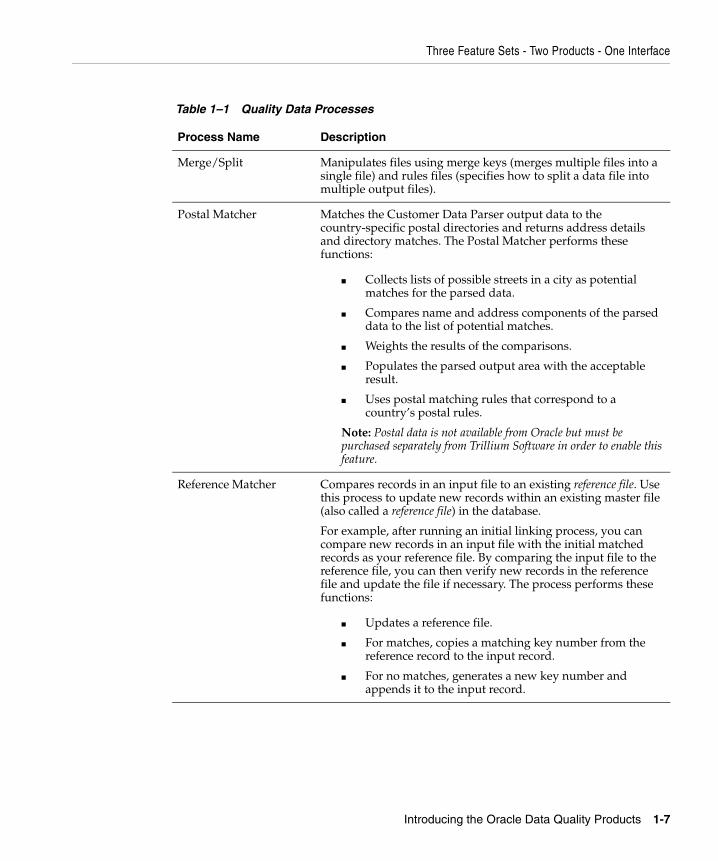
Merge/Split Manipulates files using merge keys (merges multiple files into a single file) and rules files (specifies how to split a data file into multiple output files).
Postal Matcher Matches the Customer Data Parser output data to the country-specific postal directories and returns address details and directory matches. The Postal Matcher performs these functions:
■ Collects lists of possible streets in a city as potential matches for the parsed data.
■ Compares name and address components of the parsed data to the list of potential matches.
■ Weights the results of the comparisons.
■ Populates the parsed output area with the acceptable result.
■ Uses postal matching rules that correspond to a country’s postal rules.
Note: Postal data is not available from Oracle but must be purchased separately from Trillium Software in order to enable this feature.
Reference Matcher Compares records in an input file to an existing reference file. Use this process to update new records within an existing master file (also called a reference file) in the database.
For example, after running an initial linking process, you can compare new records in an input file with the initial matched records as your reference file. By comparing the input file to the reference file, you can then verify new records in the reference file and update the file if necessary. The process performs these functions:
■ Updates a reference file.
■ For matches, copies a matching key number from the reference record to the input record.
■ For no matches, generates a new key number and appends it to the input record.
Table 1–1 Quality Data Processes
Process Name Description
Introducing the Oracle Data Quality Products 1-7
Three Feature Sets - Two Products - One Interface
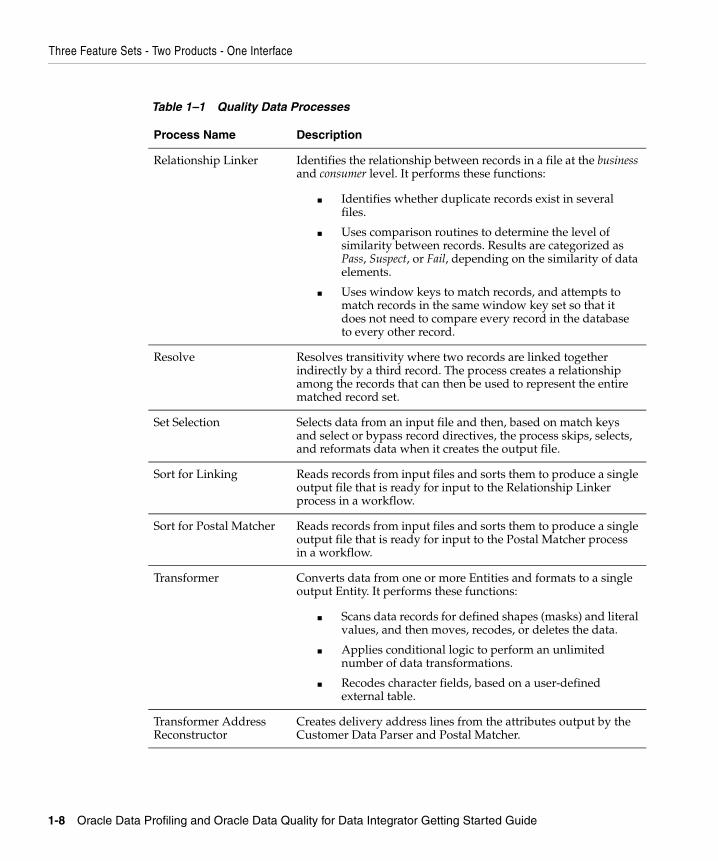
Relationship Linker Identifies the relationship between records in a file at the business and consumer level. It performs these functions:
■ Identifies whether duplicate records exist in several files.
■ Uses comparison routines to determine the level of similarity between records. Results are categorized as Pass, Suspect, or Fail, depending on the similarity of data elements.
■ Uses window keys to match records, and attempts to match records in the same window key set so that it does not need to compare every record in the database to every other record.
Resolve Resolves transitivity where two records are linked together indirectly by a third record. The process creates a relationship among the records that can then be used to represent the entire matched record set.
Set Selection Selects data from an input file and then, based on match keys and select or bypass record directives, the process skips, selects, and reformats data when it creates the output file.
Sort for Linking Reads records from input files and sorts them to produce a single output file that is ready for input to the Relationship Linker process in a workflow.
Sort for Postal Matcher Reads records from input files and sorts them to produce a single output file that is ready for input to the Postal Matcher process in a workflow.
Transformer Converts data from one or more Entities and formats to a single output Entity. It performs these functions:
■ Scans data records for defined shapes (masks) and literal values, and then moves, recodes, or deletes the data.
■ Applies conditional logic to perform an unlimited number of data transformations.
■ Recodes character fields, based on a user-defined external table.
Transformer Address Reconstructor
Creates delivery address lines from the attributes output by the Customer Data Parser and Postal Matcher.
Table 1–1 Quality Data Processes
Process Name Description
1-8 Oracle Data Profiling and Oracle Data Quality for Data Integrator Getting Started Guide
Methodology
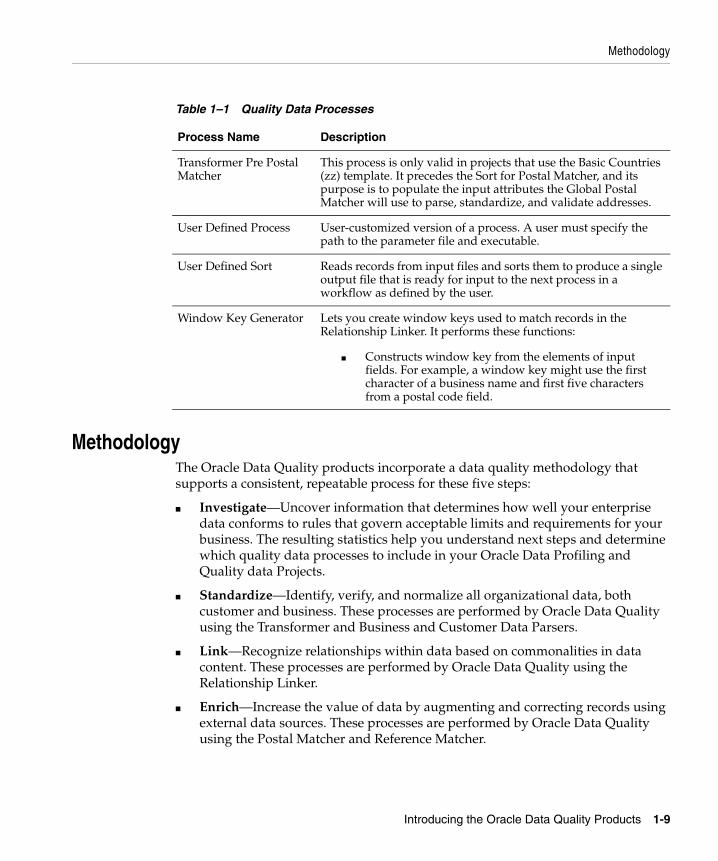
MethodologyThe Oracle Data Quality products incorporate a data quality methodology that supports a consistent, repeatable process for these five steps:
■ Investigate—Uncover information that determines how well your enterprise data conforms to rules that govern acceptable limits and requirements for your business. The resulting statistics help you understand next steps and determine which quality data processes to include in your Oracle Data Profiling and Quality data Projects.
■ Standardize—Identify, verify, and normalize all organizational data, both customer and business. These processes are performed by Oracle Data Quality using the Transformer and Business and Customer Data Parsers.
■ Link—Recognize relationships within data based on commonalities in data content. These processes are performed by Oracle Data Quality using the Relationship Linker.
■ Enrich—Increase the value of data by augmenting and correcting records using external data sources. These processes are performed by Oracle Data Quality using the Postal Matcher and Reference Matcher.
Transformer Pre Postal Matcher
This process is only valid in projects that use the Basic Countries (zz) template. It precedes the Sort for Postal Matcher, and its purpose is to populate the input attributes the Global Postal Matcher will use to parse, standardize, and validate addresses.
User Defined Process User-customized version of a process. A user must specify the path to the parameter file and executable.
User Defined Sort Reads records from input files and sorts them to produce a single output file that is ready for input to the next process in a workflow as defined by the user.
Window Key Generator Lets you create window keys used to match records in the Relationship Linker. It performs these functions:
■ Constructs window key from the elements of input fields. For example, a window key might use the first character of a business name and first five characters from a postal code field.
Table 1–1 Quality Data Processes
Process Name Description
Introducing the Oracle Data Quality Products 1-9
Getting Started with Oracle Data Profiling and Quality
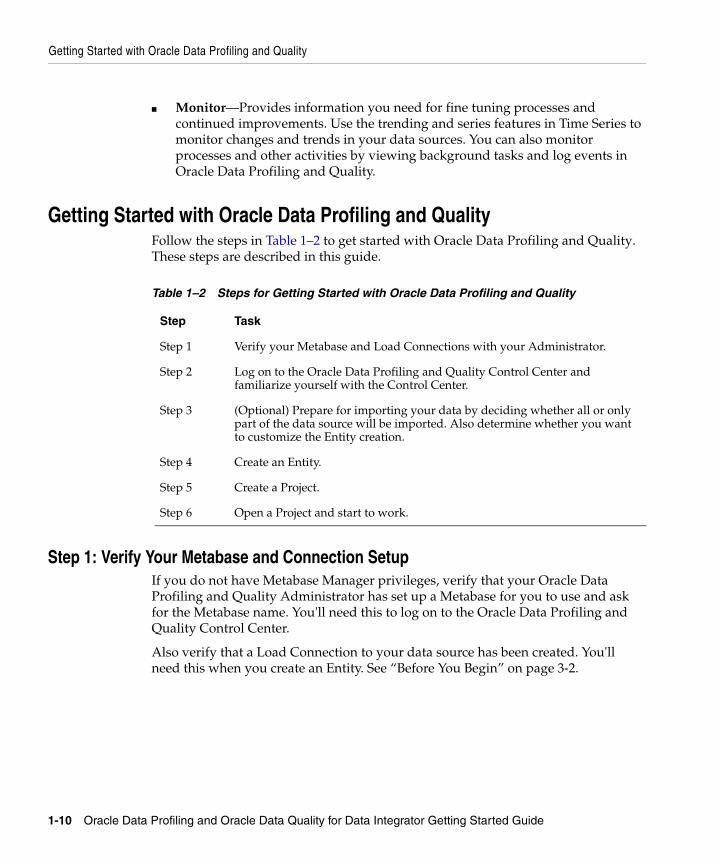
■ Monitor—Provides information you need for fine tuning processes and continued improvements. Use the trending and series features in Time Series to monitor changes and trends in your data sources. You can also monitor processes and other activities by viewing background tasks and log events in Oracle Data Profiling and Quality.
Getting Started with Oracle Data Profiling and QualityFollow the steps in Table 1–2 to get started with Oracle Data Profiling and Quality. These steps are described in this guide.
Table 1–2 Steps for Getting Started with Oracle Data Profiling and Quality
Step 1: Verify Your Metabase and Connection SetupIf you do not have Metabase Manager privileges, verify that your Oracle Data Profiling and Quality Administrator has set up a Metabase for you to use and ask for the Metabase name. You'll need this to log on to the Oracle Data Profiling and Quality Control Center.
Also verify that a Load Connection to your data source has been created. You'll need this when you create an Entity. See “Before You Begin” on page 3-2.
Step Task
Step 1 Verify your Metabase and Load Connections with your Administrator.
Step 2 Log on to the Oracle Data Profiling and Quality Control Center and familiarize yourself with the Control Center.
Step 3 (Optional) Prepare for importing your data by deciding whether all or only part of the data source will be imported. Also determine whether you want to customize the Entity creation.
Step 4 Create an Entity.
Step 5 Create a Project.
Step 6 Open a Project and start to work.
1-10 Oracle Data Profiling and Oracle Data Quality for Data Integrator Getting Started Guide

Getting Started with Oracle Data Profiling and Quality
Step 2: Log on to Oracle Data Profiling and QualityNext, log on to the Oracle Data Profiling and Quality Control Center and familiarize yourself with the Control Center.
See “Logging on to the Oracle Data Profiling and Quality Control Center” on page 1-12 for instructions.
Use Chapter 2, Touring the Oracle Data Profiling and Quality Control Center, to learn about the Oracle Data Quality products and the components of the Oracle Data Profiling and Quality Control Center. As you begin to work with data, you can refer back to Chapter 2 to learn how to manipulate List View data and resize window panes.
Step 3: Prepare for Data Import Chapter 3, Importing Data and Creating Entities, describes a number of options you may want to consider prior to creating an Entity. These include:
■ Importing sample data files
■ Customizing data during Entity creation
■ Configuring compliance standards using Data Standard Definitions (DSDs) and business rules
If you are interested in setting up business rules and DSDs prior to importing data, refer to the Oracle Data Profiling and Oracle Data Quality for Data Integrator Help.
Also see “About Importing Sample Data Files” on page 3-3 and “Selecting a Subset of Fields (Columns) to Import” on page 3-4.
Step 4: Create an EntityAn Entity is an object stored in a Metabase as a virtual image of the data table or file with which you want to work. When you work with an Entity you are not overwriting any data that physically exists in your data source, but instead working with a copy of it.
You can create a Dynamic Entity, however, which links directly to an external data source and allows you to profile your data in real time. When you create an Entity, you must choose to create a ‘real’ Entity or a Dynamic Entity.
You'll find information about creating Entities in Chapter 3, Importing Data and Creating Entities.
Introducing the Oracle Data Quality Products 1-11
Logging on to the Oracle Data Profiling and Quality Control Center
Step 5: Create a ProjectEach of the three data quality feature sets has its own Project type. You must first select the feature set with which you want to work—Profiling, Time Series, or Quality—and then create a Project. Next, you identify the Entities you want to include in the Project, and then you can begin working with the Entity data.
How you create and manage the Projects in Oracle Data Profiling and Quality depends on your business needs and data quality management setup. Chapter 4 describes the different types of Projects and how to set up each Project type: Profiling, Time Series, or Quality.
Step 6: Open a Project and Start to WorkYou'll find Oracle Data Profiling, Time Series, and Quality Projects described separately in Chapter 4. Go to these sections to find the detailed information you'll need to get started.
Logging on to the Oracle Data Profiling and Quality Control CenterBefore you log on to the Oracle Data Profiling and Quality Control Center, verify that the Metabase administrator has completed the following:
■ Created a Metabase—contains the data that is designated for your use.
■ Created a Loader Connection—connects to the data source with which you want to work.
■ Added you as a Metabase User—creates the user name and password unique to your user account.
These tasks are described in the Oracle Data Integrator Installation Guide, and must be completed before you can begin your work.
Before You BeginBefore you begin to work with Oracle Data Profiling and Quality, make sure you have the following information:
■ Name of the Metabase that contains your data
■ Name of the Repository where it is located
■ Name of the Loader Connector used to connect to your data
■ User name and Password required to log on to Oracle Data Profiling and Quality
1-12 Oracle Data Profiling and Oracle Data Quality for Data Integrator Getting Started Guide
Next Step
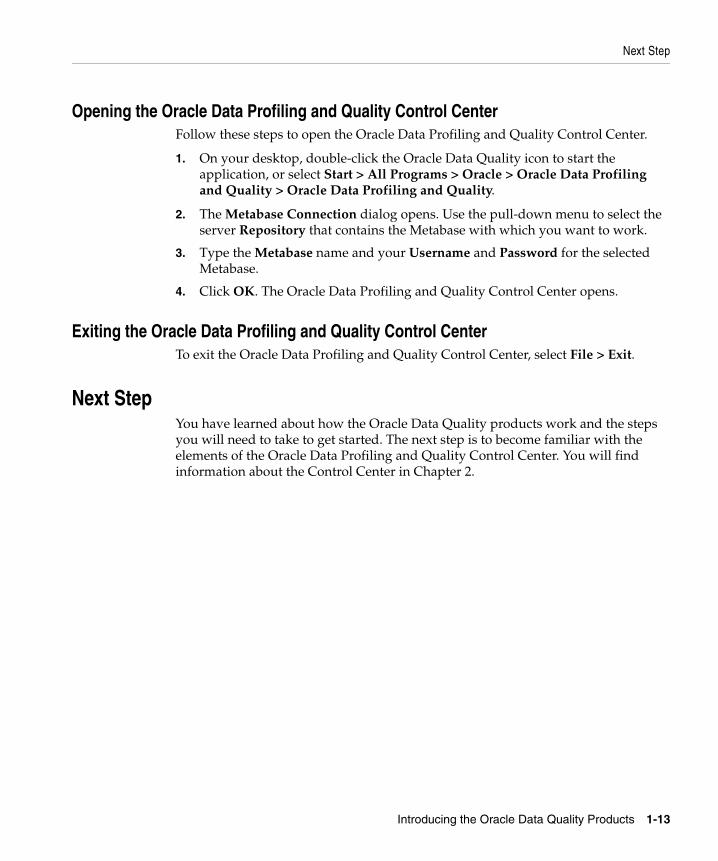
Opening the Oracle Data Profiling and Quality Control CenterFollow these steps to open the Oracle Data Profiling and Quality Control Center.
1. On your desktop, double-click the Oracle Data Quality icon to start the application, or select Start > All Programs > Oracle > Oracle Data Profiling and Quality > Oracle Data Profiling and Quality.
2. The Metabase Connection dialog opens. Use the pull-down menu to select the server Repository that contains the Metabase with which you want to work.
3. Type the Metabase name and your Username and Password for the selected Metabase.
4. Click OK. The Oracle Data Profiling and Quality Control Center opens.
Exiting the Oracle Data Profiling and Quality Control CenterTo exit the Oracle Data Profiling and Quality Control Center, select File > Exit.
Next StepYou have learned about how the Oracle Data Quality products work and the steps you will need to take to get started. The next step is to become familiar with the elements of the Oracle Data Profiling and Quality Control Center. You will find information about the Control Center in Chapter 2.
Introducing the Oracle Data Quality Products 1-13

Next Step
1-14 Oracle Data Profiling and Oracle Data Quality for Data Integrator Getting Started Guide
Touring the Oracle Data Profiling and Quality Control C
2
Touring the Oracle Data Profiling andQuality Control Center
This chapter describes the Oracle® Data Profiling and Quality Control Center and describes concepts and terminology you will encounter when performing tasks. Use the topics in this Tour to become familiar with navigation features, views, menus, and toolbars.
For additional information, be sure to use the Oracle Data Profiling and Data Quality for Data Integrator Help which contains an online Tour of the Control Center. You can access Help from the main menu by selecting Help > Manuals.
This chapter includes the following topics:
■ Oracle Data Quality Control Center
■ Navigating the Explorer
■ Using the Explorer Tabs
■ Navigating List Views
■ Refreshing the Oracle Data Profiling and Quality Control Center
■ Monitoring Metabase Activities
■ Next Step
enter 2-1

Oracle Data Quality Control Center
Oracle Data Quality Control CenterThe Oracle Data Profiling and Quality Control Center provides a single data quality management interface from which you can profile, evaluate, and manage your data assets. The interface includes:
■ Metabase Explorer—use to explore the contents of your Metabase. Metabases contain the data you want to analyze or process in the Oracle Data Quality products.
■ List Views—multiple List Views display data details.
■ Project Views—help you manage data projects and quality processes.
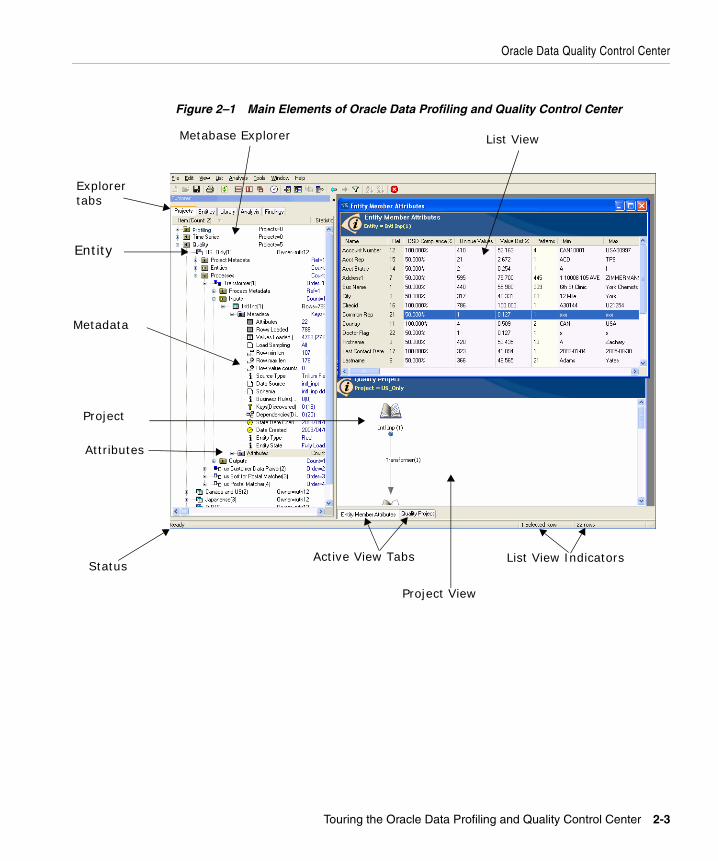
The main elements of the Oracle Data Profiling and Quality Control Center are shown in Figure 2–1.
2-2 Oracle Data Profiling and Oracle Data Quality for Data Integrator Getting Started Guide
Oracle Data Quality Control Center
Figure 2–1 Main Elements of Oracle Data Profiling and Quality Control Center
StatusActive View Tabs List View Indicators
Project View
List ViewMetabase Explorer
Explorer tabs
Entity
Metadata
Project
Attributes
Touring the Oracle Data Profiling and Quality Control Center 2-3
Oracle Data Quality Control Center
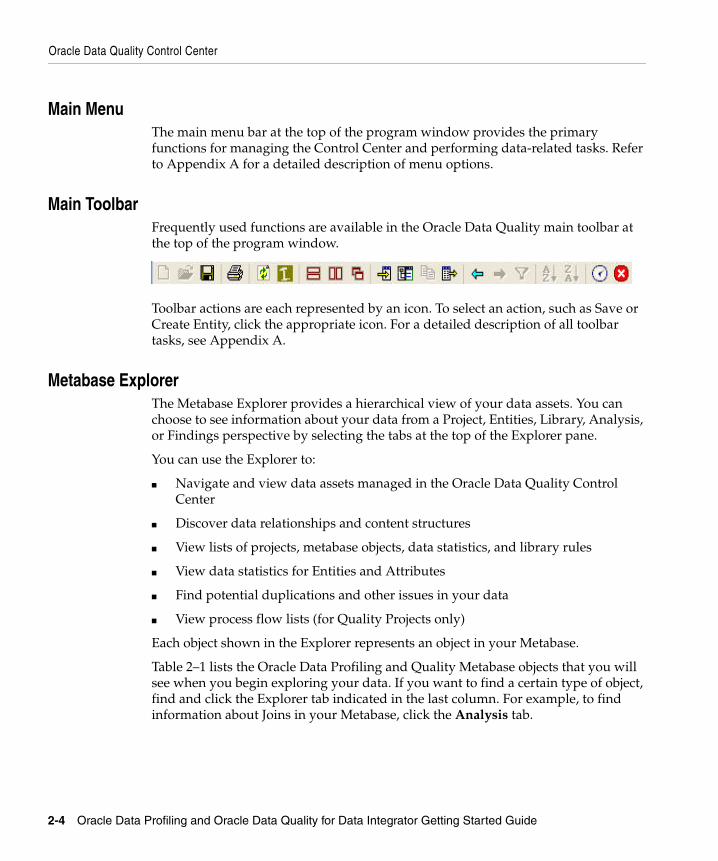
Main MenuThe main menu bar at the top of the program window provides the primary functions for managing the Control Center and performing data-related tasks. Refer to Appendix A for a detailed description of menu options.
Main ToolbarFrequently used functions are available in the Oracle Data Quality main toolbar at the top of the program window.
Toolbar actions are each represented by an icon. To select an action, such as Save or Create Entity, click the appropriate icon. For a detailed description of all toolbar tasks, see Appendix A.
Metabase ExplorerThe Metabase Explorer provides a hierarchical view of your data assets. You can choose to see information about your data from a Project, Entities, Library, Analysis, or Findings perspective by selecting the tabs at the top of the Explorer pane.
You can use the Explorer to:
■ Navigate and view data assets managed in the Oracle Data Quality Control Center
■ Discover data relationships and content structures
■ View lists of projects, metabase objects, data statistics, and library rules
■ View data statistics for Entities and Attributes
■ Find potential duplications and other issues in your data
■ View process flow lists (for Quality Projects only)
Each object shown in the Explorer represents an object in your Metabase.
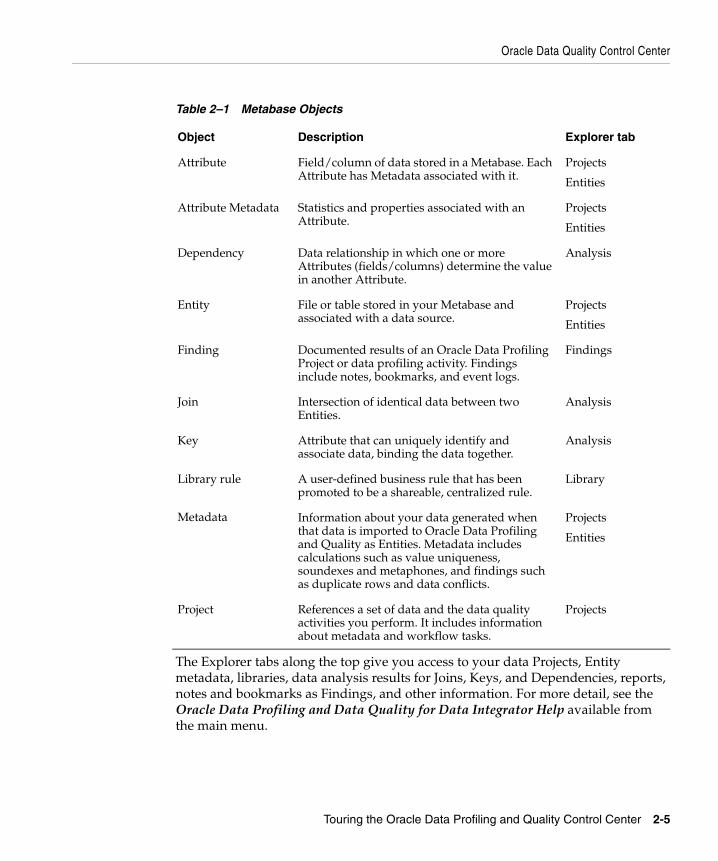
Table 2–1 lists the Oracle Data Profiling and Quality Metabase objects that you will see when you begin exploring your data. If you want to find a certain type of object, find and click the Explorer tab indicated in the last column. For example, to find information about Joins in your Metabase, click the Analysis tab.
2-4 Oracle Data Profiling and Oracle Data Quality for Data Integrator Getting Started Guide
Oracle Data Quality Control Center
The Explorer tabs along the top give you access to your data Projects, Entity metadata, libraries, data analysis results for Joins, Keys, and Dependencies, reports, notes and bookmarks as Findings, and other information. For more detail, see the Oracle Data Profiling and Data Quality for Data Integrator Help available from the main menu.
Table 2–1 Metabase Objects
Object Description Explorer tab
Attribute Field/column of data stored in a Metabase. Each Attribute has Metadata associated with it.
Projects
Entities
Attribute Metadata Statistics and properties associated with an Attribute.
Projects
Entities
Dependency Data relationship in which one or more Attributes (fields/columns) determine the value in another Attribute.
Analysis
Entity File or table stored in your Metabase and associated with a data source.
Projects
Entities
Finding Documented results of an Oracle Data Profiling Project or data profiling activity. Findings include notes, bookmarks, and event logs.
Findings
Join Intersection of identical data between two Entities.
Analysis
Key Attribute that can uniquely identify and associate data, binding the data together.
Analysis
Library rule A user-defined business rule that has been promoted to be a shareable, centralized rule.
Library
Metadata Information about your data generated when that data is imported to Oracle Data Profiling and Quality as Entities. Metadata includes calculations such as value uniqueness, soundexes and metaphones, and findings such as duplicate rows and data conflicts.
Projects
Entities
Project References a set of data and the data quality activities you perform. It includes information about metadata and workflow tasks.
Projects
Touring the Oracle Data Profiling and Quality Control Center 2-5
Oracle Data Quality Control Center
About MetabasesA Metabase stores data objects. It also stores any information related to the stored data, called Metadata. The type of information you can discover about your data includes:
■ Data structures, contents, and relationships
■ Data compliance with business rules and Data Standard Definitions (DSD)
■ Data statistics, drill-down details, and data patterns
■ Data trends and changes over time
■ Data quality processing and results
■ Documentation of data observations, compliance issues, and more
Initially, when you create a Metabase, it is empty. Only when you create a “real” Entity will it contain a copy of your data source. Or, if you do not wish to import a copy of your data, you can create a “dynamic” Entity. Dynamic Entities show you the data in your data source without importing that data to a Metabase.
When you import data from a data source to a Metabase, Oracle Data Quality creates data objects that correspond to the tables, columns, and rows in the imported data. The data objects in a Metabase are:
The data object that corresponds to a data table or file is called an Entity; data in columns are Attributes, and data in rows are Rows.
All Metabase objects are viewed through the Metabase Explorer, often referred to as Explorer, in the Oracle Data Quality Control Center.
EntitiesDepending on the structure of your source data, an Entity can represent the following data sources:
■ If the data source is a relational database, an Entity represents a physical table.
Metabase Object Original data type
Entity data tables and files
Attribute fields in columns
Row records in rows
2-6 Oracle Data Profiling and Oracle Data Quality for Data Integrator Getting Started Guide
Oracle Data Quality Control Center
■ If the data source is a flat file, an Entity represents a physical file.
■ If the data source is a hierarchical database, an Entity represents an IMS segment or an IDMS record.
■ Regardless of the data source, an Entity could represent a schema structure without data (Dynamic Entity).
For information about working with Entities, see Chapter 3 and the Oracle Data Profiling and Data Quality for Data Integrator Help (Help > Manuals).
AttributesOracle Data Quality refers to data columns with a standardized term, Attribute. The Entities tab in the Explorer contains a complete list of all Entities and their associated Attributes in a Metabase. An Attribute cannot exist in the Metabase without an Entity.
Depending on the structure of the source data, an Attribute can represent the following forms:
■ If data source is a relational database, Attribute represents a column.
■ If data source is a flat file, Attribute represents a field.
■ If data source is a COBOL application, Attribute represents a field.
The Metabase uniquely identifies each Attribute with a reference number, allowing for Attributes with duplicate names to exist.
For detailed information about Attributes, see the Oracle Data Profiling and Data Quality for Data Integrator Help available from the main menu of the Control Center (Help > Manuals).
RowsA Row is a data record that is associated with a specific Entity. When Oracle Data Quality imports data, it analyzes each data record/row and imports data records as Metabase objects called Rows. Statistics about imported Rows are shown in the Explorer.
Using the drill-down features of Oracle Data Quality, you can discover the following information about Rows:
■ Number of Rows in an Entity
■ Maximum and minimum lengths of Rows in an Entity
Touring the Oracle Data Profiling and Quality Control Center 2-7

Oracle Data Quality Control Center
■ Potential duplicate Rows and how many
■ Number of NULL values in Rows
■ Data in Rows
There are, however, two types of rows in Oracle Data Quality—Rows that represent data records, and rows in List Views that display detailed statistics and information. In all instances, if you see the word capitalized, the reference is to imported data records. If the word is lower-cased, the reference is to the rows in a List View pane.
About List ViewsA List View displays metadata and statistical information as data values and rows using a spreadsheet format. When you select an object in the Explorer or a task in the main menu, the information in the List View shows the data details you have requested.
Use the Metabase Explorer and List Views together. Potential issues that you find in the Explorer can be explored and verified in a List View. You can select data details in List View columns and rows for further analysis and inquiry. When you begin to explore List Views and how they work, try drilling down by double-clicking rows or right-clicking and selecting drill-down options.
Use the List View tabs and indicators (see Figure 2–1) at the bottom of the Oracle Data Profiling and Quality Control Center window to open active List Views and identify their contents.
The List View also functions as a report formatter. By displaying the relevant data and customizing the List View, the information can then be saved in XML, HTML, CSV, tab delimited, or ODQ files.
You will find more information about List Views in “Navigating List Views” on page 2-19. You can also refer to the Oracle Data Profiling and Data Quality for Data Integrator Help for detailed information, available from the main menu of the Control Center (Help > Manuals).
About Project ViewsProject Views (Figure 2–2) are Control Center windows that contain the Project information and process workflows for organizing Oracle Data Profiling, Time Series and Quality projects. However, before you can display a Project in a Project View, you will need to create an Entity and then create a Project. See Chapters 3 and 4.
2-8 Oracle Data Profiling and Oracle Data Quality for Data Integrator Getting Started Guide
Oracle Data Quality Control Center
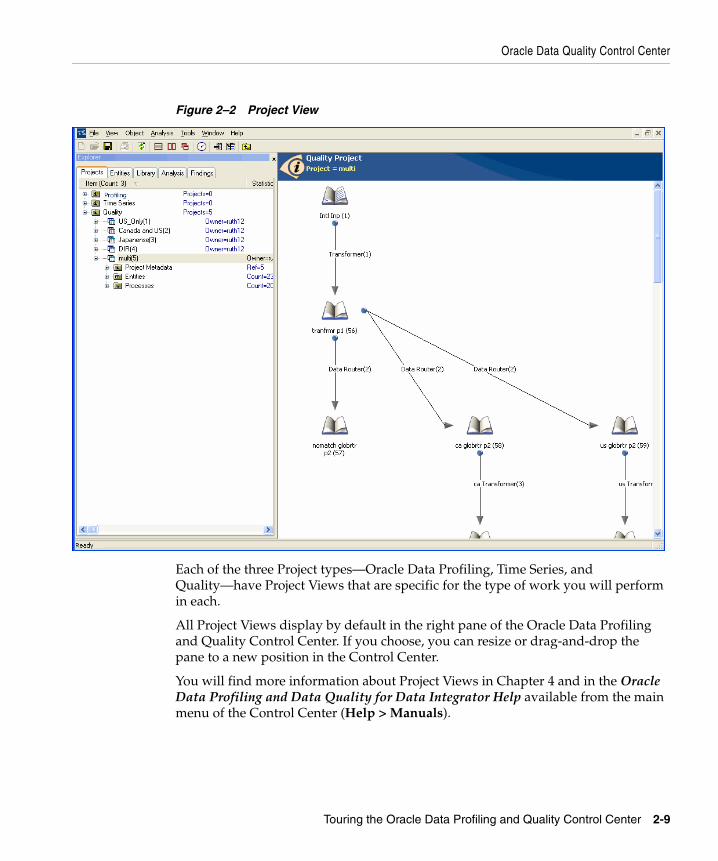
Figure 2–2 Project View
Each of the three Project types—Oracle Data Profiling, Time Series, and Quality—have Project Views that are specific for the type of work you will perform in each.
All Project Views display by default in the right pane of the Oracle Data Profiling and Quality Control Center. If you choose, you can resize or drag-and-drop the pane to a new position in the Control Center.
You will find more information about Project Views in Chapter 4 and in the Oracle Data Profiling and Data Quality for Data Integrator Help available from the main menu of the Control Center (Help > Manuals).
Touring the Oracle Data Profiling and Quality Control Center 2-9
Navigating the Explorer
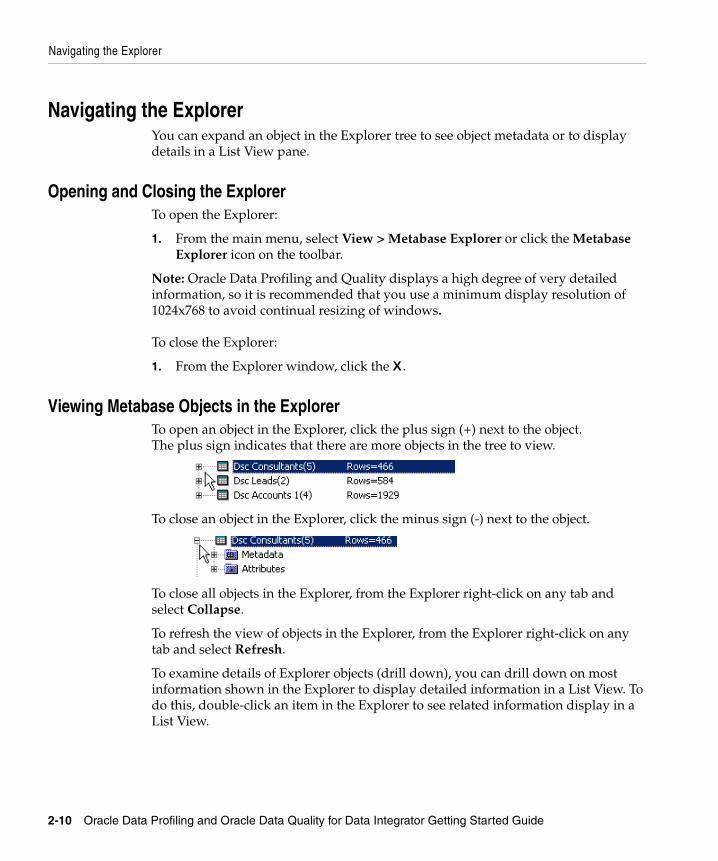
Navigating the ExplorerYou can expand an object in the Explorer tree to see object metadata or to display details in a List View pane.
Opening and Closing the ExplorerTo open the Explorer:
1. From the main menu, select View > Metabase Explorer or click the Metabase Explorer icon on the toolbar.
Note: Oracle Data Profiling and Quality displays a high degree of very detailed information, so it is recommended that you use a minimum display resolution of 1024x768 to avoid continual resizing of windows.
To close the Explorer:
1. From the Explorer window, click the X.
Viewing Metabase Objects in the ExplorerTo open an object in the Explorer, click the plus sign (+) next to the object. The plus sign indicates that there are more objects in the tree to view.
To close an object in the Explorer, click the minus sign (-) next to the object.
To close all objects in the Explorer, from the Explorer right-click on any tab and select Collapse.
To refresh the view of objects in the Explorer, from the Explorer right-click on any tab and select Refresh.
To examine details of Explorer objects (drill down), you can drill down on most information shown in the Explorer to display detailed information in a List View. To do this, double-click an item in the Explorer to see related information display in a List View.
2-10 Oracle Data Profiling and Oracle Data Quality for Data Integrator Getting Started Guide
Using the Explorer Tabs
For information about creating Entities, see Chapter 3. For detailed information about Entities, see the Oracle Data Profiling and Data Quality for Data Integrator Help available from the main menu of the Control Center (Help > Manuals).
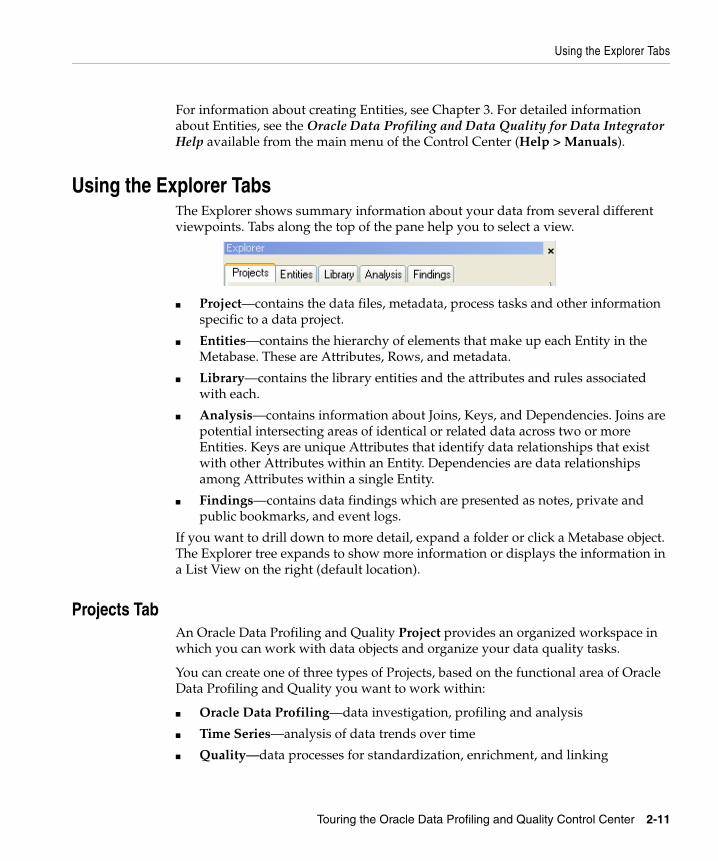
Using the Explorer TabsThe Explorer shows summary information about your data from several different viewpoints. Tabs along the top of the pane help you to select a view.
■ Project—contains the data files, metadata, process tasks and other information specific to a data project.
■ Entities—contains the hierarchy of elements that make up each Entity in the Metabase. These are Attributes, Rows, and metadata.
■ Library—contains the library entities and the attributes and rules associated with each.
■ Analysis—contains information about Joins, Keys, and Dependencies. Joins are potential intersecting areas of identical or related data across two or more Entities. Keys are unique Attributes that identify data relationships that exist with other Attributes within an Entity. Dependencies are data relationships among Attributes within a single Entity.
■ Findings—contains data findings which are presented as notes, private and public bookmarks, and event logs.
If you want to drill down to more detail, expand a folder or click a Metabase object. The Explorer tree expands to show more information or displays the information in a List View on the right (default location).
Projects TabAn Oracle Data Profiling and Quality Project provides an organized workspace in which you can work with data objects and organize your data quality tasks.
You can create one of three types of Projects, based on the functional area of Oracle Data Profiling and Quality you want to work within:
■ Oracle Data Profiling—data investigation, profiling and analysis
■ Time Series—analysis of data trends over time
■ Quality—data processes for standardization, enrichment, and linking
Touring the Oracle Data Profiling and Quality Control Center 2-11
Using the Explorer Tabs
You can view all Oracle Data Profiling and Quality Projects from the Projects tab in the Explorer. Projects in each area are kept separated, because they perform separate and distinct functions. However, you may include the same Entity in different Projects, depending on your data quality objectives.
For information about how to get started with organizing and creating Projects, see Chapter 4.
Oracle Data Profiling ProjectsAn Oracle Data Profiling Project contains references to
■ Entities
■ Attributes
■ Permanent Joins
These objects can be referenced by multiple Projects. In other words, it is possible to include the same Entity or Permanent Join object in several Projects. Grouping objects in this way allows analysis activities by all users who are profiling the same Entity for different purposes.
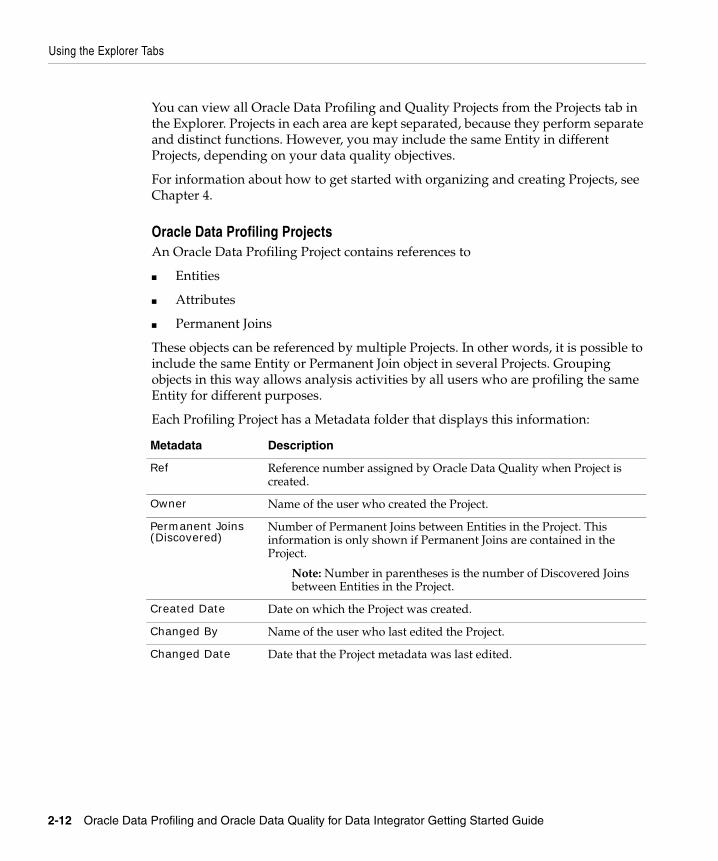
Each Profiling Project has a Metadata folder that displays this information:
Metadata Description
Ref Reference number assigned by Oracle Data Quality when Project is created.
Owner Name of the user who created the Project.
Permanent Joins (Discovered)
Number of Permanent Joins between Entities in the Project. This information is only shown if Permanent Joins are contained in the Project.
Note: Number in parentheses is the number of Discovered Joins between Entities in the Project.
Created Date Date on which the Project was created.
Changed By Name of the user who last edited the Project.
Changed Date Date that the Project metadata was last edited.
2-12 Oracle Data Profiling and Oracle Data Quality for Data Integrator Getting Started Guide
Using the Explorer Tabs
Time Series ProjectsA Time Series Project contains references to:
■ Metadata
■ Attribute History
■ Entity Generations
These objects can be referenced by multiple Projects. In other words, it is possible for the same Entity or Attribute object to be included in Oracle Data Profiling Projects.
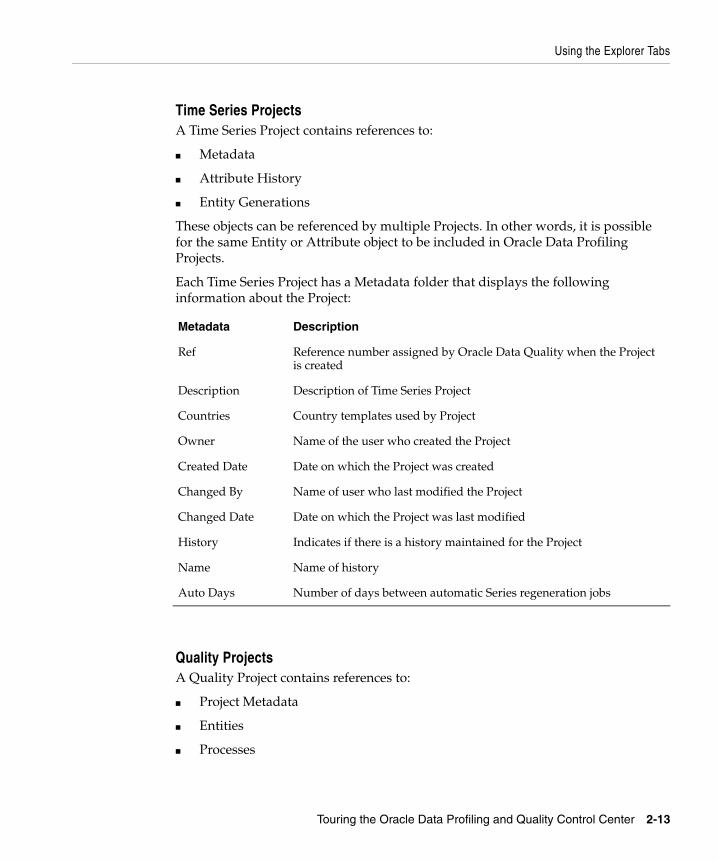
Each Time Series Project has a Metadata folder that displays the following information about the Project:
Quality ProjectsA Quality Project contains references to:
■ Project Metadata
■ Entities
■ Processes
Metadata Description
Ref Reference number assigned by Oracle Data Quality when the Project is created
Description Description of Time Series Project
Countries Country templates used by Project
Owner Name of the user who created the Project
Created Date Date on which the Project was created
Changed By Name of user who last modified the Project
Changed Date Date on which the Project was last modified
History Indicates if there is a history maintained for the Project
Name Name of history
Auto Days Number of days between automatic Series regeneration jobs
Touring the Oracle Data Profiling and Quality Control Center 2-13
Using the Explorer Tabs
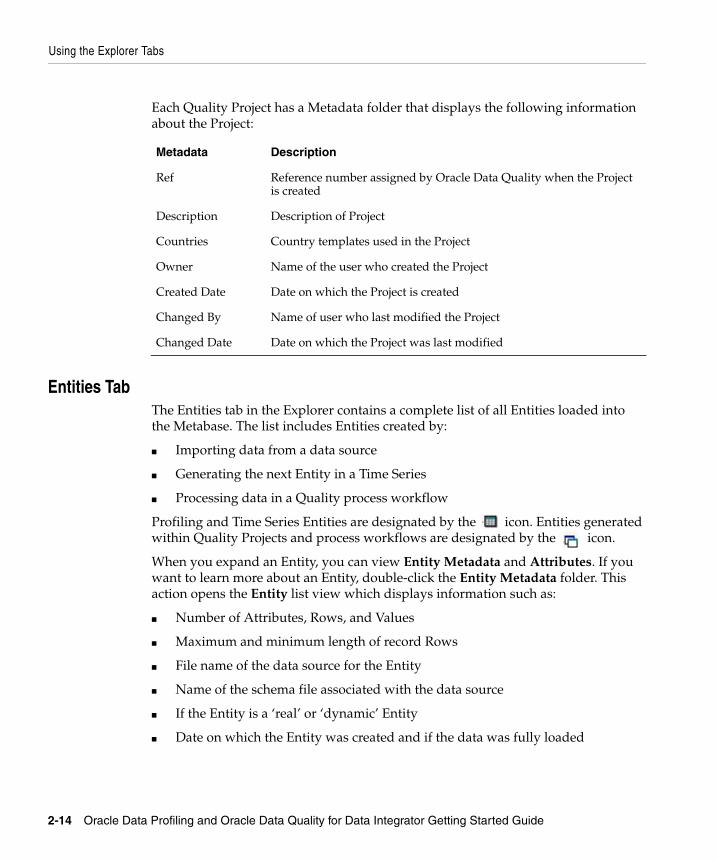
Each Quality Project has a Metadata folder that displays the following information about the Project:
Entities TabThe Entities tab in the Explorer contains a complete list of all Entities loaded into the Metabase. The list includes Entities created by:
■ Importing data from a data source
■ Generating the next Entity in a Time Series
■ Processing data in a Quality process workflow
Profiling and Time Series Entities are designated by the icon. Entities generated within Quality Projects and process workflows are designated by the icon.
When you expand an Entity, you can view Entity Metadata and Attributes. If you want to learn more about an Entity, double-click the Entity Metadata folder. This action opens the Entity list view which displays information such as:
■ Number of Attributes, Rows, and Values
■ Maximum and minimum length of record Rows
■ File name of the data source for the Entity
■ Name of the schema file associated with the data source
■ If the Entity is a ‘real’ or ‘dynamic’ Entity
■ Date on which the Entity was created and if the data was fully loaded
Metadata Description
Ref Reference number assigned by Oracle Data Quality when the Project is created
Description Description of Project
Countries Country templates used in the Project
Owner Name of the user who created the Project
Created Date Date on which the Project is created
Changed By Name of user who last modified the Project
Changed Date Date on which the Project was last modified
2-14 Oracle Data Profiling and Oracle Data Quality for Data Integrator Getting Started Guide
Using the Explorer Tabs
For information about how to get started with creating Entities, see Chapter 3, Importing Data and Creating Entities. For more information about Entities in general, see the Oracle Data Profiling and Data Quality for Data Integrator Help.
Library TabWhen you create a centralized, or library, rule by promoting a user-defined business rule, you connect it to an object called the library entity. Library entities contain library rule definitions and control how library rules get applied across real entities. From the Library Entity window you can open all library rules and library attributes, modify attribute associations, and associate library entities to real entities, thereby associating real entities with library rules. Double-clicking an entity in the Library Entity window drills down to a list of associated library rules.
When you click the Library tab in the Metabase Explorer, a list of all library entities displays. Expand a library entity to see the following:
■ Library attributes associated with the rules in the library entity.
■ Library rules added to the library entity.
The library is saved to the metabase in the ODQ repository. There is one library per metabase.
Library Rules Library rules are shared by associating them with real entities. Library rules and all related entity and attribute associations are stored the Library. From the Library Rules window you can edit and delete the rule, and copy the rule to a real entity.
Library AttributesLibrary attributes are virtual attributes stored in the Library. Library attributes must be mapped to real attributes contained in a real entity. This mapping occurs when real entities are associated with library entities. Whenever a library entity is associated with a real entity, all the attributes for all the rules in that library entity are mapped together. Therefore, if the same attribute is referenced in three rules, the mapping of that attribute need only be performed once.
Touring the Oracle Data Profiling and Quality Control Center 2-15
Using the Explorer Tabs
Analysis TabOracle Data Profiling provides the features for analyzing and discovering data dependencies, keys, and joins in the Oracle Data Quality products. For more information about how to investigate data relationships, see the Oracle Data Profiling and Data Quality for Data Integrator Help available from the Oracle Data Quality Control Center.
Data relationship analysis results are available in the Explorer. Click the Analysis tab to see what Dependency, Key, or Join statistics are discovered for an Entity.
If you need to re-run a Dependency or Key Analysis or create a new Dependency or Key, use the Analysis options on the main menu.
DependenciesA Dependency is a data relationship where one or more Attributes determines the value in another Attribute within a single Entity. Some examples of Dependencies within an Entity are listed below.
■ Post code determines city.
■ Credit card number should only be associated with a single expiry date.
■ Commission on a sale should only be claimed by a single agent.
Oracle Data Profiling automatically performs Dependency analysis on a sample of your data during data import to find possible Dependencies between Attributes.
If Oracle Data Profiling does not find relevant Dependencies during the data import or did not identify an expected Dependency, you can re-run the Dependency analysis on a different sample size, uniqueness threshold, fields/columns to exclude, or number of Attributes that might comprise a Dependency.
You can examine Dependencies to view Attributes involved in the Dependency and any breaks within that Dependency. For example, post code RG12 8SA should always indicate the city of Bracknell. If there is an occurrence of the city Beracknell with the RG12 8SA post code, then Oracle Data Profiling shows this as a conflict to the Dependency. You can then drill down to view the conflict and decide whether this is an issue. If a Dependency is relevant to your analysis, you can save it; otherwise, discard it.
2-16 Oracle Data Profiling and Oracle Data Quality for Data Integrator Getting Started Guide
Using the Explorer Tabs
KeysOracle Data Profiling automatically performs key analysis on a sample of your data during data import to find possible primary or composite keys. These keys are Attributes that can uniquely identify the data, either on their own or tied in with other Attributes in the Entity, and which meet a default criterion for uniqueness.
If Oracle Data Profiling does not find suitable keys or does not identify an expected column as a key, you can re-run the key analysis on a different sample size, uniqueness threshold, or number of columns that might comprise a composite key.
You can examine the key quality, how many values are duplicated, and across how many rows. You can also drill down to see actual values and then drill down further to see entire rows containing duplicates. Since many keys could be discovered, you can save only those that are relevant to your analysis.
JoinsOracle Data Profiling allows you to assess the suitability of data for integration or cleansing activities involving merges or joins between Entities. Depending on your data profiling needs, you may need to examine relationships between disparate Entities (for example, COBOL files merging with Oracle tables).
With Oracle Data Profiling you can perform “what if” scenarios on selected Entities that could participate in a join or merge. Venn diagrams and Entity Relationship Diagrams help visualize the joins.
Findings TabFindings is a general term referring to Oracle Data Profiling-based documentation highlighting issues, concerns, checkpoints, or even progress of your data discovery activities. This documentation includes:
■ Project Notes
■ Bookmarks
■ Event logs
For more information about Findings, see the Oracle Data Profiling and Data Quality for Data Integrator Help available from the Control Center main menu.
Touring the Oracle Data Profiling and Quality Control Center 2-17
Using the Explorer Tabs
Project NotesProject Notes can provide communication within and across teams that need information about the data in your Projects. They are a way to:
■ Request and provide information to business users
■ Distribute information about data objects
Follow the best practices of your site to group and share Notes, possibly by related topics, priorities, or business groups. You can also copy data examples into Notes. For information about adding notes to a Project, see “Adding Notes to a Project” on page 4-19.
Private and Public BookmarksOracle Data Quality lets you bookmark the results of your data analysis and other findings. A Bookmark saves the data displayed in a List View and captures metadata and details for later viewing.
Note: A Private Bookmark is one that only you can view; a Public Bookmark is one that can be viewed by others.
Because Bookmarks are actively linked to an object (for example, an Entity or Join), you can perform drill downs and other functions on the object in the same way you might view data in a List View. Bookmarks require that the object they reference exist in the Metabase. If the object has been deleted and no longer appears in the Explorer, the Bookmark is no longer valid.
You can use bookmarks to:
■ Mark data checkpoints for data profiling
■ Prepare reports
■ Share, communicate, and report on findings
For information about Private and Public Bookmarks, see the Oracle Data Profiling and Data Quality for Data Integrator Help.
Event LogsEvent Logs contain information about the final results of Metabase activities. The logs are placed in folders in the Explorer where you can review them at any time. For information about viewing event logs, see “Viewing Event Logs” on page 2-21.
2-18 Oracle Data Profiling and Oracle Data Quality for Data Integrator Getting Started Guide
Navigating List Views
Navigating List ViewsThis section describes some of the ways you use List Views to display, filter, and compare data values and statistics. By opening multiple List Views at the same time, you can:
■ Compare information about two different objects that are not sequentially shown in the Explorer
■ View metadata in the Explorer alongside the actual data in the List View
■ Compare information between multiple List Views
You can also use filter expressions to create special views of your data.
Opening Multiple List ViewsTo open multiple List Views
1. From the main menu, select Window > New Window. A new List View window appears.
2. Drag and drop the window to a new position or organize the List View window using the Window menu option. See “Organizing List Views” on page 2-19.
Organizing List ViewsThese instructions only apply when more than one List View is open.
To organize multiple List Views
1. From the main menu, select Window.
2. Select one of the following options.
For more information about List Views, see the Oracle Data Profiling and Data Quality for Data Integrator Help available from the main menu of the Control Center (Help > Manuals).
Cascade Arrange List Views so that they overlap, with the title bars visible. This is the default.
Tile Horizontally Arrange List Views so that one is above the other.
Tile Vertically Arrange List Views so that they are side by side.
Arrange Icons Arrange minimized List Views so that they are side by side. This only functions when the List Views are minimized.
Touring the Oracle Data Profiling and Quality Control Center 2-19
Refreshing the Oracle Data Profiling and Quality Control Center
Filtering Information in List ViewsAny information that displays in the List View (other than Metadata Views) can be queried to find specific information. You can build complex search expressions.
Tip: If you regularly apply a particular filter, create a Business Rule instead. The advantage is that Business Rules are saved and filters are not.
To filter the List View:
1. Ensure that the List View is displaying the information that you want to filter. You may have to click the Back button to clear your previous filter results.
Note: If the information you are looking for is not contained somewhere in the List View, you will not get expected results.
2. From the main menu, select List > Filter.
Note: You can also right-click in the List View and select Filter or click .
Refreshing the Oracle Data Profiling and Quality Control CenterAll metadata and statistics shown in the Explorer are cached on your client machine to reduce the network traffic to the Metabase server. You can periodically update this information by performing a refresh operation.
Note: If an expected object is not displayed in the Control Center, try refreshing.
To refresh information
1. From the main menu, select View > Refresh. There is a brief pause as the Metabase information is refreshed.
Note: You can also click the toolbar button.
To refresh information in the Explorer
1. Click any Explorer tab.
2. Right-click the tab and select Refresh .
There is a brief pause as the information is refreshed from the server. The Explorer redraws when the operation completes.
2-20 Oracle Data Profiling and Oracle Data Quality for Data Integrator Getting Started Guide
Monitoring Metabase Activities
Monitoring Metabase ActivitiesYou can monitor various activities within an Oracle Data Profiling Metabase through:
■ Background Tasks
■ Event Logs
■ Messages
Viewing Background TasksYou can view information about the progress of background tasks such as data loads (with each phase broken out), Join analysis, Key and Dependency analysis, DSD analysis, Business Rule analysis, and Quality data processes.
To list all background tasks
1. From the main menu, select Analysis > Background Tasks. The List View displays the progress of all background tasks. The information displayed depends on how you logged into the Metabase. Refer to the table below to understand how information is displayed based on user type.
Viewing Event LogsYou can view results of completed Metabase activities in the Oracle Data Profiling and Quality Event Log. The Event Log organizes final results of Metabase activities into folders in the Explorer.
To view an event log
1. Double-click a folder to view log results that display in a List View.
The information that displays in a List View is based on user access privileges. Users with limited privileges can see the events for Entities they own or have permission to access. Users with full privileges can see all events in the log.
Limited User can see all background activities related to Entities the user owns.
Full User can see all background activities no matter the Entity owner
Touring the Oracle Data Profiling and Quality Control Center 2-21
Next Step
Viewing MessagesOracle Data Profiling and Quality can alert you to Metabase changes that might impact you.
To view message alerts
1. From the main menu, select View > Messages.
A window displays at the bottom of the Control Center. This window updates when objects change in the Metabase. The information displayed depends on how you logged on to the Metabase (regular or administrative user).
PrintingWhen you click the icon on the toolbar, Oracle Data Profiling and Quality prints the active window, which can be a:
■ List View
■ Project Notes
■ Entity Relationship Diagram
To print the active window, from the main menu, select File > Print....
To preview a window as it will look when printed
1. Activate the window to print.
2. From the main menu, select File > Print Preview.
To configure the printer, from the main menu, select File > Print Setup....
Next StepThe next step is to import the data into a Metabase by creating an Entity.
Entity creation is described in Chapter 3, Importing Data and Creating Entities.
2-22 Oracle Data Profiling and Oracle Data Quality for Data Integrator Getting Started Guide
Importing Data and Creating E
3
Importing Data and Creating EntitiesThis chapter describes how to import data into a Metabase and create a Metabase object, called an Entity. It also describes the different types of data sources that you can import, and how to use the Create Entity Wizard.
You can create one of two types of Entities. Both Entity types are described in this chapter:
This chapter includes the following topics:
■ Types of Sources for Entity Creation
■ Before You Begin
■ Customizing Data During Entity Creation
■ Creating an Entity
■ Monitoring the Entity Creation Process
■ About Verifying New Entities
■ About DSD Failures
■ About Overflow
■ About Metabase Clean-Up Tasks
■ Next Steps
Entity Referred to as a real Entity, this type contains Metabase data imported from an external data source.
Dynamic Entity This Entity type links directly to an external data source.
ntities 3-1

Types of Sources for Entity Creation
Types of Sources for Entity CreationOracle Data Quality can import, or link directly to, data from any of the following data sources:
Before You BeginEach Entity you create requires that a Metabase administrator first create the following:
■ Metabase to import the data to
■ Loader Connection to the data source
Before you begin, verify with your administrator that the Metabase and Loader Connections that you need are set up. If these have not been set up properly, you will not be able to log on to the Oracle Data Quality Control Center and create an Entity.
Data Source Type Description
Delimited files Delimited text files and comma-separated value (CSV) files
■ With ASCII, extended ASCII, or Hexadecimal delimiters
■ With or without ANSI DDL
COBOL copybook Flat, fixed length files described by COBOL copybooks
■ Character encoding including, but not limited to ASCII, EBCDIC, and Unicode
■ Big or little endian byte orders
■ One or two byte data alignment
Relational data Relational data stored in a relational database management system (RDBMS) application. Oracle Data Quality can import or link via:
■ Direct connection to Oracle and IBM DB2 databases
■ ODBC-compliant RDBMS connection
■ RDBMS extraction into a delimited file with a corresponding ANSI DDL
ODQ files File generated by the Oracle Data Quality for Data Integrator application
3-2 Oracle Data Profiling and Oracle Data Quality for Data Integrator Getting Started Guide
Before You Begin
Optionally, you may want to test your data by limiting the initial number of rows you import or by using sample data files. Oracle recommends that you import sample data for testing purposes, especially if you plan to import large volumes of data.
If you are creating a Dynamic Entity (that is, an Entity that is linked to an external data source), you will only need a Loader Connection to the data source. You do not need the administrator to create a Metabase for you.
About Importing Sample Data FilesOracle Data Quality products support simple data sample tests during Entity creation. If you require complex sampling, the data may need to be pre-processed before you create the Entity.
If you pre-process the data in any way prior to creating Entities, Oracle recommends that you document all data preparation or sampling information by adding Notes to the Entity after you import to a Metabase.
Note: For information about adding Notes, see the Oracle Data Profiling and Oracle Data Quality for Data Integrator online help available from the Oracle Data Profiling and Quality Control Center. Select Help > Manuals from the main menu.
For best results when importing samples of data, make sure the imported data contains a consistent sampling of data across all Entities you plan to import to the Metabase. If the data sample is inconsistent, the resulting sample data analysis will not be representative of the data in the data source.
For example, if you imported only 10,000 customer records, and imported all 100,000 account records, the result will be a 10% match quality of these two Entities. However, if all customer records are imported, then the match quality might be 90% or higher.
In this same example, if you imported the first 10,000 records to create a customer Entity, then you should make sure the accounts for the same customers are imported. This will give you a higher % match quality.
In the same way, if you are planning to perform a Join Analysis using sample data, the sample data must be consistent and of the same size in order to correctly interpret the quality of the Join Analysis results.
Importing Data and Creating Entities 3-3
Customizing Data During Entity Creation
Customizing Data During Entity CreationWhen you create an Entity, the Create Entity Wizard gives you a Preview option that allows you to look at the data you have selected to import. While you are in Preview mode, you can select fields (data table columns) you want ignored during the import process, and customize how the data displays after it is imported.
Selecting a Subset of Fields (Columns) to ImportTo import a subset of fields:1. Open the Create Entity Wizard. See “To open the Create Entity Wizard:” on
page 3-5 and “To create an Entity:” on page 3-5.
2. When you get to the schema settings dialog, apply the schema settings and click Preview. The data displays in the pane below the wizard. From this pane you can organize how the data should be represented in the new Entity.
3. From the Preview pane below the wizard, right-click anywhere on the column header and select Choose Columns....
4. Hide any columns that are not important to your data analysis. The columns you hide are ignored during the import process.
5. Continue with the Create Entity Wizard. Only those columns that you selected to remain displayed will be represented in the new Entity.
Creating an EntityDuring installation, your Oracle Data Quality products administrator set up at least one data staging area that the Oracle Data Profiling and Quality application can connect to, and from which you can import data. Depending on your security needs, data can be stored in multiple secure locations.
Using the Create Entity WizardAfter you verify that the Metabase and Loader Connection have been created by the Metabase administrator, you are ready to create an Entity. You can either import data directly into the Metabase or link to an external source.
Use the Create Entity Wizard to create each Entity separately. The Wizard guides you through steps for creating an Entity and presents different dialogs depending on which data source you select for the Entity creation.
3-4 Oracle Data Profiling and Oracle Data Quality for Data Integrator Getting Started Guide
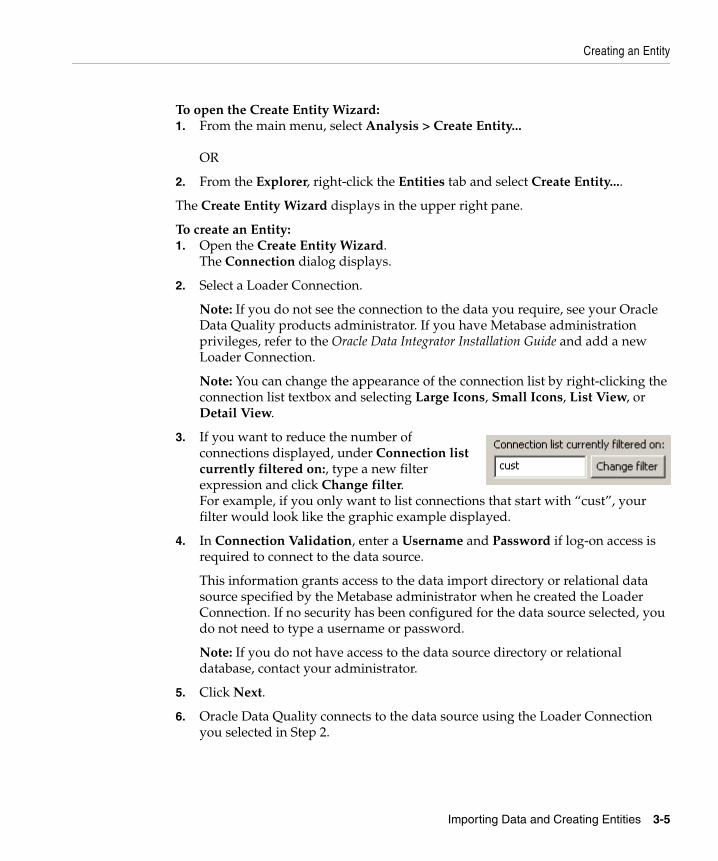
Creating an Entity
To open the Create Entity Wizard:1. From the main menu, select Analysis > Create Entity...
OR
2. From the Explorer, right-click the Entities tab and select Create Entity....
The Create Entity Wizard displays in the upper right pane.
To create an Entity:1. Open the Create Entity Wizard.
The Connection dialog displays.
2. Select a Loader Connection.
Note: If you do not see the connection to the data you require, see your Oracle Data Quality products administrator. If you have Metabase administration privileges, refer to the Oracle Data Integrator Installation Guide and add a new Loader Connection.
Note: You can change the appearance of the connection list by right-clicking the connection list textbox and selecting Large Icons, Small Icons, List View, or Detail View.
3. If you want to reduce the number of connections displayed, under Connection list currently filtered on:, type a new filter expression and click Change filter. For example, if you only want to list connections that start with “cust”, your filter would look like the graphic example displayed.
4. In Connection Validation, enter a Username and Password if log-on access is required to connect to the data source.
This information grants access to the data import directory or relational data source specified by the Metabase administrator when he created the Loader Connection. If no security has been configured for the data source selected, you do not need to type a username or password.
Note: If you do not have access to the data source directory or relational database, contact your administrator.
5. Click Next.
6. Oracle Data Quality connects to the data source using the Loader Connection you selected in Step 2.
Importing Data and Creating Entities 3-5
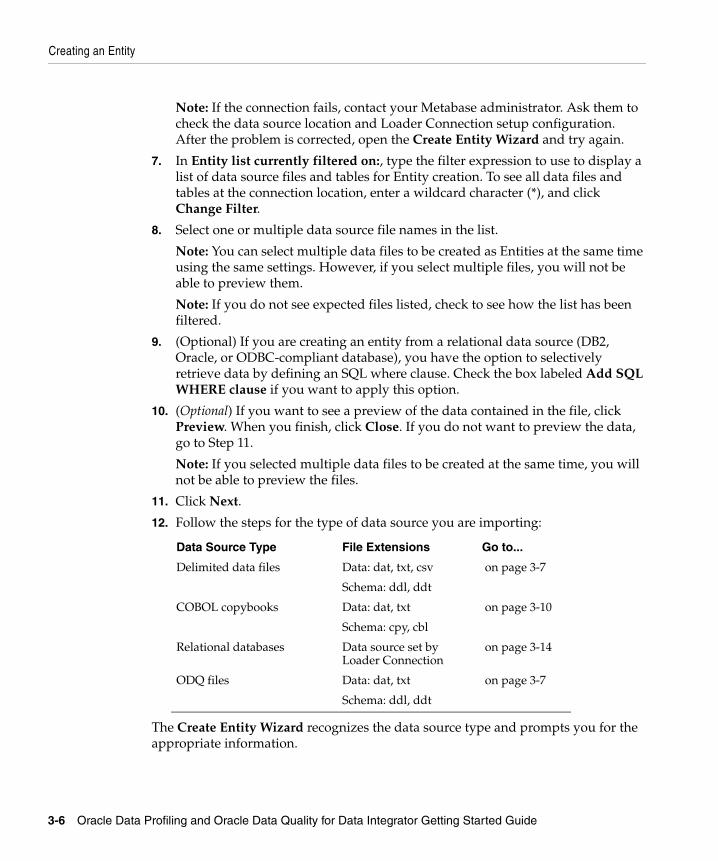
Creating an Entity
Note: If the connection fails, contact your Metabase administrator. Ask them to check the data source location and Loader Connection setup configuration. After the problem is corrected, open the Create Entity Wizard and try again.
7. In Entity list currently filtered on:, type the filter expression to use to display a list of data source files and tables for Entity creation. To see all data files and tables at the connection location, enter a wildcard character (*), and click Change Filter.
8. Select one or multiple data source file names in the list.
Note: You can select multiple data files to be created as Entities at the same time using the same settings. However, if you select multiple files, you will not be able to preview them.
Note: If you do not see expected files listed, check to see how the list has been filtered.
9. (Optional) If you are creating an entity from a relational data source (DB2, Oracle, or ODBC-compliant database), you have the option to selectively retrieve data by defining an SQL where clause. Check the box labeled Add SQL WHERE clause if you want to apply this option.
10. (Optional) If you want to see a preview of the data contained in the file, click Preview. When you finish, click Close. If you do not want to preview the data, go to Step 11.
Note: If you selected multiple data files to be created at the same time, you will not be able to preview the files.
11. Click Next.
12. Follow the steps for the type of data source you are importing:
The Create Entity Wizard recognizes the data source type and prompts you for the appropriate information.
Data Source Type File Extensions Go to...
Delimited data files Data: dat, txt, csv
Schema: ddl, ddt
on page 3-7
COBOL copybooks Data: dat, txt
Schema: cpy, cbl
on page 3-10
Relational databases Data source set by Loader Connection
on page 3-14
ODQ files Data: dat, txt
Schema: ddl, ddt
on page 3-7
3-6 Oracle Data Profiling and Oracle Data Quality for Data Integrator Getting Started Guide

Creating an Entity
To create an Entity from delimited files or ODQ files:
1. Follow Steps 1-11 in “To create an Entity:” on page 3-5.
2. Select the schema settings for the selected data file (Figure 3–1)
Figure 3–1 Schema Settings for Delimited and ODQ Files.
3. Use this table to guide your selections:
Option Description
Characters
Delimiter Select a delimiter from the list provided or, if the delimiter that you require is not shown, click Advanced to specify a Decimal or Hexadecimal (HEX) representation of the delimiter.
Note: An extended ASCII character can be a delimiter.
Quote If your data uses characters to group strings together, you must select the character that represents the grouping.
For example, if your file is comma-delimited, but one of the columns of data contains the value “Edinburg, Texas,” then you would select double-quote (“) as the character to use to group the string: Edinburg, Texas.
If the character you want to use is not shown in the drop-down list, click Advanced to specify:
■ Decimal or Hexadecimal (HEX) representation of the character
■ Double delimiters, such as ||
Note: An extended ASCII character can be a quote.
Importing Data and Creating Entities 3-7
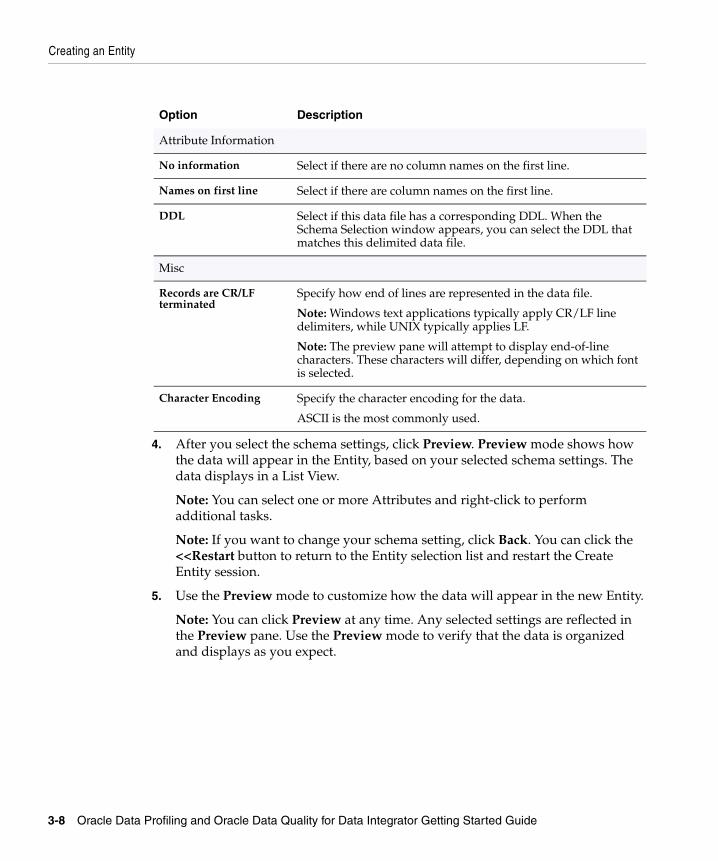
Creating an Entity
4. After you select the schema settings, click Preview. Preview mode shows how the data will appear in the Entity, based on your selected schema settings. The data displays in a List View.
Note: You can select one or more Attributes and right-click to perform additional tasks.
Note: If you want to change your schema setting, click Back. You can click the <<Restart button to return to the Entity selection list and restart the Create Entity session.
5. Use the Preview mode to customize how the data will appear in the new Entity.
Note: You can click Preview at any time. Any selected settings are reflected in the Preview pane. Use the Preview mode to verify that the data is organized and displays as you expect.
Attribute Information
No information Select if there are no column names on the first line.
Names on first line Select if there are column names on the first line.
DDL Select if this data file has a corresponding DDL. When the Schema Selection window appears, you can select the DDL that matches this delimited data file.
Misc
Records are CR/LF terminated
Specify how end of lines are represented in the data file.
Note: Windows text applications typically apply CR/LF line delimiters, while UNIX typically applies LF.
Note: The preview pane will attempt to display end-of-line characters. These characters will differ, depending on which font is selected.
Character Encoding Specify the character encoding for the data.
ASCII is the most commonly used.
Option Description
3-8 Oracle Data Profiling and Oracle Data Quality for Data Integrator Getting Started Guide
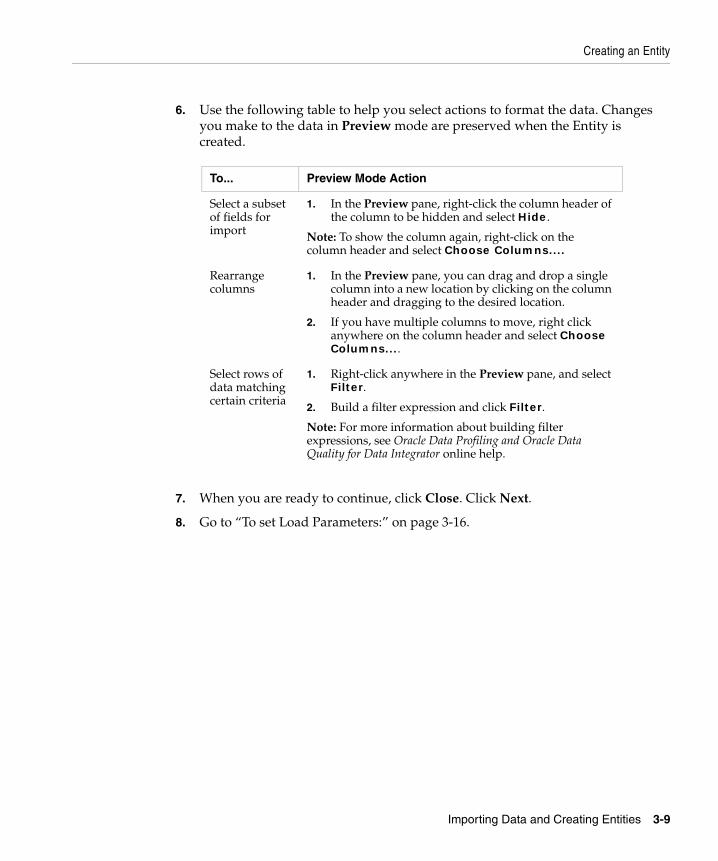
Creating an Entity
6. Use the following table to help you select actions to format the data. Changes you make to the data in Preview mode are preserved when the Entity is created.
7. When you are ready to continue, click Close. Click Next.
8. Go to “To set Load Parameters:” on page 3-16.
To... Preview Mode Action
Select a subset of fields for import
1. In the Preview pane, right-click the column header of the column to be hidden and select Hide.
Note: To show the column again, right-click on the column header and select Choose Columns....
Rearrange columns
1. In the Preview pane, you can drag and drop a single column into a new location by clicking on the column header and dragging to the desired location.
2. If you have multiple columns to move, right click anywhere on the column header and select Choose Columns....
Select rows of data matching certain criteria
1. Right-click anywhere in the Preview pane, and select Filter.
2. Build a filter expression and click Filter.
Note: For more information about building filter expressions, see Oracle Data Profiling and Oracle Data Quality for Data Integrator online help.
Importing Data and Creating Entities 3-9
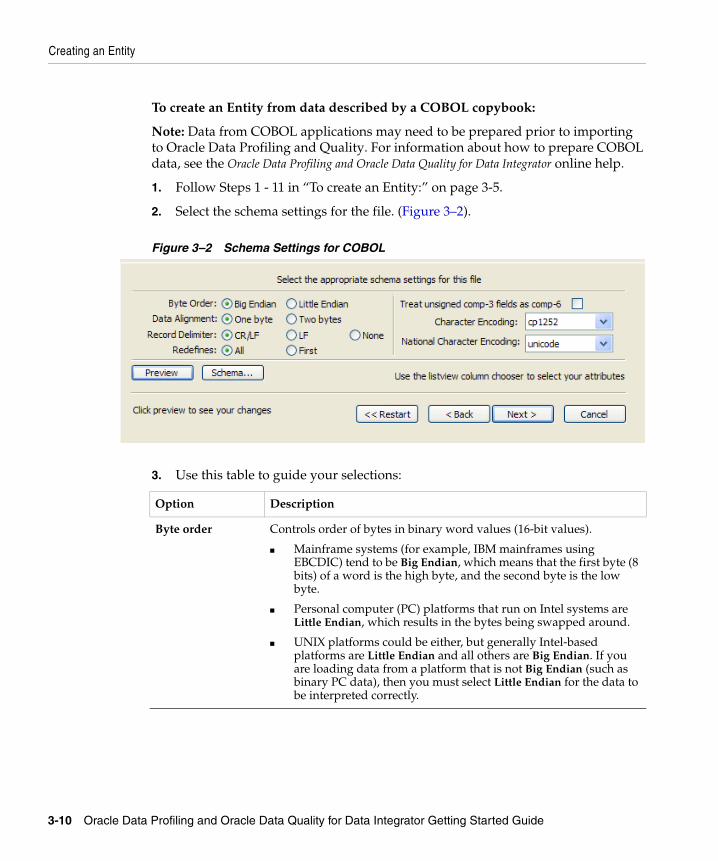
Creating an Entity
To create an Entity from data described by a COBOL copybook:
Note: Data from COBOL applications may need to be prepared prior to importing to Oracle Data Profiling and Quality. For information about how to prepare COBOL data, see the Oracle Data Profiling and Oracle Data Quality for Data Integrator online help.
1. Follow Steps 1 - 11 in “To create an Entity:” on page 3-5.
2. Select the schema settings for the file. (Figure 3–2).
Figure 3–2 Schema Settings for COBOL
3. Use this table to guide your selections:
Option Description
Byte order Controls order of bytes in binary word values (16-bit values).
■ Mainframe systems (for example, IBM mainframes using EBCDIC) tend to be Big Endian, which means that the first byte (8 bits) of a word is the high byte, and the second byte is the low byte.
■ Personal computer (PC) platforms that run on Intel systems are Little Endian, which results in the bytes being swapped around.
■ UNIX platforms could be either, but generally Intel-based platforms are Little Endian and all others are Big Endian. If you are loading data from a platform that is not Big Endian (such as binary PC data), then you must select Little Endian for the data to be interpreted correctly.
3-10 Oracle Data Profiling and Oracle Data Quality for Data Integrator Getting Started Guide
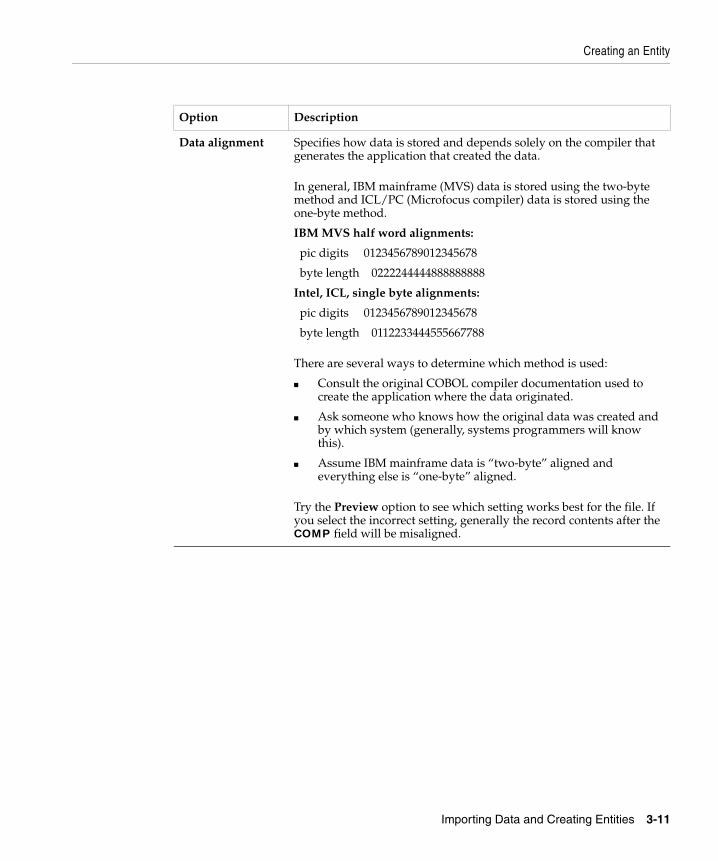
Creating an Entity
Data alignment Specifies how data is stored and depends solely on the compiler that generates the application that created the data.
In general, IBM mainframe (MVS) data is stored using the two-byte method and ICL/PC (Microfocus compiler) data is stored using the one-byte method.
IBM MVS half word alignments:
pic digits 0123456789012345678
byte length 0222244444888888888
Intel, ICL, single byte alignments:
pic digits 0123456789012345678
byte length 0112233444555667788
There are several ways to determine which method is used:
■ Consult the original COBOL compiler documentation used to create the application where the data originated.
■ Ask someone who knows how the original data was created and by which system (generally, systems programmers will know this).
■ Assume IBM mainframe data is “two-byte” aligned and everything else is “one-byte” aligned.
Try the Preview option to see which setting works best for the file. If you select the incorrect setting, generally the record contents after the COMP field will be misaligned.
Option Description
Importing Data and Creating Entities 3-11

Creating an Entity
Record delimiter Specifies how records are delimited in your data file.
Usually COBOL data files are fixed length and have no record delimiter. But, if COBOL data is exported from the original application and transferred into other file systems (especially UNIX), they could contain record delimiters added by the export or transfer process.
If the file originated from:
■ Windows, select CR/LF
■ UNIX, select LF
■ mainframe, select None
Note: The Preview pane attempts to display end-of-line characters. These characters will differ, depending on what font is selected.
Redefines Select:
All to account for all REDEFINES clauses in a copybook.
If this option is selected and Oracle Data Quality encounters a REDEFINES clause, it removes the REDEFINES clause and keeps both representations of the data in the copybook. The data file will be populated to match the copybook.
Note: You cannot selectively pick REDEFINES clauses to describe data areas. If this is the case, modify your copybook prior to importing data to a Metabase.
Note: Oracle Data Profiling and Quality handles nested REDEFINES clauses.
Select:
First to ignore all REDEFINES clauses in the copybook.
Treat unsigned comp-3 fields as comp-6
Place a check in this box only if your COBOL compiler supports COMP-3 without an embedded sign.
Character Encoding Controls the character set for the file. EBCDIC data is translated into a correct ASCII representation on load.
Generally, UNIX COBOL files will be ASCII and IBM mainframe data will be EBCDIC.
Option Description
3-12 Oracle Data Profiling and Oracle Data Quality for Data Integrator Getting Started Guide
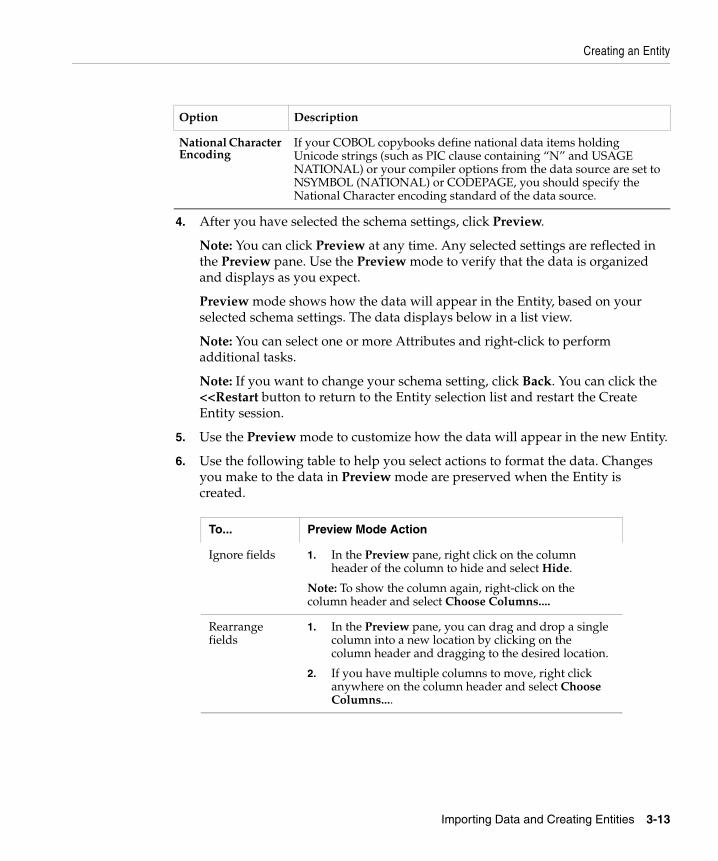
Creating an Entity
4. After you have selected the schema settings, click Preview.
Note: You can click Preview at any time. Any selected settings are reflected in the Preview pane. Use the Preview mode to verify that the data is organized and displays as you expect.
Preview mode shows how the data will appear in the Entity, based on your selected schema settings. The data displays below in a list view.
Note: You can select one or more Attributes and right-click to perform additional tasks.
Note: If you want to change your schema setting, click Back. You can click the <<Restart button to return to the Entity selection list and restart the Create Entity session.
5. Use the Preview mode to customize how the data will appear in the new Entity.
6. Use the following table to help you select actions to format the data. Changes you make to the data in Preview mode are preserved when the Entity is created.
National Character Encoding
If your COBOL copybooks define national data items holding Unicode strings (such as PIC clause containing “N” and USAGE NATIONAL) or your compiler options from the data source are set to NSYMBOL (NATIONAL) or CODEPAGE, you should specify the National Character encoding standard of the data source.
To... Preview Mode Action
Ignore fields 1. In the Preview pane, right click on the column header of the column to hide and select Hide.
Note: To show the column again, right-click on the column header and select Choose Columns....
Rearrange fields
1. In the Preview pane, you can drag and drop a single column into a new location by clicking on the column header and dragging to the desired location.
2. If you have multiple columns to move, right click anywhere on the column header and select Choose Columns....
Option Description
Importing Data and Creating Entities 3-13
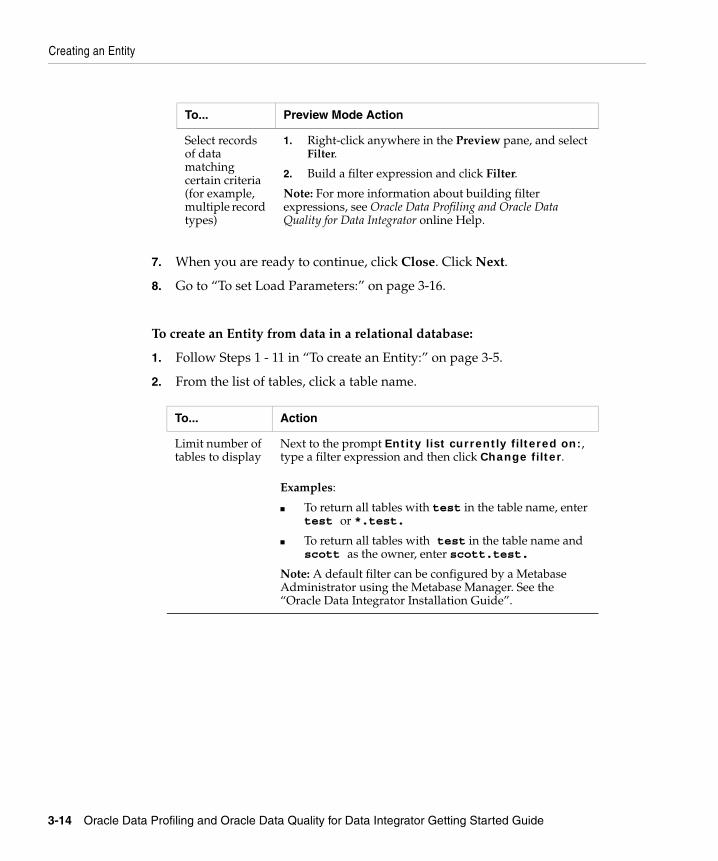
Creating an Entity
7. When you are ready to continue, click Close. Click Next.
8. Go to “To set Load Parameters:” on page 3-16.
To create an Entity from data in a relational database:
1. Follow Steps 1 - 11 in “To create an Entity:” on page 3-5.
2. From the list of tables, click a table name.
Select records of data matching certain criteria (for example, multiple record types)
1. Right-click anywhere in the Preview pane, and select Filter.
2. Build a filter expression and click Filter.
Note: For more information about building filter expressions, see Oracle Data Profiling and Oracle Data Quality for Data Integrator online Help.
To... Action
Limit number of tables to display
Next to the prompt Entity list currently filtered on:, type a filter expression and then click Change filter.
Examples:
■ To return all tables with test in the table name, enter test or *.test.
■ To return all tables with test in the table name and scott as the owner, enter scott.test.
Note: A default filter can be configured by a Metabase Administrator using the Metabase Manager. See the “Oracle Data Integrator Installation Guide”.
To... Preview Mode Action
3-14 Oracle Data Profiling and Oracle Data Quality for Data Integrator Getting Started Guide
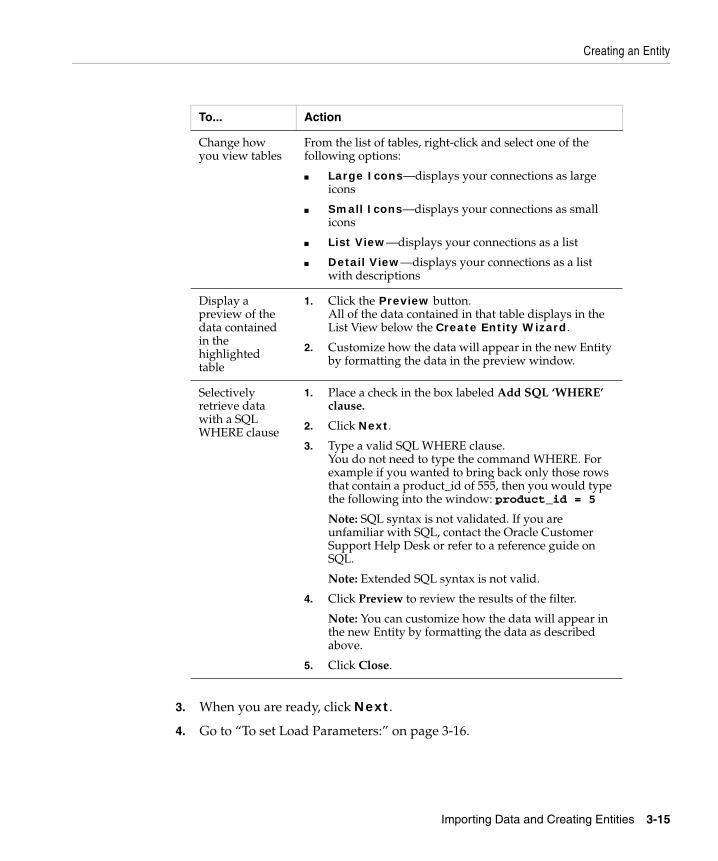
Creating an Entity
3. When you are ready, click Next.
4. Go to “To set Load Parameters:” on page 3-16.
Change how you view tables
From the list of tables, right-click and select one of the following options:
■ Large Icons—displays your connections as large icons
■ Small Icons—displays your connections as small icons
■ List View—displays your connections as a list
■ Detail View—displays your connections as a list with descriptions
Display a preview of the data contained in the highlighted table
1. Click the Preview button. All of the data contained in that table displays in the List View below the Create Entity Wizard.
2. Customize how the data will appear in the new Entity by formatting the data in the preview window.
Selectively retrieve data with a SQL WHERE clause
1. Place a check in the box labeled Add SQL ‘WHERE’ clause.
2. Click Next.
3. Type a valid SQL WHERE clause. You do not need to type the command WHERE. For example if you wanted to bring back only those rows that contain a product_id of 555, then you would type the following into the window: product_id = 5
Note: SQL syntax is not validated. If you are unfamiliar with SQL, contact the Oracle Customer Support Help Desk or refer to a reference guide on SQL.
Note: Extended SQL syntax is not valid.
4. Click Preview to review the results of the filter.
Note: You can customize how the data will appear in the new Entity by formatting the data as described above.
5. Click Close.
To... Action
Importing Data and Creating Entities 3-15
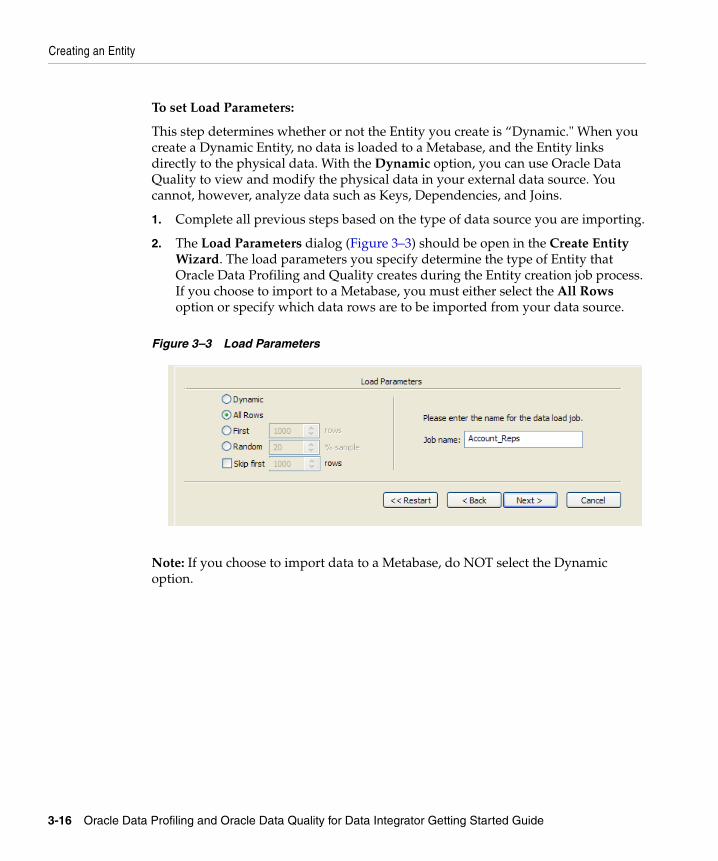
Creating an Entity
To set Load Parameters:
This step determines whether or not the Entity you create is “Dynamic." When you create a Dynamic Entity, no data is loaded to a Metabase, and the Entity links directly to the physical data. With the Dynamic option, you can use Oracle Data Quality to view and modify the physical data in your external data source. You cannot, however, analyze data such as Keys, Dependencies, and Joins.
1. Complete all previous steps based on the type of data source you are importing.
2. The Load Parameters dialog (Figure 3–3) should be open in the Create Entity Wizard. The load parameters you specify determine the type of Entity that Oracle Data Profiling and Quality creates during the Entity creation job process. If you choose to import to a Metabase, you must either select the All Rows option or specify which data rows are to be imported from your data source.
Figure 3–3 Load Parameters
Note: If you choose to import data to a Metabase, do NOT select the Dynamic option.
3-16 Oracle Data Profiling and Oracle Data Quality for Data Integrator Getting Started Guide
Creating an Entity
3. Select the load parameters for the Entity creation process. Use this table to guide your selections:
4. Click Next to continue.
Note: If you click Create & Restart to schedule the job, you are returned to the Entity selection list where you can select another Entity. Use this button when you want to quickly load several files from the same source with different settings.
Option Description
Dynamic A link is created to the external source allowing you to:
■ drill down to the rows
■ create and run Business Rules
■ filter
No data is imported into the Metabase.
Important: If you select the Dynamic option, you will not have access to features such as DSD, Key, and Dependency analysis until you load the data into a Metabase.
Note: If the external source changes, the date displayed in Oracle Data Quality also changes.
This setting is ideal for quickly examining very large data sources.
All Rows Load all of the data rows.
First [number] rows Load a selected number of rows from the beginning of the file (for example, the first 1000 rows).
Random [percent] % sample Randomly sample a percentage of rows from the file.
Skip first [number] rows This option is not available if you select “Dynamic.” Allows you to specify a starting row for data imports.
For example, if your file has 300 rows and you select All Rows and Skip first 99 rows, Oracle Data Profiling and Quality loads 200 rows, starting with the 100th row.
Job name Name of data load job. Option is not available when you select “Dynamic.”
Importing Data and Creating Entities 3-17
Monitoring the Entity Creation Process
5. In Confirm Settings, review the list of settings and click Finish to schedule the Entity creation job.
To schedule a job:
You can schedule a job to:
■ Run Now - run the job immediately.
■ Run Later - schedule to run at another date and time.
■ Cancel - do not create the Project.
Monitoring the Entity Creation ProcessIf you are importing a large volume of data, the Entity creation (data load) process may take some time to complete, depending on the job parameters and Load Connection settings selected. If you choose, you can continue to work on other activities while you monitor the load progress. To do this, follow these steps to display Oracle Data Profiling and Quality background tasks.
To monitor the Entity creation process:
1. From the main menu, select Window > New Window.
2. Select Window > Tile Horizontally.
Note: You can also arrange the windows vertically (Window > Tile Vertically) or cascade the windows (Window > Cascade).
3. Select Analysis > Background Tasks. All background tasks display in the new window.
4. You can continue working in the other windows. Select another window by clicking on the title bar.
5. After all activities associated with the Entity creation show a State of Completed, expand the new Entity in the Explorer pane (left side) and begin viewing Attributes, Rows, and Metadata.
About Verifying New EntitiesDuring the data import process, Oracle Data Quality translates your data files into three basic components (Metabase objects): Entities, Attributes, and Rows.
3-18 Oracle Data Profiling and Oracle Data Quality for Data Integrator Getting Started Guide
About DSD Failures
You can view Metabase objects in the Metabase Explorer, located in the left pane of the Oracle Data Quality Control Center. (See “Viewing Metabase Objects in the Explorer” on page 2-10.)
To verify a new Entity, review the contents of the Entity in the Explorer. You can expand Explorer folders to see a list of Entities, Attributes and Rows, related Metadata, and data analysis Statistics.
Perform the following list of verification tasks to ensure that the data you expected has been successfully imported to a Metabase and is correctly represented in the Metabase Explorer.
■ Make sure that every data file imported has one corresponding Entity. Skip this check task for COBOL data sources.
■ Make sure that the column names do not contain any special characters, with the exception of underscore (_) or minus sign (-) characters.
Note: Minus signs and underscores are translated into spaces during the data load process.
■ Make sure that every column imported has one corresponding Attribute. Skip this task for schema files.
Note: For COBOL copybooks, the Attribute names are taken from the copybook.
■ Make sure that you have one Entity Row for every data row imported.
About DSD FailuresWhen you create an Entity, Oracle Data Quality verifies the quality of the imported data against data compliance standards defined as Data Standard Definitions (DSD).
Data Standard Definitions check compliance on each Attribute, and when an Attribute does not pass a standard, the Attribute name displays in the Explorer in the color red. You can see the percentage of compliance by clicking on the Attribute name and finding DSD Compliance % in the List View to the right (default position).
Note: Oracle Data Quality applies DSD checks at the Attribute level and evaluates data quality only for Attributes in Entities that are not Dynamic Entities. DSD compliance checks require that data be imported into a Metabase in order to perform the analysis and show compliance statistics.
Importing Data and Creating Entities 3-19
About Overflow
To investigate DSD failures:
1. Right-click any Attribute name that displays in red and select Drill down to DSD Metadata.
2. The Attribute DSD Tests list view displays. The view shows which DSD checks are enabled and whether the Attribute passed or failed the check.
3. Find the DSD Check(s) that failed and review the statistics in that row.
4. Double-click a failed DSD Check name to open the DSD configuration dialog for that check.
5. At the top right of the dialog, click failing in “Drill to passing and failing values.”
6. The Check Failed list view displays and shows the row that has caused the failure.
Note: There are ten types of DSD checks that you can perform when importing or reanalyzing data. These are described in detail in the Oracle Data Profiling and Oracle Data Quality for Data Integrator Help.
About OverflowIt is possible that a schema file may not accurately reflect the data in the associated data file. For example, the data may have a longer record length than the length described by the schema.
Since this is a common issue, Oracle Data Quality loads the schema and does not reject data that does not match. Instead, when the data is imported, the data is represented exactly as the schema describes it with the addition of an Attribute named Overflow.
To check for Overflow Attributes:
1. From the Explorer, click the Entities tab.
2. Expand each Entity and its Attributes.
3. Look for any Attribute with the name Overflow.
4. Make note of which Entity or Entities have an Overflow Attribute and then investigate the causes of Overflow.
Note: The Entity name can be found next to the Attribute name.
3-20 Oracle Data Profiling and Oracle Data Quality for Data Integrator Getting Started Guide
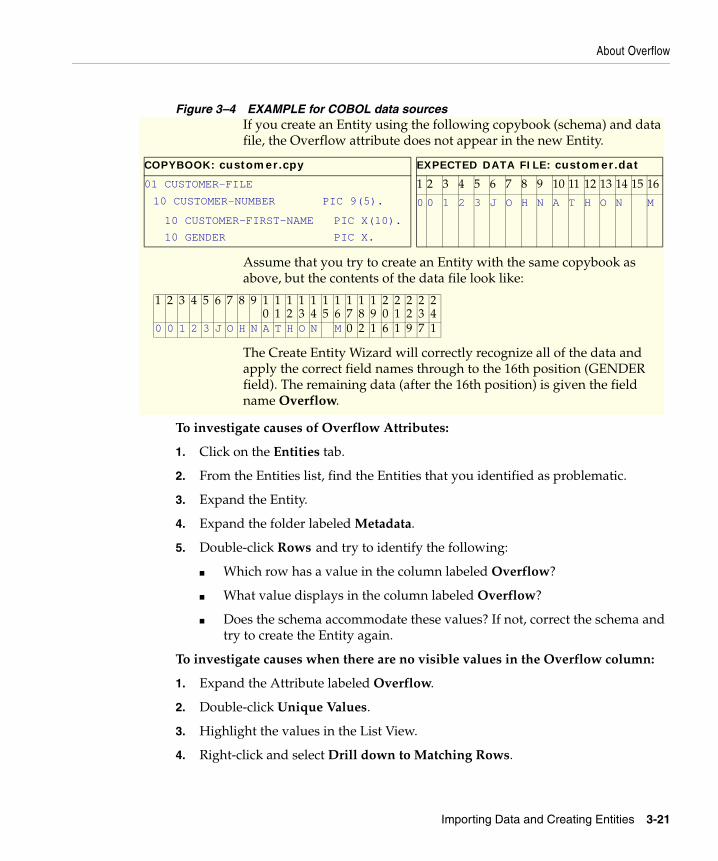
About Overflow
Figure 3–4 EXAMPLE for COBOL data sources
To investigate causes of Overflow Attributes:
1. Click on the Entities tab.
2. From the Entities list, find the Entities that you identified as problematic.
3. Expand the Entity.
4. Expand the folder labeled Metadata.
5. Double-click Rows and try to identify the following:
■ Which row has a value in the column labeled Overflow?
■ What value displays in the column labeled Overflow?
■ Does the schema accommodate these values? If not, correct the schema and try to create the Entity again.
To investigate causes when there are no visible values in the Overflow column:
1. Expand the Attribute labeled Overflow.
2. Double-click Unique Values.
3. Highlight the values in the List View.
4. Right-click and select Drill down to Matching Rows.
If you create an Entity using the following copybook (schema) and data file, the Overflow attribute does not appear in the new Entity.
Assume that you try to create an Entity with the same copybook as above, but the contents of the data file look like:
The Create Entity Wizard will correctly recognize all of the data and apply the correct field names through to the 16th position (GENDER field). The remaining data (after the 16th position) is given the field name Overflow.
COPYBOOK: customer.cpy EXPECTED DATA FILE: customer.dat
01 CUSTOMER-FILE
10 CUSTOMER-NUMBER PIC 9(5).
10 CUSTOMER-FIRST-NAME PIC X(10).
10 GENDER PIC X.
1 2 3 4 5 6 7 8 9 10 11 12 13 14 15 16
0 0 1 2 3 J O H N A T H O N M
1 2 3 4 5 6 7 8 9 10
11
12
13
14
15
16
17
18
19
20
21
22
23
24
0 0 1 2 3 J O H N A T H O N M 0 2 1 6 1 9 7 1
Importing Data and Creating Entities 3-21
About Metabase Clean-Up Tasks
5. Examine the rows to determine the problem. Ask:
■ What values are common in the last column of that Entity (column left of Overflow)?
■ Does the schema have enough space allocated for each Attribute (field)? For example, does a PIC X(10) contain data that is 13 characters long? If not, correct the schema and try to create the Entity again.
About Metabase Clean-Up TasksAfter you have created all required Entities for your project and validated that all Entities are as expected, you may want to clean up the Metabase by performing one or more of these tasks:
■ Change display names to be more user-friendly
■ Make note of any pre-import processing (such as flattening schema data or breaking out multiple record types)
■ Delete any Entities that are not required for data analysis
For more information, see the Oracle Data Profiling and Oracle Data Quality for Data Integrator online help.
Next StepsAfter you create one or more Entities, the next step is to create a Project. In Chapter 2, you learned about different types of Projects you can create. In Chapter 4, Setting Up Projects, you will learn more about Project types, when to use them, and how to create them.
3-22 Oracle Data Profiling and Oracle Data Quality for Data Integrator Getting Started Guide
Setting Up Pr
4
Setting Up ProjectsThis chapter describes the process for preparing and creating new projects in the Oracle® Data Profiling and Quality user interface. It does not include information about process setup and configuration or about advanced data processing.
For detailed information about how to process data contained in an Oracle Data Profiling and Quality Project, see the Oracle Data Profiling and Oracle Data Quality for Data Integrator Help available from the main menu (Help > Manuals).
This chapter includes the following topics:
■ About Oracle Data Profiling and Quality Project Types
■ Viewing Projects in the Explorer
■ About Oracle Data Profiling Projects
■ About Time Series Projects
■ About Quality Projects
■ Modifying Process Workflow
■ Managing Projects
■ Next Steps
ojects 4-1
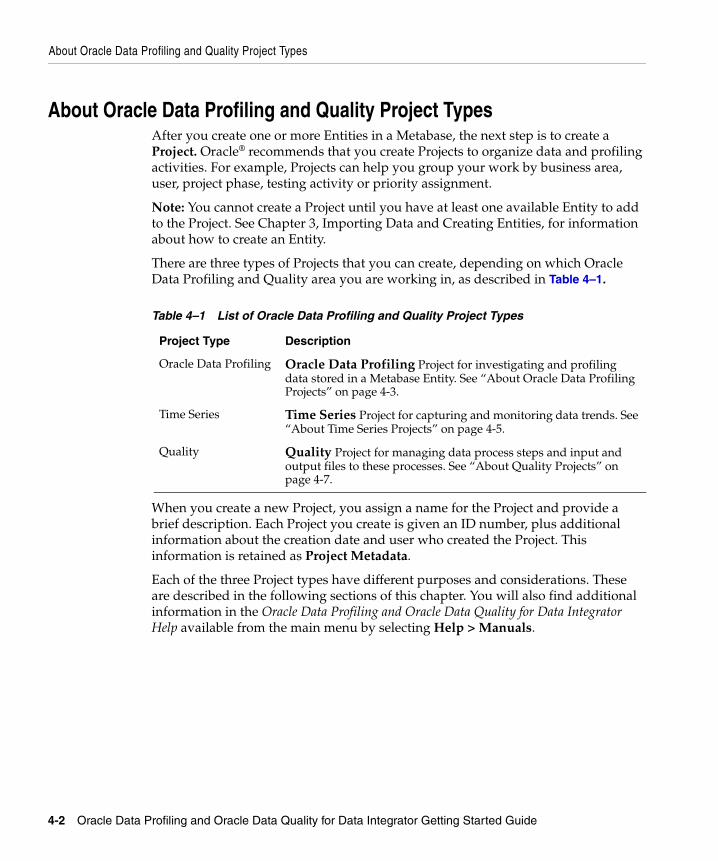
About Oracle Data Profiling and Quality Project Types
About Oracle Data Profiling and Quality Project TypesAfter you create one or more Entities in a Metabase, the next step is to create a Project. Oracle® recommends that you create Projects to organize data and profiling activities. For example, Projects can help you group your work by business area, user, project phase, testing activity or priority assignment.
Note: You cannot create a Project until you have at least one available Entity to add to the Project. See Chapter 3, Importing Data and Creating Entities, for information about how to create an Entity.
There are three types of Projects that you can create, depending on which Oracle Data Profiling and Quality area you are working in, as described in Table 4–1.
Table 4–1 List of Oracle Data Profiling and Quality Project Types
When you create a new Project, you assign a name for the Project and provide a brief description. Each Project you create is given an ID number, plus additional information about the creation date and user who created the Project. This information is retained as Project Metadata.
Each of the three Project types have different purposes and considerations. These are described in the following sections of this chapter. You will also find additional information in the Oracle Data Profiling and Oracle Data Quality for Data Integrator Help available from the main menu by selecting Help > Manuals.
Project Type Description
Oracle Data Profiling Oracle Data Profiling Project for investigating and profiling data stored in a Metabase Entity. See “About Oracle Data Profiling Projects” on page 4-3.
Time Series Time Series Project for capturing and monitoring data trends. See “About Time Series Projects” on page 4-5.
Quality Quality Project for managing data process steps and input and output files to these processes. See “About Quality Projects” on page 4-7.
4-2 Oracle Data Profiling and Oracle Data Quality for Data Integrator Getting Started Guide
About Oracle Data Profiling Projects
Viewing Projects in the ExplorerYou can view all existing Projects by clicking on the Projects tab in the Metabase Explorer. Projects are organized by type (see Table 4-1).
To view a list of existing Projects:
1. Open the Explorer.
2. Click the Projects tab.
3. Determine which Project type you want to view, and expand the corresponding folder - Oracle Data Profiling, Time Series, or Quality. To expand a folder, click the folder name.
4. Projects are denoted by this icon . Click any Project to open it.
To open a Project:
1. Open the Explorer.
2. Click the Projects tab.
3. Determine which Project type you want to view, and expand the corresponding folder - Oracle Data Profiling, Time Series or Quality.
4. Right-click the Project name and select Open.
About Oracle Data Profiling ProjectsOracle Data Profiling Projects contain references to one or more Entities (Attributes and Permanent Joins) stored in a Metabase and allow you to logically group objects for the purpose of data investigation. In this way, Projects can help you to manage the different sets of data, profiling activities, and analysis tasks you might want to perform on your data. Projects are viewable in the Metabase Explorer and let you easily identify your work and the status of your profiling activities.
About Setting Up Oracle Data Profiling ProjectsYou may choose to set up your own Projects, or your Oracle Data Quality Administrator may choose to set up Projects for you, especially if the Project will be utilized by more than one person in your company. In such cases, Projects may be set up for specific profiling tasks, and can assist in preventing duplicate efforts by different business teams.
Setting Up Projects 4-3
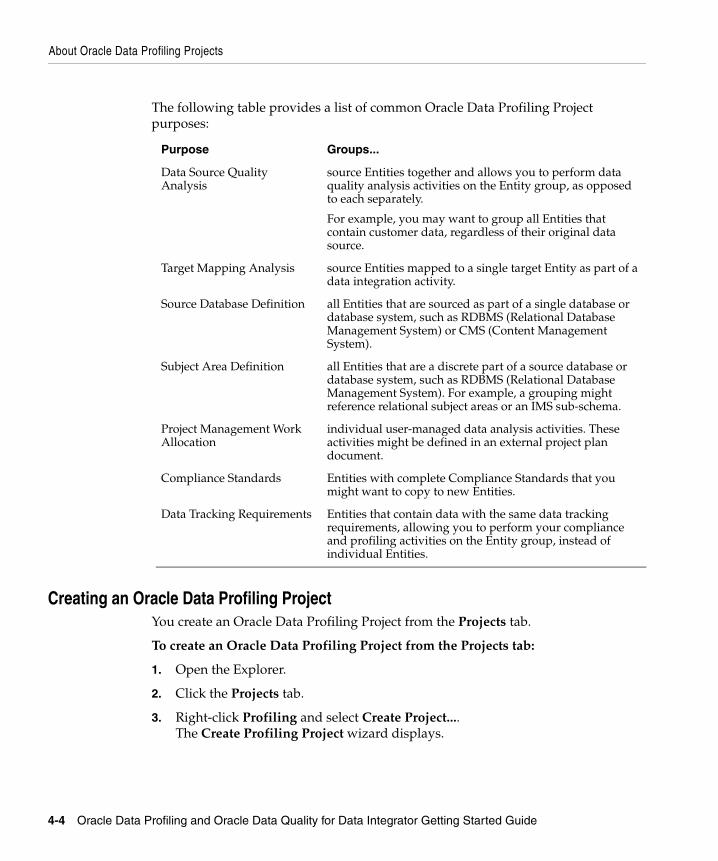
About Oracle Data Profiling Projects
The following table provides a list of common Oracle Data Profiling Project purposes:
Creating an Oracle Data Profiling ProjectYou create an Oracle Data Profiling Project from the Projects tab.
To create an Oracle Data Profiling Project from the Projects tab:
1. Open the Explorer.
2. Click the Projects tab.
3. Right-click Profiling and select Create Project.... The Create Profiling Project wizard displays.
Purpose Groups...
Data Source Quality Analysis
source Entities together and allows you to perform data quality analysis activities on the Entity group, as opposed to each separately.
For example, you may want to group all Entities that contain customer data, regardless of their original data source.
Target Mapping Analysis source Entities mapped to a single target Entity as part of a data integration activity.
Source Database Definition all Entities that are sourced as part of a single database or database system, such as RDBMS (Relational Database Management System) or CMS (Content Management System).
Subject Area Definition all Entities that are a discrete part of a source database or database system, such as RDBMS (Relational Database Management System). For example, a grouping might reference relational subject areas or an IMS sub-schema.
Project Management Work Allocation
individual user-managed data analysis activities. These activities might be defined in an external project plan document.
Compliance Standards Entities with complete Compliance Standards that you might want to copy to new Entities.
Data Tracking Requirements Entities that contain data with the same data tracking requirements, allowing you to perform your compliance and profiling activities on the Entity group, instead of individual Entities.
4-4 Oracle Data Profiling and Oracle Data Quality for Data Integrator Getting Started Guide
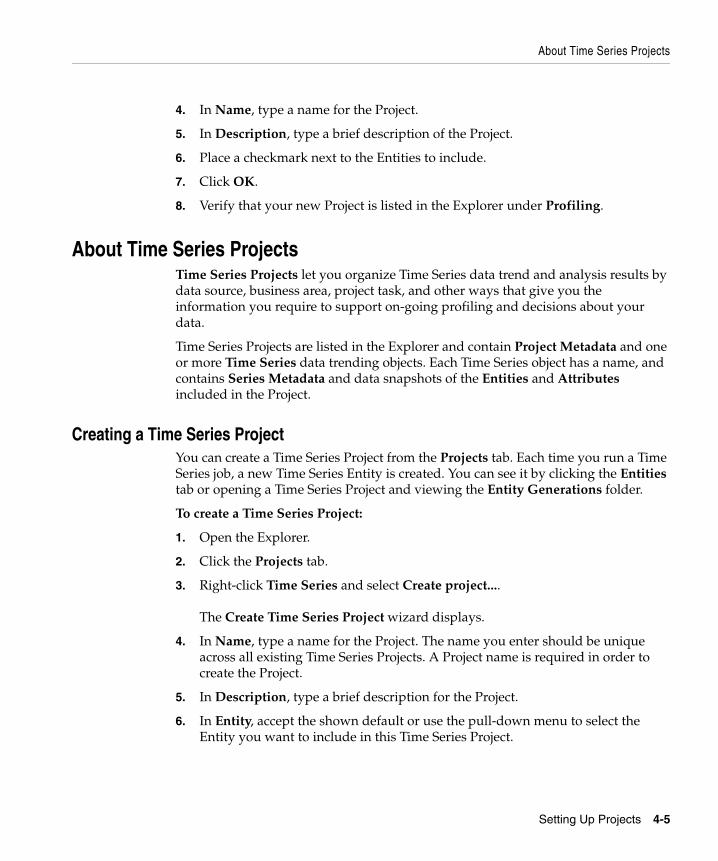
About Time Series Projects
4. In Name, type a name for the Project.
5. In Description, type a brief description of the Project.
6. Place a checkmark next to the Entities to include.
7. Click OK.
8. Verify that your new Project is listed in the Explorer under Profiling.
About Time Series ProjectsTime Series Projects let you organize Time Series data trend and analysis results by data source, business area, project task, and other ways that give you the information you require to support on-going profiling and decisions about your data.
Time Series Projects are listed in the Explorer and contain Project Metadata and one or more Time Series data trending objects. Each Time Series object has a name, and contains Series Metadata and data snapshots of the Entities and Attributes included in the Project.
Creating a Time Series ProjectYou can create a Time Series Project from the Projects tab. Each time you run a Time Series job, a new Time Series Entity is created. You can see it by clicking the Entities tab or opening a Time Series Project and viewing the Entity Generations folder.
To create a Time Series Project:
1. Open the Explorer.
2. Click the Projects tab.
3. Right-click Time Series and select Create project.... The Create Time Series Project wizard displays.
4. In Name, type a name for the Project. The name you enter should be unique across all existing Time Series Projects. A Project name is required in order to create the Project.
5. In Description, type a brief description for the Project.
6. In Entity, accept the shown default or use the pull-down menu to select the Entity you want to include in this Time Series Project.
Setting Up Projects 4-5
About Time Series Projects
7. In Data Source, the data source for the selected Entity displays.
8. Under Automation Interval, select a time interval between Entity regeneration jobs. Choose one of the following:
None (Default) The Time Series project will run automatically. If you plan to generate each Entity iteration manually, select this option.
Days Every: Enter the time interval in number of days. This designates the number of days between regeneration of the Entity.
At: Enter the time when the regeneration should start. The format is hh:mm:ss.
Starting: Enter the date on which you want the regeneration to begin. If you accept the default (today's date), the first regeneration starts today at the time indicated above. If it is past the time indicated, the first regeneration begins when you click OK to close the dialog.
Weekly Every: Use the drop-down menu to select the day of the week on which the Entity regeneration should run.
At: Enter the time when the regeneration should start. The format is hh:mm:ss.
Starting: Enter the date on which you want the regeneration to begin. If you change the day of the week in Every:, the default starting date becomes the next occurrence of that day.
Monthly Every: Enter a calendar day on which, each month, the Entity regeneration should run. If you select 29, 30, or 31, on months with fewer days, the job will run on the last day of the month. For example, if you selected ‘30’, because February has only 28 days, the job will run on February 28th.
At: Enter the time when the regeneration should start. The format is hh:mm:ss.
Starting: Enter a starting date. To set an initial generation to run earlier than the selected calendar day, enter a date that occurs before the calendar day you selected. When you change the calendar day in the Every: field, the next Series regeneration date in Starting: resets to the next occurrence of that calendar day.
4-6 Oracle Data Profiling and Oracle Data Quality for Data Integrator Getting Started Guide
About Quality Projects
9. Click OK.
10. Verify that your new Project is listed in the Explorer under Time Series.
About Quality ProjectsA Quality Project contains the blueprint for processing Entity data using Quality data process modules. You will find a list of the Quality processes in Table 1–1, “Quality Data Processes,” on page 1-5.
A Quality Project includes the data files, schema files, settings files, output and statistics files, user-defined tables and scripts for each process you select. These files are managed by Oracle Data Quality. When you create a Project, you select the type of data with which you want to work (Name and Address or Business), and the Entities that contain the data for your Project. If you select Name and Address, you must also select the countries for which the data is relevant.
You may also choose to create an Empty Project if you want a customized process workflow.
Note: You need to specify parameter files and executables only if you are creating a Project that uses the User-Defined Process.
After you create a Quality Project, the Project is listed in the Explorer. Click the Projects tab and expand Quality to verify that your new Project was created correctly.
When you select a Project in the Explorer, the process workflow for that Project displays in a Project View. The view identifies each Entity and process in the sequence. When you run the Project, the Entity you selected for processing uses the displayed workflow. See Figure 4–1, “Quality Project View" for an example of a Quality Project display in a Project View.
Setting Up Projects 4-7
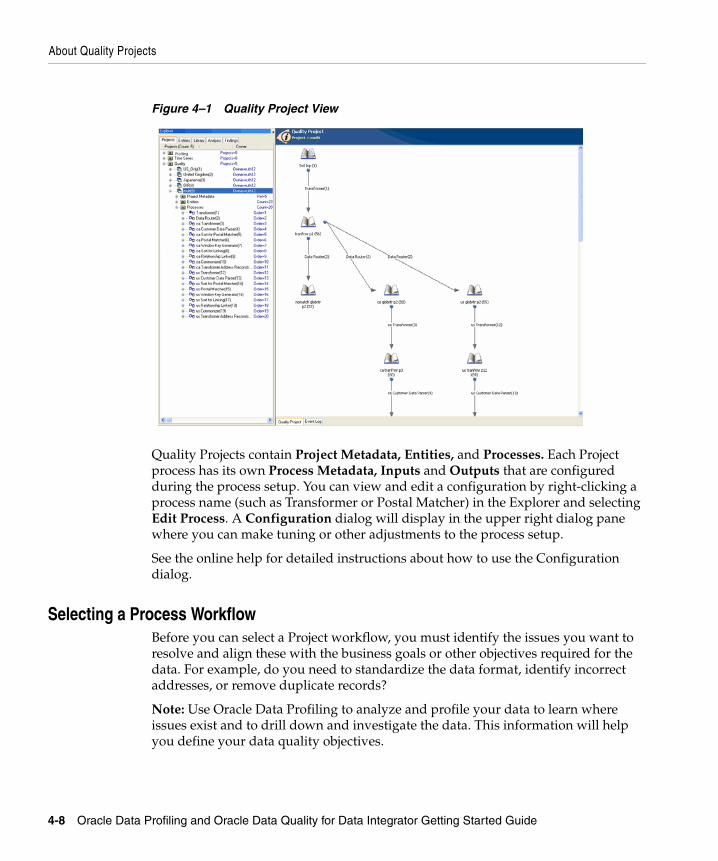
About Quality Projects
Figure 4–1 Quality Project View
Quality Projects contain Project Metadata, Entities, and Processes. Each Project process has its own Process Metadata, Inputs and Outputs that are configured during the process setup. You can view and edit a configuration by right-clicking a process name (such as Transformer or Postal Matcher) in the Explorer and selecting Edit Process. A Configuration dialog will display in the upper right dialog pane where you can make tuning or other adjustments to the process setup.
See the online help for detailed instructions about how to use the Configuration dialog.
Selecting a Process WorkflowBefore you can select a Project workflow, you must identify the issues you want to resolve and align these with the business goals or other objectives required for the data. For example, do you need to standardize the data format, identify incorrect addresses, or remove duplicate records?
Note: Use Oracle Data Profiling to analyze and profile your data to learn where issues exist and to drill down and investigate the data. This information will help you define your data quality objectives.
4-8 Oracle Data Profiling and Oracle Data Quality for Data Integrator Getting Started Guide
About Quality Projects
Some of the most common data quality objectives are:
■ Identify and remove duplicate records
■ Cleanse and standardize data formats
■ Identify specific data elements
■ Normalize name and address data
■ Identify and standardize all data that is NOT name and address related
■ Identify incorrect, obsolete, or invalid data
■ Identify multiple customers within a household and link them together
■ Find the same customer among multiple files
■ Update files with new data
■ Re-engineer and consolidate data after cleansing to create unique views
If you have enterprise data-cleansing standards, you can set up complex workflows using business rules and other rules-driven processes to bring data into compliance with your data governance requirements.
For more information about selecting a process workflow, see the Oracle Data Profiling and Oracle Data Quality for Data Integrator Help.
Creating a Quality ProjectAfter you have determined how you want to process your data and decided on the Quality process flow, you are ready to create a Quality Project and configure your workflow.
To create a Quality Project:
1. Open the Explorer.
2. Click the Projects tab.
3. Right-click Quality and select Create project.... The Create Quality Project dialog displays.
4. In Name, type a unique name for the Quality Project you want to create.
5. In Description, type a brief description.
Setting Up Projects 4-9

About Quality Projects
6. Choose one of the following options to identify the Project type by record format. The option you select determines the Project template used to define the initial default set of Quality processes in a workflow:
7. If you want to add latitude and longitude values to your data, check the Include global locator process when adding new countries box.
8. In the Entity selection text box, select the Entities to include in the Project by highlighting each Entity name.
Note: If you want to select the project’s input entity from a list of all entities, including those that were created as output entities in previous Quality projects, click the Display all entities checkbox.
9. Click Next.
Option Description
Name and Address Project Create this type of project for Entities that contain name and address records. When the project job runs, it runs the following processes in this sequence: Transformer, Customer Data Parser, Sort for Postal Matcher, Postal Matcher, Window Key Generator, Sort for Linking, Relationship Linker, Commonizer, and Data Reconstructor. You can add or delete processes after creating the project to customize the data process workflow.
For process descriptions, see Table 4–2, “Basic Name and Address Process Workflow,” on page 4-13.
Business Data Project Create this type of project for Entities that contain business data with no name and address records. When the project job runs, it runs the following processes in this sequence: Transformer, Business Data Parser, Window Key Generator, Sort for Linking, Relationship Linker, and Commonizer. You can add or delete processes after creating the project to customize the data process workflow.
For process descriptions, see Table 4–3, “Business Data Process Workflow,” on page 4-15.
Empty Project Use if you want to customize the project process flow by creating a user-defined workflow. It allows you to create a Project that contains only Entities you select to include in the project and no processes. You must add or delete processes to customize the process workflow.
For a list of processes, see Table 1–1, “Quality Data Processes,” on page 1-5.
4-10 Oracle Data Profiling and Oracle Data Quality for Data Integrator Getting Started Guide
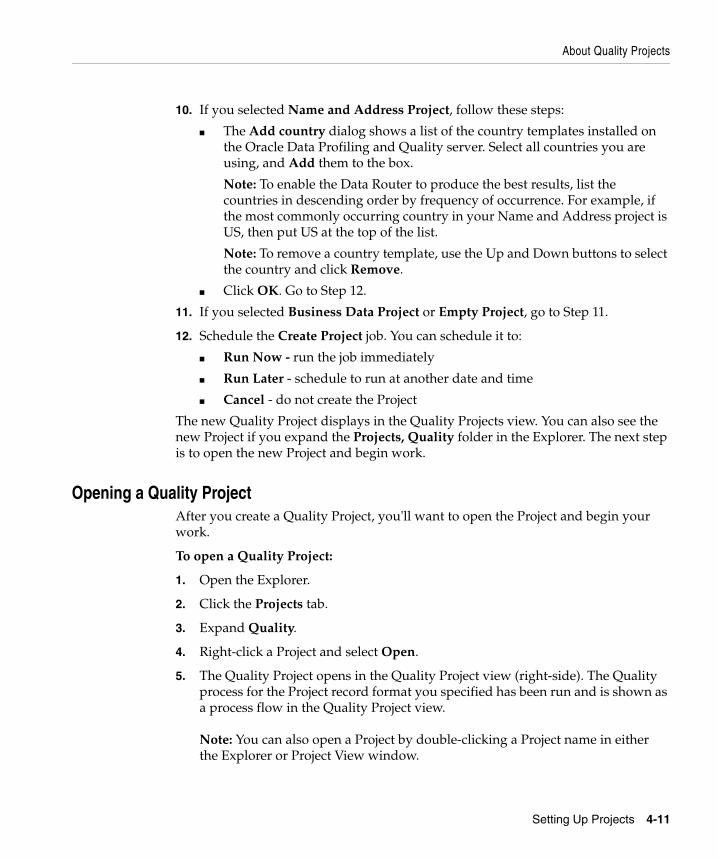
About Quality Projects
10. If you selected Name and Address Project, follow these steps:
■ The Add country dialog shows a list of the country templates installed on the Oracle Data Profiling and Quality server. Select all countries you are using, and Add them to the box.
Note: To enable the Data Router to produce the best results, list the countries in descending order by frequency of occurrence. For example, if the most commonly occurring country in your Name and Address project is US, then put US at the top of the list.
Note: To remove a country template, use the Up and Down buttons to select the country and click Remove.
■ Click OK. Go to Step 12.
11. If you selected Business Data Project or Empty Project, go to Step 11.
12. Schedule the Create Project job. You can schedule it to:
■ Run Now - run the job immediately
■ Run Later - schedule to run at another date and time
■ Cancel - do not create the Project
The new Quality Project displays in the Quality Projects view. You can also see the new Project if you expand the Projects, Quality folder in the Explorer. The next step is to open the new Project and begin work.
Opening a Quality ProjectAfter you create a Quality Project, you'll want to open the Project and begin your work.
To open a Quality Project:
1. Open the Explorer.
2. Click the Projects tab.
3. Expand Quality.
4. Right-click a Project and select Open.
5. The Quality Project opens in the Quality Project view (right-side). The Quality process for the Project record format you specified has been run and is shown as a process flow in the Quality Project view. Note: You can also open a Project by double-clicking a Project name in either the Explorer or Project View window.
Setting Up Projects 4-11
Modifying Process Workflow
Modifying Process WorkflowQuality processes (see Table 1–1) are the building blocks that make up the workflow for each Quality Project. There are two basic types of workflow:
■ Name and Address—for data that contains name and address records
■ Business Data—for business data that contains no name and address records
When you create a Project, you create either a Name and Address Project or a Business Data Project based on the type of data in the Entity (or Entities) in the Project. You can also create an Empty Project which requires that you construct a workflow by adding Quality processes that you select from a Configuration dialog. The process for creating your own workflow is described in the following section.
About Quality Project WorkflowsBefore you begin to create or modify a workflow, you should become familiar with the data quality functions performed by each process and where it makes sense to use them in a workflow sequence.
When you create a Project and select Name and Address, the Oracle Data Quality product application creates an optimum process flow for name and address records (see Table 4–2).
Note: The process flow described in Table 4–2 is the default flow for a single- country project. If you selected multiple countries or checked the Include global locator process option when you created the project, the flow include additional processes.
When you select a Business Data Project, the Oracle Data Quality product application creates a workflow optimized for non-name and address data (see Table 4–3). When you select an Empty Project, you can create the workflow yourself. See “Adding Quality Processes” on page 4-16.
For additional information, please refer to the Oracle Data Profiling and Oracle Data Quality for Data Integrator Help where you will find topics about working with Quality processes.
4-12 Oracle Data Profiling and Oracle Data Quality for Data Integrator Getting Started Guide
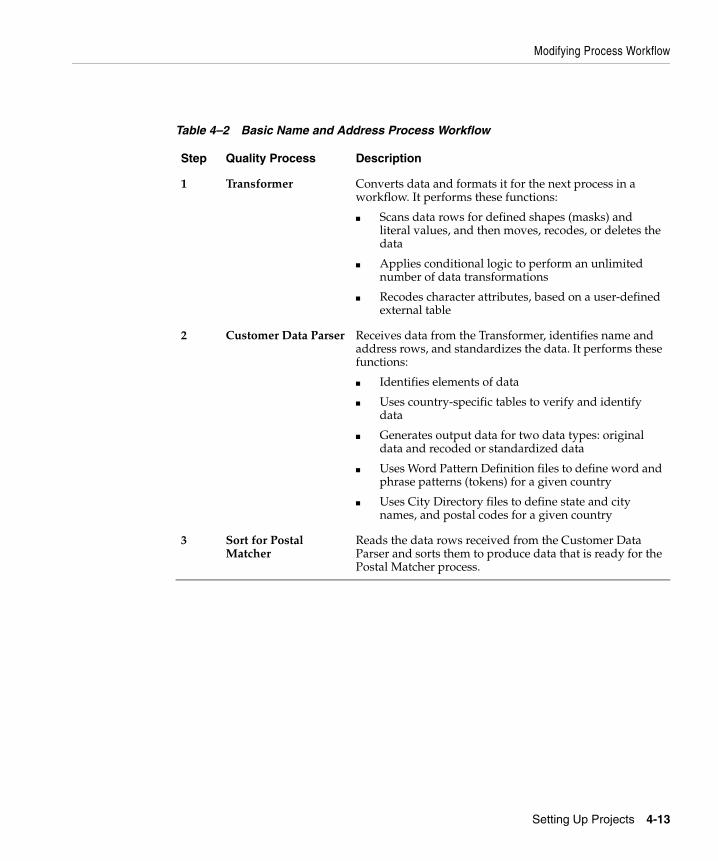
Modifying Process Workflow
Table 4–2 Basic Name and Address Process Workflow
Step Quality Process Description
1 Transformer Converts data and formats it for the next process in a workflow. It performs these functions:
■ Scans data rows for defined shapes (masks) and literal values, and then moves, recodes, or deletes the data
■ Applies conditional logic to perform an unlimited number of data transformations
■ Recodes character attributes, based on a user-defined external table
2 Customer Data Parser Receives data from the Transformer, identifies name and address rows, and standardizes the data. It performs these functions:
■ Identifies elements of data
■ Uses country-specific tables to verify and identify data
■ Generates output data for two data types: original data and recoded or standardized data
■ Uses Word Pattern Definition files to define word and phrase patterns (tokens) for a given country
■ Uses City Directory files to define state and city names, and postal codes for a given country
3 Sort for Postal Matcher
Reads the data rows received from the Customer Data Parser and sorts them to produce data that is ready for the Postal Matcher process.
Setting Up Projects 4-13
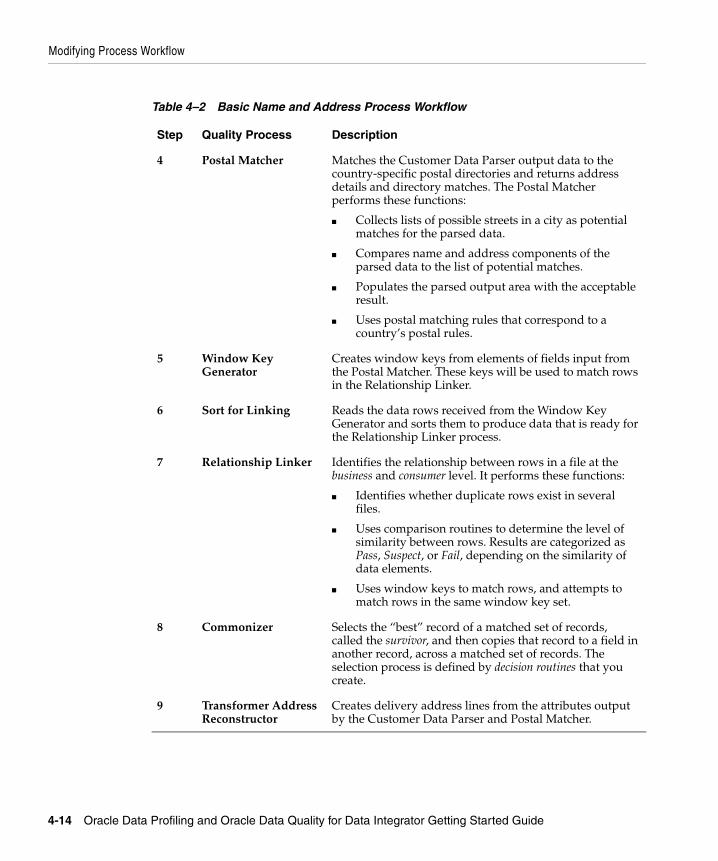
Modifying Process Workflow
4 Postal Matcher Matches the Customer Data Parser output data to the country-specific postal directories and returns address details and directory matches. The Postal Matcher performs these functions:
■ Collects lists of possible streets in a city as potential matches for the parsed data.
■ Compares name and address components of the parsed data to the list of potential matches.
■ Populates the parsed output area with the acceptable result.
■ Uses postal matching rules that correspond to a country’s postal rules.
5 Window Key Generator
Creates window keys from elements of fields input from the Postal Matcher. These keys will be used to match rows in the Relationship Linker.
6 Sort for Linking Reads the data rows received from the Window Key Generator and sorts them to produce data that is ready for the Relationship Linker process.
7 Relationship Linker Identifies the relationship between rows in a file at the business and consumer level. It performs these functions:
■ Identifies whether duplicate rows exist in several files.
■ Uses comparison routines to determine the level of similarity between rows. Results are categorized as Pass, Suspect, or Fail, depending on the similarity of data elements.
■ Uses window keys to match rows, and attempts to match rows in the same window key set.
8 Commonizer Selects the “best” record of a matched set of records, called the survivor, and then copies that record to a field in another record, across a matched set of records. The selection process is defined by decision routines that you create.
9 Transformer Address Reconstructor
Creates delivery address lines from the attributes output by the Customer Data Parser and Postal Matcher.
Table 4–2 Basic Name and Address Process Workflow
Step Quality Process Description
4-14 Oracle Data Profiling and Oracle Data Quality for Data Integrator Getting Started Guide
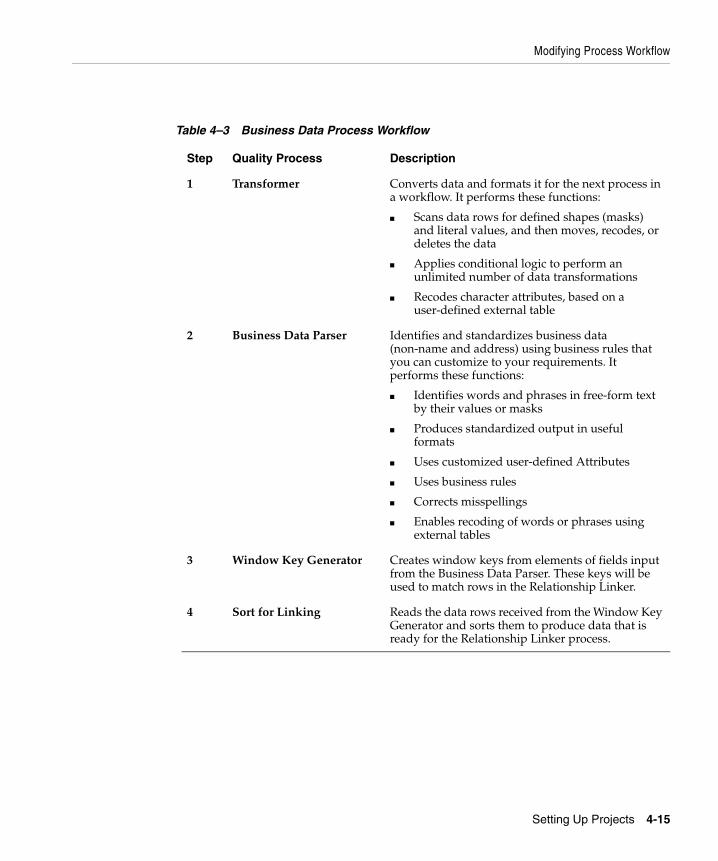
Modifying Process Workflow
Table 4–3 Business Data Process Workflow
Step Quality Process Description
1 Transformer Converts data and formats it for the next process in a workflow. It performs these functions:
■ Scans data rows for defined shapes (masks) and literal values, and then moves, recodes, or deletes the data
■ Applies conditional logic to perform an unlimited number of data transformations
■ Recodes character attributes, based on a user-defined external table
2 Business Data Parser Identifies and standardizes business data (non-name and address) using business rules that you can customize to your requirements. It performs these functions:
■ Identifies words and phrases in free-form text by their values or masks
■ Produces standardized output in useful formats
■ Uses customized user-defined Attributes
■ Uses business rules
■ Corrects misspellings
■ Enables recoding of words or phrases using external tables
3 Window Key Generator Creates window keys from elements of fields input from the Business Data Parser. These keys will be used to match rows in the Relationship Linker.
4 Sort for Linking Reads the data rows received from the Window Key Generator and sorts them to produce data that is ready for the Relationship Linker process.
Setting Up Projects 4-15
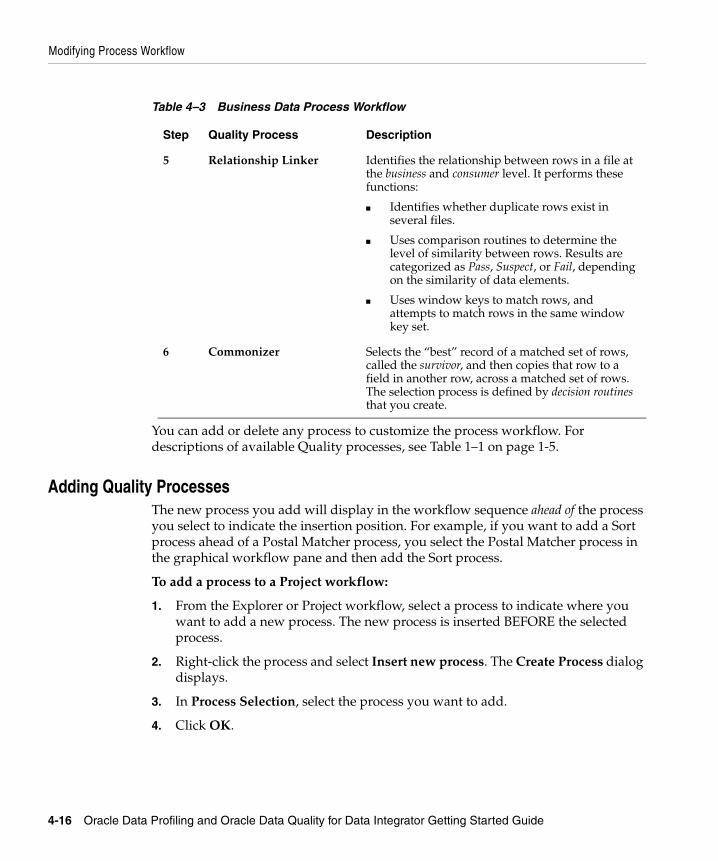
Modifying Process Workflow
You can add or delete any process to customize the process workflow. For descriptions of available Quality processes, see Table 1–1 on page 1-5.
Adding Quality ProcessesThe new process you add will display in the workflow sequence ahead of the process you select to indicate the insertion position. For example, if you want to add a Sort process ahead of a Postal Matcher process, you select the Postal Matcher process in the graphical workflow pane and then add the Sort process.
To add a process to a Project workflow:
1. From the Explorer or Project workflow, select a process to indicate where you want to add a new process. The new process is inserted BEFORE the selected process.
2. Right-click the process and select Insert new process. The Create Process dialog displays.
3. In Process Selection, select the process you want to add.
4. Click OK.
5 Relationship Linker Identifies the relationship between rows in a file at the business and consumer level. It performs these functions:
■ Identifies whether duplicate rows exist in several files.
■ Uses comparison routines to determine the level of similarity between rows. Results are categorized as Pass, Suspect, or Fail, depending on the similarity of data elements.
■ Uses window keys to match rows, and attempts to match rows in the same window key set.
6 Commonizer Selects the “best” record of a matched set of rows, called the survivor, and then copies that row to a field in another row, across a matched set of rows. The selection process is defined by decision routines that you create.
Table 4–3 Business Data Process Workflow
Step Quality Process Description
4-16 Oracle Data Profiling and Oracle Data Quality for Data Integrator Getting Started Guide
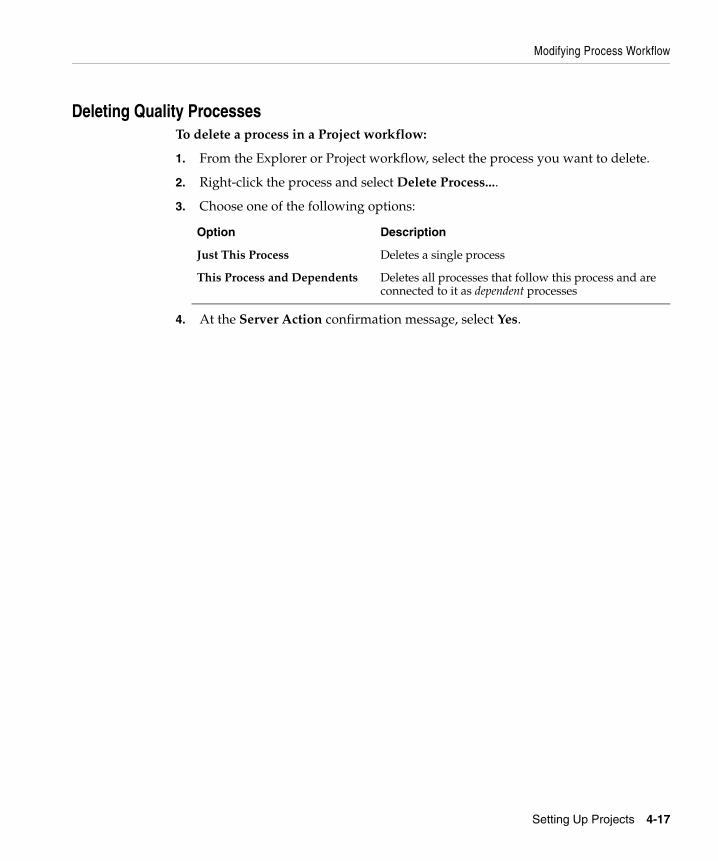
Modifying Process Workflow
Deleting Quality ProcessesTo delete a process in a Project workflow:
1. From the Explorer or Project workflow, select the process you want to delete.
2. Right-click the process and select Delete Process....
3. Choose one of the following options:
4. At the Server Action confirmation message, select Yes.
Option Description
Just This Process Deletes a single process
This Process and Dependents Deletes all processes that follow this process and are connected to it as dependent processes
Setting Up Projects 4-17
Managing Projects
Managing ProjectsYou can edit Project Metadata, add and view Project Notes, and delete Projects. For Quality Projects, in addition to the above, you can run the data processes you have configured for the Project, and export the Project process steps to a script for running later in batch mode or from a command line.
For information about setting up Quality data process workflows and specifying input files, output files, and business rules, see the Oracle Data Profiling and Oracle Data Quality for Data Integrator Help.
Editing ProjectsYou can edit Projects by modifying Project detail. The specific fields you can edit vary by Project Type. For a Time Series Project, you can change the name, description, and schedule. For a Quality Project, you can only change the Project’s name and description. For a Profiling Project, you can change the name, description, and Entities used by the project.
To edit Project details:
1. Open the Metabase Explorer.
2. Click the Projects tab.
3. Expand the Profiling, Time Series or Quality folder, depending on the type of Project you want to edit.
4. Right-click the Project name and select Edit project details. The Edit Project dialog displays.
5. Make the appropriate changes and click OK.
Deleting ProjectsTo delete a Project:
1. Open the Metabase Explorer.
2. Click the Projects tab.
3. Expand the Profiling, Time Series or Quality folder, depending where the Project you want to delete is located.
4. Right-click the Project name and select Delete.
4-18 Oracle Data Profiling and Oracle Data Quality for Data Integrator Getting Started Guide
Managing Projects
5. You are asked to confirm the deletion and, if necessary, to remove any related objects. Click Yes.
6. Verify that the Project has been removed from the Explorer list.
Adding Notes to a ProjectProject Notes are a way to provide communication within and across teams that need information about the data in your Projects.
For detailed information about Notes and ways to use them, see the Oracle Data Profiling and Oracle Data Quality for Data Integrator Help.
To add Project Notes:
1. Open the Metabase Explorer.
2. Click the Projects tab.
3. Expand the Profiling, Time Series or Quality folder, depending on the type of Project you want to add Notes to.
4. Right-click the Project name and select Notes > Add.
Managing Quality ProjectsProjects can help you manage the total data quality process by giving you a space in which you can work. However, managing a Quality Project is more than creating a Project workflow. It requires that you do some up-front planning and preparation, such as:
■ Identifying the goals and business objectives for your data
■ Preparing the data you want to process
■ Choosing and testing the appropriate data process steps, and fine tuning the results.
The Oracle Data Profiling and Oracle Data Quality for Data Integrator Help contains information to assist you in these tasks, and provides detailed information about setting up Project workflows and data processes.
Note: If you do not have the Oracle Data Quality add-on component installed, the following features are not available.
Setting Up Projects 4-19
Next Steps
Running a Quality Project JobAfter you identify the data quality processes and workflow you want to run, you will start the processing at the Project level. Follow these instructions for running a Quality data quality job.
To run a Quality Project job:
1. Open the Metabase Explorer.
2. Click the Projects tab.
3. Expand the Quality folder to find the Project you want to run.
4. Right-click the Project name and select Run.
Note: If you want to view the process workflow before running it, right-click the Project name and select Open, review the process, and then select Run.
To view Project Notes:
1. Open the Metabase Explorer.
2. Click the Projects tab.
3. Expand the Profiling, Time Series or Quality folder, depending on the type of Project you want to view Notes for.
4. Right-click the Project name and select Notes > Drill down to Notes.
To view all Project Notes:
1. Open the Metabase Explorer.
2. Click the Projects tab.
3. Expand the Profiling, Time Series or Quality folder, depending on the type of Project you want to view Notes for.
4. Right-click a Project name and select Notes > Drill down to All Notes.
Next StepsCreating Entities and Projects are two fundamental steps to getting started using the Oracle Data Profiling and Quality user interface. After you have imported and set
4-20 Oracle Data Profiling and Oracle Data Quality for Data Integrator Getting Started Guide
Next Steps
up data in projects, you can begin to investigate and evaluate the data in your Metabase.
If you are working with Oracle Data Profiling and Quality for the first time, your next step may be to become familiar with the data and metadata in the Entity you created. Use the Metabase Explorer to investigate your data and take advantage of drill-down features to help you explore underlying details.
As you work, refer to the Oracle Data Profiling and Oracle Data Quality for Data Integrator Help for answers to your questions and detailed information about tasks. The Help is divided into these areas of information:
■ Tour of User Interface
■ Basic Steps to Getting Started
■ Working with Oracle Data Profiling
■ Working with Time Series
■ Working with Quality
Each section contains detailed instructions for performing activities and includes reference information to help you make decisions and choices that support your data quality objectives.
You will find Help located in the main menu at the top of the Oracle Data Profiling and Quality products program window.
Setting Up Projects 4-21

Next Steps
4-22 Oracle Data Profiling and Oracle Data Quality for Data Integrator Getting Started Guide
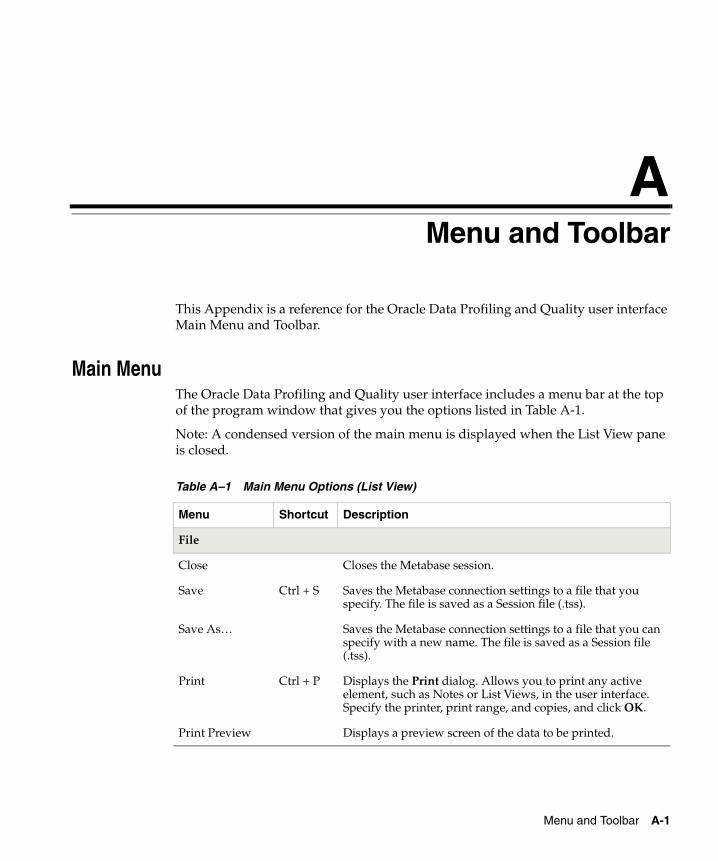
Menu and To
A
Menu and ToolbarThis Appendix is a reference for the Oracle Data Profiling and Quality user interface Main Menu and Toolbar.
Main MenuThe Oracle Data Profiling and Quality user interface includes a menu bar at the top of the program window that gives you the options listed in Table A-1.
Note: A condensed version of the main menu is displayed when the List View pane is closed.
Table A–1 Main Menu Options (List View)
Menu Shortcut Description
File
Close Closes the Metabase session.
Save Ctrl + S Saves the Metabase connection settings to a file that you specify. The file is saved as a Session file (.tss).
Save As… Saves the Metabase connection settings to a file that you can specify with a new name. The file is saved as a Session file (.tss).
Print Ctrl + P Displays the Print dialog. Allows you to print any active element, such as Notes or List Views, in the user interface. Specify the printer, print range, and copies, and click OK.
Print Preview Displays a preview screen of the data to be printed.
olbar A-1
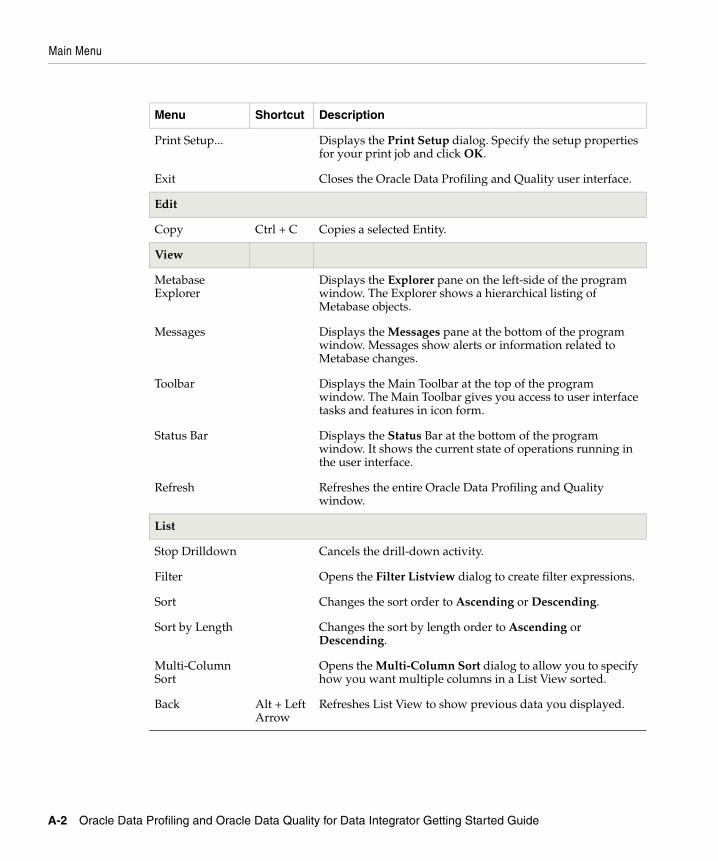
Main Menu
Print Setup... Displays the Print Setup dialog. Specify the setup properties for your print job and click OK.
Exit Closes the Oracle Data Profiling and Quality user interface.
Edit
Copy Ctrl + C Copies a selected Entity.
View
Metabase Explorer
Displays the Explorer pane on the left-side of the program window. The Explorer shows a hierarchical listing of Metabase objects.
Messages Displays the Messages pane at the bottom of the program window. Messages show alerts or information related to Metabase changes.
Toolbar Displays the Main Toolbar at the top of the program window. The Main Toolbar gives you access to user interface tasks and features in icon form.
Status Bar Displays the Status Bar at the bottom of the program window. It shows the current state of operations running in the user interface.
Refresh Refreshes the entire Oracle Data Profiling and Quality window.
List
Stop Drilldown Cancels the drill-down activity.
Filter Opens the Filter Listview dialog to create filter expressions.
Sort Changes the sort order to Ascending or Descending.
Sort by Length Changes the sort by length order to Ascending or Descending.
Multi-Column Sort
Opens the Multi-Column Sort dialog to allow you to specify how you want multiple columns in a List View sorted.
Back Alt + Left Arrow
Refreshes List View to show previous data you displayed.
Menu Shortcut Description
A-2 Oracle Data Profiling and Oracle Data Quality for Data Integrator Getting Started Guide
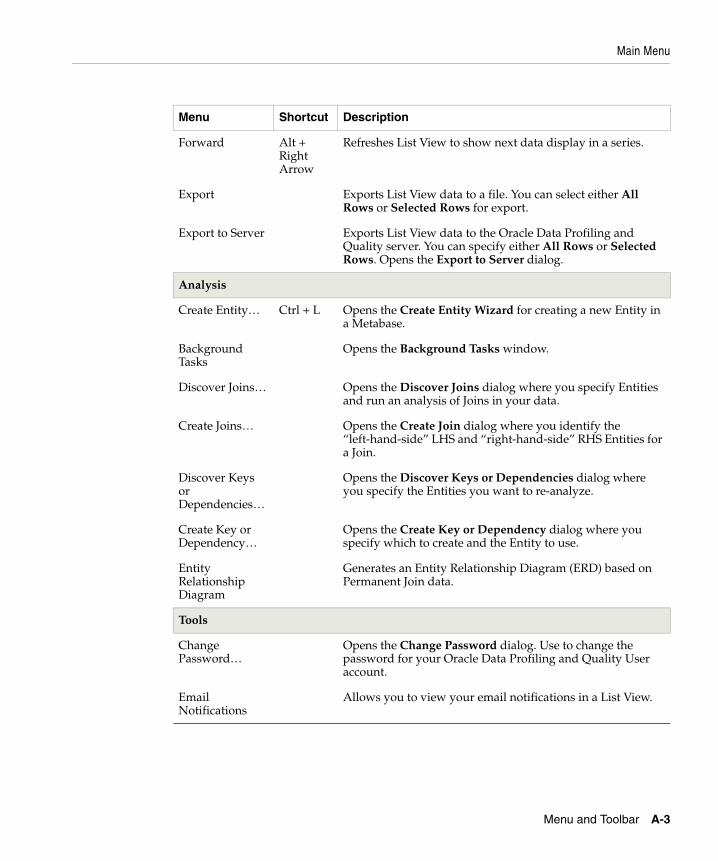
Main Menu
Forward Alt + Right Arrow
Refreshes List View to show next data display in a series.
Export Exports List View data to a file. You can select either All Rows or Selected Rows for export.
Export to Server Exports List View data to the Oracle Data Profiling and Quality server. You can specify either All Rows or Selected Rows. Opens the Export to Server dialog.
Analysis
Create Entity… Ctrl + L Opens the Create Entity Wizard for creating a new Entity in a Metabase.
Background Tasks
Opens the Background Tasks window.
Discover Joins… Opens the Discover Joins dialog where you specify Entities and run an analysis of Joins in your data.
Create Joins… Opens the Create Join dialog where you identify the “left-hand-side” LHS and “right-hand-side” RHS Entities for a Join.
Discover Keys or Dependencies…
Opens the Discover Keys or Dependencies dialog where you specify the Entities you want to re-analyze.
Create Key or Dependency…
Opens the Create Key or Dependency dialog where you specify which to create and the Entity to use.
Entity Relationship Diagram
Generates an Entity Relationship Diagram (ERD) based on Permanent Join data.
Tools
Change Password…
Opens the Change Password dialog. Use to change the password for your Oracle Data Profiling and Quality User account.
Email Notifications
Allows you to view your email notifications in a List View.
Menu Shortcut Description
Menu and Toolbar A-3
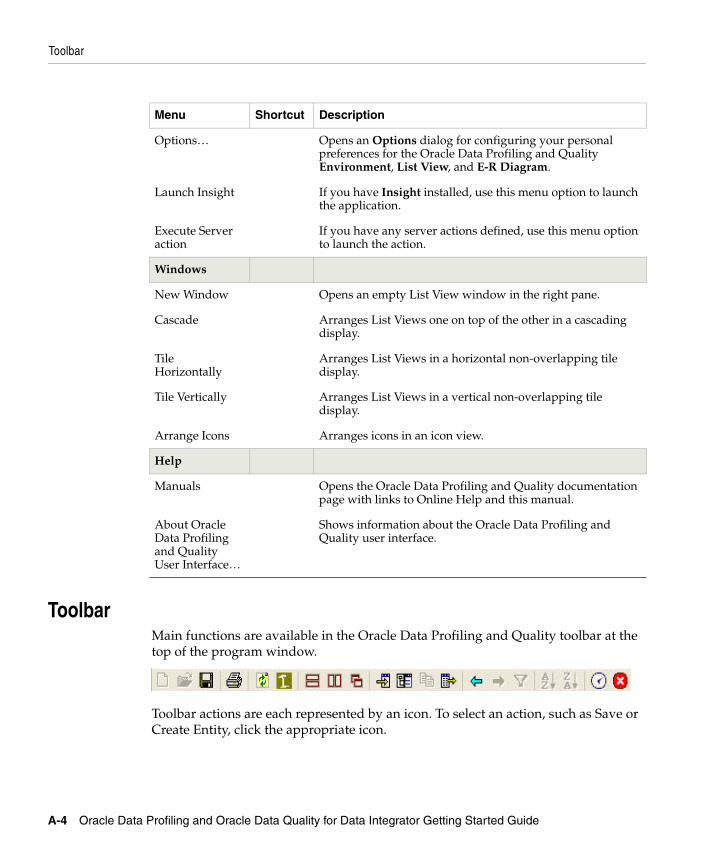
Toolbar
ToolbarMain functions are available in the Oracle Data Profiling and Quality toolbar at the top of the program window.
Toolbar actions are each represented by an icon. To select an action, such as Save or Create Entity, click the appropriate icon.
Options… Opens an Options dialog for configuring your personal preferences for the Oracle Data Profiling and Quality Environment, List View, and E-R Diagram.
Launch Insight If you have Insight installed, use this menu option to launch the application.
Execute Server action
If you have any server actions defined, use this menu option to launch the action.
Windows
New Window Opens an empty List View window in the right pane.
Cascade Arranges List Views one on top of the other in a cascading display.
Tile Horizontally
Arranges List Views in a horizontal non-overlapping tile display.
Tile Vertically Arranges List Views in a vertical non-overlapping tile display.
Arrange Icons Arranges icons in an icon view.
Help
Manuals Opens the Oracle Data Profiling and Quality documentation page with links to Online Help and this manual.
About Oracle Data Profiling and Quality User Interface…
Shows information about the Oracle Data Profiling and Quality user interface.
Menu Shortcut Description
A-4 Oracle Data Profiling and Oracle Data Quality for Data Integrator Getting Started Guide
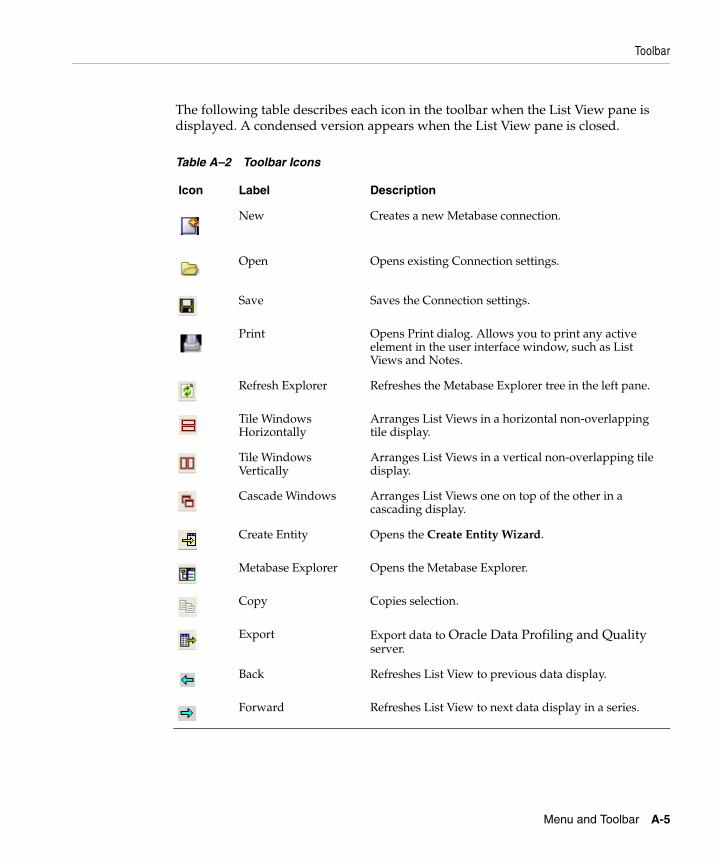
Toolbar
The following table describes each icon in the toolbar when the List View pane is displayed. A condensed version appears when the List View pane is closed.
Table A–2 Toolbar Icons
Icon Label Description
New Creates a new Metabase connection.
Open Opens existing Connection settings.
Save Saves the Connection settings.
Print Opens Print dialog. Allows you to print any active element in the user interface window, such as List Views and Notes.
Refresh Explorer Refreshes the Metabase Explorer tree in the left pane.
Tile Windows Horizontally
Arranges List Views in a horizontal non-overlapping tile display.
Tile Windows Vertically
Arranges List Views in a vertical non-overlapping tile display.
Cascade Windows Arranges List Views one on top of the other in a cascading display.
Create Entity Opens the Create Entity Wizard.
Metabase Explorer Opens the Metabase Explorer.
Copy Copies selection.
Export Export data to Oracle Data Profiling and Quality server.
Back Refreshes List View to previous data display.
Forward Refreshes List View to next data display in a series.
Menu and Toolbar A-5
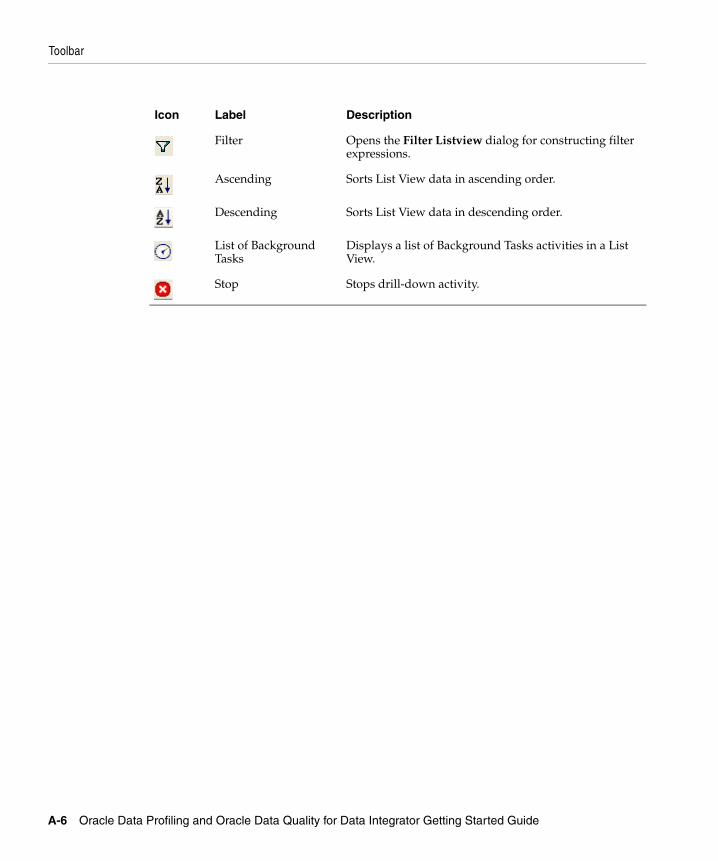
Toolbar
Filter Opens the Filter Listview dialog for constructing filter expressions.
Ascending Sorts List View data in ascending order.
Descending Sorts List View data in descending order.
List of Background Tasks
Displays a list of Background Tasks activities in a List View.
Stop Stops drill-down activity.
Icon Label Description
A-6 Oracle Data Profiling and Oracle Data Quality for Data Integrator Getting Started Guide
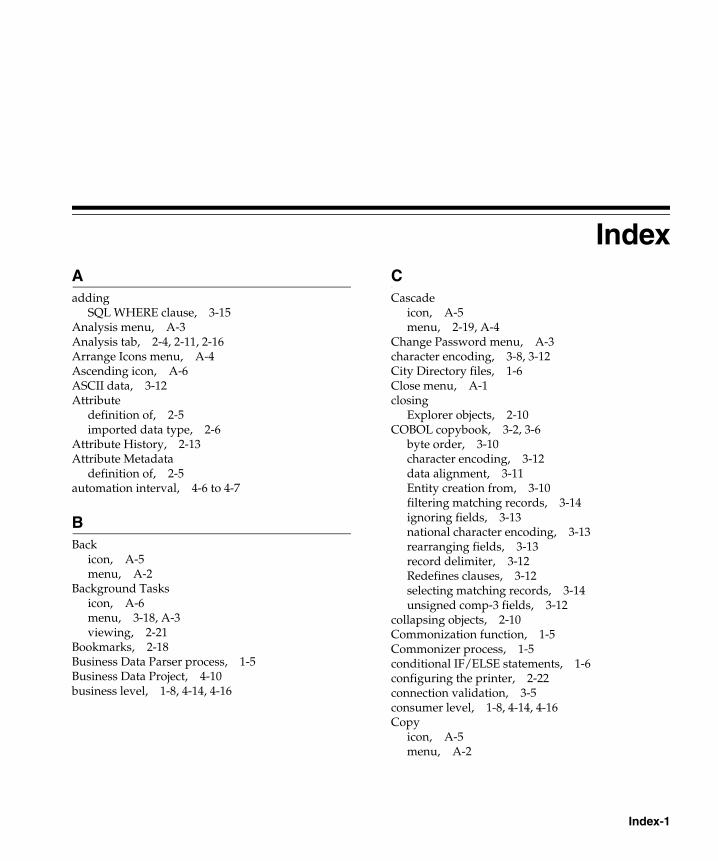
Index
AaddingSQL WHERE clause, 3-15Analysis menu, A-3Analysis tab, 2-4, 2-11, 2-16Arrange Icons menu, A-4Ascending icon, A-6ASCII data, 3-12Attribute
definition of, 2-5imported data type, 2-6
Attribute History, 2-13Attribute Metadata
definition of, 2-5automation interval, 4-6 to 4-7
BBack
icon, A-5menu, A-2
Background Tasksicon, A-6menu, 3-18, A-3viewing, 2-21
Bookmarks, 2-18Business Data Parser process, 1-5Business Data Project, 4-10business level, 1-8, 4-14, 4-16
CCascade
icon, A-5menu, 2-19, A-4
Change Password menu, A-3character encoding, 3-8, 3-12City Directory files, 1-6Close menu, A-1closing
Explorer objects, 2-10COBOL copybook, 3-2, 3-6
byte order, 3-10character encoding, 3-12data alignment, 3-11Entity creation from, 3-10filtering matching records, 3-14ignoring fields, 3-13national character encoding, 3-13rearranging fields, 3-13record delimiter, 3-12Redefines clauses, 3-12selecting matching records, 3-14unsigned comp-3 fields, 3-12
collapsing objects, 2-10Commonization function, 1-5Commonizer process, 1-5conditional IF/ELSE statements, 1-6configuring the printer, 2-22connection validation, 3-5consumer level, 1-8, 4-14, 4-16Copy
icon, A-5menu, A-2
Index-1
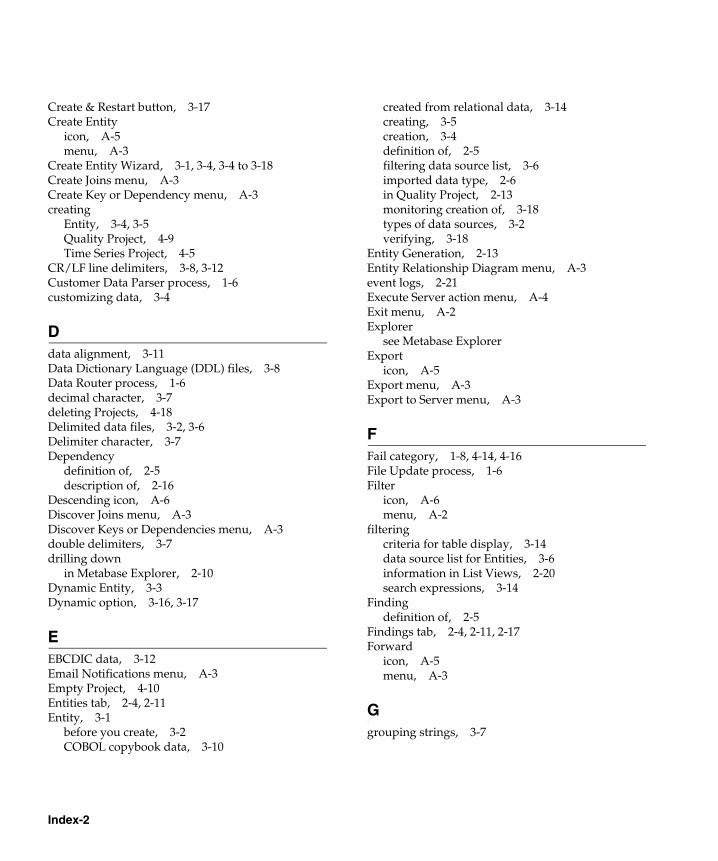
Create & Restart button, 3-17Create Entity
icon, A-5menu, A-3
Create Entity Wizard, 3-1, 3-4, 3-4 to 3-18Create Joins menu, A-3Create Key or Dependency menu, A-3creating
Entity, 3-4, 3-5Quality Project, 4-9Time Series Project, 4-5
CR/LF line delimiters, 3-8, 3-12Customer Data Parser process, 1-6customizing data, 3-4
Ddata alignment, 3-11Data Dictionary Language (DDL) files, 3-8Data Router process, 1-6decimal character, 3-7deleting Projects, 4-18Delimited data files, 3-2, 3-6Delimiter character, 3-7Dependency
definition of, 2-5description of, 2-16
Descending icon, A-6Discover Joins menu, A-3Discover Keys or Dependencies menu, A-3double delimiters, 3-7drilling down
in Metabase Explorer, 2-10Dynamic Entity, 3-3Dynamic option, 3-16, 3-17
EEBCDIC data, 3-12Email Notifications menu, A-3Empty Project, 4-10Entities tab, 2-4, 2-11Entity, 3-1
before you create, 3-2COBOL copybook data, 3-10
created from relational data, 3-14creating, 3-5creation, 3-4definition of, 2-5filtering data source list, 3-6imported data type, 2-6in Quality Project, 2-13monitoring creation of, 3-18types of data sources, 3-2verifying, 3-18
Entity Generation, 2-13Entity Relationship Diagram menu, A-3event logs, 2-21Execute Server action menu, A-4Exit menu, A-2Explorer
see Metabase ExplorerExport
icon, A-5Export menu, A-3Export to Server menu, A-3
FFail category, 1-8, 4-14, 4-16File Update process, 1-6Filter
icon, A-6menu, A-2
filteringcriteria for table display, 3-14data source list for Entities, 3-6information in List Views, 2-20search expressions, 3-14
Findingdefinition of, 2-5
Findings tab, 2-4, 2-11, 2-17Forward
icon, A-5menu, A-3
Ggrouping strings, 3-7
Index-2
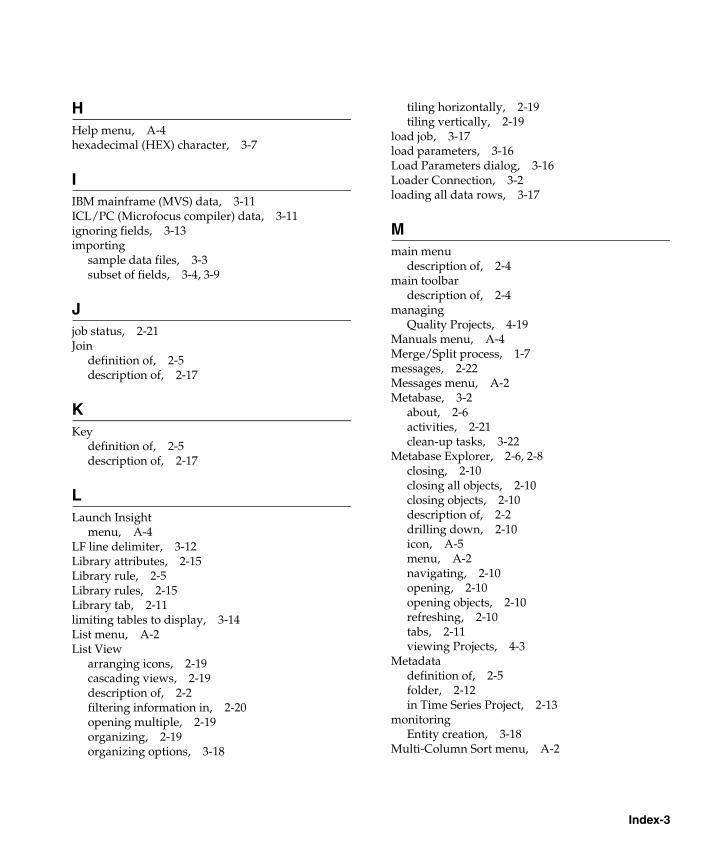
HHelp menu, A-4hexadecimal (HEX) character, 3-7
IIBM mainframe (MVS) data, 3-11ICL/PC (Microfocus compiler) data, 3-11ignoring fields, 3-13importing
sample data files, 3-3subset of fields, 3-4, 3-9
Jjob status, 2-21Join
definition of, 2-5description of, 2-17
KKey
definition of, 2-5description of, 2-17
LLaunch Insight
menu, A-4LF line delimiter, 3-12Library attributes, 2-15Library rule, 2-5Library rules, 2-15Library tab, 2-11limiting tables to display, 3-14List menu, A-2List View
arranging icons, 2-19cascading views, 2-19description of, 2-2filtering information in, 2-20opening multiple, 2-19organizing, 2-19organizing options, 3-18
tiling horizontally, 2-19tiling vertically, 2-19
load job, 3-17load parameters, 3-16Load Parameters dialog, 3-16Loader Connection, 3-2loading all data rows, 3-17
Mmain menu
description of, 2-4main toolbar
description of, 2-4managing
Quality Projects, 4-19Manuals menu, A-4Merge/Split process, 1-7messages, 2-22Messages menu, A-2Metabase, 3-2
about, 2-6activities, 2-21clean-up tasks, 3-22
Metabase Explorer, 2-6, 2-8closing, 2-10closing all objects, 2-10closing objects, 2-10description of, 2-2drilling down, 2-10icon, A-5menu, A-2navigating, 2-10opening, 2-10opening objects, 2-10refreshing, 2-10tabs, 2-11viewing Projects, 4-3
Metadatadefinition of, 2-5folder, 2-12in Time Series Project, 2-13
monitoringEntity creation, 3-18
Multi-Column Sort menu, A-2
Index-3
NName and Address Project, 4-10national character encoding, 3-13New icon, A-5New Window menu, A-4Notes
see Project Notes
OODQ files, 3-2, 3-6Open icon, A-5opening
Explorer objects, 2-10Metabase Explorer, 2-10multiple List Views, 2-19Projects, 4-3Quality Project, 4-11
Options menu, A-4Oracle Data Profiling Project, 2-11, 2-12, 4-2organizing
List Views, 2-19Overflow, 3-20 to 3-22
Attributes check, 3-20Attributes investigation, 3-21COBOL data source example, 3-21
PPass category, 1-8, 4-14, 4-16Postal Matcher process, 1-7, 1-8Preview option, 3-4, 3-6, 3-8, 3-13, 3-15Print
icon, A-5menu, A-1
Print Preview menu, 2-22, A-1Print Setup menu, 2-22, A-2printing
active window, 2-22preview, 2-22
Processin Quality Project, 2-13
Projectdefinition of, 2-5deleting, 4-18
types of, 2-11Project Metadata
in Quality Project, 2-13Project metadata, 4-2Project Notes
description of, 2-18viewing, 4-20
Project tab, 2-4, 2-11Project View
description of, 2-2Projects, 3-22
managing, 4-18opening, 4-3types of, 4-2
Projects tab, 2-11, 4-3, 4-4, 4-5
QQuality application
introduction, 1-5Quality process
list of, 1-5Quality Project, 2-11, 2-13, 4-2
creating, 4-9data source, 4-6list of data processes, 1-5managing, 4-19opening, 4-11running a job, 4-20selecting process workflow, 4-8
quote character, 3-7
Rrandom sampling, 3-17rearranging columns, 3-9rearranging fields, 3-13record termination, 3-8Redefines clauses, 3-12Reference Matcher process, 1-7Refresh Explorer icon, A-5Refresh menu, A-2refreshing
Explorer views, 2-10
Index-4
relational datacreating Entities from, 3-14data source for Entity, 3-2limiting tables to display, 3-14preview of data, 3-15SQL WHERE clause, 3-15table view options, 3-15
relational data source, 3-6Relational databases, 3-6Relationship Linker process, 1-8Resolve process, 1-8Restart button, 3-8, 3-13restarting Create Entity session, 3-8Row
imported data type, 2-6Rules files, 1-6running Quality Project job, 4-20
SSave
icon, A-5menu, A-1
Save As menu, A-1schema settings, 3-7, 3-10selecting
fields to import, 3-4matching records of data, 3-14matching rows of data, 3-9number of records to import, 3-17Quality process workflow, 4-8subset of fields, 3-9
Set Selection process, 1-8setting load parameters, 3-16Sort by Length menu, A-2Sort for Linking process, 1-8Sort for Postal Matcher process, 1-8Sort menu, A-2specifying import start row, 3-17Status Bar menu, A-2Stop Drilldown menu, A-2Stop icon, A-6Survivorship function, 1-5Suspect category, 1-8, 4-14, 4-16
Ttable view options, 3-15Tile Horizontally
icon, A-5menu, A-4
Tile Verticallyicon, A-5menu, A-4
Time Series applicationintroduction, 1-4
Time Series Project, 2-11, 2-13, 4-2automation interval, 4-6 to 4-7creating, 4-5data trending objects, 4-5description of, 4-5
Toolbar menu, A-2Tools menu, A-3Transformer process, 1-8
UUNICODE strings, 3-13UNIX COBOL files, 3-12User Defined Process, 1-9User Defined Sort process, 1-9
Vverifying new Entities, 3-18View menu, A-2viewing
messages, 2-22
WWindow Key Generator process, 1-9window keys, 1-8, 4-14, 4-16Windows menu, A-4Word Pattern Definition files, 1-6
Index-5

Index-6