getting started with the feature pack for osgi ... · international technical support organization...
TRANSCRIPT

ibm.com/redbooks
Front cover
Getting Started with the Feature Pack for OSGi Applications and JPA 2.0
Daniel HaischtPhilipp Huber
Valentin MahrwaldCarla Sadtler
Experience the new frontier of OSGi enterprise componentry creation
Apply persistence based on Java Persistence API 2.0
Build, deploy, and integrate OSGi applications


International Technical Support Organization
Getting Started with the Feature Pack for OSGi Applications and JPA 2.0
December 2010
SG24-7911-00

© Copyright International Business Machines Corporation 2010. All rights reserved.Note to U.S. Government Users Restricted Rights -- Use, duplication or disclosure restricted by GSA ADP ScheduleContract with IBM Corp.
First Edition (December 2010)
This edition applies to WebSphere Application Server V7 Feature Pack for OSGi Applications and JPA 2.0.
Note: Before using this information and the product it supports, read the information in “Notices” on page vii.

Contents
Notices . . . . . . . . . . . . . . . . . . . . . . . . . . . . . . . . . . . . . . . . . . . . . . . . . . . . . . . . . . . . . . . . . viiTrademarks . . . . . . . . . . . . . . . . . . . . . . . . . . . . . . . . . . . . . . . . . . . . . . . . . . . . . . . . . . . . . viii
Preface . . . . . . . . . . . . . . . . . . . . . . . . . . . . . . . . . . . . . . . . . . . . . . . . . . . . . . . . . . . . . . . . . ixThe team who wrote this book . . . . . . . . . . . . . . . . . . . . . . . . . . . . . . . . . . . . . . . . . . . . . . . . ixNow you can become a published author, too! . . . . . . . . . . . . . . . . . . . . . . . . . . . . . . . . . . . .xComments welcome. . . . . . . . . . . . . . . . . . . . . . . . . . . . . . . . . . . . . . . . . . . . . . . . . . . . . . . . .xStay connected to IBM Redbooks . . . . . . . . . . . . . . . . . . . . . . . . . . . . . . . . . . . . . . . . . . . . . xi
Part 1. Architecture and overview . . . . . . . . . . . . . . . . . . . . . . . . . . . . . . . . . . . . . . . . . . . . . . . . . . . . . . . . 1
Chapter 1. Introduction to the feature pack . . . . . . . . . . . . . . . . . . . . . . . . . . . . . . . . . . . 31.1 Feature pack overview . . . . . . . . . . . . . . . . . . . . . . . . . . . . . . . . . . . . . . . . . . . . . . . . . . 41.2 How to use this book. . . . . . . . . . . . . . . . . . . . . . . . . . . . . . . . . . . . . . . . . . . . . . . . . . . . 4
1.2.1 Developers with knowledge of OSGi and Eclipse plug-ins . . . . . . . . . . . . . . . . . . . 41.2.2 Developers with knowledge of JPA. . . . . . . . . . . . . . . . . . . . . . . . . . . . . . . . . . . . . 51.2.3 Developers with knowledge of Java Enterprise Edition . . . . . . . . . . . . . . . . . . . . . 51.2.4 Developers with knowledge of pure Java . . . . . . . . . . . . . . . . . . . . . . . . . . . . . . . . 5
1.3 Installation tips . . . . . . . . . . . . . . . . . . . . . . . . . . . . . . . . . . . . . . . . . . . . . . . . . . . . . . . . 51.3.1 Installation with pre-existing Rational Application Developer . . . . . . . . . . . . . . . . . 51.3.2 Installation with pre-existing WebSphere Application Server . . . . . . . . . . . . . . . . . 8
Chapter 2. Introduction to OSGi and OSGi applications . . . . . . . . . . . . . . . . . . . . . . . . 132.1 OSGi overview . . . . . . . . . . . . . . . . . . . . . . . . . . . . . . . . . . . . . . . . . . . . . . . . . . . . . . . 14
2.1.1 OSGi . . . . . . . . . . . . . . . . . . . . . . . . . . . . . . . . . . . . . . . . . . . . . . . . . . . . . . . . . . . 142.1.2 Modularity with OSGi . . . . . . . . . . . . . . . . . . . . . . . . . . . . . . . . . . . . . . . . . . . . . . 142.1.3 Dynamism with OSGi . . . . . . . . . . . . . . . . . . . . . . . . . . . . . . . . . . . . . . . . . . . . . . 19
2.2 Enterprise OSGi . . . . . . . . . . . . . . . . . . . . . . . . . . . . . . . . . . . . . . . . . . . . . . . . . . . . . . 202.2.1 Key elements . . . . . . . . . . . . . . . . . . . . . . . . . . . . . . . . . . . . . . . . . . . . . . . . . . . . 212.2.2 Blueprint Container specification. . . . . . . . . . . . . . . . . . . . . . . . . . . . . . . . . . . . . . 21
2.3 OSGi applications . . . . . . . . . . . . . . . . . . . . . . . . . . . . . . . . . . . . . . . . . . . . . . . . . . . . . 232.3.1 Application model . . . . . . . . . . . . . . . . . . . . . . . . . . . . . . . . . . . . . . . . . . . . . . . . . 242.3.2 Packaging an OSGi application . . . . . . . . . . . . . . . . . . . . . . . . . . . . . . . . . . . . . . 262.3.3 Programming model . . . . . . . . . . . . . . . . . . . . . . . . . . . . . . . . . . . . . . . . . . . . . . . 27
2.4 OSGi applications feature for WebSphere Application Server V7. . . . . . . . . . . . . . . . . 282.4.1 Administering OSGi applications. . . . . . . . . . . . . . . . . . . . . . . . . . . . . . . . . . . . . . 282.4.2 Programming for WebSphere Application Server . . . . . . . . . . . . . . . . . . . . . . . . . 30
2.5 Other support for OSGi applications . . . . . . . . . . . . . . . . . . . . . . . . . . . . . . . . . . . . . . . 322.5.1 OSGi application tooling . . . . . . . . . . . . . . . . . . . . . . . . . . . . . . . . . . . . . . . . . . . . 322.5.2 Integration with the Feature Pack for Service Component Architecture . . . . . . . . 34
2.6 More information . . . . . . . . . . . . . . . . . . . . . . . . . . . . . . . . . . . . . . . . . . . . . . . . . . . . . . 35
Chapter 3. Introduction to the Java Persistence API 2.0 . . . . . . . . . . . . . . . . . . . . . . . . 373.1 Specifications . . . . . . . . . . . . . . . . . . . . . . . . . . . . . . . . . . . . . . . . . . . . . . . . . . . . . . . . 38
3.1.1 JSR 317: Java Persistence API, Version 2.0 . . . . . . . . . . . . . . . . . . . . . . . . . . . . 383.1.2 JSR 303: Bean Validation . . . . . . . . . . . . . . . . . . . . . . . . . . . . . . . . . . . . . . . . . . . 38
3.2 JPA V2.0 enhancements. . . . . . . . . . . . . . . . . . . . . . . . . . . . . . . . . . . . . . . . . . . . . . . . 393.2.1 Bean Validation. . . . . . . . . . . . . . . . . . . . . . . . . . . . . . . . . . . . . . . . . . . . . . . . . . . 393.2.2 Criteria API . . . . . . . . . . . . . . . . . . . . . . . . . . . . . . . . . . . . . . . . . . . . . . . . . . . . . . 40
© Copyright IBM Corp. 2010. All rights reserved. iii

3.2.3 Access type. . . . . . . . . . . . . . . . . . . . . . . . . . . . . . . . . . . . . . . . . . . . . . . . . . . . . . 413.2.4 Extended map. . . . . . . . . . . . . . . . . . . . . . . . . . . . . . . . . . . . . . . . . . . . . . . . . . . . 413.2.5 Orphan removal . . . . . . . . . . . . . . . . . . . . . . . . . . . . . . . . . . . . . . . . . . . . . . . . . . 433.2.6 Derived identity . . . . . . . . . . . . . . . . . . . . . . . . . . . . . . . . . . . . . . . . . . . . . . . . . . . 433.2.7 Nested embedding . . . . . . . . . . . . . . . . . . . . . . . . . . . . . . . . . . . . . . . . . . . . . . . . 453.2.8 New collection mappings . . . . . . . . . . . . . . . . . . . . . . . . . . . . . . . . . . . . . . . . . . . 453.2.9 Unidirectional one-to-many mapping . . . . . . . . . . . . . . . . . . . . . . . . . . . . . . . . . . 463.2.10 Ordered list mapping. . . . . . . . . . . . . . . . . . . . . . . . . . . . . . . . . . . . . . . . . . . . . . 463.2.11 Pessimistic locking . . . . . . . . . . . . . . . . . . . . . . . . . . . . . . . . . . . . . . . . . . . . . . . 473.2.12 Standard properties . . . . . . . . . . . . . . . . . . . . . . . . . . . . . . . . . . . . . . . . . . . . . . 483.2.13 API enhancements . . . . . . . . . . . . . . . . . . . . . . . . . . . . . . . . . . . . . . . . . . . . . . . 483.2.14 JPQL enhancements . . . . . . . . . . . . . . . . . . . . . . . . . . . . . . . . . . . . . . . . . . . . . 51
3.3 JPA 2.0 in the WebSphere Application Server . . . . . . . . . . . . . . . . . . . . . . . . . . . . . . . 523.4 Where to learn more about JPA . . . . . . . . . . . . . . . . . . . . . . . . . . . . . . . . . . . . . . . . . . 54
Part 2. Examples . . . . . . . . . . . . . . . . . . . . . . . . . . . . . . . . . . . . . . . . . . . . . . . . . . . . . . . . . . . . . . . . . . . . . 55
Chapter 4. Sample application . . . . . . . . . . . . . . . . . . . . . . . . . . . . . . . . . . . . . . . . . . . . . 574.1 Sample material for this chapter . . . . . . . . . . . . . . . . . . . . . . . . . . . . . . . . . . . . . . . . . . 584.2 Introducing the ITSO Bank application . . . . . . . . . . . . . . . . . . . . . . . . . . . . . . . . . . . . . 584.3 JPA entities . . . . . . . . . . . . . . . . . . . . . . . . . . . . . . . . . . . . . . . . . . . . . . . . . . . . . . . . . . 59
4.3.1 Customer entity . . . . . . . . . . . . . . . . . . . . . . . . . . . . . . . . . . . . . . . . . . . . . . . . . . . 604.3.2 Account entity . . . . . . . . . . . . . . . . . . . . . . . . . . . . . . . . . . . . . . . . . . . . . . . . . . . . 604.3.3 Transaction entity . . . . . . . . . . . . . . . . . . . . . . . . . . . . . . . . . . . . . . . . . . . . . . . . . 614.3.4 Relationships . . . . . . . . . . . . . . . . . . . . . . . . . . . . . . . . . . . . . . . . . . . . . . . . . . . . 61
4.4 Persistent storage (using Apache Derby tables) . . . . . . . . . . . . . . . . . . . . . . . . . . . . . . 614.5 Front-end web application. . . . . . . . . . . . . . . . . . . . . . . . . . . . . . . . . . . . . . . . . . . . . . . 624.6 Enhancements that are specific to JPA 2.0 . . . . . . . . . . . . . . . . . . . . . . . . . . . . . . . . . 63
4.6.1 JPA entities . . . . . . . . . . . . . . . . . . . . . . . . . . . . . . . . . . . . . . . . . . . . . . . . . . . . . . 644.6.2 Persistent storage (using Apache Derby tables). . . . . . . . . . . . . . . . . . . . . . . . . . 654.6.3 Front-end web application. . . . . . . . . . . . . . . . . . . . . . . . . . . . . . . . . . . . . . . . . . . 66
Chapter 5. Developing OSGi applications . . . . . . . . . . . . . . . . . . . . . . . . . . . . . . . . . . . 675.1 Sample material for this chapter . . . . . . . . . . . . . . . . . . . . . . . . . . . . . . . . . . . . . . . . . . 685.2 Introducing the sample . . . . . . . . . . . . . . . . . . . . . . . . . . . . . . . . . . . . . . . . . . . . . . . . . 685.3 Developing the application . . . . . . . . . . . . . . . . . . . . . . . . . . . . . . . . . . . . . . . . . . . . . . 70
5.3.1 The API bundle . . . . . . . . . . . . . . . . . . . . . . . . . . . . . . . . . . . . . . . . . . . . . . . . . . . 705.3.2 The persistence bundle. . . . . . . . . . . . . . . . . . . . . . . . . . . . . . . . . . . . . . . . . . . . . 755.3.3 The business bundle . . . . . . . . . . . . . . . . . . . . . . . . . . . . . . . . . . . . . . . . . . . . . . . 885.3.4 The web bundle . . . . . . . . . . . . . . . . . . . . . . . . . . . . . . . . . . . . . . . . . . . . . . . . . . 945.3.5 The application . . . . . . . . . . . . . . . . . . . . . . . . . . . . . . . . . . . . . . . . . . . . . . . . . . 101
5.4 Deploying the application . . . . . . . . . . . . . . . . . . . . . . . . . . . . . . . . . . . . . . . . . . . . . . 1045.4.1 Setting up Derby Data Sources . . . . . . . . . . . . . . . . . . . . . . . . . . . . . . . . . . . . . 1055.4.2 Deploying through Rational Application Developer. . . . . . . . . . . . . . . . . . . . . . . 1065.4.3 Deploying through the administrative console . . . . . . . . . . . . . . . . . . . . . . . . . . 1075.4.4 Using the application. . . . . . . . . . . . . . . . . . . . . . . . . . . . . . . . . . . . . . . . . . . . . . 110
5.5 Using shared bundles . . . . . . . . . . . . . . . . . . . . . . . . . . . . . . . . . . . . . . . . . . . . . . . . . 1115.5.1 Depending on packages: Adding logging . . . . . . . . . . . . . . . . . . . . . . . . . . . . . . 1115.5.2 Depending on services: Monitoring transactions . . . . . . . . . . . . . . . . . . . . . . . . 1155.5.3 Assurances around sharing . . . . . . . . . . . . . . . . . . . . . . . . . . . . . . . . . . . . . . . . 119
5.6 OSGi application troubleshooting . . . . . . . . . . . . . . . . . . . . . . . . . . . . . . . . . . . . . . . . 1225.6.1 Understanding provisioning problems. . . . . . . . . . . . . . . . . . . . . . . . . . . . . . . . . 1225.6.2 Debugging runtime problems: osgiApplicationConsole. . . . . . . . . . . . . . . . . . . . 124
5.7 Using the expert tools: Composite bundles and Use-Bundle . . . . . . . . . . . . . . . . . . . 129
iv Getting Started with the Feature Pack for OSGi Applications and JPA 2.0

5.7.1 Composite bundles . . . . . . . . . . . . . . . . . . . . . . . . . . . . . . . . . . . . . . . . . . . . . . . 1295.7.2 Isolating slf4j configurations . . . . . . . . . . . . . . . . . . . . . . . . . . . . . . . . . . . . . . . . 1305.7.3 Deploying composite bundles . . . . . . . . . . . . . . . . . . . . . . . . . . . . . . . . . . . . . . . 131
Chapter 6. OSGi applications and managing change . . . . . . . . . . . . . . . . . . . . . . . . . 1356.1 Sample material for this chapter . . . . . . . . . . . . . . . . . . . . . . . . . . . . . . . . . . . . . . . . . 1366.2 OSGi application life cycle: Fine-grained updates . . . . . . . . . . . . . . . . . . . . . . . . . . . 136
6.2.1 OSGi versioning . . . . . . . . . . . . . . . . . . . . . . . . . . . . . . . . . . . . . . . . . . . . . . . . . 1366.2.2 Developing and deploying programming bug fixes . . . . . . . . . . . . . . . . . . . . . . . 1386.2.3 Larger updates for new features . . . . . . . . . . . . . . . . . . . . . . . . . . . . . . . . . . . . . 1426.2.4 Update restrictions . . . . . . . . . . . . . . . . . . . . . . . . . . . . . . . . . . . . . . . . . . . . . . . 148
6.3 Exploiting OSGi dynamics. . . . . . . . . . . . . . . . . . . . . . . . . . . . . . . . . . . . . . . . . . . . . . 1486.3.1 OSGi dynamics with OSGi applications . . . . . . . . . . . . . . . . . . . . . . . . . . . . . . . 1486.3.2 The core application and infrastructure. . . . . . . . . . . . . . . . . . . . . . . . . . . . . . . . 1506.3.3 A greeting handler. . . . . . . . . . . . . . . . . . . . . . . . . . . . . . . . . . . . . . . . . . . . . . . . 1556.3.4 A more complex content handler . . . . . . . . . . . . . . . . . . . . . . . . . . . . . . . . . . . . 1576.3.5 Dynamic update . . . . . . . . . . . . . . . . . . . . . . . . . . . . . . . . . . . . . . . . . . . . . . . . . 159
Chapter 7. Connecting OSGi applications . . . . . . . . . . . . . . . . . . . . . . . . . . . . . . . . . . 1637.1 Sample material for this chapter . . . . . . . . . . . . . . . . . . . . . . . . . . . . . . . . . . . . . . . . . 1647.2 Service Component Architecture . . . . . . . . . . . . . . . . . . . . . . . . . . . . . . . . . . . . . . . . 1647.3 Connecting JEE to OSGi applications. . . . . . . . . . . . . . . . . . . . . . . . . . . . . . . . . . . . . 166
7.3.1 Creating the currency converter OSGi application project . . . . . . . . . . . . . . . . . 1677.3.2 Creating the currency converter SCA project . . . . . . . . . . . . . . . . . . . . . . . . . . . 1727.3.3 Creating the enterprise application project . . . . . . . . . . . . . . . . . . . . . . . . . . . . . 1787.3.4 Deployment using the WebSphere administrative console. . . . . . . . . . . . . . . . . 1817.3.5 Testing the scenario through the Universal Test Client . . . . . . . . . . . . . . . . . . . 185
7.4 Connecting two OSGi applications . . . . . . . . . . . . . . . . . . . . . . . . . . . . . . . . . . . . . . . 1877.4.1 Modifying the existing OSGi bank application. . . . . . . . . . . . . . . . . . . . . . . . . . . 1897.4.2 Creating the ITSO Bank SCA project . . . . . . . . . . . . . . . . . . . . . . . . . . . . . . . . . 1907.4.3 Final scenario testing using the ITSO Bank web application . . . . . . . . . . . . . . . 192
7.5 Connecting OSGi applications to JEE. . . . . . . . . . . . . . . . . . . . . . . . . . . . . . . . . . . . . 1947.5.1 The JEE part . . . . . . . . . . . . . . . . . . . . . . . . . . . . . . . . . . . . . . . . . . . . . . . . . . . . 1977.5.2 Using CustomerServiceRemote from the ITSO Bank sample . . . . . . . . . . . . . . 2017.5.3 Modeling application dependencies in BLA . . . . . . . . . . . . . . . . . . . . . . . . . . . . 2037.5.4 Alternative: Binding.ejb . . . . . . . . . . . . . . . . . . . . . . . . . . . . . . . . . . . . . . . . . . . . 206
7.6 Message-driven services . . . . . . . . . . . . . . . . . . . . . . . . . . . . . . . . . . . . . . . . . . . . . . 2077.6.1 Using TextMessage communication . . . . . . . . . . . . . . . . . . . . . . . . . . . . . . . . . . 2077.6.2 Using ObjectMessage communication . . . . . . . . . . . . . . . . . . . . . . . . . . . . . . . . 2117.6.3 Other binding options . . . . . . . . . . . . . . . . . . . . . . . . . . . . . . . . . . . . . . . . . . . . . 212
7.7 More information . . . . . . . . . . . . . . . . . . . . . . . . . . . . . . . . . . . . . . . . . . . . . . . . . . . . . 213
Chapter 8. Java Persistence API Criteria API . . . . . . . . . . . . . . . . . . . . . . . . . . . . . . . . 2158.1 Sample material for this chapter . . . . . . . . . . . . . . . . . . . . . . . . . . . . . . . . . . . . . . . . . 2168.2 JPA Criteria API . . . . . . . . . . . . . . . . . . . . . . . . . . . . . . . . . . . . . . . . . . . . . . . . . . . . . 2168.3 JPA Criteria API usage . . . . . . . . . . . . . . . . . . . . . . . . . . . . . . . . . . . . . . . . . . . . . . . . 217
8.3.1 JPA Criteria API overview. . . . . . . . . . . . . . . . . . . . . . . . . . . . . . . . . . . . . . . . . . 2178.3.2 Samples . . . . . . . . . . . . . . . . . . . . . . . . . . . . . . . . . . . . . . . . . . . . . . . . . . . . . . . 218
Chapter 9. Java Persistence API Bean Validation . . . . . . . . . . . . . . . . . . . . . . . . . . . . 2299.1 Sample material for this chapter . . . . . . . . . . . . . . . . . . . . . . . . . . . . . . . . . . . . . . . . . 2309.2 Introduction to Bean Validation . . . . . . . . . . . . . . . . . . . . . . . . . . . . . . . . . . . . . . . . . . 230
9.2.1 Terminology . . . . . . . . . . . . . . . . . . . . . . . . . . . . . . . . . . . . . . . . . . . . . . . . . . . . 2309.2.2 Bean Validation overview . . . . . . . . . . . . . . . . . . . . . . . . . . . . . . . . . . . . . . . . . . 230
Contents v
9.3 Bean Validation . . . . . . . . . . . . . . . . . . . . . . . . . . . . . . . . . . . . . . . . . . . . . . . . . . . . . . 2319.3.1 Built-in constraints. . . . . . . . . . . . . . . . . . . . . . . . . . . . . . . . . . . . . . . . . . . . . . . . 2319.3.2 Custom constraints . . . . . . . . . . . . . . . . . . . . . . . . . . . . . . . . . . . . . . . . . . . . . . . 2339.3.3 Validation groups . . . . . . . . . . . . . . . . . . . . . . . . . . . . . . . . . . . . . . . . . . . . . . . . 238
9.4 Combining JPA 2.0 and Bean Validation . . . . . . . . . . . . . . . . . . . . . . . . . . . . . . . . . . 2429.4.1 JPA 2.0 with integrated Bean Validation. . . . . . . . . . . . . . . . . . . . . . . . . . . . . . . 2429.4.2 Installation and integration of JPA 2.0 and Bean Validation . . . . . . . . . . . . . . . . 246
Appendix A. Additional material . . . . . . . . . . . . . . . . . . . . . . . . . . . . . . . . . . . . . . . . . . 263Locating the web material . . . . . . . . . . . . . . . . . . . . . . . . . . . . . . . . . . . . . . . . . . . . . . . . . 263Using the web material. . . . . . . . . . . . . . . . . . . . . . . . . . . . . . . . . . . . . . . . . . . . . . . . . . . . 263
How to use the web material. . . . . . . . . . . . . . . . . . . . . . . . . . . . . . . . . . . . . . . . . . . . . 264Web material structure . . . . . . . . . . . . . . . . . . . . . . . . . . . . . . . . . . . . . . . . . . . . . . . . . . . . 264
OSGi samples. . . . . . . . . . . . . . . . . . . . . . . . . . . . . . . . . . . . . . . . . . . . . . . . . . . . . . . . 264JPA 2.0 samples . . . . . . . . . . . . . . . . . . . . . . . . . . . . . . . . . . . . . . . . . . . . . . . . . . . . . . 274
Related publications . . . . . . . . . . . . . . . . . . . . . . . . . . . . . . . . . . . . . . . . . . . . . . . . . . . . 277IBM Redbooks publications . . . . . . . . . . . . . . . . . . . . . . . . . . . . . . . . . . . . . . . . . . . . . . . . 277Online resources . . . . . . . . . . . . . . . . . . . . . . . . . . . . . . . . . . . . . . . . . . . . . . . . . . . . . . . . 277How to get IBM Redbooks publications . . . . . . . . . . . . . . . . . . . . . . . . . . . . . . . . . . . . . . . 278Help from IBM . . . . . . . . . . . . . . . . . . . . . . . . . . . . . . . . . . . . . . . . . . . . . . . . . . . . . . . . . . 278
vi Getting Started with the Feature Pack for OSGi Applications and JPA 2.0

Notices
This information was developed for products and services offered in the U.S.A.
IBM may not offer the products, services, or features discussed in this document in other countries. Consult your local IBM representative for information on the products and services currently available in your area. Any reference to an IBM product, program, or service is not intended to state or imply that only that IBM product, program, or service may be used. Any functionally equivalent product, program, or service that does not infringe any IBM intellectual property right may be used instead. However, it is the user's responsibility to evaluate and verify the operation of any non-IBM product, program, or service.
IBM may have patents or pending patent applications covering subject matter described in this document. The furnishing of this document does not give you any license to these patents. You can send license inquiries, in writing, to: IBM Director of Licensing, IBM Corporation, North Castle Drive, Armonk, NY 10504-1785 U.S.A.
The following paragraph does not apply to the United Kingdom or any other country where such provisions are inconsistent with local law: INTERNATIONAL BUSINESS MACHINES CORPORATION PROVIDES THIS PUBLICATION "AS IS" WITHOUT WARRANTY OF ANY KIND, EITHER EXPRESS OR IMPLIED, INCLUDING, BUT NOT LIMITED TO, THE IMPLIED WARRANTIES OF NON-INFRINGEMENT, MERCHANTABILITY OR FITNESS FOR A PARTICULAR PURPOSE. Some states do not allow disclaimer of express or implied warranties in certain transactions, therefore, this statement may not apply to you.
This information could include technical inaccuracies or typographical errors. Changes are periodically made to the information herein; these changes will be incorporated in new editions of the publication. IBM may make improvements and/or changes in the product(s) and/or the program(s) described in this publication at any time without notice.
Any references in this information to non-IBM Web sites are provided for convenience only and do not in any manner serve as an endorsement of those Web sites. The materials at those Web sites are not part of the materials for this IBM product and use of those Web sites is at your own risk.
IBM may use or distribute any of the information you supply in any way it believes appropriate without incurring any obligation to you.
Information concerning non-IBM products was obtained from the suppliers of those products, their published announcements or other publicly available sources. IBM has not tested those products and cannot confirm the accuracy of performance, compatibility or any other claims related to non-IBM products. Questions on the capabilities of non-IBM products should be addressed to the suppliers of those products.
This information contains examples of data and reports used in daily business operations. To illustrate them as completely as possible, the examples include the names of individuals, companies, brands, and products. All of these names are fictitious and any similarity to the names and addresses used by an actual business enterprise is entirely coincidental.
COPYRIGHT LICENSE:
This information contains sample application programs in source language, which illustrate programming techniques on various operating platforms. You may copy, modify, and distribute these sample programs in any form without payment to IBM, for the purposes of developing, using, marketing or distributing application programs conforming to the application programming interface for the operating platform for which the sample programs are written. These examples have not been thoroughly tested under all conditions. IBM, therefore, cannot guarantee or imply reliability, serviceability, or function of these programs.
© Copyright IBM Corp. 2010. All rights reserved. vii

Trademarks
IBM, the IBM logo, and ibm.com are trademarks or registered trademarks of International Business Machines Corporation in the United States, other countries, or both. These and other IBM trademarked terms are marked on their first occurrence in this information with the appropriate symbol (® or ™), indicating US registered or common law trademarks owned by IBM at the time this information was published. Such trademarks may also be registered or common law trademarks in other countries. A current list of IBM trademarks is available on the Web at http://www.ibm.com/legal/copytrade.shtml
The following terms are trademarks of the International Business Machines Corporation in the United States, other countries, or both:
DB2®developerWorks®Global Business Services®IBM®
MVS™Rational®Redbooks®Redpaper™
Redbooks (logo) ®WebSphere®z/OS®
The following terms are trademarks of other companies:
Java, and all Java-based trademarks are trademarks of Sun Microsystems, Inc. in the United States, other countries, or both.
Microsoft, Windows, and the Windows logo are trademarks of Microsoft Corporation in the United States, other countries, or both.
Other company, product, or service names may be trademarks or service marks of others.
viii Getting Started with the Feature Pack for OSGi Applications and JPA 2.0

Preface
This IBM® Redbooks® publication introduces Open Service Gateway initiative (OSGi) applications and Java™ Persistence API (JPA) 2.0 technology and describes their implementation in the Feature Pack for OSGi Applications and JPA 2.0 for WebSphere® Application Server 7.0.
The book will help you understand the position of these new technologies as well as how to leverage them for Java enterprise development in a WebSphere Application Server environment. Though synergetic, both technologies can be used in isolation. This publication is structured to appeal to those individuals using the technologies together or independently.
The book is split into two parts. Part 1, “Architecture and overview” on page 1 introduces OSGi applications and JPA 2.0 and details how to set up a development and test environment. Part 2, “Examples” on page 55 uses examples to illustrate how to exploit the features of OSGi applications and JPA 2.0.
The team who wrote this book
This book was produced by a team of specialists from around the world working at the International Technical Support Organization, Raleigh Center.
Daniel Haischt is an IBM Advisory Software Development Engineer working in the IBM Research and Development lab in Boeblingen, Germany, in the Information Platform and Solutions organization. Prior to joining IBM in 2007, Daniel worked as a freelancer since 2000. During this time, he worked on novel technologies, such as an in-memory Massively multiplayer online role-playing game (MMORPG) engine, which serves a web-based and cell phone-based user experience for over 1.3 million simultaneous users, long before the advent of today’s multimedia-capable cell phones. He also participates as a committer (for more than 10 years) in several open source projects, such as Apache OpenEJB, wzdftpd, pfSense, and FreeNAS. Daniel holds a diploma in Information Management and an MSc in Business Information Management from the Reutlingen University, Germany.
Philipp Huber is an Advisory IT Architect working for IBM Global Business Services® in Zurich, Switzerland. Philipp holds a degree in Computer Science from the University of Applied Science Aargau in Switzerland and is Open Group Master-Certified. He has more than 10 years of experience in software architecture and development. His areas of expertise include service-oriented and messaging architectures and Java Enterprise Edition (EE) technologies.
Valentin Mahrwald is a software engineer at the IBM Hursley Development Laboratory in Hampshire. He has over two years of experience working on WebSphere Application Server, most of this time spent on the OSGi Applications feature. He is an active Apache Software Foundation committer in the Apache Aries project. Valentin holds a Masters degree in Mathematics and Computer Science from the University of York.
© Copyright IBM Corp. 2010. All rights reserved. ix

Carla Sadtler is a Consulting IT Specialist at the ITSO, Raleigh Center. She writes extensively about WebSphere products and solutions. Before joining the ITSO in 1985, Carla worked in the Raleigh branch office as a Program Support Representative, supporting MVS™ clients. She holds a degree in Mathematics from the University of North Carolina at Greensboro.
Thanks to the following people for their contributions to this project:
Margaret TicknorInternational Technical Support Organization, Raleigh Center
Kevin SutterIBM US
Alasdair NottinghamIBM UK
Scott KurzIBM US
Graham ChartersIBM US
Now you can become a published author, too!
Here’s an opportunity to spotlight your skills, grow your career, and become a published author—all at the same time! Join an ITSO residency project and help write a book in your area of expertise, while honing your experience using leading-edge technologies. Your efforts will help to increase product acceptance and client satisfaction, as you expand your network of technical contacts and relationships. Residencies run from two to six weeks in length, and you can participate either in person or as a remote resident working from your home base.
Find out more about the residency program, browse the residency index, and apply online at:
ibm.com/redbooks/residencies.html
Comments welcome
Your comments are important to us!
We want our books to be as helpful as possible. Send us your comments about this book or other IBM Redbooks publications in one of the following ways:
� Use the online Contact us review Redbooks form found at:
ibm.com/redbooks
� Send your comments in an email to:
� Mail your comments to:
IBM Corporation, International Technical Support OrganizationDept. HYTD Mail Station P0992455 South RoadPoughkeepsie, NY 12601-5400
x Getting Started with the Feature Pack for OSGi Applications and JPA 2.0

Stay connected to IBM Redbooks
� Find us on Facebook:
http://www.facebook.com/IBMRedbooks
� Follow us on Twitter:
http://twitter.com/ibmredbooks
� Look for us on LinkedIn:
http://www.linkedin.com/groups?home=&gid=2130806
� Explore new Redbooks publications, residencies, and workshops with the IBM Redbooks weekly newsletter:
https://www.redbooks.ibm.com/Redbooks.nsf/subscribe?OpenForm
� Stay current on recent Redbooks publications with RSS Feeds:
http://www.redbooks.ibm.com/rss.html
Preface xi

xii Getting Started with the Feature Pack for OSGi Applications and JPA 2.0

Part 1 Architecture and overview
In this part, we introduce the WebSphere Feature Pack for Open Service Gateway initiative (OSGi) applications and Java Persistence API (JPA) 2.0. Before we look at the features individually, we provide an overview about the feature pack as a whole.
Part 1
© Copyright IBM Corp. 2010. All rights reserved. 1

2 Getting Started with the Feature Pack for OSGi Applications and JPA 2.0

Chapter 1. Introduction to the feature pack
This chapter introduces the Feature Pack for Open Service Gateway initiative (OSGi) Applications and Java Persistence API (JPA) 2.0. It discusses the target audience for the feature pack and gives a high-level overview of the features, which are covered in greater detail in the next two chapters and in the samples. This chapter also shows how to install the feature pack and set up the accompanying development environment.
1
© Copyright IBM Corp. 2010. All rights reserved. 3

1.1 Feature pack overview
The Feature Pack for OSGi Applications and JPA 2.0 contains two features that you install separately (1.3, “Installation tips” on page 5 explains how to install each of the features):
� OSGi applications
This feature introduces a completely new programming model to WebSphere Application Server. OSGi applications, which are built around solid OSGi technology, define a way to build highly modular applications that are based on a standardized Spring-like plain old java object (POJO) programming model.
OSGi applications can make use of many features that are available to Java enterprise developers, such as the WebSphere Application Server container support for developing web applications and the support for JPA and Java Naming and Directory Interface (JNDI), while at the same time exploiting all of the best parts of OSGi as well.
� JPA 2.0
This feature provides an implementation of the Java Persistence API Version 2.0, which adds many useful features and is fully backward-compatible to Version 1.0:
– A type of safe query alternative for Java persistence query language (JPQL)
– Integration with bean validation for JPA entities
– Additional standardized persistence properties, which supersede vendor-specific solutions
– Additional support for advanced database structures and mapping models
– APIs to control caching and locking on a detailed level
Even though both features can be installed in isolation, developers interested in OSGi applications need to strongly consider installing the JPA 2.0 feature as well because OSGi applications commonly make heavy use of JPA.
1.2 How to use this book
This IBM Redbooks publication has been written for a target audience of Java developers and architects. The following sections illustrate what readers with differing knowledge levels and backgrounds can expect from this book.
1.2.1 Developers with knowledge of OSGi and Eclipse plug-ins
For readers with an OSGi or Eclipse plug-in development background, the sections that focus on OSGi applications are the most interesting. Chapter 2, “Introduction to OSGi and OSGi applications” on page 13 contains an introduction to OSGi but also introduces OSGi applications, which will be new. Chapter 5, “Developing OSGi applications” on page 67 goes into depth on how to build an actual OSGi application. Chapter 6, “OSGi applications and managing change” on page 135 shows how OSGi applications can help simplify software life cycle management around updating and extending applications. Chapter 7, “Connecting OSGi applications” on page 163 explains how to integrate the application with the larger WebSphere Application Server environment. Chapter 3, “Introduction to the Java Persistence API 2.0” on page 37, gives an overview of the included JPA 2.0 functionality, which might also be interesting as complementary reading.
4 Getting Started with the Feature Pack for OSGi Applications and JPA 2.0

1.2.2 Developers with knowledge of JPA
If you have a strong JPA background, start with Chapter 3, “Introduction to the Java Persistence API 2.0” on page 37, which introduces the new features of JPA 2.0. After that, Chapter 8, “Java Persistence API Criteria API” on page 215 and Chapter 9, “Java Persistence API Bean Validation” on page 229 focus on two of the most prominent features of the new release. Chapter 5, “Developing OSGi applications” on page 67 shows you the usage of JPA in a new environment.
1.2.3 Developers with knowledge of Java Enterprise Edition
Java Platform Enterprise Edition (EE) developers and architects might be interested in evaluating the OSGi application model. Chapter 2, “Introduction to OSGi and OSGi applications” on page 13 gives an overview of the strengths and purpose of OSGi and OSGi applications. Chapter 5, “Developing OSGi applications” on page 67 and Chapter 6, “OSGi applications and managing change” on page 135 describe in detail how to create and manage OSGi applications to exploit these strengths. Chapter 7, “Connecting OSGi applications” on page 163 shows how OSGi applications can be integrated into an existing Java Platform, Enterprise Edition (JEE) architecture.
Also, for an introduction to the Java Persistence API and new features, see Chapter 3, “Introduction to the Java Persistence API 2.0” on page 37. This chapter might interest readers with a non-JPA background, such as a classic Hibernate background, because JPA 2 covers many new features that were previously available in other object-relational mapping solutions but not in JPA.
1.2.4 Developers with knowledge of pure Java
For readers with a pure Java programming background, we strongly recommend reading Chapter 2, “Introduction to OSGi and OSGi applications” on page 13, which exposes the strengths of the OSGi programming model and why it complements pure Java programming models. Chapter 5, “Developing OSGi applications” on page 67 shows how to develop a sample application in the new model. If you want to learn more about JPA 2.0, we suggest reading Chapter 3, “Introduction to the Java Persistence API 2.0” on page 37, Chapter 8, “Java Persistence API Criteria API” on page 215, and Chapter 9, “Java Persistence API Bean Validation” on page 229.
1.3 Installation tips
You install and update the WebSphere Application Server feature packs using the IBM Installation Manager. This process differs from the installation and maintenance processes for WebSphere Application Server. This section provides a quick outline of the steps needed to install the Feature Pack for OSGi Applications and JPA 2 for readers who are unfamiliar with IBM Installation Manager. Use this information along with the documentation that comes with the products and maintenance packages.
1.3.1 Installation with pre-existing Rational Application Developer
Rational® Application Developer is the primary development tool that is used to create applications for WebSphere Application Server. With Rational Application Developer, you can deploy applications (both JEE and OSGi applications) to an integrated WebSphere
Chapter 1. Introduction to the feature pack 5

Application Server test environment, which is a fully functional WebSphere Application Server integrated into the workspace with an interface for developers.
You can install the feature packs on a test environment as well as on a stand-alone WebSphere Application Server environment. Installing the feature packs on Rational Application Developer systems involves the following steps:
1. To get started, install Rational Application Developer. You can start the installation by executing the launchpad.exe utility in the RADSETUP directory.
2. First, the IBM Installation Manager installs. You must respond to a series of prompts to complete this installation. If you already have the Installation Manager, the installation wizard checks for updates, and you are asked to update to the latest release. When the installation process is complete, you must restart the Installation Manager.
3. When the Installation Manager starts, click Install:
a. Select Rational Application Developer 8.0.0 and WebSphere Application Server test environment 7.0 to install.
b. Complete the installation by following the wizard panels. Take the defaults for the packages to install.
Do not install the feature packs to the test environment at this time. You need to go back through the update process later to bring the test environment up to WebSphere Application Server 7.0.0.11 before installing the feature packs.
c. Clear the option to create a profile. Creating a profile at this stage gives you an application server that is not augmented for the feature packs.
d. Clear the options to create any additional tools that you think might be needed for the feature packs. If you later determine that you are missing a feature pack, you can go back through the installation process to install it.
4. Select Update from the Installation Manager menu. If you do not have the latest level of the Installation Manager, you are prompted to perform that update first.
Microsoft® Windows® 7 users: On Windows 7, start IBM Installation Manager directly from the appropriate Microsoft Windows start menu entry rather than using the launchpad. In the IBM Installation Manager, navigate to File Preferences. Add the repository.config file, which is in the RADSETUP directory, to the list of available repositories. Close the Preferences dialog, and click Install on the IBM Installation Manager window to initiate the installation process.
Installation Manager updates: In certain cases, the Installation Manager might not update itself if the “Search for Installation Manager updates” is not active. In this situation, activate the appropriate option by using the according Installation Manager Preferences menu entry. To activate this option, click File Preferences Updates, and select Search for Installation Manager updates (Figure 1-1 on page 7). On the next installation or update, the Installation Manager will update itself prior to installing or updating a package.
6 Getting Started with the Feature Pack for OSGi Applications and JPA 2.0

Figure 1-1 Installation Manager configured to update itself
5. After you update the Installation Manager, select Updates again to update to Rational Application Developer 8.0.0 and WebSphere Application Server 7.0.0.11:
a. When you select to update the WebSphere Application Server test environment to 7.0.0.11, select the option to install the Feature Pack for OSGi Applications and JPA 2.0.
b. The Feature Pack for OSGi Applications and JPA 2.0 has two additional options: the OSGi Applications feature and the Java Persistence API 2.0 feature.
If you are certain that you will not use either the OSGi or JPA 2.0 capabilities of the Feature Pack for OSGi Applications and JPA 2.0, you can elect to not install that feature (in this book, we use both features, and therefore, they are mandatory if you want to use the example in this book).
c. Allow the update process to create an application server profile.
6. Select Modify to update Rational Application Developer to add the OSGi development tools package (Figure 2-1). The support for JPA 2.0 development is already installed as part of the Java EE development tooling in Rational Application Developer. Also, the OSGi development tools include support for JPA 2.0 in OSGi applications.
Searching the correct repositories for updates: If the Installation Manager does not find the WebSphere Application Server or feature pack updates when it scans for available updates, be sure that you have the following repositories defined to the Installation Manager (select File Preferences Repositories). When you add each repository, you are prompted to provide an IBM user name and password. Make sure that you also look for firewall blocking from your system and allow the Installation Manager to access the web:
� http://public.dhe.ibm.com/software/websphere/repositories/repository.config
� https://www.ibm.com/software/rational/repositorymanager/repositories/websphere/repository.config
If you have WebSphere Application Server 7.0.0.11 installed and did not install the Feature Pack for OSGi Applications and JPA 2.0, select the Installation Manager Modify option to install the feature packs (instead of selecting the Update option). Also, consider installing only the feature packs that you intend to use.
Chapter 1. Introduction to the feature pack 7

Figure 1-2 IBM Installation Manager Modify Packages (adding OSGi development tools support)
1.3.2 Installation with pre-existing WebSphere Application Server
This section describes the installation process if you have only WebSphere Application Server installed on the system (no Rational Application Developer or other product that uses the Installation Manager). Follow these general steps:
1. Install WebSphere Application Server using the launchpad.exe utility, which is the traditional method. You do not use the IBM Installation Manager for this process.
2. Download the latest fixes for WebSphere Application Server and the Java developer kit (7.0.0.11 currently) and the latest Update Installer from the support site:
http://www-01.ibm.com/support/docview.wss?rs=180&uid=swg27004980#ver70
3. Install the WebSphere Application Server Update Installer.
4. Install both WebSphere Application Server and the Java developer kit fix packs using the Update Installer.
5. Download the Installation Manager for WebSphere from the following website and install it:
http://www-01.ibm.com/support/docview.wss?rs=180&uid=swg24023498
Be sure to update the JDK also: The key to successfully installing Fix Pack 11 as a prerequisite for the Feature Pack for OSGi Applications and JPA 2.0 installation is to download and install both the WebSphere Application Server updates and the Java developer kit updates, which are two separate installations.
8 Getting Started with the Feature Pack for OSGi Applications and JPA 2.0

6. Start the Installation Manager, and select Import to import the WebSphere Application Server installation. Then, follow these steps:
a. Enter the location of the WebSphere Application Server installation (it might already be part of the combo box contents if you try to expand it).
b. Select a location for the shared resources directory.
c. Review the summary information, and select Import.
7. Follow the import panels until you receive the Import Existing WebSphere Installation panel with a green check and the message, The Import is complete, as shown in Figure 1-3.
Figure 1-3 WebSphere Application Server import complete
8. Update the Installation Manager repositories to include the WebSphere repository (select File Preferences Repositories). Accessing these repositories requires an IBM login. You are prompted for this login the first time that you attempt to access these repositories:
http://public.dhe.ibm.com/software/websphere/repositories/repository.config
Chapter 1. Introduction to the feature pack 9

9. Select Install in the Installation Manager to install the Feature Pack for OSGi Applications and JPA 2.0.
Select IBM WebSphere Application Server V7 Feature Pack for OSGi Applications and Java Persistence API 2.0 and any prerequisites that are displayed (Figure 1-4). Also, select the IBM WebSphere Application Server V7 Feature Pack for Service Component Architecture (SCA) if you want to develop OSGi applications with SCA integration (see Chapter 7, “Connecting OSGi applications” on page 163).
Figure 1-4 Installation Manager providing a facility to select package options to be installed
10 Getting Started with the Feature Pack for OSGi Applications and JPA 2.0

10.If there are fixes available for the feature pack to be installed, you might be prompted with an additional panel to choose from a list of fixes. Select every available fix that relates to the Feature Pack for OSGi Applications and JPA 2.0.
Figure 1-5 Feature pack selection panel for additional fixes
11.Follow the panels until you get the “Packages Installed” message, and then click Finish. At this point, you can launch the Profile Management Tool to create your profiles, if needed.
Advanced installation scenarios: The IBM WebSphere Application Server Version 7.0 Feature Pack for OSGi Applications and JPA 2.0 Information Center contains advanced installation scenarios, such as installing the feature pack on z/OS® using the WebSphere Application Server profile management tool:
http://publib.boulder.ibm.com/infocenter/wasinfo/v7r0/topic/com.ibm.websphere.jpafep.multiplatform.doc/info/ae/ae/welcome_fepjpa.html
Chapter 1. Introduction to the feature pack 11

12 Getting Started with the Feature Pack for OSGi Applications and JPA 2.0

Chapter 2. Introduction to OSGi and OSGi applications
This chapter introduces the Open Service Gateway initiative (OSGi) applications part of the IBM WebSphere Application Server V7 Feature Pack for OSGi Applications and Java Persistence API (JPA) 2.0 and sets the stage for the OSGi-related samples in Part 2, “Examples” on page 55.
First, we describe OSGi and why you might use it. We explain the OSGi specifications that are related to the enterprise environment and the OSGi applications. We provide an overview of the OSGi application programming model and then describe the implementation in the feature pack. We also explain tooling and the integration with other programming models in the WebSphere environment.
2
© Copyright IBM Corp. 2010. All rights reserved. 13

2.1 OSGi overview
In this section, we introduce you to OSGi - The Dynamic Module System for Java. If you are already familiar with core OSGi, skip to 2.2, “Enterprise OSGi” on page 20, which deals with recent developments in the OSGi enterprise space.
2.1.1 OSGi
OSGi is a framework for writing applications and components in Java that exhibit high modularity and extremely loose coupling at the level of the module and that are dynamic and can collaborate with as well as depend on other components in a highly dynamic way.
OSGi is middleware that allows components to be written in a specific way that permits and encourages modularity and dynamism.
OSGi is a well-seasoned technology. It has been around since Java 1.0. The OSGi alliance, which is the non-profit standards body behind OSGi, was founded as early as 1998. Although originally aimed at Java development for embedded devices, OSGi with its goals of modularity and dynamism has proved applicable to a far wider market. OSGi technology has been adopted from Java Platform, Enterprise Edition (JEE) application server run times to integrated development environments, and the specification has grown and changed to match this adoption.
With revision 4.2 of the OSGi specifications, which is the latest released version at the time of this writing, OSGi has moved into yet another space, enterprise applications.
Because OSGi is an open, specification-based technology, a number of implementations exist. The two most prominent implementations are the Apache Felix project (http://felix.apache.org) and the Eclipse Equinox project (http://eclipse.org/equinox), which is used in WebSphere Application Server.
2.1.2 Modularity with OSGi
To understand the modularity benefits of OSGi, you must understand the problems that it is trying to solve and its relationship to other solutions in the same space.
Problem: No modularity between the application and class levelsAt the time of this writing, Java as a language has no concept of modularity at the module level, although this situation might change in the future with the advent of project Jigsaw (http://openjdk.java.net/projects/jigsaw). Project Jigsaw is a dependency management system, which will include the modularization of the Java developer kit.
Java has the usual support for encapsulation and information hiding at the class level through the use of class, method, and field-level access qualifiers. Furthermore, isolation and encapsulation are available at the application level either through separate virtual machines or in an application server. However, the vast and important space of modules in between is not covered. In this context, by module we mean any kind of reusable libraries or individual modules of an application.
Often, Java modules correspond to individual Java archive (JAR) files. However, JARs are just a way of packaging classes. They offer no encapsulation or modularity.
14 Getting Started with the Feature Pack for OSGi Applications and JPA 2.0

JARs in Java have the following issues (Figure 2-1).
Figure 2-1 JAR archives versus bundles
JARs in Java have these characteristics:
� No distinction exists between “public to the outside” and “public to the JAR”. As depicted in Figure 2-1, the classes inside a JAR file are accessible to clients regardless of whether they are conceptually public or private. Any public class is accessible to everyone. For example, any utility classes that are not in the same package as the classes in the module that use them must be public. As a consequence, these utility classes are public for everyone. Users of the module start to depend on utility classes that really need to be internals.
� There is no way to discern whether a library will actually work at run time. In Java, a class declares what other classes it depends on. Therefore, the Java run time can flag when one of the dependencies is not there by using NoClassDefFoundError.
However, the Java run time, for good reasons, flags missing dependencies on use rather than preemptively, and it does not aggregate these missing dependencies to the library layer. So, when you drop a new JAR file into the run time, you have no way to know whether the new library works without testing the code paths thoroughly.
Problem: No versioningAssuming that the concerns around encapsulation on the module level were resolved, the solution is still insufficient in the Java environment without support for versioning. Libraries are not written once and then kept unchanged. Instead, libraries develop and grow. Sometimes, developers rewrite libraries entirely and remove support for certain APIs or features.
A single application can depend, indirectly through the libraries that it uses, on two versions of the same library. You cannot have two versions of the same library in plain Java, because only one of the two libraries can supply any given class to the application. With only the previously defined modularity, every library must include and hide all its dependencies to prevent clashes. Clearly, that approach is extremely inefficient in terms of disk and memory usage.
Without modularity and versioning, the situation is even worse. Libraries might require the same dependency at separate versions. Without modularity, this situation leads inevitably to a clash when using both libraries at one time, because only one version is used. However, this problem might not be obvious, because the dependency might be repackaged and thus hidden inside a library.
To escape from this situation, first-class support for separate versions of modules and packages is needed, alongside a mechanism for a module to specify its dependencies and their versions.
Public
Private
Public
Private
JAR Bundle
Chapter 2. Introduction to OSGi and OSGi applications 15

BundlesOSGi solves the modularity and versioning problems through the concept of a bundle. A bundle is essentially nothing but a standard, traditional JAR file with additional metadata in the JAR manifest file. So, enabling an existing library for OSGi is a non-invasive change. The extra headers in the JAR manifest will be ignored in non-OSGi environments. In an OSGi environment however, the extra headers allow a bundle to be more than a unit of packaging. The bundle now defines a unit of modularity.
OSGi classloadingA bundle defines the packages on which it depends as well as the packages that it provides, tagged with versions in both cases. The OSGi run time uses this information to wire a bundle in these ways (Figure 2-2):
� It has access to exactly the declared packages as dependencies.� Other bundles can only see those packages that are explicitly exported. All other
packages are hidden inside the bundle.
Figure 2-2 JEE versus OSGi classloading (system classloader is omitted)
Instead of a hierarchical classloading structure that is traditional in Java, particularly JEE, OSGi has a network classloading structure (Figure 2-2). In the hierarchical model, classes are searched from the bottom, through various layers of system classes, extension libraries, runtime libraries, and application modules. All classes are visible in the same layer and any lower layers. So, a new library in the extension libraries affects the whole stack as displayed. In contrast to that design, OSGi bundles are wired in a network. Furthermore, a bundle has visibility only of the individual packages for which it declares dependencies and no more.
Because, by default, everything is hidden, as a consequence, the same module can exist many times in this type of a network. And, a single module can depend indirectly on the same module in many versions.
Furthermore, with the modularity metadata, which also allows package dependencies to be marked as optional, you can check whether a bundle will work at run time or whether there
Extensionlibraries
Serverruntimelibraries
App1modules
JEE classloading OSGi classloading
App2modules
16 Getting Started with the Feature Pack for OSGi Applications and JPA 2.0

are missing dependencies. So, with correctly written metadata, a bundle will never throw a NoClassDefFoundError at run time.
This change of classloading structure is invasive. Certain assumptions that exist in JEE no longer exist for OSGi bundles. For example, the thread context classloader is a commonly used mechanism in JEE to access both application and server runtime classes. However, in OSGi, the thread context classloader contains only the classes that are visible to a single bundle. Consequently, certain commonly used libraries are not fully OSGi-compatible even when repackaged, a topic that we will discuss later in this book (for example, see the discussion about Apache commons logging on page 101).
The bundle manifestAll the dependency metadata goes into the jar manifest, which is called the bundle manifest in OSGi. Example 2-1shows an example of a bundle manifest. The manifest highlights the most important headers that OSGi defines.
Example 2-1 Sample bundle manifest
Manifest-Version: 1Bundle-ManifestVersion: 2Bundle-SymbolicName: my.very.useful.libraryBundle-Version: 42.0.0Import-Package: org.osgi.framework;version=”[1.5.0,2.0.0)”Export-Package: my.very.useful.library.stringops;version=23.2.1,my.very.useful.library.interop;version=5.0.0
The sample bundle manifest in Example 2-1 uses the following headers:
� Bundle-ManifestVersion
This header must be set to “2” to indicate that the bundle is written to revision 4.x of the OSGi specification rather than previous, outdated revisions.
� Bundle-SymbolicName and Bundle-Version
These two headers define the identity of the module. Every bundle in an OSGi system has a unique identity that is determined by its symbolic name and its version. The Bundle-Version header is optional. If the header is not present, the bundle version defaults to “0.0.0”.
� Import-Package
This header defines which packages are visible to a bundle. A bundle always has access to all java.* packages and all the packages inside the bundle, plus, depending on the OSGi framework configuration, javax.* packages that are part of the Java developer kit. All other packages must be imported.
Every package import carries a version range that defines the accepted versions of the dependencies. This version range is entirely independent of the bundle version.
Example 2-1 declares that the bundle only needs org.osgi.framework between version 1.5.0 (inclusive, denoted by a square bracket) and 2.0.0 (exclusive, denoted by a round bracket) in addition to its own classes and the java.* classes. If no version range is specified, which is not recommended, all versions of the package are allowed. Note that “1.0.0” is a version range of version 1 and higher, not an exact version.
Chapter 2. Introduction to OSGi and OSGi applications 17

� Export-Package
This header defines the package externals of a bundle. Only the specified packages can be used by other bundles. Every exported package carries a version, which defaults to “0.0.0” if unspecified.
Problem: How to obtain concrete instances of dependenciesBundles alone however are not enough. True modularity also means that modules interact not on the level of concrete implementation classes but only interfaces. Even using factories hardcodes one module to exactly one implementation of another module, which increases the coupling between the two modules.
This challenge exists outside OSGi as well and the Java ecosystem that has seen numerous solutions. Most of them, such as Spring and Enterprise JavaBeans 3 (EJB3), define a container-based injection model where the container is responsible for instantiating the concrete implementation classes and then wiring them together. This approach, which is known as dependency injection1, has proven extremely effective in restricting coupling between business classes and introducing separation between the core logic of a class and the wiring logic that is required to set up its dependencies. Also, classes written using these technologies are commonly much easier to unit test. A similar container-based solution to these approaches is also available in OSGi with the Blueprint container, which is discussed in 2.2.2, “Blueprint Container specification” on page 21.
However, even a container-based solution that allows the implementation classes of one module to be wired to non-exported classes of another module undermines a bundle’s strict encapsulation. In fact, logically, a bundle can only depend on the interface that it imports from the other bundle.
The service registryTo support this strict notion of modularity, OSGi defines a type of clearing house where the concrete implementation of interfaces can be made available for the consumption by other bundles: the OSGi service registry (Figure 2-3 on page 18).
Figure 2-3 Service-based interaction
1 http://martinfowler.com/articles/injection.html
CC I1I1
A/1.0.0A/1.0.0
A/2.0.0A/2.0.0
I2I2
Service registry
P/1.0.0
P/1.0.0
P/2.0.0
SI
SI
18 Getting Started with the Feature Pack for OSGi Applications and JPA 2.0
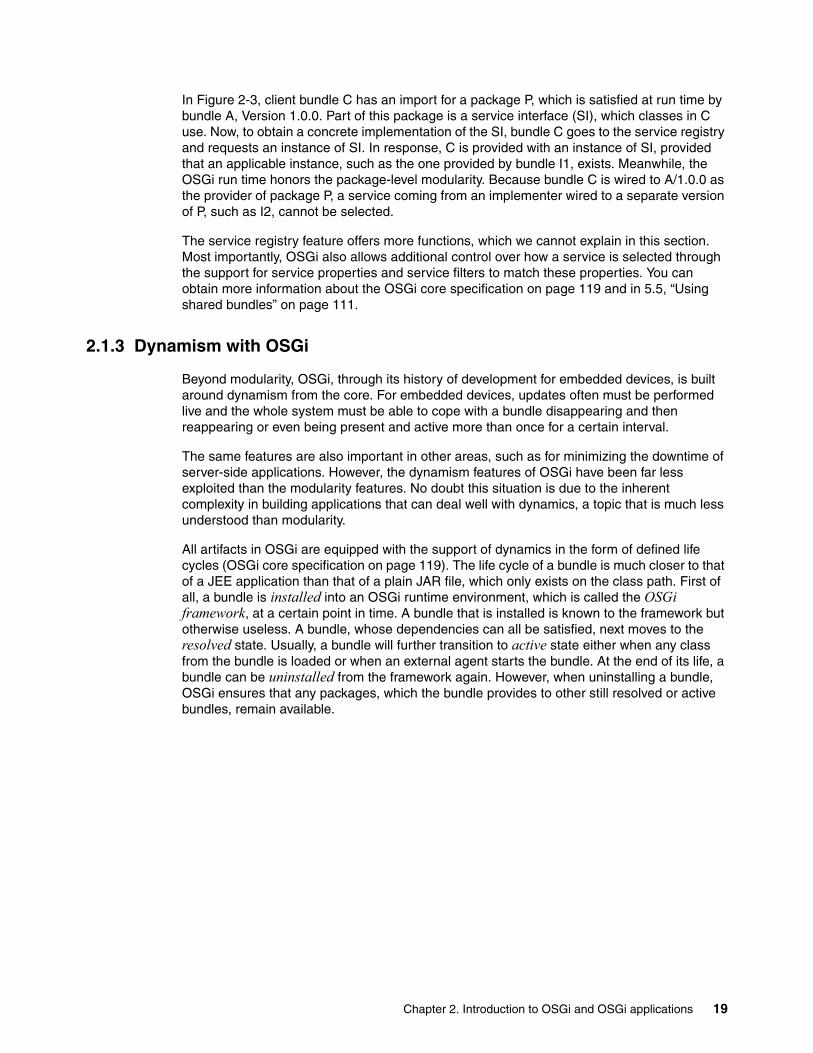
In Figure 2-3, client bundle C has an import for a package P, which is satisfied at run time by bundle A, Version 1.0.0. Part of this package is a service interface (SI), which classes in C use. Now, to obtain a concrete implementation of the SI, bundle C goes to the service registry and requests an instance of SI. In response, C is provided with an instance of SI, provided that an applicable instance, such as the one provided by bundle I1, exists. Meanwhile, the OSGi run time honors the package-level modularity. Because bundle C is wired to A/1.0.0 as the provider of package P, a service coming from an implementer wired to a separate version of P, such as I2, cannot be selected.
The service registry feature offers more functions, which we cannot explain in this section. Most importantly, OSGi also allows additional control over how a service is selected through the support for service properties and service filters to match these properties. You can obtain more information about the OSGi core specification on page 119 and in 5.5, “Using shared bundles” on page 111.
2.1.3 Dynamism with OSGi
Beyond modularity, OSGi, through its history of development for embedded devices, is built around dynamism from the core. For embedded devices, updates often must be performed live and the whole system must be able to cope with a bundle disappearing and then reappearing or even being present and active more than once for a certain interval.
The same features are also important in other areas, such as for minimizing the downtime of server-side applications. However, the dynamism features of OSGi have been far less exploited than the modularity features. No doubt this situation is due to the inherent complexity in building applications that can deal well with dynamics, a topic that is much less understood than modularity.
All artifacts in OSGi are equipped with the support of dynamics in the form of defined life cycles (OSGi core specification on page 119). The life cycle of a bundle is much closer to that of a JEE application than that of a plain JAR file, which only exists on the class path. First of all, a bundle is installed into an OSGi runtime environment, which is called the OSGi framework, at a certain point in time. A bundle that is installed is known to the framework but otherwise useless. A bundle, whose dependencies can all be satisfied, next moves to the resolved state. Usually, a bundle will further transition to active state either when any class from the bundle is loaded or when an external agent starts the bundle. At the end of its life, a bundle can be uninstalled from the framework again. However, when uninstalling a bundle, OSGi ensures that any packages, which the bundle provides to other still resolved or active bundles, remain available.
Chapter 2. Introduction to OSGi and OSGi applications 19

Figure 2-4 Bundle life cycle states (non-relevant transitions omitted)
When a bundle moves to the active state, the OSGi framework optionally invokes a special class, called the bundle activator, which is specified in the bundle manifest. The bundle activator allows an OSGi bundle to be more than just a provider of classes, but actively to execute tasks, register and consume services, and so forth. Application developers must use blueprint in preference to bundle activators wherever possible.
Finally, that OSGi is built with support for convenience. Bundles are not started unnecessarily but only when explicitly requested or first needed. Even when started explicitly, a bundle author can defer activation to when the first class is loaded from the bundle, which is called lazy activation.
As an immediate consequence of bundles having life cycles, services must also have life cycles. The life cycle of a service, by default, is framed by the life cycle of the bundle that provides it. However, bundles can choose to dynamically publish and retract services due to changes in the environment, for example, due to one required service going away or coming back.
Bundle and service life cycles, along with the event notification support that OSGi defines around them, give developers the tools to build truly dynamic applications. However, even with this support, it is not trivial to write code that can cope appropriately with a truly dynamic environment in which services can come and go at any time.
We describe OSGi dynamics and how to exploit them further in 6.3, “Exploiting OSGi dynamics” on page 148.
2.2 Enterprise OSGi
Revision 4.2 of the OSGi Service Platform includes the Enterprise Specification. This specification defines key pieces of support that were previously missing for writing enterprise-strength applications in OSGi. The specification prescribes how commonly used
Installed Resolved
Starting
Active
Stopping
Uninstalled
uninstall
uninstall
install resolve
start
stop
20 Getting Started with the Feature Pack for OSGi Applications and JPA 2.0

JEE technologies, such as servlets, Java Naming and Directory Interface (JNDI), and JPA, integrate with OSGi.
The driving force behind this move was a rapidly growing interest in making OSGi accessible not only to application server and middleware vendors but also to application developers. The Spring dynamic modules project made early headlines in this area.
2.2.1 Key elements
The Enterprise specification contains a number of specifications that cater to various purposes in the vast space of enterprise application development. We list the key elements that are relevant to this book. We describe each of these elements in more detail in Part 2, “Examples” on page 55 when we use the individual features:
� Web Application Specification
This specification defines how to support the Servlet 2.5 and JavaServer Pages (JSP) 2.1 specifications in OSGi. Bundles that build on this support are called Web Application Bundles (WABs). At the very least, WABs must be marked by the Web-ContextPath bundle manifest header.
� JNDI Services Specification
This specification defines how OSGi bundles can access javax.naming services and, on the reverse side, how JNDI can be used to access the OSGi service registry.
� JPA Service Specification
This specification defines the basic support for unmanaged JPA in an OSGi bundle that is called a persistence bundle, which must be marked by the Meta-Persistence manifest header. This specification defines packaging requirements around persistence bundles as well as provider selection and integration with the JPA run time.
� Blueprint Container specification
This specification is based on the Spring dynamic modules project. Blueprint provides a lightweight, XML-based, plain old Java object (POJO) injection model with special support for the OSGi service registry. The Blueprint Container specification can be found in the Compendium Specification of the OSGi Service Platform V4.2 specifications.
2.2.2 Blueprint Container specification
Because the Blueprint Container specification, which is usually referred to as Blueprint, is a core piece of technology for the rest of this book, we take time here to introduce the core concepts.
At its core, Blueprint combines the aspect of a dependency injection framework with that of declarative management of OSGi services. The latter aspect is also covered by the Declarative Services specification (OSGi Enterprise specification, chapter 112). Apache Felix iPOJO (http://felix.apache.org/site/apache-felix-ipojo.html) provides an alternative for both aspects.
Blueprint has the following key differentiators:
� Blueprint is based on the extremely popular Spring framework; therefore, the concepts and syntax are familiar to a wide audience of developers.
� Blueprint provides service-damping as the default. When using Blueprint, the developer is shielded from part of the most complex aspects of service dynamics, which are handled by Blueprint in the background.
Chapter 2. Introduction to OSGi and OSGi applications 21

Bundles can exploit the benefits of Blueprint by including one or more Blueprint descriptors. These descriptors can either be located inside the OSGI-inf/blueprint directory or be specified through the Bundle-Blueprint manifest header. A bundle that includes Blueprint descriptors is often referred to as a Blueprint bundle.
Example 2-2 shows a sample Blueprint descriptor that demonstrates the Spring-like syntax. We use this example to highlight the key concepts in Blueprint.
Example 2-2 Blueprint sample
1 <blueprint xmlns="http://www.osgi.org/xmlns/blueprint/v1.0.0">2 <bean id="myBizObject" class="my.sample.impl.BizObject">3 <property name=”helper” ref=”myHelper” />4 <property name="service" ref="serv" />5 </bean>67 <bean id=”myHelper” class=”my.sample.util.Helper”>8 <argument ref=”blueprintBundleContext” />9 </bean>1011 <service interface="my.sample.BizInterface" ref="myBizObject">12 <service-properties>13 <entry key=”service.level” value=”gold” />14 </service-properties>15 </service>1617 <reference id="serv" interface="my.services.SampleService" 18 availability=”mandatory” 19 filter=”(transactional=true)”>20 </reference>21 </blueprint>
At the simplest level, Blueprint can create instances of classes inside the bundle (or imported in the bundle manifest), as shown in line 7 of Example 2-2. This capability on its own is not extremely useful without the ability to also inject dependencies either for each constructor (line 8) or through setter methods (lines 3 and 4). Example 2-3 and Example 2-4 on page 22 show the corresponding classes.
Example 2-3 Helper.java
public class Helper {public Helper(BundleContext context) { … }…
}
Example 2-4 BizObject.java
public class BizObject {public void setHelper(Helper h) { … }public void setService(SampleService ss) { … }…
}
The injected elements can either explicitly give a primitive value or reference another Blueprint manager (that is, any of the named top-level elements). Blueprint also defines
22 Getting Started with the Feature Pack for OSGi Applications and JPA 2.0

default managers, such as the blueprintBundleContext manager (line 8), which essentially is the BundleContext object of the bundle containing this blueprint descriptor.
Finally, the sample shows how to integrate with other modules through the service registry. Lines 17-20 in the Blueprint that is shown in Example 2-2 on page 22 declare a dependency on a service with the SampleService interface. The SampleService interface, in turn, then is injected normally into the BizObject in line 4. Line 19 highlights Blueprint’s support for service filters.
Line 18 in Example 2-2 on page 22 is perhaps the most interesting. Blueprint service references can be mandatory or optional. If a reference is mandatory, the Blueprint extender will not create any beans in the Blueprint module unless that reference is satisfied by a service. That means the Blueprint extender will not instantiate beans or publish services for that Blueprint module until all mandatory references are satisfied. If the mandatory references are not satisfied within a given internal (by default, 5 minutes), Blueprint will give up and destroy the Blueprint module.
When the Blueprint container is already up and running, a service can still go away. This action does not terminate the Blueprint container. Instead, when a call is made to the service that has gone away, Blueprint waits for a set amount of time (by default, 5 minutes) for a new service that satisfies the reference to appear before throwing an exception. This behavior, called service damping, ensures that Blueprint beans are unaffected by a temporary absence of a mandatory service. This behavior also means that the service to which a reference is bound can change over time without bringing down the running blueprint. This facility is extremely powerful.
Finally, lines 11-15 in Example 2-2 on page 22 show how easy it is to publish a service through Blueprint and exemplifies Blueprint’s support for custom service properties.
The Blueprint specification defines much more than is covered in Example 2-4. In addition to the support for primitive values that shown in Example 2-4, Blueprint allows the creation of arbitrary collection of primitives and beans as well as customized conversion between literal values and required class instances. Furthermore, Blueprint bundles can hook into the service dynamics through reference and service registration listeners. Consult the Blueprint Container specification for more information.
2.3 OSGi applications
So far, we have discussed the benefits of OSGi and the concepts and constructs around it as well as the enterprise-specific support. However, you might wonder how to actually develop an application with this technology. OSGi at its core is all about reusable modules, in the form of bundles, and not about applications. The enterprise support however is all about enabling
Extender pattern: The extender pattern is commonly used to provide additional functionality at run time based on bundle content. For this purpose, an extender bundle scans new bundles at a certain point in their life cycles and decides whether to take additional actions based on the scans. Additional actions might include creating extra resources, instantiating components, publishing services externally, and so forth. The majority of the functionality in the OSGi Service Platform Enterprise Specification is supported through extender bundles, most notably Blueprint, JPA, and WAB support.
You can read an excellent introduction and rationale to the Extender in Peter Kriens’ blog:
http://www.osgi.org/blog/2007/02/osgi-extender-model.html
Chapter 2. Introduction to OSGi and OSGi applications 23

enterprise technologies without actually giving a clear indication how to write an application. The missing piece is something on the same level as enterprise applications (and the corresponding .ear files that get deployed in JEE).
In this chapter, we discuss the application model, which is used in Apache Aries and the OSGi applications feature, as well as the upcoming release, Version 3, of Apache Geronimo. Both the latter run times are based on Apache Aries. An alternative but similar model is used in Eclipse Virgo. Apache Aries and also the Apache Geronimo community are actively extending and tweaking the application model. So, this discussion is primarily aimed at the model as found in the feature pack and might differ slightly from the model in the open source projects at the time of reading this book.
2.3.1 Application model
At a fundamental level, an OSGi application model is about how to define the contents of an application and how to package the application so that it can be installed on a target system.
In the feature pack and Apache Aries, an application is conceptually nothing more than a single manifest file that describes the application. Example 2-5 shows a sample application manifest.
Example 2-5 Application manifest
Manifest-Version: 1.0Application-ManifestVersion: 1.0Application-Name: Very cool appApplication-SymbolicName: my.very.cool.appApplication-Version: 1.0Application-Content: very.cool.web.bundle;version=[1.0.0,42.0.0), very.cool.persistence.bundle;version=[2.0.1,4.0.0)
In a manner that is similar to a bundle manifest, the application manifest defines the identity of the application (Application-SymbolicName and Application-Version) as well as the version of the application model (Application-ManifestVersion), which at the time of this writing is only 1.0. Last but not least, the manifest defines what is part of the application, meaning, which bundles form the core application content. Each Application-Content bundle has an associated version range. So, the application manifest does not describe one particular deployment scenario but potentially many separate scenarios.
Resolution and provisioningThe logical description of an application is useful, but how does the target system know which versions of the Application-Content bundles to actually install. And, how do you ensure that the bundles will actually resolve?
At this point, the OSGi application differs from a JEE model. In JEE, an application already defines the deployment, so no extra process is needed. An OSGi application however needs to be resolved in a similar way to how a bundle is resolved. In concrete terms, you must choose a specific version of the Application-Content bundles, check their dependencies, and if necessary, pull in new bundles as shared content. These new bundles might have additional dependencies, which require even more bundles to be pulled in, and so forth. Where the extra bundles come from is system-dependent.
In any case, at the end of the resolve step, we have a concrete set of bundles to be installed, which are divided into two sets: core bundles (those mentioned in the Application-Content) and shared bundles (which were pulled in to satisfy dependencies). This arrangement is
24 Getting Started with the Feature Pack for OSGi Applications and JPA 2.0
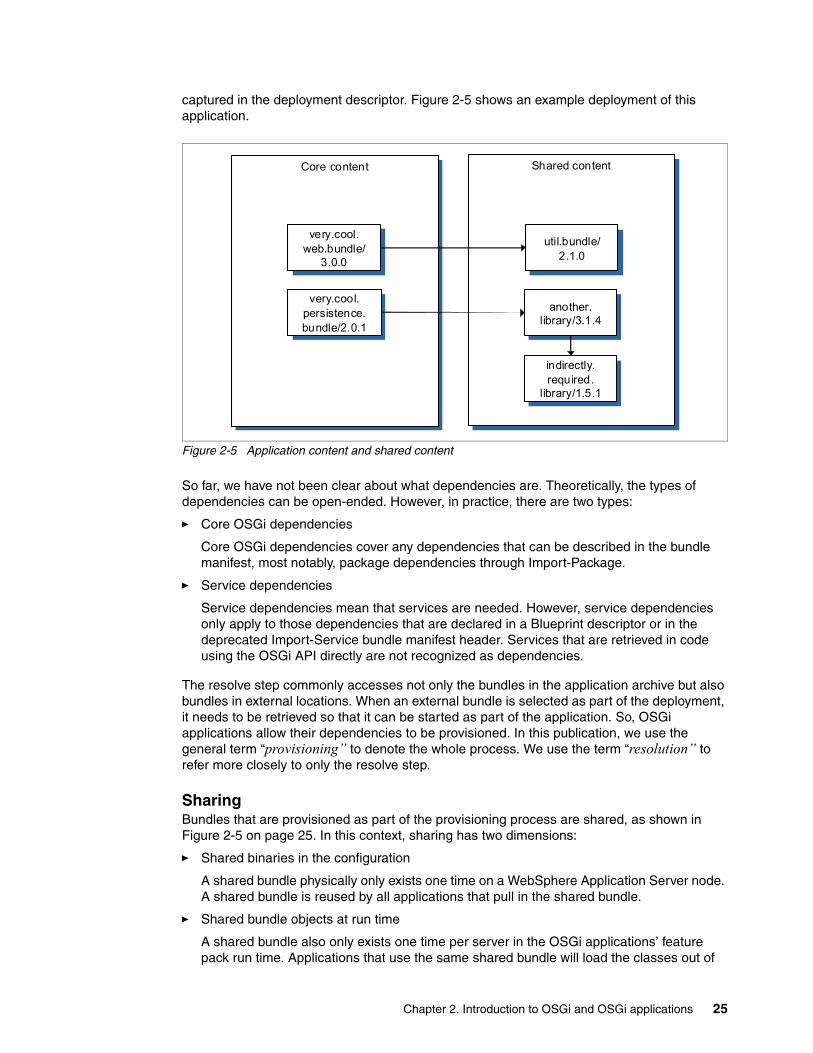
captured in the deployment descriptor. Figure 2-5 shows an example deployment of this application.
Figure 2-5 Application content and shared content
So far, we have not been clear about what dependencies are. Theoretically, the types of dependencies can be open-ended. However, in practice, there are two types:
� Core OSGi dependencies
Core OSGi dependencies cover any dependencies that can be described in the bundle manifest, most notably, package dependencies through Import-Package.
� Service dependencies
Service dependencies mean that services are needed. However, service dependencies only apply to those dependencies that are declared in a Blueprint descriptor or in the deprecated Import-Service bundle manifest header. Services that are retrieved in code using the OSGi API directly are not recognized as dependencies.
The resolve step commonly accesses not only the bundles in the application archive but also bundles in external locations. When an external bundle is selected as part of the deployment, it needs to be retrieved so that it can be started as part of the application. So, OSGi applications allow their dependencies to be provisioned. In this publication, we use the general term “provisioning” to denote the whole process. We use the term “resolution” to refer more closely to only the resolve step.
SharingBundles that are provisioned as part of the provisioning process are shared, as shown in Figure 2-5 on page 25. In this context, sharing has two dimensions:
� Shared binaries in the configuration
A shared bundle physically only exists one time on a WebSphere Application Server node. A shared bundle is reused by all applications that pull in the shared bundle.
� Shared bundle objects at run time
A shared bundle also only exists one time per server in the OSGi applications’ feature pack run time. Applications that use the same shared bundle will load the classes out of
Core contentCore content
very.cool.web.bundle/
3.0.0
very.cool.web.bundle/
3.0.0
very.cool.persistence.bundle/2.0.1
very.cool.persistence.bundle/2.0.1
Shared contentShared content
util.bundle/2.1.0
util.bundle/2.1.0
another.library/3.1.4
another.library/3.1.4
indirectly.required.
library/1.5.1
indirectly.required.
library/1.5.1
Chapter 2. Introduction to OSGi and OSGi applications 25

the exact same bundle, which implies that applications can share parts of the class space using shared bundles. It also implies that applications can communicate through shared services or shared classes with static fields. However, this practice is discouraged, because it requires application co-location. We describe a better way to connect two (or more) OSGi applications in 7.4, “Connecting two OSGi applications” on page 187.
Not all libraries are suitable for sharing. Libraries that maintain an internal state might need to be included as part of the application content rather than the shared content. However, the vast majority of useful libraries, especially those libraries that are available as OSGi bundles, can be shared freely between applications.
Provisioning versus run timeIt is important to note what the provisioning model ensures and what it does not. The deployment descriptor is usually not visible to users, because the deployment that is determined at provisioning time is not necessarily the configuration that will be in effect at run time. This concept applies to shared bundles.
In a common implementation, all shared bundles reside in a single OSGi framework. Under these conditions, the wiring between the shared bundles or the shared bundles and the applications might not be the same as the wiring at provisioning time. However, the isolated application bundles are always provided with their necessary dependencies, but not necessarily at the version that is suggested in the deployment descriptor.
Use-BundleIn certain cases, the features around shared libraries are not what the developer wants. There might be packages that logically come out of shared libraries but that cannot be allowed to be supplied by any bundle (for whatever reason). In this case, an additional restriction can be placed upon the provisioning with the Use-Bundle clause:
Use-Bundle: util.bundle;version=”[2.1.0,2.3.0)”
The Use-Bundle header ensures that packages that can be provided to the application content by a version of util.bundle in the given range will always be provided by that bundle. No other bundles are allowed. This assurance holds at both provisioning time and run time. Use-Bundle is specifically designed for package dependencies, not service dependencies.
2.3.2 Packaging an OSGi application
In the last section, we discussed the logical application model in great detail. We next explain the packaged unit of an OSGi application. OSGi applications are packaged as compressed archives with the enterprise bundle archive (.eba) extension.
There are two supported scenarios for the contents of the .eba archive:
� The .eba archive contains a fully formed application descriptor in META-INF/APPLICATION.MF, as shown in Example 2-5 on page 24, which is the default and suggested use. The application descriptor defines the application and is used by the run time as the input to provisioning the application.
The archive might include any number of bundles and other files. Included bundles will be used in the provisioning process to provide either core or shared content. Other files will generally be ignored but can be turned into bundles and used by particular implementations. For example, included war files, which are not web application bundles, are converted to web application bundles in the feature pack (and added to the application content).
26 Getting Started with the Feature Pack for OSGi Applications and JPA 2.0

The key point is that the only thing that really matters is the application descriptor. Bundles that are included in the archive are not necessarily selected as part of the deployment and they will certainly not be part of the Application-Content unless they are already listed.
� The .eba archive does not contain an application descriptor, or it is missing headers (in particular, Application-Content).
The cases of no header and a header that does not have the Application-Content header are essentially the same. In either case, a valid application manifest is generated. The manifest respects any existing headers and defaults the missing headers. The Application-Content header is generated as the list of bundles contained in the .eba archive, with locked-down version ranges.
So, in this case, the bundles inside the archive will always be part of the deployment. However, due to the locked-down version ranges, this scenario provides a lot less flexibility for the administrator, specifically where updates are concerned.
2.3.3 Programming model
The application model however is not complete without indications of how typical applications are expected to be written. The following points are merely suggestions of common patterns that are encouraged or have special support in the OSGi applications’ programming model:
� Web content is packaged in web application bundles.
� Business logic is written as POJOs. Blueprint instantiates the corresponding business services and wires them to their dependencies.
� Bundles share interfaces and services rather than concrete implementations. Other bundles depend on services.
� Persistence is achieved through JPA-managed persistence. Apache Aries and the WebSphere Application Server Feature Pack define specific support for managed JPA using the same methods that the JPA Services Specification defines for unmanaged JPA.Java Transaction API (JTA)-integrated persistence contexts are injected into the business services through a custom blueprint extension.
� Declarative transactions are provided by another custom blueprint extension.
As this list suggests, the OSGi application programming model is extremely Blueprint-centric. Unfortunately, the Blueprint Container specification does not define an extension mechanism in the first revision. Various implementers have defined separate but overall similar mechanisms in which extensions to Blueprint can be provided. These mechanisms are expected to be part of the next version of the Blueprint Container specification. The Apache Aries Blueprint implementation makes extensions available by way of xml namespaces, as shown in Example 2-6 on page 27.
Example 2-6 Using blueprint extensions
1 <blueprint xmlns="http://www.osgi.org/xmlns/blueprint/v1.0.0" 2 xmlns:bpjpa="http://aries.apache.org/xmlns/jpa/v1.0.0" 3 xmlns:bptx="http://aries.apache.org/xmlns/transactions/v1.0.0">45 <bean class="my.persistence.Service">6 <bpjpa:context property="entityManager" 7 unitname="myPersistenceUnit" 8 type="TRANSACTION" />9 <bptx:transaction value="Required" method="*"/>10 </bean>11
Chapter 2. Introduction to OSGi and OSGi applications 27

12 </blueprint>
Lines 2 and 3 define the extended functionality, in this case, JPA integration and declarative transactions. Lines 6-9 show how to use the special elements. The first element sets up the injection of a JPA-managed persistence context for the myPersistenceUnit persistence unit through the entityManager property. The next element specifies that all of the methods on the my.persistence.Service are to be called in a transaction.
If no transaction is associated with the thread on entry to any of the methods on the bean, a transaction will be started. In this case, when the bean method completes normally or throws a checked Exception, the transaction is committed. Alternatively, if the bean method throws an unchecked Exception or Error, the transaction is rolled back.
2.4 OSGi applications feature for WebSphere Application Server V7
The OSGi feature of the IBM WebSphere Application Server V7 Feature Pack for OSGi Applications and JPA 2.0 Feature Pack provides a run time for OSGi applications. It also provides full administrative support to install and manage OSGi applications, including detailed updates. In addition, several extensions to the OSGi application model and the programming model are available as well as the extended capabilities of base WebSphere Application Server.
2.4.1 Administering OSGi applications
On WebSphere Application Server, OSGi applications use the business-level application (BLA) framework and its support for extensible application types.
The business-level application feature is new to Version 7 of WebSphere Application Server and is designed to support administrative aggregation of applications and sets of applications. The BLA framework also supports an extensible application model where feature packs can contribute additional application types beyond JEE. Figure 2-6 on page 28 illustrates the key BLA concepts for an OSGi application.
Figure 2-6 Business-level application with OSGi applications
EBAEBAAsset
Composit ionUnit
Business-levelApplication
CompositionUnit
JEEAsset
Business-levelApplication
28 Getting Started with the Feature Pack for OSGi Applications and JPA 2.0

An OSGi application, in the form of an EBA archive, is imported into WebSphere Application Server to create an EBA asset. At this point, the OSGi application will be fully resolved, but you cannot run it, because it is not part of any application. To represent a configuration that can run, the administrator creates a business-level application (BLA) and adds the appropriate assets to it. This action will yield one composition unit (CU) per asset that is added to the BLA. Besides EBA assets, BLAs can contain other types of assets as well as BLAs. We discuss these more complex scenarios in Chapter 7, “Connecting OSGi applications” on page 163.
When the administrator adds an EBA asset to a BLA, various configuration options are supported (similar to what is supported for the configuration for JEE applications):
� Context roots and virtual hosts can be set for web bundles (see Figure 2-7 on page 29 for an example).
� Web module resource references can be bound.
� Web module security roles can be configured.
� Blueprint resource references (see 2.4.2, “Programming for WebSphere Application Server” on page 30) can be mapped to authentication aliases.
Figure 2-7 Configuring a WAB
Updating applicationsThe admin functionality in WebSphere Application Server provides a feature for detailed updates. This function allows an administrator to specifically update individual bundles rather than replacing the entire application. So, the detailed update mechanism is ideally suited to roll out bug fixes or small feature enhancements with low service disruption and high confidence.
Furthermore, the admin support provides the capability to export and import the deployment configurations. This functionality allows an administrator to move the exact deployment that is used on a test system to the production system. In this way, you can avoid provisioning differences.
Bundle repositoriesWe did not discuss shared bundles in depth in the discussion about the provisioning of OSGi applications. In WebSphere Application Server, the administrator can define bundle repositories, which act as a storage place for commonly used libraries or application bundles.
Chapter 2. Introduction to OSGi and OSGi applications 29

Both repositories, which are managed by the application server (internal bundle repository) or externally (external bundle repository), are supported. Figure 2-8 on page 30 shows an example of the internal repository containing four bundles.
With the help of bundle repositories, an administrator can define a central place from which separate OSGi applications can reuse the same libraries. With external bundle repositories, even applications in separate WebSphere Application Server cells can access the same shared bundles. Furthermore, bundle repositories are the place where the administrator can host updates for existing applications.
Bundles that are pulled in from a bundle repository are cached locally on the application server that hosts an OSGi application to ward against changes or outages of the bundle repository. So, as a consequence, changes in the bundle repository, such as new bundle binaries uploaded, old binaries updated, and so forth, do not affect installed applications until the administrator updates or reinstalls the application.
Figure 2-8 Internal bundle repository
Migration supportEBA archives that are installed on the feature pack can contain traditional WAR files. These WAR files are automatically converted into WABs when the EBA archive is added as an asset. So, converting an enterprise application that consists solely of WAR files to the OSGi application model is as easy as renaming the archive .eba. Note, however that the conversion of utility jars and EJB jars is not supported. You can obtain more information about migration scenarios in the WebSphere Application Server V7.0 Information Center:
http://publib.boulder.ibm.com/infocenter/wasinfo/v7r0/topic/com.ibm.websphere.osgifep.multiplatform.doc/topics/ta_mig.html
2.4.2 Programming for WebSphere Application Server
In addition to the OSGi application model that is described in 2.3, “OSGi applications” on page 23, the OSGi applications feature pack provides several specific extensions.
30 Getting Started with the Feature Pack for OSGi Applications and JPA 2.0

WebSphere Application Server web container integrationA web bundle that is deployed on WebSphere Application Server can take advantage of the reliability assurances and capabilities of the web container, such as session replication. You can use extensions to the servlet and JSP specifications as well as additional features, such as portlets and web services, in web application bundles.
Composite bundlesIn addition to isolating application bundles, sometimes it is necessary to isolate shared bundles, as well, and create well-defined boundaries through which they can be used by application bundles and other shared bundles. For example, a developer might want to always use two libraries together at specific versions rather than relying on the libraries’ metadata. Composite bundles fulfill this requirement and other requirements.
A composite bundle, such as a bundle or an OSGi application, is defined by a manifest, in this case, in META-INF/COMPOSITEBUNDLE.MF. Example 2-7 shows a sample composite bundle manifest.
Example 2-7 Composite bundle manifest
Manifest-Version: 1.0CompositeBundle-ManifestVersion: 1Bundle-Name: test.composite.bundleBundle-SymbolicName: test.composite.bundleBundle-Version: 1.0.0.qualifierCompositeBundle-Content: a.shared.bundle;version="[1.0.0,1.0.0]", another.shared.bundle;version="[1.1.0,1.1.0]"Import-Package: some.utilities;version="[1.3.0,2.0.0)"Export-Package: the.stuff.to.be.shared;version="1.0.0"
Composite bundles, in contrast to applications, cannot pull in additional dependencies. Instead, a composite bundle will fail to install if the contained bundles do not resolve with only the dependencies in the composite bundle manifest. For example, if in Example 2-7, a.shared.bundle needs another package called p, which was not exported by another.shared.bundle, the composite bundle is invalid. You need to add package p to the Import-Package header.
Also, the composite bundle content must always contain locked-down version ranges. So, similar to plain bundles, composite bundles exactly define their content up front. Finally, the capabilities that are provided in Example 2-7 are in the single package that is listed in Export-Package, because nothing else is visible to the applications or other shared bundles.
In addition to sharing packages, composite bundles can also import and export services through the CompositeBundle-ImportService and the CompositeBundle-ExportService headers. For more information about composite bundles and all the supported headers, consult the WebSphere Application Server V7.0 Information Center:
http://publib.boulder.ibm.com/infocenter/wasinfo/v7r0/topic/com.ibm.websphere.osgifep.multiplatform.doc/topics/ca_about_cba.html
Enhanced JPA supportFor persistence bundles, the OSGi application feature on WebSphere Application Server supports the runtime enhancement of JPA entities as opposed to requiring the developer to pre-enhance entities. Furthermore, a developer can choose to use JPA annotations to inject JPA persistence units and persistence context into the Blueprint beans.
Chapter 2. Introduction to OSGi and OSGi applications 31

Blueprint resource referencesAn additional namespace exists in WebSphere Application Server to support resource references within a Blueprint module. The namespace is specifically designed to permit the administrator to define the authentication with which a blueprint module accesses a secured resource. Blueprint resource references are also supported from inside persistence descriptors, hence allowing persistence bundles to access secured data sources. You can obtain more information in can be found in the WebSphere Application Server V7.0 Information Center:
http://publib.boulder.ibm.com/infocenter/wasinfo/v7r0/topic/com.ibm.websphere.osgifep.multiplatform.doc/topics/ca_blueprint_references.html
Java 2 security supportOSGi as a platform is fully integrated with Java 2 security, and all the core APIs offer detailed security controls. The OSGi applications feature pack supports the definition of permissions at the bundle as well as the application level, where application-level permissions provide a default for bundles. You can obtain more information in can be found in the WebSphere Application Server V7.0 Information Center:
http://publib.boulder.ibm.com/infocenter/wasinfo/v7r0/topic/com.ibm.websphere.osgifep.multiplatform.doc/topics/ca_java2sec.html
Local transaction containmentIn the same way that servlets and beans support local transaction containment, Blueprint beans always run in a local transaction containment. The local transaction containment allows the user to access databases without resorting to the overhead of global transactions. Also, uncommitted work will always be cleaned up at method boundaries.
2.5 Other support for OSGi applications
Additional support elements exist for OSGi applications: tooling and Service Component Architecture (SCA) integration. Both elements are key pieces to developing OSGi applications effectively. This section provides an overview of their capabilities, and later, the chapters in Part 2, “Examples” on page 55 will show their use.
2.5.1 OSGi application tooling
The Eclipse Plug-in Development tools have excellent support for developing OSGi bundles. So, quite feasibly, you can develop OSGi applications using nothing but a standard Eclipse installation. However, extremely convenient extra support is available from the IBM Rational software, both licensed and at no charge.
Rational Application Developer Version 8 ships with full support for developing OSGi applications. Figure 2-9 on page 33 shows a sample of the tools.
32 Getting Started with the Feature Pack for OSGi Applications and JPA 2.0

Figure 2-9 Rational Application Developer workbench with OSGi applications
Rational Application Developer workbench with OSGi applications includes the following features:
� Graphical editors for OSGi application, bundle, and composite bundle manifests as well as Blueprint descriptors
� Predefined project templates for OSGi bundle, persistence bundle, and web bundles
� WebSphere test environment for both running the application out of the workspace and with resources on the server
� Graphical bundle explorer tool for visualizing the contents of an OSGi application, which is shown in Figure 2-9
No-charge toolsIn addition to the licensed tooling in Rational Application Developer, a version with marginally reduced features is available at no charge from this website:
http://www.ibm.com/developerworks/rational/downloads/10/rationaldevtoolsforosgiapplications.html
The no-charge tools include support for the OSGi application and composite bundle manifest editors as well as the predefined OSGi bundle archetypes. However, they lack other features of Rational Application Developer, such as the graphical bundle explorer or the graphical Blueprint editor. The no-charge tools also do not support refactoring between classes and the blueprint that references them.
Chapter 2. Introduction to OSGi and OSGi applications 33

For this book, we used Rational Application Developer for the added integration feature, specifically, the ability to deploy directly from the workspace to a WebSphere Application Server test environment. However, most of the steps described also work with the no-charge tools. In addition, you can set up a test environment for an Apache Aries-based run time, as described at this website:
http://coding.alasdair.info/2010/09/developing-osgi-applications-with.html
2.5.2 Integration with the Feature Pack for Service Component Architecture
With Version 1.0.1.5, the Feature Pack for Service Component Architecture (SCA) has first-class support for OSGi applications, which allows an OSGi application to integrate with other OSGi applications as well as JEE applications.
Conceptually, SCA provides a component and assembly model that sits on top of entire modules, such as OSGi applications, JEE applications, EJB jars, and so forth. The implementation of a component is transparent or a “black box” to SCA. The component implementation only connects through defined inputs (references) and outputs (services). SCA provides a multitude of options for binding services and references to other SCA components as well as EJBs, Java Message Service (JMS) queues, and so forth.
Figure 2-10 OSGi implementation of an SCA component
Specifically, for an OSGi application, Figure 2-10 shows how an OSGi implementation of an SCA component works. In its manifest, an OSGi application might define externally provided services (Application-ImportService), as well as services that are to be provided to the outside (Application-ExportService). The SCA run time will match the externally provided services to SCA references and the services provided to the outside as SCA services.
Installing the no-charge Rational Development Tools for OSGi Applications
To install the Rational Development Tools for OSGi Applications, you are required to download and install Eclipse Software Developer Kit (SDK) 3.6 (Helios) from http://eclipse.org/ prior to installing the Rational Development Tools for OSGi Applications. Additionally, make sure to use a Java SDK equal to or greater than Version 5.
After installing the Eclipse SDK, choose Help Install New Software to use the provided Rational Development Tools for OSGi Applications update site for Eclipse to install the tools. After the tools are installed, you can create new OSGi-based projects. Additionally, the Eclipse help system provides information about more OSGi-related topics.
SCA Component
OSGiApplication
JEE, OSGi,JMS,etc.
JEE, OSGi,JMS,etc.
34 Getting Started with the Feature Pack for OSGi Applications and JPA 2.0

On the import side, the SCA run time publishes proxy services into the OSGi service registry for all wired Application-ImportServices entries. These services differ slightly from regular services. In order for an application bundle to be able to specify whether to wire to externally provided services, the SCA published services exist in the equivalent of a separate namespace and must be looked up with a special service filter.
Similarly, on the export side, the SCA run time will choose a specially marked Blueprint service out of the OSGi service registry and make it available externally. Apart from SCA-specific special markers in the service properties, SCA imported and exported services behave the same as normal services for an OSGi application.
2.6 More information
These websites are also relevant as further information sources:
� Home page of the OSGi alliance
http://www.osgi.org
� OSGi Service Platform specifications
http://www.osgi.org/Specifications/HomePage
� Eclipse Equinox OSGi implementation
http://eclipse.org/equinox/
� WebSphere Application Server V7.0 Information Center for the Feature Pack for OSGi Applications and JPA 2.0
http://publib.boulder.ibm.com/infocenter/wasinfo/v7r0/index.jsp?topic=/com.ibm.websphere.jpafep.multiplatform.doc/info/ae/ae/welcome_fepjpa.html
� Developing enterprise OSGi applications for WebSphere Application Server
http://www.ibm.com/developerworks/websphere/techjournal/1007_robinson/1007_robinson.html
� Best practices for developing and working with OSGi applications
https://www.ibm.com/developerworks/websphere/techjournal/1007_charters/1007_charters.html
� Apache Software Foundation: Aries project
http://incubator.apache.org/projects/aries.html
� IBM Education Assistant: IBM WebSphere Application Server Feature Pack for OSGi Applications and Java Persistence API 2.0
http://publib.boulder.ibm.com/infocenter/ieduasst/v1r1m0/index.jsp?topic=/com.ibm.iea.wasfposgi/plugin_coverpage.html
� Service Component Architecture Feature Pack Information Center
http://publib.boulder.ibm.com/infocenter/wasinfo/v7r0/topic/com.ibm.websphere.soafep.multiplatform.doc/info/ae/ae/welcome_fepsca.html
Chapter 2. Introduction to OSGi and OSGi applications 35

36 Getting Started with the Feature Pack for OSGi Applications and JPA 2.0

Chapter 3. Introduction to the Java Persistence API 2.0
This chapter introduces Version 2.0 of the Java Persistence application programming interface (API) (JPA) and prepares the foundation for the samples in the second part of this book.
After a high-level discussion of JPA 2.0 and Bean Validation specifications, we discuss the enhancements that are available with Version 2.0. In a later section, we will discuss the JPA 2.0 provider implementation that is delivered as part of the WebSphere Application Server V7.0 Feature Pack for Open Service Gateway initiative (OSGi) Applications and Java Persistence API 2.0.
The discussions contained in this chapter presume a fundamental understanding of JPA versions 1.0 and 2.0. To obtain information about these topics, see 3.4, “Where to learn more about JPA” on page 54.
3
© Copyright IBM Corp. 2010. All rights reserved. 37

3.1 Specifications
This section gives an overview of JPA 2.0 and the related Bean Validation specification.
3.1.1 JSR 317: Java Persistence API, Version 2.0
JPA 2.0 has been specified as an enhancement to the Java platform following the Java Community Process (JCP) under the name of Java Specification Request 317 (JSR 317).
JPA 2.0 has been approved by the JCP as of 10 December 2009 and forms part of the Java Enterprise Environment (EE) 6 specification. The major objectives of JPA 2.0 include solidifying the existing standard, reducing areas of non-portability, and standardizing commonly used optional functionality. As a result of these objectives, JPA 2.0 incorporates the following enhancements:
� Criteria API to support type safe queries� Integration of Bean Validation to allow automatic entity validation� Support for pessimistic locking for more advanced database access scenarios� Add-ons in the areas of collections and maps to modeling support� Enhanced APIs around EntityManagerFactory, EntityManager, and cache and query for
additional flexibility
You can download the final release of JSR 317 from the JCP JSR 317 page:
http://jcp.org/aboutJava/communityprocess/final/jsr317/index.html
Reference implementation
Reference implementation (RI) for JPA 2.0 is realized by EclipseLink 2.0.0. You can download the RI for JPA 2.0 from this website:
http://www.eclipse.org/eclipselink/downloads/ri.php
3.1.2 JSR 303: Bean Validation
Bean Validation has been specified as an enhancement to the Java platform following the JCP under the name of Java Specification Request 303 (JSR 303).
Bean Validation has been approved by the JCP as of 16 November 2009 and also forms part of the Java EE 6 specification. Bean Validation is a new validation model, which is based on constraints in the form of XML configuration files or annotations placed on the field level, method level, or class level of beans.
Bean Validation includes the following features:
� Validation can be implemented and integrated on any layer.� Validation is provided on the attribute and class level.� Built-in validators are provided, and the implementation of custom validators is supported.� Validation constraints can be grouped for scenario-based activation.� Internationalization is supported using i18n and parameterizable messages.� Constraints are configurable on an annotation or XML basis.
OpenJPA: WebSphere Application Server V7.0 Feature Pack for OSGi Applications and Java Persistence API 2.0 is based on the Apache OpenJPA 2.0 distribution. OpenJPA passed Technology Compatibility Kit verification for JPA 2.0 and is fully specification-compliant.
38 Getting Started with the Feature Pack for OSGi Applications and JPA 2.0

You can download the final release of JSR 303 from the JCP JSR 303 page:
http://jcp.org/aboutJava/communityprocess/final/jsr303/index.html
Reference implementationReference implementation (RI) for Bean Validation is realized by Hibernate Validator 4.0.1. You can download it from this website:
http://jcp.org/aboutJava/communityprocess/final/jsr303/index.html
3.2 JPA V2.0 enhancements
This section provides an overview of the enhancements that come with Version 2.0 of JPA. Several of these features have already been present as provider-specific extensions in JPA V1. However, these enhancements are only portable between various providers with JPA 2.0. We will discuss object relational mappings exclusively on an annotation level. File-based configurations using orm.xml are also supported.
3.2.1 Bean Validation
JPA 2.0 covers the optional integration of Bean Validation. Bean Validation allows for an extremely powerful programming model where persistence and validation concerns are added to the modeled business entities and the containers ensure the consistency of the saved data.
Bean Validation provides functionality to define validation constraints on the class or field level using annotations or xml configuration files. When manipulating data in the underlying data store, JPA automatically validates the related entities and throws exceptions in cases where constraints are violated. Validations can be independently configured to apply to persist, update, and delete operations. Example 3-1 shows a generic account entity that is enriched with validation entities.
Example 3-1 Account entity with validation constraints
@AccountPermission 03public class Account implements Serializable {
@Idprivate String id;
@NotNull 01@Between(min="-10000", max="1000000") 02private BigDecimal balance;
private AccountType type;
private Customer holder;...
}
Apache Bean Validation: Apache Bean Validation, although still in an early or incubator state, has been certified to be specification compliant using the Technology Compatibility Kit (TCK) that is provided by Red Hat/JBoss. You can download it from this website:
http://incubator.apache.org/bval/cwiki/index.html
Chapter 3. Introduction to the Java Persistence API 2.0 39

The numbered boxes in Example 3-1 on page 39 correspond to these explanations:
01 With the standard @NotNull annotation, we assert that an account balance must always be initialized.
02 With a custom field-level annotation, @Between, we can validate that the balance is in a suitable range.
03 With a custom class-level annotation, @AccountPermission, we can verify that several properties are consistent. For example, we want to check that the account type is supported for the referenced customer.
For further information, see Chapter 9, “Java Persistence API Bean Validation” on page 229.
3.2.2 Criteria API
JPA Criteria API allows for type safety when defining database queries. The base for the Criteria API is a metamodel that is generated from the application’s domain entities. The metamodel is used at development time for defining queries, which later allow the compiler to perform syntax checks during compile time. Example 3-2 shows a simple example of using the Criteria API along with the equivalent Java Persistence Query Language (JPQL).
Example 3-2 Example criteria query
// JPQLTypedQuery<Account> jpqlQuery = entityManager.createQuery(
“SELECT a FROM Account a WHERE a.balance > 66000”,Account.class);
List<Account> resultList = typedQuery.getResultList();
// CriteriaCriteriaBuilder criteriaBuilder = entityManager.getCriteriaBuilder();CriteriaQuery<Account> criteriaQuery = criteriaBuilder.createQuery(Account.class);
criteriaQuery.where(criteriaBuilder.gt( criteriaQuery.from(Account.class).get(Account_.balance),
66000));
TypedQuery<Account> criteriaQuery = entityManager.createQuery(criteriaQuery);resultList = typedQuery.getResultList();
The JPQL custom domain language is significantly more concise than the Criteria equivalent. However, the Criteria query compensates for that with extra safety:
� JPQL keywords can be misspelled, or the syntax can be incorrect. With the Criteria API, the available interface methods enforce correct spelling and syntax through the compiler (in many cases).
� The JPQL query is just a string. Refactoring the entity class or even just the entity attributes can break the query. With the Criteria API (and appropriate tooling), the generated metamodel reflects refactorings and keeps the queries valid.
� In JPQL, parameters are not type-checked. It is possible to hard-code a parameter of the wrong type or change a field type without changing the parameter. With the Criteria API, parameters are type-checked with the help of the static metamodel to enforce types that match the operations.
40 Getting Started with the Feature Pack for OSGi Applications and JPA 2.0

The choice between JPQL and Criteria API is of course application dependent. For example, the more frequent change occurs in the entity model, the more suitable a compiler-checked solution becomes. For further information, see Chapter 8, “Java Persistence API Criteria API” on page 215.
3.2.3 Access type
With JPA 1.0, you cannot mix access types within an entity or even an entity hierarchy. Developers were required to choose either field or property access decoration. This decision is limiting, particularly when reusing third-party entities, which can follow a separate convention than the preferred convention. With JPA 2.0, this restriction has been removed with the addition of a new annotation called @Access. The @Access annotation is placed either on the class or attribute level and allows you to have a combination of both field-based and property-based access types within the same entity. As an argument to the @Access annotation, the access type field or property needs to be specified.
Example 3-3 illustrates the usage of the @Access annotation.
Example 3-3 Access type sample
@Entity@Access(AccessType.FIELD) 01public class Customer implements Serializable {
@Idprivate String ssn;private String title;...
@Access(AccessType.PROPERTY) 02@Column(name="title")public String getTitle() {
return this.title;}
...}
The numbered boxes in Example 3-3 correspond to these explanations:
01 We use the @Access annotation on the class level to indicate that field access needs to be the default for our Customer class.
02 For the title attribute, we nevertheless configure property access by overwriting the class-level definition using another @Access annotation.
3.2.4 Extended map
With JPA 1.0, you can use Java maps to contain entities in one-to-many and many-to-many relationships as long as the key of the map is either a primary key attribute or a unique attribute of the target entity. With JPA 2.0, the support for maps has been enhanced in a way that they are now able to contain any combination of basic types, embeddables, or entities as keys or values. The following annotations have been introduced for supporting these new mappings:
@MapKeyColumn The @MapKeyColumn annotation is used for mappings where the key of the map is a basic type. The annotation allows specifications around the column that stores the basic key.
Chapter 3. Introduction to the Java Persistence API 2.0 41

@MapKeyClass The @MapKeyClass annotation is used to specify the type of the map’s key. If the map is specified using Java generics, the @MapKeyClass annotation can be omitted.
@MapKeyJoinColumn The @MapKeyJoinColumn is used for mappings where the key of the map is an entity type. The map key join column is the column in the target entity that is used to represent the map and builds the relationship to the entity acting as key.
For demonstrating extended map functionality, consider the case where various phone numbers are stored for each customer. The phone numbers are categorized into types, such as home, mobile, or office. Figure 3-1 shows the data model for our scenario.
Figure 3-1 Extended map data model
For the object relational mapping, we have decided to put a Java map on the customer entity. For the key for the map, we want to use phone type. For the value, we want to use the phone entity. Example 3-4 shows the code for this mapping.
Example 3-4 Extended map sample
@Entitypublic class Customer {
@Idprivate String ssn;...@OneToMany(mappedBy="customer") 01@MapKeyJoinColumn(name="PHONE_TYPE_ID") 02private Map<PhoneType, Phone> phones; 03...
}
@Entitypublic class Phone {
@Idprivate String id;...@ManyToOne 04private Customer customer;...
}
@Entitypublic class PhoneType {
@Idprivate String id;private String type;...
}
42 Getting Started with the Feature Pack for OSGi Applications and JPA 2.0

The numbered boxes in Example 3-4 on page 42 correspond to these explanations:
01 We specify an ordinary bidirectional one-to-many relationship between the customer and phone entities.
02 Because we want to use an entity for the key of our map, we need to use the @MapKeyJoinColumn and provide the field in the phone entity that sets phone and phone type entities in relation to each other.
03 We use generic typing to indicate that our map key is of type PhoneType, which relieves us from using the @MapKeyClass annotation.
04 On line 01, we have noted the bidirectional one-to-many relationship between customer and phone. On this line, we have the reverse relationship where we reference the customer entity from the phone entities using many-to-one.
3.2.5 Orphan removal
In JPA 2.0, the persistence provider can optionally manage the relationships between parent and child entities automatically in one-to-one and one-to-many relationships. If, on the parent side, the relationship to a child is removed, the child entity is also removed from the database. For demonstrating this feature, we enhance Example 3-4 on page 42. If a phone entity is removed from the map on the customer entity, we want the entire phone record to automatically disappear from the database. We achieve this behavior by introducing an orphanRemoval attribute that is set to true, as shown in Example 3-5.
Example 3-5 Orphan removal sample
@Entitypublic class Customer implements Serializable {
@Idprivate String ssn;...@OneToMany(mappedBy="customer", orphanRemoval=true) 01@MapKeyJoinColumn(name="PHONE_TYPE_ID")private Map<PhoneType, Phone> phones;...
}
The numbered box in Example 3-5 corresponds to this explanation:
01 We want the persistence provider to remove phone entities from the database if they are removed from the customer’s phones map.
When the orphanRemoval attribute is set to true, there is no need to specify cascade=REMOVE on the same relationship, because it is implied by the orphanRemoval attribute:
� If the child entity is removed from the parent collection (one-to-many) or the entity value is set to null (one-to-one), the child entity will be removed from the database during a flush operation.
� If the parent entity is removed from the database, the child entity will be removed as well.
3.2.6 Derived identity
With JPA 1.0, primary key columns can only be mapped to basic attributes or a composition of basic attributes, but not to attributes that designate relationships, such as foreign keys.
Chapter 3. Introduction to the Java Persistence API 2.0 43

Primary keys that are derived from foreign keys have to be mapped twice: one time as the relationship mapping and again as a basic type.
JPA 2.0 adds the functionality to use relationships for the primary key. This functionality allows the developer to directly define the identity either by an attribute of another related entity or even as a composition of attributes of both the source entity and the related entity. In the source entity, assigning the @Id annotation to a one-to-one or many-to-one mapping marks the relationship as being identity relevant. For derived identity mapping, the following rules apply:
� If the ID is a single value, the ID of the source entity is the same as the ID of the target entity.
� If the ID is a composite, the @IdClass annotation needs to define the basic ID attributes. These attributes can either come from the source entity or be derived from the target entity.
� If the ID of the target entity is also a composite ID, the IdClass of the source entity contains the IdClass of the target entity.
To demonstrate the derived identity functionality, consider the following case. All phone numbers for a customer are stored in a separate phone table. The primary key of the phone table is a composite key consisting of the type of the phone number, such as home, mobile, or office phone, and the primary key of the customer. Figure 3-2 shows the data model for our scenario.
Figure 3-2 Derived identity data model
Example 3-6 shows the code for our scenario.
Example 3-6 Derived identity sample
@Entity@IdClass(PhonePK.class) 01public class Phone {
@Id 02String type;@Id 03@ManyToOneCustomer customer;...
}
public class PhonePk {String type;String customer; 04
}
44 Getting Started with the Feature Pack for OSGi Applications and JPA 2.0

The numbered boxes in Example 3-6 on page 44 correspond to these explanations:
01 Because the ID of the phone entity is a composite key, we need to assign an @IdClass annotation for indication purposes.
02 The type of the phone is one of the primary key elements of the phone entity as indicated by the @Id annotation.
03 The primary key of the customer entity is used in the phone entity as a second primary key element. Therefore, we need to provide the @Id annotation on the customer relationship.
04 In the primary key class, we need to specify the composite primary key of the phone entity. In our case, the primary key consists of the type and the Social Security number (SSN) of the customer. The name of the relationship attribute, in our case, customer, needs to match exactly with the name of the attribute in the primary key class. The type of the primary key element corresponds to the type of the customer’s primary key, which is, in our part, the SSN of type String.
3.2.7 Nested embedding
With JPA 1.0, only basic relationships are allowed in an embeddable. Nested embeddables or embeddables holding entities were unsupported. With JPA 2.0, this limitation has been removed, and nested embeddables, and relationships to other entities, are now supported. Example 3-7 shows the phone embeddable referencing the availability embeddable and a customer entity.
Example 3-7 Nested embedding sample
@Embeddablepublic class Phone {
…@EmbeddedAvailability availability;@ManyToOneCustomer customer;...
3.2.8 New collection mappings
With JPA 1.0, only collections of entities are supported. With JPA 2.0, this rule has changed and collections can now also hold embeddables and primitives. Two new annotations unlock this new functionality:
@ElementCollection The @ElementCollection annotation is used to indicate that the entities in the collection are stored in a collection table. The annotation is only relevant for collections containing basic types or embeddables.
@CollectionTable The @CollectionTable annotation allows you to specify details about the collection table.
Example 3-8 on page 46 shows how to use new collection mappings. For a customer, the phone numbers are stored in a dedicated phone table. The phone table consists of the phone number and the foreign key to the customer.
Chapter 3. Introduction to the Java Persistence API 2.0 45

Example 3-8 New collection mapping sample
@Entitypublic class Customer {
...@ElementCollectionprivate List<String> phoneNumbers;...
}
3.2.9 Unidirectional one-to-many mapping
JPA 1.0 does not support unidirectional one-to-many relationships directly. Developers must either fall back to a many-to-one relationship and use the inverse end or introduce an additional join table. The problem with unidirectional one-to-many relationships is that the foreign key is located on the wrong side, the side of the target entity. The source entity, which actually needs to manage the foreign key, does not know about the relationship. JPA 2.0 resolves this problem and eliminates the limitation with a new annotation, @JoinColumn.@JoinColumn is used in unidirectional one-to-many relationships for defining the foreign key column.
Example 3-9 shows a sample where a customer entity has an unidirectional one-to-many relationship to a list of phone entities.
Example 3-9 Unidirectional one-to-many sample
@Entitypublic class Customer {
@Idprivate String ssn;...@OneToMany 01@JoinColumn(name="CUSTOMER_ID") 02private List<Phone> phones;...
}
The numbered boxes in Example 3-9 correspond to these explanations:
01 We indicate a one-to-many mapping using the @OneToMany annotation.
02 We use the @JoinColumn annotation for informing our customer entity about the foreign key that is located on the target entity side.
3.2.10 Ordered list mapping
JPA 2.0 introduces an annotation for instructing the persistence provider to maintain the order of lists, @OrderColumn. @OrderColumn is used on one-to-many and many-to-many relationships and on element collections to have the persistence provider automatically manage the order of the list. If an element is inserted, removed, or rearranged within the list, the provider is responsible for assuring the correct order.
Example 3-10 on page 47 shows using the ordered list feature to have the persistence provider manage the order of the customer’s phone numbers, which are ordered by the customer’s priority.
46 Getting Started with the Feature Pack for OSGi Applications and JPA 2.0

Example 3-10 Ordered list mapping sample
@Entity@Tablepublic class Customer { ...
@OneToMany@OrderColumn(name=”PHONE_ORDER”) 01private List<Phone> phones;
}
The numbered box in Example 3-10 corresponds to this explanation:
01 We want the persistence provider to have the order of the phone entities managed; therefore, we use the @OrderColumn annotation. We specify that the column PHONE_ORDER must be used for persisting the order information.
3.2.11 Pessimistic locking
With JPA 1.0, only optimistic locking is supported by the specification. With JPA 2.0, this rule has changed, and now support is also provided for pessimistic-locking scenarios. The following locking modes have been added in JPA 2.0:
PESSIMISTIC_READ This mode represents a shared lock. For read operations, the entity manager locks the entity when the transaction begins and releases it as soon as the transaction is finished.
PESSIMISTIC_WRITE This mode represents an exclusive lock. For update operations, the entity manager locks the entity.
PESSIMISTIC_FORCE_INCREMENT In this mode, the entity manager locks an entity when a transaction performs a read on it. The entity’s version number is incremented toward the end of the transaction, independently of whether an entity update took place.
Example 3-11 shows using an entity manager for assigning a pessimistic lock when retrieving a customer from the database.
Example 3-11 Pessimistic locking sample
...Customer customer = entityManager.find(Customer.class, “111-11-1111,
LockModeType.PESSIMISTIC_WRITE);...
Chapter 3. Introduction to the Java Persistence API 2.0 47

3.2.12 Standard properties
With JPA 1.0, properties related to the persistence.xml configuration file are vendor specific. With JPA 2.0, the most common properties have now been standardized:
� javax.persistence.jdbc.driver� javax.persistence.jdbc.url� javax.persistence.jdbc.user� javax.persistence.jdbc.password
3.2.13 API enhancements
With JPA 2.0, various API enhancements and interface changes have taken place. In this section, we provide an overview of the changes that we think deliver the most benefit and effect. The overview is on an interface basis and includes the following areas:
� EntityManagerFactory� EntityManager� Cache� Query
For more details about APIs and interfaces, see the specification. You can obtain specification-related information in 3.1.1, “JSR 317: Java Persistence API, Version 2.0” on page 38.
EntityManagerFactoryWith JPA 2.0, additional methods have been added to the EntityManagerFactory interface. Table 3-1 lists the added methods.
Table 3-1 EntityManagerFactory interface additions
EntityManagerWith JPA 2.0, additional methods have been added to the EntityManager interface. Table 3-2 on page 49 lists the added methods.
Method Description
CriteriaBuilder getCriteriaBuilder() Retrieves a criteria builder for utilizing the Criteria API.
Metamodel getMetamodel() The method has newly been added. Retrieves a metamodel of the persistence unit.
Map<String, Object> getProperties() Retrieves the properties, which are in effect for the entity manager factory.
Cache getCache() Retrieves the cache, which is associated with the entity manager factory.
PersistenceUnitUtil getPersistenceUnitUtil() Retrieves an interface, which provides utility methods for manipulating the persistence unit.
48 Getting Started with the Feature Pack for OSGi Applications and JPA 2.0

Table 3-2 EntityManager interface additions
CacheWith JPA 2.0, a new Cache interface is offered that allows the manipulation of the entity cache shared across all the entity managers of a persistence unit. A Cache instance can be retrieved through the EntityManagerFactory. The Cache interface defines the methods that are shown in Table 3-3 on page 50.
Method Description
<T> T find(Class<T> entityClass, Object primaryKey, ...)
The lock mode and properties parameters have been added, which have resulted in new shapes of find. The lock mode enables parameterization of the locking behavior. The properties parameter provides standard and vendor-specific attributes for advanced parameterization purposes.
void refresh(Object entity, ...) The lock mode and properties parameters have been added, which have resulted in new shapes of refresh. The lock mode enables parameterization of the locking behavior. The properties parameter provides standard and vendor-specific attributes for advanced parameterization purposes.
void lock(Object entity, LockModeType lockMode, Map<String, Object> properties)
The properties parameter has been added, which has resulted in new shapes of lock. The properties parameter provides standard and vendor-specific attributes for advanced parameterization purposes.
void detach(Object entity) Detaches the entity from the persistence context.
<T> T unwrap(Class<T> cls) Retrieves an object of type cls for getting access to the provider-specific API.
getEntityManagerFactory() Retrieves the entity manager factory for the entity manager.
void setProperty(String propertyName, Object value)
Sets a property or hint for the entity manager.
Map getProperties() Retrieves the properties that are in effect for the entity manager.
<T> TypedQuery<T> createQuery(...) Additional shapes of this method have been added for supporting criteria queries and indicating result types.
<T> TypedQuery<T> createNamedQuery(...) Additional shapes of this method have been added for supporting result type indication.
LockModeType getLockMode(Object entity) Retrieves the current lock mode for the entity.
CriteriaBuilder getCriteriaBuilder() Retrieves a criteria builder from the entity manager.
Metamodel getMetamodel() Retrieves a metamodel of the persistence unit.
Chapter 3. Introduction to the Java Persistence API 2.0 49

Table 3-3 Cache interface
For demonstrating the use of the Cache interface, consider a database that performs stored procedure-based modifications on customer records with each update. Because our JPA application is unaware of the changes occurring at a database level, we need to manually evict our customer entity from the cache. Example 3-12 shows how to evict a stale customer entity from the cache.
Example 3-12 Cache sample
...Cache cache = entityManagerFactory.getCache();if (cache.contains(Customer.class, id)) {
cache.evict(Customer.class, id);}...
QueryThe JPA 1.0 Query interface has been enhanced with additional methods. Table 3-4 on page 51 shows the methods that have been added for JPA 2.0.
Method Description
boolean contains(Class cls, Object pk); Checks if entity of type cls and identified by pk is contained in the cache.
void evict(Class cls, Object pk); Removes entity identified by pk from the cache.
void evict(Class cls); Removes all entities of type cls from the cache.
void evictAll(); Removes all entities from the cache.
50 Getting Started with the Feature Pack for OSGi Applications and JPA 2.0

Table 3-4 Query interface additions
3.2.14 JPQL enhancements
JPA 2.0 enhances JPQL syntax and functionality with several new features:
� Querying is supported for one or more entity types:
SELECT c FROM Customer c WHERE TYPE(c) IN (NaturalPerson, LegalEntity)
� SELECT supports map keys, values, and entries:
SELECT KEY(c.phones) FROM Customer cSELECT VALUE(c.phones) FROM Customer cSELECT ENTRY(c.phones) FROM Customer c
� Querying is supported on map keys and values:
SELECT c FROM Customer c JOIN c.phones p WHERE KEY(p) = 'Home' AND VALUE(p) = '12345678'
Method Description
int getFirstResult() Retrieves the position of the first result that the query object was set to fetch.
int getMaxResults() Retrieves the maximum number of results that the query was set to fetch.
Map getHints() Retrieves the properties and hints that are in effect for the query.
... setParameter(...) Additional shapes of setParameter have been added.
Set<Parameter<?>> getParameters() Retrieves all parameters that belong to the query.
... getParameter(...) Additional shapes of getParameter have been added.
boolean isBound(Parameter<?> param) Checks if a value has been assigned to the parameter.
... getParameterValue(...) Returns the value bound to a parameter. The method has been added in various shapes.
FlushModeType getFlushMode() Retrieves the flush mode that is in effect for the query.
Query setLockMode(LockModeType lockMode)
Set the lock mode type for the query execution.
LockModeType getLockMode(Object entity)
Retrieves the current lock mode for the entity.
<T> T unwrap(Class<T> cls) Retrieves an object of type cls for getting access to the provider-specific API.
Query API: With JPA 2.0, the Query API has also been enhanced with new interfaces, most of which are related to the JPA Criteria API:
� TypedQuery: For the JPA Criteria API to control query execution
� Tuple: For the JPA Criteria API as result types for queries
� TupleElement: For the JPA Criteria API as an element returned by the tuple
� Parameter: For defining query parameters
Chapter 3. Introduction to the Java Persistence API 2.0 51

� IN condition supports collection parameters:
SELECT c FROM Customer c WHERE c.id IN :param
� CONCAT function supports multiple arguments:
SELECT c FROM Customer c WHERE CONCAT(c.title, ‘ ‘, c.firstname, ‘ ‘, c.lastname) = :name
� SUBSTRING supports, in addition to the string, a single argument:
SELECT c FROM Customer c WHERE SUBSTRING(c.lastname, 2) = 'bama'
� Syntax supports CASE function:
SELECT CASE WHEN (c.title = ‘mr’) THEN ‘Mr.’ WHEN (c.title = ‘ms’) THEN ‘Ms.’ WHEN (c.title = ‘mrs’) THEN ‘Mrs.’ ELSE ‘’ END, c.lastname FROM Customer c
� Syntax supports COALESCE function:
SELECT c.title, c.firstname, c.lastname, COALESCE(c.mobilephone, c.workphone, c.homephone) FROM Customer c
� Syntax supports NULLIF function:
SELECT NULLIF(c.title, ‘’), c.lastname FROM Customer c
� Querying is supported in indexed lists:
SELECT c FROM Customer c JOIN c.phones p WHERE INDEX(p) BETWEEN 1 AND 3
� JOINs support nested dot notation:
SELECT c FROM Customer c JOIN c.phone.reachingDetail r WHERE r.preferredTime = ‘morning’
� SELECT supports AS option:
SELECT CONCAT(c.firstname, ‘ ‘, c.lastname) AS name FROM Customer c ORDER BY name
� Syntax supports JDBC date and time escape:
SELECT c FROM Customer c WHERE c.birthdate < {d'2000-01-01'}
3.3 JPA 2.0 in the WebSphere Application Server
The JPA 2.0 solution, which is delivered with the WebSphere Application Server V7 Feature Pack for OSGi Applications and Java Persistence API 2.0, is based on the Apache OpenJPA 2.0 distribution. OpenJPA passed Technology Compatibility Kit verification for JPA 2.0 and is fully specification compliant. On top of the OpenJPA distribution, IBM provides WebSphere Application Server-specific enhancements mainly for improving integration functionality in the areas of management, debugging, monitoring, and security. Noteworthy in this context is the integration with other IBM stack and complementary products, such as DB2® and eXtreme Scale. From a DB2 perspective, the pureQuery feature provides static SQL and performance improvements for the WebSphere Application Server JPA solution. An eXtreme Scale plug-in allows this caching technology to be used with OpenJPA.
JPA for WebSphere Application Server comes with two JPA 2.0 persistence providers:
� Apache OpenJPA persistence provider� JPA for WebSphere Application Server persistence provider
52 Getting Started with the Feature Pack for OSGi Applications and JPA 2.0

Even though it is also built from the Apache OpenJPA persistence provider, the JPA for WebSphere Application Server persistence provider contains the following enhancements and differences:
� Enhanced tracing support
JPA for WebSphere Application Server has extended OpenJPA with an extended trace mechanism that generates additional information in the trace file. You can configure enhanced JPA tracing by using wsadmin scripting or the WebSphere Application Server administrative console.
� Version ID generation
JPA for WebSphere Application Server has extended OpenJPA to work with database-generated version IDs. Trigger-based version ID generation is supported for all databases that WebSphere Application Server supports. Support is based on two version strategies where the version field is either of type Timestamp or Long.
� WebSphere eXtreme Scale cache plug-in support
If operating in a single Java virtual machine (JVM) environment, the JVM maintains and shares a data cache across all EntityManager instances that are obtained from a particular EntityManagerFactory. The OpenJPA data cache is unable to perform this function in a distributed environment; therefore, JPA for WebSphere Application Server has extended OpenJPA with a plug-in for WebSphere eXtreme Scale. WebSphere eXtreme Scale is able to deliver cache functionality also in distributed environments; however, performance is not as efficient as local cache support.
� Access intent support
JPA for WebSphere Application Server access intent specifies the isolation level and lock level that are used when reading data from a data source. Access intent controls the Java Database Connectivity (JDBC) isolation level and whether read, update, or exclusive locks are acquired when retrieving data.
� WebSphere product-specific commands and scripts
WebSphere Application Server provides commands and scripts for configuration and administration purposes. Commands and scripts are ready to be used together with command-line utilities or in custom scripts.
� Translated message files
JPA for WebSphere Application Server has extended OpenJPA with National Language Support (NLS) message files.
� Static SQL support using the DB2 pureQuery feature
JPA for WebSphere Application Server has extended OpenJPA with support for Data Studio pureQuery. PureQuery allows accessing a database using static SQL.
For further information, see the information center documentation:
http://publib.boulder.ibm.com/infocenter/wasinfo/v7r0/index.jsp?topic=/com.ibm.websphere.jpafep.multiplatform.doc/info/ae/ae/welcome_fepjpa.html
OpenJPA: The WebSphere JPA 2.0 solution is built on OpenJPA, but all OpenJPA functions, extensions, and configurations are unaffected by the WebSphere Application Server extensions and independent of the chosen provider. You do not need to make changes to OpenJPA applications to use these applications in WebSphere Application Server.
Chapter 3. Introduction to the Java Persistence API 2.0 53

3.4 Where to learn more about JPA
These websites are also relevant as further information sources:
� The information center for the Feature Pack for OSGi Applications and JPA 2.0:
http://publib.boulder.ibm.com/infocenter/wasinfo/v7r0/index.jsp?topic=/com.ibm.websphere.jpafep.multiplatform.doc/info/ae/ae/welcome_fepjpa.html
� Apache Software Foundation: OpenJPA project:
http://openjpa.apache.org/
� IBM Redpaper™ publication WebSphere Application Server Version 6.1 Feature Pack for EJB 3.0, SG24-7611:
http://www.redbooks.ibm.com/abstracts/sg247611.html?Open
� IBM Education Assistant: IBM WebSphere Application Server Feature Pack for OSGi Applications and Java Persistence API 2.0:
http://publib.boulder.ibm.com/infocenter/ieduasst/v1r1m0/index.jsp?topic=/com.ibm.iea.wasfposgi/plugin_coverpage.html
� Apache Software Foundation: Bean Validation project:
http://incubator.apache.org/bval/cwiki/index.html
54 Getting Started with the Feature Pack for OSGi Applications and JPA 2.0

Part 2 Examples
In this part, we focus on use case scenarios introducing Open Service Gateway initiative (OSGi), Java Persistence API (JPA), and integration aspects that are provided by the WebSphere Application Server V7.0 Feature Pack for OSGi Applications and JPA 2.0. Each of the scenarios is based around a simple banking application.
We specifically look at the development of applications using Rational Application Developer V8.0, including its built-in OSGi and JPA tool support.
Part 2
© Copyright IBM Corp. 2010. All rights reserved. 55

56 Getting Started with the Feature Pack for OSGi Applications and JPA 2.0

Chapter 4. Sample application
The Open Service Gateway initiative (OSGi) applications and Java Persistence API (JPA) 2.0 examples in this book are predominantly based on a simple banking application called ITSO Bank. To satisfy the various needs of OSGi applications and JPA 2.0, we have created two variations of the banking application: one version for the OSGi examples and one version for the JPA 2.0 examples. This chapter introduces the OSGi banking application as a base and then covers enhancements added to the base specifically for the JPA 2.0 examples.
4
© Copyright IBM Corp. 2010. All rights reserved. 57

4.1 Sample material for this chapter
The additional material that is provided for this book contains examples for OSGi and JPA 2.0. The examples for both topics have been kept strictly separate from each other and do not have any relationship, thus allowing readers to focus on single topics. For more information about downloading and using the samples, see Appendix A, “Additional material” on page 263.
4.2 Introducing the ITSO Bank application
On an extremely high-level view, the core ITSO Bank application consists of the following components (Figure 4-1):
� A front-end web application bundle� An OSGi business bundle� An OSGi persistence bundle� JPA entity objects� Persistence storage (using Apache Derby tables)
As part of the OSGi application, sample various extensions are added to the core structure to show sharing, update, and integration scenarios. These extensions are not discussed here but when they are first introduced.
Figure 4-1 Sample application: ITSO Bank
Web ClientWeb Client
Web Container
Web Module
Web OSGi Bundle
Control
View
Service1 2
35
6
Persistence OSGi Bundle
Service
Bean
Reference
Bean
Biz OSGi Bundle
4
58 Getting Started with the Feature Pack for OSGi Applications and JPA 2.0

Figure 4-1 on page 58depicts the event flow (the following numbers reference the highlighted numbered lines in Figure 4-1 on page 58):
1. An HTTP request from a web client is sent to a servlet in the control layer, which is also known as the front controller, which extracts the parameters from the request. The OSGi web application bundle defines servlets and associated handlers following the command pattern. The servlet sends the request to the appropriate controller, which is a plain Java bean. This bean verifies whether the request is valid in the current user and application states.
2. If the request is valid, the control layer sends it on to the business layer through an OSGi service for the ITSO Bank implementation, which is retrieved with a standard Java Naming and Directory Interface (JNDI) lookup.
3. The ITSO Bank implementation bean executes the appropriate business logic that is related to the request. This business logic includes accessing entity objects in the OSGi persistence bundle of the application framework. Persistence functionality is again accessed through an OSGi service. In this instance, the lookup is handled in the background by Blueprint.
4. The JPA 2.0-capable OSGi persistence bundle accesses the persistence store (Apache Derby in the sample) to retrieve the data and then sends the populated plain old Java objects (POJOs) back to the business layer based on the query executed.
5. The front controller servlet sets the response POJO as a request attribute and forwards the request to the appropriate JavaServer Page (JSP) in the view layer, which is responsible for rendering the response back to the client.
6. The view JSP accesses the response POJO to build the user response. The result view, which is usually in HTML format, is returned to the client.
4.3 JPA entities
The ITSO Bank entity model contains three entity objects (Figure 4-2 on page 60): Customer, Account, and Transaction.
Chapter 4. Sample application 59

Figure 4-2 Entity model of the ITSO Bank application
Additionally, a JPA persistence service is used to access each JPA entity for read/write operations. The service can be looked up from the business application layer and thus is available to the ITSOBank business object. However, the entities are not directly available to the presentation logic. So, changes to the persistent storage always have to be routed through the business layer.
4.3.1 Customer entity
The Customer entity contains the attributes of a customer and the relationships to all the accounts of the customer:
� ssn: Social Security number (ID or key)� title: Title (Mr, Mrs, or Ms)� firstname: First name� lastname: Last name� accountCollection: Collection of all accounts (many)
The only methods of Customer entity are the getter and setters for its attributes.
4.3.2 Account entity
An Account entity has these attributes and relationships:
� id: Account number� balance: Account balance
60 Getting Started with the Feature Pack for OSGi Applications and JPA 2.0

� customerCollection: Collection of customers that own this account (many)� transactionsCollection: Collection of transactions performed (many)
The methods of the Account entity are the getters and setters.
4.3.3 Transaction entity
The Transaction entity has these attributes and relationships:
� id: Generated unique ID� amount: Amount of transaction� transtime: Timestamp of the transaction� transtype: Type of transaction (debit or credit)� account: Account that owns this transaction (one)
The methods of the Transaction entity are the getters and setters.
4.3.4 Relationships
The entity model contains two relationships:
� A many-to-many relationship between Customer and Account. A customer can own many accounts, and one account can be owned by many customers (joint ownership).
� A one-to-many relationship between Account and Transaction. There are many transactions for one account, but each transaction belongs to one account.
4.4 Persistent storage (using Apache Derby tables)
The entity model is implemented in a relational database named ITSOBANK, with five tables (Figure 4-3 on page 62):
� CUSTOMER: This table holds all the customers.
� ACCOUNT: This table holds all the accounts.
� TRANSACTIONS: This table holds all the transactions. One column is the foreign key (account_id) that points to the owning account.
� OPENJPA_SEQUENCE_TABLE: This table is used in the OSGi-specific scenarios to generate primary key values (for example, ID values).
� ACCOUNTS_CUSTOMERS: This table holds the many-to-many relationship between the CUSTOMER and ACCOUNT tables. It contains two foreign keys that point to the customer and account that are related.
Chapter 4. Sample application 61

Figure 4-3 ITSO Bank database schema
4.5 Front-end web application
Figure 4-4 on page 63 shows the structure of the front-end web application, which is named itso.bank.web in the case of the OSGi scenario:
� index.html: Home page and starting point
� rates.html and insurance.html: Static pages with information
� redbank.html: Login page for customers
� listAccounts.jsp: Displays the customer information and a list of the accounts after login. The user can select an account.
� feedback.jsp: Provides an HTML form to allow the submission of new feedback records to a bank accountant.
� feedbackHistory.jsp: Displays the submitted feedback records for a specific customer.
� accountDetails.jsp: Displays the details of the account and a menu to perform operations: list transactions, make deposits, withdraw funds, and transfer funds
� listTransactions.jsp: Displays the list of transactions for one account
� showException.jsp: Displays error information
62 Getting Started with the Feature Pack for OSGi Applications and JPA 2.0

Figure 4-4 Web diagram of the ITSO Bank web front-end application
The ITSO Bank application can perform these functions:
� ListAccounts: Verifies the customer login, retrieves the customer and the accounts, and calls the listAccounts.jsp.
� ListFeedback: Verifies the customer login, retrieves the customer and customer feedback provided in the past, if any, and calls the feedbackHistory.jsp.
� PerformFeedback: Verifies the customer login, retrieves the customer and submits a new feedback record, and calls the feedbackHistory.jsp to display the just submitted feedback record.
� AccountDetails: Retrieves the selected account, and calls the accountDetails.jsp.
� PerformTransaction: Performs deposit, withdraw, and transfer requests by calling appropriate command classes, and then re-displays the updated account with the accountDetails.jsp.
� Additional servlets to delete an account (DeleteAccount), create a new account (NewAccount), and update and delete a customer (UpdateCustomer) were added to the original web application to test the corresponding functions of the session bean.
4.6 Enhancements that are specific to JPA 2.0
The OSGi applications and JPA 2.0 samples are both based on the ITSO Bank application; however, we have modified the database and domain model of the JPA 2.0 samples with specific enhancements. This section describes the enhancements that we have made.
Chapter 4. Sample application 63

4.6.1 JPA entities
Figure 4-5 shows the ITSO Bank entity model specific to the JPA 2.0 examples. We have enhanced the model with the following entities:
� PhoneType: This entity holds the phone types (home, mobile, and office).
� Phone: This entity holds the customer’s phone number.
� Address: This embeddable holds the customer’s address.
Figure 4-5 Entity model for the JPA 2.0 ITSO Bank application
Customer entityThe Customer entity contains the attributes of a customer, an address embeddable, a phone map, and a relationship to all the accounts of the customer:
� ssn: Social Security number (ID or key)� title: Title (Mr, Mrs, or Ms)� firstname: First name� lastname: Last name� address: Address� accountCollection: Collection of all accounts (many)� phones: Map of all phone numbers (many)
The only methods of Customer are the getter and setters for its attributes.
64 Getting Started with the Feature Pack for OSGi Applications and JPA 2.0

PhoneType entityThe PhoneType entity contains the attributes of a phone type:
� id: Generated unique ID (ID or key)� type: Type (mobile, home, or office)
The only methods of PhoneType are the getter and setters for its attributes.
Phone entityThe Phone entity contains the attributes of a phone:
� id: Generated unique ID (ID or key)� number: Phone number (mobile, home, or office)� customer: Reference to customer
The only methods of Phone are the getter and setters for its attributes.
Address embeddableThe Address embeddable contains the attributes of an address:
� street: Street of the address� city: City of the address� state: State of the address� zip: Zip code of the address� country: Country of the address
The only methods of Address are the getter and setters for its attributes.
RelationshipsThe entity model contains the following additional relationships:
� A one-to-many relationship between Customer and Phone. There are many phone numbers for one customer, but each phone number belongs to one customer.
4.6.2 Persistent storage (using Apache Derby tables)
Figure 4-6 on page 66 shows the ITSOBANK database model specific to the JPA 2.0 examples.
Chapter 4. Sample application 65

Figure 4-6 ITSO Bank database schema for JPA 2.0 examples
The database has been enhanced with the following tables:
� PHONE_TYPE: This table holds the type of phones (home, mobile, or office).
� PHONE: This table holds the customer’s phone numbers.
The following columns have been added to the CUSTOMER table:
� STREET: This column holds the street as part of the address.
� CITY: This column holds the city as part of the address.
� STATE: This column holds the state as part of the address.
� ZIP: This column holds the zip code as part of the address.
� COUNTRY: This column holds the country as part of the address.
4.6.3 Front-end web application
The front-end web application, which is named itso.bank.web, in the case of the JPA 2.0 scenario, consists of a single servlet, JPABeanValidationTest.java, for demonstrating Bean Validation and JPA provider integration in a Java Platform, Enterprise Edition (JEE) environment.
66 Getting Started with the Feature Pack for OSGi Applications and JPA 2.0

Chapter 5. Developing OSGi applications
In this chapter, we describe in detail the task of developing an Open Service Gateway initiative (OSGi) application. We start with a simple three-tier web application with a front end, business logic, and a back end, which is based on the Java Persistence API (JPA). With this simple setup, the application shows the core feature set of OSGi applications and the integration with JPA.
After the structure is in place, we delve into more complex application structures, including shared content. Shared content shows how the OSGi feature pack allows developers and administrators to build their applications on common components and administer these applications centrally.
Finally, this chapter discusses the use of the more complicated tools for defining the application and also methods to debug problems that might occur.
5
© Copyright IBM Corp. 2010. All rights reserved. 67

5.1 Sample material for this chapter
The sample applications that are developed in this chapter are included as downloadable material for this publication (see Appendix A, “Additional material” on page 263). Refer to “OSGi samples” on page 264 to install the sample material.
Follow these steps to use the files that we reference in this chapter:
1. Extract the 01_itso-bank_rad-sample.zip file that contains the scenario to a folder (extracted_v100_files).
2. Extract the 02_itso-bank_with_update_and_sharing.zip file that contains the update and sharing scenario to a folder (extracted_v101_files).
3. Extract the 09_itso-bank_criteria.zip file that contains the scenario with the JPA 2.0 criteria extension (extracted_v102_files).
5.2 Introducing the sample
The sample application builds an ITSO Bank application. This application is part of the bank internal infrastructure that is available to the bank clerks. At a fundamental level, the application allows the user to query an account and transaction log and to perform transactions on the accounts.
We build this standard web application scenario using a three-tier architecture with a front end, business logic, and a back end in an OSGi application. The OSGi application starts consisting of four bundles (see Figure 5-1 on page 69):
� An API bundle containing the interfaces that connect the web to the business and the business to persistence
� A business bundle that contains the business logic and acts as an intermediary between the presentation logic and the database
� A persistence bundle that encapsulates the JPA-based database access pattern
� A web bundle for servlets, JavaServer Pages (JSPs), and static content, which delegates the actual business functionality to the business bundle
68 Getting Started with the Feature Pack for OSGi Applications and JPA 2.0

Figure 5-1 Application structure overview
Loose couplingAlthough the three-tier (web, business, and persistence) split is a standard pattern, the architecture diagram that is shown in Figure 5-1 contains a number of OSGi-specific twists.
First, all of the implementation layers are connected through interfaces only. Depending only on interfaces is a widely acknowledged best practice that helps to minimize the dependencies of a class and ensure unit testability. OSGi helps to make sure that concrete classes are simply not visible, and hence, individual module developers choose to use the provided interfaces only. To obtain the concrete implementation of the service interfaces, we use the OSGi integration mechanism, the OSGi service registry.
However, even using the OSGi APIs for accessing the service registry will bloat the business classes unnecessarily with OSGi-specific code. Instead, as second step, we use Blueprint to provide the detailed dependency injection that separates the wiring of business beans to and from services from their implementation. Unfortunately, the Apache Aries Blueprint container and the WebSphere Application Server web container do not integrate. Hence, for the web bundle, we have to use a more direct approach. However, we can still avoid using the OSGi APIs by using Java Naming and Directory Interface (JNDI)-service registry integration technology (see “Connecting to the business services through JNDI” on page 99).
Finally, there is the API bundle, which warrants a closer look. In traditional Java Platform, Enterprise Edition (JEE)-style development, we likely include the interfaces in the bundles that also provide the implementation. However, in idiomatic OSGi development, the key criteria for deciding on packaging and module boundaries are responsibilities and frequency of change across the whole module life cycle.
In this case, providing the service and entity interfaces for persistence and implementing them are two separate concerns. Beside a JPA-based persistence mechanism, we can see a mechanism that accesses a No-SQL persistence store or a flat file. Rather than packaging the interfaces in each implementation, we separate any concerns early.
Furthermore, the frequency of change also distinguishes interfaces and implementation. While in initial development, it is likely that interfaces and implementation will change almost
Blueprint
Service Ref
Bean
Blueprint
Service Bean
Biz Persistence
WebWeb
APIAPI
Package dependency
Service dependency
Chapter 5. Developing OSGi applications 69

simultaneously, the same is not true for the life cycle beyond the first release. Interfaces are less likely to change, because the cost for change is high because client code can easily be broken. However, the hidden implementation classes will likely change much more frequently without requiring interface changes, specifically, as result of defects. Hence, separate packaging conceptually means that we can update the implementation without changing the interface bundles. With regard to OSGi dynamics, this change is a significant difference. Replacing interface classes is never seamless, but replacing a service implementation can be.
5.3 Developing the application
In this section, we get from zero to a working core for the sample application. Although we show the steps in Rational Application Developer, the majority of the steps are also applicable to the no-charge tools for OSGi applications from Rational. Later sections and chapters have fewer hands-on instructions than this section, so that we can focus more on the important parts. Refer back to this section if concrete steps are unclear.
5.3.1 The API bundle
Separate API from implementation.1
1 http://www.ibm.com/developerworks/websphere/techjournal/1007_charters/1007_charters.html
70 Getting Started with the Feature Pack for OSGi Applications and JPA 2.0

In this first step, we define the API that delineates the boundaries between presentation (web), business, and persistence logic. Figure 5-2 shows the finished product with the packages in the project explorer and also the bundle export package settings in the bundle manifest editor.
Figure 5-2 The bundle manifest editor defining the bundle contents
Chapter 5. Developing OSGi applications 71

Creating the API bundleTo create the itso.bank.api bundle project in the workspace, ensure that Rational Application Developer is in the Java EE perspective, and then, follow these steps:
1. In the Enterprise Explorer view, right-click and select New OSGi Bundle Project. Click Next.
Figure 5-3 Create a new OSGi bundle project
72 Getting Started with the Feature Pack for OSGi Applications and JPA 2.0

2. In the first panel of the OSGi bundle project wizard, complete the following fields, as shown in Figure 5-4:
a. Enter the Project name as itso.bank.api.
b. Ensure that the Target runtime is set to WebSphere Application Server v7.0.
c. Clear the Add bundle to application check box. We explain creating the ITSO Bank application project in a separate section.
Figure 5-4 Provide the API bundle project information
3. Click Finish. The new project is created in the workspace.
Next, define the interface structure for both the business layer and the persistence layer to be created. Figure 5-5 on page 74 shows the interfaces for both the business layer and the persistence layer. The interfaces consist of these packages:
� A package for the business layer called itso.bank.api with the business interfaces for Account, Bank, Customer, and Transaction
� A package for the persistence layer called itso.bank.api.persistence with the persistence interfaces for MutableAccount, MutableBank, MutableCustomer, and MutableTransaction
� A package for exception classes called itso.bank.api.exceptions
Chapter 5. Developing OSGi applications 73

Figure 5-5 There is a distinction between business and persistence API interfaces
In the sample application, we have opted to separate the interfaces that connect the presentation layer to the business layer from those interfaces that connect the business layer to the persistence layer. Even though related concepts are present in both interactions, it allows the specific function sets to differ. The web bundle is only able to read data whereas the business layer is allowed to effect changes. To make this point, we use a naming convention of Mutable* to indicate that these API interfaces change persistent data.
Furthermore, with the two independent interfaces, we can develop the two interfaces independently to a certain extent. For example, adding a new persistence provider might entail tweaks to the existing persistence interfaces, but the interfaces for the web bundle are not changed. With the package separation, we make sure that the web bundle code cannot be affected by such changes.
Whether a single interface or two separate ones is the correct choice depends, of course, on the application. For the simple application that we describe, you can use either choice.
In a final step, export the new packages using the manifest editor:
1. Double-click the bundle project’s manifest entry.
2. Switch to the Runtime tab, and add packages to the list of exported packages.
3. Click Add to browse for packages to be added.
4. Add the following packages to the list of exported packages:
– itso.bank.api– itso.bank.api.exceptions– itso.bank.api.persistence
5. Ensure that the version to be exported of each package has been set to 1.0.0 by clicking Properties.
Sample material: These packages have been included in the additional material for this book. Follow these steps to import the packages that you see in Figure 5-5 into your bundle:
1. Right-click the src folder, and select Import. 2. Select General File System as the source type, and click Next. 3. Browse to the extracted_v100_files.itso.bank.api\src folder, and click OK. 4. Select the src folder (including everything under it), and click Finish.
74 Getting Started with the Feature Pack for OSGi Applications and JPA 2.0

Example 5-1 shows the resulting manifest. In Rational Application Developer, you can obtain the source on MANIFEST.MF tab of the bundle manifest editor.
Example 5-1 Bundle manifest for itso.bank.api
Manifest-Version: 1.0Bundle-ManifestVersion: 2Bundle-Name: itso.bank.apiBundle-SymbolicName: itso.bank.apiBundle-Version: 1.0.0Bundle-RequiredExecutionEnvironment: JavaSE-1.6Export-Package: itso.bank.api;version="1.0.0", itso.bank.api.exceptions;version="1.0.0", itso.bank.api.persistence;version="1.0.0"
Throughout this introduction, we focus on sensible versioning. We explain the ramifications and formalities of versioning in detail in 6.2, “OSGi application life cycle: Fine-grained updates” on page 136, at which time the proper versioning will turn out to be crucial.
Another convention that we follow in this example is to prefix package names with the symbolic name of the bundle. Although this naming convention might lead to slightly longer names, it clearly indicates the provenance of a package and allows you to identify the containing bundle by glancing at the package name.
5.3.2 The persistence bundle
Use persistence bundles to share your persistence units.2
The persistence bundle encapsulates the persistence requirements of the application. It is a way of hiding a JPA persistence unit with matching entities. In the architecture that is described in 5.1, “Sample material for this chapter” on page 68, the usage of JPA is abstracted behind a data access interface. Thus, the persistence bundle is highly cohesive and better adapted for reuse; specifically, the choice of persistence technology is hidden behind the abstraction.
2 http://www.ibm.com/developerworks/websphere/techjournal/1007_charters/1007_charters.html
Chapter 5. Developing OSGi applications 75

The entitiesFigure 5-6 shows the entities in the simplified ITSO Bank relational model.
Figure 5-6 Physical data model of the ITSO Bank database schema
Example 5-2 OpenJPA support of runtime forward mapping to create a DB schema at run time
<persistence-unit name="CustomerServiceEJB"> <jta-data-source>jdbc/crm</jta-data-source> <non-jta-data-source>jdbc/crmnonjta</non-jta-data-source> <class>itso.crm.entity.QuestionEntity</class> <properties>
Sample material: The sample material that is provided with this publication contains sample database setup scripts for Apache Derby database for use with the sample. Additionally, to be able to work with JPA-based persistence, you are required to set up the appropriate Apache Derby data sources on a WebSphere Application Server. 5.4.1, “Setting up Derby Data Sources” on page 105 illustrates how to accomplish this task.
Various approaches to create the ITSO database schema: “Set up the ITSOBANK database (Apache Derby)” on page 272 outlines a bottom-up approach to create the database schema for the sample application using Data Definition Language (DDL) and Data Manipulation Language (DML) scripts. Those scripts are database vendor specific. OpenJPA supports a top-down approach to create the database schema that is database vendor agnostic. During the development time, we used this top-down approach that is based on adding specific properties to the persistence.xml descriptor. Example 5-2 illustrates how to use the openjpa.jdbc.SynchronizeMappings property to create the database schema at run time based on the JPA entities that are defined in the sample code. Remember that, according to the OpenJPA documentation, these properties are meant to be used during debug and development time and need to be removed later while transitioning to a production environment:
http://openjpa.apache.org/builds/2.0.1/apache-openjpa-2.0.1/docs/manual/manual.html#ref_guide_mapping_synch
76 Getting Started with the Feature Pack for OSGi Applications and JPA 2.0

<property name="openjpa.jdbc.Schema" value="ITSOCRM" /> <property name="openjpa.jdbc.SynchronizeMappings" value="buildSchema(ForeignKeys=true)" /> </properties></persistence-unit>
The data model that is shown in Figure 5-6 on page 76 also includes a technical entity called OPENJPA_SEQUENCE_TABLE, which is used to dynamically create primary keys for new data sets to be created. Tables that are shown in the data model can be mapped to JPA entities, as Example 5-3 illustrates for the Customer entity.
Example 5-3 Customer entity
@Entity@Table(schema = "ITSO", name = "CUSTOMER")public class Customer implements MutableCustomer {
private static final long serialVersionUID = 1L;
@Idprivate String ssn;private String title;private String firstname;private String lastname;
@ManyToMany(mappedBy = "customerCollection")private Set<Account> accountCollection;
// getters, setters, others …}
Chapter 5. Developing OSGi applications 77

Creating the persistence bundle projectThis section outlines how to create the ITSO Bank persistence bundle project using Rational Application Developer. Follow these steps to create the ITSO Bank persistence bundle project in the workspace:
1. In the Enterprise Explorer, right-click to select New OSGi Bundle Project. Click Next.
2. On the first panel of the New OSGi Bundle Project wizard, complete the following fields as shown in Figure 5-7:
a. Enter the Project name as itso.bank.persistence.
b. Ensure that the Target runtime is set to WebSphere Application Server v7.0.
c. Ensure that the configuration is set to OSGi JPA Configuration.
d. Clear the Add bundle to application check box. We will add bundles to an OSGi application project later while creating the ITSO Bank application project.
Figure 5-7 Provide the persistence bundle project information
78 Getting Started with the Feature Pack for OSGi Applications and JPA 2.0

3. Click Next until you reach the JPA Facet panel (Figure 5-8).
In the JPA Facet wizard panel, you need to either create a new database connection or reuse an existing database connection. In our example, we click Add connection to define the connection to the Apache Derby sample database.
Figure 5-8 Provide additional, JPA-specific project information
Chapter 5. Developing OSGi applications 79

The example values that we used to connect to the database are shown in the summary of the new connection wizard (Figure 5-9).
Figure 5-9 Connection profile summary
4. After you have created the new connection profile, click Finish on the JPA Facet panel. The new project is created in the workspace, as shown in Figure 5-10.
Figure 5-10 OSGi persistence bundle project contents
To complete the ITSO Bank persistence bundle project, we cover the following steps:
1. Import the required packages from the API bundle project.2. Create the necessary package and class structure.3. Configure the data source lookup in the Persistence Unit.4. Add a blueprint file that exposes the JPA persistence service implementation as an OSGi
service.
80 Getting Started with the Feature Pack for OSGi Applications and JPA 2.0

Setting up the bundle manifestBefore making changes to the bundle manifest, the OSGi JPA configuration adds the minimum necessary headers for a persistence bundle. The manifest already imports javax.persistence and also contains an empty Meta-Persistence header.
Perform these steps to import the required packages from the API bundle project:
1. Double-click the manifest of the persistence bundle to open its manifest editor.
2. In the manifest editor, navigate to the Dependencies tab to add packages to be imported.
3. In the Imported Packages section, click Add to import the itso.bank.api, itso.bank.api.exceptions, and itso.bank.api.persistence packages.
4. Set the version ranges of the itso.bank.api (just for the enum Transaction.TransactionType) and itso.bank.api.exceptions dependency to [1.0.0,2.0.0) and the itso.bank.api.persistence version range to [1.0.0,1.1.0). Select Properties, and use the values that are shown in Table 5-1 to set these ranges. The range of versions will become important later in 6.2, “OSGi application life cycle: Fine-grained updates” on page 136.
Table 5-1 Import package settings
Meta-Persistence header: This header marks a bundle as a persistence bundle and declares any nonstandard locations for persistence descriptors in the bundle. In the simplest (and a common) scenario where the persistence.xml resides in META-INF, the Meta-Persistence header is left blank (a single space after the colon), because the default location is always searched. However, the header cannot be omitted. Without it present, the bundle will not be recognized as a persistence bundle, and JPA capabilities will not be available.
In more complex cases, the Meta-Persistence header can reference to persistence descriptors inside the bundle or even in embedded archives, which can be useful especially when one or more existing persistence jars are wrapped to a bundle:
Meta-Persistence: persistence/persistence.xml,lib/entities.jar!/META-INF/persistence.xml
In this example, three locations will be searched for persistence descriptors:
� The location persistence/persistence.xml from the root of the bundle� The file META-INF/persistence.xml in the embedded jar file named entities.jar� The default location META-INF/persistence.xml
Package Minimum version
Maximum version
itso.bank.api 1.0.0 Inclusive 2.0.0 Exclusive
itso.bank.api.exceptions 1.0.0 Inclusive 2.0.0 Exclusive
itso.bank.api.persistence 1.0.0 Inclusive 1.1.0 Exclusive
Chapter 5. Developing OSGi applications 81

Importing the sample contentTo create the required package structure of the persistence bundle project, you need to create the following packages and populate them with content, as shown in Figure 5-11:
� itso.bank.persistence (hosts the persistence OSGi service implementation to be exposed)� itso.bank.persistence.entity (hosts the annotated JPA entities)
Figure 5-11 Package contents of OSGi persistence bundle
Configuring the persistence unitRational Application Developer has already created a basic persistence descriptor containing the itso.bank.persistence persistence unit. To be usable, this persistence unit needs to specify how to obtain access to the database. In the sample, we use basic JNDI. Follow these steps:
1. Double-click the persistence.xml file to edit it using the Persistence XML Editor.
2. In the design tab, select the persistence unit and provide the following information in the details section:
a. Set the JTA data source JNDI name to jdbc/bank.b. Set the non-JTA data source JNDI name to jdbc/banknojta.
These settings use traditional JNDI lookups as the data source access scheme. The information center describes two alternatives:
http://publib.boulder.ibm.com/infocenter/wasinfo/v7r0/topic/com.ibm.websphere.osgifep.multiplatform.doc/topics/ca_jpa.html
Sample material: Follow these steps to import the packages that you see in Figure 5-11 into your bundle:
1. Right-click the src folder, and select Import. Select General File System as the source type, and click Next.
2. Browse to the extracted_v100_files\itso.bank.persistence\src folder, and click OK.
3. Select the src\itso folder (including everything under it), and click Finish.
82 Getting Started with the Feature Pack for OSGi Applications and JPA 2.0

Setting up the Blueprint descriptorNow, we can create the blueprint file for the persistence bundle project. Perform the following steps to create the blueprint file that is required to expose the persistence service externally:
1. Right-click the persistence bundle project, and choose New Blueprint File.
2. Leave the values on the first wizard panel unchanged, and click Next.
3. On the second wizard panel, ensure that the check box for JPA is selected.
4. Click Finish to create the blueprint file and to be taken to the blueprint editor.
To modify the blueprint, you use the editor’s design view. In the design view, perform these steps:
1. Add a bean definition to the blueprint by clicking Add, selecting Bean, and clicking OK.
2. The Bean Class implementation needs to point to itso.bank.persistence.JpaPersistenceService, as shown in Figure 5-12. Click OK.
Figure 5-12 Bean definition
3. To export the newly created persistence bean definition as a service, right-click the Blueprint root node, and choose Add Service (Figure 5-13).
Figure 5-13 Add the bean definition as a service
Chapter 5. Developing OSGi applications 83

4. On the first panel, provide the following data, as shown in Figure 5-14:
a. Enter the Service Interface as itso.bank.api.persistence.PersistenceService.b. Enter the Service ID as JpaPersistenceServiceBeanService.c. Enter the Bean Reference as JpaPersistenceServiceBean.d. Click OK.
Figure 5-14 Service element properties
5. Save the blueprint file and ensure that its content matches the content that is shown in Example 5-4.
Example 5-4 Persistence bundle blueprint
<blueprint xmlns="http://www.osgi.org/xmlns/blueprint/v1.0.0"><bean id="JpaPersistenceServiceBean"
class="itso.bank.persistence.JpaPersistenceService"></bean>
<service id="JpaPersistenceServiceBeanService"interface="itso.bank.api.persistence.PersistenceService"ref="JpaPersistenceServiceBean">
</service></blueprint>
Accessing JPA servicesFinally, we need to explain obtaining the JPA services. Example 5-5 shows a snippet of the sample persistence service.
Example 5-5 JPA persistence manager using dependency injection to access its EntityManager
public class JpaPersistenceService implements PersistenceService {
@PersistenceContext(unitName = "itso.bank.persistence")private EntityManager em;
@Overridepublic MutableCustomer searchCustomerBySsn(String number) {
return em.find(Customer.class, number);}
…
84 Getting Started with the Feature Pack for OSGi Applications and JPA 2.0

}
The highlighted @PersistenceContext annotation defines a dependency for a javax.persistence.EntityManager instance. At run time, the JPA container sets up a Blueprint injection based on the presence of the annotation. Similarly, an EntityManagerFactory can be injected by way of the @PersistenceUnit annotation. Notice that, similar to the JEE context, the annotation cannot be used in any class; the class must be managed by Blueprint.
Excursion: Requiring JPA 2.0
For many simple and even a lot of complicated applications, the subset of features included in JPA 1 is sufficient. The application can run on a system where the JPA 2 feature has not been installed as well as on a system where the JPA 2 feature is present. However, after JPA 2 specific features get used, a bundle must declare this dependency in the bundle manifest.
Any use of one of the new packages, javax.persistence.criteria or javax.persistence.metamodel, forces JPA 2.0 to be used. Otherwise, for example, if only new
Blueprint-based injection of persistence services: The injection of persistence services based on @PersistenceContext or @PersistenceUnit, as shown in Example 5-5 on page 84, works similarly to what you might be familiar with from Enterprise JavaBean 3 (EJB3). But in the context of OSGi applications, the support for injection based on javax.persistence annotations is a value-add in the OSGi applications feature pack on WebSphere Application Server. The same functionality can be obtained by way of the blueprint extension namespace for JPA in both Apache Aries and the feature pack. Use this method when portability to an open source stack is more important than ease of use.
Also, in the context of OSGi applications, the injection by annotation is still Blueprint-based and can only work if, as in Example 5-5 on page 84, the class containing the annotation is managed (and instantiated) by Blueprint. This snippet shows how:
<blueprint xmlns="http://www.osgi.org/xmlns/blueprint/v1.0.0" xmlns:bpjpa="http://aries.apache.org/xmlns/jpa/v1.0.0" xmlns:bpext="http://aries.apache.org/blueprint/xmlns/blueprint-ext/v1.0.0">
<bean id="JpaPersistenceServiceBean"class="itso.bank.persistence.JpaPersistenceService"bpext:field-injection="true"><bpjpa:context property="em" unitname="itso.bank.persistence"
type="TRANSACTION"/></bean>…
</blueprint>
There are two concerns here: injecting the persistence context and enabling blueprint properties to be injected directly into fields. Both concerns are necessary to replicate exactly the annotation that we used before.
An EntityManager can also be injected by way of a setter. In this case, the field-injection attribute and as the blueprint extension namespace declaration are unnecessary.
Finally, we noticed that the available version of Rational Application Developer flags a validation error for this use of the blueprint extension namespace. The code however is valid and works with the run time, so you can ignore this error.
Chapter 5. Developing OSGi applications 85

annotations or new methods on EntityManager are used, you must update the javax.persistence import to declare the reliance on JPA 2.0:
Import-Package: javax.persistence;version="1.1.0"
The JPA 2.0 packages are not versioned at 2.0.0 but rather at 1.1.0 due to the OSGi version semantics that are discussed in 6.2.1, “OSGi versioning” on page 136. So, this import statement declares a dependency for JPA 2 annotations and APIs without using either of the new packages.
The sample application as described in this chapter does not use any JPA 2.0 specific features and can be used without installing the JPA 2.0 feature. Hence, we have chosen to import javax.persistence at version 1.0.0 rather than 1.1.0 in “Setting up the bundle manifest” on page 81.
Providing statistics on the front pageAs an example of JPA 2.0 usage, we want to show statistics on the ITSOBank front page, as depicted in Figure 5-15.
Figure 5-15 ITSOBank with usage statistics
There are various ways that you can implement this functionality; the simplest way is probably using count queries on the database. In this case, rather than writing Java Persistence Query Language (JPQL), we use the Criteria API, as described in Chapter 8, “Java Persistence API Criteria API” on page 215.
In this section, we focus on the changes to the persistence bundle. The changes necessary to update the presentation logic and also the business layers are omitted here but can be found in the sample materials.
Sample material: The sample code for the Criteria API usage is contained in the 09_itso-bank_criteria.zip file. Import it into Rational Application Developer, as described in “Importing the sample projects” on page 270.
86 Getting Started with the Feature Pack for OSGi Applications and JPA 2.0

Follow these steps:
1. Add the new functionality to the PersistenceService interface in the itso.bank.api bundle. Concretely, we add three new methods:
public long getNoOfAccounts();public long getNoOfCustomers();public long getNoOfTransactions();
2. Next, modify the persistence bundle manifest to import the package javax.persistence.criteria at Version 1.1.0 or higher. With this change, you can no longer install the ITSOBank sample application on systems where the JPA 2.0 feature is not present.
3. Finally, implement the new functionality in the JpaPersistenceService, as shown in Example 5-6.
Example 5-6 Exploiting the criteria API to obtain count statistics for the three entity types
import javax.persistence.criteria.CriteriaBuilder;import javax.persistence.criteria.CriteriaQuery;
public class JpaPersistenceService implements PersistenceService {// …
private<T> long runCount(Class<T> clazz) { 01CriteriaBuilder cb = em.getCriteriaBuilder();CriteriaQuery<Long> q = cb.createQuery(Long.class); 02q = q.select(cb.count(q.from(clazz))); 03return em.createQuery(q).getSingleResult();
}
public long getNoOfAccounts() {return runCount(Account.class);
}
public long getNoOfCustomers() {return runCount(Customer.class);
}
public long getNoOfTransactions() {return runCount(Transaction.class);
}}
The numbered boxes in Example 5-6 correspond to these explanations:
01 Because the queries to be run differ only by what entity is counted, we define a helper method called runCount, which takes an entity class object and runs a query to count the entities of the given class. To implement the actual public methods, we simply invoke runCount with the appropriate entity class.
02 We construct a CriteriaQuery instance with an expected return value of Long from the CriteriaBuilder.
03 Finally, this line contains the actual query logic. Here, we declare that the query selects the counts of the given input class.
Chapter 5. Developing OSGi applications 87
With the Criteria API implementation, we can eliminate repetition among the three essentially identical queries and still keep the queries’ types safe and avoid string manipulation.
Excursion: Modular persistence bundlesThe itso.bank.app uses a single persistence bundle to contain a single persistence unit with only a few entities. In larger applications, you can use multiple persistence units with many entities and complex entity hierarchies. The following suggestions might help to avoid problems.
Package entities in the persistence bundleThe JPA service specification explicitly requires that all entities, including mapped superclasses, are contained in the persistence bundle. This rule is a hard requirement for load-time weaving. Users of Apache Aries-based run times, such as the OSGi application feature pack, have reported success for using pre-enhanced entities out of imported packages, but this scenario is explicitly not supported.
Include the bundle symbolic name in persistence unit namesPersistence units are published as services on the scope of the whole application, or, for shared bundles, the whole shared framework. To allow persistence bundles to be reused easily without having to worry about clashes, persistence unit names must be prefixed with a unique string, such as the bundle symbolic name.
Expose persistence through a data access serviceAs demonstrated in the itso.bank.sample, it is extremely easy to encapsulate the use of JPA completely inside the persistence bundle and offer a generic data access service to other bundles. The rest of the application bundles are technology agnostic in this way. Persistence services can easily be reused among separate applications that use the same data model.
5.3.3 The business bundle
Use Blueprint.3
The business bundle is another plain bundle, so it follows the same project structure as the API bundle. However, that is also where the similarities end. The intention of the API bundles is to provide interfaces and a few classes for consumption by other bundles. The business bundle, however, does not export any packages. Instead, it exports its capabilities in the form of a service implementing the Bank interface into the OSGi service registry.
Creating the business bundle projectThis section outlines how to create the ITSO Bank business bundle project using Rational Application Developer.
Follow the steps to create the itso.bank.biz bundle in the workspace:
1. In the Enterprise Explorer, right-click and select New OSGi Bundle Project.
2. On the first panel of the New OSGi Bundle Project wizard, complete the following fields, as shown in Figure 5-16 on page 89:
a. Enter the Project name as itso.bank.biz.
b. Ensure that the Target runtime is set to WebSphere Application Server v7.0.
c. Clear the Add bundle to application check box. We will add bundles to an OSGi application project later when creating the ITSO Bank application project.
3 http://www.ibm.com/developerworks/websphere/techjournal/1007_charters/1007_charters.html
88 Getting Started with the Feature Pack for OSGi Applications and JPA 2.0

Figure 5-16 Provide the business bundle project information
3. Click Finish. The new project is created in the workspace.
Setting up the manifestThe biz bundle consume all the packages from the itso.bank.api bundle. Set up the manifest:
1. Double-click the manifest of the web bundle to open its manifest editor.
2. In the manifest editor, navigate to the Dependencies tab to add packages to be imported:
a. Click Add to the right of the Imported Packages section to import the itso.bank.api, itso.bank.api.exceptions, and itso.bank.api.persistence packages.
b. Set the version range of the *.exceptions and *.persistence dependencies to [1.0.0,2.0.0). Set the itso.bank.api version ranges to [1.0.0,1.1.0).
c. Click Properties, and enter the values that are shown in Table 5-2 to set these ranges.
Table 5-2 Import package settings
Package Minimum version
Maximum version
itso.bank.api 1.0.0 Inclusive 1.1.0 Exclusive
itso.bank.api.exceptions 1.0.0 Inclusive 2.0.0 Exclusive
itso.bank.api.persistence 1.0.0 Inclusive 2.0.0 Exclusive
Chapter 5. Developing OSGi applications 89

d. Save the manifest.
Importing the sample source codeTo create the required package structure of the business bundle project, you need to create the following packages and populate them with content, as shown in Figure 5-17:
� itso.bank.biz (hosts the bank service to be exposed as an OSGi service)
� itso.bank.biz.proxy (hosts proxy classes to hide the Mutable* objects of the persistence layer from the presentation layer, which uses read-only objects)
Figure 5-17 Business OSGi bundle package structure and contents
Creating the Blueprint descriptorCreate the blueprint file that is required to expose the bank service to the OSGi service registry:
1. Right-click the business bundle project, and choose New Blueprint File. Click Next.
2. On the second wizard panel, ensure that only the check box for Transactions is selected. Click Finish to create the blueprint file. This action will open the blueprint editor.
Sample materials: Follow these steps to import the packages that you see in Figure 5-17 into your bundle:
1. Right-click the src folder, and select Import. 2. Select General File System as the source type, and click Next. 3. Browse to the extracted_v100_files\itso.bank.biz\src folder, and click OK.4. Select the src\itso folder (including everything under it), and click Finish.
90 Getting Started with the Feature Pack for OSGi Applications and JPA 2.0

Modify the blueprint. You will use the editor’s design view to create the bank bean alongside the persistence service that it consumes and the business service that it offers:
1. Add a bean definition to the blueprint by using Add to open the creation selection. Select Bean, and click OK.
2. Enter the bean ID, and select the bean class implementation itso.bank.biz.ITSOBank, as shown in Figure 5-18. Click OK.
Figure 5-18 Enter the Bean Class and Bean ID
3. To export the new bank bean definition as a service, right-click the Blueprint root node in the Design tab for the blueprint file, and choose Add Service.
4. On the Service Details panel, provide the following data, as shown in Figure 5-19:
a. Enter the Service Interface as itso.bank.api.Bank.
b. Enter the Service ID as ItsoBankBeanService.
c. Enter the Bean Reference as ITSOBankBean.
d. Click OK.
Figure 5-19 Add a service
Chapter 5. Developing OSGi applications 91

5. Add a reference by right-clicking the Blueprint root node, choosing Add Reference, and providing the following data, as shown in Figure 5-20:
a. Set the Reference Interface to itso.bank.api.persistence.PersistenceService.
b. Set the Reference ID to service.
c. Omit the Bean Reference value.
d. Click OK.
Figure 5-20 Add a reference
6. Add a persistence service property to the ITSOBankBean definition by right-clicking ITSOBankBean (Bean) and choosing Add Property. Select the new property, and provide the following values in the Details section:
a. Enter persistenceService as the Property name.
b. Enter service as the Reference value.
c. Save the blueprint file, and click the Source tab to ensure that its content matches the content that is shown in Example 5-7.
Example 5-7 Business bundle blueprint descriptor (without transactions)
<blueprint xmlns="http://www.osgi.org/xmlns/blueprint/v1.0.0"xmlns:bptx="http://aries.apache.org/xmlns/transactions/v1.0.0"><bean id="ItsoBankBean" class="itso.bank.biz.ITSOBank">
<property name="persistenceService" ref="service" /></bean><service id="ItsoBankBeanService" interface="itso.bank.api.Bank"
ref="ItsoBankBean"></service><reference id="service"
interface="itso.bank.api.persistence.PersistenceService"></reference>
</blueprint>
92 Getting Started with the Feature Pack for OSGi Applications and JPA 2.0
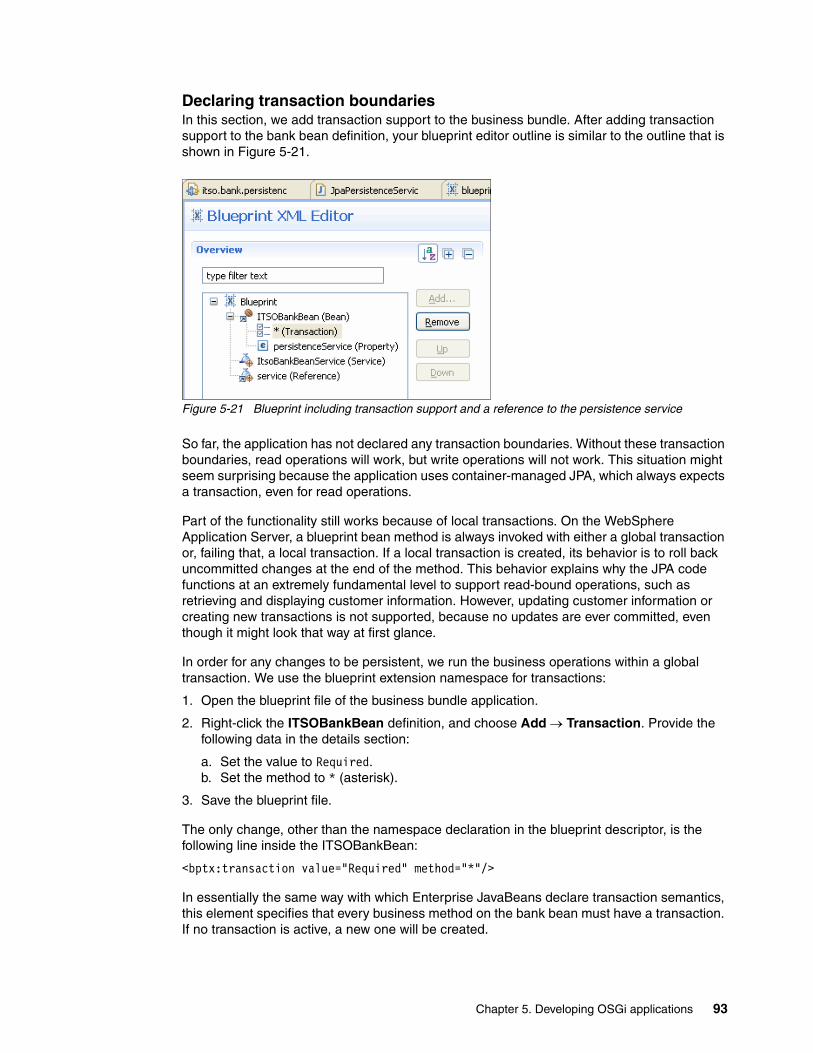
Declaring transaction boundariesIn this section, we add transaction support to the business bundle. After adding transaction support to the bank bean definition, your blueprint editor outline is similar to the outline that is shown in Figure 5-21.
Figure 5-21 Blueprint including transaction support and a reference to the persistence service
So far, the application has not declared any transaction boundaries. Without these transaction boundaries, read operations will work, but write operations will not work. This situation might seem surprising because the application uses container-managed JPA, which always expects a transaction, even for read operations.
Part of the functionality still works because of local transactions. On the WebSphere Application Server, a blueprint bean method is always invoked with either a global transaction or, failing that, a local transaction. If a local transaction is created, its behavior is to roll back uncommitted changes at the end of the method. This behavior explains why the JPA code functions at an extremely fundamental level to support read-bound operations, such as retrieving and displaying customer information. However, updating customer information or creating new transactions is not supported, because no updates are ever committed, even though it might look that way at first glance.
In order for any changes to be persistent, we run the business operations within a global transaction. We use the blueprint extension namespace for transactions:
1. Open the blueprint file of the business bundle application.
2. Right-click the ITSOBankBean definition, and choose Add Transaction. Provide the following data in the details section:
a. Set the value to Required.b. Set the method to * (asterisk).
3. Save the blueprint file.
The only change, other than the namespace declaration in the blueprint descriptor, is the following line inside the ITSOBankBean:
<bptx:transaction value="Required" method="*"/>
In essentially the same way with which Enterprise JavaBeans declare transaction semantics, this element specifies that every business method on the bank bean must have a transaction. If no transaction is active, a new one will be created.
Chapter 5. Developing OSGi applications 93

The full configuration options are described in the information center:
http://publib.boulder.ibm.com/infocenter/wasinfo/v7r0/topic/com.ibm.websphere.osgifep.multiplatform.doc/topics/ca_transactions.html
5.3.4 The web bundle
Make WABs not WARs.4
OSGi web applications support all of the common features of the WebSphere Application Server web container. In this sample, we use a single web bundle with plain servlets, JSPs and a few taglibs. Portlets, web services, and other extended use cases are all supported in an OSGi Web Application Bundle (WAB). However, administrative support specifically for WABs might not be available for every web container extension.
In addition to web application bundles, OSGi applications can also contain traditional WAR files. These WAR files are converted at installation time into web bundles. Rational Application Developer supports traditional web projects and web bundle projects as part of an OSGi application project. Using WAR files in any but migration scenarios, however, is discouraged, because WAR files cannot fully exploit OSGi modularity, specifically, declarative dependencies.
4 http://www.ibm.com/developerworks/websphere/techjournal/1007_charters/1007_charters.html
WABs and web services: Certain advanced Rational Application Developer tooling features that are found in standard Java EE web applications might be difficult to use or even be outright unavailable in OSGi Web Application Bundles (WABs).
Web service policy sets, a feature of Rational Application Developer tooling, are unavailable to OSGi WABs. Web service policy sets might be used to add declarative authorization or authentication support to Java API for XML Web Services (JAX-WS). We discovered that both Rational Application Developer and WebSphere Application Server do not fully recognize web service endpoints that are part of a WAB, and thus, tooling support is incomplete.
Nonetheless, it is possible to expose a plain old Java Object (POJO) as a JAX-WS web service by using the standard @javax.ws.WebService Java annotation. These annotation-enriched POJO classes are successfully deployed to a WebSphere Application Server. However, because WebSphere Application Server does not completely recognize web services that are part of a WAB, the declarative approach based on web service policy sets cannot be used for authentication and authorization. Instead, the developer needs to provide authentication and authorization programmatically based on using handlers. IBM WebSphere Application Server V7.0 Web Services Guide, SG24-7758, describes in detail how to create logical and protocol handlers.
94 Getting Started with the Feature Pack for OSGi Applications and JPA 2.0

Creating the web bundle projectFollow these steps to create the ITSO Bank web bundle project in the workspace:
1. In the Enterprise Explorer view, right-click, and select New OSGi Bundle Project.
2. In the New OSGi Bundle Project wizard, complete the following fields, as shown in Figure 5-22:
a. Enter the Project name as itso.bank.web.
b. Ensure that the Target runtime is set to WebSphere Application Server v7.0.
c. Ensure that the Configuration is set to OSGi Web Configuration to turn the bundle into a web project.
d. Clear the Add bundle to application check box.
Figure 5-22 Provide the web bundle project information
e. Click Finish to create the project in your workspace.
Setting up the bundle manifestFirst, we need to modify the existing bundle manifest to import the itso.bank.api packages:
1. Double-click the manifest of the web bundle to open its manifest editor.
2. In the manifest editor, navigate to the Dependencies tab to add packages to import:
a. Click Add in the Imported Packages section to import both the itso.bank.api and itso.bank.api.exceptions packages.
Chapter 5. Developing OSGi applications 95

b. Set the version range of each of those dependencies is to [1.0.0,2.0.0) by clicking Properties (Figure 5-23).
Figure 5-23 Setting a user’s version range for the itso.bank.api.exceptions package
Example 5-8 shows the complete manifest where the WEB-INF/lib/* entries will be added as a result of instructions further on.
Example 5-8 Bundle manifest for itso.bank.web
Manifest-Version: 1.0Bundle-ManifestVersion: 2Bundle-Name: itso.bank.webBundle-SymbolicName: itso.bank.webBundle-Version: 1.0.0.qualifierBundle-ClassPath: WEB-INF/classes, WEB-INF/lib/commons-beanutils.jar, WEB-INF/lib/commons-collections.jar, WEB-INF/lib/commons-digester.jar, WEB-INF/lib/sitelib.jar, WEB-INF/lib/struts.jarBundle-RequiredExecutionEnvironment: JavaSE-1.6Web-ContextPath: /itsobankImport-Package: itso.bank.api;version="[1.0.0,2.0.0)", itso.bank.api.exceptions;version="[1.0.0,2.0.0)", javax.el;version="2.0";resolution:=optional, javax.servlet;version="2.5", javax.servlet.http;version="2.5", javax.servlet.jsp;version="2.0", javax.servlet.jsp.el;version="2.0", javax.servlet.jsp.tagext;version="2.0"
96 Getting Started with the Feature Pack for OSGi Applications and JPA 2.0

Rational Application Developer generates and maintains a number of important headers in the background for OSGi bundle projects with the OSGi web configuration:
Web-ContextPath This header marks the bundle as a WAB. The value is used as the default context path where the web containers host the web content. This value can be overwritten as part of the installation on WebSphere Application Server.
Import-Package Rational Application Developer pre-generates import package statements for all of the common servlet and JSP library packages.
Bundle-ClassPath This header specifies where classes reside in the bundle. Because a WAB follows the structure of a WAR, user classes are located in WEB-INF/classes rather than at the root of the bundle, and additional libraries are included in WEB-INF/lib. Rational Application Developer maintains this header for libraries in WebContent/WEB-INF/lib on the project class path.
Creating the Java and web resourcesTo set up the required package structure of the web bundle project, create the following packages and populate them with content from the supplied samples, as shown in Figure 5-24 on page 98:
� itso.bank.web.command (used to host command pattern implementations)
� itso.bank.web.servlet (used to host Java Servlet implementations)
� itso.bank.web.util (contains a single utility class to look up the bank business service implementation)
Chapter 5. Developing OSGi applications 97

Figure 5-24 Web bundle package structure and contents
Sample material: Follow these steps to import the packages that you see in Figure 5-24 into your bundle:
1. Right-click the Java Resources/src folder, and select Import.
2. Select General File System as the source type, and click Next.
3. Browse to the extracted_v100_files\itso.bank.web\src folder, and click OK.
4. Select the src\itso folder (including everything under it), and click Finish.
98 Getting Started with the Feature Pack for OSGi Applications and JPA 2.0
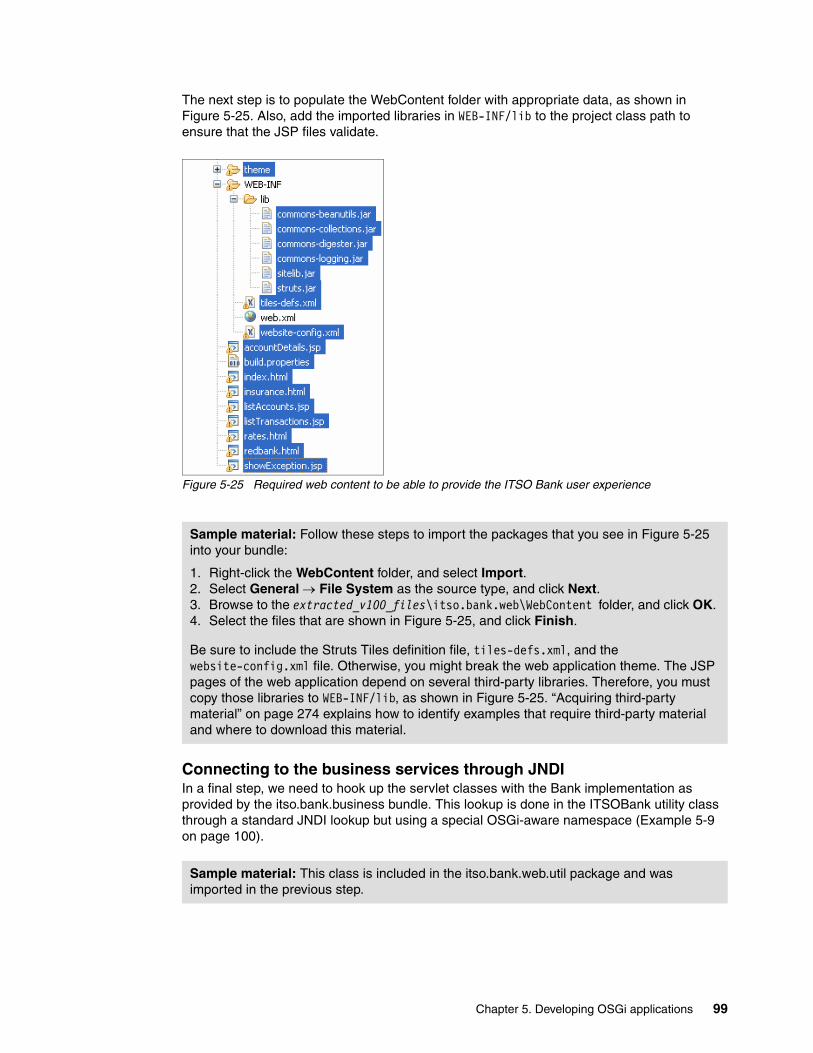
The next step is to populate the WebContent folder with appropriate data, as shown in Figure 5-25. Also, add the imported libraries in WEB-INF/lib to the project class path to ensure that the JSP files validate.
Figure 5-25 Required web content to be able to provide the ITSO Bank user experience
Connecting to the business services through JNDIIn a final step, we need to hook up the servlet classes with the Bank implementation as provided by the itso.bank.business bundle. This lookup is done in the ITSOBank utility class through a standard JNDI lookup but using a special OSGi-aware namespace (Example 5-9 on page 100).
Sample material: Follow these steps to import the packages that you see in Figure 5-25 into your bundle:
1. Right-click the WebContent folder, and select Import. 2. Select General File System as the source type, and click Next. 3. Browse to the extracted_v100_files\itso.bank.web\WebContent folder, and click OK. 4. Select the files that are shown in Figure 5-25, and click Finish.
Be sure to include the Struts Tiles definition file, tiles-defs.xml, and the website-config.xml file. Otherwise, you might break the web application theme. The JSP pages of the web application depend on several third-party libraries. Therefore, you must copy those libraries to WEB-INF/lib, as shown in Figure 5-25. “Acquiring third-party material” on page 274 explains how to identify examples that require third-party material and where to download this material.
Sample material: This class is included in the itso.bank.web.util package and was imported in the previous step.
Chapter 5. Developing OSGi applications 99

Example 5-9 JNDI lookup with OSGi-aware namespace
public class ITSOBank {
public static Bank getBank() {Bank bank = null;
try {Context ctx = new InitialContext();bank = (Bank) ctx.lookup("osgi:service/itso.bank.api.Bank");
} catch (NamingException e) {// … appropriate error handling
}
return bank;}
}
The critical part of Example 5-9 is the line that looks up the implementation of the Bank interface. As discussed in the application overview (5.1, “Sample material for this chapter” on page 68), the business service implementation is published to the service registry by the itso.bank.biz bundle from where the web bundle needs to access it. There are three ways to perform this function:
� Use JNDI-Service registry integration.
This method is the simplest way. For simple scenarios, this method is appropriate. The integration mechanism, which is defined in chapter 126 of the JNDI Services Specification of the OSGi Service Platform, Enterprise Specification 4.2, allows a bundle to access any service in its own OSGi framework through a JNDI URL lookup with osgi:service. The lookup uses this format:
osgi:service/<service interface name>[/<service filter>]
In this case, we have no need to filter the services, because in the isolated application framework, there is only one implementation of the Bank interface.
Beyond the osgi:service, the JNDI Services Specification also defines lookup methods to obtain a list of services rather than a single service and to obtain the BundleContext.
� Use the osgi.framework API directly.
A web bundle has access to its BundleContext from the servlet context, as defined in section 128.6 of the Web Application Specification in the OSGi Service Platform, Enterprise Specification 4.2. Proper usage of the OSGi APIs is not simple. Hence, this method is not suggested when a JNDI lookup is sufficient. However, this method provides full access to the whole power of the OSGi service registry, specifically, looking up services that are not class-space-consistent with the web bundle.
� Use blueprint.
For complex service usage scenarios, it can be more effective to use the Blueprint container to manage service dependencies. Note, however, that the Blueprint container and the web container are not integrated. So, a servlet (in the web container) cannot be directly managed by Blueprint. However, a forward servlet can delegate to a Blueprint-managed implementation through one of the two previous mechanisms. The backing implementation can then exploit Blueprint’s service capabilities and other facilities, such as dependency injection and declarative transactions, to name two.
100 Getting Started with the Feature Pack for OSGi Applications and JPA 2.0

You can read about a variation of this scheme at this website:
http://publib.boulder.ibm.com/infocenter/wasinfo/v7r0/topic/com.ibm.websphere.osgifep.multiplatform.doc/topics/ta_mig_spring.html
5.3.5 The application
To complete the ITSO Bank application, we create an OSGi application project, itso.bank.app (Figure 5-26 on page 102). Similar to an enterprise application project, the itso.bank.app project acts as a wrapper for defining the application and allowing export and deployment. The only actual content in the project is the application manifest, which defines the content of the application.
As discussed in 2.3.1, “Application model” on page 24, an application is logically divided into isolated bundles, Use-Bundles, and provisioned bundles. Only the first two types are referenced in the application manifest. Provisioned bundles, as the name suggests, are transparently provisioned at deployment. Choosing whether a bundle is isolated is based on whether the bundle might be needed by more than one application and whether the services that it provides can be shared.
Context-classloader issues: In 2.1.2, “Modularity with OSGi” on page 14, we mentioned that certain libraries can be affected by the various classloader strategies in an OSGi environment, in particular, due to interactions with the context classloader. We provide an example of a harmless, for the sample application, problem that highlights what can happen.
The sample application, more precisely, the web bundle that is created in this section, uses a number of utility libraries that depend on the Apache commons library. WebSphere Application Server already ships a version of Apache commons logging, but the web bundle (for historical reasons) also ships a copy of commons logging inside WEB-INF/lib. This approach, which is already dubious without a PARENT_LAST classloader strategy in JEE, no longer works in the OSGi environment and causes a nasty but harmless stack trace to appear on application start:
Caused by: org.apache.commons.logging.LogConfigurationException: Class org.apache.commons.logging.impl.Jdk14Logger does not implement Logat org.apache.commons.logging.impl.LogFactoryImpl.getLogConstructor(LogFactoryImpl.java:412)... 63 more
The real problem is that the OSGi web bundle correctly loads the org.apache.commons.logging classes out of the embedded JAR in WEB-INF/lib. However, the commons logging interface classes, in turn, load the real implementation reflectively from the thread context classloader. That method might still work if the OSGi context classloader only provided access to the bundle classspace. Unfortunately, the context classloader for a WAB is not only the bundle classloader but, for compatibility reasons with other libraries, provides access also to all WebSphere Application Server runtime classes. The result is a mismatch of classes and an exception. The interface classes are loaded by the bundle, but the implementation classes and the interface classes that they implement are loaded from WebSphere.
There are two solutions:
� Do not use a library that works through the thread context classloader in a WAB.
� Import commons logging packages from the WebSphere Application Server run time rather than repackaging the library.
Chapter 5. Developing OSGi applications 101

In the case of the itso.bank.app, all of the bundles that are created are only used in the one application, so far. Hence, they are all part of the isolated application content. Note, though, that, for example, the API bundle can be shared whereas the web bundle must not be shared.
Figure 5-26 Application manifest editor
Finally, certain bundles must never be part of the application content. For example, it is a bad idea to pull in bits of the run time in the application content, such as the core Equinox OSGi run time or an implementation of the Blueprint container, because these parts will conflict with the OSGi application feature pack run time.
102 Getting Started with the Feature Pack for OSGi Applications and JPA 2.0

Creating the OSGi application projectFollow these required steps to create an OSGi application project:
1. In the Enterprise Explorer, right-click, and choose New OSGi Application Project.
2. On the first panel of the New OSGi Application Project wizard, complete the following fields, as shown in Figure 5-27:
a. Enter the Project name as itso.bank.app.
b. Ensure that the Target runtime is set to WebSphere Application Server v7.0.
c. Click Next.
Figure 5-27 Providing the OSGi application project information
Chapter 5. Developing OSGi applications 103

3. On the second panel of the New OSGi Application Project wizard, select the following bundles from the list of contained bundles, as shown in Figure 5-28:
– itso.bank.api– itso.bank.biz– itso.bank.persistence– itso.bank.web
Figure 5-28 Assembling the application contents by adding new bundles
4. Click Finish.
Example 5-10 shows the resulting manifest. The application manifest only contains the bare minimum headers. We explore further options around shared bundles and Service Component Architecture integration in later sections and chapters.
Example 5-10 Application manifest for itso.bank.app
Application-Name: itso.bank.appApplication-SymbolicName: itso.bank.appApplication-ManifestVersion: 1.0Application-Version: 1.0.0.qualifierManifest-Version: 1.0Application-Content: itso.bank.api;version=1.0.0, itso.bank.biz;version=1.0.0, itso.bank.web;version=1.0.0, itso.bank.persistence;version=1.0.0
5.4 Deploying the application
During development, an OSGi application can either be published through Rational Application Developer or through the OSGi admin extensions in the administrative console or wsadmin, which is the path for a production environment. Although less convenient, the second path might be useful when dealing with complex application structures involving multiple versions and sharing.
104 Getting Started with the Feature Pack for OSGi Applications and JPA 2.0

This section also covers how to set up the required data sources for working with JPA.
5.4.1 Setting up Derby Data Sources
The persistence unit configured in “Configuring the persistence unit” on page 82 exposes appropriate JNDI namespaces, each pointing to a data source to be configured on a WebSphere Application Server instance. To configure both a Java Transaction API (JTA)-capable and a non-JTA-capable data source, first create an appropriate Apache Derby database instance (see instructions in “Set up the ITSOBANK database (Apache Derby)” on page 272). Specifying a non-JTA-capable data source is not strictly for the sample scenarios, but suggested practice, because several advanced JPA features can require the presence of both a JTA-capable and a non-JTA-capable data source.
Then, through the WebSphere Application Server administrative console, create the Java Database Connectivity (JDBC) data sources:
1. Make sure that an appropriate Derby JDBC provider is configured. To verify which JDBC providers are configured already, navigate to Resources JDBC JDBC providers.
2. If no Apache Derby JDBC provider has been configured yet, create an Apache Derby JDBC provider by clicking New and providing the following data:
a. Set Scope to server scope prior to clicking New.
b. Set Database type to Derby.
c. Set Provider type to Derby JDBC Provider 40 (Type 4 JDBC driver).
d. Set Implementation type to Connection pool data source.
e. Choose an identifying text string as a JDBC provider name.
f. Click Finish, followed by clicking Save to persist the changes.
3. Next, navigate to Resources JDBC Data sources to create both a JTA-capable data source and a non-JTA-capable data source.
4. Click New to create a data source and provide the following data on the next windows.
5. Choose an identifying text string for “Data source name”.
6. Provide the JNDI name for either the JTA data source or the non-JTA data source, depending on which data source type you are going to create. The JNDI name has been configured earlier in the persistence.xml descriptor, as shown in Example 5-11.
Example 5-11 JNDI lookup names configured in the JPA persistence.xml descriptor
<?xml version="1.0" encoding="UTF-8"?><persistence version="2.0" xmlns="http://java.sun.com/xml/ns/persistence" xmlns:xsi="http://www.w3.org/2001/XMLSchema-instance" xsi:schemaLocation="http://java.sun.com/xml/ns/persistence http://java.sun.com/xml/ns/persistence/persistence_2_0.xsd">
<persistence-unit name="itso.bank.persistence"><jta-data-source>jdbc/bank</jta-data-source><non-jta-data-source>jdbc/banknojta</non-jta-data-source></persistence-unit>
</persistence>
7. Select an existing JDBC provider, and choose Apache Derby JDBC driver.
8. Provide the exact path value that points to the Apache Derby database location as it got created while following the steps in “Set up the ITSOBANK database (Apache Derby)” on page 272.
9. Leave the security aliases window unconfigured.
Chapter 5. Developing OSGi applications 105

10.Persist the data source setup by clicking Finish, followed by clicking Save.
11.A final step requires your setting a flag on one of the two data sources as an indicator to treat this particular data source as a non-JTA capable data source. To do so, select the appropriate data source from the list of available data sources by clicking its hyperlink:
a. Under Additional properties, click WebSphere Application Server data source properties.
b. Under General Properties, select Non-transactional data source, as shown in Figure 5-29, to indicate that this particular data source must not support transaction handling.
Figure 5-29 Option indicating to not use transaction handling for a data source
5.4.2 Deploying through Rational Application Developer
Deploying the application in Rational Application Developer is extremely simple, because OSGi applications are fully supported in WebSphere Application Server test environment. In the Servers tab, right-click the desired server that has the OSGi feature installed and select Add and Remove. In the resulting dialog, select itso.bank.app and move it to the list of configured applications, as shown in Figure 5-30.
Figure 5-30 Adding the OSGi application to the test environment
106 Getting Started with the Feature Pack for OSGi Applications and JPA 2.0

5.4.3 Deploying through the administrative console
Alternatively, you can deploy an OSGi application through the administrative console or wsadmin scripting. At a minimum, this deployment involves the following steps (see 2.4.1, “Administering OSGi applications” on page 28 for a discussion of the business-level application framework and its relationship to OSGi applications):
1. Export the OSGi application Project itso.bank.app as an OSGi Application enterprise bundle archive (.eba) or (EBA), and include all the dependencies, as shown in Figure 5-31.
The exported archive might contain less than the full application content or contain additional bundles for shared content. We discussed the supported packaging options in 2.3.2, “Packaging an OSGi application” on page 26. In the current case, we choose the most convenient option of including all of the required bundles in the exported archive.
You might also wonder about the last two entries: com.ibm.websphere.apis and javax.j2ee.persistence. These bundles are defined in Rational Application Developer to make the WebSphere Application Server runtime packages, including packages for the OSGi applications and JPA 2.0 feature, available to OSGi applications. You must never include these two bundles in the exported EBA.
Figure 5-31 Export OSGi application project itso.bank.app
Chapter 5. Developing OSGi applications 107

2. In the administrative console, navigate to Applications Application Types Assets. Click Import and select the .eba file that was exported in step 1. In the wizard, accept all the defaults.
Figure 5-32 shows the import wizard. Step 2: EBA asset conversion and resolution warnings, which is displayed in the upper-left corner, will not appear at this stage, but only after introducing shared bundles in 5.5, “Using shared bundles” on page 111.
Figure 5-32 Importing the itso.bank.app
3. Save your changes.
4. Navigate to Applications Application Types Business-level applications. Click New to create a new, empty business-level application (BLA) with an arbitrary name, such as bank.
108 Getting Started with the Feature Pack for OSGi Applications and JPA 2.0

5. On the business-level application detail panel that appears after creating the bank BLA, choose Add Add Asset under in the Deployed Assets section, as shown in Figure 5-33. Choose the asset that was created in Step 2 from the list of assets.
Figure 5-33 Adding the asset to the BLA
6. Finally, in the wizard (Figure 5-34), check that the defaults are correct for the installation:
– In Step 2, select the server on which the itso.bank.app application is to be run.
– In Step 3, select the desired context root to which the itso.bank.app is to be mapped.
– In Step 4, select the desired virtual host.
Figure 5-34 Wizard for configuring the composition unit as part of adding an EBA asset to a BLA
7. Save the changes.
8. Start the bank BLA.
Chapter 5. Developing OSGi applications 109

These steps are standard for operating on business-level applications, except for step 3 where we have to save changes in between. In the case of an OSGi application, provisioning happens when importing the asset. As a result of provisioning, bundles might need to be retrieved from a bundle repository (internal or external). This process needs to be complete before the asset can be added to a BLA. However, downloads are only triggered after the asset import has been saved. Hence, saving the changes after importing the asset is required.
5.4.4 Using the application
Figure 5-35 shows the application in use. To get started, navigate to http://localhost:9080/itsobank/redbank.html, and enter an account number, for example, 111-11-1111. At this stage, the application provides the capabilities to update customers and inspect accounts and transactions.
Figure 5-35 ITSO Bank application
110 Getting Started with the Feature Pack for OSGi Applications and JPA 2.0

5.5 Using shared bundles
In this section, we discuss the sharing capabilities of the OSGi application feature pack. Specifically, we will show you how to use common external libraries in conjunction with the sample application and in-house-developed libraries. We also discuss the provisioning process for an OSGi application.
In this section, we will augment the architecture that was introduced in Figure 5-1 on page 69 to the architecture that is shown in Figure 5-36.
Figure 5-36 Sample application architecture with shared bundles
5.5.1 Depending on packages: Adding logging
So far, we have had a number of calls to System.out.println to trace the internal workings of the sample application. In production, this behavior is, of course, unacceptable. Instead, we want to use a full-fledged logging system. One choice is Simple Logging Facade for Java (SLF4J), which we will use for introducing rudimentary logging in the business layer. You can read about and download SLF4J from this website:
http://www.slf4j.org
Logging is a prime example of a shared bundle. Most applications use a form of logging library. Having each of the applications package and ship its own version of the same library is clearly the wrong path.
SharedShared
AppApp
APIAPI PersistencePersistence
BP
BizBiz
BP
WebWeb
Slf4j.apiSlf4j.api
Slf4j.implSlf4j.impl
Monitor.implMonitor.impl
Monitor.apiMonitor.api
Chapter 5. Developing OSGi applications 111

There are two alternatives:
� Sharing a single canonical version of the logging library that everyone must use.� Each application declares its dependencies, and any number of versions of the shared
library can be used. This alternative works only with the extra OSGi dependency metadata.
In an OSGi application, the second alternative is preferable. We discuss it next.
To start, we need to make the slf4j bundles available both to the server runtime environment and the development environment.
Making the libraries available to the run timeTo make the slf4j libraries available on the server, we use the administrative console to add them to the internal repository, as shown in Figure 5-37. We need the API and one implementation JAR file, which is slf4j.simple in the following example. Follow these steps:
1. Navigate to Environment OSGi bundle repositories Internal bundle repository.
2. For each of the two slf4j bundles, click New and upload the bundle jar file.
Figure 5-37 Uploading the slf4j bundles in the internal repository
Making the libraries available to the development environmentThe Rational Application Developer support for OSGi applications is based on the Eclipse plug-in development environment (PDE). PDE provides many of the features around generating and validating bundle manifests. To be able to validate the slf4j package imports that we use, we need to ensure that slf4j is in the Eclipse target platform, which is a representation of the OSGi environment on which the developed bundles are meant to run. Perform these steps to make the slf4j.api bundle available in the Eclipse target platform:
1. In the Rational Application Developer workspace, select Windows Preferences.
2. Expand Plugin-Development, and select Target Platform.
112 Getting Started with the Feature Pack for OSGi Applications and JPA 2.0

3. Click WebSphere Application Server v7.0 to select the configuration, and then, click Edit.
4. Click Add.
5. Select Directory, and click Next.
6. Click Browse to select the directory that contains the SLF4J libraries. Click Next.
7. On the Preview Contents panel, select slf4j.api. Click Finish.
8. Click Finish again to return to the Target Platform preferences panel. Then, click OK.
Updating the applicationNow, add the dependencies on slf4j to the sample application. First, add the package import to the Import-Package header of the itso.bank.biz bundle manifest:
Import-Package: itso.bank.api;version="[1.0.0,1.1.0)",itso.bank.api.exceptions;version="[1.0.0,2.0.0)",itso.bank.api.persistence;version="[1.0.0,2.0.0)",org.slf4j;version="[1.6.1,2.0.0)"
Next, modify the ITSOBank class to output logging data, as shown in Example 5-12.
Example 5-12 ITSOBank with logging
public class ITSOBank implements Bank {
private Logger logger = LoggerFactory.getLogger("ITSOBank");
...
private void processTransaction(String accountNumber, BigDecimal amount,TransactionType transactionType) throws InvalidAccountException,InvalidTransactionException {
logger.info("Starting transaction {} for amount {} on account {}", new Object[] {transactionType, amount, accountNumber});
MutableAccount account = this.service.searchAccountByAccountNumber(accountNumber);
this.service.createTransaction(account, amount, transactionType);
BigDecimal newBalance;BigDecimal balance = account.getBalance();
if (transactionType == TransactionType.Credit) {newBalance = balance.add(amount);
} else if (transactionType == TransactionType.Debit) {if (balance.compareTo(amount) < 0) {
logger.info("Transaction failed");throw new InvalidTransactionException("Amount too large");
}newBalance = balance.subtract(amount);
} else {logger.info("Transaction failed");throw new InvalidTransactionException("Invalid credit/debit code");
}account.setBalance(newBalance);
Chapter 5. Developing OSGi applications 113

logger.info("Transaction complete");}
}
Seeing the resultsWith these modifications, log messages start to appear when transactions are made:
[9/10/10 13:00:08:953 EDT] 00000028 SystemErr R 663735 [WebContainer : 1] INFO ITSOBank - Starting transaction Debit for amount 200 on account 001-111001[9/10/10 13:00:08:953 EDT] 00000028 SystemErr R 663735 [WebContainer : 1] INFO ITSOBank - Transaction complete
Due to our selection of the slf4j.simple implementation, log statements go to the SystemErr.log file. This behavior is inconvenient in a production environment; however, the resulting log entries are conveniently shown in the server console window in Rational Application Developer.
How does this workWhen an OSGi application is installed, it is also resolved and provisioned, as shown in Figure 5-38. During the EBA archive import, the admin system inspects the application metadata to determine all of the bundles that make up the application. Then, it attempts to satisfy all their dependencies, their dependencies’ dependencies, and so forth.
Figure 5-38 Provisioning process
Sample material: The logging code is included in the itso.bank.biz project in the 02_itso-bank_with_update_and_sharing.zip archive.
EBA
Bundle repositories
ProvisioningSystem
APPLICATION.MF
Application-Content:A, BUse-Bundle: C, D
A/1.0.0needs B ,C
A/1.0.0needs B,C
B/1.0.0needs E
B/1.0.0needs E
C/1.0.0C/1.0.0
B/1.0.1needs E
B/1.0.1needs E D/1.0.0D/1.0.0
E/1.0.0needs F
E/1.0 .0needs F F/1.0 .0F/1.0.0
Deployment
Isolated bundles:A/1.0.0, B/1.0.1
Deployed use bundles:C/1.0.0
Provisioned bundles:E/1.0.0, F/1.0.0
DownloadsB/1.0.1, E/1.0.0,
F/1.0.0
114 Getting Started with the Feature Pack for OSGi Applications and JPA 2.0

In Figure 5-38 on page 114, the application consists of bundles A and B, as well as special shared bundles C and D (we discuss the Use-Bundle header further in 5.5.3, “Assurances around sharing” on page 119). Versions of A and B are available in the EBA archive. In addition, a higher version of B is available in a bundle repository, which is chosen over the version in the EBA archive. Next, all of the dependencies of A and B, that is, B, C, and E, need to be satisfied. Finally, E has another dependency, which is satisfied by F. At the end of this process, all of the dependencies are satisfied and result in a valid deployment, as shown on the right in Figure 5-38 on page 114. Note that D is not part of the deployment, because it is not needed directly nor transitively by the application content.
In addition, at the end of the provisioning, the admin system also has a list of bundles to retrieve from various bundle repositories. These bundles are downloaded to a local cache on the system where the application is installed.
In the ITSO Bank application example, the slf4j bundles are recognized as necessary dependencies and downloaded to a local cache, even though the internal bundle repository is shown in the same box for a single server installation. The slf4j.simple bundle is provisioned, because the slf4j.api bundle has a package import for org.slf4j.impl, which is satisfied by the slf4j.simple bundle. Furthermore, note that, in the presence of multiple implementation bundles, it is undetermined which implementation is selected. We explore this issue in more detail in 5.7, “Using the expert tools: Composite bundles and Use-Bundle” on page 129.
But, what if the slf4j library is not available on the target server? In that case, the application installation will discover the problem and output an error:
com.ibm.ws.eba.provisioning.services.ResolverException: CWSAO0007E: The system cannot provision the EBA itso.bank.app_1.0.0.201009101323 because the following problems in the dependency chain were detected: The package dependency org.slf4j with the version greater than or equal to 1.6.1 required by bundle [itso.bank.biz_1.0.0.201009101323, itso.bank.biz_1.0.0.qualifier] cannot be resolved.
In a rather roundabout way, this message means that the bundle itso.bank.biz declares an import package statement for org.slf4j 1.6.1 or higher, but the package is nowhere to be found. So, relying on the provisioning capabilities of the feature pack is both convenient and safe:
� The developer only has to specify the dependencies that the application needs and with which the application was tested, but the developer does not have to worry about packaging them.
� The administrator will be alerted for any missing dependencies.
5.5.2 Depending on services: Monitoring transactions
Use Blueprint to enable service-based provisioning.Share services, not implementations.5
Sharing at configuration time and run time: Shared bundles that are provisioned as described in this section are shared between applications. Therefore, shared bundles are only downloaded one time for each WebSphere Application Server node, and applications consume all shared bundles out of the same local cache.
Furthermore, shared bundles are only loaded into the run time one time. All applications that use the same shared bundle will be wired to exactly the same bundle instance in the OSGi framework for shared bundles.
Chapter 5. Developing OSGi applications 115

Sharing bundles and pulling them based on package dependency are good features, but they do not fit entirely with the architectural model of the sample application where all dependencies are interface-based and satisfied through the service registry. This issue is usually not an issue for open source libraries, which mostly provide classes rather than merely services. However, for custom-developed utilities, service-based provisioning becomes valuable. The OSGi applications feature pack supports service-based provisioning in addition to package-based provisioning.
For any given bundle, the provisioning system not only respects the bundle manifest but also any blueprint descriptors. A bundle with reference or reference-list elements has service dependencies. A bundle with service elements has service capabilities, which can be used to satisfy the service dependencies. Only service capabilities and dependencies declared in Blueprint are respected during provisioning. A service that is looked up or published through the OSGi APIs, or another container, such as Declarative Services, does not fit in the provisioning process.
To illustrate this capability, we want to add a simple facility to monitor transactions. This facility is a shared service that allows other OSGi applications to reuse the same service.
Implementing the TransactionMonitor interfaceWe start by creating two OSGi bundle projects, itso.monitoring.api and itso.monitoring.impl, without adding them to the sample application. We aim for the structure that is shown in Figure 5-39.
Figure 5-39 Monitoring project outline
The interface for transaction monitoring, which is shown in Example 5-13, is simple. Actual scenarios will almost certainly require much more detail.
Example 5-13 TransactionMonitor interface
package itso.monitoring.api;
5 http://www.ibm.com/developerworks/websphere/techjournal/1007_charters/1007_charters.html
116 Getting Started with the Feature Pack for OSGi Applications and JPA 2.0

public interface TransactionMonitor {public void log(String tranId, String target, BigDecimal amount,
Timestamp time);}
The implementation is equally simple. It only checks two arbitrary rules:
� A transaction is suspicious if it is for an amount of less than 10 cents.
� A transaction is suspicious if the previous transaction to the same target has been made less than 5 seconds before.
Example 5-14 Sample TransactionMonitor implementation
public class BasicTransactionMonitor implements TransactionMonitor {
private final static Logger logger = LoggerFactory.getLogger("TranMonitor");private final static BigDecimal MIN_AMOUNT = new BigDecimal(0.1);private final static long MIN_DELAY = 5000;
private ConcurrentHashMap<String, Timestamp> lastTrans = new ConcurrentHashMap<String, Timestamp>();
@Overridepublic void log(String tranId, String target,
BigDecimal amount, Timestamp time) {if (amount.compareTo(MIN_AMOUNT) == -1) {
logger.warn("Suspiciously small amount {} in transaction {} for target {}", new Object[] {amount, tranId, target});
}
Timestamp lastTran = lastTrans.get(target);if (lastTran != null && (time.getTime() - lastTran.getTime() < MIN_DELAY)) {
logger.warn("Suspiciously close transactions on target {} at times {} and {}",new Object[] {target, lastTran, time});
}}
}
To wire these bundle projects together, we configure the bundle manifests in the same way as in the sample application bundles. We also create a Blueprint file for the implementation bundle, which exports the BasicTransactionMonitor as a service. As described, the service declaration that is shown in Example 5-15 on page 117 does not only publish the TransactionMonitor service at run time. In addition, during provisioning, the service element declares that the itso.monitoring.impl bundle provide a service with the TransactionMonitor interface and no additional properties.
Example 5-15 Blueprint for itso.monitoring.impl
<blueprint xmlns="http://www.osgi.org/xmlns/blueprint/v1.0.0"><bean id="BasicTransactionMonitorBean"
class="itso.monitoring.impl.BasicTransactionMonitor"></bean><service id="BasicTransactionMonitorBeanService"
interface="itso.monitoring.api.TransactionMonitor"
Chapter 5. Developing OSGi applications 117

ref="BasicTransactionMonitorBean"></service>
</blueprint>
Finally, export the two projects from the workspace, and import them to the internal bundle repository on the test system, as described in the previous section.
Monitoring transactionsPulling in the new capability is extremely easy. In the ITSOBank class, we need a new setter method to inject the service alongside as well as a call to the service in the processTransaction utility method to log all incoming transactions, as shown in Example 5-16.
Example 5-16 TransactionMonitor usage in ITSOBank
private TransactionMonitor monitor = null;
public void setTranMonitor(TransactionMonitor monitor) {this.monitor = monitor;
}
…
private void processTransaction(String accountNumber, BigDecimal amount,TransactionType transactionType) throws InvalidAccountException, InvalidTransactionException {
monitor.log(tran.getId(), "ITSOBank:"+accountNumber, amount, tran.getTimeStamp());
…}
To actually inject the service, we add a new reference element and matching property to the blueprint, as shown in Example 5-17. Similar to the service element in the itso.monitoring.impl bundle, the reference element declares a dependency on a service with the TransactionMonitor interface during provisioning. This dependency is matched by the service capability of the itso.monitoring.impl bundle, and hence, the itso.monitoring.impl bundle is provisioned.
Example 5-17 Blueprint changes to provision TransactionMonitor service
<?xml version="1.0" encoding="UTF-8"?><blueprint xmlns="http://www.osgi.org/xmlns/blueprint/v1.0.0"
xmlns:bptx="http://aries.apache.org/xmlns/transactions/v1.0.0"><bean id="ItsoBankBean" class="itso.bank.biz.ITSOBank">
<bptx:transaction value="Required" method="*"/><property name="persistenceService" ref="service" /><property name="tranMonitor" ref="tm" />
</bean><service id="ItsoBankBeanService" interface="itso.bank.api.Bank"
ref="ItsoBankBean"></service><reference id="service"
interface="itso.bank.api.persistence.PersistenceService"></reference>
118 Getting Started with the Feature Pack for OSGi Applications and JPA 2.0

<reference id="tm"interface="itso.monitoring.api.TransactionMonitor">
</reference></blueprint>
The other reference is also used during resolving. However, because the service dependency is satisfied by the application content, no new bundles are provisioned as a result. Still, if there were a mismatch between the service expected by the business bundle and the service published by the persistence bundle, this mismatch is flagged during provisioning.
With those changes in place, a transaction of one cent yields a log message similar to this log message:
[9/10/10 15:27:40:437 EDT] 0000002f SystemErr R 261062 [WebContainer : 0] WARN TranMonitor - Suspiciously small amount 0.01 in transaction 201 for target ITSOBank:001-111003
And thus, you now have service-based provisioning of shared bundles.
5.5.3 Assurances around sharing
Only Use-Bundle when you must.6
There is a danger with shared bundles to expect more assurances than the run time actually offers, based on the fact that things work in a simple test environment. This section discusses warnings and solutions.
Testing the service provisioning: In the initial version of Rational Application Developer Version 8, the WebSphere Test Environment does not fully support service-based provisioning, even though the OSGi feature pack run time does. To test service provisioning, either export the sample application and deploy it through the administrative console (or through scripting) or by modifying the Rational Application Developer publish settings for the test server to “Run server with resources on Server”.
External Bundle Repositories: The OSGi application feature supports two types of bundle repositories: the internal repository, which is used throughout this book, and external bundle repositories. External bundle repositories are useful for sharing bundles across more than one WebSphere Application Server cell. From an administration perspective, an external repository is simply a URL to the repository descriptor.
The format of the repository follows the draft OSGi Bundle Repository (OBR) specification (Requests for Comments-0112 or RFC-0112). You can obtain more information about this format on the Apache Felix website:
http://felix.apache.org/site/apache-felix-osgi-bundle-repository.html
The OSGi Alliance maintains a list of existing bundle repositories at this website:
http://www.osgi.org/Repository/HomePage
External bundle repositories do not support service-based provisioning as described in this section or composite bundles (discussed in 5.7, “Using the expert tools: Composite bundles and Use-Bundle” on page 129), because the appropriate metadata is not generated by any existing tools for generating OBR repositories.
6 http://www.ibm.com/developerworks/websphere/techjournal/1007_charters/1007_charters.html
Chapter 5. Developing OSGi applications 119

For example, you might want to use shared bundles as a simple way to connect two OSGi applications. If both applications pull in the same package, they can then communicate through static fields on any of the classes in that package. This approach might work in simple cases, but, in general, you must take special care in this type of a scenario that both bundles import exactly the same package (Figure 5-40).
Figure 5-40 Isolated applications communicating through shared classes
The following warnings exist:
� Two applications depend on the same package with a version range. However, there are two versions of the bundle that provide the shared package in the shared framework. In this case, it is possible that both applications wire to a separate version of the shared bundle.
� Two applications depend on the same package with an exact version. However, there are two separate bundles that are available in the shared framework, providing the shared package at the required version. Again, the two applications might wire to either of the two shared bundles.
� An application might wire to a separate shared bundle after a server restart. Wiring depends on what bundles are available in the shared framework and can change as a result of new shared bundles being provisioned by other applications. A wiring between two applications can stop working after a server restart.
The root problem here is that the administrator and the application developer do not have any control over bundles that get provisioned purely on the basis of package dependencies. Furthermore, the run time makes no assurances about what bundles will satisfy any given package import from the shared framework, beyond the fact that the package import will be satisfied.
Use-Bundle to the rescueThere is one mechanism though to obtain the necessary assurances to use the shared framework to connect OSGi applications: the Use-Bundle header. With this header, the application developer can specify a set of bundles to be preferred when satisfying the package dependencies of application bundles. Furthermore, if the application consumes a
Shared
App1 App2
Isolated bundle Isolated bundle
Shared bundle
120 Getting Started with the Feature Pack for OSGi Applications and JPA 2.0

package from a Use-Bundle, this package is assured to come from exactly the same bundle at run time.
We can use this assurance for the previous scenario of connecting two applications. If both applications add the following Use-Bundle stanza to their application manifests, sharing is ensured to work (this situation, of course, assumes that shared.bundle is actually available at version x.y.z in a repository):
Use-Bundle: shared.bundle;version=”[x.y.z, x.y.z]”
Note, however, the various restrictions around Use-Bundle:
� Use-Bundles must provide packages to the isolated content.
Bundles that do not provide packages to the isolated content cannot be deployed as use bundles, even if they are provisioned for another reason. As a consequence, the Use-Bundle header cannot be used to lock down the bundle that provides a service to the application unless it also provides a package.
� If a package dependency cannot be satisfied with a Use-Bundle, it can still be satisfied through ordinary provisioning.
In the previous example, let x.y.z be 1.0.0. Now, assume that no shared.bundle with version 1.0.0 exists in any repository, but that a shared bundle with version 1.0.1 exists. In this case, the bundle with version 1.0.1 is pulled in as an ordinary provisioned bundle. None of the Use-Bundle assurances holds for 1.0.1.
� Use-Bundle version ranges can still allow separate bundles to be provisioned.
A Use-Bundle version range does not need to be locked down as in the previous example. In this case, the administrator can check, and if necessary, correct the version of the bundle that is consumed by the application.
� Use-Bundle statements concern only the resolution of packages between the provisioned Use-Bundle and the application. It does not provide any assurance about other wirings in the shared space.
For example, it is a bad idea to try to restrict the SLF4J implementation using a Use-Bundle (and an extra import package statement in an application bundle for org.slf4j.impl). Although that approach will ensure that org.slf4j.impl package in the isolated application framework comes from the correct provider, it does not ensure, in the absence of a “uses” clause on the org.slf4j.impl export, that the org.slf4j.api bundle actually uses that package, because that wiring exists purely in the shared space.
Careful use of “uses clauses” in the org.slf4j.impl bundle actually prevents this corner case, but a good number of open source bundles, including unfortunately slf4j, do not use that attribute.
� The Use-Bundle header does not work with substitutable bundles.
A substitutable bundle is a bundle that re-imports the API packages that it exports. In the presence of two bundles providing the same packages, only one version of the packages will be available in the OSGi framework, rather than two versions. This approach allows clients that only depend on the interface to work with both providers at the same time.
However, a substitutable bundle that is provisioned through a Use-Bundle header might not actually, at run time, export the package for which it was provisioned. In this case, the application fails during application start.
So, rather than being a fairly generic answer to provisioning worries, the Use-Bundle header is a precise tool, which requires careful application. We describe one application in 5.7, “Using the expert tools: Composite bundles and Use-Bundle” on page 129.
Chapter 5. Developing OSGi applications 121

5.6 OSGi application troubleshooting
Knowing how to debug OSGi applications is extremely valuable. This section focuses on OSGi-specific issues rather than general debugging techniques, with which we assume that you are familiar. The following problems are two of the most common sources of OSGi-specific problems:
� Provisioning errors
An application that works and wires well on paper and in the test environment fails to install on the target system due to provisioning problems, particularly during the resolve step.
� Runtime wiring problems
These runtime wiring problems occur when, although the application resolves successfully, at run time, a part or even all of the application does not work. Often, this problem is accompanied by blueprint timeout exceptions or obscure LinkageErrors.
5.6.1 Understanding provisioning problems
Provisioning problems occur either when first importing an EBA asset or during an update operation. Usually, they are a sign of a dependency that is not available, for example, as in 5.5.1, “Depending on packages: Adding logging” on page 111. But, they can also indicate structural problems in the application, such as an incorrect division between shared and isolated content.
When the problem is not immediately obvious, mentally following the resolution flow or even tracing it out on paper becomes crucial to determine the root cause. As an example, the following message occurs when trying to install the application as it is shown in Figure 5-36 on page 111 without the slf4j.impl bundle in the repository:
com.ibm.ws.eba.provisioning.services.ResolverException: CWSAO0007E: The system cannot provision the EBA itso.bank.app_1.0.0.201009101323 because the following problems in the dependency chain were detected: The service dependency with attributes {objectClass=itso.monitoring.api.TransactionMonitor} cannot be resolved. The package dependency org.slf4j with the version greater than or equal to 1.6.1 and less than 2.0.0 cannot be resolved. The package dependency org.slf4j.impl with the version greater than or equal to 1.6.0 cannot be resolved. The package dependency org.slf4j with the version greater than or equal to 1.6.1 required by bundle itso.bank.biz_1.0.0.201009101507 cannot be resolved." occurred. Check log for details.
The information that is shown is by no means perfect and can be confusing, particularly when more bundles are involved or the bundles have more package or service capabilities. To understand the resolver message, note the following considerations:
� A resolution failure is always triggered by content defined in the application manifest (that is, a bundle in Application-Content or Use-Bundle, usually the former).
In the previous case, the package dependency org.slf4j comes from the itso.bank.biz bundle. Also, although not shown, the service dependency on the TransactionMonitor also comes from the itso.bank.biz bundle.
� The dependency problems are in no particular order, unfortunately. So, it is up to the user to piece the parts together:
122 Getting Started with the Feature Pack for OSGi Applications and JPA 2.0

– The TransactionMonitor service must be deployed by the itso.monitor.impl bundle. However, this bundle depends on the org.slf4j package, which is also part of the unresolved dependencies. Hence, this failure is only intermediate.
– The org.slf4j.package must be made available by the org.slf4j.api bundle. But, looking at that bundle, it has another package import for org.slf4j.impl. The package org.slf4j.impl again is part of the missing dependencies. Hence, this failure also is an intermediate failure.
– Finally, the package dependency org.slf4j.impl is at the end of the chain. It is not supplied by any bundle, because we deleted it from the repository. Hence, we have found the root cause of the resolution failure.
Figure 5-41 shows the whole dependency picture. All the dashed lines are listed in the message in terms of unsatisfied dependencies. Note that the dashed lines all lead to the single root cause in this case. In practice, there might be multiple missing bundles, but the technique of following the dependency flow remains the same.
Figure 5-41 Tree of dependency failures
Another problem that can happen and might be even more surprising to the unsuspecting user is the following problem:
com.ibm.ws.eba.provisioning.services.ResolverException: Suspected circular dependency. Unsatisfied requirements list isolated content required by shared content.
This message unfortunately does not offer a lot of information about the particular resolution problem. This type of problem usually occurs when the application content is inconsistent. It can occur when the application content does not encompass all of the bundles that are
SharedShared
AppApp
APIAPI PersistencePersistence
BizBizWebWeb
Slf4j.apiSlf4j.api
Slf4j.implSlf4j.impl
Monitor.implMonitor.impl
Monitor.apiMonitor.api
Missing bundle
Missing bundle
Unresolvedbundle
Unresolvedbundle
Chapter 5. Developing OSGi applications 123

conceptually part of the core application. Or when, to the opposite effect, there are bundles that conceptually must be shared in the application content. In the itso.bank.app, we can get this error by leaving the itso.bank.persistence bundle out of the application content, while still having the bundle available in the EBA or in the internal repository.
In that case, the itso.bank.persistence bundle is pulled in as a provisioned bundle to satisfy the Blueprint reference for the persistence service in the itso.bank.biz bundle. But, in order for the itso.bank.persistence bundle to resolve, it needs the packages in itso.bank.api. So, itso.bank.api needs to be provisioned into the shared space as well, even though it is already provisioned into the isolated space.
At this point, the provisioning system flags an inconsistency, because the itso.bank.api bundle is both shared and isolated. Its packages hence exist in two separate versions within the same application. This scenario is highly dubious and rejected by the feature pack provisioning system with the previous error.
5.6.2 Debugging runtime problems: osgiApplicationConsole
After an OSGi application has made it past the initial challenge of provisioning, the majority of wiring-related problems are gone. However, it is possible to still trick the provisioning system in complex scenarios. Furthermore, two classes of problems, around the Blueprint and JPA components and service dependencies not based on Blueprint, such as the JNDI lookup in the web bundle, are not validated by the provisioning system and will lead to problems at run time. In these cases, the application starts successfully as far as the administrative console is concerned, but it does not work when invoked. Usually, the failures that occur suggest that parts of the application and required services are not available.
The OSGi application run time is dynamic. Extenders, such as Blueprint, are designed to deal with the dynamics of separate parts of the application starting up in their own time. Unfortunately, a consequence for the feature pack is that the start event result does not capture all the information about the start, because various extenders might still be performing work or waiting for other extenders to perform work.
An extremely tool is included in the OSGi feature pack for identifying these problems: the osgiApplicationConsole. Next, we show it in operation on several concrete scenarios that might happen with the sample projects. The osgiApplicationConsole is modeled after the osgi console that is included in Equinox. Users acquainted with that tool will find the descriptions familiar.
Example 1: Misspelled JPA persistence unit nameThe first scenario is a misspelling in the persistence configuration. The most frustrating scenario that we know is getting the persistence unit name wrong. For example, in the JpaPersistenceService, change the persistence context injection to this name:
public class JpaPersistenceService implements PersistenceService {@PersistenceContext(unitName = "itso.bank.persistenc")EntityManager em;…
}
Logically, the application will not work. Indeed, a JEE application with this problem fails to start, with a visible error message in the logs. However, suspiciously, an OSGi application can still be started successfully. But, when going to the web page, an error occurs. Alternatively, if you wait patiently, the following two timeout errors eventually appear (after five minutes on the default Blueprint grace period settings) in the logs. One error is for the itso.bank.biz bundle, and the other error is for the itso.bank.persistence bundle:
124 Getting Started with the Feature Pack for OSGi Applications and JPA 2.0

[9/15/10 14:27:09:109 EDT] 0000001d BlueprintCont E org.apache.aries.blueprint.container.BlueprintContainerImpl$1 run Unable to start blueprint container for bundle itso.bank.persistence due to unresolved dependencies [(&(&(org.apache.aries.jpa.proxy.factory=*)(osgi.unit.name=itso.bank.persistenc))(objectClass=javax.persistence.EntityManagerFactory))]java.util.concurrent.TimeoutException
at org.apache.aries.blueprint.container.BlueprintContainerImpl$1.run(BlueprintContainerImpl.java:273)
at java.util.concurrent.Executors$RunnableAdapter.call(Executors.java:453)at java.util.concurrent.FutureTask$Sync.innerRun(FutureTask.java:315)…
As discussed in “Accessing JPA services” on page 84, JPA services are injected through Blueprint. Problems around unsatisfied Blueprint references are among the hardest to diagnose because of the long timeout. However, these exceptions are infrequent. Most problems are caught by the provisioning system during installation. But, when a problem slips through the provisioning system, the osgiApplicationConsole can be invaluable.
We want immediate feedback about what is happening in the run time. To get this feedback, start the osgiApplicationConsole script under $INSTALL_ROOT/feature_packs/aries/bin or $PROFILE_ROOT/bin.
First, type list() to display the running application frameworks:
ID Framework Version Node Server 0 SharedBundles 7.0.0 kcgg1f1Node01 server1 1 itso.bank.app 1.0.0.qualifier kcgg1f1Node01 server1
Next, select the sample application’s framework with connect(1), because we are interested in the state of the isolated bundles. After that step, it is time to see the state of the framework, so type ss():
0 ACTIVE org.eclipse.osgi_3.5.2.R35x_v201001261 ACTIVE itso.bank.app_1.0.0.qualifier2 ACTIVE itso.bank.api_1.0.0.qualifier3 ACTIVE itso.bank.persistence_1.0.0.qualifier4 ACTIVE itso.bank.web_1.0.0.qualifier5 ACTIVE itso.bank.biz_1.0.0.qualifier
All the bundles are there and active. Anything else, for example, a bundle with an invalid bundle activator, leads to a failed application start. At this point, we want to see what the services are doing. The first service that is needed is the Bank service that is published by the biz bundle. Type bundle(5) to see what it is doing:
Id=5, Status=ACTIVE Location=reference:file:/C:/WebSphere/RAD8/SDP/runtimes/base_v7/profiles/was70profile1/installedEBAs/itso.bank.app_1.0.0.qualifier/byValue/9fe59a19-322c-424e-8967-651d034b40e8.1/1/ No registered services. No services in use. No exported packages Imported Packages itso.bank.api; version="1.0.0"<itso.bank.api_1.0.0.qualifier [5]> itso.bank.api.exceptions; version="1.0.0"<itso.bank.api_1.0.0.qualifier [5]> itso.bank.api.persistence; version="1.0.0"<itso.bank.api_1.0.0.qualifier [5]> itso.currency.api; version="1.0.0"<itso.bank.app_1.0.0.qualifier [5]> itso.monitoring.api; version="1.0.0"<itso.bank.app_1.0.0.qualifier [5]>
Chapter 5. Developing OSGi applications 125

org.slf4j; version="1.6.1"<itso.bank.app_1.0.0.qualifier [5]> No fragment bundles No host bundles No named class spaces No required bundles
The bundle command is good for getting an overview of what is happening with a particular bundle. It shows service usage (both used and registered) and the package wiring. In this case, notably, there are no services published, which is not as expected. In a healthy scenario, the services section will more like the following example (where the “Services in use” section might be empty, because services are only obtained “lazily” when first needed):
Registered Services {itso.bank.api.Bank}={service.id=48,osgi.service.blueprint.compname=ItsoBankBean} {org.osgi.service.blueprint.container.BlueprintContainer}={osgi.blueprint.container.symbolicname=itso.bank.biz,service.id=50,osgi.blueprint.container.version=1.0.0.qualifier} Services in use: {itso.bank.api.persistence.PersistenceService}={service.id=47,osgi.service.blueprint.compname=JpaPersistenceServiceBean}
So, the blueprint container has not started successfully. As a consequence, the Bank service has not been registered either. The predominant reason for this behavior is that one or more of the dependencies (reference or reference-list elements) of the Blueprint module are not there. Other reasons, such as incorrect configuration, lead to an error message in the SystemOut.log immediately after application start. We can check whether all services are available by querying them individually with services(“<filter to match the desired service>”):
wsadmin>services("(objectClass=*TransactionMonitor)"){itso.monitoring.api.TransactionMonitor}={service.id=28,osgi.service.blueprint.compname=BasicTransactionMonitorBean} Registered by bundle: itso.bank.app_1.0.0.qualifier [1] No bundles using service.wsadmin>services("(objectClass=*PersistenceService)")No matching services
So, the culprit is the PersistenceService service, which is to be exported by the persistence bundle. We move on to the itso.bank.persistence bundle then with bundle(3):
itso.bank.persistence_1.0.0.qualifier [3] Id=3, Status=ACTIVE Location=reference:file:/C:/WebSphere/RAD8/SDP/runtimes/base_v7/profiles/was70profile1/installedEBAs/itso.bank.app_1.0.0.qualifier/byValue/9fe59a19-322c-424e-8967-651d034b40e8.2/2/ Registered Services {javax.persistence.EntityManagerFactory}={osgi.unit.provider=org.apache.openjpa.persistence.PersistenceProviderImpl,service.id=45,osgi.unit.name=itso.bank.persistence,osgi.unit.version=1.3.0,org.apache.aries.jpa.container.managed=true,org.apache.aries.jpa.default.unit.name=false} No services in use. No exported packages Imported Packages itso.bank.api; version="1.0.0"<itso.bank.api_1.0.0.qualifier [3]> itso.bank.api.exceptions; version="1.0.0"<itso.bank.api_1.0.0.qualifier [3]> itso.bank.api.persistence; version="1.0.0"<itso.bank.api_1.0.0.qualifier [3]> javax.persistence; version="1.0.0"<itso.bank.app_1.0.0.qualifier [3]>
126 Getting Started with the Feature Pack for OSGi Applications and JPA 2.0

No fragment bundles No host bundles No named class spaces No required bundles
Again, there is no visible Blueprint. But, there are no references in the Blueprint so how can it be waiting? The key is to recall from the discussion in 5.3.2, “The persistence bundle” on page 75 that JPA persistence context injection is only a product of Blueprint injection transparently, because the annotations are transformed into the blueprint extensions at run time. Hence, we need to look in the configuration of that reference. At this point, the spelling mistake will be obvious.
Alternatively, if it still not clear what blueprint is waiting for or if the scenario happens too frequently for the user to go through the necessary typing, switching on trace for org.apache.aries.blueprint.* will reveal messages of the following type:
[9/15/10 16:07:22:812 EDT] 0000002f BlueprintEven 1 org.apache.aries.blueprint.container.BlueprintEventDispatcher blueprintEvent Sending blueprint container event BlueprintEvent[type=GRACE_PERIOD, dependencies=[(objectClass=itso.bank.api.persistence.PersistenceService)]] for bundle itso.bank.biz…[9/15/10 16:07:23:015 EDT] 0000001e BlueprintEven 1 org.apache.aries.blueprint.container.BlueprintEventDispatcher blueprintEvent Sending blueprint container event BlueprintEvent[type=GRACE_PERIOD, dependencies=[(&(&(org.apache.aries.jpa.proxy.factory=*)(osgi.unit.name=itso.bank.persistenc))(objectClass=javax.persistence.EntityManagerFactory))]] for bundle itso.bank.persistence
These messages show up whenever the Blueprint container for a particular bundle enters the waiting stage. Also, the second entry also shows the magic filter that JPA blueprint extension has added to the Blueprint.
Example 2: Switching slf4j implementationFor the second example, we show how to investigate package wirings and also how to understand the shared framework. The scenario is a bit far-fetched, but it shows the type of peculiar weird problems that a developer might encounter.
Customizing the Blueprint grace period: The Blueprint Container specification allows you to customize the grace period, which is the time interval that Blueprint waits for mandatory references to become satisfied before starting the Blueprint container. For example, to restrict the waiting time to 30 seconds for the itso.bank.biz bundle, adjust the bundle manifest:
Bundle-SymbolicName: itso.bank.biz;blueprint.timeout:=30000
Furthermore, you can disable the initial timeout in the bundle manifest completely. In this case, the Blueprint container will start regardless of whether all mandatory references are satisfied:
Bundle-SymbolicName: itso.bank.biz;blueprint.graceperiod:=false
Note that the grace period only applies to the interval that Blueprint waits for services during startup. If a mandatory service goes away afterwards and is later invoked, the waiting time is governed by the timeout attribute on the corresponding reference element or, if that is unspecified, the default-timeout attribute on the blueprint element.
Chapter 5. Developing OSGi applications 127

After having chosen slf4j.simple as the provider to produce the logging, we want to move to a proper logging provider, such as slf4j.jdk14. One way you might think this works is to take the old implementation bundle out of the internal bundle repository, put the new bundle into the internal bundle repository, and then, re-provision the application. You can re-provision the application either through reinstalling the application or through performing an unrelated update operation. However, strangely after the change, logs still go to SystemOut.log.
We need to investigate. Launch the OSGi application console, run list(), and then, connect to the shared framework, usually with connect(0). Finally, execute ss() to show what is happening:
0 ACTIVE org.eclipse.osgi_3.5.2.R35x_v201001261 ACTIVE shared.bundle.framework_0.0.02 ACTIVE itso.currency.simple_1.0.0.2010091314243 ACTIVE itso.currency.api_1.0.0.2010091314244 RESOLVED slf4j.simple_1.6.1 Master=55 ACTIVE slf4j.api_1.6.1 Fragments=4,96 ACTIVE itso.monitoring.impl_1.0.0.2010091014477 ACTIVE itso.monitoring.api_1.0.0.2010091014469 RESOLVED slf4j.jdk14_1.6.1 Master=510 ACTIVE itso.bank.app_1.0.0.qualifier
This view already shows the problem. Both implementations of slf4j are still present, and worse, the unwanted implementation comes first. This case illustrates a subtle point in the feature pack: shared bundles live longer in the run time than the application that installed them. In this case, when the sample application was re-provisioned and then stopped, the slf4j bundles remained in the shared run time, because they might be in use by other applications. Afterward, when the sample application is added again, the slf4j.jdk14 bundle is installed, but it is simply added on top of an already fully loaded slf4j bundle. So, it does not replace the existing implementation. Even though the correct implementation happened to be provisioned, it does not force the run time to use it.
While in this view, bundle(10) shows you the wiring of the application, which packages get imported, and from what. Bundle 10 is a special bundle that represents the complete application and all its wiring to the outside world. You can obtain a similar view through bundle(1) in the isolated framework:
itso.bank.app_1.0.0.qualifier [10] Id=10, Status=ACTIVE Location=itso.bank.app 1.0.0.qualifier No registered services. No services in use. No exported packages Imported Packages org.apache.commons.logging; version="1.0.3"<org.eclipse.osgi_3.5.2.R35x_v20100126 [10]> itso.currency.api; version="1.0.0"<itso.currency.api_1.0.0.201009131424 [10]> javax.servlet.jsp; version="2.1.0"<org.eclipse.osgi_3.5.2.R35x_v20100126 [10]> javax.persistence; version="1.1.0"<org.eclipse.osgi_3.5.2.R35x_v20100126 [10]> javax.servlet.http; version="2.5.0"<org.eclipse.osgi_3.5.2.R35x_v20100126 [10]> org.slf4j; version="1.6.1"<slf4j.api_1.6.1 [10]>
128 Getting Started with the Feature Pack for OSGi Applications and JPA 2.0

itso.monitoring.api; version="1.0.0"<itso.monitoring.api_1.0.0.201009101446[10]> javax.servlet; version="2.5.0"<org.eclipse.osgi_3.5.2.R35x_v20100126 [10]> javax.el; version="2.1.0"<org.eclipse.osgi_3.5.2.R35x_v20100126 [10]> javax.servlet.jsp.el; version="2.1.0"<org.eclipse.osgi_3.5.2.R35x_v20100126 [10]> javax.servlet.jsp.tagext; version="2.1.0"<org.eclipse.osgi_3.5.2.R35x_v20100126 [10]> No fragment bundles No host bundles No named class spaces No required bundles
You can read about many more situational commands in the information center:
http://publib.boulder.ibm.com/infocenter/wasinfo/v7r0/topic/com.ibm.websphere.osgifep.multiplatform.doc/topics/ta_admin_runtime_console.html
Or, you can use the help() command.
5.7 Using the expert tools: Composite bundles and Use-Bundle
In the previous sections, we have pointed out in numerous places how difficult it is to ensure any specific wiring in the shared framework. In particular, slf4j, due to its unusual split between API bundle and various implementation fragment bundles, posed a specific problem. In this section, we see how composite bundles, in conjunction with the Use-Bundle header, can ensure that an application wires to exactly the desired slf4j implementation without affecting other applications.
5.7.1 Composite bundles
Composite bundles conceptually are between ordinary bundles and OSGi applications. Just like a bundle, a composite bundle provides packages and services into the shared space. It also consumes packages and services from the shared space. However, just like an application, the composite bundle acts as a wrapper around a set of bundles that exist inside their own isolated OSGi framework.
The purpose of composite bundles is to capsulate a set of bundles that work well in conjunction and isolate them from other shared bundles. Bundles inside a composite bundle can only export and import packages and services declared in the composite manifest to and from the outside. In essence, the composite content must resolve (under the same rules that applications are resolved) with just a locked down set of imported packages and imported services. Applications and composite bundles differ in this respect. An application does not need to lock down which shared packages or services might be needed by the application content. This information will be determined during provisioning. For a composite bundle however, the locked down imports will only be verified.
One notable restriction around composite bundles in the feature pack is that they can only be used in the shared space. An application cannot contain a composite bundle in the application content.
Chapter 5. Developing OSGi applications 129

5.7.2 Isolating slf4j configurations
From the previous description, composite bundles are exactly the correct tool to isolate various slf4j implementations from each other. This isolation is required to be able to access separate implementations simultaneously (Figure 5-42 on page 130).
Figure 5-42 Slf4j isolation and selection with composite bundles and Use-Bundle
However, composite bundles alone do not solve the extra requirement that an application must be able to reliably select a particular implementation of slf4j. In core OSGi, you can use the bundle-symbolic-name attribute on a package import. However, this attribute is not allowed for packages that are wired from the shared framework into the isolated application framework. Instead, use Use-Bundle. The requirement matches exactly the suggested use for Use-Bundle: locking down the bundle, which in this case happens to be a composite bundle, that provides a package import. Figure 5-42 shows the resulting architecture.
There are other solutions beside Use-Bundle. For example, it is possible to add a custom attribute to the org.slf4j package when it is exported by the composite bundle to denote the implementation. This solution allows individual bundles to select a particular logging implementation. However, the choice of logging feels more like an application-level decision, which is why we describe the Use-Bundle solution here.
Creating the composite bundle is trivial. In Rational Application Developer (or in the no-charge tools), create a new composite bundle project. Then, add the slf4j.api and the desired implementation bundles to the contained bundles, and finally, export the org.slf4j package. The resulting composite manifest is similar to Example 5-18 (ignoring the order of the headers).
Example 5-18 COMPOSITEBUNDLE.MF for slf4j.simple.composite
Manifest-Version: 1.0CompositeBundle-ManifestVersion: 1Bundle-SymbolicName: slf4j.simple.compositeBundle-Version: 1.0.0Bundle-Name: slf4j.simple.compositeCompositeBundle-Content: slf4j.api;version="[1.6.1,1.6.1]", slf4j.simple;version="[1.6.1,1.6.1]"Export-Package: org.slf4j;version=1.6.1
SharedShared
AppApp
Slf4j.simple.compositeSlf4j.simple.composite
Slf4j.apiSlf4j.api
Slf4j.implSlf4j.impl
Slf4j.simple.composite
Slf4j.simple.composite
Slf4j.jdk14.composite
Slf4j.jdk14.composite
Use-Bundle: slf4j.simple.composite
130 Getting Started with the Feature Pack for OSGi Applications and JPA 2.0

In the manifest that is shown in Example 5-18, most headers are familiar from bundle manifests. Of the two exceptions, CompositeBundle-ManifestVersion is required in the case of future incompatible specifications for composite bundles. Finally, CompositeBundle-Content is similar to Application-Content; it lists the bundles to be isolated inside the composite. Note, however, that all the version ranges need to be locked down in the case of composite bundle manifest header.
It is a bad idea to add this line to the composite manifest:
Import-Package: org.slf4j;version=”[1.6.1,1.7.0)”
Because a substitutable bundle (that is, a bundle that imports the packages that it exports in case another provider is present) often will not export the substitutable packages. In conjunction with a Use-Bundle restriction, this approach is almost certainly going to fail when starting the application. This awareness, in particular, is important when adding use bundle requirements for external libraries, which are often packaged as substitutable bundles in accordance with commonly accepted practices.
Finally, add the Use-Bundle header to the itso.bank.app application manifest and re-export the itso.bank.app application:
Use-Bundle: slf4j.simple.composite;version="1.0.0"
5.7.3 Deploying composite bundles
After setting up the composite bundle project, export the project to obtain the composite bundle archive (CBA) for slf4j.simple.composite. CBAs are similar to applications in that they do not need to actually contain the bundles that are listed in the content section.
In order for the bank application to be able to pull in the composite bundle, we need to import it to the internal bundle repository. This process works the same as for normal bundles. However, additional restrictions exist that might cause importing a composite bundle to fail:
� Composite bundles must always resolve. If the definition of the composite bundle is incorrect, for example, the composite content bundles do not resolve with only the declared package imports, the import operation will throw an exception.
� All the content bundles must be available in the internal bundle repository. The content bundles have to be added before the composite bundle that uses them, when the composite bundle archive does not contain all the necessary bundles. Also, all the composite content bundles will be added to the internal bundle repositories and can be used in provisioning.
� Bundles cannot be removed from the internal bundle repository as long as there is at least one composite bundle that uses them.
With the composite bundle in the internal repository, reinstall the banking application with the Use-Bundle header as previously described. We now use the desired slf4j implementation. To
Using composite bundles: Because adding a composite bundle to the internal bundle repository entails adding all the bundles to the internal repository, composite bundles must not be used to hide a package at provisioning time. Any application can still import the package that is supposed to be hidden by pulling in the bundle contained in the composite because it is in the internal bundle repository. Instead, use composite bundles to hide packages at run time to prevent interference between separate suppliers of the same package.
Chapter 5. Developing OSGi applications 131

verify that state, use the osgiApplicationConsole, as described in 5.6.2, “Debugging runtime problems: osgiApplicationConsole” on page 124. First list all of the frameworks:
wsadmin>list()ID Framework Version Node Server0 SharedBundles 7.0.0 kcgg1f1Node01 server11 itso.bank.app 1.0.0.qualifier kcgg1f1Node01 server12 slf4j.simple.composite 1.0.0 kcgg1f1Node01 server1
The following example shows the composite bundle with its own framework, which can be inspected in the same way as the shared space and the application framework. However, for now, connect to the shared framework to investigate the wiring:
wsadmin>connect(0)wsadmin>ss()ID State Bundle0 ACTIVE org.eclipse.osgi_3.5.2.R35x_v201001261 ACTIVE shared.bundle.framework_0.0.02 ACTIVE slf4j.api_1.6.1 Fragments=53 ACTIVE itso.currency.api_1.0.0.2010092014384 ACTIVE itso.monitoring.api_1.0.0.2010091014465 RESOLVED slf4j.jdk14_1.6.1 Master=26 ACTIVE itso.monitoring.impl_1.0.0.qualifier7 ACTIVE itso.currency.simple_1.0.0.2010092014388 ACTIVE slf4j.simple.composite_1.0.09 ACTIVE itso.bank.app_1.0.0.qualifier
As previously discussed to work around a problem, slf4j is also provisioned normally into the shared space. Despite that, the application is still wired to the correct version:
wsadmin>bundle(9)itso.bank.app_1.0.0.qualifier [9]…Imported Packages org.slf4j; version="1.6.1"<slf4j.simple.composite_1.0.0 [9]>…
Avoid trouble: When developing this scenario, we discovered that erroneously the run time does not install and start provisioned bundles and use bundles all at one time but as two separate batches. Unfortunately, therefore, a Use-Bundle can satisfy the dependencies of a provisioned bundle at provisioning time but not at run time. This issue surfaces during application start where the provisioned bundle fails to start, because its dependencies cannot (yet) be satisfied.
In particular, this situation is a problem with the test application, because the itso.monitoring.impl bundle also uses the org.slf4j package. We can work around that problem by changing the import package statement in itso.monitorying.impl to this statement:
Import-Package: itso.monitoring.api;version="[1.0.0,1.1.0)", org.slf4j;version="[1.6.1,2.0.0)";bundle-symbolic-name="slf4j.api"
The bundle-symbolic-name attribute prevents the import from matching the composite bundle. Hence, slf4j.api will also be provisioned in the provisioned bundle set. However, that implementation will not be used by the application, because it requires the package through Use-Bundle.
132 Getting Started with the Feature Pack for OSGi Applications and JPA 2.0

Moreover, this result is not a product of accident. As described, the run time ensures the correct provenance of Use-Bundle packages, which can be verified by looking at the generated bundle headers:
wsadmin>headers(9)…Import-Package = org.slf4j;version="1.6.1"; bundle-symbolic-name=slf4j.simple.composite;bundle-version="[1.0.0,1.0.0]",…
Chapter 5. Developing OSGi applications 133

134 Getting Started with the Feature Pack for OSGi Applications and JPA 2.0

Chapter 6. OSGi applications and managing change
In this chapter, we illustrate the strengths of Open Service Gateway initiative (OSGi) and OSGi applications when it comes to dealing with change. We consider two separate aspects:
� Handling application life cycle changes, for example, updating an existing application to apply programming bug fixes or to make small feature improvements.
We will show how the OSGi application model allows detailed application updates that are both efficient and safe. We will also introduce the administrative tools that back up these capabilities.
� Exploiting OSGi dynamism
We explore how OSGi dynamics can be harnessed despite the static OSGi application model in the feature pack. The result is a simple web application that can be dynamically extended and updated.
6
© Copyright IBM Corp. 2010. All rights reserved. 135

6.1 Sample material for this chapter
The sample applications that are developed in this chapter are included as downloadable material for this publication (see Appendix A, “Additional material” on page 263). Refer to “OSGi samples” on page 264 for instructions to install the sample material.
Follow these steps to use the files that are referenced in this chapter:
� Extract the 02_itso-bank_with_update_and_sharing.zip file containing the update and sharing scenario to a folder.
� Extract the 08_dynamic_webapp.zip file containing the dynamic web application scenario.
6.2 OSGi application life cycle: Fine-grained updates
In this section, we go beyond the initial application of the ITSO Bank application to illustrate the specific support that OSGi applications offer for maintenance and continued development. We show how the OSGi application programming model and the feature pack administrative capabilities are well suited to make such life cycle operations as painless and safe as possible.
To illustrate this support, we consider two cases:
� a fix update� a new feature update
First, however, there is one detail that warrants closer attention than was paid to it: OSGi versioning. OSGi version policies are crucial for safe updates, and we need the discussion to set the scene for the rest of this section. There are ramifications for the version choices that were made in Chapter 5, “Developing OSGi applications” on page 67.
6.2.1 OSGi versioning
Version that which is versionable.1
OSGi versioning is at the heart of how OSGi makes modules impervious to changes in their environments. OSGi modules do not merely declare dependencies and capabilities; they also declare versions for them. Dependencies have version ranges. Capabilities have only versions. Without these versions, a bundle is on either of the two extremes regarding a change to a dependency:
� Accept only a single version of a dependency and fail to exploit newer compatible versions.
� Accept all of the versions of a dependency and suffer from incompatible changes being made to the dependency.
With versioning, bundles can allow separate versions of a dependency in a window of compatibility. OSGi versions must be semantic versions, which means that they carry
Sample material: The bundle projects and source code for this section are contained in the 02_itso-bank_with_update_and_sharing.zip archive.
1 http://www.ibm.com/developerworks/websphere/techjournal/1007_charters/1007_charters.html
136 Getting Started with the Feature Pack for OSGi Applications and JPA 2.0

commonly understood meanings. A bundle author can rely on these meanings when declaring the versions of a bundle’s dependencies.
This function gives us the ability to write modules today that can interoperate with current libraries and future versions of those libraries but that will fail to resolve against incompatible future versions of those libraries. However, to reap the full benefits, a bundle author needs to understand and follow the OSGi semantic versioning practices.
OSGi distinguishes between bundle versions and package versions. Versioning a bundle does not version the packages and vice versa. Both follow the form:
<major>.<minor>.<micro>.<qualifier>
The qualifier part carries no semantics and is often used to denote build numbers. In Rational Application Developer, the qualifier is automatically replaced by a build time stamp during export. In contrast, the numeric major, minor, and micro parts commonly have specific semantics for packages that are based around the effect of the changes for clients (as noted in the specification OSGi Service Platform Core Specification, chapter 3.6.2):
� A change in the major version denotes a breaking API change, for example, the parameters of a method changed. Such a change is breaking, because a client cannot work (non-reflectively) with the previous version and the new version of the API.
� A change in the minor version denotes a backward compatible API change, for example, adding a new method to an interface. Existing clients can function both with the old and new versions. Implementers must be updated to support the new method.
� A change in the micro version denotes a bug fix, and no change to the API is allowed.
On top of single versions, OSGi defines the concept of version ranges, for example, that are used on Import-Package statements. Version ranges come in two forms:
[1.0.0,2.0.0) Defines a version range from 1.0.0 (inclusive) to 2.0.0 (exclusive). An angle bracket denotes an inclusive endpoint whereas a round bracket denotes an exclusive endpoint.
1.0.0 Defines an open version range of 1.0.0 and higher. Open version ranges must not be confused with single versions. Whether the version is a single version or a range is determined by the context. For example, Export-Package and Bundle-Version have single versions whereas Import-Package and Application-Content have version ranges.
From these semantics derive the common version policies that we have followed in the sample bundles for versioning imports:
� A bundle that uses a bundle imports the package with an open range from the minimum necessary version up to but excluding the next major version. So, for example, the web bundle, which uses the itso.bank.api package, imports it with the version range “[1.0.0,2.0.0)”.
� A bundle that implements interfaces in a package imports the package with an open range from the minimum version up to but excluding the next minor version. So, for example, the business bundle, which implements the interfaces in itso.bank.api, imports that package with the range “[1.0.0,1.1.0)”.
Chapter 6. OSGi applications and managing change 137

� Exceptions to these rules are packages that are defined in the Java Community Process (JCP) specification. JCP specifications always try to maintain backward compatibility, but unfortunately, their versioning does not always follow the OSGi semantics. Hence, the advice for javax.* packages is to specify a minimum version but not a maximum version. For example, the persistence bundle imports javax.persistence at version “1.0.0”, which allows any future versions to be used as well.
Also, javax package versions might differ in OSGi from the spec versions. For example, the Java Persistence API (JPA) 2.0 APIs are exported at version 1.1.0, because the changes are backward compatible for clients.
By default, Rational Application Developer and generic Eclipse do not follow these practices. Hence, a user must always adjust package versions.
6.2.2 Developing and deploying programming bug fixes
In the life of every application, a programming bug fix update will be necessary sooner or later. Bugs might be identified in either the core proprietary code or in external libraries that are used by the application. We start by looking at a problem in the biz bundle of the sample application. In 5.5.1, “Depending on packages: Adding logging” on page 111, we added logging to the application, but we failed to trace out the ID of the newly created transaction so that it can be easily retrieved from the database. As an example of a bug fix, we look at remedying this omission.
Before making any other changes, we update the bundle version of the itso.bank.biz bundle to “1.0.1.qualifier”. This change defines what we develop as a new version of the bundle to OSGi. Without it, the run time can treat the original version and the new version interchangeably (despite potentially separate build numbers), because having the same version, they are expected to contain exactly the same contents. As mentioned previously, bundle versions have no commonly agreed to semantics. In this case, due to the small change, we have chosen only to increment the micro version.
After that, it is time to make the code changes, as shown in Example 6-1. With the changes in place, export the bundle, and add it to the internal bundle repository in the run time (for instructions, refer back to the discussion in 5.5, “Using shared bundles” on page 111).
Example 6-1 Logging the transaction ID in processTransaction
private void processTransaction(…) … {…
MutableTransaction tran = this.service.createTransaction(account, amount, transactionType);
logger.info("Starting transaction {} of type {} for amount {} on account {}",
Non-linear versioning: Despite being a good fit for most development scenarios, the OSGi version policy cannot cover all situations. The most notable restriction is the fact that OSGi versions are conceived as linear. That is, Version 1.7 must contain all of the features of Version 1.6 (otherwise, this version is a breaking change and Version 1.7 becomes Version 2.0). As a consequence, new features can only be introduced on the latest version within one major package version. It is not possible to introduce features at earlier versions. This design can be a problem with large products that maintain a stable API (that is, infrequent major version changes), and development wants to combine this version with multiple minor versions that are supported and actively extended.
138 Getting Started with the Feature Pack for OSGi Applications and JPA 2.0

new Object[] {tran.getId(), transactionType, amount, accountNumber});
…}
This point is where the distinction between a bundle’s provenance (whether it comes from a bundle repository or outside an enterprise bundle archive (.eba)) and its isolation level (whether it is isolated application content or provisioned as shared content) becomes important. A bundle in the bundle repository can be shared as well as isolated. The updated bundle, even though it is placed in the internal repository rather than the EBA archive, is meant to be deployed as application content rather than shared content.
With the new updated bundle now available for provisioning, the updated bundle can now be selected from the Assets detail panel using Update bundle versions in this application, as shown in Figure 6-1.
Figure 6-1 Updating an OSGi application from the Assets detail panel
Updating an application is a four-step process:
1. Select the desired updates.
An example is shown in Figure 6-2 on page 140. The drop-down boxes list all of the available versions, plus the “No preference” option. The semantics are quite simple. Selecting a specific version instructs the provisioning system to stick to exactly that version for the update. Selecting “No preference” instructs the provisioning system to find the highest version that works with the other selections.
With both selections, the new version must fall into the range that is specified in the application manifest. For example, the following application content specifies that only bundle versions from 1.0.0 but less than 2.0.0 are admissible during provisioning and updates:
Application-Content: itso.bank.biz;version=”[1.0.0,2.0.0)”, …
In the scenario under discussion, we want to pull the 1.0.1 version of the biz bundle. Selecting “No preference” can achieve the same effect, assuming that there are no later versions of the biz bundle available.
Chapter 6. OSGi applications and managing change 139

Figure 6-2 Update selection
2. Click Preview to see the results of the proposed changes.
The next panel either shows the successful resolution of the update instructions to a concrete set of bundle versions, that is, with all the “No preference” selections resolved to one specific version, or a resolution exception if the user’s choices are inconsistent.In the simple bug fix example, not surprisingly, the resolution is as shown in Figure 6-3. The itso.bank.biz bundle moves to Version 1.0.1 and all the other bundles stay at Version 1.0.0. If the resolution is as you intended, click Commit to commit the update, and then, save the workspace changes, which will trigger the bundle downloads (see step 3).
Figure 6-3 Update changes preview
140 Getting Started with the Feature Pack for OSGi Applications and JPA 2.0

3. Wait for downloads to finish.
The new bundles can come from both internal or external bundle repositories. In either case, the run time must cache the bundles locally so that applications are not affected by changes to the bundle repositories. This process of downloading the new versions to create local copies can take a short amount of time with external repositories or extremely large bundles, but it is mostly instantaneous when working with the internal bundle repository. If in doubt, you can check the status of downloads from the Asset detail panel or the Composition unit status detail panel (Figure 6-4).
4. Restart the application.
After all of the bundle downloads have completed, the next restart of the application will pull in the changes. Whether this action has already happened can be seen from the status box on the composition unit detail panel (Figure 6-4). The message “New version available.” indicates that the update is fully downloaded and ready to be applied with the next restart. After a restart, the message changes to “Up-to-date.” to indicate that there are no further updates that are waiting to be applied.
Figure 6-4 Composition unit update status
After completing all those steps, new transactions will now be logged as shown, which proves that the update has been applied correctly:
[9/13/10 10:59:08:843 EDT] 0000001c SystemErr R 4916922 [WebContainer : 2] INFO ITSOBank - Starting transaction 301 of type Debit for amount 7540 on account 001-111002[9/13/10 10:59:08:843 EDT] 0000001c SystemErr R 4916922 [WebContainer : 2] INFO ITSOBank - Transaction complete
Updating provisioned bundlesThe described update process applies only to bundles that are listed in either the Application-Content header or the Use-Bundle header of the application manifest, but not to bundles that are simply provisioned to satisfy package or service dependencies. However, what happens if there is a new version of a provisioned bundle with a critical patch?
As described in 5.5.3, “Assurances around sharing” on page 119, the provisioning, in the absence of Use-Bundle constraints, makes no assurance about which bundles and versions get used beyond the assurance that they will satisfy the resolution constraints in the bundle manifests, Blueprint descriptors, and the application metadata. Hence, both options to force updates on provisioned bundles revolve around modifying those constraints:
� Change the bundle manifest or the blueprint of at least one of the application bundles that requires the library needing the patch. We suggest this solution, because it adds the constraint to the place where the dependency originates. So, the author of the bundle that pulls in a shared bundle is in control of what version of the library has the necessary patches for the bundle’s intended use. The drawback of this approach is that a new bug fix version of at least one application bundle is required to update a shared library for an application.
Chapter 6. OSGi applications and managing change 141

� Add a Use-Bundle stanza for the bundle to be updated, and then, update it through the administration panels normally. This solution is restricted to package dependencies. Furthermore, this approach leads to a proliferation of Use-Bundle content, which is not a recommended pattern to follow. Hence, only use this approach if the developer or administrator expects frequent critical updates to a shared bundle.
Pulling in a version of a package is a straightforward change to the version. The same is not true for services. A bug fix in a service usually does not require changing the version of any package. The service interface has not changed, and the service implementation package is not exported. There are two ways to still select a new service:
� Change the package version of the service interface package, despite no code changes. This approach entails an unnecessarily invasive change, because typically the version has to be incremented to the next minor version to break the compatibility with the old service implementation.
� Introduce a version attribute on the service itself. One simple scheme is to give the service a version as part of the service properties:
<service ref=”<some bean>” interface=”<some interface>”><service-properties>
<entry key=”version”><value type=”org.osgi.framework.Version”>1.0.1</value>
</entry></service-properties>
</service>
Matching that in the client bundle’s blueprint descriptor, add a filter attribute to select the higher version:
<reference interface=”<some interface>” filter=”(version>=1.0.1)” />
6.2.3 Larger updates for new features
As a second larger example, we consider a new feature for our banking application that allows banking transactions to be performed in more than one currency. To satisfy this use case, we introduce a new shared service that provides currency conversion. Using this service also requires a number of changes to the core application bundles. The changes are schematically shown in Figure 6-5 on page 143 where the dotted bundles and connections on the right highlight the changes.
The scenario allows us to discuss several of the more detailed versioning decisions that accompany application development and to explore the limitations of the update functionality. The same scenario also factors into Chapter 7, “Connecting OSGi applications” on page 163 where we will use this scenario to show how to connect two OSGi applications.
142 Getting Started with the Feature Pack for OSGi Applications and JPA 2.0

Figure 6-5 Overview of 1.1.0 changes for adding currency conversion
Currency conversionFirst, we introduce the new shared service. We introduce two new bundles:
� An API bundle, itso.currency.api, which exports the itso.currency.api package at Version 1.0.0
� A separate implementation bundle, itso.currency.impl, which provides the currency conversion service
Example 6-2 shows the currency conversion. We omit the implementation, which simply uses a number of hard-coded conversions, and the corresponding blueprint to export the service.
We describe the procedure to create the projects in detail in 5.5.2, “Depending on services: Monitoring transactions” on page 115.
Example 6-2 CurrencyConverter interface
package itso.currency.api;
import java.math.BigDecimal;import java.util.Set;
public interface CurrencyConverter {public Set<String> getSupportedCurrencies();
SharedShared
AppApp
APIAPI PersistencePersistence
BizBizWebWeb
Slf4j.apiSlf4j.api
Slf4j.implSlf4j.impl
Monitor.implMonitor.impl
Monitor.apiMonitor.api
SharedShared
AppApp
API1.1.0
API1.1.0
PersistencePersistence
Biz1.1.0
Biz1.1.0
Web1.1.0
Web1.1.0
Slf4j.apiSlf4j.api
Slf4j.implSlf4j.impl
Monitor.implMonitor.impl
Monitor.apiMonitor.api
Currency.impl
Currency.impl
Currency.apiCurrency.api
Sample material: You can obtain the source in the sample material file 02_itso-bank_with_update_and_sharing.zip.
Chapter 6. OSGi applications and managing change 143

public BigDecimal convert(BigDecimal amount, String sourceCurrency, String targetCurrency);
}
Updating the business logicAs the next step, we pull in the currency functionality from the business layer and make it available on the business interface. First, we add the four new methods that are shown in Example 6-3 to the itso.bank.api.Bank interface to expose the new functionality.
Example 6-3 New methods for itso.bank.api.Bank interface
public void deposit(String accountNumber, BigDecimal amount, String currency)throws InvalidAccountException, InvalidCurrencyException,InvalidTransactionException;
public void withdraw(String accountNumber, BigDecimal amount, String currency)throws InvalidAccountException, InvalidCurrencyException, InvalidTransactionException;
public void transfer(String debitAccountNumber, String creditAccountNumber,BigDecimal amount, String currency) throws InvalidAccountException, InvalidCurrencyException,InvalidTransactionException;
public Set<String> getSupportedCurrencies();
This change adds new methods, but it does not remove or change any of the existing methods. From an API point of view, we can also modify the existing methods. However, the latter change is a breaking change. Instead, the change in Example 6-3 is backward compatible, so we only increment the minor version. We also add a new class called InvalidCurrencyException in the itso.bank.api.exception package, which again means an increment to the minor version. Finally, along with the package version changes, we change the bundle version to match the new package versions. The changes to the itso.bank.api bundle manifest are shown in Example 6-4.
Example 6-4 Bundle manifest for itso.bank.api bundle at Version 1.1.0
Bundle-SymbolicName: itso.bank.apiBundle-Version: 1.1.0.qualifierExport-Package: itso.bank.api;version="1.1.0", itso.bank.api.exceptions;version="1.1.0", itso.bank.api.persistence;version="1.0.0"…
It is key that the version of the itso.bank.api.persistence package has not changed, because no changes were made to classes in that package. As a result, the itso.bank.persistence bundle does not have to change, because its imports are still satisfied, which is desirable, because an extension to the API bundle must not affect the persistence layer.
However, the compatibility with the itso.bank.biz bundle has been broken, because the itso.bank.api package import is no longer satisfied:
itso.bank.api;version=”[1.0.0,1.1.0)”
Again, this behavior is desirable, because the ITSOBank implementation in the old itso.bank.biz bundle does not implement the new methods on itso.bank.api.Bank. So, building
144 Getting Started with the Feature Pack for OSGi Applications and JPA 2.0

on the changes to the API bundle (Example 6-3 on page 144), we are forced to update the business logic as well. The steps are simple. You can fill in the details:
1. Add a new reference for the CurrencyConverter service.
2. Add a matching setter method and a field, which is called converter, to the ITSOBank class.
3. Implement the new methods by forwarding the new methods to the existing methods with the same name after converting the input amount to “USD” (Example 6-5).
Example 6-5 Implementing currency conversion for transfer method
public class ITSOBank implements Bank {// …
private final static String CURRENCY = "USD";
public void transfer(String debitAccountNumber, String creditAccountNumber,BigDecimal amount, String currency) throws InvalidAccountException, InvalidCurrencyException, InvalidTransactionException {
transfer(debitAccountNumber, creditAccountNumber, convert(amount, currency));
}
private BigDecimal convert(BigDecimal amount, String currency) throws InvalidCurrencyException {if (!!!getSupportedCurrencies().contains(currency))
throw new InvalidCurrencyException(currency);
return converter.convert(amount, currency, CURRENCY);}
}
4. Update the bundle manifest, as shown in Example 6-6. Both the itso.bank.api package and the itso.bank.api.exceptions package are imported with minimum Version 1.1.0, because the changes to both packages are necessary to implement the new Bank interface. The ranges continue to follow the pattern that the itso.bank.api package, from which interfaces are implemented, is imported only to the next minor version. The itso.bank.api.exceptions package, from which classes only are used, is imported to the next major version. We must also adjust the bundle version.
Example 6-6 Bundle manifest for the itso.bank.biz bundle at Version 1.1.0
Bundle-SymbolicName: itso.bank.bizBundle-Version: 1.1.0.qualifierImport-Package: itso.bank.api;version="[1.1.0,1.2.0)", itso.bank.api.exceptions;version="[1.1.0,2.0.0)", itso.bank.api.persistence;version="[1.0.0,2.0.0)", itso.currency.api;version="[1.0.0,2.0.0)", itso.monitoring.api;version="[1.0.0,2.0.0)", org.slf4j;version="1.6.1"…
The new reference element and the package import statement are the only references to the new dependency of the application. As part of the update process, these two new
Chapter 6. OSGi applications and managing change 145

dependencies are correctly recognized and provisioned respectively. The update is rejected if the dependencies (or any of their transitive dependencies) are not available.
Finally, to update the presentation layer, we need to apply similar changes to move the imports of itso.bank.api packages to 1.1.0 and also perform minor JavaServer Pages (JSP) and servlet tweaks, which are not discussed here.
Performing the updateThe update process is essentially the same as described in the last section for bug fixes:
1. Export the five new bundles from Rational Application Developer.2. Import the bundles into the internal bundle repository.3. Navigate to the Update selection panel for the itso.bank.app asset.4. Select “No preference” and move to the Preview page, which is similar to Figure 6-6.5. Commit the changes, and save the workspace.6. Restart the application.
Figure 6-6 Preview for new version
146 Getting Started with the Feature Pack for OSGi Applications and JPA 2.0

With the updates made, the application includes a new feature to handle transactions in separate currencies, as shown in Figure 6-7.
Figure 6-7 ITSOBank with currency conversion
Beyond the ease of updating the bundles, it is important to realize what the update process accomplishes for the administrator:
� New dependencies are found and provisioned transparently.
As long as all of the new bundles are there, the administrator does not have to worry about making libraries available. Nor does the application developer have to worry about packaging new libraries with an update.
If any dependencies are missing, this situation is reported as an error, which prevents the update. For example, if the itso.currency.impl bundle is not present in a bundle repository, the update cannot be applied.
� The validity of the update is checked.
The new configuration has exactly the same assurances as the initial deployment configuration. The selected versions resolve together, and all of the dependencies are available. Therefore, the administrator can freely change individual bundles rather than work on the level of complete configurations.
For example, to temporarily disable the new functionality, the administrator can downgrade just the itso.bank.web bundle to Version 1.0.0, thus keeping any unrelated fixes that were made in the itso.bank.biz bundle. However, the update system prevents an update to inconsistent configurations, for example, choosing 1.1.0 for the itso.bank.api bundle but 1.0.0 for the itso.bank.persistence bundle.
Chapter 6. OSGi applications and managing change 147
6.2.4 Update restrictions
Even though these two examples cover a large number of update scenarios, a number of cases are not supported by the OSGi application update mechanism:
� Introducing new application content.
The application content is fixed in the application manifest and cannot be changed afterwards. Hence, to introduce new isolated bundles, the developer must author a new application manifest and redeploy the application.
� Updating a bundle beyond the version range in the application manifest.
So far, all of the bundle ranges in the application manifests have been open-ended. However, it is possible to specify smaller ranges and also ranges that restrict to a single version, such as EBA archives without an application manifest where the application content is generated from the bundle contained in the archive. If the range is restricted, then an update cannot pull in versions of bundles that fall outside of the specified ranges.
� Changing Service Component Architecture (SCA) service imports or service exports. We describe this functionality in Chapter 7, “Connecting OSGi applications” on page 163.
6.3 Exploiting OSGi dynamics
The discussions of OSGi applications so far have focused on OSGi modularity, which reflects the focus of the feature pack as well. However, in this section, we want to show how far the OSGi dynamics aspect can also be exploited. The application shown is educational in nature. The purpose is to show techniques for harnessing OSGi dynamics, rather than to try to assert that the method described is the only way to build dynamic web applications.
6.3.1 OSGi dynamics with OSGi applications
In the OSGi application model that is provided in the feature pack, isolated applications are static. After the application is installed, the application core configuration will not change, meaning, no new bundles are installed. No new package imports from the shared framework are possible in the feature pack, and the existing service filters cannot be changed. Furthermore, updates are not dynamic, because they always entail an application restart in the feature pack.
So, there is only one recourse to exploit dynamic features: the shared space. All OSGi applications share the same OSGi framework for shared bundles. Hence, any shared bundle that is started by an application is visible to all other applications, specifically, any shared bundles that are used by those applications. Therefore, new functionality can be added to the shared space dynamically as a result of starting OSGi applications. This section exploits this dynamism in the shared space to build a trivial, dynamic web application. This web application allows the dynamic addition of servlet content and updates of existing content.
ArchitectureFigure 6-8 on page 149 shows the full architecture of what we develop in this section. Do not worry if the diagram does not immediately make sense; we explain all of the parts in detail. The application is going to satisfy web requests by forwarding them to a central hub, which in
Sample material: The source code for this section is contained in the 08_dynamic_webapp.zip archive.
148 Getting Started with the Feature Pack for OSGi Applications and JPA 2.0

turn delegates to an appropriate handler that is available in the service registry of the shared framework.
Figure 6-8 Dynamic web application overview
The following numbers refer to the numbers in Figure 6-8:
1. The isolated application is going to consist of a single web bundle called dynamic.web (Figure 6-8). The web bundle has a single servlet for all web paths, which forwards incoming requests onward.
2. The target of the forwarded requests is a central ContentProvider service, which comes out of the shared framework. When a request comes in, this service will in turn attempt to find an appropriate ContentHandler in the service registry. The ContentHandler services carry appropriate metadata that supports this request handler matching.
3. The first handler that we implement is a simple greeting handler. This handler is not installed with the basic application. Instead, it will be provisioned later through another application, which is not shown, that has no purpose other than provisioning the shared bundle called content.bundle (Figure 6-8). Various ways exist to construct an application that will provision the shared bundle. In this section, we will use a specially crafted service dependency.
4. Similarly, we then add another ContentHandler for obtaining the current balance (from the ITSOBank database). We are going to reuse the itso.bank.persistence bundle.
5. However, for certain ContentHandler services, we might want to hide part or even all of the implementation bundles, so that they are not shared with other applications or shared bundles. In Figure 6-8, the persistence services for accessing the itso.bank JPA services is encapsulated in a composite bundle, which exposes only the ContentHandler service as an exported service.
SharedShared
dynamic.web.appdynamic.web.app
dynamic.web.api
dynamic.web.api
CompositeComposite
dynamic.web
dynamic.web
content.bundle
content.bundle
query.bundle
query.bundle
itso.bank.api
itso.bank.api
itso.bank.persistence
itso.bank.persistence
1
2
3
4
5
ContentProvider
ContentHandler
P
H
P
H
H
dynamic.web.provider
dynamic.web.provider
Chapter 6. OSGi applications and managing change 149

LimitationsBefore jumping into building the application, be aware of the various limitations that this architecture entails:
� All content is in the shared framework and potentially visible to other applications. For security-critical services, that approach might not be appropriate. Also, the shared bundles cannot be configured, which is irrelevant in the given example, because the content in the shared space will not include web application bundles (WABs) or Blueprint resource references.
� Bundles in the shared bundle space are never uninstalled. Hence, after ContentHandlers are installed, they cannot be removed other than through a server restart. However, they can be updated by hiding the existing service behind a new service.
� The resolution in the shared framework is far harder to control than the resolution in isolated applications. If a package requirement is satisfied by more than one provider, no assurances are made about which provider is chosen. Furthermore, separate bundles might wire to separate providers and hence have incompatible class spaces. In the present example, multiple versions of the APIs exported by dynamic.web.api mean that content providers can wire to separate versions of the API. In this case, only the subset that wires to the same package to which dynamic.web.provider is wired is visible to dynamic.web.provider. So, for all intents and purposes, that bundle is a singleton.
� To dynamically provision additional content to the dynamic.web.app application, through a new shared service, we use an application whose only purpose is to require the shared service so that it gets provisioned and installed in the run time. In this way, we achieve the goal of not having to reprovision and restart the major application.
6.3.2 The core application and infrastructure
First, we build the core infrastructure. As usual, the interfaces for connecting all of the parts are a good place to start. Two separate interfaces are needed, and both interfaces are packaged in one API bundle, dynamic.web.api:
� The ContentProvider interface allows the web bundle to request an incoming request to be routed to the appropriate ContentHandler. Example 6-7 shows a simple implementation.
Example 6-7 ContentProvider interface
package dynamic.web.api.provider;
import java.util.Map;
import javax.servlet.http.HttpServletRequest;import javax.servlet.http.HttpServletResponse;
public interface ContentProvider {public boolean handle(HttpServletRequest req, HttpServletResponse resp);Map<String,String> getHandledURLs();
}
� The ContentHandler interface represents a handler for a single web URL pattern. The interface by design is similar to the design of HttpServlet.
Example 6-8 ContentHandler interface
package dynamic.web.api.content;
import javax.servlet.http.HttpServletRequest;
150 Getting Started with the Feature Pack for OSGi Applications and JPA 2.0
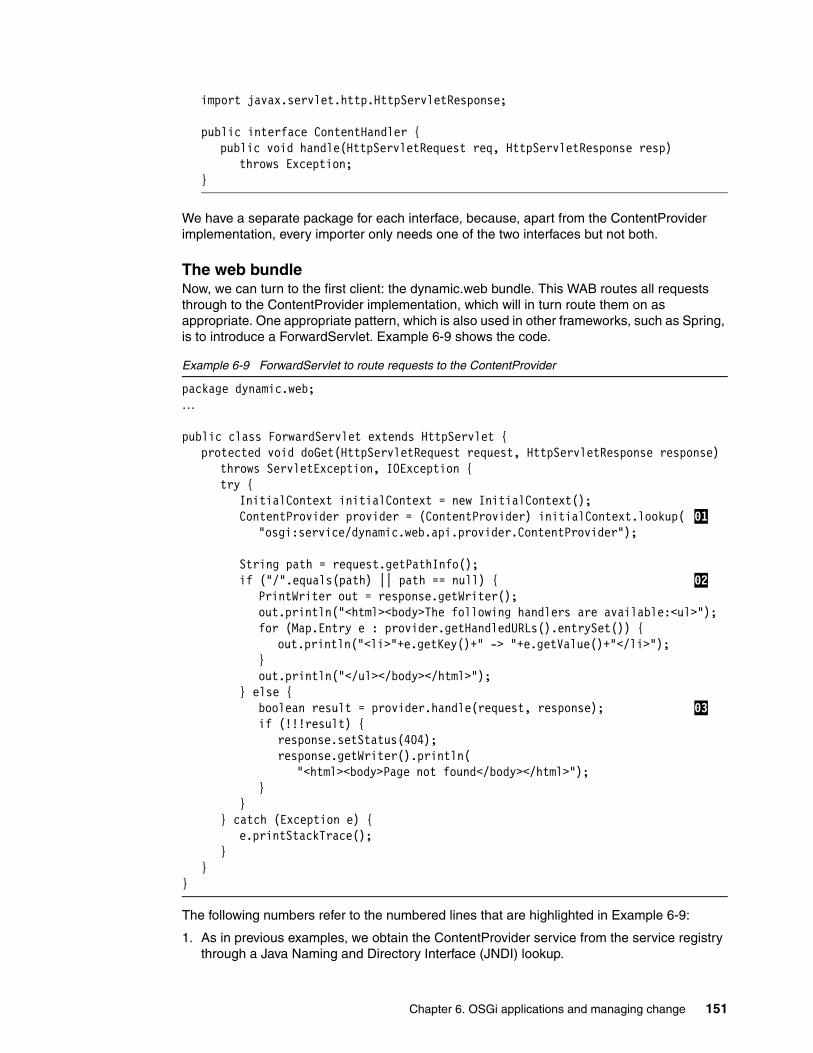
import javax.servlet.http.HttpServletResponse;
public interface ContentHandler {public void handle(HttpServletRequest req, HttpServletResponse resp)
throws Exception;}
We have a separate package for each interface, because, apart from the ContentProvider implementation, every importer only needs one of the two interfaces but not both.
The web bundleNow, we can turn to the first client: the dynamic.web bundle. This WAB routes all requests through to the ContentProvider implementation, which will in turn route them on as appropriate. One appropriate pattern, which is also used in other frameworks, such as Spring, is to introduce a ForwardServlet. Example 6-9 shows the code.
Example 6-9 ForwardServlet to route requests to the ContentProvider
package dynamic.web;…
public class ForwardServlet extends HttpServlet {protected void doGet(HttpServletRequest request, HttpServletResponse response)
throws ServletException, IOException {try {
InitialContext initialContext = new InitialContext();ContentProvider provider = (ContentProvider) initialContext.lookup( 01
"osgi:service/dynamic.web.api.provider.ContentProvider");
String path = request.getPathInfo();if ("/".equals(path) || path == null) { 02
PrintWriter out = response.getWriter();out.println("<html><body>The following handlers are available:<ul>");for (Map.Entry e : provider.getHandledURLs().entrySet()) {
out.println("<li>"+e.getKey()+" -> "+e.getValue()+"</li>");}out.println("</ul></body></html>");
} else {boolean result = provider.handle(request, response); 03if (!!!result) {
response.setStatus(404);response.getWriter().println(
"<html><body>Page not found</body></html>");}
}} catch (Exception e) {
e.printStackTrace();}
}}
The following numbers refer to the numbered lines that are highlighted in Example 6-9:
1. As in previous examples, we obtain the ContentProvider service from the service registry through a Java Naming and Directory Interface (JNDI) lookup.
Chapter 6. OSGi applications and managing change 151

2. The ForwardServlet distinguishes two types of requests:
– The root page, “/”, displays a list of available handlers by querying the ContentProvider.
– In all other cases, we forward the request to the ContentProvider unchanged.
3. Add the servlet configuration to handle all incoming requests through the ForwardServlet, as shown in Example 6-10.
Example 6-10 ForwardServlet configuration
<web-app id="WebApp_ID" version="2.5"><display-name>dynamic.web</display-name><servlet>
<display-name>ForwardServlet</display-name><servlet-name>ForwardServlet</servlet-name><servlet-class>dynamic.web.ForwardServlet</servlet-class>
</servlet><servlet-mapping>
<servlet-name>ForwardServlet</servlet-name><url-pattern>/*</url-pattern>
</servlet-mapping></web-app>
There is one tricky piece left. In this architecture, the ContentProvider service lives in the shared framework, so it must be provisioned and then, at run time, pulled into the isolated application framework. However, currently the service is only looked up through JNDI, which, similar to lookups through the OSGi APIs, is not used in the provisioning process. One solution is to introduce a blueprint, as shown in Example 6-11. Even though the web container and the Blueprint container are not integrated, a web bundle can have a blueprint descriptor. Furthermore, a blueprint descriptor does not actually have to define beans; it is entirely legitimate to only include it for provisioning as in this case.
Example 6-11 Provisioning ContentProvider through blueprint
<blueprint xmlns="http://www.osgi.org/xmlns/blueprint/v1.0.0"><reference interface="dynamic.web.api.provider.ContentProvider" />
</blueprint>
Implementing the ContentProviderFinally, we need an actual ContentProvider implementation, which is probably the most complex piece, so we split it into smaller parts to make it easier to understand.
First, we look at the high-level picture. Handling a request is a two-step process of finding the appropriate handler and then invoking it. Example 6-12 shows the Java outline with the corresponding Blueprint descriptor that is shown in Example 6-13 on page 153.
Example 6-12 ContentProvider implementation overview
package dynamic.web.provider;
import org.osgi.framework.BundleContext;import org.osgi.framework.ServiceReference;…
public class Provider implements ContentProvider {private List<ServiceReference> services;private BundleContext ctx;
152 Getting Started with the Feature Pack for OSGi Applications and JPA 2.0

// … setters
public boolean handle(HttpServletRequest req, HttpServletResponse resp) {ServiceReference handler = findHandler(req.getPathInfo());if (handler == null) return false;else return invokeHandler(handler, req,resp);
}
// … }
The key piece is the reference-list element in the Blueprint descriptor. This element can be used to inject a list of ContentHandler or, in this case, ServiceReference objects corresponding to ContentHandler services into the Provider bean. However, the true power is that Blueprint keeps the list dynamically up-to-date as ContentHandler services appear and disappear.
The type of list entries is determined by the member-type attribute. In this case, rather than ContentHandlers (member-type=“service-object”), we want the OSGi service reference objects for reasons that we explain next. The reference-list is declared with availability as optional, which allows us to install the application even when no ContentHandlers are available.
Also, in certain cases having access to core OSGi objects, such as the BundleContext object, is necessary. Blueprint provides for this scenario with a special predefined manager, blueprintBundleContext. The Blueprint specification defines three further useful managers: blueprintContainer, blueprintBundle, and blueprintConverter.
Example 6-13 Blueprint descriptor for dynamic.web.provider bundle
<blueprint xmlns="http://www.osgi.org/xmlns/blueprint/v1.0.0"><bean id="ProviderBean" class="dynamic.web.provider.Provider">
<property name="services" ref="ContentHandlers" /><property name="bundleContext" ref="blueprintBundleContext" />
</bean>
<reference-list member-type="service-reference" availability="optional" id="ContentHandlers" interface="dynamic.web.api.content.ContentHandler" />
<service id="ProviderBeanService"interface="dynamic.web.api.provider.ContentProvider"ref="ProviderBean" />
</blueprint>
With the core done, we turn to selecting an appropriate ContentHandler. We need metadata that describes the handler and, at a minimum, which web paths it can handle. We can add methods for that purpose directly on the ContentHandler interface. However, OSGi already has a built-in mechanism to support properties for services, which is more appropriate because it can also be used as a basis for provisioning. The only drawback is that we have to work with ServiceReference objects rather than directly with ContentHandlers to access these properties.
As for the metadata, we use two properties for now:
Chapter 6. OSGi applications and managing change 153

handled.url A Java regular expression for selecting web paths to handle. In the case of two handlers that match the same path, the handler with the longer expression wins.
handler.name The ID of the ContentHandler.
Example 6-14 shows an implementation of findHandler.
Example 6-14 Implementation of findHandler
private ServiceReference findHandler(String path) {ServiceReference bestMatch = null;String bestPrefix = null;for (ServiceReference ref : services) {
String handledPrefix = (String) ref.getProperty("handled.url"); 01if (path.matches(handledPrefix)) { 02
if (bestPrefix == null || bestPrefix.length() < handledPrefix.length()) {bestPrefix = handledPrefix;bestMatch = ref;
}}
}
return bestMatch;}
The following numbers refer to the numbered lines that are highlighted in Example 6-14:
01 Obtain the handled.url property from the service reference.
02 Check whether the handler matches the path of the incoming request.
Next, to invoke the actual ContentHandler, we need to obtain it first through the OSGi API (Example 6-15). There is an extremely short window of time between selecting the appropriate handler and obtaining a reference to the backing object. So, in the worst case, the service might have disappeared between selection and invocation; but this situation is not an issue for the intended use case where changes are driven by the administrator.
Example 6-15 Implementation of invokeHandler
private boolean invokeHandler(ServiceReference ref, HttpServletRequest req, HttpServletResponse resp) {ContentHandler handler = (ContentHandler) ctx.getService(ref); 01
if (handler != null) { 02try {
handler.handle(req, resp); 03return true;
} catch (Exception e) {// … appropriate error handling
}}
return false;}
The following numbers refer to the numbered lines that are highlighted in Example 6-15:
154 Getting Started with the Feature Pack for OSGi Applications and JPA 2.0

01 Obtain the actual service object through the injected BundleContext.
02 Check that the service was retrieved successfully.
03 Invoke the ContentHandler with the request.
Finally, the getHandledURLs method simply needs to accumulate the service properties into a map (Example 6-16). The result of this method is only a snapshot. By the time that a service is invoked, the set might have changed.
Example 6-16 Implementation of getHandledURLs
public Map<String, String> getHandledURLs() {Map<String,String> result = new HashMap<String, String>();for (ServiceReference ref : services) {
String handlerName = (String) ref.getProperty("handler.name"); String handledPrefix = (String) ref.getProperty("handled.url");
result.put(handlerName, handledPrefix);}return result;
}
Wrapping it upThe core application now consists of two shared bundles, dynamic.web.api and dynamic.web.provider, the web bundle dynamic.web, and the dominating application dynamic.web.app, which pulls in the web bundle. Installing the application and navigating to http://localhost:9080/dynamic/ gives this result:
The following handlers are available:
No handlers are listed, because we have not yet written an actual ContentHandler.
6.3.3 A greeting handler
The major challenge for writing a ContentHandler is not the handler but rather the packaging that is required around it. To recap, the ContentHandler must be a service from a bundle in the shared bundle space. It must define the handled.url and handler.name service properties. And, it must be provisioned. Next, we look at these requirements in order.
The greeting ContentHandlerThe handler implementation of the content handler is trivial:
public class HelloHandler implements ContentHandler {public void handle(HttpServletRequest req, HttpServletResponse resp)
throws Exception {resp.getWriter().println("<html><body>Hello there!</body></html>");
}}
Defining the service with the extra properties is also not complicated. You need an extra service-properties element, which declares the two service properties, as shown in Example 6-17.
Example 6-17 Publishing the HelloHandler service
<blueprint xmlns="http://www.osgi.org/xmlns/blueprint/v1.0.0"><bean id="HelloHandlerBean" class="content.bundle.HelloHandler"/>
Chapter 6. OSGi applications and managing change 155

<service id="HelloHandlerBeanService"interface="dynamic.web.api.content.ContentHandler"ref="HelloHandlerBean"><service-properties>
<entry key="handler.name" value="HelloHandler"/><entry key="handled.url" value="/hello"/>
</service-properties></service>
</blueprint>
The pseudo applicationIn order to deploy this bundle, it needs to be provisioned by an application. Because we want to extend the dynamic.web.app application dynamically, it has to be a separate application. We have several alternatives to cause the provisioning. The simplest alternative is to set up a dummy blueprint descriptor whose only purpose is to require the HelloHandler service (Example 6-18). To ensure that we provision the HelloHandler, we include an extra filter beside the interface name.
Example 6-18 Blueprint descriptor for provisioning the greeting ContentHandler
<blueprint xmlns="http://www.osgi.org/xmlns/blueprint/v1.0.0"><reference interface="dynamic.web.api.content.ContentHandler"
filter="(handler.name=HelloHandler)"/></blueprint>
This blueprint exists in a bundle whose only purpose is to contain the blueprint, and, this bundle finally sits in an application whose only purpose is to contain the previously mentioned bundle.
Testing the new handlerAfter packaging the two new bundles in the .eba file and deploying it on the server, navigate again to http://localhost:9080/dynamic. The result now is similar to Figure 6-9 (it might be necessary to refresh your browser).
Also, http://localhost:9080/dynamic/hello now shows “hello”. We have not touched the dynamic.web application; the extension was added completely dynamically.
Figure 6-9 The first handler is there
Next, we consider a more realistic content handler that accesses the database to display information.
156 Getting Started with the Feature Pack for OSGi Applications and JPA 2.0

6.3.4 A more complex content handler
For the second example, we want to implement a simple query service that retrieves the account balance for an ITSOBank account. This scenario allows us to show how multiple bundles collaborating to provide a ContentHandler service can be isolated from the rest of the shared framework. This practice is essential for avoiding clashes in the shared framework under an architecture, such as the previous architecture where the shared framework acts as the exchange hub for service.
Isolation is available in two types: OSGi applications and composite bundles. In this case, we need a composite bundle, because, unlike applications, composite bundles allow services to be exported to the shared framework. Example 6-19 shows the necessary composite bundle manifest. To implement the query service, we reuse the persistence back end that was developed in 5.3, “Developing the application” on page 70. On top of that back end, one new bundle is needed to implement the actual ContentHandler.
Example 6-19 Composite bundle manifest for query content handler
Bundle-Name: query.compositeBundle-SymbolicName: query.compositeBundle-Version: 1.0.0CompositeBundle-ManifestVersion: 1Manifest-Version: 1.0CompositeBundle-Content: query.bundle;version="[1.0.0,1.0.0]", itso.bank.api;version="[1.0.0,1.0.0]", itso.bank.persistence;version="[1.0.0,1.0.0]"Import-Package: dynamic.web.api.content;version=1.0.0, javax.servlet;version=2.5.0, javax.servlet.http;version=2.5.0, javax.persistence;version=1.0.0CompositeBundle-ExportService: dynamic.web.api.content.ContentHandler;filter="(handler.name=ITSOBankQuery)"
The one header that was not introduced in 5.7, “Using the expert tools: Composite bundles and Use-Bundle” on page 129 is CompositeBundle-ExportService. This header fullfils two roles and, in our experience, can be challenging to get right:
� The header declares the service that will be exported from inside the composite bundle framework to the outside. The associated filter is augmented with the interface name to give the real filter that is used at run time for selecting which services to export.
� The header also declares the service that can be provisioned against when provisioning an OSGi application. In this context, the filter declares the service attributes that will be available to the provisioning system. Note, however, that, at run time, the actual exported service will have all the attributes with which it was published, not just the attributes that are listed in the filter. Note also that currently the filter attribute appears to be mandatory.
In order to provision the content handler service correctly, the handler.name property needs to be part of the CompositeBundle-ExportService declaration. The handled.url property however is only used at run time and hence does not need to be specified here.
Implementing the handlerAfter this setup, writing the handler is almost trivial, especially because the persistence back end is already readily available. Example 6-20 on page 158 shows the key parts of the ITSOBankQuery handler.
Chapter 6. OSGi applications and managing change 157

Example 6-20 QueryHandler implementation
package query.bundle;
import itso.bank.api.persistence.MutableAccount;import itso.bank.api.persistence.PersistenceService;…
public class QueryHandler implements ContentHandler {private PersistenceService service;public void setService(PersistenceService service) {…}
public void handle(HttpServletRequest req, HttpServletResponse resp) throws Exception {String accountNo = req.getParameter("no");if (accountNo == null) {
resp.getWriter().println("<html><body>Account number required</body></html>");
} else {MutableAccount account = service.searchAccountByAccountNumber(accountNo);if (account != null) {
resp.getWriter().println("<html><body>Current balance is: "+account.getBalance()+"</body></html>");
} else {resp.getWriter().println(
"<html><body>Invalid account no</body></html>");}
}}
}
Corresponding to the service implementation, we also need to add a Blueprint setup with a bean definition for QueryHandler, a reference for the PersistenceService, and a service declaration with handled.url=/query.* and handler.name=ITSOBankQuery. Refer to the example in 6.3.3, “A greeting handler” on page 155 for the details.
Wrapping up and testingAs discussed in “The pseudo application” on page 156, we also need an application to provision the new composite bundle. With the exception of the handler, bundle, and application IDs, the procedure is exactly the same and we will not describe it here.
Finally, export the composite bundle project, import the composite bundle archive (CBA) into the internal bundle repository, and then, install and start the new dummy application. The results of using the dynamic web application now look similar to Figure 6-10 on page 159 and Figure 6-11 on page 159 (you might need to refresh the front page).
Figure 6-10 on page 159 shows the results of entering the URL http://localhost:9080/dynamic/.
158 Getting Started with the Feature Pack for OSGi Applications and JPA 2.0

Figure 6-10 Two content handlers
Figure 6-11 shows the results of entering the URL http://localhost:9080/dynamic/query?no=001-111001.
Figure 6-11 Content handler for retrieving account balance (account number and balance might vary)
6.3.5 Dynamic update
Even with the restrictions as described in 6.3.2, “The core application and infrastructure” on page 150, and the fact that content handler services after they are installed only go away with server restart, we can allow existing handlers to be updated with a simple strategy. With the ContentProvider implementation, we have a hook point where we can add the logic to prefer newer services over older services, thus allowing updates. Remember that this mechanism will not work for all use cases. Although updates are possible, downgrades are not. Also, stateful web handlers require a more elaborate update strategy.
In order to be able to tell older services from newer services, you can use various mechanisms, for example, querying the version of the registering bundle, or introducing a free-form version attribute among them. For this sample, we reuse another existing OSGi mechanism: service rankings. The ranking of a service determines which service is selected in a service lookup with multiple matches. The ranking is also numeric so that it is easy to compare to other rankings.
To demonstrate the capability, create a 1.1.0 version of the content bundle with the modified display logic:
public void handle(HttpServletRequest req, HttpServletResponse resp) throws Exception {String name = req.getParameter("name");if (name == null) name="stranger";resp.getWriter().println("<html><body>Hello "+ name + "!</body></html>");
}
Chapter 6. OSGi applications and managing change 159

Furthermore, we introduce the ranking attribute on the blueprint service declaration, as shown in Example 6-21. The choice of 10 as the ranking is somewhat arbitrary. Service rankings are integer values, but we only need to ensure that the chosen ranking is higher than the default ranking, which is 0.
Example 6-21 HelloHandler with service ranking
<blueprint xmlns="http://www.osgi.org/xmlns/blueprint/v1.0.0">…<service id="HelloHandlerBeanService"
interface="dynamic.web.api.content.ContentHandler"ref="HelloHandlerBean"ranking="10">…
</service></blueprint>
To provision this new bundle, we also need to modify the dummy blueprint in the content.app.pseudo bundle. The new filter must look like this example (note the escaped ampersand (&) character):
(&(handler.name=HelloHandler)(service.ranking>=10))
Finally, we show the extended handler matching logic, as shown in Example 6-22. The service ranking comparison has already been handled by OSGi in the comparison of service reference objects. So, in line 01, which is highlighted in Example 6-22, we simply use that mechanism to determine the better handler when two versions of the same handler are available.
Example 6-22 Service ranking-aware ContentHandler selection
private ServiceReference findHandler(String path) {ServiceReference bestMatch = null;String bestPrefix = null;String bestHandler = null;for (ServiceReference ref : services) {
String handledPrefix = (String) ref.getProperty("handled.url");String handlerId = (String) ref.getProperty("handler.name");
if (path.matches(handledPrefix)) {boolean betterMatch = bestPrefix == null ||
bestPrefix.length() < handledPrefix.length();boolean sameHandler = handlerId.equals(bestHandler);
if (betterMatch || (sameHandler && (bestMatch.compareTo(ref) < 0))) { 01bestPrefix = handledPrefix;bestHandler = handlerId;bestMatch = ref;
}}
}
return bestMatch;}
160 Getting Started with the Feature Pack for OSGi Applications and JPA 2.0

Seeing the update in actionBefore trying the update, we need to put the new code for the dynamic.web.provider bundle on the server. Refer to the instructions in “Excursion: Updating shared bundles without version changes” on page 161. To pick up the changes, restart the dynamic.web.app application afterward.
Now, with the greeting handler at the base level, uninstall the content.app, reinstall it with the updated bundles (one update to the implementation and one update to the auxiliary bundle that is for provisioning), and then start it. The greeting handler seamlessly switches from the old HelloHandler to the new one.
To test it, try a query, such as http://localhost:9080/dynamic/hello?name=Aalbert. Figure 6-12 shows the result.
Figure 6-12 HelloHandler after update
Excursion: Updating shared bundles without version changesIn a development scenario where shared bundles are a key part of the architecture, you might need to update a shared bundle on the server without changing the bundle version. This update is rather challenging to achieve, especially when the bundles are installed into the internal bundle repository.
In most development scenarios, you can avoid updating shared bundles directly by using one of these methods:
� Treating the shared bundles as application content while under development� Packaging the shared bundles inside the .eba archive rather than putting them in a bundle
repository
Follow these steps to update the dynamic.web.provider bundle outside of the internal bundle repository:
1. Make sure that the bundle will no longer be provisioned in the shared framework by removing the composition unit that provisions it.
2. Restart the server. The first two steps ensure that the jar file is no longer locked on Microsoft Windows systems.
3. Remove the old version of the bundle from the internal bundle repository.
4. Install the new version in the internal bundle repository.
5. Update the version in the bundle cache through the BundleCacheManager Managed Bean (MBean). The query works well on a single server environment, but it will need modification for a distributed environment:
wsadmin>name = AdminControl.queryNames('type=BundleCacheManager,*')wsadmin>AdminControl.invoke(name,'getBundleLocationURL', 'dynamic.web.provider_1.0.0.jar')
Chapter 6. OSGi applications and managing change 161

'file:/C:/WebSphere/RAD8/SDP/runtimes/base_v7/profiles/was70profile1/config/bundleRepository/dynamic.web.provider_1.0.0.jar'wsadmin>AdminControl.invoke(name,'removeBundleFromCache','dynamic.web.provid er_1.0.0.jar')‘true’wsadmin>AdminControl.invoke(name,'requestBundleDownload', ['dynamic.web.provider_1.0.0.jar', 'file:/C:/WebSphere/RAD8/SDP/runtimes/base_v7/profiles/was70profile1/config/bundleRepository/dynamic.web.provider_1.0.0.jar'])‘’wsadmin>AdminControl.invoke(name,'downloadBundles')‘’
6. Re-create the composition unit that was removed in step 1.
162 Getting Started with the Feature Pack for OSGi Applications and JPA 2.0

Chapter 7. Connecting OSGi applications
In actual deployment scenarios, enterprises rarely develop a complete new application from scratch and in isolation. Rather, many development efforts are targeted at these situations:
� Replacing a part of an existing application using a better architecture or a more suited technology
� Adding capabilities to an existing application to react to business needs
We use the term “application” in an extremely loose sense. Often a number of systems, which from a technological point of view can be classified as applications, are connected to satisfy the business use case.
Open Service Gateway initiative (OSGi) applications (the newcomers) need to be able to interact well with existing technologies so that applications can be assembled that also include OSGi application components.
In this chapter, we discuss the following connection scenarios, of which the first three are chiefly concerned with connecting applications running in the same WebSphere Application Server cell. Although we discuss the scenarios separately, they can be freely mixed in real applications:
� OSGi application to OSGi application� Java Platform, Enterprise Environment (JEE) to OSGi application� OSGi application to JEE� Java Message Service (JMS) to OSGi application
Rather than focusing on individual solutions, this chapter shows how to use the Feature Pack for Service Component Architecture (SCA), Version 1.0.1.5 or higher, to serve as a connection layer. SCA is equally suited for all of these scenarios and the OSGi application integration with SCA has first-class support from both feature packs.
Nonetheless, the use of SCA is incidental to our goal of connecting OSGi applications. Hence, this chapter does not aim to cover all the many fine aspects of SCA. Rather, we provide what we hope is a practical guide to getting OSGi applications talking to the outside world.
7
© Copyright IBM Corp. 2010. All rights reserved. 163
7.1 Sample material for this chapter
The sample applications that are developed in this chapter are included as downloadable material for this publication (see “Locating the web material” on page 263). Refer to “OSGi samples” on page 264 for instructions to install the sample material.
Follow these steps to use the files that are referenced in this chapter:
1. Extract the 03_itso-bank_with_sca_jee2osgi.zip file containing only the JEE to OSGi integration scenario to a folder (extracted_v103_files).
2. Extract the 04_itso-bank_with_sca_osgi2osgi.zip file containing only the OSGi to OSGi integration scenario to a folder (extracted_v104_files).
3. Extract the 05_itso-bank_with_sca_osgi2jee.zip file containing every SCA scenario to a folder (extracted_v105_files).
4. Extract the 06_itso-bank_jms_text.zip file containing only the JMS connection scenario using text messages to a folder (extracted_v106_files).
5. Extract the 07_itso-bank_jms_object.zip file containing only the JMS connection scenario using object messages to a folder (extracted_v107_files).
7.2 Service Component Architecture
Service Component Architecture (SCA) defines a model for the construction, assembly, and deployment of service components using a service-oriented architecture (SOA) approach. With SCA, components provide and consume services. These service requirements and capabilities are wired together to provide a logical business function. Each component has an implementation type (for example, JEE or OSGi application). The communications technology that is used to call services can be chosen based on quality of service (QoS) requirements (for example, reliability needs) and changed, independently of the component implementation. This ability to flexibly configure and assemble components around services is at the heart of the SOA concept.
A classic example that is often used to show the capabilities of SOA is that of a banking application. Components that represent business functions, such as getting a balance, depositing funds, withdrawing funds, transferring funds (withdrawing then depositing), or handling a loan application, can all be wired to a user interface that allows customers to perform online banking.
SCA is not new to IBM WebSphere products. WebSphere Enterprise Service Bus and WebSphere Process Server both provide users with the ability to build SCA applications. Those products use what we refer to as a “classic SCA implementation”, which is built around the same concepts but predates the standardization as part of the OSOA community (http://www.osoa.org).
The WebSphere Application Server Feature Pack for SCA however provides support that is based on the Open SOA Collaboration SCA 1.0 programming model. For a list of the portions of the specification that are not supported, see this website:
http://publib.boulder.ibm.com/infocenter/wasinfo/v7r0/topic/com.ibm.websphere.soafep.multiplatform.doc/info/ae/ae/csca_spec_gaps.html
164 Getting Started with the Feature Pack for OSGi Applications and JPA 2.0

TerminologyFigure 7-1 illustrates the key pieces of SCA terminology. The basic unit of deployment is the composite. It contains one or more components, which can be either primitive components or child composites. A component can define a number of services, which have interfaces that allow another component or an external client to invoke functionality that is provided by the component. Similarly, a component can require other component’s services through references. In the case of primitive components, the implementation type determines how services are defined and how references are consumed. For composite components, services and references wire to services and references of contained components. Finally, from where references are satisfied and how services are exported to the outside are determined by the binding type. Several binding types are supported, including SCA internal wiring, as well as binding to JMS and Enterprise JavaBean (EJB) resources. Furthermore, you can use SCA bindings to expose component services as web services or through other http-based mechanisms. For an overview of available bindings, see this website:
http://publib.boulder.ibm.com/infocenter/wasinfo/v7r0/topic/com.ibm.websphere.soafep.multiplatform.doc/info/ae/ae/tsca_scabindings.html
Figure 7-1 SCA concepts
Installation of the SCA feature packThe installation of the SCA feature pack, Version 1.0.1.5 or higher, both on existing WebSphere Application server installation and as a Rational Application Developer test environment, occurs through Installation Manager in the same way as described for the Feature Pack for OSGi Applications and Java Persistence API (JPA) 2.0 in 1.3, “Installation tips” on page 5. For detailed instructions, consult chapter 2 of Getting Started with WebSphere Application Server Feature Pack for Service Component Architecture, REDP-4633. For the purpose of this chapter, augment the WebSphere Application Server profile, at least as shown in Figure 7-2 on page 166.
Composite
Component
Implementation.osgiapp
Composite
Component
Implementation.jee
Binding
Reference Service
Chapter 7. Connecting OSGi applications 165

Figure 7-2 Server profile supporting OSGi applications and SCA feature pack capabilities
More information about the SCA feature packThe intent of this chapter is to show how SCA can be used with relatively little complexity for the purpose of interconnecting OSGi applications. Hence, the focus is on achieving the desired connections rather than exploring the whole functionality that SCA offers. If you want more in-depth information about SCA, consult Getting Started with WebSphere Application Server Feature Pack for Service Component Architecture, REDP-4633, and the following series of IBM developerWorks® articles:
http://www.ibm.com/developerworks/views/websphere/libraryview.jsp?show_abstract=true&type_by=All+Types&search_by=Exploring+the+WebSphere+Application+Server+Feature+Pack+for+SCA&url=http%3A%2F%2Fwww.ibm.com%2Fdeveloperworks%2Fviews%2Faix%2Flibrary.jsp
7.3 Connecting JEE to OSGi applications
For this sample, we do not use the bank application. Instead, we implement a currency conversion service as an OSGi application and then use it from inside a JEE application. For this sample, we build on the currency conversion service, which was first introduced in 6.2.3, “Larger updates for new features” on page 142. This sample shows how to build these elements:
� An OSGi application providing a a currency conversion service
� An SCA composite using the OSGi currency converter application as its implementation
� A client EJB application invoking the currency converter service that is provided by the SCA composite. The choice of an EJB implementation is insubstantial. The described mechanism works the same in servlets or JavaServer Pages (JSPs).
Figure 7-3 on page 167 shows the implementation details of the JEE to OSGi sample scenario. The remaining sections of this scenario describe how to create each element using Rational Application Developer.
166 Getting Started with the Feature Pack for OSGi Applications and JPA 2.0

Figure 7-3 Integrating an OSGi bundle with an existing JEE application
7.3.1 Creating the currency converter OSGi application project
Follow these steps to create a new OSGi application project to host the currency converter OSGi service:
1. In the Enterprise Explorer, right-click to choose New OSGi OSGi Application Project.
2. On the first page of the New OSGi Application Project, complete the following fields, as shown in Figure 7-4:
a. Enter the Project name as itso.currency.app.
b. Ensure that the Target runtime is set to WebSphere Application Server v7.0.
c. Click Next.
Figure 7-4 Creating the itso.currency.app OSGi application project
CurrencyComposite (deployable)
FixedCurrencyConverterBeanServiceOSGi Component
EJB
Java EE OSGi
Chapter 7. Connecting OSGi applications 167

3. On the second page of the New OSGi Application Project wizard, select the following bundles, which were developed in “Larger updates for new features” on page 142, from the list of available bundles, as shown in Figure 7-5:
– itso.currency.api– itso.currency.simple
Figure 7-5 Adding bundles to the itso.currency.app application
4. Click Finish. The new OSGi application project is created in the workspace.
With the application created, we now want to mark the currency converter service as an export to SCA. You must list the CurrencyConverter interface in the Application-ExportService header of the application manifest:
Application-ExportService: itso.currency.api.CurrencyConverter
The Application-ExportService header contains a comma-separated list of interface names. These interface names denote services that are permitted to be published to the outside through SCA. In Rational Application Developer, follow these steps:
1. Open the application manifest of the itso.currency.app project.
2. In the Exported Services section of the graphical manifest editor, click Add to export a service.
3. On the Search for OSGi services dialog, search for itso.currency.api.CurrencyConverter and add it to the list of exported services. Your application manifest now contains the itso.currency.api.CurrencyConverter service, as shown in Figure 7-6 on page 169.
Tip: When using OSGi application projects with SCA, remove the “.qualifier” part, which is generated by default, from the OSGi application version. You can change the value in the OSGi application manifest editor.
SCA projects reference OSGi applications through the full version, including the “.qualifier” part. However, when exporting OSGi applications, the “.qualifier” is replaced by a time stamp, and hence, the version no longer matches the version in the SCA project.
168 Getting Started with the Feature Pack for OSGi Applications and JPA 2.0

Figure 7-6 Exporting the itso.currency.api.CurrencyConverter service
4. Close and save the application manifest.
The Application-ExportService header alone is insufficient to export a service to SCA. In addition, we need to add a service property, service.exported.interfaces, to the service element in the blueprint of the itso.currency.simple bundle. Using these two separate mechanisms allows a bundle to declare more SCA services than are exported by the application. The deployer has the ability to select only a subset of all possible SCA-bound services for export. Also, note that, as described in the gray box on page 170, SCA services have separate invocation semantics from normal OSGi services.
Follow these steps to add the service.exported.interfaces service property. The resulting blueprint is shown in Example 7-1 on page 170:
1. Locate the blueprint file in itso.currency.simple/BundleContent/OSGI-INF/blueprint/blueprint.xml. Open the blueprint by double-clicking it.
2. In the graphical Blueprint editor, right-click FixedCurrencyConverterBeanService (Service), and choose Add Service Properties, as shown in Figure 7-7.
Figure 7-7 Defining service properties to Blueprint service element
3. Right-click the new service property, and choose Add Entry. Provide the following data for this entry:
a. Set the key to service.exported.interfaces.
b. Set the value to * (asterisk), which means export all interfaces.
c. Save and close the blueprint file.
Chapter 7. Connecting OSGi applications 169

Example 7-1 Blueprint for exporting CurrencyConverter service
<blueprint xmlns="http://www.osgi.org/xmlns/blueprint/v1.0.0"> <bean id="FixedCurrencyConverterBean" class="itso.currency.simple.FixedCurrencyConverter"> </bean>
<service id="FixedCurrencyConverterBeanService" interface="itso.currency.api.CurrencyConverter" ref="FixedCurrencyConverterBean"> <service-properties> <entry key="service.exported.interfaces" value="*"/> </service-properties> </service></blueprint>
The service.exported.interfaces property marks a service as remotable (through SCA). Also, the property ensures that the service is no longer visible by default inside the application. If other bundles inside the application want to use the CurrencyConverter service, we add a second service element for the FixedCurrencyConverterBean bean without the service.exported.interfaces property. For service-based provisioning, you must use Blueprint to define SCA services. Using the OSGi APIs directly to publish the service or using another component model, such as Declarative Services, is not supported.
As a final touch, we want to make sure that the API bundle can be reused unmodified by the JEE application. We need to add the @Remotable annotation to the CurrencyConverter interface. For OSGi applications, the service.exported.interfaces property is the equivalent of the @Remotable annotation. Hence, for OSGi applications, the @Remotable annotation does not need to be specified.
Pass-by-reference and pass-by-value semantics: Plain OSGi services and SCA-bound OSGi services are kept strictly separate for a good reason: they have separate invocation semantics. Plain OSGi services are called in what is known as pass-by-reference. Here, the caller and the service share a reference to the same object in memory for any non-primitive argument that is passed to the service. So, changes to the argument are visible to the caller and can affect its behavior. SCA services, however, can be called remotely and are invoked with “pass-by-value” semantics. In this case, the caller and the service have two separate copies of the same object. Hence, changes that are made to arguments inside an SCA service are not visible to the caller.
A developer needs to be aware of this distinction when defining service interfaces to use for SCA.
OSGi application and JEE class spaces: An OSGi application almost never share the same class space with a JEE application. The only exceptions are classes in WebSphere Application Server (that is, java.*, javax.*, or com.ibm.websphere.* packages). Every other package lives in separate class spaces, because OSGi deploys applications into isolated frameworks that are shielded from the rest of WebSphere Application Server and do not support the notion, for example, of global utility jars. Hence, application classes that are to be shared between OSGi applications and JEE applications need to be present at least twice.
170 Getting Started with the Feature Pack for OSGi Applications and JPA 2.0
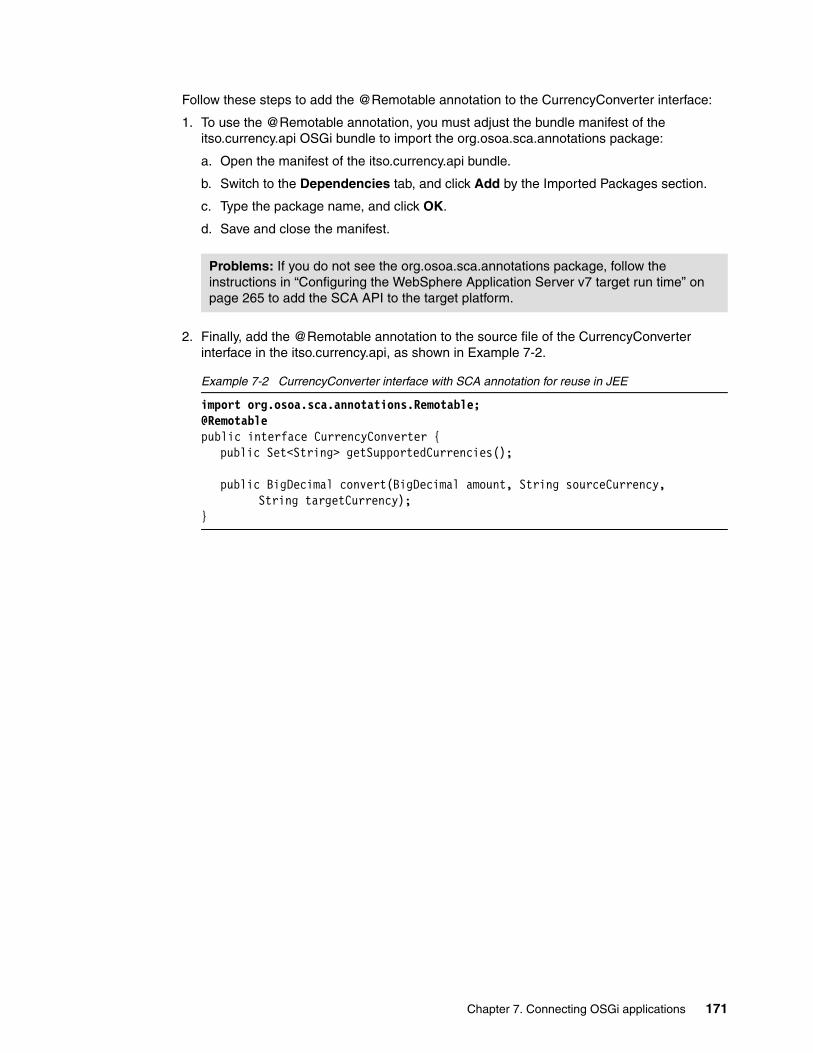
Follow these steps to add the @Remotable annotation to the CurrencyConverter interface:
1. To use the @Remotable annotation, you must adjust the bundle manifest of the itso.currency.api OSGi bundle to import the org.osoa.sca.annotations package:
a. Open the manifest of the itso.currency.api bundle.
b. Switch to the Dependencies tab, and click Add by the Imported Packages section.
c. Type the package name, and click OK.
d. Save and close the manifest.
2. Finally, add the @Remotable annotation to the source file of the CurrencyConverter interface in the itso.currency.api, as shown in Example 7-2.
Example 7-2 CurrencyConverter interface with SCA annotation for reuse in JEE
import org.osoa.sca.annotations.Remotable;@Remotablepublic interface CurrencyConverter {
public Set<String> getSupportedCurrencies();
public BigDecimal convert(BigDecimal amount, String sourceCurrency,String targetCurrency);
}
Problems: If you do not see the org.osoa.sca.annotations package, follow the instructions in “Configuring the WebSphere Application Server v7 target run time” on page 265 to add the SCA API to the target platform.
Chapter 7. Connecting OSGi applications 171

7.3.2 Creating the currency converter SCA project
Along with the SCA-enabled OSGi application, you need an SCA project to define the SCA-level artifacts and bindings. Otherwise, the SCA feature pack run time does not recognize the OSGi application as an SCA participant. To create the required SCA project, follow these steps:
1. In the Enterprise Explorer view, right-click and select New SCA Project, as shown in Figure 7-8.
Figure 7-8 Create SCA project
172 Getting Started with the Feature Pack for OSGi Applications and JPA 2.0

2. In the first page of the New SCA project wizard, complete the following fields, as shown in Figure 7-9:
a. Set the Project name to itso.currency.sca.
b. Select WebSphere Application Server v7.0 for the Target Runtime.
c. Select WebSphere v7.0 Feature Pack for SCA 1.0.1 for the Facet Configuration.
d. For the Implementation Types for SCA Components, select only OSGi Application (Composite will also be selected, by default).
Figure 7-9 New SCA Project Wizard for itso.currency.sca
Chapter 7. Connecting OSGi applications 173

3. Click Finish. Inspect the outline of the newly created SCA project and compare it with the outline that is shown in Figure 7-10.
Figure 7-10 SCA project outline for itso.currency.sca
Next, you modify the itso.currency.sca project for these results:
� It provides a composite to integrate with the JEE application.
� The composite provides a component that is based on an OSGi implementation providing the actual currency converter service.
� The component offers an appropriate SCA service.
Perform these steps to create an SCA composite:
1. Right-click the Composites node, and select New SCA Composite, as shown in Figure 7-11.
Figure 7-11 Creating a new SCA composite
174 Getting Started with the Feature Pack for OSGi Applications and JPA 2.0

2. On the new SCA Composite wizard page, provide the following data, as shown in Figure 7-12:
a. Enter the Composite name as CurrencyComposite.
b. Set the Target namespace to http://itso.currency.
c. Leave everything else to their defaults.
Figure 7-12 Creating the SCA composite for the currency converter OSGi application
3. Click Finish.
Chapter 7. Connecting OSGi applications 175

Next, create a component in the composite:
1. On the SCA composite diagram, right-click and select Create Component. Name it CurrencyComponent.
2. Provide an implementation type for the new component, as shown in Figure 7-13:
a. Right-click the component, which is now part of your SCA diagram.
b. Choose Set Implementation OSGi application as the implementation type.
c. When prompted for an OSGi application to be provided, choose itso.currency.app as the implementation, and click OK.
Figure 7-13 Setting a component implementation type to be based on an OSGi application
To define a service binding, create a component service:
1. Right-click in the component, and select Create Service.
2. Open the Properties tab for the service to configure the following additional settings for the ComponentService, as shown in Figure 7-14 on page 177 and in Figure 7-15 on page 177:
a. Open the Core tab, and change the service name to FixedCurrencyConverterBeanService. This name must match the ID attribute of the service element in the itso.currency.simple blueprint (see Example 7-1 on page 170).
b. On the Binding tab, add a new SCA binding without any further settings. This setting makes the service available under the Uniform Resource Identifier (URI) <component name>/<service name> in the default cell-level SCA domain, which is CurrencyComponent/FixedCurrencyConverterBeanService in this case. The SCA binding is the default binding. So, not specifying an explicit binding has the same effect.
176 Getting Started with the Feature Pack for OSGi Applications and JPA 2.0

Figure 7-14 Component service properties
Figure 7-15 Component service binding
3. Save the SCA diagram.
Refresh from implementation facility: Rational Application Developer provides a convenient option to generate service and reference definitions from the OSGi application. In this chapter, we choose to show the manual approach instead, which better illustrates the necessary configuration steps. If you want to exploit the convenience of the refresh from implementation facility, follow these steps:
1. Add a project reference from the SCA project to the OSGi application project. Right-click the SCA project, and select Properties. Then, select Project References in the configuration dialog. Finally, select the check box for the OSGi application project that is used as the SCA component implementation.
2. In the SCA assembly diagram, right-click the SCA component, and choose Refresh from Implementation. Select the appropriate services and references to add to the SCA component from the selection dialog. Rational Application Developer will display services that do not have the service.exported.interfaces property. Do not choose these services, because they will not be accessible to SCA at run time.
Chapter 7. Connecting OSGi applications 177

To validate your actions, you can inspect the source of the composite definition by right-clicking the composite in the Enterprise Explorer and choosing Open With Text Editor. The result needs to look like Example 7-3.
Example 7-3 SCA composite definition for OSGi currency converter application
<?xml version="1.0" encoding="UTF-8"?><composite xmlns="http://www.osoa.org/xmlns/sca/1.0"
xmlns:was="http://www.ibm.com/xmlns/prod/websphere/sca/1.0/2007/06" autowire="false" name="CurrencyComposite" targetNamespace="http://itso.currency">
<component name="CurrencyComponent"> <was:implementation.osgiapp
applicationSymbolicName="itso.currency.app" applicationVersion="1.0.0"/>
<service name="FixedCurrencyConverterBeanService"> <binding.sca/> </service> </component></composite>
Finally, create an SCA contribution for the new composite. Without an SCA contribution, exported SCA jars are not deployable on the SCA feature pack. Right-click the SCA Content Contributions node, and select New SCA Contribution. In the New Contribution Wizard, set deployable components to itso.currency.sca. Leave everything else to their defaults.
7.3.3 Creating the enterprise application project
The SCA project that you have now created serves as the glue between the actual OSGi implementation and its consumer, which is an enterprise application. For this example, the enterprise application consists of a single session bean invoking the currency converter service.
Create the enterprise application, including the EJB session bean:
1. Create a new enterprise application project and provide the following data:
a. Enter CurrencyConverterConsumer as the Project name.
b. Select WebSphere Application Server v7.0 for the Target runtime.
c. Select Default Configuration for WebSphere Application Server V7.0 as the configuration.
d. Do not add any JEE module dependencies.
2. Click Finish.
Sample material: You can obtain the currency converter enterprise application and every artifact belonging to the sample that is discussed in this section in the 03_itso-bank_with_sca_jee2osgi.zip archive, as explained in “Using the web material” on page 263.
178 Getting Started with the Feature Pack for OSGi Applications and JPA 2.0

After creating the enterprise application, you need to add the itso.currency.api bundle as a Utility JAR to the enterprise application:
1. Right-click the enterprise application, and choose Properties.
2. Navigate to the Deployment Assembly section.
3. Add the itso.currency.api project as a dependency, as shown in Figure 7-16.
4. Click OK to save and close the properties.
Figure 7-16 Adding the OSGi bundle itso.currency.api to the JEE application
Next, create a new EJB project to host the session bean that invokes the currency converter service. In this example, the session bean simply acts as a proxy for the rest of the (hypothetical) JEE application:
1. Create a new EJB project, and provide the following data:
a. Enter the Project name as CurrencyConverterConsumerEJB.
b. Select EJB module version 3.0.
c. Select Default Configuration for WebSphere Application Server V7.0 as the configuration.
d. Add the EJB project to the CurrencyConverterConsumer enterprise application.
e. Do not create an EJB client JAR, as indicated by the last wizard page.
2. Click Finish.
3. Right-click the Session Beans entry of the deployment descriptor, and select New Session Bean (EJB 3.x) to create a new session bean.
Chapter 7. Connecting OSGi applications 179

4. Provide the following data as shown in Figure 7-17:
a. Select itso.currency.converter for the Java package.
b. Enter Consumer for the Class name.
c. Select Stateless for the State type.
d. Select Local for the type of business interface to create and name it ConsumerLocal.
Figure 7-17 Stateless session bean for invoking the currency converter OSGi service
5. Click Finish.
Finally, add the code for the local interface and the session bean implementation. Add the code that is shown in Example 7-4 to the ConsumerLocal.java interface, and import the appropriate Java classes that are required to resolve errors.
Example 7-4 Local EJB interface to be implemented by the currency converter session bean
@Localpublic interface ConsumerLocal {
public BigDecimal convert(BigDecimal amount, String sourceCurrency,String targetCurrency);
}
180 Getting Started with the Feature Pack for OSGi Applications and JPA 2.0

Next, add the Consumer session bean implementation, as shown in Example 7-5. The implementation tries to look up the currency converter service that is provided by the itso.currency.sca SCA project.
You also need to import the appropriate Java and SCA classes to resolve the errors. You use SCA API classes that are contained in the SCA API jar under $INSTALL_ROOT/feature_packs/sca/dev/sca-api.jar, which must be added to the build path of the EJB project. Also, adjust the deployment assembly of the EJB project to list itso.currency.api as a dependency; otherwise, the SCA lookup of the currency converter service will fail.
Example 7-5 Session bean implementation looking up the SCA composite backed by an OSGi service
@Statelesspublic class Consumer implements ConsumerLocal {
public BigDecimal convert(BigDecimal amount, String sourceCurrency,String targetCurrency) {
CompositeContext ctx = CurrentCompositeContext.getContext(); 1CurrencyConverter converter = ctx.getService(CurrencyConverter.class,
"CurrencyComponent/FixedCurrencyConverterBeanService"); 2return converter.convert(amount, sourceCurrency, targetCurrency);
}}
The following numbers refer to the highlighted numbered lines in Example 7-5:
01 To access the SCA default domain, we obtain a CompositeContext object from CurrentCompositeContext. This access mechanism does not require the JEE application to be an SCA participant. Also, as noted previously, the mechanism is not specific to EJBs, and it can be used in servlets or JSPs, also.
02 Using the CompositeContext, the currency converter retrieves the CurrencyConverter service using the interface class and the service URI, which is in the <component name>/<service name> format, as described in “Creating the currency converter SCA project” on page 172.
The use of CompositeContext provides an easy way to access SCA services from an existing JEE application, which is why we have chosen it in this example. Also, this lookup mechanism is completely dynamic. This lookup mechanism can be desirable for certain applications. However, there is a downside to it in that the SCA wiring is embedded in the application rather than in a separate SCA contribution, which limits the flexibility of the SCA assembler. You can obtain information about this more flexible approach of using a proper SCA contribution in the information center:
http://publib.boulder.ibm.com/infocenter/wasinfo/v7r0/topic/com.ibm.websphere.soafep.multiplatform.doc/info/ae/ae/tsca_scaannotinjeecomponents.html
7.3.4 Deployment using the WebSphere administrative console
To deploy the sample application, we describe the path through the administrative console. OSGi applications with SCA contributions can also be published through Rational Application Developer. The key is to publish only the SCA project to the server, which will, in turn, install the referenced OSGi application as required. For the installation through the administrative console, export the itso.currency.sca project and the itso.currency.app project.
Chapter 7. Connecting OSGi applications 181

Follow these steps to export the SCA project:
1. Right-click the itso.currency.sca project, and select Export.
2. In the wizard, choose Service Component Architecture SCA Archive File. Click Next.
3. Export the SCA contribution, as shown in Figure 7-18. Both .jar and .zip are allowed as extensions.
4. Click Finish.
Figure 7-18 Exporting an SCA project to an SCA archive file
182 Getting Started with the Feature Pack for OSGi Applications and JPA 2.0
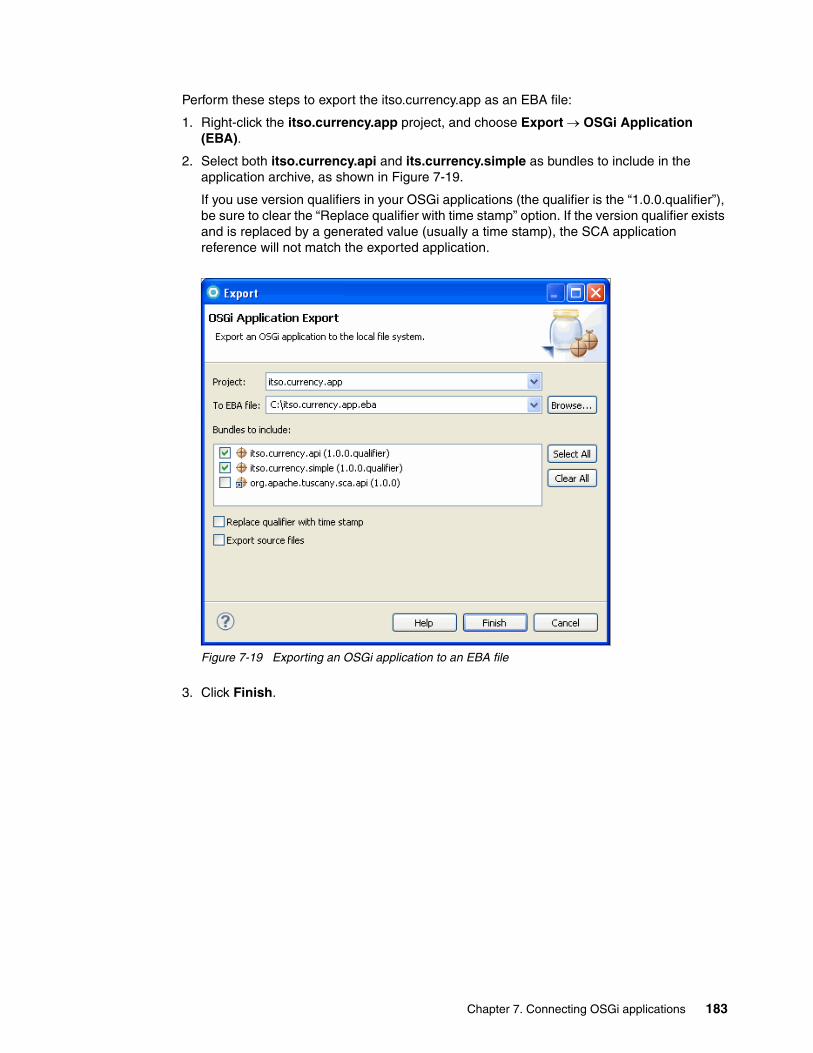
Perform these steps to export the itso.currency.app as an EBA file:
1. Right-click the itso.currency.app project, and choose Export OSGi Application (EBA).
2. Select both itso.currency.api and its.currency.simple as bundles to include in the application archive, as shown in Figure 7-19.
If you use version qualifiers in your OSGi applications (the qualifier is the “1.0.0.qualifier”), be sure to clear the “Replace qualifier with time stamp” option. If the version qualifier exists and is replaced by a generated value (usually a time stamp), the SCA application reference will not match the exported application.
Figure 7-19 Exporting an OSGi application to an EBA file
3. Click Finish.
Chapter 7. Connecting OSGi applications 183

Each project of the projects that we have just exported now needs to be installed as an asset on the application server using the Assets panel in the WebSphere administrative console. Open the console to deploy the exported archives:
1. Navigate to Applications Application Types Assets. Click Import to start the wizard to import the following assets:
a. itso.currency.app.eba, as shown in Figure 7-20, accepting the default settings
b. itso.currency.sca.jar, accepting the default settings
Figure 7-20 Importing an asset from the local file system
Finally, the two assets must be hosted in a single logical containment, which is called a business-level application (BLA). Create a new BLA for the currency converter OSGi application and its accompanying SCA composite:
1. Navigate to Applications Application Types Business-level Applications.
2. Click New to define a new BLA. Enter CurrencyConverter as the name, and click Apply.
3. Click Add Add Asset in the Deployed assets section to add the following assets to the BLA in the specified order, accepting all the defaults:
– itso.currency.app.eba– itso.currency.sca.jar
4. Save the new BLA. If there is an error that the OSGi application cannot be found, ensure that you are not using a version qualifier in the OSGi application version, which has been replaced by a time stamp.
5. Start the CurrencyConverter Business Level Application by selecting it and clicking Start.
Deploy the CurrencyConverterConsumer enterprise application by selecting the Rational Application Developer built-in tooling Add and Remove (available from the Server context menu).
184 Getting Started with the Feature Pack for OSGi Applications and JPA 2.0

7.3.5 Testing the scenario through the Universal Test Client
There are numerous ways that you can integrate the previously described EJB session bean into a larger JEE application. However, instead of spending time to develop more JEE artifacts, we show how to test the EJB directly by using the Universal Test Client tool that is built into the Rational Application Developer.
Follow these steps:
6. To open the Universal Test Client, right-click WebSphere Application Server v7.0 in the Servers view, and select Universal Test Client Run, as shown in Figure 7-21.
Figure 7-21 Invoking the Universal Test Client facility
Business-level applications: A business-level application (BLA) is a concept that aims to expand the notion of “Application” beyond JEE. Its administration model provides the entire definition of an application as it makes sense to the business. In contrast with an enterprise application (EAR file), a BLA is only a logical WebSphere configuration artifact, similar to a server or cluster, that is stored in the configuration repository. You can use BLAs in several ways. Often a business application, such as an Order System, does not consist of only one enterprise application (EAR), but rather multiple applications that must all be running for the whole business application to work. If you want to learn more about BLAs, consult the WebSphere Application Server V7 Administration and Configuration Guide, SG24-7615, which explains the subject in detail. We also discuss the topic further in 7.5.3, “Modeling application dependencies in BLA” on page 203.
Cached data: The Universal Test Client caches data. If the data that is returned by the Universal Test Client seems out-of-date, right-click the test server in the Servers view and choose Universal Test Client Restart to completely refresh the Universal Test Client application.
Chapter 7. Connecting OSGi applications 185

With the Universal Test Client, test the functionality of the currency converter EJB session bean:
1. Navigate to the JNDI Explorer and then to the local EJB beans node.
2. Expand the Local EJB Beans node, and search for and click the CurrencyConverterConsumer bean, as shown in Figure 7-22.
Figure 7-22 Searching the JNDI tree for EJB beans
3. The convert bean method (BigDecimal convert(BigDecimal, String, String) shows on the left navigation bar, as shown in Figure 7-23. Click BigDecimal convert(BigDecimal, String, String).
Figure 7-23 Examine a bean method signature and invoking it
4. Enter the following data prior to invoking the bean method:
a. BigDecimal value: 100b. String #1: USDc. String #2: EUR
186 Getting Started with the Feature Pack for OSGi Applications and JPA 2.0

5. Invoke the bean method by clicking Invoke. Examine the returned result value, which is similar to Figure 7-24.
Figure 7-24 Inspecting the result that is returned after invoking a bean method
7.4 Connecting two OSGi applications
In this section, we show how to connect two OSGi applications together. As an example, we integrate the currency converter service with the bank application using SCA rather than using it as a shared service. The bank application in this scenario consists of the following elements:
� The OSGi application, itso.currency.app, providing the currency conversion service, as described in 7.3, “Connecting JEE to OSGi applications” on page 166.
� The OSGi application, itso.bank.app, from “Larger updates for new features” on page 142 with a modification to invoke the currency conversion service through SCA.
� A new SCA composite with a single component that uses the OSGi currency converter application as its implementation, which was described in “Creating the currency converter SCA project” on page 172.
� A new SCA composite with a single component for the itso.bank.app OSGi application as its implementation.
Sample material: You can obtain the currency converter enterprise application and every artifact belonging to the sample that is discussed in this section in the 04_itso-bank_with_sca_osgi2osgi.zip archive, as explained in “Using the web material” on page 263.
Chapter 7. Connecting OSGi applications 187

Figure 7-25 shows the implementation details of the OSGi-to-OSGi scenario. We described the OSGi currency converter application in 7.3, “Connecting JEE to OSGi applications” on page 166, and you can reuse it without changes. For the rest of this section, we focus on the modifications to the itso.bank.app OSGi application and the accompanying SCA project.
We have chosen in this chapter to develop each SCA component in its own project. This approach provides maximum flexibility for deploying the SCA components and their implementations for various use cases. However, in simple cases, it might be more convenient to include all the SCA components in the same SCA project and composite. In this case, all the artifacts have to be deployed in the same BLA in WebSphere Application Server.
Figure 7-25 The bank OSGi application calls a currency converter OSGi application
BankComposite (deployable)
BankComponentOSGi Component
CurrencyComposite (deployable)
FixedCurrencyConverterBeanServiceOSGi Component
OSGi OSGi
188 Getting Started with the Feature Pack for OSGi Applications and JPA 2.0

7.4.1 Modifying the existing OSGi bank application
For this scenario, you need to modify both the itso.bank.biz OSGi bundle and the itso.bank.app OSGi application. As a first step, you need to change the current reference to include a new filter:
1. Open the blueprint of the itso.bank.biz OSGi bundle at Version 1.1.0, and select the currencyConverter reference.
2. In the Details section, add the filter attribute with value (service.imported=*) to the reference, as shown in Figure 7-26.
Figure 7-26 Modifying the currencyConverter reference to attach a filter value
The purpose of this filter might seem somewhat strange. As mentioned in the introduction (2.5.2, “Integration with the Feature Pack for Service Component Architecture” on page 34), services targeted for SCA are essentially in a separate namespace from normal services. This namespace is controlled through the service filter and the service properties. A service lookup without the service.imported filter cannot see an imported service. However, a lookup with the filter can see an imported service. Similarly, for exported services, a lookup needs to contain a filter for service.exported.interfaces.
In the same way that exporting services needs to be specified in the exporting bundle’s blueprint and the exporting application’s manifest, imported services are also configured both in the importing bundle’s blueprint and the application’s manifest. The bundle-level configuration denotes a reference that uses pass-by-reference semantics (see page 170) whereas the application-level configuration allows the application assembler to configure which services are imported.
Chapter 7. Connecting OSGi applications 189

You need to modify the itso.bank.app OSGi application in a way to be able to invoke the currency converter service:
1. Open the itso.bank.app application bundle manifest.
2. Under Imported services, add the itso.currency.api.CurrencyConverter as a service (Figure 7-27).
Figure 7-27 Imported service configuration to pull in the CurrencyConverter service through SCA
This step corresponds to the following application manifest header:
Application-ImportService: itso.currency.api.CurrencyConverter
7.4.2 Creating the ITSO Bank SCA project
To create the ITSO Bank SCA project, which interconnects with the currency converter SCA composite, perform the following steps:
1. In the Enterprise Explorer view, right-click and select New SCA Project.
2. In the first page of the New SCA Project Wizard, provide the following information:
a. Enter itso.bank.sca for the Project name.
b. Select WebSphere Application Server v7.0 as the Target Runtime.
c. Select WebSphere V7 Feature Pack for SCA 1.0.1 for the Facet Configuration.
d. For the Implementation type, select only OSGi Application.
3. Click Finish.
To be able to encapsulate the actual OSGi bank application using SCA, you need to create a new SCA composite:
1. Right-click Composites in the itso.bank.sca project in the Enterprise Explorer view and select New SCA Composite. Provide the following data:
a. Composite name must be BankComposite.
b. Set the Namespace to http://itso.bank.
c. Leave everything else at the default values.
2. Click Finish.
Next, define a component:
1. On the SCA composite diagram, create a new SCA component, and name it BankComponent.
2. Define an implementation type for the BankComponent by right-clicking the component in the SCA diagram.
190 Getting Started with the Feature Pack for OSGi Applications and JPA 2.0

3. Choose Set Implementation OSGi application as an appropriate implementation type.
4. When prompted to choose the OSGi application project, as shown in Figure 7-28, choose itso.bank.app.
Figure 7-28 The bank SCA component is based on an OSGi implementation
To be able to invoke the currency converter service that is provided by the currency converter SCA composite, you need to define an appropriate ComponentReference:
1. Right-click the component, and select Create Reference.
2. On the Properties view, set the following configuration for the reference:
a. On the Core tab, change the reference Name to itso.currency.api.CurrencyConverter, as shown in Figure 7-29. The name must match the qualified class name of the imported interface and the interface name on the blueprint reference element in itso.bank.biz.
Figure 7-29 SCA reference properties for CurrencyConverter component reference
Chapter 7. Connecting OSGi applications 191

b. On the Binding tab, add a new SCA binding, and use CurrencyComponent as an URI value, as shown on Figure 7-30.
Figure 7-30 SCA binding configuration for CurrencyConverter component reference
3. Save the SCA diagram.
For component services, the default binding for component references is binding.sca. Another way to configure component references without using an explicit binding is to set the target attribute at the bottom of the Core tab. The target can refer to the target component, CurrencyComponent, and to a specific service, using a value such as <component name>/<service name>. In the present example, specifying the component name is sufficient.
The resulting reference element is:
<reference name="itso.currency.api.CurrencyConverter" target="CurrencyComponent"/>
Finally, create a new SCA contribution for the composite that was just created. Your bank SCA project outline now is similar to the outline that is shown in Figure 7-31.
Figure 7-31 ITSO Bank SCA project structure
7.4.3 Final scenario testing using the ITSO Bank web application
To deploy the two sample applications, follow the steps as described in 7.3.4, “Deployment using the WebSphere administrative console” on page 181, creating a separate BLA for each OSGi application, plus a SCA jar. Make sure that the shared bundles slf4j.api, slf4j.simple, itso.monitoring.api, itso.monitoring.impl, and itso.currency.api are either included in the itso.bank EBA file or available from the internal bundle repository. The outline of each BLA needs to look like the following list:
� CurrencyConverterApplication (BLA):
– CurrencyComposite (Asset)
192 Getting Started with the Feature Pack for OSGi Applications and JPA 2.0

– itso.currency.app_0001.eba (Asset)
� BankApplication (BLA):
– BankComposite (Asset)
– itso.bank.app_0001.eba (Asset)
Also, you can use BLAs to connect the life cycles of these two applications together. We investigate this topic further in 7.5.3, “Modeling application dependencies in BLA” on page 203.
Testing the scenario is straightforward. Simply open a web browser, and point it to this website:
http://localhost:9080/itsobank/redbank.html
The login window of the ITSO Bank sample application opens. Follow these steps:
1. Enter a sample customer number, for example, 111-11-1111, to display the accounts that are owned by Joe-One Doe-One.
2. Select one of the accounts.
3. Initiate a withdrawal transaction. Provide an amount and a corresponding currency, and submit the transaction.
Transparently, the OSGi application invokes the currency converter service using the appropriate SCA mechanism. Figure 7-32 illustrates the result of invoking this transaction based on the OSGi application to OSGi application demonstration scenario.
Figure 7-32 OSGi to OSGi sample scenario at work
Chapter 7. Connecting OSGi applications 193

7.5 Connecting OSGi applications to JEE
For this section, we abandon the currency converter example and add another new bit of functionality to the application. We introduce a simple customer relationship management (CRM) question and answer (Q&A) functionality to allow a customer to ask general questions.
Figure 7-33 Invoking a JEE-based CRM application from an OSGi bundle
Sample material: You can obtain all of the artifacts that belong to the sample that we discuss in this section in the 05_itso-bank_with_sca_osgi2jee.zip archive. You can import them as explained in “Using the web material” on page 263.
OSGi Java EE
BankComposite (deployable)
BankComponentOSGi Component
CurrencyComposite (deployable)
FixedCurrencyConverterBeanServiceOSGi Component
CustomerServiceComposite (deployable)
CustomerServiceJEE Component
194 Getting Started with the Feature Pack for OSGi Applications and JPA 2.0

To implement this new functionality, we hook into a JEE application asset for handling Q&A. For this sample, we create a new JEE application for this scenario. However, the same techniques apply for the more realistic scenario where the JEE application already exists and most likely cannot be changed. Figure 7-34 and Figure 7-35 on page 196 show the results.
Figure 7-34 Entering customer queries
Chapter 7. Connecting OSGi applications 195

Figure 7-35 Showing the queries
196 Getting Started with the Feature Pack for OSGi Applications and JPA 2.0

7.5.1 The JEE part
In this section, we briefly highlight the parts of the JEE CustomerService application to which we connect later. Then, we describe the required steps for exposing the application in SCA.
The CustomerService interfaceTo start, we have a remote interface for an ordinary stateless session bean. Figure 7-36 shows the interface. To make this scenario realistic, the findQuestionsForCustomer method actually returns a business object, which needs to be serialized across to the OSGi application.
Figure 7-36 Customer service remote business interface
The QuestionEntity class is merely a simple bean (according to the JavaBeans specification) with a long ID field, and three String fields for customer ID, question, and answer. The implementation of QuestionEntity and the stateless session bean CustomerService are omitted here. You can see the implementation in the sample archive file called 03_itso-bank_with_sca_jee2osgi.zip that accompanies this publication, as described in “Using the web material” on page 263.
The SCA configurationFirst, we need to create a new SCA project, which is named CustomerService.sca, with implementation types JEE and Java:
1. Create a new composite, and then, create a component inside. The names and namespaces that are chosen do not matter for this use case.
2. Then, select the implementation type JEE and point it to the CustomerService application. The resulting SCA composite descriptor must look like Example 7-6.
Example 7-6 SCA composite for customer service application
<?xml version="1.0" encoding="UTF-8"?><composite xmlns="http://www.osoa.org/xmlns/sca/1.0" autowire="false" name="CustomerServiceComposite" targetNamespace="http://itso.crm"> <component name="CustomerServiceComponent"> <implementation.jee archive="CustomerService.ear"/> </component></composite>
package itso.crm.api;
import itso.crm.entity.QuestionEntity;
import java.util.List;
import javax.ejb.Remote;
@Remotepublic interface CustomerServiceRemote {
public long submit(String customer, String question);
public List<QuestionEntity> findQuestionsForCustomer(String customerId);}
Chapter 7. Connecting OSGi applications 197

This configuration is geared toward the pattern in the previous applications of using the default (SCA) binding throughout. However, another implementation is possible by using an EJB-specific binding, which we discuss in 7.5.4, “Alternative: Binding.ejb” on page 206.
Next, for the binding that we have chosen, we need to make sure that the interface classes, that is, CustomerServiceRemote and QuestionEntity, are contained in the sca.jar and the EJB jar. The simplest solution is to copy the source code into the SCA project. The seemingly odd requirement results from how SCA performs serialization for implementation.jee projects.
Finally, create a new SCA contribution that includes the CustomerServiceComposite composite and export the SCA project as an SCA archive (.zip or .jar). The resulting archive must contain at least the following content:
META-INF/sca-contribution.xmlCustomerServiceComposite.compositeitso/crm/api/CustomerServiceRemote.classitso/crm/entity/QuestionEntity.class
SCA serialization: Even though the JEE application and the OSGi application reside on the same physical machine and the same Java virtual machine (JVM) in this scenario, communication is still remote. As noted before, OSGi applications cannot share class space with non-OSGi applications. Hence, all data has to be serialized between caller and receiver.
All of the interface objects are marshalled as XML corresponding to the JavaBeans properties, ignoring any other serialization mechanism, such as Serializable. For implementation.jee, a further restriction exists that all of the relevant classes to be serialized need to be loadable through the SCA jar itself. See this website, also:
http://publib.boulder.ibm.com/infocenter/wasinfo/v7r0/topic/com.ibm.websphere.soafep.multiplatform.doc/info/ae/ae/tsca_devsca_bottomup.html
198 Getting Started with the Feature Pack for OSGi Applications and JPA 2.0

Putting things togetherTo use the JEE application together with the SCA asset, you must install them in a particular way that differs from the normal path:
1. Import both the EAR file and the SCA jar as assets (Figure 7-37).
Figure 7-37 Assets for OSGi to JEE integration
2. Create a new empty business-level application (BLA).
3. Add the CustomerService.ear asset to the new BLA as an asset. At this step, all of the usual JEE configuration panels are available for configuring the application. Note that the application is renamed to a generated name as part of this process.
Chapter 7. Connecting OSGi applications 199

4. Add the CustomerService.sca.jar asset to the new BLA. The wizard shows that the SCA component implementation matches to the application that was created in step 3, as shown in Figure 7-38.
Figure 7-38 SCA asset mapping onto CustomerService application
Finally, configure the BLA, as shown in Figure 7-39.
Figure 7-39 CustomerService BLA containing the JEE application and the SCA composite
5. Start the BLA. The customer service back end is now ready to use.
200 Getting Started with the Feature Pack for OSGi Applications and JPA 2.0

7.5.2 Using CustomerServiceRemote from the ITSO Bank sample
With the JEE foundations in place, we now turn to integrating the EJB with the itso.bank.app OSGi application.
Packaging the JEE interface classesFirst, we need to make the CustomerServiceRemote interface and the QuestionEntity class available to the OSGi application. This step is necessary, because we assume that in this scenario, the EJB jar does not define the appropriate OSGi metadata.
Several ways exist to make the CustomerServiceRemote interface and the QuestionEntity class available to the OSGi application, including creating yet another copy of the source files. In this case, we elect to wrap the existing binary. In Rational Application Developer, we wrap the existing binary by creating a new OSGi bundle project and importing the existing EJB jar into the BundleContent directory.
Next, we configure the metadata to export the required classes directly out of the jar and import any dependencies. The resulting bundle manifest needs to look like Example 7-7 (with non-essential headers omitted).
Example 7-7 Bundle manifest
Manifest-Version: 1.0Bundle-ManifestVersion: 2Bundle-SymbolicName: itso.bank.crm.apiBundle-Version: 1.0.0Bundle-ClassPath: CustomerServiceEJB.jarExport-Package: itso.crm.api;version="1.0.0", itso.crm.entity;version="1.0.0"Import-Package: javax.ejb;version="3.0.0", javax.persistence;version="1.0.0"
The key is the Bundle-ClassPath header, which you might remember from the context of web bundles. In Example 7-7, the header instructs the OSGi run time to serve classes, not as the default from the root of the bundle, but instead to look inside the embedded jar file CustomerServiceEJB.jar. Note that we have to make sure to include all of the necessary import statements to make the packages resolve at run time, which, in this example, are the import statements for the packages that contain the EJB and JPA annotations.
Chapter 7. Connecting OSGi applications 201

Creating the SCA metadataFor this section, we use the itso.bank.app that was developed in 7.4, “Connecting two OSGi applications” on page 187 as a basis. Follow these steps to add the new SCA service:
1. Create a new Application-ImportService entry to import itso.crm.api.CustomerServiceRemote. The browse functionality in Rational Application Developer might not find the file if the interface is not imported anywhere in the application. In this case, you can still edit the source file directly.
2. On the existing BankComposite, add a new reference with name itso.crm.api.CustomerServiceRemote and an SCA binding with the URI CustomerServiceComponent/CustomerService_CustomerServiceRemote. Example 7-8 is similar to the resulting composite descriptor.
Example 7-8 SCA configuration for itso.bank.sca
<?xml version="1.0" encoding="UTF-8"?><composite xmlns="http://www.osoa.org/xmlns/sca/1.0" xmlns:was="http://www.ibm.com/xmlns/prod/websphere/sca/1.0/2007/06" autowire="false" name="BankComposite" targetNamespace="http://itso.bank">
Wrapping with the Bnd tool: For more sizable jars, we advise that you use a tool to verify dependencies automatically from the byte code of the included classes rather than verify the dependencies manually. An excellent tool, the Bnd tool, exists exactly for that purpose. To wrap an existing jar as a bundle with Bnd, use the wrap command:
> java -jar bnd.jar wrap -output converted.jar CustomerServiceEJB.jarCustomerServiceEJB 5 0One warning1 : Superfluous export-package instructions: [itso]
Then, use the print command to inspect the result:
> java -jar bnd.jar print -manifest converted.jar[MANIFEST converted.jar]Bnd-LastModified 1284648284250Bundle-ManifestVersion 2Bundle-Name CustomerServiceEJBBundle-SymbolicName CustomerServiceEJBBundle-Version 0Class-PathCreated-By 1.5.0 (IBM Corporation)Export-Package itso.crm;uses:="javax.ejb,itso.crm.entity,itso.crm.api,javax.persistence",itso.crm.api;uses:="javax.ejb,itso.crm.entity",itso.crm.entity;uses:="javax.persistence"Import-Package itso.crm;resolution:=optional,itso.crm.api;resolution:=optional,itso.crm.entity;resolution:=optional,javax.ejb;resolution:=optional,javax.persistence;resolution:=optionalManifest-Version 1.0Tool Bnd-0.0.384
This example shows only a small part of the tool. The Bnd tool has options that address most use cases and support for integrating the tool into Eclipse or ant builds. You can obtain the tool and the usage documentation from this website:
http://www.aqute.biz/Code/Bnd
202 Getting Started with the Feature Pack for OSGi Applications and JPA 2.0

<component name="BankComponent"> <was:implementation.osgiapp applicationSymbolicName="itso.bank.app"
applicationVersion="1.0.0"/> <reference name="itso.currency.api.CurrencyConverter"> <binding.sca uri="CurrencyComponent"/> </reference> <reference name="itso.crm.api.CustomerServiceRemote"> <binding.sca
uri="CustomerServiceComponent/CustomerService_CustomerServiceRemote"/> </reference> </component></composite>
Accessing the CustomerServiceRemote serviceIn Example 7-8 on page 202, we pulled in the remote SCA service through a Blueprint reference. However, on the client’s side, the services can also be used directly from the service registry. The same function is not available for exported services; these services have to be declared in Blueprint so that they are picked up by the SCA run time.
In the present scenario, we can access the customer service functionality directly from the itso.bank.web bundle by using the code that is shown in Example 7-9.
Example 7-9 Code to access the service
Context ctx = new InitialContext();CustomerServiceRemote service = (CustomerServiceRemote) ctx.lookup(
"osgi:service/itso.crm.api.CustomerServiceRemote/(service.imported=*)");
List<QuestionEntity> questions = service.findQuestionsForCustomer(customerNumber);
As in the Blueprint reference case that is described in 7.4.1, “Modifying the existing OSGi bank application” on page 189, the filter for the service.imported property is necessary. A lookup into the service registry, either through Blueprint or through JNDI, must specify the service.imported filter to be able to access services with remote semantics, such as SCA services. Also, note that the retrieved service must not be cached but instead retrieved again for every use. In this way, services dynamics and SCA dynamic service selection are properly exploited by the application.
With two extra servlets and a few changes to the JSPs that are available in the sample code, we now have the rudimentary Q&A functionality.
7.5.3 Modeling application dependencies in BLA
Although the solution works, there is at least one more cleanup step to perform. What happens if an administrator starts the ITSO Bank application but forgets to start another required application, such as the customer service enterprise application?
Unfortunately, in this scenario, the application will start. However, without the actual applications to back the SCA services, an exception similar to Example 7-10 on page 204 will occur at run time, and at least part of the application is unavailable.
Chapter 7. Connecting OSGi applications 203

Example 7-10 Exception
org.osoa.sca.ServiceUnavailableException: Service CustomerServiceComponent/CustomerService_CustomerServiceRemote is installed but currently not available, could be stoppedat com.ibm.ws.soa.sca.serviceregistry.SCAServiceRegistryImpl.get
(SCAServiceRegistryImpl.java:328)at com.ibm.ws.soa.sca.binding.sca.SCATargetInvoker.getSCAFPServiceInfo
(SCATargetInvoker.java:478)…at $Proxy91.findQuestionsForCustomer(Unknown Source)at itso.bank.web.servlet.ListFeedback.performTask(ListFeedback.java:95)at itso.bank.web.servlet.ListFeedback.doGet(ListFeedback.java:62)…
In this situation, we can exploit the aggregation aspect of the BLA support in WebSphere Application Server Version 7. The currency converter and customer service applications are independent applications without dependencies. However, the ITSO Bank application has a dependency on the two other applications. This dependency can be modeled in the BLA framework by adding the currency converter BLA and the customer service BLA to the ITSO Bank BLA, as shown in Figure 7-40 on page 205. Regardless of the BLA modeling, you must write the application to cope gracefully with the absence of back-end services. You might display a “service unavailable” message or throw an appropriate exception.
204 Getting Started with the Feature Pack for OSGi Applications and JPA 2.0

Figure 7-40 ITSO Bank application including other BLA dependencies
With this change, starting the ITSO Bank application will trigger the start of the BLAs on which it depends. Furthermore, stopping one of the child applications is still possible, but it will now provide visual feedback to the administrator that the ITSO Bank application is also affected by that change.
Chapter 7. Connecting OSGi applications 205

Figure 7-41 shows that the bank application is only partially running when the currency BLA has been stopped.
Figure 7-41 State of the ITSO Bank application after stopping the currency converter application
7.5.4 Alternative: Binding.ejb
The solution that we described wraps the existing JEE application inside its own SCA asset, which means that the EJBs are fully available as SCA services in the SCA domain. This approach is particularly useful when further SCA configuration or mappings are meant to be added to these services.
There is also another, simpler solution that directly wires the component references to the target EJB. Unfortunately, it requires a rigid configuration. However, using binding.ejb also has significant advantages:
� The existing JEE application does not need to be touched or installed in a new way. Note that, in fact, the target JEE application must not be installed in a BLA but through the customary JEE route.
� No SCA composite is required for JEE, which means one less duplication of the interface classes.
Fortunately, the implementation that you chose is specified only in the SCA reference binding. So, from the point of view of the ITSO Bank sample application, switching between the two mechanisms is as simple as changing one binding and reinstalling the SCA jar. Figure 7-42 on page 207 shows the configuration for binding.ejb. Rational Application Developer can populate many of these values from a JEE application project and the configured test servers. The full description of the ejb.binding format is available in the information center:
http://publib.boulder.ibm.com/infocenter/wasinfo/v7r0/topic/com.ibm.websphere.soafep.multiplatform.doc/info/ae/ae/tsca_ejb_binding.html
206 Getting Started with the Feature Pack for OSGi Applications and JPA 2.0

Figure 7-42 Binding.ejb configuration for accessing the CustomerService application
7.6 Message-driven services
The Enterprise JavaBeans (EJB) programming model with message-driven beans (MDBs) offers a popular functionality to interoperate with JMS when using a plain old Java object (POJO) programming model. You can use a similar model, although with more incidental configuration, for OSGi applications. This section completes the interconnection scenarios by showing how, with the help of SCA, an OSGi application can be connected easily to the WebSphere Application Server messaging services.
For this section, we extend the itso.bank application again. However, for the sake of simplicity, we start from the initial itso.bank application rather than the full complex application that we used previously. The scenario that we want to introduce is the ability to invoke transactions through JMS so that third-party entities can interact directly with the bank application.
This section does not show how to send messages from an OSGi application through the standard javax.jms APIs. The usage does not differ from the base usage in JEE that is described extensively at this website:
http://www.ibm.com/developerworks/java/tutorials/j-jms/
7.6.1 Using TextMessage communication
The first example uses text messages. Using text messages avoids the complexity of having to worry about class consistency between receiver and sender and object deserialization.
Adding a remote transaction to the applicationFirst, we expose an appropriate service from the OSGi application. In this case, we need a simplified version of the Bank interface that is suitable for invocation through JMS.
Sample code: You can follow the chapter in two ways. You can start from the base sample code in 01_itso-bank_rad-sample.zip and make the changes as described in the text. Alternatively, you can import the full solution in 06_itso-bank_jms_text.zip and 07_itso-bank_jms_object.zip.
Chapter 7. Connecting OSGi applications 207

Example 7-11 shows the code. The interface belongs in the itso.bank.api bundle, which is apparent from the package name.
Example 7-11 RemoteBank interface
package itso.bank.api;
import itso.bank.api.exceptions.ITSOBankException;
public interface RemoteBank {public String transfer(String message) throws ITSOBankException;
}
The RemoteBank interface has no mention of any javax.jms APIs. Instead, the transfer method will be called with the text content of the javax.jms.TextMessage. Also, for the optional response message, the String return value is mapped into a TextMessage object.
With the interface defined, we need to augment the existing bank business bean to also implement RemoteBank. Example 7-12 shows the implementation, which parses the message as semicolon-separated values. Example 7-12 is, of course, only for demonstration and is insufficient in many ways for a real application.
Example 7-12 ITSOBank with RemoteBank implementation
public ITSOBank implements Bank, RemoteBank {…
public String transfer(String message) {String[] parts = message.split(";");if (parts.length != 3)
return "Failure - Unexpected message format";
String type = parts[0];String account = parts[1];BigDecimal amount = new BigDecimal(parts[2]);
try {if (type.equalsIgnoreCase("debit")) {
withdraw(account, amount);} else {
deposit(account, amount);}
} catch (ITSOBankException ibe) {ibe.printStackTrace();return "Failure - "+ibe.getMessage();
}
return "Success";}
}
Next, we need to expose the RemoteBank in the service registry, in addition to exposing the Bank service. So, in essence the same bean will be exposed under two separate interfaces in two services. Were it not for the requirement that the service targeted for SCA needs to have special service properties, we can export the bean with one service definition but two interfaces. In this case, the bean that can be invoked locally and remotely needs to be
208 Getting Started with the Feature Pack for OSGi Applications and JPA 2.0

compatible with both pass-by-reference and pass-by-value semantics (see page 170). Example 7-13 shows the modified blueprint.
Example 7-13 Blueprint with RemoteBank service
<blueprint xmlns="http://www.osgi.org/xmlns/blueprint/v1.0.0" xmlns:bptx="http://aries.apache.org/xmlns/transactions/v1.0.0">
<bean id="ItsoBankBean" class="itso.bank.biz.ITSOBank"><property name="persistenceService" ref="service"></property><bptx:transaction value="Required" method="*"/>
</bean><service id="ItsoBankBeanService" interface="itso.bank.api.Bank"
ref="ItsoBankBean"></service>
<service id="ItsoRemoteBankService" interface="itso.bank.api.RemoteBank" ref="ItsoBankBean"><service-properties>
<entry key="service.exported.interfaces" value="*" /></service-properties>
</service>
<reference id="service"interface="itso.bank.api.persistence.PersistenceService">
</reference></blueprint>
Finally, the RemoteBank services must be part of the Application-ExportService header:
Application-ExportService: itso.bank.api.RemoteBank
SCA configurationAs shown in 7.4, “Connecting two OSGi applications” on page 187, we create an SCA project for the itso.bank application and the SCA composite, component, and contribution.
Finally, create a component service for the ItsoRemoteBankService blueprint service. It is the binding of that service where we will use binding.jms instead of binding.sca. Figure 7-43 on page 210 shows the key binding configuration properties. The settings are configured for a reply-response scenario. Of course, a simple no-response scenario is also possible.
Chapter 7. Connecting OSGi applications 209

Figure 7-43 JMS binding configuration for RemoteBank service
For ease of use, we have used the Create resource setting “ifnotexist”. This setting means that the JMS resources will be created initially, which in a production application might not be the desired behavior. However, for the example use case, it makes little difference.
Many more settings are available than the settings that are used in this example. For a fuller discussion of the various options, consult chapter 8 “Using JMS bindings” of Getting Started with WebSphere Application Server Feature Pack for Service Component Architecture, REDP-4633, the WebSphere Application Server V7 Messaging Administration Guide, SG24-7770, or the information center:
http://publib.boulder.ibm.com/infocenter/wasinfo/v7r0/topic/com.ibm.websphere.soafep.multiplatform.doc/info/ae/ae/tsca_scajmsbinding.html
Example 7-14 shows the resulting SCA composite descriptor.
Example 7-14 SCA composite descriptor
<composite xmlns="http://www.osoa.org/xmlns/sca/1.0" xmlns:tuscany="http://tuscany.apache.org/xmlns/sca/1.0" xmlns:was="http://www.ibm.com/xmlns/prod/websphere/sca/1.0/2007/06" autowire="false" name="BankComposite" targetNamespace="http://itsobank">
<component name="BankComponent"> <was:implementation.osgiapp applicationSymbolicName="itso.bank.app"
210 Getting Started with the Feature Pack for OSGi Applications and JPA 2.0

applicationVersion="1.0.0"/> <service name="ItsoRemoteBankService"> <binding.jms> <destination create="ifnotexist" name="jms/itsoBankQueue"/> <response> <destination create="ifnotexist" name="jms/itsoBankResponseQueue"/> <connectionFactory create="ifnotexist"
name="jms/DefaultSCAConnectionFactory"/> </response> <tuscany:wireFormat.jmsText/> </binding.jms> </service> </component></composite>
You have completed the necessary tasks. The OSGi application and SCA jar are deployed in the same way as in the previous sections. To test the functionality, the sample code includes a basic servlet that puts a credit message on itsoBankQueue (Figure 7-44). You can inspect the result from the response queue, for example, through the administrative console.
Figure 7-44 Successful message round-trip
7.6.2 Using ObjectMessage communication
In more complex cases, it might be desirable to use a data transfer object rather than textual representations. You can adapt the prior scenario easily to use javax.jms.ObjectMessages instead of TextMessages. Follow these steps:
1. Change the RemoteBank interface method to this line:
public void transfer(RemoteRequest message) throws ITSOBankException;
2. Add a RemoteRequest class to the itso.bank.api bundle, as shown in Example 7-15.
Example 7-15 RemoteRequest bean
package itso.bank.api;
import itso.bank.api.Transaction.TransactionType;
Chapter 7. Connecting OSGi applications 211

import java.io.Serializable;import java.math.BigDecimal;
public class RemoteRequest implements Serializable {private static final long serialVersionUID = 42L;
private final TransactionType type;private final BigDecimal amount;private final String accountId;
// … constructor and getters}
3. Change the ITSOBank implementation of the RemoteBank interface from parsing the text message to querying the RemoteRequest object.
4. Finally, modify the binding.jms properties to use object messages. This example also shows a no-response model rather than request-response:
<binding.jms correlationScheme="None"><destination create="ifnotexist" name="jms/itsoBankQueue"/><tuscany:wireFormat.jmsObject/>
</binding.jms>
Clients of the JMS service must have the RemoteRequest and the Transaction class on the class path. Usually, you embed the itso.bank.api.jar for a non-OSGi application, or use it from the shared space in the case of another OSGi application.
7.6.3 Other binding options
The previous option has shown how convenient SCA is for exposing OSGi applications as JMS endpoints. The JMS support, however, is a small part of the SCA capabilities. You can see additional binding options in the information center:
http://publib.boulder.ibm.com/infocenter/wasinfo/v7r0/topic/com.ibm.websphere.soafep.multiplatform.doc/info/ae/ae/tsca_scabindings.html
We particularly want to highlight the web service binding. Exposing an existing SCA service as a web service is as simple as adding <binding.ws /> to the service definition. The SCA run time will, in this case, create a Web Service Description Language (WSDL) description of the service and publish the service alongside its WSDL definition. As an example, we can export the CurrencyConverterService that is described in 7.3, “Connecting JEE to OSGi applications” on page 166:
<component name="CurrencyComponent"> <was:implementation.osgiapp applicationSymbolicName="itso.currency.app" applicationVersion="1.0.0"/> <service name="FixedCurrencyConverterBeanService"> <binding.ws/> </service></component>
The resulting web service is published to this address:
http://localhost:9080/<component name>/<service name>
212 Getting Started with the Feature Pack for OSGi Applications and JPA 2.0

For the CurrencyConverterService SCA service, the result is similar to Figure 7-45. You can retrieve the WSDL definition by adding ?wsdl to the URL that is shown.
Many more options exist for binding.ws, specifically for working with existing WSDL documents, that we do not discuss here. For more details, refer to the information center:
http://publib.boulder.ibm.com/infocenter/wasinfo/v7r0/topic/com.ibm.websphere.soafep.multiplatform.doc/info/ae/ae/tsca_scawebservices_binding.html
Figure 7-45 Automatically generated web service for CurrencyConverterService
7.7 More information
Refer to these resources for more information:
� IBM Education Assistant: Feature Pack for Service Component Architecture
http://publib.boulder.ibm.com/infocenter/ieduasst/v1r1m0/topic/com.ibm.iea.wasfpsca/plugin_coverpage.html
� Best practices for developing and working with OSGi applications
http://www.ibm.com/developerworks/websphere/techjournal/1007_charters/1007_charters.html
� Exploring the WebSphere Application Server Feature Pack for SCA, Part 1: An overview of the Service Component Architecture feature pack
http://www.ibm.com/developerworks/websphere/library/techarticles/0812_beck/0812_beck.html
� Exploring the WebSphere Application Server Feature Pack for SCA, Part 5: Protocol bindings for Service Component Architecture services
http://www.ibm.com/developerworks/websphere/library/techarticles/0904_beck/0904_beck.html
� Design and develop SCA components using the Spring Framework, Part 1: The trifecta: Spring, SCA, and Apache Tuscany
http://www.ibm.com/developerworks/opensource/library/os-springsca1/
� Design and develop SCA components using the Spring Framework, Part 2: Advanced techniques using Apache Tuscany
http://www.ibm.com/developerworks/opensource/library/os-springsca2/index.html
Chapter 7. Connecting OSGi applications 213

214 Getting Started with the Feature Pack for OSGi Applications and JPA 2.0

Chapter 8. Java Persistence API Criteria API
In this chapter, we discuss the new Java Persistence API (JPA) Criteria API. First, we discuss the JPA Criteria API and its features. Then, we describe how to apply this new functionality to applications.
8
© Copyright IBM Corp. 2010. All rights reserved. 215

8.1 Sample material for this chapter
The examples that are shown in this chapter are provided as JUnit test cases. For further information, see “JPA 2.0 samples” on page 274.
8.2 JPA Criteria API
The JPA Criteria API is a new feature that has been added to Version 2 of JPA. It allows the definition of queries, which can be verified for syntactical correctness at compile time. A similar feature was previously available through Java language extensions, such as SQLJ (see, for example, section 3.5.2 on page 44 of DB2 for z/OS and OS/390: Ready for Java, SG24-6435). The JPA Criteria API does not require a language extension. It is embedded in core Java. Popular database access mechanisms, such as Java Database Connectivity (JDBC) or Java Persistence Query Language (JPQL), use a String-based notation for declaring database access statements. Neither of these technologies provides any means to allow the compiler to ensure type safety. Of course, the usage of the JPA Criteria API has a cost; in fact, the utilization of the JPA Criteria API requires us to write more code than with earlier technologies. However, in reward, we nevertheless get more certainty of having written correctly working code.
The Criteria API decomposes into two separate concerns: a metamodel of the domain entities and the interfaces to construct type-safe queries from the metamodel. The metamodel, as mentioned, exists purely in Java code, which is generated from the domain model entities. For each entity, the metamodel generator creates a metadata class, which is required at development time for retrieving attribute information. The JPA 2.0 specification stipulates that for each Java class making up an entity, a new Java class is generated where the name of the new class needs to follows the format <entity class name>_. Figure 8-1 shows the creation of the Account_.java file on the basis of Account.java.
Figure 8-1 Metadata generation
Example 8-1 shows the source code that is hosted by the newly generated Account_.java file. All of the fields of Account are reflected as metadata in Account_.
Example 8-1 Account.java metaclass
package itso.bank.persistence.entity;
import java.math.BigDecimal;import javax.annotation.Generated;import javax.persistence.metamodel.SetAttribute;import javax.persistence.metamodel.SingularAttribute;import javax.persistence.metamodel.StaticMetamodel;
@Generated(value="Dali", date="2010-09-15T10:32:26.453-0400")@StaticMetamodel(Account.class)public class Account_ {
public static volatile SingularAttribute<Account, String> id;public static volatile SingularAttribute<Account, BigDecimal> balance;
Account.java Account_.java
216 Getting Started with the Feature Pack for OSGi Applications and JPA 2.0

public static volatile SetAttribute<Account, Transaction> transactionsCollection;
public static volatile SetAttribute<Account, Customer> customerCollection;}
In the next section, we show how JPA Criteria API and this metadata are used for writing type-safe queries.
8.3 JPA Criteria API usage
We start this section with a high-level overview of the JPA Criteria API. After that, we turn to its usage and demonstrate how it is used in numerous examples.
8.3.1 JPA Criteria API overview
The two most important elements of the JPA Criteria API are the CriteriaBuilder and the CriteriaQuery classes. The CriteriaBuilder provides an entry point into the API and delivers various factory methods for constructing queries. The CriteriaQuery class is a container for holding and assembling query elements.
Criteria BuilderYou can obtain CriteriaBuilder objects from EntityManagerFactory or EntityManager instances. In addition to providing factory methods for creating CriteriaQuery objects, the CriteriaBuilder provides a way to perform these tasks:
� Declaring comparison operations that are used in conditional query elements, such as lt, le, gt, or ge
� Creating functional expressions, such as abs, sum, or avg
� Manipulating subqueries, collections, and basic Java types
Criteria QueryCriteriaQuery instances are obtained from a CriteriaBuilder. They represent query definitions consisting of multiple query elements. CriteriaQuery provides a set of operations for maintaining the query elements. The following list shows several of the available operations for adding query elements. The names of the operations are derived from SQL clauses and are therefore quite intuitive:
� select() and multiselect() for defining the fields to be retrieved as part of the result� from() for defining the entity that forms the base of the query� where() for defining the conditional expression� orderBy() for defining the order in which the result is to be displayed� groupBy() for defining the fields to be grouped
Metamodel generation in Rational Application Developer: Rational Application Developer provides support for generating the canonical metamodel. For enabling an automatic generation, you need to set the source folder in the Canonical Metamodel (JPA 2.0) section of the Java Persistence properties area. You can best reach the Java Persistence properties area by right-clicking JPA Project in the Project Explorer view. Then, you locate the Canonical Metamodel section in Properties Java Persistence.
Chapter 8. Java Persistence API Criteria API 217

In addition to adding query elements, CriteriaQuery also offers functionality for browsing and removing its included elements. The offered browse and remove functionality is simple and intuitive, similar to the add functionality. For details, see the JPA 2.0 specification:
http://jcp.org/aboutJava/communityprocess/final/jsr317/index.html
8.3.2 Samples
In this section, we base our discussion on a sample to explain how to use the JPA Criteria API for building type-safe queries. We start with easy and straightforward samples and will end with more advanced examples of use. The samples have all been tested using JUnit test infrastructure. In the source snippets, we occasionally include JUnit specifics to support better understanding.
The samples that we present all follow the same template for ensuring consistency and improving orientation. Example 8-2 shows the template structure. Do not worry if you do not understand every row immediately. The samples have an underlying structure. If you need orientation, refer back to this section.
Example 8-2 Sample template
...CriteriaBuilder criteriaBuilder = entityManager.getCriteriaBuilder();CriteriaQuery<ResultType> criteriaQuery = criteriaBuilder.createQuery(ResultType.class);Root<SomeEntity> root = criteriaQuery.from(SomeEntity.class);Join<SomeEntity,RelatedEntity> join = root.join(...);...// the following in any order:criteriaQuery.select(…)criteriaQuery..where(…)criteriaQuery..orderBy(…)...TypedQuery<ResultType> typedQuery = entityManager.createQuery(criteriaQuery);List<ResultType> resultList = typedQuery.getResultList();...
218 Getting Started with the Feature Pack for OSGi Applications and JPA 2.0

Figure 8-2 shows the ITSO Bank domain model, which we use as a base for our JPA Criteria API samples. For a description of the domain model, see Chapter 4, “Sample application” on page 57.
Figure 8-2 ITSO Bank domain model
Simple queryIn our first sample, we start small by retrieving the single account from the database, which has a balance greater than 66,000. We use the JPA Criteria API to perform this task.
Example 8-3 Simple query
/*** Test method for demonstrating simple query.*/public void testSimpleQuery() {
//select * from itso.account where balance > 66000;CriteriaBuilder criteriaBuilder = entityManager.getCriteriaBuilder(); 01CriteriaQuery<Account> criteriaQuery =
criteriaBuilder.createQuery(Account.class); 02Root<Account> root = criteriaQuery.from(Account.class); 03Predicate predicate = criteriaBuilder.gt(root.get(Account_.balance), 66000);04criteriaQuery.where(predicate); 05TypedQuery<Account> typedQuery = entityManager.createQuery(criteriaQuery); 06List<Account> resultList = typedQuery.getResultList(); 07
assertTrue(resultList.size() == 1);}
SQL statements: For all JPA Criteria API samples, we also provide native SQL statements. The statements are included as comments in the Java code and are meant for enhancing your understanding and a comparison with earlier techniques.
OpenJPACriteriaQuery.toCQL() is an extension that is provided by OpenJPA. The utility outputs the corresponding JPQL statement for the criteria query. The utility is helpful when migrating from JPQL to the Criteria API and provides valuable help with debugging.
Chapter 8. Java Persistence API Criteria API 219

The following numbers correspond to the highlighted numbers in Example 8-3 on page 219:
01 We use the EntityManager instance for retrieving an instance of a CriteriaBuilder. The CriteriaBuilder acts as an entry point into the Criteria API and provides further methods.
02 Using the CriteriaBuilder, we create a CriteriaQuery instance, which acts as a container for our query elements (for example, from and where parts). As an argument for the createQuery method, we need to pass the type of the result object that we expect to get back when executing the query. In our case, we will retrieve one or more objects of type Account. Even though multiple objects can be returned, we do not provide List or Set as a parameter but the Class, which is contained in the container class. This parameter allows generic result typing, as shown in line 07.
03 We use the from method of the CriteriaQuery instance to define that we want to retrieve information from the table mapped by the Account entity. As a result, we get back a generically typed Root class. The Root instance is one of our entity types that later provides the entry point for navigating our domain model, for example, to define conditional query elements.
04 As a next step, we start creating the where element for our query. For this task, the CriteriaBuilder provides a set of filter methods, such as equal, not equal, gt, ge, lt, le, and so on. In our case, we need to retrieve accounts that have a balance greater than 66000. Therefore, we need the gt method. We need to indicate filter-relevant fields based on the Root instance. Also, note the use of the class Account_.
05 We provide the conditional predicate created before as parameter to our CriteriaQuery instance using the where method.
06 We transform our CriteriaQuery instance to a TypedQuery object.
07 We finally retrieve the result by calling the getResultList method on our TypedQuery instance. We get back a generically typed list; the type is derived from our line 02 code.
In the introduction, we have cited type-safety as one of the compelling features of the JPA Criteria API. In the context of Example 8-3 on page 219, we discuss this statement in more detail:
� The field name, balance, is provided from the metamodel. Changing the field name will produce a compile error when the metamodel is regenerated from the new code.
� The field value is type-checked. Using “ABC” or even “66000” in the greater than clause leads to a compile failure.
� The code that uses the query can use the list without casting as the return type.
� The structure of the query is dictated by the API and hence cannot be incorrect. JPQL errors, for example, are not detected until run time. It is easy to get the query structure wrong or to misspell a keyword, which, of course, is only a problem in the absence of unit tests.
� The root class of the predicate in the where clause is not checked against the type of the criteria query. So, if in lines 03-05 of Example 8-3 on page 219, the example consistently used transaction instead of account and amount instead of balance, the code compiles but the query is still illegal. Do not think that it is impossible to write incorrect queries with the JPA Criteria API; it is merely a lot harder.
For now, we have built our first simple query using the JPA Criteria API. In the following sections, we enhance our query with additional functionality and show you how to write more sophisticated queries.
220 Getting Started with the Feature Pack for OSGi Applications and JPA 2.0

Order byAn ITSO Bank requirement demands that we retrieve all the accounts with a balance higher than 60,000 and display them in an ordered way. The order is ascending. Example 8-4 shows how ordered results can be retrieved using the JPA Criteria API.
Example 8-4 Query with result ordering
...//select * from itso.account where balance > 60000 order by balance;CriteriaBuilder criteriaBuilder = entityManager.getCriteriaBuilder();CriteriaQuery<Account> criteriaQuery =
criteriaBuilder.createQuery(Account.class);Root<Account> root = criteriaQuery.from(Account.class);Predicate predicate = criteriaBuilder.gt(root.get(Account_.balance), 60000);criteriaQuery.where(predicate);criteriaQuery.orderBy(criteriaBuilder.asc(root.get(Account_.balance))); 01TypedQuery<Account> typedQuery = entityManager.createQuery(criteriaQuery);List<Account> resultList = typedQuery.getResultList();...
The following number corresponds to the highlighted number in Example 8-4:
01 For retrieving ordered results, we use our CriteriaQuery instance, which provides the methods asc and desc for either ascending or descending ordering. We need to provide an ascending order; therefore, we use the asc method. As a parameter to the asc method, we provide the field on which to base the ordering.
InExample 8-5 shows how we can apply in clauses with the JPA Criteria API. The query in the sample in Example 8-5 retrieves all of the accounts that have a balance of 66,666.66 or 65,484.23.
Example 8-5 In query
...//select * from itso.account where balance in (66666.66, 65484.23);CriteriaBuilder criteriaBuilder = entityManager.getCriteriaBuilder();CriteriaQuery<Account> criteriaQuery =
criteriaBuilder.createQuery(Account.class);Root<Account> root = criteriaQuery.from(Account.class);Predicate predicate = root.get(Account_.balance).in(66666.66, 65484.23); 01criteriaQuery.where(predicate);TypedQuery<Account> typedQuery = entityManager.createQuery(criteriaQuery);List<Account> resultList = typedQuery.getResultList();...
The following number corresponds to the highlighted number in Example 8-5:
01 We use the Root object to indicate that we want to retrieve all of the accounts whose balances are one of the values that we supplied as the argument to the in method.
Chapter 8. Java Persistence API Criteria API 221

JoinFor demonstrating join functionality, we retrieve all of the accounts that have associated transactions with an amount over 9,000. Example 8-6 shows how account and transaction can be joined for retrieving the expected result.
Example 8-6 Join query
...//select * from itso.account a, itso.transactions t // where a.id = t.account_id and t.amount > 9000;CriteriaBuilder criteriaBuilder = entityManager.getCriteriaBuilder();CriteriaQuery<Account> criteriaQuery =
criteriaBuilder.createQuery(Account.class);Root<Account> root = criteriaQuery.from(Account.class);Join<Account, Transaction> join = root.join(Account_.transactionsCollection); 01Predicate predicate = criteriaBuilder.gt(join.get(Transaction_.amount), 9000); 02criteriaQuery.where(predicate);TypedQuery<Account> typedQuery = entityManager.createQuery(criteriaQuery);List<Account> resultList = typedQuery.getResultList();...
The following numbers correspond to the highlighted numbers in Example 8-6:
01 For joining account and transaction, we take our Root instance and call its join method. The join method takes an Account_.transactionsCollection to identify the dependent entity one more time in a type-safe way. The Join instance, which is returned by the join method, is comparable to Root and provides the navigational entry point into the domain model through the transaction entity.
02 We need to retrieve accounts with transactions whose amount is greater than 9,000. This sentence expresses that we need to base our condition on transactions; therefore, we need to use the Join instance for specifying the predicate. If our condition is based on accounts, we depend on the Root instance as in earlier samples.
Functional expressionThe JPA Criteria API offers expressions for using database built-in functions, such as abs, avg, count, and sum. For demonstrating the use of functional expressions, we provide a sample that counts the number of accounts present in the ITSO Bank. Example 8-7 shows how to count the number of accounts using the count function.
Example 8-7 Functional expression query
...//select count(*) from itso.accountCriteriaBuilder criteriaBuilder = entityManager.getCriteriaBuilder();CriteriaQuery<Long> criteriaQuery = criteriaBuilder.createQuery(Long.class); 01Root<Account> root = criteriaQuery.from(Account.class);criteriaQuery.select(criteriaBuilder.count(root)); 02TypedQuery<Long> typedQuery = entityManager.createQuery(criteriaQuery); 03Long result = typedQuery.getSingleResult(); 04...
The following numbers correspond to the highlighted numbers in Example 8-7:
01 When we create our CriteriaQuery object, we need to indicate that we will get back a result of type Long, which is what the count function produces.
222 Getting Started with the Feature Pack for OSGi Applications and JPA 2.0

02 The CriteriaBuilder instance provides a count function, which we call by providing the Root instance as parameter. By providing the Root instance as a parameter, we indicate that we want to count the number of accounts.
03 In accordance with the return type, we define the TypedQuery with a generically typed Long.
04 We know that we will not get back a result list but just one result. We, therefore, use the method getSingleResult and let the JPA Criteria API do the type cast. In the previous examples, we have always used the getResultList method for retrieving multiple results.
Query by ExampleQuery by Example is functionality that is not included in JPA 2.0, but OpenJPA, which is part of the WebSphere JPA provider, offers it as an extension. Query by Example allows building a conditional predicate that is based on a prefilled template entity. Consider, for example, we want to retrieve information from a customer with the firstname John 1 and lastname Doe 1. To create the condition, we need to construct a new customer entity instance, fill its firstname and lastname fields with the respective values, and provide the instance to the JPA Criteria API. The JPA Criteria API subsequently uses the provided customer entity instance to derive the conditional predicate for the query. Example 8-8 shows how we use Query By Example for retrieving the customer information.
Example 8-8 Query by Example
...CriteriaBuilder criteriaBuilder = entityManager.getCriteriaBuilder();CriteriaQuery<Customer> criteriaQuery =
criteriaBuilder.createQuery(Customer.class);Root<Customer> root = criteriaQuery.from(Customer.class);
Customer customer = new Customer(); 01customer.setLastname("Doe 1"); 02customer.setFirstname("John 1"); 03Predicate predicate =
((OpenJPACriteriaBuilder)criteriaBuilder).qbe(root, customer); 04criteriaQuery.where(predicate);TypedQuery<Customer> typedQuery = entityManager.createQuery(criteriaQuery);List<Customer> resultList = typedQuery.getResultList();...
The following numbers correspond to the highlighted numbers in Example 8-8:
01, 02, 03 We create a new customer entity instance and provide the field values to use for querying the database.
04 We create a predicate by using our CriteriaBuilder instance with its qbe method and provide the Root instance and the prefilled Customer instance as parameters. Because the qbe method is not included in the JPA Criteria API but is part of OpenJPA, an explicit type cast to OpenJPACriteriaBuilder is required.
Defining query resultsA native SQL query typically is built using select, from, and where elements. In our previous examples, we have used from and where elements in each sample, but we have typically omitted the select element. We have not used select elements that extensively because of the simple nature of our queries. If no explicit select element is provided, JPA Criteria API uses the return type that is provided in the createQuery method of CriteriaBuilder for building an
Chapter 8. Java Persistence API Criteria API 223

implicit select element. See Example 8-9 and Example 8-10. The only difference between both examples is the added select element in the second example. The outcome is the same for both examples.
Example 8-9 Query without select clause
...//select * from itso.accountCriteriaQuery<Account> criteriaQuery = criteriaBuilder.createQuery(Account.class);Root<Account> root = criteriaQuery.from(Account.class);TypedQuery<Account> typedQuery = entityManager.createQuery(criteriaQuery);List<Account> resultList = typedQuery.getResultList();...
Example 8-10 Query with select clause
...//select * from itso.accountCriteriaQuery<Account> criteriaQuery = criteriaBuilder.createQuery(Account.class);Root<Account> root = criteriaQuery.from(Account.class);criteriaQuery.select(Account.class);TypedQuery<Account> typedQuery = entityManager.createQuery(criteriaQuery);List<Account> resultList = typedQuery.getResultList();...
Similar to native SQL queries, JPA Criteria API provides more sophisticated ways to define a query result format. A helpful JPA Criteria API feature allows the construction of non-persistent classes using this query result definition functionality. Consider, for example, a class CustomerSmall, which consists of the fields ssn and lastname. An existing ITSO Bank interface requires that this class is used for transporting information. Example 8-11 shows how you can use the JPA Criteria API construction feature for creating custom class instances, such as CustomerSmall.
Example 8-11 Class construction select query
...//select c.ssn, c.lastname from itso.customer c;CriteriaBuilder criteriaBuilder = entityManager.getCriteriaBuilder();CriteriaQuery<CustomerSmall> criteriaQuery =
criteriaBuilder.createQuery(CustomerSmall.class); 01Root<Customer> root = criteriaQuery.from(Customer.class);criteriaQuery.select(criteriaBuilder.construct(CustomerSmall.class,
root.get(Customer_.ssn), root.get(Customer_.lastname))); 02TypedQuery<CustomerSmall> typedQuery =
entityManager.createQuery(criteriaQuery);List<CustomerSmall> resultList = typedQuery.getResultList();...
The following numbers correspond to the highlighted numbers in Example 8-11:
01 When we create our CriteriaQuery instance, we need to specify the result of our query. In our case, we will retrieve one or more objects of type CustomerSmall.
02 We use the construct method of our CriteriaBuilder instance for creating a new object. The parameters given to the method define the Java class to be constructed and the fields to be retrieved from the database that are used to fill the custom class instance.
224 Getting Started with the Feature Pack for OSGi Applications and JPA 2.0

A more generic result definition is possible by using Object arrays as return types, as shown in Example 8-12.
Example 8-12 Object array construction select query
...//select c.ssn, c.lastname from itso.customer c;CriteriaBuilder criteriaBuilder = entityManager.getCriteriaBuilder();CriteriaQuery<Object[]> criteriaQuery = criteriaBuilder.createQuery(Object[].class); 01Root<Customer> root = criteriaQuery.from(Customer.class);criteriaQuery.select(criteriaBuilder.array(root.get(Customer_.ssn),
root.get(Customer_.lastname))); 02TypedQuery<Object[]> typedQuery = entityManager.createQuery(criteriaQuery);List<Object[]> resultList = typedQuery.getResultList();
assertTrue(resultList.size() == 4);Object[] firstResult = resultList.get(0);assertEquals("111-11-1111", firstResult[0]); 03assertEquals("Doe 1", firstResult[1]); 04...
The following numbers correspond to the highlighted numbers in Example 8-12:
01 Again, we create our CriteriaQuery instance, but this time, we provide Object[] as the return type.
02 We use the array method of our CriteriaBuilder instance and specify within the parameter section which fields to retrieve from the database to use to fill in our Object array.
03, 04 As a result, we get back a list of Object arrays. The Object array contains the values in the order that we have provided the fields as parameters in the CriteriaBuilder’s array method: ssn followed by lastname.
Another way to define query results is based on tuples and is actually quite similar to JDBC ResultSets. A tuple is a generic container for information, which is able to hold any types of data. For retrieving data from a tuple, getter methods are offered that take as an argument either an index or the name of the field that must be retrieved. Example 8-13 shows the use of tuples.
Example 8-13 Tuple select query
...//select c.ssn, c.lastname from itso.customer c;CriteriaBuilder criteriaBuilder = entityManager.getCriteriaBuilder();CriteriaQuery<Tuple> criteriaQuery = criteriaBuilder.createQuery(Tuple.class); 01Root<Customer> root = criteriaQuery.from(Customer.class);criteriaQuery.select(criteriaBuilder.tuple(
root.get(Customer_.ssn).alias("ssn"), root.get(Customer_.lastname).alias("lastname"))); 02
TypedQuery<Tuple> typedQuery = entityManager.createQuery(criteriaQuery);List<Tuple> resultList = typedQuery.getResultList();
Constructor: The class, which needs to be created by the construct method of the CriteriaBuilder, must provide a constructor defining exactly the same parameter as supplied by the construct method.
Chapter 8. Java Persistence API Criteria API 225

assertTrue(resultList.size() == 4);Tuple firstResult = resultList.get(0);assertEquals("111-11-1111", firstResult.get("ssn")); 03assertEquals("Doe 1", firstResult.get("lastname"));...
The following numbers correspond to the highlighted numbers in Example 8-13 on page 225:
01 We create our CriteriaQuery instance and provide Tuple as the return type.
02 We use the tuple method of our CriteriaBuilder instance and specify within the parameter section which fields to retrieve from the database that will fill in our tuple. We use an alias method for assigning a name to the field. Later, we will use the same name for retrieving data from the tuple. If we do not provide an alias name, we depend on indexes to retrieve data later.
03 The query result is a list of Tuple instances. We retrieve data from a tuple by calling a getter that provides the name of the field that we want to retrieve as a parameter.
Finally, there is one further way to define query results that we want to show. In addition to the select method that we have used in the previous examples, the JPA Criteria API also offers a multiselect method. Multiselect automatically determines, based on the result type that is supplied to the CriteriaBuilder’s createQuery method, what result it needs to create. Multiselect allows for an interchangeable implementation of the previous examples by merely exchanging the result type (Example 8-14).
Example 8-14 Multiselect query
...//select c.ssn, c.lastname from itso.customer c;CriteriaBuilder criteriaBuilder = entityManager.getCriteriaBuilder();CriteriaQuery<CustomerSmall> criteriaQuery =
criteriaBuilder.createQuery(CustomerSmall.class);Root<Customer> root = criteriaQuery.from(Customer.class);criteriaQuery.multiselect(root.get(Customer_.ssn), root.get(Customer_.lastname));TypedQuery<CustomerSmall> typedQuery = entityManager.createQuery(criteriaQuery);List<CustomerSmall> resultList = typedQuery.getResultList();
assertTrue(resultList.size() == 4);assertTrue(resultList.get(0) instanceof CustomerSmall);...
This example is exactly the same as Example 8-11 on page 224. We have called a construct method to define that we want to get results of type CustomerSmall. With the multiselect method, JPA Criteria API determines, based on the result parameter that is supplied to the CriteriaBuilder’s createQuery method automatically, what return type it needs to produce. This method works for the Object array and tuple scenarios in the same way.
Weak typingEven though one goal of the JPA Criteria API was to provide a type-safe way for querying databases, it nevertheless does not eliminate the possibility of using weak typing. Instead of using the metamodel for specifying persistent field information to query elements, you can
Projecting query results: Projecting query results is also a commonly used term and synonym for defining query results.
226 Getting Started with the Feature Pack for OSGi Applications and JPA 2.0

also supply String values. Example 8-15 shows how weak typing is applied for specifying a conditional query element.
Example 8-15 Weakly typed simple sample
...//select * from itso.account where balance > 66000;CriteriaBuilder criteriaBuilder = entityManager.getCriteriaBuilder();CriteriaQuery<Account> criteriaQuery =
criteriaBuilder.createQuery(Account.class);Root<Account> root = criteriaQuery.from(Account.class);Predicate predicate = criteriaBuilder.gt(
root.<BigDecimal>get("balance"), 66000); 01criteriaQuery.where(predicate);TypedQuery<Account> typedQuery = entityManager.createQuery(criteriaQuery);List<Account> resultList = typedQuery.getResultList();...
The following number refers to the numbered line that is highlighted in Example 8-15:
01 Instead of using the metamodel for supplying persistent field information, we merely provide a String parameter.
Chapter 8. Java Persistence API Criteria API 227

228 Getting Started with the Feature Pack for OSGi Applications and JPA 2.0

Chapter 9. Java Persistence API Bean Validation
Bean Validation and Java Persistence API (JPA) 2.0 are specified following the Java Community Process (JCP) and are covered by independent Java Specification Requests (JSRs). JSR 303 defines Bean Validation whereas JPA 2.0 is described in JSR 317. Explicitly, section 3.6 of JSR 317 defines the support of Bean Validation in JPA 2.0:
This specification defines support for use of Bean Validation[8] within Java Persistence applications. Managed classes (entities, mapped superclasses, and embeddable classes) may be configured to include Bean Validation constraints.1
[8] JSR-303: Bean Validation. http://jcp.org/en/jsr/detail?id=303
This chapter discusses Bean Validation functionality and its use within JPA 2.0. Bean Validation is specified and can be used independently of JPA 2.0. It can provide validation support in many layers of an application, not just in the persistence layer. Because of the persistency-agnostic nature of Bean Validation, this chapter is organized in two parts. The first part discusses Bean Validation functionality. The second part is focused on using Bean Validation together with JPA 2.0.
9
1 Section 3.6 of JSR 317 at http://jcp.org/en/jsr/detail?id=317
Bean Validation providers: The feature pack does not include a Bean Validation provider. It provides the integration point with JPA, however. If you want to get started with Bean Validation, you need to download and install a provider, such as Apache Bean Validation, in addition to the feature pack. Section 9.4.2, “Installation and integration of JPA 2.0 and Bean Validation” on page 246 describes how to download and install a provider.
© Copyright IBM Corp. 2010. All rights reserved. 229

9.1 Sample material for this chapter
The examples that are shown in this chapter are provided as JUnit and Servlet test cases. For further information, see “JPA 2.0 samples” on page 274.
9.2 Introduction to Bean Validation
Before starting the actual Bean Validation discussions, we will clarify the meaning of the terms that are used in this chapter and provide a high-level overview of Bean Validation.
9.2.1 Terminology
The JPA 2.0 and Bean Validation specifications both make heavy use of JavaBean terminology. Explicitly, section 2.2 of JSR 317 clarifies the terms field, property, and attribute:
The persistent state of an entity is accessed by the persistence provider runtime[1] either via JavaBeans style property accessors (“property access”) or via instance variables (“field access”).
[1] The term “persistence provider runtime” refers to the runtime environment of the persistence implementation. In Java EE environments, this may be the Java EE container or a third-party persistence provider implementation integrated with it.
...
Terminology Note: The persistent fields and properties of an entity class are generically referred to in this document as the “attributes” of the class.2
We use the terms field, property, and attribute in this chapter in the following way:
� Field: Variable contained in a Java class that stores information� Property: Getter or setter method for accessing a field in a Java class� Attribute: Umbrella term for fields and properties
9.2.2 Bean Validation overview
The concept of Bean Validation is based on the enhancement of domain models with validation-relevant metainformation. At development time, the developer defines the validation constraints of the domain model using annotation on domain classes and attributes. To illustrate the major concepts, we use the domain model that we developed for the ITSO Bank application, as shown in Figure 9-1 on page 231. For a description of the domain model, see Chapter 4, “Sample application” on page 57.
2 Section 2.2 of JSR 317 at http://jcp.org/en/jsr/detail?id=317.
230 Getting Started with the Feature Pack for OSGi Applications and JPA 2.0

Figure 9-1 Domain model ITSO Bank
9.3 Bean Validation
This section discusses the core features that are provided with Bean Validation. Even though this section is JPA-independent, the functionality and samples that are presented also apply when used in conjunction with JPA entities.
9.3.1 Built-in constraints
Bean Validation defines a set of built-in constraints. These built-in constraints can be applied as annotations on either the entity field or property level. See Table 9-1 on page 232 for an overview of the built-in Bean Validation constraints.
Chapter 9. Java Persistence API Bean Validation 231

Table 9-1 Built-in Bean Validation constraints
Sample using built-in annotationsFor ITSO Bank, we need to ensure that the balance field of the account entity is fully initialized at all times. We want the balance value to stay within a defined boundary. The lower boundary (@Min) limits the overdraft amount available to customers. The upper boundary (@Max) assures that technical constraints, in our case such as the type range, are not exceeded. Example 9-1 shows how we realize these requirements using built-in annotations.
Example 9-1 Built-in annotation sample
public class Account implements Serializable {...@NotNull 01@Min(-10000) 02@Max(1000000) 03private BigDecimal balance;...
Constraint Description
@Null Verifies if the annotated field is null.
@NotNull Verifies if the annotated field is not null.
@AssertTrue Verifies if the annotated field is true.
@AssertFalse Verifies if the annotated field is false.
@Min Verifies if the annotated field is bigger or equal to the specified value.
@Max Verifies if the annotated field is smaller or equal to the specified value.
@DecimalMin Verifies if the annotated field is bigger or equal to the specified value.
@DecimalMax Verifies if the annotated field is smaller or equal to the specified value.
@Size(min=, max=) Verifies if the annotated field is between or equal to the given min and max parameters. The constraint is provided for the types String, Collection, Map, and Arrays.
@Digits(integer=, fraction=) Verifies if the annotated field is a number following the given integer and fraction parameter specification.
@Past Checks if the annotated Date or Calendar field is in the past.
@Future Checks if the annotated Date or Calendar field is in the future.
@Pattern(regex=,flag=) Checks if the annotated String field follows the given regex parameter.
232 Getting Started with the Feature Pack for OSGi Applications and JPA 2.0

The following numbers refer to the numbered lines that are highlighted in Example 9-1 on page 232:
01 @NotNull is a built-in constraint that verifies if the balance field is null. If the field is null, a constraint violation is triggered during the validation.
02 @Min(-10000) is a built-in constraint that verifies if the balance field is over a defined value. In our sample, the balance value is required to be over -10,000, thus limiting the overdraft that a customer can have.
03 @Max(1000000) is a built-in constraint that checks whether the balance field is under a defined value. In our sample, the balance value is required to be under 1,000,000, thus assuring that a technical upper boundary is not exceeded.
Although built-in constraints cover a large part of the day-to-day validation requirements, they are limited to dedicated rules and are intended for fundamental validation scenarios where fields are validated independently of each other. If more advanced validation rules are required, custom constraints can provide additional means of addressing them.
9.3.2 Custom constraints
Custom constraints support the realization of validation rules that are not supported by the built-in constraints. Custom constraints are used in these situations:
� Built-in constraints do not support the required functionality.� Multiple entity fields need to be considered as a group.� More dynamic and parameterizable rules are required.� Multiple built-in constraints must be realized as one validation rule.
Custom constraints can be placed on the attribute or class level. At attribute level, we have the choice between field or property annotation.
The tasks involved in creating a custom constraint are independent of the level to which the custom constraint is applied. We need to perform these tasks to create a custom constraint:
1. Create a constraint annotation.2. Implement a constraint validator.
We will describe these tasks in detail in the subsequent sections.
Attribute-level custom constraintYou use attribute-level custom constraints similarly to built-in constraints, except that attribute-level custom constraints are not provided by the Bean Validation framework. Instead, the developer defines these annotations in the application code.
Attribute-level sampleIn Example 9-1 on page 232, we used built-in constraints @Min and @Max to verify that an account’s balance stays within defined boundaries. This attribute-level custom constraint example shows how to achieve the same result by using only a single constraint. We
Annotation concepts: For the following sections, it is advantageous if you already know about annotation techniques. A large part of custom constraints is related to annotation concepts, so familiarity with these concepts is favorable but not absolutely required.
Refer to the following developerWorks article to develop custom annotations:
http://www.ibm.com/developerworks/java/library/j-annotate2.html
Chapter 9. Java Persistence API Bean Validation 233

introduce a new custom validation annotation called @Between. Example 9-2 on page 234 shows the Account class with the @Between constraint assigned to the balance field. We do not use the @Min and @Max annotations.
Example 9-2 Custom attribute annotation sample
public class Account implements Serializable {...@NotNull 01@Between(min=-10000, max=1000000) 02private BigDecimal balance;...
The following numbers refer to the numbered lines that are highlighted in Example 9-2:
01 @NotNull is a built-in constraint that verifies if the balance field is null. We copied this constraint from the built-in sample, Example 9-1 on page 232, without any modifications.
02 @Between is a custom constraint that verifies if the balance field is between the given parameters. This constraint replaces the previous use of @Min and @Max annotations.
So far, we have assigned a custom constraint annotation to the balance field of the Account class. To make this custom constraint annotation work, we also need to write the corresponding annotation and validation code. Example 9-3 shows the code for the @Between annotation.
Example 9-3 Custom attribute constraint annotation
package itso.bank.persistence.constraint;
import static java.lang.annotation.ElementType.*;import static java.lang.annotation.RetentionPolicy.*;import java.lang.annotation.Documented;import java.lang.annotation.Retention;import java.lang.annotation.Target;import javax.validation.Constraint;import javax.validation.Payload;
@Target({METHOD, FIELD}) 01@Retention(RUNTIME) 02@Constraint(validatedBy=BetweenValidator.class) 03@Documented 04public @interface Between { 05
String message() default "{itso.bank.persistence.constraint.between}"; 06Class<?>[] groups() default{}; 07Class<? extends Payload>[] payload() default {}; 08float min(); 09float max(); 10
}
234 Getting Started with the Feature Pack for OSGi Applications and JPA 2.0
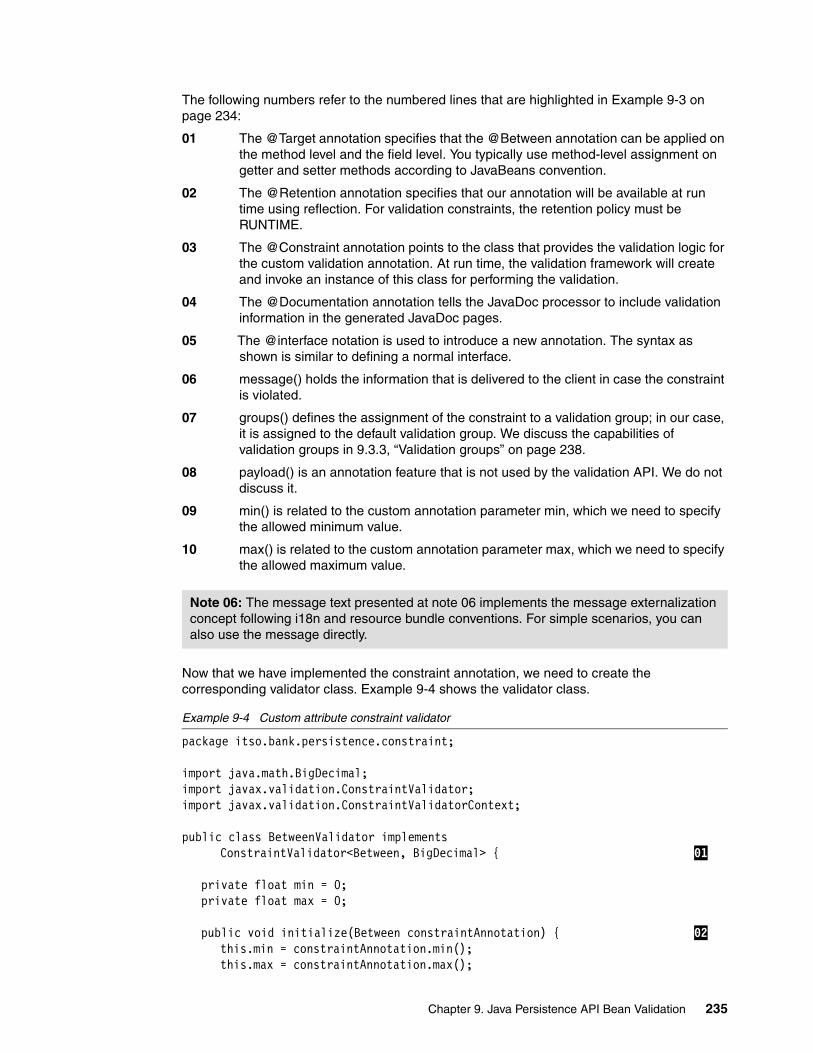
The following numbers refer to the numbered lines that are highlighted in Example 9-3 on page 234:
01 The @Target annotation specifies that the @Between annotation can be applied on the method level and the field level. You typically use method-level assignment on getter and setter methods according to JavaBeans convention.
02 The @Retention annotation specifies that our annotation will be available at run time using reflection. For validation constraints, the retention policy must be RUNTIME.
03 The @Constraint annotation points to the class that provides the validation logic for the custom validation annotation. At run time, the validation framework will create and invoke an instance of this class for performing the validation.
04 The @Documentation annotation tells the JavaDoc processor to include validation information in the generated JavaDoc pages.
05 The @interface notation is used to introduce a new annotation. The syntax as shown is similar to defining a normal interface.
06 message() holds the information that is delivered to the client in case the constraint is violated.
07 groups() defines the assignment of the constraint to a validation group; in our case, it is assigned to the default validation group. We discuss the capabilities of validation groups in 9.3.3, “Validation groups” on page 238.
08 payload() is an annotation feature that is not used by the validation API. We do not discuss it.
09 min() is related to the custom annotation parameter min, which we need to specify the allowed minimum value.
10 max() is related to the custom annotation parameter max, which we need to specify the allowed maximum value.
Now that we have implemented the constraint annotation, we need to create the corresponding validator class. Example 9-4 shows the validator class.
Example 9-4 Custom attribute constraint validator
package itso.bank.persistence.constraint;
import java.math.BigDecimal;import javax.validation.ConstraintValidator;import javax.validation.ConstraintValidatorContext;
public class BetweenValidator implements ConstraintValidator<Between, BigDecimal> { 01
private float min = 0;private float max = 0;
public void initialize(Between constraintAnnotation) { 02this.min = constraintAnnotation.min();this.max = constraintAnnotation.max();
Note 06: The message text presented at note 06 implements the message externalization concept following i18n and resource bundle conventions. For simple scenarios, you can also use the message directly.
Chapter 9. Java Persistence API Bean Validation 235
}
public boolean isValid(BigDecimal value, ConstraintValidatorContextconstraintContext) { 03
if (value != null) {if (value.compareTo(new BigDecimal(min)) != 1 ||
value.compareTo(new BigDecimal(max)) != -1)return false;
}
return true;}
}
The following numbers refer to the numbered lines that are highlighted in Example 9-4 on page 235:
01 Custom constraint validator classes must implement the ConstraintValidator interface. This interface declares two methods: initialize and isValid. The validation framework triggers initialization after the constraint class has been instantiated. Afterward, particular values are validated with calls to isValid. The generic arguments on ConstraintValidator capture the annotation corresponding to the validator and the supported value type.
02 The validation framework triggers the initialize method as soon as it discovers a constraint annotation that needs to be validated. When calling initialize, the validation framework provides an instance of the respective annotation type, in our case, @Between, as a parameter. In the initialize method, we use this parameter to retrieve the min and max parameters, which have been declared as part of the annotation.
03 The isValid method contains the validation logic. When calling isValid, the validation framework delivers the value to be validated and context information as method parameters. A return value of false indicates an invalid value and causes the validation framework to deliver the message, which is defined in the constraint annotation, to the client. In our case, the framework sends the message itso.bank.persistence.constraint.between.
Class-level custom constraintYou use class-level custom constraints in situations where multiple fields of the same class depend on each other and cannot be validated individually. The creation and use of annotation and validator on the class level are similar to attribute-level constraints. We show an example in the next section.
Class-level sampleFor a class-level constraint, consider an address class where the zip code must be validated. The format of zip codes is not the same in all countries. Therefore, we need to provide custom address validation logic for each country. The challenge is that the validation of the zip code depends on the value of the country field. In the case of the ITSO Bank, the requirements demand proof for addresses within the US, but not for non-US addresses. In our sample, US zip codes are a five-digit number.
Validator class name: The name of the validator class that is shown in Example 9-4 on page 235 matches the name that is specified in the validatedBy parameter of the @Constraint annotation in Example 9-3 on page 234.
236 Getting Started with the Feature Pack for OSGi Applications and JPA 2.0

To implement this requirement, we define a custom constraint, USZip, which will be used on the Address class. Example 9-5 on page 237 shows the modified Address class.
Example 9-5 Custom class annotation sample
package itso.bank.persistence.entity;import itso.bank.persistence.constraint.USZip;import java.io.Serializable;import javax.persistence.Embeddable;
@Embeddable@USZip 01public class Address implements Serializable {
private String street;private String city;private String state;private Integer zip;private String country;...
The following number refers to the numbered line that is highlighted in Example 9-5:
01 @USZip annotates the Address class on a class level, because we need to take both the country field and the zip field into account for validation. @USZip is our custom constraint annotation that indicates whether addresses comply with the rule that US zip codes need to have a five-digit number format.
For now, we have assigned a custom constraint annotation to the Address class, but to make this custom constraint annotation work, we also need to write the corresponding annotation and validation code. Example 9-6 shows sample code for the@USZip annotation.
Example 9-6 Custom class constraint annotation
package itso.bank.persistence.constraint;
import static java.lang.annotation.ElementType.*;import static java.lang.annotation.RetentionPolicy.*;import java.lang.annotation.Documented;import java.lang.annotation.Retention;import java.lang.annotation.Target;import javax.validation.Constraint;import javax.validation.Payload;
@Target(TYPE) 01@Retention(RUNTIME)@Constraint(validatedBy=USZipValidator.class)@Documentedpublic @interface USZip {
String message() default "{itso.bank.persistence.constraint.uszip}";Class<?>[] groups() default{};Class<? extends Payload>[] payload() default {};
}
The following number refers to the numbered line that is highlighted in Example 9-6:
01 The @Target annotation defines that our @USZip annotation is only applicable to classes.
Chapter 9. Java Persistence API Bean Validation 237

Now that we have implemented our constraint annotation, we define the corresponding validator class, as shown in Example 9-7 on page 238.
Example 9-7 Custom class constraint validator
package itso.bank.persistence.constraint;
import itso.bank.persistence.entity.Address;
import javax.validation.ConstraintValidator;import javax.validation.ConstraintValidatorContext;
public class USZipValidator implements ConstraintValidator<USZip, Address> {public final static String US_ISO = "US";
public void initialize(USZip constraintAnnotation) {//Do nothing here
}
public boolean isValid(Address address, ConstraintValidatorContext constraintContext) {
if (address != null) {//Just perform validation if country is USif (US_ISO.equals(address.getCountry())) {
//US zip needs to be a five digit numberif (address.getZip() == null ||
address.getZip().intValue() < 10000 || address.getZip().intValue() > 99999) {return false;
} }
}
return true;}
}
With this example, we now have shown you the fundamentals of Bean Validation. We have shown you how to implement custom annotations that are backed with custom validation logic, both on the attribute level and the class level.
9.3.3 Validation groups
Validation groups offer functionality for the categorization of validation rules. Consider our ITSO Bank scenario, where we need to set up use cases, such as withdrawals or deposits. Even though our domain model is the same for both use cases, the validation requirements differ. By assigning constraints to one or more validation groups, we can control the validation rules that are triggered in each scenario and achieve more detailed control over validation logic.
This feature might seem like a mere performance consideration, but it is in fact much more. In complex use cases, there might not be a unified concept of a valid entity any more; instead, validity depends on the scenario. For example, consider accounts that belong to “gold” customers as opposed to normal customers. In our scenario, in the case of a withdrawal from
238 Getting Started with the Feature Pack for OSGi Applications and JPA 2.0

a gold customer’s account, overdraft rules differ from normal customers’ accounts where no overdrafts are possible.
Simple validation groupsTo demonstrate the use of validation groups, we will enhance Example 9-2 on page 234 where we used the @Between constraint to verify that the account’s balance follows defined boundaries. New requirements demand that this validation must take place if the customer is not a gold member. To realize this new requirement, we assign the @Between constraint to a new validation group called NormalCustomerChecks, as shown in Example 9-8.
Example 9-8 Simple validation group scenario
...public class Account implements Serializable {
@Idprivate String id;
@NotNull@Between(min=-10000, max=1000000, groups=NormalCustomerChecks.class) 01private BigDecimal balance;...
The following number refers to the numbered line that is highlighted in Example 9-8:
01 The @Between constraint is assigned to the NormalCustomerChecks group by providing the group name as an argument to the corresponding annotation. By assigning the @Between constraint to the NormalCustomerChecks group, we ensure that this rule is only called if the client explicitly indicates that this group is part of the validation. Example 9-10 shows how the client indicates the validation of defined rules.
Now we know how to assign a constraint to a validation group, but to make this constraint work, we also need to write the corresponding code:
� A marker interface that names the validation group� Client code that calls the group to be validated
Creating a marker interface is straightforward and does not require much explanation. Its only purpose is to assign a name to the group (Example 9-9).
Example 9-9 Group validation marker interface
package itso.bank.persistence.constraint;
public interface NormalCustomerChecks {}
The next step is to create client code that calls the validation group as required. Example 9-10 shows a sample client using the JUnit infrastructure. Next, we discuss validation clients.
Example 9-10 Validation client and validation group functionality
package itso.bank.persistence;
Group assignment: If a constraint is not explicitly assigned to a validation group, it belongs to the Default group.
Chapter 9. Java Persistence API Bean Validation 239

import itso.bank.persistence.constraint.NormalCustomerChecks;import itso.bank.persistence.entity.Account;
import java.math.BigDecimal;import java.util.Set;import javax.validation.ConstraintViolation;import javax.validation.Validation;import javax.validation.Validator;import javax.validation.ValidatorFactory;
import junit.framework.TestCase;
/** * <b>Description:</b><br> * JUnit-Tests for demonstrating bean validation functionality. */public class BeanValidationTest extends TestCase {
/** * Test method for demonstrating simple validation groups. */public void testSimpleValidationGroup() {
ValidatorFactory validatorFactory = Validation.buildDefaultValidatorFactory(); 01
Validator validator = validatorFactory.getValidator(); 02Set<ConstraintViolation<Account>> constraintViolation = null;
//Test with triggering betweenAccount account = new Account();account.setBalance(new BigDecimal(-10000));constraintViolation = validator.validate(account,
NormalCustomerChecks.class); 03assertTrue(constraintViolation.iterator().next()
.getConstraintDescriptor().getAnnotation().toString()
.indexOf("itso.bank.persistence.constraint.between") > -1); 04
//Test without triggering betweenconstraintViolation = validator.validate(account); 05assertTrue(constraintViolation.size() == 0);
}}
The following numbers refer to the numbered lines that are highlighted in Example 9-10 on page 239:
01 As the entry point into the Bean Validation API, we retrieve a ValidatorFactory instance from a static builder method.
02 From the ValidatorFactory instance, we retrieve a validator object, which we use to initialize the validation on our beans.
03 Using the validate method of the Validator instance, we call validation on the account object that we created previously. As an additional parameter to the account object, we have provided the NormalCustomerChecks.class, which defines the validation group in context.
240 Getting Started with the Feature Pack for OSGi Applications and JPA 2.0

04 As a result of the validation, the validator object returns a set of ConstraintViolation instances. One instance of a ConstraintViolation indicates one violated constraint. As part of the ConstraintViolation, the message that we have defined in the @Between annotation is returned.
05 In the last two lines, we call the validate method again, this time without a validation group. Because the @Between constraint is not part of the Default validation group, it will not trigger, and hence, there are no validation constraint violations.
The Validator’s validate method supports more than one validation group as the input parameter, which supports the common case where a validation rule must be active in more than only one scenario. Example 9-11 shows how our code looks if the default group must also be validated. With this change, the last assertion now fails.
Example 9-11 Validate method with multiple validation groups provided
...constraintViolation = validator.validate(account, Default.class,
NormalCustomerChecks.class);...
Sequenced validation groupsValidation groups have another use case in sequencing validations. By default, the sequence in which validation rules are triggered is undefined. There are nevertheless situations where a specific order is required. Bean Validation offers facilities for this use case.
To demonstrate the use of sequenced validation groups, we enhance Example 9-11 where we have used the NotNull and @Between constraints for validation purposes. Based on efficiency considerations, we have decided to change our code so that the @Between constraint is only called in case the balance field is not null. One major benefit is that the code in the custom validators can be more focussed on validating a single constraint as opposed to also checking constraints, which are already covered through various annotations. In Example 9-4 on page 235, we can remove the redundant null check.
This decision implies that we first need to use the NotNull constraint for a not null validation and afterward the @Between constraint for further checks. The decision implies further that if the NotNull constraint fails, the @Between constraint is not called. All of the implications can be met by using a sequenced validation group where we assign the NotNull constraint to the Default and the @Between constraint to the NormalCustomerChecks group. We then only need to make sure that both groups are validated and that the Default group is validated first.
The following artifacts are required to create a sequenced validation group:
� A marker interface to name the validation group and validation sequence� Client code that calls the sequenced validation group
Example 9-12 shows the marker interface for a sequenced validation group.
Example 9-12 Sequenced validation group interface
package itso.bank.persistence.constraint;
import javax.validation.GroupSequence;import javax.validation.groups.Default;
@GroupSequence({Default.class, NormalCustomerChecks.class})01public interface SequencedChecks {
Chapter 9. Java Persistence API Bean Validation 241

}
The following number refers to the numbered line that is highlighted in Example 9-12 on page 241:
01 The sequence in which validation groups is called is indicated by the annotation @GroupSequence, whose parameters correspond to the ordered validation group list. In our case, the Default group is called before the NormalCustomerCheck group.
Example 9-13 shows how our validation client calls the sequenced valiation group that we created Example 9-12 on page 241. In fact, the only change is that we supply the SequencedChecks instead of the NormalCustomerChecks group as a parameter.
Example 9-13 Sequenced validation group client
...constraintViolation = validator.validate(account, SequencedChecks.class);...
9.4 Combining JPA 2.0 and Bean Validation
In this section, we discuss the additional features that are available to JPA 2.0 if Bean Validation is integrated. We discuss how to integrate both providers and how to best use these additional features.
First, we discuss the integration of Bean Validation and JPA 2.0 from a high-level view. We explain how to perform the integration and describe the available configuration options. Then, we provide a hands-on scenario where we set up a Rational Application Developer workspace with JUnit and the WebSphere Application Server test environment. The workspace provides the basis for the JPA samples that are shipped as part of the additional material. The samples provide a JPA 2.0 application with integrated Bean Validation functionality. We also describe this application.
9.4.1 JPA 2.0 with integrated Bean Validation
In a Java Platform, Enterprise Edition (JEE) environment, you enable both JPA 2.0 and Bean Validation by adding their specific libraries to the class path. JPA 2.0 also provides the means for explicitly enabling or disabling Bean Validation integration. You configure this capability in the JPA’s persistence.xml file where you choose one of the following options for the validation mode:
� Auto
Auto is the default. Bean Validation is enabled for JPA if a Bean Validation provider is found in the class path.
� Callback
Bean Validation is enabled, and a respective provider needs to be present. If no provider can be found, an exception is called.
@GroupSequence: You can also assign the annotation @GroupSequence to beans, which overwrites the Default group definition for this class.
242 Getting Started with the Feature Pack for OSGi Applications and JPA 2.0

� None
Bean Validation is disabled for JPA.
Example 9-14 shows the persistence.xml file with configured CALLBACK validation mode.
Example 9-14 Persistence.xml with callback validation mode
<?xml version="1.0" encoding="UTF-8"?><persistence version="2.0" xmlns="http://java.sun.com/xml/ns/persistence" xmlns:xsi="http://www.w3.org/2001/XMLSchema-instance" xsi:schemaLocation="http://java.sun.com/xml/ns/persistence http://java.sun.com/xml/ns/persistence/persistence_2_0.xsd">
<persistence-unit name="ITSOBank"><class>itso.bank.persistence.entity.Customer</class><class>itso.bank.persistence.entity.Address</class><class>itso.bank.persistence.entity.Account</class><class>itso.bank.persistence.entity.Transaction</class><class>itso.bank.persistence.entity.Phone</class><class>itso.bank.persistence.entity.PhoneType</class><validation-mode>CALLBACK</validation-mode> 01<properties>
<property name="javax.persistence.jdbc.url" 02value="jdbc:derby:<DB_HOME>\ITSOBANK"/>
<property name="javax.persistence.jdbc.driver" 03value="org.apache.derby.jdbc.EmbeddedDriver"/>
<property name="javax.persistence.jdbc.user" value=""/> 04<property name="javax.persistence.jdbc.password" value=""/> 05
</properties></persistence-unit>
</persistence>
The following numbers refer to the numbered lines that are highlighted in Example 9-14:
01 The validation mode is set to CALLBACK, thus requiring JPA 2.0 to depend on Bean Validation support.
02-05 With JPA 2.0, the most common properties in the persistence.xml file have been standardized.
Bean Validation functionality within JPA 2.0 is automatically called by the provider as part of the JPA life cycle processing. Supported events include PrePersist, PreUpdate, and PreRemove. Each time that a respective event is fired, for example, during insert or update procedures, the Bean Validation API is called to perform entity validation. By default, validation is enabled for the Default validation group and for the PrePersist and PreUpdate events, but not for the PreRemove event. If this default configuration needs to be changed, you change it in the persistence.xml file.
Now that you know how to enable and configure Bean Validation for use in JPA 2.0, we discuss the JPA client code. In fact, the required changes are only related to the exception handling. In the case of validation failures, Bean Validation functionality triggers a ConstraintViolationException, which contains a Set of ConstraintViolation objects. ConstraintViolation objects provide information about detected validation failures and contain, for example, the message text. For more information, see Example 9-3 on page 234. It is up to the client to decide, based on the metainformation that is provided by the ConstraintViolation objects, how to handle the failures. Example 9-15 on page 244 shows a JPA 2.0 client realized as a JUnit test in a Java Platform, Standard Edition (JSE) environment.
Chapter 9. Java Persistence API Bean Validation 243

The test provokes a validation failure by updating an account instance with an uninitialized balance field.
Example 9-15 JPA 2.0 and Bean Validation client code in a JSE environment
/*** Test method for demonstrating JPA bean validation integration.*/public void testJPABeanValidationIntegration() {
try {entityManager.getTransaction().begin();
Account account = entityManager.find(Account.class, "001-111001");account.setBalance(null); 01
entityManager.getTransaction().commit(); 02fail("No exception during testJPABeanValidationIntegration");
} catch (ConstraintViolationException cve) { 03
Set<ConstraintViolation<?>> constraintViolation = cve.getConstraintViolations();
assertTrue(constraintViolation.iterator().next().getConstraintDescriptor().getAnnotation().toString().indexOf("javax.validation.constraints.NotNull") > -1);
} catch (Exception ex) {
entityManager.getTransaction().rollback();logger.severe(ex.getMessage());fail("Wrong exception during testJPABeanValidationIntegration");
}}
The following numbers refer to the numbered lines that are highlighted in Example 9-15:
01 Our test needs to invoke a validation failure that is caused by an uninitialized balance field. We therefore load an account entity from the database and set its balance field to null.
02 While committing our changes, the JPA 2.0 provider calls the Bean Validation functionality to verify our account object’s balance field. As you might recall from Example 9-2 on page 234, the account’s balance field is annotated with a NotNull constraint.
03 Our test expects the retrieval of a ConstraintValidationException holding a NotNull message to indicate the validation failure.
To show the integration of Apache Bean Validation and JPA for the WebSphere Application Server persistence provider in the WebSphere run time, we create a web application consisting of a simple client servlet. Example 9-16 shows the servlet, which retrieves an account instance from the database, sets the balance field to null, and attempts to commit the changes to the database.
Example 9-16 JPA 2.0 and Bean Validation client code in a JEE environment
/** * Servlet implementation class JPABeanValidationTest */public class JPABeanValidationTest extends HttpServlet {
244 Getting Started with the Feature Pack for OSGi Applications and JPA 2.0

private static final long serialVersionUID = 1L;private static Logger logger =
Logger.getLogger(JPABeanValidationTest.class.getName());
protected void doGet(HttpServletRequest request, HttpServletResponse response) throws ServletException, IOException {
process(request, response);}
protected void doPost(HttpServletRequest request, HttpServletResponse response)throws ServletException, IOException {
process(request, response);}
private void process(HttpServletRequest request, HttpServletResponse response) throws ServletException, IOException {
EntityManagerFactory entityManagerFactory = null;EntityManager entityManager = null;
response.setContentType("text/html;charset=UTF8");PrintWriter out = response.getWriter(); 01beginHtml(out);
try {entityManagerFactory =
Persistence.createEntityManagerFactory("ITSOBank"); 02entityManager = entityManagerFactory.createEntityManager(); 03
entityManager.getTransaction().begin(); 04Account account = entityManager.find(Account.class, "001-111001"); 05account.setBalance(null);entityManager.getTransaction().commit(); 06out.println("Everything just worked fine."); 07
}catch (ConstraintViolationException cve) { 08
logger.info(cve.getMessage());out.println("The test case successfully detected a validation
failure:<br>" + cve.getMessage());} catch (Exception ex) {
logger.severe(ex.getMessage());ex.printStackTrace(out);
}finally {
closeHtml(out);}
}
private void beginHtml(PrintWriter out) {out.println("<html><head><title>");out.println("JPABeanValidationTest");out.println("</title></head>");out.println("<body>");
}
Chapter 9. Java Persistence API Bean Validation 245
private void closeHtml(PrintWriter out) {out.println("</body>");out.println("</head>");
}}
The following numbers refer to the numbered lines that are highlighted in Example 9-16 on page 244:
01 The servlet writes plain html back to the response stream to inform the user about the state of the processing.
02, 03 As in earlier JPA client code, we need to retrieve EntityManagerFactory and EntityManager instances as hooks into the JPA.
04 Because we have chosen and configured unmanaged transactions in the persistence.xml file, we need to manage the transaction handling by opening and closing transaction boundaries. For Bean Validation, the choice of managed or unmanaged JPA is inconsequential.
05 We retrieve an account instance from the database for setting its balance field to null later.
06 When we commit the transaction, the NotNull constraint that is defined on the balance field triggers a validation failure, which leads to a ConstraintViolationException.
07 The message “Everything just worked fine” actually never needs to be displayed. Processing jumps from commit directly to the ConstraintViolationException catch block.
08 We catch the ConstraintViolationException and display and log the message.
9.4.2 Installation and integration of JPA 2.0 and Bean Validation
JPA 2.0 and Bean Validation support both Java Platform, Standard Edition (JSE) and Java Platform, Enterprise Edition (JEE) environments. Next, we describe how support for Bean Validation and JPA 2.0 is enabled in both of these environments. We discuss the installation and configuration steps based on a hands-on sample. We start with Rational Application Developer and the feature pack installed. We end running JUnit tests and having a working application.
Figure 9-2 on page 247 shows an overview of the JUnit and the WebSphere Application Server test environment for our JPA samples. If an artifact is shown in both of the environments, it is the same artifact.
Bean Validation and JPA in Open Service Gateway initiative (OSGi) applications: At the time that this book was written, OSGi did not support integrating bean validation and JPA 2.0. Even with the Bean Validation provider installed as described in this section, the javax.validation packages are not visible to the OSGi JPA bundle, and hence, you cannot use bean validation in OSGi applications.
246 Getting Started with the Feature Pack for OSGi Applications and JPA 2.0
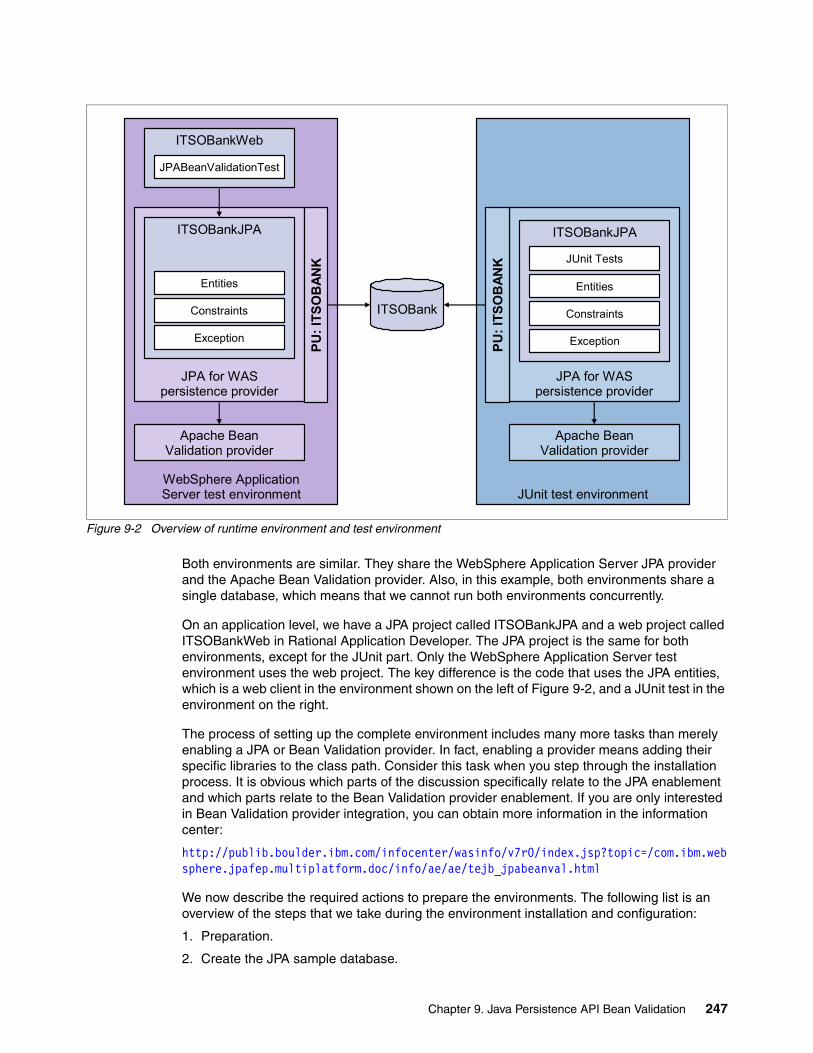
Figure 9-2 Overview of runtime environment and test environment
Both environments are similar. They share the WebSphere Application Server JPA provider and the Apache Bean Validation provider. Also, in this example, both environments share a single database, which means that we cannot run both environments concurrently.
On an application level, we have a JPA project called ITSOBankJPA and a web project called ITSOBankWeb in Rational Application Developer. The JPA project is the same for both environments, except for the JUnit part. Only the WebSphere Application Server test environment uses the web project. The key difference is the code that uses the JPA entities, which is a web client in the environment shown on the left of Figure 9-2, and a JUnit test in the environment on the right.
The process of setting up the complete environment includes many more tasks than merely enabling a JPA or Bean Validation provider. In fact, enabling a provider means adding their specific libraries to the class path. Consider this task when you step through the installation process. It is obvious which parts of the discussion specifically relate to the JPA enablement and which parts relate to the Bean Validation provider enablement. If you are only interested in Bean Validation provider integration, you can obtain more information in the information center:
http://publib.boulder.ibm.com/infocenter/wasinfo/v7r0/index.jsp?topic=/com.ibm.websphere.jpafep.multiplatform.doc/info/ae/ae/tejb_jpabeanval.html
We now describe the required actions to prepare the environments. The following list is an overview of the steps that we take during the environment installation and configuration:
1. Preparation.
2. Create the JPA sample database.
JUnit test environment
JPA for WASpersistence provider
WebSphere ApplicationServer test environment
JPA for WASpersistence provider
ITSOBankJPA ITSOBankJPA
Entities
Constraints
Exception
JUnit Tests
Entities
Constraints
Exception
ITSOBankWeb
JPABeanValidationTest
Apache BeanValidation provider
PU
: IT
SO
BA
NK
PU
: IT
SO
BA
NK
Apache BeanValidation provider
ITSOBank
Chapter 9. Java Persistence API Bean Validation 247

3. Prepare the Rational Application Developer workspace:
a. Create the EAR project.
b. Create the JPA project.
c. Create the web project.
4. Configure the WebSphere Application Server test environment.
5. Install the JPA samples.
6. Run the tests:
a. Run the JUnit tests.
b. Run the web application.
PreparationDuring our hands-on sample demonstration, we use variable names when referencing file system locations. Table 9-2 shows a list of these variables and their locations in our environment. Any time that you see a listed variable, you need to replace it with the value that is appropriate for your environment.
Table 9-2 File system variables
Product configurationWe have tested the installation and configuration on the following product configuration:
� Microsoft Windows XP� Rational Application Developer V8.0� WebSphere Application Server test environment V7.0.0.11� WebSphere Application Server V7 Feature Pack for OSGi Applications and JPA 2.0 1.0.0� Apache Derby 10.2
Required librariesFor our samples, we depend on Apache Bean Validation. Download the components that are shown in Table 9-3 on page 249 and store them in <TEMP>/10_itso-bank_jpa_crit-api_bean-val/libraries. You can get the Apache Commons libraries from the Apache Commons page at this website:
http://commons.apache.org
You can get the Bean Validation libraries from the Apache Bean Validation incubator page:
http://incubator.apache.org/bval/cwiki/downloads.html
Variable Description Location
<RAD_HOME> Rational Application Developer installation directory
C:\RAD
<DB_HOME> ITSOBank database directory C:\jpa-itsobank-samples\database
<TEMP> Temporary directory C:\Temp
<WAS_HOME> WebSphere Application Server test environment directory
<RAD_HOME>\SDP\runtimes\base_v7
Download materials: All JPA sample content is provided as additional material in the 10_itso-bank_jpa_crit-api_bean-val.zip file. Extract the file to your <TEMP> local temporary directory.
248 Getting Started with the Feature Pack for OSGi Applications and JPA 2.0

Table 9-3 Apache Bean Validation and dependent libraries
Create the JPA sample database
To make the scripts runnable in your specific environment, you need to modify the <WAS_HOME> variable contained in the scripts. Make sure that the <WAS_HOME> variable in the following scripts points to the runtime root directory of the WebSphere Application Server V7 Test Environment:
� DerbyCreate.bat� DerbyLoad.bat� DerbyList.bat
Example 9-17 shows the statement in the scripts that you might need to adjust.
Example 9-17 Derby scripts WAS_HOME variable
SET WAS_HOME=C:\RAD\SDP\runtimes\base_v7
If you have adjusted the variable in all three scripts, copy all of the files that are contained in <TEMP>/10_itso-bank_jpa_crit-api_bean-val/database to the <DB_HOME> directory. Execute the scripts, DerbyCreate.bat and DerbyLoad.bat, in this order. The scripts will create the physical database structure and populate the tables with test data.
To verify that the setup was successful, execute the DerbyList.bat script, which queries the database. The output shows four results for the first query and twelve results for the other three queries.
Component Version Required library
Apache Commons BeanUtils 1.8.3 commons-beanutils-1.8.3.jar
Apache Commons Lang 2.4 commons-lang-2.4.jar
Apache Commons Logging 1.1.1 commons-logging-api-1.1.1.jar
Apache Bean Validation Core 0.2 bval-core-0.2-incubating.jar
Apache Bean Validation JSR-303 0.2 bval-jsr303-0.2-incubating.jar
Apache Geronimo Bean Validation Spec API 1.1 geronimo-validation_1.0_spec-1.1.jar
Download material: As part of the additional material in Appendix A, “Additional material” on page 263, we provide scripts for setting up and populating the JPA ITSOBank database automatically. You can obtain the scripts in the <TEMP>/10_itso-bank_jpa_crit-api_bean-val/database directory.
To create the database, it is important that you use the database setup scripts that are delivered with 10_itso-bank_jpa_crit-api_bean-val.zip.
We also provide database setup scripts for the OSGi samples. Using the latter scripts creates an incompatible database and leads to failures when running the JPA samples.
Derby database instance: Executing DerbyCreate.bat creates a new directory called <DB_HOME>\ITSOBANK. This directory is our Derby ITSOBank database instance.
Chapter 9. Java Persistence API Bean Validation 249

Prepare the Rational Application Developer workspaceFor our samples, we need to set up a Rational Application Developer workspace, which consists of the following three projects:
� ITSOBankEAR ITSOBankEAR is an enterprise archive (EAR) file that reflects our JEE deployment time assembly. The ITSOBankEAR hosts the ITSOBankWeb module, the ITSOBankJPA utility JAR, and the Apache Bean Validation libraries. The EAR is relevant for the WebSphere Application Server test environment and for our JSE-based JUnit test environment.
� ITSOBankJPA The ITSOBankJPA is a JPA project that hosts our created JPA and Bean Validation artifacts, including the source code. It holds the JUnit test classes for verifying JPA and Bean Validation functionality. The JPA project is exactly the same for both environments: WebSphere Application Server test environment and JUnit test environment.
� ITSOBankWeb The ITSOBankWeb is a web project that hosts the servlet in Example 9-16 on page 244. The servlet demonstrates JPA and Bean Validation integration in a JEE environment. The web project is used in the WebSphere Application Server test environment and is also used in our JSE-based JUnit test environment.
The following sections describe the creation procedures for the ITSOBank projects. We have separated the project creation procedure, which includes the installation and configuration of the environment, from the installation of the actual sample, thus fostering reuse.
250 Getting Started with the Feature Pack for OSGi Applications and JPA 2.0

Create the ITSOBankEAR projectThe EAR project ITSOBankEAR represents the deployment container for our JEE-based WebSphere Application Server test environment. It bundles the ITSOBankWeb module, the ITSOBankJPA utility JAR, and the Apache Bean Validation libraries. To create the ITSOBankEAR project, perform the following tasks:
1. Choose the Java EE perspective in Rational Application Developer, and right-click in the Enterprise Explorer view. On the context menu, choose New, and click Project, as shown in Figure 9-3.
Figure 9-3 Project creation wizard
2. In the upcoming New Project window, choose Java EE Enterprise Application Project, and click Next.
3. On the New EAR Application Project window, type ITSOBankEAR as the Project name, and click Finish.
The creation of the ITSOBankEAR is now finished. We can configure the project for its use in the WebSphere Application Server test environment.
Configure the ITSOBankEAR projectThe WebSphere Application Server test environment run time requires access to Apache Bean Validation libraries. As part of the ITSOBankEAR configuration process, we add the
Chapter 9. Java Persistence API Bean Validation 251

Bean Validation libraries as utility JARs to the ITSOBankEAR. To add the Apache Bean libraries to the ITSOBankEAR, perform the following tasks:
1. Right-click the ITSOBankEAR Project in the Rational Application Developer workspace, and choose Import Java EE Utility JAR.
2. In the Import window that opens, choose Copy Utility JARs into an existing EAR from an external location, and click Next.
3. Choose the External JAR directory by clicking Browse. On the Browse for Folder window, navigate to <TEMP>/10_itso-bank_jpa_crit-api_bean-val/libraries, and click OK.
4. A list of JAR files is displayed in the Utility JARs and web libraries section. Select all of the displayed libraries, and click Finish.
The EAR project configuration is finished for now. When we create the JPA and web projects, Rational Application Developer will automatically add them to the EAR.
Create the ITSOBankJPA projectNext, we create the JPA project ITSOBankJPA. The project will host our JPA sample code, including the JUnit tests. To create the ITSOBankJPA project, perform the following tasks:
1. Choose the Java EE perspective in Rational Application Developer, and right-click in the Enterprise Explorer view. On the upcoming context menu, click New, and choose Project.
2. In the New Project window, choose JPA JPA Project, and click Next.
3. On the New JPA Project window, type ITSOBankJPA as the Project name (Figure 9-4 on page 253). Then, click Next.
Shared libraries: Libraries can also be provided as shared libraries to the WebSphere Application Server environment. The difference to the approach previously described is the visibility context. In the case of the EAR file, the visibility is limited to archive boundaries. In the case of the shared library approach, libraries can be shared across applications. See WebSphere Application Server V7 Administration and Configuration Guide, SG24-7615, for information about shared libraries.
252 Getting Started with the Feature Pack for OSGi Applications and JPA 2.0

Figure 9-4 New JPA Project: JPA Project section
We now create a new source folder called test for hosting our JUnit test code. We also want to configure our JPA project for separating java source files from class files.
4. Choose Add Folder.
5. In the Add Source Folder window, type test as the Name of the new source folder, and click OK.
6. Back on the New JPA Project window, type bin as the default output folder. The New JPA Project window is similar to Figure 9-5 on page 254. Verify the information, and click Next.
Chapter 9. Java Persistence API Bean Validation 253

Figure 9-5 New JPA Project: Java section
254 Getting Started with the Feature Pack for OSGi Applications and JPA 2.0

7. On the New JPA Project window, in the JPA Facet section, we choose Create mapping file (orm.xml), as shown in Figure 9-6, and click Finish to complete the ITSOBankJPA creation.
Figure 9-6 New JPA Project: JPA Facet section
Configure the ITSOBankJPA projectThe ITSOBankJPA configuration process includes updating the Java Build Path and JPA 2.0 metamodel configuration. In the case of the Java Build Path, we need to add libraries for Apache Bean Validation, Derby, JUnit, and JPA support. In the case of the JPA 2.0 metamodel, we need to set the source folder for the metamodel generation. By setting the source folder, metamodel files are automatically generated from JPA entities. Metamodel files are required for JPA Criteria API functionality.
Chapter 9. Java Persistence API Bean Validation 255

To configure the ITSOBankJPA project, perform the following tasks:
1. Right-click the ITSOBankJPA project, and choose Properties.
2. In the Properties for ITSOBankJPA window, choose Java Build Path in the navigation section of the window:
a. To add Apache Bean Validation libraries, choose Add JARs in the Libraries tab. In the resulting window, choose all of the JARs that are contained in the ITSOBankEAR folder, then click OK.
b. To add Derby support, choose Add Library in the Libraries tab. In the resulting window, choose Connectivity Driver Definition, and click Next. Choose Derby 10.2 - Embedded JDBC Driver Default as the driver definition, and click Finish.
c. To add JUnit support, choose Add Library in the Libraries tab. In the resulting window, choose JUnit, and click Next. Choose JUnit 4 as JUnit Library Version, and click Finish.
d. To add JPA support, choose Add External JARs in the Libraries tab. In the resulting window, navigate to <WAS_HOME>\feature_packs\jpa\runtimes. Add the library com.ibm.ws.jpa.thinclient_JPA2FEP1.0.0.jar, and then, click Finish.
By now, your Java Build Path looks similar to Figure 9-7.
Figure 9-7 Properties for ITSOBankJPA: Java Build Path Libraries tab
3. For the last step in the Java Build Path configuration, we need to ensure that the Apache Commons Lang library commons-lang-2.4.jar is in the Java Build Path order higher than the WebSphere Application Server V7.0 libraries. If it is not, the JUnit tests will not fail,
JPA support: JPA support is added for JSE environments, such as the JUnit test environment. For JEE and the WebSphere Application Server test environment, the libraries are included by default and do not need to be added to the deployment bundle.
256 Getting Started with the Feature Pack for OSGi Applications and JPA 2.0

because an older version of the commons-lang library from the WebSphere Application Server runtime libraries is used. Follow these steps:
a. Choose the Order and Export tab in the Java Build Path section of the Properties for ITSOBankJPA window.
b. Select commons-lang-2.4.jar - ITSOBankEAR and move the entry up until it is directly over the WebSphere Application Server v7.0 entry. Figure 9-8 shows the correct order of the Java Build Path entries.
Figure 9-8 Properties for ITSOBankJPA: Java Build Path Order and Export tab
4. Choose Java Persistence in the navigation section of the Properties for ITSOBankJPA window.
5. In the Java Persistence section, set .apt_generated as the source folder for the Canonical metamodel (JPA 2.0). Then, click OK.
Create the ITSOBankWeb projectIn this step, we create the web project ITSOBankWeb. The project hosts our web sample code.
Failure message: If you see the failure message java.lang.NoSuchMethodError: org/apache/commons/lang/ClassUtils.getClass(Ljava/lang/String;)Ljava/lang/Class; when running the JUnit tests later, you probably got the order of the Java Build Path entries wrong.
Chapter 9. Java Persistence API Bean Validation 257

Follow these steps:
1. Choose the Java EE perspective in Rational Application Developer, and right-click in the Enterprise Explorer view. On the context menu, choose Project.
2. In the New Project window, choose Dynamic Web Project, and click Next.
3. On the New Dynamic Web Project window, type ITSOBankWeb as the Project name, and click Finish.
Configure the ITSOBankWeb projectNow, we need to configure the deployment assembly for the ITSOBankWeb project by again using the Properties window of the project:
1. Right-click the ITSOBankWeb project, and choose Properties.
2. In the Properties for ITSOBankWeb window, choose Deployment Assembly in the navigation section of the window.
3. In the Manifest Entries tab, click Add and select all of the manifest entries that are displayed in the upcoming list, and then, click Finish.
4. Back on the Properties window, click OK.
Configure the WebSphere Application Server test environmentTo enable Apache Bean Validation in the WebSphere Application Server test environment, we need to provide the location of the Bean Validation provider API. You must repeat this step for all of the WebSphere Application Server instances where JPA 2.0 and Bean Validation will be used in conjunction:
1. Start the WebSphere Application Server test environment, log in to the administrative console, and navigate to the Custom properties section of the Java virtual machine by selecting Application servers server1 Process definition Java Virtual Machine Custom properties.
2. In the Custom properties section, enter an additional property, as shown in Figure 9-9:
Name: com.ibm.websphere.validation.api.jar.path
Value: <location of file geronimo-validation_1.0_spec-1.1.jar>
Figure 9-9 Configuring WebSphere Application Server with the validation API path
258 Getting Started with the Feature Pack for OSGi Applications and JPA 2.0

3. Refresh the WebSphere Application Server OSGi cache by using the command <WAS_HOME>/bin/osgiCfgInit.bat -all.
Install the JPA samplesYou install the JPA samples by copying the prepared sample code artifacts to the ITSOBankJPA and ITSOBankWeb projects. The procedure follows a simple copy and paste scenario where you use Microsoft Windows Explorer to copy directories or files from a source folder to the clipboard. In Rational Application Developer, you paste the artifacts from the clipboard to a target folder.
Copy the sample code to the ITSOBankJPA projectTo install the JPA elements, you need to copy the following artifacts:
� Copy directory itso from <TEMP>\10_itso-bank_jpa_crit-api_bean-val\code\ITSOBankJPA\src to the src directory in project ITSOBankJPA.
� Copy directory itso from <TEMP>\10_itso-bank_jpa_crit-api_bean-val\code\ITSOBankJPA\test to the test directory in project ITSOBankJPA.
� Copy the files orm.xml and persistence.xml from the directory <TEMP>\10_itso-bank_jpa_crit-api_bean-val\code\ITSOBankJPA\src\META-INF to the src\META-INF directory in project ITSOBankJPA.
Adjust the persistence.xml file by configuring the property javax.persistence.jdbc.url according to your environment.
The installation of the JPA code is finished, which allows us to execute the JUnit tests. To execute the tests, see “Run the JUnit tests” on page 260.
Copy the sample code to the ITSOBankWeb projectTo install the web elements, you need to copy the following artifacts:
� Copy directory itso from <TEMP>\10_itso-bank_jpa_crit-api_bean-val\code\ITSOBankWeb\src to the src directory in project ITSOBankWeb.
Making libraries available at run time: The geronimo-validation_1.0_spec-1.1.jar library contains the Bean Validation specification API. At run time, the same library needs to be available to the WebSphere Application Server run time and the JPA project. This requirement is why we need to provide the library location as a JVM custom property to WebSphere Application Server. Even though we have bundled the library in our ITSOBankEAR, it will have no effect at run time. Instead, the library from the provided location will be used. In a non-sample environment, we exclude the geronimo-validation_1.0_spec-1.1.jar library from deployment with the EAR file.
In contrast to the Bean Validation specification API jar, the other libraries that are added to the EAR (see Table 9-3 on page 249 for a list) represent either provider libraries or libraries that are used by provider libraries. They do not need to be available to the WebSphere Application Server run time; bundling them only as part of the EAR file is a valid approach.
Chapter 9. Java Persistence API Bean Validation 259

Run the testsThis section describes the tasks for preparing and running the tests for the JUnit and WebSphere Application Server test environments. Both sets of tests depend on the same database instance; therefore, do not run them concurrently.
Run the JUnit testsTo run the JUnit tests, we prepare a run configuration for our ITSOBankJPA JUnit tests:
1. Right-click the project ITSOBankJPA, and choose Run As Run Configurations.
2. On the resulting Run Configurations window, double-click JUnit in the navigation section. Rational Application Developer creates a new JUnit Run Configuration called ITSOBankJPA and displays its Test tab. On the Test tab, choose JUnit 4 as the Test Runner.
3. On the Arguments tab of the Run Configuration window, set the VM arguments to -javaagent:<WAS_HOME>\plugins\com.ibm.ws.jpa.jar, as shown in Figure 9-10 on page 261. Replace the <WAS_HOME> variable in the argument according to your environment.
The -javaagent argument: The VM argument -javaagent lets the JVM automatically enhance the entities as they are loaded into the JVM. The argument is only required for JSE environments. In JEE environments, the Application Server handles entity enhancement automatically. For more information, go to this website:
http://people.apache.org/~mprudhom/openjpa/site/openjpa-project/manual/ref_guide_pc_enhance.html
260 Getting Started with the Feature Pack for OSGi Applications and JPA 2.0

Figure 9-10 ITSOBankJPA Run Configurations
4. Click Run on the Run Configurations window (Figure 9-10) to execute the JUnit test cases. If you have set up everything correctly, all 21 test cases will run successfully, as shown in Figure 9-11 on page 262.
Chapter 9. Java Persistence API Bean Validation 261

Figure 9-11 JSE sample test success panel
Run the JEE testsTo run the JEE tests on the WebSphere Application Server test environment, right-click the JPABeanValidationTest.java file found in the ITSOBankWeb project under Java Resources src itso.bank.web.servlet. Choose Run As Run on Server. On the Run on Server window, click Finish. Rational Application Developer now starts the WebSphere Application Server test environment, deploys the ITSOBankEAR, and calls the test servlet.
If the test runs successfully, a browser window will display the message that is shown in Figure 9-12.
Figure 9-12 JEE sample test success pane
Calling the test servlet: You can call the test servlet from your own browser by using the following URL. In the case of failures, make sure that the port (9080 in the example) is correct for your environment.
http://localhost:9080/ITSOBankWeb/servlet/itso.bank.web.servlet.JPABeanValidationTest
262 Getting Started with the Feature Pack for OSGi Applications and JPA 2.0

Appendix A. Additional material
This book refers to additional material that can be downloaded from the Internet as described below.
Locating the web material
The web material associated with this book is available in softcopy on the Internet from the IBM Redbooks web server. Point your web browser at:
ftp://www.redbooks.ibm.com/redbooks/SG247911
Alternatively, you can go to the IBM Redbooks website at:
ibm.com/redbooks
Select the Additional materials and open the directory that corresponds with the IBM Redbooks form number, SG247911.
Using the web material
The additional web material that accompanies this book includes the following files:
File name Description
01_itso-bank_rad-sample.zipBasic Open Service Gateway initiative (OSGi) sample scenarios. This sample is used in Chapter 5, “Developing OSGi applications” on page 67.
02_itso-bank_with_update_and_sharing.zipOSGi sample scenarios covering update and sharing. This sample is used in Chapter 5, “Developing OSGi applications” on page 67 and Chapter 6, “OSGi applications and managing change” on page 135.
03_itso-bank_with_sca.zipComplete set of OSGi and Service Component Architecture (SCA)
A
© Copyright IBM Corp. 2010. All rights reserved. 263

integration scenarios. This sample is used in Chapter 7, “Connecting OSGi applications” on page 163.
04_itso-bank_with_sca_jee2osgi.zipJava Platform, Enterprise Edition (JEE)-specific OSGi and SCA integration scenarios. This sample is used in Chapter 7, “Connecting OSGi applications” on page 163.
05_itso-bank_with_sca_osgi2osgi.zipOSGi to OSGi integration scenarios based on SCA. This sample is used in Chapter 7, “Connecting OSGi applications” on page 163.
06_itso-bank_jms_text.zipJava Message Service (JMS) text messaging scenarios. This sample is used in Chapter 7, “Connecting OSGi applications” on page 163.
07_itso-bank_jms_object.zipJMS complex-type messaging scenarios. This sample is used in Chapter 7, “Connecting OSGi applications” on page 163.
08_itso-bank_dynamic_webapp.zipOSGi scenarios exploring dynamics in OSGi. This sample is used in Chapter 6, “OSGi applications and managing change” on page 135.
10_itso-bank_jpa_crit-api_bean-val.zipJava Persistence API (JPA) scenarios demonstrating bean validation and the Criteria API. The sample contains material that is discussed in Chapter 3, “Introduction to the Java Persistence API 2.0” on page 37, Chapter 8, “Java Persistence API Criteria API” on page 215, and Chapter 9, “Java Persistence API Bean Validation” on page 229.
How to use the web material
Create a subdirectory (folder) on your workstation, and extract the contents of the web material zip file into this folder.
Web material structure
The web material covers samples for OSGi and JPA 2.0. The samples for both topics are separate from each other and do not have any relationship.
The samples are delivered as multiple compressed files. File starting with “0”, such as 01_itso-bank_rad-sample.zip contain OSGi samples. Files starting with “1” contain JPA 2.0 samples. For an overview, look at “Using the web material” on page 263.
OSGi samples
OSGi samples are delivered using multiple zip files. Files starting with “0”, such as 01_itso-bank_rad-sample.zip contain OSGi samples.
OSGi only: The installation and configuration procedure that is described in this section relates to only the OSGi application samples and are not applicable for JPA 2.0 samples.
264 Getting Started with the Feature Pack for OSGi Applications and JPA 2.0

Configuring the WebSphere Application Server v7 target run timeTo work with the Service Component Architecture (SCA) sample scenarios, you must configure the WebSphere Application Server v7 target run time to recognize additional dependencies. The following dependencies need to be added to the target run time:
� Simple Logging Facade for Java (SLF4J)� Apache Commons Logging� SCA API (originating from the WebSphere Feature Pack for SCA)
Follow these steps to edit your target runtime definition for WebSphere Application Server v7:
1. Open the Target Platform Preferences editor by navigating to Window Preferences and then clicking Plugin-Development Target Platform.
2. Make sure that WebSphere Application Server v7.0 is the active target platform, as shown in Figure A-1, and select it from the list. Click Edit.
Figure A-1 OSGi requires WebSphere Application Server V7.0 as a target platform
3. On the Locations tab, click Add, select Directory, and click Next. Add the location to SLF4J to your target platform as shown in Figure A-2. Click OK. You can download SLF4J from http://www.slf4j.org/.
Figure A-2 Adding Simple Logging Facade for Java to the target platform
Appendix A. Additional material 265

4. Switch to the Content tab to selectively choose which SLF4J artifact to make part of the target platform. Select the following plug-ins from the list of available plug-ins, as shown in Figure A-3:
a. slf4j.apib. slf4j.simple
Figure A-3 Adding specific SLF4J artifacts to the target platform
5. Again, switch back to the Locations tab to add Apache Commons Logging to the target platform. Click Add, select Directory, and click Next.
266 Getting Started with the Feature Pack for OSGi Applications and JPA 2.0

6. You can locate Apache Commons Logging in $RAD_INSTALL_ROOT/runtimes/base_v7/plugins, as shown in Figure A-4.
Figure A-4 Adding Apache Commons Logging to the target platform
Appendix A. Additional material 267

7. On the Contents tab, only select com.ibm.ws.prereq.commons-logging to add to the target platform, as shown in Figure A-5.
Figure A-5 Adding specific Apache Commons Logging artifacts to the target platform
8. Finally, use the Locations tab to add the SCA API to the target platform. You can obtain the SCA API in $RAD_INSTALL_ROOT/runtimes/base_v7/feature_packs/sca/plugins.
268 Getting Started with the Feature Pack for OSGi Applications and JPA 2.0

9. In the Contents tab, select the SCA API artifacts that are shown in Figure A-6 to add to the target platform.
Figure A-6 Adding specific SCA API artifacts to the target platform
10.Click Finish.
11.Click OK to close the Preferences window.
Appendix A. Additional material 269

Importing the sample projectsPerform these steps to import this pre-existing material into a new Rational Application Developer workspace:
1. In the Enterprise Explorer view of the Java EE perspective, right-click and choose Import Import, as shown in Figure A-7.
Figure A-7 Importing preliminary sample material
2. In the Import wizard, expand the General node and select Existing Projects into Workspace, as shown in Figure A-8. Click Next.
Figure A-8 Importing existing sample project
3. On the Import Projects wizard page, choose Select archive file, and click Browse.
270 Getting Started with the Feature Pack for OSGi Applications and JPA 2.0

4. Select the sample archive to import, for example: C:\osgisample\02_itso-bank_with_update_and_sharing.zip. Ensure that every project has been selected for import, as shown in Figure A-9.
Figure A-9 Sample material to be used for the SCA scenarios
5. Click Finish to import every project into your workspace.
Appendix A. Additional material 271

Set up the ITSOBANK database (Apache Derby)We implement the ITSOBANK database as an Apache Derby database for all chapters. The following procedure illustrates how to set up the ITSOBANK Apache Derby database:
1. Extract the ITSOBANK database files from itsobank_db_derby.zip into the (root) C:\directory. Figure A-10 shows a listing of these files.
Figure A-10 ITSOBANK database files for Apache Derby
2. Open the following files in a text editor:
– DerbyCreate.bat– DerbyLoad.bat– DerbyList.bat
3. Modify the paths on the first three lines to match the installation directory of WebSphere Application Server:
SET WAS_HOME=C:\WAS_HOMESET JAVA_HOME=C:\WAS_HOME\javaSET DERBY_HOME=C:\WAS_HOME\derby
4. Run DerbyCreate.bat to create the database schema and tables, which creates an ITSOBANK directory that contains the database. See Figure A-11.
Figure A-11 ITSOBANK database directory
5. Run DerbyLoad.bat to load the banking application data into the database.
6. Run DerbyList.bat to test the database and list all its contents. See Example A-1.
Example: A-1 Database listing
Y:\Chapters\sample\database\itsobank_db_derby>java -cp "C:\WAS\SDP\runtimes\base_v7\derby\lib\derby.jar;C:\WAS\SDP\runtimes\base_v7\derby\lib\derbytools.jar" org.apache.derby.tools.ij list.bat
Note the database directory: Keep the full path of the database directory handy. We use when configuring the JAP-specific data source for the ITSOBANK OSGi application, specifically, its persistence bundle.
The path is C:/Database/ITSOBANK.
272 Getting Started with the Feature Pack for OSGi Applications and JPA 2.0

ij version 10.3ij> connect 'jdbc:derby:ITSOBANK';ij> run 'itsobanklist.sql';ij> SELECT ssn, char(title,5) as TITLE, char(firstname,10) as FIRSTNAME, char(lastname,10) as LASTNAME FROM ITSO.CUSTOMER ORDER BY ssn;SSN |TITLE|FIRSTNAME |LASTNAME----------------------------------------111-11-1111 |Mr |John-One |Doe-One222-22-2222 |Mr |John-Two |Doe-Two333-33-3333 |Ms |John-Three|Doe-Three999-99-9999 |Mr |John-Four |Doe-Four
4 rows selectedij> SELECT * FROM ITSO.ACCOUNTS_CUSTOMERS;ACCOUNT_ID |CUSTOMER_SSN-----------------------------001-111001 |111-11-1111001-111002 |111-11-1111001-111003 |111-11-1111002-222001 |222-22-2222002-222002 |222-22-2222002-222003 |222-22-2222003-333001 |333-33-3333003-333002 |333-33-3333003-333003 |333-33-3333009-999001 |999-99-9999009-999002 |999-99-9999009-999003 |999-99-9999
12 rows selectedij> SELECT * FROM ITSO.ACCOUNT ORDER BY id;ID |BALANCE---------------------------001-111001 |12345.67001-111002 |6543.21001-111003 |98.76002-222001 |65484.23002-222002 |87.96002-222003 |654.65003-333001 |9876.52003-333002 |568.79003-333003 |21.56009-999001 |66666.66009-999002 |6666.66009-999003 |66.66
12 rows selectedij> SELECT char(id,14) as ID, char(transtype,8) as TYPE, transtime, account_id, amount FROM ITSO.TRANSACTIONS ORDER BY transtime;ID |TYPE |TRANSTIME |ACCOUNT_ID |AMOUNT------------------------------------------------------------------------------0000013 |Credit |1943-01-07 10:30:20.0 |009-999001 |9999.990000010 |Debit |1943-01-07 10:30:20.0 |003-333001 |9999.99
Appendix A. Additional material 273

0000001 |Credit |1990-01-01 23:23:23.0 |001-111001 |2222.220000002 |Debit |1994-02-02 10:11:12.0 |001-111001 |800.800000003 |Credit |1997-03-03 15:16:17.0 |001-111001 |21.500000004 |Credit |1998-04-04 22:22:22.0 |002-222001 |1000.110000005 |Credit |2001-05-05 13:44:20.0 |002-222001 |876.540000006 |Debit |2002-06-06 12:12:12.0 |002-222001 |3.330000011 |Debit |2003-07-07 14:14:14.0 |009-999001 |6666.660000008 |Credit |2003-07-07 14:14:14.0 |003-333001 |6666.660000012 |Credit |2004-01-08 23:03:20.0 |009-999001 |700.770000009 |Debit |2004-01-08 23:03:20.0 |003-333001 |700.77
12 rows selectedij> SELECT * FROM SHOP.ITEM;ID |NAME |QUANTITY--------------------------------------------------------1001 |THINKPAD |101002 |z901 |11003 |WAS 6.1 |51004 |Eclipse 3.2 |201005 |FP for EJB 3.0 |15
5 rows selectedij> disconnect all;ij> exit;
Acquiring third-party materialPart of the sample material has dependencies on third-party libraries that are provided by the Apache Software Foundation. If you want to run an application, find the third-party-material.txt text files, which indicate the material that needs to be downloaded from the web and where to place it. The following list is an example of the third-party material dependencies that are required by the itso.bank.web OSGI web application bundle:
� Apache Commons Beanutils Version 1.6, which is available at this website:
http://commons.apache.org/beanutils/
� Apache Commons Collections Version 2.1, which is available at this website:
http://commons.apache.org/collections/
� Apache Commons Digester Version 1.5, which is available at this website:
http://commons.apache.org/digester/
� Apache Commons Logging Version 1.0.3, which is available at this website:
http://commons.apache.org/logging/
� Apache Struts Version 1.1, which is available at this website:
http://struts.apache.org/
JPA 2.0 samples
JPA 2.0 samples are contained in 10_itso-bank_jpa_crit-api_bean-val.zip. You can obtain documentation discussing the installation and configuration process in 9.4.2, “Installation and integration of JPA 2.0 and Bean Validation” on page 246.
274 Getting Started with the Feature Pack for OSGi Applications and JPA 2.0

Sample material: OSGi and JPA 2.0 samples have been kept separate. Chapter 9, “Java Persistence API Bean Validation” on page 229 provides all of the required information to configure the environment and install the samples. You must take the provided JPA 2.0 sample material only from file 10_itso-bank_jpa_crit-api_bean-val.zip. Using any other material will lead to failures. This is true for the JPA database, which has a separate structure from the OSGi sample database.
Appendix A. Additional material 275

276 Getting Started with the Feature Pack for OSGi Applications and JPA 2.0

Related publications
The publications listed in this section are considered particularly suitable for a more detailed discussion of the topics covered in this book.
IBM Redbooks publications
For information about ordering these publications, see “How to get IBM Redbooks publications” on page 278. Note that several of the documents referenced here might be available in softcopy only.
� Getting Started with WebSphere Application Server Feature Pack for Service Component Architecture, REDP-4633
� WebSphere Application Server V7 Administration and Configuration Guide, SG24-7615
� WebSphere Application Server Version 6.1 Feature Pack for EJB 3.0, SG24-7611
� Rational Application Developer V7.5 Programming Guide, SG24-7672
� WebSphere Application Server V7 Messaging Administration Guide, SG24-7770
Online resources
These web sites are also relevant as further information sources:
� Home page of the OSGi alliance
http://www.osgi.org
� OSGi Service Platform specifications
http://www.osgi.org/Specifications/HomePage
� Eclipse Equinox OSGi implementation
http://eclipse.org/equinox/
� WebSphere Application Server v7 Information Center for the Feature Pack for OSGi Applications and JPA 2.0
http://publib.boulder.ibm.com/infocenter/wasinfo/v7r0/index.jsp?topic=/com.ibm.websphere.jpafep.multiplatform.doc/info/ae/ae/welcome_fepjpa.html
� Developing enterprise OSGi applications for WebSphere Application Server
http://www.ibm.com/developerworks/websphere/techjournal/1007_robinson/1007_robinson.html
� Best practices for developing and working with OSGi applications
https://www.ibm.com/developerworks/websphere/techjournal/1007_charters/1007_charters.html
� Apache Software Foundation: Aries project
http://incubator.apache.org/projects/aries.html
© Copyright IBM Corp. 2010. All rights reserved. 277

� IBM Education Assistant: IBM WebSphere Application Server Feature Pack for OSGi Applications and Java Persistence API 2.0
http://publib.boulder.ibm.com/infocenter/ieduasst/v1r1m0/index.jsp?topic=/com.ibm.iea.wasfposgi/plugin_coverpage.html
� Service Component Architecture Feature Pack Information Center
http://publib.boulder.ibm.com/infocenter/wasinfo/v7r0/topic/com.ibm.websphere.soafep.multiplatform.doc/info/ae/ae/welcome_fepsca.html
� WebSphere Application Server v7 Information Center
http://publib.boulder.ibm.com/infocenter/wasinfo/v7r0/index.jsp
� IBM Education Assistant: Feature Pack for Service Component Architecture
http://publib.boulder.ibm.com/infocenter/ieduasst/v1r1m0/topic/com.ibm.iea.wasfpsca/plugin_coverpage.html
� Exploring the WebSphere Application Server Feature Pack for SCA, Part 1: An overview of the Service Component Architecture feature pack
http://www.ibm.com/developerworks/websphere/library/techarticles/0812_beck/0812_beck.html
� Exploring the WebSphere Application Server Feature Pack for SCA, Part 5: Protocol bindings for Service Component Architecture services
http://www.ibm.com/developerworks/websphere/library/techarticles/0904_beck/0904_beck.html
� Design and develop SCA components using the Spring Framework, Part 1: The trifecta: Spring, SCA, and Apache Tuscany
http://www.ibm.com/developerworks/opensource/library/os-springsca1/
� Design and develop SCA components using the Spring Framework, Part 2: Advanced techniques using Apache Tuscany
http://www.ibm.com/developerworks/opensource/library/os-springsca2/index.html
How to get IBM Redbooks publications
You can search for, view, or download IBM Redbooks publications, Redpapers, web docs (Technotes), draft publications and Additional materials, as well as order hardcopy IBM Redbooks publications, at this web site:
ibm.com/redbooks
Help from IBM
IBM Support and downloads
ibm.com/support
IBM Global Services
ibm.com/services
278 Getting Started with the Feature Pack for OSGi Applications and JPA 2.0

(0.5” spine)0.475”<
->0.873”
250 <->
459 pages
Getting Started with the Feature Pack for OSGi Applications and JPA 2.0
Getting Started with the Feature Pack
for OSGi Applications and JPA 2.0
Getting Started with the Feature
Pack for OSGi Applications and JPA 2.0
Getting Started with the Feature Pack for OSGi Applications and JPA 2.0

Getting Started with the Feature
Pack for OSGi Applications and JPA 2.0
Getting Started with the Feature
Pack for OSGi Applications and JPA 2.0


®
SG24-7911-00 ISBN 0738434965
INTERNATIONAL TECHNICALSUPPORTORGANIZATION
BUILDING TECHNICAL INFORMATION BASED ON PRACTICAL EXPERIENCE
IBM Redbooks are developed by the IBM International Technical Support Organization. Experts from IBM, Customers and Partners from around the world create timely technical information based on realistic scenarios. Specific recommendations are provided to help you implement IT solutions more effectively in your environment.
For more information:ibm.com/redbooks
®
Getting Started with the Feature Pack for OSGi Applications and JPA 2.0
Experience the new frontier of OSGi enterprise componentry creation
Apply persistence based on Java Persistence API 2.0
Build, deploy, and integrate OSGi applications
This IBM Redbooks publication introduces OSGi applications and JPA 2.0 technology and describes their implementation in the Feature Pack for OSGi Applications and JPA 2.0 for WebSphere Application Server 7.0.
The book will help you understand the position of these new technologies as well as how to use them for Java enterprise development in a WebSphere Application Server environment. Though synergetic, both technologies can be used in isolation.
This publication is structured to appeal to administrators, application developers, and all those individuals using the technologies together or independently.
The book is split into two parts. Part 1, “Architecture and overview” on page 1 introduces OSGi applications and JPA 2.0 and describes how to set up a development and test environment. Part 2, “Examples” on page 55 uses examples to illustrate how to exploit the features of OSGi applications and JPA 2.0.
Back cover