glass door merchandiser models rm-10 rm-26 rm-49 could result in electric shock, injury, fire, or...
TRANSCRIPT

Number: MAN-227-RIssued: 02-22-2017Revised:
Glass Door Merchandiser
ModelsRM-10RM-26RM-49

2
RM-26RM-10
RM-49

3
Only qualified service technicians should install and service the appliance. To obtain the name and phone number of your local Hoshizaki Certified Service Representative, visit www.hoshizaki.com. No installation or service should be undertaken until the technician has thoroughly read this Instruction Manual. Likewise, the owner/manager should not proceed to operate the appliance until the installer has instructed them on its proper operation. Failure to install, operate, and maintain the appliance in accordance with this manual may adversely affect safety, performance, component life, and warranty coverage. Proper installation is the responsibility of the installer. Product failure or property damage due to improper installation is not covered under warranty.
Hoshizaki provides this manual primarily to assist qualified service technicians in the installation, maintenance, and service of the appliance.
Should the reader have any questions or concerns which have not been satisfactorily addressed, please call, send an e-mail message, or write to the Hoshizaki Technical Support Department for assistance.
Phone: 1-800-233-1940; (770) 487-2331Fax: 1-800-843-1056; (770) 487-3360
E-mail: [email protected]
HOSHIZAKI AMERICA, INC.618 Highway 74 SouthPeachtree City, GA 30269Attn: Hoshizaki Technical Support Department
Web Site: www.hoshizaki.com
NOTE: To expedite assistance, all correspondence/communication MUST include the following information:
• Model Number ____________________________• Serial Number _____________________________• Complete and detailed explanation of the problem.
WARNING

4
TABLE OF CONTENTS
Introduction ...............................................................Important safety information .....................................Know your equipment ...............................................Check for shipping damage ......................................Handling the cabinet ................................................Remove the crate and skid .......................................Level the cabinet .......................................................Electrical installation ..................................................Installing the shelves .................................................Start up the cooler .....................................................Use of your cooler with Carel electronic thermostat...Cleaning and preventive maintenance ......................Troubleshooting chart ................................................
55910111212131516161819

5
Important Safety Information Throughout this manual, notices appear to bring your attention to situations which could result in death, serious injury, damage to the appliance, or damage to property.
WARNING Indicates a hazardous situation which could result in death or serious injury. NOTICE Indicates a situation which could result in damage to the appliance or property.
IMPORTANT Indicates important information about the use and care of the appliance.
This appliance should be destined only to the use for which it has been expressly conceived. Any other use should be considered improper and therefore dangerous. The manufacturer cannot be held responsible for injury or damage resulting from improper, incorrect, and unreasonable use. Failure to install, operate, and maintain the appliance in accordance with this manual will adversely affect safety, performance, component life, and warranty coverage.
To reduce the risk of death, electric shock, serious injury, or fire, follow basic precautions including the following:
• Only qualified service technicians should install and service this appliance. • This appliance must be installed in accordance with applicable national,
state, and local codes and regulations. • To reduce the risk of electric shock, do not touch the power switch or plug
with damp hands. • This appliance requires an independent power supply of proper
capacity. See the nameplate for electrical specifications. Failure to use an independent power supply of proper capacity can result in a tripped breaker, blown fuse, damage to existing wiring, or component failure. This could lead to heat generation or fire.
WARNING
INTRODUCTIONThis manual contains instructions for installation, operation and general maintenance of your unit. It also includes a Troubleshooting Chart to diagnose problems along with corrective actions.

6
WARNING, continued• 115VAC Models: THIS APPLIANCE MUST BE GROUNDED: This appliance
is equipped with a NEMA 5-15 three-prong grounding plug to reduce the risk of potential shock hazards. It must be plugged into a properly grounded, independent 3-prong wall outlet. If the outlet is a 2-prong outlet, it is your personal responsibility to have a qualified electrician replace it with a properly grounded, independent 3-prong wall outlet. Do not remove the ground prong from the plug and do not use an adapter plug. Failure to follow these instructions may result in death, electric shock, or fire.
• 208-230VAC Models: THIS APPLIANCE MUST BE GROUNDED: This appliance is equipped with a NEMA L14-20 four-prong locking, grounding plug xx to reduce the risk of potential shock hazards. It must be plugged into a properly grounded, independent 4-prong wall outlet. If the outlet is a 3-prong outlet or a 4-prong non-locking outlet, it is your personal responsibility to have a qualified electrician replace it with a properly grounded, independent 4-prong locking wall outlet. Do not remove the ground prong from the plug and do not use an adapter plug. After plugging in, twist the plug clockwise to lock it into place. Failure to follow these instructions may result in death, electric shock, or fire.
• Do not use an extension cord. • Do not use an appliance with a damaged power cord. The power cord
should not be altered, jerked, bundled, weighed down, pinched, or tangled. Such actions could result in electric shock or fire. To unplug the appliance, be sure to pull the plug, not the cord, and do not jerk the cord. Before unplugging a 4-prong plug, rotate the plug counter-clockwise to unlock it.
• The GREEN ground wire in the factory-installed power cord is connected to the appliance. If it becomes necessary to remove or replace the power cord, be sure to connect the power cord's ground wire.
• Do not splash, pour, or spray water directly onto or into the appliance. This might cause short circuit, electric shock, corrosion, or failure.
• Do not make any alterations to the appliance. Alterations could result in electric shock, injury, fire, or damage to the appliance.
• This appliance is not intended for use by persons (including children) with reduced physical, sensory, or mental capabilities, or lack of experience and knowledge, unless they have been given supervision or instruction concerning use of the appliance by a person responsible for their safety.
• Children should be properly supervised around this appliance. • Do not climb, stand, or hang on the appliance or door or allow children
or animals to do so. Do not climb into the appliance or allow children or animals to do so. Death or serious injury could occur or the appliance could be damaged.

7
WARNING, continued
• Be careful not to pinch fingers when opening and closing the doors. Be careful when opening and closing the doors when children are in the area.
• Open and close the doors with care. Doors opened too quickly or forcefully may cause injury or damage to the appliance or surrounding equipment.
• Do not use combustible spray or place volatile or flammable substances in or near the appliance. They might catch fire.
• Keep the area around the appliance clean. Dirt, dust, or insects in the appliance could cause harm to individuals or damage to the equipment.
• Do not throw anything onto the shelves or load any single shelf with more than 120 lb. (54.5 kg) of product. They might fall off and cause injury.
• Do not place anything on top of the appliance. Foreign objects or moisture could enter the appliance and result in electric shock or fire.
• This appliance is designed only for storage of food. Employ sanitary methods. Use for any other purposes (for example, storage of chemicals or medical supplies such as vaccine and serum) could cause deterioration of stored items.
• Do not block the cabinet air inlet or outlet, otherwise cooling performance may be reduced.
• Do not tightly pack the cabinet. Allow some space between items to ensure good air flow. Also allow space between items and interior surfaces.
• Do not place any product on the floor of the cabinet. All product must be placed on properly installed shelves.
• Do not put warm or hot foods in the cabinet. Let them cool first, or they will raise the cabinet temperature and could deteriorate other foods in the cabinet or overload the appliance.
• All foods should be wrapped in plastic film or stored in sealed containers. Otherwise foods may dry up, pass their smells onto other foods, cause frost to develop, result in poor appliance performance, or increase the likelihood of cross-contamination. Certain dressings and food ingredients, if not stored in sealed containers, may accelerate corrosion of the evaporator, resulting in failure.
• Do not store items near the air outlet. They might freeze up and crack or break causing a risk of injury or contamination of other food.
• This unit must be installed and located appropriately, following the installation instructions before its use.
• Do not allow children to climb, step or hang onto the shelves inside the cooler. That could damage the unit and cause serious injuries to them.
• Do not touch the cold surfaces of the cooler with your hands wet or with moisture. The skin can stick to these cold surfaces.

8
NOTICE• Protect the floor when moving the appliance to prevent damage to the
floor.
• Keep ventilation openings, in the appliance enclosure or in the built-in structure, clear of obstruction. Do not place anything on top of the appliance. Blockage of airflow could negatively affect performance and damage the appliance.
• To prevent deformation or cracks, do not spray insecticide onto the plastic parts or let them come into contact with oil.
• To avoid damage to the gasket, use only the door handle when opening and closing.
WARNING, continued• Do not store gasoline or other flammable liquids or gases, near this or
other electrical equipment.• Keep your fingers away from grills; the spaces between doors and cabinet
are small, so be careful when closing doors when children are around.• Unplug the cooler before cleaning or performing any repair.

9
KNOW YOUR EQUIPMENT
LIGHT SWITCH
ELECTRONICTHERMOSTAT
DOOR
METAL CLIP
FRONT GRILL
CONDENSER
SKID
POWER CORD
BACK GRILL
SHELF
LEVELING LEG

10
CHECK FOR SHIPPING DAMAGEPrior to leaving the factory, each cabinet is throughly inspected and performance tested to assure proper operating temperatures.
Check the crate thoroughly for signs of shipping damage. If external damage exists, internal damage is also probable. Uncrating should be done while the carrier´s representative is present. Otherwise, the equipment should be uncrated as soon as possible, preferably within five (5) days.
The manufacturer is not responsible for in-transit damage and the consignee must file any required damage claims directly with the carrier.
If the damage is severe and obvious, write a brief description of the evidence on the carrier’s delivery receipt, and above the carrier representative’s signature. Call the distributor or dealer immediately, indicating that the cabinet was damaged.
If no obvious crate damage is present, within two hours of receiving the cabinet from the carrier, remove the packaging to inspect for concealed damage.
1. If concealed damage is found, call the carrier immediately, save all crating materials, and file the necessary freight claim with the carrier.
Check for accesories: Check that the shelves are inside the refrigerator, including the four clips or supports for each shelf.

11
HANDLING THE CABINET1. Always move the unit in an upright position. Do not set it on its side or upside
down as you may damage the cabinet and spill the compressor oil.
2. If lifting the unit, hold it from its base. It is recommended to use a dolly.
3. Do not let the unit fall abruptly.
4. Place the cabinet on a surface solid enough to prevent vibration and strong enough to support the combined weight of the cabinet and the product load. Quick guideline: Estimate 35 pounds per cubic foot of storage space.
5. Cabinets should never be placed in front of windows or glass doors where sunlight will be in direct contact with the units. If a cabinet is located near a window or glass door, provide an adequate shade to block the sun´s rays.
6. Ambient temperature must be between 60°F and 86°F. Low ambient temperatures below 50° F are as harmful as high ambient temperatures. Extreme temperatures will definitely affect the performance of the cabinet.
7. Failure to properly level the cabinet could hinder proper drainage and door operation. Leveling legs are provided with the cabinets. Level the cabinet by using the adjustable portion of the leveling legs as needed.
8. Clearance: Leave a space of at least 8” between the back of the cabinet and the wall to provide adequate air circulation of the unit compartment.
8”

12
REMOVE THE CRATE AND SKID
LEVEL THE CABINET
To lower, turnclockwise
Leveling leg
To raise, turn counterclockwise
1. Remove the external packaging (corrugated board and plastic wrapping). Check for concealed damage. If any damage is identified, immediately forward a complaint to the transportation company.
2. Move the cooler the closest possible to its final location, before removing the skid.
3. Using a screwdriver remove the screws that fix the skid to the cooler.
The base of the refrigerator has heavy duty leveling legs underneath so the cabinet may be leveled appropriately and to allow room to clean beneath the cabinet.Level the cabinet front to back and side to side with a level by using the adjustable portion of the leveling legs. This is vey important to insure proper draining and door operation.
13
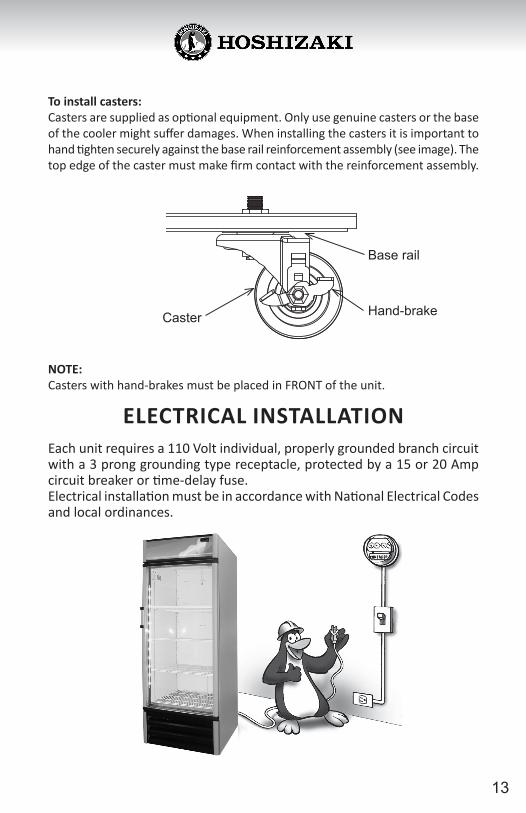
To install casters:Casters are supplied as optional equipment. Only use genuine casters or the base of the cooler might suffer damages. When installing the casters it is important to hand tighten securely against the base rail reinforcement assembly (see image). The top edge of the caster must make firm contact with the reinforcement assembly.
Each unit requires a 110 Volt individual, properly grounded branch circuit with a 3 prong grounding type receptacle, protected by a 15 or 20 Amp circuit breaker or time-delay fuse. Electrical installation must be in accordance with National Electrical Codes and local ordinances.
ELECTRICAL INSTALLATION
Caster
Base rail
NOTE:Casters with hand-brakes must be placed in FRONT of the unit.
Hand-brake
14
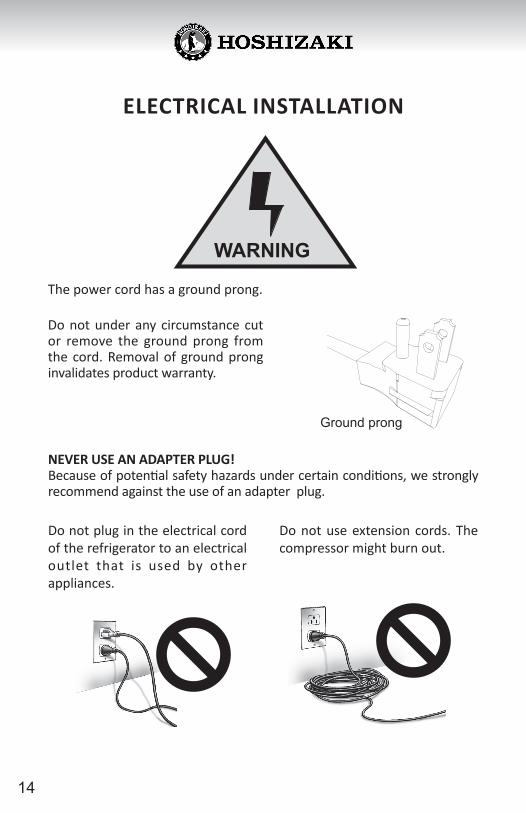
ELECTRICAL INSTALLATION
Do not under any circumstance cut or remove the ground prong from the cord. Removal of ground prong invalidates product warranty.
Ground prong
WARNING
The power cord has a ground prong.
NEVER USE AN ADAPTER PLUG!Because of potential safety hazards under certain conditions, we strongly recommend against the use of an adapter plug.
Do not plug in the electrical cord of the refrigerator to an electrical outlet that is used by other appliances.
Do not use extension cords. The compressor might burn out.

15
INSTALLING THE SHELVESShelves and shelf clips (4 clips per shelf) are packed inside the cabinet prior to shipment. After selecting the appropriate spacing inside the cabinet, install shelf clips by inserting top of clip inside the pilaster and then press the lower section of the clip while pushing inwards until it snaps into place. Repeat until all clips are in desired location. Place shelf on clips checking that all four corners of shelves are leveled and supported by the four shelf clips.
Pilaster
Metal clip

16
This controller has a feature to reduce energy consumption during the closing hours of your locale. To activate this feature press the ES button on the controller. In this refrigerator, the Energy Saving mode has been programmed to turn off the lights for one hour, or until the door is opened. The Energy Saving mode can also be deactivated by pressing the ES button, which will turn the lights back on.
1. Plug in the electrical cord of the unit to a wall outlet, following the recommendations about electrical installation in this manual.
2. Let the cooler run with no product load for 2 hours, or let the compressor complete three on/off cycles to assure that the temperature inside is appropriate for the products before loading them into the refrigerator.
3. Verify the internal illumination operation by activating the on and off switch.
4. When placing products in the cooler, you should leave small gaps between one and the other to assure free circulation of air inside the cabinet.
5. Do not leave the door open for extended periods of time, to avoid increased temperature of the products.
6. Do not unplug your cooler during the night, since when you turn it back on during the day the electrical consumption will increase.
The temperature of a cooler should be between 34°F to 40°F.
USE OF YOUR COOLER WITH CAREL ELECTRONIC THERMOSTAT
These coolers are provided with a versatile electronic thermostat that allows to cool different beverages.
To turn off the lights of the cooler press the light bulb symbol.
E N E R GY S AV I N G M O D E SELECTOR
START UP THE COOLER

17
Energy saving modeselector
Lights off
Sound alarms off
Ambient sensor failure
Open door Close the door
Low temperature alarm
High temperature alarm
Refrigeration systemfailure
Report to HoshizakiTechnical Support
Report to HoshizakiTechnical Support
Report to HoshizakiTechnical Support
Report to HoshizakiTechnical Support
ES
setmute
ES
Note: The sound alarm can be turned off by pressing the red button ”set mute” on the right side of the display.
In case the alarm is not turned off by the actions suggested, or you have any questions regarding the cooler performance, please contact to the Hoshizaki Technical Support.
CONTROLLER DISPLAY
If the display shows a number, the cooler is working inoptimal conditions and no technical service is needed
ALARM INDICATES WHAT TO DO?
CAREL ALARM INDICATORS

18
Your unit requires very little maintenance. However, periodic cleaning can help maintain efficiency and prolong product life. Remember to disconnect the power source before cleaning. Remove all products and place them in another cooler.
1. Clean once a month the condenser with a grease remover. The condenser is located in the lower part of your unit, behind the front grill.
2. Clean the inside and the exterior of your cooler, including the shelves, with a mild soap solution. Do not use strong detergents. Wipe dry the inside of the cooler before loading product again.
3. Let the cooler run with no product load for 2 hours, or let the compressor complete three on/off cycles to assure that the temperature inside is appropriate for the products before loading them into the refrigerator.
CLEANING AND PREVENTIVE MAINTENANCE
ATTENTIONAfter an interruption of the electrical power supply, the compressor will take approximately 3 minutes to start working.
Condenser

19
Compressor will not 1. Power disconnected 1. Check cord for properstart, no noise connection 2. Blown fuse or 2. Replace fuse or breaker reset breaker 3. Defective or broken 3. Repair or replace wiring 4. Defective overload 4. Replace 5. Defective relay 5. Replace Warm storage 1. Defective control 1. Replacetemperatures 2. Not enough 2. Leak check. Change refrigerant drier, evacuate and recharge 3. Cabinet location too 3. Relocate cabinet warm 4. Too much refrigerant 4. Change drier, evacuate and recharge 5. Low voltage, com- 5. Check voltage pressor cycling on supply overload
Compressor runs con- 1. Defective control 1. Replacetinuously-product too 2. Control’s sensor 2. Reposition control sensorcold out of its bracket into its bracket 3. Not enough 3. Leak check. Change refrigerant drier, evacuate and recharge
Compressor runs 1. Not enough 1. Leak check. Changecontinuously-product refrigerant drier, evacuate andtoo warm recharge 2. Inefficient compressor 2. Replace
TROUBLESHOOTING CHART
