glide cycle 500 - trojan
TRANSCRIPT

GLIDE CYCLE 500ELLIPITCAL 7 KG
FLYWHEEL CARDIO
USER MANUAL
Visit facebook.com/trojanhealthwww.trojanhealth.co.za
CAUTIONREAD ALL PRECAUTIONS AND
INSTRUCTIONS IN THIS MANUAL BEFORE USING THIS EQUIPMENT.
KEEP THIS MANUAL FOR FUTURE REFERENCE.

2 TG500
INDEx
• Important Safety Instructions ________________________________ 3
• Pre Assembly Check List ______________________________________ 5
• Hardware & Tools List ________________________________________ 6
• Parts List ____________________________________________________ 7
• Exploded Drawing ___________________________________________ 9
• Assembly Steps ______________________________________________ 10
• Computer Functions __________________________________________ 14
• Exercise Instructions ________________________________________ 15
• Maintenance ________________________________________________ 17
• Troubleshooting _____________________________________________ 17
• Fitness Tips & Techniques _____________________________________ 18
• Conditioning Guidelines _______________________________________ 19
• Warm Up & Cool Down _______________________________________ 20
• 2 Year Limited Warranty ______________________________________ 21
• Repairs Procedure ____________________________________________ 22
• Notes _______________________________________________________ 23

3 TG500
IMPORTANT SAFETY INSTRUCTIONS It is the sole responsibility of the purchaser of Trojan products to read the owner’s manual, warning labels and instruct all individuals, on proper usage of the equipment. Understanding each and every warning to the fullest is important. If any of these instructions or warnings are unclear please contact Trojan Customer Services on 0861 TROJAN (0861 876526), within the Republic of South Africa. Customers residing outside South Africa can contact us on +27 10 206 4405.
The equipment is only intended for home use and is not intended for commercial, institutional and/or studio facilities use.
Contact Trojan with any questions regarding this classification. It is recommended that all users of Trojan be informed of the following information prior to use.
HEALTH WARNING
• Before starting any exercise or conditioning program you should consult with your personal physician to see if you require a complete physical exam. This is especially important if you are inactive, pregnant or suffer from any illness.
• If at any time during exercise you feel faint, dizzy or experience pain, stop exercising immediately and consult your physician.
• To avoid muscular pain and strain, begin each workout by stretching and warming up and end each session by cooling down and stretching.
INSTALLATION
Trojan recommends that all equipment:• Be secured to or set up on a solid, level surface to stabilise and eliminate rocking or tipping over
during training.• Be set up inside your home away from moisture and dust (the equipment is not designed for outdoor use).• Be set up with sufficient ventilation to ensure proper operation.• Be set up with sufficient space around the equipment so that all exercises can be completed safely. It is
recommended that there should be at least 1 m of space around the equipment where access is required to exercise.
PROPER USAGE
• Do not use the equipment in any way other than as designed or intended by the manufacturer. It is imperative that Trojan equipment is used properly to avoid injury.
• Injuries may result from exercising improperly or excessively.• Your Trojan equipment should only be used by one person at a time.• Be careful to maintain your balance while using, mounting, dismounting or assembling your Trojan
equipment to avoid injury.• Do not attempt to adjust the seat or handlebars while you are on your Trojan equipment.• Servicing other than the procedures in this manual should be performed by an authorised service
representative only.

4 TG500
ACCESS CONTROL
• Trojan recommends that all fitness equipment be used in a supervised area. It is recommended that the equipment be located in an access controlled area. Control is the responsibility of the owner. Keep children away from all equipment.
• Parents or others supervising adults must provide close supervision of children if the equipment is used in the presence of children.
INSPECTION
• Do not use or permit use of any equipment that is damaged, or has worn or broken parts. For all Trojan equipment use only replacement parts supplied by Trojan.• Always make sure that all nuts and bolts are tightened prior to each use.• Maintain labels and nameplates – do not remove labels for any reason. They contain important information.• Equipment maintenance – preventative maintenance is the key to smooth operating equipment. Please
ensure that you follow our maintenance tips to ensure the continued correct function of your Trojan equipment.• Before any use, examine all accessories approved for use with the Trojan equipment for damage or wear.• Should your Trojan equipment appear damaged or worn, do not attempt to use or repair the equipment yourself.• Please contact our service department on 0861 TROJAN (0861 876526) to arrange a repair. Customers residing outside South Africa can contact us on +27 10 206 4405.
OPERATING WARNINGS
• It is the purchaser’s responsibility to instruct all users as to the proper operating procedures of all Trojan equipment.• Keep children away from all moving parts. Parents must provide close supervision of children if the
equipment is used in the presence of children.• Do not wear loose fitting clothing or jewellery when using the equipment. It is also recommended that
users tie up long hair to avoid contact with moving parts.• Ensure that anyone not using the equipment stays clear of the user, accessories and moving parts while
the machine is in operation.
USER WEIGHT LIMITATIONS
• This Glide Cycle 500 Elliptical may not be used by persons weighing more than 110 kg.
SAVE THIS INSTRUCTION MANUAL FOR FUTURE USE AND REFERENCE.If any of these instructions or warnings are unclear please contact Trojan Customer Services on 0861 TROJAN (0861 876526) within the Republic of South Africa or visit www.trojanhealth.co.za.Customers residing outside South Africa can contact us on +27 10 206 4405.
IMPORTANT SAFETY INSTRUCTIONS

5 TG500
PRE ASSEMbLY CHECK LIST
Thank you for choosing the Glide Cycle 500 Elliptical. We take great pride in producing this product and hope it
will provide many hours of quality exercise to make you feel better, look better and enjoy life to its fullest. Yes,
it’s a proven fact that a regular exercise program can improve your physical and mental health. Too often, our
busy lifestyles limit our time and opportunity to exercise. The Glide Cycle 500 Elliptical provides a convenient
and simple method to begin your assault on getting your body in shape and achieving a healthier lifestyle.
Before reading further, please review the drawing below and familiarise yourself with the parts that are labelled.
Read this manual carefully before using the Glide Cycle 500 Elliptical.
Tension Control Manual
Function Time / Speed / Distance / Calories
Set-up Size (mm) 1100 (l) x 500 (w) x 1550 (h)
Weight of Flywheel 7 kg
User Weight 110 kg (maximum)
Cross Walk Handles
Computer Console
Pedal
Rear End Stabiliser
Manual Tension Control

6 TG500
HARDWARE & TOOLS LIST
INSTRUCTIONS FOR ASSEMbLy
• Before you start to assemble, please check the hardware packaging to make sure all parts are included.• Basic tools, such as spanners will be provided for assembly.
#1 L/R 1/2” 2 PCS
#4 d17 2 PCS
#3 S14 2 PCS
#6 1/ 2” 2 PCS
#7 L/R 1/2” 2 PCS
#11 M8 4 PCS
#9 M8*62 4 PCS
#12 d8 x 5 16 x 1. 5 x R25 4 PCS
#20 M10 x 45 4 PCS
#13 M10 4 PCS
#74 S13 S17 S19 1 PC
1: x 32 d10 2 PCS
#31 M10 x 18 2 PCS
#33 2 PCS
#72 S6 2 PCS
#38 1 PC
#73 S8 1 PC
#34 M8 x 35 2 PCS
#55 d16 x 5 18 x 1 2 PCS

7 TG500
PARTS LIST
No. Description
1 Main Frame 1
2 Front Bottom Tube 1
3 Back Bottom Tube 1
4 Right Coupler Bar 1
5 Left Coupler Bar 1
6 R Right Pedal Tube 1
6 L Left Pedal Tube 1
7 R Right Handle Bar 1
7 L Left Handle Bar 1
8 R Right Chain Cover 1
8 L Left Chain Cover 1
9 End Cap S16 4
10 Bolt M8 X 35 2
11 Pedal 2
12 Handle Bar Shaft 1
13 End Caps (Φ2") 2
14 Foam Grips 2
15 End Caps (Φ1") 8
16 Plastic Bushing (Φ1-1/4") 4
17 Knob Bolt 5
18 End Caps (Φ2") 2
19 Steel Bushing Φ24 × 20 × Φ16.1 10
20 Steel Bushing Φ14 × 12.5 × Φ10.1 4
21 Washer D8 X Φ16 X 1.5 X R15 2
22 Fan Wheel Axle 1
23 Nut M10×1×B5 4
24 Nut M10 2
25 Nut M10×1×B10×Φ20 2
26 Plastic Insert 1
No. Description
27 Crankshaft 1
28 Plastic Cap 2
29 Washer 1
30 R Collar Housing R 1
30 L Collar Housing L 1
31 Collar Ball 2
32 Collar Housing 2
33 Nut 1
34 Chain 80Z 1
35 End Cap 2
36 Flywheel 1
37 Computer Line I 1
38 Chain Cover Screw St4.8 × 20 6
39 Chain Cover Screw St4.8 × 48 6
40 Nut M8 2
41 End Cap 1
42 Bolt M6 × 36 2
43 End Cap S19 2
44 Bolt M10 × 45 4
45 Nylon Nut M10 6
48 L/R Nylon Nut 1/2"× B8 2
49 Arc Washer Φ10 ×1.5 × Φ25 × R25.5 4
50 Computer 1
51 Spring Washer Φ10.5 × 3 × Φ18 2
52 Washer Φ16 × 1 × 2.5 × Φ28 1
53 Square End Cap 2
54 End Cap S14 4
55 Washer 1
56 D Shape Washer Φ28 × Φ16.2 × 14 × B5" 2

8 TG500
No. Description
57 Bolt M10 × 18 2
58 Bearing 2
59 Nut M6 2
60 Open-End Wrench 1
61 Bolt M10 × L55 × L25 2
62 Pedal Hinge Bolt Φ15.6 × 88.8 × 1/2” × 24.5 1
63 Pedal Hinge Bolt Φ15.6 × 88.8 × 1/2” × 24.5 1
64 Seat 1
65 Washer D8 3
66 Nylon Nut M8 3
67 Saddle Tube 1
68 Seat Post 1
69 Square Bushing 1
70 Handlebar Line 2
71 Solid Wrench S13 - 17 - 19 1
72 Socket Head Wrench S6 2
73 Socket Head Wrench S8 1
74 Spile 2
75 Middle Line 1
76 Tube Plug 4
77 Washer D8 3
78 Hexagon Bolt M8 2
No. Description
79 Handlebar Post 1
80 Nut M6 2
81 Plastic Roller 2
82 Bolt M6 X 48 2
83 Bolt M5 4
84 Handlebar Grip 2
85 Washer D8 1
86 Bolt St4.2 X 16 1
87 End Cap 2
88 Washer Φ16 × 1 × 1 × Φ28 2
89 Square Bushing 1
90 End Cap 1
91 Nut M6 1
92 Skate Brake 1
93 Nut M5 5
94 Bolt M5 X 30 2
95 Washer 1
96 Nut M5 X 16 1
97 Water Bottle 1
98 Bottle Holder 1
99 Bolt M5 X 16 2
100 Middle Handlebar 1
PARTS LIST

9 TG500
ExPLODED DRAWING
38
8L
28
2839
15
15
14
14
4
7R16
17
5752
56
19
6120
45
19
45
44
12
19
35
35
346
4749
33
55
30L
31
32
3230R29
72
31
34
8R
28
38
3938
1
5
7L
1111
17
1919
20
27
38
44
50
5652
57
71
72
73
69
70
2542
25
232623 58
36
22
16
48R
62
6R
6L
19
48R
63
19
54
549
9
99
51
53
43
37
17
7475
7677
7854 79
84
83
60
59
2
81
8146
8280
8280
1849
47
646566
67
6876
7717
85
1586
87
88
8990919293
9495
96
1515
10
214041
97
98
99
100
10 TG500
ASSEMbLY STEPS
1. PREPARATION
• Before assembling make sure that you will have enough space around the item.• Use the supplied parts and hardware for the assembly.• Before assembling please check whether all the required parts have been supplied as per the exploded
drawing on the opposite page.
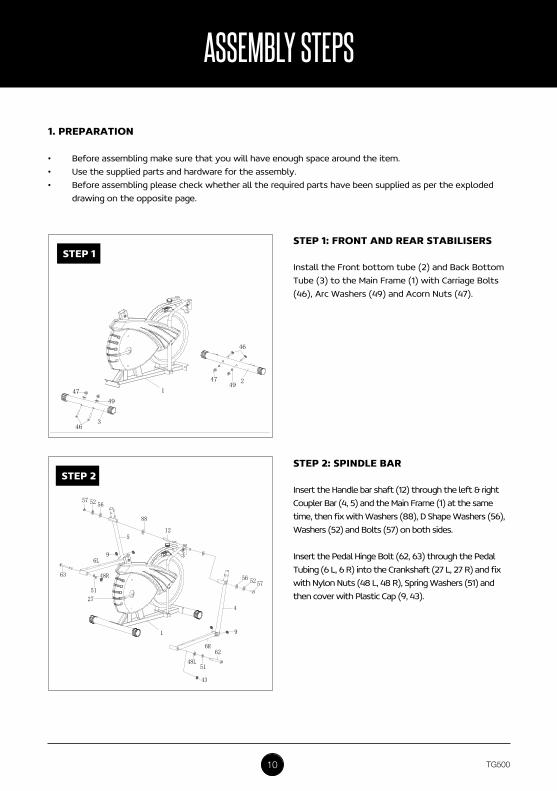
STEP 1: FRONT AND REAR STAbILISERS
Install the Front bottom tube (2) and Back Bottom Tube (3) to the Main Frame (1) with Carriage Bolts (46), Arc Washers (49) and Acorn Nuts (47).
STEP 2: SPINDLE bAR
Insert the Handle bar shaft (12) through the left & right Coupler Bar (4, 5) and the Main Frame (1) at the same time, then fix with Washers (88), D Shape Washers (56), Washers (52) and Bolts (57) on both sides.
Insert the Pedal Hinge Bolt (62, 63) through the Pedal Tubing (6 L, 6 R) into the Crankshaft (27 L, 27 R) and fix with Nylon Nuts (48 L, 48 R), Spring Washers (51) and then cover with Plastic Cap (9, 43).
STEP 1
STEP 2
346
47
49
2
46
1
4749
575256
62
5148L
27
43
9
6R
4
1
565257
48R
51
63
96L
512
88

11 TG500
ASSEMbLY STEPS
STEP 3: PEDALS
Attach the Pedals (11 L, 11 R) to the Pedal Tubes (6 L, 6 R) with Bolts (44) and Nylon Nuts (45).
STEP 3
STEP 4: HANDLEbAR
Insert the Handle Bar (7 L, 7 R) to the Coupler Bar (5, 4), select a height setting that is comfortable to the user, and make sure both Handle Bars are set at the same height. Lock each Handle Bar in place with Knobs (17) and End Cap (54) .
STEP 4
45
44
11
11
44
45
6R
7R
7L
17
17
54
54
54

12 TG500
701
64
6566
67
68
77
17
85
STEP 5: SADDLE
Insert the Vertical Seat post (67) onto the Main Frame (1). Secure it with Spring Knob (70). To select which height you want, remove Washer (77) and Nylon Nut (66) from Seat, then Tighten Seat (64) with Washer (65) and Nylon Nut (66).
Slide the Seat Post (68) into the vertical Seat Post (67) and at the desired position, align the holes and fix in place with the Locking Knob (17).
ASSEMbLY STEPS
STEP 5
STEP 6: HANDLEbAR POST
Lock the Spile (74) on the Main Frame (1) with the Knob Bolt (17).
Install the Handlebar Post (79) on the Spile (54) using the Washer (77) and the Bolt (78). Before securing properly attach Plastic Insert (26) with Computer Middle line (75).
STEP 6
13 TG500
ASSEMbLY STEPS
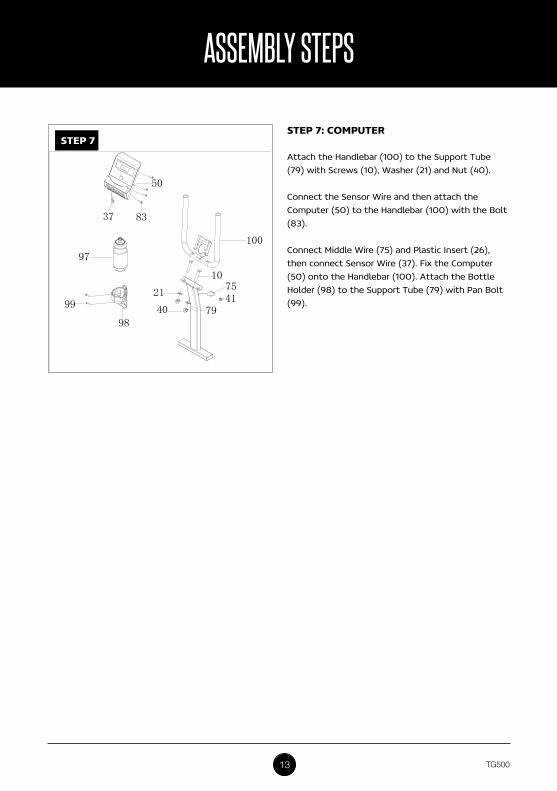
STEP 7: COMPUTER
Attach the Handlebar (100) to the Support Tube (79) with Screws (10), Washer (21) and Nut (40).
Connect the Sensor Wire and then attach the Computer (50) to the Handlebar (100) with the Bolt (83).
Connect Middle Wire (75) and Plastic Insert (26), then connect Sensor Wire (37). Fix the Computer (50) onto the Handlebar (100). Attach the Bottle Holder (98) to the Support Tube (79) with Pan Bolt (99).
STEP 7
50
37
79
83
10
21
4041
97
98
99
100
75
14 TG500
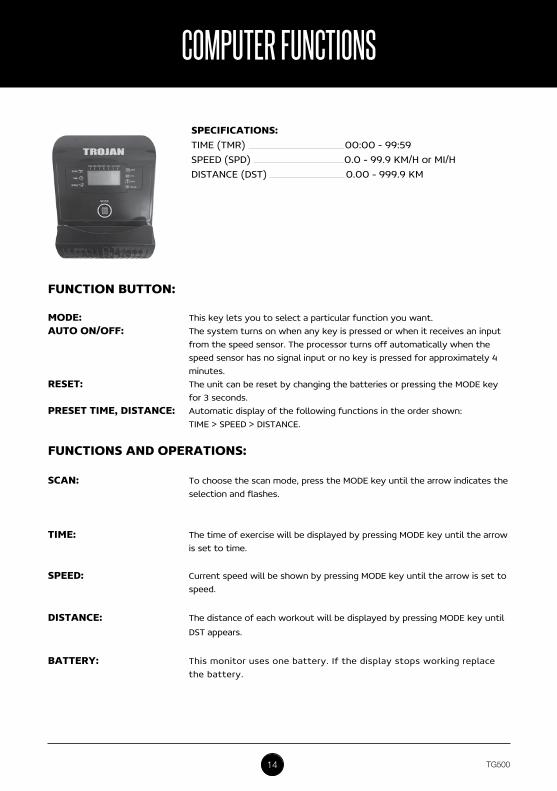
FUNCTION bUTTON:
MODE: This key lets you to select a particular function you want. AUTO ON/OFF: The system turns on when any key is pressed or when it receives an input
from the speed sensor. The processor turns off automatically when the speed sensor has no signal input or no key is pressed for approximately 4 minutes.
RESET: The unit can be reset by changing the batteries or pressing the MODE key for 3 seconds.
PRESET TIME, DISTANCE: Automatic display of the following functions in the order shown: TIME > SPEED > DISTANCE.
FUNCTIONS AND OPERATIONS:
SCAN: To choose the scan mode, press the MODE key until the arrow indicates the selection and flashes.
TIME: The time of exercise will be displayed by pressing MODE key until the arrow is set to time.
SPEED: Current speed will be shown by pressing MODE key until the arrow is set to speed.
DISTANCE: The distance of each workout will be displayed by pressing MODE key until
DST appears.
bATTERy: This monitor uses one battery. If the display stops working replace the battery.
COMPUTER FUNCTIONS
SPECIFICATIONS:TIME (TMR) 00:00 - 99:59 SPEED (SPD) 0.0 - 99.9 KM/H or MI/H DISTANCE (DST) 0.00 - 999.9 KM

15 TG500
ExERCISE INSTRUCTIONS
Using your Elliptical provides you with several benefits, it will improve your physical fitness, tonemuscle and in conjunction with calorie controlled diet help you lose weight.
THE WARM UP PHASEThis stage helps get the blood flowing around the body and the muscles working properly. It will also reducethe risk of cramp and muscle injury. It is advisable to do a few stretching exercises as shown below. Eachstretch should be held for approximately 30 seconds, do not force or jerk your muscles into a stretch.If it hurts, STOP.
THE ExERCISE PHASE
Start Position Stand on the left side of the elliptical, grasp the handlebars (under the handlebar end caps about 100 mm), then stride your left leg, place your left foot on the left pedal, then stride your right leg, place your right foot on the right pedal, adjust your hands and stand pose to a comfortable position.
Moving Position Grasp the handlebars, then switch the handlebars to and fro in tandem to move along with the pedals, do elliptical cycle movement. Your Trojan Glide Cycle 500 has reversable movement. Forward pedalling emphasizes your quadriceps muscle (front thighs), while backwards pedaling emphasizes your hamstrings (back thighs). Remember, if you want to change your movement direction, stop movement first.
SIDE BENDS OUTER THIGH
OUTER THIGH
INNER THIGHFORWARD
BENDS

16 TG500
ExERCISE INSTRUCTIONS
This is the stage where you put the effort in. After regular use, the muscles in your legs will becomestronger. Work at your own pace, but it is very important to maintain a steady tempo throughout.The rate of work should be sufficient to raise your heart beat into the target zone shown on the
graph below.
This stage is to let your Cardiovascular System and muscles wind down. This is a repeat of the warm upexercise e.g. reduce your tempo, continue for approximately 5 minutes. The stretching exercises should nowbe repeated, again remembering not to force or jerk your muscles into the stretch.
As you get fitter you may need to train longer and harder. It is advisable to train at least three times a week,and if possible space your workouts evenly throughout the week.
MUSCLE TONINGTo tone muscle while on your Elliptical you will need to have the resistance set quite high. This willput more strain on our leg muscles and may mean you cannot train for as long as you would like. If you arealso trying to improve your fitness, you need to alter your training program. You should train as normalduring the warm up and cool down phases, but towards the end of the exercise phase you should increaseresistance, making your legs work harden than normal. You may have to reduce your speed to keep yourheart rate in the target zone.
WEIGHT LOSSThe important factor here is the amount of effort you put in. The harder and longer you work the more
calories you will burn.

17 TG500
MAINTENANCE
CLEANINGThe Glide Cycle 500 Elliptical can be cleaned with a soft cloth and mild detergent. Do not useabrasives or solvents on plastic parts. Please wipe your perspiration off the Glide Cycle 500 Elliptical after each use.
Please inspect all assembly bolts and pedals on the machine for proper tightness before use.
STORAGEStore the Glide Cycle 500 Elliptical in a clean and dry environment away from children.
PRObLEM SOLUTION
There is no display on the computer.
1. Remove the computer and verify the wire that comes from the computer is properly connected to the wire that comes from the main frame.
2. Check if the batteries are correctly positioned and that the bat-tery springs are in proper contact with batteries.
3. The batteries in the computer may be dead. Change to new batteries.
Squeaking noise when in use. There may be a loose bolt, please inspect the bolts and tighten if necessary.
TROUbLESHOOTING

18 TG500
FITNESS TIPS & TECHNIqUES
VISIT: www.trojanhealth.co.za for equipment choices and exercise programs, and
AERObIC ExERCISEAerobic exercise is any sustained activity that sends oxygen to your muscles via your heart and lungs.Aerobic exercise improves the fitness of your lungs and heart − your body’s most important muscle. Aerobicexercise fitness is promoted by any activity that uses your large muscles (arms, legs, or buttock, forexample). Your heart beats quickly and you breathe deeply. An aerobic exercise should form part of yourentire exercise routine.
WEIGHT TRAININGAlong with aerobic exercising which helps get rid of and keep off the excess fat that our bodies can store,weight training is an essential part of the exercise routine process. Weight training helps tone, build andstrengthen muscle. If you are working above your target zone, you may want to do a lesser amount of reps.Always consult your physician before beginning any exercise program.
MUSCLE CHARTGLIDE CyCLE 500 ELLIPTICALThe exercise routine that is performed on the Glide Cycle 500 Elliptical will develop the upper and lower bodymuscle group as well as condition the circulatory system and provide a good aerobic workout. These musclegroups are highlighted on the muscle chart below.
Trapezius
Posterior
TricepLatissimus Dorsi
Gluteals
Hamstrings
Gastrocnemius
TrapeziusAnteriorPectoralis MajorSerratus AnteriorBicepsAbdominalSartorius
Quadriceps
Tibialis

19 TG500
ExERCISE INTENSITy
To maximise the benefits of exercising, it is important to exercise with the proper intensity. The proper intensitylevel can be found by using your heart rate as a guide. For effective aerobic exercise, your heart rate should bemaintained at a level between 65% and 85% of your maximum heart rate as you exercise. This is known as yourtarget zone. You can find your target zone in the table below.
During the first few months of your exercise program, keep your heart rate near the low end of your target zone asyou exercise. After a few months, your heart rate can be increased gradually until it is near the middle of yourtarget zone as you exercise.
To measure your heart rate, stop exercising but continue moving your legs or walking around and place two fingerson your wrist. Take a six second heartbeat count and multiply the results by 10 to find your heart rate. Forexample, if your six second heartbeat count is 14, your heart rate is 140 beats per minute. (A six second count isused because your heart rate will drop rapidly when you stop exercising).
Adjust the intensity of your exercise until your heart rate is at the proper level.
For more information visit: www.trojanhealth.co.za
CONDITIONING GUIDELINES
How you begin your exercise program depends on your physical condition. If you have been inactive forseveral years, or are severely overweight, you must start slowly and increase your time on the equipment, afew minutes per workout.
Initially, you may be able to exercise only for a few minutes in your target zone, however, your aerobicfitness will improve over the next six to eight weeks. Don’t be discouraged if it takes longer. It’s importantto work at your own pace. Ultimately, you’ll be able to exercise continuously for 30 minutes. The better youraerobic fitness, the harder you will have to work to stay in your target zone. Please remember theseessentials:
• Have your doctor review your training and diet programs to advise you of a workout routine you should adopt.
• Begin your training program slowly with realistic goals that have been set by you and your doctor.
• Monitor your pulse frequently.
• Establish your target heart rate based on your age and condition.

20 TG500
WARM UP & COOL DOWN
1
2
3
4
5
WORKOUT GUIDELINES CLEANINGEach workout should include the following three parts:
1. A WARM-UP: 5 to 10 minutes of stretching and light exercise. A proper warm-up increases your body temperature, heart rate, and circulation in preparation for exercise.
2. TRAINING zONE ExERCISE: 20 to 30 minutes of exercising with your heart rate in your training zone. (Note: During the first few weeks of your exercise program, do not keep your heart rate in your training zone for longer than 20 minutes).
3. COOL-DOWN: 5 to 10 minutes of stretching. This will increase the flexibility of your muscles and will help to prevent post-exercise problems.
ExERCISE FREQUENCyTo maintain or improve your condition, plan three workouts each week, with at least one dayof rest between workouts. After a few months of regular exercise, you may complete up to fiveworkouts each week, if desired. Remember, the key to success is to make exercise a regular andenjoyable part of your everyday life.
SUGGESTED STRETCHESThe correct form for several basic stretches is shown at the rightMove slowly as you stretch, hold the position and never bounce.
1. TOE TOUCH STRETCHStand with your knees bent slightly and slowly bend forwardfrom your hips. Allow your back and shoulders to relax as you reachdown toward your toes as far as possible. Hold for 15counts, and then relax. Repeat 3 times. Stretches: Hamstrings, back of knees and back.
2. HAMSTRING STRETCH Sit with one leg extended. Bring the sole of the opposite foot towardyou and rest it against the inner thigh of your extended leg. Reachtoward your toes as far as possible. Hold for 15 counts, and then relax.Repeat 3 times for each leg. Stretches: Hamstrings, lower back and groin.
3. CALF/ACHILLES STRETCHWith one leg in front of the other, reach forward and place your handsagainst a wall. Keep your back leg straight and your back foot flat onthe floor. Bend your front leg, lean forward and move your hips towardthe wall. Hold for 15 counts, and then relax. Repeat 3 times for eachleg. To cause further stretching of the Achilles tendons, bend you backleg as well. Stretches: Calves, Achilles tendons and ankles.
4. QUADRICEPS STRETCHWith one hand against a wall for balance, reach back and grasp onefoot with your other hand. Bring your heel as close to your buttocksas possible. Hold for 15 counts, then relax. Repeat 3 times for each leg. Stretches: Quadriceps and hip muscles.
5. INNER THIGH STRETCH Sit with the soles of your feet together and your knees outward. Pullyour feet toward your groin area as far as possible. Hold for 15 counts,and then relax. Repeat 3 times.Stretches: Quadriceps and hip muscles.

21 TG500
2 YEAR LIMITED WARRANTY
The Manufacturer hereby provides a warranty to the original purchaser of this product (‘the Consumer’)that this product will be free of manufacturing defects in materials and workmanship which undernormal, personal, family or household use (commercial use expressly excluded) manifest themselves within the 2 year from the date of purchase.
ExCLUSIONS• The warranty does not include and will not be construed to cover products damaged as a result of disaster, misuse, commercial use, not in accordance within the written instructions included with the product, abuse and/or any non-authorised modification of the product, incorrect installation of the product or normal wear and tear.• All demo models carry a 3 month warranty.
WAIVERThe warranty and the obligations of the Manufacturer provided herein are in lieu of, and the consumer,waives all other warranties, guarantees, conditions or liabilities, express or implied, arising by law orotherwise, including without limitation, any obligation of the manufacturer in respect of any injury,loss or damage (direct, indirect or consequential) arising out of the use of, or inability to use thisproduct and whether or not occasioned by the manufacturer’s negligence or any act or omission on its part.
PROOF OF PURCHASEAny claim in terms of the warranty must be supported by a proof of purchase or a warranty number.Warranty numbers can be issued through contacting our Trojan Call Centre on 0861 Trojan(0861 876526) or online at www.trojanhealth.co.za. Customers residing outside South Africa can contact us on+27 10 206 4405. If such proof is not available, then notwithstanding anything to the contrary herein, theservice agent’s prevailing charges for services/repairs including call out and/or spares will be payable by theConsumer upon collection or delivery of the repaired product.
The Consumer does not need to return the product to the store. The Consumer should call the TrojanCall Centre on 0861 Trojan (0861 876526). Customers residing outside South Africa can contact us on+27 10 206 4405 and the call centre will advise of the procedure. During the warranty period the productmay only be serviced and/or repaired by the Manufacturer’s duly authorised agent(s).
/ +27 10 206 4405

22 TG500
REPAIRS PROCEDURE
Visit facebook.com/trojanhealthwww.trojanhealth.co.za #18M03T044
Manufactured For Masstores (Pty) Ltd.16 Peltier Drive, Sunninghill, Ext 6, Sandton, 2146, South Africa.
MADE IN CHINA
If this product p roves to be faulty d uring normal use due to d efective materials or workmanship. Refer t o our website for terms and conditions.
Please call us for any product queries, after s ales support, repairs or installations.
Always consult a physician before starting a new exercise routine
Use in conjunction with a healthy eating plan
Only use product for its intended purpose to prevent injury
YEARWARRANTY
0861 876 5260861 TROJAN
+27 10 206 4405
Should you experience any faults or breakdowns on your Trojan equipment, please adhere to the followingprocedure to have the fault rectified speedily and professionally.Do not return the product to the store. Call the Trojan Call Centre on 0861 Trojan (0861 876526) to log the faulty product (under warranty or out ofwarranty). Customers residing outside South Africa can contact us on +27 10 206 4405.The operator or technical advisor will try identify the fault, and will book a service team call out.The service team will endeavour to fix the problem in your home on an agreed date and time. Only if the fault cannot be repaired in the convenience of your home, will the service team take the faultyproduct back to the service centre.
Items repaired in our service centre will be returned to your home on an agreed date and time.
Note: Should you live in an outlying area or outside South Africa, it may be necessary to return the product to the store nearest to you. Our service operator will advise you of your repair procedure.
COST OF REPAIRS
UNDER WARRANTyAny items still under warranty will be repaired free of charge, as long as it complies with the terms andconditions of the warranty (refer to “warranties” section in this manual). Any items that need to be repairedthat are NOT covered in the warranty will be for the consumer’s expense. A quote for the repair/replacementof these items will be provided to the consumer for approval prior to repairs being conducted.
OUT OF WARRANTy Any items that need to be repaired once the warranty has expired will be for the consumer’s expenseincluding call out fees. A quote for the repair/replacement of these items will be provided to the consumer for approval prior torepairs being conducted.

23 TG500
NOTES

24 TG500
NOTES