global preview v.6.0 for microsoft dynamics crm online · install, configure, and use akvelon...
TRANSCRIPT

Akvelon Global Preview User Manual
©Akvelon, Inc. 2016, All rights reserved. 1
Global Preview v.6.0
for Microsoft Dynamics CRM Online
User Manual
Akvelon Global Preview User Manual
©Akvelon, Inc. 2016, All rights reserved. 2
Contents Overview .......................................................................................................................................... 3
Licensing .......................................................................................................................................... 4
Installation ........................................................................................................................................ 5
Upgrading from previous Global Preview versions ...................................................................... 5
Global Preview Installation ........................................................................................................... 5
Activation ......................................................................................................................................... 8
Updating License Data ............................................................................................................... 10
Uninstall Global Preview ................................................................................................................ 11
Akvelon Email Preview .................................................................................................................. 12
List of Emails .............................................................................................................................. 13
Arranging Emails ........................................................................................................................ 14
Tool Bar Functionality ................................................................................................................ 14
Searching Through Emails ......................................................................................................... 16
Multiple Words Search ............................................................................................................... 17
Preview Pane ................................................................................................................................. 18
Preview Pane Locations ............................................................................................................ 18
Preview Pane Window ............................................................................................................... 19
Configuration ................................................................................................................................. 22
Global Preview User Permissions .............................................................................................. 22
Switching Preview Pane On/Off for Entities ............................................................................... 24
Configuring Entity Attributes ...................................................................................................... 25
Troubleshooting ......................................................................................................................... 26
Feedback ....................................................................................................................................... 28

Akvelon Global Preview User Manual
©Akvelon, Inc. 2016, All rights reserved. 3
Overview
Welcome to the Akvelon Global Preview User Manual. With this guide, you can learn how to
install, configure, and use Akvelon Global Preview for Microsoft Dynamics CRM Online.
Global Preview for Microsoft CRM Online is a custom module which includes two features:
- Email Preview
- Preview Pane
Email Preview provides the ability to:
View email contents and attachments without opening the emails.
Search for emails by subject, body, and regarding fields.
Organize emails multiple ways to increase efficiency.
Perform certain actions with your emails: Add to Queue, Set Regarding, Assign to,
and others, right from the Email Preview window.
Preview Pane allows you to view detailed information for any activity in one click, without
opening any additional windows, and also to configure the preview pane in the way you like.
Preview Pane provides the ability to:
View the content of any entity with one touch including custom entities.
View entity attributes and Notes.
Preview open and closed entities for selected contacts, accounts, or any other entity.
Preview open and closed entities for custom entities.
Select entities and entity attributes to preview.

Akvelon Global Preview User Manual
©Akvelon, Inc. 2016, All rights reserved. 4
Licensing
Whether you are using Microsoft Dynamics CRM Online in your production, development, or test
environment, you always need licenses.
Each organization requires its own license for Global Preview. In a typical setup you have one
single organization and only need one license. The license contains the organization name and
you can only install the license on the organization with the specified name.
If you use multiple organizations, each organization requires a separate Global Preview license.
However, you only need licenses for the organizations using Global Preview. If you have a single
CRM server with four organizations and you want to use Global Preview in two of them, then you
need two licenses.
Each organization license (except the trial one) contains a restricted number of client user
licenses (CAL). Each user of an organization that uses Global Preview must have a valid license.
If an organization has 100 users and 50 users have permissions to perform searches using
Global Preview (see the Global Preview User Permissions section), you need at least 50
Global Preview licenses, otherwise you will receive a license validation error.
When adding new users to CRM, be sure to verify that Global Preview also has corresponding
licenses for those new users.
To request Global Preview licenses please contact [email protected].

Akvelon Global Preview User Manual
©Akvelon, Inc. 2016, All rights reserved. 5
Installation
Upgrading from previous Global Preview versions
To upgrade Global Preview from 1.x.x to 6.0 you need to completely remove your current version
of Global Preview:
1. CRM Settings > Global Preview Settings
2. Click the “About” button > Deactivate
3. Remove Global Preview using Programs and Features (Control Panel > Programs and
Features).
Note: Before upgrading your CRM 2011 UR11 and older to a newer version (CRM 2011
UR12 and newer or CRM 2013 / 2015 / 2016) - you should update your current version of
Global Preview to 1.0.3. Please see detailed instruction HERE.
To upgrade Global Preview from 5.0 to 6.0 you need to completely remove your current version
of Global Preview (see Uninstall Global Preview section) and import new version of Global
Preview (see Global Preview Installation section below).
Contact [email protected] for more details and if you need assistance with upgrading
Global Preview.
Global Preview Installation
To set up Akvelon Global Preview on Microsoft Dynamics CRM, follow these steps:
1. Log on to your Microsoft Dynamics CRM Online server using an account that has
administrative privileges (System Administrator)
2. We are strongly recommend to add your CRM server site into trusted sites before installation
3. Go to Settings -> Solutions (see Figure 1)
Figure 1 Dynamics CRM Solutions Settings
4. Click the Import button (see Figure 2)

Akvelon Global Preview User Manual
©Akvelon, Inc. 2016, All rights reserved. 6
Figure 2 Import Global Preview solution
5. Follow the Import wizard.
5.1. Click the Browse button and select the path to GlobalPreview(6.0).zip and click the Next
button (see Figure 3).
Figure 3 Select Global Preview package
5.2. Click the Next button again
5.3. Check the "Activate any processes and enable any SDK message processing steps
included in the solutions" checkbox and click the Next button (see Figure 4).
Figure 4 Activate any processes and enable SDK message
Akvelon Global Preview User Manual
©Akvelon, Inc. 2016, All rights reserved. 7
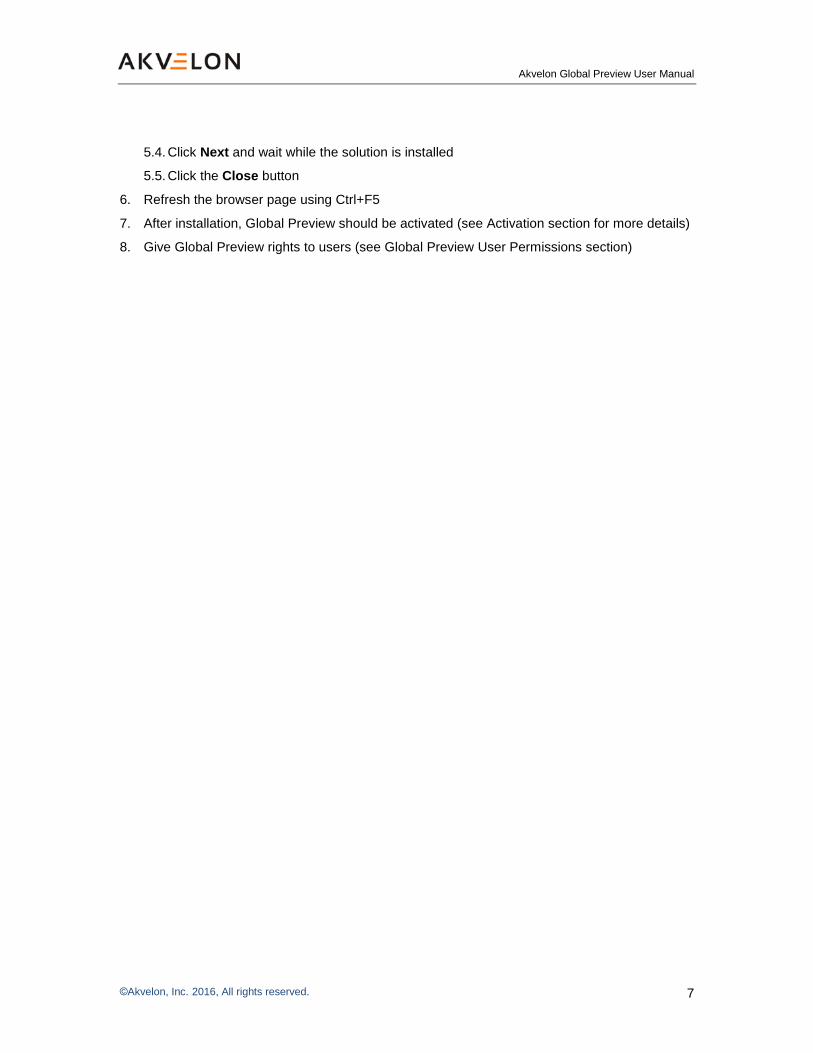
5.4. Click Next and wait while the solution is installed
5.5. Click the Close button
6. Refresh the browser page using Ctrl+F5
7. After installation, Global Preview should be activated (see Activation section for more details)
8. Give Global Preview rights to users (see Global Preview User Permissions section)

Akvelon Global Preview User Manual
©Akvelon, Inc. 2016, All rights reserved. 8
Activation
Activate Global Preview separately for each organization.
To activate Global Preview for an organization, login to your CRM organization as CRM System
Administrator, go to Settings -> Global Preview Settings and click the About button at the
upper right corner (see Figure 5).
Figure 5 About button
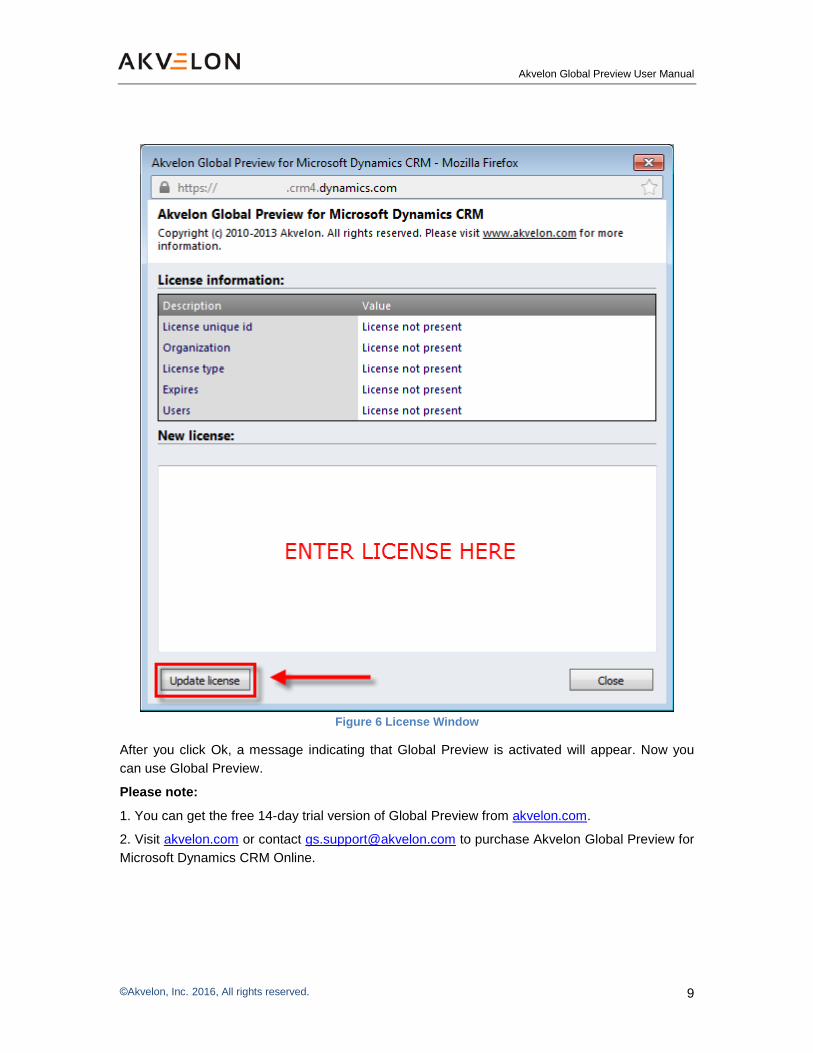
You will see the End User License Agreement, please read and accept it using the checkbox,
then click the Activate button. Input your Global Preview license into the open license window
and click the Update license button (see Figure 6).
Akvelon Global Preview User Manual
©Akvelon, Inc. 2016, All rights reserved. 9
Figure 6 License Window
After you click Ok, a message indicating that Global Preview is activated will appear. Now you
can use Global Preview.
Please note:
1. You can get the free 14-day trial version of Global Preview from akvelon.com.
2. Visit akvelon.com or contact [email protected] to purchase Akvelon Global Preview for
Microsoft Dynamics CRM Online.

Akvelon Global Preview User Manual
©Akvelon, Inc. 2016, All rights reserved. 10
Updating License Data
If you need to update license data (e.g. to replace a trial license with a commercial license or to
update the number of users) go to Settings > Global Preview Settings, and click the About
button at the upper right-hand corner. Then click the Update license button, input the new
license data into the license textbox (see Figure 7) and click the Update license button.
Figure 7 License Information Window
Akvelon Global Preview User Manual
©Akvelon, Inc. 2016, All rights reserved. 11
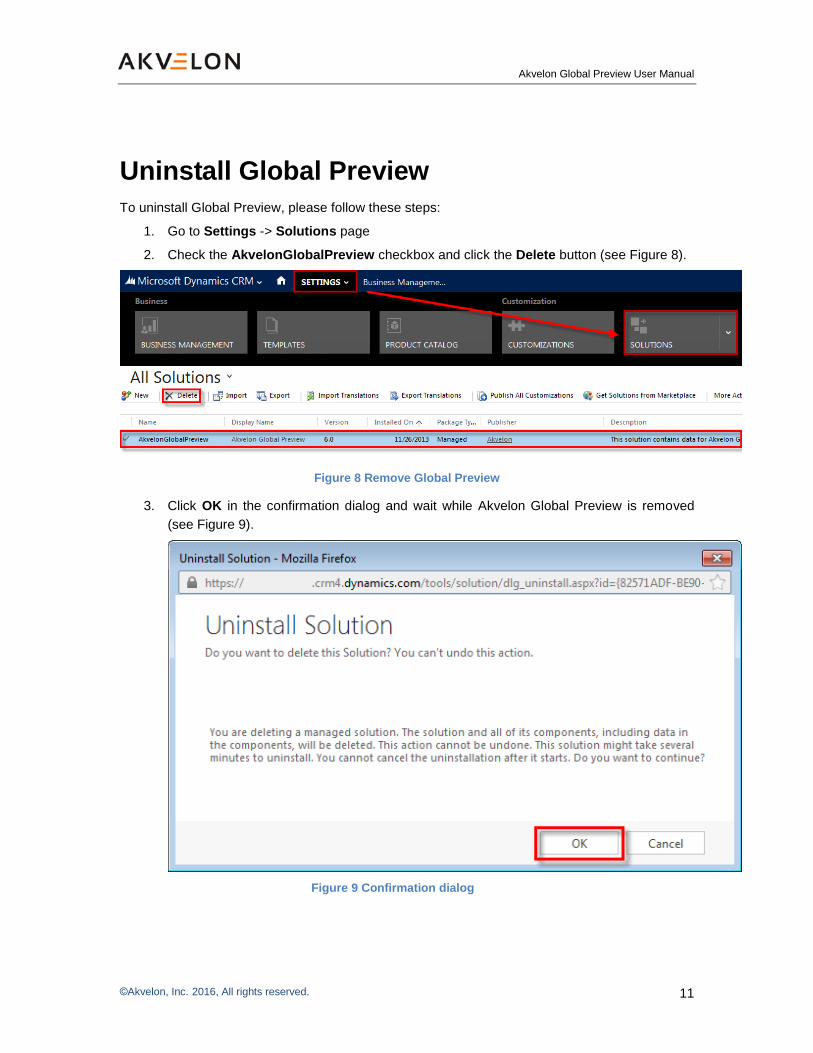
Uninstall Global Preview
To uninstall Global Preview, please follow these steps:
1. Go to Settings -> Solutions page
2. Check the AkvelonGlobalPreview checkbox and click the Delete button (see Figure 8).
Figure 8 Remove Global Preview
3. Click OK in the confirmation dialog and wait while Akvelon Global Preview is removed
(see Figure 9).
Figure 9 Confirmation dialog
Akvelon Global Preview User Manual
©Akvelon, Inc. 2016, All rights reserved. 12
Akvelon Email Preview
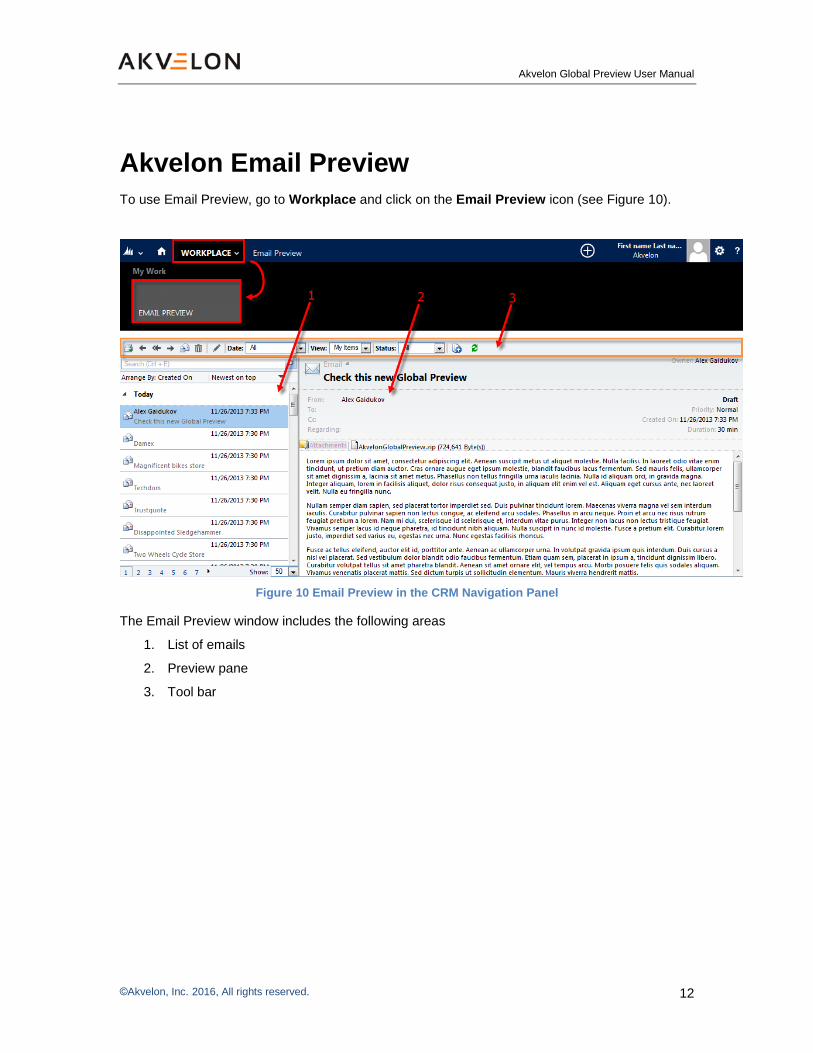
To use Email Preview, go to Workplace and click on the Email Preview icon (see Figure 10).
Figure 10 Email Preview in the CRM Navigation Panel
The Email Preview window includes the following areas
1. List of emails
2. Preview pane
3. Tool bar

Akvelon Global Preview User Manual
©Akvelon, Inc. 2016, All rights reserved. 13
List of Emails
This displays the list of emails created in the system. When an email is selected in the list, its
body is displayed in the Preview pane. The pane’s header includes information about email
properties (subject, to, cc, status, date of creation, priority) and a list of files attached. To open an
attachment, just click on it.
Email Preview displays 50 emails per page by default. If there are more than 50 emails, Email
Preview will spread the emails out on separate pages. To navigate through them, click on the
page links provided (see Figure 11). Users can change the number of emails displayed; to do that
just click on the Show dropdown list at the bottom and select any of three options: 30, 50, or 100
emails per page.
Figure 11 List of Emails

Akvelon Global Preview User Manual
©Akvelon, Inc. 2016, All rights reserved. 14
Arranging Emails
Sorting
By default Email Preview sorts emails by relevance, with the most relevant emails listed on top.
To sort by a different condition, select a sorting condition by clicking on the Arrange By button
and then select a sort order by clicking on the button to the right.
You can sort emails by one of the following conditions: From, To, Subject, Regarding, Scheduled
Start, Scheduled End, Created On, Actual Start, Actual End, Priority, Status.
Filtering
Email Preview allows users to narrow the number of emails in the List of Emails using filters.
The following filters are available (see Figure 12):
Filter Name Description
Date Allows users to view emails created within a specified date range.
View Depending on the option selected, allows users to work with all emails (“All Items”
option) or emails created by the current user only (“My Items” option).
Status Allows users to view only emails with the specified status.
Figure 12 Filters
For example, if you want to view emails which you created today and have not sent yet, select
Date=“Today”, View=”My Items”, Status=”Draft”. Emails which match the filters will be displayed
in the List of Emails.
Please note: Filters can be used together with search.
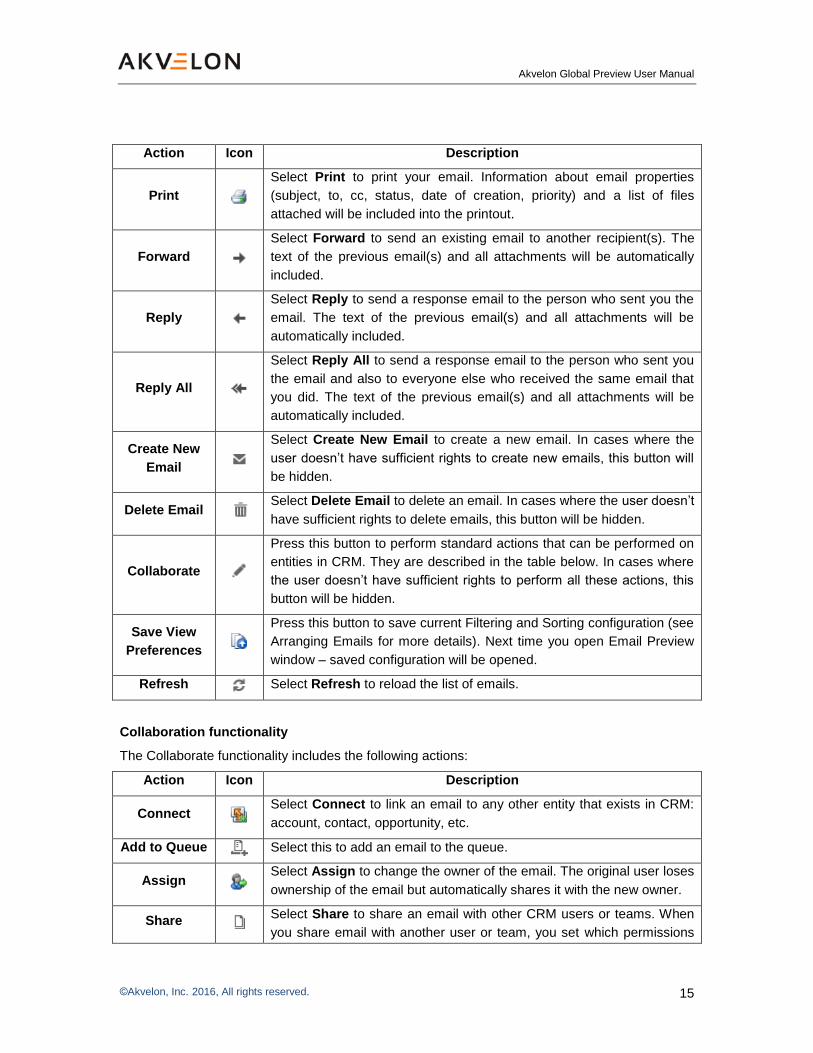
Tool Bar Functionality
The Tool Bar allows you to perform the following actions:
Akvelon Global Preview User Manual
©Akvelon, Inc. 2016, All rights reserved. 15
Action Icon Description
Select Print to print your email. Information about email properties
(subject, to, cc, status, date of creation, priority) and a list of files
attached will be included into the printout.
Forward
Select Forward to send an existing email to another recipient(s). The
text of the previous email(s) and all attachments will be automatically
included.
Reply
Select Reply to send a response email to the person who sent you the
email. The text of the previous email(s) and all attachments will be
automatically included.
Reply All
Select Reply All to send a response email to the person who sent you
the email and also to everyone else who received the same email that
you did. The text of the previous email(s) and all attachments will be
automatically included.
Create New
Select Create New Email to create a new email. In cases where the
user doesn’t have sufficient rights to create new emails, this button will
be hidden.
Delete Email Select Delete Email to delete an email. In cases where the user doesn’t
have sufficient rights to delete emails, this button will be hidden.
Collaborate
Press this button to perform standard actions that can be performed on
entities in CRM. They are described in the table below. In cases where
the user doesn’t have sufficient rights to perform all these actions, this
button will be hidden.
Save View
Preferences
Press this button to save current Filtering and Sorting configuration (see
Arranging Emails for more details). Next time you open Email Preview
window – saved configuration will be opened.
Refresh
Select Refresh to reload the list of emails.
Collaboration functionality
The Collaborate functionality includes the following actions:
Action Icon Description
Connect
Select Connect to link an email to any other entity that exists in CRM:
account, contact, opportunity, etc.
Add to Queue
Select this to add an email to the queue.
Assign
Select Assign to change the owner of the email. The original user loses
ownership of the email but automatically shares it with the new owner.
Share
Select Share to share an email with other CRM users or teams. When
you share email with another user or team, you set which permissions

Akvelon Global Preview User Manual
©Akvelon, Inc. 2016, All rights reserved. 16
that user/team will receive.
Set
Regarding
Select this to fill in the Regarding field in an email.
Copy a Link
Select this to copy a link that will open the email in the clipboard.
In cases the user doesn’t have sufficient rights to execute all these actions, the corresponding
buttons will be hidden.
Searching Through Emails
Email Preview enables users to search for emails. Search is performed by Subject, Body, and
Regarding fields. Email Preview performs case-insensitive searches using the word-beginning
search principle.
For example, if you type “hand” in the search text box you can find emails that contain “Hand”,
“handicraft”, “HANDY”.
To search:
1. Type the search query into the search text box – the query should contain two or more
characters.
2. Press Search or hit Enter.
Emails that match the search query will appear in the List of Emails. The first email in the list will
be displayed in the Preview Pane by default. The matching text found in the emails will be
highlighted in yellow (see Figure 13).
Figure 13 Email Searching
If filters were applied, only emails which match those filters will be shown.

Akvelon Global Preview User Manual
©Akvelon, Inc. 2016, All rights reserved. 17
For example:
If you search for “old” and the Date filter is set to “Today”, only today’s emails with “old” in the
Subject, Body, or Regarding field will be shown. Yesterday’s emails with “old” won’t be displayed.
To clear the results of the search, erase the text in the search text box and press Clear or hit
Enter.
Multiple Words Search
If several words are entered into the search text box, Email Preview will find all emails which
contain both of those words in their Subject, Body, or Regarding fields.
For example:
If you type Jack London into the search text box, search will find emails which have both Jack
and London in their Subject, Body, or Regarding fields.
Search will find emails which have
- “London is the capital of Great Britain. And Jack lives there.”
- “Jack” in the subject and “London” in the body.
Akvelon Global Preview User Manual
©Akvelon, Inc. 2016, All rights reserved. 18
Preview Pane
Preview Pane allows you to see the content and attributes of the selected entity.
Preview Pane Locations
Preview Pane is available in views and forms:
1. Inside Views:
- Open any view/grid on the Workplace, Sales, Marketing, or Service pages: Activities,
Contacts, Accounts, Leads, Contracts, Opportunities, etc.
- Select any entity in the opened view – a preview pane for the entity will appear at the
bottom (see Figure 14).
Figure 14 Preview Pane

Akvelon Global Preview User Manual
©Akvelon, Inc. 2016, All rights reserved. 19
2. Inside Forms:
- Open any form (entity): Account, Contact, Opportunity, Lead, etc.
- Click any item related to an opened entity in the menu at the left: Activities, Closed
Activities, Sub-Accounts, Connections, etc.
- Select any entity in the window that opens – a preview pane will appear at the bottom
(see Figure 155).
Figure 155 Preview pane in opened entity
Preview Pane is also available for custom entities. You can add custom entities for preview via
Global Preview Settings (see Switching Preview Pane On/Off for Entities section for more
details).
Preview Pane Window
The Preview Pane window contains two tabs:
General Tab – displays entity content and attributes.
Notes Tab – displays entity Notes information. The number shows how many notes the entity has
(see Figure 6). If the entity doesn’t have any Notes, the Notes tab will not be displayed.

Akvelon Global Preview User Manual
©Akvelon, Inc. 2016, All rights reserved. 20
Figure 166 Notes tab
General Tab consists of three areas:
- the header
- the description area
- the footer
Entity attributes are displayed in the header and the footer. By default, there are four attributes in
the header and four in the footer (see Figure 7).
Figure 177 Entity attributes
The attributes shown can also be changed or switched off – select “hidden” in the Global
Preview Settings area (for detailed information, see the Configuring Entity Attributes section).
The Description area contains entity description information: text, links, pictures, etc. It also may
contain formatted text or an html page. The description area can also be hidden (see Figure 8).

Akvelon Global Preview User Manual
©Akvelon, Inc. 2016, All rights reserved. 21
Figure 188 Description area
Users can tweak the Preview Pane Window size. To resize the Preview Pane Window, just drag
the top border of the preview pane up or down.
Please Note: if you changed the entity by adding or editing notes, updating email attachments,
etc., press the Refresh button to update the Preview Pane (see Figure 9).
Figure 199 Refresh button

Akvelon Global Preview User Manual
©Akvelon, Inc. 2016, All rights reserved. 22
Configuration
This section describes how to configure the Global Preview roles, entities, and attributes
displayed in the Preview Pane.
Global Preview User Permissions
To allow users to work with Global Preview, you must assign them special permissions:
1. Go to Settings > Administration > Users.
2. Select the user you want to provide with Global Preview permissions and press Manage
Roles on the upper CRM menu.
3. Add appropriate role to the user:
- assign the Akvelon Global Preview Administrators role to allow the user to change
Global Preview settings (the user won’t be allowed to work with Email Preview or view
the Preview Pane)
- assign the Akvelon Global Preview Users role to allow the user to work with Email
Preview and the Preview Pane. Access to Global Preview settings won’t be available for
this user.
After you assign a role, click the OK button (see Figure 20).
Figure 20 Global Preview Roles

Akvelon Global Preview User Manual
©Akvelon, Inc. 2016, All rights reserved. 23
4. In case you want to activate Email Preview link in the left navigation panel of opened
entity (Account, Lead, Case, etc.) you should add ISV Extensions privilege to the security
role (see Figure 1) assigned to your CRM users (e.g. Salesperson or custom role):
Open CRM Security Roles > Open specified security role (e.g. Salesperson)
Go to Customizations tab > Add ISV Extensions privilege
Save and close
Figure 201 Adding ISV Extension privilege
Please note:
1. The Akvelon Global Preview Administrators role provides the selected user with rights
to manage Settings of all Global Preview users and activate or update User License.
2. Akvelon Global Preview Administrators – doesn't influence number of Global Preview
licenses. Akvelon Global Preview Users – influences number of Global Preview
licenses.
For example: you purchased 10 Global Preview licenses, and you have 2 users with the
Akvelon Global Preview Administrators role, and 4 users with the Akvelon Global
Preview Users role – only 4 licenses are being used in this case. 6 licenses are
available for additional Global Preview users.

Akvelon Global Preview User Manual
©Akvelon, Inc. 2016, All rights reserved. 24
Switching Preview Pane On/Off for Entities
You can select entities to display the Preview Pane according to your business needs.
To switch on/off Preview Pane for entities do the following (see Figure 2):
1. Open Settings > click on the Global Preview Settings
2. Press the Manage Entities button
3. In the Entities Manager dialog that opens:
- Select entities you want to display the Preview Pane (switch on)
- uncheck entities you don’t want to display the Preview Plane (switch off)
4. Press Ok
Changes will be applied for all Global Preview users.
Figure 212 Manage Entities

Akvelon Global Preview User Manual
©Akvelon, Inc. 2016, All rights reserved. 25
Configuring Entity Attributes
You can select entity attributes and how many of them to display in the Preview Pane.
To change/hide attributes to display do the following (see Figure 3):
1. Open Settings > click on Global Preview Settings.
2. Double click on the entity to configure (or select the entity and click the “Edit entity”
button).
3. In the Entities Manager dialog that opens:
- Here you can edit header, description and footer areas;
- select any field (attribute) from the dropdown list to change the entity attribute to display;
- check the Hide checkbox to hide this attribute in the Preview Pane.
4. Press Ok.
Figure 223 Manage attributes to preview

Akvelon Global Preview User Manual
©Akvelon, Inc. 2016, All rights reserved. 26
Troubleshooting
Issue Solution
Buttons Reply to, Reply All, Forward, New email are not working in the Email Preview.
Verify, that you added your CRM
web site to exceptions of your
browser pop-up blocker. Visit you
browser support web-site to get
more information:
Mozilla Firefox
Google Chrome
Internet Explorer
Safari
In Internet Explorer 11 doesn’t show license status and it is not possible to activate or update the license.
Add your CRM web-site to
Compatibility view exception,
following this instruction.
Preview Pane doesn’t appear for a selected entity or appears with errors; when you click on buttons in Settings, they don’t work or errors appear.
Verify you cleared the cache in
Outlook and IE, see the Upgrading
from previous Global Preview
versions
To upgrade Global Preview from
1.x.x to 6.0 you need to completely
remove your current version of
Global Preview:
CRM Settings > Global Preview
Settings
Click the “About” button > Deactivate
Remove Global Preview using
Programs and Features (Control
Panel > Programs and Features).
Note: Before upgrading your CRM
2011 UR11 and older to a newer
version (CRM 2011 UR12 and
newer or CRM 2013 / 2015 / 2016) -
you should update your current
version of Global Preview to 1.0.3.
Please see detailed instruction
HERE.
To upgrade Global Preview from 5.0

Akvelon Global Preview User Manual
©Akvelon, Inc. 2016, All rights reserved. 27
to 6.0 you need to completely
remove your current version of
Global Preview (see Uninstall Global
Preview section) and import new
version of Global Preview (see
Global Preview Installation section
below).
Contact [email protected]
for more details and if you need
assistance with upgrading Global
Preview.
Global Preview Installation section.
Preview Pane doesn’t appear for a selected entity. Verify that this entity is selected in Global Preview Settings, see the Switching Preview Pane On/Off for Entities section.
Preview Pane appears, but some fields are not displayed – there is empty space in their places.
That may happen if the “Hide” check box is checked for those fields, see the Configuring Entity Attributes section.
You configured your Global Preview Settings one way, but after a while your settings changed – and you didn’t change anything.
That may happen if another user pressed the “Save as default” button and his/her configurations were applied to all users.
Preview Pane is not displayed inside a custom entity form. You should deactivate and re-activate Global Preview to make it “recognize” this new custom entity and show the Preview Pane for it.
You selected multiple rows in the view, but Preview Pane is not displayed for them.
Preview Pane is displayed for the first entity in the list of selected. Verify that the first entity is selected in Global Preview Settings, see the Switching Preview Pane On/Off for Entities section.
You updated an Attachment or Note, but Preview Pane displays the old information.
Press the refresh button to update Preview Pane.
Preview Pane doesn’t appear when you click on an entity, and when you click on the Email Preview link, you see this error message:
Verify you’ve assigned Global Preview roles to this user, see Global Preview User Permissions section.
You can work with Email Preview, but can’t view Preview Verify Global Preview roles have
Akvelon Global Preview User Manual
©Akvelon, Inc. 2016, All rights reserved. 28
Pane. When click Global Preview Settings link, you get “Insufficient privileges.” error.
organization level privileges for Akvelon Mail Organization Settings and Akvelon Mail User Settings entities. See Global Preview User Permissions section.
Akvelon Global Preview User Manual
©Akvelon, Inc. 2016, All rights reserved. 29
Feedback
If you have any questions, experience problems, or have feedback – please feel free to contact
us: [email protected].