gmp data warehouse user guide - pops-gmp. · pdf filegmp data warehouse . user guide . ......
TRANSCRIPT

GMP Data Warehouse
USER GUIDE
Created by:
Research Centre for Toxic Compounds in the Environment, Faculty of Science, Masaryk University, Brno, Czech Republic
Institute of Biostatistics and Analyses, Faculty of Medicine and Faculty of Science, Masaryk University, Brno, Czech Republic

2
GMP DWH: User Guide
Online Data Collection – General Information On-line data collection is based on a TRIALDB system developed on Yale University, Connecticut,
USA, which is widely used for this purpose
The system is user-friendly; all data can be inserted directly into the database using the web forms.
Data can be inserted from any computer with an internet access equipped with a web browser supporting communication secured with a 128-bit encryption.
It is not necessary to install any additional software. The proposed database (GMP DWH) can only be accessed by authorized users; each using their
user name and unique password. All authorized users have a full control over their access passwords, rights and recorded data.
The GMP DWH database design meets all requirements for data protection and safety policy, enacted by the existing legislation and ISO 27001 standards. The authorized data providers keep all ownership rights to the stored data sets. The data providers such as participating institutions, the Regional Organisation Groups, Global Coordination Group members and other stakeholders or participating legal entities can assess their data at any time.
Any data transfer is encrypted and the on-line collection system is designed to prevent any unauthorized usage during the data transfer. The submitted data forms are also available in a printable format.
Data will be stored in Oracle 11g database in the central server at the Masaryk University in Brno, Czech Republic. The local copies or local safety back-ups required by the users are supported by the system.
Institute of Biostatistics and Analyses, Masaryk University, Brno, Czech Republic (IBA MU, www.iba.muni.cz) works as a technical provider, supporting also the central data management.
3
GMP DWH: User Guide
Contents
Online Data Collection – General Information .................................................................................... 2
Contents .............................................................................................................................................. 3
1 Database Connection .................................................................................................................. 4
2 Basic Application Window ........................................................................................................... 6
3 Adding New Site .......................................................................................................................... 7
4 Site Search ................................................................................................................................... 9
5 Working Window of the Application ......................................................................................... 12
6 Adding New Entry ...................................................................................................................... 14
7 Entry Completion ....................................................................................................................... 15
8 Work with Submitted Entries .................................................................................................... 19
9 Track changes ............................................................................................................................ 20
10 Data validation ...................................................................................................................... 21
11 Technical Support .................................................................................................................. 23
4
GMP DWH: User Guide
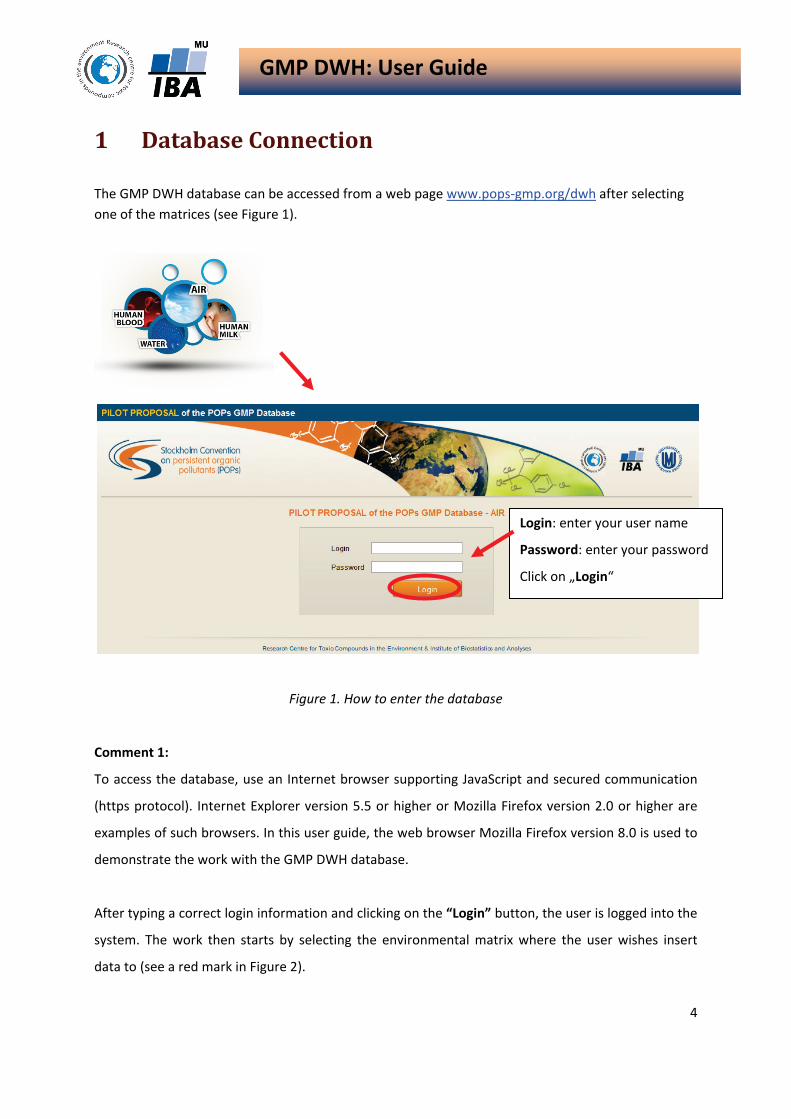
1 Database Connection
The GMP DWH database can be accessed from a web page www.pops-gmp.org/dwh after selecting one of the matrices (see Figure 1).
Figure 1. How to enter the database
Comment 1:
To access the database, use an Internet browser supporting JavaScript and secured communication
(https protocol). Internet Explorer version 5.5 or higher or Mozilla Firefox version 2.0 or higher are
examples of such browsers. In this user guide, the web browser Mozilla Firefox version 8.0 is used to
demonstrate the work with the GMP DWH database.
After typing a correct login information and clicking on the “Login” button, the user is logged into the
system. The work then starts by selecting the environmental matrix where the user wishes insert
data to (see a red mark in Figure 2).
Login: enter your user name
Password: enter your password
Click on „Login“
5
GMP DWH: User Guide
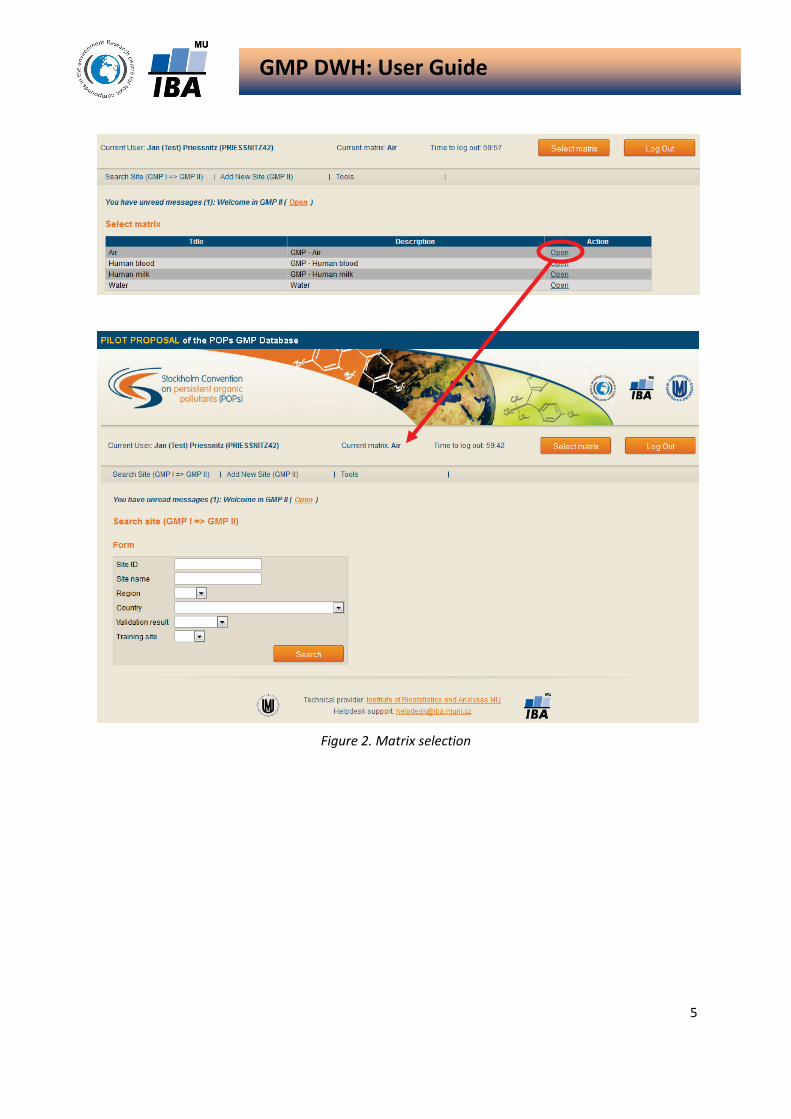
Figure 2. Matrix selection

6
GMP DWH: User Guide
2 Basic Application Window
After a successful login to the database, the initial application window shows on the screen (see
Figure 3). This window permits to search existing sites and within their forms (see Chapter 4, Site
Search), to add a new site (see Chapter 3, New Site Registration), to use supporting tools, such as
change user`s password (se A in Figure 3) and to display Help (see B in Figure 3). You can log out of
the system by using the button „Log Out“ in the upper right corner of the screen (see encircled in red
in Figure 3).
Figure 3. Initial page of the system
Comment 2
Automatic logout occurs after an inactivity of a certain duration. This function prevents an
unauthorized access to the system. To continue previous work, it is necessary to log in again.
The time remaining until the automatic logout is displayed in the middle of the top row on the screen
(see blue circle in Figure 3). Any activity in the GMP DWH database restarts the countdown.
All data inserted into the GMP DWH database are linked to a particular site (air) or country (human
milk and blood). Therefore, any sampling site recorded previously can be selected from the list of
available sites (see Chapter 4, Site Search) or a new site can be added (see Chapter 3, Adding New
Site) to enter data from a new location.
A B
7
GMP DWH: User Guide
G M P - 0 0 - 0 0 0 0 1
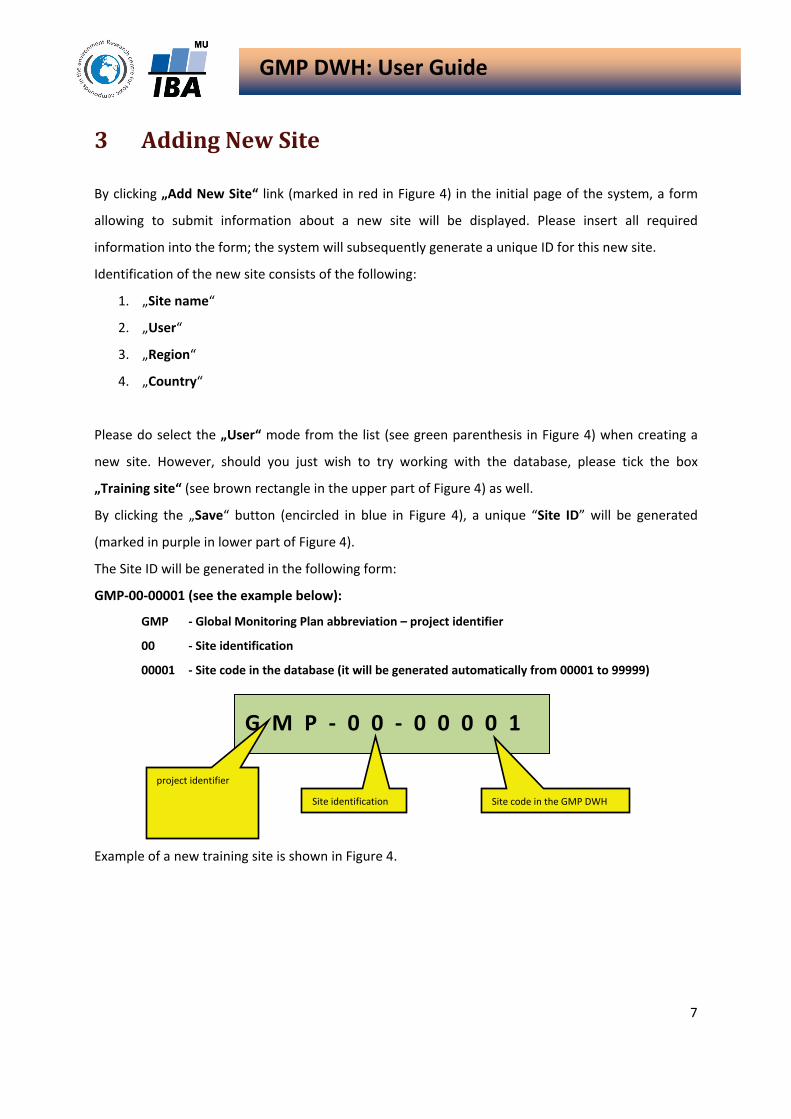
3 Adding New Site
By clicking „Add New Site“ link (marked in red in Figure 4) in the initial page of the system, a form
allowing to submit information about a new site will be displayed. Please insert all required
information into the form; the system will subsequently generate a unique ID for this new site.
Identification of the new site consists of the following:
1. „Site name“
2. „User“
3. „Region“
4. „Country“
Please do select the „User“ mode from the list (see green parenthesis in Figure 4) when creating a
new site. However, should you just wish to try working with the database, please tick the box
„Training site“ (see brown rectangle in the upper part of Figure 4) as well.
By clicking the „Save“ button (encircled in blue in Figure 4), a unique “Site ID” will be generated
(marked in purple in lower part of Figure 4).
The Site ID will be generated in the following form:
GMP-00-00001 (see the example below):
GMP - Global Monitoring Plan abbreviation – project identifier
00 - Site identification
00001 - Site code in the database (it will be generated automatically from 00001 to 99999)
Example of a new training site is shown in Figure 4.
Site code in the GMP DWH
Site identification
project identifier

8
GMP DWH: User Guide
Figure 4. Adding new site
Comment 3:
Should you wish to work with the GMP DWH database (e.g., to amend a form of an existing site), click
on the Save button. This transfers you to the main part of the system (see Chapter 5, Working
Window of the Application) that stores all forms. The main part can also be accessed by clicking the
„Data forms“ button in the header menu.
01 – Region A . . . . . 99 – Region Z
User AA . . . . . User ZZ
9
GMP DWH: User Guide
4 Site Search
There are two ways how to find previously registered sites (see „Search Site“, encircled in red in
Figure 7):
A) If you know the Site ID, please insert this ID into the relevant field and click the „Search“
button (see A in Figure 7). The record of this site will be displayed.
B) Search site according to other known parameters (such as UN region, country, type of the
site etc). Please fill the fields and click the „Search“ button (see B in Figure 7). Records of all
sites registered in a particular country matching your search will be displayed. If too many
records are displayed, we recommend adding as much additional known information about
that site as possible to limit the number of displayed records. These include „Site name“ or
„Region“ and click on the „Search“ button again. The number of records found will be
notably reduced.
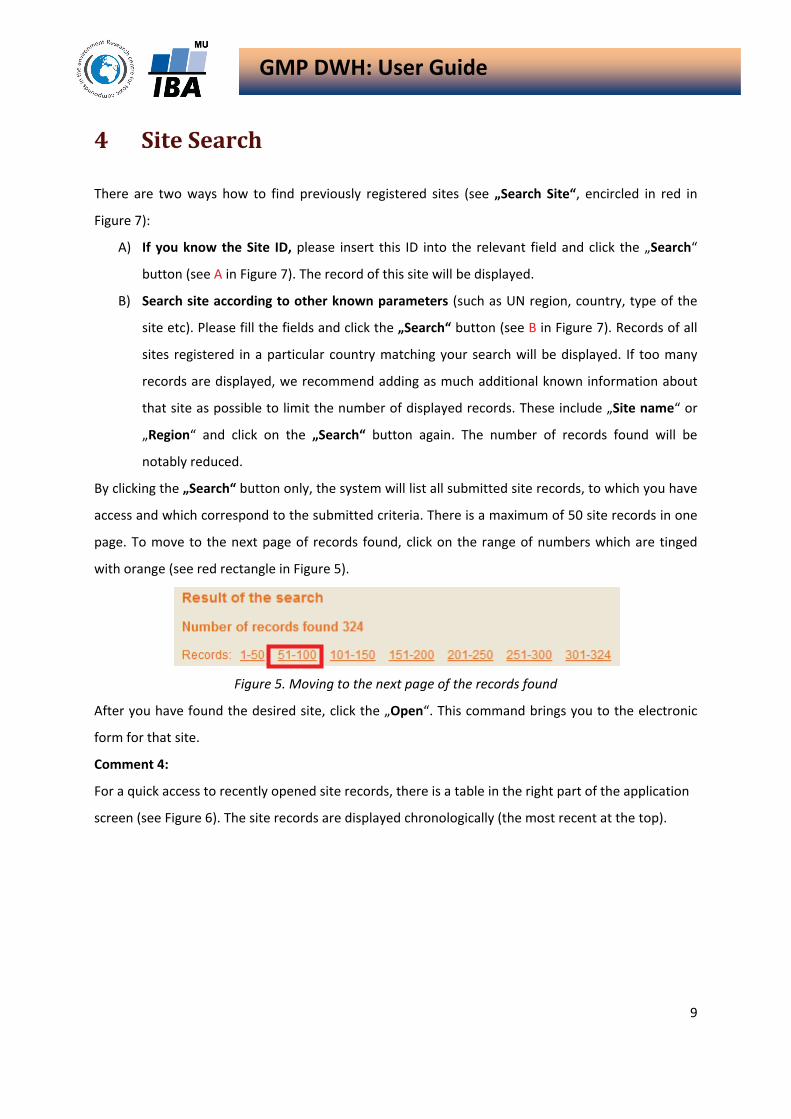
By clicking the „Search“ button only, the system will list all submitted site records, to which you have
access and which correspond to the submitted criteria. There is a maximum of 50 site records in one
page. To move to the next page of records found, click on the range of numbers which are tinged
with orange (see red rectangle in Figure 5).
Figure 5. Moving to the next page of the records found
After you have found the desired site, click the „Open“. This command brings you to the electronic
form for that site.
Comment 4:
For a quick access to recently opened site records, there is a table in the right part of the application
screen (see Figure 6). The site records are displayed chronologically (the most recent at the top).

10
GMP DWH: User Guide
Figure 6. History of opened site records
Figure 7. Site search
A B

11
GMP DWH: User Guide
Comment 5:
Search results (see Figure 8) can be sorted in ascending order or descending order by various criteria:
Site ID (see A – descending order according to Site ID), Region, Site name, Country, Date of Entry,
Entered by - name of the person who had submitted the site record (see B – ascending order
according to the criterion Entered by).
Figure 8. Search results and examples of site ordering
A
B

12
GMP DWH: User Guide
5 Working Window of the Application
The working window of the application is divided into two interconnected sections:
a) Site
b) Folders and Entries
The Site section contains a fundamental information about the site. The information displayed in the
form is copied therein automatically from the form submitted upon creation of the site (see Chapter
3, Adding New Site). It is also possible to edit (modify) the site information in this section by clicking
the „Site description“ (marked in red in Figure 9).
Figure 9. Site information update
All site forms are stored in the Folders and Entries section (purple parenthesis in Figure 9). These
forms are organized in “Folders“ (i.e. “All primary data“, “2012“ and “2011“).Content of individual
folders can be displayed by clicking on the folder; the list of individual entries (forms) will show (see
Figure 10).
Section Folders and
Entries
Section Site

13
GMP DWH: User Guide
Figure 10. Folder content
There are two options when working with Entries:
a) Create a new entry (see Chapter 6, Creation of a New Entry)
b) Edit an existing entry (see Chapter 8, Work with Submitted Entries)
14
GMP DWH: User Guide
6 Adding New Entry
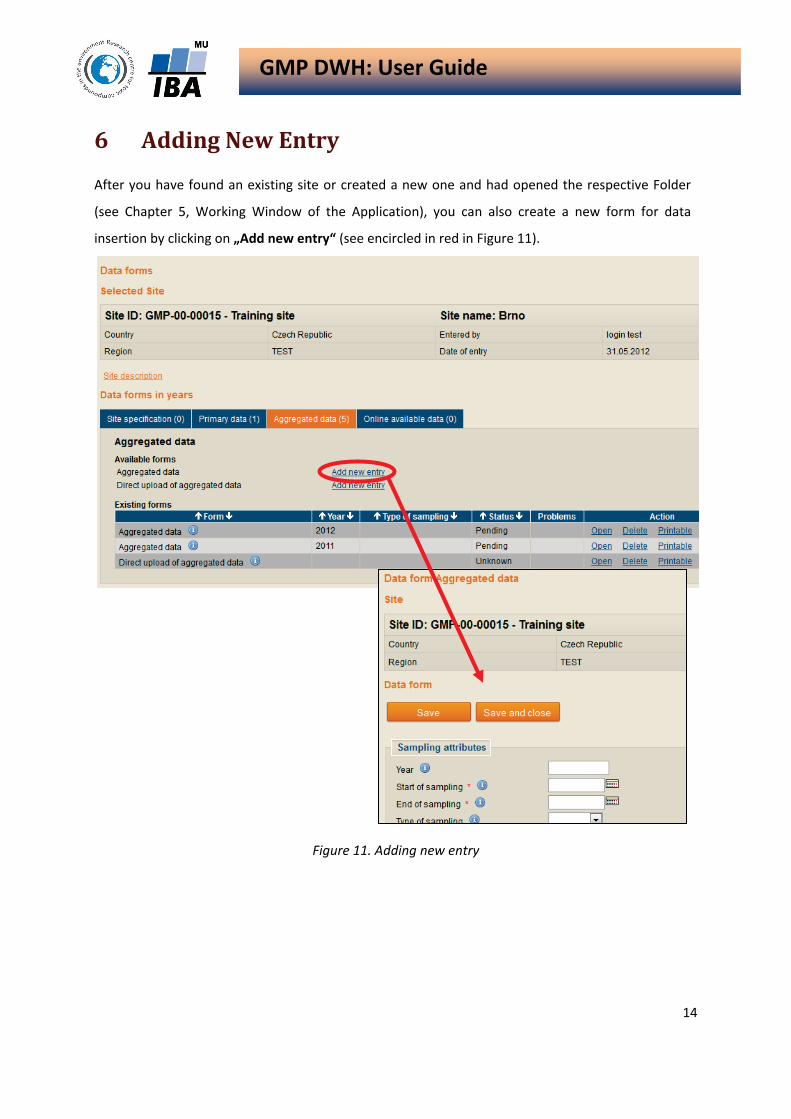
After you have found an existing site or created a new one and had opened the respective Folder
(see Chapter 5, Working Window of the Application), you can also create a new form for data
insertion by clicking on „Add new entry“ (see encircled in red in Figure 11).
Figure 11. Adding new entry
15
GMP DWH: User Guide
7 Entry Completion
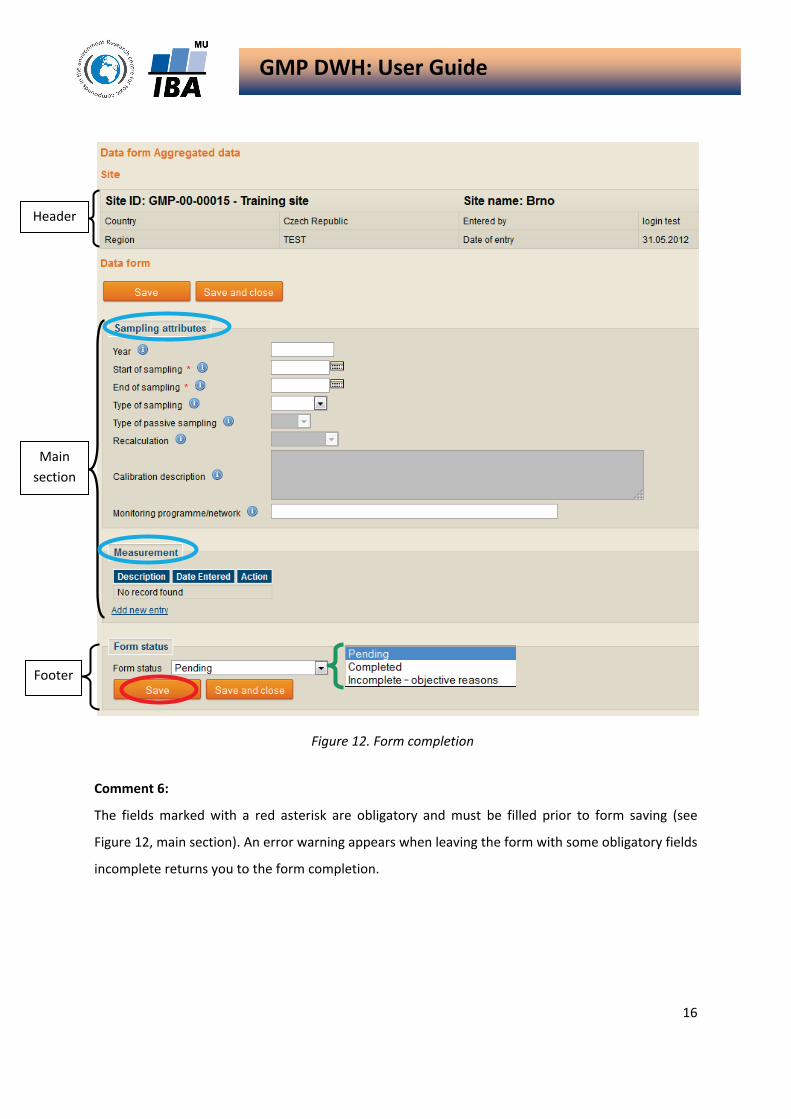
Each entry form page is divided into three sections (see example in Figure 12 :
1) header – contains basic information about the selected site
2) main section – contains data forms
3) footer – stores information on the completeness and validity of the entry
Header contains a basic information, such as Site ID, Country, Region, Entered by and Date of
entry.
Main section contains a form to insert values. It is divided into two subsections: Sampling
attributes and Measurement marked in bold (see encircled in blue in Figure 12). You can move
within the form by using the arrows of the scrollbar on the right. The form contains white and grey
fields to insert the data.
The Footer of the form contains a dropdown menu to specify status of the form: Pending,
Completed and Incomplete – objective reasons. Selected value provides information about the
status of users work on the form. Data inserted into the form can be saved by clicking ”Save“
button (see encircled in blue in Fig. 12).
In case you did not manage to complete the whole form for any reason, select the
„Pending“ option (see green parenthesis in Fig. 12). You can later continue in completion of
the form.
Upon completion of all fields of the form, select the „Completed“ option.
In case it is not possible to obtain all information necessary for a completion of the form,
select the option „Incomplete – objective reasons“.
16
GMP DWH: User Guide
Figure 12. Form completion
Comment 6:
The fields marked with a red asterisk are obligatory and must be filled prior to form saving (see
Figure 12, main section). An error warning appears when leaving the form with some obligatory fields
incomplete returns you to the form completion.
Footer
Main section
Header
17
GMP DWH: User Guide
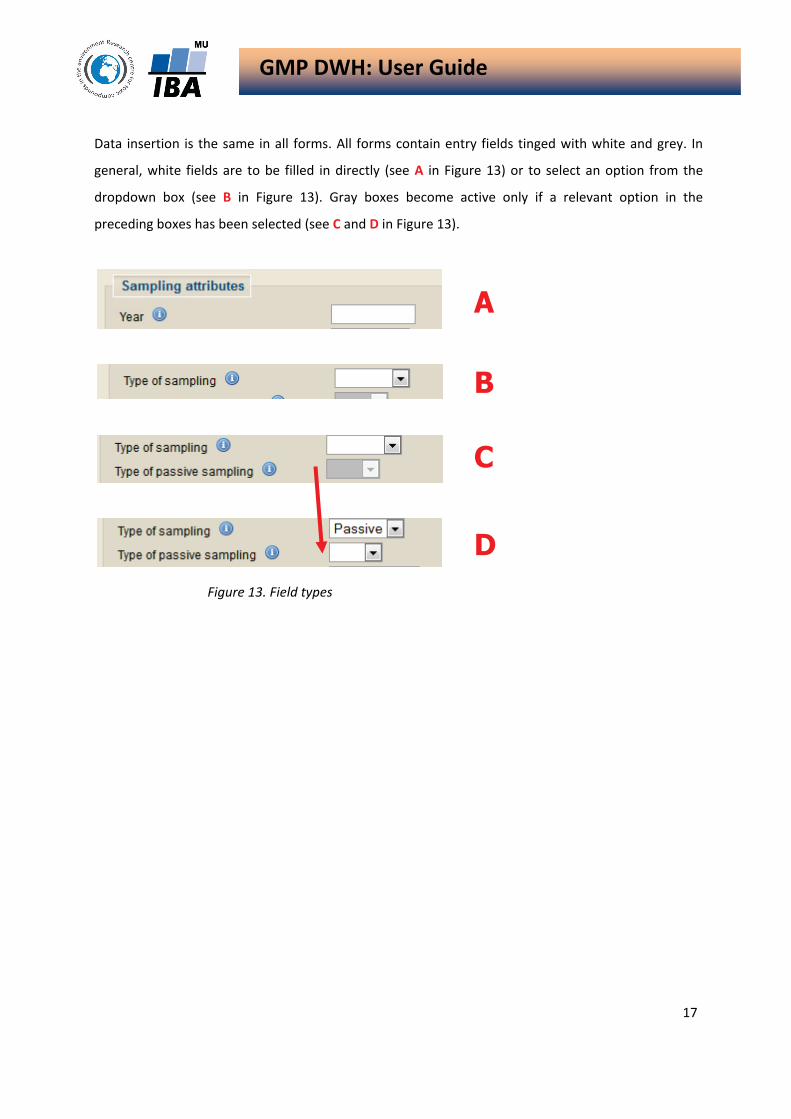
Data insertion is the same in all forms. All forms contain entry fields tinged with white and grey. In
general, white fields are to be filled in directly (see A in Figure 13) or to select an option from the
dropdown box (see B in Figure 13). Gray boxes become active only if a relevant option in the
preceding boxes has been selected (see C and D in Figure 13).
Figure 13. Field types
A
B
D
C

18
GMP DWH: User Guide
The multiple values for a particular site, year, and parameter can be inserted into one form using
„Add new entry“ and „Delete“ (encircled in red and green respectively in Figure 14). Click the „Add
new entry“ button to add a new line below the existing record.
To erase any line, click into any field of that line and then hit „Delete “ in the Action setting. Please
note that a line will be irreversibly deleted after your confirmation of the warning alert (see the
bottom part in Figure 14).
Figure 14. Inserting multiple values

19
GMP DWH: User Guide
8 Work with Submitted Entries
Previously submitted forms can be modified/edited by using the „Open“ (see A in Figure 15), printed
by using the „Printable“ (see B in Fig. 15) or deleted using the „Delete“ (see C in Figure 15).
CAUTION: Deletion of the form/all records: Deletion of the form is irreversible action! We
recommend using this function only after a careful consideration. However, upon user`s request it is
the HelpDesk (exclusively) who can perform Deletion of a whole site including its ID from the GMP
DWH database. Such request has to be sent to the HelpDesk by email. The site to be deleted must
not contain any entries (all previously submitted forms must be deleted by using the “Delete”
opotion in the menu Action).
Figure 15. Work with the form
A B
C
20
GMP DWH: User Guide
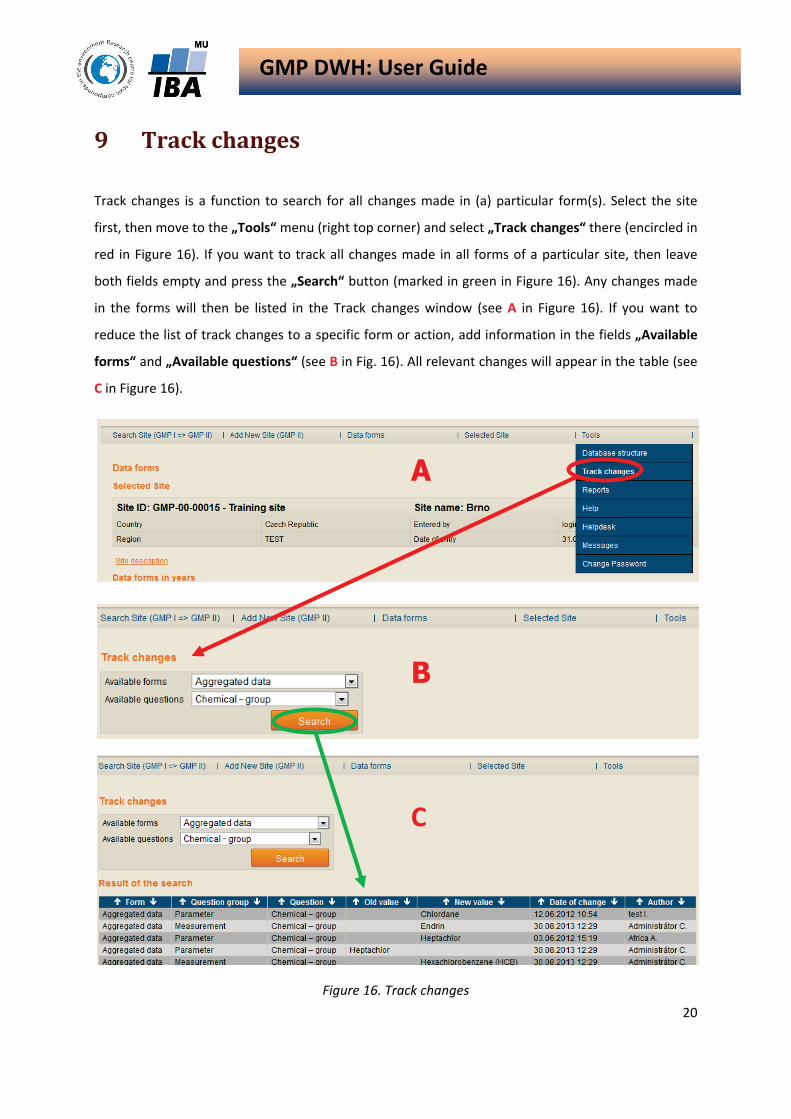
9 Track changes
Track changes is a function to search for all changes made in (a) particular form(s). Select the site
first, then move to the „Tools“ menu (right top corner) and select „Track changes“ there (encircled in
red in Figure 16). If you want to track all changes made in all forms of a particular site, then leave
both fields empty and press the „Search“ button (marked in green in Figure 16). Any changes made
in the forms will then be listed in the Track changes window (see A in Figure 16). If you want to
reduce the list of track changes to a specific form or action, add information in the fields „Available
forms“ and „Available questions“ (see B in Fig. 16). All relevant changes will appear in the table (see
C in Figure 16).
Figure 16. Track changes
A
B
C
21
GMP DWH: User Guide
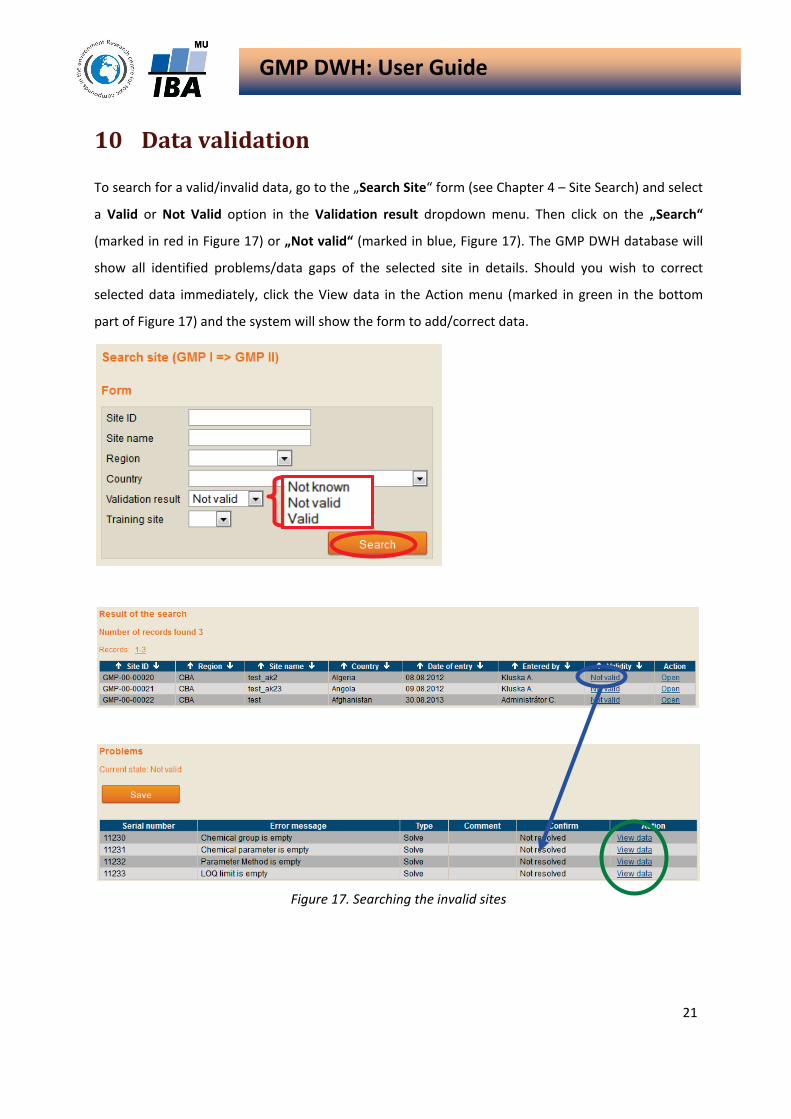
10 Data validation To search for a valid/invalid data, go to the „Search Site“ form (see Chapter 4 – Site Search) and select
a Valid or Not Valid option in the Validation result dropdown menu. Then click on the „Search“
(marked in red in Figure 17) or „Not valid“ (marked in blue, Figure 17). The GMP DWH database will
show all identified problems/data gaps of the selected site in details. Should you wish to correct
selected data immediately, click the View data in the Action menu (marked in green in the bottom
part of Figure 17) and the system will show the form to add/correct data.
Figure 17. Searching the invalid sites
22
GMP DWH: User Guide
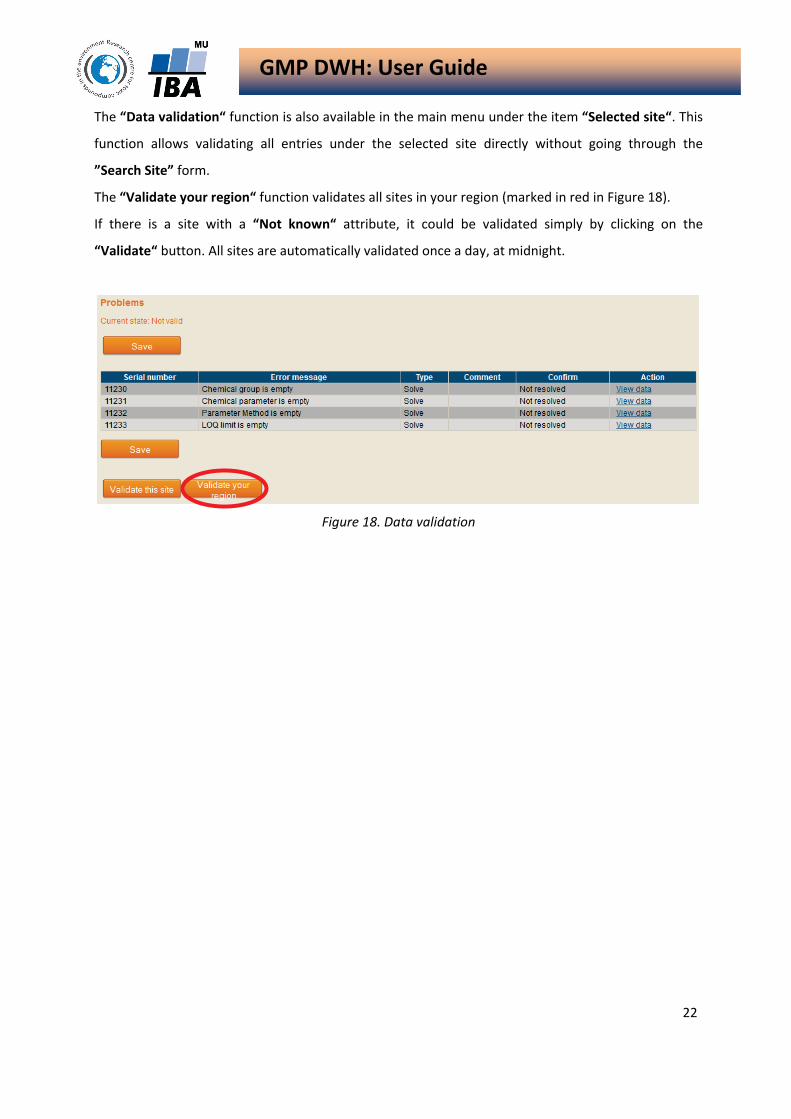
The “Data validation“ function is also available in the main menu under the item “Selected site“. This
function allows validating all entries under the selected site directly without going through the
”Search Site” form.
The “Validate your region“ function validates all sites in your region (marked in red in Figure 18).
If there is a site with a “Not known“ attribute, it could be validated simply by clicking on the
“Validate“ button. All sites are automatically validated once a day, at midnight.
Figure 18. Data validation
23
GMP DWH: User Guide
11 Technical Support
Technical Support
Institute of Biostatistics and Analyses
Faculty of Medicine and the Faculty of Science
Masaryk University, Brno
Kamenice 126/3, 625 00 Brno
http://www.iba.muni.cz
In case of technical problems or questions please contact:
Dr. Jakub Gregor, Ph.D. E-mail: [email protected] Phone: (+420) 549 49 5164