government aircraft factory nomad...
TRANSCRIPT

1
GOVERNMENT AIRCRAFT FACTORY NOMAD series.
Australian light transport aircraft.
1/72 scale

2
Leslie Applebee 15 Jan 2008 Just prior to leaving Newport for good and relocating the family to take up residence in Lara.
Here we go again
..and for the technically minded I’ve extrapolated some data from a copy of the CAA certificate of type approval 73-1 for ASTA dated 13May1992... Powerplants Two Allison 250B17B,C or E turboprops driving three blade Hartzell HC-A3VF propellers Performance Typical cruising speed 164kt with a structural max of 196kt but frankly as long as it gets me there and doesn’t go into a flat spin I’m not that fussed.. Service ceiling N22B 21000ft, N24A 20000ft or possibly 27000 ft, again it depends on where the information is coming from but the certification says quite sensibly 15000ft depending on crew oxygen requirements . If it’s really bothering you just call Air Safaris as they are more than qualified to answer this conundrum from first hand experience ! Weights It all depends on aircraft configuration, but for, say an N22B in transport mode, 3878kg max. Dimensions N24 & N22 - Wing span 16.52 ( differs according to source, 16.46m is however the prototype wing span) height 5.52m N22 length 12.56m N24 length 14.34m Capacity Accommodation for two pilots although certificated for single pilot operation. Seating in main cabin at two abreast for 12 (N22) or 16 (N24). Searchmaster B patrol aircraft is fitted with a Bendix RDR 1400 search radar and has a normal crew of four. The more sophisticated Searchmaster L has a Litton LASR (AN/APS504) search radar with 360 degree coverage in an undernose radar.
Well, a potted history is in order, both of the plane and of the model. The Nomad was developed by the Government Aircraft Factory from the late 1960s to help provide the facility with work after construction of licence built Mirage jet fighters was completed, and to offer a new rugged STOL utility transport suited to both military and civil operators both here and abroad. The Nomad included features such as a retractable undercarriage, two Allison 250 turboprops, a braced high mounted wing with full span double slotted fowler flaps and a squared sided fuselage. The first flight of the prototype Nomad N2 occurred on 23 July 1971. A second prototype first flew on 5 December that year. Having attained certification the first deliveries of the production N22 began in 1975 and a number of versions were forthcoming including the Missionmaster, Searchmaster, Surveymaster, Floatmaster, Commuterliner, Cargomaster and the Medicmaster. ( Even a Battlemaster but that’s another story..) A chequered career was to follow and Nomad production ceased in 1984 with 172 airframes having been produced. It could be said that mismanagement by the Australian government departments entrusted with its development were as much to blame for any shortcomings as any faults with the aircraft itself. GAF was renamed ASTA (Aerospace Technologies of Australia) and twelve years later was acquired by Rockwell and hence subsequently inherited by Boeing late that year. Maintenance responsibilities for the remaining 54 airframes still in service around the world has been acquired by a local aircraft manufacturing firm and when I’m given the all clear I’ll update this paragraph ! The kit itself has been a labour of love for me for over 15 years since meeting up with Fred H at Hearns and seeing his remarkable scratch built N22. I argued that plasticard beats a Matchbox Do28 and the argument rages on !!! Since having been released back then it has been, sold out, shelved, recast, released, sold out, plageurized, retooled, sold out and so on. This release sees me trying my damnest to keep it going with as much info as I can cram in and with as much scope to be able to model any of the N series variants in 1/72 ( and 1/48 but that’s another kit). What are you waiting for, get stuck into it !

3
What to expect with this kit.
REMEMBER—SAFETY FIRST: When sanding resin if at all possible do so in a tub of water to minimze dust becoming airborne—avoid inhalation of resin dust as it is harmful to your lungs. Be careful when using cyanoacrylate that you don’t stick your pinkies together and sharp knives cut flesh easier than plastic—you get the picture..
There are a number of variations to this kit with an inventory for each on the following pages. What is displayed here is a general view of some of the major components and some information that is preferential for you to know before commencing construction, especially of you’re not terribly au fait with resin kits. The materials used in production for this kit are various grades of polyurethane resin for the major components, PVCS or acetate sheet for the clear parts, ABS plastic card and some polystyrene struts. Cyanoacrylate is recommended for adhesion of all components other than the clear parts where PVA glue is recommended. The decals supplied in this kit are relative to the particular version depicted on the box-art and individual instructions are included with the sheet.
Whilst trying to keep bubbles to a minimum they will inevitably occur. Filling is easy using Milliput, baking soda & cyanoacrylate ( try it) and Tamiya Putty. You will need to trim some of
This window is valid for only some versions, if present, the hole is smaller than required simply to give you a starting point.
Resin parts can sometimes get warped in the packaging especially if they’ve been subjected to variance in temperature. The fix is easy, just soak in hot water and reshape by gently bending back to the desired position. The wings, for example may have developed anhedral, carefully heating and bending will rectify them, but take it slowly as bending too hard will break the item.
Most parts will have a mounting “tree” or a pouring “gate” which will require removal prior to assembly. Simply trim off with a sharp knife and file/sand accordingly.
Sometimes a razor saw is better than scoring/breaking when removing larger gates
Trim excess flash from parts. Clear out “potatoes” from crevices and undercuts. Cut off gates The tail section is cut or broken in two and attached to the empennage. Note that the whole horizontal tail surface moves as one from 18 degrees up to 4 degrees down. The floats for the
Wipaire version have a few bubbles that need filling
4
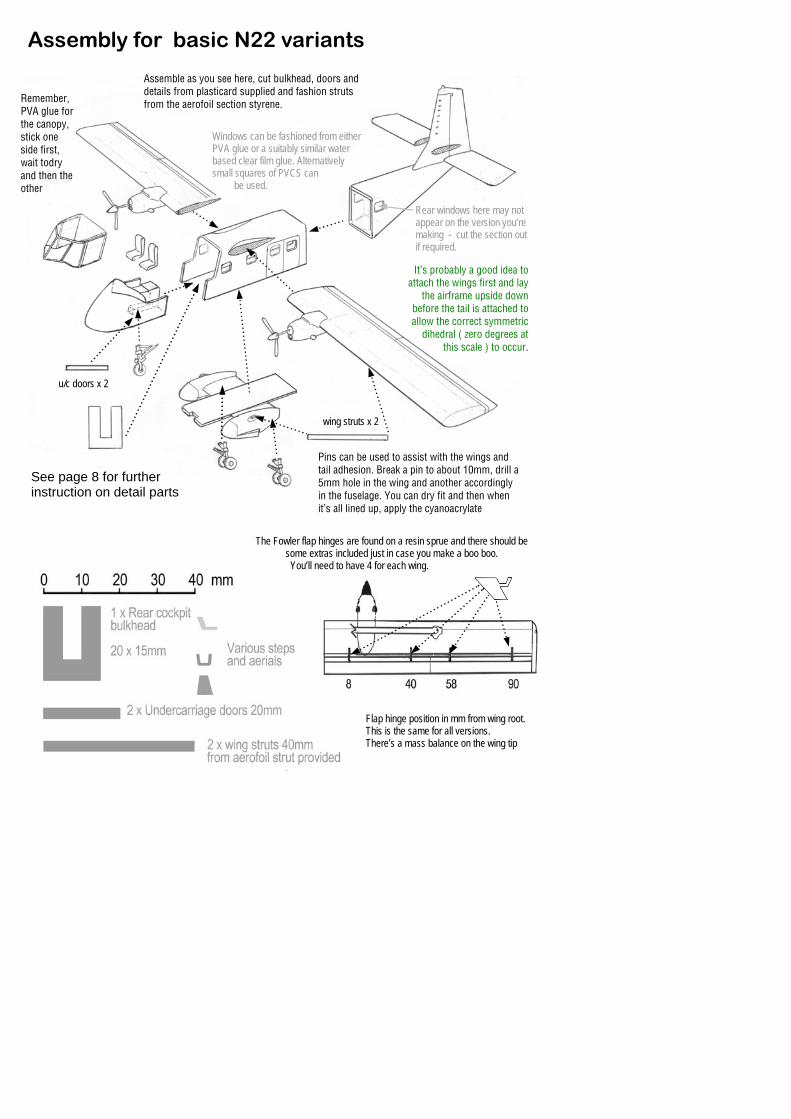
Assembly for basic N22 variants
It’s probably a good idea to attach the wings first and lay
the airframe upside down before the tail is attached to allow the correct symmetric
dihedral ( zero degrees at this scale ) to occur.
Remember, PVA glue for the canopy, stick one side first, wait todry and then the other
u/c doors x 2
wing struts x 2
Flap hinge position in mm from wing root. This is the same for all versions. There’s a mass balance on the wing tip
The Fowler flap hinges are found on a resin sprue and there should be some extras included just in case you make a boo boo.
You’ll need to have 4 for each wing.
Pins can be used to assist with the wings and tail adhesion. Break a pin to about 10mm, drill a 5mm hole in the wing and another accordingly in the fuselage. You can dry fit and then when it’s all lined up, apply the cyanoacrylate
Windows can be fashioned from either PVA glue or a suitably similar water based clear film glue. Alternatively small squares of PVCS can be used.
Assemble as you see here, cut bulkhead, doors and details from plasticard supplied and fashion struts from the aerofoil section styrene.
See page 8 for further instruction on detail parts
Rear windows here may not appear on the version you’re making - cut the section out if required.

5
Assembly for basic N24 variants
Pretty basic really, like the N22, assemble as you see here, cut bulkhead, doors and details from plasticard supplied and fashion struts from the aerofoil section styrene.
Attach the wings first and lay the airframe upside down before the tail is attached to allow the correct symmetric dihedral ( zero degrees at this scale ) to occur.
Remember, PVA glue for the canopy, stick one side first, wait todry and then the other
Pins can be used to assist with the wings and tail adhesion. Break a pin to about 10mm, drill a 5mm hole in the wing and another accordingly in the fuselage. You can dry fit and then when it’s all lined up, apply the cyanoacrylate
See page 8 for further instruction on detail parts
Windows can be fashioned from either PVA glue or a suitably similar water based clear film glue. Alternatively small squares of PVCS can be used.
u/c doors x 2
wing struts x 2
Flap hinge position in mm from wing root. This is the same for all versions. There’s a mass balance on the wing tip
The Fowler flap hinges are found on a resin sprue and there should be some extras included just in case you make a boo boo. You’ll need to have 4 for each wing.
6
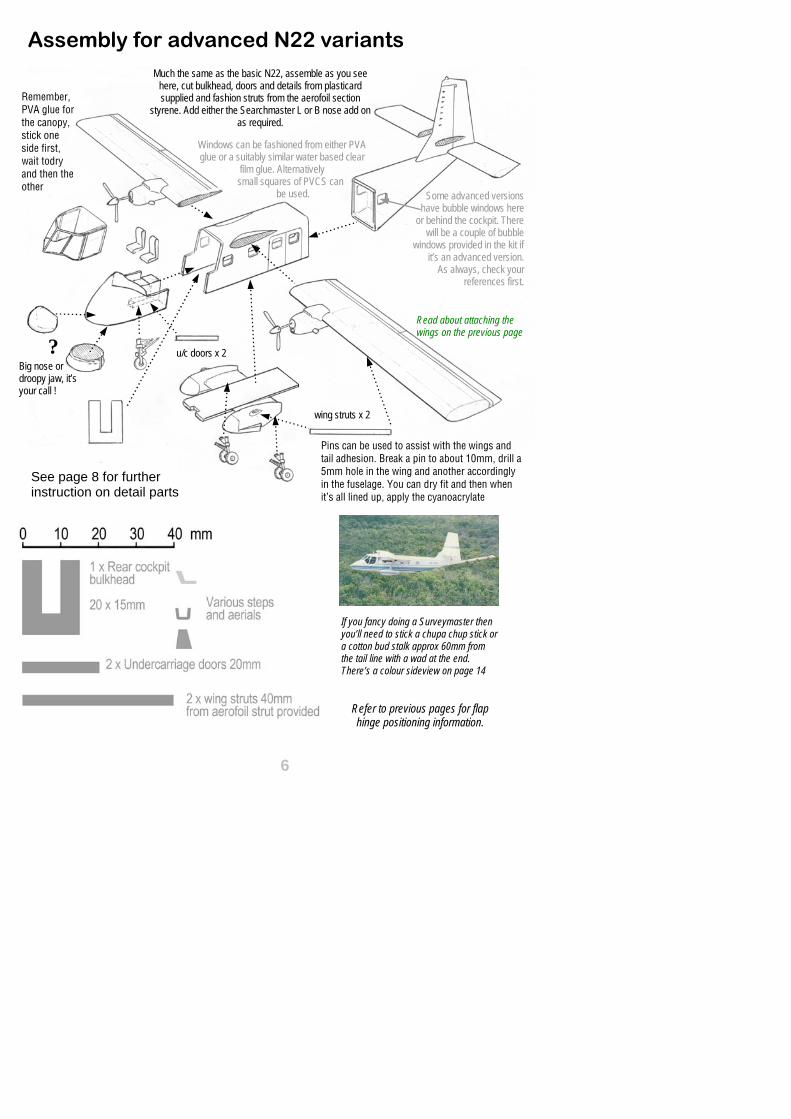
Assembly for advanced N22 variants
If you fancy doing a Surveymaster then you’ll need to stick a chupa chup stick or a cotton bud stalk approx 60mm from the tail line with a wad at the end. There’s a colour sideview on page 14
Refer to previous pages for flap hinge positioning information.
Remember, PVA glue for the canopy, stick one side first, wait todry and then the other
u/c doors x 2
wing struts x 2
Pins can be used to assist with the wings and tail adhesion. Break a pin to about 10mm, drill a 5mm hole in the wing and another accordingly in the fuselage. You can dry fit and then when it’s all lined up, apply the cyanoacrylate
Windows can be fashioned from either PVA glue or a suitably similar water based clear
film glue. Alternatively small squares of PVCS can
be used.
Much the same as the basic N22, assemble as you see here, cut bulkhead, doors and details from plasticard supplied and fashion struts from the aerofoil section
styrene. Add either the Searchmaster L or B nose add on as required.
See page 8 for further instruction on detail parts
Big nose or droopy jaw, it’s your call !
? Read about attaching the wings on the previous page
Some advanced versions have bubble windows here
or behind the cockpit. There will be a couple of bubble
windows provided in the kit if it’s an advanced version.
As always, check your references first.

7
Assembly for floatmaster variant
Refer to previous pages for flap hinge positioning
Remember, PVA glue for the canopy, stick one side first, wait todry and then the other
wing struts x 2
Pins can be used to assist with the wings and tail adhesion. Break a pin to
about 10mm, drill a 5mm hole in the wing and another accordingly in the
fuselage. You can dry fit and then when it’s all lined up, apply the
cyanoacrylate
Window advice can be found on previous pages.
This one’s the tough one. Like the N22, assemble as you see here, cut bulkhead, doors and details from plasticard supplied and fashion struts from the aerofoil section styrene. BUT, there’s a bunch of struts to get right so we’ll try to cover it as best as I can.
See page 8 for further instruction on detail parts, page 14 for a suggested scheme and page 16 for some front on detail shots
Insert a 2mm plug here for the float to sponson joint 48mm from front of float
Ventral fin 8mm from rear.
Float attachments shown on one side only—orange dots show approximate mounting points, yellow means underneath.
Nose mounts are 18mm from front..
Underwing mount point is on the same datum as wing strut.
Float front mount point is 5mm from front.
Struts common mount point underneath are mid mount and perpendicular to floats.
Read about attaching the wings on previous pages

8
A little detail.
Here’s some thoughts on what goes where and how.

9
Even though the wings are moulded as single pieces the more adventurous of you may wish to carve out some fowler flaps and some ailerons—here’s a series of photos from an old magazine to help. Some cockpit detail and instrumentation drawings are presented here for your edification also.
A little more detail..
Skin panelling details for both N22 & N24 in case you wish to get scribing.
10
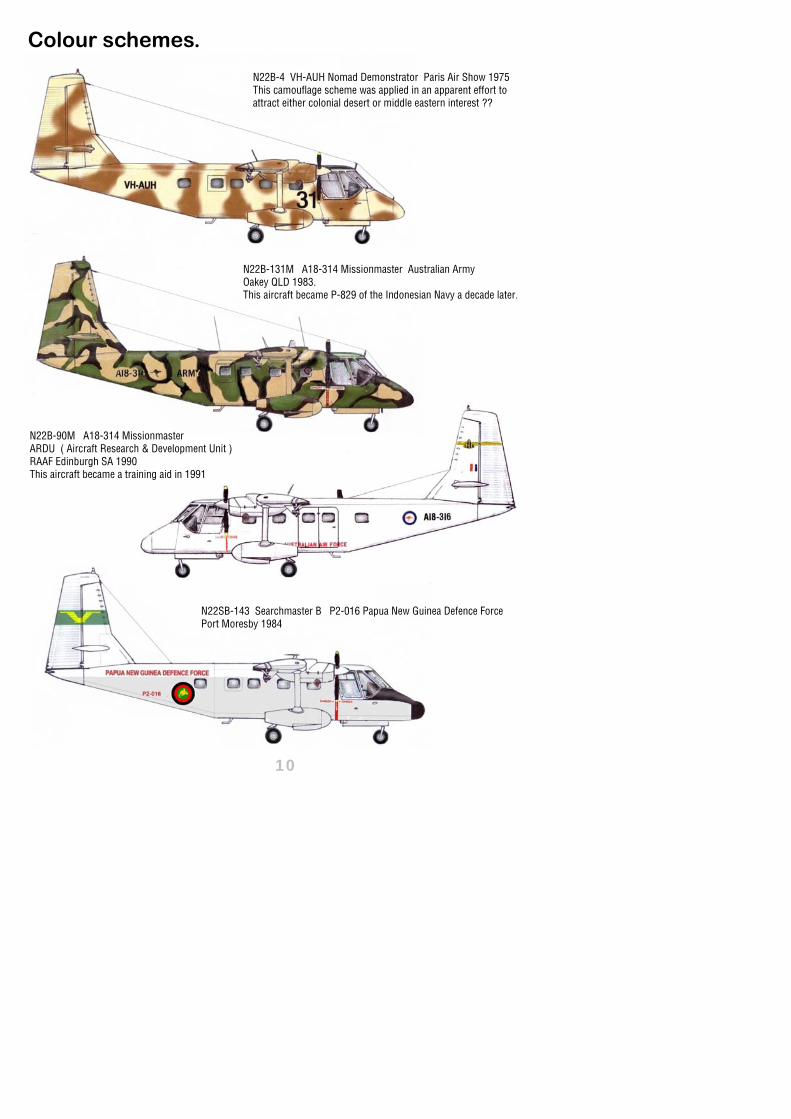
Colour schemes.
N22B-131M A18-314 Missionmaster Australian Army Oakey QLD 1983. This aircraft became P-829 of the Indonesian Navy a decade later.
N22B-90M A18-314 Missionmaster ARDU ( Aircraft Research & Development Unit ) RAAF Edinburgh SA 1990 This aircraft became a training aid in 1991
N22B-4 VH-AUH Nomad Demonstrator Paris Air Show 1975 This camouflage scheme was applied in an apparent effort to attract either colonial desert or middle eastern interest ??
N22SB-143 Searchmaster B P2-016 Papua New Guinea Defence Force Port Moresby 1984

11
Colour schemes.
N22B-103 National Safety Council of Australia Essendon Vic, 1984
N22S-92 VH-CEI Searchmaster L Australian Customs / Coastwatch contract. Essendon, Victoria 1988
Geoff Hearn provided this view of VH-CEI with a variation on the scheme seen above with “H.C.Sleigh Aviation” emblazoned on the side and a logo on the tail. Note that the radome is black at this time in the aircraft’s career.
N22S-84 VH-CEK Searchmaster L Australian Customs / Coastwatch contract. Karratha, WA. 1995

12
Colour schemes.
N24A-72 PH-HAL Holland Aerolines Rotterdam NL 1985. Interesting note is that PH-HAG, another N24, carried the name “Holland Airlines” as opposed to “Aerolines”
N24A-135 A18-403 RAAF Prior to delivery as VH HVL at Richmond NSW and subsequently in 75 Squadron RAAF livery at Tindal NT in the mid 1990’s This aircraft later became P-837 of the Indonesian Navy
N24A-139 A18-405 in Australian Army camouflage markings. Oakey QLD 1995 This aircraft later became P-839 of the Indonesian Defence Force

13
Colour schemes.
N22B-150 BL9-14/26 46134 461 Sqn 46 Wing RTAFB Pitsanuloke / Bangkok 2004. This low visibility scheme was not common as the RTAF usually operated SEA pattern camouflaged Nomads very similar to their Philippine Air Force counterparts as seen in this photo on the right of VH-UUZ prior to delivery.
N22B-22 220th Airlift Wing Philippine Air Force Manilla 1977. This was one of the first export Missionmasters having been acquired by the Phil AF in 1976.
Official badge of 201 Squadron Dolphin Gang courtesy of Tony Rigby. A rarity indeed...
There’s a rumour with no hard evidence to back it up of the RTAF operating a Missionmaster with a minigun mounted in the port doorway. This is the only photo I could find of an RTAF machine with something suspicious poking out the side. Now there’s some Update :
The minigun is a definite thing having viewed photos of the real deal. They’re a bit grainy to reproduce here but it exists alright.

14
N24A-139 A18-405 in its final guise as Indonesian Navy (Tentara Nasional Indonesia Angkatan Laut ) P-837, Surubaya Indonesia 1998
N22F-61 Floatmaster N59365 Minnesota USA 1979. This version employs the “Wipline” float conversion kit and various liveries seen on these types have been Barrier Reef Airways, Alimediterraneana, Aquatic Air, Nautilus Aviation and even Nutrimetics Corporation !
N22B-58 Surveymaster VH-FZP. Geosearch Jandakot WA 1977. This aircraft was withdrawn from service in 1982 and the fuselage was acquired by the Australian Aviation Museum in Bankstown NSW where today its fuselage has been transformed into VH-AAM, an educational device on a trailer for mobile display. These photos on the right were taken on a recent visit.
Colour schemes.

15
Three tone DSTO MRL scheme plan views.
FS30219 FS34102 FS34079 FS37038
Nothing to do with the above camouflage scheme, I just wanted to share this one with you all. It’s taken from a Koku Fan magazine and it depicts a Japanese N24A operated by Nagasaki Koku. Nomads were operated in all parts of the world and as of today there are 54 airframes still flying. Try and read the caption on the photo for a little Jinglish !
I believe this should be self explanatory. Based on the official drawings and modified from personal observation these drawings will show you how to paint an Aussie or Indonesian Nomad.

16
Nomad potpourri
17
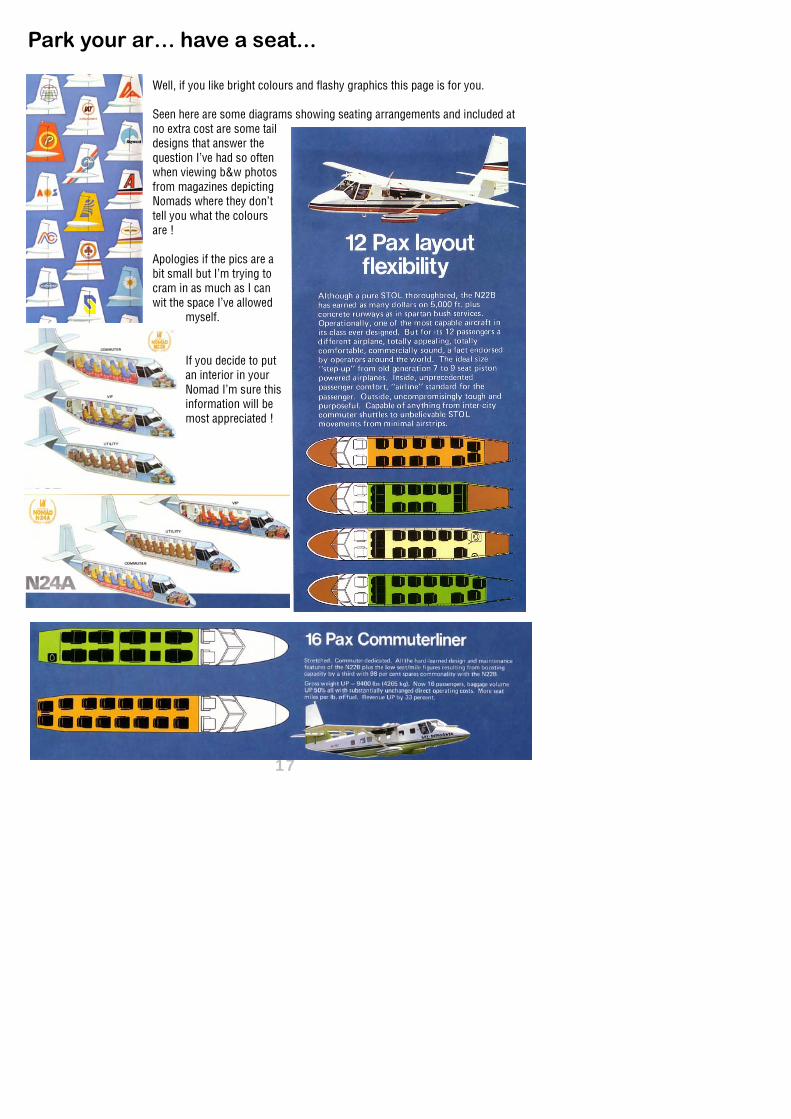
Well, if you like bright colours and flashy graphics this page is for you. Seen here are some diagrams showing seating arrangements and included at no extra cost are some tail designs that answer the question I’ve had so often when viewing b&w photos from magazines depicting Nomads where they don’t tell you what the colours are ! Apologies if the pics are a bit small but I’m trying to cram in as much as I can wit the space I’ve allowed
myself. If you decide to put an interior in your Nomad I’m sure this information will be most appreciated !
Park your ar… have a seat...

18
The mystical (dare I say mythical) N23 COIN proposals ( yes there were more than one) and the amazing hinged tail version.
I was intrigued to learn of this armed version of the Nomad which only came to my attention a couple of years ago, so much so that I made a model from my 1/48 version of the kit which is seen here participating in ModelExpo 07
Can you keep a secret ?.. Presented here are some of the lesser known Nomad variants that may be covered in model form in the near future... The rarely seen single engine version and the aggie variant of the same N series project.
19
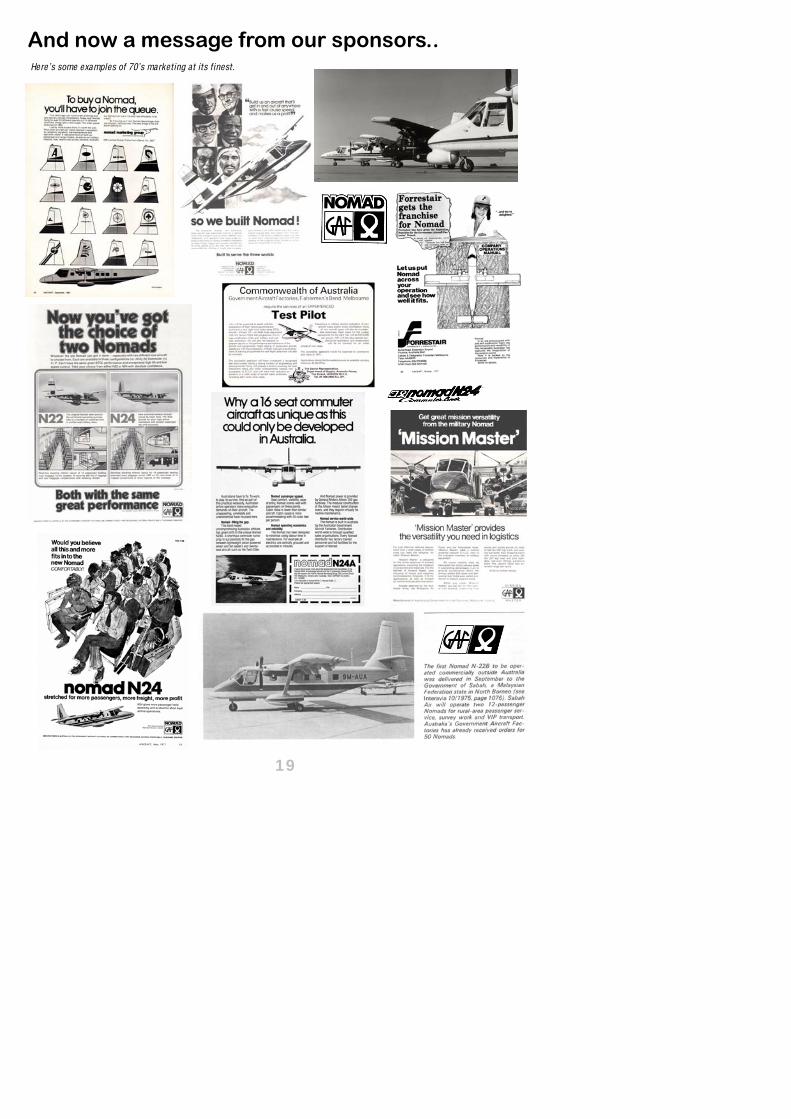
And now a message from our sponsors.. Here’s some examples of 70’s marketing at its finest.
20
Thanks to Fred Harris for being the driving force behind this project and providing me with ample reference material, the late Kevin Kerle for his many photos and wise words, Richard Hourigan for his continued support and guidance, Geoff Hearn for coming up
with some excellent reference at the eleventh hour, the chaps at IPMS for adding to the available data, Tony Rigby for some invaluable assistance and Graeme Morgan for being there then and now.
I am also indebted to a man who left me his entire collection of Nomad related newspaper clippings many years ago whose name and address details I misplaced and subsequently can’t thank properly.
If you wish to berate Uncle Les for gross modelling atrocities, send him cheery words to help
him along or if you need spares for the kit you’ve just purchased please direct your enquiries to either:
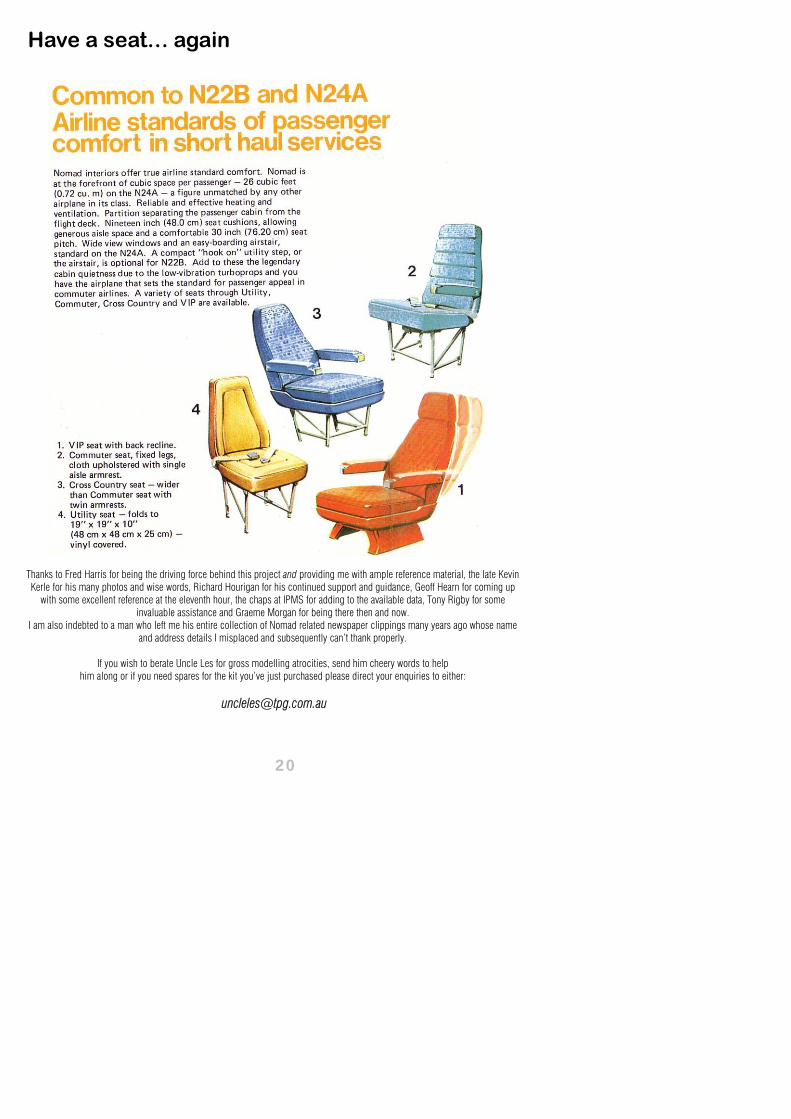
Have a seat… again