grade 2, module 8 teacher edition€¦ · grade 2, module 8 teacher edition ... grade 2 • module...
TRANSCRIPT
Published by the non-profit Great Minds.
Copyright © 2015 Great Minds. No part of this work may be reproduced, sold, or commercialized, in whole or in part, without written permission from Great Minds. Non-commercial use is licensed pursuant to a Creative Commons Attribution-NonCommercial-ShareAlike 4.0 license; for more information, go to http://greatminds.net/maps/math/copyright. “Great Minds” and “Eureka Math” are registered trademarks of Great Minds.
Printed in the U.S.A. This book may be purchased from the publisher at eureka-math.org 10 9 8 7 6 5 4 3 2 1
Eureka Math™
Grade 2, Module 8
Teacher Edition
A Story of Units®
NOTE: Student sheets should be printed at 100% scale to preserve the intended size of figures for accurate measurements. Adjust copier or printer settings to actual size and set page scaling to none.
Module 8: Time, Shapes, and Fractions as Equal Parts of Shapes
2 G R A D E
Mathematics Curriculum GRADE 2 • MODULE 8
Table of Contents
GRADE 2 • MODULE 8 Time, Shapes, and Fractions as Equal Parts of Shapes Module Overview .......................................................................................................... 2 Topic A: Attributes of Geometric Shapes ..................................................................... 9 Topic B: Composite Shapes and Fraction Concepts .................................................... 82 Mid-Module Assessment and Rubric ........................................................................ 117 Topic C: Halves, Thirds, and Fourths of Circles and Rectangles ................................ 123 Topic D: Application of Fractions to Tell Time ........................................................... 178 End-of-Module Assessment and Rubric .................................................................... 236 Answer Key ................................................................................................................ 247
A STORY OF UNITS
1
©2015 Great Minds. eureka-math.orgG 2-M8-TE-1.3 .0 -0 9.20 15
NOTE: Student sheets should be printed at 100% scale to preserve the intended size of figures for accurate measurements. Adjust copier or printer settings to actual size and set page scaling to none.
Module Overview 2 8
Module 8: Time, Shapes, and Fractions as Equal Parts of Shapes
Grade 2 • Module 8
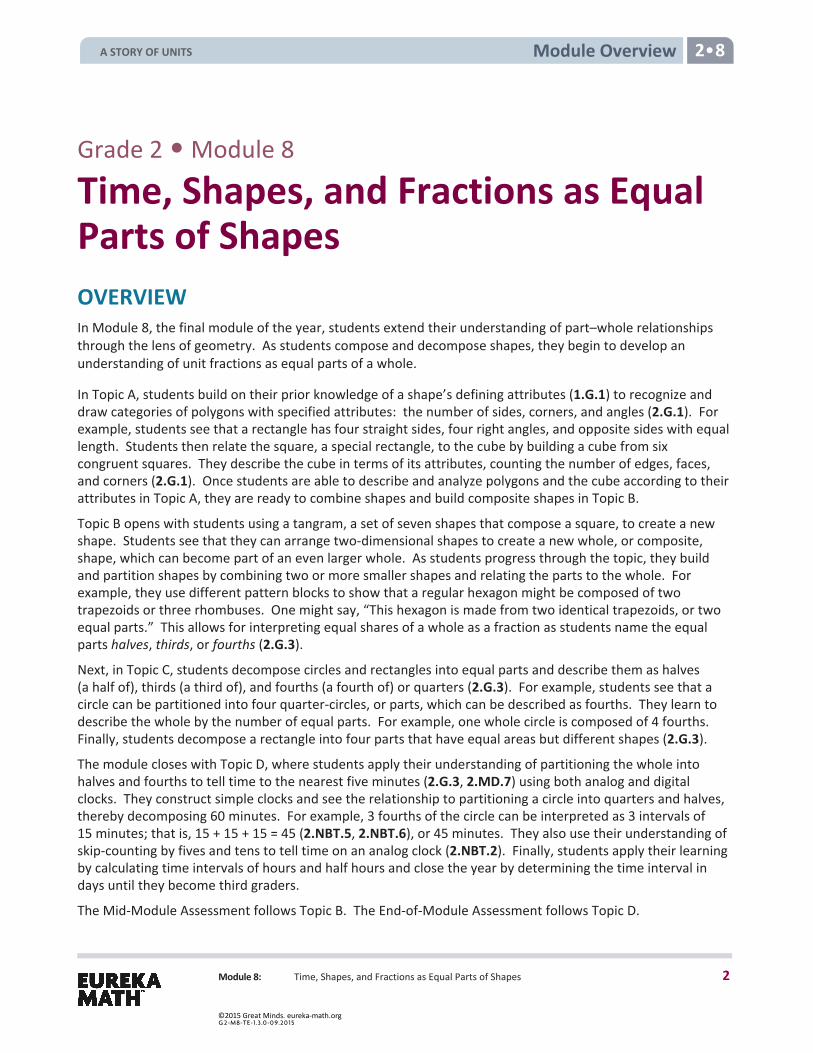
Time, Shapes, and Fractions as Equal Parts of Shapes OVERVIEW In Module 8, the final module of the year, students extend their understanding of part–whole relationships through the lens of geometry. As students compose and decompose shapes, they begin to develop an understanding of unit fractions as equal parts of a whole.
In Topic A, students build on their prior knowledge of a shape’s defining attributes (1.G.1) to recognize and draw categories of polygons with specified attributes: the number of sides, corners, and angles (2.G.1). For example, students see that a rectangle has four straight sides, four right angles, and opposite sides with equal length. Students then relate the square, a special rectangle, to the cube by building a cube from six congruent squares. They describe the cube in terms of its attributes, counting the number of edges, faces, and corners (2.G.1). Once students are able to describe and analyze polygons and the cube according to their attributes in Topic A, they are ready to combine shapes and build composite shapes in Topic B.
Topic B opens with students using a tangram, a set of seven shapes that compose a square, to create a new shape. Students see that they can arrange two-dimensional shapes to create a new whole, or composite, shape, which can become part of an even larger whole. As students progress through the topic, they build and partition shapes by combining two or more smaller shapes and relating the parts to the whole. For example, they use different pattern blocks to show that a regular hexagon might be composed of two trapezoids or three rhombuses. One might say, “This hexagon is made from two identical trapezoids, or two equal parts.” This allows for interpreting equal shares of a whole as a fraction as students name the equal parts halves, thirds, or fourths (2.G.3).
Next, in Topic C, students decompose circles and rectangles into equal parts and describe them as halves (a half of), thirds (a third of), and fourths (a fourth of) or quarters (2.G.3). For example, students see that a circle can be partitioned into four quarter-circles, or parts, which can be described as fourths. They learn to describe the whole by the number of equal parts. For example, one whole circle is composed of 4 fourths. Finally, students decompose a rectangle into four parts that have equal areas but different shapes (2.G.3).
The module closes with Topic D, where students apply their understanding of partitioning the whole into halves and fourths to tell time to the nearest five minutes (2.G.3, 2.MD.7) using both analog and digital clocks. They construct simple clocks and see the relationship to partitioning a circle into quarters and halves, thereby decomposing 60 minutes. For example, 3 fourths of the circle can be interpreted as 3 intervals of 15 minutes; that is, 15 + 15 + 15 = 45 (2.NBT.5, 2.NBT.6), or 45 minutes. They also use their understanding of skip-counting by fives and tens to tell time on an analog clock (2.NBT.2). Finally, students apply their learning by calculating time intervals of hours and half hours and close the year by determining the time interval in days until they become third graders.
The Mid-Module Assessment follows Topic B. The End-of-Module Assessment follows Topic D.
A STORY OF UNITS
2
©2015 Great Minds. eureka-math.orgG 2-M8-TE-1.3 .0 -0 9.20 15
New York State Common Core
Module Overview 2 8
Module 8: Time, Shapes, and Fractions as Equal Parts of Shapes
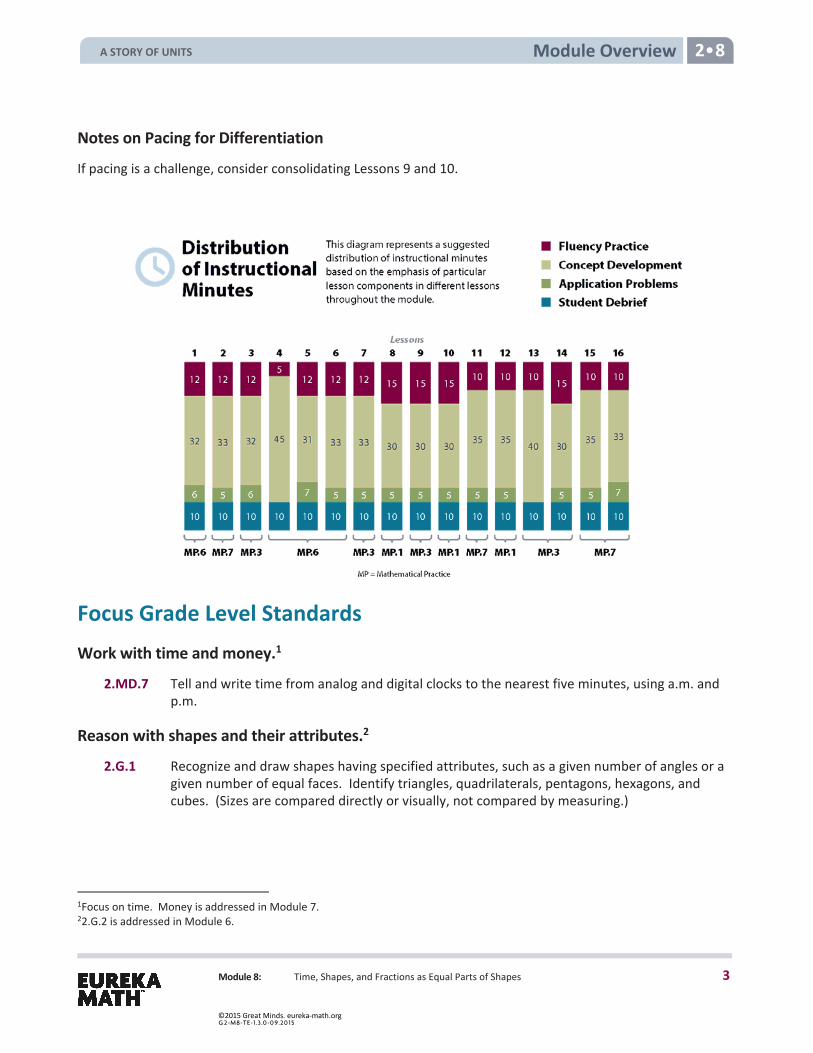
Notes on Pacing for Differentiation
If pacing is a challenge, consider consolidating Lessons 9 and 10.
Focus Grade Level Standards Work with time and money.1
2.MD.7 Tell and write time from analog and digital clocks to the nearest five minutes, using a.m. and p.m.
Reason with shapes and their attributes.2
2.G.1 Recognize and draw shapes having specified attributes, such as a given number of angles or a given number of equal faces. Identify triangles, quadrilaterals, pentagons, hexagons, and cubes. (Sizes are compared directly or visually, not compared by measuring.)
1Focus on time. Money is addressed in Module 7. 22.G.2 is addressed in Module 6.
A STORY OF UNITS
3
©2015 Great Minds. eureka-math.orgG 2-M8-TE-1.3 .0 -0 9.20 15
New York State Common Core
Module Overview 2 8
Module 8: Time, Shapes, and Fractions as Equal Parts of Shapes
2.G.3 Partition circles and rectangles into two, three, or four equal shares, describe the shares using the words halves, thirds, half of, a third of, etc., and describe the whole as two halves, three thirds, four fourths. Recognize that equal shares of identical wholes need not have the same shape.
Foundational Standards 1.MD.3 Tell and write time in hours and half-hours using analog and digital clocks. Recognize and
identify coins, their names, and their value.
1.G.1 Distinguish between defining attributes (e.g., triangles are closed and three-sided) versus non-defining attributes (e.g., color, orientation, overall size); build and draw shapes to possess defining attributes.
1.G.2 Compose two-dimensional shapes (rectangles, squares, trapezoids, triangles, half-circles, and quarter-circles) or three-dimensional shapes (cubes, right rectangular prisms, right circular cones, and right circular cylinders) to create a composite shape, and compose new shapes from the composite shape. (Students do not need to learn formal names such as “right rectangular prism.”)
1.G.3 Partition circles and rectangles into two and four equal shares, describe the shares using the words halves, fourths, and quarters, and use the phrases half of, fourth of, and quarter of. Describe the whole as two of, or four of the shares. Understand for these examples that decomposing into more equal shares creates smaller shares.
2.NBT.2 Count within 1000; skip-count by 5s3, 10s, and 100s.
2.NBT.5 Fluently add and subtract within 100 using strategies based on place value, properties of operations, and/or the relationship between addition and subtraction.
2.NBT.6 Add up to four two-digit numbers using strategies based on place value and properties of operations.
2.MD.1 Measure the length of an object by selecting and using appropriate tools such as rulers, yardsticks, meter sticks, and measuring tapes.
Focus Standards for Mathematical Practice MP.1 Make sense of problems and persevere in solving them. Students are encouraged to
persevere when arranging shapes to create specific composite shapes, when recomposing the pieces into different shapes, and when creating even larger shapes from composite shapes. When students partition composite shapes (e.g., circles and rectangles) into equal shares, they ask themselves, “How can I look at this differently?” Students organize their thinking through drawing, and they see, for example, that a circle can be described in terms of halves, thirds, or fourths.
3Use an analog clock to provide a context for skip-counting by fives.
A STORY OF UNITS
4
©2015 Great Minds. eureka-math.orgG 2-M8-TE-1.3 .0 -0 9.20 15
New York State Common Core
Module Overview 2 8
Module 8: Time, Shapes, and Fractions as Equal Parts of Shapes
MP.3 Construct viable arguments and critique the reasoning of others. Students use drawings and precise language to describe and analyze shapes, and they defend their reasoning as to what makes a quadrilateral, for example, a rhombus. Students also discuss the partitioning of a composite shape (e.g., a hexagon) and relate the different parts, or shares, to halves, thirds, and fourths. They make connections between fraction concepts and telling time, explaining the connection between their work with halves and quarters to the analog clock.
MP.6 Attend to precision. Students describe and analyze various two-dimensional shapes by attending to their specific attributes. Students accurately draw shapes using their knowledge of attributes and rulers. Then, while working with a partner, students name and analyze their partners’ shape drawings by counting the number of sides or angles. Students also appropriately name parts of a whole using terms such as halves, thirds, and fourths or quarters.
MP.7 Look for and make use of structure. Students identify attributes, such as the number of sides and angles, in order to classify shapes such as triangles and quadrilaterals. They make use of the part–whole structure to understand that a whole unit can be partitioned into equal shares, or smaller units (e.g., each of 4 equal shares = a fourth of the whole). Students use their understanding of the partitioning of a circle to tell time to the quarter and half hour. Through previous Fluency Practice, students use the pattern of skip-counting by fives to tell time on an analog clock.
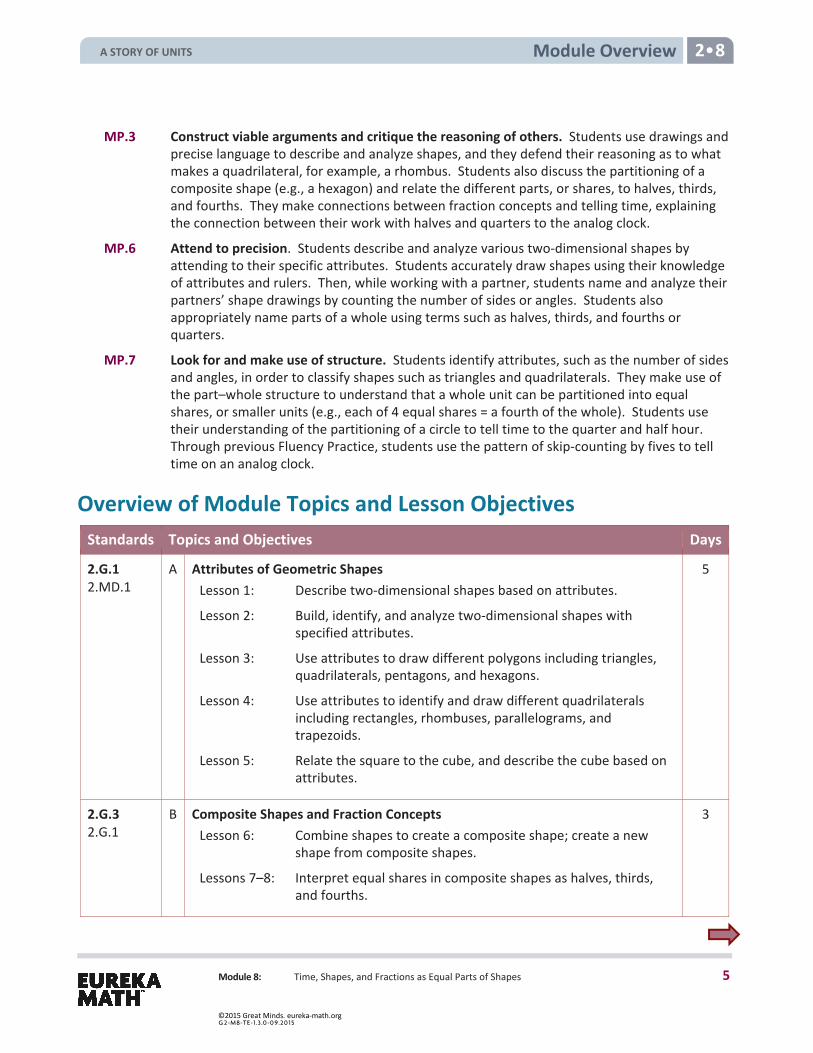
Overview of Module Topics and Lesson Objectives Standards Topics and Objectives Days
2.G.1 2.MD.1
A Attributes of Geometric Shapes Lesson 1: Describe two-dimensional shapes based on attributes.
Lesson 2: Build, identify, and analyze two-dimensional shapes with specified attributes.
Lesson 3: Use attributes to draw different polygons including triangles, quadrilaterals, pentagons, and hexagons.
Lesson 4: Use attributes to identify and draw different quadrilaterals including rectangles, rhombuses, parallelograms, and trapezoids.
Lesson 5: Relate the square to the cube, and describe the cube based on attributes.
5
2.G.3 2.G.1
B Composite Shapes and Fraction Concepts Lesson 6: Combine shapes to create a composite shape; create a new
shape from composite shapes.
Lessons 7–8: Interpret equal shares in composite shapes as halves, thirds, and fourths.
3
A STORY OF UNITS
5
©2015 Great Minds. eureka-math.orgG 2-M8-TE-1.3 .0 -0 9.20 15
New York State Common Core
Module Overview 2 8
Module 8: Time, Shapes, and Fractions as Equal Parts of Shapes
Standards Topics and Objectives Days
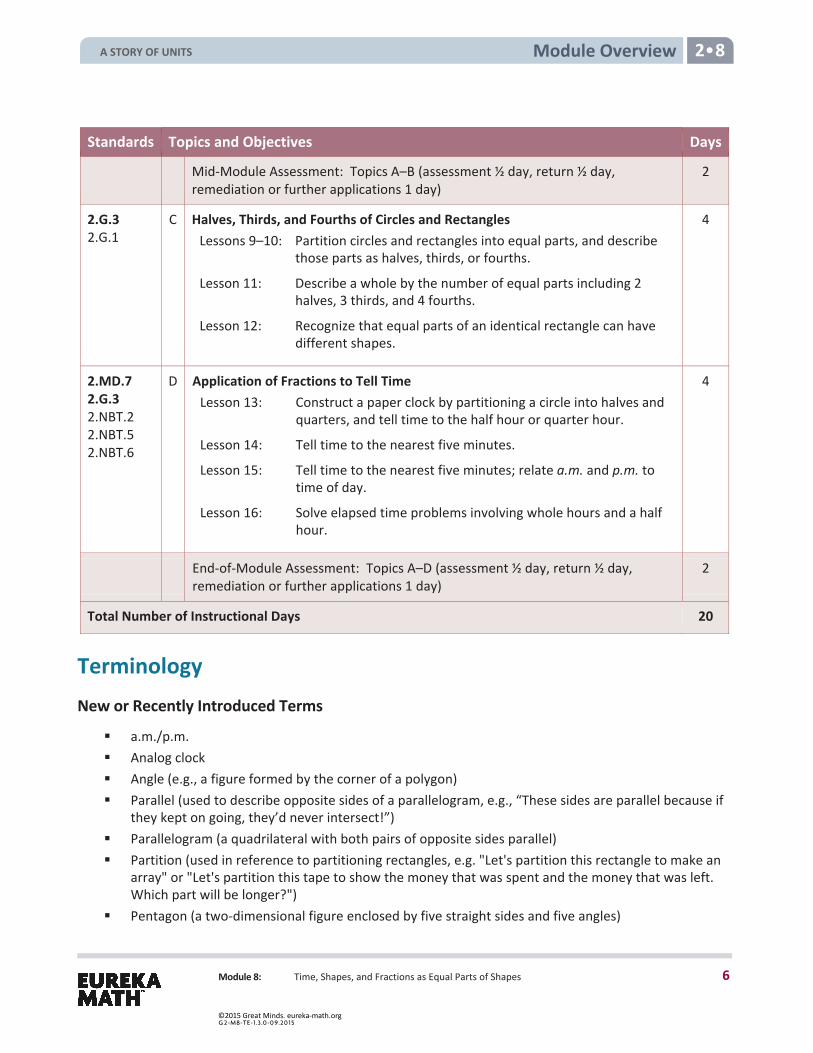
Mid-Module Assessment: Topics A–B (assessment ½ day, return ½ day, remediation or further applications 1 day)
2
2.G.32.G.1
C Halves, Thirds, and Fourths of Circles and Rectangles Lessons 9–10: Partition circles and rectangles into equal parts, and describe
those parts as halves, thirds, or fourths.
Lesson 11: Describe a whole by the number of equal parts including 2 halves, 3 thirds, and 4 fourths.
Lesson 12: Recognize that equal parts of an identical rectangle can have different shapes.
4
2.MD.72.G.32.NBT.22.NBT.52.NBT.6
D Application of Fractions to Tell Time Lesson 13: Construct a paper clock by partitioning a circle into halves and
quarters, and tell time to the half hour or quarter hour.
Lesson 14: Tell time to the nearest five minutes.
Lesson 15: Tell time to the nearest five minutes; relate a.m. and p.m. to time of day.
Lesson 16: Solve elapsed time problems involving whole hours and a half hour.
4
End-of-Module Assessment: Topics A–D (assessment ½ day, return ½ day, remediation or further applications 1 day)
2
Total Number of Instructional Days 20
Terminology New or Recently Introduced Terms
a.m./p.m. Analog clock Angle (e.g., a figure formed by the corner of a polygon) Parallel (used to describe opposite sides of a parallelogram, e.g., “These sides are parallel because if
they kept on going, they’d never intersect!”) Parallelogram (a quadrilateral with both pairs of opposite sides parallel) Partition (used in reference to partitioning rectangles, e.g. "Let's partition this rectangle to make an
array" or "Let's partition this tape to show the money that was spent and the money that was left.Which part will be longer?")
Pentagon (a two-dimensional figure enclosed by five straight sides and five angles)
A STORY OF UNITS
6
©2015 Great Minds. eureka-math.orgG 2-M8-TE-1.3 .0 -0 9.20 15
New York State Common Core
Module Overview 2 8
Module 8: Time, Shapes, and Fractions as Equal Parts of Shapes
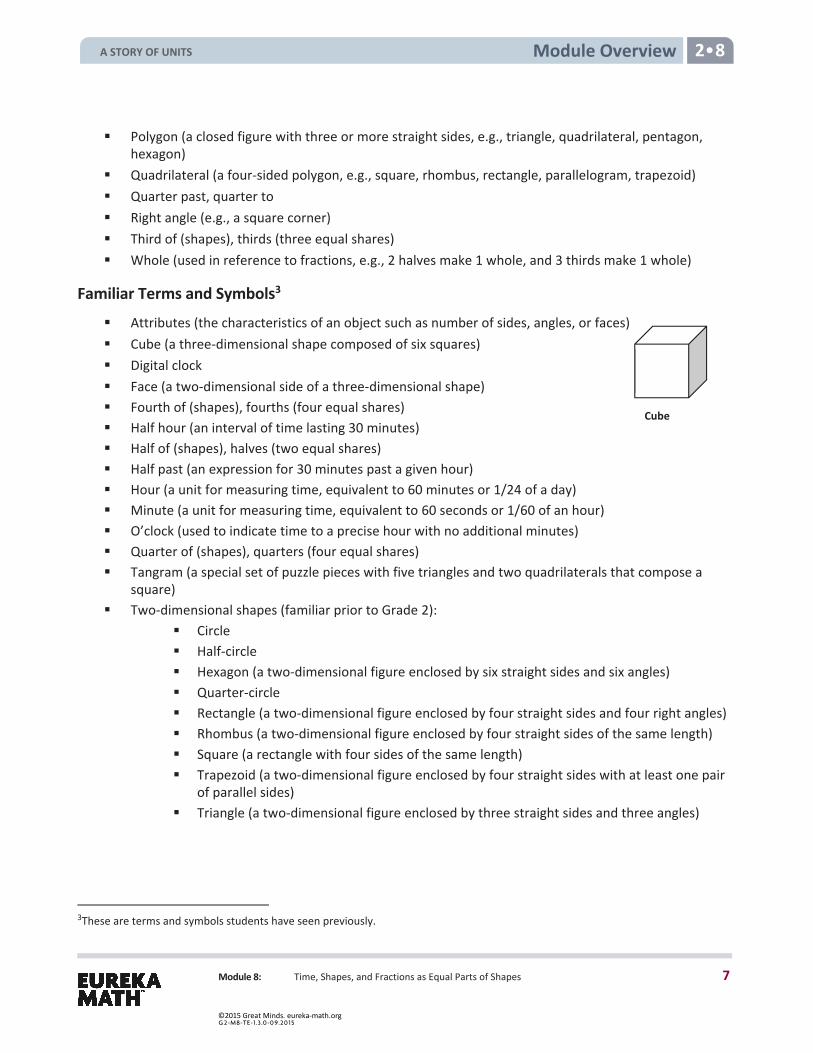
Cube
Polygon (a closed figure with three or more straight sides, e.g., triangle, quadrilateral, pentagon, hexagon)
Quadrilateral (a four-sided polygon, e.g., square, rhombus, rectangle, parallelogram, trapezoid) Quarter past, quarter to Right angle (e.g., a square corner) Third of (shapes), thirds (three equal shares) Whole (used in reference to fractions, e.g., 2 halves make 1 whole, and 3 thirds make 1 whole)
Familiar Terms and Symbols3 Attributes (the characteristics of an object such as number of sides, angles, or faces) Cube (a three-dimensional shape composed of six squares) Digital clock Face (a two-dimensional side of a three-dimensional shape) Fourth of (shapes), fourths (four equal shares) Half hour (an interval of time lasting 30 minutes) Half of (shapes), halves (two equal shares) Half past (an expression for 30 minutes past a given hour) Hour (a unit for measuring time, equivalent to 60 minutes or 1/24 of a day) Minute (a unit for measuring time, equivalent to 60 seconds or 1/60 of an hour) O’clock (used to indicate time to a precise hour with no additional minutes) Quarter of (shapes), quarters (four equal shares) Tangram (a special set of puzzle pieces with five triangles and two quadrilaterals that compose a
square) Two-dimensional shapes (familiar prior to Grade 2):
Circle Half-circle Hexagon (a two-dimensional figure enclosed by six straight sides and six angles) Quarter-circle Rectangle (a two-dimensional figure enclosed by four straight sides and four right angles) Rhombus (a two-dimensional figure enclosed by four straight sides of the same length) Square (a rectangle with four sides of the same length) Trapezoid (a two-dimensional figure enclosed by four straight sides with at least one pair
of parallel sides) Triangle (a two-dimensional figure enclosed by three straight sides and three angles)
3These are terms and symbols students have seen previously.
A STORY OF UNITS
7
©2015 Great Minds. eureka-math.orgG 2-M8-TE-1.3 .0 -0 9.20 15
New York State Common Core
Module Overview 2 8
Module 8: Time, Shapes, and Fractions as Equal Parts of Shapes
Suggested Tools and Representations Cube: a three-dimensional shape (real-world examples such as a die, alphabet blocks, or a box) Geoboards Large instructional geared clock Pattern blocks Personal white boards Rulers Spaghetti Student clocks, preferably those with gears that can provide the appropriate hour-hand alignment Tangrams Toothpicks
Scaffolds4 The scaffolds integrated into A Story of Units give alternatives for how students access information as well as express and demonstrate their learning. Strategically placed margin notes are provided within each lesson elaborating on the use of specific scaffolds at applicable times. They address many needs presented by English language learners, students with disabilities, students performing above grade level, and students performing below grade level. Many of the suggestions are organized by Universal Design for Learning (UDL) principles and are applicable to more than one population. To read more about the approach to differentiated instruction in A Story of Units, please refer to “How to Implement A Story of Units.”
Assessment Summary Type Administered Format Standards Addressed
Mid-Module Assessment Task
After Topic B Constructed response with rubric 2.G.1 2.G.3
End-of-Module Assessment Task
After Topic D Constructed response with rubric 2.MD.7 2.G.1 2.G.3
4Students with disabilities may require Braille, large print, audio, or special digital files. Please visit the website www.p12.nysed.gov/specialed/aim for specific information on how to obtain student materials that satisfy the National Instructional Materials Accessibility Standard (NIMAS) format.
A STORY OF UNITS
8
©2015 Great Minds. eureka-math.orgG 2-M8-TE-1.3 .0 -0 9.20 15
2 G R A D E
Mathematics Curriculum GRADE 2 • MODULE 8
Topic A: Attributes of Geometric Shapes
Topic A
Attributes of Geometric Shapes 2.G.1, 2.MD.1
Focus Standard: 2.G.1 Recognize and draw shapes having specified attributes, such as a given number of angles or a given number of equal faces. Identify triangles, quadrilaterals, pentagons, hexagons, and cubes. (Sizes are compared directly or visually, not compared by measuring.)
Instructional Days: 5 Coherence -Links from: G1–M5 Identifying, Composing, and Partitioning Shapes -Links to: G3–M7 Geometry and Measurement Word Problems
In Module 8, students continue to develop their geometric thinking from Grade 1, progressing from a descriptive to an analytic level of thinking where they can recognize and characterize shapes by their attributes and properties.
In Lesson 1 of Topic A, students describe various two-dimensional shapes according to specified attributes, such as the number of sides or angles (2.G.1). The names of the shapes are intentionally omitted in this lesson in order to encourage students to use precise language in their descriptions. Students must attend to a shape’s defining attributes in order to describe the difference between shapes. For example, rather than describing a shape as a quadrilateral, students describe it as a shape having four sides and four angles. In this lesson, students come to see the corner of a polygon as an angle. In Lesson 4, the right angle is introduced as a square corner. After students name the attributes of shapes, they use geoboards to create a shape given its attributes.
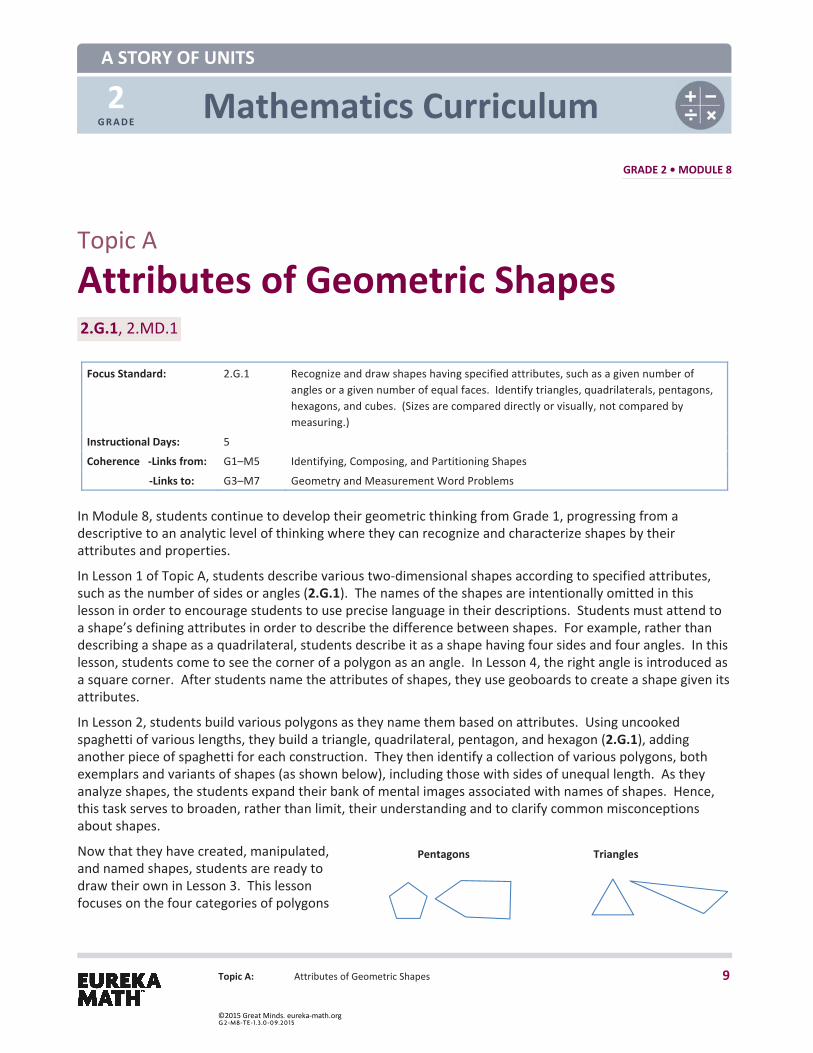
In Lesson 2, students build various polygons as they name them based on attributes. Using uncooked spaghetti of various lengths, they build a triangle, quadrilateral, pentagon, and hexagon (2.G.1), adding another piece of spaghetti for each construction. They then identify a collection of various polygons, both exemplars and variants of shapes (as shown below), including those with sides of unequal length. As they analyze shapes, the students expand their bank of mental images associated with names of shapes. Hence, this task serves to broaden, rather than limit, their understanding and to clarify common misconceptions about shapes.
Now that they have created, manipulated, and named shapes, students are ready to draw their own in Lesson 3. This lesson focuses on the four categories of polygons
Pentagons Triangles
A STORY OF UNITS
9
©2015 Great Minds. eureka-math.orgG 2-M8-TE-1.3 .0 -0 9.20 15

Topic A 2 8
Topic A: Attributes of Geometric Shapes
that students built in Lesson 2: triangles, quadrilaterals, pentagons, and hexagons. After the teacher-guided portion of the lesson, students use a ruler to draw straight lines and to create their own shapes, before trading with a partner. Partners take turns naming and analyzing shapes according to their attributes.
In Lesson 4, students use various attributes (e.g., side length, parallel lines, right angles) to identify different quadrilaterals. Along with recognizing trapezoids and rhombuses, seen in Grade 1, students are introduced to parallelograms. They learn to recognize parallel sides and square corners and to name quadrilaterals based on these attributes. For example, students might be questioned and guided as follows: “Draw a quadrilateral with both pairs of opposite sides parallel. We call this a parallelogram.” Next, “Now, draw a quadrilateral with both pairs of opposite sides parallel and four square corners, or right angles. We call this a rectangle.” Then, the teacher might continue with, “Can you draw another quadrilateral that also has opposite sides parallel, but this time use your ruler to show that all sides are equal? We call this a rhombus.” While students learn the various names of shapes, the emphasis remains on analyzing shapes based on their varied attributes. In doing so, students begin to notice the similarities and differences between various quadrilaterals.
Finally, in Lesson 5, students focus solely on the square and build its three-dimensional counterpart, the cube. In this lesson, students use toothpicks of equal length and an adhesive (e.g., sticky tack) to construct a cube. After first creating a square and naming its attributes, students are tasked with building a cube with only a picture to guide them. After constructing the cube, students count the number of corners, and they see that right angles are formed at each corner. Then, they create faces for their cube by tracing the cube’s bottom on a piece of paper, discovering that they need to trace six squares to cover the cube. Finally, with teacher guidance and modeling, students practice drawing cubes (2.G.1). From this lesson, students see a square as a face of the cube.
A Teaching Sequence Toward Mastery of Attributes of Geometric Shapes
Objective 1: Describe two-dimensional shapes based on attributes. (Lesson 1)
Objective 2: Build, identify, and analyze two-dimensional shapes with specified attributes. (Lesson 2)
Objective 3: Use attributes to draw different polygons including triangles, quadrilaterals, pentagons, and hexagons.
(Lesson 3)
Objective 4: Use attributes to identify and draw different quadrilaterals including rectangles, rhombuses, parallelograms, and trapezoids.
(Lesson 4)
Objective 5: Relate the square to the cube, and describe the cube based on attributes. (Lesson 5)
A STORY OF UNITS
10
©2015 Great Minds. eureka-math.orgG 2-M8-TE-1.3 .0 -0 9.20 15
Lesson 1: Describe two-dimensional shapes based on attributes.
Lesson 1 2
Lesson 1 Objective: Describe two-dimensional shapes based on attributes.
Suggested Lesson Structure
Fluency Practice (12 minutes) Application Problem (6 minutes) Concept Development (32 minutes) Student Debrief (10 minutes)
Total Time (60 minutes)
Fluency Practice (12 minutes)
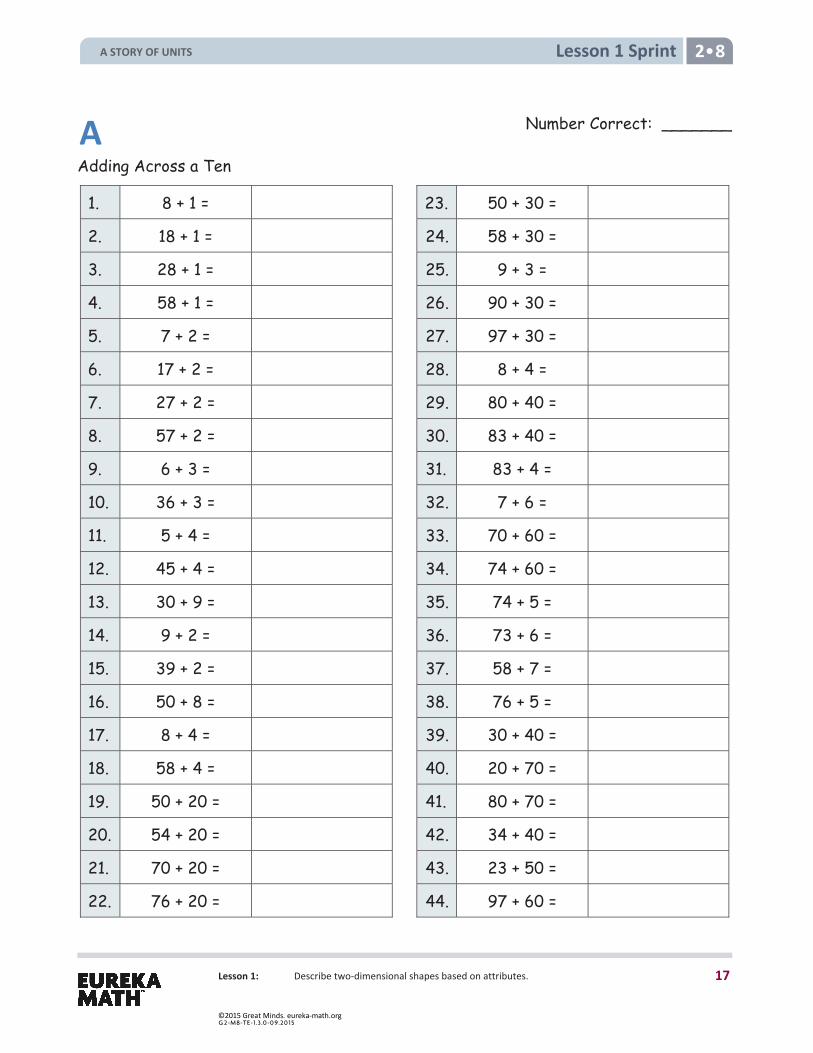
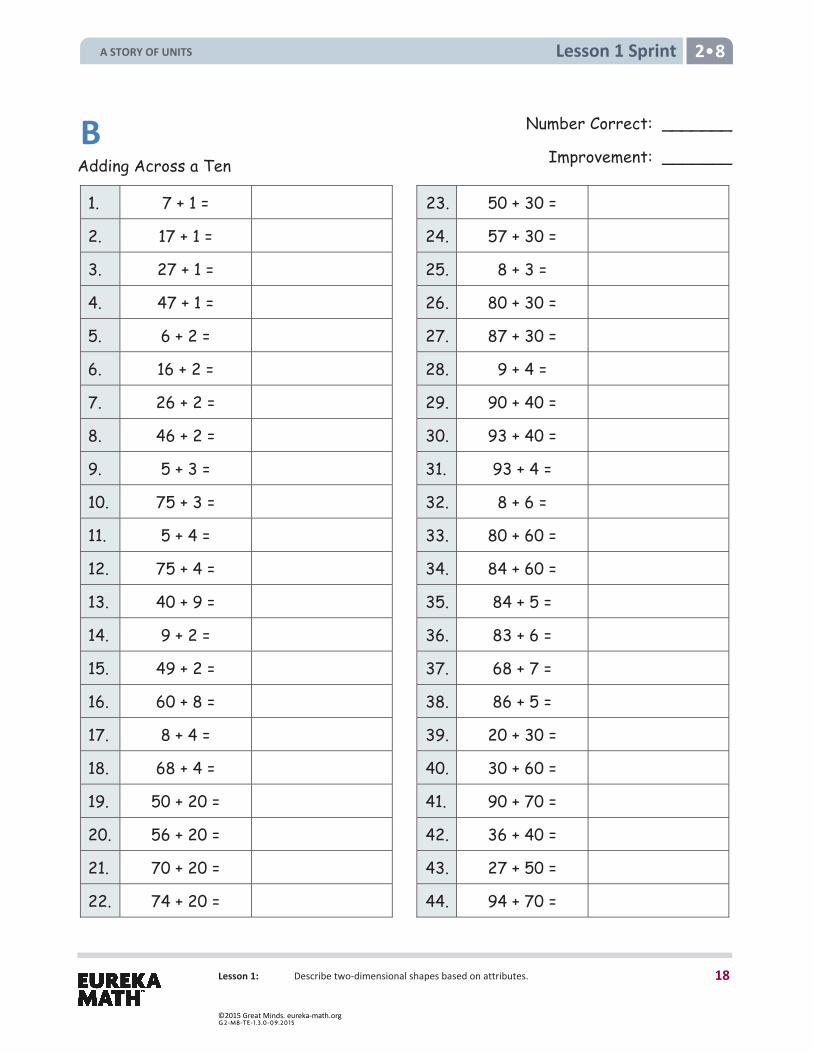
Rename for the Larger Unit 2.NBT.1 (3 minutes) Sprint: Adding Across a Ten 2.OA.2 (9 minutes)
Rename for the Larger Unit (3 minutes)
Note: This fluency activity reviews place value foundations. T: I’ll tell you a number of ones. Make as many tens as you can, and then tell how many tens and ones.
If there are no ones, only say the tens. Ready? T: 10 ones. S: 1 ten. T: 30 ones. S: 3 tens. T: 41 ones. S: 4 tens 1 one.
Continue with the following possible sequence: 50 ones, 54 ones, 80 ones, 85 ones, 99 ones, 100 ones, 105 ones, and 120 ones.
Sprint: Adding Across a Ten (9 minutes)
Materials: (S) Adding Across a Ten Sprint
Note: This Sprint gives practice with the grade level fluency of adding within 20 and applies it to larger numbers.
A STORY OF UNITS
11
©2015 Great Minds. eureka-math.orgG 2-M8-TE-1.3 .0 -0 9.20 15
Lesson 1: Describe two-dimensional shapes based on attributes.
Lesson 1 2
Application Problem (6 minutes)
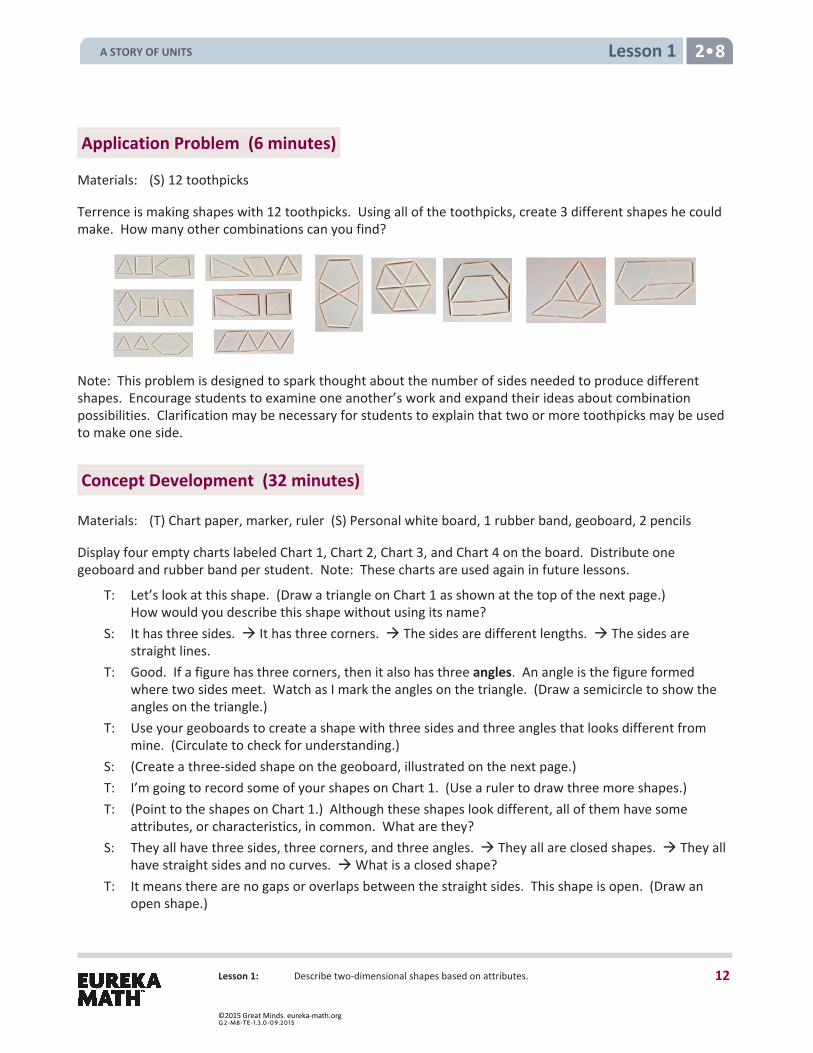
Materials: (S) 12 toothpicks
Terrence is making shapes with 12 toothpicks. Using all of the toothpicks, create 3 different shapes he could make. How many other combinations can you find?
Note: This problem is designed to spark thought about the number of sides needed to produce different shapes. Encourage students to examine one another’s work and expand their ideas about combination possibilities. Clarification may be necessary for students to explain that two or more toothpicks may be used to make one side.
Concept Development (32 minutes)
Materials: (T) Chart paper, marker, ruler (S) Personal white board, 1 rubber band, geoboard, 2 pencils
Display four empty charts labeled Chart 1, Chart 2, Chart 3, and Chart 4 on the board. Distribute one geoboard and rubber band per student. Note: These charts are used again in future lessons.
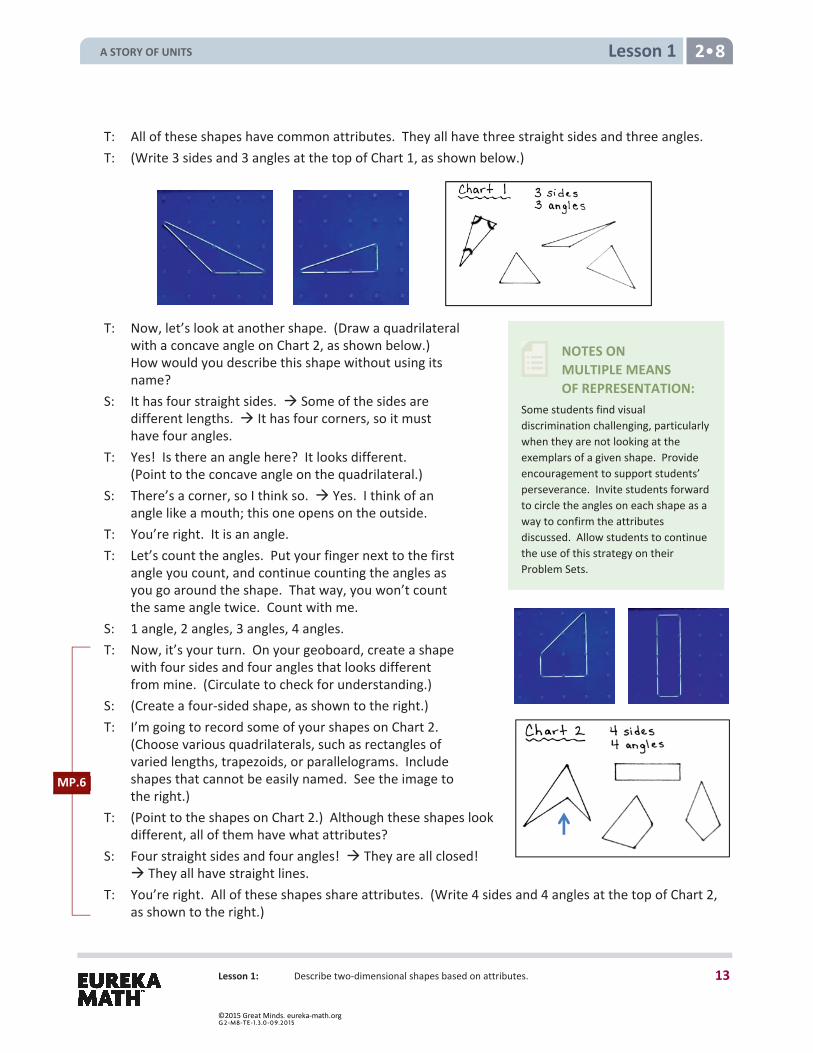
T: Let’s look at this shape. (Draw a triangle on Chart 1 as shown at the top of the next page.) How would you describe this shape without using its name?
S: It has three sides. It has three corners. The sides are different lengths. The sides are straight lines.
T: Good. If a figure has three corners, then it also has three angles. An angle is the figure formed where two sides meet. Watch as I mark the angles on the triangle. (Draw a semicircle to show the angles on the triangle.)
T: Use your geoboards to create a shape with three sides and three angles that looks different from mine. (Circulate to check for understanding.)
S: (Create a three-sided shape on the geoboard, illustrated on the next page.) T: I’m going to record some of your shapes on Chart 1. (Use a ruler to draw three more shapes.) T: (Point to the shapes on Chart 1.) Although these shapes look different, all of them have some
attributes, or characteristics, in common. What are they? S: They all have three sides, three corners, and three angles. They all are closed shapes. They all
have straight sides and no curves. What is a closed shape? T: It means there are no gaps or overlaps between the straight sides. This shape is open. (Draw an
open shape.)
A STORY OF UNITS
12
©2015 Great Minds. eureka-math.orgG 2-M8-TE-1.3 .0 -0 9.20 15
Lesson 1: Describe two-dimensional shapes based on attributes.
Lesson 1 2
NOTES ON MULTIPLE MEANS OF REPRESENTATION:
Some students find visual discrimination challenging, particularly when they are not looking at the exemplars of a given shape. Provide encouragement to support students’ perseverance. Invite students forward to circle the angles on each shape as a way to confirm the attributes discussed. Allow students to continue the use of this strategy on their Problem Sets.
T: All of these shapes have common attributes. They all have three straight sides and three angles. T: (Write 3 sides and 3 angles at the top of Chart 1, as shown below.)
T: Now, let’s look at another shape. (Draw a quadrilateral with a concave angle on Chart 2, as shown below.) How would you describe this shape without using its name?
S: It has four straight sides. Some of the sides are different lengths. It has four corners, so it must have four angles.
T: Yes! Is there an angle here? It looks different. (Point to the concave angle on the quadrilateral.)
S: There’s a corner, so I think so. Yes. I think of an angle like a mouth; this one opens on the outside.
T: You’re right. It is an angle. T: Let’s count the angles. Put your finger next to the first
angle you count, and continue counting the angles as you go around the shape. That way, you won’t count the same angle twice. Count with me.
S: 1 angle, 2 angles, 3 angles, 4 angles. T: Now, it’s your turn. On your geoboard, create a shape
with four sides and four angles that looks different from mine. (Circulate to check for understanding.)
S: (Create a four-sided shape, as shown to the right.) T: I’m going to record some of your shapes on Chart 2.
(Choose various quadrilaterals, such as rectangles of varied lengths, trapezoids, or parallelograms. Include shapes that cannot be easily named. See the image to the right.)
T: (Point to the shapes on Chart 2.) Although these shapes look different, all of them have what attributes?
S: Four straight sides and four angles! They are all closed! They all have straight lines.
T: You’re right. All of these shapes share attributes. (Write 4 sides and 4 angles at the top of Chart 2, as shown to the right.)
MP.6
A STORY OF UNITS
13
©2015 Great Minds. eureka-math.orgG 2-M8-TE-1.3 .0 -0 9.20 15
Lesson 1: Describe two-dimensional shapes based on attributes.
Lesson 1 2
NOTES ON MULTIPLE MEANS OF REPRESENTATION:
To support English language learners, write the key terms of the lesson (e.g., angle, side, and attribute), and post them on the word wall as they are introduced within the meaningful context of the instruction. Students who need the extra support are able to refer to them whenever needed.
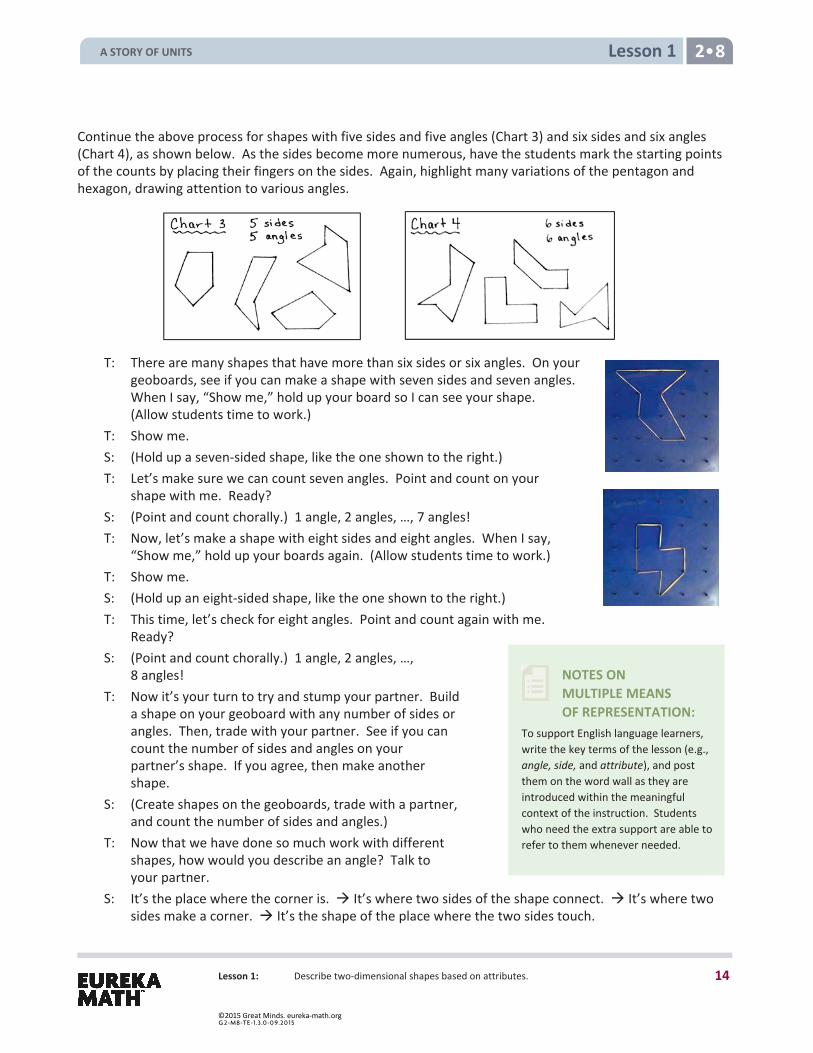
Continue the above process for shapes with five sides and five angles (Chart 3) and six sides and six angles (Chart 4), as shown below. As the sides become more numerous, have the students mark the starting points of the counts by placing their fingers on the sides. Again, highlight many variations of the pentagon and hexagon, drawing attention to various angles.
T: There are many shapes that have more than six sides or six angles. On your
geoboards, see if you can make a shape with seven sides and seven angles. When I say, “Show me,” hold up your board so I can see your shape. (Allow students time to work.)
T: Show me. S: (Hold up a seven-sided shape, like the one shown to the right.) T: Let’s make sure we can count seven angles. Point and count on your
shape with me. Ready? S: (Point and count chorally.) 1 angle, 2 angles, …, 7 angles! T: Now, let’s make a shape with eight sides and eight angles. When I say,
“Show me,” hold up your boards again. (Allow students time to work.) T: Show me. S: (Hold up an eight-sided shape, like the one shown to the right.) T: This time, let’s check for eight angles. Point and count again with me.
Ready? S: (Point and count chorally.) 1 angle, 2 angles, …,
8 angles! T: Now it’s your turn to try and stump your partner. Build
a shape on your geoboard with any number of sides or angles. Then, trade with your partner. See if you can count the number of sides and angles on your partner’s shape. If you agree, then make another shape.
S: (Create shapes on the geoboards, trade with a partner, and count the number of sides and angles.)
T: Now that we have done so much work with different shapes, how would you describe an angle? Talk to your partner.
S: It’s the place where the corner is. It’s where two sides of the shape connect. It’s where two sides make a corner. It’s the shape of the place where the two sides touch.
A STORY OF UNITS
14
©2015 Great Minds. eureka-math.orgG 2-M8-TE-1.3 .0 -0 9.20 15
Lesson 1: Describe two-dimensional shapes based on attributes.
Lesson 1 2
T: Yes. Those are all good observations. The angle is the figure formed where two sides meet. (Point to an acute angle on a triangle.) Show me this angle with two pencils. (Repeat the process for an obtuse angle and a right angle.)
Continue directing students to make angles to check their level of understanding. Give students directions, and allow them time to demonstrate various angle sizes.
T: Make a big angle. T: Make a smaller angle. T: Make a tiny angle. T: Make a huge angle.
Note: It is not necessary for students to know the terms obtuse, acute, and right for angles at this stage. This topic focuses instead on naming and describing shapes. The only angle critical to this focus is the right angle, which can be discussed as a square corner.
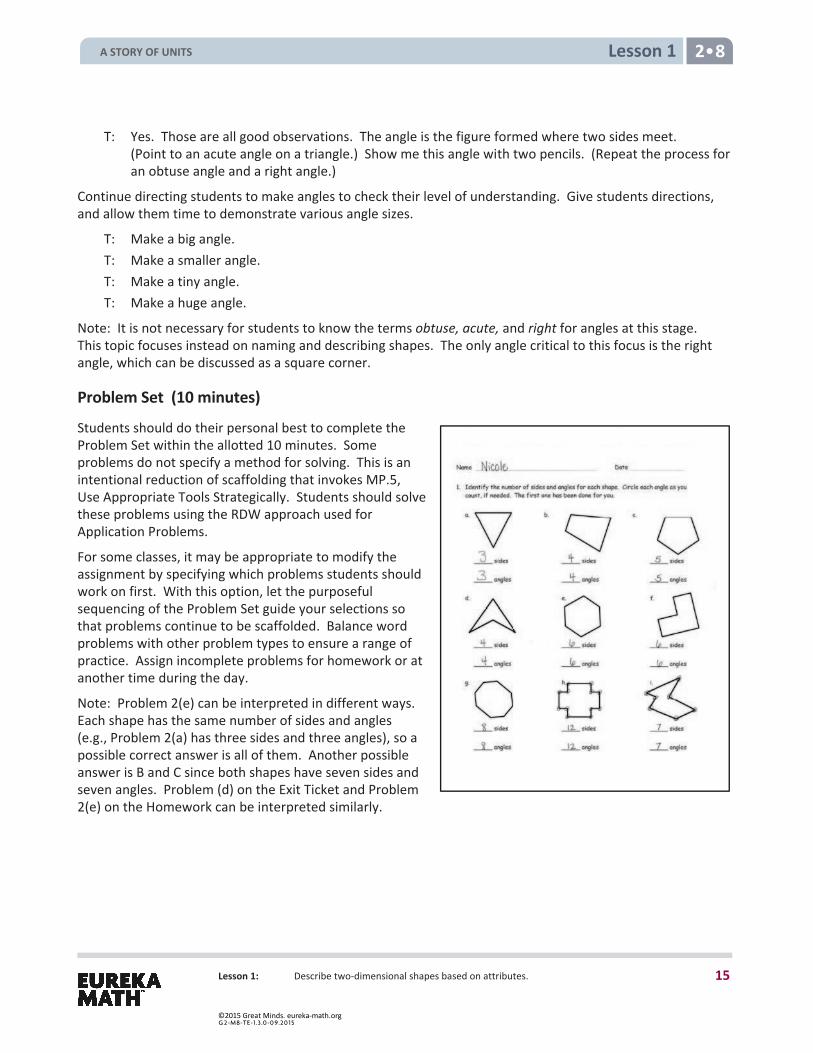
Problem Set (10 minutes)
Students should do their personal best to complete the Problem Set within the allotted 10 minutes. Some problems do not specify a method for solving. This is an intentional reduction of scaffolding that invokes MP.5, Use Appropriate Tools Strategically. Students should solve these problems using the RDW approach used for Application Problems.
For some classes, it may be appropriate to modify the assignment by specifying which problems students should work on first. With this option, let the purposeful sequencing of the Problem Set guide your selections so that problems continue to be scaffolded. Balance word problems with other problem types to ensure a range of practice. Assign incomplete problems for homework or at another time during the day.
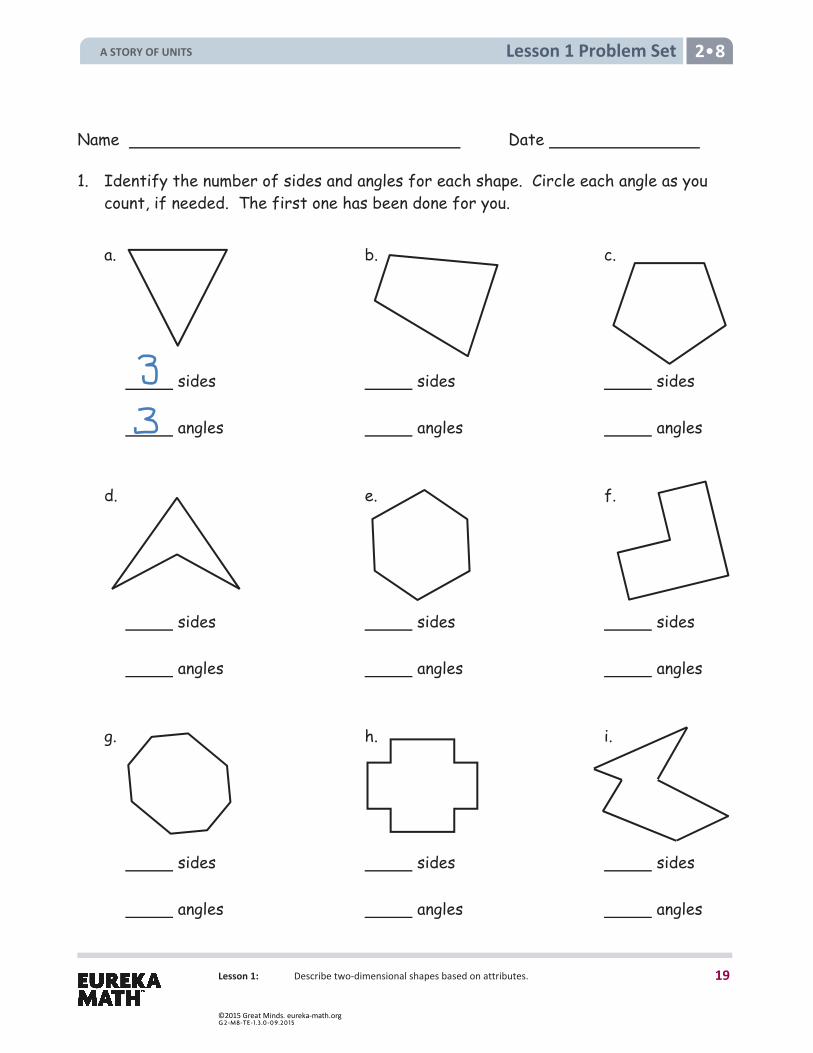
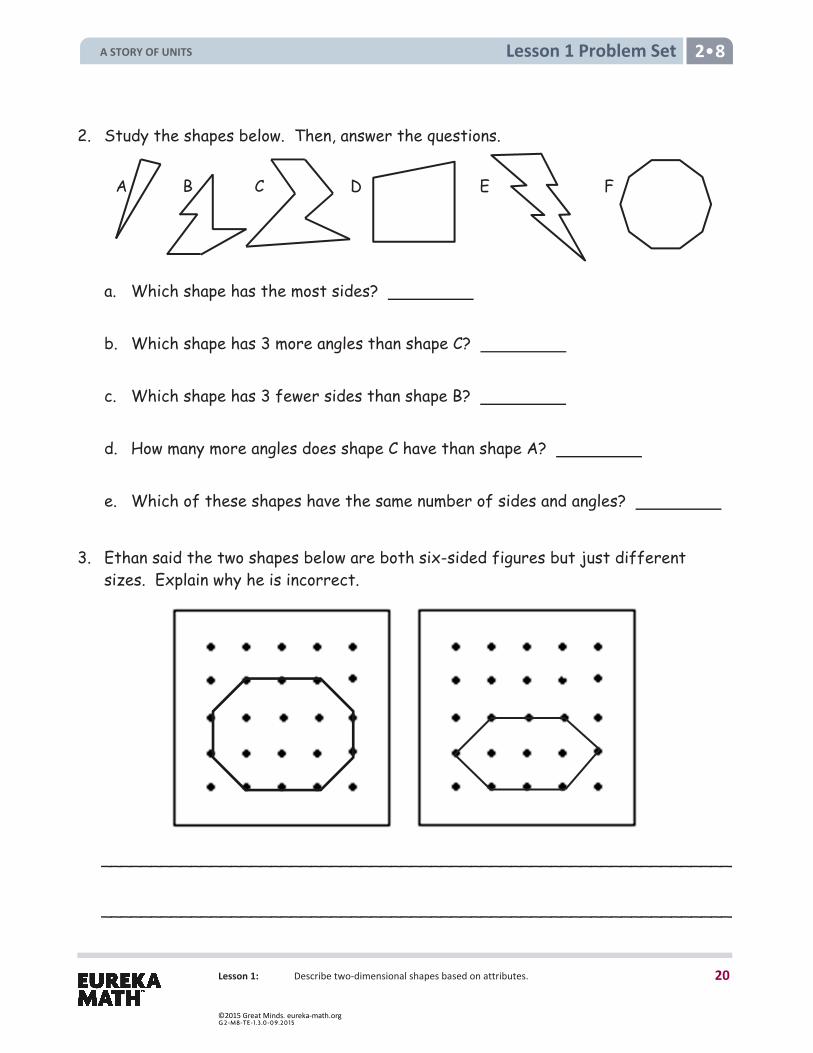
Note: Problem 2(e) can be interpreted in different ways. Each shape has the same number of sides and angles (e.g., Problem 2(a) has three sides and three angles), so a possible correct answer is all of them. Another possible answer is B and C since both shapes have seven sides and seven angles. Problem (d) on the Exit Ticket and Problem 2(e) on the Homework can be interpreted similarly.
A STORY OF UNITS
15
©2015 Great Minds. eureka-math.orgG 2-M8-TE-1.3 .0 -0 9.20 15
Lesson 1: Describe two-dimensional shapes based on attributes.
Lesson 1 2
Student Debrief (10 minutes)
Lesson Objective: Describe two-dimensional shapes based on attributes.
The Student Debrief is intended to invite reflection and active processing of the total lesson experience.
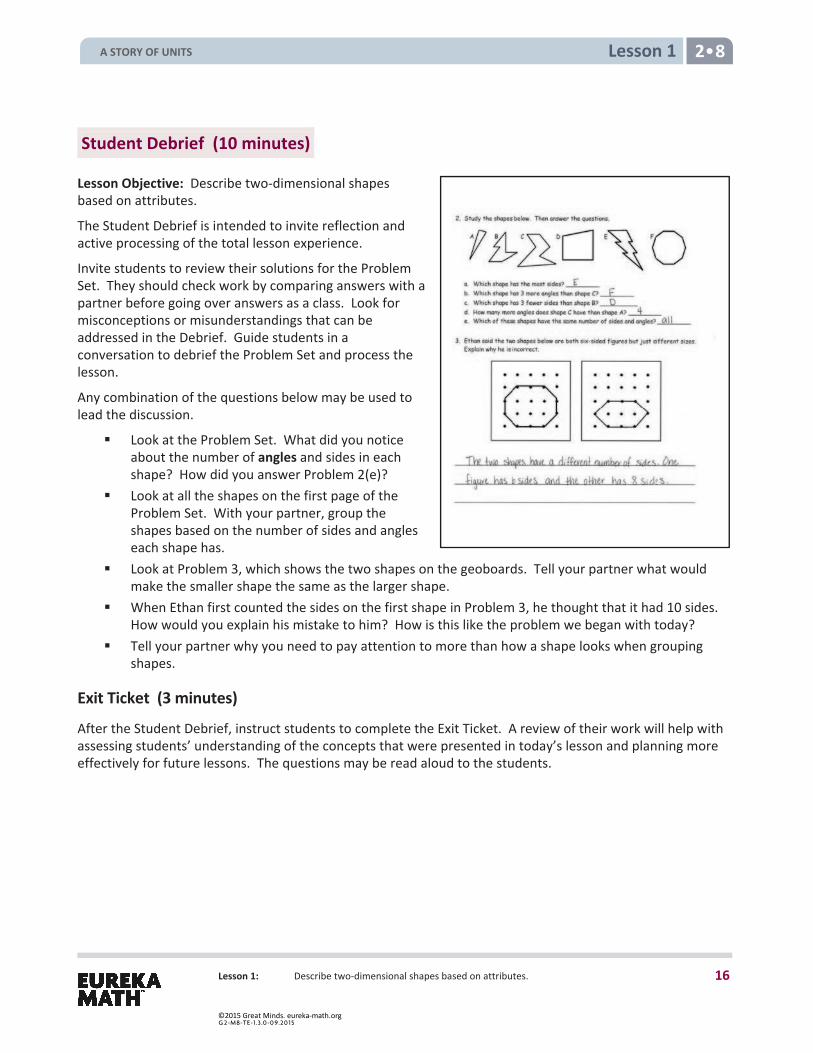
Invite students to review their solutions for the Problem Set. They should check work by comparing answers with a partner before going over answers as a class. Look for misconceptions or misunderstandings that can be addressed in the Debrief. Guide students in a conversation to debrief the Problem Set and process the lesson.
Any combination of the questions below may be used to lead the discussion.
Look at the Problem Set. What did you noticeabout the number of angles and sides in eachshape? How did you answer Problem 2(e)?
Look at all the shapes on the first page of theProblem Set. With your partner, group theshapes based on the number of sides and angleseach shape has.
Look at Problem 3, which shows the two shapes on the geoboards. Tell your partner what wouldmake the smaller shape the same as the larger shape.
When Ethan first counted the sides on the first shape in Problem 3, he thought that it had 10 sides.How would you explain his mistake to him? How is this like the problem we began with today?
Tell your partner why you need to pay attention to more than how a shape looks when groupingshapes.
Exit Ticket (3 minutes)
After the Student Debrief, instruct students to complete the Exit Ticket. A review of their work will help with assessing students’ understanding of the concepts that were presented in today’s lesson and planning more effectively for future lessons. The questions may be read aloud to the students.
A STORY OF UNITS
16
©2015 Great Minds. eureka-math.orgG 2-M8-TE-1.3 .0 -0 9.20 15
Lesson 1: Describe two-dimensional shapes based on attributes.
Lesson 1 Sprint 2
Adding Across a Ten
1. 8 + 1 = 23. 50 + 30 =
2. 18 + 1 = 24. 58 + 30 =
3. 28 + 1 = 25. 9 + 3 =
4. 58 + 1 = 26. 90 + 30 =
5. 7 + 2 = 27. 97 + 30 =
6. 17 + 2 = 28. 8 + 4 =
7. 27 + 2 = 29. 80 + 40 =
8. 57 + 2 = 30. 83 + 40 =
9. 6 + 3 = 31. 83 + 4 =
10. 36 + 3 = 32. 7 + 6 =
11. 5 + 4 = 33. 70 + 60 =
12. 45 + 4 = 34. 74 + 60 =
13. 30 + 9 = 35. 74 + 5 =
14. 9 + 2 = 36. 73 + 6 =
15. 39 + 2 = 37. 58 + 7 =
16. 50 + 8 = 38. 76 + 5 =
17. 8 + 4 = 39. 30 + 40 =
18. 58 + 4 = 40. 20 + 70 =
19. 50 + 20 = 41. 80 + 70 =
20. 54 + 20 = 42. 34 + 40 =
21. 70 + 20 = 43. 23 + 50 =
22. 76 + 20 = 44. 97 + 60 =
A Number Correct: _______
A STORY OF UNITS
17
©2015 Great Minds. eureka-math.orgG 2-M8-TE-1.3 .0 -0 9.20 15
Lesson 1: Describe two-dimensional shapes based on attributes.
Lesson 1 Sprint 2
Adding Across a Ten
1. 7 + 1 = 23. 50 + 30 = 2. 17 + 1 = 24. 57 + 30 = 3. 27 + 1 = 25. 8 + 3 = 4. 47 + 1 = 26. 80 + 30 = 5. 6 + 2 = 27. 87 + 30 = 6. 16 + 2 = 28. 9 + 4 = 7. 26 + 2 = 29. 90 + 40 = 8. 46 + 2 = 30. 93 + 40 = 9. 5 + 3 = 31. 93 + 4 = 10. 75 + 3 = 32. 8 + 6 = 11. 5 + 4 = 33. 80 + 60 = 12. 75 + 4 = 34. 84 + 60 = 13. 40 + 9 = 35. 84 + 5 = 14. 9 + 2 = 36. 83 + 6 = 15. 49 + 2 = 37. 68 + 7 = 16. 60 + 8 = 38. 86 + 5 = 17. 8 + 4 = 39. 20 + 30 = 18. 68 + 4 = 40. 30 + 60 = 19. 50 + 20 = 41. 90 + 70 = 20. 56 + 20 = 42. 36 + 40 = 21. 70 + 20 = 43. 27 + 50 = 22. 74 + 20 = 44. 94 + 70 =
B Number Correct: _______
Improvement: _______
A STORY OF UNITS
18
©2015 Great Minds. eureka-math.orgG 2-M8-TE-1.3 .0 -0 9.20 15
Lesson 1: Describe two-dimensional shapes based on attributes.
Lesson 1 Problem Set 2
Name Date
1. Identify the number of sides and angles for each shape. Circle each angle as you count, if needed. The first one has been done for you.
a. b. c. sides sides sides angles angles angles d. e. f. sides sides sides angles angles angles g. h. i. sides sides sides angles angles angles
A STORY OF UNITS
19
©2015 Great Minds. eureka-math.orgG 2-M8-TE-1.3 .0 -0 9.20 15
Lesson 1: Describe two-dimensional shapes based on attributes.
Lesson 1 Problem Set 2
2. Study the shapes below. Then, answer the questions. A B C D E F
a. Which shape has the most sides?
b. Which shape has 3 more angles than shape C?
c. Which shape has 3 fewer sides than shape B?
d. How many more angles does shape C have than shape A?
e. Which of these shapes have the same number of sides and angles?
3. Ethan said the two shapes below are both six-sided figures but just different sizes. Explain why he is incorrect.
_______________________________________________________________ _______________________________________________________________
A STORY OF UNITS
20
©2015 Great Minds. eureka-math.orgG 2-M8-TE-1.3 .0 -0 9.20 15
Lesson 1: Describe two-dimensional shapes based on attributes.
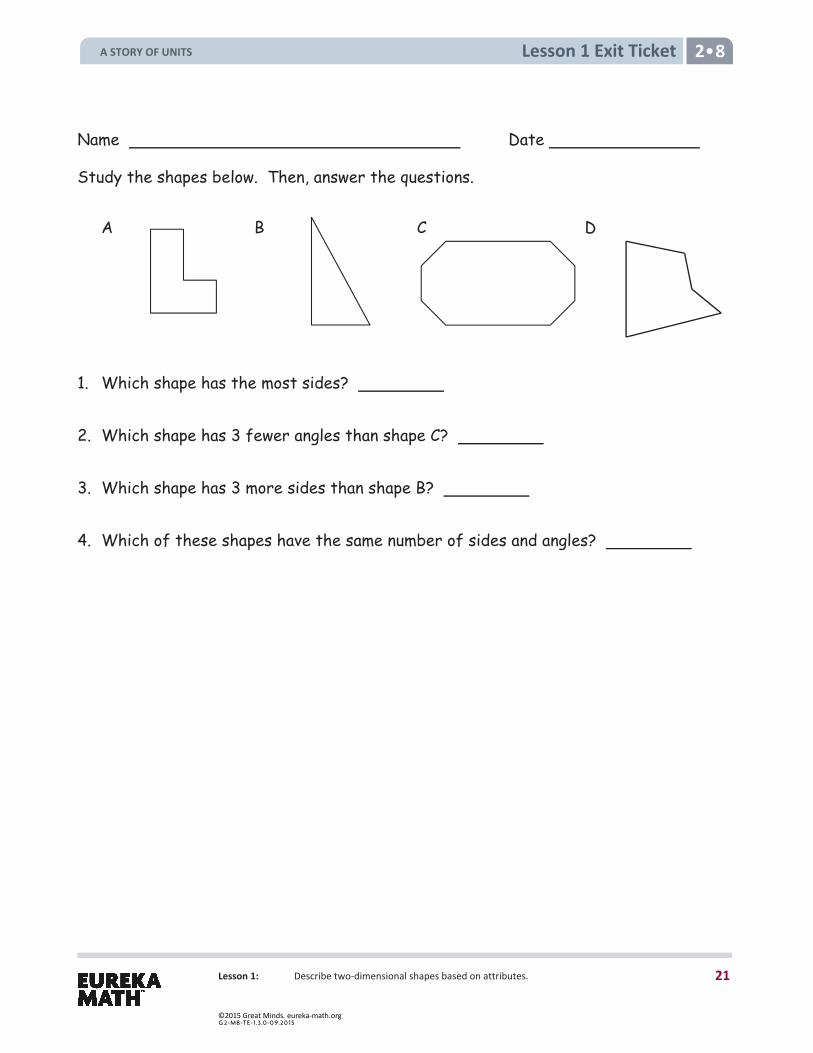
Lesson 1 Exit Ticket 2
Name Date
Study the shapes below. Then, answer the questions.
A B C D
1. Which shape has the most sides?
2. Which shape has 3 fewer angles than shape C?
3. Which shape has 3 more sides than shape B?
4. Which of these shapes have the same number of sides and angles?
A STORY OF UNITS
21
©2015 Great Minds. eureka-math.orgG 2-M8-TE-1.3 .0 -0 9.20 15
Lesson 1: Describe two-dimensional shapes based on attributes.
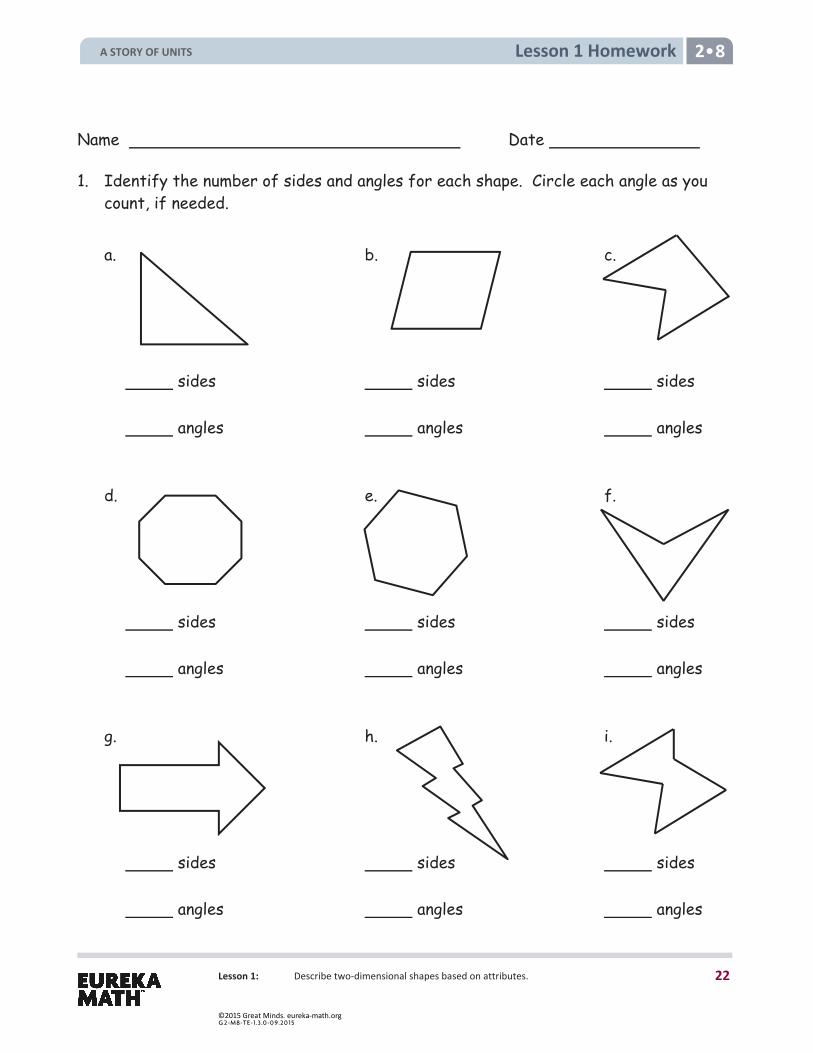
Lesson 1 Homework 2
Name Date
1. Identify the number of sides and angles for each shape. Circle each angle as you count, if needed.
a. b. c.
sides sides sides angles angles angles
d. e. f. sides sides sides angles angles angles
g. h. i. sides sides sides angles angles angles
A STORY OF UNITS
22
©2015 Great Minds. eureka-math.orgG 2-M8-TE-1.3 .0 -0 9.20 15
Lesson 1: Describe two-dimensional shapes based on attributes.
Lesson 1 Homework 2
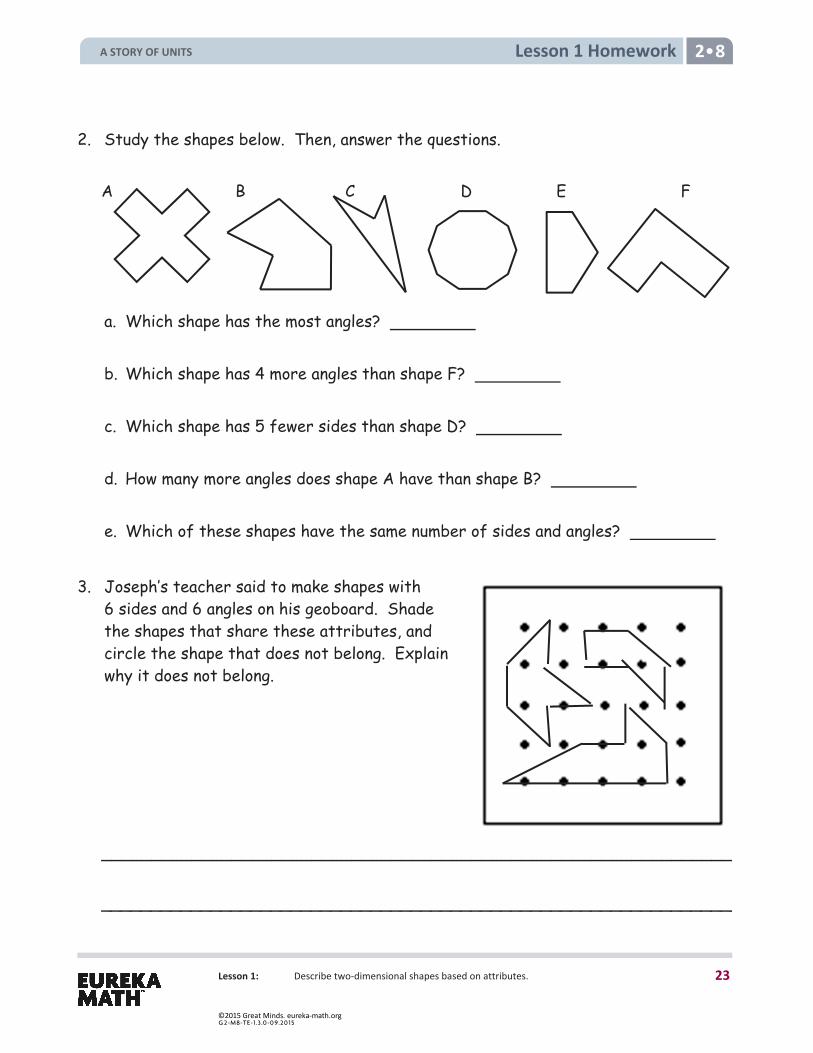
2. Study the shapes below. Then, answer the questions.
A B C D E F
a. Which shape has the most angles?
b. Which shape has 4 more angles than shape F?
c. Which shape has 5 fewer sides than shape D?
d. How many more angles does shape A have than shape B?
e. Which of these shapes have the same number of sides and angles?
3. Joseph’s teacher said to make shapes with 6 sides and 6 angles on his geoboard. Shade the shapes that share these attributes, and circle the shape that does not belong. Explain why it does not belong.
_______________________________________________________________ _______________________________________________________________
A STORY OF UNITS
23
©2015 Great Minds. eureka-math.orgG 2-M8-TE-1.3 .0 -0 9.20 15
Lesson 2 2 8
Lesson 2: Build, identify, and analyze two-dimensional shapes with specified attributes.
Lesson 2 Objective: Build, identify, and analyze two-dimensional shapes with specified attributes.
Suggested Lesson Structure
Fluency Practice (12 minutes) Application Problem (5 minutes) Concept Development (33 minutes) Student Debrief (10 minutes)
Total Time (60 minutes)
Fluency Practice (12 minutes)
Rename for the Larger Unit 2.NBT.1 (3 minutes) Sprint: Make a Hundred to Add 2.NBT.7 (9 minutes)
Rename for the Larger Unit (3 minutes)
Note: This fluency activity reviews place value foundations. T: (Write 10 ones = ten.) T: I’m going to give you a number of ones. I want you to make as many tens as you can and then tell
me how many tens and ones. If there are no ones, then just say the tens. Ready? T: Say the number sentence. S: 10 ones = 1 ten. T: (Write 100 ones = tens 10 ones.) Say the number sentence. S: 100 ones is 9 tens 10 ones. T: 120 ones = tens 10 ones. S: 120 ones = 11 tens 10 ones.
Continue with the following possible sequence: 140 ones, 210 ones, 250 ones, 225 ones, 381 ones, 360 ones, and 306 ones.
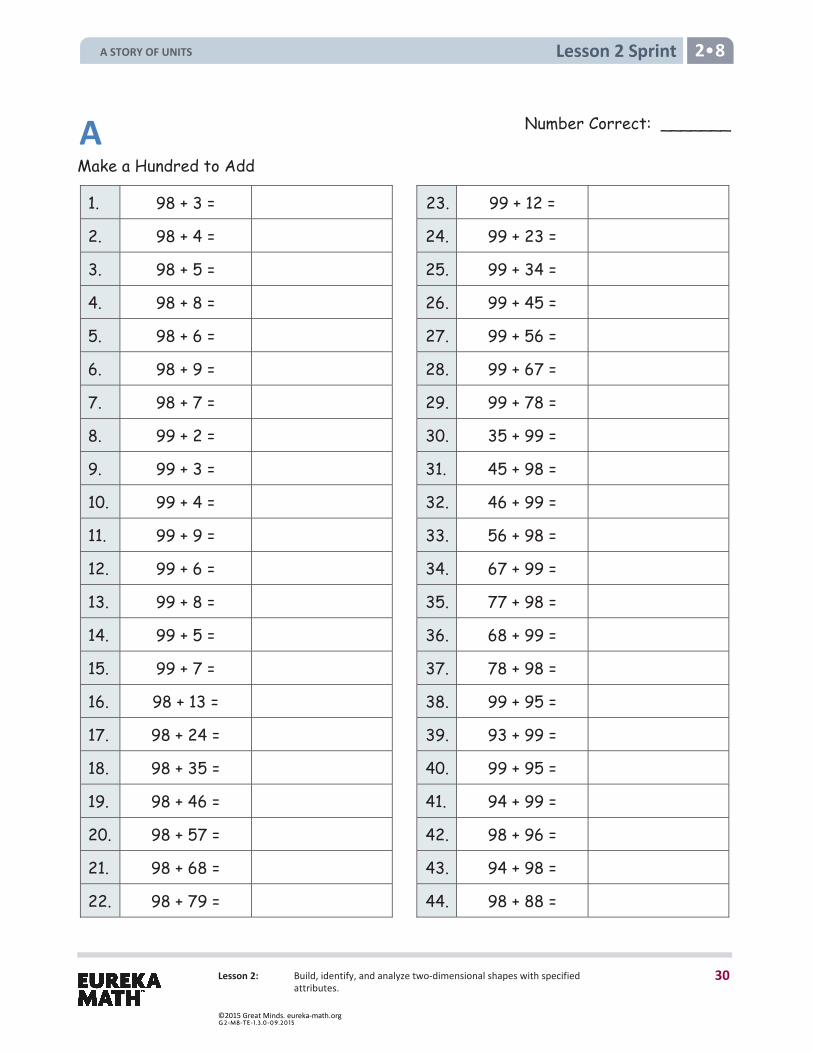
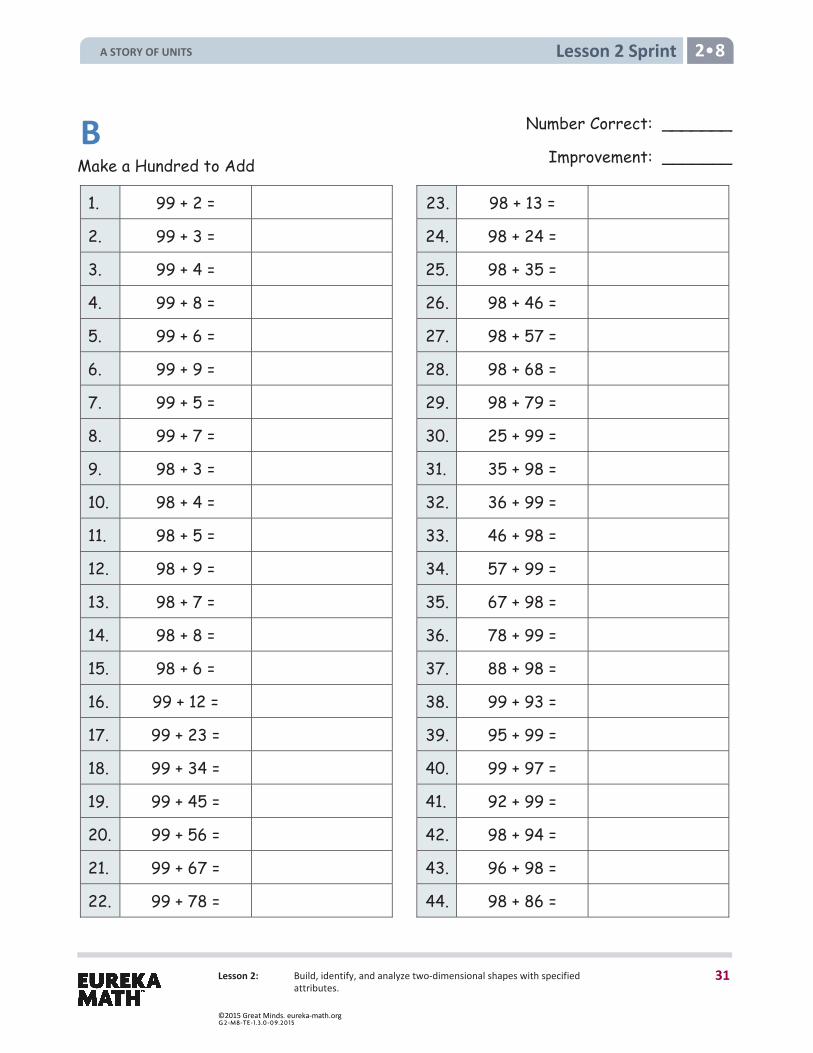
Sprint: Make a Hundred to Add (9 minutes)
Materials: (S) Make a Hundred to Add Sprint
Note: Students review compensation to make a hundred when adding to gain automaticity.
A STORY OF UNITS
24
©2015 Great Minds. eureka-math.orgG 2-M8-TE-1.3 .0 -0 9.20 15
Lesson 2 2 8
Lesson 2: Build, identify, and analyze two-dimensional shapes with specified attributes.
NOTES ON MULTIPLE MEANS OF ACTION AND EXPRESSION:
Offer students having difficulty seeing the solution a strategy to solve the triangle Application Problem. They can write the numbers inside the most obvious triangles and then lightly shade the larger triangles within the pentagon.
Another option is to print the whole page and have students shade one triangle at a time on each separate image.
NOTES ON MULTIPLE MEANS OF ACTION AND EXPRESSION:
Tap into the culture of English language learners by asking them to contribute the words for polygon, triangle, rectangle, pentagon, hexagon, and octagon in their native language (parents can help). Add the names in the students’ languages to the charts. This not only helps students to bridge the languages but enriches the whole class’s experience as well, since in Latin-based languages these are generally cognates. For example, in Spanish, they are polígano, triángulo, rectángulo, pentágono, hexágono, and octágono.
Application Problem (5 minutes)
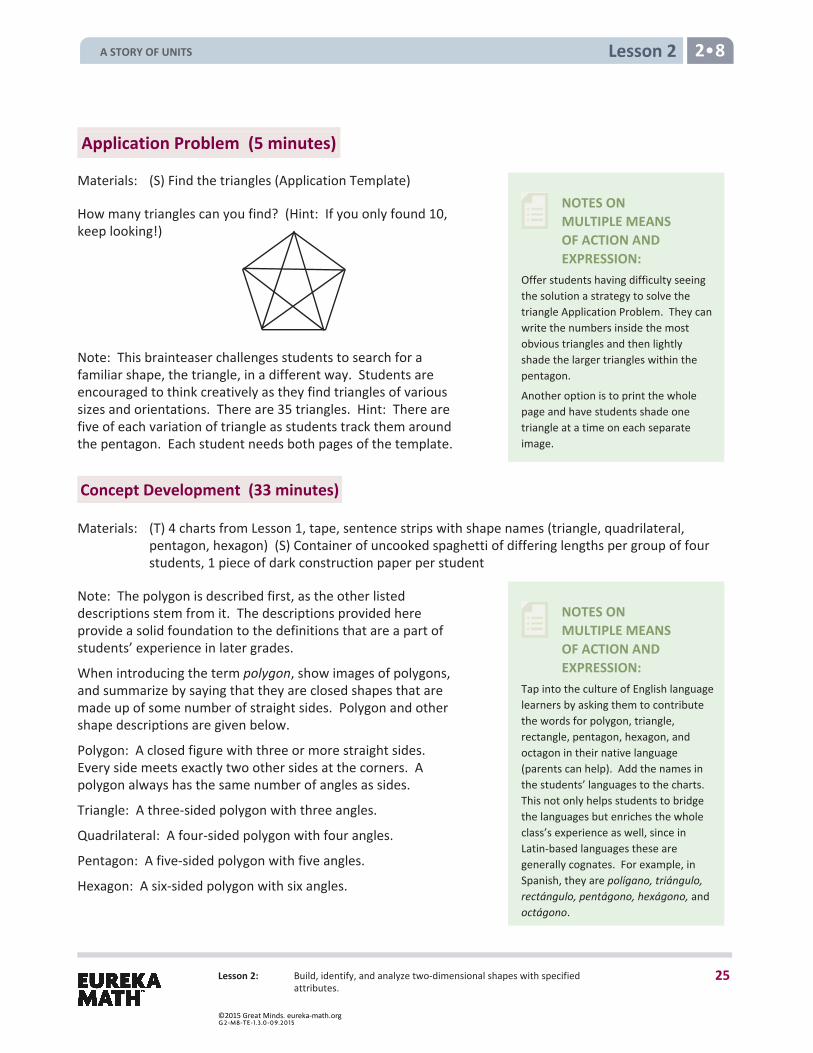
Materials: (S) Find the triangles (Application Template)
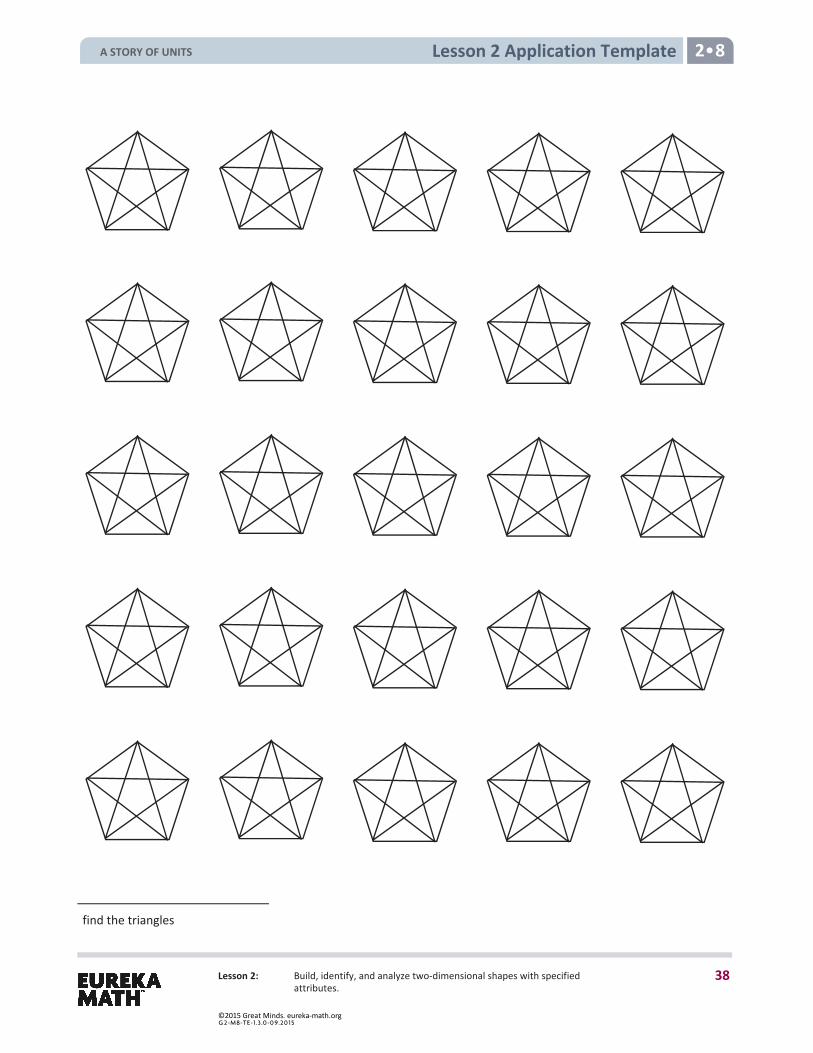
How many triangles can you find? (Hint: If you only found 10, keep looking!)
Note: This brainteaser challenges students to search for a familiar shape, the triangle, in a different way. Students are encouraged to think creatively as they find triangles of various sizes and orientations. There are 35 triangles. Hint: There are five of each variation of triangle as students track them around the pentagon. Each student needs both pages of the template.
Concept Development (33 minutes)
Materials: (T) 4 charts from Lesson 1, tape, sentence strips with shape names (triangle, quadrilateral, pentagon, hexagon) (S) Container of uncooked spaghetti of differing lengths per group of four students, 1 piece of dark construction paper per student
Note: The polygon is described first, as the other listed descriptions stem from it. The descriptions provided here provide a solid foundation to the definitions that are a part of students’ experience in later grades.
When introducing the term polygon, show images of polygons, and summarize by saying that they are closed shapes that are made up of some number of straight sides. Polygon and other shape descriptions are given below.
Polygon: A closed figure with three or more straight sides. Every side meets exactly two other sides at the corners. A polygon always has the same number of angles as sides.
Triangle: A three-sided polygon with three angles.
Quadrilateral: A four-sided polygon with four angles.
Pentagon: A five-sided polygon with five angles.
Hexagon: A six-sided polygon with six angles.
A STORY OF UNITS
25
©2015 Great Minds. eureka-math.orgG 2-M8-TE-1.3 .0 -0 9.20 15
Lesson 2 2 8
Lesson 2: Build, identify, and analyze two-dimensional shapes with specified attributes.
Prior to the lesson, arrange students in groups of four with a container of spaghetti for building shapes and 1 piece of dark construction paper per student.
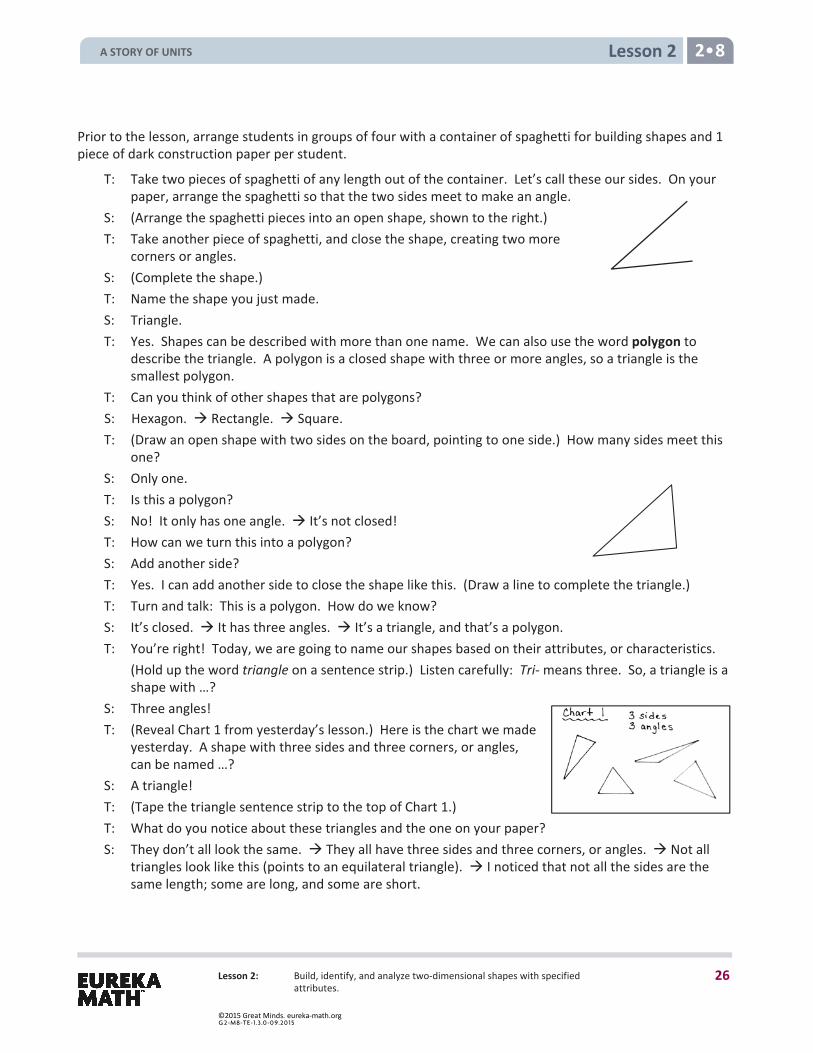
T: Take two pieces of spaghetti of any length out of the container. Let’s call these our sides. On your paper, arrange the spaghetti so that the two sides meet to make an angle.
S: (Arrange the spaghetti pieces into an open shape, shown to the right.) T: Take another piece of spaghetti, and close the shape, creating two more
corners or angles. S: (Complete the shape.) T: Name the shape you just made. S: Triangle. T: Yes. Shapes can be described with more than one name. We can also use the word polygon to
describe the triangle. A polygon is a closed shape with three or more angles, so a triangle is the smallest polygon.
T: Can you think of other shapes that are polygons? S: Hexagon. Rectangle. Square. T: (Draw an open shape with two sides on the board, pointing to one side.) How many sides meet this
one? S: Only one. T: Is this a polygon? S: No! It only has one angle. It’s not closed! T: How can we turn this into a polygon? S: Add another side? T: Yes. I can add another side to close the shape like this. (Draw a line to complete the triangle.) T: Turn and talk: This is a polygon. How do we know? S: It’s closed. It has three angles. It’s a triangle, and that’s a polygon. T: You’re right! Today, we are going to name our shapes based on their attributes, or characteristics. (Hold up the word triangle on a sentence strip.) Listen carefully: Tri- means three. So, a triangle is a
shape with …? S: Three angles! T: (Reveal Chart 1 from yesterday’s lesson.) Here is the chart we made
yesterday. A shape with three sides and three corners, or angles, can be named …?
S: A triangle! T: (Tape the triangle sentence strip to the top of Chart 1.) T: What do you notice about these triangles and the one on your paper? S: They don’t all look the same. They all have three sides and three corners, or angles. Not all
triangles look like this (points to an equilateral triangle). I noticed that not all the sides are the same length; some are long, and some are short.
A STORY OF UNITS
26
©2015 Great Minds. eureka-math.orgG 2-M8-TE-1.3 .0 -0 9.20 15
Lesson 2 2 8
Lesson 2: Build, identify, and analyze two-dimensional shapes with specified attributes.
T: Good. So, even though they don’t look the same, they are all triangles because they all have three sides and three corners, or angles.
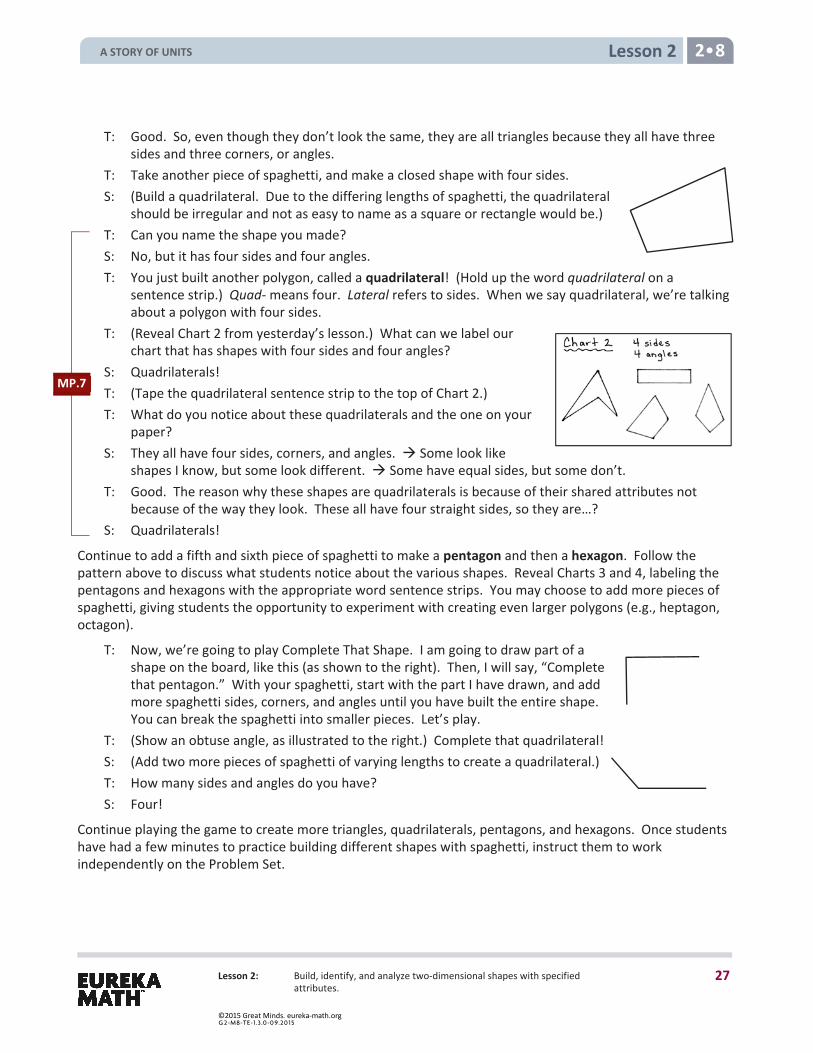
T: Take another piece of spaghetti, and make a closed shape with four sides. S: (Build a quadrilateral. Due to the differing lengths of spaghetti, the quadrilateral
should be irregular and not as easy to name as a square or rectangle would be.) T: Can you name the shape you made? S: No, but it has four sides and four angles. T: You just built another polygon, called a quadrilateral! (Hold up the word quadrilateral on a
sentence strip.) Quad- means four. Lateral refers to sides. When we say quadrilateral, we’re talking about a polygon with four sides.
T: (Reveal Chart 2 from yesterday’s lesson.) What can we label our chart that has shapes with four sides and four angles?
S: Quadrilaterals! T: (Tape the quadrilateral sentence strip to the top of Chart 2.) T: What do you notice about these quadrilaterals and the one on your
paper? S: They all have four sides, corners, and angles. Some look like
shapes I know, but some look different. Some have equal sides, but some don’t. T: Good. The reason why these shapes are quadrilaterals is because of their shared attributes not
because of the way they look. These all have four straight sides, so they are…? S: Quadrilaterals!
Continue to add a fifth and sixth piece of spaghetti to make a pentagon and then a hexagon. Follow the pattern above to discuss what students notice about the various shapes. Reveal Charts 3 and 4, labeling the pentagons and hexagons with the appropriate word sentence strips. You may choose to add more pieces of spaghetti, giving students the opportunity to experiment with creating even larger polygons (e.g., heptagon, octagon).
T: Now, we’re going to play Complete That Shape. I am going to draw part of a shape on the board, like this (as shown to the right). Then, I will say, “Complete that pentagon.” With your spaghetti, start with the part I have drawn, and add more spaghetti sides, corners, and angles until you have built the entire shape. You can break the spaghetti into smaller pieces. Let’s play.
T: (Show an obtuse angle, as illustrated to the right.) Complete that quadrilateral! S: (Add two more pieces of spaghetti of varying lengths to create a quadrilateral.) T: How many sides and angles do you have? S: Four!
Continue playing the game to create more triangles, quadrilaterals, pentagons, and hexagons. Once students have had a few minutes to practice building different shapes with spaghetti, instruct them to work independently on the Problem Set.
MP.7
A STORY OF UNITS
27
©2015 Great Minds. eureka-math.orgG 2-M8-TE-1.3 .0 -0 9.20 15
Lesson 2 2 8
Lesson 2: Build, identify, and analyze two-dimensional shapes with specified attributes.
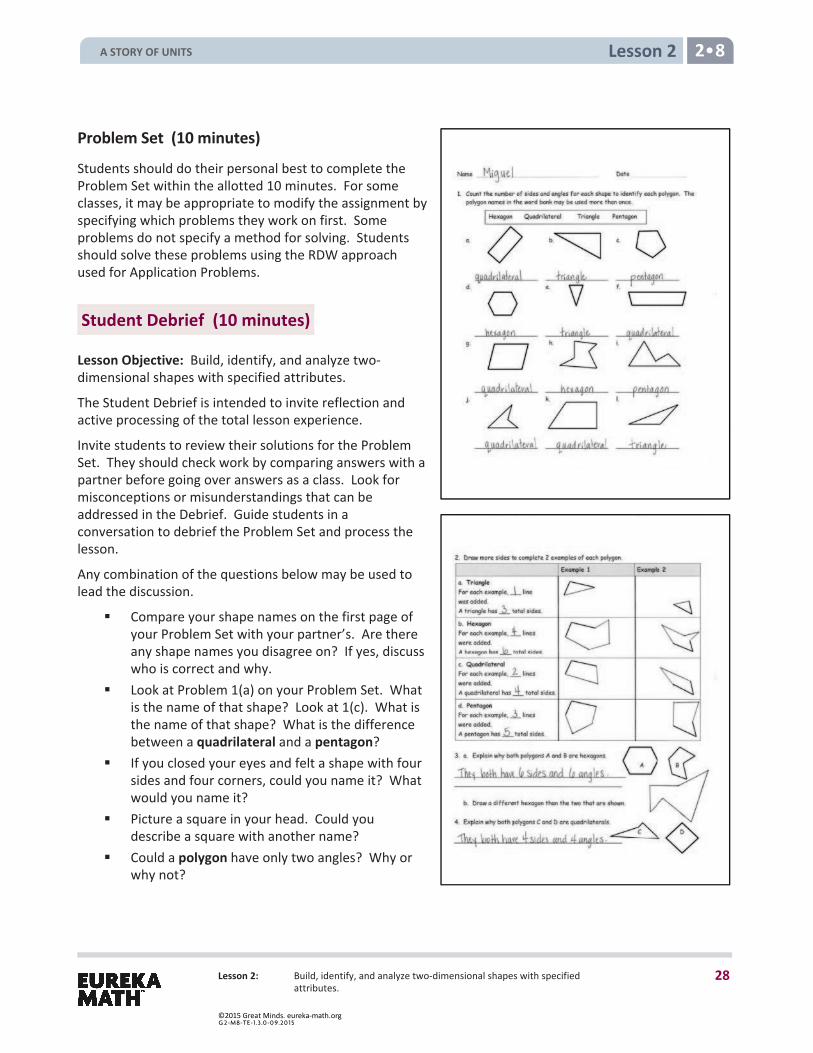
Problem Set (10 minutes)
Students should do their personal best to complete the Problem Set within the allotted 10 minutes. For some classes, it may be appropriate to modify the assignment by specifying which problems they work on first. Some problems do not specify a method for solving. Students should solve these problems using the RDW approach used for Application Problems.
Student Debrief (10 minutes)
Lesson Objective: Build, identify, and analyze two-dimensional shapes with specified attributes.
The Student Debrief is intended to invite reflection and active processing of the total lesson experience.
Invite students to review their solutions for the Problem Set. They should check work by comparing answers with a partner before going over answers as a class. Look for misconceptions or misunderstandings that can be addressed in the Debrief. Guide students in a conversation to debrief the Problem Set and process the lesson.
Any combination of the questions below may be used to lead the discussion.
Compare your shape names on the first page ofyour Problem Set with your partner’s. Are thereany shape names you disagree on? If yes, discusswho is correct and why.
Look at Problem 1(a) on your Problem Set. Whatis the name of that shape? Look at 1(c). What isthe name of that shape? What is the differencebetween a quadrilateral and a pentagon?
If you closed your eyes and felt a shape with foursides and four corners, could you name it? Whatwould you name it?
Picture a square in your head. Could youdescribe a square with another name?
Could a polygon have only two angles? Why orwhy not?
A STORY OF UNITS
28
©2015 Great Minds. eureka-math.orgG 2-M8-TE-1.3 .0 -0 9.20 15
Lesson 2 2 8
Lesson 2: Build, identify, and analyze two-dimensional shapes with specified attributes.
Polygons have many angles. Poly- means many, and -gon means angle. What is the smallest number of angles a polygon can have? What do you think the largest number of angles could be?
Exit Ticket (3 minutes)
After the Student Debrief, instruct students to complete the Exit Ticket. A review of their work will help with assessing students’ understanding of the concepts that were presented in today’s lesson and planning more effectively for future lessons. The questions may be read aloud to the students.
A STORY OF UNITS
29
©2015 Great Minds. eureka-math.orgG 2-M8-TE-1.3 .0 -0 9.20 15
Lesson 2 Sprint 2 8
Lesson 2: Build, identify, and analyze two-dimensional shapes with specified attributes.
Make a Hundred to Add
1. 98 + 3 = 23. 99 + 12 =
2. 98 + 4 = 24. 99 + 23 =
3. 98 + 5 = 25. 99 + 34 =
4. 98 + 8 = 26. 99 + 45 =
5. 98 + 6 = 27. 99 + 56 =
6. 98 + 9 = 28. 99 + 67 =
7. 98 + 7 = 29. 99 + 78 =
8. 99 + 2 = 30. 35 + 99 =
9. 99 + 3 = 31. 45 + 98 =
10. 99 + 4 = 32. 46 + 99 =
11. 99 + 9 = 33. 56 + 98 =
12. 99 + 6 = 34. 67 + 99 =
13. 99 + 8 = 35. 77 + 98 =
14. 99 + 5 = 36. 68 + 99 =
15. 99 + 7 = 37. 78 + 98 =
16. 98 + 13 = 38. 99 + 95 =
17. 98 + 24 = 39. 93 + 99 =
18. 98 + 35 = 40. 99 + 95 =
19. 98 + 46 = 41. 94 + 99 =
20. 98 + 57 = 42. 98 + 96 =
21. 98 + 68 = 43. 94 + 98 =
22. 98 + 79 = 44. 98 + 88 =
A Number Correct: _______
A STORY OF UNITS
30
©2015 Great Minds. eureka-math.orgG 2-M8-TE-1.3 .0 -0 9.20 15
Lesson 2 Sprint 2 8
Lesson 2: Build, identify, and analyze two-dimensional shapes with specified attributes.
Make a Hundred to Add
1. 99 + 2 = 23. 98 + 13 = 2. 99 + 3 = 24. 98 + 24 = 3. 99 + 4 = 25. 98 + 35 = 4. 99 + 8 = 26. 98 + 46 = 5. 99 + 6 = 27. 98 + 57 = 6. 99 + 9 = 28. 98 + 68 = 7. 99 + 5 = 29. 98 + 79 = 8. 99 + 7 = 30. 25 + 99 = 9. 98 + 3 = 31. 35 + 98 = 10. 98 + 4 = 32. 36 + 99 = 11. 98 + 5 = 33. 46 + 98 = 12. 98 + 9 = 34. 57 + 99 = 13. 98 + 7 = 35. 67 + 98 = 14. 98 + 8 = 36. 78 + 99 = 15. 98 + 6 = 37. 88 + 98 = 16. 99 + 12 = 38. 99 + 93 = 17. 99 + 23 = 39. 95 + 99 = 18. 99 + 34 = 40. 99 + 97 = 19. 99 + 45 = 41. 92 + 99 = 20. 99 + 56 = 42. 98 + 94 = 21. 99 + 67 = 43. 96 + 98 = 22. 99 + 78 = 44. 98 + 86 =
B Number Correct: _______
Improvement: _______
A STORY OF UNITS
31
©2015 Great Minds. eureka-math.orgG 2-M8-TE-1.3 .0 -0 9.20 15
Lesson 2 Problem Set 2 8
Lesson 2: Build, identify, and analyze two-dimensional shapes with specified attributes.
Name Date
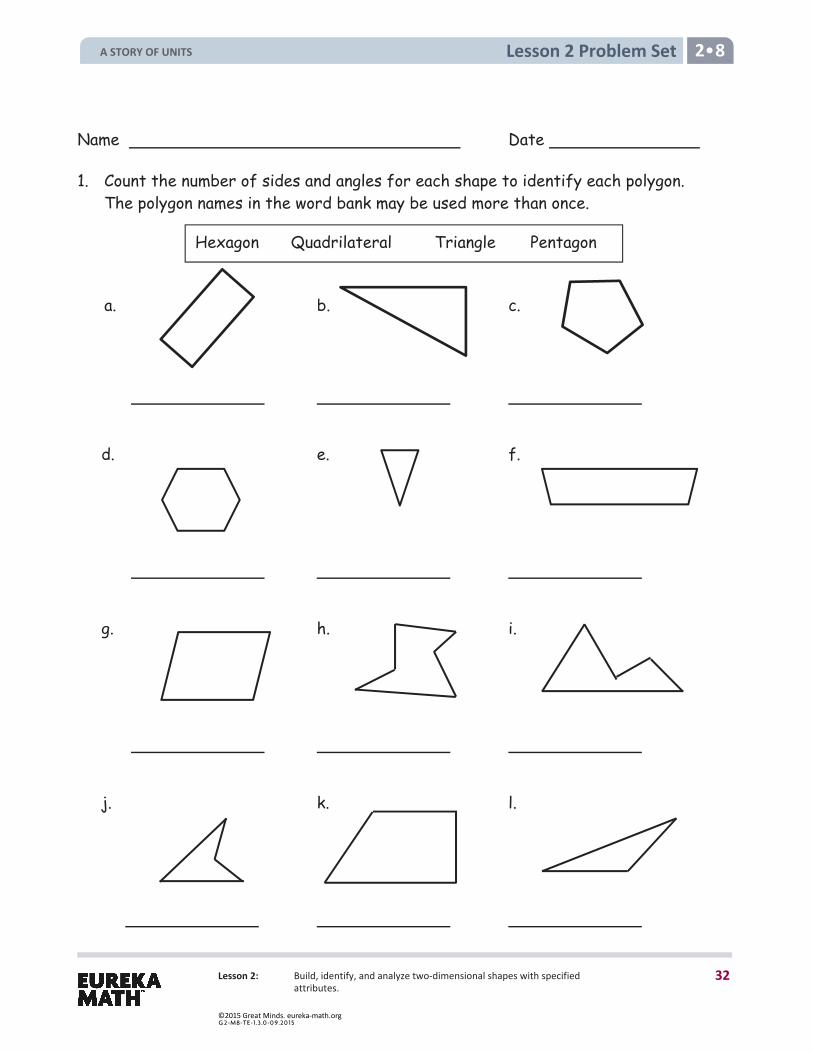
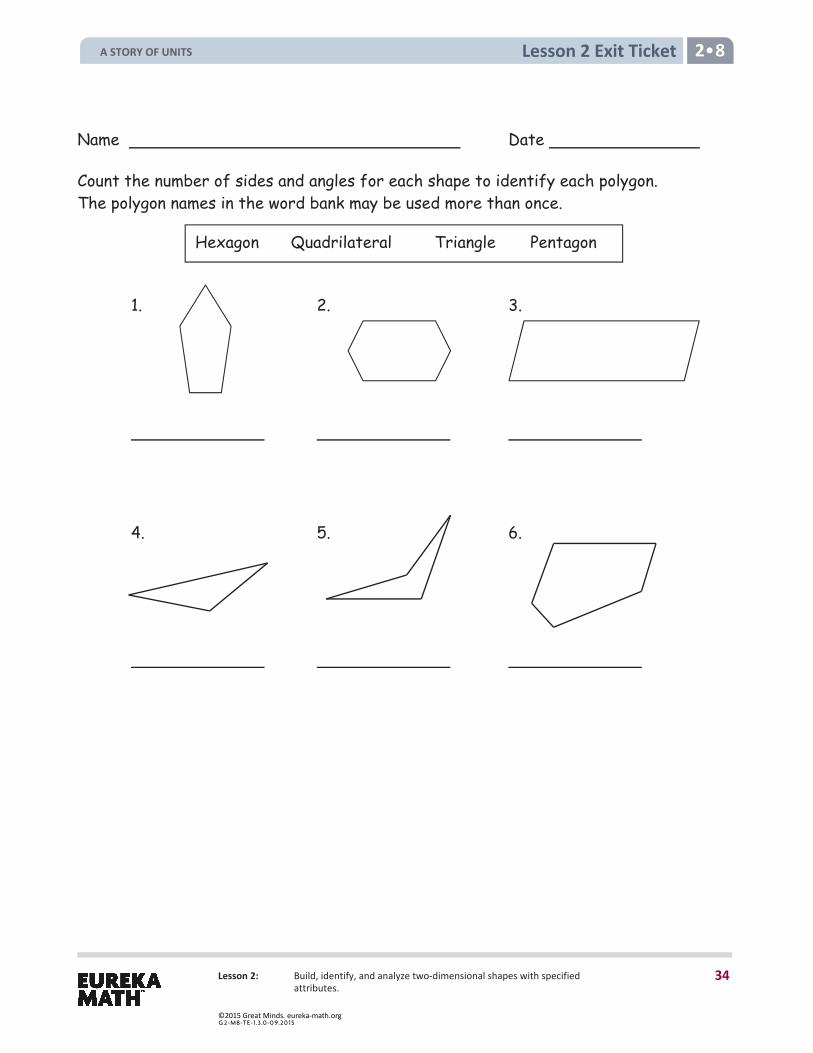
1. Count the number of sides and angles for each shape to identify each polygon. The polygon names in the word bank may be used more than once.
a. b. c.
d. e. f.
g. h. i.
j. k. l.
Hexagon Quadrilateral Triangle Pentagon
A STORY OF UNITS
32
©2015 Great Minds. eureka-math.orgG 2-M8-TE-1.3 .0 -0 9.20 15

Lesson 2 Problem Set 2 8
Lesson 2: Build, identify, and analyze two-dimensional shapes with specified attributes.
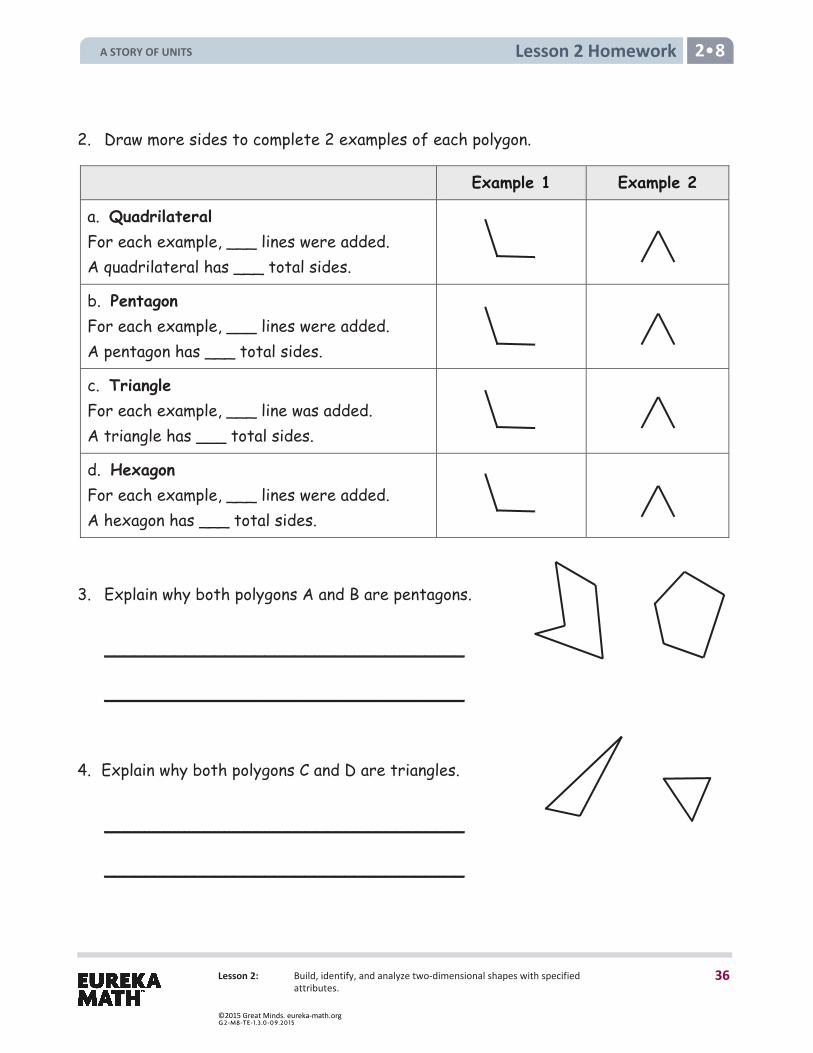
2. Draw more sides to complete 2 examples of each polygon.
Example 1 Example 2
a. Triangle For each example, line was added. A triangle has total sides.
b. Hexagon For each example, lines were added. A hexagon has total sides.
c. Quadrilateral For each example, lines were added. A quadrilateral has total sides.
d. Pentagon For each example, lines were added. A pentagon has total sides.
3.
a. Explain why both polygons A and B are hexagons.
____________________________________ ____________________________________
b. Draw a different hexagon than the two that are shown.
4. Explain why both polygons C and D are quadrilaterals.
________________________________________ ________________________________________
CD
A B
A STORY OF UNITS
33
©2015 Great Minds. eureka-math.orgG 2-M8-TE-1.3 .0 -0 9.20 15
Lesson 2 Exit Ticket 2 8
Lesson 2: Build, identify, and analyze two-dimensional shapes with specified attributes.
Name Date
Count the number of sides and angles for each shape to identify each polygon. The polygon names in the word bank may be used more than once.
1. 2. 3.
4. 5. 6.
Hexagon Quadrilateral Triangle Pentagon
A STORY OF UNITS
34
©2015 Great Minds. eureka-math.orgG 2-M8-TE-1.3 .0 -0 9.20 15
Lesson 2 Homework 2 8
Lesson 2: Build, identify, and analyze two-dimensional shapes with specified attributes.
Name Date
1. Count the number of sides and angles for each shape to identify each polygon. The polygon names in the word bank may be used more than once.
a. b. c.
d. e. f.
g. h. i.
j. k. l.
Hexagon Quadrilateral Triangle Pentagon
A STORY OF UNITS
35
©2015 Great Minds. eureka-math.orgG 2-M8-TE-1.3 .0 -0 9.20 15
Lesson 2 Homework 2 8
Lesson 2: Build, identify, and analyze two-dimensional shapes with specified attributes.
2. Draw more sides to complete 2 examples of each polygon.
Example 1 Example 2
a. Quadrilateral For each example, ___ lines were added. A quadrilateral has ___ total sides.
b. Pentagon For each example, ___ lines were added. A pentagon has ___ total sides.
c. Triangle For each example, ___ line was added. A triangle has ___ total sides.
d. Hexagon For each example, ___ lines were added. A hexagon has ___ total sides.
3. Explain why both polygons A and B are pentagons.
____________________________________ ____________________________________
4. Explain why both polygons C and D are triangles.
____________________________________ ____________________________________
A STORY OF UNITS
36
©2015 Great Minds. eureka-math.orgG 2-M8-TE-1.3 .0 -0 9.20 15
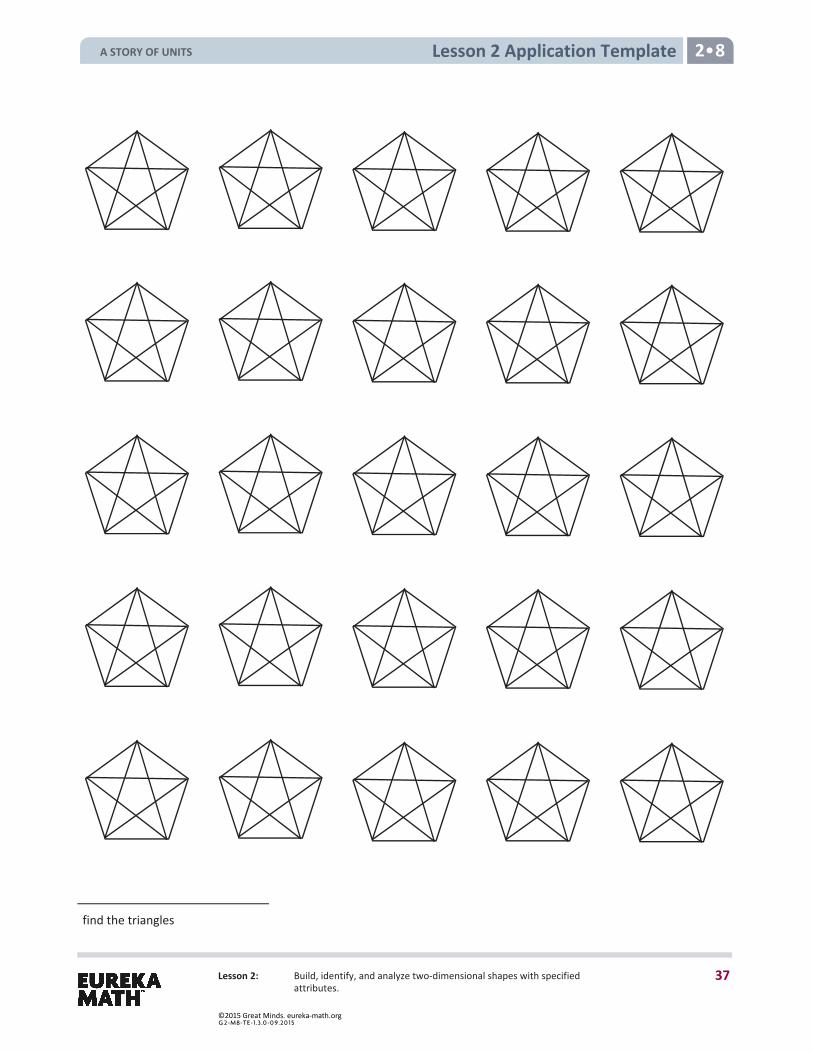
Lesson 2 Application Template 2 8
Lesson 2: Build, identify, and analyze two-dimensional shapes with specified attributes.
find the triangles
A STORY OF UNITS
37
©2015 Great Minds. eureka-math.orgG 2-M8-TE-1.3 .0 -0 9.20 15
Lesson 2 Application Template 2 8
Lesson 2: Build, identify, and analyze two-dimensional shapes with specified attributes.
find the triangles
A STORY OF UNITS
38
©2015 Great Minds. eureka-math.orgG 2-M8-TE-1.3 .0 -0 9.20 15

Lesson 3 2 8
Lesson 3: Use attributes to draw different polygons including triangles, quadrilaterals, pentagons, and hexagons.
Lesson 3 Objective: Use attributes to draw different polygons including triangles, quadrilaterals, pentagons, and hexagons.
Suggested Lesson Structure
Fluency Practice (12 minutes) Application Problem (6 minutes) Concept Development (32 minutes) Student Debrief (10 minutes)
Total Time (60 minutes)
Fluency Practice (12 minutes)
Addition with Renaming 2.NBT.5 (7 minutes) Grade 2 Core Fluency Differentiated Practice Sets 2.OA.2 (5 minutes)
Addition with Renaming (7 minutes)
Materials: (S) Personal white board, hundreds place value chart (Fluency Template)
Note: This fluency activity reviews the application of the chip model while recording with the algorithm. Allow students work time between each problem, and reinforce place value understandings by having students say their answers in both unit form and in standard form. Students use their personal white boards and a place value chart to solve.
T: Slide the place value chart template into your personal white boards. T: (Write 159 + 17 horizontally on the board.) Let’s use a chip model to add. On your personal white
boards, record your work using the algorithm. S: (Solve.) T: 1 hundred 5 tens 9 ones plus 1 ten 7 ones is…? S: 1 hundred 7 tens 6 ones! T: 159 + 17 is…? S: 176.
Continue with the following possible sequence: 224 + 28, 267 + 82, 398 + 31, and 336 + 55.
A STORY OF UNITS
39
©2015 Great Minds. eureka-math.orgG 2-M8-TE-1.3 .0 -0 9.20 15
Lesson 3 2 8
Lesson 3: Use attributes to draw different polygons including triangles, quadrilaterals, pentagons, and hexagons.
NOTES ON MULTIPLE MEANS OF ACTION AND EXPRESSION:
To help students working below grade level engage with the Application Problem, offer a version with simpler numbers (e.g., sides of 3 cm, 9 cm, and 2 cm with a perimeter of 20 cm). Students can then solve the word problem without getting bogged down by the numbers.
Grade 2 Core Fluency Differentiated Practice Sets (5 minutes)
Materials: (S) Core Fluency Practice Sets
Note: During Topic A and for the remainder of the year, each day’s Fluency Practice includes an opportunity for review and mastery of the sums and differences with totals through 20 by means of the Core Fluency Practice Sets or Sprints. Five options are provided in this lesson for the Core Fluency Practice Set, with Sheet A being the most simple addition fluency of the grade to Sheet E being the most complex. Start all students on Sheet A. Keep a record of student progress so that you can move students to more complex sheets when they are ready.
Students complete as many problems as they can in 120 seconds. We recommend 100% accuracy and completion before moving to the next level. Collect any Practice Sheets that have been completed within the 120 seconds, and check the answers. The next time Core Fluency Practice Sets are used, students who have successfully completed their set today can be provided with the next level.
Consider assigning early finishers a counting pattern and start number. Celebrate improvement as well as advancement. Students should be encouraged to compete with themselves rather than their peers. Discuss possible strategies to solve with students. Notify caring adults of each student’s progress.
Application Problem (6 minutes)
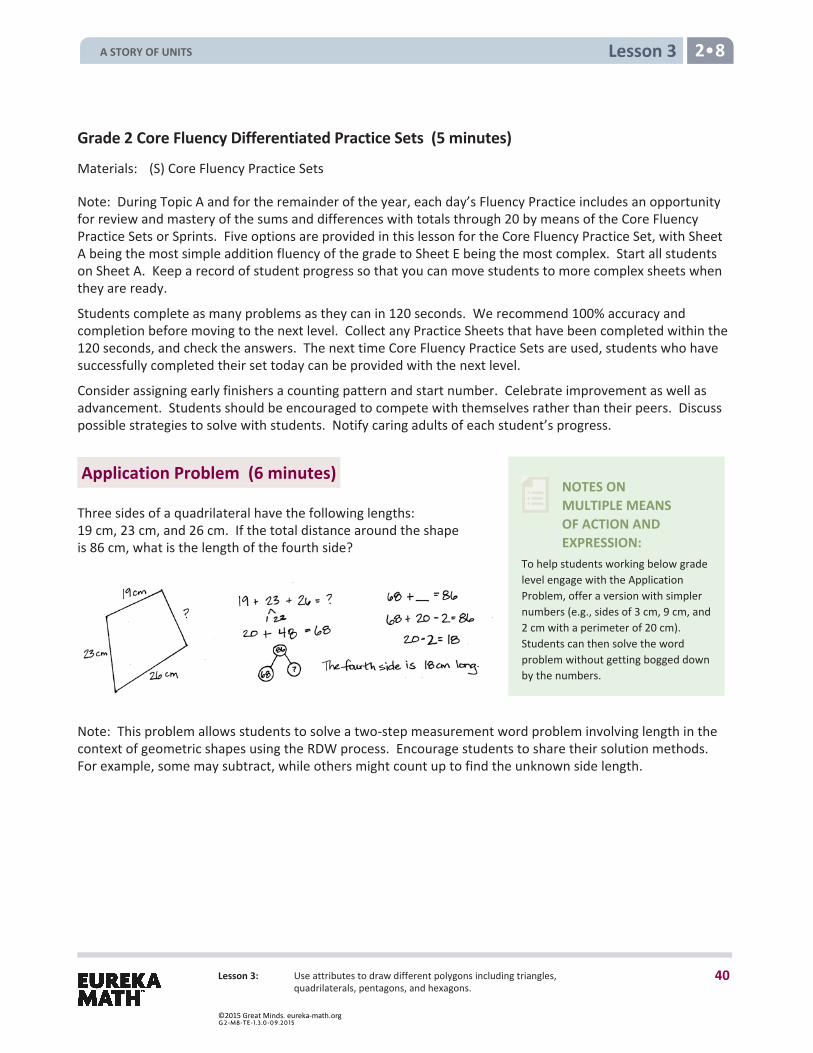
Three sides of a quadrilateral have the following lengths: 19 cm, 23 cm, and 26 cm. If the total distance around the shape is 86 cm, what is the length of the fourth side?
Note: This problem allows students to solve a two-step measurement word problem involving length in the context of geometric shapes using the RDW process. Encourage students to share their solution methods. For example, some may subtract, while others might count up to find the unknown side length.
A STORY OF UNITS
40
©2015 Great Minds. eureka-math.orgG 2-M8-TE-1.3 .0 -0 9.20 15
Lesson 3 2 8
Lesson 3: Use attributes to draw different polygons including triangles, quadrilaterals, pentagons, and hexagons.
NOTES ON MULTIPLE MEANS OF ACTION AND EXPRESSION:
Throughout the lesson, point to visuals posted on the board to help English language learners follow along. For instance, when asking students, “What do you know about the sides of the polygon?” point first to a side and then to a drawn pentagon.
Concept Development (32 minutes)
Materials: (T) Document camera (if available), large piece of chart paper for a polygon sort (S) Straightedge, scissors, piece of white 8½″ × 11″ inch paper
Part 1: Drawing Polygons
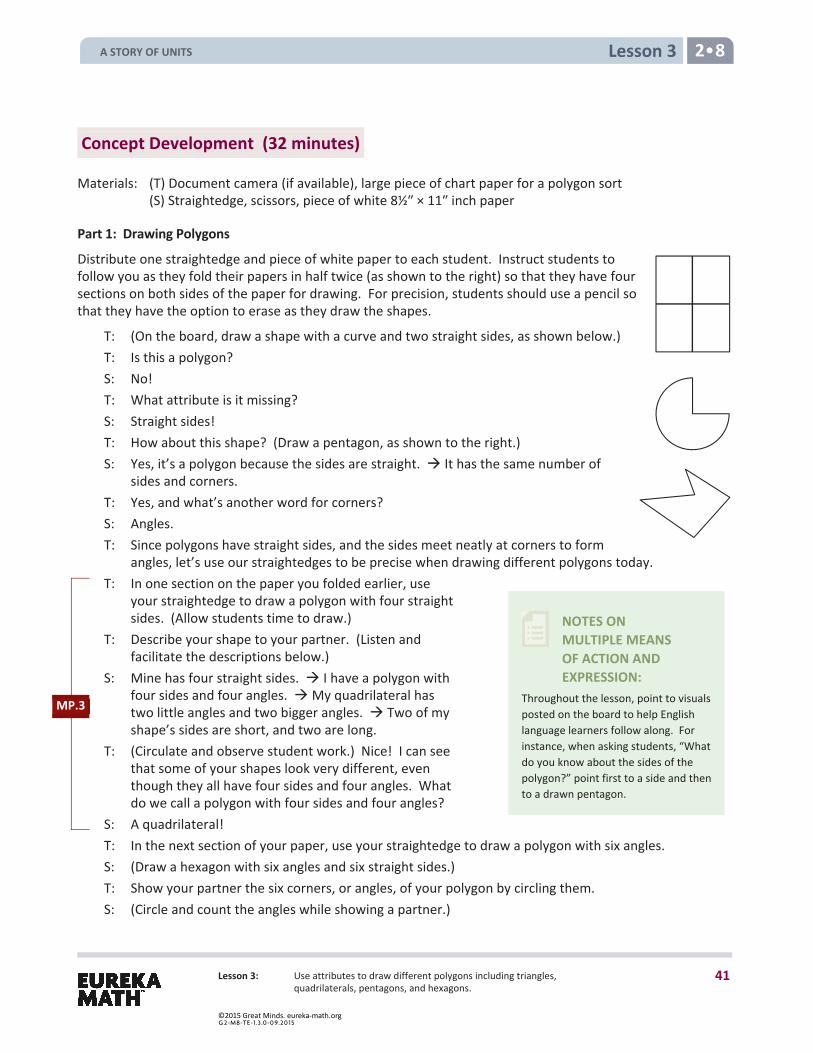
Distribute one straightedge and piece of white paper to each student. Instruct students to follow you as they fold their papers in half twice (as shown to the right) so that they have four sections on both sides of the paper for drawing. For precision, students should use a pencil so that they have the option to erase as they draw the shapes.
T: (On the board, draw a shape with a curve and two straight sides, as shown below.) T: Is this a polygon? S: No! T: What attribute is it missing? S: Straight sides! T: How about this shape? (Draw a pentagon, as shown to the right.) S: Yes, it’s a polygon because the sides are straight. It has the same number of
sides and corners. T: Yes, and what’s another word for corners? S: Angles. T: Since polygons have straight sides, and the sides meet neatly at corners to form
angles, let’s use our straightedges to be precise when drawing different polygons today. T: In one section on the paper you folded earlier, use
your straightedge to draw a polygon with four straight sides. (Allow students time to draw.)
T: Describe your shape to your partner. (Listen and facilitate the descriptions below.)
S: Mine has four straight sides. I have a polygon with four sides and four angles. My quadrilateral has two little angles and two bigger angles. Two of my shape’s sides are short, and two are long.
T: (Circulate and observe student work.) Nice! I can see that some of your shapes look very different, even though they all have four sides and four angles. What do we call a polygon with four sides and four angles?
S: A quadrilateral! T: In the next section of your paper, use your straightedge to draw a polygon with six angles. S: (Draw a hexagon with six angles and six straight sides.) T: Show your partner the six corners, or angles, of your polygon by circling them. S: (Circle and count the angles while showing a partner.)
MP.3
A STORY OF UNITS
41
©2015 Great Minds. eureka-math.orgG 2-M8-TE-1.3 .0 -0 9.20 15
Lesson 3 2 8
Lesson 3: Use attributes to draw different polygons including triangles, quadrilaterals, pentagons, and hexagons.
T: Good. Now, show your partner the six straight sides of your polygon. Remember to place your finger at the starting point so you don’t count the same side twice as you count around the figure.
S: (Count sides while showing a partner.) T: (Circulate and observe students sharing.) Great thinking! What is the
same about all of your shapes? S: They all have six sides. They are all called hexagons. They have six corners and six angles. T: Yes, and what is different? S: The sides have different lengths. Some are big, and some are little. They all look a little
different.
Instruct students to fill in the remaining two sections of their papers with a polygon with three sides and then a polygon with five angles (see the examples to the right) using the above vignette as necessary or appropriate.
Find a Friend: Instruct students to quietly walk to find a friend with a different looking polygon with three, four, five, and six sides: “Find a friend with a triangle that looks different from yours.”
Part 2: Sorting Polygons
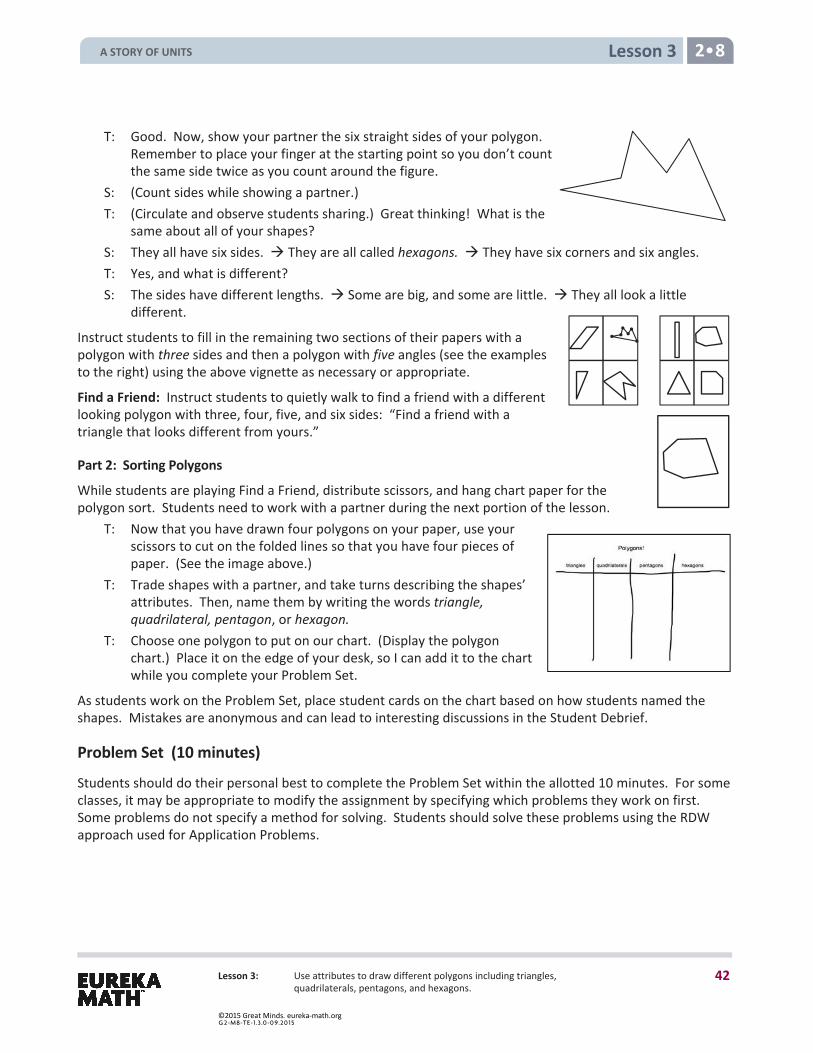
While students are playing Find a Friend, distribute scissors, and hang chart paper for the polygon sort. Students need to work with a partner during the next portion of the lesson.
T: Now that you have drawn four polygons on your paper, use your scissors to cut on the folded lines so that you have four pieces of paper. (See the image above.)
T: Trade shapes with a partner, and take turns describing the shapes’ attributes. Then, name them by writing the words triangle, quadrilateral, pentagon, or hexagon.
T: Choose one polygon to put on our chart. (Display the polygon chart.) Place it on the edge of your desk, so I can add it to the chart while you complete your Problem Set.
As students work on the Problem Set, place student cards on the chart based on how students named the shapes. Mistakes are anonymous and can lead to interesting discussions in the Student Debrief.
Problem Set (10 minutes)
Students should do their personal best to complete the Problem Set within the allotted 10 minutes. For some classes, it may be appropriate to modify the assignment by specifying which problems they work on first. Some problems do not specify a method for solving. Students should solve these problems using the RDW approach used for Application Problems.
A STORY OF UNITS
42
©2015 Great Minds. eureka-math.orgG 2-M8-TE-1.3 .0 -0 9.20 15
Lesson 3 2 8
Lesson 3: Use attributes to draw different polygons including triangles, quadrilaterals, pentagons, and hexagons.
Student Debrief (10 minutes)
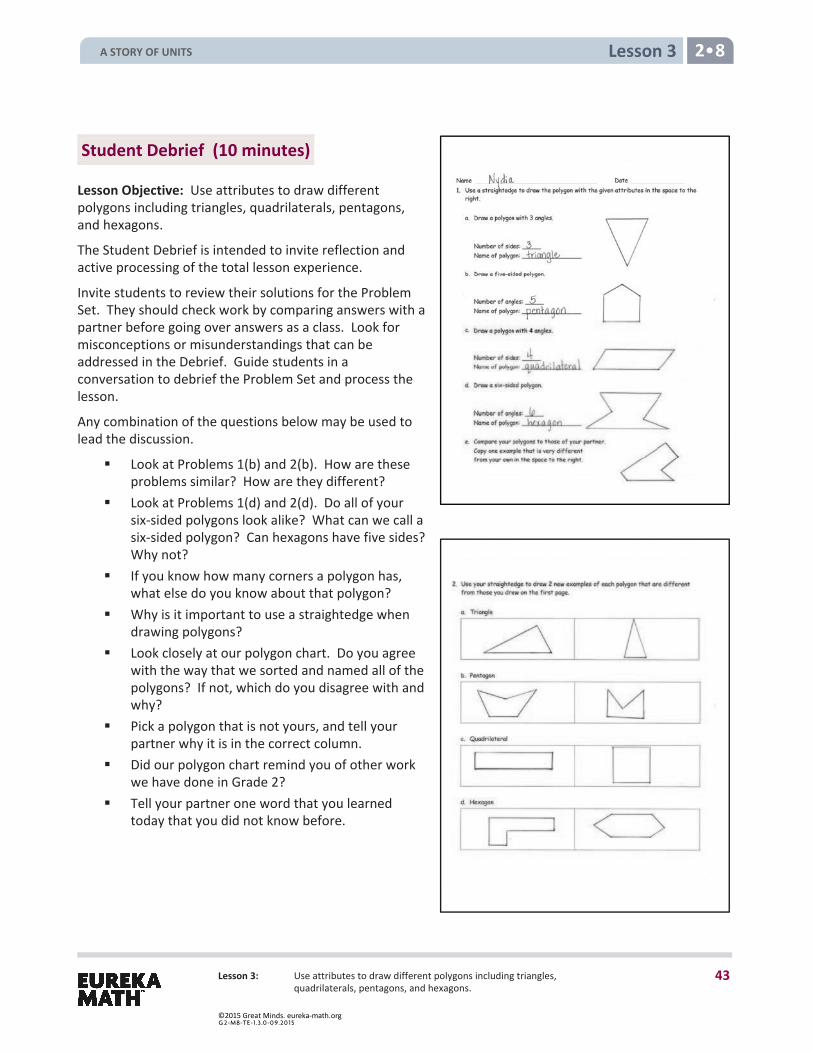
Lesson Objective: Use attributes to draw different polygons including triangles, quadrilaterals, pentagons, and hexagons.
The Student Debrief is intended to invite reflection and active processing of the total lesson experience.
Invite students to review their solutions for the Problem Set. They should check work by comparing answers with a partner before going over answers as a class. Look for misconceptions or misunderstandings that can be addressed in the Debrief. Guide students in a conversation to debrief the Problem Set and process the lesson.
Any combination of the questions below may be used to lead the discussion.
Look at Problems 1(b) and 2(b). How are theseproblems similar? How are they different?
Look at Problems 1(d) and 2(d). Do all of yoursix-sided polygons look alike? What can we call asix-sided polygon? Can hexagons have five sides?Why not?
If you know how many corners a polygon has,what else do you know about that polygon?
Why is it important to use a straightedge whendrawing polygons?
Look closely at our polygon chart. Do you agreewith the way that we sorted and named all of thepolygons? If not, which do you disagree with andwhy?
Pick a polygon that is not yours, and tell yourpartner why it is in the correct column.
Did our polygon chart remind you of other workwe have done in Grade 2?
Tell your partner one word that you learnedtoday that you did not know before.
A STORY OF UNITS
43
©2015 Great Minds. eureka-math.orgG 2-M8-TE-1.3 .0 -0 9.20 15
Lesson 3 2 8
Lesson 3: Use attributes to draw different polygons including triangles, quadrilaterals, pentagons, and hexagons.
Exit Ticket (3 minutes)
After the Student Debrief, instruct students to complete the Exit Ticket. A review of their work will help assessing students’ understanding of the concepts that were presented in today’s lesson and planning more effectively for future lessons. The questions may be read aloud to the students.
A STORY OF UNITS
44
©2015 Great Minds. eureka-math.orgG 2-M8-TE-1.3 .0 -0 9.20 15

Lesson 3 Core Fluency Practice Set A 2 8
Lesson 3: Use attributes to draw different polygons including triangles, quadrilaterals, pentagons, and hexagons.
Name Date
1. 10 + 9 = 21. 3 + 9 =
2. 10 + 1 = 22. 4 + 8 =
3. 11 + 2 = 23. 5 + 9 =
4. 13 + 6 = 24. 8 + 8 =
5. 15 + 5 = 25. 7 + 5 =
6. 14 + 3 = 26. 5 + 8 =
7. 13 + 5 = 27. 8 + 3 =
8. 12 + 4 = 28. 6 + 8 =
9. 16 + 2 = 29. 4 + 6 =
10. 18 + 1 = 30. 7 + 6 =
11. 11 + 7 = 31. 7 + 4 =
12. 13 + 4 = 32. 7 + 9 =
13. 14 + 5 = 33. 7 + 7 =
14. 9 + 4 = 34. 8 + 6 =
15. 9 + 2 = 35. 6 + 9 =
16. 9 + 9 = 36. 8 + 5 =
17. 6 + 9 = 37. 4 + 7 =
18. 8 + 9 = 38. 3 + 9 =
19 7 + 8 = 39. 8 + 6 =
20. 8 + 8 = 40. 9 + 4 =
A STORY OF UNITS
45
©2015 Great Minds. eureka-math.orgG 2-M8-TE-1.3 .0 -0 9.20 15

Lesson 3 Core Fluency Practice Set B 2 8
Lesson 3: Use attributes to draw different polygons including triangles, quadrilaterals, pentagons, and hexagons.
Name Date
1. 10 + 8 = 21. 5 + 8 =
2. 4 + 10 = 22. 6 + 7 =
3. 9 + 10 = 23. ____ + 4 = 12
4. 11 + 5 = 24. ____ + 7 = 13
5. 13 + 3 = 25. 6 + = 14
6. 12 + 4 = 26. 7 + = 15
7. 16 + 3 = 27. ____ = 9 + 8
8. 15 + = 19 28. ____ = 7 + 5
9. 18 + = 20 29. ____ = 4 + 8
10. 13 + 5 = 30. 3 + 9 =
11. ____ = 4 + 16 31. 6 + 7 =
12. ____ = 6 + 12 32. 8 + = 13
13. ____ = 14 + 6 33. ____ = 7 + 9
14. 9 + 3 = 34. 6 + 6 =
15. 7 + 9 = 35. ____ = 7 + 5
16. ____ + 4 = 11 36. ____ = 4 + 8
17. ____ + 6 = 13 37. 20 = 13 + ____
18. ____ + 5 = 12 38. 18 = + 9
19 ____ + 8 = 14 39. 16 = + 7
20. ____ + 9 = 15 40. 20 = 9 + ____
A STORY OF UNITS
46
©2015 Great Minds. eureka-math.orgG 2-M8-TE-1.3 .0 -0 9.20 15
Lesson 3 Core Fluency Practice Set C 2 8
Lesson 3: Use attributes to draw different polygons including triangles, quadrilaterals, pentagons, and hexagons.
Name Date
1. 19 – 9 = 21. 15 – 7 =
2. 19 – 11 = 22. 18 – 9 =
3. 17 – 10 = 23. 16 – 8 =
4. 12 – 2 = 24. 15 – 6 =
5. 15 – 12 = 25. 17 – 8 =
6. 18 – 10 = 26. 14 – 6 =
7. 17 – 5 = 27. 16 – 9 =
8. 20 – 9 = 28. 13 – 8 =
9. 14 – 4 = 29. 12 – 5 =
10. 16 – 13 = 30. 19 – 8 =
11. 11 – 2 = 31. 17 – 9 =
12. 12 – 3 = 32. 16 – 7 =
13. 14 – 2 = 33. 14 – 8 =
14. 13 – 4 = 34. 15 – 9 =
15. 11 – 3 = 35. 13 – 7 =
16. 12 – 4 = 36. 12 – 8 =
17. 13 – 2 = 37. 15 – 8 =
18. 14 – 5 = 38. 14 – 9 =
19 11 – 4 = 39. 12 – 7 =
20. 12 – 5 = 40. 11 – 9 =
A STORY OF UNITS
47
©2015 Great Minds. eureka-math.orgG 2-M8-TE-1.3 .0 -0 9.20 15
Lesson 3 Core Fluency Practice Set D 2 8
Lesson 3: Use attributes to draw different polygons including triangles, quadrilaterals, pentagons, and hexagons.
Name Date
1. 12 – 3 = 21. 13 – 7 =
2. 13 – 5 = 22. 15 – 9 =
3. 11 – 2 = 23. 18 – 7 =
4. 12 – 5 = 24. 14 – 7 =
5. 13 – 4 = 25. 17 – 9 =
6. 13 – 2 = 26. 12 – 9 =
7. 11 – 4 = 27. 13 – 6 =
8. 12 – 6 = 28. 15 – 7 =
9. 11 – 3 = 29. 16 – 8 =
10. 13 – 6 = 30. 12 – 6 =
11. ____ = 11 – 9 31. ____ = 13 – 9
12. ____ = 13 – 8 32. ____ = 17 – 8
13. ____ = 12 – 7 33. ____ = 14 – 9
14. ____ = 11 – 6 34. ____ = 13 – 5
15. ____ = 13 – 9 35. ____ = 15 – 8
16. ____ = 14 – 8 36. ____ = 18 – 9
17. ____ = 11 – 7 37. ____ = 16 – 7
18. ____ = 15 – 6 38. ____ = 20 – 12
19 ____ = 16 – 9 39. ____ = 20 – 6
20. ____ = 12 – 8 40. ____ = 20 – 17
A STORY OF UNITS
48
©2015 Great Minds. eureka-math.orgG 2-M8-TE-1.3 .0 -0 9.20 15
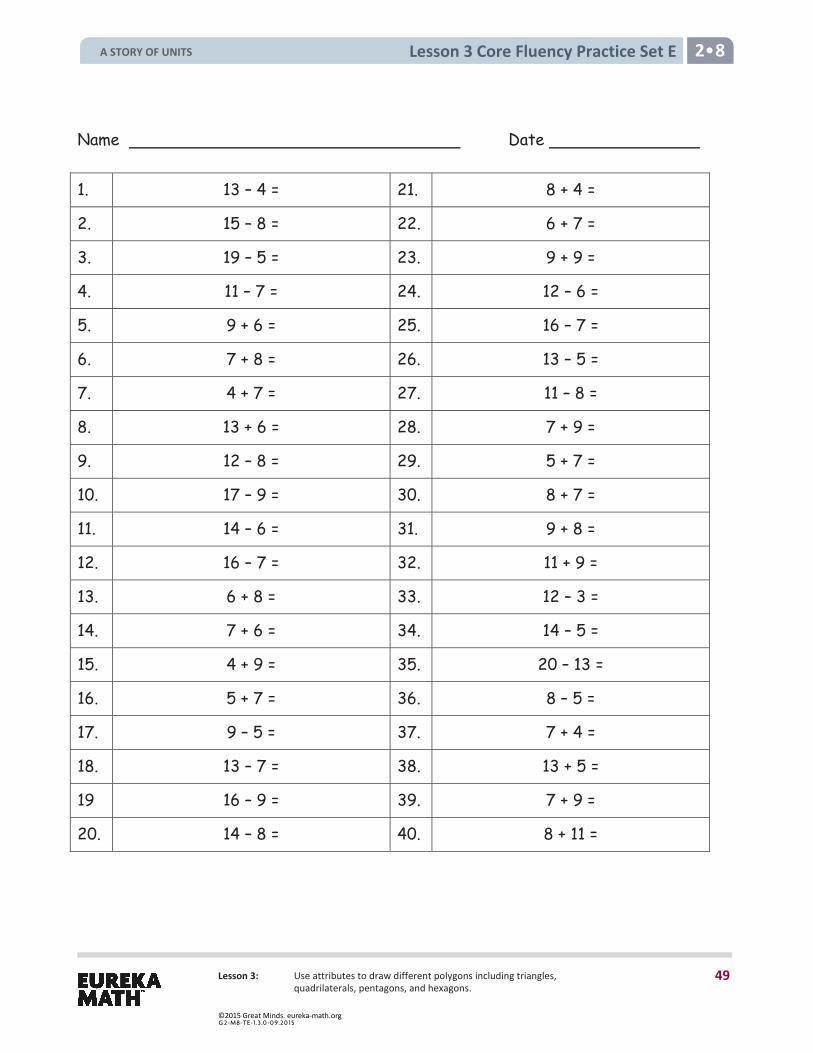
Lesson 3 Core Fluency Practice Set E 2 8
Lesson 3: Use attributes to draw different polygons including triangles, quadrilaterals, pentagons, and hexagons.
Name Date
1. 13 – 4 = 21. 8 + 4 =
2. 15 – 8 = 22. 6 + 7 =
3. 19 – 5 = 23. 9 + 9 =
4. 11 – 7 = 24. 12 – 6 =
5. 9 + 6 = 25. 16 – 7 =
6. 7 + 8 = 26. 13 – 5 =
7. 4 + 7 = 27. 11 – 8 =
8. 13 + 6 = 28. 7 + 9 =
9. 12 – 8 = 29. 5 + 7 =
10. 17 – 9 = 30. 8 + 7 =
11. 14 – 6 = 31. 9 + 8 =
12. 16 – 7 = 32. 11 + 9 =
13. 6 + 8 = 33. 12 – 3 =
14. 7 + 6 = 34. 14 – 5 =
15. 4 + 9 = 35. 20 – 13 =
16. 5 + 7 = 36. 8 – 5 =
17. 9 – 5 = 37. 7 + 4 =
18. 13 – 7 = 38. 13 + 5 =
19 16 – 9 = 39. 7 + 9 =
20. 14 – 8 = 40. 8 + 11 =
A STORY OF UNITS
49
©2015 Great Minds. eureka-math.orgG 2-M8-TE-1.3 .0 -0 9.20 15
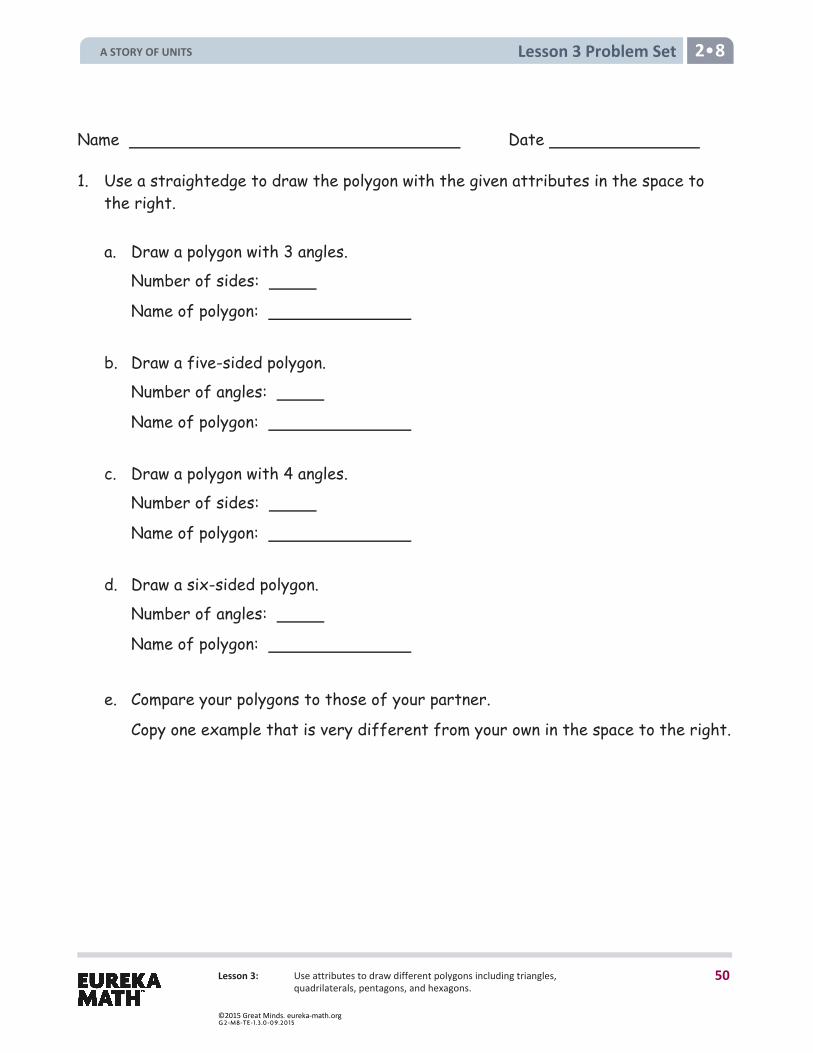
Lesson 3 Problem Set 2 8
Lesson 3: Use attributes to draw different polygons including triangles, quadrilaterals, pentagons, and hexagons.
Name Date
1. Use a straightedge to draw the polygon with the given attributes in the space to the right. a. Draw a polygon with 3 angles.
Number of sides:
Name of polygon: b. Draw a five-sided polygon.
Number of angles:
Name of polygon: c. Draw a polygon with 4 angles.
Number of sides:
Name of polygon: d. Draw a six-sided polygon.
Number of angles:
Name of polygon:
e. Compare your polygons to those of your partner.
Copy one example that is very different from your own in the space to the right.
A STORY OF UNITS
50
©2015 Great Minds. eureka-math.orgG 2-M8-TE-1.3 .0 -0 9.20 15
Lesson 3 Problem Set 2 8
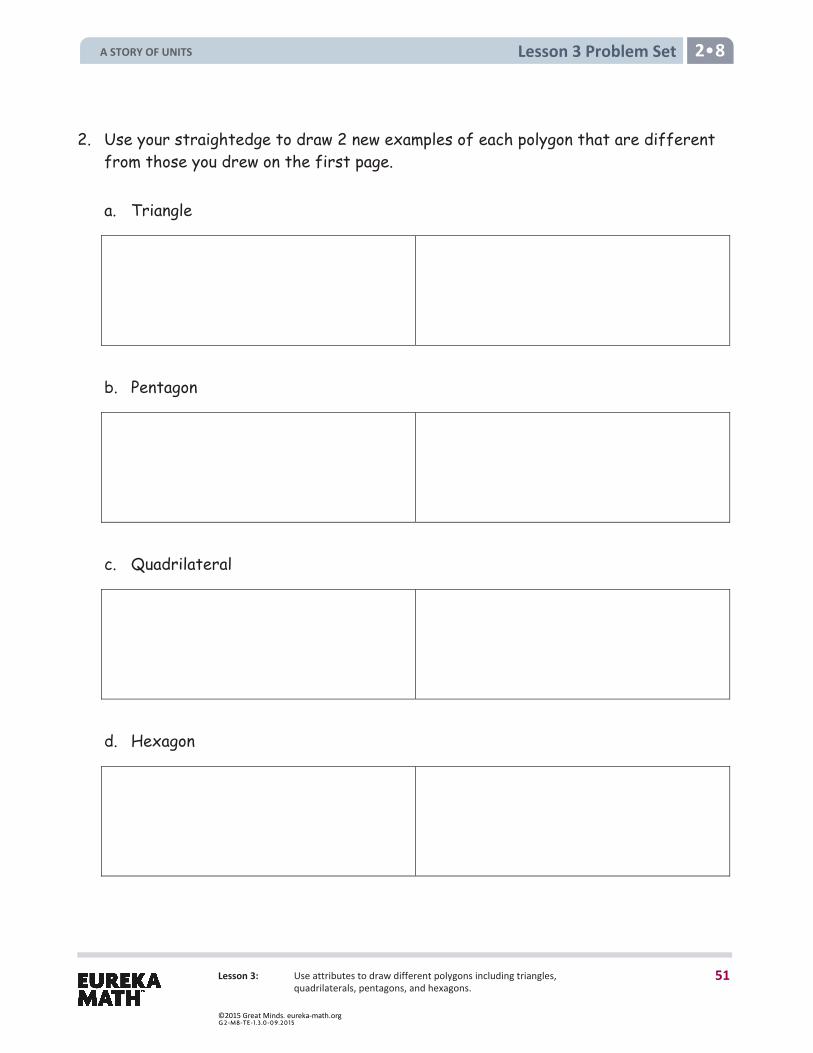
Lesson 3: Use attributes to draw different polygons including triangles, quadrilaterals, pentagons, and hexagons.
2. Use your straightedge to draw 2 new examples of each polygon that are different from those you drew on the first page. a. Triangle
b. Pentagon
c. Quadrilateral
d. Hexagon
A STORY OF UNITS
51
©2015 Great Minds. eureka-math.orgG 2-M8-TE-1.3 .0 -0 9.20 15
2 8
Lesson 3: Use attributes to draw different polygons including triangles, quadrilaterals, pentagons, and hexagons.
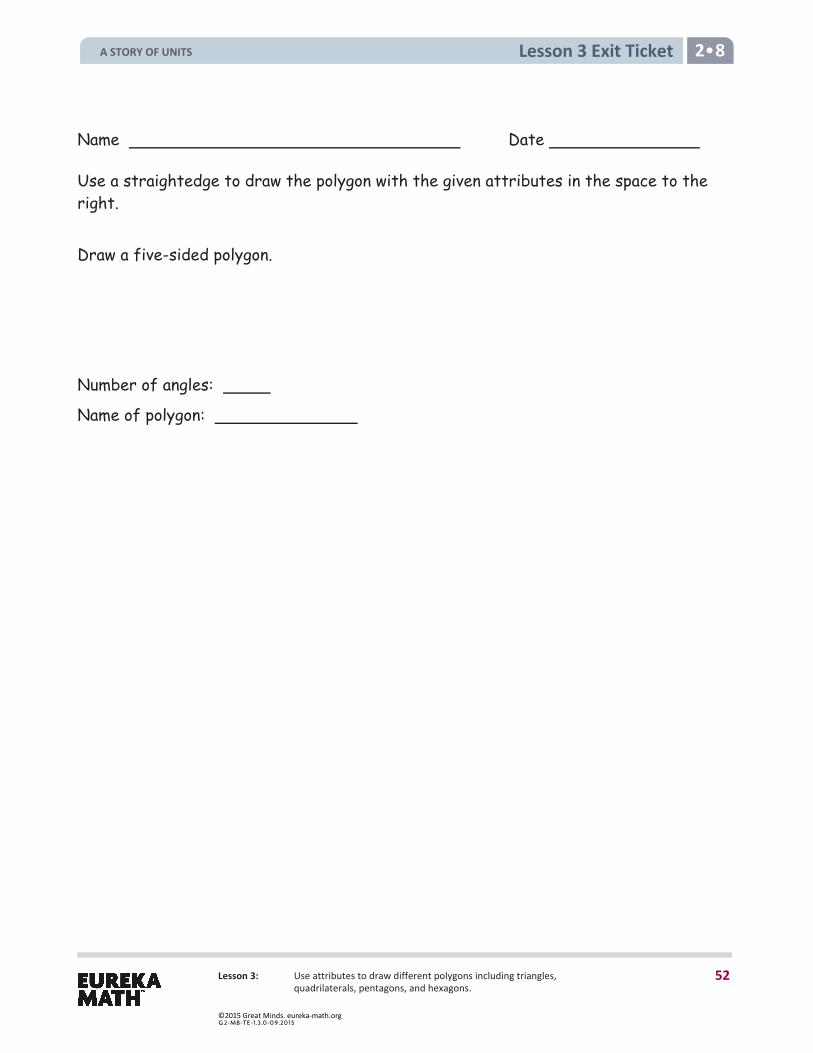
Name Date
Use a straightedge to draw the polygon with the given attributes in the space to the right. Draw a five-sided polygon.
Number of angles:
Name of polygon:
A STORY OF UNITS
52
©2015 Great Minds. eureka-math.orgG 2-M8-TE-1.3 .0 -0 9.20 15
Lesson 3 Exit Ticket
Lesson 3 Homework 2 8
Lesson 3: Use attributes to draw different polygons including triangles, quadrilaterals, pentagons, and hexagons.
Name Date
1. Use a straightedge to draw the polygon with the given attributes in the space to the right. a. Draw a polygon with 4 angles.
Number of sides:
Name of polygon:
b. Draw a six-sided polygon.
Number of angles:
Name of polygon:
c. Draw a polygon with 3 angles.
Number of sides:
Name of polygon:
d. Draw a five-sided polygon.
Number of angles:
Name of polygon:
A STORY OF UNITS
53
©2015 Great Minds. eureka-math.orgG 2-M8-TE-1.3 .0 -0 9.20 15
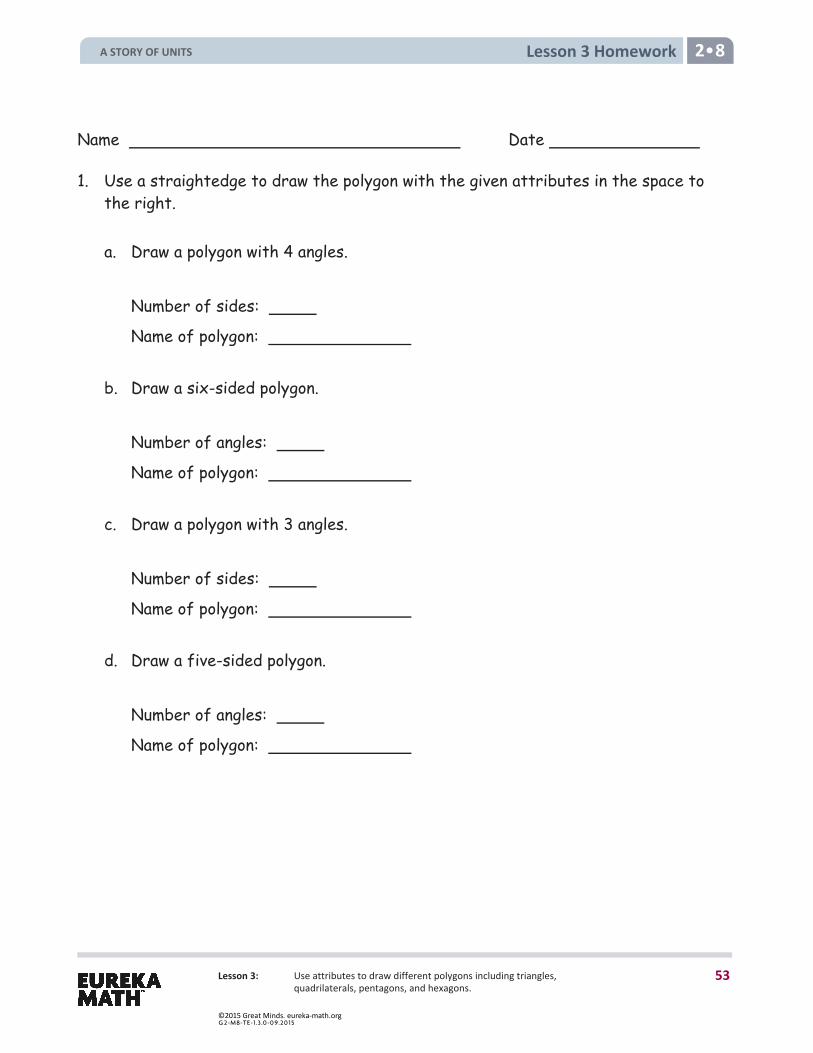
Lesson 3 Homework 2 8
Lesson 3: Use attributes to draw different polygons including triangles, quadrilaterals, pentagons, and hexagons.
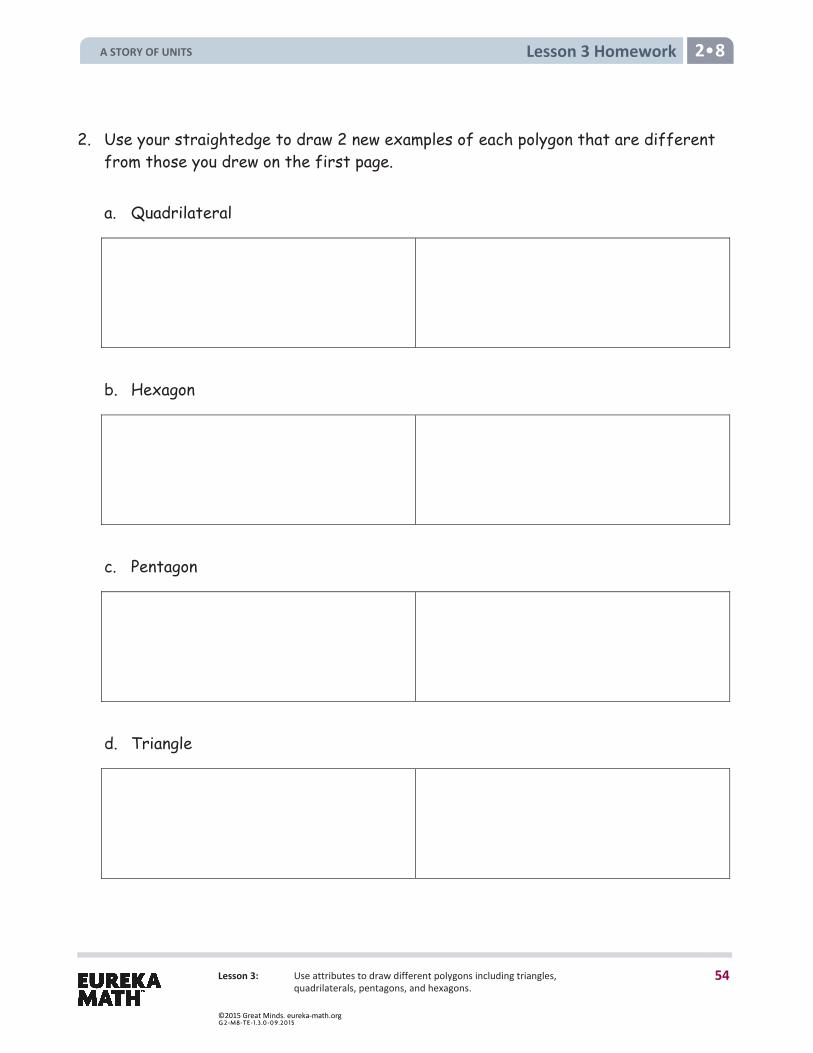
2. Use your straightedge to draw 2 new examples of each polygon that are different from those you drew on the first page.
a. Quadrilateral
b. Hexagon
c. Pentagon
d. Triangle
A STORY OF UNITS
54
©2015 Great Minds. eureka-math.orgG 2-M8-TE-1.3 .0 -0 9.20 15

Lesson 3 Fluency Template 2 8
Lesson 3: Use attributes to draw different polygons including triangles, quadrilaterals, pentagons, and hexagons.
0F0F0F
hundreds place value chart
A STORY OF UNITS
55
©2015 Great Minds. eureka-math.orgG 2-M8-TE-1.3 .0 -0 9.20 15
Lesson 4 2 8
Lesson 4: Use attributes to identify and draw different quadrilaterals including rectangles, rhombuses, parallelograms, and trapezoids.
Lesson 4 Objective: Use attributes to identify and draw different quadrilaterals including rectangles, rhombuses, parallelograms, and trapezoids.
Suggested Lesson Structure
Fluency Practice (5 minutes) Concept Development (45 minutes) Student Debrief (10 minutes)
Total Time (60 minutes)
Fluency Practice (5 minutes)
Addition with Renaming 2.NBT.7 (5 minutes)
Addition with Renaming (5 minutes)
Materials: (S) Personal white board, hundreds place value chart (Lesson 3 Fluency Template)
Note: This fluency activity reviews the application of a chip model while recording with the algorithm. Allow students work time between each problem, and reinforce place value understandings by having students say their answers in both unit form and in standard form. Students use their personal white boards and a place value chart to solve.
T: Slide the place value chart template into your personal white board. T: (Write 167 + 47 vertically on the board.) Let’s use a chip model to add. On your personal white
board, record your work using the algorithm. S: (Solve.) T: 1 hundred 6 tens 7 ones plus 4 tens 7 ones is…? S: 2 hundreds 1 ten 4 ones! T: 167 + 47 is…? S: 214.
Continue with the following possible sequence: 285 + 38, 234 + 67, 317 + 94, and 367 + 55.
A STORY OF UNITS
56
©2015 Great Minds. eureka-math.orgG 2-M8-TE-1.3 .0 -0 9.20 15
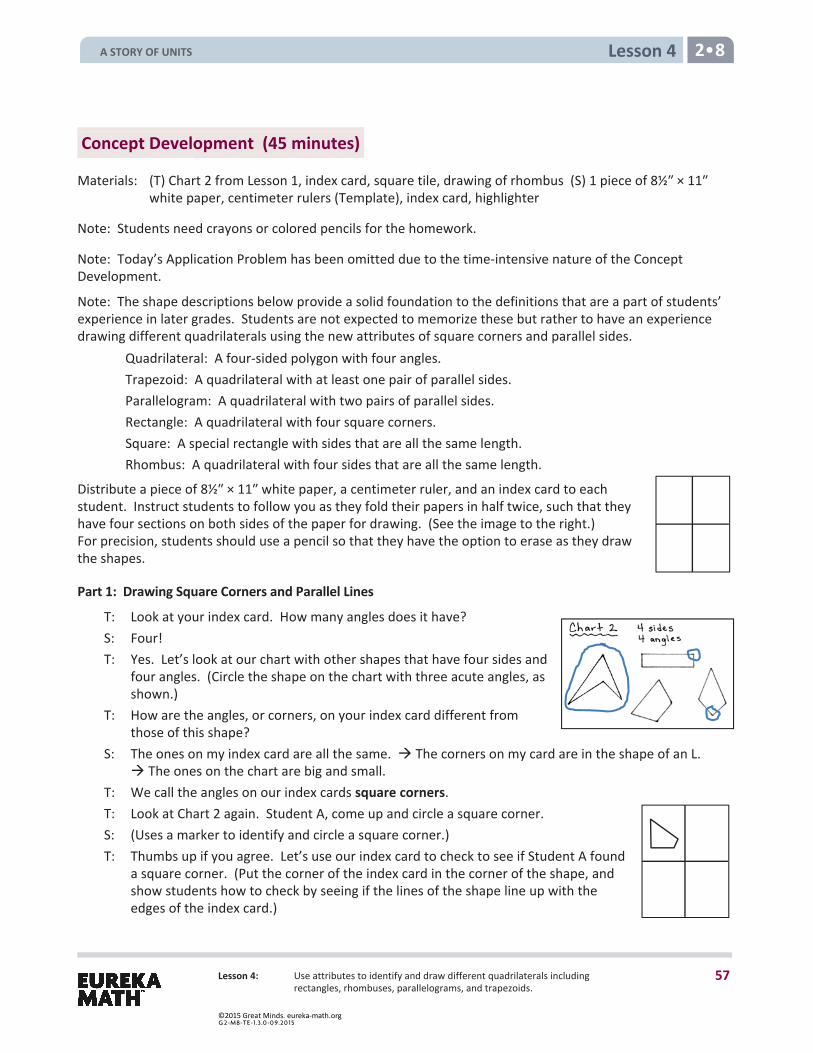
Lesson 4 2 8
Lesson 4: Use attributes to identify and draw different quadrilaterals including rectangles, rhombuses, parallelograms, and trapezoids.
Concept Development (45 minutes)
Materials: (T) Chart 2 from Lesson 1, index card, square tile, drawing of rhombus (S) 1 piece of 8½″ × 11″ white paper, centimeter rulers (Template), index card, highlighter
Note: Students need crayons or colored pencils for the homework.
Note: Today’s Application Problem has been omitted due to the time-intensive nature of the Concept Development.
Note: The shape descriptions below provide a solid foundation to the definitions that are a part of students’ experience in later grades. Students are not expected to memorize these but rather to have an experience drawing different quadrilaterals using the new attributes of square corners and parallel sides.
Quadrilateral: A four-sided polygon with four angles. Trapezoid: A quadrilateral with at least one pair of parallel sides. Parallelogram: A quadrilateral with two pairs of parallel sides. Rectangle: A quadrilateral with four square corners. Square: A special rectangle with sides that are all the same length.
Rhombus: A quadrilateral with four sides that are all the same length.
Distribute a piece of 8½″ × 11″ white paper, a centimeter ruler, and an index card to each student. Instruct students to follow you as they fold their papers in half twice, such that they have four sections on both sides of the paper for drawing. (See the image to the right.) For precision, students should use a pencil so that they have the option to erase as they draw the shapes.
Part 1: Drawing Square Corners and Parallel Lines
T: Look at your index card. How many angles does it have? S: Four! T: Yes. Let’s look at our chart with other shapes that have four sides and
four angles. (Circle the shape on the chart with three acute angles, as shown.)
T: How are the angles, or corners, on your index card different from those of this shape?
S: The ones on my index card are all the same. The corners on my card are in the shape of an L. The ones on the chart are big and small.
T: We call the angles on our index cards square corners. T: Look at Chart 2 again. Student A, come up and circle a square corner. S: (Uses a marker to identify and circle a square corner.) T: Thumbs up if you agree. Let’s use our index card to check to see if Student A found
a square corner. (Put the corner of the index card in the corner of the shape, and show students how to check by seeing if the lines of the shape line up with the edges of the index card.)
A STORY OF UNITS
57
©2015 Great Minds. eureka-math.orgG 2-M8-TE-1.3 .0 -0 9.20 15
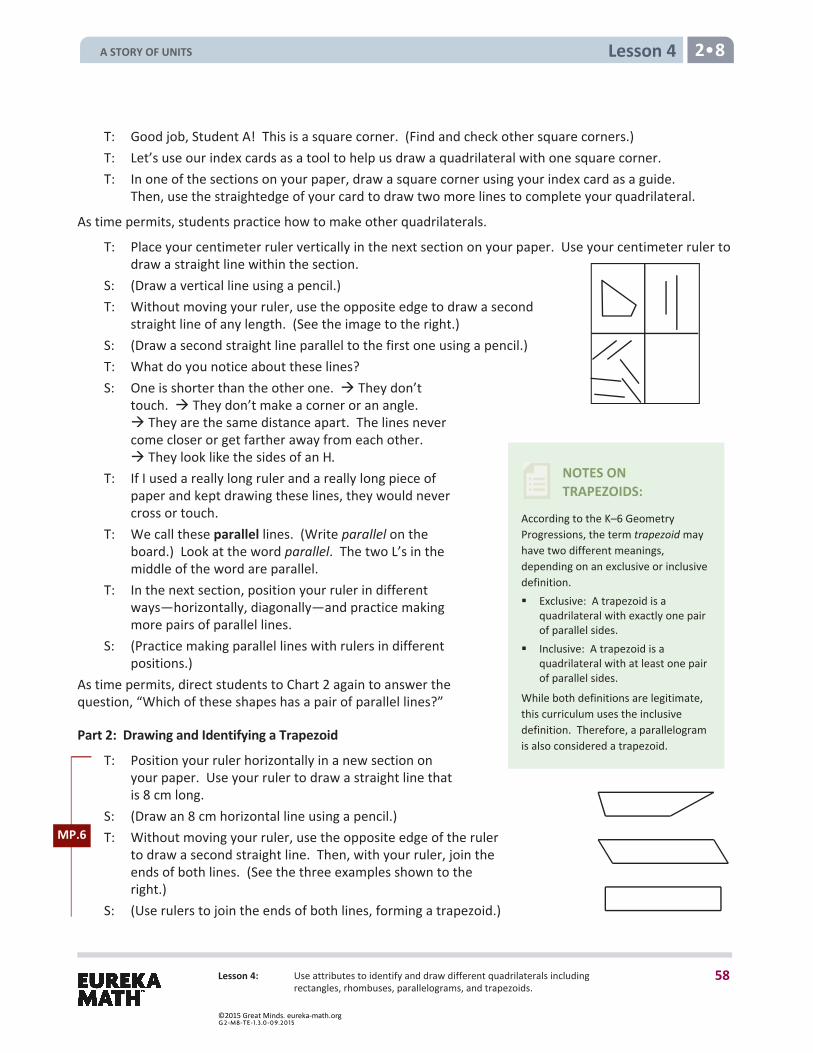
Lesson 4 2 8
Lesson 4: Use attributes to identify and draw different quadrilaterals including rectangles, rhombuses, parallelograms, and trapezoids.
NOTES ON TRAPEZOIDS:
According to the K–6 Geometry Progressions, the term trapezoid may have two different meanings, depending on an exclusive or inclusive definition. Exclusive: A trapezoid is a
quadrilateral with exactly one pair of parallel sides.
Inclusive: A trapezoid is a quadrilateral with at least one pair of parallel sides.
While both definitions are legitimate, this curriculum uses the inclusive definition. Therefore, a parallelogram is also considered a trapezoid.
T: Good job, Student A! This is a square corner. (Find and check other square corners.) T: Let’s use our index cards as a tool to help us draw a quadrilateral with one square corner. T: In one of the sections on your paper, draw a square corner using your index card as a guide.
Then, use the straightedge of your card to draw two more lines to complete your quadrilateral.
As time permits, students practice how to make other quadrilaterals.
T: Place your centimeter ruler vertically in the next section on your paper. Use your centimeter ruler to draw a straight line within the section.
S: (Draw a vertical line using a pencil.) T: Without moving your ruler, use the opposite edge to draw a second
straight line of any length. (See the image to the right.) S: (Draw a second straight line parallel to the first one using a pencil.) T: What do you notice about these lines? S: One is shorter than the other one. They don’t
touch. They don’t make a corner or an angle. They are the same distance apart. The lines never come closer or get farther away from each other. They look like the sides of an H.
T: If I used a really long ruler and a really long piece of paper and kept drawing these lines, they would never cross or touch.
T: We call these parallel lines. (Write parallel on the board.) Look at the word parallel. The two L’s in the middle of the word are parallel.
T: In the next section, position your ruler in different ways—horizontally, diagonally—and practice making more pairs of parallel lines.
S: (Practice making parallel lines with rulers in different positions.)
As time permits, direct students to Chart 2 again to answer the question, “Which of these shapes has a pair of parallel lines?”
Part 2: Drawing and Identifying a Trapezoid
T: Position your ruler horizontally in a new section on your paper. Use your ruler to draw a straight line that is 8 cm long.
S: (Draw an 8 cm horizontal line using a pencil.) T: Without moving your ruler, use the opposite edge of the ruler
to draw a second straight line. Then, with your ruler, join the ends of both lines. (See the three examples shown to the right.)
S: (Use rulers to join the ends of both lines, forming a trapezoid.)
MP.6
A STORY OF UNITS
58
©2015 Great Minds. eureka-math.orgG 2-M8-TE-1.3 .0 -0 9.20 15
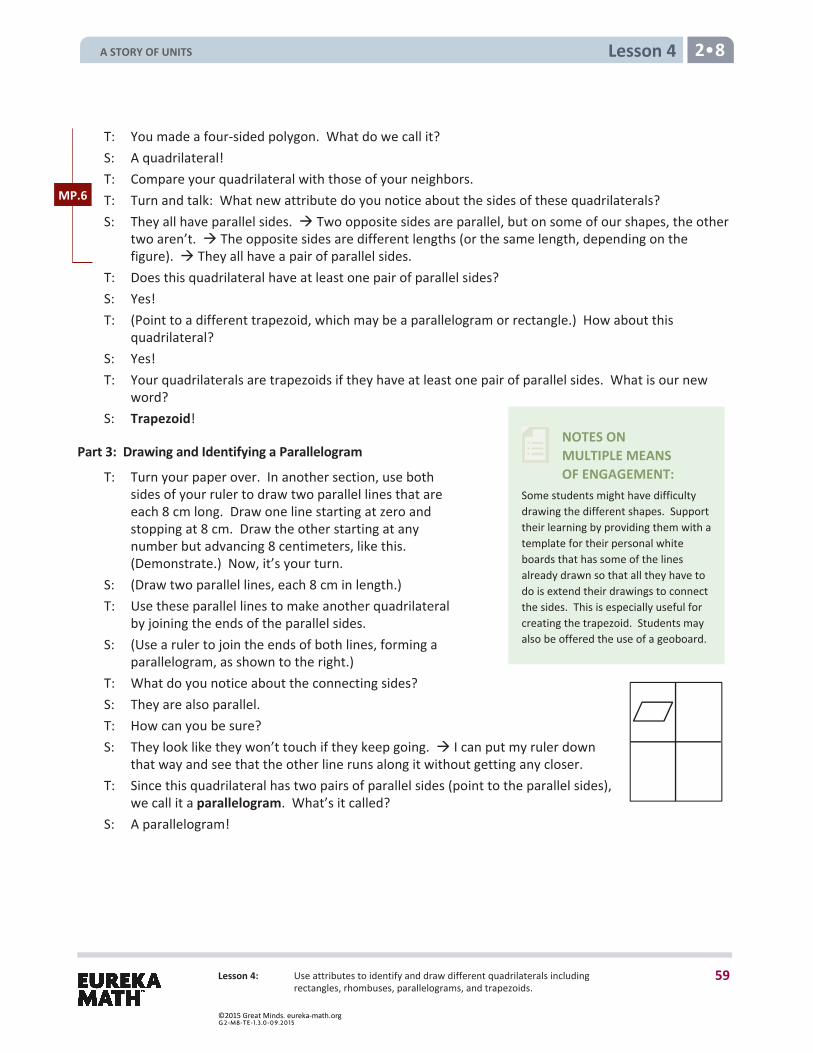
Lesson 4 2 8
Lesson 4: Use attributes to identify and draw different quadrilaterals including rectangles, rhombuses, parallelograms, and trapezoids.
NOTES ON MULTIPLE MEANS OF ENGAGEMENT:
Some students might have difficulty drawing the different shapes. Support their learning by providing them with a template for their personal white boards that has some of the lines already drawn so that all they have to do is extend their drawings to connect the sides. This is especially useful for creating the trapezoid. Students may also be offered the use of a geoboard.
T: You made a four-sided polygon. What do we call it? S: A quadrilateral! T: Compare your quadrilateral with those of your neighbors. T: Turn and talk: What new attribute do you notice about the sides of these quadrilaterals? S: They all have parallel sides. Two opposite sides are parallel, but on some of our shapes, the other
two aren’t. The opposite sides are different lengths (or the same length, depending on the figure). They all have a pair of parallel sides.
T: Does this quadrilateral have at least one pair of parallel sides? S: Yes! T: (Point to a different trapezoid, which may be a parallelogram or rectangle.) How about this
quadrilateral? S: Yes! T: Your quadrilaterals are trapezoids if they have at least one pair of parallel sides. What is our new
word? S: Trapezoid!
Part 3: Drawing and Identifying a Parallelogram
T: Turn your paper over. In another section, use both sides of your ruler to draw two parallel lines that are each 8 cm long. Draw one line starting at zero and stopping at 8 cm. Draw the other starting at any number but advancing 8 centimeters, like this. (Demonstrate.) Now, it’s your turn.
S: (Draw two parallel lines, each 8 cm in length.) T: Use these parallel lines to make another quadrilateral
by joining the ends of the parallel sides. S: (Use a ruler to join the ends of both lines, forming a
parallelogram, as shown to the right.) T: What do you notice about the connecting sides? S: They are also parallel. T: How can you be sure? S: They look like they won’t touch if they keep going. I can put my ruler down
that way and see that the other line runs along it without getting any closer. T: Since this quadrilateral has two pairs of parallel sides (point to the parallel sides),
we call it a parallelogram. What’s it called? S: A parallelogram!
MP.6
A STORY OF UNITS
59
©2015 Great Minds. eureka-math.orgG 2-M8-TE-1.3 .0 -0 9.20 15
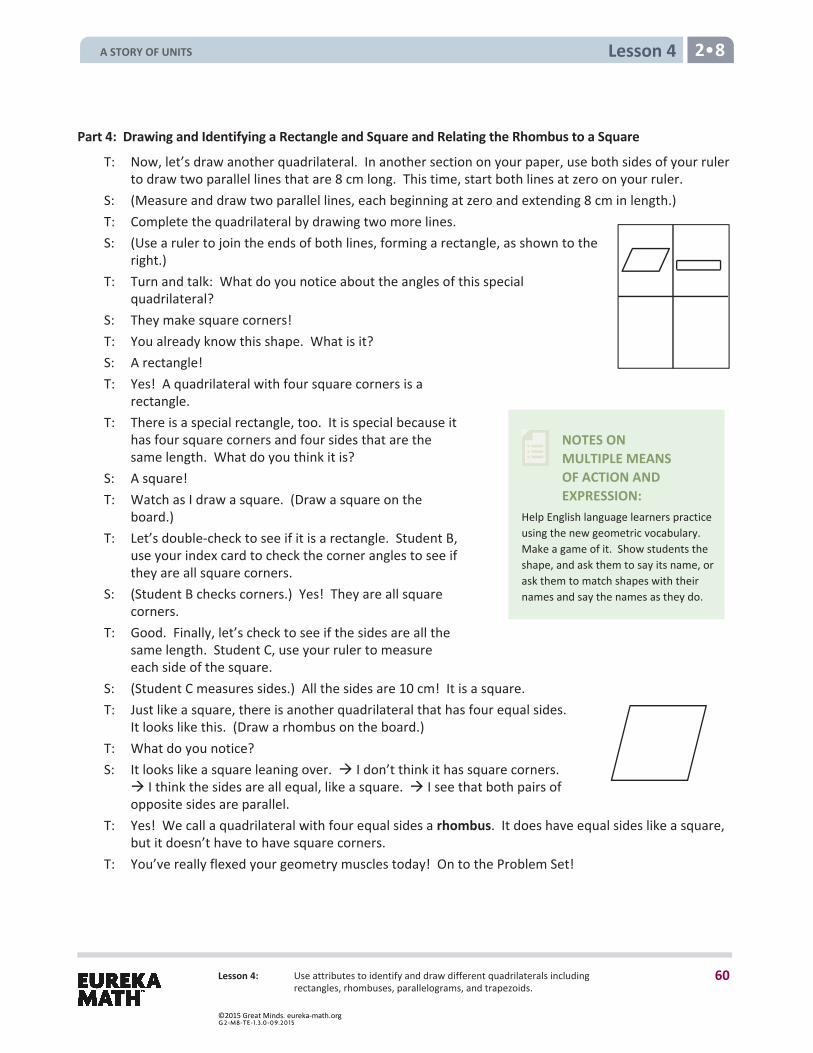
Lesson 4 2 8
Lesson 4: Use attributes to identify and draw different quadrilaterals including rectangles, rhombuses, parallelograms, and trapezoids.
NOTES ON MULTIPLE MEANS OF ACTION AND EXPRESSION:
Help English language learners practice using the new geometric vocabulary. Make a game of it. Show students the shape, and ask them to say its name, or ask them to match shapes with their names and say the names as they do.
Part 4: Drawing and Identifying a Rectangle and Square and Relating the Rhombus to a Square
T: Now, let’s draw another quadrilateral. In another section on your paper, use both sides of your ruler to draw two parallel lines that are 8 cm long. This time, start both lines at zero on your ruler.
S: (Measure and draw two parallel lines, each beginning at zero and extending 8 cm in length.) T: Complete the quadrilateral by drawing two more lines. S: (Use a ruler to join the ends of both lines, forming a rectangle, as shown to the
right.) T: Turn and talk: What do you notice about the angles of this special
quadrilateral? S: They make square corners! T: You already know this shape. What is it? S: A rectangle! T: Yes! A quadrilateral with four square corners is a
rectangle. T: There is a special rectangle, too. It is special because it
has four square corners and four sides that are the same length. What do you think it is?
S: A square! T: Watch as I draw a square. (Draw a square on the
board.) T: Let’s double-check to see if it is a rectangle. Student B,
use your index card to check the corner angles to see if they are all square corners.
S: (Student B checks corners.) Yes! They are all square corners.
T: Good. Finally, let’s check to see if the sides are all the same length. Student C, use your ruler to measure each side of the square.
S: (Student C measures sides.) All the sides are 10 cm! It is a square. T: Just like a square, there is another quadrilateral that has four equal sides.
It looks like this. (Draw a rhombus on the board.) T: What do you notice? S: It looks like a square leaning over. I don’t think it has square corners.
I think the sides are all equal, like a square. I see that both pairs of opposite sides are parallel.
T: Yes! We call a quadrilateral with four equal sides a rhombus. It does have equal sides like a square, but it doesn’t have to have square corners.
T: You’ve really flexed your geometry muscles today! On to the Problem Set!
A STORY OF UNITS
60
©2015 Great Minds. eureka-math.orgG 2-M8-TE-1.3 .0 -0 9.20 15
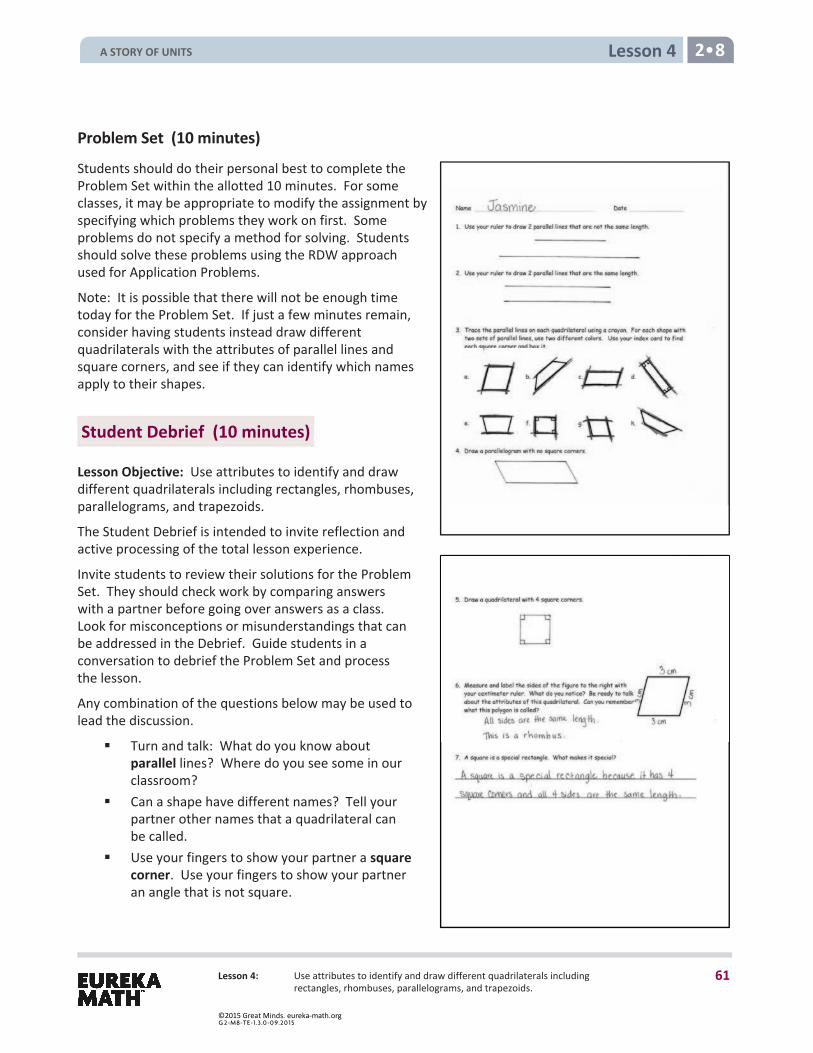
Lesson 4 2 8
Lesson 4: Use attributes to identify and draw different quadrilaterals including rectangles, rhombuses, parallelograms, and trapezoids.
Problem Set (10 minutes)
Students should do their personal best to complete the Problem Set within the allotted 10 minutes. For some classes, it may be appropriate to modify the assignment by specifying which problems they work on first. Some problems do not specify a method for solving. Students should solve these problems using the RDW approach used for Application Problems.
Note: It is possible that there will not be enough time today for the Problem Set. If just a few minutes remain, consider having students instead draw different quadrilaterals with the attributes of parallel lines and square corners, and see if they can identify which names apply to their shapes.
Student Debrief (10 minutes)
Lesson Objective: Use attributes to identify and draw different quadrilaterals including rectangles, rhombuses, parallelograms, and trapezoids.
The Student Debrief is intended to invite reflection and active processing of the total lesson experience.
Invite students to review their solutions for the Problem Set. They should check work by comparing answers with a partner before going over answers as a class. Look for misconceptions or misunderstandings that can be addressed in the Debrief. Guide students in a conversation to debrief the Problem Set and process the lesson.
Any combination of the questions below may be used to lead the discussion.
Turn and talk: What do you know aboutparallel lines? Where do you see some in ourclassroom?
Can a shape have different names? Tell yourpartner other names that a quadrilateral canbe called.
Use your fingers to show your partner a squarecorner. Use your fingers to show your partneran angle that is not square.
A STORY OF UNITS
61
©2015 Great Minds. eureka-math.orgG 2-M8-TE-1.3 .0 -0 9.20 15
Lesson 4 2 8
Lesson 4: Use attributes to identify and draw different quadrilaterals including rectangles, rhombuses, parallelograms, and trapezoids.
What did all the shapes we talked about today have in common? (They all were quadrilaterals, or four-sided polygons, with four sides and four corners or angles.)
Use some of the new vocabulary words you learned today to describe to your partner the attributes of a rectangle. A trapezoid. A parallelogram. A square. A rhombus.
What makes a square a special rectangle? Explain how you know.
Exit Ticket (3 minutes)
After the Student Debrief, instruct students to complete the Exit Ticket. A review of their work will help with assessing students’ understanding of the concepts that were presented in today’s lesson and planning more effectively for future lessons. The questions may be read aloud to the students.
A STORY OF UNITS
62
©2015 Great Minds. eureka-math.orgG 2-M8-TE-1.3 .0 -0 9.20 15
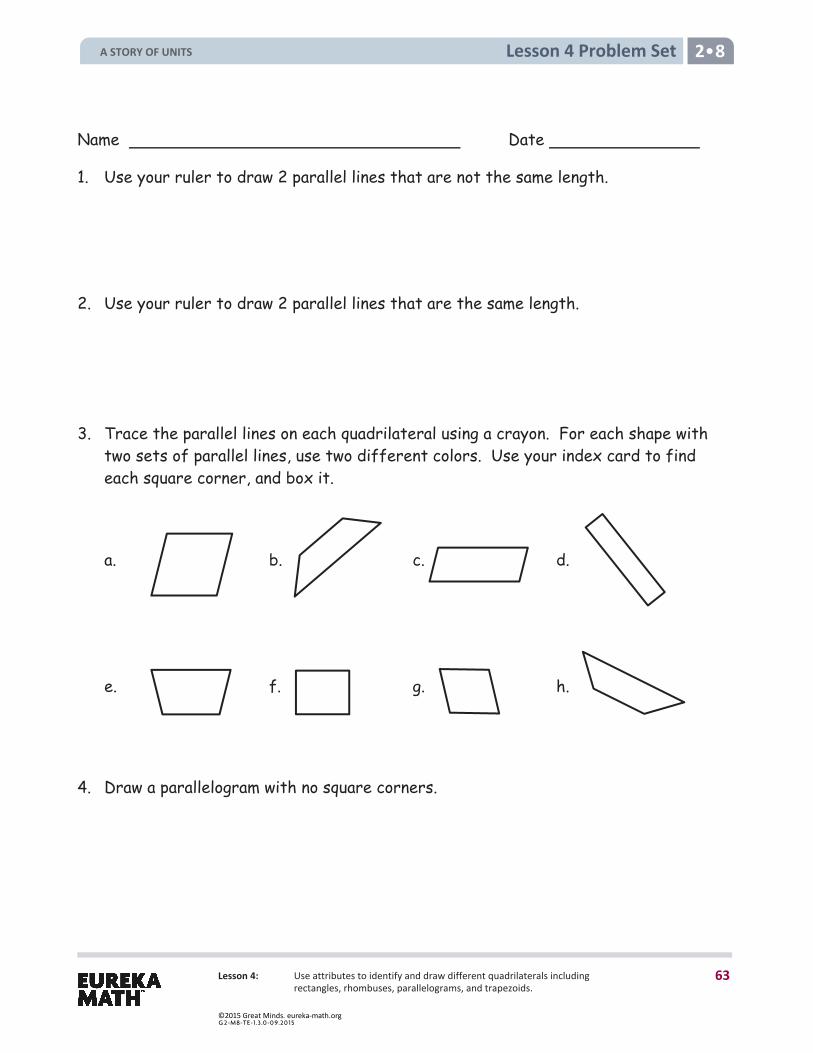
Lesson 4 Problem Set 2 8
Lesson 4: Use attributes to identify and draw different quadrilaterals including rectangles, rhombuses, parallelograms, and trapezoids.
Name Date
1. Use your ruler to draw 2 parallel lines that are not the same length. 2. Use your ruler to draw 2 parallel lines that are the same length.
3. Trace the parallel lines on each quadrilateral using a crayon. For each shape with two sets of parallel lines, use two different colors. Use your index card to find each square corner, and box it.
a. b. c. d.
e. f. g. h.
4. Draw a parallelogram with no square corners.
A STORY OF UNITS
63
©2015 Great Minds. eureka-math.orgG 2-M8-TE-1.3 .0 -0 9.20 15
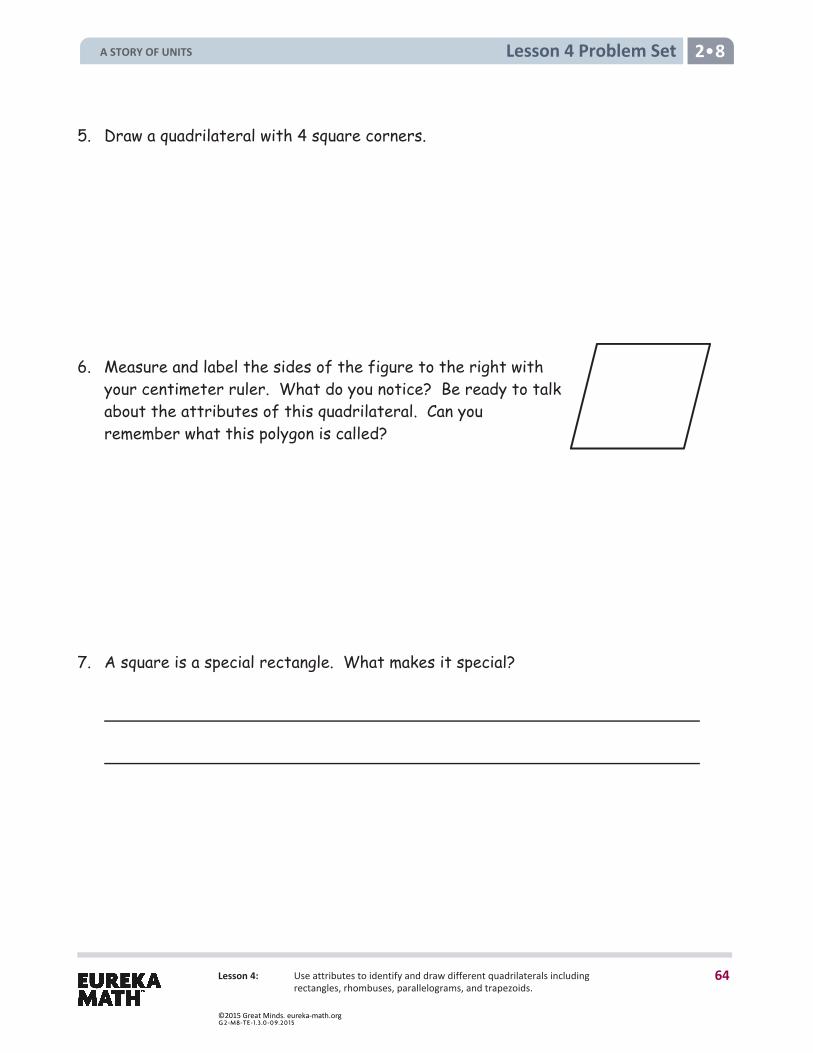
Lesson 4 Problem Set 2 8
Lesson 4: Use attributes to identify and draw different quadrilaterals including rectangles, rhombuses, parallelograms, and trapezoids.
5. Draw a quadrilateral with 4 square corners.
6. Measure and label the sides of the figure to the right with your centimeter ruler. What do you notice? Be ready to talk about the attributes of this quadrilateral. Can you remember what this polygon is called?
7. A square is a special rectangle. What makes it special?
A STORY OF UNITS
64
©2015 Great Minds. eureka-math.orgG 2-M8-TE-1.3 .0 -0 9.20 15

Lesson 4: Use attributes to identify and draw different quadrilaterals including rectangles, rhombuses, parallelograms, and trapezoids.
Lesson 4 Exit Ticket 2 8
Name Date
Use crayons to trace the parallel sides on each quadrilateral. Use your index card to find each square corner, and box it.
1. 2. 3. 4.
A STORY OF UNITS
65
©2015 Great Minds. eureka-math.orgG 2-M8-TE-1.3 .0 -0 9.20 15
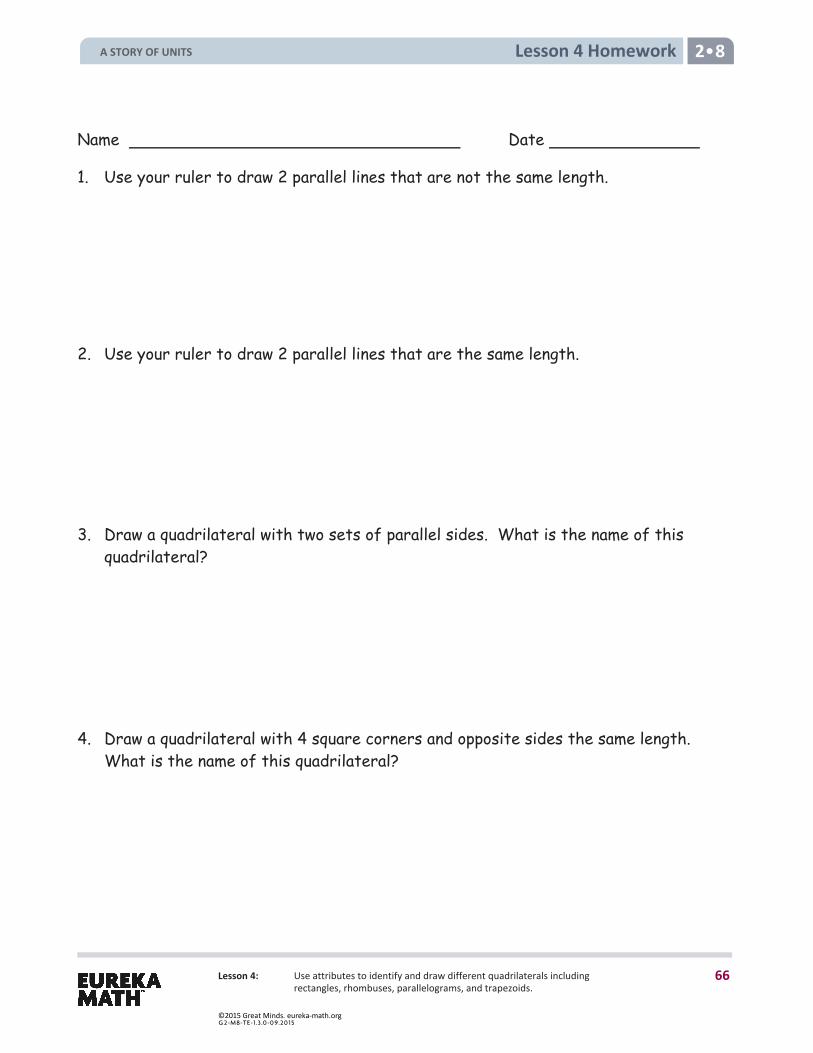
Lesson 4: Use attributes to identify and draw different quadrilaterals including rectangles, rhombuses, parallelograms, and trapezoids.
Lesson 4 Homework 2 8
Name Date
1. Use your ruler to draw 2 parallel lines that are not the same length. 2. Use your ruler to draw 2 parallel lines that are the same length.
3. Draw a quadrilateral with two sets of parallel sides. What is the name of this quadrilateral?
4. Draw a quadrilateral with 4 square corners and opposite sides the same length. What is the name of this quadrilateral?
A STORY OF UNITS
66
©2015 Great Minds. eureka-math.orgG 2-M8-TE-1.3 .0 -0 9.20 15
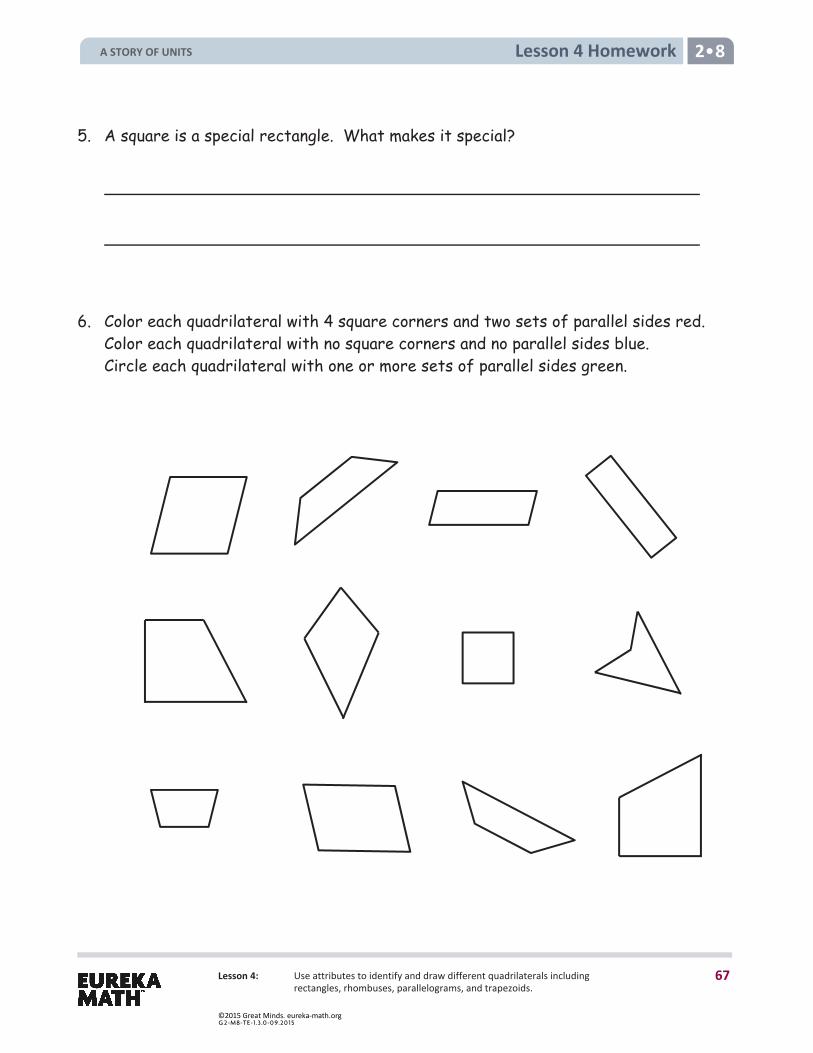
Lesson 4: Use attributes to identify and draw different quadrilaterals including rectangles, rhombuses, parallelograms, and trapezoids.
Lesson 4 Homework 2 8
5. A square is a special rectangle. What makes it special?
6. Color each quadrilateral with 4 square corners and two sets of parallel sides red. Color each quadrilateral with no square corners and no parallel sides blue. Circle each quadrilateral with one or more sets of parallel sides green.
A STORY OF UNITS
67
©2015 Great Minds. eureka-math.orgG 2-M8-TE-1.3 .0 -0 9.20 15
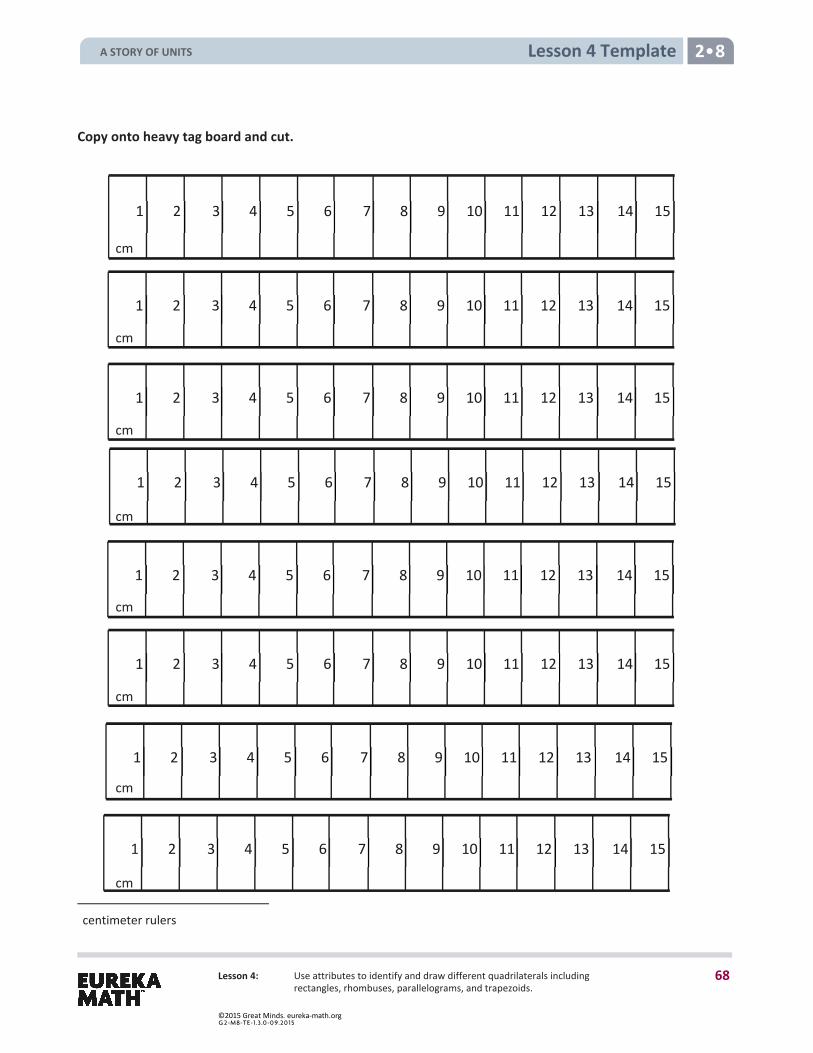
Lesson 4: Use attributes to identify and draw different quadrilaterals including rectangles, rhombuses, parallelograms, and trapezoids.
Lesson 4 Template 2 8
Copy onto heavy tag board and cut.
centimeter rulers
15 14 13 1211109876 5 4 3 2 1
15 14 131211109876 5 4 3 2 1
15 14 131211109876 5 4 3 2 1
15 14 131211109876 5 4 3 2 1
15 14 131211109876 5 4 3 2 1
cm
cm
cm
cm
15 14 131211109876 5 4 3 2 1
15 14 131211109876 5 4 3 2 1
15 14 131211109876 5 4 3 2 1
cm
cm
cm
cm
A STORY OF UNITS
68
©2015 Great Minds. eureka-math.orgG 2-M8-TE-1.3 .0 -0 9.20 15
Lesson 5 2 8
Lesson 5: Relate the square to the cube, and describe the cube based on attributes.
Lesson 5 Objective: Relate the square to the cube, and describe the cube based on attributes.
Suggested Lesson Structure
Fluency Practice (12 minutes) Application Problem (7 minutes) Concept Development (31 minutes) Student Debrief (10 minutes)
Total Time (60 minutes)
Fluency Practice (12 minutes)
Rename for the Smaller Unit 2.NBT.1 (3 minutes) Sprint: Subtraction Patterns 2.OA.2, 2.NBT.5 (9 minutes)
Rename for the Smaller Unit (3 minutes)
Note: This fluency activity reviews using place value understanding to rename units in preparation for subtraction with chips and the algorithm during Fluency Practice in Lessons 7 and 8.
T: (Write 1 hundred = tens.) T: I’m going to give you a number in unit form. I want you to rename 1 of the hundreds for 10 tens and
then tell me how many hundreds, tens, or ones. Ready? T: Say the number sentence. S: 1 hundred = 10 tens. T: (Write 1 hundred 1 ten = tens.) Say the number sentence. S: 1 hundred 1 ten = 11 tens. T: (Write 2 hundreds = 1 hundred tens.) Say the number sentence. S: 2 hundreds = 1 hundred 10 tens. T: (Write 2 hundreds 1 ten = 1 hundred tens.) Say the number sentence. S: 2 hundreds 1 ten = 1 hundred 11 tens. T: (Write 2 hundreds = 1 hundred 9 tens ones.) Say the number sentence. S: 2 hundreds = 1 hundred, 9 tens, 10 ones.
Continue with the following possible sequence: 1 hundred 3 tens; 2 hundreds 3 tens; 3 hundreds 4 tens; and 5 hundreds 7 tens.
A STORY OF UNITS
69
©2015 Great Minds. eureka-math.orgG 2-M8-TE-1.3 .0 -0 9.20 15
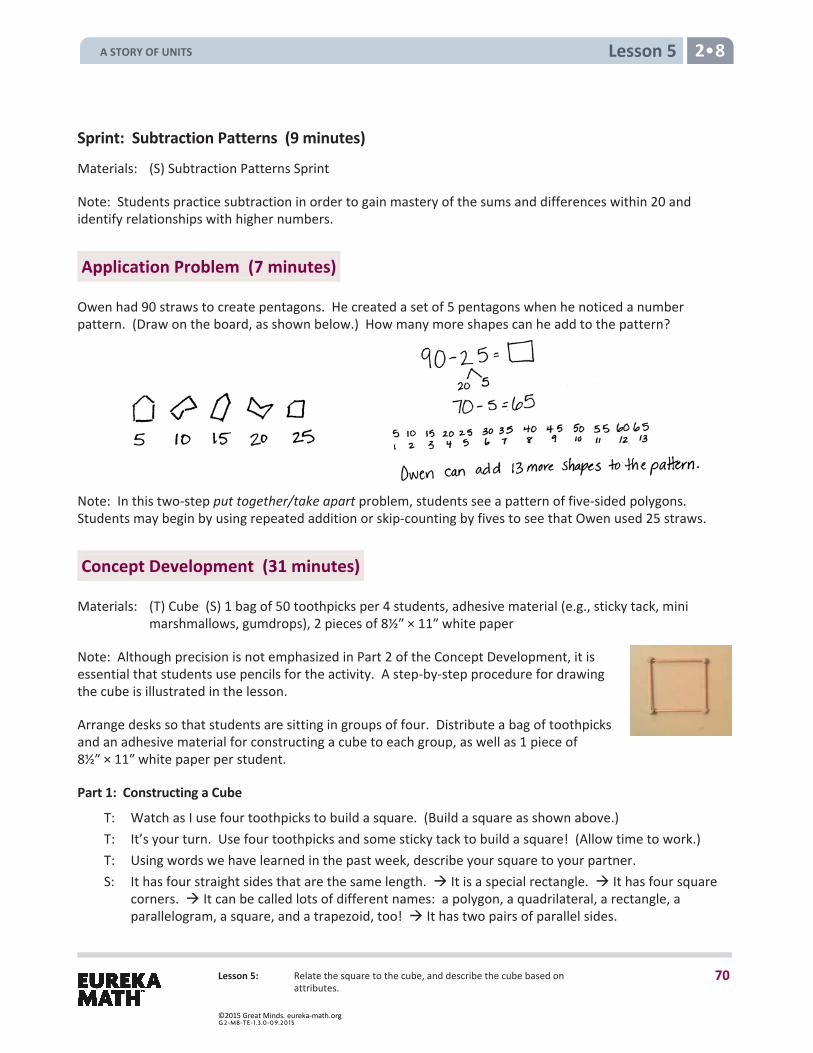
Lesson 5 2 8
Lesson 5: Relate the square to the cube, and describe the cube based on attributes.
Sprint: Subtraction Patterns (9 minutes)
Materials: (S) Subtraction Patterns Sprint
Note: Students practice subtraction in order to gain mastery of the sums and differences within 20 and identify relationships with higher numbers.
Application Problem (7 minutes)
Owen had 90 straws to create pentagons. He created a set of 5 pentagons when he noticed a number pattern. (Draw on the board, as shown below.) How many more shapes can he add to the pattern?
Note: In this two-step put together/take apart problem, students see a pattern of five-sided polygons. Students may begin by using repeated addition or skip-counting by fives to see that Owen used 25 straws.
Concept Development (31 minutes)
Materials: (T) Cube (S) 1 bag of 50 toothpicks per 4 students, adhesive material (e.g., sticky tack, mini marshmallows, gumdrops), 2 pieces of 8½″ × 11″ white paper
Note: Although precision is not emphasized in Part 2 of the Concept Development, it is essential that students use pencils for the activity. A step-by-step procedure for drawing the cube is illustrated in the lesson.
Arrange desks so that students are sitting in groups of four. Distribute a bag of toothpicks and an adhesive material for constructing a cube to each group, as well as 1 piece of 8½″ × 11″ white paper per student.
Part 1: Constructing a Cube
T: Watch as I use four toothpicks to build a square. (Build a square as shown above.) T: It’s your turn. Use four toothpicks and some sticky tack to build a square! (Allow time to work.) T: Using words we have learned in the past week, describe your square to your partner. S: It has four straight sides that are the same length. It is a special rectangle. It has four square
corners. It can be called lots of different names: a polygon, a quadrilateral, a rectangle, a parallelogram, a square, and a trapezoid, too! It has two pairs of parallel sides.
A STORY OF UNITS
70
©2015 Great Minds. eureka-math.orgG 2-M8-TE-1.3 .0 -0 9.20 15
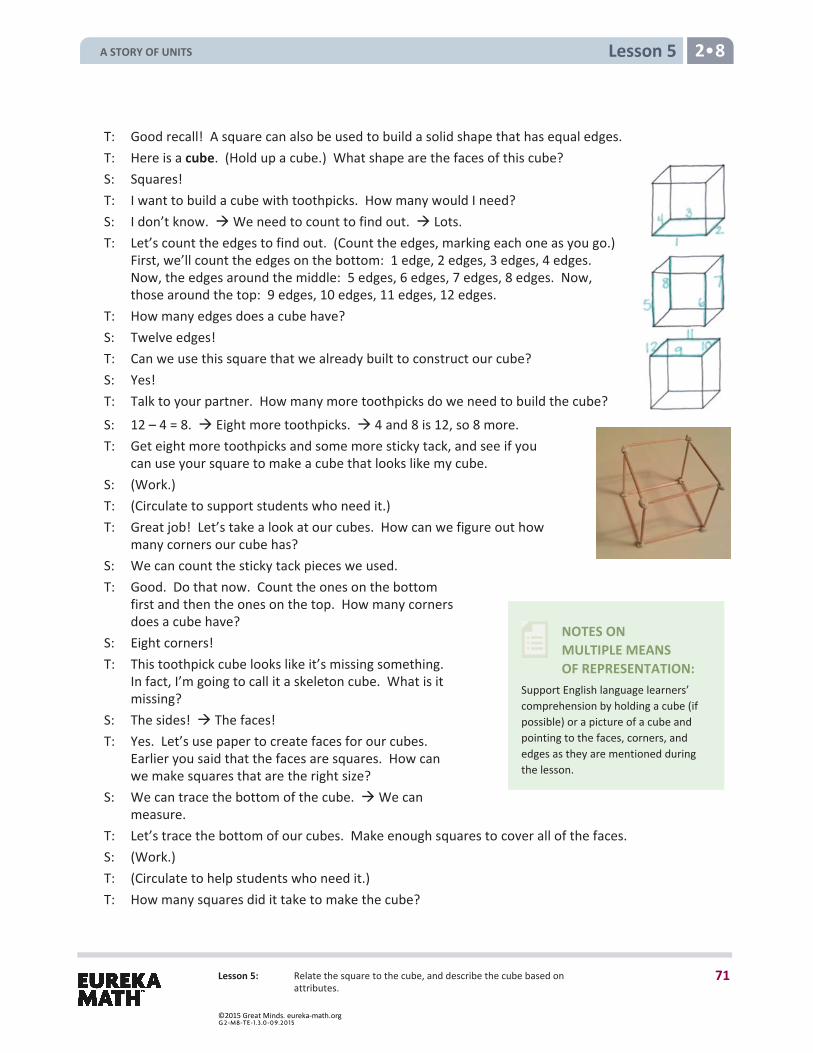
Lesson 5 2 8
Lesson 5: Relate the square to the cube, and describe the cube based on attributes.
NOTES ON MULTIPLE MEANS OF REPRESENTATION:
Support English language learners’ comprehension by holding a cube (if possible) or a picture of a cube and pointing to the faces, corners, and edges as they are mentioned during the lesson.
T: Good recall! A square can also be used to build a solid shape that has equal edges. T: Here is a cube. (Hold up a cube.) What shape are the faces of this cube? S: Squares! T: I want to build a cube with toothpicks. How many would I need? S: I don’t know. We need to count to find out. Lots. T: Let’s count the edges to find out. (Count the edges, marking each one as you go.)
First, we’ll count the edges on the bottom: 1 edge, 2 edges, 3 edges, 4 edges. Now, the edges around the middle: 5 edges, 6 edges, 7 edges, 8 edges. Now, those around the top: 9 edges, 10 edges, 11 edges, 12 edges.
T: How many edges does a cube have? S: Twelve edges! T: Can we use this square that we already built to construct our cube? S: Yes! T: Talk to your partner. How many more toothpicks do we need to build the cube? S: 12 – 4 = 8. Eight more toothpicks. 4 and 8 is 12, so 8 more. T: Get eight more toothpicks and some more sticky tack, and see if you
can use your square to make a cube that looks like my cube. S: (Work.) T: (Circulate to support students who need it.) T: Great job! Let’s take a look at our cubes. How can we figure out how
many corners our cube has? S: We can count the sticky tack pieces we used. T: Good. Do that now. Count the ones on the bottom
first and then the ones on the top. How many corners does a cube have?
S: Eight corners! T: This toothpick cube looks like it’s missing something.
In fact, I’m going to call it a skeleton cube. What is it missing?
S: The sides! The faces! T: Yes. Let’s use paper to create faces for our cubes.
Earlier you said that the faces are squares. How can we make squares that are the right size?
S: We can trace the bottom of the cube. We can measure.
T: Let’s trace the bottom of our cubes. Make enough squares to cover all of the faces. S: (Work.) T: (Circulate to help students who need it.) T: How many squares did it take to make the cube?
A STORY OF UNITS
71
©2015 Great Minds. eureka-math.orgG 2-M8-TE-1.3 .0 -0 9.20 15
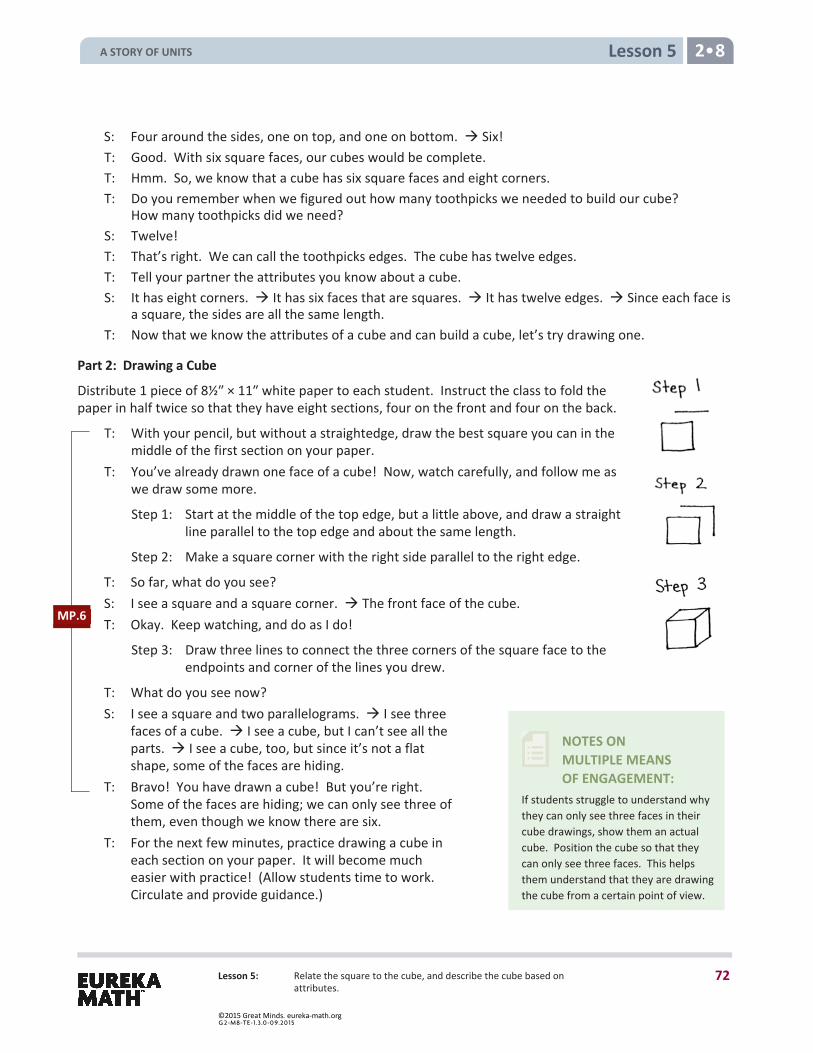
Lesson 5 2 8
Lesson 5: Relate the square to the cube, and describe the cube based on attributes.
NOTES ON MULTIPLE MEANS OF ENGAGEMENT:
If students struggle to understand why they can only see three faces in their cube drawings, show them an actual cube. Position the cube so that they can only see three faces. This helps them understand that they are drawing the cube from a certain point of view.
S: Four around the sides, one on top, and one on bottom. Six! T: Good. With six square faces, our cubes would be complete. T: Hmm. So, we know that a cube has six square faces and eight corners. T: Do you remember when we figured out how many toothpicks we needed to build our cube?
How many toothpicks did we need? S: Twelve! T: That’s right. We can call the toothpicks edges. The cube has twelve edges. T: Tell your partner the attributes you know about a cube. S: It has eight corners. It has six faces that are squares. It has twelve edges. Since each face is
a square, the sides are all the same length. T: Now that we know the attributes of a cube and can build a cube, let’s try drawing one.
Part 2: Drawing a Cube
Distribute 1 piece of 8½″ × 11″ white paper to each student. Instruct the class to fold the paper in half twice so that they have eight sections, four on the front and four on the back.
T: With your pencil, but without a straightedge, draw the best square you can in the middle of the first section on your paper.
T: You’ve already drawn one face of a cube! Now, watch carefully, and follow me as we draw some more.
Step 1: Start at the middle of the top edge, but a little above, and draw a straight line parallel to the top edge and about the same length.
Step 2: Make a square corner with the right side parallel to the right edge.
T: So far, what do you see? S: I see a square and a square corner. The front face of the cube. T: Okay. Keep watching, and do as I do!
Step 3: Draw three lines to connect the three corners of the square face to the endpoints and corner of the lines you drew.
T: What do you see now? S: I see a square and two parallelograms. I see three
faces of a cube. I see a cube, but I can’t see all the parts. I see a cube, too, but since it’s not a flat shape, some of the faces are hiding.
T: Bravo! You have drawn a cube! But you’re right. Some of the faces are hiding; we can only see three of them, even though we know there are six.
T: For the next few minutes, practice drawing a cube in each section on your paper. It will become much easier with practice! (Allow students time to work. Circulate and provide guidance.)
MP.6
A STORY OF UNITS
72
©2015 Great Minds. eureka-math.orgG 2-M8-TE-1.3 .0 -0 9.20 15
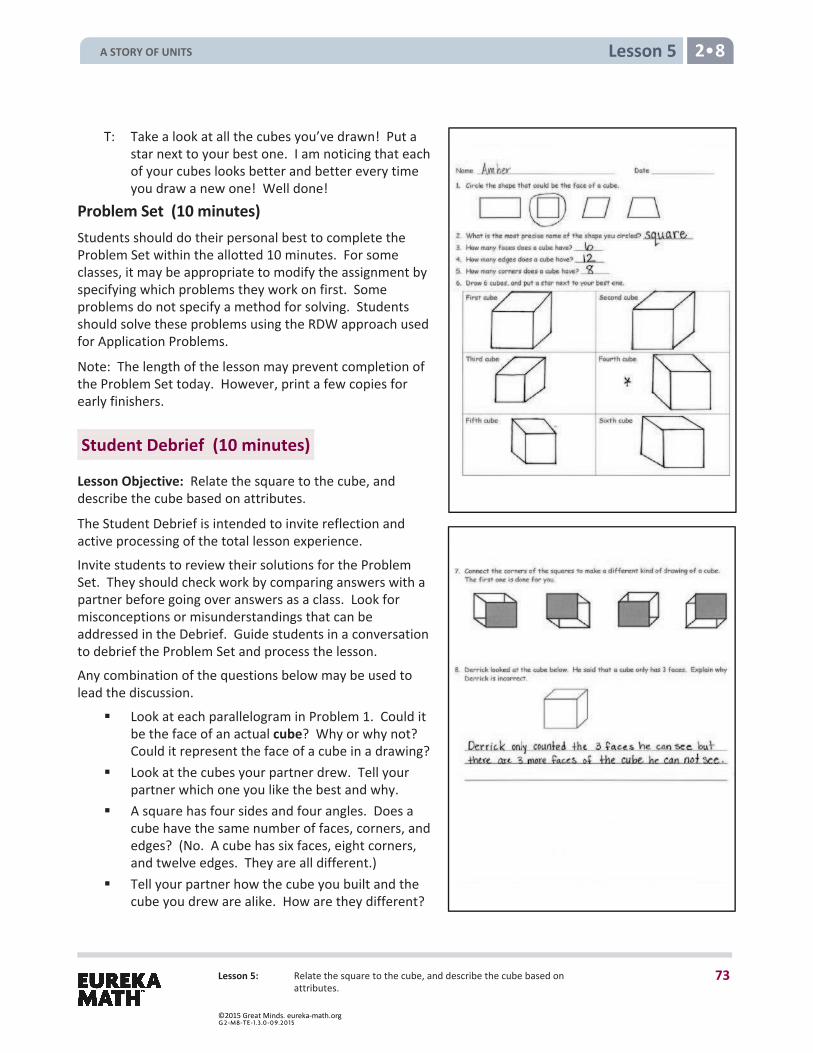
Lesson 5 2 8
Lesson 5: Relate the square to the cube, and describe the cube based on attributes.
T: Take a look at all the cubes you’ve drawn! Put a star next to your best one. I am noticing that each of your cubes looks better and better every time you draw a new one! Well done!
Problem Set (10 minutes) Students should do their personal best to complete the Problem Set within the allotted 10 minutes. For some classes, it may be appropriate to modify the assignment by specifying which problems they work on first. Some problems do not specify a method for solving. Students should solve these problems using the RDW approach used for Application Problems.
Note: The length of the lesson may prevent completion of the Problem Set today. However, print a few copies for early finishers.
Student Debrief (10 minutes)
Lesson Objective: Relate the square to the cube, and describe the cube based on attributes.
The Student Debrief is intended to invite reflection and active processing of the total lesson experience. Invite students to review their solutions for the Problem Set. They should check work by comparing answers with a partner before going over answers as a class. Look for misconceptions or misunderstandings that can be addressed in the Debrief. Guide students in a conversation to debrief the Problem Set and process the lesson. Any combination of the questions below may be used to lead the discussion.
Look at each parallelogram in Problem 1. Could itbe the face of an actual cube? Why or why not?Could it represent the face of a cube in a drawing?
Look at the cubes your partner drew. Tell yourpartner which one you like the best and why.
A square has four sides and four angles. Does acube have the same number of faces, corners, andedges? (No. A cube has six faces, eight corners,and twelve edges. They are all different.)
Tell your partner how the cube you built and thecube you drew are alike. How are they different?
A STORY OF UNITS
73
©2015 Great Minds. eureka-math.orgG 2-M8-TE-1.3 .0 -0 9.20 15
Lesson 5 2 8
Lesson 5: Relate the square to the cube, and describe the cube based on attributes.
Was it easier to count and see the faces, corners, and edges on the toothpick cube or on the one you drew? Why?
Exit Ticket (3 minutes)
After the Student Debrief, instruct students to complete the Exit Ticket. A review of their work will help with assessing students’ understanding of the concepts that were presented in today’s lesson and planning more effectively for future lessons. The questions may be read aloud to the students.
A STORY OF UNITS
74
©2015 Great Minds. eureka-math.orgG 2-M8-TE-1.3 .0 -0 9.20 15
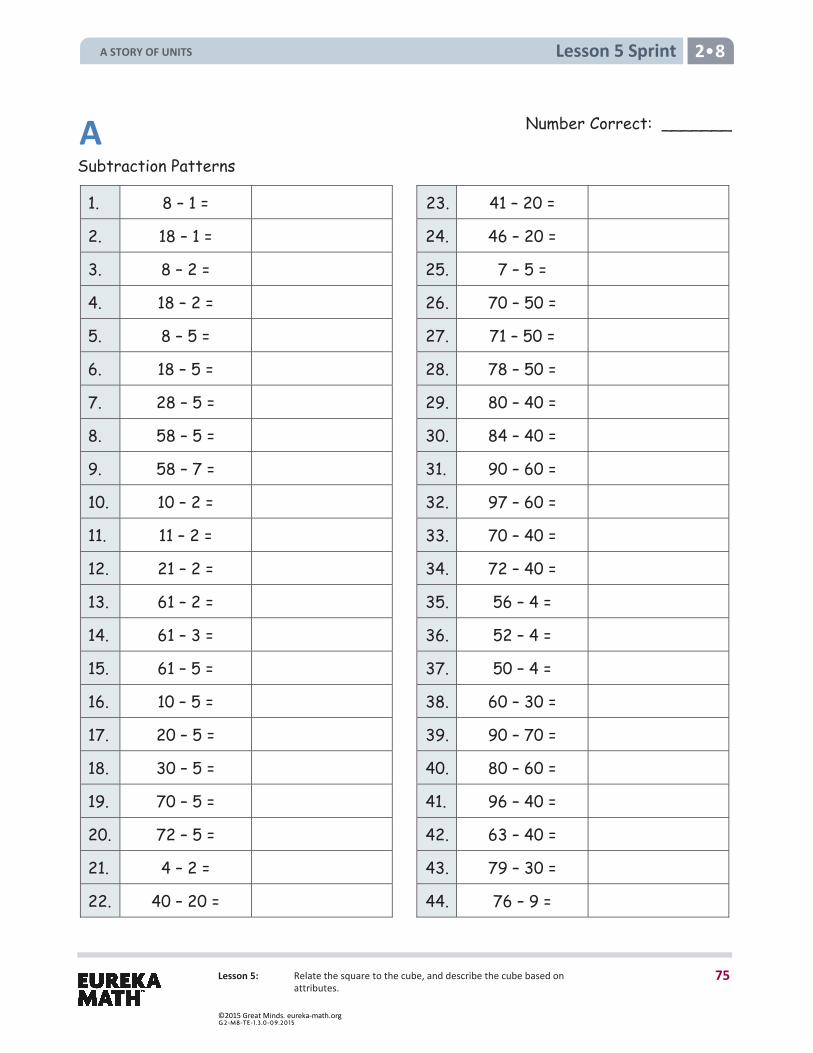
Lesson 5 Sprint 2 8
Lesson 5: Relate the square to the cube, and describe the cube based on attributes.
Subtraction Patterns
1. 8 – 1 = 23. 41 – 20 =
2. 18 – 1 = 24. 46 – 20 =
3. 8 – 2 = 25. 7 – 5 =
4. 18 – 2 = 26. 70 – 50 =
5. 8 – 5 = 27. 71 – 50 =
6. 18 – 5 = 28. 78 – 50 =
7. 28 – 5 = 29. 80 – 40 =
8. 58 – 5 = 30. 84 – 40 =
9. 58 – 7 = 31. 90 – 60 =
10. 10 – 2 = 32. 97 – 60 =
11. 11 – 2 = 33. 70 – 40 =
12. 21 – 2 = 34. 72 – 40 =
13. 61 – 2 = 35. 56 – 4 =
14. 61 – 3 = 36. 52 – 4 =
15. 61 – 5 = 37. 50 – 4 =
16. 10 – 5 = 38. 60 – 30 =
17. 20 – 5 = 39. 90 – 70 =
18. 30 – 5 = 40. 80 – 60 =
19. 70 – 5 = 41. 96 – 40 =
20. 72 – 5 = 42. 63 – 40 =
21. 4 – 2 = 43. 79 – 30 =
22. 40 – 20 = 44. 76 – 9 =
A Number Correct: _______
A STORY OF UNITS
75
©2015 Great Minds. eureka-math.orgG 2-M8-TE-1.3 .0 -0 9.20 15
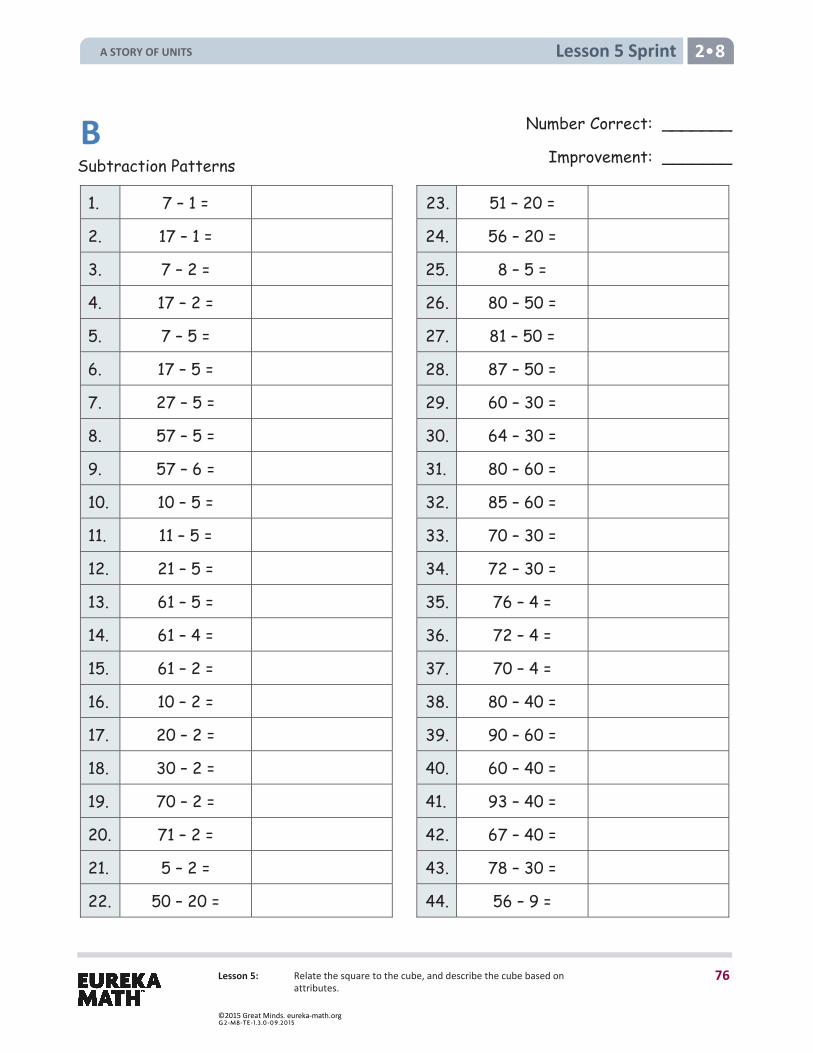
Lesson 5 Sprint 2 8
Lesson 5: Relate the square to the cube, and describe the cube based on attributes.
Subtraction Patterns
1. 7 – 1 = 23. 51 – 20 = 2. 17 – 1 = 24. 56 – 20 = 3. 7 – 2 = 25. 8 – 5 = 4. 17 – 2 = 26. 80 – 50 = 5. 7 – 5 = 27. 81 – 50 = 6. 17 – 5 = 28. 87 – 50 = 7. 27 – 5 = 29. 60 – 30 = 8. 57 – 5 = 30. 64 – 30 = 9. 57 – 6 = 31. 80 – 60 = 10. 10 – 5 = 32. 85 – 60 = 11. 11 – 5 = 33. 70 – 30 = 12. 21 – 5 = 34. 72 – 30 = 13. 61 – 5 = 35. 76 – 4 = 14. 61 – 4 = 36. 72 – 4 = 15. 61 – 2 = 37. 70 – 4 = 16. 10 – 2 = 38. 80 – 40 = 17. 20 – 2 = 39. 90 – 60 = 18. 30 – 2 = 40. 60 – 40 = 19. 70 – 2 = 41. 93 – 40 = 20. 71 – 2 = 42. 67 – 40 = 21. 5 – 2 = 43. 78 – 30 = 22. 50 – 20 = 44. 56 – 9 =
B Number Correct: _______
Improvement: _______
A STORY OF UNITS
76
©2015 Great Minds. eureka-math.orgG 2-M8-TE-1.3 .0 -0 9.20 15
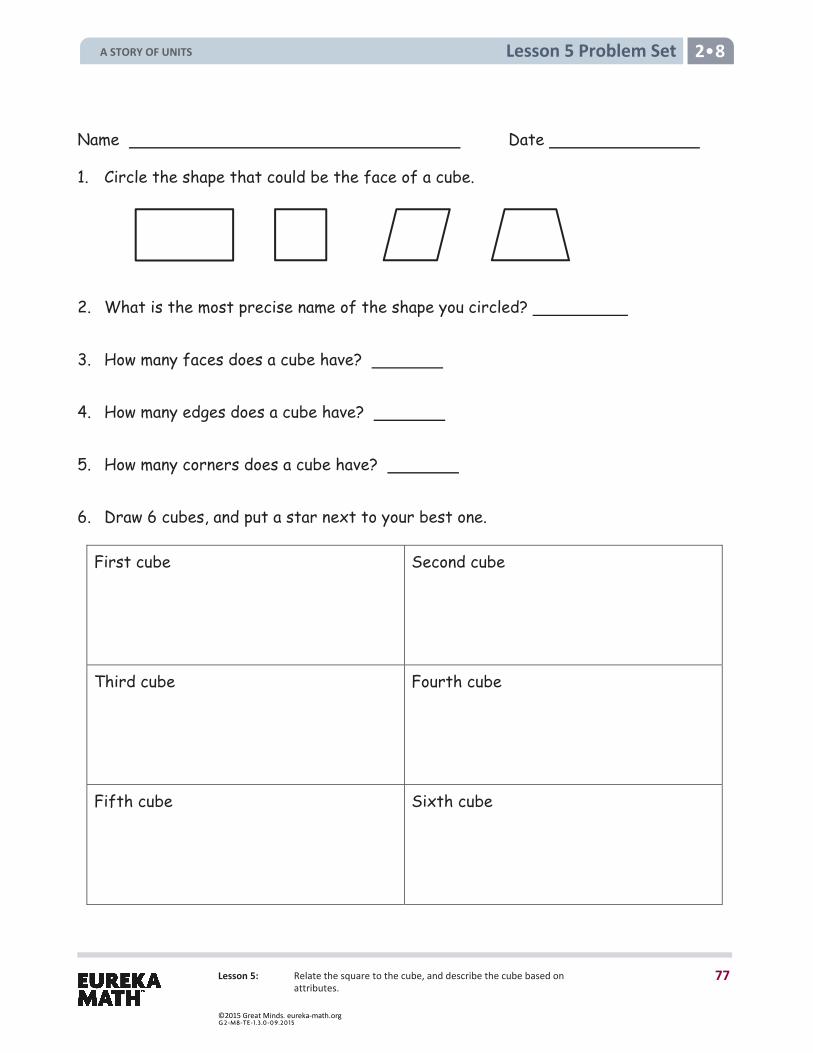
Lesson 5 Problem Set 2 8
Lesson 5: Relate the square to the cube, and describe the cube based on attributes.
Name Date
1. Circle the shape that could be the face of a cube.
2. What is the most precise name of the shape you circled?
3. How many faces does a cube have?
4. How many edges does a cube have?
5. How many corners does a cube have?
6. Draw 6 cubes, and put a star next to your best one.
First cube
Second cube
Third cube
Fourth cube
Fifth cube
Sixth cube
A STORY OF UNITS
77
©2015 Great Minds. eureka-math.orgG 2-M8-TE-1.3 .0 -0 9.20 15
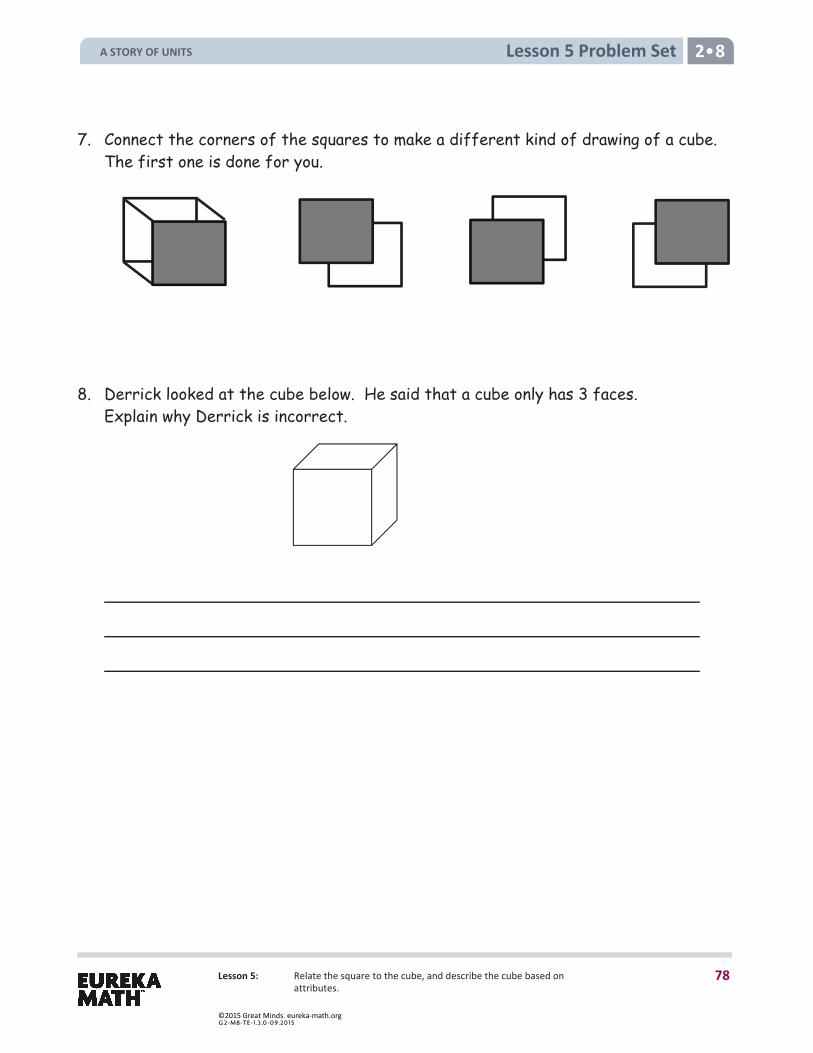
Lesson 5 Problem Set 2 8
Lesson 5: Relate the square to the cube, and describe the cube based on attributes.
7. Connect the corners of the squares to make a different kind of drawing of a cube. The first one is done for you.
8. Derrick looked at the cube below. He said that a cube only has 3 faces. Explain why Derrick is incorrect.
A STORY OF UNITS
78
©2015 Great Minds. eureka-math.orgG 2-M8-TE-1.3 .0 -0 9.20 15
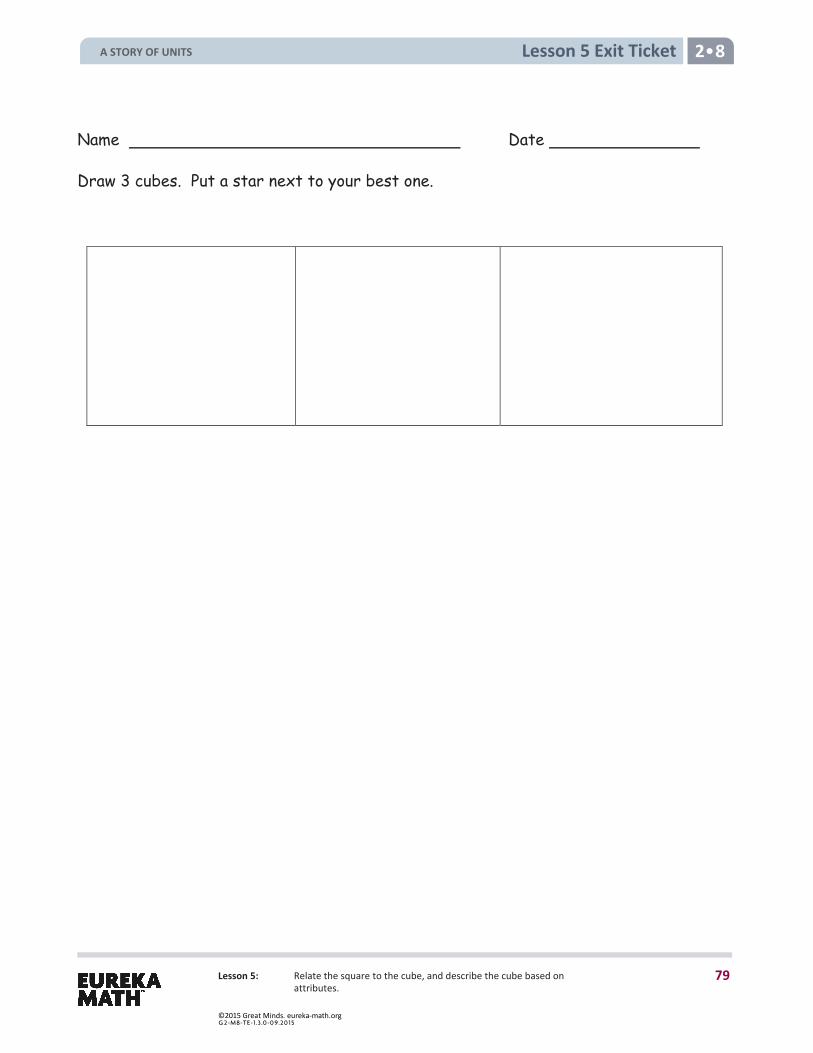
Lesson 5 Exit Ticket 2 8
Lesson 5: Relate the square to the cube, and describe the cube based on attributes.
Name Date
Draw 3 cubes. Put a star next to your best one.
A STORY OF UNITS
79
©2015 Great Minds. eureka-math.orgG 2-M8-TE-1.3 .0 -0 9.20 15
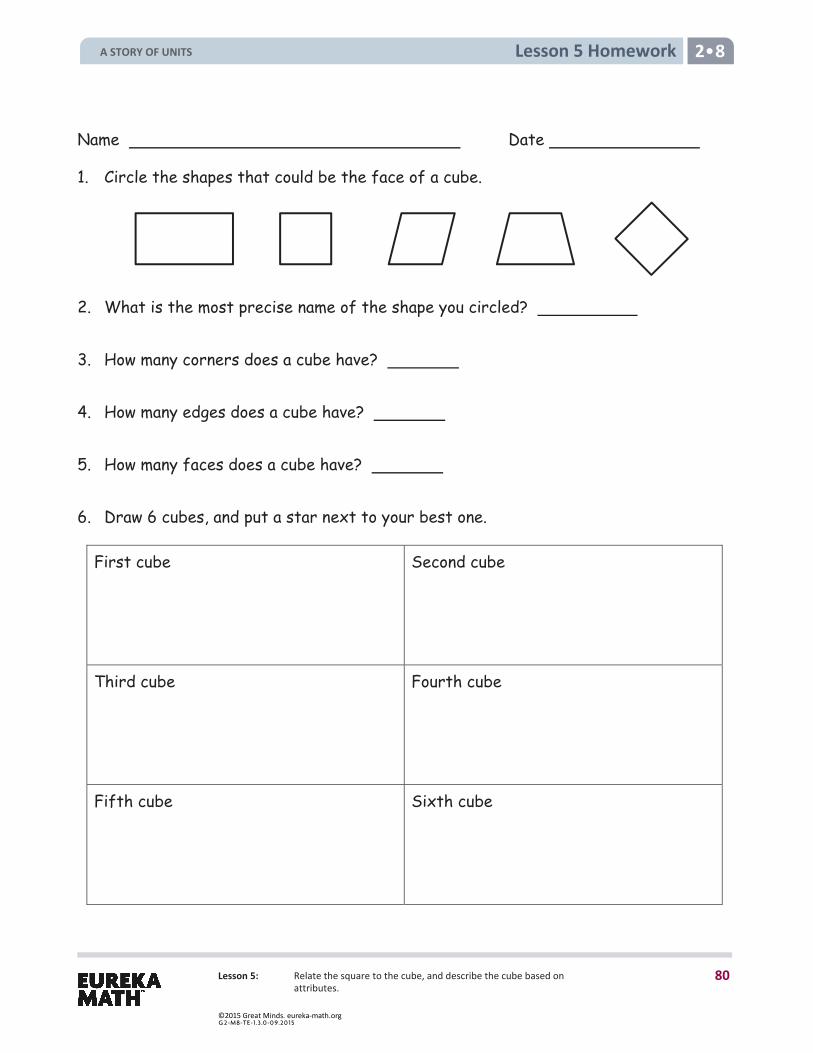
Lesson 5: Relate the square to the cube, and describe the cube based on attributes.
Lesson 5 Homework 2 8
Name Date
1. Circle the shapes that could be the face of a cube.
2. What is the most precise name of the shape you circled?
3. How many corners does a cube have?
4. How many edges does a cube have?
5. How many faces does a cube have?
6. Draw 6 cubes, and put a star next to your best one.
First cube
Second cube
Third cube
Fourth cube
Fifth cube
Sixth cube
A STORY OF UNITS
80
©2015 Great Minds. eureka-math.orgG 2-M8-TE-1.3 .0 -0 9.20 15
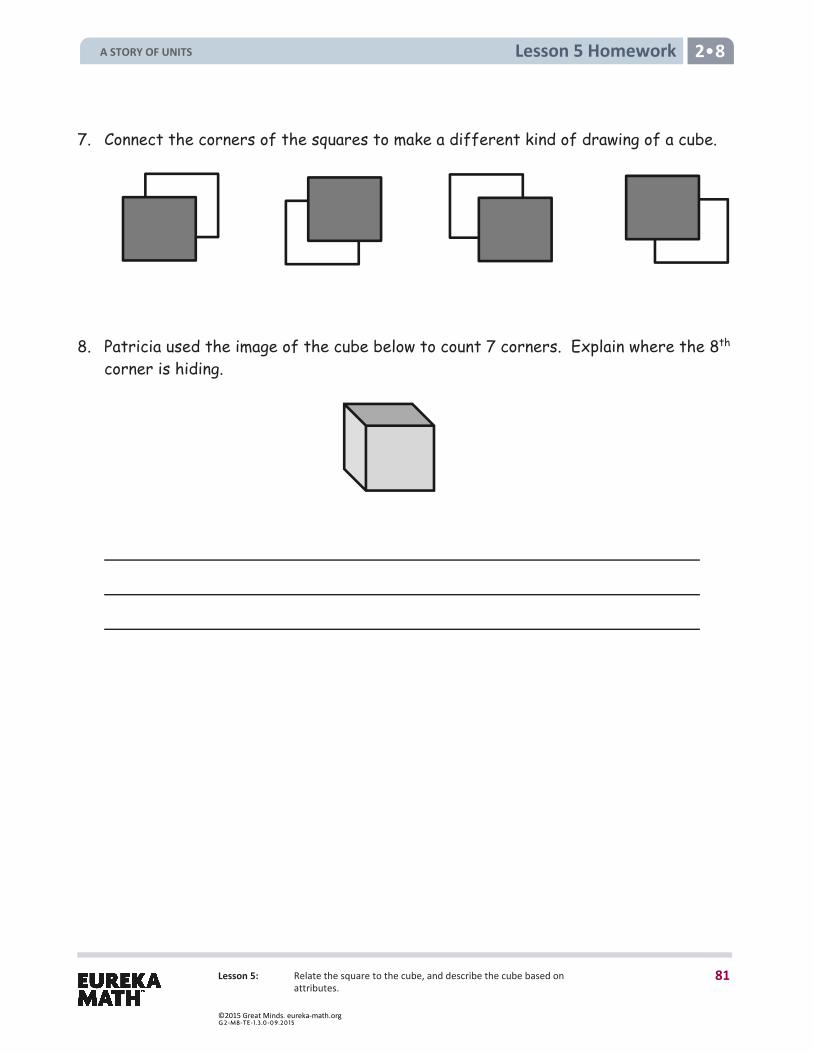
Lesson 5: Relate the square to the cube, and describe the cube based on attributes.
Lesson 5 Homework 2 8
7. Connect the corners of the squares to make a different kind of drawing of a cube.
8. Patricia used the image of the cube below to count 7 corners. Explain where the 8th corner is hiding.
A STORY OF UNITS
81
©2015 Great Minds. eureka-math.orgG 2-M8-TE-1.3 .0 -0 9.20 15
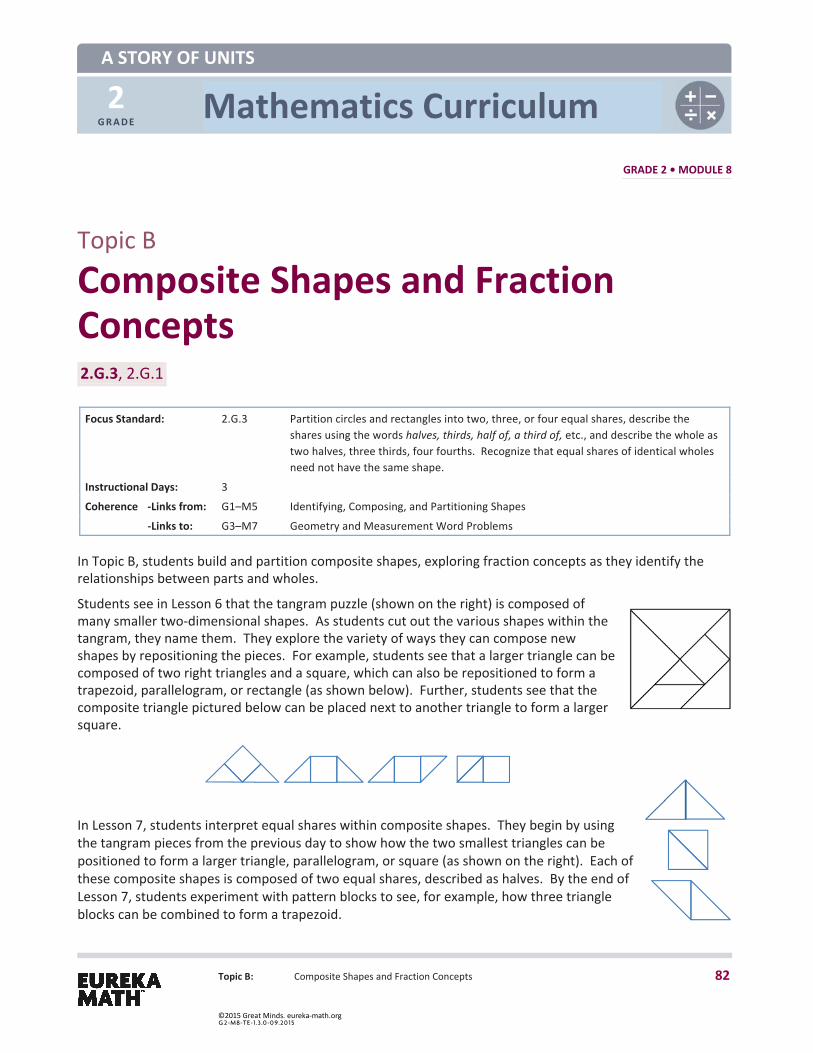
2 G R A D E
Mathematics Curriculum GRADE 2 • MODULE 8
Topic B: Composite Shapes and Fraction Concepts
Topic B
Composite Shapes and Fraction Concepts 2.G.3, 2.G.1
Focus Standard: 2.G.3 Partition circles and rectangles into two, three, or four equal shares, describe the shares using the words halves, thirds, half of, a third of, etc., and describe the whole as two halves, three thirds, four fourths. Recognize that equal shares of identical wholes need not have the same shape.
Instructional Days: 3 Coherence -Links from: G1–M5 Identifying, Composing, and Partitioning Shapes -Links to: G3–M7 Geometry and Measurement Word Problems
In Topic B, students build and partition composite shapes, exploring fraction concepts as they identify the relationships between parts and wholes.
Students see in Lesson 6 that the tangram puzzle (shown on the right) is composed of many smaller two-dimensional shapes. As students cut out the various shapes within the tangram, they name them. They explore the variety of ways they can compose new shapes by repositioning the pieces. For example, students see that a larger triangle can be composed of two right triangles and a square, which can also be repositioned to form a trapezoid, parallelogram, or rectangle (as shown below). Further, students see that the composite triangle pictured below can be placed next to another triangle to form a larger square.
In Lesson 7, students interpret equal shares within composite shapes. They begin by using the tangram pieces from the previous day to show how the two smallest triangles can be positioned to form a larger triangle, parallelogram, or square (as shown on the right). Each of these composite shapes is composed of two equal shares, described as halves. By the end of Lesson 7, students experiment with pattern blocks to see, for example, how three triangle blocks can be combined to form a trapezoid.
A STORY OF UNITS
82
©2015 Great Minds. eureka-math.orgG 2-M8-TE-1.3 .0 -0 9.20 15
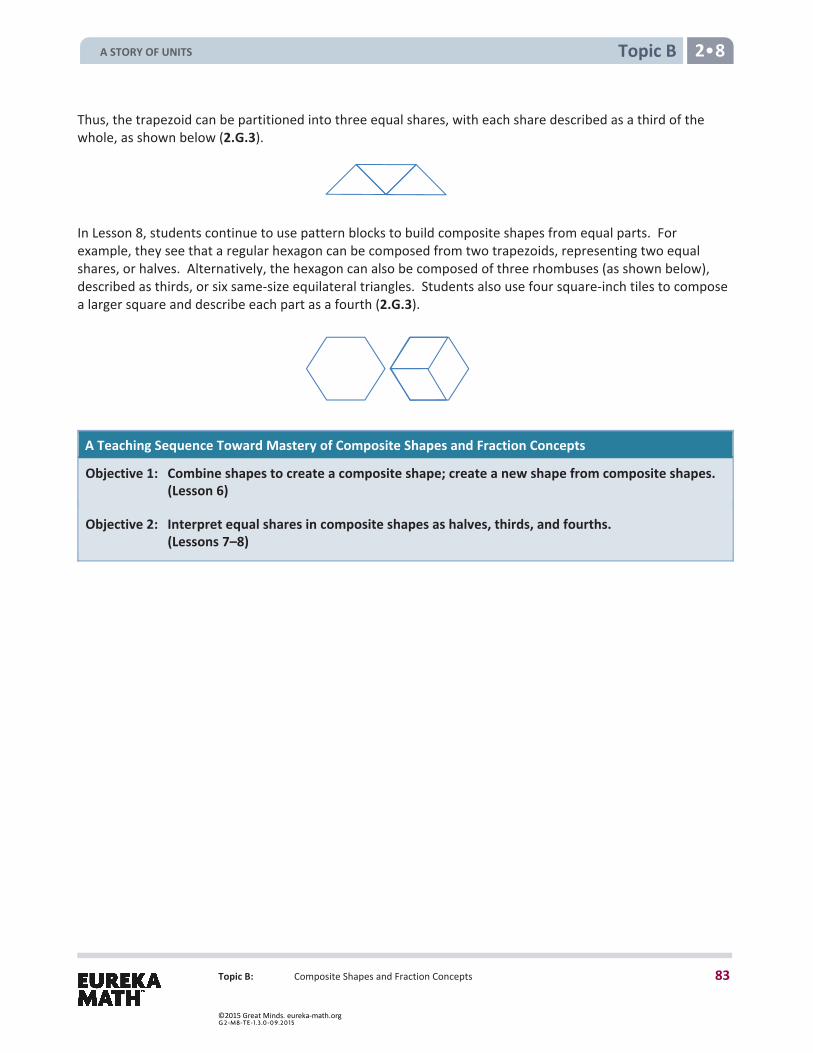
Topic B 2 8
Topic B: Composite Shapes and Fraction Concepts
Thus, the trapezoid can be partitioned into three equal shares, with each share described as a third of the whole, as shown below (2.G.3).
In Lesson 8, students continue to use pattern blocks to build composite shapes from equal parts. For example, they see that a regular hexagon can be composed from two trapezoids, representing two equal shares, or halves. Alternatively, the hexagon can also be composed of three rhombuses (as shown below), described as thirds, or six same-size equilateral triangles. Students also use four square-inch tiles to compose a larger square and describe each part as a fourth (2.G.3).
A Teaching Sequence Toward Mastery of Composite Shapes and Fraction Concepts
Objective 1: Combine shapes to create a composite shape; create a new shape from composite shapes.(Lesson 6)
Objective 2: Interpret equal shares in composite shapes as halves, thirds, and fourths. (Lessons 7–8)
A STORY OF UNITS
83
©2015 Great Minds. eureka-math.orgG 2-M8-TE-1.3 .0 -0 9.20 15
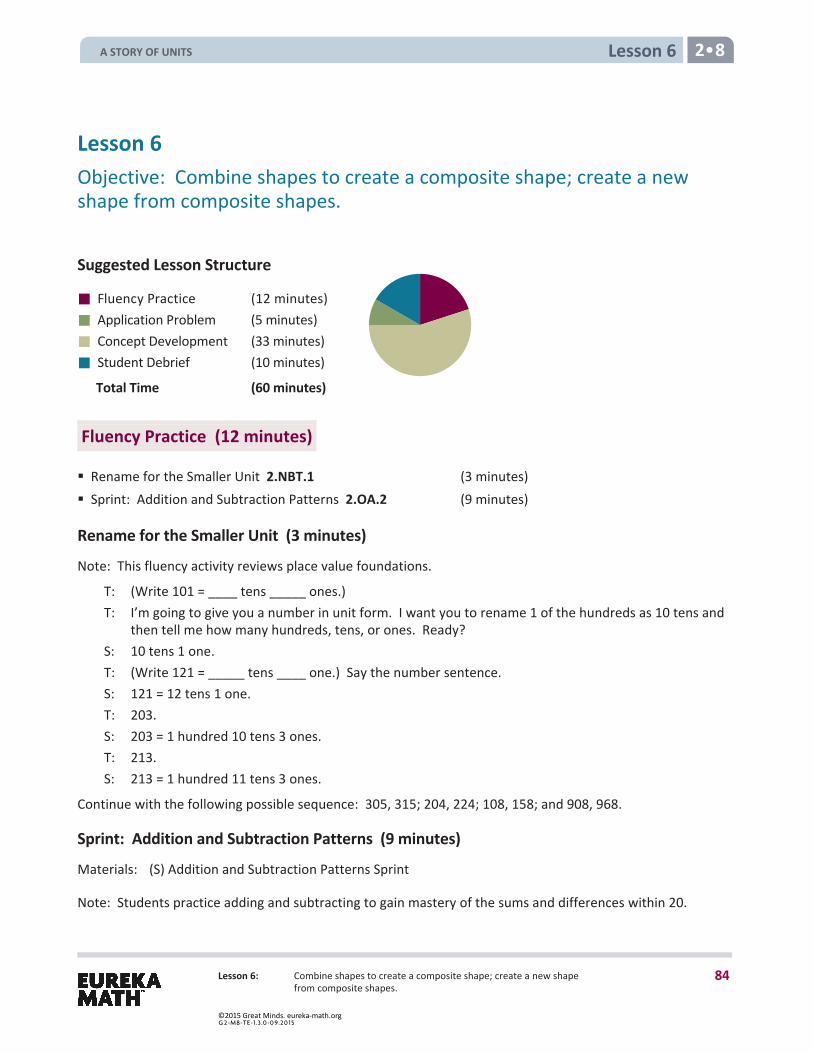
Lesson 6 2 8
Lesson 6: Combine shapes to create a composite shape; create a new shape from composite shapes.
Lesson 6 Objective: Combine shapes to create a composite shape; create a new shape from composite shapes.
Suggested Lesson Structure
Fluency Practice (12 minutes) Application Problem (5 minutes) Concept Development (33 minutes) Student Debrief (10 minutes)
Total Time (60 minutes)
Fluency Practice (12 minutes)
Rename for the Smaller Unit 2.NBT.1 (3 minutes) Sprint: Addition and Subtraction Patterns 2.OA.2 (9 minutes)
Rename for the Smaller Unit (3 minutes)
Note: This fluency activity reviews place value foundations. T: (Write 101 = ____ tens _____ ones.) T: I’m going to give you a number in unit form. I want you to rename 1 of the hundreds as 10 tens and
then tell me how many hundreds, tens, or ones. Ready? S: 10 tens 1 one. T: (Write 121 = _____ tens ____ one.) Say the number sentence. S: 121 = 12 tens 1 one. T: 203. S: 203 = 1 hundred 10 tens 3 ones. T: 213. S: 213 = 1 hundred 11 tens 3 ones.
Continue with the following possible sequence: 305, 315; 204, 224; 108, 158; and 908, 968.
Sprint: Addition and Subtraction Patterns (9 minutes)
Materials: (S) Addition and Subtraction Patterns Sprint
Note: Students practice adding and subtracting to gain mastery of the sums and differences within 20.
A STORY OF UNITS
84
©2015 Great Minds. eureka-math.orgG 2-M8-TE-1.3 .0 -0 9.20 15
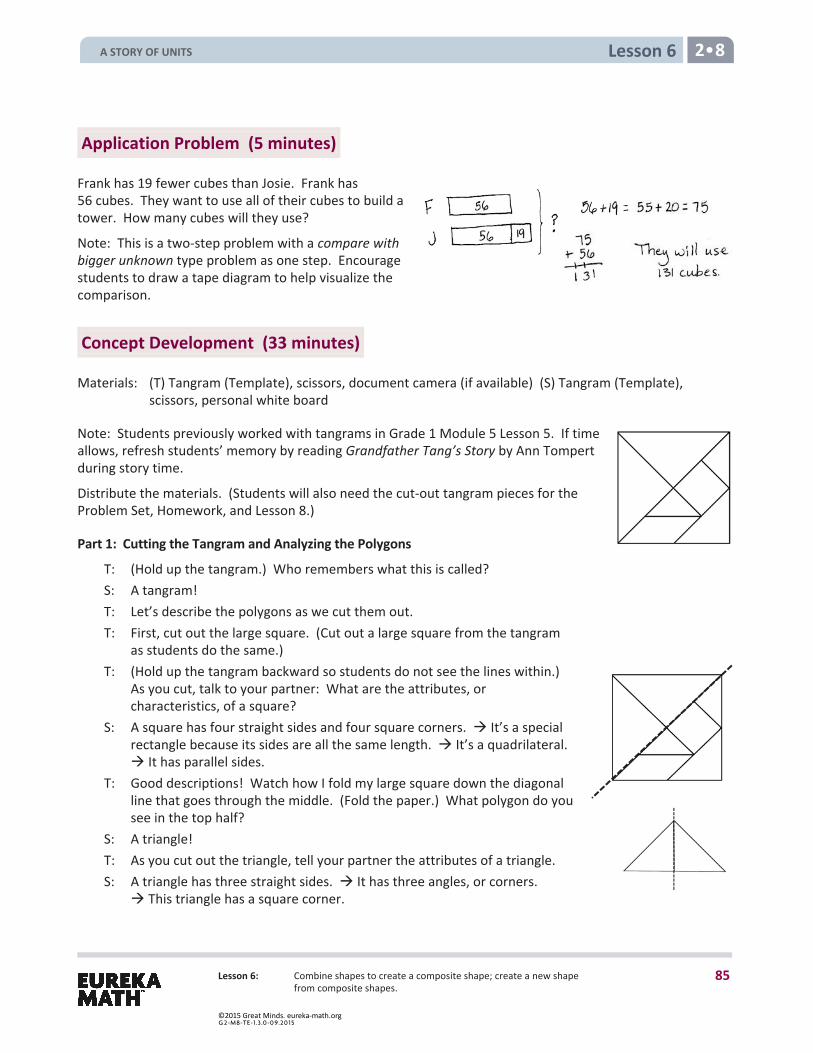
Lesson 6 2 8
Lesson 6: Combine shapes to create a composite shape; create a new shape from composite shapes.
Application Problem (5 minutes)
Frank has 19 fewer cubes than Josie. Frank has 56 cubes. They want to use all of their cubes to build a tower. How many cubes will they use?
Note: This is a two-step problem with a compare with bigger unknown type problem as one step. Encourage students to draw a tape diagram to help visualize the comparison.
Concept Development (33 minutes)
Materials: (T) Tangram (Template), scissors, document camera (if available) (S) Tangram (Template), scissors, personal white board
Note: Students previously worked with tangrams in Grade 1 Module 5 Lesson 5. If time allows, refresh students’ memory by reading Grandfather Tang’s Story by Ann Tompert during story time.
Distribute the materials. (Students will also need the cut-out tangram pieces for the Problem Set, Homework, and Lesson 8.)
Part 1: Cutting the Tangram and Analyzing the Polygons
T: (Hold up the tangram.) Who remembers what this is called? S: A tangram! T: Let’s describe the polygons as we cut them out. T: First, cut out the large square. (Cut out a large square from the tangram
as students do the same.) T: (Hold up the tangram backward so students do not see the lines within.)
As you cut, talk to your partner: What are the attributes, or characteristics, of a square?
S: A square has four straight sides and four square corners. It’s a special rectangle because its sides are all the same length. It’s a quadrilateral. It has parallel sides.
T: Good descriptions! Watch how I fold my large square down the diagonal line that goes through the middle. (Fold the paper.) What polygon do you see in the top half?
S: A triangle! T: As you cut out the triangle, tell your partner the attributes of a triangle. S: A triangle has three straight sides. It has three angles, or corners.
This triangle has a square corner.
A STORY OF UNITS
85
©2015 Great Minds. eureka-math.orgG 2-M8-TE-1.3 .0 -0 9.20 15
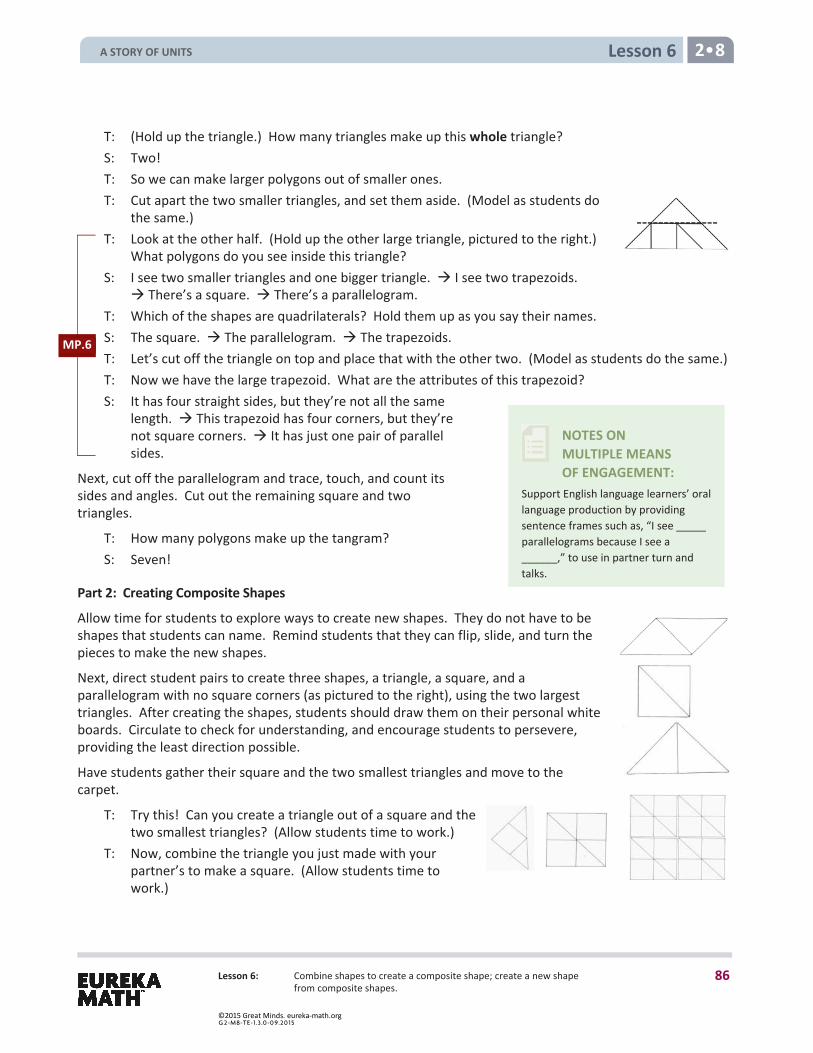
Lesson 6 2 8
Lesson 6: Combine shapes to create a composite shape; create a new shape from composite shapes.
NOTES ON MULTIPLE MEANS OF ENGAGEMENT:
Support English language learners’ oral language production by providing sentence frames such as, “I see _____ parallelograms because I see a ______,” to use in partner turn and talks.
T: (Hold up the triangle.) How many triangles make up this whole triangle? S: Two! T: So we can make larger polygons out of smaller ones. T: Cut apart the two smaller triangles, and set them aside. (Model as students do
the same.) T: Look at the other half. (Hold up the other large triangle, pictured to the right.)
What polygons do you see inside this triangle? S: I see two smaller triangles and one bigger triangle. I see two trapezoids.
There’s a square. There’s a parallelogram. T: Which of the shapes are quadrilaterals? Hold them up as you say their names. S: The square. The parallelogram. The trapezoids. T: Let’s cut off the triangle on top and place that with the other two. (Model as students do the same.) T: Now we have the large trapezoid. What are the attributes of this trapezoid? S: It has four straight sides, but they’re not all the same
length. This trapezoid has four corners, but they’re not square corners. It has just one pair of parallel sides.
Next, cut off the parallelogram and trace, touch, and count its sides and angles. Cut out the remaining square and two triangles.
T: How many polygons make up the tangram? S: Seven!
Part 2: Creating Composite Shapes
Allow time for students to explore ways to create new shapes. They do not have to be shapes that students can name. Remind students that they can flip, slide, and turn the pieces to make the new shapes.
Next, direct student pairs to create three shapes, a triangle, a square, and a parallelogram with no square corners (as pictured to the right), using the two largest triangles. After creating the shapes, students should draw them on their personal white boards. Circulate to check for understanding, and encourage students to persevere, providing the least direction possible.
Have students gather their square and the two smallest triangles and move to the carpet.
T: Try this! Can you create a triangle out of a square and the two smallest triangles? (Allow students time to work.)
T: Now, combine the triangle you just made with your partner’s to make a square. (Allow students time to work.)
MP.6
A STORY OF UNITS
86
©2015 Great Minds. eureka-math.orgG 2-M8-TE-1.3 .0 -0 9.20 15
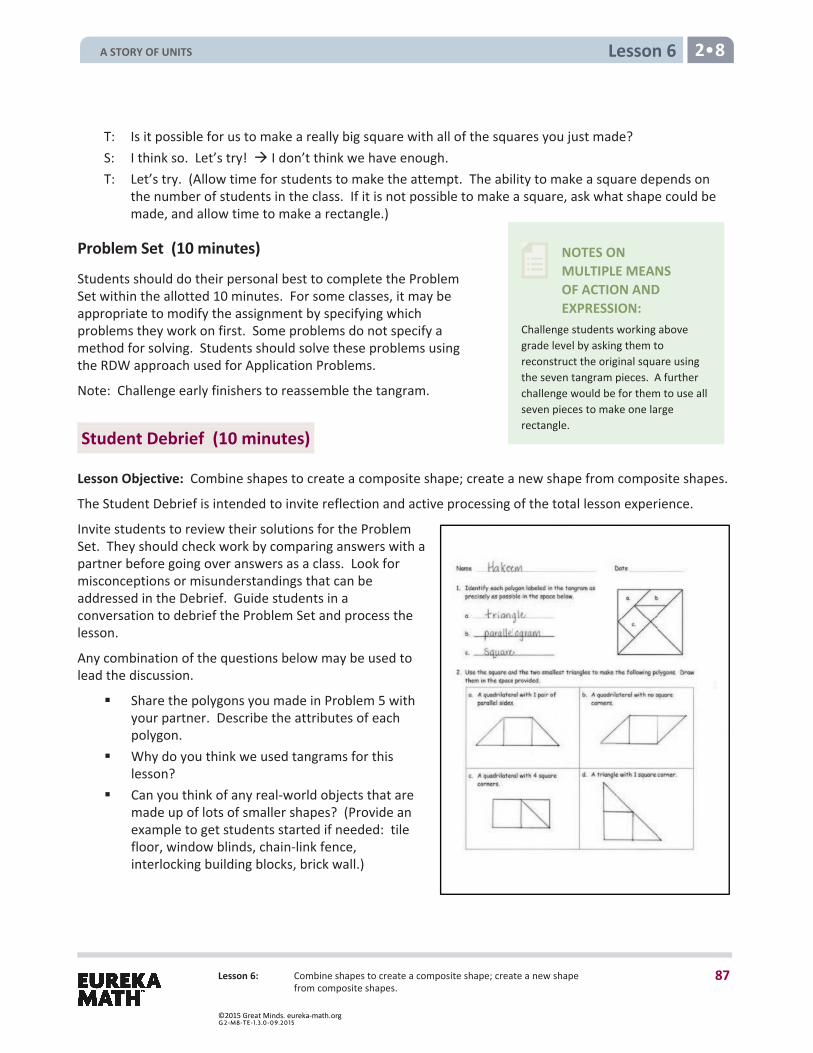
Lesson 6 2 8
Lesson 6: Combine shapes to create a composite shape; create a new shape from composite shapes.
NOTES ON MULTIPLE MEANS OF ACTION AND EXPRESSION:
Challenge students working above grade level by asking them to reconstruct the original square using the seven tangram pieces. A further challenge would be for them to use all seven pieces to make one large rectangle.
T: Is it possible for us to make a really big square with all of the squares you just made? S: I think so. Let’s try! I don’t think we have enough. T: Let’s try. (Allow time for students to make the attempt. The ability to make a square depends on
the number of students in the class. If it is not possible to make a square, ask what shape could be made, and allow time to make a rectangle.)
Problem Set (10 minutes)
Students should do their personal best to complete the Problem Set within the allotted 10 minutes. For some classes, it may be appropriate to modify the assignment by specifying which problems they work on first. Some problems do not specify a method for solving. Students should solve these problems using the RDW approach used for Application Problems.
Note: Challenge early finishers to reassemble the tangram.
Student Debrief (10 minutes)
Lesson Objective: Combine shapes to create a composite shape; create a new shape from composite shapes.
The Student Debrief is intended to invite reflection and active processing of the total lesson experience.
Invite students to review their solutions for the Problem Set. They should check work by comparing answers with a partner before going over answers as a class. Look for misconceptions or misunderstandings that can be addressed in the Debrief. Guide students in a conversation to debrief the Problem Set and process the lesson.
Any combination of the questions below may be used to lead the discussion.
Share the polygons you made in Problem 5 withyour partner. Describe the attributes of eachpolygon.
Why do you think we used tangrams for thislesson?
Can you think of any real-world objects that aremade up of lots of smaller shapes? (Provide anexample to get students started if needed: tilefloor, window blinds, chain-link fence,interlocking building blocks, brick wall.)
A STORY OF UNITS
87
©2015 Great Minds. eureka-math.orgG 2-M8-TE-1.3 .0 -0 9.20 15
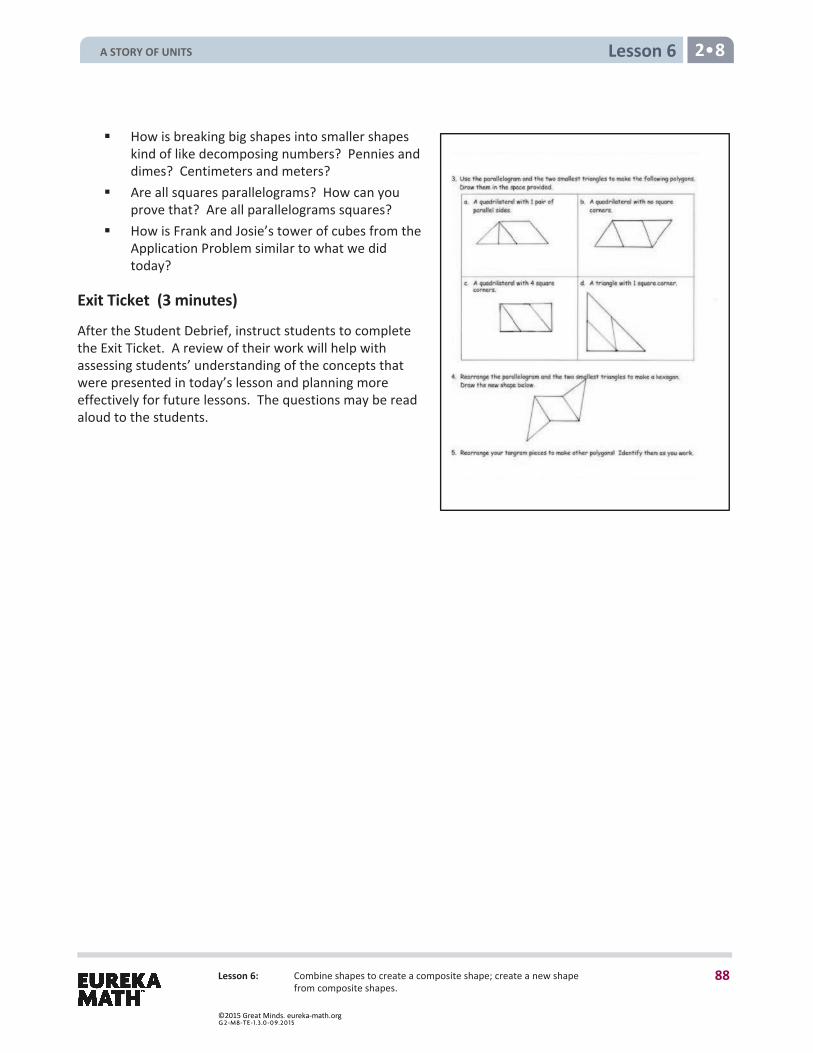
Lesson 6 2 8
Lesson 6: Combine shapes to create a composite shape; create a new shape from composite shapes.
How is breaking big shapes into smaller shapeskind of like decomposing numbers? Pennies anddimes? Centimeters and meters?
Are all squares parallelograms? How can youprove that? Are all parallelograms squares?
How is Frank and Josie’s tower of cubes from theApplication Problem similar to what we didtoday?
Exit Ticket (3 minutes)
After the Student Debrief, instruct students to complete the Exit Ticket. A review of their work will help with assessing students’ understanding of the concepts that were presented in today’s lesson and planning more effectively for future lessons. The questions may be read aloud to the students.
A STORY OF UNITS
88
©2015 Great Minds. eureka-math.orgG 2-M8-TE-1.3 .0 -0 9.20 15
Lesson 6 Sprint 2 8
Lesson 6: Combine shapes to create a composite shape; create a new shape from composite shapes.
Addition and Subtraction Patterns
1. 8 + 3 = 23. 8 + 8 =
2. 11 – 3 = 24. 16 – 8 =
3. 9 + 2 = 25. 9 + 6 =
4. 11 – 2 = 26. 15 – 9 =
5. 6 + 5 = 27. 9 + 9 =
6. 11 – 6 = 28. 18 – 9 =
7. 7 + 4 = 29. 7 + 7 =
8. 11 – 7 = 30. 14 – 7 =
9. 8 + 4 = 31. 8 + 9 =
10. 12 – 4 = 32. 17 – 8 =
11. 9 + 3 = 33. 7 + 9 =
12. 12 – 3 = 34. 16 – 7 =
13. 7 + 5 = 35. 19 – 6 =
14. 12 – 7 = 36. 6 + 7 =
15. 6 + 6 = 37. 17 – 6 =
16. 12 – 6 = 38. 11 – 7 =
17. 8 + 6 = 39. 7 + 6 =
18. 14 – 8 = 40. 13 – 7 =
19. 9 + 4 = 41. 19 – 7 =
20. 13 – 9 = 42. 3 + 8 =
21. 8 + 7 = 43. 5 + 8 =
22. 15 – 8 = 44. 18 – 5 =
A Number Correct: _______
A STORY OF UNITS
89
©2015 Great Minds. eureka-math.orgG 2-M8-TE-1.3 .0 -0 9.20 15

Lesson 6 Sprint 2 8
Lesson 6: Combine shapes to create a composite shape; create a new shape from composite shapes.
Addition and Subtraction Patterns
1. 9 + 2 = 23. 9 + 6 = 2. 11 – 2 = 24. 15 – 9 = 3. 8 + 3 = 25. 8 + 8 = 4. 11 – 3 = 26. 16 – 8 = 5. 7 + 4 = 27. 7 + 7 = 6. 11 – 7 = 28. 14 – 7 = 7. 6 + 5 = 29. 9 + 9 = 8. 11 – 6 = 30. 18 – 9 = 9. 9 + 3 = 31. 7 + 9 = 10. 12 – 3 = 32. 16 – 9 = 11. 8 + 4 = 33. 8 + 9 = 12. 12 – 4 = 34. 17 – 9 = 13. 7 + 5 = 35. 19 – 7 = 14. 12 – 5 = 36. 5 + 8 = 15. 6 + 6 = 37. 18 – 5 = 16. 12 – 6 = 38. 13 – 8 = 17. 9 + 4 = 39. 6 + 7 = 18. 13 – 4 = 40. 13 – 6 = 19. 8 + 6 = 41. 19 – 6 = 20. 14 – 8 = 42. 3 + 9 = 21. 7 + 8 = 43. 6 + 9 = 22. 15 – 7 = 44. 18 – 6 =
B Number Correct: _______
Improvement: _______
A STORY OF UNITS
90
©2015 Great Minds. eureka-math.orgG 2-M8-TE-1.3 .0 -0 9.20 15
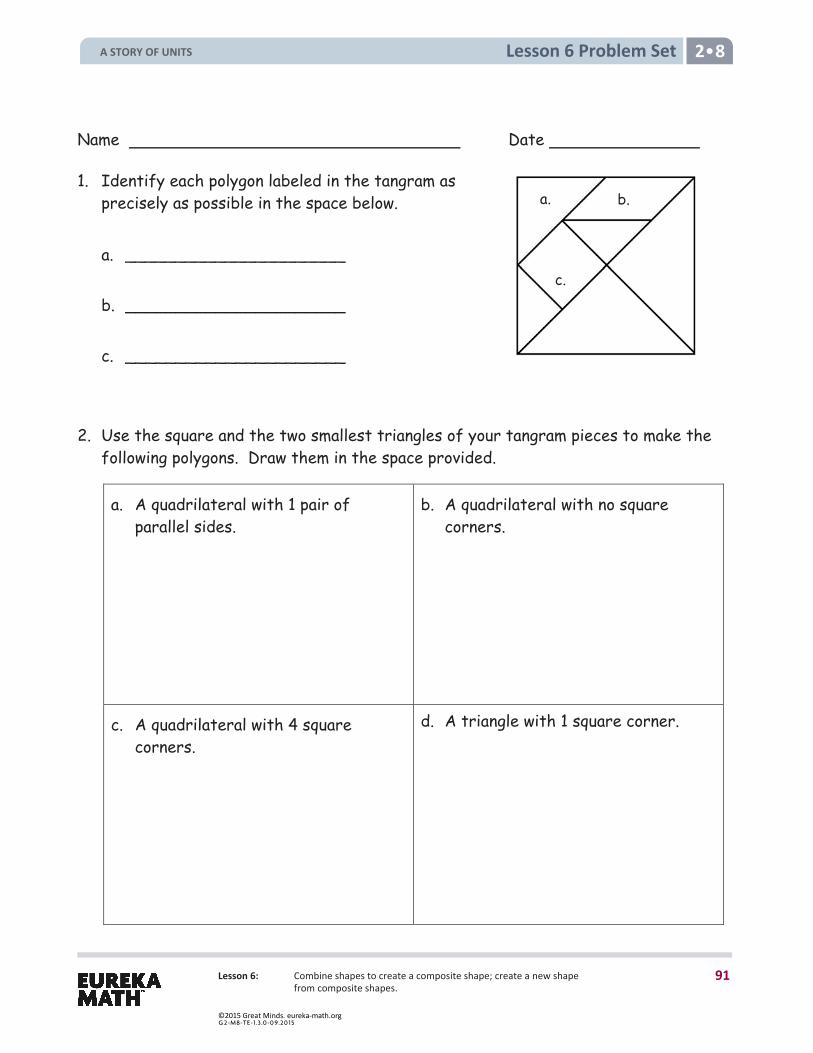
Lesson 6 Problem Set 2 8
Lesson 6: Combine shapes to create a composite shape; create a new shape from composite shapes.
Name Date
1. Identify each polygon labeled in the tangram as precisely as possible in the space below.
a. ______________________
b. ______________________
c. ______________________
2. Use the square and the two smallest triangles of your tangram pieces to make the following polygons. Draw them in the space provided.
a. A quadrilateral with 1 pair of parallel sides.
b. A quadrilateral with no square corners.
c. A quadrilateral with 4 square corners.
d. A triangle with 1 square corner.
a. b.
c.
A STORY OF UNITS
91
©2015 Great Minds. eureka-math.orgG 2-M8-TE-1.3 .0 -0 9.20 15

Lesson 6 Problem Set 2 8
Lesson 6: Combine shapes to create a composite shape; create a new shape from composite shapes.
3. Use the parallelogram and the two smallest triangles of your tangram pieces to make the following polygons. Draw them in the space provided.
a. A quadrilateral with 1 pair of parallel sides.
b. A quadrilateral with no square corners.
c. A quadrilateral with 4 square corners.
d. A triangle with 1 square corner.
4. Rearrange the parallelogram and the two smallest triangles to make a hexagon. Draw the new shape below.
5. Rearrange your tangram pieces to make other polygons! Identify them as you work.
A STORY OF UNITS
92
©2015 Great Minds. eureka-math.orgG 2-M8-TE-1.3 .0 -0 9.20 15
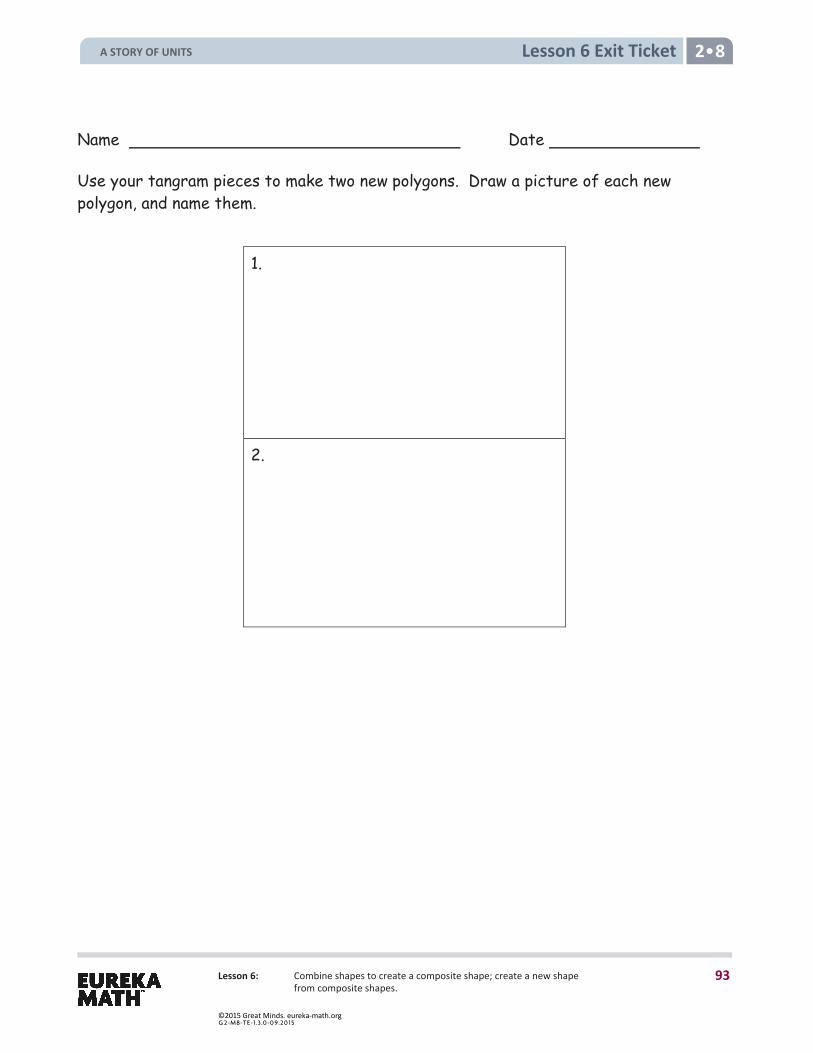
Lesson 6 Exit Ticket 2 8
Lesson 6: Combine shapes to create a composite shape; create a new shape from composite shapes.
Name Date
Use your tangram pieces to make two new polygons. Draw a picture of each new polygon, and name them.
1.
2.
A STORY OF UNITS
93
©2015 Great Minds. eureka-math.orgG 2-M8-TE-1.3 .0 -0 9.20 15

Lesson 6 Homework 2 8
Lesson 6: Combine shapes to create a composite shape; create a new shape from composite shapes.
Name Date
1. Identify each polygon labeled in the tangram as precisely as possible in the space below.
a. ______________________
b. ______________________
c. ______________________
2. Use the square and the two smallest triangles of your tangram pieces to make the following polygons. Draw them in the space provided.
a. A triangle with 1 square corner.
b. A quadrilateral with 4 square corners.
c. A quadrilateral with no square corners.
d. A quadrilateral with only 1 pair of parallel sides.
a.
b.
c.
A STORY OF UNITS
94
©2015 Great Minds. eureka-math.orgG 2-M8-TE-1.3 .0 -0 9.20 15
Lesson 6 Homework 2 8
Lesson 6: Combine shapes to create a composite shape; create a new shape from composite shapes.
3. Rearrange the parallelogram and the two smallest triangles of your tangram pieces to make a hexagon. Draw the new shape below.
4. Rearrange your tangram pieces to make at least 6 other polygons! Draw and name them below.
A STORY OF UNITS
95
©2015 Great Minds. eureka-math.orgG 2-M8-TE-1.3 .0 -0 9.20 15
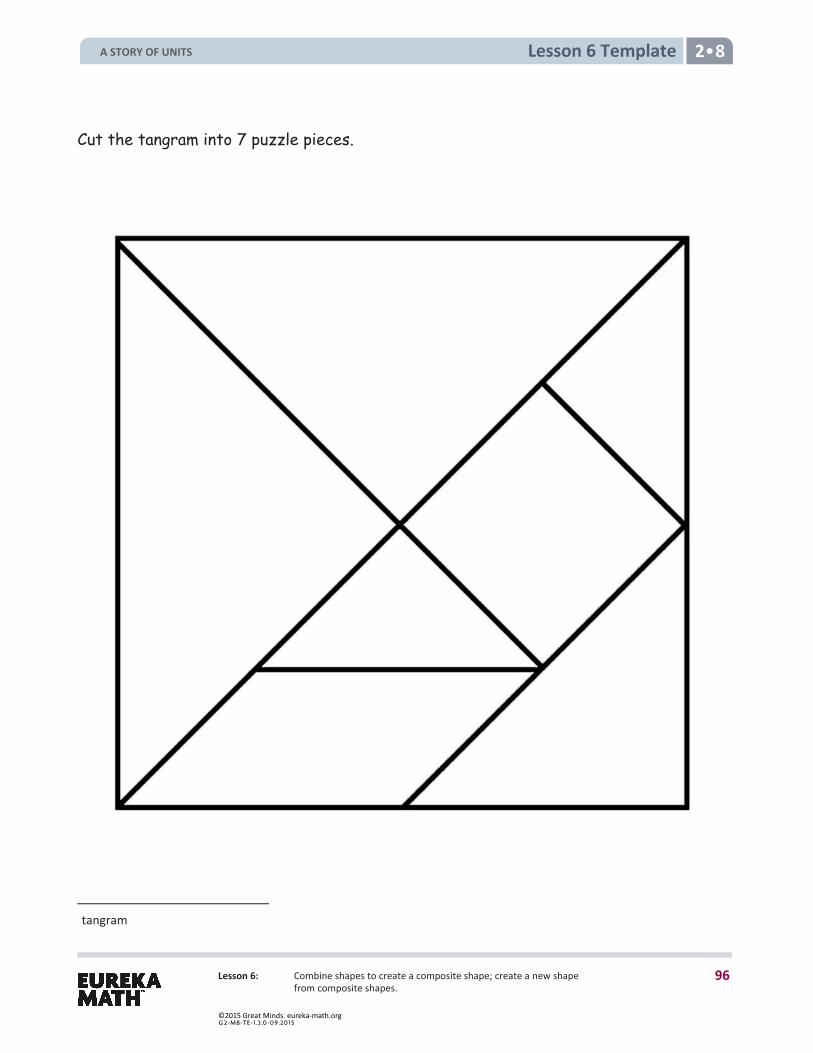
Lesson 6: Combine shapes to create a composite shape; create a new shape from composite shapes.
Lesson 6 Template 2 8
Cut the tangram into 7 puzzle pieces.
tangram
A STORY OF UNITS
96
©2015 Great Minds. eureka-math.orgG 2-M8-TE-1.3 .0 -0 9.20 15
Lesson 7 2 8
Lesson 7: Interpret equal shares in composite shapes as halves, thirds, and fourths.
Lesson 7 Objective: Interpret equal shares in composite shapes as halves, thirds, and fourths.
Suggested Lesson Structure
Fluency Practice (12 minutes) Application Problem (5 minutes) Concept Development (33 minutes) Student Debrief (10 minutes)
Total Time (60 minutes)
Fluency Practice (12 minutes)
Subtraction with Renaming 2.NBT.7 (7 minutes) Grade 2 Core Fluency Differentiated Practice Sets 2.OA.2 (5 minutes)
Subtraction with Renaming (7 minutes) Materials: (S) Personal white board, hundreds place value chart (Lesson 3 Fluency Template)
Note: This fluency activity reviews the application of a chip model while recording with the algorithm. Allow students work time between each problem. Students use their personal white boards and a place value chart to solve.
T: Slide the place value chart template into your personal white board. T: (Write 161 – 18 horizontally on the board.) Let’s use a chip model to subtract. On your personal
white board, record your work using the algorithm. S: (Solve.) T: 161 – 18 is…? S: 143.
Continue with the following possible sequence: 152 – 29, 237 – 56, 319 – 28, 463 – 54, and 208 – 57.
Grade 2 Core Fluency Differentiated Practice Sets (5 minutes)
Materials: (S) Core Fluency Practice Sets (Lesson 3)
Note: During Topic B and for the remainder of the year, each day’s Fluency Practice includes an opportunity for review and mastery of the sums and differences with totals through 20 by means of the Core Fluency Practice Sets or Sprints. The process is detailed, with Practice Sets provided, in Lesson 3.
A STORY OF UNITS
97
©2015 Great Minds. eureka-math.orgG 2-M8-TE-1.3 .0 -0 9.20 15
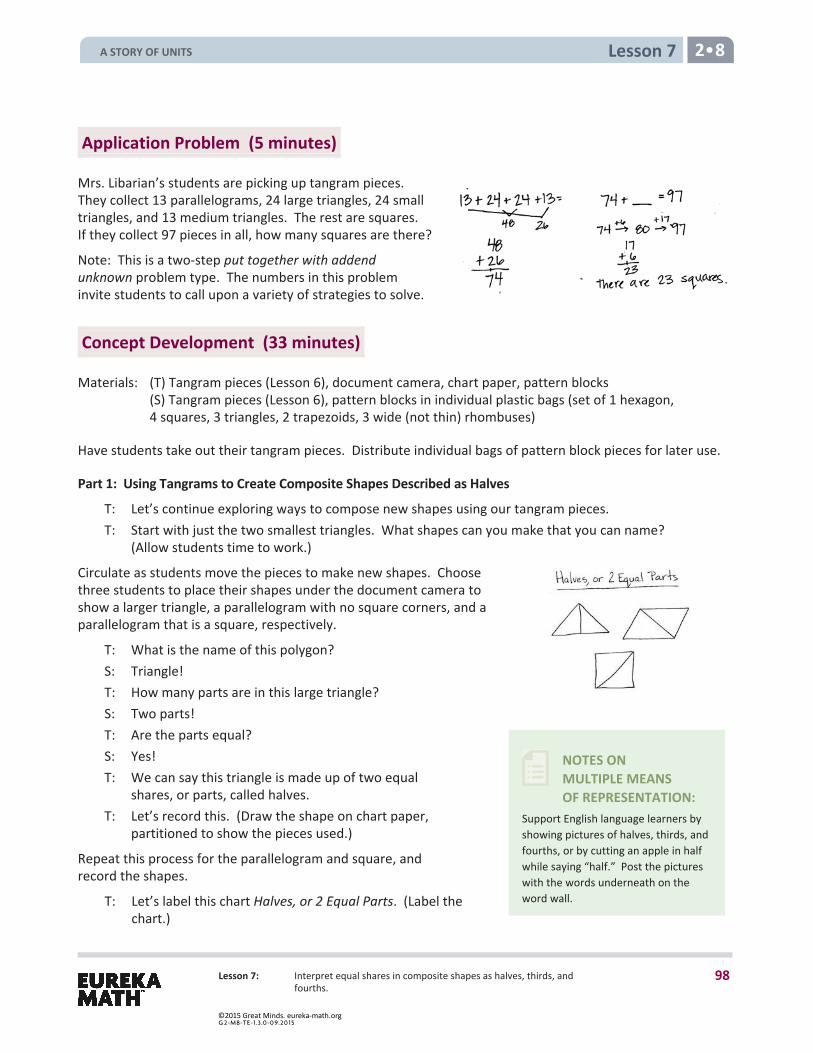
Lesson 7 2 8
Lesson 7: Interpret equal shares in composite shapes as halves, thirds, and fourths.
NOTES ON MULTIPLE MEANS OF REPRESENTATION:
Support English language learners by showing pictures of halves, thirds, and fourths, or by cutting an apple in half while saying “half.” Post the pictures with the words underneath on the word wall.
Application Problem (5 minutes)
Mrs. Libarian’s students are picking up tangram pieces. They collect 13 parallelograms, 24 large triangles, 24 small triangles, and 13 medium triangles. The rest are squares. If they collect 97 pieces in all, how many squares are there?
Note: This is a two-step put together with addend unknown problem type. The numbers in this problem invite students to call upon a variety of strategies to solve.
Concept Development (33 minutes)
Materials: (T) Tangram pieces (Lesson 6), document camera, chart paper, pattern blocks (S) Tangram pieces (Lesson 6), pattern blocks in individual plastic bags (set of 1 hexagon, 4 squares, 3 triangles, 2 trapezoids, 3 wide (not thin) rhombuses)
Have students take out their tangram pieces. Distribute individual bags of pattern block pieces for later use.
Part 1: Using Tangrams to Create Composite Shapes Described as Halves
T: Let’s continue exploring ways to compose new shapes using our tangram pieces. T: Start with just the two smallest triangles. What shapes can you make that you can name?
(Allow students time to work.)
Circulate as students move the pieces to make new shapes. Choose three students to place their shapes under the document camera to show a larger triangle, a parallelogram with no square corners, and a parallelogram that is a square, respectively.
T: What is the name of this polygon? S: Triangle! T: How many parts are in this large triangle? S: Two parts! T: Are the parts equal? S: Yes! T: We can say this triangle is made up of two equal
shares, or parts, called halves. T: Let’s record this. (Draw the shape on chart paper,
partitioned to show the pieces used.)
Repeat this process for the parallelogram and square, and record the shapes.
T: Let’s label this chart Halves, or 2 Equal Parts. (Label the chart.)
A STORY OF UNITS
98
©2015 Great Minds. eureka-math.orgG 2-M8-TE-1.3 .0 -0 9.20 15
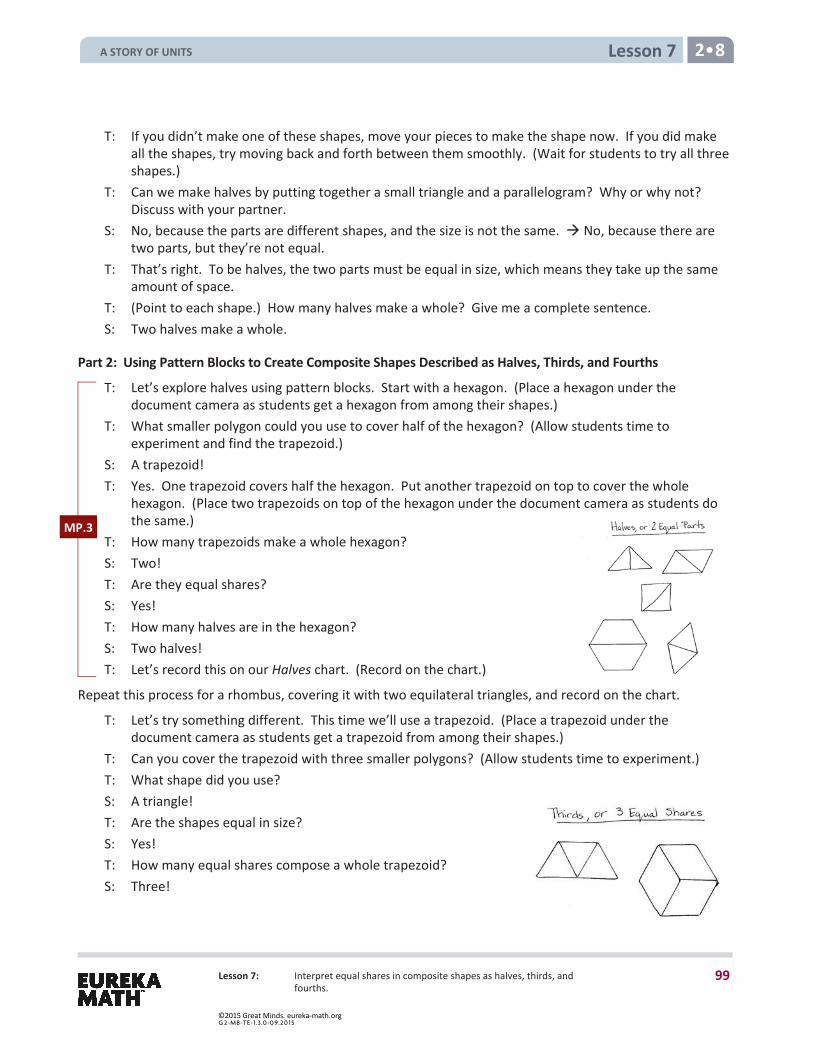
Lesson 7 2 8
Lesson 7: Interpret equal shares in composite shapes as halves, thirds, and fourths.
T: If you didn’t make one of these shapes, move your pieces to make the shape now. If you did make all the shapes, try moving back and forth between them smoothly. (Wait for students to try all three shapes.)
T: Can we make halves by putting together a small triangle and a parallelogram? Why or why not? Discuss with your partner.
S: No, because the parts are different shapes, and the size is not the same. No, because there are two parts, but they’re not equal.
T: That’s right. To be halves, the two parts must be equal in size, which means they take up the same amount of space.
T: (Point to each shape.) How many halves make a whole? Give me a complete sentence. S: Two halves make a whole.
Part 2: Using Pattern Blocks to Create Composite Shapes Described as Halves, Thirds, and Fourths
T: Let’s explore halves using pattern blocks. Start with a hexagon. (Place a hexagon under the document camera as students get a hexagon from among their shapes.)
T: What smaller polygon could you use to cover half of the hexagon? (Allow students time to experiment and find the trapezoid.)
S: A trapezoid! T: Yes. One trapezoid covers half the hexagon. Put another trapezoid on top to cover the whole
hexagon. (Place two trapezoids on top of the hexagon under the document camera as students do the same.)
T: How many trapezoids make a whole hexagon? S: Two! T: Are they equal shares? S: Yes! T: How many halves are in the hexagon? S: Two halves! T: Let’s record this on our Halves chart. (Record on the chart.)
Repeat this process for a rhombus, covering it with two equilateral triangles, and record on the chart.
T: Let’s try something different. This time we’ll use a trapezoid. (Place a trapezoid under the document camera as students get a trapezoid from among their shapes.)
T: Can you cover the trapezoid with three smaller polygons? (Allow students time to experiment.) T: What shape did you use? S: A triangle! T: Are the shapes equal in size? S: Yes! T: How many equal shares compose a whole trapezoid? S: Three!
MP.3
A STORY OF UNITS
99
©2015 Great Minds. eureka-math.orgG 2-M8-TE-1.3 .0 -0 9.20 15
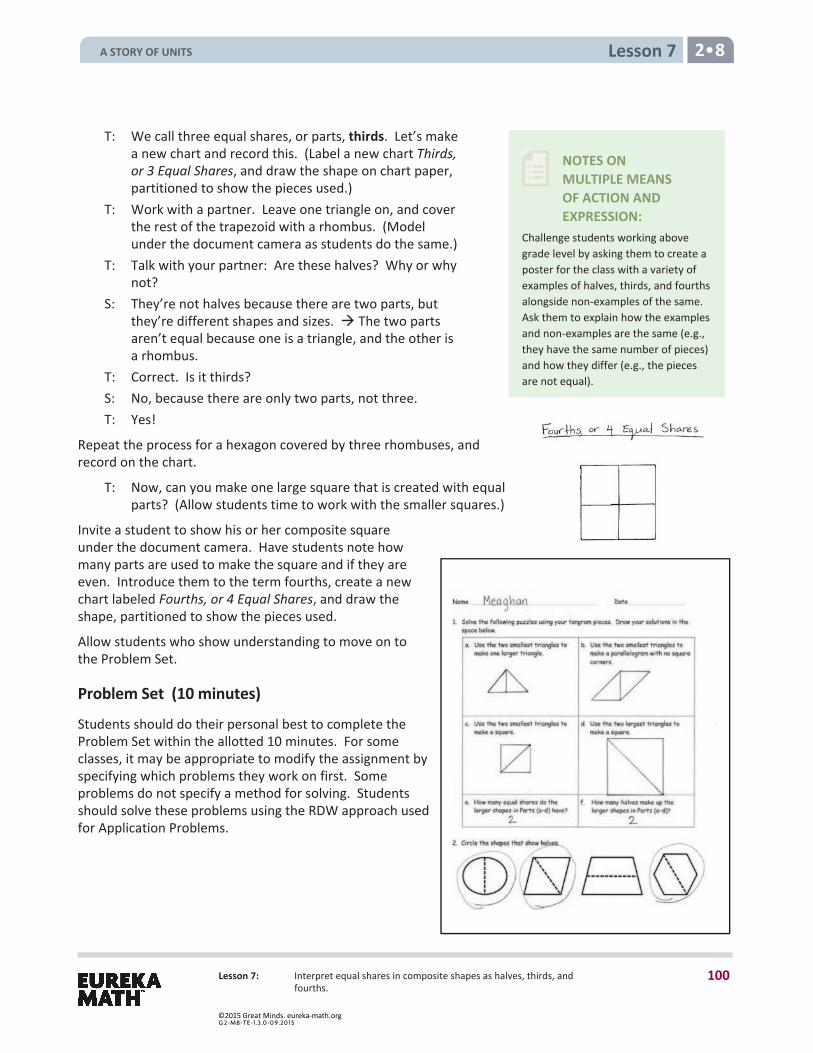
Lesson 7 2 8
Lesson 7: Interpret equal shares in composite shapes as halves, thirds, and fourths.
NOTES ON MULTIPLE MEANS OF ACTION AND EXPRESSION:
Challenge students working above grade level by asking them to create a poster for the class with a variety of examples of halves, thirds, and fourths alongside non-examples of the same. Ask them to explain how the examples and non-examples are the same (e.g., they have the same number of pieces) and how they differ (e.g., the pieces are not equal).
T: We call three equal shares, or parts, thirds. Let’s make a new chart and record this. (Label a new chart Thirds, or 3 Equal Shares, and draw the shape on chart paper, partitioned to show the pieces used.)
T: Work with a partner. Leave one triangle on, and cover the rest of the trapezoid with a rhombus. (Model under the document camera as students do the same.)
T: Talk with your partner: Are these halves? Why or why not?
S: They’re not halves because there are two parts, but they’re different shapes and sizes. The two parts aren’t equal because one is a triangle, and the other is a rhombus.
T: Correct. Is it thirds? S: No, because there are only two parts, not three. T: Yes!
Repeat the process for a hexagon covered by three rhombuses, and record on the chart.
T: Now, can you make one large square that is created with equal parts? (Allow students time to work with the smaller squares.)
Invite a student to show his or her composite square under the document camera. Have students note how many parts are used to make the square and if they are even. Introduce them to the term fourths, create a new chart labeled Fourths, or 4 Equal Shares, and draw the shape, partitioned to show the pieces used.
Allow students who show understanding to move on to the Problem Set.
Problem Set (10 minutes)
Students should do their personal best to complete the Problem Set within the allotted 10 minutes. For some classes, it may be appropriate to modify the assignment by specifying which problems they work on first. Some problems do not specify a method for solving. Students should solve these problems using the RDW approach used for Application Problems.
A STORY OF UNITS
100
©2015 Great Minds. eureka-math.orgG 2-M8-TE-1.3 .0 -0 9.20 15
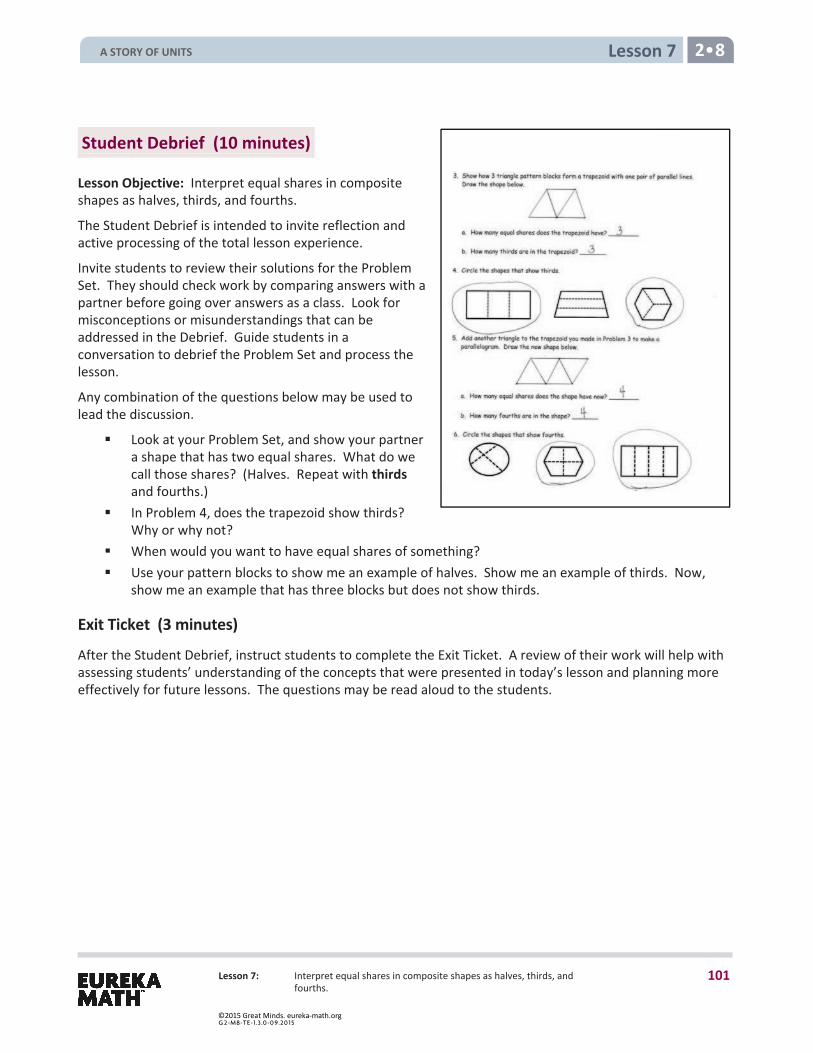
Lesson 7 2 8
Lesson 7: Interpret equal shares in composite shapes as halves, thirds, and fourths.
Student Debrief (10 minutes)
Lesson Objective: Interpret equal shares in composite shapes as halves, thirds, and fourths.
The Student Debrief is intended to invite reflection and active processing of the total lesson experience.
Invite students to review their solutions for the Problem Set. They should check work by comparing answers with a partner before going over answers as a class. Look for misconceptions or misunderstandings that can be addressed in the Debrief. Guide students in a conversation to debrief the Problem Set and process the lesson.
Any combination of the questions below may be used to lead the discussion.
Look at your Problem Set, and show your partnera shape that has two equal shares. What do wecall those shares? (Halves. Repeat with thirdsand fourths.)
In Problem 4, does the trapezoid show thirds?Why or why not?
When would you want to have equal shares of something? Use your pattern blocks to show me an example of halves. Show me an example of thirds. Now,
show me an example that has three blocks but does not show thirds.
Exit Ticket (3 minutes)
After the Student Debrief, instruct students to complete the Exit Ticket. A review of their work will help with assessing students’ understanding of the concepts that were presented in today’s lesson and planning more effectively for future lessons. The questions may be read aloud to the students.
A STORY OF UNITS
101
©2015 Great Minds. eureka-math.orgG 2-M8-TE-1.3 .0 -0 9.20 15
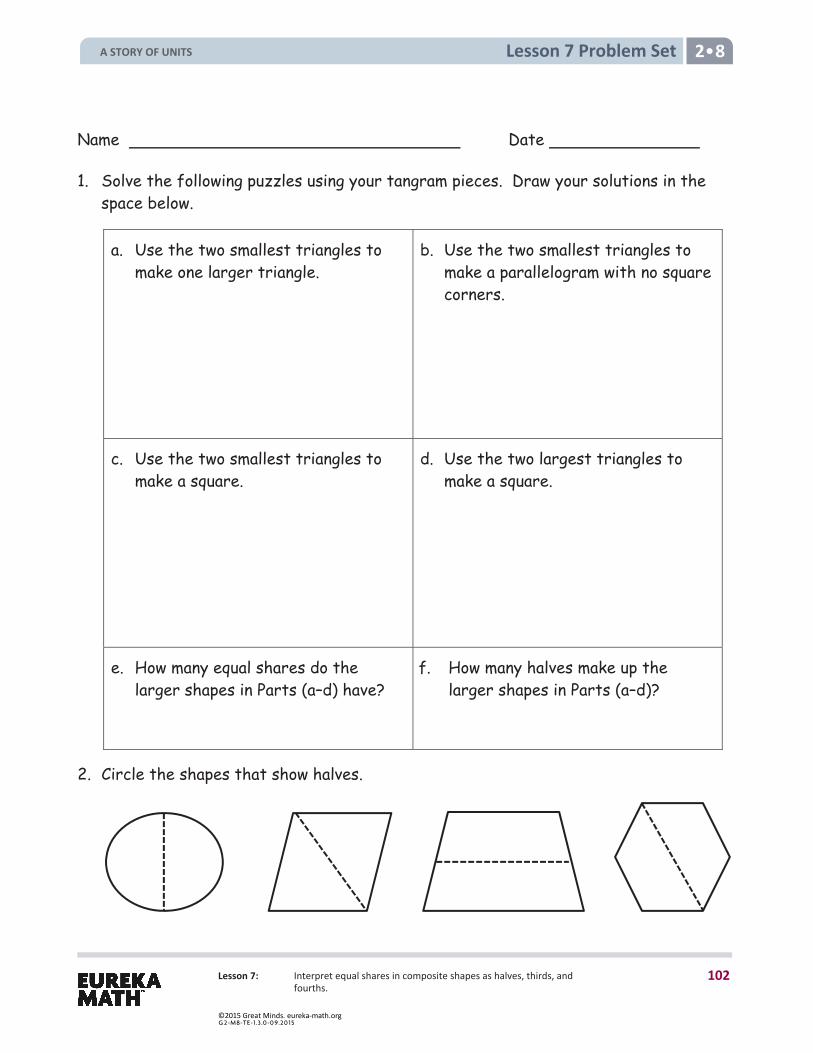
Lesson 7: Interpret equal shares in composite shapes as halves, thirds, and fourths.
Lesson 7 Problem Set 2 8
Name Date
1. Solve the following puzzles using your tangram pieces. Draw your solutions in the space below.
a. Use the two smallest triangles to make one larger triangle.
b. Use the two smallest triangles to make a parallelogram with no square corners.
c. Use the two smallest triangles to make a square.
d. Use the two largest triangles to make a square.
e. How many equal shares do the larger shapes in Parts (a–d) have?
f. How many halves make up the larger shapes in Parts (a–d)?
2. Circle the shapes that show halves.
A STORY OF UNITS
102
©2015 Great Minds. eureka-math.orgG 2-M8-TE-1.3 .0 -0 9.20 15
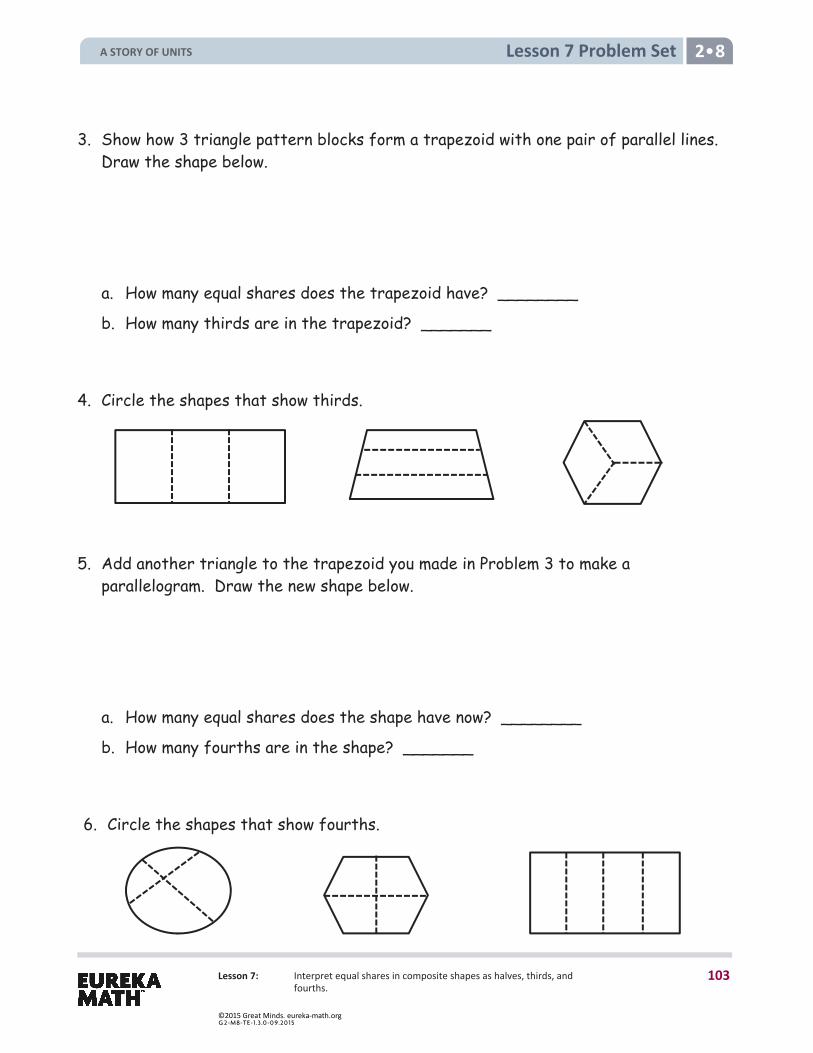
Lesson 7: Interpret equal shares in composite shapes as halves, thirds, and fourths.
Lesson 7 Problem Set 2 8
3. Show how 3 triangle pattern blocks form a trapezoid with one pair of parallel lines. Draw the shape below.
a. How many equal shares does the trapezoid have? ________
b. How many thirds are in the trapezoid? _______ 4. Circle the shapes that show thirds.
5. Add another triangle to the trapezoid you made in Problem 3 to make a parallelogram. Draw the new shape below.
a. How many equal shares does the shape have now? ________
b. How many fourths are in the shape? _______ 6. Circle the shapes that show fourths.
A STORY OF UNITS
103
©2015 Great Minds. eureka-math.orgG 2-M8-TE-1.3 .0 -0 9.20 15
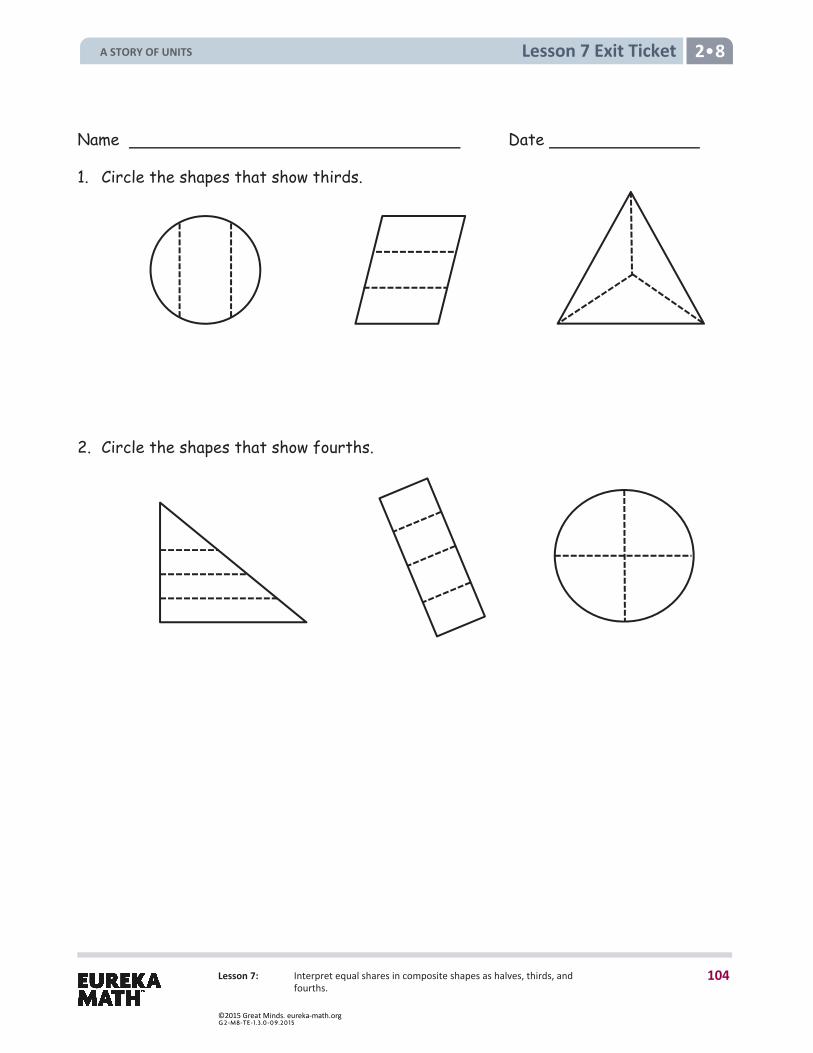
Lesson 7: Interpret equal shares in composite shapes as halves, thirds, and fourths.
Lesson 7 Exit Ticket 2 8
Name Date
1. Circle the shapes that show thirds.
2. Circle the shapes that show fourths.
A STORY OF UNITS
104
©2015 Great Minds. eureka-math.orgG 2-M8-TE-1.3 .0 -0 9.20 15

Lesson 7: Interpret equal shares in composite shapes as halves, thirds, and fourths.
Lesson 7 Homework 2 8
Name Date
1. Solve the following puzzles using your tangram pieces. Draw your solutions in the space below.
a. Use the two largest triangles to make a square.
b. Use the two smallest triangles to make a square.
c. Use the two smallest triangles to make a parallelogram with no square corners.
d. Use the two smallest triangles to make one larger triangle.
e. How many equal shares do the larger shapes in Parts (a–d) have?
f. How many halves make up the larger shapes in Parts (a–d)?
2. Circle the shapes that show halves.
A STORY OF UNITS
105
©2015 Great Minds. eureka-math.orgG 2-M8-TE-1.3 .0 -0 9.20 15
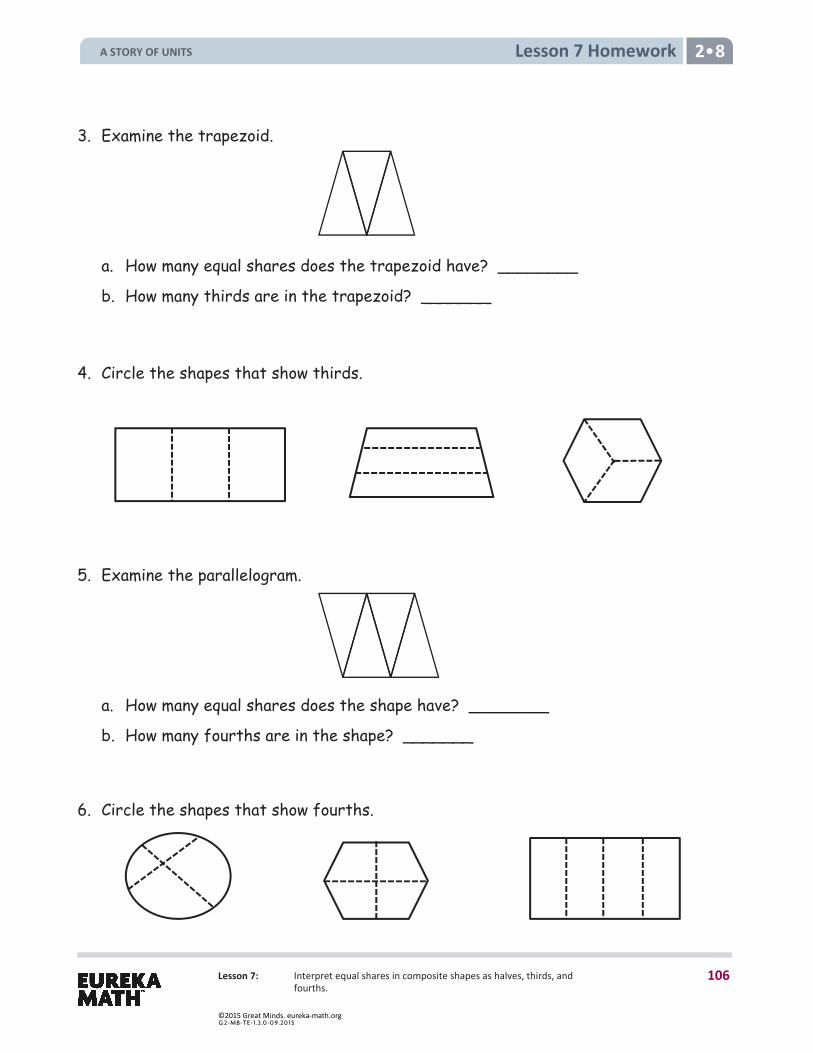
Lesson 7: Interpret equal shares in composite shapes as halves, thirds, and fourths.
Lesson 7 Homework 2 8
3. Examine the trapezoid.
a. How many equal shares does the trapezoid have? ________
b. How many thirds are in the trapezoid? _______ 4. Circle the shapes that show thirds. 5. Examine the parallelogram.
a. How many equal shares does the shape have? ________
b. How many fourths are in the shape? _______ 6. Circle the shapes that show fourths.
A STORY OF UNITS
106
©2015 Great Minds. eureka-math.orgG 2-M8-TE-1.3 .0 -0 9.20 15
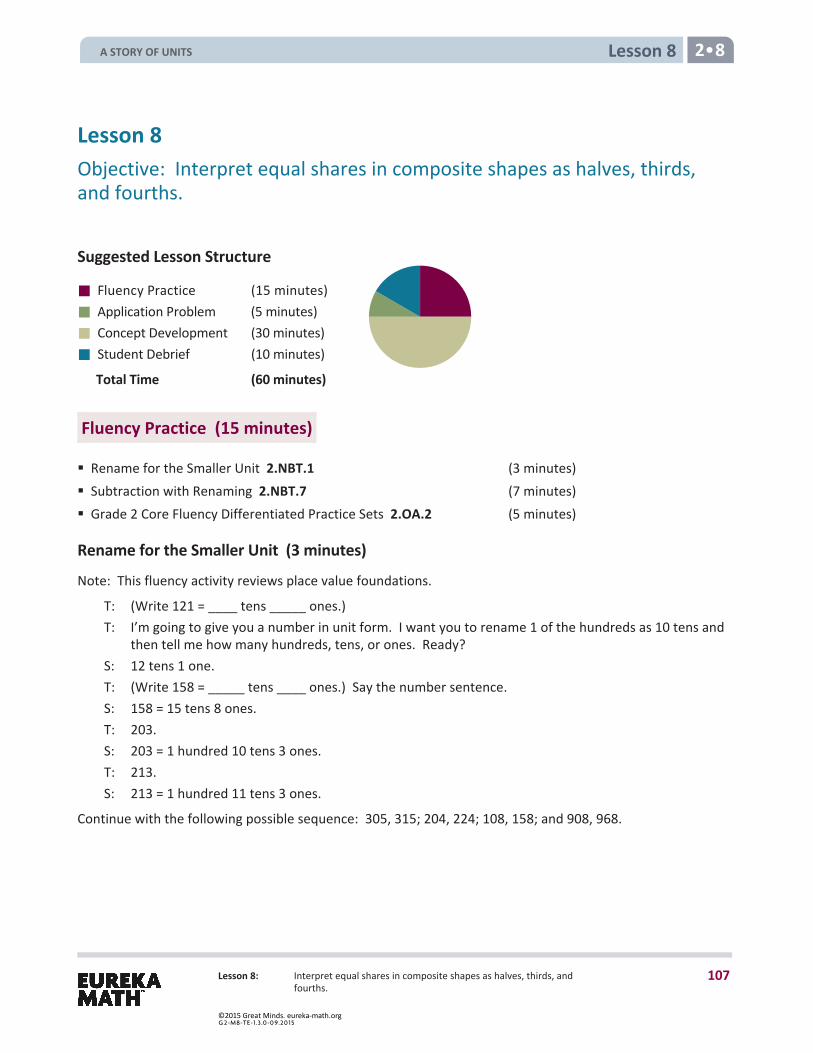
Lesson 8 2 8
Lesson 8: Interpret equal shares in composite shapes as halves, thirds, and fourths.
Lesson 8 Objective: Interpret equal shares in composite shapes as halves, thirds, and fourths.
Suggested Lesson Structure
Fluency Practice (15 minutes) Application Problem (5 minutes) Concept Development (30 minutes) Student Debrief (10 minutes)
Total Time (60 minutes)
Fluency Practice (15 minutes)
Rename for the Smaller Unit 2.NBT.1 (3 minutes) Subtraction with Renaming 2.NBT.7 (7 minutes) Grade 2 Core Fluency Differentiated Practice Sets 2.OA.2 (5 minutes)
Rename for the Smaller Unit (3 minutes)
Note: This fluency activity reviews place value foundations.
T: (Write 121 = ____ tens _____ ones.) T: I’m going to give you a number in unit form. I want you to rename 1 of the hundreds as 10 tens and
then tell me how many hundreds, tens, or ones. Ready? S: 12 tens 1 one. T: (Write 158 = _____ tens ____ ones.) Say the number sentence. S: 158 = 15 tens 8 ones. T: 203. S: 203 = 1 hundred 10 tens 3 ones. T: 213. S: 213 = 1 hundred 11 tens 3 ones.
Continue with the following possible sequence: 305, 315; 204, 224; 108, 158; and 908, 968.
A STORY OF UNITS
107
©2015 Great Minds. eureka-math.orgG 2-M8-TE-1.3 .0 -0 9.20 15
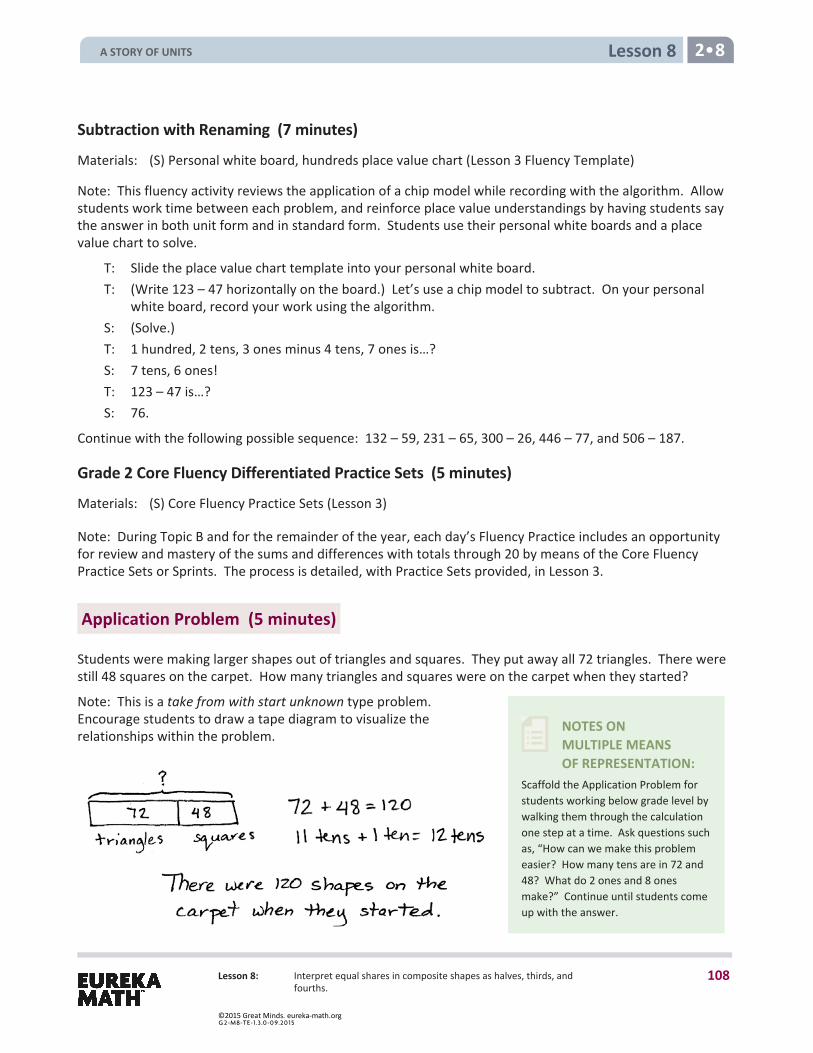
Lesson 8 2 8
Lesson 8: Interpret equal shares in composite shapes as halves, thirds, and fourths.
NOTES ON MULTIPLE MEANS OF REPRESENTATION:
Scaffold the Application Problem for students working below grade level by walking them through the calculation one step at a time. Ask questions such as, “How can we make this problem easier? How many tens are in 72 and 48? What do 2 ones and 8 ones make?” Continue until students come up with the answer.
Subtraction with Renaming (7 minutes)
Materials: (S) Personal white board, hundreds place value chart (Lesson 3 Fluency Template)
Note: This fluency activity reviews the application of a chip model while recording with the algorithm. Allow students work time between each problem, and reinforce place value understandings by having students say the answer in both unit form and in standard form. Students use their personal white boards and a place value chart to solve.
T: Slide the place value chart template into your personal white board. T: (Write 123 – 47 horizontally on the board.) Let’s use a chip model to subtract. On your personal
white board, record your work using the algorithm. S: (Solve.) T: 1 hundred, 2 tens, 3 ones minus 4 tens, 7 ones is…? S: 7 tens, 6 ones! T: 123 – 47 is…? S: 76.
Continue with the following possible sequence: 132 – 59, 231 – 65, 300 – 26, 446 – 77, and 506 – 187.
Grade 2 Core Fluency Differentiated Practice Sets (5 minutes)
Materials: (S) Core Fluency Practice Sets (Lesson 3)
Note: During Topic B and for the remainder of the year, each day’s Fluency Practice includes an opportunity for review and mastery of the sums and differences with totals through 20 by means of the Core Fluency Practice Sets or Sprints. The process is detailed, with Practice Sets provided, in Lesson 3.
Application Problem (5 minutes)
Students were making larger shapes out of triangles and squares. They put away all 72 triangles. There were still 48 squares on the carpet. How many triangles and squares were on the carpet when they started?
Note: This is a take from with start unknown type problem. Encourage students to draw a tape diagram to visualize the relationships within the problem.
A STORY OF UNITS
108
©2015 Great Minds. eureka-math.orgG 2-M8-TE-1.3 .0 -0 9.20 15
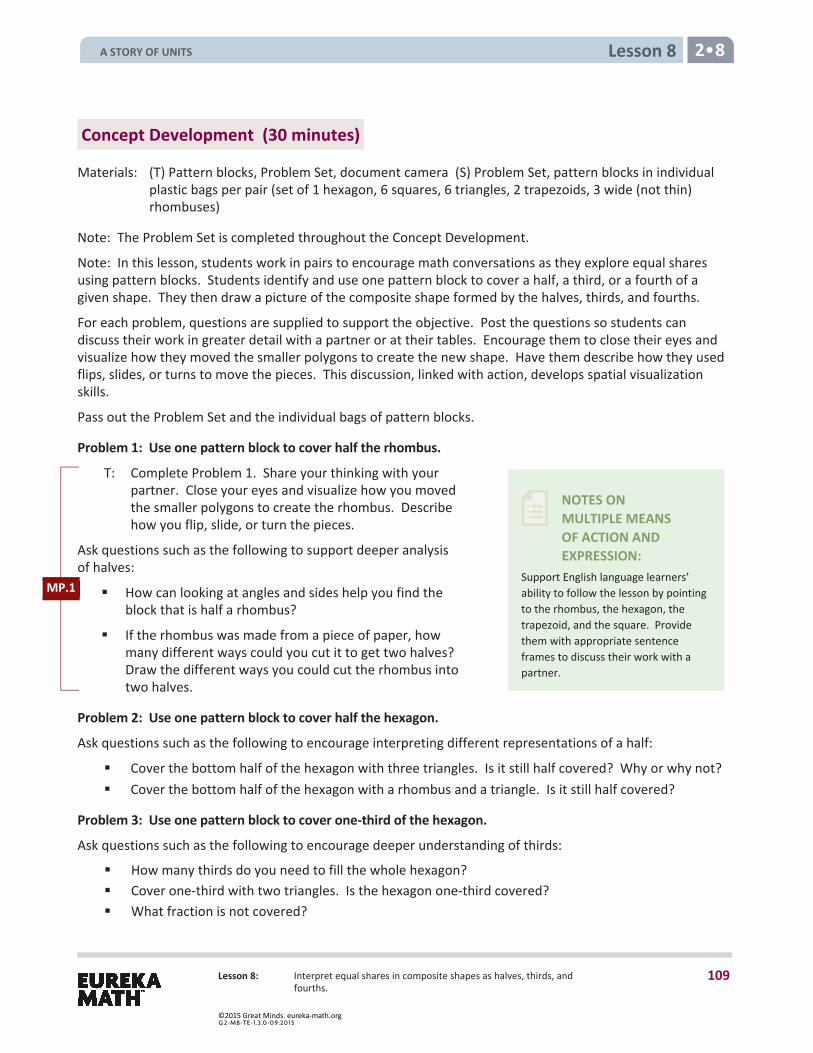
Lesson 8 2 8
Lesson 8: Interpret equal shares in composite shapes as halves, thirds, and fourths.
NOTES ON MULTIPLE MEANS OF ACTION AND EXPRESSION:
Support English language learners’ ability to follow the lesson by pointing to the rhombus, the hexagon, the trapezoid, and the square. Provide them with appropriate sentence frames to discuss their work with a partner.
Concept Development (30 minutes)
Materials: (T) Pattern blocks, Problem Set, document camera (S) Problem Set, pattern blocks in individual plastic bags per pair (set of 1 hexagon, 6 squares, 6 triangles, 2 trapezoids, 3 wide (not thin) rhombuses)
Note: The Problem Set is completed throughout the Concept Development.
Note: In this lesson, students work in pairs to encourage math conversations as they explore equal shares using pattern blocks. Students identify and use one pattern block to cover a half, a third, or a fourth of a given shape. They then draw a picture of the composite shape formed by the halves, thirds, and fourths.
For each problem, questions are supplied to support the objective. Post the questions so students can discuss their work in greater detail with a partner or at their tables. Encourage them to close their eyes and visualize how they moved the smaller polygons to create the new shape. Have them describe how they used flips, slides, or turns to move the pieces. This discussion, linked with action, develops spatial visualization skills.
Pass out the Problem Set and the individual bags of pattern blocks.
Problem 1: Use one pattern block to cover half the rhombus.
T: Complete Problem 1. Share your thinking with your partner. Close your eyes and visualize how you moved the smaller polygons to create the rhombus. Describe how you flip, slide, or turn the pieces.
Ask questions such as the following to support deeper analysis of halves:
How can looking at angles and sides help you find the block that is half a rhombus?
If the rhombus was made from a piece of paper, how many different ways could you cut it to get two halves? Draw the different ways you could cut the rhombus into two halves.
Problem 2: Use one pattern block to cover half the hexagon.
Ask questions such as the following to encourage interpreting different representations of a half:
Cover the bottom half of the hexagon with three triangles. Is it still half covered? Why or why not? Cover the bottom half of the hexagon with a rhombus and a triangle. Is it still half covered?
Problem 3: Use one pattern block to cover one-third of the hexagon.
Ask questions such as the following to encourage deeper understanding of thirds:
How many thirds do you need to fill the whole hexagon? Cover one-third with two triangles. Is the hexagon one-third covered? What fraction is not covered?
MP.1
A STORY OF UNITS
109
©2015 Great Minds. eureka-math.orgG 2-M8-TE-1.3 .0 -0 9.20 15

Lesson 8 2 8
Lesson 8: Interpret equal shares in composite shapes as halves, thirds, and fourths.
Problem 4: Use one pattern block to cover one-third of the trapezoid.
Prompt students to interpret thirds in relationship to a whole:
Use your drawing of the trapezoid formed by thirds to talk about how many small triangles wouldmake a whole hexagon.
How many thirds are in the trapezoid? In the hexagon?
Problem 5: Use four pattern blocks to make one larger square.
Prompt students to support different understandings of fourths:
How many equal shares does the large square have? How many fourths make up the large square? How many fourths equal one whole square? Use your blocks to show that 2 fourths is the same as a half of the large square.
Problem 6: Use one pattern block to cover one-sixth of the hexagon.
Ask questions such as the following to support thinking about sixths:
How many equal parts does the hexagon have? How many sixths make up the hexagon?
Student Debrief (10 minutes)
Lesson Objective: Interpret equal shares in composite shapes as halves, thirds, and fourths.
The Student Debrief is intended to invite reflection and active processing of the total lesson experience.
Invite students to review their solutions for the Problem Set. They should check work by comparing answers with a partner before going over answers as a class. Look for misconceptions or misunderstandings that can be addressed in the Debrief. Guide students in a conversation to debrief the Problem Set and process the lesson.
Any combination of the questions below may be used to lead the discussion. Consider using some of the discussion questions posed to pairs during the Concept Development as part of the Student Debrief. This will give students an opportunity to share their learning and to solidify their understanding if they overcame a misconception.
Which problem was most difficult to solve? Whatstrategies did you use to solve it? What madeyou keep trying even when it was hard?
A STORY OF UNITS
110
©2015 Great Minds. eureka-math.orgG 2-M8-TE-1.3 .0 -0 9.20 15
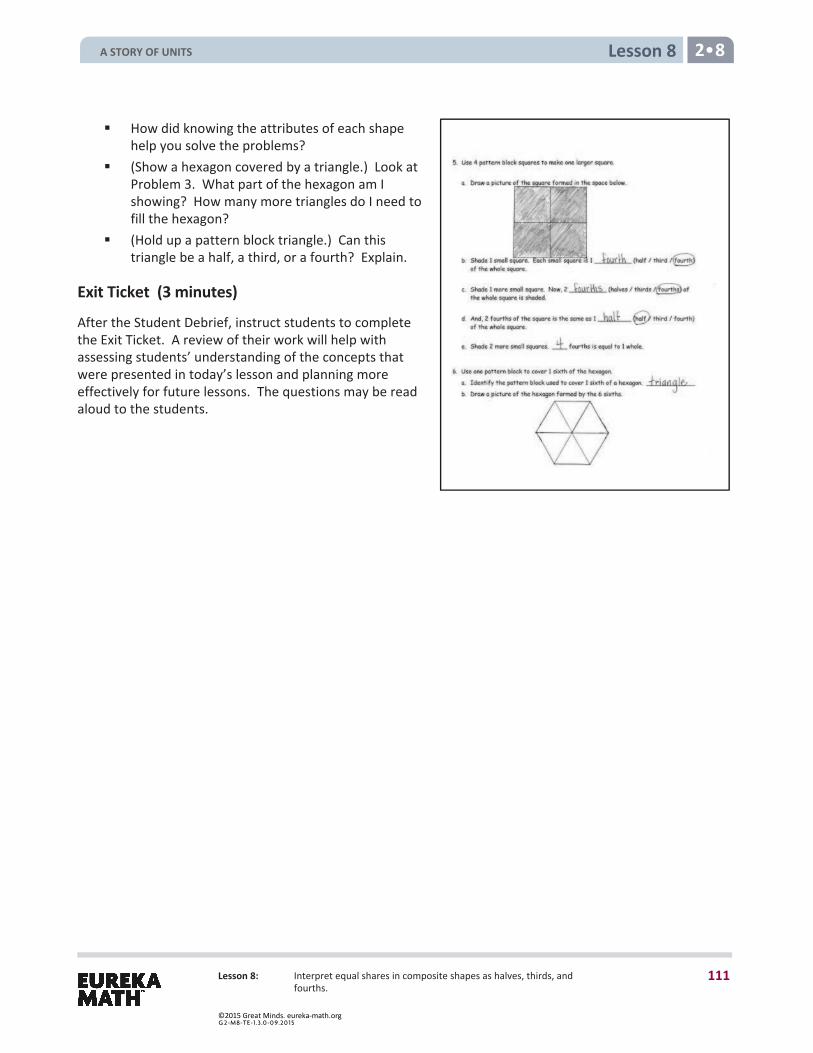
Lesson 8 2 8
Lesson 8: Interpret equal shares in composite shapes as halves, thirds, and fourths.
How did knowing the attributes of each shapehelp you solve the problems?
(Show a hexagon covered by a triangle.) Look atProblem 3. What part of the hexagon am Ishowing? How many more triangles do I need tofill the hexagon?
(Hold up a pattern block triangle.) Can thistriangle be a half, a third, or a fourth? Explain.
Exit Ticket (3 minutes)
After the Student Debrief, instruct students to complete the Exit Ticket. A review of their work will help with assessing students’ understanding of the concepts that were presented in today’s lesson and planning more effectively for future lessons. The questions may be read aloud to the students.
A STORY OF UNITS
111
©2015 Great Minds. eureka-math.orgG 2-M8-TE-1.3 .0 -0 9.20 15

Lesson 8 Problem Set 2 8
Lesson 8: Interpret equal shares in composite shapes as halves, thirds, and fourths.
Name Date
1. Use one pattern block to cover half the rhombus.
a. Identify the pattern block used to cover half of the rhombus. _____________
b. Draw a picture of the rhombus formed by the 2 halves.
2. Use one pattern block to cover half the hexagon.
a. Identify the pattern block used to cover half of a hexagon. _______________
b. Draw a picture of the hexagon formed by the 2 halves.
3. Use one pattern block to cover 1 third of the hexagon.
a. Identify the pattern block used to cover 1 third of a hexagon. _____________
b. Draw a picture of the hexagon formed by the 3 thirds.
4. Use one pattern block to cover 1 third of the trapezoid.
a. Identify the pattern block used to cover 1 third of a trapezoid. ___________
b. Draw a picture of the trapezoid formed by the 3 thirds.
A STORY OF UNITS
112
©2015 Great Minds. eureka-math.orgG 2-M8-TE-1.3 .0 -0 9.20 15
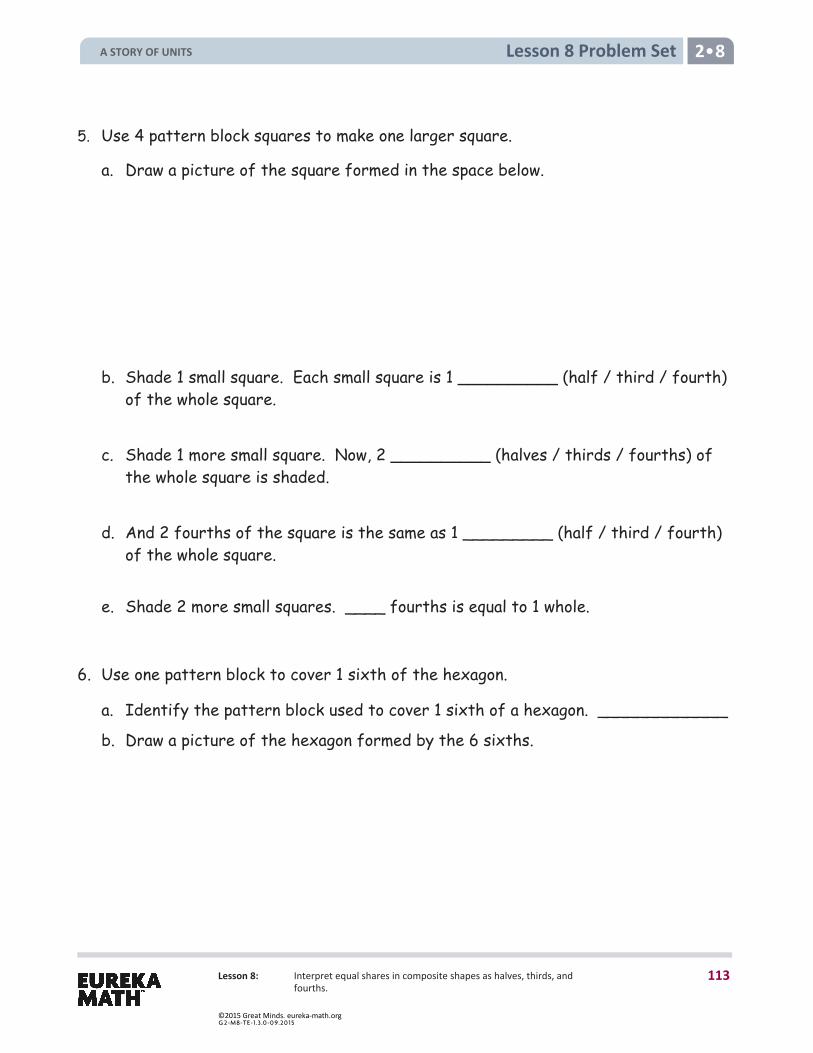
Lesson 8 Problem Set 2 8
Lesson 8: Interpret equal shares in composite shapes as halves, thirds, and fourths.
5. Use 4 pattern block squares to make one larger square.
a. Draw a picture of the square formed in the space below.
b. Shade 1 small square. Each small square is 1 __________ (half / third / fourth) of the whole square.
c. Shade 1 more small square. Now, 2 __________ (halves / thirds / fourths) of the whole square is shaded.
d. And 2 fourths of the square is the same as 1 _________ (half / third / fourth) of the whole square.
e. Shade 2 more small squares. ____ fourths is equal to 1 whole.
6. Use one pattern block to cover 1 sixth of the hexagon.
a. Identify the pattern block used to cover 1 sixth of a hexagon. _____________
b. Draw a picture of the hexagon formed by the 6 sixths.
A STORY OF UNITS
113
©2015 Great Minds. eureka-math.orgG 2-M8-TE-1.3 .0 -0 9.20 15
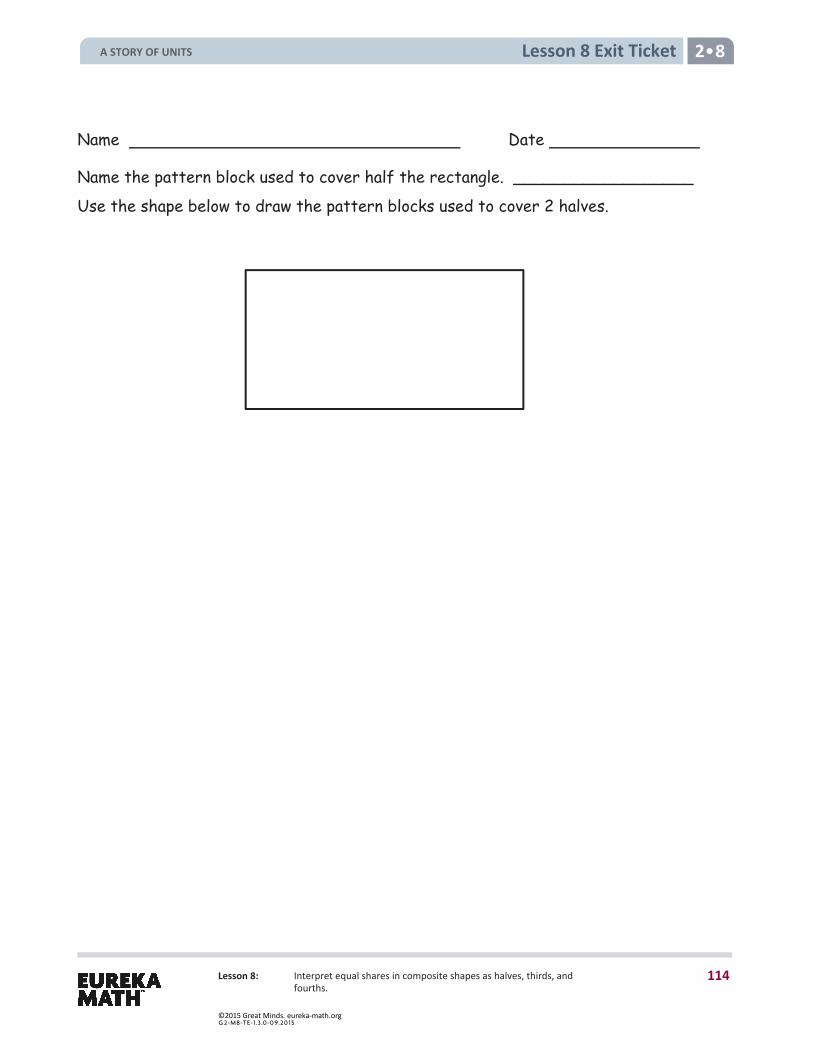
Lesson 8 Exit Ticket 2 8
Lesson 8: Interpret equal shares in composite shapes as halves, thirds, and fourths.
Name Date
Name the pattern block used to cover half the rectangle. __________________
Use the shape below to draw the pattern blocks used to cover 2 halves.
A STORY OF UNITS
114
©2015 Great Minds. eureka-math.orgG 2-M8-TE-1.3 .0 -0 9.20 15
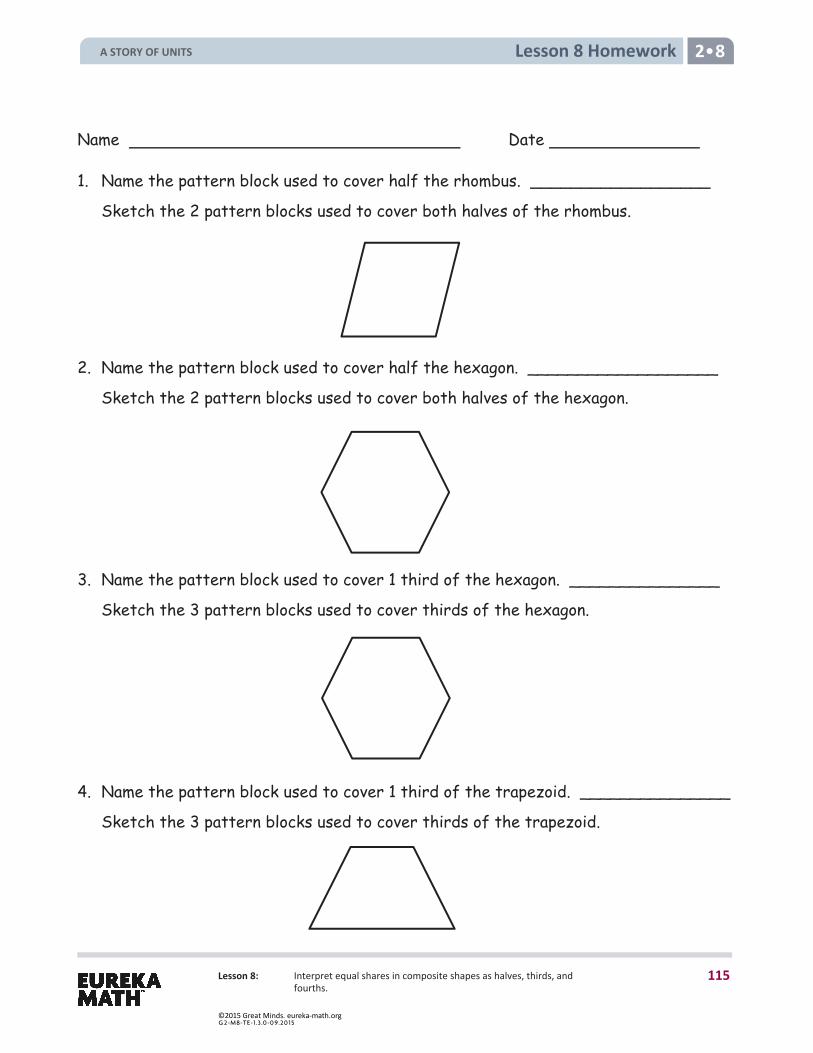
Lesson 8 Homework 2 8
Lesson 8: Interpret equal shares in composite shapes as halves, thirds, and fourths.
Name Date
1. Name the pattern block used to cover half the rhombus. __________________
Sketch the 2 pattern blocks used to cover both halves of the rhombus.
2. Name the pattern block used to cover half the hexagon. ___________________
Sketch the 2 pattern blocks used to cover both halves of the hexagon.
3. Name the pattern block used to cover 1 third of the hexagon. _______________
Sketch the 3 pattern blocks used to cover thirds of the hexagon.
4. Name the pattern block used to cover 1 third of the trapezoid. _______________
Sketch the 3 pattern blocks used to cover thirds of the trapezoid.
A STORY OF UNITS
115
©2015 Great Minds. eureka-math.orgG 2-M8-TE-1.3 .0 -0 9.20 15
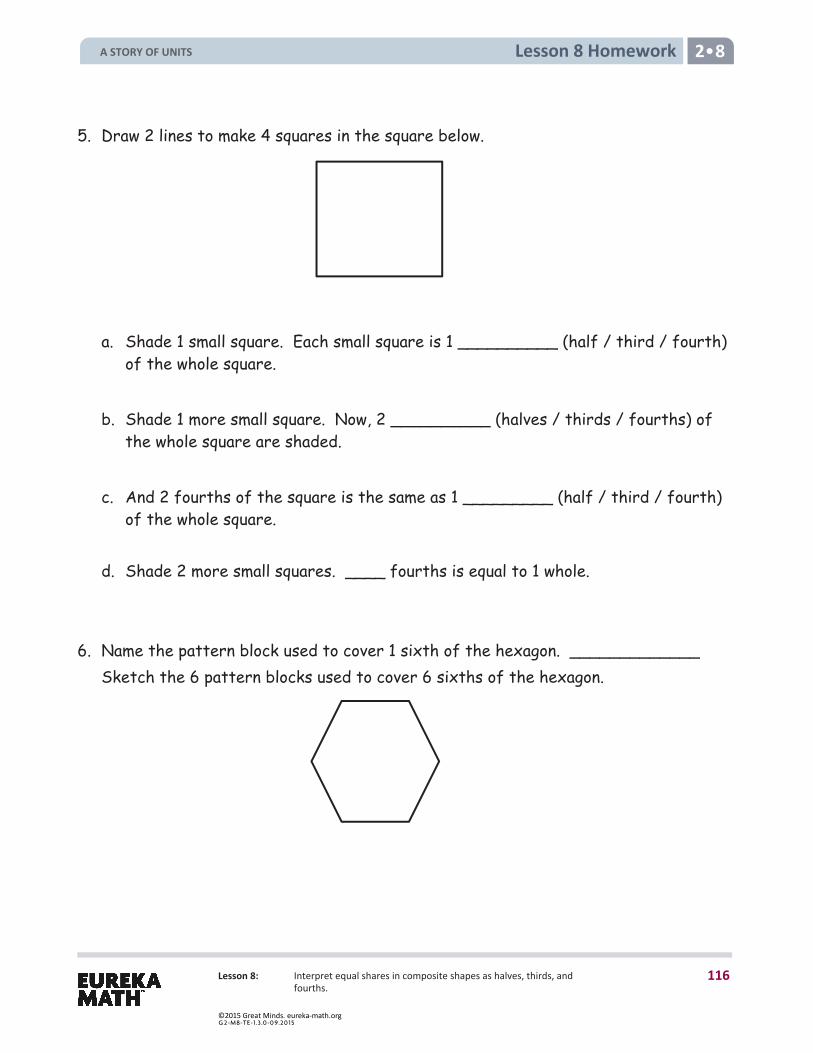
Lesson 8 Homework 2 8
Lesson 8: Interpret equal shares in composite shapes as halves, thirds, and fourths.
5. Draw 2 lines to make 4 squares in the square below.
a. Shade 1 small square. Each small square is 1 __________ (half / third / fourth) of the whole square.
b. Shade 1 more small square. Now, 2 __________ (halves / thirds / fourths) of the whole square are shaded.
c. And 2 fourths of the square is the same as 1 _________ (half / third / fourth) of the whole square.
d. Shade 2 more small squares. ____ fourths is equal to 1 whole.
6. Name the pattern block used to cover 1 sixth of the hexagon. _____________ Sketch the 6 pattern blocks used to cover 6 sixths of the hexagon.
A STORY OF UNITS
116
©2015 Great Minds. eureka-math.orgG 2-M8-TE-1.3 .0 -0 9.20 15
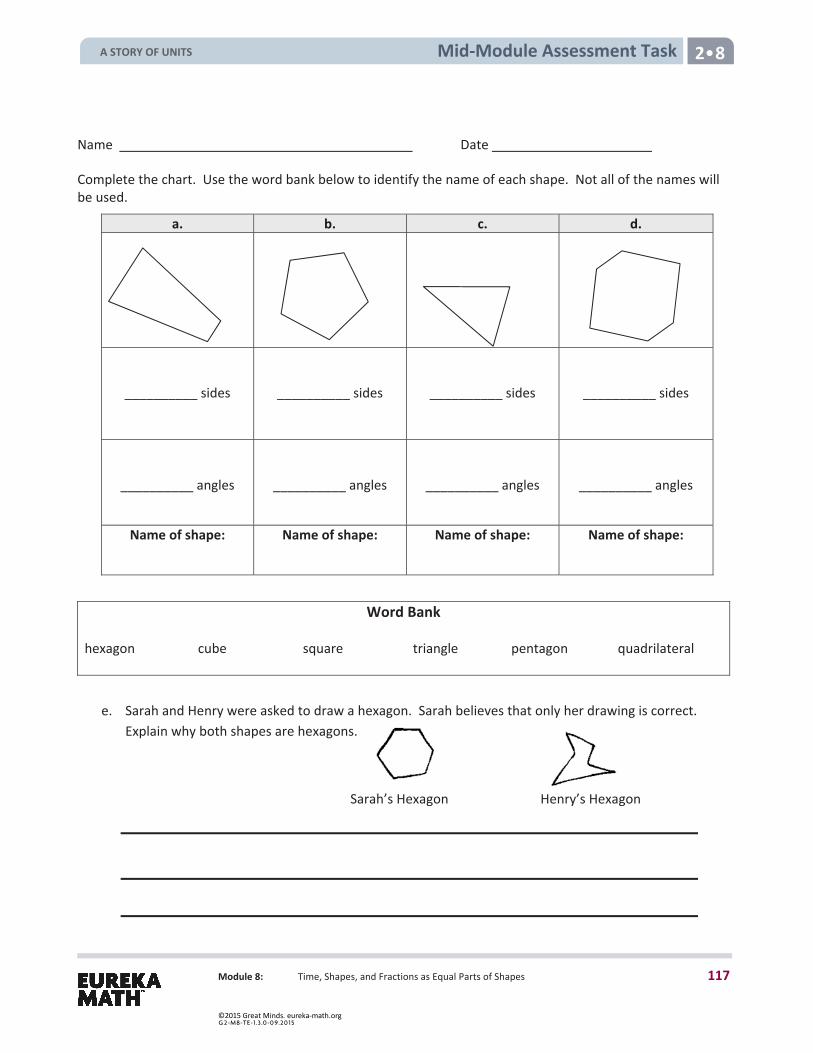
Mid-Module Assessment Task 2 8
Module 8: Time, Shapes, and Fractions as Equal Parts of Shapes
Name Date
Complete the chart. Use the word bank below to identify the name of each shape. Not all of the names will be used.
a. b. c. d.
__________ sides
__________ sides
__________ sides
__________ sides
__________ angles
__________ angles
__________ angles
__________ angles
Name of shape: Name of shape: Name of shape: Name of shape:
Word Bank hexagon cube square triangle pentagon quadrilateral
e. Sarah and Henry were asked to draw a hexagon. Sarah believes that only her drawing is correct. Explain why both shapes are hexagons.
Sarah’s Hexagon Henry’s Hexagon
A STORY OF UNITS
117
©2015 Great Minds. eureka-math.orgG 2-M8-TE-1.3 .0 -0 9.20 15
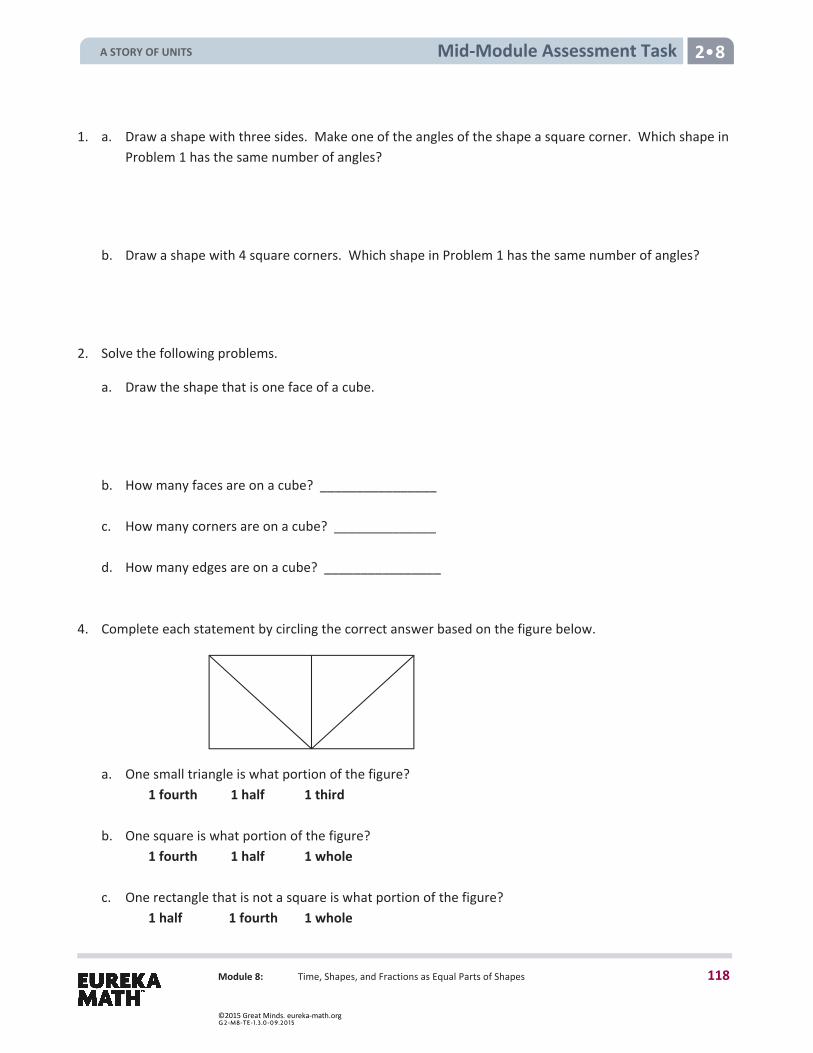
Mid-Module Assessment Task 2 8
Module 8: Time, Shapes, and Fractions as Equal Parts of Shapes
1. a. Draw a shape with three sides. Make one of the angles of the shape a square corner. Which shape in Problem 1 has the same number of angles?
b. Draw a shape with 4 square corners. Which shape in Problem 1 has the same number of angles?
2. Solve the following problems.
a. Draw the shape that is one face of a cube.
b. How many faces are on a cube? ________________
c. How many corners are on a cube? ______________
d. How many edges are on a cube? ________________
4. Complete each statement by circling the correct answer based on the figure below.
a. One small triangle is what portion of the figure? 1 fourth 1 half 1 third
b. One square is what portion of the figure? 1 fourth 1 half 1 whole
c. One rectangle that is not a square is what portion of the figure? 1 half 1 fourth 1 whole
A STORY OF UNITS
118
©2015 Great Minds. eureka-math.orgG 2-M8-TE-1.3 .0 -0 9.20 15
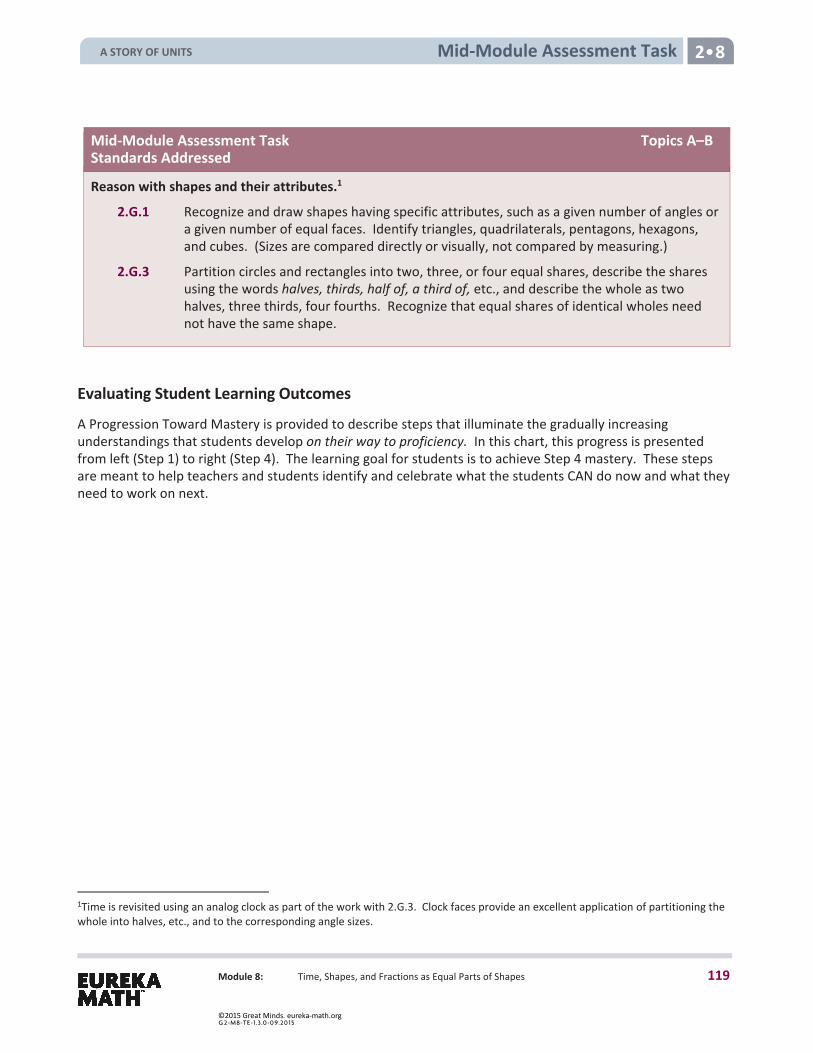
Mid-Module Assessment Task 2 8
Module 8: Time, Shapes, and Fractions as Equal Parts of Shapes
Mid-Module Assessment Task Topics A–BStandards Addressed
Reason with shapes and their attributes.1
2.G.1 Recognize and draw shapes having specific attributes, such as a given number of angles or a given number of equal faces. Identify triangles, quadrilaterals, pentagons, hexagons, and cubes. (Sizes are compared directly or visually, not compared by measuring.)
2.G.3 Partition circles and rectangles into two, three, or four equal shares, describe the shares using the words halves, thirds, half of, a third of, etc., and describe the whole as two halves, three thirds, four fourths. Recognize that equal shares of identical wholes need not have the same shape.
Evaluating Student Learning Outcomes
A Progression Toward Mastery is provided to describe steps that illuminate the gradually increasing understandings that students develop on their way to proficiency. In this chart, this progress is presented from left (Step 1) to right (Step 4). The learning goal for students is to achieve Step 4 mastery. These steps are meant to help teachers and students identify and celebrate what the students CAN do now and what they need to work on next.
1Time is revisited using an analog clock as part of the work with 2.G.3. Clock faces provide an excellent application of partitioning the whole into halves, etc., and to the corresponding angle sizes.
A STORY OF UNITS
119
©2015 Great Minds. eureka-math.orgG 2-M8-TE-1.3 .0 -0 9.20 15
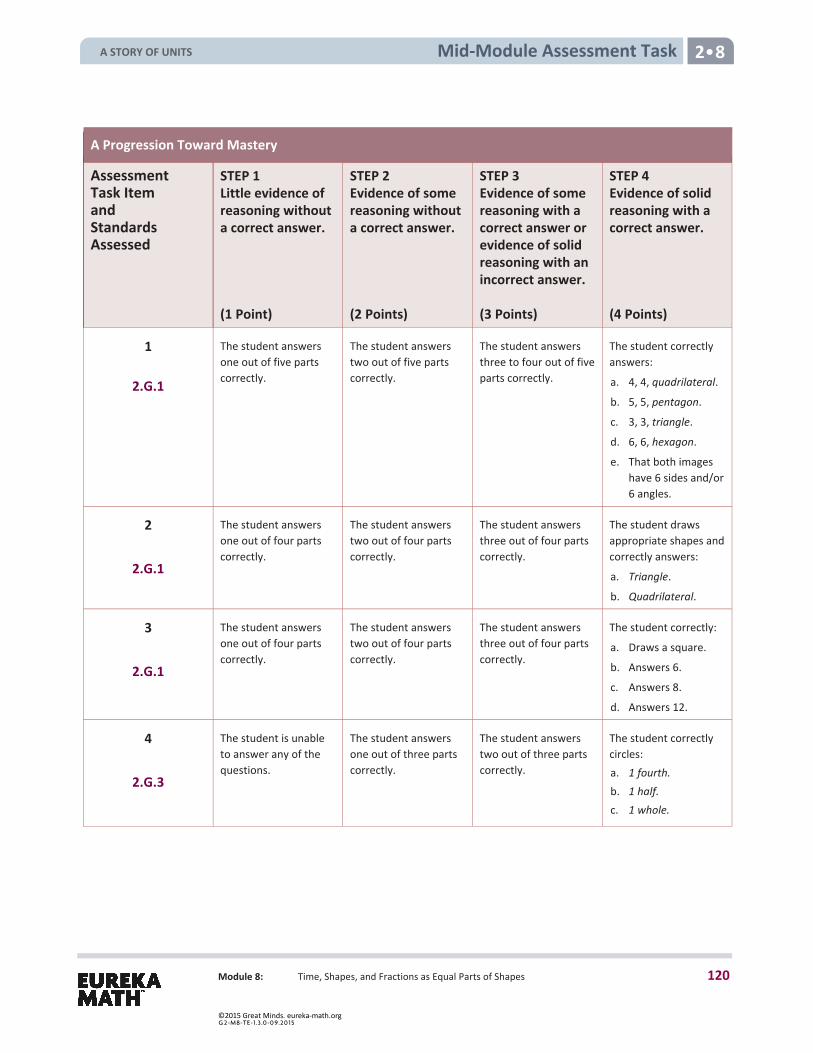
Mid-Module Assessment Task 2 8
Module 8: Time, Shapes, and Fractions as Equal Parts of Shapes
A Progression Toward Mastery
Assessment Task Item and Standards Assessed
STEP 1 Little evidence of reasoning without a correct answer. (1 Point)
STEP 2Evidence of some reasoning without a correct answer. (2 Points)
STEP 3Evidence of some reasoning with a correct answer or evidence of solid reasoning with an incorrect answer. (3 Points)
STEP 4 Evidence of solid reasoning with a correct answer. (4 Points)
1
2.G.1
The student answers one out of five parts correctly.
The student answers two out of five parts correctly.
The student answers three to four out of five parts correctly.
The student correctly answers:
a. 4, 4, quadrilateral.
b. 5, 5, pentagon.
c. 3, 3, triangle.
d. 6, 6, hexagon.
e. That both images have 6 sides and/or 6 angles.
2
2.G.1
The student answers one out of four parts correctly.
The student answers two out of four parts correctly.
The student answers three out of four parts correctly.
The student draws appropriate shapes and correctly answers:
a. Triangle.
b. Quadrilateral.
3
2.G.1
The student answers one out of four parts correctly.
The student answers two out of four parts correctly.
The student answers three out of four parts correctly.
The student correctly:
a. Draws a square.
b. Answers 6.
c. Answers 8.
d. Answers 12.
4
2.G.3
The student is unable to answer any of the questions.
The student answers one out of three parts correctly.
The student answers two out of three parts correctly.
The student correctly circles: a. 1 fourth. b. 1 half. c. 1 whole.
A STORY OF UNITS
120
©2015 Great Minds. eureka-math.orgG 2-M8-TE-1.3 .0 -0 9.20 15
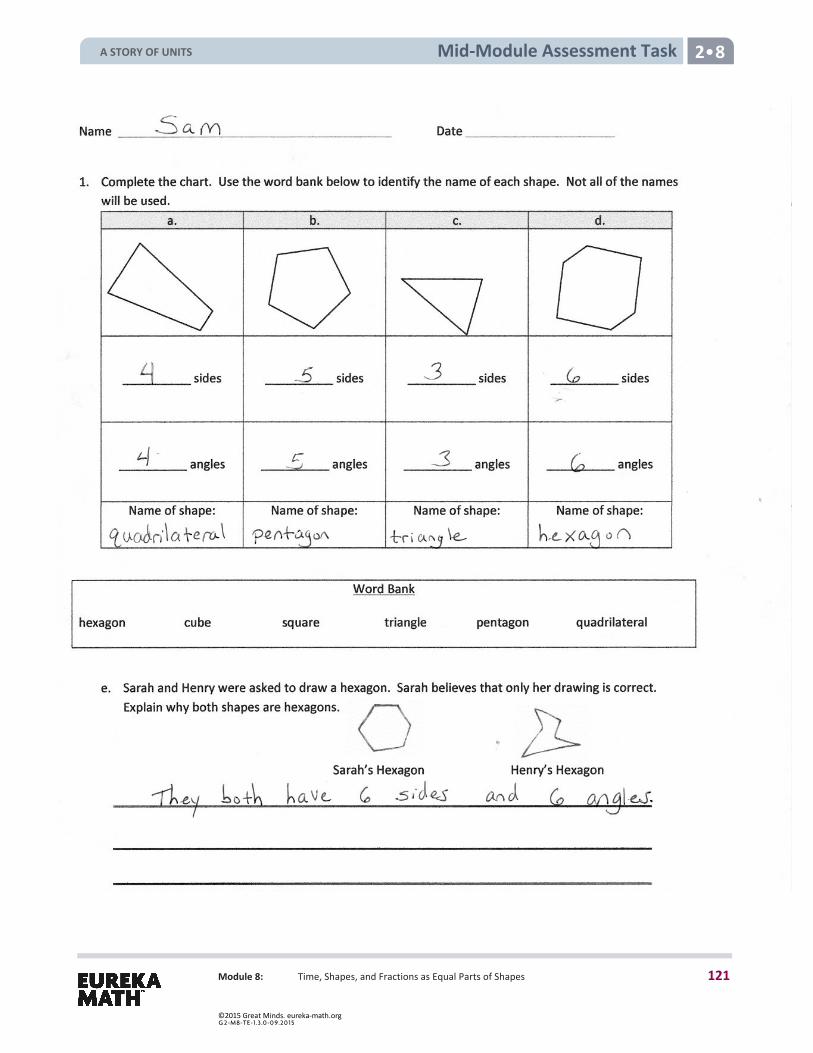
Mid-Module Assessment Task 2 8
Module 8: Time, Shapes, and Fractions as Equal Parts of Shapes
A STORY OF UNITS
121
©2015 Great Minds. eureka-math.orgG 2-M8-TE-1.3 .0 -0 9.20 15
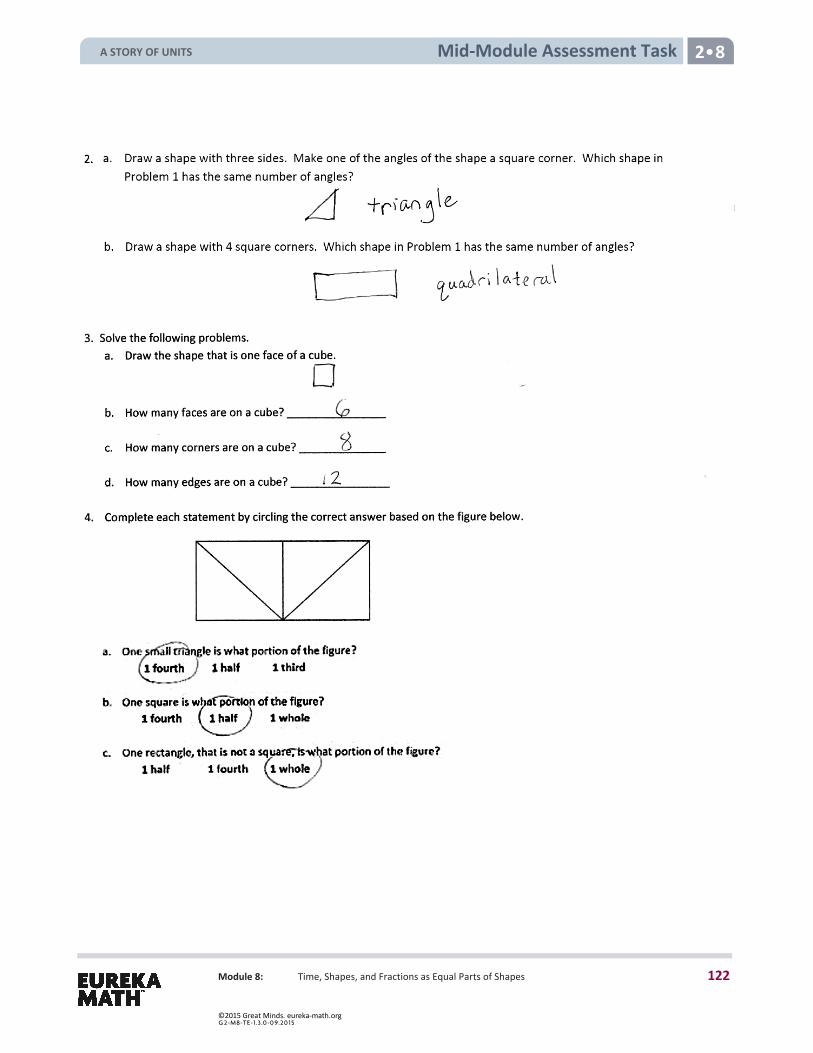
Mid-Module Assessment Task 2 8
Module 8: Time, Shapes, and Fractions as Equal Parts of Shapes
A STORY OF UNITS
122
©2015 Great Minds. eureka-math.orgG 2-M8-TE-1.3 .0 -0 9.20 15
2 G R A D E
Mathematics Curriculum GRADE 2 • MODULE 8
Topic C: Halves, Thirds, and Fourths of Circles and Rectangles
Topic C
Halves, Thirds, and Fourths of Circles and Rectangles 2.G.3, 2.G.1
Focus Standard: 2.G.3 Partition circles and rectangles into two, three, or four equal shares, describe the shares using the words halves, thirds, half of, a third of, etc., and describe the whole as two halves, three thirds, four fourths. Recognize that equal shares of identical wholes need not have the same shape.
Instructional Days: 4 Coherence -Links from: G1–M5 Identifying, Composing, and Partitioning Shapes -Links to: G3–M5 Fractions as Numbers on the Number Line
Topic C focuses on partitioning circles and rectangles into equal fractional parts. In Lesson 9, students are introduced to partitioning shapes into two equal shares, or halves, using both circles and rectangles. First, partners choose different ways to fold a sheet of paper in half. Then, they label and share their halves, discovering that though they each folded their rectangle differently, they each have two equal parts of the original whole. Next, they cut out a circle and fold, color, and label one half. They then rotate their circles and discover that halves are determined by equal parts, not by the orientation of the line. Finally, students look at pictures of partitioned shapes and discuss whether the shaded (or unshaded) portion is or is not two equal shares. To encourage student reasoning about equal shares, a variety of partitions and orientations are used.
Lesson 10 continues the same process with thirds and fourths. Students learn to decompose a whole into three equal parts to create thirds. They create fourths by splitting two halves into two equal parts. Given a variety of partitioned shapes, students are asked to determine how many thirds or fourths are represented by the shaded (or unshaded) portion. Lesson 10 ends with students synthesizing their understanding of halves, thirds, and fourths by partitioning a pizza and a rectangular sheet cake, making decisions based on their share of the pizza or cake.
In Lesson 11, students build upon their new knowledge by assembling a whole out of fractional parts. Given a circle made of two parts, students see that the whole circle is composed of 2 halves. Similarly, they see that a whole rectangle cut into thirds is made of 3 thirds, or that a square cut into fourths is made of 4 fourths.
A STORY OF UNITS
123
©2015 Great Minds. eureka-math.orgG 2-M8-TE-1.3 .0 -0 9.20 15
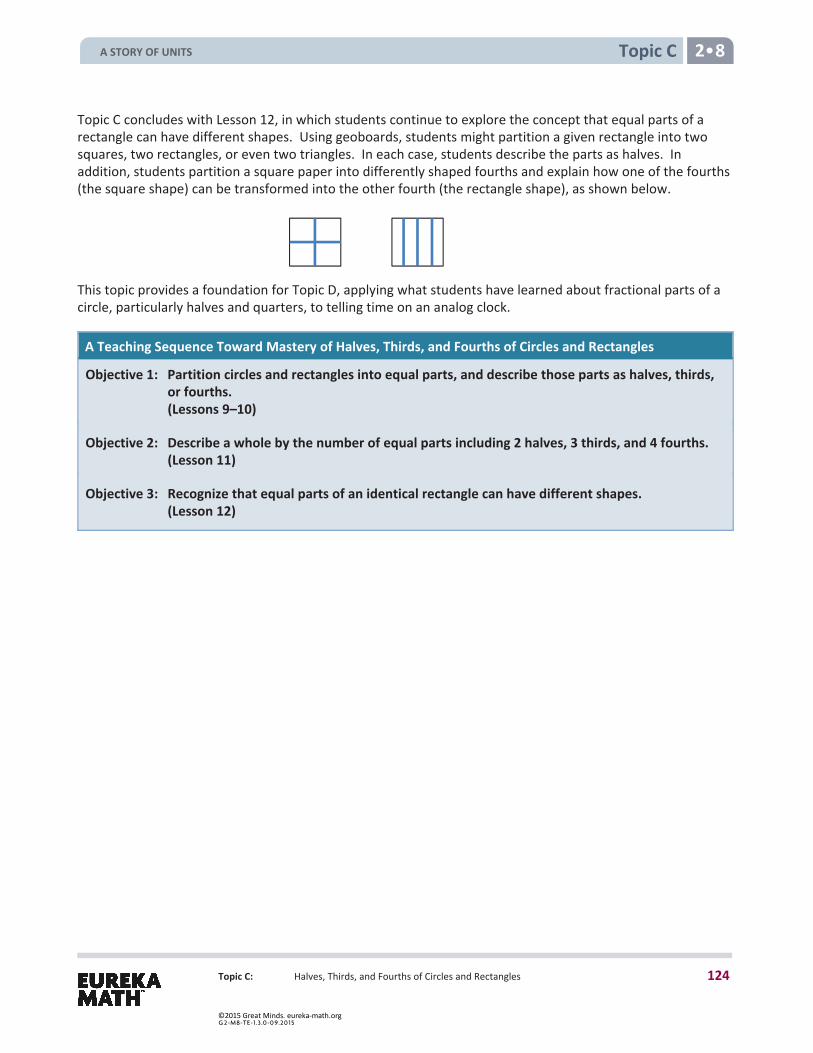
Topic C 2 8
Topic C: Halves, Thirds, and Fourths of Circles and Rectangles
Topic C concludes with Lesson 12, in which students continue to explore the concept that equal parts of a rectangle can have different shapes. Using geoboards, students might partition a given rectangle into two squares, two rectangles, or even two triangles. In each case, students describe the parts as halves. In addition, students partition a square paper into differently shaped fourths and explain how one of the fourths (the square shape) can be transformed into the other fourth (the rectangle shape), as shown below.
This topic provides a foundation for Topic D, applying what students have learned about fractional parts of a circle, particularly halves and quarters, to telling time on an analog clock.
A Teaching Sequence Toward Mastery of Halves, Thirds, and Fourths of Circles and Rectangles
Objective 1: Partition circles and rectangles into equal parts, and describe those parts as halves, thirds, or fourths. (Lessons 9–10)
Objective 2: Describe a whole by the number of equal parts including 2 halves, 3 thirds, and 4 fourths.(Lesson 11)
Objective 3: Recognize that equal parts of an identical rectangle can have different shapes. (Lesson 12)
A STORY OF UNITS
124
©2015 Great Minds. eureka-math.orgG 2-M8-TE-1.3 .0 -0 9.20 15

Lesson 9 2 8
Lesson 9: Partition circles and rectangles into equal parts, and describe those parts as halves, thirds, or fourths.
Lesson 9 Objective: Partition circles and rectangles into equal parts, and describe those parts as halves, thirds, or fourths.
Suggested Lesson Structure
Fluency Practice (15 minutes)Application Problem (5 minutes) Concept Development (30 minutes) Student Debrief (10 minutes)
Total Time (60 minutes)
Fluency Practice (15 minutes)
Rename for the Larger Unit 2.NBT.1 (6 minutes) Sprint: Subtraction Patterns 2.OA.2, 2.NBT.5 (9 minutes)
Rename for the Larger Unit (6 minutes)
Note: This fluency activity reviews place value foundations. T: I’m going to tell you a number of ones. Tell me the largest units that can be made. Ready? T: (Write 12 ones = ____ ten ___ ones.) T: Say the number sentence. (Point to the board.) S: 12 ones = 1 ten 2 ones. T: (Write 29 ones = ____ tens ___ ones.) Say the number sentence. S: 29 ones = 2 tens 9 ones. T: (Write 29 ones = 1 ten ___ ones.) Say the number sentence. S: 29 ones = 1 ten 19 ones.
Continue with the following possible sequence: 58 ones, 97 ones, 100 ones, 130 ones, 148 ones, 254 ones, 309 ones, and 880 ones.
Sprint: Subtraction Patterns (9 minutes)
Materials: (S) Subtraction Patterns Sprint
Note: Students practice subtracting in order to gain mastery of the sums and differences within 20 and relate those facts to larger numbers.
A STORY OF UNITS
125
©2015 Great Minds. eureka-math.orgG 2-M8-TE-1.3 .0 -0 9.20 15
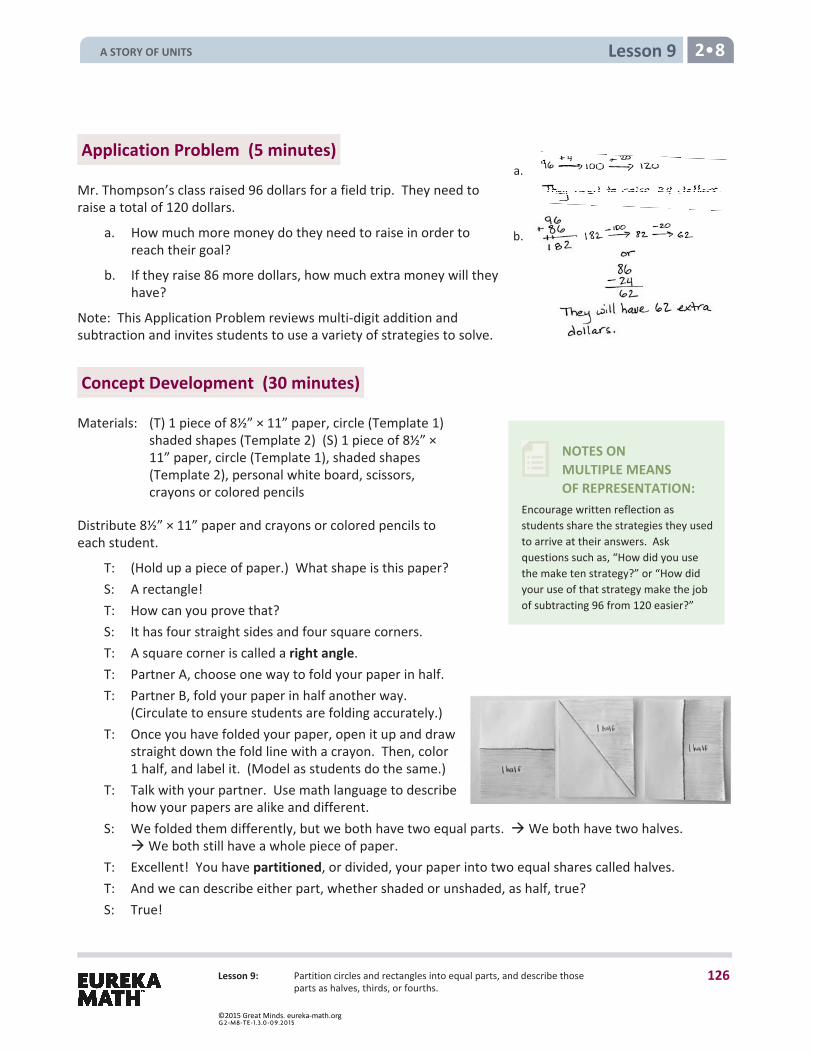
Lesson 9 2 8
Lesson 9: Partition circles and rectangles into equal parts, and describe those parts as halves, thirds, or fourths.
a.
b.
NOTES ON MULTIPLE MEANS OF REPRESENTATION:
Encourage written reflection as students share the strategies they used to arrive at their answers. Ask questions such as, “How did you use the make ten strategy?” or “How did your use of that strategy make the job of subtracting 96 from 120 easier?”
Application Problem (5 minutes)
Mr. Thompson’s class raised 96 dollars for a field trip. They need to raise a total of 120 dollars.
a. How much more money do they need to raise in order to reach their goal?
b. If they raise 86 more dollars, how much extra money will they have?
Note: This Application Problem reviews multi-digit addition and subtraction and invites students to use a variety of strategies to solve.
Concept Development (30 minutes)
Materials: (T) 1 piece of 8½” × 11” paper, circle (Template 1) shaded shapes (Template 2) (S) 1 piece of 8½” × 11” paper, circle (Template 1), shaded shapes (Template 2), personal white board, scissors, crayons or colored pencils
Distribute 8½” × 11” paper and crayons or colored pencils to each student.
T: (Hold up a piece of paper.) What shape is this paper? S: A rectangle! T: How can you prove that? S: It has four straight sides and four square corners. T: A square corner is called a right angle. T: Partner A, choose one way to fold your paper in half. T: Partner B, fold your paper in half another way.
(Circulate to ensure students are folding accurately.) T: Once you have folded your paper, open it up and draw
straight down the fold line with a crayon. Then, color 1 half, and label it. (Model as students do the same.)
T: Talk with your partner. Use math language to describe how your papers are alike and different.
S: We folded them differently, but we both have two equal parts. We both have two halves. We both still have a whole piece of paper.
T: Excellent! You have partitioned, or divided, your paper into two equal shares called halves. T: And we can describe either part, whether shaded or unshaded, as half, true? S: True!
A STORY OF UNITS
126
©2015 Great Minds. eureka-math.orgG 2-M8-TE-1.3 .0 -0 9.20 15
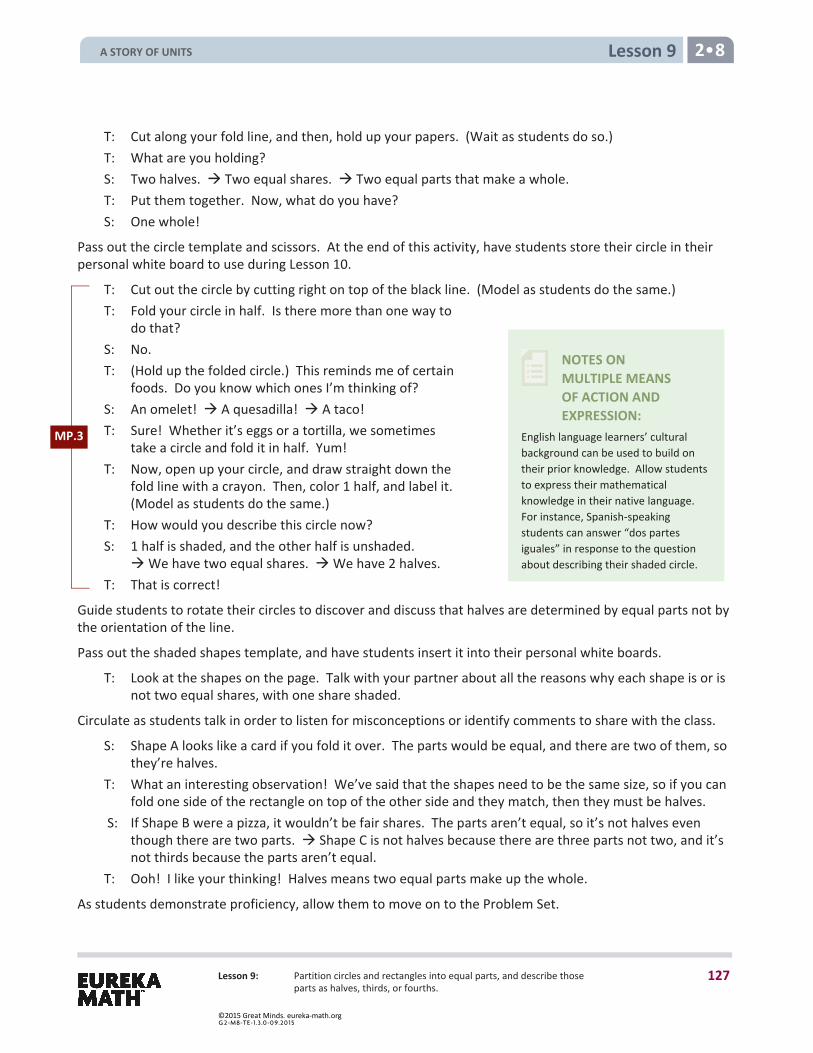
Lesson 9 2 8
Lesson 9: Partition circles and rectangles into equal parts, and describe those parts as halves, thirds, or fourths.
NOTES ON MULTIPLE MEANS OF ACTION AND EXPRESSION:
English language learners’ cultural background can be used to build on their prior knowledge. Allow students to express their mathematical knowledge in their native language. For instance, Spanish-speaking students can answer “dos partes iguales” in response to the question about describing their shaded circle.
T: Cut along your fold line, and then, hold up your papers. (Wait as students do so.) T: What are you holding? S: Two halves. Two equal shares. Two equal parts that make a whole. T: Put them together. Now, what do you have? S: One whole!
Pass out the circle template and scissors. At the end of this activity, have students store their circle in their personal white board to use during Lesson 10.
T: Cut out the circle by cutting right on top of the black line. (Model as students do the same.) T: Fold your circle in half. Is there more than one way to
do that? S: No. T: (Hold up the folded circle.) This reminds me of certain
foods. Do you know which ones I’m thinking of? S: An omelet! A quesadilla! A taco! T: Sure! Whether it’s eggs or a tortilla, we sometimes
take a circle and fold it in half. Yum! T: Now, open up your circle, and draw straight down the
fold line with a crayon. Then, color 1 half, and label it. (Model as students do the same.)
T: How would you describe this circle now? S: 1 half is shaded, and the other half is unshaded.
We have two equal shares. We have 2 halves. T: That is correct!
Guide students to rotate their circles to discover and discuss that halves are determined by equal parts not by the orientation of the line.
Pass out the shaded shapes template, and have students insert it into their personal white boards.
T: Look at the shapes on the page. Talk with your partner about all the reasons why each shape is or is not two equal shares, with one share shaded.
Circulate as students talk in order to listen for misconceptions or identify comments to share with the class.
S: Shape A looks like a card if you fold it over. The parts would be equal, and there are two of them, so they’re halves.
T: What an interesting observation! We’ve said that the shapes need to be the same size, so if you can fold one side of the rectangle on top of the other side and they match, then they must be halves.
S: If Shape B were a pizza, it wouldn’t be fair shares. The parts aren’t equal, so it’s not halves even though there are two parts. Shape C is not halves because there are three parts not two, and it’s not thirds because the parts aren’t equal.
T: Ooh! I like your thinking! Halves means two equal parts make up the whole.
As students demonstrate proficiency, allow them to move on to the Problem Set.
MP.3
A STORY OF UNITS
127
©2015 Great Minds. eureka-math.orgG 2-M8-TE-1.3 .0 -0 9.20 15
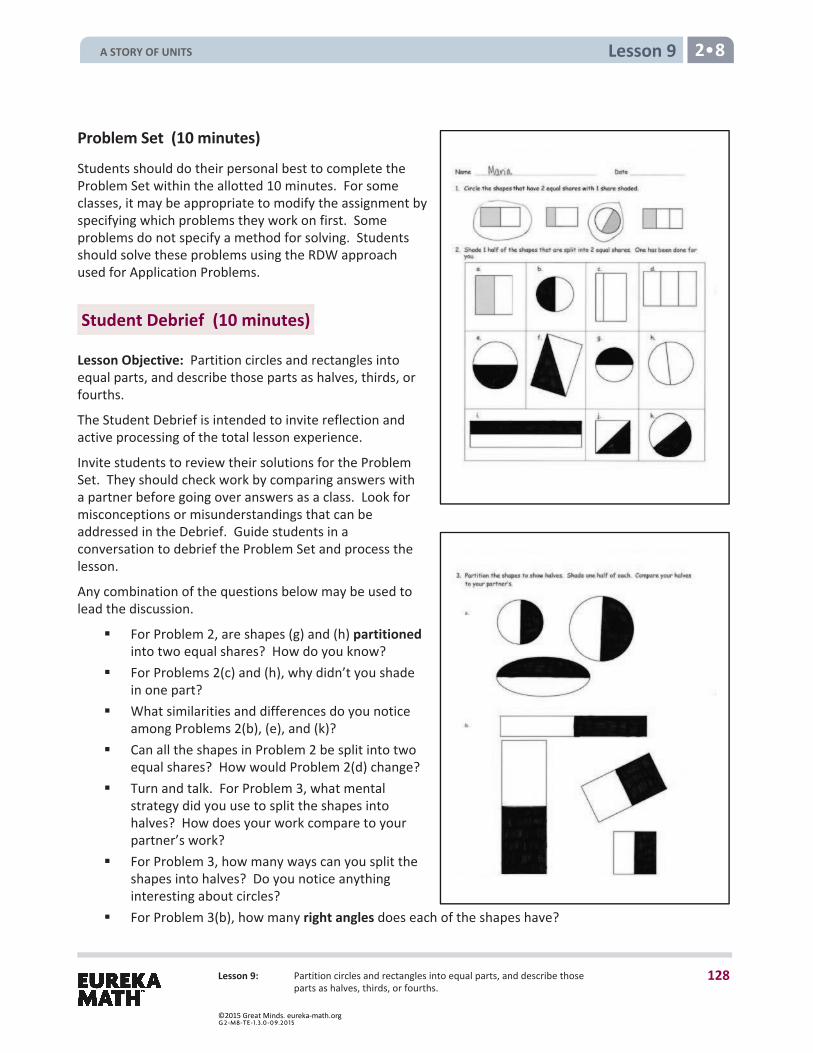
Lesson 9 2 8
Lesson 9: Partition circles and rectangles into equal parts, and describe those parts as halves, thirds, or fourths.
Problem Set (10 minutes)
Students should do their personal best to complete the Problem Set within the allotted 10 minutes. For some classes, it may be appropriate to modify the assignment by specifying which problems they work on first. Some problems do not specify a method for solving. Students should solve these problems using the RDW approach used for Application Problems.
Student Debrief (10 minutes)
Lesson Objective: Partition circles and rectangles into equal parts, and describe those parts as halves, thirds, or fourths.
The Student Debrief is intended to invite reflection and active processing of the total lesson experience.
Invite students to review their solutions for the Problem Set. They should check work by comparing answers with a partner before going over answers as a class. Look for misconceptions or misunderstandings that can be addressed in the Debrief. Guide students in a conversation to debrief the Problem Set and process the lesson.
Any combination of the questions below may be used to lead the discussion.
For Problem 2, are shapes (g) and (h) partitionedinto two equal shares? How do you know?
For Problems 2(c) and (h), why didn’t you shadein one part?
What similarities and differences do you noticeamong Problems 2(b), (e), and (k)?
Can all the shapes in Problem 2 be split into twoequal shares? How would Problem 2(d) change?
Turn and talk. For Problem 3, what mentalstrategy did you use to split the shapes intohalves? How does your work compare to yourpartner’s work?
For Problem 3, how many ways can you split theshapes into halves? Do you notice anythinginteresting about circles?
For Problem 3(b), how many right angles does each of the shapes have?
A STORY OF UNITS
128
©2015 Great Minds. eureka-math.orgG 2-M8-TE-1.3 .0 -0 9.20 15

Lesson 9 2 8
Lesson 9: Partition circles and rectangles into equal parts, and describe those parts as halves, thirds, or fourths.
Exit Ticket (3 minutes)
After the Student Debrief, instruct students to complete the Exit Ticket. A review of their work will help with assessing students’ understanding of the concepts that were presented in today’s lesson and planning more effectively for future lessons. The questions may be read aloud to the students.
A STORY OF UNITS
129
©2015 Great Minds. eureka-math.orgG 2-M8-TE-1.3 .0 -0 9.20 15
Lesson 9 Sprint 2 8
Lesson 9: Partition circles and rectangles into equal parts, and describe those parts as halves, thirds, or fourths.
Subtraction Patterns
1. 5 – 1 = 23. 10 – 2 =
2. 15 – 1 = 24. 11 – 2 =
3. 25 – 1 = 25. 21 – 2 =
4. 75 – 1 = 26. 31 – 2 =
5. 5 – 2 = 27. 51 – 2 =
6. 15 – 2 = 28. 51 – 12 =
7. 25 – 2 = 29. 10 – 5 =
8. 75 – 2 = 30. 11 – 5 =
9. 4 – 1 = 31. 12 – 5 =
10. 40 – 10 = 32. 22 – 5 =
11. 43 – 10 = 33. 32 – 5 =
12. 43 – 20 = 34. 62 – 5 =
13. 43 – 21 = 35. 62 – 15 =
14. 43 – 23 = 36. 72 – 15 =
15. 12 – 2 = 37. 82 – 15 =
16. 62 – 2 = 38. 32 – 15 =
17. 62 – 12 = 39. 10 – 9 =
18. 18 – 8 = 40. 11 – 9 =
19. 78 – 8 = 41. 51 – 9 =
20. 78 – 18 = 42. 51 – 10 =
21. 41 – 11 = 43. 51 – 19 =
22. 92 – 12 = 44. 65 – 46 =
Number Correct: _______A
A STORY OF UNITS
130
©2015 Great Minds. eureka-math.orgG 2-M8-TE-1.3 .0 -0 9.20 15
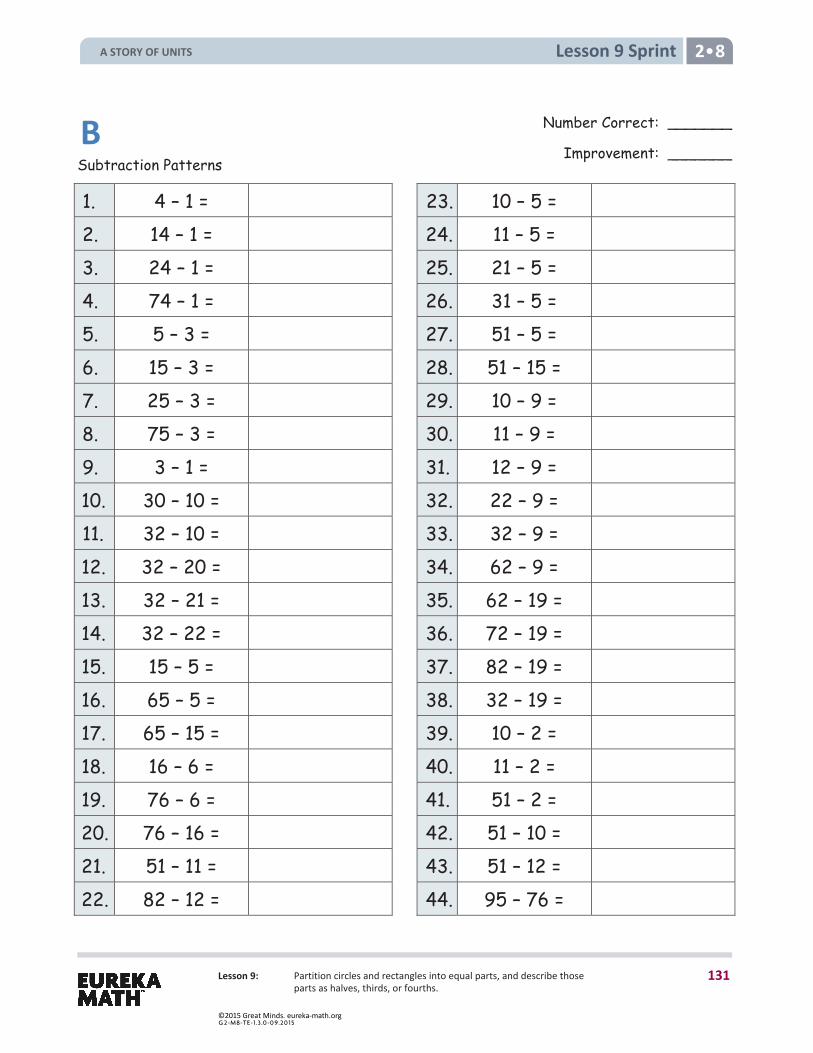
Lesson 9 Sprint 2 8
Lesson 9: Partition circles and rectangles into equal parts, and describe those parts as halves, thirds, or fourths.
Subtraction Patterns
1. 4 – 1 = 23. 10 – 5 = 2. 14 – 1 = 24. 11 – 5 = 3. 24 – 1 = 25. 21 – 5 = 4. 74 – 1 = 26. 31 – 5 = 5. 5 – 3 = 27. 51 – 5 = 6. 15 – 3 = 28. 51 – 15 = 7. 25 – 3 = 29. 10 – 9 = 8. 75 – 3 = 30. 11 – 9 = 9. 3 – 1 = 31. 12 – 9 = 10. 30 – 10 = 32. 22 – 9 = 11. 32 – 10 = 33. 32 – 9 = 12. 32 – 20 = 34. 62 – 9 = 13. 32 – 21 = 35. 62 – 19 = 14. 32 – 22 = 36. 72 – 19 = 15. 15 – 5 = 37. 82 – 19 = 16. 65 – 5 = 38. 32 – 19 = 17. 65 – 15 = 39. 10 – 2 = 18. 16 – 6 = 40. 11 – 2 = 19. 76 – 6 = 41. 51 – 2 = 20. 76 – 16 = 42. 51 – 10 = 21. 51 – 11 = 43. 51 – 12 = 22. 82 – 12 = 44. 95 – 76 =
B Number Correct: _______
Improvement: _______
A STORY OF UNITS
131
©2015 Great Minds. eureka-math.orgG 2-M8-TE-1.3 .0 -0 9.20 15
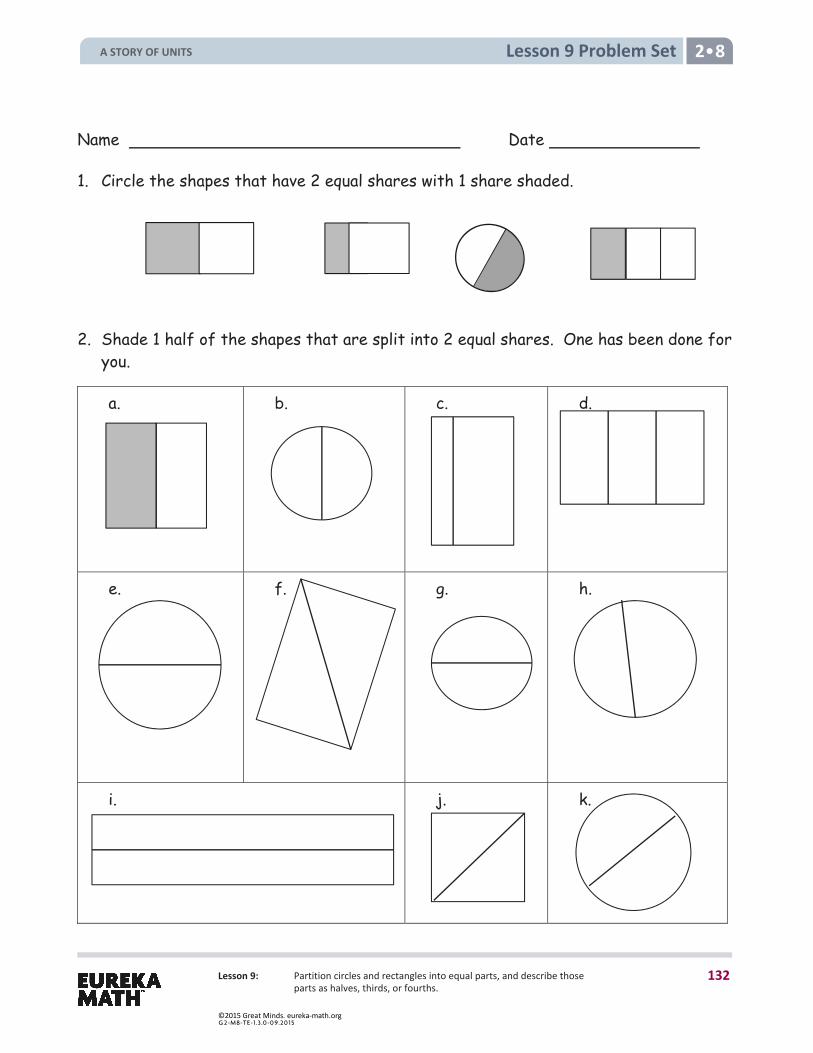
Lesson 9 Problem Set 2 8
Lesson 9: Partition circles and rectangles into equal parts, and describe those parts as halves, thirds, or fourths.
Name Date
1. Circle the shapes that have 2 equal shares with 1 share shaded.
2. Shade 1 half of the shapes that are split into 2 equal shares. One has been done for you.
a.
b.
c. d.
e. f. g. h.
i.
j. k.
A STORY OF UNITS
132
©2015 Great Minds. eureka-math.orgG 2-M8-TE-1.3 .0 -0 9.20 15
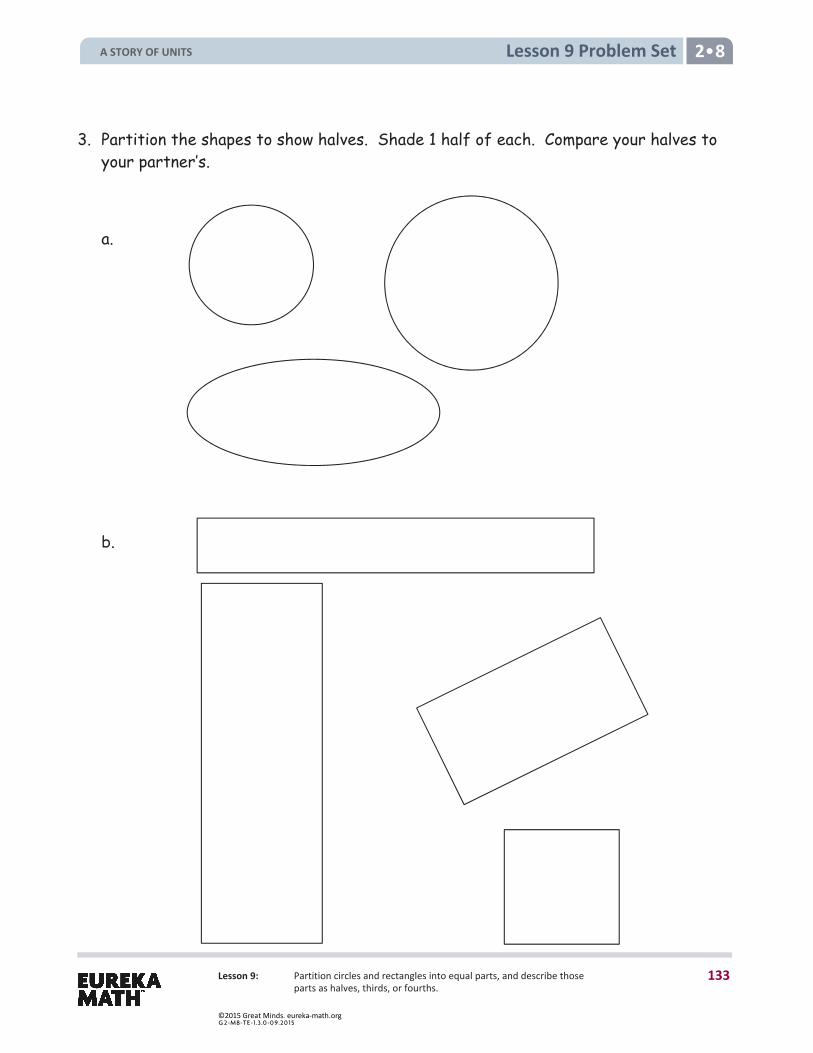
Lesson 9 Problem Set 2 8
Lesson 9: Partition circles and rectangles into equal parts, and describe those parts as halves, thirds, or fourths.
3. Partition the shapes to show halves. Shade 1 half of each. Compare your halves to your partner’s.
a.
b.
A STORY OF UNITS
133
©2015 Great Minds. eureka-math.orgG 2-M8-TE-1.3 .0 -0 9.20 15
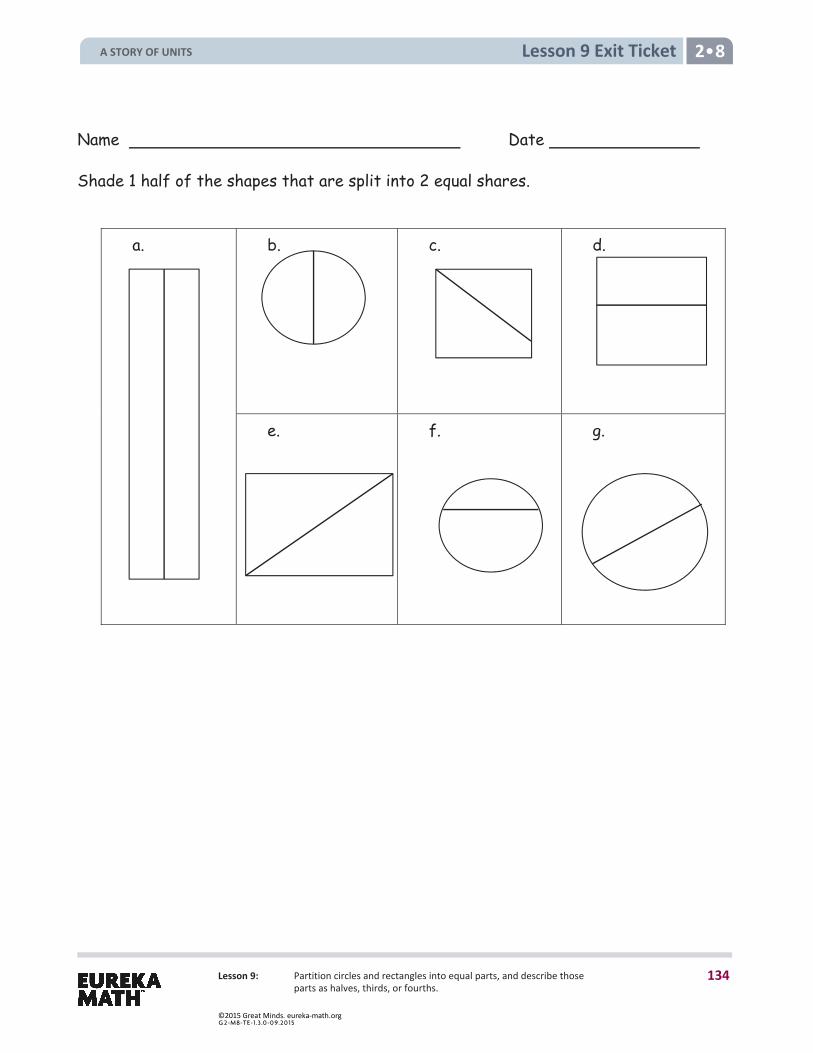
Lesson 9 Exit Ticket 2 8
Lesson 9: Partition circles and rectangles into equal parts, and describe those parts as halves, thirds, or fourths.
Name Date
Shade 1 half of the shapes that are split into 2 equal shares.
a.
b.
c. d.
e. f. g.
A STORY OF UNITS
134
©2015 Great Minds. eureka-math.orgG 2-M8-TE-1.3 .0 -0 9.20 15
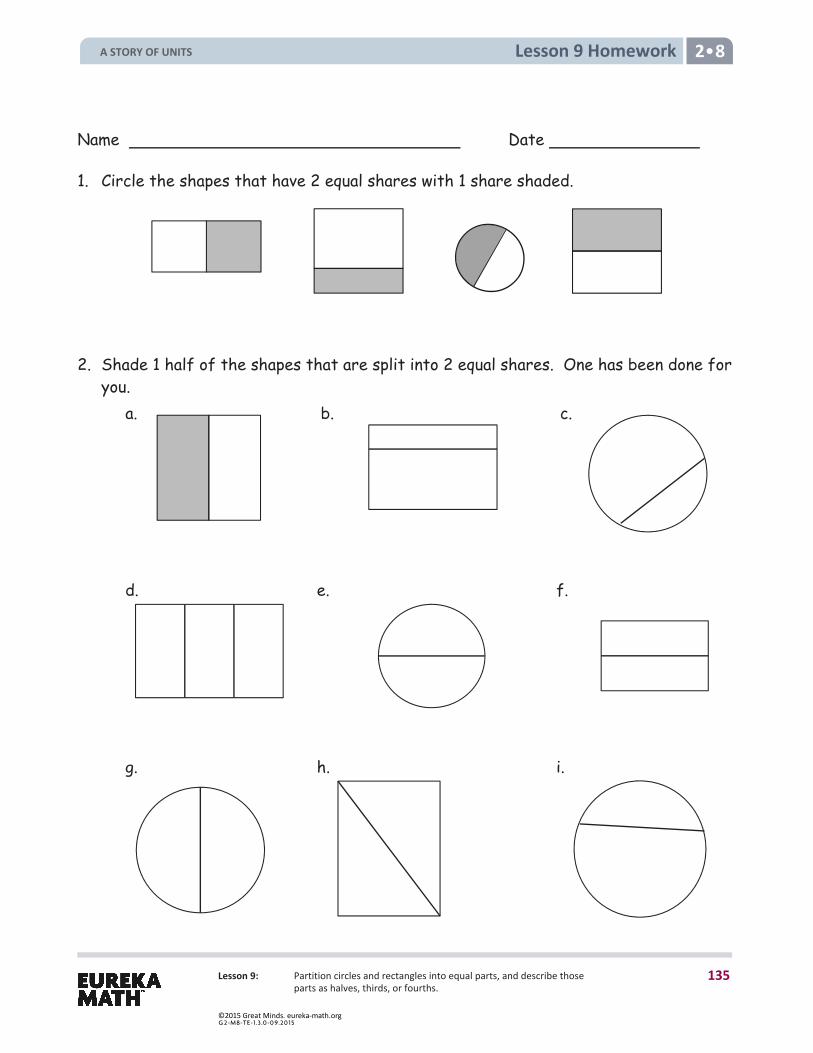
Lesson 9: Partition circles and rectangles into equal parts, and describe those parts as halves, thirds, or fourths.
Lesson 9 Homework 2 8
Name Date
1. Circle the shapes that have 2 equal shares with 1 share shaded.
2. Shade 1 half of the shapes that are split into 2 equal shares. One has been done for you.
a. b. c. d. e. f. g. h. i.
A STORY OF UNITS
135
©2015 Great Minds. eureka-math.orgG 2-M8-TE-1.3 .0 -0 9.20 15
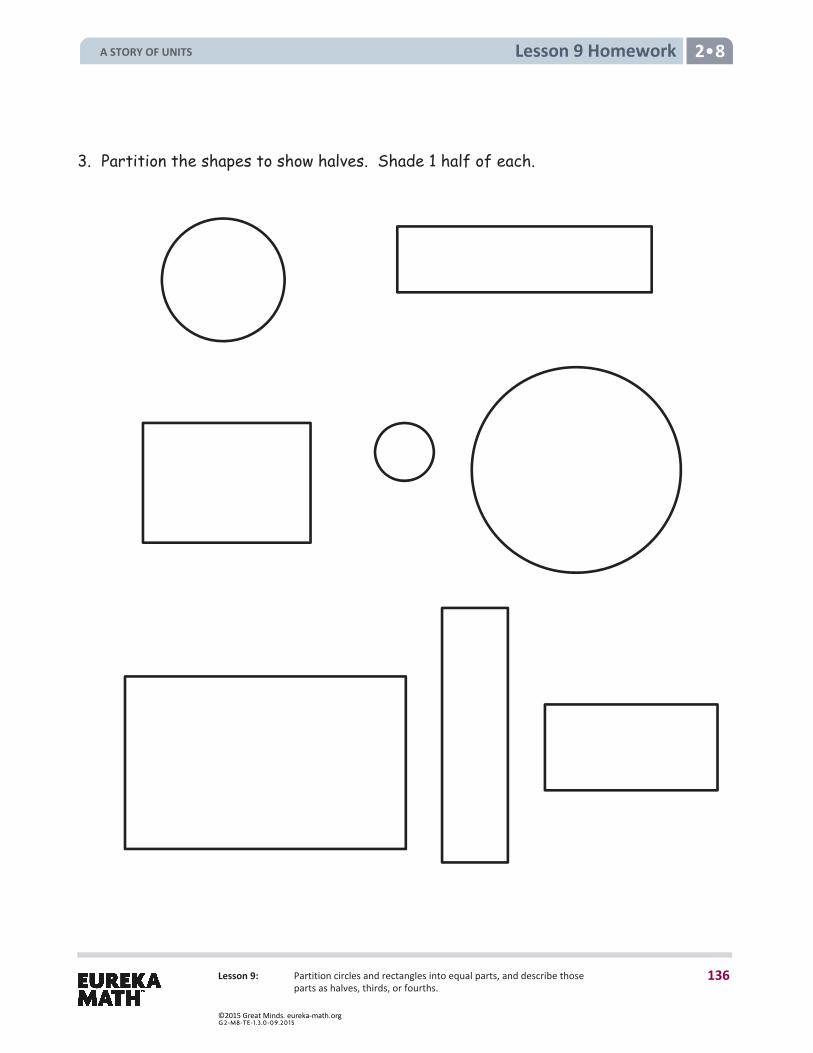
Lesson 9: Partition circles and rectangles into equal parts, and describe those parts as halves, thirds, or fourths.
Lesson 9 Homework 2 8
3. Partition the shapes to show halves. Shade 1 half of each.
A STORY OF UNITS
136
©2015 Great Minds. eureka-math.orgG 2-M8-TE-1.3 .0 -0 9.20 15
Lesson 9: Partition circles and rectangles into equal parts, and describe those parts as halves, thirds, or fourths.
Lesson 9 Template 1 2 8
circle
A STORY OF UNITS
137
©2015 Great Minds. eureka-math.orgG 2-M8-TE-1.3 .0 -0 9.20 15
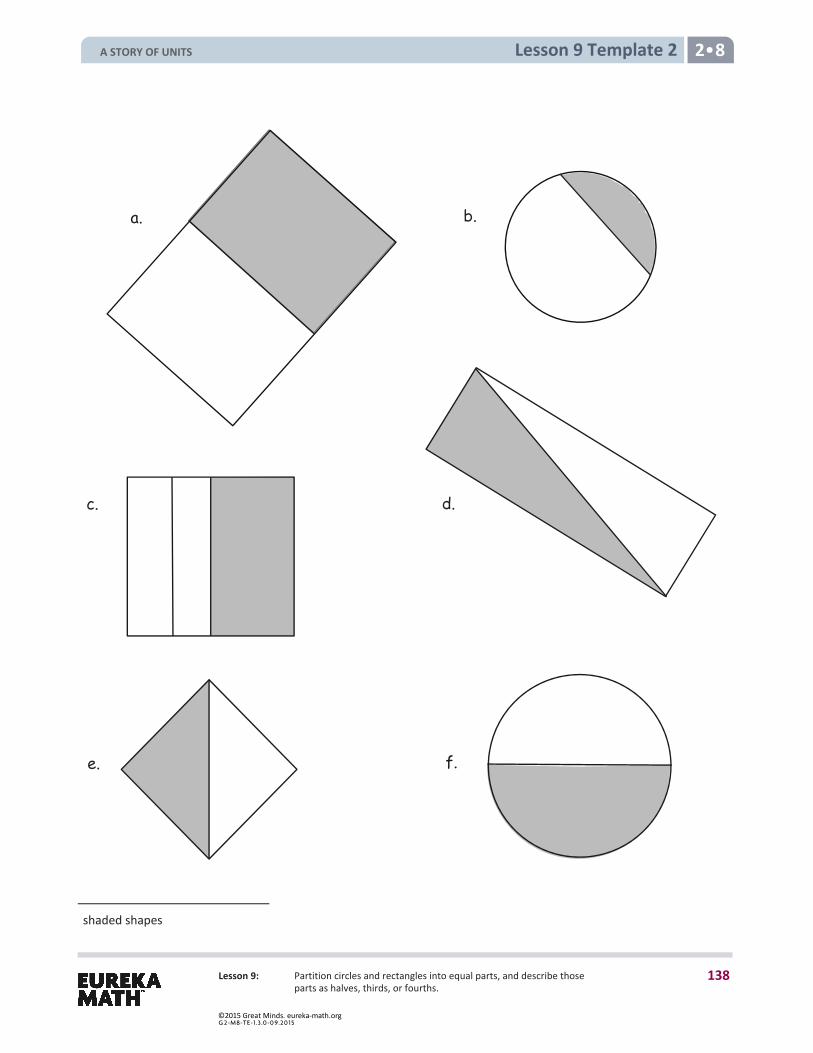
Lesson 9: Partition circles and rectangles into equal parts, and describe those parts as halves, thirds, or fourths.
Lesson 9 Template 2 2 8
shaded shapes
a. b.
e. f.
c. d.
A STORY OF UNITS
138
©2015 Great Minds. eureka-math.orgG 2-M8-TE-1.3 .0 -0 9.20 15
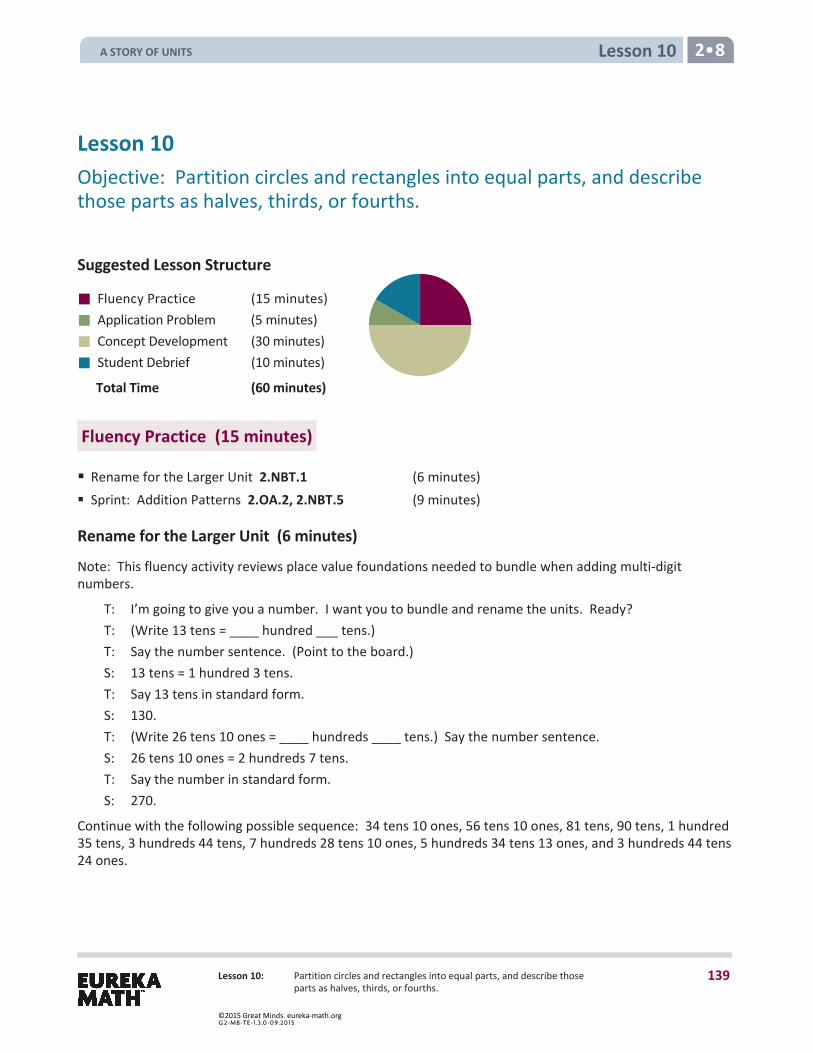
Lesson 10: Partition circles and rectangles into equal parts, and describe those parts as halves, thirds, or fourths.
Lesson 10 2 8
Lesson 10 Objective: Partition circles and rectangles into equal parts, and describe those parts as halves, thirds, or fourths.
Suggested Lesson Structure
Fluency Practice (15 minutes) Application Problem (5 minutes)Concept Development (30 minutes) Student Debrief (10 minutes)
Total Time (60 minutes)
Fluency Practice (15 minutes)
Rename for the Larger Unit 2.NBT.1 (6 minutes) Sprint: Addition Patterns 2.OA.2, 2.NBT.5 (9 minutes)
Rename for the Larger Unit (6 minutes)
Note: This fluency activity reviews place value foundations needed to bundle when adding multi-digit numbers.
T: I’m going to give you a number. I want you to bundle and rename the units. Ready? T: (Write 13 tens = ____ hundred ___ tens.) T: Say the number sentence. (Point to the board.) S: 13 tens = 1 hundred 3 tens. T: Say 13 tens in standard form. S: 130. T: (Write 26 tens 10 ones = ____ hundreds ____ tens.) Say the number sentence. S: 26 tens 10 ones = 2 hundreds 7 tens. T: Say the number in standard form. S: 270.
Continue with the following possible sequence: 34 tens 10 ones, 56 tens 10 ones, 81 tens, 90 tens, 1 hundred 35 tens, 3 hundreds 44 tens, 7 hundreds 28 tens 10 ones, 5 hundreds 34 tens 13 ones, and 3 hundreds 44 tens 24 ones.
A STORY OF UNITS
139
©2015 Great Minds. eureka-math.orgG 2-M8-TE-1.3 .0 -0 9.20 15

Lesson 10: Partition circles and rectangles into equal parts, and describe those parts as halves, thirds, or fourths.
Lesson 10 2 8
NOTES ON MULTIPLE MEANS OF ENGAGEMENT:
Some students might have difficulty partitioning a rectangle into thirds. Give them a ruler to help them find where to draw their two lines to make equal parts. They can also fold their papers into thirds, thereby making a mark for them to draw their lines.
Sprint: Addition Patterns (9 minutes) Materials: (S) Addition Patterns Sprint
Note: Students practice adding in order to gain mastery of the sums and differences within 20 and relate those facts to larger numbers.
Application Problem (5 minutes)
Felix is passing out raffle tickets. He passes out 98 tickets and has 57 left. How many raffle tickets did he have to start?
Note: This is an add to with start unknown type problem that reviews two-digit addition with two compositions.
Concept Development (30 minutes)
Materials: (T) 1 piece of 8½” × 11” paper, cut and colored circle (Lesson 9 Template 1) (S) Rectangles and circles (Template), personal white board, 1 piece of 8½” × 11” paper, crayons or colored pencils, cut and colored circle (Lesson 9 Template 1)
Part 1: Making Thirds
Pass out rectangles and circles template, and have students insert it into their personal white boards.
T: Yesterday, we worked with halves. Today, let’s take a look at thirds. T: When something is divided into thirds, how many equal shares does it have? S: Three! T: Correct! Draw two lines in the top two rectangles to
show two different ways to partition them into thirds. (Demonstrate and then allow students time to work.)
T: Shade in 1 third of each rectangle. What do you notice?
S: The thirds look different. Even though they are both thirds, one is long and skinny, and one is short and fat. Even though they’re different shapes, they’re both one third of the whole shape. They both have two parts unshaded.
T: Practice partitioning the rest of the rectangles into thirds. (Allow students time to work.)
T: Choose your rectangle that best shows thirds. Let’s color each third and count as we go. Point to 1 third, and count with me. This is 1 third.
S: (Point and count.) 1 third. (Continue, coloring to show 2 thirds and then 3 thirds, counting after each.)
A STORY OF UNITS
140
©2015 Great Minds. eureka-math.orgG 2-M8-TE-1.3 .0 -0 9.20 15
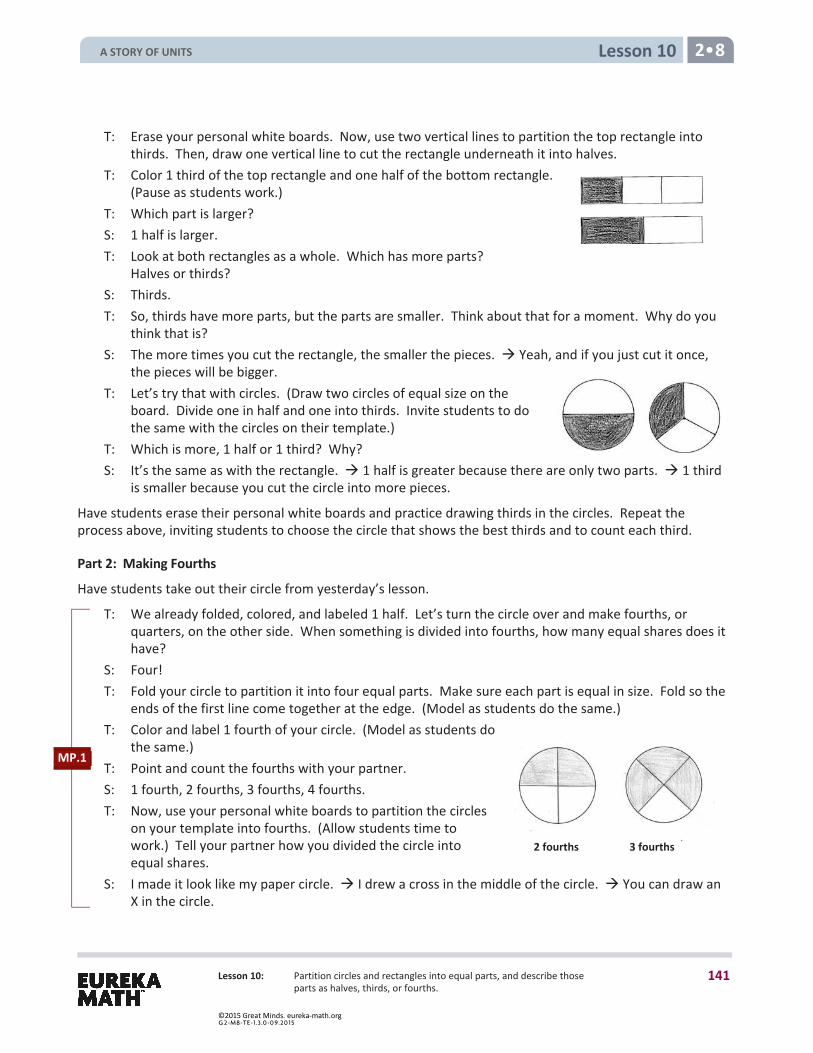
Lesson 10: Partition circles and rectangles into equal parts, and describe those parts as halves, thirds, or fourths.
Lesson 10 2 8
T: Erase your personal white boards. Now, use two vertical lines to partition the top rectangle into thirds. Then, draw one vertical line to cut the rectangle underneath it into halves.
T: Color 1 third of the top rectangle and one half of the bottom rectangle. (Pause as students work.)
T: Which part is larger? S: 1 half is larger. T: Look at both rectangles as a whole. Which has more parts?
Halves or thirds? S: Thirds. T: So, thirds have more parts, but the parts are smaller. Think about that for a moment. Why do you
think that is? S: The more times you cut the rectangle, the smaller the pieces. Yeah, and if you just cut it once,
the pieces will be bigger. T: Let’s try that with circles. (Draw two circles of equal size on the
board. Divide one in half and one into thirds. Invite students to do the same with the circles on their template.)
T: Which is more, 1 half or 1 third? Why? S: It’s the same as with the rectangle. 1 half is greater because there are only two parts. 1 third
is smaller because you cut the circle into more pieces.
Have students erase their personal white boards and practice drawing thirds in the circles. Repeat the process above, inviting students to choose the circle that shows the best thirds and to count each third.
Part 2: Making Fourths
Have students take out their circle from yesterday’s lesson.
T: We already folded, colored, and labeled 1 half. Let’s turn the circle over and make fourths, or quarters, on the other side. When something is divided into fourths, how many equal shares does it have?
S: Four! T: Fold your circle to partition it into four equal parts. Make sure each part is equal in size. Fold so the
ends of the first line come together at the edge. (Model as students do the same.) T: Color and label 1 fourth of your circle. (Model as students do
the same.) T: Point and count the fourths with your partner. S: 1 fourth, 2 fourths, 3 fourths, 4 fourths. T: Now, use your personal white boards to partition the circles
on your template into fourths. (Allow students time to work.) Tell your partner how you divided the circle into equal shares.
S: I made it look like my paper circle. I drew a cross in the middle of the circle. You can draw an X in the circle.
2 fourths 3 fourths
MP.1
A STORY OF UNITS
141
©2015 Great Minds. eureka-math.orgG 2-M8-TE-1.3 .0 -0 9.20 15
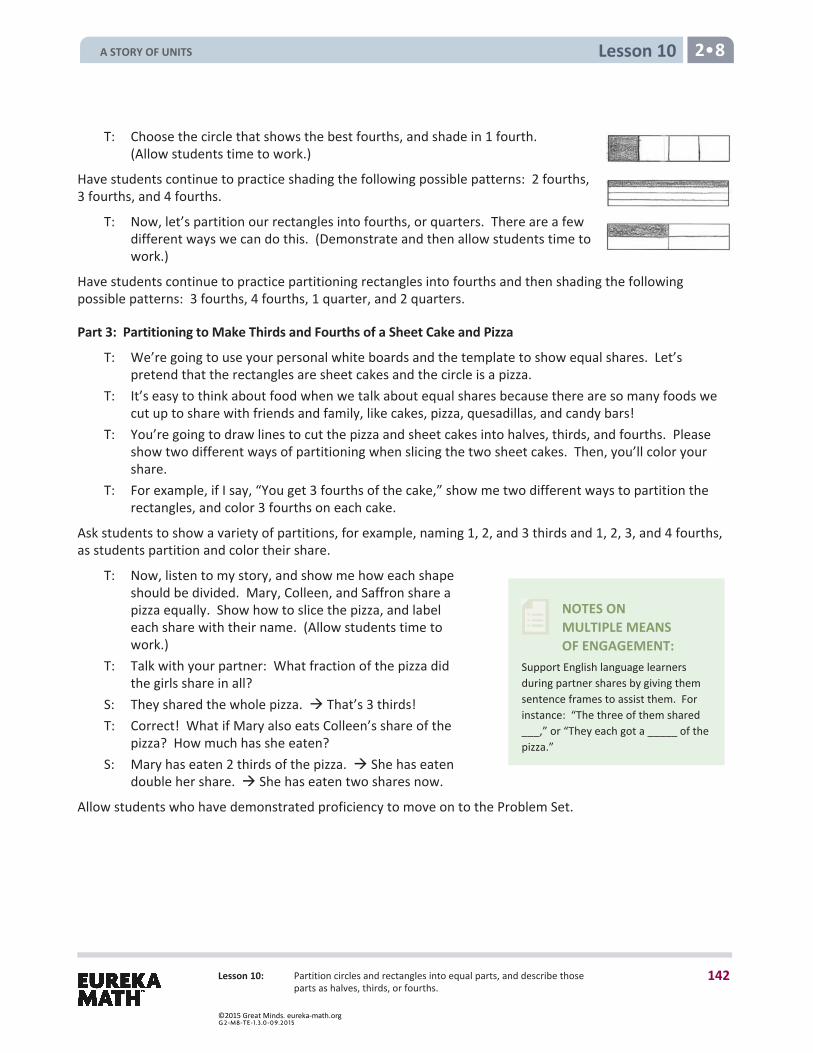
Lesson 10: Partition circles and rectangles into equal parts, and describe those parts as halves, thirds, or fourths.
Lesson 10 2 8
NOTES ON MULTIPLE MEANS OF ENGAGEMENT:
Support English language learners during partner shares by giving them sentence frames to assist them. For instance: “The three of them shared ___,” or “They each got a _____ of the pizza.”
T: Choose the circle that shows the best fourths, and shade in 1 fourth. (Allow students time to work.)
Have students continue to practice shading the following possible patterns: 2 fourths, 3 fourths, and 4 fourths.
T: Now, let’s partition our rectangles into fourths, or quarters. There are a few different ways we can do this. (Demonstrate and then allow students time to work.)
Have students continue to practice partitioning rectangles into fourths and then shading the following possible patterns: 3 fourths, 4 fourths, 1 quarter, and 2 quarters.
Part 3: Partitioning to Make Thirds and Fourths of a Sheet Cake and Pizza
T: We’re going to use your personal white boards and the template to show equal shares. Let’s pretend that the rectangles are sheet cakes and the circle is a pizza.
T: It’s easy to think about food when we talk about equal shares because there are so many foods we cut up to share with friends and family, like cakes, pizza, quesadillas, and candy bars!
T: You’re going to draw lines to cut the pizza and sheet cakes into halves, thirds, and fourths. Please show two different ways of partitioning when slicing the two sheet cakes. Then, you’ll color your share.
T: For example, if I say, “You get 3 fourths of the cake,” show me two different ways to partition the rectangles, and color 3 fourths on each cake.
Ask students to show a variety of partitions, for example, naming 1, 2, and 3 thirds and 1, 2, 3, and 4 fourths, as students partition and color their share.
T: Now, listen to my story, and show me how each shape should be divided. Mary, Colleen, and Saffron share a pizza equally. Show how to slice the pizza, and label each share with their name. (Allow students time to work.)
T: Talk with your partner: What fraction of the pizza did the girls share in all?
S: They shared the whole pizza. That’s 3 thirds! T: Correct! What if Mary also eats Colleen’s share of the
pizza? How much has she eaten? S: Mary has eaten 2 thirds of the pizza. She has eaten
double her share. She has eaten two shares now.
Allow students who have demonstrated proficiency to move on to the Problem Set.
A STORY OF UNITS
142
©2015 Great Minds. eureka-math.orgG 2-M8-TE-1.3 .0 -0 9.20 15
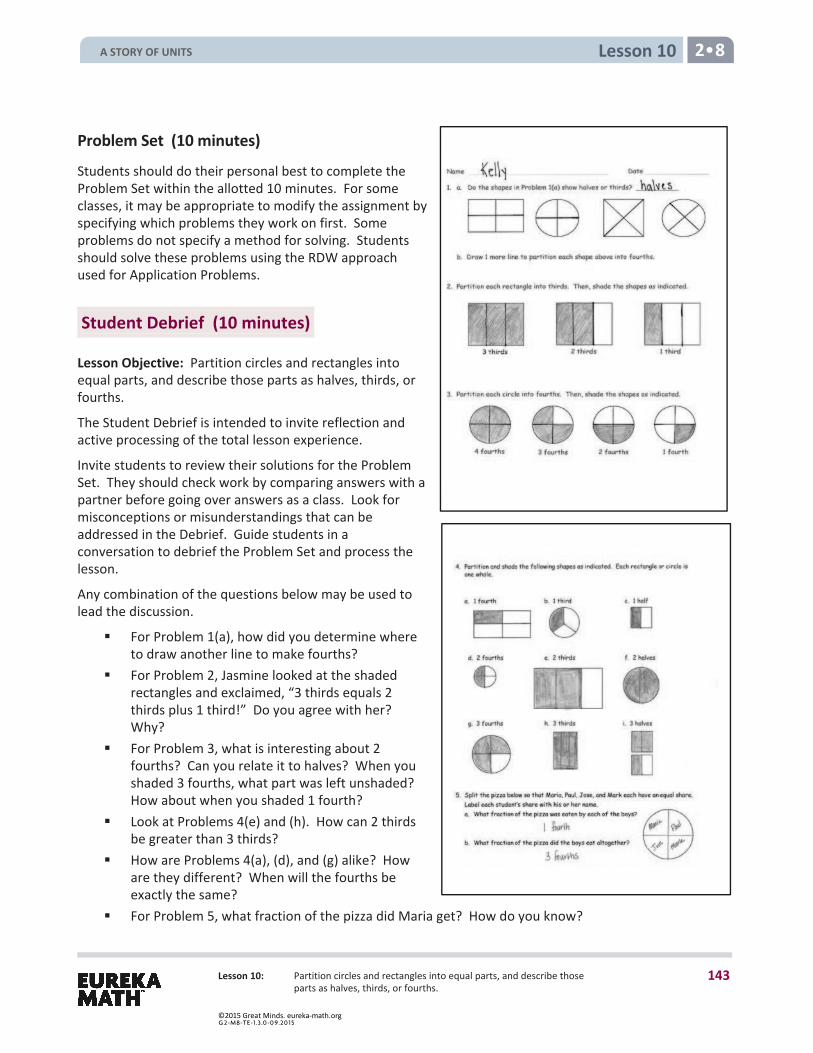
Lesson 10: Partition circles and rectangles into equal parts, and describe those parts as halves, thirds, or fourths.
Lesson 10 2 8
Problem Set (10 minutes)
Students should do their personal best to complete the Problem Set within the allotted 10 minutes. For some classes, it may be appropriate to modify the assignment by specifying which problems they work on first. Some problems do not specify a method for solving. Students should solve these problems using the RDW approach used for Application Problems.
Student Debrief (10 minutes)
Lesson Objective: Partition circles and rectangles into equal parts, and describe those parts as halves, thirds, or fourths.
The Student Debrief is intended to invite reflection and active processing of the total lesson experience.
Invite students to review their solutions for the Problem Set. They should check work by comparing answers with a partner before going over answers as a class. Look for misconceptions or misunderstandings that can be addressed in the Debrief. Guide students in a conversation to debrief the Problem Set and process the lesson.
Any combination of the questions below may be used to lead the discussion.
For Problem 1(a), how did you determine whereto draw another line to make fourths?
For Problem 2, Jasmine looked at the shadedrectangles and exclaimed, “3 thirds equals 2thirds plus 1 third!” Do you agree with her?Why?
For Problem 3, what is interesting about 2fourths? Can you relate it to halves? When youshaded 3 fourths, what part was left unshaded?How about when you shaded 1 fourth?
Look at Problems 4(e) and (h). How can 2 thirdsbe greater than 3 thirds?
How are Problems 4(a), (d), and (g) alike? Howare they different? When will the fourths beexactly the same?
For Problem 5, what fraction of the pizza did Maria get? How do you know?
A STORY OF UNITS
143
©2015 Great Minds. eureka-math.orgG 2-M8-TE-1.3 .0 -0 9.20 15
Lesson 10: Partition circles and rectangles into equal parts, and describe those parts as halves, thirds, or fourths.
Lesson 10 2 8
Exit Ticket (3 minutes)
After the Student Debrief, instruct students to complete the Exit Ticket. A review of their work will help with assessing students’ understanding of the concepts that were presented in today’s lesson and planning more effectively for future lessons. The questions may be read aloud to the students.
A STORY OF UNITS
144
©2015 Great Minds. eureka-math.orgG 2-M8-TE-1.3 .0 -0 9.20 15
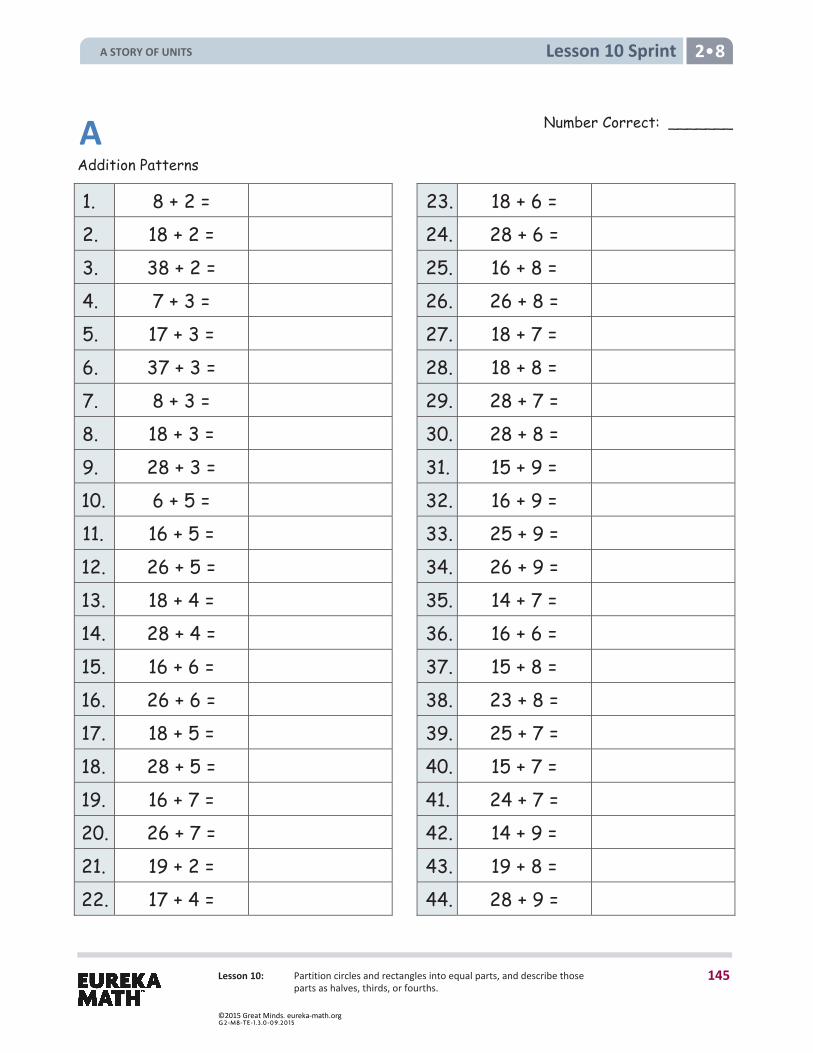
Lesson 10: Partition circles and rectangles into equal parts, and describe those parts as halves, thirds, or fourths.
Lesson 10 Sprint 2 8
Addition Patterns
1. 8 + 2 = 23. 18 + 6 =
2. 18 + 2 = 24. 28 + 6 =
3. 38 + 2 = 25. 16 + 8 =
4. 7 + 3 = 26. 26 + 8 =
5. 17 + 3 = 27. 18 + 7 =
6. 37 + 3 = 28. 18 + 8 =
7. 8 + 3 = 29. 28 + 7 =
8. 18 + 3 = 30. 28 + 8 =
9. 28 + 3 = 31. 15 + 9 =
10. 6 + 5 = 32. 16 + 9 =
11. 16 + 5 = 33. 25 + 9 =
12. 26 + 5 = 34. 26 + 9 =
13. 18 + 4 = 35. 14 + 7 =
14. 28 + 4 = 36. 16 + 6 =
15. 16 + 6 = 37. 15 + 8 =
16. 26 + 6 = 38. 23 + 8 =
17. 18 + 5 = 39. 25 + 7 =
18. 28 + 5 = 40. 15 + 7 =
19. 16 + 7 = 41. 24 + 7 =
20. 26 + 7 = 42. 14 + 9 =
21. 19 + 2 = 43. 19 + 8 =
22. 17 + 4 = 44. 28 + 9 =
A Number Correct: _______
A STORY OF UNITS
145
©2015 Great Minds. eureka-math.orgG 2-M8-TE-1.3 .0 -0 9.20 15
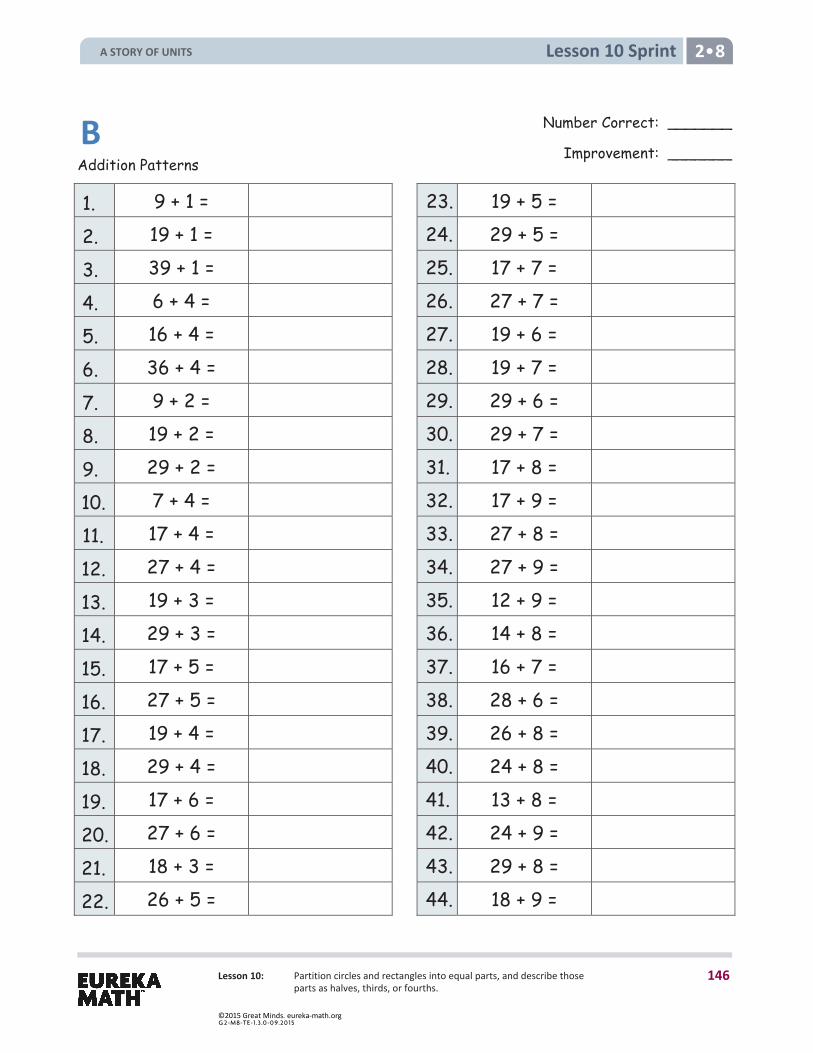
Lesson 10: Partition circles and rectangles into equal parts, and describe those parts as halves, thirds, or fourths.
Lesson 10 Sprint 2 8
Addition Patterns
1. 9 + 1 = 23. 19 + 5 = 2. 19 + 1 = 24. 29 + 5 = 3. 39 + 1 = 25. 17 + 7 = 4. 6 + 4 = 26. 27 + 7 = 5. 16 + 4 = 27. 19 + 6 = 6. 36 + 4 = 28. 19 + 7 = 7. 9 + 2 = 29. 29 + 6 = 8. 19 + 2 = 30. 29 + 7 = 9. 29 + 2 = 31. 17 + 8 = 10. 7 + 4 = 32. 17 + 9 = 11. 17 + 4 = 33. 27 + 8 = 12. 27 + 4 = 34. 27 + 9 = 13. 19 + 3 = 35. 12 + 9 = 14. 29 + 3 = 36. 14 + 8 = 15. 17 + 5 = 37. 16 + 7 = 16. 27 + 5 = 38. 28 + 6 = 17. 19 + 4 = 39. 26 + 8 = 18. 29 + 4 = 40. 24 + 8 = 19. 17 + 6 = 41. 13 + 8 = 20. 27 + 6 = 42. 24 + 9 = 21. 18 + 3 = 43. 29 + 8 = 22. 26 + 5 = 44. 18 + 9 =
B Number Correct: _______
Improvement: _______
A STORY OF UNITS
146
©2015 Great Minds. eureka-math.orgG 2-M8-TE-1.3 .0 -0 9.20 15
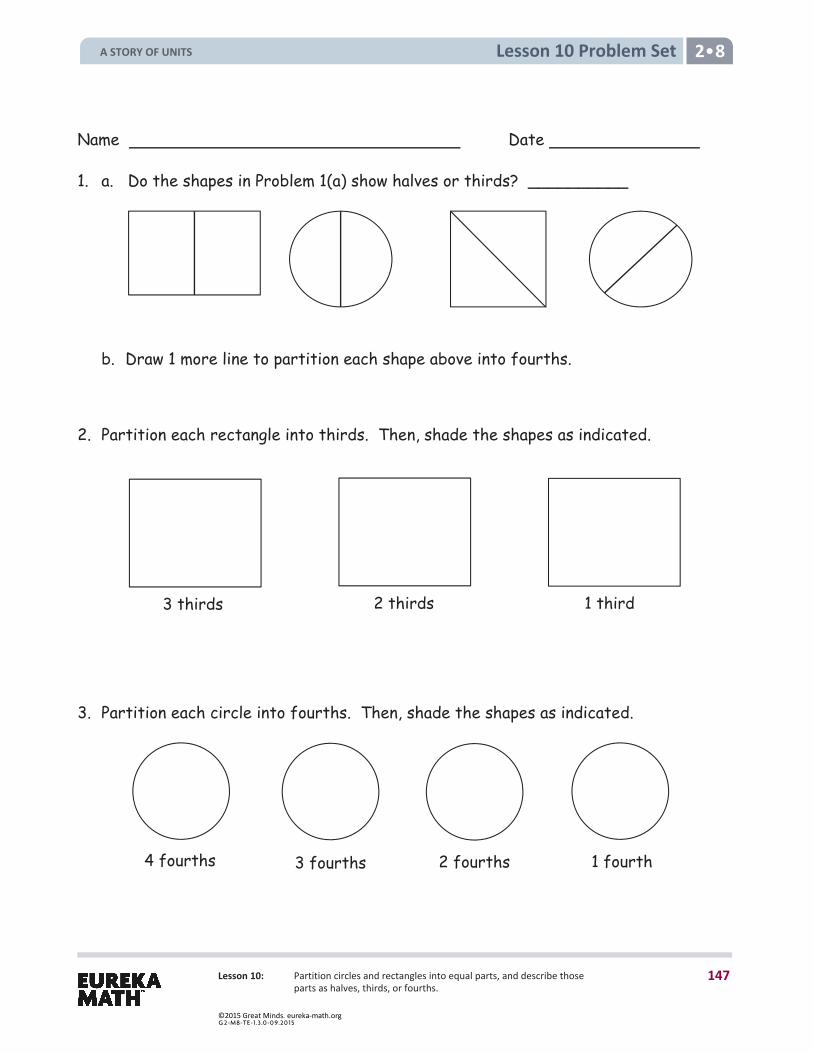
Lesson 10: Partition circles and rectangles into equal parts, and describe those parts as halves, thirds, or fourths.
Lesson 10 Problem Set 2 8
3 thirds 2 thirds 1 third
Name Date
1. a. Do the shapes in Problem 1(a) show halves or thirds? __________
b. Draw 1 more line to partition each shape above into fourths.
2. Partition each rectangle into thirds. Then, shade the shapes as indicated.
3. Partition each circle into fourths. Then, shade the shapes as indicated.
4 fourths 3 fourths 1 fourth 2 fourths
A STORY OF UNITS
147
©2015 Great Minds. eureka-math.orgG 2-M8-TE-1.3 .0 -0 9.20 15
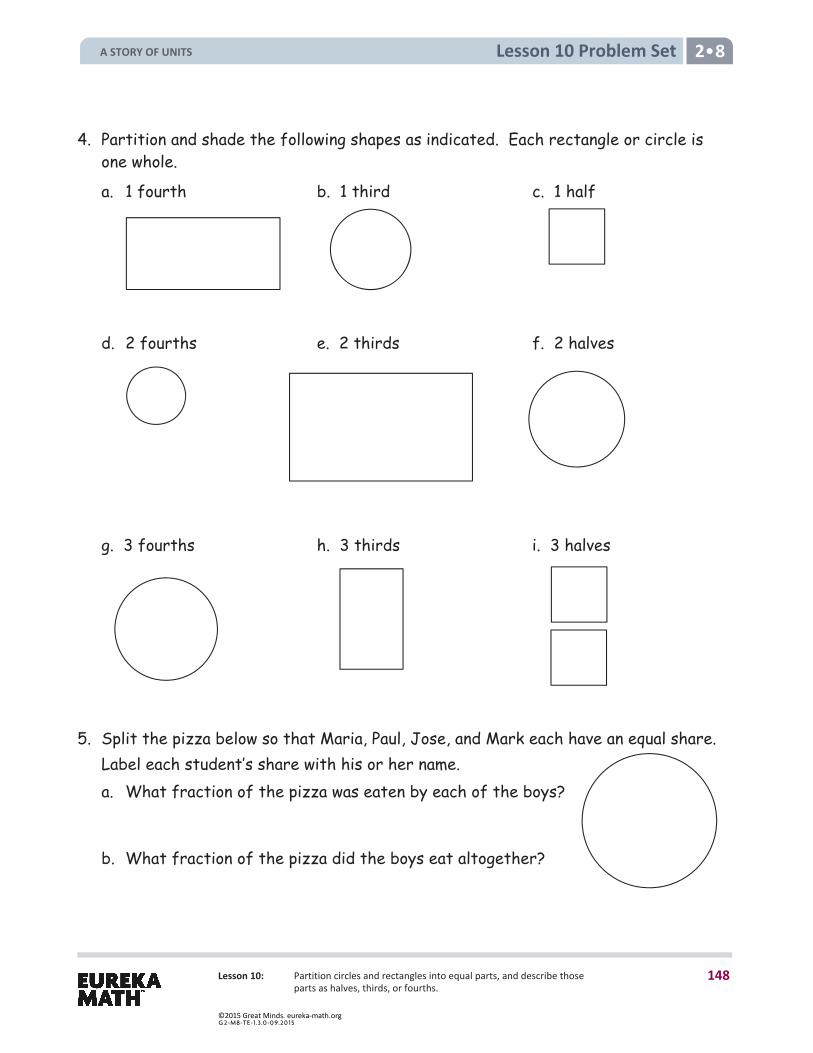
Lesson 10: Partition circles and rectangles into equal parts, and describe those parts as halves, thirds, or fourths.
Lesson 10 Problem Set 2 8
4. Partition and shade the following shapes as indicated. Each rectangle or circle is one whole.
a. 1 fourth b. 1 third c. 1 half
d. 2 fourths e. 2 thirds f. 2 halves g. 3 fourths h. 3 thirds i. 3 halves
5. Split the pizza below so that Maria, Paul, Jose, and Mark each have an equal share. Label each student’s share with his or her name.
a. What fraction of the pizza was eaten by each of the boys?
b. What fraction of the pizza did the boys eat altogether?
A STORY OF UNITS
148
©2015 Great Minds. eureka-math.orgG 2-M8-TE-1.3 .0 -0 9.20 15
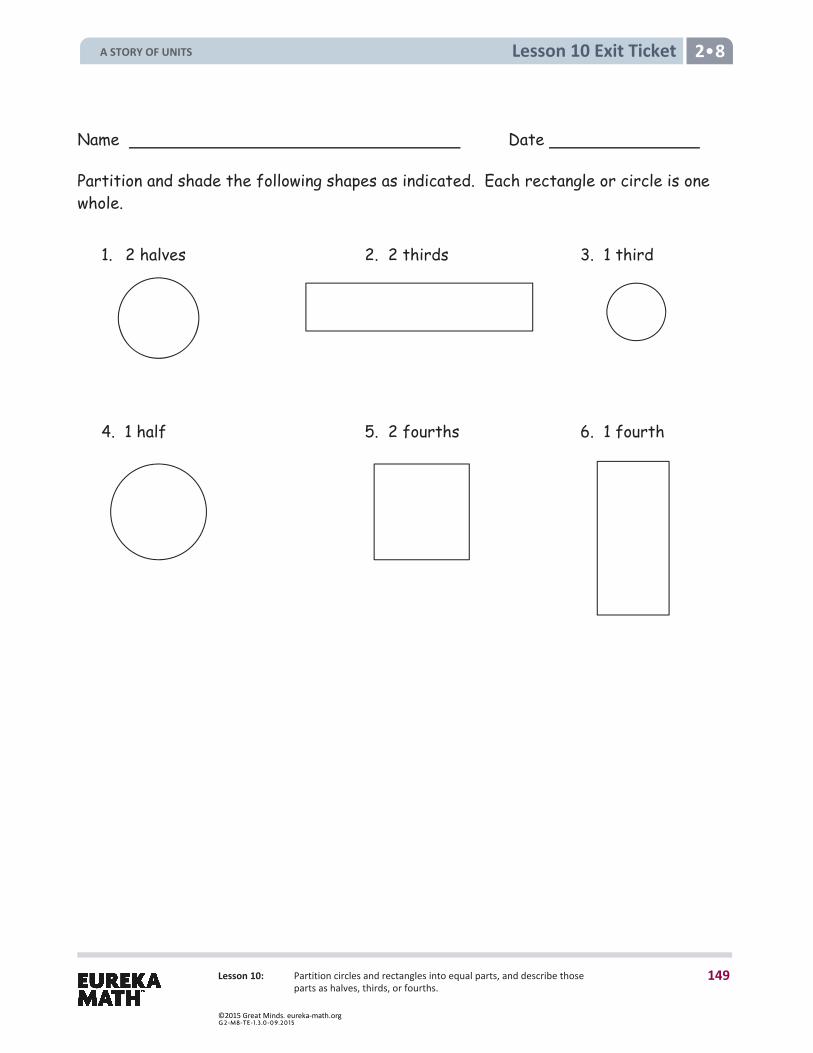
Lesson 10: Partition circles and rectangles into equal parts, and describe those parts as halves, thirds, or fourths.
Lesson 10 Exit Ticket 2 8
Name Date
Partition and shade the following shapes as indicated. Each rectangle or circle is one whole.
1. 2 halves 2. 2 thirds 3. 1 third
4. 1 half 5. 2 fourths 6. 1 fourth
A STORY OF UNITS
149
©2015 Great Minds. eureka-math.orgG 2-M8-TE-1.3 .0 -0 9.20 15
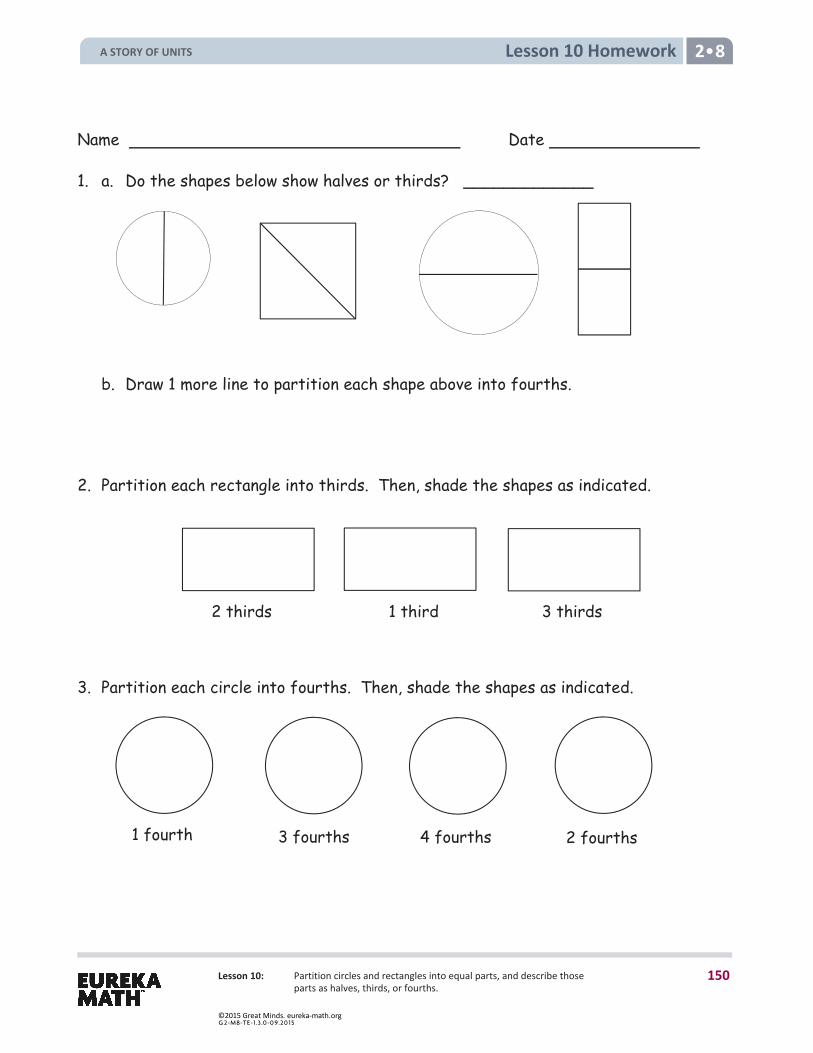
Lesson 10: Partition circles and rectangles into equal parts, and describe those parts as halves, thirds, or fourths.
Lesson 10 Homework 2 8
Name Date
1. a. Do the shapes below show halves or thirds? _____________
b. Draw 1 more line to partition each shape above into fourths.
2. Partition each rectangle into thirds. Then, shade the shapes as indicated.
2 thirds 1 third 3 thirds 3. Partition each circle into fourths. Then, shade the shapes as indicated.
1 fourth 3 fourths 2 fourths 4 fourths
A STORY OF UNITS
150
©2015 Great Minds. eureka-math.orgG 2-M8-TE-1.3 .0 -0 9.20 15
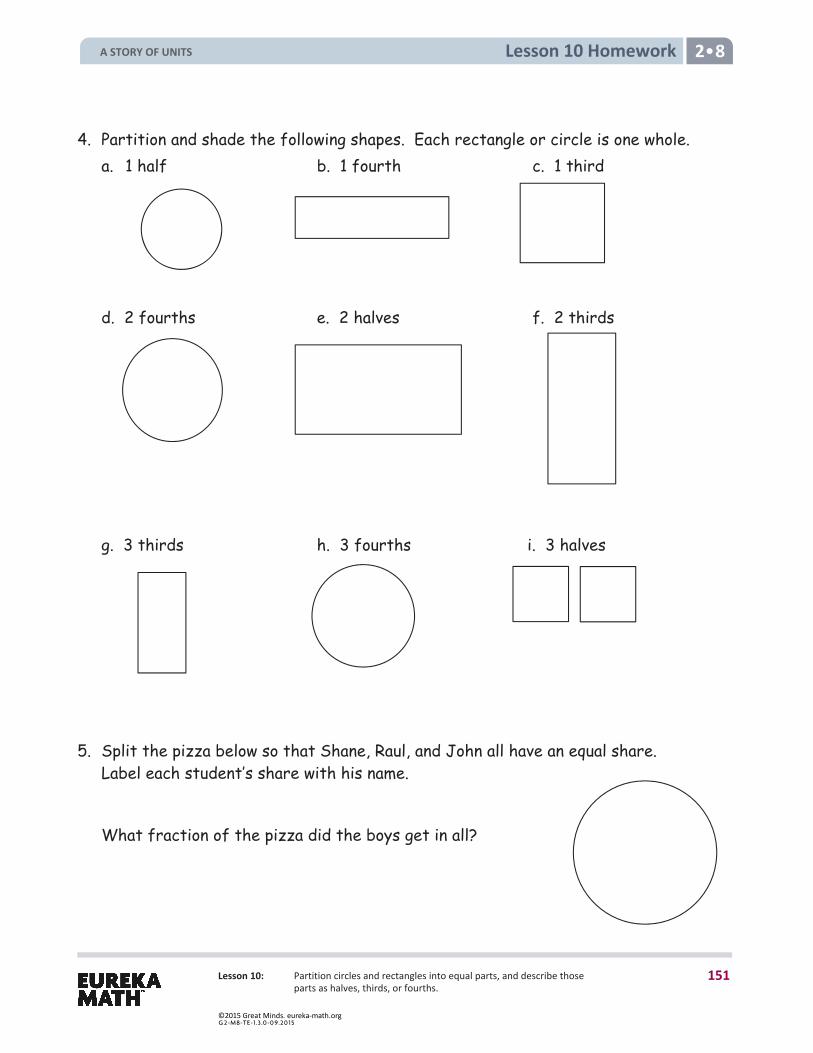
Lesson 10: Partition circles and rectangles into equal parts, and describe those parts as halves, thirds, or fourths.
Lesson 10 Homework 2 8
4. Partition and shade the following shapes. Each rectangle or circle is one whole. a. 1 half b. 1 fourth c. 1 third
d. 2 fourths e. 2 halves f. 2 thirds g. 3 thirds h. 3 fourths i. 3 halves
5. Split the pizza below so that Shane, Raul, and John all have an equal share. Label each student’s share with his name.
What fraction of the pizza did the boys get in all?
A STORY OF UNITS
151
©2015 Great Minds. eureka-math.orgG 2-M8-TE-1.3 .0 -0 9.20 15
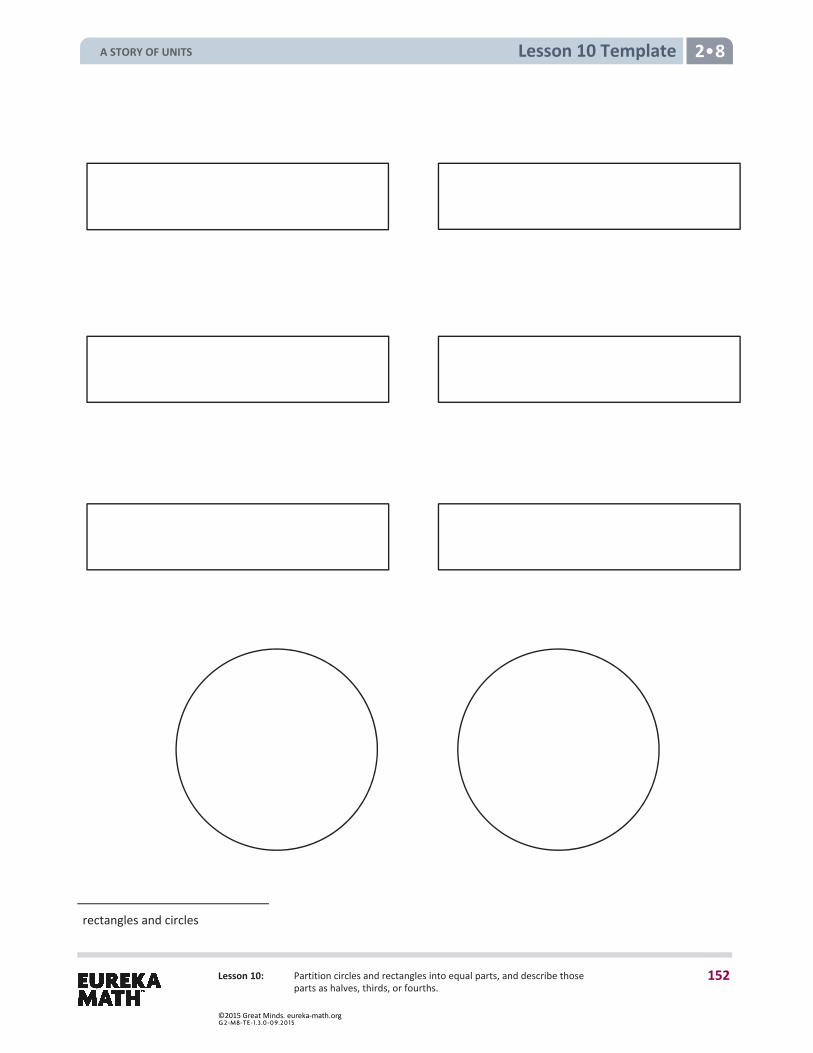
Lesson 10: Partition circles and rectangles into equal parts, and describe those parts as halves, thirds, or fourths.
Lesson 10 Template 2 8
rectangles and circles
A STORY OF UNITS
152
©2015 Great Minds. eureka-math.orgG 2-M8-TE-1.3 .0 -0 9.20 15
Lesson 11 2•8
Lesson 11: Describe a whole by the number of equal parts including 2 halves, 3 thirds, and 4 fourths.
Lesson 11 Objective: Describe a whole by the number of equal parts including 2 halves, 3 thirds, and 4 fourths.
Suggested Lesson Structure
Fluency Practice (10 minutes) Application Problem (5 minutes) Concept Development (35 minutes) Student Debrief (10 minutes)
Total Time (60 minutes)
Fluency Practice (10 minutes)
Addition with Renaming 2.NBT.5 (5 minutes) Grade 2 Core Fluency Differentiated Practice Sets 2.OA.2 (5 minutes)
Addition with Renaming (5 minutes)
Materials: (S) Personal white board, hundreds place value chart (Lesson 3 Fluency Template)
Note: This fluency activity reviews the application of a chip model while recording with the algorithm. Allow students work time between each problem, and reinforce place value understandings by having students say their answer in both unit form and in standard form. Students use their personal white boards and a place value chart to solve.
T: Slide the place value chart template into your personal white board. T: (Write 112 + 159 horizontally on the board.) Let’s use a chip model to add. On your personal white
board, record your work using the vertical method. S: (Solve.) T: 112 + 159 is…? S: 271.
Continue with the following possible sequence: 184 + 135, 385 + 108, 323 + 491, 263 + 178, 589 + 223, and 471 + 289.
A STORY OF UNITS
153
©2015 Great Minds. eureka-math.orgG 2-M8-TE-1.3 .0 -0 9.20 15
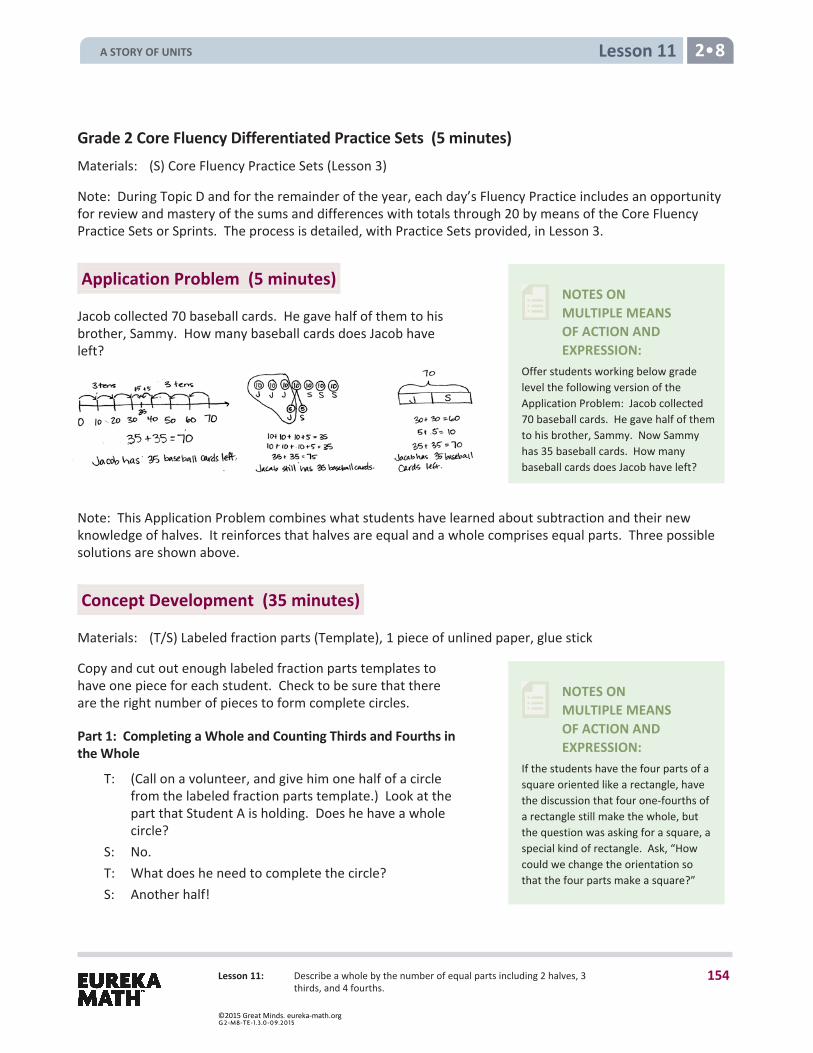
Lesson 11 2•8
Lesson 11: Describe a whole by the number of equal parts including 2 halves, 3 thirds, and 4 fourths.
NOTES ON MULTIPLE MEANS OF ACTION AND EXPRESSION:
Offer students working below grade level the following version of the Application Problem: Jacob collected 70 baseball cards. He gave half of them to his brother, Sammy. Now Sammy has 35 baseball cards. How many baseball cards does Jacob have left?
NOTES ON MULTIPLE MEANS OF ACTION AND EXPRESSION:
If the students have the four parts of a square oriented like a rectangle, have the discussion that four one-fourths of a rectangle still make the whole, but the question was asking for a square, a special kind of rectangle. Ask, “How could we change the orientation so that the four parts make a square?”
Grade 2 Core Fluency Differentiated Practice Sets (5 minutes) Materials: (S) Core Fluency Practice Sets (Lesson 3)
Note: During Topic D and for the remainder of the year, each day’s Fluency Practice includes an opportunity for review and mastery of the sums and differences with totals through 20 by means of the Core Fluency Practice Sets or Sprints. The process is detailed, with Practice Sets provided, in Lesson 3.
Application Problem (5 minutes)
Jacob collected 70 baseball cards. He gave half of them to his brother, Sammy. How many baseball cards does Jacob have left?
Note: This Application Problem combines what students have learned about subtraction and their new knowledge of halves. It reinforces that halves are equal and a whole comprises equal parts. Three possible solutions are shown above.
Concept Development (35 minutes)
Materials: (T/S) Labeled fraction parts (Template), 1 piece of unlined paper, glue stick
Copy and cut out enough labeled fraction parts templates to have one piece for each student. Check to be sure that there are the right number of pieces to form complete circles.
Part 1: Completing a Whole and Counting Thirds and Fourths in the Whole
T: (Call on a volunteer, and give him one half of a circle from the labeled fraction parts template.) Look at the part that Student A is holding. Does he have a whole circle?
S: No. T: What does he need to complete the circle? S: Another half!
A STORY OF UNITS
154
©2015 Great Minds. eureka-math.orgG 2-M8-TE-1.3 .0 -0 9.20 15
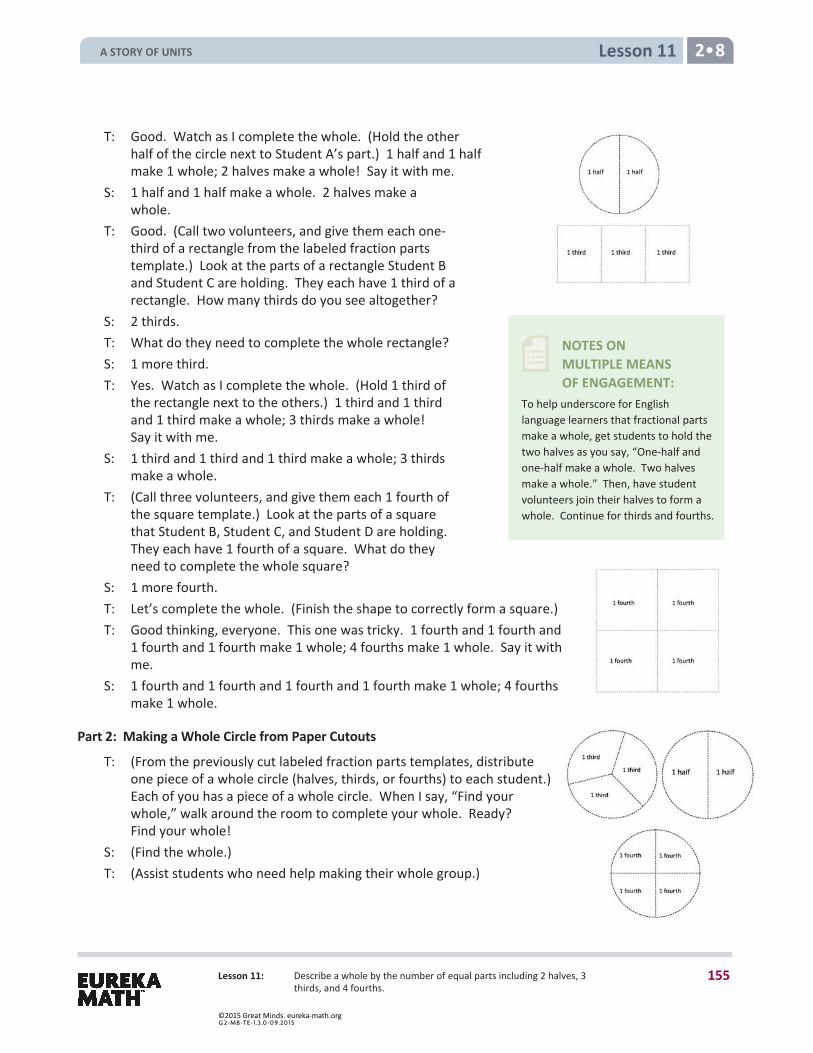
Lesson 11 2•8
Lesson 11: Describe a whole by the number of equal parts including 2 halves, 3 thirds, and 4 fourths.
NOTES ON MULTIPLE MEANS OF ENGAGEMENT:
To help underscore for English language learners that fractional parts make a whole, get students to hold the two halves as you say, “One-half and one-half make a whole. Two halves make a whole.” Then, have student volunteers join their halves to form a whole. Continue for thirds and fourths.
T: Good. Watch as I complete the whole. (Hold the other half of the circle next to Student A’s part.) 1 half and 1 half make 1 whole; 2 halves make a whole! Say it with me.
S: 1 half and 1 half make a whole. 2 halves make a whole.
T: Good. (Call two volunteers, and give them each one-third of a rectangle from the labeled fraction parts template.) Look at the parts of a rectangle Student B and Student C are holding. They each have 1 third of a rectangle. How many thirds do you see altogether?
S: 2 thirds. T: What do they need to complete the whole rectangle? S: 1 more third. T: Yes. Watch as I complete the whole. (Hold 1 third of
the rectangle next to the others.) 1 third and 1 third and 1 third make a whole; 3 thirds make a whole! Say it with me.
S: 1 third and 1 third and 1 third make a whole; 3 thirds make a whole.
T: (Call three volunteers, and give them each 1 fourth of the square template.) Look at the parts of a square that Student B, Student C, and Student D are holding. They each have 1 fourth of a square. What do they need to complete the whole square?
S: 1 more fourth. T: Let’s complete the whole. (Finish the shape to correctly form a square.) T: Good thinking, everyone. This one was tricky. 1 fourth and 1 fourth and
1 fourth and 1 fourth make 1 whole; 4 fourths make 1 whole. Say it with me.
S: 1 fourth and 1 fourth and 1 fourth and 1 fourth make 1 whole; 4 fourths make 1 whole.
Part 2: Making a Whole Circle from Paper Cutouts
T: (From the previously cut labeled fraction parts templates, distribute one piece of a whole circle (halves, thirds, or fourths) to each student.) Each of you has a piece of a whole circle. When I say, “Find your whole,” walk around the room to complete your whole. Ready? Find your whole!
S: (Find the whole.) T: (Assist students who need help making their whole group.)
A STORY OF UNITS
155
©2015 Great Minds. eureka-math.orgG 2-M8-TE-1.3 .0 -0 9.20 15

Lesson 11 2•8
Lesson 11: Describe a whole by the number of equal parts including 2 halves, 3 thirds, and 4 fourths.
T: Very good. Let’s look at our whole groups. Do all of our groups have the same number of people? S: No! T: Which group has the most people? Which group has the fewest number of people? S: The fourths have the most people because it takes 4 fourths to make the whole circle.
The halves have the fewest number of people because it only takes 2 halves to make a whole. T: Which group has the biggest pieces? Which group has the smallest pieces? S: The halves are the biggest. The fourths are the smallest. T: Good. So what can we say about thirds compared to halves and fourths? S: Thirds are bigger than fourths but smaller than halves! A shape can have more thirds than
halves.
Part 3: Drawing a Whole from One Part to the Whole
T: (Hold up 1 fourth of a square.) What part do I have? S: 1 fourth! T: I’m going to glue my 1 fourth on my paper. How many more fourths do I
need to complete the whole square? S: 3 more. T: Watch as I draw 3 more fourths to complete the whole (pictured to the
right). 4 fourths make 1 whole. S: I have a half! This is a third. Mine is the same as the teacher’s,
1 fourth. T: (Pass out unlined paper and glue sticks.) Take your piece of a whole, and glue it on your paper.
Use a crayon to complete the whole. S: (Work quietly while the teacher circulates to help those needing assistance.) T: Great job making a whole! Show your partner your work! Let’s practice some more on our Problem
Set.
Extension: Have some extra cut-up, labeled fraction parts for early finishers to complete halves, thirds, and fourths.
Problem Set (10 minutes)
Students should do their personal best to complete the Problem Set within the allotted 10 minutes. For some classes, it may be appropriate to modify the assignment by specifying which problems they work on first. Some problems do not specify a method for solving. Students should solve these problems using the RDW approach used for Application Problems.
MP.7
A STORY OF UNITS
156
©2015 Great Minds. eureka-math.orgG 2-M8-TE-1.3 .0 -0 9.20 15
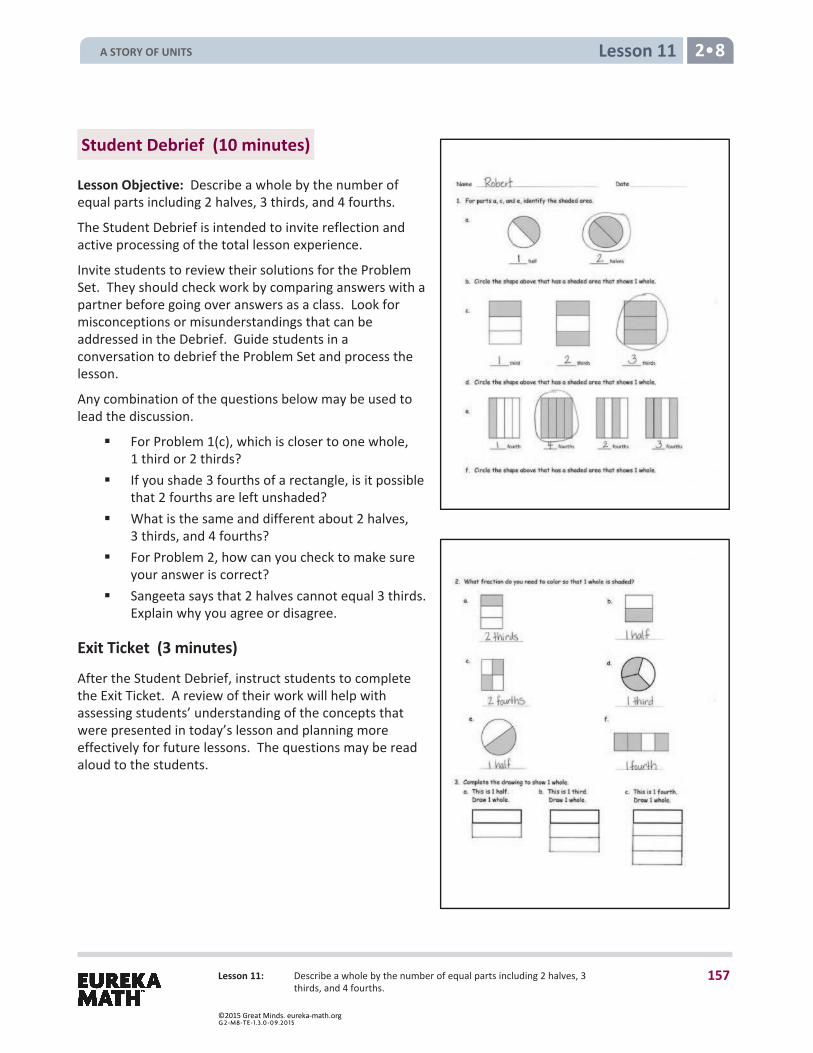
Lesson 11 2•8
Lesson 11: Describe a whole by the number of equal parts including 2 halves, 3 thirds, and 4 fourths.
Student Debrief (10 minutes)
Lesson Objective: Describe a whole by the number of equal parts including 2 halves, 3 thirds, and 4 fourths.
The Student Debrief is intended to invite reflection and active processing of the total lesson experience.
Invite students to review their solutions for the Problem Set. They should check work by comparing answers with a partner before going over answers as a class. Look for misconceptions or misunderstandings that can be addressed in the Debrief. Guide students in a conversation to debrief the Problem Set and process the lesson.
Any combination of the questions below may be used to lead the discussion.
For Problem 1(c), which is closer to one whole,1 third or 2 thirds?
If you shade 3 fourths of a rectangle, is it possiblethat 2 fourths are left unshaded?
What is the same and different about 2 halves,3 thirds, and 4 fourths?
For Problem 2, how can you check to make sureyour answer is correct?
Sangeeta says that 2 halves cannot equal 3 thirds.Explain why you agree or disagree.
Exit Ticket (3 minutes)
After the Student Debrief, instruct students to complete the Exit Ticket. A review of their work will help with assessing students’ understanding of the concepts that were presented in today’s lesson and planning more effectively for future lessons. The questions may be read aloud to the students.
A STORY OF UNITS
157
©2015 Great Minds. eureka-math.orgG 2-M8-TE-1.3 .0 -0 9.20 15
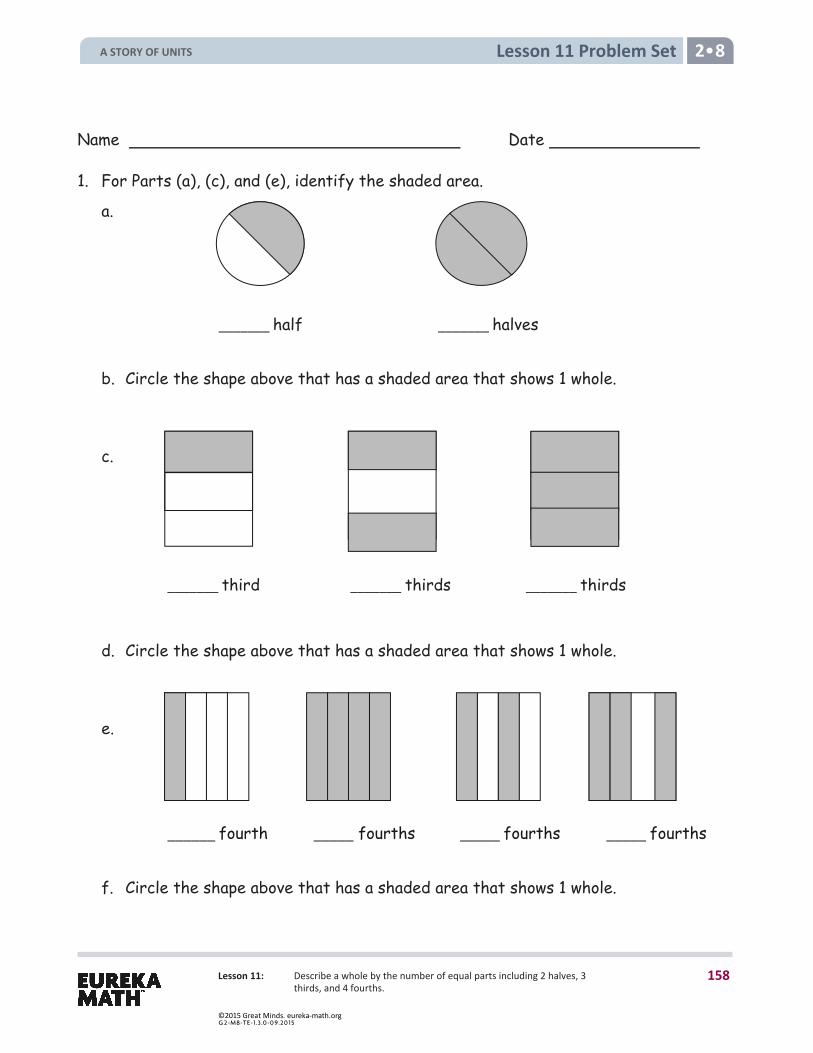
Lesson 11 Problem Set 2•8
Lesson 11: Describe a whole by the number of equal parts including 2 halves, 3 thirds, and 4 fourths.
Name Date
1. For Parts (a), (c), and (e), identify the shaded area.
a.
b. Circle the shape above that has a shaded area that shows 1 whole.
c.
d. Circle the shape above that has a shaded area that shows 1 whole.
e.
f. Circle the shape above that has a shaded area that shows 1 whole.
_______ half _______ halves
_______ third _______ thirds _______ thirds
______ fourth _____ fourths _____ fourths _____ fourths
A STORY OF UNITS
158
©2015 Great Minds. eureka-math.orgG 2-M8-TE-1.3 .0 -0 9.20 15
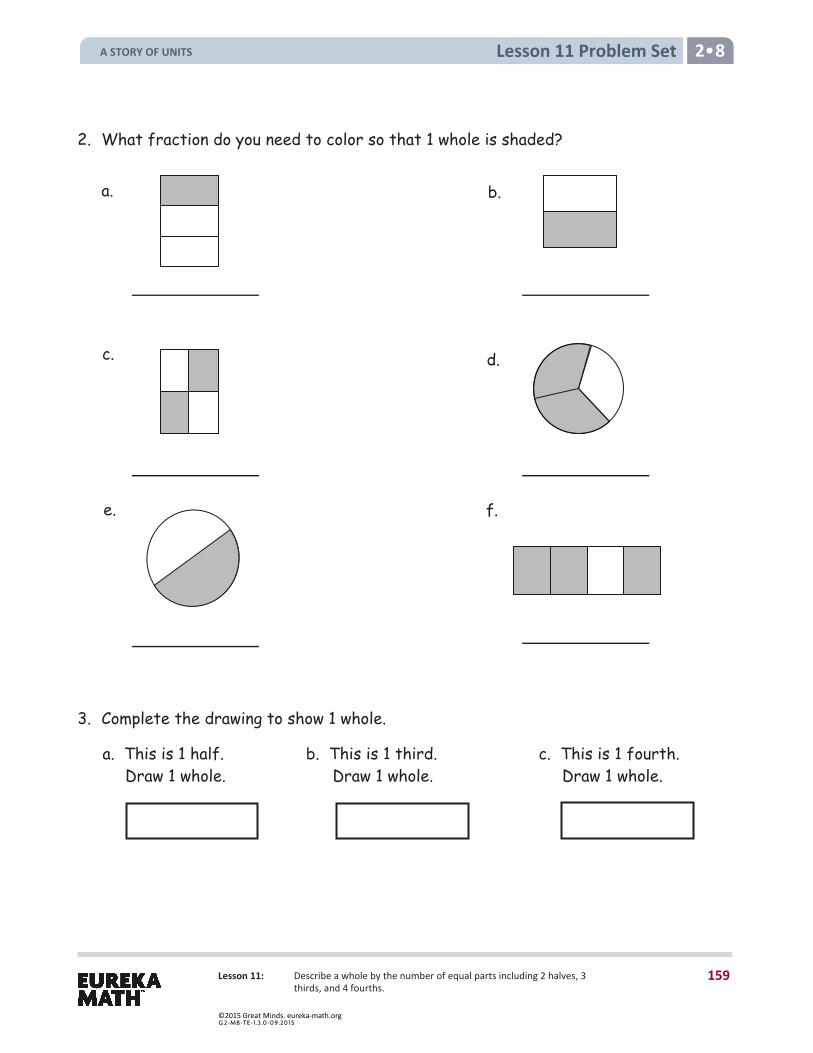
Lesson 11 Problem Set 2•8
Lesson 11: Describe a whole by the number of equal parts including 2 halves, 3 thirds, and 4 fourths.
2. What fraction do you need to color so that 1 whole is shaded?
a.
3. Complete the drawing to show 1 whole.
a. This is 1 half. Draw 1 whole.
b. This is 1 third. Draw 1 whole.
c. This is 1 fourth. Draw 1 whole.
d.
b.
f.e.
c.
A STORY OF UNITS
159
©2015 Great Minds. eureka-math.orgG 2-M8-TE-1.3 .0 -0 9.20 15

Lesson 11 Exit Ticket 2•8
Lesson 11: Describe a whole by the number of equal parts including 2 halves, 3 thirds, and 4 fourths.
Name Date
What fraction do you need to color so that 1 whole is shaded?
1.
4.
2.
3.
A STORY OF UNITS
160
©2015 Great Minds. eureka-math.orgG 2-M8-TE-1.3 .0 -0 9.20 15
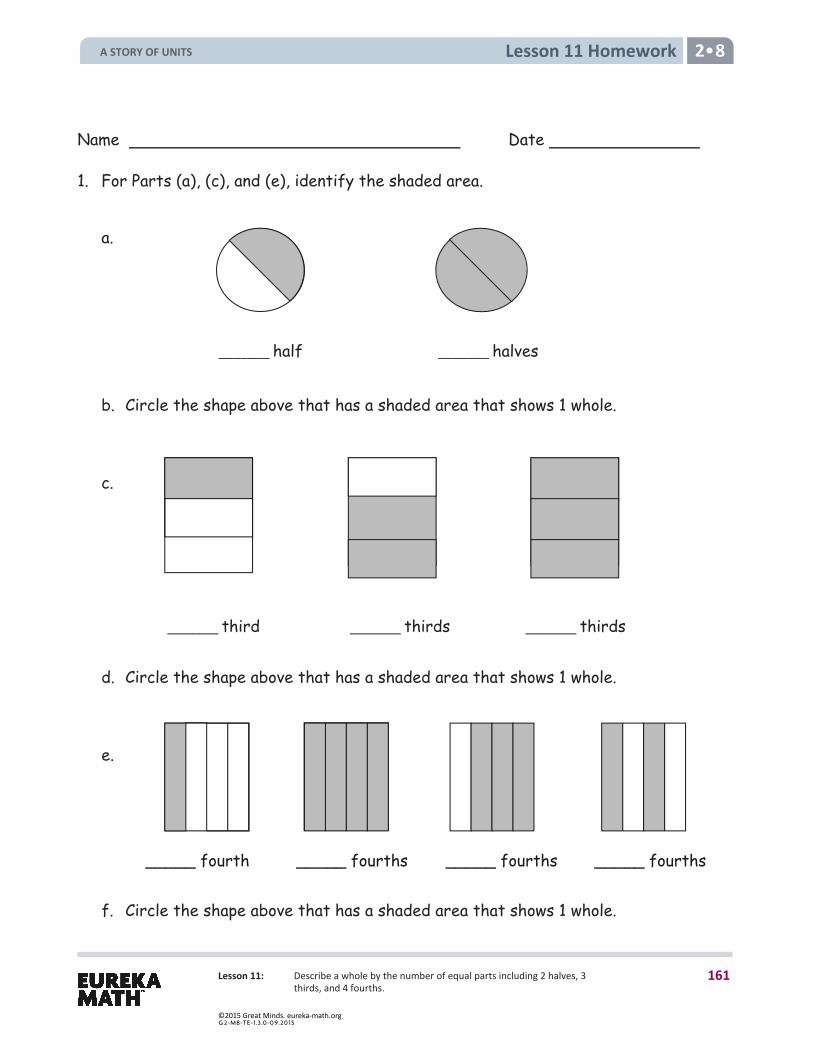
Lesson 11 Homework 2•8
Lesson 11: Describe a whole by the number of equal parts including 2 halves, 3 thirds, and 4 fourths.
Name Date
1. For Parts (a), (c), and (e), identify the shaded area.
a.
b. Circle the shape above that has a shaded area that shows 1 whole.
c.
d. Circle the shape above that has a shaded area that shows 1 whole.
e.
f. Circle the shape above that has a shaded area that shows 1 whole.
_______ half _______ halves
_______ third _______ thirds _______ thirds
_____ fourth _____ fourths _____ fourths _____ fourths
A STORY OF UNITS
161
©2015 Great Minds. eureka-math.orgG 2-M8-TE-1.3 .0 -0 9.20 15
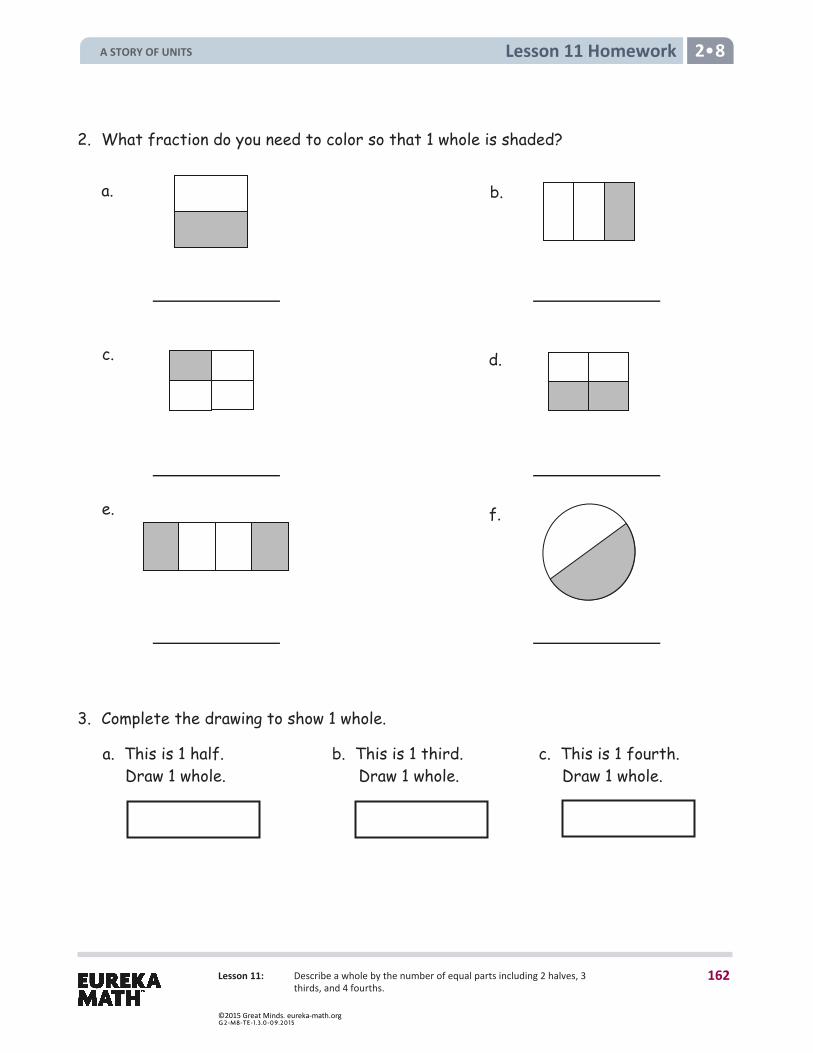
Lesson 11 Homework 2•8
Lesson 11: Describe a whole by the number of equal parts including 2 halves, 3 thirds, and 4 fourths.
2. What fraction do you need to color so that 1 whole is shaded?
a.
3. Complete the drawing to show 1 whole.
a. This is 1 half. Draw 1 whole.
b. This is 1 third. Draw 1 whole.
c. This is 1 fourth. Draw 1 whole.
d.
b.
f.e.
c.
A STORY OF UNITS
162
©2015 Great Minds. eureka-math.orgG 2-M8-TE-1.3 .0 -0 9.20 15
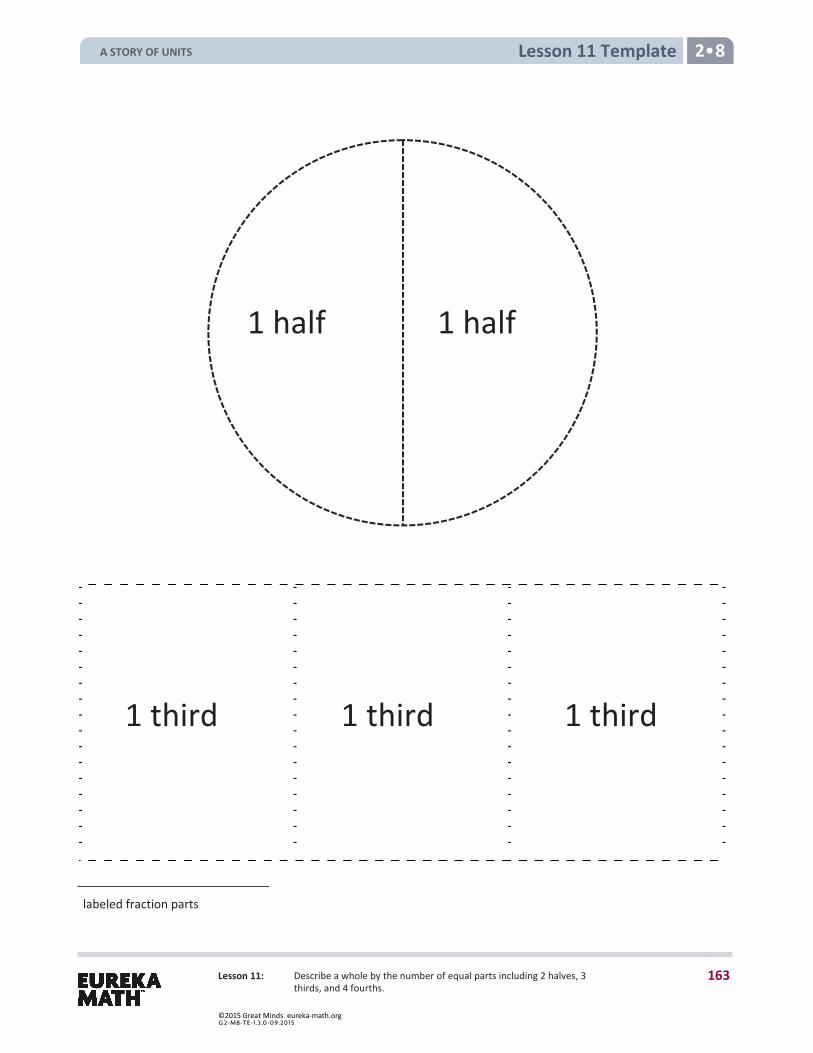
Lesson 11 Template 2•8
Lesson 11: Describe a whole by the number of equal parts including 2 halves, 3 thirds, and 4 fourths.
labeled fraction parts
1 half 1 half
1 third 1 third 1 third
A STORY OF UNITS
163
©2015 Great Minds. eureka-math.orgG 2-M8-TE-1.3 .0 -0 9.20 15
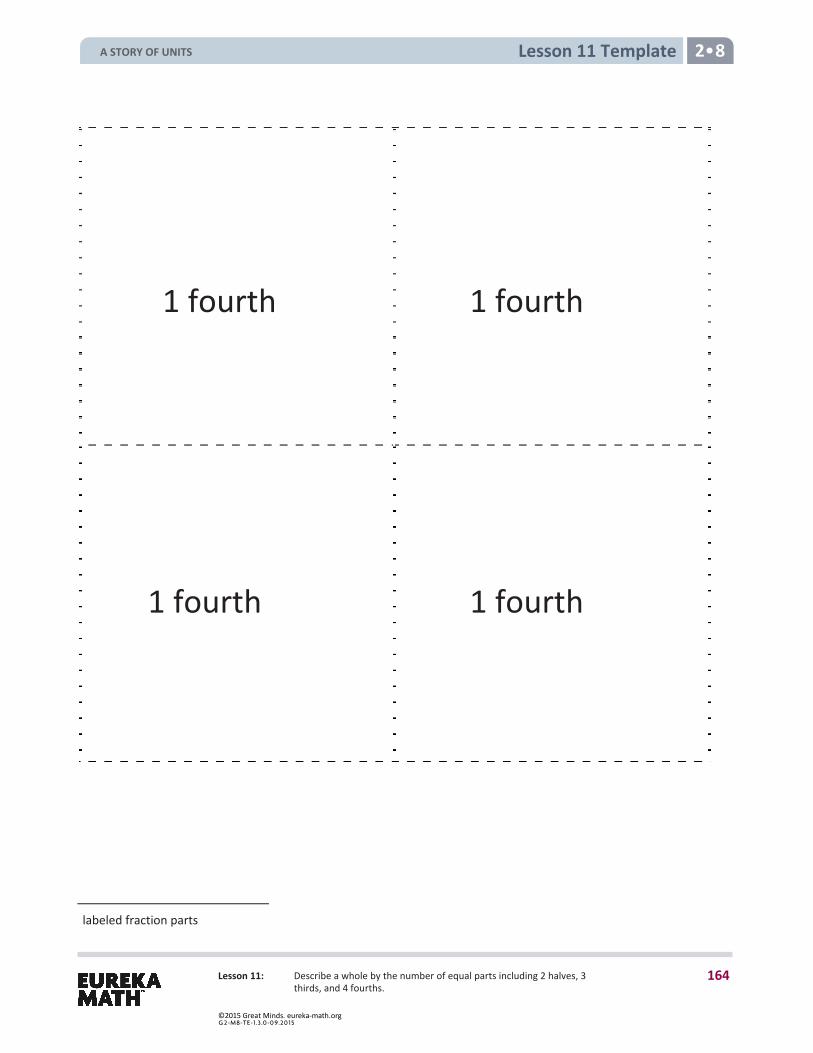
Lesson 11 Template 2•8
Lesson 11: Describe a whole by the number of equal parts including 2 halves, 3 thirds, and 4 fourths.
labeled fraction parts
1 fourth 1 fourth
1 fourth 1 fourth
A STORY OF UNITS
164
©2015 Great Minds. eureka-math.orgG 2-M8-TE-1.3 .0 -0 9.20 15
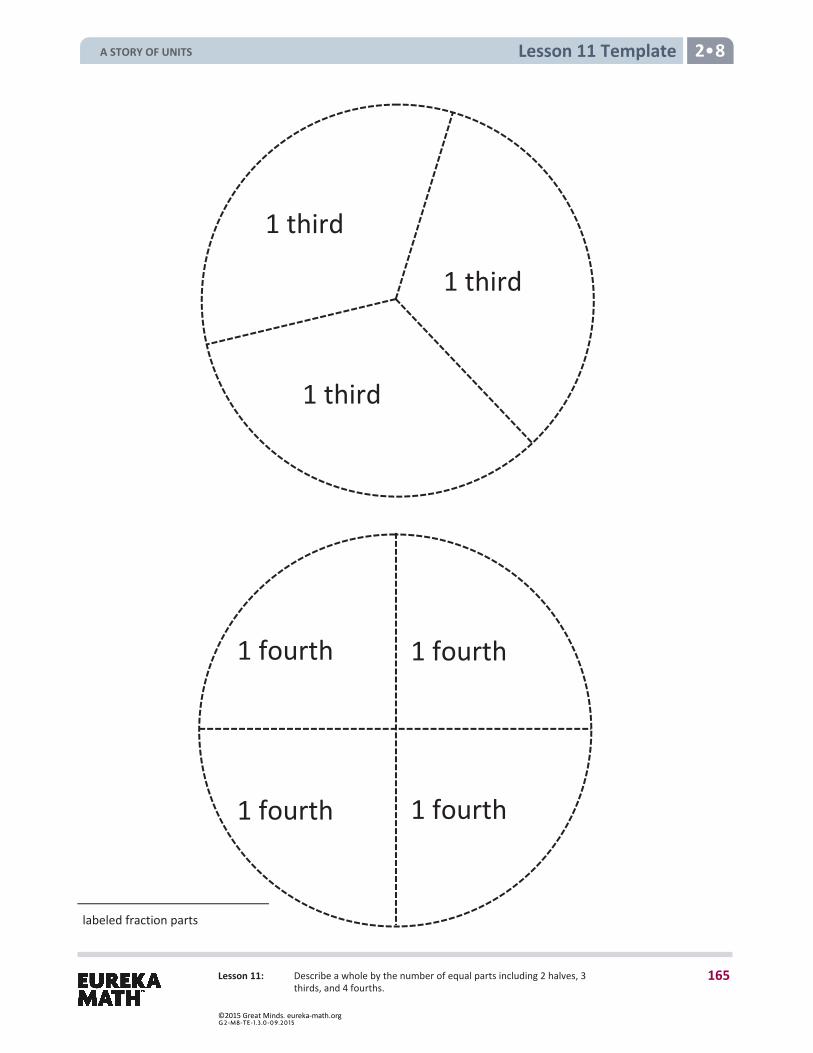
Lesson 11 Template 2•8
Lesson 11: Describe a whole by the number of equal parts including 2 halves, 3 thirds, and 4 fourths.
labeled fraction parts
1 fourth
1 fourth
1 fourth
1 fourth
1 third
1 third
1 third
A STORY OF UNITS
165
©2015 Great Minds. eureka-math.orgG 2-M8-TE-1.3 .0 -0 9.20 15
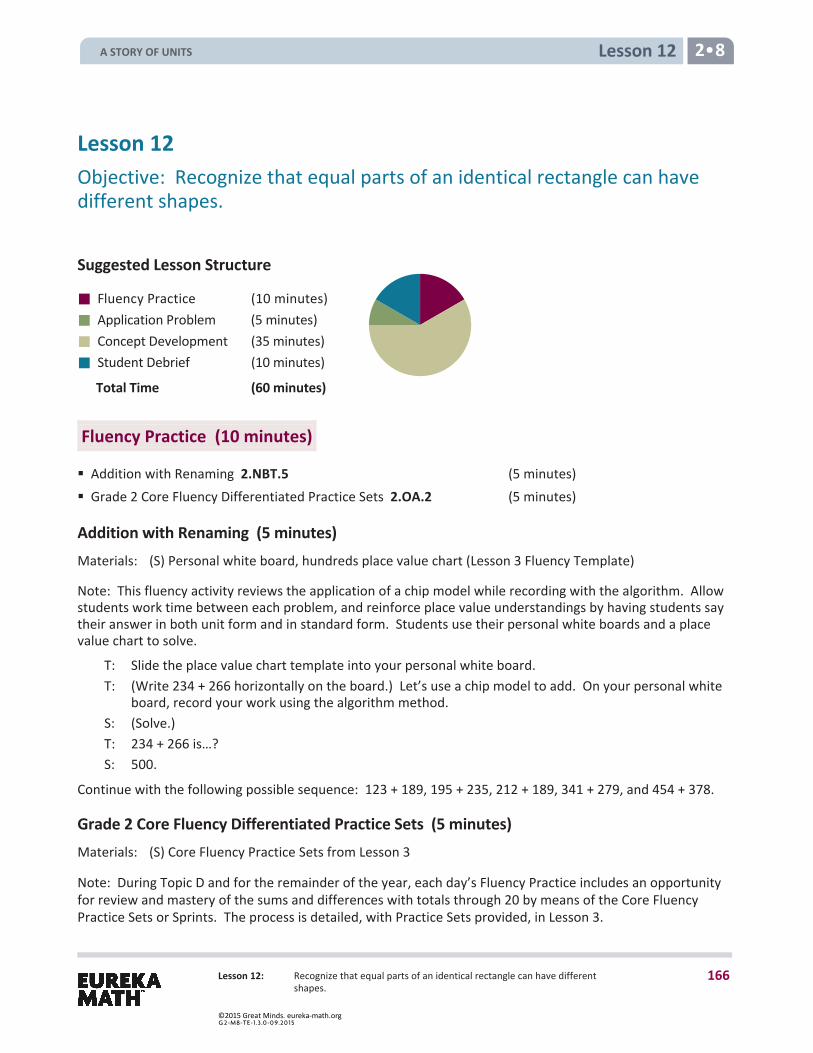
Lesson 12 2 8
Lesson 12: Recognize that equal parts of an identical rectangle can have different shapes.
Lesson 12 Objective: Recognize that equal parts of an identical rectangle can have different shapes.
Suggested Lesson Structure
Fluency Practice (10 minutes) Application Problem (5 minutes) Concept Development (35 minutes) Student Debrief (10 minutes)
Total Time (60 minutes)
Fluency Practice (10 minutes)
Addition with Renaming 2.NBT.5 (5 minutes) Grade 2 Core Fluency Differentiated Practice Sets 2.OA.2 (5 minutes)
Addition with Renaming (5 minutes) Materials: (S) Personal white board, hundreds place value chart (Lesson 3 Fluency Template)
Note: This fluency activity reviews the application of a chip model while recording with the algorithm. Allow students work time between each problem, and reinforce place value understandings by having students say their answer in both unit form and in standard form. Students use their personal white boards and a place value chart to solve.
T: Slide the place value chart template into your personal white board. T: (Write 234 + 266 horizontally on the board.) Let’s use a chip model to add. On your personal white
board, record your work using the algorithm method. S: (Solve.) T: 234 + 266 is…? S: 500.
Continue with the following possible sequence: 123 + 189, 195 + 235, 212 + 189, 341 + 279, and 454 + 378.
Grade 2 Core Fluency Differentiated Practice Sets (5 minutes) Materials: (S) Core Fluency Practice Sets from Lesson 3
Note: During Topic D and for the remainder of the year, each day’s Fluency Practice includes an opportunity for review and mastery of the sums and differences with totals through 20 by means of the Core Fluency Practice Sets or Sprints. The process is detailed, with Practice Sets provided, in Lesson 3.
A STORY OF UNITS
166
©2015 Great Minds. eureka-math.orgG 2-M8-TE-1.3 .0 -0 9.20 15
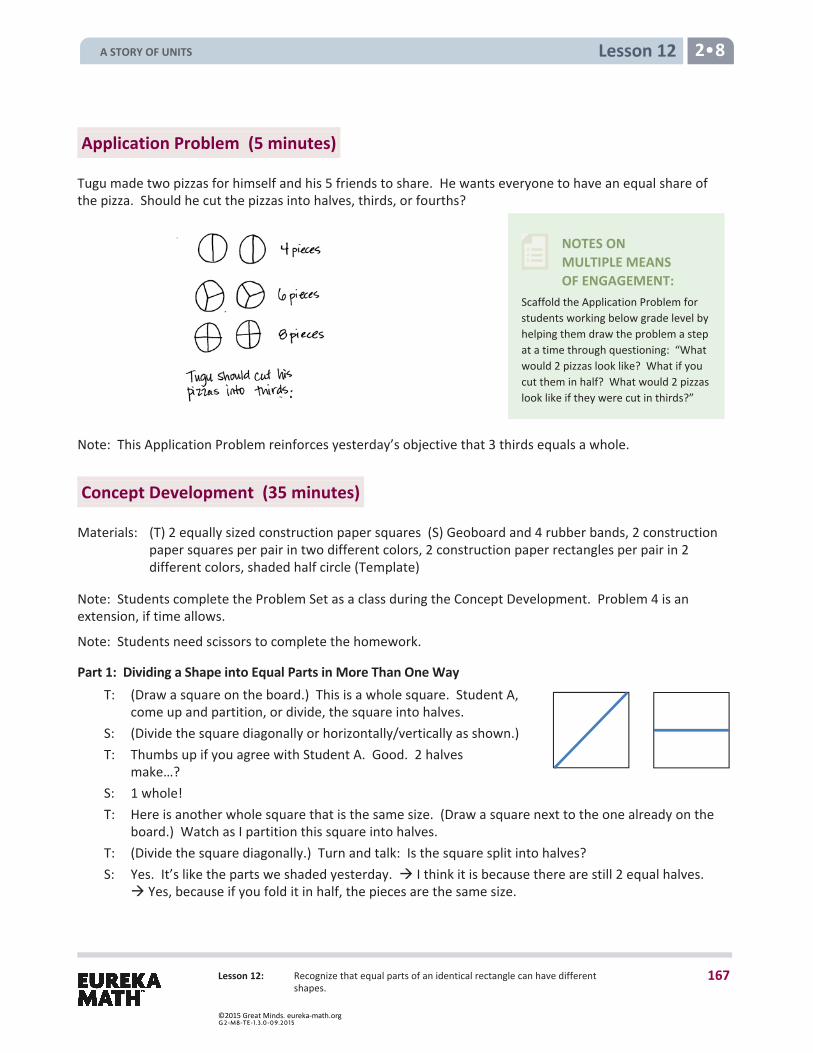
Lesson 12 2 8
Lesson 12: Recognize that equal parts of an identical rectangle can have different shapes.
NOTES ON MULTIPLE MEANS OF ENGAGEMENT:
Scaffold the Application Problem for students working below grade level by helping them draw the problem a step at a time through questioning: “What would 2 pizzas look like? What if you cut them in half? What would 2 pizzas look like if they were cut in thirds?”
Application Problem (5 minutes)
Tugu made two pizzas for himself and his 5 friends to share. He wants everyone to have an equal share of the pizza. Should he cut the pizzas into halves, thirds, or fourths?
Note: This Application Problem reinforces yesterday’s objective that 3 thirds equals a whole.
Concept Development (35 minutes)
Materials: (T) 2 equally sized construction paper squares (S) Geoboard and 4 rubber bands, 2 construction paper squares per pair in two different colors, 2 construction paper rectangles per pair in 2 different colors, shaded half circle (Template)
Note: Students complete the Problem Set as a class during the Concept Development. Problem 4 is an extension, if time allows.
Note: Students need scissors to complete the homework.
Part 1: Dividing a Shape into Equal Parts in More Than One Way T: (Draw a square on the board.) This is a whole square. Student A,
come up and partition, or divide, the square into halves. S: (Divide the square diagonally or horizontally/vertically as shown.) T: Thumbs up if you agree with Student A. Good. 2 halves
make…? S: 1 whole! T: Here is another whole square that is the same size. (Draw a square next to the one already on the
board.) Watch as I partition this square into halves. T: (Divide the square diagonally.) Turn and talk: Is the square split into halves? S: Yes. It’s like the parts we shaded yesterday. I think it is because there are still 2 equal halves.
Yes, because if you fold it in half, the pieces are the same size.
A STORY OF UNITS
167
©2015 Great Minds. eureka-math.orgG 2-M8-TE-1.3 .0 -0 9.20 15
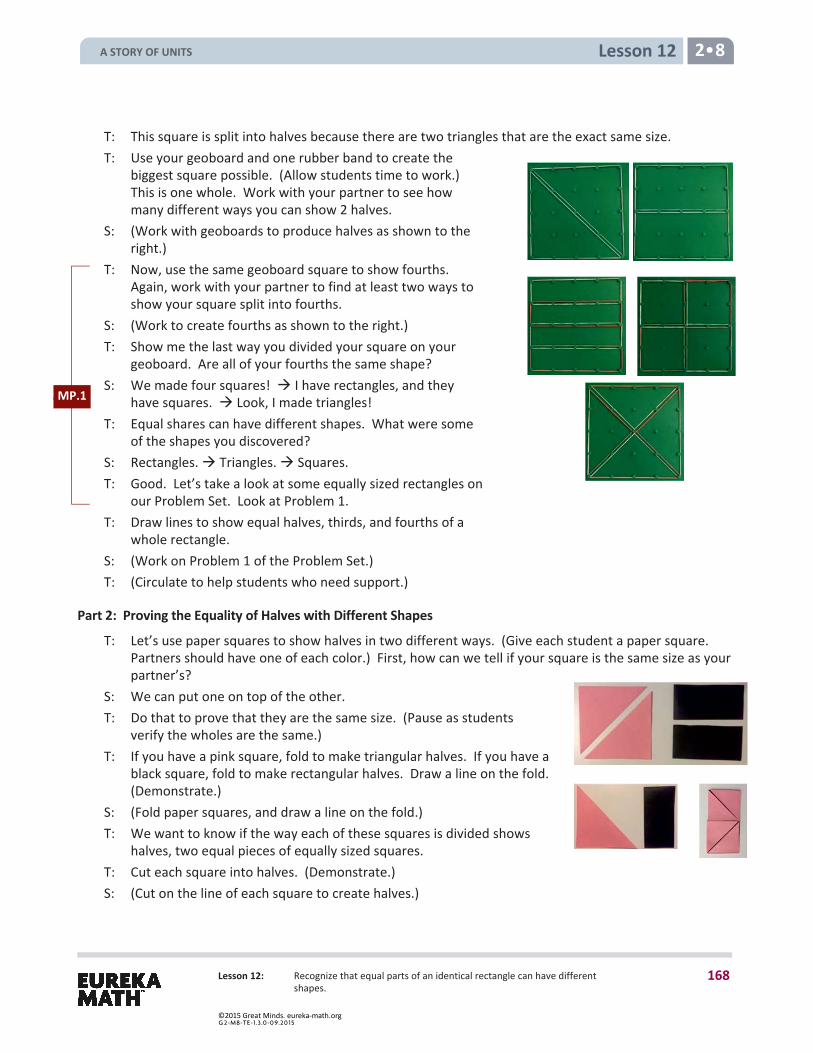
Lesson 12 2 8
Lesson 12: Recognize that equal parts of an identical rectangle can have different shapes.
T: This square is split into halves because there are two triangles that are the exact same size. T: Use your geoboard and one rubber band to create the
biggest square possible. (Allow students time to work.) This is one whole. Work with your partner to see how many different ways you can show 2 halves.
S: (Work with geoboards to produce halves as shown to the right.)
T: Now, use the same geoboard square to show fourths. Again, work with your partner to find at least two ways to show your square split into fourths.
S: (Work to create fourths as shown to the right.) T: Show me the last way you divided your square on your
geoboard. Are all of your fourths the same shape? S: We made four squares! I have rectangles, and they
have squares. Look, I made triangles! T: Equal shares can have different shapes. What were some
of the shapes you discovered? S: Rectangles. Triangles. Squares. T: Good. Let’s take a look at some equally sized rectangles on
our Problem Set. Look at Problem 1. T: Draw lines to show equal halves, thirds, and fourths of a
whole rectangle. S: (Work on Problem 1 of the Problem Set.) T: (Circulate to help students who need support.)
Part 2: Proving the Equality of Halves with Different Shapes
T: Let’s use paper squares to show halves in two different ways. (Give each student a paper square. Partners should have one of each color.) First, how can we tell if your square is the same size as your partner’s?
S: We can put one on top of the other. T: Do that to prove that they are the same size. (Pause as students
verify the wholes are the same.) T: If you have a pink square, fold to make triangular halves. If you have a
black square, fold to make rectangular halves. Draw a line on the fold. (Demonstrate.)
S: (Fold paper squares, and draw a line on the fold.) T: We want to know if the way each of these squares is divided shows
halves, two equal pieces of equally sized squares. T: Cut each square into halves. (Demonstrate.) S: (Cut on the line of each square to create halves.)
MP.1
A STORY OF UNITS
168
©2015 Great Minds. eureka-math.orgG 2-M8-TE-1.3 .0 -0 9.20 15
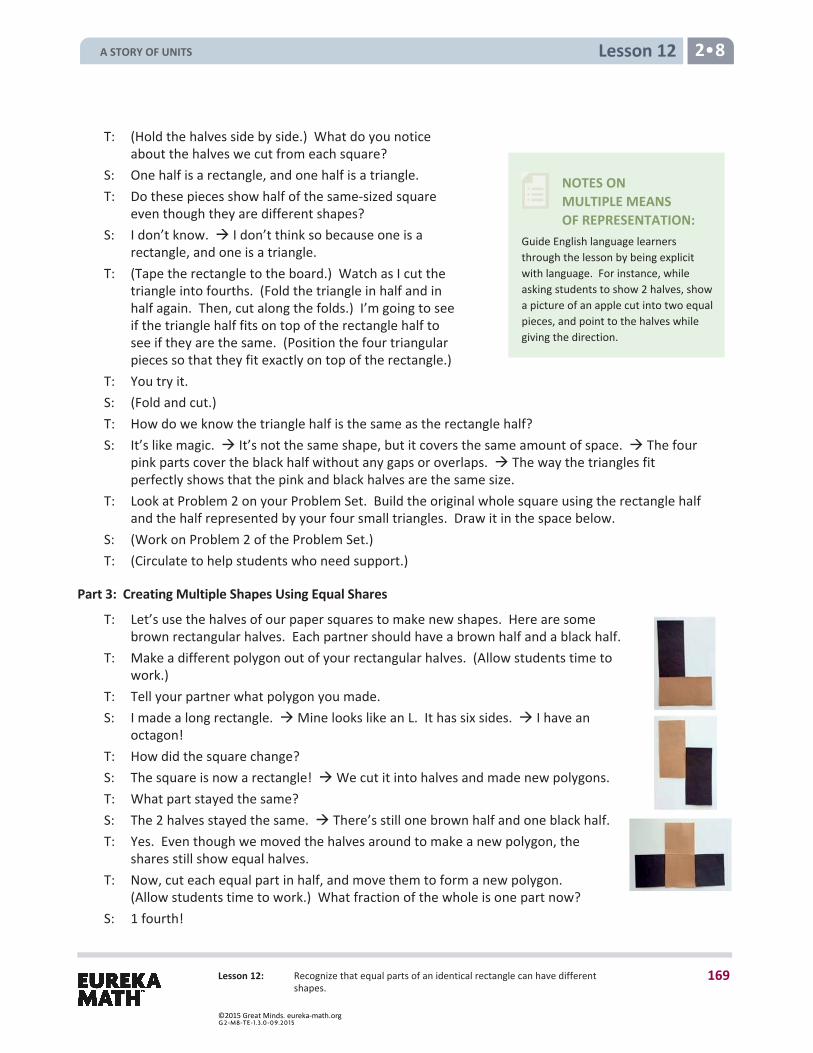
Lesson 12 2 8
Lesson 12: Recognize that equal parts of an identical rectangle can have different shapes.
NOTES ON MULTIPLE MEANS OF REPRESENTATION:
Guide English language learners through the lesson by being explicit with language. For instance, while asking students to show 2 halves, show a picture of an apple cut into two equal pieces, and point to the halves while giving the direction.
T: (Hold the halves side by side.) What do you notice about the halves we cut from each square?
S: One half is a rectangle, and one half is a triangle. T: Do these pieces show half of the same-sized square
even though they are different shapes? S: I don’t know. I don’t think so because one is a
rectangle, and one is a triangle. T: (Tape the rectangle to the board.) Watch as I cut the
triangle into fourths. (Fold the triangle in half and in half again. Then, cut along the folds.) I’m going to see if the triangle half fits on top of the rectangle half to see if they are the same. (Position the four triangular pieces so that they fit exactly on top of the rectangle.)
T: You try it. S: (Fold and cut.) T: How do we know the triangle half is the same as the rectangle half? S: It’s like magic. It’s not the same shape, but it covers the same amount of space. The four
pink parts cover the black half without any gaps or overlaps. The way the triangles fit perfectly shows that the pink and black halves are the same size.
T: Look at Problem 2 on your Problem Set. Build the original whole square using the rectangle half and the half represented by your four small triangles. Draw it in the space below.
S: (Work on Problem 2 of the Problem Set.) T: (Circulate to help students who need support.)
Part 3: Creating Multiple Shapes Using Equal Shares
T: Let’s use the halves of our paper squares to make new shapes. Here are some brown rectangular halves. Each partner should have a brown half and a black half.
T: Make a different polygon out of your rectangular halves. (Allow students time to work.)
T: Tell your partner what polygon you made. S: I made a long rectangle. Mine looks like an L. It has six sides. I have an
octagon! T: How did the square change? S: The square is now a rectangle! We cut it into halves and made new polygons. T: What part stayed the same? S: The 2 halves stayed the same. There’s still one brown half and one black half. T: Yes. Even though we moved the halves around to make a new polygon, the
shares still show equal halves. T: Now, cut each equal part in half, and move them to form a new polygon.
(Allow students time to work.) What fraction of the whole is one part now? S: 1 fourth!
A STORY OF UNITS
169
©2015 Great Minds. eureka-math.orgG 2-M8-TE-1.3 .0 -0 9.20 15

Lesson 12 2 8
Lesson 12: Recognize that equal parts of an identical rectangle can have different shapes.
T: What changed when we switched from halves to fourths? S: There are 4 fourths instead of 2 halves. The halves were rectangles, but the fourths are squares.
I can make a different polygon with the fourths. T: What stayed the same? S: It’s still the same amount of brown and black. The whole stayed the same. We didn’t lose any
parts or add any parts. We just cut them. T: That’s right. We cut up the square into halves and then fourths, but the new polygon was made
from the original square. Can you still see the square in your head? Could you move the pieces back so it looks like the square again? (Partners move fourths to form the original square.)
T: Good job. You will all get a chance to do this with a square and a circle from the Problem Set. T: (Invite students to work on Problems 3 and 4 independently.)
Student Debrief (10 minutes)
Lesson Objective: Recognize that equal parts of an identical rectangle can have different shapes.
The Student Debrief is intended to invite reflection and active processing of the total lesson experience.
Invite students to review their solutions for the Problem Set. They should check work by comparing answers with a partner before going over answers as a class. Look for misconceptions or misunderstandings that can be addressed in the Debrief. Guide students in a conversation to debrief the Problem Set and process the lesson.
Any combination of the questions below may be used to lead the discussion.
(Draw examples from Problem 1(c).) If you splittwo rectangles of the same size into fourths andmake four triangles or four rectangles, whichfourth is bigger?
For Problem 1, if you were to cut out your equalshares in the left-hand column and rearrangethem, would they fit on top of the equal shares inthe right-hand column? Why?
For Problem 4, share your drawing with yourpartner. How many equal shares do you have?What fraction is shaded? When you rearrangedyour circles to create a new shape, what fractionwas shaded?
If you split two rectangles in half, will the halvesalways have the same shape? What must therectangles have in common first?
A STORY OF UNITS
170
©2015 Great Minds. eureka-math.orgG 2-M8-TE-1.3 .0 -0 9.20 15
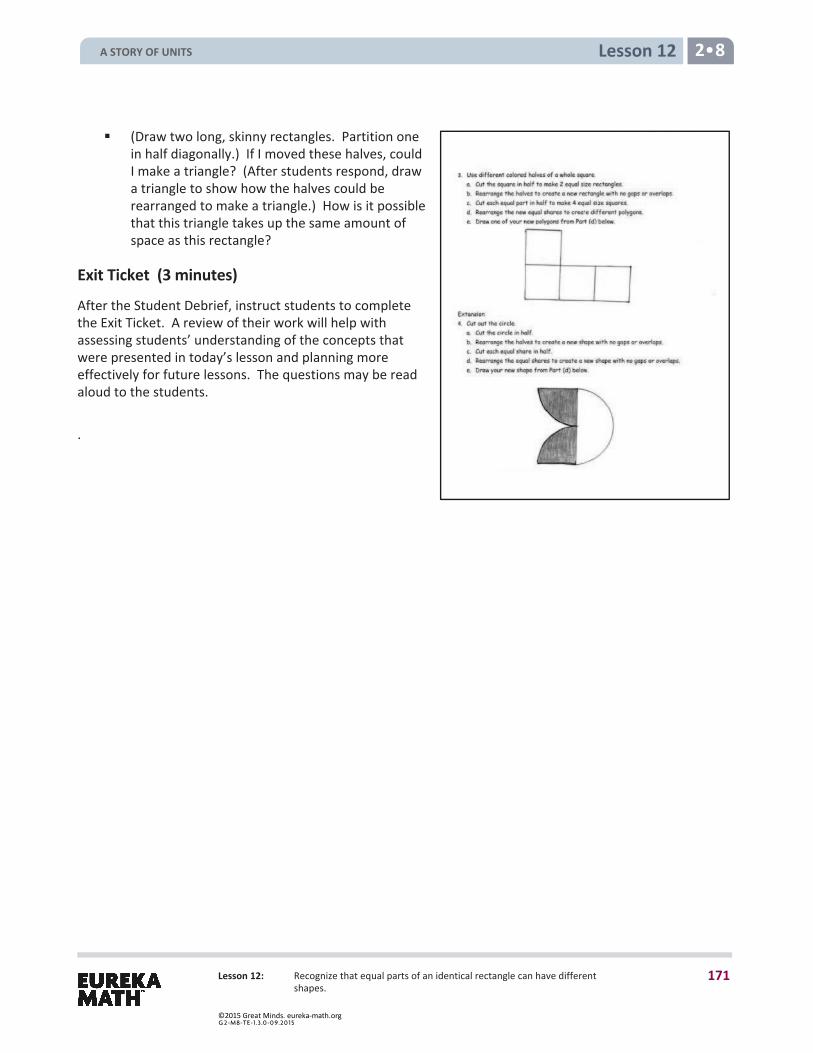
Lesson 12 2 8
Lesson 12: Recognize that equal parts of an identical rectangle can have different shapes.
(Draw two long, skinny rectangles. Partition onein half diagonally.) If I moved these halves, couldI make a triangle? (After students respond, drawa triangle to show how the halves could berearranged to make a triangle.) How is it possiblethat this triangle takes up the same amount ofspace as this rectangle?
Exit Ticket (3 minutes)
After the Student Debrief, instruct students to complete the Exit Ticket. A review of their work will help with assessing students’ understanding of the concepts that were presented in today’s lesson and planning more effectively for future lessons. The questions may be read aloud to the students.
.
A STORY OF UNITS
171
©2015 Great Minds. eureka-math.orgG 2-M8-TE-1.3 .0 -0 9.20 15
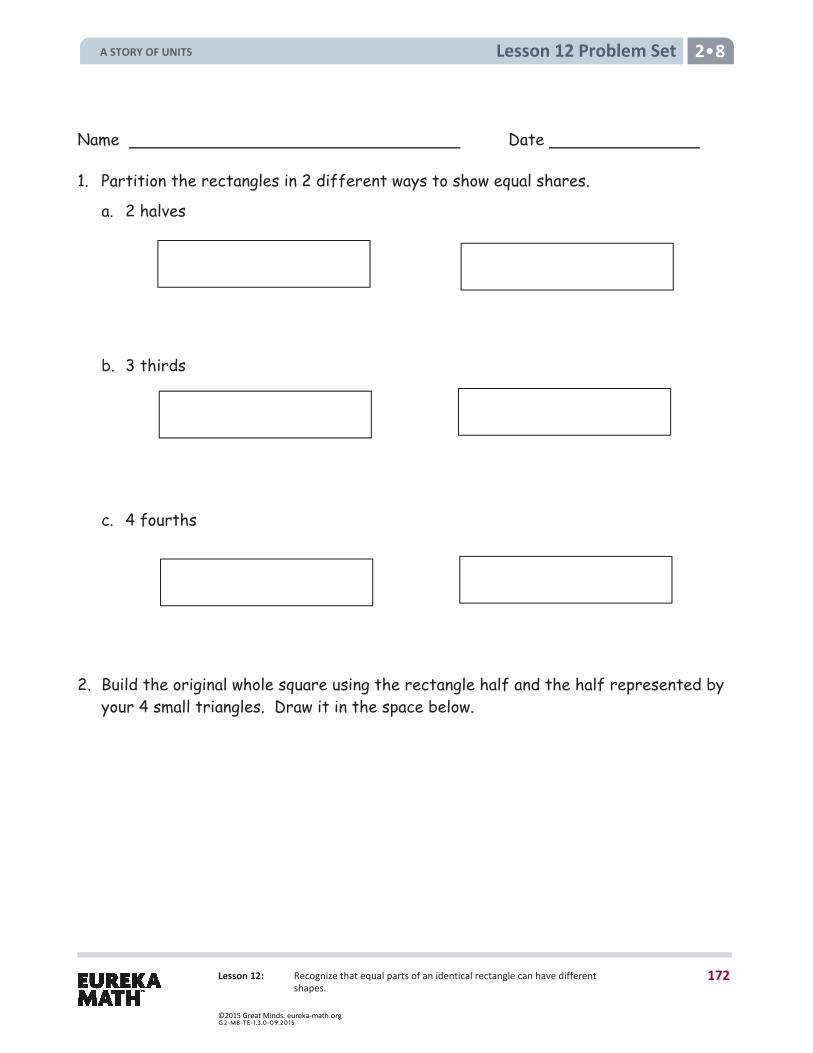
Lesson 12 Problem Set 2
Lesson 12: Recognize that equal parts of an identical rectangle can have different shapes.
Name Date
1. Partition the rectangles in 2 different ways to show equal shares.
a. 2 halves
b. 3 thirds
c. 4 fourths
2. Build the original whole square using the rectangle half and the half represented by your 4 small triangles. Draw it in the space below.
A STORY OF UNITS
172
©2015 Great Minds. eureka-math.orgG 2-M8-TE-1.3 .0 -0 9.20 15
Lesson 12 Problem Set 2
Lesson 12: Recognize that equal parts of an identical rectangle can have different shapes.
3. Use different-colored halves of a whole square.
a. Cut the square in half to make 2 equal-size rectangles.
b. Rearrange the halves to create a new rectangle with no gaps or overlaps.
c. Cut each equal part in half to make 4 equal-size squares.
d. Rearrange the new equal shares to create different polygons.
e. Draw one of your new polygons from Part (d) below.
Extension
4. Cut out the circle.
a. Cut the circle in half.
b. Rearrange the halves to create a new shape with no gaps or overlaps.
c. Cut each equal share in half.
d. Rearrange the equal shares to create a new shape with no gaps or overlaps.
e. Draw your new shape from Part (d) below.
A STORY OF UNITS
173
©2015 Great Minds. eureka-math.orgG 2-M8-TE-1.3 .0 -0 9.20 15
Lesson 12 Exit Ticket 2
Lesson 12: Recognize that equal parts of an identical rectangle can have different shapes.
Name Date
Partition the rectangles in 2 different ways to show equal shares.
1. 2 halves
2. 3 thirds
3. 4 fourths
A STORY OF UNITS
174
©2015 Great Minds. eureka-math.orgG 2-M8-TE-1.3 .0 -0 9.20 15
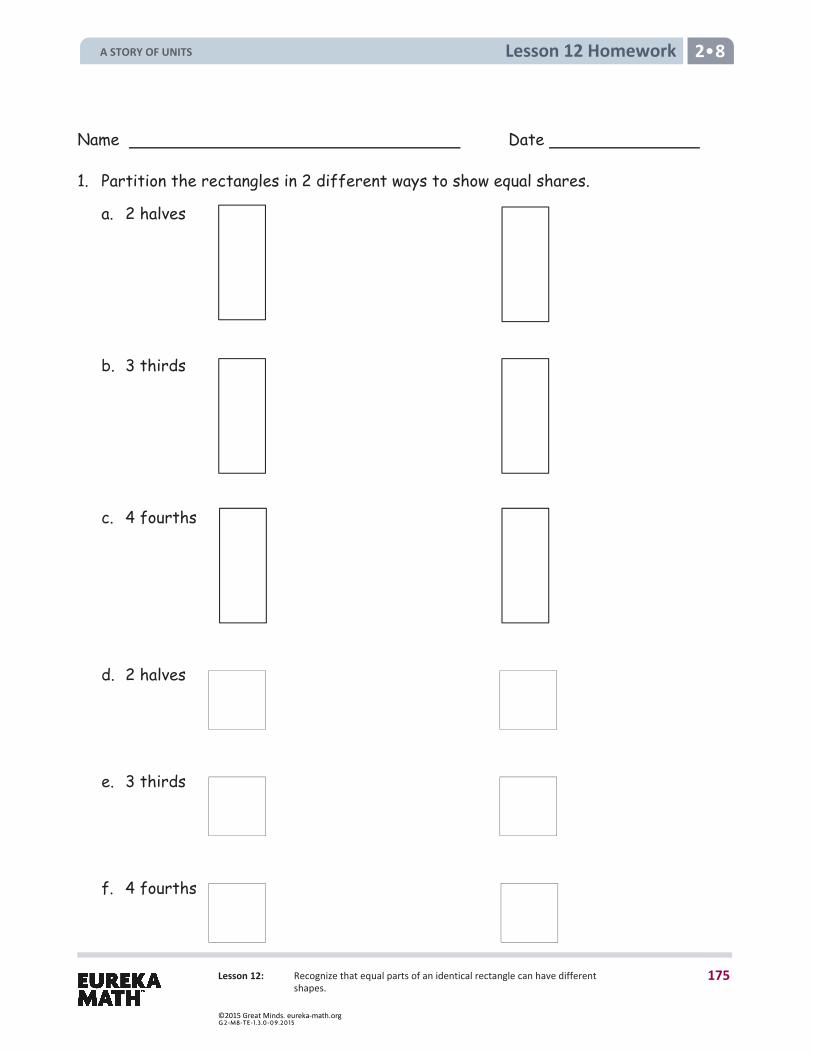
Lesson 12: Recognize that equal parts of an identical rectangle can have different shapes.
Lesson 12 Homework 2
Name Date
1. Partition the rectangles in 2 different ways to show equal shares.
a. 2 halves
b. 3 thirds
c. 4 fourths
d. 2 halves
e. 3 thirds
f. 4 fourths
A STORY OF UNITS
175
©2015 Great Minds. eureka-math.orgG 2-M8-TE-1.3 .0 -0 9.20 15
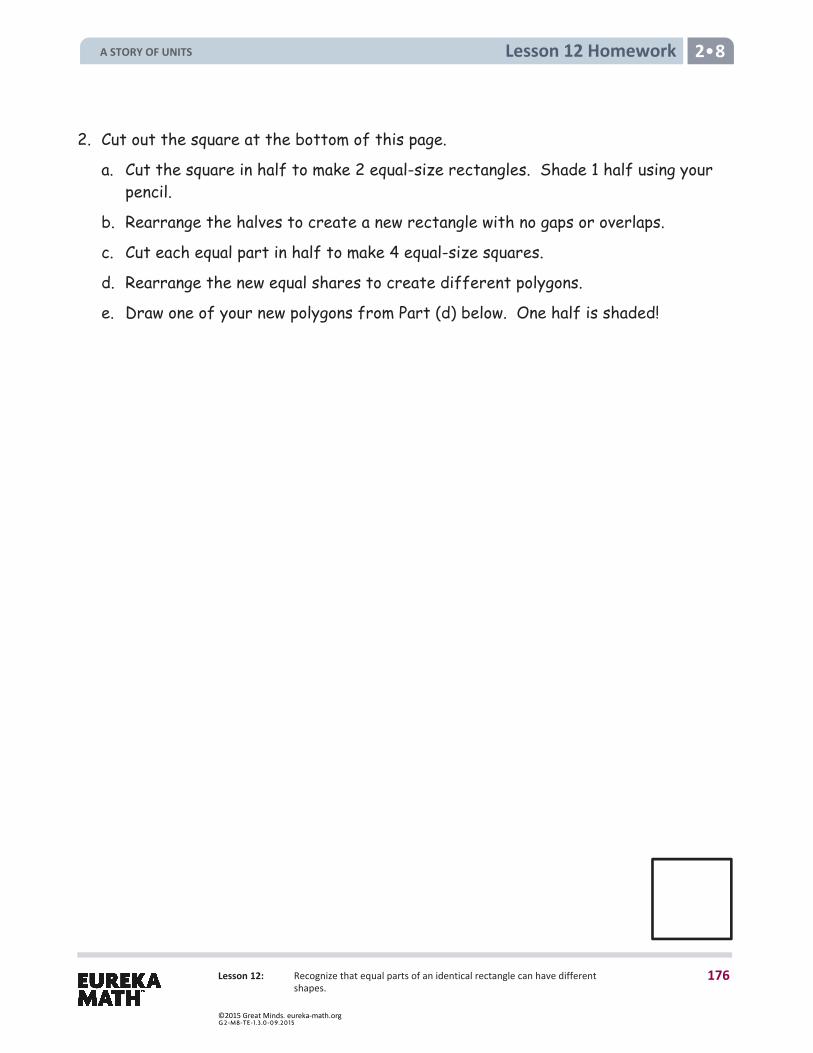
Lesson 12: Recognize that equal parts of an identical rectangle can have different shapes.
Lesson 12 Homework 2
2. Cut out the square at the bottom of this page.
a. Cut the square in half to make 2 equal-size rectangles. Shade 1 half using your pencil.
b. Rearrange the halves to create a new rectangle with no gaps or overlaps.
c. Cut each equal part in half to make 4 equal-size squares.
d. Rearrange the new equal shares to create different polygons.
e. Draw one of your new polygons from Part (d) below. One half is shaded!
A STORY OF UNITS
176
©2015 Great Minds. eureka-math.orgG 2-M8-TE-1.3 .0 -0 9.20 15
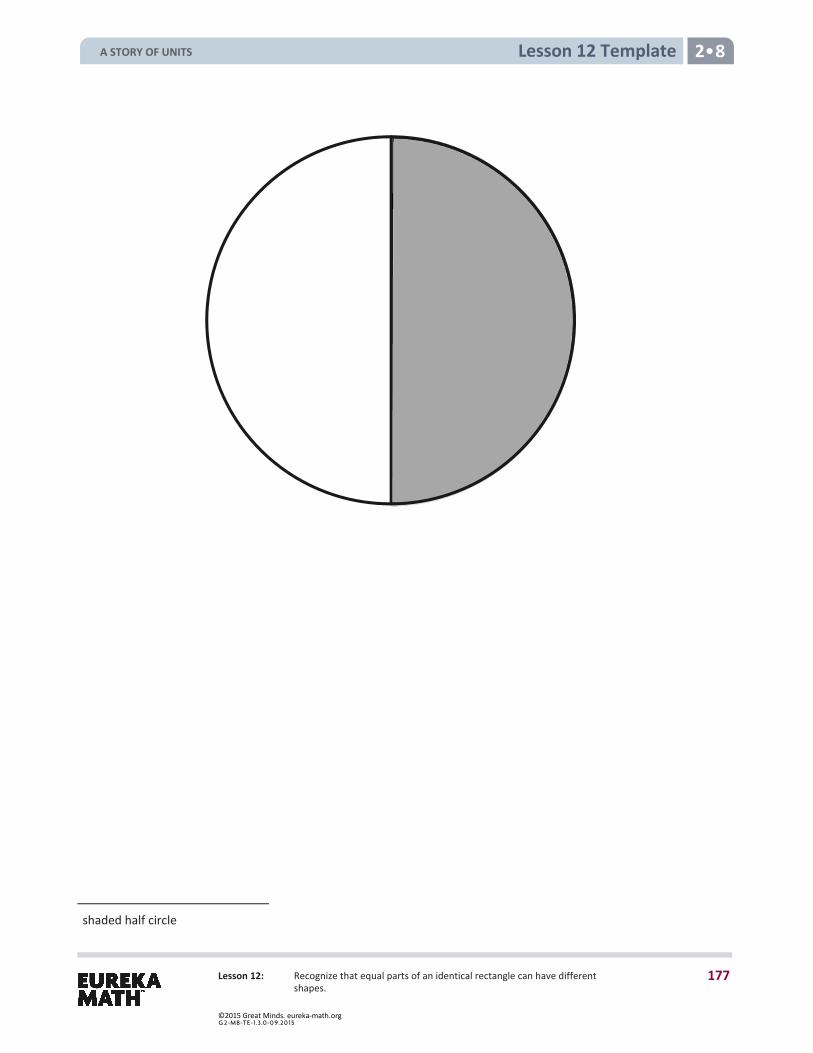
Lesson 12: Recognize that equal parts of an identical rectangle can have different shapes.
Lesson 12 Template 2
shaded half circle
A STORY OF UNITS
177
©2015 Great Minds. eureka-math.orgG 2-M8-TE-1.3 .0 -0 9.20 15
2 G R A D E
Mathematics Curriculum GRADE 2 • MODULE 8
Topic D: Application of Fractions to Tell Time
Topic D
Application of Fractions to Tell Time 2.MD.7, 2.G.3, 2.NBT.2, 2.NBT.5, 2.NBT.6
Focus Standards: 2.MD.7 Tell and write time from analog and digital clocks to the nearest five minutes, using a.m. and p.m.
2.G.3 Partition circles and rectangles into two, three, or four equal shares, describe the shares using the words halves, thirds, half of, a third of, etc., and describe the whole as two halves, three thirds, four fourths. Recognize that equal shares of identical wholes need not have the same shape.
Instructional Days: 4 Coherence -Links from: G1–M5 Identifying, Composing, and Partitioning Shapes -Links to: G3–M2 Place Value and Problem Solving with Units of Measure
In Topic D, students apply fraction and skip-counting skills to telling time. The topic starts with Lesson 13, in which students make paper clocks from templates. After a brief review of the clock using a geared instructional clock, students fold their paper clock face in half and trace along the fold line to delineate the 2 halves. They then mark the top of the fold with 12 and the bottom with 6. Students next fold the clock in half again so that the two fold points meet, creating quarters. Students trace along this second fold line and mark 3 and 9 at the new fold points. In the end, they label the remaining numbers and attach hands in order to use it as a practice clock. Having constructed this tool, students then practice telling time to the nearest half and quarter hour. They relate 30 minutes to a half hour and 15 minutes to a quarter hour, associating, for example, “half past 7” with 7:30 or 2:45 with “a quarter to 3.” In Lesson 14, students start to relate each of the 12 numbers on the clock face to intervals of 5 minutes. They use skip-counting to count up to and down from 60 by fives in preparation for telling time to the nearest 5 minutes. Next, they learn to tell time by counting numbers on the clock face for the minute hand, as well as relating the position of the hour hand to the correct hour. Lesson 15 continues the same process, now adding the complexity of a.m. and p.m. Students view pictures showing everyday activities along with the time represented in digital clock form. They determine whether the time shown in the picture would be a.m. or p.m. In Lesson 16, students apply their subtraction skills to solve problems involving time intervals. Given two times, they must calculate how much time has passed between them, whether in whole hours or a half hour (e.g., the elapsed time between 3:00 p.m. and 7:00 p.m. or 6:30 a.m. and 7:00 a.m.). Finally, they close the year determining the time interval in days before they become third-graders.
A STORY OF UNITS
178
©2015 Great Minds. eureka-math.orgG 2-M8-TE-1.3 .0 -0 9.20 15
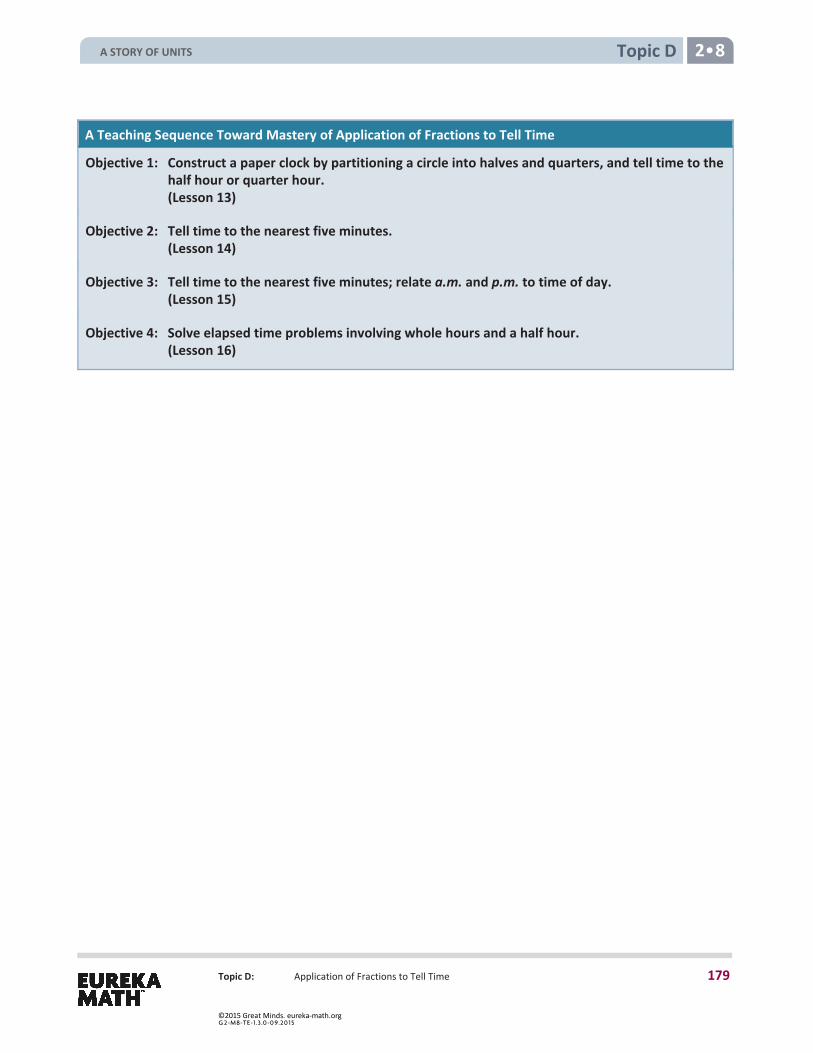
Topic D 2 8
Topic D: Application of Fractions to Tell Time
A Teaching Sequence Toward Mastery of Application of Fractions to Tell Time
Objective 1: Construct a paper clock by partitioning a circle into halves and quarters, and tell time to the half hour or quarter hour. (Lesson 13)
Objective 2: Tell time to the nearest five minutes.(Lesson 14)
Objective 3: Tell time to the nearest five minutes; relate a.m. and p.m. to time of day. (Lesson 15)
Objective 4: Solve elapsed time problems involving whole hours and a half hour.(Lesson 16)
A STORY OF UNITS
179
©2015 Great Minds. eureka-math.orgG 2-M8-TE-1.3 .0 -0 9.20 15
Lesson 13 2 8
Lesson 13: Construct a paper clock by partitioning a circle into halves and quarters, and tell time to the half hour or quarter hour.
Lesson 13 Objective: Construct a paper clock by partitioning a circle into halves and quarters, and tell time to the half hour or quarter hour.
Suggested Lesson Structure
Fluency Practice (10 minutes) Concept Development (40 minutes) Student Debrief (10 minutes)
Total Time (60 minutes)
Fluency Practice (10 minutes)
Rename for the Smaller Unit 2.NBT.1 (1 minute) Subtraction with Renaming 2.NBT.7 (9 minutes)
Rename for the Smaller Unit (1 minute)
Note: This fluency activity reviews using place value understanding to rename units in preparation for subtraction with chips and the algorithm during Fluency Practice in Lessons 14, 15, and 16.
T: I’m going to give you a number of hundreds and tens. I want you to rename 1 of the hundreds for 10 tens and then tell me how many hundreds and tens. Ready?
T: (Write 1 hundred 1 ten = ____ tens.) Say the number sentence. S: 1 hundred 1 ten = 11 tens. T: (Write 2 hundreds = 1 hundred ____ tens.) Say the number sentence. S: 2 hundreds = 1 hundred 10 tens. T: (Write 2 hundreds = 1 hundred 9 tens ____ ones.) Say the number sentence. S: 2 hundreds = 1 hundred 9 tens 10 ones.
Repeat the process for 3 hundreds 3 tens and 4 hundreds 4 tens.
Subtraction with Renaming (9 minutes)
Materials: (S) Personal white board, hundreds place value chart (Lesson 3 Fluency Template)
Note: This fluency activity reviews the application of a chip model while recording with the algorithm. Allow students work time between each problem, and reinforce place value understandings by having students say their answer in both unit form and in standard form. Students use their personal white boards and a place value chart to solve.
A STORY OF UNITS
180
©2015 Great Minds. eureka-math.orgG 2-M8-TE-1.3 .0 -0 9.20 15
Lesson 13 2 8
Lesson 13: Construct a paper clock by partitioning a circle into halves and quarters, and tell time to the half hour or quarter hour.
T: Slide the place value chart template into your personal white board. T: (Write 132 – 118 horizontally on the board.) Let’s use a chip model to subtract. On your board,
record your work using the algorithm. S: (Solve.) T: 132 – 118 is…? S: 14.
Continue with the following possible sequence: 183 – 129, 278 – 159, 347 – 183, 563 – 271, 646 – 295, and 438 – 239.
Concept Development (40 minutes)
Materials: (T) Large instructional clock with gears, clock (Template), document camera (if available), crayon, sentence strips to post vocabulary: half past, a quarter past, a quarter to (S) clock (Template) printed on cardstock, scissors, crayon, brad fastener, personal white board
Note: To allow ample time for the Concept Development, there is no Application Problem in this lesson.
Call students to the carpet. Use a geared demonstration clock to review the hour and minute hands and how they move in relation to each other, as well as the meaning of the numbers on the clock. Then, review telling time to the whole hour, starting at twelve o’clock.
Part 1: Brief Review Using a Geared Clock
T: (Show 12:00.) Where is the minute hand? S: At the 12. T: Where is the hour hand? S: At the 12. T: What time is it? S: Twelve o’clock. T: When the minute hand moves all the way around the clock, it has been 60 minutes, or 1 whole hour.
When 1 hour passes, what time will it be? (Move the minute hand a full rotation.) S: One o’clock.
Show various hours on the clock, and have students name them.
T: (Show 1:00 again.) When half an hour has passed, the minute hand is halfway around the circle. (Move the minute hand.) Tell me when to stop.
S: Stop! T: At what number did the minute hand stop? S: At the 6. T: And the hour hand is halfway between the 1 and…? S: 2. T: What fraction of the whole hour has passed? S: Half an hour.
A STORY OF UNITS
181
©2015 Great Minds. eureka-math.orgG 2-M8-TE-1.3 .0 -0 9.20 15
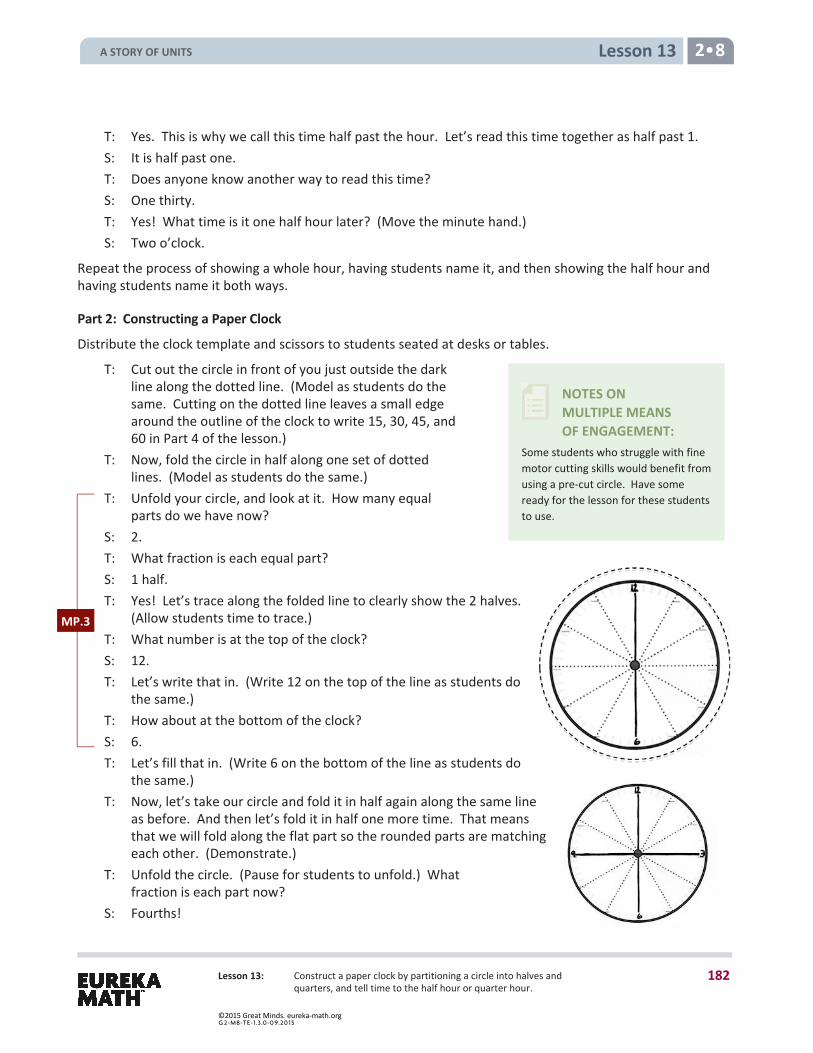
Lesson 13 2 8
Lesson 13: Construct a paper clock by partitioning a circle into halves and quarters, and tell time to the half hour or quarter hour.
NOTES ON MULTIPLE MEANS OF ENGAGEMENT:
Some students who struggle with fine motor cutting skills would benefit from using a pre-cut circle. Have some ready for the lesson for these students to use.
T: Yes. This is why we call this time half past the hour. Let’s read this time together as half past 1. S: It is half past one. T: Does anyone know another way to read this time? S: One thirty. T: Yes! What time is it one half hour later? (Move the minute hand.) S: Two o’clock.
Repeat the process of showing a whole hour, having students name it, and then showing the half hour and having students name it both ways.
Part 2: Constructing a Paper Clock
Distribute the clock template and scissors to students seated at desks or tables.
T: Cut out the circle in front of you just outside the dark line along the dotted line. (Model as students do the same. Cutting on the dotted line leaves a small edge around the outline of the clock to write 15, 30, 45, and 60 in Part 4 of the lesson.)
T: Now, fold the circle in half along one set of dotted lines. (Model as students do the same.)
T: Unfold your circle, and look at it. How many equal parts do we have now?
S: 2. T: What fraction is each equal part? S: 1 half. T: Yes! Let’s trace along the folded line to clearly show the 2 halves.
(Allow students time to trace.) T: What number is at the top of the clock? S: 12. T: Let’s write that in. (Write 12 on the top of the line as students do
the same.) T: How about at the bottom of the clock? S: 6. T: Let’s fill that in. (Write 6 on the bottom of the line as students do
the same.) T: Now, let’s take our circle and fold it in half again along the same line
as before. And then let’s fold it in half one more time. That means that we will fold along the flat part so the rounded parts are matching each other. (Demonstrate.)
T: Unfold the circle. (Pause for students to unfold.) What fraction is each part now?
S: Fourths!
MP.3
A STORY OF UNITS
182
©2015 Great Minds. eureka-math.orgG 2-M8-TE-1.3 .0 -0 9.20 15
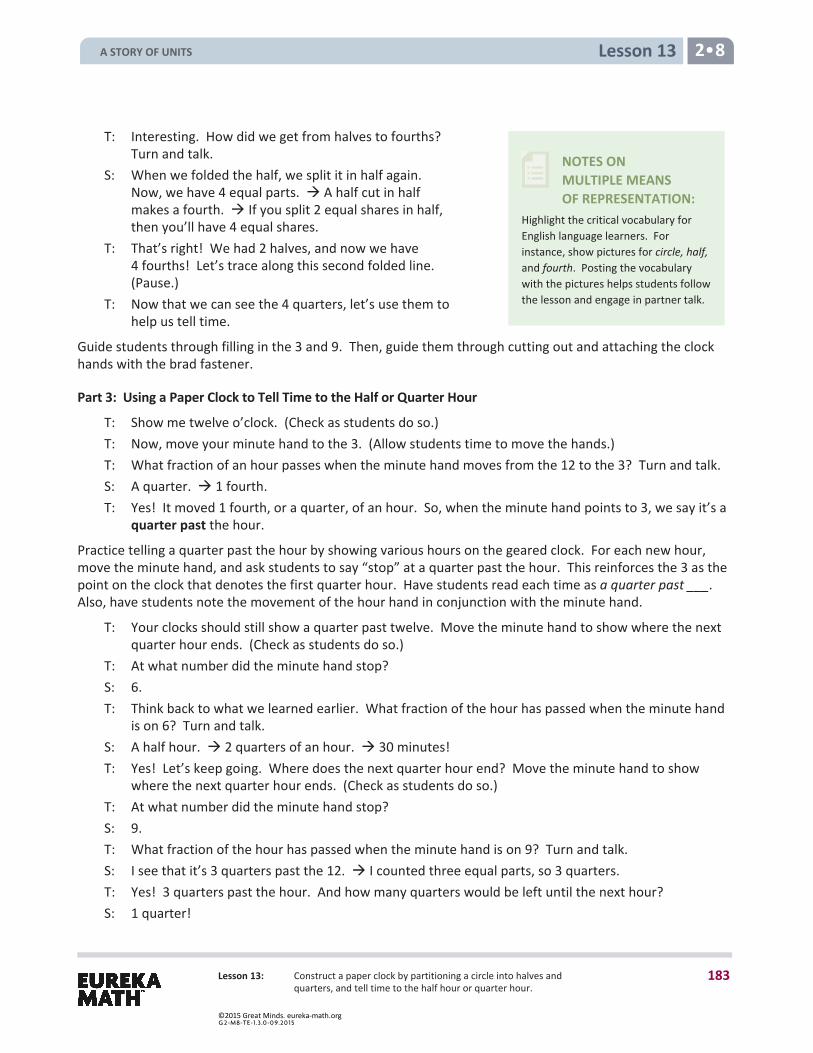
Lesson 13 2 8
Lesson 13: Construct a paper clock by partitioning a circle into halves and quarters, and tell time to the half hour or quarter hour.
NOTES ON MULTIPLE MEANS OF REPRESENTATION:
Highlight the critical vocabulary for English language learners. For instance, show pictures for circle, half, and fourth. Posting the vocabulary with the pictures helps students follow the lesson and engage in partner talk.
T: Interesting. How did we get from halves to fourths? Turn and talk.
S: When we folded the half, we split it in half again. Now, we have 4 equal parts. A half cut in half makes a fourth. If you split 2 equal shares in half, then you’ll have 4 equal shares.
T: That’s right! We had 2 halves, and now we have 4 fourths! Let’s trace along this second folded line. (Pause.)
T: Now that we can see the 4 quarters, let’s use them to help us tell time.
Guide students through filling in the 3 and 9. Then, guide them through cutting out and attaching the clock hands with the brad fastener.
Part 3: Using a Paper Clock to Tell Time to the Half or Quarter Hour
T: Show me twelve o’clock. (Check as students do so.) T: Now, move your minute hand to the 3. (Allow students time to move the hands.) T: What fraction of an hour passes when the minute hand moves from the 12 to the 3? Turn and talk. S: A quarter. 1 fourth. T: Yes! It moved 1 fourth, or a quarter, of an hour. So, when the minute hand points to 3, we say it’s a
quarter past the hour.
Practice telling a quarter past the hour by showing various hours on the geared clock. For each new hour, move the minute hand, and ask students to say “stop” at a quarter past the hour. This reinforces the 3 as the point on the clock that denotes the first quarter hour. Have students read each time as a quarter past ___. Also, have students note the movement of the hour hand in conjunction with the minute hand.
T: Your clocks should still show a quarter past twelve. Move the minute hand to show where the next quarter hour ends. (Check as students do so.)
T: At what number did the minute hand stop? S: 6. T: Think back to what we learned earlier. What fraction of the hour has passed when the minute hand
is on 6? Turn and talk. S: A half hour. 2 quarters of an hour. 30 minutes! T: Yes! Let’s keep going. Where does the next quarter hour end? Move the minute hand to show
where the next quarter hour ends. (Check as students do so.) T: At what number did the minute hand stop? S: 9. T: What fraction of the hour has passed when the minute hand is on 9? Turn and talk. S: I see that it’s 3 quarters past the 12. I counted three equal parts, so 3 quarters. T: Yes! 3 quarters past the hour. And how many quarters would be left until the next hour? S: 1 quarter!
A STORY OF UNITS
183
©2015 Great Minds. eureka-math.orgG 2-M8-TE-1.3 .0 -0 9.20 15
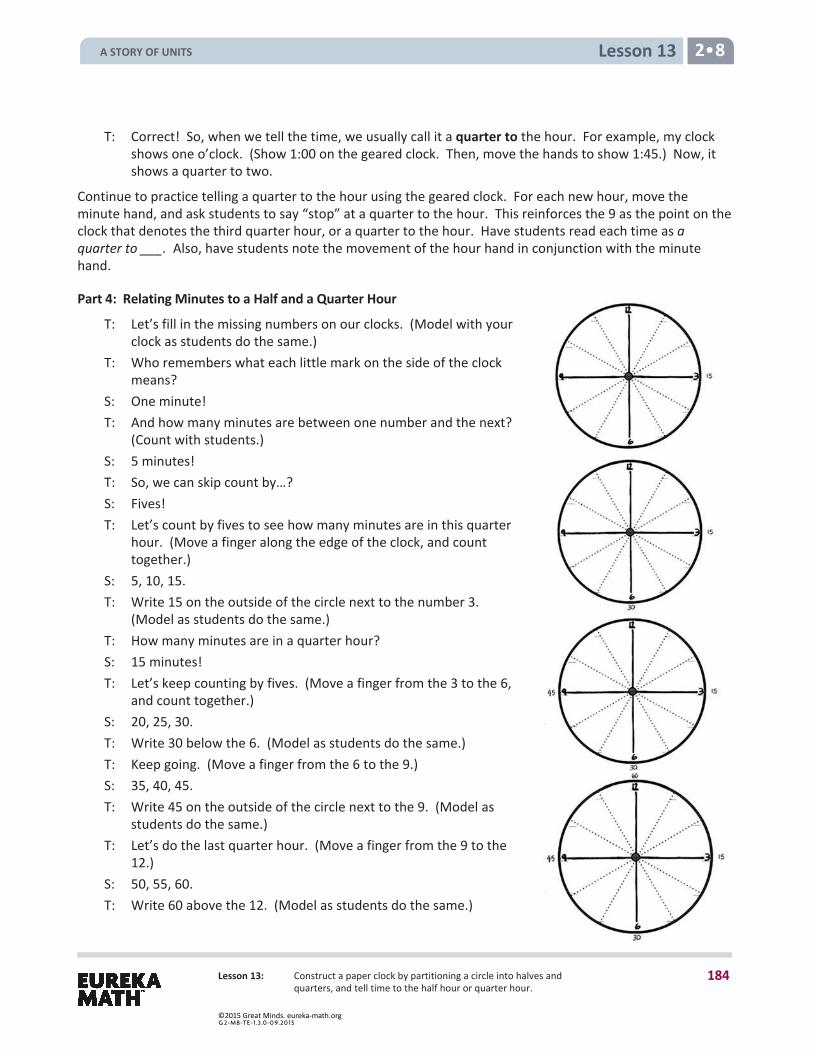
Lesson 13 2 8
Lesson 13: Construct a paper clock by partitioning a circle into halves and quarters, and tell time to the half hour or quarter hour.
T: Correct! So, when we tell the time, we usually call it a quarter to the hour. For example, my clock shows one o’clock. (Show 1:00 on the geared clock. Then, move the hands to show 1:45.) Now, it shows a quarter to two.
Continue to practice telling a quarter to the hour using the geared clock. For each new hour, move the minute hand, and ask students to say “stop” at a quarter to the hour. This reinforces the 9 as the point on the clock that denotes the third quarter hour, or a quarter to the hour. Have students read each time as a quarter to ___. Also, have students note the movement of the hour hand in conjunction with the minute hand.
Part 4: Relating Minutes to a Half and a Quarter Hour
T: Let’s fill in the missing numbers on our clocks. (Model with your clock as students do the same.)
T: Who remembers what each little mark on the side of the clock means?
S: One minute! T: And how many minutes are between one number and the next?
(Count with students.) S: 5 minutes! T: So, we can skip count by…? S: Fives! T: Let’s count by fives to see how many minutes are in this quarter
hour. (Move a finger along the edge of the clock, and count together.)
S: 5, 10, 15. T: Write 15 on the outside of the circle next to the number 3.
(Model as students do the same.) T: How many minutes are in a quarter hour? S: 15 minutes! T: Let’s keep counting by fives. (Move a finger from the 3 to the 6,
and count together.) S: 20, 25, 30. T: Write 30 below the 6. (Model as students do the same.) T: Keep going. (Move a finger from the 6 to the 9.) S: 35, 40, 45. T: Write 45 on the outside of the circle next to the 9. (Model as
students do the same.) T: Let’s do the last quarter hour. (Move a finger from the 9 to the
12.) S: 50, 55, 60. T: Write 60 above the 12. (Model as students do the same.)
A STORY OF UNITS
184
©2015 Great Minds. eureka-math.orgG 2-M8-TE-1.3 .0 -0 9.20 15
Lesson 13 2 8
Lesson 13: Construct a paper clock by partitioning a circle into halves and quarters, and tell time to the half hour or quarter hour.
T: When the minute hand moves through all 4 quarters, we have completed what whole unit? S: One hour! T: (Show 6:15 on the geared clock.) How many minutes past the hour is it? Turn and talk. S: It would be 5, 10, 15, so 15 minutes. Three fives is 15, so 15 minutes. It’s 15 minutes past the
hour. T: Yes! The 3 represents 15 minutes past the hour, 3 groups of 5 minutes. And what fraction of the
hour does it also represent? S: A quarter. A fourth. T: Yes! A quarter of an hour is also 15 minutes. T: Turn and talk. When the minute hand points to the 6, how many minutes past the hour is it? S: It’s another quarter, so 15 + 15 is 30, so 30 minutes. An hour is 60 minutes, and 60 is 6 tens, and
half of 6 is 3, so 30 minutes. 5, 10, 15, 20, 25, 30. 30 minutes. Half of 60 is 30, so 30 minutes. T: Yes! Half an hour is 30 minutes. Great!
Repeat for the 9 as well.
Show various times on the geared clock, and have students name the time using both the posted vocabulary and the minutes (e.g., 4:15 and a quarter past four, 2:30 and half past two). Then, name times, alternating word form and number form, and have students show the time on their clocks and write it on their personal white boards, using both words and numbers.
T: On your personal white boards, write the time shown on your clocks in both words and numbers. Remember, we write the hour, then a colon, then the number of minutes. (Model the first few as students do the same.)
Check to ensure that the hour hands are positioned correctly, especially with a quarter to two, as some students may be confused by the language to two. As they demonstrate proficiency, instruct students to work on the Problem Set. Allow early finishers to shade each quarter of their clock a different color.
Note: Teachers may want to collect the clocks after students write their names on them because the clocks are used again in the next lesson.
Problem Set (10 minutes)
Students should do their personal best to complete the Problem Set within the allotted 10 minutes. For some classes, it may be appropriate to modify the assignment by specifying which problems they work on first. Some problems do not specify a method for solving. Students should solve these problems using the RDW approach used for Application Problems.
A STORY OF UNITS
185
©2015 Great Minds. eureka-math.orgG 2-M8-TE-1.3 .0 -0 9.20 15
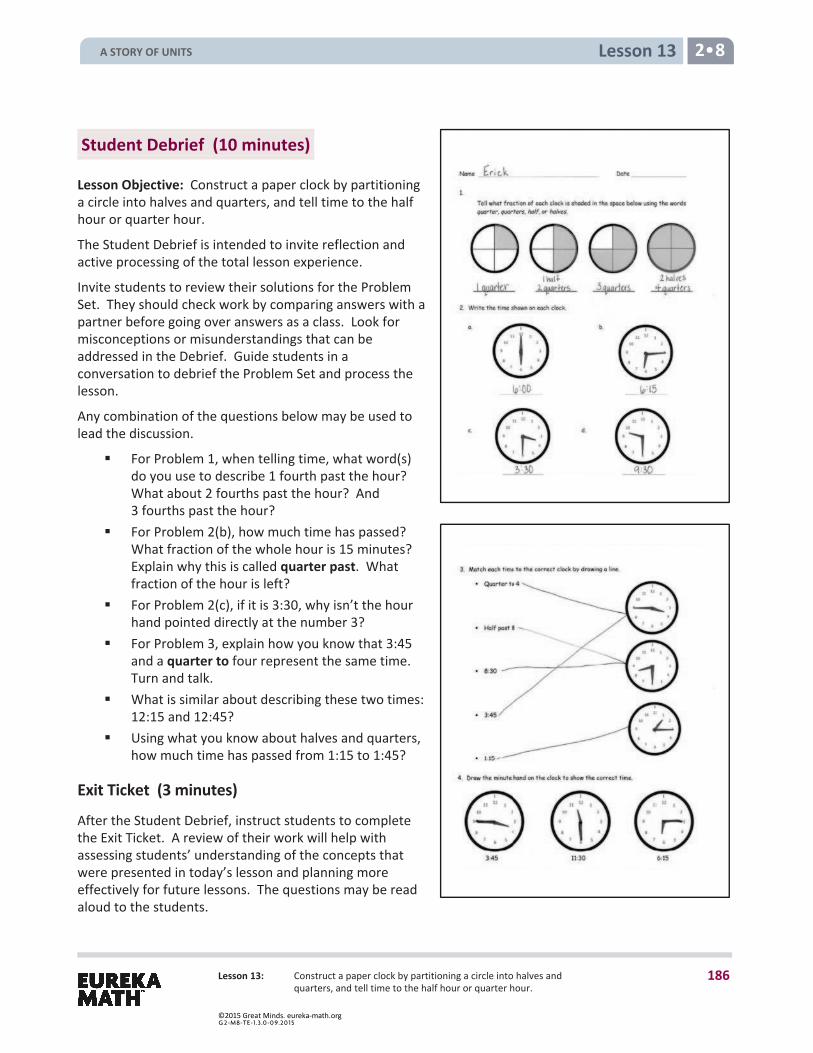
Lesson 13 2 8
Lesson 13: Construct a paper clock by partitioning a circle into halves and quarters, and tell time to the half hour or quarter hour.
Student Debrief (10 minutes)
Lesson Objective: Construct a paper clock by partitioning a circle into halves and quarters, and tell time to the half hour or quarter hour.
The Student Debrief is intended to invite reflection and active processing of the total lesson experience.
Invite students to review their solutions for the Problem Set. They should check work by comparing answers with a partner before going over answers as a class. Look for misconceptions or misunderstandings that can be addressed in the Debrief. Guide students in a conversation to debrief the Problem Set and process the lesson.
Any combination of the questions below may be used to lead the discussion.
For Problem 1, when telling time, what word(s)do you use to describe 1 fourth past the hour?What about 2 fourths past the hour? And3 fourths past the hour?
For Problem 2(b), how much time has passed?What fraction of the whole hour is 15 minutes?Explain why this is called quarter past. Whatfraction of the hour is left?
For Problem 2(c), if it is 3:30, why isn’t the hourhand pointed directly at the number 3?
For Problem 3, explain how you know that 3:45and a quarter to four represent the same time.Turn and talk.
What is similar about describing these two times:12:15 and 12:45?
Using what you know about halves and quarters,how much time has passed from 1:15 to 1:45?
Exit Ticket (3 minutes)
After the Student Debrief, instruct students to complete the Exit Ticket. A review of their work will help with assessing students’ understanding of the concepts that were presented in today’s lesson and planning more effectively for future lessons. The questions may be read aloud to the students.
A STORY OF UNITS
186
©2015 Great Minds. eureka-math.orgG 2-M8-TE-1.3 .0 -0 9.20 15
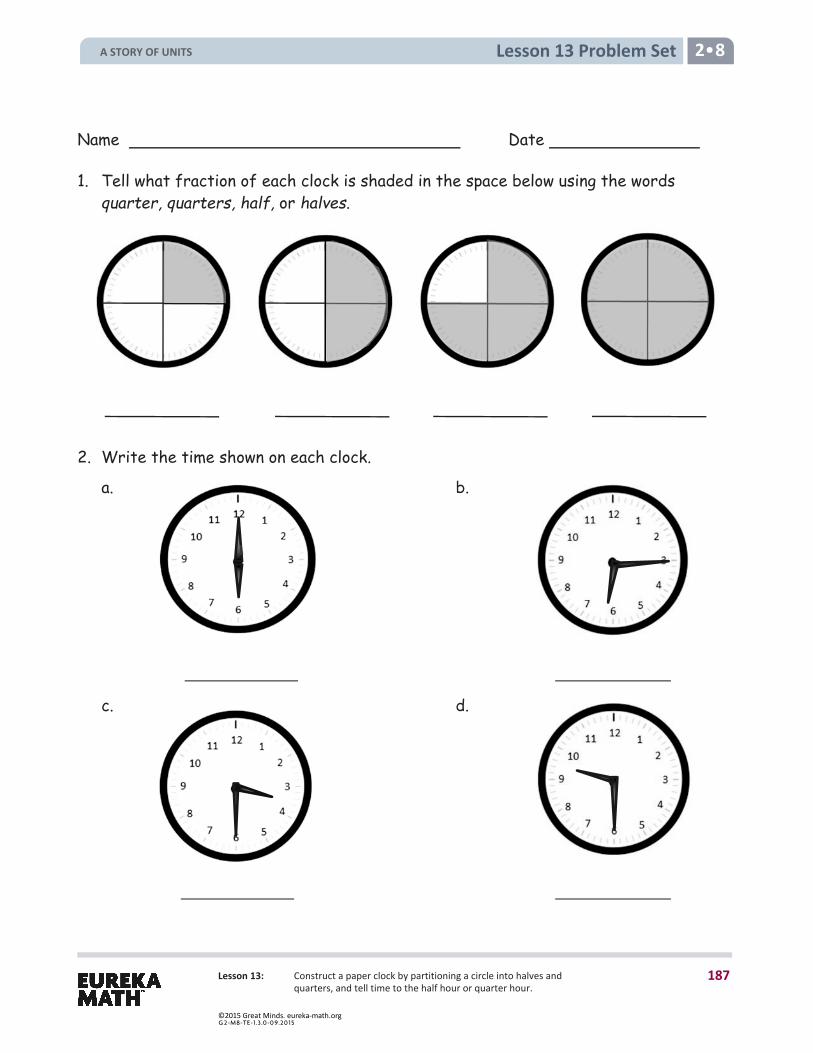
Lesson 13 Problem Set 2 8
Lesson 13: Construct a paper clock by partitioning a circle into halves and quarters, and tell time to the half hour or quarter hour.
Name Date
1. Tell what fraction of each clock is shaded in the space below using the words quarter, quarters, half, or halves.
2. Write the time shown on each clock.
a.
b.
c.
d.
A STORY OF UNITS
187
©2015 Great Minds. eureka-math.orgG 2-M8-TE-1.3 .0 -0 9.20 15
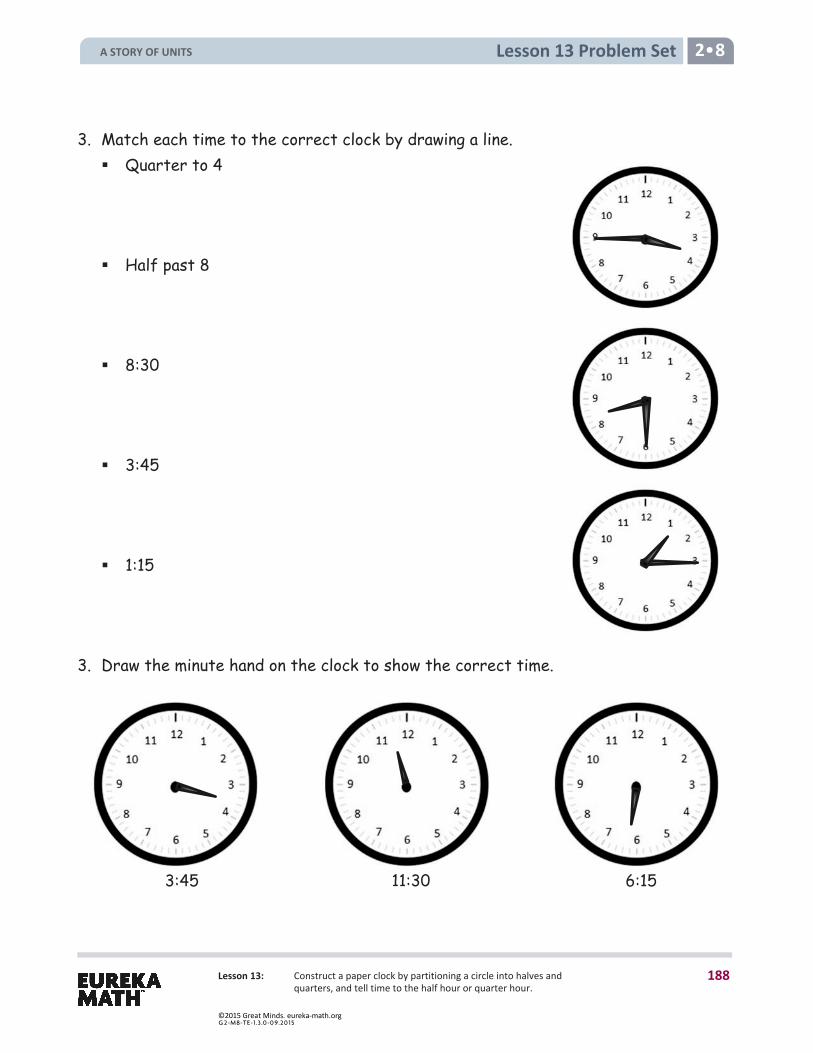
Lesson 13 Problem Set 2 8
Lesson 13: Construct a paper clock by partitioning a circle into halves and quarters, and tell time to the half hour or quarter hour.
3. Match each time to the correct clock by drawing a line. Quarter to 4
Half past 8
8:30
3:45
1:15
3. Draw the minute hand on the clock to show the correct time.
11:303:45 6:15
A STORY OF UNITS
188
©2015 Great Minds. eureka-math.orgG 2-M8-TE-1.3 .0 -0 9.20 15
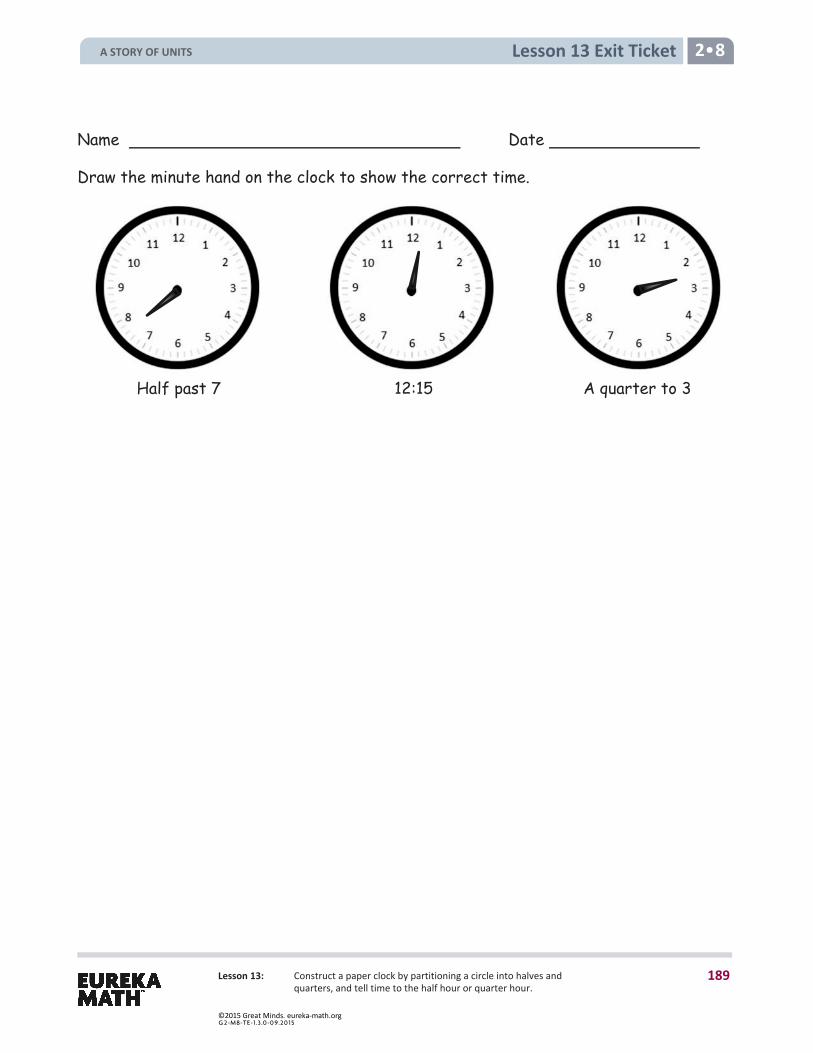
Lesson 13 Exit Ticket 2 8
Lesson 13: Construct a paper clock by partitioning a circle into halves and quarters, and tell time to the half hour or quarter hour.
Name Date
Draw the minute hand on the clock to show the correct time.
Half past 7 A quarter to 312:15
A STORY OF UNITS
189
©2015 Great Minds. eureka-math.orgG 2-M8-TE-1.3 .0 -0 9.20 15
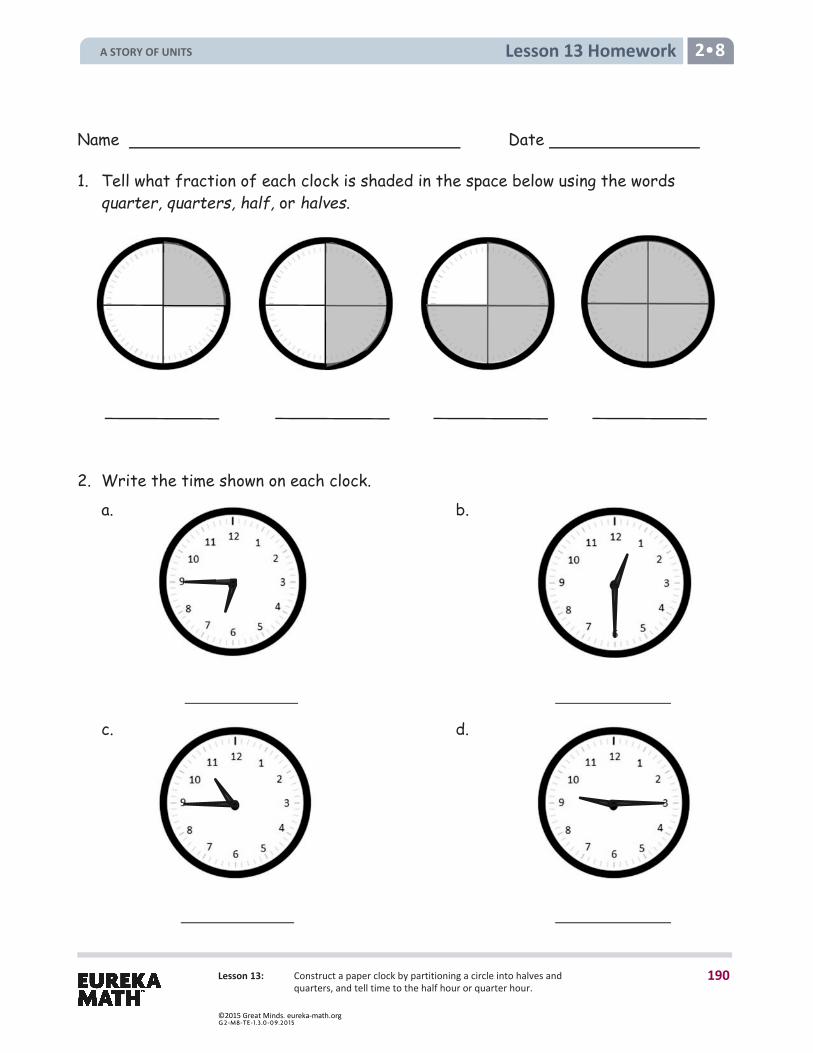
Lesson 13 Homework 2 8
Lesson 13: Construct a paper clock by partitioning a circle into halves and quarters, and tell time to the half hour or quarter hour.
Name Date
1. Tell what fraction of each clock is shaded in the space below using the words quarter, quarters, half, or halves.
2. Write the time shown on each clock.
a.
b.
c.
d.
A STORY OF UNITS
190
©2015 Great Minds. eureka-math.orgG 2-M8-TE-1.3 .0 -0 9.20 15

Lesson 13 Homework 2 8
Lesson 13: Construct a paper clock by partitioning a circle into halves and quarters, and tell time to the half hour or quarter hour.
3. Match each time to the correct clock by drawing a line. Quarter to 5
Half past 5
5:15
Quarter after 5
4:45
4. Draw the minute hand on the clock to show the correct time.
11:453:30 6:15
A STORY OF UNITS
191
©2015 Great Minds. eureka-math.orgG 2-M8-TE-1.3 .0 -0 9.20 15
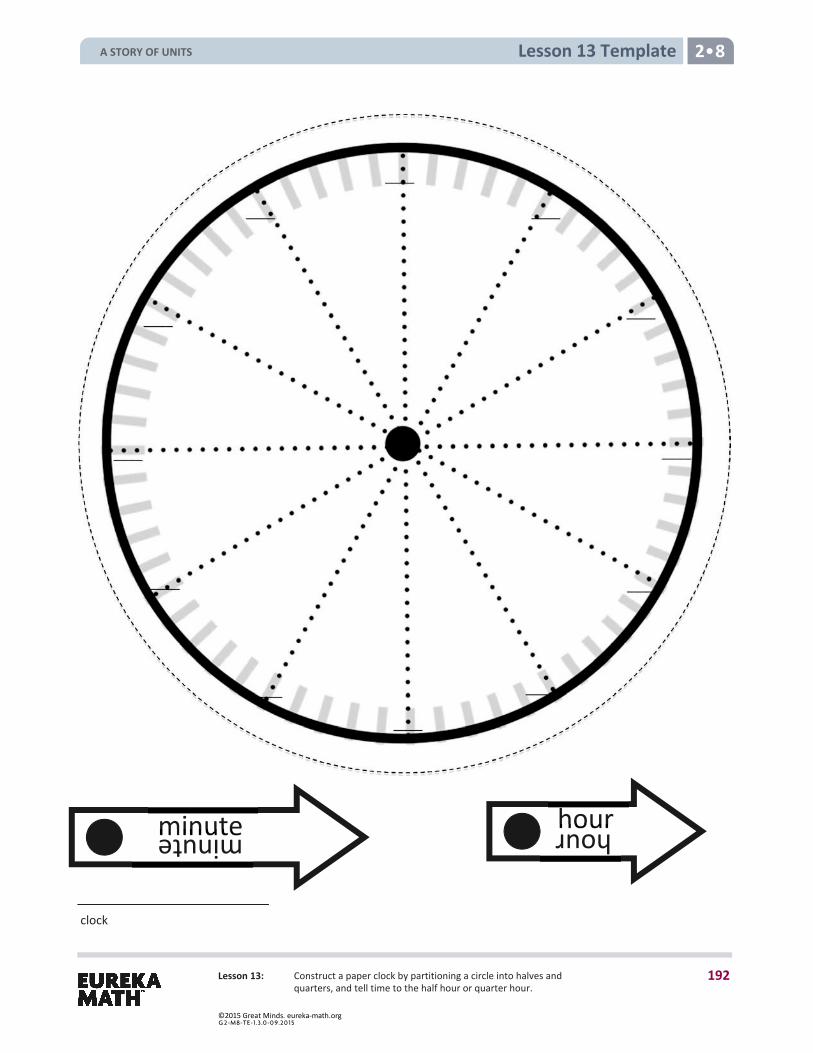
Lesson 13: Construct a paper clock by partitioning a circle into halves and quarters, and tell time to the half hour or quarter hour.
Lesson 13 Template 2 8
clock
____
____
____
____
____
____
____
____
____
____
____
____
minute minute hour hour
A STORY OF UNITS
192
©2015 Great Minds. eureka-math.orgG 2-M8-TE-1.3 .0 -0 9.20 15

Lesson 14 2 8
Lesson 14: Tell time to the nearest five minutes.
Lesson 14 Objective: Tell time to the nearest five minutes.
Suggested Lesson Structure
Fluency Practice (15 minutes) Concept Development (30 minutes) Application Problem (5 minutes) Student Debrief (10 minutes)
Total Time (60 minutes)
Fluency Practice (15 minutes)
Subtraction with Renaming 2.NBT.7 (5 minutes) Happy Counting by Fives 2.NBT.2 (1 minute) Sprint: Adding and Subtracting by 5 2.OA.2 (9 minutes)
Subtraction with Renaming (5 minutes) Materials: (S) Personal white board, hundreds place value chart (Lesson 3 Fluency Template)
Note: This fluency activity reviews the application of a chip model while recording with the algorithm. Allow students work time between each problem, and reinforce place value understandings by having students say their answer in both unit form and in standard form. Students use their personal white boards and a place value chart to solve.
T: Slide the place value chart template into your personal white board. T: (Write 367 – 185 horizontally on the board.) Let’s use a chip model to subtract. On your personal
white board, record your work using the algorithm. S: (Solve.) T: 367 – 185 is…? S: 182.
Continue with the following possible sequence: 456 – 274, 625 – 295, 817 – 319, 528 – 229, 804 – 372, and 905 – 253.
Happy Counting by Fives (1 minute) T: Let’s do some Happy Counting!
A STORY OF UNITS
193
©2015 Great Minds. eureka-math.orgG 2-M8-TE-1.3 .0 -0 9.20 15
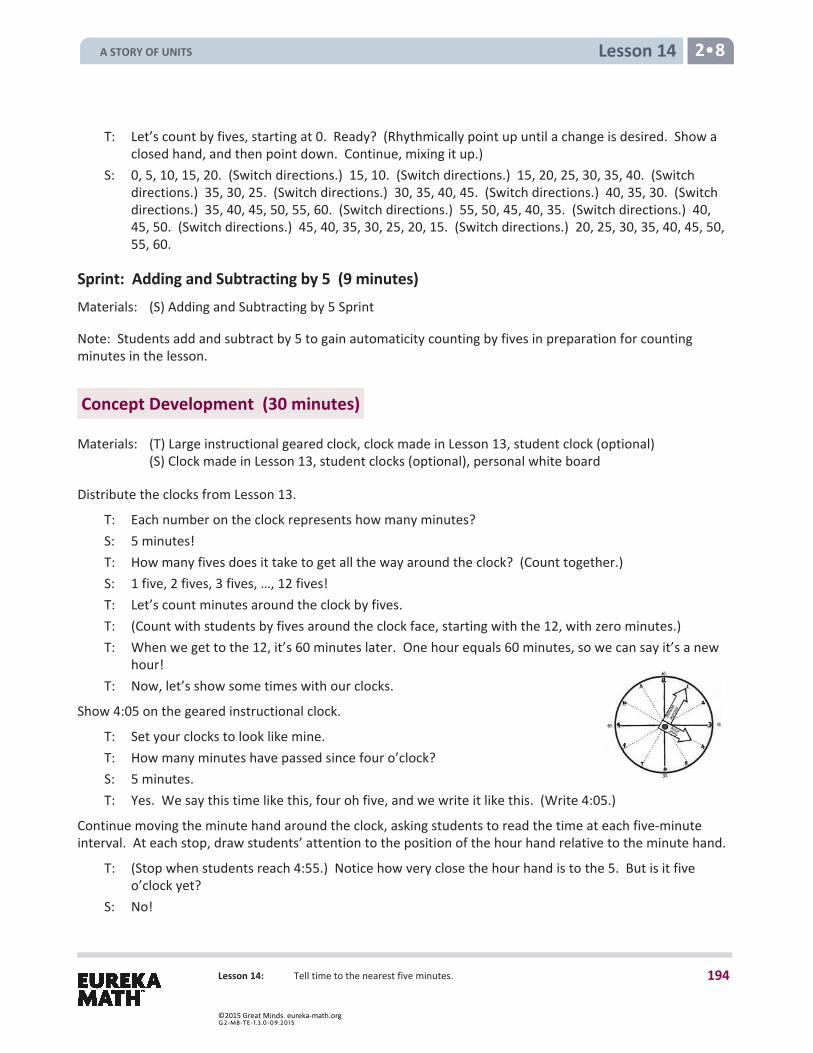
Lesson 14 2 8
Lesson 14: Tell time to the nearest five minutes.
T: Let’s count by fives, starting at 0. Ready? (Rhythmically point up until a change is desired. Show a closed hand, and then point down. Continue, mixing it up.)
S: 0, 5, 10, 15, 20. (Switch directions.) 15, 10. (Switch directions.) 15, 20, 25, 30, 35, 40. (Switch directions.) 35, 30, 25. (Switch directions.) 30, 35, 40, 45. (Switch directions.) 40, 35, 30. (Switch directions.) 35, 40, 45, 50, 55, 60. (Switch directions.) 55, 50, 45, 40, 35. (Switch directions.) 40, 45, 50. (Switch directions.) 45, 40, 35, 30, 25, 20, 15. (Switch directions.) 20, 25, 30, 35, 40, 45, 50, 55, 60.
Sprint: Adding and Subtracting by 5 (9 minutes) Materials: (S) Adding and Subtracting by 5 Sprint
Note: Students add and subtract by 5 to gain automaticity counting by fives in preparation for counting minutes in the lesson.
Concept Development (30 minutes)
Materials: (T) Large instructional geared clock, clock made in Lesson 13, student clock (optional) (S) Clock made in Lesson 13, student clocks (optional), personal white board
Distribute the clocks from Lesson 13.
T: Each number on the clock represents how many minutes? S: 5 minutes! T: How many fives does it take to get all the way around the clock? (Count together.) S: 1 five, 2 fives, 3 fives, …, 12 fives! T: Let’s count minutes around the clock by fives. T: (Count with students by fives around the clock face, starting with the 12, with zero minutes.) T: When we get to the 12, it’s 60 minutes later. One hour equals 60 minutes, so we can say it’s a new
hour! T: Now, let’s show some times with our clocks.
Show 4:05 on the geared instructional clock.
T: Set your clocks to look like mine. T: How many minutes have passed since four o’clock? S: 5 minutes. T: Yes. We say this time like this, four oh five, and we write it like this. (Write 4:05.)
Continue moving the minute hand around the clock, asking students to read the time at each five-minute interval. At each stop, draw students’ attention to the position of the hour hand relative to the minute hand.
T: (Stop when students reach 4:55.) Notice how very close the hour hand is to the 5. But is it five o’clock yet?
S: No!
A STORY OF UNITS
194
©2015 Great Minds. eureka-math.orgG 2-M8-TE-1.3 .0 -0 9.20 15
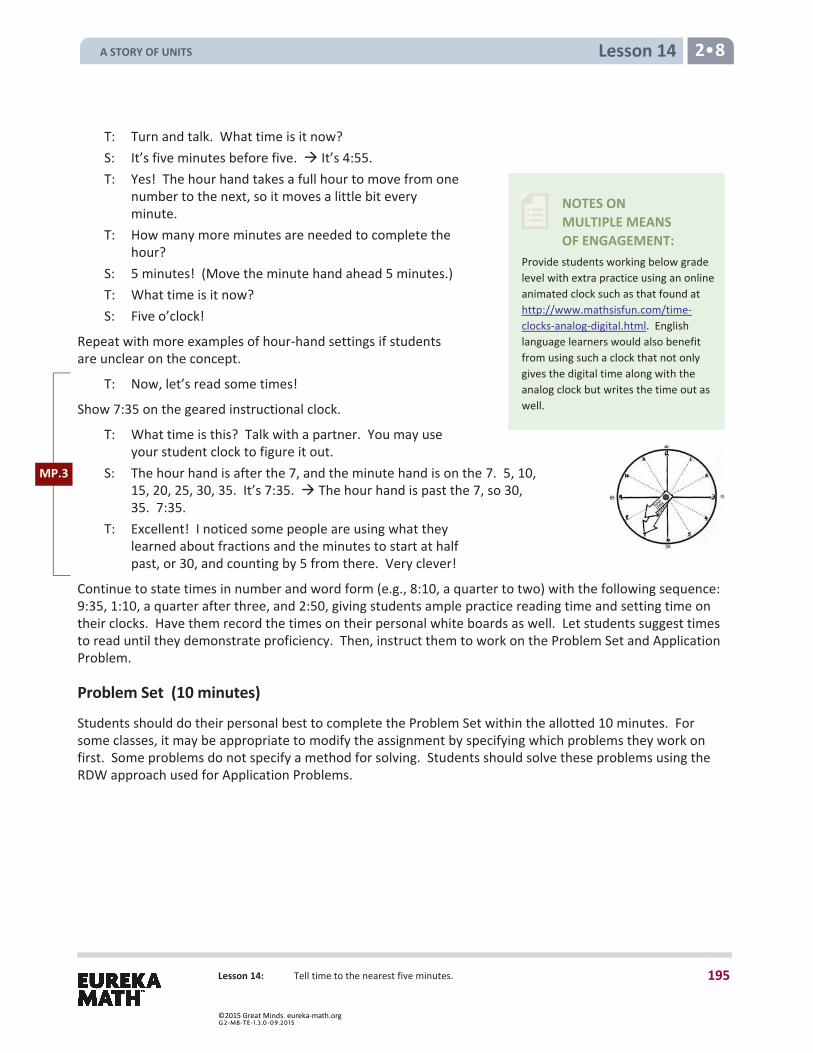
Lesson 14 2 8
Lesson 14: Tell time to the nearest five minutes.
NOTES ON MULTIPLE MEANS OF ENGAGEMENT:
Provide students working below grade level with extra practice using an online animated clock such as that found at http://www.mathsisfun.com/time-clocks-analog-digital.html. English language learners would also benefit from using such a clock that not only gives the digital time along with the analog clock but writes the time out as well.
T: Turn and talk. What time is it now? S: It’s five minutes before five. It’s 4:55. T: Yes! The hour hand takes a full hour to move from one
number to the next, so it moves a little bit every minute.
T: How many more minutes are needed to complete the hour?
S: 5 minutes! (Move the minute hand ahead 5 minutes.) T: What time is it now? S: Five o’clock!
Repeat with more examples of hour-hand settings if students are unclear on the concept.
T: Now, let’s read some times!
Show 7:35 on the geared instructional clock.
T: What time is this? Talk with a partner. You may use your student clock to figure it out.
S: The hour hand is after the 7, and the minute hand is on the 7. 5, 10, 15, 20, 25, 30, 35. It’s 7:35. The hour hand is past the 7, so 30, 35. 7:35.
T: Excellent! I noticed some people are using what they learned about fractions and the minutes to start at half past, or 30, and counting by 5 from there. Very clever!
Continue to state times in number and word form (e.g., 8:10, a quarter to two) with the following sequence: 9:35, 1:10, a quarter after three, and 2:50, giving students ample practice reading time and setting time on their clocks. Have them record the times on their personal white boards as well. Let students suggest times to read until they demonstrate proficiency. Then, instruct them to work on the Problem Set and Application Problem.
Problem Set (10 minutes)
Students should do their personal best to complete the Problem Set within the allotted 10 minutes. For some classes, it may be appropriate to modify the assignment by specifying which problems they work on first. Some problems do not specify a method for solving. Students should solve these problems using the RDW approach used for Application Problems.
MP.3
A STORY OF UNITS
195
©2015 Great Minds. eureka-math.orgG 2-M8-TE-1.3 .0 -0 9.20 15
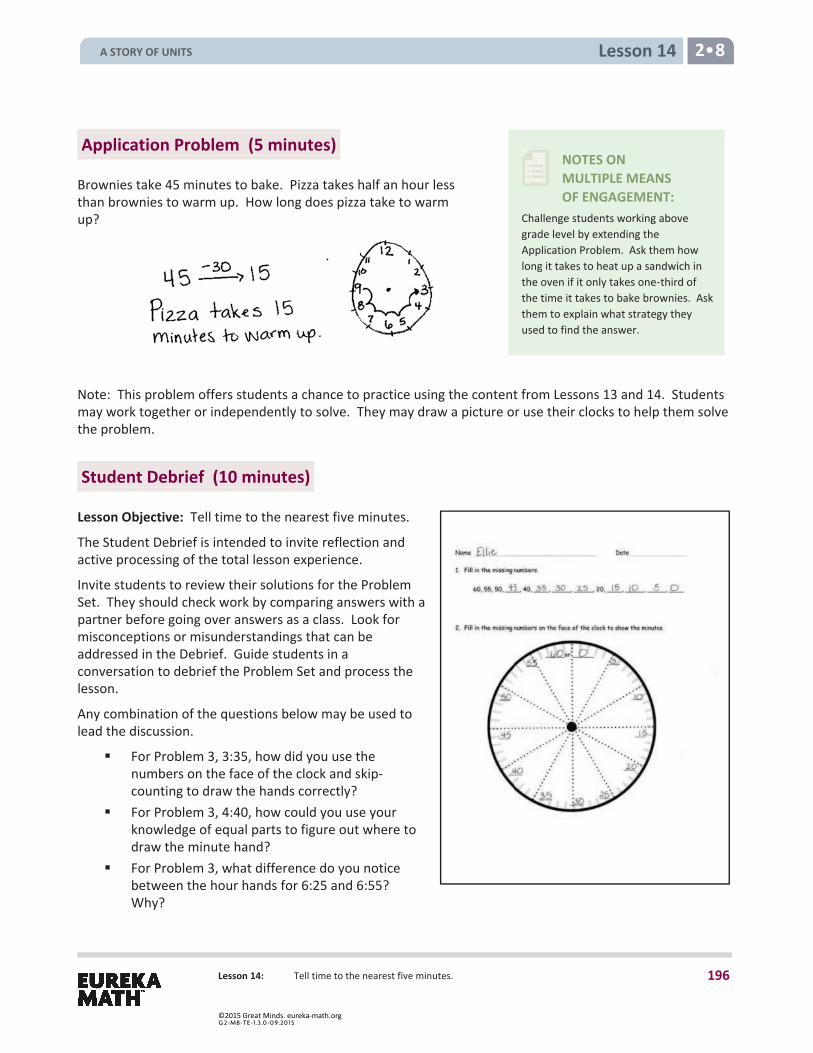
Lesson 14 2 8
Lesson 14: Tell time to the nearest five minutes.
NOTES ON MULTIPLE MEANS OF ENGAGEMENT:
Challenge students working above grade level by extending the Application Problem. Ask them how long it takes to heat up a sandwich in the oven if it only takes one-third of the time it takes to bake brownies. Ask them to explain what strategy they used to find the answer.
Application Problem (5 minutes)
Brownies take 45 minutes to bake. Pizza takes half an hour less than brownies to warm up. How long does pizza take to warm up?
Note: This problem offers students a chance to practice using the content from Lessons 13 and 14. Students may work together or independently to solve. They may draw a picture or use their clocks to help them solve the problem.
Student Debrief (10 minutes)
Lesson Objective: Tell time to the nearest five minutes.
The Student Debrief is intended to invite reflection and active processing of the total lesson experience.
Invite students to review their solutions for the Problem Set. They should check work by comparing answers with a partner before going over answers as a class. Look for misconceptions or misunderstandings that can be addressed in the Debrief. Guide students in a conversation to debrief the Problem Set and process the lesson.
Any combination of the questions below may be used to lead the discussion.
For Problem 3, 3:35, how did you use thenumbers on the face of the clock and skip-counting to draw the hands correctly?
For Problem 3, 4:40, how could you use yourknowledge of equal parts to figure out where todraw the minute hand?
For Problem 3, what difference do you noticebetween the hour hands for 6:25 and 6:55?Why?
A STORY OF UNITS
196
©2015 Great Minds. eureka-math.orgG 2-M8-TE-1.3 .0 -0 9.20 15
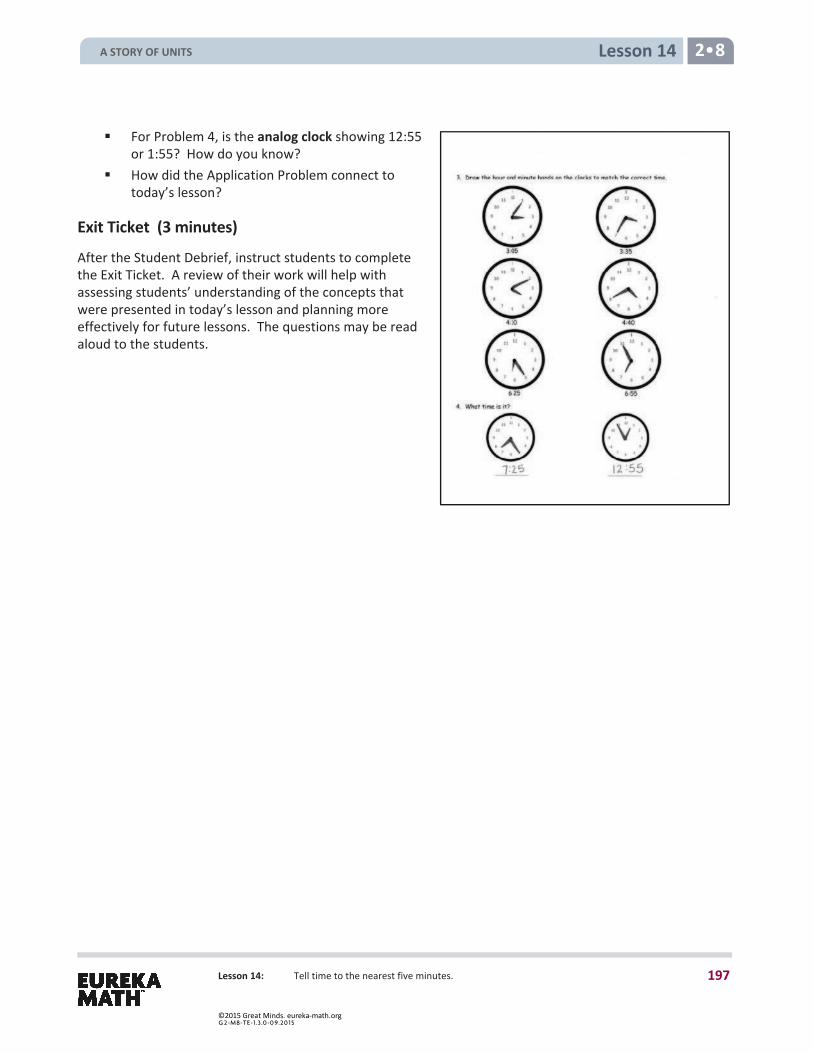
Lesson 14 2 8
Lesson 14: Tell time to the nearest five minutes.
For Problem 4, is the analog clock showing 12:55or 1:55? How do you know?
How did the Application Problem connect totoday’s lesson?
Exit Ticket (3 minutes)
After the Student Debrief, instruct students to complete the Exit Ticket. A review of their work will help with assessing students’ understanding of the concepts that were presented in today’s lesson and planning more effectively for future lessons. The questions may be read aloud to the students.
A STORY OF UNITS
197
©2015 Great Minds. eureka-math.orgG 2-M8-TE-1.3 .0 -0 9.20 15
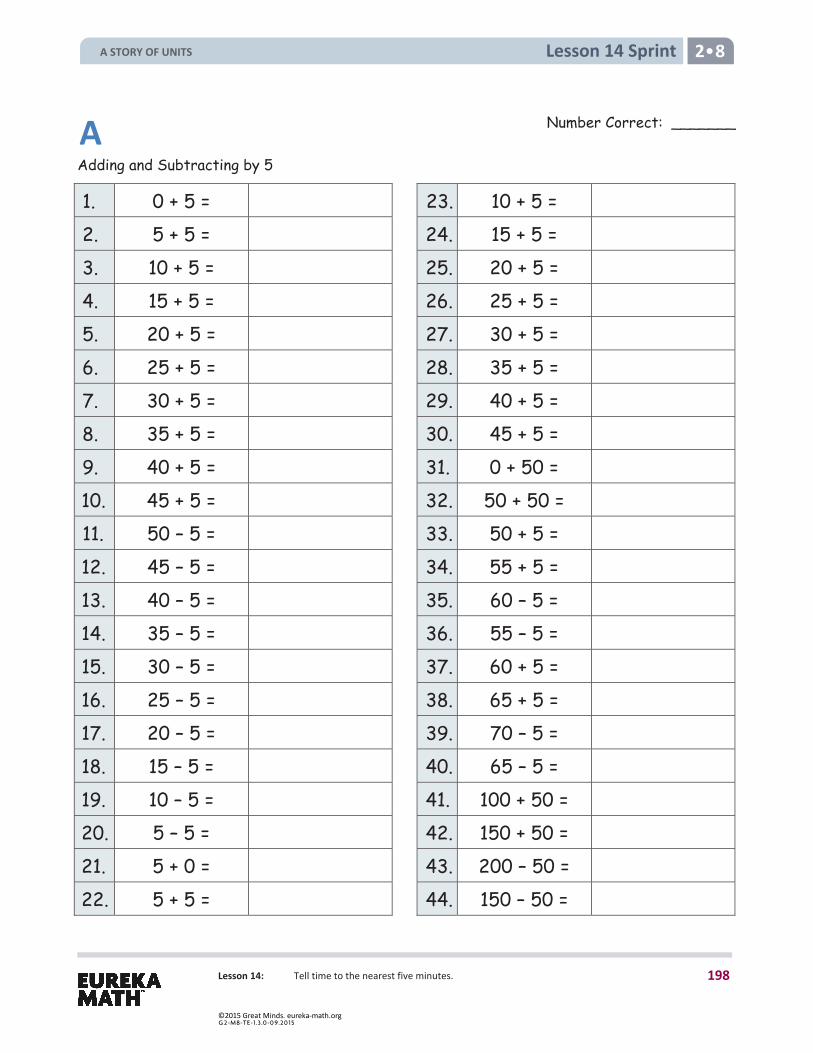
Lesson 14 Sprint 2 8
Lesson 14: Tell time to the nearest five minutes.
Adding and Subtracting by 5
1. 0 + 5 = 23. 10 + 5 =
2. 5 + 5 = 24. 15 + 5 =
3. 10 + 5 = 25. 20 + 5 =
4. 15 + 5 = 26. 25 + 5 =
5. 20 + 5 = 27. 30 + 5 =
6. 25 + 5 = 28. 35 + 5 =
7. 30 + 5 = 29. 40 + 5 =
8. 35 + 5 = 30. 45 + 5 =
9. 40 + 5 = 31. 0 + 50 =
10. 45 + 5 = 32. 50 + 50 =
11. 50 – 5 = 33. 50 + 5 =
12. 45 – 5 = 34. 55 + 5 =
13. 40 – 5 = 35. 60 – 5 =
14. 35 – 5 = 36. 55 – 5 =
15. 30 – 5 = 37. 60 + 5 =
16. 25 – 5 = 38. 65 + 5 =
17. 20 – 5 = 39. 70 – 5 =
18. 15 – 5 = 40. 65 – 5 =
19. 10 – 5 = 41. 100 + 50 =
20. 5 – 5 = 42. 150 + 50 =
21. 5 + 0 = 43. 200 – 50 =
22. 5 + 5 = 44. 150 – 50 =
A Number Correct: _______
A STORY OF UNITS
198
©2015 Great Minds. eureka-math.orgG 2-M8-TE-1.3 .0 -0 9.20 15
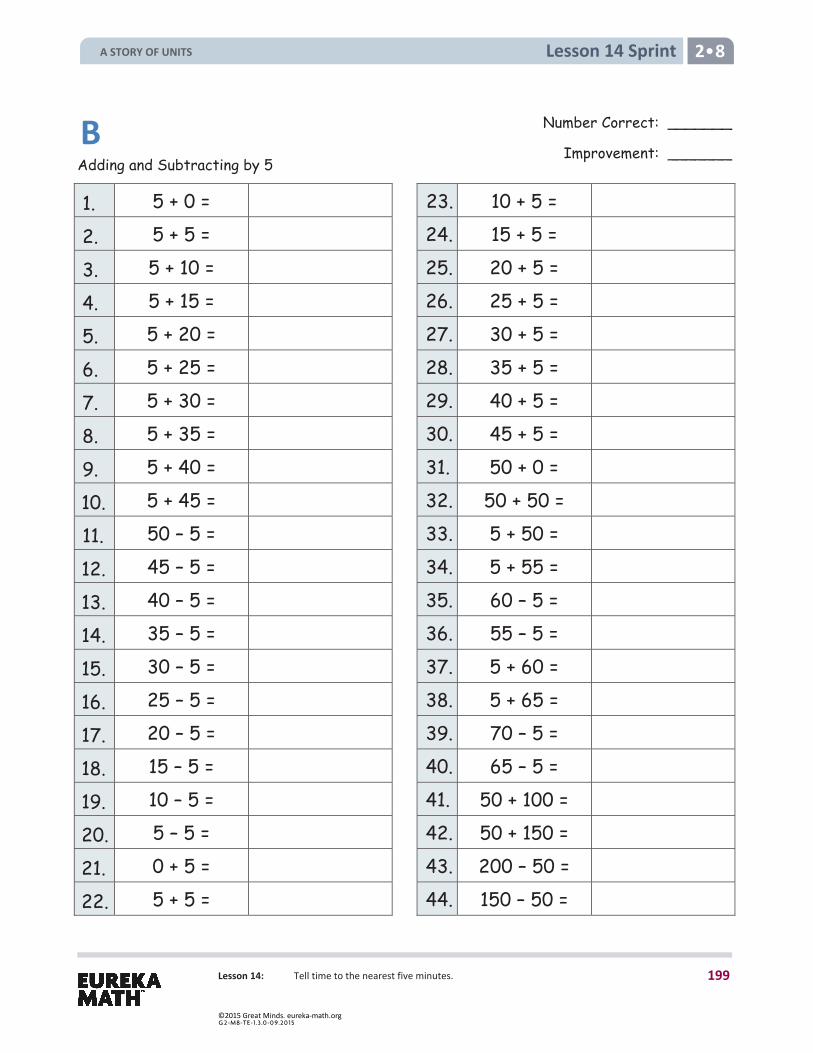
Lesson 14 Sprint 2 8
Lesson 14: Tell time to the nearest five minutes.
Adding and Subtracting by 5
1. 5 + 0 = 23. 10 + 5 = 2. 5 + 5 = 24. 15 + 5 = 3. 5 + 10 = 25. 20 + 5 = 4. 5 + 15 = 26. 25 + 5 = 5. 5 + 20 = 27. 30 + 5 = 6. 5 + 25 = 28. 35 + 5 = 7. 5 + 30 = 29. 40 + 5 = 8. 5 + 35 = 30. 45 + 5 = 9. 5 + 40 = 31. 50 + 0 = 10. 5 + 45 = 32. 50 + 50 = 11. 50 – 5 = 33. 5 + 50 = 12. 45 – 5 = 34. 5 + 55 = 13. 40 – 5 = 35. 60 – 5 = 14. 35 – 5 = 36. 55 – 5 = 15. 30 – 5 = 37. 5 + 60 = 16. 25 – 5 = 38. 5 + 65 = 17. 20 – 5 = 39. 70 – 5 = 18. 15 – 5 = 40. 65 – 5 = 19. 10 – 5 = 41. 50 + 100 = 20. 5 – 5 = 42. 50 + 150 = 21. 0 + 5 = 43. 200 – 50 = 22. 5 + 5 = 44. 150 – 50 =
B Number Correct: _______
Improvement: _______
A STORY OF UNITS
199
©2015 Great Minds. eureka-math.orgG 2-M8-TE-1.3 .0 -0 9.20 15
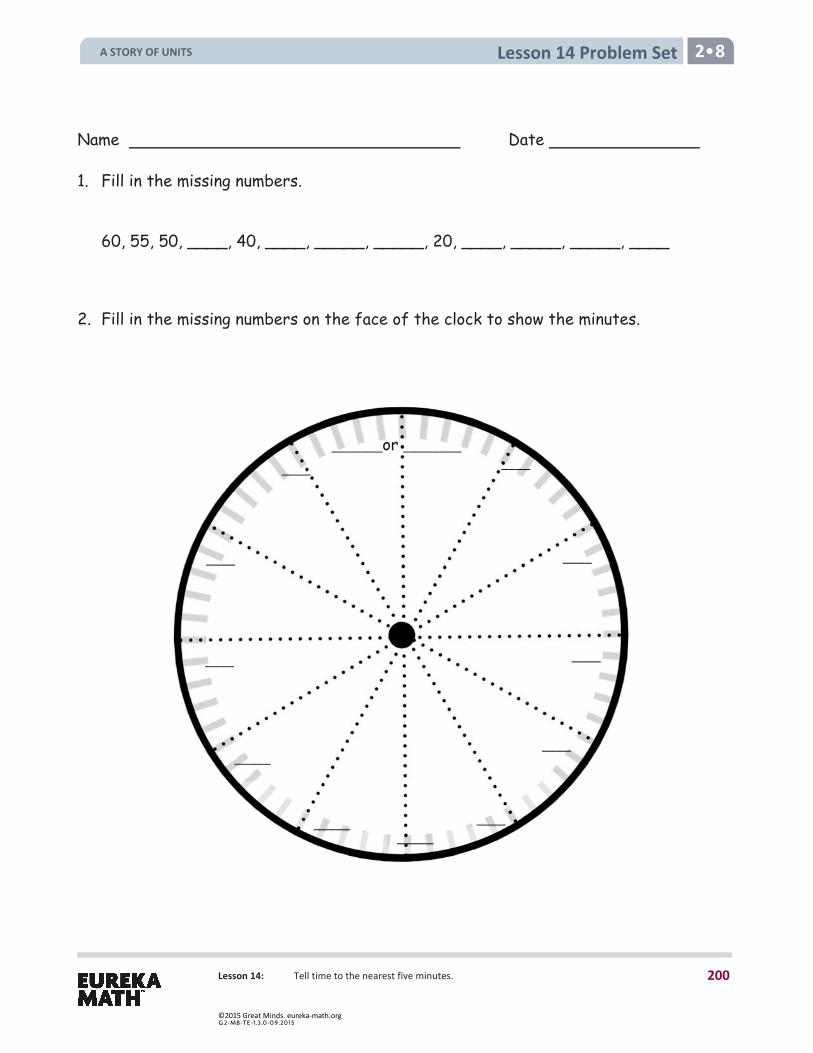
Lesson 14 Problem Set 2 8
Lesson 14: Tell time to the nearest five minutes.
Name Date
1. Fill in the missing numbers.
60, 55, 50, ____, 40, ____, _____, _____, 20, ____, _____, _____, ____
2. Fill in the missing numbers on the face of the clock to show the minutes.
____
_________
_____
____
____
____ ____
____
____
_____
_______or ________
A STORY OF UNITS
200
©2015 Great Minds. eureka-math.orgG 2-M8-TE-1.3 .0 -0 9.20 15
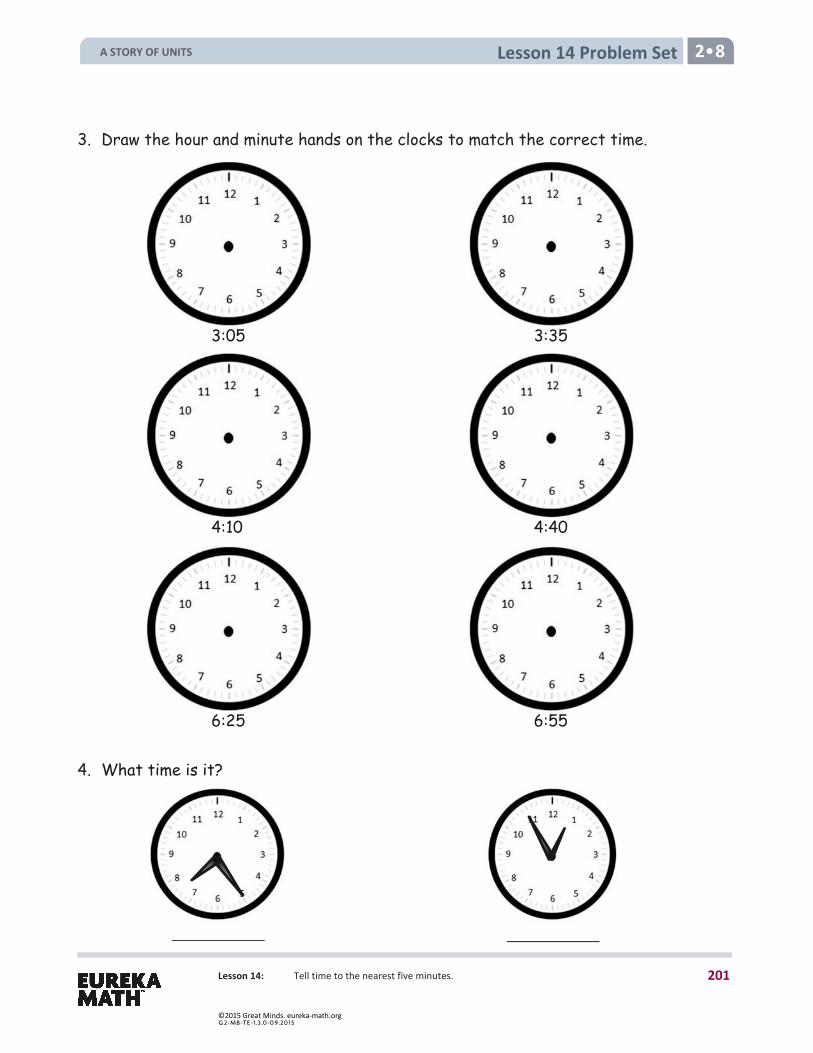
Lesson 14 Problem Set 2 8
Lesson 14: Tell time to the nearest five minutes.
3. Draw the hour and minute hands on the clocks to match the correct time.
4. What time is it?
3:05 3:35
4:404:10
6:25 6:55
A STORY OF UNITS
201
©2015 Great Minds. eureka-math.orgG 2-M8-TE-1.3 .0 -0 9.20 15
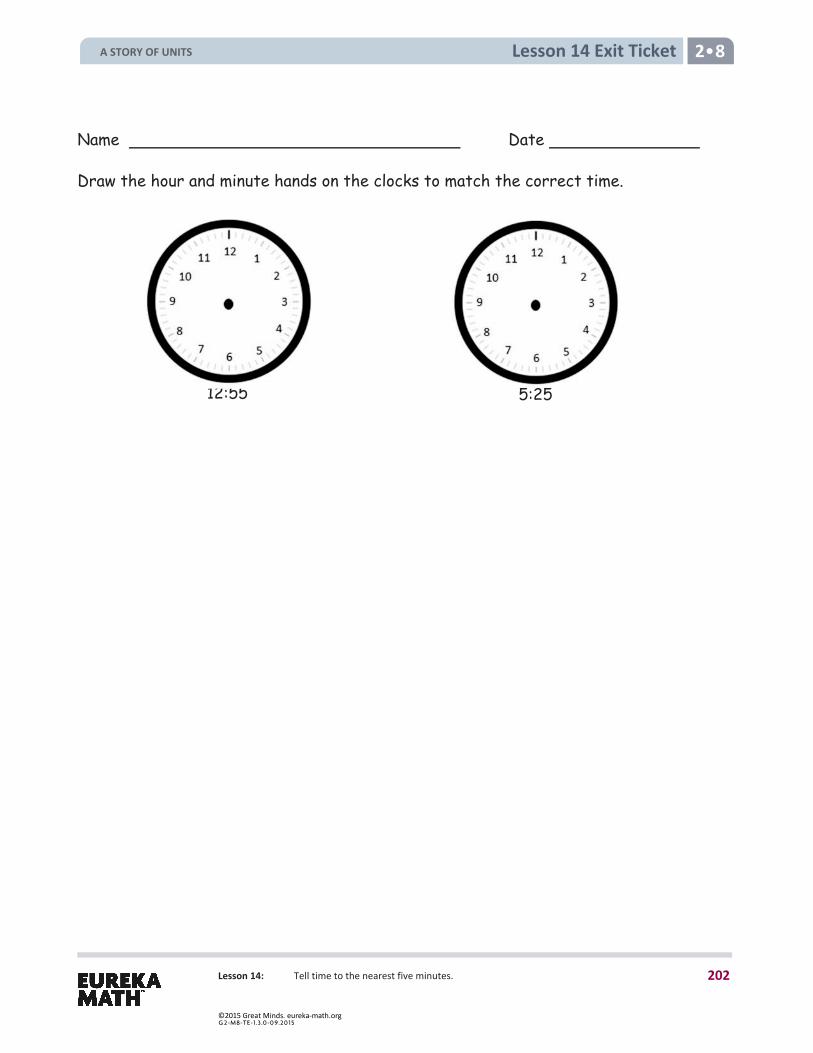
Lesson 14 Exit Ticket 2 8
Lesson 14: Tell time to the nearest five minutes.
Name Date
Draw the hour and minute hands on the clocks to match the correct time.
12:55 5:25
A STORY OF UNITS
202
©2015 Great Minds. eureka-math.orgG 2-M8-TE-1.3 .0 -0 9.20 15
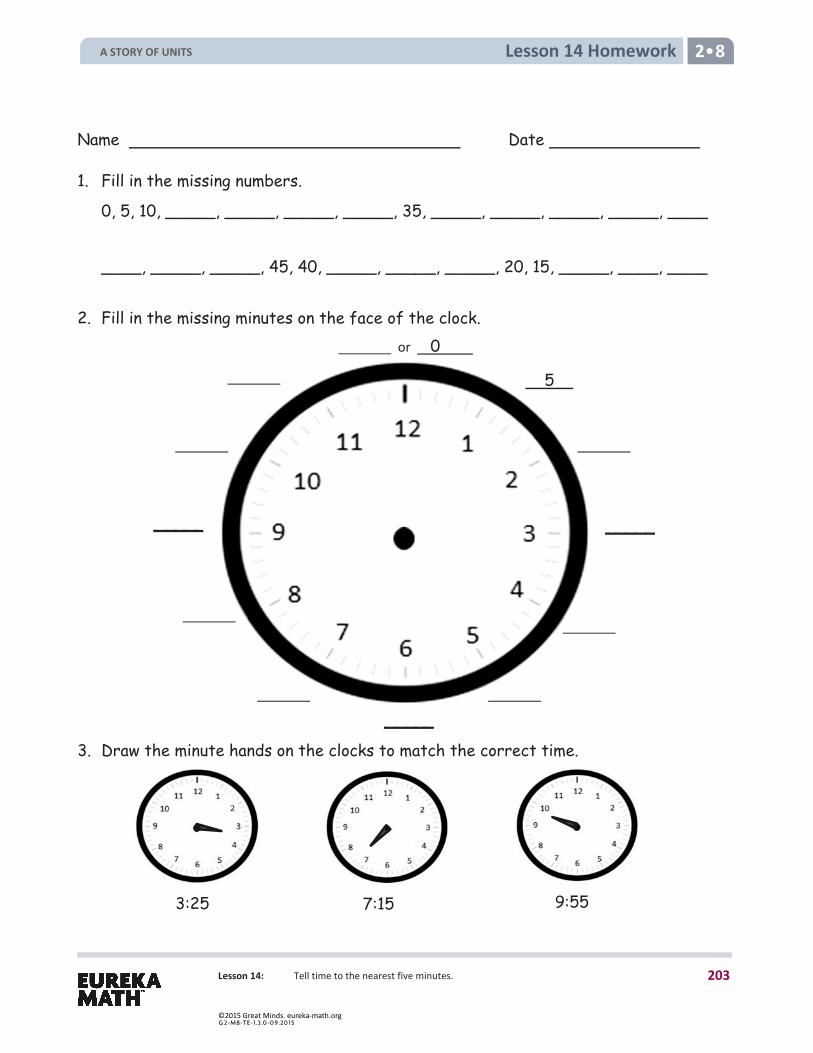
Lesson 14: Tell time to the nearest five minutes.
Lesson 14 Homework 2 8
Name Date
1. Fill in the missing numbers.
0, 5, 10, _____, _____, _____, _____, 35, _____, _____, _____, _____, ____
____, _____, _____, 45, 40, _____, _____, _____, 20, 15, _____, ____, ____
2. Fill in the missing minutes on the face of the clock.
3. Draw the minute hands on the clocks to match the correct time. 3:25 7:15 9:55
5
or 0
_____
_____ _____
A STORY OF UNITS
203
©2015 Great Minds. eureka-math.orgG 2-M8-TE-1.3 .0 -0 9.20 15
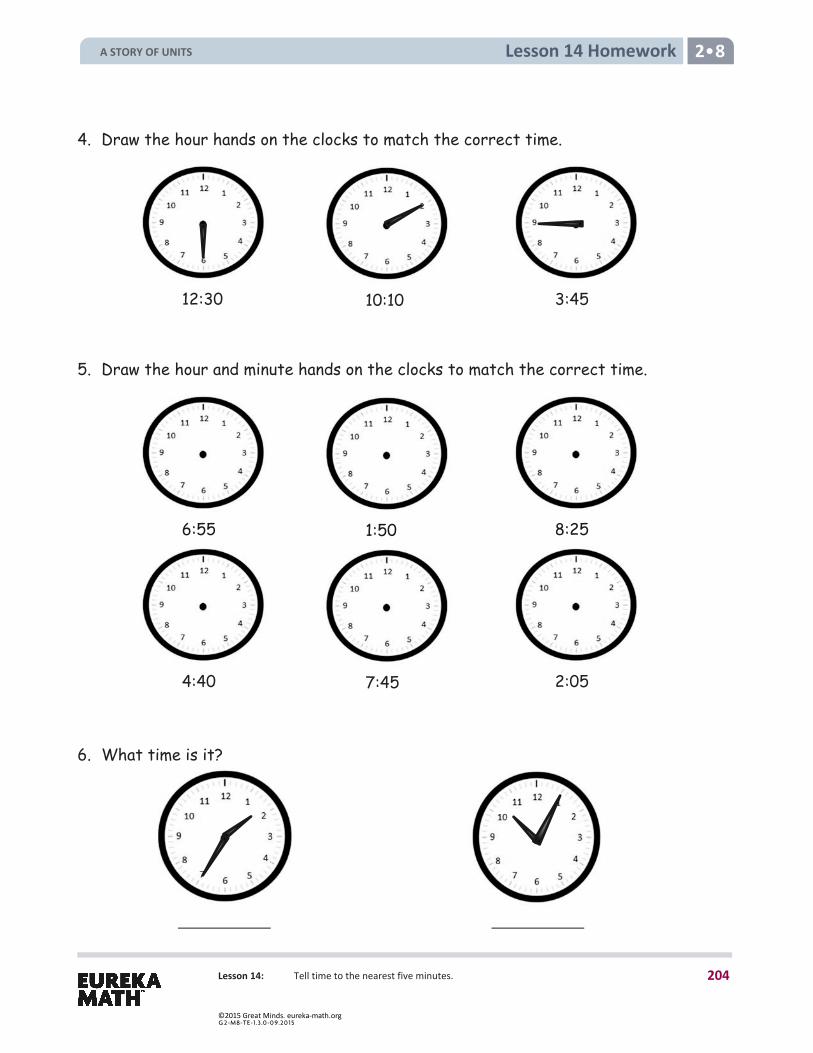
Lesson 14: Tell time to the nearest five minutes.
Lesson 14 Homework 2 8
4. Draw the hour hands on the clocks to match the correct time.
5. Draw the hour and minute hands on the clocks to match the correct time.
6. What time is it?
12:30 10:10 3:45
6:55 1:50 8:25
4:40 7:45 2:05
A STORY OF UNITS
204
©2015 Great Minds. eureka-math.orgG 2-M8-TE-1.3 .0 -0 9.20 15
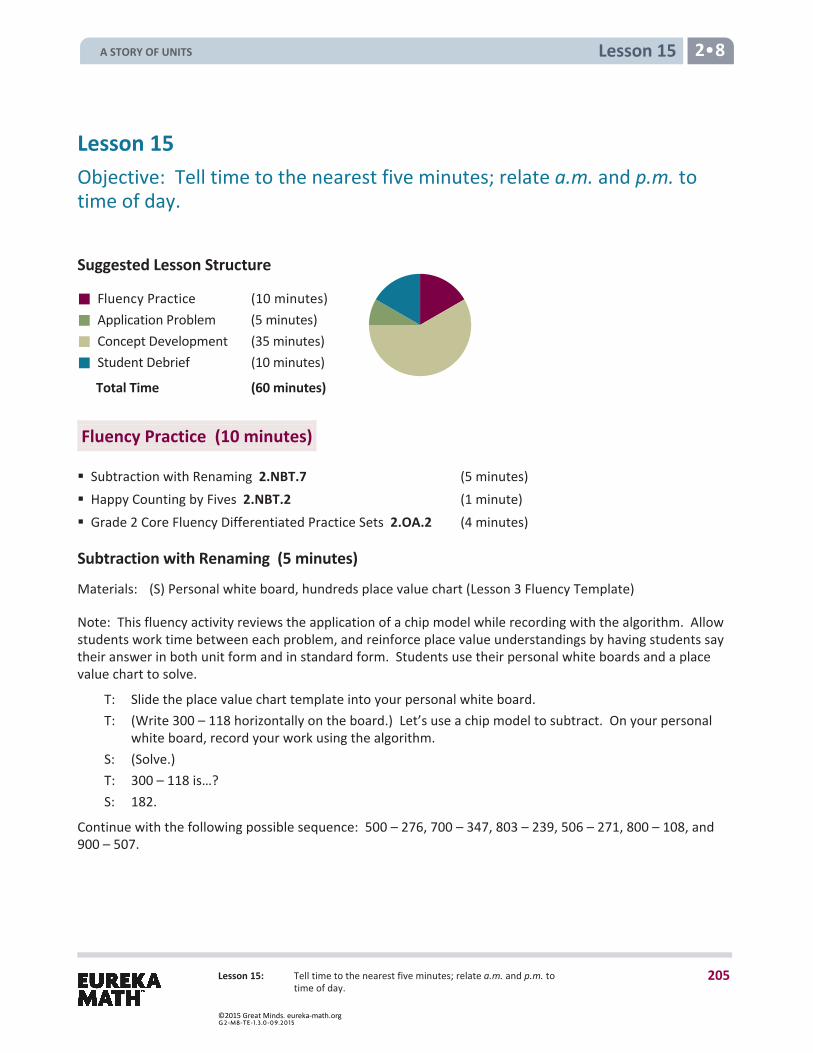
Lesson 15 2 8
Lesson 15: Tell time to the nearest five minutes; relate a.m. and p.m. to time of day.
Lesson 15 Objective: Tell time to the nearest five minutes; relate a.m. and p.m. to time of day.
Suggested Lesson Structure
Fluency Practice (10 minutes) Application Problem (5 minutes) Concept Development (35 minutes) Student Debrief (10 minutes)
Total Time (60 minutes)
Fluency Practice (10 minutes)
Subtraction with Renaming 2.NBT.7 (5 minutes) Happy Counting by Fives 2.NBT.2 (1 minute) Grade 2 Core Fluency Differentiated Practice Sets 2.OA.2 (4 minutes)
Subtraction with Renaming (5 minutes)
Materials: (S) Personal white board, hundreds place value chart (Lesson 3 Fluency Template)
Note: This fluency activity reviews the application of a chip model while recording with the algorithm. Allow students work time between each problem, and reinforce place value understandings by having students say their answer in both unit form and in standard form. Students use their personal white boards and a place value chart to solve.
T: Slide the place value chart template into your personal white board. T: (Write 300 – 118 horizontally on the board.) Let’s use a chip model to subtract. On your personal
white board, record your work using the algorithm. S: (Solve.) T: 300 – 118 is…? S: 182.
Continue with the following possible sequence: 500 – 276, 700 – 347, 803 – 239, 506 – 271, 800 – 108, and 900 – 507.
A STORY OF UNITS
205
©2015 Great Minds. eureka-math.orgG 2-M8-TE-1.3 .0 -0 9.20 15

Lesson 15 2 8
Lesson 15: Tell time to the nearest five minutes; relate a.m. and p.m. to time of day.
NOTES ON MULTIPLE MEANS OF REPRESENTATION:
For students who are working below grade level, scaffold the Application Problem by guiding them through the problem-solving process through questioning. Give them a number bond template and ask, “Are we looking for a part or the whole when we want to know how much free time students have in all? What do they have more time for: recess or lunch? How can we find out how much more time they have for lunch?”
Happy Counting by Fives (1 minute)
T: Let’s do some Happy Counting! T: Let’s count by fives, starting at 0. Ready? (Rhythmically point up until a change is desired. Show a
closed hand, and then point down. Continue, mixing it up.) S: 0, 5, 10, 15, 20. (Switch directions.) 15, 10. (Switch directions.) 15, 20, 25, 30, 35, 40.
(Switch directions.) 35, 30, 25. (Switch directions.) 30, 35, 40, 45. (Switch directions.) 40, 35, 30. (Switch directions.) 35, 40, 45, 50. (Switch directions.) 45, 40, 35. (Switch directions.) 40, 45, 50. (Switch directions.) 45, 40, 35, 30, 25, 20, 15.
Grade 2 Core Fluency Differentiated Practice Sets (4 minutes)
Materials: (S) Core Fluency Practice Sets from Lesson 3
Note: During Topic D and for the remainder of the year, each day’s fluency includes an opportunity for review and mastery of the sums and differences with totals through 20 by means of the Core Fluency Practice Sets or Sprints. The process is detailed, with Practice Sets provided, in Lesson 3.
Application Problem (5 minutes)
At Memorial School, students have a quarter hour for morning recess and 33 minutes for a lunch break. How much free time do they have in all? How much more time for lunch than recess do they have?
Note: Students have the opportunity to solve another two-step problem involving addition and subtraction with time. At this stage, some do not need to draw a tape diagram, but for those who struggle, encourage them to do so.
A STORY OF UNITS
206
©2015 Great Minds. eureka-math.orgG 2-M8-TE-1.3 .0 -0 9.20 15

Lesson 15 2 8
Lesson 15: Tell time to the nearest five minutes; relate a.m. and p.m. to time of day.
NOTES ON MULTIPLE MEANS OF ENGAGEMENT:
Support English language learners’ oral language by providing them with sentence starters to aid them in sharing their ideas with a partner. “The sky would be _____ if it were 10 p.m.” and “When it is 5 a.m., I am _____.”
Concept Development (35 minutes)
Materials: (T) Telling time story (Template) as a display or booklet, document camera (if available) (S) Telling time story (Template) as a booklet, crayons (optional)
Note: Students are asked to tell the current time of day. The vignette uses an example of a morning class. Adjust the questions to fit if math is scheduled for the afternoon.
Images are provided in a format that can either be printed as a full-size book to be read to the whole class, as a booklet to be distributed, or as images to project. The four-on-a-page template appears before the full-page version in this document. Copies of either version may be given to students if resources are available, and they can color them in school or at home to make a home connection. The pictures can also be either cut out and ordered by students or left in chronological order as they appear.
If the teacher is showing the book to the group, gather students in the center of the room.
T: Look at the classroom clock. What time is it now? S: (Tell time to the nearest five minutes.) T: Where does the clock tell us if it is morning or night? S: The clock doesn’t tell that. The sun is shining, so it is morning. We know it is morning because
we just got to school. We haven’t had lunch yet, so it must be morning. T: Will the clock look exactly like this again today? S: I’m not sure. Yes! It will show [insert time] again tonight. T: That’s right. The clock will look just like it does now at [insert time] tonight. T: (Hold up the analog clock showing the time that school starts.) What time does this clock show? S: (Tell time.) T: What do we do at [time] each morning? S: That’s the beginning of school! T: What do you do around this time each evening? S: Get ready for bed. Finish my homework. Take a shower.
Repeat using a few other important times in the class schedule, and include both morning and afternoon times.
T: Which comes first in the alphabet, A or P? S: A! T: Yes! Which comes first in a day, the morning or the
afternoon? S: The morning! T: Yes! That’s an easy way to remember a.m. and p.m.
(Write a.m. and p.m. on the board.) T: We use a.m. as a short way to talk about the time
between 12:00 midnight and 12:00 noon, or morning.
MP.7
A STORY OF UNITS
207
©2015 Great Minds. eureka-math.orgG 2-M8-TE-1.3 .0 -0 9.20 15
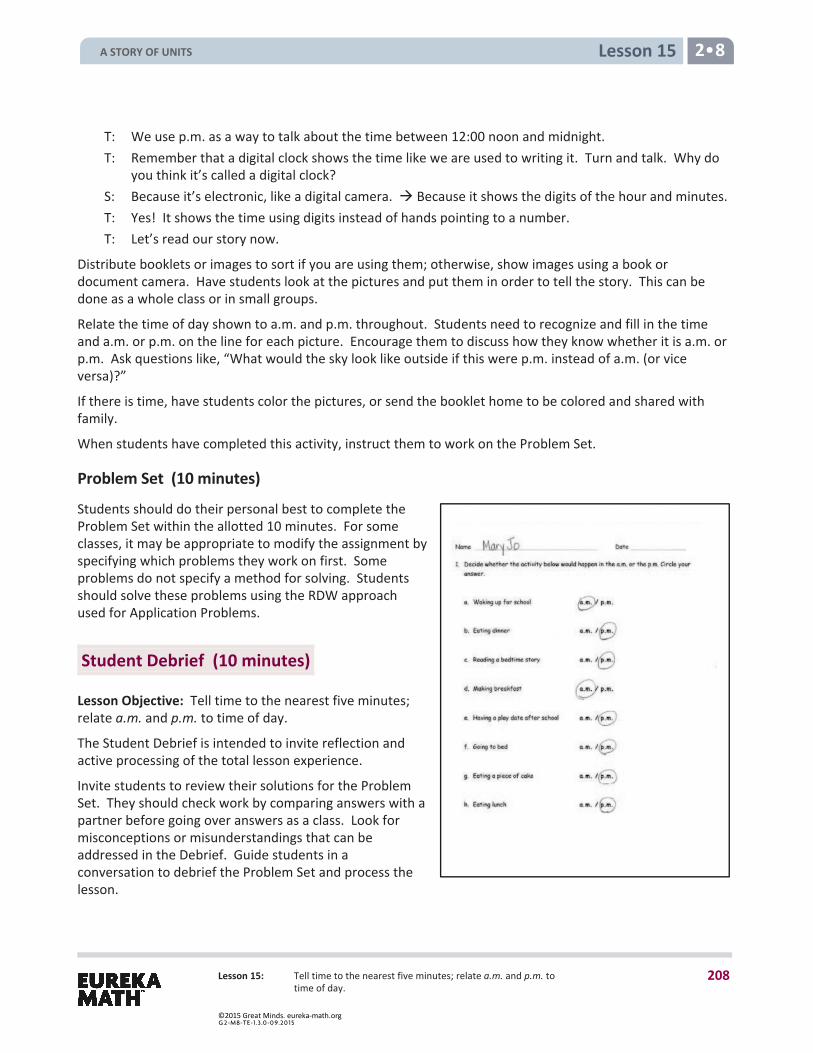
Lesson 15 2 8
Lesson 15: Tell time to the nearest five minutes; relate a.m. and p.m. to time of day.
T: We use p.m. as a way to talk about the time between 12:00 noon and midnight. T: Remember that a digital clock shows the time like we are used to writing it. Turn and talk. Why do
you think it’s called a digital clock? S: Because it’s electronic, like a digital camera. Because it shows the digits of the hour and minutes. T: Yes! It shows the time using digits instead of hands pointing to a number. T: Let’s read our story now.
Distribute booklets or images to sort if you are using them; otherwise, show images using a book or document camera. Have students look at the pictures and put them in order to tell the story. This can be done as a whole class or in small groups.
Relate the time of day shown to a.m. and p.m. throughout. Students need to recognize and fill in the time and a.m. or p.m. on the line for each picture. Encourage them to discuss how they know whether it is a.m. or p.m. Ask questions like, “What would the sky look like outside if this were p.m. instead of a.m. (or vice versa)?”
If there is time, have students color the pictures, or send the booklet home to be colored and shared with family.
When students have completed this activity, instruct them to work on the Problem Set.
Problem Set (10 minutes)
Students should do their personal best to complete the Problem Set within the allotted 10 minutes. For some classes, it may be appropriate to modify the assignment by specifying which problems they work on first. Some problems do not specify a method for solving. Students should solve these problems using the RDW approach used for Application Problems.
Student Debrief (10 minutes)
Lesson Objective: Tell time to the nearest five minutes; relate a.m. and p.m. to time of day.
The Student Debrief is intended to invite reflection and active processing of the total lesson experience.
Invite students to review their solutions for the Problem Set. They should check work by comparing answers with a partner before going over answers as a class. Look for misconceptions or misunderstandings that can be addressed in the Debrief. Guide students in a conversation to debrief the Problem Set and process the lesson.
A STORY OF UNITS
208
©2015 Great Minds. eureka-math.orgG 2-M8-TE-1.3 .0 -0 9.20 15
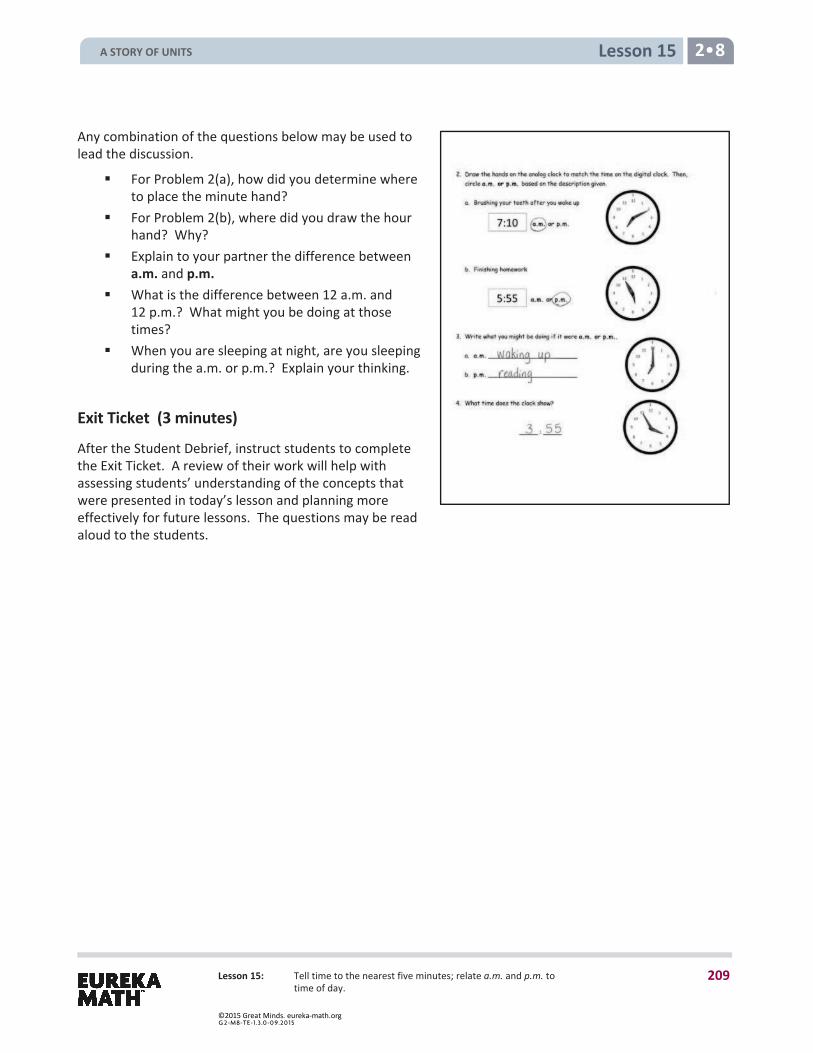
Lesson 15 2 8
Lesson 15: Tell time to the nearest five minutes; relate a.m. and p.m. to time of day.
Any combination of the questions below may be used to lead the discussion.
For Problem 2(a), how did you determine whereto place the minute hand?
For Problem 2(b), where did you draw the hourhand? Why?
Explain to your partner the difference betweena.m. and p.m.
What is the difference between 12 a.m. and12 p.m.? What might you be doing at thosetimes?
When you are sleeping at night, are you sleepingduring the a.m. or p.m.? Explain your thinking.
Exit Ticket (3 minutes)
After the Student Debrief, instruct students to complete the Exit Ticket. A review of their work will help with assessing students’ understanding of the concepts that were presented in today’s lesson and planning more effectively for future lessons. The questions may be read aloud to the students.
A STORY OF UNITS
209
©2015 Great Minds. eureka-math.orgG 2-M8-TE-1.3 .0 -0 9.20 15
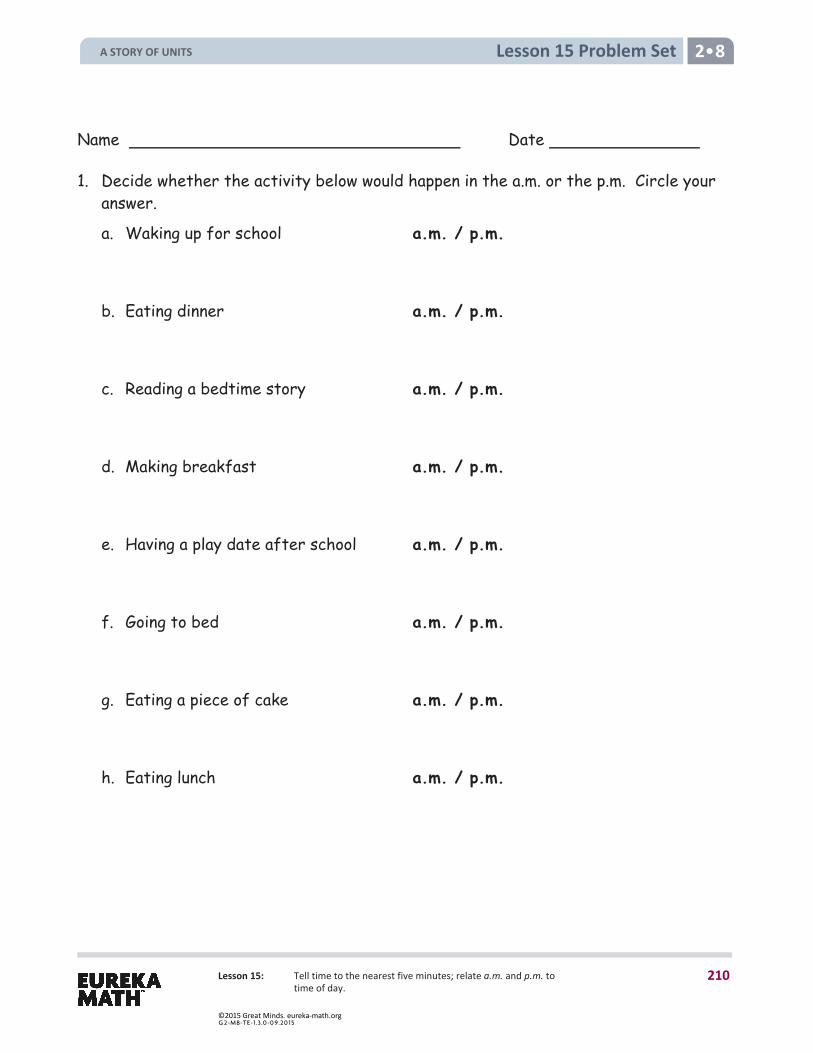
Lesson 15 Problem Set 2 8
Lesson 15: Tell time to the nearest five minutes; relate a.m. and p.m. to time of day.
Name Date
1. Decide whether the activity below would happen in the a.m. or the p.m. Circle your answer.
a. Waking up for school a.m. / p.m.
b. Eating dinner a.m. / p.m.
c. Reading a bedtime story a.m. / p.m.
d. Making breakfast a.m. / p.m.
e. Having a play date after school a.m. / p.m.
f. Going to bed a.m. / p.m.
g. Eating a piece of cake a.m. / p.m.
h. Eating lunch a.m. / p.m.
A STORY OF UNITS
210
©2015 Great Minds. eureka-math.orgG 2-M8-TE-1.3 .0 -0 9.20 15
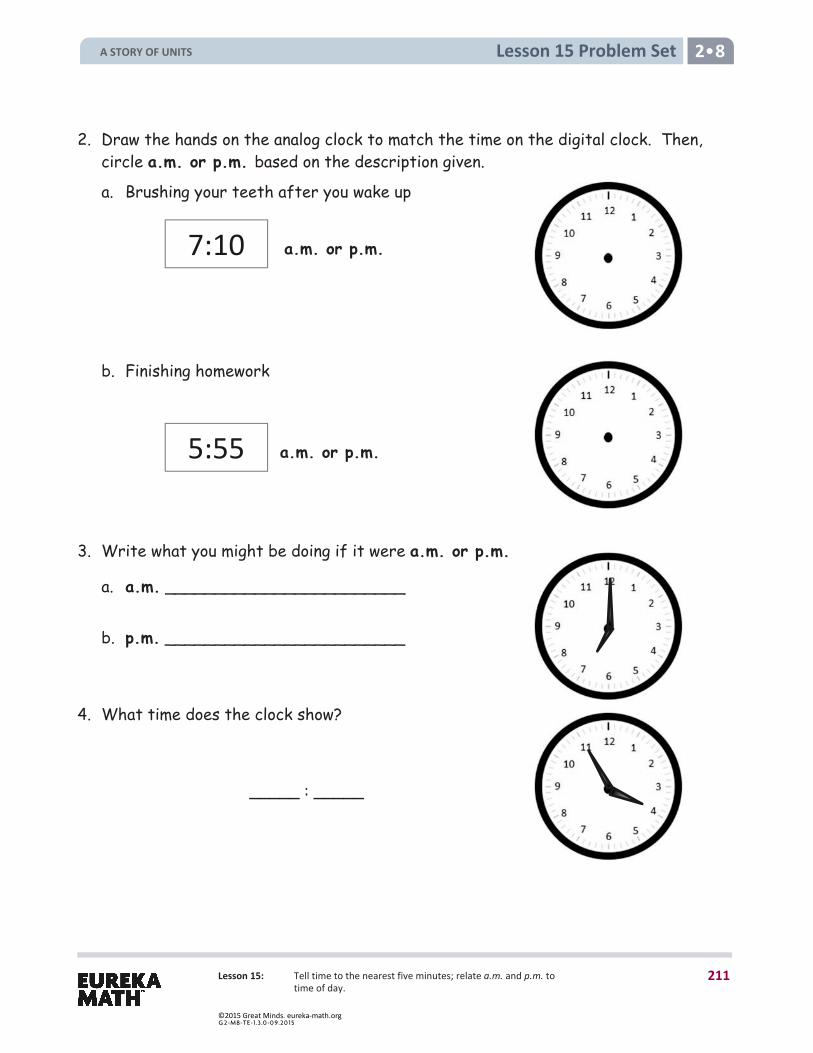
Lesson 15 Problem Set 2 8
Lesson 15: Tell time to the nearest five minutes; relate a.m. and p.m. to time of day.
2. Draw the hands on the analog clock to match the time on the digital clock. Then, circle a.m. or p.m. based on the description given.
a. Brushing your teeth after you wake up
b. Finishing homework
3. Write what you might be doing if it were a.m. or p.m.
a. a.m. ________________________
b. p.m. ________________________
4. What time does the clock show? _____ : _____
7:10
5:55
a.m. or p.m.
a.m. or p.m.
A STORY OF UNITS
211
©2015 Great Minds. eureka-math.orgG 2-M8-TE-1.3 .0 -0 9.20 15
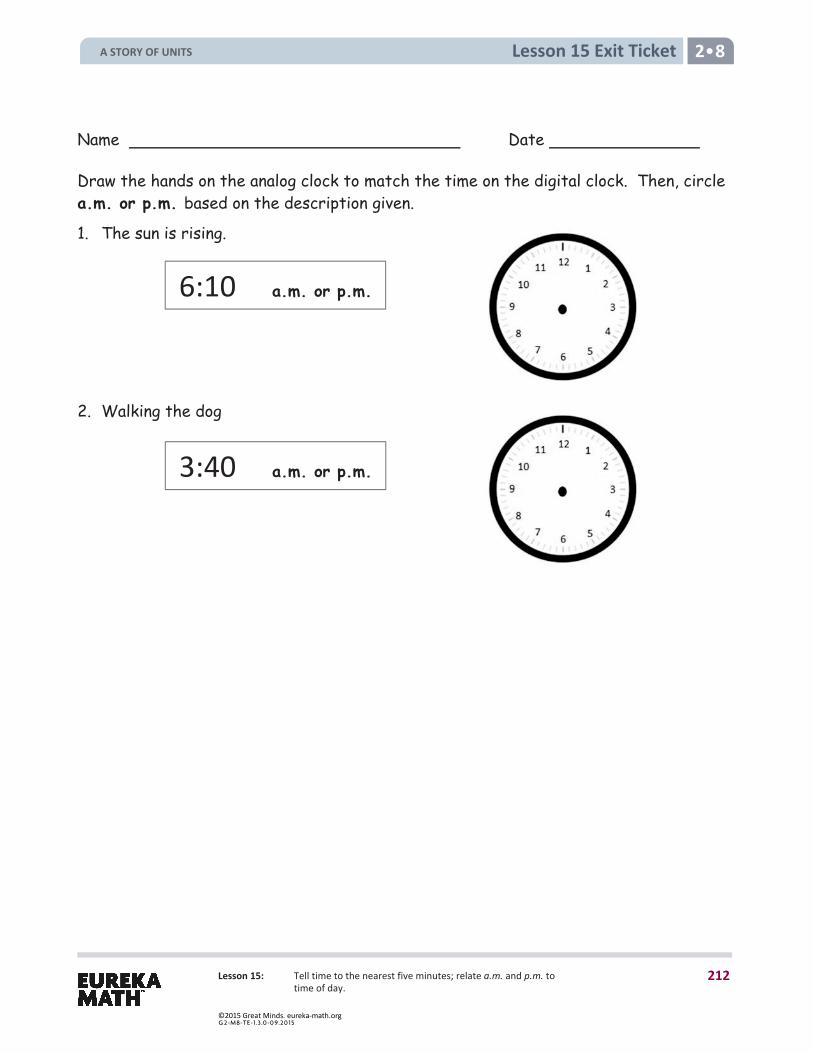
Lesson 15 Exit Ticket 2 8
Lesson 15: Tell time to the nearest five minutes; relate a.m. and p.m. to time of day.
Name Date
Draw the hands on the analog clock to match the time on the digital clock. Then, circle a.m. or p.m. based on the description given.
1. The sun is rising.
2. Walking the dog
6:10 a.m. or p.m.
3:40 a.m. or p.m.
A STORY OF UNITS
212
©2015 Great Minds. eureka-math.orgG 2-M8-TE-1.3 .0 -0 9.20 15
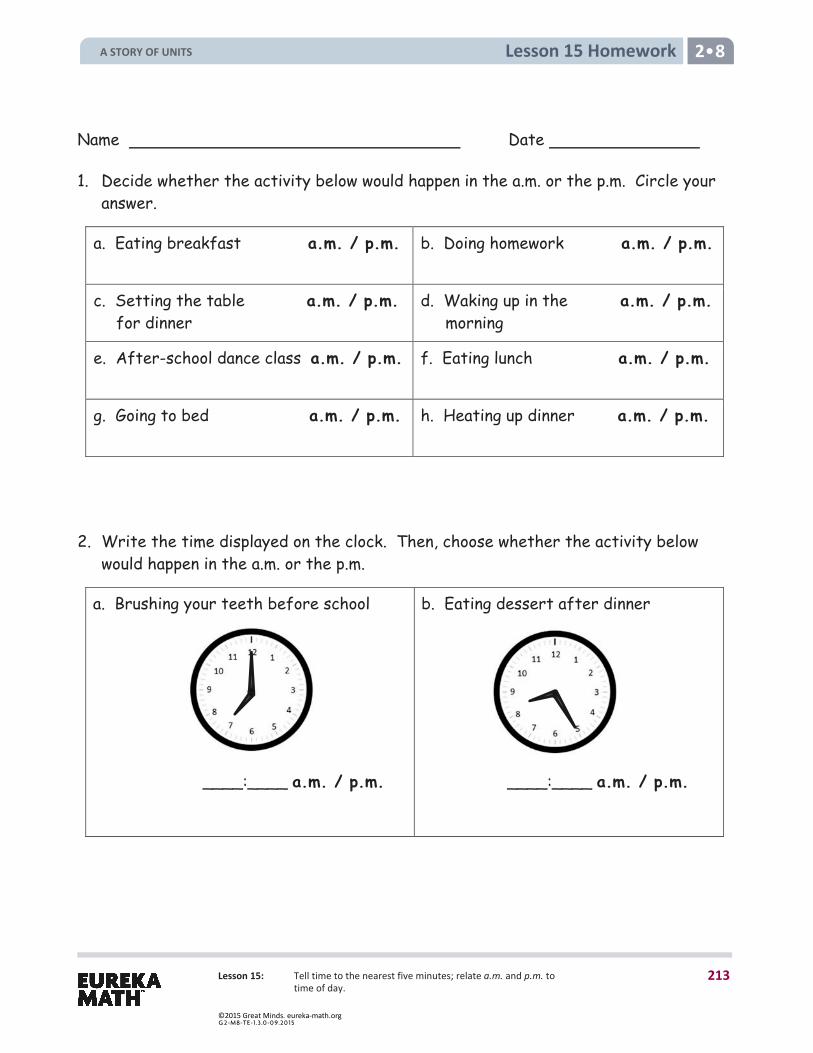
Lesson 15 Homework 2 8
Lesson 15: Tell time to the nearest five minutes; relate a.m. and p.m. to time of day.
Name Date
1. Decide whether the activity below would happen in the a.m. or the p.m. Circle your answer.
a. Eating breakfast a.m. / p.m.
b. Doing homework a.m. / p.m.
c. Setting the table a.m. / p.m. for dinner
d. Waking up in the a.m. / p.m. morning
e. After-school dance class a.m. / p.m. f. Eating lunch a.m. / p.m.
g. Going to bed a.m. / p.m.
h. Heating up dinner a.m. / p.m.
2. Write the time displayed on the clock. Then, choose whether the activity below would happen in the a.m. or the p.m.
a. Brushing your teeth before school ____:____ a.m. / p.m.
b. Eating dessert after dinner ____:____ a.m. / p.m.
A STORY OF UNITS
213
©2015 Great Minds. eureka-math.orgG 2-M8-TE-1.3 .0 -0 9.20 15

Lesson 15 Homework 2 8
Lesson 15: Tell time to the nearest five minutes; relate a.m. and p.m. to time of day.
3. Draw the hands on the analog clock to match the time on the digital clock. Then, circle a.m. or p.m. based on the description given.
a. Brushing your teeth before bedtime
b. Recess after lunch
4. Write what you might be doing if it were a.m. or p.m.
a. a.m. ________________________
b. p.m. ________________________
c. a.m. ________________________
d. p.m. ________________________
8:15 a.m. or p.m.
12:30 a.m. or p.m.
A STORY OF UNITS
214
©2015 Great Minds. eureka-math.orgG 2-M8-TE-1.3 .0 -0 9.20 15
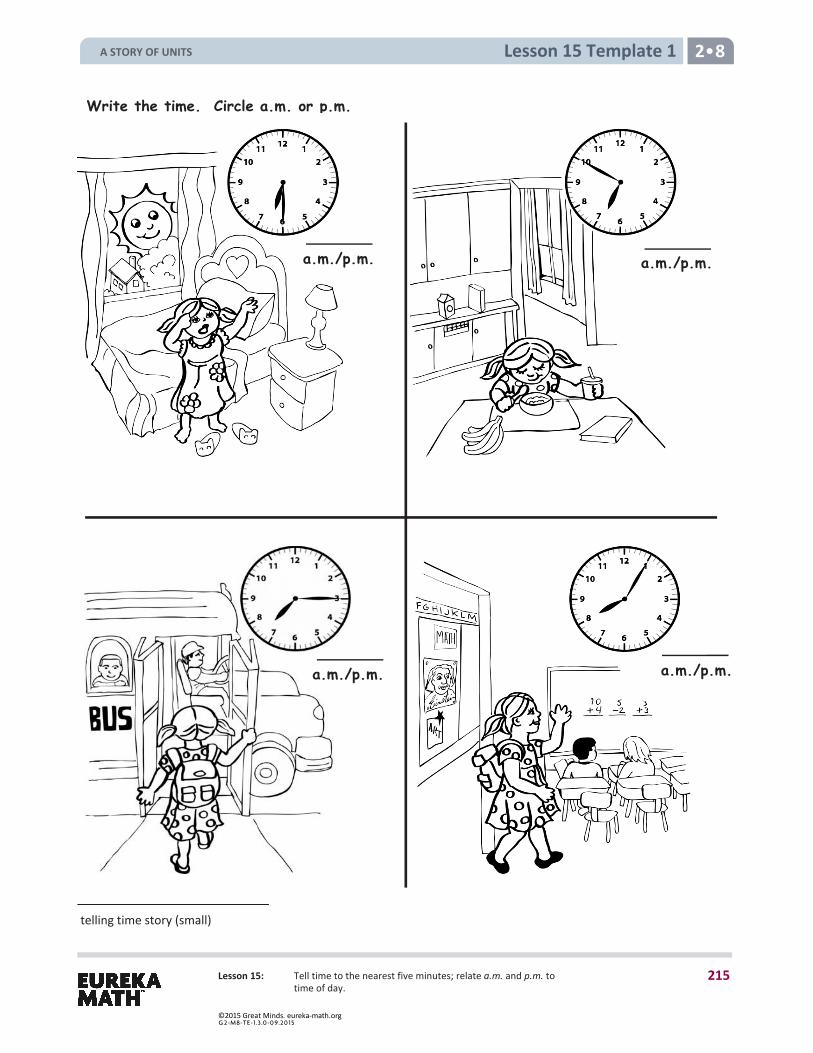
Lesson 15 Template 1 2 8
Lesson 15: Tell time to the nearest five minutes; relate a.m. and p.m. to time of day.
telling time story (small)
Write the time. Circle a.m. or p.m.
a.m./p.m.
a.m./p.m. a.m./p.m.
a.m./p.m.
A STORY OF UNITS
215
©2015 Great Minds. eureka-math.orgG 2-M8-TE-1.3 .0 -0 9.20 15

Lesson 15 Template 1 2 8
Lesson 15: Tell time to the nearest five minutes; relate a.m. and p.m. to time of day.
telling time story (small)
Write the time. Circle a.m. or p.m.
a.m./p.m. a.m./p.m
a.m./p.m. a.m./p.m.
A STORY OF UNITS
216
©2015 Great Minds. eureka-math.orgG 2-M8-TE-1.3 .0 -0 9.20 15
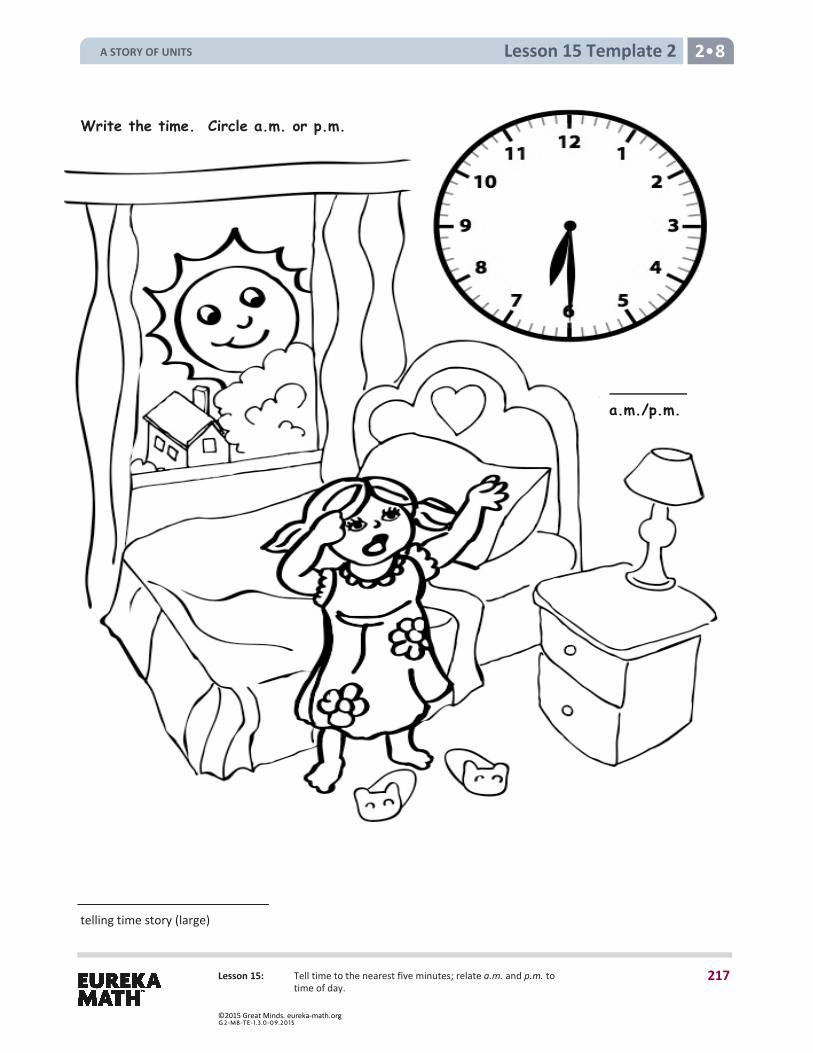
Lesson 15: Tell time to the nearest five minutes; relate a.m. and p.m. to time of day.
Lesson 15 Template 2 2 8
telling time story (large)
a.m. / p.m.
Write the time. Circle a.m. or p.m.
a.m./p.m.
A STORY OF UNITS
217
©2015 Great Minds. eureka-math.orgG 2-M8-TE-1.3 .0 -0 9.20 15
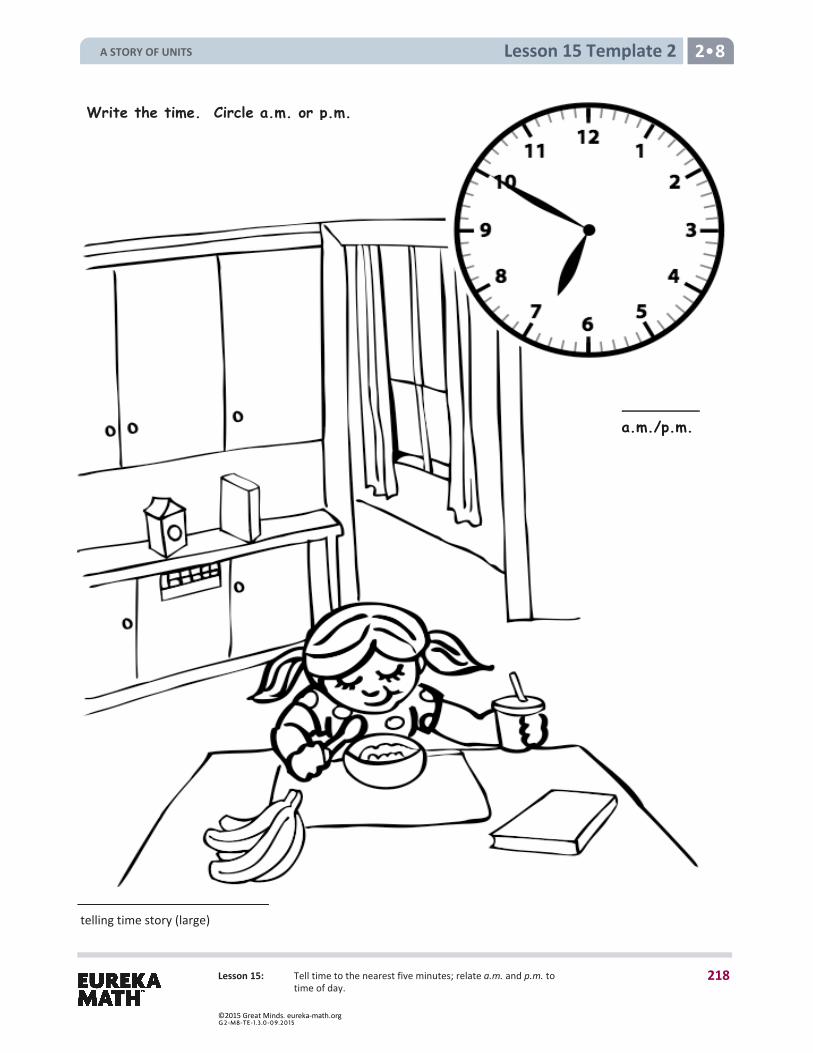
Lesson 15: Tell time to the nearest five minutes; relate a.m. and p.m. to time of day.
Lesson 15 Template 2 2 8
a.m./p.m.
telling time story (large)
Write the time. Circle a.m. or p.m.
A STORY OF UNITS
218
©2015 Great Minds. eureka-math.orgG 2-M8-TE-1.3 .0 -0 9.20 15
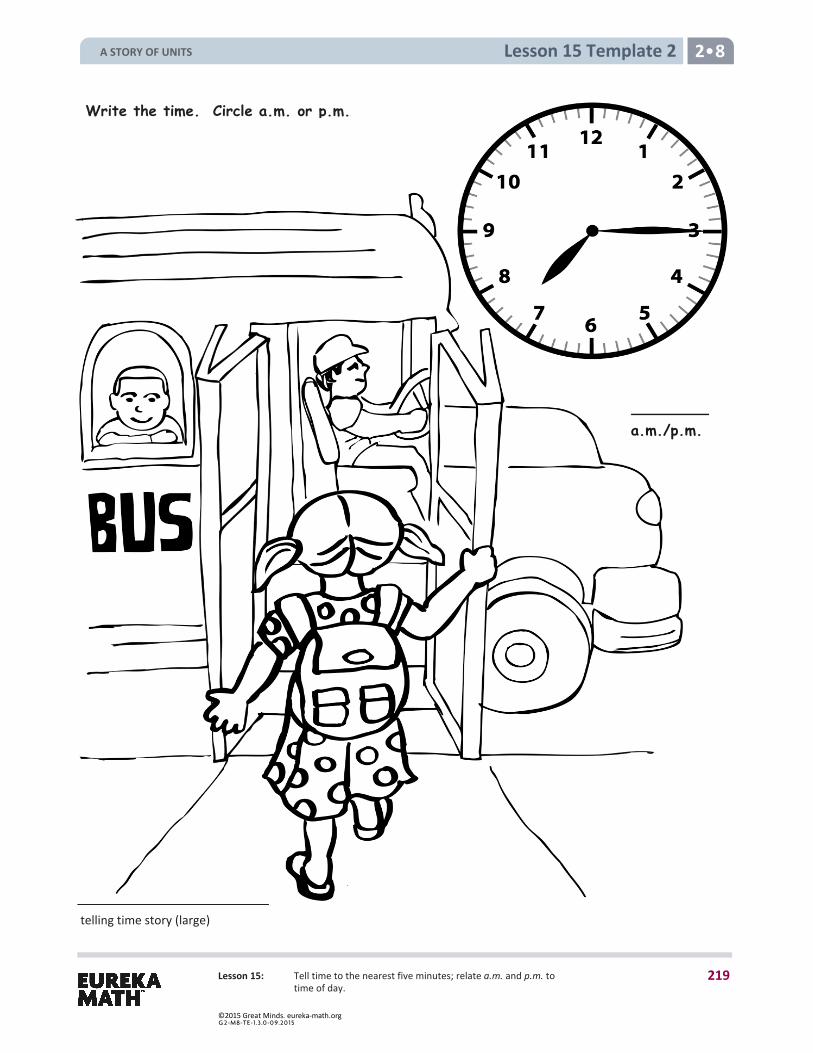
Lesson 15: Tell time to the nearest five minutes; relate a.m. and p.m. to time of day.
Lesson 15 Template 2 2 8
a.m./p.m.
telling time story (large)
Write the time. Circle a.m. or p.m.
A STORY OF UNITS
219
©2015 Great Minds. eureka-math.orgG 2-M8-TE-1.3 .0 -0 9.20 15
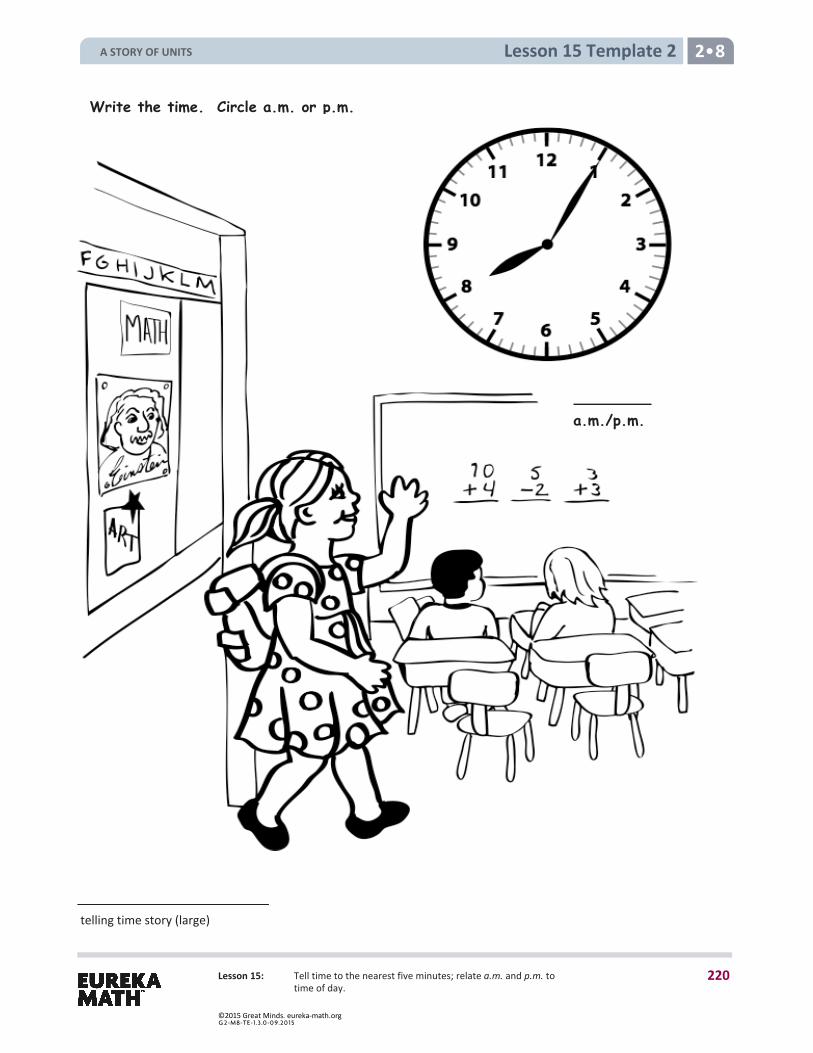
Lesson 15: Tell time to the nearest five minutes; relate a.m. and p.m. to time of day.
Lesson 15 Template 2 2 8
telling time story (large)
Write the time. Circle a.m. or p.m.
a.m./p.m.
A STORY OF UNITS
220
©2015 Great Minds. eureka-math.orgG 2-M8-TE-1.3 .0 -0 9.20 15
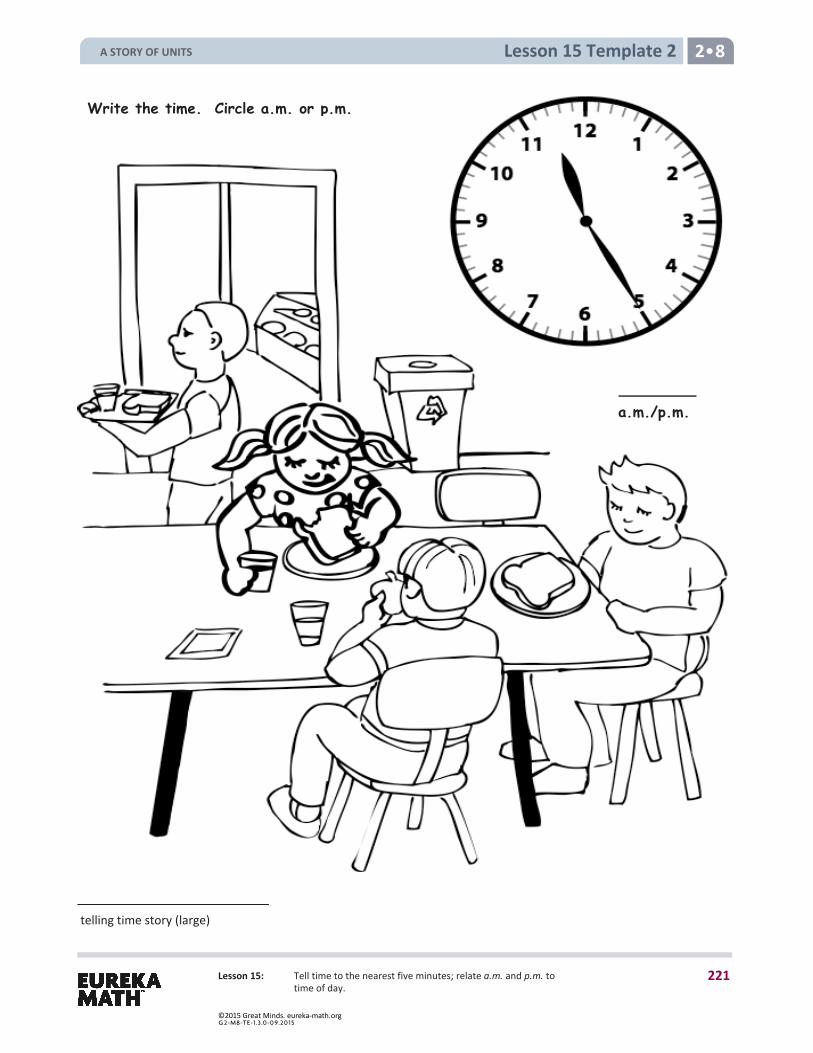
Lesson 15: Tell time to the nearest five minutes; relate a.m. and p.m. to time of day.
Lesson 15 Template 2 2 8
a.m./p.m.
telling time story (large)
Write the time. Circle a.m. or p.m.
A STORY OF UNITS
221
©2015 Great Minds. eureka-math.orgG 2-M8-TE-1.3 .0 -0 9.20 15
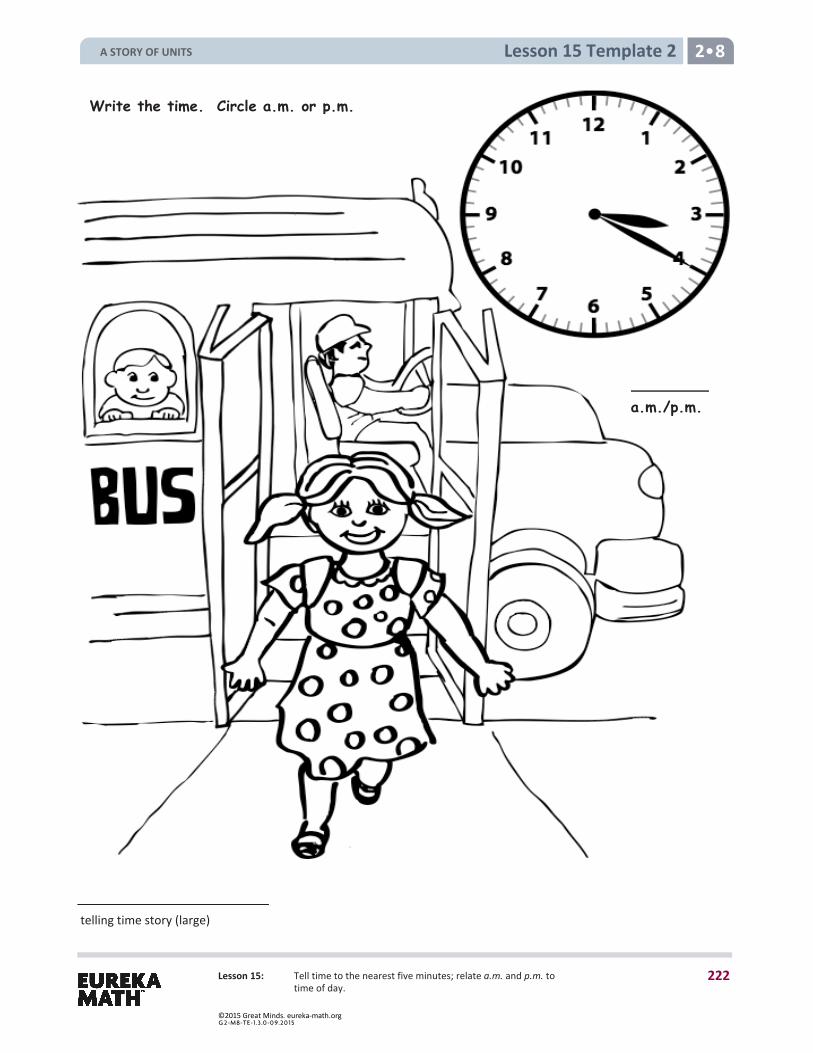
Lesson 15: Tell time to the nearest five minutes; relate a.m. and p.m. to time of day.
Lesson 15 Template 2 2 8
a.m./p.m.
telling time story (large)
Write the time. Circle a.m. or p.m.
A STORY OF UNITS
222
©2015 Great Minds. eureka-math.orgG 2-M8-TE-1.3 .0 -0 9.20 15
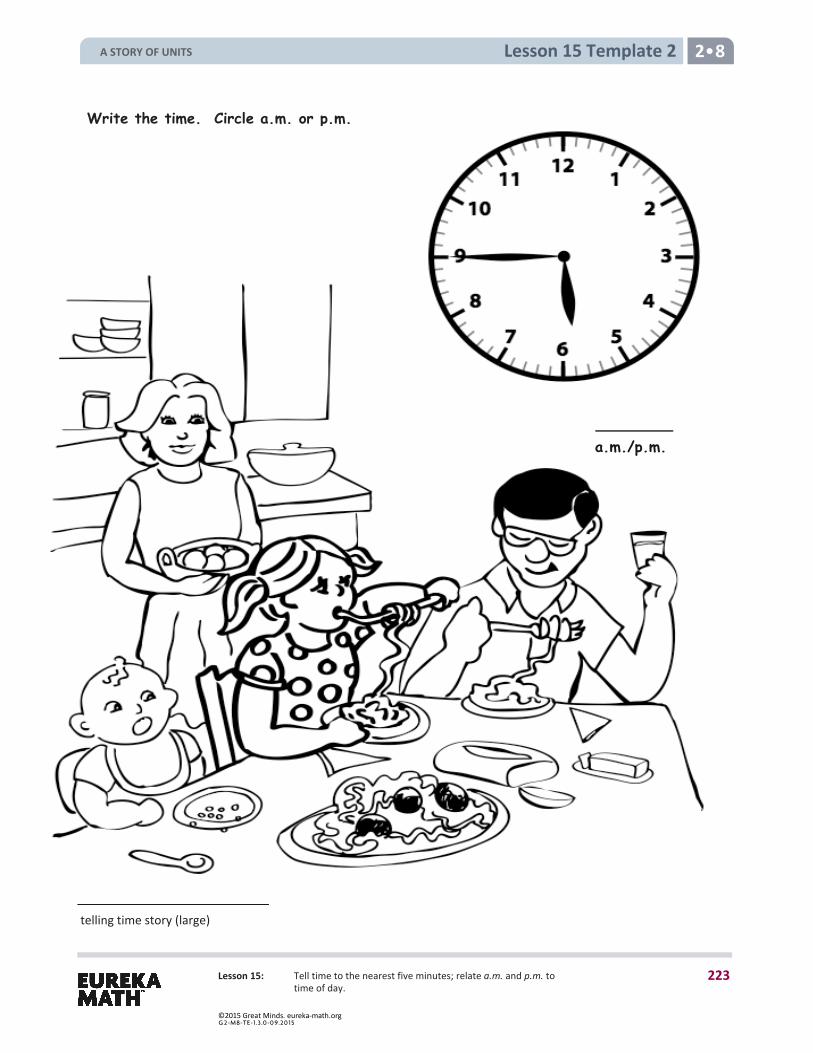
Lesson 15: Tell time to the nearest five minutes; relate a.m. and p.m. to time of day.
Lesson 15 Template 2 2 8
telling time story (large)
Write the time. Circle a.m. or p.m.
a.m./p.m.
A STORY OF UNITS
223
©2015 Great Minds. eureka-math.orgG 2-M8-TE-1.3 .0 -0 9.20 15

Lesson 15: Tell time to the nearest five minutes; relate a.m. and p.m. to time of day.
Lesson 15 Template 2 2 8
a.m./p.m.
telling time story (large)
Write the time. Circle a.m. or p.m.
A STORY OF UNITS
224
©2015 Great Minds. eureka-math.orgG 2-M8-TE-1.3 .0 -0 9.20 15

Lesson 16 2 8
Lesson 16: Solve elapsed time problems involving whole hours and a half hour.
Lesson 16 Objective: Solve elapsed time problems involving whole hours and a half hour.
Suggested Lesson Structure
Fluency Practice (10 minutes) Application Problem (7 minutes) Concept Development (33 minutes) Student Debrief (10 minutes)
Total Time (60 minutes)
Fluency Practice (10 minutes)
Subtraction with Renaming 2.NBT.7 (5 minutes) Grade 2 Core Fluency Differentiated Practice Sets 2.OA.2 (5 minutes)
Subtraction with Renaming (5 minutes)
Materials: (S) Personal white board, hundreds place value chart (Lesson 3 Fluency Template)
Note: This fluency activity reviews the application of a chip model while recording with the algorithm. Allow students work time between each problem, and reinforce place value understandings by having students say their answer in both unit form and in standard form. Students use their personal white boards and a place value chart to solve.
T: Slide the place value chart template into your personal white board. T: (Write 600 – 356 horizontally on the board.) Let’s use a chip model to subtract. On your personal
white board, record your work using the algorithm. S: (Solve.) T: 600 – 356 is…? S: 244.
Continue with the following possible sequence: 406 – 218, 507 – 269, 314 – 185, 672 – 274, and 842 – 296.
A STORY OF UNITS
225
©2015 Great Minds. eureka-math.orgG 2-M8-TE-1.3 .0 -0 9.20 15
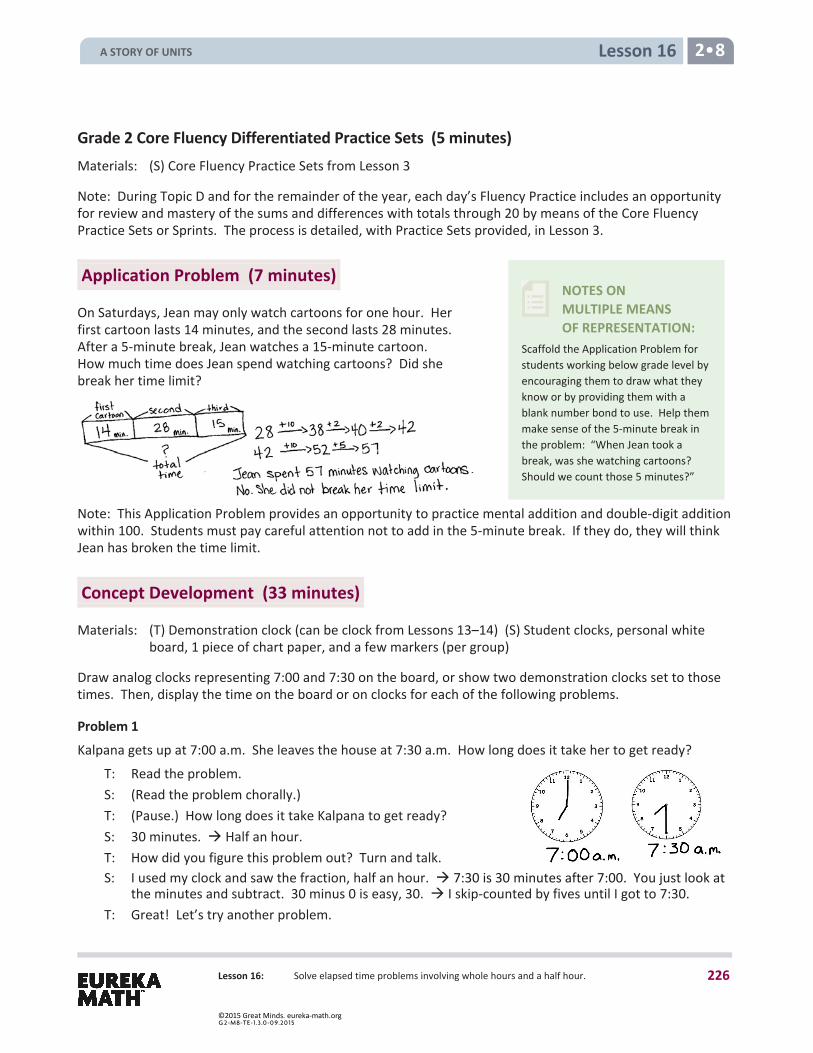
Lesson 16 2 8
Lesson 16: Solve elapsed time problems involving whole hours and a half hour.
NOTES ON MULTIPLE MEANS OF REPRESENTATION:
Scaffold the Application Problem for students working below grade level by encouraging them to draw what they know or by providing them with a blank number bond to use. Help them make sense of the 5-minute break in the problem: “When Jean took a break, was she watching cartoons? Should we count those 5 minutes?”
Grade 2 Core Fluency Differentiated Practice Sets (5 minutes) Materials: (S) Core Fluency Practice Sets from Lesson 3
Note: During Topic D and for the remainder of the year, each day’s Fluency Practice includes an opportunity for review and mastery of the sums and differences with totals through 20 by means of the Core Fluency Practice Sets or Sprints. The process is detailed, with Practice Sets provided, in Lesson 3.
Application Problem (7 minutes)
On Saturdays, Jean may only watch cartoons for one hour. Her first cartoon lasts 14 minutes, and the second lasts 28 minutes. After a 5-minute break, Jean watches a 15-minute cartoon. How much time does Jean spend watching cartoons? Did she break her time limit?
Note: This Application Problem provides an opportunity to practice mental addition and double-digit addition within 100. Students must pay careful attention not to add in the 5-minute break. If they do, they will think Jean has broken the time limit.
Concept Development (33 minutes)
Materials: (T) Demonstration clock (can be clock from Lessons 13–14) (S) Student clocks, personal white board, 1 piece of chart paper, and a few markers (per group)
Draw analog clocks representing 7:00 and 7:30 on the board, or show two demonstration clocks set to those times. Then, display the time on the board or on clocks for each of the following problems.
Problem 1 Kalpana gets up at 7:00 a.m. She leaves the house at 7:30 a.m. How long does it take her to get ready?
T: Read the problem. S: (Read the problem chorally.) T: (Pause.) How long does it take Kalpana to get ready? S: 30 minutes. Half an hour. T: How did you figure this problem out? Turn and talk. S: I used my clock and saw the fraction, half an hour. 7:30 is 30 minutes after 7:00. You just look at
the minutes and subtract. 30 minus 0 is easy, 30. I skip-counted by fives until I got to 7:30. T: Great! Let’s try another problem.
A STORY OF UNITS
226
©2015 Great Minds. eureka-math.orgG 2-M8-TE-1.3 .0 -0 9.20 15
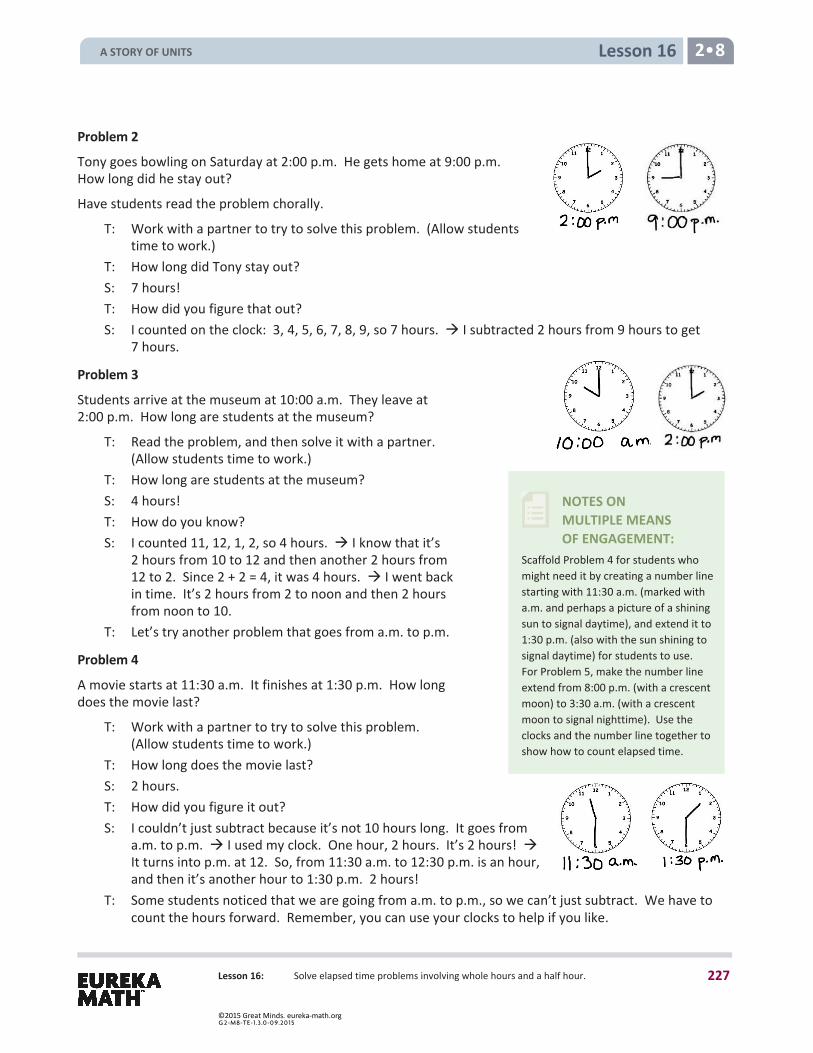
Lesson 16 2 8
Lesson 16: Solve elapsed time problems involving whole hours and a half hour.
NOTES ON MULTIPLE MEANS OF ENGAGEMENT:
Scaffold Problem 4 for students who might need it by creating a number line starting with 11:30 a.m. (marked with a.m. and perhaps a picture of a shining sun to signal daytime), and extend it to 1:30 p.m. (also with the sun shining to signal daytime) for students to use. For Problem 5, make the number line extend from 8:00 p.m. (with a crescent moon) to 3:30 a.m. (with a crescent moon to signal nighttime). Use the clocks and the number line together to show how to count elapsed time.
Problem 2
Tony goes bowling on Saturday at 2:00 p.m. He gets home at 9:00 p.m. How long did he stay out?
Have students read the problem chorally.
T: Work with a partner to try to solve this problem. (Allow students time to work.)
T: How long did Tony stay out? S: 7 hours! T: How did you figure that out? S: I counted on the clock: 3, 4, 5, 6, 7, 8, 9, so 7 hours. I subtracted 2 hours from 9 hours to get
7 hours.
Problem 3
Students arrive at the museum at 10:00 a.m. They leave at 2:00 p.m. How long are students at the museum?
T: Read the problem, and then solve it with a partner. (Allow students time to work.)
T: How long are students at the museum? S: 4 hours! T: How do you know? S: I counted 11, 12, 1, 2, so 4 hours. I know that it’s
2 hours from 10 to 12 and then another 2 hours from 12 to 2. Since 2 + 2 = 4, it was 4 hours. I went back in time. It’s 2 hours from 2 to noon and then 2 hours from noon to 10.
T: Let’s try another problem that goes from a.m. to p.m.
Problem 4
A movie starts at 11:30 a.m. It finishes at 1:30 p.m. How long does the movie last?
T: Work with a partner to try to solve this problem. (Allow students time to work.)
T: How long does the movie last? S: 2 hours. T: How did you figure it out? S: I couldn’t just subtract because it’s not 10 hours long. It goes from
a.m. to p.m. I used my clock. One hour, 2 hours. It’s 2 hours! It turns into p.m. at 12. So, from 11:30 a.m. to 12:30 p.m. is an hour, and then it’s another hour to 1:30 p.m. 2 hours!
T: Some students noticed that we are going from a.m. to p.m., so we can’t just subtract. We have to count the hours forward. Remember, you can use your clocks to help if you like.
A STORY OF UNITS
227
©2015 Great Minds. eureka-math.orgG 2-M8-TE-1.3 .0 -0 9.20 15
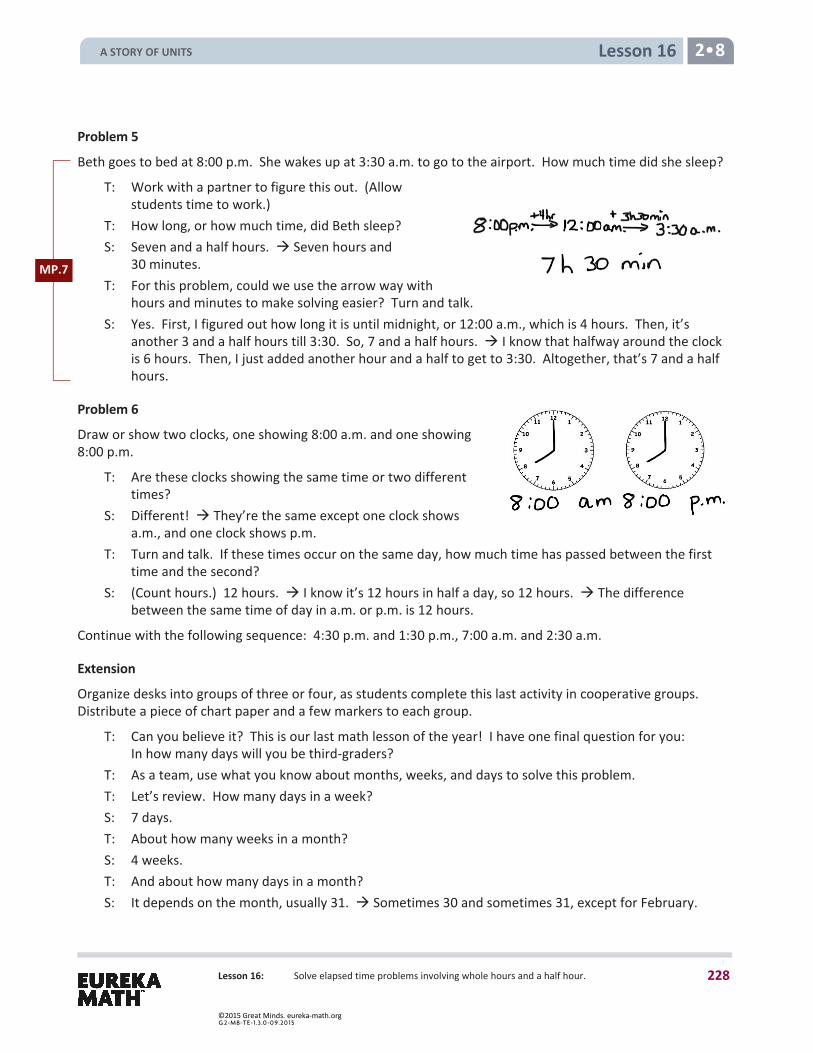
Lesson 16 2 8
Lesson 16: Solve elapsed time problems involving whole hours and a half hour.
Problem 5
Beth goes to bed at 8:00 p.m. She wakes up at 3:30 a.m. to go to the airport. How much time did she sleep?
T: Work with a partner to figure this out. (Allow students time to work.)
T: How long, or how much time, did Beth sleep? S: Seven and a half hours. Seven hours and
30 minutes. T: For this problem, could we use the arrow way with
hours and minutes to make solving easier? Turn and talk. S: Yes. First, I figured out how long it is until midnight, or 12:00 a.m., which is 4 hours. Then, it’s
another 3 and a half hours till 3:30. So, 7 and a half hours. I know that halfway around the clock is 6 hours. Then, I just added another hour and a half to get to 3:30. Altogether, that’s 7 and a half hours.
Problem 6
Draw or show two clocks, one showing 8:00 a.m. and one showing 8:00 p.m.
T: Are these clocks showing the same time or two different times?
S: Different! They’re the same except one clock shows a.m., and one clock shows p.m.
T: Turn and talk. If these times occur on the same day, how much time has passed between the first time and the second?
S: (Count hours.) 12 hours. I know it’s 12 hours in half a day, so 12 hours. The difference between the same time of day in a.m. or p.m. is 12 hours.
Continue with the following sequence: 4:30 p.m. and 1:30 p.m., 7:00 a.m. and 2:30 a.m.
Extension
Organize desks into groups of three or four, as students complete this last activity in cooperative groups. Distribute a piece of chart paper and a few markers to each group.
T: Can you believe it? This is our last math lesson of the year! I have one final question for you: In how many days will you be third-graders?
T: As a team, use what you know about months, weeks, and days to solve this problem. T: Let’s review. How many days in a week? S: 7 days. T: About how many weeks in a month? S: 4 weeks. T: And about how many days in a month? S: It depends on the month, usually 31. Sometimes 30 and sometimes 31, except for February.
MP.7
A STORY OF UNITS
228
©2015 Great Minds. eureka-math.orgG 2-M8-TE-1.3 .0 -0 9.20 15
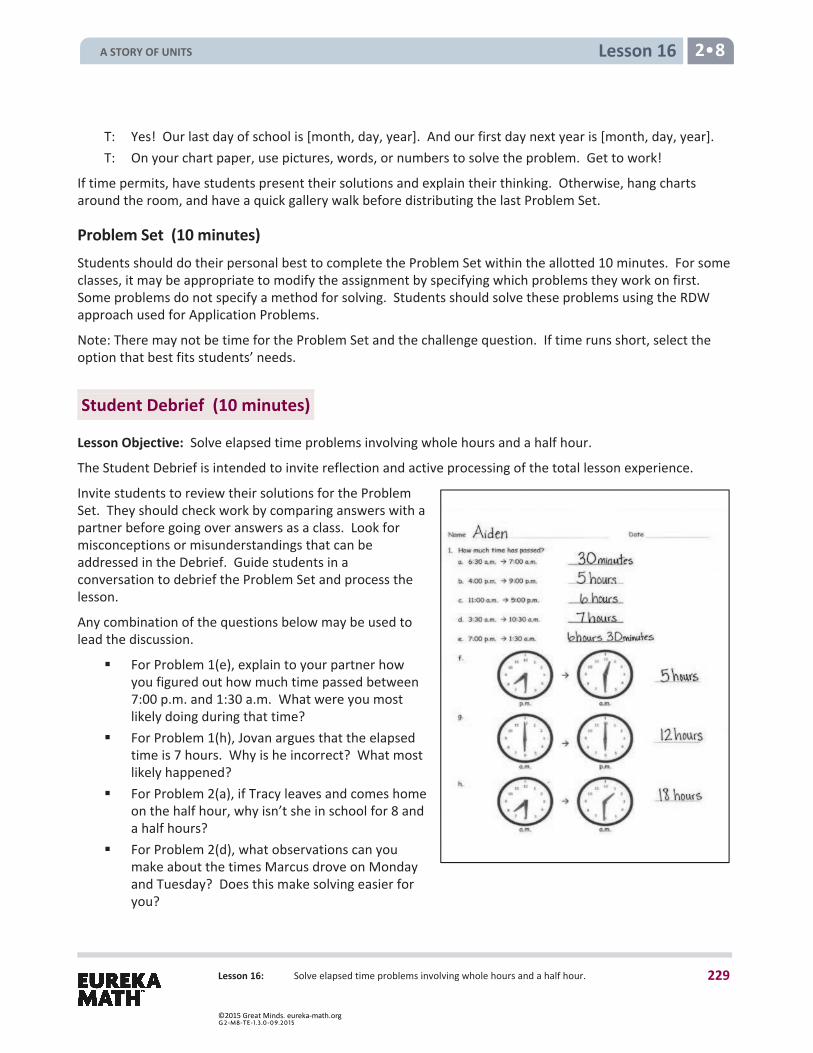
Lesson 16 2 8
Lesson 16: Solve elapsed time problems involving whole hours and a half hour.
T: Yes! Our last day of school is [month, day, year]. And our first day next year is [month, day, year]. T: On your chart paper, use pictures, words, or numbers to solve the problem. Get to work!
If time permits, have students present their solutions and explain their thinking. Otherwise, hang charts around the room, and have a quick gallery walk before distributing the last Problem Set.
Problem Set (10 minutes) Students should do their personal best to complete the Problem Set within the allotted 10 minutes. For some classes, it may be appropriate to modify the assignment by specifying which problems they work on first. Some problems do not specify a method for solving. Students should solve these problems using the RDW approach used for Application Problems.
Note: There may not be time for the Problem Set and the challenge question. If time runs short, select the option that best fits students’ needs.
Student Debrief (10 minutes)
Lesson Objective: Solve elapsed time problems involving whole hours and a half hour.
The Student Debrief is intended to invite reflection and active processing of the total lesson experience.
Invite students to review their solutions for the Problem Set. They should check work by comparing answers with a partner before going over answers as a class. Look for misconceptions or misunderstandings that can be addressed in the Debrief. Guide students in a conversation to debrief the Problem Set and process the lesson.
Any combination of the questions below may be used to lead the discussion.
For Problem 1(e), explain to your partner howyou figured out how much time passed between7:00 p.m. and 1:30 a.m. What were you mostlikely doing during that time?
For Problem 1(h), Jovan argues that the elapsedtime is 7 hours. Why is he incorrect? What mostlikely happened?
For Problem 2(a), if Tracy leaves and comes homeon the half hour, why isn’t she in school for 8 anda half hours?
For Problem 2(d), what observations can youmake about the times Marcus drove on Mondayand Tuesday? Does this make solving easier foryou?
A STORY OF UNITS
229
©2015 Great Minds. eureka-math.orgG 2-M8-TE-1.3 .0 -0 9.20 15
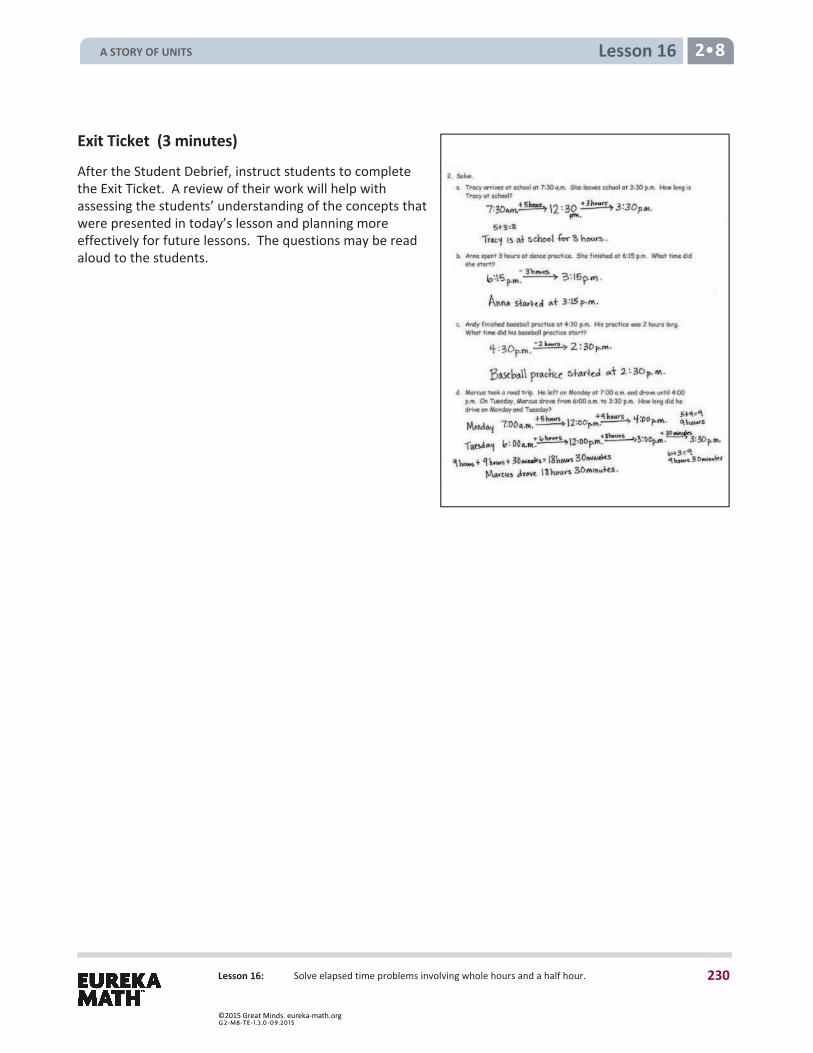
Lesson 16 2 8
Lesson 16: Solve elapsed time problems involving whole hours and a half hour.
Exit Ticket (3 minutes)
After the Student Debrief, instruct students to complete the Exit Ticket. A review of their work will help with assessing the students’ understanding of the concepts that were presented in today’s lesson and planning more effectively for future lessons. The questions may be read aloud to the students.
A STORY OF UNITS
230
©2015 Great Minds. eureka-math.orgG 2-M8-TE-1.3 .0 -0 9.20 15
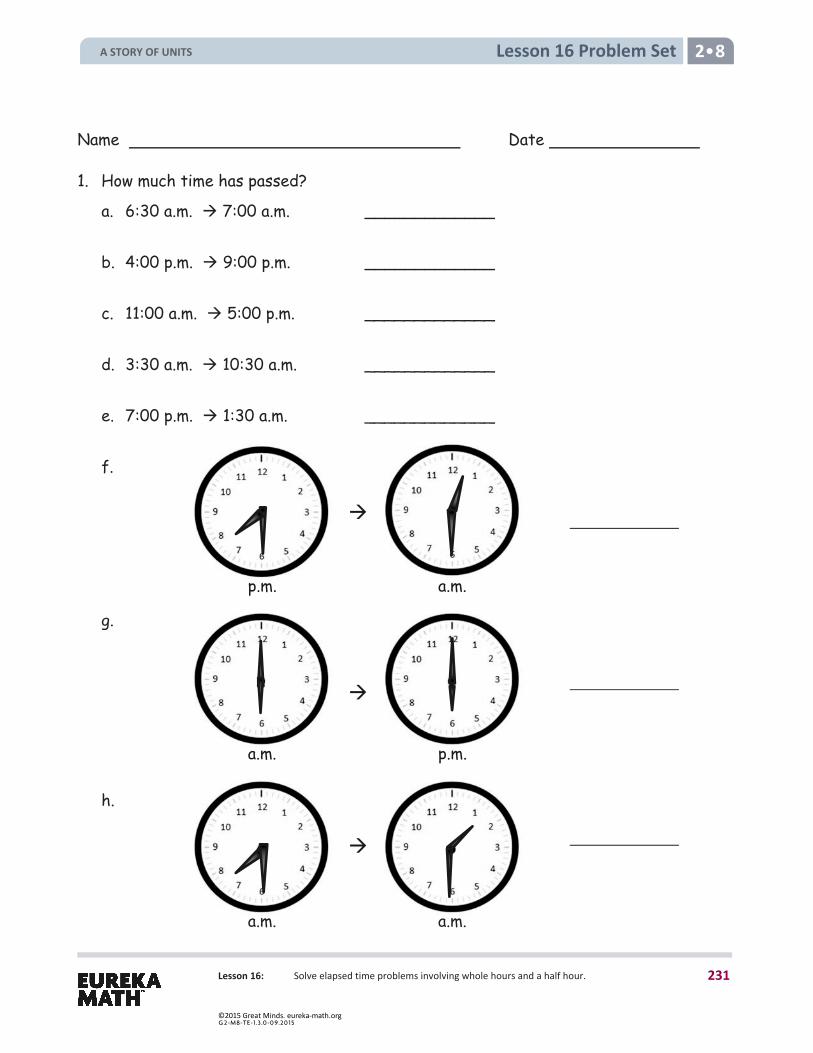
Lesson 16 Problem Set 2 8
Lesson 16: Solve elapsed time problems involving whole hours and a half hour.
Name Date
1. How much time has passed?
a. 6:30 a.m. 7:00 a.m. _____________
b. 4:00 p.m. 9:00 p.m. _____________
c. 11:00 a.m. 5:00 p.m. _____________
d. 3:30 a.m. 10:30 a.m. _____________
e. 7:00 p.m. 1:30 a.m. _____________
f.
g.
h.
a.m.p.m.
a.m. a.m.
a.m. p.m.
A STORY OF UNITS
231
©2015 Great Minds. eureka-math.orgG 2-M8-TE-1.3 .0 -0 9.20 15
Lesson 16 Problem Set 2 8
Lesson 16: Solve elapsed time problems involving whole hours and a half hour.
2. Solve.
a. Tracy arrives at school at 7:30 a.m. She leaves school at 3:30 p.m. How long is Tracy at school?
b. Anna spent 3 hours at dance practice. She finished at 6:15 p.m. What time did
she start?
c. Andy finished baseball practice at 4:30 p.m. His practice was 2 hours long. What time did his baseball practice start?
d. Marcus took a road trip. He left on Monday at 7:00 a.m. and drove until 4:00 p.m. On Tuesday, Marcus drove from 6:00 a.m. to 3:30 p.m. How long did he drive on Monday and Tuesday?
A STORY OF UNITS
232
©2015 Great Minds. eureka-math.orgG 2-M8-TE-1.3 .0 -0 9.20 15
Lesson 16 Exit Ticket 2 8
Lesson 16: Solve elapsed time problems involving whole hours and a half hour.
Name Date
How much time has passed?
1. 3:00 p.m. 11:00 p.m. _____________
2. 5:00 a.m. 12:00 p.m. (noon) _____________
3. 9:30 p.m. 7:30 a.m. _____________
A STORY OF UNITS
233
©2015 Great Minds. eureka-math.orgG 2-M8-TE-1.3 .0 -0 9.20 15

Lesson 16: Solve elapsed time problems involving whole hours and a half hour.
Lesson 16 Homework 2 8
Name Date
1. How much time has passed?
a. 2:00 p.m. 8:00 p.m. _____________
b. 7:30 a.m. 12:00 p.m. (noon) _____________
c. 10:00 a.m. 4:30 p.m. _____________
d. 1:30 p.m. 8:30 p.m. _____________
e. 9:30 a.m. 2:00 p.m. _____________
f.
g.
h.
p.m.p.m.
a.m. a.m.
a.m. p.m.
A STORY OF UNITS
234
©2015 Great Minds. eureka-math.orgG 2-M8-TE-1.3 .0 -0 9.20 15
Lesson 16: Solve elapsed time problems involving whole hours and a half hour.
Lesson 16 Homework 2 8
2. Solve.
a. Kylie started basketball practice at 2:30 p.m. and finished at 6:00 p.m. How long was Kylie at basketball practice?
b. Jamal spent 4 and a half hours at his family picnic. It started at 1:30 p.m.
What time did Jamal leave?
c. Christopher spent 2 hours doing his homework. He finished at 5:30 p.m.
What time did he start his homework?
d. Henry slept from 8 p.m. to 6:30 a.m. How many hours did Henry sleep?
A STORY OF UNITS
235
©2015 Great Minds. eureka-math.orgG 2-M8-TE-1.3 .0 -0 9.20 15
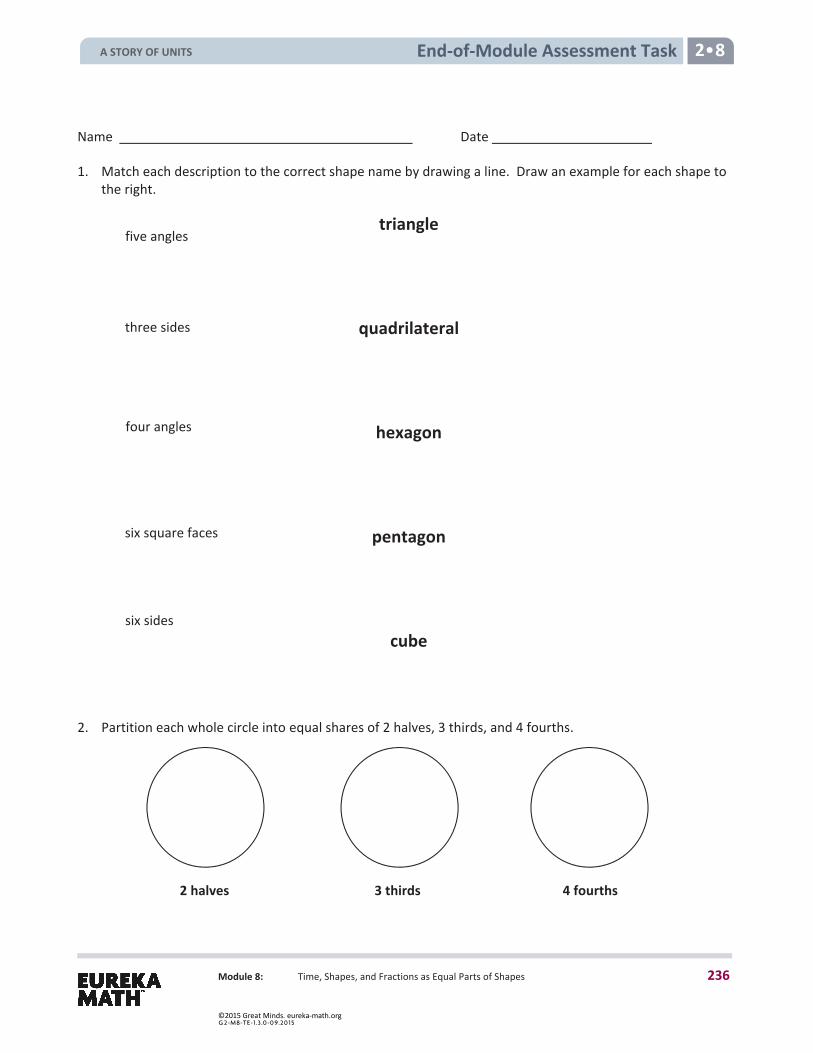
End-of-Module Assessment Task 2 8
Module 8: Time, Shapes, and Fractions as Equal Parts of Shapes
Name Date
1. Match each description to the correct shape name by drawing a line. Draw an example for each shape to the right.
2. Partition each whole circle into equal shares of 2 halves, 3 thirds, and 4 fourths.
2 halves 3 thirds 4 fourths
triangle
quadrilateral
hexagon
pentagon
cube
three sides
five angles
six square faces
six sides
four angles
A STORY OF UNITS
236
©2015 Great Minds. eureka-math.orgG 2-M8-TE-1.3 .0 -0 9.20 15
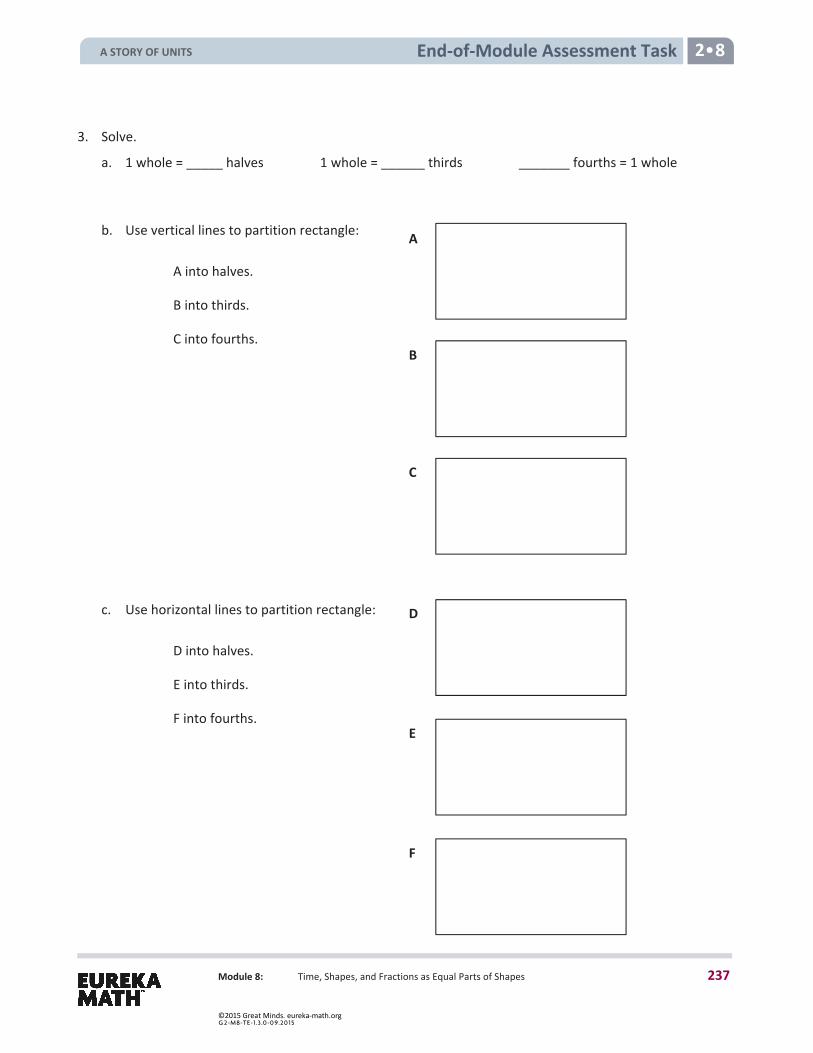
End-of-Module Assessment Task 2 8
Module 8: Time, Shapes, and Fractions as Equal Parts of Shapes
3. Solve.
a. 1 whole = _____ halves 1 whole = ______ thirds _______ fourths = 1 whole
b. Use vertical lines to partition rectangle: A into halves.
B into thirds.
C into fourths.
c. Use horizontal lines to partition rectangle: D into halves.
E into thirds.
F into fourths.
A
B
C
D
E
F
A STORY OF UNITS
237
©2015 Great Minds. eureka-math.orgG 2-M8-TE-1.3 .0 -0 9.20 15
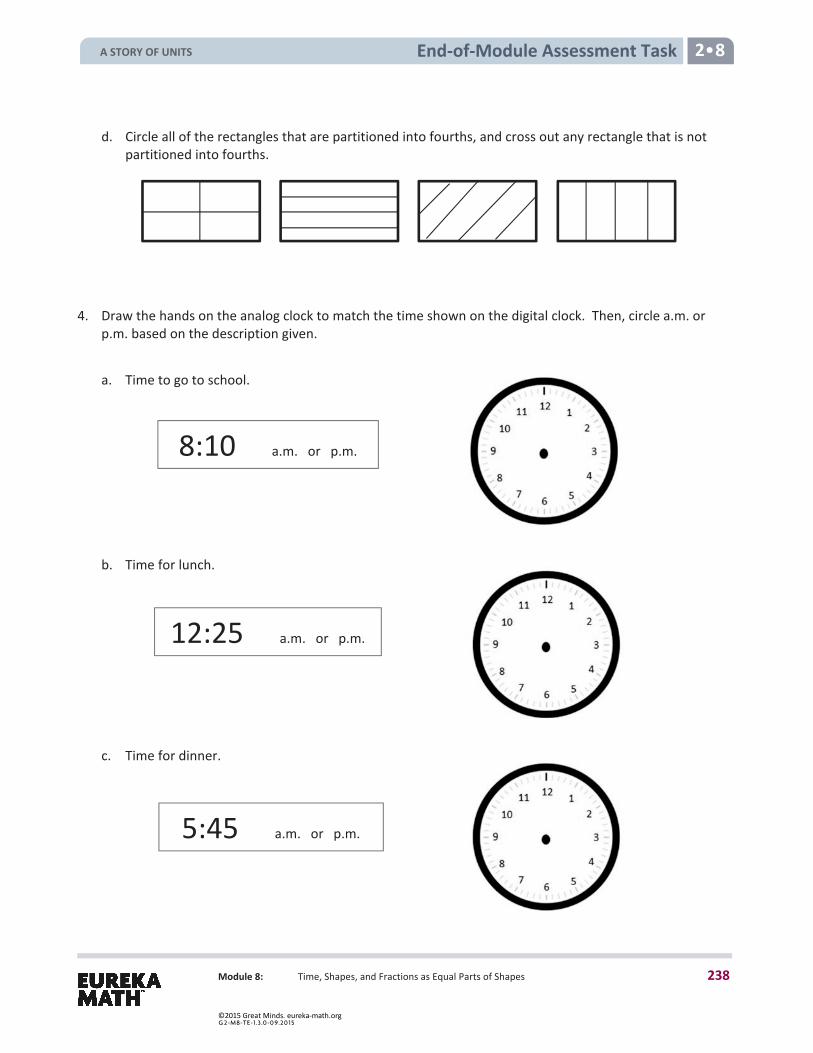
End-of-Module Assessment Task 2 8
Module 8: Time, Shapes, and Fractions as Equal Parts of Shapes
d. Circle all of the rectangles that are partitioned into fourths, and cross out any rectangle that is not partitioned into fourths.
4. Draw the hands on the analog clock to match the time shown on the digital clock. Then, circle a.m. or p.m. based on the description given.
a. Time to go to school. b. Time for lunch.
c. Time for dinner.
5:45 a.m. or p.m.
8:10 a.m. or p.m.
12:25 a.m. or p.m.
A STORY OF UNITS
238
©2015 Great Minds. eureka-math.orgG 2-M8-TE-1.3 .0 -0 9.20 15
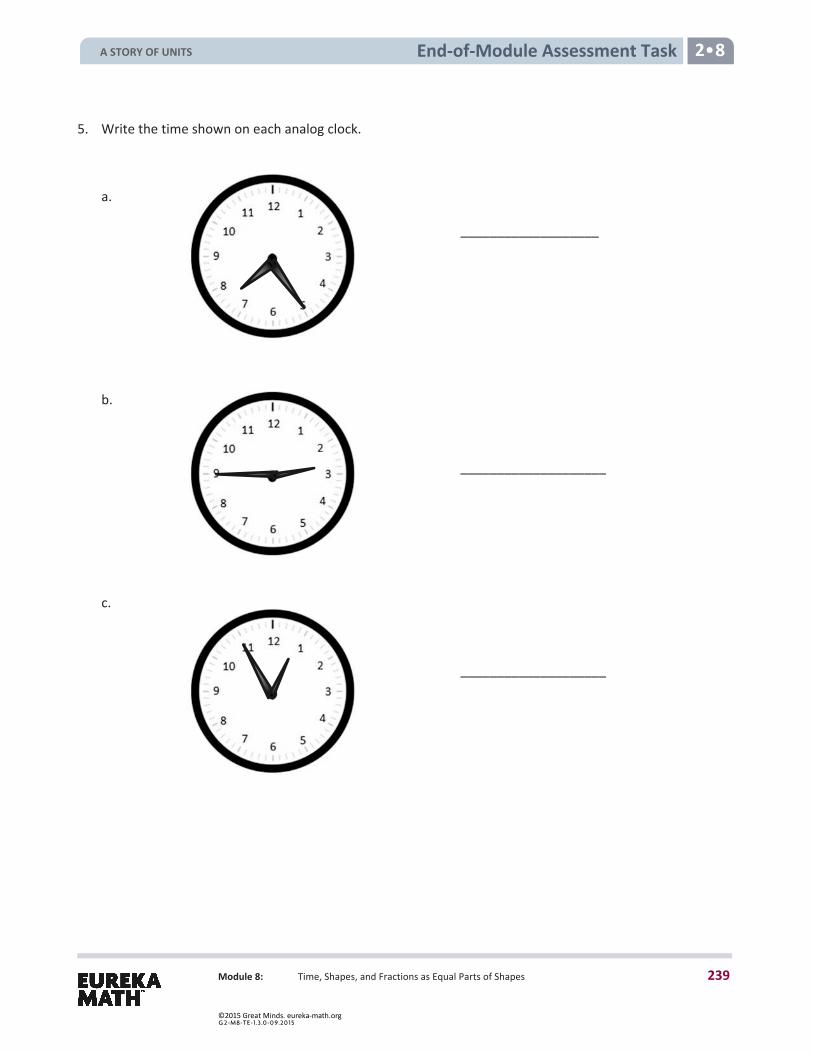
End-of-Module Assessment Task 2 8
Module 8: Time, Shapes, and Fractions as Equal Parts of Shapes
5. Write the time shown on each analog clock.
a.
___________________
b.
____________________
c.
____________________
A STORY OF UNITS
239
©2015 Great Minds. eureka-math.orgG 2-M8-TE-1.3 .0 -0 9.20 15
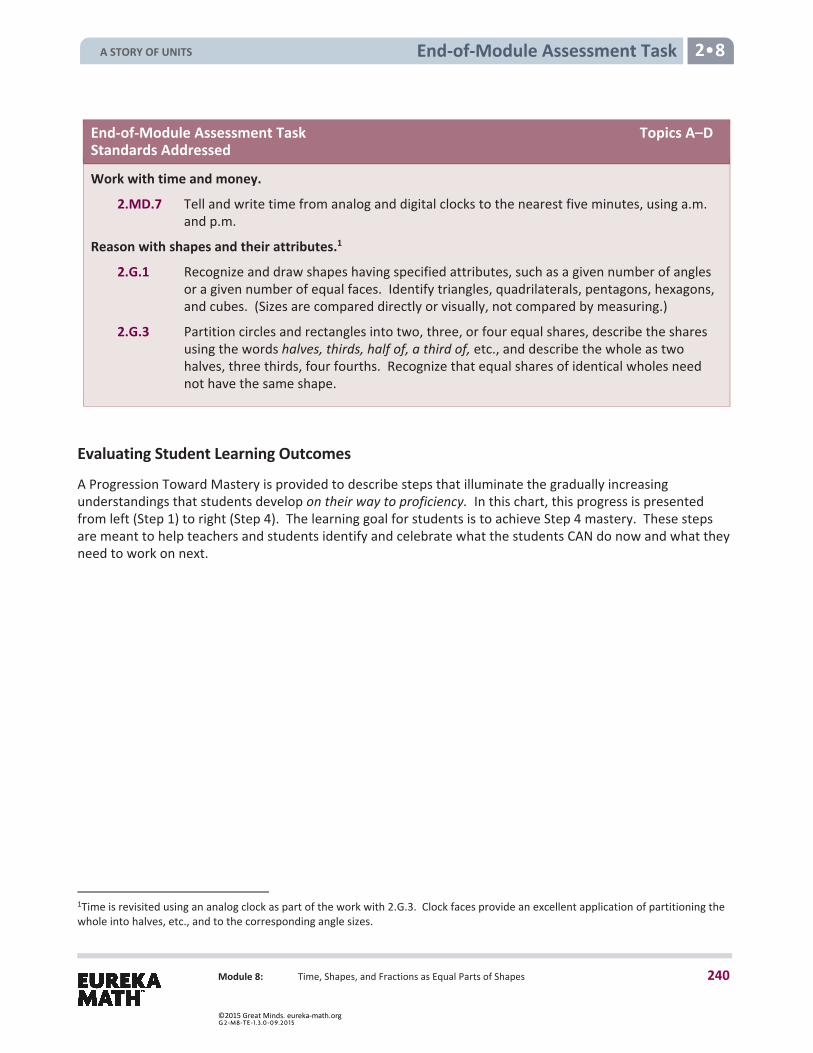
End-of-Module Assessment Task 2 8
Module 8: Time, Shapes, and Fractions as Equal Parts of Shapes
End-of-Module Assessment Task Topics A–DStandards Addressed
Work with time and money.
2.MD.7 Tell and write time from analog and digital clocks to the nearest five minutes, using a.m.and p.m.
Reason with shapes and their attributes.1
2.G.1 Recognize and draw shapes having specified attributes, such as a given number of angles or a given number of equal faces. Identify triangles, quadrilaterals, pentagons, hexagons, and cubes. (Sizes are compared directly or visually, not compared by measuring.)
2.G.3 Partition circles and rectangles into two, three, or four equal shares, describe the shares using the words halves, thirds, half of, a third of, etc., and describe the whole as two halves, three thirds, four fourths. Recognize that equal shares of identical wholes need not have the same shape.
Evaluating Student Learning Outcomes
A Progression Toward Mastery is provided to describe steps that illuminate the gradually increasing understandings that students develop on their way to proficiency. In this chart, this progress is presented from left (Step 1) to right (Step 4). The learning goal for students is to achieve Step 4 mastery. These steps are meant to help teachers and students identify and celebrate what the students CAN do now and what they need to work on next.
1Time is revisited using an analog clock as part of the work with 2.G.3. Clock faces provide an excellent application of partitioning the whole into halves, etc., and to the corresponding angle sizes.
A STORY OF UNITS
240
©2015 Great Minds. eureka-math.orgG 2-M8-TE-1.3 .0 -0 9.20 15
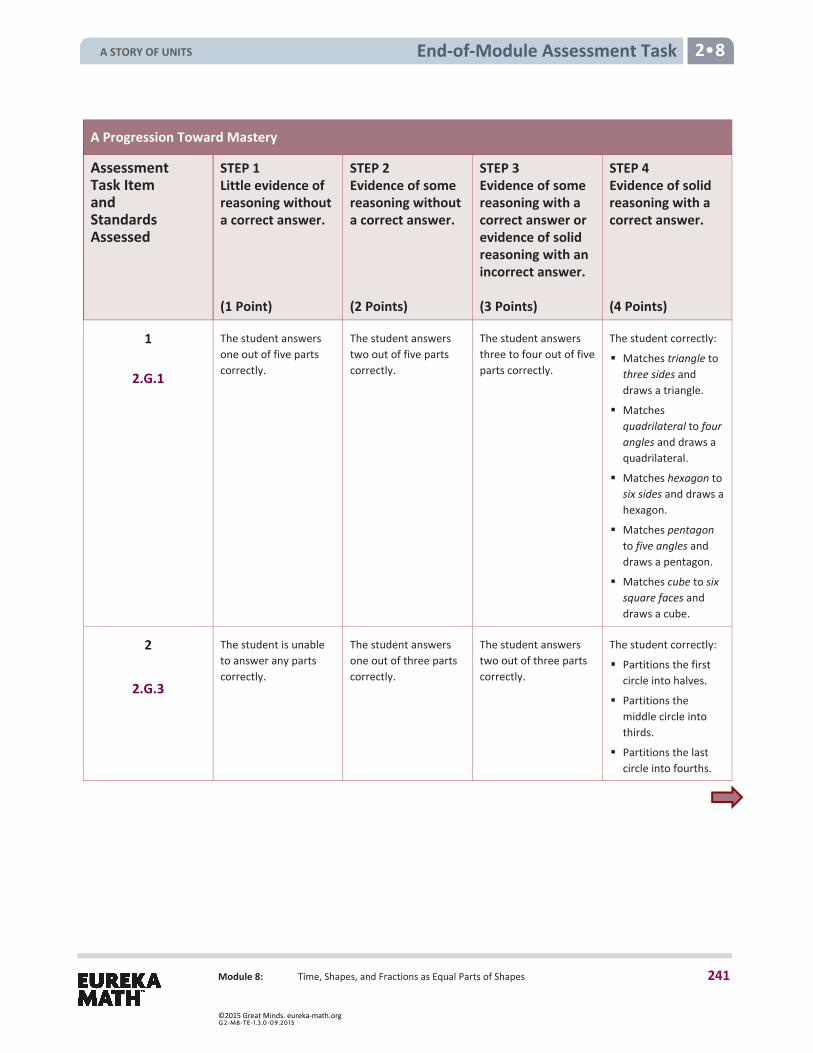
End-of-Module Assessment Task 2 8
Module 8: Time, Shapes, and Fractions as Equal Parts of Shapes
A Progression Toward Mastery
Assessment Task Item and Standards Assessed
STEP 1 Little evidence of reasoning without a correct answer.
(1 Point)
STEP 2Evidence of some reasoning without a correct answer.
(2 Points)
STEP 3Evidence of some reasoning with a correct answer or evidence of solid reasoning with an incorrect answer.
(3 Points)
STEP 4 Evidence of solid reasoning with a correct answer.
(4 Points)
1
2.G.1
The student answers one out of five parts correctly.
The student answers two out of five parts correctly.
The student answers three to four out of five parts correctly.
The student correctly:
Matches triangle tothree sides anddraws a triangle.
Matchesquadrilateral to fourangles and draws aquadrilateral.
Matches hexagon tosix sides and draws ahexagon.
Matches pentagonto five angles anddraws a pentagon.
Matches cube to sixsquare faces anddraws a cube.
2
2.G.3
The student is unable to answer any parts correctly.
The student answers one out of three parts correctly.
The student answers two out of three parts correctly.
The student correctly:
Partitions the firstcircle into halves.
Partitions themiddle circle intothirds.
Partitions the lastcircle into fourths.
A STORY OF UNITS
241
©2015 Great Minds. eureka-math.orgG 2-M8-TE-1.3 .0 -0 9.20 15
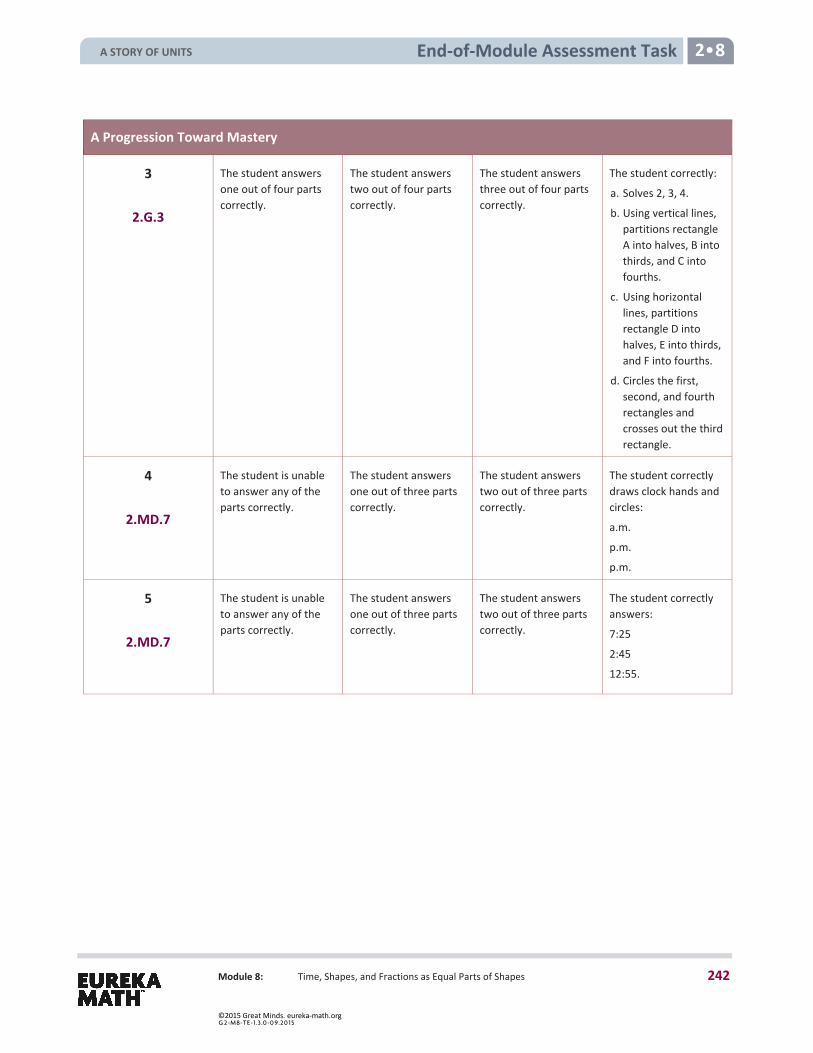
End-of-Module Assessment Task 2 8
Module 8: Time, Shapes, and Fractions as Equal Parts of Shapes
A Progression Toward Mastery
3
2.G.3
The student answers one out of four parts correctly.
The student answers two out of four parts correctly.
The student answers three out of four parts correctly.
The student correctly:
a. Solves 2, 3, 4.
b. Using vertical lines,partitions rectangleA into halves, B intothirds, and C intofourths.
c. Using horizontallines, partitionsrectangle D intohalves, E into thirds,and F into fourths.
d. Circles the first,second, and fourthrectangles andcrosses out the thirdrectangle.
4
2.MD.7
The student is unable to answer any of the parts correctly.
The student answers one out of three parts correctly.
The student answers two out of three parts correctly.
The student correctly draws clock hands and circles:
a.m.
p.m.
p.m.
5
2.MD.7
The student is unable to answer any of the parts correctly.
The student answers one out of three parts correctly.
The student answers two out of three parts correctly.
The student correctly answers:
7:25
2:45
12:55.
A STORY OF UNITS
242
©2015 Great Minds. eureka-math.orgG 2-M8-TE-1.3 .0 -0 9.20 15
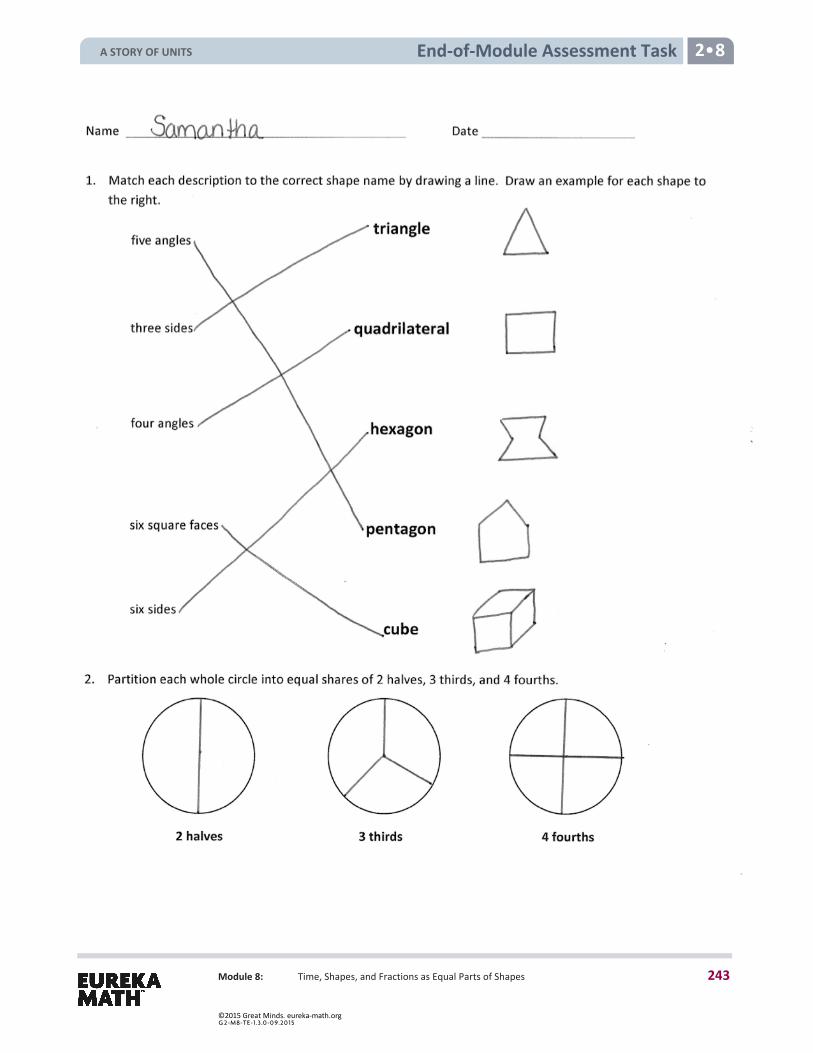
End-of-Module Assessment Task 2 8
Module 8: Time, Shapes, and Fractions as Equal Parts of Shapes
A STORY OF UNITS
243
©2015 Great Minds. eureka-math.orgG 2-M8-TE-1.3 .0 -0 9.20 15
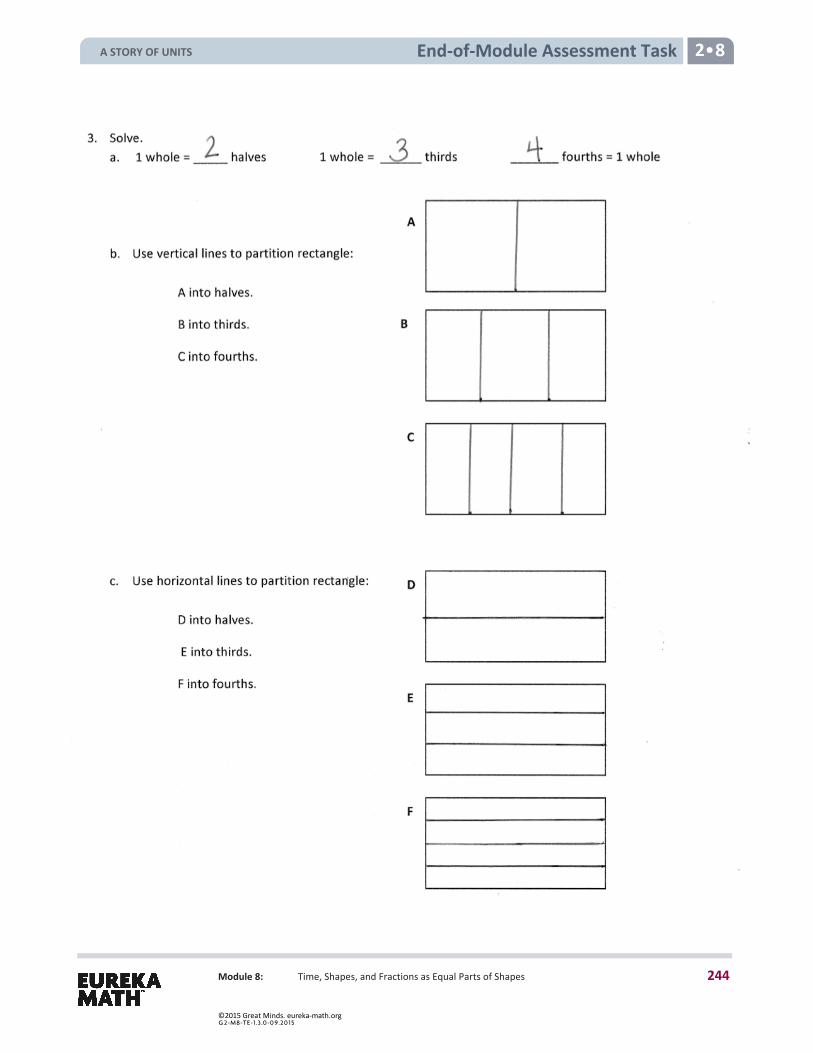
End-of-Module Assessment Task 2 8
Module 8: Time, Shapes, and Fractions as Equal Parts of Shapes
A STORY OF UNITS
244
©2015 Great Minds. eureka-math.orgG 2-M8-TE-1.3 .0 -0 9.20 15
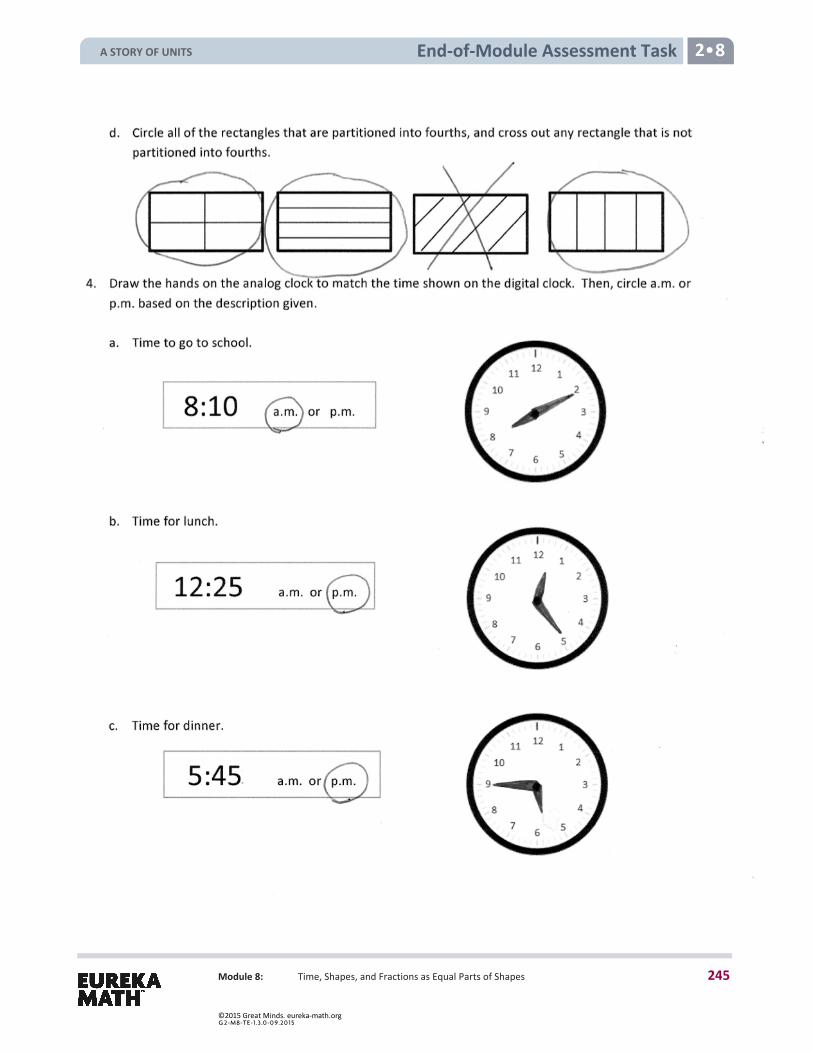
End-of-Module Assessment Task 2 8
Module 8: Time, Shapes, and Fractions as Equal Parts of Shapes
A STORY OF UNITS
245
©2015 Great Minds. eureka-math.orgG 2-M8-TE-1.3 .0 -0 9.20 15
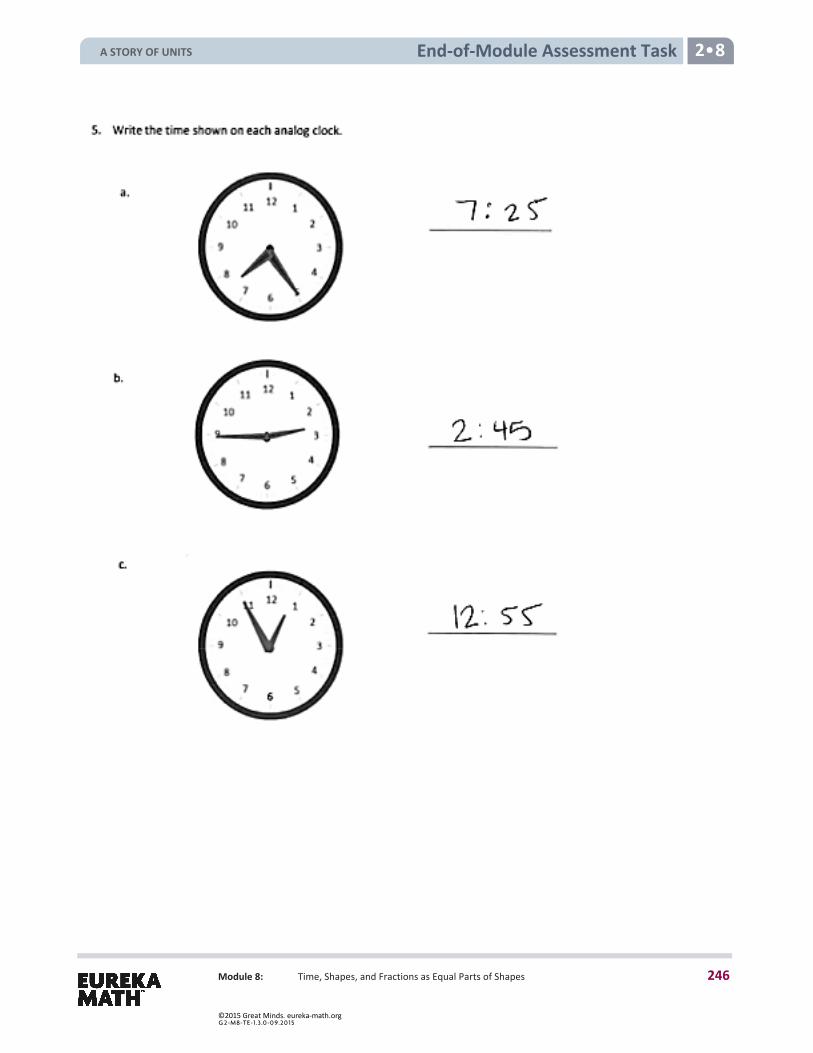
End-of-Module Assessment Task 2 8
Module 8: Time, Shapes, and Fractions as Equal Parts of Shapes
A STORY OF UNITS
246
©2015 Great Minds. eureka-math.orgG 2-M8-TE-1.3 .0 -0 9.20 15
2 G R A D E Mathematics Curriculum
GRADE 2 • MODULE 8
Module 8: Time, Shapes, and Fractions as Equal Parts of Shapes
Answer Key
GRADE 2 • MODULE 8 Time, Shapes, and Fractions as Equal Parts of Shapes
A STORY OF UNITS
247
©2015 Great Minds. eureka-math.orgG 2-M8-TE-1.3 .0 -0 9.20 15
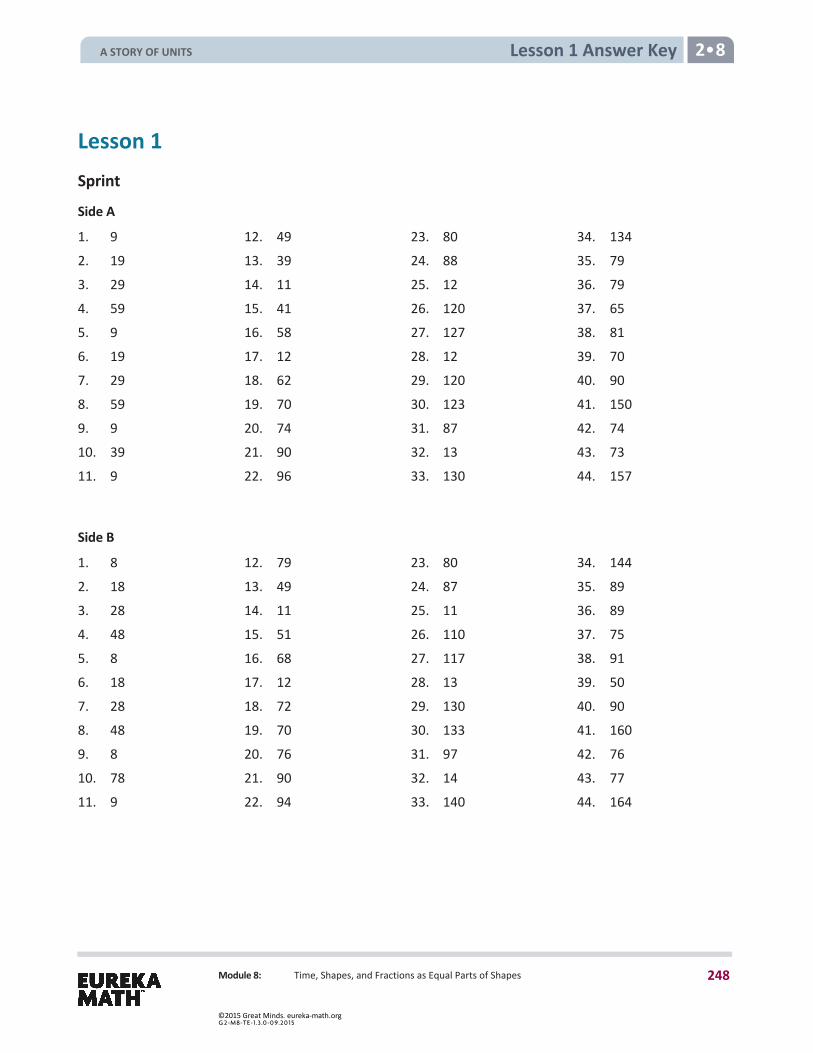
Module 8: Time, Shapes, and Fractions as Equal Parts of Shapes
Lesson 1 Answer Key 2•8
Lesson 1 Sprint
Side A
1. 9 12. 49 23. 80 34. 134 2. 19 13. 39 24. 88 35. 79 3. 29 14. 11 25. 12 36. 79 4. 59 15. 41 26. 120 37. 65 5. 9 16. 58 27. 127 38. 81 6. 19 17. 12 28. 12 39. 70 7. 29 18. 62 29. 120 40. 90 8. 59 19. 70 30. 123 41. 150 9. 9 20. 74 31. 87 42. 74 10. 39 21. 90 32. 13 43. 73 11. 9 22. 96 33. 130 44. 157
Side B
1. 8 12. 79 23. 80 34. 144 2. 18 13. 49 24. 87 35. 89 3. 28 14. 11 25. 11 36. 89 4. 48 15. 51 26. 110 37. 75 5. 8 16. 68 27. 117 38. 91 6. 18 17. 12 28. 13 39. 50 7. 28 18. 72 29. 130 40. 90 8. 48 19. 70 30. 133 41. 160 9. 8 20. 76 31. 97 42. 76 10. 78 21. 90 32. 14 43. 77 11. 9 22. 94 33. 140 44. 164
A STORY OF UNITS
248
©2015 Great Minds. eureka-math.orgG 2-M8-TE-1.3 .0 -0 9.20 15
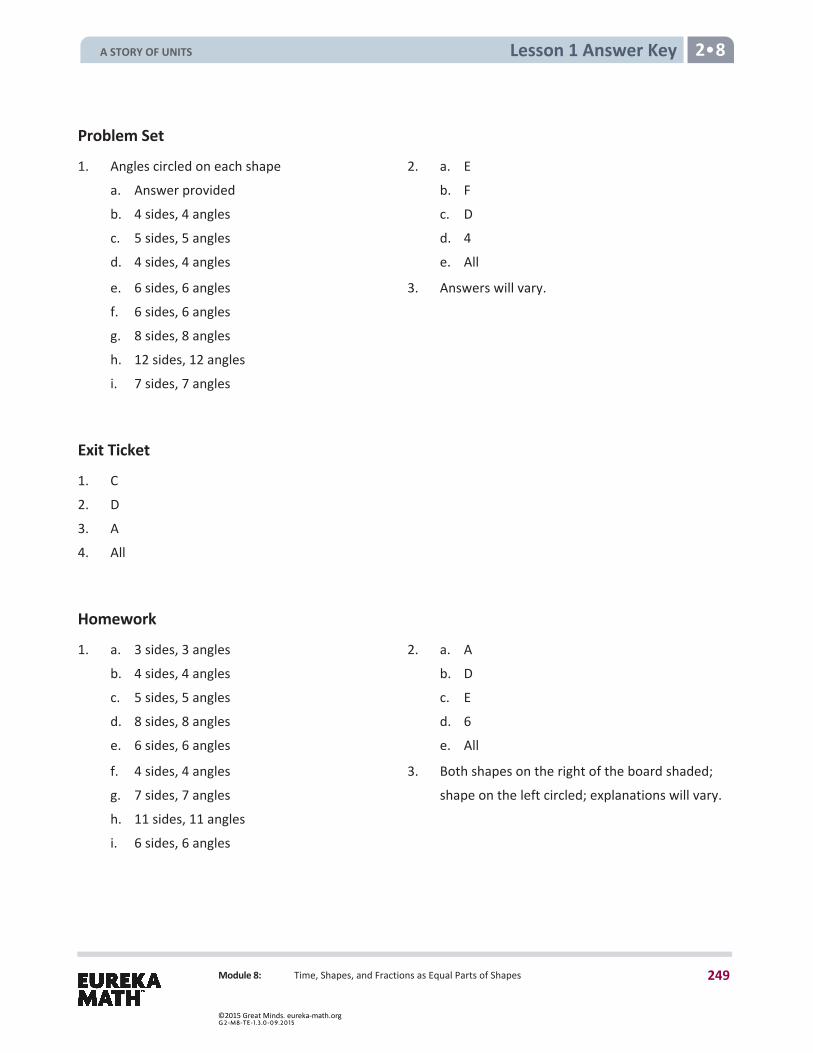
Module 8: Time, Shapes, and Fractions as Equal Parts of Shapes
Lesson 1 Answer Key 2•8
Problem Set
1. Angles circled on each shape 2. a. E a. Answer provided b. F b. 4 sides, 4 angles c. D c. 5 sides, 5 angles d. 4 d. 4 sides, 4 angles e. All
e. 6 sides, 6 angles 3. Answers will vary. f. 6 sides, 6 angles g. 8 sides, 8 angles h. 12 sides, 12 angles i. 7 sides, 7 angles
Exit Ticket
1. C 2. D 3. A 4. All
Homework
1. a. 3 sides, 3 angles 2. a. A b. 4 sides, 4 angles b. D c. 5 sides, 5 angles c. E d. 8 sides, 8 angles d. 6 e. 6 sides, 6 angles e. All
f. 4 sides, 4 angles 3. Both shapes on the right of the board shaded; g. 7 sides, 7 angles shape on the left circled; explanations will vary. h. 11 sides, 11 angles i. 6 sides, 6 angles
A STORY OF UNITS
249
©2015 Great Minds. eureka-math.orgG 2-M8-TE-1.3 .0 -0 9.20 15
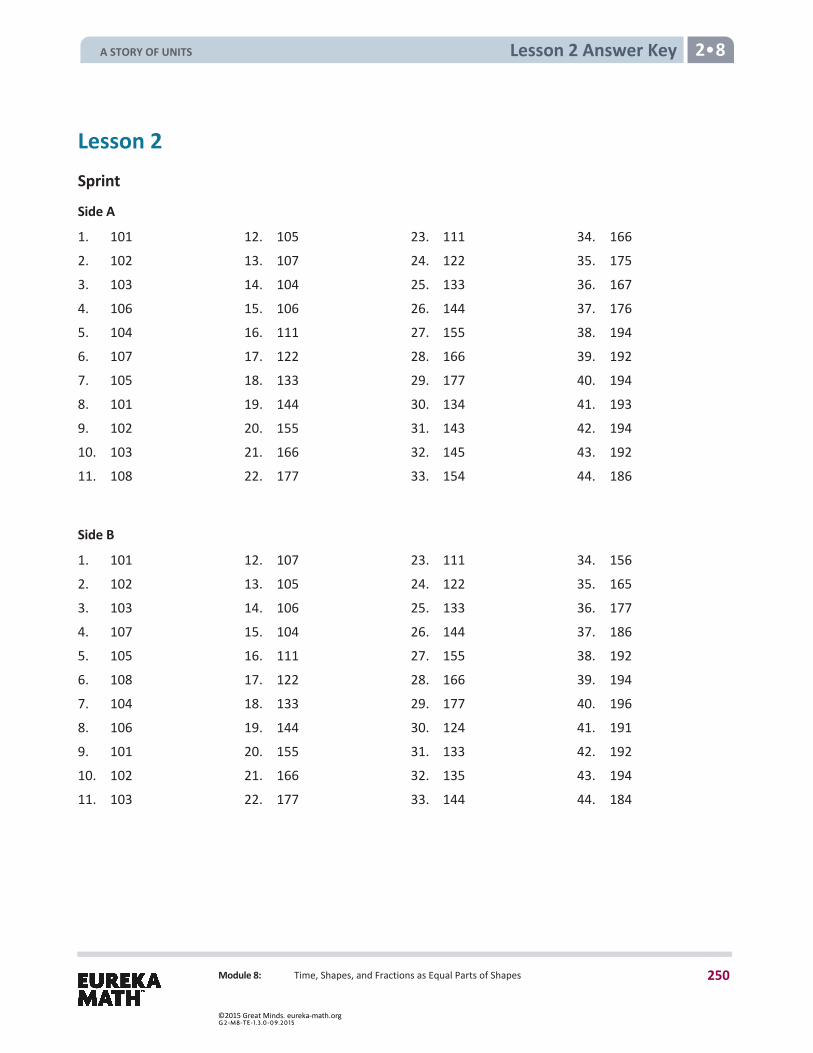
Module 8: Time, Shapes, and Fractions as Equal Parts of Shapes
Lesson 2 Answer Key 2•8
Lesson 2 Sprint
Side A
1. 101 12. 105 23. 111 34. 166 2. 102 13. 107 24. 122 35. 175 3. 103 14. 104 25. 133 36. 167 4. 106 15. 106 26. 144 37. 176 5. 104 16. 111 27. 155 38. 194 6. 107 17. 122 28. 166 39. 192 7. 105 18. 133 29. 177 40. 194 8. 101 19. 144 30. 134 41. 193 9. 102 20. 155 31. 143 42. 194 10. 103 21. 166 32. 145 43. 192 11. 108 22. 177 33. 154 44. 186
Side B
1. 101 12. 107 23. 111 34. 156 2. 102 13. 105 24. 122 35. 165 3. 103 14. 106 25. 133 36. 177 4. 107 15. 104 26. 144 37. 186 5. 105 16. 111 27. 155 38. 192 6. 108 17. 122 28. 166 39. 194 7. 104 18. 133 29. 177 40. 196 8. 106 19. 144 30. 124 41. 191 9. 101 20. 155 31. 133 42. 192 10. 102 21. 166 32. 135 43. 194 11. 103 22. 177 33. 144 44. 184
A STORY OF UNITS
250
©2015 Great Minds. eureka-math.orgG 2-M8-TE-1.3 .0 -0 9.20 15

Module 8: Time, Shapes, and Fractions as Equal Parts of Shapes
Lesson 2 Answer Key 2•8
Problem Set
1. a. Quadrilateral 2. a. 1; 3
b. Triangle 1 line drawn to complete each triangle c. Pentagon b. 4; 6 d. Hexagon 4 lines drawn to complete each hexagon e. Triangle c. 2; 4 f. Quadrilateral 2 lines drawn to complete each quadrilateral g. Quadrilateral d. 3; 5
h. Hexagon 3 lines drawn to complete each pentagon
i. Pentagon 3. a. Answers will vary. j. Quadrilateral b. Hexagons will vary. k. Quadrilateral 4. Explanations will vary. l. Triangle
Exit Ticket 1. Pentagon 4. Triangle 2. Hexagon 5. Quadrilateral 3. Quadrilateral 6. Pentagon
Homework 1. a. Quadrilateral 2. a. 2; 4
b. Triangle 2 lines drawn to complete each quadrilateral c. Quadrilateral b. 3; 5 d. Pentagon 3 lines drawn to complete each pentagon e. Pentagon c. 1; 3 f. Hexagon 1 line drawn to complete each triangle g. Quadrilateral d. 4; 6 h. Quadrilateral 4 lines drawn to complete each hexagon i. Hexagon 3. Explanations will vary. j. Quadrilateral 4. Explanations will vary. k. Pentagon l. Triangle
A STORY OF UNITS
251
©2015 Great Minds. eureka-math.orgG 2-M8-TE-1.3 .0 -0 9.20 15
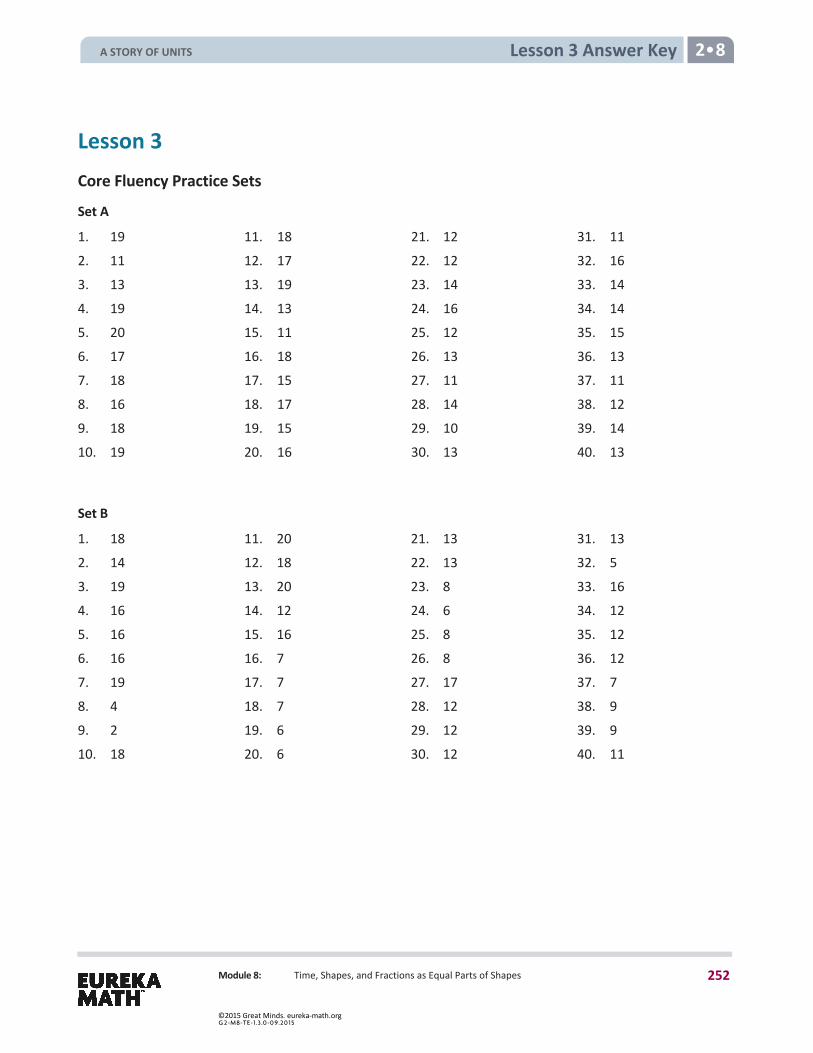
Module 8: Time, Shapes, and Fractions as Equal Parts of Shapes
Lesson 3 Answer Key 2•8
Lesson 3 Core Fluency Practice Sets
Set A
1. 19 11. 18 21. 12 31. 11 2. 11 12. 17 22. 12 32. 16 3. 13 13. 19 23. 14 33. 14 4. 19 14. 13 24. 16 34. 14 5. 20 15. 11 25. 12 35. 15 6. 17 16. 18 26. 13 36. 13 7. 18 17. 15 27. 11 37. 11 8. 16 18. 17 28. 14 38. 12 9. 18 19. 15 29. 10 39. 14 10. 19 20. 16 30. 13 40. 13
Set B
1. 18 11. 20 21. 13 31. 13 2. 14 12. 18 22. 13 32. 5 3. 19 13. 20 23. 8 33. 16 4. 16 14. 12 24. 6 34. 12 5. 16 15. 16 25. 8 35. 12 6. 16 16. 7 26. 8 36. 12 7. 19 17. 7 27. 17 37. 7 8. 4 18. 7 28. 12 38. 9 9. 2 19. 6 29. 12 39. 9 10. 18 20. 6 30. 12 40. 11
A STORY OF UNITS
252
©2015 Great Minds. eureka-math.orgG 2-M8-TE-1.3 .0 -0 9.20 15
Module 8: Time, Shapes, and Fractions as Equal Parts of Shapes
Lesson 3 Answer Key 2•8
Set C
1. 10 11. 9 21. 8 31. 8 2. 8 12. 9 22. 9 32. 9 3. 7 13. 12 23. 8 33. 6 4. 10 14. 9 24. 9 34. 6 5. 3 15. 8 25. 9 35. 6 6. 8 16. 8 26. 8 36. 4 7. 12 17. 11 27. 7 37. 7 8. 11 18. 9 28. 5 38. 5 9. 10 19. 7 29. 7 39. 5 10. 3 20. 7 30. 11 40. 2
Set D
1. 9 11. 2 21. 6 31. 4 2. 8 12. 5 22. 6 32. 9 3. 9 13. 5 23. 11 33. 5 4. 7 14. 5 24. 7 34. 8 5. 9 15. 4 25. 8 35. 7 6. 11 16. 6 26. 3 36. 9 7. 7 17. 4 27. 7 37. 9 8. 6 18. 9 28. 8 38. 8 9. 8 19. 7 29. 8 39. 14 10. 7 20. 4 30. 6 40. 3
A STORY OF UNITS
253
©2015 Great Minds. eureka-math.orgG 2-M8-TE-1.3 .0 -0 9.20 15
Module 8: Time, Shapes, and Fractions as Equal Parts of Shapes
Lesson 3 Answer Key 2•8
Set E
1. 9 11. 8 21. 12 31. 17 2. 7 12. 9 22. 13 32. 20 3. 14 13. 14 23. 18 33. 9 4. 4 14. 13 24. 6 34. 9 5. 15 15. 13 25. 9 35. 7 6. 15 16. 12 26. 8 36. 3 7. 11 17. 4 27. 3 37. 11 8. 19 18. 6 28. 16 38. 18 9. 4 19. 7 29. 12 39. 16 10. 8 20. 6 30. 15 40. 19
Problem Set
1. Drawings will vary on all answers. a. 3; triangle b. 5; pentagon c. 4; quadrilateral d. 6; hexagon e. Answers will vary.
2. Answers will vary.
Exit Ticket
Drawings will vary; 5; pentagon
Homework
1. Drawings will vary on all answers. a. 4; quadrilateral b. 6; hexagon c. 3; triangle d. 5; pentagon
2. Answers will vary.
A STORY OF UNITS
254
©2015 Great Minds. eureka-math.orgG 2-M8-TE-1.3 .0 -0 9.20 15
Module 8: Time, Shapes, and Fractions as Equal Parts of Shapes
Lesson 4 Answer Key 2•8
Lesson 4 Problem Set
1. 2 parallel lines of different lengths drawn
2. 2 parallel lines of the same length drawn
3. a. Both pairs of sides highlighted b. 1 pair of sides highlighted c. Both pairs of sides highlighted d. Both pairs of sides highlighted and boxes drawn around all 4 angles e. 1 pair of sides highlighted f. Both pairs of sides highlighted and boxes drawn around all 4 angles g. Both pairs of sides highlighted h. 1 pair of sides highlighted
4. Drawings will vary.
5. Drawings will vary.
6. Answers will vary.
7. Answers will vary.
Exit Ticket
1. 1 pair of sides highlighted
2. Both pairs of sides highlighted and boxes drawn around all 4 angles
3. Both pairs of sides highlighted
4. Both pairs of sides highlighted
A STORY OF UNITS
255
©2015 Great Minds. eureka-math.orgG 2-M8-TE-1.3 .0 -0 9.20 15
Module 8: Time, Shapes, and Fractions as Equal Parts of Shapes
Lesson 4 Answer Key 2•8
Homework
1. 2 parallel lines of different lengths drawn
2. 2 parallel lines of the same length drawn
3. Parallelogram drawn and named
4. Rectangle drawn and named
5. Answers will vary.
6. Total colored red quadrilaterals: 2 Total colored blue quadrilaterals: 2 Total circled green quadrilaterals: 10
A STORY OF UNITS
256
©2015 Great Minds. eureka-math.orgG 2-M8-TE-1.3 .0 -0 9.20 15

Module 8: Time, Shapes, and Fractions as Equal Parts of Shapes
Lesson 5 Answer Key 2•8
Lesson 5 Sprint
Side A
1. 7 12. 19 23. 21 34. 32 2. 17 13. 59 24. 26 35. 52 3. 6 14. 58 25. 2 36. 48 4. 16 15. 56 26. 20 37. 46 5. 3 16. 5 27. 21 38. 30 6. 13 17. 15 28. 28 39. 20 7. 23 18. 25 29. 40 40. 20 8. 53 19. 65 30. 44 41. 56 9. 51 20. 67 31. 30 42. 23 10. 8 21. 2 32. 37 43. 49 11. 9 22. 20 33. 30 44. 67
Side B
1. 6 12. 16 23. 31 34. 42 2. 16 13. 56 24. 36 35. 72 3. 5 14. 57 25. 3 36. 68 4. 15 15. 59 26. 30 37. 66 5. 2 16. 8 27. 31 38. 40 6. 12 17. 18 28. 37 39. 30 7. 22 18. 28 29. 30 40. 20 8. 52 19. 68 30. 34 41. 53 9. 51 20. 69 31. 20 42. 27 10. 5 21. 3 32. 25 43. 48 11. 6 22. 30 33. 40 44. 47
A STORY OF UNITS
257
©2015 Great Minds. eureka-math.orgG 2-M8-TE-1.3 .0 -0 9.20 15
Module 8: Time, Shapes, and Fractions as Equal Parts of Shapes
Lesson 5 Answer Key 2•8
Problem Set
1. Square circled 5. 8
2. Square 6. Drawings will vary.
3. 6 7. Lines connected to make cubes
4. 12 8. Explanations will vary.
Exit Ticket
Drawings will vary.
Homework
1. Square circled 5. 6
2. Square 6. Drawings will vary.
3. 8 7. Lines connected to make cubes
4. 12 8. Explanations will vary.
A STORY OF UNITS
258
©2015 Great Minds. eureka-math.orgG 2-M8-TE-1.3 .0 -0 9.20 15

Module 8: Time, Shapes, and Fractions as Equal Parts of Shapes
Lesson 6 Answer Key 2 8
Lesson 6 Sprint
Side A
1. 11 12. 9 23. 16 34. 9 2. 8 13. 12 24. 8 35. 13 3. 11 14. 5 25. 15 36. 13 4. 9 15. 12 26. 6 37. 11 5. 11 16. 6 27. 18 38. 4 6. 5 17. 14 28. 9 39. 13 7. 11 18. 6 29. 14 40. 6 8. 4 19. 13 30. 7 41. 12 9. 12 20. 4 31. 17 42. 11 10. 8 21. 15 32. 9 43. 13 11. 12 22. 7 33. 16 44. 13
Side B
1. 11 12. 8 23. 15 34. 8 2. 9 13. 12 24. 6 35. 12 3. 11 14. 7 25. 16 36. 13 4. 8 15. 12 26. 8 37. 13 5. 11 16. 6 27. 14 38. 5 6. 4 17. 13 28. 7 39. 13 7. 11 18. 9 29. 18 40. 7 8. 5 19. 14 30. 9 41. 13 9. 12 20. 6 31. 16 42. 12 10. 9 21. 15 32. 7 43. 15 11. 12 22. 8 33. 17 44. 12
A STORY OF UNITS
259
©2015 Great Minds. eureka-math.orgG 2-M8-TE-1.3 .0 -0 9.20 15
Module 8: Time, Shapes, and Fractions as Equal Parts of Shapes
Lesson 6 Answer Key 2 8
Problem Set
1. a. Triangle 3. a. Drawing of a trapezoid b. Parallelogram b. Drawing of a parallelogram c. Square c. Drawing of a rectangle
2. a. Drawing of a trapezoid d. Drawing of a right triangle
b. Drawing of a parallelogram 4. Drawings will vary. c. Drawing of a rectangle 5. Drawings will vary. d. Drawing of a right triangle
Exit Ticket
1. Drawings will vary.
2. Drawings will vary.
Homework
1. a. Parallelogram 3. Drawings will vary.
b. Triangle 4. Drawings will vary. c. Square
2. a. Drawing of a right triangle b. Drawing of a rectangle c. Drawing of a parallelogram d. Drawing of a trapezoid
A STORY OF UNITS
260
©2015 Great Minds. eureka-math.orgG 2-M8-TE-1.3 .0 -0 9.20 15
Module 8: Time, Shapes, and Fractions as Equal Parts of Shapes
Lesson 7 Answer Key 2 8
Lesson 7 Problem Set
1. a. Larger triangle drawn 3. Trapezoid drawn b. Parallelogram drawn a. 3 c. Square drawn b. 3
d. Square drawn 4. Rectangle and hexagon circled
e. 2 5. Trapezoid drawn with triangle added to form f. 2 parallelogram
2. Oval, parallelogram, and hexagon circled a. 4
b. 4 6. Hexagon and rectangle circled
Exit Ticket
1. Parallelogram and triangle circled
2. Rectangle and circle circled
Homework
1. a. Square drawn 3. a. 3 b. Square drawn b. 3
c. Parallelogram drawn 4. Rectangle and hexagon circled
d. Triangle drawn 5. a. 4 e. 2 b. 4
f. 2 6. Hexagon and rectangle circled 2. Triangle, parallelogram, and hexagon circled
A STORY OF UNITS
261
©2015 Great Minds. eureka-math.orgG 2-M8-TE-1.3 .0 -0 9.20 15
Module 8: Time, Shapes, and Fractions as Equal Parts of Shapes
Lesson 8 Answer Key 2 8
Lesson 8 Problem Set
1. a. Triangle 5. a. Square made of 4 squares drawn b. Parallelogram made of 2 triangles drawn b. Fourth
2. a. Trapezoid c. Fourths b. Hexagon made of 2 trapezoids drawn d. Half
3. a. Rhombus e. 4 b. Hexagon made of 3 rhombuses drawn 6. a. Triangle
b. Hexagon made of 6 triangles drawn 4. a. Triangle b. Trapezoid made of 3 triangles drawn
Exit Ticket
Square; 2 squares drawn within rectangle
Homework
1. Triangle 5. Square; 4 squares drawn within the square 2 triangles drawn within the rhombus a. Fourth
2. Trapezoid b. Fourths 2 trapezoids drawn within the hexagon c. Half
3. Parallelogram d. 4
3 parallelograms drawn within the hexagon 6. Triangle; 6 triangles drawn within the hexagon
4. Triangle 3 triangles drawn within the trapezoid
A STORY OF UNITS
262
©2015 Great Minds. eureka-math.orgG 2-M8-TE-1.3 .0 -0 9.20 15

Module 8: Time, Shapes, and Fractions as Equal Parts of Shapes
Lesson 9 Answer Key 2•8
Lesson 9 Sprint
Side A
1. 4 12. 23 23. 8 34. 57 2. 14 13. 22 24. 9 35. 47 3. 24 14. 20 25. 19 36. 57 4. 74 15. 10 26. 29 37. 67 5. 3 16. 60 27. 49 38. 17 6. 13 17. 50 28. 39 39. 1 7. 23 18. 10 29. 5 40. 2 8. 73 19. 70 30. 6 41. 42 9. 3 20. 60 31. 7 42. 41 10. 30 21. 30 32. 17 43. 32 11. 33 22. 80 33. 27 44. 19
Side B
1. 3 12. 12 23. 5 34. 53 2. 13 13. 11 24. 6 35. 43 3. 23 14. 10 25. 16 36. 53 4. 73 15. 10 26. 26 37. 63 5. 2 16. 60 27. 46 38. 13 6. 12 17. 50 28. 36 39. 8 7. 22 18. 10 29. 1 40. 9 8. 72 19. 70 30. 2 41. 49 9. 2 20. 60 31. 3 42. 41 10. 20 21. 40 32. 13 43. 39 11. 22 22. 70 33. 23 44. 19
A STORY OF UNITS
263
©2015 Great Minds. eureka-math.orgG 2-M8-TE-1.3 .0 -0 9.20 15
Module 8: Time, Shapes, and Fractions as Equal Parts of Shapes
Lesson 9 Answer Key 2•8
Problem Set
1. First and third shape circled
2. Shapes (b), (e), (f), (g), (i), (j), and (k) shaded
3. Partitions and shadings will vary.
Exit Ticket
Shapes (a), (b), (e), and (g) shaded
Homework
1. First, third, and fourth shapes circled
2. Shapes (e), (f), (g), and (h) shaded
3. Partitions and shadings will vary.
A STORY OF UNITS
264
©2015 Great Minds. eureka-math.orgG 2-M8-TE-1.3 .0 -0 9.20 15

Module 8: Time, Shapes, and Fractions as Equal Parts of Shapes
Lesson 10 Answer Key 2•8
Lesson 10 Sprint
Side A
1. 10 12. 31 23. 24 34. 35 2. 20 13. 22 24. 34 35. 21 3. 40 14. 32 25. 24 36. 22 4. 10 15. 22 26. 34 37. 23 5. 20 16. 32 27. 25 38. 31 6. 40 17. 23 28. 26 39. 32 7. 11 18. 33 29. 35 40. 22 8. 21 19. 23 30. 36 41. 31 9. 31 20. 33 31. 24 42. 23 10. 11 21. 21 32. 25 43. 27 11. 21 22. 21 33. 34 44. 37
Side B
1. 10 12. 31 23. 24 34. 36 2. 20 13. 22 24. 34 35. 21 3. 40 14. 32 25. 24 36. 22 4. 10 15. 22 26. 34 37. 23 5. 20 16. 32 27. 25 38. 34 6. 40 17. 23 28. 26 39. 34 7. 11 18. 33 29. 35 40. 32 8. 21 19. 23 30. 36 41. 21 9. 31 20. 33 31. 25 42. 33 10. 11 21. 21 32. 26 43. 37 11. 21 22. 31 33. 35 44. 27
A STORY OF UNITS
265
©2015 Great Minds. eureka-math.orgG 2-M8-TE-1.3 .0 -0 9.20 15
Module 8: Time, Shapes, and Fractions as Equal Parts of Shapes
Lesson 10 Answer Key 2•8
Problem Set
1. a. Halves b. 1 line drawn in each shape to partition into fourths
2. 2 lines drawn, shape shaded to show the appropriate fraction
3. Circles partitioned by 2 perpendicular lines, appropriate number of segments shaded
4. a. Horizontal and/or vertical lines drawn to partition into fourths, 1 part shaded b. Partitions drawn to make thirds, 1 part shaded c. 1 line drawn to make halves, 1 part shaded d. Perpendicular lines drawn to partition into fourths, 2 parts shaded e. 2 lines drawn to partition into thirds, 2 parts shaded f. 1 line drawn to make halves, both parts shaded g. 2 perpendicular lines drawn to make fourths, 3 parts shaded h. 2 lines drawn to make thirds, all parts shaded i. 1 line drawn in each square to make halves, 3 parts shaded
5. 2 perpendicular lines drawn to partition into fourths, drawing labeled with four names a. 1 fourth b. 3 fourths
Exit Ticket
1. 1 line drawn to make halves, both parts shaded
2. 2 lines drawn to partition into thirds, 2 parts shaded
3. 2 lines drawn to partition into thirds, 1 part shaded
4. 1 line drawn to make halves, 1 part shaded
5. Horizontal and/or vertical lines drawn to partition into fourths, 2 parts shaded
6. Horizontal and/or vertical lines drawn to partition into fourths, 1 part shaded
A STORY OF UNITS
266
©2015 Great Minds. eureka-math.orgG 2-M8-TE-1.3 .0 -0 9.20 15
Module 8: Time, Shapes, and Fractions as Equal Parts of Shapes
Lesson 10 Answer Key 2•8
Homework
1. a. Halves b. 1 line drawn in each shape to partition into fourths
2. 2 lines drawn, shape shaded to show the appropriate fraction
3. Circles partitioned by 2 perpendicular lines, appropriate number of segments shaded
4. a. 1 line drawn to make halves, 1 part shaded b. Horizontal and/or vertical lines drawn to partition into fourths, 1 part shaded c. 2 lines drawn to partition into thirds, 1 part shaded d. Perpendicular lines drawn to partition into fourths, 2 parts shaded e. 1 line drawn to make halves, both parts shaded f. 2 lines drawn to partition into thirds, 2 parts shaded g. 2 lines drawn to partition into thirds, 3 parts shaded h. Perpendicular lines drawn to partition into fourths, 3 parts shaded i. 1 line drawn in each square to make halves, 3 parts shaded
5. Circle partitioned into thirds, labeled with the three boys’ names; 3 thirds
A STORY OF UNITS
267
©2015 Great Minds. eureka-math.orgG 2-M8-TE-1.3 .0 -0 9.20 15
Module 8: Time, Shapes, and Fractions as Equal Parts of Shapes
Lesson 11 Answer Key 2•8
Lesson 11 Problem Set
1. a. 1; 2 2. a. 2 thirds b. Second circle circled b. 1 half c. 1; 2; 3 c. 2 fourths d. Third rectangle circled d. 1 third e. 1; 4; 2; 3 e. 1 half f. Second rectangle circled f. 1 fourth
3. a. 1 half drawn to complete the shape b. 2 thirds drawn to complete the shape c. 3 fourths drawn to complete the shape
Exit Ticket
1. 1 fourth
2. 1 half
3. 3 fourths
4. 1 third
Homework
1. a. 1; 2 2. a. 1 half b. Second circle circled b. 2 thirds c. 1; 2; 3 c. 3 fourths d. Third rectangle circled d. 2 fourths e. 1; 4; 3; 2 e. 2 fourths f. Second rectangle circled f. 1 half
3. a. 1 half drawn to complete the shape b. 2 thirds drawn to complete the shape c. 3 fourths drawn to complete the shape
A STORY OF UNITS
268
©2015 Great Minds. eureka-math.orgG 2-M8-TE-1.3 .0 -0 9.20 15
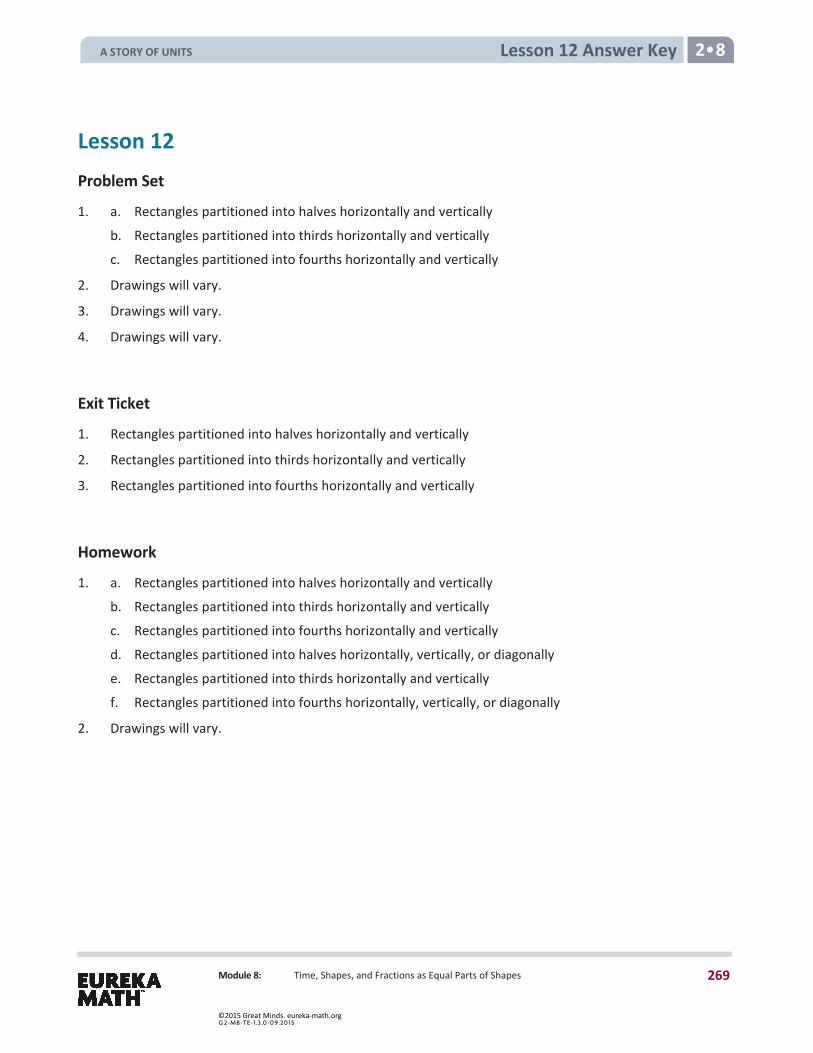
Module 8: Time, Shapes, and Fractions as Equal Parts of Shapes
Lesson 12 Answer Key 2•8
Lesson 12 Problem Set
1. a. Rectangles partitioned into halves horizontally and vertically b. Rectangles partitioned into thirds horizontally and vertically c. Rectangles partitioned into fourths horizontally and vertically
2. Drawings will vary.
3. Drawings will vary.
4. Drawings will vary.
Exit Ticket
1. Rectangles partitioned into halves horizontally and vertically
2. Rectangles partitioned into thirds horizontally and vertically
3. Rectangles partitioned into fourths horizontally and vertically
Homework
1. a. Rectangles partitioned into halves horizontally and vertically b. Rectangles partitioned into thirds horizontally and vertically c. Rectangles partitioned into fourths horizontally and vertically d. Rectangles partitioned into halves horizontally, vertically, or diagonally e. Rectangles partitioned into thirds horizontally and vertically f. Rectangles partitioned into fourths horizontally, vertically, or diagonally
2. Drawings will vary.
A STORY OF UNITS
269
©2015 Great Minds. eureka-math.orgG 2-M8-TE-1.3 .0 -0 9.20 15
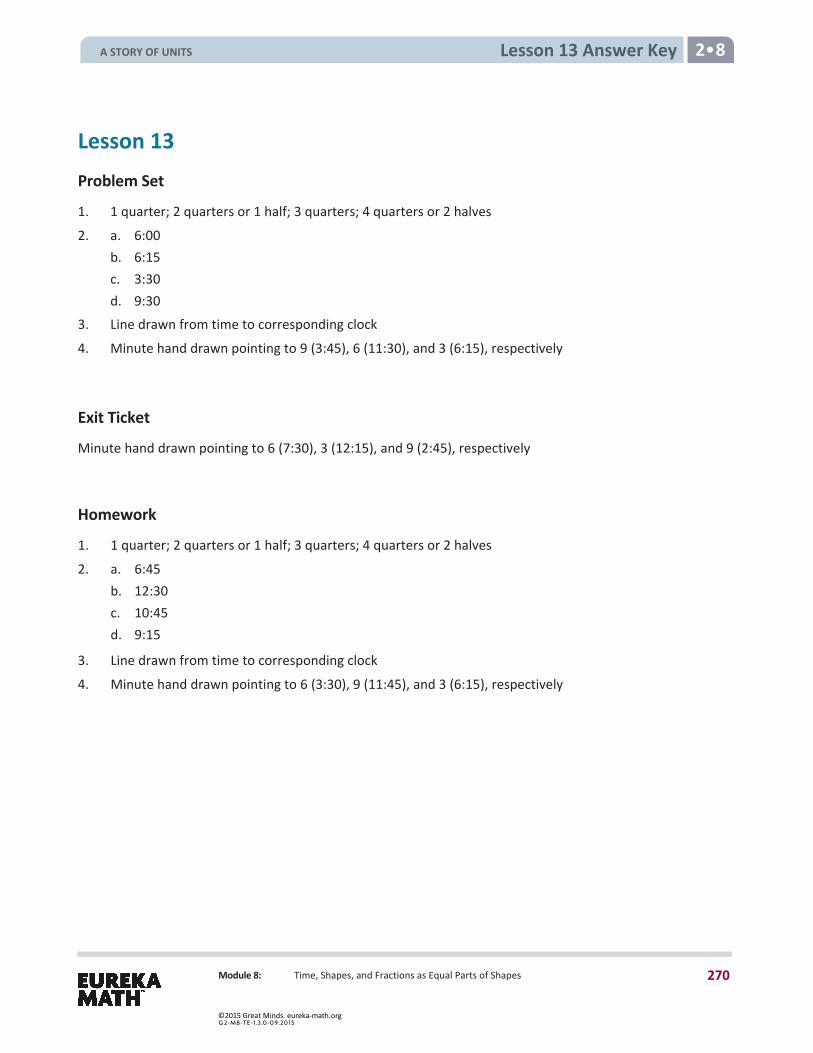
Module 8: Time, Shapes, and Fractions as Equal Parts of Shapes
Lesson 13 Answer Key 2•8
Lesson 13 Problem Set
1. 1 quarter; 2 quarters or 1 half; 3 quarters; 4 quarters or 2 halves 2. a. 6:00
b. 6:15 c. 3:30 d. 9:30
3. Line drawn from time to corresponding clock 4. Minute hand drawn pointing to 9 (3:45), 6 (11:30), and 3 (6:15), respectively
Exit Ticket
Minute hand drawn pointing to 6 (7:30), 3 (12:15), and 9 (2:45), respectively
Homework
1. 1 quarter; 2 quarters or 1 half; 3 quarters; 4 quarters or 2 halves 2. a. 6:45
b. 12:30 c. 10:45 d. 9:15
3. Line drawn from time to corresponding clock 4. Minute hand drawn pointing to 6 (3:30), 9 (11:45), and 3 (6:15), respectively
A STORY OF UNITS
270
©2015 Great Minds. eureka-math.orgG 2-M8-TE-1.3 .0 -0 9.20 15
Module 8: Time, Shapes, and Fractions as Equal Parts of Shapes
Lesson 14 Answer Key 2•8
Lesson 14 Sprint
Side A
1. 5 12. 40 23. 15 34. 60 2. 10 13. 35 24. 20 35. 55 3. 15 14. 30 25. 25 36. 50 4. 20 15. 25 26. 30 37. 65 5. 25 16. 20 27. 35 38. 70 6. 30 17. 15 28. 40 39. 65 7. 35 18. 10 29. 45 40. 60 8. 40 19. 5 30. 50 41. 150 9. 45 20. 0 31. 50 42. 200 10. 50 21. 5 32. 100 43. 150 11. 45 22. 10 33. 55 44. 100
Side B
1. 5 12. 40 23. 15 34. 60 2. 10 13. 35 24. 20 35. 55 3. 15 14. 30 25. 25 36. 50 4. 20 15. 25 26. 30 37. 65 5. 25 16. 20 27. 35 38. 70 6. 30 17. 15 28. 40 39. 65 7. 35 18. 10 29. 45 40. 60 8. 40 19. 5 30. 50 41. 150 9. 45 20. 0 31. 50 42. 200 10. 50 21. 5 32. 100 43. 150 11. 45 22. 10 33. 55 44. 100
A STORY OF UNITS
271
©2015 Great Minds. eureka-math.orgG 2-M8-TE-1.3 .0 -0 9.20 15
Module 8: Time, Shapes, and Fractions as Equal Parts of Shapes
Lesson 14 Answer Key 2•8
Problem Set
1. 45; 35, 30, 25; 15, 10, 5, 0 2. 0 or 60, 5, 10, 15, 20, 25, 30, 35, 40, 45, 50, 55 3. Hands drawn to show 3:05, 3:35, 4:10, 4:40, 6:25, and 6:55, respectively 4. 7:25; 12:55
Exit Ticket
Hands drawn to show 12:55 and 5:25, respectively
Homework
1. 15, 20, 25, 30; 40, 45, 50, 55, 60 60, 55, 50; 35, 30, 25; 10, 5, 0
2. First two answers provided, 10, 15, 20, 25, 30, 35, 40, 45, 50, 55, 60 3. Minute hand drawn to show 3:25, 7:15, and 9:55, respectively 4. Hour hand drawn to show 12:30, 10:10, and 3:45, respectively 5. Hands drawn to show 6:55, 1:50, 8:25, 4:40, 7:45, and 2:05, respectively 6. 1:35; 10:05
A STORY OF UNITS
272
©2015 Great Minds. eureka-math.orgG 2-M8-TE-1.3 .0 -0 9.20 15
Lesson 15 Answer Key 2•8
Module 8: Time, Shapes, and Fractions as Equal Parts of Shapes
Lesson 15 Problem Set
1. a. a.m. 2. a. Hands drawn to show 7:10; a.m. circled b. p.m. b. Hands drawn to show 5:55; p.m. circled c. p.m. 3. Answers will vary. d. a.m. 4. 3:55 e. p.m. f. p.m. g. p.m. h. a.m. or p.m.
Exit Ticket
1. Hands drawn to show 6:10; a.m. circled 2. Hands drawn to show 3:40; p.m. circled
Homework
1. a. a.m. 2. a. 7 a.m. b. p.m. b. 8:25 p.m. c. p.m. 3. a. Hands drawn to show 8:15; p.m. circled d. a.m. b. Hands drawn to show 12:30; p.m. circled e. p.m. 4. Answers will vary. f. a.m. or p.m. g. p.m. h. p.m.
A STORY OF UNITS
273
©2015 Great Minds. eureka-math.orgG 2-M8-TE-1.3 .0 -0 9.20 15
Module 8: Time, Shapes, and Fractions as Equal Parts of Shapes
Lesson 16 Answer Key 2•8
Lesson 16 Problem Set
1. a. A half hour, or 30 minutes 2. a. 8 hours b. 5 hours b. 3:15 p.m. c. 6 hours c. 2:30 p.m. d. 7 hours d. 18 and a half hours, or 18 hours and e. 6 and a half hours, or 6 hours and 30 minutes
30 minutes f. 5 hours g. 12 hours h. 18 hours
Exit Ticket
1. 8 hours 2. 7 hours 3. 10 hours
Homework
1. a. 6 hours 2. a. 3 and a half hours, or 3 hours and b. 4 and a half hours, or 4 hours and 30 minutes
30 minutes b. 6:00 p.m. c. 6 and a half hours, or 6 hours and c. 3:30 p.m.
30 minutes d. 10 and a half hours, or 10 hours and d. 7 hours 30 minutes e. 4 and a half hours, or 4 hours and
30 minutes f. 5 hours g. 3 and a half hours, or 3 hours and
30 minutes h. 2 and a half hours, or 2 hours and
30 minutes
A STORY OF UNITS
274
©2015 Great Minds. eureka-math.orgG 2-M8-TE-1.3 .0 -0 9.20 15