groupware technologies, inc. provide …€¦ · release 4.3 groupware technologies, inc. provide®...
TRANSCRIPT

Release
4.3
GROUPWARE TECHNOLOGIES, INC.
Provide® Enterprise Care Management Software
Broward County
Ryan White Part A User Guide

- 2 -
Pro v i d e ® E n te rp r i se
Broward County Ryan White Part A
User Guide
2010 Groupware Technologies, Inc. All rights reserved. The GTI logo and Provide®
Enterprise are registered trademarks of Groupware Technologies, Inc. All other product and company names referenced herein may be trademarks or registered
trademarks of their respective companies.
Last Updated May 14, 2013
- 3 -
Table of Contents
INTRODUCTION ............................................................................................................................................................................... 10
NAVIGATING PROVIDE® ENTERPRISE...................................................................................................................................... 11
LOGGING INTO PROVIDE®
ENTERPRISE .............................................................................................................................................. 11 WINDOWS TOOLBAR .......................................................................................................................................................................... 12
File Menu ...................................................................................................................................................................................... 12 Change Password ............................................................................................................................................................................................... 12 Lock .................................................................................................................................................................................................................... 14 Exit ...................................................................................................................................................................................................................... 14
Find Menu ..................................................................................................................................................................................... 15 Find Client .......................................................................................................................................................................................................... 15
View Menu ..................................................................................................................................................................................... 16 Actions Menu ................................................................................................................................................................................. 17
Register Client .................................................................................................................................................................................................... 17 Tools Menu .................................................................................................................................................................................... 17
Preferences ......................................................................................................................................................................................................... 18 Refresh ................................................................................................................................................................................................................ 24
Reports Menu ................................................................................................................................................................................ 24 Run ...................................................................................................................................................................................................................... 24
Windows Menu .............................................................................................................................................................................. 25 Layout Selection ................................................................................................................................................................................................. 25
Help Menu ..................................................................................................................................................................................... 27 FIELDS ............................................................................................................................................................................................... 27
Picklist ........................................................................................................................................................................................... 28 Multi-value field ............................................................................................................................................................................ 28 Required Fields ............................................................................................................................................................................. 28 Radio Button .................................................................................................................................................................................. 29 Check Box ...................................................................................................................................................................................... 29 Field Dialog Control Button .......................................................................................................................................................... 30
Provider Field Single Value .............................................................................................................................................................................. 30 Provider Field Multi-value ................................................................................................................................................................................ 31 Diagnosis Field Single Value ............................................................................................................................................................................ 33 Diagnosis Field Multi-value .............................................................................................................................................................................. 34 Procedure Field Single Value ........................................................................................................................................................................... 35 Procedure Field Multi-value ............................................................................................................................................................................. 36 Drug Field Single Value .................................................................................................................................................................................... 37 Drug Field Multi-value ...................................................................................................................................................................................... 38 Test Field Single Value ...................................................................................................................................................................................... 39 Test Field Multi-value ....................................................................................................................................................................................... 40
Button Bar ..................................................................................................................................................................................... 40 Print ..................................................................................................................................................................................................................... 40 Edit ...................................................................................................................................................................................................................... 40 Action ................................................................................................................................................................................................................. 41 Create .................................................................................................................................................................................................................. 41 Document History ............................................................................................................................................................................................. 41 Delete .................................................................................................................................................................................................................. 42 Un-Delete ........................................................................................................................................................................................................... 43 Saving Record Changes ..................................................................................................................................................................................... 43 Save and Create Another .................................................................................................................................................................................. 45
CENTRAL INTAKE PROCEDURES ............................................................................................................................................... 46
NEW CLIENT REGISTRATION .............................................................................................................................................................. 46 Registration Verification ............................................................................................................................................................... 46
Find Client .......................................................................................................................................................................................................... 46 New Client Registration ................................................................................................................................................................. 47 Schedule Intake Appointment ......................................................................................................................................................... 49 Client Profile Completion .............................................................................................................................................................. 50
Start a Client Profile Review............................................................................................................................................................................. 51 Completing the Client Profile .......................................................................................................................................................................... 51 Checking for Completeness ............................................................................................................................................................................. 73 End a Client Profile Review ............................................................................................................................................................................. 74
Completing Ryan White Certification ............................................................................................................................................ 75 Scanning Documents ........................................................................................................................................................................................ 76 Completing the Certification ............................................................................................................................................................................ 78
Setting Client Eligibility ................................................................................................................................................................ 79 Requesting Service Category Specific Eligibility Overrides .......................................................................................................... 80 Printing an Eligibility Summary for the Client .............................................................................................................................. 81

- 4 -
RECERTIFICATION OF EXISTING CLIENTS ........................................................................................................................................... 82 INTAKE SUMMARY ............................................................................................................................................................................. 83
Certifications Tab .......................................................................................................................................................................... 84 Referrals Tab ................................................................................................................................................................................. 84 Other Activity ................................................................................................................................................................................ 86
Hospitalization ................................................................................................................................................................................................... 86 Letter ................................................................................................................................................................................................................... 88
ACCESS APPLICATION ..................................................................................................................................................................... 89 SERVICE DOCUMENTATION ............................................................................................................................................................... 91
Progress Log ................................................................................................................................................................................. 91 Summary Tab ..................................................................................................................................................................................................... 93 Medical Appointments Tab .............................................................................................................................................................................. 93 Goals Addressed Tab ........................................................................................................................................................................................ 93 Referrals Tab ...................................................................................................................................................................................................... 94 Completing the Progress Log ........................................................................................................................................................................... 95
Service Provided ............................................................................................................................................................................ 95 DISCHARGING A CLIENT .................................................................................................................................................................... 97
Client Service Category Profile Record ......................................................................................................................................... 97 Client Service Profile ..................................................................................................................................................................... 99
MEDICAL CASE MANAGEMENT PROVIDERS ....................................................................................................................... 102
INTAKE AND ASSESSMENT DOCUMENTATION .................................................................................................................................. 102 Client Profile ............................................................................................................................................................................... 102
Opening Existing Clients to your Agency .................................................................................................................................................... 102 Re-Opening Existing Clients to your Agency .............................................................................................................................................. 103 Opening Existing Clients to your Service Category .................................................................................................................................... 105 Re-Opening Existing Clients to Your Service Category ............................................................................................................................. 107 Assign the Case Manager ................................................................................................................................................................................ 109 Prescription Assistance Program Enrollment .............................................................................................................................................. 109 APA (AIDS Pharmaceutical Assistance) Program Status ........................................................................................................................... 109
Case Management Summary ....................................................................................................................................................... 110 Needs Assessment ........................................................................................................................................................................................... 111 Level of Care .................................................................................................................................................................................................... 122 Action Plan ....................................................................................................................................................................................................... 122
Requesting Service Category Specific Eligibility Overrides ........................................................................................................ 129 SERVICE DOCUMENTATION ............................................................................................................................................................. 131
Progress Log ............................................................................................................................................................................... 131 Summary Tab ................................................................................................................................................................................................... 132 Medical Appointments Tab ............................................................................................................................................................................ 133 Goals Addressed Tab ...................................................................................................................................................................................... 134 Referrals Tab .................................................................................................................................................................................................... 135 Completing the Progress Log ......................................................................................................................................................................... 137
Service Provided .......................................................................................................................................................................... 137 ONGOING DOCUMENTATION ............................................................................................................................................................ 139
Medications ................................................................................................................................................................................. 139 Drug Record..................................................................................................................................................................................................... 140 Filled Prescriptions .......................................................................................................................................................................................... 141
Test Results .................................................................................................................................................................................. 141 Adding a Test Result ....................................................................................................................................................................................... 142 Adding a Lab Panel ......................................................................................................................................................................................... 143
Referrals ...................................................................................................................................................................................... 144 Adding a Referral ............................................................................................................................................................................................. 144
Other Activity .............................................................................................................................................................................. 146 Appointments .................................................................................................................................................................................................. 146 Hospitalization ................................................................................................................................................................................................. 147 Letter ................................................................................................................................................................................................................. 149 Additional Ongoing Documentation ............................................................................................................................................................ 150
REQUIRED ACTIONS ......................................................................................................................................................................... 150 Monitoring Required Actions ....................................................................................................................................................... 151
My Tasks ........................................................................................................................................................................................................... 151 Client Profile .................................................................................................................................................................................................... 151
DISCHARGING A CLIENT .................................................................................................................................................................. 152 Client Service Category Profile Record ....................................................................................................................................... 152 Client Service Profile ................................................................................................................................................................... 154 Terminate the Provider Relationship ........................................................................................................................................... 156 Closing the Action Plan ............................................................................................................................................................... 157
MEDICAL CARE/PHARMACY PROVIDERS ............................................................................................................................. 159
INTAKE AND ASSESSMENT DOCUMENTATION .................................................................................................................................. 159 Client Profile ............................................................................................................................................................................... 159
- 5 -
Opening Existing Clients to your Agency .................................................................................................................................................... 159 Re-Opening Existing Clients to your Agency .............................................................................................................................................. 160 Opening Existing Clients to your Service Category .................................................................................................................................... 162 Re-Opening Existing Clients to Your Service Category ............................................................................................................................. 164 Assign the Client Level Medical Care Coordinator ..................................................................................................................................... 166
Requesting Service Category Specific Eligibility Overrides ........................................................................................................ 166 SERVICE DOCUMENTATION ............................................................................................................................................................. 167
Medical Summary ........................................................................................................................................................................ 167 Outpatient Medical Care Provider Service Documentation ....................................................................................................................... 169 Pharmacy Provider Service Documentation ................................................................................................................................................ 173
ADDITIONAL REQUIRED MEDICAL DOCUMENTATION ..................................................................................................................... 174 Diagnosis ..................................................................................................................................................................................... 174 TB Assessment ............................................................................................................................................................................. 175 Treatment .................................................................................................................................................................................... 177 Care Actions ................................................................................................................................................................................ 178 Test Results .................................................................................................................................................................................. 179
Adding a Test Result ....................................................................................................................................................................................... 179 Adding a Lab Panel ......................................................................................................................................................................................... 180
Pregnancies ................................................................................................................................................................................. 181 Vaccinations ................................................................................................................................................................................ 182 Referrals ...................................................................................................................................................................................... 184
Adding a Referral ............................................................................................................................................................................................. 184 Other Activity .............................................................................................................................................................................. 185
Appointments .................................................................................................................................................................................................. 186 Hospitalization ................................................................................................................................................................................................. 187 Letter ................................................................................................................................................................................................................. 188
REQUIRED ACTIONS ......................................................................................................................................................................... 189 Monitoring Required Actions ....................................................................................................................................................... 190
My Tasks ............................................................................................................................................................................................................ 190 Client Profile ...................................................................................................................................................................................................... 190
DISCHARGING A CLIENT .................................................................................................................................................................. 191 Client Service Category Profile Record ....................................................................................................................................... 191 Client Service Profile ................................................................................................................................................................... 193 Terminate the Provider Relationship ........................................................................................................................................... 195
LAB IMPORT TRACKING ................................................................................................................................................................... 195 Reviewing Errors in View Lab Import Tracking .......................................................................................................................... 195 Normal Run – No Errors/No File Processed ............................................................................................................................... 197 Normal Run – With Errors........................................................................................................................................................... 198 Working Errors from the Lab Errors by Client View ................................................................................................................... 202 Linking Lab Errors to a Client in Mass ....................................................................................................................................... 202
ORAL HEALTH CARE PROVIDERS ........................................................................................................................................... 205
INTAKE AND ASSESSMENT DOCUMENTATION .................................................................................................................................. 205 Client Profile ............................................................................................................................................................................... 205
Opening Existing Clients to your Agency .................................................................................................................................................... 205 Re-Opening Existing Clients to your Agency .............................................................................................................................................. 206 Opening Existing Clients to your Service Category .................................................................................................................................... 208 Re-Opening Existing Clients to Your Service Category ............................................................................................................................. 210
Requesting Service Category Specific Eligibility Overrides ........................................................................................................ 212 SERVICE DOCUMENTATION ............................................................................................................................................................. 213
Oral Health Care Summary ......................................................................................................................................................... 214 Episode of Care ............................................................................................................................................................................................... 214 Oral Health Care Provider Service Documentation .................................................................................................................................... 216
Other Activity .............................................................................................................................................................................. 217 Appointments .................................................................................................................................................................................................. 217 Hospitalization ................................................................................................................................................................................................. 218 Letter ................................................................................................................................................................................................................. 220
DISCHARGING A CLIENT .................................................................................................................................................................. 221 Client Service Category Profile Record ....................................................................................................................................... 221 Client Service Profile ................................................................................................................................................................... 223
FOOD BANK PROVIDERS ............................................................................................................................................................. 226
INTAKE AND ASSESSMENT DOCUMENTATION .................................................................................................................................. 226 Client Profile ............................................................................................................................................................................... 226
Opening Existing Clients to your Agency .................................................................................................................................................... 226 Re-Opening Existing Clients to your Agency .............................................................................................................................................. 227 Opening Existing Clients to your Service Category .................................................................................................................................... 229 Re-Opening Existing Clients to Your Service Category ............................................................................................................................. 231
Requesting Service Category Specific Eligibility Overrides ........................................................................................................ 233 SERVICE DOCUMENTATION ............................................................................................................................................................. 234

- 6 -
Food Bank Summary ................................................................................................................................................................... 235 Service Provided .............................................................................................................................................................................................. 235
ADDITIONAL DOCUMENTATION ....................................................................................................................................................... 236 Food Bank Assessments ............................................................................................................................................................... 237 Referrals ...................................................................................................................................................................................... 238
Adding a Referral ............................................................................................................................................................................................. 238 Appointments .................................................................................................................................................................................................. 239 Hospitalization ................................................................................................................................................................................................. 240 Letter ................................................................................................................................................................................................................. 242
REQUIRED ACTIONS ......................................................................................................................................................................... 244 Monitoring Required Actions ....................................................................................................................................................... 244
My Tasks ............................................................................................................................................................................................................ 244 Client Profile ...................................................................................................................................................................................................... 244
DISCHARGING A CLIENT .................................................................................................................................................................. 245 Client Service Category Profile Record ....................................................................................................................................... 245 Client Service Profile ................................................................................................................................................................... 247
OUTREACH PROVIDERS .............................................................................................................................................................. 250
INTAKE AND ASSESSMENT DOCUMENTATION .................................................................................................................................. 250 Client Profile ............................................................................................................................................................................... 250
Opening Existing Clients to your Agency .................................................................................................................................................... 250 Re-Opening Existing Clients to your Agency .............................................................................................................................................. 251 Opening Existing Clients to your Service Category .................................................................................................................................... 253 Re-Opening Existing Clients to Your Service Category ............................................................................................................................. 255
ASSIGN THE OUTREACH WORKER ................................................................................................................................................... 257 Requesting Service Category Specific Eligibility Overrides ........................................................................................................ 258
SERVICE DOCUMENTATION ............................................................................................................................................................. 259 Outreach Summary ...................................................................................................................................................................... 259
Episode of Care ............................................................................................................................................................................................... 260 Progress Logs ................................................................................................................................................................................................... 261 Summary Tab ................................................................................................................................................................................................... 262 Medical Appointments Tab ............................................................................................................................................................................ 263 Goals Addressed Tab ...................................................................................................................................................................................... 264 Referrals Tab .................................................................................................................................................................................................... 264 Progress Log Save Rules ................................................................................................................................................................................. 265 Completing the Progress Log ............................................................................................................................................................................ 268
ADDITIONAL DOCUMENTATION ....................................................................................................................................................... 268 Referrals ...................................................................................................................................................................................... 269
Adding a Referral ............................................................................................................................................................................................. 269 Appointments .................................................................................................................................................................................................. 270 Hospitalization ................................................................................................................................................................................................. 271 Letter ................................................................................................................................................................................................................. 273
REQUIRED ACTIONS ......................................................................................................................................................................... 275 Monitoring Required Actions ....................................................................................................................................................... 275
My Tasks ............................................................................................................................................................................................................ 275 Client Profile ...................................................................................................................................................................................................... 276
DISCHARGING A CLIENT .................................................................................................................................................................. 276 Client Service Category Profile Record ....................................................................................................................................... 276 Client Service Profile ................................................................................................................................................................... 278 Terminate the Provider Relationship ........................................................................................................................................... 280
LEGAL SERVICE PROVIDERS .................................................................................................................................................... 282
INTAKE AND ASSESSMENT DOCUMENTATION .................................................................................................................................. 282 Client Profile ............................................................................................................................................................................... 282
Opening Existing Clients to your Agency .................................................................................................................................................... 282 Re-Opening Existing Clients to your Agency .............................................................................................................................................. 283 Opening Existing Clients to your Service Category .................................................................................................................................... 285 Re-Opening Existing Clients to Your Service Category ............................................................................................................................. 287
Requesting Service Category Specific Eligibility Overrides ........................................................................................................ 289 SERVICE DOCUMENTATION ............................................................................................................................................................. 290
Legal Summary ............................................................................................................................................................................ 291 Service Provided .............................................................................................................................................................................................. 291
ADDITIONAL DOCUMENTATION ....................................................................................................................................................... 292 Referrals ...................................................................................................................................................................................... 292
Adding a Referral ............................................................................................................................................................................................. 293 Appointments .................................................................................................................................................................................................. 294 Hospitalization ................................................................................................................................................................................................. 295 Letter ................................................................................................................................................................................................................. 297
REQUIRED ACTIONS ......................................................................................................................................................................... 298 Monitoring Required Actions ....................................................................................................................................................... 299

- 7 -
My Tasks ............................................................................................................................................................................................................ 299 Client Profile ...................................................................................................................................................................................................... 299
DISCHARGING A CLIENT .................................................................................................................................................................. 299 Client Service Category Profile Record ....................................................................................................................................... 300 Client Service Profile ................................................................................................................................................................... 301
MENTAL HEALTH PROVIDERS ................................................................................................................................................. 304
INTAKE AND ASSESSMENT DOCUMENTATION .................................................................................................................................. 304 Client Profile ............................................................................................................................................................................... 304
Opening Existing Clients to your Agency .................................................................................................................................................... 304 Re-Opening Existing Clients to your Agency .............................................................................................................................................. 305 Opening Existing Clients to your Service Category .................................................................................................................................... 307 Re-Opening Existing Clients to Your Service Category ............................................................................................................................. 309 Assign the Mental Health Counselor ............................................................................................................................................................ 311
Mental Health Summary .............................................................................................................................................................. 312 Psychosocial Evaluation ................................................................................................................................................................................. 313 Brief Psychiatric Rating Scale ......................................................................................................................................................................... 315 CES-D Assessment ......................................................................................................................................................................................... 317 Goldberg Bipolar Screening Assessment ...................................................................................................................................................... 319 Hamilton Anxiety Scale................................................................................................................................................................................... 321 Action Plan ....................................................................................................................................................................................................... 323
Requesting Service Category Specific Eligibility Overrides ........................................................................................................ 330 SERVICE DOCUMENTATION ............................................................................................................................................................. 331
Progress Log ............................................................................................................................................................................... 332 Summary Tab ................................................................................................................................................................................................... 333 Medical Appointments Tab ............................................................................................................................................................................ 334 Goals Addressed Tab ...................................................................................................................................................................................... 335 Referrals Tab .................................................................................................................................................................................................... 336 Completing the Progress Log ......................................................................................................................................................................... 337
Service Provided .......................................................................................................................................................................... 338 ONGOING DOCUMENTATION ............................................................................................................................................................ 339
Referrals ...................................................................................................................................................................................... 339 Adding a Referral ............................................................................................................................................................................................. 339
Other Activity .............................................................................................................................................................................. 341 Appointments .................................................................................................................................................................................................. 341 Hospitalization ................................................................................................................................................................................................. 342 Letter ................................................................................................................................................................................................................. 343 Additional Ongoing Documentation ............................................................................................................................................................ 345
RELEASING BEHAVIORAL HEALTH DOCUMENTATION TO ANOTHER BEHAVIORAL HEALTH PROVIDER .......................................... 345 REQUIRED ACTIONS ......................................................................................................................................................................... 346
Monitoring Required Actions ....................................................................................................................................................... 346 My Tasks ............................................................................................................................................................................................................ 347 Client Profile ...................................................................................................................................................................................................... 347
DISCHARGING A CLIENT .................................................................................................................................................................. 347 Client Service Profile ................................................................................................................................................................... 348 Terminate the Provider Relationship ........................................................................................................................................... 349 Closing the Action Plan ............................................................................................................................................................... 350
SUBSTANCE ABUSE PROVIDERS ............................................................................................................................................... 352
INTAKE AND ASSESSMENT DOCUMENTATION .................................................................................................................................. 352 Client Profile ............................................................................................................................................................................... 352
Opening Existing Clients to your Agency .................................................................................................................................................... 352 Re-Opening Existing Clients to your Agency .............................................................................................................................................. 353 Opening Existing Clients to your Service Category .................................................................................................................................... 355 Re-Opening Existing Clients to Your Service Category ............................................................................................................................. 357 Assign the Substance Abuse Counselor ........................................................................................................................................................ 359
Substance Abuse Summary .......................................................................................................................................................... 360 Psychosocial Evaluation ................................................................................................................................................................................. 361 Brief Psychiatric Rating Scale ......................................................................................................................................................................... 363 CES-D Assessment ......................................................................................................................................................................................... 365 Goldberg Bipolar Screening Assessment ...................................................................................................................................................... 367 Hamilton Anxiety Scale................................................................................................................................................................................... 369 Action Plan ....................................................................................................................................................................................................... 371
Requesting Service Category Specific Eligibility Overrides ........................................................................................................ 378 SERVICE DOCUMENTATION ............................................................................................................................................................. 379
Progress Log ............................................................................................................................................................................... 380 Summary Tab ................................................................................................................................................................................................... 381 Medical Appointments Tab ............................................................................................................................................................................ 382 Goals Addressed Tab ...................................................................................................................................................................................... 383 Referrals Tab .................................................................................................................................................................................................... 384

- 8 -
Completing the Progress Log ......................................................................................................................................................................... 385 Service Provided .......................................................................................................................................................................... 386
ONGOING DOCUMENTATION ............................................................................................................................................................ 387 Referrals ...................................................................................................................................................................................... 387
Adding a Referral ............................................................................................................................................................................................. 387 Other Activity .............................................................................................................................................................................. 389
Appointments .................................................................................................................................................................................................. 389 Hospitalization ................................................................................................................................................................................................. 390 Letter ................................................................................................................................................................................................................. 391 Additional Ongoing Documentation ............................................................................................................................................................ 393
RELEASING BEHAVIORAL HEALTH DOCUMENTATION TO ANOTHER BEHAVIORAL HEALTH PROVIDER .......................................... 393 REQUIRED ACTIONS ......................................................................................................................................................................... 394
Monitoring Required Actions ....................................................................................................................................................... 394 My Tasks ............................................................................................................................................................................................................ 395 Client Profile ...................................................................................................................................................................................................... 395
DISCHARGING A CLIENT .................................................................................................................................................................. 395 Client Service Profile ................................................................................................................................................................... 396 Terminate the Provider Relationship ........................................................................................................................................... 397 Closing the Action Plan ............................................................................................................................................................... 398
IMPORTING PROVIDERS ............................................................................................................................................................. 400
IMPORTING CLIENT RECORDS .......................................................................................................................................................... 401 Creating an Input File ................................................................................................................................................................. 401 Determine the Field Names ......................................................................................................................................................... 401 Formatting Excel Spreadsheet for Input File ............................................................................................................................... 402 Import Process............................................................................................................................................................................. 403 Field Name Validation ................................................................................................................................................................. 404 Import Test and Error File .......................................................................................................................................................... 405 Final Import ................................................................................................................................................................................ 406
IMPORTING CLIENT SUB-RECORDS .................................................................................................................................................. 406 Import Process ................................................................................................................................................................................................. 407 Advanced Options........................................................................................................................................................................................... 408
IMPORTING ACTIVITY RECORDS ...................................................................................................................................................... 409 Import Process............................................................................................................................................................................. 410
Advanced Options........................................................................................................................................................................................... 411
AICP (AIDS INSURANCE CONTINUATION PROGRAM)........................................................................................................ 413
ENROLLMENT DOCUMENTATION ..................................................................................................................................................... 413 Client Profile ............................................................................................................................................................................... 413 Payment Request Documentation ................................................................................................................................................ 419
Payment Request Processing .......................................................................................................................................................................... 421 DISCHARGING A CLIENT .................................................................................................................................................................. 423
AICP Enrollment ......................................................................................................................................................................... 423 Client Service Profile ................................................................................................................................................................... 423
INVOICING ...................................................................................................................................................................................... 426
INTRODUCTION ................................................................................................................................................................................ 426 RECONCILIATION ............................................................................................................................................................................. 426 CREATING AN INVOICE .................................................................................................................................................................... 428
PROCESSING INVOICES............................................................................................................................................................... 431
PROCESSING INVOICES ..................................................................................................................................................................... 431 LINE ITEM REJECT ........................................................................................................................................................................... 431
OUTCOMES REPORTING ............................................................................................................................................................. 434
BROWARD OUTCOME REPORT ......................................................................................................................................................... 434 Creating a New Broward Outcome Report Template .................................................................................................................. 434 Editing and Running a Saved Report Template ........................................................................................................................... 436
HAB OUTCOME REPORT .................................................................................................................................................................. 438 Creating a New HAB Outcome Report Template ......................................................................................................................... 438 Editing and Running a Saved Report Template ........................................................................................................................... 440
RYAN WHITE REPORTING (RDR/RSR) ..................................................................................................................................... 442
REPORTING OVERVIEW .................................................................................................................................................................... 442 Data Entry Requirements............................................................................................................................................................. 443
All Ryan White Providers ............................................................................................................................................................................... 443 Ryan White Medical Care Providers .............................................................................................................................................................. 444
Creating a New Program Data Report Template ......................................................................................................................... 447

- 9 -
Editing and Running a Saved Report Template ........................................................................................................................... 453 Running Ryan White Reports from the PDR Template ................................................................................................................. 454 RSR Error Report ........................................................................................................................................................................ 455
Error Report Key ............................................................................................................................................................................................ 455
RYAN WHITE PDR CLIENT LEVEL FILE OUTPUT ................................................................................................................ 457
CLIENT ELIGIBILITY DETERMINATION ................................................................................................................................ 462
RECORDING SERVICES ..................................................................................................................................................................... 462 CLIENT PROFILE AND RYAN WHITE ELIGIBILITY ............................................................................................................................. 462 NIGHTLY MEDICAID ENROLLMENT CHECKING ................................................................................................................................ 464 NIGHTLY SERVICE ELIGIBILITY AGENT ........................................................................................................................................... 464 NIGHTLY MOST RECENT SERVICE DATE AGENT ............................................................................................................................. 464

Chapter
1
Introduction
In 1999, the Broward County Health Care Services Division (BCHCS) purchased the
Provide®
Care Management system under the direction of the Ryan White Planning Council.
It was the software package selected to address the Plan of Care Information System (PCIS)
project requirements. In 2009, the Broward County database has been upgraded to the new
version of the software, Provide® Enterprise.
The system is being utilized to accomplish a number of goals:
Provide a care management tool to funded agencies that enables them to collect all data
and produce the Ryan White CARE Act Data Report and Client Level Data Extract.
Enable agencies to bill BCHCS electronically.
Improve the consistency and reliability of the data collected.
Reduce duplication of services to Clients.
Facilitate improved community planning with more accurate and comprehensive
information on the Clients being served and the impact of the services being delivered.
Coordinate care between provider agencies.
This User Guide is organized into sections to help you determine what data you need to enter
into Provide® Enterprise in order to meet your data collection and reporting requirements. It
also will walk you through the steps to produce your monthly invoices to BCHCS for the
services you deliver.

- 11 -
Chapter
2
Navigating Provide®
Enterprise
Prior to accessing the Provide® Enterprise database for the first time, the system will need to
be installed on your computer. For Installation instructions, please see the Provide® Enterprise
Installation Guide.
Logging into Provide® Enterprise Any time you are going to log into Provide
® Enterprise, you will need to make sure that your
computer is connected to the Internet. The first time you log in, you will receive messages
that you will not see at any other time during your use of the system. These messages are
discussed in the Provide® Enterprise Installation Guide.
To launch Provide® Enterprise, you will want to double click with your mouse on the
Provide® Enterprise Client Icon that has been placed on your Desktop during
installation (similar to that in the figure below).
The Log In Screen will appear, similar to that in the figure below:

- 12 -
Enter the User Name, Password, Server and Database provided to you by the GTI
Technical Support Team or your System Administrator. NOTE: After you have
logged on for the first time, the User name, Server and Database will be automatically
saved in the login dialog box. You will only need to re-enter your password.
Click on the button to log into the system.
As Provide® Enterprise
is loading you will notice a window similar to the following on your
screen:
As a security measure, Provide® Enterprise will automatically lock your account after three
consecutive failed logins. If this happens, you will need to contact your Provide® Enterprise
Administrator to reset your account.
Windows Toolbar If you do not have a Start up Action defined when you log into Provide
® Enterprise
for the
first time, all you will see is the Windows Toolbar, similar to the following. By clicking on
each of the menu choices you will have different choices for configuring, navigating or
viewing information. Some of the more important menu choices will be discussed below:
File Menu
The most common File Menu options (Change Password, Lock, Import and Exit) will be
discussed in greater detail below.
Change Password
You can change your password in Provide® Enterprise
by completing the following steps.
From your Windows menu choose “File” and then “Change Password” as shown below.
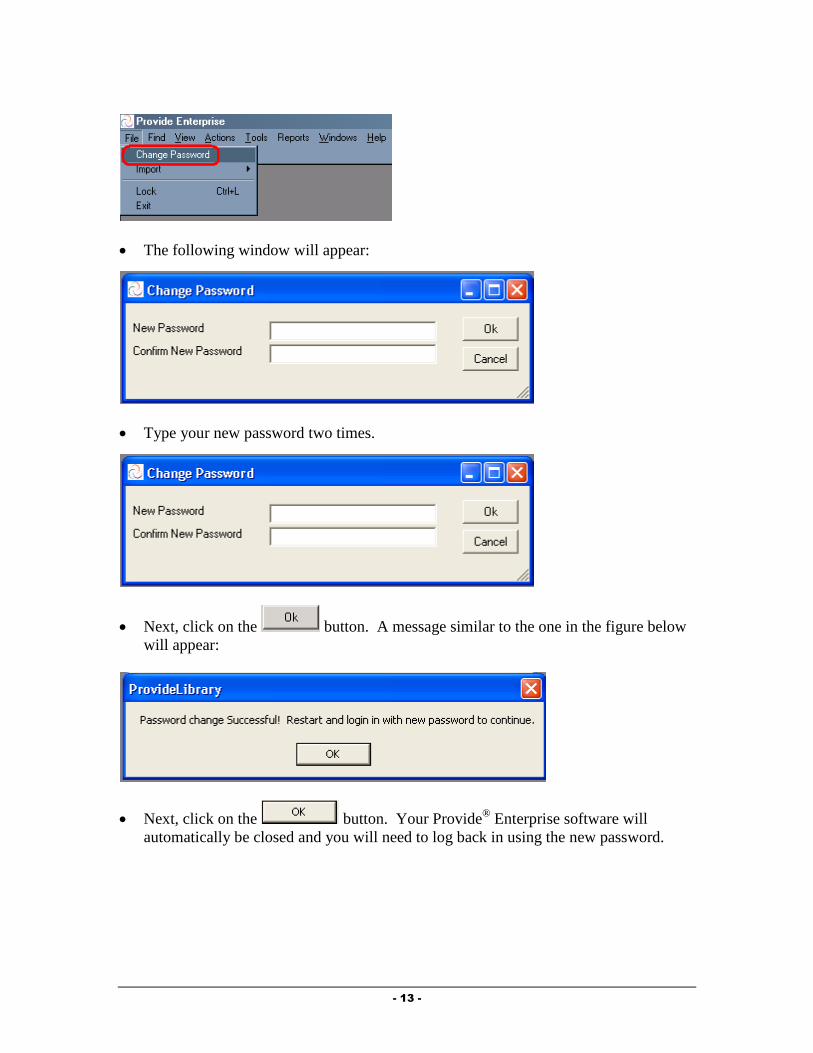
- 13 -
The following window will appear:
Type your new password two times.
Next, click on the button. A message similar to the one in the figure below
will appear:
Next, click on the button. Your Provide® Enterprise software will
automatically be closed and you will need to log back in using the new password.
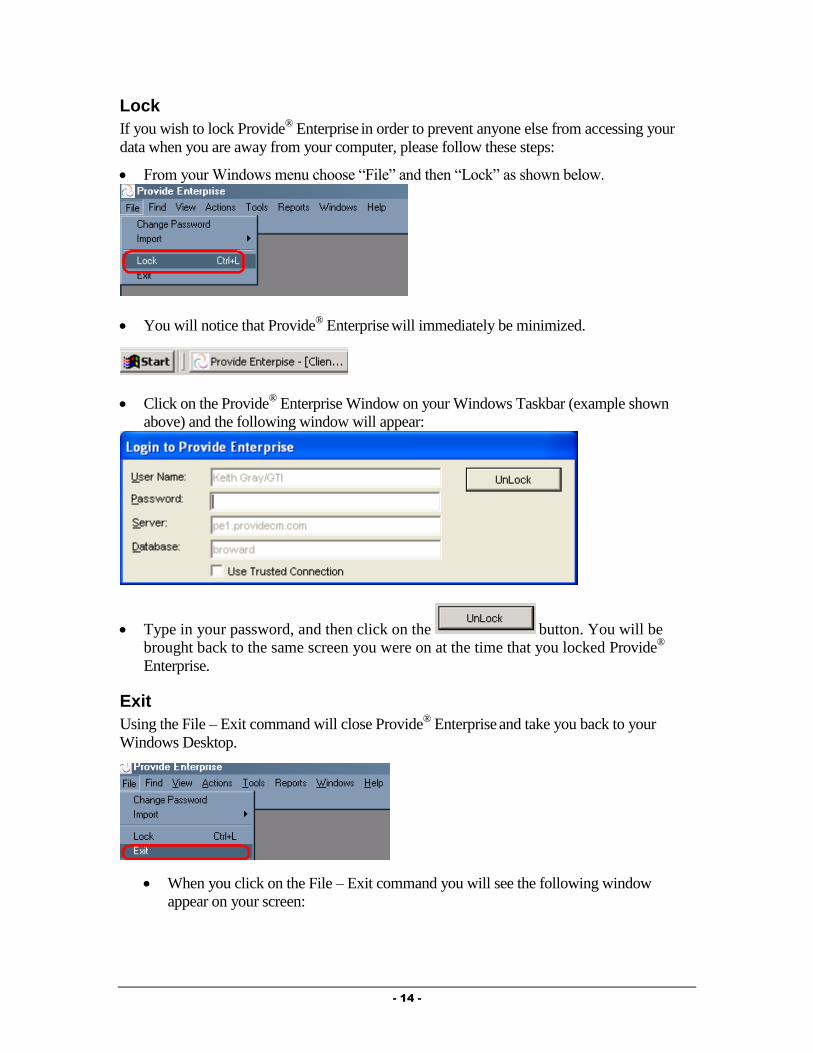
- 14 -
Lock
If you wish to lock Provide® Enterprise
in order to prevent anyone else from accessing your
data when you are away from your computer, please follow these steps:
From your Windows menu choose “File” and then “Lock” as shown below.
You will notice that Provide® Enterprise
will immediately be minimized.
Click on the Provide® Enterprise Window on your Windows Taskbar (example shown
above) and the following window will appear:
Type in your password, and then click on the button. You will be
brought back to the same screen you were on at the time that you locked Provide®
Enterprise.
Exit
Using the File – Exit command will close Provide® Enterprise
and take you back to your
Windows Desktop.
When you click on the File – Exit command you will see the following window
appear on your screen:

- 15 -
Select to exit or to continue working in Provide® Enterprise.
Find Menu
The Find Menu in Provide® Enterprise
has one action which is discussed below:
Find Client
You can bring up the Find - Client tool in Provide® Enterprise
by completing the following
steps.
From your Windows menu choose “Find” and then “Client” as the following shows.
A window similar to the one below will appear:
Type in one or more of the search fields and then click on the button. You
can enter an asterisk (*) as a wild card to do more general searches. If multiple fields
are entered, only those client records that match all of the values will be found.
After the search is completed, the Client records that match the search criteria are
listed and displayed below the search dialog in a view like the one below:
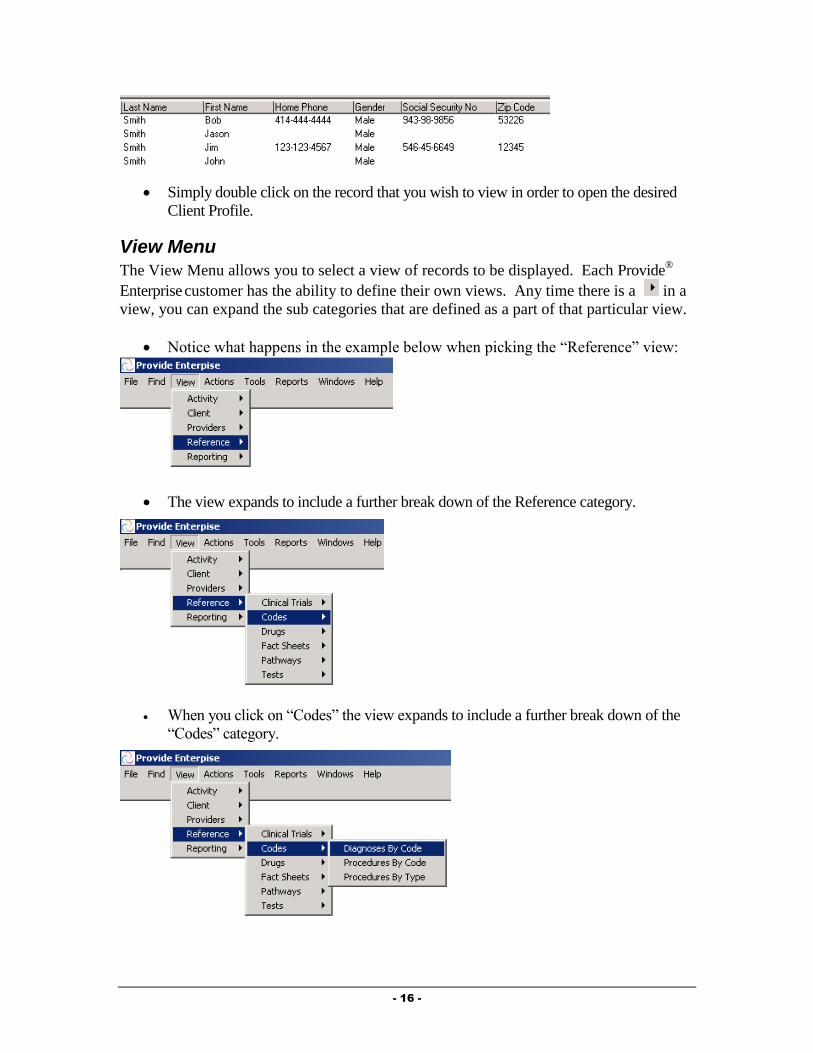
- 16 -
Simply double click on the record that you wish to view in order to open the desired
Client Profile.
View Menu
The View Menu allows you to select a view of records to be displayed. Each Provide®
Enterprise customer has the ability to define their own views. Any time there is a in a
view, you can expand the sub categories that are defined as a part of that particular view.
Notice what happens in the example below when picking the “Reference” view:
The view expands to include a further break down of the Reference category.
When you click on “Codes” the view expands to include a further break down of the
“Codes” category.
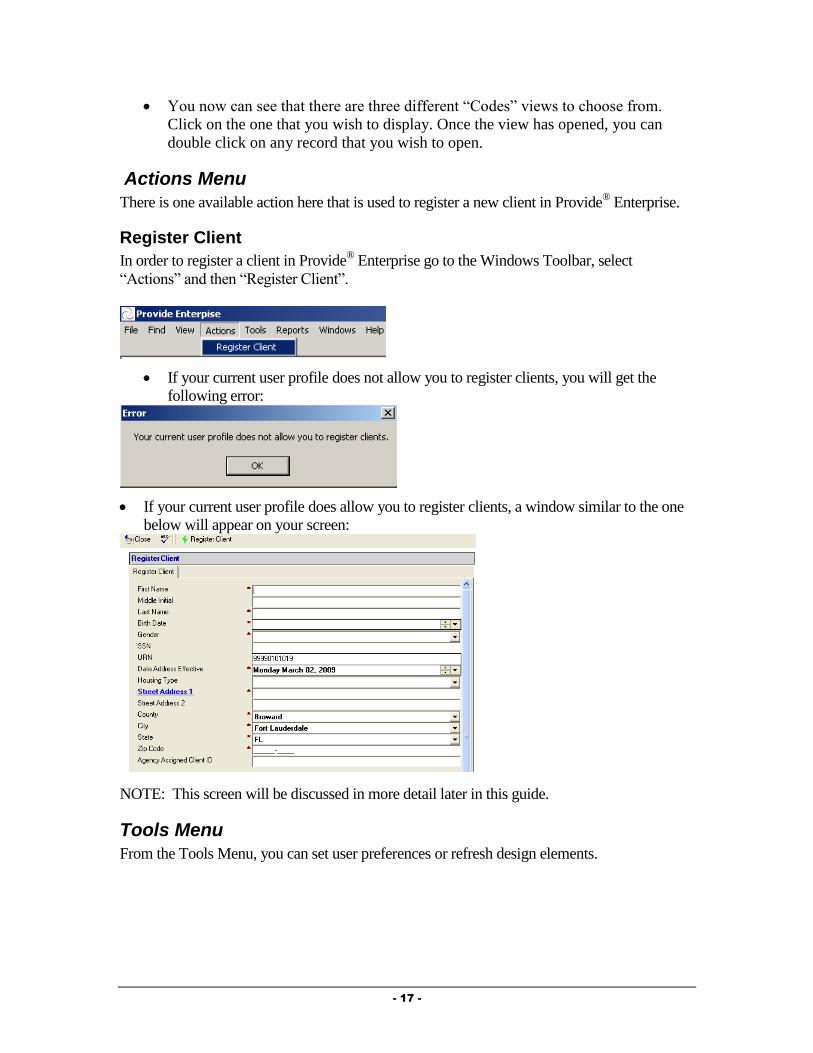
- 17 -
You now can see that there are three different “Codes” views to choose from.
Click on the one that you wish to display. Once the view has opened, you can
double click on any record that you wish to open.
Actions Menu
There is one available action here that is used to register a new client in Provide® Enterprise.
Register Client
In order to register a client in Provide® Enterprise go to the Windows Toolbar, select
“Actions” and then “Register Client”.
If your current user profile does not allow you to register clients, you will get the
following error:
If your current user profile does allow you to register clients, a window similar to the one
below will appear on your screen:
NOTE: This screen will be discussed in more detail later in this guide.
Tools Menu
From the Tools Menu, you can set user preferences or refresh design elements.
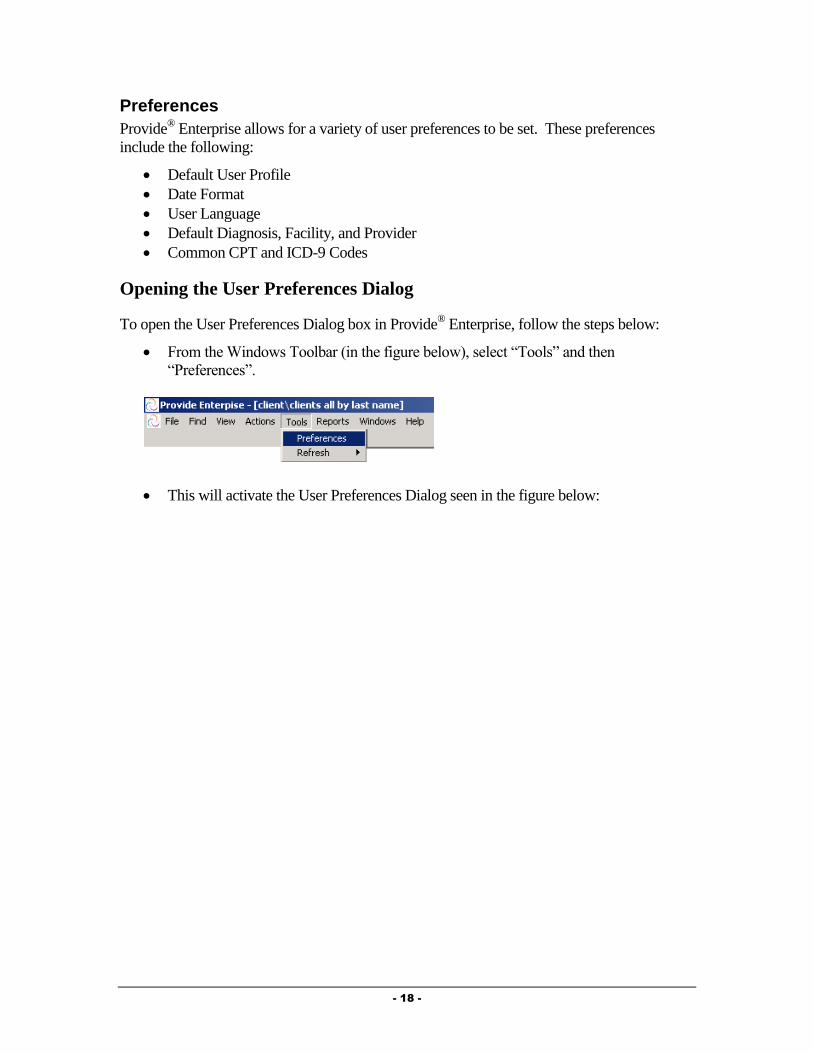
- 18 -
Preferences
Provide® Enterprise allows for a variety of user preferences to be set. These preferences
include the following:
Default User Profile
Date Format
User Language
Default Diagnosis, Facility, and Provider
Common CPT and ICD-9 Codes
Opening the User Preferences Dialog
To open the User Preferences Dialog box in Provide® Enterprise, follow the steps below:
From the Windows Toolbar (in the figure below), select “Tools” and then
“Preferences”.
This will activate the User Preferences Dialog seen in the figure below:
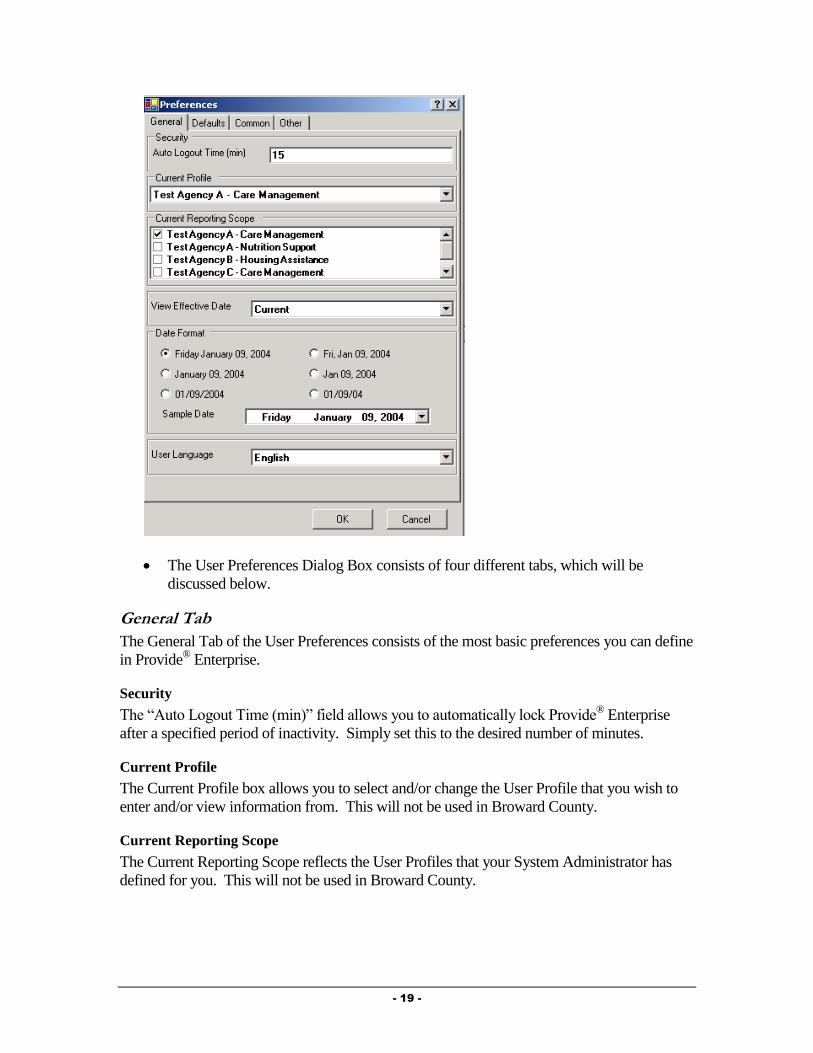
- 19 -
The User Preferences Dialog Box consists of four different tabs, which will be
discussed below.
General Tab
The General Tab of the User Preferences consists of the most basic preferences you can define
in Provide® Enterprise.
Security
The “Auto Logout Time (min)” field allows you to automatically lock Provide® Enterprise
after a specified period of inactivity. Simply set this to the desired number of minutes.
Current Profile
The Current Profile box allows you to select and/or change the User Profile that you wish to
enter and/or view information from. This will not be used in Broward County.
Current Reporting Scope
The Current Reporting Scope reflects the User Profiles that your System Administrator has
defined for you. This will not be used in Broward County.

- 20 -
View Effective Date
The View Effective Date preference allows you to select how you want to view client
information – Current records or records as of a particular date range in the past.
To change the View Effective Date, follow these steps:
Click on the next to the View Effective Date field. Your two choices can be seen
in the following figure.
If you select “Past”, an additional field (seen in the figure below) will appear to allow
you to select the date that you wish to view information from.
Simply click on the appropriate date in the calendar. To scroll between months, click
on the or buttons.
Date Format
The Date Format user preference allows you to select the format of all date fields within the
Provide® Enterprise system.
To change your default Date Format, simply follow these steps:
Single click in the radio button ( ) next to the format that you wish to use.
A Sample of the selected date format will be shown in the Sample Date section.

- 21 -
User Language
The User Language preference allows you to select what language should be used within the
Provide® Enterprise system.
To change your default User Language, follow these steps:
Click on the next to the User Language Field.
Single click on the language you wish to be the default. Your choice will then be
displayed in this field. Changing the User Language (such as from English to
Spanish) can change Field descriptions throughout the Client Profile and Activity
records to the Spanish equivalents based on Field Prompts set up in the Data
Dictionary by your System Administrator.
Defaults Tab
The Defaults Tab of the User Preferences allows you to define some of the values that will
default in various activity records throughout Provide® Enterprise. You can define a default
Diagnosis, Facility, Provider, Superbill and Appointment Length. These default values are
then used to populate fields on Activity records you create. For example, if you set the default
Appointment Length to 15 minutes, every time you create an Appointment the end time will
default to15 minutes after the start time.
Common Tab
The Common Tab of the User Preferences allows you to define some of the values that will
default in various activity records throughout the system. You can define a common list of
Diagnosis, Procedures, Providers, Drugs and Tests.
Other Tab
The Other Tab of the User Preferences allows you to define some additional values that will
be assigned to your preferences throughout Provide® Enterprise.

- 22 -
Supervisor: This field allows you to define your Supervisor from the Provider’s List.
Administrative Support: This field allows you to define your Administrative
Support person from the Provider’s list.
Show/Hide Soft Deletes: This field allows you to specify whether or not you want to
see deleted records when reviewing a Client Chart.
Startup Action: This field allows you to define what happens automatically when
you launch the Provide® Enterprise Client. The options are “Find Client”, Action
“Register Client” or even open a view each time that you start up Provide® Enterprise.
Defining a Startup Action
To define a Startup Action, follow the steps below:
Click on the button in the upper right hand corner (seen circled in the figure below)
of the Startup Action box.
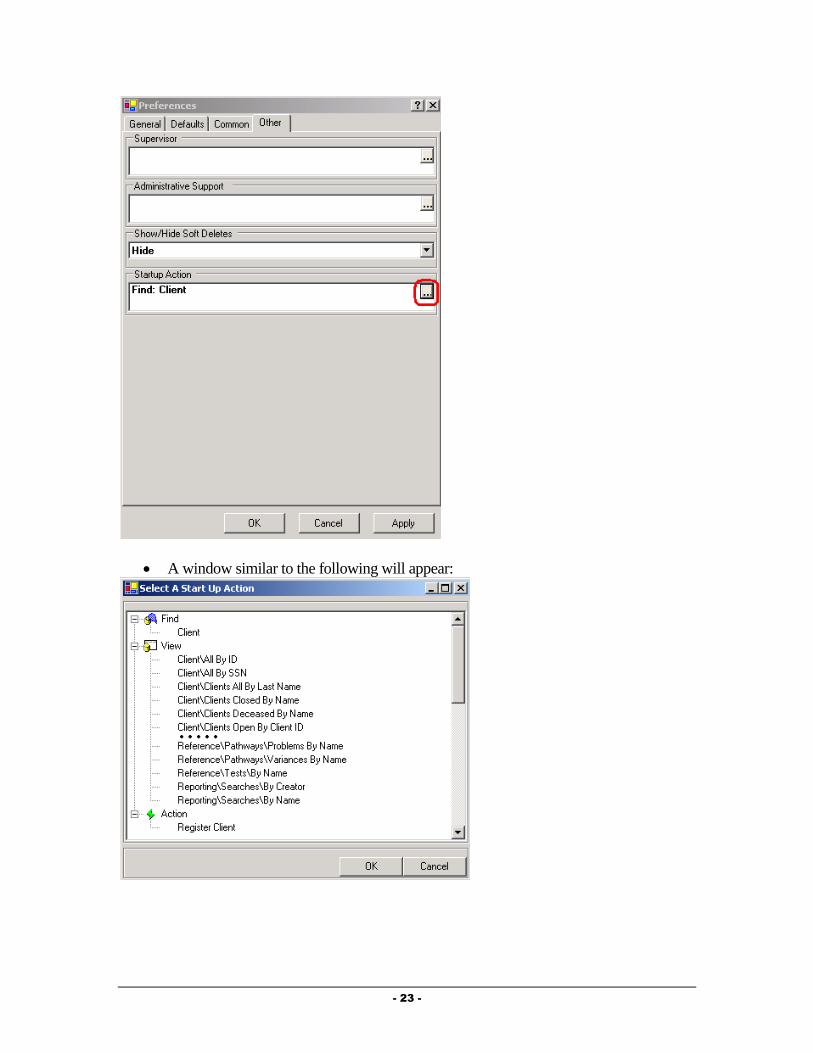
- 23 -
A window similar to the following will appear:
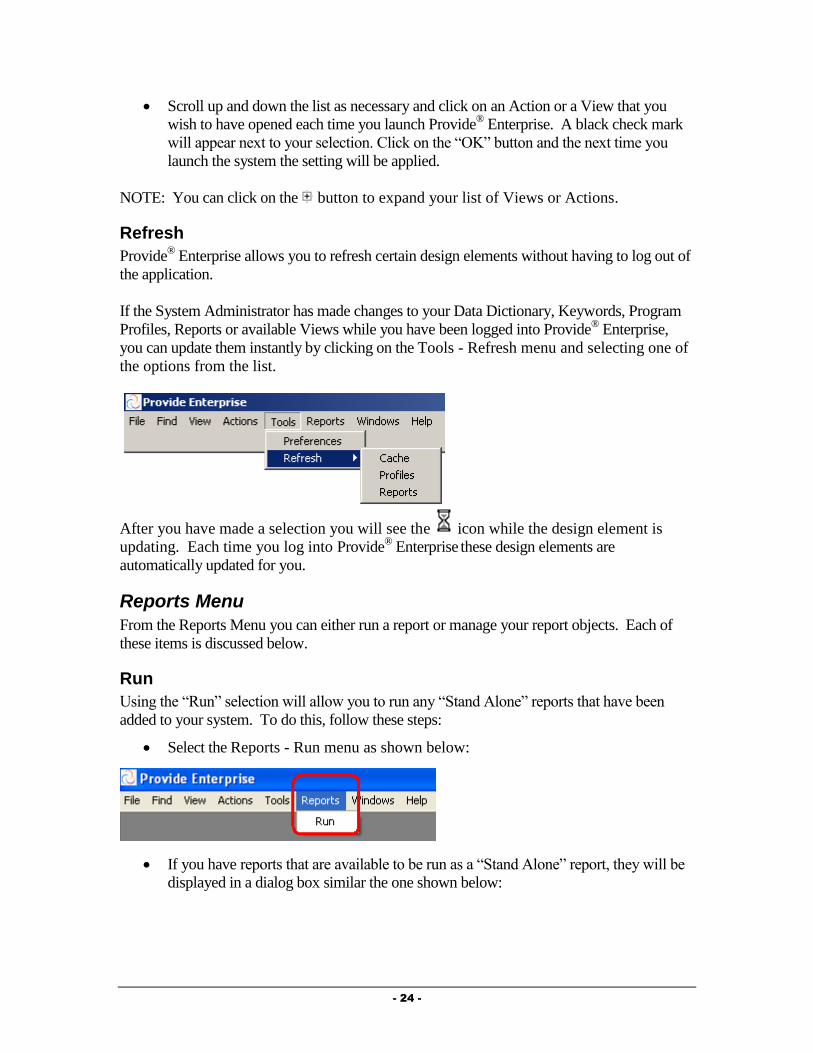
- 24 -
Scroll up and down the list as necessary and click on an Action or a View that you
wish to have opened each time you launch Provide® Enterprise. A black check mark
will appear next to your selection. Click on the “OK” button and the next time you
launch the system the setting will be applied.
NOTE: You can click on the button to expand your list of Views or Actions.
Refresh
Provide® Enterprise allows you to refresh certain design elements without having to log out of
the application.
If the System Administrator has made changes to your Data Dictionary, Keywords, Program
Profiles, Reports or available Views while you have been logged into Provide® Enterprise,
you can update them instantly by clicking on the Tools - Refresh menu and selecting one of
the options from the list.
After you have made a selection you will see the icon while the design element is
updating. Each time you log into Provide® Enterprise
these design elements are
automatically updated for you.
Reports Menu
From the Reports Menu you can either run a report or manage your report objects. Each of
these items is discussed below.
Run
Using the “Run” selection will allow you to run any “Stand Alone” reports that have been
added to your system. To do this, follow these steps:
Select the Reports - Run menu as shown below:
If you have reports that are available to be run as a “Stand Alone” report, they will be
displayed in a dialog box similar the one shown below:
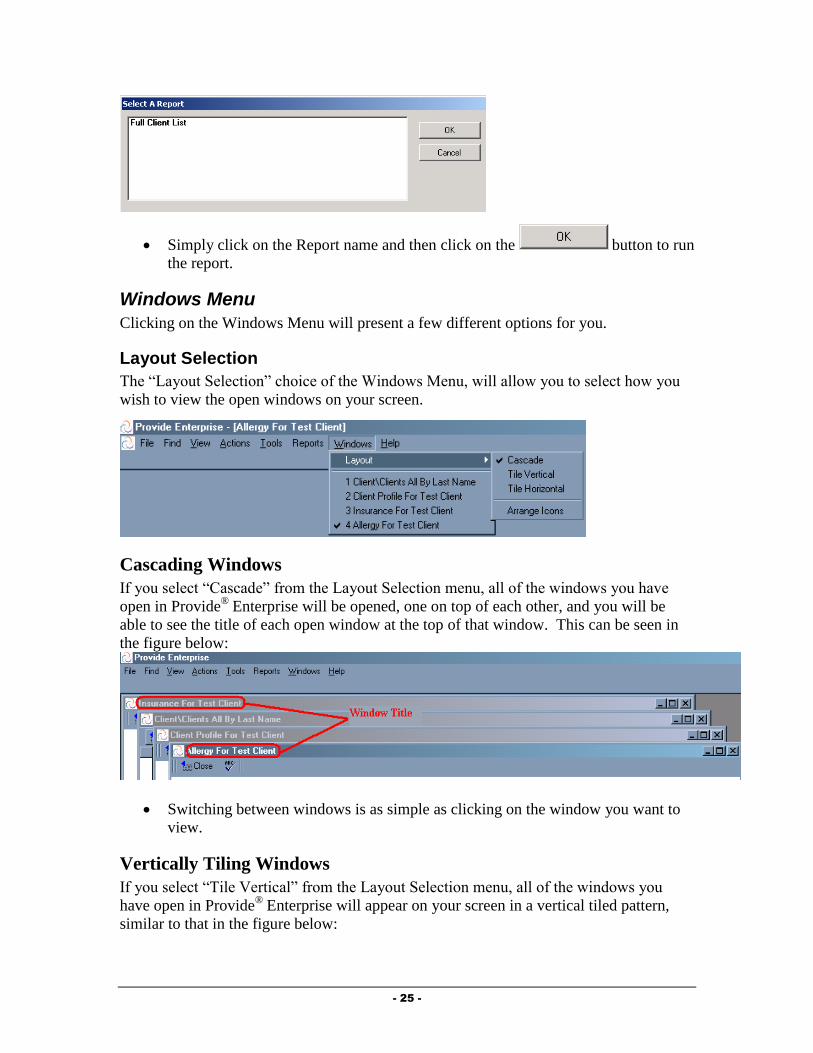
- 25 -
Simply click on the Report name and then click on the button to run
the report.
Windows Menu
Clicking on the Windows Menu will present a few different options for you.
Layout Selection
The “Layout Selection” choice of the Windows Menu, will allow you to select how you
wish to view the open windows on your screen.
Cascading Windows
If you select “Cascade” from the Layout Selection menu, all of the windows you have
open in Provide® Enterprise will be opened, one on top of each other, and you will be
able to see the title of each open window at the top of that window. This can be seen in
the figure below:
Switching between windows is as simple as clicking on the window you want to
view.
Vertically Tiling Windows
If you select “Tile Vertical” from the Layout Selection menu, all of the windows you
have open in Provide® Enterprise will appear on your screen in a vertical tiled pattern,
similar to that in the figure below:
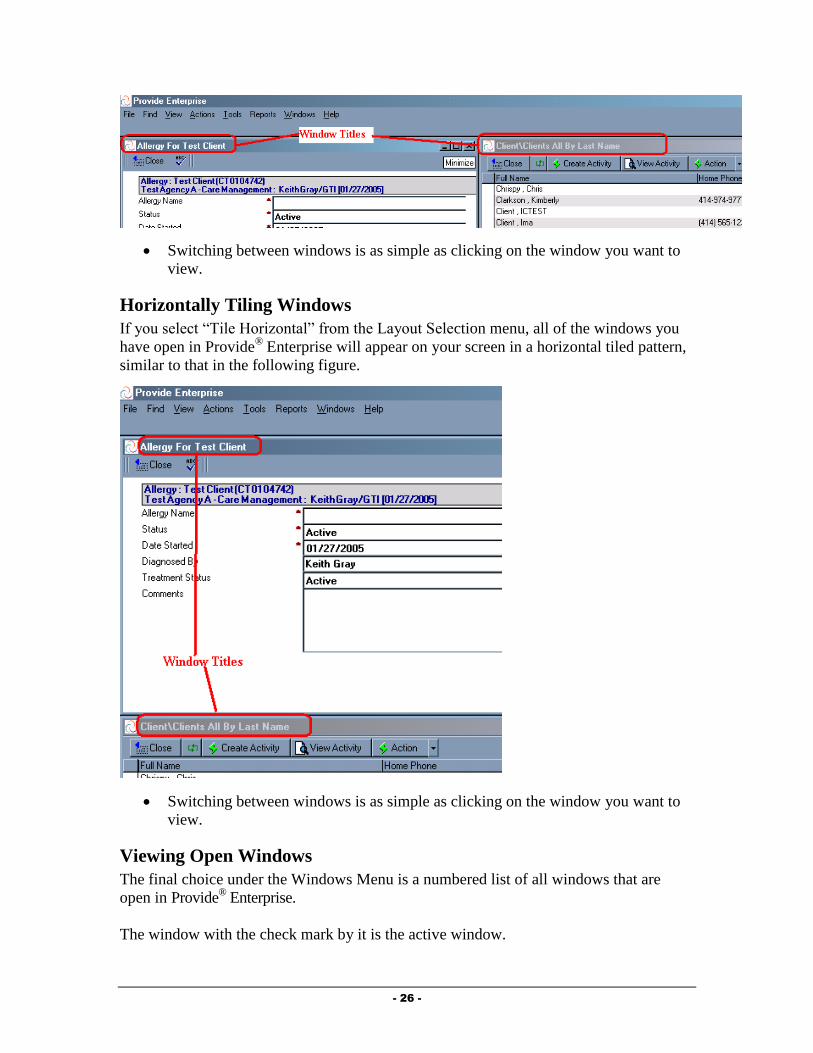
- 26 -
Switching between windows is as simple as clicking on the window you want to
view.
Horizontally Tiling Windows
If you select “Tile Horizontal” from the Layout Selection menu, all of the windows you
have open in Provide® Enterprise will appear on your screen in a horizontal tiled pattern,
similar to that in the following figure.
Switching between windows is as simple as clicking on the window you want to
view.
Viewing Open Windows
The final choice under the Windows Menu is a numbered list of all windows that are
open in Provide® Enterprise.
The window with the check mark by it is the active window.

- 27 -
You can select any of the numbered window choices to move to a different window.
Help Menu
From the Help Menu you can find more information regarding the Provide® Enterprise
version on your machine.
Clicking on “Help” and then “About” will bring up the following Window:
NOTE: You can see the current version of the Provide® Enterprise that is installed on your
machine.
Fields
There are several different types of fields used within the Provide® Enterprise system. They
will each be described briefly below.

- 28 -
When a field is editable, the text is bold. When not editable it is grayed out. It may be grayed
out because you are not in edit mode or because your System Administrator has locked the
field.
Picklist
For fields that contain a downward arrow like this , click on the arrow to display the
list of preset values from which to choose. You can also type the first letter of a value
if known and it will jump to the first keyword that starts with that value. Typing the
same letter again will scroll you to the next value that starts with that letter. For
example in a State field, typing “w” will bring up “WA”, typing a “w” a second time
will bring up “WI” and typing “w” a third time will bring up “WV”.
Multi-value field
There are some fields similar to the one shown below that allow multiple values to be
selected. To check an item on the list, click on the item’s name and a check mark will
appear to the left of the name. To remove a check mark, click on the name again.
Required Fields
A red asterisk (*) next to any field signifies that the field is required by Provide®
Enterprise in order to save the document. Some required fields already have a default
value while others are blank by default.

- 29 -
Date Fields
When you see a date field in Provide® Enterprise you can accept the default value, hit
the delete or backspace key to remove the current date and type in a different date, or
click on the button which will bring up a calendar window shown below.
Click on the day you wish to select. To move backward or forward a month at a
time, use the appropriate button.
You can also change the month by clicking on the name of the current month. This
will bring up a list of months. Simply select the month that you wish to navigate to.
You can change the year that is shown by clicking in the year (on the calendar) and
using the up and down arrows (circled in the following figure) to change the year.
Radio Button
An example of a radio button ( ) is shown below:
A radio button will allow you to select one or more choices. Simply click on the radio
button ( ) that corresponds to the choice or choices you wish to select.
Check Box
Some fields in the system have check box fields. To check an item, click on the box to
select it.

- 30 -
Field Dialog Control Button
Some fields have lists from which to choose a value. Most of these fields will have a
button to click that will activate the list. To select an item in the list, click on the item
name. To deselect an item, click on the item name again. Provider fields, Diagnosis fields,
Procedure fields, Drug name fields and Test name fields are examples where Field Dialog
Control Buttons are used. In some cases you are able to select only a single value and in
others you are able to select multiple values. Both types will be discussed below.
Provider Field Single Value
There are many fields within Provide® Enterprise where you can select a Facility,
Individual, Medical Group, Service Organization, Service Program or manually enter a
value. You will be able to view your available provider options when you click on the
button as the following shows.
Provider Type: The choices available for this field are set by your System Administrator in
the data dictionary field properties of Provide® Enterprise. Generally you will have the
ability to choose from a Facility, Individual, Medical Group, Service Organization or
Service Program. Both the “Provider Type” and the “Select” group that is chosen will
limit your choices in the “Provider Name” view.
Select: By default this field is set to Common and will display a list of common providers that
you have defined in your user preferences. If you have not defined any common
providers, the “Provider Name” view will be blank. You may also choose to change this
setting to “All” to display all providers that have been defined in Provide® Enterprise.
List of Items (Provider Name): This view will be limited by both the “Provider Type” and
the “Select” group that is chosen.
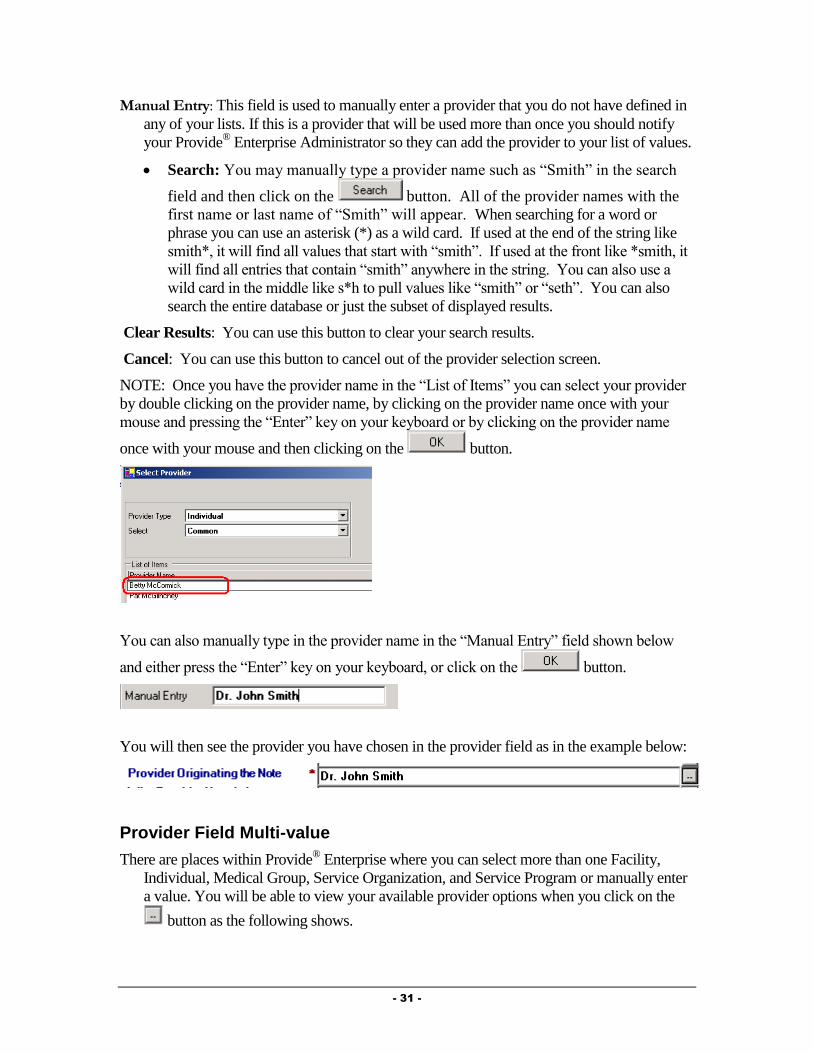
- 31 -
Manual Entry: This field is used to manually enter a provider that you do not have defined in
any of your lists. If this is a provider that will be used more than once you should notify
your Provide® Enterprise Administrator so they can add the provider to your list of values.
Search: You may manually type a provider name such as “Smith” in the search
field and then click on the button. All of the provider names with the
first name or last name of “Smith” will appear. When searching for a word or
phrase you can use an asterisk (*) as a wild card. If used at the end of the string like
smith*, it will find all values that start with “smith”. If used at the front like *smith, it
will find all entries that contain “smith” anywhere in the string. You can also use a
wild card in the middle like s*h to pull values like “smith” or “seth”. You can also
search the entire database or just the subset of displayed results.
Clear Results: You can use this button to clear your search results.
Cancel: You can use this button to cancel out of the provider selection screen.
NOTE: Once you have the provider name in the “List of Items” you can select your provider
by double clicking on the provider name, by clicking on the provider name once with your
mouse and pressing the “Enter” key on your keyboard or by clicking on the provider name
once with your mouse and then clicking on the button.
You can also manually type in the provider name in the “Manual Entry” field shown below
and either press the “Enter” key on your keyboard, or click on the button.
You will then see the provider you have chosen in the provider field as in the example below:
Provider Field Multi-value
There are places within Provide® Enterprise where you can select more than one Facility,
Individual, Medical Group, Service Organization, and Service Program or manually enter
a value. You will be able to view your available provider options when you click on the
button as the following shows.
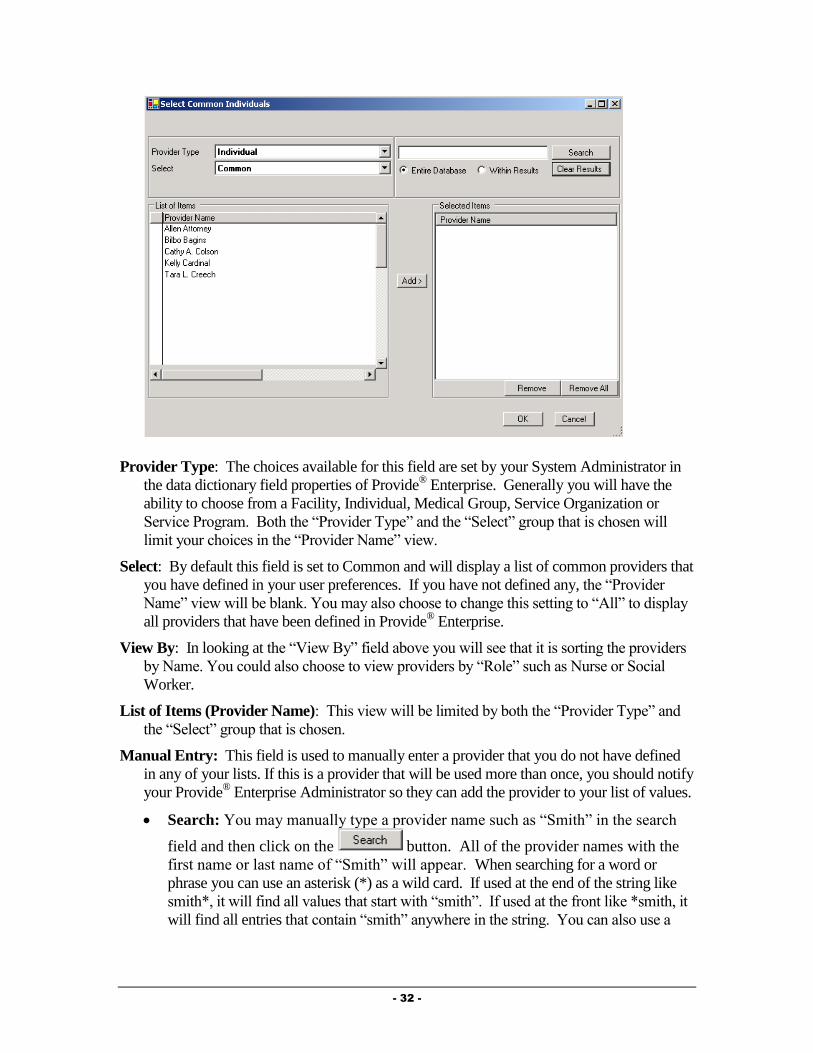
- 32 -
Provider Type: The choices available for this field are set by your System Administrator in
the data dictionary field properties of Provide® Enterprise. Generally you will have the
ability to choose from a Facility, Individual, Medical Group, Service Organization or
Service Program. Both the “Provider Type” and the “Select” group that is chosen will
limit your choices in the “Provider Name” view.
Select: By default this field is set to Common and will display a list of common providers that
you have defined in your user preferences. If you have not defined any, the “Provider
Name” view will be blank. You may also choose to change this setting to “All” to display
all providers that have been defined in Provide® Enterprise.
View By: In looking at the “View By” field above you will see that it is sorting the providers
by Name. You could also choose to view providers by “Role” such as Nurse or Social
Worker.
List of Items (Provider Name): This view will be limited by both the “Provider Type” and
the “Select” group that is chosen.
Manual Entry: This field is used to manually enter a provider that you do not have defined
in any of your lists. If this is a provider that will be used more than once, you should notify
your Provide® Enterprise Administrator so they can add the provider to your list of values.
Search: You may manually type a provider name such as “Smith” in the search
field and then click on the button. All of the provider names with the
first name or last name of “Smith” will appear. When searching for a word or
phrase you can use an asterisk (*) as a wild card. If used at the end of the string like
smith*, it will find all values that start with “smith”. If used at the front like *smith, it
will find all entries that contain “smith” anywhere in the string. You can also use a
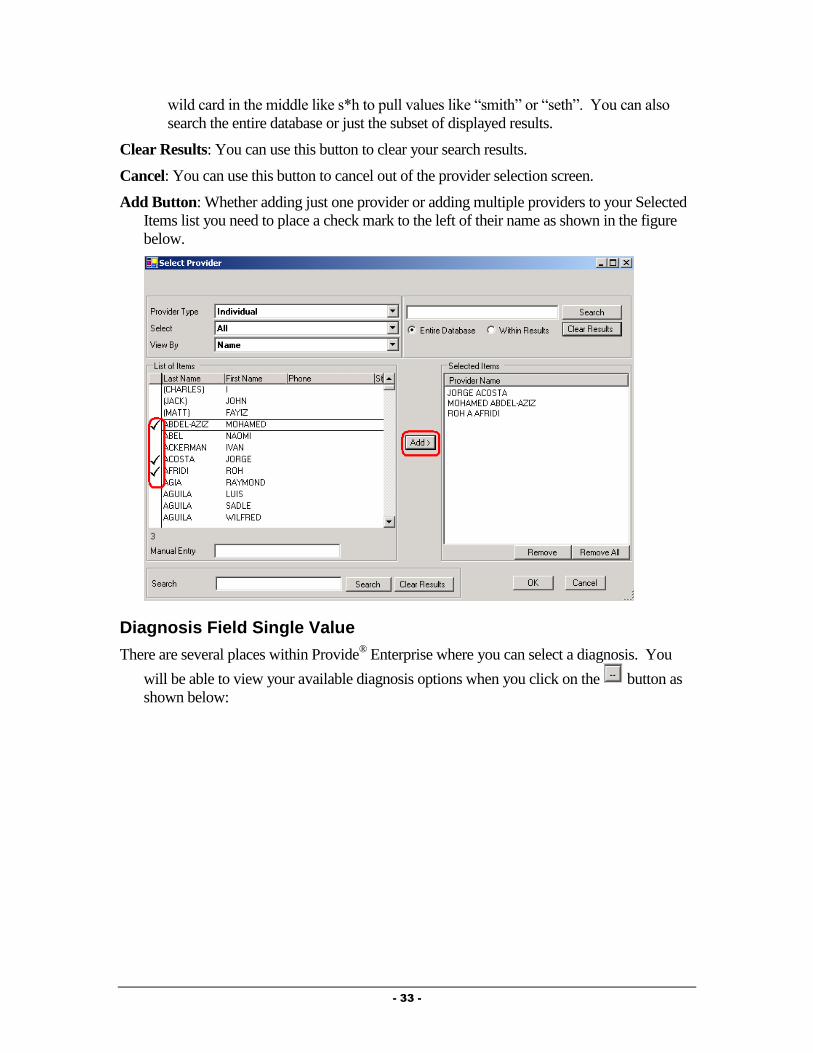
- 33 -
wild card in the middle like s*h to pull values like “smith” or “seth”. You can also
search the entire database or just the subset of displayed results.
Clear Results: You can use this button to clear your search results.
Cancel: You can use this button to cancel out of the provider selection screen.
Add Button: Whether adding just one provider or adding multiple providers to your Selected
Items list you need to place a check mark to the left of their name as shown in the figure
below.
Diagnosis Field Single Value
There are several places within Provide® Enterprise where you can select a diagnosis. You
will be able to view your available diagnosis options when you click on the button as
shown below:

- 34 -
Select Menu: By default this field is set to your “Common” values. You can also
choose to see “All” DSM-IV Axis I, II or III diagnosis types. The “Search”,
“Clear Results”, “OK” and “Cancel” buttons work the same way as described in
the “Provider Field Single Value” except there is no option for manual entry.
Diagnosis Field Multi-value
There are places within Provide® Enterprise where you can select more than one diagnosis
record. You will be able to view your available diagnosis options when you click on the
button as shown below:
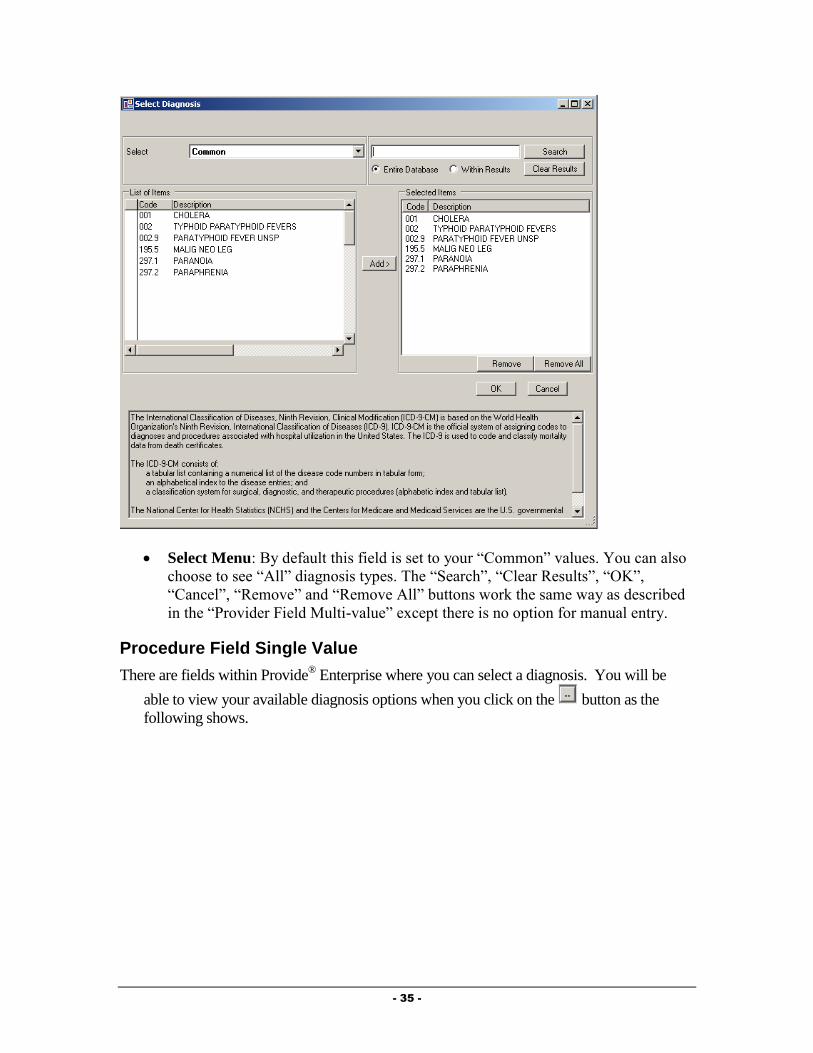
- 35 -
Select Menu: By default this field is set to your “Common” values. You can also
choose to see “All” diagnosis types. The “Search”, “Clear Results”, “OK”,
“Cancel”, “Remove” and “Remove All” buttons work the same way as described
in the “Provider Field Multi-value” except there is no option for manual entry.
Procedure Field Single Value
There are fields within Provide® Enterprise where you can select a diagnosis. You will be
able to view your available diagnosis options when you click on the button as the
following shows.
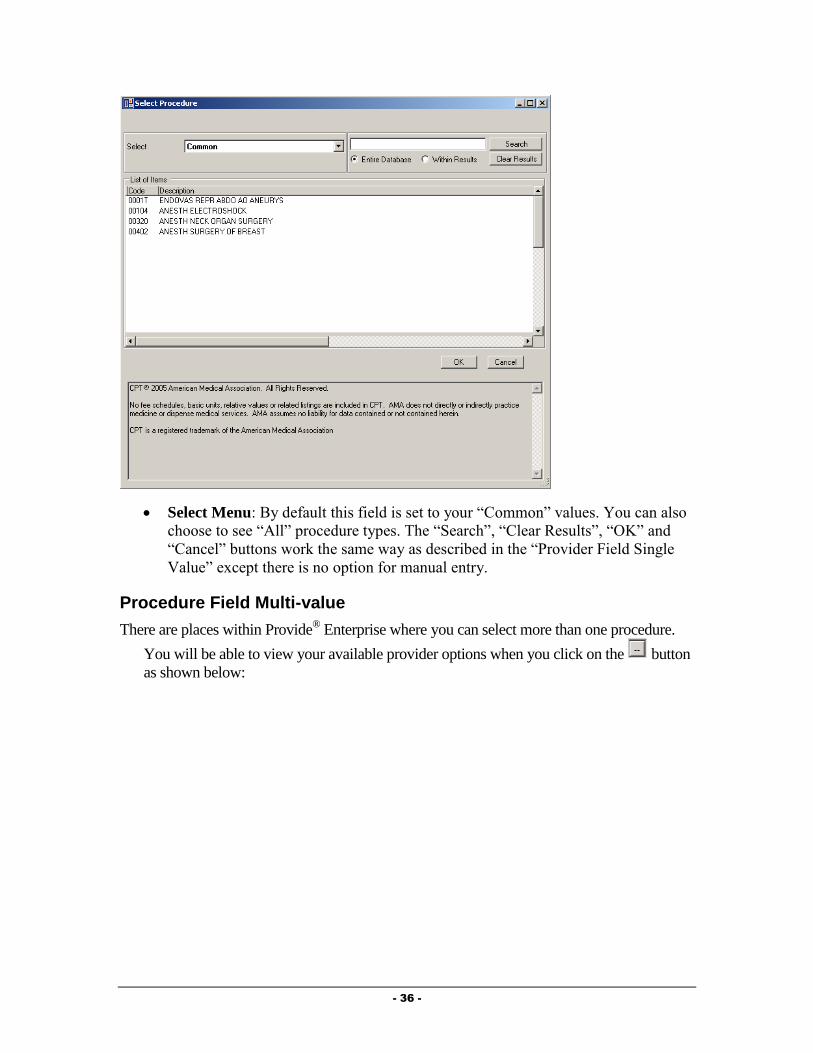
- 36 -
Select Menu: By default this field is set to your “Common” values. You can also
choose to see “All” procedure types. The “Search”, “Clear Results”, “OK” and
“Cancel” buttons work the same way as described in the “Provider Field Single
Value” except there is no option for manual entry.
Procedure Field Multi-value
There are places within Provide® Enterprise where you can select more than one procedure.
You will be able to view your available provider options when you click on the button
as shown below:
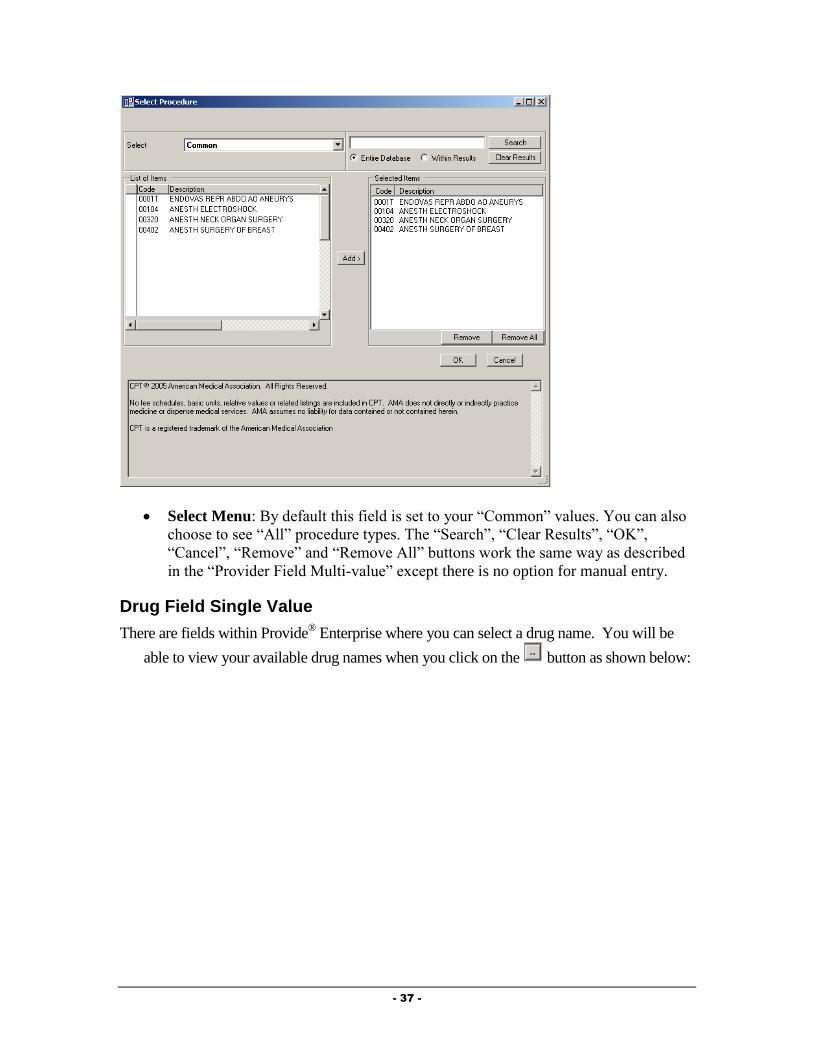
- 37 -
Select Menu: By default this field is set to your “Common” values. You can also
choose to see “All” procedure types. The “Search”, “Clear Results”, “OK”,
“Cancel”, “Remove” and “Remove All” buttons work the same way as described
in the “Provider Field Multi-value” except there is no option for manual entry.
Drug Field Single Value
There are fields within Provide® Enterprise where you can select a drug name. You will be
able to view your available drug names when you click on the button as shown below:
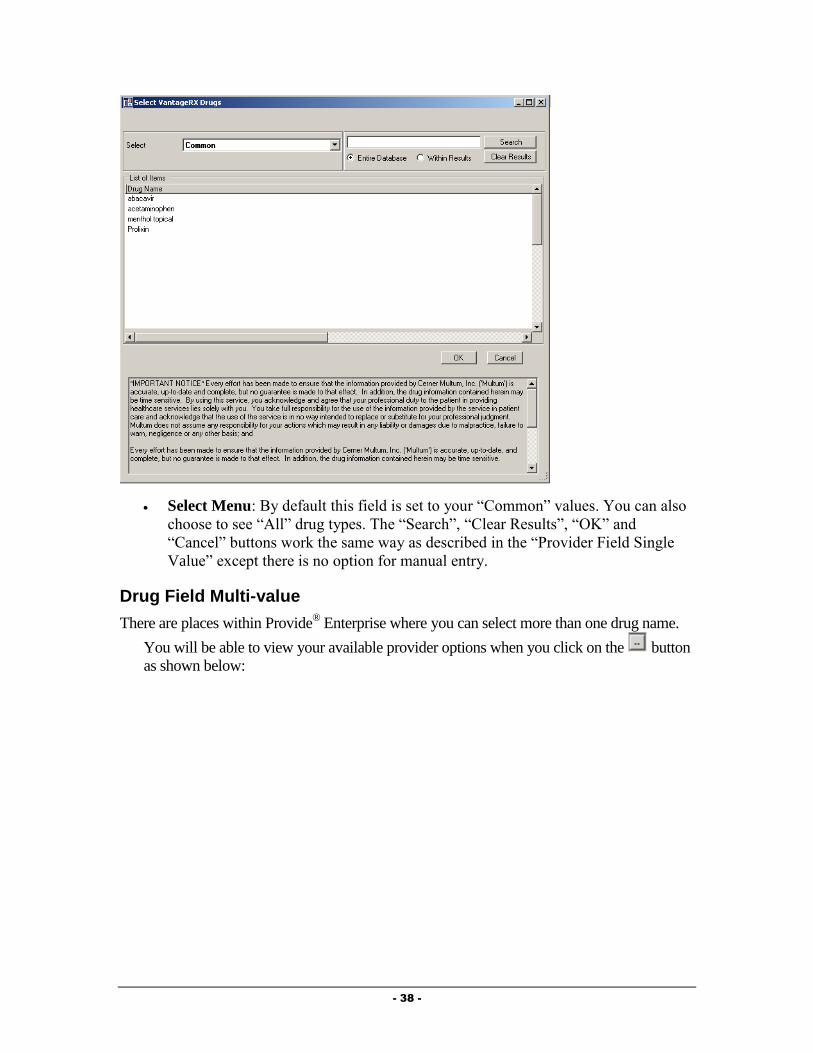
- 38 -
Select Menu: By default this field is set to your “Common” values. You can also
choose to see “All” drug types. The “Search”, “Clear Results”, “OK” and
“Cancel” buttons work the same way as described in the “Provider Field Single
Value” except there is no option for manual entry.
Drug Field Multi-value
There are places within Provide® Enterprise where you can select more than one drug name.
You will be able to view your available provider options when you click on the button
as shown below:

- 39 -
Select Menu: By default this field is set to your “Common” values. You can also
choose to see “All” drug names. The “Search”, “Clear Results”, “OK”, “Cancel”,
“Remove” and “Remove All” buttons work the same way as described in the
“Provider Field Multi-value” except there is no option for manual entry.
Choose Type: This Field allows you to sort drugs by Brand Name, by Drug
Name, Brand Name By Therapeutic Class or Drug Name By Therapeutic Class.
Test Field Single Value
There are fields within Provide® Enterprise where you can select a test name. You will be
able to view your test names when you click on the button as shown below:
Select Menu: By default this field is set to your “Common” values.
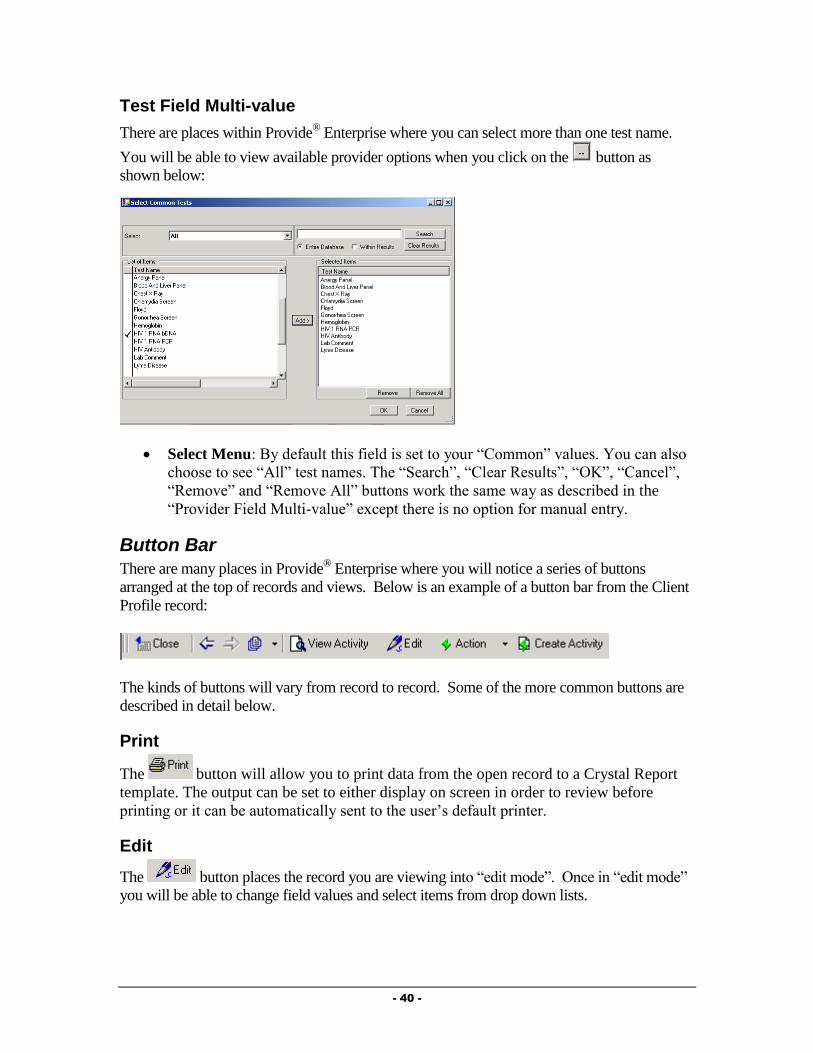
- 40 -
Test Field Multi-value
There are places within Provide® Enterprise where you can select more than one test name.
You will be able to view available provider options when you click on the button as
shown below:
Select Menu: By default this field is set to your “Common” values. You can also
choose to see “All” test names. The “Search”, “Clear Results”, “OK”, “Cancel”,
“Remove” and “Remove All” buttons work the same way as described in the
“Provider Field Multi-value” except there is no option for manual entry.
Button Bar
There are many places in Provide® Enterprise where you will notice a series of buttons
arranged at the top of records and views. Below is an example of a button bar from the Client
Profile record:
The kinds of buttons will vary from record to record. Some of the more common buttons are
described in detail below.
The button will allow you to print data from the open record to a Crystal Report
template. The output can be set to either display on screen in order to review before
printing or it can be automatically sent to the user’s default printer.
Edit
The button places the record you are viewing into “edit mode”. Once in “edit mode”
you will be able to change field values and select items from drop down lists.
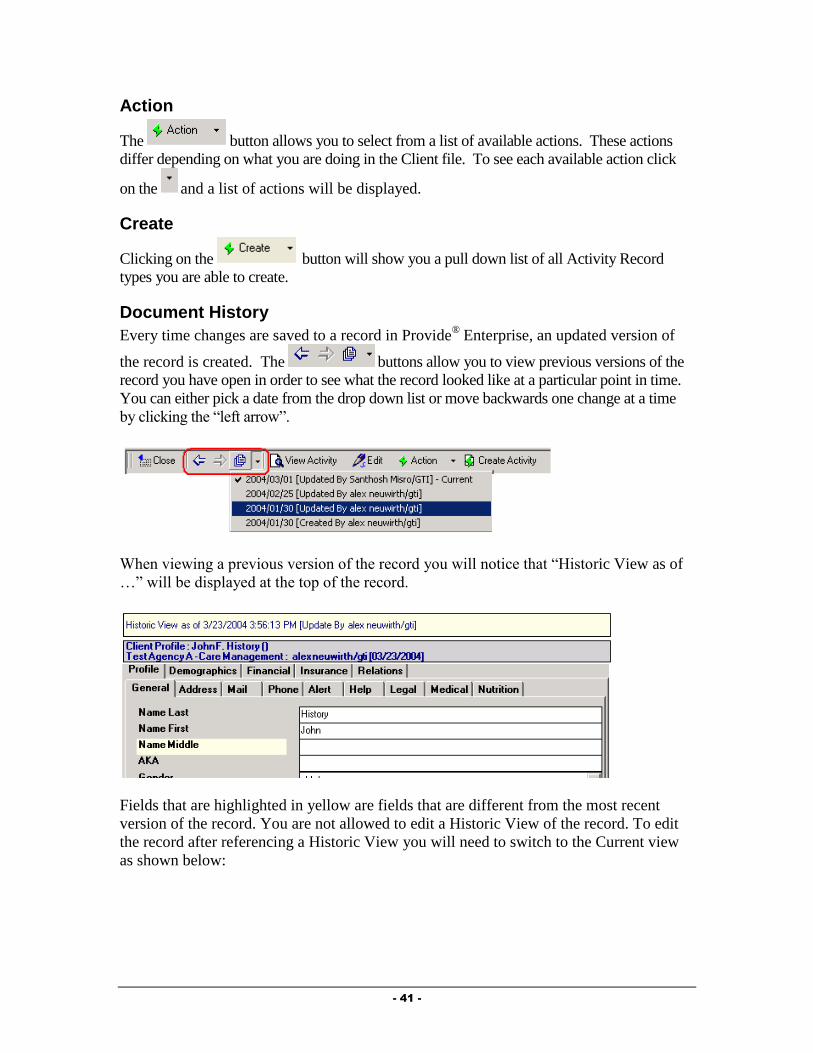
- 41 -
Action
The button allows you to select from a list of available actions. These actions
differ depending on what you are doing in the Client file. To see each available action click
on the and a list of actions will be displayed.
Create
Clicking on the button will show you a pull down list of all Activity Record
types you are able to create.
Document History
Every time changes are saved to a record in Provide® Enterprise, an updated version of
the record is created. The buttons allow you to view previous versions of the
record you have open in order to see what the record looked like at a particular point in time.
You can either pick a date from the drop down list or move backwards one change at a time
by clicking the “left arrow”.
When viewing a previous version of the record you will notice that “Historic View as of
…” will be displayed at the top of the record.
Fields that are highlighted in yellow are fields that are different from the most recent
version of the record. You are not allowed to edit a Historic View of the record. To edit
the record after referencing a Historic View you will need to switch to the Current view
as shown below:

- 42 -
Delete
Provide® Enterprise allows you to delete any Client Sub-Records and Activity Records. Only
the creator of the original document or their supervisor can delete the document. When a
document is deleted it is not truly deleted from the database. It will remain a permanent part
of the client record, but will be “marked” as deleted (similar to putting a line through an
incorrect entry in a paper record) and thus, will not be counted in reports. To delete a record,
follow these steps:
Open the Record in question.
On the Action Bar, you will see the button. Clicking on this button will
activate the following dialog box:
Select the reason you are deleting the chart note and then click on the
button. You will be backed out of the note.
Any time the record is opened in the future, you will see a message similar to that in
the following figure at the top of the record:
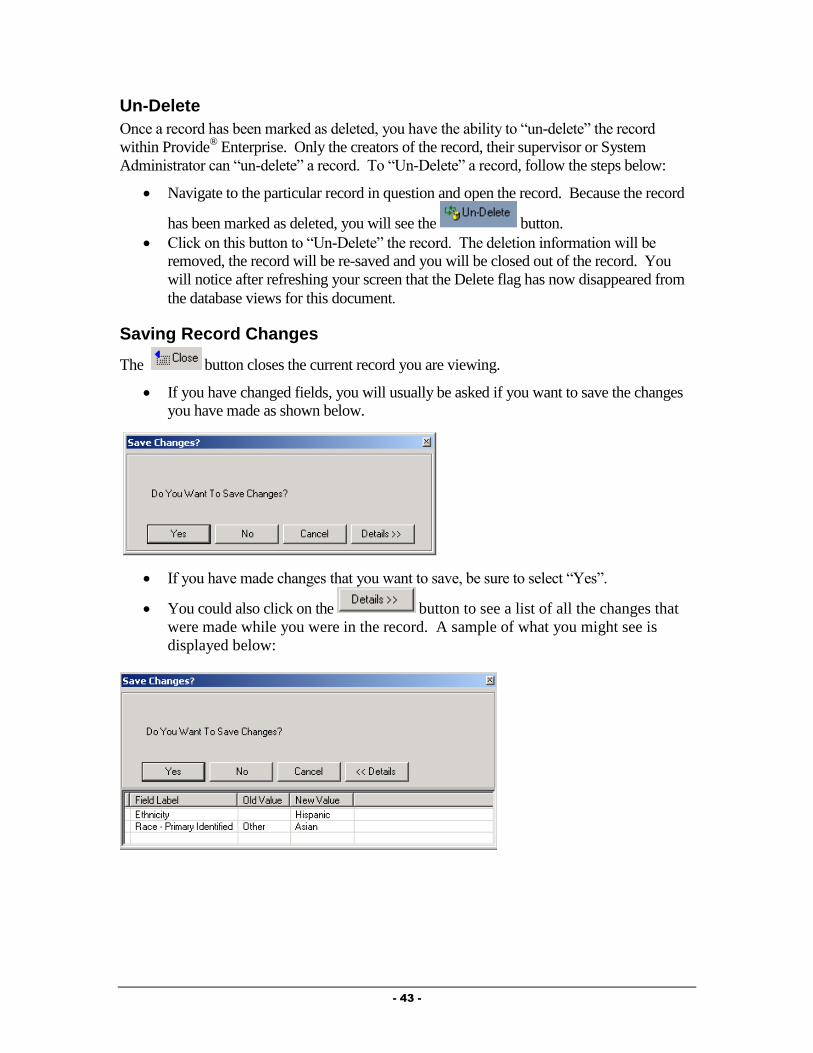
- 43 -
Un-Delete
Once a record has been marked as deleted, you have the ability to “un-delete” the record
within Provide® Enterprise. Only the creators of the record, their supervisor or System
Administrator can “un-delete” a record. To “Un-Delete” a record, follow the steps below:
Navigate to the particular record in question and open the record. Because the record
has been marked as deleted, you will see the button.
Click on this button to “Un-Delete” the record. The deletion information will be
removed, the record will be re-saved and you will be closed out of the record. You
will notice after refreshing your screen that the Delete flag has now disappeared from
the database views for this document.
Saving Record Changes
The button closes the current record you are viewing.
If you have changed fields, you will usually be asked if you want to save the changes
you have made as shown below.
If you have made changes that you want to save, be sure to select “Yes”.
You could also click on the button to see a list of all the changes that
were made while you were in the record. A sample of what you might see is
displayed below:
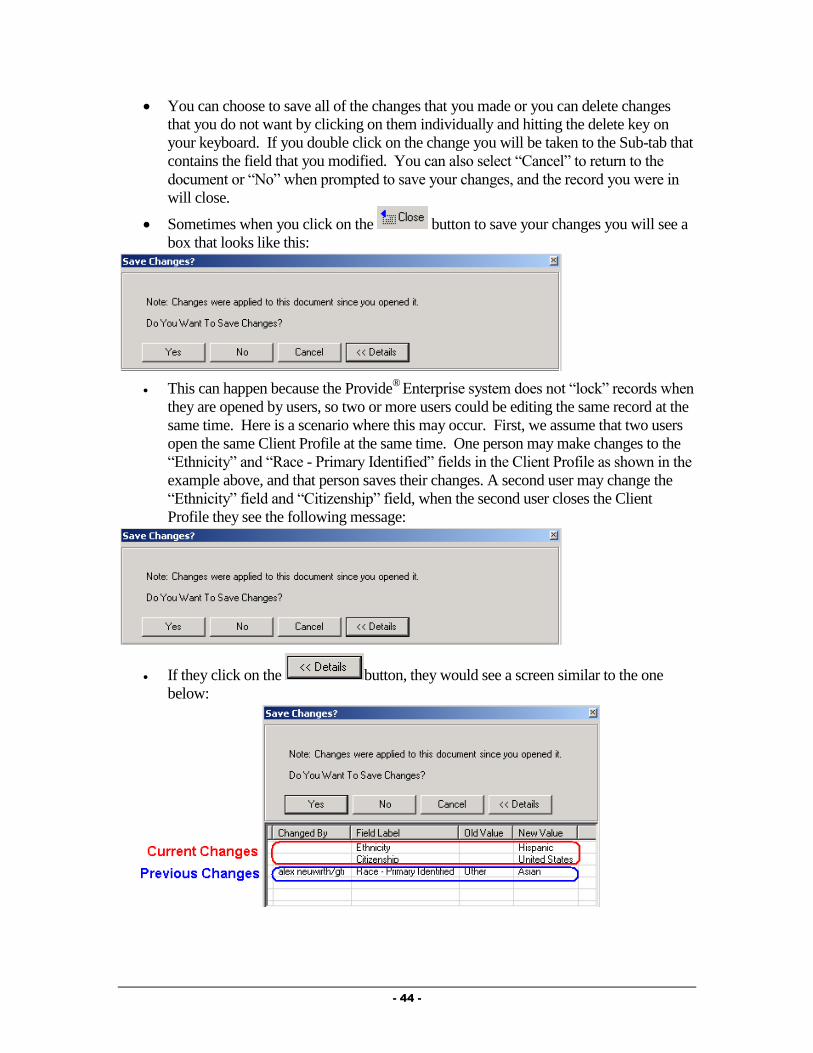
- 44 -
You can choose to save all of the changes that you made or you can delete changes
that you do not want by clicking on them individually and hitting the delete key on
your keyboard. If you double click on the change you will be taken to the Sub-tab that
contains the field that you modified. You can also select “Cancel” to return to the
document or “No” when prompted to save your changes, and the record you were in
will close.
Sometimes when you click on the button to save your changes you will see a
box that looks like this:
This can happen because the Provide®
Enterprise system does not “lock” records when
they are opened by users, so two or more users could be editing the same record at the
same time. Here is a scenario where this may occur. First, we assume that two users
open the same Client Profile at the same time. One person may make changes to the
“Ethnicity” and “Race - Primary Identified” fields in the Client Profile as shown in the
example above, and that person saves their changes. A second user may change the
“Ethnicity” field and “Citizenship” field, when the second user closes the Client
Profile they see the following message:
If they click on the button, they would see a screen similar to the one
below:

- 45 -
The following rules apply to the “Details” display when two users make changes to the same
record:
The first user to save their changes will have the changes applied without any warning
message.
The second user to save their changes will see the warning “Note: Changes were applied
to this document since you opened it. Do You Want To Save Changes?”
If both users make changes to the same field, the second user will only see the original
value of the field and the changes that they made. The “Changed By” box will be blank.
If only the first user changed a field (See “Race - Primary Identified”), the second user
will see both the original value and the new value of that field. The “Changed By” box
will show the name of the user who made the change.
The second user will always see every field they changed and the original value. The
“Changed By” box will be blank.
Any change that is deleted from the “Details” display will result in the original value that
is shown in the “Old Value” field being saved.
If the second user accepts all of the changes and clicks on the “Yes” button, they will
update every field they changed and all unique changes that the first user made.
If the second user selects “No” when prompted “Do You Want To Save Changes?”, only
the first user’s changes will remain.
You can choose to save all of the changes that you or the other person made by clicking on the
button, or you can delete changes that you do not want by clicking on them
individually and hitting the delete key on your keyboard. If you double click on the change,
you will be taken to the Sub-tab that contains the field that you modified. You can also select
“Cancel” to return to the document or “No” when prompted to save your changes and the
record you were in will close.
NOTE: You might also see the “Changes were applied to this document since you opened it”
if you make changes to the Client Profile and then edit the Current address record. This
happens because whenever you save changes to the “Current Address” record the Provide®
Enterprise program automatically updates the fields in the Client Profile then as well. This is
accomplished by saving a new version of the Client Profile with the same values as entered on
the Current Address record.
Save and Create Another
The Button is available in many of the Activity Records within Provide®
Enterprise. When you see this button, you can use it to close and save the current document
you are in and open a blank record of the same type.

- 46 -
Chapter
3
Central Intake Procedures
The following procedures should be followed by Central Intake to document new client
registration, certification, eligibility verification, and recertification.
New Client Registration
The following procedures should be followed at the time a new client is to be entered in the
Provide® Enterprise system.
Registration Verification
Prior to entering the client in the Provide® Enterprise database, you should check to make sure
that the client has not previously been entered in the database. To verify that the client has not
already been registered, follow the steps below.
Find Client
The “Find Client” function will search the entire database to see if the client has previously
been entered in the system and, therefore, has received Ryan White Part A services in the
Broward County community in the past. To do this, follow the steps below:
Select the “Find Client” screen in the menu bar.
This will activate the “Search” criteria screen, seen in the figure below:
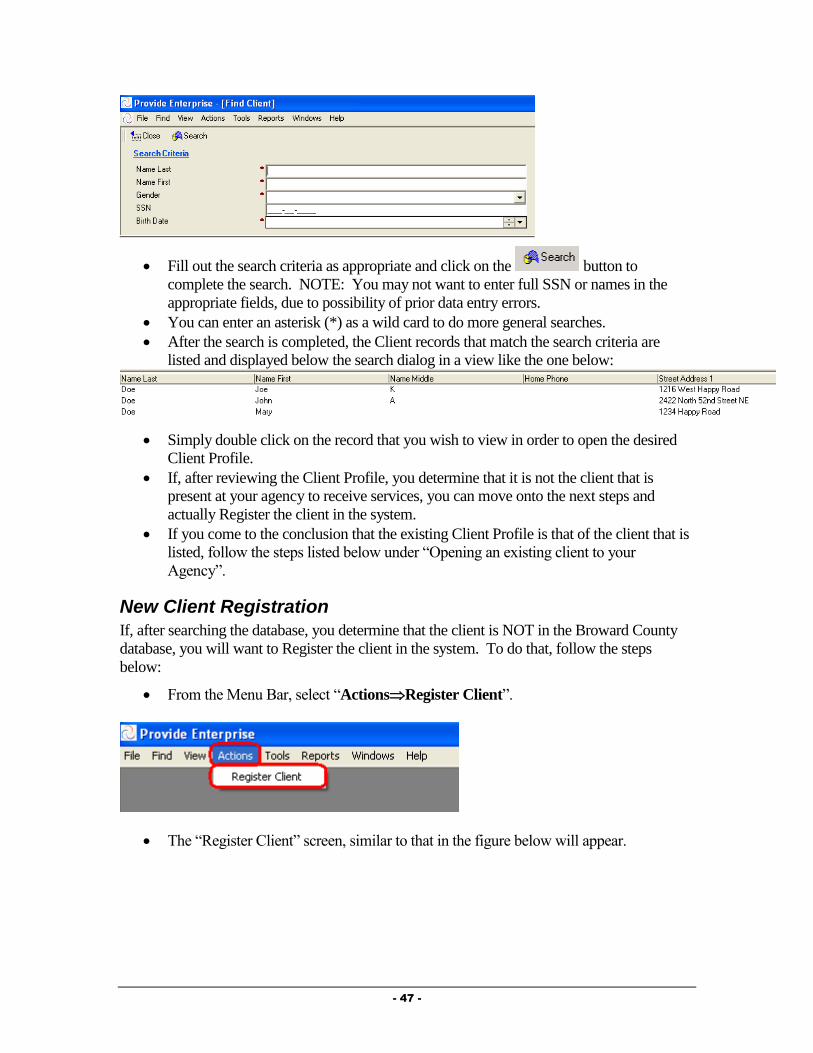
- 47 -
Fill out the search criteria as appropriate and click on the button to
complete the search. NOTE: You may not want to enter full SSN or names in the
appropriate fields, due to possibility of prior data entry errors.
You can enter an asterisk (*) as a wild card to do more general searches.
After the search is completed, the Client records that match the search criteria are
listed and displayed below the search dialog in a view like the one below:
Simply double click on the record that you wish to view in order to open the desired
Client Profile.
If, after reviewing the Client Profile, you determine that it is not the client that is
present at your agency to receive services, you can move onto the next steps and
actually Register the client in the system.
If you come to the conclusion that the existing Client Profile is that of the client that is
listed, follow the steps listed below under “Opening an existing client to your
Agency”.
New Client Registration
If, after searching the database, you determine that the client is NOT in the Broward County
database, you will want to Register the client in the system. To do that, follow the steps
below:
From the Menu Bar, select “ActionsRegister Client”.
The “Register Client” screen, similar to that in the figure below will appear.

- 48 -
Fill out the fields as appropriate. NOTE: The URN is automatically calculated based
on the First and Last Name, Date of Birth, and Gender of the client you are registering
in the system.
The “Agency Assigned Client ID” should reflect the ID number that is used at your
agency to identify clients. NOTE: You should always prepend your agency identifier
with the abbreviation of your agency (i.e. BH, SBHD, NBHD, MDEI, etc.). If your
agency is one of the medical providers that uses the URN as your agency identifier,
you can click on the button to the right of this field to compute the ID number. In
addition, if your agency uses a formula to assign ID number to your clients, GTI can
build the formula into this button (as long as the fields used to compute your ID
number are in the Register Client screen). Contact the Provide® Help Desk for more
information.
Once all appropriate fields have been entered, click on the button on
the button bar.
At this time, the system will start the Duplicate Check process to see if this client may
already be in the database.
If there is already a client in the system with the same Social Security Number,
Agency Assigned Client ID, or URN, a message similar to the following will appear
and your registration will be cancelled.
When this occurs, you should follow the steps under “Registration Verification”
(earlier in this chapter) to find the Client Profile. Once you have found the existing
profile, you can follow the section entitled “Opening an Existing Client to your
Agency” later in this guide to open the client to your agency.

- 49 -
If the system believes (based on the name, date of birth, gender or address) that this
client is possibly already in the system, a dialog box similar to the following will
appear:
If you are sure that the client you are registering is NOT one of the clients shown in the
duplicate check window, you can click on the button to proceed with the
registration.
If you believe that one of the clients listed in the duplicate check window IS the client you
are trying to register, simply place a checkmark next to the client that is a duplicate and
click on the button to go to that Client Profile rather than registering a
duplicate client.
If you continue with the registration, a new Client Profile will appear.
Schedule Intake Appointment
Once the client has been registered in the system, you should schedule the Client for a formal
intake process if the Client is not currently sitting in front of an Intake worker. Create an
Appointment record to document where, when and with whom the Intake will be completed.
Adding a new appointment record can be done by following the steps below:
From within the Client Profile, select the button and select
“Appointment” to open an appointment record similar to that in the figure below:
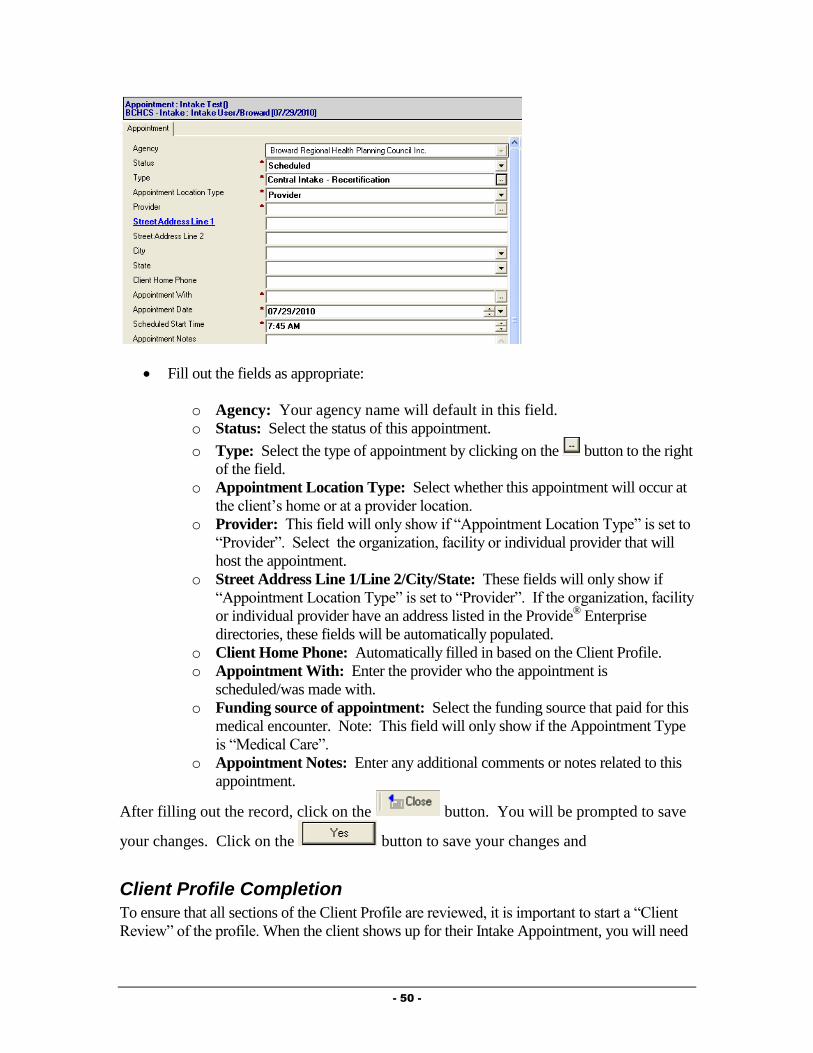
- 50 -
Fill out the fields as appropriate:
o Agency: Your agency name will default in this field.
o Status: Select the status of this appointment.
o Type: Select the type of appointment by clicking on the button to the right
of the field.
o Appointment Location Type: Select whether this appointment will occur at
the client’s home or at a provider location.
o Provider: This field will only show if “Appointment Location Type” is set to
“Provider”. Select the organization, facility or individual provider that will
host the appointment.
o Street Address Line 1/Line 2/City/State: These fields will only show if
“Appointment Location Type” is set to “Provider”. If the organization, facility
or individual provider have an address listed in the Provide® Enterprise
directories, these fields will be automatically populated.
o Client Home Phone: Automatically filled in based on the Client Profile.
o Appointment With: Enter the provider who the appointment is
scheduled/was made with.
o Funding source of appointment: Select the funding source that paid for this
medical encounter. Note: This field will only show if the Appointment Type
is “Medical Care”.
o Appointment Notes: Enter any additional comments or notes related to this
appointment.
After filling out the record, click on the button. You will be prompted to save
your changes. Click on the button to save your changes and
Client Profile Completion
To ensure that all sections of the Client Profile are reviewed, it is important to start a “Client
Review” of the profile. When the client shows up for their Intake Appointment, you will need

- 51 -
to complete the Client Profile. NOTE: There are a number of fields in the Client Profile that
are NOT required to save the document; however, they are required to determine eligibility
and bill for the client. Because of this, the “Check for Completeness” function, which will be
described later in this guide, was created.
Start a Client Profile Review
To start a Review, follow the steps below:
On the Client Profile Button Bar, select [Client Profile Button BarActionStart
Client Review].
The screen will refresh and a button will appear on each section of the profile, similar
to that in the figure below:
Review each tab and sub-tab of the Client Profile, filling out all applicable
information. The sections of the Client Profile will be discussed in the next section of
this guide. After reviewing each section and updating the appropriate information,
verify that a complete review of the section has been completed by clicking the
button. [Click Button
Click When Section Reviewed].
Completing the Client Profile
This section of the guide will review all of the sections of the client profile.
Profile Section - General Sub-Tab
The General Tab of the profile collects basic information related to who the client is.
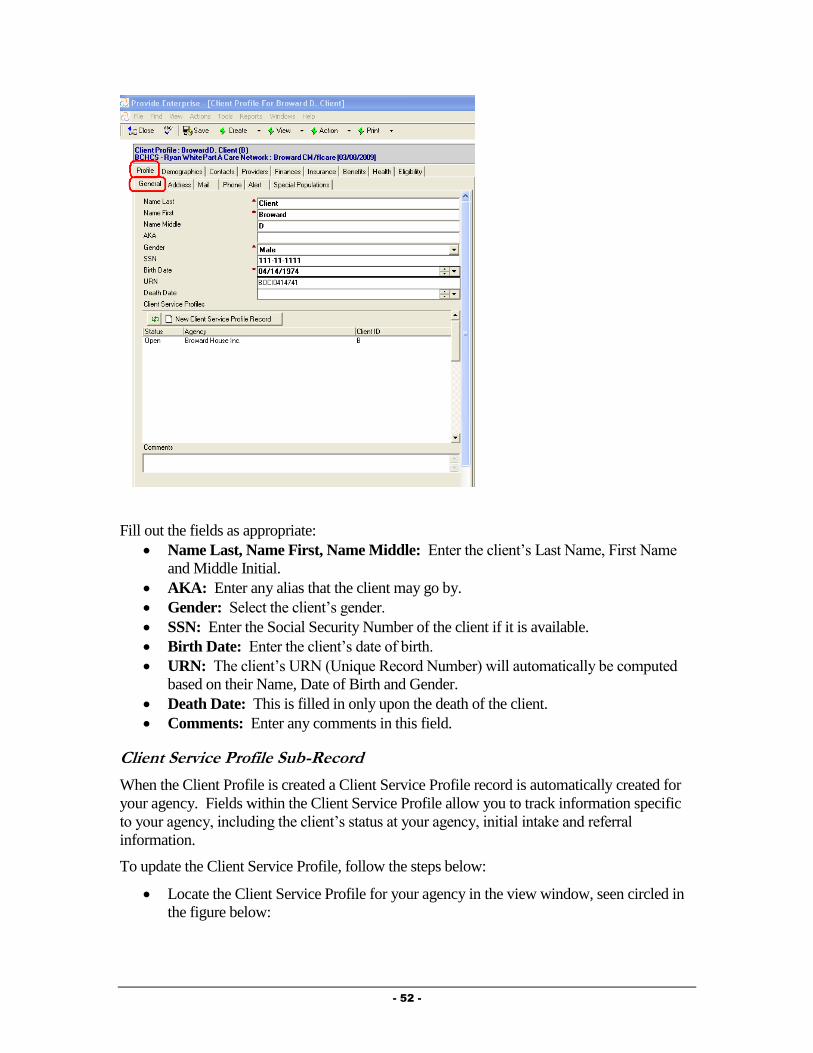
- 52 -
Fill out the fields as appropriate:
Name Last, Name First, Name Middle: Enter the client’s Last Name, First Name
and Middle Initial.
AKA: Enter any alias that the client may go by.
Gender: Select the client’s gender.
SSN: Enter the Social Security Number of the client if it is available.
Birth Date: Enter the client’s date of birth.
URN: The client’s URN (Unique Record Number) will automatically be computed
based on their Name, Date of Birth and Gender.
Death Date: This is filled in only upon the death of the client.
Comments: Enter any comments in this field.
Client Service Profile Sub-Record
When the Client Profile is created a Client Service Profile record is automatically created for
your agency. Fields within the Client Service Profile allow you to track information specific
to your agency, including the client’s status at your agency, initial intake and referral
information.
To update the Client Service Profile, follow the steps below:
Locate the Client Service Profile for your agency in the view window, seen circled in
the figure below:
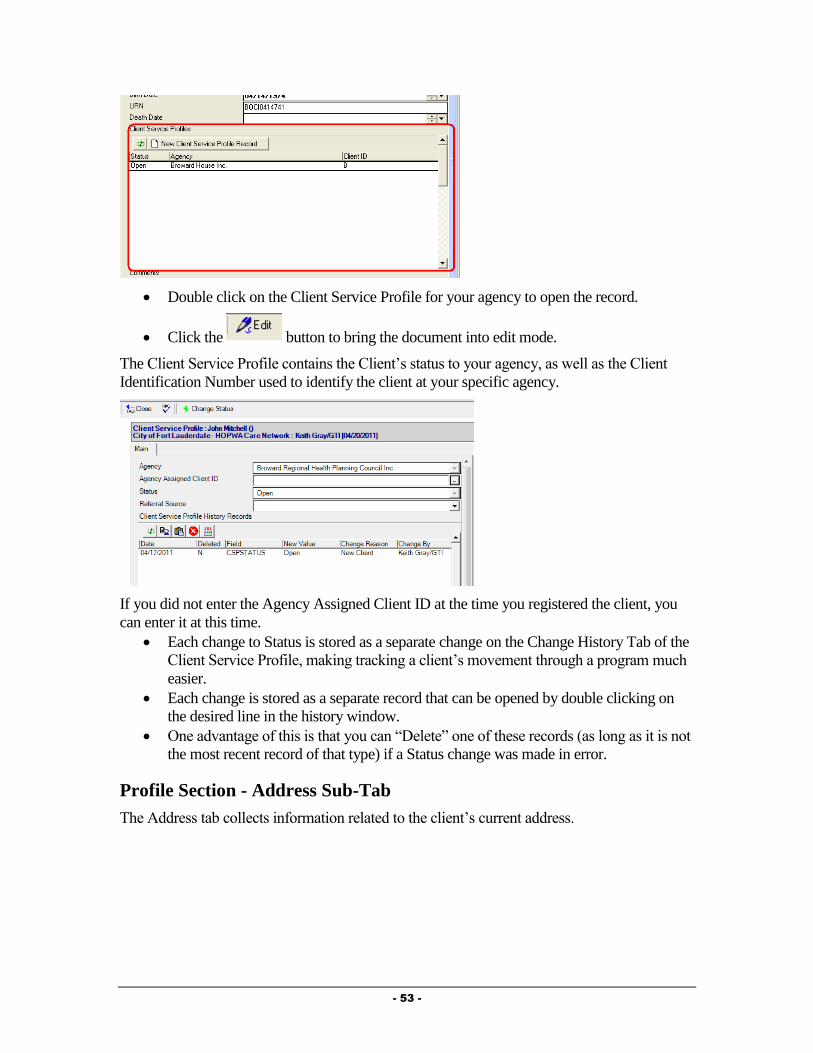
- 53 -
Double click on the Client Service Profile for your agency to open the record.
Click the button to bring the document into edit mode.
The Client Service Profile contains the Client’s status to your agency, as well as the Client
Identification Number used to identify the client at your specific agency.
If you did not enter the Agency Assigned Client ID at the time you registered the client, you
can enter it at this time.
Each change to Status is stored as a separate change on the Change History Tab of the
Client Service Profile, making tracking a client’s movement through a program much
easier.
Each change is stored as a separate record that can be opened by double clicking on
the desired line in the history window.
One advantage of this is that you can “Delete” one of these records (as long as it is not
the most recent record of that type) if a Status change was made in error.
Profile Section - Address Sub-Tab
The Address tab collects information related to the client’s current address.

- 54 -
Fill out fields as appropriate:
Date Effective: Provide® Enterprise asks the effective date of the address because it
will automatically generate an Address record (any time the address information is
edited and the profile is saved) to allow tracking of address history over time.
Housing Type: Select the type of housing related to this address.
Street Address 1 and 2: Enter the client’s street address. Line 2 is meant to track the
apartment number if needed. NOTE: Address one is highlighted in blue. If you click
on this highlighted field, the system will bring up Google Maps for this address.
[Click Field PromptStreet Address 1].
County/City/State/Zip Code: Enter the county, city, state and zip code related to this
address.
Commission District: Enter the client’s commission district. NOTE: Commission
District is highlighted in blue. If you do not know the client’s district, you can click
on this highlighted field and the system will open the Broward County Commission
web site to help you to determine the district.
[Click Field PromptCommission District].
Email Address: Enter the client’s email address.
Comments: Enter any other miscellaneous comments related to this address.
Profile Section - Mail Sub-Tab
The mail tab collects the client’s current mailing address information.
Fill out the fields as appropriate:
OK to Send Mail?: Select whether or not the client agrees to have mail sent to them.
NOTE: If you’re running mailing labels out of Provide® Enterprise and this field is set to
“No”, the client will not have a mailing label printed. In addition, if you select “Yes” in
this field and do not enter a Mailing Address, a blank label will be printed for the client.
Mailing Address Line 1/2/3/4: The mailing address fields should contain the address
that the client wants mail sent to. These fields should look exactly how you want them

- 55 -
formatted in a mailing label. (For example, Line 1 should contain the Client Name).
If the client’s mailing address is the same as their street address, you can click on the
blue highlighted field, Mailing Address Line 1 to copy the Street Address into the
appropriate Mailing Address fields. [Click Field PromptMailing Address Line
1].
Profile Section - Phone Sub-Tab
On the Phone tab, you can enter contact phone numbers for the client.
Fill out the fields as appropriate:
Home Phone: Enter the client’s home phone number.
Home Phone Message Type: Enter what type of phone message can be left for the
client at this number.
Office Phone: Enter the client’s office phone number.
Office Phone Message Type: Enter what type of phone message can be left for the
client at this number.
Other Phone: Enter any other phone number for the client.
Other Phone Message Type: Enter what type of phone message can be left for the
client at this number.
Profile Section - Alert Sub-Tab
The Alert section of the client file is used to ensure any staff dealing with the client will
receive any vital information immediately upon opening the client file.
Client Profile Complete?: This field will be automatically computed, based on
whether or not all fields necessary for billing and reporting to BCHCS.

- 56 -
Pop-up Alert Message: Information you place in the Pop-up Alert Message field
will appear in a dialog box that will pop-up as the client file is opened.
Client Required Tasks: Any Required Actions that are applicable for the client will
show in this section of the profile.
Profile Section - Special Populations Sub-Tab
The Special Populations Section of the Client Profile contains fields necessary for reporting
specifics related to the special populations served in the Broward County EMA.
Fill out the fields as appropriate:
Commercial Sex Worker – Status: Select whether or not the client has a history of
working as a Commercial Sex Worker.
Commercial Sex Worker - Date Last Worked: This question will only appear if you
selected “Current” or “Past” for the field above. Enter the Date the client last worked
as a Commercial Sex Worker.
Crack Cocaine Use – Status: Select whether or not the client has a history of using Crack
Cocaine.
Crack Cocaine User - Date Last Used: This question will only appear if you selected
“Current” or “Past” for the field above. Enter the Date the client last used Crack
Cocaine.
Injection Drug Use – Status: Select whether or not the client has a history of using
Injection Drugs.
Injection Drug Use - Date Last Used: This question will only appear if you selected
“Current” or “Past” for the field above. Enter the Date the client last used Injection
Drugs.
Incarceration History – Status: Select whether or not the client has a history of
Incarceration.
Incarceration History - Date Last Released: This question will only appear if you
selected “Current” or “Past” for the field above. Enter the Date the client was last
incarcerated.
Haitian?: Select whether or not the client identifies as Haitian.
Moved to Broward from Haiti due to earthquake? Select whether or not the client
moved to Broward County due to the 2009 Haiti earthquake.
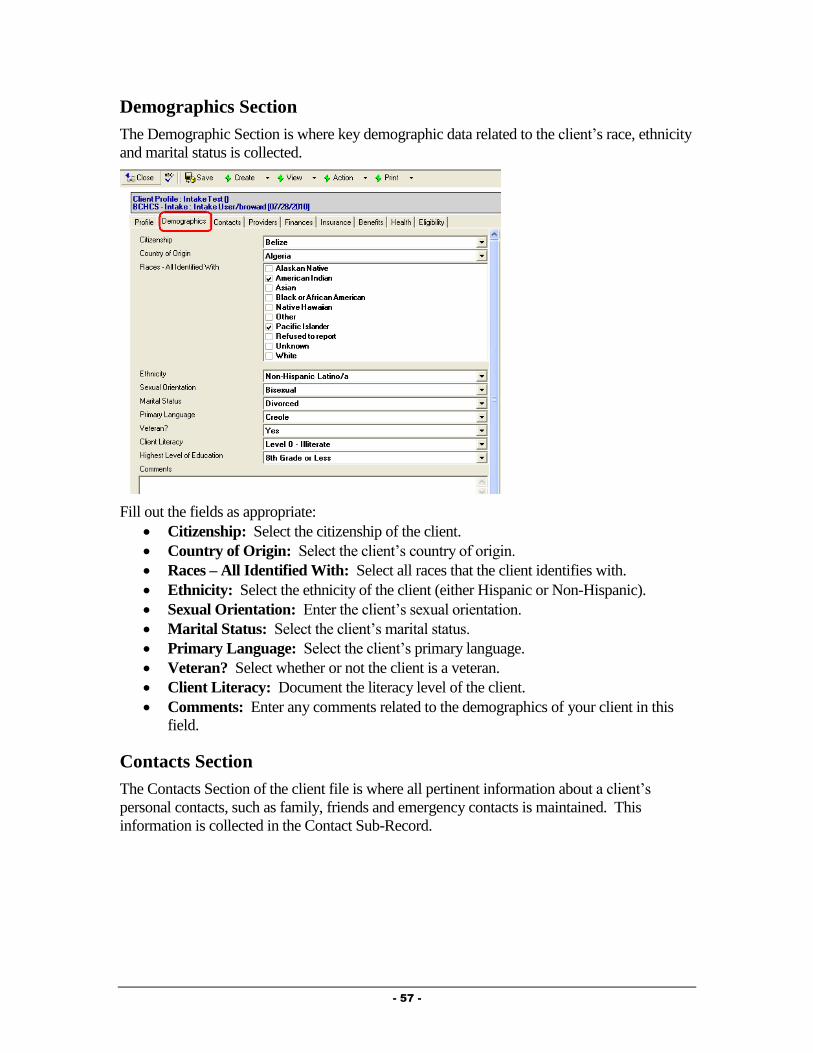
- 57 -
Demographics Section
The Demographic Section is where key demographic data related to the client’s race, ethnicity
and marital status is collected.
Fill out the fields as appropriate:
Citizenship: Select the citizenship of the client.
Country of Origin: Select the client’s country of origin.
Races – All Identified With: Select all races that the client identifies with.
Ethnicity: Select the ethnicity of the client (either Hispanic or Non-Hispanic).
Sexual Orientation: Enter the client’s sexual orientation.
Marital Status: Select the client’s marital status.
Primary Language: Select the client’s primary language.
Veteran? Select whether or not the client is a veteran.
Client Literacy: Document the literacy level of the client.
Comments: Enter any comments related to the demographics of your client in this
field.
Contacts Section
The Contacts Section of the client file is where all pertinent information about a client’s
personal contacts, such as family, friends and emergency contacts is maintained. This
information is collected in the Contact Sub-Record.

- 58 -
The fields on this tab are as follows:
Household Member Definition: Clicking on this field will bring up a dialog box
similar to that in the figure below, providing you with the Ryan White Household
Member definition. Clicking on the button will close the definition.
Total Household Size: Clicking on this field will calculate the total household size
from any contact sub-records entered in the client file.
Creating a New Contact Record
For each household member and emergency contact, a Contact Sub-Record should be created.
To create a new Contact sub-record, follow these steps:
From within the Contacts tab of the Client Profile, click the button on
the action bar.
This will activate a blank Contact record (similar to the one seen below):
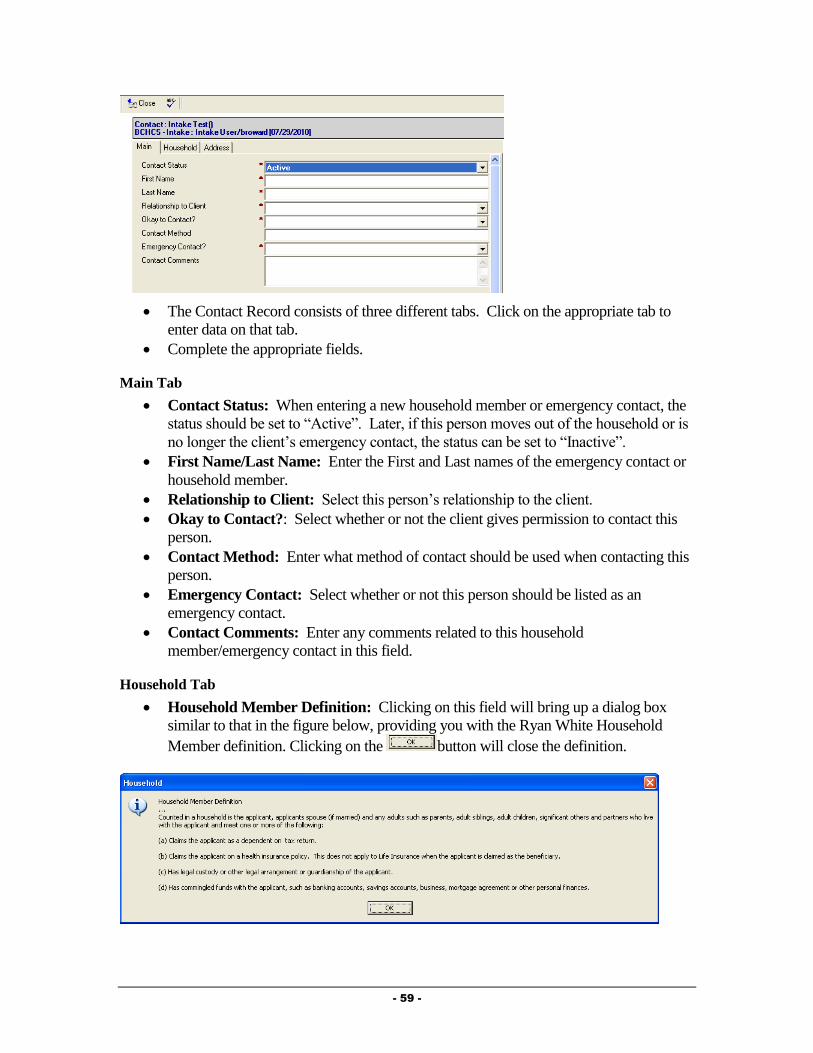
- 59 -
The Contact Record consists of three different tabs. Click on the appropriate tab to
enter data on that tab.
Complete the appropriate fields.
Main Tab
Contact Status: When entering a new household member or emergency contact, the
status should be set to “Active”. Later, if this person moves out of the household or is
no longer the client’s emergency contact, the status can be set to “Inactive”.
First Name/Last Name: Enter the First and Last names of the emergency contact or
household member.
Relationship to Client: Select this person’s relationship to the client.
Okay to Contact?: Select whether or not the client gives permission to contact this
person.
Contact Method: Enter what method of contact should be used when contacting this
person.
Emergency Contact: Select whether or not this person should be listed as an
emergency contact.
Contact Comments: Enter any comments related to this household
member/emergency contact in this field.
Household Tab
Household Member Definition: Clicking on this field will bring up a dialog box
similar to that in the figure below, providing you with the Ryan White Household
Member definition. Clicking on the button will close the definition.

- 60 -
Household Member?: Select whether or not this person is a member of the client’s
household.
The following fields will only show if the “Household Member” field is set to “Yes”.
Date of Birth: Enter the household members date of birth.
Gender: Select the gender of this household member.
Race – All Self Identified: Select all races that the household member identifies
with.
Ethnicity: Enter the household member’s ethnicity.
Monthly Income: This field will only show if the above field is set to “Yes”. Enter
the household member’s monthly income. If they do not have any income, simply
enter 0.
Social Security Number: Enter the Social Security Number.
Citizenship: Select the citizenship of this household member.
Marital Status: Select the marital status of this individual.
Attends School?: Document whether or not this person attends school.
Last Grade Completed: Select the last grade that this person completed.
Buys and eats food with you? Select whether or not this individual buys and/or eats
food with the client.
Address Tab
Enter the address and phone information for this contact person, if appropriate.
After all appropriate fields have been completed, select the button to save the
information and return to the client file.
NOTE: If you need to edit the Contact record in the future, navigate to the Contacts Section
of the Client Profile. In the Contact Records view window, double click on the record to edit
with your mouse. Once the record is open you can do such things as view, edit or delete the
record.
Providers Section
The Providers section of the client file is where you can identify various individuals,
organizations and facilities involved with the client’s care. You can associate an unlimited
number of providers to a client file.

- 61 -
Creating Provider Relationship Records
To create a Provider Relationship record, follow these steps:
From within the Providers tab of the Client Profile, click the button on the
action bar.
This will activate a blank Provider Relationship record, similar to the one seen below:
Enter the appropriate information in the record.
o Provider Name: Select the name of the individual, organization or facility
that you wish to associate with this client. To enter the name, click on the
button to activate the Provider Selection Dialog. For information on how to
use this dialog box, see Chapter 2 of this Guide. NOTE: Once this record has
been saved, clicking on the Blue Highlighted Provider Name field will bring
you to the details related to this provider (such as phone number, email
address, etc.)
o Provider Relationship: Enter the relationship of this individual to your
client. To do this, click on the button to activate the picklist appropriate to
the type of provider you are entering.

- 62 -
o Provider Relationship Start Date/End Date: Enter the date this provider
started working with the client. The End Date will remain blank while the
provider is actively working with the client.
Once you have finished, select the button to save the Provider Relationship
document.
The new Provider Relationship document will now appear in the Client Provider
Relationship Records view window.
NOTE: If you need to edit the Provider Relationship record in the future, navigate to the
Providers Section of the Client Profile. In the Client Provider Relationship Records view
window, double click on the record to edit with your mouse. Once the record is open you can
do such things as view, edit or delete the record.
Finances Section - Employment Sub-Tab
The Employment Sub-Tab of the client file is where all information relating to current and
past employment is maintained.
Provide® Enterprise allows you to track any changes the client might have in employment. In
addition, you can track detailed information about each employment using documentation
created as a separate Sub-Record.
Fill out the client’s current employment status. Any comments related to the client’s
employment status can be entered in the “Comments” section.
If the client is employed, document the employment in the Employment Sub-Record.
NOTE: You can NOT document employment income unless you complete an
Employment Sub-Record.
Creating New Employment Records
To create a new Employment Sub-Record, follow these procedures:

- 63 -
On the Action Bar select the button to activate a blank Employment Record
similar to the one following.
Fill out fields as appropriate:
o Employment Status: Select whether this is a current or past employer.
o Date Started/Ended: Enter the date the client started working at this job. If
the status is set to “Past”, you can enter the End Date in this field.
o Employer Name: Enter the name of the employer.
o Monthly Gross Amount: Enter the monthly income for the client from this
employer.
o Employer Address/Phone/Title/Job Description: Enter more detailed
information in these fields if appropriate.
Once you have finished, select the button to save the Employment sub-
record.
NOTE: If you need to edit the Employment sub-record in the future, navigate to the Income
Section and Employment Sub-Tab of the Client Profile. In the Client Employment Records
view window, double click on the record to edit with your mouse. Once the record is open you
can do such things as view, edit or delete the record.
Finances Section - Income Sub-Tab
Information on any income the client may have is maintained in the Income section of the
client file, as the following figure shows.
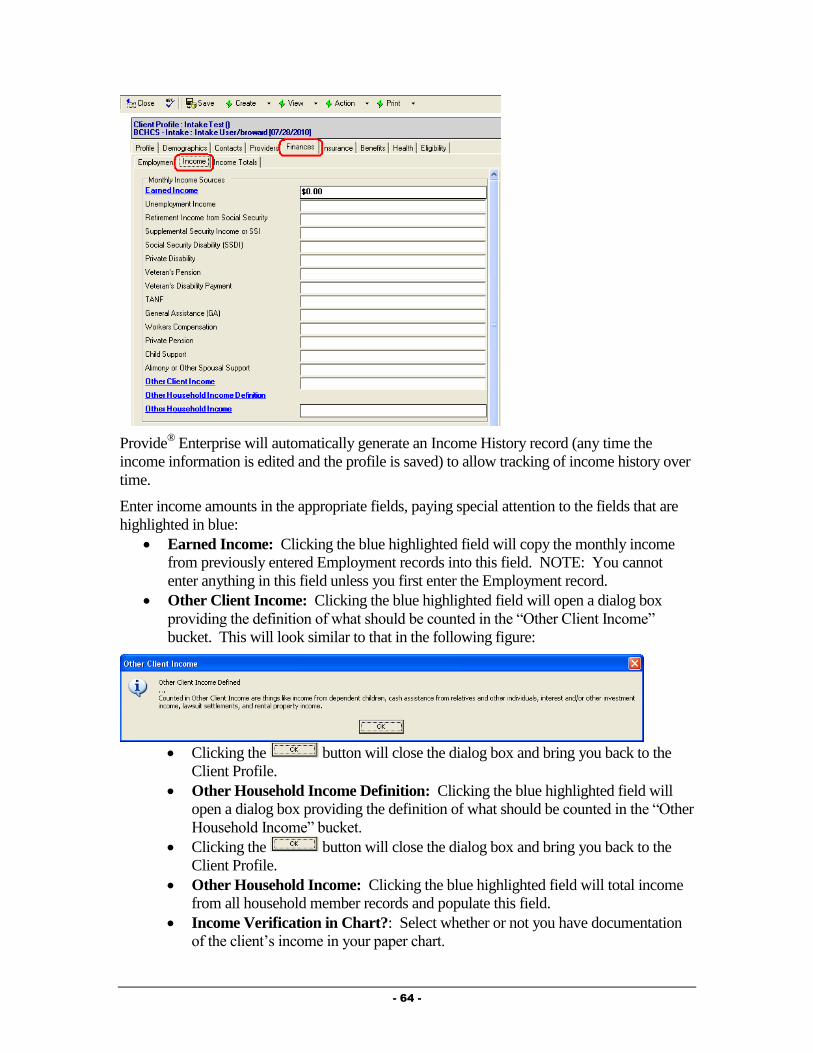
- 64 -
Provide® Enterprise will automatically generate an Income History record (any time the
income information is edited and the profile is saved) to allow tracking of income history over
time.
Enter income amounts in the appropriate fields, paying special attention to the fields that are
highlighted in blue:
Earned Income: Clicking the blue highlighted field will copy the monthly income
from previously entered Employment records into this field. NOTE: You cannot
enter anything in this field unless you first enter the Employment record.
Other Client Income: Clicking the blue highlighted field will open a dialog box
providing the definition of what should be counted in the “Other Client Income”
bucket. This will look similar to that in the following figure:
Clicking the button will close the dialog box and bring you back to the
Client Profile.
Other Household Income Definition: Clicking the blue highlighted field will
open a dialog box providing the definition of what should be counted in the “Other
Household Income” bucket.
Clicking the button will close the dialog box and bring you back to the
Client Profile.
Other Household Income: Clicking the blue highlighted field will total income
from all household member records and populate this field.
Income Verification in Chart?: Select whether or not you have documentation
of the client’s income in your paper chart.

- 65 -
Income Verification Source: This field will appear only if the above field is set
to “Yes”. Select the source of income verification that you have on file for the
client.
Finances Section - Income Totals Sub-Tab
This tab will show the household monthly income total and poverty level.
Household Monthly Income: Clicking the blue highlighted field will calculate the
Household Monthly Income and Household Poverty Level based on the Income
amounts entered on the Income Sub-Tab and the Household Size entered on the
Contacts Section.
Did You Confirm Client Has Zero Income?: This field will only show if the
Household Monthly Income field is blank or set to 0. If the client has no source(s) of
income and you have verified such, set this field to “Yes”.
Comments: Enter any comments related to the client/household income here.
Insurance Section - Public Health Coverage
The Insurance section of the client file is where you track the client’s insurance status, as well
as detailed information about any private insurance or public benefits the client may have.
Checking Medicaid Enrollment
When you reach the Insurance tab of the Client Profile select the Check Medicaid Enrollment
Action. To do this, follow the steps below.
Within the Client Profile, select the Action Button and pick “Check Medicaid
Enrollment”.
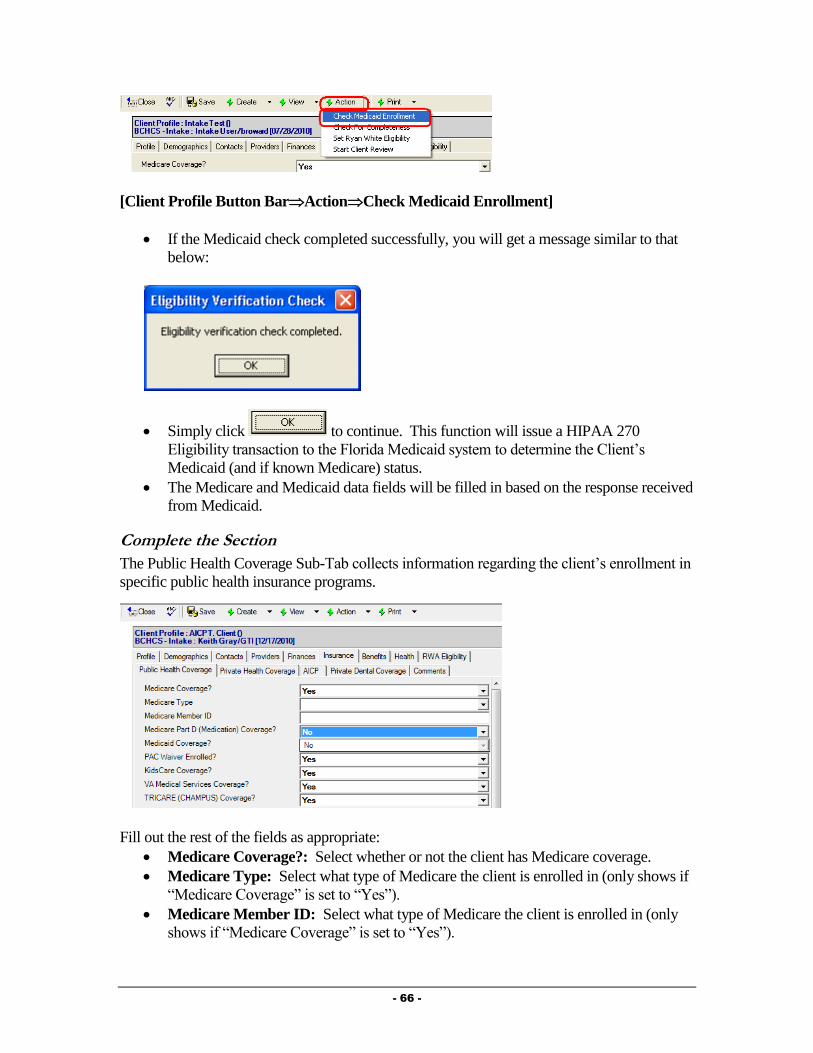
- 66 -
[Client Profile Button BarActionCheck Medicaid Enrollment]
If the Medicaid check completed successfully, you will get a message similar to that
below:
Simply click to continue. This function will issue a HIPAA 270
Eligibility transaction to the Florida Medicaid system to determine the Client’s
Medicaid (and if known Medicare) status.
The Medicare and Medicaid data fields will be filled in based on the response received
from Medicaid.
Complete the Section
The Public Health Coverage Sub-Tab collects information regarding the client’s enrollment in
specific public health insurance programs.
Fill out the rest of the fields as appropriate:
Medicare Coverage?: Select whether or not the client has Medicare coverage.
Medicare Type: Select what type of Medicare the client is enrolled in (only shows if
“Medicare Coverage” is set to “Yes”).
Medicare Member ID: Select what type of Medicare the client is enrolled in (only
shows if “Medicare Coverage” is set to “Yes”).
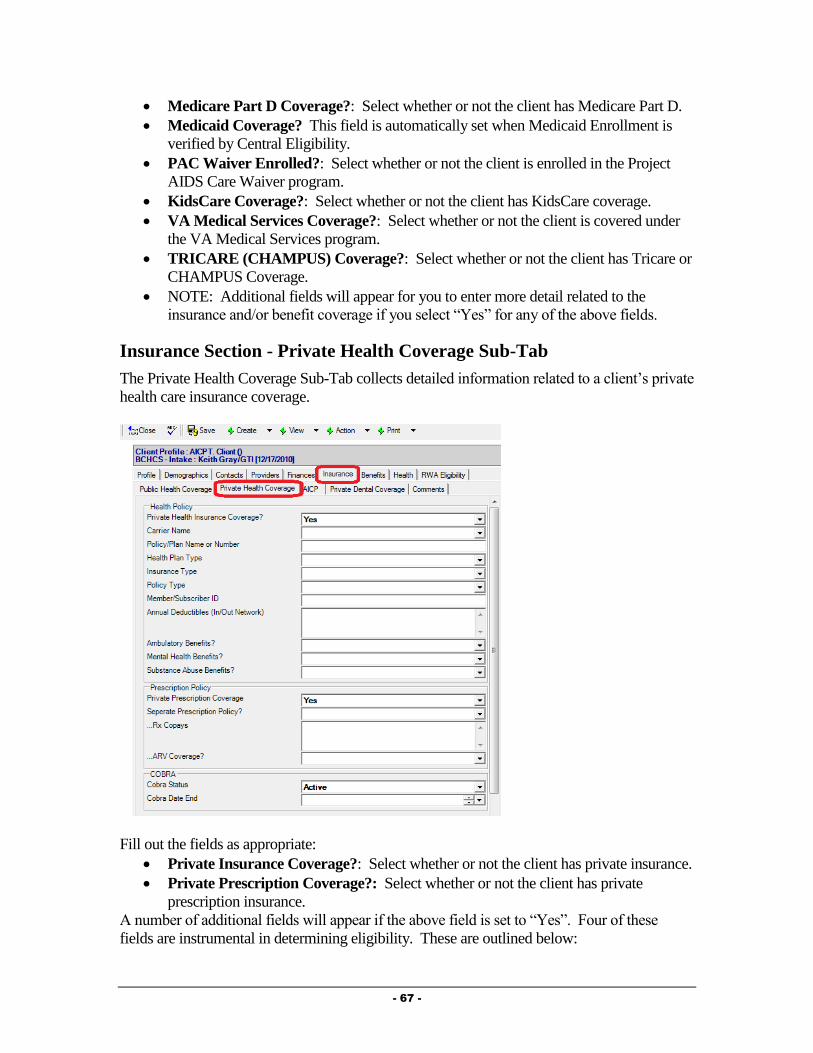
- 67 -
Medicare Part D Coverage?: Select whether or not the client has Medicare Part D.
Medicaid Coverage? This field is automatically set when Medicaid Enrollment is
verified by Central Eligibility.
PAC Waiver Enrolled?: Select whether or not the client is enrolled in the Project
AIDS Care Waiver program.
KidsCare Coverage?: Select whether or not the client has KidsCare coverage.
VA Medical Services Coverage?: Select whether or not the client is covered under
the VA Medical Services program.
TRICARE (CHAMPUS) Coverage?: Select whether or not the client has Tricare or
CHAMPUS Coverage.
NOTE: Additional fields will appear for you to enter more detail related to the
insurance and/or benefit coverage if you select “Yes” for any of the above fields.
Insurance Section - Private Health Coverage Sub-Tab
The Private Health Coverage Sub-Tab collects detailed information related to a client’s private
health care insurance coverage.
Fill out the fields as appropriate:
Private Insurance Coverage?: Select whether or not the client has private insurance.
Private Prescription Coverage?: Select whether or not the client has private
prescription insurance.
A number of additional fields will appear if the above field is set to “Yes”. Four of these
fields are instrumental in determining eligibility. These are outlined below:
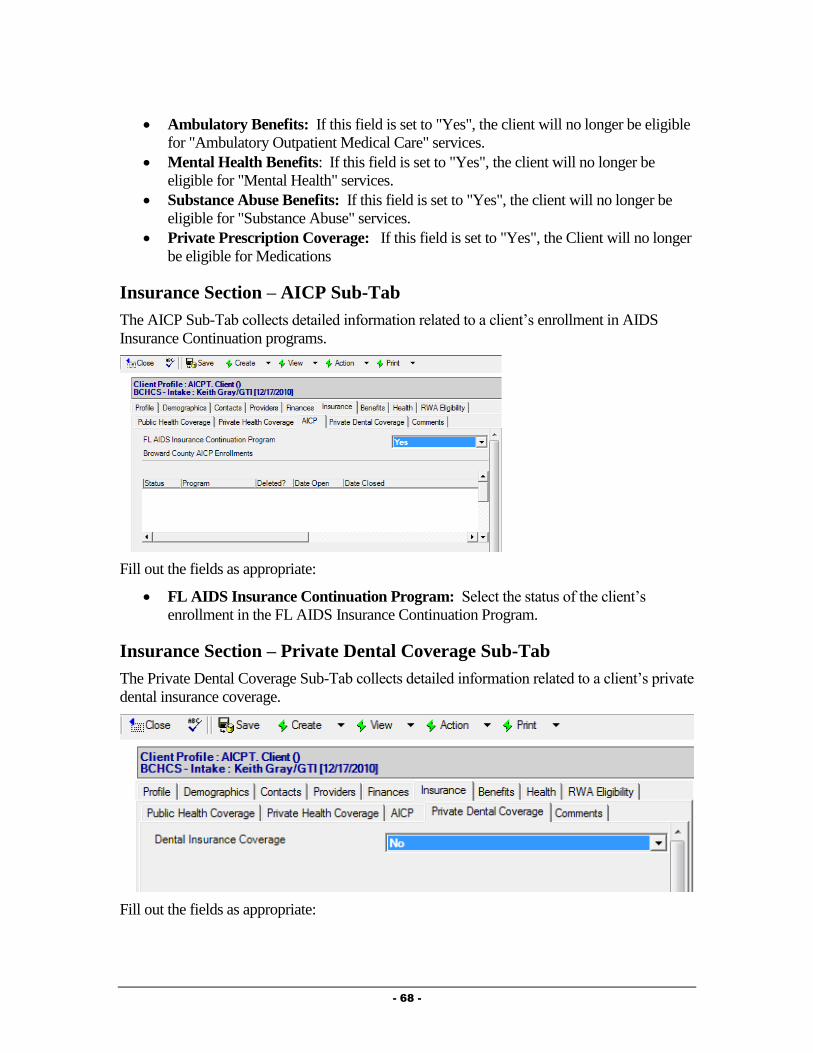
- 68 -
Ambulatory Benefits: If this field is set to "Yes", the client will no longer be eligible
for "Ambulatory Outpatient Medical Care" services.
Mental Health Benefits: If this field is set to "Yes", the client will no longer be
eligible for "Mental Health" services.
Substance Abuse Benefits: If this field is set to "Yes", the client will no longer be
eligible for "Substance Abuse" services.
Private Prescription Coverage: If this field is set to "Yes", the Client will no longer
be eligible for Medications
Insurance Section – AICP Sub-Tab
The AICP Sub-Tab collects detailed information related to a client’s enrollment in AIDS
Insurance Continuation programs.
Fill out the fields as appropriate:
FL AIDS Insurance Continuation Program: Select the status of the client’s
enrollment in the FL AIDS Insurance Continuation Program.
Insurance Section – Private Dental Coverage Sub-Tab
The Private Dental Coverage Sub-Tab collects detailed information related to a client’s private
dental insurance coverage.
Fill out the fields as appropriate:
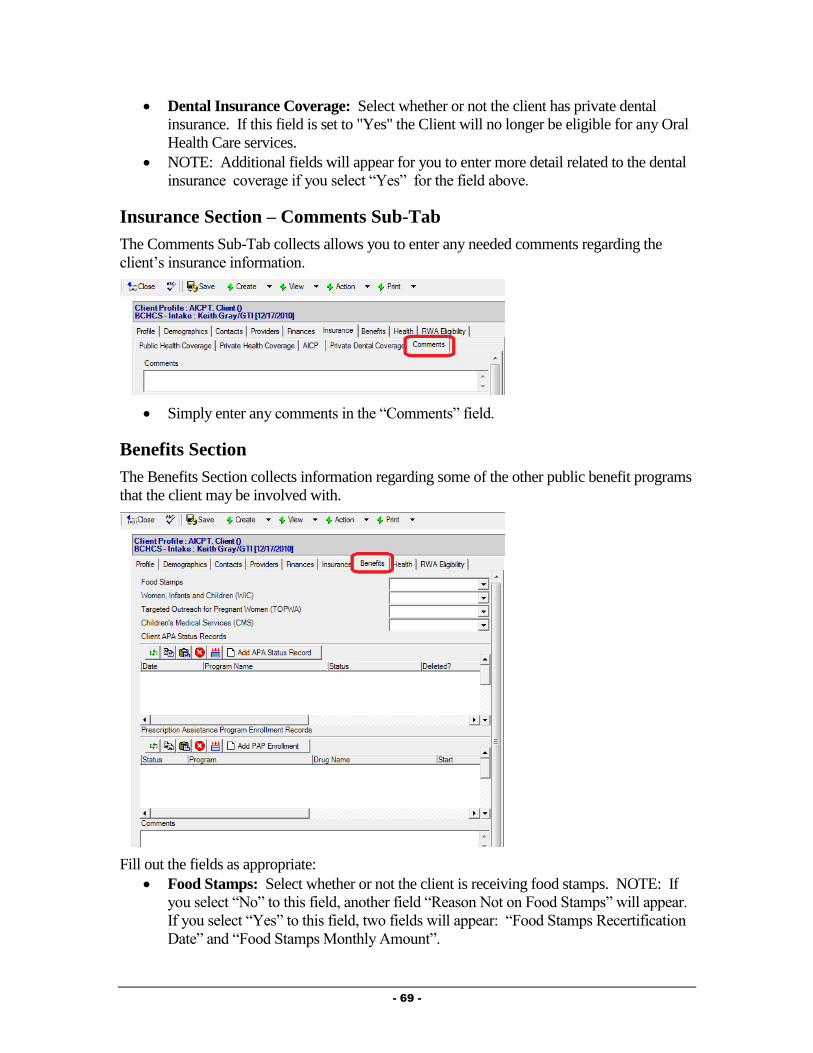
- 69 -
Dental Insurance Coverage: Select whether or not the client has private dental
insurance. If this field is set to "Yes" the Client will no longer be eligible for any Oral
Health Care services.
NOTE: Additional fields will appear for you to enter more detail related to the dental
insurance coverage if you select “Yes” for the field above.
Insurance Section – Comments Sub-Tab
The Comments Sub-Tab collects allows you to enter any needed comments regarding the
client’s insurance information.
Simply enter any comments in the “Comments” field.
Benefits Section
The Benefits Section collects information regarding some of the other public benefit programs
that the client may be involved with.
Fill out the fields as appropriate:
Food Stamps: Select whether or not the client is receiving food stamps. NOTE: If
you select “No” to this field, another field “Reason Not on Food Stamps” will appear.
If you select “Yes” to this field, two fields will appear: “Food Stamps Recertification
Date” and “Food Stamps Monthly Amount”.
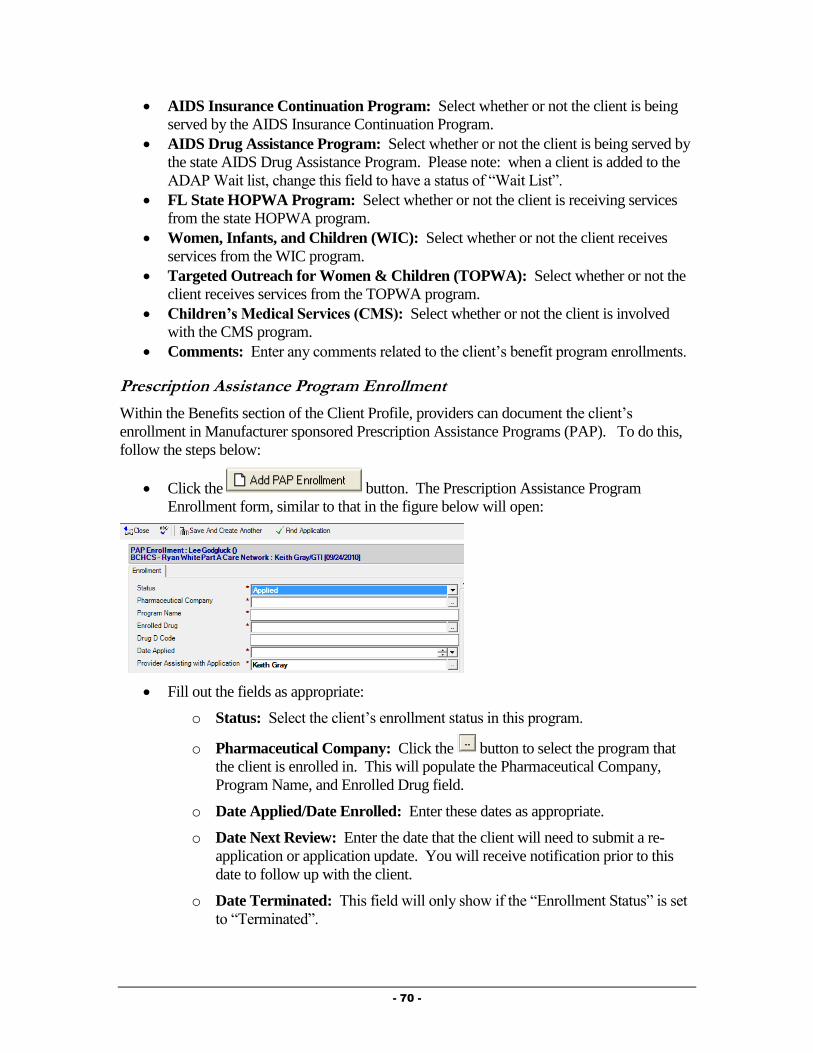
- 70 -
AIDS Insurance Continuation Program: Select whether or not the client is being
served by the AIDS Insurance Continuation Program.
AIDS Drug Assistance Program: Select whether or not the client is being served by
the state AIDS Drug Assistance Program. Please note: when a client is added to the
ADAP Wait list, change this field to have a status of “Wait List”.
FL State HOPWA Program: Select whether or not the client is receiving services
from the state HOPWA program.
Women, Infants, and Children (WIC): Select whether or not the client receives
services from the WIC program.
Targeted Outreach for Women & Children (TOPWA): Select whether or not the
client receives services from the TOPWA program.
Children’s Medical Services (CMS): Select whether or not the client is involved
with the CMS program.
Comments: Enter any comments related to the client’s benefit program enrollments.
Prescription Assistance Program Enrollment
Within the Benefits section of the Client Profile, providers can document the client’s
enrollment in Manufacturer sponsored Prescription Assistance Programs (PAP). To do this,
follow the steps below:
Click the button. The Prescription Assistance Program
Enrollment form, similar to that in the figure below will open:
Fill out the fields as appropriate:
o Status: Select the client’s enrollment status in this program.
o Pharmaceutical Company: Click the button to select the program that
the client is enrolled in. This will populate the Pharmaceutical Company,
Program Name, and Enrolled Drug field.
o Date Applied/Date Enrolled: Enter these dates as appropriate.
o Date Next Review: Enter the date that the client will need to submit a re-
application or application update. You will receive notification prior to this
date to follow up with the client.
o Date Terminated: This field will only show if the “Enrollment Status” is set
to “Terminated”.
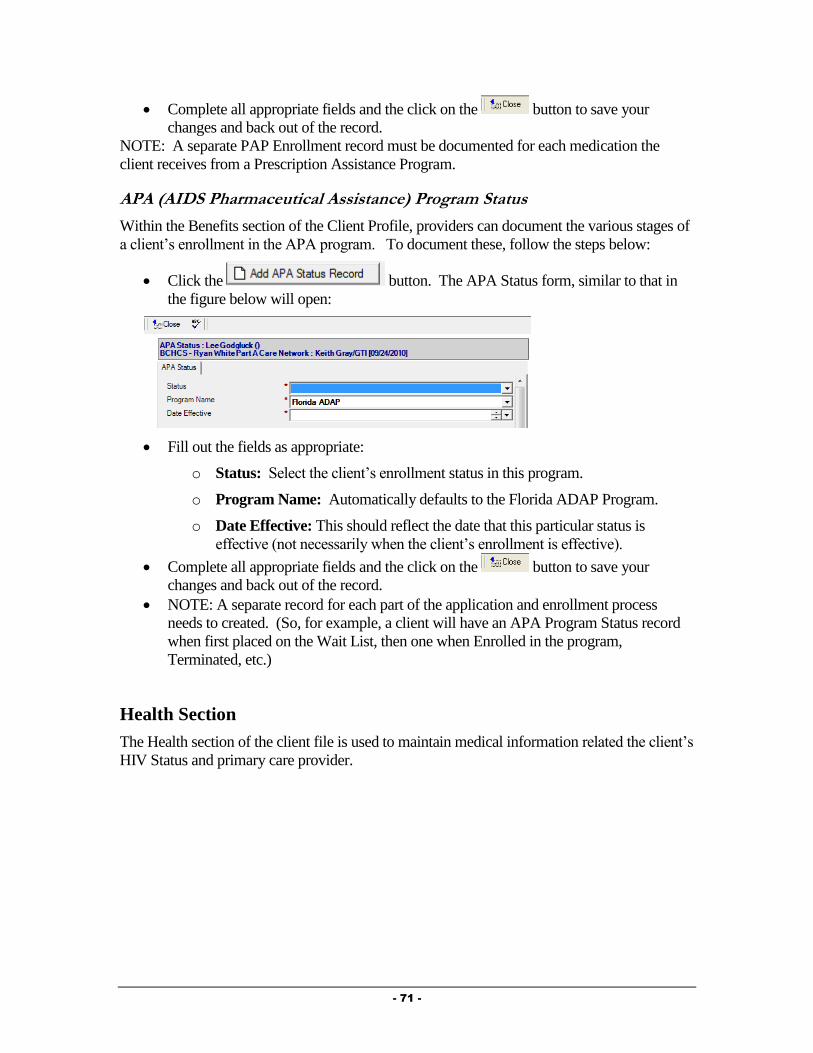
- 71 -
Complete all appropriate fields and the click on the button to save your
changes and back out of the record.
NOTE: A separate PAP Enrollment record must be documented for each medication the
client receives from a Prescription Assistance Program.
APA (AIDS Pharmaceutical Assistance) Program Status
Within the Benefits section of the Client Profile, providers can document the various stages of
a client’s enrollment in the APA program. To document these, follow the steps below:
Click the button. The APA Status form, similar to that in
the figure below will open:
Fill out the fields as appropriate:
o Status: Select the client’s enrollment status in this program.
o Program Name: Automatically defaults to the Florida ADAP Program.
o Date Effective: This should reflect the date that this particular status is
effective (not necessarily when the client’s enrollment is effective).
Complete all appropriate fields and the click on the button to save your
changes and back out of the record.
NOTE: A separate record for each part of the application and enrollment process
needs to created. (So, for example, a client will have an APA Program Status record
when first placed on the Wait List, then one when Enrolled in the program,
Terminated, etc.)
Health Section
The Health section of the client file is used to maintain medical information related the client’s
HIV Status and primary care provider.
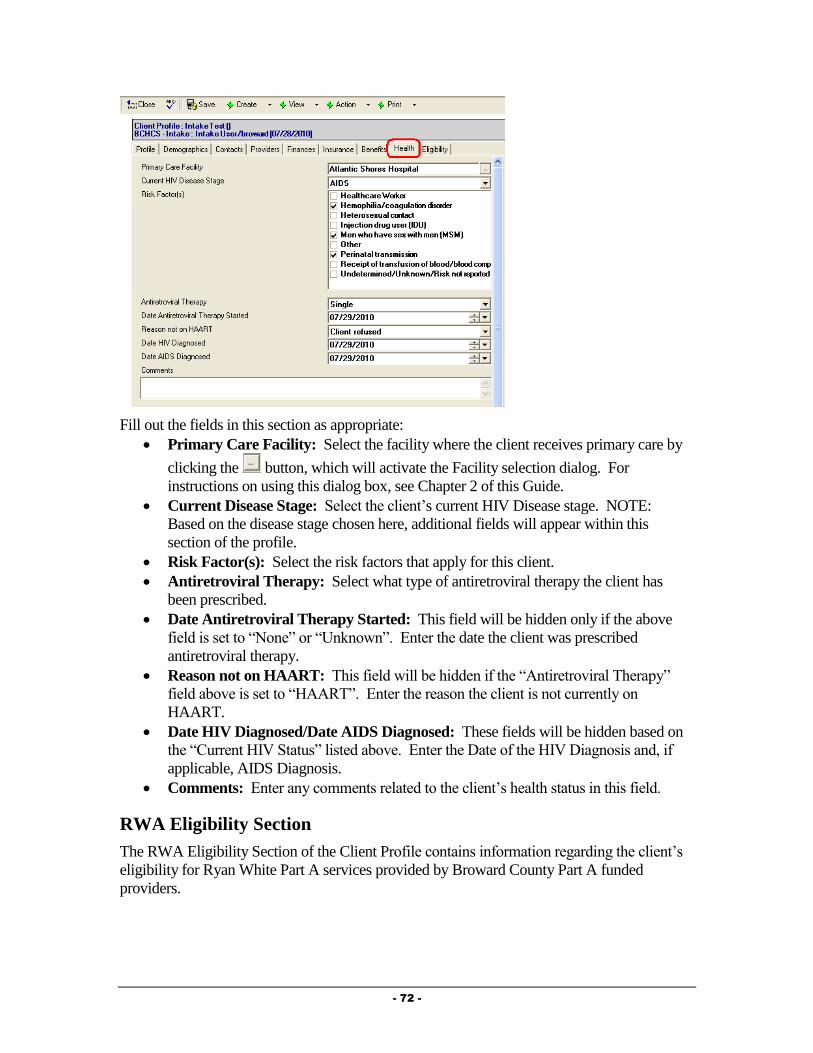
- 72 -
Fill out the fields in this section as appropriate:
Primary Care Facility: Select the facility where the client receives primary care by
clicking the button, which will activate the Facility selection dialog. For
instructions on using this dialog box, see Chapter 2 of this Guide.
Current Disease Stage: Select the client’s current HIV Disease stage. NOTE:
Based on the disease stage chosen here, additional fields will appear within this
section of the profile.
Risk Factor(s): Select the risk factors that apply for this client.
Antiretroviral Therapy: Select what type of antiretroviral therapy the client has
been prescribed.
Date Antiretroviral Therapy Started: This field will be hidden only if the above
field is set to “None” or “Unknown”. Enter the date the client was prescribed
antiretroviral therapy.
Reason not on HAART: This field will be hidden if the “Antiretroviral Therapy”
field above is set to “HAART”. Enter the reason the client is not currently on
HAART.
Date HIV Diagnosed/Date AIDS Diagnosed: These fields will be hidden based on
the “Current HIV Status” listed above. Enter the Date of the HIV Diagnosis and, if
applicable, AIDS Diagnosis.
Comments: Enter any comments related to the client’s health status in this field.
RWA Eligibility Section
The RWA Eligibility Section of the Client Profile contains information regarding the client’s
eligibility for Ryan White Part A services provided by Broward County Part A funded
providers.

- 73 -
This section will always show the most recent eligibility check that has been
performed in the client file. The “Client Eligibility History” window contains records
of each of the eligibility scans that have been performed in the client’s file.
Information in this section is automatically computed when an agency sets the client’s
eligibility based on the Broward County Ryan White Part A eligibility criteria.
Setting eligibility will be discussed later in this Chapter.
Checking for Completeness
At any time when you are working in the Client Profile, you can scan to see if all fields
necessary for invoicing and reporting have been completed. NOTE: If the Client Profile is
NOT complete, you will be unable to set the client’s eligibility level.
To perform a completeness check, follow the steps below:
From within the Client Profile, click on the Actions button and select “Check for
Completeness”.
The system will review your Client Profile and check to see if all fields necessary for
invoicing and/or reporting have been completed. If you have not filled out all required
fields, a dialog box similar to that in the figure below will appear:

- 74 -
This dialog shows you the Section of the profile as well as the specific field(s) in that
section that need to be completed. To return to the profile to fill out the missing fields,
simply click the button.
If all required data is complete in the profile, you will see a message similar to that in
the figure below:
Simply click the button to return to the profile.
Remember, you can run the Check for Completeness at any time to verify that all
documentation is complete.
End a Client Profile Review
After reviewing all tabs and sub-tabs of the Client Profile, you can document that the
Review of the profile has been completed. To do this, select the End Client Review
Action. [Client Profile Button BarActionEnd Client Review].
NOTE: You will not be able to Complete the Review until all sections of the profile
have been reviewed. If you do not see “End Client Review” as an option under the
Actions button, one of the tabs or sub-tabs of the Client Profile was not marked as
reviewed. Simply review each tab and sub-tab of the Client Profile to find the “Click
When Section Reviewed” button on the tab or sub-tab that was not marked as
reviewed.

- 75 -
After selecting “End Client Review”, a form, similar to that in the figure below will
appear:
Change the “Review Started Date” and enter any comments related to the Review of
the Profile under “Review Comments”.
Mark the Review as Complete. [Click Button Complete Review]. A dialog box
similar to that in the figure below will appear:
Enter the date the Client Profile Review was completed and click the
button.
The Review will be Completed and Saved and you will be returned to the Client
Profile.
Completing Ryan White Certification
Provide® Enterprise has a form for Central Intake to use to capture all of the supporting
documentation associated with the Certification/Recertification process. To document this,
follow the steps below:

- 76 -
Click on the button and select “Ryan White Certification”. A form
similar to that in the figure below will open. NOTE: You can also access this via the
“Intake Summary” discussed later in this chapter.
Fill in the fields and then scan in the required supporting documentation for each tab.
o Income Doc.: Select the type of Income Documentation being supplied and
then scan in the supporting documentation.
o Residency Doc.: Select the type of Residency verification and scan in the
supporting documentation.
o HIV Doc.: Select the type of HIV Verification being provided by the client
and then scan in the supporting documentation.
o Consents: Select whether or not the client has signed PCIS Consent forms
and then scan in these forms.
o Miscellaneous: Scan in any additional documents.
Scanning Documents
To scan supporting documentation into Provide Enterprise, follow the steps below:
From within the appropriate section of the Ryan White Certification, select the
button, circled in the figure below:
Depending on the type of scanner attached to your computer, you will see a message
pop up on your screen telling you that the scanning is being completed.
Once the scan has completed, the scanned document will appear on your screen:
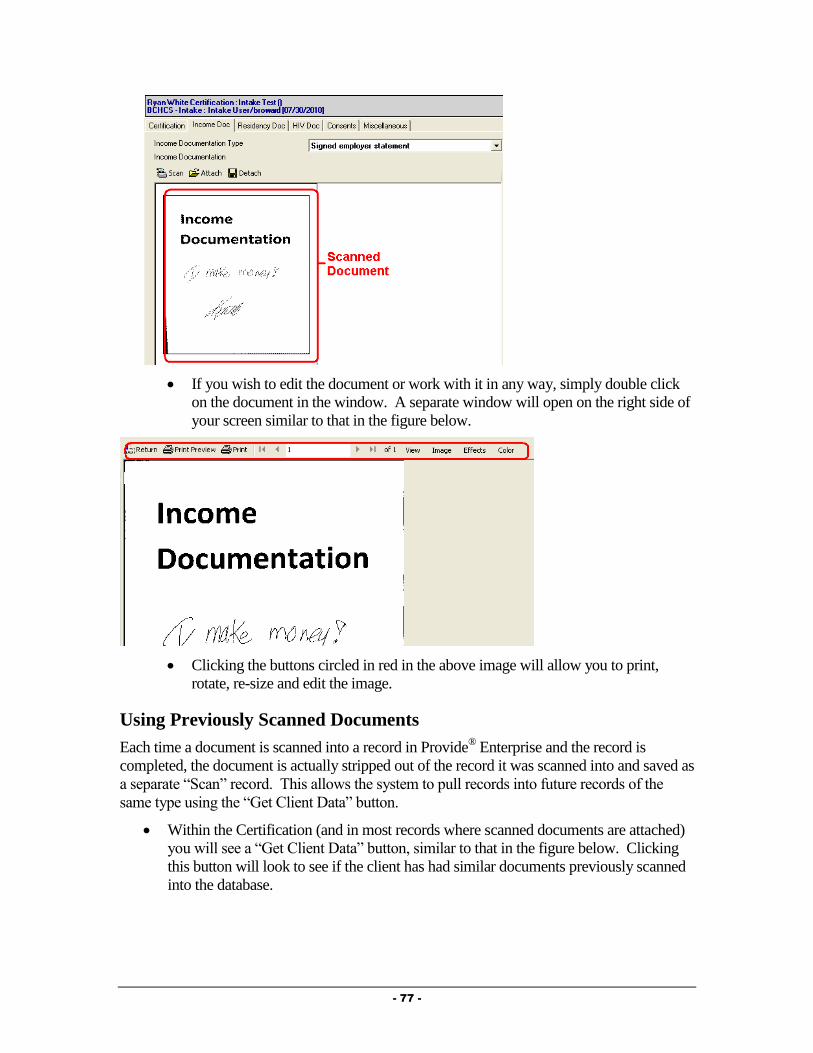
- 77 -
If you wish to edit the document or work with it in any way, simply double click
on the document in the window. A separate window will open on the right side of
your screen similar to that in the figure below.
Clicking the buttons circled in red in the above image will allow you to print,
rotate, re-size and edit the image.
Using Previously Scanned Documents
Each time a document is scanned into a record in Provide® Enterprise and the record is
completed, the document is actually stripped out of the record it was scanned into and saved as
a separate “Scan” record. This allows the system to pull records into future records of the
same type using the “Get Client Data” button.
Within the Certification (and in most records where scanned documents are attached)
you will see a “Get Client Data” button, similar to that in the figure below. Clicking
this button will look to see if the client has had similar documents previously scanned
into the database.

- 78 -
If the client had previously had a document of that type scanned into the system, you
will see a message similar to that in the figure below:
Clicking on the highlighted “Is existing proof document(s) sufficient?” will open the
previously scanned document for review. If you believe that the previously scanned
document meets all guidelines and rules established by the grantee, then you can
answer “Yes” to the “Is existing proof document(s) sufficient?” question. If you do
not believe that the document is sufficient, you will be able to select “No” for this
field.
The record will then change and allow you to scan in a new document, following the
steps listed above under “Scanning Documents”.
Completing the Certification
Once you have finished documenting all information and scanning the supporting records into
the system, you want to mark the certification as Completed.
This is an important step, because until the Ryan White Certification is marked Complete, the
client file will ONLY be able to be accessed by Centralized Eligibility provider agency. Other
Ryan White Part A Network providers will NOT be able to view or work with this client
record until it has been marked as Complete.
Once the record is marked complete, you will not be able to edit or update the record.
NOTE: You can save the record as is at any point, by clicking the button sand
saying “Yes” to the “Do you want to Save Changes” message. You can view saved Ryan
White Certifications via the “Intake Summary” discussed later in this chapter.
To mark the Ryan White Certification as complete, simply follow the steps below:

- 79 -
Click the button.
If you have not yet scanned in the appropriate documentation, you will see a message
similar to that in the figure below:
This will occur for each of the “sections” of the Ryan White Certification if they have
not had supporting documentation attached.
Scan and attach all required documentation and you will then be able to complete the
record.
If you have already scanned in and attached all appropriate documentation, you will
see a message similar to the one below appear:
Select to save the status change and close the record.
Setting Client Eligibility
Provide® Enterprise allows users to determine client eligibility for Part A services directly
within the software system. NOTE: The current/most recent eligibility will always show on
the Eligibility section of the Client Profile.
See Appendix B for detailed documentation on the rules associated with the computation of
the Ryan White Part A eligibility.
To Set Eligibility, follow the steps below:
From within the Client Profile, click on the Actions button and select “Set Ryan White
Eligibility”.
If you have not yet completed all required fields for reporting/invoicing, the following
message will appear:

- 80 -
Simply click on the button to return to the Client Profile. If you are unsure
of which fields are not yet completed, complete a “Check for Completeness”,
discussed above.
If the profile is complete, you will get a dialog box similar to that in the figure below:
Enter the Date eligibility is being set and then click on the button.
After the eligibility check has completed, you will see all of the fields of the Eligibility
Section of the Client Profile will be filled out (see screen shot below).
In the view window at the bottom of the screen, you will see the Eligibility determination
record is saved. To review the record, simply double click on it.
Requesting Service Category Specific Eligibility Overrides
Provide® Enterprise allows users to request overrides for client eligibility for Part A services
directly within the software system. NOTE: Only Broward County staff will be able to
approve these requests.
To request an Eligibility Override, follow the steps below:
From within the Client Profile, click on the button and select “Eligibility
Override”.
The form, similar to that in the figure below will open:

- 81 -
Fill out the fields as appropriate:
o Status: This will be set to “Pending” initially and will change once you mark
the override as “Complete”.
o Eligibility Setting: Select whether the client should be eligible or not eligible
for the service category.
o Service Category: Select the Service Category that the override is valid for.
o Date Start/Date End: Enter the start and end date that this override is valid
for.
o Override Request Reason: Document the reasoning behind this particular
override.
o Support Doc Attachment Type: Select whether the backup documentation
you are using is an image file or a different file type.
o Images/Files: Attach appropriate backup documentation here.
Once all fields have been completed, you can submit this override. Please note: the
override will not take effect (meaning that it will not affect billing) until it has been
approved by the county.
To submit the override, simply click on the button. The override “status”
will change and the document will be saved.
Printing an Eligibility Summary for the Client
Once eligibility for Ryan White Services has been determined, a summary of the client’s
current eligibility can be printed and provided to the client. The client can take this summary
with them as certification of their eligibility on that date. NOTE: Provider agencies are
responsible for verifying the client’s current eligibility within the Provide® Enterprise system.

- 82 -
To print an Eligibility summary, follow these steps:
From within the Client Profile, click the “Print” button and select “Ryan White Eligibility
Summary” choice.
The print out, similar to that in the figure below, will open.
Click the button to send the document to a printer.
Recertification of Existing Clients
The following procedures should be followed at the time an existing client needs to be re-
certified for Ryan White Services. The directions for completing each of these steps can be
found earlier in this section. This is simply an outline of the procedures.
Find Client
Schedule Re-Certification Appointment

- 83 -
Client Profile Completion
Start a Client Profile Review
Completing the Client Profile
Checking for Completeness
Ending a Client Review
Completing Ryan White Certification
Scanning Documents
Completing the Certification
Setting Ryan White Eligibility
Print Ryan White Eligibility Summary
Intake Summary The “Intake Summary” is a form containing many of the most commonly used documents for
Centralized Intake and Eligibility Determination staff, including the services provided to a
client by CIED staff.
To get to the Intake Summary, follow the steps below:
Navigate to the Client Profile. Once in the Profile, select the “View” button and then
choose “Intake Summary”.
A form similar to that in the figure below will open:

- 84 -
The Intake Summary contains four tabs of information, described below:
o Certifications: All Ryan White Certifications for this client will be listed in
this window. New Certifications can be created from this tab.
o Contacts and Services: This tab holds information regarding services
provided to the client, including Progress Logs and Services Provided records.
Progress Logs and Services Provided can be created from this tab. NOTE:
Progress Logs are used in invoicing Broward County for services provided to
individual clients. Service Provided records are used for documenting ONLY
non-client specific encounters and are documented against an “anonymous”
client. NOTE: These will be discussed in the “Service Documentation”
section of this Chapter.
o Referrals: Referrals made on behalf of the client can be seen on this tab and
also can be created from here.
o Other Activity: On this tab, you will see any Medical appointments for a
client, as well as Hospitalization history and Letters written on behalf of or to
the client. All three of these Activity types can also be created from this tab.
Certifications Tab
The Certifications Tab of the “Intake Summary” shows all Ryan White Certifications
associated with this client.
New Ryan White Certifications can be created by clicking the
button circled in the figure above.
Referrals Tab
The Referrals Tab of the “Intake Summary” shows referrals made on behalf of the client to
both Ryan White Part A providers as well as to other agencies within the community
The “Referrals” Tab looks similar to that in the figure below:
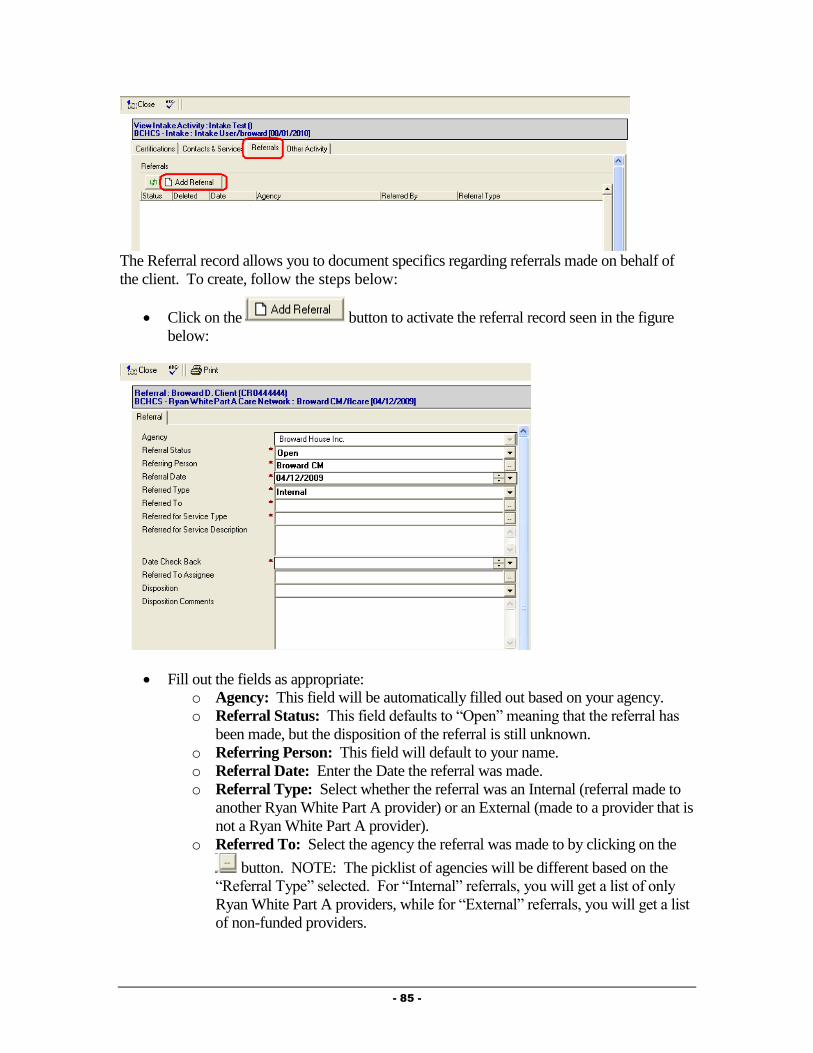
- 85 -
The Referral record allows you to document specifics regarding referrals made on behalf of
the client. To create, follow the steps below:
Click on the button to activate the referral record seen in the figure
below:
Fill out the fields as appropriate:
o Agency: This field will be automatically filled out based on your agency.
o Referral Status: This field defaults to “Open” meaning that the referral has
been made, but the disposition of the referral is still unknown.
o Referring Person: This field will default to your name.
o Referral Date: Enter the Date the referral was made.
o Referral Type: Select whether the referral was an Internal (referral made to
another Ryan White Part A provider) or an External (made to a provider that is
not a Ryan White Part A provider).
o Referred To: Select the agency the referral was made to by clicking on the
button. NOTE: The picklist of agencies will be different based on the
“Referral Type” selected. For “Internal” referrals, you will get a list of only
Ryan White Part A providers, while for “External” referrals, you will get a list
of non-funded providers.
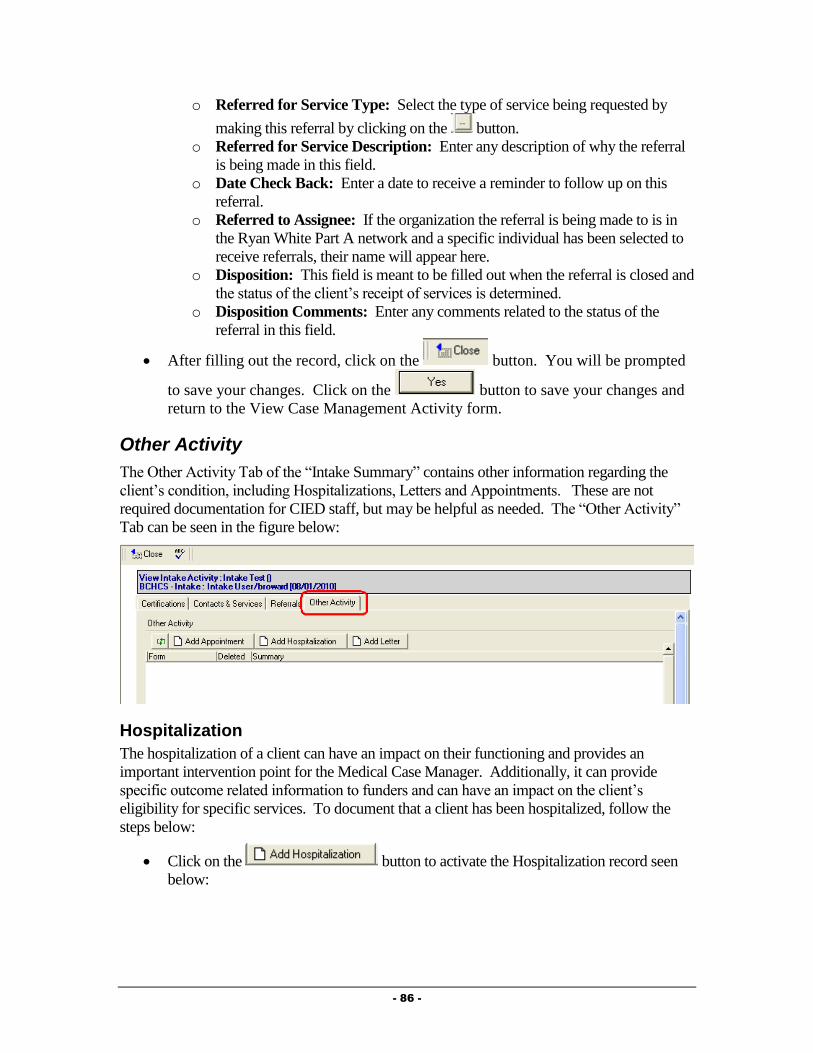
- 86 -
o Referred for Service Type: Select the type of service being requested by
making this referral by clicking on the button.
o Referred for Service Description: Enter any description of why the referral
is being made in this field.
o Date Check Back: Enter a date to receive a reminder to follow up on this
referral.
o Referred to Assignee: If the organization the referral is being made to is in
the Ryan White Part A network and a specific individual has been selected to
receive referrals, their name will appear here.
o Disposition: This field is meant to be filled out when the referral is closed and
the status of the client’s receipt of services is determined.
o Disposition Comments: Enter any comments related to the status of the
referral in this field.
After filling out the record, click on the button. You will be prompted
to save your changes. Click on the button to save your changes and
return to the View Case Management Activity form.
Other Activity
The Other Activity Tab of the “Intake Summary” contains other information regarding the
client’s condition, including Hospitalizations, Letters and Appointments. These are not
required documentation for CIED staff, but may be helpful as needed. The “Other Activity”
Tab can be seen in the figure below:
Hospitalization
The hospitalization of a client can have an impact on their functioning and provides an
important intervention point for the Medical Case Manager. Additionally, it can provide
specific outcome related information to funders and can have an impact on the client’s
eligibility for specific services. To document that a client has been hospitalized, follow the
steps below:
Click on the button to activate the Hospitalization record seen
below:
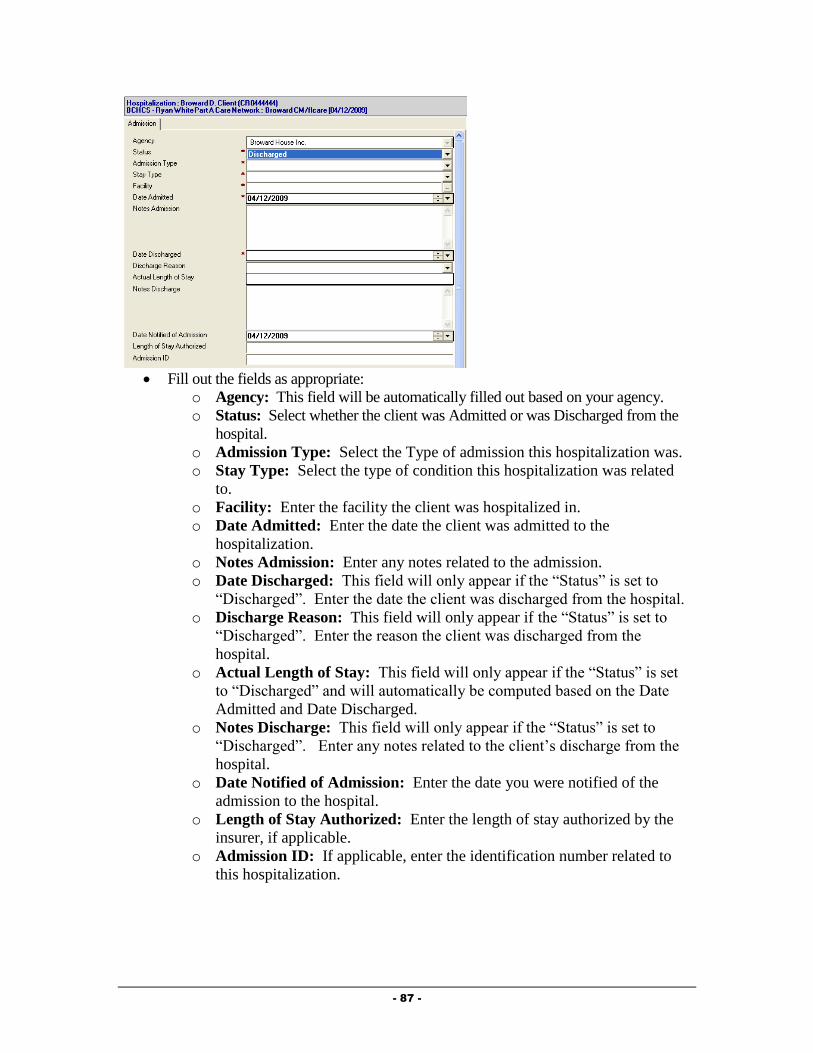
- 87 -
Fill out the fields as appropriate:
o Agency: This field will be automatically filled out based on your agency.
o Status: Select whether the client was Admitted or was Discharged from the
hospital.
o Admission Type: Select the Type of admission this hospitalization was.
o Stay Type: Select the type of condition this hospitalization was related
to.
o Facility: Enter the facility the client was hospitalized in.
o Date Admitted: Enter the date the client was admitted to the
hospitalization.
o Notes Admission: Enter any notes related to the admission.
o Date Discharged: This field will only appear if the “Status” is set to
“Discharged”. Enter the date the client was discharged from the hospital.
o Discharge Reason: This field will only appear if the “Status” is set to
“Discharged”. Enter the reason the client was discharged from the
hospital.
o Actual Length of Stay: This field will only appear if the “Status” is set
to “Discharged” and will automatically be computed based on the Date
Admitted and Date Discharged.
o Notes Discharge: This field will only appear if the “Status” is set to
“Discharged”. Enter any notes related to the client’s discharge from the
hospital.
o Date Notified of Admission: Enter the date you were notified of the
admission to the hospital.
o Length of Stay Authorized: Enter the length of stay authorized by the
insurer, if applicable.
o Admission ID: If applicable, enter the identification number related to
this hospitalization.

- 88 -
After filling out the record, click on the button. You will be prompted
to save your changes. Click on the button to save your changes and
return to the View Case Management Activity form.
Letter
Provide® Enterprise allows you to document letters written to or on behalf of a client. To
document a letter, follow the steps below:
Click on the button to activate the Letter record seen below:
Fill out the fields as appropriate:
o Agency: This field will be automatically filled out based on your agency.
o Get Provider Address: If you are writing this letter to a provider, you
can click on this button to bring up the Provider selection dialog
(discussed in Chapter 2 of this Guide). Simply select the provider you are
writing the letter to and the system will automatically fill out the Address
and Salutation fields.
o Subject: The subject of the letter will not be printed, but will help you
find the letter in the future.
o Date: Enter the date you are writing this letter.
o Address: If writing the letter to the client and a Mailing Address is listed
in the Client Profile, the address will be filled in for you. If you used the
“Get Provider Address” button, the providers address will be listed.

- 89 -
o Salutation: This field will automatically be filled out based on who the
letter is to.
o Body: Enter the text of the letter in this field. You can also select
“sample text” or pre-defined letters by clicking on the
button. A window of the pre-defined letters will appear and you will be
able to select the letter that you wish to write.
o Closing: This field will automatically be set to “Sincerely”, but can be
changed if appropriate.
o Sender Name: This field will automatically default to your name, but can
be changed if appropriate.
o Postscript: The postscript is a paragraph, phrase, etc., added to a letter
that has already been concluded and signed by the writer.
To print this letter, simply click on the button. The letter print out will
open on your screen to be printed.
After filling out the record, click on the button. You will be prompted
to save your changes. Click on the button to save your changes and
return to the View Case Management Activity form.
ACCESS Application Provide
® Enterprise collects all informant necessary to complete the Florida ACCESS
(Automated Community Connection to Economic Self-Sufficiency application for Medicaid,
Cash Benefits and/or Food Stamps. If applicable, you can create the “ACCESS Application”
within Provide® Enterprise and print it out to send to the Florida Department of Children and
Families for processing. To create an ACCESS Application, follow the steps below:
From within the Client Profile, click on the button and select “Access
Application”. The ACCESS application, similar to that in the figure below will open:
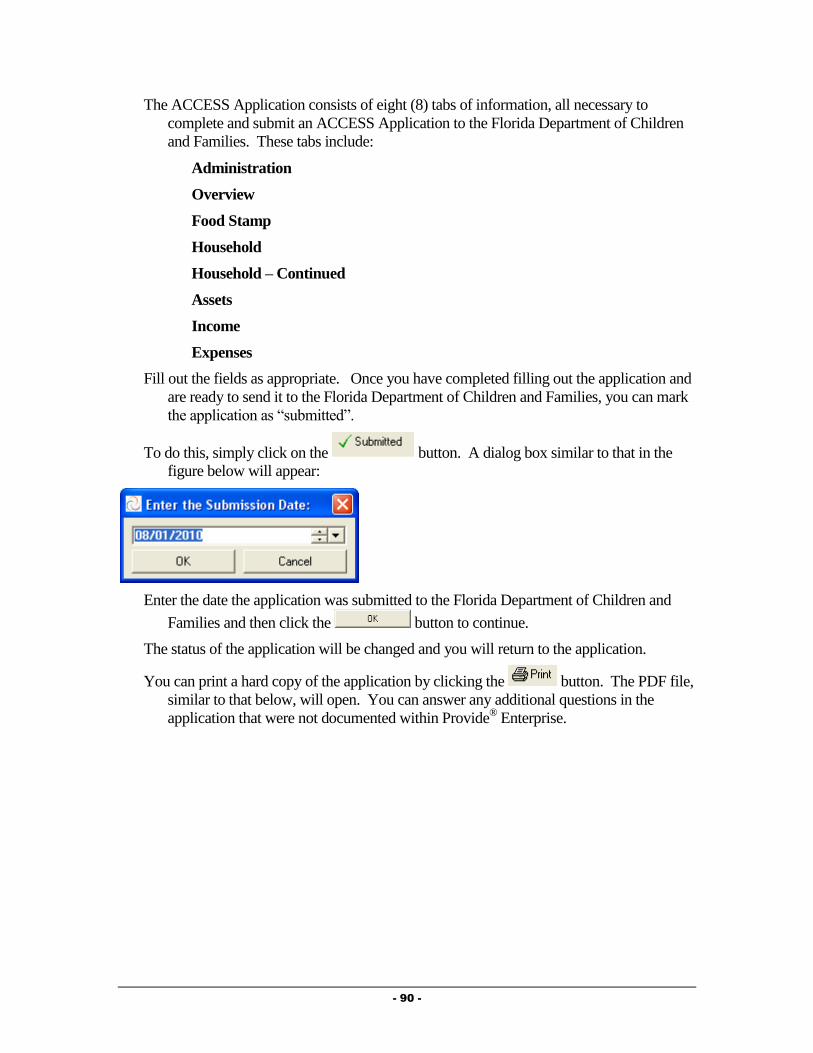
- 90 -
The ACCESS Application consists of eight (8) tabs of information, all necessary to
complete and submit an ACCESS Application to the Florida Department of Children
and Families. These tabs include:
Administration
Overview
Food Stamp
Household
Household – Continued
Assets
Income
Expenses
Fill out the fields as appropriate. Once you have completed filling out the application and
are ready to send it to the Florida Department of Children and Families, you can mark
the application as “submitted”.
To do this, simply click on the button. A dialog box similar to that in the
figure below will appear:
Enter the date the application was submitted to the Florida Department of Children and
Families and then click the button to continue.
The status of the application will be changed and you will return to the application.
You can print a hard copy of the application by clicking the button. The PDF file,
similar to that below, will open. You can answer any additional questions in the
application that were not documented within Provide® Enterprise.
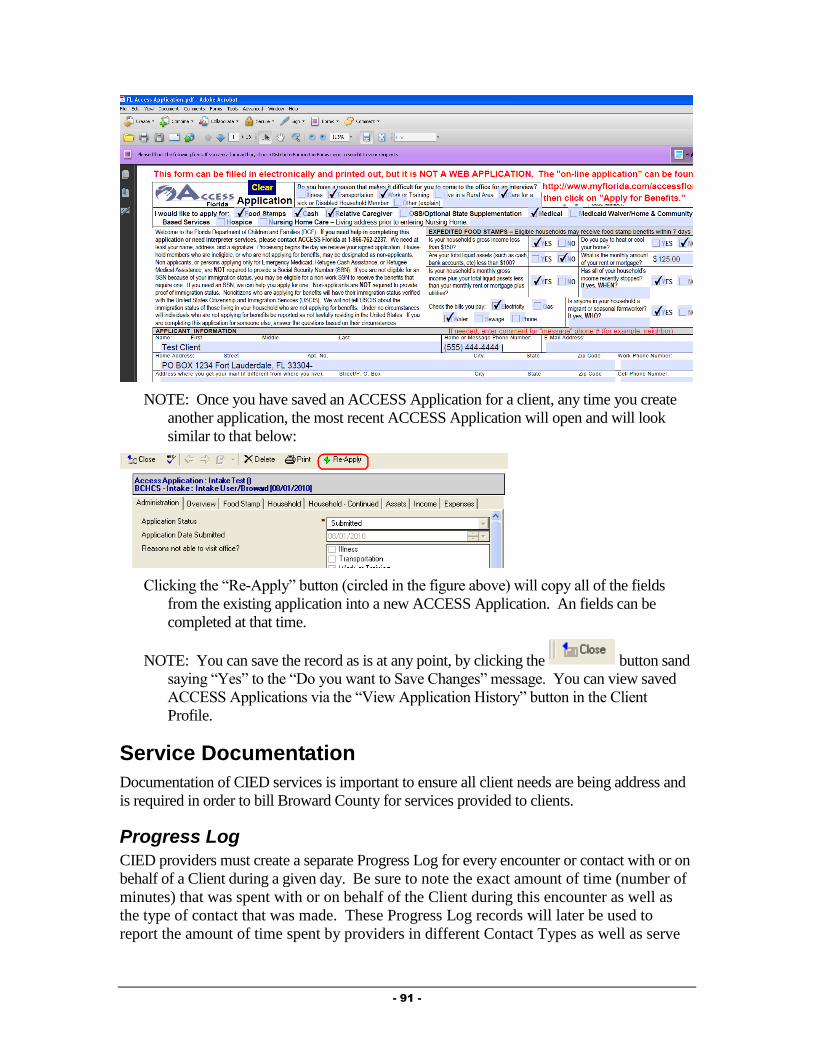
- 91 -
NOTE: Once you have saved an ACCESS Application for a client, any time you create
another application, the most recent ACCESS Application will open and will look
similar to that below:
Clicking the “Re-Apply” button (circled in the figure above) will copy all of the fields
from the existing application into a new ACCESS Application. An fields can be
completed at that time.
NOTE: You can save the record as is at any point, by clicking the button sand
saying “Yes” to the “Do you want to Save Changes” message. You can view saved
ACCESS Applications via the “View Application History” button in the Client
Profile.
Service Documentation
Documentation of CIED services is important to ensure all client needs are being address and
is required in order to bill Broward County for services provided to clients.
Progress Log
CIED providers must create a separate Progress Log for every encounter or contact with or on
behalf of a Client during a given day. Be sure to note the exact amount of time (number of
minutes) that was spent with or on behalf of the Client during this encounter as well as
the type of contact that was made. These Progress Log records will later be used to
report the amount of time spent by providers in different Contact Types as well as serve
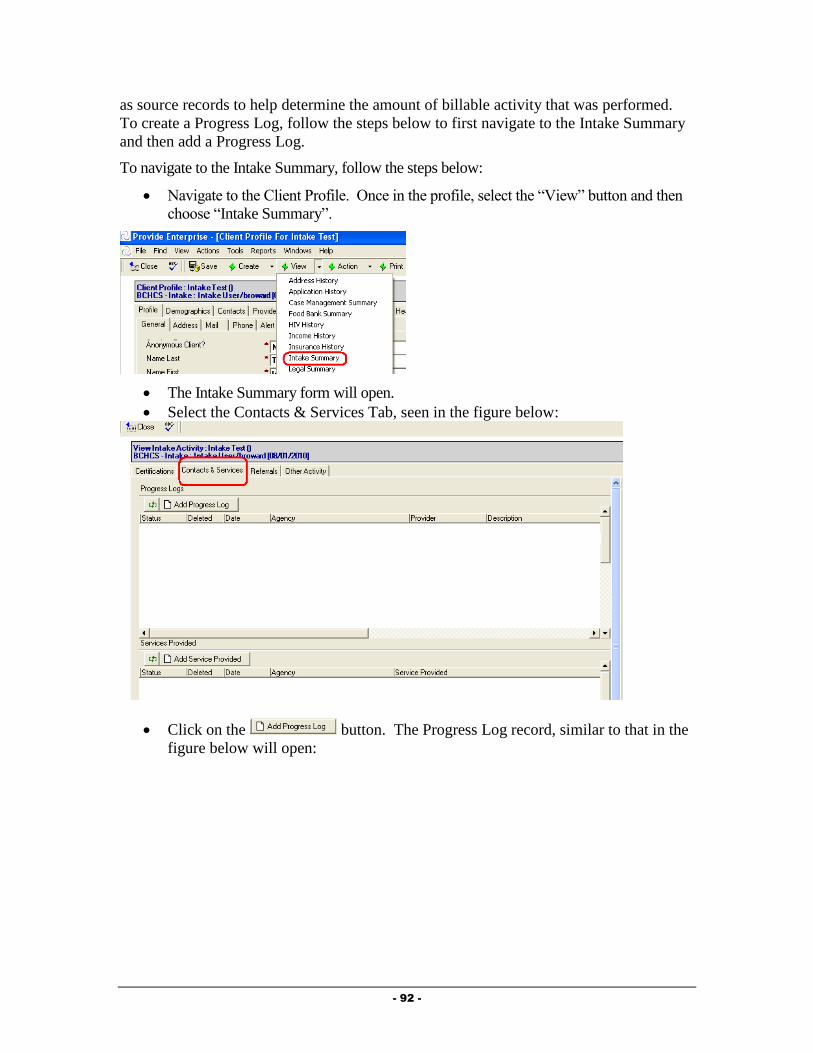
- 92 -
as source records to help determine the amount of billable activity that was performed.
To create a Progress Log, follow the steps below to first navigate to the Intake Summary
and then add a Progress Log.
To navigate to the Intake Summary, follow the steps below:
Navigate to the Client Profile. Once in the profile, select the “View” button and then
choose “Intake Summary”.
The Intake Summary form will open.
Select the Contacts & Services Tab, seen in the figure below:
Click on the button. The Progress Log record, similar to that in the
figure below will open:

- 93 -
Summary Tab
The Summary Tab of the Progress Log contains the specific details about the Case
Management encounter.
Fill out the fields as appropriate:
o Agency: Your agency name will default in this field.
o Status: The status of the Progress Log will default to “In Progress” while you
are working on it. NOTE: It is important to mark the Progress Log as
“Complete” when you are done with it. “In Progress” Progress Logs will not
be counted in reports or billing. Once a Progress Log has been marked as
“Complete”, you will no longer be able to edit the note.
o Provider: This field will default to your name.
o Date: Enter the date of the encounter.
o Start Time: Enter the start time of the Encounter.
o Minutes: Enter the number of minutes of this encounter.
o Contact Category: This will default to be “Centralized Intake and
Eligibility Determination”.
o CIED Type: Select the type of encounter.
o Full Description: Enter detailed information to describe the encounter.
Medical Appointments Tab
This tab is not utilized by the CIED program.
Goals Addressed Tab
This tab is not utilized by the CIED program.
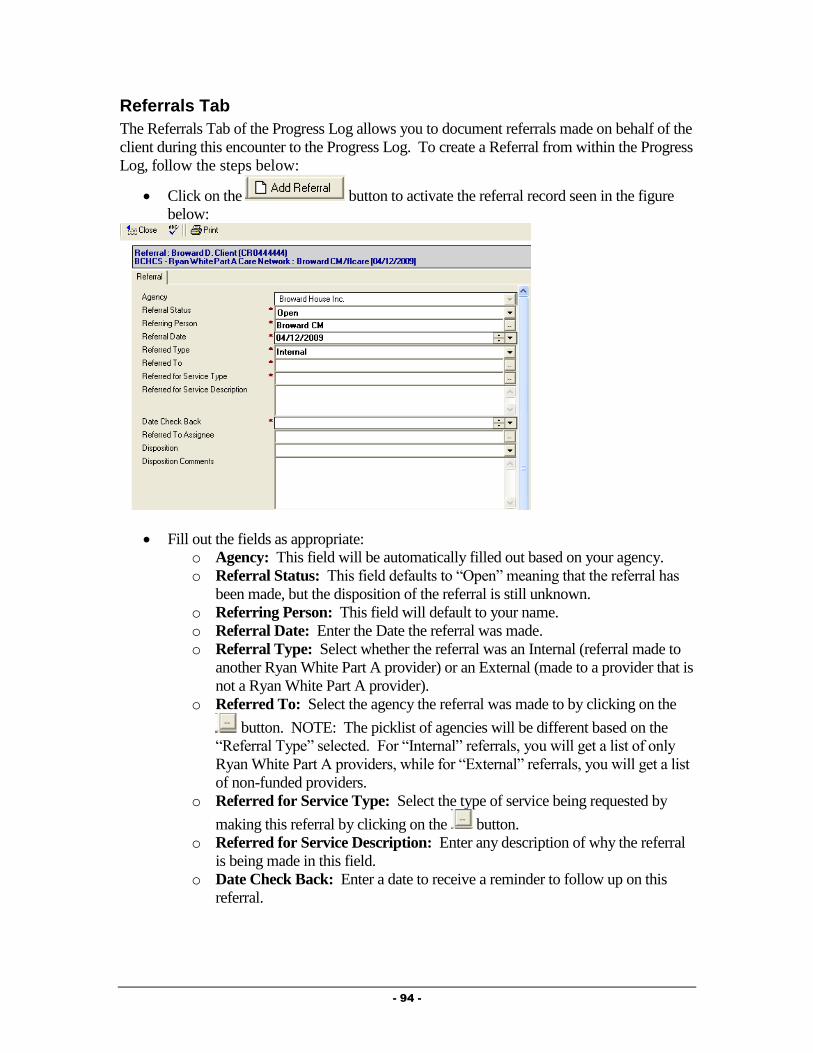
- 94 -
Referrals Tab
The Referrals Tab of the Progress Log allows you to document referrals made on behalf of the
client during this encounter to the Progress Log. To create a Referral from within the Progress
Log, follow the steps below:
Click on the button to activate the referral record seen in the figure
below:
Fill out the fields as appropriate:
o Agency: This field will be automatically filled out based on your agency.
o Referral Status: This field defaults to “Open” meaning that the referral has
been made, but the disposition of the referral is still unknown.
o Referring Person: This field will default to your name.
o Referral Date: Enter the Date the referral was made.
o Referral Type: Select whether the referral was an Internal (referral made to
another Ryan White Part A provider) or an External (made to a provider that is
not a Ryan White Part A provider).
o Referred To: Select the agency the referral was made to by clicking on the
button. NOTE: The picklist of agencies will be different based on the
“Referral Type” selected. For “Internal” referrals, you will get a list of only
Ryan White Part A providers, while for “External” referrals, you will get a list
of non-funded providers.
o Referred for Service Type: Select the type of service being requested by
making this referral by clicking on the button.
o Referred for Service Description: Enter any description of why the referral
is being made in this field.
o Date Check Back: Enter a date to receive a reminder to follow up on this
referral.
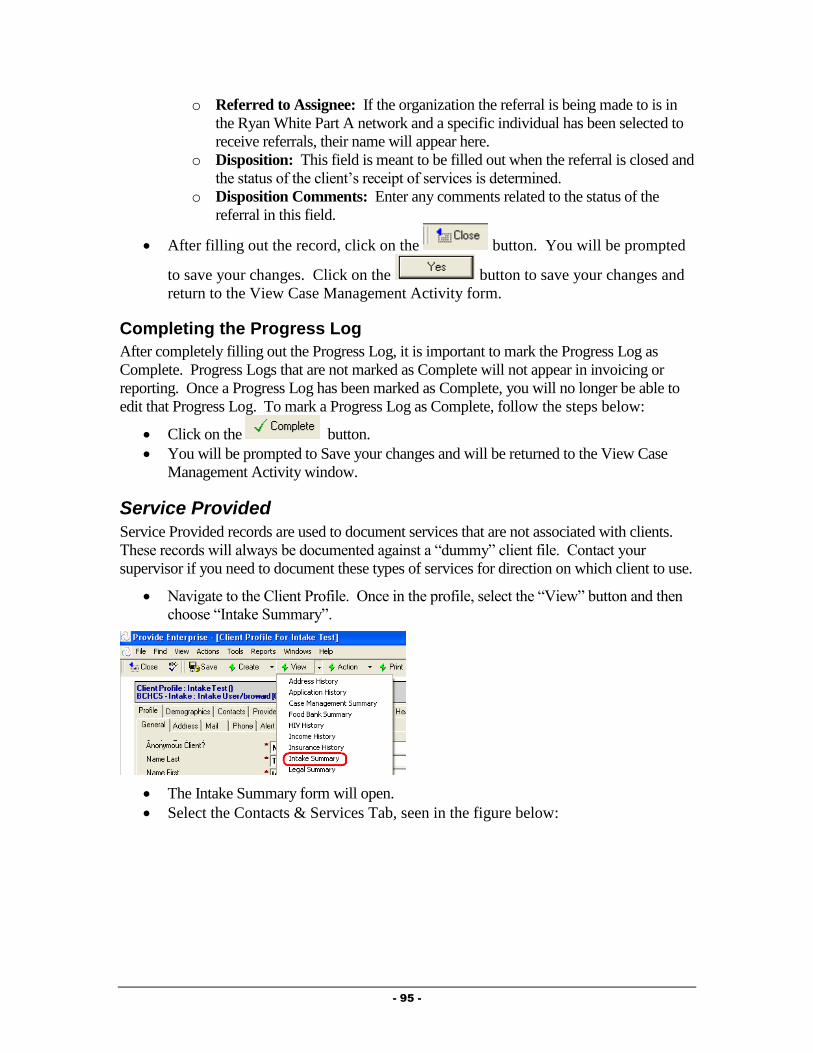
- 95 -
o Referred to Assignee: If the organization the referral is being made to is in
the Ryan White Part A network and a specific individual has been selected to
receive referrals, their name will appear here.
o Disposition: This field is meant to be filled out when the referral is closed and
the status of the client’s receipt of services is determined.
o Disposition Comments: Enter any comments related to the status of the
referral in this field.
After filling out the record, click on the button. You will be prompted
to save your changes. Click on the button to save your changes and
return to the View Case Management Activity form.
Completing the Progress Log
After completely filling out the Progress Log, it is important to mark the Progress Log as
Complete. Progress Logs that are not marked as Complete will not appear in invoicing or
reporting. Once a Progress Log has been marked as Complete, you will no longer be able to
edit that Progress Log. To mark a Progress Log as Complete, follow the steps below:
Click on the button.
You will be prompted to Save your changes and will be returned to the View Case
Management Activity window.
Service Provided
Service Provided records are used to document services that are not associated with clients.
These records will always be documented against a “dummy” client file. Contact your
supervisor if you need to document these types of services for direction on which client to use.
Navigate to the Client Profile. Once in the profile, select the “View” button and then
choose “Intake Summary”.
The Intake Summary form will open.
Select the Contacts & Services Tab, seen in the figure below:

- 96 -
Click on the button. The Service Provided record, similar
to that in the figure below will open:
Fill out the fields as appropriate:
o Agency: This field will default to your agency.
o Status: This field defaults to “Completed”. NOTE: Services Provided
records will not be counted in reports or invoicing unless they are
“Completed”. Once a Services Provided is marked as Completed, you will not
be able to edit the Services Provided.
o Provider: This field will default to be your name.
o Service Date: Enter the date the bus pass was provided to the client.
o Service Category: Select CIED and then select the specific service being
documented. This will also populate the “Service Provided” field.
o Units of Service: This number will automatically default to “1”. Change as
needed.
o Units of Measure: This field will automatically be populated.
o Unit Cost of Service: This field will automatically be populated.

- 97 -
o Total Cost of Service: This field will automatically be populated.
o Comments: Enter any comments related to the provision of this service to the
client.
Click on the button to document the completion of this Service Provided.
You will be prompted to Save your changes and will be returned to the View Intake
Activity window.
Discharging a Client
A client should be discharged for a number of reasons based on Broward County Standards of
Care, including the client moving outside of the service territory, death and the client’s self
decision. When a client needs to be discharged from your agency there are several tasks that
need to be performed. These are outlined below.
Client Service Category Profile Record
When a client is no longer going to be served by your service category at your agency,
you must close the client’s Client Service Category Profile record. NOTE: If the client
is going to be discharged from your agency as a whole, you must also follow the steps
under “Client Service Profile” below.
To do this, follow the steps below:
First, Navigate into the Client Profile (via “Find – Client” or one of the “Views”
of Client information.
In the Profile Section – General Sub-Tab, location the “Client Service Profiles”
view (circled in the figure below.)
Double click on the “Client Service Profile” for your agency. It will open on
your screen and will look similar to that in the figure below.

- 98 -
Double click on the Client Service Category Profile Record for your Service
Category. It will open on your screen and will look similar to that in the figure
below.
Click the button to bring the record into edit mode.
Next, click the button. A dialog box, similar to that in the figure
below will open on your screen:
Fill out the fields as appropriate:
o Status: Select the status to change the client to.

- 99 -
o Reason for change: Click on the button to the right of the field ( ) to
activate the picklist and select the appropriate value.
o Date change effective: Enter the date that this change should be effective
from.
Once done, click on the button to save your changes.
Next, click the button to save your changes and back out of the record.
Click the button again to back out of the Client Service Profile.
Client Service Profile
Documenting that a client is being discharged from your agency as whole is done via the
Client Service Profile. NOTE: This should only be done when you are discharging the client
from all services at your agency.
This can be done by following the steps below:
Navigate to the Profile Section – General Sub-Tab of the Client Profile, seen in the
figure below:
Double click on the Client Service for your agency. The Client Service Profile
will open and will look similar to that in the figure below:

- 100 -
Click on the button. The Client Service Profile will be brought into Edit
mode.
Click on the button to activate the Status Change dialog box,
similar to that in the figure below:
Complete all fields as appropriate:
o Status: Select “Closed” as the status.
o Reason for change: Select the reason the client is being discharged from
your agency.
o Date change effective: Enter the date the client is being discharged from
your agency.
Click on the button to save your changes. You will be returned to
the Client Service Profile.
After verifying the status change, click on the button. You will be
prompted to save your changes. Click on the button to save your
changes and return to the Client Profile.

- 101 -
- 102 -
Chapter
4
Medical Case Management
Providers
This chapter outlines the tasks that need to be completed by Medical Case Management
Providers in Provide® Enterprise to meet all billing and reporting requirements. Over time, the
data elements outlined in this Chapter must also be kept current as things change for the client.
Intake and Assessment Documentation
At the time of Intake, and as required based on standards of care, there are a number of records
that must be entered into Provide®
Enterprise in order to meet all billing and invoicing
Requirements.
Client Profile
Within the Client Profile, it is important to keep all information updated as the client’s life
situation changes.
Opening Existing Clients to your Agency
If the client had previously been registered in Provide® Enterprise and served by another
agency, you will need to create a Client Service Profile to document that the Client is
now being served by your agency.
To do this, follow the steps below:
First, Navigate into the Client Profile (via “Find – Client” or one of the “Views”
of Client information.
In the Profile Section – General Sub-Tab, location the “Client Service Profiles”
view (circled in the figure below.)
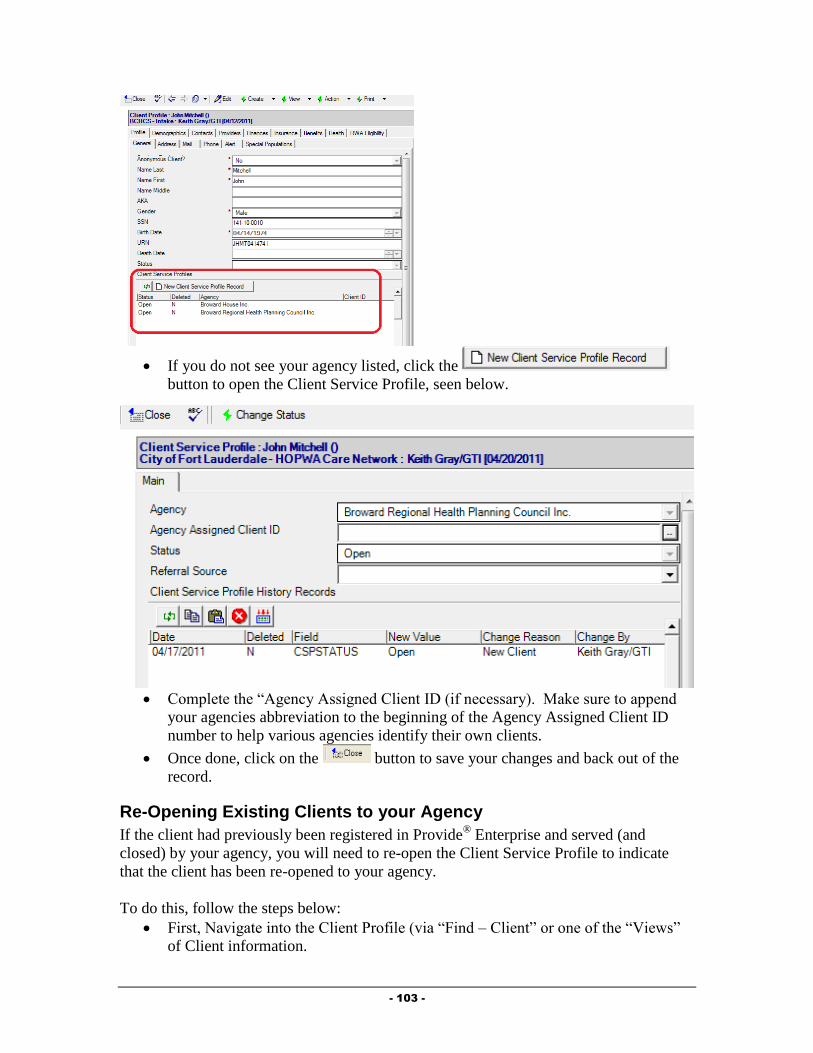
- 103 -
If you do not see your agency listed, click the
button to open the Client Service Profile, seen below.
Complete the “Agency Assigned Client ID (if necessary). Make sure to append
your agencies abbreviation to the beginning of the Agency Assigned Client ID
number to help various agencies identify their own clients.
Once done, click on the button to save your changes and back out of the
record.
Re-Opening Existing Clients to your Agency
If the client had previously been registered in Provide® Enterprise and served (and
closed) by your agency, you will need to re-open the Client Service Profile to indicate
that the client has been re-opened to your agency.
To do this, follow the steps below:
First, Navigate into the Client Profile (via “Find – Client” or one of the “Views”
of Client information.

- 104 -
Double click on the Client Service for your agency. The Client Service Profile will
open and will look similar to that in the figure below:
Click on the button. The Client Service Profile will be brought into Edit
mode, similar to that in the figure below:
Click on the button to activate the Status Change dialog box,
similar to that in the figure below:
Complete all fields as appropriate:

- 105 -
o Status: Select “Open” as the status.
o Reason for change: Select the reason the client is being re-opened to
your agency.
o Date change effective: Enter the date the client is being re-opened to
your agency.
Click on the button to save your changes. You will be returned to
the Client Service Profile.
After verifying the status change, click on the button. You will be
prompted to save your changes. Click on the button to save your
changes and return to the Client Profile.
Opening Existing Clients to your Service Category
If the client had previously been registered in Provide®
Enterprise and served by another
agency or by other programs at your agency, you will need to create a Client Service
Category Profile to document that the Client is now being served by your agency and
service category. NOTE: If the client has previously been served by your Service
Category, follow the steps below under “Re-Opening Existing Clients to Your Service
Category”.
To do this, follow the steps below:
First, Navigate into the Client Profile (via “Find – Client” or one of the “Views”
of Client information.
In the Profile Section – General Sub-Tab, location the “Client Service Profiles”
view (circled in the figure below.)
If you do not see your agency listed, follow the steps in the previous section to
“Open Existing Clients to your Agency”.
Double click on the “Client Service Profile” for your agency. It will open on
your screen and will look similar to that in the figure below.

- 106 -
Click the button to open a Cleint Service
Category Profile record, similar to that in the figure below:
Fill out the fields as appropriate:
o Service Category: Select the category of service that you wish to open
the client to.
o Client ID: If your program uses a client ID number, enter this hear.
o Status Effective/Status Reason: These will automatically be computed.
o Client Service Category Profile History Records: This window will
track each change to the Service Profile History Status records over time.
This will automatically occur when changes are made to these records.

- 107 -
Once done, click on the button to save your changes and back out of the
record. Click the button again to back out of the Client Service Profile.
Re-Opening Existing Clients to Your Service Category
If the client had previously been registered in Provide®
Enterprise and served by your
agency and service category, you will need to re-open the client to your service category
(if they are closed). Please note that if the client was closed to your agency, you will
need to re-open the client to your agency as well. See the steps above under “Re-
Opening a Client to Your Agency.”
To do this, follow the steps below:
First, Navigate into the Client Profile (via “Find – Client” or one of the “Views”
of Client information.
In the Profile Section – General Sub-Tab, location the “Client Service Profiles”
view (circled in the figure below.)
Double click on the “Client Service Profile” for your agency. It will open on
your screen and will look similar to that in the figure below.
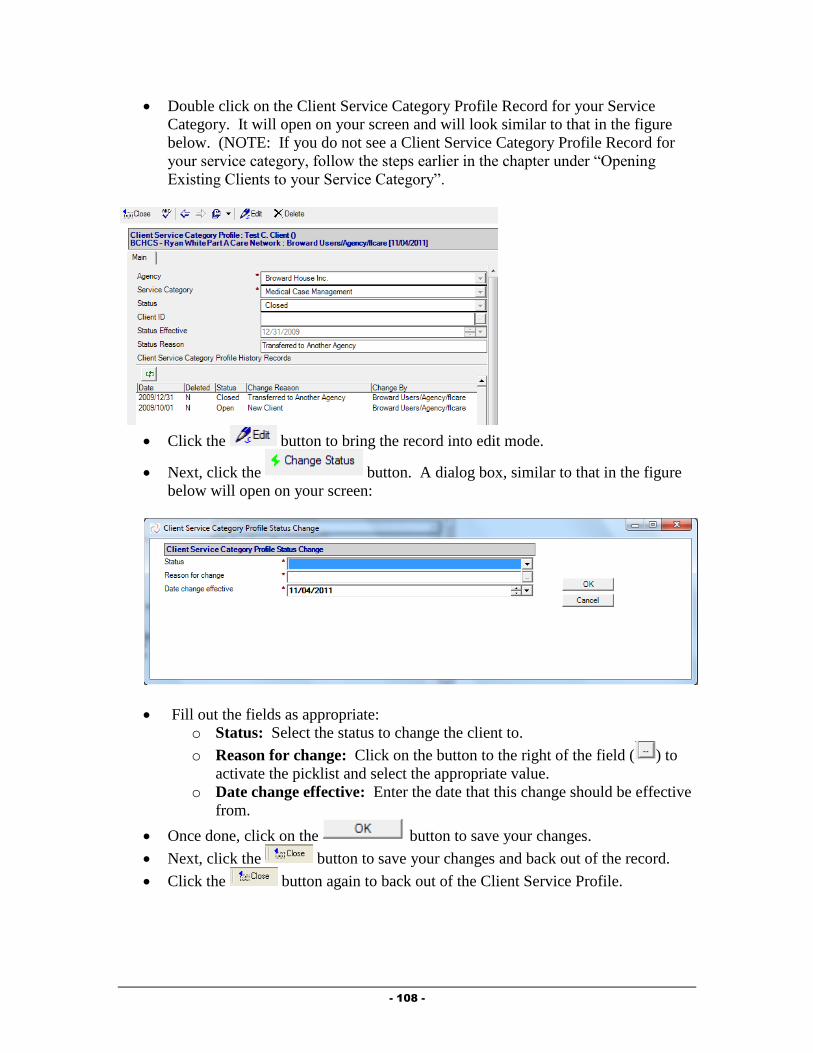
- 108 -
Double click on the Client Service Category Profile Record for your Service
Category. It will open on your screen and will look similar to that in the figure
below. (NOTE: If you do not see a Client Service Category Profile Record for
your service category, follow the steps earlier in the chapter under “Opening
Existing Clients to your Service Category”.
Click the button to bring the record into edit mode.
Next, click the button. A dialog box, similar to that in the figure
below will open on your screen:
Fill out the fields as appropriate:
o Status: Select the status to change the client to.
o Reason for change: Click on the button to the right of the field ( ) to
activate the picklist and select the appropriate value.
o Date change effective: Enter the date that this change should be effective
from.
Once done, click on the button to save your changes.
Next, click the button to save your changes and back out of the record.
Click the button again to back out of the Client Service Profile.

- 109 -
Assign the Case Manager
It is important to assign the Case Manager to the client and to keep this updated as necessary.
To Assign the Case Manager, follow the steps in Chapter 3, under “Creating Provider
Relationship Records”. The “Provider Relationship” should be set to Case Manager.
Prescription Assistance Program Enrollment
Within the Benefits section of the Client Profile, providers can document the client’s
enrollment in Manufacturer sponsored Prescription Assistance Programs (PAP). To do this,
follow the steps below:
Click the button. The Prescription Assistance Program
Enrollment form, similar to that in the figure below will open:
Fill out the fields as appropriate:
o Status: Select the client’s enrollment status in this program.
o Pharmaceutical Company: Click the button to select the program that
the client is enrolled in. This will populate the Pharmaceutical Company,
Program Name, and Enrolled Drug field.
o Date Applied/Date Enrolled: Enter these dates as appropriate.
o Date Next Review: Enter the date that the client will need to submit a re-
application or application update. You will receive notification prior to this
date to follow up with the client.
o Date Terminated: This field will only show if the “Enrollment Status” is set
to “Terminated”.
Complete all appropriate fields and the click on the button to save your
changes and back out of the record.
NOTE: A separate PAP Enrollment record must be documented for each medication the
client receives from a Prescription Assistance Program.
APA (AIDS Pharmaceutical Assistance) Program Status
Within the Benefits section of the Client Profile, providers can document the various stages of
a client’s enrollment in the APA program. To document these, follow the steps below:
Click the button. The APA Status form, similar to that in
the figure below will open:

- 110 -
Fill out the fields as appropriate:
o Status: Select the client’s enrollment status in this program.
o Program Name: Automatically defaults to the Florida ADAP Program.
o Date Effective: This should reflect the date that this particular status is
effective (not necessarily when the client’s enrollment is effective).
Complete all appropriate fields and the click on the button to save your
changes and back out of the record.
NOTE: A separate record for each part of the application and enrollment process
needs to created. (So, for example, a client will have an APA Program Status record
when first placed on the Wait List, then one when Enrolled in the program,
Terminated, etc.)
Case Management Summary
Much of the data related to the client’s assessment as well as services provided to a client, can
be found within the Case Management Summary.
To get to the Case Management Summary, follow the steps below:
Navigate to the Client Profile. Once in the Profile, select the “View” button and then
choose “Case Management Summary”.
A form similar to that in the figure below will open:

- 111 -
The Case Management Summary contains nine tabs of information, described below:
o Assessments: The Assessments tab contains information on the client’s
Needs Assessments and Level of Care Assessments.
o Action Plan: The Action Plan tab contains all Action Plan information.
o Contacts and Services: This tab holds information regarding services
provided to the client, including Progress Logs and Services Provided records.
Progress Logs and Services Provided can be created from this tab.
o Rides: This tab contains information related to van rides scheduled and
provided for the client.
o Procedures: This tab contains all medical and dental procedures documented
in the system by other Part A Medical or Oral Health providers.
o Medications: The Medications tab holds information on the client’s current
drug protocol as well as prescriptions the client may have had filled by other
Part A providers.
o Test Results: This tab displays all labs the client has had completed,
including CD-4 and Viral Load counts. You can also create an individual Test
Result or a Lab Panel from this tab.
o Referrals: The Referrals tab of the Case Management Summary displays any
referrals made for the client and also allows for creation of a Referral record.
o Other Activity: On this tab, you will see any Medical appointments for a
client, as well as Hospitalization history and Letters written on behalf of or to
the client. All three of these Activity types can also be created from this tab.
Needs Assessment
The Needs Assessment allows you to track the client’s current needs and what types of
services the client is hoping to receive. In Provide®
Enterprise, the Broward County Needs
Assessment is listed as “Client Assessment”.
To create the Needs Assessment, follow these steps:
From within the Case Management Summary, select the
button.
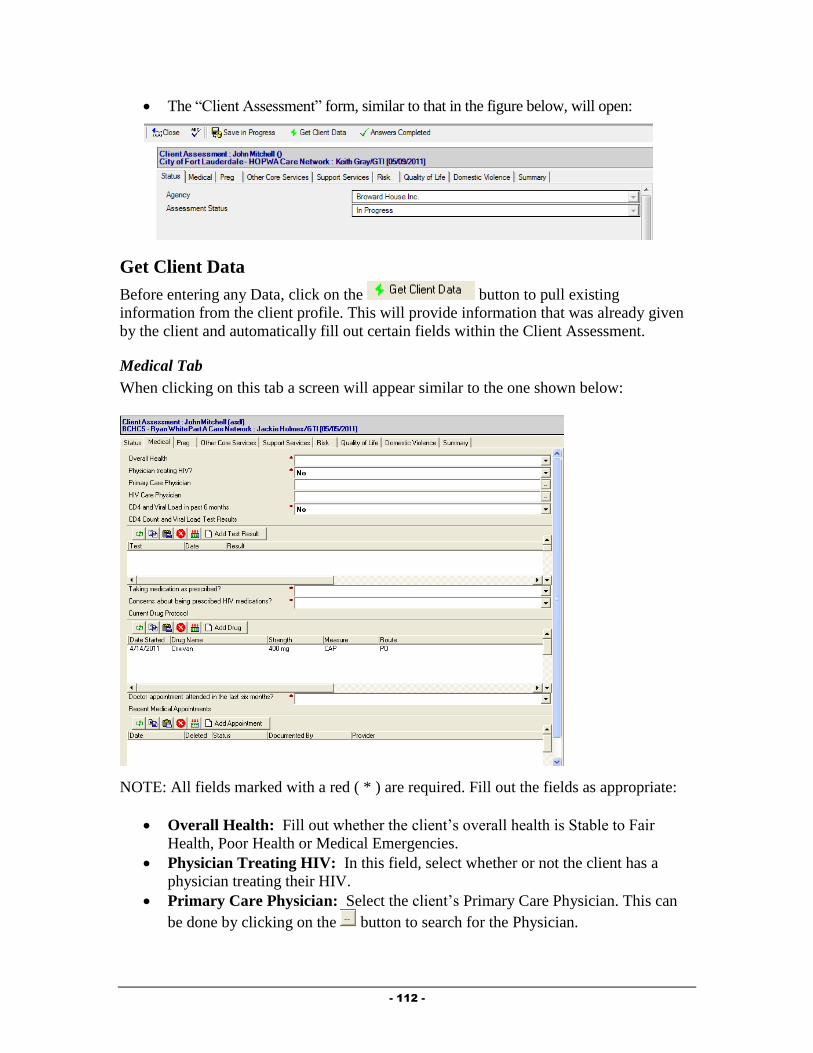
- 112 -
The “Client Assessment” form, similar to that in the figure below, will open:
Get Client Data
Before entering any Data, click on the button to pull existing
information from the client profile. This will provide information that was already given
by the client and automatically fill out certain fields within the Client Assessment.
Medical Tab
When clicking on this tab a screen will appear similar to the one shown below:
NOTE: All fields marked with a red ( * ) are required. Fill out the fields as appropriate:
Overall Health: Fill out whether the client’s overall health is Stable to Fair
Health, Poor Health or Medical Emergencies.
Physician Treating HIV: In this field, select whether or not the client has a
physician treating their HIV.
Primary Care Physician: Select the client’s Primary Care Physician. This can
be done by clicking on the button to search for the Physician.
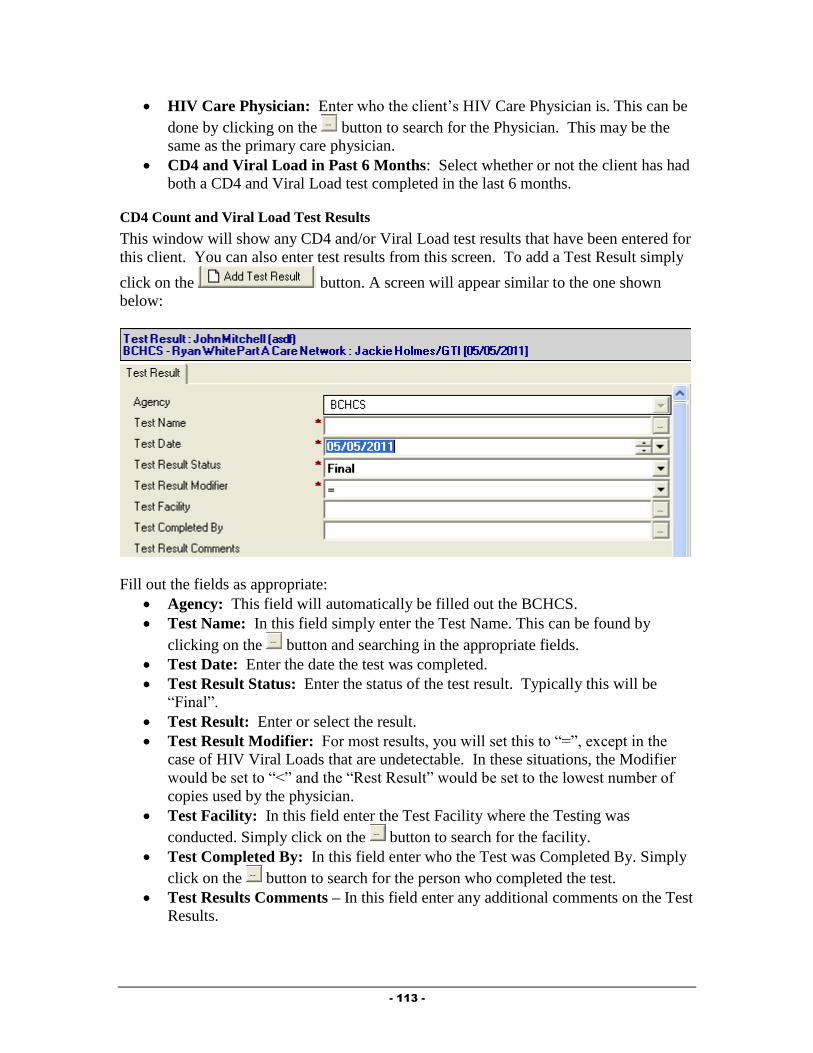
- 113 -
HIV Care Physician: Enter who the client’s HIV Care Physician is. This can be
done by clicking on the button to search for the Physician. This may be the
same as the primary care physician.
CD4 and Viral Load in Past 6 Months: Select whether or not the client has had
both a CD4 and Viral Load test completed in the last 6 months.
CD4 Count and Viral Load Test Results
This window will show any CD4 and/or Viral Load test results that have been entered for
this client. You can also enter test results from this screen. To add a Test Result simply
click on the button. A screen will appear similar to the one shown
below:
Fill out the fields as appropriate:
Agency: This field will automatically be filled out the BCHCS.
Test Name: In this field simply enter the Test Name. This can be found by
clicking on the button and searching in the appropriate fields.
Test Date: Enter the date the test was completed.
Test Result Status: Enter the status of the test result. Typically this will be
“Final”.
Test Result: Enter or select the result.
Test Result Modifier: For most results, you will set this to “=”, except in the
case of HIV Viral Loads that are undetectable. In these situations, the Modifier
would be set to “<” and the “Rest Result” would be set to the lowest number of
copies used by the physician.
Test Facility: In this field enter the Test Facility where the Testing was
conducted. Simply click on the button to search for the facility.
Test Completed By: In this field enter who the Test was Completed By. Simply
click on the button to search for the person who completed the test.
Test Results Comments – In this field enter any additional comments on the Test
Results.

- 114 -
To Save the Test Result click on the button. A screen will appear asking you
if you would like to Save Your Changes. Click “Yes” here.
Taking Medication as Prescribed: In this field enter Yes, No, or No – Not
Prescribed.
Concerns About Being Prescribed HIV Medications: In this field enter if the
client has concerns about the HIV Medication. Select one of the following, No
Concerns and No Issues With Adherence, Client Self-Identifies Minor Concerns
About Taking Medications or Client Self-Identifies Major Concerns About
Taking Medications.
Current Drug Protocol
This window will show any Drug records that have been entered for this client. You can
also enter drug records from this screen.
To add a drug click on the button. A screen will appear similar to the one
shown below:
Fill out the fields as appropriate:
Drug Status: Enter the Drug Status either Active or Inactive.
Drug Started: In this field enter the date when the drug was started.
Drug Name: Enter the name of the drug in this field. This can be found by
simply clicking on the button and searching in the appropriate fields for the
name.
Drug Name Generic: This will be automatically filled out after you select the
“Drug Name” above.
Strength: Enter the strength of the drug in this field.
Route: In this field enter the Route.
Dosage Form: In this field enter the Dosage Form.
Frequency: Select the frequency.
Instructions – In this field enter instructions on how to take the drug.
Drug Comments: Document any other comments related to this drug.
To save the record, click on the button. A screen will appear asking you if you
would like to Save Your Changes. Simply click Yes to save the record.
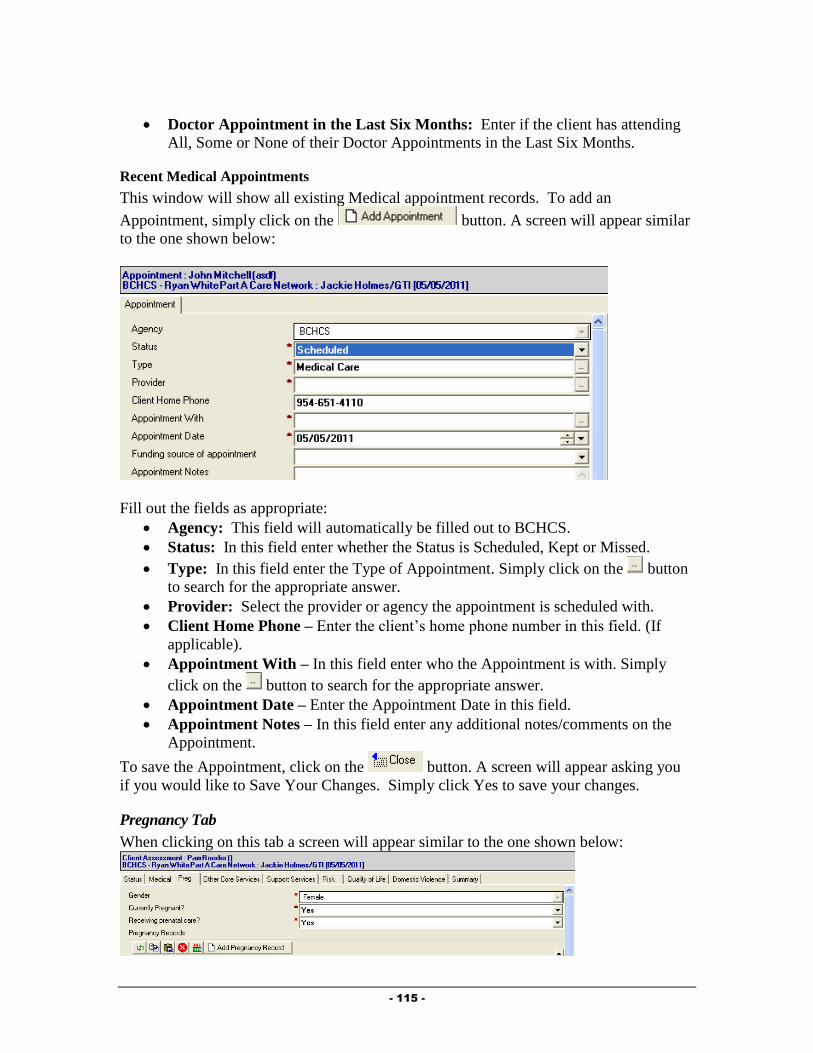
- 115 -
Doctor Appointment in the Last Six Months: Enter if the client has attending
All, Some or None of their Doctor Appointments in the Last Six Months.
Recent Medical Appointments
This window will show all existing Medical appointment records. To add an
Appointment, simply click on the button. A screen will appear similar
to the one shown below:
Fill out the fields as appropriate:
Agency: This field will automatically be filled out to BCHCS.
Status: In this field enter whether the Status is Scheduled, Kept or Missed.
Type: In this field enter the Type of Appointment. Simply click on the button
to search for the appropriate answer.
Provider: Select the provider or agency the appointment is scheduled with.
Client Home Phone – Enter the client’s home phone number in this field. (If
applicable).
Appointment With – In this field enter who the Appointment is with. Simply
click on the button to search for the appropriate answer.
Appointment Date – Enter the Appointment Date in this field.
Appointment Notes – In this field enter any additional notes/comments on the
Appointment.
To save the Appointment, click on the button. A screen will appear asking you
if you would like to Save Your Changes. Simply click Yes to save your changes.
Pregnancy Tab
When clicking on this tab a screen will appear similar to the one shown below:

- 116 -
NOTE: The Gender field will automatically be filled out based on the information from
the Client Profile. (After you have clicked the “Get Client Data” button). If the client is a
male, no additional fields will appear. If the client is a female, the following field
appears:
Currently Pregnant?: Select whether or not the client is currently pregnant. If
this field is set to “Yes”, one additional field will appear, described below.
Receiving Prenatal Care?: Select whether or not the client is receiving prenatal
care.
If a client is pregnant, you must document details about the pregnancy. This is done in
the Pregnancy record.
Pregnancy Record
To create a Pregnancy Record simply click on the button. A
screen will appear similar to the one shown below:
Fill out the fields as appropriate:
Status: In this field enter the Pregnancy Status either Active or Inactive.
Estimated Conception Date: In this field enter the Estimated Date of
Conception.
EDC: Estimated Date of Confinement (Due Date) – In this field enter the
Estimated Due Date.
When Entered Prenatal Care: Enter when Prenatal Care was received; 1st
Trimester, 2nd
Trimester, 3rd
Trimester, Time of Delivery or Unknown.
Antiretrovirals Prescribed: In this field enter either Yes or No.
If the pregnancy record “Status” is set to “Inactive”, additional fields appear:
End Date: Enter the date the pregnancy ended.
Pregnancy Outcome: Select what the outcome of the pregnancy was.
If the pregnancy “Outcome” is set to “Live Birth”, additional fields appear:
Delivery Type: Enter the type of delivery.
Apgar Score: Enter the Apgar score, if known.
Birth Weight (lbs./oz.): Enter the birth weight in pounds and ounces, if known.
HIV Status of Newborn: Document the newborn’s HIV Status. This can be
updated after final testing has been completed.
Other Core Services Tab
When clicking on this tab a screen will appear similar to the one shown below:
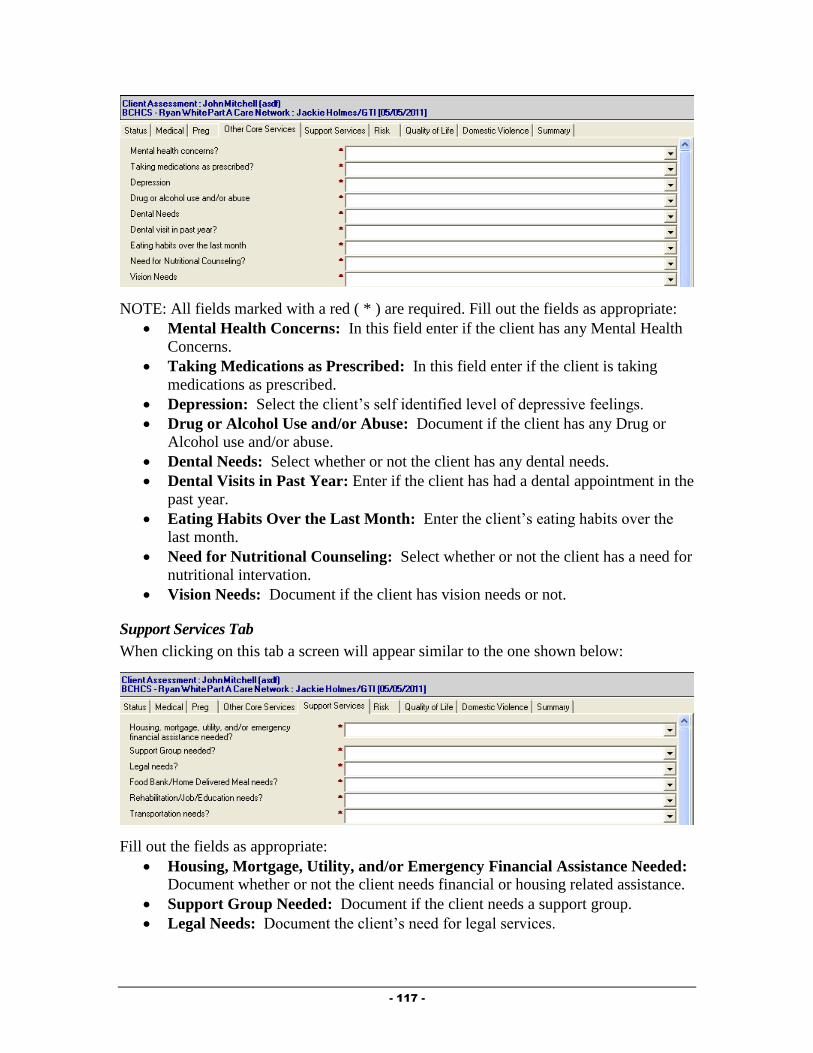
- 117 -
NOTE: All fields marked with a red ( * ) are required. Fill out the fields as appropriate:
Mental Health Concerns: In this field enter if the client has any Mental Health
Concerns.
Taking Medications as Prescribed: In this field enter if the client is taking
medications as prescribed.
Depression: Select the client’s self identified level of depressive feelings.
Drug or Alcohol Use and/or Abuse: Document if the client has any Drug or
Alcohol use and/or abuse.
Dental Needs: Select whether or not the client has any dental needs.
Dental Visits in Past Year: Enter if the client has had a dental appointment in the
past year.
Eating Habits Over the Last Month: Enter the client’s eating habits over the
last month.
Need for Nutritional Counseling: Select whether or not the client has a need for
nutritional intervation.
Vision Needs: Document if the client has vision needs or not.
Support Services Tab
When clicking on this tab a screen will appear similar to the one shown below:
Fill out the fields as appropriate:
Housing, Mortgage, Utility, and/or Emergency Financial Assistance Needed: Document whether or not the client needs financial or housing related assistance.
Support Group Needed: Document if the client needs a support group.
Legal Needs: Document the client’s need for legal services.
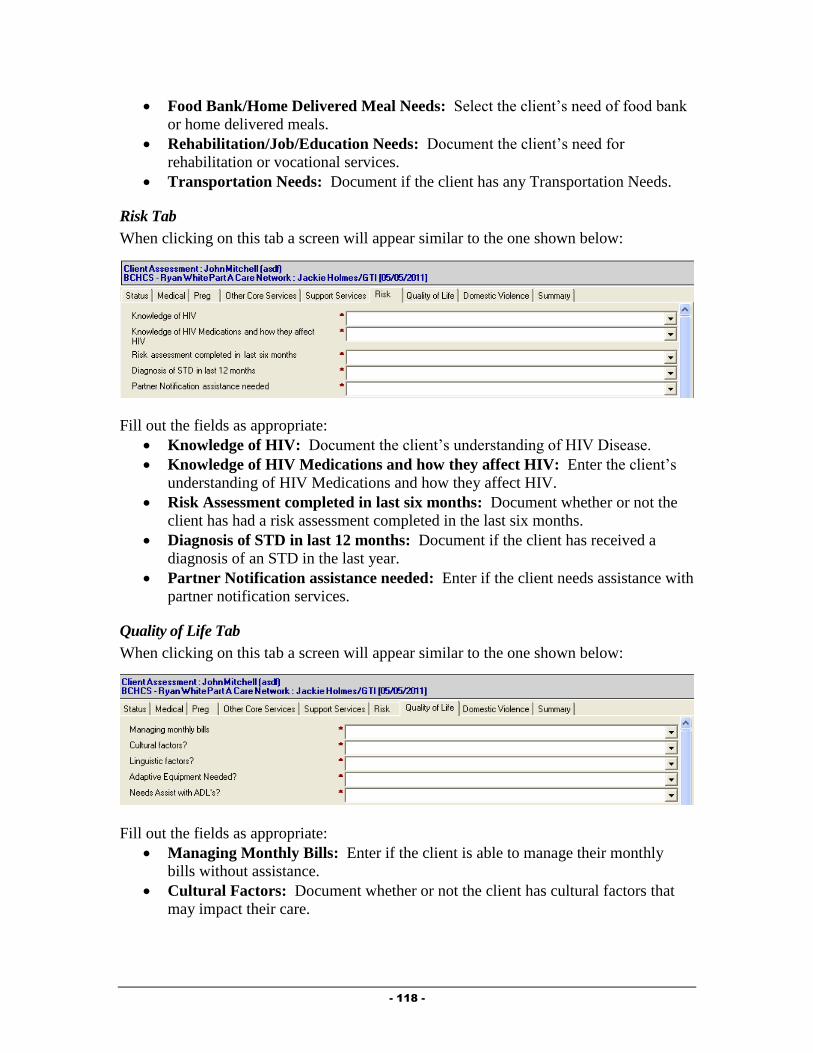
- 118 -
Food Bank/Home Delivered Meal Needs: Select the client’s need of food bank
or home delivered meals.
Rehabilitation/Job/Education Needs: Document the client’s need for
rehabilitation or vocational services.
Transportation Needs: Document if the client has any Transportation Needs.
Risk Tab
When clicking on this tab a screen will appear similar to the one shown below:
Fill out the fields as appropriate:
Knowledge of HIV: Document the client’s understanding of HIV Disease.
Knowledge of HIV Medications and how they affect HIV: Enter the client’s
understanding of HIV Medications and how they affect HIV.
Risk Assessment completed in last six months: Document whether or not the
client has had a risk assessment completed in the last six months.
Diagnosis of STD in last 12 months: Document if the client has received a
diagnosis of an STD in the last year.
Partner Notification assistance needed: Enter if the client needs assistance with
partner notification services.
Quality of Life Tab
When clicking on this tab a screen will appear similar to the one shown below:
Fill out the fields as appropriate:
Managing Monthly Bills: Enter if the client is able to manage their monthly
bills without assistance.
Cultural Factors: Document whether or not the client has cultural factors that
may impact their care.

- 119 -
Culture Identified With: This field will only show if “Cultural Factors” is set to
“Cultural barriers to accessing services”. Enter information related to the culture
the client identifies with.
Linguistic Factor: Document whether or not the client has linguistic factors that
may impact their care.
Needs Interpreter: This field only shows if “Linguistic Factors” is set to
“Language barriers to accessing services”. Select whether the client needs an
interpreter when obtaining care.
Which to you prefer to write?: This field only shows if “Linguistic Factors” is
set to “Language barriers to accessing services”. Document the language in
which the client prefers to write.
Which do you prefer to read?: This field only shows if “Linguistic Factors” is
set to “Language barriers to accessing services”. Document the language in
which the client prefers to write.
Adaptive Equipment Needed: Document the client’s need for adaptive
equipment.
Needs Assist with ADL: Select whether or not the client needs assistane
completing their activities of daily living.
Domestic Violence Tab
When clicking on this tab a screen will appear similar to the one shown below:
Fill out the fields as appropriate:
Fear of harm regarding disclosure of HIV status: Document whether or not
the client fears actual harm when disclosing their HIV status.
Domestic Violence or Abuse in Current Relationship: Select if the client is
currently in a violent or abusive relationship.
Perpetrates Violence Toward Partner, Child, Others: Document if the client
is a perpetrator of violence.
Summary Tab
When clicking on this tab a screen will appear similar to the one shown below:
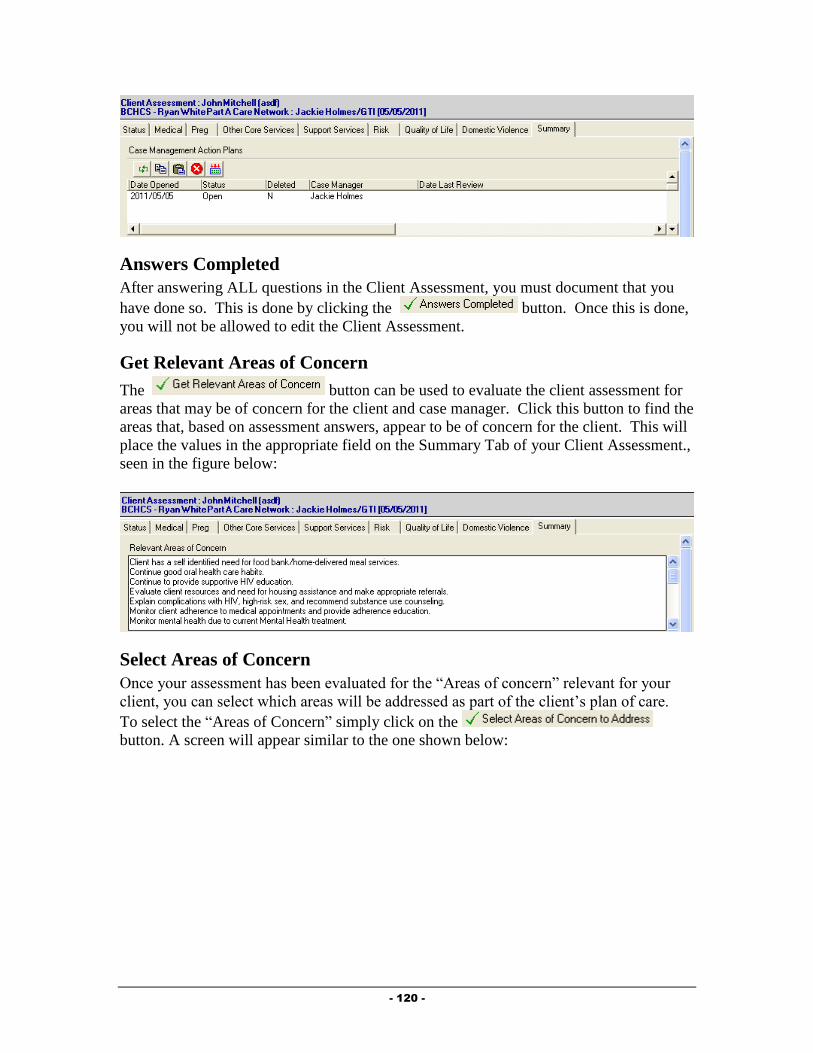
- 120 -
Answers Completed
After answering ALL questions in the Client Assessment, you must document that you
have done so. This is done by clicking the button. Once this is done,
you will not be allowed to edit the Client Assessment.
Get Relevant Areas of Concern
The button can be used to evaluate the client assessment for
areas that may be of concern for the client and case manager. Click this button to find the
areas that, based on assessment answers, appear to be of concern for the client. This will
place the values in the appropriate field on the Summary Tab of your Client Assessment.,
seen in the figure below:
Select Areas of Concern
Once your assessment has been evaluated for the “Areas of concern” relevant for your
client, you can select which areas will be addressed as part of the client’s plan of care.
To select the “Areas of Concern” simply click on the
button. A screen will appear similar to the one shown below:
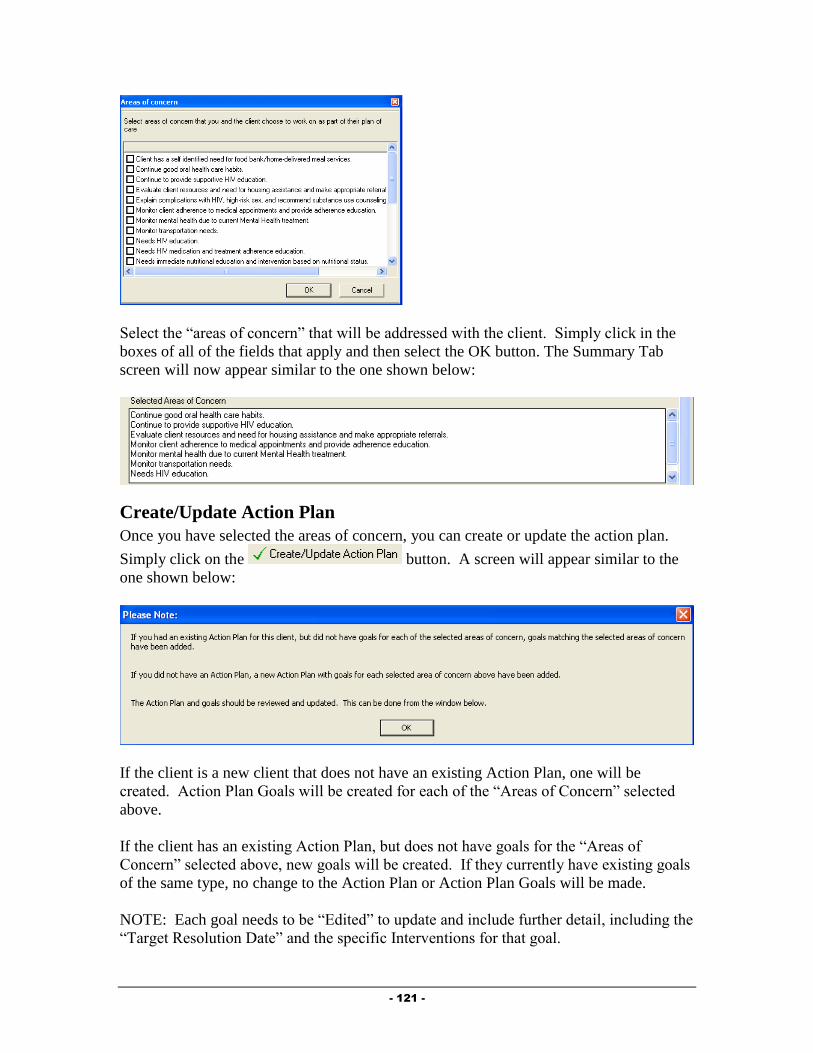
- 121 -
Select the “areas of concern” that will be addressed with the client. Simply click in the
boxes of all of the fields that apply and then select the OK button. The Summary Tab
screen will now appear similar to the one shown below:
Create/Update Action Plan
Once you have selected the areas of concern, you can create or update the action plan.
Simply click on the button. A screen will appear similar to the
one shown below:
If the client is a new client that does not have an existing Action Plan, one will be
created. Action Plan Goals will be created for each of the “Areas of Concern” selected
above.
If the client has an existing Action Plan, but does not have goals for the “Areas of
Concern” selected above, new goals will be created. If they currently have existing goals
of the same type, no change to the Action Plan or Action Plan Goals will be made.
NOTE: Each goal needs to be “Edited” to update and include further detail, including the
“Target Resolution Date” and the specific Interventions for that goal.
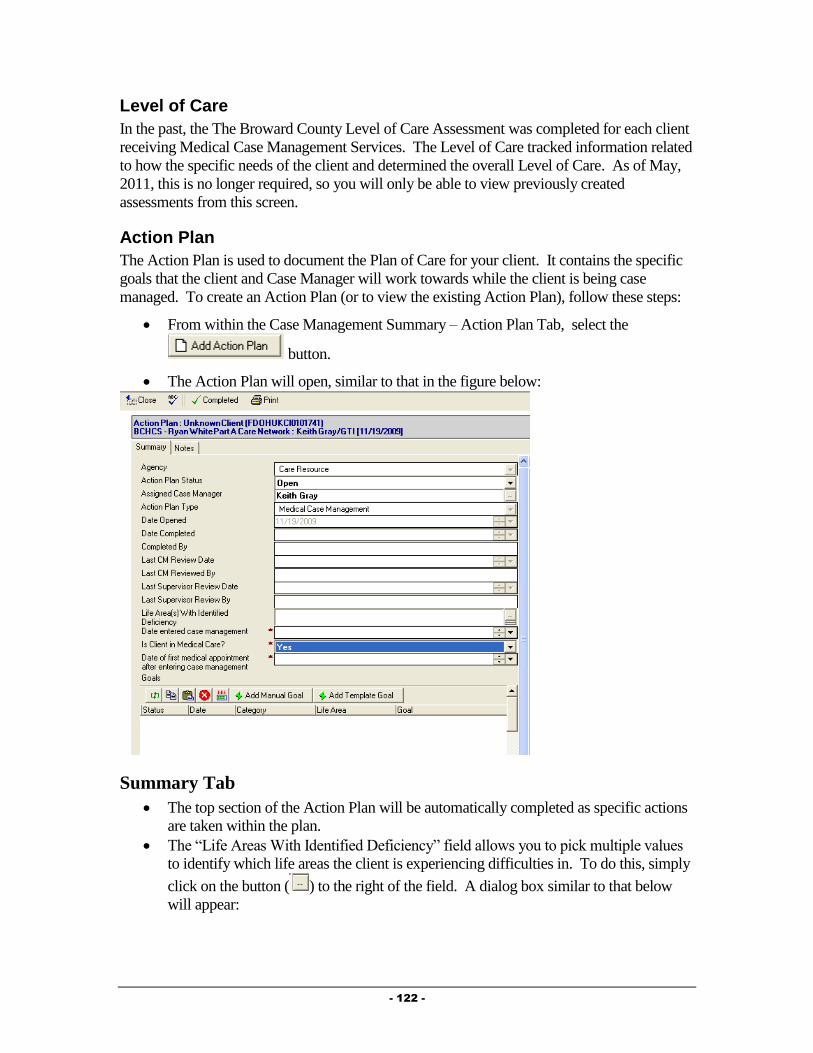
- 122 -
Level of Care
In the past, the The Broward County Level of Care Assessment was completed for each client
receiving Medical Case Management Services. The Level of Care tracked information related
to how the specific needs of the client and determined the overall Level of Care. As of May,
2011, this is no longer required, so you will only be able to view previously created
assessments from this screen.
Action Plan
The Action Plan is used to document the Plan of Care for your client. It contains the specific
goals that the client and Case Manager will work towards while the client is being case
managed. To create an Action Plan (or to view the existing Action Plan), follow these steps:
From within the Case Management Summary – Action Plan Tab, select the
button.
The Action Plan will open, similar to that in the figure below:
Summary Tab
The top section of the Action Plan will be automatically completed as specific actions
are taken within the plan.
The “Life Areas With Identified Deficiency” field allows you to pick multiple values
to identify which life areas the client is experiencing difficulties in. To do this, simply
click on the button ( ) to the right of the field. A dialog box similar to that below
will appear:

- 123 -
Select the appropriate life areas by clicking on them while holding the CTRL
(Control) key down on your keyboard (if selecting multiple values). After selecting
the applicable life areas, click the button. The values will be placed into
the field on your Action Plan.
These additional fields show only on Medical Case Management Action Plans in
order to track information needed for outcomes reporting:
o Date Entered case management: Enter the date the client entered Case
Management services.
o Is Client in Medical Care: Select whether or not the client is receiving
medical care.
o Date of first medical appointment after entering case management: If
the client is in medical care, enter the date of their first medical
appointment after entering case management.
Notes Tab
The Notes tab of the Action Plan holds information related to the overall General
Action Plan, as well as Action Plan Progress Notes related to the plan. Simply type
any general notes in the “General Action Plan Notes” section.
Action Plan Progress Notes
Action Plan Progress Notes are meant to be used to document progress towards
meeting the goals that make up the Action Plan.
To create an Action Plan Progress Note, simply click on the button. The
Action Plan Progress Note, similar to that in the figure below will appear:

- 124 -
Fill out the fields as appropriate:
o Agency: This field will automatically default to your Agency.
o Review Date: Enter the Date of the Review of the plan.
o Reviewed By: This field will default to your name.
o Current Progress: Select the reason this note is being entered.
o Notes: Enter any notes related to this Action Plan Progress Note, such as why
the goal is being opened, closed or what specific progress has been made
towards meeting the goal.
Adding Manual Goals to an Action Plan
Provide® Enterprise allows you to create “Manual” Goals to associate with a client’s Action
Plan. Manual Goals are ones that you and the client develop to work on together. These are
different from the “Template” Goals which will be developed by a workgroup of Case
Management providers and will be available for all Case Managers to add to their Action
Plans (the workgroup is working on this in the near future). To create a “Manual” Goal,
follow these steps:
While in the Action Plan, click the button. The Action Plan Goal form,
similar to that below, will appear on your screen. You will notice that the Action Plan
Goal contains two tabs: Summary and Notes.
Fill out the fields as appropriate:
Summary Tab
o Agency: Automatically populated based on the Agency you work for.
o Goal Status: Automatically set to “Open”
o Goal Type: Automatically set to “Manual”.
o Goal Category: Select the category that matches the goal that you are adding
to the Action Plan (Access, Adherence or Retention).
o Goal Life Area: Select the life area that this goal most closely relates to.
o Goal Statement: Enter a brief summary describing the goal.
o Interventions: Type in the specific interventions that will be followed in
working towards meeting this goal.
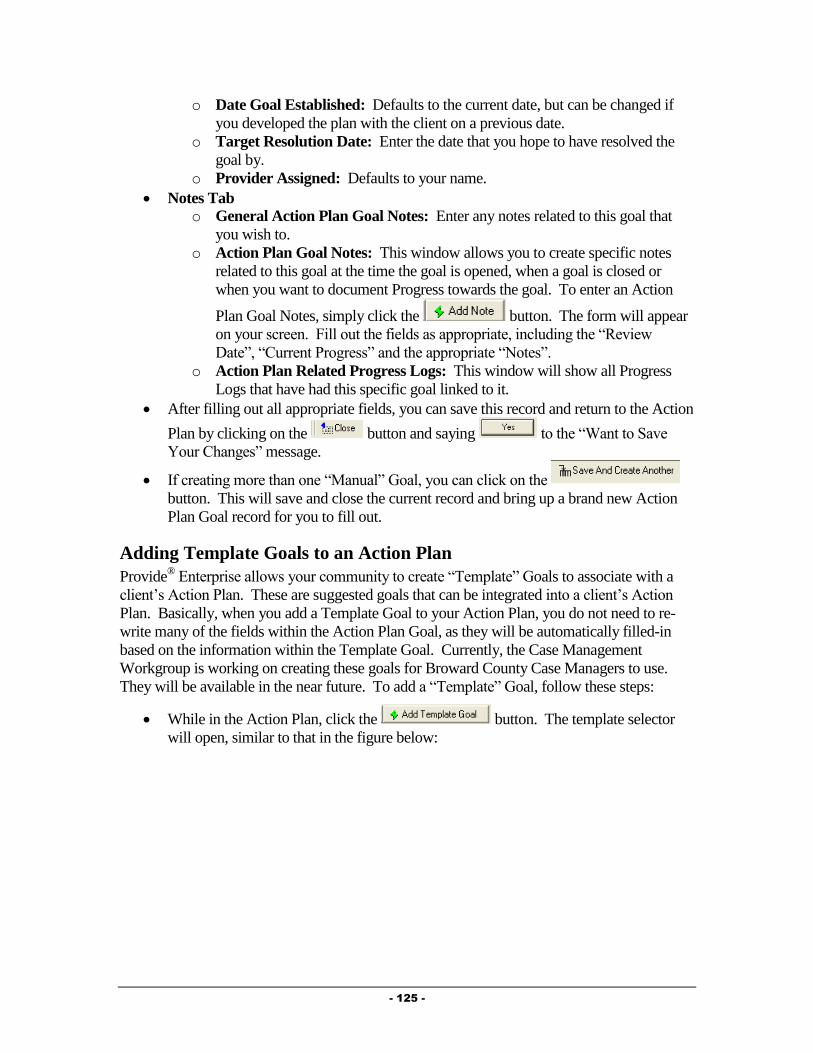
- 125 -
o Date Goal Established: Defaults to the current date, but can be changed if
you developed the plan with the client on a previous date.
o Target Resolution Date: Enter the date that you hope to have resolved the
goal by.
o Provider Assigned: Defaults to your name.
Notes Tab o General Action Plan Goal Notes: Enter any notes related to this goal that
you wish to.
o Action Plan Goal Notes: This window allows you to create specific notes
related to this goal at the time the goal is opened, when a goal is closed or
when you want to document Progress towards the goal. To enter an Action
Plan Goal Notes, simply click the button. The form will appear
on your screen. Fill out the fields as appropriate, including the “Review
Date”, “Current Progress” and the appropriate “Notes”.
o Action Plan Related Progress Logs: This window will show all Progress
Logs that have had this specific goal linked to it.
After filling out all appropriate fields, you can save this record and return to the Action
Plan by clicking on the button and saying to the “Want to Save
Your Changes” message.
If creating more than one “Manual” Goal, you can click on the
button. This will save and close the current record and bring up a brand new Action
Plan Goal record for you to fill out.
Adding Template Goals to an Action Plan
Provide® Enterprise allows your community to create “Template” Goals to associate with a
client’s Action Plan. These are suggested goals that can be integrated into a client’s Action
Plan. Basically, when you add a Template Goal to your Action Plan, you do not need to re-
write many of the fields within the Action Plan Goal, as they will be automatically filled-in
based on the information within the Template Goal. Currently, the Case Management
Workgroup is working on creating these goals for Broward County Case Managers to use.
They will be available in the near future. To add a “Template” Goal, follow these steps:
While in the Action Plan, click the button. The template selector
will open, similar to that in the figure below:
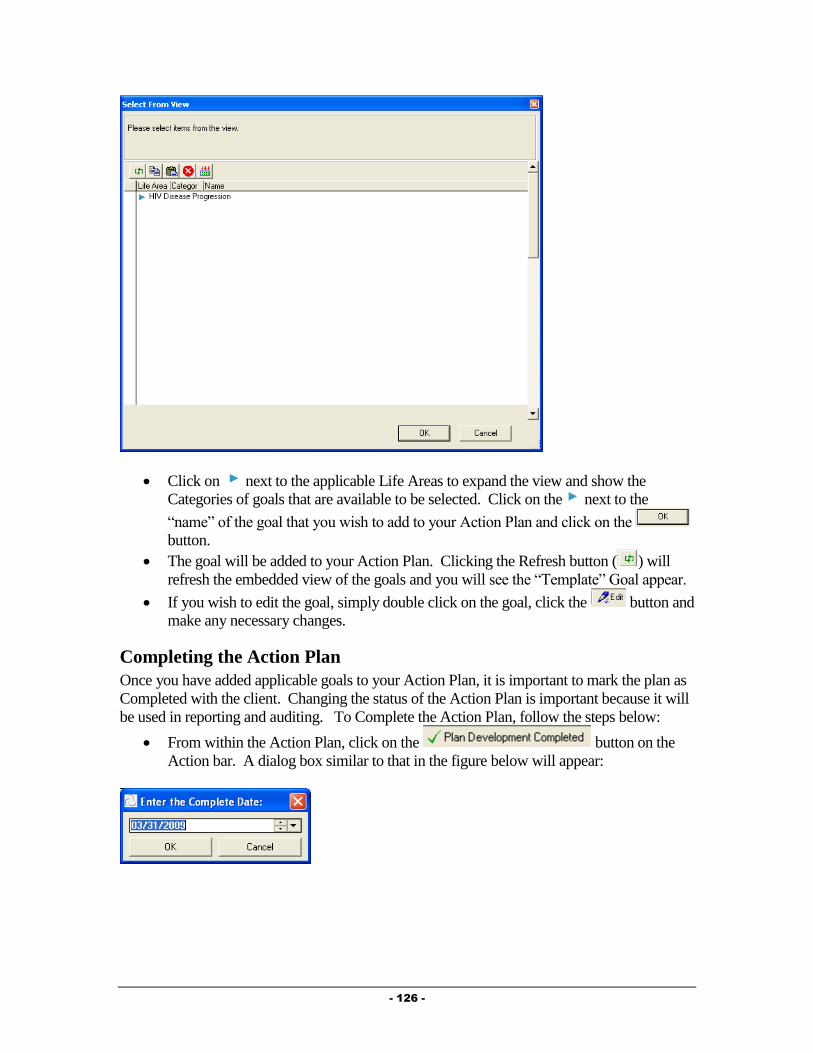
- 126 -
Click on next to the applicable Life Areas to expand the view and show the
Categories of goals that are available to be selected. Click on the next to the
“name” of the goal that you wish to add to your Action Plan and click on the
button.
The goal will be added to your Action Plan. Clicking the Refresh button ( ) will
refresh the embedded view of the goals and you will see the “Template” Goal appear.
If you wish to edit the goal, simply double click on the goal, click the button and
make any necessary changes.
Completing the Action Plan
Once you have added applicable goals to your Action Plan, it is important to mark the plan as
Completed with the client. Changing the status of the Action Plan is important because it will
be used in reporting and auditing. To Complete the Action Plan, follow the steps below:
From within the Action Plan, click on the button on the
Action bar. A dialog box similar to that in the figure below will appear:

- 127 -
Enter or Select the Date that the Action Plan was completed with your client and click
on the button. The Action Plan will refresh, with the “Action Plan
Status” changing to “Completed” and the “Date Completed” and “Completed By”
fields being populated (seen in the figure below):
The Completed button will then disappear and new buttons will appear. These will be
discussed below.
Reviewing the Action Plan
Once the Action Plan has been marked as Completed, you will be available to “Review” the
Action Plan at any time. Marking the Action Plan as Reviewed is certifying that you have
reviewed the plan with your client and made any adjustments and updates necessary. To
mark the Action Plan as Reviewed, follow the steps below:
From within the Action Plan, click on the button on the Action bar. A
dialog box similar to that in the figure below will appear:
Enter or Select the Date that the Action Plan was reviewed with your client and click
on the button. The Action Plan will refresh with the “Action Plan
Status” changing to “Reviewed” and the “Last CM Review Date” and “Last CM
Reviewed By” fields being populated (seen in the figure below):
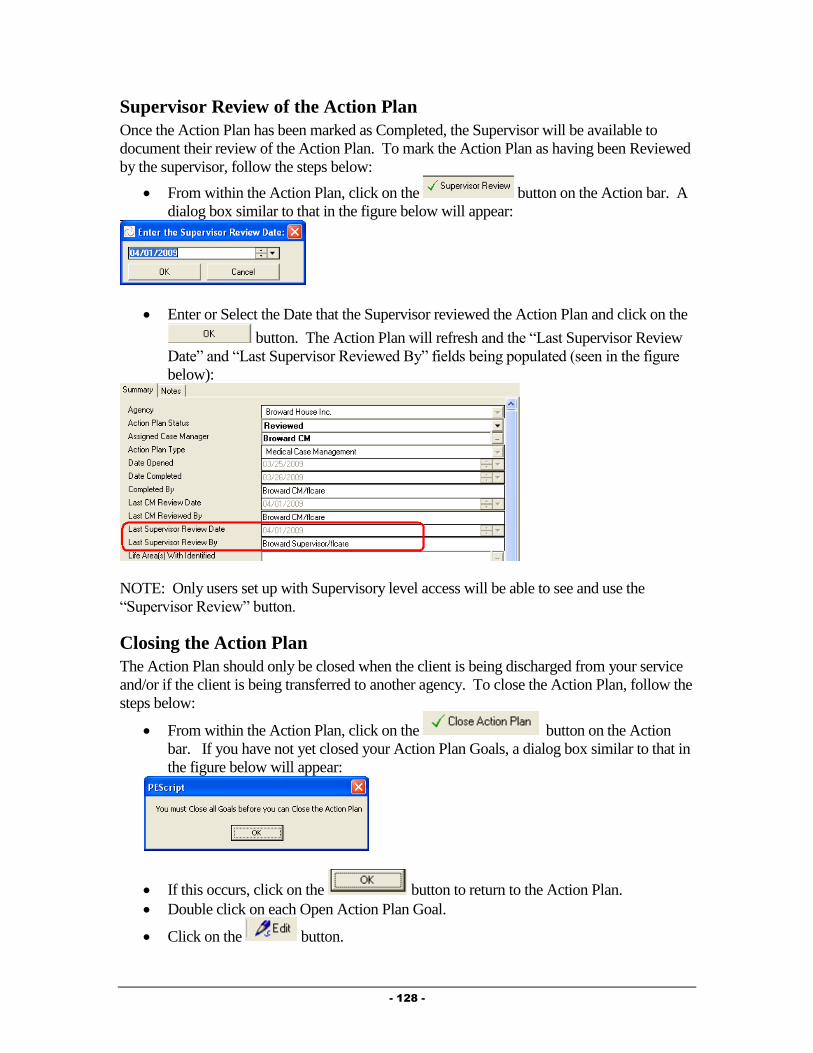
- 128 -
Supervisor Review of the Action Plan
Once the Action Plan has been marked as Completed, the Supervisor will be available to
document their review of the Action Plan. To mark the Action Plan as having been Reviewed
by the supervisor, follow the steps below:
From within the Action Plan, click on the button on the Action bar. A
dialog box similar to that in the figure below will appear:
Enter or Select the Date that the Supervisor reviewed the Action Plan and click on the
button. The Action Plan will refresh and the “Last Supervisor Review
Date” and “Last Supervisor Reviewed By” fields being populated (seen in the figure
below):
NOTE: Only users set up with Supervisory level access will be able to see and use the
“Supervisor Review” button.
Closing the Action Plan
The Action Plan should only be closed when the client is being discharged from your service
and/or if the client is being transferred to another agency. To close the Action Plan, follow the
steps below:
From within the Action Plan, click on the button on the Action
bar. If you have not yet closed your Action Plan Goals, a dialog box similar to that in
the figure below will appear:
If this occurs, click on the button to return to the Action Plan.
Double click on each Open Action Plan Goal.
Click on the button.
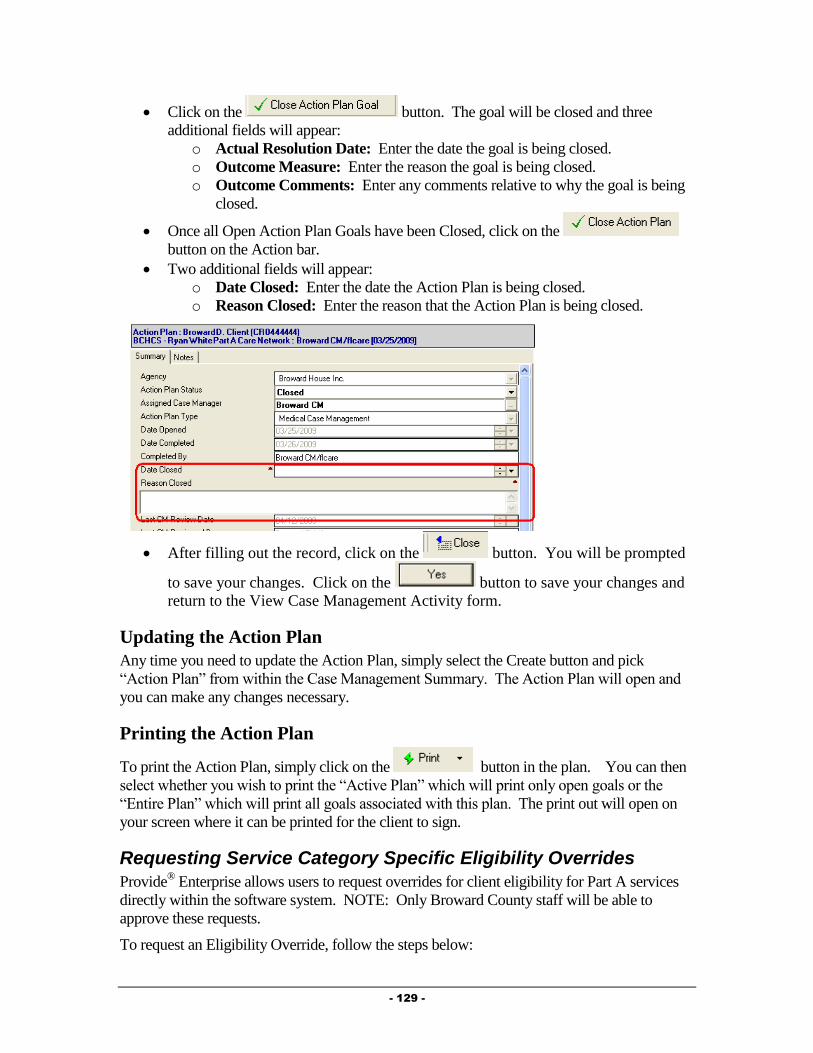
- 129 -
Click on the button. The goal will be closed and three
additional fields will appear:
o Actual Resolution Date: Enter the date the goal is being closed.
o Outcome Measure: Enter the reason the goal is being closed.
o Outcome Comments: Enter any comments relative to why the goal is being
closed.
Once all Open Action Plan Goals have been Closed, click on the
button on the Action bar.
Two additional fields will appear:
o Date Closed: Enter the date the Action Plan is being closed.
o Reason Closed: Enter the reason that the Action Plan is being closed.
After filling out the record, click on the button. You will be prompted
to save your changes. Click on the button to save your changes and
return to the View Case Management Activity form.
Updating the Action Plan
Any time you need to update the Action Plan, simply select the Create button and pick
“Action Plan” from within the Case Management Summary. The Action Plan will open and
you can make any changes necessary.
Printing the Action Plan
To print the Action Plan, simply click on the button in the plan. You can then
select whether you wish to print the “Active Plan” which will print only open goals or the
“Entire Plan” which will print all goals associated with this plan. The print out will open on
your screen where it can be printed for the client to sign.
Requesting Service Category Specific Eligibility Overrides
Provide® Enterprise allows users to request overrides for client eligibility for Part A services
directly within the software system. NOTE: Only Broward County staff will be able to
approve these requests.
To request an Eligibility Override, follow the steps below:
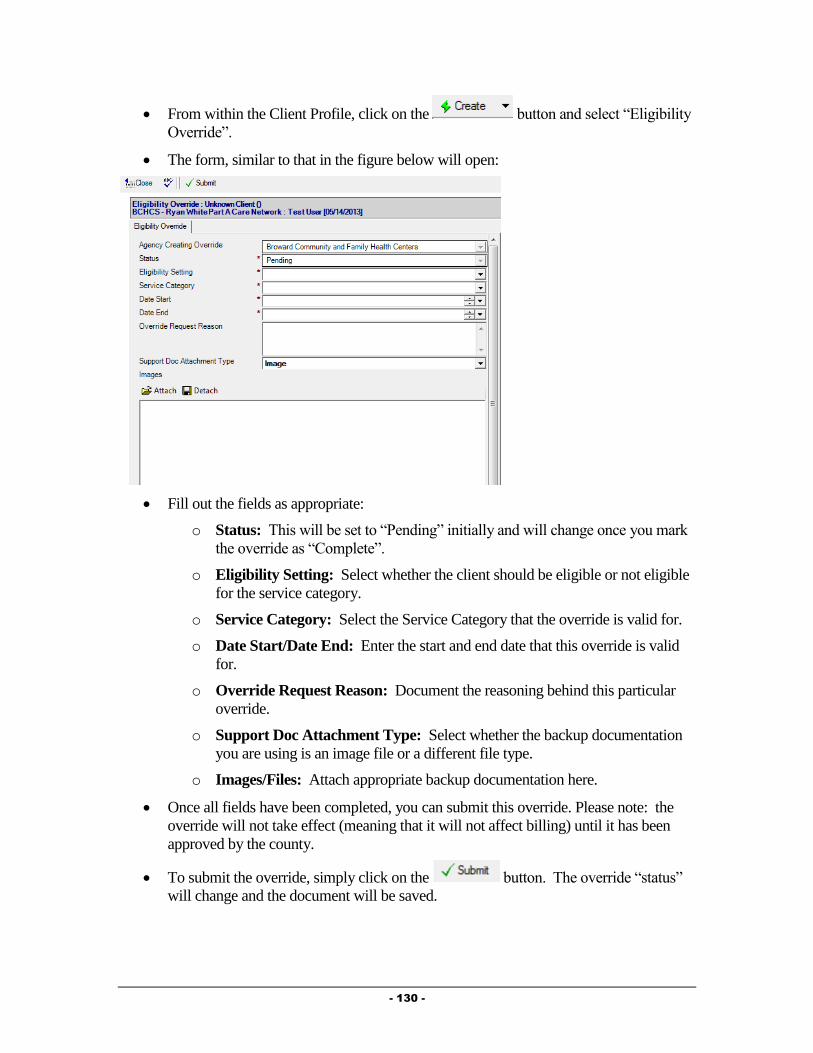
- 130 -
From within the Client Profile, click on the button and select “Eligibility
Override”.
The form, similar to that in the figure below will open:
Fill out the fields as appropriate:
o Status: This will be set to “Pending” initially and will change once you mark
the override as “Complete”.
o Eligibility Setting: Select whether the client should be eligible or not eligible
for the service category.
o Service Category: Select the Service Category that the override is valid for.
o Date Start/Date End: Enter the start and end date that this override is valid
for.
o Override Request Reason: Document the reasoning behind this particular
override.
o Support Doc Attachment Type: Select whether the backup documentation
you are using is an image file or a different file type.
o Images/Files: Attach appropriate backup documentation here.
Once all fields have been completed, you can submit this override. Please note: the
override will not take effect (meaning that it will not affect billing) until it has been
approved by the county.
To submit the override, simply click on the button. The override “status”
will change and the document will be saved.
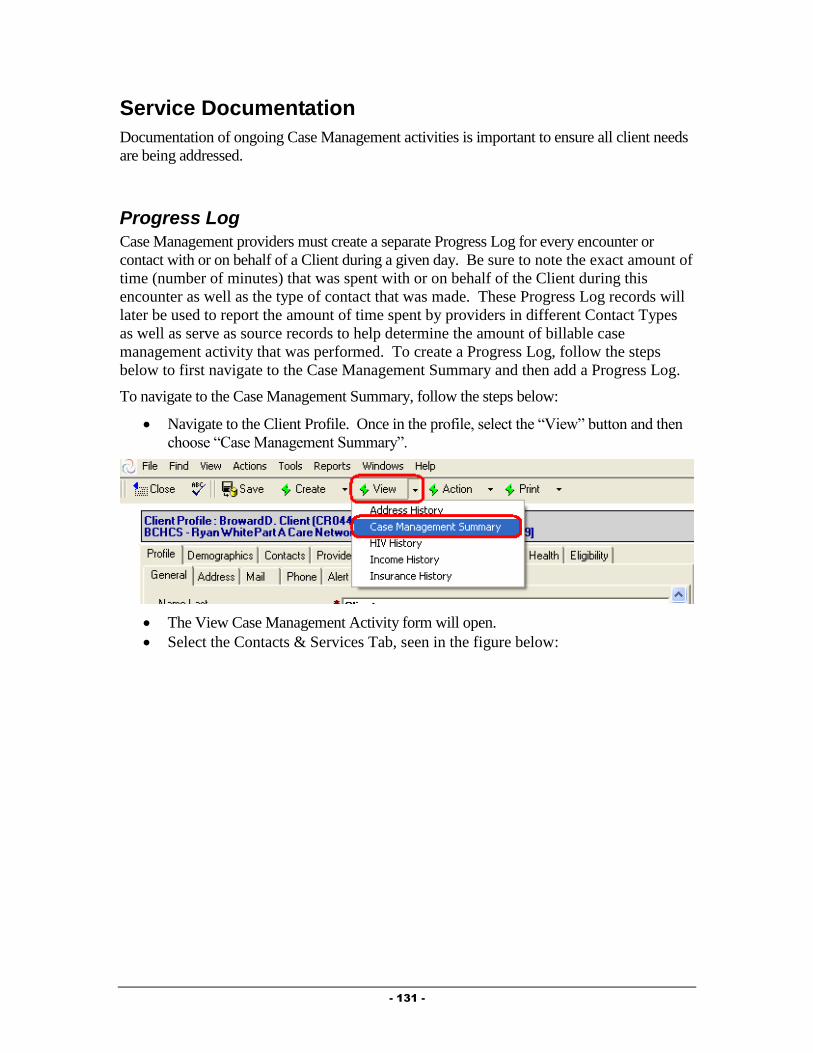
- 131 -
Service Documentation
Documentation of ongoing Case Management activities is important to ensure all client needs
are being addressed.
Progress Log
Case Management providers must create a separate Progress Log for every encounter or
contact with or on behalf of a Client during a given day. Be sure to note the exact amount of
time (number of minutes) that was spent with or on behalf of the Client during this
encounter as well as the type of contact that was made. These Progress Log records will
later be used to report the amount of time spent by providers in different Contact Types
as well as serve as source records to help determine the amount of billable case
management activity that was performed. To create a Progress Log, follow the steps
below to first navigate to the Case Management Summary and then add a Progress Log.
To navigate to the Case Management Summary, follow the steps below:
Navigate to the Client Profile. Once in the profile, select the “View” button and then
choose “Case Management Summary”.
The View Case Management Activity form will open.
Select the Contacts & Services Tab, seen in the figure below:

- 132 -
Click on the button. The Progress Log record, similar to that in the
figure below will open:
Summary Tab
The Summary Tab of the Progress Log contains the specific details about the Case
Management encounter.
Fill out the fields as appropriate:
o Agency: Your agency name will default in this field.
o Status: The status of the Progress Log will default to “In Progress” while you
are working on it. NOTE: It is important to mark the Progress Log as
- 133 -
“Complete” when you are done with it. “In Progress” Progress Logs will not
be counted in reports or billing. Once a Progress Log has been marked as
“Complete”, you will no longer be able to edit the note.
o Provider: This field will default to your name.
o Date: Enter the date of the encounter.
o Start Time: Enter the start time of the Encounter.
o Minutes: Enter the number of minutes of this encounter.
o Contact Category: Select whether the encounter was a Medical Case
Management encounter or a Peer Counseling Encounter.
o Case Management Type: Select the type of Case Management encounter.
o Time Spent on PAP Application: This field will only show if the
“Contact Category” is “Medical Case Management” or “Peer Counseling”.
Enter the amount of time spent completing a prescription assistance
program application with the client. NOTE: This number must be less
than or equal to the number of minutes entered in the “Minutes” field
above.
o Is Client Adherent with Medications?: Select whether or not the client is
adherent with their HIV medications.
o Reason Adherence is N/A? This field will only show if the above field is
set to N/A. Select the reason this question is not applicable for this client.
o Brief Description: Enter a brief description of the encounter.
o Full Description: Enter detailed information to describe the encounter.
Medical Appointments Tab
The Medical Appointments Tab of the Progress Log will show all medical appointments for
the past year. You can also add documentation of new appointments from within this tab.
Fill out the field as appropriate:
o Have recent medical appointments been documented? Select whether
or not you have documented the client’s recent Medical Appointments.
Adding a new appointment record can be done by following the steps below:
Click on the to open an appointment record seen in the figure
below:
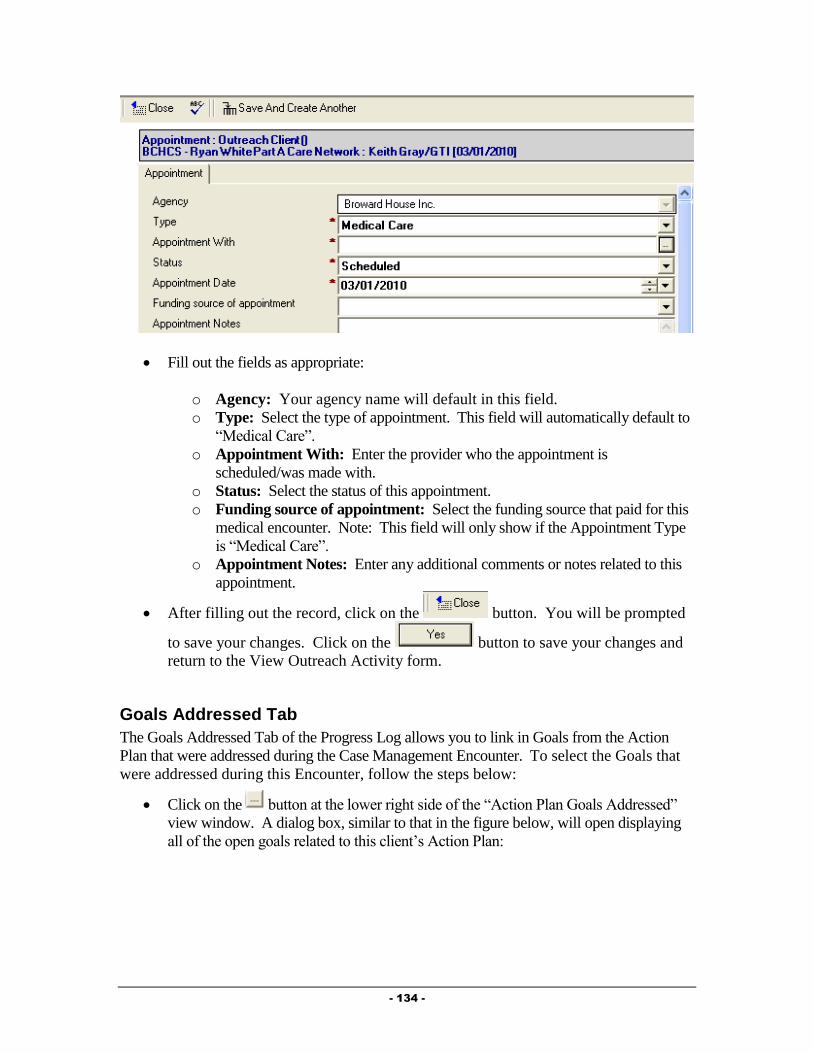
- 134 -
Fill out the fields as appropriate:
o Agency: Your agency name will default in this field.
o Type: Select the type of appointment. This field will automatically default to
“Medical Care”.
o Appointment With: Enter the provider who the appointment is
scheduled/was made with.
o Status: Select the status of this appointment.
o Funding source of appointment: Select the funding source that paid for this
medical encounter. Note: This field will only show if the Appointment Type
is “Medical Care”.
o Appointment Notes: Enter any additional comments or notes related to this
appointment.
After filling out the record, click on the button. You will be prompted
to save your changes. Click on the button to save your changes and
return to the View Outreach Activity form.
Goals Addressed Tab
The Goals Addressed Tab of the Progress Log allows you to link in Goals from the Action
Plan that were addressed during the Case Management Encounter. To select the Goals that
were addressed during this Encounter, follow the steps below:
Click on the button at the lower right side of the “Action Plan Goals Addressed”
view window. A dialog box, similar to that in the figure below, will open displaying
all of the open goals related to this client’s Action Plan:
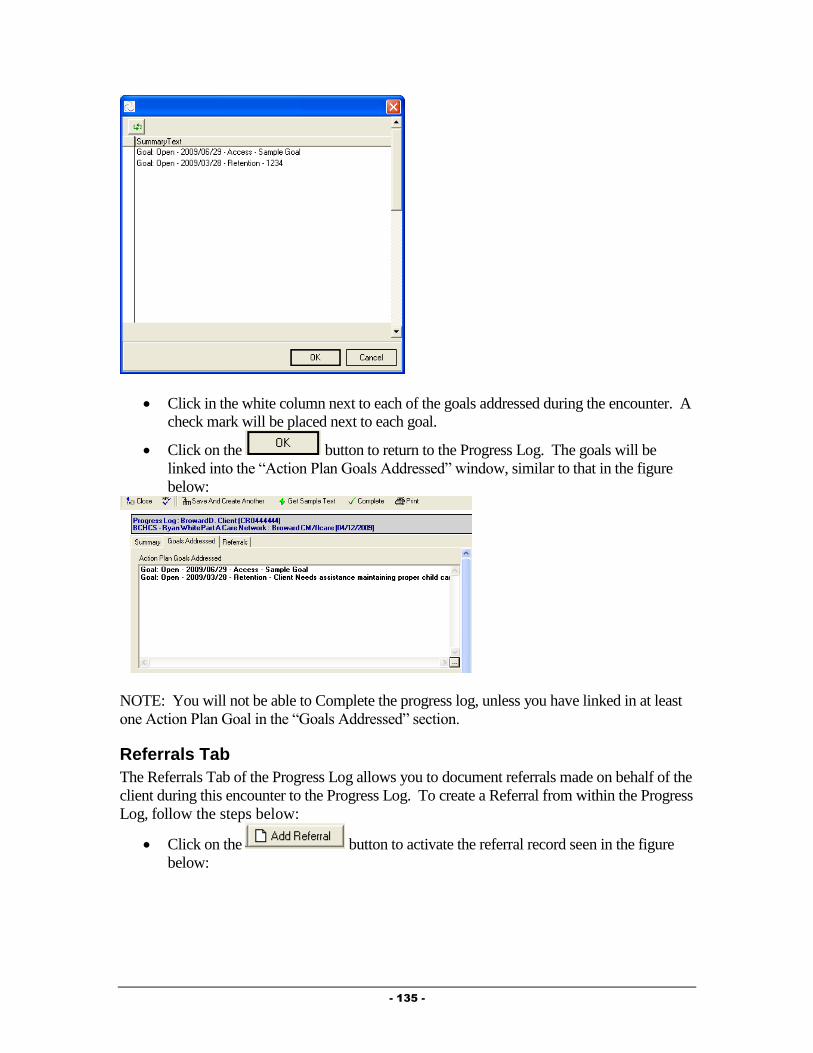
- 135 -
Click in the white column next to each of the goals addressed during the encounter. A
check mark will be placed next to each goal.
Click on the button to return to the Progress Log. The goals will be
linked into the “Action Plan Goals Addressed” window, similar to that in the figure
below:
NOTE: You will not be able to Complete the progress log, unless you have linked in at least
one Action Plan Goal in the “Goals Addressed” section.
Referrals Tab
The Referrals Tab of the Progress Log allows you to document referrals made on behalf of the
client during this encounter to the Progress Log. To create a Referral from within the Progress
Log, follow the steps below:
Click on the button to activate the referral record seen in the figure
below:
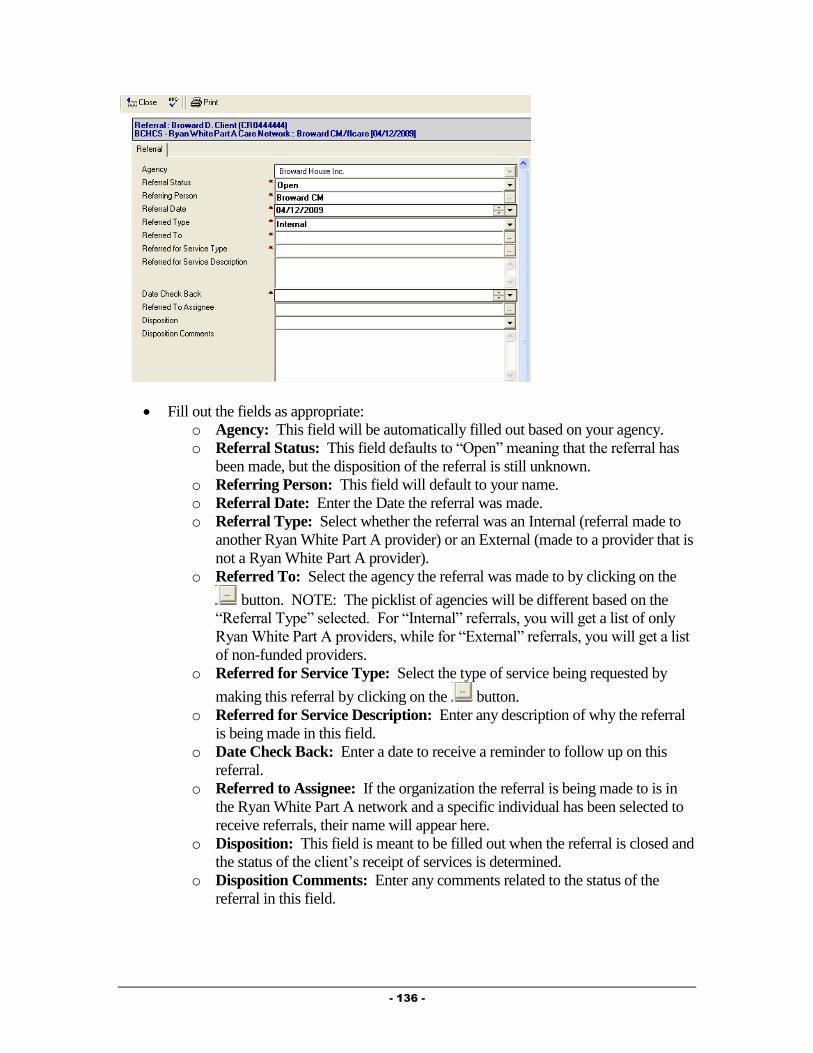
- 136 -
Fill out the fields as appropriate:
o Agency: This field will be automatically filled out based on your agency.
o Referral Status: This field defaults to “Open” meaning that the referral has
been made, but the disposition of the referral is still unknown.
o Referring Person: This field will default to your name.
o Referral Date: Enter the Date the referral was made.
o Referral Type: Select whether the referral was an Internal (referral made to
another Ryan White Part A provider) or an External (made to a provider that is
not a Ryan White Part A provider).
o Referred To: Select the agency the referral was made to by clicking on the
button. NOTE: The picklist of agencies will be different based on the
“Referral Type” selected. For “Internal” referrals, you will get a list of only
Ryan White Part A providers, while for “External” referrals, you will get a list
of non-funded providers.
o Referred for Service Type: Select the type of service being requested by
making this referral by clicking on the button.
o Referred for Service Description: Enter any description of why the referral
is being made in this field.
o Date Check Back: Enter a date to receive a reminder to follow up on this
referral.
o Referred to Assignee: If the organization the referral is being made to is in
the Ryan White Part A network and a specific individual has been selected to
receive referrals, their name will appear here.
o Disposition: This field is meant to be filled out when the referral is closed and
the status of the client’s receipt of services is determined.
o Disposition Comments: Enter any comments related to the status of the
referral in this field.
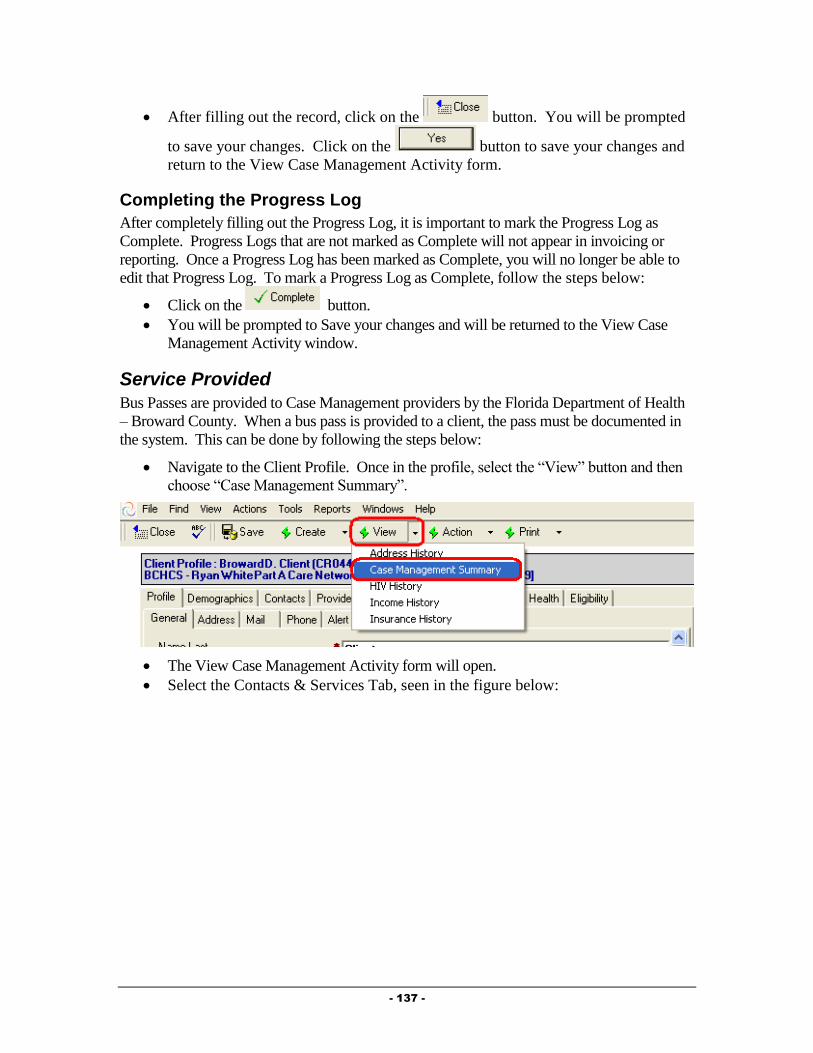
- 137 -
After filling out the record, click on the button. You will be prompted
to save your changes. Click on the button to save your changes and
return to the View Case Management Activity form.
Completing the Progress Log
After completely filling out the Progress Log, it is important to mark the Progress Log as
Complete. Progress Logs that are not marked as Complete will not appear in invoicing or
reporting. Once a Progress Log has been marked as Complete, you will no longer be able to
edit that Progress Log. To mark a Progress Log as Complete, follow the steps below:
Click on the button.
You will be prompted to Save your changes and will be returned to the View Case
Management Activity window.
Service Provided
Bus Passes are provided to Case Management providers by the Florida Department of Health
– Broward County. When a bus pass is provided to a client, the pass must be documented in
the system. This can be done by following the steps below:
Navigate to the Client Profile. Once in the profile, select the “View” button and then
choose “Case Management Summary”.
The View Case Management Activity form will open.
Select the Contacts & Services Tab, seen in the figure below:
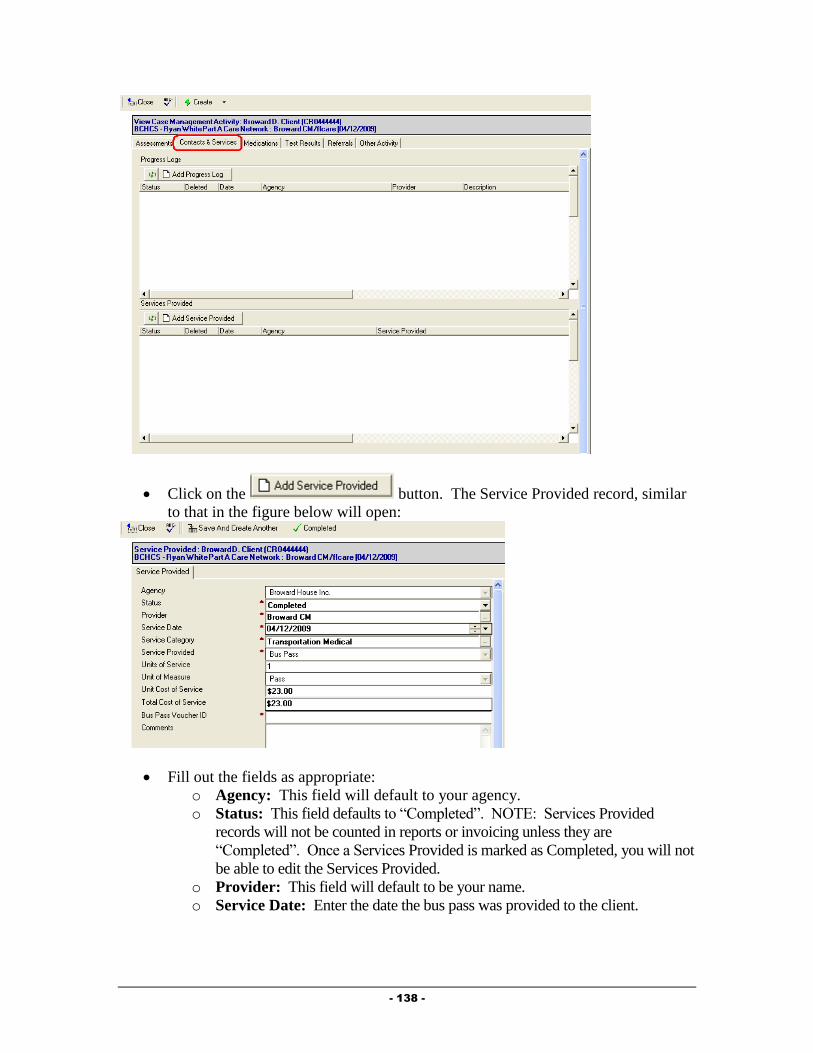
- 138 -
Click on the button. The Service Provided record, similar
to that in the figure below will open:
Fill out the fields as appropriate:
o Agency: This field will default to your agency.
o Status: This field defaults to “Completed”. NOTE: Services Provided
records will not be counted in reports or invoicing unless they are
“Completed”. Once a Services Provided is marked as Completed, you will not
be able to edit the Services Provided.
o Provider: This field will default to be your name.
o Service Date: Enter the date the bus pass was provided to the client.
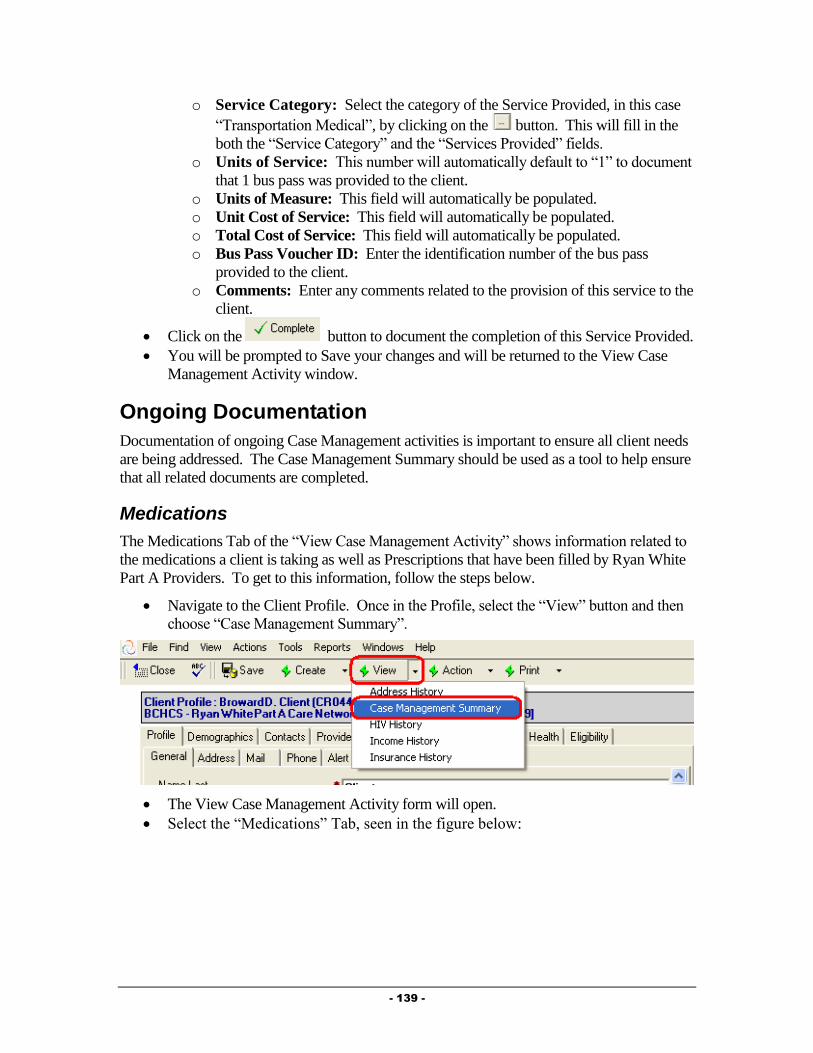
- 139 -
o Service Category: Select the category of the Service Provided, in this case
“Transportation Medical”, by clicking on the button. This will fill in the
both the “Service Category” and the “Services Provided” fields.
o Units of Service: This number will automatically default to “1” to document
that 1 bus pass was provided to the client.
o Units of Measure: This field will automatically be populated.
o Unit Cost of Service: This field will automatically be populated.
o Total Cost of Service: This field will automatically be populated.
o Bus Pass Voucher ID: Enter the identification number of the bus pass
provided to the client.
o Comments: Enter any comments related to the provision of this service to the
client.
Click on the button to document the completion of this Service Provided.
You will be prompted to Save your changes and will be returned to the View Case
Management Activity window.
Ongoing Documentation
Documentation of ongoing Case Management activities is important to ensure all client needs
are being addressed. The Case Management Summary should be used as a tool to help ensure
that all related documents are completed.
Medications
The Medications Tab of the “View Case Management Activity” shows information related to
the medications a client is taking as well as Prescriptions that have been filled by Ryan White
Part A Providers. To get to this information, follow the steps below.
Navigate to the Client Profile. Once in the Profile, select the “View” button and then
choose “Case Management Summary”.
The View Case Management Activity form will open.
Select the “Medications” Tab, seen in the figure below:

- 140 -
Drug Record
To document a client’s medication protocol, create a “Drug” record for each medication a
client is taking. To do this, follow the steps below to add a Drug Record:
Click the button to activate the drug record, similar to that in the
figure below:
Fill out the fields as appropriate:
o Status: This field will default to “Active” to indicate that the client is
actively taking this medication.
o Date Started: Enter the date the client started taking this medication.

- 141 -
o Date Ended: This field will only show if the “Status” is set to “Inactive”,
meaning that the client is no longer taking this medication. Enter the date
the client stopped taking this medication.
o Drug Name: Click on the button to activate the Drug selection dialog
(discussed in Chapter 2 of this Guide).
o Drug Name Generic/Drug Code/Strength/Route/Dosage Form: These
will all be filled out automatically after selecting the Medication, Strength,
Route and Dosage Form from the drug selection dialog.
o Frequency: Select the frequency of which the client is prescribed to take
this medication.
o Instructions: Enter any necessary instructions related to this medication.
o Reason Ended: This field will only show if the “Status” is set to
“Inactive”, meaning that the client is no longer taking this medication.
Simply select the reason the client stopped taking the medication.
o Comments: Enter any comments related to the medication.
After filling out the record, click on the button. You will be prompted
to save your changes. Click on the button to save your changes and
return to the View Case Management Activity form.
Filled Prescriptions
The “Filled Prescriptions” window will show you any prescriptions that have been filled by
another Ryan White Part A network provider (if the client is receiving this service). You can
view these specific records by double clicking on the record in this window. You will not be
able to edit these documents.
Test Results
The Test Results Tab of the “View Case Management Activity” shows information related to
specific medical tests a client has been given, including CD-4, Viral Load, STI and OI
screening tests. To get to this information, follow the steps below.
Navigate to the Client Profile. Once in the Profile, select the “View” button and then
choose “Case Management Summary”.
The View Case Management Activity form will open.
Select the “Test Results” Tab, seen in the figure below:
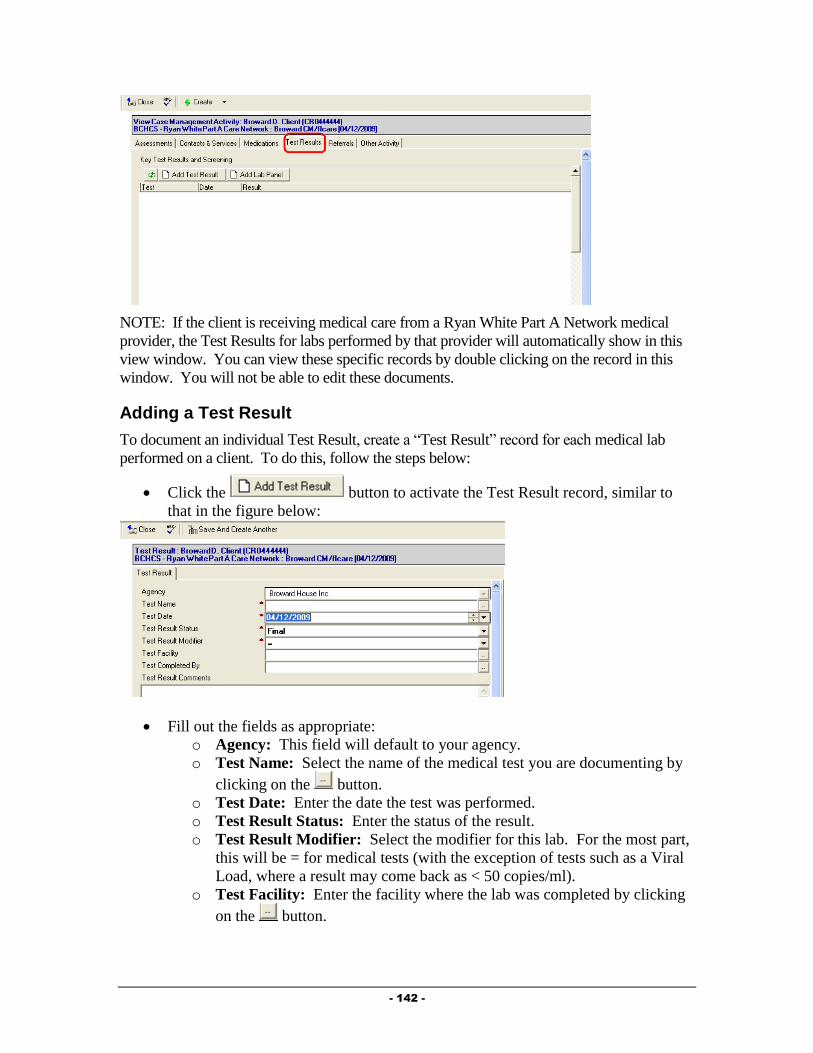
- 142 -
NOTE: If the client is receiving medical care from a Ryan White Part A Network medical
provider, the Test Results for labs performed by that provider will automatically show in this
view window. You can view these specific records by double clicking on the record in this
window. You will not be able to edit these documents.
Adding a Test Result
To document an individual Test Result, create a “Test Result” record for each medical lab
performed on a client. To do this, follow the steps below:
Click the button to activate the Test Result record, similar to
that in the figure below:
Fill out the fields as appropriate:
o Agency: This field will default to your agency.
o Test Name: Select the name of the medical test you are documenting by
clicking on the button.
o Test Date: Enter the date the test was performed.
o Test Result Status: Enter the status of the result.
o Test Result Modifier: Select the modifier for this lab. For the most part,
this will be = for medical tests (with the exception of tests such as a Viral
Load, where a result may come back as < 50 copies/ml).
o Test Facility: Enter the facility where the lab was completed by clicking
on the button.
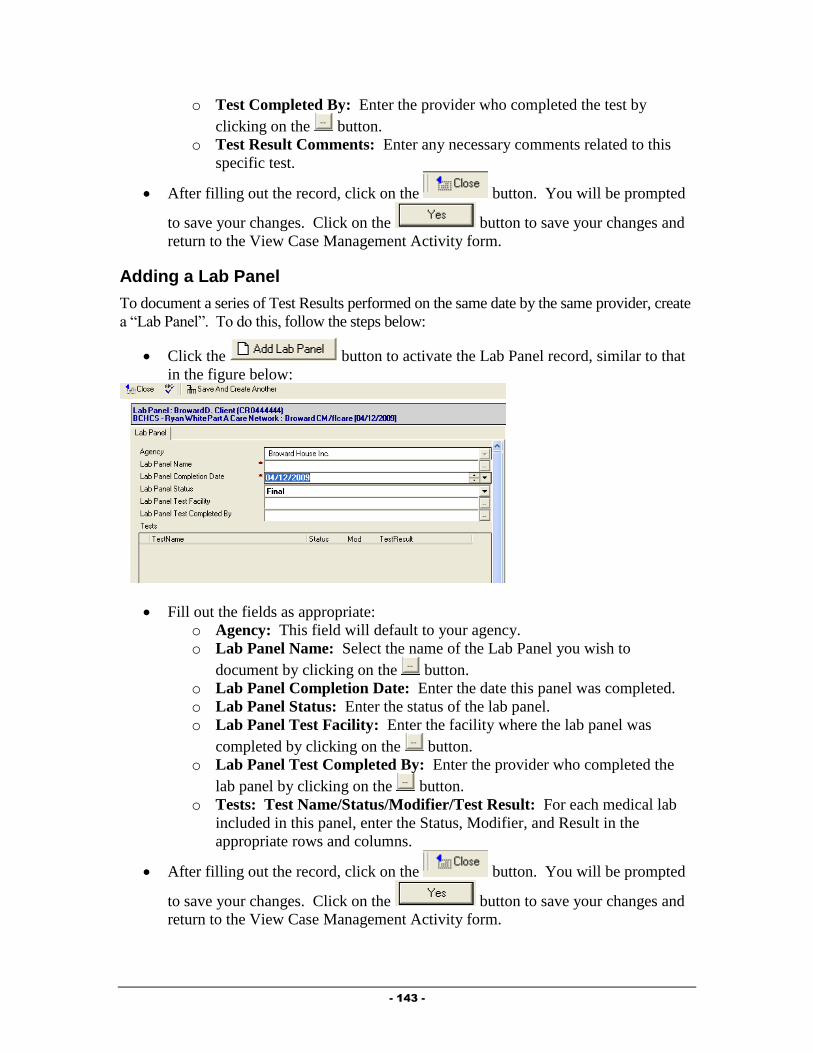
- 143 -
o Test Completed By: Enter the provider who completed the test by
clicking on the button.
o Test Result Comments: Enter any necessary comments related to this
specific test.
After filling out the record, click on the button. You will be prompted
to save your changes. Click on the button to save your changes and
return to the View Case Management Activity form.
Adding a Lab Panel
To document a series of Test Results performed on the same date by the same provider, create
a “Lab Panel”. To do this, follow the steps below:
Click the button to activate the Lab Panel record, similar to that
in the figure below:
Fill out the fields as appropriate:
o Agency: This field will default to your agency.
o Lab Panel Name: Select the name of the Lab Panel you wish to
document by clicking on the button.
o Lab Panel Completion Date: Enter the date this panel was completed.
o Lab Panel Status: Enter the status of the lab panel.
o Lab Panel Test Facility: Enter the facility where the lab panel was
completed by clicking on the button.
o Lab Panel Test Completed By: Enter the provider who completed the
lab panel by clicking on the button.
o Tests: Test Name/Status/Modifier/Test Result: For each medical lab
included in this panel, enter the Status, Modifier, and Result in the
appropriate rows and columns.
After filling out the record, click on the button. You will be prompted
to save your changes. Click on the button to save your changes and
return to the View Case Management Activity form.

- 144 -
Referrals
The Referrals Tab of the “View Case Management Activity” shows referrals made on behalf
of the client to both Ryan White Part A providers as well as to other agencies within the
community. To get to this information, follow the steps below.
Navigate to the Client Profile. Once in the Profile, select the “View” button and then
choose “Case Management Summary”.
The View Case Management Activity form will open.
Select the “Referrals” Tab, seen in the figure below:
Adding a Referral
The Referral record allows you to document specifics regarding referrals made on behalf of
the client. To create, follow the steps below:
Click on the button to activate the referral record seen in the figure
below:

- 145 -
Fill out the fields as appropriate:
o Agency: This field will be automatically filled out based on your agency.
o Referral Status: This field defaults to “Open” meaning that the referral has
been made, but the disposition of the referral is still unknown.
o Referring Person: This field will default to your name.
o Referral Date: Enter the Date the referral was made.
o Referral Type: Select whether the referral was an Internal (referral made to
another Ryan White Part A provider) or an External (made to a provider that is
not a Ryan White Part A provider).
o Referred To: Select the agency the referral was made to by clicking on the
button. NOTE: The picklist of agencies will be different based on the
“Referral Type” selected. For “Internal” referrals, you will get a list of only
Ryan White Part A providers, while for “External” referrals, you will get a list
of non-funded providers.
o Referred for Service Type: Select the type of service being requested by
making this referral by clicking on the button.
o Referred for Service Description: Enter any description of why the referral
is being made in this field.
o Date Check Back: Enter a date to receive a reminder to follow up on this
referral.
o Referred to Assignee: If the organization the referral is being made to is in
the Ryan White Part A network and a specific individual has been selected to
receive referrals, their name will appear here.
o Disposition: This field is meant to be filled out when the referral is closed and
the status of the client’s receipt of services is determined.
o Disposition Comments: Enter any comments related to the status of the
referral in this field.
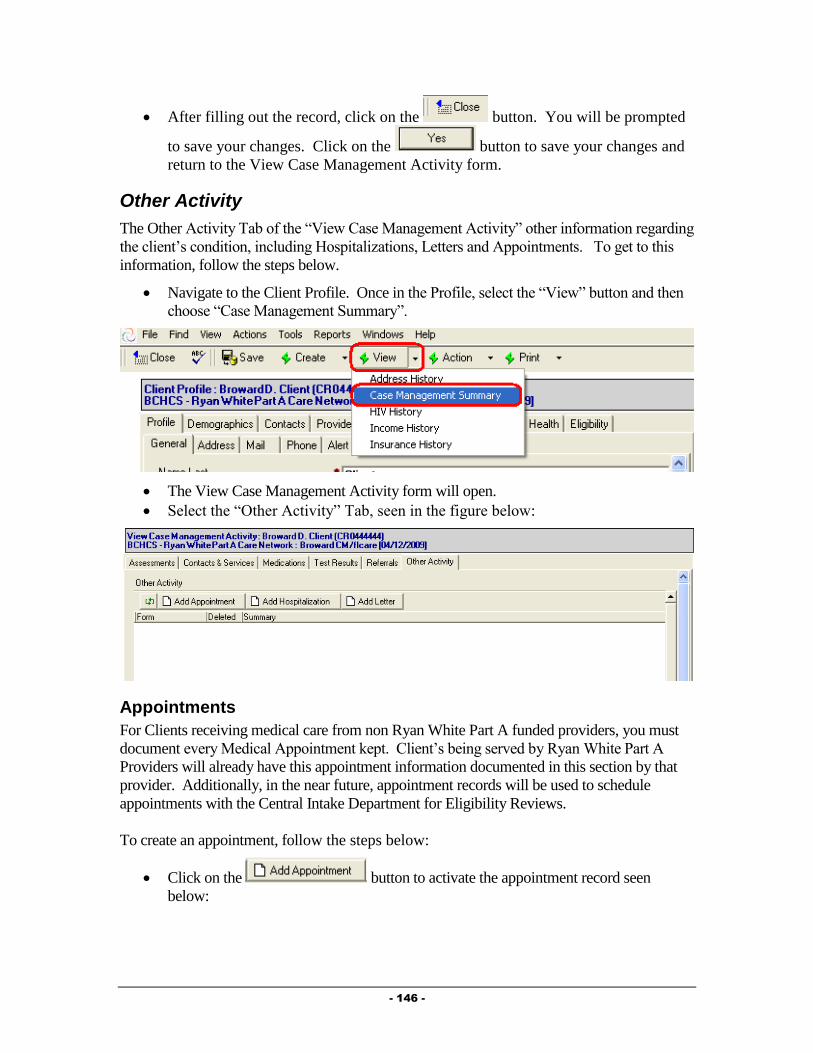
- 146 -
After filling out the record, click on the button. You will be prompted
to save your changes. Click on the button to save your changes and
return to the View Case Management Activity form.
Other Activity
The Other Activity Tab of the “View Case Management Activity” other information regarding
the client’s condition, including Hospitalizations, Letters and Appointments. To get to this
information, follow the steps below.
Navigate to the Client Profile. Once in the Profile, select the “View” button and then
choose “Case Management Summary”.
The View Case Management Activity form will open.
Select the “Other Activity” Tab, seen in the figure below:
Appointments
For Clients receiving medical care from non Ryan White Part A funded providers, you must
document every Medical Appointment kept. Client’s being served by Ryan White Part A
Providers will already have this appointment information documented in this section by that
provider. Additionally, in the near future, appointment records will be used to schedule
appointments with the Central Intake Department for Eligibility Reviews.
To create an appointment, follow the steps below:
Click on the button to activate the appointment record seen
below:

- 147 -
Fill out the fields as appropriate:
o Agency: This field will be automatically filled out based on your agency.
o Type: Select the Type of Appointment this was (either Medical Care or
Centralized Eligibility.
o Appointment With: Enter the provider that this appointment is with.
o Status: Select whether this appointment is scheduled, has been kept, or
was missed.
o Appointment Date: Enter the date of the appointment.
o Appointment Notes: Enter any other information related to this
appointment.
After filling out the record, click on the button. You will be prompted
to save your changes. Click on the button to save your changes and
return to the View Case Management Activity form.
Hospitalization
The hospitalization of a client can have an impact on their functioning and provides an
important intervention point for the Medical Case Manager. Additionally, it can provide
specific outcome related information to funders and can have an impact on the client’s
eligibility for specific services. To document that a client has been hospitalized, follow the
steps below:
Click on the button to activate the Hospitalization record seen
below:

- 148 -
Fill out the fields as appropriate:
o Agency: This field will be automatically filled out based on your agency.
o Status: Select whether the client was Admitted or was Discharged from the
hospital.
o Admission Type: Select the Type of admission this hospitalization was.
o Stay Type: Select the type of condition this hospitalization was related
to.
o Facility: Enter the facility the client was hospitalized in.
o Date Admitted: Enter the date the client was admitted to the
hospitalization.
o Notes Admission: Enter any notes related to the admission.
o Date Discharged: This field will only appear if the “Status” is set to
“Discharged”. Enter the date the client was discharged from the hospital.
o Discharge Reason: This field will only appear if the “Status” is set to
“Discharged”. Enter the reason the client was discharged from the
hospital.
o Actual Length of Stay: This field will only appear if the “Status” is set
to “Discharged” and will automatically be computed based on the Date
Admitted and Date Discharged.
o Notes Discharge: This field will only appear if the “Status” is set to
“Discharged”. Enter any notes related to the client’s discharge from the
hospital.
o Date Notified of Admission: Enter the date you were notified of the
admission to the hospital.
o Length of Stay Authorized: Enter the length of stay authorized by the
insurer, if applicable.
o Admission ID: If applicable, enter the identification number related to
this hospitalization.
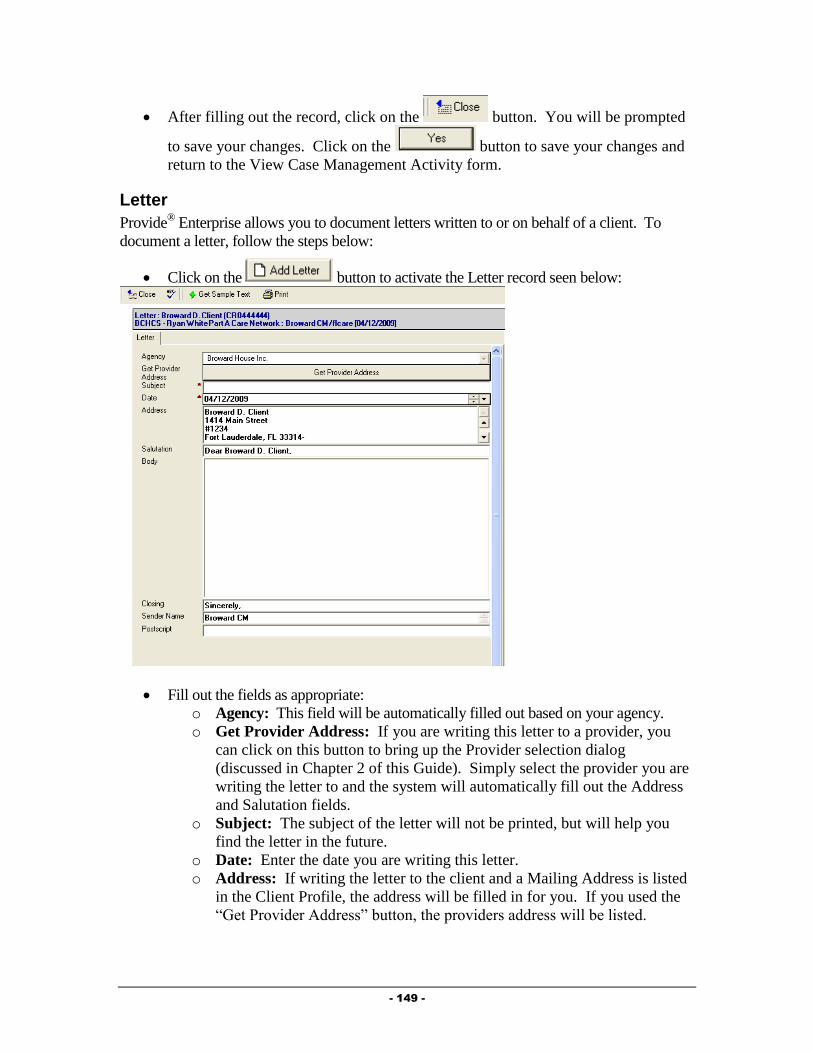
- 149 -
After filling out the record, click on the button. You will be prompted
to save your changes. Click on the button to save your changes and
return to the View Case Management Activity form.
Letter
Provide® Enterprise allows you to document letters written to or on behalf of a client. To
document a letter, follow the steps below:
Click on the button to activate the Letter record seen below:
Fill out the fields as appropriate:
o Agency: This field will be automatically filled out based on your agency.
o Get Provider Address: If you are writing this letter to a provider, you
can click on this button to bring up the Provider selection dialog
(discussed in Chapter 2 of this Guide). Simply select the provider you are
writing the letter to and the system will automatically fill out the Address
and Salutation fields.
o Subject: The subject of the letter will not be printed, but will help you
find the letter in the future.
o Date: Enter the date you are writing this letter.
o Address: If writing the letter to the client and a Mailing Address is listed
in the Client Profile, the address will be filled in for you. If you used the
“Get Provider Address” button, the providers address will be listed.

- 150 -
o Salutation: This field will automatically be filled out based on who the
letter is to.
o Body: Enter the text of the letter in this field. You can also select
“sample text” or pre-defined letters by clicking on the
button. A window of the pre-defined letters will appear and you will be
able to select the letter that you wish to write.
o Closing: This field will automatically be set to “Sincerely”, but can be
changed if appropriate.
o Sender Name: This field will automatically default to your name, but can
be changed if appropriate.
o Postscript: The postscript is a paragraph, phrase, etc., added to a letter
that has already been concluded and signed by the writer.
To print this letter, simply click on the button. The letter print out will
open on your screen to be printed.
After filling out the record, click on the button. You will be prompted
to save your changes. Click on the button to save your changes and
return to the View Case Management Activity form.
Additional Ongoing Documentation
Additional documentation should be completed as changes occur in a client’s life. This
documentation is listed below.
Update the Action Plan as needed, adding new goals to address problems and closing
goals that are no longer applicable.
Update the Client Profile and associated records as needed to reflect changes in the client’s
life.
Required Actions
The Provide® Enterprise system has been designed to assist Case Managers in meeting many
of the Ryan White Part A Standards for Service Delivery. The system captures specific Client
information and then uses this information to determine if a Standard has been met. The
system will generate a list for you (My Tasks) of actions needed to comply with the Standards
of Care. NOTE: Items will appear on the list in advance of the date required by the Standard
and will continue to appear on the list until the required action has been taken.
Some of these Required Actions built into the system are listed below.
Client has missed their medical appointment (if the client no/shows or misses a
medical appointment that they have a van ride scheduled for, the system will
automatically notify the case manager of such. In these case, if you open the record by
double clicking on it, click the “Edit” button, and then click the “Acknowledge
Receipt” button, the record will be removed from your Task List).
Case Management Action Plan Review Due

- 151 -
Case Management Action Plan Supervisory Review Due
Case Management Needs Assessment Due
Client should apply for Food Stamps
Level of Care Brief Face to Face Contact Due Every 12 Months
Level of Care Brief Phone Contact Due Every 6 Months
Level of Care Intensive Face to Face Contact Due Every 1 Months
Level of Care Intensive Phone Contact Due Every Week
Level of Care Minimum Face to Face Contact Due Every 6 Months
Level of Care Minimum Phone Contact Due Every 3 Months
Level of Care Moderate Face to Face Contact Due Every 3 Months
Level of Care Moderate Phone Contact Due Every 1 Months
Monitoring Required Actions
Required Actions can be monitored in a few different ways. These are discussed below.
My Tasks
The “My Tasks” views will show you any Required Actions assigned to you. The “My
Tasks” views can be accessed via the Activity views in the database. These are found under
“View – Activity – My Tasks” and can be viewed By Client or By Due Date.
When opening these views, you can view the specific assigned tasks by expanding the view
by clicking on the next to the appropriate column.
Client Profile
Client specific tasks can be found within the Client Profile in the Profile Section, Alert Tab,
seen in the figure below:

- 152 -
To view a specific task, simply double click on that task to open that record.
Discharging a Client
A client should be discharged for a number of reasons based on Broward County Standards of
Care, including the client moving outside of the service territory, death and the client’s self
decision. When a client needs to be discharged from your agency there are several tasks that
need to be performed. These are outlined below.
Client Service Category Profile Record
When a client is no longer going to be served by your service category at your agency,
you must close the client’s Client Service Category Profile record. NOTE: If the client
is going to be discharged from your agency as a whole, you must also follow the steps
under “Client Service Profile” below.
To do this, follow the steps below:
First, Navigate into the Client Profile (via “Find – Client” or one of the “Views”
of Client information.
In the Profile Section – General Sub-Tab, location the “Client Service Profiles”
view (circled in the figure below.)

- 153 -
Double click on the “Client Service Profile” for your agency. It will open on
your screen and will look similar to that in the figure below.
Double click on the Client Service Category Profile Record for your Service
Category. It will open on your screen and will look similar to that in the figure
below.

- 154 -
Click the button to bring the record into edit mode.
Next, click the button. A dialog box, similar to that in the figure
below will open on your screen:
Fill out the fields as appropriate:
o Status: Select the status to change the client to.
o Reason for change: Click on the button to the right of the field ( ) to
activate the picklist and select the appropriate value.
o Date change effective: Enter the date that this change should be effective
from.
Once done, click on the button to save your changes.
Next, click the button to save your changes and back out of the record.
Click the button again to back out of the Client Service Profile.
Client Service Profile
Documenting that a client is being discharged from your agency as whole is done via the
Client Service Profile. NOTE: This should only be done when you are discharging the client
from all services at your agency.
This can be done by following the steps below:
Navigate to the Profile Section – General Sub-Tab of the Client Profile, seen in the
figure below:

- 155 -
Double click on the Client Service for your agency. The Client Service Profile
will open and will look similar to that in the figure below:
Click on the button. The Client Service Profile will be brought into Edit
mode.
Click on the button to activate the Status Change dialog box,
similar to that in the figure below:

- 156 -
Complete all fields as appropriate:
o Status: Select “Closed” as the status.
o Reason for change: Select the reason the client is being discharged from
your agency.
o Date change effective: Enter the date the client is being discharged from
your agency.
Click on the button to save your changes. You will be returned to
the Client Service Profile.
After verifying the status change, click on the button. You will be
prompted to save your changes. Click on the button to save your
changes and return to the Client Profile.
Terminate the Provider Relationship
When discharging a client from your agency, you must end your provider relationship with the
client. This can be done by following the steps below:
Navigate to the Providers Section of the Client Profile, seen in the figure below:
Double click on your Provider Relationship to open the record.

- 157 -
Click on the button and enter a “Provider Relationship End Date”.
After entering the End Date, click on the button. You will be prompted to save
your changes. Click on the button to save your changes and return to the
Client Profile.
Closing the Action Plan
When discharging a client from your agency, you must close the Action Plan. This can be
done from within the Case Management Summary.
To navigate to the Case Management Summary, follow the steps below:
Navigate to the Client Profile. Once in the Profile, select the “View” button and then
choose “Case Management Summary”.
The View Case Management Activity form will open.
Click on the button and select “Action Plan”.
o From within the Action Plan, click on the button on the
Action bar. If you have not yet closed your Action Plan Goals, a dialog box
similar to that in the figure below will appear:
o If this occurs, click on the button to return to the Action Plan.

- 158 -
o Double click on each Open Action Plan Goal.
o Click on the button.
o Click on the button. The goal will be closed and
three additional fields will appear:
Actual Resolution Date: Enter the date the goal is being closed.
Outcome Measure: Enter the reason the goal is being closed.
Outcome Comments: Enter any comments relative to why the goal
is being closed.
o Once all Open Action Plan Goals have been Closed, click on the
button on the Action bar.
o Two additional fields will appear:
Date Closed: Enter the date the Action Plan is being closed.
Reason Closed: Enter the reason that the Action Plan is being closed.
o After filling out the record, click on the button. You will be
prompted to save your changes. Click on the button to save
your changes and return to the View Case Management Activity form.
- 159 -
Chapter
5
Medical Care/Pharmacy
Providers
This Chapter outlines the tasks that need to be completed by Medical and Pharmacy providers
in Provide® Enterprise to meet all billing and reporting requirements. Over time, the data
elements outlined in this Chapter must also be kept current as things change for the client.
Intake and Assessment Documentation
At the time of Intake, and as required based on Standards of Care, there are a number of
records that must be entered in Provide®
Enterprise in order to meet all billing and invoicing
requirements.
Client Profile
Within the Client Profile, it is important to keep all information updated as the client’s life
situation changes.
Opening Existing Clients to your Agency
If the client had previously been registered in Provide® Enterprise and served by another
agency, you will need to create a Client Service Profile to document that the Client is
now being served by your agency. To do this, follow the steps below:
First, Navigate into the Client Profile (via “Find – Client” or one of the “Views”
of Client information.
In the Profile Section – General Sub-Tab, location the “Client Service Profiles”
view (circled in the figure below.)

- 160 -
If you do not see your agency listed, click the
button to open the Client Service Profile, seen below.
Complete the “Agency Assigned Client ID (if necessary). Make sure to append
your agencies abbreviation to the beginning of the Agency Assigned Client ID
number to help various agencies identify their own clients.
Once done, click on the button to save your changes and back out of the
record.
Re-Opening Existing Clients to your Agency
If the client had previously been registered in Provide® Enterprise and served (and
closed) by your agency, you will need to re-open the Client Service Profile to indicate
that the client has been re-opened to your agency.
To do this, follow the steps below:
First, Navigate into the Client Profile (via “Find – Client” or one of the “Views”
of Client information.

- 161 -
Double click on the Client Service for your agency. The Client Service Profile will
open and will look similar to that in the figure below:
Click on the button. The Client Service Profile will be brought into Edit
mode, similar to that in the figure below:
Click on the button to activate the Status Change dialog box,
similar to that in the figure below:
Complete all fields as appropriate:
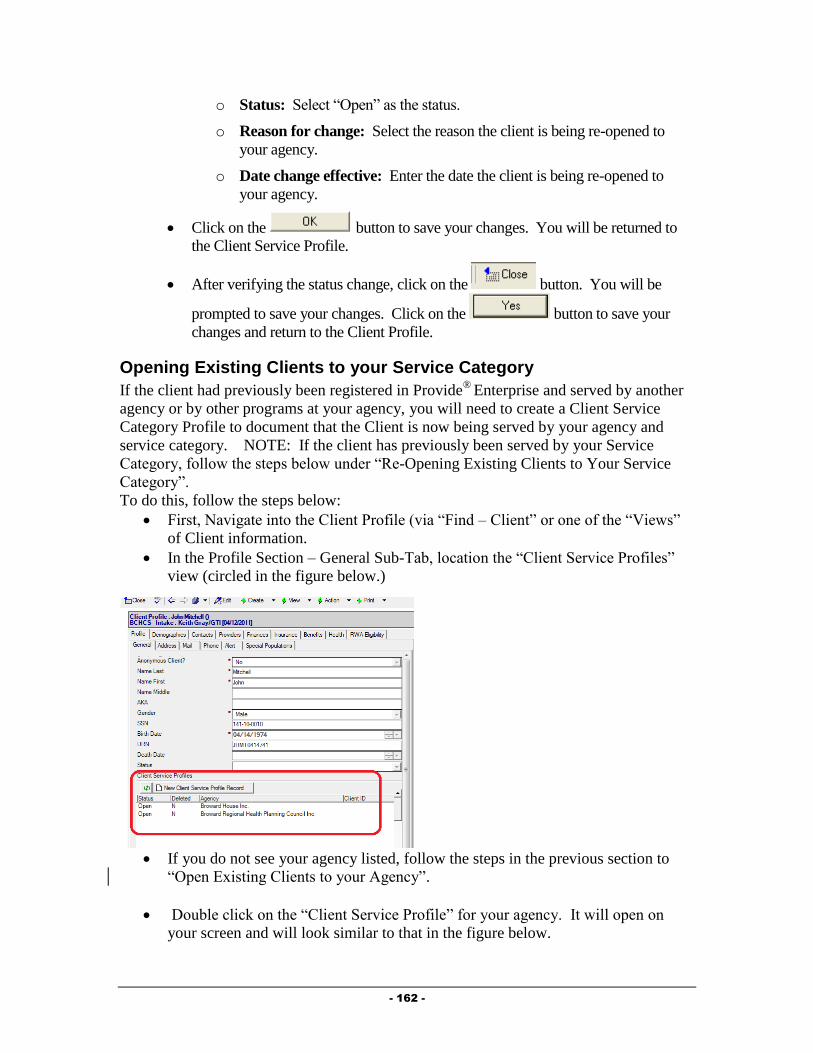
- 162 -
o Status: Select “Open” as the status.
o Reason for change: Select the reason the client is being re-opened to
your agency.
o Date change effective: Enter the date the client is being re-opened to
your agency.
Click on the button to save your changes. You will be returned to
the Client Service Profile.
After verifying the status change, click on the button. You will be
prompted to save your changes. Click on the button to save your
changes and return to the Client Profile.
Opening Existing Clients to your Service Category
If the client had previously been registered in Provide®
Enterprise and served by another
agency or by other programs at your agency, you will need to create a Client Service
Category Profile to document that the Client is now being served by your agency and
service category. NOTE: If the client has previously been served by your Service
Category, follow the steps below under “Re-Opening Existing Clients to Your Service
Category”.
To do this, follow the steps below:
First, Navigate into the Client Profile (via “Find – Client” or one of the “Views”
of Client information.
In the Profile Section – General Sub-Tab, location the “Client Service Profiles”
view (circled in the figure below.)
If you do not see your agency listed, follow the steps in the previous section to
“Open Existing Clients to your Agency”.
Double click on the “Client Service Profile” for your agency. It will open on
your screen and will look similar to that in the figure below.
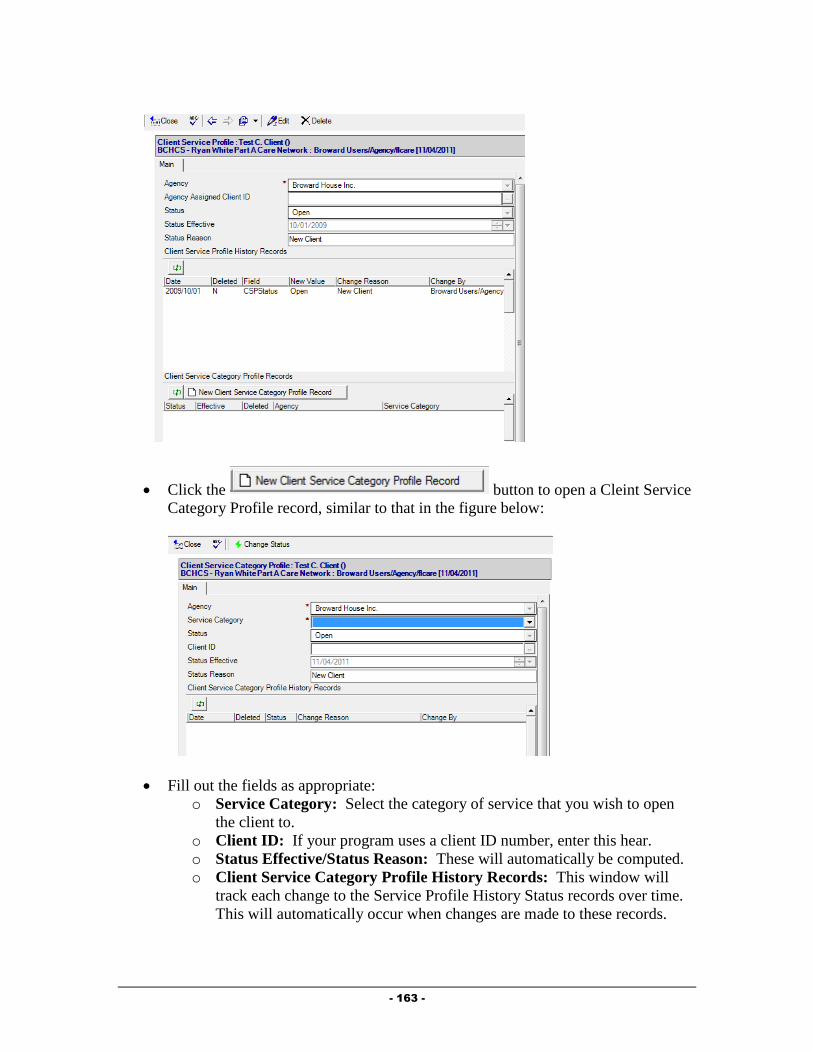
- 163 -
Click the button to open a Cleint Service
Category Profile record, similar to that in the figure below:
Fill out the fields as appropriate:
o Service Category: Select the category of service that you wish to open
the client to.
o Client ID: If your program uses a client ID number, enter this hear.
o Status Effective/Status Reason: These will automatically be computed.
o Client Service Category Profile History Records: This window will
track each change to the Service Profile History Status records over time.
This will automatically occur when changes are made to these records.
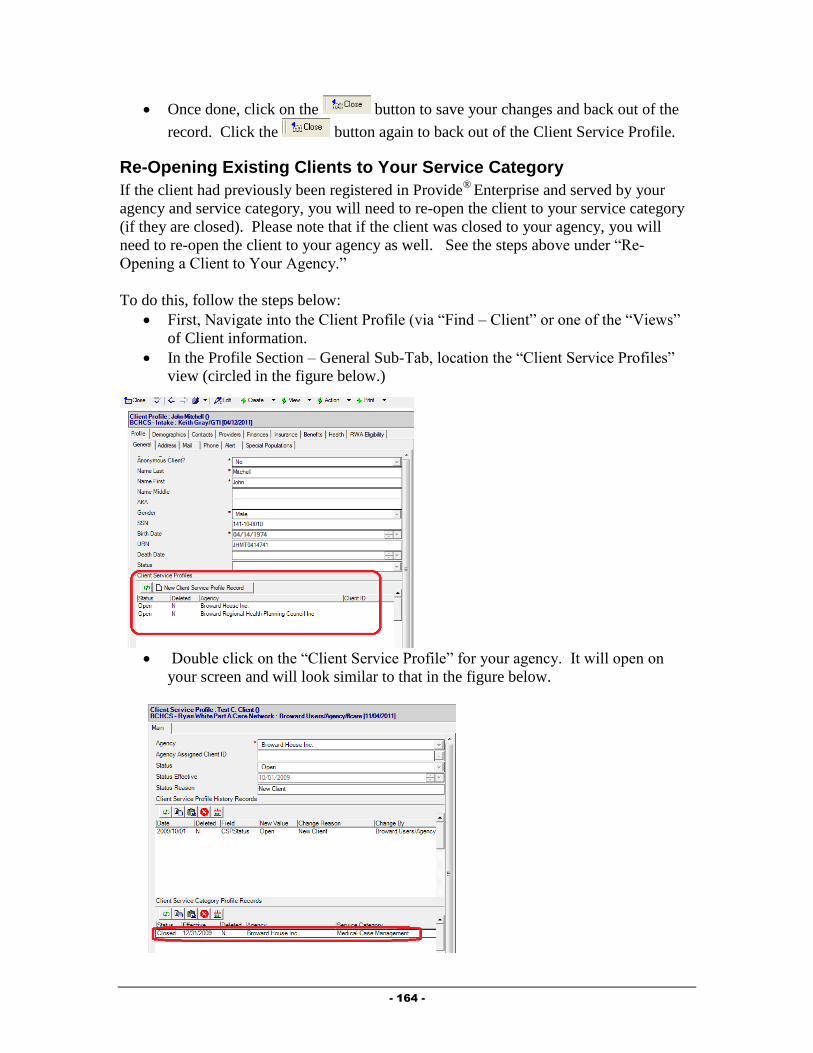
- 164 -
Once done, click on the button to save your changes and back out of the
record. Click the button again to back out of the Client Service Profile.
Re-Opening Existing Clients to Your Service Category
If the client had previously been registered in Provide®
Enterprise and served by your
agency and service category, you will need to re-open the client to your service category
(if they are closed). Please note that if the client was closed to your agency, you will
need to re-open the client to your agency as well. See the steps above under “Re-
Opening a Client to Your Agency.”
To do this, follow the steps below:
First, Navigate into the Client Profile (via “Find – Client” or one of the “Views”
of Client information.
In the Profile Section – General Sub-Tab, location the “Client Service Profiles”
view (circled in the figure below.)
Double click on the “Client Service Profile” for your agency. It will open on
your screen and will look similar to that in the figure below.

- 165 -
Double click on the Client Service Category Profile Record for your Service
Category. It will open on your screen and will look similar to that in the figure
below. (NOTE: If you do not see a Client Service Category Profile Record for
your service category, follow the steps earlier in the chapter under “Opening
Existing Clients to your Service Category”.
Click the button to bring the record into edit mode.
Next, click the button. A dialog box, similar to that in the figure
below will open on your screen:
Fill out the fields as appropriate:
o Status: Select the status to change the client to.
o Reason for change: Click on the button to the right of the field ( ) to
activate the picklist and select the appropriate value.
o Date change effective: Enter the date that this change should be effective
from.
Once done, click on the button to save your changes.
Next, click the button to save your changes and back out of the record.
Click the button again to back out of the Client Service Profile.
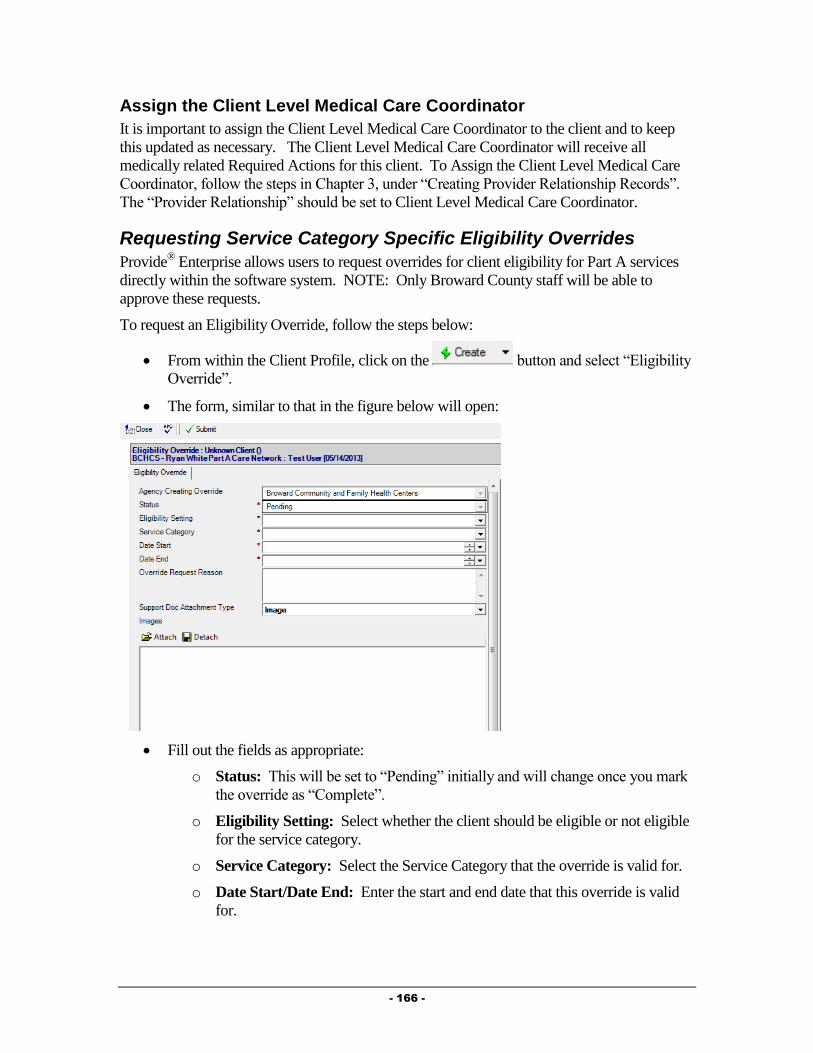
- 166 -
Assign the Client Level Medical Care Coordinator
It is important to assign the Client Level Medical Care Coordinator to the client and to keep
this updated as necessary. The Client Level Medical Care Coordinator will receive all
medically related Required Actions for this client. To Assign the Client Level Medical Care
Coordinator, follow the steps in Chapter 3, under “Creating Provider Relationship Records”.
The “Provider Relationship” should be set to Client Level Medical Care Coordinator.
Requesting Service Category Specific Eligibility Overrides
Provide® Enterprise allows users to request overrides for client eligibility for Part A services
directly within the software system. NOTE: Only Broward County staff will be able to
approve these requests.
To request an Eligibility Override, follow the steps below:
From within the Client Profile, click on the button and select “Eligibility
Override”.
The form, similar to that in the figure below will open:
Fill out the fields as appropriate:
o Status: This will be set to “Pending” initially and will change once you mark
the override as “Complete”.
o Eligibility Setting: Select whether the client should be eligible or not eligible
for the service category.
o Service Category: Select the Service Category that the override is valid for.
o Date Start/Date End: Enter the start and end date that this override is valid
for.

- 167 -
o Override Request Reason: Document the reasoning behind this particular
override.
o Support Doc Attachment Type: Select whether the backup documentation
you are using is an image file or a different file type.
o Images/Files: Attach appropriate backup documentation here.
Once all fields have been completed, you can submit this override. Please note: the
override will not take effect (meaning that it will not affect billing) until it has been
approved by the county.
To submit the override, simply click on the button. The override “status”
will change and the document will be saved.
Service Documentation
As Services are provided to a client, it is necessary for billing and reporting to document all of
these specific services.
Medical Summary
Much of the data related to the client’s Medical Care can be found in the Medical Summary.
To navigate to the Medical Summary, follow the steps below:
Navigate to the Client Profile. Once in the Profile, select the “View” button and then
choose “Medical Summary”.
A form similar to that in the figure below will open:
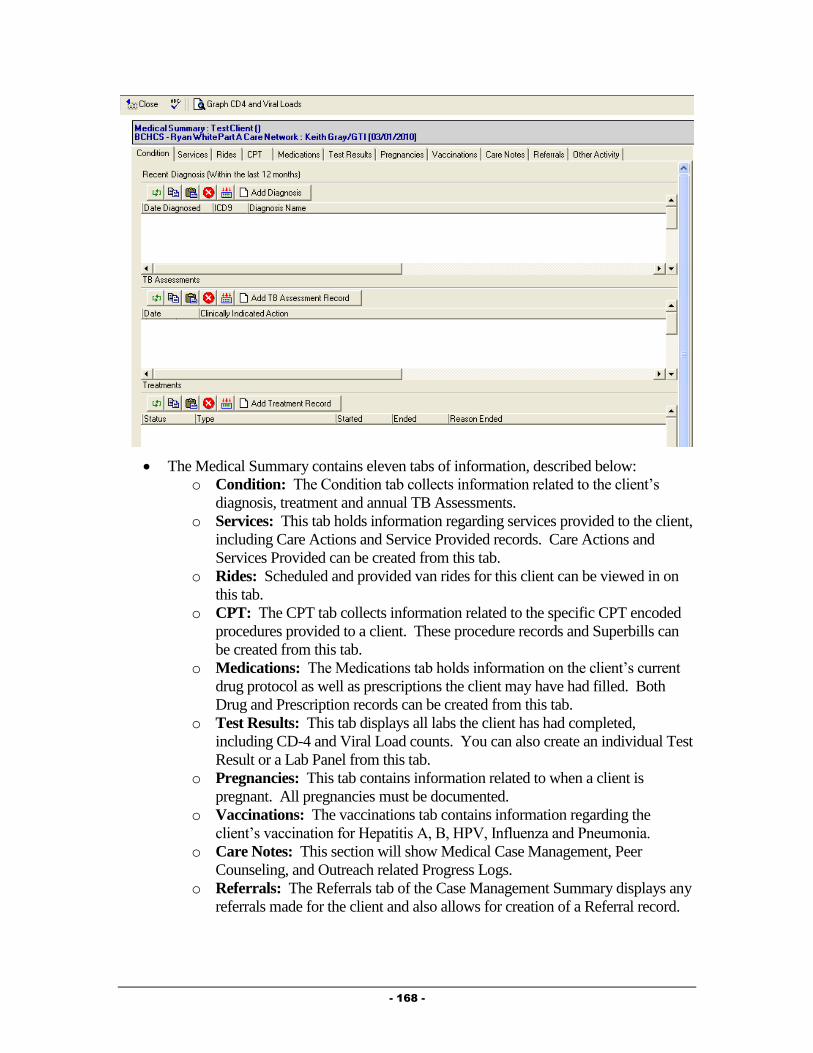
- 168 -
The Medical Summary contains eleven tabs of information, described below:
o Condition: The Condition tab collects information related to the client’s
diagnosis, treatment and annual TB Assessments.
o Services: This tab holds information regarding services provided to the client,
including Care Actions and Service Provided records. Care Actions and
Services Provided can be created from this tab.
o Rides: Scheduled and provided van rides for this client can be viewed in on
this tab.
o CPT: The CPT tab collects information related to the specific CPT encoded
procedures provided to a client. These procedure records and Superbills can
be created from this tab.
o Medications: The Medications tab holds information on the client’s current
drug protocol as well as prescriptions the client may have had filled. Both
Drug and Prescription records can be created from this tab.
o Test Results: This tab displays all labs the client has had completed,
including CD-4 and Viral Load counts. You can also create an individual Test
Result or a Lab Panel from this tab.
o Pregnancies: This tab contains information related to when a client is
pregnant. All pregnancies must be documented.
o Vaccinations: The vaccinations tab contains information regarding the
client’s vaccination for Hepatitis A, B, HPV, Influenza and Pneumonia.
o Care Notes: This section will show Medical Case Management, Peer
Counseling, and Outreach related Progress Logs.
o Referrals: The Referrals tab of the Case Management Summary displays any
referrals made for the client and also allows for creation of a Referral record.

- 169 -
o Other Activity: On this tab, you will see any Medical appointments for a
client, as well as Hospitalization history and Letters written on behalf of or to
the client. All three of these Activity types can also be created from this tab.
Outpatient Medical Care Provider Service Documentation
Much of the data related to the client’s Medical Care can be found in the Medical Summary.
To navigate to the Medical Summary, follow the steps listed above. Outpatient Medical Care
services are documented on the “CPT” tab of the Medical Summary using either Procedure
Records (to document a single procedure performed on a client) or Superbills (used to
document multiple procedures performed on a client by the same provider on the same date).
Additionally, Service Provided records are used to document Medically Related Phone Calls
and Multi-Disciplinary Staffings.
Procedure Records
Procedure Records are used to document single procedures performed on a client. To create a
Procedure Record, follow the steps below:
From within the Medical Summary, CPT Tab, click on the button.
The Procedure record, similar to that in the figure below, will open:
Fill out the fields as appropriate:
o Agency: This field will default to your Agency.
o Date Completed: Enter the date this procedure was completed.
o Procedure Code: Select the Procedure Code for the procedure being
documented. Clicking on the button will activate the Procedure field
selection dialog, discussed in Chapter 2 of this Guide.
o Procedure Description: This field will automatically be filled in when the
Procedure Code is selected.
o Place of Service: Enter the location that the procedure was performed at.
o Associated Diagnosis Code: Select the Primary Diagnosis code associated
with the specific procedure provided to the client. Clicking on the button
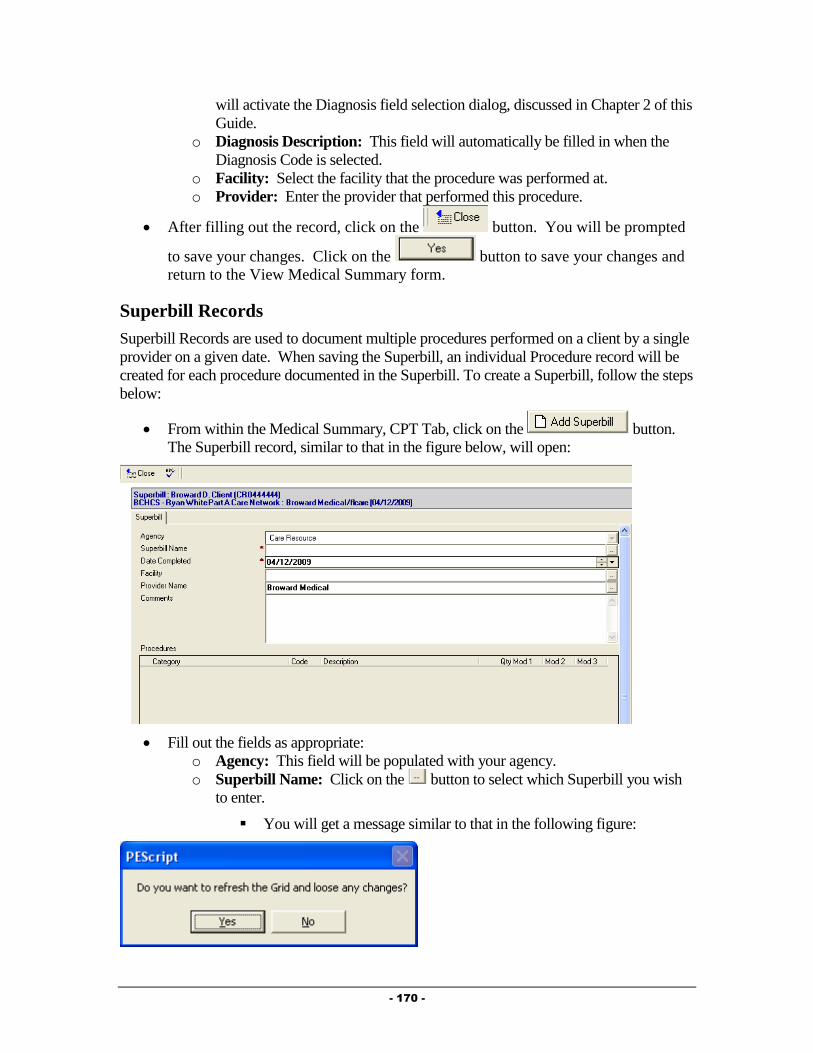
- 170 -
will activate the Diagnosis field selection dialog, discussed in Chapter 2 of this
Guide.
o Diagnosis Description: This field will automatically be filled in when the
Diagnosis Code is selected.
o Facility: Select the facility that the procedure was performed at.
o Provider: Enter the provider that performed this procedure.
After filling out the record, click on the button. You will be prompted
to save your changes. Click on the button to save your changes and
return to the View Medical Summary form.
Superbill Records
Superbill Records are used to document multiple procedures performed on a client by a single
provider on a given date. When saving the Superbill, an individual Procedure record will be
created for each procedure documented in the Superbill. To create a Superbill, follow the steps
below:
From within the Medical Summary, CPT Tab, click on the button.
The Superbill record, similar to that in the figure below, will open:
Fill out the fields as appropriate:
o Agency: This field will be populated with your agency.
o Superbill Name: Click on the button to select which Superbill you wish
to enter.
You will get a message similar to that in the following figure:

- 171 -
Click on the button to continue. Another dialog box will
appear for you to select the Superbill you wish to load. Double Click
on the Superbill you wish to load. The screen will load and the
“Procedures” tab will look similar to that in the figure below:
Select the Procedures provided to the client on this date by clicking in
the Qty column for the specific procedure and enter the quantity of that
procedure provided to the client on this date.
o Date Completed: Enter the date the procedure(s) were performed.
o Facility: Enter the facility where these procedure(s) were performed.
o Provider: Enter the name of the provider who performed these procedures.
o Comments: Enter any comments related to the procedures performed.
After filling out the record, click on the button. You will be prompted
to save your changes. Click on the button to save your changes and
return to the Medical Summary form.
NOTE: If your preferences are set to load a Specific Superbill (Tools – Preferences –
Defaults Tab – Superbill field), the Superbill will pre-load for you.
Service Provided
Service Provided records are used to document Medically Related Phone Calls and Multi-
Disciplinary Staffings. When one of these services is provided to a client, the service must be
documented in the system. This can be done by following the steps below:
Navigate to the Client Profile. Once in the Profile, select the “View” button and then
choose “Medical Summary”.
The View Medical Summary form will open.
Select the Services Tab, seen in the figure below:

- 172 -
Click on the button. The Service Provided record, similar
to that in the figure below will open:
Fill out the fields as appropriate:
o Agency: The Agency will default to your agency.
o Status: Defaults to “Completed”. NOTE: Service Provided records will not
be counted in reports or invoicing unless they are “Completed”. Once a
Service Provided is marked as Completed, you will not be able to edit the
Service Provided.
o Provider: This field will default to be your name.
o Service Date: Enter the date the bus pass was provided to the client.
o Service Category: Select the category of the Service Provided, in this case
“Ambulatory Outpatient Medical Care” , by clicking on the button. This
will fill in the both the “Service Category” and the “Service Provided” fields.

- 173 -
o Units of Service: This number will automatically default to “1”. Change if
needed.
o Units of Measure: This field will automatically be populated.
o Unit Cost of Service: This field will automatically be populated.
o Total Cost of Service: This field will automatically be populated.
o Comments: Enter any comments related to the provision of this service to the
client.
Click on the button to document the completion of this Service Provided.
You will be prompted to Save your changes and will be returned to the Medical
Summary window.
Pharmacy Provider Service Documentation
Pharmacy Provider services are documented on the “Medications” tab of the Medical
Summary using Prescription records. These can be created and viewed within the Medical
Summary. To navigate to the Medical Summary, follow the steps listed earlier in this
Chapter. To create a Prescription record, follow the steps below:
From within the Medical Summary, Medications Tab, click on the
button in the “Filled Prescriptions” view window. The Prescription record, similar to
that in the figure below, will open:
Fill out the fields as appropriate:
o Agency: This field will default to your agency.
- 174 -
o Status: The “Status” field defaults to “Filled”. Only “filled” prescriptions are
included in invoices.
o Date Filled: Enter the date the prescription was filled.
o Refill: Select whether or not this was a refill.
o Drug Name/Drug Name Generic/Strength/Route/Dosage Form/Drug
Code NDC/Drug Code: These fields will automatically be computed based
on the drug, dosage, and NDC codes selected by clicking on the button.
This will activate the Drug selection dialog, discussed in Chapter 2 of this
Guide.
o Frequency: Enter the frequency this medication is prescribed for.
o Instructions: Enter any necessary instructions related to this medication.
o Quantity Prescribed: Enter the quantity prescribed.
o # of Days Prescribed: Enter the number of days medications were prescribed
for.
o Prescription End Date: Enter the end date of the prescription.
o Number of Refills Authorized: Enter the number of refills authorized by the
prescribing physician.
o Prescribed By: Select the provider who prescribed this medication.
o Pharmacy: Select the pharmacy that filled this prescription.
o Dispensed By: Enter the name of the provider who dispensed this
medication.
o Prescription ID: If appropriate, enter the identification number for this
prescription.
o Lot ID: If appropriate, enter the Lot # for this prescription.
o Prescription Price: Enter the price of this prescription.
o Dispensing Fee: Enter the dispensing fee associated with this prescription, if
applicable.
o CoPay Amount: Enter the amount of the copay paid by the client, if
appropriate.
o Prescription Comments: Enter any comments related to this prescription.
After filling out the record, click on the button. You will be prompted
to save your changes. Click on the button to save your changes and
return to the Medical Summary form.
Additional Required Medical Documentation
Ryan White requires that specific information be reported based on medical conditions,
diagnoses and treatments related to clients that receive medical care from Ryan White funded
providers.
Diagnosis
Diagnosis records are used to track medical diagnoses a client may have received. To create a
Diagnosis record, follow the steps below:
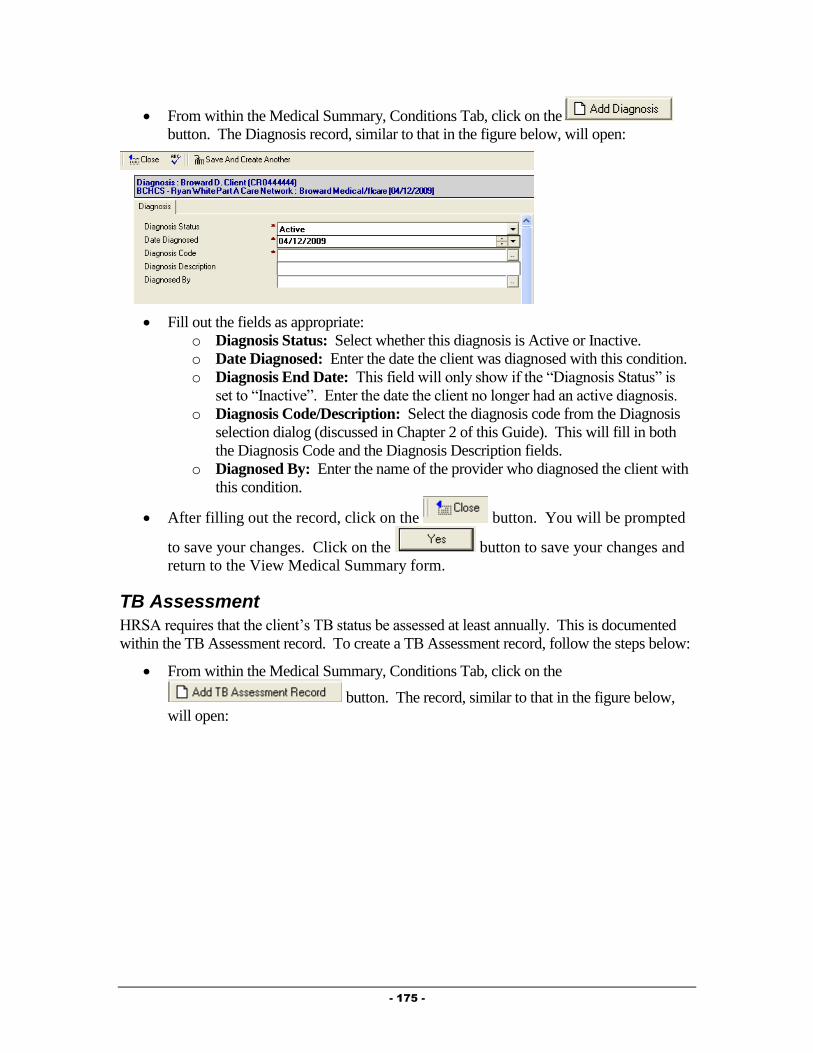
- 175 -
From within the Medical Summary, Conditions Tab, click on the
button. The Diagnosis record, similar to that in the figure below, will open:
Fill out the fields as appropriate:
o Diagnosis Status: Select whether this diagnosis is Active or Inactive.
o Date Diagnosed: Enter the date the client was diagnosed with this condition.
o Diagnosis End Date: This field will only show if the “Diagnosis Status” is
set to “Inactive”. Enter the date the client no longer had an active diagnosis.
o Diagnosis Code/Description: Select the diagnosis code from the Diagnosis
selection dialog (discussed in Chapter 2 of this Guide). This will fill in both
the Diagnosis Code and the Diagnosis Description fields.
o Diagnosed By: Enter the name of the provider who diagnosed the client with
this condition.
After filling out the record, click on the button. You will be prompted
to save your changes. Click on the button to save your changes and
return to the View Medical Summary form.
TB Assessment
HRSA requires that the client’s TB status be assessed at least annually. This is documented
within the TB Assessment record. To create a TB Assessment record, follow the steps below:
From within the Medical Summary, Conditions Tab, click on the
button. The record, similar to that in the figure below,
will open:

- 176 -
NOTE: Many of the fields shown in the above figure will be hidden until certain
fields are filled out (i.e. PPD Status, PPD Result, etc.).
Fill out the fields as appropriate:
o Agency: This field will automatically be populated based on your agency.
o Date Assessed: Enter the date the client’s TB status was assessed.
o Clinically Indicated Action: Select the action that was clinically indicated
for this client.
o PPD Status: This field will only show if the “Clinically Indicated Action” is
set to “PPD”. Select the status of the client’s PPD.
o PPD Reaction Size/PPD Result: These fields will show only if the “PPD
Status” is set to “Completed”. Enter the reaction size and/or the result of the
client’s PPD skin test.
o Chest X Ray Status: This field will only show if the “PPD Result” is set to
“Positive” or “Indeterminate”. Enter the status of the client’s Chest X-Ray.
o TB Type: This field will only show if the “Chest X Ray Status” is set to
“Completed”. Enter the type of Tuberculosis indicated by the client’s Chest
X-Ray.
o PPD Treatment: This field will show only if the “TB Type” is set to
“Active” or “Latent”. Enter the status of the client’s treatment for
tuberculosis.
o TB Treatment Started/TB Treatment Ended: These fields will only show
if the “PPD Treatment” is set to “Started” or “Completed”. Enter the
applicable dates in these fields.
o Treating Provider: This field will only show if the “PPD Treatment” is set to
“Started” or “Completed”. Enter the provider who is treating the client for
tuberculosis.
After filling out the record, click on the button. You will be prompted
to save your changes. Click on the button to save your changes and
return to the View Medical Summary form.
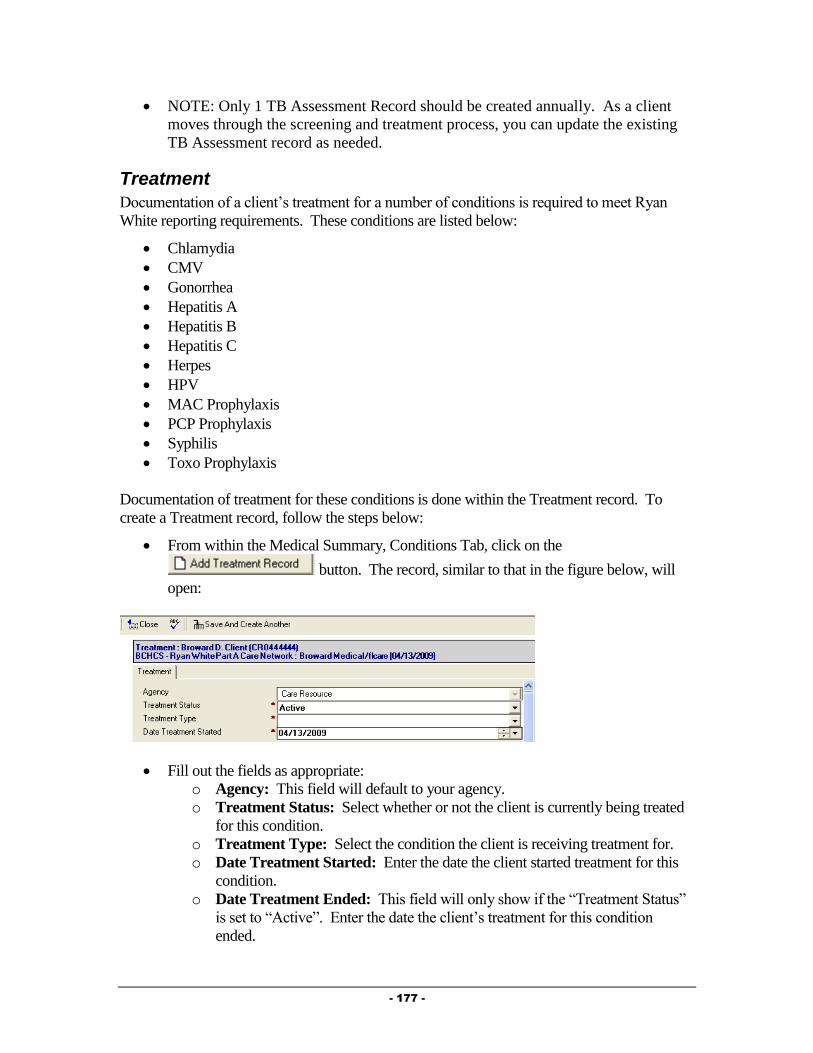
- 177 -
NOTE: Only 1 TB Assessment Record should be created annually. As a client
moves through the screening and treatment process, you can update the existing
TB Assessment record as needed.
Treatment
Documentation of a client’s treatment for a number of conditions is required to meet Ryan
White reporting requirements. These conditions are listed below:
Chlamydia
CMV
Gonorrhea
Hepatitis A
Hepatitis B
Hepatitis C
Herpes
HPV
MAC Prophylaxis
PCP Prophylaxis
Syphilis
Toxo Prophylaxis
Documentation of treatment for these conditions is done within the Treatment record. To
create a Treatment record, follow the steps below:
From within the Medical Summary, Conditions Tab, click on the
button. The record, similar to that in the figure below, will
open:
Fill out the fields as appropriate:
o Agency: This field will default to your agency.
o Treatment Status: Select whether or not the client is currently being treated
for this condition.
o Treatment Type: Select the condition the client is receiving treatment for.
o Date Treatment Started: Enter the date the client started treatment for this
condition.
o Date Treatment Ended: This field will only show if the “Treatment Status”
is set to “Active”. Enter the date the client’s treatment for this condition
ended.

- 178 -
After filling out the record, click on the button. You will be prompted
to save your changes. Click on the button to save your changes and
return to the Medical Summary form.
Care Actions
Care Actions are used to document the completion of key clinical or dental interventions that
are required for HAB Clinical Outcomes reporting. These interventions may or may not have
been provided by your agency, but need to be documented when they occur. They include:
Adherence Counseling
Dental Treatment Plan
HIV Risk Counseling
Mental Health Evaluation
Oral Health Education
Oral Health Exam
Oral Health History
Substance Abuse Evaluation
To create a Care Action, follow the steps below:
From within the Medical Summary, Services Tab, click on the
button. The record, similar to that in the figure below, will open:
Fill out the fields as appropriate:
o Agency: This field will default to your agency.
o Date: Enter the date the interventions were performed.
o Provider: Enter the name of the provider that provided these interventions.
o Care Action(s): Select the interventions that were provided to the client.
After filling out the record, click on the button. You will be prompted
to save your changes. Click on the button to save your changes and
return to the Medical Summary form.
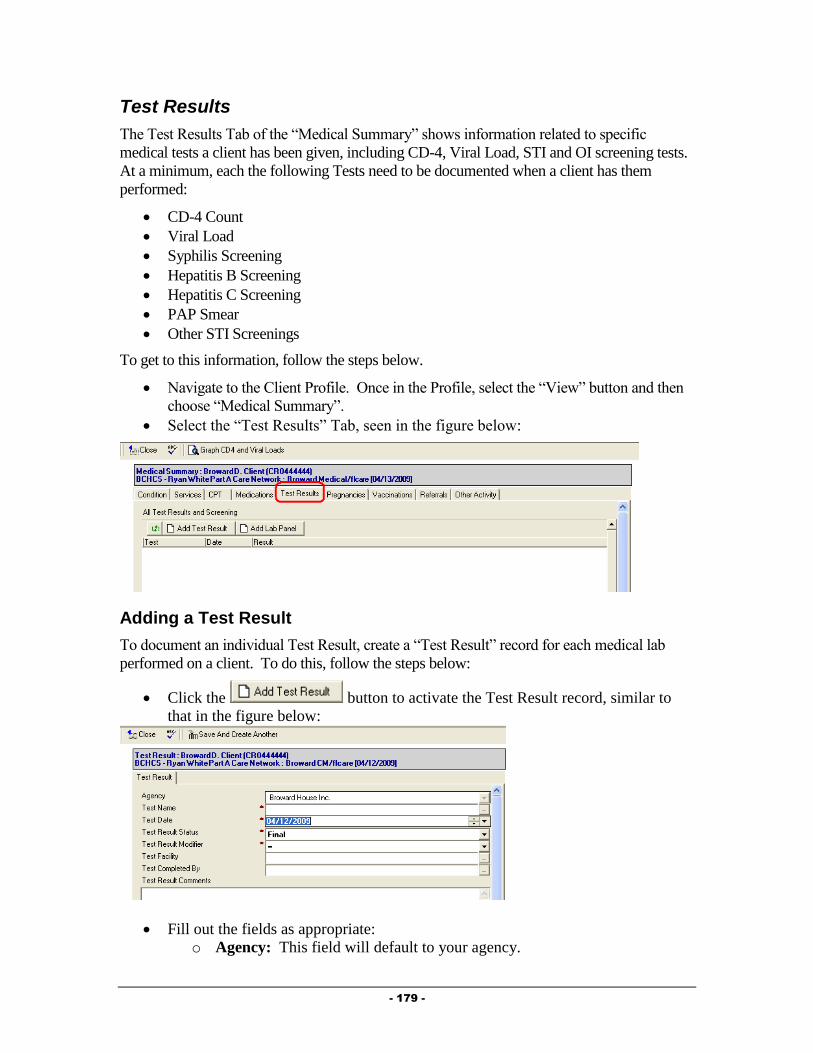
- 179 -
Test Results
The Test Results Tab of the “Medical Summary” shows information related to specific
medical tests a client has been given, including CD-4, Viral Load, STI and OI screening tests.
At a minimum, each the following Tests need to be documented when a client has them
performed:
CD-4 Count
Viral Load
Syphilis Screening
Hepatitis B Screening
Hepatitis C Screening
PAP Smear
Other STI Screenings
To get to this information, follow the steps below.
Navigate to the Client Profile. Once in the Profile, select the “View” button and then
choose “Medical Summary”.
Select the “Test Results” Tab, seen in the figure below:
Adding a Test Result
To document an individual Test Result, create a “Test Result” record for each medical lab
performed on a client. To do this, follow the steps below:
Click the button to activate the Test Result record, similar to
that in the figure below:
Fill out the fields as appropriate:
o Agency: This field will default to your agency.

- 180 -
o Test Name: Select the name of the medical test you are documenting by
clicking on the button.
o Test Date: Enter the date the test was performed.
o Test Result Status: Enter the status of the result.
o Test Result Modifier: Select the modifier for this lab. For the most part,
this will be = for medical tests (with the exception of tests such as a Viral
Load, where a result may come back as < 50 copies/ml).
o Test Facility: Enter the facility where the lab was completed by clicking
on the button.
o Test Completed By: Enter the provider who completed the test by
clicking on the button.
o Test Result Comments: Enter any necessary comments related to this
specific test.
After filling out the record, click on the button. You will be prompted
to save your changes. Click on the button to save your changes and
return to the Medical Summary form.
Adding a Lab Panel
To document a series of Test Results performed on the same date by the same provider, create
a “Lab Panel”. To do this, follow the steps below:
Click the button to activate the Lab Panel record, similar to that
in the figure below:
Fill out the fields as appropriate:
o Agency: This field will default to your agency.
o Lab Panel Name: Select the name of the Lab Panel you wish to
document by clicking on the button.
o Lab Panel Completion Date: Enter the date this panel was completed.
o Lab Panel Status: Enter the status of the lab panel.
o Lab Panel Test Facility: Enter the facility where the lab panel was
completed by clicking on the button.

- 181 -
o Lab Panel Test Completed By: Enter the provider who completed the
lab panel by clicking on the button.
o Tests: Test Name/Status/Modifier/Test Result: For each medical lab
included in this panel, enter the Status, Modifier, and Result in the
appropriate rows and columns.
After filling out the record, click on the button. You will be prompted
to save your changes. Click on the button to save your changes and
return to the Medical Summary form.
Pregnancies
The Pregnancies Tab of the “Medical Summary” shows detailed information related to a
client’s pregnancy. In order to meet reporting requirements, each pregnancy must be fully
documented.
To get to this information, follow the steps below.
Navigate to the Client Profile. Once in the Profile, select the “View” button and then
choose “Medical Summary”.
Select the “Pregnancies” Tab, seen in the figure below:
To add a new Pregnancy record, simply click on the
button. The Pregnancy record, seen in the figure below will open:
- 182 -
(Note: Not all fields seen in the above figure will show unless certain values are
set within the record).
Fill out the fields as appropriate:
o Status: Enter the status of the pregnancy (either Active or Inactive)
o Estimated Conception Date: Enter the estimated date of conception.
o EDC Estimated Date of Confinement (Due Date): Enter the due date.
o End Date: Enter the End Date of the pregnancy. This field will only
show if the Status is set to “Inactive”.
o Pregnancy Outcome: Enter the outcome of the pregnancy. This field
will only show if the Status is set to “Inactive”.
o Delivery Type: This field will only show if the “Pregnancy Outcome” is
set to “Live Birth”. Select the type of delivery.
o Apgar Score: This field will only show if the “Pregnancy Outcome” is
set to “Live Birth”. If applicable, enter the newborn’s Apgar score.
o Birth Weight (lbs)/Birth Weight (oz): Enter the newborn’s birth weight
in pounds and ounces. This field will only show if the “Pregnancy
Outcome” is set to “Live Birth”.
o When Entered Prenatal Care: Select when the client entered prenatal
care.
o Antiretrovirals Prescribed: Select whether or not the client was
prescribed antiretroviral therapy to prevent transmission of HIV to the
infant.
o Week When Antiretrovirals Started: Enter the week (#) of the
pregnancy in which the client began taking antiretrovirals. This field will
only show if the “Antiretrovirals Prescribed” field is set to “Yes”.
o Antiretroviral Names: Select the name(s) of the antiretrovirals the client
was prescribed. This field will only show if the “Antiretrovirals
Prescribed” field is set to “Yes”.
o HIV Status of Newborn: Select the HIV Status of the newborn infant.
This field will only show if the “Pregnancy Outcome” field is set to “Live
Birth”.
After filling out the record, click on the button. You will be prompted to
save your changes. Click on the button to save your changes and return
to the Medical Summary form.
Vaccinations
Information related to the client’s vaccination for the following conditions must be
documented:
Hepatitis A
Hepatitis B
HPV
Influenza
Pneumococcal
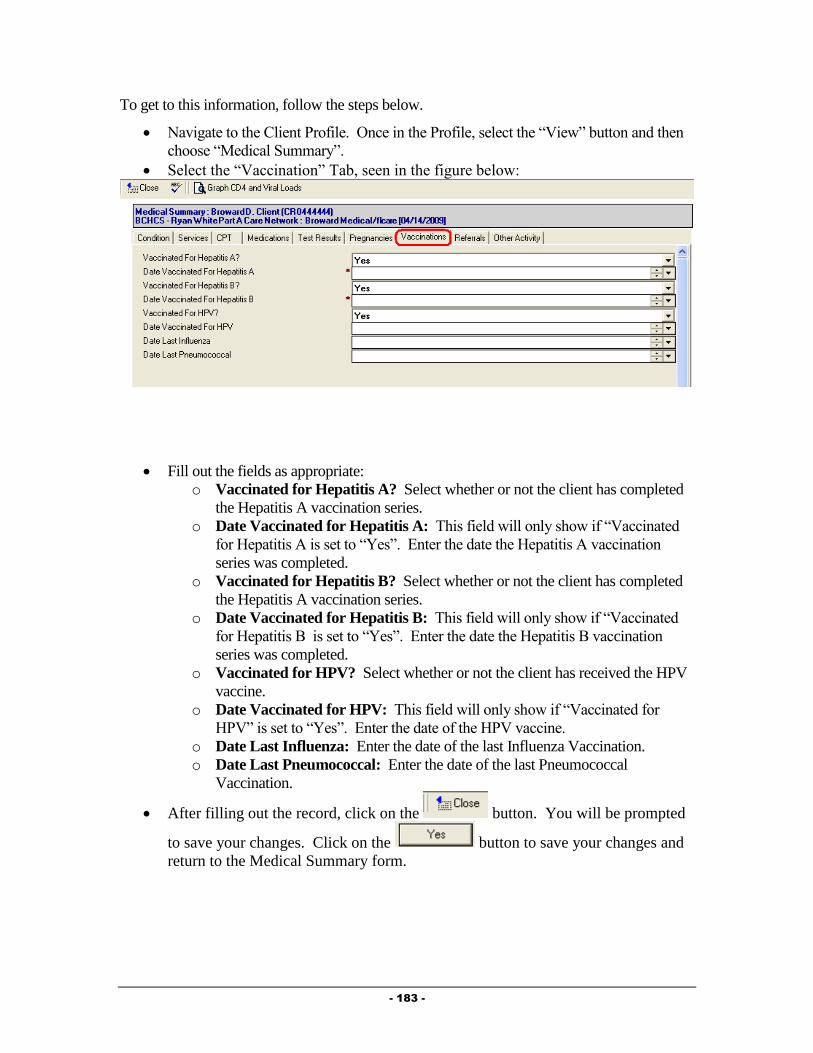
- 183 -
To get to this information, follow the steps below.
Navigate to the Client Profile. Once in the Profile, select the “View” button and then
choose “Medical Summary”.
Select the “Vaccination” Tab, seen in the figure below:
Fill out the fields as appropriate:
o Vaccinated for Hepatitis A? Select whether or not the client has completed
the Hepatitis A vaccination series.
o Date Vaccinated for Hepatitis A: This field will only show if “Vaccinated
for Hepatitis A is set to “Yes”. Enter the date the Hepatitis A vaccination
series was completed.
o Vaccinated for Hepatitis B? Select whether or not the client has completed
the Hepatitis A vaccination series.
o Date Vaccinated for Hepatitis B: This field will only show if “Vaccinated
for Hepatitis B is set to “Yes”. Enter the date the Hepatitis B vaccination
series was completed.
o Vaccinated for HPV? Select whether or not the client has received the HPV
vaccine.
o Date Vaccinated for HPV: This field will only show if “Vaccinated for
HPV” is set to “Yes”. Enter the date of the HPV vaccine.
o Date Last Influenza: Enter the date of the last Influenza Vaccination.
o Date Last Pneumococcal: Enter the date of the last Pneumococcal
Vaccination.
After filling out the record, click on the button. You will be prompted
to save your changes. Click on the button to save your changes and
return to the Medical Summary form.
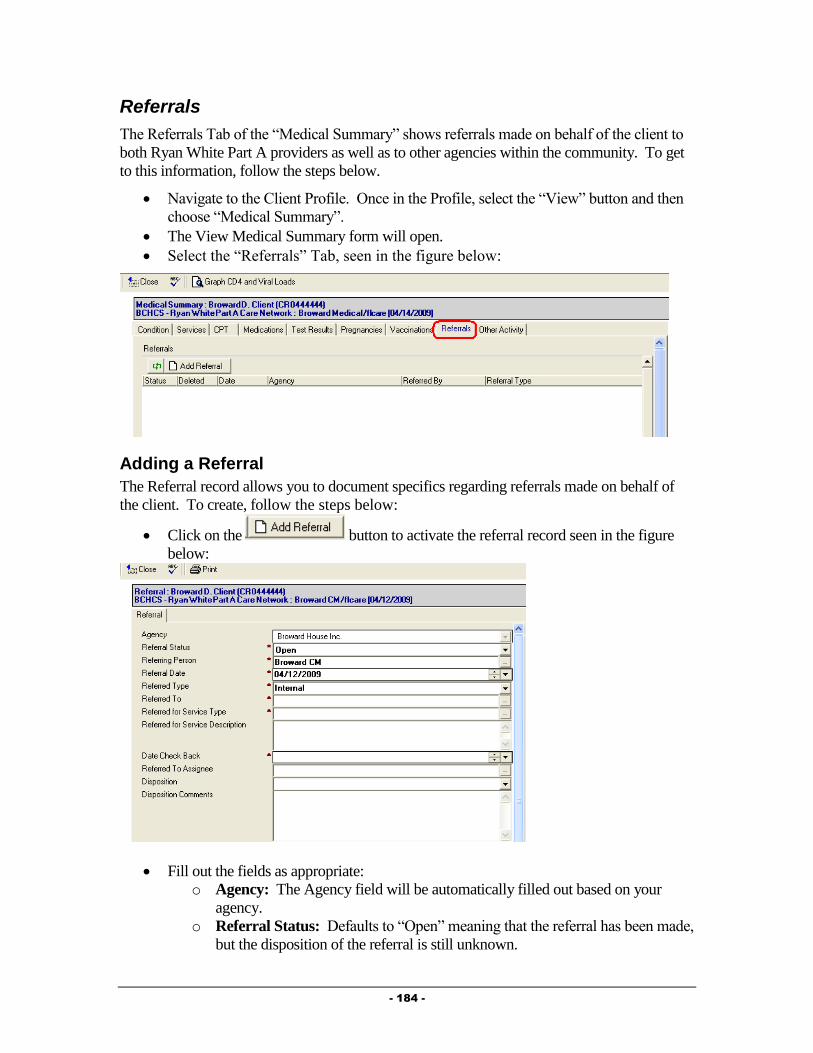
- 184 -
Referrals
The Referrals Tab of the “Medical Summary” shows referrals made on behalf of the client to
both Ryan White Part A providers as well as to other agencies within the community. To get
to this information, follow the steps below.
Navigate to the Client Profile. Once in the Profile, select the “View” button and then
choose “Medical Summary”.
The View Medical Summary form will open.
Select the “Referrals” Tab, seen in the figure below:
Adding a Referral
The Referral record allows you to document specifics regarding referrals made on behalf of
the client. To create, follow the steps below:
Click on the button to activate the referral record seen in the figure
below:
Fill out the fields as appropriate:
o Agency: The Agency field will be automatically filled out based on your
agency.
o Referral Status: Defaults to “Open” meaning that the referral has been made,
but the disposition of the referral is still unknown.

- 185 -
o Referring Person: This will default to your name.
o Referral Date: Enter the Date the referral was made.
o Referral Type: Select whether the referral was an Internal (referral made to
another Ryan White Part A provider) or an External (made to a provider that is
not a Ryan White Part A provider).
o Referred To: Select the agency the referral was made to by clicking on the
button. NOTE: The picklist of agencies will be different based on the
“Referral Type” selected. For “Internal” referrals, you will get a list of only
Ryan White Part A providers, while for “External” referrals, you will get a list
of non-funded providers.
o Referred for Service Type: Select the type of service being requested by
making this referral by clicking on the button.
o Referred for Service Description: Enter any description of why the referral
is being made in this field.
o Date Check Back: Enter a date to receive a reminder to follow up on this
referral.
o Referred to Assignee: If the organization the referral is being made to is in
the Ryan White Part A network and a specific individual has been selected to
receive referrals, their name will appear here.
o Disposition: This field is meant to be filled out when the referral is closed and
the status of the client’s receipt of services is determined.
o Disposition Comments: Enter any comments related to the status of the
referral in this field.
After filling out the record, click on the button. You will be prompted
to save your changes. Click on the button to save your changes and
return to the Medical Summary form.
Other Activity
The Other Activity Tab of the “Medical Summary” shows other information regarding the
client’s condition, including Hospitalizations, Letters and Appointments. To get to this
information, follow the steps below.
Navigate to the Client Profile. Once in the Profile, select the “View” button and then
choose “Medical Summary”.
The View Medical Summary form will open.
Select the “Referrals” Tab, seen in the figure below:
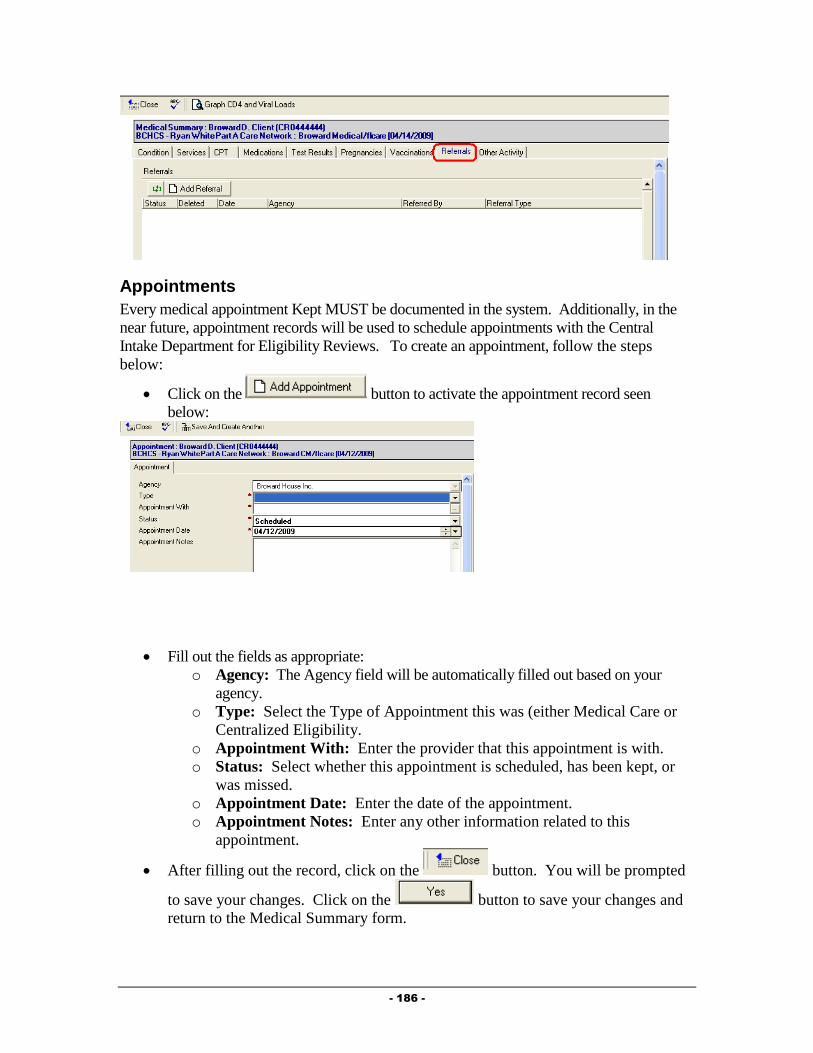
- 186 -
Appointments
Every medical appointment Kept MUST be documented in the system. Additionally, in the
near future, appointment records will be used to schedule appointments with the Central
Intake Department for Eligibility Reviews. To create an appointment, follow the steps
below:
Click on the button to activate the appointment record seen
below:
Fill out the fields as appropriate:
o Agency: The Agency field will be automatically filled out based on your
agency.
o Type: Select the Type of Appointment this was (either Medical Care or
Centralized Eligibility.
o Appointment With: Enter the provider that this appointment is with.
o Status: Select whether this appointment is scheduled, has been kept, or
was missed.
o Appointment Date: Enter the date of the appointment.
o Appointment Notes: Enter any other information related to this
appointment.
After filling out the record, click on the button. You will be prompted
to save your changes. Click on the button to save your changes and
return to the Medical Summary form.

- 187 -
Hospitalization
The hospitalization of a client can have an impact on their functioning and provides an
important intervention point for the Medical Provider. Additionally, it can provide specific
outcome related information to funders and can have an impact on the client’s eligibility for
specific services. To document that a client has been hospitalized, follow the steps below:
Click on the button to activate the Hospitalization record seen
below:
Fill out the fields as appropriate:
o Agency: The Agency field will be automatically filled out based on your
agency.
o Status: Select whether the client was Admitted or was Discharged from the
hospital.
o Admission Type: Select the Type of admission this hospitalization was.
o Stay Type: Select the type of condition this hospitalization was related
to.
o Facility: Enter the facility the client was hospitalized in.
o Date Admitted: Enter the date the client was admitted to the
hospitalization.
o Notes Admission: Enter any notes related to the admission.
o Date Discharged: This field will only appear if the “Status” is set to
“Discharged”. Enter the date the client was discharged from the hospital.
o Discharge Reason: This field will only appear if the “Status” is set to
“Discharged”. Enter the reason the client was discharged from the
hospital.
o Actual Length of Stay: This field will only appear if the “Status” is set
to “Discharged” and will automatically be computed based on the Date
Admitted and Date Discharged.
o Notes Discharge: This field will only appear if the “Status” is set to
“Discharged”. Enter any notes related to the client’s discharge from the
hospital.
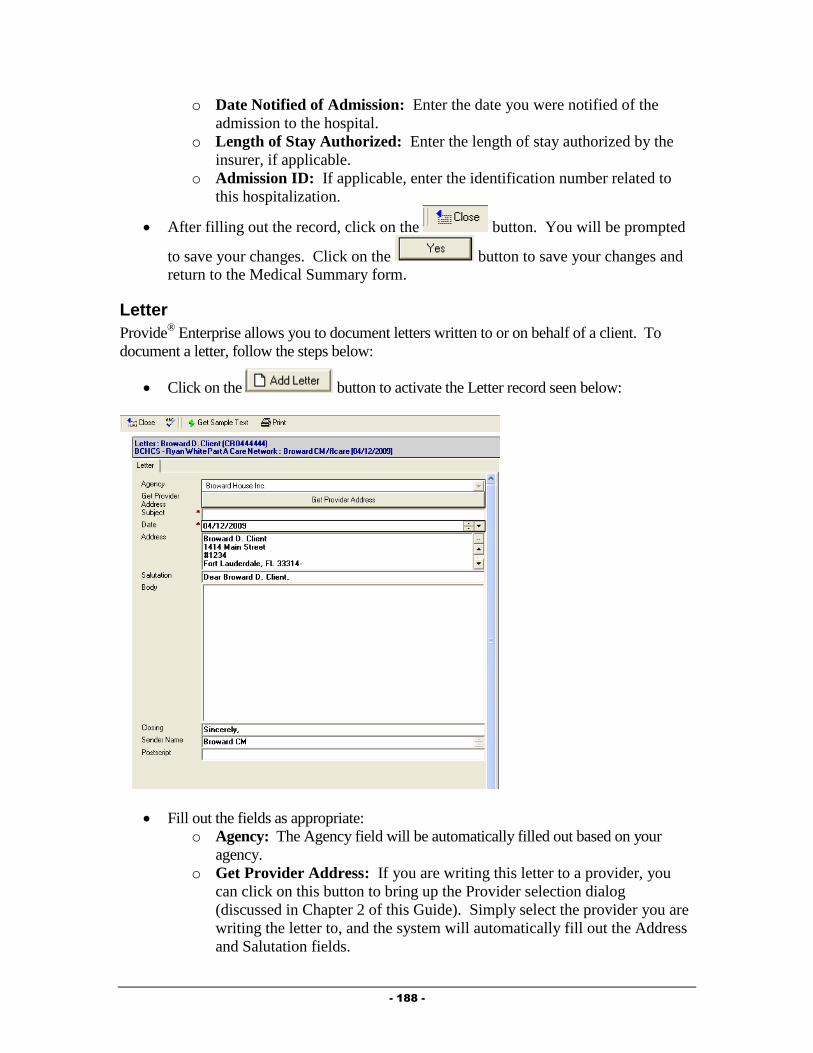
- 188 -
o Date Notified of Admission: Enter the date you were notified of the
admission to the hospital.
o Length of Stay Authorized: Enter the length of stay authorized by the
insurer, if applicable.
o Admission ID: If applicable, enter the identification number related to
this hospitalization.
After filling out the record, click on the button. You will be prompted
to save your changes. Click on the button to save your changes and
return to the Medical Summary form.
Letter
Provide® Enterprise allows you to document letters written to or on behalf of a client. To
document a letter, follow the steps below:
Click on the button to activate the Letter record seen below:
Fill out the fields as appropriate:
o Agency: The Agency field will be automatically filled out based on your
agency.
o Get Provider Address: If you are writing this letter to a provider, you
can click on this button to bring up the Provider selection dialog
(discussed in Chapter 2 of this Guide). Simply select the provider you are
writing the letter to, and the system will automatically fill out the Address
and Salutation fields.
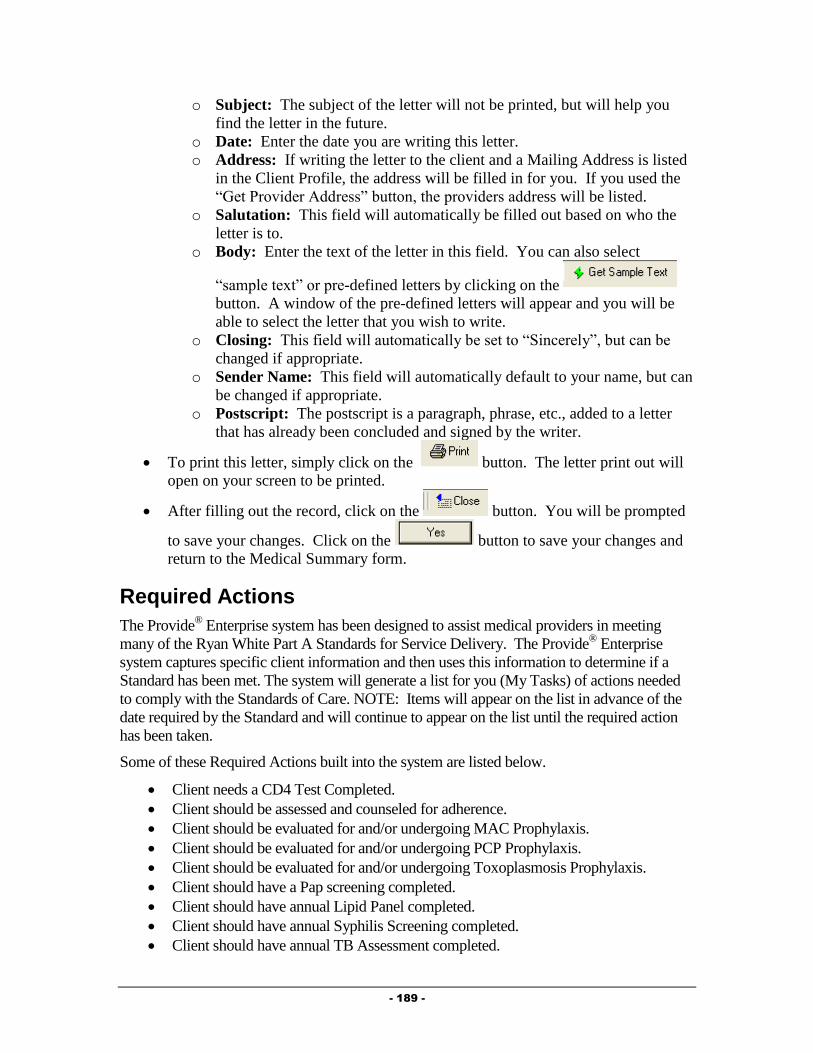
- 189 -
o Subject: The subject of the letter will not be printed, but will help you
find the letter in the future.
o Date: Enter the date you are writing this letter.
o Address: If writing the letter to the client and a Mailing Address is listed
in the Client Profile, the address will be filled in for you. If you used the
“Get Provider Address” button, the providers address will be listed.
o Salutation: This field will automatically be filled out based on who the
letter is to.
o Body: Enter the text of the letter in this field. You can also select
“sample text” or pre-defined letters by clicking on the
button. A window of the pre-defined letters will appear and you will be
able to select the letter that you wish to write.
o Closing: This field will automatically be set to “Sincerely”, but can be
changed if appropriate.
o Sender Name: This field will automatically default to your name, but can
be changed if appropriate.
o Postscript: The postscript is a paragraph, phrase, etc., added to a letter
that has already been concluded and signed by the writer.
To print this letter, simply click on the button. The letter print out will
open on your screen to be printed.
After filling out the record, click on the button. You will be prompted
to save your changes. Click on the button to save your changes and
return to the Medical Summary form.
Required Actions
The Provide® Enterprise system has been designed to assist medical providers in meeting
many of the Ryan White Part A Standards for Service Delivery. The Provide® Enterprise
system captures specific client information and then uses this information to determine if a
Standard has been met. The system will generate a list for you (My Tasks) of actions needed
to comply with the Standards of Care. NOTE: Items will appear on the list in advance of the
date required by the Standard and will continue to appear on the list until the required action
has been taken.
Some of these Required Actions built into the system are listed below.
Client needs a CD4 Test Completed.
Client should be assessed and counseled for adherence.
Client should be evaluated for and/or undergoing MAC Prophylaxis.
Client should be evaluated for and/or undergoing PCP Prophylaxis.
Client should be evaluated for and/or undergoing Toxoplasmosis Prophylaxis.
Client should have a Pap screening completed.
Client should have annual Lipid Panel completed.
Client should have annual Syphilis Screening completed.
Client should have annual TB Assessment completed.

- 190 -
Client should have Hepatitis B Vaccination Series.
Client should have Hepatitis C Screening Completed.
Client should receive annual HIV Risk Counseling.
Client should receive annual Oral Exam.
Medical Care Visit Due.
Monitoring Required Actions
Required Actions can be monitored in a few different ways. These are discussed below:
My Tasks
The “My Tasks” views will show you any Required Actions assigned to you. The “My
Tasks” views can be accessed via the Activity views in the database. These are found under
“View – Activity – My Tasks” and can be viewed By Client or By Due Date.
When opening these views, you can view the specific assigned tasks by expanding the view
by clicking on the next to the appropriate column.
Client Profile
Client specific tasks can be found within the Client Profile in the Profile Section, Alert Tab,
seen in the figure below:
To view a specific task, simply double click on that task to open that record.
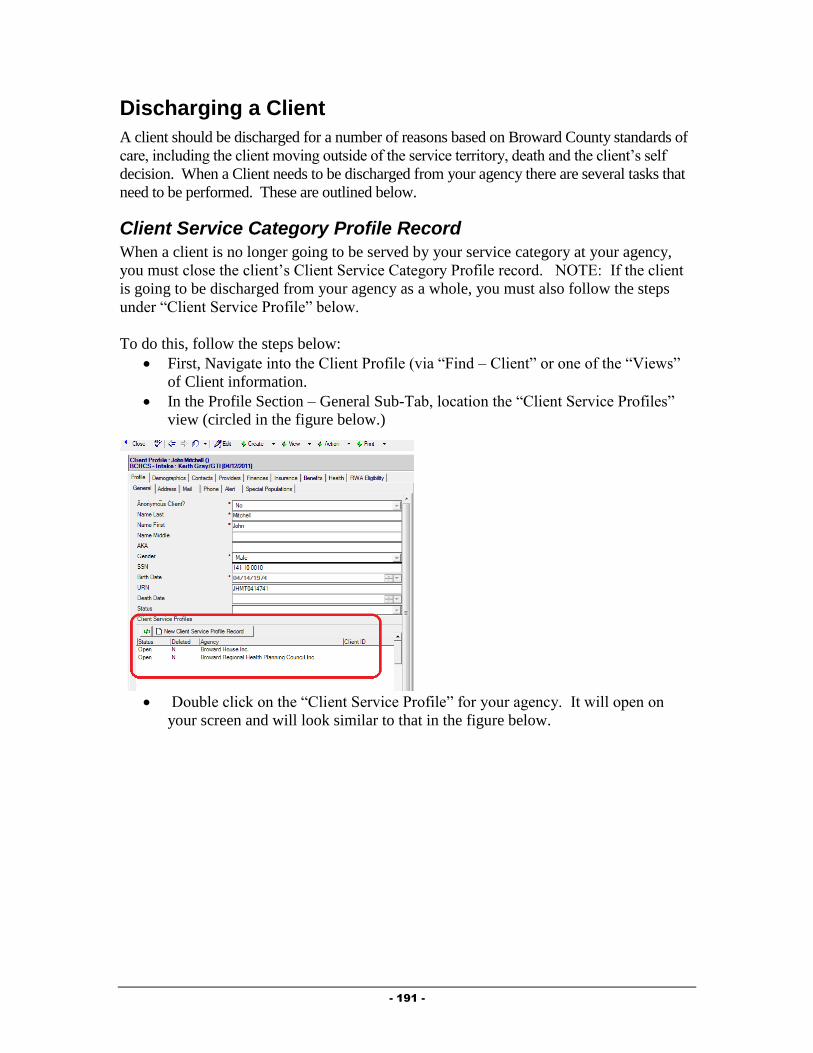
- 191 -
Discharging a Client
A client should be discharged for a number of reasons based on Broward County standards of
care, including the client moving outside of the service territory, death and the client’s self
decision. When a Client needs to be discharged from your agency there are several tasks that
need to be performed. These are outlined below.
Client Service Category Profile Record
When a client is no longer going to be served by your service category at your agency,
you must close the client’s Client Service Category Profile record. NOTE: If the client
is going to be discharged from your agency as a whole, you must also follow the steps
under “Client Service Profile” below.
To do this, follow the steps below:
First, Navigate into the Client Profile (via “Find – Client” or one of the “Views”
of Client information.
In the Profile Section – General Sub-Tab, location the “Client Service Profiles”
view (circled in the figure below.)
Double click on the “Client Service Profile” for your agency. It will open on
your screen and will look similar to that in the figure below.

- 192 -
Double click on the Client Service Category Profile Record for your Service
Category. It will open on your screen and will look similar to that in the figure
below.
Click the button to bring the record into edit mode.
Next, click the button. A dialog box, similar to that in the figure
below will open on your screen:
Fill out the fields as appropriate:
o Status: Select the status to change the client to.

- 193 -
o Reason for change: Click on the button to the right of the field ( ) to
activate the picklist and select the appropriate value.
o Date change effective: Enter the date that this change should be effective
from.
Once done, click on the button to save your changes.
Next, click the button to save your changes and back out of the record.
Click the button again to back out of the Client Service Profile.
Client Service Profile
Documenting that a client is being discharged from your agency as whole is done via the
Client Service Profile. NOTE: This should only be done when you are discharging the client
from all services at your agency.
This can be done by following the steps below:
Navigate to the Profile Section – General Sub-Tab of the Client Profile, seen in the
figure below:
Double click on the Client Service for your agency. The Client Service Profile
will open and will look similar to that in the figure below:

- 194 -
Click on the button. The Client Service Profile will be brought into Edit
mode.
Click on the button to activate the Status Change dialog box,
similar to that in the figure below:
Complete all fields as appropriate:
o Status: Select “Closed” as the status.
o Reason for change: Select the reason the client is being discharged from
your agency.
o Date change effective: Enter the date the client is being discharged from
your agency.
Click on the button to save your changes. You will be returned to
the Client Service Profile.
After verifying the status change, click on the button. You will be
prompted to save your changes. Click on the button to save your
changes and return to the Client Profile.
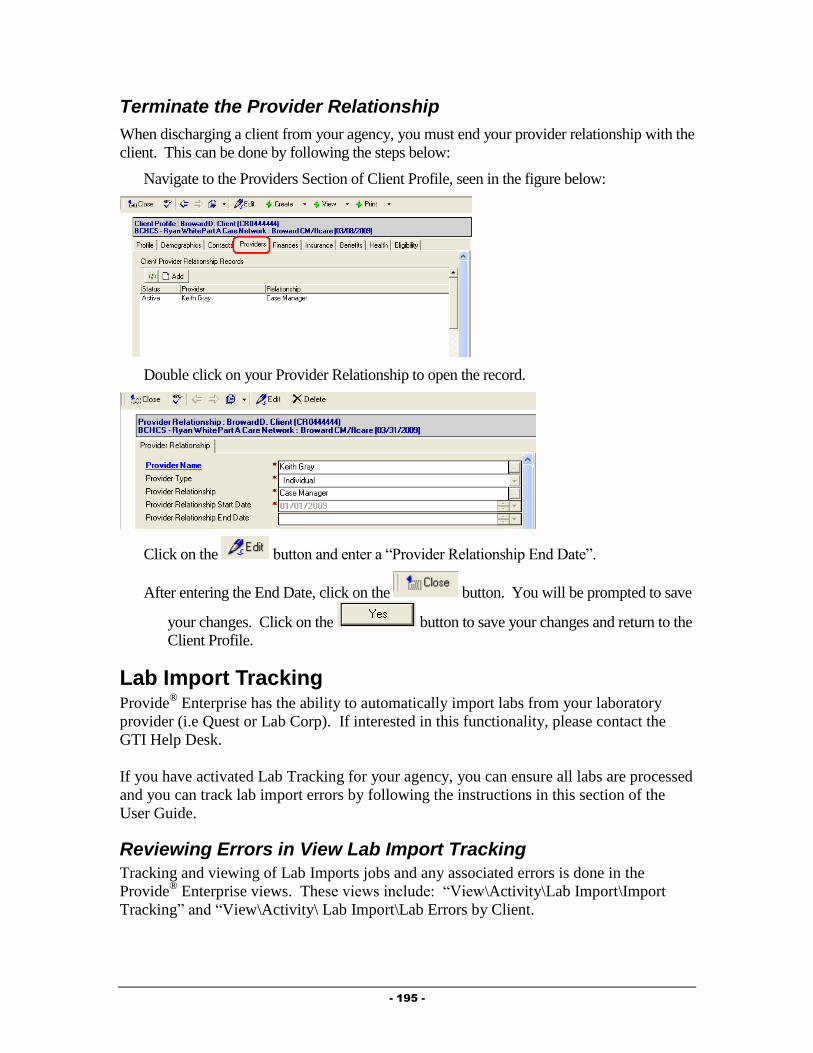
- 195 -
Terminate the Provider Relationship
When discharging a client from your agency, you must end your provider relationship with the
client. This can be done by following the steps below:
Navigate to the Providers Section of Client Profile, seen in the figure below:
Double click on your Provider Relationship to open the record.
Click on the button and enter a “Provider Relationship End Date”.
After entering the End Date, click on the button. You will be prompted to save
your changes. Click on the button to save your changes and return to the
Client Profile.
Lab Import Tracking Provide
® Enterprise has the ability to automatically import labs from your laboratory
provider (i.e Quest or Lab Corp). If interested in this functionality, please contact the
GTI Help Desk.
If you have activated Lab Tracking for your agency, you can ensure all labs are processed
and you can track lab import errors by following the instructions in this section of the
User Guide.
Reviewing Errors in View Lab Import Tracking
Tracking and viewing of Lab Imports jobs and any associated errors is done in the
Provide® Enterprise views. These views include: “View\Activity\Lab Import\Import
Tracking” and “View\Activity\ Lab Import\Lab Errors by Client.
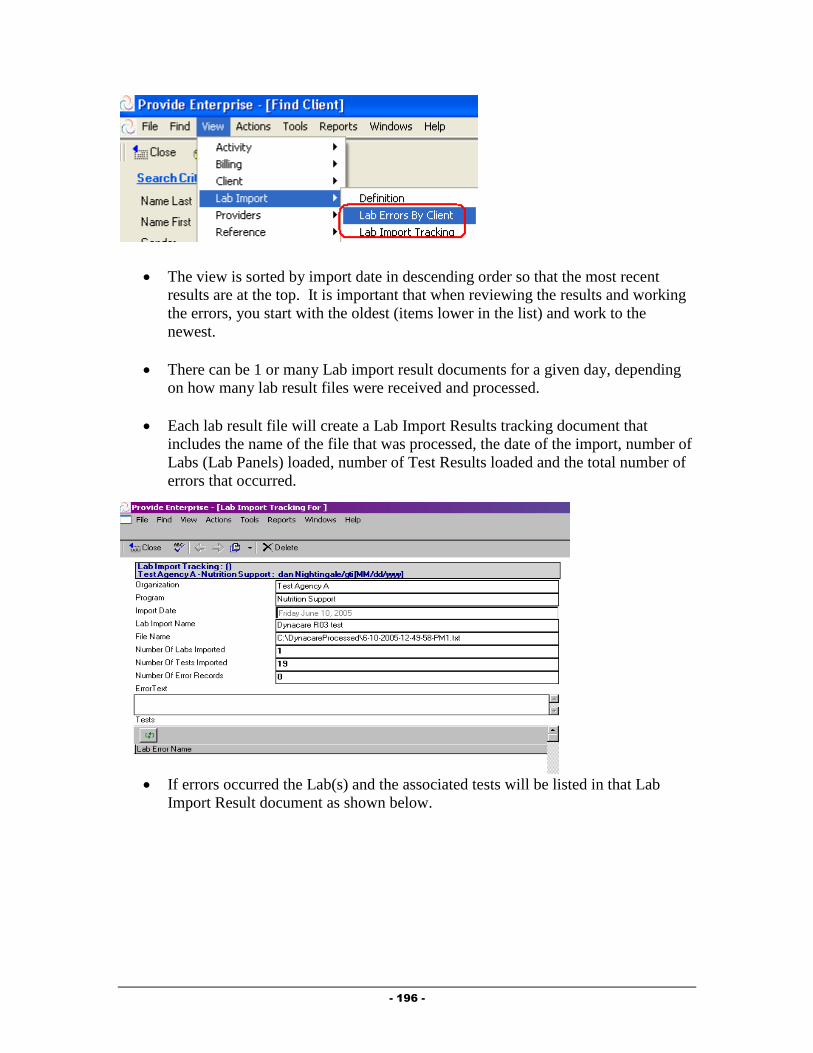
- 196 -
The view is sorted by import date in descending order so that the most recent
results are at the top. It is important that when reviewing the results and working
the errors, you start with the oldest (items lower in the list) and work to the
newest.
There can be 1 or many Lab import result documents for a given day, depending
on how many lab result files were received and processed.
Each lab result file will create a Lab Import Results tracking document that
includes the name of the file that was processed, the date of the import, number of
Labs (Lab Panels) loaded, number of Test Results loaded and the total number of
errors that occurred.
If errors occurred the Lab(s) and the associated tests will be listed in that Lab
Import Result document as shown below.

- 197 -
Normal Run – No Errors/No File Processed
If the import completed with no errors, the Lab Import Tracking will report 0
Errors.
There is nothing to do with these documents and they can be deleted using the
button at the top of the document.
Example of Normal Run No Errors
Example of Normal Run No files Processed
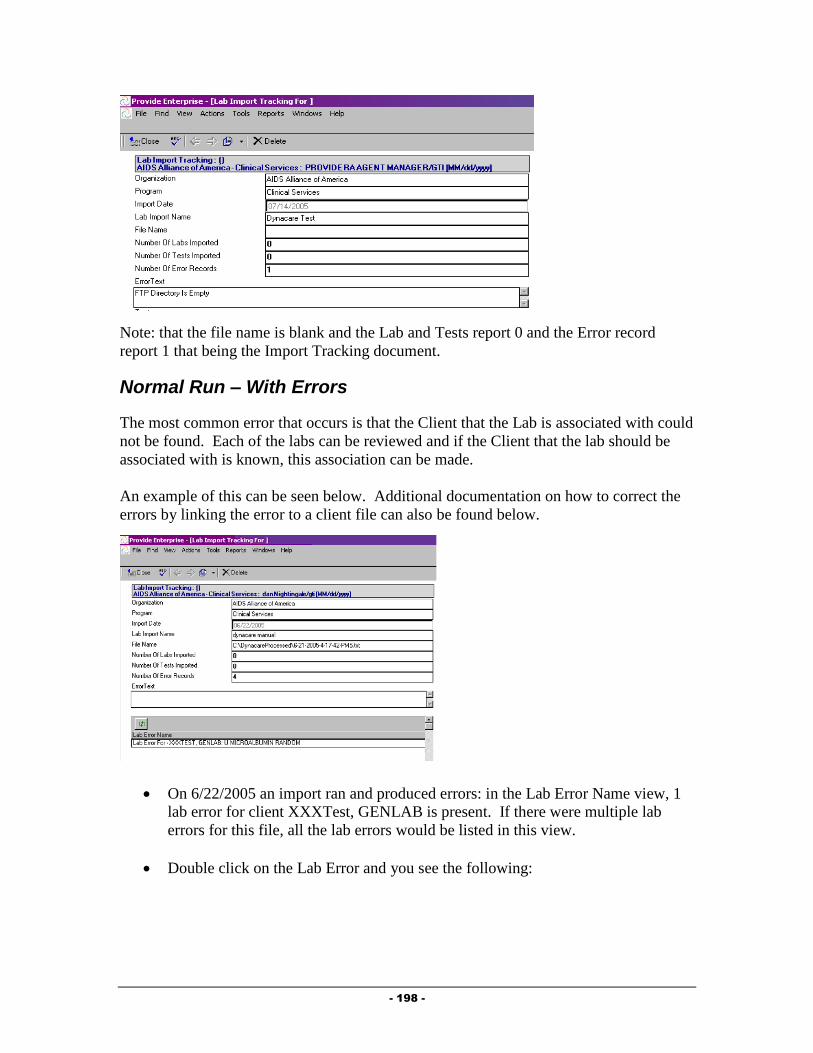
- 198 -
Note: that the file name is blank and the Lab and Tests report 0 and the Error record
report 1 that being the Import Tracking document.
Normal Run – With Errors
The most common error that occurs is that the Client that the Lab is associated with could
not be found. Each of the labs can be reviewed and if the Client that the lab should be
associated with is known, this association can be made.
An example of this can be seen below. Additional documentation on how to correct the
errors by linking the error to a client file can also be found below.
On 6/22/2005 an import ran and produced errors: in the Lab Error Name view, 1
lab error for client XXXTest, GENLAB is present. If there were multiple lab
errors for this file, all the lab errors would be listed in this view.
Double click on the Lab Error and you see the following:
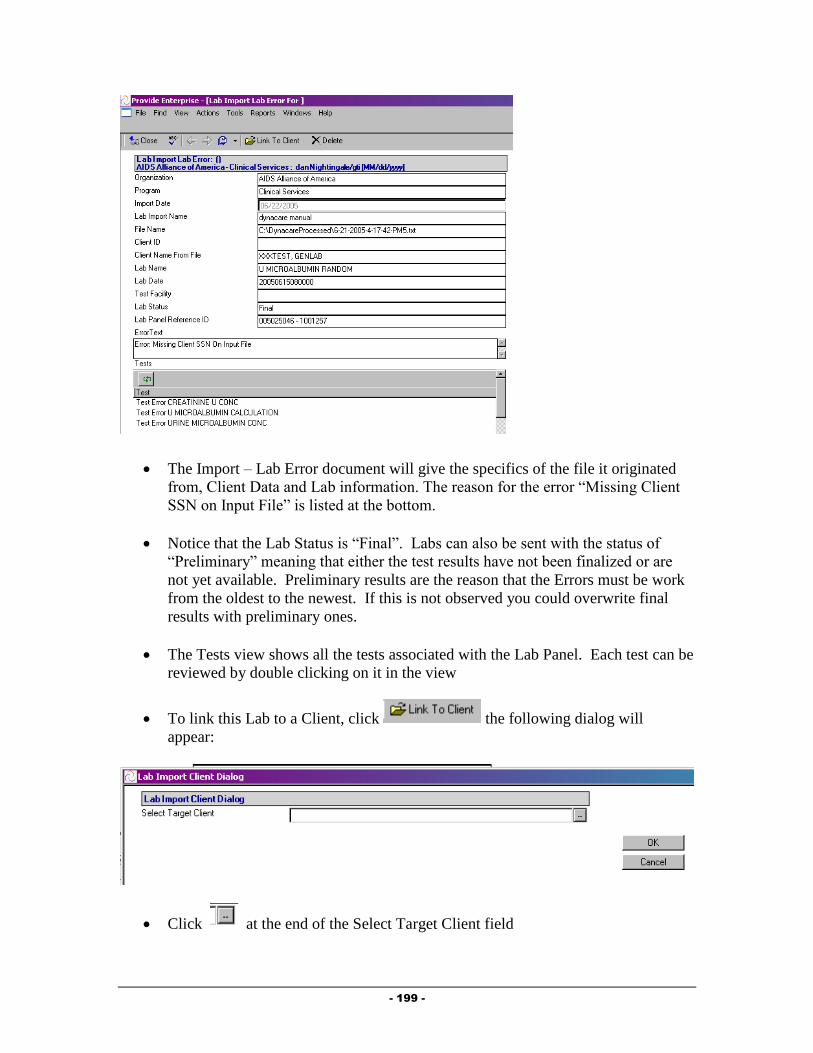
- 199 -
The Import – Lab Error document will give the specifics of the file it originated
from, Client Data and Lab information. The reason for the error “Missing Client
SSN on Input File” is listed at the bottom.
Notice that the Lab Status is “Final”. Labs can also be sent with the status of
“Preliminary” meaning that either the test results have not been finalized or are
not yet available. Preliminary results are the reason that the Errors must be work
from the oldest to the newest. If this is not observed you could overwrite final
results with preliminary ones.
The Tests view shows all the tests associated with the Lab Panel. Each test can be
reviewed by double clicking on it in the view
To link this Lab to a Client, click the following dialog will
appear:
Click at the end of the Select Target Client field

- 200 -
Select the appropriate client in the Find Client Dialog and Click and
the following will be presented.
Click and the following will be presented
Click to complete the link
The Lab Error document will be closed and the Lab Import Tracking Document
presented
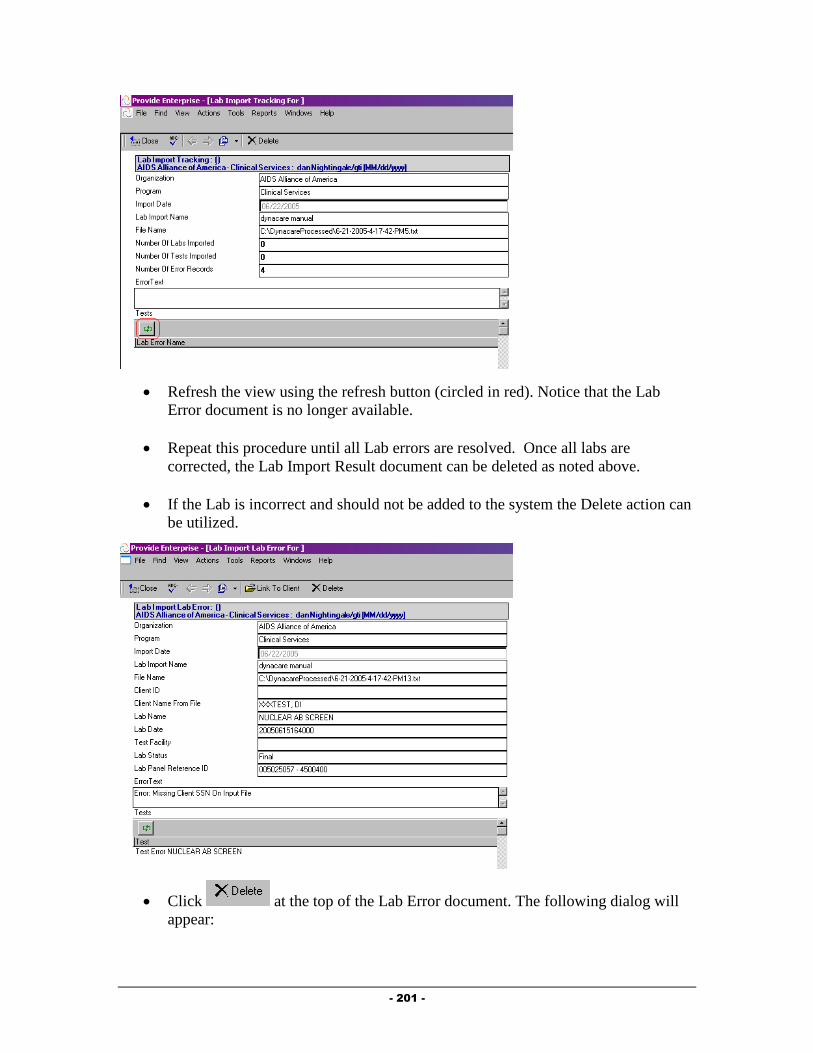
- 201 -
Refresh the view using the refresh button (circled in red). Notice that the Lab
Error document is no longer available.
Repeat this procedure until all Lab errors are resolved. Once all labs are
corrected, the Lab Import Result document can be deleted as noted above.
If the Lab is incorrect and should not be added to the system the Delete action can
be utilized.
Click at the top of the Lab Error document. The following dialog will
appear:

- 202 -
Click to delete this specific Lab Error and the associated Test Errors
The Lab Error document will be closed and the Lab Import Tracking Document
Presented
Refresh the view using the refresh button. Notice that the Lab Error document is
no longer available.
Working Errors from the Lab Errors by Client View
Go to the view – Activity-Lab Import – Lab Errors by Client
This view is a list of all Lab Errors sorted and categorized by the client name.
These Lab Error records are the same records that show in the Lab Import
tracking documents. This view makes it simpler to see just the Clients have Lab
Import Errors that need to be addressed.
Linking Lab Errors to a Client in Mass
To link all the Lab Errors to the client, expand the category for the individual
Client name and select all the clients Lab Errors by clicking in the selection area
to the left of the view (circled in red):
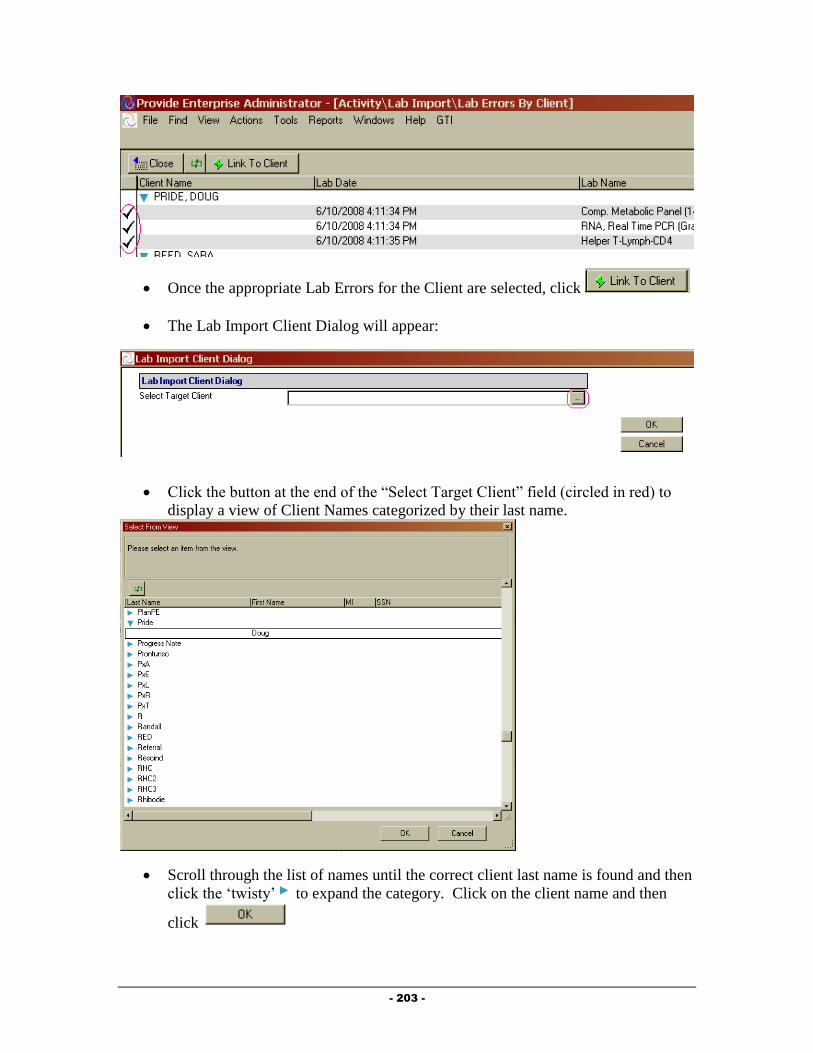
- 203 -
Once the appropriate Lab Errors for the Client are selected, click
The Lab Import Client Dialog will appear:
Click the button at the end of the “Select Target Client” field (circled in red) to
display a view of Client Names categorized by their last name.
Scroll through the list of names until the correct client last name is found and then
click the ‘twisty’ to expand the category. Click on the client name and then
click

- 204 -
The name will then appear in the Lab Import Client Dialog
Click and the following will be presented
Click to continue
The Lab Errors and all the associated Test Results will then be created in the
selected Client record. Once the Labs and Test are written, the Lab Errors will be
removed from the view.

- 205 -
Chapter
6
Oral Health Care Providers
This Chapter outlines the tasks that need to be completed by Oral Health Care providers in
Provide® Enterprise to meet all billing and reporting requirements. Over time, the data
elements outlined in this Chapter must also be kept current as things change for the client.
Intake and Assessment Documentation
At the time of Intake, and as required based on Standards of Care, there are a number of
records that must be entered in Provide®
Enterprise in order to meet all billing and invoicing
requirements.
Client Profile
Within the Client Profile, it is important to keep all information updated as the client’s life
situation changes.
Opening Existing Clients to your Agency
If the client had previously been registered in Provide® Enterprise and served by another
agency, you will need to create a Client Service Profile to document that the Client is
now being served by your agency. To do this, follow the steps below:
First, Navigate into the Client Profile (via “Find – Client” or one of the “Views”
of Client information.
In the Profile Section – General Sub-Tab, location the “Client Service Profiles”
view (circled in the figure below.)
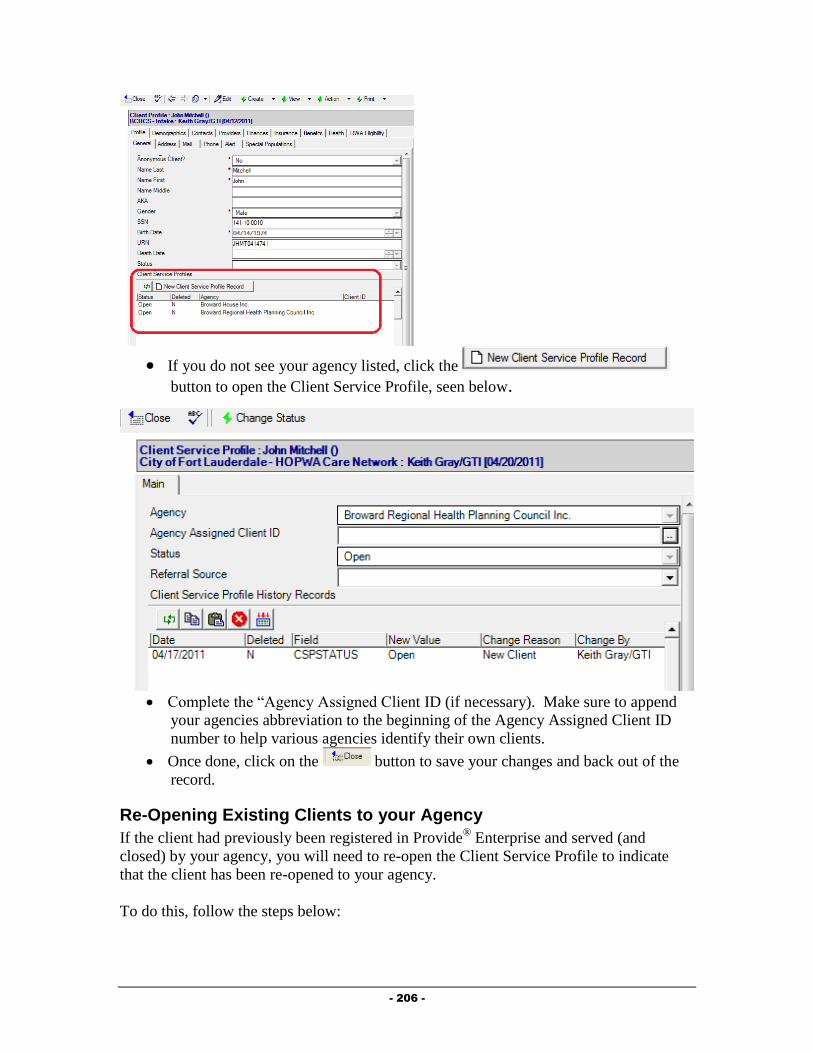
- 206 -
If you do not see your agency listed, click the
button to open the Client Service Profile, seen below.
Complete the “Agency Assigned Client ID (if necessary). Make sure to append
your agencies abbreviation to the beginning of the Agency Assigned Client ID
number to help various agencies identify their own clients.
Once done, click on the button to save your changes and back out of the
record.
Re-Opening Existing Clients to your Agency
If the client had previously been registered in Provide® Enterprise and served (and
closed) by your agency, you will need to re-open the Client Service Profile to indicate
that the client has been re-opened to your agency.
To do this, follow the steps below:

- 207 -
First, Navigate into the Client Profile (via “Find – Client” or one of the “Views”
of Client information.
Double click on the Client Service for your agency. The Client Service Profile will
open and will look similar to that in the figure below:
Click on the button. The Client Service Profile will be brought into Edit
mode, similar to that in the figure below:
Click on the button to activate the Status Change dialog box,
similar to that in the figure below:

- 208 -
Complete all fields as appropriate:
o Status: Select “Open” as the status.
o Reason for change: Select the reason the client is being re-opened to
your agency.
o Date change effective: Enter the date the client is being re-opened to
your agency.
Click on the button to save your changes. You will be returned to
the Client Service Profile.
After verifying the status change, click on the button. You will be
prompted to save your changes. Click on the button to save your
changes and return to the Client Profile.
Opening Existing Clients to your Service Category
If the client had previously been registered in Provide®
Enterprise and served by another
agency or by other programs at your agency, you will need to create a Client Service
Category Profile to document that the Client is now being served by your agency and
service category. NOTE: If the client has previously been served by your Service
Category, follow the steps below under “Re-Opening Existing Clients to Your Service
Category”.
To do this, follow the steps below:
First, Navigate into the Client Profile (via “Find – Client” or one of the “Views”
of Client information.
In the Profile Section – General Sub-Tab, location the “Client Service Profiles”
view (circled in the figure below.)

- 209 -
If you do not see your agency listed, follow the steps in the previous section to
“Open Existing Clients to your Agency”.
Double click on the “Client Service Profile” for your agency. It will open on
your screen and will look similar to that in the figure below.
Click the button to open a Cleint Service
Category Profile record, similar to that in the figure below:

- 210 -
Fill out the fields as appropriate:
o Service Category: Select the category of service that you wish to open
the client to.
o Client ID: If your program uses a client ID number, enter this hear.
o Status Effective/Status Reason: These will automatically be computed.
o Client Service Category Profile History Records: This window will
track each change to the Service Profile History Status records over time.
This will automatically occur when changes are made to these records.
Once done, click on the button to save your changes and back out of the
record. Click the button again to back out of the Client Service Profile.
Re-Opening Existing Clients to Your Service Category
If the client had previously been registered in Provide®
Enterprise and served by your
agency and service category, you will need to re-open the client to your service category
(if they are closed). Please note that if the client was closed to your agency, you will
need to re-open the client to your agency as well. See the steps above under “Re-
Opening a Client to Your Agency.”
To do this, follow the steps below:
First, Navigate into the Client Profile (via “Find – Client” or one of the “Views”
of Client information.
In the Profile Section – General Sub-Tab, location the “Client Service Profiles”
view (circled in the figure below.)

- 211 -
Double click on the “Client Service Profile” for your agency. It will open on
your screen and will look similar to that in the figure below.
Double click on the Client Service Category Profile Record for your Service
Category. It will open on your screen and will look similar to that in the figure
below. (NOTE: If you do not see a Client Service Category Profile Record for
your service category, follow the steps earlier in the chapter under “Opening
Existing Clients to your Service Category”.

- 212 -
Click the button to bring the record into edit mode.
Next, click the button. A dialog box, similar to that in the figure
below will open on your screen:
Fill out the fields as appropriate:
o Status: Select the status to change the client to.
o Reason for change: Click on the button to the right of the field ( ) to
activate the picklist and select the appropriate value.
o Date change effective: Enter the date that this change should be effective
from.
Once done, click on the button to save your changes.
Next, click the button to save your changes and back out of the record.
Click the button again to back out of the Client Service Profile.
Requesting Service Category Specific Eligibility Overrides
Provide® Enterprise allows users to request overrides for client eligibility for Part A services
directly within the software system. NOTE: Only Broward County staff will be able to
approve these requests.
To request an Eligibility Override, follow the steps below:
From within the Client Profile, click on the button and select “Eligibility
Override”.
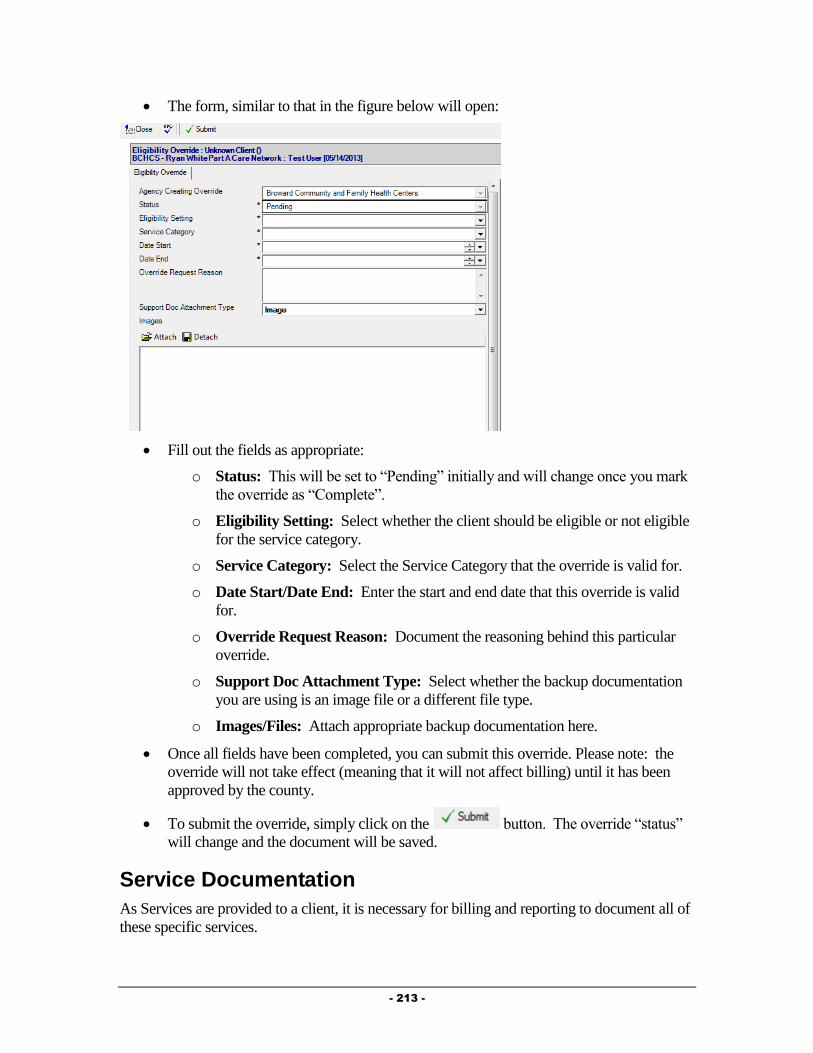
- 213 -
The form, similar to that in the figure below will open:
Fill out the fields as appropriate:
o Status: This will be set to “Pending” initially and will change once you mark
the override as “Complete”.
o Eligibility Setting: Select whether the client should be eligible or not eligible
for the service category.
o Service Category: Select the Service Category that the override is valid for.
o Date Start/Date End: Enter the start and end date that this override is valid
for.
o Override Request Reason: Document the reasoning behind this particular
override.
o Support Doc Attachment Type: Select whether the backup documentation
you are using is an image file or a different file type.
o Images/Files: Attach appropriate backup documentation here.
Once all fields have been completed, you can submit this override. Please note: the
override will not take effect (meaning that it will not affect billing) until it has been
approved by the county.
To submit the override, simply click on the button. The override “status”
will change and the document will be saved.
Service Documentation
As Services are provided to a client, it is necessary for billing and reporting to document all of
these specific services.

- 214 -
Oral Health Care Summary
Much of the data related to the client’s Medical Care can be found in the Medical Summary.
To navigate to the Medical Summary, follow the steps below:
Navigate to the Client Profile. Once in the Profile, select the “View” button and then
choose “Oral Health Care”.
A form similar to that in the figure below will open:
The Oral Health Activity form contains three tabs of information, described below:
o Episodes of Care: Episode of Care records are used to document each
episode of care that is received by a client.
o Procedures: The Procedures tab collects information related to the specific
CPT encoded procedures provided to a client. These procedure records and
Superbills can be created from this tab.
o Test Results: The Test Results Tab contains all labs entered by any Ryan
White Part A provider.
o Other Activity: On this tab, you will see any Medical appointments for a
client, as well as Hospitalization history and Letters written on behalf of or to
the client. All three of these Activity types can also be created from this tab.
Episode of Care
Episode of Care records are used to document each episode of care that is received by a client.
To create an Episode of Care record, follow the steps below to first navigate to the Oral
Health Activity and then add a Progress Log:
To navigate to the Oral Health Activity, follow the steps below:
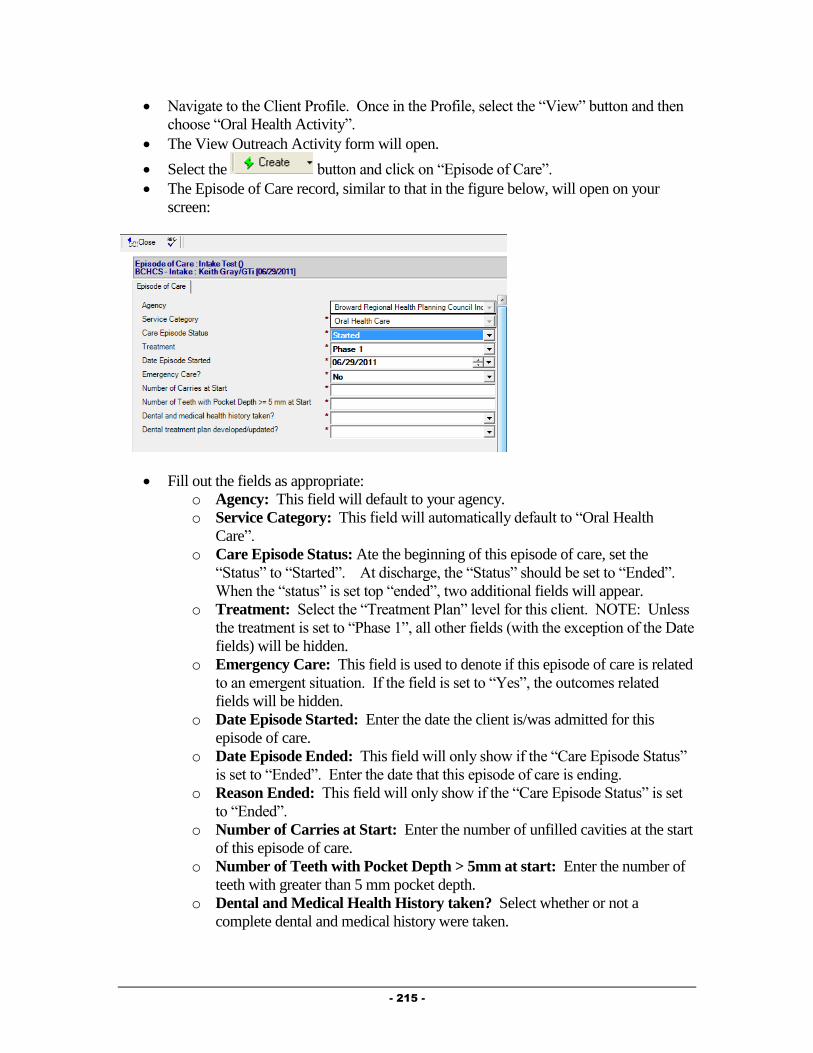
- 215 -
Navigate to the Client Profile. Once in the Profile, select the “View” button and then
choose “Oral Health Activity”.
The View Outreach Activity form will open.
Select the button and click on “Episode of Care”.
The Episode of Care record, similar to that in the figure below, will open on your
screen:
Fill out the fields as appropriate:
o Agency: This field will default to your agency.
o Service Category: This field will automatically default to “Oral Health
Care”.
o Care Episode Status: Ate the beginning of this episode of care, set the
“Status” to “Started”. At discharge, the “Status” should be set to “Ended”.
When the “status” is set top “ended”, two additional fields will appear.
o Treatment: Select the “Treatment Plan” level for this client. NOTE: Unless
the treatment is set to “Phase 1”, all other fields (with the exception of the Date
fields) will be hidden.
o Emergency Care: This field is used to denote if this episode of care is related
to an emergent situation. If the field is set to “Yes”, the outcomes related
fields will be hidden.
o Date Episode Started: Enter the date the client is/was admitted for this
episode of care.
o Date Episode Ended: This field will only show if the “Care Episode Status”
is set to “Ended”. Enter the date that this episode of care is ending.
o Reason Ended: This field will only show if the “Care Episode Status” is set
to “Ended”.
o Number of Carries at Start: Enter the number of unfilled cavities at the start
of this episode of care.
o Number of Teeth with Pocket Depth > 5mm at start: Enter the number of
teeth with greater than 5 mm pocket depth.
o Dental and Medical Health History taken? Select whether or not a
complete dental and medical history were taken.

- 216 -
o Dental Treatment Plan developed/updated?: Select whether or not a
treatment plan was developed or updated.
o Number of Carries at End: This field will be hidden until the “Care Episode
Status” is set to “Ended”. Enter the number of unfilled cavities at the end of
this episode of care.
o Number of Teeth with Pocket Depth > 5mm at start: This field will be
hidden until the “Care Episode Status” is set to “Ended”. Enter the number of
teeth with greater than 5 mm pocket depth at the end of this episode of care.
After filling out the record, click on the button. You will be prompted
to save your changes. Click on the button to save your changes and
return to the View Oral Health Activity form.
Oral Health Care Provider Service Documentation
Much of the data related to the client’s Oral Health Care can be found in the Oral Health
Summary.
To navigate to the Oral Health Activity, follow the steps listed above.
Oral Health Care services are documented on the “CPT” tab of the Medical Summary using
Procedure Records.
To create a Procedure Record, follow the steps below:
From within the Medical Summary, CPT Tab, click on the button.
The Procedure record, similar to that in the figure below, will open:
Fill out the fields as appropriate:
o Agency: This field will default to your Agency.
o Date Completed: Enter the date this procedure was completed.
o Procedure Code: Select the Procedure Code for the procedure being
documented. Clicking on the button will activate the Procedure field
selection dialog, discussed in Chapter 2 of this Guide.
o Tooth Number: This field will only show if the Procedure code is a Dental
Code. Simply enter the number(s) of the teeth this procedure was performed
on.
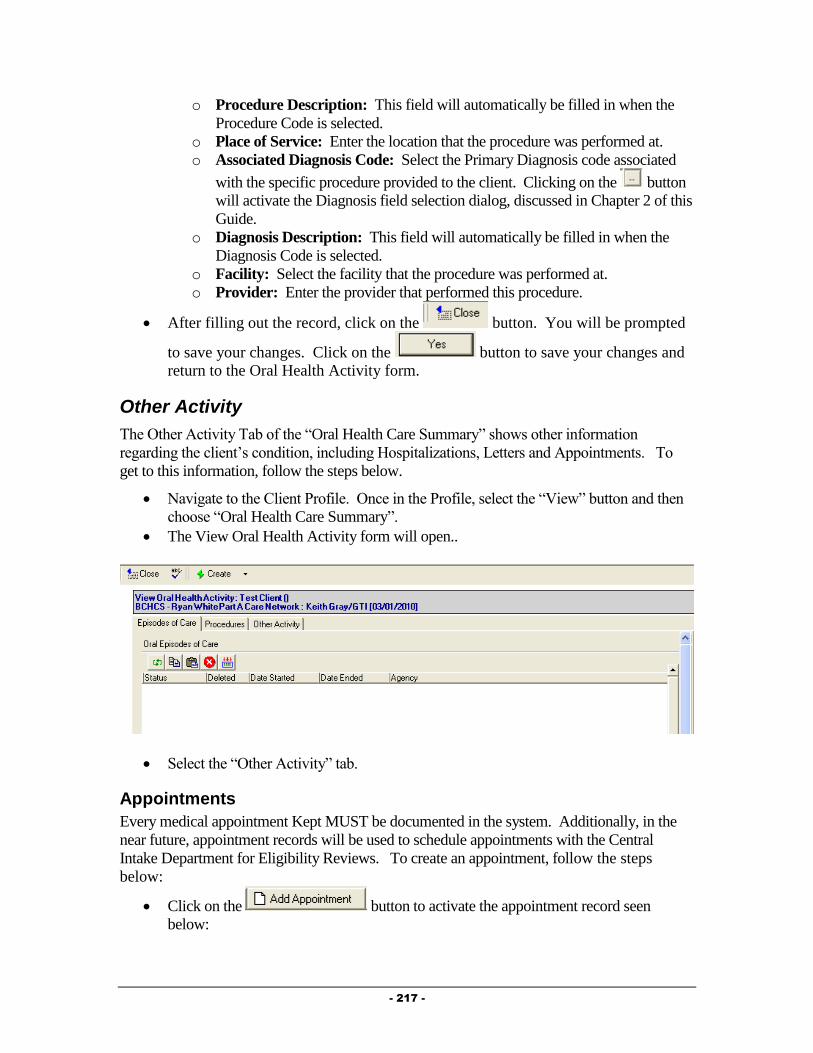
- 217 -
o Procedure Description: This field will automatically be filled in when the
Procedure Code is selected.
o Place of Service: Enter the location that the procedure was performed at.
o Associated Diagnosis Code: Select the Primary Diagnosis code associated
with the specific procedure provided to the client. Clicking on the button
will activate the Diagnosis field selection dialog, discussed in Chapter 2 of this
Guide.
o Diagnosis Description: This field will automatically be filled in when the
Diagnosis Code is selected.
o Facility: Select the facility that the procedure was performed at.
o Provider: Enter the provider that performed this procedure.
After filling out the record, click on the button. You will be prompted
to save your changes. Click on the button to save your changes and
return to the Oral Health Activity form.
Other Activity
The Other Activity Tab of the “Oral Health Care Summary” shows other information
regarding the client’s condition, including Hospitalizations, Letters and Appointments. To
get to this information, follow the steps below.
Navigate to the Client Profile. Once in the Profile, select the “View” button and then
choose “Oral Health Care Summary”.
The View Oral Health Activity form will open..
Select the “Other Activity” tab.
Appointments
Every medical appointment Kept MUST be documented in the system. Additionally, in the
near future, appointment records will be used to schedule appointments with the Central
Intake Department for Eligibility Reviews. To create an appointment, follow the steps
below:
Click on the button to activate the appointment record seen
below:

- 218 -
Fill out the fields as appropriate:
o Agency: The Agency field will be automatically filled out based on your
agency.
o Type: Select the Type of Appointment this was (either Medical Care or
Centralized Eligibility.
o Appointment With: Enter the provider that this appointment is with.
o Status: Select whether this appointment is scheduled, has been kept, or
was missed.
o Appointment Date: Enter the date of the appointment.
o Appointment Notes: Enter any other information related to this
appointment.
After filling out the record, click on the button. You will be prompted
to save your changes. Click on the button to save your changes and
return to the Medical Summary form.
Hospitalization
The hospitalization of a client can have an impact on their functioning and provides an
important intervention point for the Medical Provider. Additionally, it can provide specific
outcome related information to funders and can have an impact on the client’s eligibility for
specific services. To document that a client has been hospitalized, follow the steps below:
Click on the button to activate the Hospitalization record seen
below:

- 219 -
Fill out the fields as appropriate:
o Agency: The Agency field will be automatically filled out based on your
agency.
o Status: Select whether the client was Admitted or was Discharged from the
hospital.
o Admission Type: Select the Type of admission this hospitalization was.
o Stay Type: Select the type of condition this hospitalization was related
to.
o Facility: Enter the facility the client was hospitalized in.
o Date Admitted: Enter the date the client was admitted to the
hospitalization.
o Notes Admission: Enter any notes related to the admission.
o Date Discharged: This field will only appear if the “Status” is set to
“Discharged”. Enter the date the client was discharged from the hospital.
o Discharge Reason: This field will only appear if the “Status” is set to
“Discharged”. Enter the reason the client was discharged from the
hospital.
o Actual Length of Stay: This field will only appear if the “Status” is set
to “Discharged” and will automatically be computed based on the Date
Admitted and Date Discharged.
o Notes Discharge: This field will only appear if the “Status” is set to
“Discharged”. Enter any notes related to the client’s discharge from the
hospital.
o Date Notified of Admission: Enter the date you were notified of the
admission to the hospital.
o Length of Stay Authorized: Enter the length of stay authorized by the
insurer, if applicable.
o Admission ID: If applicable, enter the identification number related to
this hospitalization.
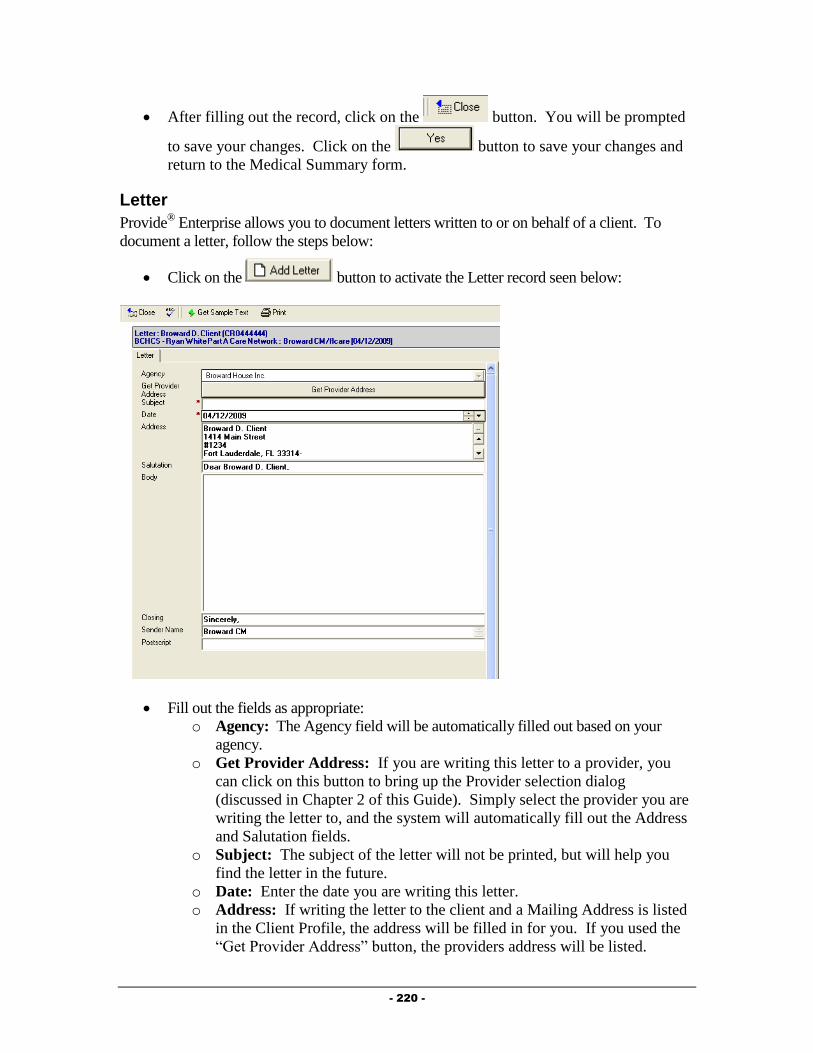
- 220 -
After filling out the record, click on the button. You will be prompted
to save your changes. Click on the button to save your changes and
return to the Medical Summary form.
Letter
Provide® Enterprise allows you to document letters written to or on behalf of a client. To
document a letter, follow the steps below:
Click on the button to activate the Letter record seen below:
Fill out the fields as appropriate:
o Agency: The Agency field will be automatically filled out based on your
agency.
o Get Provider Address: If you are writing this letter to a provider, you
can click on this button to bring up the Provider selection dialog
(discussed in Chapter 2 of this Guide). Simply select the provider you are
writing the letter to, and the system will automatically fill out the Address
and Salutation fields.
o Subject: The subject of the letter will not be printed, but will help you
find the letter in the future.
o Date: Enter the date you are writing this letter.
o Address: If writing the letter to the client and a Mailing Address is listed
in the Client Profile, the address will be filled in for you. If you used the
“Get Provider Address” button, the providers address will be listed.
- 221 -
o Salutation: This field will automatically be filled out based on who the
letter is to.
o Body: Enter the text of the letter in this field. You can also select
“sample text” or pre-defined letters by clicking on the
button. A window of the pre-defined letters will appear and you will be
able to select the letter that you wish to write.
o Closing: This field will automatically be set to “Sincerely”, but can be
changed if appropriate.
o Sender Name: This field will automatically default to your name, but can
be changed if appropriate.
o Postscript: The postscript is a paragraph, phrase, etc., added to a letter
that has already been concluded and signed by the writer.
To print this letter, simply click on the button. The letter print out will
open on your screen to be printed.
After filling out the record, click on the button. You will be prompted
to save your changes. Click on the button to save your changes and
return to the Medical Summary form.
Discharging a Client
A client should be discharged for a number of reasons based on Broward County standards of
care, including the client moving outside of the service territory, death and the client’s self
decision. When a Client needs to be discharged from your agency there are several tasks that
need to be performed. These are outlined below.
Client Service Category Profile Record
When a client is no longer going to be served by your service category at your agency,
you must close the client’s Client Service Category Profile record. NOTE: If the client
is going to be discharged from your agency as a whole, you must also follow the steps
under “Client Service Profile” below.
To do this, follow the steps below:
First, Navigate into the Client Profile (via “Find – Client” or one of the “Views”
of Client information.
In the Profile Section – General Sub-Tab, location the “Client Service Profiles”
view (circled in the figure below.)

- 222 -
Double click on the “Client Service Profile” for your agency. It will open on
your screen and will look similar to that in the figure below.
Double click on the Client Service Category Profile Record for your Service
Category. It will open on your screen and will look similar to that in the figure
below.

- 223 -
Click the button to bring the record into edit mode.
Next, click the button. A dialog box, similar to that in the figure
below will open on your screen:
Fill out the fields as appropriate:
o Status: Select the status to change the client to.
o Reason for change: Click on the button to the right of the field ( ) to
activate the picklist and select the appropriate value.
o Date change effective: Enter the date that this change should be effective
from.
Once done, click on the button to save your changes.
Next, click the button to save your changes and back out of the record.
Click the button again to back out of the Client Service Profile.
Client Service Profile
Documenting that a client is being discharged from your agency as whole is done via the
Client Service Profile. NOTE: This should only be done when you are discharging the client
from all services at your agency.
This can be done by following the steps below:
Navigate to the Profile Section – General Sub-Tab of the Client Profile, seen in the
figure below:
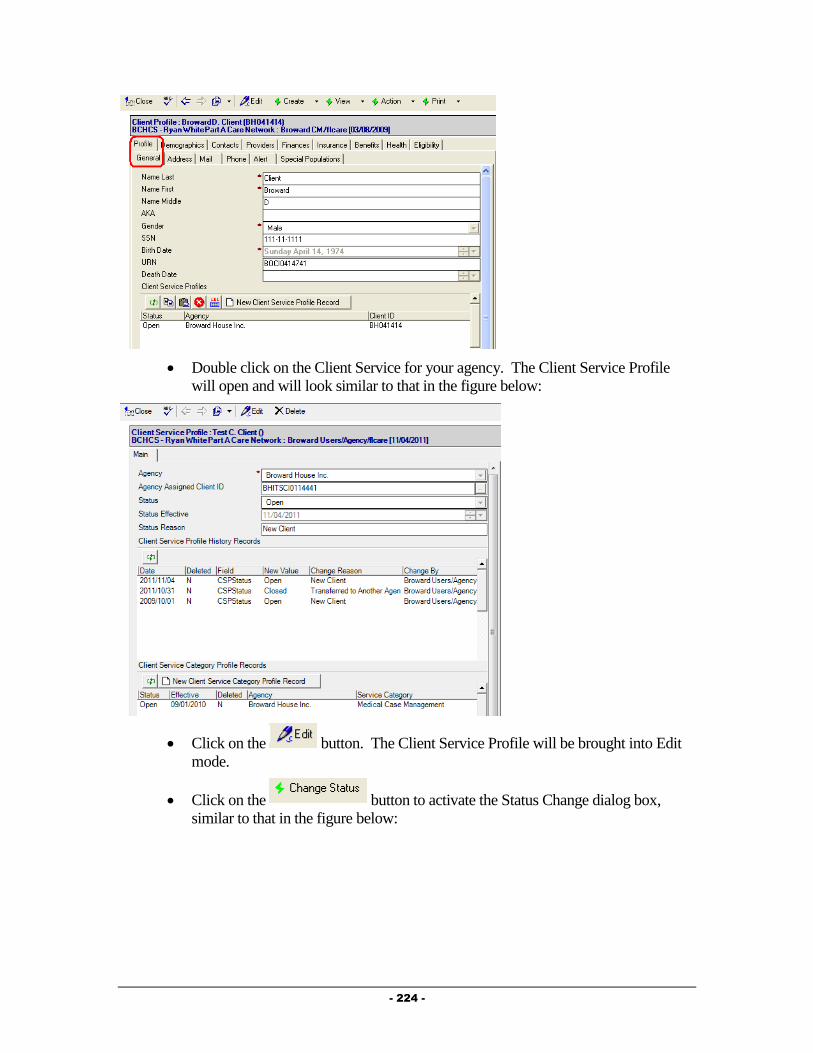
- 224 -
Double click on the Client Service for your agency. The Client Service Profile
will open and will look similar to that in the figure below:
Click on the button. The Client Service Profile will be brought into Edit
mode.
Click on the button to activate the Status Change dialog box,
similar to that in the figure below:

- 225 -
Complete all fields as appropriate:
o Status: Select “Closed” as the status.
o Reason for change: Select the reason the client is being discharged from
your agency.
o Date change effective: Enter the date the client is being discharged from
your agency.
Click on the button to save your changes. You will be returned to
the Client Service Profile.
After verifying the status change, click on the button. You will be
prompted to save your changes. Click on the button to save your
changes and return to the Client Profile.

- 226 -
Chapter
7
Food Bank Providers
This Chapter outlines the tasks that need to be completed by Food Bank providers in Provide®
Enterprise to meet all billing and reporting requirements. Over time, the data elements
outlined in this Chapter must also be kept current as things change for the client.
Intake and Assessment Documentation
At the time of Intake, and as required based on Standards of Care, there are a number of
records that must be entered with Provide®
Enterprise in order to meet all billing and invoicing
Requirements.
Client Profile
Within the Client Profile, it is important to keep all information updated as the client’s life
situation changes.
Opening Existing Clients to your Agency
If the client had previously been registered in Provide® Enterprise and served by another
agency, you will need to create a Client Service Profile to document that the Client is
now being served by your agency. To do this, follow the steps below:
First, Navigate into the Client Profile (via “Find – Client” or one of the “Views”
of Client information.
In the Profile Section – General Sub-Tab, location the “Client Service Profiles”
view (circled in the figure below.)

- 227 -
If you do not see your agency listed, click the
button to open the Client Service Profile, seen below.
Complete the “Agency Assigned Client ID (if necessary). Make sure to append
your agencies abbreviation to the beginning of the Agency Assigned Client ID
number to help various agencies identify their own clients.
Once done, click on the button to save your changes and back out of the
record.
Re-Opening Existing Clients to your Agency
If the client had previously been registered in Provide® Enterprise and served (and
closed) by your agency, you will need to re-open the Client Service Profile to indicate
that the client has been re-opened to your agency.
To do this, follow the steps below:

- 228 -
First, Navigate into the Client Profile (via “Find – Client” or one of the “Views”
of Client information.
Double click on the Client Service for your agency. The Client Service Profile will
open and will look similar to that in the figure below:
Click on the button. The Client Service Profile will be brought into Edit
mode, similar to that in the figure below:
Click on the button to activate the Status Change dialog box,
similar to that in the figure below:

- 229 -
Complete all fields as appropriate:
o Status: Select “Open” as the status.
o Reason for change: Select the reason the client is being re-opened to
your agency.
o Date change effective: Enter the date the client is being re-opened to
your agency.
Click on the button to save your changes. You will be returned to
the Client Service Profile.
After verifying the status change, click on the button. You will be
prompted to save your changes. Click on the button to save your
changes and return to the Client Profile.
Opening Existing Clients to your Service Category
If the client had previously been registered in Provide®
Enterprise and served by another
agency or by other programs at your agency, you will need to create a Client Service
Category Profile to document that the Client is now being served by your agency and
service category. NOTE: If the client has previously been served by your Service
Category, follow the steps below under “Re-Opening Existing Clients to Your Service
Category”.
To do this, follow the steps below:
First, Navigate into the Client Profile (via “Find – Client” or one of the “Views”
of Client information.
In the Profile Section – General Sub-Tab, location the “Client Service Profiles”
view (circled in the figure below.)

- 230 -
If you do not see your agency listed, follow the steps in the previous section to
“Open Existing Clients to your Agency”.
Double click on the “Client Service Profile” for your agency. It will open on
your screen and will look similar to that in the figure below.
Click the button to open a Cleint Service
Category Profile record, similar to that in the figure below:
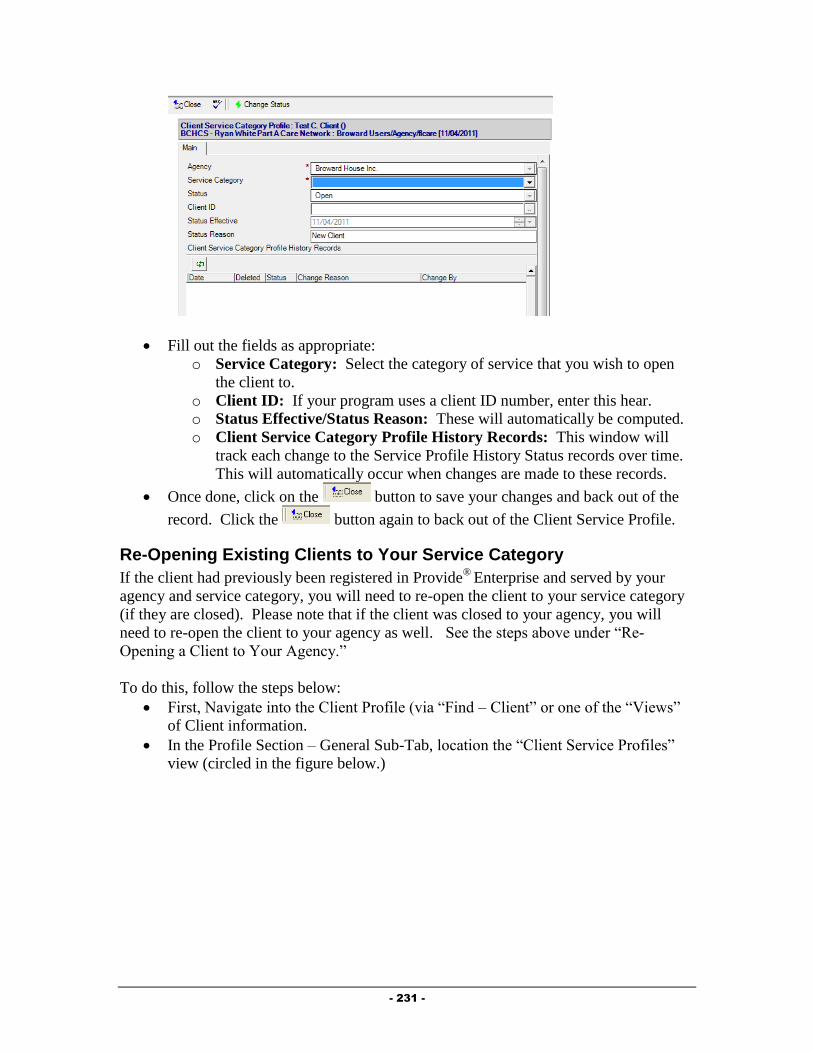
- 231 -
Fill out the fields as appropriate:
o Service Category: Select the category of service that you wish to open
the client to.
o Client ID: If your program uses a client ID number, enter this hear.
o Status Effective/Status Reason: These will automatically be computed.
o Client Service Category Profile History Records: This window will
track each change to the Service Profile History Status records over time.
This will automatically occur when changes are made to these records.
Once done, click on the button to save your changes and back out of the
record. Click the button again to back out of the Client Service Profile.
Re-Opening Existing Clients to Your Service Category
If the client had previously been registered in Provide®
Enterprise and served by your
agency and service category, you will need to re-open the client to your service category
(if they are closed). Please note that if the client was closed to your agency, you will
need to re-open the client to your agency as well. See the steps above under “Re-
Opening a Client to Your Agency.”
To do this, follow the steps below:
First, Navigate into the Client Profile (via “Find – Client” or one of the “Views”
of Client information.
In the Profile Section – General Sub-Tab, location the “Client Service Profiles”
view (circled in the figure below.)

- 232 -
Double click on the “Client Service Profile” for your agency. It will open on
your screen and will look similar to that in the figure below.
Double click on the Client Service Category Profile Record for your Service
Category. It will open on your screen and will look similar to that in the figure
below. (NOTE: If you do not see a Client Service Category Profile Record for
your service category, follow the steps earlier in the chapter under “Opening
Existing Clients to your Service Category”.

- 233 -
Click the button to bring the record into edit mode.
Next, click the button. A dialog box, similar to that in the figure
below will open on your screen:
Fill out the fields as appropriate:
o Status: Select the status to change the client to.
o Reason for change: Click on the button to the right of the field ( ) to
activate the picklist and select the appropriate value.
o Date change effective: Enter the date that this change should be effective
from.
Once done, click on the button to save your changes.
Next, click the button to save your changes and back out of the record.
Click the button again to back out of the Client Service Profile.
Requesting Service Category Specific Eligibility Overrides
Provide® Enterprise allows users to request overrides for client eligibility for Part A services
directly within the software system. NOTE: Only Broward County staff will be able to
approve these requests.
To request an Eligibility Override, follow the steps below:
From within the Client Profile, click on the button and select “Eligibility
Override”.

- 234 -
The form, similar to that in the figure below will open:
Fill out the fields as appropriate:
o Status: This will be set to “Pending” initially and will change once you mark
the override as “Complete”.
o Eligibility Setting: Select whether the client should be eligible or not eligible
for the service category.
o Service Category: Select the Service Category that the override is valid for.
o Date Start/Date End: Enter the start and end date that this override is valid
for.
o Override Request Reason: Document the reasoning behind this particular
override.
o Support Doc Attachment Type: Select whether the backup documentation
you are using is an image file or a different file type.
o Images/Files: Attach appropriate backup documentation here.
Once all fields have been completed, you can submit this override. Please note: the
override will not take effect (meaning that it will not affect billing) until it has been
approved by the county.
To submit the override, simply click on the button. The override “status”
will change and the document will be saved.
Service Documentation
Documentation of ongoing Food Bank services is necessary to ensure all billing and reporting
requirements are met.
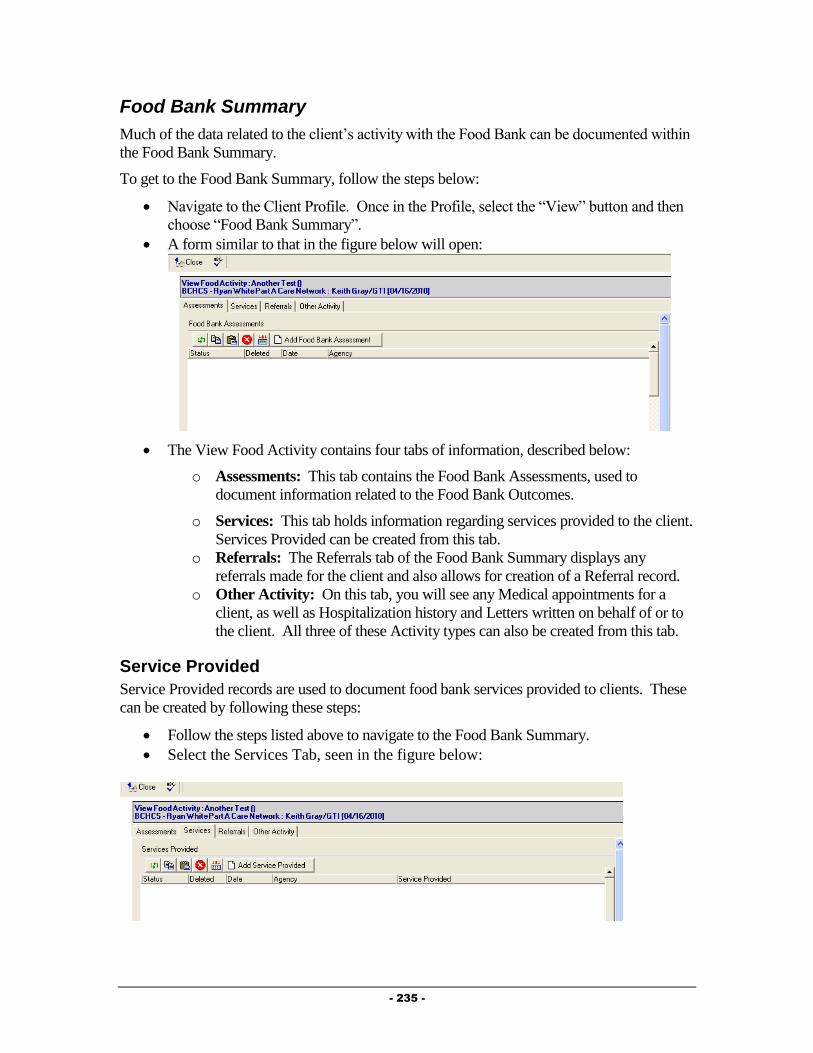
- 235 -
Food Bank Summary
Much of the data related to the client’s activity with the Food Bank can be documented within
the Food Bank Summary.
To get to the Food Bank Summary, follow the steps below:
Navigate to the Client Profile. Once in the Profile, select the “View” button and then
choose “Food Bank Summary”.
A form similar to that in the figure below will open:
The View Food Activity contains four tabs of information, described below:
o Assessments: This tab contains the Food Bank Assessments, used to
document information related to the Food Bank Outcomes.
o Services: This tab holds information regarding services provided to the client.
Services Provided can be created from this tab.
o Referrals: The Referrals tab of the Food Bank Summary displays any
referrals made for the client and also allows for creation of a Referral record.
o Other Activity: On this tab, you will see any Medical appointments for a
client, as well as Hospitalization history and Letters written on behalf of or to
the client. All three of these Activity types can also be created from this tab.
Service Provided
Service Provided records are used to document food bank services provided to clients. These
can be created by following these steps:
Follow the steps listed above to navigate to the Food Bank Summary.
Select the Services Tab, seen in the figure below:

- 236 -
Click on the button. The Service Provided record, similar
to that in the figure below will open:
Fill out the fields as appropriate:
o Agency: The Agency will default to your agency.
o Status: Defaults to “Completed”. NOTE: Service Provided records will not
be counted in reports or invoicing unless they are “Completed”. Once a
Service Provided is marked as Completed, you will not be able to edit the
Service Provided.
o Provider: This field will default to be your name.
o Service Date: Enter the date the service was provided to the client.
o Service Category: Select the category of the Service Provided. This will fill
in the both the “Service Category” and the “Service Provided” fields.
o Units of Service: This number will automatically default to “1”.
o Units of Measure: This field will automatically be populated.
o Unit Cost of Service: This field will automatically be populated.
o Total Cost of Service: This field will automatically be populated.
o Comments: Enter any comments related to the provision of this service to the
client.
Click on the button to document the completion of this Service Provided.
You will be prompted to Save your changes and will be returned to the View Food
Activity window.
Additional Documentation
There are additional documents that can be entered in and viewed in a client file. NOTE: If
the client is being served by a Case Management or Medical provider, some of the
information discussed below may already be documented in the system, and you should have
access to view the information.
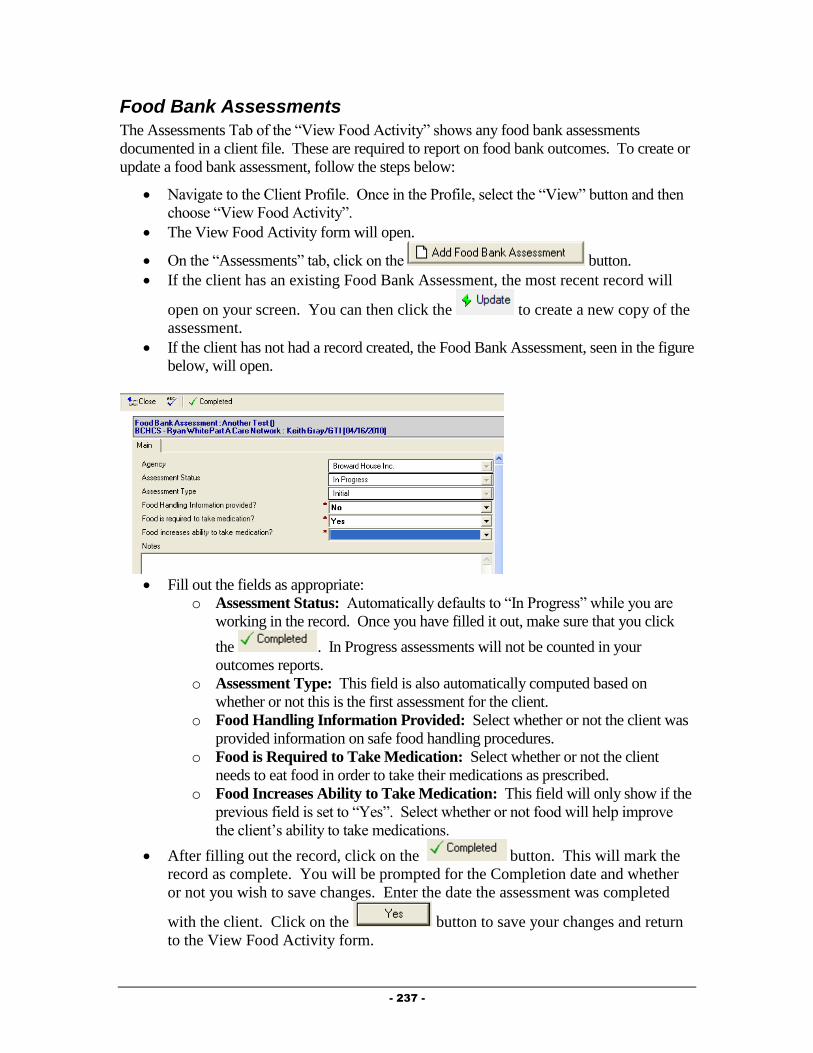
- 237 -
Food Bank Assessments
The Assessments Tab of the “View Food Activity” shows any food bank assessments
documented in a client file. These are required to report on food bank outcomes. To create or
update a food bank assessment, follow the steps below:
Navigate to the Client Profile. Once in the Profile, select the “View” button and then
choose “View Food Activity”.
The View Food Activity form will open.
On the “Assessments” tab, click on the button.
If the client has an existing Food Bank Assessment, the most recent record will
open on your screen. You can then click the to create a new copy of the
assessment.
If the client has not had a record created, the Food Bank Assessment, seen in the figure
below, will open.
Fill out the fields as appropriate:
o Assessment Status: Automatically defaults to “In Progress” while you are
working in the record. Once you have filled it out, make sure that you click
the . In Progress assessments will not be counted in your
outcomes reports.
o Assessment Type: This field is also automatically computed based on
whether or not this is the first assessment for the client.
o Food Handling Information Provided: Select whether or not the client was
provided information on safe food handling procedures.
o Food is Required to Take Medication: Select whether or not the client
needs to eat food in order to take their medications as prescribed.
o Food Increases Ability to Take Medication: This field will only show if the
previous field is set to “Yes”. Select whether or not food will help improve
the client’s ability to take medications.
After filling out the record, click on the button. This will mark the
record as complete. You will be prompted for the Completion date and whether
or not you wish to save changes. Enter the date the assessment was completed
with the client. Click on the button to save your changes and return
to the View Food Activity form.
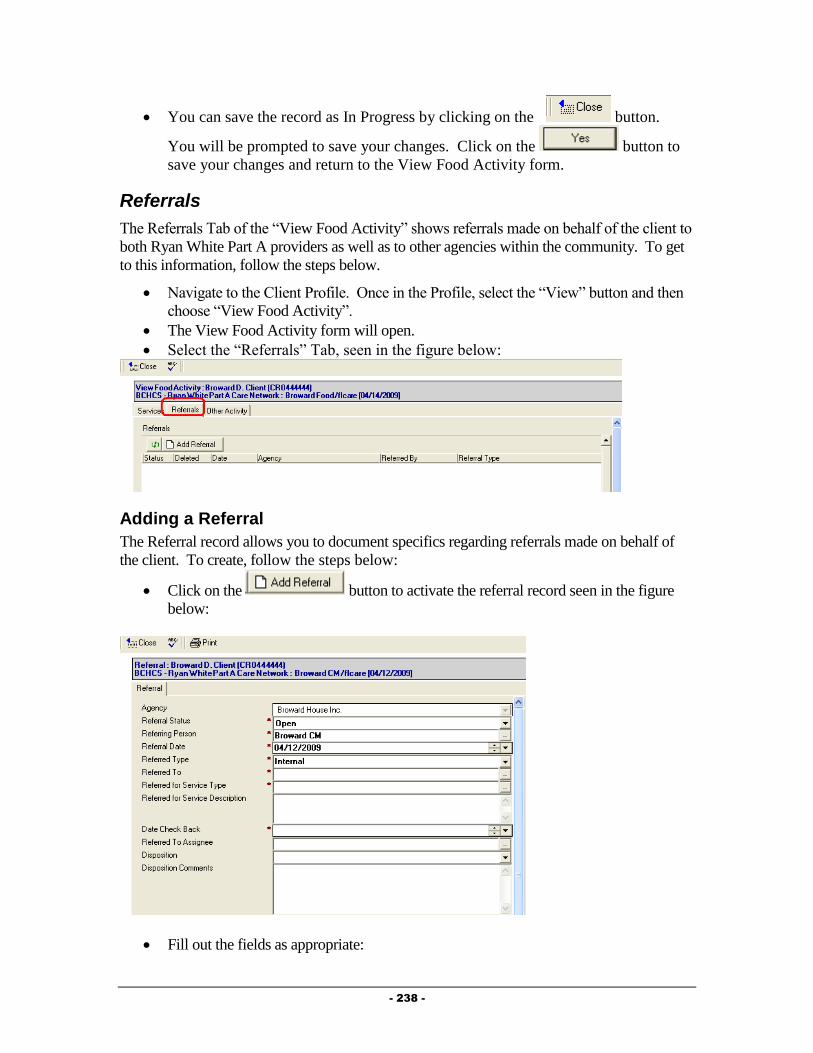
- 238 -
You can save the record as In Progress by clicking on the button.
You will be prompted to save your changes. Click on the button to
save your changes and return to the View Food Activity form.
Referrals
The Referrals Tab of the “View Food Activity” shows referrals made on behalf of the client to
both Ryan White Part A providers as well as to other agencies within the community. To get
to this information, follow the steps below.
Navigate to the Client Profile. Once in the Profile, select the “View” button and then
choose “View Food Activity”.
The View Food Activity form will open.
Select the “Referrals” Tab, seen in the figure below:
Adding a Referral
The Referral record allows you to document specifics regarding referrals made on behalf of
the client. To create, follow the steps below:
Click on the button to activate the referral record seen in the figure
below:
Fill out the fields as appropriate:

- 239 -
o Agency: The Agency field will be automatically filled out based on your
agency.
o Referral Status: Defaults to “Open” meaning that the referral has been made,
but the disposition of the referral is still unknown.
o Referring Person: This will default to your name.
o Referral Date: Enter the Date the referral was made.
o Referral Type: Select whether the referral was an Internal (referral made to
another Ryan White Part A provider) or an External (made to a provider that is
not a Ryan White Part A provider).
o Referred To: Select the agency the referral was made to by clicking on the
button. NOTE: The picklist of agencies will be different based on the
“Referral Type” selected. For “Internal” referrals, you will get a list of only
Ryan White Part A providers, while for “External” referrals, you will get a list
of non-funded providers.
o Referred for Service Type: Select the type of service being requested by
making this referral by clicking on the button.
o Referred for Service Description: Enter any description of why the referral
is being made in this field.
o Date Check Back: Enter a date to receive a reminder to follow up on this
referral.
o Referred to Assignee: If the organization the referral is being made to is in
the Ryan White Part A network and a specific individual has been selected to
receive referrals, their name will appear here.
o Disposition: This field is meant to be filled out when the referral is closed and
the status of the client’s receipt of services is determined.
o Disposition Comments: Enter any comments related to the status of the
referral in this field.
After filling out the record, click on the button. You will be prompted
to save your changes. Click on the button to save your changes and
return to the View Food Activity form.
Appointments
Clients receiving medical care, who are being Case Managed, should have every Kept medical
appointment documented in the system. Additionally, in the near future, appointment records
will be used to schedule appointments with the Central Intake Department for Eligibility
Reviews. To create an appointment, follow the steps below:
Navigate to the “View Food Activity” form by following the steps listed earlier in this
chapter.
Select the “Other Activity” Tab, seen in the figure below:

- 240 -
Click on the button to activate the appointment record seen
below:
Fill out the fields as appropriate:
o Agency: The Agency field will be automatically filled out based on your
agency.
o Type: Select the Type of Appointment this was (either Medical Care or
Centralized Eligibility.
o Appointment With: Enter the provider that this appointment is with.
o Status: Select whether this appointment is scheduled, has been kept, or
was missed.
o Appointment Date: Enter the date of the appointment.
o Appointment Notes: Enter any other information related to this
appointment.
After filling out the record, click on the button. You will be prompted
to save your changes. Click on the button to save your changes and
return to the View Food Activity form.
Hospitalization
The hospitalization of a client can have an impact on their functioning and provides an
important intervention point. Additionally, it can provide specific outcome related
information to funders, and can have an impact on the client’s eligibility for specific services.
To document that a client has been hospitalized, follow the steps below:
Navigate to the “View Food Activity” form by following the steps listed earlier in this
chapter.
Select the “Other Activity” Tab, seen in the figure below:
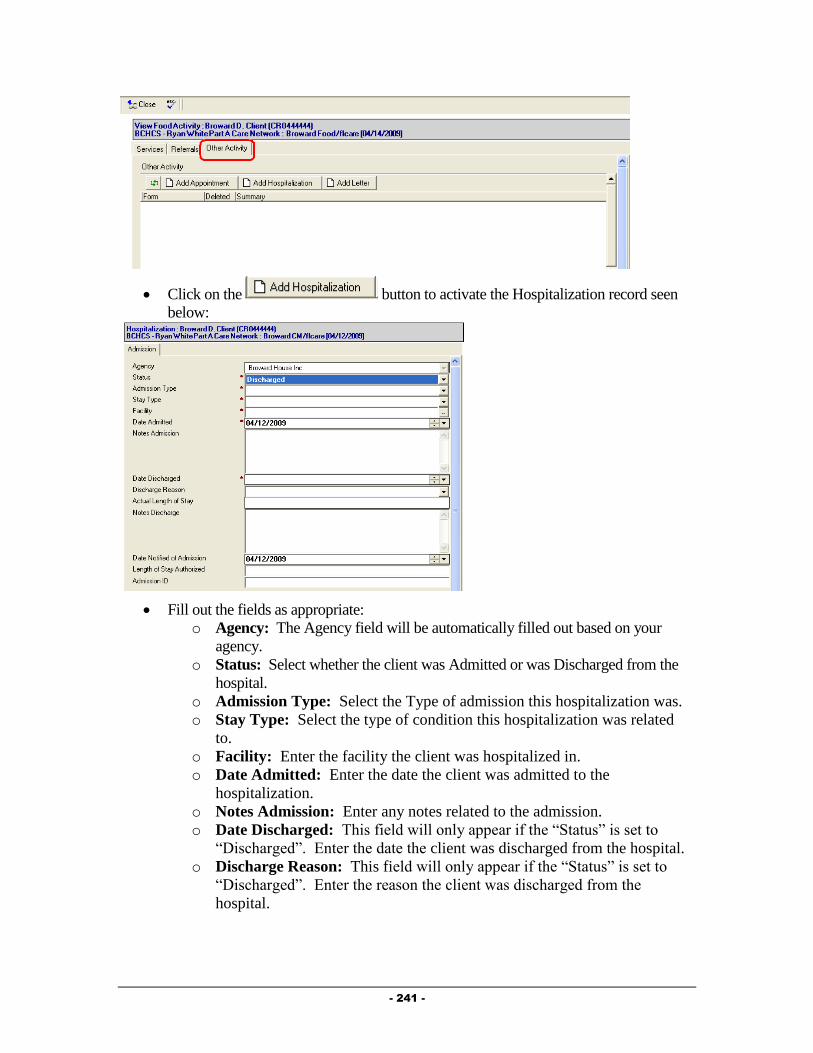
- 241 -
Click on the button to activate the Hospitalization record seen
below:
Fill out the fields as appropriate:
o Agency: The Agency field will be automatically filled out based on your
agency.
o Status: Select whether the client was Admitted or was Discharged from the
hospital.
o Admission Type: Select the Type of admission this hospitalization was.
o Stay Type: Select the type of condition this hospitalization was related
to.
o Facility: Enter the facility the client was hospitalized in.
o Date Admitted: Enter the date the client was admitted to the
hospitalization.
o Notes Admission: Enter any notes related to the admission.
o Date Discharged: This field will only appear if the “Status” is set to
“Discharged”. Enter the date the client was discharged from the hospital.
o Discharge Reason: This field will only appear if the “Status” is set to
“Discharged”. Enter the reason the client was discharged from the
hospital.
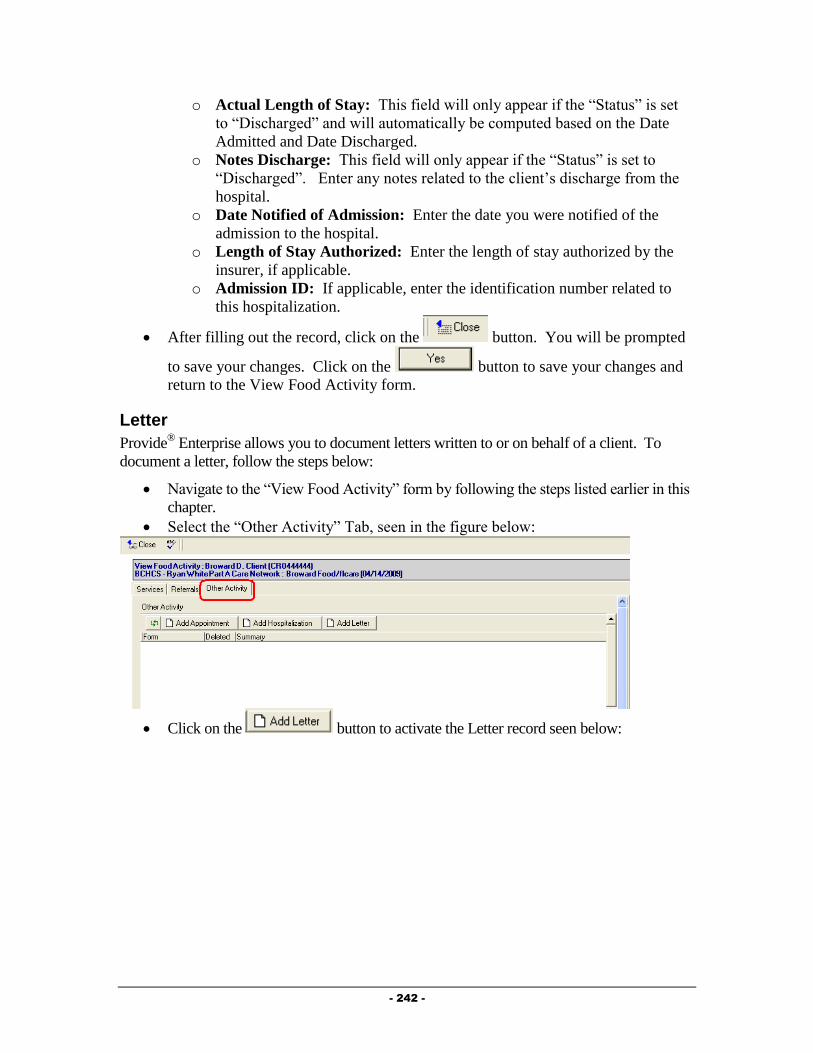
- 242 -
o Actual Length of Stay: This field will only appear if the “Status” is set
to “Discharged” and will automatically be computed based on the Date
Admitted and Date Discharged.
o Notes Discharge: This field will only appear if the “Status” is set to
“Discharged”. Enter any notes related to the client’s discharge from the
hospital.
o Date Notified of Admission: Enter the date you were notified of the
admission to the hospital.
o Length of Stay Authorized: Enter the length of stay authorized by the
insurer, if applicable.
o Admission ID: If applicable, enter the identification number related to
this hospitalization.
After filling out the record, click on the button. You will be prompted
to save your changes. Click on the button to save your changes and
return to the View Food Activity form.
Letter
Provide® Enterprise allows you to document letters written to or on behalf of a client. To
document a letter, follow the steps below:
Navigate to the “View Food Activity” form by following the steps listed earlier in this
chapter.
Select the “Other Activity” Tab, seen in the figure below:
Click on the button to activate the Letter record seen below:

- 243 -
Fill out the fields as appropriate:
o Agency: The Agency field will be automatically filled out based on your
agency.
o Get Provider Address: If you are writing this letter to a provider, you
can click on this button to bring up the Provider selection dialog
(discussed in Chapter 2 of this guide). Simply select the provider you are
writing the letter to, and the system will automatically fill out the Address
and Salutation fields.
o Subject: The subject of the letter will not be printed, but will help you
find the letter in the future.
o Date: Enter the date you are writing this letter.
o Address: If writing the letter to the client and a Mailing Address is listed
in the Client Profile, the address will be filled in for you. If you used the
“Get Provider Address” button, the providers address will be listed.
o Salutation: This field will automatically be filled out based on who the
letter is to.
o Body: Enter the text of the letter in this field. You can also select
“sample text” or pre-defined letters by clicking on the
button. A window of the pre-defined letters will appear and you will be
able to select the letter that you wish to write.
o Closing: This field will automatically be set to “Sincerely”, but can be
changed if appropriate.
o Sender Name: This field will automatically default to your name, but can
be changed if appropriate.
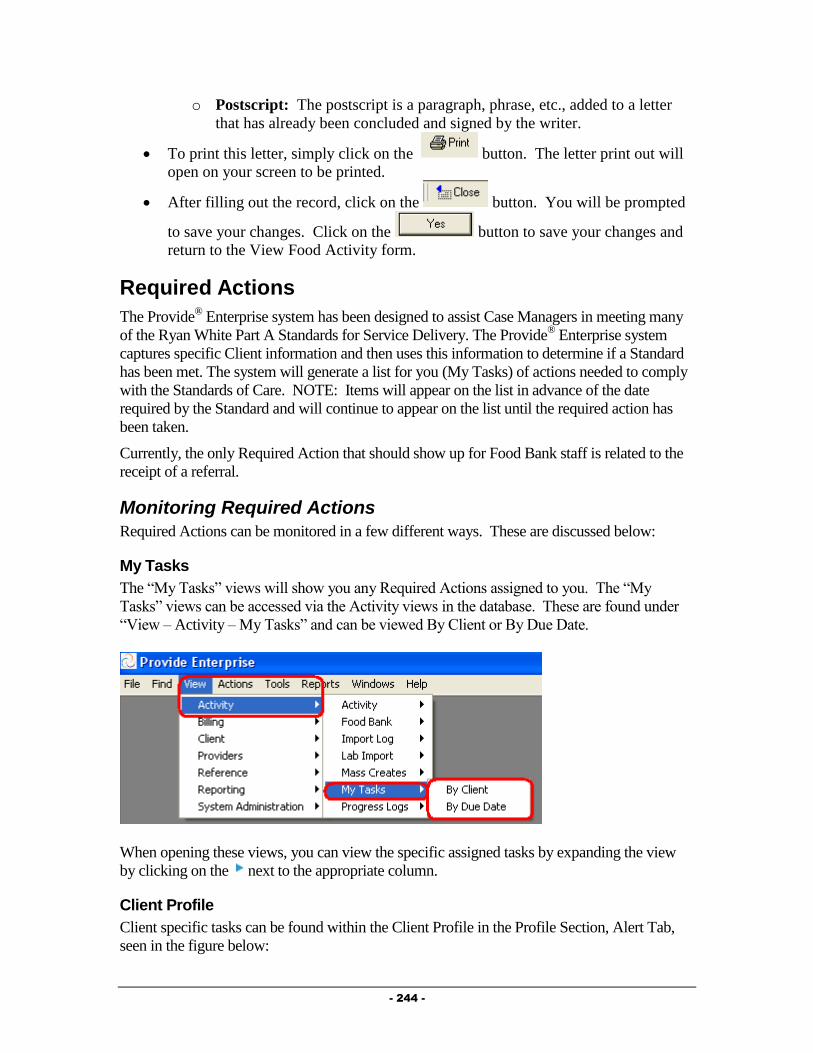
- 244 -
o Postscript: The postscript is a paragraph, phrase, etc., added to a letter
that has already been concluded and signed by the writer.
To print this letter, simply click on the button. The letter print out will
open on your screen to be printed.
After filling out the record, click on the button. You will be prompted
to save your changes. Click on the button to save your changes and
return to the View Food Activity form.
Required Actions
The Provide® Enterprise system has been designed to assist Case Managers in meeting many
of the Ryan White Part A Standards for Service Delivery. The Provide® Enterprise system
captures specific Client information and then uses this information to determine if a Standard
has been met. The system will generate a list for you (My Tasks) of actions needed to comply
with the Standards of Care. NOTE: Items will appear on the list in advance of the date
required by the Standard and will continue to appear on the list until the required action has
been taken.
Currently, the only Required Action that should show up for Food Bank staff is related to the
receipt of a referral.
Monitoring Required Actions
Required Actions can be monitored in a few different ways. These are discussed below:
My Tasks
The “My Tasks” views will show you any Required Actions assigned to you. The “My
Tasks” views can be accessed via the Activity views in the database. These are found under
“View – Activity – My Tasks” and can be viewed By Client or By Due Date.
When opening these views, you can view the specific assigned tasks by expanding the view
by clicking on the next to the appropriate column.
Client Profile
Client specific tasks can be found within the Client Profile in the Profile Section, Alert Tab,
seen in the figure below:

- 245 -
To view a specific task, simply double click on that task to open that record.
Discharging a Client
A client should be discharged for a number of reasons based on Broward County standards of
care, including the client moving outside of the service territory, death and the client’s self
decision. When a Client needs to be discharged from your agency there are several tasks that
need to be performed. These are outlined below.
Client Service Category Profile Record
When a client is no longer going to be served by your service category at your agency,
you must close the client’s Client Service Category Profile record. NOTE: If the client
is going to be discharged from your agency as a whole, you must also follow the steps
under “Client Service Profile” below.
To do this, follow the steps below:
First, Navigate into the Client Profile (via “Find – Client” or one of the “Views”
of Client information.
In the Profile Section – General Sub-Tab, location the “Client Service Profiles”
view (circled in the figure below.)

- 246 -
Double click on the “Client Service Profile” for your agency. It will open on
your screen and will look similar to that in the figure below.
Double click on the Client Service Category Profile Record for your Service
Category. It will open on your screen and will look similar to that in the figure
below.

- 247 -
Click the button to bring the record into edit mode.
Next, click the button. A dialog box, similar to that in the figure
below will open on your screen:
Fill out the fields as appropriate:
o Status: Select the status to change the client to.
o Reason for change: Click on the button to the right of the field ( ) to
activate the picklist and select the appropriate value.
o Date change effective: Enter the date that this change should be effective
from.
Once done, click on the button to save your changes.
Next, click the button to save your changes and back out of the record.
Click the button again to back out of the Client Service Profile.
Client Service Profile
Documenting that a client is being discharged from your agency as whole is done via the
Client Service Profile. NOTE: This should only be done when you are discharging the client
from all services at your agency.
This can be done by following the steps below:
Navigate to the Profile Section – General Sub-Tab of the Client Profile, seen in the
figure below:

- 248 -
Double click on the Client Service for your agency. The Client Service Profile
will open and will look similar to that in the figure below:
Click on the button. The Client Service Profile will be brought into Edit
mode.
Click on the button to activate the Status Change dialog box,
similar to that in the figure below:
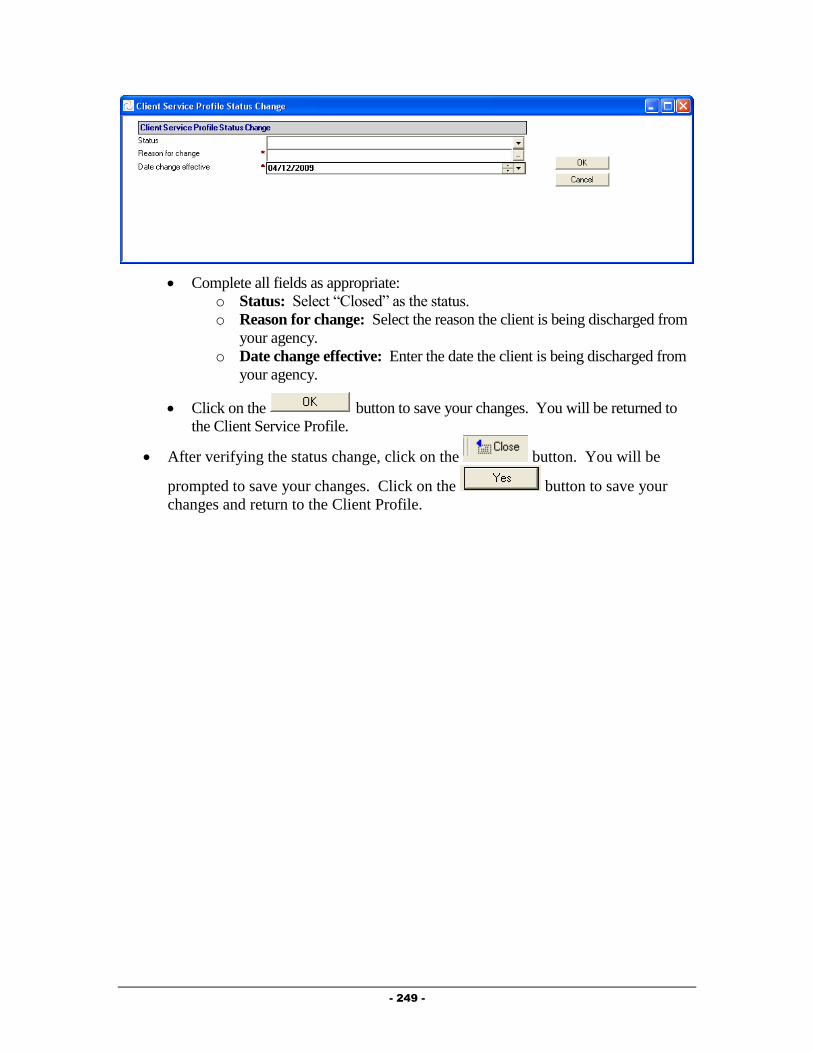
- 249 -
Complete all fields as appropriate:
o Status: Select “Closed” as the status.
o Reason for change: Select the reason the client is being discharged from
your agency.
o Date change effective: Enter the date the client is being discharged from
your agency.
Click on the button to save your changes. You will be returned to
the Client Service Profile.
After verifying the status change, click on the button. You will be
prompted to save your changes. Click on the button to save your
changes and return to the Client Profile.
- 250 -
Chapter
8
Outreach Providers
This chapter outlines the tasks that need to be completed by Outreach providers in Provide®
Enterprise to meet all billing and reporting requirements. Over time, the data elements
outlined in this Chapter must also be kept current as things change for the client.
Intake and Assessment Documentation
At the time of Intake, and as required based on Standards of Care, there are a number of
records that must be entered with Provide®
Enterprise in order to meet all billing and invoicing
Requirements.
Client Profile
Within the Client Profile, it is important to keep all information updated as the client’s life
situation changes.
Opening Existing Clients to your Agency
If the client had previously been registered in Provide® Enterprise and served by another
agency, you will need to create a Client Service Profile to document that the Client is
now being served by your agency. To do this, follow the steps below:
First, Navigate into the Client Profile (via “Find – Client” or one of the “Views”
of Client information.
In the Profile Section – General Sub-Tab, location the “Client Service Profiles”
view (circled in the figure below.)

- 251 -
If you do not see your agency listed, click the
button to open the Client Service Profile, seen below.
Complete the “Agency Assigned Client ID (if necessary). Make sure to append
your agencies abbreviation to the beginning of the Agency Assigned Client ID
number to help various agencies identify their own clients.
Once done, click on the button to save your changes and back out of the
record.
Re-Opening Existing Clients to your Agency
If the client had previously been registered in Provide® Enterprise and served (and
closed) by your agency, you will need to re-open the Client Service Profile to indicate
that the client has been re-opened to your agency.
To do this, follow the steps below:
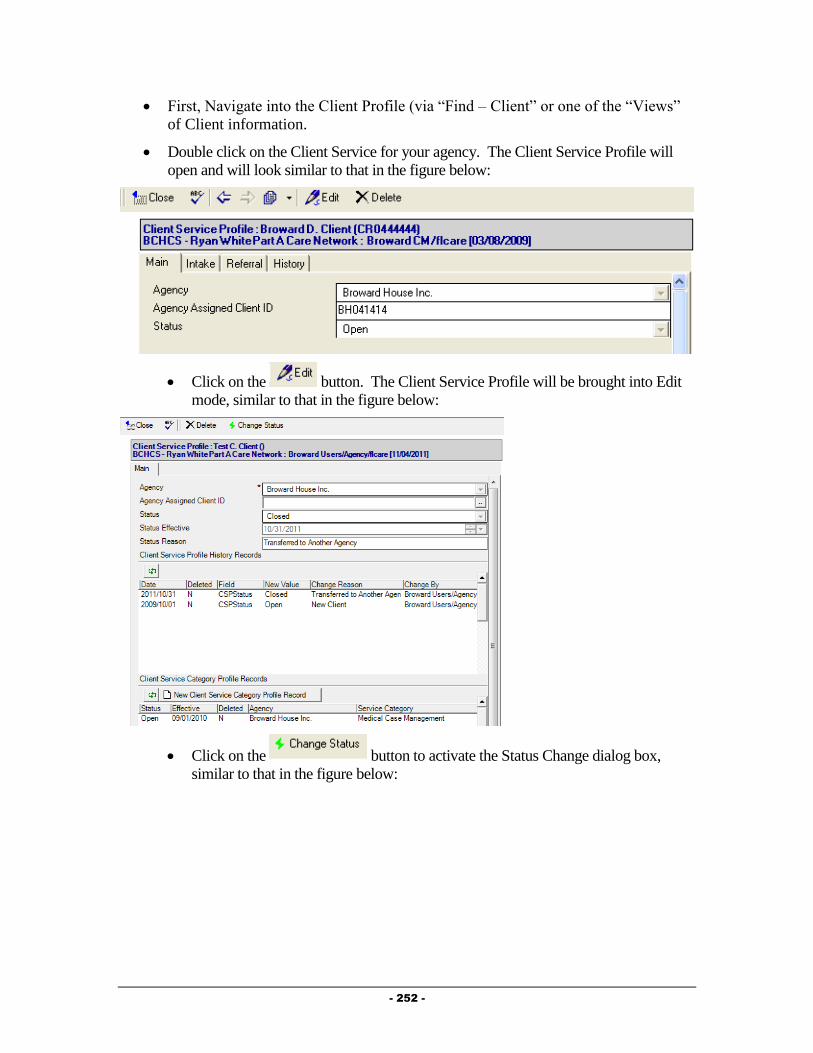
- 252 -
First, Navigate into the Client Profile (via “Find – Client” or one of the “Views”
of Client information.
Double click on the Client Service for your agency. The Client Service Profile will
open and will look similar to that in the figure below:
Click on the button. The Client Service Profile will be brought into Edit
mode, similar to that in the figure below:
Click on the button to activate the Status Change dialog box,
similar to that in the figure below:

- 253 -
Complete all fields as appropriate:
o Status: Select “Open” as the status.
o Reason for change: Select the reason the client is being re-opened to
your agency.
o Date change effective: Enter the date the client is being re-opened to
your agency.
Click on the button to save your changes. You will be returned to
the Client Service Profile.
After verifying the status change, click on the button. You will be
prompted to save your changes. Click on the button to save your
changes and return to the Client Profile.
Opening Existing Clients to your Service Category
If the client had previously been registered in Provide®
Enterprise and served by another
agency or by other programs at your agency, you will need to create a Client Service
Category Profile to document that the Client is now being served by your agency and
service category. NOTE: If the client has previously been served by your Service
Category, follow the steps below under “Re-Opening Existing Clients to Your Service
Category”.
To do this, follow the steps below:
First, Navigate into the Client Profile (via “Find – Client” or one of the “Views”
of Client information.
In the Profile Section – General Sub-Tab, location the “Client Service Profiles”
view (circled in the figure below.)

- 254 -
If you do not see your agency listed, follow the steps in the previous section to
“Open Existing Clients to your Agency”.
Double click on the “Client Service Profile” for your agency. It will open on
your screen and will look similar to that in the figure below.
Click the button to open a Cleint Service
Category Profile record, similar to that in the figure below:

- 255 -
Fill out the fields as appropriate:
o Service Category: Select the category of service that you wish to open
the client to.
o Client ID: If your program uses a client ID number, enter this hear.
o Status Effective/Status Reason: These will automatically be computed.
o Client Service Category Profile History Records: This window will
track each change to the Service Profile History Status records over time.
This will automatically occur when changes are made to these records.
Once done, click on the button to save your changes and back out of the
record. Click the button again to back out of the Client Service Profile.
Re-Opening Existing Clients to Your Service Category
If the client had previously been registered in Provide®
Enterprise and served by your
agency and service category, you will need to re-open the client to your service category
(if they are closed). Please note that if the client was closed to your agency, you will
need to re-open the client to your agency as well. See the steps above under “Re-
Opening a Client to Your Agency.”
To do this, follow the steps below:
First, Navigate into the Client Profile (via “Find – Client” or one of the “Views”
of Client information.
In the Profile Section – General Sub-Tab, location the “Client Service Profiles”
view (circled in the figure below.)

- 256 -
Double click on the “Client Service Profile” for your agency. It will open on
your screen and will look similar to that in the figure below.
Double click on the Client Service Category Profile Record for your Service
Category. It will open on your screen and will look similar to that in the figure
below. (NOTE: If you do not see a Client Service Category Profile Record for
your service category, follow the steps earlier in the chapter under “Opening
Existing Clients to your Service Category”.
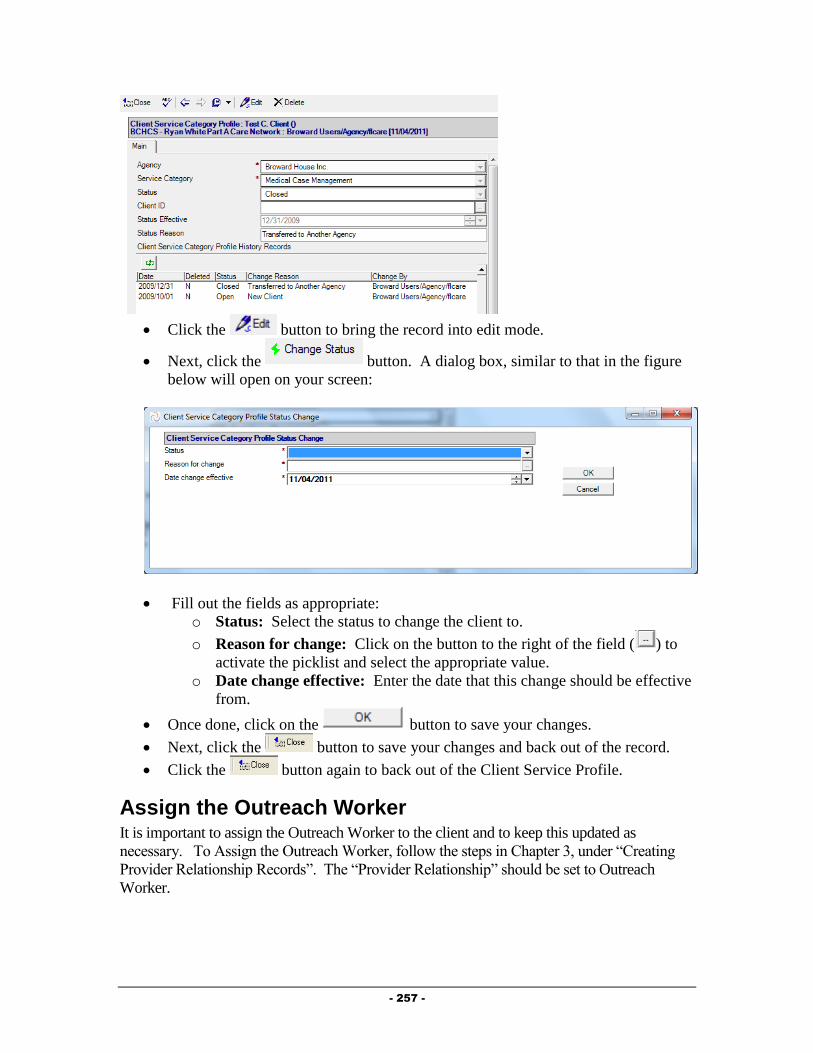
- 257 -
Click the button to bring the record into edit mode.
Next, click the button. A dialog box, similar to that in the figure
below will open on your screen:
Fill out the fields as appropriate:
o Status: Select the status to change the client to.
o Reason for change: Click on the button to the right of the field ( ) to
activate the picklist and select the appropriate value.
o Date change effective: Enter the date that this change should be effective
from.
Once done, click on the button to save your changes.
Next, click the button to save your changes and back out of the record.
Click the button again to back out of the Client Service Profile.
Assign the Outreach Worker It is important to assign the Outreach Worker to the client and to keep this updated as
necessary. To Assign the Outreach Worker, follow the steps in Chapter 3, under “Creating
Provider Relationship Records”. The “Provider Relationship” should be set to Outreach
Worker.

- 258 -
Requesting Service Category Specific Eligibility Overrides
Provide® Enterprise allows users to request overrides for client eligibility for Part A services
directly within the software system. NOTE: Only Broward County staff will be able to
approve these requests.
To request an Eligibility Override, follow the steps below:
From within the Client Profile, click on the button and select “Eligibility
Override”.
The form, similar to that in the figure below will open:
Fill out the fields as appropriate:
o Status: This will be set to “Pending” initially and will change once you mark
the override as “Complete”.
o Eligibility Setting: Select whether the client should be eligible or not eligible
for the service category.
o Service Category: Select the Service Category that the override is valid for.
o Date Start/Date End: Enter the start and end date that this override is valid
for.
o Override Request Reason: Document the reasoning behind this particular
override.
o Support Doc Attachment Type: Select whether the backup documentation
you are using is an image file or a different file type.
o Images/Files: Attach appropriate backup documentation here.

- 259 -
Once all fields have been completed, you can submit this override. Please note: the
override will not take effect (meaning that it will not affect billing) until it has been
approved by the county.
To submit the override, simply click on the button. The override “status”
will change and the document will be saved.
Service Documentation
Documentation of ongoing Outreach services is necessary to ensure all billing and reporting
requirements are met.
Outreach Summary
Much of the data related to the client’s activity with the Outreach providers can be
documented within the Outreach Summary.
To get to the Outreach Summary, follow the steps below:
Navigate to the Client Profile. Once in the Profile, select the “View” button and then
choose “Outreach Summary”.
A form similar to that in the figure below will open:
The View Outreach Activity contains eight tabs of information, described below:
o Episodes of Care: Episode of Care records are used to document each
episode of care that is received by a client.
o Services: This tab holds information regarding progress logs and services
provided to the client. Both Progress Logs and Services Provided can be
created from this tab.
o Rides: Scheduled and completed van rides are documented on this tab.
o Procedures and Labs: Medical procedures and tests are documented in this
tab.
o Medications: Filled prescription records are documented on this tab.
o Test Results: The results of medical test completed for the client are
documented on this tab. New Test Results or Lab Panels can be created from
this tab.

- 260 -
o Referrals: The Referrals tab of the Outreach Summary displays any referrals
made for the client and also allows for creation of a Referral record.
o Other Activity: On this tab, you will see any Medical appointments for a
client, as well as Hospitalization history and Letters written on behalf of or to
the client. All three of these Activity types can also be created from this tab.
Episode of Care
Episode of Care records are used to document each episode of care that is received by a client.
To create an Episode of Care record, follow the steps below to first navigate to the
Outreach Summary and then add a Progress Log:
To navigate to the Outreach Summary, follow the steps below:
Navigate to the Client Profile. Once in the Profile, select the “View” button and then
choose “Outreach Summary”.
The View Outreach Activity form will open.
Select the button and click on “Episode of Care”.
The Episode of Care record, similar to that in the figure below, will open on your
screen:
Fill out the fields as appropriate:
o Agency: This field will default to your agency.
o Service Category: This field will automatically default to “Outreach”.
o Care Episode Status: Ate the beginning of this episode of care, set the
“Status” to “Started”. At discharge, the “Status” should be set to “Ended”.
When the “status” is set top “ended”, two additional fields will appear.
o Date Episode Started: Enter the date the client is/was admitted for this
episode of care.

- 261 -
o Date Episode Ended: This field will only show if the “Care Episode Status”
is set to “Ended”. Enter the date that this episode of care is ending.
o Reason Ended: This field will only show if the “Care Episode Status” is set
to “Ended”.
o Eligibility Documentation Received? In order to be eligible for Outreach
services after 45 days from when the Episode of Care starts, you must collect
Ryan White Part A eligibility determining documentation including proof of
residency, income, and HIV status. Set this field to “Yes” when you have that
information collected and the Client is eligible. Then, you can continue to
provide Outreach for up to a maximum of four months from the start of the
Episode of Care.
o Enrolled in Medical Case Management? This field will show only if the
“Reason Ended” is set to “Client Enrolled in Care”. Select whether or not the
client was enrolled in Medical Case Management services.
o Medical Case Management Agency: If the “Enrolled in Medical Case
Management?” field is set to “Yes”, you will see this field. Select which
agency the client was enrolled in Medical Case Management services at.
o Enrolled in Medical Care? This field will show only if the “Reason Ended”
is set to “Client Enrolled in Care”. Select whether or not the client was
enrolled in Medical Care.
o Medical Care Provider: If the “Enrolled in Medical Care?” field is set to
“Yes”, you will see this field. Enter the provider or agency where the client is
receiving medical care services from.
After filling out the record, click on the button. You will be prompted
to save your changes. Click on the button to save your changes and
return to the View Outreach Activity form.
Progress Logs
Outreach providers must create a separate Progress Log for every encounter or contact with or
on behalf of a client during a given day. Be sure to note the exact amount of time (number
of minutes) that was spent with or on behalf of the Client during this encounter as well as
the type of contact that was made. These Progress Log records will later be used to
report the amount of time spent by providers in different Contact Types as well as serve
as source records to help determine the amount of billable outreach activity that was
performed. To create a Progress Log, follow the steps below to first navigate to the
Outreach Summary and then add a Progress Log:
To navigate to the Outreach Summary, follow the steps below:
Navigate to the Client Profile. Once in the Profile, select the “View” button and then
choose “Outreach Summary”.
The View Outreach Activity form will open.
Select the Services Tab, seen in the figure below:
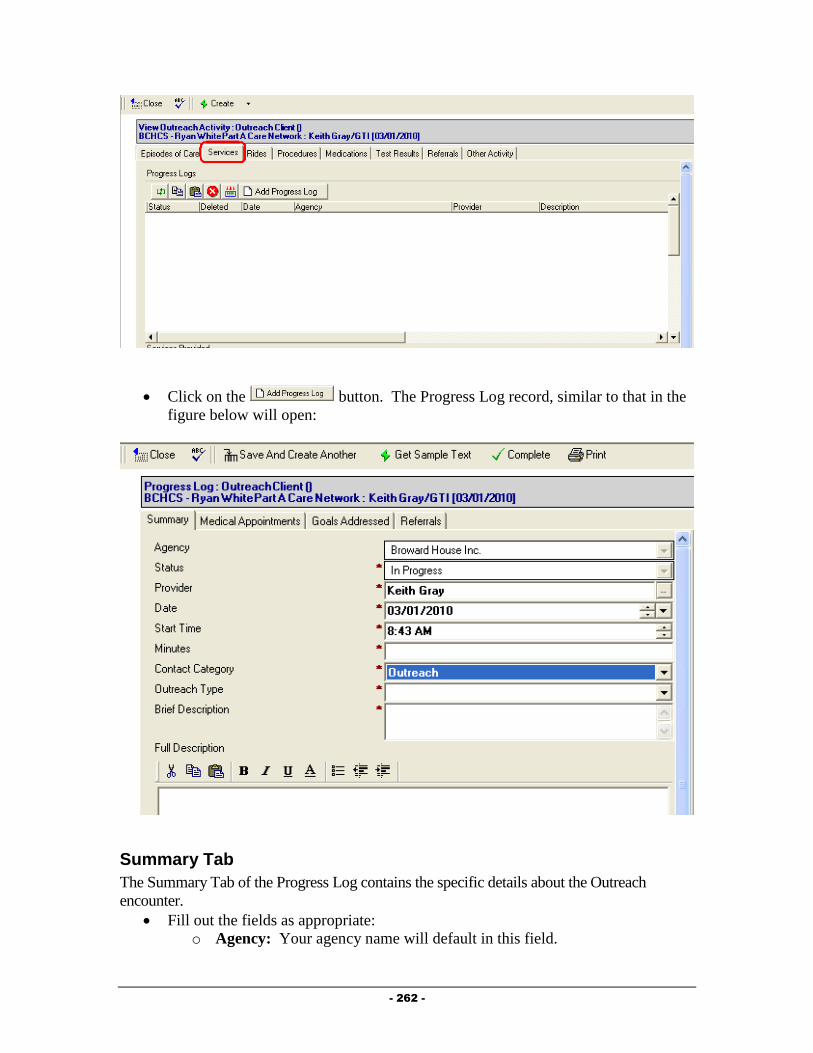
- 262 -
Click on the button. The Progress Log record, similar to that in the
figure below will open:
Summary Tab
The Summary Tab of the Progress Log contains the specific details about the Outreach
encounter.
Fill out the fields as appropriate:
o Agency: Your agency name will default in this field.
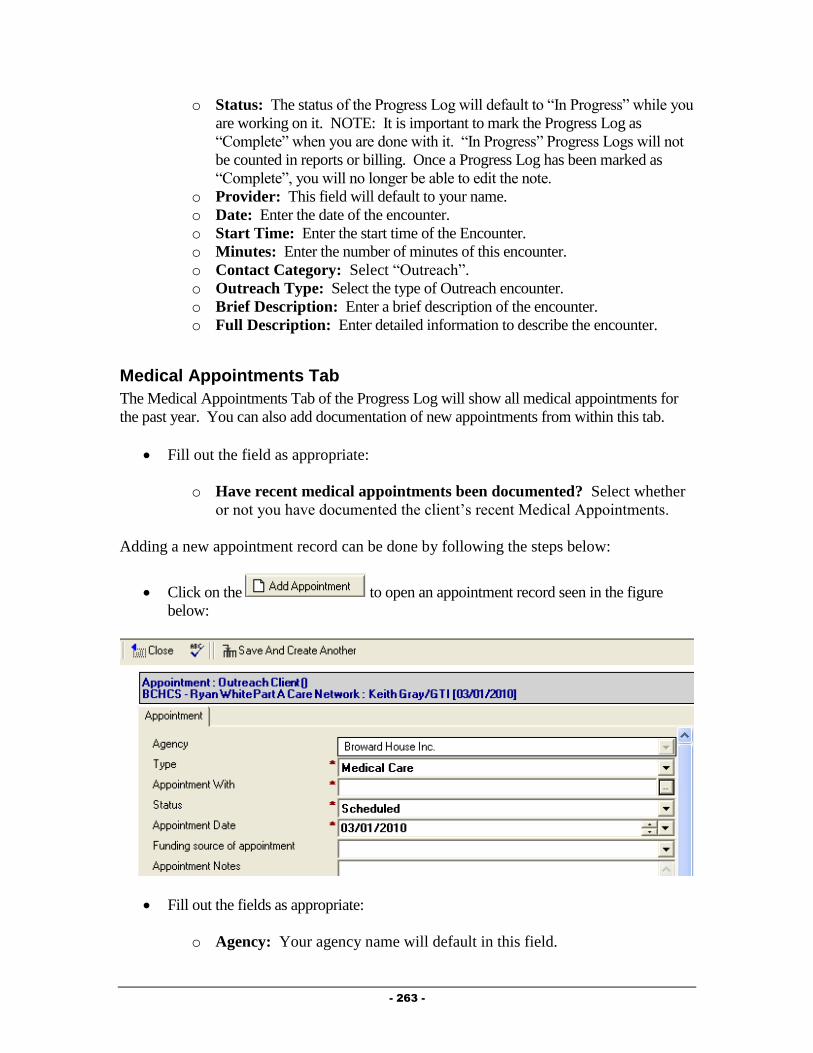
- 263 -
o Status: The status of the Progress Log will default to “In Progress” while you
are working on it. NOTE: It is important to mark the Progress Log as
“Complete” when you are done with it. “In Progress” Progress Logs will not
be counted in reports or billing. Once a Progress Log has been marked as
“Complete”, you will no longer be able to edit the note.
o Provider: This field will default to your name.
o Date: Enter the date of the encounter.
o Start Time: Enter the start time of the Encounter.
o Minutes: Enter the number of minutes of this encounter.
o Contact Category: Select “Outreach”.
o Outreach Type: Select the type of Outreach encounter.
o Brief Description: Enter a brief description of the encounter.
o Full Description: Enter detailed information to describe the encounter.
Medical Appointments Tab
The Medical Appointments Tab of the Progress Log will show all medical appointments for
the past year. You can also add documentation of new appointments from within this tab.
Fill out the field as appropriate:
o Have recent medical appointments been documented? Select whether
or not you have documented the client’s recent Medical Appointments.
Adding a new appointment record can be done by following the steps below:
Click on the to open an appointment record seen in the figure
below:
Fill out the fields as appropriate:
o Agency: Your agency name will default in this field.

- 264 -
o Type: Select the type of appointment. This field will automatically default to
“Medical Care”.
o Appointment With: Enter the provider who the appointment is
scheduled/was made with.
o Status: Select the status of this appointment.
o Funding source of appointment: Select the funding source that paid for this
medical encounter. Note: This field will only show if the Appointment Type
is “Medical Care”.
o Appointment Notes: Enter any additional comments or notes related to this
appointment.
After filling out the record, click on the button. You will be prompted
to save your changes. Click on the button to save your changes and
return to the View Outreach Activity form.
Goals Addressed Tab
This does not apply for Outreach Encounters!
Referrals Tab
The Referrals Tab of the Progress Log allows you to document referrals made on behalf of the
client during this encounter to the Progress Log. To create a Referral from within the Progress
Log, follow the steps below:
Click on the button to activate the referral record seen in the figure
below:
Fill out the fields as appropriate:
o Agency: The Agency field will be automatically filled out based on your
agency.

- 265 -
o Referral Status: Defaults to “Open” meaning that the referral has been made,
but the disposition of the referral is still unknown.
o Referring Person: This will default to your name.
o Referral Date: Enter the Date the referral was made.
o Referral Type: Select whether the referral was an Internal (referral made to
another Ryan White Part A provider) or an External (made to a provider that is
not a Ryan White Part A provider).
o Referred To: Select the agency the referral was made to by clicking on the
button. NOTE: The picklist of agencies will be different based on the
“Referral Type” selected. For “Internal” referrals, you will get a list of only
Ryan White Part A providers, while for “External” referrals, you will get a list
of non-funded providers.
o Referred for Service Type: Select the type of service being requested by
making this referral by clicking on the button.
o Referred for Service Description: Enter any description of why the referral
is being made in this field.
o Date Check Back: Enter a date to receive a reminder to follow up on this
referral.
o Referred to Assignee: If the organization the referral is being made to is in
the Ryan White Part A network and a specific individual has been selected to
receive referrals, their name will appear here.
o Disposition: This field is meant to be filled out when the referral is closed and
the status of the client’s receipt of services is determined.
o Disposition Comments: Enter any comments related to the status of the
referral in this field.
After filling out the record, click on the button. You will be prompted
to save your changes. Click on the button to save your changes and
return to the View Outreach Activity form.
Progress Log Save Rules
The following rules have been added to the Progress Log for Outreach Encounters.
Anonymous Clients/Encounters
Only certain types of encounters can be documented in client files that are listed in the
Client Profile as being “Anonymous”. These include the following:
General Outreach
Individual Supervision
Group Supervision
General Outreach encounters can only be documented in “Anonymous Client” files. The
“Anonymous Client” flag can be found in the Client Profile on the “General Section of
the “Profile” tab (seen in the figure below).
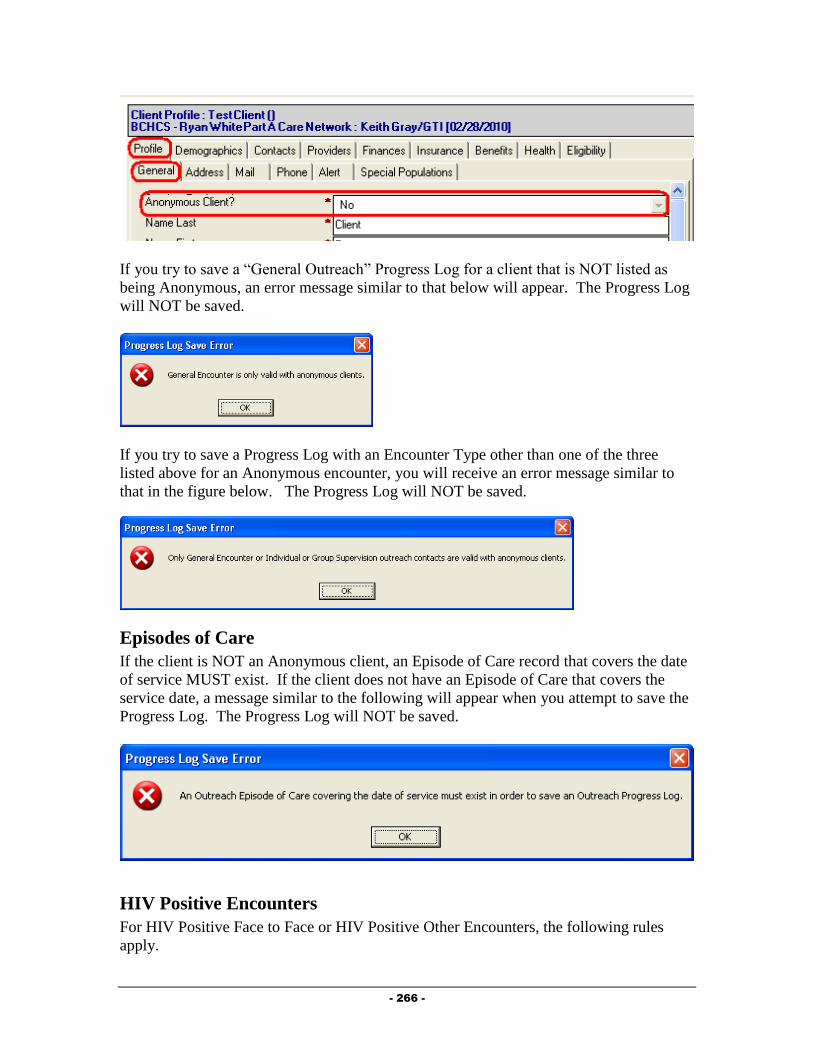
- 266 -
If you try to save a “General Outreach” Progress Log for a client that is NOT listed as
being Anonymous, an error message similar to that below will appear. The Progress Log
will NOT be saved.
If you try to save a Progress Log with an Encounter Type other than one of the three
listed above for an Anonymous encounter, you will receive an error message similar to
that in the figure below. The Progress Log will NOT be saved.
Episodes of Care
If the client is NOT an Anonymous client, an Episode of Care record that covers the date
of service MUST exist. If the client does not have an Episode of Care that covers the
service date, a message similar to the following will appear when you attempt to save the
Progress Log. The Progress Log will NOT be saved.
HIV Positive Encounters
For HIV Positive Face to Face or HIV Positive Other Encounters, the following rules
apply.
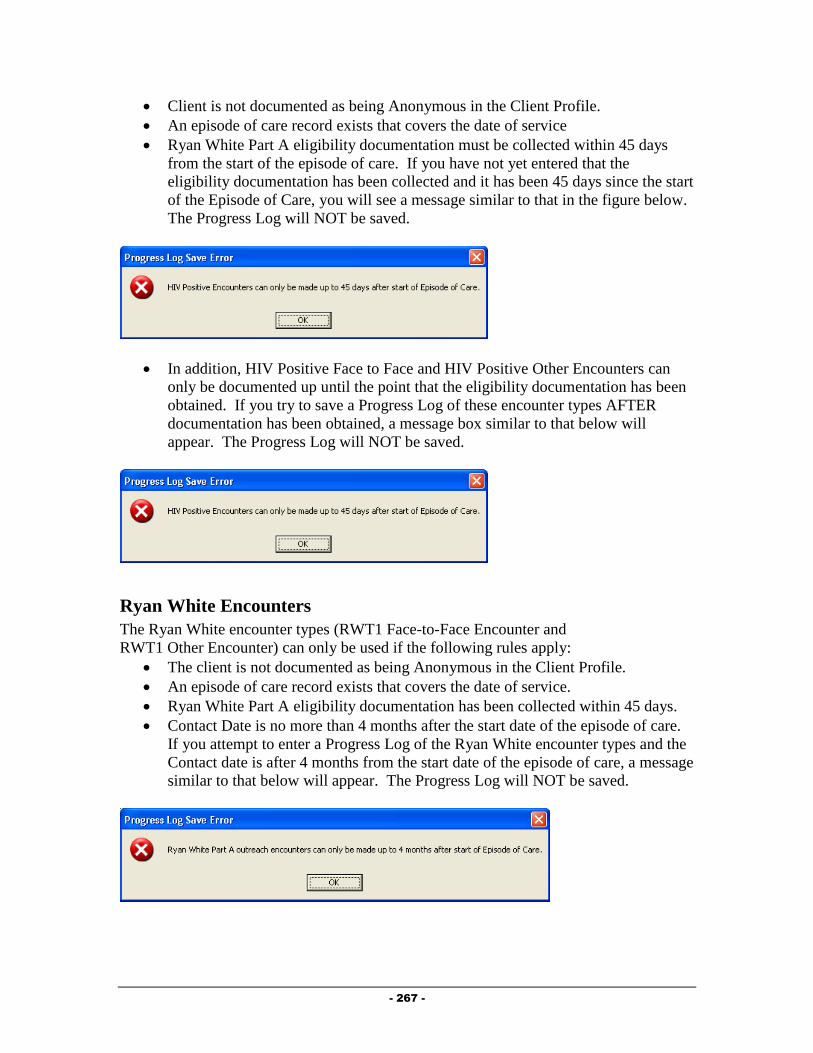
- 267 -
Client is not documented as being Anonymous in the Client Profile.
An episode of care record exists that covers the date of service
Ryan White Part A eligibility documentation must be collected within 45 days
from the start of the episode of care. If you have not yet entered that the
eligibility documentation has been collected and it has been 45 days since the start
of the Episode of Care, you will see a message similar to that in the figure below.
The Progress Log will NOT be saved.
In addition, HIV Positive Face to Face and HIV Positive Other Encounters can
only be documented up until the point that the eligibility documentation has been
obtained. If you try to save a Progress Log of these encounter types AFTER
documentation has been obtained, a message box similar to that below will
appear. The Progress Log will NOT be saved.
Ryan White Encounters
The Ryan White encounter types (RWT1 Face-to-Face Encounter and
RWT1 Other Encounter) can only be used if the following rules apply:
The client is not documented as being Anonymous in the Client Profile.
An episode of care record exists that covers the date of service.
Ryan White Part A eligibility documentation has been collected within 45 days.
Contact Date is no more than 4 months after the start date of the episode of care.
If you attempt to enter a Progress Log of the Ryan White encounter types and the
Contact date is after 4 months from the start date of the episode of care, a message
similar to that below will appear. The Progress Log will NOT be saved.

- 268 -
If you have not yet entered that Ryan White Part A eligibility documentation has
been collected within the episode of care record, the following message will
appear. The Progress Log will NOT be saved.
Completing the Progress Log
After completely filling out the Progress Log, it is important to mark the Progress Log as
Complete. Progress Logs that are not marked as Complete will not appear in invoicing or
reporting. Once a Progress Log has been marked as Complete, you will no longer be able to
edit that Progress Log. To mark a Progress Log as Complete, follow the steps below:
Click on the button.
o If the Progress Log does not fall within the dates of an “Episode of Care”
record, you will not be able to complete the Progress Log and will see a
message similar to that in the figure below:
o Click on the button to return to the Progress Log. At this point,
you can simply click on the button to save your changes. You
can then go back to the View Outreach Activity window and enter the
appropriate “Episode of Care” record. Once that is complete, you can re-
=open this P{ro0gress Log and then you should be able to mark the record
as “Complete”.
o You will be prompted to Save your changes and will be returned to the View
Outreach Activity window.
If you have already completed your Episode of Care, the status of the Progress Log
will be changed to “Complete” and you will be returned to the Outreach Summary.
Additional Documentation
There are additional documents that can be entered in and viewed in a client file. NOTE: If
the client is being served by a Case Management or Medical provider, some of the

- 269 -
information discussed below may already be documented in the system, and you should have
access to view the information.
Referrals
The Referrals Tab of the “View Outreach Activity” shows referrals made on behalf of the
client to both Ryan White Part A providers as well as to other agencies within the community.
To get to this information, follow the steps below.
Navigate to the Client Profile. Once in the Profile, select the “View” button and then
choose “View Outreach Activity”.
The View Outreach Activity form will open.
Select the “Referrals” Tab, seen in the figure below:
Adding a Referral
The Referral record allows you to document specifics regarding referrals made on behalf of
the client. To create, follow the steps below:
Click on the button to activate the referral record seen in the figure
below:
Fill out the fields as appropriate:
o Agency: The Agency field will be automatically filled out based on your
agency.
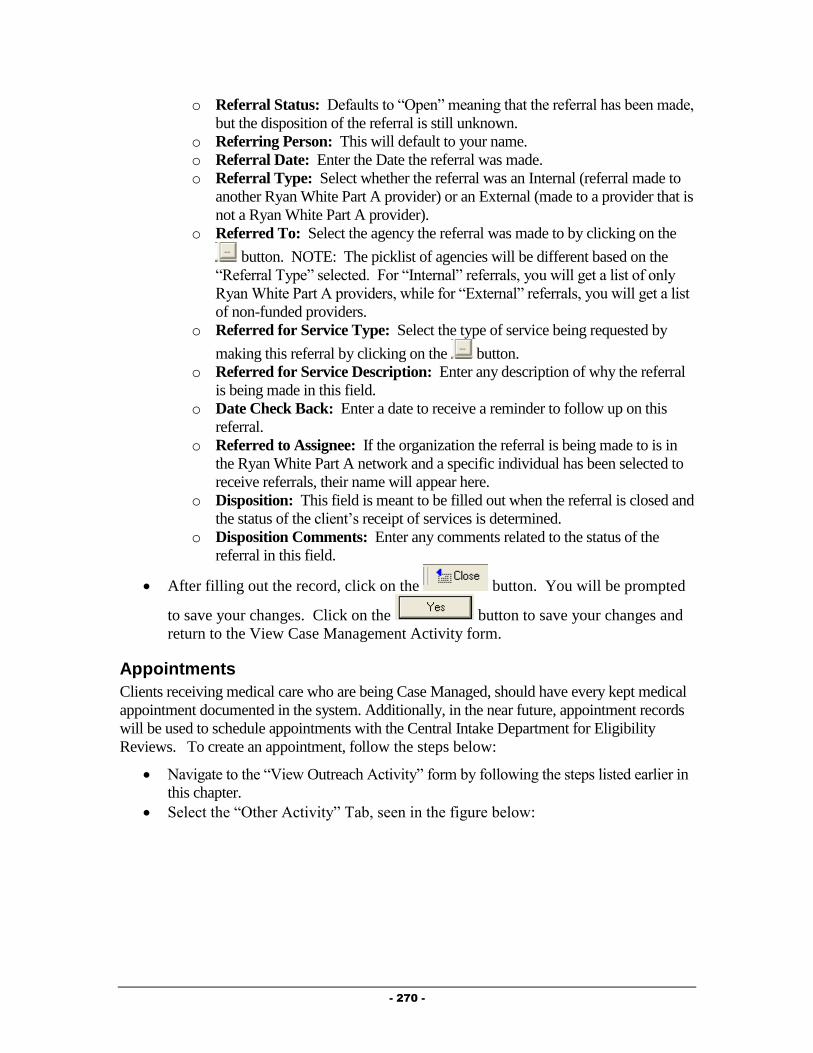
- 270 -
o Referral Status: Defaults to “Open” meaning that the referral has been made,
but the disposition of the referral is still unknown.
o Referring Person: This will default to your name.
o Referral Date: Enter the Date the referral was made.
o Referral Type: Select whether the referral was an Internal (referral made to
another Ryan White Part A provider) or an External (made to a provider that is
not a Ryan White Part A provider).
o Referred To: Select the agency the referral was made to by clicking on the
button. NOTE: The picklist of agencies will be different based on the
“Referral Type” selected. For “Internal” referrals, you will get a list of only
Ryan White Part A providers, while for “External” referrals, you will get a list
of non-funded providers.
o Referred for Service Type: Select the type of service being requested by
making this referral by clicking on the button.
o Referred for Service Description: Enter any description of why the referral
is being made in this field.
o Date Check Back: Enter a date to receive a reminder to follow up on this
referral.
o Referred to Assignee: If the organization the referral is being made to is in
the Ryan White Part A network and a specific individual has been selected to
receive referrals, their name will appear here.
o Disposition: This field is meant to be filled out when the referral is closed and
the status of the client’s receipt of services is determined.
o Disposition Comments: Enter any comments related to the status of the
referral in this field.
After filling out the record, click on the button. You will be prompted
to save your changes. Click on the button to save your changes and
return to the View Case Management Activity form.
Appointments
Clients receiving medical care who are being Case Managed, should have every kept medical
appointment documented in the system. Additionally, in the near future, appointment records
will be used to schedule appointments with the Central Intake Department for Eligibility
Reviews. To create an appointment, follow the steps below:
Navigate to the “View Outreach Activity” form by following the steps listed earlier in
this chapter.
Select the “Other Activity” Tab, seen in the figure below:
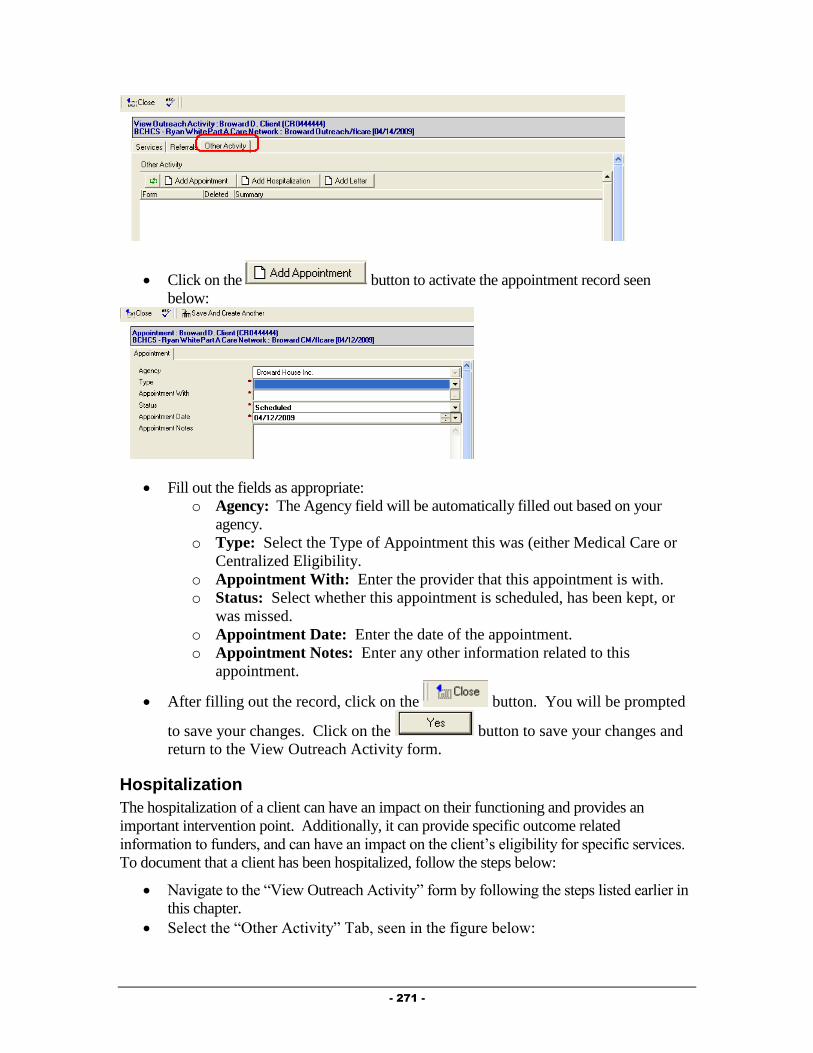
- 271 -
Click on the button to activate the appointment record seen
below:
Fill out the fields as appropriate:
o Agency: The Agency field will be automatically filled out based on your
agency.
o Type: Select the Type of Appointment this was (either Medical Care or
Centralized Eligibility.
o Appointment With: Enter the provider that this appointment is with.
o Status: Select whether this appointment is scheduled, has been kept, or
was missed.
o Appointment Date: Enter the date of the appointment.
o Appointment Notes: Enter any other information related to this
appointment.
After filling out the record, click on the button. You will be prompted
to save your changes. Click on the button to save your changes and
return to the View Outreach Activity form.
Hospitalization
The hospitalization of a client can have an impact on their functioning and provides an
important intervention point. Additionally, it can provide specific outcome related
information to funders, and can have an impact on the client’s eligibility for specific services.
To document that a client has been hospitalized, follow the steps below:
Navigate to the “View Outreach Activity” form by following the steps listed earlier in
this chapter.
Select the “Other Activity” Tab, seen in the figure below:
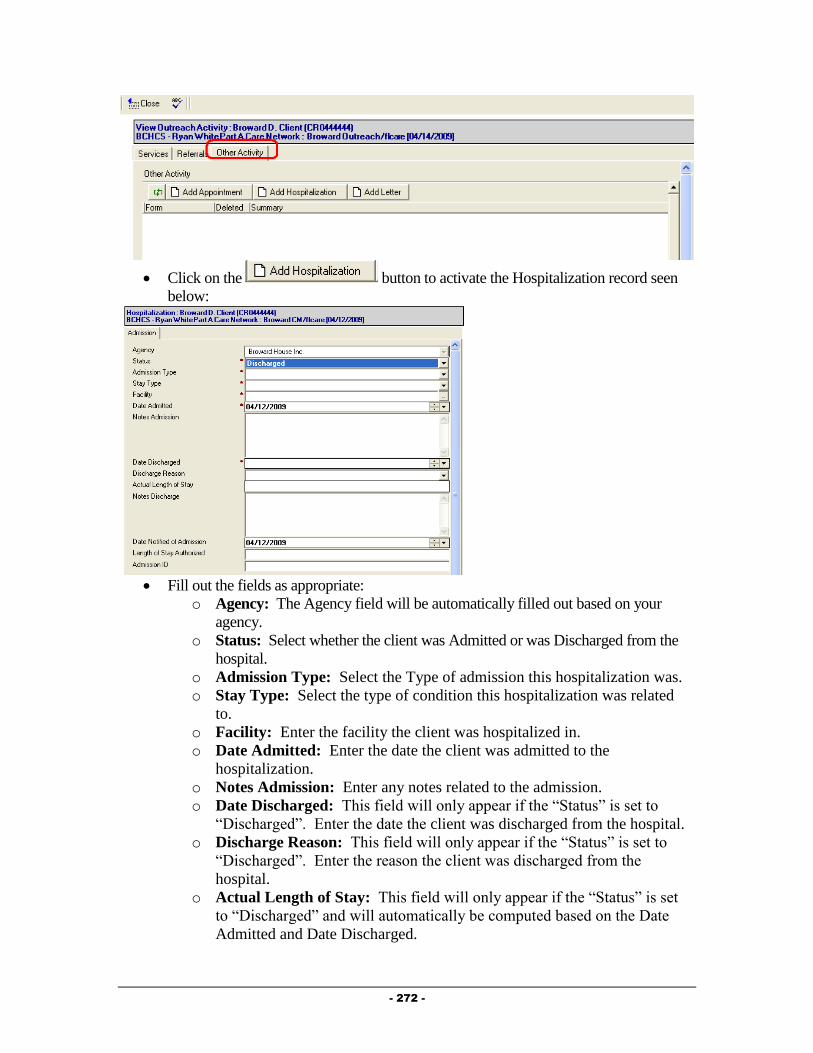
- 272 -
Click on the button to activate the Hospitalization record seen
below:
Fill out the fields as appropriate:
o Agency: The Agency field will be automatically filled out based on your
agency.
o Status: Select whether the client was Admitted or was Discharged from the
hospital.
o Admission Type: Select the Type of admission this hospitalization was.
o Stay Type: Select the type of condition this hospitalization was related
to.
o Facility: Enter the facility the client was hospitalized in.
o Date Admitted: Enter the date the client was admitted to the
hospitalization.
o Notes Admission: Enter any notes related to the admission.
o Date Discharged: This field will only appear if the “Status” is set to
“Discharged”. Enter the date the client was discharged from the hospital.
o Discharge Reason: This field will only appear if the “Status” is set to
“Discharged”. Enter the reason the client was discharged from the
hospital.
o Actual Length of Stay: This field will only appear if the “Status” is set
to “Discharged” and will automatically be computed based on the Date
Admitted and Date Discharged.
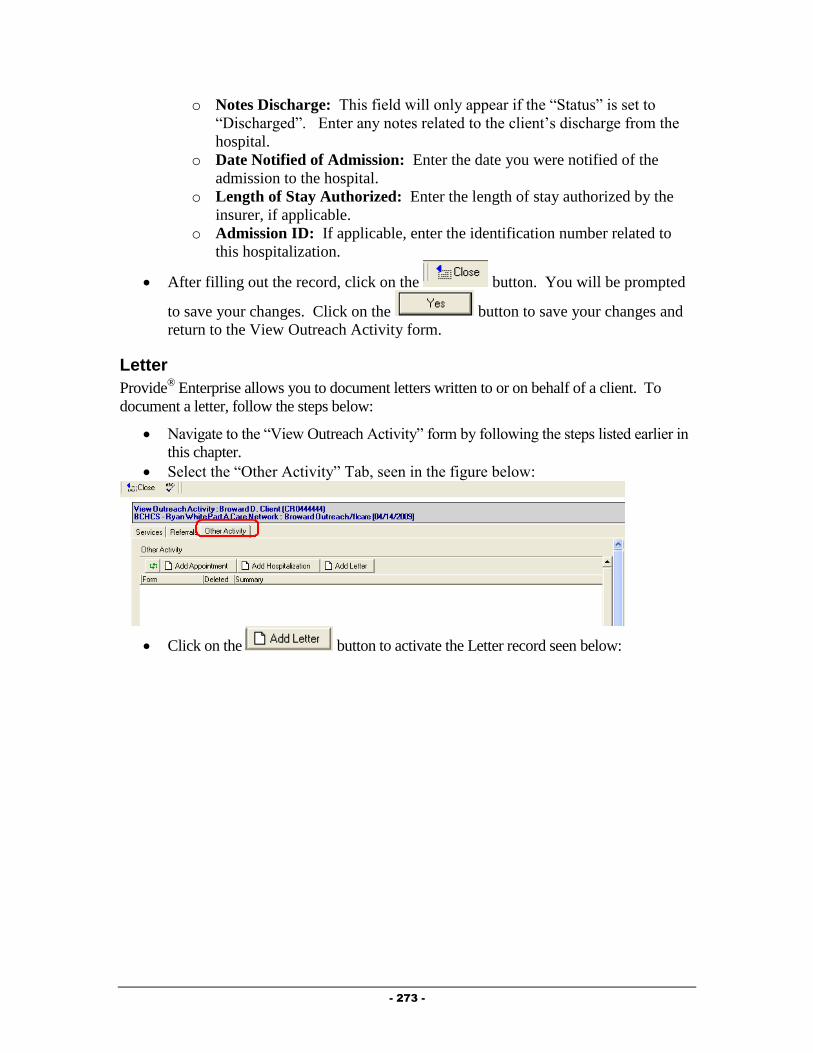
- 273 -
o Notes Discharge: This field will only appear if the “Status” is set to
“Discharged”. Enter any notes related to the client’s discharge from the
hospital.
o Date Notified of Admission: Enter the date you were notified of the
admission to the hospital.
o Length of Stay Authorized: Enter the length of stay authorized by the
insurer, if applicable.
o Admission ID: If applicable, enter the identification number related to
this hospitalization.
After filling out the record, click on the button. You will be prompted
to save your changes. Click on the button to save your changes and
return to the View Outreach Activity form.
Letter
Provide® Enterprise allows you to document letters written to or on behalf of a client. To
document a letter, follow the steps below:
Navigate to the “View Outreach Activity” form by following the steps listed earlier in
this chapter.
Select the “Other Activity” Tab, seen in the figure below:
Click on the button to activate the Letter record seen below:

- 274 -
Fill out the fields as appropriate:
o Agency: The Agency field will be automatically filled out based on your
agency.
o Get Provider Address: If you are writing this letter to a provider, you
can click on this button to bring up the Provider selection dialog
(discussed in Chapter 2 of this guide). Simply select the provider you are
writing the letter to, and the system will automatically fill out the Address
and Salutation fields.
o Subject: The subject of the letter will not be printed, but will help you
find the letter in the future.
o Date: Enter the date you are writing this letter.
o Address: If writing the letter to the client and a Mailing Address is listed
in the Client Profile, the address will be filled in for you. If you used the
“Get Provider Address” button, the providers address will be listed.
o Salutation: This field will automatically be filled out based on who the
letter is to.
o Body: Enter the text of the letter in this field. You can also select
“sample text” or pre-defined letters by clicking on the
button. A window of the pre-defined letters will appear and you will be
able to select the letter that you wish to write.
o Closing: This field will automatically be set to “Sincerely”, but can be
changed if appropriate.
o Sender Name: This field will automatically default to your name, but can
be changed if appropriate.
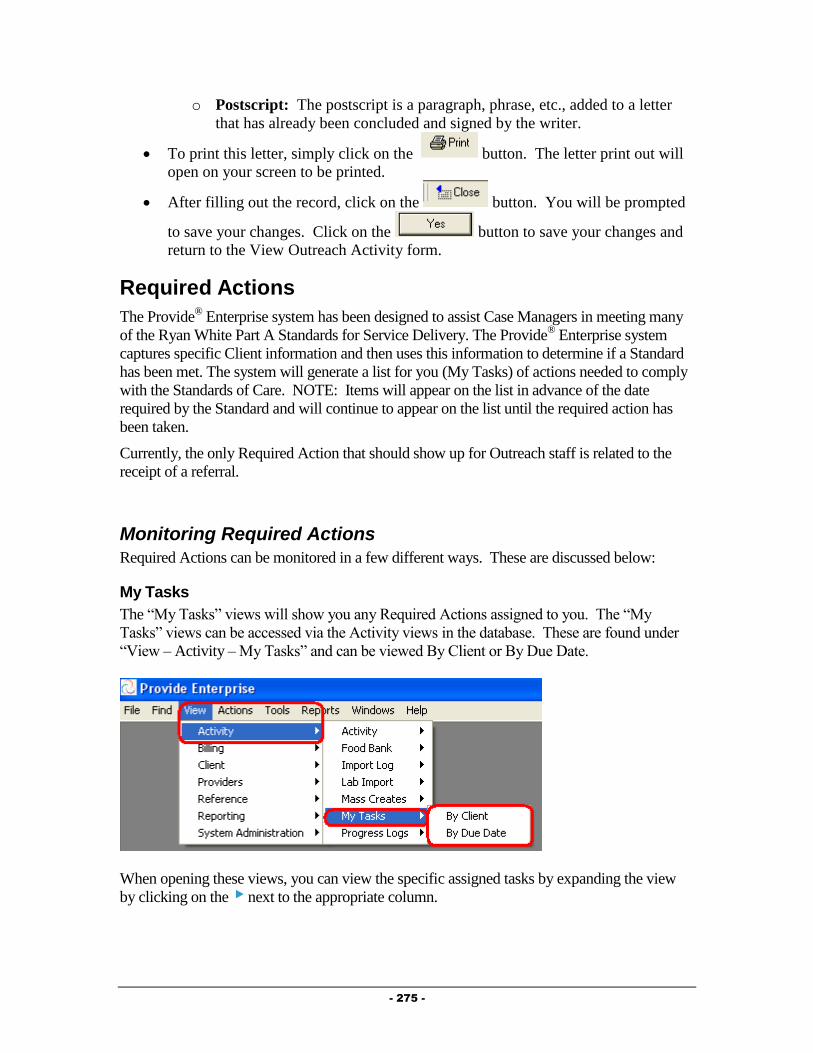
- 275 -
o Postscript: The postscript is a paragraph, phrase, etc., added to a letter
that has already been concluded and signed by the writer.
To print this letter, simply click on the button. The letter print out will
open on your screen to be printed.
After filling out the record, click on the button. You will be prompted
to save your changes. Click on the button to save your changes and
return to the View Outreach Activity form.
Required Actions
The Provide® Enterprise system has been designed to assist Case Managers in meeting many
of the Ryan White Part A Standards for Service Delivery. The Provide® Enterprise system
captures specific Client information and then uses this information to determine if a Standard
has been met. The system will generate a list for you (My Tasks) of actions needed to comply
with the Standards of Care. NOTE: Items will appear on the list in advance of the date
required by the Standard and will continue to appear on the list until the required action has
been taken.
Currently, the only Required Action that should show up for Outreach staff is related to the
receipt of a referral.
Monitoring Required Actions
Required Actions can be monitored in a few different ways. These are discussed below:
My Tasks
The “My Tasks” views will show you any Required Actions assigned to you. The “My
Tasks” views can be accessed via the Activity views in the database. These are found under
“View – Activity – My Tasks” and can be viewed By Client or By Due Date.
When opening these views, you can view the specific assigned tasks by expanding the view
by clicking on the next to the appropriate column.
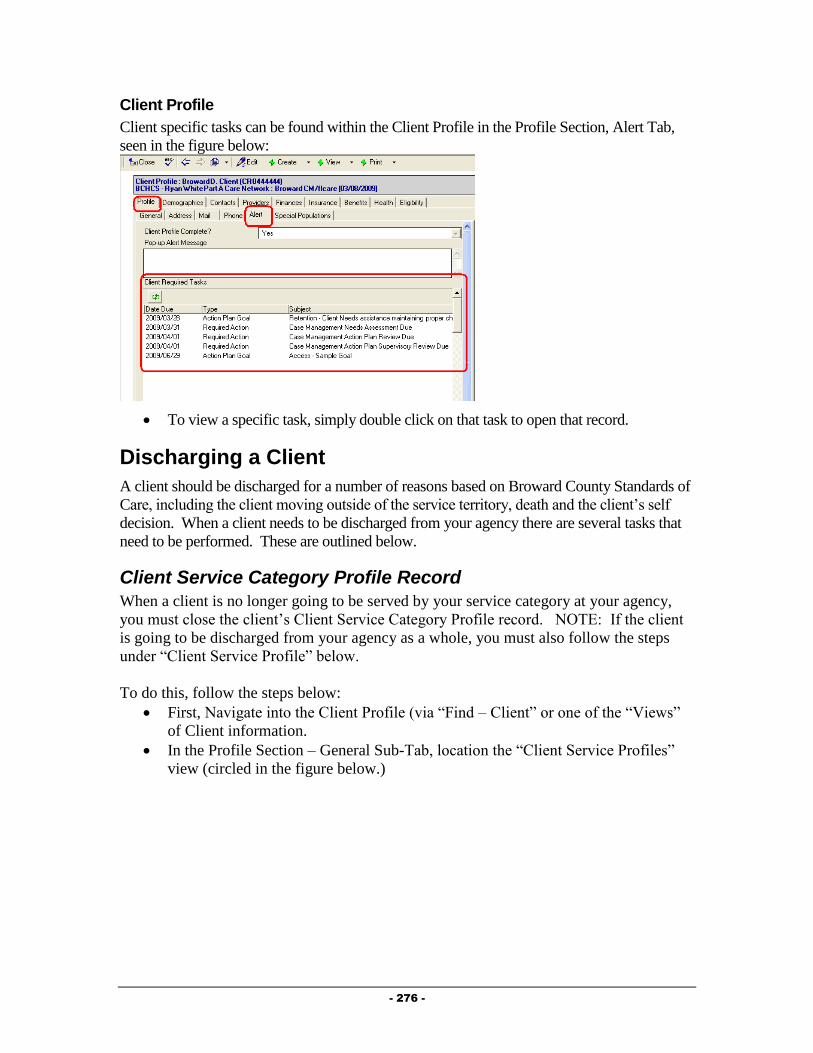
- 276 -
Client Profile
Client specific tasks can be found within the Client Profile in the Profile Section, Alert Tab,
seen in the figure below:
To view a specific task, simply double click on that task to open that record.
Discharging a Client
A client should be discharged for a number of reasons based on Broward County Standards of
Care, including the client moving outside of the service territory, death and the client’s self
decision. When a client needs to be discharged from your agency there are several tasks that
need to be performed. These are outlined below.
Client Service Category Profile Record
When a client is no longer going to be served by your service category at your agency,
you must close the client’s Client Service Category Profile record. NOTE: If the client
is going to be discharged from your agency as a whole, you must also follow the steps
under “Client Service Profile” below.
To do this, follow the steps below:
First, Navigate into the Client Profile (via “Find – Client” or one of the “Views”
of Client information.
In the Profile Section – General Sub-Tab, location the “Client Service Profiles”
view (circled in the figure below.)
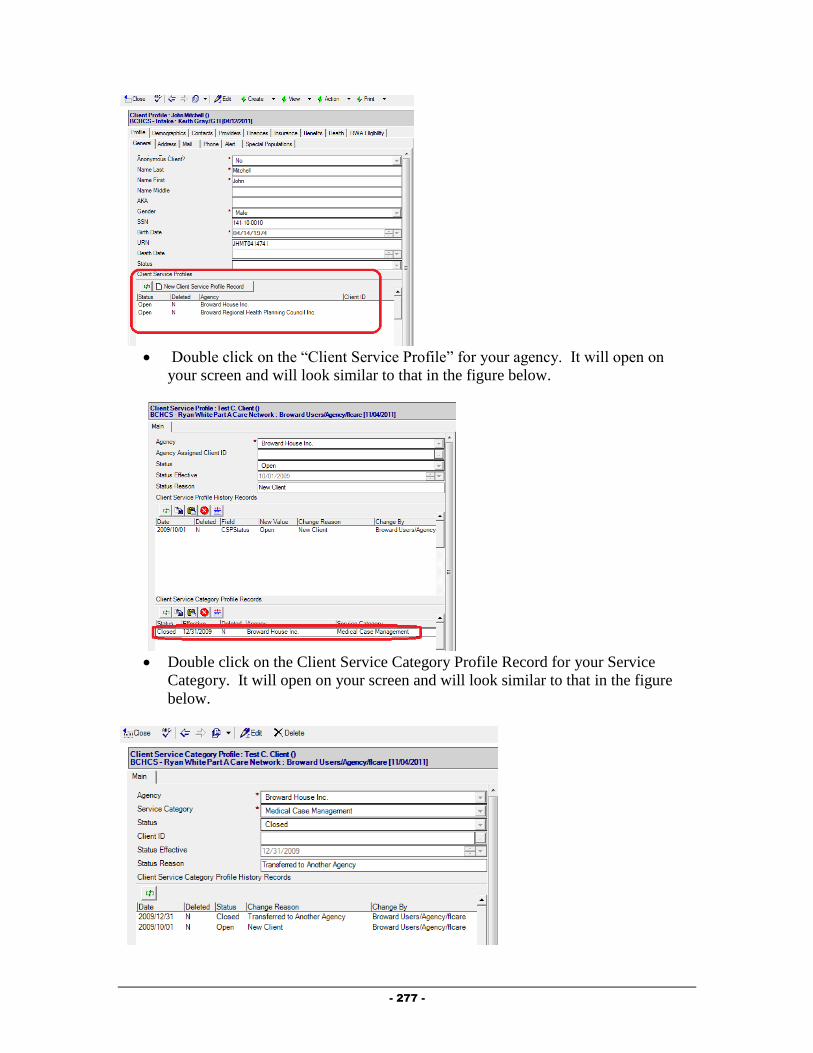
- 277 -
Double click on the “Client Service Profile” for your agency. It will open on
your screen and will look similar to that in the figure below.
Double click on the Client Service Category Profile Record for your Service
Category. It will open on your screen and will look similar to that in the figure
below.
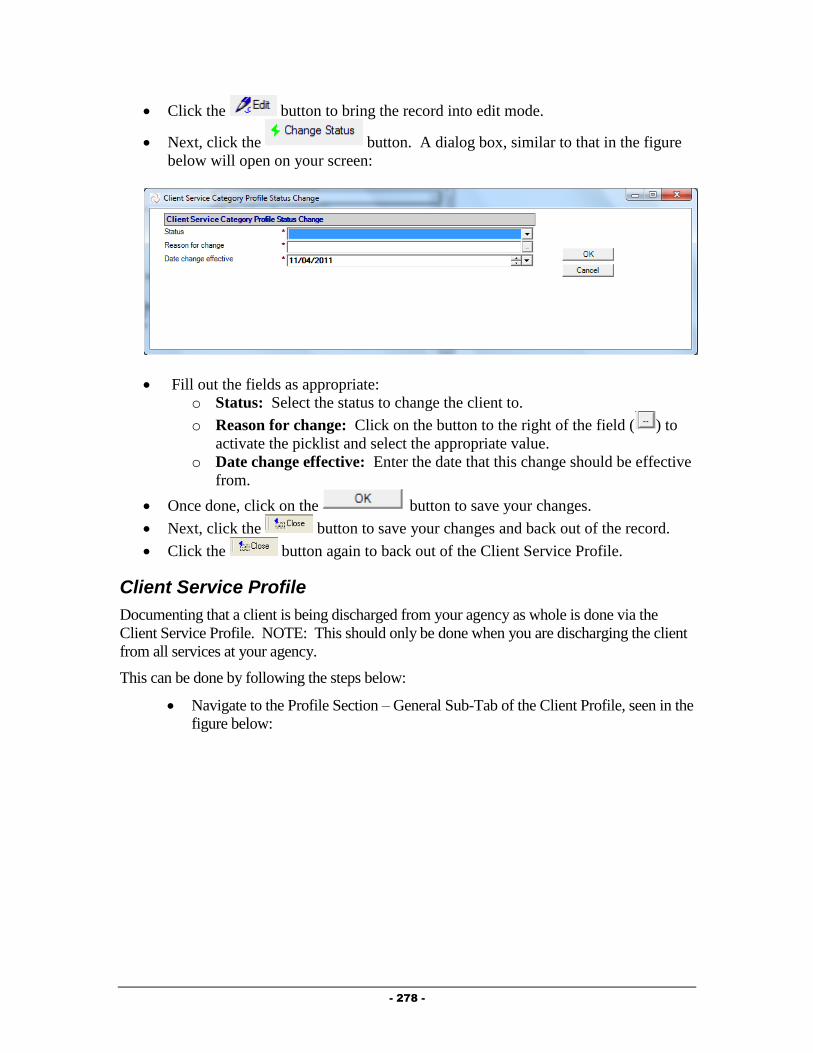
- 278 -
Click the button to bring the record into edit mode.
Next, click the button. A dialog box, similar to that in the figure
below will open on your screen:
Fill out the fields as appropriate:
o Status: Select the status to change the client to.
o Reason for change: Click on the button to the right of the field ( ) to
activate the picklist and select the appropriate value.
o Date change effective: Enter the date that this change should be effective
from.
Once done, click on the button to save your changes.
Next, click the button to save your changes and back out of the record.
Click the button again to back out of the Client Service Profile.
Client Service Profile
Documenting that a client is being discharged from your agency as whole is done via the
Client Service Profile. NOTE: This should only be done when you are discharging the client
from all services at your agency.
This can be done by following the steps below:
Navigate to the Profile Section – General Sub-Tab of the Client Profile, seen in the
figure below:

- 279 -
Double click on the Client Service for your agency. The Client Service Profile
will open and will look similar to that in the figure below:
Click on the button. The Client Service Profile will be brought into Edit
mode.
Click on the button to activate the Status Change dialog box,
similar to that in the figure below:

- 280 -
Complete all fields as appropriate:
o Status: Select “Closed” as the status.
o Reason for change: Select the reason the client is being discharged from
your agency.
o Date change effective: Enter the date the client is being discharged from
your agency.
Click on the button to save your changes. You will be returned to
the Client Service Profile.
After verifying the status change, click on the button. You will be
prompted to save your changes. Click on the button to save your
changes and return to the Client Profile.
Terminate the Provider Relationship
When discharging a client from your agency, you must end your provider relationship with the
client. This can be done by following the steps below:
Navigate to the Providers Section of Client Profile, seen in the figure below:
Double click on your Provider Relationship to open the record.
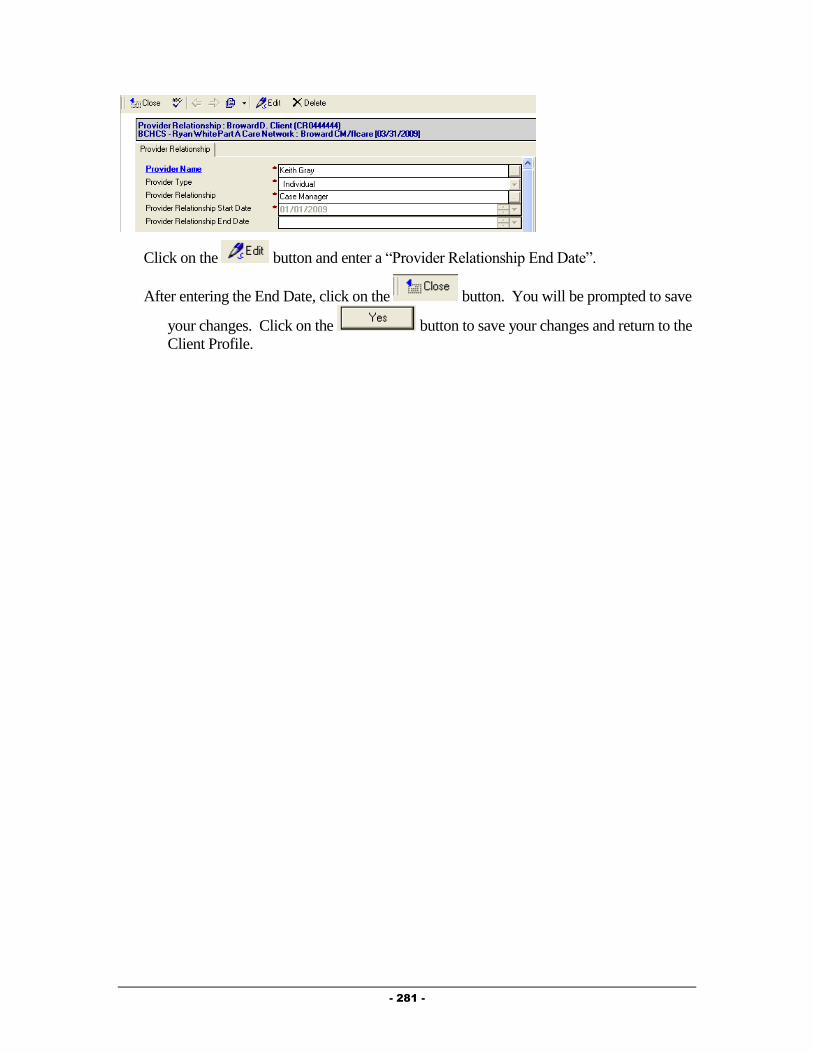
- 281 -
Click on the button and enter a “Provider Relationship End Date”.
After entering the End Date, click on the button. You will be prompted to save
your changes. Click on the button to save your changes and return to the
Client Profile.

- 282 -
Chapter
9
Legal Service Providers
This Chapter outlines the tasks that need to be completed by Legal Service providers in
Provide® Enterprise to meet all billing and reporting requirements. Over time, the data
elements outlined in this chapter must also be kept current as things change for the client.
Intake and Assessment Documentation
At the time of Intake, and as required based on Standards of Care, there are a number of
records that must be entered with Provide®
Enterprise in order to meet all billing and invoicing
Requirements.
Client Profile
Within the Client Profile, it is important to keep all information updated as the client’s life
situation changes.
Opening Existing Clients to your Agency
If the client had previously been registered in Provide® Enterprise and served by another
agency, you will need to create a Client Service Profile to document that the Client is
now being served by your agency. To do this, follow the steps below:
First, Navigate into the Client Profile (via “Find – Client” or one of the “Views”
of Client information.
In the Profile Section – General Sub-Tab, location the “Client Service Profiles”
view (circled in the figure below.)

- 283 -
If you do not see your agency listed, click the
button to open the Client Service Profile, seen below.
Complete the “Agency Assigned Client ID (if necessary). Make sure to append
your agencies abbreviation to the beginning of the Agency Assigned Client ID
number to help various agencies identify their own clients.
Once done, click on the button to save your changes and back out of the
record.
Re-Opening Existing Clients to your Agency
If the client had previously been registered in Provide® Enterprise and served (and
closed) by your agency, you will need to re-open the Client Service Profile to indicate
that the client has been re-opened to your agency.
To do this, follow the steps below:

- 284 -
First, Navigate into the Client Profile (via “Find – Client” or one of the “Views”
of Client information.
Double click on the Client Service for your agency. The Client Service Profile will
open and will look similar to that in the figure below:
Click on the button. The Client Service Profile will be brought into Edit
mode, similar to that in the figure below:
Click on the button to activate the Status Change dialog box,
similar to that in the figure below:
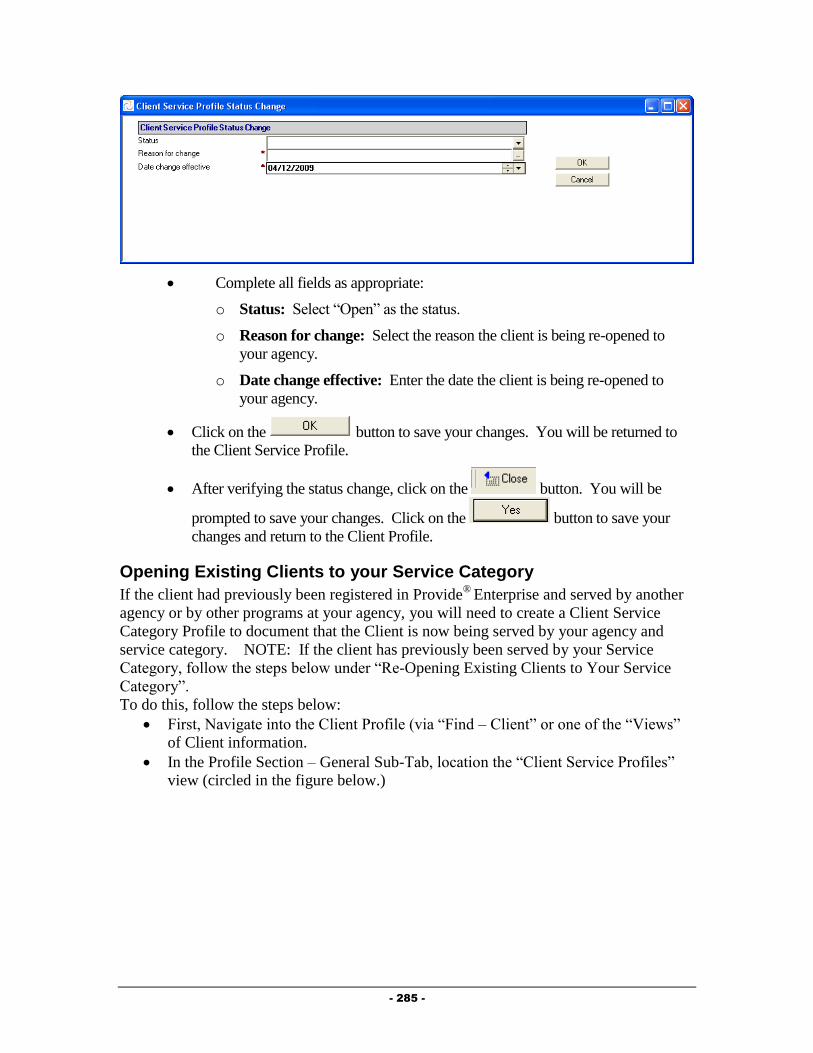
- 285 -
Complete all fields as appropriate:
o Status: Select “Open” as the status.
o Reason for change: Select the reason the client is being re-opened to
your agency.
o Date change effective: Enter the date the client is being re-opened to
your agency.
Click on the button to save your changes. You will be returned to
the Client Service Profile.
After verifying the status change, click on the button. You will be
prompted to save your changes. Click on the button to save your
changes and return to the Client Profile.
Opening Existing Clients to your Service Category
If the client had previously been registered in Provide®
Enterprise and served by another
agency or by other programs at your agency, you will need to create a Client Service
Category Profile to document that the Client is now being served by your agency and
service category. NOTE: If the client has previously been served by your Service
Category, follow the steps below under “Re-Opening Existing Clients to Your Service
Category”.
To do this, follow the steps below:
First, Navigate into the Client Profile (via “Find – Client” or one of the “Views”
of Client information.
In the Profile Section – General Sub-Tab, location the “Client Service Profiles”
view (circled in the figure below.)

- 286 -
If you do not see your agency listed, follow the steps in the previous section to
“Open Existing Clients to your Agency”.
Double click on the “Client Service Profile” for your agency. It will open on
your screen and will look similar to that in the figure below.
Click the button to open a Cleint Service
Category Profile record, similar to that in the figure below:

- 287 -
Fill out the fields as appropriate:
o Service Category: Select the category of service that you wish to open
the client to.
o Client ID: If your program uses a client ID number, enter this hear.
o Status Effective/Status Reason: These will automatically be computed.
o Client Service Category Profile History Records: This window will
track each change to the Service Profile History Status records over time.
This will automatically occur when changes are made to these records.
Once done, click on the button to save your changes and back out of the
record. Click the button again to back out of the Client Service Profile.
Re-Opening Existing Clients to Your Service Category
If the client had previously been registered in Provide®
Enterprise and served by your
agency and service category, you will need to re-open the client to your service category
(if they are closed). Please note that if the client was closed to your agency, you will
need to re-open the client to your agency as well. See the steps above under “Re-
Opening a Client to Your Agency.”
To do this, follow the steps below:
First, Navigate into the Client Profile (via “Find – Client” or one of the “Views”
of Client information.
In the Profile Section – General Sub-Tab, location the “Client Service Profiles”
view (circled in the figure below.)

- 288 -
Double click on the “Client Service Profile” for your agency. It will open on
your screen and will look similar to that in the figure below.
Double click on the Client Service Category Profile Record for your Service
Category. It will open on your screen and will look similar to that in the figure
below. (NOTE: If you do not see a Client Service Category Profile Record for
your service category, follow the steps earlier in the chapter under “Opening
Existing Clients to your Service Category”.
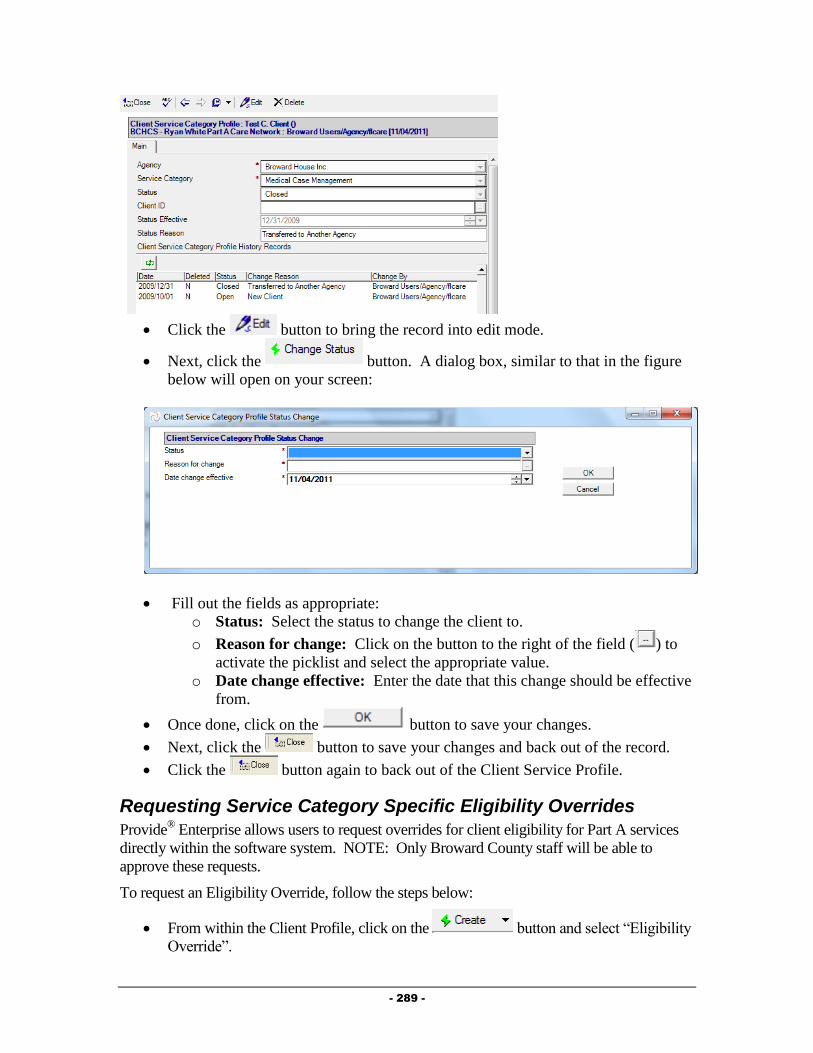
- 289 -
Click the button to bring the record into edit mode.
Next, click the button. A dialog box, similar to that in the figure
below will open on your screen:
Fill out the fields as appropriate:
o Status: Select the status to change the client to.
o Reason for change: Click on the button to the right of the field ( ) to
activate the picklist and select the appropriate value.
o Date change effective: Enter the date that this change should be effective
from.
Once done, click on the button to save your changes.
Next, click the button to save your changes and back out of the record.
Click the button again to back out of the Client Service Profile.
Requesting Service Category Specific Eligibility Overrides
Provide® Enterprise allows users to request overrides for client eligibility for Part A services
directly within the software system. NOTE: Only Broward County staff will be able to
approve these requests.
To request an Eligibility Override, follow the steps below:
From within the Client Profile, click on the button and select “Eligibility
Override”.
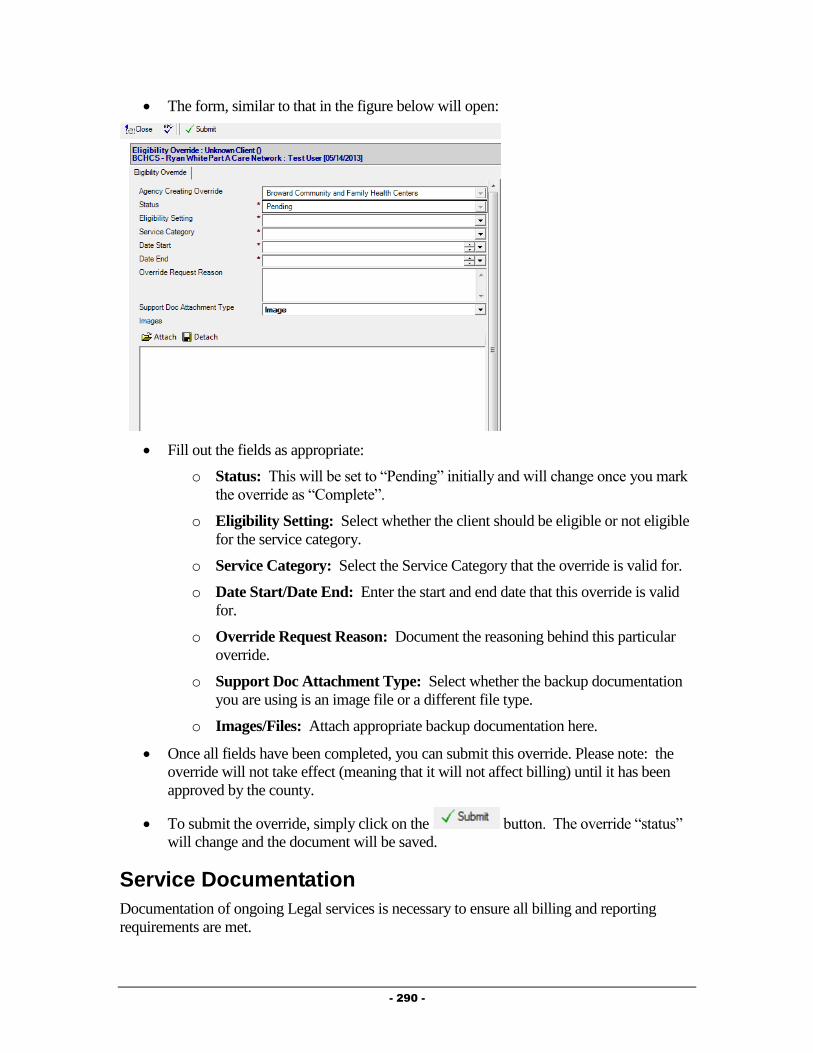
- 290 -
The form, similar to that in the figure below will open:
Fill out the fields as appropriate:
o Status: This will be set to “Pending” initially and will change once you mark
the override as “Complete”.
o Eligibility Setting: Select whether the client should be eligible or not eligible
for the service category.
o Service Category: Select the Service Category that the override is valid for.
o Date Start/Date End: Enter the start and end date that this override is valid
for.
o Override Request Reason: Document the reasoning behind this particular
override.
o Support Doc Attachment Type: Select whether the backup documentation
you are using is an image file or a different file type.
o Images/Files: Attach appropriate backup documentation here.
Once all fields have been completed, you can submit this override. Please note: the
override will not take effect (meaning that it will not affect billing) until it has been
approved by the county.
To submit the override, simply click on the button. The override “status”
will change and the document will be saved.
Service Documentation
Documentation of ongoing Legal services is necessary to ensure all billing and reporting
requirements are met.

- 291 -
Legal Summary
Much of the data related to the client’s activity with the Food Bank can be documented within
the Legal Summary.
To get to the Legal Summary, follow the steps below:
Navigate to the Client Profile. Once in the Profile, select the “View” button and then
choose “Legal Summary”.
A form similar to that in the figure below will open:
The View Legal Activity contains three tabs of information, described below:
o Services: This tab holds information regarding services provided to the client.
Services Provided can be created from this tab.
o Referrals: The Referrals tab of the Food Bank Summary displays any
referrals made for the client and also allows for creation of a Referral record.
o Other Activity: On this tab, you will see any Medical appointments for a
client, as well as Hospitalization history and Letters written on behalf of or to
the client. All three of these Activity types can also be created from this tab.
Service Provided
Service Provided records are used to document legal services provided to clients. These can
be created by following these steps:
Follow the steps listed above to navigate to the Legal Summary.
Select the Services Tab, seen in the figure below:
Click on the button. The Service Provided record, similar
to that in the figure below will open:

- 292 -
Fill out the fields as appropriate:
o Agency: The Agency will default to your agency.
o Status: Defaults to “Completed”. NOTE: Service Provided records will not
be counted in reports or invoicing unless they are “Completed”. Once a
Service Provided is marked as Completed, you will not be able to edit the
Service Provided.
o Provider: This field will default to be your name.
o Service Date: Enter the date the service was provided to the client.
o Service Category: Select the category of the Service Provided. This will fill
in the both the “Service Category” and the “Service Provided” fields.
o Units of Service: This number will automatically default to “1”.
o Units of Measure: This field will automatically be populated.
o Unit Cost of Service: This field will automatically be populated.
o Total Cost of Service: This field will automatically be populated.
o Comments: Enter any comments related to the provision of this service to the
client.
Click on the button to document the completion of this Service Provided.
You will be prompted to Save your changes and will be returned to the View Legal
Summary window.
Additional Documentation
There are additional documents that can be entered in and viewed in a client file. NOTE: If
the client is being served by a Case Management or Medical provider, some of the
information discussed below may already be documented in the system, and you should have
access to view the information.
Referrals
The Referrals Tab of the “View Legal Activity” shows referrals made on behalf of the client
to both Ryan White Part A providers as well as to other agencies within the community. To
get to this information, follow the steps below.

- 293 -
Navigate to the Client Profile. Once in the Profile, select the “View” button and then
choose “View Legal Activity”.
The View Legal Activity form will open.
Select the “Referrals” Tab, seen in the figure below:
Adding a Referral
The Referral record allows you to document specifics regarding referrals made on behalf of
the client. To create, follow the steps below:
Click on the button to activate the referral record seen in the figure
below:
Fill out the fields as appropriate:
o Agency: The Agency field will be automatically filled out based on your
agency.
o Referral Status: Defaults to “Open” meaning that the referral has been made,
but the disposition of the referral is still unknown.
o Referring Person: This will default to your name.
o Referral Date: Enter the Date the referral was made.

- 294 -
o Referral Type: Select whether the referral was an Internal (referral made to
another Ryan White Part A provider) or an External (made to a provider that is
not a Ryan White Part A provider).
o Referred To: Select the agency the referral was made to by clicking on the
button. NOTE: The picklist of agencies will be different based on the
“Referral Type” selected. For “Internal” referrals, you will get a list of only
Ryan White Part A providers, while for “External” referrals, you will get a list
of non-funded providers.
o Referred for Service Type: Select the type of service being requested by
making this referral by clicking on the button.
o Referred for Service Description: Enter any description of why the referral
is being made in this field.
o Date Check Back: Enter a date to receive a reminder to follow up on this
referral.
o Referred to Assignee: If the organization the referral is being made to is in
the Ryan White Part A network and a specific individual has been selected to
receive referrals, their name will appear here.
o Disposition: This field is meant to be filled out when the referral is closed and
the status of the client’s receipt of services is determined.
o Disposition Comments: Enter any comments related to the status of the
referral in this field.
After filling out the record, click on the button. You will be prompted
to save your changes. Click on the button to save your changes and
return to the View Legal Activity form.
Appointments
Clients receiving medical care who are being Case Managed, should have every Kept medical
appointment documented in the system. Additionally, in the near future, appointment records
will be used to schedule appointments with the Central Intake Department for Eligibility
Reviews. To create an appointment, follow the steps below:
Navigate to the “View Food Activity” form by following the steps listed earlier in this
chapter.
Select the “Other Activity” Tab, seen in the figure below:
Click on the button to activate the appointment record seen
below:
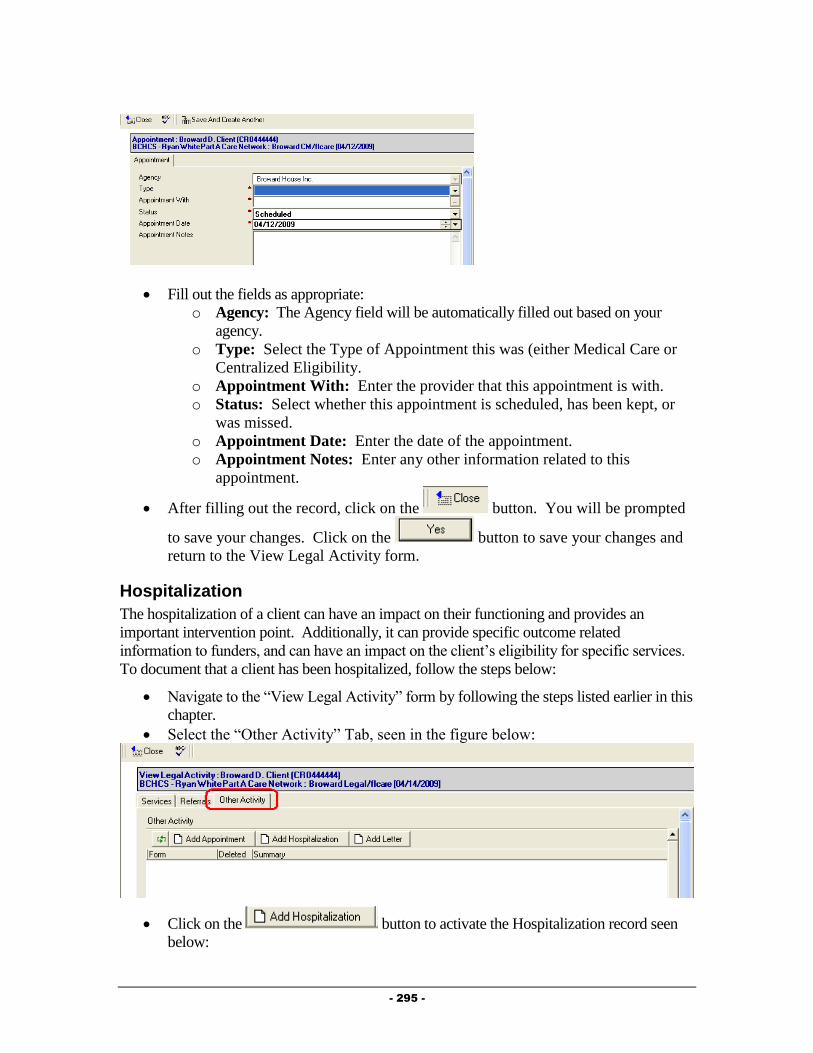
- 295 -
Fill out the fields as appropriate:
o Agency: The Agency field will be automatically filled out based on your
agency.
o Type: Select the Type of Appointment this was (either Medical Care or
Centralized Eligibility.
o Appointment With: Enter the provider that this appointment is with.
o Status: Select whether this appointment is scheduled, has been kept, or
was missed.
o Appointment Date: Enter the date of the appointment.
o Appointment Notes: Enter any other information related to this
appointment.
After filling out the record, click on the button. You will be prompted
to save your changes. Click on the button to save your changes and
return to the View Legal Activity form.
Hospitalization
The hospitalization of a client can have an impact on their functioning and provides an
important intervention point. Additionally, it can provide specific outcome related
information to funders, and can have an impact on the client’s eligibility for specific services.
To document that a client has been hospitalized, follow the steps below:
Navigate to the “View Legal Activity” form by following the steps listed earlier in this
chapter.
Select the “Other Activity” Tab, seen in the figure below:
Click on the button to activate the Hospitalization record seen
below:

- 296 -
Fill out the fields as appropriate:
o Agency: The Agency field will be automatically filled out based on your
agency.
o Status: Select whether the client was Admitted or was Discharged from the
hospital.
o Admission Type: Select the Type of admission this hospitalization was.
o Stay Type: Select the type of condition this hospitalization was related
to.
o Facility: Enter the facility the client was hospitalized in.
o Date Admitted: Enter the date the client was admitted to the
hospitalization.
o Notes Admission: Enter any notes related to the admission.
o Date Discharged: This field will only appear if the “Status” is set to
“Discharged”. Enter the date the client was discharged from the hospital.
o Discharge Reason: This field will only appear if the “Status” is set to
“Discharged”. Enter the reason the client was discharged from the
hospital.
o Actual Length of Stay: This field will only appear if the “Status” is set
to “Discharged” and will automatically be computed based on the Date
Admitted and Date Discharged.
o Notes Discharge: This field will only appear if the “Status” is set to
“Discharged”. Enter any notes related to the client’s discharge from the
hospital.
o Date Notified of Admission: Enter the date you were notified of the
admission to the hospital.
o Length of Stay Authorized: Enter the length of stay authorized by the
insurer, if applicable.
o Admission ID: If applicable, enter the identification number related to
this hospitalization.

- 297 -
After filling out the record, click on the button. You will be prompted
to save your changes. Click on the button to save your changes and
return to the View Legal Activity form.
Letter
Provide® Enterprise allows you to document letters written to or on behalf of a client. To
document a letter, follow the steps below:
Navigate to the “View Legal Activity” form by following the steps listed earlier in this
chapter.
Select the “Other Activity” Tab, seen in the figure below:
Click on the button to activate the Letter record seen below:
Fill out the fields as appropriate:
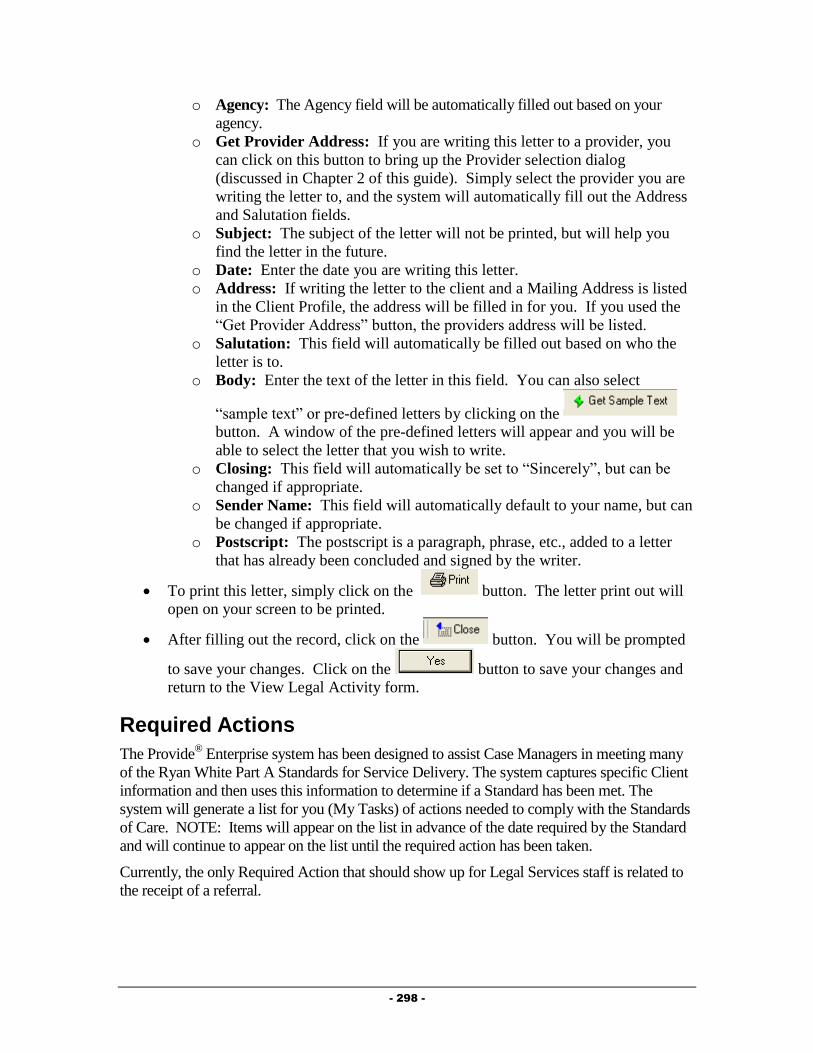
- 298 -
o Agency: The Agency field will be automatically filled out based on your
agency.
o Get Provider Address: If you are writing this letter to a provider, you
can click on this button to bring up the Provider selection dialog
(discussed in Chapter 2 of this guide). Simply select the provider you are
writing the letter to, and the system will automatically fill out the Address
and Salutation fields.
o Subject: The subject of the letter will not be printed, but will help you
find the letter in the future.
o Date: Enter the date you are writing this letter.
o Address: If writing the letter to the client and a Mailing Address is listed
in the Client Profile, the address will be filled in for you. If you used the
“Get Provider Address” button, the providers address will be listed.
o Salutation: This field will automatically be filled out based on who the
letter is to.
o Body: Enter the text of the letter in this field. You can also select
“sample text” or pre-defined letters by clicking on the
button. A window of the pre-defined letters will appear and you will be
able to select the letter that you wish to write.
o Closing: This field will automatically be set to “Sincerely”, but can be
changed if appropriate.
o Sender Name: This field will automatically default to your name, but can
be changed if appropriate.
o Postscript: The postscript is a paragraph, phrase, etc., added to a letter
that has already been concluded and signed by the writer.
To print this letter, simply click on the button. The letter print out will
open on your screen to be printed.
After filling out the record, click on the button. You will be prompted
to save your changes. Click on the button to save your changes and
return to the View Legal Activity form.
Required Actions
The Provide® Enterprise system has been designed to assist Case Managers in meeting many
of the Ryan White Part A Standards for Service Delivery. The system captures specific Client
information and then uses this information to determine if a Standard has been met. The
system will generate a list for you (My Tasks) of actions needed to comply with the Standards
of Care. NOTE: Items will appear on the list in advance of the date required by the Standard
and will continue to appear on the list until the required action has been taken.
Currently, the only Required Action that should show up for Legal Services staff is related to
the receipt of a referral.
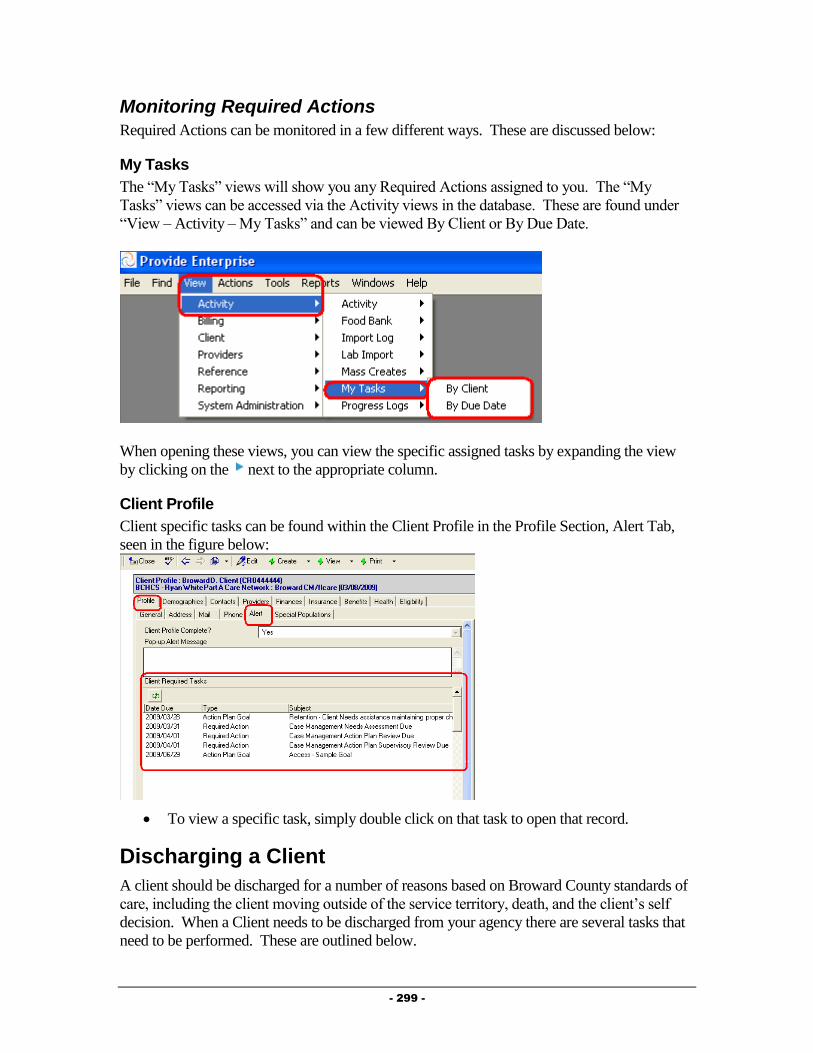
- 299 -
Monitoring Required Actions
Required Actions can be monitored in a few different ways. These are discussed below:
My Tasks
The “My Tasks” views will show you any Required Actions assigned to you. The “My
Tasks” views can be accessed via the Activity views in the database. These are found under
“View – Activity – My Tasks” and can be viewed By Client or By Due Date.
When opening these views, you can view the specific assigned tasks by expanding the view
by clicking on the next to the appropriate column.
Client Profile
Client specific tasks can be found within the Client Profile in the Profile Section, Alert Tab,
seen in the figure below:
To view a specific task, simply double click on that task to open that record.
Discharging a Client
A client should be discharged for a number of reasons based on Broward County standards of
care, including the client moving outside of the service territory, death, and the client’s self
decision. When a Client needs to be discharged from your agency there are several tasks that
need to be performed. These are outlined below.
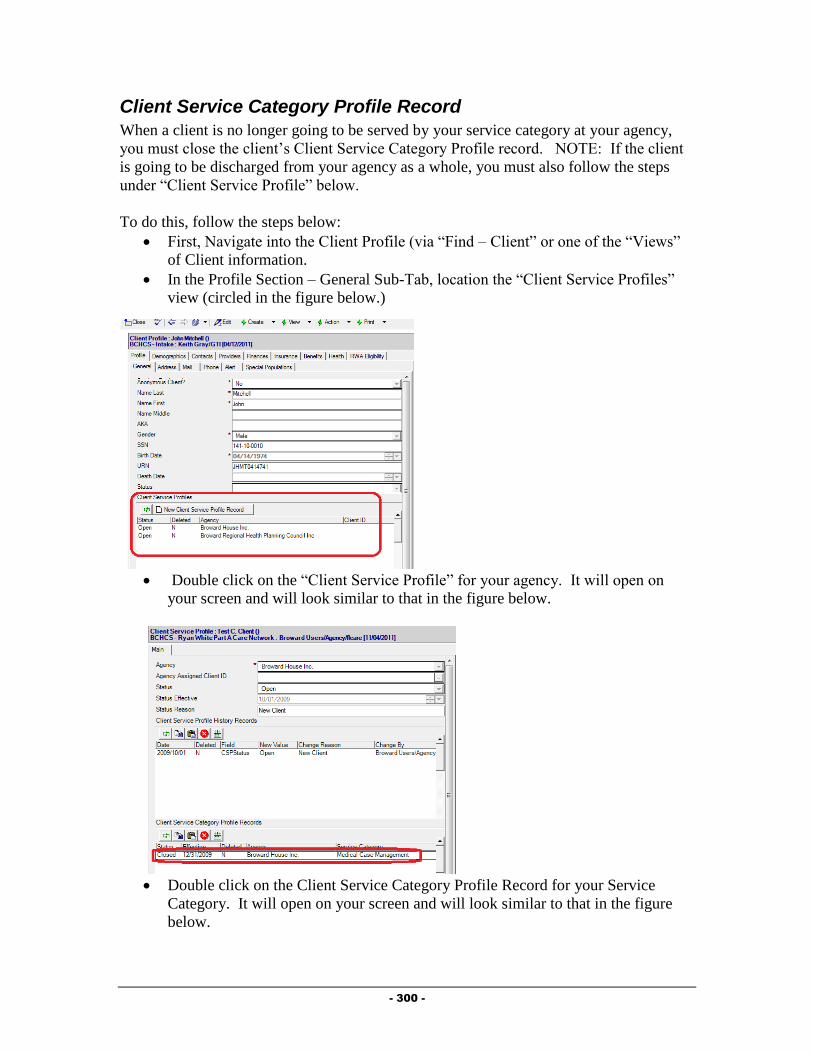
- 300 -
Client Service Category Profile Record
When a client is no longer going to be served by your service category at your agency,
you must close the client’s Client Service Category Profile record. NOTE: If the client
is going to be discharged from your agency as a whole, you must also follow the steps
under “Client Service Profile” below.
To do this, follow the steps below:
First, Navigate into the Client Profile (via “Find – Client” or one of the “Views”
of Client information.
In the Profile Section – General Sub-Tab, location the “Client Service Profiles”
view (circled in the figure below.)
Double click on the “Client Service Profile” for your agency. It will open on
your screen and will look similar to that in the figure below.
Double click on the Client Service Category Profile Record for your Service
Category. It will open on your screen and will look similar to that in the figure
below.

- 301 -
Click the button to bring the record into edit mode.
Next, click the button. A dialog box, similar to that in the figure
below will open on your screen:
Fill out the fields as appropriate:
o Status: Select the status to change the client to.
o Reason for change: Click on the button to the right of the field ( ) to
activate the picklist and select the appropriate value.
o Date change effective: Enter the date that this change should be effective
from.
Once done, click on the button to save your changes.
Next, click the button to save your changes and back out of the record.
Click the button again to back out of the Client Service Profile.
Client Service Profile
Documenting that a client is being discharged from your agency as whole is done via the
Client Service Profile. NOTE: This should only be done when you are discharging the client
from all services at your agency.
This can be done by following the steps below:
Navigate to the Profile Section – General Sub-Tab of the Client Profile, seen in the
figure below:

- 302 -
Double click on the Client Service for your agency. The Client Service Profile
will open and will look similar to that in the figure below:
Click on the button. The Client Service Profile will be brought into Edit
mode.
Click on the button to activate the Status Change dialog box,
similar to that in the figure below:

- 303 -
Complete all fields as appropriate:
o Status: Select “Closed” as the status.
o Reason for change: Select the reason the client is being discharged from
your agency.
o Date change effective: Enter the date the client is being discharged from
your agency.
Click on the button to save your changes. You will be returned to
the Client Service Profile.
After verifying the status change, click on the button. You will be
prompted to save your changes. Click on the button to save your
changes and return to the Client Profile.

- 304 -
Chapter
10
Mental Health Providers
This Chapter outlines the tasks that need to be completed by Mental Health providers within
Provide® Enterprise to meet all billing and reporting requirements. Over time, the data
elements outlined in this chapter must also be kept current as things change for the client.
Intake and Assessment Documentation
At the time of Intake, and as required based on standards of care, there are a number of records
that must be entered with Provide®
Enterprise in order to meet all billing and invoicing
Requirements.
Client Profile
Within the Client Profile, it is important to keep all information updated as the client’s life
situation changes.
Opening Existing Clients to your Agency
If the client had previously been registered in Provide® Enterprise and served by another
agency, you will need to create a Client Service Profile to document that the Client is
now being served by your agency. To do this, follow the steps below:
First, Navigate into the Client Profile (via “Find – Client” or one of the “Views”
of Client information.
In the Profile Section – General Sub-Tab, location the “Client Service Profiles”
view (circled in the figure below.)

- 305 -
If you do not see your agency listed, click the
button to open the Client Service Profile, seen below.
Complete the “Agency Assigned Client ID (if necessary). Make sure to append
your agencies abbreviation to the beginning of the Agency Assigned Client ID
number to help various agencies identify their own clients.
Once done, click on the button to save your changes and back out of the
record.
Re-Opening Existing Clients to your Agency
If the client had previously been registered in Provide® Enterprise and served (and
closed) by your agency, you will need to re-open the Client Service Profile to indicate
that the client has been re-opened to your agency.
To do this, follow the steps below:

- 306 -
First, Navigate into the Client Profile (via “Find – Client” or one of the “Views”
of Client information.
Double click on the Client Service for your agency. The Client Service Profile will
open and will look similar to that in the figure below:
Click on the button. The Client Service Profile will be brought into Edit
mode, similar to that in the figure below:
Click on the button to activate the Status Change dialog box,
similar to that in the figure below:

- 307 -
Complete all fields as appropriate:
o Status: Select “Open” as the status.
o Reason for change: Select the reason the client is being re-opened to
your agency.
o Date change effective: Enter the date the client is being re-opened to
your agency.
Click on the button to save your changes. You will be returned to
the Client Service Profile.
After verifying the status change, click on the button. You will be
prompted to save your changes. Click on the button to save your
changes and return to the Client Profile.
Opening Existing Clients to your Service Category
If the client had previously been registered in Provide®
Enterprise and served by another
agency or by other programs at your agency, you will need to create a Client Service
Category Profile to document that the Client is now being served by your agency and
service category. NOTE: If the client has previously been served by your Service
Category, follow the steps below under “Re-Opening Existing Clients to Your Service
Category”.
To do this, follow the steps below:
First, Navigate into the Client Profile (via “Find – Client” or one of the “Views”
of Client information.
In the Profile Section – General Sub-Tab, location the “Client Service Profiles”
view (circled in the figure below.)

- 308 -
If you do not see your agency listed, follow the steps in the previous section to
“Open Existing Clients to your Agency”.
Double click on the “Client Service Profile” for your agency. It will open on
your screen and will look similar to that in the figure below.
Click the button to open a Cleint Service
Category Profile record, similar to that in the figure below:

- 309 -
Fill out the fields as appropriate:
o Service Category: Select the category of service that you wish to open
the client to.
o Client ID: If your program uses a client ID number, enter this hear.
o Status Effective/Status Reason: These will automatically be computed.
o Client Service Category Profile History Records: This window will
track each change to the Service Profile History Status records over time.
This will automatically occur when changes are made to these records.
Once done, click on the button to save your changes and back out of the
record. Click the button again to back out of the Client Service Profile.
Re-Opening Existing Clients to Your Service Category
If the client had previously been registered in Provide®
Enterprise and served by your
agency and service category, you will need to re-open the client to your service category
(if they are closed). Please note that if the client was closed to your agency, you will
need to re-open the client to your agency as well. See the steps above under “Re-
Opening a Client to Your Agency.”
To do this, follow the steps below:
First, Navigate into the Client Profile (via “Find – Client” or one of the “Views”
of Client information.
In the Profile Section – General Sub-Tab, location the “Client Service Profiles”
view (circled in the figure below.)

- 310 -
Double click on the “Client Service Profile” for your agency. It will open on
your screen and will look similar to that in the figure below.
Double click on the Client Service Category Profile Record for your Service
Category. It will open on your screen and will look similar to that in the figure
below. (NOTE: If you do not see a Client Service Category Profile Record for
your service category, follow the steps earlier in the chapter under “Opening
Existing Clients to your Service Category”.

- 311 -
Click the button to bring the record into edit mode.
Next, click the button. A dialog box, similar to that in the figure
below will open on your screen:
Fill out the fields as appropriate:
o Status: Select the status to change the client to.
o Reason for change: Click on the button to the right of the field ( ) to
activate the picklist and select the appropriate value.
o Date change effective: Enter the date that this change should be effective
from.
Once done, click on the button to save your changes.
Next, click the button to save your changes and back out of the record.
Click the button again to back out of the Client Service Profile.
Assign the Mental Health Counselor
It is important to assign the Mental Health Counselor to the client and to keep this updated as
necessary. To Assign the Mental Health Counselor, follow the steps in Chapter 3, under
“Creating Provider Relationship Records”. The “Provider Relationship” should be set to
Mental Health Counselor.

- 312 -
Mental Health Summary
Much of the data related to the client’s assessment as well as services provided to a client, can
be found within the Mental Health Summary.
To get to the Mental Health Summary, follow the steps below:
Navigate to the Client Profile. Once in the Profile, select the “View” button and then
choose “Mental Health Summary”.
A form similar to that in the figure below will open:
The Mental Health Summary contains nine tabs of information, described below:
o Assessments: The Assessments tab contains information on the client’s
Psychosocial and specific mental health screening/evaluations completed.
o Action Plans: The Action Plans Tab contains all of the client’s action plan
records.
o Contacts & Services: This tab holds information regarding services provided
to the client, including Progress Logs and Service Provided records. Progress
Logs and Services Provided can also be created from this tab.
o Rides: The Rides tab shows information regarding scheduled and provided
van rides for this client.
o Procedures: The procedures tab shows all medical and dental procedure
records entered by Part A providers.
o Medications: The medications tab shows information on all drugs the client
is on and any prescriptions that have been filled by Part A pharmacies. New
drug records can also be added from here.
o Test Results: This tab shows any test result records entered by any provider
serving the client. New Test Result records can also be added from this tab.
o Referrals: The Referrals tab of the Mental Health Summary displays any
referrals made for the client and also allows for creation of a Referral record.
o Other Activity: On this tab, you will see any Medical appointments for a
client, as well as Hospitalization history and Letters written on behalf of or to
the client. All three of these Activity types can also be created from this tab.

- 313 -
Psychosocial Evaluation
It is a Broward County requirement that Mental Health Counselors complete a psychosocial
evaluation on each client they serve. After this assessment some of the Clinical Tools built
into the system can be used to finalize a client’s diagnosis (Instructions to complete these tools
follows the instructions for the Psychosocial Evaluation). To create the Psychosocial
Evaluation, follow these steps:
From just above the Evaluation view window within the Mental Health Summary,
select button .
The Psychosocial Evaluation form, similar to that in the figure below, will open:
Fill out the fields as appropriate.
Main Tab
o Agency: This will default to show your agency.
o Assessment Status: Defaults to “In Progress” until you have marked the
psychosocial evaluation as complete.
o Reason Seeking Treatment: Enter the reason the client is seeking
treatment at this time.
History Tab
o Previous Psychological Treatment: Document the client’s history of
psychological treatment.
o Drug and Alcohol History: Document details of the client’s drug and
alcohol history.
o Residence History: Enter a history of the client’s living
situation/residence.
o Relationship History: Document details of the client’s relationships.
o Cultural/Spiritual/Philosophical History: Enter details regarding the
client’s cultural, spiritual and philosophical history.
- 314 -
Current Status Tab
o Education/Employment/Military: Document details regarding the
client’s current educational, employment and/or military status.
o Interests/Hobbies: Enter detailed information about the client’s current
interests and hobbies.
o Current and Past Legal Issues: Detail the client’s current and past legal
history.
o Past and Present Family Issues: Enter detailed information about the
client’s current and past family issues.
o Current Primary Support System: Document details about the client’s
current primary source of support.
o Mental Status Summary Evaluation: Enter an evaluation of the client’s
mental status.
Axis I Tab
o Primary Diagnosis Code/Description: Select the DSM-IV Code and
Description using the Diagnosis Field Single Value dialog box, discussed
in Chapter 1 of this guide.
o Primary Diagnosis Severity: Select the severity of the client’s diagnosis.
o Primary Diagnosis Comments: Enter any comments related to the
client’s primary Axis I Diagnosis.
o NOTE: The above listed fields are repeated for a Secondary Diagnosis as
well as a Tertiary Diagnosis.
Axis II Tab
o Primary Diagnosis Code/Description: Select the DSM-IV Code and
Description using the Diagnosis Field Single Value dialog box, discussed
in Chapter 1 of this guide.
o Primary Diagnosis Severity: Select the severity of the client’s diagnosis.
o Primary Diagnosis Comments: Enter any comments related to the
client’s primary Axis II Diagnosis.
o NOTE: The above listed fields are repeated for a Secondary Diagnosis as
well as a Tertiary Diagnosis.
Axis III Tab
o Primary Diagnosis Code/Description: Select the DSM-IV Code and
Description using the Diagnosis Field Single Value dialog box, discussed
in Chapter 1 of this guide.
o Primary Diagnosis Severity: Select the severity of the client’s diagnosis.
o Primary Diagnosis Comments: Enter any comments related to the
client’s primary Axis III Diagnosis.
o NOTE: The above listed fields are repeated for a Secondary Diagnosis as
well as a Tertiary Diagnosis.
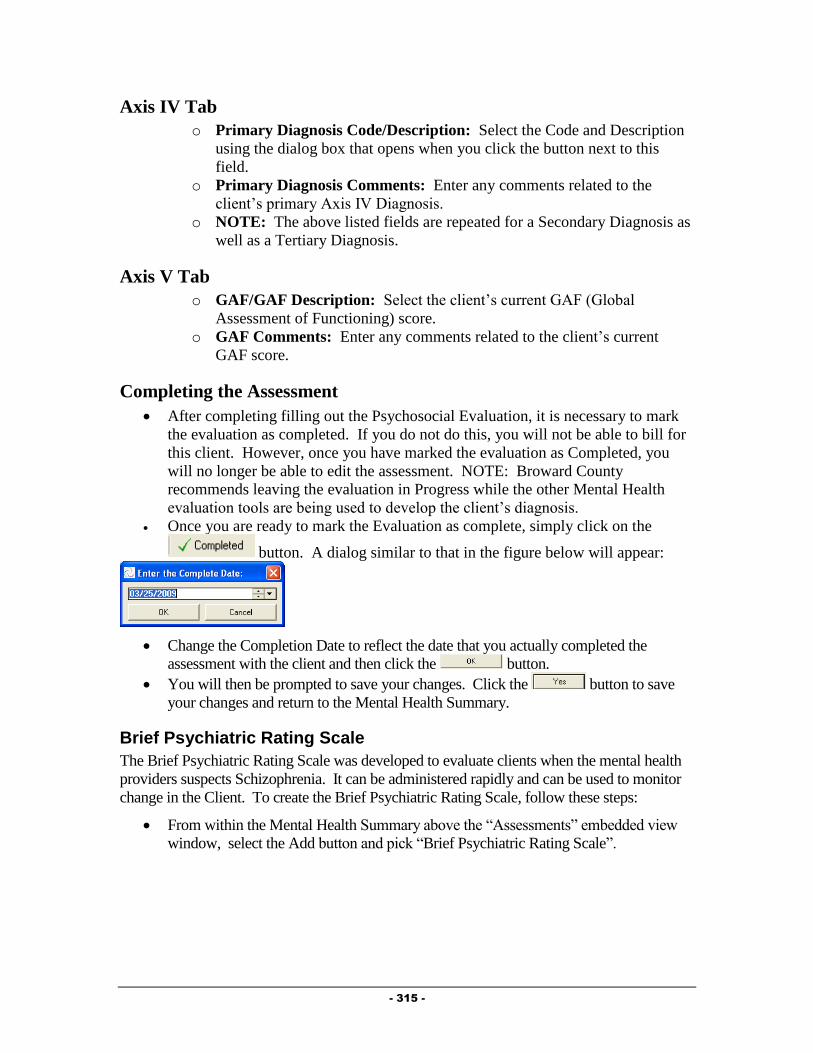
- 315 -
Axis IV Tab
o Primary Diagnosis Code/Description: Select the Code and Description
using the dialog box that opens when you click the button next to this
field.
o Primary Diagnosis Comments: Enter any comments related to the
client’s primary Axis IV Diagnosis.
o NOTE: The above listed fields are repeated for a Secondary Diagnosis as
well as a Tertiary Diagnosis.
Axis V Tab
o GAF/GAF Description: Select the client’s current GAF (Global
Assessment of Functioning) score.
o GAF Comments: Enter any comments related to the client’s current
GAF score.
Completing the Assessment
After completing filling out the Psychosocial Evaluation, it is necessary to mark
the evaluation as completed. If you do not do this, you will not be able to bill for
this client. However, once you have marked the evaluation as Completed, you
will no longer be able to edit the assessment. NOTE: Broward County
recommends leaving the evaluation in Progress while the other Mental Health
evaluation tools are being used to develop the client’s diagnosis.
Once you are ready to mark the Evaluation as complete, simply click on the
button. A dialog similar to that in the figure below will appear:
Change the Completion Date to reflect the date that you actually completed the
assessment with the client and then click the button.
You will then be prompted to save your changes. Click the button to save
your changes and return to the Mental Health Summary.
Brief Psychiatric Rating Scale
The Brief Psychiatric Rating Scale was developed to evaluate clients when the mental health
providers suspects Schizophrenia. It can be administered rapidly and can be used to monitor
change in the Client. To create the Brief Psychiatric Rating Scale, follow these steps:
From within the Mental Health Summary above the “Assessments” embedded view
window, select the Add button and pick “Brief Psychiatric Rating Scale”.
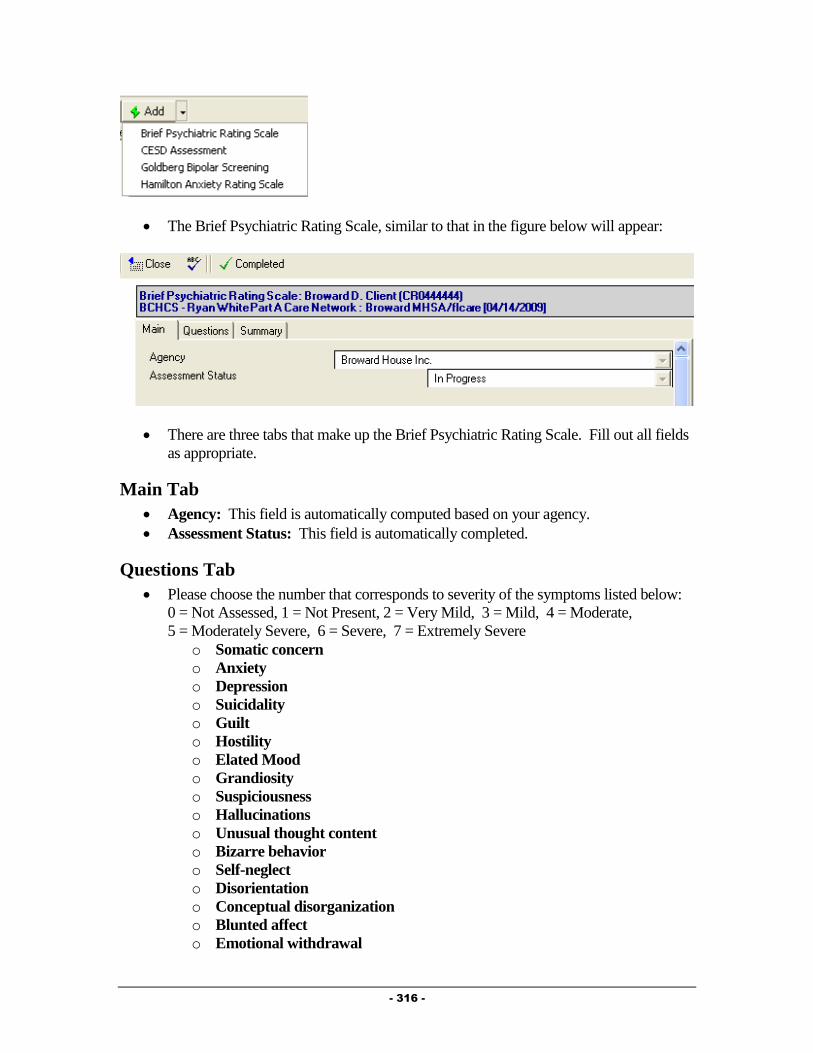
- 316 -
The Brief Psychiatric Rating Scale, similar to that in the figure below will appear:
There are three tabs that make up the Brief Psychiatric Rating Scale. Fill out all fields
as appropriate.
Main Tab
Agency: This field is automatically computed based on your agency.
Assessment Status: This field is automatically completed.
Questions Tab
Please choose the number that corresponds to severity of the symptoms listed below:
0 = Not Assessed, 1 = Not Present, 2 = Very Mild, 3 = Mild, 4 = Moderate,
5 = Moderately Severe, 6 = Severe, 7 = Extremely Severe
o Somatic concern
o Anxiety
o Depression
o Suicidality
o Guilt
o Hostility
o Elated Mood
o Grandiosity
o Suspiciousness
o Hallucinations
o Unusual thought content
o Bizarre behavior
o Self-neglect
o Disorientation
o Conceptual disorganization
o Blunted affect
o Emotional withdrawal

- 317 -
o Motor retardation
o Tension
o Uncooperativeness
o Excitement
o Distractibility
o Motor hyperactivity
o Mannerisms and posturing
Summary Tab
o Score of BPRS Questions: This field will be automatically computed based
on the answers to the questions above.
o Severity Level: This field is automatically computed based on what
information was entered above.
o Sources of Information: Select the sources of information used in
completing this tool.
Confidence in Assessment (1 = Not at All, 5 = Very Confident): Select the level of
confidence of this assessment
Reason(s) Questionable: If applicable, enter why there is not complete confidence in
the assessment.
Completing the Assessment
After completing filling out the Brief Psychiatric Rating Scale, it is necessary to
mark the evaluation as completed. Once you have marked the evaluation as
Completed, you will no longer be able to edit the assessment
Once you are ready to mark the Evaluation as complete, simply click on the
button. A dialog similar to that in the figure below will appear:
Change the Completion Date to reflect the date that you actually completed the
assessment with the client and then click the button.
You will then be prompted to save your changes. Click the button to save
your changes and return to the Mental Health Summary.
CES-D Assessment
The Center for Epidemiological Studies-Depression Scale (CES-D) is a 20-item instrument
that was developed by the National Institute of Mental Health to detect major or clinical
depression in adolescents and adults. To create a CES-D Assessment, follow these steps:
From within the Mental Health Summary above the “Assessments” embedded view
window, select the Add button and pick “CESD Assessment”.

- 318 -
The CESD Assessment form, similar to that in the figure below will appear:
There are three tabs that make up the CESD Assessment. Fill out all fields as
appropriate.
Main Tab
Agency: This field is automatically computed based on your agency.
Assessment Status: This field is automatically completed.
Assessment Created for: Select the reason the assessment was created.
Questions Tab
For Each Statement, please chose the category which best describes how often the
client felt this way during the past week.
o I was bothered by things that usually don't bother me.
o I did not feel like eating; my appetite was poor.
o I felt that I could not shake off the blues even with help from my friends.
o I felt that I was just as good as other people.
o I had trouble keeping my mind on what I was doing.
o I felt depressed.
o I felt that everything I did was an effort.
o I felt hopeful about the future.
o I thought my life had been a failure.
o I felt fearful.
o My sleep was restless.
o I was happy.
o I talked less than usual.
o I felt lonely.
o People were unfriendly.
o I enjoyed life.
o I had crying spells.

- 319 -
o I felt sad.
o I felt that people disliked me.
o I could not get "going".
Score Tab
Total CES-D Score: This field will automatically be computed based on the answers
to the other questions.
Depression Summary: This field will automatically be computed based on the
answers to the other questions.
Completing the Assessment
After completing filling out the CES-D Assessment, it is necessary to mark the
assessment as completed. Once you have marked the assessment as Completed,
you will no longer be able to edit the assessment
Once you are ready to mark the assessment as complete, simply click on the
button. A dialog similar to that in the figure below will appear:
Change the Completion Date to reflect the date that you actually completed the
assessment with the client and then click the button.
You will then be prompted to save your changes. Click the button to save
your changes and return to the Mental Health Summary.
Goldberg Bipolar Screening Assessment
The Goldberg Bipolar Screening was designed to screen for the possibility of a disorder in the
bipolar spectrum in individuals, 18 or older, who have had depression severe enough to have
caused them distress and/or interfered with their functioning at home, work, school or in their
interpersonal relationships. To create a Goldberg Bipolar Screening follow these steps:
From within the Mental Health Summary above the “Assessments” embedded view
window, select the Add button and pick “Goldberg Bipolar Screening”.
The Goldberg Bipolar Screening form, similar to that in the figure below will appear:

- 320 -
There are three tabs that make up the Goldberg Bipolar Screening Assessment. Fill
out all fields as appropriate.
Main Tab
Agency: This field is automatically computed based on your agency.
Assessment Status: This field is automatically completed.
Questions Tab
The items below refer to how the client has and behaved over much of your life. If the
client has usually been one way and recently changed their response, this should
reflect how they have USUALLY been. 0 = Not At All, 1 = Just a Little,
2 = Somewhat, 3 = Moderately, 4 = Quite a Lot, 5 = Very Much
o At times I am much more talkative or speak much faster than usual.
o There have been times when I was much more active or did many more
things than usual.
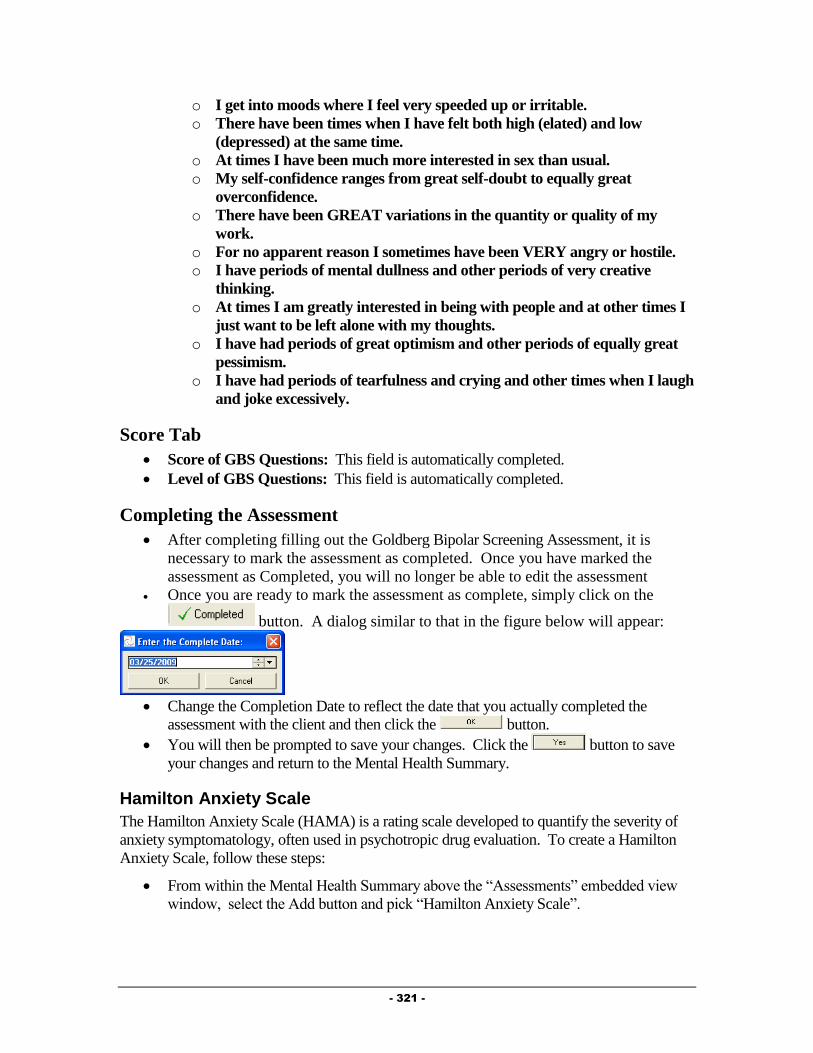
- 321 -
o I get into moods where I feel very speeded up or irritable.
o There have been times when I have felt both high (elated) and low
(depressed) at the same time.
o At times I have been much more interested in sex than usual.
o My self-confidence ranges from great self-doubt to equally great
overconfidence.
o There have been GREAT variations in the quantity or quality of my
work.
o For no apparent reason I sometimes have been VERY angry or hostile.
o I have periods of mental dullness and other periods of very creative
thinking.
o At times I am greatly interested in being with people and at other times I
just want to be left alone with my thoughts.
o I have had periods of great optimism and other periods of equally great
pessimism.
o I have had periods of tearfulness and crying and other times when I laugh
and joke excessively.
Score Tab
Score of GBS Questions: This field is automatically completed.
Level of GBS Questions: This field is automatically completed.
Completing the Assessment
After completing filling out the Goldberg Bipolar Screening Assessment, it is
necessary to mark the assessment as completed. Once you have marked the
assessment as Completed, you will no longer be able to edit the assessment
Once you are ready to mark the assessment as complete, simply click on the
button. A dialog similar to that in the figure below will appear:
Change the Completion Date to reflect the date that you actually completed the
assessment with the client and then click the button.
You will then be prompted to save your changes. Click the button to save
your changes and return to the Mental Health Summary.
Hamilton Anxiety Scale
The Hamilton Anxiety Scale (HAMA) is a rating scale developed to quantify the severity of
anxiety symptomatology, often used in psychotropic drug evaluation. To create a Hamilton
Anxiety Scale, follow these steps:
From within the Mental Health Summary above the “Assessments” embedded view
window, select the Add button and pick “Hamilton Anxiety Scale”.
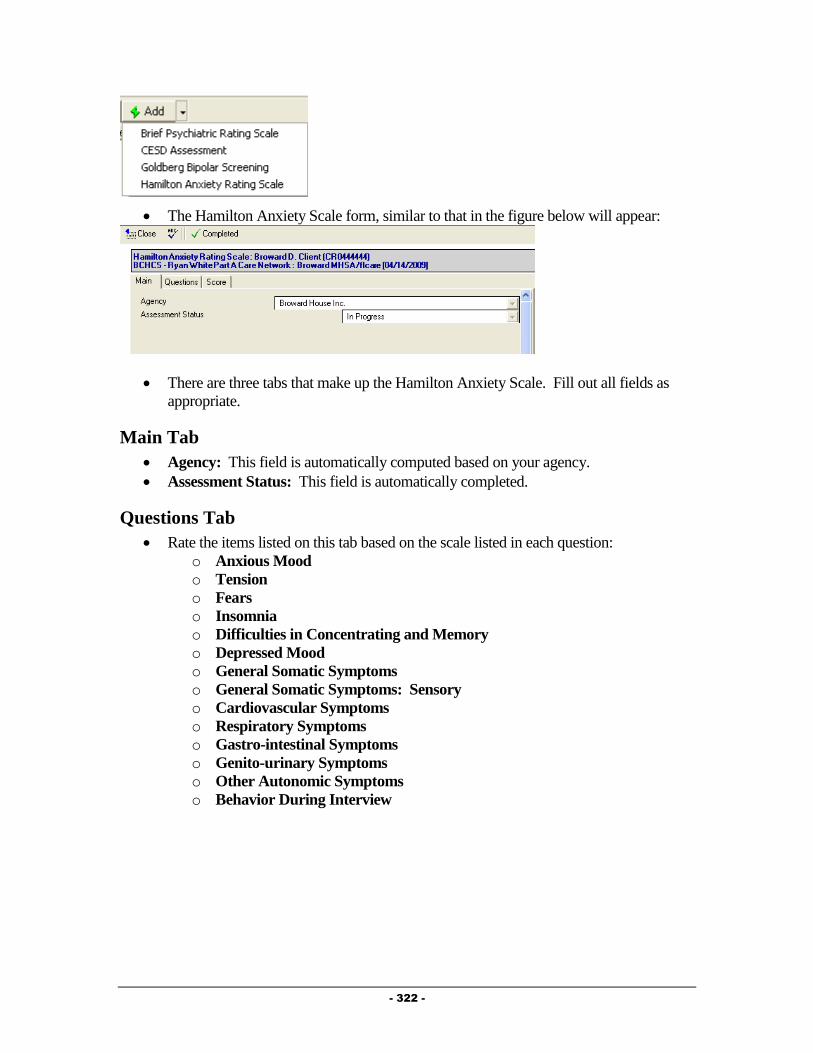
- 322 -
The Hamilton Anxiety Scale form, similar to that in the figure below will appear:
There are three tabs that make up the Hamilton Anxiety Scale. Fill out all fields as
appropriate.
Main Tab
Agency: This field is automatically computed based on your agency.
Assessment Status: This field is automatically completed.
Questions Tab
Rate the items listed on this tab based on the scale listed in each question:
o Anxious Mood
o Tension
o Fears
o Insomnia
o Difficulties in Concentrating and Memory
o Depressed Mood
o General Somatic Symptoms
o General Somatic Symptoms: Sensory
o Cardiovascular Symptoms
o Respiratory Symptoms
o Gastro-intestinal Symptoms
o Genito-urinary Symptoms
o Other Autonomic Symptoms
o Behavior During Interview

- 323 -
Score Tab
Score: This field is automatically completed.
Level: This field is automatically completed.
Completing the Assessment
After completing filling out the Hamilton Anxiety Scale, it is necessary to mark the
assessment as completed. Once you have marked the assessment as Completed,
you will no longer be able to edit the assessment
Once you are ready to mark the assessment as complete, simply click on the
button. A dialog similar to that in the figure below will appear:
Change the Completion Date to reflect the date that you actually completed the
assessment with the client and then click the button.
You will then be prompted to save your changes. Click the button to save
your changes and return to the Mental Health Summary.
Action Plan
The Action Plan is used to document the plan of care for your client. It contains the specific
goals that the client and Counselor will work towards while the client is being served. To
create an Action Plan (or to view the existing Action Plan), follow these steps:
From within the Mental Health Summary, select the Action Plans tab and click on the
button.
The Action Plan will open, similar to that in the figure below:
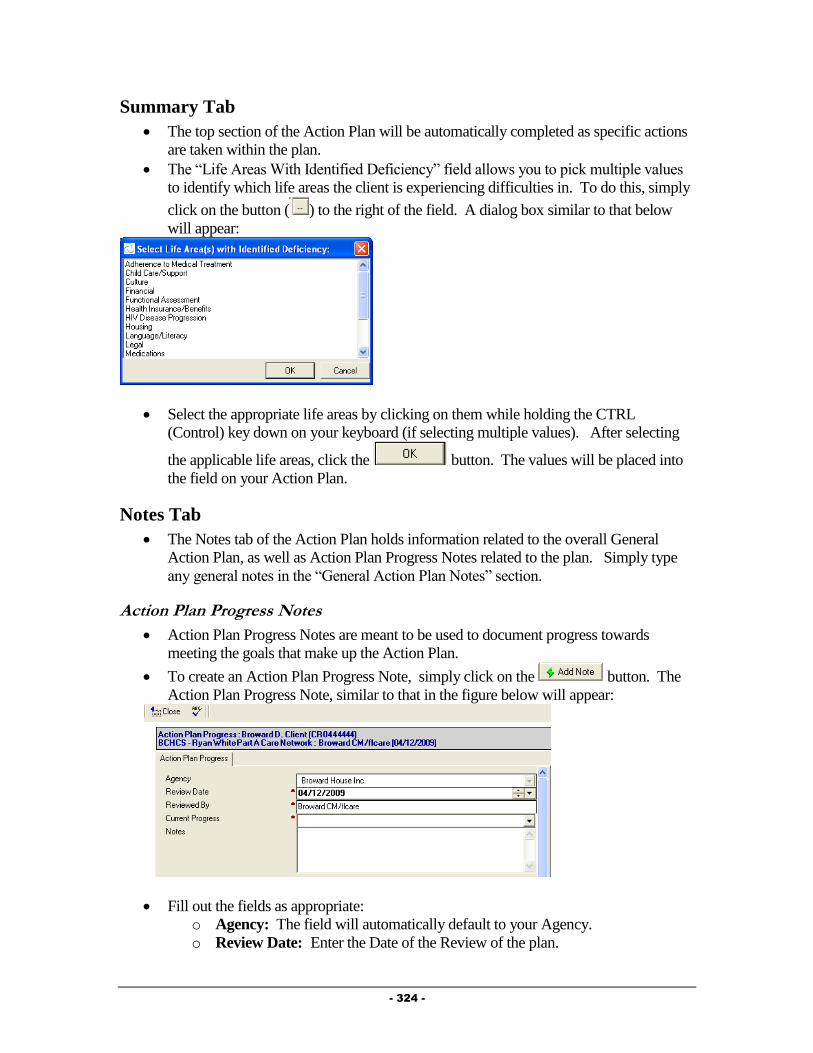
- 324 -
Summary Tab
The top section of the Action Plan will be automatically completed as specific actions
are taken within the plan.
The “Life Areas With Identified Deficiency” field allows you to pick multiple values
to identify which life areas the client is experiencing difficulties in. To do this, simply
click on the button ( ) to the right of the field. A dialog box similar to that below
will appear:
Select the appropriate life areas by clicking on them while holding the CTRL
(Control) key down on your keyboard (if selecting multiple values). After selecting
the applicable life areas, click the button. The values will be placed into
the field on your Action Plan.
Notes Tab
The Notes tab of the Action Plan holds information related to the overall General
Action Plan, as well as Action Plan Progress Notes related to the plan. Simply type
any general notes in the “General Action Plan Notes” section.
Action Plan Progress Notes
Action Plan Progress Notes are meant to be used to document progress towards
meeting the goals that make up the Action Plan.
To create an Action Plan Progress Note, simply click on the button. The
Action Plan Progress Note, similar to that in the figure below will appear:
Fill out the fields as appropriate:
o Agency: The field will automatically default to your Agency.
o Review Date: Enter the Date of the Review of the plan.
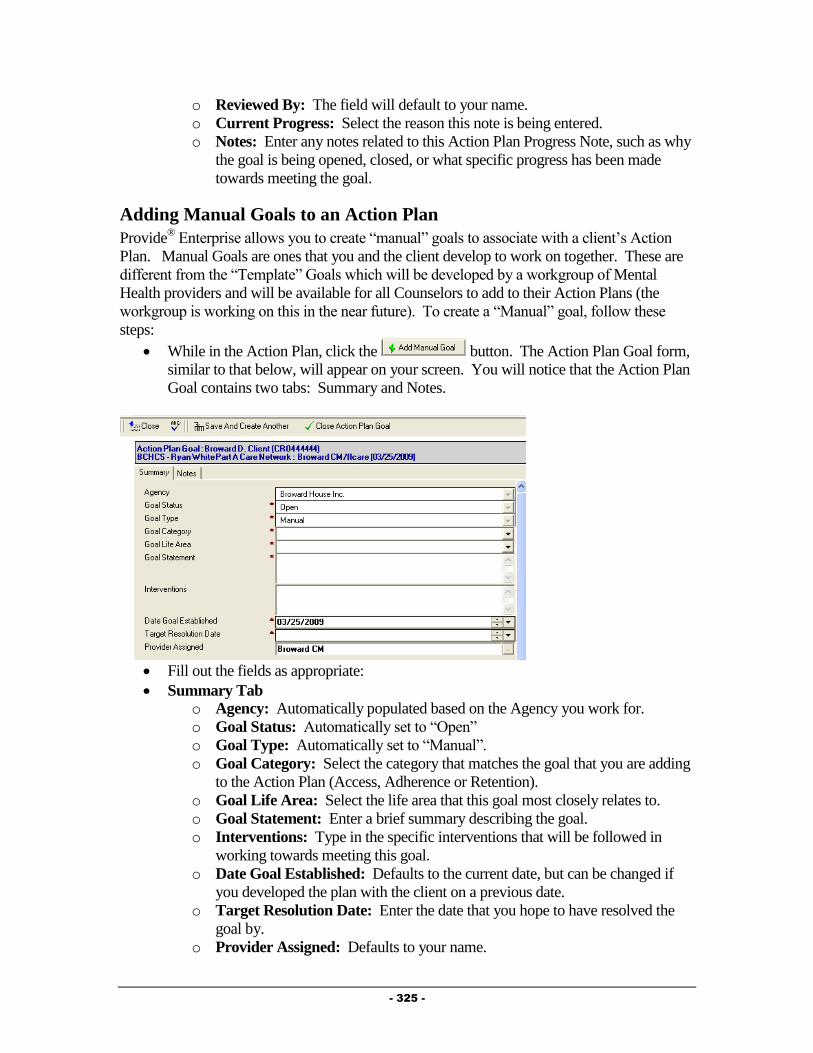
- 325 -
o Reviewed By: The field will default to your name.
o Current Progress: Select the reason this note is being entered.
o Notes: Enter any notes related to this Action Plan Progress Note, such as why
the goal is being opened, closed, or what specific progress has been made
towards meeting the goal.
Adding Manual Goals to an Action Plan
Provide® Enterprise allows you to create “manual” goals to associate with a client’s Action
Plan. Manual Goals are ones that you and the client develop to work on together. These are
different from the “Template” Goals which will be developed by a workgroup of Mental
Health providers and will be available for all Counselors to add to their Action Plans (the
workgroup is working on this in the near future). To create a “Manual” goal, follow these
steps:
While in the Action Plan, click the button. The Action Plan Goal form,
similar to that below, will appear on your screen. You will notice that the Action Plan
Goal contains two tabs: Summary and Notes.
Fill out the fields as appropriate:
Summary Tab
o Agency: Automatically populated based on the Agency you work for.
o Goal Status: Automatically set to “Open”
o Goal Type: Automatically set to “Manual”.
o Goal Category: Select the category that matches the goal that you are adding
to the Action Plan (Access, Adherence or Retention).
o Goal Life Area: Select the life area that this goal most closely relates to.
o Goal Statement: Enter a brief summary describing the goal.
o Interventions: Type in the specific interventions that will be followed in
working towards meeting this goal.
o Date Goal Established: Defaults to the current date, but can be changed if
you developed the plan with the client on a previous date.
o Target Resolution Date: Enter the date that you hope to have resolved the
goal by.
o Provider Assigned: Defaults to your name.

- 326 -
Notes Tab o General Action Plan Goal Notes: Enter any notes related to this goal that
you wish to.
o Action Plan Goal Notes: This window allows you to create specific notes
related to this goal at the time the goal is opened, when a goal is closed, or
when you want to document Progress towards the goal. To enter an Action
Plan Goal Notes, simply click the button. The form will appear
on your screen. Fill out the fields as appropriate, including the “Review
Date”, “Current Progress”, and the appropriate “Notes”.
o Action Plan Related Progress Logs: This window will show all Progress
Logs that have had this specific goal linked to it.
After filling out all appropriate fields, you can close save this record and return to the
Action plan (by clicking on the button and saying to the “Want to
Save Your Changes” message.
If creating more than one “Manual” Goal, you can click on the
button. This will save and close the current record and bring up a brand new Action
Plan Goal record for you to fill out.
Adding Template Goals to an Action Plan
Provide® Enterprise allows your community to create “template” goals to associate with a
client’s Action Plan. These are suggested goals that can be integrated into a client’s Action
Plan. Basically, when you add a Template Goal to your Action Plan, you do not need to re-
write many of the fields within the Action Plan Goal, as they will be automatically filled in
based on the information within the Template goal. Currently, the Mental Health Workgroup
is working on creating these goals for Broward County Counselors to use. They will be
available in the near future. To add a “Template” Goal, follow these steps:
While in the Action Plan, click the button. The template selector
will open, similar to that in the figure below:

- 327 -
Click on next to the applicable Life Areas to expand the view and show the
Categories of goals that are available to be selected. Click on the next to the
“name” of the goal that you wish to add to your Action Plan and click on the
button.
The goal will be added to your Action Plan. Clicking the Refresh button ( ) will
refresh the embedded view of the goals and you will see the “Template” Goal appear.
If you wish to edit the goal, simply double click on the goal, click the button and
make any necessary changes.
Completing the Action Plan
Once you have added applicable goals to your Action Plan, it is important to mark that the
plan has been Completed with the client. Changing the status of the Action Plan is important
because it will be used in reporting and auditing. To Complete the Action Plan, follow the
steps below:
From within the Action Plan, click on the button on the
Action bar. A dialog box similar to that in the figure below will appear:
Enter or Select the Date that the Action Plan was completed with your client and click
on the button. The Action Plan will refresh, with the “Action Plan

- 328 -
Status” changing to “Completed” and the “Date Completed” and “Completed By”
fields being populated (seen in the figure below):
The Completed button will then disappear and new buttons will appear. These will be
discussed below.
Reviewing the Action Plan
Once the Action Plan has been marked as Completed, you will be available to “Review” the
Action Plan at any time. Marking the Action Plan as reviewed is certifying that you have
reviewed the plan with your client and made any adjustments and updates necessary. To
mark the Action Plan as reviewed, follow the steps below:
From within the Action Plan, click on the button on the Action bar. A dialog
box similar to that in the figure below will appear:
Enter or Select the Date that the Action Plan was reviewed with your client and click
on the button. The Action Plan will refresh, with the “Action Plan
Status” changing to “Reviewed” and the “Last CM Review Date” and “Last CM
Reviewed By” fields being populated (seen in the figure below):
Supervisor Review of the Action Plan
Once the Action Plan has been marked as Completed, the Supervisor will be available to
document their review of the Action Plan. To mark the Action Plan as having been reviewed
by the supervisor, follow the steps below:
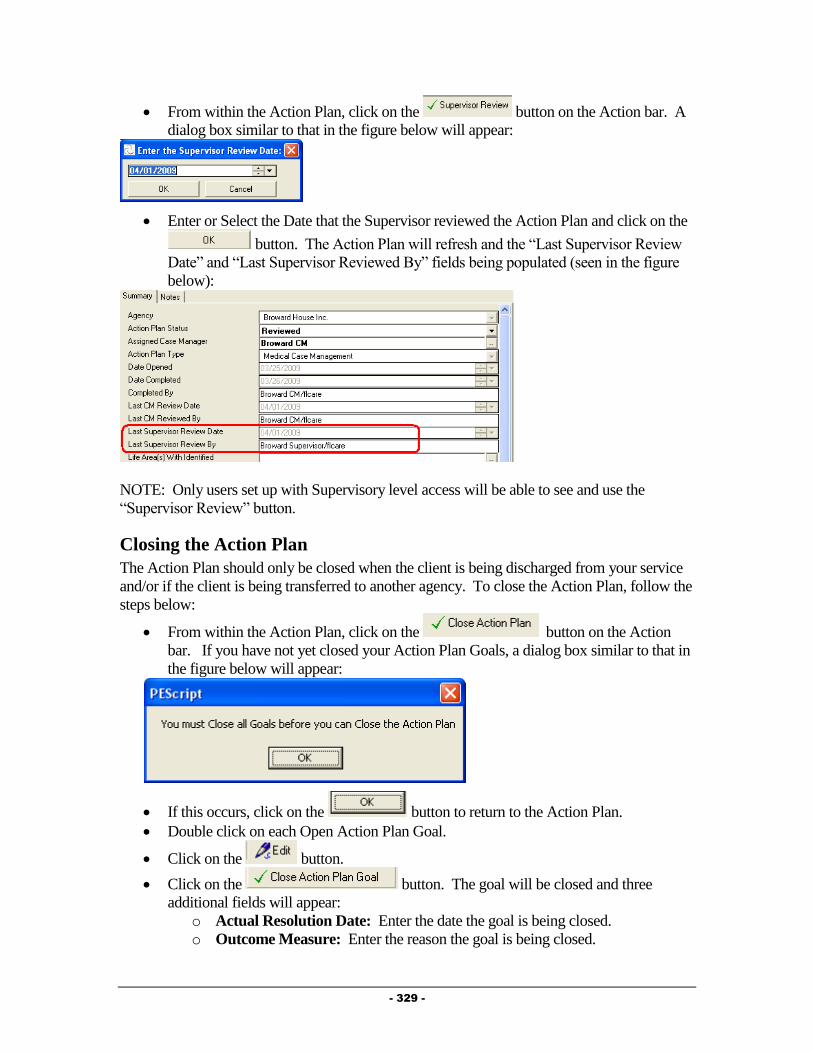
- 329 -
From within the Action Plan, click on the button on the Action bar. A
dialog box similar to that in the figure below will appear:
Enter or Select the Date that the Supervisor reviewed the Action Plan and click on the
button. The Action Plan will refresh and the “Last Supervisor Review
Date” and “Last Supervisor Reviewed By” fields being populated (seen in the figure
below):
NOTE: Only users set up with Supervisory level access will be able to see and use the
“Supervisor Review” button.
Closing the Action Plan
The Action Plan should only be closed when the client is being discharged from your service
and/or if the client is being transferred to another agency. To close the Action Plan, follow the
steps below:
From within the Action Plan, click on the button on the Action
bar. If you have not yet closed your Action Plan Goals, a dialog box similar to that in
the figure below will appear:
If this occurs, click on the button to return to the Action Plan.
Double click on each Open Action Plan Goal.
Click on the button.
Click on the button. The goal will be closed and three
additional fields will appear:
o Actual Resolution Date: Enter the date the goal is being closed.
o Outcome Measure: Enter the reason the goal is being closed.
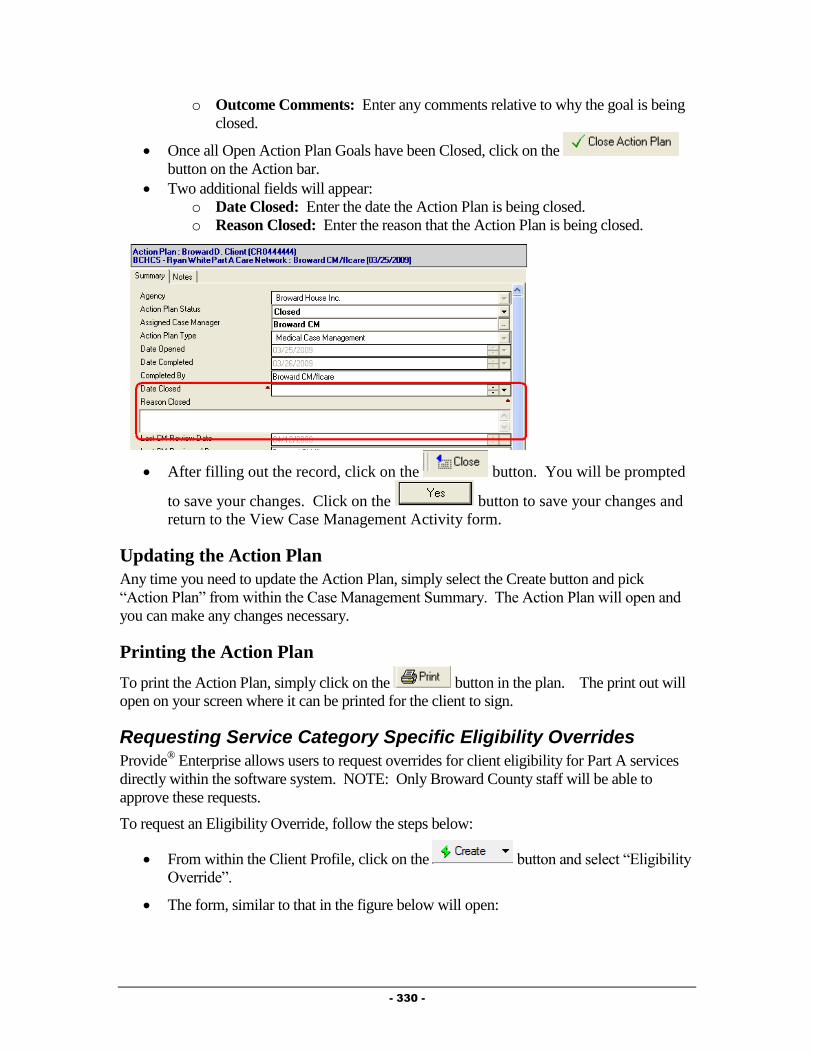
- 330 -
o Outcome Comments: Enter any comments relative to why the goal is being
closed.
Once all Open Action Plan Goals have been Closed, click on the
button on the Action bar.
Two additional fields will appear:
o Date Closed: Enter the date the Action Plan is being closed.
o Reason Closed: Enter the reason that the Action Plan is being closed.
After filling out the record, click on the button. You will be prompted
to save your changes. Click on the button to save your changes and
return to the View Case Management Activity form.
Updating the Action Plan
Any time you need to update the Action Plan, simply select the Create button and pick
“Action Plan” from within the Case Management Summary. The Action Plan will open and
you can make any changes necessary.
Printing the Action Plan
To print the Action Plan, simply click on the button in the plan. The print out will
open on your screen where it can be printed for the client to sign.
Requesting Service Category Specific Eligibility Overrides
Provide® Enterprise allows users to request overrides for client eligibility for Part A services
directly within the software system. NOTE: Only Broward County staff will be able to
approve these requests.
To request an Eligibility Override, follow the steps below:
From within the Client Profile, click on the button and select “Eligibility
Override”.
The form, similar to that in the figure below will open:

- 331 -
Fill out the fields as appropriate:
o Status: This will be set to “Pending” initially and will change once you mark
the override as “Complete”.
o Eligibility Setting: Select whether the client should be eligible or not eligible
for the service category.
o Service Category: Select the Service Category that the override is valid for.
o Date Start/Date End: Enter the start and end date that this override is valid
for.
o Override Request Reason: Document the reasoning behind this particular
override.
o Support Doc Attachment Type: Select whether the backup documentation
you are using is an image file or a different file type.
o Images/Files: Attach appropriate backup documentation here.
Once all fields have been completed, you can submit this override. Please note: the
override will not take effect (meaning that it will not affect billing) until it has been
approved by the county.
To submit the override, simply click on the button. The override “status”
will change and the document will be saved.
Service Documentation
Documentation of ongoing Mental Health related activities is important to ensure all client
needs are being addressed. This, historically, has been done using the Service Provided
record. Effective in early 2010, Mental Health providers will be required to document
encounters using Progress Logs.
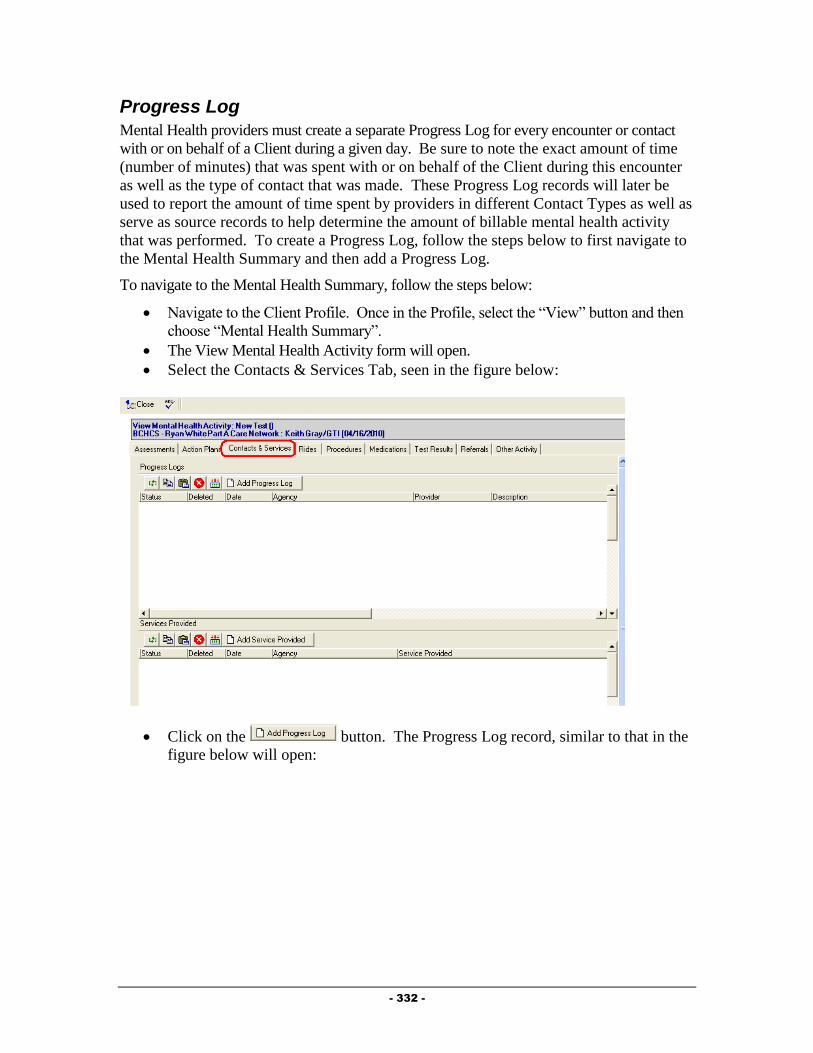
- 332 -
Progress Log
Mental Health providers must create a separate Progress Log for every encounter or contact
with or on behalf of a Client during a given day. Be sure to note the exact amount of time
(number of minutes) that was spent with or on behalf of the Client during this encounter
as well as the type of contact that was made. These Progress Log records will later be
used to report the amount of time spent by providers in different Contact Types as well as
serve as source records to help determine the amount of billable mental health activity
that was performed. To create a Progress Log, follow the steps below to first navigate to
the Mental Health Summary and then add a Progress Log.
To navigate to the Mental Health Summary, follow the steps below:
Navigate to the Client Profile. Once in the Profile, select the “View” button and then
choose “Mental Health Summary”.
The View Mental Health Activity form will open.
Select the Contacts & Services Tab, seen in the figure below:
Click on the button. The Progress Log record, similar to that in the
figure below will open:
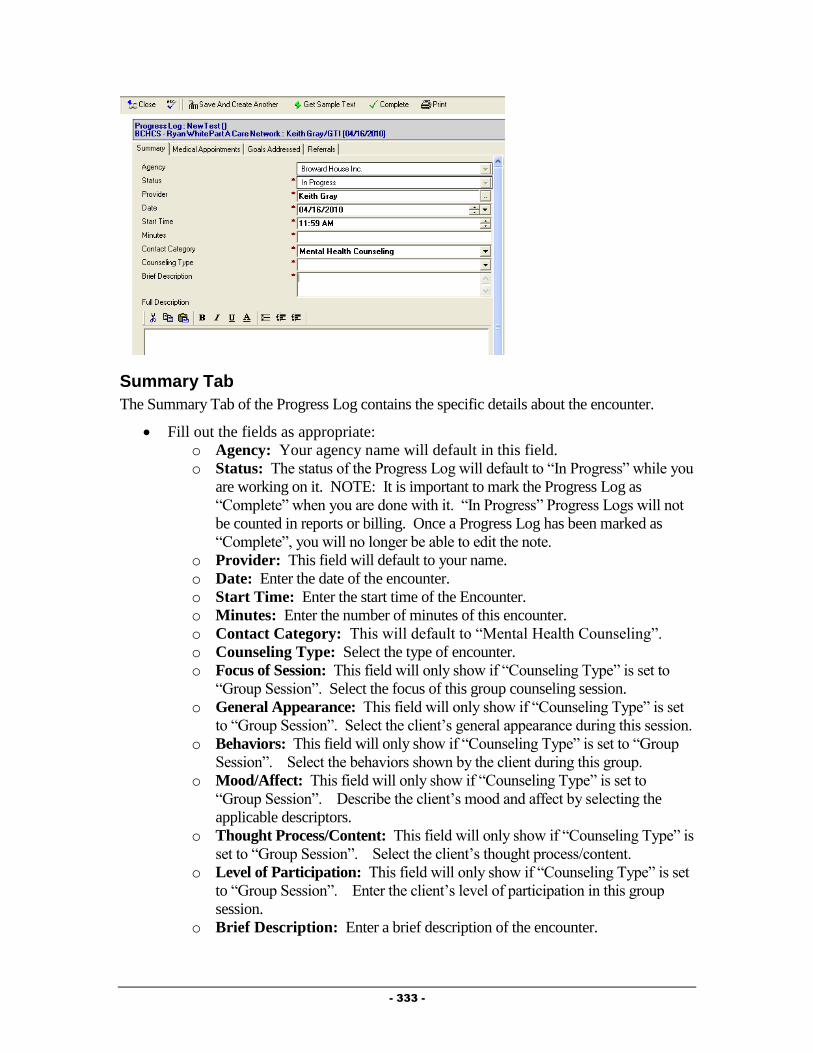
- 333 -
Summary Tab
The Summary Tab of the Progress Log contains the specific details about the encounter.
Fill out the fields as appropriate:
o Agency: Your agency name will default in this field.
o Status: The status of the Progress Log will default to “In Progress” while you
are working on it. NOTE: It is important to mark the Progress Log as
“Complete” when you are done with it. “In Progress” Progress Logs will not
be counted in reports or billing. Once a Progress Log has been marked as
“Complete”, you will no longer be able to edit the note.
o Provider: This field will default to your name.
o Date: Enter the date of the encounter.
o Start Time: Enter the start time of the Encounter.
o Minutes: Enter the number of minutes of this encounter.
o Contact Category: This will default to “Mental Health Counseling”.
o Counseling Type: Select the type of encounter.
o Focus of Session: This field will only show if “Counseling Type” is set to
“Group Session”. Select the focus of this group counseling session.
o General Appearance: This field will only show if “Counseling Type” is set
to “Group Session”. Select the client’s general appearance during this session.
o Behaviors: This field will only show if “Counseling Type” is set to “Group
Session”. Select the behaviors shown by the client during this group.
o Mood/Affect: This field will only show if “Counseling Type” is set to
“Group Session”. Describe the client’s mood and affect by selecting the
applicable descriptors.
o Thought Process/Content: This field will only show if “Counseling Type” is
set to “Group Session”. Select the client’s thought process/content.
o Level of Participation: This field will only show if “Counseling Type” is set
to “Group Session”. Enter the client’s level of participation in this group
session.
o Brief Description: Enter a brief description of the encounter.
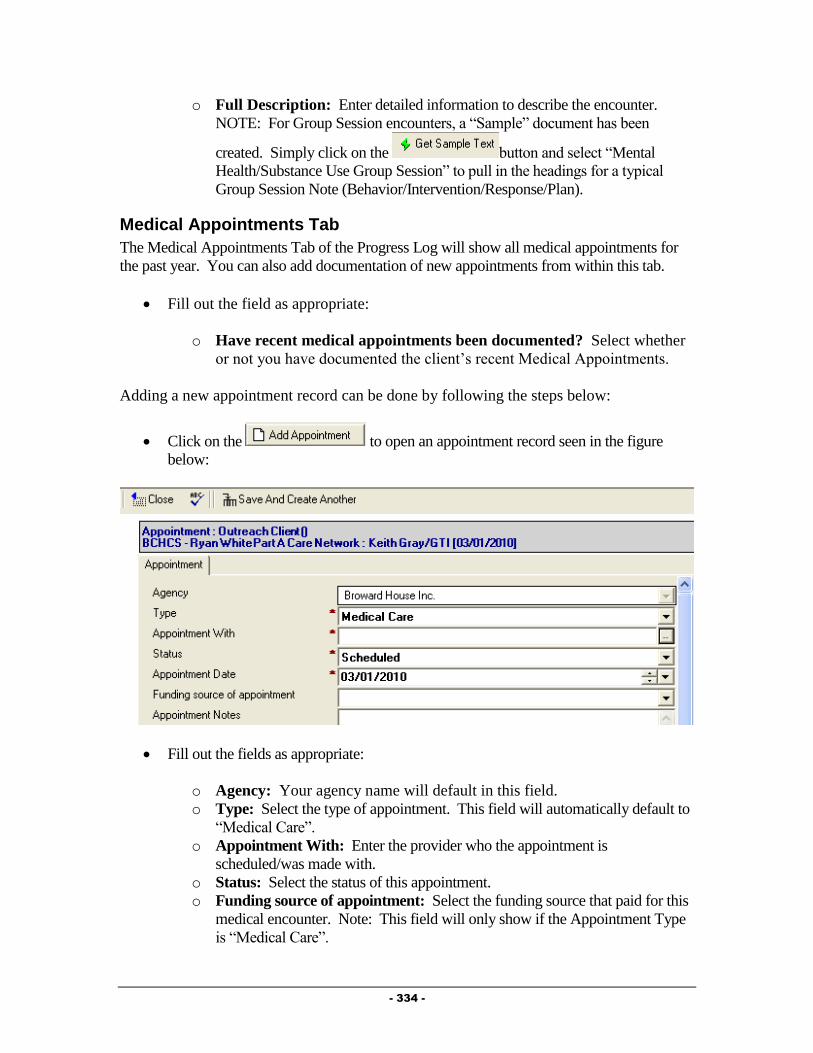
- 334 -
o Full Description: Enter detailed information to describe the encounter.
NOTE: For Group Session encounters, a “Sample” document has been
created. Simply click on the button and select “Mental
Health/Substance Use Group Session” to pull in the headings for a typical
Group Session Note (Behavior/Intervention/Response/Plan).
Medical Appointments Tab
The Medical Appointments Tab of the Progress Log will show all medical appointments for
the past year. You can also add documentation of new appointments from within this tab.
Fill out the field as appropriate:
o Have recent medical appointments been documented? Select whether
or not you have documented the client’s recent Medical Appointments.
Adding a new appointment record can be done by following the steps below:
Click on the to open an appointment record seen in the figure
below:
Fill out the fields as appropriate:
o Agency: Your agency name will default in this field.
o Type: Select the type of appointment. This field will automatically default to
“Medical Care”.
o Appointment With: Enter the provider who the appointment is
scheduled/was made with.
o Status: Select the status of this appointment.
o Funding source of appointment: Select the funding source that paid for this
medical encounter. Note: This field will only show if the Appointment Type
is “Medical Care”.

- 335 -
o Appointment Notes: Enter any additional comments or notes related to this
appointment.
After filling out the record, click on the button. You will be prompted
to save your changes. Click on the button to save your changes and
return to the View Outreach Activity form.
Goals Addressed Tab
The Goals Addressed Tab of the Progress Log allows you to link in Goals from the Action
Plan that were addressed during the Encounter. To select the Goals that were addressed
during this Encounter, follow the steps below:
Click on the button at the lower right side of the “Action Plan Goals Addressed”
view window. A dialog box, similar to that in the figure below, will open displaying
all of the open goals related to this client’s Action Plan:
Click in the white column next to each of the goals addressed during the encounter. A
check mark will be placed next to each goal.
Click on the button to return to the Progress Log. The goals will be
linked into the “Action Plan Goals Addressed” window, similar to that in the figure
below:

- 336 -
NOTE: You will not be able to Complete the progress log, unless you have linked in at least
one Action Plan Goal in the “Goals Addressed” section.
Referrals Tab
The Referrals Tab of the Progress Log allows you to document referrals made on behalf of the
client during this encounter to the Progress Log. To create a Referral from within the Progress
Log, follow the steps below:
Click on the button to activate the referral record seen in the figure
below:
Fill out the fields as appropriate:
o Agency: This field will be automatically filled out based on your agency.
o Referral Status: This field defaults to “Open” meaning that the referral has
been made, but the disposition of the referral is still unknown.
o Referring Person: This field will default to your name.
o Referral Date: Enter the Date the referral was made.
o Referral Type: Select whether the referral was an Internal (referral made to
another Ryan White Part A provider) or an External (made to a provider that is
not a Ryan White Part A provider).

- 337 -
o Referred To: Select the agency the referral was made to by clicking on the
button. NOTE: The picklist of agencies will be different based on the
“Referral Type” selected. For “Internal” referrals, you will get a list of only
Ryan White Part A providers, while for “External” referrals, you will get a list
of non-funded providers.
o Referred for Service Type: Select the type of service being requested by
making this referral by clicking on the button.
o Referred for Service Description: Enter any description of why the referral
is being made in this field.
o Date Check Back: Enter a date to receive a reminder to follow up on this
referral.
o Referred to Assignee: If the organization the referral is being made to is in
the Ryan White Part A network and a specific individual has been selected to
receive referrals, their name will appear here.
o Disposition: This field is meant to be filled out when the referral is closed and
the status of the client’s receipt of services is determined.
o Disposition Comments: Enter any comments related to the status of the
referral in this field.
After filling out the record, click on the button. You will be prompted
to save your changes. Click on the button to save your changes and
return to the View Mental Health Activity form.
Completing the Progress Log
After completely filling out the Progress Log, it is important to mark the Progress Log as
Complete. Progress Logs that are not marked as Complete will not appear in invoicing or
reporting.
IMPORTANT BILLING NOTE: The billing requirements are slightly different than the
protocols of the service delivery model. No services can be billed in until the treatment plan
and biopsychosocial are completed in Provide® Enterprise. Any service provided 45 days prior
to the authorization date of the treatment is billable once the treatment plan is entered in
Provide® Enterprise. You still have the ability to document Progress logs for the individual
sessions in PE but they can’t be marked as complete in the system until the Treatment plan or
Action plan is entered into PE. (To save your note in Progress after completing all required
fields (red asterisk marked fields), simply click on the button and select “Yes” to
the save changes question.).
Once a Progress Log has been marked as Complete, you will no longer be able to edit that
Progress Log. To mark a Progress Log as Complete, follow the steps below:
Click on the button.
You will be prompted to Save your changes and will be returned to the View Mental
Health Activity window.
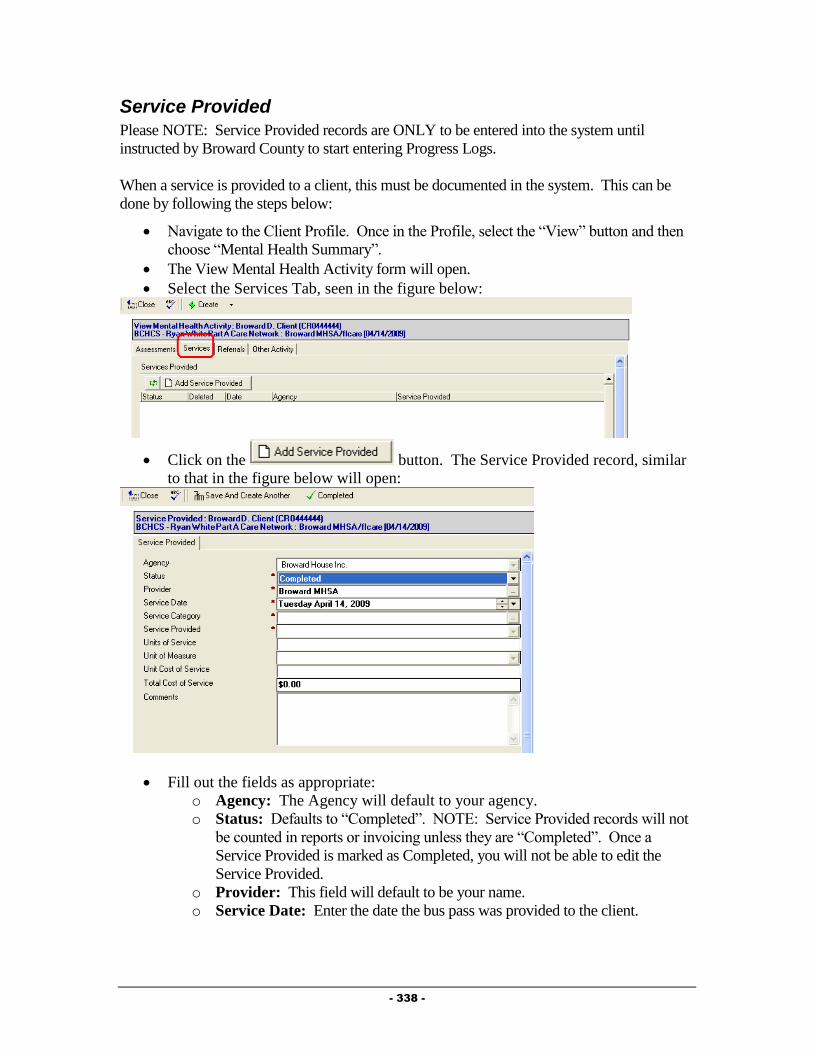
- 338 -
Service Provided
Please NOTE: Service Provided records are ONLY to be entered into the system until
instructed by Broward County to start entering Progress Logs.
When a service is provided to a client, this must be documented in the system. This can be
done by following the steps below:
Navigate to the Client Profile. Once in the Profile, select the “View” button and then
choose “Mental Health Summary”.
The View Mental Health Activity form will open.
Select the Services Tab, seen in the figure below:
Click on the button. The Service Provided record, similar
to that in the figure below will open:
Fill out the fields as appropriate:
o Agency: The Agency will default to your agency.
o Status: Defaults to “Completed”. NOTE: Service Provided records will not
be counted in reports or invoicing unless they are “Completed”. Once a
Service Provided is marked as Completed, you will not be able to edit the
Service Provided.
o Provider: This field will default to be your name.
o Service Date: Enter the date the bus pass was provided to the client.

- 339 -
o Service Category: Select the category of the Service Provided by clicking
on the button. This will fill in the both the “Service Category” and the
“Service Provided” fields.
o Units of Service: This number will automatically default to “1”. Change if
the units of service is different.
o Units of Measure: This field will automatically be populated.
o Unit Cost of Service: This field will automatically be populated.
o Total Cost of Service: This field will automatically be populated.
o Comments: Enter any comments related to the provision of this service to the
client.
Click on the button to document the completion of this Service Provided.
You will be prompted to Save your changes and will be returned to the View Mental
Health Activity window.
Ongoing Documentation
Documentation of ongoing Mental Health activities is important to ensure all client needs are
being addressed. The Mental Health Summary should be used as a tool to help ensure that all
related documents are completed.
Referrals
The Referrals Tab of the “View Mental Health Activity” shows referrals made on behalf of
the client to both Ryan White Part A providers as well as to other agencies within the
community. To get to this information, follow the steps below.
Navigate to the Client Profile. Once in the Profile, select the “View” button and then
choose “Mental Health Summary”.
The View Mental Health Activity form will open.
Select the “Referrals” Tab, seen in the figure below:
Adding a Referral
The Referral record allows you to document specifics regarding referrals made on behalf of
the client. To create, follow the steps below:
Click on the button to activate the referral record seen in the figure
below:
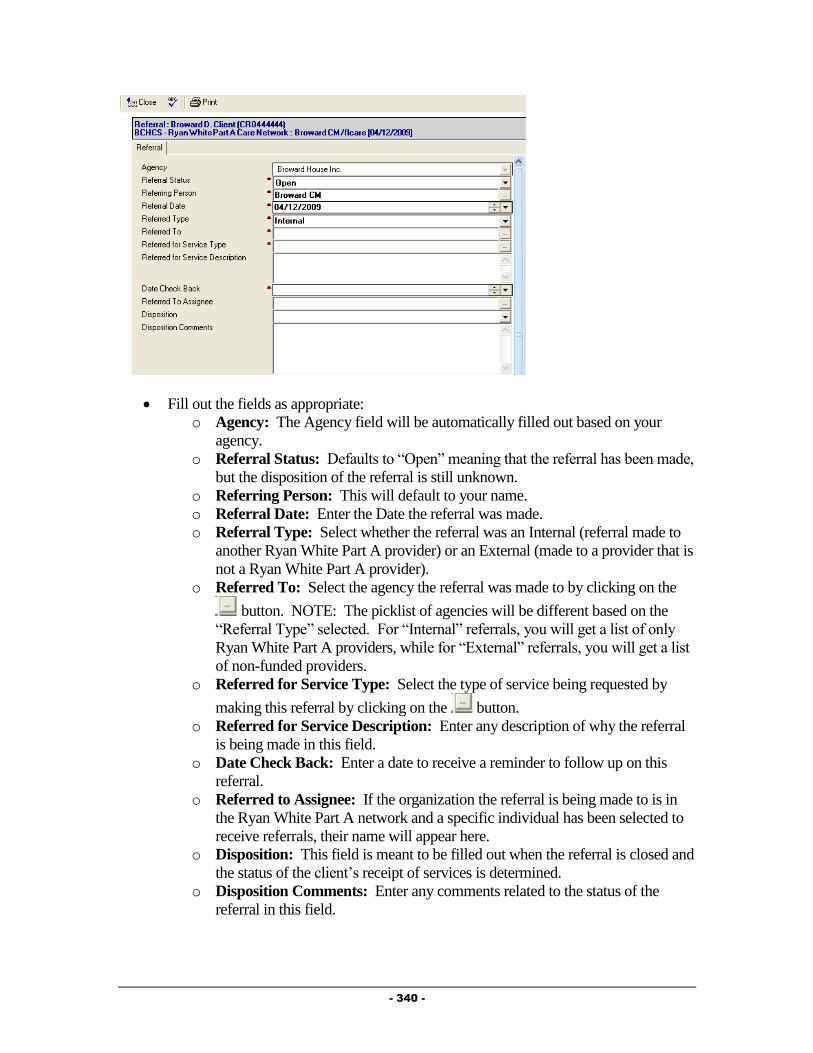
- 340 -
Fill out the fields as appropriate:
o Agency: The Agency field will be automatically filled out based on your
agency.
o Referral Status: Defaults to “Open” meaning that the referral has been made,
but the disposition of the referral is still unknown.
o Referring Person: This will default to your name.
o Referral Date: Enter the Date the referral was made.
o Referral Type: Select whether the referral was an Internal (referral made to
another Ryan White Part A provider) or an External (made to a provider that is
not a Ryan White Part A provider).
o Referred To: Select the agency the referral was made to by clicking on the
button. NOTE: The picklist of agencies will be different based on the
“Referral Type” selected. For “Internal” referrals, you will get a list of only
Ryan White Part A providers, while for “External” referrals, you will get a list
of non-funded providers.
o Referred for Service Type: Select the type of service being requested by
making this referral by clicking on the button.
o Referred for Service Description: Enter any description of why the referral
is being made in this field.
o Date Check Back: Enter a date to receive a reminder to follow up on this
referral.
o Referred to Assignee: If the organization the referral is being made to is in
the Ryan White Part A network and a specific individual has been selected to
receive referrals, their name will appear here.
o Disposition: This field is meant to be filled out when the referral is closed and
the status of the client’s receipt of services is determined.
o Disposition Comments: Enter any comments related to the status of the
referral in this field.

- 341 -
After filling out the record, click on the button. You will be prompted
to save your changes. Click on the button to save your changes and
return to the View Mental Health Activity form.
Other Activity
The Other Activity Tab of the “View Mental Health Activity” other information regarding the
client’s condition, including Hospitalizations, Letters, and Appointments. To get to this
information, follow the steps below.
Navigate to the Client Profile. Once in the Profile, select the “View” button and then
choose “Mental Health Summary”.
The View Mental Health Activity form will open.
Select the “Other Activity” Tab, seen in the figure below:
Appointments
For Clients receiving medical care from non Ryan White Part A funded providers, every
Medical Appointment kept must be documented (typically by their Case Manager or Medical
Care Provider). Client’s being served by Ryan White Part A Providers will already have this
appointment information documented in this section by that provider. Additionally, in the
near future, appointment records will be used to schedule appointments with the Central
Intake Department for Eligibility Reviews.
To create an appointment, follow the steps below:
Click on the button to activate the appointment record seen
below:
Fill out the fields as appropriate:
o Agency: The Agency field will be automatically filled out based on your
agency.
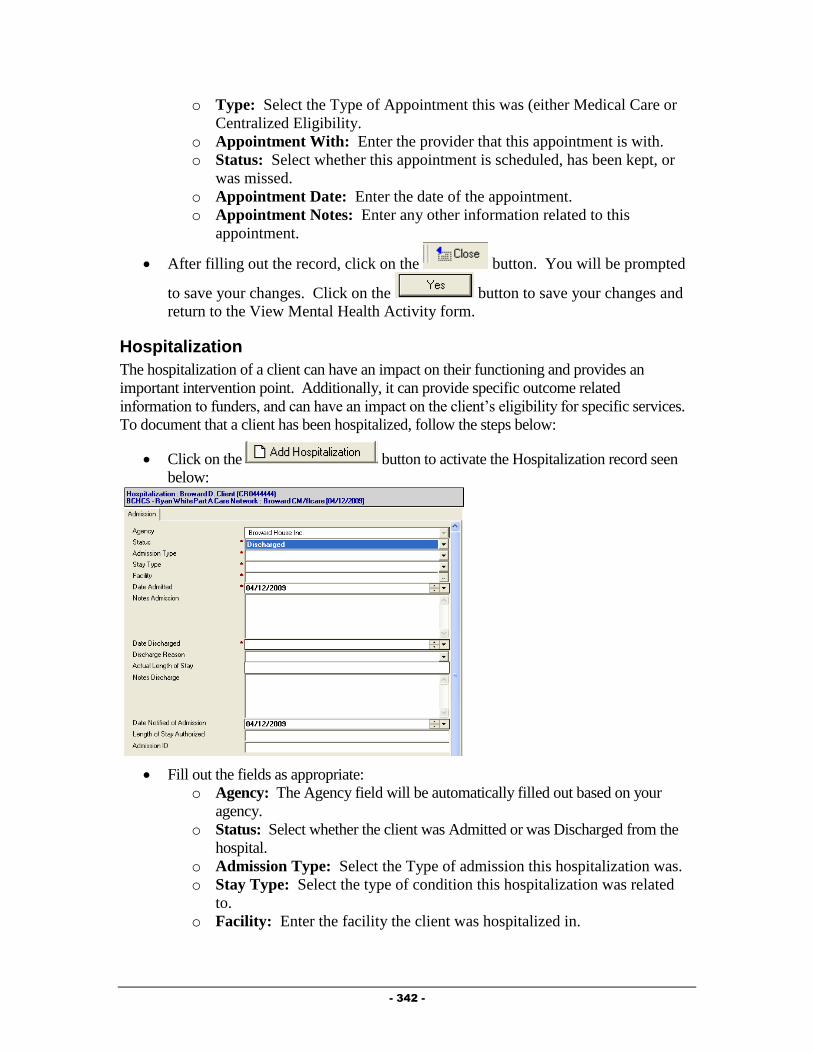
- 342 -
o Type: Select the Type of Appointment this was (either Medical Care or
Centralized Eligibility.
o Appointment With: Enter the provider that this appointment is with.
o Status: Select whether this appointment is scheduled, has been kept, or
was missed.
o Appointment Date: Enter the date of the appointment.
o Appointment Notes: Enter any other information related to this
appointment.
After filling out the record, click on the button. You will be prompted
to save your changes. Click on the button to save your changes and
return to the View Mental Health Activity form.
Hospitalization
The hospitalization of a client can have an impact on their functioning and provides an
important intervention point. Additionally, it can provide specific outcome related
information to funders, and can have an impact on the client’s eligibility for specific services.
To document that a client has been hospitalized, follow the steps below:
Click on the button to activate the Hospitalization record seen
below:
Fill out the fields as appropriate:
o Agency: The Agency field will be automatically filled out based on your
agency.
o Status: Select whether the client was Admitted or was Discharged from the
hospital.
o Admission Type: Select the Type of admission this hospitalization was.
o Stay Type: Select the type of condition this hospitalization was related
to.
o Facility: Enter the facility the client was hospitalized in.

- 343 -
o Date Admitted: Enter the date the client was admitted to the
hospitalization.
o Notes Admission: Enter any notes related to the admission.
o Date Discharged: This field will only appear if the “Status” is set to
“Discharged”. Enter the date the client was discharged from the hospital.
o Discharge Reason: This field will only appear if the “Status” is set to
“Discharged”. Enter the reason the client was discharged from the
hospital.
o Actual Length of Stay: This field will only appear if the “Status” is set
to “Discharged” and will automatically be computed based on the Date
Admitted and Date Discharged.
o Notes Discharge: This field will only appear if the “Status” is set to
“Discharged”. Enter any notes related to the client’s discharge from the
hospital.
o Date Notified of Admission: Enter the date you were notified of the
admission to the hospital.
o Length of Stay Authorized: Enter the length of stay authorized by the
insurer, if applicable.
o Admission ID: If applicable, enter the identification number related to
this hospitalization.
After filling out the record, click on the button. You will be prompted
to save your changes. Click on the button to save your changes and
return to the View Mental Health Activity form.
Letter
Provide® Enterprise allows you to document letters written to or on behalf of a client. To
document a letter, follow the steps below:
Click on the button to activate the Letter record seen below:

- 344 -
Fill out the fields as appropriate:
o Agency: The Agency field will be automatically filled out based on your
agency.
o Get Provider Address: If you are writing this letter to a provider, you
can click on this button to bring up the Provider selection dialog
(discussed in Chapter 2 of this Guide). Simply select the provider you are
writing the letter to, and the system will automatically fill out the Address
and Salutation fields.
o Subject: The subject of the letter will not be printed, but will help you
find the letter in the future.
o Date: Enter the date you are writing this letter.
o Address: If writing the letter to the client and a Mailing Address is listed
in the Client Profile, the address will be filled in for you. If you used the
“Get Provider Address” button, the providers address will be listed.
o Salutation: This field will automatically be filled out based on who the
letter is to.
o Body: Enter the text of the letter in this field. You can also select
“sample text” or pre-defined letters by clicking on the
button. A window of the pre-defined letters will appear and you will be
able to select the letter that you wish to write.
o Closing: This field will automatically be set to “Sincerely”, but can be
changed if appropriate.
o Sender Name: This field will automatically default to your name, but can
be changed if appropriate.

- 345 -
o Postscript: The postscript is a paragraph, phrase, etc., added to a letter
that has already been concluded and signed by the writer.
To print this letter, simply click on the button. The letter print out will
open on your screen to be printed.
After filling out the record, click on the button. You will be prompted
to save your changes. Click on the button to save your changes and
return to the View Mental Health Activity form.
Additional Ongoing Documentation
Additional documentation should be completed as changes occur in a client’s life. This
documentation is listed below.
Update the Action Plan as needed, adding new goals to address problems and closing
goals that are no longer applicable.
Update the Client Profile and associated records as needed to reflect changes in the
Client’s life.
Releasing Behavioral Health Documentation to Another Behavioral Health Provider To release Behavioral Health records to another agency, please follow the steps below:
1) Navigate to the “View Mental Health Summary” form from within the Client
Profile.
2) Select the “Releases” Tab, seen in the figure below.
3) Click on the button to open the Release record, similar to that in
the figure below:

- 346 -
4) Fill out the fields as appropriate:
a. Status: Defaults to “Active”
b. Releasing Agency: Defaults to your agency.
c. Releasing to Agency: Select the Mental Health or Substance Abuse
service providing agency that you want to release Mental Health or
Substance Abuse records to.
d. Activity Release Effective Date: Enter the date to start releasing records
from.
e. Authorized By: This will default to your name.
f. Scanned Release: Attach or Scan in the release of information form
allowing this release.
5) Click the button to save the record.
6) Select “Yes” to the “Save Changes” dialog to save the change. The other agency
will be able to view the information in the record within 30 minutes or so, after
the system has processed the release.
Required Actions
The Provide® Enterprise system has been designed to assist Counselors in meeting many of
the Ryan White Part A Standards for Service Delivery. The Provide® Enterprise system
captures specific Client information and then uses this information to determine if a Standard
has been met. The system will generate a list for you (My Tasks) of actions needed to comply
with the Standards of Care. NOTE: Items will appear on the list in advance of the date
required by the Standard and will continue to appear on the list until the required action has
been taken. Broward County and the Mental Health workgroup are currently defining the
Required Actions that will be used for Mental Health Counselors.
Monitoring Required Actions
Required Actions can be monitored in a few different ways. These are discussed below:

- 347 -
My Tasks
The “My Tasks” views will show you any Required Actions assigned to you. The “My
Tasks” views can be accessed via the Activity views in the database. These are found under
“View – Activity – My Tasks” and can be viewed By Client or By Due Date.
When opening these views, you can view the specific assigned tasks by expanding the view
by clicking on the next to the appropriate column.
Client Profile
Client specific tasks can be found within the Client Profile in the Profile Section, Alert Tab,
seen in the figure below:
To view a specific task, simply double click on that task to open that record.
Discharging a Client
A client should be discharged for a number of reasons based on Broward County Standards of
Care, including the client moving outside of the service territory, death and the client’s self
decision. When a Client needs to be discharged from your agency there are several tasks that
need to be performed. These are outlined below.
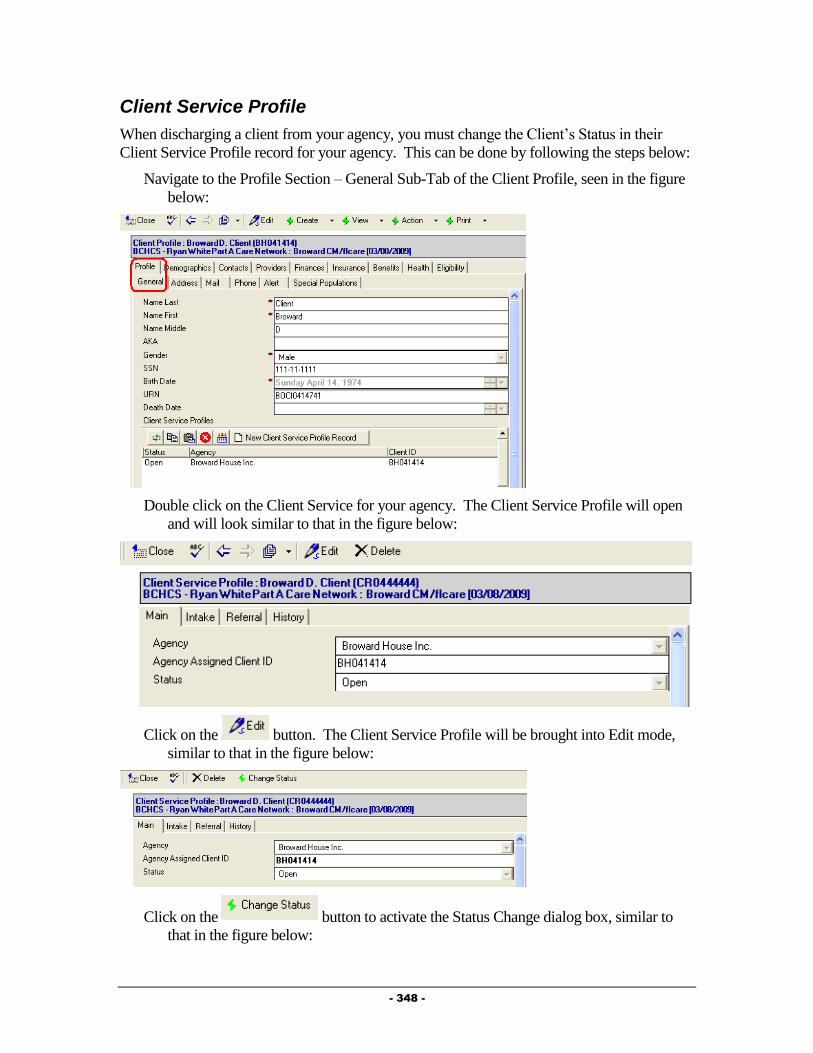
- 348 -
Client Service Profile
When discharging a client from your agency, you must change the Client’s Status in their
Client Service Profile record for your agency. This can be done by following the steps below:
Navigate to the Profile Section – General Sub-Tab of the Client Profile, seen in the figure
below:
Double click on the Client Service for your agency. The Client Service Profile will open
and will look similar to that in the figure below:
Click on the button. The Client Service Profile will be brought into Edit mode,
similar to that in the figure below:
Click on the button to activate the Status Change dialog box, similar to
that in the figure below:

- 349 -
Complete all fields as appropriate:
Status: Select “Closed” as the status.
Reason for change: Select the reason the clients is being discharged from your
agency.
Date change effective: Enter the date the client is being discharged from your
agency.
Click on the button to save your changes. You will be returned to the Client
Service Profile.
After verifying the status change, click on the button. You will be
prompted to save your changes. Click on the button to save your
changes and return to the Client Profile.
Terminate the Provider Relationship
When discharging a client from your agency, you must end your provider relationship with the
client. This can be done by following the steps below:
Navigate to the Providers Section of Client Profile, seen in the figure below:
Double click on your Provider Relationship to open the record.

- 350 -
Click on the button and enter a “Provider Relationship End Date”.
After entering the End Date, click on the button. You will be prompted to save
your changes. Click on the button to save your changes and return to the
Client Profile.
Closing the Action Plan
When discharging a client from your agency, you must close the Action Plan. This can be
done from within the Mental Health Summary.
To navigate to the Mental Health Summary, follow the steps below:
Navigate to the Client Profile. Once in the Profile, select the “View” button and then
choose “Mental Health Summary”.
The View Mental Health Activity form will open.
Click on the button and select “Action Plan”.
o From within the Action Plan, click on the button on the
Action bar. If you have not yet closed your Action Plan Goals, a dialog box
similar to that in the figure below will appear:
o If this occurs, click on the button to return to the Action Plan.
o Double click on each Open Action Plan Goal.
o Click on the button.
o Click on the button. The goal will be closed and
three additional fields will appear:
Actual Resolution Date: Enter the date the goal is being closed.
Outcome Measure: Enter the reason the goal is being closed.
Outcome Comments: Enter any comments relative to why the goal
is being closed.
o Once all Open Action Plan Goals have been Closed, click on the
button on the Action bar.
o Two additional fields will appear:
Date Closed: Enter the date the Action Plan is being closed.
Reason Closed: Enter the reason that the Action Plan is being closed.

- 351 -
o After filling out the record, click on the button. You will be
prompted to save your changes. Click on the button to save
your changes and return to the View Mental Health Activity form.
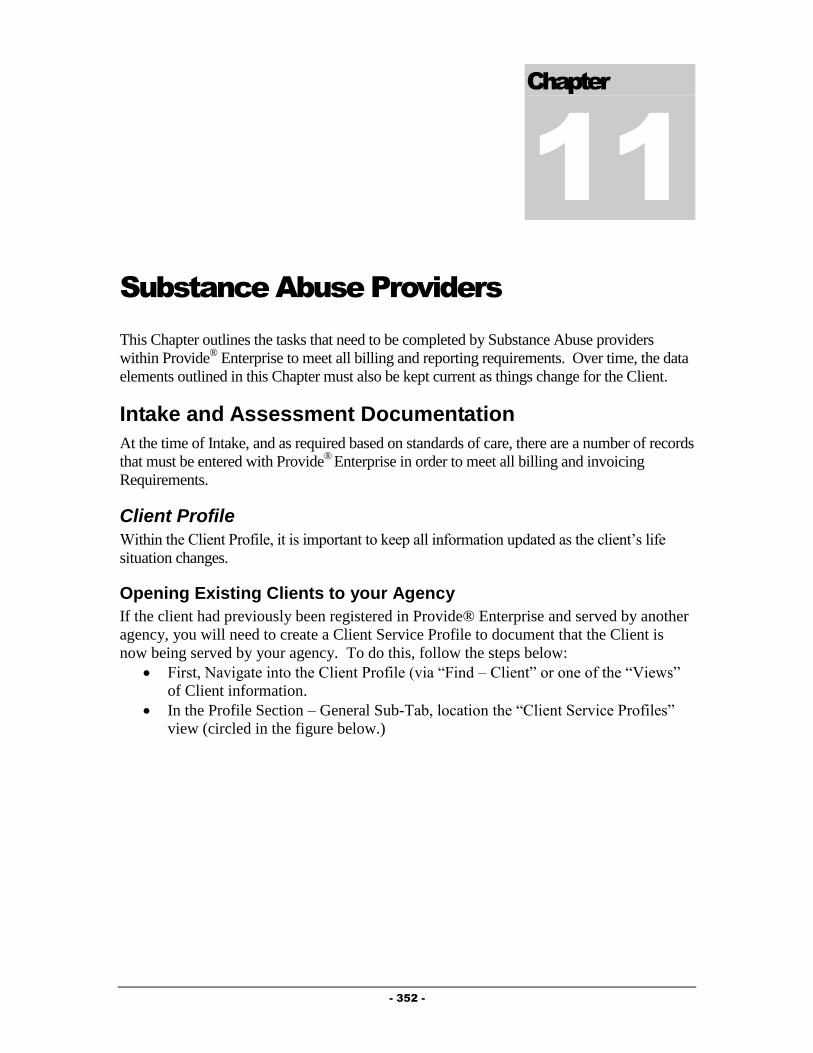
- 352 -
Chapter
11
Substance Abuse Providers
This Chapter outlines the tasks that need to be completed by Substance Abuse providers
within Provide® Enterprise to meet all billing and reporting requirements. Over time, the data
elements outlined in this Chapter must also be kept current as things change for the Client.
Intake and Assessment Documentation
At the time of Intake, and as required based on standards of care, there are a number of records
that must be entered with Provide®
Enterprise in order to meet all billing and invoicing
Requirements.
Client Profile
Within the Client Profile, it is important to keep all information updated as the client’s life
situation changes.
Opening Existing Clients to your Agency
If the client had previously been registered in Provide® Enterprise and served by another
agency, you will need to create a Client Service Profile to document that the Client is
now being served by your agency. To do this, follow the steps below:
First, Navigate into the Client Profile (via “Find – Client” or one of the “Views”
of Client information.
In the Profile Section – General Sub-Tab, location the “Client Service Profiles”
view (circled in the figure below.)
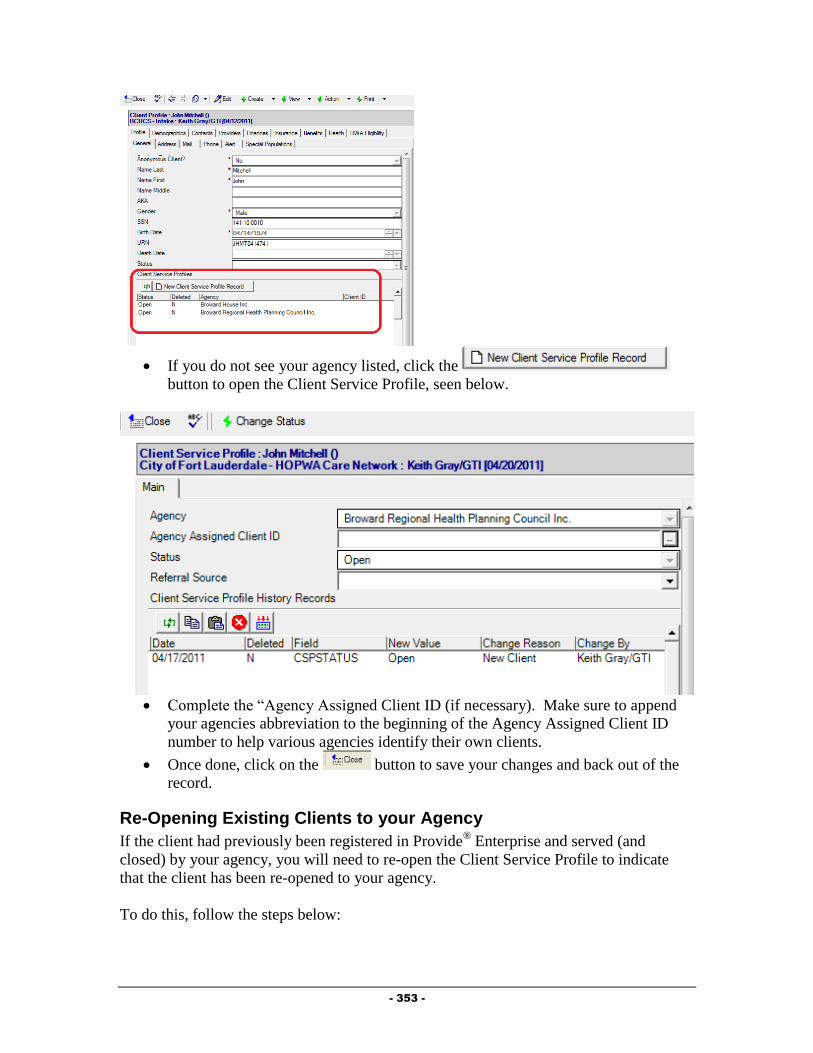
- 353 -
If you do not see your agency listed, click the
button to open the Client Service Profile, seen below.
Complete the “Agency Assigned Client ID (if necessary). Make sure to append
your agencies abbreviation to the beginning of the Agency Assigned Client ID
number to help various agencies identify their own clients.
Once done, click on the button to save your changes and back out of the
record.
Re-Opening Existing Clients to your Agency
If the client had previously been registered in Provide® Enterprise and served (and
closed) by your agency, you will need to re-open the Client Service Profile to indicate
that the client has been re-opened to your agency.
To do this, follow the steps below:

- 354 -
First, Navigate into the Client Profile (via “Find – Client” or one of the “Views”
of Client information.
Double click on the Client Service for your agency. The Client Service Profile will
open and will look similar to that in the figure below:
Click on the button. The Client Service Profile will be brought into Edit
mode, similar to that in the figure below:
Click on the button to activate the Status Change dialog box,
similar to that in the figure below:

- 355 -
Complete all fields as appropriate:
o Status: Select “Open” as the status.
o Reason for change: Select the reason the client is being re-opened to
your agency.
o Date change effective: Enter the date the client is being re-opened to
your agency.
Click on the button to save your changes. You will be returned to
the Client Service Profile.
After verifying the status change, click on the button. You will be
prompted to save your changes. Click on the button to save your
changes and return to the Client Profile.
Opening Existing Clients to your Service Category
If the client had previously been registered in Provide®
Enterprise and served by another
agency or by other programs at your agency, you will need to create a Client Service
Category Profile to document that the Client is now being served by your agency and
service category. NOTE: If the client has previously been served by your Service
Category, follow the steps below under “Re-Opening Existing Clients to Your Service
Category”.
To do this, follow the steps below:
First, Navigate into the Client Profile (via “Find – Client” or one of the “Views”
of Client information.
In the Profile Section – General Sub-Tab, location the “Client Service Profiles”
view (circled in the figure below.)
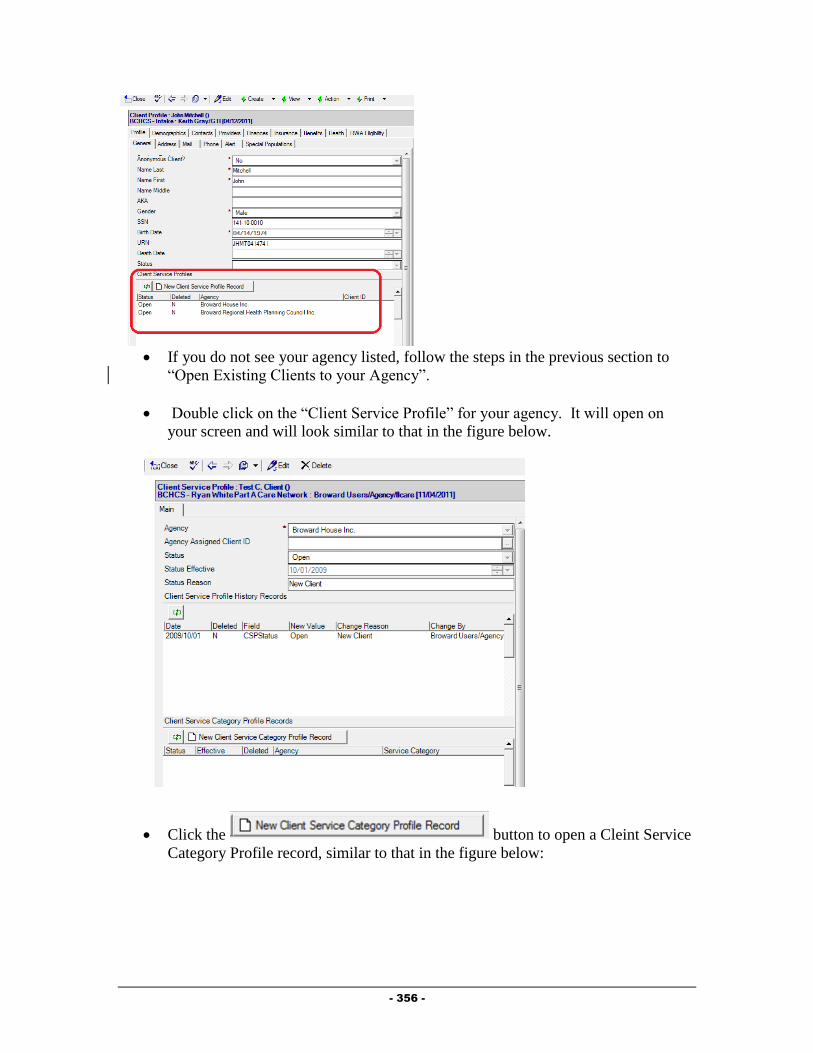
- 356 -
If you do not see your agency listed, follow the steps in the previous section to
“Open Existing Clients to your Agency”.
Double click on the “Client Service Profile” for your agency. It will open on
your screen and will look similar to that in the figure below.
Click the button to open a Cleint Service
Category Profile record, similar to that in the figure below:

- 357 -
Fill out the fields as appropriate:
o Service Category: Select the category of service that you wish to open
the client to.
o Client ID: If your program uses a client ID number, enter this hear.
o Status Effective/Status Reason: These will automatically be computed.
o Client Service Category Profile History Records: This window will
track each change to the Service Profile History Status records over time.
This will automatically occur when changes are made to these records.
Once done, click on the button to save your changes and back out of the
record. Click the button again to back out of the Client Service Profile.
Re-Opening Existing Clients to Your Service Category
If the client had previously been registered in Provide®
Enterprise and served by your
agency and service category, you will need to re-open the client to your service category
(if they are closed). Please note that if the client was closed to your agency, you will
need to re-open the client to your agency as well. See the steps above under “Re-
Opening a Client to Your Agency.”
To do this, follow the steps below:
First, Navigate into the Client Profile (via “Find – Client” or one of the “Views”
of Client information.
In the Profile Section – General Sub-Tab, location the “Client Service Profiles”
view (circled in the figure below.)

- 358 -
Double click on the “Client Service Profile” for your agency. It will open on
your screen and will look similar to that in the figure below.
Double click on the Client Service Category Profile Record for your Service
Category. It will open on your screen and will look similar to that in the figure
below. (NOTE: If you do not see a Client Service Category Profile Record for
your service category, follow the steps earlier in the chapter under “Opening
Existing Clients to your Service Category”.

- 359 -
Click the button to bring the record into edit mode.
Next, click the button. A dialog box, similar to that in the figure
below will open on your screen:
Fill out the fields as appropriate:
o Status: Select the status to change the client to.
o Reason for change: Click on the button to the right of the field ( ) to
activate the picklist and select the appropriate value.
o Date change effective: Enter the date that this change should be effective
from.
Once done, click on the button to save your changes.
Next, click the button to save your changes and back out of the record.
Click the button again to back out of the Client Service Profile.
Assign the Substance Abuse Counselor
It is important to assign the Substance Abuse Counselor to the client and to keep this updated
as necessary. To Assign the Substance Abuse Counselor, follow the steps in Chapter 3, under
“Creating Provider Relationship Records”. The “Provider Relationship” should be set to
Substance Abuse Counselor.

- 360 -
Substance Abuse Summary
Much of the data related to the client’s assessment as well as services provided to a client, can
be found within the Substance Abuse Summary.
To get to the Substance Abuse Summary, follow the steps below:
Navigate to the Client Profile. Once in the Profile, select the “View” button and then
choose “Substance Abuse Summary”.
A form similar to that in the figure below will open:
The Substance Abuse Summary contains nine tabs of information, described below:
o Assessments: The Assessments tab contains information on the client’s
Psychosocial and specific mental health/substance abuse screening/evaluations
completed.
o Action Plans: The Action Plans Tab contains all of the client’s action plan
records.
o Contacts & Services: This tab holds information regarding services provided
to the client, including Progress Logs and Service Provided records. Progress
Logs and Services Provided can also be created from this tab.
o Rides: The Rides tab shows information regarding scheduled and provided
van rides for this client.
o Procedures: The procedures tab shows all medical and dental procedure
records entered by Part A providers.
o Medications: The medications tab shows information on all drugs the client
is on and any prescriptions that have been filled by Part A pharmacies. New
drug records can also be added from here.
o Test Results: This tab shows any test result records entered by any provider
serving the client. New Test Result records can also be added from this tab.
o Referrals: The Referrals tab of the Mental Health Summary displays any
referrals made for the client and also allows for creation of a Referral record.
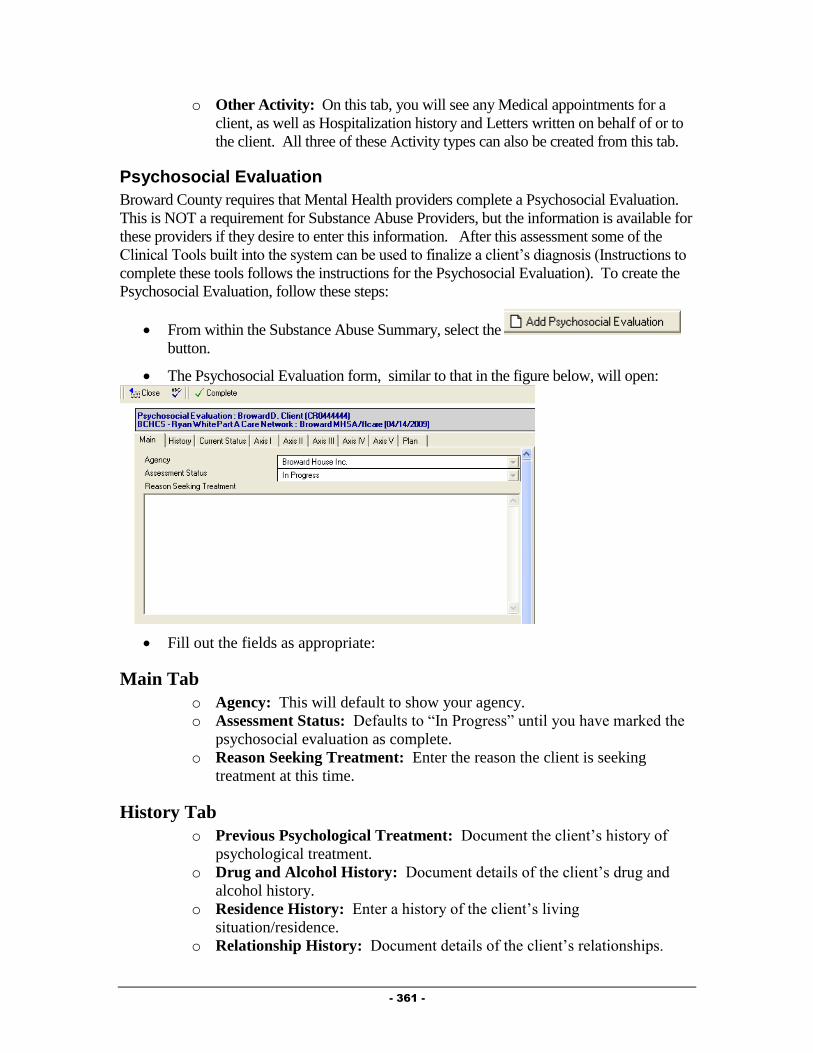
- 361 -
o Other Activity: On this tab, you will see any Medical appointments for a
client, as well as Hospitalization history and Letters written on behalf of or to
the client. All three of these Activity types can also be created from this tab.
Psychosocial Evaluation
Broward County requires that Mental Health providers complete a Psychosocial Evaluation.
This is NOT a requirement for Substance Abuse Providers, but the information is available for
these providers if they desire to enter this information. After this assessment some of the
Clinical Tools built into the system can be used to finalize a client’s diagnosis (Instructions to
complete these tools follows the instructions for the Psychosocial Evaluation). To create the
Psychosocial Evaluation, follow these steps:
From within the Substance Abuse Summary, select the
button.
The Psychosocial Evaluation form, similar to that in the figure below, will open:
Fill out the fields as appropriate:
Main Tab
o Agency: This will default to show your agency.
o Assessment Status: Defaults to “In Progress” until you have marked the
psychosocial evaluation as complete.
o Reason Seeking Treatment: Enter the reason the client is seeking
treatment at this time.
History Tab
o Previous Psychological Treatment: Document the client’s history of
psychological treatment.
o Drug and Alcohol History: Document details of the client’s drug and
alcohol history.
o Residence History: Enter a history of the client’s living
situation/residence.
o Relationship History: Document details of the client’s relationships.
- 362 -
o Cultural/Spiritual/Philosophical History: Enter details regarding the
client’s cultural, spiritual and philosophical history.
Current Status Tab
o Education/Employment/Military: Document details regarding the
client’s current educational, employment and/or military status.
o Interests/Hobbies: Enter detailed information about the client’s current
interests and hobbies.
o Current and Past Legal Issues: Detail the client’s current and past legal
history.
o Past and Present Family Issues: Enter detailed information about the
client’s current and past family issues.
o Current Primary Support System: Document details about the client’s
current primary source of support.
o Mental Status Summary Evaluation: Enter an evaluation of the client’s
mental status.
Axis I Tab
o Primary Diagnosis Code/Description: Select the DSM-IV Code and
Description using the Diagnosis Field Single Value dialog box, discussed
in Chapter 1 of this guide.
o Primary Diagnosis Severity: Select the severity of the client’s diagnosis.
o Primary Diagnosis Comments: Enter any comments related to the
client’s primary Axis I Diagnosis.
o NOTE: The above listed fields are repeated for a Secondary Diagnosis as
well as a Tertiary Diagnosis.
Axis II Tab
o Primary Diagnosis Code/Description: Select the DSM-IV Code and
Description using the Diagnosis Field Single Value dialog box, discussed
in Chapter 1 of this guide.
o Primary Diagnosis Severity: Select the severity of the client’s diagnosis.
o Primary Diagnosis Comments: Enter any comments related to the
client’s primary Axis II Diagnosis.
o NOTE: The above listed fields are repeated for a Secondary Diagnosis as
well as a Tertiary Diagnosis.
Axis III Tab
o Primary Diagnosis Code/Description: Select the DSM-IV Code and
Description using the Diagnosis Field Single Value dialog box, discussed
in Chapter 1 of this guide.
o Primary Diagnosis Severity: Select the severity of the client’s diagnosis.
o Primary Diagnosis Comments: Enter any comments related to the
client’s primary Axis III Diagnosis.

- 363 -
o NOTE: The above listed fields are repeated for a Secondary Diagnosis as
well as a Tertiary Diagnosis.
Axis IV Tab
o Primary Diagnosis Code/Description: Select the Code and Description
using the dialog box that opens when you click the button next to this
field..
o Primary Diagnosis Comments: Enter any comments related to the
client’s primary Axis IV Diagnosis.
o NOTE: The above listed fields are repeated for a Secondary Diagnosis as
well as a Tertiary Diagnosis.
Axis V Tab
o GAF/GAF Description: Select the client’s current GAF (Global
Assessment of Functioning) score.
o GAF Comments: Enter any comments related to the client’s current
GAF score.
Completing the Assessment
After completing filling out the Psychosocial Evaluation, it is necessary to mark
the evaluation as completed. If you do not do this, you will not be able to bill for
this client. However, once you have marked the evaluation as Completed, you
will no longer be able to edit the assessment. NOTE: Broward County
recommends leaving the evaluation in Progress while the other Substance Abuse
evaluation tools are being used to develop the client’s diagnosis.
Once you are ready to mark the Evaluation as complete, simply click on the
button. A dialog similar to that in the figure below will appear:
Change the Completion Date to reflect the date that you actually completed the
assessment with the client and then click the button.
You will then be prompted to save your changes. Click the button to save
your changes and return to the Substance Abuse Summary.
Brief Psychiatric Rating Scale
The Brief Psychiatric Rating Scale was developed to evaluate clients when the Substance
Abuse providers suspects Schizophrenia. It can be administered rapidly and can be used to
monitor change in the Client. To create the Brief Psychiatric Rating Scale, follow these steps:
From within the Substance Abuse Summary above the “Evaluations” embedded view
window, select the Add button and pick “Brief Psychiatric Rating Scale”.

- 364 -
The Brief Psychiatric Rating Scale, similar to that in the figure below will appear:
There are three tabs that make up the Brief Psychiatric Rating Scale. Fill out all fields
as appropriate.
Main Tab
Agency: This field is automatically computed based on your agency.
Assessment Status: This field is automatically completed.
Questions Tab
Please choose the number that corresponds to severity of the symptoms listed below:
0 = Not Assessed, 1 = Not Present, 2 = Very Mild, 3 = Mild, 4 = Moderate,
5 = Moderately Severe, 6 = Severe, 7 = Extremely Severe
o Somatic concern
o Anxiety
o Depression
o Suicidality
o Guilt
o Hostility
o Elated Mood
o Grandiosity
o Suspiciousness
o Hallucinations
o Unusual thought content
o Bizarre behavior
o Self-neglect
o Disorientation
o Conceptual disorganization
o Blunted affect
o Emotional withdrawal
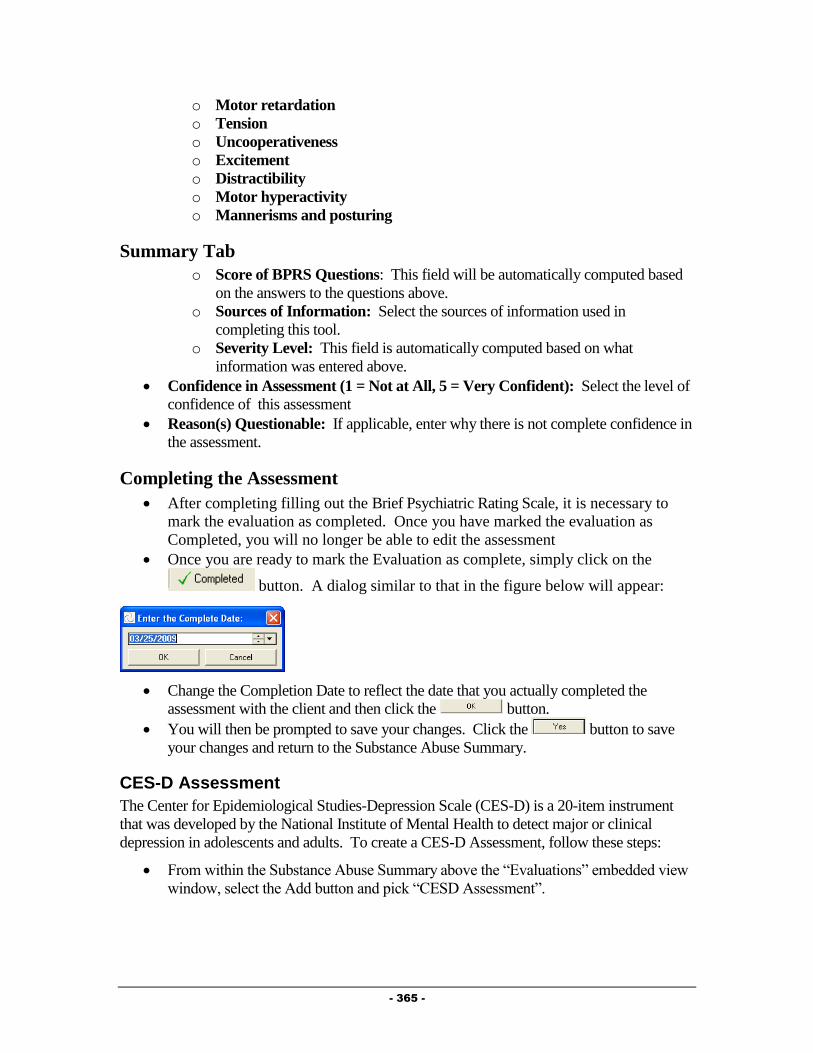
- 365 -
o Motor retardation
o Tension
o Uncooperativeness
o Excitement
o Distractibility
o Motor hyperactivity
o Mannerisms and posturing
Summary Tab
o Score of BPRS Questions: This field will be automatically computed based
on the answers to the questions above.
o Sources of Information: Select the sources of information used in
completing this tool.
o Severity Level: This field is automatically computed based on what
information was entered above.
Confidence in Assessment (1 = Not at All, 5 = Very Confident): Select the level of
confidence of this assessment
Reason(s) Questionable: If applicable, enter why there is not complete confidence in
the assessment.
Completing the Assessment
After completing filling out the Brief Psychiatric Rating Scale, it is necessary to
mark the evaluation as completed. Once you have marked the evaluation as
Completed, you will no longer be able to edit the assessment
Once you are ready to mark the Evaluation as complete, simply click on the
button. A dialog similar to that in the figure below will appear:
Change the Completion Date to reflect the date that you actually completed the
assessment with the client and then click the button.
You will then be prompted to save your changes. Click the button to save
your changes and return to the Substance Abuse Summary.
CES-D Assessment
The Center for Epidemiological Studies-Depression Scale (CES-D) is a 20-item instrument
that was developed by the National Institute of Mental Health to detect major or clinical
depression in adolescents and adults. To create a CES-D Assessment, follow these steps:
From within the Substance Abuse Summary above the “Evaluations” embedded view
window, select the Add button and pick “CESD Assessment”.

- 366 -
The CESD Assessment form, similar to that in the figure below will appear:
There are three tabs that make up the CESD Assessment. Fill out all fields as
appropriate.
Main Tab
Agency: This field is automatically computed based on your agency.
Assessment Status: This field is automatically completed.
Assessment Created for: Select the reason the assessment was created.
Questions Tab
For Each Statement, please chose the category which best describes how often the
client felt this way during the past week.
o I was bothered by things that usually don't bother me.
o I did not feel like eating; my appetite was poor.
o I felt that I could not shake off the blues even with help from my friends.
o I felt that I was just as good as other people.
o I had trouble keeping my mind on what I was doing.
o I felt depressed.
o I felt that everything I did was an effort.
o I felt hopeful about the future.
o I thought my life had been a failure.
o I felt fearful.
o My sleep was restless.
o I was happy.
o I talked less than usual.
o I felt lonely.
o People were unfriendly.
o I enjoyed life.
o I had crying spells.

- 367 -
o I felt sad.
o I felt that people disliked me.
o I could not get "going".
Score Tab
Total CES-D Score: This field will automatically be computed based on the answers
to the other questions.
Depression Summary: This field will automatically be computed based on the
answers to the other questions.
Completing the Assessment
After completing filling out the CES-D Assessment, it is necessary to mark the
assessment as completed. Once you have marked the assessment as Completed,
you will no longer be able to edit the assessment
Once you are ready to mark the assessment as complete, simply click on the
button. A dialog similar to that in the figure below will appear:
Change the Completion Date to reflect the date that you actually completed the
assessment with the client and then click the button.
You will then be prompted to save your changes. Click the button to save
your changes and return to the Substance Abuse Summary.
Goldberg Bipolar Screening Assessment
The Goldberg Bipolar Screening was designed to screen for the possibility of a disorder in the
bipolar spectrum in individuals, 18 or older, who have had depression severe enough to have
caused them distress and/or interfered with their functioning at home, work, school or in their
interpersonal relationships. To create a Goldberg Bipolar Screening follow these steps:
From within the Substance Abuse Summary above the “Evaluations” embedded view
window, select the Add button and pick “Goldberg Bipolar Screening”.
The Goldberg Bipolar Screening form, similar to that in the figure below will appear:

- 368 -
There are three tabs that make up the Goldberg Bipolar Screening Assessment. Fill
out all fields as appropriate.
Main Tab
Agency: This field is automatically computed based on your agency.
Assessment Status: This field is automatically completed.
Questions Tab
The items below refer to how the client has and behaved over much of your life. If the
client has usually been one way and recently changed their response, this should
reflect how they have USUALLY been. 0 = Not At All, 1 = Just a Little,
2 = Somewhat, 3 = Moderately, 4 = Quite a Lot, 5 = Very Much
o At times I am much more talkative or speak much faster than usual.
o There have been times when I was much more active or did many more
things than usual.
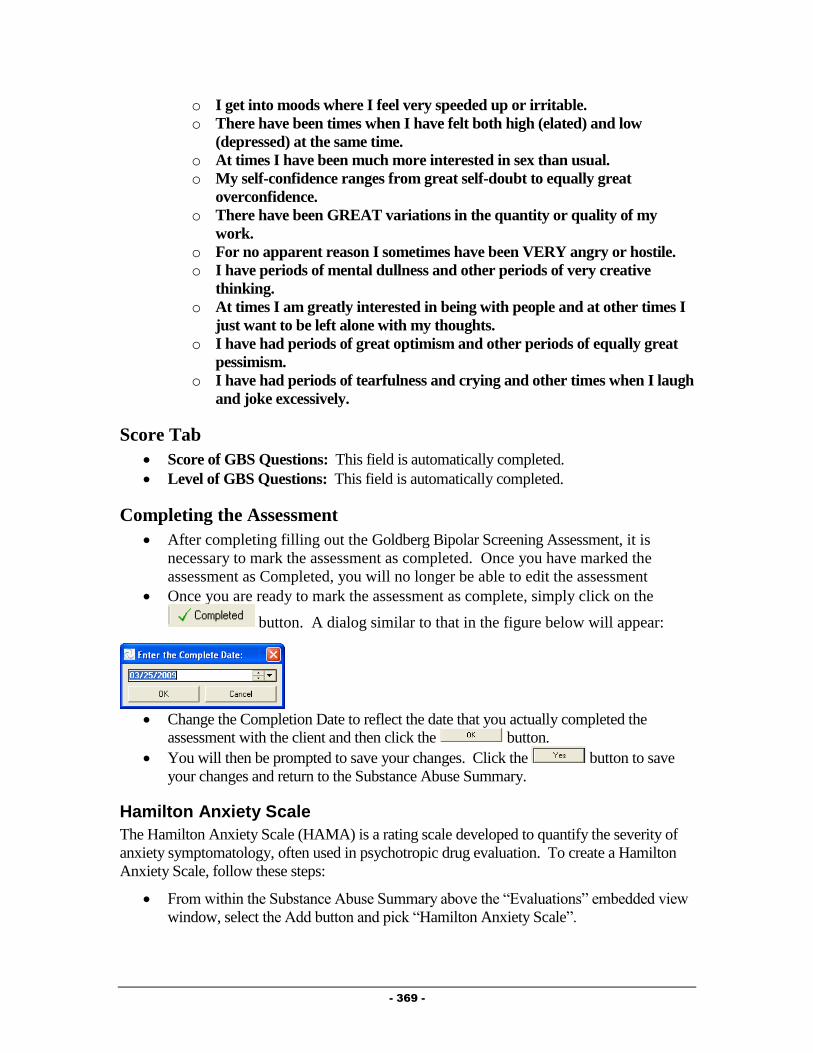
- 369 -
o I get into moods where I feel very speeded up or irritable.
o There have been times when I have felt both high (elated) and low
(depressed) at the same time.
o At times I have been much more interested in sex than usual.
o My self-confidence ranges from great self-doubt to equally great
overconfidence.
o There have been GREAT variations in the quantity or quality of my
work.
o For no apparent reason I sometimes have been VERY angry or hostile.
o I have periods of mental dullness and other periods of very creative
thinking.
o At times I am greatly interested in being with people and at other times I
just want to be left alone with my thoughts.
o I have had periods of great optimism and other periods of equally great
pessimism.
o I have had periods of tearfulness and crying and other times when I laugh
and joke excessively.
Score Tab
Score of GBS Questions: This field is automatically completed.
Level of GBS Questions: This field is automatically completed.
Completing the Assessment
After completing filling out the Goldberg Bipolar Screening Assessment, it is
necessary to mark the assessment as completed. Once you have marked the
assessment as Completed, you will no longer be able to edit the assessment
Once you are ready to mark the assessment as complete, simply click on the
button. A dialog similar to that in the figure below will appear:
Change the Completion Date to reflect the date that you actually completed the
assessment with the client and then click the button.
You will then be prompted to save your changes. Click the button to save
your changes and return to the Substance Abuse Summary.
Hamilton Anxiety Scale
The Hamilton Anxiety Scale (HAMA) is a rating scale developed to quantify the severity of
anxiety symptomatology, often used in psychotropic drug evaluation. To create a Hamilton
Anxiety Scale, follow these steps:
From within the Substance Abuse Summary above the “Evaluations” embedded view
window, select the Add button and pick “Hamilton Anxiety Scale”.

- 370 -
The Hamilton Anxiety Scale form, similar to that in the figure below will appear:
There are three tabs that make up the Hamilton Anxiety Scale. Fill out all fields as
appropriate.
Main Tab
Agency: This field is automatically computed based on your agency.
Assessment Status: This field is automatically completed.
Questions Tab
Rate the items listed on this tab based on the scale listed in each question:
o Anxious Mood
o Tension
o Fears
o Insomnia
o Difficulties in Concentrating and Memory
o Depressed Mood
o General Somatic Symptoms
o General Somatic Symptoms: Sensory
o Cardiovascular Symptoms
o Respiratory Symptoms
o Gastro-intestinal Symptoms
o Genito-urinary Symptoms
o Other Autonomic Symptoms
o Behavior During Interview
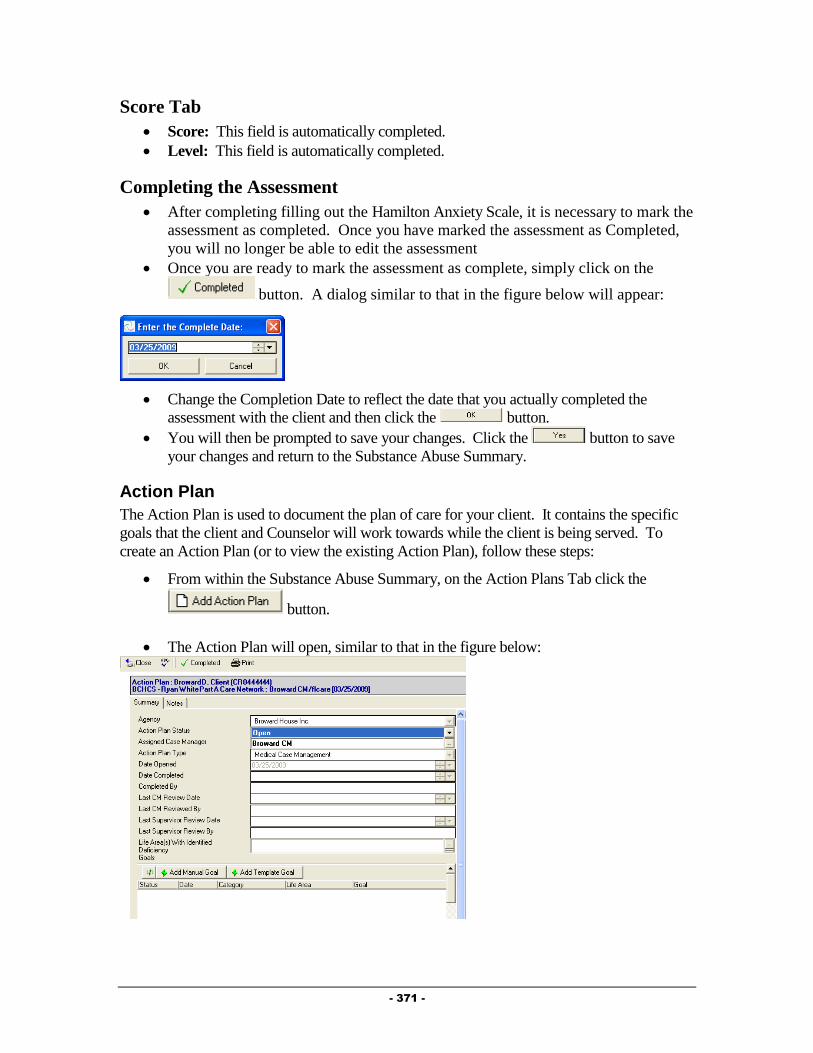
- 371 -
Score Tab
Score: This field is automatically completed.
Level: This field is automatically completed.
Completing the Assessment
After completing filling out the Hamilton Anxiety Scale, it is necessary to mark the
assessment as completed. Once you have marked the assessment as Completed,
you will no longer be able to edit the assessment
Once you are ready to mark the assessment as complete, simply click on the
button. A dialog similar to that in the figure below will appear:
Change the Completion Date to reflect the date that you actually completed the
assessment with the client and then click the button.
You will then be prompted to save your changes. Click the button to save
your changes and return to the Substance Abuse Summary.
Action Plan
The Action Plan is used to document the plan of care for your client. It contains the specific
goals that the client and Counselor will work towards while the client is being served. To
create an Action Plan (or to view the existing Action Plan), follow these steps:
From within the Substance Abuse Summary, on the Action Plans Tab click the
button.
The Action Plan will open, similar to that in the figure below:

- 372 -
Summary Tab
The top section of the Action Plan will be automatically completed as specific actions
are taken within the plan.
The “Life Areas With Identified Deficiency” field allows you to pick multiple values
to identify which life areas the client is experiencing difficulties in. To do this, simply
click on the button ( ) to the right of the field. A dialog box similar to that below
will appear:
Select the appropriate life areas by clicking on them while holding the CTRL
(Control) key down on your keyboard (if selecting multiple values). After selecting
the applicable life areas, click the button. The values will be placed into
the field on your Action Plan.
Notes Tab
The Notes tab of the Action Plan holds information related to the overall General
Action Plan, as well as Action Plan Progress Notes related to the plan. Simply type
any general notes in the “General Action Plan Notes” section.
Action Plan Progress Notes
Action Plan Progress Notes are meant to be used to document progress towards
meeting the goals that make up the Action Plan.
To create an Action Plan Progress Note, simply click on the button. The
Action Plan Progress Note, similar to that in the figure below will appear:
Fill out the fields as appropriate:
o Agency: The field will automatically default to your Agency.
o Review Date: Enter the Date of the Review of the plan.

- 373 -
o Reviewed By: The field will default to your name.
o Current Progress: Select the reason this note is being entered.
o Notes: Enter any notes related to this Action Plan Progress Note, such as why
the goal is being opened, closed, or what specific progress has been made
towards meeting the goal.
Adding Manual Goals to an Action Plan
Provide® Enterprise allows you to create “manual” goals to associate with a client’s Action
Plan. Manual Goals are ones that you and the client develop to work on together. These are
different from the “Template” Goals which will be developed by a workgroup of Substance
Abuse providers and will be available for all Counselors to add to their Action Plans (the
workgroup is working on this in the near future). To create a “Manual” goal, follow these
steps:
While in the Action Plan, click the button. The Action Plan Goal form,
similar to that below, will appear on your screen. You will notice that the Action Plan
Goal contains two tabs: Summary and Notes.
Fill out the fields as appropriate:
Summary Tab
o Agency: Automatically populated based on the Agency you work for.
o Goal Status: Automatically set to “Open”
o Goal Type: Automatically set to “Manual”.
o Goal Category: Select the category that matches the goal that you are adding
to the Action Plan (Access, Adherence or Retention).
o Goal Life Area: Select the life area that this goal most closely relates to.
o Goal Statement: Enter a brief summary describing the goal.
o Interventions: Type in the specific interventions that will be followed in
working towards meeting this goal.
o Date Goal Established: Defaults to the current date, but can be changed if
you developed the plan with the client on a previous date.
o Target Resolution Date: Enter the date that you hope to have resolved the
goal by.
o Provider Assigned: Defaults to your name.

- 374 -
Notes Tab o General Action Plan Goal Notes: Enter any notes related to this goal that
you wish to.
o Action Plan Goal Notes: This window allows you to create specific notes
related to this goal at the time the goal is opened, when a goal is closed, or
when you want to document Progress towards the goal. To enter an Action
Plan Goal Notes, simply click the button. The form will appear
on your screen. Fill out the fields as appropriate, including the “Review
Date”, “Current Progress”, and the appropriate “Notes”.
o Action Plan Related Progress Logs: This window will show all Progress
Logs that have had this specific goal linked to it.
After filling out all appropriate fields, you can close save this record and return to the
Action plan (by clicking on the button and saying to the “Want to
Save Your Changes” message.
If creating more than one “Manual” Goal, you can click on the
button. This will save and close the current record and bring up a brand new Action
Plan Goal record for you to fill out.
Adding Template Goals to an Action Plan
Provide® Enterprise allows your community to create “template” goals to associate with a
client’s Action Plan. These are suggested goals that can be integrated into a client’s Action
Plan. Basically, when you add a Template Goal to your Action Plan, you do not need to re-
write many of the fields within the Action Plan Goal, as they will be automatically filled in
based on the information within the Template goal. Currently, the Substance Abuse
Workgroup is working on creating these goals for Broward County Counselors to use. They
will be available in the near future. To add a “Template” Goal, follow these steps:
While in the Action Plan, click the button. The template selector
will open, similar to that in the figure below:
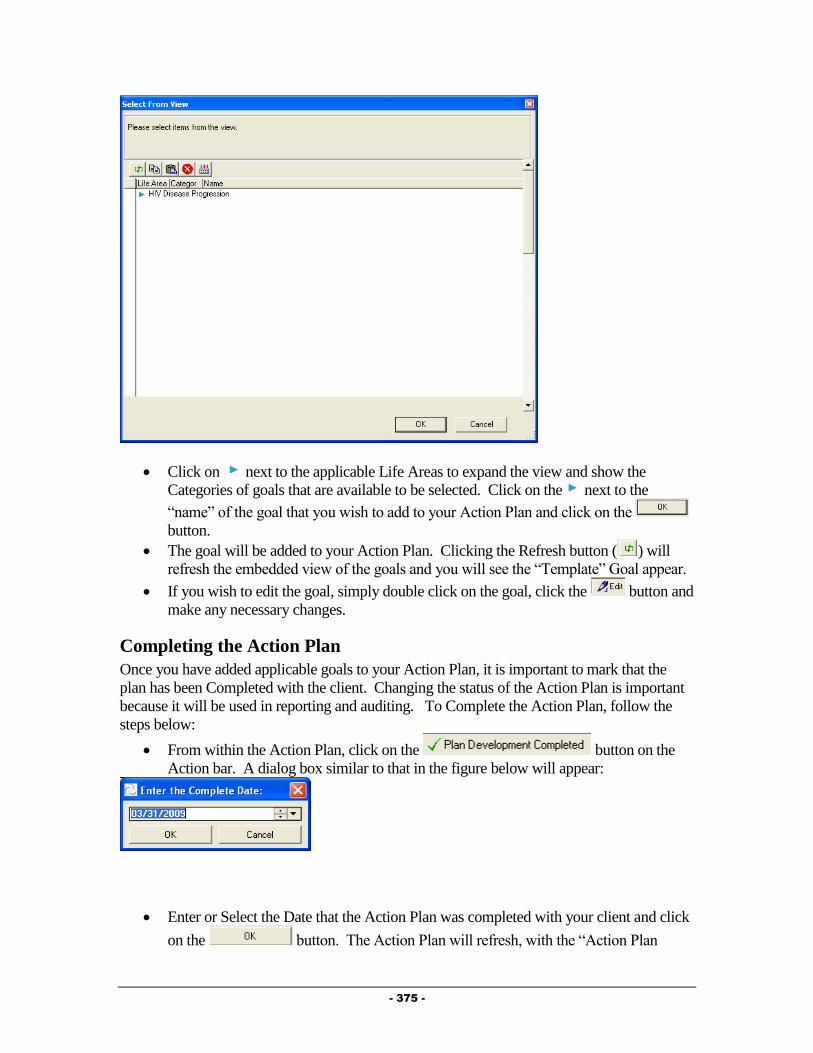
- 375 -
Click on next to the applicable Life Areas to expand the view and show the
Categories of goals that are available to be selected. Click on the next to the
“name” of the goal that you wish to add to your Action Plan and click on the
button.
The goal will be added to your Action Plan. Clicking the Refresh button ( ) will
refresh the embedded view of the goals and you will see the “Template” Goal appear.
If you wish to edit the goal, simply double click on the goal, click the button and
make any necessary changes.
Completing the Action Plan
Once you have added applicable goals to your Action Plan, it is important to mark that the
plan has been Completed with the client. Changing the status of the Action Plan is important
because it will be used in reporting and auditing. To Complete the Action Plan, follow the
steps below:
From within the Action Plan, click on the button on the
Action bar. A dialog box similar to that in the figure below will appear:
Enter or Select the Date that the Action Plan was completed with your client and click
on the button. The Action Plan will refresh, with the “Action Plan
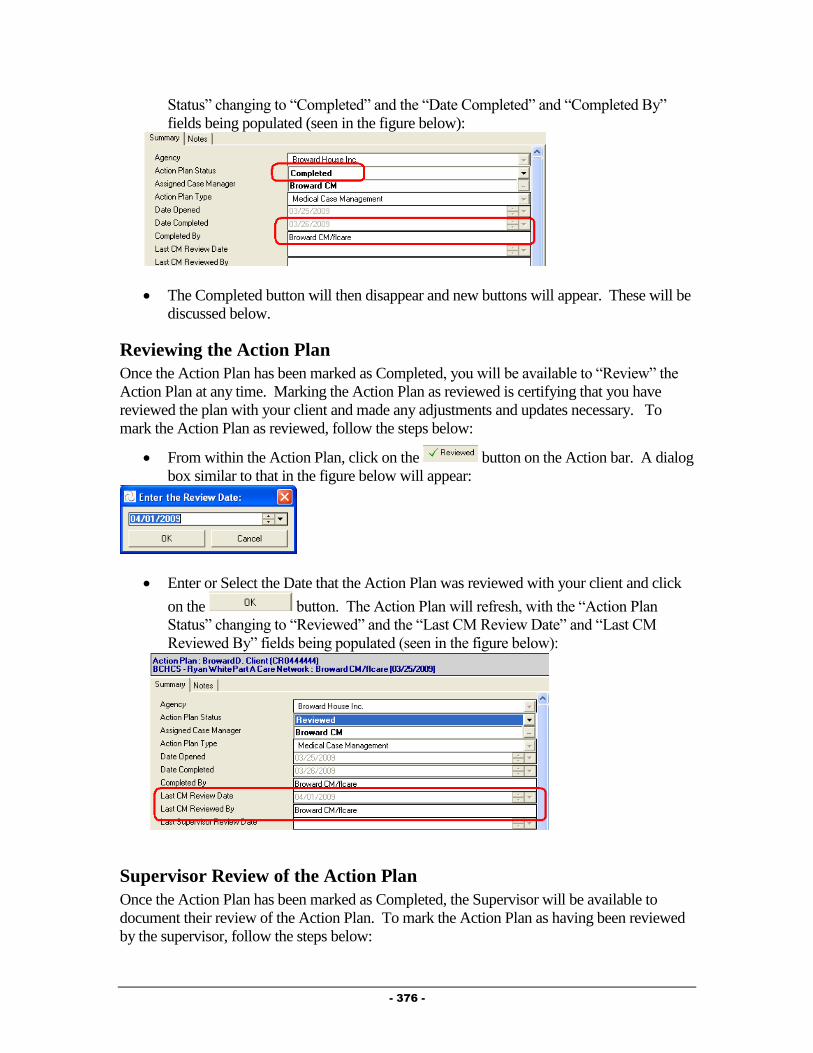
- 376 -
Status” changing to “Completed” and the “Date Completed” and “Completed By”
fields being populated (seen in the figure below):
The Completed button will then disappear and new buttons will appear. These will be
discussed below.
Reviewing the Action Plan
Once the Action Plan has been marked as Completed, you will be available to “Review” the
Action Plan at any time. Marking the Action Plan as reviewed is certifying that you have
reviewed the plan with your client and made any adjustments and updates necessary. To
mark the Action Plan as reviewed, follow the steps below:
From within the Action Plan, click on the button on the Action bar. A dialog
box similar to that in the figure below will appear:
Enter or Select the Date that the Action Plan was reviewed with your client and click
on the button. The Action Plan will refresh, with the “Action Plan
Status” changing to “Reviewed” and the “Last CM Review Date” and “Last CM
Reviewed By” fields being populated (seen in the figure below):
Supervisor Review of the Action Plan
Once the Action Plan has been marked as Completed, the Supervisor will be available to
document their review of the Action Plan. To mark the Action Plan as having been reviewed
by the supervisor, follow the steps below:

- 377 -
From within the Action Plan, click on the button on the Action bar. A
dialog box similar to that in the figure below will appear:
Enter or Select the Date that the Supervisor reviewed the Action Plan and click on the
button. The Action Plan will refresh and the “Last Supervisor Review
Date” and “Last Supervisor Reviewed By” fields being populated (seen in the figure
below):
NOTE: Only users set up with Supervisory level access will be able to see and use the
“Supervisor Review” button.
Closing the Action Plan
The Action Plan should only be closed when the client is being discharged from your service
and/or if the client is being transferred to another agency. To close the Action Plan, follow the
steps below:
From within the Action Plan, click on the button on the Action
bar. If you have not yet closed your Action Plan Goals, a dialog box similar to that in
the figure below will appear:
If this occurs, click on the button to return to the Action Plan.
Double click on each Open Action Plan Goal.
Click on the button.
Click on the button. The goal will be closed and three
additional fields will appear:
o Actual Resolution Date: Enter the date the goal is being closed.
o Outcome Measure: Enter the reason the goal is being closed.

- 378 -
o Outcome Comments: Enter any comments relative to why the goal is being
closed.
Once all Open Action Plan Goals have been Closed, click on the
button on the Action bar.
Two additional fields will appear:
o Date Closed: Enter the date the Action Plan is being closed.
o Reason Closed: Enter the reason that the Action Plan is being closed.
After filling out the record, click on the button. You will be prompted
to save your changes. Click on the button to save your changes and
return to the View Case Management Activity form.
Updating the Action Plan
Any time you need to update the Action Plan, simply select the Create button and pick
“Action Plan” from within the Case Management Summary. The Action Plan will open and
you can make any changes necessary.
Printing the Action Plan
To print the Action Plan, simply click on the button in the plan. The print out will
open on your screen where it can be printed for the client to sign.
Requesting Service Category Specific Eligibility Overrides
Provide® Enterprise allows users to request overrides for client eligibility for Part A services
directly within the software system. NOTE: Only Broward County staff will be able to
approve these requests.
To request an Eligibility Override, follow the steps below:
From within the Client Profile, click on the button and select “Eligibility
Override”.
The form, similar to that in the figure below will open:
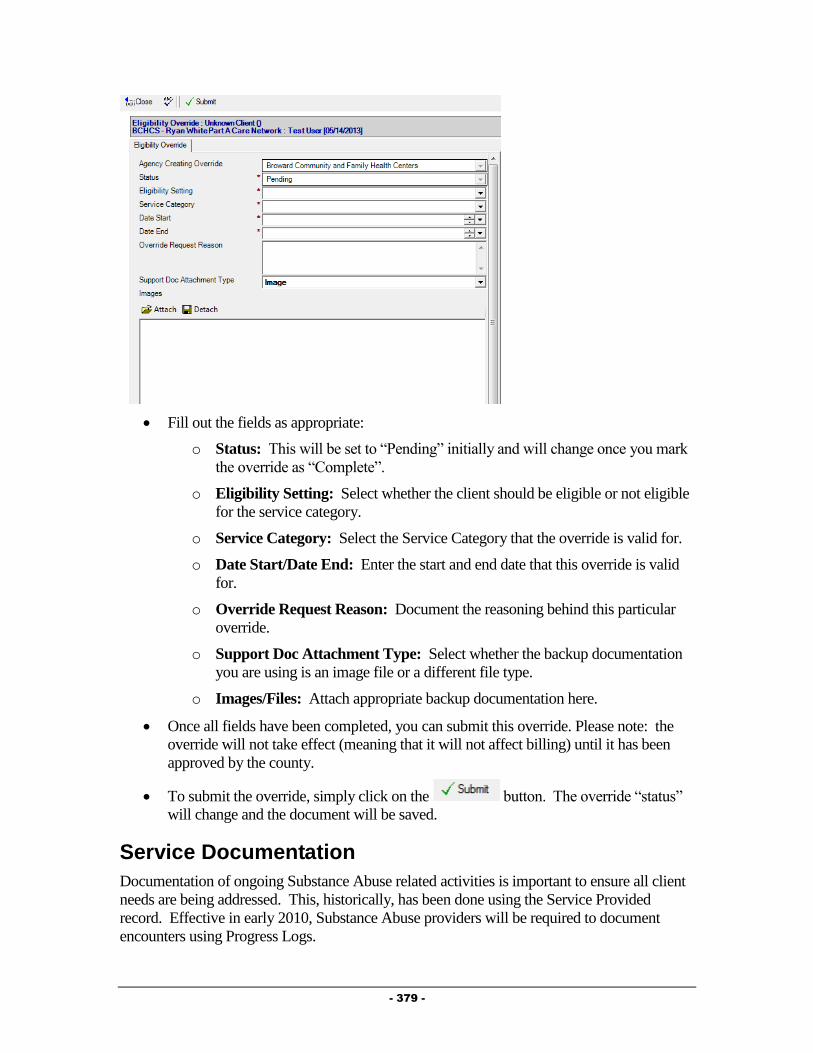
- 379 -
Fill out the fields as appropriate:
o Status: This will be set to “Pending” initially and will change once you mark
the override as “Complete”.
o Eligibility Setting: Select whether the client should be eligible or not eligible
for the service category.
o Service Category: Select the Service Category that the override is valid for.
o Date Start/Date End: Enter the start and end date that this override is valid
for.
o Override Request Reason: Document the reasoning behind this particular
override.
o Support Doc Attachment Type: Select whether the backup documentation
you are using is an image file or a different file type.
o Images/Files: Attach appropriate backup documentation here.
Once all fields have been completed, you can submit this override. Please note: the
override will not take effect (meaning that it will not affect billing) until it has been
approved by the county.
To submit the override, simply click on the button. The override “status”
will change and the document will be saved.
Service Documentation
Documentation of ongoing Substance Abuse related activities is important to ensure all client
needs are being addressed. This, historically, has been done using the Service Provided
record. Effective in early 2010, Substance Abuse providers will be required to document
encounters using Progress Logs.
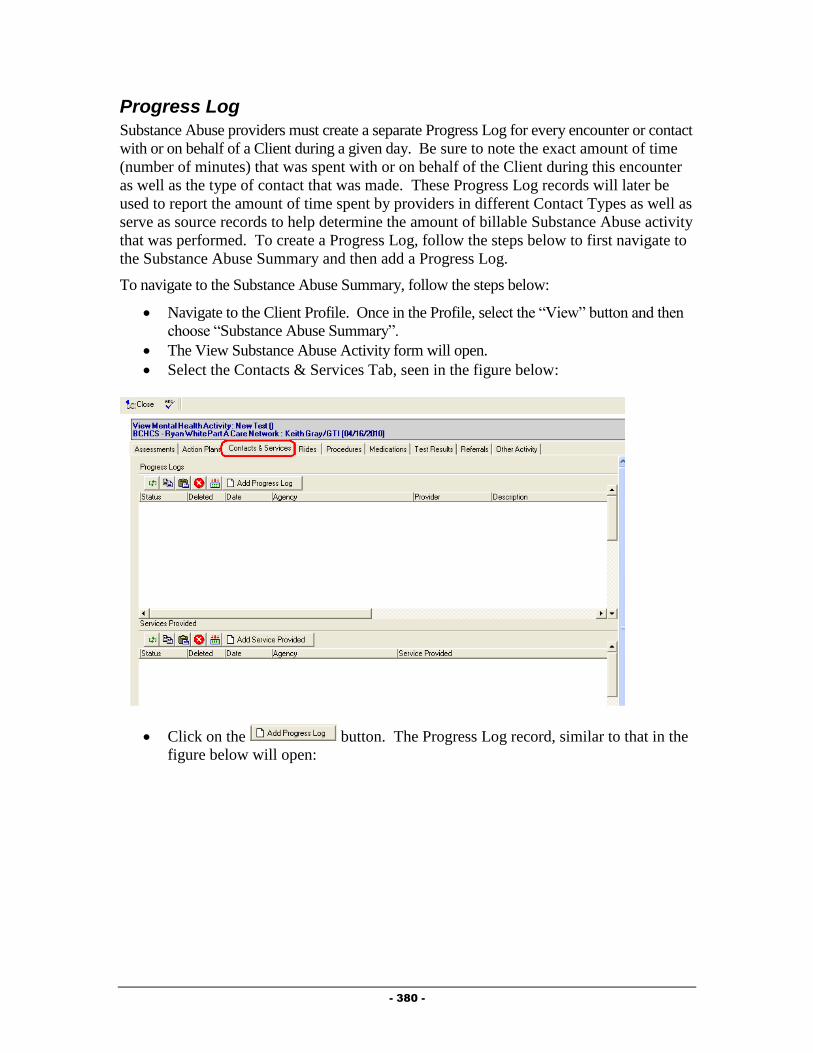
- 380 -
Progress Log
Substance Abuse providers must create a separate Progress Log for every encounter or contact
with or on behalf of a Client during a given day. Be sure to note the exact amount of time
(number of minutes) that was spent with or on behalf of the Client during this encounter
as well as the type of contact that was made. These Progress Log records will later be
used to report the amount of time spent by providers in different Contact Types as well as
serve as source records to help determine the amount of billable Substance Abuse activity
that was performed. To create a Progress Log, follow the steps below to first navigate to
the Substance Abuse Summary and then add a Progress Log.
To navigate to the Substance Abuse Summary, follow the steps below:
Navigate to the Client Profile. Once in the Profile, select the “View” button and then
choose “Substance Abuse Summary”.
The View Substance Abuse Activity form will open.
Select the Contacts & Services Tab, seen in the figure below:
Click on the button. The Progress Log record, similar to that in the
figure below will open:

- 381 -
Summary Tab
The Summary Tab of the Progress Log contains the specific details about the encounter.
Fill out the fields as appropriate:
o Agency: Your agency name will default in this field.
o Status: The status of the Progress Log will default to “In Progress” while you
are working on it. NOTE: It is important to mark the Progress Log as
“Complete” when you are done with it. “In Progress” Progress Logs will not
be counted in reports or billing. Once a Progress Log has been marked as
“Complete”, you will no longer be able to edit the note.
o Provider: This field will default to your name.
o Date: Enter the date of the encounter.
o Start Time: Enter the start time of the Encounter.
o Minutes: Enter the number of minutes of this encounter.
o Contact Category: This will default to “Substance Abuse Counseling”.
o Counseling Type: Select the type of encounter.
o Counseling Type: Select the type of encounter.
o Focus of Session: This field will only show if “Counseling Type” is set to
“Group Session”. Select the focus of this group counseling session.
o General Appearance: This field will only show if “Counseling Type” is set
to “Group Session”. Select the client’s general appearance during this session.
o Behaviors: This field will only show if “Counseling Type” is set to “Group
Session”. Select the behaviors shown by the client during this group.
o Mood/Affect: This field will only show if “Counseling Type” is set to
“Group Session”. Describe the client’s mood and affect by selecting the
applicable descriptors.
o Thought Process/Content: This field will only show if “Counseling Type” is
set to “Group Session”. Select the client’s thought process/content.
o Level of Participation: This field will only show if “Counseling Type” is set
to “Group Session”. Enter the client’s level of participation in this group
session.
o Brief Description: Enter a brief description of the encounter.

- 382 -
o Full Description: Enter detailed information to describe the encounter.
o NOTE: For Group Session encounters, a “Sample” document has been
created. Simply click on the button and select “Mental
Health/Substance Use Group Session” to pull in the headings for a typical
Group Session Note (Behavior/Intervention/Response/Plan).
Medical Appointments Tab
The Medical Appointments Tab of the Progress Log will show all medical appointments for
the past year. You can also add documentation of new appointments from within this tab.
Fill out the field as appropriate:
o Have recent medical appointments been documented? Select whether
or not you have documented the client’s recent Medical Appointments.
Adding a new appointment record can be done by following the steps below:
Click on the to open an appointment record seen in the figure
below:
Fill out the fields as appropriate:
o Agency: Your agency name will default in this field.
o Type: Select the type of appointment. This field will automatically default to
“Medical Care”.
o Appointment With: Enter the provider who the appointment is
scheduled/was made with.
o Status: Select the status of this appointment.
o Funding source of appointment: Select the funding source that paid for this
medical encounter. Note: This field will only show if the Appointment Type
is “Medical Care”.
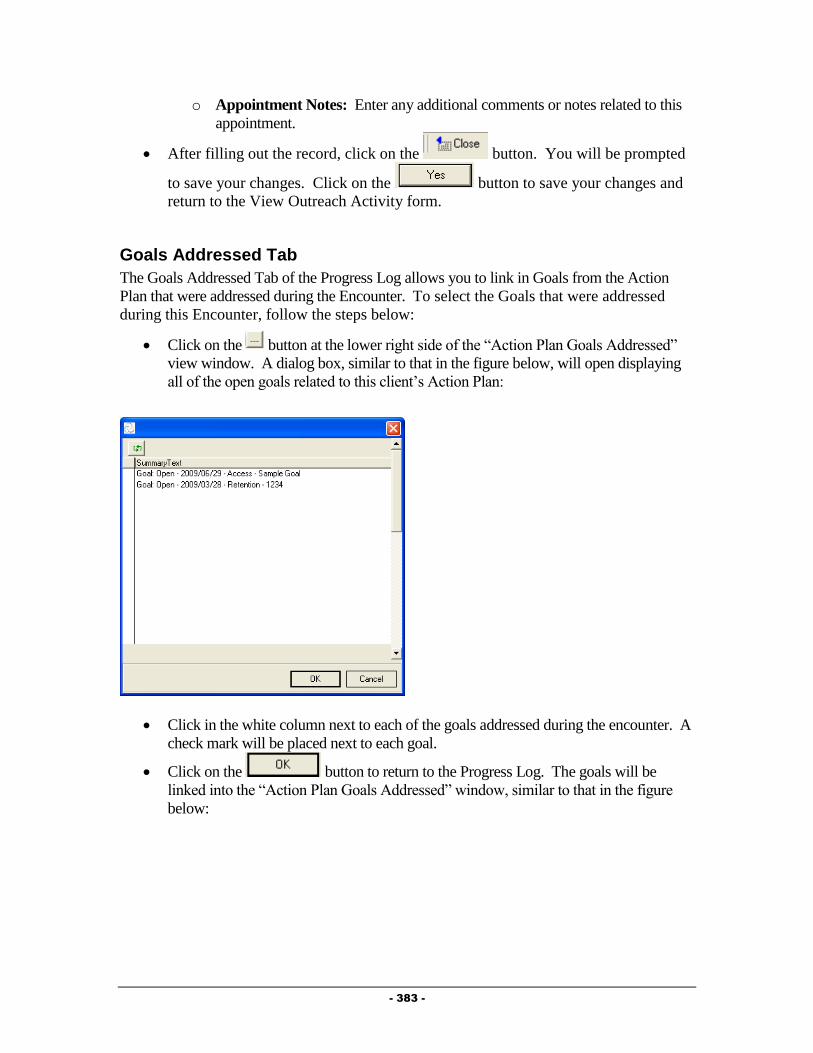
- 383 -
o Appointment Notes: Enter any additional comments or notes related to this
appointment.
After filling out the record, click on the button. You will be prompted
to save your changes. Click on the button to save your changes and
return to the View Outreach Activity form.
Goals Addressed Tab
The Goals Addressed Tab of the Progress Log allows you to link in Goals from the Action
Plan that were addressed during the Encounter. To select the Goals that were addressed
during this Encounter, follow the steps below:
Click on the button at the lower right side of the “Action Plan Goals Addressed”
view window. A dialog box, similar to that in the figure below, will open displaying
all of the open goals related to this client’s Action Plan:
Click in the white column next to each of the goals addressed during the encounter. A
check mark will be placed next to each goal.
Click on the button to return to the Progress Log. The goals will be
linked into the “Action Plan Goals Addressed” window, similar to that in the figure
below:
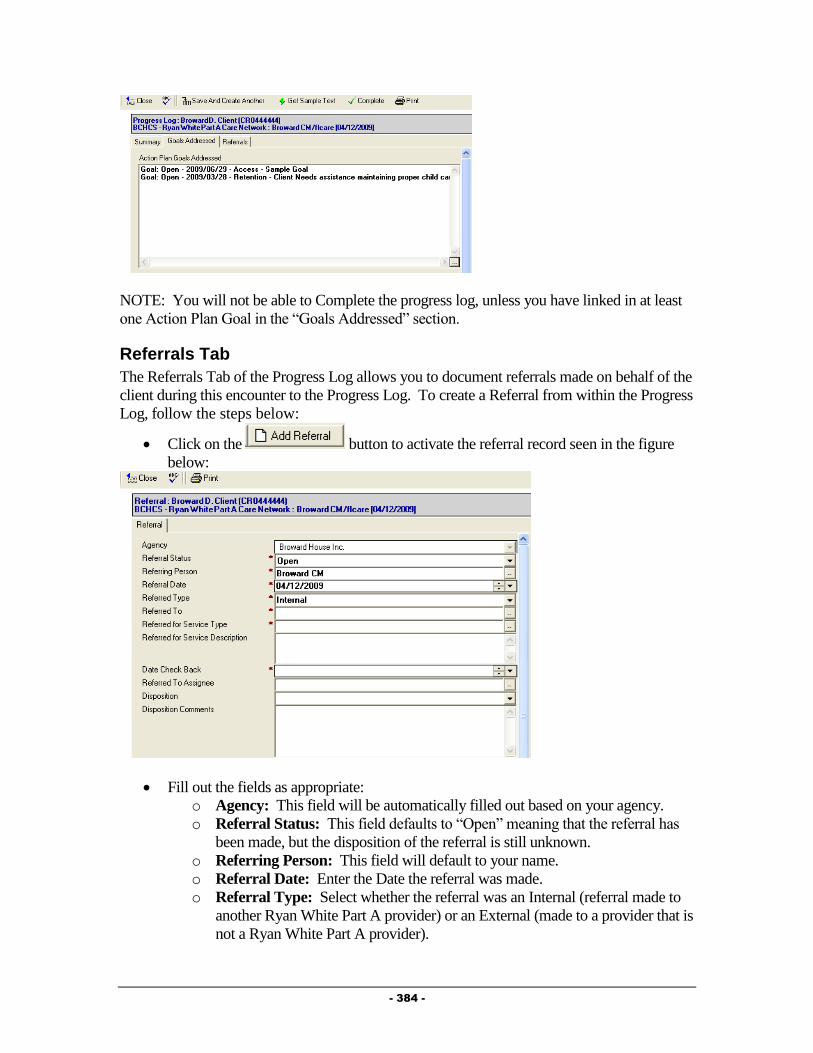
- 384 -
NOTE: You will not be able to Complete the progress log, unless you have linked in at least
one Action Plan Goal in the “Goals Addressed” section.
Referrals Tab
The Referrals Tab of the Progress Log allows you to document referrals made on behalf of the
client during this encounter to the Progress Log. To create a Referral from within the Progress
Log, follow the steps below:
Click on the button to activate the referral record seen in the figure
below:
Fill out the fields as appropriate:
o Agency: This field will be automatically filled out based on your agency.
o Referral Status: This field defaults to “Open” meaning that the referral has
been made, but the disposition of the referral is still unknown.
o Referring Person: This field will default to your name.
o Referral Date: Enter the Date the referral was made.
o Referral Type: Select whether the referral was an Internal (referral made to
another Ryan White Part A provider) or an External (made to a provider that is
not a Ryan White Part A provider).

- 385 -
o Referred To: Select the agency the referral was made to by clicking on the
button. NOTE: The picklist of agencies will be different based on the
“Referral Type” selected. For “Internal” referrals, you will get a list of only
Ryan White Part A providers, while for “External” referrals, you will get a list
of non-funded providers.
o Referred for Service Type: Select the type of service being requested by
making this referral by clicking on the button.
o Referred for Service Description: Enter any description of why the referral
is being made in this field.
o Date Check Back: Enter a date to receive a reminder to follow up on this
referral.
o Referred to Assignee: If the organization the referral is being made to is in
the Ryan White Part A network and a specific individual has been selected to
receive referrals, their name will appear here.
o Disposition: This field is meant to be filled out when the referral is closed and
the status of the client’s receipt of services is determined.
o Disposition Comments: Enter any comments related to the status of the
referral in this field.
After filling out the record, click on the button. You will be prompted
to save your changes. Click on the button to save your changes and
return to the View Substance Abuse Activity form.
Completing the Progress Log
After completely filling out the Progress Log, it is important to mark the Progress Log as
Complete. Progress Logs that are not marked as Complete will not appear in invoicing or
reporting.
IMPORTANT BILLING NOTE: The billing requirements are slightly different than the
protocols of the service delivery model. No services can be billed in until the treatment plan
and biopsychosocial are completed in Provide® Enterprise. Any service provided 45 days prior
to the authorization date of the treatment is billable once the treatment plan is entered in
Provide® Enterprise. You still have the ability to document Progress logs for the individual
sessions in PE but they can’t be marked as complete in the system until the Treatment plan or
Action plan is entered into PE. (To save your note in Progress after completing all required
fields (red asterisk marked fields), simply click on the button and select “Yes” to
the save changes question.).
Once a Progress Log has been marked as Complete, you will no longer be able to edit that
Progress Log. To mark a Progress Log as Complete, follow the steps below:
Click on the button.
You will be prompted to Save your changes and will be returned to the View
Substance Abuse Activity window.
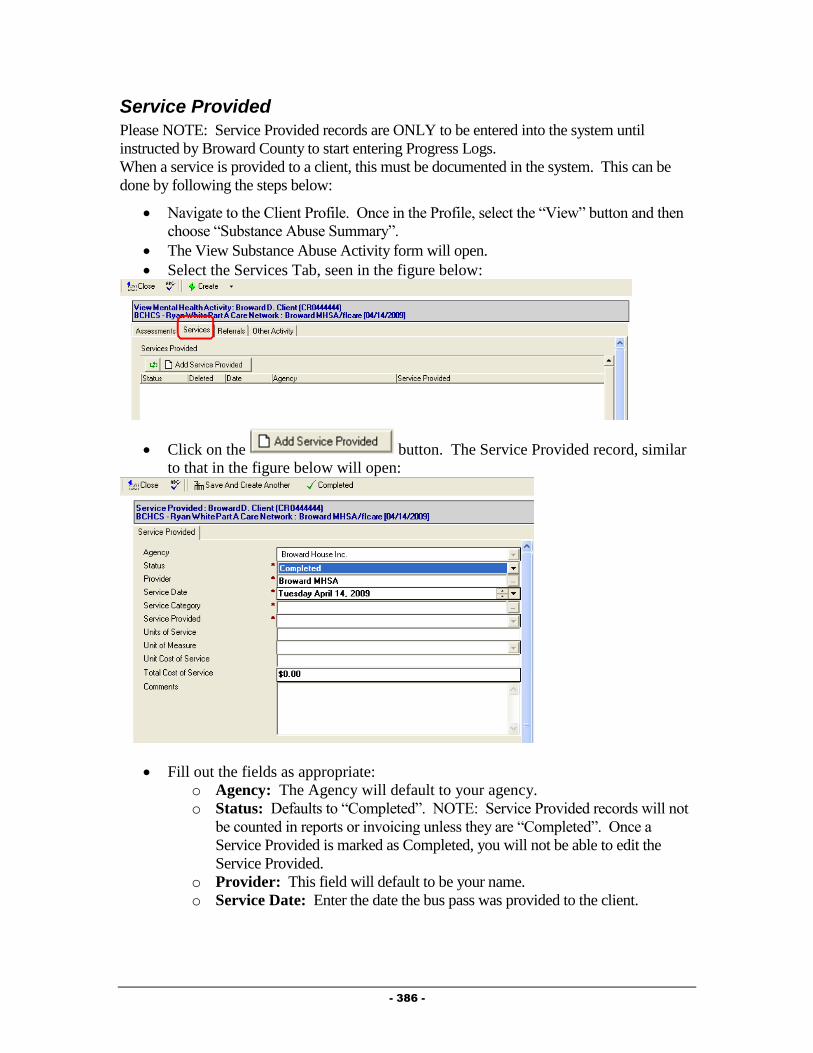
- 386 -
Service Provided
Please NOTE: Service Provided records are ONLY to be entered into the system until
instructed by Broward County to start entering Progress Logs.
When a service is provided to a client, this must be documented in the system. This can be
done by following the steps below:
Navigate to the Client Profile. Once in the Profile, select the “View” button and then
choose “Substance Abuse Summary”.
The View Substance Abuse Activity form will open.
Select the Services Tab, seen in the figure below:
Click on the button. The Service Provided record, similar
to that in the figure below will open:
Fill out the fields as appropriate:
o Agency: The Agency will default to your agency.
o Status: Defaults to “Completed”. NOTE: Service Provided records will not
be counted in reports or invoicing unless they are “Completed”. Once a
Service Provided is marked as Completed, you will not be able to edit the
Service Provided.
o Provider: This field will default to be your name.
o Service Date: Enter the date the bus pass was provided to the client.
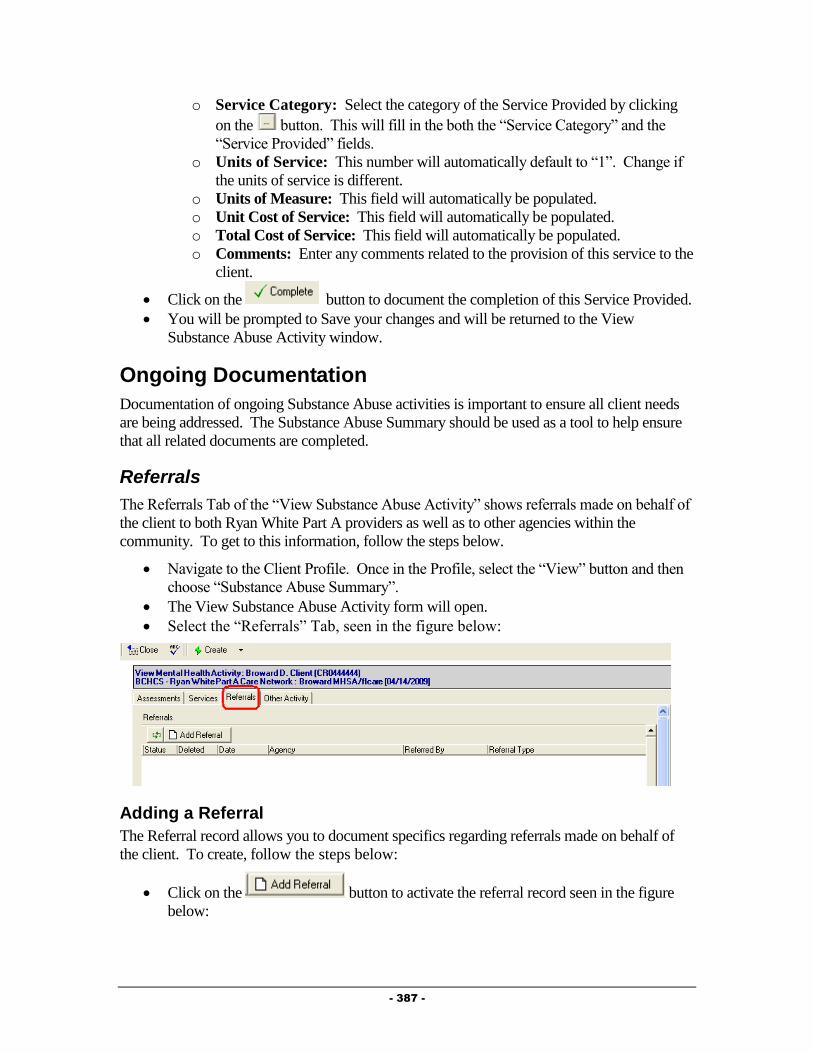
- 387 -
o Service Category: Select the category of the Service Provided by clicking
on the button. This will fill in the both the “Service Category” and the
“Service Provided” fields.
o Units of Service: This number will automatically default to “1”. Change if
the units of service is different.
o Units of Measure: This field will automatically be populated.
o Unit Cost of Service: This field will automatically be populated.
o Total Cost of Service: This field will automatically be populated.
o Comments: Enter any comments related to the provision of this service to the
client.
Click on the button to document the completion of this Service Provided.
You will be prompted to Save your changes and will be returned to the View
Substance Abuse Activity window.
Ongoing Documentation
Documentation of ongoing Substance Abuse activities is important to ensure all client needs
are being addressed. The Substance Abuse Summary should be used as a tool to help ensure
that all related documents are completed.
Referrals
The Referrals Tab of the “View Substance Abuse Activity” shows referrals made on behalf of
the client to both Ryan White Part A providers as well as to other agencies within the
community. To get to this information, follow the steps below.
Navigate to the Client Profile. Once in the Profile, select the “View” button and then
choose “Substance Abuse Summary”.
The View Substance Abuse Activity form will open.
Select the “Referrals” Tab, seen in the figure below:
Adding a Referral
The Referral record allows you to document specifics regarding referrals made on behalf of
the client. To create, follow the steps below:
Click on the button to activate the referral record seen in the figure
below:

- 388 -
Fill out the fields as appropriate:
o Agency: The Agency field will be automatically filled out based on your
agency.
o Referral Status: Defaults to “Open” meaning that the referral has been made,
but the disposition of the referral is still unknown.
o Referring Person: This will default to your name.
o Referral Date: Enter the Date the referral was made.
o Referral Type: Select whether the referral was an Internal (referral made to
another Ryan White Part A provider) or an External (made to a provider that is
not a Ryan White Part A provider).
o Referred To: Select the agency the referral was made to by clicking on the
button. NOTE: The picklist of agencies will be different based on the
“Referral Type” selected. For “Internal” referrals, you will get a list of only
Ryan White Part A providers, while for “External” referrals, you will get a list
of non-funded providers.
o Referred for Service Type: Select the type of service being requested by
making this referral by clicking on the button.
o Referred for Service Description: Enter any description of why the referral
is being made in this field.
o Date Check Back: Enter a date to receive a reminder to follow up on this
referral.
o Referred to Assignee: If the organization the referral is being made to is in
the Ryan White Part A network and a specific individual has been selected to
receive referrals, their name will appear here.
o Disposition: This field is meant to be filled out when the referral is closed and
the status of the client’s receipt of services is determined.
o Disposition Comments: Enter any comments related to the status of the
referral in this field.
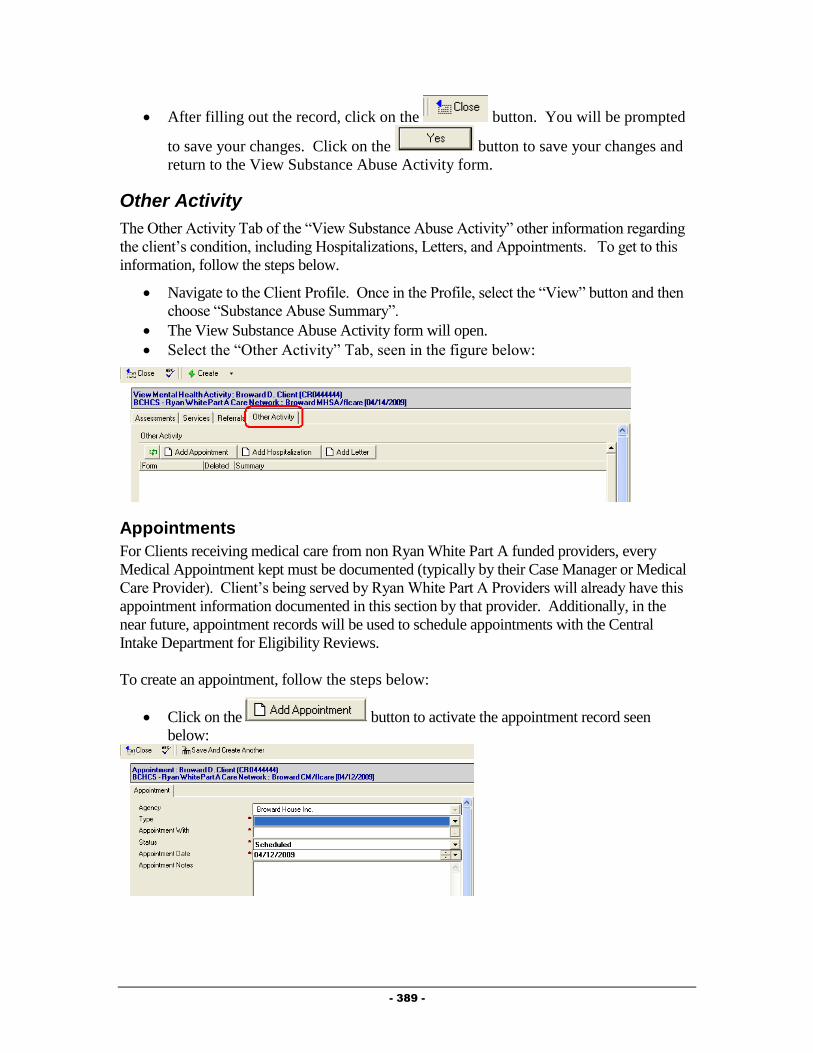
- 389 -
After filling out the record, click on the button. You will be prompted
to save your changes. Click on the button to save your changes and
return to the View Substance Abuse Activity form.
Other Activity
The Other Activity Tab of the “View Substance Abuse Activity” other information regarding
the client’s condition, including Hospitalizations, Letters, and Appointments. To get to this
information, follow the steps below.
Navigate to the Client Profile. Once in the Profile, select the “View” button and then
choose “Substance Abuse Summary”.
The View Substance Abuse Activity form will open.
Select the “Other Activity” Tab, seen in the figure below:
Appointments
For Clients receiving medical care from non Ryan White Part A funded providers, every
Medical Appointment kept must be documented (typically by their Case Manager or Medical
Care Provider). Client’s being served by Ryan White Part A Providers will already have this
appointment information documented in this section by that provider. Additionally, in the
near future, appointment records will be used to schedule appointments with the Central
Intake Department for Eligibility Reviews.
To create an appointment, follow the steps below:
Click on the button to activate the appointment record seen
below:
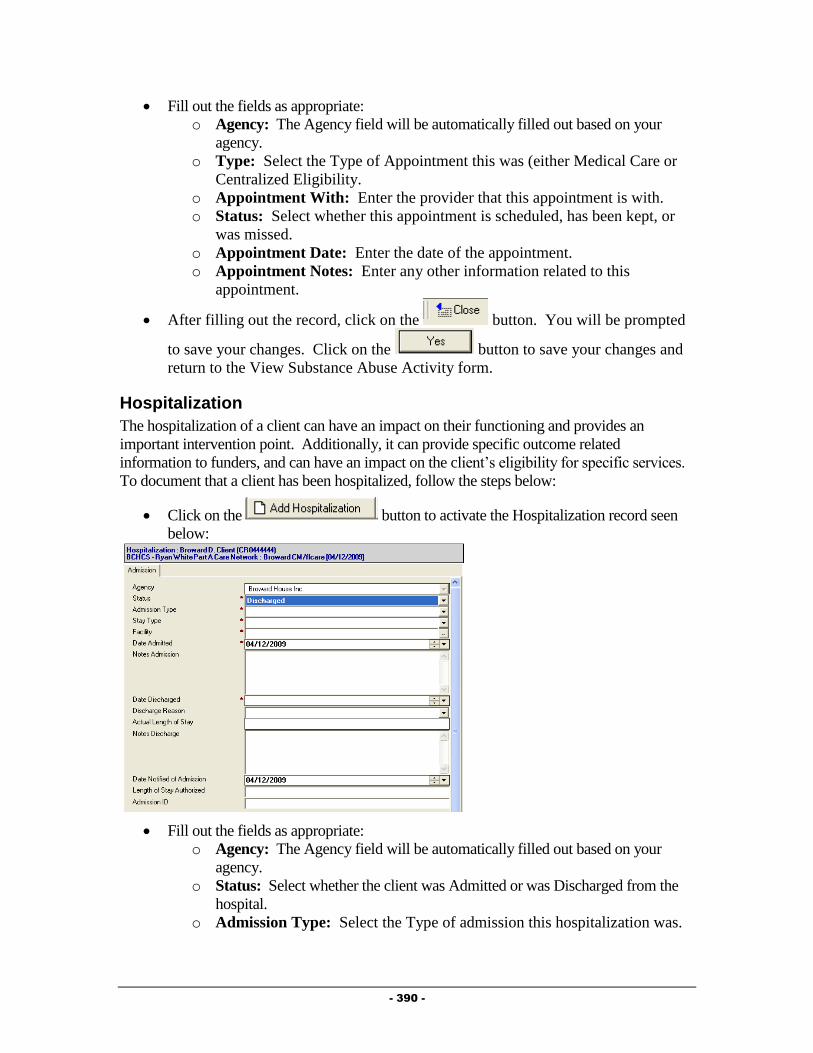
- 390 -
Fill out the fields as appropriate:
o Agency: The Agency field will be automatically filled out based on your
agency.
o Type: Select the Type of Appointment this was (either Medical Care or
Centralized Eligibility.
o Appointment With: Enter the provider that this appointment is with.
o Status: Select whether this appointment is scheduled, has been kept, or
was missed.
o Appointment Date: Enter the date of the appointment.
o Appointment Notes: Enter any other information related to this
appointment.
After filling out the record, click on the button. You will be prompted
to save your changes. Click on the button to save your changes and
return to the View Substance Abuse Activity form.
Hospitalization
The hospitalization of a client can have an impact on their functioning and provides an
important intervention point. Additionally, it can provide specific outcome related
information to funders, and can have an impact on the client’s eligibility for specific services.
To document that a client has been hospitalized, follow the steps below:
Click on the button to activate the Hospitalization record seen
below:
Fill out the fields as appropriate:
o Agency: The Agency field will be automatically filled out based on your
agency.
o Status: Select whether the client was Admitted or was Discharged from the
hospital.
o Admission Type: Select the Type of admission this hospitalization was.

- 391 -
o Stay Type: Select the type of condition this hospitalization was related
to.
o Facility: Enter the facility the client was hospitalized in.
o Date Admitted: Enter the date the client was admitted to the
hospitalization.
o Notes Admission: Enter any notes related to the admission.
o Date Discharged: This field will only appear if the “Status” is set to
“Discharged”. Enter the date the client was discharged from the hospital.
o Discharge Reason: This field will only appear if the “Status” is set to
“Discharged”. Enter the reason the client was discharged from the
hospital.
o Actual Length of Stay: This field will only appear if the “Status” is set
to “Discharged” and will automatically be computed based on the Date
Admitted and Date Discharged.
o Notes Discharge: This field will only appear if the “Status” is set to
“Discharged”. Enter any notes related to the client’s discharge from the
hospital.
o Date Notified of Admission: Enter the date you were notified of the
admission to the hospital.
o Length of Stay Authorized: Enter the length of stay authorized by the
insurer, if applicable.
o Admission ID: If applicable, enter the identification number related to
this hospitalization.
After filling out the record, click on the button. You will be prompted
to save your changes. Click on the button to save your changes and
return to the View Substance Abuse Activity form.
Letter
Provide® Enterprise allows you to document letters written to or on behalf of a client. To
document a letter, follow the steps below:
Click on the button to activate the Letter record seen below:
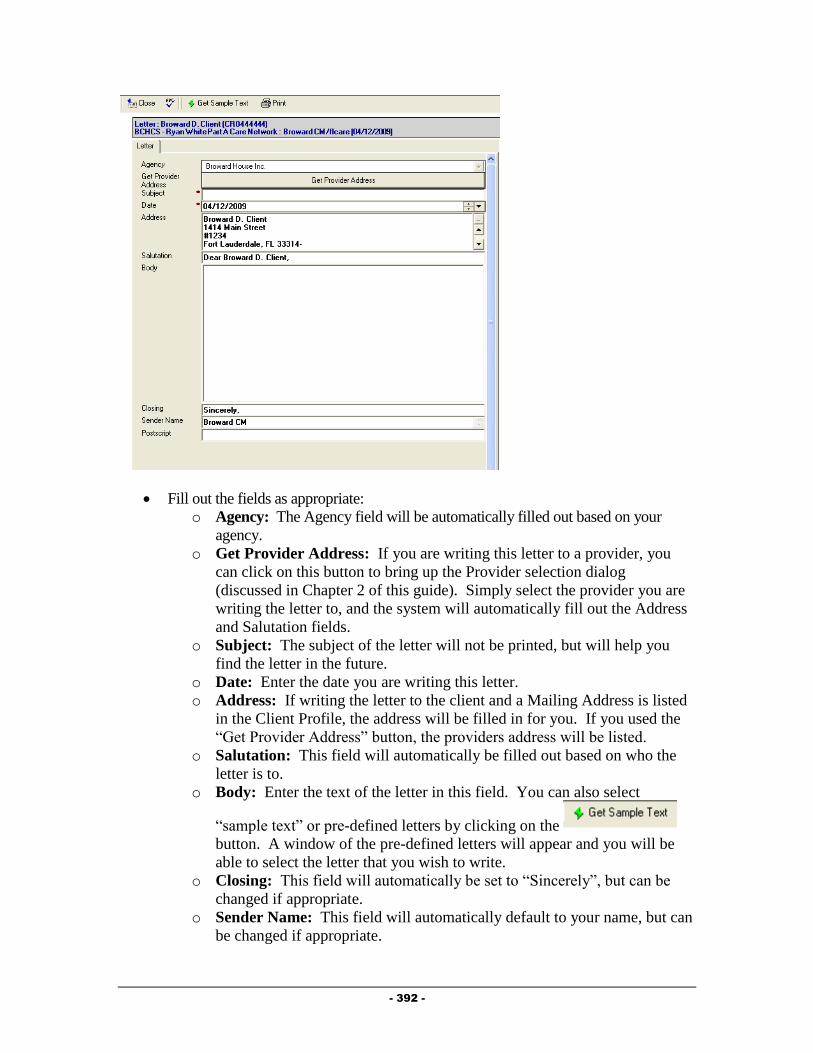
- 392 -
Fill out the fields as appropriate:
o Agency: The Agency field will be automatically filled out based on your
agency.
o Get Provider Address: If you are writing this letter to a provider, you
can click on this button to bring up the Provider selection dialog
(discussed in Chapter 2 of this guide). Simply select the provider you are
writing the letter to, and the system will automatically fill out the Address
and Salutation fields.
o Subject: The subject of the letter will not be printed, but will help you
find the letter in the future.
o Date: Enter the date you are writing this letter.
o Address: If writing the letter to the client and a Mailing Address is listed
in the Client Profile, the address will be filled in for you. If you used the
“Get Provider Address” button, the providers address will be listed.
o Salutation: This field will automatically be filled out based on who the
letter is to.
o Body: Enter the text of the letter in this field. You can also select
“sample text” or pre-defined letters by clicking on the
button. A window of the pre-defined letters will appear and you will be
able to select the letter that you wish to write.
o Closing: This field will automatically be set to “Sincerely”, but can be
changed if appropriate.
o Sender Name: This field will automatically default to your name, but can
be changed if appropriate.

- 393 -
o Postscript: The postscript is a paragraph, phrase, etc., added to a letter
that has already been concluded and signed by the writer.
To print this letter, simply click on the button. The letter print out will
open on your screen to be printed.
After filling out the record, click on the button. You will be prompted
to save your changes. Click on the button to save your changes and
return to the View Substance Abuse Activity form.
Additional Ongoing Documentation
Additional documentation should be completed as changes occur in a client’s life. This
documentation is listed below.
Update the Action Plan as needed, adding new goals to address problems and closing
goals that are no longer applicable.
Update the Client Profile and associated records as needed to reflect changes in the
Client’s life.
Releasing Behavioral Health Documentation to Another Behavioral Health Provider To release Behavioral Health records to another agency, please follow the steps below:
1) Navigate to the “View Substance Abuse Summary” forms from within the Client
Profile.
2) Select the “Releases” Tab, seen in the figure below.
3) Click on the button to open the Release record, similar to that in
the figure below:
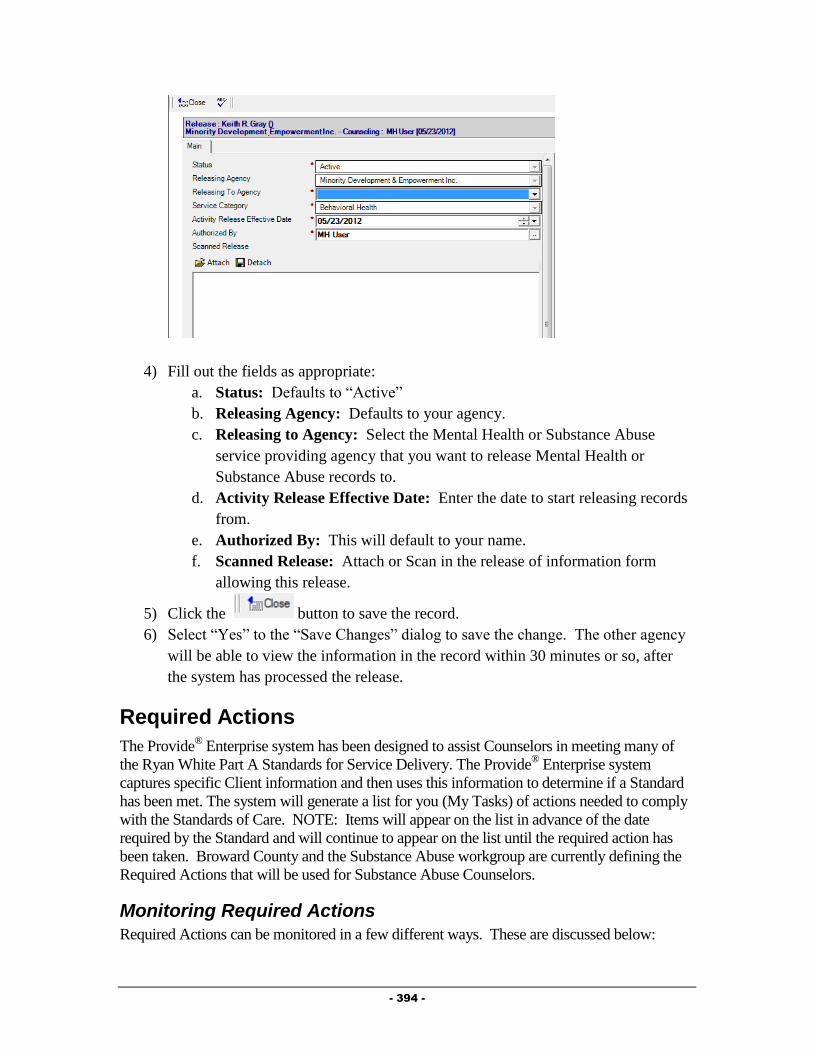
- 394 -
4) Fill out the fields as appropriate:
a. Status: Defaults to “Active”
b. Releasing Agency: Defaults to your agency.
c. Releasing to Agency: Select the Mental Health or Substance Abuse
service providing agency that you want to release Mental Health or
Substance Abuse records to.
d. Activity Release Effective Date: Enter the date to start releasing records
from.
e. Authorized By: This will default to your name.
f. Scanned Release: Attach or Scan in the release of information form
allowing this release.
5) Click the button to save the record.
6) Select “Yes” to the “Save Changes” dialog to save the change. The other agency
will be able to view the information in the record within 30 minutes or so, after
the system has processed the release.
Required Actions
The Provide® Enterprise system has been designed to assist Counselors in meeting many of
the Ryan White Part A Standards for Service Delivery. The Provide® Enterprise system
captures specific Client information and then uses this information to determine if a Standard
has been met. The system will generate a list for you (My Tasks) of actions needed to comply
with the Standards of Care. NOTE: Items will appear on the list in advance of the date
required by the Standard and will continue to appear on the list until the required action has
been taken. Broward County and the Substance Abuse workgroup are currently defining the
Required Actions that will be used for Substance Abuse Counselors.
Monitoring Required Actions
Required Actions can be monitored in a few different ways. These are discussed below:
- 395 -
My Tasks
The “My Tasks” views will show you any Required Actions assigned to you. The “My
Tasks” views can be accessed via the Activity views in the database. These are found under
“View – Activity – My Tasks” and can be viewed By Client or By Due Date.
When opening these views, you can view the specific assigned tasks by expanding the view
by clicking on the next to the appropriate column.
Client Profile
Client specific tasks can be found within the Client Profile in the Profile Section, Alert Tab,
seen in the figure below:
To view a specific task, simply double click on that task to open that record.
Discharging a Client
A client should be discharged for a number of reasons based on Broward County standards of
care, including the client moving outside of the service territory, death, and the client’s self
decision. When a Client needs to be discharged from your agency there are several tasks that
need to be performed. These are outlined below.

- 396 -
Client Service Profile
When discharging a client from your agency, you must change the Client’s Status in their
Client Service Profile record for your agency. This can be done by following the steps below:
Navigate to the Profile Section – General Sub-Tab of the Client Profile, seen in the figure
below:
Double click on the Client Service for your agency. The Client Service Profile will open
and will look similar to that in the figure below:
Click on the button. The Client Service Profile will be brought into Edit mode,
similar to that in the figure below:
Click on the button to activate the Status Change dialog box, similar to
that in the figure below:
- 397 -
Complete all fields as appropriate:
Status: Select “Closed” as the status.
Reason for change: Select the reason the clients is being discharged from your
agency.
Date change effective: Enter the date the client is being discharged from your
agency.
Click on the button to save your changes. You will be returned to the Client
Service Profile.
After verifying the status change, click on the button. You will be
prompted to save your changes. Click on the button to save your
changes and return to the Client Profile.
Terminate the Provider Relationship
When discharging a client from your agency, you must end your provider relationship with the
client. This can be done by following the steps below:
Navigate to the Providers Section of Client Profile, seen in the figure below:
Double click on your Provider Relationship to open the record.
- 398 -
Click on the button and enter a “Provider Relationship End Date”.
After entering the End Date, click on the button. You will be prompted to save
your changes. Click on the button to save your changes and return to the
Client Profile.
Closing the Action Plan
When discharging a client from your agency, you must close the Action Plan. This can be
done from within the Substance Abuse Summary.
To navigate to the Substance Abuse Summary, follow the steps below:
Navigate to the Client Profile. Once in the Profile, select the “View” button and then
choose “Substance Abuse Summary”.
The View Substance Abuse Activity form will open.
Click on the button and select “Action Plan”.
o From within the Action Plan, click on the button on the
Action bar. If you have not yet closed your Action Plan Goals, a dialog box
similar to that in the figure below will appear:
o If this occurs, click on the button to return to the Action Plan.
o Double click on each Open Action Plan Goal.
o Click on the button.
o Click on the button. The goal will be closed and
three additional fields will appear:
Actual Resolution Date: Enter the date the goal is being closed.
Outcome Measure: Enter the reason the goal is being closed.
Outcome Comments: Enter any comments relative to why the goal
is being closed.
o Once all Open Action Plan Goals have been Closed, click on the
button on the Action bar.
o Two additional fields will appear:
Date Closed: Enter the date the Action Plan is being closed.
Reason Closed: Enter the reason that the Action Plan is being closed.
- 399 -
o After filling out the record, click on the button. You will be
prompted to save your changes. Click on the button to save
your changes and return to the View Substance Abuse Activity form.
- 400 -
Chapter
12
Importing Providers
You can import Client Records, Client Sub Records and Activity Records into Provide®
Enterprise.
There are a number of common characteristics that you must keep in mind when preparing to
import records into the system.
All input files need to be formatted as ASCII delimited text files with the first record
(header) containing the Provide® Enterprise field names.
GTI recommends using “tab” for the field delimiter as input files may contain commas
or semicolons.
GTI does not support the import of rich text fields.
All dates must be in MM/DD/YYYY format
Imports require a unique file for each table. For example, data fields for the Client
Profile cannot be imported at the same time as data fields for an Allergy Record. You
must do two separate imports.
Additionally, each record must have a separate row in the input file. For example, you
cannot have three vaccinations in one row. A separate record would be needed for
each vaccination.
All records have a certain number of required fields that are needed in order to save a
record, within Provide® Enterprise these fields are marked with a red asterisk. When
importing, however, the only time all required fields are necessary is when doing the
initial client import. Though you may be able to import records without including all
required fields, it is always better to include them. Not importing all required fields
may cause errors when editing the record at a later date.
All imports generate error files.
In order for Client Sub-Records and Activity Records to be imported, the record’s
Client Key (“Client ID”, “Client Name”, “HealthPlan + Member ID” or “SSN”) must
match an existing Client Key of a Client Service Profile that fits the user’s
(Importer’s) User Profile.
In order for Client Sub-Records and Activity Records to be imported, the Client
Profile or a backup Client Profile must be released to the record’s Organization-
Program.
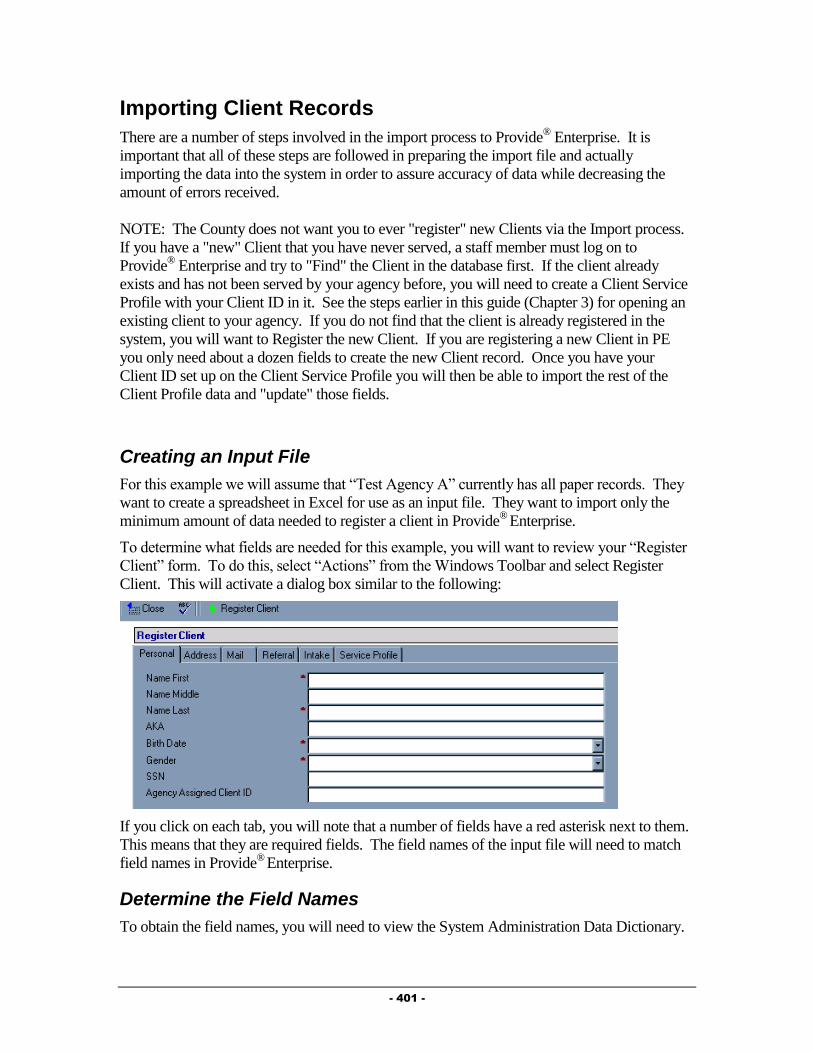
- 401 -
Importing Client Records
There are a number of steps involved in the import process to Provide® Enterprise. It is
important that all of these steps are followed in preparing the import file and actually
importing the data into the system in order to assure accuracy of data while decreasing the
amount of errors received.
NOTE: The County does not want you to ever "register" new Clients via the Import process.
If you have a "new" Client that you have never served, a staff member must log on to
Provide® Enterprise and try to "Find" the Client in the database first. If the client already
exists and has not been served by your agency before, you will need to create a Client Service
Profile with your Client ID in it. See the steps earlier in this guide (Chapter 3) for opening an
existing client to your agency. If you do not find that the client is already registered in the
system, you will want to Register the new Client. If you are registering a new Client in PE
you only need about a dozen fields to create the new Client record. Once you have your
Client ID set up on the Client Service Profile you will then be able to import the rest of the
Client Profile data and "update" those fields.
Creating an Input File
For this example we will assume that “Test Agency A” currently has all paper records. They
want to create a spreadsheet in Excel for use as an input file. They want to import only the
minimum amount of data needed to register a client in Provide®
Enterprise.
To determine what fields are needed for this example, you will want to review your “Register
Client” form. To do this, select “Actions” from the Windows Toolbar and select Register
Client. This will activate a dialog box similar to the following:
If you click on each tab, you will note that a number of fields have a red asterisk next to them.
This means that they are required fields. The field names of the input file will need to match
field names in Provide®
Enterprise.
Determine the Field Names
To obtain the field names, you will need to view the System Administration Data Dictionary.
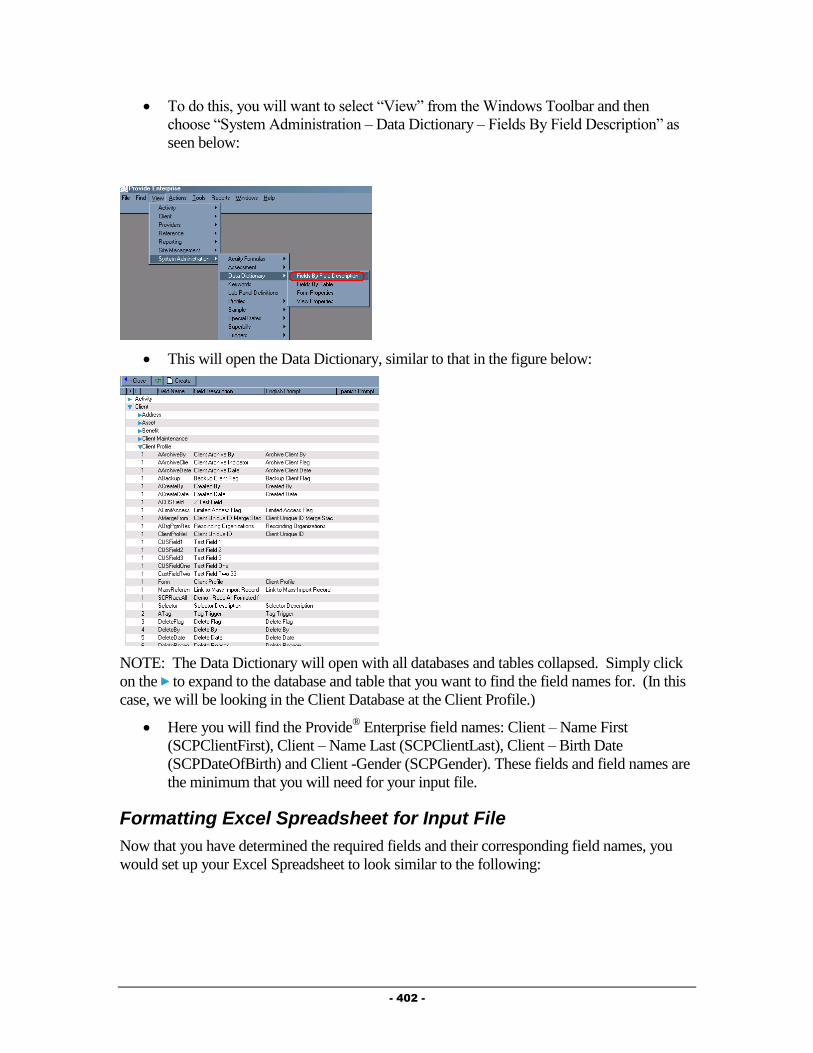
- 402 -
To do this, you will want to select “View” from the Windows Toolbar and then
choose “System Administration – Data Dictionary – Fields By Field Description” as
seen below:
This will open the Data Dictionary, similar to that in the figure below:
NOTE: The Data Dictionary will open with all databases and tables collapsed. Simply click
on the to expand to the database and table that you want to find the field names for. (In this
case, we will be looking in the Client Database at the Client Profile.)
Here you will find the Provide® Enterprise field names: Client – Name First
(SCPClientFirst), Client – Name Last (SCPClientLast), Client – Birth Date
(SCPDateOfBirth) and Client -Gender (SCPGender). These fields and field names are
the minimum that you will need for your input file.
Formatting Excel Spreadsheet for Input File
Now that you have determined the required fields and their corresponding field names, you
would set up your Excel Spreadsheet to look similar to the following:
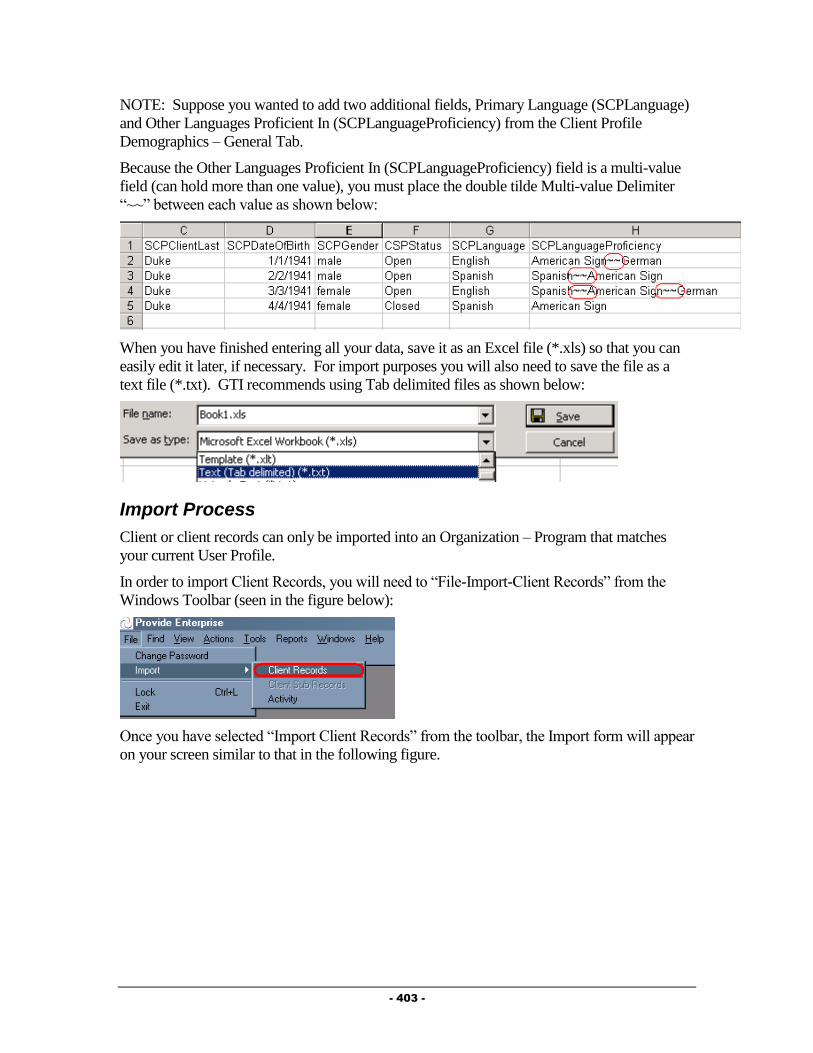
- 403 -
NOTE: Suppose you wanted to add two additional fields, Primary Language (SCPLanguage)
and Other Languages Proficient In (SCPLanguageProficiency) from the Client Profile
Demographics – General Tab.
Because the Other Languages Proficient In (SCPLanguageProficiency) field is a multi-value
field (can hold more than one value), you must place the double tilde Multi-value Delimiter
“~~” between each value as shown below:
When you have finished entering all your data, save it as an Excel file (*.xls) so that you can
easily edit it later, if necessary. For import purposes you will also need to save the file as a
text file (*.txt). GTI recommends using Tab delimited files as shown below:
Import Process
Client or client records can only be imported into an Organization – Program that matches
your current User Profile.
In order to import Client Records, you will need to “File-Import-Client Records” from the
Windows Toolbar (seen in the figure below):
Once you have selected “Import Client Records” from the toolbar, the Import form will appear
on your screen similar to that in the following figure.

- 404 -
Fill out the fields as described below:
Client Key: Select the key that you want to match records by. The choices are
“Client ID”, “Client Name”, “HealthPlan Member ID” or “SSN”.
Actions on Match Found on Key: Set this field to “Update”. When the system finds
a client that is already in the system, it will then update the existing profile with any
updated information.
Actions on No Match Found on Key: Set this field to “Bypass” so that you cannot
import new clients into the system..
Input File: The button allows you to browse for the location of the input file.
Field Delimiter: Select the field delimiter that is used in the input file. The options
are “Tab”, “Comma” or “Semicolon”.
Multi-value Delimiter: Currently the “~~”, “:” or “;” are the only options for a multi-
value delimiter.
Error file: The button allows you to browse for the destination location of the
error report and create a name for the file.
Field Name Validation
Once all of the above Import fields are completed, click the button to
perform a validation of the field names that you set up. If any of the field names do not
match a field name in the Data Dictionary (in the System Administration Database), you
will see INVALID before the field name. You will need to correct the field name on your
input file before you continue.
If the field names are valid, you will notice that the “Field”, “# Allowed Values” and
“Type” will now be filled in without any errors. An example of what the table might look
like is following.
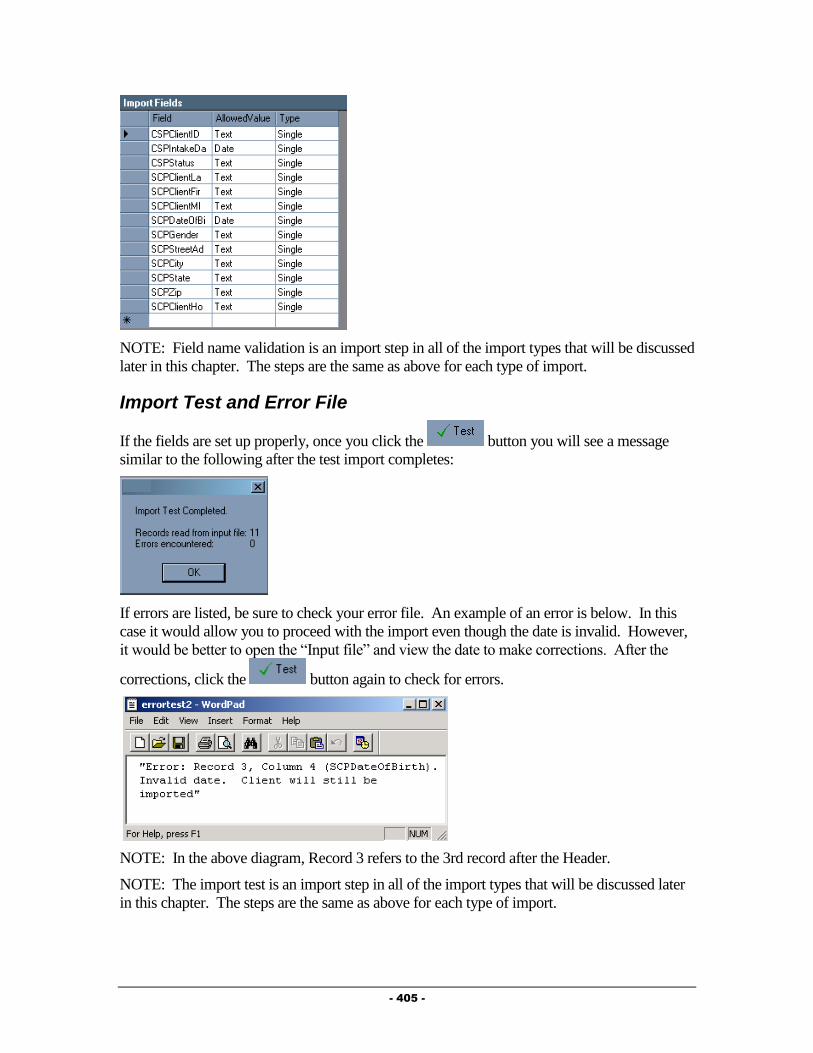
- 405 -
NOTE: Field name validation is an import step in all of the import types that will be discussed
later in this chapter. The steps are the same as above for each type of import.
Import Test and Error File
If the fields are set up properly, once you click the button you will see a message
similar to the following after the test import completes:
If errors are listed, be sure to check your error file. An example of an error is below. In this
case it would allow you to proceed with the import even though the date is invalid. However,
it would be better to open the “Input file” and view the date to make corrections. After the
corrections, click the button again to check for errors.
NOTE: In the above diagram, Record 3 refers to the 3rd record after the Header.
NOTE: The import test is an import step in all of the import types that will be discussed later
in this chapter. The steps are the same as above for each type of import.

- 406 -
If you are importing client updates into the system, you must check your error file to find out
which clients are not already in the system. For any clients that are not in the system, you
MUST register them in the system manually (see Chapter 3 of this guide for instructions on
doing this.)
Your error file will have a message similar to the following for clients that it cannot find in the
system “Error: Record 1, No Client match found for record number 1. The client will not be
imported.” This messages tells you to look in your Client Import spreadsheet at the FIRST
client. (Note – the record numbers correspond to the line of the spreadsheet the client is found
in. The record number does NOT take into count the first line of column headers, so the
record number count actually begins on the first line of data. You can compare your error file
to your client import file to find out which clients will need to manually be entered in the
system, or their Client Service Profile created.)
Final Import
After you have completed a Test Import without receiving errors, you will be able to import
the data into the system.
Simply click on the button. Once the import process has completed, the
following window will appear.
Again, if you receive any error messages, make sure to review your error file so that
any necessary corrections can be made.
Importing Client Sub-Records
There are a number of steps involved in the import process in Provide® Enterprise. It is
important that all of these steps are followed in preparing the import file and actually
importing the data into the system in order to assure accuracy of data while decreasing the
amount of errors received.
The process of importing Client Activity Records is very similar to that of importing Client
records. In fact, you should follow the steps detailed in the Importing Client Records for the
following:
Creating Input File (NOTE: When reviewing the required fields, you will want to
open the Sub-Record type you wish to import by selecting a client, opening the client
profile, navigating to the appropriate section of the file and clicking on the “Add”
button.)
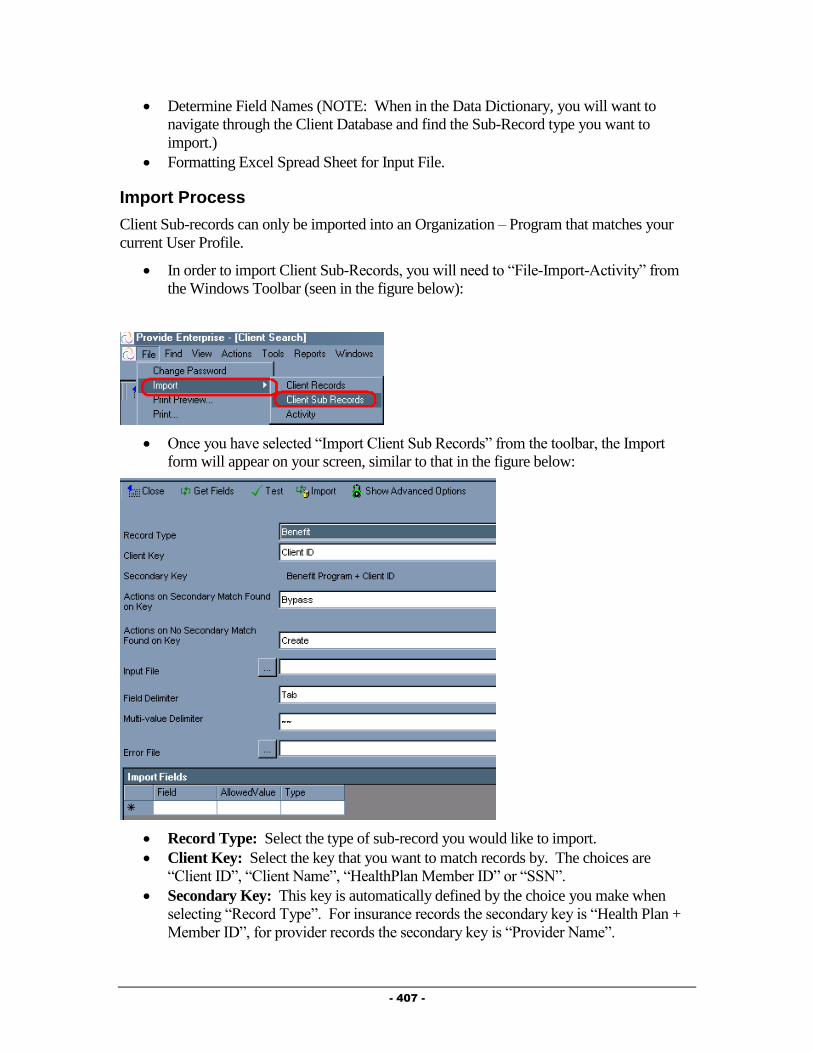
- 407 -
Determine Field Names (NOTE: When in the Data Dictionary, you will want to
navigate through the Client Database and find the Sub-Record type you want to
import.)
Formatting Excel Spread Sheet for Input File.
Import Process
Client Sub-records can only be imported into an Organization – Program that matches your
current User Profile.
In order to import Client Sub-Records, you will need to “File-Import-Activity” from
the Windows Toolbar (seen in the figure below):
Once you have selected “Import Client Sub Records” from the toolbar, the Import
form will appear on your screen, similar to that in the figure below:
Record Type: Select the type of sub-record you would like to import.
Client Key: Select the key that you want to match records by. The choices are
“Client ID”, “Client Name”, “HealthPlan Member ID” or “SSN”.
Secondary Key: This key is automatically defined by the choice you make when
selecting “Record Type”. For insurance records the secondary key is “Health Plan +
Member ID”, for provider records the secondary key is “Provider Name”.
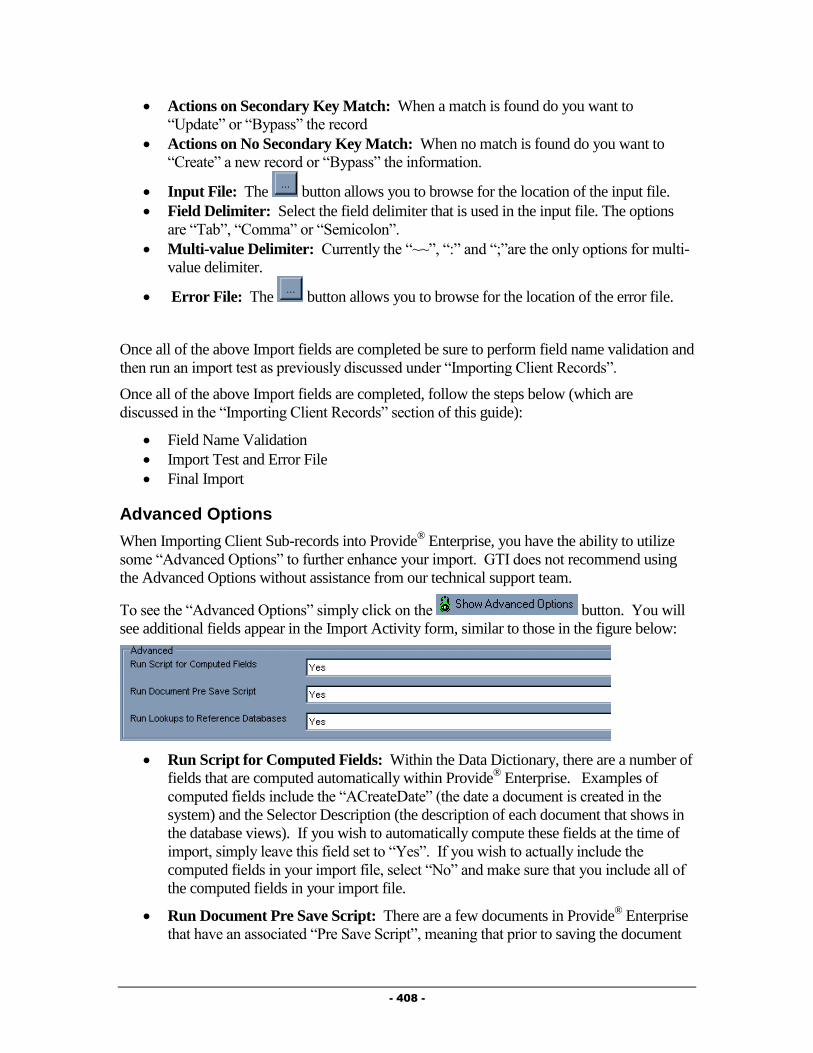
- 408 -
Actions on Secondary Key Match: When a match is found do you want to
“Update” or “Bypass” the record
Actions on No Secondary Key Match: When no match is found do you want to
“Create” a new record or “Bypass” the information.
Input File: The button allows you to browse for the location of the input file.
Field Delimiter: Select the field delimiter that is used in the input file. The options
are “Tab”, “Comma” or “Semicolon”.
Multi-value Delimiter: Currently the “~~”, “:” and “;”are the only options for multi-
value delimiter.
Error File: The button allows you to browse for the location of the error file.
Once all of the above Import fields are completed be sure to perform field name validation and
then run an import test as previously discussed under “Importing Client Records”.
Once all of the above Import fields are completed, follow the steps below (which are
discussed in the “Importing Client Records” section of this guide):
Field Name Validation
Import Test and Error File
Final Import
Advanced Options
When Importing Client Sub-records into Provide® Enterprise, you have the ability to utilize
some “Advanced Options” to further enhance your import. GTI does not recommend using
the Advanced Options without assistance from our technical support team.
To see the “Advanced Options” simply click on the button. You will
see additional fields appear in the Import Activity form, similar to those in the figure below:
Run Script for Computed Fields: Within the Data Dictionary, there are a number of
fields that are computed automatically within Provide® Enterprise. Examples of
computed fields include the “ACreateDate” (the date a document is created in the
system) and the Selector Description (the description of each document that shows in
the database views). If you wish to automatically compute these fields at the time of
import, simply leave this field set to “Yes”. If you wish to actually include the
computed fields in your import file, select “No” and make sure that you include all of
the computed fields in your import file.
Run Document Pre Save Script: There are a few documents in Provide® Enterprise
that have an associated “Pre Save Script”, meaning that prior to saving the document
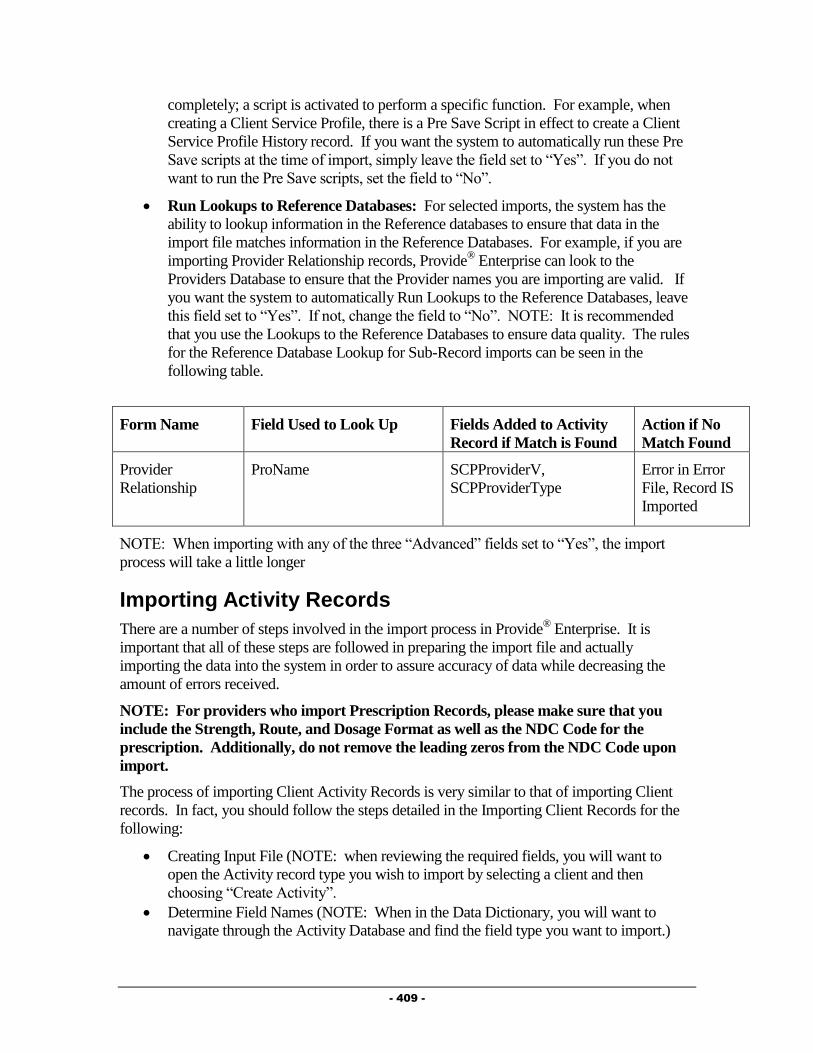
- 409 -
completely; a script is activated to perform a specific function. For example, when
creating a Client Service Profile, there is a Pre Save Script in effect to create a Client
Service Profile History record. If you want the system to automatically run these Pre
Save scripts at the time of import, simply leave the field set to “Yes”. If you do not
want to run the Pre Save scripts, set the field to “No”.
Run Lookups to Reference Databases: For selected imports, the system has the
ability to lookup information in the Reference databases to ensure that data in the
import file matches information in the Reference Databases. For example, if you are
importing Provider Relationship records, Provide® Enterprise can look to the
Providers Database to ensure that the Provider names you are importing are valid. If
you want the system to automatically Run Lookups to the Reference Databases, leave
this field set to “Yes”. If not, change the field to “No”. NOTE: It is recommended
that you use the Lookups to the Reference Databases to ensure data quality. The rules
for the Reference Database Lookup for Sub-Record imports can be seen in the
following table.
Form Name Field Used to Look Up Fields Added to Activity
Record if Match is Found
Action if No
Match Found
Provider
Relationship
ProName SCPProviderV,
SCPProviderType
Error in Error
File, Record IS
Imported
NOTE: When importing with any of the three “Advanced” fields set to “Yes”, the import
process will take a little longer
Importing Activity Records
There are a number of steps involved in the import process in Provide® Enterprise. It is
important that all of these steps are followed in preparing the import file and actually
importing the data into the system in order to assure accuracy of data while decreasing the
amount of errors received.
NOTE: For providers who import Prescription Records, please make sure that you
include the Strength, Route, and Dosage Format as well as the NDC Code for the
prescription. Additionally, do not remove the leading zeros from the NDC Code upon
import.
The process of importing Client Activity Records is very similar to that of importing Client
records. In fact, you should follow the steps detailed in the Importing Client Records for the
following:
Creating Input File (NOTE: when reviewing the required fields, you will want to
open the Activity record type you wish to import by selecting a client and then
choosing “Create Activity”.
Determine Field Names (NOTE: When in the Data Dictionary, you will want to
navigate through the Activity Database and find the field type you want to import.)

- 410 -
Formatting Excel Spread Sheet for Input File.
Import Process
Activity records can only be imported into an Organization – Program that matches your
current User Profile.
In order to import Activity Records, you will need to “File-Import-Activity” from the
Windows Toolbar as seen in the figure below:
Once you have selected “Import Activity” from the toolbar, the Import form will appear on
your screen, similar to that in the following figure.
Record Type: Select the type of record you would like to import.
Client Key: Select the key that you want to match records by. The choices are
“Client ID”, “Client Name”, “HealthPlan Member ID” or “SSN”.
Input File: The button allows you to browse for the location of the input file.
Field Delimiter: Select the field delimiter that is used in the input file. The options
are “Tab”, “Comma” or “Semicolon”.
Multi-value Delimiter: Currently the “~~”, “:” or “;” are the only options for a multi-
value delimiter.
Error file: The button allows you to browse for the destination location of the
error report and create a name for the file.
Once all of the above Import fields are completed, follow the steps below (which are
discussed in the “Importing Client Records” section of this guide:
Field Name Validation
Import Test and Error File

- 411 -
Final Import
Advanced Options
When Importing Activity records into Provide® Enterprise, you have the ability to utilize some
“Advanced Options” to further enhance your import. GTI does not recommend using the
Advanced Options without assistance from our technical support team.
To see the “Advanced Options”, simply click on the button. You will
see additional fields appear in the Import Activity form, similar to those in the figure below:
Run Script for Computed Fields: Within the Data Dictionary, there are a number of
fields that are computed automatically within Provide® Enterprise. Examples of
computed fields include the “ACreateDate” (the date a document is created in the
system) and the Selector Description (the description of each document that shows in
the database views). If you wish to automatically compute these fields at the time of
import, simply leave this field set to “Yes”. If you wish to actually include the
computed fields in your import file, select “No” and make sure that you include all of
the computed fields in your import file.
Run Document Pre Save Script: There are a few documents in Provide® Enterprise
that have an associated “Pre Save Script”, meaning that prior to saving the document
completely; a script is activated to perform a specific function. For example, when
creating a Client Service Profile, there is a Pre Save Script in effect to create a Client
Service Profile History record. If you want the system to automatically run these Pre
Save scripts at the time of import, simply leave the field set to “Yes”. If you do not
want to run the Pre Save scripts, set the field to “No”.
Run Lookups to Reference Databases: For selected Activity imports, the system
has the ability to lookup information in the Reference databases to ensure that data in
the import file matches information in the Reference Databases. For example, if you
are importing Procedure records, Provide® Enterprise can look to the Code Sets
Database to ensure that the CPT Codes you are importing are valid. If you want the
system to automatically Run lookups to the Reference Databases, leave this field set to
“Yes”. If not, change the field to “No”. NOTE: It is recommended that you use the
lookups to the Reference Databases to ensure data quality. The rules for the Reference
Database Lookup can be seen in the table below:
Form Name Field Used to Look Up Fields Added to Activity
Record if Match is
Found
Action if No
Match Found

- 412 -
Diagnosis CLADiagICD9 CLADiagName Error in Error
File, Activity
Record NOT
Imported
Drug CLADrugName CLADrugAPA,
CLADrugNameGeneric,
CLADrugAPAs
Error in Error
File, Activity
Record NOT
Imported
Hospitalization CLAHospitalPrimaryDiagICD9 CLAHospitalPRimaryDia
g
Error in Error
File, Record IS
Imported
Hospitalization CLAHospitalPrimDisDiagICD9 CLAHospitalPrimDisDiag Error in Error
File, Record IS
Imported
Hospitalization CLAHospitalOtherDiagICD9 CLAHospitalOtherDiag Error in Error
File, Record IS
Imported
Hospitalization CLAHospitalOtherDisDiagICD9 CLAHospitalOtherDisDia
g
Error in Error
File, Record IS
Imported
Prescription CLADrugNDC
OR
CLADrugName
CLADrugAPA,
CLADrugName,
CLADrugNameGeneric,
CLADrugAPAs
OR
CLADrugAPA,
CLADrugNameGeneric,
CLADrugAPAs
Error in Error
File, Record
NOT Imported
if there is no
match on both
fields
Procedure CLAProcCode CLAProcDescription Error in Error
File, Record
NOT Imported
Test Result CLATestName No Additional Fields
Added
Error in Error
File, Record
NOT Imported
NOTE: When importing with any of the three “Advanced” fields set to “Yes”, the import
process will take a little longer.

- 413 -
Chapter
13
AICP (AIDS Insurance
Continuation Program)
This Chapter outlines the tasks that need to be completed by Broward County Ryan White
Part A AICP program staff within Provide® Enterprise to meet all billing and reporting
requirements.
Enrollment Documentation
At the time of enrollment in the AICP, it is important to ensure that all Private Health,
Prescription, and Dental Insurance information in the Client Profile is up to date.
Client Profile
The Insurance Tab of the Client Profile has five Sub-Tabs containing information on the
health, prescription and dental care benefits and insurance coverage that the client has. AICP
staff need to make sure that the information on the Private Health Coverage Sub-Tab is
current.
Insurance Section - Private Health Coverage Sub-Tab
The Private Health Coverage Sub-Tab collects detailed information related to a client’s private
health care insurance coverage.

- 414 -
Fill out the fields as appropriate:
Private Insurance Coverage?: Select whether or not the client has private insurance.
A number of additional fields will appear if the above field is set to “Yes”. Four of
these fields are instrumental in determining eligibility. These are outlined below:
o Ambulatory Benefits: If this field is set to "Yes", the client will no longer be
eligible for "Ambulatory Outpatient Medical Care" services.
o Mental Health Benefits: If this field is set to "Yes", the client will no longer
be eligible for "Mental Health" services.
o Substance Abuse Benefits: If this field is set to "Yes", the client will no
longer be eligible for "Substance Abuse" services.
o Private Prescription Coverage: If this field is set to "Yes", the Client will
no longer be eligible for Medications
Private Prescription Coverage?: Select whether or not the client has private
prescription insurance.
NOTE: AICP staff need to document all of the details regarding the health insurance
coverage that the client has.
Insurance Section – AICP Sub-Tab
The AICP Sub-Tab collects detailed information related to a client’s enrollment in AIDS
Insurance Continuation programs.

- 415 -
Fill out the fields as appropriate:
FL AIDS Insurance Continuation Program: Select the status of the client’s
enrollment in the FL AIDS Insurance Continuation Program.
NOTE: The client is only eligible for Ryan White Part A AICP services if they are on the
Wait List for the State AICP.
Enroll the Client in the AICP
In the AICP section of the Client profile, you are able to document the client’s enrollment in
the AICP. To enroll the client, follow the steps below:
Within the AICP section of the Client Profile, click on the
button. The AICP Enrollment form, similar to that in the figure below will open:
Fill out the fields as appropriate:
AICP Enrollment Tab

- 416 -
Status: Enter the client’s enrollment status in the AICP program.
Program Type: Defaults to Broward County.
Date Open/Date Placed on Wait List: These will show based on the “Status”
entered above. Enter either the date the client was placed on the AICP wait list or the
date they were enrolled in the AICP.
Date Closed: This will only show when the “Status” is set to “Closed”, meaning that
the client is no longer enrolled in the AICP.
Last Client Premium Payment Date Paid: Enter the date that the last premium
payment was made by the client.
Last Client Premium Payment Coverage From/Coverage To: Enter the dates of
the coverage reflected by the last client premium payment.
First AICP Payment Due Date: Enter the due date of the client’s first AICP
payment.
First AICP Payment Coverage From/To Date: Enter the coverage dates of the first
AICP Payment.
First AICP Payment Amount: Enter the amount of the first AICP payment due.
Estimated Monthly Premium Next Scheduled Due Date: Enter the due date of the
next AICP Payment.
Estimated Monthly Premium Payment Amount: Enter the amount of the monthly
premium to be paid.
AICP Payment History: This view window will show the history of all AICP
Payments. Documenting AICP payments will be discussed later in this chapter.
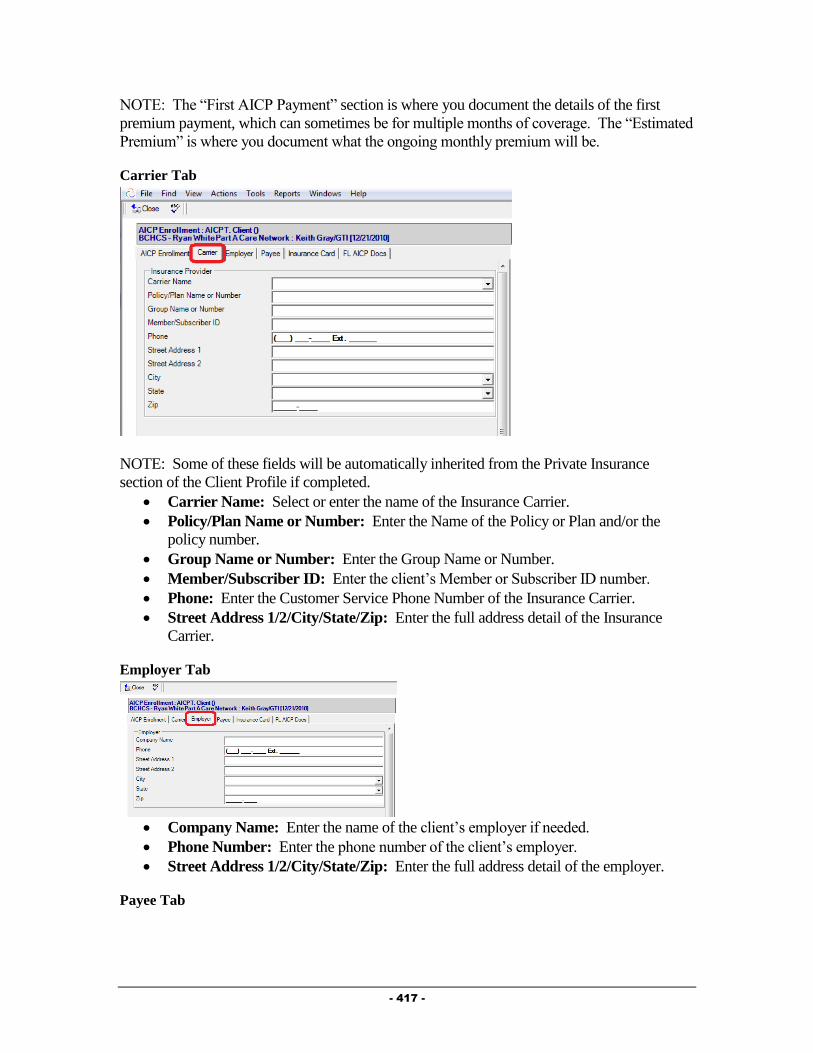
- 417 -
NOTE: The “First AICP Payment” section is where you document the details of the first
premium payment, which can sometimes be for multiple months of coverage. The “Estimated
Premium” is where you document what the ongoing monthly premium will be.
Carrier Tab
NOTE: Some of these fields will be automatically inherited from the Private Insurance
section of the Client Profile if completed.
Carrier Name: Select or enter the name of the Insurance Carrier.
Policy/Plan Name or Number: Enter the Name of the Policy or Plan and/or the
policy number.
Group Name or Number: Enter the Group Name or Number.
Member/Subscriber ID: Enter the client’s Member or Subscriber ID number.
Phone: Enter the Customer Service Phone Number of the Insurance Carrier.
Street Address 1/2/City/State/Zip: Enter the full address detail of the Insurance
Carrier.
Employer Tab
Company Name: Enter the name of the client’s employer if needed.
Phone Number: Enter the phone number of the client’s employer.
Street Address 1/2/City/State/Zip: Enter the full address detail of the employer.
Payee Tab
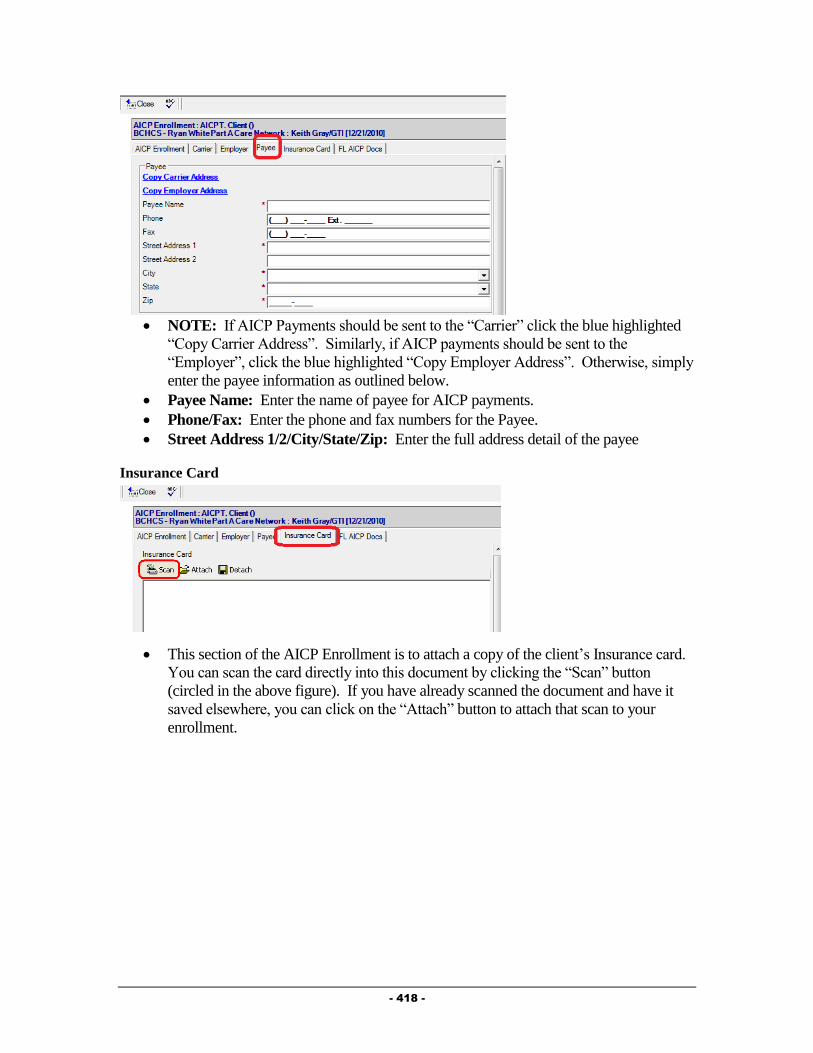
- 418 -
NOTE: If AICP Payments should be sent to the “Carrier” click the blue highlighted
“Copy Carrier Address”. Similarly, if AICP payments should be sent to the
“Employer”, click the blue highlighted “Copy Employer Address”. Otherwise, simply
enter the payee information as outlined below.
Payee Name: Enter the name of payee for AICP payments.
Phone/Fax: Enter the phone and fax numbers for the Payee.
Street Address 1/2/City/State/Zip: Enter the full address detail of the payee
Insurance Card
This section of the AICP Enrollment is to attach a copy of the client’s Insurance card.
You can scan the card directly into this document by clicking the “Scan” button
(circled in the above figure). If you have already scanned the document and have it
saved elsewhere, you can click on the “Attach” button to attach that scan to your
enrollment.

- 419 -
FL AICP Docs
This section of the AICP Enrollment is to attach a copy of the client’s State of Florida
AICP documentation. You can scan this information directly into this document by
clicking the “Scan” button (circled in the above figure). If you have already scanned
the documentation and have it saved elsewhere, you can click on the “Attach” button
to attach that scan to your enrollment.
After filling out all information in the Enrollment click on the button to
save and close the enrollment. This will return you to the Client Profile.
Insurance Section – Comments Sub-Tab
The Comments Sub-Tab collects allows you to enter any needed comments regarding the
client’s insurance information.
Simply enter any comments in the “Comments” field.
Payment Request Documentation
Documentation of Payment Requests is completed from within the AICP Enrollment record.
A view has been created to assist you in identifying clients that are enrolled in the AICP
program so that you can quickly enter the Payment Request record.
View\Client\AICP Open Enrollments: This is a view of clients that have AICP
Enrollments that are in the “Status” of “Open”. It can be used to document a Payment
Request without actually having to go into the AICP Enrollment record. Double
clicking on a client’s name in this view will open the AICP Enrollment Record.

- 420 -
When you are ready to enter the payment request record, you can navigate to the view listed
above, or access the client’s Open AICP Enrollment via the Insurance Section – AICP Sub-
Tab of the Client Profile.
If accessing the Payment Request record from the via listed above, simply single click
on the client name that you wish to enter the request for and then click the
button. If accessing the Payment Request from directly within
the AICP Enrollment, click the button.
Either way, a Service Provided form similar to that in the figure below will open:
Fill out the fields as appropriate:
o Agency: This will default to be your agency.
o Status: Defaults to “Pending”. Should not be changed until the payment has
been processed via the accounting department.
o Provider: This will default to your name. If you are entering this on
someone’s behalf, you can change the “Provider” to be that person’s name.
o Service Date: This should reflect the date that this payment is being entered
into the database.
o Service Category/Service Provided/Service Code: These will all default.
o Due Date: Enter the date that the payment is due at the payee site.
o Units of Service/Units of Measure/Unit Cost/Total Cost: These will all
default based on the information listed in the AICP Enrollment record.
o Voucher ID: This will be blank when the record is first being entered. It will
be updated once Finance has processed this payment.
o Service From Date/Service To Date: Enter the dates that reflect the time
period the payment is being made for.
o Comments: Enter any additional comments about this payment.

- 421 -
After filling out all appropriate fields, click the . This will
save your record and open the Check Request Form on your screen (similar to that in
the figure below). The button can be used if you are not needing the print
the voucher, but simply want to save and close your record.
Click the button (circled in the above figure) to print out this Check Request.
Deliver the Check Request to your supervisor for approval. Click the “X” in the
upper right hand corner (circled below) to close the Check Request after it has been
printed.
Click the button to close your record and return to the Enrollment. This
will save and, essentially “submit” the payment request.
Payment Request Processing
Once a Payment Request has been submitted and the voucher/check has been cut by finance, it
is important to finalize the processing of the request in Provide Enterprise. This will be used
in the generation of the invoice to Broward County for your services.
You will always be able to access all payment requests attached to a given AICP
enrollment by first opening the AICP Enrollment from the AICP Sub-Tab of the
Insurance Section of the Client Profile. Additionally, a view of Pending Payments
has been added to help you to quickly find a pending payment so that it can be
completed and final documentation added. This view is “View\Activity\AICP
Payments\Pending By Client Name”.
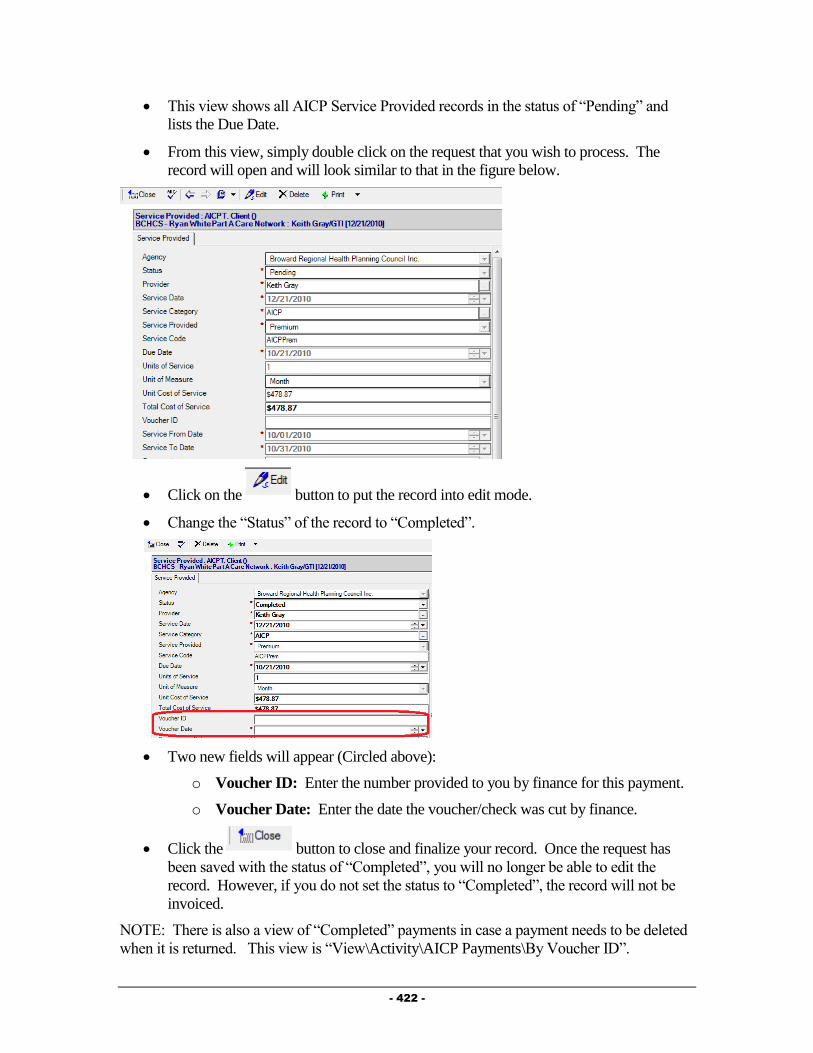
- 422 -
This view shows all AICP Service Provided records in the status of “Pending” and
lists the Due Date.
From this view, simply double click on the request that you wish to process. The
record will open and will look similar to that in the figure below.
Click on the button to put the record into edit mode.
Change the “Status” of the record to “Completed”.
Two new fields will appear (Circled above):
o Voucher ID: Enter the number provided to you by finance for this payment.
o Voucher Date: Enter the date the voucher/check was cut by finance.
Click the button to close and finalize your record. Once the request has
been saved with the status of “Completed”, you will no longer be able to edit the
record. However, if you do not set the status to “Completed”, the record will not be
invoiced.
NOTE: There is also a view of “Completed” payments in case a payment needs to be deleted
when it is returned. This view is “View\Activity\AICP Payments\By Voucher ID”.

- 423 -
Discharging a Client
When the client is going to be discharged from the AICP program there are two main records
that need to be modified. These are outlined below.
AICP Enrollment
When a client is being closed to the AICP, you must change the Status of the AICP
Enrollment record. This can be done by following the steps below:
Navigate to the Insurance Section –AICP Sub-Tab of the Client Profile and access the
AICP Enrollment by double clicking on it in the embedded view window. You can
also navigate to the AICP Enrollment using the view View\Client\AICP Open
Enrollments. Simply double click on the client/enrollment in this view to open that
enrollment.
Click on the button to put the record into edit mode.
Change the “Status” of the record to “Closed”.
Enter the “Date Closed”.
Click the button to close and finalize your record.
Client Service Profile
When discharging a client from your agency, you must change the Client’s Status in their
Client Service Profile record for your agency. This can be done by following the steps below:
Navigate to the Profile Section – General Sub-Tab of the Client Profile, seen in the figure
below:

- 424 -
Double click on the Client Service for your agency (circled in the above figure). The
Client Service Profile will open and will look similar to that in the figure below:
Click on the button. The Client Service Profile will be brought into Edit mode,
similar to that in the figure below:
Click on the button to activate the Status Change dialog box, similar to
that in the figure below:

- 425 -
Complete all fields as appropriate:
Status: Select “Closed” as the status.
Reason for change: Select the reason the clients is being discharged from your
agency.
Date change effective: Enter the date the client is being discharged from your
agency.
Click on the button to save your changes. You will be returned to the Client
Service Profile.
After verifying the status change, click on the button. You will be
prompted to save your changes. Click on the button to save your
changes and return to the Client Profile.
- 426 -
Chapter
14
Invoicing
Using Provide® Enterprise to generate your invoices to BCHCS is fairly easy. After creating
the proper documentation as discussed in previous chapters, you need to follow these steps in
the Provide® Reporting Database.
Introduction
Using Provide® Enterprise to generate your invoices to Broward County is fairly easy. After
creating the proper documentation as discussed in the program specific “cheat sheets”, you
need to follow these steps.
Reconciliation
The reconciliation process will create ledger entries for any services that have been entered
during the Contract period that match any of the Billing Rate documents associated with the
specific Contract. Each time an invoice is going to be run, it is important to reconcile to
convert newly entered or deleted service records to Ledger Entries. NOTE: The
reconciliation process may take several minutes to run, depending on the amount of data that
has been entered in the system. The reconciliation process will delete all unbilled ledger
entries and create new entries for newly billable services.
NOTE: Prior to actually reconciling the services, review the contract information, including
the start and end dates, contract amount and contract cap period. If any information is
incorrect, contact your Contract’s Administrator to correct the problem.
Reconciliation needs to be completed on EACH contract in order to pull any new services in
as ledger entries.
NOTE: If you have multiple contracts for exactly the same service, you need to reconcile the
smaller contract first and complete the invoice on the smaller contract prior to moving on to
the larger contract.
To reconcile, follow the steps below:
Find the appropriate contract that you want to reconcile. [Menu
BarView\Billing\Contracts\Open by Payee]

- 427 -
Open the contract. [Double ClickContract you wish to reconcile]
Reconcile the contract by clicking the button.
While the contract reconciles, you will not see anything happen on the screen. However,
when the reconciliation process completes, a dialog box will appear telling you how many
ledger entries were generated, similar to that in the figure below:

- 428 -
Creating an Invoice
Once activity for a contract has been reconciled to the ledger, an invoice can be
generated.
Create an invoice by clicking on the button.
The invoice will appear:
Enter the Invoice Period End Date (the last day of the month being invoiced).
Run a Trial Invoice by clicking on the button. The invoice will run and
refresh to show you all the totals.
Print out the Trial Invoice so that you can review it and make any adjustments to the
Service Provided, Progress Log, Prescription or Superbill documents for your Clients.
To print it, simply click on the Print Button and select “Invoice”. The trial invoice will
run and appear on your screen, similar to that in the figure below:

- 429 -
If necessary, make any needed changes to Client files and re-reconcile (following the
steps above). You can then generate another Trial Invoice and review it again.
Once satisfied with your Trial Invoice, you can submit the invoice. Once you have
submitted the invoice, no changes can be made to it.
To submit the invoice, simply click on the button. This will run the invoice
again and will mark it as billed.
At this point, you need to print the invoice out and mail it to BCSAHCSD with the
appropriate cover sheet. [Button BarClick ButtonPrint\Invoice]
Special Handling of Unbillable Services
The Reconciliation process will find all documented services that are potentially
billable for the selected contract in the specified date range. The system examines the
service records and creates ledger entries for those that can be billed. The
reconciliation process can also identify services that are not billable and create ledger
records used to report “unbillable” services. These “unbillable” services fall into one
of the following three categories:
o Contract Cap: Services fall into this category when the contract cap has been
met for the billing period. If a provider has already billed or accumulated for
billing services that meet the cap of a contract at that point in time, the service
- 430 -
would be billable if the contract cap was raised or in a subsequent month when
the provider could then bill for more services. For example, assume a
Contract was for $120,000 with the 1/12th rule in place and it was the sixth
month of the Contract and the provider had already billed $50,000 after the
first five months. If during the sixth month the provider documented $12,000
of services that would be billable against the contract, only the first $10,000
could be billed and the last $2,000 would be “banked” – e.g. reported on the
invoice as unbillable due to “Contract Cap”. If in the seventh month the
provider only then documented $8,000 of services they will be able to bill
$10,000 because the $2,000 of services that had been unbillable due to
Contract Cap being exceeded would now be billable.
o Service Cap: Services fall into this category if the service exceeds the amount
of the specified service that can be billed for during a Contract specified period
of time. This cap can be either limited to the Service itself or the Service to a
given Client. For example, if a Contract dictates that no Client may receive
and the provider be paid for giving more than 3 units of Food Pantry
assistance per month and a Client had four units documented in a given month,
the 4th unit would be reported as “unbillable” due to a Service Cap being met.
Since this Service would never be billable (unless the Service Cap was
removed or raised for the Contract) the value of this service cannot be
“Banked” and it is therefore reported as having a value of zero.
o Client Eligibility: Services fall into this category if a Client doesn’t match the
criteria of the Contract. For example, if the Contract stipulates that the Client
must be living in Broward County to receive a given service and the client is
documented as living in another County, the Service would be reported as
“unbillable” due to a Client Eligibility limitation. If a Service is “Unbillable”
due to “Client Eligibility”, the billable amount will be set to zero, because the
service will never be able to be billed.

- 431 -
Chapter
15
Processing Invoices
This Chapter is for BCHCS Staff only!
NOTE: Prior to actually reconciling the services, review the contract information, including
the start and end dates, contract amount and contract cap period. If any information is
incorrect, adjust the contract as appropriate.
Processing Invoices
This can only be done by Broward County staff!
Once an invoice has been submitted by an agency the invoice will appear. Broward
County staff can view these invoices easily. [Menu
BarView\Billing\Contracts\All by Payee] [Double Click Contract to Review]
[Double ClickInvoice to Review] [Button BarClick ButtonPrint\Invoice]
If the invoice appears to be complete and accurate (and staff have been notified that
the check for the invoice has been cut), the invoice can be marked as paid as billed.
[Button BarClick ButtonPaid as Billed]
After reviewing the invoice, if Broward County staff detects errors in the invoice, they can
reject the invoice in Provide® Enterprise. [Button BarClick ButtonRejected] The
agency would then need to re-submit their invoices.
Line Item Reject
Broward County staff have the ability to Reject individual line items within a particular
invoice. The rejection process will do the following:
Reverse the Ledger Entry for that particular service.
Update the following fields on the invoice to reflect the removal of this ledger entry.
o Service Invoice Amount
o Overhead Invoice Amount
o Invoice Amount
“Soft” delete the activity record (Progress Log, Service Provided, Prescription, or
Procedure) associated with the rejected ledger entry if you answered “Yes” to the
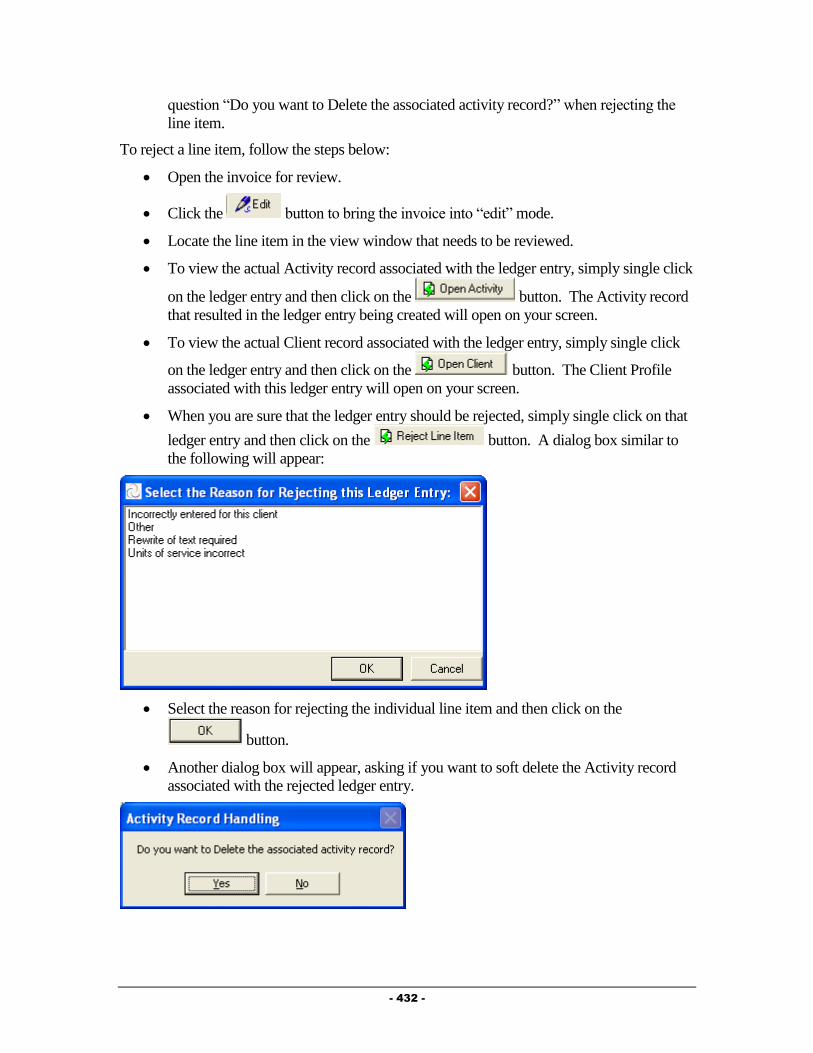
- 432 -
question “Do you want to Delete the associated activity record?” when rejecting the
line item.
To reject a line item, follow the steps below:
Open the invoice for review.
Click the button to bring the invoice into “edit” mode.
Locate the line item in the view window that needs to be reviewed.
To view the actual Activity record associated with the ledger entry, simply single click
on the ledger entry and then click on the button. The Activity record
that resulted in the ledger entry being created will open on your screen.
To view the actual Client record associated with the ledger entry, simply single click
on the ledger entry and then click on the button. The Client Profile
associated with this ledger entry will open on your screen.
When you are sure that the ledger entry should be rejected, simply single click on that
ledger entry and then click on the button. A dialog box similar to
the following will appear:
Select the reason for rejecting the individual line item and then click on the
button.
Another dialog box will appear, asking if you want to soft delete the Activity record
associated with the rejected ledger entry.

- 433 -
If you wish to Delete the Activity record, click on the button. If you do
not want to soft delete the Activity record, click the button. NOTE: If
you do not delete the activity record, the next time the contract is invoiced, a new
ledger entry will be created and invoiced.
The ledger entry will be removed from the invoice and the invoice will be updated to
reflect this.
NOTE: There is no need to re-reconcile the contract or re-invoice. If you simply
“Print” the invoice again, the updated print out will reflect the rejection of the ledger
entry. If you “print” the unbillable service report (Print\Unbillable Services Report),
the ledger entry that was rejected will appear including the reason it was rejected.
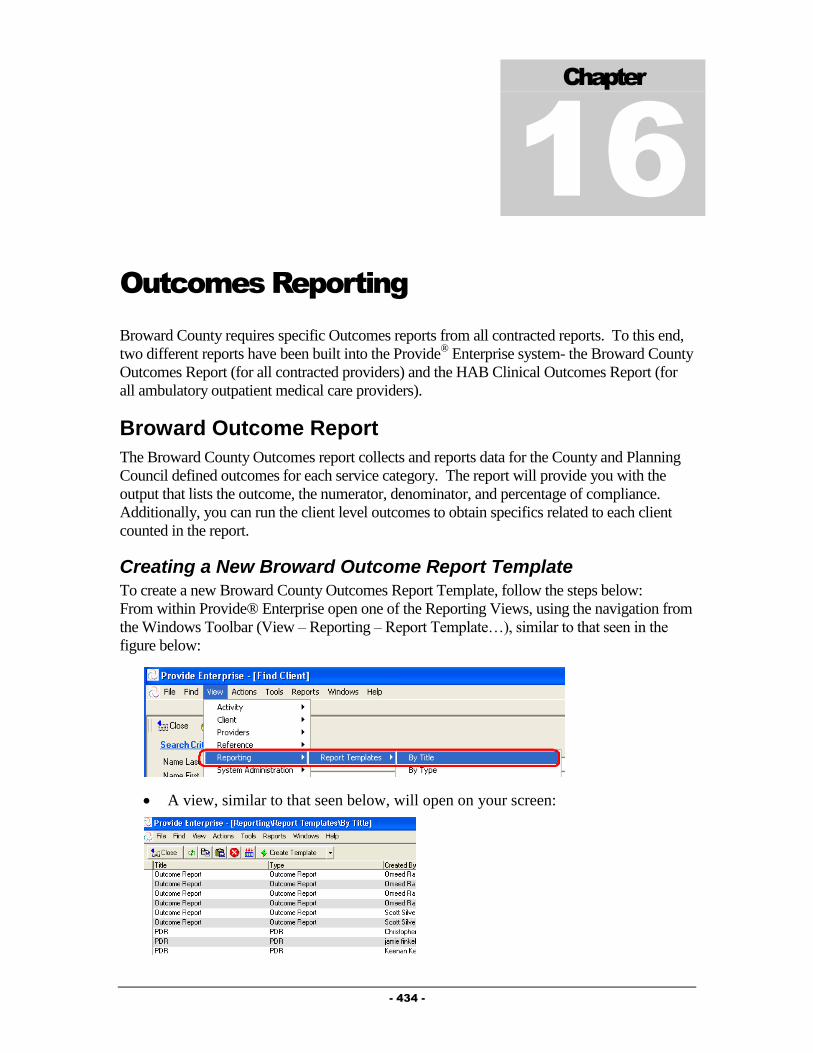
- 434 -
Chapter
16
Outcomes Reporting
Broward County requires specific Outcomes reports from all contracted reports. To this end,
two different reports have been built into the Provide® Enterprise system- the Broward County
Outcomes Report (for all contracted providers) and the HAB Clinical Outcomes Report (for
all ambulatory outpatient medical care providers).
Broward Outcome Report
The Broward County Outcomes report collects and reports data for the County and Planning
Council defined outcomes for each service category. The report will provide you with the
output that lists the outcome, the numerator, denominator, and percentage of compliance.
Additionally, you can run the client level outcomes to obtain specifics related to each client
counted in the report.
Creating a New Broward Outcome Report Template
To create a new Broward County Outcomes Report Template, follow the steps below:
From within Provide® Enterprise open one of the Reporting Views, using the navigation from
the Windows Toolbar (View – Reporting – Report Template…), similar to that seen in the
figure below:
A view, similar to that seen below, will open on your screen:

- 435 -
Click the “Create Template” button and select “Broward Outcome Report”. The
report template, similar to that in the figure below, will open on your screen:
Fill out the fields as appropriate:
o Title: Enter whatever title you want to for this report template. This will help
you find it in the future. GTI suggests that you enter the name of your agency
in this field to help differentiate this template from others in the system.
o Agency(s): Select the agency you are running the report for. You will only
be able to select the agency(s) you are associated with.
o Report Output Option: There are three output options. If you select
“Report”, the Broward Outcome Report will be produced. If you select
“Client Level Output” the GTI defined Client Level data file will be generated
into the file named in the field “Export File” below. If you select “Client
Level and Report”, both the Broward Outcome Report and the Client Level
Output file will be generated.
o Export File: This field only appears if something other than “Report” is
selected above. It specifies the name and location of the file that is produced.
Make sure that you have the rights to save files to this location.
o Report Object: Two different report templates are available. “Broward
Outcome Report” will generate the typical outcome report with no additional
parameters. “Broward Outcome Report Expanded Parameters” will run a
Crystal Report that will allow you to add additional parameters to further limit
your output, including:
Race
Ethnicity
Age Category
Poverty Level
Gender

- 436 -
Risk Factor
HIV Status
Commercial Sex Worker Status
Intravenous Drug User Status
Medicare Status
Medicaid Status
Private Health Insurance Status
Primary Language
Education Level
o Start Date/End Date: Enter the start and End dates of your reporting period.
After you have filled out all applicable fields, you can click the
button to run the report.
When you are done working with this report template, simply click on the
button. A message similar to the one below will open.
Click on the button if you wish to save the template. Saving the template
will ensure that you can re-run the report at a later date, making only the necessary
changes in the date range of the report, without having to setup a new template.
Editing and Running a Saved Report Template
Once you have saved a Report Template, it is easy to access it at a later date so that you can
re-run it for the same date period or for a new date period without having to set up a new
report template.
From within Provide® Enterprise open one of the Reporting Views, using the
navigation from the Windows Toolbar (View – Reporting – Report Template…),
similar to that seen in the figure below:
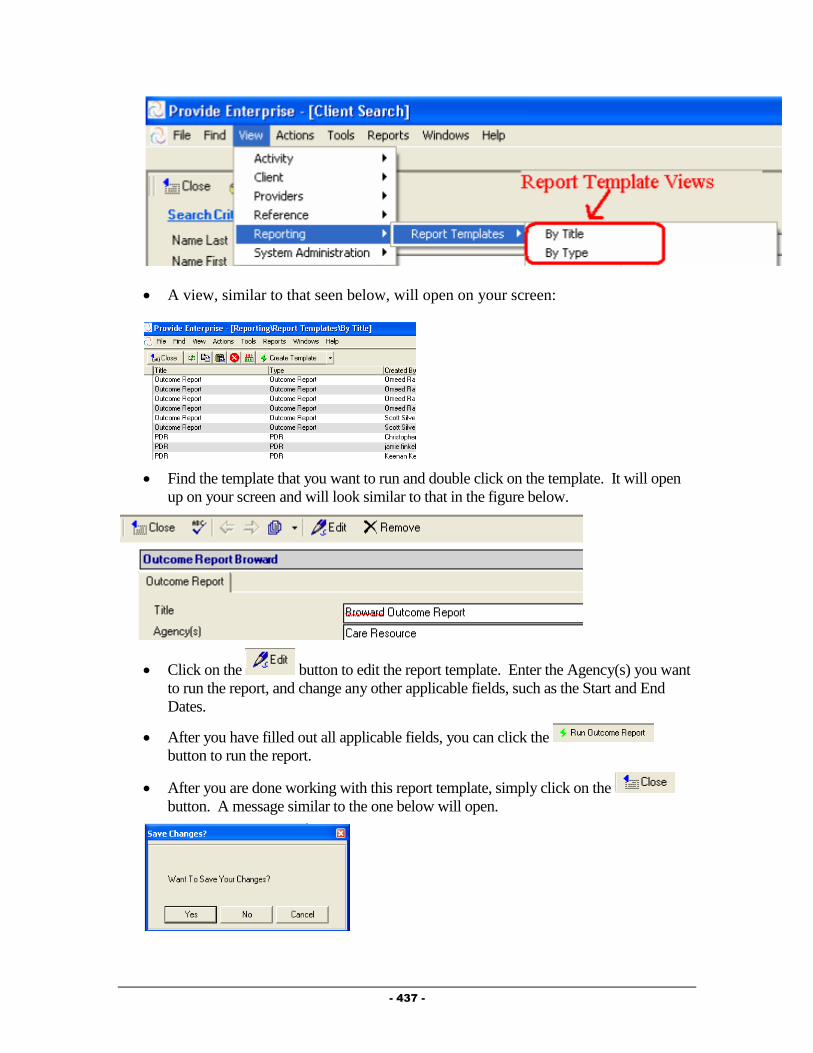
- 437 -
A view, similar to that seen below, will open on your screen:
Find the template that you want to run and double click on the template. It will open
up on your screen and will look similar to that in the figure below.
Click on the button to edit the report template. Enter the Agency(s) you want
to run the report, and change any other applicable fields, such as the Start and End
Dates.
After you have filled out all applicable fields, you can click the
button to run the report.
After you are done working with this report template, simply click on the
button. A message similar to the one below will open.
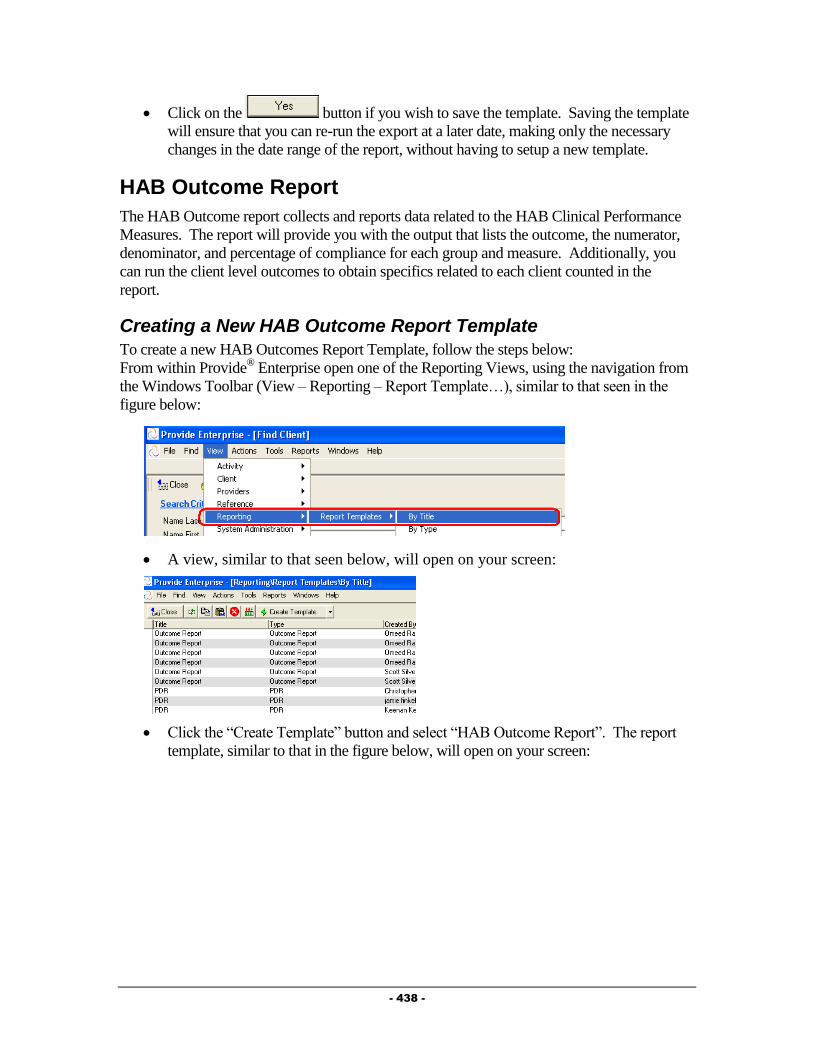
- 438 -
Click on the button if you wish to save the template. Saving the template
will ensure that you can re-run the export at a later date, making only the necessary
changes in the date range of the report, without having to setup a new template.
HAB Outcome Report
The HAB Outcome report collects and reports data related to the HAB Clinical Performance
Measures. The report will provide you with the output that lists the outcome, the numerator,
denominator, and percentage of compliance for each group and measure. Additionally, you
can run the client level outcomes to obtain specifics related to each client counted in the
report.
Creating a New HAB Outcome Report Template
To create a new HAB Outcomes Report Template, follow the steps below:
From within Provide® Enterprise open one of the Reporting Views, using the navigation from
the Windows Toolbar (View – Reporting – Report Template…), similar to that seen in the
figure below:
A view, similar to that seen below, will open on your screen:
Click the “Create Template” button and select “HAB Outcome Report”. The report
template, similar to that in the figure below, will open on your screen:

- 439 -
Fill out the fields as appropriate:
o Title: Enter whatever title you want to for this report template. This will help
you find it in the future. GTI suggests that you enter the name of your agency
in this field to help differentiate this template from others in the system.
o Agency(s): Select the agency you are running the report for. You will only
be able to select the agency(s) you are associated with.
o Report Output Option: There are three output options. If you select
“Report”, the HAB Outcome Report will be produced. If you select “Client
Level Output” the GTI defined Client Level data file will be generated into the
file named in the field “Export File” below. If you select “Client Level and
Report”, both the HAB Outcome Report and the Client Level Output file will
be generated.
o Export File: This field only appears if something other than “Report” is
selected above. It specifies the name and location of the file that is produced.
Make sure that you have the rights to save files to this location.
o Report Object: This should always be set to “Outcome Report”.
o Start Date/End Date: Enter the start and End dates of your reporting period.
After you have filled out all applicable fields, you can click the
button to run the report.
When you are done working with this report template, simply click on the
button. A message similar to the one below will open.
Click on the button if you wish to save the template. Saving the template
will ensure that you can re-run the report at a later date, making only the necessary
changes in the date range of the report, without having to setup a new template.

- 440 -
Editing and Running a Saved Report Template
Once you have saved a Report Template, it is easy to access it at a later date so that you can
re-run it for the same date period or for a new date period without having to set up a new
report template.
From within Provide® Enterprise open one of the Reporting Views, using the
navigation from the Windows Toolbar (View – Reporting – Report Template…),
similar to that seen in the figure below:
A view, similar to that seen below, will open on your screen:
Find the template that you want to run and double click on the template. It will open
up on your screen and will look similar to that in the figure below.
Click on the button to edit the report template. Enter the Agency(s) you want
to run the report, and change any other applicable fields, such as the Start and End
Dates.
After you have filled out all applicable fields, you can click the
button to run the report.
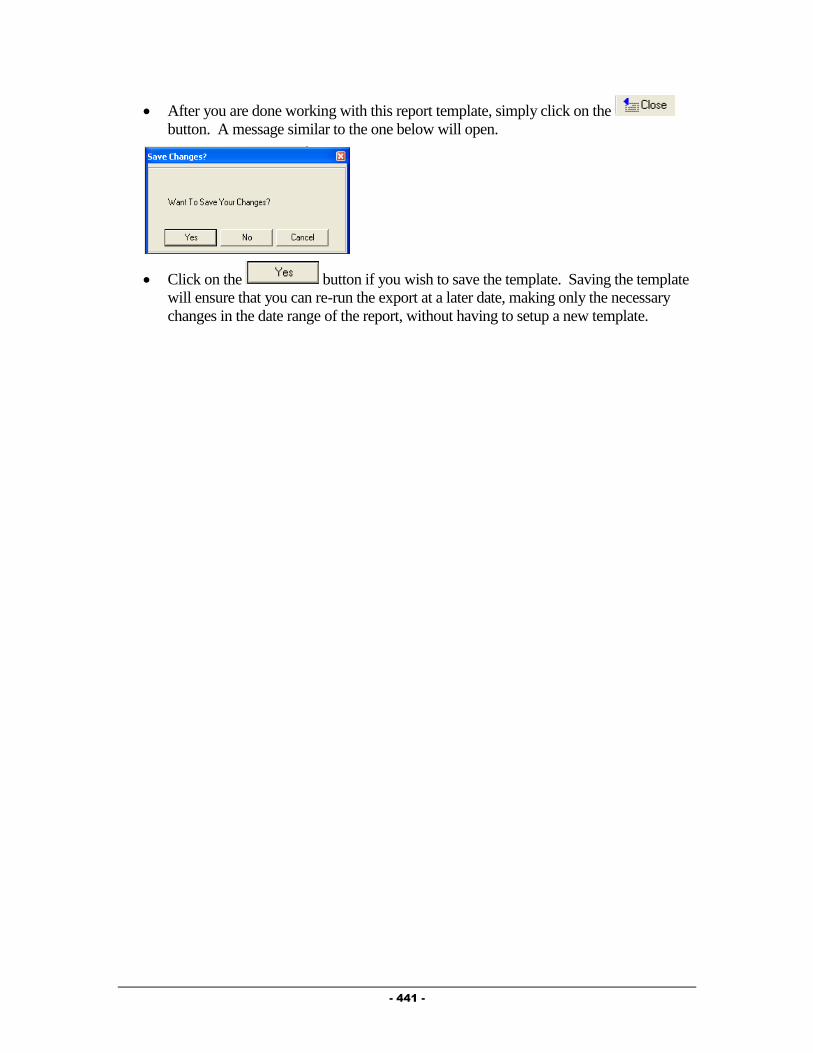
- 441 -
After you are done working with this report template, simply click on the
button. A message similar to the one below will open.
Click on the button if you wish to save the template. Saving the template
will ensure that you can re-run the export at a later date, making only the necessary
changes in the date range of the report, without having to setup a new template.

- 442 -
Chapter
17
Ryan White Reporting
(RDR/RSR)
The Ryan White Care Act is a U.S. Department of Health and Human Services program
designed to provide health and social support services to people infected and affected by HIV
and AIDS. The HIV/AIDS Bureau (HAB) administers the Ryan White program and defines
the reporting requirements for grantees and the providers they contract with to provide
services to clients.
Reporting Overview
Ryan White requires that a report, the RDR (Ryan White Program Data Report) be completed
annually and the RSR (Ryan White HIV/AIDS Program Services Report - the Client Level
XML extract) be sent in twice each year. In addition, some Part B and Part A Grantees
require that their contracted providers send them data in the form of a Microsoft Access
database called the PDI (Program Data Interface) so the data can be imported into a central
CARE Ware database. All of these reports and data extracts can be produced from within
Provide® Enterprise from one form, the PDR. In addition, GTI has also created three
additional functions to assist you in ensuring your reports and data files are accurate and
complete. First, as part of the RDR run, GTI produces our own Client Level file that details
the specific clients being counted in the RDR and their service totals. The file can be opened
using Microsoft Excel to allow you to easily review the data. Second, the RSR Data Extract is
produced in an XML format which does not lend itself to being easily reviewed. Therefore,
we added a function to “parse” the RSR Extract XML file into a series of “CSV” (comma
separated value ASCII text) files that can be opened and reviewed with MS Excel. Finally,
there is a RDR Error Report that can be run that helps you quickly see which Clients are
missing or have “unknown” values in key reported demographic data elements.
NOTE: In order for these reports to run in Provide® Enterprise, there are a number of views
and tables that need to be created in your database. Contact your System Administrator or
GTI for assistance with these. More specific details about these requirements can be found in
Appendix A under the Technical Specifications related to the report. In addition, Appendix B
provides some sample SQL queries that can be used to start building the views and tables
necessary to run this report.
- 443 -
Data Entry Requirements
Ryan White reporting requires that key data be entered into Provide®
Enterprise. While there
is a great deal of flexibility in where the data is entered in the system, certain data elements
must exist in order to accurately compile the report. All Ryan White data that must be
collected is outlined below.
NOTE: GTI has included additional data elements denoted with an asterisk (*) that we
recommend you collect if you are an Ambulatory Outpatient Medical Provider. These data
elements are required if you want to be able to produce the HAB HIV Core Clinical
Performance Measures for Adults & Adolescents report – an optional supplemental report that
GTI can activate for you. We anticipate that at some point in the future these additional data
elements will become required so we highly recommend you begin capturing the data now if
possible.
All Ryan White Providers
Ryan White requires that the following information be collected by all providers of Ryan
White services, regardless of the service category and/or funding type. A number of the data
elements must be reported as they were at the end of the reporting period rather than as they
are documented in the Client chart at the time the report is run. Since most organizations do
not run their Ryan White reports on the last day of the reporting period and changes may be
made to Client charts between the end of the reporting period and the date the report is run,
GTI recommends that you have your PE database customized to ensure that these “As of
Reporting Period End Date” data elements have their updates captured in “Historical” records
that are dated to enable your Ryan White reports to be set up to pull these elements from the
Historical record dated on or most recently prior to the Reporting Period End Date. GTI has
made changes to do this for most PE customers that report to Ryan White but if it has not been
done for your PE database yet please contact GTI for assistance in getting this done.
General Client Demographic Information
Date Of Birth
Gender
Transgender Sub-Group (Male to Female or Female to Male) This can be included in
the Gender by using a keyword such as Transgender – Male to Female.
Race - All Races Self Identified
Ethnicity
Client Demographic Information – As of Reporting Period End Date
Household Federal Poverty Level (generally, this is computed based on the Monthly
Household Income and Household Size).
Housing/Living Arrangement
Primary Source of Health Insurance (generally, this is computed based on a hierarchy
of “All Sources of Health Insurance”, listed below.)

- 444 -
All Sources of Health Insurance
First 3 Digits of the Zip Code
Client’s Vital Enrollment Status
Client HIV Information – As of Reporting Period End Date
Stage of Disease
All Possible Transmission Routes
AIDS Diagnosis Date
Service Documentation
Every Client intervention (direct with the Client or with other parties on behalf of the Client)
and every reportable service provided to the Client must be documented within the system.
Customers typically use one, or a combination of the following Provide® Enterprise forms to
capture this information: Appointment, Progress Log, Chart Note, Service Provided, Medical
Encounter, Referral, Procedure or Care Actions.
NOTE: Documentation of the FIRST Date of Service is required, whether it is done using one
of the appropriate service records or in some other manger.
Ryan White Medical Care Providers
If you are a Medical provider, you must also track the following data in Provide® Enterprise.
Note: Many Part A and B funding agencies require this data to be collected by all service
providers, even non-Medical providers.
NOTE: Documentation of the FIRST Date of Clinical Service is required, whether it is done
using one of the appropriate service records or in some other manner.
Non Clinical Annual Screenings
Documentation of a variety of non-clinical screenings is required by HRSA if the particular
activity is completed during the reporting period. These include:
HIV Risk Reduction Screening/Counseling
Screening for Substance Use
Screening for Mental Health
Alcohol Counseling*
Tobacco Cessation Counseling*
ART Treatment Information – As of Reporting Period End Date
Current Antiretroviral Therapy Level
Date Started HAART
Reason Not on HAART (if client is not currently on HAART)

- 445 -
Pregnancy
Detailed information regarding each pregnancy must be documented including the following:
Pregnancy Outcome
Trimester Entering Care
Antiretrovirals Prescribed to Prevent the Transmission of HIV to Child
Date of Birth (for pregnancies ending in a live birth)
HIV Status of Child (for pregnancies ending in a live birth)
Note: GTI recommends using the Pregnancy record in Provide® Enterprise to document the
pregnancy specifics.
Test Results
Documentation of HIV specific indicators is required by HRSA. The following tests must
have results documented:
Each CD-4 Count
Each Viral Load
Note: GTI recommends using the Test Result record in Provide® Enterprise to document the
above Tests because the actual result values must be reported.
Screenings
Documentation of the following screenings is required by HRSA. The following tests do not
require documentation of results:
Hepatitis B Screening
Hepatitis C Screening
Pap Smear for Females
Syphilis Screening
Screening/testing for any sexually transmitted infection (STI) other than syphilis
Chlamydia Screening*
Gonorrhea Screening*
Toxoplasmosis Screening*
NOTE: We recommend the use of Test Result records to capture these screenings. Test
Results also allow you to note if a test or screening is not clinically indicated or was refused.
NOTE 2: We recommend that all OI and STI Screening tests be specifically tracked based on
the condition being screen for rather than using the “any sexually transmitted infection other
than syphilis” .

- 446 -
Tuberculosis Screening and Treatment
Specific information related to a client’s TB status must be documented. HAB recommends
that a client’s TB risk be assessed at least yearly. These include:
Clinically Indicated Action
PPD Status
PPD Result
Chest X Ray Status (If PPD Result is Positive)
TB Type (If PPD Result is Positive)
TB Treatment Status (If TB Type is Active or Latent)
TB Treatment Start Date (If TB Type is Active or Latent)
TB Treatment End Date (If TB Type is Active or Latent)
NOTE: GTI Recommends documenting these results using the TB Assessment record in
Provide® Enterprise.
Treatment
Documentation of treatment for any of the following conditions needs to be completed within
Provide® Enterprise:
Treatment for syphilis
Treatment for an STI (other than syphilis)
Treatment for hepatitis C
PCP Prophylaxis
MAC Prophylaxis*
NOTE: GTI recommends documenting these results using the Treatment record in Provide®
Enterprise so you can also document if the treatment or prophylaxis was declined by the client
or ended before the full treatment course was completed. We also suggest you track other
Prophylaxis treatments like Toxoplasmosis as we anticipate that Ryan White will continue to
expand this reporting requirement.
Vaccinations
Documentation of vaccinations and completion of a series of vaccinations needs to be
completed within Provide® Enterprise:
Hepatitis B (completion of the series)
Pneumococcal Vaccination*
Influenza*
NOTE: GTI recommends documenting these results using the Vaccine History record in
Provide® Enterprise, but your agency has flexibility in how you decided to document this

- 447 -
information. Please note that while the use of the Vaccination record is effective for tracking
each dosage of a vaccine series, it is difficult to look at the individual vaccination records of a
client to determine if a series is completed. This is particularly true for Hepatitis A and B
because they come in different forms that have varying numbers of dosages. Contact GTI for
alternatives on how best to track this within Provide® Enterprise.
Creating a New Program Data Report Template
To create a new Ryan White Program Data Report Template, follow the steps below:
From within Provide® Enterprise open one of the Reporting Views, using the navigation from
the Windows Toolbar (View – Reporting – Report Template…), similar to that seen in the
figure below:
A view, similar to that seen below, will open on your screen:
Click on the portion of the button. The button will
expand to show you the available Report Templates that can be created, similar to
that seen in the figure below:
Single click on “PDR” and the report object will open on your screen, similar to
that in the figure below:
Settings Tab

- 448 -
NOTE: The only fields that must be filled out in order for the Program Data Report to
run are those on the “Settings” Tab and those on the “Data Sources” Tab (Which default
based on the View Name Suggestions from GTI).
Fill out the fields as appropriate:
o Title. Enter a descriptive title to make finding your stored template easier.
o Provider(s). Select one or more Organizations that the report is to be run for.
o Specific Payee Provider. If you set this field to “Yes”, the Payee Provider
field will appear as shown above. This flag is used if you are trying to run a
PDR report on a Provider that does not use Provide® to track their services but
you have tracked all of their services via Service Provided records and noted
the Payee Provider in the Vendor field of them.
o Payee Provider. (only visible if specific Payee Provider is “Yes”) Use the
button to select the specific Payee Provider that you are running the Ryan
White Care Act Report for.
o Report Output Option. There are three output options. If you select
“Report”, the Ryan White Program Data Report will be produced. If you
select “Client Level Output” the GTI defined Client Level data file will be
generated into the file named in the field “Export File” below. If you select
- 449 -
“Client Level and Report”, both the Program Data Report and the Client Level
Output file will be generated.
o Export File. This field only appears if something other than “Report” is
selected above. It specifies the name and location of the file that is produced.
o Report Object. This should always be set to “PDR”.
o RSR. Set this field to “Yes” if you want to generate the RSR XML Extract
file.
o RSR Output File. Set this field to a file path where the RSR XML Extract
file to be placed. NOTE: Provide® Enterprise will create the file if it doesn’t
already exist.
o RSR Parse. Set this field to “Yes” if you want to parse the RSR XML Extract
file into a series of csv files that can be opened in Microsoft® Excel files for
easy viewing.
o RSR Parse Path. Set this field to a directory (not a file) path where the RSR
XML parsed csv files should be placed.
o PDI. Set this field to “Yes” if you wish to create the PDI export file (for use
in importing data into a CAREWare®
Database.
o PDI Output File. Set this field to the file path where the CAREWare®
template file has been saved. NOTE: Provide® Enterprise will not create the
file if it doesn’t exist. Directions on how to obtain a template file can be found
just following this section of the guide.
o Reporting Period Start and End Date. These two fields set the date range
from which the activity records selected for the report are pulled from.
o Base Federal Poverty Line for Annual Household Income. Enter the base
federal poverty line for annual household income.
o Additional Income per Person for Federal Poverty Line. Enter the
additional income per additional household member for annual household
income.
NOTE: A specific CAREWare® Microsoft Access Database template file must be used in
order to complete a PDI Export. Complete one of the following steps to obtain a copy of the
CAREWare® template file before proceeding.
1. Contact the GTI Help Desk ([email protected]) to have the file emailed to
you.
2. Download the PDI Template from the GTI Web Site (if you have Login Information
for the Documentation Library). The file is located under the category of
“CAREWare Template”.
Data Sources Tab

- 450 -
o Enter the SQL Views that your RDR/RSR/PDI will use. Only the views that
correspond to the report type you are running need to be completed. For example, if
running the RSR or XML Extract, the PDR, and XML Section, PDR Only and the
XML Only section would need to be entered. NOTE: All of the fields on this tab
default to the view names recommended by GTI.
NOTE: The following Sections (Section 1, 3, 4, 5, 6, and 7) contain data elements that are
pushed directly to the report object and have no affect on the actual report. Therefore, they are
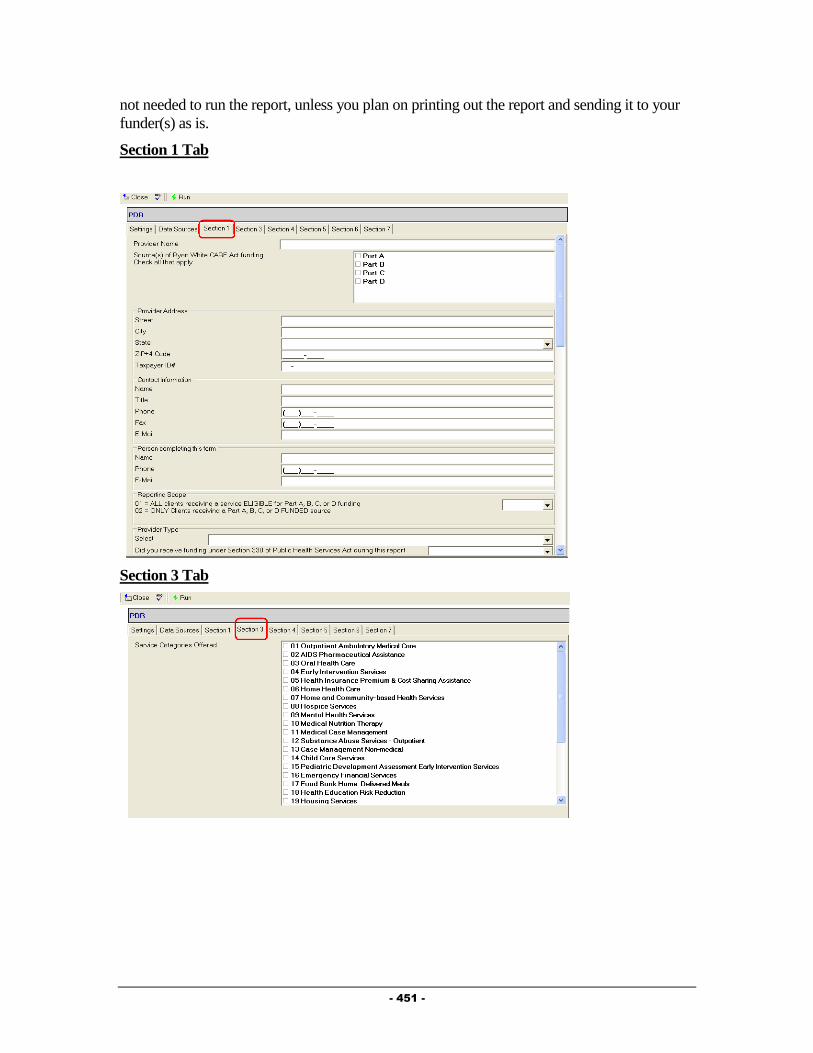
- 451 -
not needed to run the report, unless you plan on printing out the report and sending it to your
funder(s) as is.
Section 1 Tab
Section 3 Tab
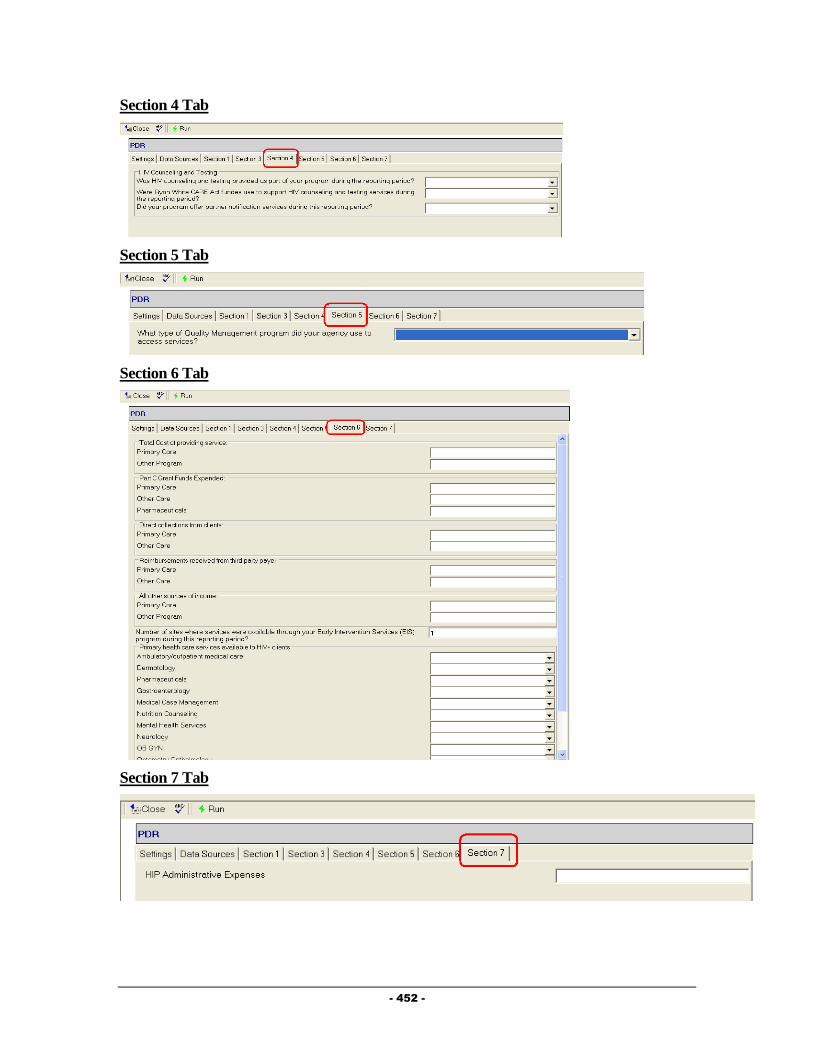
- 452 -
Section 4 Tab
Section 5 Tab
Section 6 Tab
Section 7 Tab
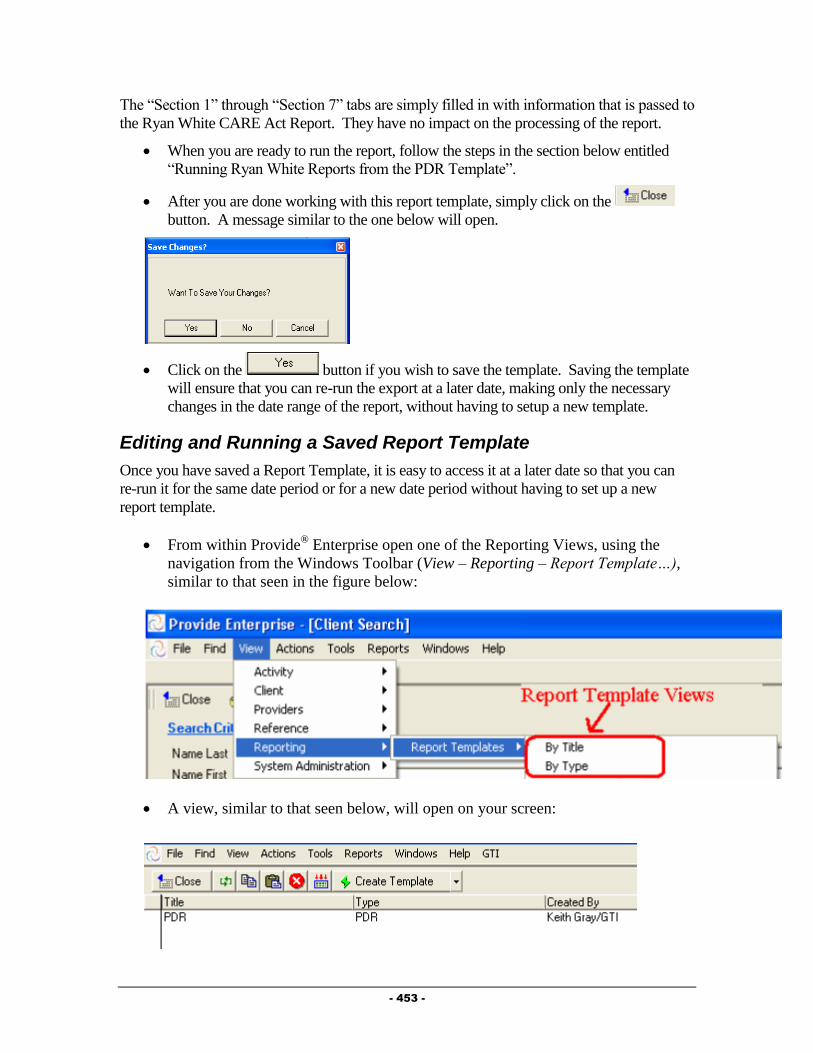
- 453 -
The “Section 1” through “Section 7” tabs are simply filled in with information that is passed to
the Ryan White CARE Act Report. They have no impact on the processing of the report.
When you are ready to run the report, follow the steps in the section below entitled
“Running Ryan White Reports from the PDR Template”.
After you are done working with this report template, simply click on the
button. A message similar to the one below will open.
Click on the button if you wish to save the template. Saving the template
will ensure that you can re-run the export at a later date, making only the necessary
changes in the date range of the report, without having to setup a new template.
Editing and Running a Saved Report Template
Once you have saved a Report Template, it is easy to access it at a later date so that you can
re-run it for the same date period or for a new date period without having to set up a new
report template.
From within Provide® Enterprise open one of the Reporting Views, using the
navigation from the Windows Toolbar (View – Reporting – Report Template…),
similar to that seen in the figure below:
A view, similar to that seen below, will open on your screen:
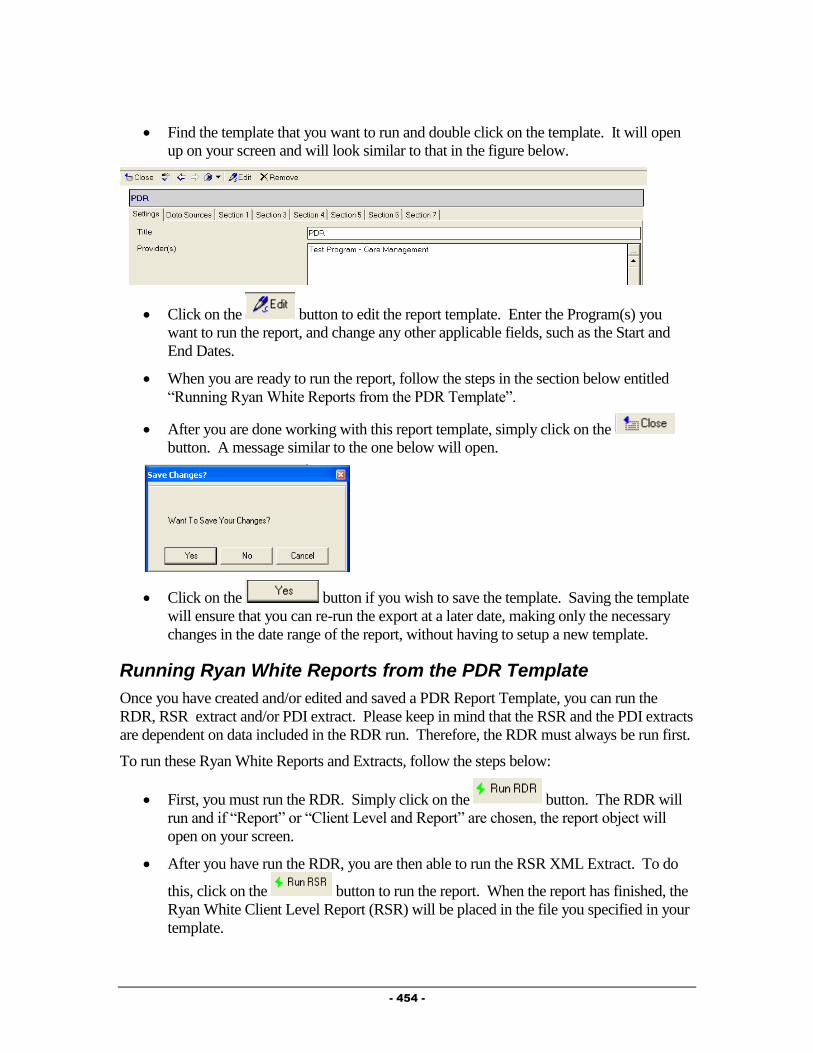
- 454 -
Find the template that you want to run and double click on the template. It will open
up on your screen and will look similar to that in the figure below.
Click on the button to edit the report template. Enter the Program(s) you
want to run the report, and change any other applicable fields, such as the Start and
End Dates.
When you are ready to run the report, follow the steps in the section below entitled
“Running Ryan White Reports from the PDR Template”.
After you are done working with this report template, simply click on the
button. A message similar to the one below will open.
Click on the button if you wish to save the template. Saving the template
will ensure that you can re-run the export at a later date, making only the necessary
changes in the date range of the report, without having to setup a new template.
Running Ryan White Reports from the PDR Template
Once you have created and/or edited and saved a PDR Report Template, you can run the
RDR, RSR extract and/or PDI extract. Please keep in mind that the RSR and the PDI extracts
are dependent on data included in the RDR run. Therefore, the RDR must always be run first.
To run these Ryan White Reports and Extracts, follow the steps below:
First, you must run the RDR. Simply click on the button. The RDR will
run and if “Report” or “Client Level and Report” are chosen, the report object will
open on your screen.
After you have run the RDR, you are then able to run the RSR XML Extract. To do
this, click on the button to run the report. When the report has finished, the
Ryan White Client Level Report (RSR) will be placed in the file you specified in your
template.

- 455 -
If you selected “Yes” for the RSR Parse field, then you can optionally click on the
button after having run the RSR. When the parse has finished, the csv
files will be placed in the directory you specified. Below is an image of what the files
may appear as in your directory.
Finally, if you wish to run the PDI Export, click on the button to run
the export. When the export has completed, the CAREWare® template file you
specified will contain the client level data. At this point the CAREWare® file can be
imported into the CAREWare® system.
RSR Error Report
The RSR Error report is a client level file containing all clients included in your RSR export.
For each client, the data elements that most often cause errors for the XML import are
reviewed and evaluated. An “X” in a field indicates that the data element is missing,
unknown, or invalid.
To run the RSR Error Report, simply follow the steps below:
First, run your RDR report.
Once this is complete, run your RSR Report
After the RSR is completed, you can click the button. The report will
run and appear on your screen.
The "Key" to the report can be found at the end of the report, and also below:
Error Report Key
An "X" indicates the data element is missing, "Unknown" or invalid.
1 = Date of First Service

- 456 -
2 = Enrollment Status
3 = Ethnicity
4 = Race
5 = Gender
6 = Poverty Level
7 = Housing Status
8 = Geographic Zip Code
9 = HIV Status
10 = AIDS DX Year
11 = HIV Risk Factor
12 = Medical Insurance
13 = Did the Client Receive an Ambulatory Service?
14* = First Ambulatory Date
15* = CD4 Not Documented
16* = Viral Load Not Documented
17* = TB Screening Missing
18* = Syphilis Screening
19* = Hep B Screening
20* = Hep C Screening Missing
21* = Substance Abuse Screen
22* = Mental Health Screening
23** = Pap Smear
24*** = Prenatal Care
* = Only Applies for Clients that Received Ambulatory Outpatient Medical Services .
** = Only Applicable for Female Clients that Received Ambulatory Outpatient Medical
Services.
*** = Only Applicable for Female Clients that Received Ambulatory Outpatient Medical
Services who were also pregnant.
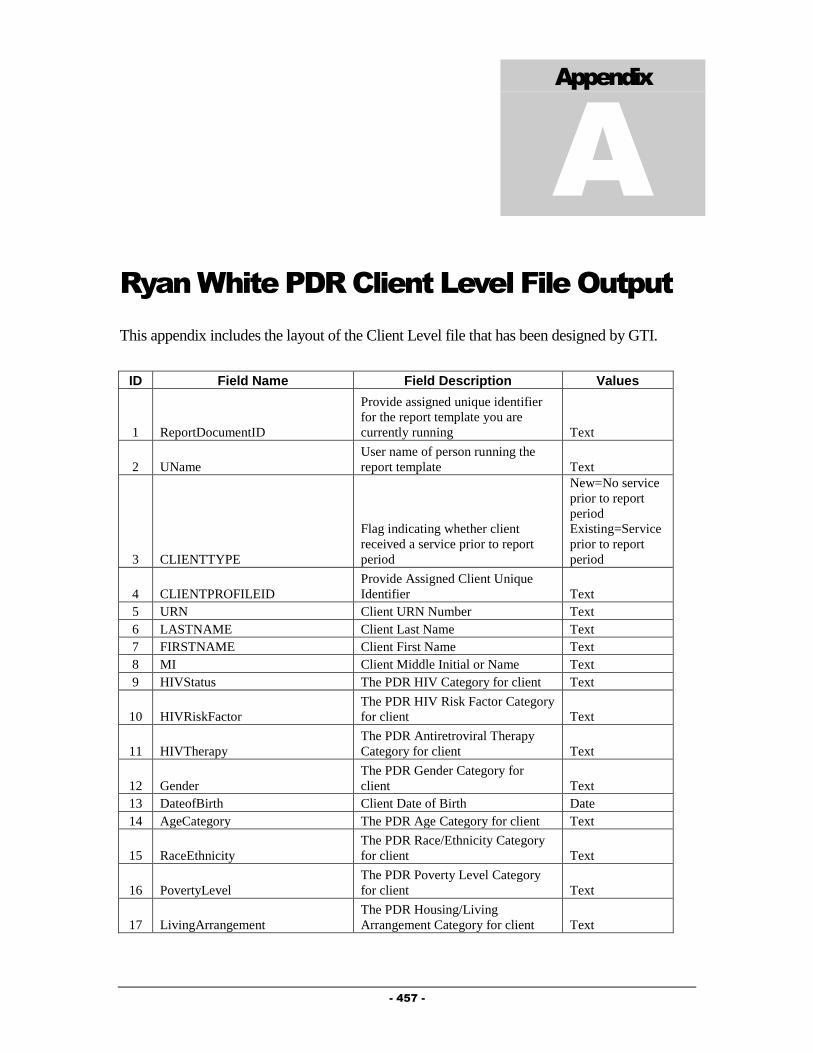
- 457 -
Appendix
A
Ryan White PDR Client Level File Output
This appendix includes the layout of the Client Level file that has been designed by GTI.
ID Field Name Field Description Values
1 ReportDocumentID
Provide assigned unique identifier
for the report template you are
currently running Text
2 UName
User name of person running the
report template Text
3 CLIENTTYPE
Flag indicating whether client
received a service prior to report
period
New=No service
prior to report
period
Existing=Service
prior to report
period
4 CLIENTPROFILEID
Provide Assigned Client Unique
Identifier Text
5 URN Client URN Number Text
6 LASTNAME Client Last Name Text
7 FIRSTNAME Client First Name Text
8 MI Client Middle Initial or Name Text
9 HIVStatus The PDR HIV Category for client Text
10 HIVRiskFactor
The PDR HIV Risk Factor Category
for client Text
11 HIVTherapy
The PDR Antiretroviral Therapy
Category for client Text
12 Gender
The PDR Gender Category for
client Text
13 DateofBirth Client Date of Birth Date
14 AgeCategory The PDR Age Category for client Text
15 RaceEthnicity
The PDR Race/Ethnicity Category
for client Text
16 PovertyLevel
The PDR Poverty Level Category
for client Text
17 LivingArrangement
The PDR Housing/Living
Arrangement Category for client Text

- 458 -
18 Insurance
The PDR Medical Insurance
Category for client Text
19 EnrollStatus Client Status
Active=Client
open to program
Inactive=Client
closed to
program
20 DeathDate Client Date of Death Date
21 VitalStatus
The PDR Vital/Enrollment Status
Category for client Text
22 Ambulatory
The number of visits in service
category "a" for client Number
23 Pharmaceutical
The number of visits in service
category "b" for client Number
24 Oral_health
The number of visits in service
category "c" for client Number
25 Early_intervention
The number of visits in service
category "d" for client Number
26 Home_health
The number of visits in service
category "f" for client Number
27 Community_health
The number of visits in service
category "g" for client Number
28 Hospice
The number of visits in service
category "h" for client Number
29 Mental_health
The number of visits in service
category "i" for client Number
30 Nutrition
The number of visits in service
category "j" for client Number
31 Medical_case_management
The number of visits in service
category "k" for client Number
32 Substance_abuse_outpatient
The number of visits in service
category "l" for client Number
33 Case_management
The number of visits in service
category "m" for client Number
34 Child_care
The number of visits in service
category "n" for client Number
35 Pediatric
The number of visits in service
category "o" for client Number
36 Emergency_financial_assistance
The number of visits in service
category "p" for client Number
37 Food_bank
The number of visits in service
category "q" for client Number
38 Health_education
The number of visits in service
category "r" for client Number
39 Housing
The number of visits in service
category "s" for client Number
40 Legal
The number of visits in service
category "t" for client Number
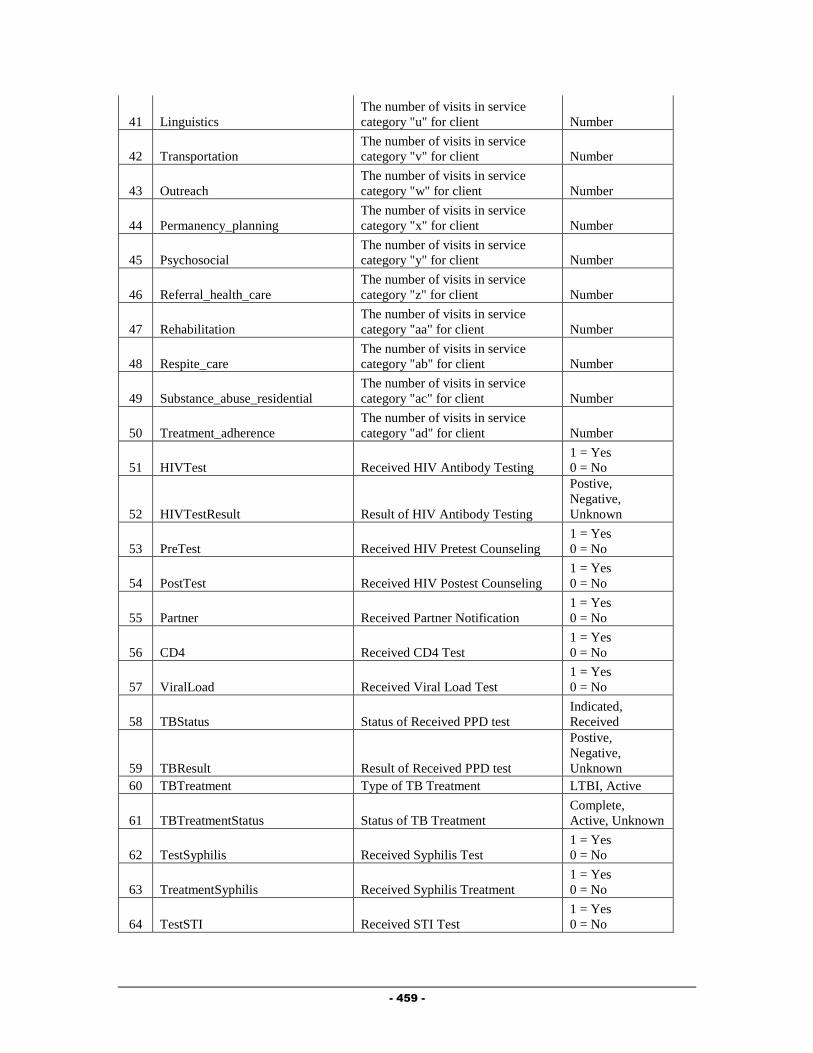
- 459 -
41 Linguistics
The number of visits in service
category "u" for client Number
42 Transportation
The number of visits in service
category "v" for client Number
43 Outreach
The number of visits in service
category "w" for client Number
44 Permanency_planning
The number of visits in service
category "x" for client Number
45 Psychosocial
The number of visits in service
category "y" for client Number
46 Referral_health_care
The number of visits in service
category "z" for client Number
47 Rehabilitation
The number of visits in service
category "aa" for client Number
48 Respite_care
The number of visits in service
category "ab" for client Number
49 Substance_abuse_residential
The number of visits in service
category "ac" for client Number
50 Treatment_adherence
The number of visits in service
category "ad" for client Number
51 HIVTest Received HIV Antibody Testing
1 = Yes
0 = No
52 HIVTestResult Result of HIV Antibody Testing
Postive,
Negative,
Unknown
53 PreTest Received HIV Pretest Counseling
1 = Yes
0 = No
54 PostTest Received HIV Postest Counseling
1 = Yes
0 = No
55 Partner Received Partner Notification
1 = Yes
0 = No
56 CD4 Received CD4 Test
1 = Yes
0 = No
57 ViralLoad Received Viral Load Test
1 = Yes
0 = No
58 TBStatus Status of Received PPD test
Indicated,
Received
59 TBResult Result of Received PPD test
Postive,
Negative,
Unknown
60 TBTreatment Type of TB Treatment LTBI, Active
61 TBTreatmentStatus Status of TB Treatment
Complete,
Active, Unknown
62 TestSyphilis Received Syphilis Test
1 = Yes
0 = No
63 TreatmentSyphilis Received Syphilis Treatment
1 = Yes
0 = No
64 TestSTI Received STI Test
1 = Yes
0 = No

- 460 -
65 TreatmentSTI Received STI Treatment
1 = Yes
0 = No
66 TestHepC Received Hepatitis C Test
1 = Yes
0 = No
67 TreatmentHepC Received Hepatitis C Treatment
1 = Yes
0 = No
68 NewAIDs Client Newly Diagnosed with AIDS
1 = Yes
0 = No
69 PapSmear Received Pap test
1 = Yes
0 = No
70 PelvicExam Received Pelvic Exam
1 = Yes
0 = No
71 PregnancyStart Date the pregnancy started Date
72 PregnancyEnd Date the pregnancy end Date
73 EnteredCareDate
Date the client started receiving
services for her pregnancy Date
74 EnteredCare
The PDR Entered Prenatal Care
Category for client
First trimester,
Second trimester,
Third trimester,
Delivery
75 PrenatalDrug Received Prenatal Drug
1 = Yes
0 = No
76 Infants
Number of infants client gave birth
to Number
77 InfantsHIVPos
Number of infants client gave birth
to with HIV Status of Positive Number
78 InfantsHIVInd
Number of infants client gave birth
to with HIV Status of Indeterminate Number
79 InfantsHIVNeg
Number of infants client gave birth
to with HIV Status of Negative Number
80 TitleIII
Received a Part C service and
should be counted in Section 6.1
1 = Yes
0 = No
81 TitleIV
Received a Part D service and
should be counted in Section 6.2
1 = Yes
0 = No
82 EISReferral
Received referral outside EIS
program
1 = Yes
0 = No
83 HIPStatus
Flag indicating whether client
received a HIP service prior to
report period
New=No service
prior to report
period
Existing=Service
prior to report
period
84 High_Risk_Premium
Client Months for High Risk
Premiums Number
85 High_Risk_Premium_Cost
Client Total Cost for High Risk
Premiums Number
86 High_Risk_Deductible
Client Months for High Risk
Deductibles Number
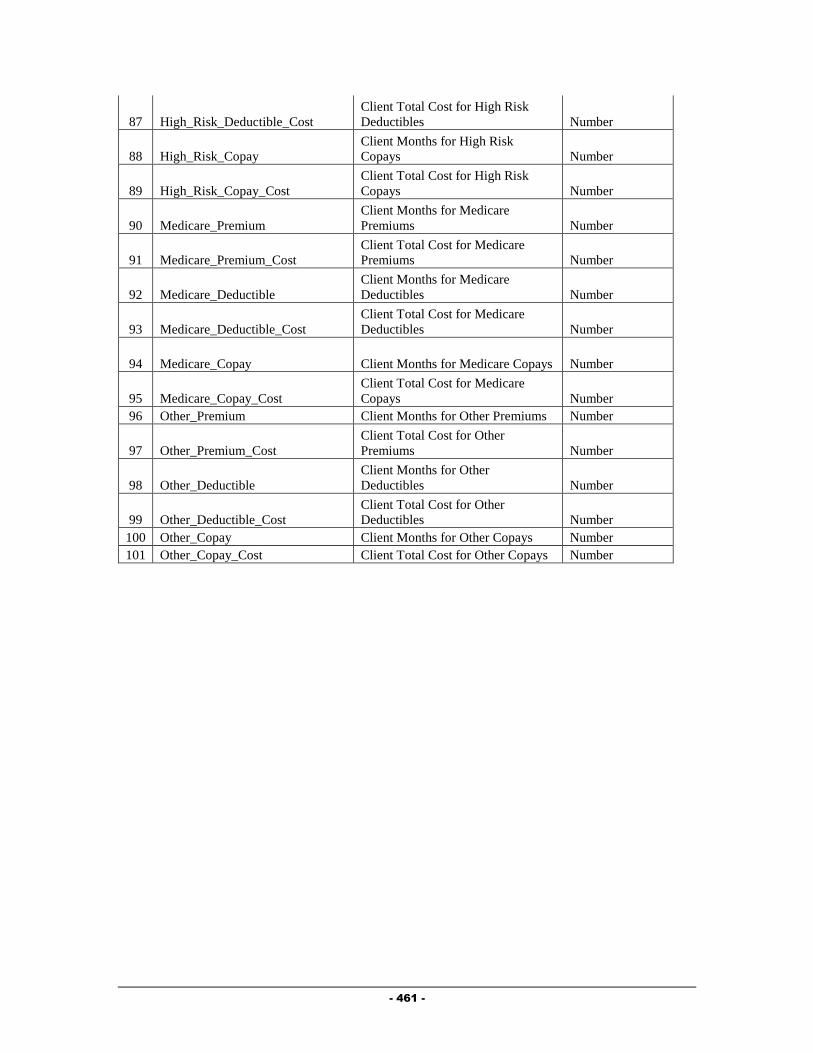
- 461 -
87 High_Risk_Deductible_Cost
Client Total Cost for High Risk
Deductibles Number
88 High_Risk_Copay
Client Months for High Risk
Copays Number
89 High_Risk_Copay_Cost
Client Total Cost for High Risk
Copays Number
90 Medicare_Premium
Client Months for Medicare
Premiums Number
91 Medicare_Premium_Cost
Client Total Cost for Medicare
Premiums Number
92 Medicare_Deductible
Client Months for Medicare
Deductibles Number
93 Medicare_Deductible_Cost
Client Total Cost for Medicare
Deductibles Number
94 Medicare_Copay Client Months for Medicare Copays Number
95 Medicare_Copay_Cost
Client Total Cost for Medicare
Copays Number
96 Other_Premium Client Months for Other Premiums Number
97 Other_Premium_Cost
Client Total Cost for Other
Premiums Number
98 Other_Deductible
Client Months for Other
Deductibles Number
99 Other_Deductible_Cost
Client Total Cost for Other
Deductibles Number
100 Other_Copay Client Months for Other Copays Number
101 Other_Copay_Cost Client Total Cost for Other Copays Number

- 462 -
Appendix
B
Client Eligibility Determination
Outlined below is an overview of how Client Eligibility for Ryan White Part A funded
services is tracked in the Provide® Enterprise system and how it impacts a provider’s
ability to bill Broward County for services they provide.
Recording Services Provider agencies can directly enter service documentation or periodically manually
import records of services into the Provide Enterprise system. Billing units are captured
in one of the following forms:
Progress Log: Case Management, Outreach, Mental Health and Substance Abuse
Counseling Services.
Procedure: CPT encoded Outpatient Ambulatory Medical Care and Laboratory
Procedures and ADA coded Dental Procedures.
Service Provided: Food Bank services and bus passes.
Ride Schedule: Van rides.
Prescription: Pharmacy services.
When using the Provide®
Enterprise system directly to capture services, many of the
records have process rules built in that help ensure that supplemental required data points
are included in the records. For example, a Progress Log for Case Management cannot
be “Completed” unless the Progress Log has at least one Goal from the Action Plan
associated with it. When records are imported these rules cannot be applied as
effectively, so in some cases the County requires that the records be manually entered
instead of imported.
Client Profile and Ryan White Eligibility Every time a Client Profile record is saved, the system re-calculates the Client’s Ryan
White Part A Eligibility. A series of flag fields exist on the Eligibility tab of the Client
Profile – one Yes/No flag field for each of the Ryan White Service Categories (and sub
categories in the cases of Oral Health, Transportation) to indicated current eligibility for
each service category. If any service category eligibility field has changed due to
changes in data in the Client Profile (Income, County of Residence, HIV status, Medicare
or Medicaid enrollment), then the Ryan White Service Category flags are saved and the

- 463 -
“Eligibility Expiration Date” field is set to 30 Days in the Future. This alerts the care
providers and Central Intake that the Client needs to go through a Ryan White Part A
Recertification.
When changes to the Service Category Eligibility flags are saved, an “Eligibility History”
record is created with the newly computed Service Category Eligibility flags and the
“effective date” set to the date when the change was saved. These Eligibility History
records are used when determining if a given service is eligible to be billed to the
provider’s Ryan White Part A contract.
The logic used to calculate the eligibility is as follows:
The Client Profile is checked to see if the County of Residence is Broward and
that the Client is HIV positive. If either of these is not true the Client is deemed
ineligible for any Ryan White Part A services.
Second, the Household Income is used to determine service category specific
eligibility.
o If the household income is greater than 400% of poverty, the Client is
ineligible for any Part A services. If the household income is less than
400% of poverty then the Client is deemed eligible for services for the
following categories:
Ambulatory Medical Care
Oral Health Care (those services Medicaid eligible)
Oral Health Care (those services not Medicaid eligible)
Medical Case Management
Mental Health
Substance Abuse
o If the Household Income is less than 300% of poverty then the Client is
deemed eligible for services in the following categories:
Nutritional Counseling (although at this time Broward County does
not fund this category)
Legal Services
Outreach
Transportation – Medically related
Transportation – Not Medically related
Food Bank (if the Food Bank Eligibility Override flag is set to
“Yes”)
o If the Household Income is less than 150% then the Client is deemed
eligible for Food Bank services.
Third, the Client’s Medicaid status is checked.
o If the Client is enrolled in Medicaid then the four character Medicaid
“Category” is used to check if the specific Medicaid coverage category
makes the Client ineligible for any of the Ryan White Part A service
categories. For those Ryan White categories that the Medicaid category
makes the Client ineligible for the Service Category Eligibility flags are
set to “No”, ineligible.

- 464 -
Finally, the Client’s Medicare status is checked. If the Client is enrolled in
Medicare Part B Only, Part A & B, or Part C then the Client is deemed ineligible
for Ambulatory Medical Care and Substance Abuse and Mental Health
Counseling. If the Client has Medicare Part D coverage then the Client is also
deemed ineligible for Pharmacy services.
Nightly Medicaid Enrollment Checking Every evening, the Provide
® Enterprise system looks for any Clients that have received a
Ryan White Part A service that day but has not had their Medicaid Enrollment checked
within 30 days. For these Clients, the system generates a Medicaid Enrollment Request
(HIPAA 270 transaction) and routes it to Florida Medicaid thru the MedData system.
The responses are processed and if there is a change in the Client’s Medicaid enrollment
status the Client Profile is updated as appropriate and when saved the Client’s Ryan
White Eligibility is re-computed and if appropriate a new Eligibility History record is
created.
Nightly Service Eligibility Agent Each evening, an agent runs on the Broward County Provide Enterprise database that
checks every service record (Progress Log, Procedure, Service Provided, Prescription,
and Ride Schedule) to see if it is eligible to be billed to Ryan White Part A.
Eligibility History records are used to re-compute every service record’s
eligibility. The most recent (prior to the date of the service being delivered)
eligibility history record is used to check the Client’s eligibility for the category
of the service. If the date of service was prior to any Eligibility History record for
the Client, the Ryan White Eligible flag is set to “Unknown”.
The system automatically re-evaluates every service record in the entire database
every evening.
o If Eligibility History record is backdated or entered after the fact, services
may be impacted by that change and will have their Ryan White Billing
Eligible flag field modified if necessary. This could cause service data
that had not billed previously to post on the next invoice for a provider or
could cause previously billed services to be reversed on the next provider
invoice.
Nightly Most Recent Service Date Agent Each evening, an agent runs on the Broward Client database and updates a field in the
Client Profile records (DateOfLastService) that indicates the date of the most recent
service record for each Client. This is used to help restrict which Clients are flagged as
needing a Recertification completed. Any Client that has not been served in more than
six months will not be flagged as needing a Recertification since it is assumed the Client
is inactive.