grower’s guide - home - mighty axe hops content mighty axe hops 2017 8505 95th st ne, foley, mn...
TRANSCRIPT

PAGE 1ALL CONTENT © MIGHTY AXE HOPS 2017 8505 95TH ST NE, FOLEY, MN 56329 WWW.MIGHTYAXEHOPS.COM
grower’s guide to minnesota hops 2nd edition
© Mighty Axe Hops 2017
PAGE 2ALL CONTENT © MIGHTY AXE HOPS 2017 8505 95TH ST NE, FOLEY, MN 56329 WWW.MIGHTYAXEHOPS.COM
PREFACE Thanks for reading. This is our experience. This report is not intended to be a step-by-step, exhaustive install guide. What this report is intended to do is to make your life easier when considering whether or not to install hops, and what to do after deciding to install. This report is detailed for a 1/4 acre install (the starting point we recommend for new growers) but contains relevant information for backyard growers as well as commercial growers. The reason we produced this report is because Minnesota needs more hops growers. We believe in a collaborative hops growing industry. Good luck out there!
DISCLOSURE This is simply a recommendation. We are not suggesting this is the best or the only way to grow hops. This is our experience thus far. We are not perfect. Neither are you. You must still follow all applicable laws, regulations, ordinances, labels, etc... You assume all risk for following the recommendations below, we are not responsible for your safety during install, we offer no guarantee that your costs, results, or experience will be the same as ours. Duh.
PICKING YOUR LAND The three most important factors for choosing your land are:
1. Full sun2. Access to water for irrigation3. Moderate to well draining soil
Growers would do well to avoid heavy clay soils, though most other types can be made to work through amendments for fertility and hilling for drainage.
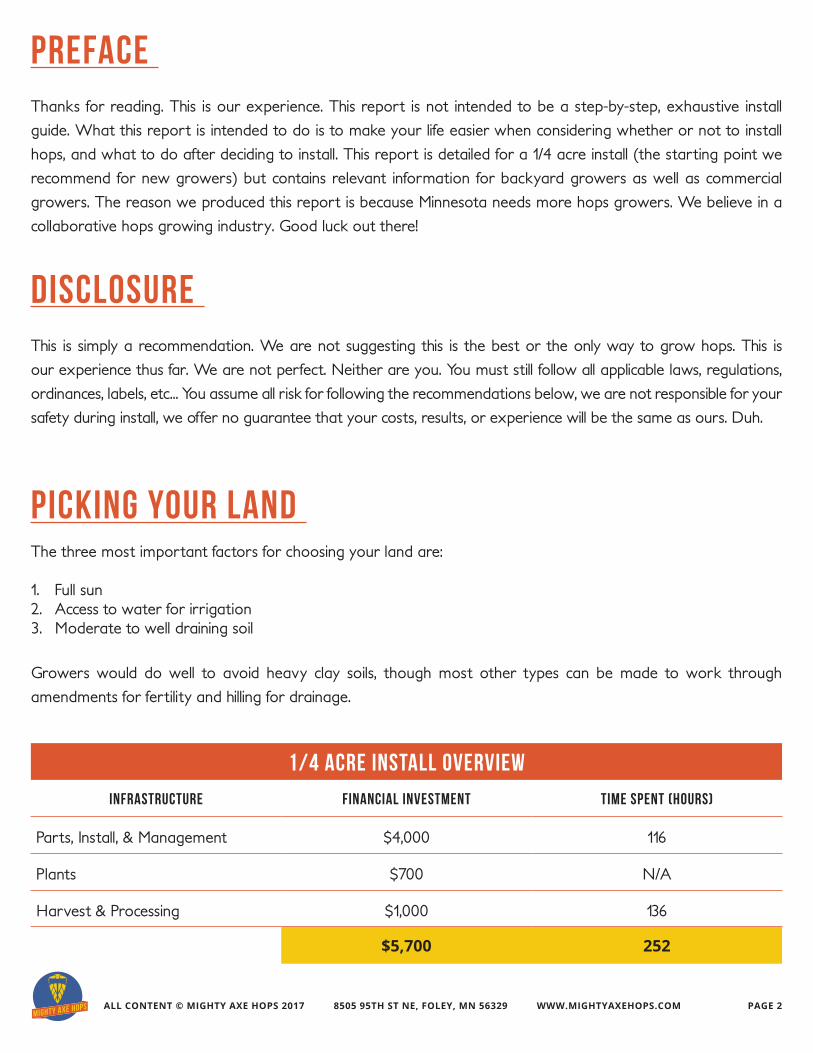
1/4 ACRE INSTALL OVERVIEW
INFRASTRUCTURE FINANCIAL INVESTMENT TIME SPENT (HOURS)
Parts, Install, & Management $4,000 116
Plants $700 N/A
Harvest & Processing $1,000 136
$5,700 252
PAGE 3ALL CONTENT © MIGHTY AXE HOPS 2017 8505 95TH ST NE, FOLEY, MN 56329 WWW.MIGHTYAXEHOPS.COM
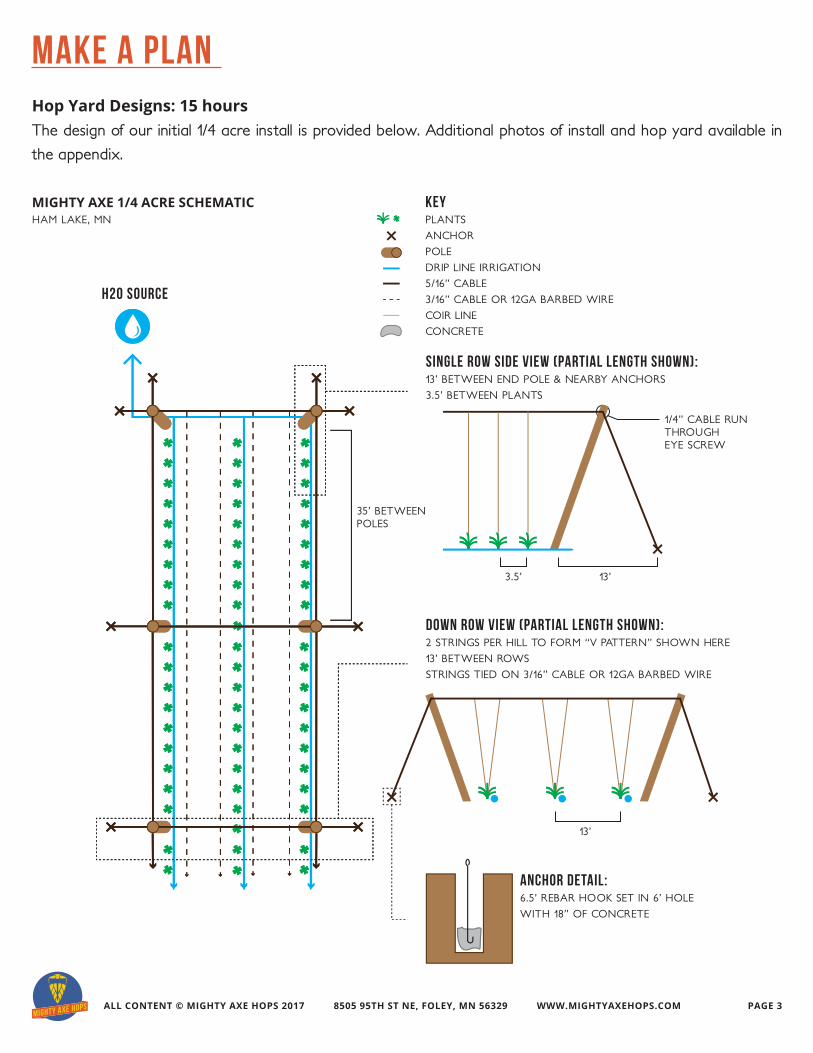
MAKE A PLAN Hop Yard Designs: 15 hoursThe design of our initial 1/4 acre install is provided below. Additional photos of install and hop yard available in the appendix.
H20 SOURCE
MIGHTY AXE 1/4 ACRE SCHEMATICHAM LAKE, MN
ANCHOR DETAIL:6.5’ REBAR HOOK SET IN 6’ HOLEWITH 18” OF CONCRETE
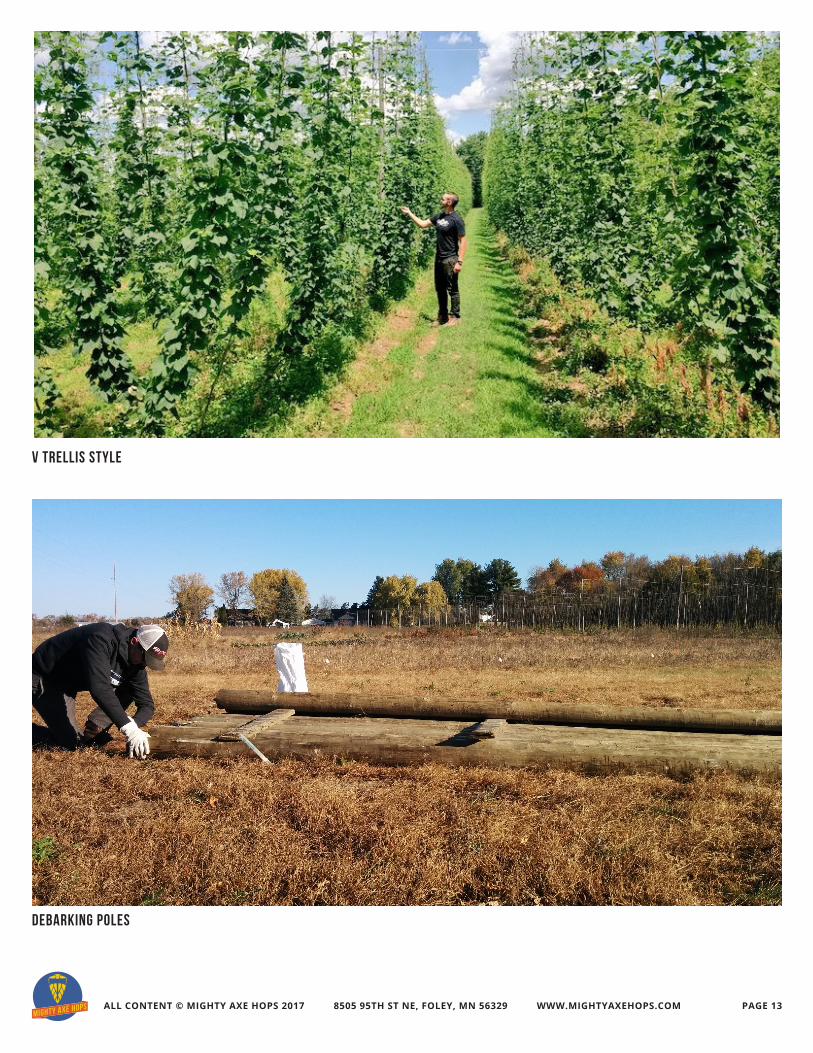
DOWN ROW VIEW (PARTIAL LENGTH SHOWN):2 STRINGS PER HILL TO FORM “V PATTERN” SHOWN HERE13’ BETWEEN ROWSSTRINGS TIED ON 3/16” CABLE OR 12GA BARBED WIRE
SINGLE ROW SIDE VIEW (PARTIAL LENGTH SHOWN):13’ BETWEEN END POLE & NEARBY ANCHORS3.5’ BETWEEN PLANTS
3.5’ 13’
1/4” CABLE RUN THROUGHEYE SCREW
13’
35’ BETWEEN POLES
KEYPLANTSANCHORPOLEDRIP LINE IRRIGATION5/16” CABLE3/16” CABLE OR 12GA BARBED WIRECOIR LINECONCRETE
PAGE 4ALL CONTENT © MIGHTY AXE HOPS 2017 8505 95TH ST NE, FOLEY, MN 56329 WWW.MIGHTYAXEHOPS.COM
OVERVIEW OF INSTALL PROCESS 1. Prep Poles2. Drill Holes3. Place Poles4. Set Poles5. Install Cabling6. Install Irrigation7. Install Plants
1. POLES W H A T T Y P E O F P O L E S ? - 2 4 E A 2 2 ’ X 6 ” = $ 1 , 2 0 0The typical life of a hopyard can extend from 10-25 years before replanting is necessary. As such, poles should be rot resistant to match this lifespan. Naturally rot resistant options include tamarack, cedar and black locust while other forms of treated lumber are also available. Be sure treated options are suitable for agricultural systems - some treatments are deemed unsafe for inclusion in f ields.
Hops do best when given at least 16’ of height to grow and poles ought to be set 4’ in the ground to get below the frost line and maintain stability from year to year. As such, pole length should be a minimum of 20’. Our f ield includes poles with a minimum butt diameter of 6”.
T R A N S P O R T A T I O NDepending on your source you will have different options. Some wholesalers may deliver at your quantity, others may not. If you are unable to arrange a delivery and do not have the proper truck and trailer combo to haul the logs. A 20 foot+ straight truck can be rented from any number of vehicle rental places.
D E - B A R K I N G : 1 0 H O U R S ( O N L Y N E C E S S A R Y I F Y O U U S E N A T U R A L P O L E S )
Removing the bark of natural log poles going into the ground is necessary to slow rot and prevent the harboring of pests over winter. Some yards use completely stripped lumber, we instead stripped the bottom 5’ in the interest of saving time while still addressing rot prevention. A draw blade will take a signif icant amount of time and we preferred the use of a planer bar attached to a chainsaw.
PAGE 5ALL CONTENT © MIGHTY AXE HOPS 2017 8505 95TH ST NE, FOLEY, MN 56329 WWW.MIGHTYAXEHOPS.COM
2. INSTALL EQUIPMENT H O L E D R I L L I N G : 1 H O U RHoles should be 4 feet deep to get below the frost line. We recommend a 12” auger on the front end of a skid steer.
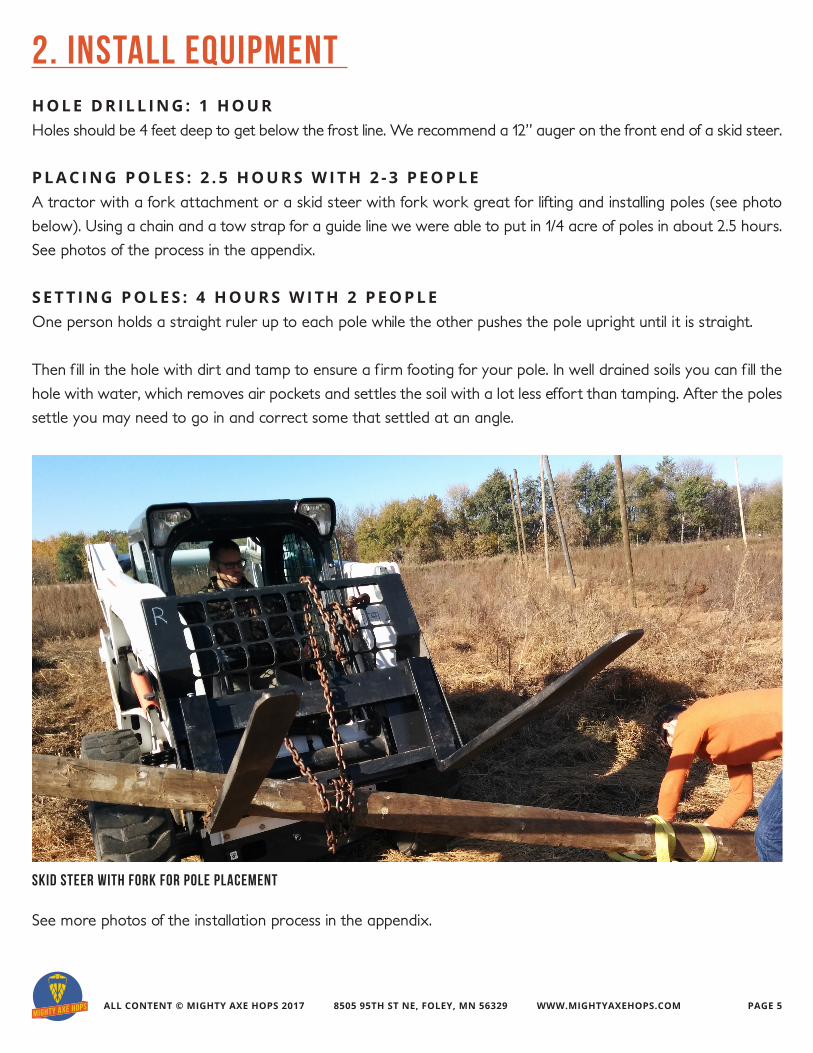
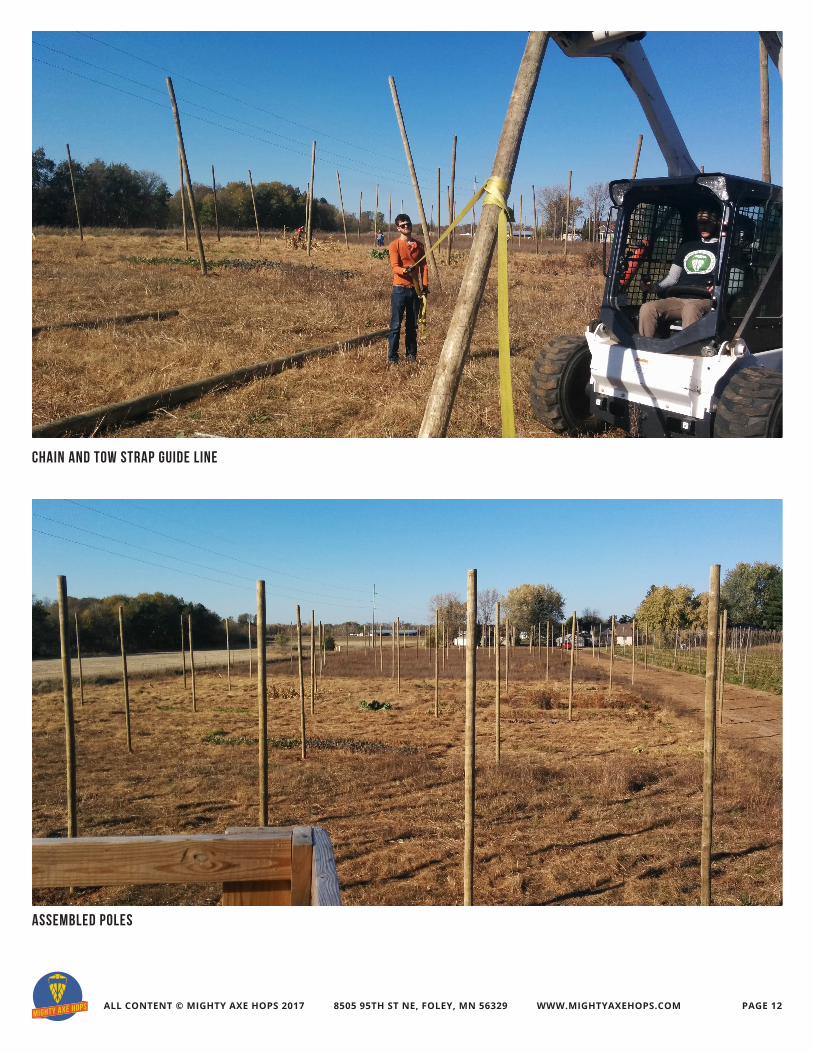
P L A C I N G P O L E S : 2 . 5 H O U R S W I T H 2 - 3 P E O P L EA tractor with a fork attachment or a skid steer with fork work great for lifting and installing poles (see photo below). Using a chain and a tow strap for a guide line we were able to put in 1/4 acre of poles in about 2.5 hours. See photos of the process in the appendix.
S E T T I N G P O L E S : 4 H O U R S W I T H 2 P E O P L EOne person holds a straight ruler up to each pole while the other pushes the pole upright until it is straight.
Then f ill in the hole with dirt and tamp to ensure a f irm footing for your pole. In well drained soils you can f ill the hole with water, which removes air pockets and settles the soil with a lot less effort than tamping. After the poles settle you may need to go in and correct some that settled at an angle.
SKID STEER WITH FORK FOR POLE PLACEMENT
See more photos of the installation process in the appendix.
PAGE 6ALL CONTENT © MIGHTY AXE HOPS 2017 8505 95TH ST NE, FOLEY, MN 56329 WWW.MIGHTYAXEHOPS.COM
3. HARDWARE C A B L E : 1 2 H O U R S W I T H 2 P E O P L E1,500 feet of 5/16inch aircraft cable, sourced from Pine River Group ~$5001,300 feet of 12.5ga dull cut barbed wire, sourced from Pine River Group ~$185
S T A P L E S : 1 H O U R + $ 5 0We recommend using fully forged, 2 3/4 inch staples. One per pole, hammered into the top straddling your top cable. Note: cable must be free enough to slide back and forth, do not hammer the staples all the way in. Sourced from Amazon.
S T R I N G S : 9 H O U R S W I T H 2 P E O P L E + $ 5 0 0Coconut coir twin, pre cut 20ft length. Two strings per plant. Other twines and string are not as strong or as rot resistant and cannot be fed through hop picking machines.
There are many ways reach the top of your cable for string tying: man lift, scissor lift, wagon, ladder, all up to you. Be careful. Line up strings with plants, tie the strings to the nearest top wire using a clove hitch knot and pull it tight.
On the ground, use w-clips (Legacy Hill Hop Supply) and w-clip applicator (Legacy Hill Hop Supply), to punch each string into the ground, as near to the crown root of your plan as possible. Strings should be punched in and be tight. Each plant will end up with two strings which start at the root of the plant and stretch up to the top wire on either side of the row. When you look down the rows you should see a V shape of strings.
4. IRRIGATION Hop plants need to be irrigated, requiring as much as 2 gallons per plant, per day. Drip irrigation is a must, sprinkler irrigation can lead to higher disease pressure and is an ineff icient means of increasing plant available water in the soil. MIDC in Roseville, MN has great products and knowledgeable staff.
I N S T A L L : 1 H O U RRoll out irrigation line taking care to keep the line directly aligned with your plants.
PAGE 7ALL CONTENT © MIGHTY AXE HOPS 2017 8505 95TH ST NE, FOLEY, MN 56329 WWW.MIGHTYAXEHOPS.COM
5. PLANTS V A R I E T I E SWe chose Cascade as the best variety for our new yard. Cascade is lauded as a resilient variety that does well in the short, hot, humid Minnesota growing season with good resistance to downy mildew and relatively high yields. It is also easily marketed as all brewers are familiar with Cascade hops and their f lavors are currently popular in the marketplace.
Short list of recommended varieties for Minnesota:
Cascade Chinook Nugget Newport
R H I Z O M E S V S C U T T I N G SSelection of planting stock for hop growers will inevitably come down to a choice between rhizomes and rooted cuttings, also called plantlets. We highly recommend plantlets for the following reasons:
1. Disease free stock. Rhizomes from a production yard are not cultivated with the intent to be sold, they are instead an incidental byproduct of hop farming. As such, they do not receive the same care in disease prevention as do plantlets that have been propagated in a nursery for the plant market. You MUST be assured from your plant source that their plants are virus free, ask to see virus and disease screening records. iIf they can’t or won’t share those don’t buy the plants. This is your one chance to start your yard with clean stock.
2. Rate of successful transplantation. Rhizomes are an unreliable form of planting stock, meaning that there is a high likelihood of a planted rhizome never taking root and growing out. For this reason, commercial growers will plant 2-4 rhizomes per hill, ensuring success but increasing cost to that of nursery-sourced plantlets. Our transplanted stock had a 100% success rate without the need for any additional plants to replace failures.
S O U R C I N G O F P L A N T S : ~ $ 8 0 0200 plants for this 1/4 acre design. We recommend Sandy Ridge Hops and Saint Croix Valley Hops as good, clean nurseries capable of producing high quality plants.
P L A N T I N G : 4 H O U R SPlanting should occur in late Spring (after threat of frost) or late summer. For American varieties grown in the US Hop producing regions, plants should be spaced 3.5 feet apart. Plants should be planted with the top of their plug 2 inches below top of the soil.

PAGE 8ALL CONTENT © MIGHTY AXE HOPS 2017 8505 95TH ST NE, FOLEY, MN 56329 WWW.MIGHTYAXEHOPS.COM
MANAGEMENT S C O U T I N G : 2 H O U R S P E R W E E KBe in the yard. Take notes. Observe. Take pictures. Learn and look for signs of disease and pests. We recommend The Compendium of Hop Diseases and Pests for learning to identify and manage common diseases and pests.
S P R A Y I N G : 4 H O U R S P E R W E E KHops get diseases and pests. To get a harvestable crop you need to protect against disease and pests. Spraying for downy mildew, powdery mildew, and various pests is an important requirement. You must follow all labels and rules for application of sprays. We have found a backpack sprayer to be an effective, if slow, method for spraying a small yard of hops. Track and log all of your inputs.
W E E D I N G : 4 H O U R S P E R W E E KKill and remove the plants that are not hops. At a 1/4 acre scale, hand and mechanical removing is possible. We highly recommend heavy mulching or chemical control.
HARVEST S A F E T YSafe hop harvesting and handling practices include hand washing, gloves, long sleeves, particulate face masks, and eye protection. Hops can cause skin irritation so we highly recommend gloves and long sleeve shirts.
T I M I N GWhile you can estimate the readiness of hops for picking by the look and feel of the hops, we recommend a more objective approach. The quality of the hop is closely related to when it was picked. Research has strongly correlated the development of alpha acids and aromatic oils with an optimum moisture level - between 74% and 78%. Determining moisture level is as easy as taking a f ield sample, drying it and running some numbers.
SAMPLE SIZE: Roughly 10 grams, taken from different plants and different heights on the plant.
DRYING TECHNIQUE: Document the original weight of the sample. Make sure you have a scale that can measure 0.1 grams. Then, using a microwave, treat the sample with high heat in 45 second increments. Between each heat treatment, allow the sample to cool, then measure and document the weight. Once the weight stops going down after each treatment, for three treatments in a row, you know you’ve reached your dry weight - the number used as a base for your calculations.
PAGE 9ALL CONTENT © MIGHTY AXE HOPS 2017 8505 95TH ST NE, FOLEY, MN 56329 WWW.MIGHTYAXEHOPS.COM
With the f ield weight (original weight of sample) and the dry weight, you can now calculate the amount of water in your hops at the time of sampling using this equation:
100 -((Dry WeightField Weight)*100) =
The percent of water is your moisture content. With this number, you can determine if your hops are too wet and thus need to wait for harvesting, or if they’ve reached or dried beyond the optimum 74-78% window.
TIP: Use a plastic, glass or ceramic plate when microwaving the sample. Paper will absorb moisture evaporating from the hops and skew results.
This same technique can also be used to assess the progress of your post-harvest drying efforts.
C U T T I N G : 2 H O U R S W I T H 2 P E O P L EPlace a large tarp below the plant. First, make the bottom cut. You should leave as much as 5ft of plant material in the f ield to ensure full root development and proper dormancy - cutting to close to the ground will end up hurting your crop in the following season. This is especially important for those who harvest f irst year plants. With the bottom cut made and the bine hanging, use a pole saw or pole mounted tree pruner to cut as high on the twine as possible. This is made easier if someone pulls on the bine to add tension. The plant will fall onto the tarp and be ready for transport. Repeat until the tarp is full, then drag to the picking area for unloading.
Note: bines will begin to decompose soon after harvest. Immediate picking is absolutely critical. If transferring to a different location for harvest, be sure to keep the bines cool and well ventilated - do NOT cover with a tarp, and spread the pile as much as possible.
M A N U A L P I C K I N G : 1 S T R I N G P E R P E R S O N P E R H O U RRemove cones only, leaving as much stem and leaf behind as possible. Leave cones that are too small, brown, or those that show insect damage.
M E C H A N I C A L P I C K I N G : T I M I N G V A R I E SSmall-scale picking machines are not uniform in results and can be extremely expensive. We highly recommend watching, or using, any model of picker before purchase.
PAGE 10ALL CONTENT © MIGHTY AXE HOPS 2017 8505 95TH ST NE, FOLEY, MN 56329 WWW.MIGHTYAXEHOPS.COM
PROCESSING Note if you are selling any amount of your crop fresh, do not follow the instructions below. Fresh hops must be kept cool, out of the sun, and be brewed within 24 hours.
S A F E T YSafe hop handling practices include hand washing, gloves, long sleeves, particulate face masks, and eye protection. Drying, baling, pelleting, and packing need to happen in a clean, washable setting. You should closely track all inputs you use on your hops in a log book.
D R Y I N G : T I M I N G V A R I E SIt is important to plan your drying process before you even plant your hops. Drying takes up a lot of space.
Drying is a mandatory method of processing for any hops not sold fresh - it preserves the hop from rotting and prevents the development of off f lavors. Most sources have shown the ideal moisture content to be between 8% and 11%. Any drier and cones become prone to shattering and faster degradation. Any wetter and the hops are exposed to damaging microbial processes (rotting).
Traditionally, hops are heated to 140 degrees F in large kilns with ample airf low. Chemical analysis, however, has shown that temperatures over 114F damage the alpha acid and oil prof ile of hops, pointing to a need for cooler drying. We place our hops on screen-bottom beds, heat to 100F and circulate air using two furnace fans. Many designs are different and it’s worth assessing available space and materials to determine what will work best for you. Ultimately, airf low and temperature are the primary concerns; maximizing the former will speed drying without relying on overheating. Ideally, your hops will reach the ideal moisture level of 10% in under 48hrs.
As you begin drying, take a sample and measure its moisture content using a gram scale and the f ield moisture tests outlined previously. This base line will help you determine what your hops should weight when they reach ideal moisture. To measure as the drying process commences, isolate a separate sample for continued measurements - we used mesh lingerie laundry bags for our sample. Measure the weight of the hops and bag separately, then calculate what the entire bag should weigh once 10% moisture is achieved. Using this method, assessment of progress is as easy as taking out your sample bag from the drier, measuring weight, then returning to the drier until the ideal moisture is reached. We checked our sample every 3 hours and found this a suitable increment - you may need to move faster depending on available time and rate of drying.
Once the hops are suitably dry they should be ‘conditioned’ - a process that refers to letting the hops sit in a pile while the moisture throughout each cone, and the entire yield, evens out. This helps solidify the preservation gained by drying in the f irst place and reduces the chance of decomposition during storage. In most cases, it is done by dumping the hops onto several large tarps or a clean f loor and letting them rest for 30-60 minutes after drying.

PAGE 11ALL CONTENT © MIGHTY AXE HOPS 2017 8505 95TH ST NE, FOLEY, MN 56329 WWW.MIGHTYAXEHOPS.COM
P A C K A G I N G : 4 H O U R S W I T H 3 P E O P L EYour hops must be packaged immediately following drying and conditioning. At a 1/4 acre scale you can use a simple home vacuum sealer. While systems using clear plastic vacuum bags are easy to f ind and relatively cheap, mylar bags are superior as they block out UV light that can damage oils and are more familiar to brewers. Hops are typically packaged in 11lb increments, with some local growers selling in counts of 10lbs instead. Pick one and stick with it - all your packages should be of uniform weight. Alternatively, you can choose to bale your hops into larger sacks. Generally, hops are baled before packaging or pelleting as an interim step. Again, be sure your bales are the same weight, contain only one variety, and are clearly labelled with variety, harvest date, and f ield.
S T O R A G EPackaged hops should be stored in cool, dark conditions. Refrigerated storage is a must while frozen storage at 26 degrees is ideal. A chest freezer is an eff icient, relatively inexpensive mechanism. For larger storage needs, a CoolBot coupled with an A/C unit can be used to cool larger areas down below freezing.
. . . A N D N O W Y O U R H O P S A R E R E A D Y F O R S A L E !
APPENDIX F U R T H E R R E A D I N G SThe University of Vermont has lots of resources about install a hop yard and processing your harvest, including oast and trellis design schemes.
The University of Michigan supports the largest local hop industry in the US.
Michigan State University cost of production study.
PAGE 12ALL CONTENT © MIGHTY AXE HOPS 2017 8505 95TH ST NE, FOLEY, MN 56329 WWW.MIGHTYAXEHOPS.COM
CHAIN AND TOW STRAP GUIDE LINE
ASSEMBLED POLES
PAGE 13ALL CONTENT © MIGHTY AXE HOPS 2017 8505 95TH ST NE, FOLEY, MN 56329 WWW.MIGHTYAXEHOPS.COM
V TRELLIS STYLE
DEBARKING POLES