gtcert operations handbook (version 2.0) - city of tampa
TRANSCRIPT

Greater Tampa Community Emergency Response
Team (CERT)
Operations Handbook
Version 2.0 Board Reviewed
Community Emergency Response Team Name: __________________________________________ Team: __________________________________________ Team Leader: ____________________________________ Team Leader Contact Number: ______________________ Emergency Operations Center (EOC): _________________ Staging Area: ____________________________________ Primary Rally Point: _______________________________ Alternate Rally Point: ______________________________

2
Table of Contents
Version 2.0 Board Reviewed
Section I: Introduction …………………….………………..………………….………...…. 5
I-1 General ……………………….……….………..………….………….……………5 I-2 Purpose ……………………….……….………..………….………….……………5 I-3 Applicability and Scope ………………………..…………………….…………… 5 I-4 Super-session …………………………………..…………………….…………… 5 I-5 References …………………….………………..…………………….…………… 6 I-6 Policy ……………………………………………..………………………………… 6 I-7 Reporting ……………………………………………………………………………6 I-8 Disaster Magnitude Classification (DMC) and - Hazard Potential Classification System …………………………………………………………………………………. 6
Section II: CERT Missions, Personal, and Team Equipment ………………..……….. 8 II-1 General …………………………………..…………………….………………..… 8 II-2 CERT Missions ………………….……………..…………………….…………… 8 II-3 CERT Personal Clothing ………….…………..…………………….…………… 8 II-4 CERT Equipment ……………….………………………………………………… 9 II-4.1 CERT Personal Equipment …………..……………………………………….10 II-4.2 CERT Team Equipment …….………………………………..……………….10
Section III – CERT General Mission Procedures ……………………………..……...…11 III-1 General ……………..…………………..…………………….…….…………… 11 III-2 Accountability ……………………………..…………………………………….. 12 III-3 Before CERTS Leave Their Homes …………………………………….……. 12 III-4 CERT Crisis Size-up ……………………………..……………………..……… 12 III-5 Fire Safety ……………………………..……………………..…………………. 13 III-5.1 General ……………………………..…………………………………..………13 III-5.2 Understanding Fire Chemistry ……………………………..…….………..…13 III-5.3 Matching the Correct Fire Extinguisher to the Class of Fire …………...... 13 III-5.4 Deciding to Fight a Fire ..………………………..……………………..….. 14 III-5.5 Classes of Fire and Choosing the Correct Tool to Contain or Extinguish 14 III-5.5.1 Operating a Fire Extinguisher …………………………...……………….. 15 III-5.5.2 Buddy Team Fire Extinguisher Procedures to Suppress Small Fires ... 15 III-5.6 Fire Suppression Safety …………………………………………………….. 16 III-5.7 Shutting off Utilities …………………………...……………………………... 17 III-5.7.1 Gas …………………………...……………………………….…………….. 17 III-5.7.2 Electricity …………………………...………………………..……………... 18 III-5.7.3 Water …………………………...………………………………………….... 18 III-5.7.3 Propane ……………………………………………………………………... 19 III-6 Hazardous Material …………………………………………………………….. 19 III-6.1 General …………………………………………………….………………….. 19 III-6.2 Defining the HAZMAT Threat ……………………………………………….. 19 III-6.3 HAZMAT Procedures ………………………….…………………………….. 19 III-6.4 Understanding the HAZMAT Placard ……………………………………… 19 III-6.5 Identifying HAZMAT in Fixed Facilities …………………………………….. 20 III-6.6 Identifying HAZMAT in Transit ………………………………………..…….. 21 III-6.7 HAZMAT in Household ………………………….………….……………….. 21 III-7 Disaster Medical Operations ……………………………………………......... 21

3
III-7.1 General …………………………………………………………………..……. 22 III-7.2 Simple Triage – Triage in a Disaster Environment ……………………….. 22 III-7.3 Simple Triage – Medical Marking System ……………..………………….. 23 III-8 Light Search and Rescue ……………………………..………………………. 23 III-8.1 General …………………………………………….……………………......... 23 III-8.2 Physical Search – Exterior Marking of Searched Areas …………………. 24 III-8.3 Conducting a Systematic Building Search ………………..……………….. 25 III-8.4 Locating and Evacuating Trapped Victims ……………….……………….. 26 III-8.4.1 Types of Voids …………………..……………………………………..…... 26 III-8.4.2 Protecting the Rescue Force Personnel ………………..……………….. 27 III-8.4.2.1 Rescuer Safety Procedures ………………..…………………….…….. 27 III-8.4.2.2 Safety Steps if a Rescuer is the Victim of Electrical Shock …..…….. 27 III-8.4.3 Extraction Methods ……………..……………………………………..…... 28 III-8.4.4 Personal Evacuation Methods ………………..………………………….. 28
III-8.4.4.1 Planning Victim Removal ………………..…………………….……….. 28 III-8.4.4.2 Victim Carries and Drags ……………..…………………….………….. 29 III-8.4.4.2.1 Victim Carries ……………..……………………………….………….. 29 III-8.4.4.2.1 Victim Drags ……………..…………………..…………….………….. 30
III-9 Field Engineering ……………..…………………..…………….….………….. 30 III-9.1 General ……………..………………………………………….….………….. 30 III-9.2 Box Cribbing ………..………………………………………….….………….. 31 III-9.3 Removing Debris ……………..…………………..…………….….……….... 33 III-9.4 Using Sandbags to Forestall Flooding ……………..…………………….... 33 III-9.4.1 How to Fill Sandbags ……………..…………………..……..….……….... 33 III-9.4.2 How to Place Sandbags ……………..……………………………….….... 34 III-9.4.3 Use of Polyethylene ……………..……………..…………………….….... 34 III-10 Terrorism ……………..………………………..…..……………….…….….... 35 III-10.1 General ……………..………………………..…..…………………….….... 35 III-10.2 CERT Protocols for Terrorist Incidents ……………..……………….….... 35 III-10.3 Environmental Indicators of a Biological or Chemical ………………...... 36 III-10.4 Possible Physical Indications of a Terrorist Attack ……………..……..... 36 III-10.5 Actions in Response to Possible Exposure to Chemical or Radiological Contamination ……………..………………………..…..………………………….... 36 III-10-6 Incident Zones ………………………………………………..……….…..... 37 III-11 Disaster Psychology ………………………………………………..……….... 37 III-11.1 General ………………………………………………..………………..….... 37 III-11.2 Team Well-Being ………………………………………………..……..….... 38 III-11.3 Preventative Measures ………………………………………………..….... 38 III-11.4 Emotional Phases following a Disaster …………………………………... 39 III-11.5 Goal of On-scene Psychological Intervention ……………………..…..... 39 III-11.6 Dealing with Death ……………………………………….……..…….….... 39 III-12 Post-Disaster Planning Considerations …………………..…………..…..... 40 III-12.1 Post-Hurricane Planning Considerations …………………………..…..... 40 III-12.1.1 Hurricane Categories Table ……………………..…............................. 40 III-12.1.2 Hurricane Categories Damage Descriptions ………………………...... 40 III-12.1.2.1 Category 1 "Minimal" …………………………………………………... 40 III-12.1.2.2 Category 2 "Moderate" ……………………………………………….... 41 III-12.1.2.3 Category 3 "Extensive” ………………………………………………... 41 III-12.1.2.4 Category 4 "Extreme" …………………………………………………. 41 III-12.1.2.5 Category 5 "Catastrophic" …………………………………………..... 41

4
Section IV – CERT Communications ………………………………………...…....41 IV-1 General ………………………………………….………………………...…..... 41 IV-1.1 Language …………………………………………………..…………...…..... 42 IV-2 Radio Communications ……………………………………………..…...…..... 42 IV-2.1 Short-Range Communications …………………..………………………..... 42 IV-2.1.1 Procedures for use of FRS and CB radios during emergency communication in the local area ………………………………………………….... 42 IV-2.1.2 Team Short-Range Radio Frequency Assignments ………………..….. 43 IV-2.1.3 CERT FRS and CB Radio Procedures …………………………….…..…43 IV-2.1.4 Use of Plain Speech Communications ……………..……………..…..… 44 IV-3 Wide Area Local Communications ………………………………………..….. 45 IV-4 Visual and Audio Signals ………………………....…………………..…..…. . 45 IV-4.1 Visual Signals …………………………………....…….…..………..…..…. . 45 IV-4.1.1 Hand and Arm Signals …………………………………………....…..…. . 45 V-4.1.1.A. Hand and Arm Signals for Lifting Operations …………….....…..…. . 45 IV-4.1.1.B. Hand and Arm Signals for Controlling Traffic ……………....…..…. . 47 IV-4.1.2 Flag Signals …………………………………....…….…………....…..…. . 48 IV-4.1.3 Signal Mirror …………………………………....…….…………....……. . 49 IV-4.2 Audio Signals …………………………………....…….………………...…... 50 IV-4.2.1 Whistle Signals …………………………………....…….…………….…... 50 IV-4.2.2 Banging or Tapping …..……………....…….……………..…..…. ……... 51 IV-4-2-3 Radios ……………………………………………………....…….……….. 51 IV-4-2-4 Telephones …………………………………....…….……………..……… 51 IV-4-2-4-A Landlines …………………………………....…….……………..…….... 51 IV-4-2-4-B Cellular Telephones ………………………....…….……………..…….. 51 Section V – Field Hygiene ……….……………………....…….……………..….…. 51 V-1 General ………………………...…………………....…….……………..……… 52 V-2 Water Purification ………….……………………....…….……………..…….... 52 V-3 Making a Fire ………………...……………………....…….……………..…….. 53 V-4 Personal Field Sanitation ………………………………………………………. 53 V-4.1 Personnel Field Hygiene Do’s and Don’ts …………………………………. 54 V-5 Team Field Sanitation ………….……………………....…….……………...… 56 V-5.1 Team Field Sanitation –Human Wastes ………………………………..….. 57 V-5.1.1 Human Waste ………….……………………....…….……………..…….... 57 V-5.1.2 Field “Toilets” ……….……………………....…….……………..………..... 57 V-5.2 Team Field Sanitation – Trash ……….……………………....…….……..... 57 V-5.3 Team Field Sanitation – Cooking Wastes ……….……………………........ 58 Section VI – Annexes …………….……………………....…….……………..……. 58 Annex A - CERT Forms …………….……………..…………..………………..59 - 64 Annex B - Volunteer Reception Center Diagram…....……….…..……..………… 65 Annex C – Glossary and Definitions …………….……....…….……..……….66 – 69 Annex D – Supplemental Helmet Markings ………………………………70 - 71

5
Section I – Introduction I-1 General The Greater Tampa - Community Emergency Response Team (hereinafter “GT-CERT”) provides volunteer support to emergency services organizations in the City of Tampa. This document outlines some of the more common actions or procedures that CERT members might use when called upon to supplement community emergency services during emergency or hazardous situations. These procedures will be reviewed annually by relevant emergency service leadership and the GT-CERT planning committee. I-2 Purpose The GT-CERT Operations Handbook (Handbook) defines what active GT-CERT members should know, defines what is expected of them during normal operations, training and during emergencies and unusual situations. These procedures provide a baseline for actions in ambiguous situations. Appropriate application of these procedures will facilitate maintaining a qualified and trained volunteer CERT membership, facilitate marshalling CERT personnel and equipment, direct CERT resources to respond during crises, and help preserve life and minimize damage to property. Knowledge of these procedures is everyone’s personal responsibility. These procedures have been coordinated with the City of Tampa Fire Rescue, Office of Emergency Management and the GT CERT leadership. I-3 Applicability and Scope The provisions of this document apply to all GT-CERT personnel. Every active member of the GT-CERT is responsible for having read and familiarized themselves with these administrative procedures. Annual training on this plan is required by all GT-CERT personnel. This document is not meant to replace CERT training and is used as an operational guide to GT CERT members. I-4 Supersession This document supersedes any existing GT-CERT Handbooks. Upon adoption, this document will serve as the functional GT-CERT Handbook for GT-CERT personnel. This document, in turn, will be superseded when updated. I-5 References/Supporting Documentation
• All-Weather CERT Field Operating Guide No. 573 • SM-317, Community Emergency Response Team Participant Manual, June 2003 • Tampa Bay REACT, Inc. Team 6127 Radio Procedures • Volunteer Reception Center Standard Operating Procedures

6
I-6 Policy The GT-CERT recognizes and acknowledges that the protection of its assets and operations is a major responsibility of its members. It is also a policy of the GT-CERT to protect life, property, environment, and information, in that order. To this end, procedures have been developed to protect GT-CERT personnel, operations, and equipment. The leadership of GT-CERT is responsible for developing and maintaining a viable handbook that conforms to the City of Tampa emergency response plan and that is consistent with the provisions and direction of other emergency response policies, plans, and procedures. I-7 Reporting Any deployment of GT CERT assets requested by Tampa Fire Rescue, Office of Emergency Management will be reported in accordance with applicable NIMS guidelines and procedures. I-8 Disaster Magnitude Classification (DMC) and Hazard Potential Classification System Through the use of the two classification systems, CERT members can better prepare for their involvement in operations once notified. The Disaster Magnitude Classification (DMC) as described by FEMA may be used to describe the extent of the crisis event leading to the execution of some aspects of the ASOP. These levels of disaster are defined as: • Minor Disaster – Any disaster that is likely to be within the response capabilities of
local government and results in only minimal need for state or federal assistance. • Major Disaster – Any disaster that will likely exceed local capabilities and require a
broad range of outside resource support including state or federal assistance. The State of Florida Emergency Management Agency and the Federal Emergency Management Agency (FEMA) will be notified and potential state and federal assistance will likely be predominately recovery-oriented.
• Catastrophic Disaster – Any disaster that will require massive state and federal assistance. State and federal assistance will involve response and recovery needs.
The Hazard Potential Classification System is based on the probable loss of human life and the potential for economic losses, environmental damage, and/or disruption to normal operations.
• Low Hazard Potential – Low hazard potential situations are those where failure or failed operation results in no probable loss of human life and low economic and/or environmental losses. Losses are principally limited to the owner’s property.
• High Hazard Potential - High hazard potential situations are those where failure or failed operation will probably cause loss of human life.
• Significant Hazard Potential – Significant hazard potential situations are those where failure or failed operation results in no probable loss of human life but can cause economic loss, environmental damage, disruption of lifeline facilities, or can impact other concerns.

7
Hazard Potential Classification
Loss of Human Life
Economic, Environmental, Lifeline Losses
Low None expected Low and generally limited to owner
Significant None expected Yes
High Probable. One or more expected
Yes (but not necessary for this classification)
8
Section II – CERT Personal, Team Equipment, and Missions II-1 General Much of what GT-CERT does during normal operations, training and during emergencies and unusual situations requires special protective equipment. The equipment is critical for the protection of the CERT member and the public which it is assisting. This equipment largely falls out in two categories: Personal equipment and team equipment. Team equipment is further broken down into equipment for general missions and special mission equipment. II-2 CERT Missions Based on mission analysis, special skills of some GT-CERT members, and the operational needs of emergency responders, some GT-CERT members may be organized into special teams with specific equipment and training requirements. Team equipment requirements for these teams will be based on the mission analysis. Some examples of special teams might be:
• Volunteer Reception Center (VRC) Operations – This is a separate GT-CERT plan.
• Emergency Response Center (ERC) Communications • Point of Distribution (POD) Operations • Re-entry Point Operations - • Division Zone Operations (formerly called HAZ operations) • Emergency Readiness Centers (ERC) - • special needs assessment • donation management • community information line support • utilities control • advanced first aid (qualified CERTs) • Communication support (landline, HAM radio, UHF/VHF/FM operations
support, etc) • watercraft operations • other missions specified by city emergency management or Tampa Fire and
Rescue (within the scope of CERT training). II-3 CERT Personal Clothing Although there is no prescribed uniform for CERT members, wearing the right type of clothing is critical to being able to accomplish the mission. CERT members might find themselves in a range of environments from duty at an Emergency Operations Center (EOC) or a city/county shelter, all the way to debris strewn field sites in rural and urban terrain. Wearing appropriate clothing can make the difference between being an asset to emergency services and becoming a casualty or liability. GT-CERT identification must be displayed at all times and in all working environments.

9
1. People working in an EOC or shelter can wear normal attire supplemented by
whatever is needed to identify themselves as a CERT member.
2. CERT members placed in an austere environment should wear: sturdy shoes that provide ankle support and prevent penetration through the sole; good socks that can wick moisture; long pants that can withstand the debris, possibly with cargo pockets for immediate access to critical items; a long sleeve shirt (again preferably with pockets); CERT vest; a brimmed hat for all-around shade or the CERT hard hat, and some sort of eye protection. All clothes should fit loosely to the body,
3. The wearing of the CERT helmet (green hard hat) is based on the operational
environment and risk assessment. Its use is recommended in areas with debris, when working in buildings at any time, when the wind might pickup ground debris, or during periods of reduced visibility where you might need to add lights to the helmet to increase your ability to be seen and to see. Its wear is mandatory in areas designated by the incident commander or locally by the CERT leader. Although not included, it is recommended that individuals purchase chin straps to help retain the helmet on the head and fore and aft lights to facilitate operations during times of reduced visibility.
II-4 CERT Equipment CERT personnel and teams are provided equipment in order to accomplish their missions. CERT personal equipment is a standard issue presented to the graduates of the CERT training program. Equipment provided to the different CERT teams is based on the analysis of the team’s mission. II-4.1 CERT Personal Equipment When an individual successfully completes Community Emergency Response Team Training SM-317, they are presented with a standardized complement of equipment and apparel useful in accomplishing the basic mission of CERT members. Experience and personal needs indicate that this issue does not fully represent the tools needed for the full range of situations a CERT member may find themselves confronted with so it is acceptable that this equipment may be supplemented by the individual member. A stocked CERT kit is important to every volunteer in case they are activated. Suggested here are other items to place in your kit, or to take should you be activated.
Basics - CERT Bag - CERT Vest - Helmet (optional marking – see Annex C) - CERT identification badge - CERT shirt, - hat - Identification tags or personal identification
- toilet articles such as: soap, shampoo, washcloths, towels, toothbrush, dental floss and fluoride toothpaste, and talcum powder and foot powder - Pen, Markers & Paper - all-weather paper is most versatile - Masking tape (2”) - Duct tape - Safety Glasses or goggles – and backup

10
- CERT forms/handbook (waterproof available) - Headlamps for helmet - A safety light for back of helmet (e.g., bike light) - Cell phone &/or pager with contact numbers - Change of clothes and an extra pair of socks - Water (at least 2 qt) and personal snacks – a backpack hydration system is a great option. - Non perishable food (for 1 day) - Water purifications tablets - Money, including a small amount of change - Mosquito repellent with DEET - Sunscreen – preferably 30 SPF or greater - Hand sanitizer - Hand or baby wipes - Personal medicines prescribed to you: - Diabetics: insulin and supplies, snacks, hard candies, etc. as you may be doing physical work beyond your everyday activities. - Asthmatics: Bring your 'Rescue Inhaler/MDI' - Allergies: There may be a lot of dust and debris, so if you have allergies, take your allergy medication before you head out. - All other medical conditions: Please take your medicine before you leave home or bring it with you in its labeled container. - Tylenol or Ibuprofen is also nice to have - Map(s) or the area - hearing protection (e.g., earplugs, headphones, etc.)
pair - Dust masks - Leather Work Gloves- 2 pairs preferred - Leatherman tool – multipurpose tool with a knife, preferably one that has a knife you can operate one-handed - Ear plugs (have extras whenever possible) - Flashlights (spare batteries/extra bulbs) - Secondary flashlight/light sticks - Lumber crayon/SAR Marker - Whistle with a d-ring or a hook to the vest - Blanket(s) - Plastic bags – for trash and biohazards - Caution/hazards tape - “On Duty” 4 in 1 gas and water shut-off, digger, and pry bar - Rope (preferable 25 ft with a 300lbs capacity) - Shovel (folding or multi-purpose) - Orange spray paint - Adjustable wrench - Scissors - Utility knife - Waterproof matches - Triage tags - Basic first aid kit including: tongue depressors, band-aids, triangular bandages, gauze rolls and squares (both sterile and unsterile), Mylar blanket, gloves, various rolls of tape, safety pins, personal protective equipment (PPE) - Rain gear - Helmet chin strap - magnifying lens
II-4.2 CERT Team Equipment GT CERT Team Leaders are issued a Team Leader Kit that is equipped with enough basic safety supplies and equipment to support 3-4 CERT members. Refer to table below. Team equipment should be able to support two mission categories: general and specific team mission. All GT-CERT subordinate teams should collect equipment that will support all of the general missions that a CERT (e.g., disaster preparedness, fire safety, disaster medical operations, light search and rescue, fire safety, etc.). An initial assessment of team general mission equipment suggests the following:

11
Team Recommended Equipment - backup gear bag(s) - reflective traffic control gloves - emergency radio/weather hazards radio- battery operated - Ham Radio (for those w/licensed operators) - power generation equipment – gas generator, solar charger, etc. - GPS - light sticks- various colors - shaker or windup flashlight and radio - Iodine or alternative way to clean water - tarp(s) - cribbing material (blocks, wedges, lever, etc.) - 4 foot pinch Bars - bolt Cutters - team tool kit - hand or hack saw - pry bars (short &/or long) - SAR full kits - First Responder kits for those certified through First Responder training. - AED (if trained) - Evacuation Roll Stretchers - Fire Extinguisher - Carbon Monoxide Alarms - Cots - Coolers
Extra Medical Equipment (a basic kit is fine unless you have additional training) -band-aids - cleaner for wounds and scrapes - topical anti-bacterial cream - bandage scissors (trauma-shears) - gauze pads (4X4, 3X3, 2X2) sterile - splint material (may be made from cardboard) - rolled gauze and bandages (sterile and non-sterile) - abdominal pads - rolls of ace bandages or athletic wraps - triangular brace bandages - gloves- latex and non-latex - alcohol wipes and hand wipes - various rolls of tape - thermal (Mylar) blanket - CPR masks - safety pins - Personal Protective Equipment (PPE) - hot & cold packs - hand sanitizer - small pack of baby wipes
Section III – CERT General Mission Procedures
The CERT goal is to do the greatest good for the greatest number with a special emphasis placed on personal safety.
III-1 General Although emergency service personnel are the best trained and best equipped to handle and emergency, it is extremely plausible that they might not be available in all situations at all times. Following a catastrophic event, entire sections of the city or county may be inaccessible to emergency service personnel and might be on their own for extended periods. CERT personnel are trained to perform general basic missions in a post disaster environment providing service to themselves, their families and neighbors. These missions fall under the following categories:
• Fire Safety • Disaster Medicine

12
• Light Search and Rescue Operations III-2 Accountability/Safety Depending on the scenario, CERT members that participate in area CERT teams and the CERT leadership may be issued two accountability tags/badges. One tag will always be carried by the CERT member and one tag/badge will be surrendered to the CERT team leader prior to the CERT member entering into a hazard area. CERT members will recover their accountability tag/badge upon leaving the hazard area. Accountability information will be communicated to the CERT liaison officer at the EOC to be available on request of the incident commander. III-3 Before CERTs Leave Their Homes/Neighborhoods
Check family to ensure safety Inspect house for damages Inspect utilities and secure as needed Call out-of-state contact per family disaster plan Get family disaster supplies Locate your CERT equipment and carry it with you Assist immediate neighbors; conduct a neighborhood survey Do not start out on your own. Document all messages and activities; keep track of personnel at all times
III-4 CERT Crisis Size-up The CERT “size-up” is a nine step process CERT members use to gain an appreciation of the environment before undertaking an operation or task. It is a critical step in confronting a disaster dilemma and is instrumental in ensuring the safety of the CERT member and the public as well as determining the most prudent solution. The nine steps are: 1. Gather facts What has happened? How many people are involved (if you know)?
What is the current situation? 2. Assess and communicate the damage Take a lap around the building. Try to
determine what has happened, what is happening now, and how bad things can really get.
3. Consider probabilities What is likely to happen? What could happen through
cascading events? 4. Assess your own situation Are you in immediate danger? Have you been trained
to handle the situation? Do you have the equipment that you need? 5. Establish priorities Are lives at risk? Can you help? Remember, life safety is the
first priority! 6. Make decisions Base your decisions on the answers to Steps 1 through 3 and in
accordance with the priorities that you established.

13
7. Develop plans of action Develop a plan that will help you accomplish your
priorities. Simple plans may be verbal, but more complex plans should always be written.
8. Take action Execute your plan, documenting deviations and status changes so that
you can report the situation accurately to first responders. 9. Evaluate progress At intervals, evaluate your progress in accomplishing the
objectives in the plan of action to determine what is working and what changes you may have to make to stabilize the situation.
III-5 Fire Safety Always work with a buddy and wear safety equipment and never turn your back on the fire! III-5.1 General During a disaster, the first priorities of professional firefighters are life safety and putting out major fires. They may be hampered by impassable roads, inadequate resources, and other factors. CERT extends the capabilities of the professional fire services by:
• Putting out small fires. • Preventing additional fires. • Shutting off utilities. • Helping with evacuations where necessary. • Personnel safety equipment for fighting fires: gloves, helmet, goggles, mask, and
boots. III-5.2 Understanding Fire Chemistry
FUEL
OXYGEN
HEAT
Chemical Reaction
Fire requires heat, fuel, and oxygen. The combination of these elements can cause a chemical exothermic reaction (fire). If any of these elements is missing or if any is taken away, fire will not occur or will extinguish.
III-5.3 Matching the Correct Fire Extinguisher to the Class of Fire Fire Type
Extinguishing Agent Combustible Method
Water Foam Dry chemical
paper, cloth, wood, rubber, most plastics
Removes Heat Removes air and Heat Fires in paper, cloth, wood, rubber, and many plastics require a water type extinguisher labeled A. ________________________ Breaks chain reaction

14
Foam, CO2, or dry chemical Foam
Flammable liquids such as: oil, gasoline, charcoal lighter fluid and kerosene. NOTE - These fuels burn only at the surface because oxygen cannot penetrate the depth of the fluid. Only the vapor burns when ignited.
Removes Air Flammable Liquids - Fires in oils, gasoline, some paints, lacquers, grease, solvents, and other flammable liquids require an extinguisher labeled B.
Dry chemical Class C fires are energized by electrical equipment such as wiring and motors. When the electricity is turned off and is no longer feeding the fire, the fire becomes a Class A or B fire depending on the source of the fuel.
Breaks chain reaction Electrical Equipment - Fires in wiring, fuse boxes, energized electrical equipment, computers, and other electrical sources require an extinguisher labeled C.
Multi--purpose . Ordinary Combustibles, Flammable Liquids, or Electrical Equipment - Multi-purpose dry chemical is suitable for use on class A, B, and C.
D
Sodium Chloride, Copper based, Graphite, Sodium Carbonate
Combustible metals such as: aluminum, magnesium, titanium, potassium, zirconium. NOTE - Although not normally found in residential areas,
Metals - Fires involving powders, flakes or shavings of combustible metals such as magnesium, titanium, potassium, and sodium require special extinguishers labeled D.
Dry and wet chemical extinguishers for kitchen fires
Kitchen Fires Fires involving combustible cooking fluids such as oils and fats. Note: Your present fire extinguishing equipment may not put out a fire involving vegetable oil in your deep fat fryer.
III -5.4 Deciding to Fight a Fire
• Can my buddy and I fight the fire safely? • Do my buddy and I have the right equipment? • Are there other hazards? • Is the building structurally damaged? • Can my buddy and I escape?
III-5.5 Classes of Fire and Choosing the Correct Tool to Contain or Extinguish One
Conduct your CERT Size-up!
A CERT member can usually find at least one of four types of firefighting resources in a situation: • Portable fire extinguishers: The most common device for suppressing small fires. A
well-prepared home or workplace will have at least two portable fire extinguishers. There are several types of fire extinguishers optimized for a particular class of fire.
• Confinement: Confining an interior fire by closing doors to rooms and hallways may help to restrict the spread of smoke and heat and limits the amount of oxygen available to the fire. Exercise caution if you have to re-enter a room, test the door with the back of your hand.

15
• Creative resources: Available materials can be used to fight fires. Examples include: swimming pool or spa water and buckets, sand or dirt and shovels, a garden hose, etc.
II-5.5.1 Operating a Fire Extinguisher Remember to PASS the fire Extinguisher Pull Pull the safety pin on the extinguisher’s handle Aim Aim the extinguisher’s output at the base of the fire. Squeeze Squeeze the activating handle on the top of the fire Sweep Sweep the extinguisher back and forth along the base of the fire
Always operate extinguisher in upright position. As shown in figure, the acronym to remember when operating a portable extinguisher in PASS: pull aim, squeeze, and sweep. Aim at the base of the fire. For fire to exist, the following four elements must be present at the same time:
Enough oxygen to sustain combustion,
Enough heat to raise the material to its ignition temperature,
Some sort of fuel or combustible material, and
The chemical reaction that is fire.
III-5.5.2 Buddy Team Fire Extinguisher Procedures to Suppress Small Fires Never turn you back on a fire!
Can I escape quickly and safely from the area if I attempt to extinguish the fire?
Do I have the right type of extinguisher?
Is the extinguisher large enough for the fire?
Is the area free from other dangers such as hazardous materials and falling debris?
Extinguish the Fire!
LEAVE IMMEDIATELY!
LEAVE IMMEDIATELY!
LEAVE IMMEDIATELY!
LEAVE IMMEDIATELY!
No
No
No
No
Yes
Yes
Yes
Yes
Can I escape quickly and safely from the area if I attempt to extinguish the fire?Can I escape quickly and safely from the area if I attempt to extinguish the fire?
Do I have the right type of extinguisher?Do I have the right type of extinguisher?
Is the extinguisher large enough for the fire?Is the extinguisher large enough for the fire?
Is the area free from other dangers such as hazardous materials and falling debris?Is the area free from other dangers such as hazardous materials and falling debris?
Extinguish the Fire!
LEAVE IMMEDIATELY!
LEAVE IMMEDIATELY!
LEAVE IMMEDIATELY!
LEAVE IMMEDIATELY!
No
No
No
No
YesYes
YesYes
YesYes
YesYes

16
Fires should be fought using the buddy or team method. The extinguisher operator is focused on suppressing or extinguishing the fire and the backup/guide is focused on the environment ensuring the safety of the team. The operator and backup can exchange places should the need require.
• Every member of the buddy team should have an operable fire extinguisher. • Both team members should walk toward the fire. The No 1 person should watch
the fire and the No 2 person should stay close to No. 1, keeping his or her hand on No. 1’s shoulder. Number 2’s job is to protect No. 1.
• Number 1 should approach the fire from the windward side (i.e., with the wind to the team member’s back). When approximately 10 feet from the fire, No. 1 should begin to discharge the extinguisher at the base of the fire, continuing the approach until the range for the extinguisher is optimal.
• Number 1 should sweep the base of the fire until it is extinguished. • When No. 1 is ready to exit the fire area, he or she should say, “Backing out.”
Number 2 should repeat the command. Number 2 should guide No. 1 from the area with his or her hands as No. 1 continues facing the fire and looking for hazards.
III-5.6 Fire Suppression Safety Fire suppression safety rules include: Use safety equipment at all times. Wear your helmet, goggles, dust mask, leather
gloves, and heavy shoes. If you are not equipped to protect your personal safety, leave the building.
Work with a buddy. Buddies serve an important purpose. They protect your safety.
Don’t ever try to fight a fire alone. Have a backup team, whenever possible. A backup team just makes good sense.
A backup team can support your fire suppression efforts and can provide help if you need it.
Always have two ways to exit the fire area. Fires spread much faster than you
might think. Always have a backup escape plan in case your main escape route becomes blocked.
Feel closed doors with the back of the hand, working from the bottom of the door
up. Do not touch the door handle before feeling the door. If the door is hot, there is fire behind it. Do not enter! Opening the door will feed additional oxygen to the fire.
Confine the fire, whenever possible, by keeping doors closed.
( p)( p)
Wind
Flammable Liquid FireFlammable Liquid Fire
1- CERT Extinguisher Operator
2 - CERT Backup/Guide

17
Stay low to the ground. Smoke will naturally rise. Keeping low to the ground will
provide you with fresher air to breathe. Maintain a safe distance. Remember the effective range of your fire extinguisher.
Don’t get closer than necessary to extinguish the fire. Overhaul the fire to be sure that it is extinguished—and stays extinguished. Fire
overhaul is when fire suppression is complete and you search the structure for hidden fire or hot embers. Firefighters usually search in ceilings, between walls, or in other obscure areas.
What CERTs don’t do when suppressing fires is as important as what they should do. DON’T: Get too close. Stay near the outer range of your extinguisher. If you feel the heat,
you are too close. Never turn you back on a fire as fires can reignite. Back away from the fire,
watching it to make sure that it does not reignite. Try to fight a fire alone. Remember that your first priority is your personal safety.
Don’t put yourself at risk. Try to suppress large fires. Learn the capability of your equipment, and do not try
to suppress a fire that is clearly too large for the equipment at hand (i.e., a fire that is larger than the combined ratings of available fire extinguishers).
Enter smoke-filled areas. Fire suppression in smoke-filled areas requires
equipment that CERTs don’t have. III-5.7 Shutting off Utilities III-5.7.1 Gas IMPORTANT – Only turn off gas at the meter if you smell gas! To turn off natural gas in your house, take a wrench and tighten it on to the quarter turn valve that is on the pipe that feeds into the gas meter. Turn it one quarter turn to turn the indicator across the pipe (parallel to the ground). In most locations, once you do this you cannot turn the gas back on to the house without the utility company.

18
III-5.7.2 Electricity In the event that you need to turn off the electricity in your house, go to the breaker box and do the following:
• Turn off smaller breakers one by one • Flip the “main” breaker last • Never turn a breaker on or off if you are standing in water or if you are unsure of
the proper operation of the electric equipment. To reenergize your home, reverse the steps above
III-5.7.3 Water In the event you need to shut water off inside your home, find the main water valve and turn it clockwise. To open the flow of water back into the house, turn it counter-clockwise.

19
III-5.7.4 Propane If you live in an area that uses outdoor propane or LPG you will find this outside the home. Open the top of the tank and you will see either a regular turn knob or a quarter turn valve. Turn the knob clockwise to shut off the flow of propane into your house. For quarter turn valve see above. III-6 Hazardous Material (HAZMAT) III-6.1 General Hazardous materials pose an ever-present danger. They are stored in all types of locations and are transported by a variety of means. Knowledge that hazardous materials are present helps to protect CERT members’ safety and is also valuable size-up information for first responders. Personnel safety equipment for fighting small fires: gloves, helmet, goggles, mask, and boots. III-6.2 Defining the HAZMAT Threat Materials are considered hazardous if they have any of these characteristics: can corrode other materials, may explode or are easily ignited, will react strongly with water, are unstable when exposed to heat or shock, and are otherwise toxic to humans, animals, or the environment. Hazardous materials include, but are not limited to: explosives, flammable gases and liquids, poisons and poisonous gases, corrosives, nonflammable gases, oxidizers, and radioactive materials. III- 6.3 HAZMAT Procedures
1. Stay upwind 2. Call 911 3. If authorities cannot be reached, isolate the area as much as possible 4. Do not attempt to rescue injured until situation is assessed. 5. Do not walk into or touch spilled material. Avoid inhalation of fumes, smoke and
vapors. III-6.4 Understanding the HAZMAT Placard
Red
3
4
3
W
Blue Yellow
White National Fire Protection Association 704 Diamond, showing four quadrants and hazard ratings.
20
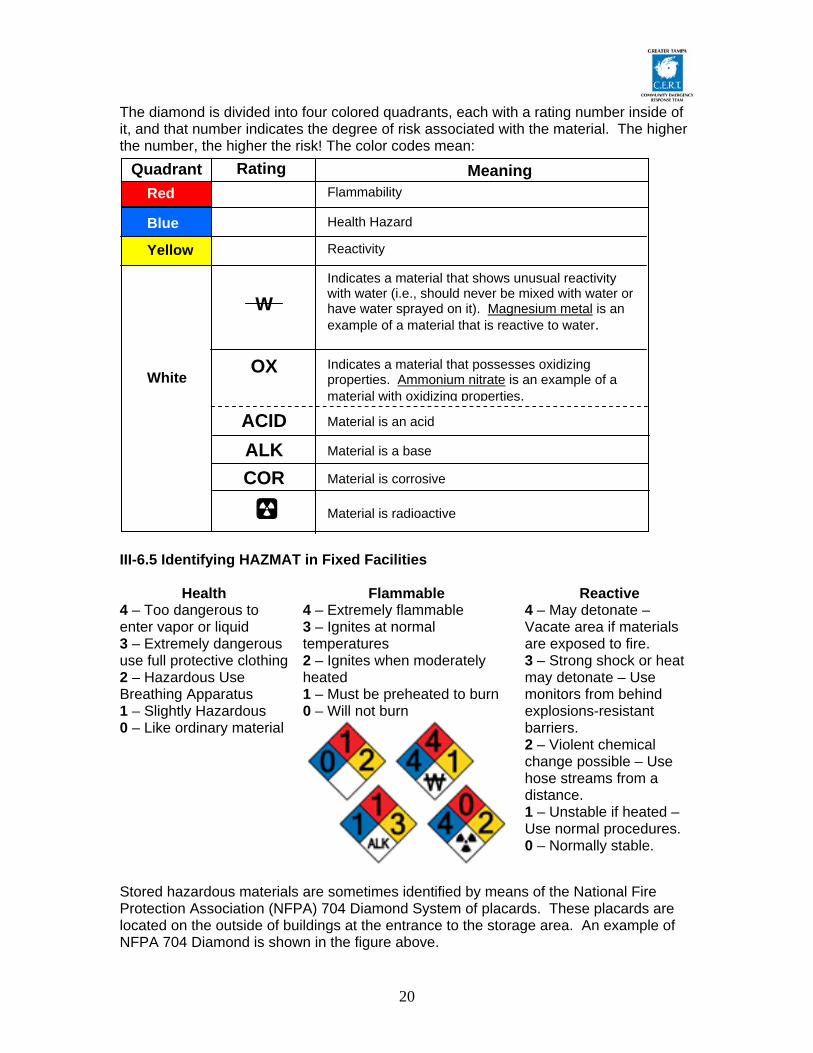
The diamond is divided into four colored quadrants, each with a rating number inside of it, and that number indicates the degree of risk associated with the material. The higher the number, the higher the risk! The color codes mean:
III-6.5 Identifying HAZMAT in Fixed Facilities
Health 4 – Too dangerous to enter vapor or liquid 3 – Extremely dangerous use full protective clothing 2 – Hazardous Use Breathing Apparatus 1 – Slightly Hazardous 0 – Like ordinary material
Flammable 4 – Extremely flammable 3 – Ignites at normal temperatures 2 – Ignites when moderately heated 1 – Must be preheated to burn 0 – Will not burn
Reactive 4 – May detonate – Vacate area if materials are exposed to fire. 3 – Strong shock or heat may detonate – Use monitors from behind explosions-resistant barriers. 2 – Violent chemical change possible – Use hose streams from a distance. 1 – Unstable if heated – Use normal procedures. 0 – Normally stable.
Stored hazardous materials are sometimes identified by means of the National Fire Protection Association (NFPA) 704 Diamond System of placards. These placards are located on the outside of buildings at the entrance to the storage area. An example of NFPA 704 Diamond is shown in the figure above.
Quadrant Rating Meaning
Material is an acid
Indicates a material that possesses oxidizing properties. Ammonium nitrate is an example of a material with oxidizing properties.
Indicates a material that shows unusual reactivity with water (i.e., should never be mixed with water or have water sprayed on it). Magnesium metal is an example of a material that is reactive to water.
Reactivity
Health Hazard
Flammability
White
Yellow
Blue
Red
W
OX
ACID Material is a base
Material is corrosive
Material is radioactive
ALK COR

21
III-6.6 Identifying HAZMAT in Transit Included with the DOT placards are United Nations identification numbers specific to each transportation substance. The numbers are displayed inside the placard or in a range rectangle immediately below the placard. DOT placards should be a stop sign for CERT members. If they are present, there is danger. Stop!
CLASS 1 – Explosives CLASS 2 -Gases CLASS 3 – Flammable Liquids CLASS 4 – Flammable Solids CLASS 5 – Oxidizers CLASS 6 – Toxic Materials CLASS 7 – Radioactive Materials CLASS 8 – Corrosive Materials CLASS 9 – Miscellaneous dangerous materials DANGEROUS – Includes a mixed load of hazardous materials
III-6.7 HAZMAT in Household Remember that while conducting searches in homes, there are probably many products that contain hazardous chemicals that may be dangerous or poisonous. These items may be located in many rooms in the household. Examples include certain paints, cleaners, stains and varnishes, car batteries, motor oil, pool chemicals, and fertilizers. Household chemicals, such as bleach, ammonia, all-purpose cleaners, bathroom cleaners, scouring powders, oven cleaners, furniture polish, and spot removers, are corrosive and toxic. Even items such as nail polish, artist’s paints, bug spray, and batteries can be hazardous. III-7 Disaster Medical Operations Do the greatest good for the greatest number of victims by conducting simple triage and rapid treatment.
ORGANIC UNKNOWN
Radioactive
7
DANGEROUS
FLAMMABLE LIQUID
NON-FLAMMABLE GAS
NON-FLAMMABLE GAS
2
2

22
III.7.1 General The usual CERT member receives medical training designed to help fill the gap between the number of casualties post disaster and the local capacity to treat them. Rapid treatment is for life threatening conditions – airway obstruction, bleeding and shock and then for less urgent conditions. Always try to mobilize survivors to assist with the latter type of conditions. Personnel safety equipment: Helmet, goggles, gloves, mask, and boots. A timesaving technique is to wear latex gloves under your work gloves. Then, when you find a victim, you can remove your work gloves and are ready to work with the victim. III-7.2 Simple Triage – Triage in a Disaster Environment Triage, like other disaster response efforts, begins with size-up. The general procedure for triage in a disaster environment is as follows:
• Stop, Look, Listen and Think. Before you start, stop and size up the situation by looking around you and listening. Above all, think about how you will approach the task at hand, Continue to size up the situation as you work.
• Conduct Voice Triage. Begin with voice triage, calling out something like, “Emergency Response Team. If you can walk, come to the sound of my voice.” Instruct those survivors who are ambulatory to remain at a designated location, and continue with the triage operations.
• Follow a Systemic Route. Start with victims closest to you and outward in a symmetric fashion.
• Conduct Triage Evaluation. Evaluate victims and tag them I (immediate), D (delayed), or DEAD. Remember to evaluate the walking wounded. Everyone must get a tag.
• Treat “I” Victims Immediately. Initiate airway management, bleeding control, and/or treatment for shock Category I (Immediate) victims.
• Document Results. Document triages results for: o Effective deployment of resources. o Information on locations of victims. o A quick record of the number for responders and transportation units.
Always wear personal protective equipment when performing triage, so that you do not endanger your own health.

23
III-7.3 Simple Triage – Medical Marking System Status Tag Color Critical , Immediate treatment Red Injured but delayed treatment Yellow Minor or no injuries Green Dead Black
III-8 Light Search and Rescue III-8.1 General Regardless of the severity of structural damage, rescuer safety must be the primary concern. The two most frequent causes of rescuer deaths are disorientation and secondary collapse. As with most CERT operations use of the buddy system and being aware of your environment and alert for hazards can keep a rescuer from becoming someone who needs to be rescued. CERTs are restricted to light search and rescue only. Their mission when dealing with heavily damaged structures or situations that are clearly unsafe (e.g., rising or swiftly-moving water) is to warn others. Like every other CERT operation, search and rescue requires a thorough size-up at the beginning of the operation and it must be continually through the rescue as long as the
24
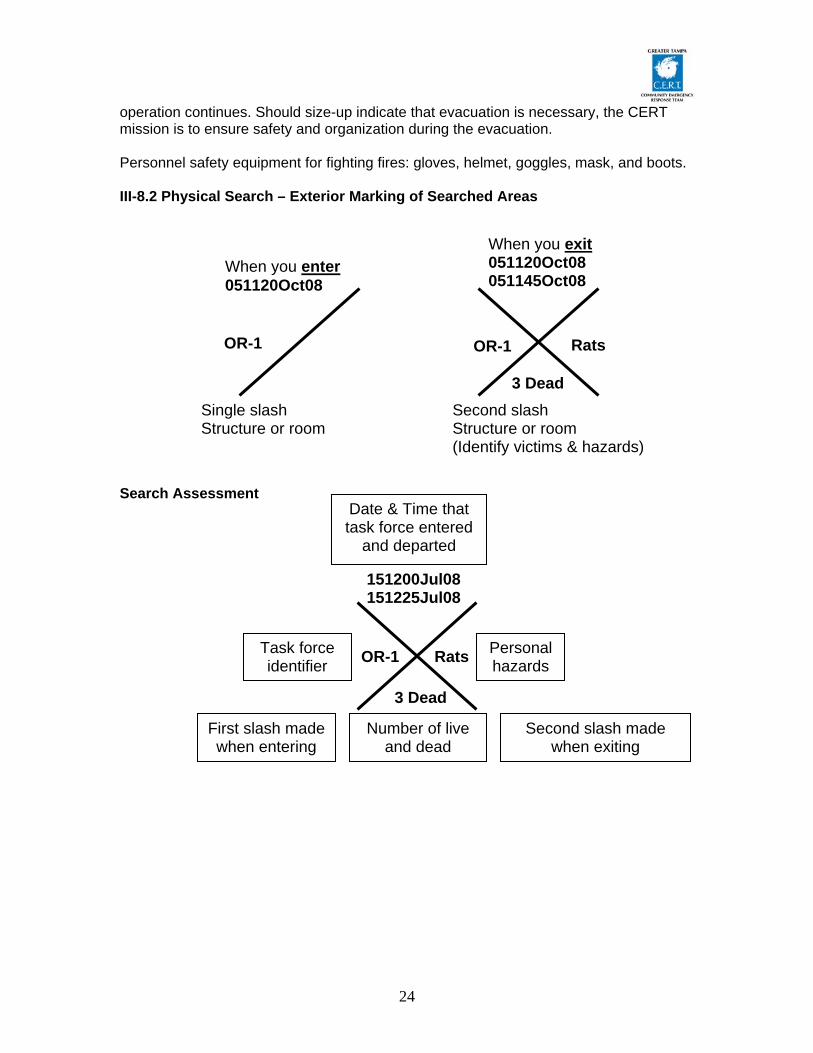
operation continues. Should size-up indicate that evacuation is necessary, the CERT mission is to ensure safety and organization during the evacuation. Personnel safety equipment for fighting fires: gloves, helmet, goggles, mask, and boots. III-8.2 Physical Search – Exterior Marking of Searched Areas
Search Assessment
151200Jul08 151225Jul08
Rats OR-1
3 Dead
Personal hazards
Task force identifier
First slash made when entering
Second slash made when exiting
Number of live and dead
When you exit 051120Oct08 051145Oct08
When you enter 051120Oct08
Single slash Structure or room
Second slash Structure or room (Identify victims & hazards)
OR-1 OR-1 Rats
3 Dead
Date & Time that task force entered
and departed

25
Marking Searched Areas
III-8.3 Conducting a Systematic Building Search Step 1. Begin the search by calling out to victims. Shout something like, "If anyone can hear my voice, come here." If any victims respond, give them further directions such as "Stay here" or "Wait outside" (depending on the condition of the building). Ask victims who respond for any information that they may have about the building or others who may be trapped. Step 2. Use a systematic search pattern
Sample Systematic Room Search
Conduct a systematic room-search pattern following bottom-up/top-down or right wall/left wall methods to ensure that the entire building is searched. Step 3. Stop frequently to listen Step 4. Triangulate.
Triangulation enables rescuers to view a single location from several perspectives. Three rescuers, guided by victim sounds, form a triangle around the area and direct
Dangerous—DO NOT ENTER
Action Taken7:31 a.m.
DR GAS OFF
Search Completed
O
Time
CERT Initials
Number of victims Dangerous—DO NOT ENTER
Action Taken7:31 a.m.
DR GAS OFF
Search Completed
O
Time
Dangerous—DO NOT ENTER
Action Taken7:31 a.m.
DR GAS OFF
Search Completed
O
Time
CERT Initials
Number of victims Dangerous—DO NOT ENTER
Action Taken7:31 a.m.
DR GAS OFF
Search Completed
O
Time

26
flashlights into the area. The light shining from different directions will eliminate shadows that could otherwise hide victims. Step 5. Mark searched areas to document results Step 6. Report results Keep complete records both of removed victims and of victims who remain trapped or are dead. Report this information to emergency services personnel when they reach the scene. III-8.4 Locating and Evacuating Trapped Victims The first step in locating potential victims is to conduct a size-up of the situation inside the structure to gather more precise information about damage and to develop priorities and plans. The data gathered will provide more information about areas of entrapment—or voids. Many victims will be trapped in void areas where there is a chance of survivable space. Voids are largely unstable areas. III-8.4.1 Types of Voids After a building collapse, many victims may be trapped in void areas where there is a chance of survivable space. Voids are largely unstable areas and rescues in void areas should be left largely to professional rescue personnel. a. Pancake Voids
Pancake Void, in which floors collapse diagonally onto each other, creating voids in the areas where the floors remain attached to the walls. If CERT members see pancake voids, this is considered heavy damage, and they should get out immediately. b. Lean-to-Void
Lean-to voids are created when a collapsed wall or floor is resting against an outside wall. A victim trapped in a lean-to void has the greatest chance of being alive. Lean-to

27
voids also indicate structural instability. If CERT members see lean-to voids, they should note the location for professional responders but leave the building immediately! c. “V” Void
“V” voids are created by a “V” collapse of a floor or wall (the middle collapses and the ends lean against an outside wall). Remind the group that a “V” void creates two lean-to voids, one on either side of the collapse, in which victims can be trapped—but the sloping floor caused by the “V” collapse presents a severe potential hazard to the rescue team. If CERT members encounter “V” voids, they should leave the building immediately. d. Individual voids Individual voids are spaces into which the victim may have crawled for protection. Examples of individual voids include bathtubs and the space underneath desks. Children may seek shelter in smaller spaces like cabinets. III-8.4.2 Protecting the Rescue Force Personnel CERT rescuers should take the time to eat, drink fluids, rest, and relax so that they can return with a clear mind and improved energy III-8.4.2.1 Rescuer Safety Procedures Critical in any extraction is to conduct the extraction without injuring the rescuers. The first aspect of this is for the rescuers to know their limitations. Volunteers get injured or killed during rescue operations because they did not pay attention to their own physical and mental limitations. CERT members should always use the proper safety equipment required for the situation and follow established procedures, by: working in pairs; never entering an unstable structure; lifting by bending the knees; keeping the back straight; and pushing up with the legs; carrying the load close to the body; and lifting and carrying no more than is reasonable Proper Body Position for Lifting showing the back straight and lifting with the knees
III-8.4.2.2 Safety Steps if a Rescuer is the Victim of Electrical Shock

28
III-8.4.3 Extraction Methods There is no standardized method for extracting victims. Safety of the victim and rescuers is of the utmost of importance. However, CERT personnel are trained in the engineering skills of leveraging and cribbing. When used together, a great deal of material can be lifted or shored up without involving sophisticated machinery. Leveraging is accomplished by wedging a lever under the object that needs to be moved, with a stationary object underneath it to act as a fulcrum. A crib is a wooden framework used for support or strengthening. For more details see section III-9 Field Engineering III-8.4.4 Personal Evacuation Methods The evacuation of a victim is an often a critical step to treatment and their survival. CERT use two basic types of removal: self-removal or assist and lifts and drags. It is usually best to allow an ambulatory victim to extricate themselves. However, sometimes ambulatory victims are not as strong and uninjured as they think that they are. When victims become free from entrapment, they may need assistance to exit the structure. III-8.4.4.1 Planning Victim Removal CERTS consider several factors when planning and executing a removal: general stability of the immediate environment, number of rescuers available, strength and ability of the rescuers, and the condition of the victim.

29
If safety and time permit, you should not use lifts and drags to remove victims when closed-head or spinal injury is suspected. In such cases, the spine must be stabilized using a backboard. Doors, tables, and similar materials can be used as improvised backboards. The backboard must be able to carry the person, and proper lifting techniques must be used. When moving victims, rescuers must use teamwork and communication, and keep the victim's spine in a straight line. Remember, rescuer safety and the condition of the building will dictate the approach. III-8.4.4.2 Victim Carries and Drags Rescuers can also drag a victim out of a confined area by grasping either under the arms or by the feet and pulling across the floor. However, unless there is no other way to remove the victim and the victim’s removal is time critical, you should not use this drag when debris may cause additional injury. III-8.4.4.2.1 Victim Carries
a. One-Person Arm Carry
One-Person Arm Carry, which shows the rescuer holding the victim around the victim’s back and under the knees. b. One-Person Pack-Strap Carry
One-Person Pack-Strap Carry in which the rescuer places the victim’s arms over his or her shoulder and grabs the victim’s hands over his or her chest, then hoists the victim by bending over slightly.
c. Two-Person Carry

30
Two-Person Carry in which rescuer 1 squats at the victim’s head and grasps the victim from behind at the midsection. Rescuer 2 squats between the victim’s knees, grasping the outside of the knees. Both rescuers rise to a standing position. d. Chair Carry
Chair Carry in which the victim is placed in a chair and tilted backward as rescuers lift the victim. This carry requires two rescuers.
III-8.4.4.2.1 Victim Drags
a. Correct Drag
Correct Drag Technique, showing the rescuer grasping the victim by either the feet or shoulders and dragging him or her clear of the hazard.
b. Blanket Drag
Blanket Drag, showing the victim wrapped in a blanket with the rescuer squatting at the victim’s head. The rescuer grasps the blanket behind the victim’s head and drags him or her clear of the hazard. III-9 Field Engineering III-9.1 General There may be times in which CERT may need to employ some field engineering methods in order to conduct a rescue, recover a vehicle, or prevent a structural collapse or prevent flooding. You may encounter situations in which debris needs to be moved to free victims. In these situations, CERT rescuers should consider leveraging and cribbing to move and stabilize the debris until the rescue is complete.

31
Leveraging is accomplished by wedging a lever under the object that needs to be moved, with a stationary object underneath it to act as a fulcrum. When the lever is forced down over the fulcrum, the far end of the lever will lift the object. A crib is a wooden framework used for support or strengthening. Box cribbing means arranging pairs of wood pieces alternately to form a stable rectangle Leveraging and cribbing are used together by alternately lifting the object and placing cribbing materials underneath the lifted edge to stabilize it. Safety is number 1: "Lift an inch; crib an inch." Leveraging and cribbing should be gradual—both for stability and to make the job easier. It may also be necessary to use leveraging and cribbing at more than one location (e.g., front and back) to ensure stability. When you are able to achieve sufficient lift, remove the victim and reverse the leveraging and cribbing procedure to lower the object. Personnel safety equipment for fighting fires: leather gloves, helmet, goggles, mask, and boots. III-9.2 Box Cribbing 1. Conduct a size up of the scene: Gather facts, identify hazards, and establish
priorities. 2. Have one person in charge and formulate a plan of action based upon the
information you have received. Identify how and where to lift and crib. Never put any portion of your body under the object being cribbed.
3. Gather necessary materials for lifting/cribbing operations:
• Lever • Fulcrum • Cribbing blocks • Spacers/wedges
4. Use cribbing materials to stabilize the object prior to lifting. (Set the foundation of the
box crib.) 5. Distribute crib materials as necessary to be readily accessible during the lifting
operation. 6. Prepare to lift the object: Assemble the lever and fulcrum at the previously identified
location. 7. Have someone available to handle the victim. 8. Initiate the lift, using the lever and fulcrum for mechanical advantage.

32
9. As the object is lifted, add cribbing as needed; build on the foundation of the box crib. 10. When the object is adequately supported, remove the lever and fulcrum. The victim
may then be removed. 11. Reinitiate the lift and begin removing cribbing materials, reversing the process by
which the crib was built. 12. Progressively lower the object to the ground. 13. Reassemble the lifting/cribbing supplies to be available for additional operations.
Step 1 Step 2
Step 3 Step 4 Four steps for building box cribbing: Step 1: Position two pieces of wood parallel to each other on either side of the collapse. Step 2: Place two pieces of wood perpendicularly across the base pieces. Steps 3 and 4: Add additional layers of wood, with each perpendicular to the previous level. Example of Use
Medical Care or VictimRemoval Person
Crib Person
Lever Person
Group Leader
Crib Person
WallCollapse
Team Organization for Leveraging/Cribbing Operation, showing the victim underneath a collapsed wall and the CERT members at the following locations:

33
Group Leader: In front of collapse, positioned so that he or she can view the entire operation while remaining out of the rescuers’ way.
Lever Person: At the front edge of the collapsed wall and positioned so that he or she can position a fulcrum and lever under the wall.
Crib Persons: position on either side of the collapsed wall and positioned to enable the placement of cribbing as the wall is raised with the lever.
Medical Care/Victim Removal Person: Next to the Crib Person who is closest to the victim’s head. III-9.3 Removing Debris When you must remove debris to locate victims, you should set up a human chain and pass the debris from one person to the next. Survivors can be used to assist in this effort but trained CERT personnel should be positioned in the most crucial areas and to provide supervision. The chain should be positioned so that it will not interfere with rescue operations or endanger the victim or rescuers. Some debris can be placed in sandbags and used to shore up weak areas in the structure.
III-9.4 Using Sandbags to Forestall Flooding
III-9.4.1 How to Fill Sandbags
Fill sandbags 1/2 to 2/3 full, tie at top so bag will lay flat when put in place. A properly filled sand bag should weigh between 35-40 lbs.
Overfilled bags and bags tied too low leave gaps in sandbag levee allowing water to seep through. An overfilled sandbag can weigh 70 - 75 lbs.

34
TIP: Always use gloves to protect your hands during the filling operation. After handling treated bags, avoid contact with your eyes and mouth. Dress appropriately and layer clothing. Safety goggles should be used on dry and windy days.
III-9.4.2 How to Place Sandbags
Sandbags should be placed flat on ground, overlapped, tamped into place, and stair-stepped.
Remove any debris from the areas where bags are to be placed. Place the bags lengthwise and parallel to the direction of flow with the untied ends of the bags facing upstream. Fill the low spots first before placing bags the full length of the area to be raised. Start at the downstream end of the sandbag operation about 1 foot landward from the river or levee's edge and continue upstream.
Fold the open end of the bag under the filled portion. Place succeeding bags with the bottom of the bag tightly and partially overlapping the previous bag. Offset adjacent rows or layers by one-half bag length to avoid continuous joints. To eliminate voids and form a tight seal, compact and shape each bag by walking on it and continue the process as each layer is placed. This flattens the top of the bag and prevents slippage between succeeding layers.
III-9.4.3 Use of Polyethylene
Polyethylene (plastic) comes in rolls 20 ft wide by 100 ft long. It is used to wrap sandbag levees to prevent seepage. Plastic should be placed on downstream portion of levee first and then worked upstream with a two to three foot overlap. Plastic is held in place with sandbags.

35
ESTIMATED NUMBER OF SANDBAGS PER LINEAR FOOT OF WALL.
Height in feet Bags Required
1 5 2 10 3** 21 4 36 5* 55
* Five feet is the practical limit of a sandbag levee. If a higher levee is needed, alternate means of construction should be considered. ** Preferred limit is 3 feet high. III-10 Terrorism III-10.1 General Terrorists will use any weapon possible to further their cause. The weapons thought to be available to at least some terrorist groups include: biological weapons, nuclear weapons and radiological dispersal devices, incendiary devices, chemical weapons, and explosive devices. Terrorist attacks can occur with or without warning. Because of the nature of terrorist attacks, they can—and are often intended to—result in: mass casualties, loss of critical resources, disruption of vital services, disruption of the economy, individual and mass panic. When CERT becomes involved in an incident that may involve such weapons it must modify normal operations to ensure the safety of the team. Due to the nature of the severity of the consequence of such weapons use, the CERT must always do a thorough size-up and stop, look, listen, and think before taking any action. III-10.2 CERT Protocols for Terrorist Incidents

36
Terrorist incidents are a stop sign for CERT members. Take in the whole area during the size-up. If any of the indicators of a terrorist incident are present, do not proceed with the response. If terrorism using WMD is suspected, CERTs will be very limited in what they can do. Professional responders will need specialized equipment and personnel to respond to a terrorist incident. If you observe any of the indicators of a terrorist incident, you should: not disturb any suspected device; move away from the object or area; report it to authorities immediately. There are three factors that significantly affect safety at a terrorist incident: time, distance, and shielding. Time, distance, and shielding requirements are based on an initial size-up of the situation. If you are inside a building that is not damaged and you are not in immediate danger, you should listen to Emergency Alert System (EAS) broadcasts for information about whether to evacuate or shelter in place. III-10.3 Environmental indicators of a Biological or Chemical
• Numerous sick or dead animals, fish, or birds. • Unscheduled spraying or abandoned spray devices. • Vapor clouds or mists that are unusual for the area or for the time of day • The absence of crops, wildlife, or insects that is common for the area, time of
day, or time of year. • Out of place and unattended packages, boxes, or vehicles. • Packages that are leaking may be harmless—but they may also signal a terrorist
incident. • Materials or equipment that are unusual for the area. • Small explosions that disperse liquids, mists, or gases are an obvious sign that
something is wrong. • Unusual odors or tastes
III-10.4 Possible Physical Indications of a Terrorist Attack
• Multiple casualties without obvious signs of trauma. • Multiple victims who are exhibiting similar symptoms. • Large numbers of persons seeking medical attention with similar symptoms that
are not characteristic of the season. III-10.5 Actions in Response to Possible Exposure to Chemical or Radiological Contamination If there are any reason to believe that chemical or radiological contamination has occurred in your area put distance between you and the agent. If exposed to a chemical agent or radiation, use basic decontamination procedures. Be sure to make the points listed below:

37
• Leave the contaminated area immediately (at least 1,000 to 1,500 feet upwind and uphill) to limit the time of exposure and reduce contamination levels.
o Take decontamination action. Seconds count! The goal is to limit the time that the agent is in contact with the skin.
o Remove everything from the body, including jewelry. Cut off clothing that would normally be removed over the head to reduce the probability of inhaling the agent.
o Wash hands before using them to shower. o Flush the entire body, including the eyes, underarms, and groin area, with
copious amounts of cool water. Hot water opens the pores of the skin and can promote absorption of the contaminant. Using copious amounts of water is important because some chemicals react to small amounts of water.
o If soap is immediately available, mix the soap with water for decontamination. Avoid scrubbing with soap because scrubbing can reduce the layer of protective skin, thus increasing absorption of the contaminant.
o If working with a buddy, work together to decontaminate each other. If hosing someone else off, avoid both physical contact with the person and with the runoff.
o Blot dry using an absorbent cloth. Do not rub the skin! Put on clean clothes.
• Report for decontamination as soon as possible. Professional responders will be setting up decontamination stations somewhere around the site.
III-10-6 Incident Zones CERTs can expect professional responders to treat terrorist incidents much the same as hazardous materials incidents. As such, the next step that they will take is to establish three incident zones to minimize the risk of spreading contamination from the incident site. The hot zone includes the incident scene and the contaminated area around the
scene. If the incident is outdoors, the hot zone will spread downwind, taking wind speed into consideration.
The warm zone is upwind from the hot zone and is used to isolate victims during
decontamination. It is called the warm zone because the evacuees can carry or spread a contaminant into this area. Professional responders will hold those who require decontamination in the warm zone until decontamination is complete so that contaminants do not spread.
The cold zone is located upwind and beyond the warm zone. Those who are not
contaminated or who have been decontaminated will be evacuated to the cold zone and kept there until professional responders authorize them to leave.
III-11 Disaster Psychology III-11.1 General

38
CERT members will encounter events that may be beyond their normal experience of which some may have adverse psychological impacts. CERTs must understand possible emotionally and physically impacts. CERT members understand and manage their reactions to the event and to work better with others. III-11.2 Team Well-Being Be alert to signs of disaster trauma in yourself, as well as in disaster victims, so that you can take steps to alleviate stress. Vicarious trauma is the process of change in the rescuer resulting from empathic engagement with survivors. It is an “occupational hazard” for helpers. Do not over-identify with the survivors. Do not take on the survivors’ feelings as your own. Taking ownership of others’ problems will compound your stress and affect the CERT’s overall effectiveness. Psychological symptoms may include:
• Irritability or anger. • Self-blame or the blaming of others. • Isolation and withdrawal. • Fear of recurrence. • Feeling stunned, numb, or overwhelmed. • Feeling helpless. • Mood swings. • Sadness, depression, and grief. • Denial. • Concentration and memory problems. • Relationship conflicts/marital discord. • Loss of appetite. • Headaches or chest pain. • Diarrhea, stomach pain, or nausea. • Hyperactivity. • Increase in alcohol or drug consumption. • Nightmares. • The inability to sleep. • Fatigue or low energy.
III-11.3 Preventative Measures There are steps that CERT team leaders can take to promote team well-being before, during, and after an incident:
• Provide pre-disaster stress management training to all CERT personal. • Brief CERT personnel before the effort begins • Emphasize that the CERT is a team. • Encourage rescuers to rest and re-group. • Direct rescuers to take breaks

39
• Encourage rescuers to eat properly and maintain fluid intake • Rotate teams for breaks or new duties Phase out workers gradually. Conduct a brief discussion (defusing) with workers after the shift Arrange for a debriefing 1 to 3 days after the event
III-11.4 Emotional Phases following a Disaster You should not take the survivors’ surface attitudes personally. Rescuers may expect to see a range of responses that will vary from person to person, but the responses they see will be part of the psychological impact of the event—and probably will not relate to anything that the CERTs have or have not done. Survivors may go through emotional phases following a disaster:
• Impact phase, survivors do not panic and may, in fact, show no emotion. • Inventory phase, which immediately follows the event, survivors assess damage
and try to locate other survivors. During this phase, routine social ties tend to be discarded in favor of the more functional relationships required for initial response activities (e.g., search and rescue).
• Rescue phase, emergency services personnel (including CERTs) are responding and survivors are willing to take their direction from these groups without protest. This is why CERT identification (helmets, vests, etc.) is important.
• Recovery phase, the survivors appear to pull together against their rescuers, the emergency services personnel.
III-11.5 Goal of On-scene Psychological Intervention The goal of on-scene psychological intervention on the part of CERT members should be to stabilize the incident scene by stabilizing individuals. Do this in the following ways:
• Assess the survivors for injury and shock. Address any medical needs first. Observe them to determine their level of responsiveness and whether they pose a danger to themselves or to others.
• Get uninjured people involved in helping. • Provide support by:
o Listening to them talk about their feelings and their physical needs. Victims often need to talk about what they’ve been through—and they want someone to listen to them.
o Empathizing. Show by your responses that you hear their concerns. Victims want to know that someone else shares their feelings of pain and grief.
• Help survivors connect to natural support systems, such as family, friends, or clergy.
Survivors that show evidence of being suicidal, psychotic, or unable to care for themselves should be referred to mental health professionals for support. III-11.6 Dealing with Death

40
One unpleasant task that CERT may face is managing the family members at the scene of the death of a loved one. The following guidelines may enable a CERT member to effectively assist the family.
• Cover the body; treat it with respect. Wrap mutilated bodies tightly. • Have one family member look at the body and decide if the rest of the family
should see it. • Allow family members to hold or spend time with the deceased. Stay close by,
but don’t watch—try to distance yourself emotionally somewhat. • Let the family grieve.
In some cases, the family may not know of the death of their loved one, and CERT members may be called upon to tell them. Suggest that in this situation, CERT members:
• Separate the family members from others in a quiet, private place. • Have the person(s) sit down, if possible. • Make eye contact and use a calm, kind voice. • Use the following words to tell the family members about the death: “I’m sorry,
but your family member has died. I am so sorry.” III-12 Post-Disaster Planning Considerations III-12.1 Post-Hurricane Planning Considerations III-12.1.1 Hurricane Categories Table - The table below is a breakdown of the likely level of damage for each of the five hurricane categories according to the Safir-Simpson Scale.
Category
Damage Summary
Winds (mph)
Storm Surge (waves in ft.)
1 Minimal 74-95 4-5 2 Moderate 96-110 6-8 3 Extensive 111-130 9-12 4 Extreme 131-155 13-18 5 Catastrophic >155 >18
III-12.1.2 Hurricane Categories Damage Descriptions – The following are examples of the type of damage GT-CERT can expect to encounter in the Greater Tampa Area. The consequence of each storm might impact how a team communicates, assembles, and moves to their post-disaster assignments. III-12.1.2.1 Category 1 "Minimal" Damage is primarily to shrubbery, trees, foliage, and unanchored homes. No real damage to other structures. Some damage to poorly constructed signs. Low-lying coastal roads inundated, minor pier damage, some small craft in exposed anchorage torn from moorings.

41
III-12.1.2.2 Category 2 "Moderate" Considerable damage is done to: shrubbery and tree foliage; some trees blown down. Major damage can be done to exposed mobile homes. Often, there is extensive damage to poorly constructed signs. Some damage to roofing materials of buildings; some window and door damage occurs. No major damage to buildings. Coastal roads and low-lying escape routes inland are cut by rising water 2 to 4 hours before arrival of hurricane center. Considerable damage is inflicted to piers. Marinas flooded. Small craft in unprotected anchorages are torn from moorings. Evacuation of some shoreline residences and low lying areas required. III-12.1.2.3 Category 3 "Extensive" Foliage is torn from trees; large trees are blown down. Practically all poorly constructed signs blown down. Some damage can occur to roofing materials of buildings; some wind and door damage. There is some structural damage to small buildings. Mobile homes destroyed. Serious flooding at coast and many smaller structures near coast destroyed; larger structures near coast damaged by battering waves and floating debris. Low-lying escape routes inland cut by rising water 3 to 5 hours before hurricane center arrives. Flat terrain 5 feet or less above sea level flooded inland 8 miles or more. Evacuation of low-lying residences within several blocks of shoreline possibly required. III-12.1.2.4 Category 4 "Extreme" Shrubs and trees blown down; all signs down. Extensive damage can occur to roofing materials, windows and doors. Complete failures of roofs on many small residences. Complete destruction of mobile homes. Flat terrain 10 feet or less above sea level flooded inland as far as 6 miles. There is major damage to lower floors of structures near shore due to flooding and battering by waves and floating debris. Low-lying escape routes inland cut by rising water 3 to 5 hours before hurricane center arrives. Major erosion of beaches occurs. Massive evacuation of all residences within 500 yards of shore is possibly required, and of single-story residences within 2 miles of shore. III-12.1.2.5 Category 5 "Catastrophic" Shrubs and trees blown down; considerable damage to roofs of buildings; all signs down. Very severe and extensive damage to windows and doors occurs. Complete failure of roofs on many residences and industrial buildings. There is extensive shattering of glass in windows and doors. Some complete building failures. Small buildings can be overturned or blown away. Complete destruction of mobile homes. Major damage to lower floors of all structures less than 15 feet above sea level within 500 yards of shore. Low-lying escape routes inland cut by rising water 3 to 5 hours before hurricane center arrives. Massive evacuation of residential areas on low ground within 5 to 10 miles of shore may be required. Section IV – CERT Communications IV-1 General CERT communications range along the continuum of communications means available. Verbal communications (usually in English) are useful in most short-range situations.
42
There are a variety of short-range alternative to include audio (speech, whistle, radios, tapping, horns, etc) and visual means (hand and arm signals, flags, panels, etc). A prevalent means of communication both within and external to GT-CERT is radio communications. GT-CERT use radios to communicate in short-range (Family Radio Service (FRS) and Citizen Band (CB)) and long-range situations (HAM). The incident commander will speak with deployed CERT primarily through radio communications. IV-1.1 Language Although GT-CERT verbal communications are conducted in English, CERT members must anticipate encountering survivors with a variety of primary language skills. All CERT members should encourage survivors to speak in the language with which they can most effectively communicate their needs if the area CERT has someone that can speak that language. CERT language proficiencies are maintained in the CERT personnel database and should be common knowledge amongst area CERT members. IV-2 Radio Communications All CERT members are encouraged to own their own FRS and CB radios. These systems provide short-range communications and do not require licensing with the FCC. Area CERTs will be assigned XXX radios to select licensed operators within the teams or be assigned an operator and radio from other sources. IV-2.1 Short-Range Communications IV-2.1.1 Procedures for use of FRS and CB radios during emergency communication in the local area
1. Team leaders are to act as Net Control Stations (NCS) during emergency situations for their team. All team members should report to their team leader.
2. Teams should check the Frequency Assignments list below for their team’s channel, and one or two back-up channels (in case of outside traffic) to use for check in.
3. If traffic does not allow for free communication between team members on any prearranged frequencies, announce a shift to one of your prearranged frequencies and restart check in.
4. Check-in by radio should begin prior to an emergency situation, to ensure that equipment is operating properly and all team members are present.
5. Set-up a time of day for check-in of all team members, agreed upon ahead of time.
6. Listen for traffic before calling in on the radio. Wait your turn. 7. Use your own name to identify yourself to the NCS. If you have nothing to report,
check-in by saying, “Net Control, this is ________, no traffic.” 8. If you have something to report, such as damage or need of assistance, check-in
by saying, “Net Control, this is________, with traffic.” Pause after your check in. This will alert the NCS to take notes about your message, Net Control will respond with your name then tell you to go ahead. You can report your traffic.

43
9. If you have an emergency to report during the net, and can not afford to wait your turn, say, “Break, break, this is ________ (give your name or tactical stationed location). Wait for the NCS to acknowledge with a “Go ahead, ________ (your name of tactical stationed location).”
10. Always let the team leader know when you are leaving the net, even if it is only for a few minutes. Otherwise they may become concerned that they cannot reach you.
IV-2.1.2 Team Short-Range Radio Frequency Assignments
Channel/Frequency CERT Area
Team No.
FRS
CB
Arbor Green/Cross Creek/ Hunter’s Green 1 2/462.5875 2/26.975 Carrollwood/Northdale 3 2/462.5875 2/26.975 Arbor Green/Cross Creek/Hunter’s Green 2 8/467.5625 8/27.055 Racetrack 6 8/467.5625 8/27.055 Temple Terrace 11 3/462.6125 3/26.985 Lutz 4 3/462.6125 3/26.985 Pebble Creek/Wesley Chapel 5 7/462.7125 7/27.035 Town n’ Country 12 7/462.7125 7/27.035 Richmond Place and West Meadows 7 4/462.6375 4/27.005 Seminole Heights 9 4/462.6375 4/27.005 Tampa Palms 10 6/462.6875 6/27.025 South Tampa 8 6/462.6875 6/27.025 USF/North Tampa 13 5/462.6625 5/27.015 GT-CERT Leadership 14 14/467.7125 14/27.125 Spare Frequencies Spare 9 9/467.5875 29/27.295 Spare 10 10/467.6125 10/27.075 Spare 11 11/467.6375 11/27.085 Spare 12 12/467.6625 12/27.105 Spare 13 13/467.6875 13/27.115 • NOTE – Channel 1 on FRS has been provisionally designated as an “emergency” channel.
Channel 9 on CB is designated as an “emergency” channel. • Use bolded numbered channel as assigned team frequency • Use of spare channels – If there is too much traffic on your assigned FRS or CB channel, the
team leader may switch to a spare. Switching your team to a spare channel must be reported to GT-CERT Leadership.
• Channels 1 – 7: FRS users must use low power setting (<500mW) • Channels 8 – 14 are FRS only at low power. IV-2.1.3 CERT FRS and CB Radio Procedures

44
• Don’t speak straight into the radio microphone; speak sideways to prevent any distortion of your voice. When available, use a headset or earpiece/remote microphone to improve clarity and/or privacy of signals.
• Before initiating a series of transmissions, listen for a moment to make sure that the channel is clear. Never depress your Push-to-Talk button in the middle of another transmission.
• When transmitting, make sure the Push-to-Talk button is fully activated, pause for one second before speaking, and ensure it remains pressed for the duration of your intended message or messages.
• Remember to use names at the start of your transmission, always giving the name of the recipient first, followed by your own. The exception to this is terminating a series of transmissions, when only your name is necessary.
• Use “over” at the end of a transmission you make to signal that you are ending the transmission to await a response.
• Use the word “copy” to confirm or request acknowledgement of a transmission. This is useful prior to a long transmission, when you want to make sure the other party is receiving before you begin a string of messages.
• Use the words “out” or “clear” to terminate a series of transmissions. • Use “please spell” if you want a word to be spelled for you, and begin with “I spell”
when you are asked to spell a word. Use “I spell” to spell a word that may be mistaken for another. Use phonetic pronunciations of letters when spelling a word (see chart below).
• Use “say again” when asking for a message/transmission to be repeated. Use “I repeat” to preface a repeated message/transmission.
• Always repeat and request confirmation of emergency transmissions addressed to you.
• Use “stand by” to indicate you are too busy to transmit a full report, too busy to comply with a request, or that you are determining an answer. Use “standing by” to confirm a “stand by” message. Each term is treated as a temporary termination of a series of transmissions, and thus can be used like “out” or “clear.”
• When communicating emergency or other very important information, precede the message with “be advised” and then your important emergency information.
• Use the words “affirmative” and “negative” to confirm or deny any messages. • When requesting backup, try to be as precise about your location and in your
description of the situation, and what you need, as possible IV-2.1.4 Use of Plain Speech Communications • For critical information, or under noisy conditions, you may need to spell words out
with standard phonetics. Unfortunately there are two common systems of “standard” phonetics: the phonetic alphabet used by most police departments, and the ITU phonetic alphabet used by just about everyone else, including all NATO military forces, federal government agencies, all pilots, and Amateur Radio operators. ITU phonetics was chosen by the International Telecommunications Union so that each word sounds completely different from all other words regardless of language. A list of ITU phonetics is available in numerous publications.
A – Alpha (AL-fa) B – Bravo (BRAH-vo) C – Charlie (CHAR-lee) D – Delta (DELL-tah)
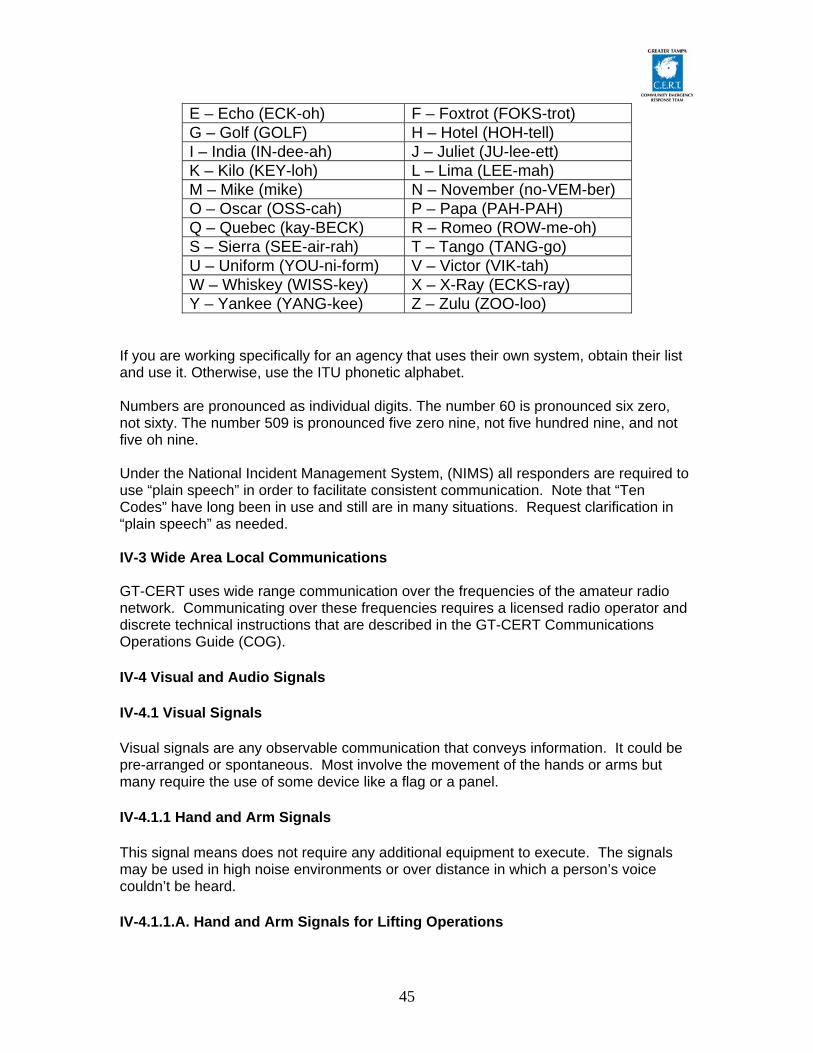
45
E – Echo (ECK-oh) F – Foxtrot (FOKS-trot) G – Golf (GOLF) H – Hotel (HOH-tell) I – India (IN-dee-ah) J – Juliet (JU-lee-ett) K – Kilo (KEY-loh) L – Lima (LEE-mah) M – Mike (mike) N – November (no-VEM-ber) O – Oscar (OSS-cah) P – Papa (PAH-PAH) Q – Quebec (kay-BECK) R – Romeo (ROW-me-oh) S – Sierra (SEE-air-rah) T – Tango (TANG-go) U – Uniform (YOU-ni-form) V – Victor (VIK-tah) W – Whiskey (WISS-key) X – X-Ray (ECKS-ray) Y – Yankee (YANG-kee) Z – Zulu (ZOO-loo)
If you are working specifically for an agency that uses their own system, obtain their list and use it. Otherwise, use the ITU phonetic alphabet. Numbers are pronounced as individual digits. The number 60 is pronounced six zero, not sixty. The number 509 is pronounced five zero nine, not five hundred nine, and not five oh nine. Under the National Incident Management System, (NIMS) all responders are required to use “plain speech” in order to facilitate consistent communication. Note that “Ten Codes” have long been in use and still are in many situations. Request clarification in “plain speech” as needed. IV-3 Wide Area Local Communications GT-CERT uses wide range communication over the frequencies of the amateur radio network. Communicating over these frequencies requires a licensed radio operator and discrete technical instructions that are described in the GT-CERT Communications Operations Guide (COG).
IV-4 Visual and Audio Signals
IV-4.1 Visual Signals
Visual signals are any observable communication that conveys information. It could be pre-arranged or spontaneous. Most involve the movement of the hands or arms but many require the use of some device like a flag or a panel.
IV-4.1.1 Hand and Arm Signals
This signal means does not require any additional equipment to execute. The signals may be used in high noise environments or over distance in which a person’s voice couldn’t be heard.
IV-4.1.1.A. Hand and Arm Signals for Lifting Operations

46
Raise the winch cable/rope – extend the arm to the side and bend it upward at the elbow. Extend the index finger from the fist, rotate the hand slowly.
Lower the winch cable/rope – Hold the arm downward and out slightly from the side. Extend the index finger from the fist, rotate the hand slowly.
If working with a boom –
Raise the boom - Extend the arm and fist toward the operator, thumb pointing up.
If working with a boom –
Lower the boom - Extend the arm and fist toward the operator, thumb pointing down.
In haul the main winch cable – Point at
Pay out the main winch cable – Bend the arm, bringing the hand in front of the chest.
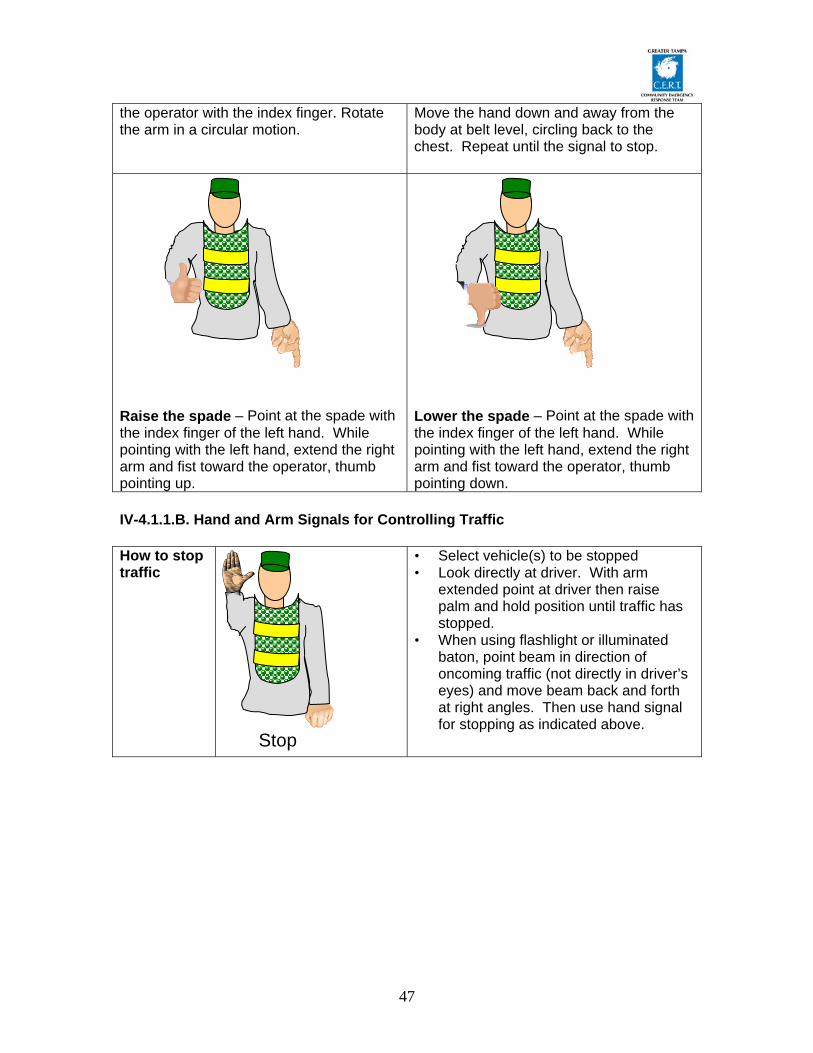
47
the operator with the index finger. Rotate the arm in a circular motion.
Move the hand down and away from the body at belt level, circling back to the chest. Repeat until the signal to stop.
Raise the spade – Point at the spade with the index finger of the left hand. While pointing with the left hand, extend the right arm and fist toward the operator, thumb pointing up.
Lower the spade – Point at the spade with the index finger of the left hand. While pointing with the left hand, extend the right arm and fist toward the operator, thumb pointing down.
IV-4.1.1.B. Hand and Arm Signals for Controlling Traffic
How to stop traffic
• Select vehicle(s) to be stopped • Look directly at driver. With arm
extended point at driver then raise palm and hold position until traffic has stopped.
• When using flashlight or illuminated baton, point beam in direction of oncoming traffic (not directly in driver’s eyes) and move beam back and forth at right angles. Then use hand signal for stopping as indicated above.
Stop
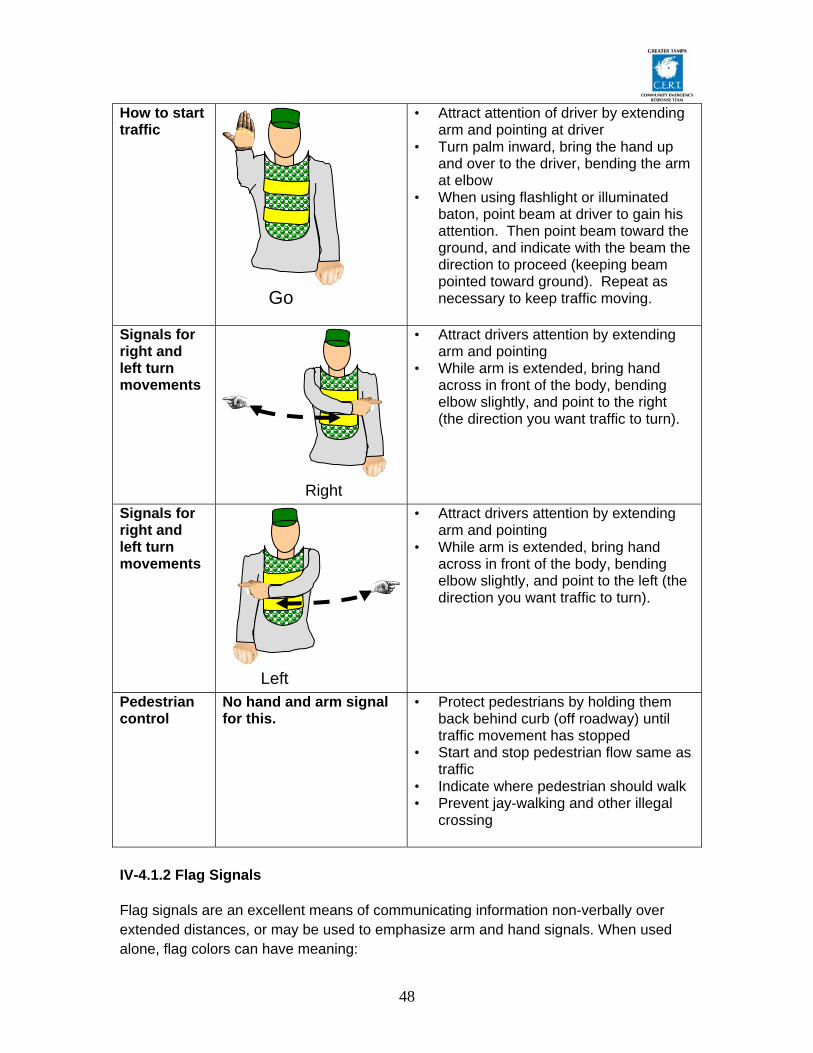
48
How to start traffic
• Attract attention of driver by extending arm and pointing at driver
• Turn palm inward, bring the hand up and over to the driver, bending the arm at elbow
• When using flashlight or illuminated baton, point beam at driver to gain his attention. Then point beam toward the ground, and indicate with the beam the direction to proceed (keeping beam pointed toward ground). Repeat as necessary to keep traffic moving.
Signals for right and left turn movements
• Attract drivers attention by extending arm and pointing
• While arm is extended, bring hand across in front of the body, bending elbow slightly, and point to the right (the direction you want traffic to turn).
Signals for right and left turn movements
• Attract drivers attention by extending arm and pointing
• While arm is extended, bring hand across in front of the body, bending elbow slightly, and point to the left (the direction you want traffic to turn).
Pedestrian control
No hand and arm signal for this.
• Protect pedestrians by holding them back behind curb (off roadway) until traffic movement has stopped
• Start and stop pedestrian flow same as traffic
• Indicate where pedestrian should walk • Prevent jay-walking and other illegal
crossing
IV-4.1.2 Flag Signals
Flag signals are an excellent means of communicating information non-verbally over extended distances, or may be used to emphasize arm and hand signals. When used alone, flag colors can have meaning:
. . . .
Go
Right
Left

49
Color/Color Combination Meaning Red Danger, cease operations, stop, do not enter Green Ready, resume operations Yellow Disregard White Help, require assistance Red & Green Send radio operator Red & Yellow Radio is inoperative Red & White Call us on radio Green & Yellow Need team leader Green & White Attention or assemble or rally on me Yellow & White Path is safe
During periods of limited visibility, flashlights with colored lens or colored chemical lights may be substituted for the flags. The numbers of colors are endless; red, green, yellow, and white are the most prevalent colors of flashlights and lens.
IV-4.1.3 Signal Mirror
Mirrors have long been used to gain the attention of someone or send messages over long distances during daylight. They are often used to get the attention of an aircraft crew during the day. Their use requires good visibility and little or no cloud cover in order to reflect the sun. Mirrors can also be used to transmit messages, if signals have been arranged or both parties know Morse code.
Any type of mirror can be used but the most effective is a mirror designed for signaling like the MK-3 signal mirror. There are 3 steps to effectively aim a signal mirror:
1. Reflect the sunlight from the mirror onto a nearby object (e.g., your hand) 2. Slowly bring the mirror up to eye-level and look through the sighting hole (if there
is none – the top edge of the mirror. You will see a bright spot of light. This is the aiming indicator or spot.
3. Hold mirror near your eye and slowly turn and manipulate it so the bright spot of light shows on the target (e.g., aircraft, fire truck, etc.).

50
Note:
• Feel free to use the mirror to “sweep” the horizon and mirror flashes may be seen over many miles – before you can see or hear the aircraft.
• Be careful not to shine the light into the cockpit or driver’s compartment.
IV-4.2 Audio Signals -
Audio signals are any non-observable communications that use sound or noise to convey information. It could range from something quite primitive like banging or tapping to use of sophisticated means like radio or telephone.
IV-4.2.1 Whistle Signals A whistle is a piece of safety equipment that is provided to all CERT members upon completion of the qualification course. CERT members should carry their whistles during all operations. The sound of a whistle will travel much further than a human voice (A whistle sound will carry further than your voice, about 1/2 to 2 miles). Manufactured whistles have more range than a human whistle and the use of a whistle does not tire your vocal chords the way shouting will. Attach the whistle to your vest with a piece of chord so it is readily available. As an example of using a whistle, for the signal for “emergency – in a search” or “evacuate – in a structure search” make short blasts with the whistle three times. Be sure to pause for a second between each blast and for a few minutes between each group of three. In the event you need to use your whistle the following are the GT-CERT standard signals used: Legend: O = short blasts -- = long blast Whistle Signal Meaning Remarks Search and Rescue
-- Where are you? O, O Come to me. O, O, O Emergency or evacuate pause and repeat until you gain
everyone’s attention Building Searches
O, O, O, Evacuate pause and repeat until everyone is out
--, -- Cease Operations pause and repeat until you gain everyone’s attention
--, O Resume Operations O, O, O, O, O Danger pause and repeat until you gain
everyone’s attention O,O,O,-- Fire repeat until everyone is out General

51
--, --, -- Rally on me O, O, O, O Attention Traffic Control -- Drivers should stop is used to attract drivers attention to
stop (include hand signal) O, O Drivers should start are used to attract drivers attention to
start (include hand signal) O, O, O Drivers pay attention are used to give warning signal
IV-4.2.2 Banging or Tapping
In some situations you have to improvise and use something to bang as a form of signaling. Hitting something three times at distinct intervals (e.g., bang, wait a second, bang, wait a second, and bang, wait twenty seconds – then repeat) usually indicate a distress signal.
IV-4.2.3 Radios
GT-CERT uses several types of radios during operations. They are broken into short-range and long-range radios. Most CERTs that do not have an Armature radio license may operate the FRS and CB radios. Instructions on how to operate these radios in a CERT operational environment are in section IV-2.1 Short-Range Communications. GT-CERT long-range communications are conducted solely by licensed radio operators and the instructions for operating these radios is included in the GT-CERT Communications Operations Guide.
IV-4.2.4 Telephones
GT-CERTs will use telephones to supplement their field communications unless telephone systems are rendered inoperable by a disaster.
IV-4.2.4.A Landlines – GT-CERT has a liaison element in the Emergency Operations Center (EOC) that man the ESF-15 station. The following table their contact numbers:
Station Person Landline Number Cellular Number EOC Operator ESF-2 ESF-7 ESF- 9 ESF-15 RACES
IV-4.2.4.B Cellular Telephones – GT-CERT will make use of the wireless cellular telephone system if it is available in a post-disaster environment. Developing phone lists will be a priority mission of team leaders during the rendezvous at the Rally Point. The phone list will be forwarded to the GT-CERT liaison team at the EOC.
Section V – Field Hygiene

52
V-1 General An individual must exercise proper field hygiene at the disaster site. It could make the difference between being a rescuer or one in need of the rescue. Satisfactory field hygiene takes planning and preparation. Preparation means having the appropriate items and knowing how to use them prior to entering the disaster area. Even the smallest hygiene kit, if properly prepared, is invaluable when faced with a living in an austere environment. In an ambiguous environment like a disaster area, it is best just to count on yourself and your teammates. Be prepared to take care of yourselves! V-2 Water Purification Rainwater collected in clean containers or in plants is usually safe for drinking. However, purify water from lakes, ponds, swamps, springs, or streams, especially the water near human settlements or in the tropics. Collect drinking water upstream from the camp site. Purify all water. Water can be purified by three methods – heat, filtration, and chemical treatment. When possible, purify all water you got from vegetation or from the ground by using iodine or chlorine, or by boiling. Purify water by:
• Boiling - Boiling water for 1 minute at sea level, adding 1 minute for each additional 300 meters above sea level. All pathogens can be killed by boiling water for ten minutes no matter where you are.
• Filtration - For filtration and chemical treatment, use the following charts as
guides. Pathogen Maximum Filter Pore Size Giardia and amoeba cysts 5 microns Enteric bacteria 0.2 to 0,5 microns Cryptosporidium 3 microns Parasitic eggs and larvae 20 to 30 microns
• Chemicals • Using water purification tablets; follow the directions provided by the
manufacturer. • Placing 5 drops of 2 percent tincture of iodine in a clean 1qt container full of
clear water. If the 1qt container is full of cloudy or cold water, use 10 drops. (Let the 1qt container of water stand for 30 minutes before drinking.)
• For chemical treatment, use the following charts as guides. Chemical Clear Water (4ppm) Cloudy Water (8ppm)Sodium chlorine (household bleach – 5.25%, unscented) shake/stir, let stand for 30 Minutes before using
2 drops/qt. 8 drops/gal. ½ teaspoon/5 gal
4 drops/qt. 16 drops/gal. 1 teasponn/5 gal

53
NOTE – After adding bleach, shake or stir the water container and let stand for 30 minutes before drinking. Be sure to use bleach to rise off any place on the exterior of the container you might drink from. V-3 Making a Fire Modem igniters use modem devices to start a fire.
• Matches - Make sure these matches are waterproof. Also, store them in a waterproof container along with a dependable striker pad.
• Convex Lens - Use this method (Figure 7-6) only on bright, sunny days. The lens can come from binoculars, camera, telescopic sights, or magnifying glasses. Angle the lens to concentrate the sun’s rays on the tinder. Hold the lens over the same spot until the tinder begins to smolder. Gently blow or fan the tinder into flame, and apply it to the fire lay.
• Metal Match - Place a flat, dry leaf under your tinder with a portion exposed. Place the tip of the metal match on the dry leaf, holding the metal match in one hand and a knife in the other. Scrape your knife against the metal match to produce sparks. The sparks will hit the tinder. When the tinder starts to smolder, proceed as above.
• Battery - Use a battery to generate a spark. Use of this method depends on the type of battery available. Attach a wire to each terminal. Touch the ends of the bare wires together next to the tinder so the sparks will ignite it.
V-4 Personnel Field Sanitation In any situation, cleanliness is an important factor in preventing infection and disease. It becomes even more important in a post-disaster situation. A daily shower with hot water and soap is ideal, but you can stay clean without this luxury. Use a cloth and soapy water or baby wipes to wash. Pay special attention to the feet, armpits, crotch, hands, and hair as these are prime areas for infestation and infection.
• Keep Your Hands Clean – One of the best preventative medicine acts you can to is to keep your hands clean. Germs on your hands can infect food and wounds. Wash your hands after handling any material that is likely to carry germs, after visiting the latrine, after caring for the sick, and before handling any food, food utensils, or drinking water. Keep your fingernails closely trimmed and clean, and keep your fingers out of your mouth.
• Keep Your Hair Clean - Your hair can become a haven for bacteria or fleas, lice,
and other parasites. Keeping your hair clean, combed, and trimmed helps you avoid this danger. If water is a problem, use waterless shampoo available at some pharmacies and medical supply stores.
• Keep Your Clothing Clean - Keep your clothing and bedding as clean as
possible to reduce the chance of skin infection as well as to decrease the danger of parasitic infestation. Clean your outer clothing whenever it becomes soiled. Wear clean underclothing and socks each day. If water is scarce, “air” clean your clothing by shaking, airing, and sunning it for 2 hours. If you are using a sleeping bag, turn it inside out after each use, fluff it, and air it.

54
• Keep Your Teeth Clean- Thoroughly clean your mouth and teeth with a
toothbrush at least twice each day. Flossing your teeth with string or fiber helps oral hygiene.
• Take Care of Your Feet - To prevent serious foot problems, break in your shoes
before wearing them. Wash and massage your feet daily. Trim your toenails straight across. Wear an insole and the proper size of dry socks. Powder and check your feet daily for blisters. Note - If you get a small blister, do not open it. An intact blister is safe from infection. Apply a padding material around the blister to relieve pressure and reduce friction. If the blister bursts, treat it as an open wound. Clean and dress it daily and pad around it. Leave large blisters intact. To avoid having the blister burst or tear under pressure and cause a painful and open sore, do the following: obtain a sewing-type needle and a clean or sterilized thread; run the needle and thread through the blister after cleaning the blister; detach the needle and leave both ends of the thread hanging out of the blister. The thread will absorb the liquid inside; this reduces the size of the hole and ensures that the hole does not close up; pad around the blister.
• Get Sufficient Rest - You need a certain amount of rest to keep going. Plan for
regular rest periods of at least 10 minutes per hour during CERT activities. Learn to make yourself comfortable under less than ideal conditions. A change from mental to physical activity or vice versa can be refreshing when time or situation does not permit total relaxation.
• Keep Camp Site Clean – Pick-up and bag your trash. Some trash (e.g., used
food containers) will tend to attract animals in the area that have had their ecosystem (and sources of food) disrupted. Keeping the camp clean also means human waste which is discussed in section V-6.
• Prevent Heat Injuries – Preventing heat injuries is a team effort. One person
can easily get caught up in the effort of providing assistance to people in need. Having a team member step back every once in a while and take a look at people can go a long way in preventing heat injuries. Assigning “buddies” or matching up people within a team to keep an eye on one another is a useful tool in this effort. As with all tasks in CERT, members should only accept tasks commensurate with their abilities and know you limitations to working in the heat is and important consideration in accepting a mission.
V-4.1 Personnel Field Hygiene Do’s and Don’ts: Acclimatize - All CERTs should work and exercise in a manner so that they gradually become acclimatized to the heat and humidity. Drink Water - Depending on the heat and activity level, you may need to drink from 1/2 to 11/4 quarts of water per hour.3 gallons/12 liters per day in hot, dry climates. Cool water (60° to 70° F) is absorbed faster than cold water. Drink small quantities of cool fluids frequently. Drink .non-caffeinated fluids even if you are not thirsty. Refill your water container at every opportunity using only treated water. Drinking water is a must in order to prevent heat injury.

55
Note - The color and volume of the urine steam are good indicators of an individual’s hydration status. If your urine stream is dark yellow and the volume is small, or if you are constipated and experience hard stools, you may not be drinking enough water. Maintain a urine stream that is clear or light yellow. Thirst is not a good indicator of dehydration during physical activity.
Use Work/Rest Cycles - Work and rest in the shade, whenever possible. Rest periods helps prevent dangerous increases in body temperatures by minimizing heat production. Eat all meals like usual - Eating all meals in the field will usually provide the body’s requirements for salts. Eating helps ensure an individual meets the daily requirements for minerals and electrolytes (sodium). DO NOT take extra salt in meals unless medically directed. Wear Loose Fitting Clothing – To reduce heat stress and to protect against ultraviolet (UV) radiation, you should cover all skin exposed to sun; wear sunscreen and lip balm with a sun protection factor of 15 or higher; protect your eyes from UV with UV-protective sunglasses, keep clothing loose at the neck, wrists, and lower legs; loose fitting clothing allows for better ventilation -tight fitting clothes reduce blood circulation and ventilation; do not wear nylon or silk-type undergarments in hot or humid environments.
Note - When the threat from biting arthropods is high, keep your shirtsleeves rolled down and pants tucked in boots.
Keep the Bugs Away - Apply DEET insect repellent to all exposed skin following the directions on the label; apply a light, even coating to exposed skin, not under Clothing; do not apply to the eyes and lips, or to damaged skin; one application may last 8 to 12 hours; if you receive bites, reapply a light uniform coating of repellent.
Note - Reapplication of DEET may be necessary due to heavy sweating, exposure to rain, or in locations where insect density is very high.
Keep Your Body and Clothes - Bathe every day if possible, or at least once a week. Good personal hygiene practices reduce infestation of insects such as body lice and mites. Wash your clothes frequently to remove arthropods and their eggs which may become attached. If needed, use a stream, lake, or washbasin. Air-dry clothes, especially underwear and socks. Follow Medical Advice - Take medications! Use medications, such as cream/shampoo for treatment of lice, chiggers, poison ivy, and so forth. Protect Yourself at Night – Sleep in a tent or use a bed net. Ensure your tent or bed net is in good repair; use your tent or bed net when sleeping; if using a bed net, tuck the net under sleeping pad or sleeping bag so there are no openings. Protect Yourself from Insects and Animals – Insects - Remove spiders from tents or buildings; shake out and inspect clothing, shoes, and bedding before use; eliminate excess clutter and clean beneath and behind large

56
items - spiders and scorpions may be resting in these areas; check around rocks and logs before resting against them; use a long-handled tool or stick to turn over debris before removing it; remove accumulations of boards, rocks, and other debris to eliminate the resting/hiding areas of spiders and scorpions; wear leather gloves to remove rocks, lumber, and such from the ground. Snakes – Do not handle, play with, or disturb snakes or other wildlife; avoid swimming in areas where snakes abound; keep hands off rock ledges where snakes may be hiding or sunning; look over the area before sitting down, especially if in deep grass or among Rocks; if snakes are known to inhabit the area, sleep off the ground; avoid walking about an area during the period from dusk to complete daylight, as many snakes are active during this period; avoid camping near piles of brush, rocks, or other debris; never step over large rocks or logs without first checking to see what is on the other side; turn rocks and logs toward you when they have to be removed so you will be shielded should snakes be beneath them; and handle freshly killed snakes only with a long-handled tool or stick; snakes can inflict fatal bites by reflex action after their death. This is Florida.
Note - If bitten, try to kill the snake and bring its head with you to the medical treatment facility. If you cannot bring the snake’s head with you, get an accurate description of the snake to assist medical personnel in treating you. DO NOT panic!
Domestic and Wild Animals or Birds – Remember that theses animals are probably upset by the post disaster environment as you are. Do not handle or approach so-called .pets; exclude such animals from your work and living areas. Do not collect or support (feed or shelter) stray or domestic animals/birds in the area. V-5 Team Field Sanitation The may be occasions in which area CERTs are deployed in areas not convenient to their homes or a modicum of basic necessities or everyday conveniences. It is times like this that the team has to come together and develop a common understanding how the team will work, rest, and survive the ordeal together One of the CERTs most prominent concerns for its team members will be heat injuries. Heat injuries can occur anywhere, depending on physical activity (work rate), clothing worn, level of hydration and often the individual’s age. However, they occur most frequently during warm-weather activities, exposure to high climatic temperatures, high humidity, and bright sunlight.- Heat injuries can occur anywhere, depending on physical activity (work rate), clothing worn, level of hydration, and often the individual’s age. However, they occur most frequently during warm-weather activities, exposure to high climatic temperatures, high humidity, and bright sunlight – Welcome to Florida! Hot weather increases daily water requirements, because body water is lost as sweat. Dehydration leads to added heat stress, increased susceptibility to heat injury, reduced work performance, and degraded mission capability. Although seemingly counterintuitive, it is recommended that people that work exposed to the elements in warm weather wear loose, comfortable clothes – usually long-sleeved shirts and with pants. The material in these clothes captures perspiration and helps with cooling the body…it is not totally lost to the atmosphere as evaporated sweat.

57
V-5.1 Team Field Sanitation – Human Wastes V-5.1.1 Human Waste - Human waste disposal becomes a problem for both the individual and the team is a disaster environment. Local, state, federal, and host-nation regulations or laws may prohibit burning or burial of waste. Chemical latrines are the preferred human waste disposal devices but they may not be available where the disaster is most severe or cut-off from most means of support. When chemical latrines are not available, individuals and teams must improvise. V-5.1.2 Field “toilets” – No matter what you call them, they’re for handling human waste. It is important not soil the ground in the work area or camp site with urine or feces. There are a variety of products on the market that a CERT can purchase or a team put together. Hopefully, the sites they send CERTs will have port-a-toilets brought in but depending on the nature of the disaster or far along we are in disaster recovery, they may not be available. Here may be some options – some effective but inexpensive and then there is always the cat-hole latrine that is free but can present a health risk if the individual or team is to operate in an area for a day or longer.
commercially available commercially available
commercially available commercially available
The cat-hole latrine is dug approximately 6/1/2 inches to 1-foot (30-centimeters) deep and is completely covered and packed down after use
Commercially available small tents are available to provide privacy around the “field toilet.” Inexpensive tarpaulins may be used as privacy screens.
V-5.2 Team Field Sanitation – Trash

58
Bring all of the trash and waste back for proper disposal. Although burying or incinerating trash may be done in a sanitary fashion, the duration of CERT missions should preclude the need to use either method. Keep the team area free of unnecessary debris, building material, and trash to limit the areas where rats and mice can hide or nest. V-5.3 Team Field Sanitation – Cooking Wastes Soakage pits are a safe means for the proper disposal of cooking wastes. In porous soil, a soakage pit 4-feet (1.2-meters) square and 4-feet (1.2-meters) deep will handle 200 gallons (760 liters) of liquid per day. Section VI - Annexes Annex A - CERT Forms Annex B - Volunteer Reception Center Operations Diagram Annex C - Glossary

59
Annex A (CERT Forms) to CERT Operations Handbook The forms are used by CERT members during any period in which they are operationally employed the city or county. These completed forms will be maintained by city and county fire and rescue organizations once used during training exercises, disaster response, or doing designated events.
Tab A -Damage Assessment Tab B - Incident Status Report (ICS 201) Tab C – GT-CERT Medical Form

60
Tab A (Damage Assessment) to Annex A (CERT Forms) to CERT Operations Handbook DAMAGE ASSESSMENT DATE: PERSON REPORTING:
TIME RECEIVED: PERSON RECEIVING:
PAGE #:
BU
RN
ING
OU
T
GA
S L
EA
K
H2O
LE
AK
ELE
CTR
IC
CH
EM
ICA
L
DA
MA
GE
D*
CO
LLA
PS
ED
INJU
RE
D
TRA
PP
ED
DE
AD
AC
CE
SS
NO
AC
CE
SS
AS
SIG
NM
EN
T C
OM
PLE
TED
TIME LOCATION/ADDRESS FIRES HAZARDS STRUCTURES PEOPLE ROADS / X

61
Tab B - Incident Status Report) to Annex A (CERT Forms) to CERT Operations Handbook
GREATER TAMPA CERT INCIDENT BRIEFING FORM
1. Incident Name
2. Date Prepared
3. Time Prepared
4. Map Sketch
(Stop and think. Remember safety is the first priority.)

62
4. Current Organization Brief diagram of GT-CERT members present at scene and their function(s). List Team Leader/Alt Team Leader as “Incident Commander” and assign other members present to different functional duties under the IC. Refer to Table below:
6. Prepared by (Name and Position)
7. Resources Summary
Resources Ordered / Needed
Personnel and/or Equipment
Resource Identification (Phone Number and or Radio
Call Sign)
ETA On Scene Location/Assignment
Incident Commander
CERT Team Member
CERT Team Member
CERT Team Member
CERT Team Member
CERT Team Member
CERT Team Member
CERT Team Member
CERT Team Member

63
8. Summary of Current Actions
9. Prepared by (Name and Position) Note: This document is to only be forwarded to appropriate authorities upon request.

64
Tab C (GT-CERT Medical Form) to Annex A (CERT Forms) to CERT Operations Handbook
GT CERT Medical Report Report # __________________ Name of Responder / Agency: _______________________________________________ Type of incident: _________________________________________________________ ________________________________________________________________________ Time of incident/ arrival on scene: __: ____ AM/ PM Scene Condition: _____________ ________________________________________________________________________ Location: _______________________________________________________________ ________________________________________________________________________ Victim 1: Triage tag: Black (dead) / Red (immediate) / Yellow (delayed) / Green (minor) Name: ______________________ Age: ___ Gender: M / F Height: __’__” Wt: ____ Lbs Respiration rate: ______ /min Pulse: ______ /min Description of injury(s)/ Patient complaint: ____________________________________ ________________________________________________________________________________________________________________________________________________ GCS: E___ V ___ M___ = GCS Total: ___ @ Time GCS Recorded ___: ____ AM/ PM Allergies: _______________________________________________________________ Medications: _____________________________________________________________ Previous medical history: ___________________________________________________ ________________________________________________________________________ Last oral intake: __________________________________________________________
Best Eye Response: 4 – Spontaneously 3 – Speech 2 – Pain 1 – No eye response (E) Total: ______
Best Verbal Response: 5 – Oriented 4 – Confused 3 – Inappropriate 2 – Sounds only 1- No verbal response (V) Total: _______
Best Motor Response: 6 – Obeys Commands 5 – Localizes to pain 4 – Withdraws from pain 3 – Flexion in response to pain 2 – Extension to pain 1 – No motor response (M) Total: ______
Injury notes: __________________________________ _____________________________________________ _____________________________________________ _____________________________________________ _____________________________________________ _____________________________________________ _____________________________________________ Actions taken: _________________________________ _____________________________________________ _____________________________________________ _____________________________________________ _____________________________________________ _____________________________________________ _____________________________________________

65

66
Annex B (Volunteer Reception Center Operations Diagram) to CERT Operations Handbook

67
Annex C (Glossary) to CERT Operations Handbook Acronyms ANS Alert and Notification System ARC American Red Cross CDC Centers for Disease Control and Prevention CERT Community Emergency Response Team CB Citizens Band COG Communications Operations Guide DMAT Disaster Medical Assistance Team DOD U.S. Department of Defense DOE U.S. Department of Energy DOT U.S. Department of Transportation DRC Disaster Recovery Center DWI Disaster Welfare Information EAS Emergency Alert System EMP Electromagnetic Pulse EMS Emergency Medical Services EPA U.S. Environmental Protection Agency EPI Emergency Public Information EPZ Emergency Planning Zone ERT Emergency Response Team ERT-A Emergency Response Team Advance Element ERT-N Emergency Response Team National ESF Emergency Support Function EST Emergency Support Team EOC Emergency Operations Center EOP Emergency Operations Plan GT Greater Tampa HAZMAT Hazardous Material HC Hillsborough County IC Incident Commander IC/UC Incident Command/Unified Command ICS Incident Command System NIMS National Incident Management System NIC National Integration Center S&R Search and Rescue SOP Standard Operating Procedures US&R Urban Search and Rescue Definitions: Community Emergency Response Team (CERT) - The Community Emergency Response Team (CERT) program is designed to help an individual protect themselves, their families, neighbors and neighborhoods in an emergency situation. CERT members use disaster related training to enable CERT teams to provide a positive and realistic approach to emergency and disaster situations where citizens may initially be on their own and their actions can make a difference. CERT trained personnel provide a core of

68
people in the community that enable the community to respond to disaster effectively and efficiently without placing themselves in unnecessary danger until professional first responders arrive on the scene. CERT teams collect disaster intelligence to support first responder efforts upon their arrival. Communication Operations Guide (COG) - Emergency Alert System (EAS) - The EAS is a national public warning system that requires broadcasters, cable television systems, wireless cable systems, satellite digital audio radio service (SDARS) providers and, direct broadcast satellite (DBS) service providers to provide the communications capability to the President to address the American public during a National emergency. The system also may be used by state and local authorities to deliver important emergency information such as AMBER alerts and weather information targeted to a specific area. Emergency Operations Center (EOC) - An EOC is a command and control center for potential emergencies related to potential emergencies identified in the community's hazard assessment. An effective EOC consists of the combination of physical facilities, equipment, personnel, and procedures that enables the jurisdiction to apply its resources efficiently and effectively to respond to an emergency situation. Field Operations Handbook - A durable pocket or desk guide that contains essential information required to perform specific assignments or functions. Greater Tampa (GT) – is focused around the City of Tampa Hillsborough County, on the west coast of the state of Florida. It serves as the county seat for Hillsborough County. Other municipalities and unincorporated areas include: City of Plant City, City of Temple Terrace, Brandon/Valrico/Riverview/Plant City, Carrollwood/Northdale, Seminole Heights, Arbor Green/Cross Creek/Hunter’s Green, Lutz, Tampa Palms, Temple Terrace, Pebble Creek/Wesley Chapel, Town n’ Country, Racetrack, Richmond Place West Meadows as well as other areas. Hillsborough County (HC) - Located midway along the west coast of Florida, Hillsborough County has 1,048 square miles of land and 24 square miles of inland water area for a total of 1,072 square miles. The unincorporated area encompasses 909 square miles, or more than 84 percent of the total county area. Municipalities account for 163 square miles. Incident Command System (ICS) - ICS is a standardized on-scene incident management concept designed specifically to allow responders to adopt an integrated organizational structure equal to the complexity and demands of any single incident or multiple incidents without being hindered by jurisdictional boundaries. Incident Commander (IC) - is responsible for directing and/or controlling resources by virtue of explicit legal, agency, or delegated authority. The individual responsible for the overall management of the response is called the Incident Commander. For responses under the National Response System (NRS), the pre-designated On-Scene Coordinator (OSC) generally assumes the role of Incident Commander. Job Aid - A checklist or other aid that is useful in performing or training for a job.

69
National Integration Center - The NIC provides strategic direction for and oversight of NIMS, supporting routine maintenance and continuous refinement of the system and its components over the long term. The NIC solicits participation from Federal departments and agencies; State, tribal, and local governments; and emergency management/response personnel, 24 including those from NGOs and the private sector. Satellite Digital Audio Radio Service (SDARS) – A satellite-based direct-broadcast radio service in which digitally encoded audio entertainment material is broadcast to Earth-based receivers, either directly from an orbiting satellite, or--in cases in which the receiver is in a shielded location--from the satellite to the receiver via a repeater station. Search and Rescue S&R – An operation normally coordinated by a Rescue Coordination Center (RCC) or rescue sub-center, using available personnel and facilities to locate persons in distress and rescue is "An operation to retrieve persons in distress, provide for their initial medical or other needs, and deliver them to a place of safety.” Standard Operating Procedure (SOP) - A complete reference document that details the procedures for performing a single function or a number of interdependent functions.

70
Annex D (Supplemental Helmet Markings) to CERT Operations Handbook CERT Helmet Team Markings Passive markings Passive markings are those markings on the helmet that either provide affiliation or a very reflective surface to make the helmet easier to see during periods of limited visibility. Passive markings do not require any power unlike helmet lights. Reflective Tape Supplementing the CERT green helmet with white reflective tape improves its visibility during periods of reduced visibility (e.g., night, in a dark building, a post disaster area without electricity.)
Team Affiliation CERT members can mark their team affiliation by applying the team’s number on the area of the helmet 3” above the bottom of the helmet and centered above where the helmet sits above the CERT’s ear.
11

71
Helmet Marking Numbers CERT Area Team No. Arbor Green/Cross Creek/ Hunter’s Green 1 Carrollwood/Northdale 3 Arbor Green/Cross Creek/Hunter’s Green 2 Racetrack 6 Temple Terrace 11 Lutz 4 Pebble Creek/Wesley Chapel 5 Town n’ Country 12 Richmond Place and West Meadows 7 Seminole Heights 9 Tampa Palms 10 South Tampa 8 USF/North Tampa 13 GT-CERT Leadership 14