gui builder 6.0 rev - epson · 4.2 basic concepts required to understand gui builder.....7 . 4.3...
TRANSCRIPT

EPSON RC+ 6.0 Option
GUI Builder 6.0
Rev. 2 EM126S2309F

EP
SO
N R
C+ 6.0 O
ption GU
I Builder 6.0 R
ev.2

EPSON RC+ 6.0 Option
GUI Builder 6.0 Rev.2
Copyright © 2009-2012 SEIKO EPSON CORPORATION. All rights reserved.
GUI Builder 6.0 Rev.2 i

FOREWORD Thank you for purchasing our robot products. This manual contains the information necessary for the correct use of the Manipulator. Please carefully read this manual and other related manuals before installing the robot system. Keep this manual handy for easy access at all times.
WARRANTY
The robot and its optional parts are shipped to our customers only after being subjected to the strictest quality controls, tests, and inspections to certify its compliance with our high performance standards. Product malfunctions resulting from normal handling or operation will be repaired free of charge during the normal warranty period. (Please ask your Regional Sales Office for warranty period information.) However, customers will be charged for repairs in the following cases (even if they occur during the warranty period): 1. Damage or malfunction caused by improper use which is not described in the manual, or
careless use.
2. Malfunctions caused by customers’ unauthorized disassembly.
3. Damage due to improper adjustments or unauthorized repair attempts.
4. Damage caused by natural disasters such as earthquake, flood, etc.
Warnings, Cautions, Usage:
1. If the robot or associated equipment is used outside of the usage conditions and product specifications described in the manuals, this warranty is void.
2. If you do not follow the WARNINGS and CAUTIONS in this manual, we cannot be responsible for any malfunction or accident, even if the result is injury or death.
3. We cannot foresee all possible dangers and consequences. Therefore, this manual cannot warn the user of all possible hazards.
ii GUI Builder 6.0 Rev.2

TRADEMARKS Microsoft, Windows, and Windows logo are either registered trademarks or trademarks of Microsoft Corporation in the United States and/or other countries. Other brand and product names are trademarks or registered trademarks of the respective holders.
TRADEMARK NOTATION IN THIS MANUAL Microsoft® Windows® XP Operating system Microsoft® Windows® Vista Operating system Microsoft® Windows® 7 Operating system Throughout this manual, Windows XP, Windows Vista, and Windows 7 refer to above respective operating systems. In some cases, Windows refers generically to Windows XP, Windows Vista, and Windows 7.
NOTICE No part of this manual may be copied or reproduced without authorization. The contents of this manual are subject to change without notice. Please notify us if you should find any errors in this manual or if you have any comments regarding its contents.
INQUIRIES Contact the following service center for robot repairs, inspections or adjustments. If service center information is not indicated below, please contact the supplier office for your region.
Please prepare the following items before you contact us.
- Your controller model and its serial number - Your manipulator model and its serial number - Software and its version in your robot system - A description of the problem
SERVICE CENTER
GUI Builder 6.0 Rev.2 iii

MANUFACTURER & SUPPLIER
Japan & Others Toyoshina Plant Factory Automation Systems Dept. 6925 Toyoshina Tazawa, Azumino-shi, Nagano, 399-8285 JAPAN
TEL : +81-(0)263-72-1530 FAX : +81-(0)263-72-1495
SUPPLIERS North & South America EPSON AMERICA, INC. Factory Automation/Robotics
18300 Central Avenue Carson, CA 90746 USA
TEL : +1-562-290-5900 FAX : +1-562-290-5999 E-MAIL : [email protected] Europe EPSON DEUTSCHLAND GmbH Factory Automation Division
Otto-Hahn-Str.4 D-40670 Meerbusch Germany
TEL : +49-(0)-2159-538-1391 FAX : +49-(0)-2159-538-3170 E-MAIL : [email protected] China EPSON China Co., Ltd Factory Automation Division
7F, Jinbao Building No. 89 Jinbao Street Dongcheng District, Beijing China, 100005
TEL : +86-(0)-10-8522-1199 FAX : +86-(0)-10-8522-1120 Taiwan EPSON Taiwan Technology & Trading Ltd.
Factory Automation Division 14F, No.7, Song Ren Road, Taipei 110 Taiwan, ROC
TEL : +886-(0)-2-8786-6688 FAX : +886-(0)-2-8786-6677
iv GUI Builder 6.0 Rev.2

Southeast Asia EPSON Singapore Pte Ltd. India Factory Automation System
1 HarbourFrontPlace, #03-02 HarbourFront Tower one, Singapore 098633
TEL : +65-(0)-6586-5696 FAX : +65-(0)-6271-3182 Korea EPSON Korea Co, Ltd. Marketing Team (Robot Business)
11F Milim Tower, 825-22 Yeoksam-dong, Gangnam-gu, Seoul, 135-934 Korea
TEL : +82-(0)-2-3420-6692
FAX : +82-(0)-2-558-4271
GUI Builder 6.0 Rev.2 v

vi GUI Builder 6.0 Rev.2

Table of Contents
Table of Contents
1. Introduction ························································································ 1
1.1 Features .................................................................................................................... 1
2. Installation·························································································· 1
3. Getting Started··················································································· 2
3.1 GUI Builder Tutorial ................................................................................................ 2
4. The GUI Builder Environment ···························································· 7
4.1 Overview.................................................................................................................. 7
4.2 Basic Concepts Required to Understand GUI Builder............................................. 7
4.3 Open the GUI Builder Window................................................................................ 8
4.4 Parts of the GUI Builder Window............................................................................ 8
4.4.1 Design Area ................................................................................................ 8
4.4.2 Toolbar........................................................................................................ 9
4.4.3 Forms Explorer......................................................................................... 10
4.4.4 Property Grid............................................................................................ 10
4.4.5 Events Grid............................................................................................... 10
4.5 Working with Forms and Controls ......................................................................... 10
4.5.1 Creating a Form........................................................................................ 10
4.5.2 Deleting a Form........................................................................................ 10
4.5.3 Opening and Closing Forms..................................................................... 11
4.5.4 Changing the size of a Form..................................................................... 11
4.5.5 Editing Multiple Forms ............................................................................ 11
4.5.6 Creating Controls ..................................................................................... 11
4.5.7 Deleting Controls ..................................................................................... 11
4.5.8 Sizing and Moving Controls..................................................................... 12
4.5.9 Copy, Cut, Paste for Controls ................................................................... 12
4.5.10 Editing Properties ................................................................................... 12
4.5.11 Working with Event Handlers ................................................................ 13
4.5.12 Changing Tab Order ............................................................................... 14
GUI Builder 6.0 Rev.2 vii

Table of Contents
viii GUI Builder 6.0 Rev.2
4.5.13 Saving Your Work .................................................................................. 14
4.6 Setting GUI Builder Preferences............................................................................ 15
5. GUI Builder Components ·································································16
5.1 Form....................................................................................................................... 16
5.2 Button Control ....................................................................................................... 19
5.3 Label Control ......................................................................................................... 21
5.4 TextBox Control..................................................................................................... 23
5.5 RadioButton Control .............................................................................................. 25
5.6 CheckBox Control ................................................................................................. 27
5.7 ListBox Control ..................................................................................................... 29
5.8 ComboBox Control ................................................................................................ 31
5.9 PictureBox Control ................................................................................................ 33
5.10 GroupBox Control ............................................................................................... 35
5.11 Timer Control ....................................................................................................... 37
5.12 VideoBox Control ................................................................................................ 38
5.13 LED Control......................................................................................................... 39
6. Operation ·························································································41
6.1 Overview................................................................................................................ 41
6.2 GUI Development in Program Mode..................................................................... 41
6.2.1 Design the GUI......................................................................................... 41
6.2.2 Debugging ................................................................................................ 42
6.3 Auto Mode ............................................................................................................. 42
6.4 Handling Pause and Continue................................................................................ 43
6.5 Handling Emergency Stop ..................................................................................... 43
6.6 Using a Help File ................................................................................................... 43
7. GUI Builder Reference ·····································································44
7.1 Overview................................................................................................................ 44
7.2 GUI Builder Properties and Events Format Description........................................ 44

1. Introduction
1. Introduction The EPSON RC+ GUI Builder 6.0 Option enables you create a GUI (Graphical User Interface) for your SPEL+ application. The design goal for GUI Builder was to create an easy to use integrated tool for creating a SPEL+ application GUI in the EPSON RC+ development environment. It is ideal for users that need a simple GUI and do not want to use a third party product such as Visual Studio. Even users that never created a GUI before can easily make one with GUI Builder.
NOTE For advanced GUI applications, you may want to consider using the EPSON RC+ VB Guide 6.0 option along with Visual Studio or another tool that can interface with the VB Guide .NET libraries.
1.1 Features The following features are supported in the GUI Builder 6.0 package:
- Your GUI is integrated completely within the EPSON RC+ environment for easy design, debugging, and display at runtime. No third party tools are required.
- You can create and debug GUI forms in your EPSON RC+ project.
- Several standard controls are provided, including button, label, textbox, etc. In addition, controls are provided for displaying video, variable status, and I/O status.
- Form and control events are executed as SPEL+ tasks. You can specify whether these task run in Normal, NoPause, or NoEmgAbort modes.
- In Auto mode, EPSON RC+ can automatically display your main form at startup, or you can show forms from your SPEL+ code.
2. Installation Please follow the instructions in this chapter to help ensure proper installation of the GUI Builder 6.0 software.
Before starting, ensure that all Windows applications have been closed.
To install GUI Builder: 1. Install EPSON RC+ 6.0. The GUI Builder option is automatically installed.
2. Ensure that the software key has been enabled for GUI Builder 6.0 in the controller you will be using. Refer to the EPSON RC+ 6.0 User’s Guide for information on how to enable options in the controller.
This completes the GUI Builder 6.0 installation.
GUI Builder 6.0 (Ver.6.0) Rev.2 1

3. Getting Started
3. Getting Started This chapter contains information for getting started with GUI Builder 6.0.
Before continuing, ensure that the GUI Builder option is enabled. See the Installation chapter for details.
If you have never used EPSON RC+ before, you should read the EPSON RC+ 6.0 User's Guide to get familiar with creating projects and programs.
The following section presents a tutorial illustrating some simple concepts.
3.1 GUI Builder Tutorial In this section we will create a simple GUI application that runs a robot cycle.
We will walk through the following tasks:
- Create a new EPSON RC+ project with a function to run the robot cycle.
- Create a form with Start and Stop buttons to run the robot cycle. This shows how to create a form and add buttons with events to start and stop a SPEL+ task.
- Add Pause and Continue buttons to the form. This shows the use of the EventTaskType property.
- Add a setup form. This form will use the Label and TextBox controls to allow the user to change robot speeds.
- Add a button on the main form to display the setup form. This shows the use of the GShowDialog statement and the DialogResult property.
Follow these steps: 1 Create a new EPSON RC+ 6.0 project called GUITest. 2. Using the Robot Manager, teach two robot points P0 and P1 in two different
positions. 3. Add code to function main in Main.prg as shown below:
Function main Robot1 Motor On Do Go P0 Wait 0.5 Go P1 Wait 0.5 Loop Fend
4. Select Tools | GUI Builder to open the GUI Builder window.
5. Click the New Form button on the GUI Builder window toolbar to create a form and name it frmMain. Click the OK button.
6. Click the New Button button on the GUI Builder window toolbar click the mouse on
the form. A new button will be created.
2 GUI Builder 6.0 (Ver.6.0) Rev.2

3. Getting Started
7. In the Property Grid, scroll down to the Name property, then change the name to btnStart and press ENTER.
8. In the Property Grid, scroll down to the Text property, then change the text from
Button1 to Start and press ENTER.
9. Double click on the Start button on your form. A new program window named
frmMain.prg will be opened with a new function for the button click event handler.
10. Change the frmMain_btnStart_Click function to start the main task as shown below.
This will cause the main function to start when the user clicks the Start button. Function frmMain_btnStart_Click(Sender$ As String) Xqt main Fend
11. Click the New Button button on the GUI Builder window toolbar, then click on the form under the Start button to create another button.
GUI Builder 6.0 (Ver.6.0) Rev.2 3

3. Getting Started
12. For the new button, change the Name property to btnStop, and change the Text property to Stop. At this point, your form should look as shown below:
13. Double click the Stop button to create the button click event handler. Then change
the code as shown below: Function frmMain_btnStop_Click(Sender$ As String) Quit main Fend
14. Press F5 to build the project and display the Run Window. If any build errors occur, correct your code and press F5 again.
15. Select the Form radio button on the Run Window.
16. Click the Start button on the Run Window.
17. frmMain will be displayed. Click the Start button on frmMain. The robot should now be moving between P0 and P1.
18. Click the Stop button on your form. The robot task will stop.
19. Now click the X button in the upper right of your form. The form will close.
We will now add Pause and Continue buttons to our GUI.
19. Show the GUI Builder window again by clicking on the GUI Builder toobar button.
20. Click the New Button button on the GUI Builder window toolbar and click the form to the right of the Start button to create a new button.
21. For the new button, change the Name property to btnPause, and change the Text property to Pause.
22. Change the EventTaskType for the Pause button to 1 – NoPause. This allows the button click event handler to execute the Pause statement without pausing the task itself.
23. Double click the Pause button to create an event handler function. Then change the code by adding the Pause statement as shown below: Function frmMain_btnPause_Click(Sender$ As String) Pause Fend
24. Click the New Button button on the GUI Builder window toolbar and click the form to the right of the Stop button to create a new button.
4 GUI Builder 6.0 (Ver.6.0) Rev.2

3. Getting Started
25. For the new button, change the Name property to "btnCont", and change the Text property to "Continue".
26. Change the EventTaskType for the Continue button to 1 – NoPause. This allows the button click event handler to execute the Cont statement when normal tasks are paused.
27. Double click the Continue button to create an event handler function. Then change the code by adding the Cont statement as shown below: Function frmSetup_btnCont_Click(Sender$ As String) Cont Fend
28. Press F5 to build the project and open the Run Window. If any build errors occur, correct your code and press F5 again.
29. Click the Start button on the Run Window. Your form will be displayed.
30. Click the Start button on your form. The robot cycle will execute.
31. Click the Pause button on your form. The robot cycle will pause.
32. Click the Continue button on your form. The robot cycle will continue.
33. Click the Stop button on your form, then close the form by clicking the X button in the upper right corner.
We will now add a setup form to our GUI.
34. Click the New Form button the GUI Builder window toolbar and name the new form frmSetup, then click OK. A new tab page will be opened showing the new form.
35. Click the New Label button and click on frmSetup to create a label.
36. In the Property Grid, change the name of the new label to "lblSpeed".
37. Change the Text property to "Speed:".
38. Click the New TextBox button and click on frmSetup to the right of the Speed label.
39. Change the Name property to "txtSpeed" and change the Text property to "10".
40. Double click on frmSetup to create the Load event handler function for the form and change the code as shown below: Function frmSetup_Load(Sender$ As String)
GSet frmSetup.txtSpeed.Text, Str$(Speed(1)) Fend
41. Click the New Button button on the GUI Builder window toolbar and click the form to add the button. Name this button "btnOK" and set the Text property to "OK".
42. Click the New Button button on the GUI Builder window toolbar and click the form to add the button. Name this button "btnCancel" and set the Text property to "Cancel". At this point, you setup form should look similar to the one shown below:
GUI Builder 6.0 (Ver.6.0) Rev.2 5

3. Getting Started
43. Double click the OK button to create an event handler function. Then change the code to set the form's DialogResult property and call GClose as shown below: Function frmSetup_btnOK_Click(Sender$ As String) GSet frmSetup.DialogResult, DIALOGRESULT_OK GClose frmSetup Fend
44. Double click the Cancel button to create an event handler function. Then change the code to set the form's DialogResult property and call GClose as shown below: Function frmSetup_btnCancel_Click(Sender$ As String) GSet frmSetup.DialogResult, DIALOGRESULT_CANCEL GClose frmSetup Fend
45. Click the frmMain tab to work with frmMain again.
46. Click the New Button button on the GUI Builder window toolbar and click the form to add the button. Name this button "btnSetup" and set the Text property to "Setup".
47. Double click the Setup button to create an event handler function. Then change the code to show the setup dialog and set the new robot speed as shown below: Function frmMain_btnSetup_Click(Sender$ As String) Integer result String value$ result = GShowDialog(frmSetup) If result = DIALOGRESULT_OK Then GGet frmSetup.txtSpeed.Text, value$ Speed Val(value$) EndIf Fend
48. Press F5 to build the project and open the Run Window.
49. Click the Start button on the Run Window. The main form will be displayed.
50. Click the Setup button on the main form. The setup dialog will be displayed with the current robot speed in the textbox.
51. Enter a new speed and click OK.
52. Click the Start button on the main form to run the robot cycle at the new speed. If the Stop button is clicked and the robot stops, the motion speed will be reset to the default.
53. This completes the tutorial.
6 GUI Builder 6.0 (Ver.6.0) Rev.2

4. The GUI Builder Environment
4. The GUI Builder Environment
4.1 Overview In this chapter we will focus on some concepts and definitions so you can gain a complete understanding of GUI Builder and its components. We will cover the following topics:
- Basic concepts which you should understand to use GUI Builder
- How to open the GUI Builder window
- Parts of the GUI Builder window
- How to work with forms and controls
- Setting GUI Builder preferences
4.2 Basic Concepts Required to Understand GUI Builder A quick explanation of some of the basic concepts will help you understand this chapter much better. Please review the concepts described below before proceeding through the rest of this chapter.
What is a GUI? GUI stands for Graphical User Interface. A GUI allows your operators to easily interact with your SPEL+ application to run cycles or perform setup functions. The basic building block for your GUI is the Form.
What is a Form? A form is a window or dialog box that contains controls. It is the basic unit of your GUI application. When a form is displayed at runtime, the controls on the form are active and ready to receive keyboard and mouse events from the user. Your GUI project can have just one form or several forms.
What is a Control? Controls are objects that are contained within a form, such as buttons, checkboxes, textboxes, etc. Each type of control has its own set of properties and events.
What is an Event? An event is a SPEL+ function created by you that is called by the GUI when a form or control event occurs. For example, when the user clicks a button control, the button click event can call the SPEL+ function that you designated to run when the click occurs.
GUI Builder 6.0 (Ver.6.0) Rev.2 7

4. The GUI Builder Environment
4.3 Open the GUI Builder Window The GUI Builder window is opened from within the EPSON RC+ development environment. After EPSON RC+ has been started, the GUI Builder window can be opened in 2 different ways:
From the main Toolbar: From the main toolbar in EPSON RC+ you should see the GUI Builder icon . Clicking on the GUI Builder icon will open the GUI Builder window.
From the Tools menu: Selecting GUI Builder from the Tools menu will open the GUI Builder window.
Once the GUI Builder window is open you can now begin using GUI Builder to design your GUI application. The next few pages describe the basic parts of the GUI Builder window.
4.4 Parts of the GUI Builder Window The GUI Builder window is shown below. Each of the indicated parts are described in the following sections.
Design Area
Tool Bar
Forms Explorer
Property Grid
Events Grid
4.4.1 Design Area This is where your forms are displayed at design time. Each opened form is displayed on its own tab. You can easily switch between forms by clicking on the associated tab or by double clicking the form in the Forms Explorer. If a form is larger than the design area, then scroll bars will be displayed and you can scroll to access all areas of the form.
8 GUI Builder 6.0 (Ver.6.0) Rev.2

4. The GUI Builder Environment
4.4.2 Toolbar The toolbar contains buttons for creating forms and controls. The GUI Builder toolbar is located at the top of the GUI Builder window just below the title bar and appears as follows:
TheGUI Builder Toolbar
Shown below are general descriptions for each of the GUI Builder toolbar buttons.
Button Description
New form: Creates a new form. A dialog pops up and the user is
asked to enter the name for the new form.
Delete Form: Deletes a form in the current project. This button is
dimmed if there are no forms for the current project.
Pointer: Click this button to abort the addition of a new control.
New Button: Creates a new button control.
New Label: Creates a new label control used to display static text.
New TextBox: Creates a new textbox control that allows operators to
input text.
New RadioButton: Creates a new radio button control.
New CheckBox: Creates a new checkbox control
New ListBox: Creates a new listbox control.
New ComboBox: Creates a new combobox control.
New PictureBox: Creates a new picturebox.
New GroupBox: Creates a new groupbox control.
New Timer: Creates a new timer control.
New VideoBox: Creates a new videobox control. This control allows you
to display video with the Vision Guide option.
New LED: Creates a new LED control. This control allows you to display I/O status. You can optionally allow the operator to double click on the control to change output status. The control can use built-in pictures with various colors, or you can use your own images for off and on status.
GUI Builder 6.0 (Ver.6.0) Rev.2 9

4. The GUI Builder Environment
4.4.3 Forms Explorer The Forms Explorer is a tree that contains each form for the current project and its associated controls. When a new form or control is created, it is added to the tree.
Double-clicking on a form opens the form in its own tab in the design area. The properties and events for the form are displayed. Right click on a form to open a menu to set the start form, delete the form, or close it.
Clicking on a control in the tree activates its associated form and sets the current design focus on the control. The properties and events for the control are then displayed
4.4.4 Property Grid
The Property Grid is used to display and edit form and control properties. When you select a form or control, the associated properties are displayed in the grid. There are two columns: Property and Value. Property is the name of the property. Value is the current value that you can edit.
4.4.5 Events Grid
The Events Grid is used to display and change the events for the associated form or control. Each event has a user function that is called when the event occurs.
4.5 Working with Forms and Controls
4.5.1 Creating a Form To create a form:
1. Open the GUI Builder window.
2. Click on the New Form button on the toolbar.
3. Type a name for the form. You may want to use a name starting with "frm" as the
prefix. Form the New Form dialog, you can optionally copy another form by selecting it from the Copy from existing form list.
4.5.2 Deleting a Form
To delete a form, right click on the form in the Forms Explorer, then select Delete. A confirmation message will be displayed. Click Yes to delete the form. Also, you can use the following methods.
- Click on the <Delete Form> button on the tool bar.
- Right click on the form tab, then select Delete.
10 GUI Builder 6.0 (Ver.6.0) Rev.2

4. The GUI Builder Environment
4.5.3 Opening and Closing Forms To open a form, double click on the form in the Forms Explorer.
To close a form, right click on the form in Forms Explorer and select Close, or right click on the form tab and select Close.
4.5.4 Changing the Size of a Form
You can change the size of a form using two methods:
- Use the mouse to drag one of the form size handles in the GUI Builder window design area.
- Change the Height and Width properties in the Property Grid at design time or using GSet at runtime.
4.5.5 Editing Multiple Forms
The GUI Builder window allows you to work with multiple forms using a tab interface. You can switch between currently open forms by click on the corresponding tab.
You can copy controls from one form and paste them in another form.
4.5.6 Creating Controls
To create a control
1. Open the form to which you want to add a control.
2. Click on the control button on the GUI Builder window toolbar. A cross cursor will be displayed.
3. You can simple click on the form near the location where you want the control and the control will be created with the default size. Or, you can use the mouse to draw an outline of the control size on the form and release the mouse to create the control using the size of the outline.
4.5.7 Deleting Controls
To delete a control
1. Open the form from which you want to delete one or more controls.
2. Click on the control you want to delete. To select more controls, hold down the Ctrl or Shift key and click on each additional control.
3. Press the Del key on the keyboard. The controls will be deleted.
GUI Builder 6.0 (Ver.6.0) Rev.2 11

4. The GUI Builder Environment
4.5.8 Sizing and Moving Controls To change the size of a control
- Use the mouse to drag one of the control's size handles in the GUI Builder window design area.
- Change the Height and Width properties in the Property Grid at design time or using GSet at runtime.
To move a control
- Click the control to activate it, then release the mouse. A move cursor is now displayed when the mouse is over the control. Click and drag the control to its new position.
- Change the Left and Top properties in the Property Grid at design time, or use GSet at runtime to change the Left and Top properties.
4.5.9 Copy, Cut, Paste for Controls
Selecting controls for copy or cut
First, click on one control. To select more controls, hold down the Ctrl or Shift key and click on each additional control. The selected controls are indicated by white (first control) and black size handles.
Copy selected controls
To copy the selected controls, type Ctrl+C, or click the Copy button on the main toolbar, or select Copy from the Edit menu.
Cut selected controls
To cut the selected controls, type Ctrl+X, or click the Cut button on the main toolbar, or select Cut from the Edit menu.
Pasting controls
To paste controls that have been copied or cut, type Ctrl+V, or click the Paste button on the main toolbar, or select Paste from the Edit menu.
4.5.10 Editing Properties
To edit properties, first click on the form or control to display the associated properties in the Property Grid.
For properties that require text input
Click on the property to change in the Property Grid. Then type in the new value and press Enter or select another property row to apply the change.
For properties that provide a dropdown list of values
Click on the property to change in the Property Grid. Click the down arrow button on the right side of the value. Select the new value from the dropdown list. The change is applied after you make the selection.
For properties that provide a button for selecting values
Click on the property to change in the Property Grid. Click the ellipses button on the right side of the value. Select the new value(s) from the dialog. The change is applied after you make the selection or click OK on the dialog.
12 GUI Builder 6.0 (Ver.6.0) Rev.2

4. The GUI Builder Environment
4.5.11 Working with Event Handlers Event handlers are SPEL+ functions with the correct parameters for the specified event. Event handler functions can be in any SPEL+ program file in the current project. By default, event handlers are created in a program file that is created for a form. For example, when you create an event handler for a Button control Click event, a form program file is created first if it does not already exist, then the function is added to the file.
To create an event handler
There are three ways to create an event handler
- Double click on the form or control to create the default event handler. For example, if you double click on a Button control, the Click event handler function is created.
- In the Events grid, double click on the event name.
- In the Events grid, select a function that already exists in the project in the value dropdown list for the event. Only functions with the correct parameters are shown in the list.
To change an event handler
You can change the event handler function by selecting another function in the event value dropdown list.
To disable an event handler
Sometimes after creating an event handler, you may decide that it is no longer needed. To disable the event handler, select (None) in the event value dropdown list. The associated function is not deleted. But it will not be called when the event occurs.
Using EventTaskType
When an event occurs, the event handler function is started as a SPEL+ task.
The EventTaskType property lets you specify which type of task will be executed. This is important for events that need to execute in a pause condition or emergency stop condition.
For example, if a button click event handler will execute Pause or Cont, the EventTaskType must be set to 1 – NoPause. Or if an event handler must execute Reset during an emergency stop condition, then the EventTaskType must be set to 2 – NoEmgAbort.
GUI Builder 6.0 (Ver.6.0) Rev.2 13

4. The GUI Builder Environment
4.5.12 Changing Tab Order After adding controls to a form, you may want to change the tab order. This is the order that focus is set when the user types Tab at runtime. It is also important to set the tab order of labels using hotkeys to be one tab index before the control that is being labeled.
To change tab order
1. Open the form for which you want to change the tab order.
2. Type the Tab key. The tab order will be displayed as shown below:
3. Click on each tab order value in the order you want.
4. Type the Tab key again to hide the tab order.
4.5.13 Saving Your Work After making changes in the GUI Builder window, you can save your work using two methods:
- From the File menu, select Save, or type Ctrl+S.
- Click the Project Save toolbar button on the EPSON RC+ main toolbar.
14 GUI Builder 6.0 (Ver.6.0) Rev.2

4. The GUI Builder Environment
4.6 Setting GUI Builder Preferences You can change how controls are managed on the forms in the GUI Builder window design area by setting the GUI Builder preferences.
Select the Setup menu | Preferences | GUI Builder.
When the Layout Mode is set to Snap Lines, GUI Builder shows line segments around the controls as you move them around the form.
Snap Lines
When Layout Mode is set to Snap To Grid, a grid is displayed on each form, and when you move a control on the form, it snaps to each grid location.
To change the size of the grid, change the Grid Width and Grid Height values and click Apply.
When you change GUI Builder preferences and click Apply, if the GUI Builder window is open, the current changes will be saved and the window will be re-opened to use the new preferences.
GUI Builder 6.0 (Ver.6.0) Rev.2 15

5. GUI Builder Components
5. GUI Builder Components This chapter describes the Form and all of the controls that can be used on a Form. Each component section has information on usage and all properties and events associated with the component.
For more details on properties, events, and statements, refer to the GUI Builder Reference chapter.
5.1 Form
5.1.1 Description The Form is the basic building block of your GUI application. It allows you to display a window or dialog box with controls for user interaction. Your GUI application can have one form or many forms.
5.1.2 Usage
Displaying a form A Form can be displayed in three ways:
1. If the Form is set as the startup form, then in auto mode when the system starts, it is displayed automatically. To set the startup form, right click on the form in the Forms Explorer, then select Startup Form, as shown below:
A form is shown in bold to indicate it is the startup form. You can also set the startup form for your project from Project | Properties | GUI Builder.
2. Using the GShowDialog function. This displays the form as a dialog box and returns the DialogResult value. result = GShowDialog(frmSetSpeed) Typically, the DialogResult value is set by buttons on the form, such as an OK button and a Cancel button.
3. Using the GShow statement. This displays the form as a window. GShow frmIODiags
16 GUI Builder 6.0 (Ver.6.0) Rev.2

5. GUI Builder Components
Setting Form Appearance Set the FormBorderStyle property. For forms used as dialogs, you should use 3 – FixedDialog.
Set ControlBox, MaximizeBox, MinimizeBox to configure the form's title bar.
Set the WindowState to show the form as Normal size, Maximized, or Minimized when it is displayed.
Using Help You can display help topics from your own help file by setting the HelpButton property to True and the HelpID property to a topic ID in the help file.
For the details, refer to 6.6 Using a Help File.
GUI Builder 6.0 (Ver.6.0) Rev.2 17

5. GUI Builder Components
5.1.3 Form Properties
Property Description AcceptButton Sets the button control whose click event executes when the user
types Enter. Default: None BackColor Sets the background color for the form. Default: Control CancelButton Sets the button control shoes click event executes when the user
types Esc. After executed, the form closes. Default: None ControlBox Sets whether the title bar control box items are displayed. Default: 1 – True Dialog Result Sets the return value when the form is closed (runtime only). EventTaskType Sets the type of task used for events. Default: 0 – Normal FormBorderStyle Sets the style of the border used for the form. Default: 3 – FixedDialog Height Sets the height of the control in pixels. HelpButton Sets whether the title bar help button is displayed. Default: 0 – False HelpID Sets the ID for the help topic that is displayed when the user clicks
the title bar help button Default: 0 Left Sets the left coordinate of the form in pixels. MaximizeBox Sets whether the title bar maximize button is displayed. Default: 0 – False MinimizeBox Sets whether the title bar minimize button is displayed. Default: 0 – False Name Sets the name of the control. StartPosition Sets the start position of the form. Default: 1 - CenterScreen Text Used to set the text of the control. Default: Name of form Top Sets The top coordinate of the form in pixels. Width Sets the width of the form in pixels. WindowState Sets the default window state for the form. Default: 0 - Normal
5.1.4 Form Events
Event Description Closed Executes after the form is closed. Load Executes when the form loads. Resize Executes when the form is resized.
18 GUI Builder 6.0 (Ver.6.0) Rev.2

5. GUI Builder Components
5.2 Button Control
5.2.1 Description The Button control allows the user to click it to perform an action. The Button control can display both text and images. When the button is clicked, it looks as if it is being pushed in and released.
5.2.2 Usage Button controls allow the operator to initiate some action by clicking with the mouse.
You can change the look of a button using several properties, such as ForeColor (used for the button text), BackColor, Font, TextAlign, Image, and ImageAlign.
You must provide a click event function to determine whether the operator clicked the button, and then take some action in the event handler.
5.2.3 Button Control Properties
Property Description BackColor The background color for the control. Default: Control BackColorMode The background color mode for the control. Default: 0 – Visual Style Enabled Sets whether the control is enabled at runtime. Default: 1 – True EventTaskType The type of task used for events. Default: 0 – Normal Font The font for the control text (design time only). Default: Microsoft Sans Serif 8.25 pt FontBold The bold attribute for the current font (runtime only). Default: 0 - False FontItalic The italic attribute for the current font (runtime only). Default: 0 - False FontName The name for the current font (runtime only). Default: Microsoft Sans Serif FontSize The size for the current font in points (runtime only). Default: 8.25 ForeColor The foreground color for the control text. Default: ControlText Height The height of the control in pixels. Image The picture for the control. To delete, press the <Delete> key. Default: Empty ImageAlign The picture alignment for the control. Default: 5 – MiddleCenter Left The left coordinate of the control in pixels.
GUI Builder 6.0 (Ver.6.0) Rev.2 19

5. GUI Builder Components
Name The name of the control. Default: ButtonXX TabIndex The tab index of the control. Text The text of the control. Default: Name of control TextAlign Selects the text alignment. Default: 5 – MiddleCenter ToolTipText The text used in the control's tooltip. Default: Empty Top The top coordinate of the control in pixels. Visible Whether the control is visible or not at runtime. Default: 1 – True Width The width of the control in pixels.
5.2.4 Button Control Events
Event Description Click Executes when the user clicks the control with the mouse.
20 GUI Builder 6.0 (Ver.6.0) Rev.2

5. GUI Builder Components
5.3 Label Control
5.3.1 Description Label controls are used to display text or images that cannot be edited by the user. They are used to identify objects on a form to provide a description of what a certain control will do if clicked, for example, or to display information in response to a run-time event or process in your application. Because the Label control cannot receive focus, it can also be used to create access keys for other controls.
5.3.2 Usage Use the Label control to display static text on your form.
Typically, label controls are used to provide a text label for another control. For example, if you have a ListBox control on a form, you can put a Label control above the listbox with the name of the list. In the example below, a label with the Text property set to "Part Numbers:" is used to label a list box.
Setting Label Appearance
Use the BorderStyle, ForeColor, BackColor, Font, Image, ImageAlign, and TextAlign properties to change the appearance of the label.
Using hotkeys (mnemonics)
You can designate a character in the label's Text property to be a hotkey. In the Text property of the label, use the ampersand character (&) before the hotkey. For example, in the example shown above, the Text property for the label is "Part &Numbers:".
At runtime, when the user types Alt+N, the focus will go to the listbox.
When using hotkeys, be sure that the tab order is set so that the label's TabIndex is one before the control's TabIndex that is labeled. See the section Changing Tab Order.
5.3.3 Label Control Properties
Property Description BackColor The background color for the control. Default: Control BorderStyle The border used for the control. Default: 0 – None Enabled Sets whether the control is enabled at runtime. Default: 1 – True EventTaskType The type of task used for events. Default: 0 – Normal Font The font for the control text (design time only). Default: Microsoft Sans Serif 8.25 pt
GUI Builder 6.0 (Ver.6.0) Rev.2 21

5. GUI Builder Components
FontBold The bold attribute for the current font (runtime only). Default: 0 – False FontItalic The italic attribute for the current font (runtime only). Default: 0 – False FontName The name for the current font (runtime only). Default: Microsoft Sans Serif FontSize The size for the current font in points (runtime only). Default: 8.25 ForeColor The foreground color for the control text. Default: ControlText Height The height of the control in pixels. Image The picture for the control. To delete, press the <Delete> key. Default: Empty ImageAlign The picture alignment for the control. Default: 5 – MiddleCenter Left The left coordinate of the control in pixels. Name The name of the control. Default: LabelXX TabIndex The tab index of the control. Text The text of the control. Default: Name of control TextAlign Selects the text alignment. Default: 1 – TopLeft ToolTipText The text used in the control's tooltip. Default: Empty Top The top coordinate of the control in pixels. Visible Whether the control is visible or not at runtime. Default: 1 – True Width The width of the control in pixels.
5.3.4 Label Control Events
Event Description Click Executes when the user clicks the control with the mouse. DblClick Executes when the user double clicks the control with the mouse.
22 GUI Builder 6.0 (Ver.6.0) Rev.2

5. GUI Builder Components
5.4 TextBox Control
5.4.1 Description Text boxes are used to get input from the operator or to display text. The TextBox control is generally used for editable text, although it can also be made read-only. Text boxes can display multiple lines, and wrap text to the size of the control. The TextBox control allows a single format for text displayed or entered in the control.
5.4.1 Usage A TextBox can be used in single line mode or multiline mode.
Single line textbox
By default, when a TextBox is created, it is in single line mode. You can only change the width of the control. The user can only type in one line of characters.
Multiline textbox
To use multiline mode, set the Multiline property to True. In this mode, you can change the height and width of the control. You can display scrollbars by setting the Scrollbars property.
Setting TextBox Appearance
Use the BorderStyle, ForeColor, BackColor, Font, and TextAlign properties to change the appearance of the textbox.
Displaying SPEL+ Global Variable Status
You can display the value of a SPEL+ global variable automatically by setting the Variable property.
5.4.3 TextBox Control Properties
Property Description AppendText Append text at runtime. BackColor The background color for the control. Default: Window BorderStyle The border used for the control. Default: 2 – Fixed3D Enabled Sets whether the control is enabled at runtime. Default: 1 – True EventTaskType The type of task used for events. Default: 0 – Normal Font The font for the control text (design time only). Default: Microsoft Sans Serif 8.25 pt FontBold The bold attribute for the current font (runtime only). Default: 0 – False FontItalic The italic attribute for the current font (runtime only). Default: 0 – False
GUI Builder 6.0 (Ver.6.0) Rev.2 23

5. GUI Builder Components
FontName The name for the current font (runtime only). Default: Microsoft Sans Serif FontSize The size for the current font in points (runtime only). Default: 8.25 ForeColor The foreground color for the control text. Default: WindowText Height The height of the control in pixels. Left The left coordinate of the control in pixels. Multiline Sets whether to display one line or multiple lines. Default: 0 - False Name The name of the control. Default: TextBoxXX PasswordChar Sets the character used to hide each character that is entered. Default: Empty ReadOnly Sets whether the user can edit text or not. Default: 0 - False ScrollBars Sets how to display the scrollbars for the control. Default: 0 - None TabIndex The tab index of the control. Text The text of the control. Default: Empty TextAlign Selects the text alignment. Default: 1 – Left ToolTipText The text used in the control's tooltip. Default: Empty Top The top coordinate of the control in pixels. Update Updates the display of textbox control (runtime only). Variable This is an optional SPEL+ global variable. Default: None Visible Whether the control is visible or not at runtime. Default: 1 – True Width The width of the control in pixels. WordWrap Sets whether to wrap words or not. Default: 1 – True
5.4.4 TextBox Control Events
Event Description KeyPress This event occurs when the control has focus and a key is pressed.
24 GUI Builder 6.0 (Ver.6.0) Rev.2

5. GUI Builder Components
5.5 RadioButton Control
5.5.1 Description RadioButton controls present a set of two or more mutually exclusive choices to the operator. While radio buttons and check boxes may appear to function similarly, there is an important difference: when a user selects a radio button, the other radio buttons in the same group cannot be selected as well.
5.5.2 Usage RadioButton controls should be grouped together in a GroupBox control. Each time the operator clicks on one of the radiobuttons in a group, the other buttons are deselected.
Use the Click event to determine if the operator clicked the radiobutton. Use the Checked property to determine if the user checked the box.
In some cases, it may be convenient to use one click event handler for all radiobuttons in a group. You can use the Sender$ parameter to determine which radiobutton was clicked. Sender$ is the name of the control that sent the event. Function frmSetup_OptionsClick(Sender$ As String)
Boolean checked
GGet frmSetup.Sender$.Checked, checked
If checked Then
Select Sender$
Case "RadioButton1":
g_Option1 = True
Case "RadioButton2":
g_Option2 = True
Send
EndIf
Fend
Setting RadioButton Appearance
Use the BorderStyle, ForeColor, BackColor, Font, Image, ImageAlign, and TextAlign properties to change the appearance of the radiobutton.
GUI Builder 6.0 (Ver.6.0) Rev.2 25

5. GUI Builder Components
5.5.3 RadioButton Control Properties
Property Description BackColor The background color for the control. Default: Control Checked Sets whether the control is selected at runtime. Default: 0 – False Enabled Sets whether the control is enabled at runtime. Default: 1 – True EventTaskType The type of task used for events. Default: 0 – Normal Font The font for the control text (design time only). Default: Microsoft Sans Serif 8.25 pt FontBold The bold attribute for the current font (runtime only). Default: 0 – False FontItalic The italic attribute for the current font (runtime only). Default: 0 – False FontName The name for the current font (runtime only). Default: Microsoft Sans Serif FontSize The size for the current font in points (runtime only). Default: 8.25 ForeColor The foreground color for the control text. Default: ControlText Height The height of the control in pixels. Image The picture for the control. To delete, press the <Delete> key. Default: Empty ImageAlign The picture alignment for the control. Default: 5 – MiddleCenter Left The left coordinate of the control in pixels. Name The name of the control. Default: RadioButtonXX TabIndex The tab index of the control. Text The text of the control. Default: Name of control TextAlign Selects the text alignment. Default: 4 – Middle Left ToolTipText The text used in the control's tooltip. Default: Empty Top The top coordinate of the control in pixels. Visible Whether the control is visible or not at runtime. Default: 1 – True Width The width of the control in pixels.
26 GUI Builder 6.0 (Ver.6.0) Rev.2

5. GUI Builder Components
5.5.4 RadioButton Control Events
Event Description Click Executes when the user clicks the control with the mouse.
5.6 CheckBox Control
5.6.1 Description The CheckBox control indicates whether a particular condition is on or off. It is commonly used to present a Yes/No or True/False selection to the user. You can use check box controls in groups to display multiple choices from which the user can select one or more. It is similar to the RadioButton control, but any number of grouped CheckBox controls may be selected.
5.6.2 Usage Use checkboxes to allow the operator to turn application preferences on or off.
Typically, you would add the checkboxes to a GroupBox control. Use the Checked property to determine if the user checked the box.
Setting CheckBox Appearance
Use the BorderStyle, ForeColor, BackColor, Font, Image, ImageAlign, and TextAlign properties to change the appearance of the checkbox.
5.6.3 CheckBox Control Properties
Property Description BackColor The background color for the control. Default: Control Checked Sets whether the control is checked at runtime. Default: 0 – False Enabled Sets whether the control is enabled at runtime. Default: 1 – True EventTaskType The type of task used for events. Default: 0 – Normal Font The font for the control text (design time only). Default: Microsoft Sans Serif 8.25 pt FontBold The bold attribute for the current font (runtime only). Default: 0 – False FontItalic The italic attribute for the current font (runtime only). Default: 0 – False
GUI Builder 6.0 (Ver.6.0) Rev.2 27

5. GUI Builder Components
FontName The name for the current font (runtime only). Default: Microsoft Sans Serif FontSize The size for the current font in points (runtime only). Default: 8.25 ForeColor The foreground color for the control text. Default: ControlText Height The height of the control in pixels. Image The picture for the control. To delete, press the <Delete> key. Default: Empty ImageAlign The picture alignment for the control. Default: 5 – MiddleCenter Left The left coordinate of the control in pixels. Name The name of the control. Default: CheckBoxXX TabIndex The tab index of the control. Text The text of the control. Default: Name of control TextAlign Selects the text alignment. Default: :4 – MiddleLeft ToolTipText The text used in the control's tooltip. Default: Empty Top The top coordinate of the control in pixels. Visible Whether the control is visible or not at runtime. Default: 1 – True Width The width of the control in pixels.
5.6.2 CheckBox Control Events
Event Description Click Executes when the user clicks the control with the mouse.
28 GUI Builder 6.0 (Ver.6.0) Rev.2

5. GUI Builder Components
5.7 ListBox Control
5.7.1 Description A ListBox control displays a list of items from which the operator can select one or more.
5.7.2 Usage Use the ListBox control to display a static list of items from which the operator can choose.
To add items to a list box
Use the AddItem property at runtime to add items to a listbox. This is normally done in the form load event. GSet frmSetup.lstModels.AddItem, "Model1"
GSet frmSetup.lstModels.AddItem, "Model2"
GSet frmSetup.lstModels.AddItem, "Model3"
Optionally, you can have the list sorted by set the Sorted property to True.
To determine which item was selected
Use the SelectedIndex property to determine the user selection. If no item has been selected, then SelectedIndex is -1. Integer index
GGet frmSetup.lstModels.SelectedIndex, index
The List array
You can access all of the items in a list using the List array property. Integer i, count
String item$
GGet frmSetup.lstModels.ListCount, count
For i = 0 To count - 1
GGet frmSetup.lstModels.List(i), item$
Next i
You can delete an item by setting the List property to an empty string. GSet frmSetup.lstModels.List(0), ""
Setting ListBox Appearance
Use the BorderStyle, ForeColor, BackColor, Font, properties to change the appearance of the listbox.
GUI Builder 6.0 (Ver.6.0) Rev.2 29

5. GUI Builder Components
5.7.3 ListBox Control Properties
Property Description AddItem Adds an item to the list at runtime. BackColor The background color for the control. Default: Window BorderStyle The border used for the control. Default: 2 – Fixed3D Enabled Sets whether the control is enabled at runtime. Default: 1 – True EventTaskType The type of task used for events. Default: 0 – Normal Font The font for the control text (design time only). Default: Microsoft Sans Serif 8.25 pt FontBold The bold attribute for the current font (runtime only). Default: 0 – False FontItalic The italic attribute for the current font (runtime only). Default: 0 – False FontName The name for the current font (runtime only). Default: Microsoft Sans Serif FontSize The size for the current font in points (runtime only). Default: 8.25 ForeColor The foreground color for the control text. Default: WindowText Height The height of the control in pixels. Left The left coordinate of the control in pixels. List Use to access the items in the list at runtime. ListCount Use to get the number of items in the list at runtime. Name The name of the control. Default: ListBoxXX SelectedIndex Use to determine which item has been selected by the operator at
runtime. Sorted Sets whether to sort the items in the list or not. Default: 0 – False TabIndex The tab index of the control. ToolTipText The text used in the control's tooltip. Default: Empty Top The top coordinate of the control in pixels. Visible Whether the control is visible or not at runtime. Default: 1 – True Width The width of the control in pixels.
30 GUI Builder 6.0 (Ver.6.0) Rev.2

5. GUI Builder Components
5.7.4 ListBox Control Events
Event Description Click Executes when the user clicks the control with the mouse. DblClick Executes when the user double clicks the control with the mouse.
5.8 ComboBox Control
5.8.1 Description The ComboBox control is used to display data in a dropdown combo box. By default, the ComboBox control appears in two parts: the top part is a text box that allows the user to type a list item. The second part is a list box that displays a list of items from which the user can select one.
5.8.2 Usage
The ComboBox control can behave in three different ways, depending on the value of the DropDownStyle property.
DropDownStyle = Simple
In simple mode, there is a textbox above a list box. The operator can edit or add selections by typing in the textbox area.
DropDownStyle = DropDown
In this mode, the listbox portion is not displayed until the operator clicks the down arrow button located on the right side of the text area. The operator can edit the selected text in the textbox area.
DropDownStyle = DropDownList
When DropDownList is specified, the operator cannot type text in the textbox area. Only items in the list can be selected.
For information on how to add items to the listbox portion of the ComboBox control, see the Usage information for the ListBox control for information on AddItem, List, ListCount, and SelectedIndex.
Setting ComboBox Appearance
Use the ForeColor, BackColor, and Font properties to change the appearance of the combobox.
GUI Builder 6.0 (Ver.6.0) Rev.2 31

5. GUI Builder Components
5.8.3 ComboBox Control Properties
Property Description AddItem Adds an item to the list at runtime. BackColor The background color for the control. Default: Window DropDownStyle Specifies the style of the combo box. Default: 1 – DropDown Enabled Sets whether the control is enabled at runtime. Default: 1 – True EventTaskType The type of task used for events. Default: 0 – Normal Font The font for the control text (design time only). Default: Microsoft Sans Serif 8.25 pt FontBold The bold attribute for the current font (runtime only). Default: 0 – False FontItalic The italic attribute for the current font (runtime only). Default: 0 – False FontName The name for the current font (runtime only). Default: Microsoft Sans Serif FontSize The size for the current font in points (runtime only). Default: 8.25 ForeColor The foreground color for the control text. Default: WindowText Height The height of the control in pixels. Left The left coordinate of the control in pixels. List Use to access the items in the list at runtime. ListCount Use to get the number of items in the list at runtime. Name The name of the control. Default: ComboBoxXX SelectedIndex Use to determine which item has been selected by the operator at
runtime. Sorted Sets whether to sort the items in the list or not. Default: 0 – False TabIndex The tab index of the control. Text The text of the control. Default: Empty ToolTipText The text used in the control's tooltip. Default: Empty Top The top coordinate of the control in pixels. Visible Whether the control is visible or not at runtime. Default: 1 – True Width The width of the control in pixels.
32 GUI Builder 6.0 (Ver.6.0) Rev.2

5. GUI Builder Components
5.8.4 ComboBox Control Events
Event Description Click Executes when the user clicks the control with the mouse.
5.9 PictureBox Control
5.9.1 Description The PictureBox control is used to display graphics in bitmap, GIF, JPEG, PNG, WMF, metafile, or icon format.
5.9.2 Usage
Use a PictureBox control to display an image from a file. You can set the image for a picturebox control at design time or runtime.
Setting the Image
At design time, use the Image property to browse for an image file.
At runtime, use the Image property to specify the full path for the image file.
Changing image size
You can specify how the image is sized by using the SizeMode property.
Setting PictureBox Appearance
Use the BackColor, BorderStyle, and SizeMode properties to change the appearance of the picturebox.
5.9.3 PictureBox Control Properties
Property Description BackColor The background color for the control. Default: Control BorderStyle The border used for the control. Default: 0 – None Enabled Sets whether the control is enabled at runtime. Default: 1 – True EventTaskType The type of task used for events. Default: 0 – Normal Height The height of the control in pixels. Image Specifies the image to be displayed. To delete, press the <Delete>
key. Left The left coordinate of the control in pixels. Name The name of the control. Default: PictureBoxXX SizeMode Specifies how the image is sized. Default: 0 – Normal TabIndex The tab index of the control. ToolTipText The text used in the control's tooltip. Default: Empty
GUI Builder 6.0 (Ver.6.0) Rev.2 33

5. GUI Builder Components
Top The top coordinate of the control in pixels. Visible Whether the control is visible or not at runtime. Default: 1 – True Width The width of the control in pixels.
5.9.4 PictureBox Control Events
Event Description Click Executes when the user clicks the control with the mouse. DblClick Executes when the user double clicks the control with the mouse.
34 GUI Builder 6.0 (Ver.6.0) Rev.2

5. GUI Builder Components
5.10 GroupBox Control
5.10.1 Description GroupBox controls are used to provide an identifiable grouping for other controls. Typically, you use group boxes to subdivide a form by function. For example, you may have a setup form that specifies robot speed options.. Grouping all options in a group box gives the user a logical visual cue.
5.10.2 Usage Use the GroupBox control to group together controls for selecting options (using RadioButtons) or setting preferences (using CheckBoxes). You can also group together other controls as well.
First, add a GroupBox control to your form.
Next, either create new controls on the groupbox, or drag existing controls to the groupbox.
Set the Text property of the groupbox to the name of the group.
Setting GroupBox Appearance
Use the BackColor, ForeColor, and Font properties to change the appearance of the picturebox.
5.10.3 GroupBox Control Properties
Property Description BackColor The background color for the control. Default: Control Enabled Sets whether the control is enabled at runtime. Default: 1 – True EventTaskType The type of task used for events. Default: 0 – Normal Font The font for the control text (design time only). Default: Microsoft Sans Serif 8.25 pt ForeColor The foreground color for the control text. Default: ControlText FontBold The bold attribute for the current font (runtime only). Default: 0 – False FontItalic The italic attribute for the current font (runtime only). Default: 0 – False FontName The name for the current font (runtime only). Default: Microsoft Sans Serif FontSize The size for the current font in points (runtime only). Default: 8.25
GUI Builder 6.0 (Ver.6.0) Rev.2 35

5. GUI Builder Components
ForeColor The foreground color for the control text. Default: ControlText Height The height of the control in pixels. Left The left coordinate of the control in pixels. Name The name of the control. Default: GroupBoxXX TabIndex The tab index of the control. Default: Text The text of the control. Default: Name of the Control ToolTipText The text used in the control's tooltip. Default: Empty Top The top coordinate of the control in pixels. Visible Whether the control is visible or not at runtime. Default: 1 – True Width The width of the control in pixels.
5.10.4 GroupBox Control Events
Event Description Click Executes when the user clicks the control with the mouse.
36 GUI Builder 6.0 (Ver.6.0) Rev.2

5. GUI Builder Components
5.11 Timer Control
5.11.1 Description The Timer is a control that raises an event at regular intervals. It is executable even when the emergency stop occurs or other normal tasks are paused.
5.11.2 Usage Use the Timer control to periodically execute code. For example, a Timer control could be used to update a status label every two seconds.
To use a Timer
1. Add a Timer control to a form. The control is displayed below the form in the design area, since this control is invisible at runtime.
2. Set the Interval property to the desired time period in milliseconds.
3. Set the Enabled property to True at design time if the timer should always run. Otherwise, set the Enabled property to True at runtime in your code.
4. Add an event handler for the Tick event to execute your code. NOTE When a timer is executing the Tick event handler, other tick events from the same timer
are ignored.
5.11.3 Timer Control Properties
Property Description Enabled Sets whether the control is enabled. Default: 0 – False Interval Sets the time interval in milliseconds Default: 100 Name The name of the control. Default: TimerXX
5.11.4 Timer Control Events
Event Description Tick Occurs when the time is enabled and the interval has been reached.
GUI Builder 6.0 (Ver.6.0) Rev.2 37

5. GUI Builder Components
5.12 VideoBox Control
5.12.1 Description The VideoBox control allows you to display video for the Vision Guide option in your forms.
5.12.2 Usage
You can easily display a video window on a form in your application by using the VideoBox control. When you run a vision sequence, the graphics can also be displayed on the window.
Perform the following steps to create a vision window:
1. Place a VideoBox control on the form you want the video to be displayed. The control size can be changed up to the full size.
2. Set the VideoEnabled property to True.
3. Set the GraphicsEnabled property to True if you want to display vision graphics.
4. By default, the Camera property value is 0. This allows the videobox to display video from any camera when a sequence is run. Set the Camera property to any camera number in the project to show the video and sequence graphics for that camera.
The video is automatically scaled to fit the size of the VideoBox. When you change the height or width of the videobox, the aspect ratio is maintained.
Setting VideoBox Appearance
Use the BorderStyle property to change the appearance of the videobox.
5.12.3 VideoBox Control Properties
Property Description BorderStyle The border used for the control. Default: 0 – None Camera Selects which camera to display video for. Default: 0 Enabled Sets whether the control is enabled at runtime. Default: 1 – True EventTaskType The type of task used for events. Default: 0 – Normal GraphicsEnabled Sets whether vision graphics are displayed or not. Default: 0 – False Height The height of the control in pixels. Left The left coordinate of the control in pixels. Name The name of the control. Default: VideoBoxXX TabIndex The tab index of the control. ToolTipText The text used in the control's tooltip. Default: Empty Top The top coordinate of the control in pixels. VideoEnabled Sets whether video is displayed on not.
38 GUI Builder 6.0 (Ver.6.0) Rev.2

5. GUI Builder Components
Default: 0 - False Visible Whether the control is visible or not at runtime. Default: 1 – True Width The width of the control in pixels.
5.12.4 VideoBox Control Events
Event Description Click Executes when the user clicks the control with the mouse. DblClick Executes when the user double clicks the control with the mouse.
5.13 LED Control
5.13.1 Description The LED control is used to display I/O status.
5.13.2 Usage To use the LED control
1. Set the Text property to the name of the status.
2. Set the IOType property. You can choose from input, output, or memory I/O.
3. Set the IOBit property. This is the bit you want to display the status for.
For outputs, you can optionally allow the operator to double click on the LED control to toggle the output status. To do this, set the AllowStateChange property to True.
Setting LED Appearance
Use the BackColor, BorderStyle, ForeColor, Font, ImageAlign, and TextAlign properties to change the appearance of the LED.
You can also change the ImageOn and ImageOff properties to use the built-in color images, or you can provide your own images.
5.13.3 LED Control Properties
Property Description AllowStateChange Allows the operator to toggle output status Default: 0 – False BackColor The background color for the control. Default: Control BorderStyle The border used for the control. Default: 0 – None Enabled Sets whether the control is enabled at runtime. Default: 1 – True EventTaskType The type of task used for events. Default: 0 – Normal Font The font for the control text (design time only). Default: Microsoft Sans Serif 8.25 pt
GUI Builder 6.0 (Ver.6.0) Rev.2 39

5. GUI Builder Components
FontBold The bold attribute for the current font (runtime only). Default: 0 – False FontItalic The italic attribute for the current font (runtime only). Default: 0 – False FontName The name for the current font (runtime only). Default: Microsoft Sans Serif FontSize The size for the current font in points (runtime only). Default: 8.25 ForeColor The foreground color for the control text. Default: ControlText Height The height of the control in pixels. ImageAlign The picture alignment for the control. Default: 4 - MiddleLeft ImageOff This sets the image displayed when the I/O status is off. Default: LedOff.ico ImageOn This sets the image displayed when the I/O status is on. Default: LedRed.ico IOBit Range: 0 to 9999
Default: 0 IOType This sets the type of I/O to monitor. Default: 0 – Input Left The left coordinate of the control in pixels. Name The name of the control. Default: LedXX TabIndex The tab index of the control. Text The text of the control. Default: Name of control TextAlign Selects the text alignment. Default: 6 – MiddleRight ToolTipText The text used in the control's tooltip. Default: Empty Top The top coordinate of the control in pixels. Visible Whether the control is visible or not at runtime. Default: 1 – True Width The width of the control in pixels.
5.13.4 LED Control Events
Event Description DblClick Executes when the user double clicks the control with the mouse.
40 GUI Builder 6.0 (Ver.6.0) Rev.2

6. Operation
GUI Builder 6.0 (Ver.6.0) Rev.2 41
6. Operation
6.1 Overview This chapter contains the following topics:
- Developing your GUI in Program Mode
- Configuring your GUI startup in Auto Mode
- Handling pause and continue
- Handling emergency stop
- Using a help file
6.2 GUI Development in Program Mode You design and debug your GUI application in program mode.
To begin, start EPSON RC+ 6.0 in program mode.
6.2.1 Design the GUI
To design the GUI for your application, follow these steps as a simple guideline.
1. Create one or more forms for the application. Typically you will designate one of the forms to be your main form.
2. Decide on how you want to start the GUI. You can set one of the forms as your startup form. This form will automatically be displayed when RC+ starts in auto mode. If you do not want to display a form at startup, then the Operator Window will be displayed and you can display any form from SPEL+ code using GShow or GShowDialog.
3. Add controls to the forms.
4. Add desired events to the controls.
For details on working with forms and controls, see the chapter Working with Forms and Controls.

6. Operation
6.2.2 Debugging You can run any of the forms in the project from the Run Window.
1. Open the Run Window
2. Select the form you want to run from the dropdown list.
3. Click Start. The selected form will be displayed and you can use the controls on the form.
4. To stop, close all forms, or click the Stop button on the Run Window.
GUI event handlers run as SPEL+ tasks, so you can set a breakpoint in any event handler, step through code, and view variable values.
6.3 Auto Mode After you have developed your application, you will need to setup EPSON RC+ to run in Auto mode. At startup time, you can choose to show one of your GUI forms, or you can show the Operator Window and then display one of your forms from your program.
To set EPSON RC+ to start in Auto mode
1. Open Setup | System Configuration.
2. In the Start Mode page, check Auto and click Apply, then click Close.
To configure a form to be displayed at startup
1. Open the GUI Builder window.
2. In the Forms Explorer, right click on the form you want displayed at startup and select Startup Form.
3. Click the Project Save button on the main toolbar.
42 GUI Builder 6.0 (Ver.6.0) Rev.2

6. Operation
6.4 Handling Pause and Continue You may want to use the pause and continue feature of the controller in your GUI. Typically, you will have a dialog with a pause button and a continue button. For these buttons to work properly, you need to set the EventTaskType property for each button to 1 – NoPause. This is because when the button click event executes, the event task must ignore the pause state of the controller. Function frmMain_btnPause_Click(Sender$ As String)
Pause Fend
Function frmMain_btnCont_Click(Sender$ As String) Cont Fend
6.5 Handling Emergency Stop After an emergency stop, you must reset the emergency stop condition before you can run the robot again. To do this, provide a reset button with the EventTaskType set to 2 – NoEmgAbort. Function frmMain_btnReset_Click(Sender$ As String)
Reset If EstopOn Then MsgBox "EStop could not be reset" EndIf Fend
6.6 Using a Help File GUI Builder supports a simple help system by allowing you to specify a help file for the project from which you can show a topic when a form help button is clicked by the operator.
Help files must be in the Microsoft HTML help format.
To use a help file:
1. Open Project | Properties | GUI Builder.
2. Browse to the help file and click open to set the help file.
3. For each form that will show help, set the HelpButton property to True, and set the
HelpID property for the topic you want to display.
GUI Builder 6.0 (Ver.6.0) Rev.2 43

7. GUI Builder Reference
44 GUI Builder 6.0 (Ver.6.0) Rev.2
7. GUI Builder Reference
7.1 Overview This chapter explains all GUI Builder form and control properties and events, and all GUI Builder SPEL+ commands. For more information on how to use GUI Builder, refer to the GUI Builder manual.
7.2 GUI Builder Properties and Events Format Description All GUI Builder properties and events are listed in the pages that follow. An explanation of the headings for the property and result reference pages is given below:
Applies To If the property or event is used with GUI Builder objects, then this section simply lists the objects for which this property applies. (Ex. Button, Label, Checkbox...) If the property or event is used with forms then the word Forms will appear in this section.
Description A simple description is given for each property or event. This section is normally very short for simplicity.
Usage The Usage Section describes how to access the property or event from the SPEL+ Language.
Values Describes the range of acceptable values which the property can be set to or which the result will return. A default value is also shown for those properties that have a default.
Remarks Explains more details than the Description Section. This section is normally used to describe any caveats or special information that may apply to the specific property or event. (It is highly recommended to read the Remarks Section for each property prior to its usage.)
See Also Gives a list of related properties, results, objects and other topics that may prove useful to review.
Runtime only This is displayed under the property or result name when it applies. Runtime only properties and results cannot be accessed from the GUI Builder. They can only be accessed from the SPEL+ language.

AcceptButton Property
AcceptButton Property
Applies To Form
Description
Gets or sets the button on the form that is clicked when the user presses the ENTER key.
Usage
GGet Form.AcceptButton, var
GSet Form.AcceptButton, value
Form Name of a form or string variable containing a form name.
var String variable that will contain the value of the property.
value String expression for the new value of the property.
Values
The name of any button on the form.
Default: None
Remarks
This property allows you to designate a default action to occur when the user presses the ENTER key in your application. The button assigned to this property must be a Button that is on the current form or located within a container on the current form.
You can use this property to allow the user to quickly navigate a simple form by allowing them to simply press the ENTER key when they are finished instead of manually clicking the accept button with their mouse.
The accept button might not be activated if the currently selected control on the form intercepts the ENTER key and processes it. For example, a multiline text box control allows the ENTER key to be pressed when it is selected to insert a new line character in the control.
See Also
Form, Button, CancelButton
Example GSet frmMain.AcceptButton, "btnOK"
GUI Builder 6.0 (Ver.6.0) Rev.2 45

AddItem Property
AddItem Property
Applies To ListBox, ComboBox
Description
Used to add an item to a ListBox or ComboBox control.
Usage
GSet Form.Control.AddItem, value
Form Name of a form or string variable containing a form name.
Control Name of a control or string variable containing a control name. The control must exist in the specified form.
value String expression for the new value of the property.
Values
A string value to be added to the list.
See Also
ComboBox, ListBox, List, ListCount, Sorted
Example
GSet frmMain.lstModels.AddItem, "Model1"
46 GUI Builder 6.0 (Ver.6.0) Rev.2

AppendText Property
AppendText Property
Applies To TextBox
Description
Appends text to a TextBox control.
Usage
GSet Form.Control.AppendText, value
Form Name of a form or string variable containing a form name.
Control Name of a control or string variable containing a control name. The control must exist in the specified form.
value String expression for the new value of the property.
Values
A string that will be added to the end of the text in the control.
See Also
TextBox
Example GSet frmMain.txtStatus.AppendText, "Cycle Complete"
GUI Builder 6.0 (Ver.6.0) Rev.2 47

AllowStateChange Property
AllowStateChange Property
Applies To LED
Description
Gets or sets the inversion actuation of LED control when double-clicked.
Usage
GGet Form.Control.AllowStateChange, var
GSet Form.Control.AllowStateChange, value
Form Name of a form or string variable containing a form name.
Control Name of a control or string variable containing a control name. The control must exist in the specified form.
var Boolean variable that will contain the value of the property.
value Boolean expression for the new value of the property.
Values
0 – False
1 – True
Default: 0 – False
Remarks To invert output, set IOType property in 1 – Output or 2 – Memory.
See Also
LED, IOType
Example GSet frmMain.Led1.AllowStateChange, True
48 GUI Builder 6.0 (Ver.6.0) Rev.2

BackColor Property
BackColor Property
Applies To Form, Button, Label, TextBox, RadioButton, CheckBox, ListBox, ComboBox, PictureBox, GroupBox, LED
Description
Gets or sets the background color of a form or control.
Usage
GGet Form.Control.BackColor, var
GSet Form.Control.BackColor, value
Form Name of a form or string variable containing a form name.
Control Name of a control or string variable containing a control name.
var String variable that will contain the value of the property.
value String expression for the new value of the property.
Values
The name of the color to be used for the background color of the form or control.
Default: Control (Form, Button, Label, RadioButton, CheckBox, PictureBox, GroupBox, LED) Window (TextBox, ListBox, ComboBox)
See Also
BackColorMode, Form, Button, Label, TextBox, RadioButton, Checkbox, ListBox, ComboBox, PictureBox, GroupBox, LED
Example GSet frmMain.lblStatus.BackColor, "Red"
GUI Builder 6.0 (Ver.6.0) Rev.2 49

BackColorMode Property
BackColorMode Property
Applies To Button
Description
Gets or sets the BackColorMode used for a button control.
Usage
GGet Form.Control.BackColorMode, var
GSet Form.Control.BackColorMode, value
Form Name of a form or string variable containing a form name.
Control Name of a control or string variable containing a control name.
var Integer variable that will contain the value of the property.
value Integer expression for the new value of the property.
Values
0 – VisualStyle. Uses the system specified BackColor.
1 - User. Uses the specified BackColor.
Remarks
When BackColorMode is 0, the background color for the control is set by Windows, depending on the current theme.
When BackColorMode is 1, the background color is set by the BackColor property value.
Default: 0 – Visual Style
See Also
BackColor, Button
Example GSet frmMain.btnOK.BackColorMode, BACKCOLORMODE_USER
50 GUI Builder 6.0 (Ver.6.0) Rev.2

BorderStyle Property
BorderStyle Property
Applies To Label, TextBox, ListBox, PictureBox, VideoBox, LED
Description
Gets or sets the control's border style.
Usage
GGet Form.Control.BorderStyle, var
GSet Form.Control.BorderStyle, value
Form Name of a form or string variable containing a form name.
Control Name of a control or string variable containing a control name.
var Integer variable that will contain the value of the property.
value Integer expression for the new value of the property.
Values
0 - None
1 - FixedSingle
2 - Fixed3D
Defualt: 0 – None (Label, PictureBox, VideoBox, LED) 2 – Fixed3D (TextBox, ListBox)
Remarks
You can use this property to add a border to the control. For example, this property can be used to differentiate a Label that labels another control from a Label that displays the status of a process in an application.
See Also
Label, TextBox, ListBox, PictureBox, VideoBox, LED
Example GSet frmMain.lblStatus.BorderStyle, BORDERSTYLE_NONE
GUI Builder 6.0 (Ver.6.0) Rev.2 51

Camera Property
Camera Property
Applies To VideoBox
Description
Gets or sets the camera number for the VideoBox control.
Usage
GGet Form.Control.Camera, var
GSet Form.Control.Camera, value
Form Name of a form or string variable containing a form name.
Control Name of a control or string variable containing a control name.
var Integer variable that will contain the value of the property.
value Integer expression for the new value of the property.
Values
The camera number for the video display. If the value is 0, then the video from any camera is displayed when VRun executes. To display the video, set the VideoEnabled property to “1 – True”.
See Also
VideoBox, VideoEnabled
Example
GSet frmMain.VideoBox1.Camera, 1
52 GUI Builder 6.0 (Ver.6.0) Rev.2

CancelButton Property
CancelButton Property
Applies To Form
Description
Gets or sets the button on the form that is clicked when the user presses the ESC key.
Usage
GGet Form.CancelButton, var
GSet Form.CancelButton, value
Form Name of a form or string variable containing a form name.
var String variable that will contain the value of the property.
value String expression for the new value of the property.
Values
The name of any button on the form.
Default: None
Remarks
The cancel button for a form is the button control that is clicked whenever the user presses the ESC key. The button assigned to this property must be a button that is on the current form or located within a container on the current form.
This property allows you to designate a default action to occur when the user presses the ESC key in your application. You can use this property to allow the user to quickly navigate a simple form by allowing them to simply press the ESC key to close a window without committing changes instead of manually clicking the cancel button with their mouse.
CancelButton may not work if another control on the form intercepts the ESC key. For example, if you have a ComboBox open on your form, ESC will close the ComboBox instead of closing the Form.
The Button control assigned to CancelButton must be visible on the form, or else pressing the ESC key will have no effect.
See Also
Form, Button, AcceptButton
Example
GSet frmMain.CancelButton, "btnCancel"
GUI Builder 6.0 (Ver.6.0) Rev.2 53

Checked Property
Checked Property
Applies To RadioButton, Checkbox
Description
Gets or sets a value indicating whether the CheckBox or RadioButton control is checked.
Usage
GGet Form.Control.Checked, var
GSet Form.Control.Checked, value
Form Name of a form or string variable containing a form name.
Control Name of a control or string variable containing a control name.
var Boolean variable that will contain the value of the property.
value Boolean expression for the new value of the property.
Values
0 - False
1 – True
Default: 0 – False
Remarks
Use this property to determine whether the CheckBox or RadioButton control is checked. This property can also be used to programmatically set the state of the CheckBox or RadioButton control.
See Also
RadioButton, CheckBox
Example GSet frmMain.chkHiPower.Checked, False
54 GUI Builder 6.0 (Ver.6.0) Rev.2

Click Event
Click Event
Applies To Button, Label, RadioButton, Checkbox, ListBox, ComboBox, PictureBox, GroupBox, VideoBox
Description
Occurs when a control is clicked.
Usage
Form_Control_Click (sender$ As String)
Sender$ Name of a control that sent the event.
Remarks
The Click event is used to respond to a click on a control by the user. You can use the Sender$ parameter to determine which control sent the event. This is useful when you want to use one function to handle more than one control, such as for radio buttons and check boxes.
See Also
Button, Label, RadioButton, Checkbox, ListBox, ComboBox, PictureBox, GroupBox, VideoBox
Example
Function frmMain_btnStart_Click(Sender$ As String) Xqt main Fend
GUI Builder 6.0 (Ver.6.0) Rev.2 55

Closed Event
Closed Event
Applies To Form
Description
Occurs when a form has been closed.
Usage
Form_Closed (Sender$ As String)
Sender$ Name of the form that sent the event.
Remarks
You can use this event to perform tasks after a form has been closed.
See Also
Form, Load, Resize
Example
Function frmMain_Closed(Sender$ As String)
Print "frmMain was closed" Fend
56 GUI Builder 6.0 (Ver.6.0) Rev.2

ControlBox Property
ControlBox Property
Applies To Form
Description
Gets or sets a value indicating whether a control box is displayed in the caption bar of the form.
Usage
GGet Form.ControlBox, var
GSet Form.ControlBox, value
Form Name of a form or string variable containing a form name.
var Boolean variable that will contain the value of the property.
value Boolean expression for the new value of the property.
Values
0 - False
1 – True
Default: True
Remarks
If the ControlBox property is set to true, the control box is displayed in the upper-left corner of the form's title bar. The control box can be used to close the form.
See Also
Form, MaximizeBox, MinimizeBox
Example GSet frmMain.ControlBox, False
GUI Builder 6.0 (Ver.6.0) Rev.2 57

DblClick Event
DblClick Event
Applies To Label, ListBox, Led, PictureBox, VideoBox, LED
Description
Occurs when a control is double clicked.
Usage
Form_Control_DblClick (Sender$ As String)
Sender$ Name of a control that sent the event.
Remarks
The DblClick event is used to respond to a double click on a control by the user. You can use the Sender$ parameter to determine which control sent the event.
See Also
Label, ListBox, PictureBox, VideoBox, LED
Example
Function frmMain_lstModels_DblClick(Sender$ As String) Integer index
GGet frmMain.lstModels.SelectedIndex, index
GGet frmMain.lstModels.List(index), g_CurrModel$
Fend
58 GUI Builder 6.0 (Ver.6.0) Rev.2

DialogResult Property
DialogResult Property
Applies To Form
Description
Gets or sets the dialog result for a form.
Usage GGet Form.DialogResult, var
GSet Form.DialogResult, value
Form Name of a form or string variable containing a form name.
var Integer variable that will contain the value of the property.
value Integer expression for the new value of the property.
Values 0 – None
1 – OK
2 – Cancel
Default: 2 – Cancel
Remarks DialogResult is used to indicated if the user accepted a form or canceled it. Typically, a dialog has an OK button and a Cancel button. When the user clicks the OK button, the DialogResult property is set to 1 - OK in the button click event. If the Cancel button is clicked, the DialogResult property is set to 2 – Cancel.
See Also
Form
Example Function frmSetSpeed_btnOK_Click(Sender$ As String)
GSet frmSetSpeed.DialogResult, DIALOGRESULT_OK
GClose frmSetSpeed
GClose frmSetSpeed
Fend
Function frmMain_btnSetSpeed_Click(Sender$ As String)
Integer result
String speed$
result = GShowDialog(frmSetSpeed)
If result = DIALOGRESULT_OK Then
GGet frmSetSpeed.txtSpeed.Text, speed$
g_RobotSpeed = Val(speed$)
Fend
GUI Builder 6.0 (Ver.6.0) Rev.2 59

DropDownStyle Property
DropDownStyle Property
Applies To ComboBox
Description
Gets or sets a value specifying the style of the combo box.
Usage
GGet Form.Control.DropDownStyle, var
GSet Form.Control.DropDownStyle, value
Form Name of a form or string variable containing a form name.
Control Name of a control or string variable containing a control name.
var Integer variable that will contain the value of the property.
value Integer expression for the new value of the property.
Values
0 – Simple
1 – DropDown
2 – DropDownList
Default: 1 – DropDown
Remarks
The DropDownStyle property controls the interface that is presented to the user. You can enter a value that provides a simple drop-down list box, where the list always displays, a drop-down list box, where the text portion is not editable and you must select an arrow to view the drop-down, or the default drop-down list box, where the text portion is editable and the user must press the arrow key to view the list. To always display a list that the user cannot edit, use a ListBox control.
See Also
ComboBox
Example GSet frmMain.cmbPartNames.DropDownStyle, DROPDOWNSTYLE_SIMPLE
60 GUI Builder 6.0 (Ver.6.0) Rev.2

Enabled Property
Enabled Property
Applies To Button, Label, TextBox, RadioButton, CheckBox, ListBox, ComboBox, PictureBox, GroupBox, Timer, VideoBox, LED
Description
Gets or sets whether a control is enabled or not at runtime.
Usage
GGet Form.Control.Enabled, var
GSet Form.Control.Enabled, value
Form Name of a form or string variable containing a form name.
Control Name of a control or string variable containing a control name.
var Boolean variable that will contain the value of the property.
value Boolean expression for the new value of the property.
Values
0 – False
1 – True
Default: 1 – True (for others than Timer) 0 – False (for Timer)
Remarks
In certain situations, you need to prevent the operator from clicking a control, such as a button. For example, when SPEL+ tasks are not running, you can dim a Pause button by setting Enabled to 0 – False.
See Also
Button, Label, TextBox, RadioButton, Checkbox, ListBox, ComboBox, PictureBox, GroupBox, Timer, VideoBox, LED
Example GSet frmMain.btnPause.Enabled, False
GUI Builder 6.0 (Ver.6.0) Rev.2 61

EventTaskType Property
EventTaskType Property
Applies To Form, Button, Label, TextBox, RadioButton, CheckBox, ListBox, ComboBox, PictureBox, GroupBox, VideoBox, LED
Description
Gets the task type of the function that starts with the event.
Usage
GGet Form.[Control].EventTaskType, var
Form Name of a form or string variable containing a form name.
Control Name of a control or string variable containing a control name.
var Integer variable that will contain the value of the property.
Values
0 – Normal
1 – NoPause
2 – NoEmgAbort
Default: 0 – Nomal
Remarks
When this property is set to 1–NoPause, the event handler function is able to be run when other tasks are paused.
When this property is set to 2–NoEmgAbort, the event handler function is able to be run in the emergency stop state.
See Also
Form, Button, Label, TextBox, RadioButton, CheckBox, ListBox, ComboBox, PictureBox, GroupBox, VideoBox, LED
Example Integer Ttype GGet frmMain.btnPause.EventTaskType, Ttype
62 GUI Builder 6.0 (Ver.6.0) Rev.2
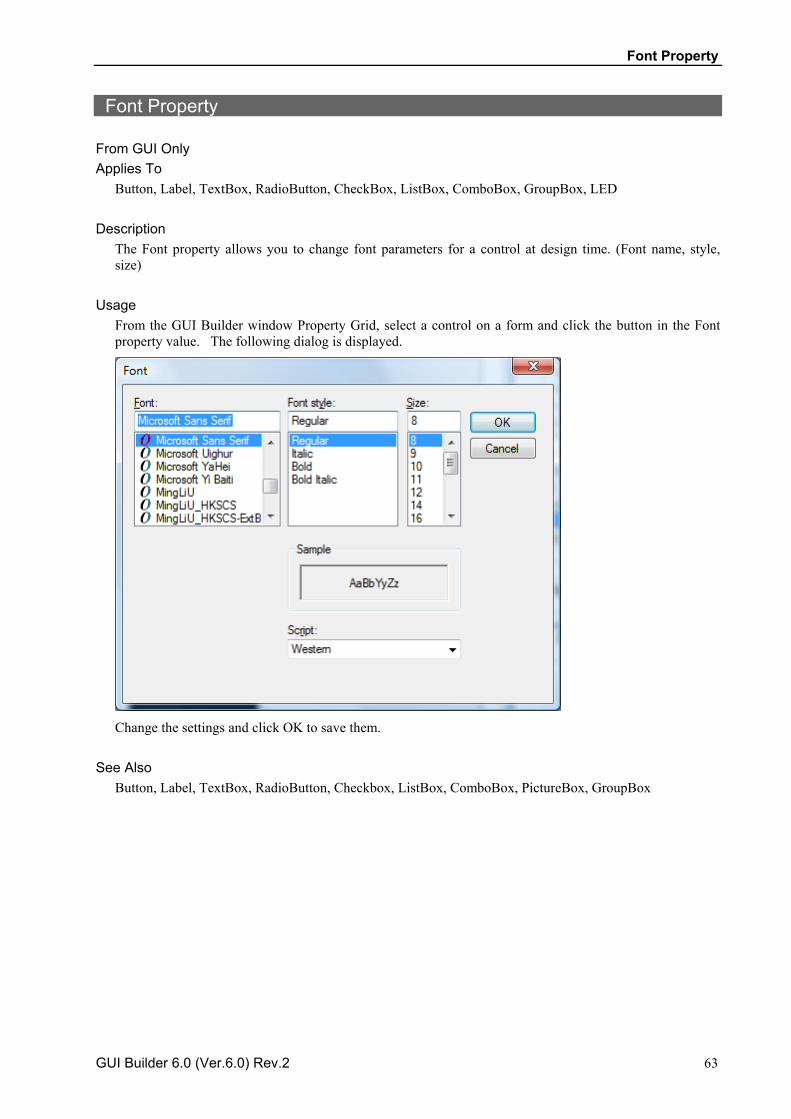
Font Property
Font Property
From GUI Only Applies To
Button, Label, TextBox, RadioButton, CheckBox, ListBox, ComboBox, GroupBox, LED
Description
The Font property allows you to change font parameters for a control at design time. (Font name, style, size)
Usage
From the GUI Builder window Property Grid, select a control on a form and click the button in the Font property value. The following dialog is displayed.
Change the settings and click OK to save them.
See Also
Button, Label, TextBox, RadioButton, Checkbox, ListBox, ComboBox, PictureBox, GroupBox
GUI Builder 6.0 (Ver.6.0) Rev.2 63

FontBold Property
FontBold Property
Applies To Button, Label, TextBox, RadioButton, CheckBox, ListBox, ComboBox, GroupBox, LED
Description
Gets or sets if the font for the text used on a control is bold at runtime.
Usage
GGet Form.Control.FontBold, var
GSet Form.Control.FontBold, value
Form Name of a form or string variable containing a form name.
Control Name of a control or string variable containing a control name.
var Boolean variable that will contain the value of the property.
value Boolean expression for the new value of the property.
Values
0 – False
1 – True
Default: 0 – False
See Also
Button, Label, TextBox, RadioButton, Checkbox, ListBox, ComboBox, GroupBox, LED, FontName, FontItalic, FontSize
Example GSet frmMain.btnOK.FontBold, True
64 GUI Builder 6.0 (Ver.6.0) Rev.2

FontItalic Property
FontItalic Property
Applies To Button, Label, TextBox, RadioButton, CheckBox, ListBox, ComboBox, GroupBox, LED
Description
Gets or sets if the font for a control is italic at runtime.
Usage
GGet Form.Control.FontItalic, var
GSet Form.Control.FontItalic, value
Form Name of a form or string variable containing a form name.
Control Name of a control or string variable containing a control name.
var Boolean variable that will contain the value of the property.
value Boolean expression for the new value of the property.
Values
0 – False
1 – True
Default: 0 – False
See Also
Button, Label, TextBox, RadioButton, Checkbox, ListBox, ComboBox, GroupBox, LED, FontName, FontBold, FontSize
Example
GSet frmMain.btnOK.FontItalic, True
GUI Builder 6.0 (Ver.6.0) Rev.2 65

FontName Property
FontName Property
Applies To Button, Label, TextBox, RadioButton, CheckBox, ListBox, ComboBox, GroupBox, LED
Description
Gets or sets the font name of the text used on a control.
Usage
GGet Form.Control.FontName, var
GSet Form.Control.FontName, value
Form Name of a form or string variable containing a form name.
Control Name of a control or string variable containing a control name.
var String variable that will contain the value of the property.
value String expression for the new value of the property.
Values
A string containing the name of the font.
Default: Microsoft Sans Serif
See Also
Button, Label, TextBox, RadioButton, Checkbox, ListBox, ComboBox, GroupBox, LED, FontSize, FontItalic, FontBold
Example
GSet frmMain.txtStatus.FontName, "Courier New"
66 GUI Builder 6.0 (Ver.6.0) Rev.2

FontSize Property
FontSize Property
Applies To Button, Label, TextBox, RadioButton, CheckBox, ListBox, ComboBox, GroupBox, LED
Description
Gets or sets the font size of the text used on a control.
Usage
GGet Form.Control.FontSize, var
GSet Form.Control.FontSize, value
Form Name of a form or string variable containing a form name.
Control Name of a control or string variable containing a control name.
var Real variable that will contain the value of the property.
value Real expression for the new value of the property.
Values
The value of the font size in points.
Default: 8.25
See Also
Button, Label, TextBox, RadioButton, Checkbox, ListBox, ComboBox, GroupBox, FontName, FontItalic, FontBold
Example GSet frmMain.btnOK.FontSize, 16
GUI Builder 6.0 (Ver.6.0) Rev.2 67

ForeColor Property
ForeColor Property
Applies To Button, Label, TextBox, RadioButton, CheckBox, ListBox, ComboBox, GroupBox, LED
Description
Gets or sets the foreground color of a control.
Usage
GGet Form.Control.ForeColor, var
GSet Form.Control.ForeColor, value
Form Name of a form or string variable containing a form name.
Control Name of a control or string variable containing a control name.
var String variable that will contain the value of the property.
value String expression for the new value of the property.
Values
A string that represents the foreground color of a control.
Default: Control Text (Button, Label, RadioButton, CheckBox, GroupBox, LED) Window Text (TexxtBox, ListBox, ComboBox)
See Also
Button, Label, TextBox, RadioButton, Checkbox, ListBox, ComboBox, GroupBox, LED
Example GSet frmMain.btnOK.ForeColor, "Blue"
68 GUI Builder 6.0 (Ver.6.0) Rev.2

FormBorderStyle Property
FormBorderStyle Property
Applies To Form
Description
Gets or sets the border style of the form.
Usage
GGet Form.FormBorderStyle, var
GSet Form.FormBorderStyle, value
Form Name of a form or string variable containing a form name.
var Integer variable that will contain the value of the property.
value Integer expression for the new value of the property.
Values
0 – None
1 – Fixed Single
2 – Fixed3D
3 – FixedDialog
4 – Sizeable
Default: 3 – FixedDialog
See Also
Form
Example GSet frmMain.FormBorderStyle, FORMBORDERSYTLE_NONE
GUI Builder 6.0 (Ver.6.0) Rev.2 69

GClose Statement
GClose Statement
Applies To Form
Description
Close the form.
Usage
GClose Form
Form Name of a form or string variable containing a form name.
See Also
GShowDialog, GShow
Example GClose frmSetup
70 GUI Builder 6.0 (Ver.6.0) Rev.2

GGet Statement
GGet Statement
Description GGet is used to get the values of properties for forms and controls in the current project.
Usage
GGet Form .Property, var
GGet Form .Control.Property, var
Form Name of a form or string variable containing a form name.
Control Name of a control or string variable containing a control name. The control must exist in the specified form.
Property Name of the property to set or return the value of.
var Variable(s) that will contain the value(s) returned.
Remarks
GGet is used to retrieve the value of a property at runtime.
See Also
GSet
GUI Builder 6.0 (Ver.6.0) Rev.2 71

GraphicsEnabled Property
GraphicsEnabled Property
Applies To VideoBox
Description
Gets or sets whether the VideoBox displays vision graphics or not.
Usage
GGet Form.Control.GraphicsEnabled, var
GSet Form.Control.GraphicsEnabled, value
Form Name of a form or string variable containing a form name.
Control Name of a control or string variable containing a control name.
var Boolean variable that will contain the value of the property.
value Boolean expression for the new value of the property.
Values
0 – False
1 – True
Default: 0 – False
See Also
VideoBox, VideoEnabled
Example GSet frmMain.VideoBox1.GraphicsEnabled, True
72 GUI Builder 6.0 (Ver.6.0) Rev.2

GSet Statement
GSet Statement
Description GSet is used to set the values of properties in GUI Builder.
Usage
GSet Form .Property, value
GSet Form .Control.Property, value
Form Name of a form or string variable containing a form name.
Control Name of an control or string variable containing an object name. The control must exist in the specified form.
Property Name of the property to set the value of.
value The epression that holds the data to be set.
Remarks
GSet is used to set the value of a form or control property at runtime.
See Also
GGet
GUI Builder 6.0 (Ver.6.0) Rev.2 73

GShow Statement
GShow Statement Applies To
Form
Description
GShow displays a form as a non-modal window.
Usage
GShow Form
Form Name of a form or string variable containing a form name.
See Also
GShowDialog
Example
GShow frmIODiags
74 GUI Builder 6.0 (Ver.6.0) Rev.2

GShowDialog Function
GShowDialog Function Applies To
Form
Description
GShow displays a form as a modal dialog box.
Usage
GShowDialog(Form)
Form Name of a form or string variable containing a form name.
Returns
The value of the form's DialogResult property is returned.
See Also
GShow
Example
result = GShowDialog(frmSetup) If result = DIALOGRESULT_OK Then Call SaveSettings EndIf
GUI Builder 6.0 (Ver.6.0) Rev.2 75

Height Property
Height Property
Applies To Form, Button, Label, TextBox, RadioButton, CheckBox, ListBox, ComboBox, PictureBox, GroupBox, VideoBox, LED
Description
Get or sets the height of a form or control in pixels.
Usage
GGet Form.[Control].Height, var
GSet Form.[Control].Height, value
Form Name of a form or string variable containing a form name.
Control Name of a control or string variable containing a control name.
var Integer variable that will contain the value of the property.
value Integer expression for the new value of the property.
Values
An integer representing the height in pixels.
See Also
Form, Button, Label, TextBox, RadioButton, Checkbox, ListBox, ComboBox, PictureBox, GroupBox, VideoBox, LED, Left, Top, Width
Example GSet frmMain.btnOK.Height, 48
76 GUI Builder 6.0 (Ver.6.0) Rev.2

HelpButton Property
HelpButton Property
Applies To Form
Description
Gets or sets a value indicating whether a Help button should be displayed in the caption box of the form.
Usage
GGet Form.HelpButton, var
GSet Form.HelpButton, value
Form Name of a form or string variable containing a form name.
var Boolean variable that will contain the value of the property.
value Boolean expression for the new value of the property.
Values
0 – False
1 – True
Default: 0 – False
Remarks
When this property is set to 1 – True, a small button with a question mark appears in the caption bar to the left of the Close button (when MaximizeBox, MinimizeBox properties are set to “False”). You can use this button to display help for your application.
See Also
Form, HelpID
Example GSet frmMain.HelpButton, True
GUI Builder 6.0 (Ver.6.0) Rev.2 77

HelpID Property
HelpID Property
Applies To Form
Description
Returns or sets an Integer containing the HelpID for a topic in a Help file.
Usage
GGet Form.HelpID, var
GSet Form.HelpID, value
Form Name of a form or string variable containing a form name.
var Integer variable that will contain the value of the property.
value Integer expression for the new value of the property.
Values
An integer value that is a topic ID in the help file. (0~999999)
Default: 0
Remarks
The HelpID property is used to display context-sensitive Help for an application. The help file is specified in the EPSON RC+ Project | Properties | GUI Builder page.
When HelpID is not 0 and the user types F1 or clicks the form help button (if the HelpButton property is True), then the help topic is displayed.
See Also
Form, HelpButton
Example GSet frmMain.HelpID, 50
78 GUI Builder 6.0 (Ver.6.0) Rev.2

Image Property
Image Property
Applies To Button, Label, RadioButton, CheckBox, PictureBox
Description
Gets or sets the image that is displayed on a control.
Usage
GGet Form.Control.Image, var
GSet Form.Control.Image, value
Form Name of a form or string variable containing a form name.
Control Name of a control or string variable containing a control name.
var String variable that will contain the value of the property.
value String expression for the new value of the property.
Values
A string containing the full path to an image file.
Default: Blank
NOTE Using the Delete key, you can delete an image file that has already been set.
See Also Button, Label, RadioButton, Checkbox, PictureBox, ImageAlign
Example GSet frmMain.btnTools.Image, "c:\Images\Tools.bmp"
GUI Builder 6.0 (Ver.6.0) Rev.2 79

ImageAlign Property
ImageAlign Property
Applies To Button, Label, RadioButton, CheckBox, LED
Description
Gets or sets the image alignment for the image that is displayed on a control.
Usage
GGet Form.Control.ImageAlign, var
GSet Form.Control.ImageAlign, value
Form Name of a form or string variable containing a form name.
Control Name of a control or string variable containing a control name.
var Integer variable that will contain the value of the property.
value Integer expression for the new value of the property.
Values
1 – TopLeft
2 – TopCenter
3 – TopRight
4 – MiddleLeft
5 – MiddleCenter
6 – MiddleRight
7 – BottomLeft
8 – BottomCenter
9 – BottomRight
Default: 5 – MiddleCenter (Button, Label, RadioButton, CheckBox) 4 – MiddleLeft (LED)
See Also
Button, Label, RadioButton, Checkbox, LED, Image
Example GSet frmMain.btnTools.ImageAlign, IMAGEALIGN_MIDDLECENTER
80 GUI Builder 6.0 (Ver.6.0) Rev.2

ImageOff Property
ImageOff Property
Applies To LED
Description
Gets or sets the image that is displayed when LED control is off.
Usage
GGet Form.Control.ImageOff, var
GSet Form.Control.ImageOff, value
Form Name of a form or string variable containing a form name.
Control Name of a control or string variable containing a control name.
var String variable that will contain the value of the property.
value String expression for the new value of the property.
Values
A string containing the full path to an image file. The file extensions should be bmp, ico, jpeg, gif, wmf, or png.
Default: LedOff.ico
See Also
LED, ImageOn
Example GSet frmMain.Led1.ImageOff, "c:\EpsonRC60\GUI\Icons\LedOff.ico"
GUI Builder 6.0 (Ver.6.0) Rev.2 81

ImageOn Property
ImageOn Property
Applies To LED
Description
Gets or sets the image that is displayed when LED control is on.
Usage
GGet Form.Control.ImageOn, var
GSet Form.Control.ImageOn, value
Form Name of a form or string variable containing a form name.
Control Name of a control or string variable containing a control name.
var String variable that will contain the value of the property.
value String expression for the new value of the property.
Values
A string containing the full path to an image file. The file extensions should be bmp, ico, jpeg, gif, wmf, or png.
Default: LedRed.ico See Also
LED, ImageOff
Example GSet frmMain.Led1.ImageOn, "c:\EpsonRC60\GUI\Icons\LedRed.ico"
82 GUI Builder 6.0 (Ver.6.0) Rev.2

Interval Property
Interval Property
Applies To Timer
Description
Gets or sets the time, in milliseconds, between timer ticks.
Usage
GGet Form.Control.Interval, var
GSet Form.Control.Interval, value
Form Name of a form or string variable containing a form name.
Control Name of a control or string variable containing a control name.
var Integer variable that will contain the value of the property.
value Integer expression for the new value of the property.
Values
The number of milliseconds between each timer tick. The integer value from 1 – 9999.
Default: 100
Remarks
To get the number of seconds in the interval, divide this number by 1,000.
See Also
Timer, Enabled
Example GSet frmMain.tmrMain.Interval, 500
GUI Builder 6.0 (Ver.6.0) Rev.2 83

IOBit Property
IOBit Property
Applies To LED
Description
Gets or sets the number of the I/Obit that indicates it to the LED Control.
Usage
GGet Form.Control.IOBit, var
GSet Form.Control.IOBit, value
Form Name of a form or string variable containing a form name.
Control Name of a control or string variable containing a control name.
var Integer variable that will contain the value of the property.
value Integer expression for the new value of the property.
Values
The integer value form 0 to 9999
Default: 0
See Also
LED, IOType
Example GSet frmMain.Led1.IOBit, 10
84 GUI Builder 6.0 (Ver.6.0) Rev.2

IOType Property
IOType Property
Applies To LED
Description
Gets or sets the type of the I/O that indicates it to the LED Control.
Usage
GGet Form.Control.IOType, var
GSet Form.Control.IOType, value
Form Name of a form or string variable containing a form name.
Control Name of a control or string variable containing a control name.
var Integer variable that will contain the value of the property.
value Integer expression for the new value of the property.
Values
0 – Input
1 – Output
2 – Memory
Default: 0 – Input
See Also LED, IOBit
Example GSet frmMain.Led1.IOType, IOTYPE_OUTPUT
GUI Builder 6.0 (Ver.6.0) Rev.2 85

KeyPress Event
KeyPress Event
Applies To TextBox
Description
Occurs when a key is pressed.
Usage
Form_Control_KeyPress (Sender$ As String, ByRef Key$ As String)
Sender$ Name of the control that sent the event.
Key$ The key that was pressed by the operator.
Remarks
The Keypress event can be used to detect the keys that are input by the operator. This event can be used as a filter. You can change the key that was pressed by setting Key$ to another character. You can cancel a keypress by setting Key$ to an empty string.
See Also
TextBox
Example
Function frmMain_txtSpeed_KeyPress(Sender$ As String, ByRef Key$ As String) ' Allow only digits to be entered
If Instr("0123456789" Key$) < 0 Then
Key$ = ""
EndIf
Fend
86 GUI Builder 6.0 (Ver.6.0) Rev.2

Left Property
Left Property
Applies To Form, Button, Label, TextBox, RadioButton, CheckBox, ListBox, ComboBox, PictureBox, GroupBox, VideoBox, LED
Description
Get or sets the left coordinate of a form or control in pixels.
Usage
GGet Form.[Control].Left, var
GSet Form.[Control].Left, value
Form Name of a form or string variable containing a form name.
Control Name of a control or string variable containing a control name.
var Integer variable that will contain the value of the property.
value Integer expression for the new value of the property.
Values
An integer representing the left coordinate in pixels.
See Also
Form, Button, Label, TextBox, RadioButton, Checkbox, ListBox, ComboBox, PictureBox, GroupBox, VideoBox, LED, Top, Height, Width
Example GSet frmMain.btnOK.Left, 200
GUI Builder 6.0 (Ver.6.0) Rev.2 87

List Property
List Property
Applies To ListBox, ComboBox
Description
Get or sets the string value of the specified element in the control item list.
Usage
GGet Form.Control.List(index), var
GSet Form.Control.List(index), value
Form Name of a form or string variable containing a form name.
Control Name of a control or string variable containing a control name. The control must exist in the specified form.
index Integer expression for the list array index staring with 0.
var Integer variable that will contain the value of the property.
value String expression for the new value of the property.
Values
String containing the specified list item.
Remarks After using AddItem to add items to the ListBox or ComboBox list, you can use the List property to get or edit the value of any of the items.
Setting a blank string, you can delete an item.
See Also
ComboBox, ListBox, ListCount, AddItem
Example String part$ GGet frmMain.lstPartNames.List(0), part$
88 GUI Builder 6.0 (Ver.6.0) Rev.2

ListCount Property
ListCount Property
Applies To ListBox, ComboBox
Description
Gets a count of the number of items in a Listbox or Combobox.
Usage
GGet Form.Control.ListCount, var
Form Name of a form or string variable containing a form name.
Control Name of a control or string variable containing a control name. The control must exist in the specified form.
var Integer variable that will contain the value of the property.
Values
Returns the number of items in the list.
See Also
ComboBox, ListBox, AddItem, List
Example Integer count GGet frmMain.lstPartNames.ListCount, count
GUI Builder 6.0 (Ver.6.0) Rev.2 89

Load Event
Load Event
Applies To Form
Description
Occurs before a form is displayed for the first time.
Usage
Form_Load (Sender$ As String)
Sender$ Name of the form that sent the event.
Remarks
You can use this event to perform tasks before a form is shown to the user.
See Also
Form, Resize, Closed
Example
Function frmMain_Load(Sender$ As String)
GSet frmMain.txtSpeed.Text, Str$(g_RobotSpeed) Fend
90 GUI Builder 6.0 (Ver.6.0) Rev.2

MaximizeBox Property
MaximizeBox Property
Applies To Form
Description
Gets or sets a value indicating whether the maximize button is displayed in the title bar of the form.
Usage
GGet Form.MaximizeBox, var
GSet Form.MaximizeBox, value
Form Name of a form or string variable containing a form name.
var Boolean variable that will contain the value of the property.
value Boolean expression for the new value of the property.
Values
0 – False
1 – True
Default: 0 – False
Remarks
A maximize button enables users to maximize a form to full screen.
See Also
Form, MinimizeBox
Example GSet frmMain.MaximizeBox, True
GUI Builder 6.0 (Ver.6.0) Rev.2 91

MinimizeBox Property
MinimizeBox Property
Applies To Form
Description
Gets or sets a value indicating whether the minimize button is displayed in the title bar of the form.
Usage
GGet Form.MinimizeBox, var
GSet Form.MinimizeBox, value
Form Name of a form or string variable containing a form name.
var Boolean variable that will contain the value of the property.
value Boolean expression for the new value of the property.
Values
0 – False
1 – True
Default: 0 – False
Remarks
A minimize button enables users to minimize a form to an icon.
See Also
Form, MaximizeBox
Example GSet frmMain.MinimizeBox, True
92 GUI Builder 6.0 (Ver.6.0) Rev.2

MultiLine Property
MultiLine Property
Applies To TextBox
Description
Gets or sets a value indicating whether this is a multiline TextBox control.
Usage
GGet Form.Control.MultiLine, var
GSet Form.Control.MultiLine, value
Form Name of a form or string variable containing a form name.
Control Name of a control or string variable containing a control name. The control must exist in the specified form.
var Boolean variable that will contain the value of the property.
value Boolean expression for the new value of the property.
Values
0 – False
1 – True
Default: 0 – False
Remarks
If you want to display multiple lines in a TextBox control, you must set MultiLine to 1 – True.
See Also
TextBox, ScrollBars
Example GSet frmMain.txtStatus.MultiLine, True
GUI Builder 6.0 (Ver.6.0) Rev.2 93

Name Property
Name Property
Applies To Form, Button, Label, TextBox, RadioButton, CheckBox, ListBox, ComboBox, PictureBox, GroupBox, Timer, VideoBox, LED
Description
Gets the name of a form or control at runtime. Used to set the Name of a form or control at design time.
Usage
GGet Form.[Control].Name, var
Form Name of a form or string variable containing a form name.
Control Name of a control or string variable containing a control name.
var String variable that will contain the value of the property.
Values
A string containing the name of the form or control.
See Also
Form, Button, Label, TextBox, RadioButton, Checkbox, ListBox, ComboBox, PictureBox, GroupBox, Timer, VideoBox, LED
Example String name$ GGet frmMain.btnOK.Name, name$
94 GUI Builder 6.0 (Ver.6.0) Rev.2

PasswordChar Property
PasswordChar Property
Applies To TextBox
Description
Gets or sets the character used to mask characters of a password in a single-line TextBox control.
Usage
GGet Form.Control.PasswordChar, var
GSet Form.Control.PasswordChar, value
Form Name of a form or string variable containing a form name.
Control Name of a control or string variable containing a control name. The control must exist in the specified form.
var String variable that will contain the value of the property.
value String expression for the new value of the property.
Values
A string containing the character used for the mask.
Remarks
Use PasswordChar to hide the characters of a password. When the user types a character, the PasswordChar is displayed. Note that the Multiline property for the TextBox control must be set to 0–False.
See Also
TextBox
Example GSet frmMain.txtPassword.PasswordChar, "*"
GUI Builder 6.0 (Ver.6.0) Rev.2 95

ReadOnly Property
ReadOnly Property
Applies To TextBox
Description
Gets or sets which the textbox control is ReadOnly or not.
Usage
GGet Form.Control.ReadOnly, var
GSet Form.Control.ReadOnly, value
Form Name of a form or string variable containing a form name.
Control Name of a control or string variable containing a control name. The control must exist in the specified form.
var Boolean variable that will contain the value of the property.
value Boolean expression for the new value of the property.
Values
0 – False
1 – True
Default 0 – False
Remarks
When this propaty is set to 1–True, Operator is not able to edit textbox.
See Also
TextBox
Example GSet frmMain.txtSpeed.ReadOnly, True
96 GUI Builder 6.0 (Ver.6.0) Rev.2

Resize Event
Resize Event
Applies To Form
Description
Occurs when the form is resized.
Usage
Form_Resize (Sender$ As String)
Sender$ Name of a form that sent the event.
See Also
Form, Load, Closed
Example
Function frmMain_Resize(Sender$ As String) Integer width
GGet frmMain.Width, width GSet frmMain.btnOK.Left, width / 2 - 100 GSet frmMain.btnCancel.Left, width / 2 + 10 Fend
GUI Builder 6.0 (Ver.6.0) Rev.2 97

ScrollBars Property
ScrollBars Property
Applies To TextBox
Description
Gets or sets which scroll bars should appear in a multiline TextBox control.
Usage
GGet Form.Control.ScrollBars, var
GSet Form.Control.ScrollBars, value
Form Name of a form or string variable containing a form name.
Control Name of a control or string variable containing a control name. The control must exist in the specified form.
var Integer variable that will contain the value of the property.
value Integer expression for the new value of the property.
Values
0 – None
1 – Horizontal
2 – Vertical
3 – Both
Default: 0 – None
Remarks
To use ScrollBars, the Multiline property for the TextBox control must be set to 1 – True.
To display the horizontal scroll bar, set WordWrap property to 0 – False.
See Also
TextBox, Multiline, WordWrap
Example GSet frmMain.txtStatus.Scrollbars, SCROLLBARS_VERT
98 GUI Builder 6.0 (Ver.6.0) Rev.2

SelectedIndex Property
SelectedIndex Property
Applies To ListBox, ComboBox
Description
Gets or sets the SelectedIndex property returns an index of the currently selected item
Usage
GGet Form.Control.SelectedIndex, var
GSet Form.Control.SelectedIndex, value
Form Name of a form or string variable containing a form name.
Control Name of a control or string variable containing a control name. The control must exist in the specified form.
var Integer variable that will contain the value of the property.
value Integer expression for the new value of the property.
Values
Returns the index of the selected item, starting with 0. -1 is returned if no items are selected.
Remarks
Use SelectedIndex to determine which item the user has selected in a ListBox or ComboBox. Typically, you would do this in the Click event of the control.
See Also
AddItem, ComboBox, List, ListBox
Example Integer index GGet frmMain.lstParts.SelectedIndex, index
GUI Builder 6.0 (Ver.6.0) Rev.2 99

SizeMode Property
SizeMode Property
Applies To PictureBox
Description
Indicates how the image is displayed.
Usage
GGet Form.Control.SizeMode, var
GSet Form.Control.SizeMode, value
Form Name of a form or string variable containing a form name.
Control Name of a control or string variable containing a control name. The control must exist in the specified form.
var Integer variable that will contain the value of the property.
value Integer expression for the new value of the property.
Values
0 – Normal
1 – StretchImage
2 – AutoSize
3 – CenterImage
4 – Zoom
Default: 0 – Normal
Remarks
By default, in Normal mode, the image is placed in the upper left corner of the PictureBox, and any part of the image too big for the PictureBox is clipped. Using the StretchImage value causes the image to stretch to fit the PictureBox. Using the AutoSize value causes the control to resize to always fit the image. Using the CenterImage value causes the image to be centered in the PictureBox. Using the Zoom value causes the image to stretch to fit the the PictureBox keeping the same aspect ratio.
See Also
PictureBox, Image, ImageAlign
Example
GSet frmMain.picLogo.SizeMode, SIZEMODE_AUTOSIZE
100 GUI Builder 6.0 (Ver.6.0) Rev.2

Sorted Property
Sorted Property
Applies To ComboBox, ListBox
Description
Gets or sets a value indicating whether the items in the ComboBox or ListBox are sorted alphabetically.
Sorting order: Numeric character (regardless of whether one-byte or two byte), alphabetical character, Katakana, Hiragana, Kanji character
Usage
GGet Form.Control.Sorted, var
GSet Form.Control.Sorted, value
Form Name of a form or string variable containing a form name.
Control Name of a control or string variable containing a control name. The control must exist in the specified form.
var Boolean variable that will contain the value of the property.
value Boolean expression for the new value of the property.
Values
0 – False
1 – True
Default: 0 – False
See Also
ComboBox, ListBox
Example GSet frmMain.lstParts.Sorted, True
GUI Builder 6.0 (Ver.6.0) Rev.2 101

StartPosition Property
StartPosition Property
Applies To Form
Description
Gets or sets the starting position of the form at run time.
Usage
GGet Form.StartPosition, var
GSet Form.StartPosition, value
Form Name of a form or string variable containing a form name.
var Integer variable that will contain the value of the property.
value Integer expression for the new value of the property.
Values
0 – Manual
1 – CenterScreen
2 – CenterParent
Default: 1 – CenterScreen
See Also
Form, WindowState
Example GSet frmMain.StartPosition, STARTPOSITION_CENTERSCREEN
102 GUI Builder 6.0 (Ver.6.0) Rev.2

TabIndex Property
TabIndex Property
Applies To Button, Label, TextBox, RadioButton, CheckBox, ListBox, ComboBox, PictureBox, GroupBox, VideoBox, LED
Description
Gets or sets the tab order of the control within its container.
Usage
GGet Form.Control.TabIndex, var
GSet Form.Control.TabIndex, value
Form Name of a form or string variable containing a form name.
Control Name of a control or string variable containing a control name.
var Integer variable that will contain the value of the property.
value Integer expression for the new value of the property.
Values
The index of the tab order of the control.
See Also
Button, Label, TextBox, RadioButton, Checkbox, ListBox, ComboBox, PictureBox, GroupBox, VideoBox, LED
Example GSet frmMain.txtStatus.TabIndex, 3
GUI Builder 6.0 (Ver.6.0) Rev.2 103

Text Property
Text Property
Applies To Form, Button, Label, TextBox, RadioButton, CheckBox, ComboBox, GroupBox, LED
Description
Gets or sets the text associated with the control.
Usage
GGet Form.[Control].Text, var
GSet Form.[Control].Text, value
Form Name of a form or string variable containing a form name.
Control Name of a control or string variable containing a control name.
var String variable that will contain the value of the property.
value String expression for the new value of the property.
Values
A string containing the text of the form or control.
See Also
Form, Button, Label, TextBox, RadioButton, Checkbox, ComboBox, GroupBox, LED, TextAlign
Example GSet frmMain.lblName.Text, "Name: "
104 GUI Builder 6.0 (Ver.6.0) Rev.2

TextAlign Property
TextAlign Property Applies To
Button, Label, TextBox, RadioButton, CheckBox, LED Description
Gets or sets the alignment of text in the control. Usage
GGet Form.Control.TextAlign, var
GSet Form.Control.TextAlign, value
Form Name of a form or string variable containing a form name.
Control Name of a control or string variable containing a control name.
var Integer variable that will contain the value of the property.
value Integer expression for the new value of the property. Values
For Button, Label, RadioButton, CheckBox controls
1 – TopLeft 2 – TopCenter 3 – TopRight 4 – MiddleLeft 5 – MiddleCenter 6 – MiddleRight 7 – BottomLeft 8 – BottomCenter 9 – BottomRight
Default : 1 – TopLeft (Label 1) 4 – MiddleLeft (RadioButton, CheckBox) 5 – MiddleCenter (Button) 6 – MiddleRight (LED)
For TextBox
1 – Left 2 – Center 3 – Right Default: 1 – Left
See Also
Button, Label, TextBox, RadioButton, Checkbox, LED, Text Example
GSet frmMain.lblName.TextAlign, TEXTALIGN_LEFT
GUI Builder 6.0 (Ver.6.0) Rev.2 105

Tick Event
Tick Event
Applies To Timer
Description
Occurs when a Timer control reaches its Interval value.
Usage
Form_Control_Tick (Sender$ As String)
Sender$ Name of a control that sent the event.
See Also
Timer, Interval, Enabled
Example
Function frmMain_Timer1_Tick(Sender$ As String)
GSet frmMain.lblDateTime.Text, Date$ + " " + Time$ Fend
106 GUI Builder 6.0 (Ver.6.0) Rev.2

ToolTipText Property
ToolTipText Property
Applies To Button, Label, TextBox, RadioButton, CheckBox, ListBox, ComboBox, PictureBox, GroupBox, VideoBox, LED
Description
Used to show a small rectangular pop-up window that displays a brief description of a control's purpose when the user rests the mouse pointer over the control.
Usage
GGet Form.Control.ToolTipText, var
GSet Form.Control.ToolTipText, value
Form Name of a form or string variable containing a form name.
Control Name of a control or string variable containing a control name.
var String variable that will contain the value of the property.
value String expression for the new value of the property.
Values
A string containing the tool tip text of the control.
Default: Empty string
See Also
Button, Label, TextBox, RadioButton, Checkbox, ListBox, ComboBox, PictureBox, GroupBox, VideoBox, LED
Example GSet frmMain.btnStart.ToolTipText, "Click Here to Start"
GUI Builder 6.0 (Ver.6.0) Rev.2 107

Top Property
Top Property
Applies To Form, Button, Label, TextBox, RadioButton, CheckBox, ListBox, ComboBox, PictureBox, GroupBox, VideoBox, LED
Description
Get or sets the top coordinate of a form or control in pixels.
Usage
GGet Form.[Control].Top, var
GSet Form.[Control].Top, value
Form Name of a form or string variable containing a form name.
Control Name of a control or string variable containing a control name.
var Integer variable that will contain the value of the property.
value Integer expression for the new value of the property.
Values
An integer representing the top coordinate in pixels.
See Also
Form, Button, Label, TextBox, RadioButton, Checkbox, ListBox, ComboBox, PictureBox, GroupBox, VideoBox, LED, Left, Height, Width
Example GSet frmMain.txtStatus.Top, 200
108 GUI Builder 6.0 (Ver.6.0) Rev.2

Update Property
Update Property
Applies To TextBox
Description Gets or sets if the value of textbox is updated automatically or not when it is set to display the global valiable.
Usage
GGet Form.Control.Update, var
GSet Form.Control.Update, value
Form Name of a form or string variable containing a form name.
Control Name of a control or string variable containing a control name.
var Boolean variable that will contain the value of the property.
value Boolean expression for the new value of the property.
Values
0 – False
1 – True
Default: 1 – True
Remarks To show a SPEL+ global variable on a textbox, set the global variable name in the Variable property. If the Update propaty is set to 0–False, the global variable value is not updated.
See Also
TextBox, Variable
Example GSet frmMain.txtStatus.Update, False
GUI Builder 6.0 (Ver.6.0) Rev.2 109
Variable Property
Variable Property
Applies To TextBox
Description
Gets or sets the name of a SPEL+ global variable used for the textbox display.
Usage
GGet Form.Control.Variable, var
GSet Form.Control.Variable, value
Form Name of a form or string variable containing a form name.
Control Name of a control or string variable containing a control name. The control must exist in the specified form.
var String variable that will contain the value of the property.
value String expression for the new value of the property.
Values
The name of a SPEL+ global variable in the current project.
Default: None
Remarks
When the Variable property is set to a SPEL+ global variable, then the Text value is automatically updated at runtime to show the value of the variable.
See Also
TextBox
Example GSet frmMain.txtStatus.Variable, "g_Status$"
110 GUI Builder 6.0 (Ver.6.0) Rev.2

VideoEnabled Property
VideoEnabled Property
Applies To VideoBox
Description
Gets or sets whether the VideoBox displays video or not.
Usage
GGet Form.Control.VideoEnabled, var
GSet Form.Control.VideoEnabled, value
Form Name of a form or string variable containing a form name.
Control Name of a control or string variable containing a control name.
var Boolean variable that will contain the value of the property.
value Boolean expression for the new value of the property.
Values
0 – False
1 – True
Default: 0 – False
See Also
VideoBox, GraphicsEnabled
Example GSet frmMain.VideoBox1.VideoEnabled, True
GUI Builder 6.0 (Ver.6.0) Rev.2 111

Visible Property
Visible Property
Applies To Button, Label, TextBox, RadioButton, CheckBox, ListBox, ComboBox, PictureBox, GroupBox, VideoBox, LED
Description
Gets or sets a value indicating whether the control is displayed at runtime.
Usage
GGet Form.Control.Visible, var
GSet Form.Control.Visible, value
Form Name of a form or string variable containing a form name.
Control Name of a control or string variable containing a control name.
var Boolean variable that will contain the value of the property.
value Boolean expression for the new value of the property.
Values
1 – True Display the control
0 – False Don't display the control
Default: 1 – True
See Also
Button, Label, TextBox, RadioButton, Checkbox, ListBox, ComboBox, PictureBox, GroupBox, VideoBox, LED, Enabled
Example GSet frmMain.txtStatus.Visible, True
112 GUI Builder 6.0 (Ver.6.0) Rev.2

Width Property
Width Property
Applies To Form, Button, Label, TextBox, RadioButton, CheckBox, ListBox, ComboBox, PictureBox, GroupBox1, VideoBox, LED
Description
Get or sets the width of a form or control in pixels.
Usage
GGet Form.[Control].Width, var
GSet Form.[Control].Width, value
Form Name of a form or string variable containing a form name.
Control Name of a control or string variable containing a control name.
var Integer variable that will contain the value of the property.
value Integer expression for the new value of the property.
Values
An integer representing the width in pixels.
See Also
Form, Button, Label, TextBox, RadioButton, Checkbox, ListBox, ComboBox, PictureBox, GroupBox, VideoBox, LED, Left, Top, Height
Example GSet frmMain.txtStatus.Width, 300
GUI Builder 6.0 (Ver.6.0) Rev.2 113

WindowState Property
WindowState Property
Applies To Form
Description
Gets or sets the form's window state.
Usage
GGet Form.WindowState, var
GSet Form.WindowState, value
Form Name of a form or string variable containing a form name.
var Integer variable that will contain the value of the property.
value Integer expression for the new value of the property.
Values
0 – Normal
1 – Minimized
2 – Maximized
Default: 0 – Normal
See Also
Form
Example GSet frmMain.WindowState, WINDOWSTATE_MAXIMIZED
114 GUI Builder 6.0 (Ver.6.0) Rev.2

WordWrap Property
WordWrap Property
Applies To TextBox
Description
Indicates whether a multiline text box control automatically wraps words to the beginning of the next line when necessary.
Usage
GGet Form.Control.WordWrap, var
GSet Form.Control.WordWrap, value
Form Name of a form or string variable containing a form name.
Control Name of a control or string variable containing a control name. The control must exist in the specified form.
var Boolean variable that will contain the value of the property.
value Boolean expression for the new value of the property.
Values
1 – True : The multiline text box control wraps words
0 – False : The text box control automatically scrolls horizontally when the user types past the right edge of the control.
Default : 1 – True
See Also TextBox, Multiline, ScrollBars
Example GSet frmMain.txtStatus.WordWrap, True
GUI Builder 6.0 (Ver.6.0) Rev.2 115

WordWrap Property
116 GUI Builder 6.0 (Ver.6.0) Rev.2