guide security and hardening - opensuse documentation
TRANSCRIPT
Security and HardeningGuide
openSUSE Leap 15.2

Security and Hardening GuideopenSUSE Leap 15.2
Introduces basic concepts of system security, covering both local and networksecurity aspects. Shows how to use the product inherent security software likeAppArmor, SELinux, or the auditing system that reliably collects information aboutany security-relevant events. Supports the administrator with security-relatedchoices and decisions in installing and setting up a secure SUSE Linux EnterpriseServer and additional processes to further secure and harden that installation.
Publication Date: December 16, 2020
SUSE LLC1800 South Novell PlaceProvo, UT 84606USA
https://documentation.suse.com
Copyright © 2006– 2020 SUSE LLC and contributors. All rights reserved.
Permission is granted to copy, distribute and/or modify this document under the terms of the GNU Free
Documentation License, Version 1.2 or (at your option) version 1.3; with the Invariant Section being this
copyright notice and license. A copy of the license version 1.2 is included in the section entitled “GNU
Free Documentation License”.
For SUSE trademarks, see https://www.suse.com/company/legal/ . All other third-party trademarks are the
property of their respective owners. Trademark symbols (®, ™ etc.) denote trademarks of SUSE and its
aliates. Asterisks (*) denote third-party trademarks.
All information found in this book has been compiled with utmost attention to detail. However, this does
not guarantee complete accuracy. Neither SUSE LLC, its aliates, the authors nor the translators shall be
held liable for possible errors or the consequences thereof.
Contents
About This Guide xvii1 Security and Confidentiality 1
1.1 Overview 1
1.2 Passwords 2
1.3 System Integrity 2
1.4 File Access 3
1.5 Networking 4
1.6 Software Vulnerabilities 4
1.7 Malware 5
1.8 Important Security Tips 6
1.9 Reporting Security Issues 6
2 Common Criteria 8
2.1 Introduction 8
2.2 Evaluation Assurance Level (EAL) 8
2.3 Generic Guiding Principles 9
2.4 For More Information 11
I AUTHENTICATION 13
3 Authentication with PAM 143.1 What is PAM? 14
3.2 Structure of a PAM Configuration File 15
3.3 The PAM Configuration of sshd 17
iii Security and Hardening Guide

3.4 Configuration of PAM Modules 20
pam_env.conf 20 • pam_mount.conf.xml 21 • limits.conf 21
3.5 Configuring PAM Using pam-config 22
3.6 Manually Configuring PAM 23
3.7 For More Information 23
4 Using NIS 25
4.1 Configuring NIS Servers 25
Configuring a NIS Master Server 25 • Configuring a NIS Slave Server 30
4.2 Configuring NIS Clients 31
5 Setting Up Authentication Clients Using YaST 33
5.1 Configuring an Authentication Client with YaST 33
5.2 SSSD 33
Checking the Status 34 • Caching 34
6 LDAP—A Directory Service 35
6.1 Structure of an LDAP Directory Tree 35
6.2 Installing the Software for 389 Directory Server 38
6.3 Manually Configuring a 389 Directory Server 38
Creating the 389 Directory Server Instance 39 • Using CA Certificates
for TSL 40 • Configuring Admin Credentials for Remote/Local
Access 41 • Configuring LDAP Users and Groups 42 • Setting Up
SSSD 45
6.4 Setting Up a 389 Directory Server with YaST 46
Creating a 389 Directory Server Instance with YaST 46 • Configuring an LDAP
Client with YaST 47
6.5 Manually Administering LDAP Data 50
6.6 For More Information 50
iv Security and Hardening Guide

7 Network Authentication with Kerberos 51
7.1 Conceptual Overview 51
7.2 Kerberos Terminology 51
7.3 How Kerberos Works 53
First Contact 53 • Requesting a Service 54 • Mutual
Authentication 55 • Ticket Granting—Contacting All Servers 55
7.4 User View of Kerberos 56
7.5 Installing and Administering Kerberos 57
Kerberos Network Topology 58 • Choosing the Kerberos
Realms 59 • Setting Up the KDC Hardware 59 • Configuring Time
Synchronization 60 • Configuring the KDC 61 • Configuring Kerberos
Clients 65 • Configuring Remote Kerberos Administration 67 • Creating
Kerberos Service Principals 69 • Enabling PAM Support for
Kerberos 71 • Configuring SSH for Kerberos Authentication 71 • Using
LDAP and Kerberos 72
7.6 Setting up Kerberos using LDAP and Kerberos Client 75
7.7 Kerberos and NFS 79
Group Membership 80 • Performance and Scalability 81 • Master KDC,
Multiple Domains, and Trust Relationships 82
7.8 For More Information 83
8 Active Directory Support 84
8.1 Integrating Linux and Active Directory Environments 84
8.2 Background Information for Linux Active Directory Support 85
Domain Join 87 • Domain Login and User Homes 88 • Offline Service
and Policy Support 89
8.3 Configuring a Linux Client for Active Directory 90
Choosing Which YaST Module to Use for Connecting to Active
Directory 91 • Joining Active Directory Using User Logon
Management 91 • Joining Active Directory Using Windows Domain
Membership 96 • Checking Active Directory Connection Status 98
v Security and Hardening Guide

8.4 Logging In to an Active Directory Domain 99
GDM 99 • Console Login 99
8.5 Changing Passwords 100
9 Setting Up a FreeRADIUS Server 102
9.1 Installation and Testing on SUSE Linux Enterprise 102
II LOCAL SECURITY 105
10 Physical Security 10610.1 System Locks 106
10.2 Locking Down the BIOS 107
10.3 Security via the Boot Loaders 108
10.4 Retiring Linux Servers with Sensitive Data 108
scrub: Disk Overwrite Utility 109
10.5 Restricting Access to Removable Media 110
11 Automatic Security Checks with seccheck 112
11.1 Seccheck Timers 112
11.2 Enabling Seccheck Timers 112
11.3 Daily, Weekly, and Monthly Checks 113
11.4 Automatic Logout 115
12 Software Management 116
12.1 Removing Unnecessary Software Packages (RPMs) 116
12.2 Patching Linux Systems 118
YaST Online Update 119 • Automatic Online Update 119 • Repository
Mirroring Tool—RMT 119 • SUSE Manager 120
13 File Management 122
13.1 Disk Partitions 122
vi Security and Hardening Guide

13.2 Checking File Permissions and Ownership 123
13.3 Default umask 123
13.4 SUID/SGID Files 124
13.5 World-Writable Files 125
13.6 Orphaned or Unowned Files 126
14 Encrypting Partitions and Files 127
14.1 Setting Up an Encrypted File System with YaST 127
Creating an Encrypted Partition during Installation 128 • Creating an
Encrypted Partition on a Running System 129 • Encrypting the Content of
Removable Media 129
14.2 Encrypting Files with GPG 130
15 Storage Encryption for Hosted Applications withcryptctl 131
15.1 Setting Up a cryptctl Server 132
15.2 Setting Up a cryptctl Client 134
15.3 Checking Partition Unlock Status Using Server-side Commands 137
15.4 Unlocking Encrypted Partitions Manually 138
15.5 Maintenance Downtime Procedure 138
15.6 For More Information 138
16 User Management 139
16.1 Various Account Checks 139
Unlocked Accounts 139 • Unused Accounts 139
16.2 Enabling Password Aging 140
16.3 Stronger Password Enforcement 142
vii Security and Hardening Guide

16.4 Password and Login Management with PAM 142
Password Strength 143 • Restricting Use of Previous
Passwords 144 • Locking User Accounts After Too Many Login Failures 145
16.5 Restricting root Logins 146
Restricting Local Text Console Logins 146 • Restricting Graphical Session
Logins 148 • Restricting SSH Logins 148
16.6 Setting an Inactivity Timeout for Interactive Shell Sessions 149
16.7 Preventing Accidental Denial of Service 151
Example for Restricting System Resources 151
16.8 Displaying Login Banners 154
16.9 Connection Accounting Utilities 155
17 Spectre/Meltdown Checker 156
17.1 Using spectre-meltdown-checker 156
17.2 Additional Information about Spectre/Meltdown 158
18 Configuring Security Settings with YaST 159
18.1 Security Overview 159
18.2 Predefined Security Configurations 160
18.3 Password Settings 161
18.4 Boot Settings 162
18.5 Login Settings 162
18.6 User Addition 162
18.7 Miscellaneous Settings 162
19 Authorization with PolKit 164
19.1 Conceptual Overview 164
Available Authentication Agents 164 • Structure of PolKit 164 • Available
Commands 165 • Available Policies and Supported Applications 165
viii Security and Hardening Guide

19.2 Authorization Types 167
Implicit Privileges 167 • Explicit Privileges 168 • Default Privileges 168
19.3 Querying Privileges 168
19.4 Modifying Configuration Files 169
Adding Action Rules 169 • Adding Authorization Rules 170 • Modifying
Configuration Files for Implicit Privileges 171
19.5 Restoring the Default Privileges 172
20 Access Control Lists in Linux 174
20.1 Traditional File Permissions 174
The setuid Bit 175 • The setgid Bit 175 • The Sticky Bit 176
20.2 Advantages of ACLs 176
20.3 Definitions 176
20.4 Handling ACLs 177
ACL Entries and File Mode Permission Bits 178 • A Directory with an
ACL 179 • A Directory with a Default ACL 182 • The ACL Check
Algorithm 184
20.5 ACL Support in Applications 185
20.6 For More Information 185
21 Certificate Store 186
21.1 Activating Certificate Store 186
21.2 Importing Certificates 186
22 Intrusion Detection with AIDE 188
22.1 Why Use AIDE? 188
22.2 Setting Up an AIDE Database 188
22.3 Local AIDE Checks 191
22.4 System Independent Checking 192
ix Security and Hardening Guide

22.5 For More Information 194
III NETWORK SECURITY 195
23 X Window System and X Authentication 196
24 SSH: Secure Network Operations 197
24.1 ssh—Secure Shell 197
Starting X Applications on a Remote Host 198 • Agent Forwarding 198
24.2 scp—Secure Copy 198
24.3 sftp—Secure File Transfer 199
Using sftp 199 • Setting Permissions for File Uploads 200
24.4 The SSH Daemon (sshd) 201
Maintaining SSH Keys 202 • Rotating Host Keys 202
24.5 SSH Authentication Mechanisms 203
Generating an SSH Key 204 • Copying an SSH Key 204 • Using the ssh-agent 205
24.6 Port Forwarding 206
24.7 Adding and Removing Public Keys on an Installed System 207
24.8 For More Information 207
25 Masquerading and Firewalls 209
25.1 Packet Filtering with iptables 209
25.2 Masquerading Basics 212
25.3 Firewalling Basics 213
25.4 firewalld 214
Configuring the Firewall on the Command Line 215 • Accessing Services
Listening on Dynamic Ports 220
25.5 Migrating from SuSEfirewall2 223
25.6 For More Information 225
x Security and Hardening Guide

26 Configuring a VPN Server 226
26.1 Conceptual Overview 226
Terminology 226 • VPN Scenarios 227
26.2 Setting Up a Simple Test Scenario 229
Configuring the VPN Server 230 • Configuring the VPN
Clients 231 • Testing the VPN Example Scenario 232
26.3 Setting Up Your VPN Server Using a Certificate Authority 232
Creating Certificates 233 • Configuring the VPN Server 234 • Configuring
the VPN Clients 236
26.4 Setting Up a VPN Server or Client Using YaST 237
26.5 For More Information 238
IV CONFINING PRIVILEGES WITH APPARMOR 239
27 Introducing AppArmor 24027.1 AppArmor Components 240
27.2 Background Information on AppArmor Profiling 241
28 Getting Started 242
28.1 Installing AppArmor 242
28.2 Enabling and Disabling AppArmor 243
28.3 Choosing Applications to Profile 244
28.4 Building and Modifying Profiles 244
28.5 Updating Your Profiles 246
29 Immunizing Programs 247
29.1 Introducing the AppArmor Framework 248
29.2 Determining Programs to Immunize 250
29.3 Immunizing cron Jobs 251
xi Security and Hardening Guide

29.4 Immunizing Network Applications 251
Immunizing Web Applications 253 • Immunizing Network Agents 255
30 Profile Components and Syntax 256
30.1 Breaking an AppArmor Profile into Its Parts 257
30.2 Profile Types 259
Standard Profiles 259 • Unattached Profiles 260 • Local
Profiles 260 • Hats 261 • Change rules 261
30.3 Include Statements 262
Abstractions 264 • Program Chunks 264 • Tunables 264
30.4 Capability Entries (POSIX.1e) 264
30.5 Network Access Control 265
30.6 Profile Names, Flags, Paths, and Globbing 266
Profile Flags 267 • Using Variables in Profiles 268 • Pattern
Matching 269 • Namespaces 270 • Profile Naming and Attachment
Specification 270 • Alias Rules 271
30.7 File Permission Access Modes 271
Read Mode (r) 272 • Write Mode (w) 272 • Append Mode (a) 272 • File
Locking Mode (k) 272 • Link Mode (l) 273 • Link Pair 273 • Optional
allow and file Rules 273 • Owner Conditional Rules 274 • Deny
Rules 275
30.8 Mount Rules 275
30.9 Pivot Root Rules 277
30.10 PTrace Rules 278
30.11 Signal Rules 278
30.12 Execute Modes 279
Discrete Profile Execute Mode (Px) 279 • Discrete Local Profile Execute
Mode (Cx) 280 • Unconfined Execute Mode (Ux) 280 • Unsafe Exec
Modes 280 • Inherit Execute Mode (ix) 281 • Allow Executable Mapping
(m) 281 • Named Profile Transitions 281 • Fallback Modes for Profile
xii Security and Hardening Guide

Transitions 282 • Variable Settings in Execution Modes 283 • safe and
unsafe Keywords 284
30.13 Resource Limit Control 284
30.14 Auditing Rules 286
31 AppArmor Profile Repositories 287
32 Building and Managing Profiles with YaST 288
32.1 Manually Adding a Profile 288
32.2 Editing Profiles 289
Adding an Entry 291 • Editing an Entry 295 • Deleting an Entry 295
32.3 Deleting a Profile 295
32.4 Managing AppArmor 295
Changing AppArmor Status 296 • Changing the Mode of Individual
Profiles 297
33 Building Profiles from the Command Line 298
33.1 Checking the AppArmor Status 298
33.2 Building AppArmor Profiles 299
33.3 Adding or Creating an AppArmor Profile 300
33.4 Editing an AppArmor Profile 300
33.5 Unloading Unknown AppArmor Profiles 300
33.6 Deleting an AppArmor Profile 301
33.7 Two Methods of Profiling 301
Stand-Alone Profiling 302 • Systemic Profiling 302 • Summary of Profiling
Tools 304
33.8 Important File Names and Directories 324
xiii Security and Hardening Guide

34 Profiling Your Web Applications UsingChangeHat 325
34.1 Configuring Apache for mod_apparmor 326
Virtual Host Directives 327 • Location and Directory Directives 327
34.2 Managing ChangeHat-Aware Applications 328
With AppArmor's Command Line Tools 328 • Adding Hats and Entries to Hats
in YaST 334
35 Confining Users with pam_apparmor 336
36 Managing Profiled Applications 337
36.1 Reacting to Security Event Rejections 337
36.2 Maintaining Your Security Profiles 337
Backing Up Your Security Profiles 337 • Changing Your Security
Profiles 338 • Introducing New Software into Your Environment 338
37 Support 339
37.1 Updating AppArmor Online 339
37.2 Using the Man Pages 339
37.3 For More Information 341
37.4 Troubleshooting 341
How to React to odd Application Behavior? 341 • My Profiles Do not Seem
to Work Anymore … 341 • Resolving Issues with Apache 345 • How to
Exclude Certain Profiles from the List of Profiles Used? 345 • Can I Manage
Profiles for Applications not Installed on my System? 345 • How to Spot and
Fix AppArmor Syntax Errors 345
37.5 Reporting Bugs for AppArmor 346
xiv Security and Hardening Guide

38 AppArmor Glossary 348
V SELINUX 351
39 Configuring SELinux 35239.1 Why Use SELinux? 352
Support Status 353 • Understanding SELinux Components 354
39.2 Policy 355
39.3 Installing SELinux Packages and Modifying GRUB 2 356
39.4 SELinux Policy 358
39.5 Configuring SELinux 359
39.6 Managing SELinux 361
Viewing the Security Context 361 • Selecting the SELinux
Mode 363 • Modifying SELinux Context Types 364 • Applying File
Contexts 366 • Configuring SELinux Policies 367 • Working with SELinux
Modules 368
39.7 Troubleshooting 369
VI THE LINUX AUDIT FRAMEWORK 373
40 Understanding Linux Audit 37440.1 Introducing the Components of Linux Audit 377
40.2 Configuring the Audit Daemon 379
40.3 Controlling the Audit System Using auditctl 384
40.4 Passing Parameters to the Audit System 387
40.5 Understanding the Audit Logs and Generating Reports 390
Understanding the Audit Logs 390 • Generating Custom Audit Reports 395
40.6 Querying the Audit Daemon Logs with ausearch 402
40.7 Analyzing Processes with autrace 405
40.8 Visualizing Audit Data 406
xv Security and Hardening Guide

40.9 Relaying Audit Event Notifications 408
41 Setting Up the Linux Audit Framework 411
41.1 Determining the Components to Audit 412
41.2 Configuring the Audit Daemon 412
41.3 Enabling Audit for System Calls 414
41.4 Setting Up Audit Rules 414
41.5 Configuring Audit Reports 416
41.6 Configuring Log Visualization 420
42 Introducing an Audit Rule Set 423
42.1 Adding Basic Audit Configuration Parameters 424
42.2 Adding Watches on Audit Log Files and Configuration Files 424
42.3 Monitoring File System Objects 425
42.4 Monitoring Security Configuration Files and Databases 427
42.5 Monitoring Miscellaneous System Calls 429
42.6 Filtering System Call Arguments 429
42.7 Managing Audit Event Records Using Keys 432
43 Useful Resources 434
A GNU Licenses 436
A.1 GNU Free Documentation License 436
xvi Security and Hardening Guide

About This Guide
This manual introduces the basic concepts of system security on openSUSE Leap. It coversextensive documentation about the authentication mechanisms available on Linux, such as NISor LDAP. It deals with aspects of local security like access control lists, encryption and intrusiondetection. In the network security part you learn how to secure computers with rewalls andmasquerading, and how to set up virtual private networks (VPN). This manual shows how to usesecurity software like AppArmor (which lets you specify per program which les the programmay read, write, and execute) or the auditing system that collects information about security-relevant events.
1 Available Documentation
Note: Online Documentation and Latest UpdatesDocumentation for our products is available at http://doc.opensuse.org/ , where youcan also nd the latest updates, and browse or download the documentation in variousformats. The latest documentation updates are usually available in the English versionof the documentation.
The following documentation is available for this product:
Book “Start-Up”
This manual will see you through your initial contact with openSUSE® Leap. Check outthe various parts of this manual to learn how to install, use and enjoy your system.
Book “Reference”
Covers system administration tasks like maintaining, monitoring and customizing aninitially installed system.
Book “Virtualization Guide”
Describes virtualization technology in general, and introduces libvirt—the uniedinterface to virtualization—and detailed information on specic hypervisors.
Book “AutoYaST Guide”
xvii Available Documentation openSUSE Leap 15.2

AutoYaST is a system for unattended mass deployment of openSUSE Leap systems using anAutoYaST prole containing installation and conguration data. The manual guides youthrough the basic steps of auto-installation: preparation, installation, and conguration.
Security and Hardening Guide
Introduces basic concepts of system security, covering both local and network securityaspects. Shows how to use the product inherent security software like AppArmor, SELinux,or the auditing system that reliably collects information about any security-relevant events.Supports the administrator with security-related choices and decisions in installing andsetting up a secure SUSE Linux Enterprise Server and additional processes to further secureand harden that installation.
Book “System Analysis and Tuning Guide”
An administrator's guide for problem detection, resolution and optimization. Find how toinspect and optimize your system by means of monitoring tools and how to ecientlymanage resources. Also contains an overview of common problems and solutions and ofadditional help and documentation resources.
Book “GNOME User Guide”
Introduces the GNOME desktop of openSUSE Leap. It guides you through using andconguring the desktop and helps you perform key tasks. It is intended mainly for endusers who want to make ecient use of GNOME as their default desktop.
The release notes for this product are available at https://www.suse.com/releasenotes/ .
2 Giving FeedbackYour feedback and contributions to this documentation are welcome! Several channels areavailable:
Bug Reports
Report issues with the documentation at https://bugzilla.opensuse.org/ . To simplify thisprocess, you can use the Report Documentation Bug links next to headlines in the HTMLversion of this document. These preselect the right product and category in Bugzilla andadd a link to the current section. You can start typing your bug report right away. ABugzilla account is required.
Contributions
xviii Giving Feedback openSUSE Leap 15.2

To contribute to this documentation, use the Edit Source links next to headlines in theHTML version of this document. They take you to the source code on GitHub, where youcan open a pull request. A GitHub account is required.For more information about the documentation environment used for thisdocumentation, see the repository's README (https://github.com/SUSE/doc-sle/blob/master/
README.adoc) .
Alternatively, you can report errors and send feedback concerning the documentation [email protected] . Make sure to include the document title, the product version andthe publication date of the documentation. Refer to the relevant section number and title(or include the URL) and provide a concise description of the problem.
Help
If you need further help on openSUSE Leap, see https://en.opensuse.org/Portal:Support .
3 Documentation ConventionsThe following notices and typographical conventions are used in this documentation:
/etc/passwd : directory names and le names
PLACEHOLDER : replace PLACEHOLDER with the actual value
PATH : the environment variable PATH
ls , --help : commands, options, and parameters
user : users or groups
package name : name of a package
Alt , Alt – F1 : a key to press or a key combination; keys are shown in uppercase as ona keyboard
File, File Save As: menu items, buttons
Dancing Penguins (Chapter Penguins, ↑Another Manual): This is a reference to a chapter inanother manual.
Commands that must be run with root privileges. Often you can also prex thesecommands with the sudo command to run them as non-privileged user.
xix Documentation Conventions openSUSE Leap 15.2

root # commandtux > sudo command
Commands that can be run by non-privileged users.
tux > command
Notices
Warning: Warning NoticeVital information you must be aware of before proceeding. Warns you about securityissues, potential loss of data, damage to hardware, or physical hazards.
Important: Important NoticeImportant information you should be aware of before proceeding.
Note: Note NoticeAdditional information, for example about dierences in software versions.
Tip: Tip NoticeHelpful information, like a guideline or a piece of practical advice.
xx Documentation Conventions openSUSE Leap 15.2

1 Security and Confidentiality
This chapter introduces basic concepts of computer security. Threats and basicmitigation techniques are described. The chapter also provides references to otherchapters, guides and Web sites with further information.
1.1 OverviewOne main characteristic of Linux is its ability to handle multiple users at the same time(multiuser) and to allow these users to simultaneously perform tasks (multitasking) on the samecomputer. To users, there is no dierence between working with data stored locally and datastored in the network.
Because of the multiuser capability, data from dierent users has to be stored separately toguarantee security and privacy. Also important is the ability to keep data available in spite ofa lost or damaged data medium, for example a hard disk.
This chapter is primarily focused on condentiality and privacy. But a comprehensive securityconcept includes a regularly updated, workable, and tested backup. Without a backup, restoringdata after it has been tampered with or after a hardware failure is very hard.
Use a defense-in-depth approach to security: Assume that no single threat mitigation can fullyprotect your systems and data, but multiple layers of defense will make an attack much harder.Components of a defense-in-depth strategy can be the following:
Hashing passwords (for example with PBKDF2, bcrypt, or scrypt) and salting them
Encrypting data (for example with AES)
Logging, monitoring, and intrusion detection
Firewall
Antivirus scanner
Dened and documented emergency procedures
Backups
Physical security
Audits, security scans, and intrusion tests
1 Overview openSUSE Leap 15.2

openSUSE Leap includes software that addresses the requirements of the list above. Thefollowing sections provide starting points for securing your system.
1.2 Passwords
On a Linux system, only hashes of passwords are stored. Hashes are one-way algorithms thatmake it easy to encrypt data. At the same time, hash algorithms make it very hard to computethe original secret from the hash.
The hashes are stored in the le /etc/shadow , which cannot be read by normal users. Becauserestoring passwords is possible with powerful computers, hashed passwords should not be visibleto regular users.
The National Institute of Standards and Technology (NIST) publishes a guideline for passwords,which is available at https://pages.nist.gov/800-63-3/sp800-63b.html#sec5
For details about how to set a password policy, see Section 18.3, “Password Settings”. For generalinformation about authentication on Linux, see Part I, “Authentication”.
1.3 System Integrity
If it is possible to physically access a computer, the rmware and boot process can bemanipulated to gain access when an authorized person boots the machine. While not allcomputers can be locked into inaccessible rooms, your rst step should be physically lockingthe server room.
Consider taking the following additional measures:
Congure your system so it cannot be booted from a removable device, either by removingthe drives entirely or by setting a UEFI password and conguring the UEFI to allow bootingfrom a hard disk only.
To make the boot procedure more tamper-resistant, enable the UEFI secure boot feature.For more information about Secure Boot, see Book “Reference”, Chapter 14 “UEFI (Unified
Extensible Firmware Interface)”.
2 Passwords openSUSE Leap 15.2

Linux systems are started by a boot loader that usually allows passing additional optionsto the booted kernel. You can prevent others from using such parameters during boot bysetting an additional password for the boot loader. This is crucial to system security. Notonly does the kernel itself run with root permissions, but it is also the rst authority togrant root permissions at system start-up.For more information about setting a password in the boot loader, see Book “Reference”,
Chapter 12 “The Boot Loader GRUB 2”, Section 12.2.6 “Setting a Boot Password”.
Enable hard disk encryption. For more information, see Chapter 14, Encrypting Partitions and
Files.
Use cryptctl to encrypt hosted storage. For more information, see Chapter 15, Storage
Encryption for Hosted Applications with cryptctl.
Use AIDE to detect any changes in your system conguration. For more information, seeChapter 22, Intrusion Detection with AIDE.
1.4 File Access
Because of the everything is a le approach in Linux, le permissions are important for controllingaccess to most resources. This means that by using le permissions, you can dene access toregular les, directories, and hardware devices. By default, most hardware devices are onlyaccessible for root . However, some devices, for example serial ports, can be accessible fornormal users.
As a general rule, always work with the most restrictive privileges possible for a given task. Forexample, it is denitely not necessary to be root to read or write e-mail. If the mail programhas a bug, this bug could be exploited for an attack that acts with exactly the permissions of theprogram at the time of the attack. By following the above rule, minimize the possible damage.
For details, see Section 20.1, “Traditional File Permissions” and Section 20.2, “Advantages of ACLs”.
AppArmor and SELinux allow you to set constraints for applications and users. For details, seePart IV, “Confining Privileges with AppArmor” and Part V, “SELinux”.
If there is a chance that hard disks could be accessed outside of the installed operating system,for example by booting a live system or removing the hardware, encrypt the data. openSUSELeap allows you to encrypt partitions containing data and the operating system. For details, seeChapter 14, Encrypting Partitions and Files.
3 File Access openSUSE Leap 15.2

1.5 NetworkingSecuring network services is a crucial task. Aim to secure as many layers of the OSI model aspossible.
All communication should be authenticated and encrypted with up-to-date cryptographicalgorithms on the transport or application layer. Use a Virtual Private Network (VPN) as anadditional secure layer on physical networks.
openSUSE Leap provides many options for securing your network:
Use openssl to create X509 certicates. These certicates can be used for encryption andauthentication of many services. You can set up your own certicate authority (CA) and useit as a source of trust in your network. For details, see man openssl .
Usually, at least parts of networks are exposed to the public Internet. Reduce attack surfacesby closing ports with rewall rules and by uninstalling or at least disabling unrequiredservices. For details, see Chapter 25, Masquerading and Firewalls.
Use OpenVPN to secure communication channels over insecure physical networks. Fordetails, see Chapter 26, Configuring a VPN Server.
Use strong authentication for network services. For details, see Part I, “Authentication”.
1.6 Software VulnerabilitiesSoftware vulnerabilities are issues in software that can be exploited to obtain unauthorizedaccess or misuse systems. Vulnerabilities are especially critical if they aect remote services,such as HTTP servers. Computer systems are very complex, therefore they always include certainvulnerabilities.
When such issues become known, they must usually be xed in the software by softwaredevelopers. The resulting update must then be installed by system administrators in a timelyand safe manner on aected systems.
Vulnerabilities are usually announced on centralized databases, for example the NationalVulnerability Database, which is maintained by the US government. You can subscribe to feedsto stay informed about newly discovered vulnerabilities. In some cases the problems inducedby the bugs can be mitigated until a software update is provided. Vulnerabilities are assigned aCommon Vulnerabilities and Exposures (CVE) number and a Common Vulnerability Scoring System(CVSS) score. The score helps identify the severity of vulnerabilities.
4 Networking openSUSE Leap 15.2
SUSE provides a feed of security advisories. It is available at https://www.suse.com/en-us/
support/update/ . There is also a list of security updates by CVE number available at https://
www.suse.com/en-us/security/cve/ .
In general, administrators should be prepared for severe vulnerabilities in their systems. Thisincludes hardening all computers as far as possible. Also, we recommend to have predenedprocedures in place for quickly installing updates for severe vulnerabilities.
To reduce the damage of possible attacks, use restrictive le permissions. See Section 20.1,
“Traditional File Permissions”.
Other useful links:
http://lists.opensuse.org/opensuse-security-announce/ , mailing list with openSUSEsecurity announcements
https://nvd.nist.gov/home , the National Vulnerability Database
https://cve.mitre.org/ , MITRE's CVE database
https://www.bsi.bund.de/DE/Service/Aktuell/Cert_Bund_Meldungen/
cert_bund_meldungen_node.html , German Federal Oce for Information Securityvulnerability feed
https://www.first.org/cvss/ , information about the Common Vulnerability Scoring System
1.7 Malware
Malware is software that is intended to interrupt the normal functioning of a computer orsteal data. This includes viruses, worms, ransomware, or rootkits. Sometimes malware usessoftware vulnerabilities to attack a computer. However, often it is accidentally executed by auser, especially when installing third-party software from unknown sources. openSUSE Leapprovides an extensive list of programs (packages) in its download repositories. This reduces theneed to download third-party software. All packages provided by SUSE are signed. The packagemanager of openSUSE Leap checks the signatures of packages after the download to verify theirintegrity.
The command rpm --checksig RPM_FILE shows whether the checksum and the signature ofa package are correct. You can nd the signing key on the rst DVD of openSUSE Leap and onmost key servers worldwide.
5 Malware openSUSE Leap 15.2
You can use the ClamAV antivirus software to detect malware on your system. ClamAV can beintegrated into several services, for example mail servers and HTTP proxies. This can be usedto lter malware before it reaches the user.
Restrictive user privileges can reduce the risk of accidental code execution.
1.8 Important Security TipsThe following tips are a quick summary of the sections above:
Stay informed about the latest security issues. Get and install the updated packagesrecommended by security announcements as quickly as possible.
Avoid using root privileges whenever possible. Set restrictive le permissions.
Only use encrypted protocols for network communication.
Disable any network services you do not absolutely require.
Conduct regular security audits. For example, scan your network for open ports.
Monitor the integrity of les on your systems with AIDE (Advanced Intrusion DetectionEnvironment).
Take proper care when installing any third-party software.
Check all your backups regularly.
Check your log les, for example with logwatch.
Congure the rewall to block all ports that are not explicitly whitelisted.
Design your security measures to be redundant.
Use encryption where possible, for example for hard disks of mobile computers.
1.9 Reporting Security IssuesIf you discover a security-related problem, rst check the available update packages. If noupdate is available, write an e-mail to [email protected] . Include a detailed description ofthe problem and the version number of the package concerned. We encourage you to encrypte-mails with GPG.
6 Important Security Tips openSUSE Leap 15.2

You can nd a current version of the SUSE GPG key at https://www.suse.com/support/security/
contact/ .
7 Reporting Security Issues openSUSE Leap 15.2

2 Common Criteria
Common Criteria is the best known and most widely used methodology to evaluate and measurethe security value of an IT product. The methodology aims to be independent, as an independentlaboratory conducts the evaluation, which a certication body will certify afterward. SecurityFunctional Requirements (SFR) are summarized in so-called Protection Proles (PP). If thedenition of a Security Target (ST) and the Evaluation Assurance Levels (EAL) are comparable,this allows the comparison of security functions of dierent products. (The denition of aSecurity Target typically references the PP—if one exists that ts the purpose of the product.)
2.1 IntroductionA clear denition of security in IT products is challenging. Security should be considered aprocess that never ends, not a static condition that can be met or not. A Common Criteriacerticate (below EAL7) does not make a clear statement about the error-proneness of thesystem, but it adds an important value to the product that cannot be described with the presenceof technology alone: That someone has independently inspected the design of the system in suchway that it corresponds to the claims that are made, and that explicit care has been taken inproducing and maintaining the product.
The certicate states a degree of maturity of both the product with its security functions andthe processes of the company that has designed, built and engineered the product, and that willmaintain the product across its lifecycle. As such, Common Criteria aims to be fairly holistic withits approach to take everything into account that is relevant for the security of an IT product.
2.2 Evaluation Assurance Level (EAL)The Evaluation Assurance Level denotes the degree of condence that the product fullls thedescribed claims. The levels are from 1 through 7:
EAL1: Functionally tested
EAL2: Structurally tested
EAL3: Methodically tested and checked
EAL4: Methodically designed, tested and reviewed
8 Introduction openSUSE Leap 15.2

EAL5: Semi-formally designed and tested
EAL6: Semi-formally veried design and tested
EAL7: Formally veried design and tested
While EAL1 only provides basic assurance for products to meet security requirements, EAL2 to 4are medium assurance levels. EAL5-EAL7 describe medium-to-high and high assurance. EAL4 isexpected to be the highest level of assurance that a product can have if it has not been designedfrom the start to achieve a higher level of assurance.
2.3 Generic Guiding Principles
Much of the advice in this guide is based on the following guidelines. Consider them whendening your own security processes or deciding about congurations that are not explicitlycovered here.
Use Data Encryption Whenever Possible
Refer to the , the limitations of cryptography are briey outlined.Be aware that cryptography is certainly useful, but only for the specic purposes that itis good for. Using cryptography is not a generic recipe for better security in a system, itsuse may even impose additional risk on the system. Make informed decisions about theuse of cryptography, and feel obliged to have a reason for your decisions. A false sense ofsecurity can be more harmful than the weakness itself.openSUSE Leap supports encryption for:
Network connections (the openssl command, stunnel ), for remote login( openssh , man ssh(1) )
Files ( gpg )
Entire le systems at block layer ( dm-crypt , cryptsetup )
VPN ( ipsec , openvpn )
Minimal Package Installation
It is useful to restrict the installed packages in your system to a minimum. Binaries notinstalled cannot be executed.
9 Generic Guiding Principles openSUSE Leap 15.2

During installation of the system, you can limit the set of packages that is installed.For example, you can deselect all packages and select only those that you want touse. For example, the selection of the apache2-mod_perl package in YaST wouldautomatically cause all packages to be selected for installation that are needed for theApache package to operate. Dependencies have often been articially cut down to handlethe system's dependency tree more exibly. You can chose the minimal system, and buildthe dependency tree from there with your (leaf) package selection.
Service Isolation—Run Different Services on Separate Systems
Whenever possible, a server should be dedicated to serving exactly one service orapplication. This limits the number of other services that could be compromised if anattacker can successfully exploit a software aw in one service (assuming that aw allowsaccess to others).The use of AppArmor for services that are provided on a system is an eective means ofcontainment. For more information, see Part IV, “Confining Privileges with AppArmor” and theman page of apparmor .The use of virtualization technology is supported with openSUSE Leap. While virtualizationis generally designed for server consolidation purposes, it is also usefulness for serviceisolation. However, virtualization technology cannot match or substitute the separationstrength that is given by running services on dierent physical machines! Be aware thatthe capability of the hypervisor to separate virtual machines is not higher or stronger thanthe Linux kernel's capability to separate processes and their address spaces.
System Fingerprinting and Backups
Doing regular backups and having a ngerprint of your system is vital, especially in thecase of a successful attack against your system. Make it an integral part of your securityroutine to verify that your backups work.A fast and directly accessible backup adds condence about the integrity of your system.However, it is important that the backup mechanism/solution has adequate versioningsupport so that you can trace changes in the system. As an example: The installation timesof packages ( rpm -q --queryformat='%{INSTALLTIME} %{NAME}\n' PACKAGE NAME )must correspond to the changed les in the backup log les.Several tools exist on openSUSE Leap 15.2 which can be used for the detection of unknown,yet successful attacks. It does not take much eort to congure them.
10 Generic Guiding Principles openSUSE Leap 15.2

In particular, we recommend using the le and directory integrity checker AIDE
(Advanced Intrusion Detection Environment). When run for initialization, it creates a hashdatabase of all les in the system that are listed in its conguration le. This allowsverifying the integrity of all cataloged les at a later time.
Warning: BackdoorsIf you use AIDE, copy the hash database to a place that is inaccessible for potentialattackers. Otherwise, the attacker may modify the integrity database after plantinga backdoor, thereby defeating the purpose of the integrity measurement.
An attacker may also have planted a backdoor in the kernel. Apart from being veryhard to detect, the kernel-based backdoor can eectively remove all traces of thesystem compromise, so system alterations become almost invisible. Consequently,an integrity check needs to be done from a rescue system (or any other independentsystem with the target system's le systems mounted manually).
Be aware that the application of security updates invalidates the integrity database. rpm-qlv packagename lists the les that are contained in a package. The RPM subsystem isvery powerful with the data that it maintains. It is accessible with the --queryformatcommand line option. A dierential update of integrity database with the changed lesbecomes more manageable with some ne-grained usage of RPM.
2.4 For More Information
The Common Criteria evaluations inspect a specic conguration of the product in an evaluatedsetup. How to install and congure the reference system that was used as baseline in the CommonCriteria evaluation is documented in the “Administrator's Guide” part of the Common Criteriaevaluation documentation.
However, it would be incorrect to understand the evaluated conguration as a hardenedconguration. The removal of setuid bits and the prescription of administrative procedures afterinstallation help to reach a specic conguration that is sane. But this is not sucient for ahardening claim.
11 For More Information openSUSE Leap 15.2

For more information about openSUSE Leap security certications and features, see https://
www.suse.com/support/security/certifications/ .
Find a list of SUSE security resources at https://www.suse.com/support/security/ .
Apart from the documentation that comes with the Common Criteria eort, see also thefollowing manual pages:
pam(8), pam(5)apparmor(7) and referred man pagesrsyslogd(8), syslog(8), syslogd(8)fstab(5), mount(8), losetup(8), cryptsetup(8)haveged(8), random(4)ssh(1), sshd(8), ssh_cong(5), sshd_cong(5), ssh-agent(1), ssh-add(1), ssh-keygen(1)cron(1), crontab(5), at(1), atd(8)systemctl(1), daemon(7), systemd.unit(5), systemd.special(5), kernel-command-line(7),bootup(7), systemd.directives
12 For More Information openSUSE Leap 15.2
I Authentication
3 Authentication with PAM 14
4 Using NIS 25
5 Setting Up Authentication Clients Using YaST 33
6 LDAP—A Directory Service 35
7 Network Authentication with Kerberos 51
8 Active Directory Support 84
9 Setting Up a FreeRADIUS Server 102

3 Authentication with PAM
Linux uses PAM (pluggable authentication modules) in the authentication processas a layer that mediates between user and application. PAM modules are availableon a system-wide basis, so they can be requested by any application. This chapterdescribes how the modular authentication mechanism works and how it iscongured.
3.1 What is PAM?
System administrators and programmers often want to restrict access to certain parts of thesystem or to limit the use of certain functions of an application. Without PAM, applications mustbe adapted every time a new authentication mechanism, such as LDAP, Samba, or Kerberos,is introduced. However, this process is time-consuming and error-prone. One way to avoidthese drawbacks is to separate applications from the authentication mechanism and delegateauthentication to centrally managed modules. Whenever a newly required authenticationscheme is needed, it is sucient to adapt or write a suitable PAM module for use by the programin question.
The PAM concept consists of:
PAM modules, which are a set of shared libraries for a specic authentication mechanism.
A module stack with of one or more PAM modules.
A PAM-aware service which needs authentication by using a module stack or PAM modules.Usually a service is a familiar name of the corresponding application, like login or su .The service name other is a reserved word for default rules.
Module arguments, with which the execution of a single PAM module can be inuenced.
A mechanism evaluating each result of a single PAM module execution. A positive valueexecutes the next PAM module. The way a negative value is dealt with depends on theconguration: “no inuence, proceed” up to “terminate immediately” and anything inbetween are valid options.
14 What is PAM? openSUSE Leap 15.2

3.2 Structure of a PAM Configuration FilePAM can be congured in two ways:
File based configuration ( /etc/pam.conf )
The conguration of each service is stored in /etc/pam.conf . However, for maintenanceand usability reasons, this conguration scheme is not used in openSUSE Leap.
Directory based configuration ( /etc/pam.d/ )
Every service (or program) that relies on the PAM mechanism has its own congurationle in the /etc/pam.d/ directory. For example, the service for sshd can be found in the/etc/pam.d/sshd le.
The les under /etc/pam.d/ dene the PAM modules used for authentication. Each le consistsof lines, which dene a service, and each line consists of a maximum of four components:
TYPE CONTROL MODULE_PATH MODULE_ARGS
The components have the following meaning:
TYPE
Declares the type of the service. PAM modules are processed as stacks. Dierent types ofmodules have dierent purposes. For example, one module checks the password, anotherveries the location from which the system is accessed, and yet another reads user-specicsettings. PAM knows about four dierent types of modules:
auth
Check the user's authenticity, traditionally by querying a password. However, thiscan also be achieved with a chip card or through biometrics (for example, ngerprintsor iris scan).
account
Modules of this type check if the user has general permission to use the requestedservice. As an example, such a check should be performed to ensure that no one canlog in with the user name of an expired account.
password
The purpose of this type of module is to enable the change of an authentication token.Usually this is a password.
15 Structure of a PAM Configuration File openSUSE Leap 15.2

session
Modules of this type are responsible for managing and conguring user sessions. Theyare started before and after authentication to log login attempts and congure theuser's specic environment (mail accounts, home directory, system limits, etc.).
CONTROL
Indicates the behavior of a PAM module. Each module can have the following control ags:
required
A module with this ag must be successfully processed before the authentication mayproceed. After the failure of a module with the required ag, all other moduleswith the same ag are processed before the user receives a message about the failureof the authentication attempt.
requisite
Modules having this ag must also be processed successfully, in much the same wayas a module with the required ag. However, in case of failure a module with thisag gives immediate feedback to the user and no further modules are processed. Incase of success, other modules are subsequently processed, like any modules with therequired ag. The requisite ag can be used as a basic lter checking for theexistence of certain conditions that are essential for a correct authentication.
sufficient
After a module with this ag has been successfully processed, the requestingapplication receives an immediate message about the success and no further modulesare processed, provided there was no preceding failure of a module with therequired ag. The failure of a module with the sufficient ag has no directconsequences, in the sense that any subsequent modules are processed in theirrespective order.
optional
The failure or success of a module with this ag does not have any directconsequences. This can be useful for modules that are only intended to display amessage (for example, to tell the user that mail has arrived) without taking anyfurther action.
include
If this ag is given, the le specied as argument is inserted at this place.
MODULE_PATH
16 Structure of a PAM Configuration File openSUSE Leap 15.2

Contains a full le name of a PAM module. It does not need to be specied explicitly,as long as the module is located in the default directory /lib/security (for all 64-bitplatforms supported by openSUSE® Leap, the directory is /lib64/security ).
MODULE_ARGS
Contains a space-separated list of options to inuence the behavior of a PAM module, suchas debug (enables debugging) or nullok (allows the use of empty passwords).
In addition, there are global conguration les for PAM modules under /etc/security , whichdene the exact behavior of these modules (examples include pam_env.conf and time.conf ).Every application that uses a PAM module actually calls a set of PAM functions, which thenprocess the information in the various conguration les and return the result to the requestingapplication.
To simplify the creation and maintenance of PAM modules, common default congurationles for the types auth , account , password , and session modules have been introduced.These are retrieved from every application's PAM conguration. Updates to the global PAMconguration modules in common-* are thus propagated across all PAM conguration leswithout requiring the administrator to update every single PAM conguration le.
The global PAM conguration les are maintained using the pam-config tool. This toolautomatically adds new modules to the conguration, changes the conguration of existing onesor deletes modules (or options) from the congurations. Manual intervention in maintainingPAM congurations is minimized or no longer required.
Note: 64-Bit and 32-Bit Mixed InstallationsWhen using a 64-bit operating system, it is possible to also include a runtime environmentfor 32-bit applications. In this case, make sure that you also install the 32-bit version ofthe PAM modules.
3.3 The PAM Configuration of sshdConsider the PAM conguration of sshd as an example:
EXAMPLE 3.1: PAM CONFIGURATION FOR SSHD (/etc/pam.d/sshd)
#%PAM-1.0 1
17 The PAM Configuration of sshd openSUSE Leap 15.2

auth requisite pam_nologin.so 2
auth include common-auth 3
account requisite pam_nologin.so 2
account include common-account 3
password include common-password 3
session required pam_loginuid.so 4
session include common-session 3
session optional pam_lastlog.so silent noupdate showfailed 5
1 Declares the version of this conguration le for PAM 1.0. This is merely a convention, butcould be used in the future to check the version.
2 Checks, if /etc/nologin exists. If it does, no user other than root may log in.
3 Refers to the conguration les of four module types: common-auth , common-account ,common-password , and common-session . These four les hold the default congurationfor each module type.
4 Sets the login UID process attribute for the process that was authenticated.
5 Displays information about the last login of a user.
By including the conguration les instead of adding each module separately to the respectivePAM conguration, you automatically get an updated PAM conguration when an administratorchanges the defaults. Formerly, you needed to adjust all conguration les manually for allapplications when changes to PAM occurred or a new application was installed. Now the PAMconguration is made with central conguration les and all changes are automatically inheritedby the PAM conguration of each service.
The rst include le ( common-auth ) calls three modules of the auth type: pam_env.so ,pam_gnome_keyring.so and pam_unix.so . See Example 3.2, “Default Configuration for the auth
Section (common-auth)”.
EXAMPLE 3.2: DEFAULT CONFIGURATION FOR THE auth SECTION (common-auth)
auth required pam_env.so 1
auth optional pam_gnome_keyring.so 2
auth required pam_unix.so try_first_pass 3
1 pam_env.so loads /etc/security/pam_env.conf to set the environment variables asspecied in this le. It can be used to set the DISPLAY variable to the correct value, becausethe pam_env module knows about the location from which the login is taking place.
2 pam_gnome_keyring.so checks the user's login and password against the GNOME key ring
18 The PAM Configuration of sshd openSUSE Leap 15.2

3 pam_unix checks the user's login and password against /etc/passwd and /etc/shadow .
The whole stack of auth modules is processed before sshd gets any feedback about whetherthe login has succeeded. All modules of the stack having the required control ag must beprocessed successfully before sshd receives a message about the positive result. If one of themodules is not successful, the entire module stack is still processed and only then is sshdnotied about the negative result.
When all modules of the auth type have been successfully processed, another include statementis processed, in this case, that in Example 3.3, “Default Configuration for the account Section (common-
account)”. common-account contains only one module, pam_unix . If pam_unix returns theresult that the user exists, sshd receives a message announcing this success and the next stack ofmodules ( password ) is processed, shown in Example 3.4, “Default Configuration for the password
Section (common-password)”.
EXAMPLE 3.3: DEFAULT CONFIGURATION FOR THE account SECTION (common-account)
account required pam_unix.so try_first_pass
EXAMPLE 3.4: DEFAULT CONFIGURATION FOR THE password SECTION (common-password)
password requisite pam_cracklib.sopassword optional pam_gnome_keyring.so use_authtokpassword required pam_unix.so use_authtok nullok shadow try_first_pass
Again, the PAM conguration of sshd involves only an include statement referring to thedefault conguration for password modules located in common-password . These modules mustsuccessfully be completed (control ags requisite and required ) whenever the applicationrequests the change of an authentication token.
Changing a password or another authentication token requires a security check. This is achievedwith the pam_cracklib module. The pam_unix module used afterward carries over any oldand new passwords from pam_cracklib , so the user does not need to authenticate again afterchanging the password. This procedure makes it impossible to circumvent the checks carriedout by pam_cracklib . Whenever the account or the auth type are congured to complainabout expired passwords, the password modules should also be used.
EXAMPLE 3.5: DEFAULT CONFIGURATION FOR THE session SECTION (common-session)
session required pam_limits.sosession required pam_unix.so try_first_pass
19 The PAM Configuration of sshd openSUSE Leap 15.2

session optional pam_umask.sosession optional pam_systemd.sosession optional pam_gnome_keyring.so auto_start only_if=gdm,gdm-password,lxdm,lightdmsession optional pam_env.so
As the nal step, the modules of the session type (bundled in the common-session le) arecalled to congure the session according to the settings for the user in question. The pam_limitsmodule loads the le /etc/security/limits.conf , which may dene limits on the use ofcertain system resources. The pam_unix module is processed again. The pam_umask modulecan be used to set the le mode creation mask. Since this module carries the optional ag, afailure of this module would not aect the successful completion of the entire session modulestack. The session modules are called a second time when the user logs out.
3.4 Configuration of PAM ModulesSome PAM modules are congurable. The conguration les are located in /etc/
security . This section briey describes the conguration les relevant to the sshd example— pam_env.conf and limits.conf .
3.4.1 pam_env.conf
pam_env.conf can be used to dene a standardized environment for users that is set wheneverthe pam_env module is called. With it, preset environment variables using the following syntax:
VARIABLE [DEFAULT=VALUE] [OVERRIDE=VALUE]
VARIABLE
Name of the environment variable to set.
[DEFAULT=<value>]
Default VALUE the administrator wants to set.
[OVERRIDE=<value>]
Values that may be queried and set by pam_env , overriding the default value.
A typical example of how pam_env can be used is the adaptation of the DISPLAY variable, whichis changed whenever a remote login takes place. This is shown in Example 3.6, “pam_env.conf”.
20 Configuration of PAM Modules openSUSE Leap 15.2

EXAMPLE 3.6: PAM_ENV.CONF
REMOTEHOST DEFAULT=localhost OVERRIDE=@{PAM_RHOST}DISPLAY DEFAULT=${REMOTEHOST}:0.0 OVERRIDE=${DISPLAY}
The rst line sets the value of the REMOTEHOST variable to localhost , which is used wheneverpam_env cannot determine any other value. The DISPLAY variable in turn contains the valueof REMOTEHOST . Find more information in the comments in /etc/security/pam_env.conf .
3.4.2 pam_mount.conf.xml
The purpose of pam_mount is to mount user home directories during the login process, and tounmount them during logout in an environment where a central le server keeps all the homedirectories of users. With this method, it is not necessary to mount a complete /home directorywhere all the user home directories would be accessible. Instead, only the home directory of theuser who is about to log in, is mounted.
After installing pam_mount , a template for pam_mount.conf.xml is available in /etc/
security . The description of the various elements can be found in the manual page man 5pam_mount.conf .
A basic conguration of this feature can be done with YaST. Select Network Settings WindowsDomain Membership Expert Settings to add the le server; see Book “Reference”, Chapter 21
“Samba”, Section 21.5 “Configuring Clients”.
Note: LUKS2 SupportLUKS2 support was added to cryptsetup 2.0, and openSUSE Leap has included supportfor LUKS2 in pam_mount since openSUSE Leap 42.3.
3.4.3 limits.conf
System limits can be set on a user or group basis in limits.conf , which is read by thepam_limits module. The le allows you to set hard limits, which may not be exceeded, andsoft limits, which may be exceeded temporarily. For more information about the syntax and theoptions, see the comments in /etc/security/limits.conf .
21 pam_mount.conf.xml openSUSE Leap 15.2

3.5 Configuring PAM Using pam-config
The pam-config tool helps you congure the global PAM conguration les ( /etc/pam.d/common-* ) and several selected application congurations. For a list of supported modules, usethe pam-config --list-modules command. Use the pam-config command to maintain yourPAM conguration les. Add new modules to your PAM congurations, delete other modulesor modify options to these modules. When changing global PAM conguration les, no manualtweaking of the PAM setup for individual applications is required.
A simple use case for pam-config involves the following:
1. Auto-generate a fresh Unix-style PAM configuration. Let pam-cong create the simplestpossible setup which you can extend later on. The pam-config --create commandcreates a simple Unix authentication conguration. Pre-existing conguration les notmaintained by pam-cong are overwritten, but backup copies are kept as *.pam-config-backup .
2. Add a new authentication method. Adding a new authentication method (for example,LDAP) to your stack of PAM modules comes down to a simple pam-config --add--ldap command. LDAP is added wherever appropriate across all common-*-pc PAMconguration les.
3. Add debugging for test purposes. To make sure the new authentication procedure worksas planned, turn on debugging for all PAM-related operations. The pam-config --add--ldap-debug turns on debugging for LDAP-related PAM operations. Find the debuggingoutput in the systemd journal (see Book “Reference”, Chapter 11 “journalctl: Query the
systemd Journal”).
4. Query your setup. Before you nally apply your new PAM setup, check if it contains allthe options you wanted to add. The pam-config --query -- MODULE command lists boththe type and the options for the queried PAM module.
5. Remove the debug options. Finally, remove the debug option from your setup when youare entirely satised with the performance of it. The pam-config --delete --ldap-debug command turns o debugging for LDAP authentication. In case you had debuggingoptions added for other modules, use similar commands to turn these o.
For more information on the pam-config command and the options available, refer to themanual page of pam-config(8) .
22 Configuring PAM Using pam-config openSUSE Leap 15.2
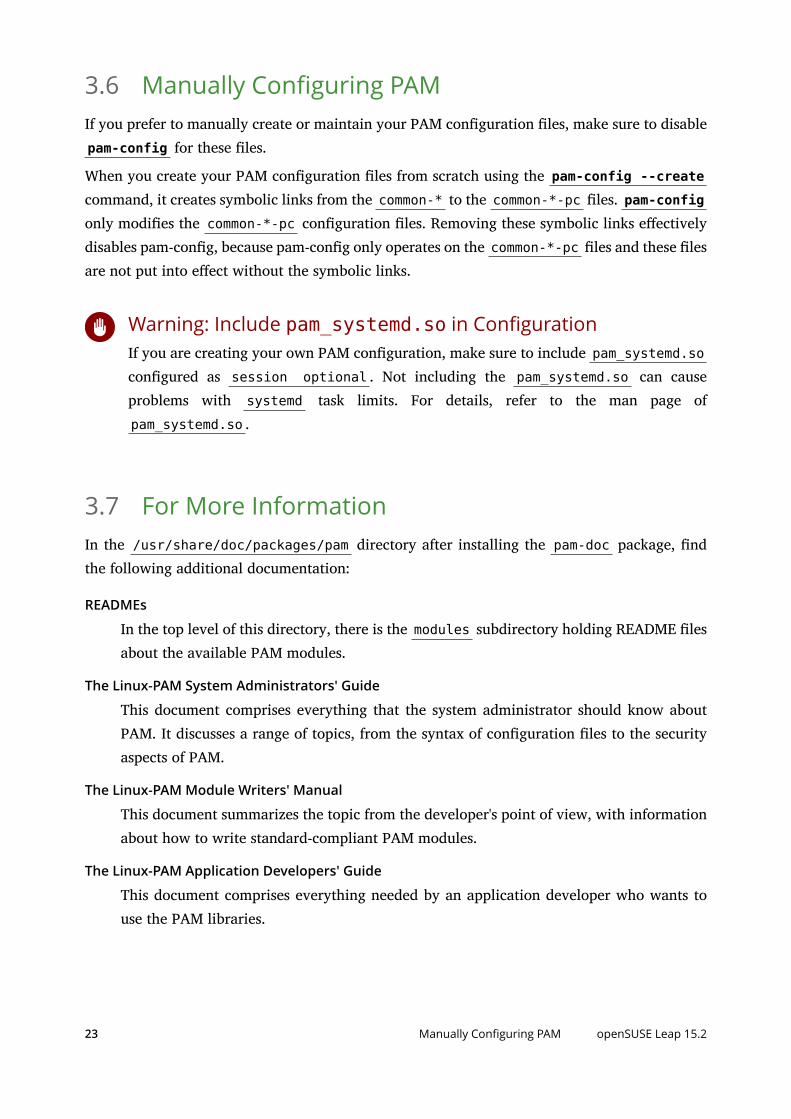
3.6 Manually Configuring PAMIf you prefer to manually create or maintain your PAM conguration les, make sure to disablepam-config for these les.
When you create your PAM conguration les from scratch using the pam-config --createcommand, it creates symbolic links from the common-* to the common-*-pc les. pam-configonly modies the common-*-pc conguration les. Removing these symbolic links eectivelydisables pam-cong, because pam-cong only operates on the common-*-pc les and these lesare not put into eect without the symbolic links.
Warning: Include pam_systemd.so in ConfigurationIf you are creating your own PAM conguration, make sure to include pam_systemd.socongured as session optional . Not including the pam_systemd.so can causeproblems with systemd task limits. For details, refer to the man page ofpam_systemd.so .
3.7 For More InformationIn the /usr/share/doc/packages/pam directory after installing the pam-doc package, ndthe following additional documentation:
READMEs
In the top level of this directory, there is the modules subdirectory holding README lesabout the available PAM modules.
The Linux-PAM System Administrators' Guide
This document comprises everything that the system administrator should know aboutPAM. It discusses a range of topics, from the syntax of conguration les to the securityaspects of PAM.
The Linux-PAM Module Writers' Manual
This document summarizes the topic from the developer's point of view, with informationabout how to write standard-compliant PAM modules.
The Linux-PAM Application Developers' Guide
This document comprises everything needed by an application developer who wants touse the PAM libraries.
23 Manually Configuring PAM openSUSE Leap 15.2

The PAM Manual Pages
PAM in general and the individual modules come with manual pages that provide a goodoverview of the functionality of all the components.
24 For More Information openSUSE Leap 15.2

4 Using NIS
When multiple Unix systems in a network access common resources, it becomesimperative that all user and group identities are the same for all machines in thatnetwork. The network should be transparent to users: their environments shouldnot vary, regardless of which machine they are actually using. This can be done bymeans of NIS and NFS services. NFS distributes le systems over a network and isdiscussed in Book “Reference”, Chapter 22 “Sharing File Systems with NFS”.
NIS (Network Information Service) can be described as a database-like service thatprovides access to the contents of /etc/passwd , /etc/shadow , and /etc/groupacross networks. NIS can also be used for other purposes (making the contentsof les like /etc/hosts or /etc/services available, for example), but this isbeyond the scope of this introduction. People often refer to NIS as YP, because itworks like the network's “yellow pages.”
4.1 Configuring NIS ServersTo distribute NIS information across networks, either install one single server (a master) thatserves all clients, or NIS slave servers requesting this information from the master and relayingit to their respective clients.
To congure just one NIS server for your network, proceed with Section 4.1.1, “Configuring
a NIS Master Server”.
If your NIS master server needs to export its data to slave servers, set up the master serveras described in Section 4.1.1, “Configuring a NIS Master Server” and set up slave servers in thesubnets as described in Section 4.1.2, “Configuring a NIS Slave Server”.
4.1.1 Configuring a NIS Master Server
To manage the NIS Server functionality with YaST, install the yast2-nis-server package byrunning the zypper in yast2-nis-server command as root. To congure a NIS master serverfor your network, proceed as follows:
1. Start YaST Network Services NIS Server.
25 Configuring NIS Servers openSUSE Leap 15.2

2. If you need just one NIS server in your network or if this server is to act as the masterfor further NIS slave servers, select Install and Set Up NIS Master Server. YaST installs therequired packages.
Tip: Already Installed NIS Server SoftwareIf NIS server software is already installed on your machine, initiate the creation ofa NIS master server by clicking Create NIS Master Server.
FIGURE 4.1: NIS SERVER SETUP
3. Determine basic NIS setup options:
a. Enter the NIS domain name.
b. Dene whether the host should also be a NIS client (enabling users to log in andaccess data from the NIS server) by selecting This Host is also a NIS Client.
c. If your NIS server needs to act as a master server to NIS slave servers in other subnets,select Active Slave NIS Server Exists.The option Fast Map Distribution is only useful with Active Slave NIS Servers Exist. Itspeeds up the transfer of maps to the slaves.
26 Configuring a NIS Master Server openSUSE Leap 15.2

d. Select Allow Changes to Passwords to allow users in your network (both local users andthose managed through the NIS server) to change their passwords on the NIS server(with the command yppasswd ). This makes the options Allow Changes to GECOSField and Allow Changes to Login Shell available. “GECOS” means that the users canalso change their names and address settings with the command ypchfn . “Shell”allows users to change their default shell with the command ypchsh (for example,to switch from Bash to sh). The new shell must be one of the predened entries in/etc/shells .
e. Select Open Port in Firewall to have YaST adapt the rewall settings for the NIS server.
FIGURE 4.2: MASTER SERVER SETUP
f. Leave this dialog with Next or click Other Global Settings to make additional settings.Other Global Settings include changing the source directory of the NIS server ( /etcby default). In addition, passwords can be merged here. The setting should be Yesto create the user database from the system authentication les /etc/passwd , /etc/shadow , and /etc/group . Also, determine the smallest user and group ID thatshould be oered by NIS. Click OK to conrm your settings and return to the previousscreen.
27 Configuring a NIS Master Server openSUSE Leap 15.2

FIGURE 4.3: CHANGING THE DIRECTORY AND SYNCHRONIZING FILES FOR A NIS SERVER
4. If you previously enabled Active Slave NIS Server Exists, enter the host names used as slavesand click Next. If no slave servers exist, this conguration step is skipped.
5. Continue to the dialog for the database conguration. Specify the NIS Server Maps, thepartial databases to transfer from the NIS server to the client. The default settings areusually adequate. Leave this dialog with Next.
6. Check which maps should be available and click Next to continue.
28 Configuring a NIS Master Server openSUSE Leap 15.2

FIGURE 4.4: NIS SERVER MAPS SETUP
7. Determine which hosts are allowed to query the NIS server. You can add, edit, or deletehosts by clicking the appropriate button. Specify from which networks requests can besent to the NIS server. Normally, this is your internal network. In this case, there shouldbe the following two entries:
255.0.0.0 127.0.0.00.0.0.0 0.0.0.0
The rst entry enables connections from your own host, which is the NIS server. Thesecond one allows all hosts to send requests to the server.
29 Configuring a NIS Master Server openSUSE Leap 15.2

FIGURE 4.5: SETTING REQUEST PERMISSIONS FOR A NIS SERVER
8. Click Finish to save your changes and exit the setup.
4.1.2 Configuring a NIS Slave Server
To congure additional NIS slave servers in your network, proceed as follows:
1. Start YaST Network Services NIS Server.
2. Select Install and Set Up NIS Slave Server and click Next.
TipIf NIS server software is already installed on your machine, initiate the creation ofa NIS slave server by clicking Create NIS Slave Server.
3. Complete the basic setup of your NIS slave server:
a. Enter the NIS domain.
b. Enter host name or IP address of the master server.
c. Set This Host is also a NIS Client if you want to enable user logins on this server.
30 Configuring a NIS Slave Server openSUSE Leap 15.2
d. Adapt the rewall settings with Open Ports in Firewall.
e. Click Next.
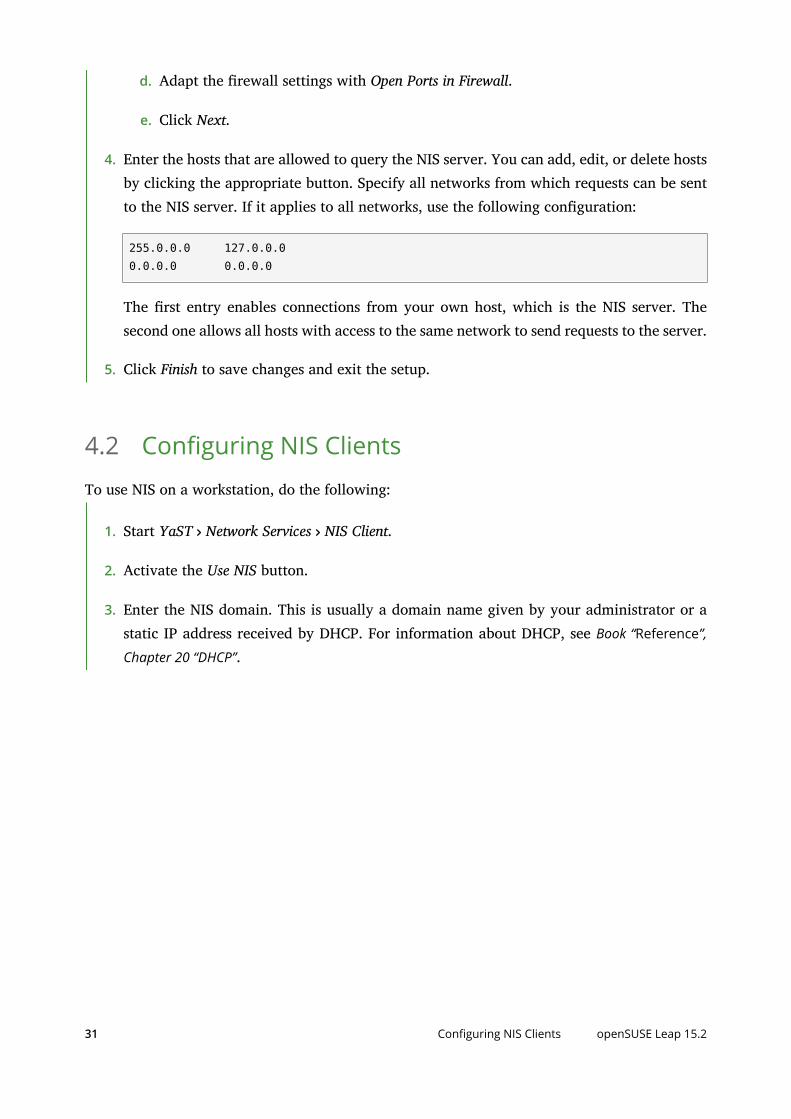
4. Enter the hosts that are allowed to query the NIS server. You can add, edit, or delete hostsby clicking the appropriate button. Specify all networks from which requests can be sentto the NIS server. If it applies to all networks, use the following conguration:
255.0.0.0 127.0.0.00.0.0.0 0.0.0.0
The rst entry enables connections from your own host, which is the NIS server. Thesecond one allows all hosts with access to the same network to send requests to the server.
5. Click Finish to save changes and exit the setup.
4.2 Configuring NIS Clients
To use NIS on a workstation, do the following:
1. Start YaST Network Services NIS Client.
2. Activate the Use NIS button.
3. Enter the NIS domain. This is usually a domain name given by your administrator or astatic IP address received by DHCP. For information about DHCP, see Book “Reference”,
Chapter 20 “DHCP”.
31 Configuring NIS Clients openSUSE Leap 15.2

FIGURE 4.6: SETTING DOMAIN AND ADDRESS OF A NIS SERVER
4. Enter your NIS servers and separate their addresses by spaces. If you do not know yourNIS server, click Find to let YaST search for any NIS servers in your domain. Dependingon the size of your local network, this may be a time-consuming process. Broadcast asksfor a NIS server in the local network after the specied servers fail to respond.
5. Depending on your local installation, you may also want to activate the automounter. Thisoption also installs additional software if required.
6. If you do not want other hosts to be able to query which server your client is using, go tothe Expert settings and disable Answer Remote Hosts. By checking Broken Server, the clientis enabled to receive replies from a server communicating through an unprivileged port.For further information, see man ypbind .
7. Click Finish to save them and return to the YaST control center. Your client is nowcongured with NIS.
32 Configuring NIS Clients openSUSE Leap 15.2

5 Setting Up Authentication Clients Using YaST
Whereas Kerberos is used for authentication, LDAP is used for authorization andidentication. Both can work together. For more information about LDAP, seeChapter 6, LDAP—A Directory Service, and about Kerberos, see Chapter 7, Network
Authentication with Kerberos.
5.1 Configuring an Authentication Client with YaSTYaST allows setting up authentication to clients using dierent modules:
User Logon Management. Use both an identity service (usually LDAP) and a userauthentication service (usually Kerberos). This option is based on SSSD and in the majorityof cases is best suited for joining Active Directory domains.This module is described in Section 8.3.2, “Joining Active Directory Using User Logon
Management”.
Windows Domain Membership. Join an Active Directory (which entails use of Kerberos andLDAP). This option is based on winbind and is best suited for joining an Active Directorydomain if support for NTLM or cross-forest trusts is necessary.This module is described in Section 8.3.3, “Joining Active Directory Using Windows Domain
Membership”.
LDAP and Kerberos Authentication. Allows setting up LDAP identities and Kerberosauthentication independently from each other and provides fewer options. While thismodule also uses SSSD, it is not as well suited for connecting to Active Directory as theprevious two options.This module is described in:
LDAP: Section 6.4.2, “Configuring an LDAP Client with YaST”
Kerberos: Section 7.6, “Setting up Kerberos using LDAP and Kerberos Client”
5.2 SSSDTwo of the YaST modules are based on SSSD: User Logon Management and LDAP and KerberosAuthentication.
33 Configuring an Authentication Client with YaST openSUSE Leap 15.2

SSSD stands for System Security Services Daemon. SSSD talks to remote directory services thatprovide user data and provides various authentication methods, such as LDAP, Kerberos, orActive Directory (AD). It also provides an NSS (Name Service Switch) and PAM (PluggableAuthentication Module) interface.
SSSD can locally cache user data and then allow users to use the data, even if the real directoryservice is (temporarily) unreachable.
5.2.1 Checking the Status
After running one of the YaST authentication modules, you can check whether SSSD is runningwith:
root # systemctl status sssdsssd.service - System Security Services Daemon Loaded: loaded (/usr/lib/systemd/system/sssd.service; enabled) Active: active (running) since Thu 2015-10-23 11:03:43 CEST; 5s ago [...]
5.2.2 Caching
To allow logging in when the authentication back-end is unavailable, SSSD will use its cacheeven if it was invalidated. This happens until the back-end is available again.
To invalidate the cache, run sss_cache -E (the command sss_cache is part of the packagesssd-tools ).
To completely remove the SSSD cache, run:
tux > sudo systemctl stop sssdtux > sudo rm -f /var/lib/sss/db/*tux > sudo systemctl start sssd
34 Checking the Status openSUSE Leap 15.2

6 LDAP—A Directory Service
The Lightweight Directory Access Protocol (LDAP) is a protocol designed toaccess and maintain information directories. LDAP can be used for user and groupmanagement, system conguration management, address management, and more.This chapter provides a basic understanding of how LDAP works.
Ideally, a central server stores the data in a directory and distributes it to all clients using a well-dened protocol. The structured data allow a wide range of applications to access them. A centralrepository reduces the necessary administrative eort. The use of an open and standardizedprotocol such as LDAP ensures that as many client applications as possible can access suchinformation.
A directory in this context is a type of database optimized for quick and eective reading andsearching. The type of data stored in a directory tends to be long lived and changes infrequently.This allows the LDAP service to be optimized for high performance concurrent reads, whereasconventional databases are optimized for accepting many writes to data in a short time.
6.1 Structure of an LDAP Directory Tree
This section introduces the layout of an LDAP directory tree, and provides the basic terminologyused with regard to LDAP. If you are familiar with LDAP, read on at Section 6.3, “Manually
Configuring a 389 Directory Server”.
An LDAP directory has a tree structure. All entries (called objects) of the directory have a denedposition within this hierarchy. This hierarchy is called the directory information tree (DIT). Thecomplete path to the desired entry, which unambiguously identies it, is called the distinguishedname or DN. An object in the tree is identied by its relative distinguished name (RDN). Thedistinguished name is built from the RDNs of all entries on the path to the entry.
The relations within an LDAP directory tree become more evident in the following example,shown in Figure 6.1, “Structure of an LDAP Directory”.
35 Structure of an LDAP Directory Tree openSUSE Leap 15.2

dc=example, dc=com
ou=devel ou=doc
cn=Octocatcn=Geekocn=Wilbercn=Tux
FIGURE 6.1: STRUCTURE OF AN LDAP DIRECTORY
The complete diagram is a ctional directory information tree. The entries on threelevels are depicted. Each entry corresponds to one box in the image. The complete, validdistinguished name for the ctional employee Geeko Linux , in this case, is cn=Geeko
Linux,ou=doc,dc=example,dc=com . It is composed by adding the RDN cn=Geeko Linux tothe DN of the preceding entry ou=doc,dc=example,dc=com .
The types of objects that can be stored in the DIT are globally determined following a Schema.The type of an object is determined by the object class. The object class determines whatattributes the relevant object must or may be assigned. The Schema contains all object classesand attributes which can be used by the LDAP server. Attributes are a structured data type. Theirsyntax, ordering and other behavior is dened by the Schema. LDAP servers supply a core setof Schemas which can work in a broad variety of environments. If a custom Schema is required,you can upload it to an LDAP server.
Table 6.1, “Commonly Used Object Classes and Attributes” oers a small overview of the object classesfrom 00core.ldif and 06inetorgperson.ldif used in the example, including requiredattributes (Req. Attr.) and valid attribute values. After installing 389-ds , these can be foundin usr/share/dirsrv/schema .
36 Structure of an LDAP Directory Tree openSUSE Leap 15.2
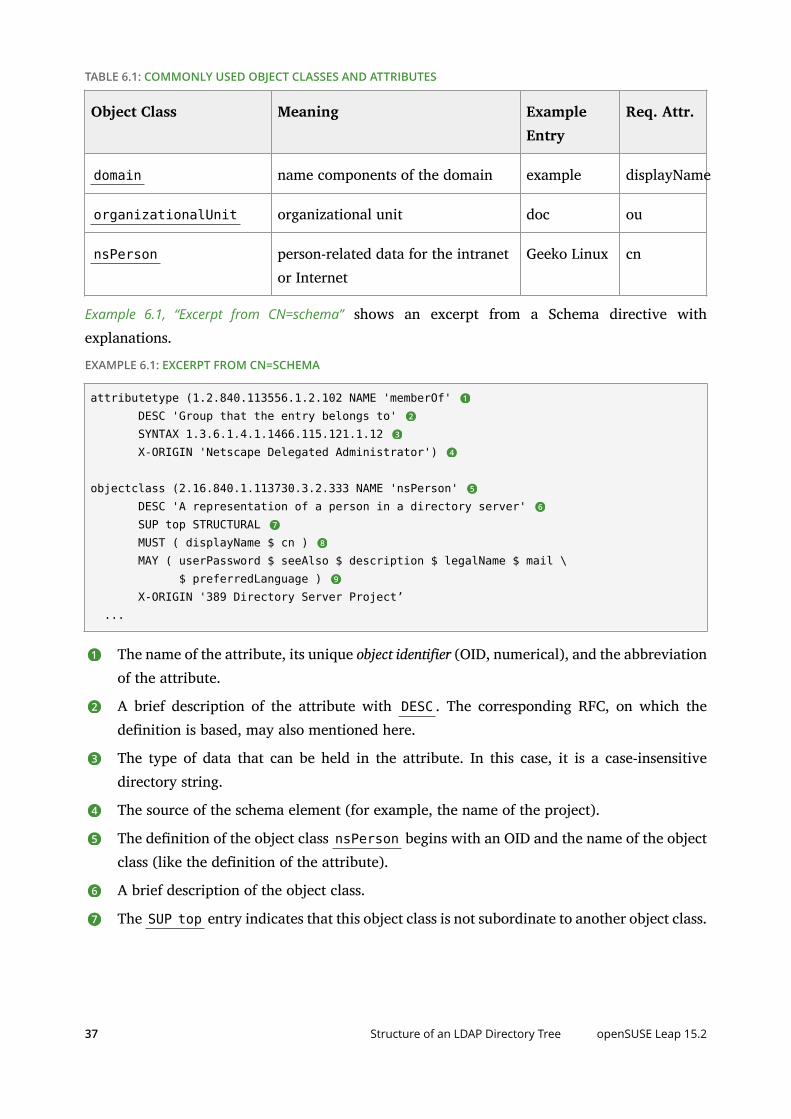
TABLE 6.1: COMMONLY USED OBJECT CLASSES AND ATTRIBUTES
Object Class Meaning ExampleEntry
Req. Attr.
domain name components of the domain example displayName
organizationalUnit organizational unit doc ou
nsPerson person-related data for the intranetor Internet
Geeko Linux cn
Example 6.1, “Excerpt from CN=schema” shows an excerpt from a Schema directive withexplanations.
EXAMPLE 6.1: EXCERPT FROM CN=SCHEMA
attributetype (1.2.840.113556.1.2.102 NAME 'memberOf' 1
DESC 'Group that the entry belongs to' 2
SYNTAX 1.3.6.1.4.1.1466.115.121.1.12 3
X-ORIGIN 'Netscape Delegated Administrator') 4
objectclass (2.16.840.1.113730.3.2.333 NAME 'nsPerson' 5
DESC 'A representation of a person in a directory server' 6
SUP top STRUCTURAL 7
MUST ( displayName $ cn ) 8
MAY ( userPassword $ seeAlso $ description $ legalName $ mail \ $ preferredLanguage ) 9
X-ORIGIN '389 Directory Server Project’ ...
1 The name of the attribute, its unique object identier (OID, numerical), and the abbreviationof the attribute.
2 A brief description of the attribute with DESC . The corresponding RFC, on which thedenition is based, may also mentioned here.
3 The type of data that can be held in the attribute. In this case, it is a case-insensitivedirectory string.
4 The source of the schema element (for example, the name of the project).
5 The denition of the object class nsPerson begins with an OID and the name of the objectclass (like the denition of the attribute).
6 A brief description of the object class.
7 The SUP top entry indicates that this object class is not subordinate to another object class.
37 Structure of an LDAP Directory Tree openSUSE Leap 15.2

8 With MUST list all attribute types that must be used with an object of the type nsPerson .
9 With MAY list all attribute types that are optionally permitted with this object class.
6.2 Installing the Software for 389 Directory ServerThe 389-ds package contains the 389 Directory Server and the administration tools. If thepackage is not installed yet, install it with the following command:
tux > sudo zypper install 389-ds
After installation, you can set up the server either manually (as described in Section 6.3) or createa very basic setup with YaST (as described in Section 6.4).
6.3 Manually Configuring a 389 Directory ServerSetting up the 389 Directory Server takes the following basic steps:
1. Creating the 389 Directory Server Instance
2. Using CA Certificates for TSL
3. Configuring Admin Credentials for Remote/Local Access
4. Configuring LDAP Users and Groups
5. Setting Up SSSD
The 389 Directory Server is controlled by three primary commands:
dsctl
Manages a local instance and requires root permissions. Requires you to be connectedto a terminal which is running the directory server instance. Used for starting, stopping,backing up the database, and more.
dsconf
The primary tool used for administration and conguration of the server. Manages aninstance's conguration via its external interfaces. This allows you to make congurationchanges remotely on the instance.
dsidm
38 Installing the Software for 389 Directory Server openSUSE Leap 15.2

Used for identity management (managing users, groups, passwords etc.). The permissionsare granted by access controls, so, for example, users can reset their own password orchange details of their own account.
6.3.1 Creating the 389 Directory Server Instance
You create the instance with the dscreate command. It can take a conguration le ( *.inf )which denes the instance conguration settings. Alternatively, the command can be runinteractively.
Note: Instance NameIf not specied otherwise, the default instance name is localhost . The instance namecannot be changed after the instance has been created.
To check the name of an instance you have not created yourself, use the dsctl -lcommand.
Example 6.2 shows an example conguration le that you can use as a starting point.Alternatively, use dscreate create-template to create a template *.inf le. The templateis commented and pre-lled, so you can adjust its variables to your needs. For more details, seethe man page of dscreate .
1. If you want to set up a trial instance, start an editor and save the following as /tmp/instance.inf :
EXAMPLE 6.2: BASIC INSTANCE CONFIGURATION FILE
# /tmp/instance.inf[general]config_version = 2
[slapd]root_password = YOUR_PASSWORD_FOR_CN=DIRECTORY_MANAGER 1
[backend-userroot]sample_entries = yessuffix = dc=example,dc=com
1 Set the root_password to the password for the directory server root user. Thepassword is used for LDAP server administration only.
39 Creating the 389 Directory Server Instance openSUSE Leap 15.2

2. To create the 389 Directory Server instance from Example 6.2, run:
tux > sudo dscreate from-file /tmp/instance.inf
This creates a working LDAP server.
3. If dscreate should fail, the messages will tell you why. For more details, repeat thecommand with the -v option:
tux > sudo dscreate -v from-file /tmp/instance.inf
4. Check the status of the server with:
tux > sudo dsctl localhost statusinstance 'Localhost' is running
5. In case you want to delete the instance later on:
tux > sudo dsctl localhost remove --do-it
With this command, you can also remove partially installed or corrupted instances.
6.3.2 Using CA Certificates for TSL
You can manage the CA certicates for 389 Directory Server with the following command linetools: certutil , openssl , and pk12util .
For testing purposes, you can create a self-signed certicate with dscreate . Find the certicateat /etc/dirsrv/slapd-localhost/ca.crt . For remote administration, copy the certicate toa readable location. For production environments, contact a CA authority of your organization'schoice and request a server certicate, a client certicate, and a root certicate.
Make sure to meet the following requirements before executing the procedure below:
You have a server certicate and a private key to use for the TSL connection.
You have set up an NSS (Network Security Services) database (for example, with thecertutil command).
Before you can import an existing private key and certicate into the NSS (NetworkSecurity Services) database, you need to create a bundle of the private key and the servercerticate. This results in a *.p12 le.
40 Using CA Certificates for TSL openSUSE Leap 15.2

Important: *.p12 File and Friendly NameWhen creating the PKCS12 bundle, you must encode a friendly name in the *.p12le.
Make sure to use Server-Cert as the friendly name. Otherwise the TLS connectionwill fail, because the 389 Directory Server searches for this exact string.
Keep in mind that the friendly name cannot be changed after you import the *.p12le into the NSS database.
1. Use the following command to create the PKCS12 bundle with the required friendly name:
root # openssl pkcs12 -export -in SERVER.crt \ -inkey SERVER.key -out SERVER.p12 \ -name Server-Cert
Replace SERVER.crt with the server certicate and SERVER.key with the private key tobe bundled. With -out , specify the name of the *.p12 le. Use -name to set the friendlyname to use: Server-Cert .
2. Before you can import the le into the NSS database, you need to obtain its password. Todo this, use the following command:
pk12util -i PATH_TO_SERVER.p12 -d sql:PATH_TO_NSS_DB -n Server-cert -W SERVER.p12_PASSWORD
You can then nd the password in the pwdfile.txt le in the PATH_TO_NSS_DBdirectory.
3. Now import the SERVER.p12 le into your NSS database:
pk12util -i SERVER.p12 -d PATH_TO_NSS_DB
6.3.3 Configuring Admin Credentials for Remote/Local Access
For remote or local administration of the 389 Directory Server, you can create a .dsrcconguration le in your home directory. This saves you typing your user name and connectiondetails with every command. Example 6.3 shows an example conguration le for remoteadministration, whereas Example 6.4 shows one for local administration.
41 Configuring Admin Credentials for Remote/Local Access openSUSE Leap 15.2

EXAMPLE 6.3: A .dsrc FILE FOR REMOTE ADMINISTRATION
# cat ~/.dsrc[localhost]uri = ldaps://REMOTE_URI 1
basedn = dc=example,dc=combinddn = cn=Directory Managertls_cacertdir = PATH_TO_CERTDIR 2
1 Needs to point to the LDAP server instance. If not specied otherwise, the default instancename is localhost .
2 Path to the certicate, at a readable location or on the client machine, from which youuse the ds* commands.
If you want to administer the instance on the same host where the 389 Directory Server runs,use the conguration le in Example 6.4.
EXAMPLE 6.4: A .dsrc FILE FOR LOCAL ADMINISTRATION
# cat ~/.dsrc[localhost]# Note that '/' is replaced with '%%2f'.uri = ldapi://%%2fvar%%2frun%%2fslapd-localhost.socket 1
basedn = dc=example,dc=combinddn = cn=Directory Manager
1 When using ldapi on the server where the 389 Directory Server instance is running, yourUID/GID will be detected. If it is 0/0 (which means you are logged in as root user), theldapi binds the local root as the directory server root dn ( cn=Directory Manager ) ofthe instance. This allows local administration of the server, but also allows you to set amachine-generated password for cn=Directory Manager that no human knows. Whoeverhas administrator rights on the server hosting the 389 Directory Server instance can accessthe instance as cn=Directory Manager .
6.3.4 Configuring LDAP Users and Groups
Users and groups can be created and managed with the dsidm command. It either runsinteractively or you can use it with arguments from the command line.
In the following example, we add two users, wilber and geeko , by specifying their data viacommand-line arguments.
42 Configuring LDAP Users and Groups openSUSE Leap 15.2

PROCEDURE 6.1: CREATING LDAP USERS
1. Create the user wilber :
tux > sudo dsidm localhost user create --uid wilber \ --cn wilber --displayName 'Wilber Fox' --uidNumber 1000 --gidNumber 1000 \ --homeDirectory /home/wilber
2. To look up a user's distinguished name (fully qualied name to the directory object,which is guaranteed unique):
tux > sudo dsidm localhost user get wilberdn: uid=wilber,ou=people,dc=example,dc=com[...]
The system prompts you for the directory server root user password (unless youcongured remote or local access as described in Section 6.3.3, “Configuring Admin Credentials
for Remote/Local Access”).You need the distinguished name for actions such as changing the password for a user.
3. To set or change the password for wilber :
a. tux > sudo dsidm localhost account reset_password \ uid=wilber,ou=people,dc=example,dc=com
The system prompts you for the directory server root user password (unless youcongured remote or local access as described in Section 6.3.3, “Configuring Admin
Credentials for Remote/Local Access”).
b. Enter the new password for wilber twice.If the action was successful, you get the following message:
reset password for uid=wilber,ou=people,dc=example,dc=com
4. Create the user geeko :
tux > sudo dsidm localhost user create --uid \ --cn geeko --displayName 'Suzanne Geeko' \ --uidNumber 1001 --gidNumber 1001 --homeDirectory /home/geeko
PROCEDURE 6.2: CREATING LDAP GROUPS AND ASSIGNING USERS TO THEM
In the following, we create a group, server_admins , and assign the user wilber to thisgroup.
43 Configuring LDAP Users and Groups openSUSE Leap 15.2

1. Create the group:
tux > sudo dsidm localhost group create
You will be prompted for a group name:
Enter value for cn :
2. Enter the name for the group, for example: server_admins .
3. Add the user wilber to the group:
tux > sudo dsidm localhost group add_member server_admins uid=wilber,ou=people,dc=example,dc=comadded member: uid=wilber,ou=people,dc=example,dc=com
4. Verify if authentication works:
tux > sudo ldapwhoami -H ldaps://localhost -D \ uid=wilber,ou=people,dc=example,dc=com -W -x
If you are prompted for the LDAP password of wilber , authentication works.If the command fails with the following error, you are probably using a self-signedcerticate:
ldap_sasl_bind(SIMPLE): Can't contact LDAP server (-1)
In that case, edit /etc/openldap/ldap.conf and add the path to the certicate. Forexample:
TLS_CACERT /etc/dirsrv/slapd-localhost/ca.crt
Alternatively, include the path to the certicate in the whoami command:
tux > sudo LDAPTLS_CACERT=/etc/dirsrv/slapd-localhost/ca.crt \ ldapwhoami -H ldaps://localhost -D \ uid=wilber,ou=people,dc=example,dc=com -W -x
44 Configuring LDAP Users and Groups openSUSE Leap 15.2

6.3.5 Setting Up SSSD
SSSD (System Security Services Daemon) is a daemon that communicates with remote identityproviders and allows pam and nsswitch to consume that data. SSSD can have multiple back-ends, cache users and groups and provides features like SSH key distributions.
1. On a separate server, install the sssd package:
tux > sudo zypper in sssd
2. Disable and stop the nscd daemon because it conicts with sssd :
tux > sudo systemctl disable nscd && systemctl stop nscd
3. Create the SSSD conguration and restrict the login to the members of the groupserver_admins that we created in Procedure 6.2:
TipThe memberOf plugin needs to be enabled, so that clients can log in and authorise.
tux > sudo dsidm localhost client_config sssd.conf server_admins
4. Review the output and paste (or redirect) it to /etc/sssd/sssd.conf . If required, editthe conguration le according to your needs.
5. To congure the certicates on your client, copy ca.crt from the LDAP server to yourclient:
tux > sudo mkdir -p /etc/openldap/certscp [...]>/ca.crt /etc/openldap/certs//usr/bin/c_rehash /etc/openldap/certs
6. Enable and start SSSD:
tux > sudo systemctl enable sssdsystemctl start sssd
7. To make sure SSSD is part of PAM and NSS, follow the instructions in sections CongurePAM (SUSE) and Congure NSS (SUSE) at http://www.port389.org/docs/389ds/howto/
howto-sssd.html .
45 Setting Up SSSD openSUSE Leap 15.2
8. Verify if the client can provide the details for user wilber :
tux > sudo id wilber uid=1000(wilber) gid=100(users) groups=100(users)
If everything is set up correctly, wilber can access the 389 Directory Server instance viaSSH to the machine where you have installed and congured SSSD. However, geeko willfail to do so, because geeko does not belong to the group server_admins that we havecongured in Procedure 6.2.
6.4 Setting Up a 389 Directory Server with YaSTYou can use YaST to quickly create a very basic setup of the 389 Directory Server.
6.4.1 Creating a 389 Directory Server Instance with YaST
1. In YaST, click Network Services Create New Directory Server. Alternatively, start the modulefrom command line with yast2 ldap-server .In the window that opens, you need to ll in all mandatory text elds.
2. Enter the Fully qualied domain name of the 389 Directory Server. It must be resolvablefrom the host.
3. In Directory server instance name, enter a local name for the LDAP server instance.
Note: Instance NameThe instance name cannot be changed after the instance has been created. If youplan for only one LDAP server, use the default instance name localhost . However,if you plan to host multiple LDAP servers, use meaningful names for the individualinstances.
4. In Directory sux, enter the base domain name of the LDAP tree. It is your domain namesplit by component. For example, example.com becomes dc=example,dc=com .
5. In the mandatory security options, enter the password for the directory manager (LDAP'sroot/admin account) and repeat the password in the next step. The password must be atleast 8 characters long.
46 Setting Up a 389 Directory Server with YaST openSUSE Leap 15.2

6. To run 389 Directory Server with a CA certicate, specify both of the following options:
a. Enter the path to the Server TLS certicate authority in PEM format, with which theserver certicates have been signed.
b. Enter the path to the Server TLS certicate and key in PKCS12 format with friendlyname "Server-Cert". The *.p12 le contains the server's private key and certicate.These must have been signed by the CA in PEM format that you have specied above.The friendly name must be Server-Cert , see Section 6.3.2, “Using CA Certificates for
TSL” for details.If you do not specify a CA certicate here, a self-signed certicate will be createdautomatically. After the instance has been created, nd the related les in /etc/dirsrv/slapd-INSTANCENAME .
7. If you are ready to create the instance, click OK.
YaST displays a message stating whether the creation was successful and where to ndthe log les.
The setup with YaST provides only a very basic conguration of the 389 Directory Server.To ne-tune more settings, see Section 6.3, “Manually Configuring a 389 Directory Server” or thedocumentation mentioned in Section 6.6, “For More Information”.
6.4.2 Configuring an LDAP Client with YaST
YaST includes the module LDAP and Kerberos Client that helps dene authentication scenariosinvolving either LDAP or Kerberos.
47 Configuring an LDAP Client with YaST openSUSE Leap 15.2

It can also be used to join Kerberos and LDAP separately. However, in many such cases, usingthis module may not be the rst choice, such as for joining Active Directory (which usesa combination of LDAP and Kerberos). For more information, see Section 5.1, “Configuring an
Authentication Client with YaST”.
Start the module by selecting Network Services LDAP and Kerberos Client.
FIGURE 6.2: LDAP AND KERBEROS CLIENT WINDOW
To congure an LDAP client, follow the procedure below:
1. In the window LDAP and Kerberos Client, click Change Settings.Make sure that the tab Use a Directory as Identity Provider (LDAP) is chosen.
48 Configuring an LDAP Client with YaST openSUSE Leap 15.2

2. Specify one or more LDAP server URLs or host names under Enter LDAP server locations. Forsecurity reasons, we recommend to use LDAPS:// URLs only. When specifying multipleaddresses, separate them with spaces.
3. Specify the appropriate LDAP distinguished name (DN) under DN of Search Base. Forexample, a valid entry could be dc=example,dc=com .
4. If your LDAP server supports TLS encryption, choose the appropriate security option underSecure LDAP Connection.To rst ask the server whether it supports TLS encryption and be able to downgrade to anunencrypted connection if it does not, use Secure Communication via StartTLS.
5. Activate other options as necessary:
You can Allow users to authenticate via LDAP and Automatically Create Home Directorieson the local computer for them.
If you want to cache LDAP entries locally, use Cache LDAP Entries For Faster Response.
Warning: Potential Security Risk with CachingUsing the cache incurs security risks, depending on the mechanism used.
nscd
If you dene an authorization rule (for example, members of groupadmin can log in), and you remove a user from that group, the clientcache will not see that change until the cache expires or refreshes. So auser whose account has been revoked can still log in later.
sssd
This caching mechanism constantly checks if group memberships arestill valid. Thus the cache risk only exists if the sssd daemon isdisconnected from the LDAP server for any reason.
Specify the types of data that should be used from the LDAP source, such as Users andGroups, Super-User Commands, and Network Disk Locations (network-shared drivesthat can be automatically mounted on request).
Specify the distinguished name (DN) and password of the user under whose nameyou want to bind to the LDAP directory in DN of Bind User and Password of the BindUser.
49 Configuring an LDAP Client with YaST openSUSE Leap 15.2

Otherwise, if the server supports it, you can also leave both text boxes empty to bindanonymously to the server.
Warning: Authentication Without EncryptionWhen using authentication without enabling transport encryption using TLSor StartTLS, the password will be transmitted in the clear.
Under Extended Options, you can additionally congure timeouts for BIND operations.
6. To check whether the LDAP connection works, click Test Connection.
7. To leave the dialog, click OK. Then wait for the setup to complete.Finally, click Finish.
6.5 Manually Administering LDAP DataThe command line tools provided by the openldap2-client package (like ldapsearch orldapmodify ) can be used for administration of data in the LDAP directory. However, they arelow-level tools and hard to use. For details about their use, refer to the respective man pagesand documentation.
6.6 For More InformationFor more information about 389 Directory Server, see the upstream documentation, availableat http://www.port389.org/docs/389ds/documentation.html .
50 Manually Administering LDAP Data openSUSE Leap 15.2

7 Network Authentication with Kerberos
Kerberos is a network authentication protocol which also provides encryption. Thischapter describes how to set up Kerberos and integrate services like LDAP and NFS.
7.1 Conceptual OverviewAn open network provides no means of ensuring that a workstation can identify its usersproperly, except through the usual password mechanisms. In common installations, the usermust enter the password each time a service inside the network is accessed. Kerberos providesan authentication method with which a user registers only once and is trusted in the completenetwork for the rest of the session. To have a secure network, the following requirements mustbe met:
Have all users prove their identity for each desired service and make sure that no one cantake the identity of someone else.
Make sure that each network server also proves its identity. Otherwise an attacker might beable to impersonate the server and obtain sensitive information transmitted to the server.This concept is called mutual authentication, because the client authenticates to the serverand vice versa.
Kerberos helps you meet these requirements by providing strongly encrypted authentication.Only the basic principles of Kerberos are discussed here. For detailed technical instruction, referto the Kerberos documentation.
7.2 Kerberos TerminologyThe following glossary denes some Kerberos terminology.
credential
Users or clients need to present some kind of credentials that authorize them to requestservices. Kerberos knows two kinds of credentials—tickets and authenticators.
ticket
51 Conceptual Overview openSUSE Leap 15.2

A ticket is a per-server credential used by a client to authenticate at a server from whichit is requesting a service. It contains the name of the server, the client's name, the client'sInternet address, a time stamp, a lifetime, and a random session key. All this data isencrypted using the server's key.
authenticator
Combined with the ticket, an authenticator is used to prove that the client presenting aticket is really the one it claims to be. An authenticator is built using the client's name, theworkstation's IP address, and the current workstation's time, all encrypted with the sessionkey known only to the client and the relevant server. An authenticator can only be usedonce, unlike a ticket. A client can build an authenticator itself.
principal
A Kerberos principal is a unique entity (a user or service) to which it can assign a ticket.A principal consists of the following components:
USER/INSTANCE@REALM
primary: The rst part of the principal. In the case of users, this is usually the sameas the user name.
instance (optional): Additional information characterizing the primary. This string isseparated from the primary by a / [email protected] and tux/[email protected] can both exist on the sameKerberos system and are treated as dierent principals.
realm: Species the Kerberos realm. Normally, your realm is your domain name inuppercase letters.
mutual authentication
Kerberos ensures that both client and server can be sure of each other's identity. They sharea session key, which they can use to communicate securely.
session key
Session keys are temporary private keys generated by Kerberos. They are known to theclient and used to encrypt the communication between the client and the server for whichit requested and received a ticket.
replay
52 Kerberos Terminology openSUSE Leap 15.2
Almost all messages sent in a network can be eavesdropped, stolen, and resent. In theKerberos context, this would be most dangerous if an attacker manages to obtain yourrequest for a service containing your ticket and authenticator. The attacker could thentry to resend it (replay) to impersonate you. However, Kerberos implements severalmechanisms to deal with this problem.
server or service
Service is used to refer to a specic action to perform. The process behind this action iscalled a server.
7.3 How Kerberos Works
Kerberos is often called a third-party trusted authentication service, which means all its clientstrust Kerberos's judgment of another client's identity. Kerberos keeps a database of all its usersand their private keys.
To ensure Kerberos is working correctly, run both the authentication and ticket-granting serveron a dedicated machine. Make sure that only the administrator can access this machinephysically and over the network. Reduce the (networking) services running on it to the absoluteminimum—do not even run sshd .
7.3.1 First Contact
Your rst contact with Kerberos is quite similar to any login procedure at a normal networkingsystem. Enter your user name. This piece of information and the name of the ticket-grantingservice are sent to the authentication server (Kerberos). If the authentication server knows you,it generates a random session key for further use between your client and the ticket-grantingserver. Now the authentication server prepares a ticket for the ticket-granting server. The ticketcontains the following information—all encrypted with a session key only the authenticationserver and the ticket-granting server know:
The names of both, the client and the ticket-granting server
The current time
A lifetime assigned to this ticket
53 How Kerberos Works openSUSE Leap 15.2
The client's IP address
The newly-generated session key
This ticket is then sent back to the client together with the session key, again in encrypted form,but this time the private key of the client is used. This private key is only known to Kerberosand the client, because it is derived from your user password. Now that the client has receivedthis response, you are prompted for your password. This password is converted into the key thatcan decrypt the package sent by the authentication server. The package is “unwrapped” andpassword and key are erased from the workstation's memory. As long as the lifetime given tothe ticket used to obtain other tickets does not expire, your workstation can prove your identity.
7.3.2 Requesting a Service
To request a service from any server in the network, the client application needs to prove itsidentity to the server. Therefore, the application generates an authenticator. An authenticatorconsists of the following components:
The client's principal
The client's IP address
The current time
A checksum (chosen by the client)
All this information is encrypted using the session key that the client has already received for thisspecial server. The authenticator and the ticket for the server are sent to the server. The serveruses its copy of the session key to decrypt the authenticator, which gives it all the informationneeded about the client requesting its service, to compare it to that contained in the ticket. Theserver checks if the ticket and the authenticator originate from the same client.
Without any security measures implemented on the server side, this stage of the process wouldbe an ideal target for replay attacks. Someone could try to resend a request stolen o the netsome time before. To prevent this, the server does not accept any request with a time stamp andticket received previously. In addition to that, a request with a time stamp diering too muchfrom the time the request is received is ignored.
54 Requesting a Service openSUSE Leap 15.2

7.3.3 Mutual Authentication
Kerberos authentication can be used in both directions. It is not only a question of the clientbeing the one it claims to be. The server should also be able to authenticate itself to the clientrequesting its service. Therefore, it sends an authenticator itself. It adds one to the checksumit received in the client's authenticator and encrypts it with the session key, which is sharedbetween it and the client. The client takes this response as a proof of the server's authenticityand they both start cooperating.
7.3.4 Ticket Granting—Contacting All Servers
Tickets are designed to be used for one server at a time. Therefore, you need to get a newticket each time you request another service. Kerberos implements a mechanism to obtain ticketsfor individual servers. This service is called the “ticket-granting service”. The ticket-grantingservice is a service (like any other service mentioned before) and uses the same access protocolsthat have already been outlined. Any time an application needs a ticket that has not alreadybeen requested, it contacts the ticket-granting server. This request consists of the followingcomponents:
The requested principal
The ticket-granting ticket
An authenticator
Like any other server, the ticket-granting server now checks the ticket-granting ticket and theauthenticator. If they are considered valid, the ticket-granting server builds a new session keyto be used between the original client and the new server. Then the ticket for the new serveris built, containing the following information:
The client's principal
The server's principal
The current time
The client's IP address
The newly-generated session key
55 Mutual Authentication openSUSE Leap 15.2

The new ticket has a lifetime, which is either the remaining lifetime of the ticket-granting ticketor the default for the service. The lesser of both values is assigned. The client receives this ticketand the session key, which are sent by the ticket-granting service. But this time the answer isencrypted with the session key that came with the original ticket-granting ticket. The client candecrypt the response without requiring the user's password when a new service is contacted.Kerberos can thus acquire ticket after ticket for the client without bothering the user.
7.4 User View of KerberosIdeally, a user only contact with Kerberos happens during login at the workstation. The loginprocess includes obtaining a ticket-granting ticket. At logout, a user's Kerberos tickets areautomatically destroyed, which makes it dicult for anyone else to impersonate this user.
The automatic expiration of tickets can lead to a situation when a user's login session lasts longerthan the maximum lifespan given to the ticket-granting ticket (a reasonable setting is 10 hours).However, the user can get a new ticket-granting ticket by running kinit . Enter the passwordagain and Kerberos obtains access to desired services without additional authentication. To geta list of all the tickets silently acquired for you by Kerberos, run klist .
Here is a short list of applications that use Kerberos authentication. These applications can befound under /usr/lib/mit/bin or /usr/lib/mit/sbin after installing the package krb5-apps-clients . They all have the full functionality of their common Unix and Linux brothersplus the additional bonus of transparent authentication managed by Kerberos:
telnet , telnetd
rlogin
rsh , rcp , rshd
ftp , ftpd
ksu
You no longer need to enter your password for using these applications because Kerberoshas already proven your identity. ssh , if compiled with Kerberos support, can even forwardall the tickets acquired for one workstation to another one. If you use ssh to log in toanother workstation, ssh makes sure that the encrypted contents of the tickets are adjustedto the new situation. Simply copying tickets between workstations is not sucient because the
56 User View of Kerberos openSUSE Leap 15.2

ticket contains workstation-specic information (the IP address). XDM and GDM oer Kerberossupport, too. Read more about the Kerberos network applications in Kerberos V5 UNIX User'sGuide at http://web.mit.edu/kerberos .
7.5 Installing and Administering Kerberos
A Kerberos environment consists of several components. A key distribution center (KDC) holdsthe central database with all Kerberos-relevant data. All clients rely on the KDC for properauthentication across the network. Both the KDC and the clients need to be congured to matchyour setup:
General Preparations
Check your network setup and make sure it meets the minimum requirements outlined inSection 7.5.1, “Kerberos Network Topology”. Choose an appropriate realm for your Kerberossetup, see Section 7.5.2, “Choosing the Kerberos Realms”. Carefully set up the machine that isto serve as the KDC and apply tight security, see Section 7.5.3, “Setting Up the KDC Hardware”.Set up a reliable time source in your network to make sure all tickets contain valid timestamps, see Section 7.5.4, “Configuring Time Synchronization”.
Basic Configuration
Congure the KDC and the clients, see Section 7.5.5, “Configuring the KDC” and Section 7.5.6,
“Configuring Kerberos Clients”. Enable remote administration for your Kerberos service, soyou do not need physical access to your KDC machine, see Section 7.5.7, “Configuring Remote
Kerberos Administration”. Create service principals for every service in your realm, seeSection 7.5.8, “Creating Kerberos Service Principals”.
Enabling Kerberos Authentication
Various services in your network can use Kerberos. To add Kerberos password-checkingto applications using PAM, proceed as outlined in Section 7.5.9, “Enabling PAM Support for
Kerberos”. To congure SSH or LDAP with Kerberos authentication, proceed as outlinedin Section 7.5.10, “Configuring SSH for Kerberos Authentication” and Section 7.5.11, “Using LDAP
and Kerberos”.
57 Installing and Administering Kerberos openSUSE Leap 15.2

7.5.1 Kerberos Network Topology
Any Kerberos environment must meet the following requirements to be fully functional:
Provide a DNS server for name resolution across your network, so clients and serverscan locate each other. Refer to Book “Reference”, Chapter 19 “The Domain Name System” forinformation on DNS setup.
Provide a time server in your network. Using exact time stamps is crucial to a Kerberossetup, because valid Kerberos tickets must contain correct time stamps. Refer to Book
“Reference”, Chapter 18 “Time Synchronization with NTP” for information on NTP setup.
Provide a key distribution center (KDC) as the center piece of the Kerberos architecture.It holds the Kerberos database. Use the tightest possible security policy on this machine toprevent any attacks on this machine compromising your entire infrastructure.
Congure the client machines to use Kerberos authentication.
The following gure depicts a simple example network with only the minimum componentsneeded to build a Kerberos infrastructure. Depending on the size and topology of yourdeployment, your setup may vary.
router
NTP, DNS Kerberos
.1
192.168.2.0/24 .100
Venus(workstation)
Jupiter(workstation)
192.168.1.0/24
.1
.116 .114
.101
FIGURE 7.1: KERBEROS NETWORK TOPOLOGY
58 Kerberos Network Topology openSUSE Leap 15.2
Tip: Configuring Subnet RoutingFor a setup similar to the one in Figure 7.1, “Kerberos Network Topology”, congure routingbetween the two subnets (192.168.1.0/24 and 192.168.2.0/24). Refer to Book “Reference”,
Chapter 13 “Basic Networking”, Section 13.4.1.5 “Configuring Routing” for more information onconguring routing with YaST.
7.5.2 Choosing the Kerberos Realms
The domain of a Kerberos installation is called a realm and is identied by a name, such asEXAMPLE.COM or simply ACCOUNTING . Kerberos is case-sensitive, so example.com is actuallya dierent realm than EXAMPLE.COM . Use the case you prefer. It is common practice, however,to use uppercase realm names.
It is also a good idea to use your DNS domain name (or a subdomain, such asACCOUNTING.EXAMPLE.COM ). As shown below, your life as an administrator can be much easierif you congure your Kerberos clients to locate the KDC and other Kerberos services via DNS.To do so, it is helpful if your realm name is a subdomain of your DNS domain name.
Unlike the DNS name space, Kerberos is not hierarchical. So if you have a realm namedEXAMPLE.COM with two “subrealms” named DEVELOPMENT and ACCOUNTING , these subordinaterealms do not inherit principals from EXAMPLE.COM . Instead, you would have three separaterealms, and you would need to congure cross-realm authentication for each realm, so that usersfrom one realm can interact with servers or other users from another realm.
For the sake of simplicity, let us assume you are setting up only one realm for your entireorganization. For the remainder of this section, the realm name EXAMPLE.COM is used in allexamples.
7.5.3 Setting Up the KDC Hardware
The rst thing required to use Kerberos is a machine that acts as the key distribution center,or KDC for short. This machine holds the entire Kerberos user database with passwords and allinformation.
59 Choosing the Kerberos Realms openSUSE Leap 15.2

The KDC is the most important part of your security infrastructure—if someone breaks into it, alluser accounts and all of your infrastructure protected by Kerberos is compromised. An attackerwith access to the Kerberos database can impersonate any principal in the database. Tightensecurity for this machine as much as possible:
1. Put the server machine into a physically secured location, such as a locked server roomto which only a very few people have access.
2. Do not run any network applications on it except the KDC. This includes servers and clients—for example, the KDC should not import any le systems via NFS or use DHCP to retrieveits network conguration.
3. Install a minimal system rst then check the list of installed packages and remove anyunneeded packages. This includes servers, such as inetd , portmap , and CUPS, plusanything X-based. Even installing an SSH server should be considered a potential securityrisk.
4. No graphical login is provided on this machine as an X server is a potential security risk.Kerberos provides its own administration interface.
5. Congure /etc/nsswitch.conf to use only local les for user and group lookup. Changethe lines for passwd and group to look like this:
passwd: filesgroup: files
Edit the passwd , group , and shadow les in /etc and remove the lines that start witha + character (these are for NIS lookups).
6. Disable all user accounts except root 's account by editing /etc/shadow and replacingthe hashed passwords with * or ! characters.
7.5.4 Configuring Time Synchronization
To use Kerberos successfully, make sure that all system clocks within your organization aresynchronized within a certain range. This is important because Kerberos protects againstreplayed credentials. An attacker might be able to observe Kerberos credentials on the networkand reuse them to attack the server. Kerberos employs several defenses to prevent this. One ofthem is that it puts time stamps into its tickets. A server receiving a ticket with a time stampthat diers from the current time rejects the ticket.
60 Configuring Time Synchronization openSUSE Leap 15.2
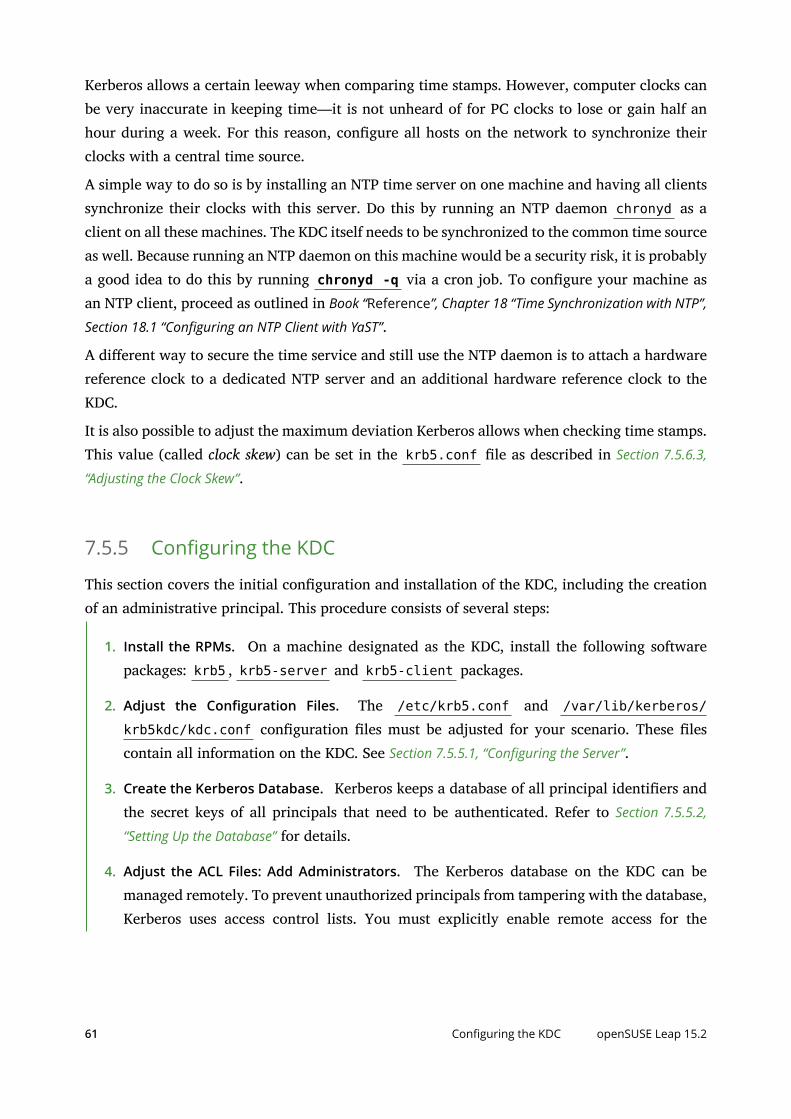
Kerberos allows a certain leeway when comparing time stamps. However, computer clocks canbe very inaccurate in keeping time—it is not unheard of for PC clocks to lose or gain half anhour during a week. For this reason, congure all hosts on the network to synchronize theirclocks with a central time source.
A simple way to do so is by installing an NTP time server on one machine and having all clientssynchronize their clocks with this server. Do this by running an NTP daemon chronyd as aclient on all these machines. The KDC itself needs to be synchronized to the common time sourceas well. Because running an NTP daemon on this machine would be a security risk, it is probablya good idea to do this by running chronyd -q via a cron job. To congure your machine asan NTP client, proceed as outlined in Book “Reference”, Chapter 18 “Time Synchronization with NTP”,
Section 18.1 “Configuring an NTP Client with YaST”.
A dierent way to secure the time service and still use the NTP daemon is to attach a hardwarereference clock to a dedicated NTP server and an additional hardware reference clock to theKDC.
It is also possible to adjust the maximum deviation Kerberos allows when checking time stamps.This value (called clock skew) can be set in the krb5.conf le as described in Section 7.5.6.3,
“Adjusting the Clock Skew”.
7.5.5 Configuring the KDC
This section covers the initial conguration and installation of the KDC, including the creationof an administrative principal. This procedure consists of several steps:
1. Install the RPMs. On a machine designated as the KDC, install the following softwarepackages: krb5 , krb5-server and krb5-client packages.
2. Adjust the Configuration Files. The /etc/krb5.conf and /var/lib/kerberos/
krb5kdc/kdc.conf conguration les must be adjusted for your scenario. These lescontain all information on the KDC. See Section 7.5.5.1, “Configuring the Server”.
3. Create the Kerberos Database. Kerberos keeps a database of all principal identiers andthe secret keys of all principals that need to be authenticated. Refer to Section 7.5.5.2,
“Setting Up the Database” for details.
4. Adjust the ACL Files: Add Administrators. The Kerberos database on the KDC can bemanaged remotely. To prevent unauthorized principals from tampering with the database,Kerberos uses access control lists. You must explicitly enable remote access for the
61 Configuring the KDC openSUSE Leap 15.2

administrator principal to enable them to manage the database. The Kerberos ACLle is located under /var/lib/kerberos/krb5kdc/kadm5.acl . Refer to Section 7.5.7,
“Configuring Remote Kerberos Administration” for details.
5. Adjust the Kerberos Database: Add Administrators. You need at least one administrativeprincipal to run and administer Kerberos. This principal must be added before starting theKDC. Refer to Section 7.5.5.3, “Creating a Principal” for details.
6. Start the Kerberos Daemon. After the KDC software is installed and properly congured,start the Kerberos daemon to provide Kerberos service for your realm. Refer toSection 7.5.5.4, “Starting the KDC” for details.
7. Create a Principal for Yourself. You need a principal for yourself. Refer to Section 7.5.5.3,
“Creating a Principal” for details.
7.5.5.1 Configuring the Server
Conguring a Kerberos server is highly variable, dependent on your network architecture, DNSand DHCP conguration, realms, and other considerations. You must have a default realm,and domain- to-realm mappings. The following example demonstrates a minimal conguration.This is not a copy-and-paste example; see https://web.mit.edu/kerberos/krb5-latest/doc/admin/
conf_files/index.html for detailed information on Kerberos conguration.
EXAMPLE 7.1: EXAMPLE KDC CONFIGURATION, /etc/krb5.conf
[libdefaults] dns_canonicalize_hostname = false rdns = false default_realm = example.com ticket_lifetime = 24h renew_lifetime = 7d
[realms] example.com = { kdc = kdc.example.com.:88 admin_server = kdc.example.com default_domain = example.com } [logging] kdc = FILE:/var/log/krb5kdc.log admin_server = FILE:/var/log/kadmind.log
62 Configuring the KDC openSUSE Leap 15.2

default = SYSLOG:NOTICE:DAEMON
[domain_realm] .example.com = example.com example.com = example.com
7.5.5.2 Setting Up the Database
Your next step is to initialize the database where Kerberos keeps all information about principals.Set up the database master key, which is used to protect the database from accidental disclosure(in particular if it is backed up to tape). The master key is derived from a pass phrase and isstored in a le called the stash le. This is so you do not need to enter the password every timethe KDC is restarted. Make sure that you choose a good pass phrase, such as a sentence froma book opened to a random page.
When you make tape backups of the Kerberos database ( /var/lib/kerberos/krb5kdc/principal ), do not back up the stash le (which is in /var/lib/kerberos/
krb5kdc/.k5.EXAMPLE.COM ). Otherwise, everyone able to read the tape could also decrypt thedatabase. Therefore, keep a copy of the pass phrase in a safe or some other secure location,because you will need it to restore your database from backup tape after a crash.
To create the stash le and the database, run:
tux > sudo kdb5_util create -r EXAMPLE.COM -s
You will see the following output:
Initializing database '/var/lib/kerberos/krb5kdc/principal' for realm 'EXAMPLE.COM',master key name 'K/[email protected]'You will be prompted for the database Master Password.It is important that you NOT FORGET this password.Enter KDC database master key: 1
Re-enter KDC database master key to verify: 2
1 Type the master password.
2 Type the password again.
To verify, use the list command:
tux > kadmin.local
kadmin> listprincs
63 Configuring the KDC openSUSE Leap 15.2

You will see several principals in the database, which are for internal use by Kerberos:
K/[email protected]/[email protected]/[email protected]/[email protected]
7.5.5.3 Creating a Principal
Create two Kerberos principals for yourself: one normal principal for everyday work and onefor administrative tasks relating to Kerberos. Assuming your login name is geeko , proceed asfollows:
tux > kadmin.local
kadmin> ank geeko
You will see the following output:
[email protected]'s Password: 1
Verifying password: 2
1 Type geeko 's password.
1 Type geeko 's password again.
Next, create another principal named geeko/admin by typing ank geeko/admin at thekadmin prompt. The admin suxed to your user name is a role. Later, use this role whenadministering the Kerberos database. A user can have several roles for dierent purposes. Rolesact like completely dierent accounts that have similar names.
7.5.5.4 Starting the KDC
Start the KDC daemon and the kadmin daemon. To start the daemons manually, enter:
tux > sudo systemctl start krb5kdcsudo systemctl start kadmind
Also make sure that the services KDC ( krb5kdc ) and kadmind ( kadmind ) are started by defaultwhen the server machine is rebooted. Enable them by entering:
tux > sudo systemctl enable krb5kdc kadmind
64 Configuring the KDC openSUSE Leap 15.2

or by using the YaST Services Manager.
7.5.6 Configuring Kerberos Clients
When the supporting infrastructure is in place (DNS, NTP) and the KDC has been properlycongured and started, congure the client machines. To congure a Kerberos client, use oneof the two manual approaches described below.
When conguring Kerberos, there are two approaches you can take—static conguration in the/etc/krb5.conf le or dynamic conguration with DNS. With DNS conguration, Kerberosapplications try to locate the KDC services using DNS records. With static conguration, addthe host names of your KDC server to krb5.conf (and update the le whenever you move theKDC or recongure your realm in other ways).
DNS-based conguration is generally a lot more exible and the amount of conguration workper machine is a lot less. However, it requires that your realm name is either the same as yourDNS domain or a subdomain of it. Conguring Kerberos via DNS also creates a security issue:An attacker can seriously disrupt your infrastructure through your DNS (by shooting downthe name server, spoong DNS records, etc.). However, this amounts to a denial of service atworst. A similar scenario applies to the static conguration case unless you enter IP addressesin krb5.conf instead of host names.
7.5.6.1 Static Configuration
One way to congure Kerberos is to edit /etc/krb5.conf . The le installed by default containsvarious sample entries. Erase all of these entries before starting. krb5.conf is made up ofseveral sections (stanzas), each introduced by the section name in brackets like [this] .
To congure your Kerberos clients, add the following stanza to krb5.conf (wherekdc.example.com is the host name of the KDC):
[libdefaults] default_realm = EXAMPLE.COM
[realms] EXAMPLE.COM = { kdc = kdc.example.com admin_server = kdc.example.com }
65 Configuring Kerberos Clients openSUSE Leap 15.2

The default_realm line sets the default realm for Kerberos applications. If you have severalrealms, add additional statements to the [realms] section.
Also add a statement to this le that tells applications how to map host names to a realm. Forexample, when connecting to a remote host, the Kerberos library needs to know in which realmthis host is located. This must be congured in the [domain_realms] section:
[domain_realm].example.com = EXAMPLE.COMwww.example.org = EXAMPLE.COM
This tells the library that all hosts in the example.com DNS domains are in the EXAMPLE.COMKerberos realm. In addition, one external host named www.example.org should also beconsidered a member of the EXAMPLE.COM realm.
7.5.6.2 DNS-Based Configuration
DNS-based Kerberos conguration makes heavy use of SRV records. See (RFC2052) A DNS RRfor specifying the location of services at http://www.ietf.org .
The name of an SRV record, as far as Kerberos is concerned, is always in the format_service._proto.realm , where realm is the Kerberos realm. Domain names in DNS arecase-insensitive, so case-sensitive Kerberos realms would break when using this congurationmethod. _service is a service name (dierent names are used when trying to contact the KDCor the password service, for example). _proto can be either _udp or _tcp , but not all servicessupport both protocols.
The data portion of SRV resource records consists of a priority value, a weight, a port number,and a host name. The priority denes the order in which hosts should be tried (lower valuesindicate a higher priority). The weight value is there to support some sort of load balancingamong servers of equal priority. You probably do not need any of this, so it is okay to set theseto zero.
MIT Kerberos currently looks up the following names when looking for services:
_kerberos
This denes the location of the KDC daemon (the authentication and ticket grantingserver). Typical records look like this:
_kerberos._udp.EXAMPLE.COM. IN SRV 0 0 88 kdc.example.com._kerberos._tcp.EXAMPLE.COM. IN SRV 0 0 88 kdc.example.com.
66 Configuring Kerberos Clients openSUSE Leap 15.2
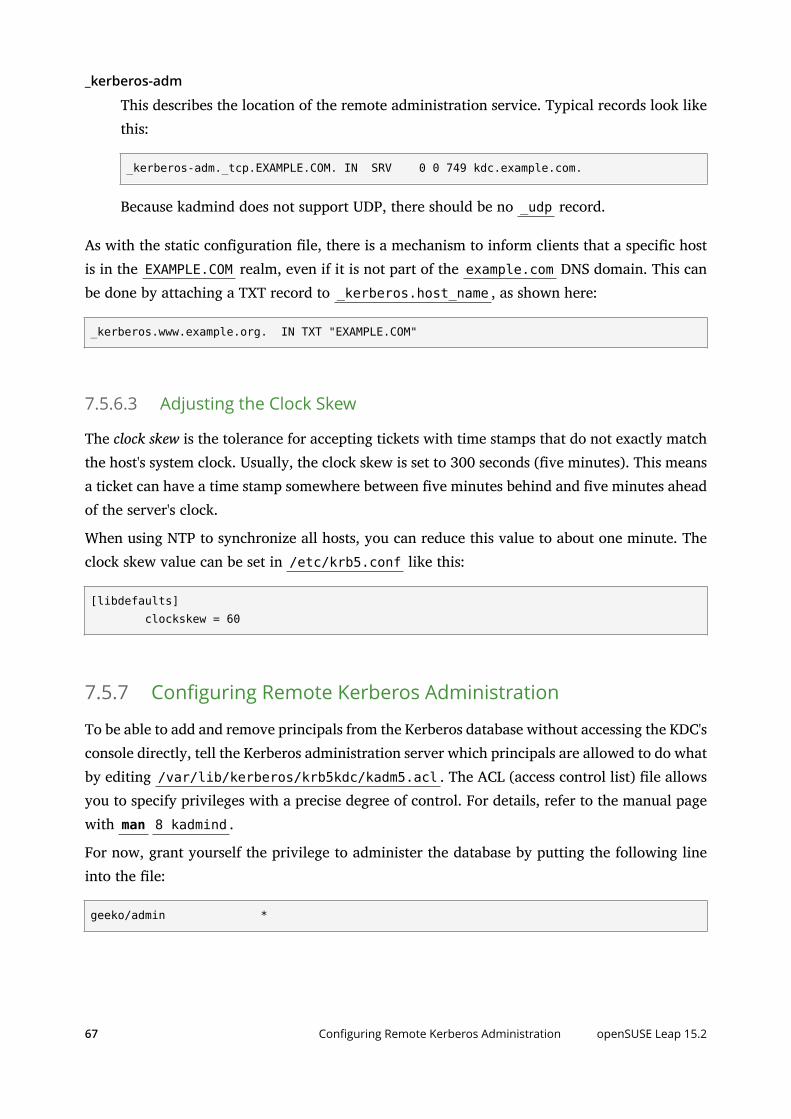
_kerberos-adm
This describes the location of the remote administration service. Typical records look likethis:
_kerberos-adm._tcp.EXAMPLE.COM. IN SRV 0 0 749 kdc.example.com.
Because kadmind does not support UDP, there should be no _udp record.
As with the static conguration le, there is a mechanism to inform clients that a specic hostis in the EXAMPLE.COM realm, even if it is not part of the example.com DNS domain. This canbe done by attaching a TXT record to _kerberos.host_name , as shown here:
_kerberos.www.example.org. IN TXT "EXAMPLE.COM"
7.5.6.3 Adjusting the Clock Skew
The clock skew is the tolerance for accepting tickets with time stamps that do not exactly matchthe host's system clock. Usually, the clock skew is set to 300 seconds (ve minutes). This meansa ticket can have a time stamp somewhere between ve minutes behind and ve minutes aheadof the server's clock.
When using NTP to synchronize all hosts, you can reduce this value to about one minute. Theclock skew value can be set in /etc/krb5.conf like this:
[libdefaults] clockskew = 60
7.5.7 Configuring Remote Kerberos Administration
To be able to add and remove principals from the Kerberos database without accessing the KDC'sconsole directly, tell the Kerberos administration server which principals are allowed to do whatby editing /var/lib/kerberos/krb5kdc/kadm5.acl . The ACL (access control list) le allowsyou to specify privileges with a precise degree of control. For details, refer to the manual pagewith man 8 kadmind .
For now, grant yourself the privilege to administer the database by putting the following lineinto the le:
geeko/admin *
67 Configuring Remote Kerberos Administration openSUSE Leap 15.2

Replace the user name geeko with your own. Restart kadmind for the change to take eect.
You should now be able to perform Kerberos administration tasks remotely using the kadmintool. First, obtain a ticket for your admin role and use that ticket when connecting to the kadminserver:
tux > kadmin -p geeko/adminAuthenticating as principal geeko/[email protected] with password.Password for geeko/[email protected]:kadmin: getprivscurrent privileges: GET ADD MODIFY DELETEkadmin:
Using the getprivs command, verify which privileges you have. The list shown above is thefull set of privileges.
As an example, modify the principal geeko :
tux > kadmin -p geeko/adminAuthenticating as principal geeko/[email protected] with password.Password for geeko/[email protected]:
kadmin: getprinc geekoPrincipal: [email protected] date: [never]Last password change: Wed Jan 12 17:28:46 CET 2005Password expiration date: [none]Maximum ticket life: 0 days 10:00:00Maximum renewable life: 7 days 00:00:00Last modified: Wed Jan 12 17:47:17 CET 2005 (admin/[email protected])Last successful authentication: [never]Last failed authentication: [never]Failed password attempts: 0Number of keys: 2Key: vno 1, Triple DES cbc mode with HMAC/sha1, no saltKey: vno 1, DES cbc mode with CRC-32, no saltAttributes:Policy: [none]
kadmin: modify_principal -maxlife "8 hours" geekoPrincipal "[email protected]" modified.kadmin: getprinc geekoPrincipal: [email protected] date: [never]Last password change: Wed Jan 12 17:28:46 CET 2005Password expiration date: [none]Maximum ticket life: 0 days 08:00:00
68 Configuring Remote Kerberos Administration openSUSE Leap 15.2
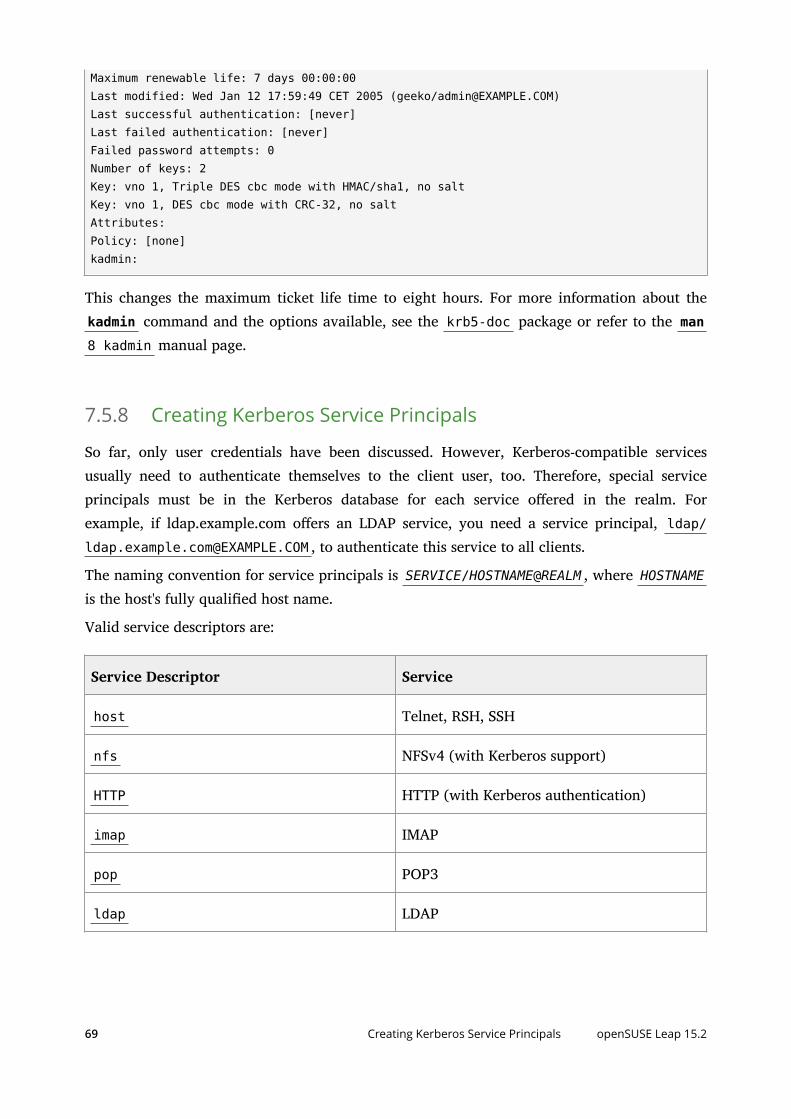
Maximum renewable life: 7 days 00:00:00Last modified: Wed Jan 12 17:59:49 CET 2005 (geeko/[email protected])Last successful authentication: [never]Last failed authentication: [never]Failed password attempts: 0Number of keys: 2Key: vno 1, Triple DES cbc mode with HMAC/sha1, no saltKey: vno 1, DES cbc mode with CRC-32, no saltAttributes:Policy: [none]kadmin:
This changes the maximum ticket life time to eight hours. For more information about thekadmin command and the options available, see the krb5-doc package or refer to the man8 kadmin manual page.
7.5.8 Creating Kerberos Service Principals
So far, only user credentials have been discussed. However, Kerberos-compatible servicesusually need to authenticate themselves to the client user, too. Therefore, special serviceprincipals must be in the Kerberos database for each service oered in the realm. Forexample, if ldap.example.com oers an LDAP service, you need a service principal, ldap/[email protected] , to authenticate this service to all clients.
The naming convention for service principals is SERVICE/HOSTNAME@REALM , where HOSTNAMEis the host's fully qualied host name.
Valid service descriptors are:
Service Descriptor Service
host Telnet, RSH, SSH
nfs NFSv4 (with Kerberos support)
HTTP HTTP (with Kerberos authentication)
imap IMAP
pop POP3
ldap LDAP
69 Creating Kerberos Service Principals openSUSE Leap 15.2

Service principals are similar to user principals, but have signicant dierences. The maindierence between a user principal and a service principal is that the key of the former isprotected by a password. When a user obtains a ticket-granting ticket from the KDC, they needsto type their password, so Kerberos can decrypt the ticket. It would be inconvenient for systemadministrators to obtain new tickets for the SSH daemon every eight hours or so.
Instead, the key required to decrypt the initial ticket for the service principal is extracted by theadministrator from the KDC only once and stored in a local le called the keytab. Services suchas the SSH daemon read this key and use it to obtain new tickets automatically, when needed.The default keytab le resides in /etc/krb5.keytab .
To create a host service principal for jupiter.example.com enter the following commandsduring your kadmin session:
tux > kadmin -p geeko/adminAuthenticating as principal geeko/[email protected] with password.Password for geeko/[email protected]:kadmin: addprinc -randkey host/jupiter.example.comWARNING: no policy specified for host/[email protected];defaulting to no policyPrincipal "host/[email protected]" created.
Instead of setting a password for the new principal, the -randkey ag tells kadmin to generatea random key. This is used here because no user interaction is wanted for this principal. It isa server account for the machine.
Finally, extract the key and store it in the local keytab le /etc/krb5.keytab . This le isowned by the superuser, so you must be root to execute the next command in the kadmin shell:
kadmin: ktadd host/jupiter.example.comEntry for principal host/jupiter.example.com with kvno 3, encryption type TripleDES cbc mode with HMAC/sha1 added to keytab WRFILE:/etc/krb5.keytab.Entry for principal host/jupiter.example.com with kvno 3, encryption type DEScbc mode with CRC-32 added to keytab WRFILE:/etc/krb5.keytab.kadmin:
When completed, make sure that you destroy the admin ticket obtained with kinit above withkdestroy .
70 Creating Kerberos Service Principals openSUSE Leap 15.2

7.5.9 Enabling PAM Support for Kerberos
Warning: Incomplete Configuration Locks Users OutAn incomplete Kerberos conguration may completely lock you out of your system,including the root user. To prevent this, add the ignore_unknown_principals directiveto the pam_krb5 module after you have added the pam_krb5 module to the existing PAMconguration les as described below.
tux > sudo pam-config --add --krb5-ignore_unknown_principals
This will direct the pam_krb5 module to ignore some errors that would otherwise causethe account phase to fail.
openSUSE® Leap comes with a PAM module named pam_krb5 , which supports Kerberos loginand password update. This module can be used by applications such as console login, su , andgraphical login applications like GDM. That is, it can be used in all cases where the user enters apassword and expects the authenticating application to obtain an initial Kerberos ticket on theirbehalf. To congure PAM support for Kerberos, use the following command:
tux > sudo pam-config --add --krb5
The above command adds the pam_krb5 module to the existing PAM conguration les andmakes sure it is called in the right order. To make precise adjustments to the way in whichpam_krb5 is used, edit the le /etc/krb5.conf and add default applications to PAM. Fordetails, refer to the manual page with man 5 pam_krb5 .
The pam_krb5 module was specically not designed for network services that accept Kerberostickets as part of user authentication. This is an entirely dierent matter, and is discussed below.
7.5.10 Configuring SSH for Kerberos Authentication
OpenSSH supports Kerberos authentication in both protocol version 1 and 2. In version 1, thereare special protocol messages to transmit Kerberos tickets. Version 2 does not use Kerberosdirectly anymore, but relies on GSSAPI, the General Security Services API. This is a programminginterface that is not specic to Kerberos—it was designed to hide the peculiarities of theunderlying authentication system, be it Kerberos, a public-key authentication system like SPKM,or others. However, the included GSSAPI library only supports Kerberos.
71 Enabling PAM Support for Kerberos openSUSE Leap 15.2

To use sshd with Kerberos authentication, edit /etc/ssh/sshd_config and set the followingoptions:
# These are for protocol version 1## KerberosAuthentication yes# KerberosTicketCleanup yes
# These are for version 2 - better to use thisGSSAPIAuthentication yesGSSAPICleanupCredentials yes
Then restart your SSH daemon using sudo systemctl restart sshd .
To use Kerberos authentication with protocol version 2, enable it on the client side as well. Dothis either in the system-wide conguration le /etc/ssh/ssh_config or on a per-user levelby editing ~/.ssh/config . In both cases, add the option GSSAPIAuthentication yes .
You should now be able to connect using Kerberos authentication. Use klist to verify that youhave a valid ticket, then connect to the SSH server. To force SSH protocol version 1, specify the-1 option on the command line.
Tip: Additional InformationThe le /usr/share/doc/packages/openssh/README.kerberos discusses theinteraction of OpenSSH and Kerberos in more detail.
Tip: Additional Directives for Protocol Version 2The GSSAPIKeyExchange mechanism (RFC 4462) is supported. This directive specieshow host keys are exchanged. For more information, see the sshd_cong manual page( man sshd_config ).
7.5.11 Using LDAP and Kerberos
While Kerberos provides authentication, LDAP is used for authorization and identication. Bothservices can work together.
For secure connections,389 Directory Server supports dierent ways of encrypting data: SSL/TLS connections, Start TLS connections, and SASL authentication. Simple Authenticationand Security Layer (SASL) is a network protocol designed for authentication. The SASL
72 Using LDAP and Kerberos openSUSE Leap 15.2

implementation used on openSUSE Leap is cyrus-sasl . Kerberos authentication is performedthrough GSS-API (General Security Services API), provided by the cyrus-sasl-gssapi
package. Using GSS-API, 389 Directory Server uses Kerberos tickets to authenticate sessions andencrypt data.
With the SASL framework you can use dierent mechanisms to authenticate a user to the server.In Kerberos, authentication is always mutual. This means that not only have you authenticatedyourself to the 389 Directory Server, but also the 389 Directory Server has authenticated itselfto you. In particular, this means communication is with the desired server, rather than with arandom service set up by an attacker.
To enable Kerberos to bind to the 389 Directory Server, create a principal ldap/
ldap.example.com and add that to the keytab. The credentials used by the 389 Directory Serverto authenticate are given to other servers by the keytab. 389 Directory Server assigns a keytabthrough the KRB5_KTNAME environment variable.
To set the variable, proceed as follows:
1. tux > sudo systemctl edit dirsrv@INSTANCE
If you used the default name for the 389 Directory Server instance, replace INSTANCEwith localhost .
2. Add the following:
[Service] Environment=KRB5_KTNAME=/etc/dirsrv/slapd-INSTANCE/krb5.keytab
3. The keytab le needs to be readable by the account under which the 389 Directory Serverruns (for example, dirserv ):
tux > sudo chown dirsrv:dirsrv /etc/dirsrv/slapd-INSTANCE/krb5.keytabtux > sudo chmod 600 /etc/dirsrv/slapd-INSTANCE/krb5.keytab
7.5.11.1 Using Kerberos Authentication with LDAP
To obtain and cache an initial ticket-granting ticket, use the principal that has been created inSection 7.5.5.3, “Creating a Principal”:
tux > kinit [email protected]
73 Using LDAP and Kerberos openSUSE Leap 15.2

To check if GSSAPI authentication works, run:
tux > ldapwhoami -Y GSSAPI -H ldap://ldapkdc.example.comdn: uid=testuser,ou=People,dc=example,dc=com
GSSAPI uses the ccache to authenticate the user to the 389 Directory Server without the user'spassword.
7.5.11.2 Configuring SASL Identity Mapping
When processing a SASL bind request, the 389 Directory Server maps the SASL authenticationID (used to authenticate to the Directory Server) with an LDAP entry stored within the server.When using Kerberos, the SASL user ID usually has the following format: userid@REALM , suchas [email protected]. This ID must be converted into the DN of the user's Directory Serverentry, such as uid=tux,ou=people,dc=example,dc=com . The 389 Directory Server comes withsome default maps for most common congurations. However, you can create customized maps.Procedure 7.1, “Managing Maps” shows how to list and display a map, how to delete a map andhow to create a custom map.
PROCEDURE 7.1: MANAGING MAPS
1. To list the existing SASL maps:
tux > dsconf INSTANCE sasl listKerberos uid mappingrfc 2829 dn syntaxrfc 2829u syntaxuid mapping
2. To display a map:
tux > sudo dsconf INSTANCE sasl get "Kerberos uid mapping"dn: cn=Kerberos uid mapping,cn=mapping,cn=sasl,cn=configcn: Kerberos uid mappingnsSaslMapBaseDNTemplate: dc=\2,dc=\3nsSaslMapFilterTemplate: (uid=\1)nsSaslMapRegexString: \(.*\)@\(.*\)\.\(.*\)objectClass: topobjectClass: nsSaslMapping
74 Using LDAP and Kerberos openSUSE Leap 15.2

3. The default map only works if your dc has two components. To delete the map (if it doesnot work for you):
tux > sudo dsconf INSTANCE sasl delete "Kerberos uid mapping"Deleting SaslMapping cn=Kerberos uid mapping,cn=mapping,cn=sasl,cn=config :Successfully deleted cn=Kerberos uid mapping,cn=mapping,cn=sasl,cn=config
4. To create a new map:
tux > sudo dsconf localhost sasl create --cn=bhgssapi --nsSaslMapRegexString "\(.*\)@EXAMPLE.NET.DE" --nsSaslMapBaseDNTemplate="dc=example,dc=net,dc=de" --nsSaslMapFilterTemplate="(uid=\1)"tux > sudo Enter value for nsSaslMapPriority :Successfully created bhgssapi
5. Display the newly created map with:
tux > sudo dsconf localhost sasl get "bhgssapi"dn: cn=bhgssapi,cn=mapping,cn=sasl,cn=configcn: bhgssapinsSaslMapBaseDNTemplate: dc=example,dc=net,dc=densSaslMapFilterTemplate: (uid=\1)nsSaslMapPriority: 100nsSaslMapRegexString: \(.*\)@EXAMPLE.NET.DEobjectClass: topobjectClass: nsSaslMapping
With this, you can check only the users of a specic realm and remap them to a dierentdc base. As you can see, the new map has 3 dc components, so the default maps wouldnot have worked for this realm ( EXAMPLE.NET.DE ), only for a realm like EXAMPLE.NET .
7.6 Setting up Kerberos using LDAP and KerberosClientYaST includes the module LDAP and Kerberos Client that helps dene authentication scenariosinvolving either LDAP or Kerberos.
It can also be used to join Kerberos and LDAP separately. However, in many such cases, usingthis module may not be the rst choice, such as for joining Active Directory (which usesa combination of LDAP and Kerberos). For more information, see Section 5.1, “Configuring an
Authentication Client with YaST”.
75 Setting up Kerberos using LDAP and Kerberos Client openSUSE Leap 15.2

Start the module by selecting Network Services LDAP and Kerberos Client.
FIGURE 7.2: LDAP AND KERBEROS CLIENT WINDOW
To congure a Kerberos client, follow the procedure below:
1. In the window LDAP and Kerberos Client, click Change Settings.Choose the tab Authentication via Kerberos.
2. Click Add Realm.
76 Setting up Kerberos using LDAP and Kerberos Client openSUSE Leap 15.2

3. In the appearing dialog, specify the correct Realm name. Usually, the realm name is anuppercase version of the domain name. Additionally, you can specify the following:
To apply mappings from the realm name to the domain name, activate Map DomainName to the Realm and/or Map Wildcard Domain Name to the Realm.
You can specify the Host Name of Administration Server, the Host Name of Master KeyDistribution Server and additional Key Distribution Centers.All of these items are optional if they can be automatically discovered via the SRVand TXT records in DNS.
To manually map Principals to local user names, use Custom Mappings of PrincipalNames to User Names.You can also use auth_to_local rules to supply such mappings using CustomRules for Mapping Principal Names to User Names. For more information aboutusing such rules, see the ocial documentation at https://web.mit.edu/kerberos/
krb5-current/doc/admin/conf_files/krb5_conf.html#realms and an article at https://
community.hortonworks.com/articles/14463/auth-to-local-rules-syntax.html .
Continue with OK.
4. To add more realms, repeat from Step 2.
5. Enable Kerberos users logging in and creation of home directories by activating AllowKerberos Users to Authenticate and Automatically Create Home Directory.
6. If you left empty the optional text boxes in Step 3, make sure to enable automatic discoveryof realms and key distribution centers by activating Use DNS TXT Record to Discover Realmsand Use DNS SRV Record to Discover KDC Servers.
7. You can additionally activate the following:
Allow Insecure Encryption (for Windows NT) allows the encryption typeslisted as weak at http://web.mit.edu/kerberos/krb5-current/doc/admin/conf_files/
kdc_conf.html#encryption-types .
Allow KDC on Other Networks to Issue Authentication Tickets allows forwarding oftickets.
77 Setting up Kerberos using LDAP and Kerberos Client openSUSE Leap 15.2

Allow Kerberos-Enabled Services to Take on The Identity Of a User allows the use ofproxies between the computer of the user and the key distribution center.
Issue Address-Less Tickets for Computers Behind NAT allows granting tickets to usersbehind networks using network address translation.
8. To set up allowed encryption types and dene the name of the keytab le which lists thenames of principals and their encrypted keys, use the Extended Options.
9. Finish with OK and Finish.YaST may now install extra packages.
To check if the setup of the Kerberos back-end inside of LDAP was successful, proceed as follows:
1. Directly access the KDC database on the host of the 389 Directory Server:
tux > sudo kadmin.local
2. List the principals:
kadmin.local > listprincs
3. Create a principal:
kadmin.local > ank [email protected]
It is written to the 389 Directory Server database.
4.tux > sudo ldapsearch -D 'cn=Directory Manager' -w password -b 'cn=EXAMPLE.COM,cn=kdc,dc=example,dc=com' -H ldaps://localhost
5. Check if the principal data from Kerberos is stored in LDAP. If yes, you get an outputsimilar to the following:
tux > sudo [email protected], EXAMPLE.COM, kdc, example.comdn: [email protected],cn=EXAMPLE.COM,cn=kdc,dc=example,dc=comkrbLoginFailedCount: 0krbPrincipalName: [email protected]:: MIG2oAMCAQGhAwIBAaIDAgEBowMCAQGkgZ8wgZwwVKAHMAWgAwIBAKFJMEeg AwIBEqFABD4gAKXAsMf7oV5vITzV5OpclhdomR+SdIRCkouS2GeNF9lVgxjT29RpnipNlCjgGOkpr 93d0nh82WhrrAF6bzBEoAcwBaADAgEAoTkwN6ADAgERoTAELhAAFiGRiI0yUjBteGHhTB6ESJYsYJ WxFa4UslUNZD1GEQGlZ/0nltLsyD2ytGc=
78 Setting up Kerberos using LDAP and Kerberos Client openSUSE Leap 15.2

krbLastPwdChange: 20190702032802ZkrbExtraData:: AAJCzxpdcm9vdC9hZG1pbkBFWEFNUExFLkNPTQA=krbExtraData:: AAgBAA==objectClass: krbprincipalobjectClass: krbprincipalauxobjectClass: krbTicketPolicyAuxobjectClass: top
6. Obtain and cache an initial ticket-granting ticket:
tux > sudo kinit [email protected]
7. Display a list of currently cached Kerberos tickets:
tux > sudo klistTicket cache: DIR::/run/user/0/krb5cc/tktDefault principal: [email protected]
Valid starting Expires Service principal07/02/19 13:29:04 07/03/19 13:29:04 krbtgt/[email protected]
7.7 Kerberos and NFS
Most NFS servers can export le systems using any combination of the default “trust thenetwork” form of security, known as sec=sys , and three dierent levels of Kerberos-basedsecurity, sec=krb5 , sec=krb5i , and sec=krb5p . The sec option is set as a mount optionon the client. It is often the case that the NFS service will rst be congured and used withsec=sys , and then Kerberos can be imposed afterwards. In this case it is likely that the serverwill be congured to support both sec=sys and one of the Kerberos levels, and then after allclients have transitioned, the sec=sys support will be removed, thus achieving true security.The transition to Kerberos should be fairly transparent if done in an orderly manner. Howeverthere is one subtle detail of NFS behavior that works dierently when Kerberos is used, andthe implications of this need to be understood and possibly addressed. See Section 7.7.1, “Group
Membership”.
The three Kerberos levels indicate dierent levels of security. With more security comes a needfor more processor power to encrypt and decrypt messages. Choosing the right balance is animportant consideration when planning a roll-out of Kerberos for NFS.
79 Kerberos and NFS openSUSE Leap 15.2

krb5 provides only authentication. The server can know who sent a request, and the client canknow that the server sent a reply. No security is provided for the content of the request or reply,so an attacker with physical network access could transform the request or reply, or both, invarious ways to deceive either server or client. They cannot directly read or change any le thatthe authenticated user could not read or change, but almost anything is theoretically possible.
krb5i adds integrity checks to all messages. With krb5i , an attacker cannot modify any requestor reply, but they can view all the data exchanged, and so could discover the content of anyle that is read.
krb5p adds privacy to the protocol. As well as reliable authentication and integrity checking,messages are fully encrypted so an attacker can only know that messages were exchangedbetween client and server, and cannot extract other information directly from the message.Whether information can be extracted from message timing is a separate question that Kerberosdoes not address.
7.7.1 Group Membership
The one behavioral dierence between sec=sys and the various Kerberos security levels thatmight be visible is related to group membership. In Unix and Linux, each le system accesscomes from a process that is owned by a particular user and has a particular group owner andseveral supplemental groups. Access rights to les can vary based on the owner and the variousgroups.
With sec=sys , the user-id, group-id, and a list of up to 16 supplementary groups are sent tothe server in each request.
If a user is a member of more than 16 supplementary groups, the extra groups are lost and someles may not be accessible over NFS that the user would normally expect to have access to. Forthis reason, most sites that use NFS nd a way to limit all users to at most 16 supplementarygroups.
If the user runs the newgrp command or runs a set-group-id program, either of which can changethe list of groups they are a member of, these changes take eect immediately and providedierent accesses over NFS.
With Kerberos, group information is not sent in requests. Only the user is identied (using aKerberos “principal”), and the server performs a lookup to determine the user ID and group listfor that principal. This means that if the user is a member of more than 16 groups, all of these
80 Group Membership openSUSE Leap 15.2

group memberships will be used in determining le access permissions. However it also meansthat if the user changes a group-id on the client in some way, the server will not notice thechange and will not take it into account in determining access rights.
Usually the improvement of having access to more groups brings a real benet, and the lossof not being able to change groups is not noticed as it is not widely used. A site administratorconsidering the use of Kerberos should be aware of the dierence though and ensure that it willnot actually cause problems.
7.7.2 Performance and Scalability
Using Kerberos for security requires extra CPU power for encrypting and decrypting messages.How much extra CPU power is required and whether the dierence is noticeable will vary withdierent hardware and dierent applications. If the server or client are already saturating theavailable CPU power, it is likely that a performance drop will be measurable when switchingfrom sec=sys to Kerberos. If there is spare CPU capacity available, it is quite possible that thetransition will not result in any throughput change. The only way to be sure how much impactthe use of Kerberos will have is to test your load on your hardware.
The only conguration options that might reduce the load will also reduce the quality of theprotection oered. sec=krb5 should produce noticeably less load than sec=krb5p but, asdiscussed above, it does not produce very strong security. Similarly it is possible to adjust thelist of ciphers that Kerberos can choose from, and this might change the CPU requirement.However the defaults are carefully chosen and should not be changed without similar carefulconsideration.
The other possible performance issue when conguring NFS to use Kerberos involves availabilityof the Kerberos authentication servers, known as the KDC or Key Distribution Center.
The use of NFS adds load to such servers to the same degree that adding the use of Kerberosfor any other services adds some load. Every time a given user (Kerberos principal) establishesa session with a service, for example by accessing les exported by a particular NFS server, theclient needs to negotiate with the KDC. Once a session key has been negotiated, the client servercan communicate without further help for many hours, depending on details of the Kerberosconguration, particularly the ticket_lifetime setting.
The concerns most likely to aect the provisioning of Kerberos KDC servers are availability andpeak usage.
81 Performance and Scalability openSUSE Leap 15.2

As with other core services such as DNS, LDAP or similar name-lookup services, having twoservers that are reasonably "close" to every client provides good availability for modest resources.Kerberos allows for multiple KDC servers with exible models for database propagation,so distributing servers as needed around campuses, buildings, and even cabinets is fairlystraightforward. The best mechanism to ensure each client nds a nearby Kerberos server isto use split-horizon DNS with each building (or similar) getting dierent details from the DNSserver. If this is not possible, then managing the /etc/krb5.conf le to be dierent at dierentlocations is a suitable alternative.
As access to the Kerberos KDC is infrequent, load is only likely to be a problem at peak times. Ifthousands of people all log in between 9:00 and 9:05, then the servers will receive many morerequests-per-minute than they might in the middle of the night. The load on the Kerberos serveris likely to be more than that on an LDAP server, but not orders of magnitude more. A sensibleguideline is to provision Kerberos replicas in the same manner that you provision LDAP replicas,and then monitor performance to determine if demand ever exceeds capacity.
7.7.3 Master KDC, Multiple Domains, and Trust Relationships
One service of the Kerberos KDC that is not easily distributed is the handling of updates, suchas password changes and new user creation. These must happen at a single master KDC.
These updates are not likely to happen with such frequency that any signicant load will begenerated, but availability could be an issue. It can be annoying to create a new user or changea password, and the master KDC on the other side of the world is temporarily unavailable.
When an organization is geographically distributed and has a policy of handling administrationtasks locally at each site, it can be benecial to create multiple Kerberos domains, one foreach administrative center. Each domain would then have its own master KDC which would begeographically local. Users in one domain can still get access to resources in another domain bysetting up trust relationships between domains.
The easiest arrangement for multiple domains is to have a global domain (forexample, EXAMPLE.COM) and various local domains (for example, ASIA.EXAMPLE.COM,EUROPE.EXAMPLE.COM). If the global domain is congured to trust each local domain, andeach local domain is congured to trust the global domain, then fully transitive trust is availablebetween any pair of domains, and any principal can establish a secure connection with anyservice. Ensuring appropriate access rights to resources, for example les provided by thatservice, will be dependent on the user name lookup service used, and the functionality of theNFS le server, and is beyond the scope of this document.
82 Master KDC, Multiple Domains, and Trust Relationships openSUSE Leap 15.2

7.8 For More InformationThe ocial site of MIT Kerberos is http://web.mit.edu/kerberos . There, nd links to any otherrelevant resource concerning Kerberos, including Kerberos installation, user, and administrationguides.
The book Kerberos—A Network Authentication System by Brian Tung (ISBN 0-201-37924-4) oersextensive information.
83 For More Information openSUSE Leap 15.2

8 Active Directory Support
Active Directory* (AD) is a directory-service based on LDAP, Kerberos, and other services. It isused by Microsoft* Windows* to manage resources, services, and people. In a Microsoft Windowsnetwork, Active Directory provides information about these objects, restricts access to them, andenforces policies. openSUSE® Leap lets you join existing Active Directory domains and integrateyour Linux machine into a Windows environment.
8.1 Integrating Linux and Active DirectoryEnvironmentsWith a Linux client (congured as an Active Directory client) that is joined to an existing ActiveDirectory domain, benet from various features not available on a pure openSUSE Leap Linuxclient:
Browsing Shared Files and Directories with SMB
GNOME Files (previously called Nautilus) supports browsing shared resources throughSMB.
Sharing Files and Directories with SMB
GNOME Files supports sharing directories and les as in Windows.
Accessing and Manipulating User Data on the Windows Server
Through GNOME Files, users can access their Windows user data and can edit, create, anddelete les and directories on the Windows server. Users can access their data withouthaving to enter their password multiple times.
Offline Authentication
Users can log in and access their local data on the Linux machine even if they are oineor the Active Directory server is unavailable for other reasons.
Windows Password Change
This port of Active Directory support in Linux enforces corporate password policies storedin Active Directory. The display managers and console support password change messagesand accept your input. You can even use the Linux passwd command to set Windowspasswords.
Single-Sign-On through Kerberized Applications
84 Integrating Linux and Active Directory Environments openSUSE Leap 15.2

Many desktop applications are Kerberos-enabled (kerberized), which means they cantransparently handle authentication for the user without the need for password reentry atWeb servers, proxies, groupware applications, or other locations.
Note: Managing Unix Attributes from Windows Server* 2016and LaterIn Windows Server 2016 and later, Microsoft has removed the role IDMU/NIS Server andalong with it the Unix Attributes plug-in for the Active Directory Users and Computers MMCsnap-in.
However, Unix attributes can still be managed manually when AdvancedOptions are enabled in the Active Directory Users and Computers MMC snap-in. For more information, see Clarification regarding the status of Identity
Management for Unix (IDMU) & NIS Server Role in Windows Server 2016 Technical
Preview and beyond (https://blogs.technet.microsoft.com/activedirectoryua/2016/02/09/
identity-management-for-unix-idmu-is-deprecated-in-windows-server/) .
Alternatively, use the method described in Procedure 8.1, “Joining an Active Directory Domain
Using User Logon Management” to complete attributes on the client side (in particular, seeStep 6.c).
The following section contains technical background for most of the previously named features.For more information about le and printer sharing using Active Directory, see Book “GNOME
User Guide”.
8.2 Background Information for Linux ActiveDirectory Support
Many system components need to interact awlessly to integrate a Linux client into an existingWindows Active Directory domain. The following sections focus on the underlying processes ofthe key events in Active Directory server and client interaction.
To communicate with the directory service, the client needs to share at least two protocols withthe server:
LDAP
85 Background Information for Linux Active Directory Support openSUSE Leap 15.2

LDAP is a protocol optimized for managing directory information. A Windows domaincontroller with Active Directory can use the LDAP protocol to exchange directoryinformation with the clients. To learn more about LDAP in general, refer to Chapter 6, LDAP
—A Directory Service.
Kerberos
Kerberos is a third-party trusted authentication service. All its clients trust Kerberosauthorization of another client's identity, enabling kerberized single-sign-on (SSO)solutions. Windows supports a Kerberos implementation, making Kerberos SSO possibleeven with Linux clients. To learn more about Kerberos in Linux, refer to Chapter 7, Network
Authentication with Kerberos.
Depending on which YaST module you use to set up Kerberos authentication, dierent clientcomponents process account and authentication data:
Solutions Based on SSSD
The sssd daemon is the central part of this solution. It handles all communicationwith the Active Directory server.
To gather name service information, sssd_nss is used.
To authenticate users, the pam_sss module for PAM is used. The creation ofuser homes for the Active Directory users on the Linux client is handled bypam_mkhomedir .For more information about PAM, see Chapter 3, Authentication with PAM.
Solution Based On Winbind (Samba)
The winbindd daemon is the central part of this solution. It handles allcommunication with the Active Directory server.
To gather name service information, nss_winbind is used.
To authenticate users, the pam_winbind module for PAM is used. The creationof user homes for the Active Directory users on the Linux client is handled bypam_mkhomedir .For more information about PAM, see Chapter 3, Authentication with PAM.
Figure 8.1, “Schema of Winbind-based Active Directory Authentication” highlights the mostprominent components of Winbind-based Active Directory authentication.
86 Background Information for Linux Active Directory Support openSUSE Leap 15.2

applicationskerberized
nss_compat
nscd
NSS PAM
Windows DC(Active Directory)
Kerberosand variousLDAP, Kerberos
pam_winbind
pam_mkhomedir
pam_unix
MS protocols
Kerberoscredential
cache
winbinddoffline cache
nss_winbind
(gdm, kdm, login)PAM-aware applications
FIGURE 8.1: SCHEMA OF WINBIND-BASED ACTIVE DIRECTORY AUTHENTICATION
Applications that are PAM-aware, like the login routines and the GNOME display manager,interact with the PAM and NSS layer to authenticate against the Windows server. Applicationssupporting Kerberos authentication (such as le managers, Web browsers, or e-mail clients) usethe Kerberos credential cache to access user's Kerberos tickets, making them part of the SSOframework.
8.2.1 Domain Join
During domain join, the server and the client establish a secure relation. On the client, thefollowing tasks need to be performed to join the existing LDAP and Kerberos SSO environmentprovided by the Windows domain controller. The entire join process is handled by the YaSTDomain Membership module, which can be run during installation or in the installed system:
1. The Windows domain controller providing both LDAP and KDC (Key Distribution Center)services is located.
87 Domain Join openSUSE Leap 15.2

2. A machine account for the joining client is created in the directory service.
3. An initial ticket granting ticket (TGT) is obtained for the client and stored in its localKerberos credential cache. The client needs this TGT to get further tickets allowing it tocontact other services, like contacting the directory server for LDAP queries.
4. NSS and PAM congurations are adjusted to enable the client to authenticate against thedomain controller.
During client boot, the winbind daemon is started and retrieves the initial Kerberos ticket forthe machine account. winbindd automatically refreshes the machine's ticket to keep it valid. Tokeep track of the current account policies, winbindd periodically queries the domain controller.
8.2.2 Domain Login and User Homes
The login manager of GNOME (GDM) has been extended to allow the handling of ActiveDirectory domain login. Users can choose to log in to the primary domain the machine hasjoined or to one of the trusted domains with which the domain controller of the primary domainhas established a trust relationship.
User authentication is mediated by several PAM modules as described in Section 8.2, “Background
Information for Linux Active Directory Support”. If there are errors, the error codes are translatedinto user-readable error messages that PAM gives at login through any of the supported methods(GDM, console, and SSH):
Password has expired
The user sees a message stating that the password has expired and needs to be changed.The system prompts for a new password and informs the user if the new password doesnot comply with corporate password policies (for example the password is too short, toosimple, or already in the history). If a user's password change fails, the reason is shownand a new password prompt is given.
Account disabled
The user sees an error message stating that the account has been disabled and to contactthe system administrator.
Account locked out
The user sees an error message stating that the account has been locked and to contactthe system administrator.
88 Domain Login and User Homes openSUSE Leap 15.2

Password has to be changed
The user can log in but receives a warning that the password needs to be changed soon.This warning is sent three days before that password expires. After expiration, the usercannot log in.
Invalid workstation
When a user is restricted to specic workstations and the current openSUSE Leap machineis not among them, a message appears that this user cannot log in from this workstation.
Invalid logon hours
When a user is only allowed to log in during working hours and tries to log in outsideworking hours, a message informs the user that logging in is not possible at that time.
Account expired
An administrator can set an expiration time for a specic user account. If that user triesto log in after expiration, the user gets a message that the account has expired and cannotbe used to log in.
During a successful authentication, the client acquires a ticket granting ticket (TGT) from theKerberos server of Active Directory and stores it in the user's credential cache. It also renewsthe TGT in the background, requiring no user interaction.
openSUSE Leap supports local home directories for Active Directory users. If congured throughYaST as described in Section 8.3, “Configuring a Linux Client for Active Directory”, user home directoriesare created when a Windows/Active Directory user rst logs in to the Linux client. Thesehome directories look and feel identical to standard Linux user home directories and workindependently of the Active Directory Domain Controller.
Using a local user home, it is possible to access a user's data on this machine (even when theActive Directory server is disconnected) as long as the Linux client has been congured toperform oine authentication.
8.2.3 Offline Service and Policy Support
Users in a corporate environment must have the ability to become roaming users (for example,to switch networks or even work disconnected for some time). To enable users to log in to adisconnected machine, extensive caching was integrated into the winbind daemon. The winbinddaemon enforces password policies even in the oine state. It tracks the number of failed loginattempts and reacts according to the policies congured in Active Directory. Oine support isdisabled by default and must be explicitly enabled in the YaST Domain Membership module.
89 Offline Service and Policy Support openSUSE Leap 15.2

When the domain controller has become unavailable, the user can still access network resources(other than the Active Directory server itself) with valid Kerberos tickets that have been acquiredbefore losing the connection (as in Windows). Password changes cannot be processed unless thedomain controller is online. While disconnected from the Active Directory server, a user cannotaccess any data stored on this server. When a workstation has become disconnected from thenetwork entirely and connects to the corporate network again later, openSUSE Leap acquiresa new Kerberos ticket when the user has locked and unlocked the desktop (for example, usinga desktop screen saver).
8.3 Configuring a Linux Client for Active Directory
Before your client can join an Active Directory domain, some adjustments must be made to yournetwork setup to ensure the awless interaction of client and server.
DNS
Congure your client machine to use a DNS server that can forward DNS requests tothe Active Directory DNS server. Alternatively, congure your machine to use the ActiveDirectory DNS server as the name service data source.
NTP
To succeed with Kerberos authentication, the client must have its time set accurately. It ishighly recommended to use a central NTP time server for this purpose (this can be also theNTP server running on your Active Directory domain controller). If the clock skew betweenyour Linux host and the domain controller exceeds a certain limit, Kerberos authenticationfails and the client is logged in using the weaker NTLM (NT LAN Manager) authentication.For more details about using Active Directory for time synchronization, see Procedure 8.2,
“Joining an Active Directory Domain Using Windows Domain Membership”.
Firewall
To browse your network neighborhood, either disable the rewall entirely or mark theinterface used for browsing as part of the internal zone.To change the rewall settings on your client, log in as root and start the YaST rewallmodule. Select Interfaces. Select your network interface from the list of interfaces and clickChange. Select Internal Zone and apply your settings with OK. Leave the rewall settingswith Next Finish. To disable the rewall, check the Disable Firewall Automatic Startingoption, and leave the rewall module with Next Finish.
90 Configuring a Linux Client for Active Directory openSUSE Leap 15.2
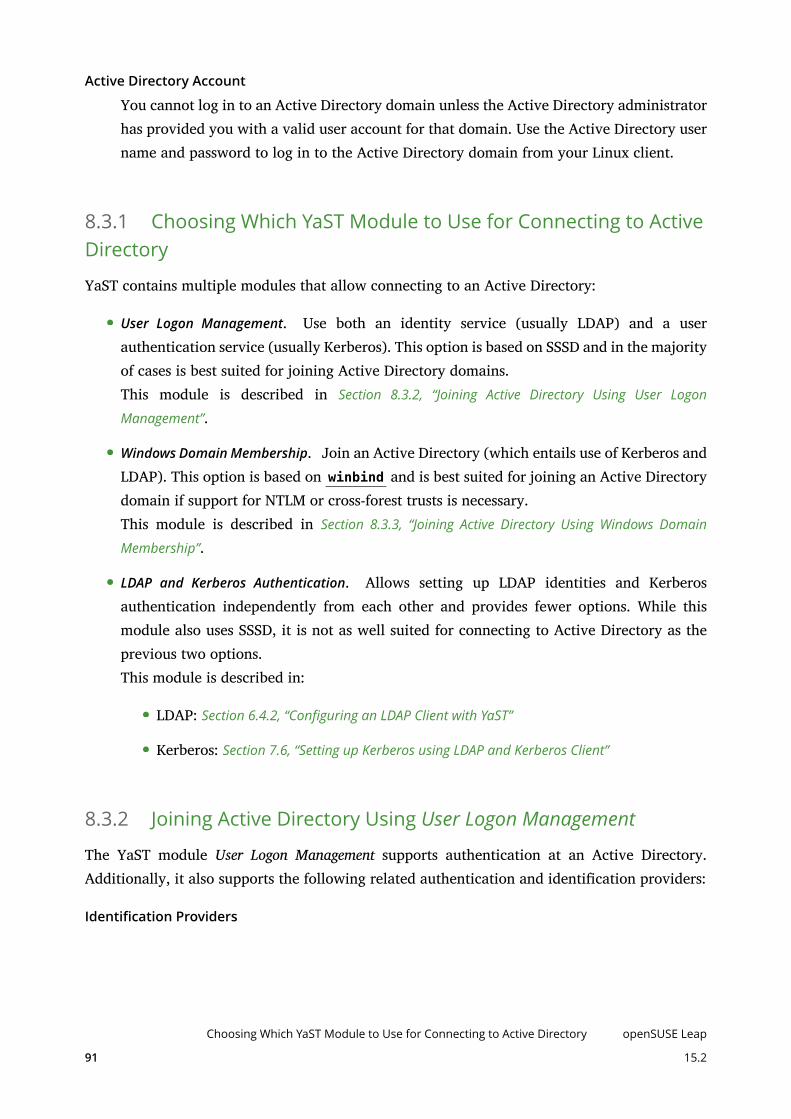
Active Directory Account
You cannot log in to an Active Directory domain unless the Active Directory administratorhas provided you with a valid user account for that domain. Use the Active Directory username and password to log in to the Active Directory domain from your Linux client.
8.3.1 Choosing Which YaST Module to Use for Connecting to ActiveDirectory
YaST contains multiple modules that allow connecting to an Active Directory:
User Logon Management. Use both an identity service (usually LDAP) and a userauthentication service (usually Kerberos). This option is based on SSSD and in the majorityof cases is best suited for joining Active Directory domains.This module is described in Section 8.3.2, “Joining Active Directory Using User Logon
Management”.
Windows Domain Membership. Join an Active Directory (which entails use of Kerberos andLDAP). This option is based on winbind and is best suited for joining an Active Directorydomain if support for NTLM or cross-forest trusts is necessary.This module is described in Section 8.3.3, “Joining Active Directory Using Windows Domain
Membership”.
LDAP and Kerberos Authentication. Allows setting up LDAP identities and Kerberosauthentication independently from each other and provides fewer options. While thismodule also uses SSSD, it is not as well suited for connecting to Active Directory as theprevious two options.This module is described in:
LDAP: Section 6.4.2, “Configuring an LDAP Client with YaST”
Kerberos: Section 7.6, “Setting up Kerberos using LDAP and Kerberos Client”
8.3.2 Joining Active Directory Using User Logon Management
The YaST module User Logon Management supports authentication at an Active Directory.Additionally, it also supports the following related authentication and identication providers:
Identification Providers
91
Choosing Which YaST Module to Use for Connecting to Active Directory openSUSE Leap
15.2
Delegate to third-party software library. Support for legacy NSS providers via a proxy.
FreeIPA. FreeIPA and Red Hat Enterprise Identity Management provider.
Generic directory service (LDAP). An LDAP provider. For more information aboutconguring LDAP, see man 5 sssd-ldap .
Local SSSD file database. An SSSD-internal provider for local users.
Authentication Providers
Delegate to third-party software library. Relay authentication to another PAM targetvia a proxy.
FreeIPA. FreeIPA and Red Hat Enterprise Identity Management provider.
Generic Kerberos service. An LDAP provider.
Generic directory service (LDAP). Kerberos authentication.
Local SSSD file database. An SSSD-internal provider for local users.
This domain does not provide authentication service. Disables authentication explicitly.
To join an Active Directory domain using SSSD and the User Logon Management module of YaST,proceed as follows:
PROCEDURE 8.1: JOINING AN ACTIVE DIRECTORY DOMAIN USING USER LOGON MANAGEMENT
1. Open YaST.
2. To be able to use DNS auto-discovery later, set up the Active Directory Domain Controller(the Active Directory server) as the name server for your client.
a. In YaST, click Network Settings.
b. Select Hostname/DNS, then enter the IP address of the Active Directory DomainController into the text box Name Server 1.Save the setting with OK.
3. From the YaST main window, start the module User Logon Management.The module opens with an overview showing dierent network properties of yourcomputer and the authentication method currently in use.
92 Joining Active Directory Using User Logon Management openSUSE Leap 15.2

FIGURE 8.2: MAIN WINDOW OF USER LOGON MANAGEMENT
4. To start editing, click Change Settings.
5. Now join the domain.
a. Click Join Domain.
b. In the appearing dialog, specify the correct Domain name. Then specify the servicesto use for identity data and authentication: Select Microsoft Active Directory for both.Ensure that Enable the domain is activated.Click OK.
c. (Optional) Usually, you can keep the default settings in the following dialog.However, there are reasons to make changes:
If the Local Host Name Does Not Match the Host Name Set on the Domain
Controller. Find out if the host name of your computer matches what thename your computer is known as to the Active Directory Domain Controller.In a terminal, run the command hostname , then compare its output to theconguration of the Active Directory Domain Controller.If the values dier, specify the host name from the Active Directoryconguration under AD hostname. Otherwise, leave the appropriate text boxempty.
If You Do Not Want to Use DNS Auto-Discovery. Specify the Host names of ActiveDirectory servers that you want to use. If there are multiple Domain Controllers,separate their host names with commas.
93 Joining Active Directory Using User Logon Management openSUSE Leap 15.2

d. To continue, click OK.If not all software is installed already, the computer will now install missing software.It will then check whether the congured Active Directory Domain Controller isavailable.
e. If everything is correct, the following dialog should now show that it has discoveredan Active Directory Server but that you are Not yet enrolled.In the dialog, specify the Username and Password of the Active Directoryadministrator account (usually Administrator ).To make sure that the current domain is enabled for Samba, activate Overwrite Sambaconguration to work with this AD.To enroll, click OK.
FIGURE 8.3: ENROLLING INTO A DOMAIN
f. You should now see a message conrming that you have enrolled successfully. Finishwith OK.
6. After enrolling, congure the client using the window Manage Domain User Logon.
94 Joining Active Directory Using User Logon Management openSUSE Leap 15.2

FIGURE 8.4: CONFIGURATION WINDOW OF USER LOGON MANAGEMENT
a. To allow logging in to the computer using login data provided by Active Directory,activate Allow Domain User Logon.
b. (Optional) Optionally, under Enable domain data source, activate additional datasources such as information on which users are allowed to use sudo or whichnetwork drives are available.
c. To allow Active Directory users to have home directories, activate Create HomeDirectories. The path for home directories can be set in multiple ways—on the client,on the server, or both ways:
To congure the home directory paths on the Domain Controller, setan appropriate value for the attribute UnixHomeDirectory for eachuser. Additionally, make sure that this attribute replicated to the globalcatalog. For information on achieving that under Windows, see https://
support.microsoft.com/en-us/kb/248717 .
To congure home directory paths on the client in such a way that precedencewill be given to the path set on the domain controller, use the optionfallback_homedir .
To congure home directory paths on the client in such a way that the clientsetting will override the server setting, use override_homedir .
95 Joining Active Directory Using User Logon Management openSUSE Leap 15.2

As settings on the Domain Controller are outside of the scope of this documentation,only the conguration of the client-side options will be described in the following.From the side bar, select Service Options Name switch, then click Extended Options.From that window, select either fallback_homedir or override_homedir , thenclick Add.Specify a value. To have home directories follow the format /home/USER_NAME ,use /home/%u . For more information about possible variables, see the man pagesssd.conf ( man 5 sssd.conf ), section override_homedir.Click OK.
7. Save the changes by clicking OK. Then make sure that the values displayed now are correct.To leave the dialog, click Cancel.
8.3.3 Joining Active Directory Using Windows Domain Membership
To join an Active Directory domain using winbind and the Windows Domain Membership moduleof YaST, proceed as follows:
PROCEDURE 8.2: JOINING AN ACTIVE DIRECTORY DOMAIN USING WINDOWS DOMAIN MEMBERSHIP
1. Log in as root and start YaST.
2. Start Network Services Windows Domain Membership.
3. Enter the domain to join at Domain or Workgroup in the Windows Domain Membership screen(see Figure 8.5, “Determining Windows Domain Membership”). If the DNS settings on your hostare properly integrated with the Windows DNS server, enter the Active Directory domainname in its DNS format ( mydomain.mycompany.com ). If you enter the short name of yourdomain (also known as the pre–Windows 2000 domain name), YaST must rely on NetBIOSname resolution instead of DNS to nd the correct domain controller.
96 Joining Active Directory Using Windows Domain Membership openSUSE Leap 15.2

FIGURE 8.5: DETERMINING WINDOWS DOMAIN MEMBERSHIP
4. To use the SMB source for Linux authentication, activate Also Use SMB Information forLinux Authentication.
5. To automatically create a local home directory for Active Directory users on the Linuxmachine, activate Create Home Directory on Login.
6. Check Oine Authentication to allow your domain users to log in even if the ActiveDirectory server is temporarily unavailable, or if you do not have a network connection.
7. To change the UID and GID ranges for the Samba users and groups, select Expert Settings.Let DHCP retrieve the WINS server only if you need it. This is the case when some machinesare resolved only by the WINS system.
8. Congure NTP time synchronization for your Active Directory environment by selectingNTP Conguration and entering an appropriate server name or IP address. This step isobsolete if you have already entered the appropriate settings in the stand-alone YaST NTPconguration module.
9. Click OK and conrm the domain join when prompted for it.
10. Provide the password for the Windows administrator on the Active Directory server andclick OK (see Figure 8.6, “Providing Administrator Credentials”).
97 Joining Active Directory Using Windows Domain Membership openSUSE Leap 15.2

FIGURE 8.6: PROVIDING ADMINISTRATOR CREDENTIALS
After you have joined the Active Directory domain, you can log in to it from your workstationusing the display manager of your desktop or the console.
Important: Domain NameJoining a domain may not succeed if the domain name ends with .local . Names endingin .local cause conicts with Multicast DNS (MDNS) where .local is reserved forlink-local host names.
Note: Only Administrators Can Enroll a ComputerOnly a domain administrator account, such as Administrator , can join openSUSE Leapinto Active Directory.
8.3.4 Checking Active Directory Connection Status
To check whether you are successfully enrolled in an Active Directory domain, use the followingcommands:
klist shows whether the current user has a valid Kerberos ticket.
getent passwd shows published LDAP data for all users.
98 Checking Active Directory Connection Status openSUSE Leap 15.2

8.4 Logging In to an Active Directory Domain
Provided your machine has been congured to authenticate against Active Directory andyou have a valid Windows user identity, you can log in to your machine using the ActiveDirectory credentials. Login is supported for GNOME, the console, SSH, and any other PAM-aware application.
Important: Offline AuthenticationopenSUSE Leap supports oine authentication, allowing you to log in to your clientmachine even when it is oine. See Section 8.2.3, “Offline Service and Policy Support” fordetails.
8.4.1 GDM
To authenticate a GNOME client machine against an Active Directory server, proceed as follows:
1. Click Not listed.
2. In the text box Username, enter the domain name and the Windows user name in this form:DOMAIN_NAME\USER_NAME .
3. Enter your Windows password.
If congured to do so, openSUSE Leap creates a user home directory on the local machine on therst login of each user authenticated via Active Directory. This allows you to benet from theActive Directory support of openSUSE Leap while still having a fully functional Linux machineat your disposal.
8.4.2 Console Login
Besides logging in to the Active Directory client machine using a graphical front-end, you canlog in using the text-based console or even remotely using SSH.
To log in to your Active Directory client from a console, enter DOMAIN_NAME\USER_NAME at thelogin: prompt and provide the password.
99 Logging In to an Active Directory Domain openSUSE Leap 15.2

To remotely log in to your Active Directory client machine using SSH, proceed as follows:
1. At the login prompt, enter:
tux > ssh DOMAIN_NAME\\USER_NAME@HOST_NAME
The \ domain and login delimiter is escaped with another \ sign.
2. Provide the user's password.
8.5 Changing PasswordsopenSUSE Leap helps the user choose a suitable new password that meets the corporate securitypolicy. The underlying PAM module retrieves the current password policy settings from thedomain controller, informing the user about the specic password quality requirements a useraccount typically has by means of a message on login. Like its Windows counterpart, openSUSELeap presents a message describing:
Password history settings
Minimum password length requirements
Minimum password age
Password complexity
The password change process cannot succeed unless all requirements have been successfullymet. Feedback about the password status is given both through the display managers and theconsole.
GDM provides feedback about password expiration and the prompt for new passwords inan interactive mode. To change passwords in the display managers, provide the passwordinformation when prompted.
To change your Windows password, you can use the standard Linux utility, passwd , insteadof having to manipulate this data on the server. To change your Windows password, proceedas follows:
1. Log in at the console.
2. Enter passwd .
100 Changing Passwords openSUSE Leap 15.2

3. Enter your current password when prompted.
4. Enter the new password.
5. Reenter the new password for conrmation. If your new password does not comply withthe policies on the Windows server, this feedback is given to you and you are promptedfor another password.
To change your Windows password from the GNOME desktop, proceed as follows:
1. Click the Computer icon on the left edge of the panel.
2. Select Control Center.
3. From the Personal section, select About Me Change Password.
4. Enter your old password.
5. Enter and conrm the new password.
6. Leave the dialog with Close to apply your settings.
101 Changing Passwords openSUSE Leap 15.2

9 Setting Up a FreeRADIUS Server
The RADIUS (Remote Authentication Dial-In User Service) protocol has long been a standardservice for manage network access. It performs authentication, authorization, and accounting(AAA) protocol for very large businesses such as Internet service providers and cellular networkproviders, and is also popular for small networks. It authenticates users and devices, authorizesthose users and devices for certain network services, and tracks use of services for billing andauditing. You don't have to use all three of the AAA protocols, but only the ones you need. Forexample, you may not need accounting but only client authentication, or perhaps all you wantis accounting, and client authorization is managed by something else.
It is extremely ecient and manages thousands of requests on modest hardware. Of course itworks for all network protocols and not just dialup, but the name remains the same.
RADIUS operates in a distributed architecture, sitting separately from the Network Access Server(NAS). User access data is stored on a central RADIUS server that is available to multiple NAS.The NAS provide the physical access to the network, such as a managed Ethernet switch, orwireless access point.
FreeRADIUS is the open source RADIUS implementation, and is the most widely-used RADIUSserver. In this chapter you will learn how to install and test a FreeRADIUS server. Becauseof the numerous possible use cases, after your initial setup is working correctly your nextstop is the ocial documentation, which is detailed and thorough (see https://freeradius.org/
documentation/ ).
9.1 Installation and Testing on SUSE Linux Enterprise
The following steps set up a simple test system. When you have veried that the server isoperating correctly and you are ready to create a production conguration, you will have severalundo steps to perform before starting your production conguration.
First install the freeradius-server and freeradius-server-utils packages. Then enter /etc/raddb/certs and run the bootstrap script to create a set of test certicates:
root # zypper in freeradius-serverroot # cd /etc/raddb/certsroot # ./bootstrap
102 Installation and Testing on SUSE Linux Enterprise openSUSE Leap 15.2

The README in the certs directory contains a great deal of useful information. When thebootstrap script has completed, start the server in debugging mode:
root # radiusd -X[...]Listening on auth address * port 1812 bound to server defaultListening on acct address * port 1813 bound to server defaultListening on auth address :: port 1812 bound to server defaultListening on acct address :: port 1813 bound to server defaultListening on auth address 127.0.0.1 port 18120 bound to server inner-tunnelListening on proxy address * port 54435Listening on proxy address :: port 58415Ready to process requests
When you see the "Listening" and "Ready to process requests" lines, your server has startedcorrectly. If it does not start, read the output carefully because it tells you what went wrong.You may direct the output to a text le with tee :
tux > radiusd -X | tee radiusd.text
The next step is to test authentication with a test client and user. The client is a client of theRADIUS server, such as a wireless access point or switch. Clients are congured in /etc/raddb/client.conf . Human users are congured in /etc/raddb/mods-config/files/authorize .
Open /etc/raddb/mods-config/files/authorize and uncomment the following lines:
bob Cleartext-Password := "hello"Reply-Message := "Hello, %{User-Name}"
A test client, client localhost , is provided in /etc/raddb/client.conf , with a secret oftesting123 . Open a second terminal, and as an unprivileged user use the radtest commandto log in as bob:
tux > radtest bob hello 127.0.0.1 0 testing123Sent Access-Request Id 241 from 0.0.0.0:35234 to 127.0.0.1:1812 length 73 User-Name = "bob" User-Password = "hello" NAS-IP-Address = 127.0.0.1 NAS-Port = 0 Message-Authenticator = 0x00 Cleartext-Password = "hello"Received Access-Accept Id 241 from 127.0.0.1:1812 to 0.0.0.0:0 length 20
In your radius -X terminal, a successful login looks like this:
(3) pap: Login attempt with password
103 Installation and Testing on SUSE Linux Enterprise openSUSE Leap 15.2

(3) pap: Comparing with "known good" Cleartext-Password(3) pap: User authenticated successfully(3) [pap] = ok[...](3) Sent Access-Accept Id 241 from 127.0.0.1:1812 to 127.0.0.1:35234 length 0(3) Finished requestWaking up in 4.9 seconds.(3) Cleaning up request packet ID 241 with timestamp +889
Now run one more login test from a dierent computer on your network. Create a clientconguration on your server by uncommenting and modifying the following entry inclients.conf :
client private-network-1 } ipaddr = 192.0.2.0/24 secret = testing123-1 {
Enter the IP address of your test client machine. On the client machine, install freeradius-server-utils , which provides a number of useful test commands. Try logging in from theclient as bob, using the radtest command. It is better to use the IP address of the RADIUSserver rather than the hostname because it is faster:
tux > radtest bob hello 192.168.2.100 0 testing123-1
If your test logins fail, review all the output to learn what went wrong. There are several testusers and test clients provided. The conguration les are full of useful information, and werecommend studying them. When you are satised with your testing and ready to create aproduction conguration, remove all the test certicates in /etc/raddb/certs and replacethem with your own certicates, comment out all the test users and clients, and stop radiusd bypressing Ctrl – c . Manage the radiusd.service with systemctl , just like any other service.
To learn how to t a FreeRADIUS server in your network, see https://freeradius.org/
documentation/ and https://networkradius.com/freeradius-documentation/ for in-depthreferences and howtos.
104 Installation and Testing on SUSE Linux Enterprise openSUSE Leap 15.2

II Local Security
10 Physical Security 106
11 Automatic Security Checks with seccheck 112
12 Software Management 116
13 File Management 122
14 Encrypting Partitions and Files 127
15 Storage Encryption for Hosted Applications with cryptctl 131
16 User Management 139
17 Spectre/Meltdown Checker 156
18 Configuring Security Settings with YaST 159
19 Authorization with PolKit 164
20 Access Control Lists in Linux 174
21 Certificate Store 186
22 Intrusion Detection with AIDE 188

10 Physical Security
Physical security should be one of the utmost concerns. Linux production servers should be inlocked data centers where only people have access that have passed security checks. Dependingon the environment and circumstances, you can also consider boot loader passwords.
Additionally, consider questions like:
Who has direct physical access to the host?
Of those that do, should they?
Can the host be protected from tampering and should it be?
The amount of physical security needed on a particular system depends on the situation, andcan also vary widely by available funds.
10.1 System Locks
Most server racks in data centers include a locking feature. Usually this will be a hasp/cylinderlock on the front of the rack that allows you to turn an included key to a locked or unlockedposition – granting or denying entry. Cage locks can help prevent someone from tamperingor stealing devices/media from the servers, or opening the cases and directly manipulating/sabotaging the hardware. Preventing system reboots or the booting from alternate devices isalso important (for example CD/DVDs/USB drives/etc.).
Some servers also have case locks. These locks can do dierent things according to the designsof the system vendor and construction. Many systems are designed to self-disable if attempts aremade to open the system without unlocking. Others have device covers that will not let you plugin or unplug keyboards or mice. While locks are sometimes a useful feature, they are usuallylower quality and easily defeated by attackers with ill intent.
106 System Locks openSUSE Leap 15.2

10.2 Locking Down the BIOS
Tip: Secure BootThis section describes only basic methods to secure the boot process. To nd outabout more advanced boot protection using UEFI and the secure boot feature, see Book
“Reference”, Chapter 14 “UEFI (Unified Extensible Firmware Interface)”, Section 14.1 “Secure Boot”.
The BIOS (Basic Input/Output System) or its successor UEFI (Unied Extensible FirmwareInterface) is the lowest level of software/rmware on PC class systems. Other hardware types(POWER, IBM Z) that run Linux also have low-level rmware that performs similar functionsas the PC BIOS. When this document references the BIOS, it usually means BIOS and/or UEFI.The BIOS dictates system conguration, puts the system into a well dened state and providesroutines for accessing low-level hardware. The BIOS executes the congured Linux boot loader(like GRUB 2) to boot the host.
Most BIOS implementations can be congured to prevent unauthorized users from manipulatingsystem and boot settings. This is typically done by setting a BIOS admin or boot password. Theadmin password only needs to be entered for changing the system conguration but the bootpassword will be required during every normal boot. For most use cases it is enough to set anadmin password and restrict booting to the built-in hard disk. This way an attacker will notbe able to simply boot a Linux live CD or USB thumb drive, for example. Although this doesnot provide a high level of security (a BIOS can be reset, removed or modied – assuming caseaccess), it can be another deterrent.
Many BIOS rmwares have various other security related settings. Check with the system vendor,the system documentation or examine the BIOS during a system boot to nd out more.
Important: Booting when a BIOS Boot Password Is SetIf a system has been set up with a boot password, the host will not boot up unattended(for example in case of a system reboot or power failure). This is a trade-o.
Important: Losing the BIOS Admin PasswordOnce a system is set up for the rst time, the BIOS admin password will not be requiredoften. Don't forget the password or you will need to clear the BIOS memory via hardwaremanipulation to get access again.
107 Locking Down the BIOS openSUSE Leap 15.2
10.3 Security via the Boot Loaders
The Linux boot loader GRUB 2, which is used by default in openSUSE Leap, can have aboot passwords set. It also provides a password feature, so that only administrators can startthe interactive operations (for example editing menu entries and entering the command lineinterface). If a password is specied, GRUB 2 will disallow any interactive control until youpress the key C and E and enter a correct password.
You can refer to the GRUB 2 man page for examples.
It is very important to keep in mind that when setting these passwords they will need to beremembered! Also, enabling these passwords might merely slow an intrusion, not necessarilyprevent it. Again, someone could boot from a removable device, and mount your root partition.If you are using BIOS-level security and a boot loader, it is a good practice to disable the abilityto boot from removable devices in your computer's BIOS, and then also password-protectingthe BIOS itself.
Also keep in mind that the boot loader conguration les will need to be protected by changingtheir mode to 600 (read/write for root only), or others will be able to read your passwordsor hashes!
10.4 Retiring Linux Servers with Sensitive Data
Security policies usually contain some procedures for the treatment of storage media that isgoing to be retired or disposed of. Disk and media wipe procedures are frequently prescribed asis complete destruction of the media. You can nd several free tools on the Internet. A searchof “dod disk wipe utility” will yield several variants. To retire servers with sensitive data, it isimportant to ensure that data cannot be recovered from the hard disks. To ensure that all tracesof data are removed, a wipe utility—such as scrub—can be used. Many wipe utilities overwritethe data several times. This assures that even sophisticated methods are not able to retrieve anyparts of the wiped data. Some tools can even be operated from a bootable removable deviceand remove data according to the U.S. Department of Defense (DoD) standards. Note that manygovernment agencies specify their own standards for data security. Some standards are strongerthan others, yet may require more time to implement.
108 Security via the Boot Loaders openSUSE Leap 15.2

Important: Wiping Wear Leveling DevicesSome devices, like SSDs, use wear leveling and do not necessarily write new data in thesame physical locations. Such devices usually provide their own erasing functionality.
10.4.1 scrub: Disk Overwrite Utility
scrub overwrites hard disks, les, and other devices with repeating patterns intended to makerecovering data from these devices more dicult. It operates in three basic modes: on a characteror block device, on a le, or on a directory specied. For more information, set the manualpage man 1 scrub .
SUPPORTED SCRUB METHODS
nnsa
4-pass NNSA Policy Letter NAP-14.1-C (XVI-8) for sanitizing removable and non-removable hard disks, which requires overwriting all locations with a pseudo randompattern twice and then with a known pattern: ran- dom(x2), 0x00, verify.
dod
4-pass DoD 5220.22-M section 8-306 procedure (d) for sanitizing removable and non-removable rigid disks which requires overwriting all addressable locations with acharacter, its complement, a random character, then verify. Note: scrub performs therandom pass rst to make verication easier: random, 0x00, 0x, verify.
bsi
9-pass method recommended by the German Center of Security in InformationTechnologies (http://www.bsi.bund.de ): 0x, 0xfe, 0xfd, 0xfb, 0xf7, 0xef, 0xdf, 0xbf,0x7f.
gutmann
The canonical 35-pass sequence described in Gutmann's paper cited below.
schneier
7-pass method described by Bruce Schneier in "Applied Cryptography" (1996): 0x00, 0x,random(x5)
pfitzner7
Roy Ptzner's 7-random-pass method: random(x7).
109 scrub: Disk Overwrite Utility openSUSE Leap 15.2
pfitzner33
Roy Ptzner's 33-random-pass method: random(x33).
usarmy
US Army AR380-19 method: 0x00, 0x, random. (Note: identical to DoD 522.22-M section8-306 procedure (e) for sanitizing magnetic core memory).
fillzero
1-pass pattern: 0x00.
fillff
1-pass pattern: 0x.
random
1-pass pattern: random(x1).
random2
2-pass pattern: random(x2).
old
6-pass pre-version 1.7 scrub method: 0x00, 0x, 0xaa, 0x00, 0x55, verify.
fastold
5-pass pattern: 0x00, 0x, 0xaa, 0x55, verify.
custom=string
1-pass custom pattern. String may contain C-style numerical escapes: \nnn (octal) or \xnn(hex).
10.5 Restricting Access to Removable MediaIn some environments it is required to restrict access to removable media such as USB storageor optical devices. The tools coming with the udisks2 package help with such a conguration.
1. Create a user group whose users will be allowed to mount and eject removable devices,for example mmedia_all :
tux > sudo groupadd mmedia_all
2. Add a specic user tux to the new group:
tux > sudo usermod -a -G mmedia_all tux
110 Restricting Access to Removable Media openSUSE Leap 15.2
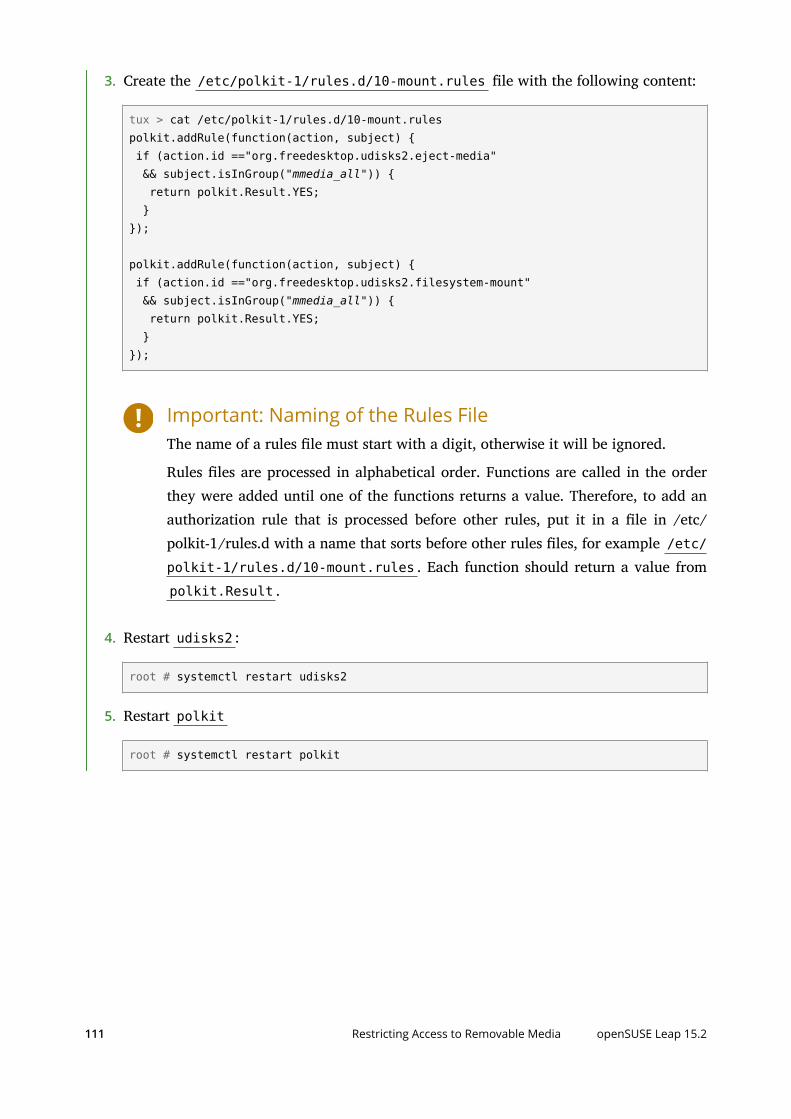
3. Create the /etc/polkit-1/rules.d/10-mount.rules le with the following content:
tux > cat /etc/polkit-1/rules.d/10-mount.rulespolkit.addRule(function(action, subject) { if (action.id =="org.freedesktop.udisks2.eject-media" && subject.isInGroup("mmedia_all")) { return polkit.Result.YES; }});
polkit.addRule(function(action, subject) { if (action.id =="org.freedesktop.udisks2.filesystem-mount" && subject.isInGroup("mmedia_all")) { return polkit.Result.YES; }});
Important: Naming of the Rules FileThe name of a rules le must start with a digit, otherwise it will be ignored.
Rules les are processed in alphabetical order. Functions are called in the orderthey were added until one of the functions returns a value. Therefore, to add anauthorization rule that is processed before other rules, put it in a le in /etc/polkit-1/rules.d with a name that sorts before other rules les, for example /etc/polkit-1/rules.d/10-mount.rules . Each function should return a value frompolkit.Result .
4. Restart udisks2 :
root # systemctl restart udisks2
5. Restart polkit
root # systemctl restart polkit
111 Restricting Access to Removable Media openSUSE Leap 15.2

11 Automatic Security Checks with seccheck
The seccheck SUSE Security Checker is a set of shell scripts designed to automatically checkthe local security of a system on a regular schedule, and emails reports to the root user, or anyuser as congured by the administrator.
If seccheck is not installed on your system, install it with sudo zypper in seccheck . Thesescripts are controlled by systemd timers, which are not enabled by default, but must be enabledby the administrator.
11.1 Seccheck TimersThere are four seccheck timers:
/usr/lib/systemd/system/seccheck-daily.timer
/usr/lib/systemd/system/seccheck-monthly.timer
/usr/lib/systemd/system/seccheck-weekly.timer
/usr/lib/systemd/system/seccheck-autologout.timer
seccheck-daily.timer , seccheck-monthly.timer , and seccheck-weekly.timer runmultiple checks as described in Section 11.3, “Daily, Weekly, and Monthly Checks”. seccheck-autologout.timer logs out inactive users, see Section 11.4, “Automatic Logout”.
You can change the recipient of the seccheck mails from root to any user in /etc/sysconfig/seccheck . The following example changes it to an admin user named firewall :
SECCHK_USER="firewall"
11.2 Enabling Seccheck TimersManage your timers with systemctl , just like any other systemd timer. The following exampleenables and starts seccheck-daily.timer :
tux > sudo systemctl enable --now seccheck-daily.timer
List all active timers:
tux > sudo systemctl list-timers
112 Seccheck Timers openSUSE Leap 15.2
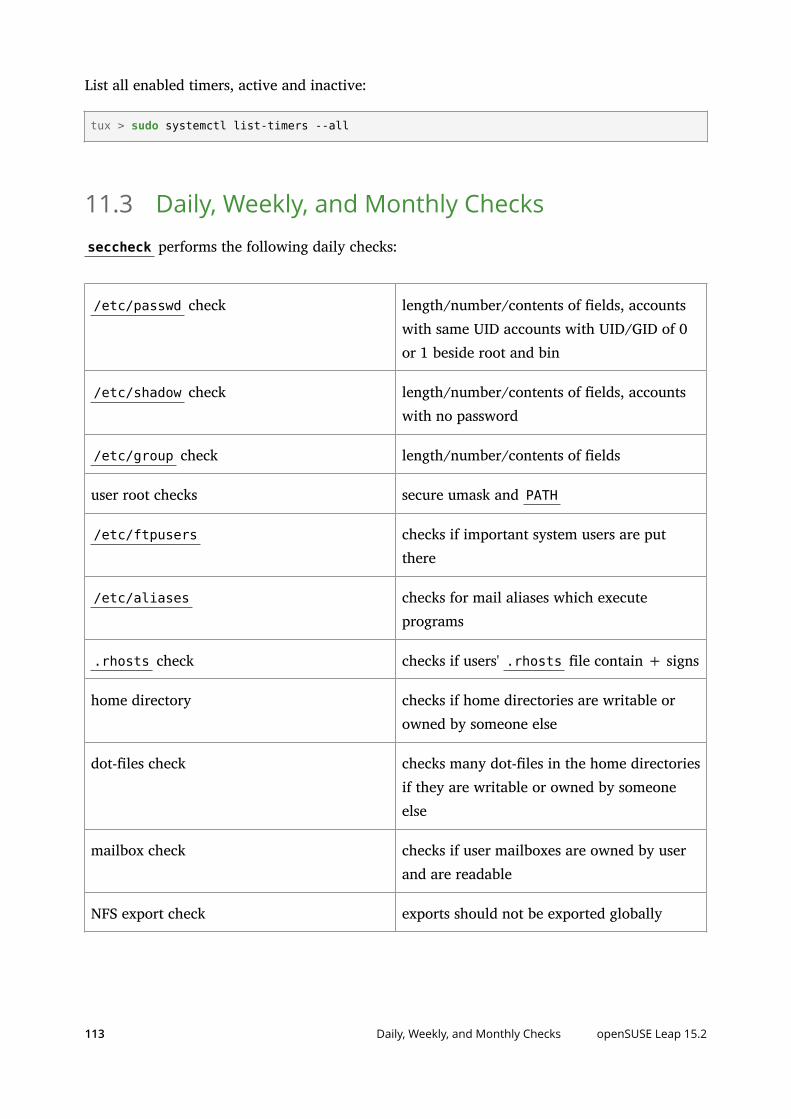
List all enabled timers, active and inactive:
tux > sudo systemctl list-timers --all
11.3 Daily, Weekly, and Monthly Checksseccheck performs the following daily checks:
/etc/passwd check length/number/contents of elds, accountswith same UID accounts with UID/GID of 0or 1 beside root and bin
/etc/shadow check length/number/contents of elds, accountswith no password
/etc/group check length/number/contents of elds
user root checks secure umask and PATH
/etc/ftpusers checks if important system users are putthere
/etc/aliases checks for mail aliases which executeprograms
.rhosts check checks if users' .rhosts le contain + signs
home directory checks if home directories are writable orowned by someone else
dot-les check checks many dot-les in the home directoriesif they are writable or owned by someoneelse
mailbox check checks if user mailboxes are owned by userand are readable
NFS export check exports should not be exported globally
113 Daily, Weekly, and Monthly Checks openSUSE Leap 15.2

NFS import check NFS mounts should have the nosuid optionset
promisc check checks if network cards are in promiscuousmode
list modules lists loaded modules
list sockets lists open ports
The following table lists the weekly checks:
password check runs john to crack the password le, userwill receive an e-mail notice to change theirpassword
RPM md5 check checks for changed les via RPM's MD5checksum feature
suid/sgid check lists all suid and sgid les
exec group write lists all executables which are group/world-writable
writable check lists all les which are world-writable(including executables)
device check lists all devices
Important: Auditing Passwords with johnTo enable password auditing, it is necessary to rst install the package john , the Johnthe Ripper fast password cracker. The package is available on the openSUSE Build Serviceat https://build.opensuse.org/package/show/security/john .
The monthly check prints a complete report, and the daily and weekly checks print dis.
114 Daily, Weekly, and Monthly Checks openSUSE Leap 15.2

11.4 Automatic LogoutThe seccheck-autologout.timer timer runs every 10 minutes, checks both remote and localterminal sessions for inactivity, and terminates them if an idle time is exceeded.
Congure your desired timeouts in /etc/security/autologout.conf le. Parameters includedefault idle and logout delay times, and the conguration for limiting maximum idle timesspecic to users, groups, TTY devices and SSH sessions. /etc/security/autologout.confincludes several conguration examples.
115 Automatic Logout openSUSE Leap 15.2

12 Software Management
12.1 Removing Unnecessary Software Packages(RPMs)
A very important step in securing a Linux system is to determine the primary function(s) orrole(s) of the Linux server. Otherwise, it can be dicult to understand what needs to be securedand securing these Linux systems can prove ineective. Therefore, it is critical to look at thedefault list of software packages and remove any unnecessary packages or packages that do notcomply with your dened security policies.
Generally, an RPM software package consists of the following:
The package's meta data that is written to the RPM database upon installation.
The package's les and directories.
Scripts that are being executed before and after installation and removal.
Packages generally do not impose any security risk to the system unless they contain:
1. setuid or setgid bits on any of the installed les
2. group- or world-writable les or directories
3. a service that is activated upon installation/activated by default.
Assuming that neither of the three conditions above apply, a package is merely a collection ofles. Neither installation nor deinstallation of such packages has inuence on the security valueof the system.
Nevertheless, it is useful to restrict the installed packages in your system to a minimum. Doingthis will result in fewer packages that require updates and will simplify maintenance eortswhen security alerts and patches are released. It is a best practice not to install, among others,development packages or desktop software packages (for example, an X Server) on productionservers. If you do not need them, you should also not install, for example, the Apache Webserver or Samba le sharing server.
116 Removing Unnecessary Software Packages (RPMs) openSUSE Leap 15.2

Important: Requirements of Third-party InstallersMany third-party vendors like Oracle and IBM require a desktop environment anddevelopment libraries to run installers. To avoid this from having an impact on thesecurity of their production servers, many organizations work around this by creating asilent installation (response le) in a development lab.
Also, other packages like FTP and Telnet daemons should not be installed as well unless thereis a justied business reason for it. ssh , scp or sftp should be used as replacements, see .
One of the rst action items should be to create a Linux image that only contains RPMs needed bythe system and applications, and those needed for maintenance and troubleshooting purposes.A good approach is to start with a minimum list of RPMs and then add packages as needed. Thisprocess is time-consuming but usually worth the eort.
Tip: Just Enough Operating System (JeOS)The SUSE Appliance Program includes a component called JeOS (Just Enough OperatingSystem). JeOS has a very small footprint and can be customized to t the specic needsof a system developer. Main uses of JeOS are for hardware/software appliance or virtualmachine development. Key benets of JeOS are eciency, higher performance, increasedsecurity and simplied management.
If JeOS is not an option for you, a good choice is the minimal installation pattern.
To generate a list of all installed packages, use the following command:
root # zypper packages -i
To retrieve details about a particular package, run:
root # zypper info PACKAGE_NAME
To check for and report potential conicts and dependencies when deleting a package, run:
root # zypper rm -D PACKAGE_NAME
This can be very useful, as running the removal command without a test can often yield a lotof complaints and require manual recursive dependency hunting.
117 Removing Unnecessary Software Packages (RPMs) openSUSE Leap 15.2

Important: Removal of Essential System PackagesWhen removing packages, be careful not to remove any essential system packages. Thiscould put your system into a broken state in which it can no longer be booted or repaired.If you are uncertain about this, then it is best to do a complete backup of your systembefore you start to remove any packages.
For the nal removal of one or more packages use the following zypper command with theadded “-u” switch, which causes any dependencies that are becoming unused by removing thenamed packages, to be removed as well:
root # zypper rm -u PACKAGE_NAME
12.2 Patching Linux Systems
Building an infrastructure for patch management is another very important part of a proactiveand secure production Linux environment.
It is recommended to have a written security policy and procedure to handle Linux securityupdates and issues. For example, a security policy should detail the time frame for assessment,testing, and roll out of patches. Network related security vulnerabilities should get the highestpriority and should be addressed immediately within a short time frame. The assessment phaseshould occur within a testing lab, and initial roll out should occur on development systems rst
A separate security log le should contain details on which Linux security announcements havebeen received, which patches have been researched and assessed, when patches have beenapplied, etc.
SUSE releases their patches in three categories, security, recommended and optional. There area few options that can be used to keep systems patched, up to date and secure. Each system canregister and then retrieve updates via the SUSE Update Web site using the included YaST tool—YaST Online Update. SUSE has also created the Repository Mirroring Tool (RMT), an ecientway to maintain a local repository of available/released patches/updates/xes that systems canthen pull from (reducing Internet trac). SUSE also oers SUSE Manager for the maintenance,patching, reporting and centralized management of Linux systems, not only SUSE, but otherdistributions as well.
118 Patching Linux Systems openSUSE Leap 15.2

12.2.1 YaST Online Update
On a per-server basis, installation of important updates and improvements is possible using theYaST Online Update tool. Current updates for the SUSE Linux Enterprise family are availablefrom the product specic update catalogs containing patches. Installation of updates andimprovements is accomplished using YaST and selecting Online Update in the Software Group. Allnew patches (except the optional ones) that are currently available for your system will alreadybe marked for installation. Clicking Accept will then automatically install these patches.
12.2.2 Automatic Online Update
YaST also oers the possibility to set up an automatic update. Select Software Automatic OnlineUpdate. Congure a Daily or a Weekly update. Some patches, such as kernel updates, require userinteraction, which would cause the automatic update procedure to stop. Check Skip InteractivePatches for the update procedure to proceed automatically.
In this case, run a manual Online Update from time to install patches that require interaction.
When Only Download Patches is checked, the patches are downloaded at the specied time butnot installed. They must be installed manually using rpm or zypper .
12.2.3 Repository Mirroring Tool—RMT
The Repository Mirroring Tool for SUSE Linux Enterprise goes one step further than the OnlineUpdate process by establishing a proxy system with repository and registration targets. Thishelps customers centrally manage software updates within the rewall on a per-system basis,while maintaining their corporate security policies and regulatory compliance.
The downloadable RMT (http://download.suse.com/ ) is integrated with SUSE Customer Center(https://scc.suse.com/ ) and provides a repository and registration target that is synchronizedwith it. This can be very helpful in tracking entitlements in large deployments. The RMTmaintains all the capabilities of SUSE Customer Center, while allowing a more secure centralizeddeployment. It is included with every SUSE Linux Enterprise subscription and is therefore fullysupported.
The RMT provides an alternative to the default conguration, which requires opening therewall to outbound connections for each device to receive updates. That requirement oftenviolates corporate security policies and can be seen as a threat to regulatory compliance by some
119 YaST Online Update openSUSE Leap 15.2

organizations. Through its integration with SUSE Customer Center, the RMT ensures that eachdevice can receive its appropriate updates without the need to open the rewall, and withoutany redundant bandwidth requirements.
The RMT also enables customers to locally track their SUSE Linux Enterprise devices (that isservers, desktops, or Point of Service terminals) throughout their enterprise. Now they can easilydetermine how many entitlements are in need of renewal at the end of a billing cycle withouthaving to physically walk through the data center to manually update spreadsheets.
The RMT informs the SUSE Linux Enterprise devices of any available software updates. Eachdevice then obtains the required software updates from the RMT. The introduction of the RMTimproves the interaction among SUSE Linux Enterprise devices within the network and simplieshow they receive their system updates. The RMT enables an infrastructure for several hundredSUSE Linux Enterprise devices per instance of each installation (depending on the specic usageprole). This oers more accurate and ecient server tracking.
In a nutshell, the Repository Mirroring Tool for SUSE Linux Enterprise provides customers with:
Assurance of rewall and regulatory compliance
Reduced bandwidth usage during software updates
Full support under active subscription from SUSE
Maintenance of existing customer interface with SUSE Customer Center
Accurate server entitlement tracking and eective measurement of subscription usage
Automated process to easily tally entitlement totals (no more spreadsheets!)
Simple installation process that automatically synchronizes server entitlement with SUSECustomer Center
12.2.4 SUSE Manager
SUSE Manager automates Linux server management, allowing you to provision and maintainyour servers faster and more accurately. It monitors the health of each Linux server from asingle console so you can identify server performance issues before they impact your business.
120 SUSE Manager openSUSE Leap 15.2

And it lets you comprehensively manage your Linux servers across physical, virtual and cloudenvironments while improving data center eciency. SUSE Manager delivers complete lifecyclemanagement for Linux:
Asset management
Provisioning
Package management
Patch management
Conguration management
Redeployment
For more information on SUSE Manager refer to https://www.suse.com/products/suse-
manager/ .
121 SUSE Manager openSUSE Leap 15.2

13 File Management
13.1 Disk Partitions
Servers should have separate le systems for at least / , /boot , /usr , /var , /tmp , and /home . This prevents, for example, that logging space and temporary space under /var and /tmp ll up the root partition. Third-party applications should be on separate le systems aswell, for example under /opt .
Another advantage of separate le systems is the possibility to choose special mount optionsthat are only suitable for certain regions in the le system hierarchy. A number of interestingmount options are:
noexec : prevents execution of les.
nodev : prevents character or block special devices from being usable.
nosuid : prevents the set-user-ID or set-group-ID bits from being eective.
ro : mounts the le system read-only .
Each of these options needs to be carefully considered before applying it to a partition mount.Applications may stop working, or the support status may be violated. When applied correctly,mount options can help against some types of security attacks or miscongurations. For example,there should be no need for set-user-ID binaries to be placed in /tmp .
You are advised to review Chapter 2, Common Criteria. It is important to understand the need toseparate the partitions that could impact a running system (for example, log les lling up /var/log are a good reason to separate /var from the / partition). Another thing to keep inmind is that you will likely need to leverage LVM or another volume manager or at the veryleast the extended partition type to work around the limit of four primary partitions on PC classsystems.
Another capability in openSUSE Leap is encrypting a partition or even a single directory or leas a container. Refer to Chapter 14, Encrypting Partitions and Files for details.
122 Disk Partitions openSUSE Leap 15.2

13.2 Checking File Permissions and OwnershipThe following sections deal with some ways the default permissions and le settings can bemodied to enhance the security of a host. It is important to note that the use of the defaultopenSUSE Leap utilities like seccheck - can be run to lock down and improve the general lesecurity and user environment. However, it is benecial to understand how to modify thesethings.
openSUSE Leap hosts include three default settings for le permissions: permissions.easy ,permissions.secure , and permissions.paranoid , all located in the /etc directory. Thepurpose of these les is to dene special permissions, such as world-writable directories or, forles, the setuser ID bit (programs with the setuser ID bit set do not run with the permissions ofthe user that has launched it, but with the permissions of the le owner, usually root ).
Administrators can use the le /etc/permissions.local to add their own settings. The easiestway to implement one of the default permission rule-sets above is to use the Local Securitymodule in YaST.
Each of the following topics will be modied by a selected rule-set, but the information isimportant to understand on its own.
13.3 Default umaskThe umask (user le-creation mode mask) command is a shell built-in command whichdetermines the default le permissions for newly created les and directories. This can beoverwritten by system calls but many programs and utilities use umask . By default, umask isset to 022 . You can modify this globally by changing the value in /etc/profile or for eachuser in the startup les of the shell.
To determine the active umask, use the umask command:
tux > umask022
The umask is subtracted from the access mode 777 if at least one bit is set.
With the default umask you see the behavior most users expect to see on a Linux system.
tux > touch atux > mkdir btux > ls -on
123 Checking File Permissions and Ownership openSUSE Leap 15.2

total 16-rw-r--r--. 1 17086 0 Nov 29 15:05 adrwxr-xr-x. 2 17086 4096 Nov 29 15:05 b
You can specify arbitrary umask values, depending on your needs.
tux > umask 111tux > touch ctux > mkdir dtux > ls -ontotal 16-rw-rw-rw-. 1 17086 0 Nov 29 15:05 cdrw-rw-rw-. 2 17086 4096 Nov 29 15:05 d
Based on your thread model you can use a stricter umask like 037 to prevent accidental dataleakage.
tux > umask 037tux > touch etux > mkdir ftux > ls -ontotal 16-rw-r-----. 1 17086 0 Nov 29 15:06 edrwxr-----. 2 17086 4096 Nov 29 15:06 f
13.4 SUID/SGID FilesWhen the SUID (set user ID) or SGID (set group ID) bits are set on an executable, it executeswith the UID or GID of the owner of the executable rather than that of the person executingit. This means that, for example, all executables that have the SUID bit set and are owned byroot are executed with the UID of root . A good example is the passwd command that allowsordinary users to update the password eld in the /etc/shadow le which is owned by root .
But SUID/SGID bits can be misused when the executable has a security hole. Therefore, youshould search the entire system for SUID/SGID executables and document it. To search the entiresystem for SUID or SGID les, you can run the following command:
root # find /bin /boot /etc /home /lib /lib64 /opt /root /sbin /srv /tmp /usr /var -type f -perm '/6000' -ls
You might need to extend the list of directories that are searched if you have a dierent lesystem structure.
124 SUID/SGID Files openSUSE Leap 15.2

SUSE only sets the SUID/SGID bit on binary if it is really necessary. Ensure that code developersdo not set SUID/SGID bits on their programs if it is not an absolute requirement. Very oftenyou can use workarounds like removing the executable bit for world/others. However, a betterapproach is to change the design of the software or use capabilities.
openSUSE Leap supports le capabilities to allow more ne grained privileges to be given toprograms rather than the full power of root :
root # getcap -v /usr/bin/ping /usr/bin/ping = cap_new_raw+eip
The previous command only grants the CAP_NET_RAW capability to whoever executes ping . Incase of vulnerabilities inside ping , an attacker can gain at most this capability in contrast withfull root . Whenever possible, le capabilities should be chosen in favor of the SUID bit. But thisonly applies when the binary is suid to root , not to other users such as news , lp and similar.
13.5 World-Writable FilesWorld-writable les are a security risk since they can be modied by any user on the system.Additionally, world-writable directories allow anyone to add or delete les. To locate world-writable les and directories, you can use the following command:
root # find /bin /boot /etc /home /lib /lib64 /opt /root /sbin /srv /tmp /usr /var -type f -perm -2 ! -type l -ls
You might need to extend the list of directories that are searched if you have a dierent lesystem structure.
The ! -type l parameter skips all symbolic links since symbolic links are always world-writable. However, this is not a problem as long as the target of the link is not world-writable,which is checked by the above nd command.
World-writable directories with the sticky bit such as the /tmp directory do not allow anyoneexcept the owner of a le to delete or rename it in this directory. The sticky bit makes lesstick to the user who created it and it prevents other users from deleting and renaming the les.Therefore, depending on the purpose of the directory, world-writable directories with sticky areusually not an issue. An example is the /tmp directory:
tux > ls -ld /tmpdrwxrwxrwt 18 root root 16384 Dec 23 22:20 /tmp
125 World-Writable Files openSUSE Leap 15.2

The t mode bit in the output denotes the sticky bit.
13.6 Orphaned or Unowned FilesFiles not owned by any user or group might not necessarily be a security problem in itself.However, unowned les could pose a security problem in the future. For example, if a new useris created and the new users happens to get the same UID as the unowned les have, then thisnew user will automatically become the owner of these les.
To locate les not owned by any user or group, use the following command:
root # find /bin /boot /etc /home /lib /lib64 /opt /root /sbin /srv /tmp /usr /var -nouser -o -nogroup
You might need to extend the list of directories that are searched if you have a dierent lesystem structure.
A dierent problem is les that were not installed via the packaging system and therefore don'treceive updates. You can check for such les with the following command:
tux > find /bin /lib /lib64 /usr -path /usr/local -prune -o -type f -a -exec /bin/sh -c "rpm -qf {} &> /dev/null || echo {}" \;
Run this command as an untrusted user (for example nobody) since crafted le names mightlead to command execution. This shouldn't be a problem since these directories should only bewriteable by root , but it's still a good security precaution.
This will show you all les under /bin , /lib , /lib64 and /usr (with the exception of lesin /usr/local ) that are not tracked by the package manager. These les might not represent asecurity issue, but you should be aware of what is not tracked and take the necessary precautionsto keep these les up to date.
126 Orphaned or Unowned Files openSUSE Leap 15.2

14 Encrypting Partitions and Files
Encrypting les, partitions, and entire disks prevents unauthorized access to your data andprotects your condential les and documents.
You can choose between the following encryption options:
Encrypting a Hard Disk Partition
It is possible to create an encrypted partition with YaST during installation or in analready installed system. For further info, see Section 14.1.1, “Creating an Encrypted Partition
during Installation” and Section 14.1.2, “Creating an Encrypted Partition on a Running System”. Thisoption can also be used for removable media, such as external hard disks, as described inSection 14.1.3, “Encrypting the Content of Removable Media”.
Encrypting Single Files with GPG
To quickly encrypt one or more les, you can use the GPG tool. See Section 14.2, “Encrypting
Files with GPG” for more information.
Warning: Encryption Offers Limited ProtectionEncryption methods described in this chapter cannot protect your running system frombeing compromised. After the encrypted volume is successfully mounted, everybody withappropriate permissions can access it. However, encrypted media are useful in case ofloss or theft of your computer, or to prevent unauthorized individuals from reading yourcondential data.
14.1 Setting Up an Encrypted File System with YaST
Use YaST to encrypt partitions or parts of your le system during installation or in an alreadyinstalled system. However, encrypting a partition in an already-installed system is more dicult,because you need to resize and change existing partitions. In such cases, it may be moreconvenient to create an encrypted le of a dened size, in which to store other les or partsof your le system. To encrypt an entire partition, dedicate a partition for encryption in thepartition layout. The standard partitioning proposal, as suggested by YaST, does not include anencrypted partition by default. Add an encrypted partition manually in the partitioning dialog.
127 Setting Up an Encrypted File System with YaST openSUSE Leap 15.2
14.1.1 Creating an Encrypted Partition during Installation
Warning: Password InputMake sure to memorize the password for your encrypted partitions well. Without thatpassword, you cannot access or restore the encrypted data.
The YaST expert dialog for partitioning oers the options needed for creating an encryptedpartition. To create a new encrypted partition proceed as follows:
1. Run the YaST Expert Partitioner with System Partitioner.
2. Select a hard disk, click Add, and select a primary or an extended partition.
3. Select the partition size or the region to use on the disk.
4. Select the le system, and mount point of this partition.
5. Activate the Encrypt device check box.
Note: Additional Software RequiredAfter checking Encrypt device, a pop-up window asking for installing additionalsoftware may appear. Conrm to install all the required packages to ensure thatthe encrypted partition works well.
6. If the encrypted le system needs to be mounted only when necessary, enable Do not mountpartition in the Fstab Options. otherwise enable Mount partition and enter the mount point.
7. Click Next and enter a password which is used to encrypt this partition. This password isnot displayed. To prevent typing errors, you need to enter the password twice.
8. Complete the process by clicking Finish. The newly-encrypted partition is now created.
During the boot process, the operating system asks for the password before mounting anyencrypted partition which is set to be auto-mounted in /etc/fstab . Such a partition is thenavailable to all users when it has been mounted.
To skip mounting the encrypted partition during start-up, press Enter when prompted for thepassword. Then decline the oer to enter the password again. In this case, the encrypted lesystem is not mounted and the operating system continues booting, blocking access to your data.
128 Creating an Encrypted Partition during Installation openSUSE Leap 15.2

To mount an encrypted partition which is not mounted during the boot process, open a lemanager and click the partition entry in the pane listing common places on your le system.You will be prompted for a password and the partition will be mounted.
When you are installing your system on a machine where partitions already exist, you can alsodecide to encrypt an existing partition during installation. In this case follow the description inSection 14.1.2, “Creating an Encrypted Partition on a Running System” and be aware that this actiondestroys all data on the existing partition.
14.1.2 Creating an Encrypted Partition on a Running System
Warning: Activating Encryption on a Running SystemIt is also possible to create encrypted partitions on a running system. However, encryptingan existing partition destroys all data on it, and requires re-sizing and restructuring ofexisting partitions.
On a running system, select System Partitioner in the YaST control center. Click Yes to proceed.In the Expert Partitioner, select the partition to encrypt and click Edit. The rest of the procedureis the same as described in Section 14.1.1, “Creating an Encrypted Partition during Installation”.
14.1.3 Encrypting the Content of Removable Media
YaST treats removable media (like external hard disks or ash disks) the same as any otherstorage device. Virtual disks or partitions on external media can be encrypted as describedabove. However, you should disable mounting at boot time, because removable media is usuallyconnected only when the system is up and running.
If you encrypted your removable device with YaST, the GNOME desktop automaticallyrecognizes the encrypted partition and prompts for the password when the device is detected. Ifyou plug in a FAT-formatted removable device when running GNOME, the desktop user enteringthe password automatically becomes the owner of the device. For devices with a le systemother than FAT, change the ownership explicitly for users other than root to give them read-write access to the device.
129 Creating an Encrypted Partition on a Running System openSUSE Leap 15.2

14.2 Encrypting Files with GPGThe GPG encryption software can be used to encrypt individual les and documents.
To encrypt a le with GPG, you need to generate a key pair rst. To do this, run the gpg --gen-key and follow the on-screen instructions. When generating the key pair, GPG creates auser ID (UID) to identify the key based on your real name, comments, and email address. Youneed this UID (or just a part of it like your rst name or email address) to specify the key youwant to use to encrypt a le. To nd the UID of an existing key, use the gpg --list-keyscommand. To encrypt a le use the following command:
tux > gpg -e -r UID FILE
Replace UID with part of the UID (for example, your rst name) and FILE with the le youwant to encrypt. For example:
tux > gpg -e -r Tux secret.txt
This command creates an encrypted version of the specied le recognizable by the .gpg leextension (in this example, it is secret.txt.gpg ).
To decrypt an encrypted le, use the following command:
tux > gpg -d -o DECRYPTED_FILE ENCRYPTED_FILE
Replace DECRYPTED_FILE with the desired name for the decrypted le and ENCRYPTED_FILEwith the encrypted le you want to decrypt.
Keep in mind that the encrypted le can be only decrypted using the same key that was usedfor encryption. If you want to share an encrypted le with another person, you have to use thatperson's public key to encrypt the le.
130 Encrypting Files with GPG openSUSE Leap 15.2

15 Storage Encryption for Hosted Applications withcryptctl
Databases and similar applications are often hosted on external servers that are serviced by third-party sta. Certain data center maintenance tasks require third-party sta to directly accessaected systems. In such cases, privacy requirements necessitate disk encryption.
cryptctl allows encrypting sensitive directories using LUKS and oers the following additionalfeatures:
Encryption keys are located on a central server, which can be located on customerpremises.
Encrypted partitions are automatically remounted after an unplanned reboot.
cryptctl consists of two components:
A client is a machine that has one or more encrypted partitions but does not permanentlystore the necessary key to decrypt those partitions. For example, clients can be cloud orotherwise hosted machines.
The server holds encryption keys that can be requested by clients to unlock encryptedpartitions.You can also set up the cryptctl server to store encryption keys on a KMIP 1.3-compatible(Key Management Interoperability Protocol) server. In that case, the cryptctl server willnot store the encryption keys of clients and is dependent upon the KMIP-compatible serverto provide these.
Warning: cryptctl Server MaintenanceSince the cryptctl server manages timeouts for the encrypted disks and, depending onthe conguration, can also hold encryption keys, it should be under your direct controland managed only by trusted personnel.
Additionally, it should be backed up regularly. Losing the server's data means losingaccess to encrypted partitions on the clients.
To handle encryption, cryptctl uses LUKS with aes-xts-256 encryption and 512-bit keys.Encryption keys are transferred using TLS with certicate verication.
131 openSUSE Leap 15.2
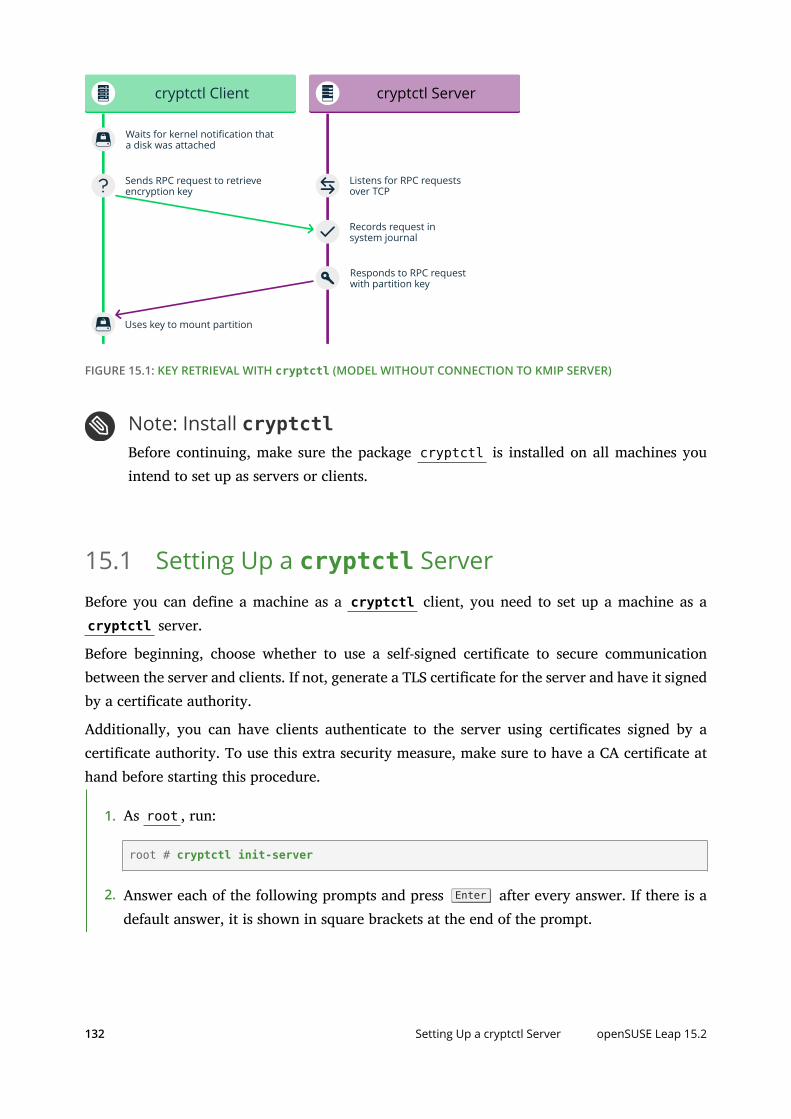
cryptctl Client
Waits for kernel notification thata disk was attached
Sends RPC request to retrieveencryption key
Uses key to mount partition
Records request insystem journal
Responds to RPC requestwith partition key
Listens for RPC requestsover TCP
cryptctl Server
FIGURE 15.1: KEY RETRIEVAL WITH cryptctl (MODEL WITHOUT CONNECTION TO KMIP SERVER)
Note: Install cryptctlBefore continuing, make sure the package cryptctl is installed on all machines youintend to set up as servers or clients.
15.1 Setting Up a cryptctl ServerBefore you can dene a machine as a cryptctl client, you need to set up a machine as acryptctl server.
Before beginning, choose whether to use a self-signed certicate to secure communicationbetween the server and clients. If not, generate a TLS certicate for the server and have it signedby a certicate authority.
Additionally, you can have clients authenticate to the server using certicates signed by acerticate authority. To use this extra security measure, make sure to have a CA certicate athand before starting this procedure.
1. As root , run:
root # cryptctl init-server
2. Answer each of the following prompts and press Enter after every answer. If there is adefault answer, it is shown in square brackets at the end of the prompt.
132 Setting Up a cryptctl Server openSUSE Leap 15.2

a. Choose a password with at least 10 characters and conrm it. This password assumesthe role of a master password, able to unlock all partitions that are registered onthe server.
b. Specify the path to a PEM-encoded TLS certicate or certicate chain le or leave theeld empty to create a self-signed certicate. If you specify a path, use an absolutepath.
c. If you want the server to be identied by a host name other than the default shown,specify a host name. cryptctl will then generate certicates which include thehost name.
d. Specify the IP address that belongs to the network interface that you want to listenon for decryption requests from the clients, then set a port number (the default isport 3737).The default IP address setting, 0.0.0.0 means that cryptctl will listen on allnetwork interfaces for client requests using IPv4.
e. Specify a directory on the server that will hold the decryption keys for clients.
f. Specify whether clients need to authenticate to the server using a TLS certicate. Ifyou choose No, this means that clients authenticate using disk UUIDs only. (However,communication will be encrypted using the server certicate in any case.)If you choose Yes, pick a PEM-encoded certicate authority to use for signing clientcerticates.
g. Specify whether to use a KMIP 1.3-compatible server (or multiple such servers) tostore encryption keys of clients. If you choose this option, provide the host namesand ports for one or multiple KMIP-compatible servers.Additionally, provide a user name, password, a CA certicate for the KMIP server,and a client identity certicate for the cryptctl server.
Important: No Easy Reconfiguration of KMIP SettingThe setting to use a KMIP server cannot easily be changed later. To change thissetting, both the cryptctl server and its clients need to be congured afresh.
h. Finally, congure an SMTP server for e-mail notications for encryption anddecryption requests or leave the prompt empty to skip setting up e-mail notications.
133 Setting Up a cryptctl Server openSUSE Leap 15.2

Note: Password-Protected Serverscryptctl currently cannot send e-mail using authentication-protected SMTPservers. If that is necessary, set up a local SMTP proxy.
i. When asked whether to start the cryptctl server, enter y .
3. To check the status of the service cryptctl-server , use:
root # systemctl status cryptctl-server
To recongure the server later, do either of the following:
Run the command cryptctl init-server again. cryptctl will then propose theexisting settings as the defaults, so that you only need to specify the values that you wantto change.
Make changes directly in the conguration le /etc/sysconfig/cryptctl-server .However, to avoid issues, do not change the settings AUTH_PASSWORD_HASH andAUTH_PASSWORD_SALT manually. The values of these options need to be calculatedcorrectly.
15.2 Setting Up a cryptctl ClientThe following interactive setup of cryptctl is currently the only setup method.
Make sure the following preconditions are fullled:
A cryptctl server is available over the network.
There is a directory to encrypt.
The client machine has an empty partition available that is large enough to t the directoryto encrypt.
When using a self-signed certicate, the certicate ( *.crt le) generated on the server isavailable locally on the client. Otherwise, the certicate authority of the server certicatemust be trusted by the client.
If you set up the server to require clients to authenticate using a client certicate, prepare aTLS certicate for the client which is signed by the CA certicate you chose for the server.
134 Setting Up a cryptctl Client openSUSE Leap 15.2

1. As root , run:
root # cryptctl encrypt
2. Answer each of the following prompts and press Enter after every answer. If there is adefault answer, it is shown in square brackets at the end of the prompt.
a. Specify the host name and port to connect to on the cryptctl server.
b. If you congured the server to have clients authenticate to it using a TLS certicate,specify a certicate and a key le for the client. The client certicate must be signedby the certicate authority chosen when setting up the server.
c. Specify the absolute path to the server certicate (the *.crt le).
d. Enter the encryption password that you specied when setting up the server.
e. Specify the path to the directory to encrypt. Specify the path to the empty partitionthat will contain the encrypted content of the directory.
f. Specify the number of machines that are allowed to decrypt the partitionsimultaneously.Then specify the timeout in seconds before additional machines are allowed todecrypt the partition after the last vital sign was received from the client or clients.When a machine unexpectedly stops working and then reboots, it needs to be able tounlock its partitions again. That means this timeout should be set to a time slightlyshorter than the reboot time of the client.
Important: Timeout LengthIf the time is set too long, the machine cannot decrypt encrypted partitions onthe rst try. cryptctl will then continue to periodically check whether theencryption key has become available. However, this will introduce a delay.
If the timeout is set too short, machines with a copy of the encrypted partitionhave an increased chance of unlocking the partition rst.
3. To start encryption, enter yes .cryptctl will now encrypt the specied directory to the previously empty partition andthen mount the newly encrypted partition. The le system type will be of the same typeas the original unencrypted le system.
135 Setting Up a cryptctl Client openSUSE Leap 15.2

Before creating the encrypted partition, cryptctl moves the unencrypted content of theoriginal directory to a location prexed with cryptctl-moved- .
4. To check that the directory is indeed mounted correctly, use:
tux > lsblk -o NAME,MOUNTPOINT,UUIDNAME MOUNTPOINT UUID[...]sdc└─sdc1 PARTITION_UUID └─cryptctl-unlocked-sdc1 /secret-partition UNLOCKED_UUID
cryptctl identies the encrypted partition by its UUID. For the previous example, thatis the UUID displayed next to sdc1 .On the server, you can check whether the directory was decrypted using cryptctl .
root # cryptctl list-keys
For a successfully decrypted partition, you will see output like:
2019/06/06 15:50:00 ReloadDB: successfully loaded database of 1 recordsTotal: 1 records (date and time are in zone EDT)Used By When UUID Max.Users Num.Users Mount PointIP_ADDRESS 2019-06-06 15:00:50 UUID 1 1 /secret-partition
For a partition not decrypted successfully, you will see output like:
2019/06/06 15:50:00 ReloadDB: successfully loaded database of 1 recordsTotal: 1 records (date and time are in zone EDT)Used By When UUID Max.Users Num.Users Mount Point 2019-06-06 15:00:50 UUID 1 1 /secret-partition
See the dierence in the empty Used by column.Verify that the UUID shown is that of the previously encrypted partition.
5. After verifying that the encrypted partition works, delete the unencrypted content fromthe client. For example, use rm . For more safety, overwrite the content of the les beforedeleting them, for example, using shred -u .
136 Setting Up a cryptctl Client openSUSE Leap 15.2

Important: shred Does Not Guarantee That Data IsCompletely ErasedDepending on the type of storage media, using shred is not a guarantee that all datais completely removed. In particular, SSDs usually employ wear leveling strategiesthat render shred ineective.
The conguration for the connection from client to server is stored in /etc/sysconfig/cryptctl-client and can be edited manually.
The server stores an encryption key for the client partition in /var/lib/cryptctl/keydb/PARTITION_UUID .
15.3 Checking Partition Unlock Status Using Server-side Commands
When a cryptctl client is active, it will send a “heartbeat” to the cryptctl server every 10seconds. If the server does not receive a heartbeat from the client for the length of the timeoutcongured during the client setup, the server will assume that the client is oine. It will thenallow another client to connect (or allow the same client to reconnect after a reboot).
To see the usage status of all keys, use:
root # cryptctl list-keys
The information under Num. Users shows whether the key is currently in use. To see moredetail on a single key, use:
root # cryptctl show-key UUID
This command will show information about mount point, mount options, usage options, the lastretrieval of the key, and the last three heartbeats from clients.
Additionally, you can use journalctl to nd logs of when keys were retrieved.
137 Checking Partition Unlock Status Using Server-side Commands openSUSE Leap 15.2

15.4 Unlocking Encrypted Partitions ManuallyThere are two ways of unlocking a partition manually, both of which are run on a client:
Online Unlocking. Online unlocking allows circumventing timeout or user limitations.This method can be used when there is a network connection between client and serverbut the client could not (yet) unlock the partition automatically. This method will unlockall encrypted partitions on a machine.To use it, run cryptctl online-unlock . Be prepared to enter the password speciedwhen setting up the server.
Offline Unlocking. This method can be used when a client cannot or must not be broughtonline to communicate with its server. The encryption key from the server must still beavailable. This method is meant as a last resort only and can only unlock a single partitionat a time.To use it, run cryptctl offline-unlock . The server's key le for the requisite partition( /var/lib/cryptctl/keydb/PARTITION_UUID ) needs to be available on the client.
15.5 Maintenance Downtime ProcedureTo ensure that partitions cannot be decrypted during a maintenance downtime, turn o theclient and disable the cryptctl server. You can do so by either:
Stopping the service cryptctl-server :
root # systemctl stop cryptctl-server
Unplugging the cryptctl server from the network.
15.6 For More InformationFor more information, also see the project home page https://github.com/HouzuoGuo/cryptctl/ .
138 Unlocking Encrypted Partitions Manually openSUSE Leap 15.2

16 User Management
16.1 Various Account Checks
16.1.1 Unlocked Accounts
It is important that all system and vendor accounts that are not used for logins are locked. Toget a list of unlocked accounts on your system, you can check for accounts that do not have anencrypted password string starting with ! or * in the /etc/shadow le. If you lock an accountusing passwd -l , it will put a !! in front of the encrypted password, eectively disabling thepassword. If you lock an account using usermod -L , it will put a ! in front of the encryptedpassword. Many system and shared accounts are usually locked by default by having a * or!! in the password eld which renders the encrypted password into an invalid string. Hence,to get a list of all unlocked (encryptable) accounts, run ( egrep is used to allow use of regular-expressions):
root # egrep -v ':\*|:\!' /etc/shadow | awk -F: '{print $1}'
Also make sure all accounts have a x in the password eld in /etc/passwd . The followingcommand lists all accounts that do not have a x in the password eld:
root # grep -v ':x:' /etc/passwd
An x in the password elds means that the password has been shadowed, for example theencrypted password needs to be looked up in the /etc/shadow le. If the password eld in /etc/passwd is empty, then the system will not look up the shadow le and it will not promptthe user for a password at the login prompt.
16.1.2 Unused Accounts
All system or vendor accounts that are not being used by users, applications, by the system orby daemons should be removed from the system. You can use the following command to ndout if there are any les owned by a specic account:
root # find / -path /proc -prune -o -user ACCOUNT -ls
139 Various Account Checks openSUSE Leap 15.2
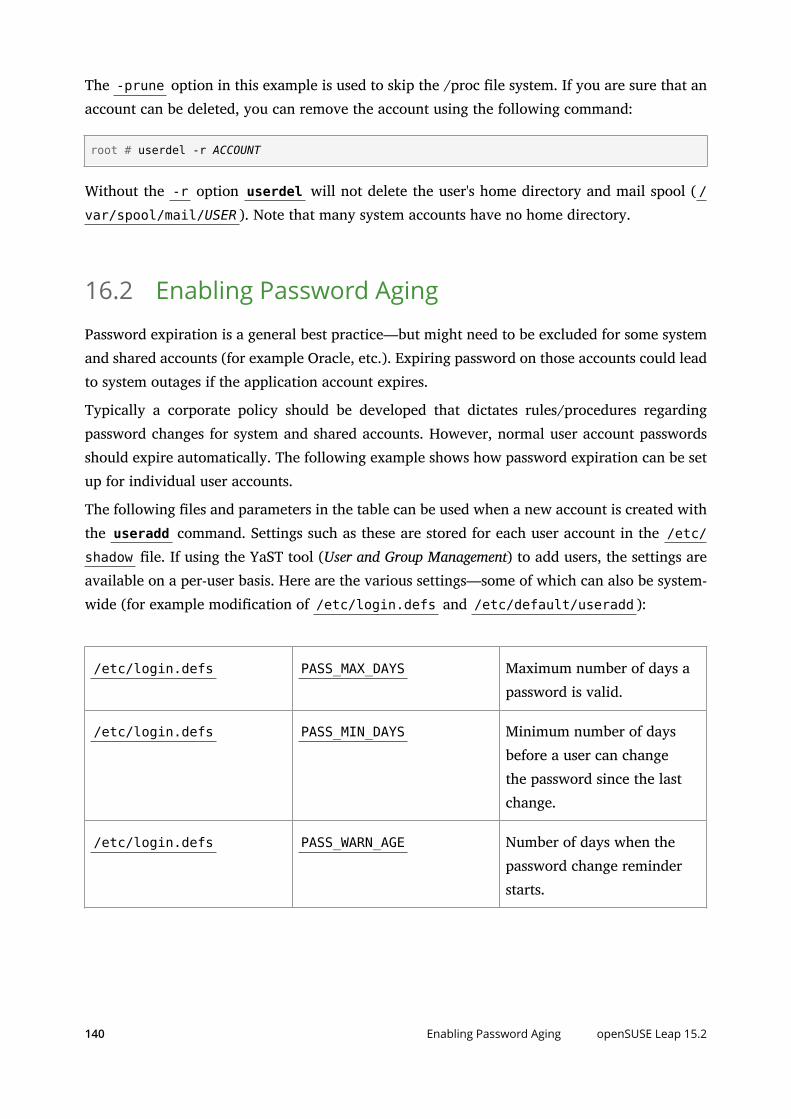
The -prune option in this example is used to skip the /proc le system. If you are sure that anaccount can be deleted, you can remove the account using the following command:
root # userdel -r ACCOUNT
Without the -r option userdel will not delete the user's home directory and mail spool ( /var/spool/mail/USER ). Note that many system accounts have no home directory.
16.2 Enabling Password Aging
Password expiration is a general best practice—but might need to be excluded for some systemand shared accounts (for example Oracle, etc.). Expiring password on those accounts could leadto system outages if the application account expires.
Typically a corporate policy should be developed that dictates rules/procedures regardingpassword changes for system and shared accounts. However, normal user account passwordsshould expire automatically. The following example shows how password expiration can be setup for individual user accounts.
The following les and parameters in the table can be used when a new account is created withthe useradd command. Settings such as these are stored for each user account in the /etc/shadow le. If using the YaST tool (User and Group Management) to add users, the settings areavailable on a per-user basis. Here are the various settings—some of which can also be system-wide (for example modication of /etc/login.defs and /etc/default/useradd ):
/etc/login.defs PASS_MAX_DAYS Maximum number of days apassword is valid.
/etc/login.defs PASS_MIN_DAYS Minimum number of daysbefore a user can changethe password since the lastchange.
/etc/login.defs PASS_WARN_AGE Number of days when thepassword change reminderstarts.
140 Enabling Password Aging openSUSE Leap 15.2

/etc/default/useradd INACTIVE Number of days afterpassword expiration thataccount is disabled.
/etc/default/useradd EXPIRE Account expiration date inthe format YYYY-MM-DD.
NoteUsers created prior to these modications will not be aected.
Ensure that the above parameters are changed in the /etc/login.defs and /etc/default/useradd les. Review of the /etc/shadow le will show how these settings get stored afteradding a user.
To create a new user account, execute the following command:
root # useradd -c "TEST_USER" -g USERS TEST
The -g option species the primary group for this account:
root # id TESTuid=509(test) gid=100(users) groups=100(users)
The settings in /etc/login.defs and /etc/default/useradd are recorded for the test userin the /etc/shadow le as follows:
root # grep TEST /etc/shadowtest:!!:12742:7:60:7:14::
Password aging can be modied at any time by use of the chage command. To disable passwordaging for system and shared accounts, you can run the following chage command:
root # chage -M -1 SYSTEM_ACCOUNT_NAME
To get password expiration information:
root # chage -l SYSTEM_ACCOUNT_NAME
For example:
root # chage -l TESTMinimum: 7Maximum: 60Warning: 7
141 Enabling Password Aging openSUSE Leap 15.2

Inactive: 14Last Change: Jan 11, 2015Password Expires: Mar 12, 2015Password Inactive: Mar 26, 2015Account Expires: Never
16.3 Stronger Password EnforcementOn an audited system it is important to restrict people from using simple passwords that canbe cracked too easily. Writing down complex passwords is all right as long as they are storedsecurely. Some will argue that strong passwords protect you against dictionary attacks and thosetype of attacks can be defeated by locking accounts after a few failed attempts. However, thisis not always an option. If set up like this, locking system accounts could bring down yourapplications and systems which would be nothing short of a denial of service attack – anotherissue.
At any rate, it is important to practice eective password management safety. Most companiesrequire that passwords have at the very least a number, one lowercase letter, and one uppercaseletter. Policies vary, but maintaining a balance between password strength/complexity andmanagement is sometimes dicult.
16.4 Password and Login Management with PAMLinux-PAM (Pluggable Authentication Modules for Linux) is a suite of shared libraries thatenable the local system administrator to choose how applications authenticate users.
It is strongly recommended to familiarize oneself with the capabilities of PAM and how thisarchitecture can be leveraged to provide the best authentication setup for an environment. Thisconguration can be done once – and implemented across all systems (a standard) or can beenhanced for individual hosts (enhanced security – by host / service / application). The key isto realize how exible the architecture is.
To learn more about the PAM architecture, nd PAM documentation in the /usr/share/doc/packages/pam directory (in a variety of formats).
The following discussions are examples of how to modify the default PAM stacks—specicallyaround password policies—for example password strength, password re-use and accountlocking. While these are only a few of the possibilities, they serve as a good start and demonstratePAM's exibility.
142 Stronger Password Enforcement openSUSE Leap 15.2

Important: pam-config LimitationsThe pam-config tool can be used to congure the common-{account,auth,password,session} PAM conguration les, which contain global options.These les include the following comment:
# This file is autogenerated by pam-config. All changes# will be overwritten.
Individual service les, such as login, password, sshd , and su must be edited directly.You may elect to edit all les directly, and not use pam-config , though pam-configincludes useful features such as converting an older conguration, updating your currentconguration, and sanity checks. For more information, see man 8 pam-config .
16.4.1 Password Strength
openSUSE Leap can leverage the pam_cracklib library to test for weak passwords – andto suggest using a stronger one if it determines obvious weakness. The following parametersrepresent an example that could be part of a corporate password policy or something requiredbecause of audit constraints.
The PAM libraries follow a dened ow. The best way to design the perfect stack usually is toconsider all of the requirements and policies and draw out a ow chart.
TABLE 16.1: SAMPLE RULES/CONSTRAINTS FOR PASSWORD ENFORCEMENT
pam_cracklib.so minlen=8 Minimum length of passwordis 8
pam_cracklib.so lcredit=-1 Minimum number oflowercase letters is 1
pam_cracklib.so ucredit=-1 Minimum number ofuppercase letters is 1
pam_cracklib.so dcredit=-1 Minimum number of digits is1
pam_cracklib.so ocredit=-1 Minimum number of othercharacters is 1
143 Password Strength openSUSE Leap 15.2

To set up these password restrictions, use the pam-config tool to specify the parameters youwant to congure. For example, the minimum length parameter could be modied like this:
tux > sudo pam-config -a --cracklib-minlen=8 --cracklib-retry=3 \--cracklib-lcredit=-1 --cracklib-ucredit=-1 --cracklib-dcredit=-1 \--cracklib-ocredit=-1 --cracklib
Now verify that the new password restrictions work for new passwords. Simply login to anon-root account and change the password using the passwd command. Note that the aboverequirements are not enforced if you run the passwd command under root.
16.4.2 Restricting Use of Previous Passwords
The pam_pwhistory module can be used to congure the number of previous passwords thatcannot be reused. The following command implements password restrictions on a system so thata password cannot be reused for at least six months:
tux > sudo pam-config -a --pwhistory --pwhistory-remember=26
Recall that in the section Section 16.2, “Enabling Password Aging” we set PASS_MIN_DAYS to 7 ,which species the minimum number of days allowed between password changes. Therefore, ifpam_unix is congured to remember 26 passwords, then the previously used passwords cannotbe reused for at least six months (26*7 days).
The PAM conguration ( /etc/pam.d/common-auth ) resulting from the pam-config commandlooks like the following:
auth required pam_env.soauth required pam_unix.so try_first_passaccount required pam_unix.so try_first_passpassword requisit pam_cracklib.sopassword required pam_pwhistory.so remember=26password optional pam_gnome_keyring.so use_authtokpassword required pam_unix.so use_authtok nullok shadow try_first_passsession required pam_limits.sosession required pam_unix.so try_first_passsession optional pam_umask.so
144 Restricting Use of Previous Passwords openSUSE Leap 15.2

16.4.3 Locking User Accounts After Too Many Login Failures
Locking accounts after a dened number of failed ssh, login, su, or sudo attempts is a commonsecurity practice. However, this could lead to outages if an application, admin, or root user islocked out. In eect this makes it easy to cause denial-of-service attacks by deliberately creatinglogin failures. Fortunately, controlling this with PAM is straightforward.
By default, PAM allows all root logins. Use pam_tally2 to control failed login behavior forall other users, including human and system users. Add the following line to the top of /etc/pam.d/login to lock out all users (except root) after six failed logins, and to automaticallyunlock the account after ten minutes:
auth required pam_tally2.so deny=6 unlock_time=600
This is an example of a complete /etc/pam.d/login le:
#%PAM-1.0auth requisite pam_nologin.soauth include common-authauth required pam_tally2.so deny=6 unlock_time=600account include common-accountaccount required pam_tally2.sopassword include common-passwordsession required pam_loginuid.sosession include common-session#session optional pam_lastlog.so nowtmp showfailedsession optional pam_mail.so standard
You may also lock out root, though obviously you must be very certain you want to do this:
auth required pam_tally2.so deny=6 even_deny_root unlock_time=600
You may dene a dierent lockout time for root:
auth required pam_tally2.so deny=6 root_unlock_time=120 unlock_time=600
If you want to require the administrator to unlock accounts, leave o the unlock_time option.The next two example commands display the number of failed login attempts and how to unlocka user account:
root # pam_tally2 -u usernameLogin Failures Latest failure Fromusername 6 12/17/19 13:49:43 pts/1
root # pam_tally2 -r -u username
145 Locking User Accounts After Too Many Login Failures openSUSE Leap 15.2

The default location for attempted accesses is recorded in /var/log/tallylog .
If the user succeeds in logging in after the login timeout expires, or after the administrator resetstheir account, the counter resets to 0.
Congure other login services to use pam_tally2 in their individual conguration les in /etc/pam.d/ : sshd, su, sudo, sudo-i , and su-l .
16.5 Restricting root LoginsBy default, the root user is assigned a password and can log in using various methods—forexample, on a local terminal, in a graphical session, or remotely via SSH. These methods shouldbe restricted as far as possible. Shared usage of the root account should be avoided. Instead,individual administrators should use tools such as su or sudo (for more information, typeman 1 su or man 8 sudo ) to obtain elevated privileges. This allows associating root loginswith particular users. This also adds another layer of security; not only the root password,but both the root and the password of an an administrator's regular account would need to becompromised to gain full root access. This section explains how to limit direct root logins onthe dierent levels of the system.
16.5.1 Restricting Local Text Console Logins
TTY devices provide text-mode system access via the console. For desktop systems these areaccessed via the local keyboard or—in case of server systems—via input devices connected to aKVM switch or a remote management card (ILO, DRAC, etc). By default, Linux oers 6 dierentconsoles, that can be switched to via the key combinations Alt – F1 to Alt – F6 , when runningin text mode, or Ctrl – Alt – F1 to Ctrl – Alt – F6 when running in a graphical session. Theassociated terminal devices are named tty1 .. tty6 accordingly.
The following steps restrict root access to the rst TTY. Even this access method is only meantfor emergency access to the system and should never be used for everyday system administrationtasks.
NoteThe steps shown here are tailored towards PC architectures (x86 and AMD64/Intel 64).On architectures such as POWER, dierent terminal device names than tty1 may beused. Be careful not to lock yourself out completely by specifying wrong terminal device
146 Restricting root Logins openSUSE Leap 15.2

names. You can determine the device name of the terminal you are currently logged intoby running the tty command. Be careful not to do this in a virtual terminal, such as viaSSH or in a graphical session (device names /dev/pts/N ), but only from an actual loginterminal reachable via Alt – FN .
PROCEDURE 16.1: RESTRICTING ROOT LOGINS ON LOCAL TTYS
1. Ensure that the PAM stack conguration le /etc/pam.d/login contains thepam_securetty module in the auth block:
auth requisite pam_nologin.so auth [user_unknown=ignore success=ok ignore=ignore auth_err=die default=bad] pam_securetty.so noconsole auth include common-auth
This will include the pam_securetty module during the authentication process on localconsoles, which restricts root to logging-in only on TTY devices that are listed in thele /etc/securetty .
2. Remove all entries from /etc/securetty except one. This limits the access to TTY devicesfor root.
## This file contains the device names of tty lines (one per line,# without leading /dev/) on which root is allowed to login.#tty1
3. Check whether logins to other terminals will be rejected for root . A login on tty2 , forexample, should be rejected immediately, without even querying the account password.Also make sure that you can still successfully login to tty1 and thus that root is notlocked out of the system completely.
ImportantDo not add the pam_securetty module to the /etc/pam.d/common-auth le. Thiswould break the su and sudo commands, because these tools would then also rejectroot authentications.
147 Restricting Local Text Console Logins openSUSE Leap 15.2

ImportantThese conguration changes will also cause root logins on serial consoles such as /dev/ttyS0 to be denied. In case you require such use cases you need to list the respective ttydevices additionally in the /etc/securetty le.
16.5.2 Restricting Graphical Session Logins
To improve security on your server, avoid using graphical environments at all. Graphicalprograms are often not designed to be run as root and are more likely to contain security issuesthan console programs. If you require a graphical login, use a non- root login. Congure yoursystem to disallow root from logging in to graphical sessions.
To prevent root from logging in to graphical sessions, you can apply the same basic stepsas outlined in Section 16.5.1, “Restricting Local Text Console Logins”. Just add the pam_securettymodule to the PAM stack le belonging to the display manager—for example, /etc/pam.d/gdmfor GDM. The graphical session also runs on a TTY device: by default, tty7 . Therefore, if yourestrict root logins to tty1 , then root will be denied login in the graphical session.
16.5.3 Restricting SSH Logins
By default, the root user is also allowed to log into a machine remotely via the SSH networkprotocol (if the SSH port is not blocked by the rewall). To restrict this, make the followingchange to the OpenSSH conguration:
1. Edit /etc/ssh/sshd_config and adjust the following parameter:
PermitRootLogin no
2. Restart the sshd service to make the changes eective:
systemctl restart sshd.service
148 Restricting Graphical Session Logins openSUSE Leap 15.2

NoteUsing the PAM pam_securetty module is not suitable in case of OpenSSH, because notall SSH logins go through the PAM stack during authorization (for example, when usingSSH public-key authentication). In addition, an attacker could dierentiate between awrong password and a successful login that was only rejected later on by policy.
16.6 Setting an Inactivity Timeout for Interactive ShellSessions
It can be a good idea to terminate an interactive shell session after a certain period of inactivity.For example, to revent open, unguarded sessions or to avoid waste of system resources.
By default, there is no inactivity timeout for shells. Nothing will happen if a shell stays open andunused for days or even years. It is possible to congure most shells in a way that idle sessionsterminate automatically after a certain amount of time. The following example shows how toset an inactivity timeout for a number of common types of shells.
The inactivity timeout can be congured for login shells only or for all interactive shells. In thelatter case the inactivity timeout is running individually for each shell instance. This means thattimeouts will accumulate. When a sub- or child-shell is started, then a new timeout begins forthe sub- or child-shell, and only afterwards will the timeout of the parent continue running.
The following table contains conguration details for a selection of common shells shipped withopenSUSE Leap:
package shellpersonalities
shellvariable
time unit readonlysetting
congpath (only
loginshell)
congpath (allshells)
bash bash, sh TMOUT seconds readonly
TMOUT=
/etc/
profile.local ,/etc/
profile.d/
/etc/
bash.bashrc
149 Setting an Inactivity Timeout for Interactive Shell Sessions openSUSE Leap 15.2

package shellpersonalities
shellvariable
time unit readonlysetting
congpath (only
loginshell)
congpath (allshells)
mksh ksh,
lksh,
mksh,
pdksh
TMOUT seconds readonly
TMOUT=
/etc/
profile.local ,/etc/
profile.d/
/etc/
ksh.kshrc.local
tcsh csh,
tcsh
autologout minutes set -r
autologout=
/etc/
csh.login.local
/etc/
csh.cshrc.local
zsh zsh TMOUT seconds readonly
TMOUT=
/etc/
profile.local ,/etc/
profile.d/
/etc/
zsh.zshrc.local
Every listed shell supports an internal timeout shell variable that can be set to a specic timevalue to cause the inactivity timeout. If you want to prevent users from overriding the timeoutsetting, you can mark the corresponding shell timeout variable as readonly. The correspondingvariable declaration syntax is also found in the table above.
NoteThis feature is only helpful for avoiding risks if a user is forgetful or follows unsafepractices. It does not protect against hostile users. The timeout only applies to interactivewait states of a shell. A malicious user can always nd ways to circumvent the timeoutand keep their session open regardless.
To congure the inactivity timeout, you need to add the matching timeout variable declarationto each shell's startup script. Use either the path for login shells only, or the one for all shells,as listed in the table. The following example uses paths and settings that are suitable for bashand ksh to setup a read-only login shell timeout that cannot be overridden by users. Create thele /etc/profile.d/timeout.sh with the following content:
# /etc/profile.d/timeout.sh for SUSE Linux#
150 Setting an Inactivity Timeout for Interactive Shell Sessions openSUSE Leap 15.2

# Timeout in seconds until the bash/ksh session is terminated# in case of inactivity.# 24h = 86400 secreadonly TMOUT=86400
TipWe recommend using the screen tool in order to detach sessions before logging out.screen sessions are not terminated and can be re-attached whenever required. An activesession can be locked without logging out (read about Ctrl – a – x / lockscreen inman screen for details).
16.7 Preventing Accidental Denial of ServiceLinux allows you to set limits on the amount of system resources that users and groups canconsume. This is also very handy if bugs in programs cause them to use up too much resources(for example memory leaks), slow down the machine, or even render the system unusable.Incorrect settings can allow programs to use too many resources which may make the serverunresponsive to new connections or even local logins (for example if a program uses up allavailable le handles on the host). This can also be a security concern if someone is allowed toconsume all system resources and therefore cause a denial of service attack – either unplanned orworse, planned. Setting resource limits for users and groups may be an eective way to protectsystems, depending on the environment.
16.7.1 Example for Restricting System Resources
The following example demonstrates the practical usage of setting or restricting system resourceconsumption for an Oracle user account. For a list of system resource settings, see /etc/security/limits.conf or man limits.conf .
Most shells like Bash provide control over various resources (for example the maximumallowable number of open le descriptors or the maximum number of processes) that areavailable on a per/user basis. To examine all current limits in the shell execute:
root # ulimit -a
For more information on ulimit for the Bash shell, examine the Bash man pages.
151 Preventing Accidental Denial of Service openSUSE Leap 15.2

Important: Setting Limits for SSH SessionsSetting "hard" and "soft" limits might not behave as expected when using an SSH session.To see valid behavior it may be necessary to login as root and then su to the id with limits(for example, oracle in these examples). Resource limits should also work assuming theapplication has been started automatically during the boot process. It may be necessaryto set UsePrivilegeSeparation in /etc/ssh/sshd_config to "no" and restart the SSHdaemon ( systemctl restart sshd ) if it seems that the changes to resource limits arenot working (via SSH). However this is not generally recommended – as it weakens asystems security.
Tip: Disabling Password Logins via sshYou can add some extra security to your server by disabling password authentication forSSH. Remember that you need to have SSH keys congured, otherwise you cannot accessthe server. To disable password login, add the following lines to /etc/ssh/sshd_config :
UseLogin noUsePAM noPasswordAuthentication noPubkeyAuthentication yes
In this example, a change to the number of le handles or open les that the user oracle canuse is made by editing /etc/security/limits.conf as root making the following changes:
oracle soft nofile 4096oracle hard nofile 63536
The soft limit in the rst line denes the limit on the number of le handles (open les) thatthe oracle user will have after login. If the user sees error messages about running out of lehandles, then the user can increase the number of le handles like in this example up to thehard limit (in this example 63536) by executing:
root # ulimit -n 63536
You can set the soft and hard limits higher if necessary.
152 Example for Restricting System Resources openSUSE Leap 15.2

NoteIt is important to be judicious with the usage of ulimits. Allowing a "hard" limit for “nole”for a user that equals the kernel limit ( /proc/sys/fs/file-max ) is very bad! If the userconsumes all the available le handles, the system cannot initiate new logins as accessing(opening) PAM modules which are required for performing a login will not be possible.
You also need to ensure that pam_limits is either congured globally in /etc/pam.d/common-auth , or for individual services like SSH, su, login, and telnet in:
/etc/pam.d/sshd (for SSH)/etc/pam.d/su (for su)/etc/pam.d/login (local logins and telnet)
If you do not want to enable it for all logins, there is a specic PAM module that will read the /etc/security/limits.conf le. Entries in pam conguration directives will have entries like:
session required /lib/security/pam_limits.sosession required /lib/security/pam_unix.so
It is important to note that changes are not immediate and require a new login session:
root # su – oracletux > ulimit -n4096
Note that these examples are specic to the Bash shell - ulimit options are dierent for othershells. The default limit for the user oracle is 4096 . To increase the number of le handlesthe user oracle can use to 63536 , do:
root # su – oracletux > ulimit -n4096tux > ulimit -n 63536tux > ulimit -n63536
Making this permanent requires the addition of the setting, ulimit -n 63536 , (again, for Bash)to the users prole ( ~/.bashrc or ~/.profile le) which is the user start-up le for the Bashshell on openSUSE Leap (to verify your shell run: echo $SHELL ). To do this you could simplytype (or copy/paste – if you are reading this on the system) the following commands for theBash shell of the user oracle :
root # su - oracle
153 Example for Restricting System Resources openSUSE Leap 15.2

tux > cat >> ~oracle/.bash_profile << EOFulimit -n 63536EOF
16.8 Displaying Login BannersIt is often necessary to place a banner on login screens on all servers for legal/audit policyreasons or to give security instructions to users.
If you want to print a login banner after a user logs in on a text based terminal for example usingSSH or on a local console, you can leverage the le /etc/motd (motd = message of the day).The le exists by default on openSUSE Leap, but it is empty. Simply add content to the le thatis applicable/required by the organization.
Note: Banner LengthTry to keep the login banner content to a single terminal page (or less), as it will scrollthe screen if it does not t, making it more dicult to read.
You can also have a login banner printed before a user logs in on a text based terminal. For localconsole logins you can edit the /etc/issue le, which will cause the banner to be displayedbefore the login prompt. For logins via SSH you can edit the “Banner” parameter in the /etc/ssh/sshd_config le, which will then appropriately display the banner text before the SSHlogin prompt.
For graphical logins via GDM, you can follow the GNOME admin guide (https://help.gnome.org/
admin/system-admin-guide/stable/login-banner.html.en) to set up a login banner. Furthermoreyou can make the following changes to require a user to acknowledge the legal banner byselecting Yes or No. Edit the /etc/gdm/Xsession le and add the following lines at the beginningof the script:
if ! /usr/bin/gdialog --yesno '\nThis system is classified...\n' 10 10; then /usr/bin/gdialog --infobox 'Aborting login' exit 1;fi
The text This system is classified... needs to be replaced with the desired bannertext. It is important to note that this dialog will not prevent a login from progressing. Formore information about GDM scripting, refer to the GDM Admin Manual (https://help.gnome.org/
admin/gdm/stable/configuration.html.en#scripting) .
154 Displaying Login Banners openSUSE Leap 15.2
16.9 Connection Accounting UtilitiesHere is a list of commands you can use to get data about user logins:
who . Lists currently logged in users.
w . Shows who is logged in and what they are doing.
last . Shows a list of last logged in users, including login time, logout time, login IP address, etc.
lastb . Same as last , except that by default it shows /var/log/btmp , which contains all thebad login attempts.
lastlog . This command reports data maintained in /var/log/lastlog , which is a record ofthe last time a user logged in.
ac . Available after installing the acct package. Prints the connect time in hours on a per-userbasis or daily basis, etc. This command reads /var/log/wtmp .
dump-utmp . Converts raw data from /var/run/utmp or /var/log/wtmp into ASCII-parseableformat.
Also check the /var/log/messages le, or the output of journalctl if no logging facilityis running. See Book “Reference”, Chapter 11 “journalctl: Query the systemd Journal” for moreinformation on the systemd journal.
155 Connection Accounting Utilities openSUSE Leap 15.2

17 Spectre/Meltdown Checker
spectre-meltdown-checker is a shell script to test if your system is vulnerableto the several speculative execution vulnerabilities that are in nearly all CPUsmanufactured in the past 20 years. This is a hardware aw that potentially allowsan attacker to read all data on the system. On cloud computing services, wheremultiple virtual machines are on a single physical host, an attacker can gainaccess to all virtual machines. Fixing these vulnerabilities requires redesigning andreplacing CPUs. Until this happens, there are several software patches that mitigatethese vulnerabilities. If you have kept your SUSE systems updated, all of thesepatches should already be installed.
spectre-meltdown-checker generates a detailed report. It is impossible toguarantee that your system is secure, but it shows you which mitigations are inplace, and potential vulnerabilities.
17.1 Using spectre-meltdown-checkerInstall the script, and then run it as root without any options:
root # zypper in spectre-meltdown-checkerroot # spectre-meltdown-checker.sh
156 Using spectre-meltdown-checker openSUSE Leap 15.2

You will see colorful output like Figure 17.1, “Output from spectre-meltdown-checker”:
FIGURE 17.1: OUTPUT FROM SPECTRE-MELTDOWN-CHECKER
spectre-meltdown-checker.sh --help lists all options. It is useful to pipe plain text output,with no colors, to a le:
root # spectre-meltdown-checker.sh --no-color| tee filename.txt
The previous examples are on a running system, which is the default. You may alsorun spectre-meltdown-checker oine by specifying the paths to the kernel, cong, andSystem.map les:
root # cd /bootroot # spectre-meltdown-checker.sh \--no-color \--kernel vmlinuz-4.12.14-lp151.28.13-default \--config config-4.12.14-lp151.28.13-default \--map System.map-4.12.14-lp151.28.13-default| tee filename.txt
Other useful options are:
--verbose, -v
Increase verbosity; repeat for more verbosity, for example -v -v -v
--explain
157 Using spectre-meltdown-checker openSUSE Leap 15.2

Print human-readable explanations
--batch [short] [json] [nrpe] [prometheus]
Format output in various machine-readable formats
Important: --disclaimer Optionspectre-meltdown-checker.sh --disclaimer provides important information aboutwhat the script does, and does not do.
17.2 Additional Information about Spectre/MeltdownFor more information, see the following references:
SUSE Knowledge Base article #7022937, Security Vulnerability: Spectre Variant 4(Speculative Store Bypass) aka CVE-2018-3639: https://www.suse.com/support/kb/doc/?
id=7022937
speed47/spectre-meltdown-checker source code on GitHub, with detailed references torelevant Common Vulnerabilities and Exposures (CVE): https://github.com/speed47/
spectre-meltdown-checker
SUSE Blog article, Meltdown and Spectre Performance: https://www.suse.com/c/meltdown-
spectre-performance/
SUSE Knowledge Base article #7022512, providing information on architectures, CVEs,and mitigations: https://www.suse.com/support/kb/doc/?id=7022512
158 Additional Information about Spectre/Meltdown openSUSE Leap 15.2

18 Configuring Security Settings with YaST
The YaST module Security Center and Hardening oers a central clearinghouse tocongure security-related settings for openSUSE Leap. Use it to congure securityaspects such as settings for the login procedure and for password creation, for bootpermissions, user creation or for default le permissions. Launch it from the YaSTcontrol center by Security and Users Security Center and Hardening. The SecurityCenter dialog always starts with the Security Overview, and other congurationdialogs are available from the right pane.
18.1 Security Overview
The Security Overview displays a comprehensive list of the most important security settings foryour system. The security status of each entry in the list is clearly visible. A green check markindicates a secure setting while a red cross indicates an entry as being insecure. Click Help toopen an overview of the setting and information on how to make it secure. To change a setting,click the corresponding link in the Status column. Depending on the setting, the following entriesare available:
Enabled/Disabled
Click this entry to toggle the status of the setting to either enabled or disabled.
Configure
Click this entry to launch another YaST module for conguration. You will return to theSecurity Overview when leaving the module.
Unknown
A setting's status is set to unknown when the associated service is not installed. Such asetting does not represent a potential security risk.
159 Security Overview openSUSE Leap 15.2

FIGURE 18.1: YAST SECURITY CENTER AND HARDENING: SECURITY OVERVIEW
18.2 Predefined Security Configurations
openSUSE Leap comes with three Predened Security Congurations. These congurations aectall the settings available in the Security Center module. Each conguration can be modied toyour needs using the dialogs available from the right pane changing its state to Custom Settings:
Workstation
A conguration for a workstation with any kind of network connection (including aconnection to the Internet).
Roaming Device
This setting is designed for a laptop or tablet that connects to dierent networks.
Network Server
Security settings designed for a machine providing network services such as a Web server,le server, name server, etc. This set provides the most secure conguration of thepredened settings.
Custom Settings
160 Predefined Security Configurations openSUSE Leap 15.2

A pre-selected Custom Settings (when opening the Predened Security Congurations dialog)indicates that one of the predened sets has been modied. Actively choosing this optiondoes not change the current conguration—you will need to change it using the SecurityOverview.
18.3 Password Settings
Passwords that are easy to guess are a major security issue. The Password Settings dialog providesthe means to ensure that only secure passwords can be used.
Check New Passwords
By activating this option, a warning will be issued if new passwords appear in a dictionary,or if they are proper names (proper nouns).
Minimum Acceptable Password Length
If the user chooses a password with a length shorter than specied here, a warning willbe issued.
Number of Passwords to Remember
When password expiration is activated (via Password Age), this setting stores the givennumber of a user's previous passwords, preventing their reuse.
Password Encryption Method
Choose a password encryption algorithm. Normally there is no need to change the default(Blowsh).
Password Age
Activate password expiration by specifying a minimum and a maximum time limit (indays). By setting the minimum age to a value greater than 0 days, you can prevent usersfrom immediately changing their passwords again (and in doing so circumventing thepassword expiration). Use the values 0 and 99999 to deactivate password expiration.
Days Before Password Expires Warning
When a password expires, the user receives a warning in advance. Specify the number ofdays prior to the expiration date that the warning should be issued.
161 Password Settings openSUSE Leap 15.2
18.4 Boot Settings
Congure which users can shut down the machine via the graphical login manager in this dialog.You can also specify how Ctrl – Alt – Del will be interpreted and who can hibernate the system.
18.5 Login Settings
This dialog lets you congure security-related login settings:
Delay after Incorrect Login Attempt
To make it dicult to guess a user's password by repeatedly logging in, it is recommendedto delay the display of the login prompt that follows an incorrect login. Specify the valuein seconds. Make sure that users who have mistyped their passwords do not need to waittoo long.
Allow Remote Graphical Login
When checked, the graphical login manager (GDM) can be accessed from the network.This is a potential security risk.
18.6 User Addition
Set minimum and maximum values for user and group IDs. These default settings would rarelyneed to be changed.
18.7 Miscellaneous Settings
Other security settings that do not t the above-mentioned categories are listed here:
File Permissions
openSUSE Leap comes with three predened sets of le permissions for system les. Thesepermission sets dene whether a regular user may read log les or start certain programs.Easy le permissions are suitable for stand-alone machines. These settings allow regularusers to, for example, read most system les. See the le /etc/permissions.easy for thecomplete conguration. The Secure le permissions are designed for multiuser machines
162 Boot Settings openSUSE Leap 15.2

with network access. A thorough explanation of these settings can be found in /etc/permissions.secure . The Paranoid settings are the most restrictive ones and should beused with care. See /etc/permissions.paranoid for more information.
User Launching updatedb
The program updatedb scans the system and creates a database of all le locations whichcan be queried with the command locate . When updatedb is run as user nobody, onlyworld-readable les will be added to the database. When run as user root , almost all les(except the ones root is not allowed to read) will be added.
Enable Magic SysRq Keys
The magic SysRq key is a key combination that enables you to have some control over thesystem even when it has crashed. The complete documentation can be found at https://
www.kernel.org/doc/html/latest/admin-guide/sysrq.html .
163 Miscellaneous Settings openSUSE Leap 15.2
19 Authorization with PolKit
PolKit (formerly known as PolicyKit) is an application framework that acts asa negotiator between the unprivileged user session and the privileged systemcontext. Whenever a process from the user session tries to carry out an action inthe system context, PolKit is queried. Based on its conguration—specied in a so-called “policy”—the answer could be “yes”, “no”, or “needs authentication”. Unlikeclassical privilege authorization programs such as sudo, PolKit does not grant rootpermissions to an entire session, but only to the action in question.
19.1 Conceptual OverviewPolKit works by limiting specic actions by users, by group, or by name. It then denes howthose users are allowed to perform this action.
19.1.1 Available Authentication Agents
When a user starts a session (using the graphical environment or on the console), each sessionconsists of the authority and an authentication agent. The authority is implemented as a serviceon the system message bus, whereas the authentication agent is used to authenticate the currentuser, which started the session. The current user needs to prove their authenticity, for example,using a passphrase.
Each desktop environment has its own authentication agent. Usually it is started automatically,whatever environment you choose.
19.1.2 Structure of PolKit
PolKit's conguration depends on actions and authorization rules:
Actions (file extension *.policy )
Written as XML les and located in /usr/share/polkit-1/actions . Each le denes oneor more actions, and each action contains descriptions and default permissions. Althougha system administrator can write their own rules, PolKit's les must not be edited.
164 Conceptual Overview openSUSE Leap 15.2

Authorization Rules (file extension *.rules )
Written as JavaScript les and located in two places: /usr/share/polkit-1/rules.d is used for third party packages and /etc/polkit-1/rules.d for local congurations.Each rule le refers to the action specied in the action le. A rule determines whatrestrictions are allowed to a subset of users. For example, a rule le could overrule arestrictive permission and allow some users to allow it.
19.1.3 Available Commands
PolKit contains several commands for specic tasks (see also the specic man page for furtherdetails):
pkaction
Get details about a dened action. See Section 19.3, “Querying Privileges” for moreinformation.
pkcheck
Checks whether a process is authorized, specied by either --process or --system-bus-name .
pkexec
Allows an authorized user to execute the specic program as another user.
pkttyagent
Starts a textual authentication agent. This agent is used if a desktop environment does nothave its own authentication agent.
19.1.4 Available Policies and Supported Applications
At the moment, not all applications requiring privileges use PolKit. Find the most importantpolicies available on openSUSE® Leap below, sorted into the categories where they are used.
PulseAudio
Set scheduling priorities for the PulseAudio daemon
CUPS
Add, remove, edit, enable or disable printers
165 Available Commands openSUSE Leap 15.2

Backup Manager
Modify schedule
GNOME
Modify system and mandatory values with GConfChange the system time
libvirt
Manage and monitor local virtualized systems
NetworkManager
Apply and modify connections
PolKit
Read and change privileges for other usersModify defaults
PackageKit
Update and remove packagesChange and refresh repositoriesInstall local lesRollbackImport repository keysAccepting EULAsSetting the network proxy
System
Wake on LANMount or unmount xed, hotpluggable and encrypted devicesEject and decrypt removable mediaEnable or disable WLANEnable or disable BluetoothDevice accessStop, suspend, hibernate and restart the systemUndock a docking station
166 Available Policies and Supported Applications openSUSE Leap 15.2

Change power-management settings
YaST
Register productChange the system time and language
19.2 Authorization TypesEvery time a PolKit-enabled process carries out a privileged operation, PolKit is asked whetherthis process is entitled to do so. PolKit answers according to the policy dened for this process.The answers can be yes , no , or authentication needed . By default, a policy containsimplicit privileges, which automatically apply to all users. It is also possible to specifyexplicit privileges which apply to a specic user.
19.2.1 Implicit Privileges
Implicit privileges can be dened for any active and inactive sessions. An active session is theone in which you are currently working. It becomes inactive when you switch to another consolefor example. When setting implicit privileges to “no”, no user is authorized, whereas “yes”authorizes all users. However, usually it is useful to demand authentication.
A user can either authorize by authenticating as root or by authenticating as self. Bothauthentication methods exist in four variants:
Authentication
The user always needs to authenticate.
One Shot Authentication
The authentication is bound to the instance of the program currently running. After theprogram is restarted, the user is required to authenticate again.
Keep Session Authentication
The authentication dialog oers a check button Remember authorization for this session. Ifchecked, the authentication is valid until the user logs out.
Keep Indefinitely Authentication
The authentication dialog oers a check button Remember authorization. If checked, theuser needs to authenticate only once.
167 Authorization Types openSUSE Leap 15.2

19.2.2 Explicit Privileges
Explicit privileges can be granted to specic users. They can either be granted withoutlimitations, or, when using constraints, limited to an active session and/or a local console.
It is not only possible to grant privileges to a user, a user can also be blocked. Blocked userscannot carry out an action requiring authorization, even though the default implicit policyallows authorization by authentication.
19.2.3 Default Privileges
Each application supporting PolKit comes with a default set of implicit policies dened by theapplication's developers. Those policies are the so-called “upstream defaults”. The privilegesdened by the upstream defaults are not necessarily the ones that are activated by defaulton SUSE systems. openSUSE Leap comes with a predened set of privileges that override theupstream defaults:
/etc/polkit-default-privs.standard
Denes privileges suitable for most desktop systems
/etc/polkit-default-privs.restrictive
Designed for machines administrated centrally
To switch between the two sets of default privileges, adjust the value of POLKIT_DEFAULT_PRIVSto either restrictive or standard in /etc/sysconfig/security . Then run the commandset_polkit_default_privs as root .
Do not modify the two les in the list above. To dene your own custom set of privileges, use /etc/polkit-default-privs.local . For details, refer to Section 19.4.3, “Modifying Configuration
Files for Implicit Privileges”.
19.3 Querying PrivilegesTo query privileges use the command pkaction included in PolKit.
PolKit comes with command line tools for changing privileges and executing commands asanother user (see Section 19.1.3, “Available Commands” for a short overview). Each existing policyhas a speaking, unique name with which it can be identied. List all available policies with thecommand pkaction . See man pkaction for more information.
168 Explicit Privileges openSUSE Leap 15.2

If you want to display the needed authorization for a given policy (for example,org.freedesktop.login1.reboot ) use pkaction as follows:
tux > pkaction -v --action-id=org.freedesktop.login1.rebootorg.freedesktop.login1.reboot: description: Reboot the system message: Authentication is required to allow rebooting the system vendor: The systemd Project vendor_url: http://www.freedesktop.org/wiki/Software/systemd icon: implicit any: auth_admin_keep implicit inactive: auth_admin_keep implicit active: yes
The keyword auth_admin_keep means that users need to enter a passphrase.
Note: Restrictions of pkaction on openSUSE Leappkaction always operates on the upstream defaults. Therefore it cannot be used to list orrestore the defaults shipped with openSUSE Leap. To do so, refer to Section 19.5, “Restoring
the Default Privileges”.
19.4 Modifying Configuration FilesAdjusting privileges by modifying conguration les is useful when you want to deploy thesame set of policies to dierent machines, for example to the computers of a specic team. It ispossible to change implicit and explicit privileges by modifying conguration les.
19.4.1 Adding Action Rules
The available actions depend on what additional packages you have installed on your system.For a quick overview, use pkaction to list all dened rules.
To get an idea, the following example describes how the command gparted (“GNOME PartitionEditor”) is integrated into PolKit.
The le /usr/share/polkit-1/actions/org.opensuse.policykit.gparted.policy
contains the following content:
<?xml version="1.0" encoding="UTF-8"?>
169 Modifying Configuration Files openSUSE Leap 15.2

<!DOCTYPE policyconfig PUBLIC "-//freedesktop//DTD PolicyKit Policy Configuration 1.0//EN" "http://www.freedesktop.org/standards/PolicyKit/1.0/policyconfig.dtd"><policyconfig> 1
<action id="org-opensuse-policykit-gparted"> 2
<message>Authentication is required to run the GParted Partition Editor</message> <icon_name>gparted</icon_name> <defaults> 3
<allow_any>auth_admin</allow_any> <allow_inactive>auth_admin</allow_inactive> < allow_active>auth_admin</allow_active> </defaults> <annotate 4
key="org.freedesktop.policykit.exec.path">/usr/sbin/gparted</annotate> <annotate 4
key="org.freedesktop.policykit.exec.allow_gui">true</annotate> </action>
</policyconfig>
1 Root element of the policy le.
2 Contains one single action.
3 The defaults element contains several permissions used in remote sessions like SSH, VNC(element allow_inactive ), when logged directly into the machine on a TTY or X display(element allow_active ), or for both (element allow_any ). The value auth_adminindicates authentication is required as an administrative user.
4 The annotate element contains specic information regarding how PolKit performs anaction. In this case, it contains the path to the executable and states whether a GUI isallowed to open a X display.
To add your own policy, create a .policy le with the structure above, add the appropriatevalue into the id attribute, and dene the default permissions.
19.4.2 Adding Authorization Rules
Your own authorization rules overrule the default settings. To add your own settings, store yourles under /etc/polkit-1/rules.d/ .
170 Adding Authorization Rules openSUSE Leap 15.2

The les in this directory start with a two-digit number, followed by a descriptive name, andend with .rules . Functions inside these les are executed in the order they have been sortedin. For example, 00-foo.rules is sorted (and hence executed) before 60-bar.rules or even90-default-privs.rules .
Inside the le, the script checks for the specied action ID, which is dened in the .policyle. For example, if you want to allow the command gparted to be executed by any memberof the admin group, check for the action ID org.opensuse.policykit.gparted :
/* Allow users in admin group to run GParted without authentication */polkit.addRule(function(action, subject) { if (action.id == "org.opensuse.policykit.gparted" && subject.isInGroup("admin")) { return polkit.Result.YES; }});
Find the description of all classes and methods of the functions in the PolKit API at http://
www.freedesktop.org/software/polkit/docs/latest/ref-api.html .
19.4.3 Modifying Configuration Files for Implicit Privileges
openSUSE Leap ships with two sets of default authorizations, located in /etc/polkit-default-privs.standard and /etc/polkit-default-privs.restrictive . For more information,refer to Section 19.2.3, “Default Privileges”.
Custom privileges are dened in /etc/polkit-default-privs.local . Privileges dened herewill always take precedence over the ones dened in the other conguration les. To deneyour custom set of privileges, do the following:
1. Open /etc/polkit-default-privs.local . To dene a privilege, add a line for eachpolicy with the following format:
<privilege_identifier> <any session>:<inactive session>:<active session>
For example:
org.freedesktop.policykit.modify-defaults auth_admin_keep_always
The following values are valid for the SESSION placeholders:
yes
171 Modifying Configuration Files for Implicit Privileges openSUSE Leap 15.2
grant privilege
no
block
auth_self
user needs to authenticate with own password every time the privilege is requested
auth_self_keep_session
user needs to authenticate with own password once per session, privilege is grantedfor the whole session
auth_self_keep_always
user needs to authenticate with own password once, privilege is granted for thecurrent and for future sessions
auth_admin
user needs to authenticate with root password every time the privilege is requested
auth_admin_keep_session
user needs to authenticate with root password once per session, privilege is grantedfor the whole session
auth_admin_keep_always
user needs to authenticate with root password once, privilege is granted for thecurrent and for future sessions
2. Run as root for changes to take eect:
# /sbin/set_polkit_default_privs
3. Optionally check the list of all privilege identiers with the command pkaction .
19.5 Restoring the Default Privileges
openSUSE Leap comes with a predened set of privileges that is activated by default and thusoverrides the upstream defaults. For details, refer to Section 19.2.3, “Default Privileges”.
172 Restoring the Default Privileges openSUSE Leap 15.2

Since the graphical PolKit tools and the command line tools always operate onthe upstream defaults, openSUSE Leap includes an additional command-line tool,set_polkit_default_privs . It resets privileges to the values dened in /etc/polkit-default-privs.* . However, the command set_polkit_default_privs will only resetpolicies that are set to the upstream defaults.
PROCEDURE 19.1: RESTORING THE OPENSUSE LEAP DEFAULTS
1. Make sure /etc/polkit-default-privs.local does not contain any overrides of thedefault policies.
Important: Custom Policy ConfigurationPolicies dened in /etc/polkit-default-privs.local will be applied on top ofthe defaults during the next step.
2. To reset all policies to the upstream defaults rst and then apply the openSUSE Leapdefaults:
tux > sudo rm -f /var/lib/polkit/* && set_polkit_default_privs
173 Restoring the Default Privileges openSUSE Leap 15.2

20 Access Control Lists in Linux
POSIX ACLs (access control lists) can be used as an expansion of the traditionalpermission concept for le system objects. With ACLs, permissions can be denedmore exibly than with the traditional permission concept.
The term POSIX ACL suggests that this is a true POSIX (portable operating system interface)standard. The respective draft standards POSIX 1003.1e and POSIX 1003.2c have beenwithdrawn for several reasons. Nevertheless, ACLs (as found on many systems belonging to theUnix family) are based on these drafts and the implementation of le system ACLs (as describedin this chapter) follows these two standards.
20.1 Traditional File Permissions
The permissions of all les included in openSUSE Leap are carefully chosen. When installingadditional software or les, take great care when setting the permissions. Always use the -loption with the command ls to detect any incorrect le permissions immediately. An incorrectle attribute does not only mean that les could be changed or deleted. Modied les couldbe executed by root or services could be hijacked by modifying conguration les. Thissignicantly increases the danger of an attack.
A openSUSE® Leap system includes the les permissions , permissions.easy ,permissions.secure , and permissions.paranoid , all in the directory /etc . The purposeof these les is to dene special permissions, such as world-writable directories or, for les, thesetuser ID bit. Programs with the setuser ID bit set do not run with the permissions of the userthat launched it, but with the permissions of the le owner, usually root . An administrator canuse the le /etc/permissions.local to add their own settings.
To dene one of the available proles, select Local Security in the Security and Users sectionof YaST. To learn more about the topic, read the comments in /etc/permissions or consultman chmod .
Find detailed information about the traditional le permissions in the GNU Coreutils Info page,Node File permissions ( info coreutils "File permissions" ). More advanced features arethe setuid, setgid, and sticky bit.
174 Traditional File Permissions openSUSE Leap 15.2

20.1.1 The setuid Bit
In certain situations, the access permissions may be too restrictive. Therefore, Linux hasadditional settings that enable the temporary change of the current user and group identity for aspecic action. For example, the passwd program normally requires root permissions to access/etc/passwd . This le contains some important information, like the home directories of usersand user and group IDs. Thus, a normal user would not be able to change passwd , because itwould be too dangerous to grant all users direct access to this le. A possible solution to thisproblem is the setuid mechanism. setuid (set user ID) is a special le attribute that instructs thesystem to execute programs marked accordingly under a specic user ID. Consider the passwdcommand:
-rwsr-xr-x 1 root shadow 80036 2004-10-02 11:08 /usr/bin/passwd
You can see the s that denotes that the setuid bit is set for the user permission. By means ofthe setuid bit, all users starting the passwd command execute it as root .
20.1.2 The setgid Bit
The setuid bit applies to users. However, there is also an equivalent property for groups: thesetgid bit. A program for which this bit was set runs under the group ID under which it was saved,no matter which user starts it. Therefore, in a directory with the setgid bit, all newly createdles and subdirectories are assigned to the group to which the directory belongs. Consider thefollowing example directory:
drwxrws--- 2 tux archive 48 Nov 19 17:12 backup
You can see the s that denotes that the setgid bit is set for the group permission. The ownerof the directory and members of the group archive may access this directory. Users that arenot members of this group are “mapped” to the respective group. The eective group ID ofall written les will be archive . For example, a backup program that runs with the group IDarchive can access this directory even without root privileges.
175 The setuid Bit openSUSE Leap 15.2

20.1.3 The Sticky Bit
There is also the sticky bit. It makes a dierence whether it belongs to an executable programor a directory. If it belongs to a program, a le marked in this way is loaded to RAM to avoidneeding to get it from the hard disk each time it is used. This attribute is used rarely, becausemodern hard disks are fast enough. If this bit is assigned to a directory, it prevents users fromdeleting each other's les. Typical examples include the /tmp and /var/tmp directories:
drwxrwxrwt 2 root root 1160 2002-11-19 17:15 /tmp
20.2 Advantages of ACLsTraditionally, three permission sets are dened for each le object on a Linux system. Thesesets include the read ( r ), write ( w ), and execute ( x ) permissions for each of three types ofusers—the le owner, the group, and other users. In addition to that, it is possible to set the setuser id, the set group id, and the sticky bit. This lean concept is fully adequate for most practicalcases. However, for more complex scenarios or advanced applications, system administratorsformerly needed to use several workarounds to circumvent the limitations of the traditionalpermission concept.
ACLs can be used as an extension of the traditional le permission concept. They allow theassignment of permissions to individual users or groups even if these do not correspond to theoriginal owner or the owning group. Access control lists are a feature of the Linux kernel andare currently supported by Ext2, Ext3, Ext4, JFS, and XFS. Using ACLs, complex scenarios canbe realized without implementing complex permission models on the application level.
The advantages of ACLs are evident if you want to replace a Windows server with a Linux server.Some connected workstations may continue to run under Windows even after the migration.The Linux system oers le and print services to the Windows clients with Samba. With Sambasupporting access control lists, user permissions can be congured both on the Linux server andin Windows with a graphical user interface (only Windows NT and later). With winbindd , partof the Samba suite, it is even possible to assign permissions to users only existing in the Windowsdomain without any account on the Linux server.
20.3 Definitions
User Class
176 The Sticky Bit openSUSE Leap 15.2

The conventional POSIX permission concept uses three classes of users for assigningpermissions in the le system: the owner, the owning group, and other users. Threepermission bits can be set for each user class, giving permission to read ( r ), write ( w ),and execute ( x ).
ACL
The user and group access permissions for all kinds of le system objects (les anddirectories) are determined by means of ACLs.
Default ACL
Default ACLs can only be applied to directories. They determine the permissions a lesystem object inherits from its parent directory when it is created.
ACL Entry
Each ACL consists of a set of ACL entries. An ACL entry contains a type, a qualier for theuser or group to which the entry refers, and a set of permissions. For some entry types,the qualier for the group or users is undened.
20.4 Handling ACLs
Table 20.1, “ACL Entry Types” summarizes the six possible types of ACL entries, each deningpermissions for a user or a group of users. The owner entry denes the permissions of the userowning the le or directory. The owning group entry denes the permissions of the le's owninggroup. The superuser can change the owner or owning group with chown or chgrp , in whichcase the owner and owning group entries refer to the new owner and owning group. Each nameduser entry denes the permissions of the user specied in the entry's qualier eld. Each namedgroup entry denes the permissions of the group specied in the entry's qualier eld. Only thenamed user and named group entries have a qualier eld that is not empty. The other entrydenes the permissions of all other users.
The mask entry further limits the permissions granted by named user, named group, and owninggroup entries by dening which of the permissions in those entries are eective and which aremasked. If permissions exist in one of the mentioned entries and in the mask, they are eective.Permissions contained only in the mask or only in the actual entry are not eective—meaningthe permissions are not granted. All permissions dened in the owner and owning group entriesare always eective. The example in Table 20.2, “Masking Access Permissions” demonstrates thismechanism.
177 Handling ACLs openSUSE Leap 15.2
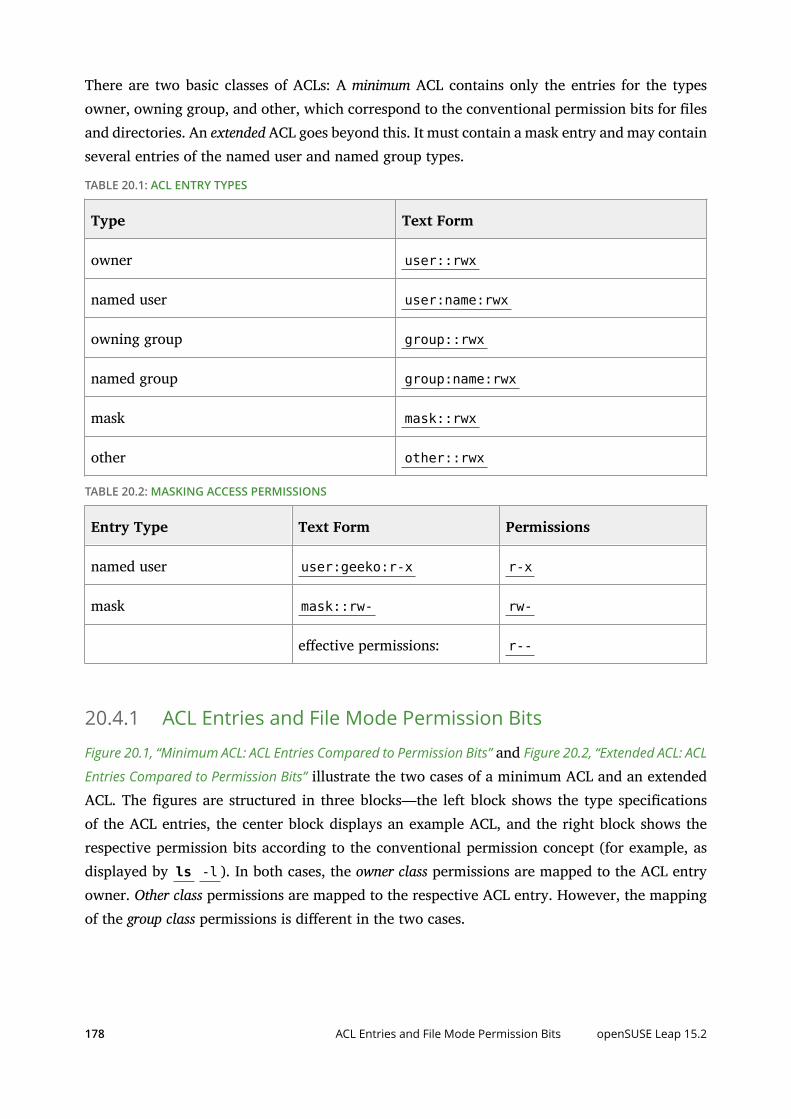
There are two basic classes of ACLs: A minimum ACL contains only the entries for the typesowner, owning group, and other, which correspond to the conventional permission bits for lesand directories. An extended ACL goes beyond this. It must contain a mask entry and may containseveral entries of the named user and named group types.
TABLE 20.1: ACL ENTRY TYPES
Type Text Form
owner user::rwx
named user user:name:rwx
owning group group::rwx
named group group:name:rwx
mask mask::rwx
other other::rwx
TABLE 20.2: MASKING ACCESS PERMISSIONS
Entry Type Text Form Permissions
named user user:geeko:r-x r-x
mask mask::rw- rw-
eective permissions: r--
20.4.1 ACL Entries and File Mode Permission Bits
Figure 20.1, “Minimum ACL: ACL Entries Compared to Permission Bits” and Figure 20.2, “Extended ACL: ACL
Entries Compared to Permission Bits” illustrate the two cases of a minimum ACL and an extendedACL. The gures are structured in three blocks—the left block shows the type specicationsof the ACL entries, the center block displays an example ACL, and the right block shows therespective permission bits according to the conventional permission concept (for example, asdisplayed by ls -l ). In both cases, the owner class permissions are mapped to the ACL entryowner. Other class permissions are mapped to the respective ACL entry. However, the mappingof the group class permissions is dierent in the two cases.
178 ACL Entries and File Mode Permission Bits openSUSE Leap 15.2

FIGURE 20.1: MINIMUM ACL: ACL ENTRIES COMPARED TO PERMISSION BITS
In the case of a minimum ACL—without mask—the group class permissions are mapped tothe ACL entry owning group. This is shown in Figure 20.1, “Minimum ACL: ACL Entries Compared to
Permission Bits”. In the case of an extended ACL—with mask—the group class permissions aremapped to the mask entry. This is shown in Figure 20.2, “Extended ACL: ACL Entries Compared to
Permission Bits”.
FIGURE 20.2: EXTENDED ACL: ACL ENTRIES COMPARED TO PERMISSION BITS
This mapping approach ensures the smooth interaction of applications, regardless of whetherthey have ACL support. The access permissions that were assigned by means of the permissionbits represent the upper limit for all other “ne adjustments” made with an ACL. Changes madeto the permission bits are reected by the ACL and vice versa.
20.4.2 A Directory with an ACL
With getfacl and setfacl on the command line, you can access ACLs. The usage of thesecommands is demonstrated in the following example.
Before creating the directory, use the umask command to dene which access permissionsshould be masked each time a le object is created. The command umask 027 sets the defaultpermissions by giving the owner the full range of permissions ( 0 ), denying the group writeaccess ( 2 ), and giving other users no permissions ( 7 ). umask actually masks the correspondingpermission bits or turns them o. For details, consult the umask man page.
179 A Directory with an ACL openSUSE Leap 15.2

mkdir mydir creates the mydir directory with the default permissions as set by umask . Usels -dl mydir to check whether all permissions were assigned correctly. The output for thisexample is:
drwxr-x--- ... tux project3 ... mydir
With getfacl mydir , check the initial state of the ACL. This gives information like:
# file: mydir# owner: tux# group: project3user::rwxgroup::r-xother::---
The rst three output lines display the name, owner, and owning group of the directory. Thenext three lines contain the three ACL entries owner, owning group, and other. In fact, in thecase of this minimum ACL, the getfacl command does not produce any information you couldnot have obtained with ls .
Modify the ACL to assign read, write, and execute permissions to an additional user geeko andan additional group mascots with:
root # setfacl -m user:geeko:rwx,group:mascots:rwx mydir
The option -m prompts setfacl to modify the existing ACL. The following argument indicatesthe ACL entries to modify (multiple entries are separated by commas). The nal part speciesthe name of the directory to which these modications should be applied. Use the getfaclcommand to take a look at the resulting ACL.
# file: mydir# owner: tux# group: project3user::rwxuser:geeko:rwxgroup::r-xgroup:mascots:rwxmask::rwxother::---
In addition to the entries initiated for the user geeko and the group mascots , a maskentry has been generated. This mask entry is set automatically so that all permissions areeective. setfacl automatically adapts existing mask entries to the settings modied, unless
180 A Directory with an ACL openSUSE Leap 15.2
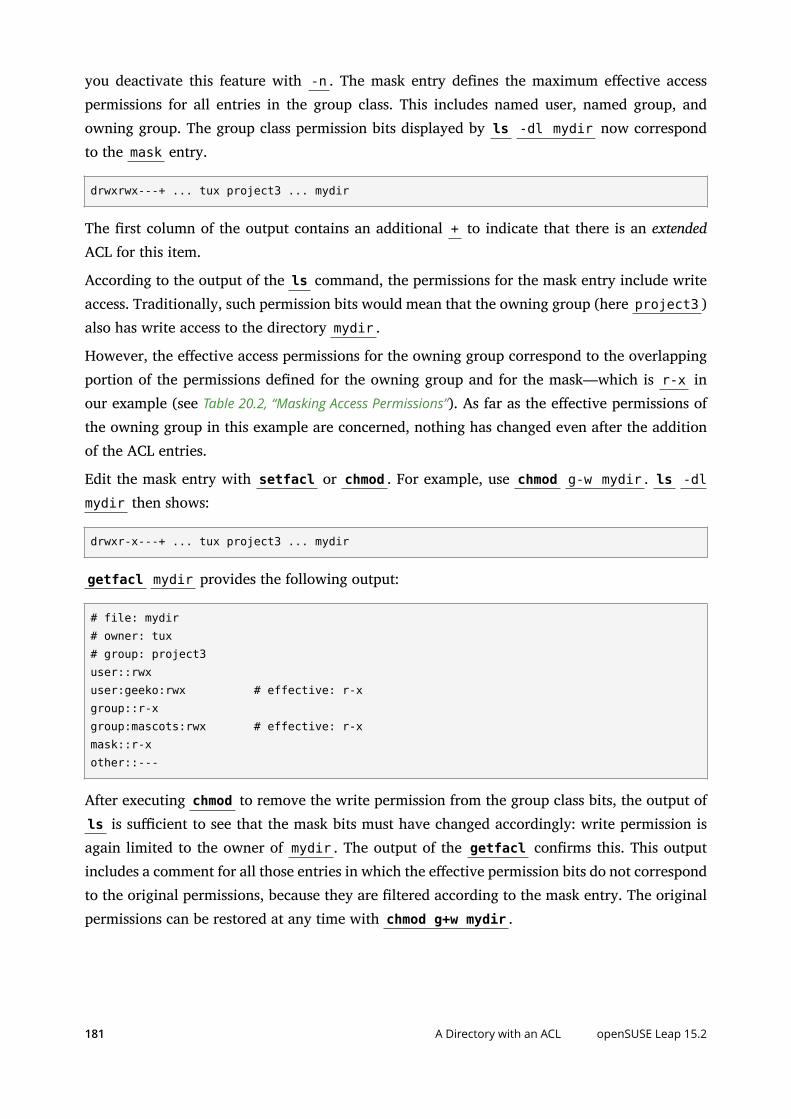
you deactivate this feature with -n . The mask entry denes the maximum eective accesspermissions for all entries in the group class. This includes named user, named group, andowning group. The group class permission bits displayed by ls -dl mydir now correspondto the mask entry.
drwxrwx---+ ... tux project3 ... mydir
The rst column of the output contains an additional + to indicate that there is an extendedACL for this item.
According to the output of the ls command, the permissions for the mask entry include writeaccess. Traditionally, such permission bits would mean that the owning group (here project3 )also has write access to the directory mydir .
However, the eective access permissions for the owning group correspond to the overlappingportion of the permissions dened for the owning group and for the mask—which is r-x inour example (see Table 20.2, “Masking Access Permissions”). As far as the eective permissions ofthe owning group in this example are concerned, nothing has changed even after the additionof the ACL entries.
Edit the mask entry with setfacl or chmod . For example, use chmod g-w mydir . ls -dlmydir then shows:
drwxr-x---+ ... tux project3 ... mydir
getfacl mydir provides the following output:
# file: mydir# owner: tux# group: project3user::rwxuser:geeko:rwx # effective: r-xgroup::r-xgroup:mascots:rwx # effective: r-xmask::r-xother::---
After executing chmod to remove the write permission from the group class bits, the output ofls is sucient to see that the mask bits must have changed accordingly: write permission isagain limited to the owner of mydir . The output of the getfacl conrms this. This outputincludes a comment for all those entries in which the eective permission bits do not correspondto the original permissions, because they are ltered according to the mask entry. The originalpermissions can be restored at any time with chmod g+w mydir .
181 A Directory with an ACL openSUSE Leap 15.2

20.4.3 A Directory with a Default ACL
Directories can have a default ACL, which is a special kind of ACL dening the accesspermissions that objects in the directory inherit when they are created. A default ACL aectsboth subdirectories and les.
20.4.3.1 Effects of a Default ACL
There are two ways in which the permissions of a directory's default ACL are passed to the lesand subdirectories:
A subdirectory inherits the default ACL of the parent directory both as its default ACL andas an ACL.
A le inherits the default ACL as its ACL.
All system calls that create le system objects use a mode parameter that denes the accesspermissions for the newly created le system object. If the parent directory does not have adefault ACL, the permission bits as dened by the umask are subtracted from the permissionsas passed by the mode parameter, with the result being assigned to the new object. If a defaultACL exists for the parent directory, the permission bits assigned to the new object correspondto the overlapping portion of the permissions of the mode parameter and those that are denedin the default ACL. The umask is disregarded in this case.
20.4.3.2 Application of Default ACLs
The following three examples show the main operations for directories and default ACLs:
1. Add a default ACL to the existing directory mydir with:
tux > setfacl -d -m group:mascots:r-x mydir
The option -d of the setfacl command prompts setfacl to perform the followingmodications (option -m ) in the default ACL.Take a closer look at the result of this command:
tux > getfacl mydir
182 A Directory with a Default ACL openSUSE Leap 15.2

# file: mydir# owner: tux# group: project3user::rwxuser:geeko:rwxgroup::r-xgroup:mascots:rwxmask::rwxother::---default:user::rwxdefault:group::r-xdefault:group:mascots:r-xdefault:mask::r-xdefault:other::---
getfacl returns both the ACL and the default ACL. The default ACL is formed by all linesthat start with default . Although you merely executed the setfacl command with anentry for the mascots group for the default ACL, setfacl automatically copied all otherentries from the ACL to create a valid default ACL. Default ACLs do not have an immediateeect on access permissions. They only come into play when le system objects are created.These new objects inherit permissions only from the default ACL of their parent directory.
2. In the next example, use mkdir to create a subdirectory in mydir , which inherits thedefault ACL.
tux > mkdir mydir/mysubdir
getfacl mydir/mysubdir
# file: mydir/mysubdir# owner: tux# group: project3user::rwxgroup::r-xgroup:mascots:r-xmask::r-xother::---default:user::rwxdefault:group::r-xdefault:group:mascots:r-xdefault:mask::r-xdefault:other::---
183 A Directory with a Default ACL openSUSE Leap 15.2

As expected, the newly-created subdirectory mysubdir has the permissions from thedefault ACL of the parent directory. The ACL of mysubdir is an exact reection of thedefault ACL of mydir . The default ACL that this directory will hand down to its subordinateobjects is also the same.
3. Use touch to create a le in the mydir directory, for example, touch mydir/myfile .ls -l mydir/myfile then shows:
-rw-r-----+ ... tux project3 ... mydir/myfile
The output of getfacl mydir/myfile is:
# file: mydir/myfile# owner: tux# group: project3user::rw-group::r-x # effective:r--group:mascots:r-x # effective:r--mask::r--other::---
touch uses a mode with the value 0666 when creating new les, which means that theles are created with read and write permissions for all user classes, provided no otherrestrictions exist in umask or in the default ACL (see Section 20.4.3.1, “Effects of a Default
ACL”). In eect, this means that all access permissions not contained in the mode value areremoved from the respective ACL entries. Although no permissions were removed fromthe ACL entry of the group class, the mask entry was modied to mask permissions notset in mode .This approach ensures the smooth interaction of applications (such as compilers) withACLs. You can create les with restricted access permissions and subsequently mark themas executable. The mask mechanism guarantees that the right users and groups can executethem as desired.
20.4.4 The ACL Check Algorithm
A check algorithm is applied before any process or application is granted access to an ACL-protected le system object. As a basic rule, the ACL entries are examined in the followingsequence: owner, named user, owning group or named group, and other. The access is handledin accordance with the entry that best suits the process. Permissions do not accumulate.
184 The ACL Check Algorithm openSUSE Leap 15.2

Things are more complicated if a process belongs to more than one group and would potentiallysuit several group entries. An entry is randomly selected from the suitable entries with therequired permissions. It is irrelevant which of the entries triggers the nal result “accessgranted”. Likewise, if none of the suitable group entries contain the required permissions, arandomly selected entry triggers the nal result “access denied”.
20.5 ACL Support in ApplicationsACLs can be used to implement very complex permission scenarios that meet the requirements ofmodern applications. The traditional permission concept and ACLs can be combined in a smartmanner. The basic le commands ( cp , mv , ls , etc.) support ACLs, as do Samba and Nautilus.
Vi/Vim and emacs both fully support ACLs by preserving the permissions on writing lesincluding backups. Unfortunately, many editors and le managers still lack ACL support. Whenmodifying les with an editor, the ACLs of les are sometimes preserved and sometimes not,depending on the backup mode of the editor used. If the editor writes the changes to theoriginal le, the ACL is preserved. If the editor saves the updated contents to a new le thatis subsequently renamed to the old le name, the ACLs may be lost, unless the editor supportsACLs. Except for the star archiver, there are currently no backup applications that preserveACLs.
20.6 For More InformationFor more information about ACLs, see the man pages for getfacl(1) , acl(5) , andsetfacl(1) .
185 ACL Support in Applications openSUSE Leap 15.2

21 Certificate Store
Certicates play an important role in the authentication of companies andindividuals. Usually certicates are administered by the application itself. In somecases, it makes sense to share certicates between applications. The certicate storeis a common ground for Firefox, Evolution, and NetworkManager. This chapterexplains some details.
The certicate store is a common database for Firefox, Evolution, and NetworkManager at themoment. Other applications that use certicates are not covered but may be in the future. If youhave such an application, you can continue to use its private, separate conguration.
21.1 Activating Certificate StoreThe conguration is mostly done in the background. To activate it, proceed as follows:
1. Decide if you want to activate the certicate store globally (for every user on your system)or specically to a certain user:
For every user. Use the le /etc/profile.local
For a specific user. Use the le ~/.profile
2. Open the le from the previous step and insert the following line:
export NSS_USE_SHARED_DB=1
Save the le
3. Log out of and log in to your desktop.
All the certicates are stored under $HOME/.local/var/pki/nssdb/ .
21.2 Importing CertificatesTo import a certicate into the certicate store, do the following:
1. Start Firefox.
186 Activating Certificate Store openSUSE Leap 15.2

2. Open the dialog from Edit Preferences. Change to Advanced Encryption and click ViewCerticates.
3. Import your certicate depending on your type: use Servers to import server certicate,People to identify other, and Your Certicates to identify yourself.
187 Importing Certificates openSUSE Leap 15.2

22 Intrusion Detection with AIDE
Securing your systems is a mandatory task for any mission-critical systemadministrator. Because it is impossible to always guarantee that the system is notcompromised, it is very important to do extra checks regularly (for example withcron ) to ensure that the system is still under your control. This is where AIDE, theAdvanced Intrusion Detection Environment, comes into play.
22.1 Why Use AIDE?An easy check that often can reveal unwanted changes can be done by means of RPM. Thepackage manager has a built-in verify function that checks all the managed les in the systemfor changes. To verify of all les, run the command rpm -Va . However, this command will alsodisplay changes in conguration les and you will need to do some ltering to detect importantchanges.
An additional problem to the method with RPM is that an intelligent attacker will modify rpmitself to hide any changes that might have been done by some kind of root-kit which allows theattacker to mask its intrusion and gain root privilege. To solve this, you should implement asecondary check that can also be run completely independent of the installed system.
22.2 Setting Up an AIDE Database
Important: Initialize AIDE Database After InstallationBefore you install your system, verify the checksum of your medium (see Book “Start-
Up”, Chapter 4 “Troubleshooting”, Section 4.1 “Checking Media”) to make sure you do not use acompromised source. After you have installed the system, initialize the AIDE database. Tomake sure that all went well during and after the installation, do an installation directlyon the console, without any network attached to the computer. Do not leave the computerunattended or connected to any network before AIDE creates its database.
AIDE is not installed by default on openSUSE Leap. To install it, either use Computer InstallSoftware, or enter zypper install aide on the command line as root .
188 Why Use AIDE? openSUSE Leap 15.2

To tell AIDE which attributes of which les should be checked, use the /etc/aide.confconguration le. It must be modied to become the actual conguration. The rst sectionhandles general parameters like the location of the AIDE database le. More relevant for localcongurations are the Custom Rules and the Directories and Files sections. A typicalrule looks like the following:
Binlib = p+i+n+u+g+s+b+m+c+md5+sha1
After dening the variable Binlib , the respective check boxes are used in the les section.Important options include the following:
TABLE 22.1: IMPORTANT AIDE CHECK BOXES
Option Description
p Check for the le permissions of the selectedles or directories.
i Check for the inode number. Every le namehas a unique inode number that should notchange.
n Check for the number of links pointing to therelevant le.
u Check if the owner of the le has changed.
g Check if the group of the le has changed.
s Check if the le size has changed.
b Check if the block count used by the le haschanged.
m Check if the modication time of the le haschanged.
c Check if the les access time has changed.
S Check for a changed le size.
189 Setting Up an AIDE Database openSUSE Leap 15.2

Option Description
I Ignore changes of the le name.
md5 Check if the md5 checksum of the le haschanged. We recommend to use sha256 orsha512.
sha1 Check if the sha1 (160 Bit) checksum ofthe le has changed. We recommend to usesha256 or sha512.
sha256 Check if the sha256 checksum of the le haschanged.
sha512 Check if the sha512 checksum of the le haschanged.
This is a conguration that checks for all les in /sbin with the options dened in Binlibbut omits the /sbin/conf.d/ directory:
/sbin Binlib!/sbin/conf.d
To create the AIDE database, proceed as follows:
1. Open /etc/aide.conf .
2. Dene which les should be checked with which check boxes. For a complete listof available check boxes, see /usr/share/doc/packages/aide/manual.html . Thedenition of the le selection needs some knowledge about regular expressions. Save yourmodications.
3. To check whether the conguration le is valid, run:
root # aide --config-check
Any output of this command is a hint that the conguration is not valid. For example, ifyou get the following output:
root # aide --config-check
190 Setting Up an AIDE Database openSUSE Leap 15.2

35:syntax error:!35:Error while reading configuration:!Configuration error
The error is to be expected in line 36 of /etc/aide.conf . Note that the error messagecontains the last successfully read line of the conguration le.
4. Initialize the AIDE database. Run the command:
root # aide -i
5. Copy the generated database to a save location like a CD-R or DVD-R, a remote server ora ash disk for later use.
Important:This step is essential as it avoids compromising your database. It is recommendedto use a medium which can be written only once to prevent the database beingmodied. Never leave the database on the computer which you want to monitor.
22.3 Local AIDE ChecksTo perform a le system check, proceed as follows:
1. Rename the database:
root # mv /var/lib/aide/aide.db.new /var/lib/aide/aide.db
2. After any conguration change, you always need to re-initialize the AIDE database andsubsequently move the newly generated database. It is also a good idea to make a backupof this database. See Section 22.2, “Setting Up an AIDE Database” for more information.
3. Perform the check with the following command:
root # aide --check
If the output is empty, everything is ne. If AIDE found changes, it displays a summary ofchanges, for example:
root # aide --check
191 Local AIDE Checks openSUSE Leap 15.2

AIDE found differences between database and filesystem!!
Summary: Total number of files: 1992 Added files: 0 Removed files: 0 Changed files: 1
To learn about the actual changes, increase the verbose level of the check with the parameter-V . For the previous example, this could look like the following:
root # aide --check -VAIDE found differences between database and filesystem!!Start timestamp: 2009-02-18 15:14:10
Summary: Total number of files: 1992 Added files: 0 Removed files: 0 Changed files: 1
---------------------------------------------------Changed files:---------------------------------------------------
changed: /etc/passwd
--------------------------------------------------Detailed information about changes:---------------------------------------------------
File: /etc/passwd Mtime : 2009-02-18 15:11:02 , 2009-02-18 15:11:47 Ctime : 2009-02-18 15:11:02 , 2009-02-18 15:11:47
In this example, the le /etc/passwd was touched to demonstrate the eect.
22.4 System Independent Checking
To avoid risk, it is advisable to also run the AIDE binary from a trusted source. This excludesthe risk that some attacker also modied the aide binary to hide its traces.
192 System Independent Checking openSUSE Leap 15.2
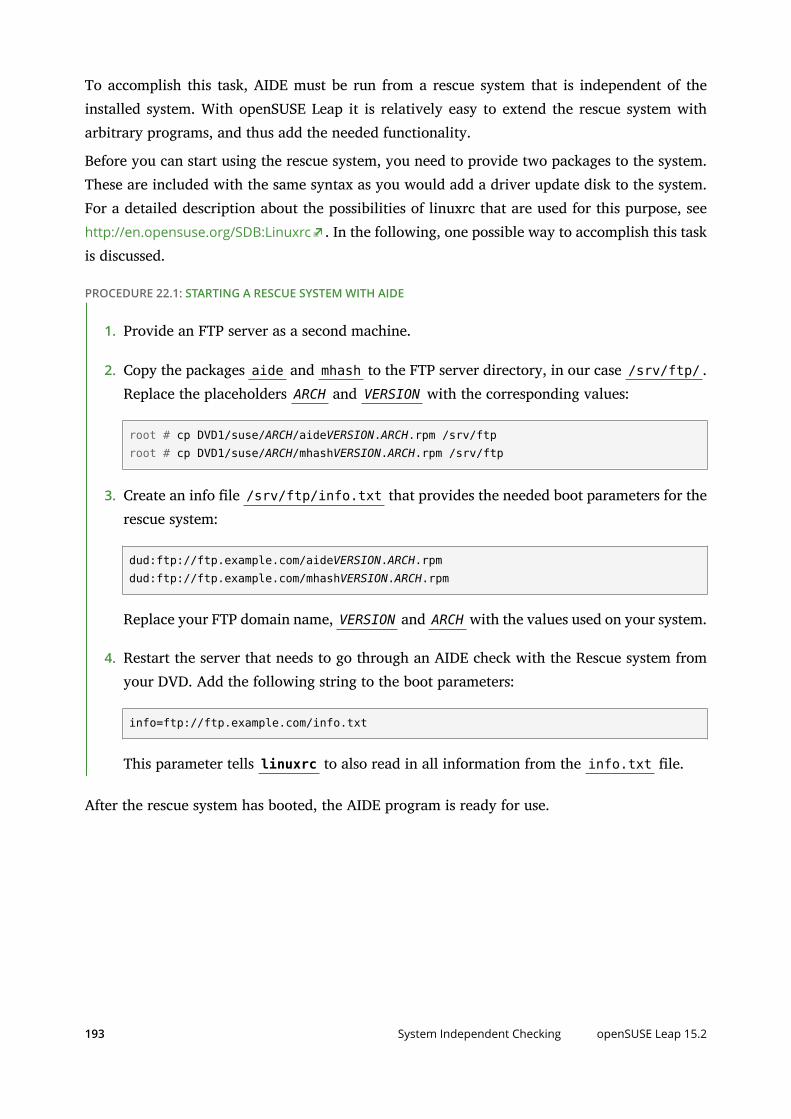
To accomplish this task, AIDE must be run from a rescue system that is independent of theinstalled system. With openSUSE Leap it is relatively easy to extend the rescue system witharbitrary programs, and thus add the needed functionality.
Before you can start using the rescue system, you need to provide two packages to the system.These are included with the same syntax as you would add a driver update disk to the system.For a detailed description about the possibilities of linuxrc that are used for this purpose, seehttp://en.opensuse.org/SDB:Linuxrc . In the following, one possible way to accomplish this taskis discussed.
PROCEDURE 22.1: STARTING A RESCUE SYSTEM WITH AIDE
1. Provide an FTP server as a second machine.
2. Copy the packages aide and mhash to the FTP server directory, in our case /srv/ftp/ .Replace the placeholders ARCH and VERSION with the corresponding values:
root # cp DVD1/suse/ARCH/aideVERSION.ARCH.rpm /srv/ftproot # cp DVD1/suse/ARCH/mhashVERSION.ARCH.rpm /srv/ftp
3. Create an info le /srv/ftp/info.txt that provides the needed boot parameters for therescue system:
dud:ftp://ftp.example.com/aideVERSION.ARCH.rpmdud:ftp://ftp.example.com/mhashVERSION.ARCH.rpm
Replace your FTP domain name, VERSION and ARCH with the values used on your system.
4. Restart the server that needs to go through an AIDE check with the Rescue system fromyour DVD. Add the following string to the boot parameters:
info=ftp://ftp.example.com/info.txt
This parameter tells linuxrc to also read in all information from the info.txt le.
After the rescue system has booted, the AIDE program is ready for use.
193 System Independent Checking openSUSE Leap 15.2

22.5 For More InformationInformation about AIDE is available at the following places:
The home page of AIDE: http://aide.sourceforge.net
In the documented template conguration /etc/aide.conf .
In several les below /usr/share/doc/packages/aide after installing the aide
package.
On the AIDE user mailing list at https://www.ipi.fi/mailman/listinfo/aide .
194 For More Information openSUSE Leap 15.2

III Network Security
23 X Window System and X Authentication 196
24 SSH: Secure Network Operations 197
25 Masquerading and Firewalls 209
26 Configuring a VPN Server 226

23 X Window System and X Authentication
As mentioned at the beginning, network transparency is one of the central characteristics of aUnix system. X, the windowing system of Unix operating systems, can use this feature in animpressive way. With X, it is no problem to log in to a remote host and start a graphical programthat is then sent over the network to be displayed on your computer.
When an X client needs to be displayed remotely using an X server, the latter should protect theresource managed by it (the display) from unauthorized access. In more concrete terms, certainpermissions must be given to the client program. With the X Window System, there are twoways to do this, called host-based access control and cookie-based access control. The formerrelies on the IP address of the host where the client should run. The program to control thisis xhost . xhost enters the IP address of a legitimate client into a database belonging to theX server. However, relying on IP addresses for authentication is not very secure. For example,if there were a second user working on the host sending the client program, that user wouldhave access to the X server as well—like someone spoong the IP address. Because of theseshortcomings, this authentication method is not described in more detail here, but you can learnabout it with man xhost .
In the case of cookie-based access control, a character string is generated that is only knownto the X server and to the legitimate user, like an ID card of some kind. This cookie is storedon login in the le .Xauthority in the user's home directory and is available to any X clientwanting to use the X server to display a window. The le .Xauthority can be examined bythe user with the tool xauth . If you rename .Xauthority , or if you delete the le from yourhome directory by accident, you cannot open any new windows or X clients.
SSH (secure shell) can be used to encrypt a network connection and forward it to an X servertransparently. This is also called X forwarding. X forwarding is achieved by simulating an Xserver on the server side and setting a DISPLAY variable for the shell on the remote host. Furtherdetails about SSH can be found in Chapter 24, SSH: Secure Network Operations.
Warning: X Forwarding Can Be InsecureIf you do not consider the computer where you log in to be a secure host, do not useX forwarding. If X forwarding is enabled, an attacker could authenticate via your SSHconnection. The attacker could then intrude on your X server and, for example, read yourkeyboard input.
196 openSUSE Leap 15.2

24 SSH: Secure Network Operations
In networked environments, it is often necessary to access hosts from a remotelocation. If a user sends login and password strings for authentication purposesas plain text, they could be intercepted and misused to gain access to that useraccount. This would open all the user's les to an attacker and the illegal accountcould be used to obtain administrator or root access, or to penetrate othersystems. In the past, remote connections were established with telnet , rsh orrlogin , which oered no guards against eavesdropping in the form of encryptionor other security mechanisms. There are other unprotected communicationchannels, like the traditional FTP protocol and some remote copying programs likercp .
The SSH suite provides the necessary protection by encrypting the authentication strings (usuallya login name and a password) and all the other data exchanged between the hosts. With SSH, thedata ow could still be recorded by a third party, but the contents are encrypted and cannot bereverted to plain text unless the encryption key is known. So SSH enables secure communicationover insecure networks, such as the Internet. The SSH implementation coming with openSUSELeap is OpenSSH.
openSUSE Leap installs the OpenSSH package by default providing the commands ssh , scp ,and sftp . In the default conguration, remote access of a openSUSE Leap system is only possiblewith the OpenSSH utilities, and only if the sshd is running and the rewall permits access.
SSH on openSUSE Leap uses cryptographic hardware acceleration if available. As a result, thetransfer of large quantities of data through an SSH connection is considerably faster than withoutcryptographic hardware. As an additional benet, the CPU will see a signicant reduction inload.
24.1 ssh—Secure ShellWith ssh it is possible to log in to remote systems and to work interactively. To log in to thehost sun as user tux enter one of the following commands:
tux > ssh tux@suntux > ssh -l tux sun
197 ssh—Secure Shell openSUSE Leap 15.2

If the user name is the same on both machines, you can omit it. Using ssh sun is sucient. Theremote host prompts for the remote user's password. After a successful authentication, you canwork on the remote command line or use interactive applications, such as YaST in text mode.
Furthermore, ssh oers the possibility to run non-interactive commands on remote systemsusing ssh HOST COMMAND . COMMAND needs to be properly quoted. Multiple commands can beconcatenated as on a local shell.
tux > ssh root@sun "dmesg -T | tail -n 25"tux > ssh root@sun "cat /etc/issue && uptime"
24.1.1 Starting X Applications on a Remote Host
SSH also simplies the use of remote X applications. If you run ssh with the -X option, theDISPLAY variable is automatically set on the remote machine and all X output is exported tothe local machine over the existing SSH connection. At the same time, X applications startedremotely cannot be intercepted by unauthorized individuals.
24.1.2 Agent Forwarding
By adding the -A option, the ssh-agent authentication mechanism is carried over to the nextmachine. This way, you can work from dierent machines without having to enter a password,but only if you have distributed your public key to the destination hosts and properly saved itthere. Refer to Section 24.5.2, “Copying an SSH Key” for details.
This mechanism is deactivated in the default settings, but can be permanently activatedat any time in the system-wide conguration le /etc/ssh/sshd_config by settingAllowAgentForwarding yes .
24.2 scp—Secure Copyscp copies les to or from a remote machine. If the user name on jupiter is dierent than theuser name on sun, specify the latter using the USER_NAME@host format. If the le should becopied into a directory other than the remote user's home directory, specify it as sun: DIRECTORY .The following examples show how to copy a le from a local to a remote machine and vice versa.
tux > scp ~/MyLetter.tex tux@sun:/tmp 1
198 Starting X Applications on a Remote Host openSUSE Leap 15.2

tux > scp tux@sun:/tmp/MyLetter.tex ~ 2
1 local to remote
2 remote to local
Tip: The -l OptionWith the ssh command, the option -l can be used to specify a remote user (as analternative to the USER_NAME@host format). With scp the option -l is used to limit thebandwidth consumed by scp .
After the correct password is entered, scp starts the data transfer. It displays a progress bar andthe time remaining for each le that is copied. Suppress all output with the -q option.
scp also provides a recursive copying feature for entire directories. The command
tux > scp -r src/ sun:backup/
copies the entire contents of the directory src including all subdirectories to the ~/backupdirectory on the host sun. If this subdirectory does not exist, it is created automatically.
The -p option tells scp to leave the time stamp of les unchanged. -C compresses the datatransfer. This minimizes the data volume to transfer, but creates a heavier burden on theprocessors of both machines.
24.3 sftp—Secure File Transfer
24.3.1 Using sftpIf you want to copy several les from or to dierent locations, sftp is a convenient alternativeto scp . It opens a shell with a set of commands similar to a regular FTP shell. Type help atthe sftp-prompt to get a list of available commands. More details are available from the sftpman page.
tux > sftp sunEnter passphrase for key '/home/tux/.ssh/id_rsa':Connected to sun.sftp> helpAvailable commands:
199 sftp—Secure File Transfer openSUSE Leap 15.2

bye Quit sftpcd path Change remote directory to 'path'[...]
24.3.2 Setting Permissions for File Uploads
As with a regular FTP server, a user cannot only download, but also upload les to a remotemachine running an SFTP server by using the put command. By default the les will beuploaded to the remote host with the same permissions as on the local host. There are twooptions to automatically alter these permissions:
Setting a umask
A umask works as a lter against the permissions of the original le on the local host. Itcan only withdraw permissions:
TABLE 24.1:
permissions original umask permissions uploaded
0666 0002 0664
0600 0002 0600
0775 0025 0750
To apply a umask on an SFTP server, edit the le /etc/ssh/sshd_configuration . Searchfor the line beginning with Subsystem sftp and add the -u parameter with the desiredsetting, for example:
Subsystem sftp /usr/lib/ssh/sftp-server -u 0002
Explicitly Setting the Permissions
Explicitly setting the permissions sets the same permissions for all les uploaded via SFTP.Specify a three-digit pattern such as 600 , 644 , or 755 with -u . When both -m and -u are specied, -u is ignored.To apply explicit permissions for uploaded les on an SFTP server, edit the le /etc/ssh/sshd_configuration . Search for the line beginning with Subsystem sftp and add the-m parameter with the desired setting, for example:
Subsystem sftp /usr/lib/ssh/sftp-server -m 600
200 Setting Permissions for File Uploads openSUSE Leap 15.2

24.4 The SSH Daemon (sshd)
To work with the SSH client programs ssh and scp , a server (the SSH daemon) must be runningin the background, listening for connections on TCP/IP port 22 . The daemon generatesthree key pairs when starting for the rst time. Each key pair consists of a private and apublic key. Therefore, this procedure is called public key-based. To guarantee the security ofthe communication via SSH, access to the private key les must be restricted to the systemadministrator. The le permissions are set accordingly by the default installation. The privatekeys are only required locally by the SSH daemon and must not be given to anyone else.The public key components (recognizable by the name extension .pub ) are sent to the clientrequesting the connection. They are readable for all users.
A connection is initiated by the SSH client. The waiting SSH daemon and the requesting SSHclient exchange identication data to compare the protocol and software versions, and to preventconnections through the wrong port. Because a child process of the original SSH daemon repliesto the request, several SSH connections can be made simultaneously.
For the communication between SSH server and SSH client, OpenSSH supports versions 1 and2 of the SSH protocol. Version 2 of the SSH protocol is used by default. Override this to useversion 1 of protocol with the -1 option.
When using version 1 of SSH, the server sends its public host key and a server key, which isregenerated by the SSH daemon every hour. Both allow the SSH client to encrypt a freely chosensession key, which is sent to the SSH server. The SSH client also tells the server which encryptionmethod (cipher) to use. Version 2 of the SSH protocol does not require a server key. Both sidesuse an algorithm according to Die-Hellman to exchange their keys.
The private host and server keys are absolutely required to decrypt the session key and cannotbe derived from the public parts. Only the contacted SSH daemon can decrypt the session keyusing its private keys. This initial connection phase can be watched closely by turning on verbosedebugging using the -v option of the SSH client.
Tip: Viewing the SSH Daemon Log FileTo watch the log entries from the sshd use the following command:
tux > sudo journalctl -u sshd
201 The SSH Daemon (sshd) openSUSE Leap 15.2

24.4.1 Maintaining SSH Keys
It is recommended to back up the private and public keys stored in /etc/ssh/ in a secure,external location. In this way, key modications can be detected or the old ones can be usedagain after having installed a new system.
Tip: Existing SSH Host KeysIf you install openSUSE Leap on a machine with existing Linux installations, theinstallation routine automatically imports the SSH host key with the most recent accesstime from an existing installation.
When establishing a secure connection with a remote host for the rst time, the client storesall public host keys in ~/.ssh/known_hosts . This prevents any man-in-the-middle attacks—attempts by foreign SSH servers to use spoofed names and IP addresses. Such attacks are detectedeither by a host key that is not included in ~/.ssh/known_hosts , or by the server's inabilityto decrypt the session key in the absence of an appropriate private counterpart.
If the public keys of a host have changed (that needs to be veried before connecting to such aserver), the oending keys can be removed with ssh-keygen -r HOSTNAME .
24.4.2 Rotating Host Keys
As of version 6.8, OpenSSH comes with a protocol extension that supports host key rotation. Itmakes sense to replace keys, if you are still using weak keys such as 1024-bit RSA keys. It isstrongly recommended to replace such a key and go for 2048-bit DSA keys or something evenbetter. The client will then use the “best” host key.
Tip: Restarting sshdAfter installing new host keys on the server, restart sshd.
This protocol extension can inform a client of all the new host keys on the server, if the userinitiates a connection with ssh . Then, the software on the client updates ~/.ssh/known_hosts ,and the user is not required to accept new keys of previously known and trusted hosts manually.The local known_hosts le will contain all the host keys of the remote hosts, in addition to theone that authenticated the host during this session.
202 Maintaining SSH Keys openSUSE Leap 15.2

Once the administrator of the server knows that all the clients have fetched the new keys, theycan remove the old keys. The protocol extension ensures that the obsolete keys will be removedfrom the client's conguration, too. The key removal occurs while initiating an ssh session.
For more information, see:
http://blog.djm.net.au/2015/02/key-rotation-in-openssh-68.html
http://heise.de/-2540907 („Endlich neue Schlüssel für SSH-Server,“ German only)
24.5 SSH Authentication Mechanisms
In its simplest form, authentication is done by entering the user's password just as if loggingin locally. However, having to memorize passwords of several users on remote machines isinecient. What is more, these passwords may change. On the other hand—when grantingroot access—an administrator needs to be able to quickly revoke such a permission withouthaving to change the root password.
To accomplish a login that does not require to enter the remote user's password, SSH uses anotherkey pair, which needs to be generated by the user. It consists of a public ( id_rsa.pub orid_dsa.pub ) and a private key ( id_rsa or id_dsa ).
To be able to log in without having to specify the remote user's password, the public key of the“SSH user” must be in ~/.ssh/authorized_keys . This approach also ensures that the remoteuser has got full control: adding the key requires the remote user's password and removing thekey revokes the permission to log in from remote.
For maximum security such a key should be protected by a passphrase which needs to be enteredevery time you use ssh , scp , or sftp . Contrary to the simple authentication, this passphraseis independent from the remote user and therefore always the same.
An alternative to the key-based authentication described above, SSH also oers a host-basedauthentication. With host-based authentication, users on a trusted host can log in to another hoston which this feature is enabled using the same user name. openSUSE Leap is set up for usingkey-based authentication, covering setting up host-based authentication on openSUSE Leap isbeyond the scope of this manual.
203 SSH Authentication Mechanisms openSUSE Leap 15.2

Note: File Permissions for Host-Based AuthenticationIf the host-based authentication is to be used, the le /usr/lib/ssh/ssh-keysignshould have the setuid bit set, which is not the default setting in openSUSE Leap. Insuch case, set the le permissions manually. You should use /etc/permissions.localfor this purpose, to make sure that the setuid bit is preserved after security updates ofopenssh .
24.5.1 Generating an SSH Key
1. To generate a key with default parameters (RSA, 2048 bits), enter the command ssh-keygen .
2. Accept the default location to store the key ( ~/.ssh/id_rsa ) by pressing Enter (stronglyrecommended) or enter an alternative location.
3. Enter a passphrase consisting of 10 to 30 characters. The same rules as for creating safepasswords apply. It is strongly advised to refrain from specifying no passphrase.
You should make absolutely sure that the private key is not accessible by anyone other thanyourself (always set its permissions to 0600 ). The private key must never fall into the handsof another person.
To change the password of an existing key pair, use the command ssh-keygen -p .
24.5.2 Copying an SSH Key
To copy a public SSH key to ~/.ssh/authorized_keys of a user on a remote machine, usethe command ssh-copy-id . To copy your personal key stored under ~/.ssh/id_rsa.pub youmay use the short form. To copy DSA keys or keys of other users, you need to specify the path:
tux > ~/.ssh/id_rsa.pubssh-copy-id -i tux@sun
tux > ~/.ssh/id_dsa.pubssh-copy-id -i ~/.ssh/id_dsa.pub tux@sun
tux > ~notme/.ssh/id_rsa.pubssh-copy-id -i ~notme/.ssh/id_rsa.pub tux@sun
204 Generating an SSH Key openSUSE Leap 15.2

To successfully copy the key, you need to enter the remote user's password. To remove anexisting key, manually edit ~/.ssh/authorized_keys .
24.5.3 Using the ssh-agent
When doing lots of secure shell operations it is cumbersome to type the SSH passphrase for eachsuch operation. Therefore, the SSH package provides another tool, ssh-agent , which retainsthe private keys for the duration of an X or terminal session. All other windows or programsare started as clients to the ssh-agent . By starting the agent, a set of environment variablesis set, which will be used by ssh , scp , or sftp to locate the agent for automatic login. Seethe ssh-agent man page for details.
After the ssh-agent is started, you need to add your keys by using ssh-add . It will promptfor the passphrase. After the password has been provided once, you can use the secure shellcommands within the running session without having to authenticate again.
24.5.3.1 Using ssh-agent in an X Session
On openSUSE Leap, the ssh-agent is automatically started by the GNOME display manager.To also invoke ssh-add to add your keys to the agent at the beginning of an X session, dothe following:
1. Log in as the desired user and check whether the le ~/.xinitrc exists.
2. If it does not exist, use an existing template or copy it from /etc/skel :
if [ -f ~/.xinitrc.template ]; then mv ~/.xinitrc.template ~/.xinitrc; \else cp /etc/skel/.xinitrc.template ~/.xinitrc; fi
3. If you have copied the template, search for the following lines and uncomment them. If~/.xinitrc already existed, add the following lines (without comment signs).
# if test -S "$SSH_AUTH_SOCK" -a -x "$SSH_ASKPASS"; then# ssh-add < /dev/null# fi
4. When starting a new X session, you will be prompted for your SSH passphrase.
205 Using the ssh-agent openSUSE Leap 15.2

24.5.3.2 Using ssh-agent in a Terminal Session
In a terminal session you need to manually start the ssh-agent and then call ssh-addafterward. There are two ways to start the agent. The rst example given below starts a newBash shell on top of your existing shell. The second example starts the agent in the existing shelland modies the environment as needed.
tux > ssh-agent -s /bin/basheval $(ssh-agent)
After the agent has been started, run ssh-add to provide the agent with your keys.
24.6 Port Forwarding
ssh can also be used to redirect TCP/IP connections. This feature, also called SSH tunneling ,redirects TCP connections to a certain port to another machine via an encrypted channel.
With the following command, any connection directed to jupiter port 25 (SMTP) is redirectedto the SMTP port on sun. This is especially useful for those using SMTP servers without SMTP-AUTH or POP-before-SMTP features. From any arbitrary location connected to a network, e-mail can be transferred to the “home” mail server for delivery.
root # ssh -L 25:sun:25 jupiter
Similarly, all POP3 requests (port 110) on jupiter can be forwarded to the POP3 port of sunwith this command:
root # ssh -L 110:sun:110 jupiter
Both commands must be executed as root , because the connection is made to privileged localports. E-mail is sent and retrieved by normal users in an existing SSH connection. The SMTPand POP3 host must be set to localhost for this to work. Additional information can be foundin the manual pages for each of the programs described above and in the OpenSSH packagedocumentation under /usr/share/doc/packages/openssh .
206 Port Forwarding openSUSE Leap 15.2

24.7 Adding and Removing Public Keys on anInstalled System
In some environments, it is convenient or necessary to log in over SSH. As such, the user needsto provide a public SSH key. To add or remove an SSH key, proceed as follows:
1. Open YaST.
2. Under Security and Users, open the User and Group Management module.
3. Select the user you want to change and press Edit.
4. Switch to the SSH Public Key tab.
5. Add or remove your public key(s). If you add a public SSH key, look for the le extension.pub .
6. Conrm with Ok.
Your public SSH key is saved in ~/.ssh/authorized_keys .
24.8 For More Information
http://www.openssh.com
The home page of OpenSSH
http://en.wikibooks.org/wiki/OpenSSH
The OpenSSH Wikibook
man sshd
The man page of the OpenSSH daemon
man ssh_config
The man page of the OpenSSH SSH client conguration les
207 Adding and Removing Public Keys on an Installed System openSUSE Leap 15.2

man scp ,
man sftp ,
man slogin ,
man ssh ,
man ssh-add ,
man ssh-agent ,
man ssh-copy-id ,
man ssh-keyconvert ,
man ssh-keygen ,
man ssh-keyscan
Man pages of several binary les to securely copy les ( scp , sftp ), to log in ( slogin ,ssh ), and to manage keys.
/usr/share/doc/packages/openssh/README.SUSE ,
/usr/share/doc/packages/openssh/README.FIPS
SUSE package specic documentation; changes in defaults with respect to upstream, noteson FIPS mode etc.
208 For More Information openSUSE Leap 15.2
25 Masquerading and Firewalls
Whenever Linux is used in a network environment, you can use the kernel functions that allowthe manipulation of network packets to maintain a separation between internal and externalnetwork areas. The Linux netfilter framework provides the means to establish an eectiverewall that keeps dierent networks apart. Using iptables—a generic table structure for thedenition of rule sets—precisely controls the packets allowed to pass a network interface. Sucha packet lter can be set up using firewalld and its graphical interface firewall-config .
openSUSE Leap 15.0 introduces firewalld as the new default software rewall, replacingSuSErewall2. SuSErewall2 has not been removed from openSUSE Leap 15.0 and is still partof the main repository, though not installed by default. This chapter provides guidance forconguring firewalld , and migrating from SuSErewall2 for users who have upgraded fromolder openSUSE Leap releases.
25.1 Packet Filtering with iptablesThis section discusses the low-level details of packet ltering. The components netfilter andiptables are responsible for the ltering and manipulation of network packets and for networkaddress translation (NAT). The ltering criteria and any actions associated with them are storedin chains, which must be matched one after another by individual network packets as theyarrive. The chains to match are stored in tables. The iptables command allows you to alterthese tables and rule sets.
The Linux kernel maintains three tables, each for a particular category of functions of the packetlter:
filter
This table holds the bulk of the lter rules, because it implements the packet lteringmechanism in the stricter sense, which determines whether packets are let through( ACCEPT ) or discarded ( DROP ), for example.
nat
This table denes any changes to the source and target addresses of packets. Using thesefunctions also allows you to implement masquerading, which is a special case of NAT usedto link a private network with the Internet.
mangle
209 Packet Filtering with iptables openSUSE Leap 15.2

The rules held in this table make it possible to manipulate values stored in IP headers(such as the type of service).
These tables contain several predened chains to match packets:
PREROUTING
This chain is applied to all incoming packets.
INPUT
This chain is applied to packets destined for the system's internal processes.
FORWARD
This chain is applied to packets that are only routed through the system.
OUTPUT
This chain is applied to packets originating from the system itself.
POSTROUTING
This chain is applied to all outgoing packets.
Figure 25.1, “iptables: A Packet's Possible Paths” illustrates the paths along which a network packetmay travel on a given system. For the sake of simplicity, the gure lists tables as parts of chains,but in reality these chains are held within the tables themselves.
In the simplest case, an incoming packet destined for the system itself arrives at the eth0interface. The packet is rst referred to the PREROUTING chain of the mangle table then to thePREROUTING chain of the nat table. The following step, concerning the routing of the packet,determines that the actual target of the packet is a process of the system itself. After passingthe INPUT chains of the mangle and the filter table, the packet nally reaches its target,provided that the rules of the filter table allow this.
210 Packet Filtering with iptables openSUSE Leap 15.2
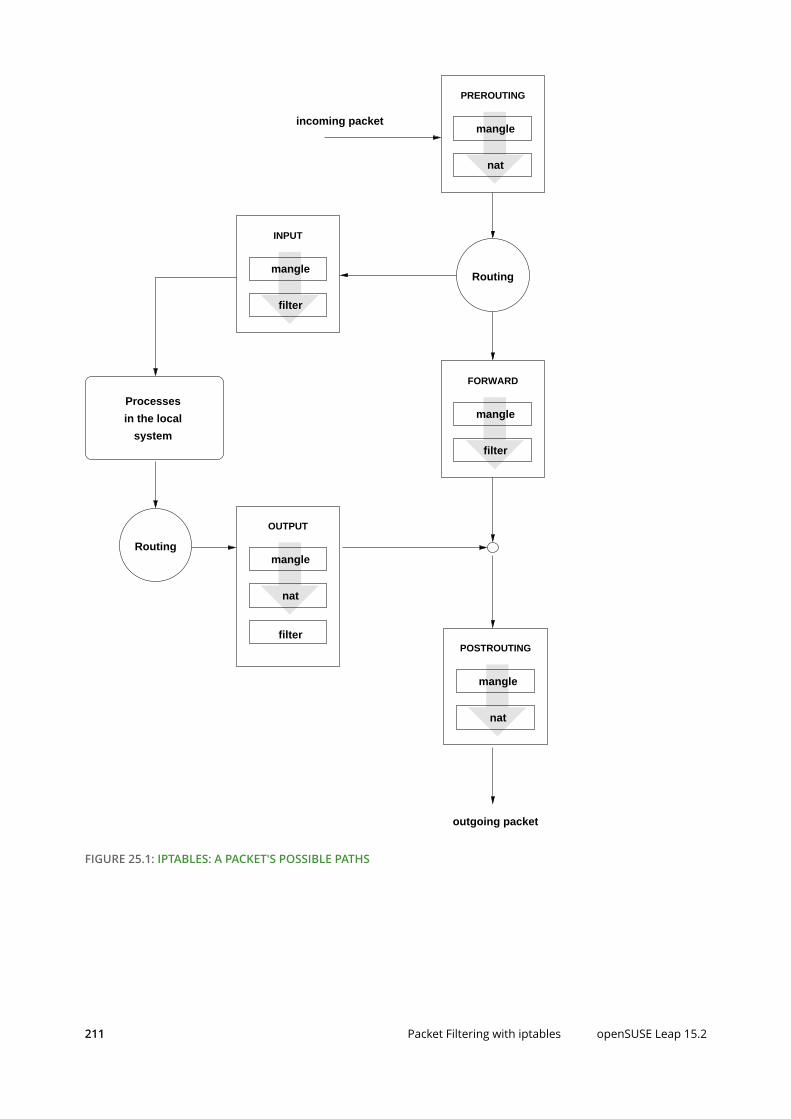
Routing
Routing
in the local
system
Processes
outgoing packet
incoming packet
filter
nat
mangle
POSTROUTING
PREROUTING
nat
mangle
FORWARD
mangle
filter
INPUT
mangle
filter
OUTPUT
nat
mangle
FIGURE 25.1: IPTABLES: A PACKET'S POSSIBLE PATHS
211 Packet Filtering with iptables openSUSE Leap 15.2
25.2 Masquerading Basics
Masquerading is the Linux-specic form of NAT (network address translation) and can be usedto connect a small LAN with the Internet. LAN hosts use IP addresses from the private range (seeBook “Reference”, Chapter 13 “Basic Networking”, Section 13.1.2 “Netmasks and Routing”) and on theInternet ocial IP addresses are used. To be able to connect to the Internet, a LAN host's privateaddress is translated to an ocial one. This is done on the router, which acts as the gatewaybetween the LAN and the Internet. The underlying principle is a simple one: The router hasmore than one network interface, typically a network card and a separate interface connectingwith the Internet. While the latter links the router with the outside world, one or several otherslink it with the LAN hosts. With these hosts in the local network connected to the network card(such as eth0 ) of the router, they can send any packets not destined for the local network totheir default gateway or router.
Important: Using the Correct Network MaskWhen conguring your network, make sure both the broadcast address and the netmaskare the same for all local hosts. Failing to do so prevents packets from being routedproperly.
As mentioned, whenever one of the LAN hosts sends a packet destined for an Internet address,it goes to the default router. However, the router must be congured before it can forward suchpackets. For security reasons, this is not enabled in a default installation. To enable it, add theline net.ipv4.ip_forward = 1 in the le /etc/sysctl.conf . Alternatively do this via YaST,for example by calling yast routing ip-forwarding on .
The target host of the connection can see your router, but knows nothing about the host in yourinternal network where the packets originated. This is why the technique is called masquerading.Because of the address translation, the router is the rst destination of any reply packets. Therouter must identify these incoming packets and translate their target addresses, so packets canbe forwarded to the correct host in the local network.
With the routing of inbound trac depending on the masquerading table, there is no way toopen a connection to an internal host from the outside. For such a connection, there would beno entry in the table. In addition, any connection already established has a status entry assignedto it in the table, so the entry cannot be used by another connection.
212 Masquerading Basics openSUSE Leap 15.2

As a consequence of all this, you might experience some problems with several applicationprotocols, such as ICQ, cucme, IRC (DCC, CTCP), and FTP (in PORT mode). Web browsers, thestandard FTP program, and many other programs use the PASV mode. This passive mode ismuch less problematic as far as packet ltering and masquerading are concerned.
25.3 Firewalling Basics
Firewall is probably the term most widely used to describe a mechanism that controls the dataow between networks. Strictly speaking, the mechanism described in this section is called apacket lter. A packet lter regulates the data ow according to certain criteria, such as protocols,ports, and IP addresses. This allows you to block packets that, according to their addresses, arenot supposed to reach your network. To allow public access to your Web server, for example,explicitly open the corresponding port. However, a packet lter does not scan the contents ofpackets with legitimate addresses, such as those directed to your Web server. For example, ifincoming packets were intended to compromise a CGI program on your Web server, the packetlter would still let them through.
A more eective but more complex mechanism is the combination of several types of systems,such as a packet lter interacting with an application gateway or proxy. In this case, the packetlter rejects any packets destined for disabled ports. Only packets directed to the applicationgateway are accepted. This gateway or proxy pretends to be the actual client of the server. Ina sense, such a proxy could be considered a masquerading host on the protocol level used bythe application. One example for such a proxy is Squid, an HTTP and FTP proxy server. To useSquid, the browser must be congured to communicate via the proxy. Any HTTP pages or FTPles requested are served from the proxy cache and objects not found in the cache are fetchedfrom the Internet by the proxy.
The following section focuses on the packet lter that comes with openSUSE Leap. For furtherinformation about packet ltering and rewalling, read the Firewall HOWTO (http://www.tldp.org/
HOWTO/Firewall-HOWTO.html) .
213 Firewalling Basics openSUSE Leap 15.2

25.4 firewalld
Note: firewalld Replaces SuSEfirewall2openSUSE Leap 15.0 introduces firewalld as the new default software rewall,replacing SuSErewall2. SuSErewall2 has not been removed from openSUSE Leap15.0 and is still part of the main repository, though not installed by default. If youare upgrading from a release older than openSUSE Leap 15.0, SuSErewall2 will beunchanged and you must manually upgrade to firewalld (see Section 25.5, “Migrating
from SuSEfirewall2”).
firewalld is a daemon that maintains the system's iptables rules and oers a D-Bus interfacefor operating on them. It comes with a command line utility firewall-cmd and a graphicaluser interface firewall-config for interacting with it. Since firewalld is running in thebackground and provides a well dened interface it allows other applications to request changesto the iptables rules, for example to set up virtual machine networking.
firewalld implements dierent security zones. Several predened zones like internal andpublic exist. The administrator can dene additional custom zones if desired. Each zonecontains its own set of iptables rules. Each network interface is a member of exactly one zone.Individual connections can also be assigned to a zone based on the source addresses.
Each zone represents a certain level of trust. For example the public zone is not trusted, becauseother computers in this network are not under your control (suitable for Internet or wirelesshotspot connections). On the other hand the internal zone is used for networks that are underyour control, like a home or company network. By utilizing zones this way, a host can oerdierent kinds of services to trusted networks and untrusted networks in a dened way.
For more information about the predened zones and their meaning in firewalld , refer to itsmanual at http://www.firewalld.org/documentation/zone/predefined-zones.html .
Note: No Zone Assigned BehaviorThe initial state for network interfaces is to be assigned to no zone at all. In this case thenetwork interface will be implicitly handled in the default zone, which can be determinedby calling firewall-cmd --get-default-zone . If not congured otherwise, the defaultzone is the public zone.
214 firewalld openSUSE Leap 15.2

The firewalld packet ltering model allows any outgoing connections to pass. Outgoingconnections are connections that are actively established by the local host. Incoming connectionsthat are established by remote hosts are blocked if the respective service is not allowed in thezone in question. Therefore, each of the interfaces with incoming trac must be placed in asuitable zone to allow for the desired services to be accessible. For each of the zones, dene theservices or protocols you need.
An important concept of firewalld is the distinction between two separate congurations:the runtime and the permanent conguration. The runtime conguration represents the currentlyactive rules, while the permanent conguration represents the saved rules that will be appliedwhen restarting firewalld . This allows to add temporary rules that will be discarded afterrestarting firewalld , or to experiment with new rules while being able to revert back tothe original state. When you are changing the conguration, you need to be aware of whichconguration you are editing. How this is done is discussed in Section 25.4.1.2, “Runtime Versus
Permanent Configuration”.
To perform the firewalld conguration using the graphical user interface firewall-config refer to its documentation (http://www.firewalld.org/documentation/utilities/firewall-
config.html) . In the following section we will be looking at how to perform typical firewalldconguration tasks using firewall-cmd on the command line.
25.4.1 Configuring the Firewall on the Command Line
25.4.1.1 Firewall Startup
firewalld will be installed and enabled by default. It is a regular systemd service that canbe congured via systemctl or the YaST Services Manager.
Important: Automatic Firewall ConfigurationAfter the installation, YaST automatically starts firewalld and leaves all interfaces inthe default public zone. If a server application is congured and activated on the system,YaST can adjust the rewall rules via the options Open Ports on Selected Interface in Firewallor Open Ports on Firewall in the server conguration modules. Some server module dialogsinclude a Firewall Details button for activating additional services and ports.
215 Configuring the Firewall on the Command Line openSUSE Leap 15.2

25.4.1.2 Runtime Versus Permanent Configuration
By default all firewall-cmd commands operate on the runtime conguration. You can applymost operations to the permanent conguration only by adding the --permanent parameter.When doing so the change will only aect the permanent conguration and will not be eectiveimmediately in the runtime conguration. There is currently no way to add a rule to bothruntime and permanent congurations in a single invocation. To achieve this you can apply allnecessary changes to the runtime conguration and when all is working as expected issue thefollowing command:
root # firewall-cmd --runtime-to-permanent
This will write all current runtime rules into the permanent conguration. Any temporarymodications you or other programs may have made to the rewall in other contexts are madepermanent this way. If you are unsure about this, you can also take the opposite approach tobe on the safe side: Add new rules to the permanent conguration and reload firewalld tomake them active.
NoteSome conguration items, like the default zone, are shared by both the runtime andpermanent congurations. Changing them will reect in both congurations at once.
To revert the runtime conguration to the permanent conguration and thereby discard anytemporary changes, two possibilities exist, either via the firewalld command line interfaceor via systemd :
root # firewall-cmd --reload
root # systemctl reload firewalld
For brevity the examples in the following sections will always operate on the runtimeconguration, if applicable. Adjust them accordingly to make them permanent.
25.4.1.3 Assignment of Interfaces to Zones
You can list all network interfaces currently assigned to a zone like this:
root # firewall-cmd --zone=public --list-interfaceseth0
216 Configuring the Firewall on the Command Line openSUSE Leap 15.2

Similarly you can query which zone a specic interface is assigned to:
root # firewall-cmd --get-zone-of-interface=eth0public
The following command lines assign an interface to a zone. The variant using --add-interfacewill only work if eth0 is not already assigned to another zone. The variant using --change-interface will always work, removing eth0 from its current zone if necessary:
root # firewall-cmd --zone=internal --add-interface=eth0root # firewall-cmd --zone=internal --change-interface=eth0
Any operations without an explicit --zone argument will implicitly operate on the default zone.This pair of commands can be used for getting and setting the default zone assignment:
root # firewall-cmd --get-default-zonedmzroot # firewall-cmd --set-default-zone=public
ImportantAny network interfaces not explicitly assigned to a zone will be automatically part ofthe default zone. Changing the default zone will reassign all those network interfacesimmediately for the permanent and runtime congurations. You should never use atrusted zone like internal as the default zone, to avoid unexpected exposure tothreats. For example hotplugged network interfaces like USB Ethernet interfaces wouldautomatically become part of the trusted zone in such cases.
Also note that interfaces that are not explicitly part of any zone will not appear in thezone interface list. There is currently no command to list unassigned interfaces. Due tothis it is best to avoid unassigned network interfaces during regular operation.
25.4.1.4 Making Network Services Accessible
firewalld has a concept of services. A service consists of denitions of ports and protocols.These denitions logically belong together in the context of a given network service like a Web ormail server protocol. The following commands can be used to get information about predenedservices and their details:
root # firewall-cmd --get-services
217 Configuring the Firewall on the Command Line openSUSE Leap 15.2

[...] dhcp dhcpv6 dhcpv6-client dns docker-registry [...]root # firewall-cmd --info-service dhcpdhcp ports: 67/udp protocols: source-ports: modules: destination:
These service denitions can be used for easily making the associated network functionalityaccessible in a zone. This command line will open the HTTP Web server port in the internalzone, for example:
root # firewall-cmd --add-service=http --zone=internal
The removal of a service from a zone is performed using the counterpart command --remove-service . You can also dene custom services using the --new-service subcommand. Referto http://www.firewalld.org/documentation/howto/add-a-service.html for more details on howto do this.
If you just want to open a single port by number, you can use the following approach. This willopen TCP port 8000 in the internal zone:
root # firewall-cmd --add-port=8000/tcp --zone=internal
For removal use the counterpart command --remove-port .
Tip: Temporarily Opening a Service or Portfirewalld supports a --timeout parameter that allows to open a service or port for alimited time duration. This can be helpful for quick testing and makes sure that closingthe service or port will not be forgotten. To allow the imap service in the internalzone for 5 minutes, you would call
root # firewall-cmd --add-service=imap --zone=internal --timeout=5m
218 Configuring the Firewall on the Command Line openSUSE Leap 15.2

25.4.1.5 Lockdown Mode
firewalld oers a lockdown mode that prevents changes to the rewall rules while it is active.Since applications can automatically change the rewall rules via the D-Bus interface, anddepending on the PolicyKit rules regular users may be able to do the same, it can be helpfulto prevent changes in some situations. You can nd more information about this at https://
fedoraproject.org/wiki/Features/FirewalldLockdown .
It is important to understand that the lockdown mode feature provides no real security, butmerely protection against accidental or benign attempts to change the rewall. The way thelockdown mode is currently implemented in firewalld provides no security against maliciousintent. as is pointed out at http://seclists.org/oss-sec/2017/q3/139 .
25.4.1.6 Adding Custom iptables Rules
firewalld claims exclusive control over the host's netfilter rules. You should never modifyrewall rules using other tools like iptables . Doing so could confuse firewalld and breaksecurity or functionality.
If you need to add custom rewall rules that aren't covered by firewalld features then thereare two ways to do so. To directly pass raw iptables syntax you can use the --direct option.It expects the table, chain, and priority as initial arguments and the rest of the command lineis passed as is to iptables . The following example adds a connection tracking rule for theforwarding lter table:
root # firewall-cmd --direct --add-rule ipv4 filter FORWARD 0 -i eth0 -o eth1 \ -p tcp --dport 80 -m state --state NEW,RELATED,ESTABLISHED -j ACCEPT
Additionally, firewalld implements so called rich rules, an extended syntax forspecifying iptables rules in an easier way. You can nd the syntax specication athttp://www.firewalld.org/documentation/man-pages/firewalld.richlanguage.html . The followingexample drops all IPv4 packets originating from a certain source address:
root # firewall-cmd --zone=public --add-rich-rule='rule family="ipv4" \ source address="192.168.2.4" drop'
219 Configuring the Firewall on the Command Line openSUSE Leap 15.2

25.4.1.7 Routing, Forwarding, and Masquerading
firewalld is not designed to run as a fully edged router. The basic functionality fortypical home router setups is available. For a corporate production router you should not usefirewalld , however, but use dedicated router and rewall devices instead. The followingprovides just a few pointers on what to look for to utilize routing in firewalld :
First of all IP forwarding needs to be enabled as outlined in Section 25.2, “Masquerading
Basics”.
To enable IPv4 masquerading, for example in the internal zone, issue the followingcommand.
root # firewall-cmd --zone=internal --add-masquerade
firewalld can also enable port forwarding. The following command will forward localTCP connections on port 80 to another host:
root # firewall-cmd --zone=public \ --add-forward-port=port=80:proto=tcp:toport=80:toaddr=192.168.1.10
25.4.2 Accessing Services Listening on Dynamic Ports
Some network services do not listen on predened port numbers. Instead they operate basedon the portmapper or rpcbind protocol. We will use the term rpcbind from here on. Whenone of these services starts, it chooses a random local port and talks to rpcbind to make theport number known. rpcbind itself is listening on a well known port. Remote systems canthen query rpcbind about the network services it knows about and on which ports they arelistening. Not many programs use this approach anymore today. Popular examples are NetworkInformation Services (NIS; ypserv and ypbind ) and the Network File System (NFS) version 3.
Note: About NFSv4The newer NFSv4 only requires the single well known TCP port 2049. For protocolversion 4.0 the kernel parameter fs.nfs.nfs_callback_tcpport may need to be setto a static port (see Example 25.1, “Callback Port Configuration for the nfs Kernel Module in /
etc/modprobe.d/60-nfs.conf”). Starting with protocol version 4.1 this setting has alsobecome unnecessary.
220 Accessing Services Listening on Dynamic Ports openSUSE Leap 15.2
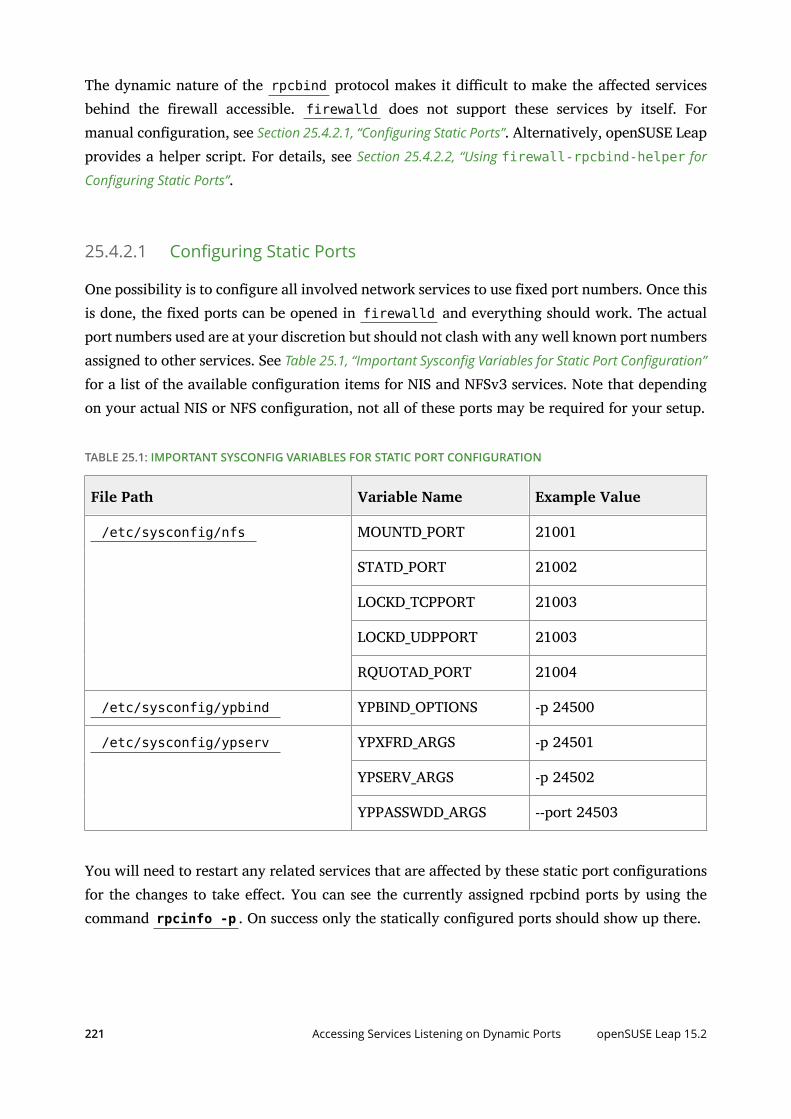
The dynamic nature of the rpcbind protocol makes it dicult to make the aected servicesbehind the rewall accessible. firewalld does not support these services by itself. Formanual conguration, see Section 25.4.2.1, “Configuring Static Ports”. Alternatively, openSUSE Leapprovides a helper script. For details, see Section 25.4.2.2, “Using firewall-rpcbind-helper for
Configuring Static Ports”.
25.4.2.1 Configuring Static Ports
One possibility is to congure all involved network services to use xed port numbers. Once thisis done, the xed ports can be opened in firewalld and everything should work. The actualport numbers used are at your discretion but should not clash with any well known port numbersassigned to other services. See Table 25.1, “Important Sysconfig Variables for Static Port Configuration”
for a list of the available conguration items for NIS and NFSv3 services. Note that dependingon your actual NIS or NFS conguration, not all of these ports may be required for your setup.
TABLE 25.1: IMPORTANT SYSCONFIG VARIABLES FOR STATIC PORT CONFIGURATION
File Path Variable Name Example Value
MOUNTD_PORT 21001
STATD_PORT 21002
LOCKD_TCPPORT 21003
LOCKD_UDPPORT 21003
/etc/sysconfig/nfs
RQUOTAD_PORT 21004
/etc/sysconfig/ypbind YPBIND_OPTIONS -p 24500
YPXFRD_ARGS -p 24501
YPSERV_ARGS -p 24502
/etc/sysconfig/ypserv
YPPASSWDD_ARGS --port 24503
You will need to restart any related services that are aected by these static port congurationsfor the changes to take eect. You can see the currently assigned rpcbind ports by using thecommand rpcinfo -p . On success only the statically congured ports should show up there.
221 Accessing Services Listening on Dynamic Ports openSUSE Leap 15.2

Apart from the port conguration for network services running in userspace there are alsoports that are used by the Linux kernel directly when it comes to NFS. One of these ports isnfs_callback_tcpport . It is only required for NFS protocol versions older than 4.1. There isa sysctl named fs.nfs.nfs_callback_tcpport to congure this port. This sysctl node onlyappears dynamically when NFS mounts are active. Therefore it is best to congure the port viakernel module parameters. This can be achieved by creating a le as shown in Example 25.1,
“Callback Port Configuration for the nfs Kernel Module in /etc/modprobe.d/60-nfs.conf”.
EXAMPLE 25.1: CALLBACK PORT CONFIGURATION FOR THE nfs KERNEL MODULE IN /etc/modprobe.d/60-nfs.conf
options nfs callback_tcpport=21005
To make this change eective it is easiest to reboot the machine. Otherwise all NFS servicesneed to be stopped and the nfs kernel module needs to be reloaded. To verify the active NFScallback port, check the output of cat /sys/module/nfs/parameters/callback_tcpport .
For easy handling of the now statically congured RPC ports, it is useful to create a newfirewalld service denition. This service denition will group all related ports and, forexample, makes it easy to make them accessible in a specic zone. In Example 25.2, “Commands
to Define a new firewalld RPC Service for NFS” this is done for the NFS ports as they have beencongured in the accompanying examples.
EXAMPLE 25.2: COMMANDS TO DEFINE A NEW firewalld RPC SERVICE FOR NFS
root # firewall-cmd --permanent --new-service=nfs-rpcroot # firewall-cmd --permanent --service=nfs-rpc --set-description="NFS related, statically configured RPC ports"# add UDP and TCP ports for the given sequenceroot # for port in 21001 21002 21003 21004; do firewall-cmd --permanent --service=nfs-rpc --add-port ${port}/udp --add-port ${port}/tcpdone# the callback port is TCP onlyroot # firewall-cmd --permanent --service=nfs-rpc --add-port 21005/tcp
# show the complete definition of the new custom serviceroot # firewall-cmd --info-service=nfs-rpc --permanent -vnfs-rpc summary: description: NFS and related, statically configured RPC ports ports: 4711/tcp 21001/udp 21001/tcp 21002/udp 21002/tcp 21003/udp 21003/tcp 21004/udp 21004/tcp
222 Accessing Services Listening on Dynamic Ports openSUSE Leap 15.2

protocols: source-ports: modules: destination:
# reload firewalld to make the new service definition availableroot # firewall-cmd --reload
# the new service definition can now be used to open the ports for example in the internal zoneroot # firewall-cmd --add-service=nfs-rpc --zone=internal
25.4.2.2 Using firewall-rpcbind-helper for Configuring Static Ports
The steps to congure static ports as shown in the previous section can be simplied by using theSUSE helper tool firewall-rpc-helper.py . Install it with zypper in firewalld-rpcbind-helper .
The tool allows interactive conguration of the service patterns discussed in the previous section.It can also display current port assignments and can be used for scripting. For details, seefirewall-rpc-helper.py --help .
25.5 Migrating from SuSEfirewall2
Note: Creating a firewalld Configuration for AutoYaSTSee the Firewall Conguration section of the AutoYaST Guide to learn how to create afirewalld conguration for AutoYaST.
When upgrading from any version of openSUSE Leap before 15.0 to openSUSE Leap15.2, SuSErewall2 is not changed and remains active. There is no automatic migration,so you must migrate to firewalld manually. firewalld includes a helper migrationscript, susefirewall2-to-firewalld . Depending on the complexity of your SuSErewall2conguration, the script may perform a perfect migration, or it may fail. Most likely it willpartially succeed and you will have to review your new firewalld conguration and makeadjustments.
223 Migrating from SuSEfirewall2 openSUSE Leap 15.2

The resulting conguration will make firewalld behave somewhat like SuSErewall2. To takefull advantage of firewalld 's features you may elect to create a new conguration, rather thantrying to migrate your old conguration. It is safe to run the susefirewall2-to-firewalldscript with no options, as it makes no permanent changes to your system. However, if you areadministering the system remotely you could get locked out.
Install and run susefirewall2-to-firewalld :
root # zypper in susefirewall2-to-firewalldroot # susefirewall2-to-firewalldINFO: Reading the /etc/sysconfig/SuSEfirewall2 fileINFO: Ensuring all firewall services are in a well-known state.INFO: This will start/stop/restart firewall services and it's likelyINFO: to cause network disruption.INFO: If you do not wish for this to happen, please stop the script now!5...4...3...2...1...Lets do it!INFO: Stopping firewalldINFO: Restarting SuSEfirewall2_initINFO: Restarting SuSEfirewall2INFO: DIRECT: Adding direct rule="ipv4 -t filter -A INPUT -p udp -m udp --dport 5353 -m pkttype --pkt-type multicast -j ACCEPT"[...]INFO: Enabling direct rule=ipv6 -t filter -A INPUT -p udp -m udp --dport 546 -j ACCEPTINFO: Enabling direct rule=ipv6 -t filter -A INPUT -p udp -m udp --dport 5353 -m pkttype --pkt-type multicast -j ACCEPTINFO: Enable logging for denied packetsINFO: ##########################################################INFO:INFO: The dry-run has been completed. Please check the above output to ensureINFO: that everything looks good.INFO:INFO: ###########################################################INFO: Stopping firewalldINFO: Restarting SuSEfirewall2_initINFO: Restarting SuSEfirewall2
This results in a lot of output, which you may wish to direct to a le for easier review:
root # susefirewall2-to-firewalld | tee newfirewallrules.txt
The script supports these options:
-c
224 Migrating from SuSEfirewall2 openSUSE Leap 15.2

Commit changes. The script will make changes to the system, so make sure you only usethis option if you are really happy with the proposed changes. This will reset your currentfirewalld conguration, so make sure you make backups!
-d
Super noisy. Use it to le bug reports but be careful to mask sensitive information.
-h
This message.
-q
No output. Errors will not be printed either!
-v
Verbose mode. It will print warnings and other informative messages.
25.6 For More InformationThe most up-to-date information and other documentation about the firewalld package isfound in /usr/share/doc/packages/firewalld . The home page of the netlter and iptablesproject, http://www.netfilter.org , provides a large collection of documents about iptables ingeneral in many languages.
225 For More Information openSUSE Leap 15.2

26 Configuring a VPN Server
Today, Internet connections are cheap and available almost everywhere. However,not all connections are secure. Using a Virtual Private Network (VPN), you cancreate a secure network within an insecure network such as the Internet or Wi-Fi. Itcan be implemented in dierent ways and serves several purposes. In this chapter,we focus on the OpenVPN (http://www.openvpn.net) implementation to link branchoces via secure wide area networks (WANs).
26.1 Conceptual Overview
This section denes some terms regarding VPN and gives a brief overview of some scenarios.
26.1.1 Terminology
Endpoint
The two “ends” of a tunnel, the source or destination client.
Tap Device
A tap device simulates an Ethernet device (layer 2 packets in the OSI model, such asEthernet frames). A tap device is used for creating a network bridge. It works with Ethernetframes.
Tun Device
A tun device simulates a point-to-point network (layer 3 packets in the OSI model, such asIP packets). A tun device is used with routing and works with IP frames.
Tunnel
Linking two locations through a primarily public network. From a more technicalviewpoint, it is a connection between the client's device and the server's device. Usually atunnel is encrypted, but it does need to be by denition.
226 Conceptual Overview openSUSE Leap 15.2

26.1.2 VPN Scenarios
Whenever you set up a VPN connection, your IP packets are transferred over a secured tunnel.A tunnel can use either a tun or tap device. They are virtual network kernel drivers whichimplement the transmission of Ethernet frames or IP frames/packets.
Any user space program, such as OpenVPN, can attach itself to a tun or tap device to receivepackets sent by your operating system. The program is also able to write packets to the device.
There are many solutions to set up and build a VPN connection. This section focuses on theOpenVPN package. Compared to other VPN software, OpenVPN can be operated in two modes:
Routed VPN
Routing is an easy solution to set up. It is more ecient and scales better than a bridgedVPN. Furthermore, it allows the user to tune MTU (Maximum Transfer Unit) to raiseeciency. However, in a heterogeneous environment, if you do not have a Samba serveron the gateway, NetBIOS broadcasts do not work. If you need IPv6, the drivers for thetun devices on both ends must support this protocol explicitly. This scenario is depictedin Figure 26.1, “Routed VPN”.
Machine 1 (Server)
LAN 1 (192.168.1.1/24)
Switch/Router
eth0
tun0 (192.168.0.1)
eth1
Machine 2 (Client)
tun0 (192.168.0.2)
eth1
LAN 2 (192.168.2.1/24)
eth0
InternetVPN Tunnel
Switch/Router
FIGURE 26.1: ROUTED VPN
227 VPN Scenarios openSUSE Leap 15.2

Bridged VPN
Bridging is a more complex solution. It is recommended when you need to browse Windowsle shares across the VPN without setting up a Samba or WINS server. Bridged VPN is alsoneeded to use non-IP protocols (such as IPX) or applications relying on network broadcasts.However, it is less ecient than routed VPN. Another disadvantage is that it does not scalewell. This scenario is depicted in the following gures.
Machine 1 (Server)
Switch/Router
eth0
tap0 (192.168.100.1/24)
Machine 2 (Client)
tap0 (192.168.100.2/24)
eth0
InternetVPN Bridge
Switch/Router
FIGURE 26.2: BRIDGED VPN - SCENARIO 1
Machine 1 (Server)
Switch/Router
eth0
br0 (192.168.100.1/24)
Machine 2 (Client)
tap0 (192.168.100.2/24)
eth0
InternetVPN Bridge
Switch/Router
LAN 2 eth1
LAN 1 eth1 tap0
FIGURE 26.3: BRIDGED VPN - SCENARIO 2
228 VPN Scenarios openSUSE Leap 15.2

Machine 1 (Server)
Switch/Router
eth0
br0 (192.168.100.1/24)
Machine 2 (Client)
tap0 (192.168.100.2/24)
eth0
InternetVPN Bridge
Switch/Router
LAN 2(part 2)
eth1
LAN 1(part 1)
eth1 tap0
br0 (192.168.100.2/24)
FIGURE 26.4: BRIDGED VPN - SCENARIO 3
The major dierence between bridging and routing is that a routed VPN cannot IP-broadcastwhile a bridged VPN can.
26.2 Setting Up a Simple Test Scenario
In the following example, we will create a point-to-point VPN tunnel. The example demonstrateshow to create a VPN tunnel between one client and a server. It is assumed that your VPNserver will use private IP addresses like IP_OF_SERVER and your client will use the IP addressIP_OF_CLIENT . Make sure you select addresses which do not conict with other IP addresses.
Warning: Use Only for TestingThis following scenario is provided as an example meant for familiarizing yourself withVPN technology. Do not use this as a real world scenario, as it can compromise the securityand safety of your IT infrastructure!
229 Setting Up a Simple Test Scenario openSUSE Leap 15.2
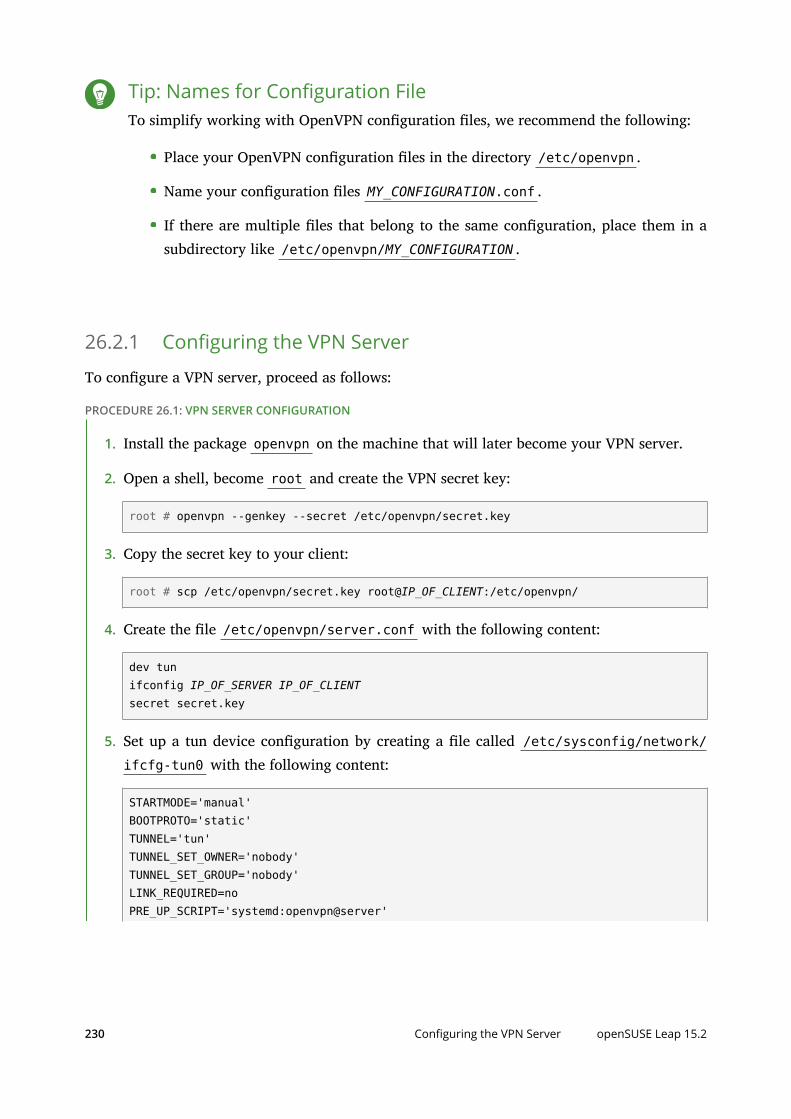
Tip: Names for Configuration FileTo simplify working with OpenVPN conguration les, we recommend the following:
Place your OpenVPN conguration les in the directory /etc/openvpn .
Name your conguration les MY_CONFIGURATION.conf .
If there are multiple les that belong to the same conguration, place them in asubdirectory like /etc/openvpn/MY_CONFIGURATION .
26.2.1 Configuring the VPN Server
To congure a VPN server, proceed as follows:
PROCEDURE 26.1: VPN SERVER CONFIGURATION
1. Install the package openvpn on the machine that will later become your VPN server.
2. Open a shell, become root and create the VPN secret key:
root # openvpn --genkey --secret /etc/openvpn/secret.key
3. Copy the secret key to your client:
root # scp /etc/openvpn/secret.key root@IP_OF_CLIENT:/etc/openvpn/
4. Create the le /etc/openvpn/server.conf with the following content:
dev tunifconfig IP_OF_SERVER IP_OF_CLIENTsecret secret.key
5. Set up a tun device conguration by creating a le called /etc/sysconfig/network/ifcfg-tun0 with the following content:
STARTMODE='manual'BOOTPROTO='static'TUNNEL='tun'TUNNEL_SET_OWNER='nobody'TUNNEL_SET_GROUP='nobody'LINK_REQUIRED=noPRE_UP_SCRIPT='systemd:openvpn@server'
230 Configuring the VPN Server openSUSE Leap 15.2

PRE_DOWN_SCRIPT='systemd:openvpn@service'
The notation openvpn@server points to the OpenVPN server conguration le located at/etc/openvpn/server.conf . For more information, see /usr/share/doc/packages/openvpn/README.SUSE .
6. If you use a rewall, start YaST and open UDP port 1194 (Security andUsers Firewall Allowed Services).
7. Start the OpenVPN server service by setting the tun device to up :
tux > sudo wicked ifup tun0
You should see the conrmation:
tun0 up
26.2.2 Configuring the VPN Clients
To congure the VPN client, do the following:
PROCEDURE 26.2: VPN CLIENT CONFIGURATION
1. Install the package openvpn on your client VPN machine.
2. Create /etc/openvpn/client.conf with the following content:
remote DOMAIN_OR_PUBLIC_IP_OF_SERVERdev tunifconfig IP_OF_CLIENT IP_OF_SERVERsecret secret.key
Replace the placeholder IP_OF_CLIENT in the rst line with either the domain name, orthe public IP address of your server.
3. Set up a tun device conguration by creating a le called /etc/sysconfig/network/ifcfg-tun0 with the following content:
STARTMODE='manual'BOOTPROTO='static'TUNNEL='tun'TUNNEL_SET_OWNER='nobody'TUNNEL_SET_GROUP='nobody'
231 Configuring the VPN Clients openSUSE Leap 15.2

LINK_REQUIRED=noPRE_UP_SCRIPT='systemd:openvpn@client'PRE_DOWN_SCRIPT='systemd:openvpn@client'
4. If you use a rewall, start YaST and open UDP port 1194 as described in Step 6 ofProcedure 26.1, “VPN Server Configuration”.
5. Start the OpenVPN server service by setting the tun device to up :
tux > sudo wicked ifup tun0
You should see the conrmation:
tun0 up
26.2.3 Testing the VPN Example Scenario
After OpenVPN has successfully started, test the availability of the tun device with the followingcommand:
ip addr show tun0
To verify the VPN connection, use ping on both client and server side to see if they can reacheach other. Ping the server from the client:
ping -I tun0 IP_OF_SERVER
Ping the client from the server:
ping -I tun0 IP_OF_CLIENT
26.3 Setting Up Your VPN Server Using a CertificateAuthorityThe example in Section 26.2 is useful for testing, but not for daily work. This section explainshow to build a VPN server that allows more than one connection at the same time. This is donewith a public key infrastructure (PKI). A PKI consists of a pair of public and private keys forthe server and each client, and a master certicate authority (CA), which is used to sign everyserver and client certicate.
232 Testing the VPN Example Scenario openSUSE Leap 15.2

This setup involves the following basic steps:
1. Section 26.3.1, “Creating Certificates”
2. Section 26.3.2, “Configuring the VPN Server”
3. Section 26.3.3, “Configuring the VPN Clients”
26.3.1 Creating Certificates
Before a VPN connection can be established, the client must authenticate the server certicate.Conversely, the server must also authenticate the client certicate. This is called mutualauthentication.
Creating certicates is not supported on openSUSE Leap. The following assumes you havecreated a CA certicate, a server certicate, and a client certicate on another system.
The server certicate is required in the PEM and unencrypted key in PEM formats. Copy thePEM version to /etc/openvpn/server_crt.pem on the VPN server. The unencrypted versionneeds to go to /etc/openvpn/server_key.pem .
Client certicates need to be of the format PKCS12 (preferred) or PEM. The certicate in PKCS12format needs to contain the CA chain and needs to be copied to /etc/openvpn/CLIENT.p12 .In case you have client certicates in PEM format containing the CA chain, copy them to /etc/openvpn/CLIENT.pem . In case you have split the PEM certicates into client certicate( *.ca ), client key ( *.key ), and the CA certicate ( *.ca ), copy these les to /etc/openvpn/on each client.
The CA certicate needs to be copied to /etc/openvpn/vpn_ca.pem on the server and eachclient.
Important: Splitting Client CertificatesIf you split client certicates into client certicate, client key, and the CA certicate,you need to provide the respective le names in the OpenVPN conguration le on therespective clients (see Example 26.1, “VPN Server Configuration File”).
233 Creating Certificates openSUSE Leap 15.2

26.3.2 Configuring the VPN Server
As the basis of your conguration le, copy /usr/share/doc/packages/openvpn/sample-config-files/server.conf to /etc/openvpn/ . Then customize it to your needs.
EXAMPLE 26.1: VPN SERVER CONFIGURATION FILE
# /etc/openvpn/server.confport 1194 1
proto udp 2
dev tun0 3
# Security 4
ca vpn_ca.pemcert server_crt.pemkey server_key.pem
# ns-cert-type server remote-cert-tls client 5
dh server/dh2048.pem 6
server 192.168.1.0 255.255.255.0 7
ifconfig-pool-persist /var/run/openvpn/ipp.txt 8
# Privileges 9
user nobodygroup nobody
# Other configuration 10
keepalive 10 120comp-lzopersist-keypersist-tun# status /var/log/openvpn-status.tun0.log 11
# log-append /var/log/openvpn-server.log 12
verb 4
1 The TCP/UDP port on which OpenVPN listens. You need to open the port in the rewall,see Chapter 25, Masquerading and Firewalls. The standard port for VPN is 1194, so you canusually leave that as it is.
2 The protocol, either UDP or TCP.
3 The tun or tap device. For the dierence between these, see Section 26.1.1, “Terminology”.
234 Configuring the VPN Server openSUSE Leap 15.2

4 The following lines contain the relative or absolute path to the root server CA certicate( ca ), the root CA key ( cert ), and the private server key ( key ). These were generated inSection 26.3.1, “Creating Certificates”.
5 Require that peer certicates have been signed with an explicit key usage and extendedkey usage based on RFC3280 TLS rules.
6 The Die-Hellman parameters. Create the required le with the following command:
openssl dhparam -out /etc/openvpn/dh2048.pem 2048
7 Supplies a VPN subnet. The server can be reached by 192.168.1.1 .
8 Records a mapping of clients and its virtual IP address in the given le. Useful when theserver goes down and (after the restart) the clients get their previously assigned IP address.
9 For security reasons, run the OpenVPN daemon with reduced privileges. To do so, specifythat it should use the group and user nobody .
10 Several conguration options—see the comment in the example conguration le: /usr/share/doc/packages/openvpn/sample-config-files .
11 Enable this option to write short status updates with statistical data (“operational statusdump”) to the named le. By default, this is not enabled.All output is written to the system journal, which can be displayed with journalctl . If youhave more than one conguration le (for example, one for home and another for work),it is recommended to include the device name into the le name. This avoids overwritingoutput les accidentally. In this case, it is tun0 , taken from the dev directive—see 3 .
12 By default, log messages go to syslog. Overwrite this behavior by removing the hashcharacter. In that case, all messages go to /var/log/openvpn-server.log . Do not forgetto congure a logrotate service. See man 8 logrotate for further details.
After having completed this conguration, you can see log messages of your OpenVPN serverunder /var/log/openvpn.log . After having started it for the rst time, it should nish with:
... Initialization Sequence Completed
If you do not see this message, check the log carefully for any hints of what is wrong in yourconguration le.
235 Configuring the VPN Server openSUSE Leap 15.2

26.3.3 Configuring the VPN Clients
As the basis of your conguration le, copy /usr/share/doc/packages/openvpn/sample-config-files/client.conf to /etc/openvpn/ . Then customize it to your needs.
EXAMPLE 26.2: VPN CLIENT CONFIGURATION FILE
# /etc/openvpn/client.confclient 1
dev tun 2
proto udp 3
remote IP_OR_HOST_NAME 1194 4
resolv-retry infinitenobind
remote-cert-tls server 5
# Privileges 6
user nobodygroup nobody
# Try to preserve some state across restarts.persist-keypersist-tun
# Security 7
pkcs12 client1.p12
comp-lzo 8
1 Species that this machine is a client.
2 The network device. Both clients and server must use the same device.
3 The protocol. Use the same settings as on the server.
5 This is security option for clients which ensures that the host they connect to is a designatedserver.
4 Replace the placeholder IP_OR_HOST_NAME with the respective host name or IP address ofyour VPN server. After the host name, the port of the server is given. You can have multiplelines of remote entries pointing to dierent VPN servers. This is useful for load balancingbetween dierent VPN servers.
6 For security reasons, run the OpenVPN daemon with reduced privileges. To do so, specifythat it should use the group and user nobody .
7 Contains the client les. For security reasons, use a separate pair of les for each client.
236 Configuring the VPN Clients openSUSE Leap 15.2

8 Turn on compression. Only use this parameter if compression is enabled on the server aswell.
26.4 Setting Up a VPN Server or Client Using YaSTYou can also use YaST to set up a VPN server. However, the YaST module does not supportOpenVPN. Instead, it provides support for the IPsec protocol (as implemented in the softwareStrongSwan). Like OpenVPN, IPsec is a widely supported VPN scheme.
PROCEDURE 26.3: SETTING UP AN IPSEC SERVER
1. To start the YaST VPN module, select Applications VPN Gateways and Clients.
2. Under Global Conguration, activate Enable VPN Daemon.
3. To create a new VPN, click New VPN, then enter a name for the connection.
4. Under Type, select Gateway (Server).
5. Then choose the scenario:
The scenarios Secure communication with a pre-shared key and Secure communicationwith a certicate are best suited to Linux client setups.
The scenario Provide access to Android, iOS, Mac OS X clients sets up a congurationthat is natively supported by modern versions of Android, iOS, and macOS. It is basedon a pre-shared key setup with an additional user name and password authentication.
The scenario Provide access to Windows 7, Windows 8 clients is a conguration that isnatively supported by Windows and BlackBerry devices. It is based on a certicatesetup with an additional user name and password authentication.
For this example, choose Secure communication with a pre-shared key.
6. To specify the key, click Edit Credentials. Activate Show key, then type the secret key.Conrm with OK.
7. Choose whether and how to limit access within your VPN under Provide VPN clients accessto. To enable only certain IP ranges, specify these in CIDR format, separated by commas inLimited CIDRs. For more information about the CIDR format, see https://en.wikipedia.org/
wiki/Classless_Inter-Domain_Routing .
237 Setting Up a VPN Server or Client Using YaST openSUSE Leap 15.2
8. Under Clients' address pool, specify the format of IP addresses your VPN should provideto its clients.
9. To nish, click OK. The YaST VPN module will now automatically add and enable rewallrules to allow clients to connect to the new VPN.To view the connection status, in the following conrmation window, click Yes. You willthen see the output of systemctl status for your VPN, which allows you to check ifthe VPN is running and congured correctly.
26.5 For More InformationFor more information on setting up a VPN connection using NetworkManager, see Book
“Reference”, Chapter 28 “Using NetworkManager”, Section 28.3.4 “NetworkManager and VPN”.
For more information about VPN in general, see:
http://www.openvpn.net : the OpenVPN home page
man openvpn
/usr/share/doc/packages/openvpn/sample-config-files/ : example congurationles for dierent scenarios.
/usr/src/linux/Documentation/networking/tuntap.txt , to install the kernel-
source package.
238 For More Information openSUSE Leap 15.2
IV Confining Privileges with AppArmor
27 Introducing AppArmor 240
28 Getting Started 242
29 Immunizing Programs 247
30 Profile Components and Syntax 256
31 AppArmor Profile Repositories 287
32 Building and Managing Profiles with YaST 288
33 Building Profiles from the Command Line 298
34 Profiling Your Web Applications Using ChangeHat 325
35 Confining Users with pam_apparmor 336
36 Managing Profiled Applications 337
37 Support 339
38 AppArmor Glossary 348

27 Introducing AppArmor
Many security vulnerabilities result from bugs in trusted programs. A trusted program runs withprivileges that attackers want to possess. The program fails to keep that trust if there is a bugin the program that allows the attacker to acquire said privilege.
AppArmor® is an application security solution designed specically to apply privilegeconnement to suspect programs. AppArmor allows the administrator to specify the domainof activities the program can perform by developing a security prole. A security prole isa listing of les that the program may access and the operations the program may perform.AppArmor secures applications by enforcing good application behavior without relying onattack signatures, so it can prevent attacks even if previously unknown vulnerabilities are beingexploited.
27.1 AppArmor Components
AppArmor consists of:
A library of AppArmor proles for common Linux* applications, describing what les theprogram needs to access.
A library of AppArmor prole foundation classes (prole building blocks) needed forcommon application activities, such as DNS lookup and user authentication.
A tool suite for developing and enhancing AppArmor proles, so that you can change theexisting proles to suit your needs and create new proles for your own local and customapplications.
Several specially modied applications that are AppArmor enabled to provide enhancedsecurity in the form of unique subprocess connement (including Apache).
The AppArmor-related kernel code and associated control scripts to enforce AppArmorpolicies on your openSUSE® Leap system.
240 AppArmor Components openSUSE Leap 15.2

27.2 Background Information on AppArmor ProfilingFor more information about the science and security of AppArmor, refer to the following papers:
SubDomain: Parsimonious Server Security by Crispin Cowan, Steve Beattie, Greg Kroah-Hartman,
Calton Pu, Perry Wagle, and Virgil Gligor
Describes the initial design and implementation of AppArmor. Published in the proceedingsof the USENIX LISA Conference, December 2000, New Orleans, LA. This paper is now out ofdate, describing syntax and features that are dierent from the current AppArmor product.This paper should be used only for background, and not for technical documentation.
Defcon Capture the Flag: Defending Vulnerable Code from Intense Attack by Crispin Cowan, Seth
Arnold, Steve Beattie, Chris Wright, and John Viega
A good guide to strategic and tactical use of AppArmor to solve severe security problemsin a very short period of time. Published in the Proceedings of the DARPA InformationSurvivability Conference and Expo (DISCEX III), April 2003, Washington, DC.
AppArmor for Geeks by Seth Arnold
This document tries to convey a better understanding of the technical details of AppArmor.It is available at http://en.opensuse.org/SDB:AppArmor_geeks .
241 Background Information on AppArmor Profiling openSUSE Leap 15.2

28 Getting Started
Prepare a successful deployment of AppArmor on your system by carefully considering thefollowing items:
1. Determine the applications to prole. Read more on this in Section 28.3, “Choosing
Applications to Profile”.
2. Build the needed proles as roughly outlined in Section 28.4, “Building and Modifying Profiles”.Check the results and adjust the proles when necessary.
3. Update your proles whenever your environment changes or you need to react to securityevents logged by the reporting tool of AppArmor. Refer to Section 28.5, “Updating Your
Profiles”.
28.1 Installing AppArmorAppArmor is installed and running on any installation of openSUSE® Leap by default, regardlessof what patterns are installed. The packages listed below are needed for a fully-functionalinstance of AppArmor:
apparmor-docs
apparmor-parser
apparmor-profiles
apparmor-utils
audit
libapparmor1
perl-libapparmor
yast2-apparmor
TipIf AppArmor is not installed on your system, install the pattern apparmor for acomplete AppArmor installation. Either use the YaST Software Management module forinstallation, or use Zypper on the command line:
tux > sudo zypper in -t pattern apparmor
242 Installing AppArmor openSUSE Leap 15.2

28.2 Enabling and Disabling AppArmor
AppArmor is congured to run by default on any fresh installation of openSUSE Leap. There aretwo ways of toggling the status of AppArmor:
Using YaST Services Manager
Disable or enable AppArmor by removing or adding its boot script to the sequence of scriptsexecuted on system boot. Status changes are applied on reboot.
Using AppArmor Configuration Window
Toggle the status of AppArmor in a running system by switching it o or on using the YaSTAppArmor Control Panel. Changes made here are applied instantaneously. The ControlPanel triggers a stop or start event for AppArmor and removes or adds its boot script inthe system's boot sequence.
To disable AppArmor permanently (by removing it from the sequence of scripts executed onsystem boot) proceed as follows:
1. Start YaST.
2. Select System Services Manager.
3. Mark apparmor by clicking its row in the list of services, then click Enable/Disable in thelower part of the window. Check that Enabled changed to Disabled in the apparmor row.
4. Conrm with OK.
AppArmor will not be initialized on reboot, and stays inactive until you re-enable it. Re-enablinga service using the YaST Services Manager tool is similar to disabling it.
Toggle the status of AppArmor in a running system by using the AppArmor Congurationwindow. These changes take eect when you apply them and survive a reboot of the system.To toggle the status of AppArmor, proceed as follows:
1. Start YaST, select AppArmor Conguration, and click Settings in the main window.
2. Enable AppArmor by checking Enable AppArmor or disable AppArmor by deselecting it.
3. Click Done in the AppArmor Conguration window.
243 Enabling and Disabling AppArmor openSUSE Leap 15.2

28.3 Choosing Applications to ProfileYou only need to protect the programs that are exposed to attacks in your particular setup, soonly use proles for those applications you actually run. Use the following list to determine themost likely candidates:
Network AgentsWeb ApplicationsCron Jobs
To nd out which processes are currently running with open network ports and might need aprole to conne them, run aa-unconfined as root .
EXAMPLE 28.1: OUTPUT OF aa-unconfined
19848 /usr/sbin/cupsd not confined19887 /usr/sbin/sshd not confined19947 /usr/lib/postfix/master not confined1328 /usr/sbin/smbd confined by '/usr/sbin/smbd (enforce)'
Each of the processes in the above example labeled not confined might need a custom proleto conne it. Those labeled confined by are already protected by AppArmor.
Tip: For More InformationFor more information about choosing the right applications to prole, refer to Section 29.2,
“Determining Programs to Immunize”.
28.4 Building and Modifying ProfilesAppArmor on openSUSE Leap ships with a precongured set of proles for the most importantapplications. In addition, you can use AppArmor to create your own proles for any applicationyou want.
There are two ways of managing proles. One is to use the graphical front-end provided bythe YaST AppArmor modules and the other is to use the command line tools provided by theAppArmor suite itself. The main dierence is that YaST supports only basic functionality forAppArmor proles, while the command line tools let you update/tune the proles in a morene-grained way.
244 Choosing Applications to Profile openSUSE Leap 15.2

For each application, perform the following steps to create a prole:
1. As root , let AppArmor create a rough outline of the application's prole by running aa-genprof PROGRAM_NAME .orOutline the basic prole by running YaST Security and Users AppArmorConguration Manually Add Prole and specifying the complete path to the applicationyou want to prole.A new basic prole is outlined and put into learning mode, which means that it logs anyactivity of the program you are executing, but does not yet restrict it.
2. Run the full range of the application's actions to let AppArmor get a very specic pictureof its activities.
3. Let AppArmor analyze the log les generated in Step 2 by typing S in aa-genprof.AppArmor scans the logs it recorded during the application's run and asks you to set theaccess rights for each event that was logged. Either set them for each le or use globbing.
4. Depending on the complexity of your application, it might be necessary to repeat Step 2
and Step 3. Conne the application, exercise it under the conned conditions, and processany new log events. To properly conne the full range of an application's capabilities, youmight be required to repeat this procedure often.
5. When you nish aa-genprof , your prole is set to enforce mode. The prole is appliedand AppArmor restricts the application according to it.If you started aa-genprof on an application that had an existing prole that was incomplain mode, this prole remains in learning mode upon exit of this learning cycle.For more information about changing the mode of a prole, refer to Section 33.7.3.2,
“aa-complain—Entering Complain or Learning Mode” and Section 33.7.3.6, “aa-enforce—Entering
Enforce Mode”.
Test your prole settings by performing every task you need with the application you conned.Normally, the conned program runs smoothly and you do not notice AppArmor activities.However, if you notice certain misbehavior with your application, check the system logs and seeif AppArmor is too tightly conning your application. Depending on the log mechanism usedon your system, there are several places to look for AppArmor log entries:
/var/log/audit/audit.log
The command journalctl | grep -i apparmor
245 Building and Modifying Profiles openSUSE Leap 15.2
The command dmesg -T
To adjust the prole, analyze the log messages relating to this application again as described inSection 33.7.3.9, “aa-logprof—Scanning the System Log”. Determine the access rights or restrictionswhen prompted.
Tip: For More InformationFor more information about prole building and modication, refer to Chapter 30, Profile
Components and Syntax, Chapter 32, Building and Managing Profiles with YaST, and Chapter 33,
Building Profiles from the Command Line.
28.5 Updating Your ProfilesSoftware and system congurations change over time. As a result, your prole setup forAppArmor might need some ne-tuning from time to time. AppArmor checks your system log forpolicy violations or other AppArmor events and lets you adjust your prole set accordingly. Anyapplication behavior that is outside of any prole denition can be addressed by aa-logprof .For more information, see Section 33.7.3.9, “aa-logprof—Scanning the System Log”.
246 Updating Your Profiles openSUSE Leap 15.2

29 Immunizing Programs
Eective hardening of a computer system requires minimizing the number of programs thatmediate privilege, then securing the programs as much as possible. With AppArmor, you onlyneed to prole the programs that are exposed to attack in your environment, which drasticallyreduces the amount of work required to harden your computer. AppArmor proles enforcepolicies to make sure that programs do what they are supposed to do, but nothing else.
AppArmor provides immunization technologies that protect applications from the inherentvulnerabilities they possess. After installing AppArmor, setting up AppArmor proles, andrebooting the computer, your system becomes immunized because it begins to enforce theAppArmor security policies. Protecting programs with AppArmor is called immunizing.
Administrators need only concern themselves with the applications that are vulnerable toattacks, and generate proles for these. Hardening a system thus comes down to building andmaintaining the AppArmor prole set and monitoring any policy violations or exceptions loggedby AppArmor's reporting facility.
Users should not notice AppArmor. It runs “behind the scenes” and does not require anyuser interaction. Performance is not noticeably aected by AppArmor. If some activity of theapplication is not covered by an AppArmor prole or if some activity of the application isprevented by AppArmor, the administrator needs to adjust the prole of this application.
AppArmor sets up a collection of default application proles to protect standard Linux services.To protect other applications, use the AppArmor tools to create proles for the applications thatyou want protected. This chapter introduces the philosophy of immunizing programs. Proceedto Chapter 30, Profile Components and Syntax, Chapter 32, Building and Managing Profiles with YaST, orChapter 33, Building Profiles from the Command Line if you are ready to build and manage AppArmorproles.
AppArmor provides streamlined access control for network services by specifying which leseach program is allowed to read, write, and execute, and which type of network it is allowedto access. This ensures that each program does what it is supposed to do, and nothing else.AppArmor quarantines programs to protect the rest of the system from being damaged by acompromised process.
AppArmor is a host intrusion prevention or mandatory access control scheme. Previously, accesscontrol schemes were centered around users because they were built for large timeshare systems.Alternatively, modern network servers largely do not permit users to log in, but instead provide
247 openSUSE Leap 15.2

a variety of network services for users (such as Web, mail, le, and print servers). AppArmorcontrols the access given to network services and other programs to prevent weaknesses frombeing exploited.
Tip: Background Information for AppArmorTo get a more in-depth overview of AppArmor and the overall concept behind it, refer toSection 27.2, “Background Information on AppArmor Profiling”.
29.1 Introducing the AppArmor Framework
This section provides a very basic understanding of what is happening “behind the scenes” (andunder the hood of the YaST interface) when you run AppArmor.
An AppArmor prole is a plain text le containing path entries and access permissions. SeeSection 30.1, “Breaking an AppArmor Profile into Its Parts” for a detailed reference prole. Thedirectives contained in this text le are then enforced by the AppArmor routines to quarantinethe process or program.
The following tools interact in the building and enforcement of AppArmor proles and policies:
aa-status
aa-status reports various aspects of the current state of the running AppArmorconnement.
aa-unconfined
aa-unconfined detects any application running on your system that listens for networkconnections and is not protected by an AppArmor prole. Refer to Section 33.7.3.12, “aa-
unconfined—Identifying Unprotected Processes” for detailed information about this tool.
aa-autodep
aa-autodep creates a basic framework of a prole that needs to be eshed out before itis put to use in production. The resulting prole is loaded and put into complain mode,reporting any behavior of the application that is not (yet) covered by AppArmor rules.Refer to Section 33.7.3.1, “aa-autodep—Creating Approximate Profiles” for detailed informationabout this tool.
aa-genprof
248 Introducing the AppArmor Framework openSUSE Leap 15.2
aa-genprof generates a basic prole and asks you to rene this prole by executing theapplication and generating log events that need to be taken care of by AppArmor policies.You are guided through a series of questions to deal with the log events that have beentriggered during the application's execution. After the prole has been generated, it isloaded and put into enforce mode. Refer to Section 33.7.3.8, “aa-genprof—Generating Profiles”
for detailed information about this tool.
aa-logprof
aa-logprof interactively scans and reviews the log entries generated by an applicationthat is conned by an AppArmor prole in both complain and enforced modes. It assistsyou in generating new entries in the prole concerned. Refer to Section 33.7.3.9, “aa-logprof
—Scanning the System Log” for detailed information about this tool.
aa-easyprof
aa-easyprof provides an easy-to-use interface for AppArmor prole generation. aa-easyprof supports the use of templates and policy groups to quickly prole an application.Note that while this tool can help with policy generation, its utility is dependent on thequality of the templates, policy groups and abstractions used. aa-easyprof may create aprole that is less restricted than creating the prole with aa-genprof and aa-logprof .
aa-complain
aa-complain toggles the mode of an AppArmor prole from enforce to complain.Violations to rules set in a prole are logged, but the prole is not enforced. Refer toSection 33.7.3.2, “aa-complain—Entering Complain or Learning Mode” for detailed informationabout this tool.
aa-enforce
aa-enforce toggles the mode of an AppArmor prole from complain to enforce.Violations to rules set in a prole are logged and not permitted—the prole is enforced.Refer to Section 33.7.3.6, “aa-enforce—Entering Enforce Mode” for detailed information aboutthis tool.
aa-disable
aa-disable disables the enforcement mode for one or more AppArmor proles. Thiscommand will unload the prole from the kernel and prevent it from being loaded onAppArmor start-up. The aa-enforce and aa-complain utilities may be used to changethis behavior.
aa-exec
249 Introducing the AppArmor Framework openSUSE Leap 15.2

aa-exec launches a program conned by the specied AppArmor prole and/ornamespace. If both a prole and namespace are specied, the command will be connedby the prole in the new policy namespace. If only a namespace is specied, the prolename of the current connement will be used. If neither a prole or namespace is specied,the command will be run using standard prole attachment—as if run without aa-exec .
aa-notify
aa-notify is a handy utility that displays AppArmor notications in your desktopenvironment. You can also congure it to display a summary of notications for thespecied number of recent days. For more information, see Section 33.7.3.13, “aa-notify”.
29.2 Determining Programs to Immunize
Now that you have familiarized yourself with AppArmor, start selecting the applications forwhich to build proles. Programs that need proling are those that mediate privilege. Thefollowing programs have access to resources that the person using the program does not have,so they grant the privilege to the user when used:
cron Jobs
Programs that are run periodically by cron . Such programs read input from a variety ofsources and can run with special privileges, sometimes with as much as root privilege.For example, cron can run /usr/sbin/logrotate daily to rotate, compress, or evenmail system logs. For instructions for nding these types of programs, refer to Section 29.3,
“Immunizing cron Jobs”.
Web Applications
Programs that can be invoked through a Web browser, including CGI Perl scripts, PHPpages, and more complex Web applications. For instructions for nding these types ofprograms, refer to Section 29.4.1, “Immunizing Web Applications”.
Network Agents
Programs (servers and clients) that have open network ports. User clients, such as mailclients and Web browsers mediate privilege. These programs run with the privilege towrite to the user's home directory and they process input from potentially hostile remotesources, such as hostile Web sites and e-mailed malicious code. For instructions for ndingthese types of programs, refer to Section 29.4.2, “Immunizing Network Agents”.
250 Determining Programs to Immunize openSUSE Leap 15.2

Conversely, unprivileged programs do not need to be proled. For example, a shell script mightinvoke the cp program to copy a le. Because cp does not by default have its own prole orsubprole, it inherits the prole of the parent shell script. Thus cp can copy any les that theparent shell script's prole can read and write.
29.3 Immunizing cron Jobs
To nd programs that are run by cron , inspect your local cron conguration. Unfortunately,cron conguration is rather complex, so there are numerous les to inspect. Periodic cronjobs are run from these les:
/etc/crontab/etc/cron.d/*/etc/cron.daily/*/etc/cron.hourly/*/etc/cron.monthly/*/etc/cron.weekly/*
The crontab command lists/edits the current user's crontab. To manipulate root 's cron jobs,rst become root , and then edit the tasks with crontab -e or list them with crontab -l .
29.4 Immunizing Network Applications
An automated method for nding network server daemons that should be proled is to use theaa-unconfined tool.
The aa-unconfined tool uses the command netstat -nlp to inspect open ports from insideyour computer, detect the programs associated with those ports, and inspect the set of AppArmorproles that you have loaded. aa-unconfined then reports these programs along with theAppArmor prole associated with each program, or reports “none” (if the program is notconned).
NoteIf you create a new prole, you must restart the program that has been proled to haveit be eectively conned by AppArmor.
251 Immunizing cron Jobs openSUSE Leap 15.2

Below is a sample aa-unconfined output:
3702 1 /usr/sbin/sshd 2 confined by '/usr/sbin/sshd 3 (enforce)'4040 /usr/sbin/smbd confined by '/usr/sbin/smbd (enforce)'4373 /usr/lib/postfix/master confined by '/usr/lib/postfix/master (enforce)'4505 /usr/sbin/httpd2-prefork confined by '/usr/sbin/httpd2-prefork (enforce)'646 /usr/lib/wicked/bin/wickedd-dhcp4 not confined647 /usr/lib/wicked/bin/wickedd-dhcp6 not confined5592 /usr/bin/ssh not confined7146 /usr/sbin/cupsd confined by '/usr/sbin/cupsd (complain)'
1 The rst portion is a number. This number is the process ID number (PID) of the listeningprogram.
2 The second portion is a string that represents the absolute path of the listening program
3 The nal portion indicates the prole conning the program, if any.
Noteaa-unconfined requires root privileges and should not be run from a shell that isconned by an AppArmor prole.
aa-unconfined does not distinguish between one network interface and another, so it reportsall unconned processes, even those that might be listening to an internal LAN interface.
Finding user network client applications is dependent on your user preferences. The aa-unconfined tool detects and reports network ports opened by client applications, but only thoseclient applications that are running at the time the aa-unconfined analysis is performed. Thisis a problem because network services tend to be running all the time, while network clientapplications tend only to be running when the user is interested in them.
Applying AppArmor proles to user network client applications is also dependent on userpreferences. Therefore, we leave the proling of user network client applications as an exercisefor the user.
To aggressively conne desktop applications, the aa-unconfined command supports a --paranoid option, which reports all processes running and the corresponding AppArmor prolesthat might or might not be associated with each process. The user can then decide whether eachof these programs needs an AppArmor prole.
252 Immunizing Network Applications openSUSE Leap 15.2

If you have new or modied proles, you can submit them to the [email protected] list along with a use case for the application behavior that you exercised. The AppArmorteam reviews and may submit the work into openSUSE Leap. We cannot guarantee that everyprole will be included, but we make a sincere eort to include as much as possible.
29.4.1 Immunizing Web Applications
To nd Web applications, investigate your Web server conguration. The Apache Web serveris highly congurable and Web applications can be stored in many directories, depending onyour local conguration. openSUSE Leap, by default, stores Web applications in /srv/www/cgi-bin/ . To the maximum extent possible, each Web application should have an AppArmor prole.
Once you nd these programs, you can use the aa-genprof and aa-logprof tools to createor update their AppArmor proles.
Because CGI programs are executed by the Apache Web server, the prole for Apacheitself, usr.sbin.httpd2-prefork for Apache2 on openSUSE Leap, must be modied toadd execute permissions to each of these programs. For example, adding the line /srv/www/cgi-bin/my_hit_counter.pl rPx grants Apache permission to execute the Perl scriptmy_hit_counter.pl and requires that there be a dedicated prole for my_hit_counter.pl .If my_hit_counter.pl does not have a dedicated prole associated with it, the rule shouldsay /srv/www/cgi-bin/my_hit_counter.pl rix to cause my_hit_counter.pl to inherit theusr.sbin.httpd2-prefork prole.
Some users might nd it inconvenient to specify execute permission for every CGI script thatApache might invoke. Instead, the administrator can grant controlled access to collections of CGIscripts. For example, adding the line /srv/www/cgi-bin/*.{pl,py,pyc} rix allows Apache toexecute all les in /srv/www/cgi-bin/ ending in .pl (Perl scripts) and .py or .pyc (Pythonscripts). As above, the ix part of the rule causes Python scripts to inherit the Apache prole,which is appropriate if you do not want to write individual proles for each CGI script.
NoteIf you want the subprocess connement module ( apache2-mod-apparmor ) functionalitywhen Web applications handle Apache modules ( mod_perl and mod_php ), use theChangeHat features when you add a prole in YaST or at the command line. To takeadvantage of the subprocess connement, refer to Section 34.2, “Managing ChangeHat-Aware
Applications”.
253 Immunizing Web Applications openSUSE Leap 15.2

Proling Web applications that use mod_perl and mod_php requires slightly dierent handling.In this case, the “program” is a script interpreted directly by the module within the Apacheprocess, so no exec happens. Instead, the AppArmor version of Apache calls change_hat()using a subprole (a “hat”) corresponding to the name of the URI requested.
NoteThe name presented for the script to execute might not be the URI, depending on howApache has been congured for where to look for module scripts. If you have conguredyour Apache to place scripts in a dierent place, the dierent names appear in the logle when AppArmor complains about access violations. See Chapter 36, Managing Profiled
Applications.
For mod_perl and mod_php scripts, this is the name of the Perl script or the PHP page requested.For example, adding this subprole allows the localtime.php page to execute and access tothe local system time and locale les:
/usr/bin/httpd2-prefork { # ... ^/cgi-bin/localtime.php { /etc/localtime r, /srv/www/cgi-bin/localtime.php r, /usr/lib/locale/** r, }}
If no subprole has been dened, the AppArmor version of Apache applies the DEFAULT_URIhat. This subprole is sucient to display a Web page. The DEFAULT_URI hat that AppArmorprovides by default is the following:
^DEFAULT_URI { /usr/sbin/suexec2 mixr, /var/log/apache2/** rwl, @{HOME}/public_html r, @{HOME}/public_html/** r, /srv/www/htdocs r, /srv/www/htdocs/** r, /srv/www/icons/*.{gif,jpg,png} r, /srv/www/vhosts r, /srv/www/vhosts/** r, /usr/share/apache2/** r, /var/lib/php/sess_* rwl
254 Immunizing Web Applications openSUSE Leap 15.2

}
To use a single AppArmor prole for all Web pages and CGI scripts served by Apache, agood approach is to edit the DEFAULT_URI subprole. For more information on conning Webapplications with Apache, see Chapter 34, Profiling Your Web Applications Using ChangeHat.
29.4.2 Immunizing Network Agents
To nd network server daemons and network clients (such as fetchmail or Firefox) that needto be proled, you should inspect the open ports on your machine. Also consider the programsthat are answering on those ports, and provide proles for as many of those programs as possible.If you provide proles for all programs with open network ports, an attacker cannot get to thele system on your machine without passing through an AppArmor prole policy.
Scan your server for open network ports manually from outside the machine using a scanner(such as nmap), or from inside the machine using the netstat --inet -n -p command asroot . Then, inspect the machine to determine which programs are answering on the discoveredopen ports.
TipRefer to the man page of the netstat command for a detailed reference of all possibleoptions.
255 Immunizing Network Agents openSUSE Leap 15.2

30 Profile Components and Syntax
Building AppArmor proles to conne an application is very straightforward and intuitive.AppArmor ships with several tools that assist in prole creation. It does not require you to doany programming or script handling. The only task that is required of the administrator is todetermine a policy of strictest access and execute permissions for each application that needsto be hardened.
Updates or modications to the application proles are only required if the softwareconguration or the desired range of activities changes. AppArmor oers intuitive tools tohandle prole updates and modications.
You are ready to build AppArmor proles after you select the programs to prole. To do so, itis important to understand the components and syntax of proles. AppArmor proles containseveral building blocks that help build simple and reusable prole code:
Include Files
Include statements are used to pull in parts of other AppArmor proles to simplify thestructure of new proles.
Abstractions
Abstractions are include statements grouped by common application tasks.
Program Chunks
Program chunks are include statements that contain chunks of proles that are specicto program suites.
Capability Entries
Capability entries are prole entries for any of the POSIX.1e http://en.wikipedia.org/wiki/
POSIX#POSIX.1 Linux capabilities allowing a ne-grained control over what a connedprocess is allowed to do through system calls that require privileges.
Network Access Control Entries
Network Access Control Entries mediate network access based on the address type andfamily.
Local Variable Definitions
Local variables dene shortcuts for paths.
File Access Control Entries
File Access Control Entries specify the set of les an application can access.
256 openSUSE Leap 15.2

rlimit Entries
rlimit entries set and control an application's resource limits.
For help determining the programs to prole, refer to Section 29.2, “Determining Programs to
Immunize”. To start building AppArmor proles with YaST, proceed to Chapter 32, Building and
Managing Profiles with YaST. To build proles using the AppArmor command line interface,proceed to Chapter 33, Building Profiles from the Command Line.
For more details about creating AppArmor proles, see man 5 apparmor .
30.1 Breaking an AppArmor Profile into Its PartsThe easiest way of explaining what a prole consists of and how to create one is to show thedetails of a sample prole, in this case for a hypothetical application called /usr/bin/foo :
#include <tunables/global> 1
# a comment naming the application to confine/usr/bin/foo 2 { 3
#include <abstractions/base> 4
capability setgid 5 , network inet tcp 6 ,
link /etc/sysconfig/foo -> /etc/foo.conf, 7
/bin/mount ux, /dev/{,u} 8 random r, /etc/ld.so.cache r, /etc/foo/* r, /lib/ld-*.so* mr, /lib/lib*.so* mr, /proc/[0-9]** r, /usr/lib/** mr, /tmp/ r, 9
/tmp/foo.pid wr, /tmp/foo.* lrw, /@{HOME} 10 /.foo_file rw, /@{HOME}/.foo_lock kw, owner 11 /shared/foo/** rw, /usr/bin/foobar Cx, 12
/bin/** Px -> bin_generic, 13
# a comment about foo's local (children) profile for /usr/bin/foobar.
257 Breaking an AppArmor Profile into Its Parts openSUSE Leap 15.2

profile /usr/bin/foobar 14 { /bin/bash rmix, /bin/cat rmix, /bin/more rmix, /var/log/foobar* rwl, /etc/foobar r, }
# foo's hat, bar. ^bar 15 { /lib/ld-*.so* mr, /usr/bin/bar px, /var/spool/* rwl, }}
1 This loads a le containing variable denitions.
2 The normalized path to the program that is conned.
3 The curly braces ( {} ) serve as a container for include statements, subproles, path entries,capability entries, and network entries.
4 This directive pulls in components of AppArmor proles to simplify proles.
5 Capability entry statements enable each of the 29 POSIX.1e draft capabilities.
6 A directive determining the kind of network access allowed to the application. For details,refer to Section 30.5, “Network Access Control”.
7 A link pair rule specifying the source and the target of a link. See Section 30.7.6, “Link Pair”
for more information.
8 The curly braces ( {} ) here allow for each of the listed possibilities, one of which is theempty string.
9 A path entry specifying what areas of the le system the program can access. The rst partof a path entry species the absolute path of a le (including regular expression globbing)and the second part indicates permissible access modes (for example r for read, w forwrite, and x for execute). A whitespace of any kind (spaces or tabs) can precede the pathname, but must separate the path name and the mode specier. Spaces between the accessmode and the trailing comma are optional. Find a comprehensive overview of the availableaccess modes in Section 30.7, “File Permission Access Modes”.
10 This variable expands to a value that can be changed without changing the entire prole.
11 An owner conditional rule, granting read and write permission on les owned by the user.Refer to Section 30.7.8, “Owner Conditional Rules” for more information.
258 Breaking an AppArmor Profile into Its Parts openSUSE Leap 15.2

12 This entry denes a transition to the local prole /usr/bin/foobar . Find a comprehensiveoverview of the available execute modes in Section 30.12, “Execute Modes”.
13 A named prole transition to the prole bin_generic located in the global scope. SeeSection 30.12.7, “Named Profile Transitions” for details.
14 The local prole /usr/bin/foobar is dened in this section.
15 This section references a “hat” subprole of the application. For more details on AppArmor'sChangeHat feature, refer to Chapter 34, Profiling Your Web Applications Using ChangeHat.
When a prole is created for a program, the program can access only the les, modes, andPOSIX capabilities specied in the prole. These restrictions are in addition to the native Linuxaccess controls.
Example: To gain the capability CAP_CHOWN , the program must have both access to CAP_CHOWNunder conventional Linux access controls (typically, be a root -owned process) and have thecapability chown in its prole. Similarly, to be able to write to the le /foo/bar the programmust have both the correct user ID and mode bits set in the les attributes and have /foo/bar w in its prole.
Attempts to violate AppArmor rules are recorded in /var/log/audit/audit.log if the auditpackage is installed, or in /var/log/messages , or only in journalctl if no traditional syslogis installed. Often AppArmor rules prevent an attack from working because necessary les arenot accessible and, in all cases, AppArmor connement restricts the damage that the attackercan do to the set of les permitted by AppArmor.
30.2 Profile TypesAppArmor knows four dierent types of proles: standard proles, unattached proles, localproles and hats. Standard and unattached proles are stand-alone proles, each stored in a leunder /etc/apparmor.d/ . Local proles and hats are children proles embedded inside of aparent prole used to provide tighter or alternate connement for a subtask of an application.
30.2.1 Standard Profiles
The default AppArmor prole is attached to a program by its name, so a prole name mustmatch the path to the application it is to conne.
/usr/bin/foo {
259 Profile Types openSUSE Leap 15.2

...}
This prole will be automatically used whenever an unconned process executes /usr/bin/foo .
30.2.2 Unattached Profiles
Unattached proles do not reside in the le system namespace and therefore are notautomatically attached to an application. The name of an unattached prole is preceded by thekeyword profile . You can freely choose a prole name, except for the following limitations:the name must not begin with a : or . character. If it contains a whitespace, it must be quoted.If the name begins with a / , the prole is considered to be a standard prole, so the followingtwo proles are identical:
profile /usr/bin/foo {...}/usr/bin/foo {...}
Unattached proles are never used automatically, nor can they be transitioned to through a Pxrule. They need to be attached to a program by either using a named prole transition (seeSection 30.12.7, “Named Profile Transitions”) or with the change_profile rule (see Section 30.2.5,
“Change rules”).
Unattached proles are useful for specialized proles for system utilities that generally shouldnot be conned by a system-wide prole (for example, /bin/bash ). They can also be used toset up roles or to conne a user.
30.2.3 Local Profiles
Local proles provide a convenient way to provide specialized connement for utility programslaunched by a conned application. They are specied like standard proles, except that theyare embedded in a parent prole and begin with the profile keyword:
/parent/profile { ...
260 Unattached Profiles openSUSE Leap 15.2

profile /local/profile { ... }}
To transition to a local prole, either use a cx rule (see Section 30.12.2, “Discrete Local Profile
Execute Mode (Cx)”) or a named prole transition (see Section 30.12.7, “Named Profile Transitions”).
30.2.4 Hats
AppArmor "hats" are a local proles with some additional restrictions and an implicit ruleallowing for change_hat to be used to transition to them. Refer to Chapter 34, Profiling Your Web
Applications Using ChangeHat for a detailed description.
30.2.5 Change rules
AppArmor provides change_hat and change_profile rules that control domain transitioning.change_hat are specied by dening hats in a prole, while change_profile rules refer toanother prole and start with the keyword change_profile :
change_profile -> /usr/bin/foobar,
Both change_hat and change_profile provide for an application directed prole transition,without having to launch a separate application. change_profile provides a generic one waytransition between any of the loaded proles. change_hat provides for a returnable parentchild transition where an application can switch from the parent prole to the hat prole andif it provides the correct secret key return to the parent prole at a later time.
change_profile is best used in situations where an application goes through a trusted setupphase and then can lower its privilege level. Any resources mapped or opened during the start-upphase may still be accessible after the prole change, but the new prole will restrict the openingof new resources, and will even limit some resources opened before the switch. Specically,memory resources will still be available while capability and le resources (as long as they arenot memory mapped) can be limited.
change_hat is best used in situations where an application runs a virtual machine or aninterpreter that does not provide direct access to the applications resources (for exampleApache's mod_php ). Since change_hat stores the return secret key in the application's memorythe phase of reduced privilege should not have direct access to memory. It is also important that
261 Hats openSUSE Leap 15.2

le access is properly separated, since the hat can restrict accesses to a le handle but does notclose it. If an application does buering and provides access to the open les with buering, theaccesses to these les might not be seen by the kernel and hence not restricted by the new prole.
Warning: Safety of Domain TransitionsThe change_hat and change_profile domain transitions are less secure than a domaintransition done through an exec because they do not aect a process's memory mappings,nor do they close resources that have already been opened.
30.3 Include StatementsInclude statements are directives that pull in components of other AppArmor proles to simplifyproles. Include les retrieve access permissions for programs. By using an include, you cangive the program access to directory paths or les that are also required by other programs.Using includes can reduce the size of a prole.
Include statements normally begin with a hash ( # ) sign. This is confusing because the samehash sign is used for comments inside prole les. Because of this, #include is treated as aninclude only if there is no preceding # ( ##include is a comment) and there is no whitespacebetween # and include ( # include is a comment).
You can also use include without the leading # .
include "/etc/apparmor.d/abstractions/foo"
is the same as using
#include "/etc/apparmor.d/abstractions/foo"
Note: No Trailing ','Note that because includes follow the C pre-processor syntax, they do not have a trailing',' like most AppArmor rules.
By slight changes in syntax, you can modify the behavior of include . If you use "" around theincluding path, you instruct the parser to do an absolute or relative path lookup.
include "/etc/apparmor.d/abstractions/foo" # absolute path
262 Include Statements openSUSE Leap 15.2

include "abstractions/foo" # relative path to the directory of current file
Note that when using relative path includes, when the le is included, it is considered the newcurrent le for its includes. For example, suppose you are in the /etc/apparmor.d/bar le,then
include "abstractions/foo"
includes the le /etc/apparmor.d/abstractions/foo . If then there is
include "example"
inside the /etc/apparmor.d/abstractions/foo le, it includes /etc/apparmor.d/
abstractions/example .
The use of <> species to try the include path (specied by -I , defaults to the /etc/apparmor.d directory) in an ordered way. So assuming the include path is
-I /etc/apparmor.d/ -I /usr/share/apparmor/
then the include statement
include <abstractions/foo>
will try /etc/apparmor.d/abstractions/foo , and if that le does not exist, the next try is /usr/share/apparmor/abstractions/foo .
TipThe default include path can be overridden manually by passing -I to theapparmor_parser , or by setting the include paths in /etc/apparmor/parser.conf :
Include /usr/share/apparmor/Include /etc/apparmor.d/
Multiple entries are allowed, and they are taken in the same order as when they are whenusing -I or --Include from the apparmor_parser command line.
If an include ends with '/', this is considered a directory include, and all les within the directoryare included.
To assist you in proling your applications, AppArmor provides three classes of includes:abstractions, program chunks and tunables.
263 Include Statements openSUSE Leap 15.2

30.3.1 Abstractions
Abstractions are includes that are grouped by common application tasks. These tasks includeaccess to authentication mechanisms, access to name service routines, common graphicsrequirements, and system accounting. Files listed in these abstractions are specic to the namedtask. Programs that require one of these les usually also require other les listed in theabstraction le (depending on the local conguration and the specic requirements of theprogram). Find abstractions in /etc/apparmor.d/abstractions .
30.3.2 Program Chunks
The program-chunks directory ( /etc/apparmor.d/program-chunks ) contains some chunks ofproles that are specic to program suites and not generally useful outside of the suite, thusare never suggested for use in proles by the prole wizards ( aa-logprof and aa-genprof ).Currently, program chunks are only available for the postx program suite.
30.3.3 Tunables
The tunables directory ( /etc/apparmor.d/tunables ) contains global variable denitions.When used in a prole, these variables expand to a value that can be changed without changingthe entire prole. Add all the tunables denitions that should be available to every prole to/etc/apparmor.d/tunables/global .
30.4 Capability Entries (POSIX.1e)
Capability rules are simply the word capability followed by the name of the POSIX.1ecapability as dened in the capabilities(7) man page. You can list multiple capabilities ina single rule, or grant all implemented capabilities with the bare keyword capability .
capability dac_override sys_admin, # multiple capabilitiescapability, # grant all capabilities
264 Abstractions openSUSE Leap 15.2

30.5 Network Access Control
AppArmor allows mediation of network access based on the address type and family. Thefollowing illustrates the network access rule syntax:
network [[<domain> 1 ][<type 2 >][<protocol 3 >]]
1 Supported domains: inet , ax25 , ipx , appletalk , netrom , bridge , x25 , inet6 ,rose , netbeui , security , key , packet , ash , econet , atmsvc , sna , pppox ,wanpipe , bluetooth , unix , atmpvc , netlink , llc , can , tipc , iucv , rxrpc , isdn ,phonet , ieee802154 , caif , alg , nfc , vsock
2 Supported types: stream , dgram , seqpacket , rdm , raw , packet
3 Supported protocols: tcp , udp , icmp
The AppArmor tools support only family and type specication. The AppArmor module emitsonly network DOMAIN TYPE in “ACCESS DENIED” messages. And only these are output by theprole generation tools, both YaST and command line.
The following examples illustrate possible network-related rules to be used in AppArmorproles. Note that the syntax of the last two are not currently supported by the AppArmor tools.
network 1 ,network inet 2 ,network inet6 3 ,network inet stream 4 ,network inet tcp 5 ,network tcp 6 ,
1 Allow all networking. No restrictions applied with regard to domain, type, or protocol.
2 Allow general use of IPv4 networking.
3 Allow general use of IPv6 networking.
4 Allow the use of IPv4 TCP networking.
5 Allow the use of IPv4 TCP networking, paraphrasing the rule above.
6 Allow the use of both IPv4 and IPv6 TCP networking.
265 Network Access Control openSUSE Leap 15.2

30.6 Profile Names, Flags, Paths, and GlobbingA prole is usually attached to a program by specifying a full path to the program's executable.For example in the case of a standard prole (see Section 30.2.1, “Standard Profiles”), the proleis dened by
/usr/bin/foo { ... }
The following sections describe several useful techniques that can be applied when naming aprole or putting a prole in the context of other existing ones, or specifying le paths.
AppArmor explicitly distinguishes directory path names from le path names. Use a trailing /for any directory path that needs to be explicitly distinguished:
/some/random/example/* r
Allow read access to les in the /some/random/example directory.
/some/random/example/ r
Allow read access to the directory only.
/some/**/ r
Give read access to any directories below /some (but not /some/ itself).
/some/random/example/** r
Give read access to les and directories under /some/random/example (but not /some/random/example/ itself).
/some/random/example/**[^/] r
Give read access to les under /some/random/example . Explicitly exclude directories( [^/] ).
Globbing (or regular expression matching) is when you modify the directory path using wildcards to include a group of les or subdirectories. File resources can be specied with a globbingsyntax similar to that used by popular shells, such as csh, Bash, and zsh.
* Substitutes for any number of any characters,except / .
Example: An arbitrary number of le pathelements.
266 Profile Names, Flags, Paths, and Globbing openSUSE Leap 15.2

** Substitutes for any number of characters,including / .
Example: An arbitrary number of pathelements, including entire directories.
? Substitutes for any single character, except/ .
[abc] Substitutes for the single character a , b , orc .
Example: a rule that matches /home[01]/*/.plan allows a program to access .planles for users in both /home0 and /home1 .
[a-c] Substitutes for the single character a , b , orc .
{ab,cd} Expands to one rule to match ab and onerule to match cd .
Example: a rule that matches /{usr,www}/pages/** grants access to Web pages inboth /usr/pages and /www/pages .
[^a] Substitutes for any character except a .
30.6.1 Profile Flags
Prole ags control the behavior of the related prole. You can add prole ags to the proledenition by editing it manually, see the following syntax:
/path/to/profiled/binary flags=(list_of_flags) { [...]}
You can use multiple ags separated by a comma ',' or space ' '. There are three basic types ofprole ags: mode, relative, and attach ags.
Mode ag is complain (illegal accesses are allowed and logged). If it is omitted, the prole isin enforce mode (enforces the policy).
267 Profile Flags openSUSE Leap 15.2

TipA more exible way of setting the whole prole into complain mode is to create a symboliclink from the prole le inside the /etc/apparmor.d/force-complain/ directory.
ln -s /etc/apparmor.d/bin.ping /etc/apparmor.d/force-complain/bin.ping
Relative ags are chroot_relative (states that the prole is relative to the chroot instead ofnamespace) or namespace_relative (the default, with the path being relative to outside thechroot). They are mutually exclusive.
Attach ags consist of two pairs of mutually exclusive ags: attach_disconnected orno_attach_disconnected (determine if path names resolved to be outside of the namespaceare attached to the root, which means they have the '/' character at the beginning), andchroot_attach or chroot_no_attach (control path name generation when in a chrootenvironment while a le is accessed that is external to the chroot but within the namespace).
30.6.2 Using Variables in Profiles
AppArmor allows to use variables holding paths in proles. Use global variables to make yourproles portable and local variables to create shortcuts for paths.
A typical example of when global variables come in handy are network scenarios in whichuser home directories are mounted in dierent locations. Instead of rewriting paths to homedirectories in all aected proles, you only need to change the value of a variable. Globalvariables are dened under /etc/apparmor.d/tunables and need to be made available via aninclude statement. Find the variable denitions for this use case ( @{HOME} and @{HOMEDIRS} )in the /etc/apparmor.d/tunables/home le.
Local variables are dened at the head of a prole. This is useful to provide the base of for achrooted path, for example:
@{CHROOT_BASE}=/tmp/foo/sbin/rsyslogd {...# chrooted applications@{CHROOT_BASE}/var/lib/*/dev/log w,@{CHROOT_BASE}/var/log/** w,...}
268 Using Variables in Profiles openSUSE Leap 15.2

In the following example, while @{HOMEDIRS} lists where all the user home directories arestored, @{HOME} is a space-separated list of home directories. Later on, @{HOMEDIRS} isexpanded by two new specic places where user home directories are stored.
@{HOMEDIRS}=/home/@{HOME}=@{HOMEDIRS}/*/ /root/[...]@{HOMEDIRS}+=/srv/nfs/home/ /mnt/home/
NoteWith the current AppArmor tools, variables can only be used when manually editing andmaintaining a prole.
30.6.3 Pattern Matching
Prole names can contain globbing expressions allowing the prole to match against multiplebinaries.
The following example is valid for systems where the foo binary resides either in /usr/binor /bin .
/{usr/,}bin/foo { ... }
In the following example, when matching against the executable /bin/foo , the /bin/fooprole is an exact match so it is chosen. For the executable /bin/fat , the prole /bin/foodoes not match, and because the /bin/f* prole is more specic (less general) than /bin/** ,the /bin/f* prole is chosen.
/bin/foo { ... }
/bin/f* { ... }
/bin/** { ... }
For more information on prole name globbing examples, see the man page of AppArmor, man5 apparmor.d, , section Globbing .
269 Pattern Matching openSUSE Leap 15.2

30.6.4 Namespaces
Namespaces are used to provide dierent proles sets. Say one for the system, another fora chroot environment or container. Namespaces are hierarchical—a namespace can see itschildren but a child cannot see its parent. Namespace names start with a colon : followed byan alphanumeric string, a trailing colon : and an optional double slash // , such as
:childNameSpace://
Proles loaded to a child namespace will be prexed with their namespace name (viewed froma parent's perspective):
:childNameSpace://apache
Namespaces can be entered via the change_profile API, or named prole transitions:
/path/to/executable px -> :childNameSpace://apache
30.6.5 Profile Naming and Attachment Specification
Proles can have a name, and an attachment specication. This allows for proles with a logicalname that can be more meaningful to users/administrators than a prole name that containspattern matching (see Section 30.6.3, “Pattern Matching”). For example, the default prole
/** { ... }
can be named
profile default /** { ... }
Also, a prole with pattern matching can be named. For example:
/usr/lib64/firefox*/firefox-*bin { ... }
can be named
profile firefox /usr/lib64/firefox*/firefox-*bin { ... }
270 Namespaces openSUSE Leap 15.2

30.6.6 Alias Rules
Alias rules provide an alternative way to manipulate prole path mappings to site speciclayouts. They are an alternative form of path rewriting to using variables, and are done postvariable resolution. The alias rule says to treat rules that have the same source prex as if therules are at target prex.
alias /home/ -> /usr/home/
All the rules that have a prex match to /home/ will provide access to /usr/home/ . For example
/home/username/** r,
allows as well access to
/usr/home/username/** r,
Aliases provide a quick way of remapping rules without the need to rewrite them. They keepthe source path still accessible—in our example, the alias rule keeps the paths under /home/still accessible.
With the alias rule, you can point to multiple targets at the same time.
alias /home/ -> /usr/home/alias /home/ -> /mnt/home/
NoteWith the current AppArmor tools, alias rules can only be used when manually editingand maintaining a prole.
TipInsert global alias denitions in the le /etc/apparmor.d/tunables/alias .
30.7 File Permission Access ModesFile permission access modes consist of combinations of the following modes:
r Read mode
271 Alias Rules openSUSE Leap 15.2

w Write mode (mutually exclusive to a )
a Append mode (mutually exclusive to w )
k File locking mode
l Link mode
link FILE -> TARGET Link pair rule (cannot be combined withother access modes)
30.7.1 Read Mode (r)
Allows the program to have read access to the resource. Read access is required for shell scriptsand other interpreted content and determines if an executing process can core dump.
30.7.2 Write Mode (w)
Allows the program to have write access to the resource. Files must have this permission if theyare to be unlinked (removed).
30.7.3 Append Mode (a)
Allows a program to write to the end of a le. In contrast to the w mode, the append mode doesnot include the ability to overwrite data, to rename, or to remove a le. The append permissionis typically used with applications who need to be able to write to log les, but which shouldnot be able to manipulate any existing data in the log les. As the append permission is a subsetof the permissions associated with the write mode, the w and a permission ags cannot be usedtogether and are mutually exclusive.
30.7.4 File Locking Mode (k)
The application can take le locks. Former versions of AppArmor allowed les to be locked ifan application had access to them. By using a separate le locking mode, AppArmor makes surelocking is restricted only to those les which need le locking and tightens security as lockingcan be used in several denial of service attack scenarios.
272 Read Mode (r) openSUSE Leap 15.2

30.7.5 Link Mode (l)
The link mode mediates access to hard links. When a link is created, the target le must havethe same access permissions as the link created (but the destination does not need link access).
30.7.6 Link Pair
The link mode grants permission to link to arbitrary les, provided the link has a subset of thepermissions granted by the target (subset permission test).
/srv/www/htdocs/index.html rl,
By specifying origin and destination, the link pair rule provides greater control over how hardlinks are created. Link pair rules by default do not enforce the link subset permission test thatthe standard rules link permission requires.
link /srv/www/htdocs/index.html -> /var/www/index.html
To force the rule to require the test, the subset keyword is used. The following rules areequivalent:
/var/www/index.html l,link subset /var/www/index.html -> /**,
NoteCurrently link pair rules are not supported by YaST and the command line tools. Manuallyedit your proles to use them. Updating such proles using the tools is safe, because thelink pair entries will not be touched.
30.7.7 Optional allow and file Rules
The allow prex is optional, and it is idiomatically implied if not specied and the deny (seeSection 30.7.9, “Deny Rules”) keyword is not used.
allow file /example r,allow /example r,allow network,
You can also use the optional file keyword. If you omit it and there are no other rule typesthat start with a keyword, such as network or mount , it is automatically implied.
273 Link Mode (l) openSUSE Leap 15.2

file /example/rule r,
is equivalent to
/example/rule r,
The following rule grants access to all les:
file,
which is equal to
/** rwmlk,
File rules can use leading or trailing permissions. The permissions should not be specied as atrailing permission, but rather used at the start of the rule. This is important in that it makesle rules behave like any other rule types.
/path rw, # old stylerw /path, # leading permissionfile rw /path, # with explicit 'file' keywordallow file rw /path, # optional 'allow' keyword added
30.7.8 Owner Conditional Rules
The le rules can be extended so that they can be conditional upon the user being the owner ofthe le (the fsuid needs to match the le's uid). For this purpose the owner keyword is put infront of the rule. Owner conditional rules accumulate like regular le rules do.
owner /home/*/** rw
When using le ownership conditions with link rules the ownership test is done against thetarget le so the user must own the le to be able to link to it.
Note: Precedence of Regular File RulesOwner conditional rules are considered a subset of regular le rules. If a regular le ruleoverlaps with an owner conditional le rule, the rules are merged. Consider the followingexample.
/foo r,owner /foo rw, # or w,
The rules are merged—it results in r for everybody, and w for the owner only.
274 Owner Conditional Rules openSUSE Leap 15.2

TipTo address everybody but the owner of the le, use the keyword other .
owner /foo rw,other /foo r,
30.7.9 Deny Rules
Deny rules can be used to annotate or quiet known rejects. The prole generating tools will notask about a known reject treated with a deny rule. Such a reject will also not show up in theaudit logs when denied, keeping the log les lean. If this is not desired, put the keyword auditin front of the deny entry.
It is also possible to use deny rules in combination with allow rules. This allows you to specifya broad allow rule, and then subtract a few known les that should not be allowed. Deny rulescan also be combined with owner rules, to deny les owned by the user. The following exampleallows read/write access to everything in a users directory except write access to the .ssh/ les:
deny /home/*/.ssh/** w,owner /home/*/** rw,
The extensive use of deny rules is generally not encouraged, because it makes it much harderto understand what a prole does. However a judicious use of deny rules can simplify proles.Therefore the tools only generate proles denying specic les and will not use globbing indeny rules. Manually edit your proles to add deny rules using globbing. Updating such prolesusing the tools is safe, because the deny entries will not be touched.
30.8 Mount RulesAppArmor can limit mount and unmount operations, including le system types and mount ags.The rule syntax is based on the mount command syntax and starts with one of the keywordsmount , remount , or umount . Conditions are optional and unspecied conditionals are assumedto match all entries. For example, not specifying a le system means that all le systems arematched.
Conditionals can be specied by specifying conditionals with options= or options in .
275 Deny Rules openSUSE Leap 15.2

options= species conditionals that have to be met exactly. The rule
mount options=ro /dev/foo -E /mnt/,
matches
root # mount -o ro /dev/foo /mnt
but does not match
root # mount -o ro,atime /dev/foo /mntroot # mount -o rw /dev/foo /mnt
options in requires that at least one of the listed mount options is used. The rule
mount options in (ro,atime) /dev/foo -> /mnt/,
matches
root # mount -o ro /dev/foo /mntroot # mount -o ro,atime /dev/foo /mntroot # mount -o atime /dev/foo /mnt
but does not match
root # mount -o ro,sync /dev/foo /mntroot # mount -o ro,atime,sync /dev/foo /mntroot # mount -o rw /dev/foo /mntroot # mount -o rw,noatime /dev/foo /mntroot # mount /dev/foo /mnt
With multiple conditionals, the rule grants permission for each set of options. The rule
mount options=ro options=atime
matches
root # mount -o ro /dev/foo /mntroot # mount -o atime /dev/foo /mnt
but does not match
root # mount -o ro,atime /dev/foo /mnt
Separate mount rules are distinct and the options do not accumulate. The rules
276 Mount Rules openSUSE Leap 15.2

mount options=ro,mount options=atime,
are not equivalent to
mount options=(ro,atime),mount options in (ro,atime),
The following rule allows mounting /dev/foo on /mnt/ read only and using inode access timesor allows mounting /dev/foo on /mnt/ with some combination of 'nodev' and 'user'.
mount options=(ro, atime) options in (nodev, user) /dev/foo -> /mnt/,
allows
root # mount -o ro,atime /dev/foo /mntroot # mount -o nodev /dev/foo /mntroot # mount -o user /dev/foo /mntroot # mount -o nodev,user /dev/foo /mnt
30.9 Pivot Root RulesAppArmor can limit changing the root le system. The syntax is
pivot_root [oldroot=OLD_ROOT] NEW_ROOT
The paths specied in 'pivot_root' rules must end with '/' since they are directories.
# Allow any pivotpivot_root,
# Allow pivoting to any new root directory and putting the old root# directory at /mnt/root/old/pivot_root oldroot=/mnt/root/old/,
# Allow pivoting the root directory to /mnt/root/pivot_root /mnt/root/,
# Allow pivoting to /mnt/root/ and putting the old root directory at# /mnt/root/old/pivot_root oldroot=/mnt/root/old/ /mnt/root/,
# Allow pivoting to /mnt/root/, putting the old root directory at# /mnt/root/old/ and transition to the /mnt/root/sbin/init profile
277 Pivot Root Rules openSUSE Leap 15.2

pivot_root oldroot=/mnt/root/old/ /mnt/root/ -> /mnt/root/sbin/init,
30.10 PTrace RulesAppArmor supports limiting ptrace system calls. ptrace rules are accumulated so that the grantedptrace permissions are the union of all the listed ptrace rule permissions. If a rule does notspecify an access list, permissions are implicitly granted.
The trace and tracedby permissions control ptrace(2); read and readby control proc(5)le system access, kcmp(2), futexes (get_robust_list(2)) and perf trace events.
For a ptrace operation to be allowed, the tracing and traced processes need the correctpermissions. This means that the tracing process needs the trace permission and the tracedprocess needs the tracedby permission.
Example AppArmor PTrace rules:
# Allow all PTrace accessptrace,
# Explicitly allow all PTrace access,ptrace (read, readby, trace, tracedby),
# Explicitly deny use of ptrace(2)deny ptrace (trace),
# Allow unconfined processes (eg, a debugger) to ptrace usptrace (readby, tracedby) peer=unconfined,
# Allow ptrace of a process running under the /usr/bin/foo profileptrace (trace) peer=/usr/bin/foo,
30.11 Signal RulesAppArmor supports limiting inter-process signals. AppArmor signal rules are accumulated sothat the granted signal permissions are the union of all the listed signal rule permissions.AppArmor signal permissions are implied when a rule does not explicitly state an access list.
The sending and receiving process must both have the correct permissions.
Example signal rules:
# Allow all signal access
278 PTrace Rules openSUSE Leap 15.2

signal,
# Explicitly deny sending the HUP and INT signalsdeny signal (send) set=(hup, int),
# Allow unconfined processes to send us signalssignal (receive) peer=unconfined,
# Allow sending of signals to a process running under the /usr/bin/foo# profilesignal (send) peer=/usr/bin/foo,
# Allow checking for PID existencesignal (receive, send) set=("exists"),
# Allow us to signal ourselves using the built-in @{profile_name} variablesignal peer=@{profile_name},
# Allow two real-time signalssignal set=(rtmin+0 rtmin+32),
30.12 Execute ModesExecute modes, also named prole transitions, consist of the following modes:
Px Discrete prole execute mode
Cx Discrete local prole execute mode
Ux Unconned execute mode
ix Inherit execute mode
m Allow PROT_EXEC with mmap(2) calls
30.12.1 Discrete Profile Execute Mode (Px)
This mode requires that a discrete security prole is dened for a resource executed at anAppArmor domain transition. If there is no prole dened, the access is denied.
Incompatible with Ux , ux , px , and ix .
279 Execute Modes openSUSE Leap 15.2

30.12.2 Discrete Local Profile Execute Mode (Cx)
As Px , but instead of searching the global prole set, Cx only searches the local proles ofthe current prole. This prole transition provides a way for an application to have alternateproles for helper applications.
Note: Limitations of the Discrete Local Profile Execute Mode(Cx)Currently, Cx transitions are limited to top level proles and cannot be used in hats andchildren proles. This restriction will be removed in the future.
Incompatible with Ux , ux , Px , px , cx , and ix .
30.12.3 Unconfined Execute Mode (Ux)
Allows the program to execute the resource without any AppArmor prole applied to theexecuted resource. This mode is useful when a conned program needs to be able to perform aprivileged operation, such as rebooting the machine. By placing the privileged section in anotherexecutable and granting unconned execution rights, it is possible to bypass the mandatoryconstraints imposed on all conned processes. Allowing a root process to go unconned meansit can change AppArmor policy itself. For more information about what is constrained, see theapparmor(7) man page.
This mode is incompatible with ux , px , Px , and ix .
30.12.4 Unsafe Exec Modes
Use the lowercase versions of exec modes— px , cx , ux—only in very special cases. They donot scrub the environment of variables such as LD_PRELOAD . As a result, the calling domainmay have an undue amount of inuence over the called resource. Use these modes only if thechild absolutely must be run unconned and LD_PRELOAD must be used. Any prole using suchmodes provides negligible security. Use at your own risk.
280 Discrete Local Profile Execute Mode (Cx) openSUSE Leap 15.2

30.12.5 Inherit Execute Mode (ix)
ix prevents the normal AppArmor domain transition on execve(2) when the proled programexecutes the named program. Instead, the executed resource inherits the current prole.
This mode is useful when a conned program needs to call another conned program withoutgaining the permissions of the target's prole or losing the permissions of the current prole.There is no version to scrub the environment because ix executions do not change privileges.
Incompatible with cx , ux , and px . Implies m .
30.12.6 Allow Executable Mapping (m)
This mode allows a le to be mapped into memory using mmap(2) 's PROT_EXEC ag. This agmarks the pages executable. It is used on some architectures to provide non executable datapages, which can complicate exploit attempts. AppArmor uses this mode to limit which les awell-behaved program (or all programs on architectures that enforce non executable memoryaccess controls) may use as libraries, to limit the eect of invalid -L ags given to ld(1) andLD_PRELOAD , LD_LIBRARY_PATH , given to ld.so(8) .
30.12.7 Named Profile Transitions
By default, the px and cx (and their clean exec variants, too) transition to a prole whose namematches the executable name. With named prole transitions, you can specify a prole to betransitioned to. This is useful if multiple binaries need to share a single prole, or if they need touse a dierent prole than their name would specify. Named prole transitions can be used withcx , Cx , px and Px . Currently there is a limit of twelve named prole transitions per prole.
Named prole transitions use -> to indicate the name of the prole that needs to be transitionedto:
/usr/bin/foo{ /bin/** px -> shared_profile, ... /usr/*bash cx -> local_profile, ... profile local_profile { ... }
281 Inherit Execute Mode (ix) openSUSE Leap 15.2
}
Note: Difference Between Normal and Named TransitionsWhen used with globbing, normal transitions provide a “one to many” relationship— /
bin/** px will transition to /bin/ping , /bin/cat , etc, depending on the programbeing run.
Named transitions provide a “many to one” relationship—all programs that match therule regardless of their name will transition to the specied prole.
Named prole transitions show up in the log as having the mode Nx . The name of theprole to be changed to is listed in the name2 eld.
30.12.8 Fallback Modes for Profile Transitions
The px and cx transitions specify a hard dependency—if the specied prole does not exist, theexec will fail. With the inheritance fallback, the execution will succeed but inherit the currentprole. To specify inheritance fallback, ix is combined with cx , Cx , px and Px into themodes cix , Cix , pix and Pix .
/path Cix -> profile_name,
or
Cix /path -> profile_name,
where -> profile_name is optional.
The same applies if you add the unconned ux mode, where the resulting modes are cux , CUx ,pux and PUx . These modes allow falling back to “unconned” when the specied prole isnot found.
/path PUx -> profile_name,
or
PUx /path -> profile_name,
where -> profile_name is optional.
The fallback modes can be used with named prole transitions, too.
282 Fallback Modes for Profile Transitions openSUSE Leap 15.2

30.12.9 Variable Settings in Execution Modes
When choosing one of the Px, Cx or Ux execution modes, take into account that the followingenvironment variables are removed from the environment before the child process inherits it. Asa consequence, applications or processes relying on any of these variables do not work anymoreif the prole applied to them carries Px, Cx or Ux ags:
GCONV_PATH
GETCONF_DIR
HOSTALIASES
LD_AUDIT
LD_DEBUG
LD_DEBUG_OUTPUT
LD_DYNAMIC_WEAK
LD_LIBRARY_PATH
LD_ORIGIN_PATH
LD_PRELOAD
LD_PROFILE
LD_SHOW_AUXV
LD_USE_LOAD_BIAS
LOCALDOMAIN
LOCPATH
MALLOC_TRACE
NLSPATH
RESOLV_HOST_CONF
RES_OPTIONS
TMPDIR
TZDIR
283 Variable Settings in Execution Modes openSUSE Leap 15.2

30.12.10 safe and unsafe Keywords
You can use the safe and unsafe keywords for rules instead of using the case modier ofexecution modes. For example
/example_rule Px,
is the same as any of the following
safe /example_rule px,safe /example_rule Px,safe px /example_rule,safe Px /example_rule,
and the rule
/example_rule px,
is the same as any of
unsafe /example_rule px,unsafe /example_rule Px,unsafe px /example_rule,unsafe Px /example_rule,
The safe / unsafe keywords are mutually exclusive and can be used in a le rule after theowner keyword, so the order of rule keywords is
[audit] [deny] [owner] [safe|unsafe] file_rule
30.13 Resource Limit ControlAppArmor can set and control an application's resource limits (rlimits, also known as ulimits).By default, AppArmor does not control application's rlimits, and it will only control those limitsspecied in the conning prole. For more information about resource limits, refer to thesetrlimit(2) , ulimit(1) , or ulimit(3) man pages.
AppArmor leverages the system's rlimits and as such does not provide an additional auditingthat would normally occur. It also cannot raise rlimits set by the system, AppArmor rlimits canonly reduce an application's current resource limits.
The values will be inherited by the children of a process and will remain even if a new proleis transitioned to or the application becomes unconned. So when an application transitions toa new prole, that prole can further reduce the application's rlimits.
284 safe and unsafe Keywords openSUSE Leap 15.2

AppArmor's rlimit rules will also provide mediation of setting an application's hard limits, shouldit try to raise them. The application cannot raise its hard limits any further than specied in theprole. The mediation of raising hard limits is not inherited as the set value is, so that when theapplication transitions to a new prole it is free to raise its limits as specied in the prole.
AppArmor's rlimit control does not aect an application's soft limits beyond ensuring that theyare less than or equal to the application's hard limits.
AppArmor's hard limit rules have the general form of:
set rlimit RESOURCE <= value,
where RESOURCE and VALUE are to be replaced with the following values:
cpu
CPU time limit in seconds.
fsize , data , stack , core , rss , as , memlock , msgqueue
a number in bytes, or a number with a sux where the sux can be K/KB (kilobytes), M/MB (megabytes), G/GB (gigabytes), for example
rlimit data <= 100M,
fsize , nofile , locks , sigpending , nproc *, rtprio
a number greater or equal to 0
nice
a value between -20 and 19
*The nproc rlimit is handled dierent than all the other rlimits. Instead of indicating the standardprocess rlimit it controls the maximum number of processes that can be running under the proleat any time. When the limit is exceeded the creation of new processes under the prole will failuntil the number of currently running processes is reduced.
NoteCurrently the tools cannot be used to add rlimit rules to proles. The only way to addrlimit controls to a prole is to manually edit the prole with a text editor. The tools willstill work with proles containing rlimit rules and will not remove them, so it is safe touse the tools to update proles containing them.
285 Resource Limit Control openSUSE Leap 15.2

30.14 Auditing RulesAppArmor provides the ability to audit given rules so that when they are matched an auditmessage will appear in the audit log. To enable audit messages for a given rule, the auditkeyword is put in front of the rule:
audit /etc/foo/* rw,
If it is desirable to audit only a given permission the rule can be split into two rules. The followingexample will result in audit messages when les are opened for writing, but not when they areopened for reading:
audit /etc/foo/* w,/etc/foo/* r,
NoteAudit messages are not generated for every read or write of a le but only when a leis opened for reading or writing.
Audit control can be combined with owner / other conditional le rules to provide auditingwhen users access les they own/do not own:
audit owner /home/*/.ssh/** rw,audit other /home/*/.ssh/** r,
286 Auditing Rules openSUSE Leap 15.2

31 AppArmor Profile Repositories
AppArmor ships with a set of proles enabled by default. These are created by the AppArmordevelopers, and are stored in /etc/apparmor.d . In addition to these proles, openSUSE Leapships proles for individual applications together with the relevant application. These prolesare not enabled by default, and reside under another directory than the standard AppArmorproles, /usr/share/apparmor/extra-profiles .
The AppArmor tools (YaST, aa-genprof and aa-logprof ) support the use of a local repository.Whenever you start to create a new prole from scratch, and there already is an inactive prolein your local repository, you are asked whether you want to use the existing inactive one from/usr/share/apparmor/extra-profiles and whether you want to base your eorts on it. Ifyou decide to use this prole, it gets copied over to the directory of proles enabled by default( /etc/apparmor.d ) and loaded whenever AppArmor is started. Any further adjustments willbe done to the active prole under /etc/apparmor.d .
287 openSUSE Leap 15.2

32 Building and Managing Profiles with YaST
YaST provides a basic way to build proles and manage AppArmor® proles. It provides twointerfaces: a graphical one and a text-based one. The text-based interface consumes less resourcesand bandwidth, making it a better choice for remote administration, or for times when a localgraphical environment is inconvenient. Although the interfaces have diering appearances, theyoer the same functionality in similar ways. Another alternative is to use AppArmor commands,which can control AppArmor from a terminal window or through remote connections. Thecommand line tools are described in Chapter 33, Building Profiles from the Command Line.
Start YaST from the main menu and enter your root password when prompted for it.Alternatively, start YaST by opening a terminal window, logging in as root , and entering yast2for the graphical mode or yast for the text-based mode.
In the Security and Users section, there is an AppArmor Conguration icon. Click it to launch theAppArmor YaST module.
32.1 Manually Adding a Profile
AppArmor enables you to create an AppArmor prole by manually adding entries into theprole. Select the application for which to create a prole, then add entries.
1. Start YaST, select AppArmor Conguration, and click Manually Add Prole in the mainwindow.
2. Browse your system to nd the application for which to create a prole.
3. When you nd the application, select it and click Open. A basic, empty prole appears inthe AppArmor Prole Dialog window.
4. In AppArmor Prole Dialog, add, edit, or delete AppArmor prole entries by clicking thecorresponding buttons and referring to Section 32.2.1, “Adding an Entry”, Section 32.2.2, “Editing
an Entry”, or Section 32.2.3, “Deleting an Entry”.
5. When nished, click Done.
288 Manually Adding a Profile openSUSE Leap 15.2

32.2 Editing Profiles
TipYaST oers basic manipulation for AppArmor proles, such as creating or editing.However, the most straightforward way to edit an AppArmor prole is to use a text editorsuch as vi :
tux > sudo vi /etc/apparmor.d/usr.sbin.httpd2-prefork
TipThe vi editor also includes syntax (error) highlighting and syntax error highlighting,which visually warns you when the syntax of the edited AppArmor prole is wrong.
AppArmor enables you to edit AppArmor proles manually by adding, editing, or deletingentries. To edit a prole, proceed as follows:
1. Start YaST, select AppArmor Conguration, and click Manage Existing Proles in the mainwindow.
289 Editing Profiles openSUSE Leap 15.2

2. From the list of proled applications, select the prole to edit.
3. Click Edit. The AppArmor Prole Dialog window displays the prole.
290 Editing Profiles openSUSE Leap 15.2

4. In the AppArmor Prole Dialog window, add, edit, or delete AppArmor prole entriesby clicking the corresponding buttons and referring to Section 32.2.1, “Adding an Entry”,Section 32.2.2, “Editing an Entry”, or Section 32.2.3, “Deleting an Entry”.
5. When you are nished, click Done.
6. In the pop-up that appears, click Yes to conrm your changes to the prole and reloadthe AppArmor prole set.
Tip: Syntax Checking in AppArmorAppArmor contains a syntax check that noties you of any syntax errors in proles youare trying to process with the YaST AppArmor tools. If an error occurs, edit the prolemanually as root and reload the prole set with systemctl reload apparmor .
32.2.1 Adding an Entry
The Add Entry button in the AppArmor Prole Window lists types of entries you can add to theAppArmor prole.
291 Adding an Entry openSUSE Leap 15.2

From the list, select one of the following:
File
In the pop-up window, specify the absolute path of a le, including the type of accesspermitted. When nished, click OK.You can use globbing if necessary. For globbing information, refer to Section 30.6,
“Profile Names, Flags, Paths, and Globbing”. For le access permission information, refer toSection 30.7, “File Permission Access Modes”.
Directory
In the pop-up window, specify the absolute path of a directory, including the type of accesspermitted. You can use globbing if necessary. When nished, click OK.For globbing information, refer to Section 30.6, “Profile Names, Flags, Paths, and Globbing”. Forle access permission information, refer to Section 30.7, “File Permission Access Modes”.
292 Adding an Entry openSUSE Leap 15.2

Network Rule
In the pop-up window, select the appropriate network family and the socket type. For moreinformation, refer to Section 30.5, “Network Access Control”.
Capability
In the pop-up window, select the appropriate capabilities. These are statements that enableeach of the 32 POSIX.1e capabilities. Refer to Section 30.4, “Capability Entries (POSIX.1e)” formore information about capabilities. When nished making your selections, click OK.
293 Adding an Entry openSUSE Leap 15.2

Include File
In the pop-up window, browse to the les to use as includes. Includes are directives thatpull in components of other AppArmor proles to simplify proles. For more information,refer to Section 30.3, “Include Statements”.
Hat
In the pop-up window, specify the name of the subprole (hat) to add to your currentprole and click Create Hat. For more information, refer to Chapter 34, Profiling Your Web
Applications Using ChangeHat.
294 Adding an Entry openSUSE Leap 15.2

32.2.2 Editing an Entry
When you select Edit Entry, a pop-up window opens. From here, edit the selected entry.
In the pop-up window, edit the entry you need to modify. You can use globbing if necessary.When nished, click OK.
For globbing information, refer to Section 30.6, “Profile Names, Flags, Paths, and Globbing”. For accesspermission information, refer to Section 30.7, “File Permission Access Modes”.
32.2.3 Deleting an Entry
To delete an entry in a given prole, select Delete Entry. AppArmor removes the selected proleentry.
32.3 Deleting a Profile
AppArmor enables you to delete an AppArmor prole manually. Simply select the applicationfor which to delete a prole then delete it as follows:
1. Start YaST, select AppArmor Conguration, and click Manage Existing Proles in the mainwindow.
2. Select the prole to delete.
3. Click Delete.
4. In the pop-up that opens, click Yes to delete the prole and reload the AppArmor proleset.
32.4 Managing AppArmor
You can change the status of AppArmor by enabling or disabling it. Enabling AppArmor protectsyour system from potential program exploitation. Disabling AppArmor, even if your proleshave been set up, removes protection from your system. To change the status of AppArmor, startYaST, select AppArmor Conguration, and click Settings in the main window.
295 Editing an Entry openSUSE Leap 15.2

To change the status of AppArmor, continue as described in Section 32.4.1, “Changing AppArmor
Status”. To change the mode of individual proles, continue as described in Section 32.4.2,
“Changing the Mode of Individual Profiles”.
32.4.1 Changing AppArmor Status
When you change the status of AppArmor, set it to enabled or disabled. When AppArmor isenabled, it is installed, running, and enforcing the AppArmor security policies.
1. Start YaST, select AppArmor Conguration, and click Settings in the main window.
2. Enable AppArmor by checking Enable AppArmor or disable AppArmor by deselecting it.
3. Click Done in the AppArmor Conguration window.
TipYou always need to restart running programs to apply the proles to them.
296 Changing AppArmor Status openSUSE Leap 15.2

32.4.2 Changing the Mode of Individual Profiles
AppArmor can apply proles in two dierent modes. In complain mode, violations of AppArmorprole rules, such as the proled program accessing les not permitted by the prole, aredetected. The violations are permitted, but also logged. This mode is convenient for developingproles and is used by the AppArmor tools for generating proles. Loading a prole in enforcemode enforces the policy dened in the prole, and reports policy violation attempts torsyslogd (or auditd or journalctl , depending on system conguration).
The Prole Mode Conguration dialog allows you to view and edit the mode of currently loadedAppArmor proles. This feature is useful for determining the status of your system during proledevelopment. During systemic proling (see Section 33.7.2, “Systemic Profiling”), you can use thistool to adjust and monitor the scope of the proles for which you are learning behavior.
To edit an application's prole mode, proceed as follows:
1. Start YaST, select AppArmor Conguration, and click Settings in the main window.
2. In the Congure Prole Modes section, select Congure.
3. Select the prole for which to change the mode.
4. Select Toggle Mode to set this prole to complain mode or to enforce mode.
5. Apply your settings and leave YaST with Done.
To change the mode of all proles, use Set All to Enforce or Set All to Complain.
Tip: Listing the Profiles AvailableBy default, only active proles are listed (any prole that has a matching applicationinstalled on your system). To set up a prole before installing the respective application,click Show All Proles and select the prole to congure from the list that appears.
297 Changing the Mode of Individual Profiles openSUSE Leap 15.2

33 Building Profiles from the Command Line
AppArmor® provides the user the ability to use a command line interface rather than a graphicalinterface to manage and congure the system security. Track the status of AppArmor and create,delete, or modify AppArmor proles using the AppArmor command line tools.
Tip: Background InformationBefore starting to manage your proles using the AppArmor command line tools, checkout the general introduction to AppArmor given in Chapter 29, Immunizing Programs andChapter 30, Profile Components and Syntax.
33.1 Checking the AppArmor StatusAppArmor can be in any one of three states:
Unloaded
AppArmor is not activated in the kernel.
Running
AppArmor is activated in the kernel and is enforcing AppArmor program policies.
Stopped
AppArmor is activated in the kernel, but no policies are enforced.
Detect the state of AppArmor by inspecting /sys/kernel/security/apparmor/profiles .If cat /sys/kernel/security/apparmor/profiles reports a list of proles, AppArmor isrunning. If it is empty and returns nothing, AppArmor is stopped. If the le does not exist,AppArmor is unloaded.
Manage AppArmor with systemctl . It lets you perform the following operations:
sudo systemctl start apparmor
Behavior depends on the state of AppArmor. If it is not activated, start activates andstarts it, putting it in the running state. If it is stopped, start causes the re-scan ofAppArmor proles usually found in /etc/apparmor.d and puts AppArmor in the runningstate. If AppArmor is already running, start reports a warning and takes no action.
298 Checking the AppArmor Status openSUSE Leap 15.2

Note: Already Running ProcessesAlready running processes need to be restarted to apply the AppArmor proles onthem.
sudo systemctl stop apparmor
Stops AppArmor if it is running by removing all proles from kernel memory, eectivelydisabling all access controls, and putting AppArmor into the stopped state. If the AppArmoris already stopped, stop tries to unload the proles again, but nothing happens.
sudo systemctl reload apparmor
Causes the AppArmor module to re-scan the proles in /etc/apparmor.d withoutunconning running processes. Freshly created proles are enforced and recently deletedones are removed from the /etc/apparmor.d directory.
33.2 Building AppArmor Profiles
The AppArmor module prole denitions are stored in the /etc/apparmor.d directory asplain text les. For a detailed description of the syntax of these les, refer to Chapter 30, Profile
Components and Syntax.
All les in the /etc/apparmor.d directory are interpreted as proles and are loaded as such.Renaming les in that directory is not an eective way of preventing proles from being loaded.You must remove proles from this directory to prevent them from being read and evaluatedeectively, or call aa-disable on the prole, which will create a symbolic link in /etc/apparmor.d/disabled/ .
You can use a text editor, such as vi , to access and make changes to these proles. The followingsections contain detailed steps for building proles:
Adding or Creating AppArmor Profiles
Refer to Section 33.3, “Adding or Creating an AppArmor Profile”
Editing AppArmor Profiles
Refer to Section 33.4, “Editing an AppArmor Profile”
Deleting AppArmor Profiles
Refer to Section 33.6, “Deleting an AppArmor Profile”
299 Building AppArmor Profiles openSUSE Leap 15.2

33.3 Adding or Creating an AppArmor ProfileTo add or create an AppArmor prole for an application, you can use a systemic or stand-alone proling method, depending on your needs. Learn more about these two approaches inSection 33.7, “Two Methods of Profiling”.
33.4 Editing an AppArmor ProfileThe following steps describe the procedure for editing an AppArmor prole:
1. If you are not currently logged in as root , enter su in a terminal window.
2. Enter the root password when prompted.
3. Go to the prole directory with cd /etc/apparmor.d/ .
4. Enter ls to view all proles currently installed.
5. Open the prole to edit in a text editor, such as vim.
6. Make the necessary changes, then save the prole.
7. Restart AppArmor by entering systemctl reload apparmor in a terminal window.
33.5 Unloading Unknown AppArmor Profiles
Warning: Danger of Unloading Wanted Profilesaa-remove-unknown will unload all proles that are not stored in /etc/apparmor.d ,for example automatically generated LXD proles. This may compromise the security ofthe system. Use the -n parameter to list all proles that will be unloaded.
To unload all AppArmor proles that are no longer in /etc/apparmor.d/ , run:
tux > sudo aa-remove-unknown
You can print a list of proles that will be removed:
tux > sudo aa-remove-unknown -n
300 Adding or Creating an AppArmor Profile openSUSE Leap 15.2

33.6 Deleting an AppArmor ProfileThe following steps describe the procedure for deleting an AppArmor prole.
1. Remove the AppArmor denition from the kernel:
tux > sudo apparmor_parser -R /etc/apparmor.d/PROFILE
2. Remove the denition le:
tux > sudo rm /etc/apparmor.d/PROFILE tux > sudo rm /var/lib/apparmor/cache/PROFILE
33.7 Two Methods of ProfilingGiven the syntax for AppArmor proles in Chapter 30, Profile Components and Syntax, you couldcreate proles without using the tools. However, the eort involved would be substantial. Toavoid such a situation, use the AppArmor tools to automate the creation and renement ofproles.
There are two ways to approach AppArmor prole creation. Tools are available for bothmethods.
Stand-Alone Profiling
A method suitable for proling small applications that have a nite runtime, such as userclient applications like mail clients. For more information, refer to Section 33.7.1, “Stand-
Alone Profiling”.
Systemic Profiling
A method suitable for proling many programs at once and for proling applicationsthat may run for days, weeks, or continuously across reboots, such as network serverapplications like Web servers and mail servers. For more information, refer to Section 33.7.2,
“Systemic Profiling”.
Automated prole development becomes more manageable with the AppArmor tools:
1. Decide which proling method suits your needs.
2. Perform a static analysis. Run either aa-genprof or aa-autodep , depending on theproling method chosen.
301 Deleting an AppArmor Profile openSUSE Leap 15.2

3. Enable dynamic learning. Activate learning mode for all proled programs.
33.7.1 Stand-Alone Profiling
Stand-alone prole generation and improvement is managed by a program called aa-genprof .This method is easy because aa-genprof takes care of everything, but is limited because itrequires aa-genprof to run for the entire duration of the test run of your program (you cannotreboot the machine while you are still developing your prole).
To use aa-genprof for the stand-alone method of proling, refer to Section 33.7.3.8, “aa-genprof
—Generating Profiles”.
33.7.2 Systemic Profiling
This method is called systemic proling because it updates all of the proles on the system atonce, rather than focusing on the one or few targeted by aa-genprof or stand-alone proling.With systemic proling, prole construction and improvement are somewhat less automated,but more exible. This method is suitable for proling long-running applications whose behaviorcontinues after rebooting, or many programs at once.
Build an AppArmor prole for a group of applications as follows:
1. Create proles for the individual programs that make up your application.Although this approach is systemic, AppArmor only monitors those programs with prolesand their children. To get AppArmor to consider a program, you must at least have aa-autodep create an approximate prole for it. To create this approximate prole, refer toSection 33.7.3.1, “aa-autodep—Creating Approximate Profiles”.
2. Put relevant proles into learning or complain mode.Activate learning or complain mode for all proled programs by entering
tux > sudo aa-complain /etc/apparmor.d/*
in a terminal window while logged in as root . This functionality is also available throughthe YaST Prole Mode module, described in Section 32.4.2, “Changing the Mode of Individual
Profiles”.
302 Stand-Alone Profiling openSUSE Leap 15.2

When in learning mode, access requests are not blocked, even if the prole dictates thatthey should be. This enables you to run through several tests (as shown in Step 3) andlearn the access needs of the program so it runs properly. With this information, you candecide how secure to make the prole.Refer to Section 33.7.3.2, “aa-complain—Entering Complain or Learning Mode” for more detailedinstructions for using learning or complain mode.
3. Exercise your application.Run your application and exercise its functionality. How much to exercise the programis up to you, but you need the program to access each le representing its access needs.Because the execution is not being supervised by aa-genprof , this step can go on fordays or weeks and can span complete system reboots.
4. Analyze the log.In systemic proling, run aa-logprof directly instead of letting aa-genprof run it (asin stand-alone proling). The general form of aa-logprof is:
tux > sudo aa-logprof [ -d /path/to/profiles ] [ -f /path/to/logfile ]
Refer to Section 33.7.3.9, “aa-logprof—Scanning the System Log” for more information aboutusing aa-logprof .
5. Repeat Step 3 and Step 4.This generates optimal proles. An iterative approach captures smaller data sets thatcan be trained and reloaded into the policy engine. Subsequent iterations generate fewermessages and run faster.
6. Edit the proles.You should review the proles that have been generated. You can open and edit theproles in /etc/apparmor.d/ using a text editor.
7. Return to enforce mode.This is when the system goes back to enforcing the rules of the proles, not onlylogging information. This can be done manually by removing the flags=(complain)text from the proles or automatically by using the aa-enforce command, which worksidentically to the aa-complain command, except it sets the proles to enforce mode.This functionality is also available through the YaST Prole Mode module, described inSection 32.4.2, “Changing the Mode of Individual Profiles”.To ensure that all proles are taken out of complain mode and put into enforce mode,enter aa-enforce /etc/apparmor.d/* .
303 Systemic Profiling openSUSE Leap 15.2

8. Re-scan all proles.To have AppArmor re-scan all of the proles and change the enforcement mode in thekernel, enter systemctl reload apparmor .
33.7.3 Summary of Profiling Tools
All of the AppArmor proling utilities are provided by the apparmor-utils RPM package andare stored in /usr/sbin . Each tool has a dierent purpose.
33.7.3.1 aa-autodep—Creating Approximate Profiles
This creates an approximate prole for the program or application selected. You can generateapproximate proles for binary executables and interpreted script programs. The resultingprole is called “approximate” because it does not necessarily contain all of the prole entriesthat the program needs to be properly conned by AppArmor. The minimum aa-autodepapproximate prole has, at minimum, a base include directive, which contains basic proleentries needed by most programs. For certain types of programs, aa-autodep generates a moreexpanded prole. The prole is generated by recursively calling ldd(1) on the executableslisted on the command line.
To generate an approximate prole, use the aa-autodep program. The program argument canbe either the simple name of the program, which aa-autodep nds by searching your shell'spath variable, or it can be a fully qualied path. The program itself can be of any type (ELFbinary, shell script, Perl script, etc.). aa-autodep generates an approximate prole to improvethrough the dynamic proling that follows.
The resulting approximate prole is written to the /etc/apparmor.d directory using theAppArmor prole naming convention of naming the prole after the absolute path of theprogram, replacing the forward slash ( / ) characters in the path with period ( . ) characters. Thegeneral syntax of aa-autodep is to enter the following in a terminal window:
tux > sudo aa-autodep [ -d /PATH/TO/PROFILES ] [PROGRAM1 PROGRAM2...]
If you do not enter the program name or names, you are prompted for them. /path/to/profiles overrides the default location of /etc/apparmor.d , should you keep proles in alocation other than the default.
304 Summary of Profiling Tools openSUSE Leap 15.2

To begin proling, you must create proles for each main executable service that is part of yourapplication (anything that might start without being a child of another program that already hasa prole). Finding all such programs depends on the application in question. Here are severalstrategies for nding such programs:
Directories
If all the programs to prole are in one directory and there are no other programs in thatdirectory, the simple command aa-autodep /path/to/your/programs/* creates basicproles for all programs in that directory.
pstree -p
You can run your application and use the standard Linux pstree command to nd allprocesses running. Then manually hunt down the location of these programs and run theaa-autodep for each one. If the programs are in your path, aa-autodep nds them foryou. If they are not in your path, the standard Linux command find might be helpful innding your programs. Execute find / -name ' MY_APPLICATION ' -print to determinean application's path ( MY_APPLICATION being an example application). You may use wildcards if appropriate.
33.7.3.2 aa-complain—Entering Complain or Learning Mode
The complain or learning mode tool ( aa-complain ) detects violations of AppArmor prolerules, such as the proled program accessing les not permitted by the prole. The violationsare permitted, but also logged. To improve the prole, turn complain mode on, run the programthrough a suite of tests to generate log events that characterize the program's access needs, thenpostprocess the log with the AppArmor tools to transform log events into improved proles.
Manually activating complain mode (using the command line) adds a ag to the top of theprole so that /bin/foo becomes /bin/foo flags=(complain) . To use complain mode, opena terminal window and enter one of the following lines as root :
If the example program ( PROGRAM1 ) is in your path, use:
tux > sudo aa-complain [PROGRAM1 PROGRAM2 ...]
If the program is not in your path, specify the entire path as follows:
tux > sudo aa-complain /sbin/PROGRAM1
305 Summary of Profiling Tools openSUSE Leap 15.2
If the proles are not in /etc/apparmor.d , use the following to override the defaultlocation:
tux > sudo aa-complain /path/to/profiles/PROGRAM1
Specify the prole for /sbin/program1 as follows:
tux > sudo aa-complain /etc/apparmor.d/sbin.PROGRAM1
Each of the above commands activates the complain mode for the proles or programs listed.If the program name does not include its entire path, aa-complain searches $PATH for theprogram. For example, aa-complain /usr/sbin/* nds proles associated with all of theprograms in /usr/sbin and puts them into complain mode. aa-complain /etc/apparmor.d/* puts all of the proles in /etc/apparmor.d into complain mode.
Tip: Toggling Profile Mode with YaSTYaST oers a graphical front-end for toggling complain and enforce mode. SeeSection 32.4.2, “Changing the Mode of Individual Profiles” for information.
33.7.3.3 aa-decode—Decoding Hex-encoded Strings in AppArmor Log Files
aa-decode will decode hex-encoded strings in the AppArmor log output. It can also processthe audit log on standard input, convert any hex-encoded AppArmor log entries, and displaythem on standard output.
33.7.3.4 aa-disable—Disabling an AppArmor Security Profile
Use aa-disable to disable the enforcement mode for one or more AppArmor proles. Thiscommand will unload the prole from the kernel, and prevent the prole from being loaded onAppArmor start-up. Use aa-enforce or aa-complain utilities to change this behavior.
306 Summary of Profiling Tools openSUSE Leap 15.2

33.7.3.5 aa-easyprof—Easy Profile Generation
aa-easyprof provides an easy-to-use interface for AppArmor prole generation. aa-easyprofsupports the use of templates and prole groups to quickly prole an application. While aa-easyprof can help with prole generation, its utility is dependent on the quality of thetemplates, prole groups and abstractions used. Also, this tool may create a prole that is lessrestricted than when creating a prole manually or with aa-genprof and aa-logprof .
For more information, see the man page of aa-easyprof (8).
33.7.3.6 aa-enforce—Entering Enforce Mode
The enforce mode detects violations of AppArmor prole rules, such as the proled programaccessing les not permitted by the prole. The violations are logged and not permitted. Thedefault is for enforce mode to be enabled. To log the violations only, but still permit them, usecomplain mode.
Manually activating enforce mode (using the command line) removes the complain ag fromthe top of the prole so that /bin/foo flags=(complain) becomes /bin/foo . To use enforcemode, open a terminal window and enter one of the following lines.
If the example program ( PROGRAM1 ) is in your path, use:
tux > sudo aa-enforce [PROGRAM1 PROGRAM2 ...]
If the program is not in your path, specify the entire path, as follows:
tux > sudo aa-enforce /sbin/PROGRAM1
If the proles are not in /etc/apparmor.d , use the following to override the defaultlocation:
tux > sudo aa-enforce -d /path/to/profiles/ program1
Specify the prole for /sbin/program1 as follows:
tux > sudo aa-enforce /etc/apparmor.d/sbin.PROGRAM1
Each of the above commands activates the enforce mode for the proles and programs listed.
If you do not enter the program or prole names, you are prompted to enter one. /path/to/profiles overrides the default location of /etc/apparmor.d .
307 Summary of Profiling Tools openSUSE Leap 15.2
The argument can be either a list of programs or a list of proles. If the program name does notinclude its entire path, aa-enforce searches $PATH for the program.
Tip: Toggling Profile Mode with YaSTYaST oers a graphical front-end for toggling complain and enforce mode. SeeSection 32.4.2, “Changing the Mode of Individual Profiles” for information.
33.7.3.7 aa-exec—Confining a Program with the Specified Profile
Use aa-exec to launch a program conned by a specied prole and/or prole namespace.If both a prole and namespace are specied, the program will be conned by the prole inthe new namespace. If only a prole namespace is specied, the prole name of the currentconnement will be used. If neither a prole nor namespace is specied, the command will berun using the standard prole attachment—as if you did not use the aa-exec command.
For more information on the command's options, see its manual page man 8 aa-exec .
33.7.3.8 aa-genprof—Generating Profiles
aa-genprof is AppArmor's prole generating utility. It runs aa-autodep on the speciedprogram, creating an approximate prole (if a prole does not already exist for it), sets it tocomplain mode, reloads it into AppArmor, marks the log, and prompts the user to execute theprogram and exercise its functionality. Its syntax is as follows:
tux > sudo aa-genprof [ -d /path/to/profiles ] PROGRAM
To create a prole for the Apache Web server program httpd2-prefork, do the following as root :
1. Enter systemctl stop apache2 .
2. Next, enter aa-genprof httpd2-prefork .
308 Summary of Profiling Tools openSUSE Leap 15.2

Now aa-genprof does the following:
1. Resolves the full path of httpd2-prefork using your shell's path variables. You canalso specify a full path. On openSUSE Leap, the default full path is /usr/sbin/httpd2-prefork .
2. Checks to see if there is an existing prole for httpd2-prefork. If there is one, itupdates it. If not, it creates one using the aa-autodep as described in Section 33.7.3,
“Summary of Profiling Tools”.
3. Puts the prole for this program into learning or complain mode so that proleviolations are logged, but are permitted to proceed. A log event looks like this (see/var/log/audit/audit.log ):
type=APPARMOR_ALLOWED msg=audit(1189682639.184:20816): \apparmor="DENIED" operation="file_mmap" parent=2692 \profile="/usr/sbin/httpd2-prefork//HANDLING_UNTRUSTED_INPUT" \name="/var/log/apache2/access_log-20140116" pid=28730 comm="httpd2-prefork" \requested_mask="::r" denied_mask="::r" fsuid=30 ouid=0
If you are not running the audit daemon, the AppArmor events are logged directly tosystemd journal (see Book “Reference”, Chapter 11 “journalctl: Query the systemd
Journal”):
Sep 13 13:20:30 K23 kernel: audit(1189682430.672:20810): \apparmor="DENIED" operation="file_mmap" parent=2692 \profile="/usr/sbin/httpd2-prefork//HANDLING_UNTRUSTED_INPUT" \name="/var/log/apache2/access_log-20140116" pid=28730 comm="httpd2-prefork" \requested_mask="::r" denied_mask="::r" fsuid=30 ouid=0
They also can be viewed using the dmesg command:
audit(1189682430.672:20810): apparmor="DENIED" \operation="file_mmap" parent=2692 \profile="/usr/sbin/httpd2-prefork//HANDLING_UNTRUSTED_INPUT" \name="/var/log/apache2/access_log-20140116" pid=28730 comm="httpd2-prefork" \requested_mask="::r" denied_mask="::r" fsuid=30 ouid=0
4. Marks the log with a beginning marker of log events to consider. For example:
Sep 13 17:48:52 figwit root: GenProf: e2ff78636296f16d0b5301209a04430d
309 Summary of Profiling Tools openSUSE Leap 15.2

3. When prompted by the tool, run the application to prole in another terminal windowand perform as many of the application functions as possible. Thus, the learning mode canlog the les and directories to which the program requires access to function properly. Forexample, in a new terminal window, enter systemctl start apache2 .
4. Select from the following options that are available in the aa-genprof terminal windowafter you have executed the program function:
S runs aa-genprof on the system log from where it was marked when aa-genprof was started and reloads the prole. If system events exist in the log,AppArmor parses the learning mode log les. This generates a series of questionsthat you must answer to guide aa-genprof in generating the security prole.
F exits the tool.
NoteIf requests to add hats appear, proceed to Chapter 34, Profiling Your Web Applications
Using ChangeHat.
5. Answer two types of questions:
A resource is requested by a proled program that is not in the prole (seeExample 33.1, “Learning Mode Exception: Controlling Access to Specific Resources”).
A program is executed by the proled program and the security domain transitionhas not been dened (see Example 33.2, “Learning Mode Exception: Defining Permissions
for an Entry”).
Each of these categories results in a series of questions that you must answer to add theresource or program to the prole. Example 33.1, “Learning Mode Exception: Controlling Access
to Specific Resources” and Example 33.2, “Learning Mode Exception: Defining Permissions for an
Entry” provide examples of each one. Subsequent steps describe your options in answeringthese questions.
Dealing with execute accesses is complex. You must decide how to proceed with thisentry regarding which execute permission type to grant to this entry:
EXAMPLE 33.1: LEARNING MODE EXCEPTION: CONTROLLING ACCESS TO SPECIFIC RESOURCES
Reading log entries from /var/log/audit/audit.log.
310 Summary of Profiling Tools openSUSE Leap 15.2

Updating AppArmor profiles in /etc/apparmor.d.
Profile: /usr/sbin/cupsdProgram: cupsdExecute: /usr/lib/cups/daemon/cups-lpdSeverity: unknown
(I)nherit / (P)rofile / (C)hild / (N)ame / (U)nconfined / (X)ix / (D)eny / Abo(r)t / (F)inish
Inherit (ix)
The child inherits the parent's prole, running with the same access controls asthe parent. This mode is useful when a conned program needs to call anotherconned program without gaining the permissions of the target's prole orlosing the permissions of the current prole. This mode is often used when thechild program is a helper application, such as the /usr/bin/mail client usingless as a pager.
Profile (px/Px)
The child runs using its own prole, which must be loaded into the kernel. Ifthe prole is not present, attempts to execute the child fail with permissiondenied. This is most useful if the parent program is invoking a global service,such as DNS lookups or sending mail with your system's MTA.Choose the prole with clean exec (Px) option to scrub the environment ofenvironment variables that could modify execution behavior when passed tothe child process.
Child (cx/Cx)
Sets up a transition to a subprole. It is like px/Px transition, except to a childprole.Choose the prole with clean exec (Cx) option to scrub the environment ofenvironment variables that could modify execution behavior when passed tothe child process.
Unconfined (ux/Ux)
The child runs completely unconned without any AppArmor prole appliedto the executed resource.
311 Summary of Profiling Tools openSUSE Leap 15.2

Choose the unconned with clean exec (Ux) option to scrub the environment ofenvironment variables that could modify execution behavior when passed tothe child process. Note that running unconned proles introduces a securityvulnerability that could be used to evade AppArmor. Only use it as a last resort.
mmap (m)
This permission denotes that the program running under the prole can accessthe resource using the mmap system call with the ag PROT_EXEC . This meansthat the data mapped in it can be executed. You are prompted to include thispermission if it is requested during a proling run.
Deny
Adds a deny rule to the prole, and permanently prevents the program fromaccessing the specied directory path entries. AppArmor then continues to thenext event.
Abort
Aborts aa-logprof , losing all rule changes entered so far and leaving allproles unmodied.
Finish
Closes aa-logprof , saving all rule changes entered so far and modifying allproles.
Example 33.2, “Learning Mode Exception: Defining Permissions for an Entry” showsAppArmor suggest allowing a globbing pattern /var/run/nscd/* for reading, thenusing an abstraction to cover common Apache-related access rules.
EXAMPLE 33.2: LEARNING MODE EXCEPTION: DEFINING PERMISSIONS FOR AN ENTRY
Profile: /usr/sbin/httpd2-preforkPath: /var/run/nscd/dbSz9CTrMode: rSeverity: 3
1 - /var/run/nscd/dbSz9CTr [2 - /var/run/nscd/*]
(A)llow / [(D)eny] / (G)lob / Glob w/(E)xt / (N)ew / Abo(r)t / (F)inish / (O)ptsAdding /var/run/nscd/* r to profile.
312 Summary of Profiling Tools openSUSE Leap 15.2
Profile: /usr/sbin/httpd2-preforkPath: /proc/11769/attr/currentMode: wSeverity: 9
[1 - #include <abstractions/apache2-common>] 2 - /proc/11769/attr/current 3 - /proc/*/attr/current
(A)llow / [(D)eny] / (G)lob / Glob w/(E)xt / (N)ew / Abo(r)t / (F)inish / (O)ptsAdding #include <abstractions/apache2-common> to profile.
AppArmor provides one or more paths or includes. By entering the option number,select the desired options then proceed to the next step.
NoteNot all of these options are always presented in the AppArmor menu.
#include
This is the section of an AppArmor prole that refers to an include le, whichprocures access permissions for programs. By using an include, you can givethe program access to directory paths or les that are also required by otherprograms. Using includes can reduce the size of a prole. It is good practice toselect includes when suggested.
Globbed Version
This is accessed by selecting Glob as described in the next step. For informationabout globbing syntax, refer to Section 30.6, “Profile Names, Flags, Paths, and
Globbing”.
Actual Path
This is the literal path to which the program needs access so that it can runproperly.
After you select the path or include, process it as an entry into the AppArmor proleby selecting Allow or Deny. If you are not satised with the directory path entry asit is displayed, you can also Glob it.
313 Summary of Profiling Tools openSUSE Leap 15.2

The following options are available to process the learning mode entries and buildthe prole:
Select Enter
Allows access to the selected directory path.
Allow
Allows access to the specied directory path entries. AppArmor suggests lepermission access. For more information, refer to Section 30.7, “File Permission
Access Modes”.
Deny
Prevents the program from accessing the specied directory path entries.AppArmor then continues to the next event.
New
Prompts you to enter your own rule for this event, allowing you to specify aregular expression. If the expression does not actually satisfy the event thatprompted the question in the rst place, AppArmor asks for conrmation andlets you reenter the expression.
Glob
Select a specic path or create a general rule using wild cards that match abroader set of paths. To select any of the oered paths, enter the number that isprinted in front of the path then decide how to proceed with the selected item.For more information about globbing syntax, refer to Section 30.6, “Profile Names,
Flags, Paths, and Globbing”.
Glob w/Ext
This modies the original directory path while retaining the le nameextension. For example, /etc/apache2/file.ext becomes /etc/apache2/*.ext , adding the wild card (asterisk) in place of the le name. This allows theprogram to access all les in the suggested directory that end with the .extextension.
Abort
Aborts aa-logprof , losing all rule changes entered so far and leaving allproles unmodied.
Finish
314 Summary of Profiling Tools openSUSE Leap 15.2
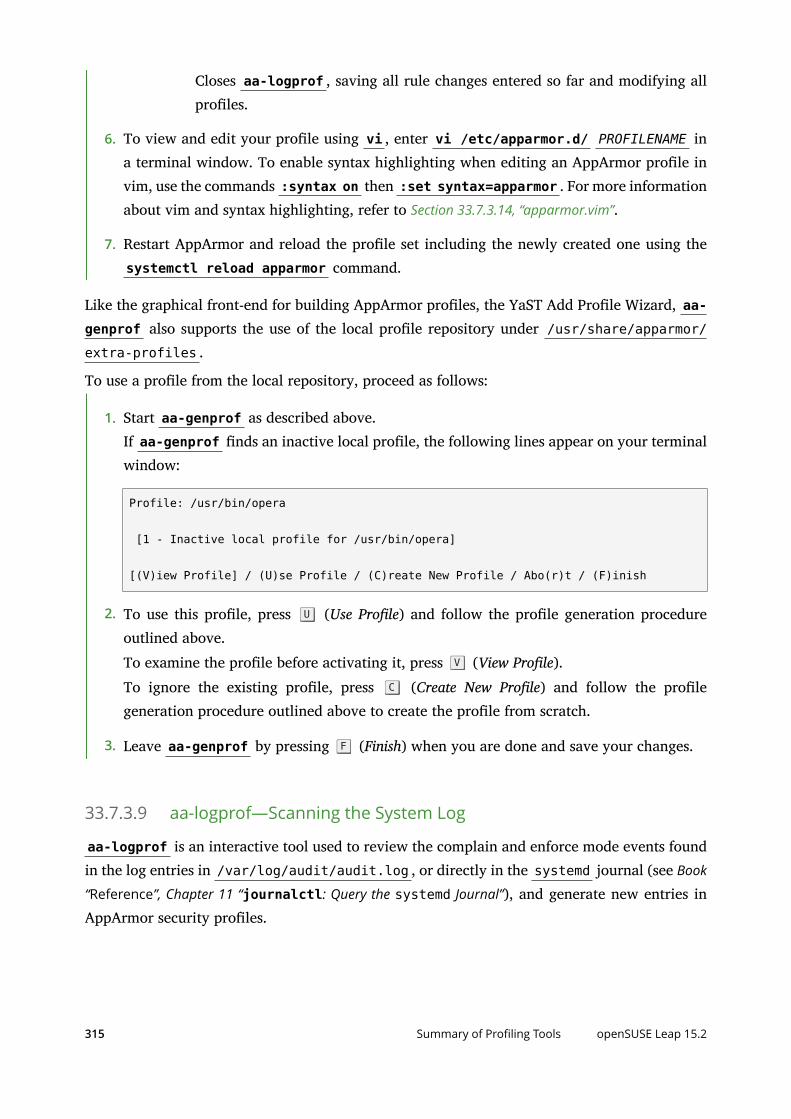
Closes aa-logprof , saving all rule changes entered so far and modifying allproles.
6. To view and edit your prole using vi , enter vi /etc/apparmor.d/ PROFILENAME ina terminal window. To enable syntax highlighting when editing an AppArmor prole invim, use the commands :syntax on then :set syntax=apparmor . For more informationabout vim and syntax highlighting, refer to Section 33.7.3.14, “apparmor.vim”.
7. Restart AppArmor and reload the prole set including the newly created one using thesystemctl reload apparmor command.
Like the graphical front-end for building AppArmor proles, the YaST Add Prole Wizard, aa-genprof also supports the use of the local prole repository under /usr/share/apparmor/extra-profiles .
To use a prole from the local repository, proceed as follows:
1. Start aa-genprof as described above.If aa-genprof nds an inactive local prole, the following lines appear on your terminalwindow:
Profile: /usr/bin/opera
[1 - Inactive local profile for /usr/bin/opera]
[(V)iew Profile] / (U)se Profile / (C)reate New Profile / Abo(r)t / (F)inish
2. To use this prole, press U (Use Prole) and follow the prole generation procedureoutlined above.To examine the prole before activating it, press V (View Prole).To ignore the existing prole, press C (Create New Prole) and follow the prolegeneration procedure outlined above to create the prole from scratch.
3. Leave aa-genprof by pressing F (Finish) when you are done and save your changes.
33.7.3.9 aa-logprof—Scanning the System Log
aa-logprof is an interactive tool used to review the complain and enforce mode events foundin the log entries in /var/log/audit/audit.log , or directly in the systemd journal (see Book
“Reference”, Chapter 11 “journalctl: Query the systemd Journal”), and generate new entries inAppArmor security proles.
315 Summary of Profiling Tools openSUSE Leap 15.2

When you run aa-logprof , it begins to scan the log les produced in complain and enforcemode and, if there are new security events that are not covered by the existing prole set, it givessuggestions for modifying the prole. aa-logprof uses this information to observe programbehavior.
If a conned program forks and executes another program, aa-logprof sees this and asks theuser which execution mode should be used when launching the child process. The executionmodes ix, px, Px, ux, Ux, cx, Cx, and named proles, are options for starting the child process.If a separate prole exists for the child process, the default selection is Px. If one does not exist,the prole defaults to ix. Child processes with separate proles have aa-autodep run on themand are loaded into AppArmor, if it is running.
When aa-logprof exits, proles are updated with the changes. If AppArmor is active, theupdated proles are reloaded and, if any processes that generated security events are stillrunning in the null-XXXX proles (unique proles temporarily created in complain mode), thoseprocesses are set to run under their proper proles.
To run aa-logprof , enter aa-logprof into a terminal window while logged in as root . Thefollowing options can be used for aa-logprof :
aa-logprof -d /path/to/profile/directory/
Species the full path to the location of the proles if the proles are not located in thestandard directory, /etc/apparmor.d/ .
aa-logprof -f /path/to/logfile/
Species the full path to the location of the log le if the log le is not located in thedefault directory or /var/log/audit/audit.log .
aa-logprof -m "string marker in logfile"
Marks the starting point for aa-logprof to look in the system log. aa-logprof ignoresall events in the system log before the specied mark. If the mark contains spaces, it mustbe surrounded by quotes to work correctly. For example:
root # aa-logprof -m "17:04:21"
or
root # aa-logprof -m e2ff78636296f16d0b5301209a04430d
aa-logprof scans the log, asking you how to handle each logged event. Each question presentsa numbered list of AppArmor rules that can be added by pressing the number of the item onthe list.
316 Summary of Profiling Tools openSUSE Leap 15.2

By default, aa-logprof looks for proles in /etc/apparmor.d/ . Often running aa-logprofas root is enough to update the prole. However, there might be times when you need to searcharchived log les, such as if the program exercise period exceeds the log rotation window (whenthe log le is archived and a new log le is started). If this is the case, you can enter zcat -f `ls -1tr /path/to/logfile* ` | aa-logprof -f -.
33.7.3.10 aa-logprof Example 1
The following is an example of how aa-logprof addresses httpd2-prefork accessing the le /etc/group . [] indicates the default option.
In this example, the access to /etc/group is part of httpd2-prefork accessing name services.The appropriate response is 1 , which includes a predened set of AppArmor rules. Selecting 1to #include the name service package resolves all of the future questions pertaining to DNSlookups and makes the prole less brittle in that any changes to DNS conguration and theassociated name service prole package can be made once, rather than needing to revise manyproles.
Profile: /usr/sbin/httpd2-preforkPath: /etc/groupNew Mode: r
[1 - #include <abstractions/nameservice>] 2 - /etc/group[(A)llow] / (D)eny / (N)ew / (G)lob / Glob w/(E)xt / Abo(r)t / (F)inish
Select one of the following responses:
Select Enter
Triggers the default action, which is, in this example, allowing access to the specieddirectory path entry.
Allow
Allows access to the specied directory path entries. AppArmor suggests le permissionaccess. For more information about this, refer to Section 30.7, “File Permission Access Modes”.
Deny
Permanently prevents the program from accessing the specied directory path entries.AppArmor then continues to the next event.
New
317 Summary of Profiling Tools openSUSE Leap 15.2

Prompts you to enter your own rule for this event, allowing you to specify whatever formof regular expression you want. If the expression entered does not actually satisfy the eventthat prompted the question in the rst place, AppArmor asks for conrmation and lets youreenter the expression.
Glob
Select either a specic path or create a general rule using wild cards that matches on abroader set of paths. To select any of the oered paths, enter the number that is printedin front of the paths then decide how to proceed with the selected item.For more information about globbing syntax, refer to Section 30.6, “Profile Names, Flags, Paths,
and Globbing”.
Glob w/Ext
This modies the original directory path while retaining the le name extension. Forexample, /etc/apache2/file.ext becomes /etc/apache2/*.ext , adding the wild card(asterisk) in place of the le name. This allows the program to access all les in thesuggested directory that end with the .ext extension.
Abort
Aborts aa-logprof , losing all rule changes entered so far and leaving all prolesunmodied.
Finish
Closes aa-logprof , saving all rule changes entered so far and modifying all proles.
33.7.3.11 aa-logprof Example 2
For example, when proling vsftpd, see this question:
Profile: /usr/sbin/vsftpdPath: /y2k.jpg
New Mode: r
[1 - /y2k.jpg]
(A)llow / [(D)eny] / (N)ew / (G)lob / Glob w/(E)xt / Abo(r)t / (F)inish
318 Summary of Profiling Tools openSUSE Leap 15.2

Several items of interest appear in this question. First, note that vsftpd is asking for a path entryat the top of the tree, even though vsftpd on openSUSE Leap serves FTP les from /srv/ftp bydefault. This is because vsftpd uses chroot and, for the portion of the code inside the chroot jail,AppArmor sees le accesses in terms of the chroot environment rather than the global absolutepath.
The second item of interest is that you should grant FTP read access to all JPEG les in thedirectory, so you could use Glob w/Ext and use the suggested path of /*.jpg . Doing so collapsesall previous rules granting access to individual .jpg les and forestalls any future questionspertaining to access to .jpg les.
Finally, you should grant more general access to FTP les. If you select Glob in the last entry,aa-logprof replaces the suggested path of /y2k.jpg with /* . Alternatively, you should granteven more access to the entire directory tree, in which case you could use the New path optionand enter /**.jpg (which would grant access to all .jpg les in the entire directory tree) or/** (which would grant access to all les in the directory tree).
These items deal with read accesses. Write accesses are similar, except that it is good policy tobe more conservative in your use of regular expressions for write accesses. Dealing with executeaccesses is more complex. Find an example in Example 33.1, “Learning Mode Exception: Controlling
Access to Specific Resources”.
In the following example, the /usr/bin/mail mail client is being proled and aa-logprofhas discovered that /usr/bin/mail executes /usr/bin/less as a helper application to “page”long mail messages. Consequently, it presents this prompt:
/usr/bin/nail -> /usr/bin/less(I)nherit / (P)rofile / (C)hild / (N)ame / (U)nconfined / (X)ix / (D)eny
NoteThe actual executable le for /usr/bin/mail turns out to be /usr/bin/nail , whichis not a typographical error.
The program /usr/bin/less appears to be a simple one for scrolling through text that is morethan one screen long and that is in fact what /usr/bin/mail is using it for. However, less isactually a large and powerful program that uses many other helper applications, such as tarand rpm .
319 Summary of Profiling Tools openSUSE Leap 15.2
TipRun less on a tar le or an RPM le and it shows you the inventory of these containers.
You do not want to run rpm automatically when reading mail messages (that leads directlyto a Microsoft* Outlook–style virus attack, because RPM has the power to install and modifysystem programs), so, in this case, the best choice is to use Inherit. This results in the lessprogram executed from this context running under the prole for /usr/bin/mail . This hastwo consequences:
You need to add all of the basic le accesses for /usr/bin/less to the prole for /usr/bin/mail .
You can avoid adding the helper applications, such as tar and rpm , to the /usr/bin/mail prole so that when /usr/bin/mail runs /usr/bin/less in this context, the lessprogram is far less dangerous than it would be without AppArmor protection. Anotheroption is to use the Cx execute modes. For more information on execute modes, seeSection 30.12, “Execute Modes”.
In other circumstances, you might instead want to use the Prole option. This has the followingeects on aa-logprof :
The rule written into the prole uses px/Px, which forces the transition to the child's ownprole.
aa-logprof constructs a prole for the child and starts building it, in the same way thatit built the parent prole, by assigning events for the child process to the child's proleand asking the aa-logprof user questions. The prole will also be applied if you run thechild as a stand-alone program.
If a conned program forks and executes another program, aa-logprof sees this and asks theuser which execution mode should be used when launching the child process. The executionmodes of inherit, prole, unconned, child, named prole, or an option to deny the executionare presented.
If a separate prole exists for the child process, the default selection is prole. If a prole does notexist, the default is inherit. The inherit option, or ix , is described in Section 30.7, “File Permission
Access Modes”.
320 Summary of Profiling Tools openSUSE Leap 15.2

The prole option indicates that the child program should run in its own prole. A secondaryquestion asks whether to sanitize the environment that the child program inherits from theparent. If you choose to sanitize the environment, this places the execution modier Px in yourAppArmor prole. If you select not to sanitize, px is placed in the prole and no environmentsanitizing occurs. The default for the execution mode is Px if you select prole execution mode.
The unconned execution mode is not recommended and should only be used in cases wherethere is no other option to generate a prole for a program reliably. Selecting unconned opensa warning dialog asking for conrmation of the choice. If you are sure and choose Yes, a seconddialog ask whether to sanitize the environment. To use the execution mode Ux in your prole,select Yes. To use the execution mode ux in your prole instead, select No. The default valueselected is Ux for unconned execution mode.
Important: Running UnconfinedSelecting ux or Ux is very dangerous and provides no enforcement of policy (from asecurity perspective) of the resulting execution behavior of the child program.
33.7.3.12 aa-unconfined—Identifying Unprotected Processes
The aa-unconfined command examines open network ports on your system, compares thatto the set of proles loaded on your system, and reports network services that do not haveAppArmor proles. It requires root privileges and that it not be conned by an AppArmorprole.
aa-unconfined must be run as root to retrieve the process executable link from the /procle system. This program is susceptible to the following race conditions:
An unlinked executable is mishandled
A process that dies between netstat(8) and further checks is mishandled
NoteThis program lists processes using TCP and UDP only. In short, this program is unsuitablefor forensics use and is provided only as an aid to proling all network-accessibleprocesses in the lab.
321 Summary of Profiling Tools openSUSE Leap 15.2

33.7.3.13 aa-notify
aa-notify is a handy utility that displays AppArmor notications in your desktop environment.This is very convenient if you do not want to inspect the AppArmor log le, but rather letthe desktop inform you about events that violate the policy. To enable AppArmor desktopnotications, run aa-notify :
tux > sudo aa-notify -p -u USERNAME --display DISPLAY_NUMBER
where USERNAME is your user name under which you are logged in, and DISPLAY_NUMBER isthe X Window display number you are currently using, such as :0 . The process is run in thebackground, and shows a notication each time a deny event happens.
TipThe active X Window display number is saved in the $DISPLAY variable, so you can use--display $DISPLAY to avoid nding out the current display number.
FIGURE 33.1: aa-notify Message in GNOME
With the -s DAYS option, you can also congure aa-notify to display a summary ofnotications for the specied number of past days. For more information on aa-notify , seeits man page man 8 aa-notify .
33.7.3.14 apparmor.vim
A syntax highlighting le for the vim text editor highlights various features of an AppArmorprole with colors. Using vim and the AppArmor syntax mode for vim, you can see the semanticimplications of your proles with color highlighting. Use vim to view and edit your prole bytyping vim at a terminal window.
322 Summary of Profiling Tools openSUSE Leap 15.2

To enable the syntax coloring when you edit an AppArmor prole in vim, use the commands:syntax on then :set syntax=apparmor . To make sure vim recognizes the edited le typecorrectly as an AppArmor prole, add
# vim:ft=apparmor
at the end of the prole.
Tipvim comes with AppArmor highlighting automatically enabled for les in /etc/
apparmor.d/ .
When you enable this feature, vim colors the lines of the prole for you:
Blue
Comments
White
Ordinary read access lines
Brown
Capability statements and complain ags
Yellow
Lines that grant write access
Green
Lines that grant execute permission (either ix or px)
Red
Lines that grant unconned access (ux)
Red background
Syntax errors that will not load properly into the AppArmor modules
Use the apparmor.vim and vim man pages and the :help syntax from within the vim editorfor further vim help about syntax highlighting. The AppArmor syntax is stored in /usr/share/vim/current/syntax/apparmor.vim.
323 Summary of Profiling Tools openSUSE Leap 15.2

33.8 Important File Names and DirectoriesThe following list contains the most important les and directories used by the AppArmorframework. If you intend to manage and troubleshoot your proles manually, make sure thatyou know about these les and directories:
/sys/kernel/security/apparmor/profiles
Virtualized le representing the currently loaded set of proles.
/etc/apparmor/
Location of AppArmor conguration les.
/usr/share/apparmor/extra-profiles
A local repository of proles shipped with AppArmor, but not enabled by default.
/etc/apparmor.d/
Location of proles, named with the convention of replacing the / in paths with . (notfor the root / ) so proles are easier to manage. For example, the prole for the program/usr/sbin/smbd is named usr.sbin.smbd .
/etc/apparmor.d/abstractions/
Location of abstractions.
/etc/apparmor.d/program-chunks/
Location of program chunks.
/proc/*/attr/current
Check this le to review the connement status of a process and the prole that is used toconne the process. The ps auxZ command retrieves this information automatically.
324 Important File Names and Directories openSUSE Leap 15.2

34 Profiling Your Web Applications Using ChangeHat
An AppArmor® prole represents the security policy for an individual program instance orprocess. It applies to an executable program, but if a portion of the program needs dierentaccess permissions than other portions, the program can “change hats” to use a dierent securitycontext, distinctive from the access of the main program. This is known as a hat or subprole.
ChangeHat enables programs to change to or from a hat within an AppArmor prole. It enablesyou to dene security at a ner level than the process. This feature requires that each applicationbe made “ChangeHat-aware”, meaning that it is modied to make a request to the AppArmormodule to switch security domains at specic times during the application execution. Oneexample of a ChangeHat-aware application is the Apache Web server.
A prole can have an arbitrary number of subproles, but there are only two levels: a subprolecannot have further child proles. A subprole is written as a separate prole. Its name consistsof the name of the containing prole followed by the subprole name, separated by a ^ .
Subproles are either stored in the same le as the parent prole, or in a separate le. The lattercase is recommended on sites with many hats—it allows the policy caching to handle changesat the per hat level. If all the hats are in the same le as the parent prole, then the parentprole and all hats must be recompiled.
An external subprole that is going to be used as a hat, must begin with the word hat or the^ character.
The following two subproles cannot be used as a hat:
/foo//bar { }
or
profile /foo//bar { }
While the following two are treated as hats:
^/foo//bar { }
or
hat /foo//bar { } # this syntax is not highlighted in vim
Note that the security of hats is considerably weaker than that of full proles. Using certain typesof bugs in a program, an attacker may be able to escape from a hat into the containing prole.This is because the security of hats is determined by a secret key handled by the containing
325 openSUSE Leap 15.2
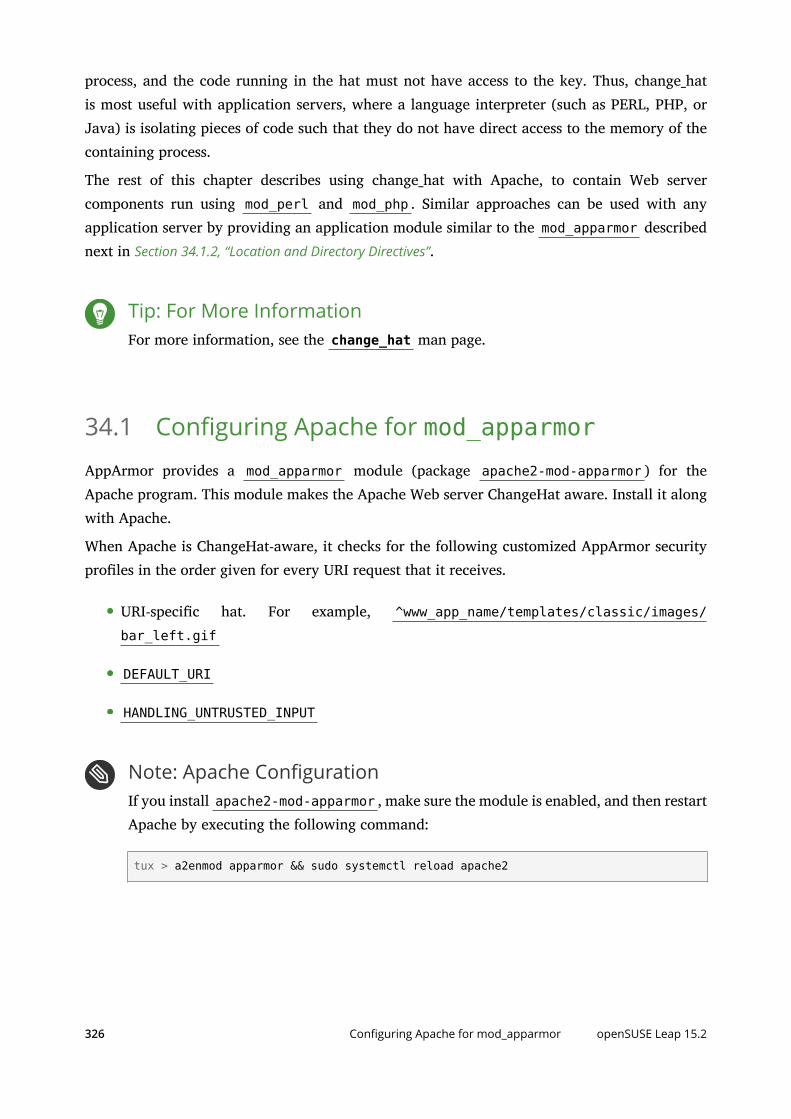
process, and the code running in the hat must not have access to the key. Thus, change_hatis most useful with application servers, where a language interpreter (such as PERL, PHP, orJava) is isolating pieces of code such that they do not have direct access to the memory of thecontaining process.
The rest of this chapter describes using change_hat with Apache, to contain Web servercomponents run using mod_perl and mod_php . Similar approaches can be used with anyapplication server by providing an application module similar to the mod_apparmor describednext in Section 34.1.2, “Location and Directory Directives”.
Tip: For More InformationFor more information, see the change_hat man page.
34.1 Configuring Apache for mod_apparmorAppArmor provides a mod_apparmor module (package apache2-mod-apparmor ) for theApache program. This module makes the Apache Web server ChangeHat aware. Install it alongwith Apache.
When Apache is ChangeHat-aware, it checks for the following customized AppArmor securityproles in the order given for every URI request that it receives.
URI-specic hat. For example, ^www_app_name/templates/classic/images/
bar_left.gif
DEFAULT_URI
HANDLING_UNTRUSTED_INPUT
Note: Apache ConfigurationIf you install apache2-mod-apparmor , make sure the module is enabled, and then restartApache by executing the following command:
tux > a2enmod apparmor && sudo systemctl reload apache2
326 Configuring Apache for mod_apparmor openSUSE Leap 15.2

Apache is congured by placing directives in plain text conguration les. The mainconguration le is usually /etc/apache2/httpd.conf . When you compile Apache, you canindicate the location of this le. Directives can be placed in any of these conguration les toalter the way Apache behaves. When you make changes to the main conguration les, youneed to reload Apache with sudo systemctl reload apache2 , so the changes are recognized.
34.1.1 Virtual Host Directives
<VirtualHost> and </VirtualHost> directives are used to enclose a group of directives thatwill apply only to a particular virtual host. For more information on Apache virtual hostdirectives, refer to http://httpd.apache.org/docs/2.4/en/mod/core.html#virtualhost .
The ChangeHat-specic conguration keyword is AADefaultHatName . It is used similarly toAAHatName , for example, AADefaultHatName My_Funky_Default_Hat .
It allows you to specify a default hat to be used for virtual hosts and other Apache serverdirectives, so that you can have dierent defaults for dierent virtual hosts. This can beoverridden by the AAHatName directive and is checked for only if there is not a matchingAAHatName or hat named by the URI. If the AADefaultHatName hat does not exist, it falls backto the DEFAULT_URI hat if it exists/
If none of those are matched, it goes back to the “parent” Apache hat.
34.1.2 Location and Directory Directives
Location and directory directives specify hat names in the program conguration le so theApache calls the hat regarding its security. For Apache, you can nd documentation about thelocation and directory directives at http://httpd.apache.org/docs/2.4/en/sections.html .
The location directive example below species that, for a given location, mod_apparmor shoulduse a specic hat:
<Location /foo/> AAHatName MY_HAT_NAME</Location>
This tries to use MY_HAT_NAME for any URI beginning with /foo/ ( /foo/ , /foo/bar , /foo/cgi/path/blah_blah/blah , etc.).
327 Virtual Host Directives openSUSE Leap 15.2

The directory directive works similarly to the location directive, except it refers to a path in thele system as in the following example:
<Directory "/srv/www/www.example.org/docs"> # Note lack of trailing slash AAHatName example.org</Directory>
34.2 Managing ChangeHat-Aware ApplicationsIn the previous section you learned about mod_apparmor and the way it helps you to securea specic Web application. This section walks you through a real-life example of creating ahat for a Web application, and using AppArmor's change_hat feature to secure it. Note that thischapter focuses on AppArmor's command line tools, as YaST's AppArmor module has limitedfunctionality.
34.2.1 With AppArmor's Command Line Tools
For illustration purposes, let us choose the Web application called Adminer (http://
www.adminer.org/en/ ). It is a full-featured SQL database management tool written in PHP, yetconsisting of a single PHP le. For Adminer to work, you need to set up an Apache Web server,PHP and its Apache module, and one of the database drivers available for PHP—MariaDB inthis example. You can install the required packages with
zypper in apache2 apache2-mod_apparmor apache2-mod_php5 php5 php5-mysql
To set up the Web environment for running Adminer, follow these steps:
PROCEDURE 34.1: SETTING UP A WEB SERVER ENVIRONMENT
1. Make sure apparmor and php5 modules are enabled for Apache. To enable the modulesin any case, use:
tux > a2enmod apparmor php5
and then restart Apache with
tux > sudo systemctl restart apache2
328 Managing ChangeHat-Aware Applications openSUSE Leap 15.2

2. Make sure MariaDB is running. If unsure, restart it with
tux > sudo systemctl restart mariadb
3. Download Adminer from http://www.adminer.org , copy it to /srv/www/htdocs/
adminer/ , and rename it to adminer.php , so that its full path is /srv/www/htdocs/adminer/adminer.php .
4. Test Adminer in your Web browser by entering http://localhost/adminer/
adminer.php in its URI address eld. If you installed Adminer to a remote server, replacelocalhost with the real host name of the server.
FIGURE 34.1: ADMINER LOGIN PAGE
TipIf you encounter problems viewing the Adminer login page, try to look for help inthe Apache error log /var/log/apache2/error.log . Another reason you cannotaccess the Web page may be that your Apache is already under AppArmor controland its AppArmor prole is too tight to permit viewing Adminer. Check it with aa-status , and if needed, set Apache temporarily in complain mode with
root # sudo aa-complain usr.sbin.httpd2-prefork
329 With AppArmor's Command Line Tools openSUSE Leap 15.2

After the Web environment for Adminer is ready, you need to congure Apache'smod_apparmor , so that AppArmor can detect accesses to Adminer and change to the specic“hat”.
PROCEDURE 34.2: CONFIGURING mod_apparmor
1. Apache has several conguration les under /etc/apache2/ and /etc/apache2/
conf.d/ . Choose your preferred one and open it in a text editor. In this example, the vimeditor is used to create a new conguration le /etc/apache2/conf.d/apparmor.conf .
tux > sudo vim /etc/apache2/conf.d/apparmor.conf
2. Copy the following snippet into the edited le.
<Directory /srv/www/htdocs/adminer> AAHatName adminer</Directory>
It tells Apache to let AppArmor know about a change_hat event when the Web useraccesses the directory /adminer (and any le/directory inside) in Apache's documentroot. Remember, we placed the adminer.php application there.
3. Save the le, close the editor, and restart Apache with
tux > sudo systemctl restart apache2
Apache now knows about our Adminer and changing a “hat” for it. It is time to create therelated hat for Adminer in the AppArmor conguration. If you do not have an AppArmor proleyet, create one before proceeding. Remember that if your Apache's main binary is /usr/sbin/httpd2-prefork , then the related prole is named /etc/apparmor.d/usr.sbin.httpd2-prefork .
PROCEDURE 34.3: CREATING A HAT FOR ADMINER
1. Open (or create one if it does not exist) the le /etc/apparmor.d/usr.sbin.httpd2-prefork in a text editor. Its contents should be similar to the following:
#include <tunables/global>
/usr/sbin/httpd2-prefork { #include <abstractions/apache2-common> #include <abstractions/base> #include <abstractions/php5>
330 With AppArmor's Command Line Tools openSUSE Leap 15.2

capability kill, capability setgid, capability setuid,
/etc/apache2/** r, /run/httpd.pid rw, /usr/lib{,32,64}/apache2*/** mr, /var/log/apache2/** rw,
^DEFAULT_URI { #include <abstractions/apache2-common> /var/log/apache2/** rw, }
^HANDLING_UNTRUSTED_INPUT { #include <abstractions/apache2-common> /var/log/apache2/** w, }}
2. Before the last closing curly bracket ( } ), insert the following section:
^adminer flags=(complain) {}
Note the (complain) addition after the hat name—it tells AppArmor to leave theadminer hat in complain mode. That is because we need to learn the hat prole byaccessing Adminer later on.
3. Save the le, and then restart AppArmor, then Apache.
tux > sudo systemctl reload apparmor apache2
4. Check if the adminer hat really is in complain mode.
tux > sudo aa-statusapparmor module is loaded.39 profiles are loaded.37 profiles are in enforce mode.[...] /usr/sbin/httpd2-prefork /usr/sbin/httpd2-prefork//DEFAULT_URI /usr/sbin/httpd2-prefork//HANDLING_UNTRUSTED_INPUT[...]2 profiles are in complain mode.
331 With AppArmor's Command Line Tools openSUSE Leap 15.2
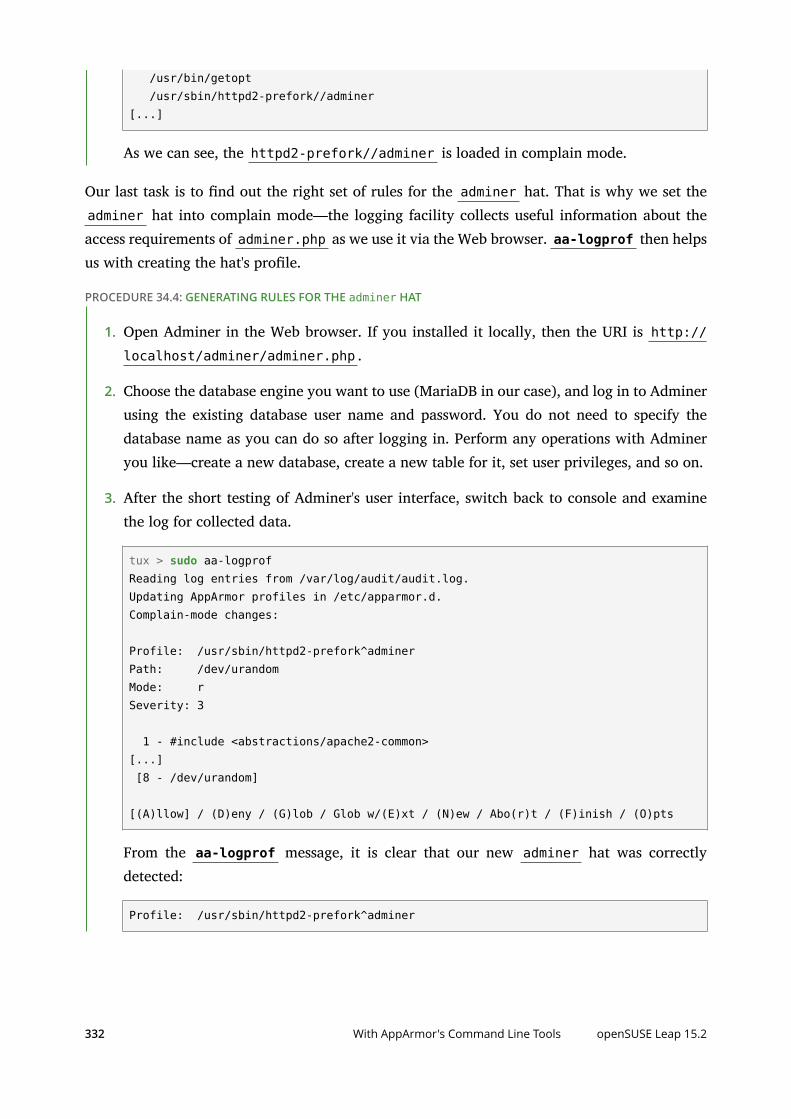
/usr/bin/getopt /usr/sbin/httpd2-prefork//adminer[...]
As we can see, the httpd2-prefork//adminer is loaded in complain mode.
Our last task is to nd out the right set of rules for the adminer hat. That is why we set theadminer hat into complain mode—the logging facility collects useful information about theaccess requirements of adminer.php as we use it via the Web browser. aa-logprof then helpsus with creating the hat's prole.
PROCEDURE 34.4: GENERATING RULES FOR THE adminer HAT
1. Open Adminer in the Web browser. If you installed it locally, then the URI is http://localhost/adminer/adminer.php .
2. Choose the database engine you want to use (MariaDB in our case), and log in to Adminerusing the existing database user name and password. You do not need to specify thedatabase name as you can do so after logging in. Perform any operations with Admineryou like—create a new database, create a new table for it, set user privileges, and so on.
3. After the short testing of Adminer's user interface, switch back to console and examinethe log for collected data.
tux > sudo aa-logprofReading log entries from /var/log/audit/audit.log.Updating AppArmor profiles in /etc/apparmor.d.Complain-mode changes:
Profile: /usr/sbin/httpd2-prefork^adminerPath: /dev/urandomMode: rSeverity: 3
1 - #include <abstractions/apache2-common>[...] [8 - /dev/urandom]
[(A)llow] / (D)eny / (G)lob / Glob w/(E)xt / (N)ew / Abo(r)t / (F)inish / (O)pts
From the aa-logprof message, it is clear that our new adminer hat was correctlydetected:
Profile: /usr/sbin/httpd2-prefork^adminer
332 With AppArmor's Command Line Tools openSUSE Leap 15.2

The aa-logprof command will ask you to pick the right rule for each discoveredAppArmor event. Specify the one you want to use, and conrm with Allow. Formore information on working with the aa-genprof and aa-logprof interface, seeSection 33.7.3.8, “aa-genprof—Generating Profiles”.
Tipaa-logprof usually oers several valid rules for the examined event. Some areabstractions—predened sets of rules aecting a specic common group of targets.Sometimes it is useful to include such an abstraction instead of a direct URI rule:
1 - #include <abstractions/php5> [2 - /var/lib/php5/sess_3jdmii9cacj1e3jnahbtopajl7p064ai242]
In the example above, it is recommended hitting 1 and conrming with A to allowthe abstraction.
4. After the last change, you will be asked to save the changed prole.
The following local profiles were changed. Would you like to save them? [1 - /usr/sbin/httpd2-prefork]
(S)ave Changes / [(V)iew Changes] / Abo(r)t
Hit S to save the changes.
5. Set the prole to enforce mode with aa-enforce
tux > sudo aa-enforce usr.sbin.httpd2-prefork
and check its status with aa-status
tux > sudo aa-statusapparmor module is loaded.39 profiles are loaded.38 profiles are in enforce mode.[...] /usr/sbin/httpd2-prefork /usr/sbin/httpd2-prefork//DEFAULT_URI /usr/sbin/httpd2-prefork//HANDLING_UNTRUSTED_INPUT /usr/sbin/httpd2-prefork//adminer[...]
333 With AppArmor's Command Line Tools openSUSE Leap 15.2
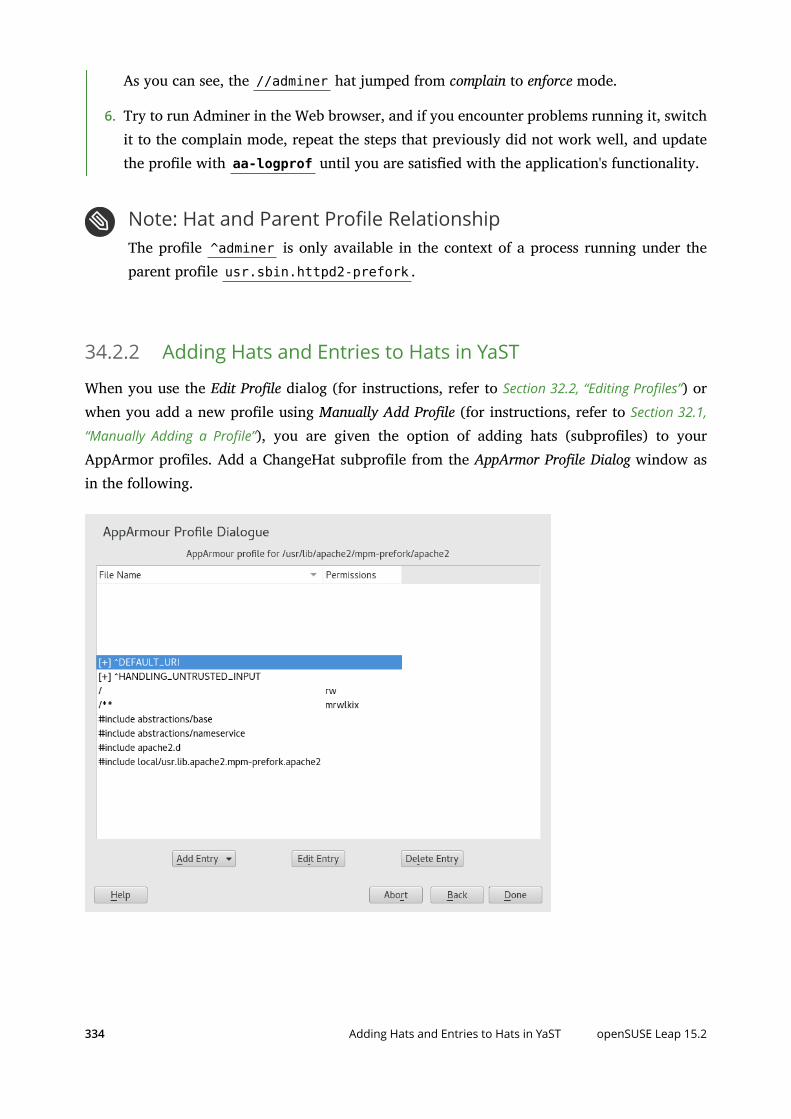
As you can see, the //adminer hat jumped from complain to enforce mode.
6. Try to run Adminer in the Web browser, and if you encounter problems running it, switchit to the complain mode, repeat the steps that previously did not work well, and updatethe prole with aa-logprof until you are satised with the application's functionality.
Note: Hat and Parent Profile RelationshipThe prole ^adminer is only available in the context of a process running under theparent prole usr.sbin.httpd2-prefork .
34.2.2 Adding Hats and Entries to Hats in YaST
When you use the Edit Prole dialog (for instructions, refer to Section 32.2, “Editing Profiles”) orwhen you add a new prole using Manually Add Prole (for instructions, refer to Section 32.1,
“Manually Adding a Profile”), you are given the option of adding hats (subproles) to yourAppArmor proles. Add a ChangeHat subprole from the AppArmor Prole Dialog window asin the following.
334 Adding Hats and Entries to Hats in YaST openSUSE Leap 15.2

1. From the AppArmor Prole Dialog window, click Add Entry then select Hat. The Enter HatName dialog opens:
2. Enter the name of the hat to add to the AppArmor prole. The name is the URI that, whenaccessed, receives the permissions set in the hat.
3. Click Create Hat. You are returned to the AppArmor Prole Dialog screen.
4. After adding the new hat, click Done.
335 Adding Hats and Entries to Hats in YaST openSUSE Leap 15.2

35 Confining Users with pam_apparmor
An AppArmor prole applies to an executable program; if a portion of the program needsdierent access permissions than other portions need, the program can change hats viachange_hat to a dierent role, also known as a subprole. The pam_apparmor PAM moduleallows applications to conne authenticated users into subproles based on group names, usernames, or a default prole. To accomplish this, pam_apparmor needs to be registered as a PAMsession module.
The package pam_apparmor is not installed by default, you can install it using YaST or zypper .Details about how to set up and congure pam_apparmor can be found in /usr/share/doc/packages/pam_apparmor/README after the package has been installed. For details on PAM,refer to Chapter 3, Authentication with PAM.
336 openSUSE Leap 15.2

36 Managing Profiled Applications
After creating proles and immunizing your applications, openSUSE® Leap becomes moreecient and better protected as long as you perform AppArmor® prole maintenance (whichinvolves analyzing log les, rening your proles, backing up your set of proles and keepingit up-to-date). You can deal with these issues before they become a problem by setting up eventnotication by e-mail, updating proles from system log entries by running the aa-logprof tool,and dealing with maintenance issues.
36.1 Reacting to Security Event Rejections
When you receive a security event rejection, examine the access violation and determine ifthat event indicated a threat or was part of normal application behavior. Application-specicknowledge is required to make the determination. If the rejected action is part of normalapplication behavior, run aa-logprof at the command line.
If the rejected action is not part of normal application behavior, this access should be considereda possible intrusion attempt (that was prevented) and this notication should be passed to theperson responsible for security within your organization.
36.2 Maintaining Your Security Profiles
In a production environment, you should plan on maintaining proles for all of the deployedapplications. The security policies are an integral part of your deployment. You should plan ontaking steps to back up and restore security policy les, plan for software changes, and allowany needed modication of security policies that your environment dictates.
36.2.1 Backing Up Your Security Profiles
Backing up proles might save you from having to re-prole all your programs after a disk crash.Also, if proles are changed, you can easily restore previous settings by using the backed up les.
Back up proles by copying the prole les to a specied directory.
337 Reacting to Security Event Rejections openSUSE Leap 15.2

1. You should rst archive the les into one le. To do this, open a terminal window andenter the following as root :
tux > sudo tar zclpf profiles.tgz /etc/apparmor.d
The simplest method to ensure that your security policy les are regularly backed up is toinclude the directory /etc/apparmor.d in the list of directories that your backup systemarchives.
2. You can also use scp or a le manager like Nautilus to store the les on some kind ofstorage media, the network, or another computer.
36.2.2 Changing Your Security Profiles
Maintenance of security proles includes changing them if you decide that your system requiresmore or less security for its applications. To change your proles in AppArmor, refer toSection 32.2, “Editing Profiles”.
36.2.3 Introducing New Software into Your Environment
When you add a new application version or patch to your system, you should always updatethe prole to t your needs. You have several options, depending on your company's softwaredeployment strategy. You can deploy your patches and upgrades into a test or productionenvironment. The following explains how to do this with each method.
If you intend to deploy a patch or upgrade in a test environment, the best method for updatingyour proles is to run aa-logprof in a terminal as root . For detailed instructions, refer toSection 33.7.3.9, “aa-logprof—Scanning the System Log”.
If you intend to deploy a patch or upgrade directly into a production environment, the bestmethod for updating your proles is to monitor the system frequently to determine if any newrejections should be added to the prole and update as needed using aa-logprof . For detailedinstructions, refer to Section 33.7.3.9, “aa-logprof—Scanning the System Log”.
338 Changing Your Security Profiles openSUSE Leap 15.2

37 Support
This chapter outlines maintenance-related tasks. Learn how to update AppArmor® and get alist of available man pages providing basic help for using the command line tools provided byAppArmor. Use the troubleshooting section to learn about some common problems encounteredwith AppArmor and their solutions. Report defects or enhancement requests for AppArmorfollowing the instructions in this chapter.
37.1 Updating AppArmor OnlineUpdates for AppArmor packages are provided in the same way as any other update for openSUSELeap. Retrieve and apply them exactly like for any other package that ships as part of openSUSELeap.
37.2 Using the Man PagesThere are man pages available for your use. In a terminal, enter man apparmor to open theAppArmor man page. Man pages are distributed in sections numbered 1 through 8. Each sectionis specic to a category of documentation:
TABLE 37.1: MAN PAGES: SECTIONS AND CATEGORIES
Section Category
1 User commands
2 System calls
3 Library functions
4 Device driver information
5 Conguration le formats
6 Games
7 High level concepts
339 Updating AppArmor Online openSUSE Leap 15.2

Section Category
8 Administrator commands
The section numbers are used to distinguish man pages from each other. For example, exit(2)describes the exit system call, while exit(3) describes the exit C library function.
The AppArmor man pages are:
aa-audit(8)
aa-autodep(8)
aa-complain(8)
aa-decode(8)
aa-disable(8)
aa-easyprof(8)
aa-enforce(8)
aa-enxec(8)
aa-genprof(8)
aa-logprof(8)
aa-notify(8)
aa-status(8)
aa-unconfined(8)
aa_change_hat(8)
logprof.conf(5)
apparmor.d(5)
apparmor.vim(5)
apparmor(7)
apparmor_parser(8)
apparmor_status(8)
340 Using the Man Pages openSUSE Leap 15.2
37.3 For More InformationFind more information about the AppArmor product at: http://wiki.apparmor.net . Find theproduct documentation for AppArmor in the installed system at /usr/share/doc/manual .
There is a mailing list for AppArmor that users can post to or join to communicate withdevelopers. See https://lists.ubuntu.com/mailman/listinfo/apparmor for details.
37.4 TroubleshootingThis section lists the most common problems and error messages that may occur usingAppArmor.
37.4.1 How to React to odd Application Behavior?
If you notice odd application behavior or any other type of application problem, you shouldrst check the reject messages in the log les to see if AppArmor is too closely constricting yourapplication. If you detect reject messages that indicate that your application or service is tooclosely restricted by AppArmor, update your prole to properly handle your use case of theapplication. Do this with aa-logprof (Section 33.7.3.9, “aa-logprof—Scanning the System Log”).
If you decide to run your application or service without AppArmor protection, remove theapplication's prole from /etc/apparmor.d or move it to another location.
37.4.2 My Profiles Do not Seem to Work Anymore …
If you have been using previous versions of AppArmor and have updated your system (but keptyour old set of proles) you might notice some applications which seemed to work perfectlybefore you updated behaving strangely, or not working.
This version of AppArmor introduces a set of new features to the prole syntax and theAppArmor tools that might cause trouble with older versions of the AppArmor proles. Thosefeatures are:
File Locking
Network Access Control
341 For More Information openSUSE Leap 15.2

The SYS_PTRACE Capability
Directory Path Access
The current version of AppArmor mediates le locking and introduces a new permission mode( k ) for this. Applications requesting le locking permission might misbehave or fail altogetherif conned by older proles which do not explicitly contain permissions to lock les. If yoususpect this being the case, check the log le under /var/log/audit/audit.log for entrieslike the following:
type=AVC msg=audit(1389862802.727:13939): apparmor="DENIED" \operation="file_lock" parent=2692 profile="/usr/bin/opera" \name="/home/tux/.qt/.qtrc.lock" pid=28730 comm="httpd2-prefork" \requested_mask="::k" denied_mask="::k" fsuid=30 ouid=0
Update the prole using the aa-logprof command as outlined below.
The new network access control syntax based on the network family and type specication,described in Section 30.5, “Network Access Control”, might cause application misbehavior or evenstop applications from working. If you notice a network-related application behaving strangely,check the log le under /var/log/audit/audit.log for entries like the following:
type=AVC msg=audit(1389864332.233:13947): apparmor="DENIED" \operation="socket_create" family="inet" parent=29985 profile="/bin/ping" \sock_type="raw" pid=30251 comm="ping"
This log entry means that our example application, /bin/ping in this case, failed to getAppArmor's permission to open a network connection. This permission needs to be explicitlystated to make sure that an application has network access. To update the prole to the newsyntax, use the aa-logprof command as outlined below.
The current kernel requires the SYS_PTRACE capability, if a process tries to access les in /proc/PID/fd/* . New proles need an entry for the le and the capability, where old prolesonly needed the le entry. For example:
/proc/*/fd/** rw,
in the old syntax would translate to the following rules in the new syntax:
capability SYS_PTRACE,/proc/*/fd/** rw,
342 My Profiles Do not Seem to Work Anymore … openSUSE Leap 15.2

To update the prole to the new syntax, use the YaST Update Prole Wizard or the aa-logprofcommand as outlined below.
With this version of AppArmor, a few changes have been made to the prole rule syntax to betterdistinguish directory from le access. Therefore, some rules matching both le and directorypaths in the previous version might now match a le path only. This could lead to AppArmornot being able to access a crucial directory, and thus trigger misbehavior of your applicationand various log messages. The following examples highlight the most important changes to thepath syntax.
Using the old syntax, the following rule would allow access to les and directories in /proc/net . It would allow directory access only to read the entries in the directory, but not give accessto les or directories under the directory, for example /proc/net/dir/foo would be matchedby the asterisk (*), but as foo is a le or directory under dir , it cannot be accessed.
/proc/net/* r,
To get the same behavior using the new syntax, you need two rules instead of one. The rstallows access to the le under /proc/net and the second allows access to directories under /proc/net . Directory access can only be used for listing the contents, not actually accessing lesor directories underneath the directory.
/proc/net/* r,/proc/net/*/ r,
The following rule works similarly both under the old and the new syntax, and allows access toboth les and directories under /proc/net (but does not allow a directory listing of /proc/net/ itself):
/proc/net/** r,
To distinguish le access from directory access using the above expression in the new syntax,use the following two rules. The rst one only allows to recursively access directories under /proc/net while the second one explicitly allows for recursive le access only.
/proc/net/**/ r,/proc/net/**[^/] r,
343 My Profiles Do not Seem to Work Anymore … openSUSE Leap 15.2

The following rule works similarly both under the old and the new syntax and allows access toboth les and directories beginning with foo under /proc/net :
/proc/net/foo** r,
To distinguish le access from directory access in the new syntax and use the ** globbingpattern, use the following two rules. The rst one would have matched both les and directoriesin the old syntax, but only matches les in the new syntax because of the missing trailing slash.The second rule matched neither le nor directory in the old syntax, but matches directoriesonly in the new syntax:
/proc/net/**foo r,/proc/net/**foo/ r,
The following rules illustrate how the use of the ? globbing pattern has changed. In theold syntax, the rst rule would have matched both les and directories (four characters, lastcharacter could be any but a slash). In the new syntax, it matches only les (trailing slash ismissing). The second rule would match nothing in the old prole syntax, but matches directoriesonly in the new syntax. The last rule matches explicitly matches a le called bar under /proc/net/foo? . Using the old syntax, this rule would have applied to both les and directories:
/proc/net/foo? r,/proc/net/foo?/ r,/proc/net/foo?/bar r,
To nd and resolve issues related to syntax changes, take some time after the update to check theproles you want to keep and proceed as follows for each application you kept the prole for:
1. Put the application's prole into complain mode:
tux > sudo aa-complain /path/to/application
Log entries are made for any actions violating the current prole, but the prole is notenforced and the application's behavior not restricted.
2. Run the application covering all the tasks you need this application to be able to perform.
3. Update the prole according to the log entries made while running the application:
tux > sudo aa-logprof /path/to/application
344 My Profiles Do not Seem to Work Anymore … openSUSE Leap 15.2

4. Put the resulting prole back into enforce mode:
tux > sudo aa-enforce /path/to/application
37.4.3 Resolving Issues with Apache
After installing additional Apache modules (like apache2-mod_apparmor ) or makingconguration changes to Apache, prole Apache again to nd out if additional rules need tobe added to the prole. If you do not prole Apache again, it could be unable to start properlyor be unable to serve Web pages.
37.4.4 How to Exclude Certain Profiles from the List of ProfilesUsed?
Run aa-disable PROGRAMNAME to disable the prole for PROGRAMNAME . This command createsa symbolic link to the prole in /etc/apparmor.d/disable/ . To reactivate the prole, deletethe link, and run systemctl reload apparmor .
37.4.5 Can I Manage Profiles for Applications not Installed on mySystem?
Managing proles with AppArmor requires you to have access to the log of the system on whichthe application is running. So you do not need to run the application on your prole build host aslong as you have access to the machine that runs the application. You can run the application onone system, transfer the logs ( /var/log/audit.log or, if audit is not installed, journalctl| grep -i apparmor > path_to_logfile ) to your prole build host and run aa-logprof-f PATH_TO_LOGFILE .
37.4.6 How to Spot and Fix AppArmor Syntax Errors
Manually editing AppArmor proles can introduce syntax errors. If you attempt to start or restartAppArmor with syntax errors in your proles, error results are shown. This example shows thesyntax of the entire parser error.
root # systemctl start apparmor.service
345 Resolving Issues with Apache openSUSE Leap 15.2

Loading AppArmor profiles AppArmor parser error in /etc/apparmor.d/usr.sbin.squid \ at line 410: syntax error, unexpected TOK_ID, expecting TOK_MODEProfile /etc/apparmor.d/usr.sbin.squid failed to load
Using the AppArmor YaST tools, a graphical error message indicates which prole containedthe error and requests you to x it.
To x a syntax error, log in to a terminal window as root , open the prole, and correct thesyntax. Reload the prole set with systemctl reload apparmor .
Tip: AppArmor Syntax Highlighting in viThe editor vi on openSUSE Leap supports syntax highlighting for AppArmor proles.Lines containing syntax errors will be displayed with a red background.
37.5 Reporting Bugs for AppArmorThe developers of AppArmor are eager to deliver products of the highest quality. Your feedbackand your bug reports help us keep the quality high. Whenever you encounter a bug in AppArmor,le a bug report against this product:
1. Use your Web browser to go to http://bugzilla.opensuse.org/ and click Log In.
2. Enter the account data of your SUSE account and click Login. If you do not have a SUSEaccount, click Create Account and provide the required data.
346 Reporting Bugs for AppArmor openSUSE Leap 15.2

3. If your problem has already been reported, check this bug report and add extra informationto it, if necessary.
4. If your problem has not been reported yet, select New from the top navigation bar andproceed to the Enter Bug page.
5. Select the product against which to le the bug. In your case, this would be your product'srelease. Click Submit.
6. Select the product version, component (AppArmor in this case), hardware platform, andseverity.
7. Enter a brief headline describing your problem and add a more elaborate descriptionincluding log les. You may create attachments to your bug report for screenshots, logles, or test cases.
8. Click Submit after you have entered all the details to send your report to the developers.
347 Reporting Bugs for AppArmor openSUSE Leap 15.2

38 AppArmor Glossary
Abstraction
See prole foundation classes below.
Apache
Apache is a freely-available Unix-based Web server. It is currently the most commonlyused Web server on the Internet. Find more information about Apache at the Apache Website at http://www.apache.org .
application fire-walling
AppArmor connes applications and limits the actions they are permitted to take. It usesprivilege connement to prevent attackers from using malicious programs on the protectedserver and even using trusted applications in unintended ways.
attack signature
Pattern in system or network activity that alerts of a possible virus or hacker attack.Intrusion detection systems might use attack signatures to distinguish between legitimateand potentially malicious activity.By not relying on attack signatures, AppArmor provides "proactive" instead of "reactive"defense from attacks. This is better because there is no window of vulnerability wherethe attack signature must be dened for AppArmor as it does for products using attacksignatures.
GUI
Graphical user interface. Refers to a software front-end meant to provide an attractiveand easy-to-use interface between a computer user and application. Its elements includewindows, icons, buttons, cursors, and scrollbars.
globbing
File name substitution. Instead of specifying explicit le name paths, you can use helpercharacters * (substitutes any number of characters except special ones such as / or ? )and ? (substitutes exactly one character) to address multiple les/directories at once. **is a special substitution that matches any le or directory below the current directory.
HIP
348 openSUSE Leap 15.2

Host intrusion prevention. Works with the operating system kernel to block abnormalapplication behavior in the expectation that the abnormal behavior represents an unknownattack. Blocks malicious packets on the host at the network level before they can “hurt”the application they target.
mandatory access control
A means of restricting access to objects that is based on xed security attributes assignedto users, les, and other objects. The controls are mandatory in the sense that they cannotbe modied by users or their programs.
profile
AppArmor prole completely denes what system resources an individual application canaccess, and with what privileges.
profile foundation classes
Prole building blocks needed for common application activities, such as DNS lookup anduser authentication.
RPM
The RPM Package Manager. An open packaging system available for anyone to use. Itworks on Red Hat Linux, openSUSE Leap, and other Linux and Unix systems. It is capableof installing, uninstalling, verifying, querying, and updating computer software packages.See http://www.rpm.org/ for more information.
SSH
Secure Shell. A service that allows you to access your server from a remote computer andissue text commands through a secure connection.
streamlined access control
AppArmor provides streamlined access control for network services by specifying whichles each program is allowed to read, write, and execute. This ensures that each programdoes what it is supposed to do and nothing else.
URI
Universal resource identier. The generic term for all types of names and addresses thatrefer to objects on the World Wide Web. A URL is one kind of URI.
URL
Uniform Resource Locator. The global address of documents and other resources on theWeb.
349 openSUSE Leap 15.2

The rst part of the address indicates what protocol to use and the second part speciesthe IP address or the domain name where the resource is located.For example, when you visit http://www.opensuse.org , you are using the HTTPprotocol, as the beginning of the URL indicates.
vulnerabilities
An aspect of a system or network that leaves it open to attack. Characteristics ofcomputer systems that allow an individual to keep it from correctly operating or thatallows unauthorized users to take control of the system. Design, administrative, orimplementation weaknesses or aws in hardware, rmware, or software. If exploited, avulnerability could lead to an unacceptable impact in the form of unauthorized access toinformation or the disruption of critical processing.
350 openSUSE Leap 15.2

V SELinux
39 Configuring SELinux 352
39 Configuring SELinux
In this chapter, you will learn how to set up and manage SELinux on openSUSE Leap. Thefollowing topics are covered:
Why Use SELinux?
Understanding SELinux
Setting Up SELinux
Managing SELinux
39.1 Why Use SELinux?SELinux was developed as an additional Linux security solution that uses the security frameworkin the Linux kernel. The purpose was to allow for a more granular security policy that goesbeyond what is oered by the default existing permissions of Read, Write, and Execute, andbeyond assigning permissions to the dierent capabilities that are available on Linux. SELinuxdoes this by trapping all system calls that reach the kernel, and denying them by default. Thismeans that on a system that has SELinux enabled and nothing else congured, nothing willwork. To allow your system to do anything, as an administrator you will need to write rulesand put them in a policy.
An example explains why a solution such as SELinux (or its counterpart AppArmor) is needed:
“One morning, I found out that my server was hacked. The server was running a fully patchedopenSUSE Leap installation. A rewall was congured on it and no unnecessary serviceswere oered by this server. Further analysis revealed that the hacker had come in through avulnerable PHP script that was a part of one of the Apache virtual hosts that were running on thisserver. The intruder had managed to get access to a shell, using the wwwrun account that wasused by the Apache Web server. As this wwwrun user, the intruder had created several scriptsin the /var/tmp and the /tmp directories, which were a part of a botnet that was launching aDistributed Denial of Service attack against several servers.”
The interesting thing about this hack is that it occurred on a server where nothing was reallywrong. All permissions where set OK, but the intruder had managed to get into the system. Whatbecomes clearly evident from this example is that in some cases additional security is needed—asecurity that goes beyond what is oered by using SELinux. As a less complete and less complexalternative, AppArmor can be used.
352 Why Use SELinux? openSUSE Leap 15.2

AppArmor connes specic processes in their abilities to read/write and execute les (and otherthings). Its view is mostly that things that happen inside a process cannot escape.
SELinux instead uses labels attached to objects (for example, les, binaries, network sockets)and uses them to determine privilege boundaries, thereby building up a level of connementthat can span more than a process or even the whole system.
SELinux was developed by the US National Security Agency (NSA), and since the beginning RedHat has been heavily involved in its development. The rst version of SELinux was oered in theera of Red Hat Enterprise Linux 4™, around the year 2006. In the beginning it oered supportfor essential services only, but over the years it has developed into a system that oers manyrules that are collected in policies to oer protection to a broad range of services.
SELinux was developed in accordance with some certication standards like Common Criteriaand FIPS 140. Because some customers specically requested solutions that met these standards,SELinux rapidly became relatively popular.
As an alternative to SELinux, Immunix, a company that was purchased by Novell in 2005, haddeveloped AppArmor. AppArmor was built on top of the same security principles as SELinux, buttook a completely dierent approach, where it was possible to restrict services to exactly whatthey needed to do by using an easy to use wizard-driven procedure. Nevertheless, AppArmorhas never reached the same status as SELinux, even if there are some good arguments to securea server with AppArmor rather than with SELinux.
Because many organizations are requesting SELinux to be in the Linux distributions they areusing, SUSE is oering support for the SELinux framework in openSUSE Leap. This does notmean that the default installation of openSUSE Leap will switch from AppArmor to SELinux inthe near future.
39.1.1 Support Status
The SELinux framework is supported on openSUSE Leap. This means that openSUSE Leap oersall binaries and libraries you need to be able to use SELinux on your server.
SELinux support is at a fairly early stage in openSUSE Leap, which means that unexpectedbehavior may occur. To limit this risk as much as possible, it is best to use only the binaries thathave been provided by default on openSUSE Leap.
353 Support Status openSUSE Leap 15.2

39.1.2 Understanding SELinux Components
Before starting the conguration of SELinux, you should know a bit about how SELinux isorganized. Three components play a role:
The security framework in the Linux kernel
The SELinux libraries and binaries
The SELinux policy
The default kernel of openSUSE Leap supports SELinux and the tools that are needed to manageit. The most important part of the work of the administrator with regard to SELinux is managingthe policy.
Warning: No Default Policy IncludedNo default or reference policy is provided in openSUSE Leap. SELinux will not operatewithout a policy, so you must build and install one. The SELinux Reference PolicyProject (https://github.com/SELinuxProject/refpolicy/wiki ) should be helpful in providingexamples and detailed information on creating your own policies, and this chapter alsoprovides guidance on managing your SELinux policy.
In the SELinux policy, security labels are applied to dierent objects on a Linux server. Theseobjects typically are users, ports, processes and les. Using these security labels, rules arecreated that dene what is and what is not allowed on a server. Remember, by default SELinuxdenies everything, and by creating the appropriate rules you can allow the access that is strictlynecessary. Rules should therefore exist for all programs that you want to use on a system.Alternatively, you should congure parts of a system to run in unconned mode, which meansthat specic ports, programs, users, les and directories are not protected by SELinux. This modeis useful if you only want to use SELinux to protect some essential services, while you are notspecically worried about other services. To get a really secure system, you should avoid this.
To ensure the appropriate protection of your system, you need an SELinux policy. This must bea tailor-made policy in which all les are provided with a label, and all services and users havea security label as well to express which les and directories can be accessed by which user andprocessed on the server. Developing such a policy is a tremendous amount of work.
The complexity of SELinux is also one of the main arguments against using it. Because a typicalLinux system is so very complex, it is easy to overlook something and leave an opening thatintruders can abuse to get into your system. And even if it is set up completely the way it should
354 Understanding SELinux Components openSUSE Leap 15.2

be, it still is very hard for an administrator to overlook all aspects with SELinux. With regardto the complexity, AppArmor takes a completely dierent approach and works with automatedprocedures that allow the administrator to set up AppArmor protection and understand exactlywhat is happening.
Note that a freely available SELinux policy might work on your server, but is unlikely to oerthe same protection as a custom policy. SUSE does not support third-party policies.
39.2 PolicyThe policy is the key component in SELinux. Note that no default or reference policy is includedin openSUSE Leap, and you must build and install one that is customized for your needs beforeproceeding. (See Warning: No Default Policy Included. )
Your SELinux policy denes rules that specify which objects can access which les, directories,ports, and processes on a system. To do this, a security context is dened for all of these. Onan SELinux system where the policy has been applied to label the le system, you can use thels -Z command on any directory to nd the security context for the les in that directory.Example 39.1: “Security Context Settings Using ls -Z” shows the security context settings for thedirectories in the / directory of a openSUSE Leap system with an SELinux-labeled le system.
EXAMPLE 39.1: SECURITY CONTEXT SETTINGS USING ls -Z
ls -Zsystem_u:object_r:bin_t binsystem_u:object_r:boot_t bootsystem_u:object_r:device_t devsystem_u:object_r:etc_t etcsystem_u:object_r:home_root_t homesystem_u:object_r:lib_t libsystem_u:object_r:lib_t lib64system_u:object_r:lost_found_t lost+foundsystem_u:object_r:mnt_t mediasystem_u:object_r:mnt_t mntsystem_u:object_r:usr_t optsystem_u:object_r:proc_t procsystem_u:object_r:default_t rootsystem_u:object_r:bin_t sbinsystem_u:object_r:security_t selinuxsystem_u:object_r:var_t srvsystem_u:object_r:sysfs_t syssystem_u:object_r:tmp_t tmpsystem_u:object_r:usr_t usr
355 Policy openSUSE Leap 15.2

system_u:object_r:var_t var
The most important line in the security context is the context type. This is the part of the securitycontext that ends in _t. It tells SELinux which kind of access the object is allowed. In the policy,rules are specied to dene which type of user or which type of role has access to which typeof context. For example, this can happen by using a rule like the following:
allow user_t bin_t:file {read execute gettattr};
This example rule states that the user who has the context type user_t (this user is called thesource object) is allowed to access objects of class "le" with the context type bin_t (the target),using the permissions read, execute and getattr.
The standard policy that you are going to use contains a huge amount of rules. To make it moremanageable, policies are often split into modules. This allows administrator to switch protectionon or o for dierent parts of the system.
When compiling the policy for your system, you will have a choice to either work with a modularpolicy, or a monolithic policy, where one huge policy is used to protect everything on yoursystem. It is strongly recommended to use a modular policy and not a monolithic policy. Modularpolicies are much easier to manage.
39.3 Installing SELinux Packages and ModifyingGRUB 2The easiest way to make sure that all SELinux components are installed is by using YaST. Theprocedure described below shows what to do on an installed openSUSE Leap:
1. Log in to your server as root and start YaST.
2. Select Software Software Management
3. Select View Patterns and select the entire C/C++ Development category for installation.
4. Select View Search and make sure that Search in Name, Keywords and Summary areselected. Now enter the keyword selinux and click Search. You now see a list of packages.
5. Make sure that all the packages you have found are selected and click Accept to installthem.
356 Installing SELinux Packages and Modifying GRUB 2 openSUSE Leap 15.2

FIGURE 39.1: SELECTING ALL SELINUX PACKAGES IN YAST
After installing the SELinux packages, you need to modify the GRUB 2 boot loader. Do this fromYaST, select System Boot Loader Kernel Parameters. Now add the following parameters to theOptional Kernel Command Line Parameters:
security=selinux selinux=1 enforcing=0
These options are used for the following purposes:
security=selinux
This option tells the kernel to use SELinux and not AppArmor
selinux=1
This option switches on SELinux
enforcing=0
This option puts SELinux in permissive mode. In this mode, SELinux is fully functional, butdoes not enforce any of the security settings in the policy. Use this mode for conguringyour system. To switch on SELinux protection, when the system is fully operational, changethe option to enforcing=1 and add SELINUX=enforcing in /etc/selinux/config .
After installing the SELinux packages and enabling the SELinux GRUB 2 boot parameters, rebootyour server to activate the conguration.
357 Installing SELinux Packages and Modifying GRUB 2 openSUSE Leap 15.2

39.4 SELinux PolicyThe policy is an essential component of SELinux. openSUSE Leap 15.2 does not include adefault or reference policy, and you must build a policy that is customized for your installation.For testing and learning, see The SELinux Reference Policy Project at https://github.com/
SELinuxProject/refpolicy/wiki . You must have a policy, as SELinux will not operate without one.
After installing the policy, you are ready to start le system labeling. Run
tux > sudo restorecon -Rp /
to start the /sbin/setfiles command to label all les on your system. The /etc/selinux/minimum/contexts/files/file_contexts input le is used. The file_contexts le needsto match your actual le system as much as possible. Otherwise, it can lead to a completelyunbootable system. If that happens, modify the records in file_contexts with the semanagefcontext command to match the real structure of the le system your server is using. Forexample
tux > sudo semanage fcontext -a -t samba_share_t /etc/example_file
changes the le type from the default etc_t to samba_share_t and adds the following recordto the related file_contexts.local le:
/etc/example_file unconfined_u:object_r:samba_share_t:s0
Then run
tux > sudo restorecon -v /etc/example_file
for the type change to take eect.
Before doing this, make sure to read the rest of this chapter, so you fully understand how contexttype is applied to les and directories. Do not forget to make a backup of the file_contextsle before starting.
Note: The User nobodyWhile using semanage , you may get a message that complains about the home directoryof nobody . In this case, change the login shell of user nobody to /sbin/nologin . Thenthe settings of nobody match the current policy settings.
358 SELinux Policy openSUSE Leap 15.2

After another reboot SELinux should be operational. To verify this, use the command sestatus-v . It should give you an output similar to Example 39.2: “Verifying that SELinux is functional”.
EXAMPLE 39.2: VERIFYING THAT SELINUX IS FUNCTIONAL
tux > sudo sestatus -vSELinux status: enabledSELinuxfs mount: /selinuxCurrent mode: permissiveMode from config file: permissivePolicy version: 26Policy from config file: minimum
Process contexts:Current context: root:staff_r:staff_tInit context: system_u:system_r:init_t/sbin/mingetty system_u:system_r:sysadm_t/usr/sbin/sshd system_u:system_r:sshd_t
File contexts:Controlling term: root:object_r:user_devpts_t/etc/passwd system_u:object_r:etc_t/etc/shadow system_u:object_r:shadow_t/bin/bash system_u:object_r:shell_exec_t/bin/login system_u:object_r:login_exec_t/bin/sh system_u:object_r:bin_t -> system_u:object_r:shell_exec_t/sbin/agetty system_u:object_r:getty_exec_t/sbin/init system_u:object_r:init_exec_t/sbin/mingetty system_u:object_r:getty_exec_t/usr/sbin/sshd system_u:object_r:sshd_exec_t/lib/libc.so.6 system_u:object_r:lib_t -> system_u:object_r:lib_t/lib/ld-linux.so.2 system_u:object_r:lib_t -> system_u:object_r:ld_so_t
39.5 Configuring SELinuxAt this point you have a completely functional SELinux system and it is time to further congureit. In the current status, SELinux is operational but not in enforcing mode. This means that itdoes not limit you in doing anything, it logs everything that it should be doing if it were inenforcing mode. This is good, because based on the log les you can nd what it is that it wouldprevent you from doing. As a rst test, put SELinux in enforcing mode and nd out if you canstill use your server after doing so: check that the option enforcing=1 is set in the GRUB 2conguration le, while SELINUX=enforcing is set in /etc/selinux/config . Reboot your
359 Configuring SELinux openSUSE Leap 15.2

server and see if it still comes up the way you expect it to. If it does, leave it like that and startmodifying the server in a way that everything works as expected. However, you may not evenbe able to boot the server properly. In that case, switch back to the mode where SELinux is notenforcing and start tuning your server.
Before you start tuning your server, verify the SELinux installation. You have already used thecommand sestatus -v to view the current mode, process, and le contexts. Next, run
tux > sudo semanage boolean -l
which lists all Boolean switches that are available, and at the same time veries that you canaccess the policy. Example 39.3, “Getting a List of Booleans and Verifying Policy Access” shows part ofthe output of this command.
EXAMPLE 39.3: GETTING A LIST OF BOOLEANS AND VERIFYING POLICY ACCESS
tux > sudo semanage boolean -lSELinux boolean Descriptionftp_home_dir -> off ftp_home_dirmozilla_read_content -> off mozilla_read_contentspamassassin_can_network -> off spamassassin_can_networkhttpd_can_network_relay -> off httpd_can_network_relayopenvpn_enable_homedirs -> off openvpn_enable_homedirsgpg_agent_env_file -> off gpg_agent_env_fileallow_httpd_awstats_script_anon_write -> off allow_httpd_awstats_script_anon_writehttpd_can_network_connect_db -> off httpd_can_network_connect_dballow_ftpd_full_access -> off allow_ftpd_full_accesssamba_domain_controller -> off samba_domain_controllerhttpd_enable_cgi -> off httpd_enable_cgivirt_use_nfs -> off virt_use_nfs
Another command that outputs useful information at this stage is
tux > sudo semanage fcontext -l
It shows the default le context settings as provided by the policy (see Example 39.4: “Getting
File Context Information” for partial output of this command).
EXAMPLE 39.4: GETTING FILE CONTEXT INFORMATION
tux > sudo semanage fcontext -l/var/run/usb(/.*)? all files system_u:object_r:hotplug_var_run_t/var/run/utmp regular file system_u:object_r:initrc_var_run_t
360 Configuring SELinux openSUSE Leap 15.2

/var/run/vbe.* regular file system_u:object_r:hald_var_run_t/var/run/vmnat.* socket system_u:object_r:vmware_var_run_t/var/run/vmware.* all files system_u:object_r:vmware_var_run_t/var/run/watchdog\.pid regular file system_u:object_r:watchdog_var_run_t/var/run/winbindd(/.*)? all files system_u:object_r:winbind_var_run_t/var/run/wnn-unix(/.*) all files system_u:object_r:canna_var_run_t/var/run/wpa_supplicant(/.*)? all files system_u:object_r:NetworkManager_var_run_t/var/run/wpa_supplicant-global socket system_u:object_r:NetworkManager_var_run_t/var/run/xdmctl(/.*)? all files system_u:object_r:xdm_var_run_t/var/run/yiff-[0-9]+\.pid regular file system_u:object_r:soundd_var_run_t
39.6 Managing SELinuxThe base SELinux conguration is now operational and it can now be congured to secure yourserver. In SELinux, an additional set of rules is used to dene exactly which process or usercan access which les, directories, or ports. To do this, SELinux applies a context to every le,directory, process, and port. This context is a security label that denes how this le, directory,process, or port should be treated. These context labels are used by the SELinux policy, whichdenes exactly what should be done with the context labels. By default, the policy blocks allnon-default access, which means that, as an administrator, you need to enable all features thatare non-default on your server.
39.6.1 Viewing the Security Context
As already mentioned, les, directories, and ports can be labeled. Within each label, dierentcontexts are used. To be able to perform your daily administration work, the type context is whatyou are most interested in. As an administrator, you will mostly work with the type context.Many commands allow you to use the -Z option to list current context settings. In Example 39.5:
“The default context for directories in the root directory” you can see what the context settings arefor the directories in the root directory.
361 Managing SELinux openSUSE Leap 15.2
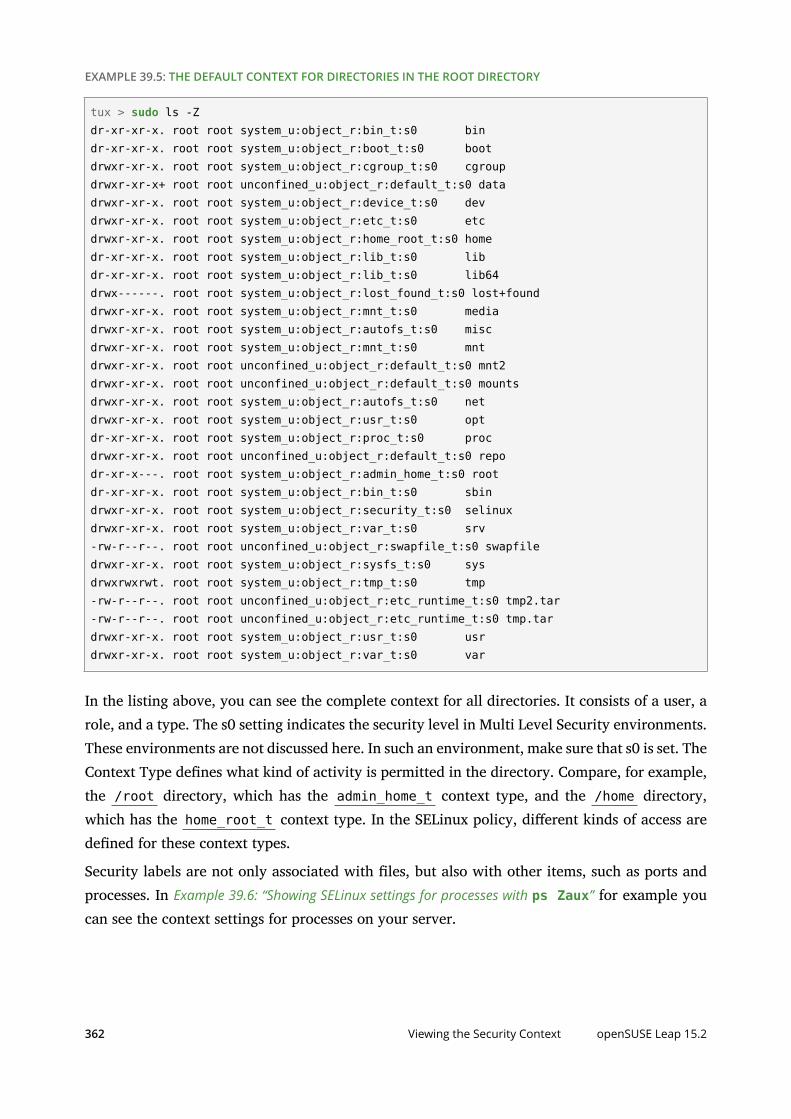
EXAMPLE 39.5: THE DEFAULT CONTEXT FOR DIRECTORIES IN THE ROOT DIRECTORY
tux > sudo ls -Zdr-xr-xr-x. root root system_u:object_r:bin_t:s0 bindr-xr-xr-x. root root system_u:object_r:boot_t:s0 bootdrwxr-xr-x. root root system_u:object_r:cgroup_t:s0 cgroupdrwxr-xr-x+ root root unconfined_u:object_r:default_t:s0 datadrwxr-xr-x. root root system_u:object_r:device_t:s0 devdrwxr-xr-x. root root system_u:object_r:etc_t:s0 etcdrwxr-xr-x. root root system_u:object_r:home_root_t:s0 homedr-xr-xr-x. root root system_u:object_r:lib_t:s0 libdr-xr-xr-x. root root system_u:object_r:lib_t:s0 lib64drwx------. root root system_u:object_r:lost_found_t:s0 lost+founddrwxr-xr-x. root root system_u:object_r:mnt_t:s0 mediadrwxr-xr-x. root root system_u:object_r:autofs_t:s0 miscdrwxr-xr-x. root root system_u:object_r:mnt_t:s0 mntdrwxr-xr-x. root root unconfined_u:object_r:default_t:s0 mnt2drwxr-xr-x. root root unconfined_u:object_r:default_t:s0 mountsdrwxr-xr-x. root root system_u:object_r:autofs_t:s0 netdrwxr-xr-x. root root system_u:object_r:usr_t:s0 optdr-xr-xr-x. root root system_u:object_r:proc_t:s0 procdrwxr-xr-x. root root unconfined_u:object_r:default_t:s0 repodr-xr-x---. root root system_u:object_r:admin_home_t:s0 rootdr-xr-xr-x. root root system_u:object_r:bin_t:s0 sbindrwxr-xr-x. root root system_u:object_r:security_t:s0 selinuxdrwxr-xr-x. root root system_u:object_r:var_t:s0 srv-rw-r--r--. root root unconfined_u:object_r:swapfile_t:s0 swapfiledrwxr-xr-x. root root system_u:object_r:sysfs_t:s0 sysdrwxrwxrwt. root root system_u:object_r:tmp_t:s0 tmp-rw-r--r--. root root unconfined_u:object_r:etc_runtime_t:s0 tmp2.tar-rw-r--r--. root root unconfined_u:object_r:etc_runtime_t:s0 tmp.tardrwxr-xr-x. root root system_u:object_r:usr_t:s0 usrdrwxr-xr-x. root root system_u:object_r:var_t:s0 var
In the listing above, you can see the complete context for all directories. It consists of a user, arole, and a type. The s0 setting indicates the security level in Multi Level Security environments.These environments are not discussed here. In such an environment, make sure that s0 is set. TheContext Type denes what kind of activity is permitted in the directory. Compare, for example,the /root directory, which has the admin_home_t context type, and the /home directory,which has the home_root_t context type. In the SELinux policy, dierent kinds of access aredened for these context types.
Security labels are not only associated with les, but also with other items, such as ports andprocesses. In Example 39.6: “Showing SELinux settings for processes with ps Zaux” for example youcan see the context settings for processes on your server.
362 Viewing the Security Context openSUSE Leap 15.2

EXAMPLE 39.6: SHOWING SELINUX SETTINGS FOR PROCESSES WITH ps Zaux
tux > sudo ps ZauxLABEL USER PID %CPU %MEM VSZ RSS TTY STAT START TIME COMMANDsystem_u:system_r:init_t root 1 0.0 0.0 10640 808 ? Ss 05:31 0:00 init [5]system_u:system_r:kernel_t root 2 0.0 0.0 0 0 ? S 05:31 0:00 [kthreadd]system_u:system_r:kernel_t root 3 0.0 0.0 0 0 ? S 05:31 0:00 [ksoftirqd/0]system_u:system_r:kernel_t root 6 0.0 0.0 0 0 ? S 05:31 0:00 [migration/0]system_u:system_r:kernel_t root 7 0.0 0.0 0 0 ? S 05:31 0:00 [watchdog/0]system_u:system_r:sysadm_t root 2344 0.0 0.0 27640 852 ? Ss 05:32 0:00 /usr/sbin/mcelog --daemon --config-file /etc/mcelog/mcelog.confsystem_u:system_r:sshd_t root 3245 0.0 0.0 69300 1492 ? Ss 05:32 0:00 /usr/sbin/sshd -o PidFile=/var/run/sshd.init.pidsystem_u:system_r:cupsd_t root 3265 0.0 0.0 68176 2852 ? Ss 05:32 0:00 /usr/sbin/cupsdsystem_u:system_r:nscd_t root 3267 0.0 0.0 772876 1380 ? Ssl 05:32 0:00 /usr/sbin/nscdsystem_u:system_r:postfix_master_t root 3334 0.0 0.0 38320 2424 ? Ss 05:32 0:00 /usr/lib/postfix/mastersystem_u:system_r:postfix_qmgr_t postfix 3358 0.0 0.0 40216 2252 ? S 05:32 0:00 qmgr -l -t fifo -usystem_u:system_r:crond_t root 3415 0.0 0.0 14900 800 ? Ss 05:32 0:00 /usr/sbin/cronsystem_u:system_r:fsdaemon_t root 3437 0.0 0.0 16468 1040 ? S 05:32 0:00 /usr/sbin/smartdsystem_u:system_r:sysadm_t root 3441 0.0 0.0 66916 2152 ? Ss 05:32 0:00 login -- rootsystem_u:system_r:sysadm_t root 3442 0.0 0.0 4596 800 tty2 Ss+ 05:32 0:00 /sbin/mingetty tty2
39.6.2 Selecting the SELinux Mode
In SELinux, three dierent modes can be used:
Enforcing:
This is the default mode. SELinux protects your server according to the rules in the policy,and SELinux logs all of its activity to the audit log.
Permissive:
363 Selecting the SELinux Mode openSUSE Leap 15.2

This mode is useful for troubleshooting. If set to Permissive, SELinux does not protect yourserver, but it still logs everything that happens to the log les.
Disabled:
In this mode, SELinux is switched o completely and no logging occurs. The le systemlabels however are not removed from the le system.
You have already read how you can set the current SELinux mode from GRUB 2 while bootingusing the enforcing boot parameter.
39.6.3 Modifying SELinux Context Types
An important part of the work of an administrator is setting context types on les to ensureappropriate working of SELinux.
If a le is created within a specic directory, it inherits the context type of the parent directoryby default. If, however, a le is moved from one location to another location, it retains thecontext type that it had in the old location.
To set the context type for les, you can use the semanage fcontext command. With thiscommand, you write the new context type to the policy, but it does not change the actualcontext type immediately! To apply the context types that are in the policy, you need to runthe restorecon command afterward.
The challenge when working with semanage fcontext is to nd out which context you actuallyneed. You can use
tux > sudo semanage fcontext -l
to list all contexts in the policy, but it may be a bit hard to nd out the actual context you needfrom that list as it is rather long (see Example 39.7: “Viewing Default File Contexts”).
EXAMPLE 39.7: VIEWING DEFAULT FILE CONTEXTS
tux > sudo semanage fcontext -l | lessSELinux fcontext type Context
/ directory system_u:object_r:root_t:s0/.* all files system_u:object_r:default_t:s0/[^/]+ regular file system_u:object_r:etc_runtime_t:s0
364 Modifying SELinux Context Types openSUSE Leap 15.2
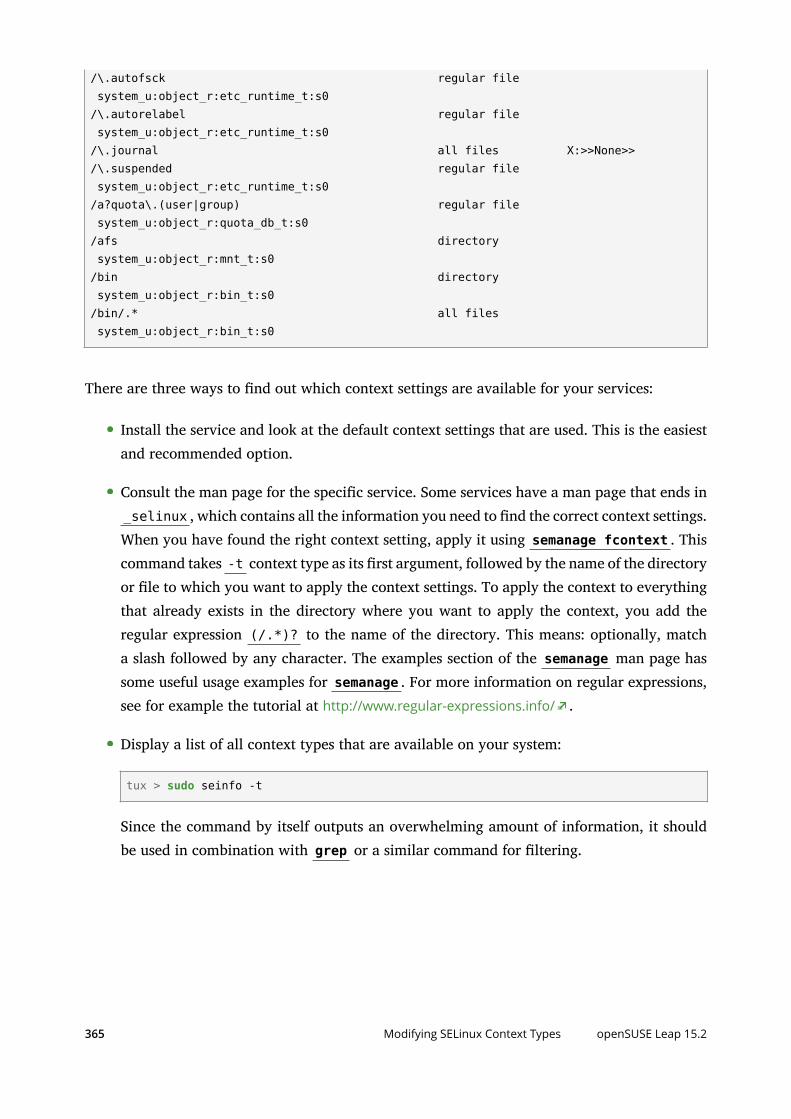
/\.autofsck regular file system_u:object_r:etc_runtime_t:s0/\.autorelabel regular file system_u:object_r:etc_runtime_t:s0/\.journal all files X:>>None>>/\.suspended regular file system_u:object_r:etc_runtime_t:s0/a?quota\.(user|group) regular file system_u:object_r:quota_db_t:s0/afs directory system_u:object_r:mnt_t:s0/bin directory system_u:object_r:bin_t:s0/bin/.* all files system_u:object_r:bin_t:s0
There are three ways to nd out which context settings are available for your services:
Install the service and look at the default context settings that are used. This is the easiestand recommended option.
Consult the man page for the specic service. Some services have a man page that ends in_selinux , which contains all the information you need to nd the correct context settings.When you have found the right context setting, apply it using semanage fcontext . Thiscommand takes -t context type as its rst argument, followed by the name of the directoryor le to which you want to apply the context settings. To apply the context to everythingthat already exists in the directory where you want to apply the context, you add theregular expression (/.*)? to the name of the directory. This means: optionally, matcha slash followed by any character. The examples section of the semanage man page hassome useful usage examples for semanage . For more information on regular expressions,see for example the tutorial at http://www.regular-expressions.info/ .
Display a list of all context types that are available on your system:
tux > sudo seinfo -t
Since the command by itself outputs an overwhelming amount of information, it shouldbe used in combination with grep or a similar command for ltering.
365 Modifying SELinux Context Types openSUSE Leap 15.2

39.6.4 Applying File Contexts
To help you apply the SELinux context properly, the following procedure shows how to seta context using semanage fcontext and restorecon . You will notice that at rst attempt,the Web server with a non-default document root does not work. After changing the SELinuxcontext, it will:
1. Create the /web directory and then change to it:
tux > sudo mkdir /web && cd /web
2. Use a text editor to create the le /web/index.html that contains the text welcome tomy Web site.
3. Open the le /etc/apache2/default-server.conf with an editor, and change theDocumentRoot line to DocumentRoot /web
4. Start the Apache Web server:
tux > sudo systemctl start apache2
5. Open a session to your local Web server:
tux > w3m localhost
You will receive a Connection refused message. Press Enter , and then q to quit w3m.
6. Find the current context type for the default Apache DocumentRoot , which is /srv/www/htdocs . It should be set to httpd_sys_content_t :
tux > sudo ls -Z /srv/www
7. Set the new context in the policy and press Enter :
tux > sudo semanage fcontext -a -f "" -t httpd_sys_content_t '/web(/.*) ?'
8. Apply the new context type:
tux > sudo restorecon /web
9. Show the context of the les in the directory /web . You will see that the new context typehas been set properly to the /web directory, but not to its contents.
tux > sudo ls -Z /web
366 Applying File Contexts openSUSE Leap 15.2

10. Apply the new context recursively to the /web directory. The type context has now beenset correctly.
tux > sudo restorecon -R /web
11. Restart the Web server:
tux > sudo systemctl restart apache2
You should now be able to access the contents of the /web directory.
39.6.5 Configuring SELinux Policies
The easiest way to change the behavior of the policy is by working with Booleans. These are on-o switches that you can use to change the settings in the policy. To nd out which Booleansare available, run
tux > sudo semanage boolean -l
It will show a long list of Booleans, with a short description of what each of these Booleanswill do for you. When you have found the Boolean you want to set, you can use setsebool -P , followed by the name of the Boolean that you want to change. It is important to use the -P option at all times when using setsebool . This option writes the setting to the policy leon disk, and this is the only way to make sure that the Boolean is applied automatically aftera reboot.
The procedure below gives an example of changing Boolean settings
1. List Booleans that are related to FTP servers.
tux > sudo semanage boolean -l | grep ftp
2. Turn the Boolean o:
tux > sudo setsebool allow_ftpd_anon_write off
Note that it does not take much time to write the change. Then verify that the Booleanis indeed turned o:
tux > sudo semanage boolean -l|grep ftpd_anon
367 Configuring SELinux Policies openSUSE Leap 15.2

3. Reboot your server.
4. Check again to see if the allow_ftpd_anon_write Boolean is still turned on. As it hasnot yet been written to the policy, you will notice that it is o.
5. Switch the Boolean and write the setting to the policy:
tux > sudo setsebool -P allow_ftpd_anon_write
39.6.6 Working with SELinux Modules
By default, SELinux uses a modular policy. This means that the policy that implements SELinuxfeatures is not just one huge policy, but it consists of many smaller modules. Each module coversa specic part of the SELinux conguration. The concept of the SELinux module was introducedto make it easier for third party vendors to make their services compatible with SELinux. To getan overview of the SELinux modules, you can use the semodule -l command. This commandlists all current modules in use by SELinux and their version numbers.
As an administrator, you can switch modules on or o. This can be useful if you want to disableonly a part of SELinux and not everything to run a specic service without SELinux protection.Especially in the case of openSUSE Leap, where there is not a completely supported SELinuxpolicy yet, it can make sense to switch o all modules that you do not need so that you can focuson the services that really do need SELinux protection. To switch o an SELinux module, use
tux > sudo semodule -d MODULENAME
To switch it on again, you can use
tux > sudo semodule -e modulename
To change the contents of any of the policy module les, compile the changes into a new policymodule le. To do this, rst install the selinux-policy-devel package. Then, in the directorywhere the les created by audit2allow are located, run:
tux > make -f /usr/share/selinux/devel/Makefile
When make has completed, you can manually load the modules into the system, using semodule-i .
368 Working with SELinux Modules openSUSE Leap 15.2

39.7 TroubleshootingBy default, if SELinux is the reason something is not working, a log message to this eect is sentto the /var/log/audit/audit.log le. That is, if the auditd service is running. If you see anempty /var/log/audit , start the auditd service using
tux > sudo systemctl start auditd
and enable it in the targets of your system, using
tux > sudo systemctl enable auditd
In Example 39.8: “Example Lines from /etc/audit/audit.log” you can see a partial example ofthe contents of /var/log/audit/audit.log
EXAMPLE 39.8: EXAMPLE LINES FROM /etc/audit/audit.log
type=DAEMON_START msg=audit(1348173810.874:6248): auditd start, ver=1.7.7 format=raw kernel=3.0.13-0.27-default auid=0 pid=4235 subj=system_u:system_r:auditd_t res=successtype=AVC msg=audit(1348173901.081:292): avc: denied { write } for pid=3426 comm="smartd" name="smartmontools" dev=sda6 ino=581743 scontext=system_u:system_r:fsdaemon_t tcontext=system_u:object_r:var_lib_t tclass=dirtype=AVC msg=audit(1348173901.081:293): avc: denied { remove_name } for pid=3426 comm="smartd" name="smartd.WDC_WD2500BEKT_75PVMT0-WD_WXC1A21E0454.ata.state~" dev=sda6 ino=582390 scontext=system_u:system_r:fsdaemon_t tcontext=system_u:object_r:var_lib_t tclass=dirtype=AVC msg=audit(1348173901.081:294): avc: denied { unlink } for pid=3426 comm="smartd" name="smartd.WDC_WD2500BEKT_75PVMT0-WD_WXC1A21E0454.ata.state~" dev=sda6 ino=582390 scontext=system_u:system_r:fsdaemon_t tcontext=system_u:object_r:var_lib_t tclass=filetype=AVC msg=audit(1348173901.081:295): avc: denied { rename } for pid=3426 comm="smartd" name="smartd.WDC_WD2500BEKT_75PVMT0-WD_WXC1A21E0454.ata.state" dev=sda6 ino=582373 scontext=system_u:system_r:fsdaemon_t tcontext=system_u:object_r:var_lib_t tclass=filetype=AVC msg=audit(1348173901.081:296): avc: denied { add_name } for pid=3426 comm="smartd" name="smartd.WDC_WD2500BEKT_75PVMT0-WD_WXC1A21E0454.ata.state~" scontext=system_u:system_r:fsdaemon_t tcontext=system_u:object_r:var_lib_t tclass=dirtype=AVC msg=audit(1348173901.081:297): avc: denied { create } for pid=3426 comm="smartd" name="smartd.WDC_WD2500BEKT_75PVMT0-WD_WXC1A21E0454.ata.state" scontext=system_u:system_r:fsdaemon_t tcontext=system_u:object_r:var_lib_t tclass=filetype=AVC msg=audit(1348173901.081:298): avc: denied { write open } for pid=3426 comm="smartd" name="smartd.WDC_WD2500BEKT_75PVMT0-WD_WXC1A21E0454.ata.state" dev=sda6 ino=582390 scontext=system_u:system_r:fsdaemon_t tcontext=system_u:object_r:var_lib_t tclass=filetype=AVC msg=audit(1348173901.081:299): avc: denied { getattr } for pid=3426 comm="smartd" path="/var/lib/smartmontools/smartd.WDC_WD2500BEKT_75PVMT0-
369 Troubleshooting openSUSE Leap 15.2

WD_WXC1A21E0454.ata.state" dev=sda6 ino=582390 scontext=system_u:system_r:fsdaemon_t tcontext=system_u:object_r:var_lib_t tclass=filetype=AVC msg=audit(1348173901.309:300): avc: denied { append } for pid=1316
At rst look, the lines in audit.log are a bit hard to read. However, on closer examinationthey are not that hard to understand. Every line can be broken down into sections. For example,the sections in the last line are:
type=AVC :
every SELinux-related audit log line starts with the type identication type=AVC
msg=audit(1348173901.309:300) :
This is the time stamp, which unfortunately is written in epoch time, the number of secondsthat have passed since Jan 1, 1970. You can use date -d on the part up to the dot in theepoch time notation to nd out when the event has happened:
tux > date -d @1348173901Thu Sep 20 16:45:01 EDT 2012
avc: denied { append } :
the specic action that was denied. In this case the system has denied the appending ofdata to a le. While browsing through the audit log le, you can see other system actions,such as write open, getattr and more.
for pid=1316 :
the process ID of the command or process that initiated the action
comm="rsyslogd" :
the specic command that was associated with that PID
name="smartmontools" :
the name of the subject of the action
dev=sda6 ino=582296 :
the block device and inode number of the le that was involved
scontext=system_u:system_r:syslogd_t :
the source context, which is the context of the initiator of the action
tclass=file :
a class identication of the subject
370 Troubleshooting openSUSE Leap 15.2

Instead of interpreting the events in audit.log yourself, there is another approach. You canuse the audit2allow command, which helps analyze the cryptic log messages in /var/log/audit/audit.log . An audit2allow troubleshooting session always consists of three dierentcommands. First, you would use audit2allow -w -a to present the audit information in amore readable way. The audit2allow -w -a by default works on the audit.log le. If youwant to analyze a specic message in the audit.log le, copy it to a temporary le and analyzethe le with:
tux > sudo audit2allow -w -i FILENAME
EXAMPLE 39.9: ANALYZING AUDIT MESSAGES
tux > sudo audit2allow -w -i testfiletype=AVC msg=audit(1348173901.309:300): avc: denied { append } for pid=1316comm="rsyslogd" name="acpid" dev=sda6 ino=582296scontext=system_u:system_r:syslogd_t tcontext=system_u:object_r:apmd_log_t tclass=file
This was caused by:
Missing type enforcement (TE) allow rule.To generate a loadable module to allow this access, run
tux > sudo audit2allow
To nd out which specic rule has denied access, you can use audit2allow -a to show theenforcing rules from all events that were logged to the audit.log le, or audit2allow -iFILENAME to show it for messages that you have stored in a specic le:
EXAMPLE 39.10: VIEWING WHICH LINES DENY ACCESS
tux > sudo audit2allow -i testfile#============= syslogd_t ==============allow syslogd_t apmd_log_t:file append;
To create an SELinux module with the name mymodule that you can load to allow the accessthat was previously denied, run
tux > sudo audit2allow -a -R -M mymodule
If you want to do this for all events that have been logged to the audit.log, use the -a -Mcommand arguments. To do it only for specic messages that are in a specic le, use -i -M as in the example below:
EXAMPLE 39.11: CREATING A POLICY MODULE ALLOWING AN ACTION PREVIOUSLY DENIED
tux > sudo audit2allow -i testfile -M example
371 Troubleshooting openSUSE Leap 15.2

******************** IMPORTANT ***********************To make this policy package active, execute:
semodule -i example.pp
As indicated by the audit2allow command, you can now run this module by using thesemodule -i command, followed by the name of the module that audit2allow has createdfor you ( example.pp in the above example).
372 Troubleshooting openSUSE Leap 15.2

VI The Linux Audit Framework
40 Understanding Linux Audit 374
41 Setting Up the Linux Audit Framework 411
42 Introducing an Audit Rule Set 423
43 Useful Resources 434

40 Understanding Linux Audit
The Linux audit framework as shipped with this version of openSUSE Leap providesa CAPP-compliant (Controlled Access Protection Proles) auditing system thatreliably collects information about any security-relevant event. The audit recordscan be examined to determine whether any violation of the security policies hasbeen committed, and by whom.
Providing an audit framework is an important requirement for a CC-CAPP/EAL(Common Criteria-Controlled Access Protection Proles/Evaluation AssuranceLevel) certication. Common Criteria (CC) for Information Technology SecurityInformation is an international standard for independent security evaluations.Common Criteria helps customers judge the security level of any IT product theyintend to deploy in mission-critical setups.
Common Criteria security evaluations have two sets of evaluation requirements,functional and assurance requirements. Functional requirements describe thesecurity attributes of the product under evaluation and are summarized underthe Controlled Access Protection Proles (CAPP). Assurance requirements aresummarized under the Evaluation Assurance Level (EAL). EAL describes anyactivities that must take place for the evaluators to be condent that securityattributes are present, eective, and implemented. Examples for activities of thiskind include documenting the developers' search for security vulnerabilities, thepatch process, and testing.
This guide provides a basic understanding of how audit works and how it can beset up. For more information about Common Criteria itself, refer to the Common
Criteria Web site (https://www.commoncriteriaportal.org/) .
Linux audit helps make your system more secure by providing you with a means to analyze whatis happening on your system in great detail. It does not, however, provide additional securityitself—it does not protect your system from code malfunctions or any kind of exploits. Instead,audit is useful for tracking these issues and helps you take additional security measures, likeAppArmor, to prevent them.
374 openSUSE Leap 15.2

Audit consists of several components, each contributing crucial functionality to the overallframework. The audit kernel module intercepts the system calls and records the relevant events.The auditd daemon writes the audit reports to disk. Various command line utilities take careof displaying, querying, and archiving the audit trail.
Audit enables you to do the following:
Associate Users with Processes
Audit maps processes to the user ID that started them. This makes it possible for theadministrator or security ocer to exactly trace which user owns which process and ispotentially doing malicious operations on the system.
Important: Renaming User IDsAudit does not handle the renaming of UIDs. Therefore avoid renaming UIDs (forexample, changing tux from uid=1001 to uid=2000 ) and obsolete UIDs ratherthan renaming them. Otherwise you would need to change auditctl data (auditrules) and would have problems retrieving old data correctly.
Review the Audit Trail
Linux audit provides tools that write the audit reports to disk and translate them intohuman readable format.
Review Particular Audit Events
Audit provides a utility that allows you to lter the audit reports for certain events ofinterest. You can lter for:
User
Group
Audit ID
Remote Host Name
Remote Host Address
System Call
System Call Arguments
375 openSUSE Leap 15.2

File
File Operations
Success or Failure
Apply a Selective Audit
Audit provides the means to lter the audit reports for events of interest and to tune auditto record only selected events. You can create your own set of rules and have the auditdaemon record only those of interest to you.
Guarantee the Availability of the Report Data
Audit reports are owned by root and therefore only removable by root . Unauthorizedusers cannot remove the audit logs.
Prevent Audit Data Loss
If the kernel runs out of memory, the audit daemon's backlog is exceeded, or its rate limit isexceeded, audit can trigger a shutdown of the system to keep events from escaping audit'scontrol. This shutdown would be an immediate halt of the system triggered by the auditkernel component without synchronizing the latest logs to disk. The default congurationis to log a warning to syslog rather than to halt the system.If the system runs out of disk space when logging, the audit system can be congured toperform clean shutdown. The default conguration tells the audit daemon to stop loggingwhen it runs out of disk space.
376 openSUSE Leap 15.2

40.1 Introducing the Components of Linux AuditThe following gure illustrates how the various components of audit interact with each other:
kernelaudit
auditd
auditd.conf
auditctl
audit.rules
audit.log
audispd
autrace
aureport
ausearch
application
FIGURE 40.1: INTRODUCING THE COMPONENTS OF LINUX AUDIT
Straight arrows represent the data ow between components while dashed arrows representlines of control between components.
auditd
The audit daemon is responsible for writing the audit messages that were generatedthrough the audit kernel interface and triggered by application and system activity to disk.The way the audit daemon is started is controlled by systemd . The audit system functions(when started) are controlled by /etc/audit/auditd.conf . For more information aboutauditd and its conguration, refer to Section 40.2, “Configuring the Audit Daemon”.
auditctl
The auditctl utility controls the audit system. It controls the log generation parametersand kernel settings of the audit interface and the rule sets that determine which eventsare tracked. For more information about auditctl , refer to Section 40.3, “Controlling the
Audit System Using auditctl”.
audit rules
377 Introducing the Components of Linux Audit openSUSE Leap 15.2

The le /etc/audit/audit.rules contains a sequence of auditctl commands thatare loaded at system boot time immediately after the audit daemon is started. For moreinformation about audit rules, refer to Section 40.4, “Passing Parameters to the Audit System”.
aureport
The aureport utility allows you to create custom reports from the audit event log. Thisreport generation can easily be scripted, and the output can be used by various otherapplications, for example, to plot these results. For more information about aureport ,refer to Section 40.5, “Understanding the Audit Logs and Generating Reports”.
ausearch
The ausearch utility can search the audit log le for certain events using various keys orother characteristics of the logged format. For more information about ausearch , referto Section 40.6, “Querying the Audit Daemon Logs with ausearch”.
audispd
The audit dispatcher daemon ( audispd ) can be used to relay event notications to otherapplications instead of (or in addition to) writing them to disk in the audit log. For moreinformation about audispd , refer to Section 40.9, “Relaying Audit Event Notifications”.
autrace
The autrace utility traces individual processes in a fashion similar to strace . The outputof autrace is logged to the audit log. For more information about autrace , refer toSection 40.7, “Analyzing Processes with autrace”.
aulast
Prints a list of the last logged-in users, similarly to last . aulast searches back throughthe audit logs (or the given audit log le) and displays a list of all users logged in and outbased on the range of time in the audit logs.
aulastlog
Prints the last login for all users of a machine similar to the way lastlog does. The loginname, port, and last login time will be printed.
378 Introducing the Components of Linux Audit openSUSE Leap 15.2

40.2 Configuring the Audit DaemonBefore you can actually start generating audit logs and processing them, congure the auditdaemon itself. The /etc/audit/auditd.conf conguration le determines how the auditsystem functions when the daemon has been started. For most use cases, the default settingsshipped with openSUSE Leap should suce. For CAPP environments, most of these parametersneed tweaking. The following list briey introduces the parameters available:
log_file = /var/log/audit/audit.loglog_format = RAWlog_group = rootpriority_boost = 4flush = INCREMENTALfreq = 20num_logs = 5disp_qos = lossydispatcher = /sbin/audispdname_format = NONE##name = mydomainmax_log_file = 6max_log_file_action = ROTATEspace_left = 75space_left_action = SYSLOGaction_mail_acct = rootadmin_space_left = 50admin_space_left_action = SUSPENDdisk_full_action = SUSPENDdisk_error_action = SUSPEND##tcp_listen_port =tcp_listen_queue = 5tcp_max_per_addr = 1##tcp_client_ports = 1024-65535tcp_client_max_idle = 0cp_client_max_idle = 0
Depending on whether you want your environment to satisfy the requirements of CAPP, youneed to be extra restrictive when conguring the audit daemon. Where you need to use particularsettings to meet the CAPP requirements, a “CAPP Environment” note tells you how to adjustthe conguration.
log_file , log_format and log_group
log_file species the location where the audit logs should be stored. log_formatdetermines how the audit information is written to disk and log_group denes the groupthat owns the log les. Possible values for log_format are raw (messages are stored
379 Configuring the Audit Daemon openSUSE Leap 15.2

exactly as the kernel sends them) or nolog (messages are discarded and not written todisk). The data sent to the audit dispatcher is not aected if you use the nolog mode.The default setting is raw and you should keep it if you want to be able to create reportsand queries against the audit logs using the aureport and ausearch tools. The value forlog_group can either be specied literally or using the group's ID.
Note: CAPP EnvironmentIn a CAPP environment, have the audit log reside on its own partition. By doing so,you can be sure that the space detection of the audit daemon is accurate and thatyou do not have other processes consuming this space.
priority_boost
Determine how much of a priority boost the audit daemon should get. Possible values are0 to 20. The resulting nice value calculates like this: 0 - priority_boost
flush and freq
Species whether, how, and how often the audit logs should be written to disk. Validvalues for flush are none , incremental , data , and sync . none tells the audit daemonnot to make any special eort to write the audit data to disk. incremental tells the auditdaemon to explicitly ush the data to disk. A frequency must be specied if incrementalis used. A freq value of 20 tells the audit daemon to request that the kernel ush thedata to disk after every 20 records. The data option keeps the data portion of the disk lesynchronized at all times while the sync option takes care of both metadata and data.
Note: CAPP EnvironmentIn a CAPP environment, make sure that the audit trail is always fully up to date andcomplete. Therefore, use sync or data with the flush parameter.
num_logs
Specify the number of log les to keep if you have given rotate as themax_log_file_action . Possible values range from 0 to 99 . A value less than 2 meansthat the log les are not rotated. As you increase the number of les to rotate, you increasethe amount of work required of the audit daemon. While doing this rotation, auditdcannot always service new data arriving from the kernel as quickly, which can result in abacklog condition (triggering auditd to react according to the failure ag, described in
380 Configuring the Audit Daemon openSUSE Leap 15.2

Section 40.3, “Controlling the Audit System Using auditctl”). In this situation, increasing thebacklog limit is recommended. Do so by changing the value of the -b parameter in the/etc/audit/audit.rules le.
disp_qos and dispatcher
The dispatcher is started by the audit daemon during its start. The audit daemon relaysthe audit messages to the application specied in dispatcher . This application must bea highly trusted one, because it needs to run as root . disp_qos determines whetheryou allow for lossy or lossless communication between the audit daemon and thedispatcher.If you select lossy , the audit daemon might discard some audit messages when themessage queue is full. These events still get written to disk if log_format is set to raw ,but they might not get through to the dispatcher. If you select lossless the audit loggingto disk is blocked until there is an empty spot in the message queue. The default valueis lossy .
name_format and name
name_format controls how computer names are resolved. Possible values are none (noname will be used), hostname (value returned by gethostname ), fqd (fully qualiedhost name as received through a DNS lookup), numeric (IP address) and user . user isa custom string that needs to be dened with the name parameter.
max_log_file and max_log_file_action
max_log_file takes a numerical value that species the maximum le size in megabytesthat the log le can reach before a congurable action is triggered. The action to be takenis specied in max_log_file_action . Possible values for max_log_file_action areignore , syslog , suspend , rotate , and keep_logs . ignore tells the audit daemonto do nothing when the size limit is reached, syslog tells it to issue a warning and sendit to syslog, and suspend causes the audit daemon to stop writing logs to disk, leavingthe daemon itself still alive. rotate triggers log rotation using the num_logs setting.keep_logs also triggers log rotation, but does not use the num_log setting, so alwayskeeps all logs.
381 Configuring the Audit Daemon openSUSE Leap 15.2

Note: CAPP EnvironmentTo keep a complete audit trail in CAPP environments, the keep_logs option shouldbe used. If using a separate partition to hold your audit logs, adjust max_log_fileand num_logs to use the entire space available on that partition. Note that the moreles that need to be rotated, the longer it takes to get back to receiving audit events.
space_left and space_left_action
space_left takes a numerical value in megabytes of remaining disk space that triggers acongurable action by the audit daemon. The action is specied in space_left_action .Possible values for this parameter are ignore , syslog , email , exec , suspend , single ,and halt . ignore tells the audit daemon to ignore the warning and do nothing, sysloghas it issue a warning to syslog, and email sends an e-mail to the account specied underaction_mail_acct . exec plus a path to a script executes the given script. Note that itis not possible to pass parameters to the script. suspend tells the audit daemon to stopwriting to disk but remain alive while single triggers the system to be brought down tosingle user mode. halt triggers a full shutdown of the system.
Note: CAPP EnvironmentMake sure that space_left is set to a value that gives the administrator enoughtime to react to the alert and allows it to free enough disk space for the auditdaemon to continue to work. Freeing disk space would involve calling aureport-t and archiving the oldest logs on a separate archiving partition or resource.The actual value for space_left depends on the size of your deployment. Setspace_left_action to email .
action_mail_acct
Specify an e-mail address or alias to which any alert messages should be sent. The defaultsetting is root , but you can enter any local or remote account as long as e-mail and thenetwork are properly congured on your system and /usr/lib/sendmail exists.
admin_space_left and admin_space_left_action
382 Configuring the Audit Daemon openSUSE Leap 15.2
admin_space_left takes a numerical value in megabytes of remaining disk space.The system is already running low on disk space when this limit is reached and theadministrator has one last chance to react to this alert and free disk space for the audit logs.The value of admin_space_left should be lower than the value for space_left . Thepossible values for admin_space_left_action are the same as for space_left_action .
Note: CAPP EnvironmentSet admin_space_left to a value that would allow the administrator's actions tobe recorded. The action should be set to single .
disk_full_action
Specify which action to take when the system runs out of disk space for the audit logs.Valid values are ignore , syslog , rotate , exec , suspend , single , and halt . For anexplanation of these values refer to space_left and space_left_action .
Note: CAPP EnvironmentAs the disk_full_action is triggered when there is absolutely no more room forany audit logs, you should bring the system down to single-user mode ( single ) orshut it down completely ( halt ).
disk_error_action
Specify which action to take when the audit daemon encounters any kind of disk errorwhile writing the logs to disk or rotating the logs. The possible value are the same as forspace_left_action .
Note: CAPP EnvironmentUse syslog , single , or halt depending on your site's policies regarding thehandling of any kind of hardware failure.
tcp_listen_port , tcp_listen_queue , tcp_client_ports , tcp_client_max_idle , and
tcp_max_per_addr
The audit daemon can receive audit events from other audit daemons. The TCPparameters let you control incoming connections. Specify a port between 1 and 65535with tcp_listen_port on which the auditd will listen. tcp_listen_queue lets you
383 Configuring the Audit Daemon openSUSE Leap 15.2

congure a maximum value for pending connections. Make sure not to set a value toosmall, since the number of pending connections may be high under certain circumstances,such as after a power outage. tcp_client_ports denes which client ports are allowed.Either specify a single port or a port range with numbers separated by a dash (for example1-1023 for all privileged ports).Specifying a single allowed client port may make it dicult for the client to restart theiraudit subsystem, as it will be unable to re-create a connection with the same host addressesand ports until the connection closure TIME_WAIT state times out. If a client does notrespond anymore, auditd complains. Specify the number of seconds after which this willhappen with tcp_client_max_idle . Keep in mind that this setting is valid for all clientsand therefore should be higher than any individual client heartbeat setting, preferably bya factor of two. tcp_max_per_addr is a numeric value representing how many concurrentconnections from one IP address are allowed.
TipWe recommend using privileged ports for client and server to prevent non-root(CAP_NET_BIND_SERVICE) programs from binding to those ports.
When the daemon conguration in /etc/audit/auditd.conf is complete, the next step is tofocus on controlling the amount of auditing the daemon does, and to assign sucient resourcesand limits to the daemon so it can operate smoothly.
40.3 Controlling the Audit System Using auditctlauditctl is responsible for controlling the status and some basic system parameters of theaudit daemon. It controls the amount of auditing performed on the system. Using audit rules,auditctl controls which components of your system are subjected to the audit and to whatextent they are audited. Audit rules can be passed to the audit daemon on the auditctlcommand line or by composing a rule set and instructing the audit daemon to process thisle. By default, the auditd daemon is congured to check for audit rules under /etc/audit/audit.rules . For more details on audit rules, refer to Section 40.4, “Passing Parameters to the
Audit System”.
384 Controlling the Audit System Using auditctl openSUSE Leap 15.2

The main auditctl commands to control basic audit system parameters are:
auditctl -e to enable or disable audit
auditctl -f to control the failure ag
auditctl -r to control the rate limit for audit messages
auditctl -b to control the backlog limit
auditctl -s to query the current status of the audit daemon
auditctl -S species which system call to audit. Before running auditctl -S on yoursystem, add -F arch=b64 to prevent the architecture mismatch warning.
The -e , -f , -r , and -b options can also be specied in the audit.rules le to avoid havingto enter them each time the audit daemon is started.
Any time you query the status of the audit daemon with auditctl -s or change the statusag with auditctl -eFLAG , a status message (including information on each of the above-mentioned parameters) is printed. The following example highlights the typical audit statusmessage.
EXAMPLE 40.1: EXAMPLE OUTPUT OF auditctl -s
enabled 1failure 1pid 790rate_limit 0backlog_limit 64lost 0backlog 0backlog_wait_time 15000loginuid_immutable 0 unlocked
TABLE 40.1: AUDIT STATUS FLAGS
Flag Meaning [Possible Values] Command
enabled Set the enable ag. [0..2]0=disable, 1=enable,2=enable and lock downthe conguration. Note thatthis only disables loggingsyscalls, and other events
auditctl -e [0|1|2]
385 Controlling the Audit System Using auditctl openSUSE Leap 15.2

Flag Meaning [Possible Values] Command
may still be logged. (See man3 audit_set_enabled inthe audit-devel .)
flag Set the failure ag. [0..2]0=silent, 1=printk,2=panic (immediate haltwithout synchronizingpending data to disk)
auditctl -f [0|1|2]
pid Process ID under whichauditd is running.
—
rate_limit Set a limit in messages persecond. If the rate is not zeroand is exceeded, the actionspecied in the failure ag istriggered.
auditctl -r RATE
backlog_limit Specify the maximumnumber of outstandingaudit buers allowed. If allbuers are full, the actionspecied in the failure ag istriggered.
auditctl -b BACKLOG
lost Count the current number oflost audit messages.
—
backlog Count the current number ofoutstanding audit buers.
—
386 Controlling the Audit System Using auditctl openSUSE Leap 15.2

40.4 Passing Parameters to the Audit SystemCommands to control the audit system can be invoked individually from the shell usingauditctl or batch read from a le using auditctl - R . This latter method is used by the initscripts to load rules from the le /etc/audit/audit.rules after the audit daemon has beenstarted. The rules are executed in order from top to bottom. Each of these rules would expandto a separate auditctl command. The syntax used in the rules le is the same as that usedfor the auditctl command.
Changes made to the running audit system by executing auditctl on the command line arenot persistent across system restarts. For changes to persist, add them to the /etc/audit/audit.rules le and, if they are not currently loaded into audit, restart the audit system toload the modied rule set by using the systemctl restart auditd command.
EXAMPLE 40.2: EXAMPLE AUDIT RULES—AUDIT SYSTEM PARAMETERS
-b 1000 1
-f 1 2
-r 10 3
-e 1 4
1 Specify the maximum number of outstanding audit buers. Depending on the level oflogging activity, you might need to adjust the number of buers to avoid causing too heavyan audit load on your system.
2 Specify the failure ag to use. See Table 40.1, “Audit Status Flags” for possible values.
3 Specify the maximum number of messages per second that may be issued by the kernel.See Table 40.1, “Audit Status Flags” for details.
4 Enable or disable the audit subsystem.
Using audit, you can track any kind of le system access to important les, congurationsor resources. You can add watches on these and assign keys to each kind of watch for betteridentication in the logs.
EXAMPLE 40.3: EXAMPLE AUDIT RULES—FILE SYSTEM AUDITING
-w /etc/shadow 1
-w /etc -p rx 2
-w /etc/passwd -k fk_passwd -p rwxa 3
1 The -w option tells audit to add a watch to the le specied, in this case /etc/shadow .All system calls requesting access permissions to this le are analyzed.
387 Passing Parameters to the Audit System openSUSE Leap 15.2

2 This rule adds a watch to the /etc directory and applies permission ltering for readand execute access to this directory ( -p rx ). Any system call requesting any of these twopermissions is analyzed. Only the creation of new les and the deletion of existing ones arelogged as directory-related events. To get more specic events for les located under thisparticular directory, you should add a separate rule for each le. A le must exist beforeyou add a rule containing a watch on it. Auditing les as they are created is not supported.
3 This rule adds a le watch to /etc/passwd . Permission ltering is applied for read, write,execute, and attribute change permissions. The -k option allows you to specify a key touse to lter the audit logs for this particular event later (for example with ausearch ). Youmay use the same key on dierent rules to be able to group rules when searching for them.It is also possible to apply multiple keys to a rule.
System call auditing lets you track your system's behavior on a level even below the applicationlevel. When designing these rules, consider that auditing a great many system calls may increaseyour system load and cause you to run out of disk space. Consider carefully which events needtracking and how they can be ltered to be even more specic.
EXAMPLE 40.4: EXAMPLE AUDIT RULES—SYSTEM CALL AUDITING
-a exit,always -S mkdir 1
-a exit,always -S access -F a1=4 2
-a exit,always -S ipc -F a0=2 3
-a exit,always -S open -F success!=0 4
-a task,always -F auid=0 5
-a task,always -F uid=0 -F auid=501 -F gid=wheel 6
1 This rule activates auditing for the mkdir system call. The -a option adds system call rules.This rule triggers an event whenever the mkdir system call is entered ( exit , always ).The -S option species the system call to which this rule should be applied.
2 This rule adds auditing to the access system call, but only if the second argument of thesystem call ( mode ) is 4 ( R_OK ). exit,always tells audit to add an audit context to thissystem call when entering it, and to write out a report when it gets audited.
3 This rule adds an audit context to the IPC multiplexed system call. The specic ipcsystem call is passed as the rst syscall argument and can be selected using -F
a0=IPC_CALL_NUMBER .
4 This rule audits failed attempts to call open.
388 Passing Parameters to the Audit System openSUSE Leap 15.2

5 This rule is an example of a task rule (keyword: task ). It is dierent from the other rulesabove in that it applies to processes that are forked or cloned. To lter these kind of events,you can only use elds that are known at fork time, such as UID, GID, and AUID. Thisexample rule lters for all tasks carrying an audit ID of 0 .
6 This last rule makes heavy use of lters. All lter options are combined with a logical ANDoperator, meaning that this rule applies to all tasks that carry the audit ID of 501 , run asroot , and have wheel as the group. A process is given an audit ID on user login. This IDis then handed down to any child process started by the initial process of the user. Evenif the user changes their identity, the audit ID stays the same and allows tracing actionsto the original user.
Tip: Filtering System Call ArgumentsFor more details on ltering system call arguments, refer to Section 42.6, “Filtering System
Call Arguments”.
You cannot only add rules to the audit system, but also remove them. There are dierent methodsfor deleting the entire rule set at once or for deleting system call rules or le and directorywatches:
EXAMPLE 40.5: DELETING AUDIT RULES AND EVENTS
-D 1
-d exit,always -S mkdir 2
-W /etc 3
1 Clear the queue of audit rules and delete any preexisting rules. This rule is used as the rstrule in /etc/audit/audit.rules les to make sure that the rules that are about to beadded do not clash with any preexisting ones. The auditctl -D command is also usedbefore doing an autrace to avoid having the trace rules clash with any rules present inthe audit.rules le.
2 This rule deletes a system call rule. The -d option must precede any system call rule thatneeds to be deleted from the rule queue, and must match exactly.
3 This rule tells audit to discard the rule with the directory watch on /etc from the rulesqueue. This rule deletes any rule containing a directory watch on /etc , regardless of anypermission ltering or key options.
To get an overview of which rules are currently in use in your audit setup, run auditctl -l .This command displays all rules with one rule per line.
389 Passing Parameters to the Audit System openSUSE Leap 15.2

EXAMPLE 40.6: LISTING RULES WITH auditctl -l
exit,always watch=/etc perm=rxexit,always watch=/etc/passwd perm=rwxa key=fk_passwdexit,always watch=/etc/shadow perm=rwxaexit,always syscall=mkdirexit,always a1=4 (0x4) syscall=accessexit,always a0=2 (0x2) syscall=ipcexit,always success!=0 syscall=open
Note: Creating Filter RulesYou can build very sophisticated audit rules by using the various lter options. Refer tothe auditctl(8) man page for more information about the options available for buildingaudit lter rules, and audit rules in general.
40.5 Understanding the Audit Logs and GeneratingReportsTo understand what the aureport utility does, it is vital to know how the logs generated bythe audit daemon are structured, and what exactly is recorded for an event. Only then can youdecide which report types are most appropriate for your needs.
40.5.1 Understanding the Audit Logs
The following examples highlight two typical events that are logged by audit and how theirtrails in the audit log are read. The audit log or logs (if log rotation is enabled) are stored in the/var/log/audit directory. The rst example is a simple less command. The second examplecovers a great deal of PAM activity in the logs when a user tries to remotely log in to a machinerunning audit.
EXAMPLE 40.7: A SIMPLE AUDIT EVENT—VIEWING THE AUDIT LOG
type=SYSCALL msg=audit(1234874638.599:5207): arch=c000003e syscall=2 success=yes exit=4 a0=62fb60 a1=0 a2=31 a3=0 items=1 ppid=25400 pid=25616 auid=0 uid=0 gid=0 euid=0 suid=0 fsuid=0 egid=0 sgid=0 fsgid=0 tty=pts1 ses=1164 comm="less" exe="/usr/bin/less" key="doc_log"
390 Understanding the Audit Logs and Generating Reports openSUSE Leap 15.2

type=CWD msg=audit(1234874638.599:5207): cwd="/root"type=PATH msg=audit(1234874638.599:5207): item=0 name="/var/log/audit/audit.log" inode=1219041 dev=08:06 mode=0100644 ouid=0 ogid=0 rdev=00:00
The above event, a simple less /var/log/audit/audit.log , wrote three messages to the log.All of them are closely linked together and you would not be able to make sense of one of themwithout the others. The rst message reveals the following information:
type
The type of event recorded. In this case, it assigns the SYSCALL type to an event triggeredby a system call. The CWD event was recorded to record the current working directory atthe time of the syscall. A PATH event is generated for each path passed to the system call.The open system call takes only one path argument, so only generates one PATH event.It is important to understand that the PATH event reports the path name string argumentwithout any further interpretation, so a relative path requires manual combination withthe path reported by the CWD event to determine the object accessed.
msg
A message ID enclosed in brackets. The ID splits into two parts. All characters before the: represent a Unix epoch time stamp. The number after the colon represents the actualevent ID. All events that are logged from one application's system call have the same eventID. If the application makes a second system call, it gets another event ID.
arch
References the CPU architecture of the system call. Decode this information using the -ioption on any of your ausearch commands when searching the logs.
syscall
The type of system call as it would have been printed by an strace on this particularsystem call. This data is taken from the list of system calls under /usr/include/asm/unistd.h and may vary depending on the architecture. In this case, syscall=2 refers tothe open system call (see man open(2) ) invoked by the less application.
success
Whether the system call succeeded or failed.
exit
The exit value returned by the system call. For the open system call used in this example,this is the le descriptor number. This varies by system call.
391 Understanding the Audit Logs openSUSE Leap 15.2

a0 to a3
The rst four arguments to the system call in numeric form. The values of these are systemcall dependent. In this example (an open system call), the following are used:
a0=62fb60 a1=8000 a2=31 a3=0
a0 is the start address of the passed path name. a1 is the ags. 8000 in hex notationtranslates to 100000 in octal notation, which in turn translates to O_LARGEFILE . a2 isthe mode, which, because O_CREAT was not specied, is unused. a3 is not passed by theopen system call. Check the manual page of the relevant system call to nd out whicharguments are used with it.
items
The number of strings passed to the application.
ppid
The process ID of the parent of the process analyzed.
pid
The process ID of the process analyzed.
auid
The audit ID. A process is given an audit ID on user login. This ID is then handed down toany child process started by the initial process of the user. Even if the user changes theiridentity (for example, becomes root ), the audit ID stays the same. Thus you can alwaystrace actions to the original user who logged in.
uid
The user ID of the user who started the process. In this case, 0 for root .
gid
The group ID of the user who started the process. In this case, 0 for root .
euid , suid , fsuid
Eective user ID, set user ID, and le system user ID of the user that started the process.
egid , sgid , fsgid
Eective group ID, set group ID, and le system group ID of the user that started theprocess.
tty
392 Understanding the Audit Logs openSUSE Leap 15.2

The terminal from which the application was started. In this case, a pseudo-terminal usedin an SSH session.
ses
The login session ID. This process attribute is set when a user logs in and can tie anyprocess to a particular user login.
comm
The application name under which it appears in the task list.
exe
The resolved path name to the binary program.
subj
auditd records whether the process is subject to any security context, such as AppArmor.unconstrained , as in this case, means that the process is not conned with AppArmor.If the process had been conned, the binary path name plus the AppArmor prole modewould have been logged.
key
If you are auditing many directories or les, assign key strings to each of these watches.You can use these keys with ausearch to search the logs for events of this type only.
The second message triggered by the example less call does not reveal anything apart fromthe current working directory when the less command was executed.
The third message reveals the following (the type and message ags have already beenintroduced):
item
In this example, item references the a0 argument—a path—that is associated with theoriginal SYSCALL message. Had the original call had more than one path argument (suchas a cp or mv command), an additional PATH event would have been logged for thesecond path argument.
name
Refers to the path name passed as an argument to the open system call.
inode
Refers to the inode number corresponding to name .
dev
393 Understanding the Audit Logs openSUSE Leap 15.2

Species the device on which the le is stored. In this case, 08:06 , which stands for /dev/sda1 or “rst partition on the rst IDE device.”
mode
Numerical representation of the le's access permissions. In this case, root has read andwrite permissions and their group ( root ) has read access while the entire rest of the worldcannot access the le.
ouid and ogid
Refer to the UID and GID of the inode itself.
rdev
Not applicable for this example. The rdev entry only applies to block or character devices,not to les.
Example 40.8, “An Advanced Audit Event—Login via SSH” highlights the audit events triggered byan incoming SSH connection. Most of the messages are related to the PAM stack and reectthe dierent stages of the SSH PAM process. Several of the audit messages carry nested PAMmessages in them that signify that a particular stage of the PAM process has been reached.Although the PAM messages are logged by audit, audit assigns its own message type to eachevent:
EXAMPLE 40.8: AN ADVANCED AUDIT EVENT—LOGIN VIA SSH
type=USER_AUTH msg=audit(1234877011.791:7731): user pid=26127 uid=0 1
auid=4294967295 ses=4294967295 msg='op=PAM:authentication acct="root" exe="/usr/sbin/sshd"(hostname=jupiter.example.com, addr=192.168.2.100, terminal=ssh res=success)'type=USER_ACCT msg=audit(1234877011.795:7732): user pid=26127 uid=0 2
auid=4294967295 ses=4294967295 msg='op=PAM:accounting acct="root" exe="/usr/sbin/sshd"(hostname=jupiter.example.com, addr=192.168.2.100, terminal=ssh res=success)'type=CRED_ACQ msg=audit(1234877011.799:7733): user pid=26125 uid=0 3
auid=4294967295 ses=4294967295 msg='op=PAM:setcred acct="root" exe="/usr/sbin/sshd"(hostname=jupiter.example.com, addr=192.168.2.100, terminal=/dev/pts/0 res=success)'type=LOGIN msg=audit(1234877011.799:7734): login pid=26125 uid=0old auid=4294967295 new auid=0 old ses=4294967295 new ses=1172type=USER_START msg=audit(1234877011.799:7735): user pid=26125 uid=0 4
auid=0 ses=1172 msg='op=PAM:session_open acct="root" exe="/usr/sbin/sshd"(hostname=jupiter.example.com, addr=192.168.2.100, terminal=/dev/pts/0 res=success)'type=USER_LOGIN msg=audit(1234877011.823:7736): user pid=26128 uid=0 5
auid=0 ses=1172 msg='uid=0: exe="/usr/sbin/sshd"(hostname=jupiter.example.com, addr=192.168.2.100, terminal=/dev/pts/0 res=success)'type=CRED_REFR msg=audit(1234877011.828:7737): user pid=26128 uid=0 6
auid=0 ses=1172 msg='op=PAM:setcred acct="root" exe="/usr/sbin/sshd"
394 Understanding the Audit Logs openSUSE Leap 15.2

(hostname=jupiter.example.com, addr=192.168.2.100, terminal=/dev/pts/0 res=success)'
1 PAM reports that is has successfully requested user authentication for root from a remotehost (jupiter.example.com, 192.168.2.100). The terminal where this is happening is ssh .
2 PAM reports that it has successfully determined whether the user is authorized to log in.
3 PAM reports that the appropriate credentials to log in have been acquired and that theterminal changed to a normal terminal ( /dev/pts0 ).
4 PAM reports that it has successfully opened a session for root .
5 The user has successfully logged in. This event is the one used by aureport -l to reportabout user logins.
6 PAM reports that the credentials have been successfully reacquired.
40.5.2 Generating Custom Audit Reports
The raw audit reports stored in the /var/log/audit directory tend to become very bulky andhard to understand. To more easily nd relevant messages, use the aureport utility and createcustom reports.
The following use cases highlight a few of the possible report types that you can generate withaureport :
Read Audit Logs from Another File
When the audit logs have moved to another machine or when you want to analyze the logsof several machines on your local machine without wanting to connect to each of theseindividually, move the logs to a local le and have aureport analyze them locally:
tux > sudo aureport -if myfile
Summary Report======================Range of time in logs: 03/02/09 14:13:38.225 - 17/02/09 14:52:27.971Selected time for report: 03/02/09 14:13:38 - 17/02/09 14:52:27.971Number of changes in configuration: 13Number of changes to accounts, groups, or roles: 0Number of logins: 6Number of failed logins: 13Number of authentications: 7Number of failed authentications: 573Number of users: 1Number of terminals: 9
395 Generating Custom Audit Reports openSUSE Leap 15.2

Number of host names: 4Number of executables: 17Number of files: 279Number of AVC's: 0Number of MAC events: 0Number of failed syscalls: 994Number of anomaly events: 0Number of responses to anomaly events: 0Number of crypto events: 0Number of keys: 2Number of process IDs: 1211Number of events: 5320
The above command, aureport without any arguments, provides only the standardgeneral summary report generated from the logs contained in myfile . To create moredetailed reports, combine the -if option with any of the options below. For example,generate a login report that is limited to a certain time frame:
tux > sudo aureport -l -ts 14:00 -te 15:00 -if myfile
Login Report============================================# date time auid host term exe success event============================================1. 17/02/09 14:21:09 root: 192.168.2.100 sshd /usr/sbin/sshd no 77182. 17/02/09 14:21:15 0 jupiter /dev/pts/3 /usr/sbin/sshd yes 7724
Convert Numeric Entities to Text
Some information, such as user IDs, are printed in numeric form. To convert these into ahuman-readable text format, add the -i option to your aureport command.
Create a Rough Summary Report
If you are interested in the current audit statistics (events, logins, processes, etc.), runaureport without any other option.
Create a Summary Report of Failed Events
If you want to break down the overall statistics of plain aureport to the statistics of failedevents, use aureport --failed :
tux > sudo aureport --failed
Failed Summary Report======================Range of time in logs: 03/02/09 14:13:38.225 - 17/02/09 14:57:35.183
396 Generating Custom Audit Reports openSUSE Leap 15.2
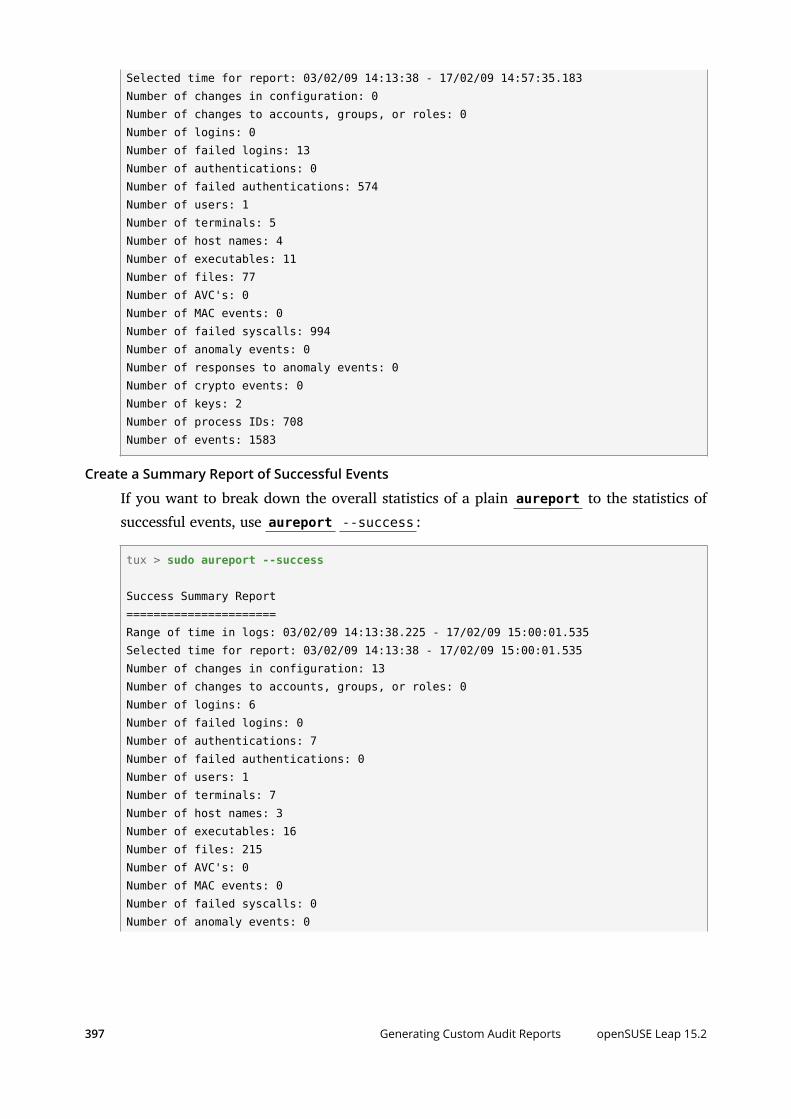
Selected time for report: 03/02/09 14:13:38 - 17/02/09 14:57:35.183Number of changes in configuration: 0Number of changes to accounts, groups, or roles: 0Number of logins: 0Number of failed logins: 13Number of authentications: 0Number of failed authentications: 574Number of users: 1Number of terminals: 5Number of host names: 4Number of executables: 11Number of files: 77Number of AVC's: 0Number of MAC events: 0Number of failed syscalls: 994Number of anomaly events: 0Number of responses to anomaly events: 0Number of crypto events: 0Number of keys: 2Number of process IDs: 708Number of events: 1583
Create a Summary Report of Successful Events
If you want to break down the overall statistics of a plain aureport to the statistics ofsuccessful events, use aureport --success :
tux > sudo aureport --success
Success Summary Report======================Range of time in logs: 03/02/09 14:13:38.225 - 17/02/09 15:00:01.535Selected time for report: 03/02/09 14:13:38 - 17/02/09 15:00:01.535Number of changes in configuration: 13Number of changes to accounts, groups, or roles: 0Number of logins: 6Number of failed logins: 0Number of authentications: 7Number of failed authentications: 0Number of users: 1Number of terminals: 7Number of host names: 3Number of executables: 16Number of files: 215Number of AVC's: 0Number of MAC events: 0Number of failed syscalls: 0Number of anomaly events: 0
397 Generating Custom Audit Reports openSUSE Leap 15.2
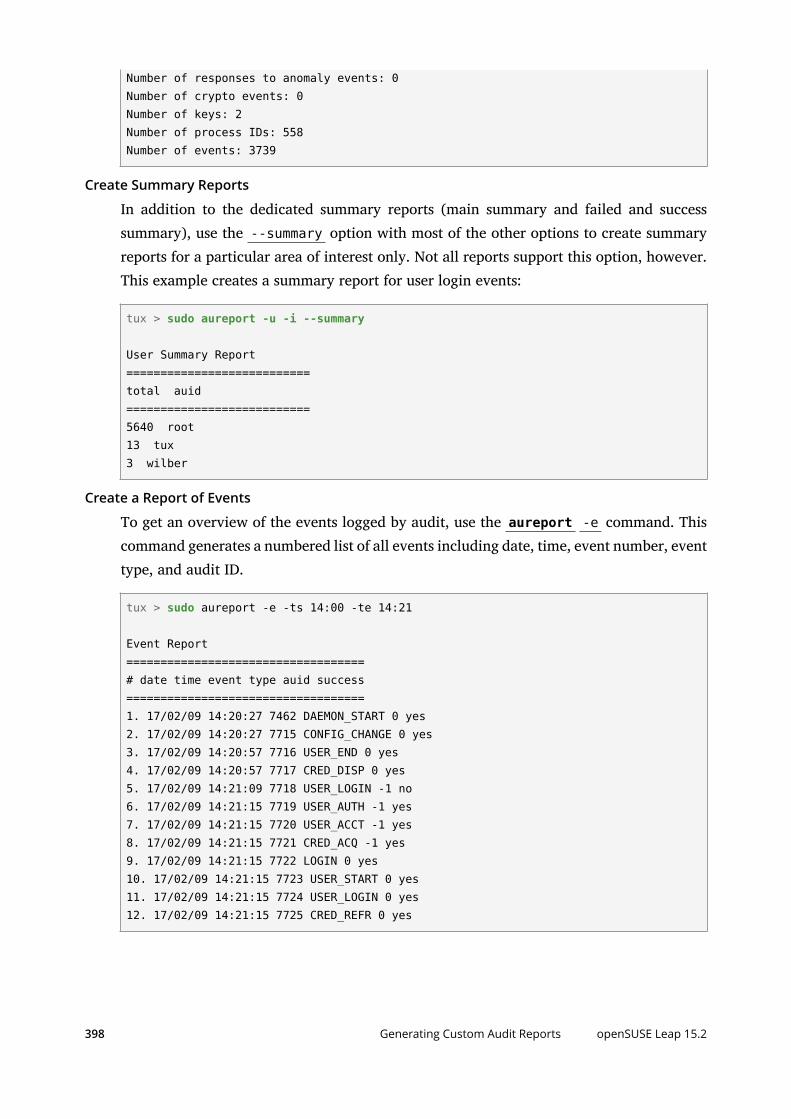
Number of responses to anomaly events: 0Number of crypto events: 0Number of keys: 2Number of process IDs: 558Number of events: 3739
Create Summary Reports
In addition to the dedicated summary reports (main summary and failed and successsummary), use the --summary option with most of the other options to create summaryreports for a particular area of interest only. Not all reports support this option, however.This example creates a summary report for user login events:
tux > sudo aureport -u -i --summary
User Summary Report===========================total auid===========================5640 root13 tux3 wilber
Create a Report of Events
To get an overview of the events logged by audit, use the aureport -e command. Thiscommand generates a numbered list of all events including date, time, event number, eventtype, and audit ID.
tux > sudo aureport -e -ts 14:00 -te 14:21
Event Report===================================# date time event type auid success===================================1. 17/02/09 14:20:27 7462 DAEMON_START 0 yes2. 17/02/09 14:20:27 7715 CONFIG_CHANGE 0 yes3. 17/02/09 14:20:57 7716 USER_END 0 yes4. 17/02/09 14:20:57 7717 CRED_DISP 0 yes5. 17/02/09 14:21:09 7718 USER_LOGIN -1 no6. 17/02/09 14:21:15 7719 USER_AUTH -1 yes7. 17/02/09 14:21:15 7720 USER_ACCT -1 yes8. 17/02/09 14:21:15 7721 CRED_ACQ -1 yes9. 17/02/09 14:21:15 7722 LOGIN 0 yes10. 17/02/09 14:21:15 7723 USER_START 0 yes11. 17/02/09 14:21:15 7724 USER_LOGIN 0 yes12. 17/02/09 14:21:15 7725 CRED_REFR 0 yes
398 Generating Custom Audit Reports openSUSE Leap 15.2

Create a Report from All Process Events
To analyze the log from a process's point of view, use the aureport -p command. Thiscommand generates a numbered list of all process events including date, time, process ID,name of the executable, system call, audit ID, and event number.
aureport -p
Process ID Report======================================# date time pid exe syscall auid event======================================1. 13/02/09 15:30:01 32742 /usr/sbin/cron 0 0 352. 13/02/09 15:30:01 32742 /usr/sbin/cron 0 0 363. 13/02/09 15:38:34 32734 /usr/lib/gdm/gdm-session-worker 0 -1 37
Create a Report from All System Call Events
To analyze the audit log from a system call's point of view, use the aureport -scommand. This command generates a numbered list of all system call events includingdate, time, number of the system call, process ID, name of the command that used thiscall, audit ID, and event number.
tux > sudo aureport -s
Syscall Report=======================================# date time syscall pid comm auid event=======================================1. 16/02/09 17:45:01 2 20343 cron -1 22792. 16/02/09 17:45:02 83 20350 mktemp 0 22843. 16/02/09 17:45:02 83 20351 mkdir 0 2285
Create a Report from All Executable Events
To analyze the audit log from an executable's point of view, use the aureport -xcommand. This command generates a numbered list of all executable events includingdate, time, name of the executable, the terminal it is run in, the host executing it, the auditID, and event number.
aureport -x
Executable Report====================================# date time exe term host auid event====================================1. 13/02/09 15:08:26 /usr/sbin/sshd sshd 192.168.2.100 -1 12
399 Generating Custom Audit Reports openSUSE Leap 15.2

2. 13/02/09 15:08:28 /usr/lib/gdm/gdm-session-worker :0 ? -1 133. 13/02/09 15:08:28 /usr/sbin/sshd ssh 192.168.2.100 -1 14
Create a Report about Files
To generate a report from the audit log that focuses on le access, use the aureport -f command. This command generates a numbered list of all le-related events includingdate, time, name of the accessed le, number of the system call accessing it, success orfailure of the command, the executable accessing the le, audit ID, and event number.
tux > sudo aureport -f
File Report===============================================# date time file syscall success exe auid event===============================================1. 16/02/09 17:45:01 /etc/shadow 2 yes /usr/sbin/cron -1 22792. 16/02/09 17:45:02 /tmp/ 83 yes /bin/mktemp 0 22843. 16/02/09 17:45:02 /var 83 no /bin/mkdir 0 2285
Create a Report about Users
To generate a report from the audit log that illustrates which users are running whatexecutables on your system, use the aureport -u command. This command generates anumbered list of all user-related events including date, time, audit ID, terminal used, host,name of the executable, and an event ID.
aureport -u
User ID Report====================================# date time auid term host exe event====================================1. 13/02/09 15:08:26 -1 sshd 192.168.2.100 /usr/sbin/sshd 122. 13/02/09 15:08:28 -1 :0 ? /usr/lib/gdm/gdm-session-worker 133. 14/02/09 08:25:39 -1 ssh 192.168.2.101 /usr/sbin/sshd 14
Create a Report about Logins
To create a report that focuses on login attempts to your machine, run the aureport -lcommand. This command generates a numbered list of all login-related events includingdate, time, audit ID, host and terminal used, name of the executable, success or failure ofthe attempt, and an event ID.
tux > sudo aureport -l -i
Login Report
400 Generating Custom Audit Reports openSUSE Leap 15.2

============================================# date time auid host term exe success event============================================1. 13/02/09 15:08:31 tux: 192.168.2.100 sshd /usr/sbin/sshd no 192. 16/02/09 12:39:05 root: 192.168.2.101 sshd /usr/sbin/sshd no 21083. 17/02/09 15:29:07 geeko: ? tty3 /bin/login yes 7809
Limit a Report to a Certain Time Frame
To analyze the logs for a particular time frame, such as only the working hours of Feb 16,2009, rst nd out whether this data is contained in the current audit.log or whetherthe logs have been rotated in by running aureport -t :
aureport -t
Log Time Range Report=====================/var/log/audit/audit.log: 03/02/09 14:13:38.225 - 17/02/09 15:30:01.636
The current audit.log contains all the desired data. Otherwise, use the -if option topoint the aureport commands to the log le that contains the needed data.Then, specify the start date and time and the end date and time of the desired time frameand combine it with the report option needed. This example focuses on login attempts:
tux > sudo aureport -ts 02/16/09 8:00 -te 02/16/09 18:00 -l
Login Report============================================# date time auid host term exe success event============================================1. 16/02/09 12:39:05 root: 192.168.2.100 sshd /usr/sbin/sshd no 21082. 16/02/09 12:39:12 0 192.168.2.100 /dev/pts/1 /usr/sbin/sshd yes 21143. 16/02/09 13:09:28 root: 192.168.2.100 sshd /usr/sbin/sshd no 21314. 16/02/09 13:09:32 root: 192.168.2.100 sshd /usr/sbin/sshd no 21335. 16/02/09 13:09:37 0 192.168.2.100 /dev/pts/2 /usr/sbin/sshd yes 2139
The start date and time are specied with the -ts option. Any event that has a time stampequal to or after your given start time appears in the report. If you omit the date, aureportassumes that you meant today. If you omit the time, it assumes that the start time shouldbe midnight of the date specied.Specify the end date and time with the -te option. Any event that has a time stamp equalto or before your given event time appears in the report. If you omit the date, aureportassumes that you meant today. If you omit the time, it assumes that the end time shouldbe now. Use the same format for the date and time as for -ts .
401 Generating Custom Audit Reports openSUSE Leap 15.2

All reports except the summary ones are printed in column format and sent to STDOUT, whichmeans that this data can be written to other commands very easily. The visualization scriptsintroduced in Section 40.8, “Visualizing Audit Data” are examples of how to further process the datagenerated by audit.
40.6 Querying the Audit Daemon Logs withausearchThe aureport tool helps you to create overall summaries of what is happening on the system,but if you are interested in the details of a particular event, ausearch is the tool to use.
ausearch allows you to search the audit logs using special keys and search phrases that relateto most of the ags that appear in event messages in /var/log/audit/audit.log . Not allrecord types contain the same search phrases. There are no hostname or uid entries in a PATHrecord, for example.
When searching, make sure that you choose appropriate search criteria to catch all records youneed. On the other hand, you could be searching for a specic type of record and still get variousother related records along with it. This is caused by dierent parts of the kernel contributingadditional records for events that are related to the one to nd. For example, you would alwaysget a PATH record along with the SYSCALL record for an open system call.
Tip: Using Multiple Search OptionsAny of the command line options can be combined with logical AND operators to narrowdown your search.
Read Audit Logs from Another File
When the audit logs have moved to another machine or when you want to analyze the logsof several machines on your local machine without wanting to connect to each of theseindividually, move the logs to a local le and have ausearch search them locally:
tux > sudo ausearch - option -if myfile
Convert Numeric Results into Text
Some information, such as user IDs are printed in numeric form. To convert these intohuman readable text format, add the -i option to your ausearch command.
402 Querying the Audit Daemon Logs with ausearch openSUSE Leap 15.2
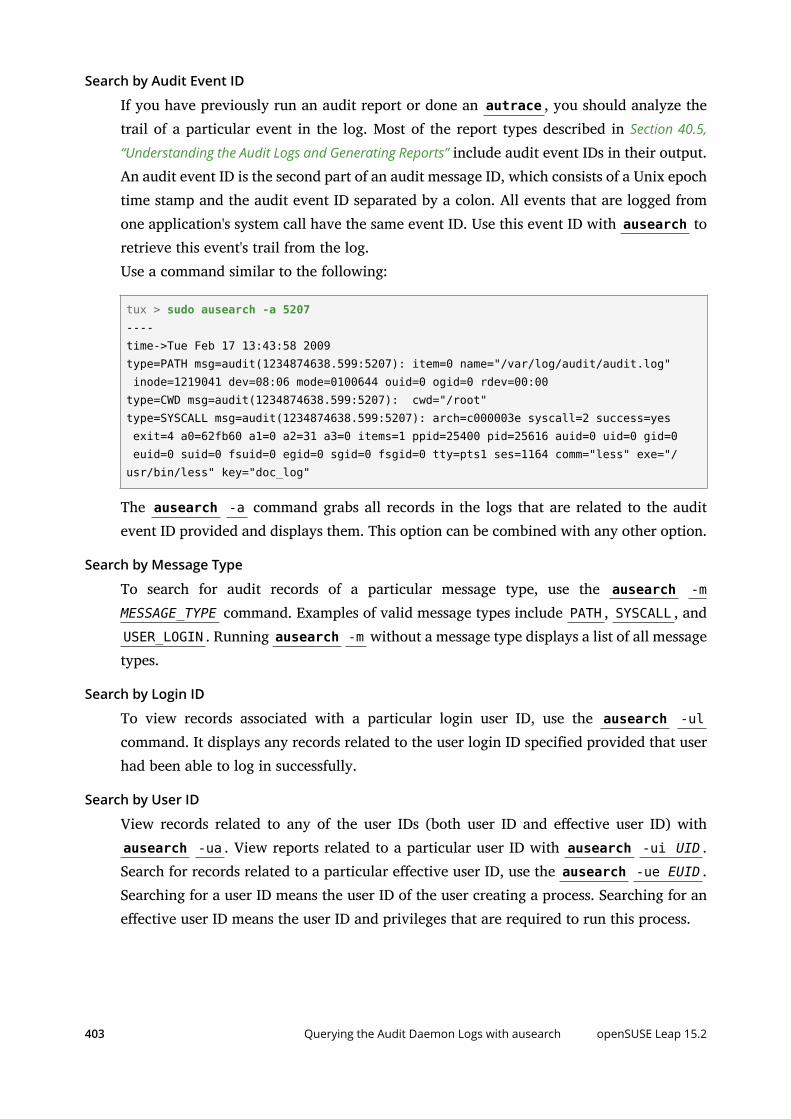
Search by Audit Event ID
If you have previously run an audit report or done an autrace , you should analyze thetrail of a particular event in the log. Most of the report types described in Section 40.5,
“Understanding the Audit Logs and Generating Reports” include audit event IDs in their output.An audit event ID is the second part of an audit message ID, which consists of a Unix epochtime stamp and the audit event ID separated by a colon. All events that are logged fromone application's system call have the same event ID. Use this event ID with ausearch toretrieve this event's trail from the log.Use a command similar to the following:
tux > sudo ausearch -a 5207----time->Tue Feb 17 13:43:58 2009type=PATH msg=audit(1234874638.599:5207): item=0 name="/var/log/audit/audit.log" inode=1219041 dev=08:06 mode=0100644 ouid=0 ogid=0 rdev=00:00type=CWD msg=audit(1234874638.599:5207): cwd="/root"type=SYSCALL msg=audit(1234874638.599:5207): arch=c000003e syscall=2 success=yes exit=4 a0=62fb60 a1=0 a2=31 a3=0 items=1 ppid=25400 pid=25616 auid=0 uid=0 gid=0 euid=0 suid=0 fsuid=0 egid=0 sgid=0 fsgid=0 tty=pts1 ses=1164 comm="less" exe="/usr/bin/less" key="doc_log"
The ausearch -a command grabs all records in the logs that are related to the auditevent ID provided and displays them. This option can be combined with any other option.
Search by Message Type
To search for audit records of a particular message type, use the ausearch -m
MESSAGE_TYPE command. Examples of valid message types include PATH , SYSCALL , andUSER_LOGIN . Running ausearch -m without a message type displays a list of all messagetypes.
Search by Login ID
To view records associated with a particular login user ID, use the ausearch -ulcommand. It displays any records related to the user login ID specied provided that userhad been able to log in successfully.
Search by User ID
View records related to any of the user IDs (both user ID and eective user ID) withausearch -ua . View reports related to a particular user ID with ausearch -ui UID .Search for records related to a particular eective user ID, use the ausearch -ue EUID .Searching for a user ID means the user ID of the user creating a process. Searching for aneective user ID means the user ID and privileges that are required to run this process.
403 Querying the Audit Daemon Logs with ausearch openSUSE Leap 15.2

Search by Group ID
View records related to any of the group IDs (both group ID and eective group ID) withthe ausearch -ga command. View reports related to a particular user ID with ausearch-gi GID . Search for records related to a particular eective group ID, use ausearch -ge EGID .
Search by Command Line Name
View records related to a certain command, using the ausearch -c COMM_NAME command,for example, ausearch -c less for all records related to the less command.
Search by Executable Name
View records related to a certain executable with the ausearch -x EXE command, forexample ausearch -x /usr/bin/less for all records related to the /usr/bin/lessexecutable.
Search by System Call Name
View records related to a certain system call with the ausearch -sc SYSCALL command,for example, ausearch -sc open for all records related to the open system call.
Search by Process ID
View records related to a certain process ID with the ausearch -p PID command, forexample ausearch -p 13368 for all records related to this process ID.
Search by Event or System Call Success Value
View records containing a certain system call success value with ausearch -sv
SUCCESS_VALUE , for example, ausearch -sv yes for all successful system calls.
Search by File Name
View records containing a certain le name with ausearch -f FILE_NAME , for example,ausearch -f /foo/bar for all records related to the /foo/bar le. Using the le namealone would work as well, but using relative paths does not work.
Search by Terminal
View records of events related to a certain terminal only with ausearch -tm TERM , forexample, ausearch -tm ssh to view all records related to events on the SSH terminaland ausearch -tm tty to view all events related to the console.
Search by Host Name
View records related to a certain remote host name with ausearch -hn HOSTNAME , forexample, ausearch -hn jupiter.example.com . You can use a host name, fully qualieddomain name, or numeric network address.
404 Querying the Audit Daemon Logs with ausearch openSUSE Leap 15.2

Search by Key Field
View records that contain a certain key assigned in the audit rule set to identify events of aparticular type. Use the ausearch -k KEY_FIELD , for example, ausearch -k CFG_etcto display any records containing the CFG_etc key.
Search by Word
View records that contain a certain string assigned in the audit rule set to identify events ofa particular type. The whole string will be matched on le name, host name, and terminal.Use the ausearch -w WORD .
Limit a Search to a Certain Time Frame
Use -ts and -te to limit the scope of your searches to a certain time frame. The -tsoption is used to specify the start date and time and the -te option is used to specify theend date and time. These options can be combined with any of the above. The use of theseoptions is similar to use with aureport .
40.7 Analyzing Processes with autraceIn addition to monitoring your system using the rules you set up, you can also perform dedicatedaudits of individual processes using the autrace command. autrace works similarly to thestrace command, but gathers slightly dierent information. The output of autrace is writtento /var/log/audit/audit.log and does not look any dierent from the standard audit logentries.
When performing an autrace on a process, make sure that any audit rules are purged from thequeue to avoid these rules clashing with the ones autrace adds itself. Delete the audit ruleswith the auditctl -D command. This stops all normal auditing.
tux > sudo auditctl -D
No rules
autrace /usr/bin/less
Waiting to execute: /usr/bin/lessCleaning up...No rulesTrace complete. You can locate the records with 'ausearch -i -p 7642'
405 Analyzing Processes with autrace openSUSE Leap 15.2

Always use the full path to the executable to track with autrace . After the trace is complete,autrace provides the event ID of the trace, so you can analyze the entire data trail withausearch . To restore the audit system to use the audit rule set again, restart the audit daemonwith systemctl restart auditd .
40.8 Visualizing Audit Data
Neither the data trail in /var/log/audit/audit.log nor the dierent report types generatedby aureport , described in Section 40.5.2, “Generating Custom Audit Reports”, provide an intuitivereading experience to the user. The aureport output is formatted in columns and thus easilyavailable to any sed, Perl, or awk scripts that users might connect to the audit framework tovisualize the audit data.
The visualization scripts (see Section 41.6, “Configuring Log Visualization”) are one example of howto use standard Linux tools available with openSUSE Leap or any other Linux distribution tocreate easy-to-read audit output. The following examples help you understand how the plainaudit reports can be transformed into human readable graphics.
The rst example illustrates the relationship of programs and system calls. To get to this kind ofdata, you need to determine the appropriate aureport command that delivers the source datafrom which to generate the nal graphic:
tux > sudo aureport -s -i
Syscall Report=======================================# date time syscall pid comm auid event=======================================1. 16/02/09 17:45:01 open 20343 cron unset 22792. 16/02/09 17:45:02 mkdir 20350 mktemp root 22843. 16/02/09 17:45:02 mkdir 20351 mkdir root 2285...
The rst thing that the visualization script needs to do on this report is to extract only thosecolumns that are of interest, in this example, the syscall and the comm columns. The outputis sorted and duplicates removed then the nal output is written into the visualization programitself:
LC_ALL=C aureport -s -i | awk '/^[0-9]/ { print $6" "$4 }' | sort | uniq | mkgraph
406 Visualizing Audit Data openSUSE Leap 15.2

FIGURE 40.2: FLOW GRAPH—PROGRAM VERSUS SYSTEM CALL RELATIONSHIP
The second example illustrates the dierent types of events and how many of each typehave been logged. The appropriate aureport command to extract this kind of information isaureport -e :
tux > sudo aureport -e -i --summary
Event Summary Report======================total type======================2434 SYSCALL816 USER_START816 USER_ACCT814 CRED_ACQ810 LOGIN806 CRED_DISP779 USER_END99 CONFIG_CHANGE52 USER_LOGIN
Because this type of report already contains a two column output, it is only fed into thevisualization script and transformed into a bar chart.
tux > sudo aureport -e -i --summary | mkbar events
407 Visualizing Audit Data openSUSE Leap 15.2

FIGURE 40.3: BAR CHART—COMMON EVENT TYPES
For background information about the visualization of audit data, refer to the Web site of theaudit project at http://people.redhat.com/sgrubb/audit/visualize/index.html .
40.9 Relaying Audit Event NotificationsThe auditing system also allows external applications to access and use the auditd daemonin real time. This feature is provided by so called audit dispatcher which allows, for example,intrusion detection systems to use auditd to receive enhanced detection information.
audispd is a daemon which controls the audit dispatcher. It is normally started by auditd .audispd takes audit events and distributes them to the programs which want to analyze themin real time. Conguration of auditd is stored in /etc/audisp/audispd.conf . The le hasthe following options:
q_depth
408 Relaying Audit Event Notifications openSUSE Leap 15.2
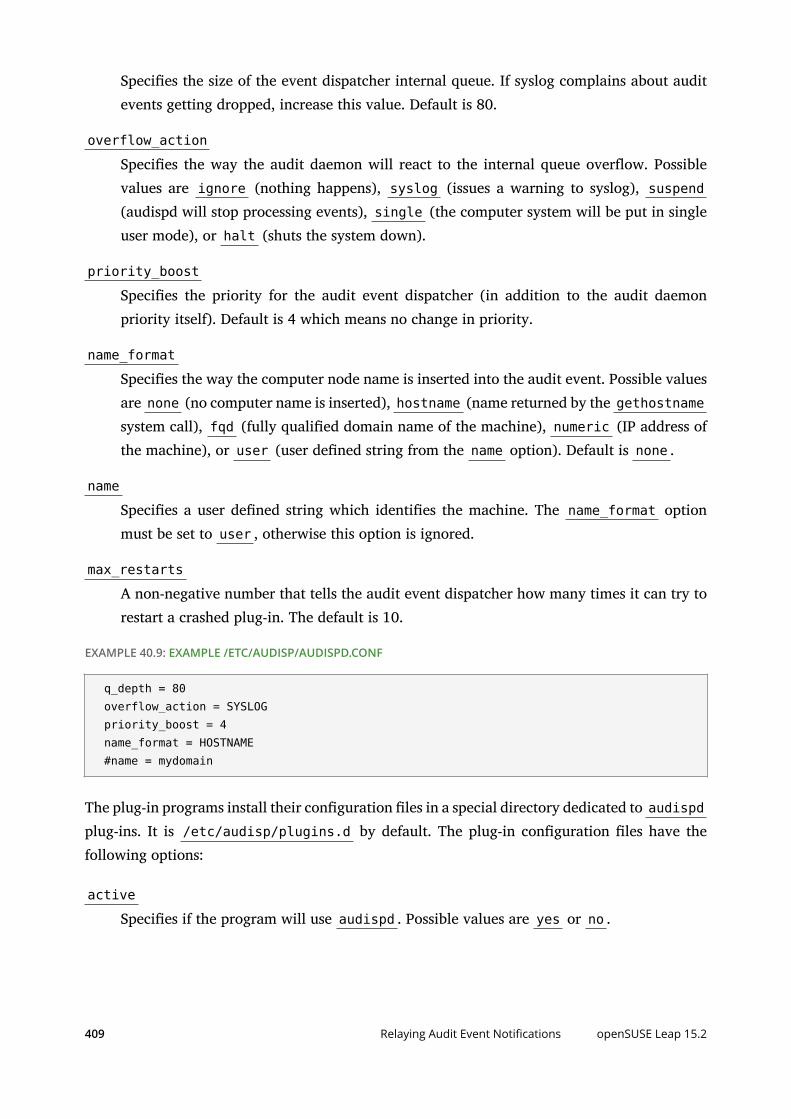
Species the size of the event dispatcher internal queue. If syslog complains about auditevents getting dropped, increase this value. Default is 80.
overflow_action
Species the way the audit daemon will react to the internal queue overow. Possiblevalues are ignore (nothing happens), syslog (issues a warning to syslog), suspend(audispd will stop processing events), single (the computer system will be put in singleuser mode), or halt (shuts the system down).
priority_boost
Species the priority for the audit event dispatcher (in addition to the audit daemonpriority itself). Default is 4 which means no change in priority.
name_format
Species the way the computer node name is inserted into the audit event. Possible valuesare none (no computer name is inserted), hostname (name returned by the gethostnamesystem call), fqd (fully qualied domain name of the machine), numeric (IP address ofthe machine), or user (user dened string from the name option). Default is none .
name
Species a user dened string which identies the machine. The name_format optionmust be set to user , otherwise this option is ignored.
max_restarts
A non-negative number that tells the audit event dispatcher how many times it can try torestart a crashed plug-in. The default is 10.
EXAMPLE 40.9: EXAMPLE /ETC/AUDISP/AUDISPD.CONF
q_depth = 80 overflow_action = SYSLOG priority_boost = 4 name_format = HOSTNAME #name = mydomain
The plug-in programs install their conguration les in a special directory dedicated to audispdplug-ins. It is /etc/audisp/plugins.d by default. The plug-in conguration les have thefollowing options:
active
Species if the program will use audispd . Possible values are yes or no .
409 Relaying Audit Event Notifications openSUSE Leap 15.2

direction
Species the way the plug-in was designed to communicate with audit. It informs the eventdispatcher in which directions the events ow. Possible values are in or out .
path
Species the absolute path to the plug-in executable. In case of internal plug-ins, this optionspecies the plug-in name.
type
Species the way the plug-in is to be run. Possible values are builtin or always . Usebuiltin for internal plug-ins ( af_unix and syslog ) and always for most (if not all)other plug-ins. Default is always .
args
Species the argument that is passed to the plug-in program. Normally, plug-in programsread their arguments from their conguration le and do not need to receive anyarguments. There is a limit of two arguments.
format
Species the format of data that the audit dispatcher passes to the plug-in program. Validoptions are binary or string . binary passes the data exactly as the event dispatcherreceives them from the audit daemon. string instructs the dispatcher to change the eventinto a string that is parseable by the audit parsing library. Default is string .
EXAMPLE 40.10: EXAMPLE /ETC/AUDISP/PLUGINS.D/SYSLOG.CONF
active = no direction = out path = builtin_syslog type = builtin args = LOG_INFO format = string
410 Relaying Audit Event Notifications openSUSE Leap 15.2

41 Setting Up the Linux Audit Framework
This chapter shows how to set up a simple audit scenario. Every step involved in conguringand enabling audit is explained in detail. After you have learned to set up audit, consider a real-world example scenario in Chapter 42, Introducing an Audit Rule Set.
To set up audit on openSUSE Leap, you need to complete the following steps:
PROCEDURE 41.1: SETTING UP THE LINUX AUDIT FRAMEWORK
1. Make sure that all required packages are installed: audit , audit-libs , and optionallyaudit-libs-python . To use the log visualization as described in Section 41.6, “Configuring
Log Visualization”, install gnuplot and graphviz from the openSUSE Leap media.
2. Determine the components to audit. Refer to Section 41.1, “Determining the Components to
Audit” for details.
3. Check or modify the basic audit daemon conguration. Refer to Section 41.2, “Configuring
the Audit Daemon” for details.
4. Enable auditing for system calls. Refer to Section 41.3, “Enabling Audit for System Calls” fordetails.
5. Compose audit rules to suit your scenario. Refer to Section 41.4, “Setting Up Audit Rules” fordetails.
6. Generate logs and congure tailor-made reports. Refer to Section 41.5, “Configuring Audit
Reports” for details.
7. Congure optional log visualization. Refer to Section 41.6, “Configuring Log Visualization” fordetails.
Important: Controlling the Audit DaemonBefore conguring any of the components of the audit system, make sure that the auditdaemon is not running by entering systemctl status auditd as root . On a defaultopenSUSE Leap system, audit is started on boot, so you need to turn it o by enteringsystemctl stop auditd . Start the daemon after conguring it with systemctl startauditd .
411 openSUSE Leap 15.2
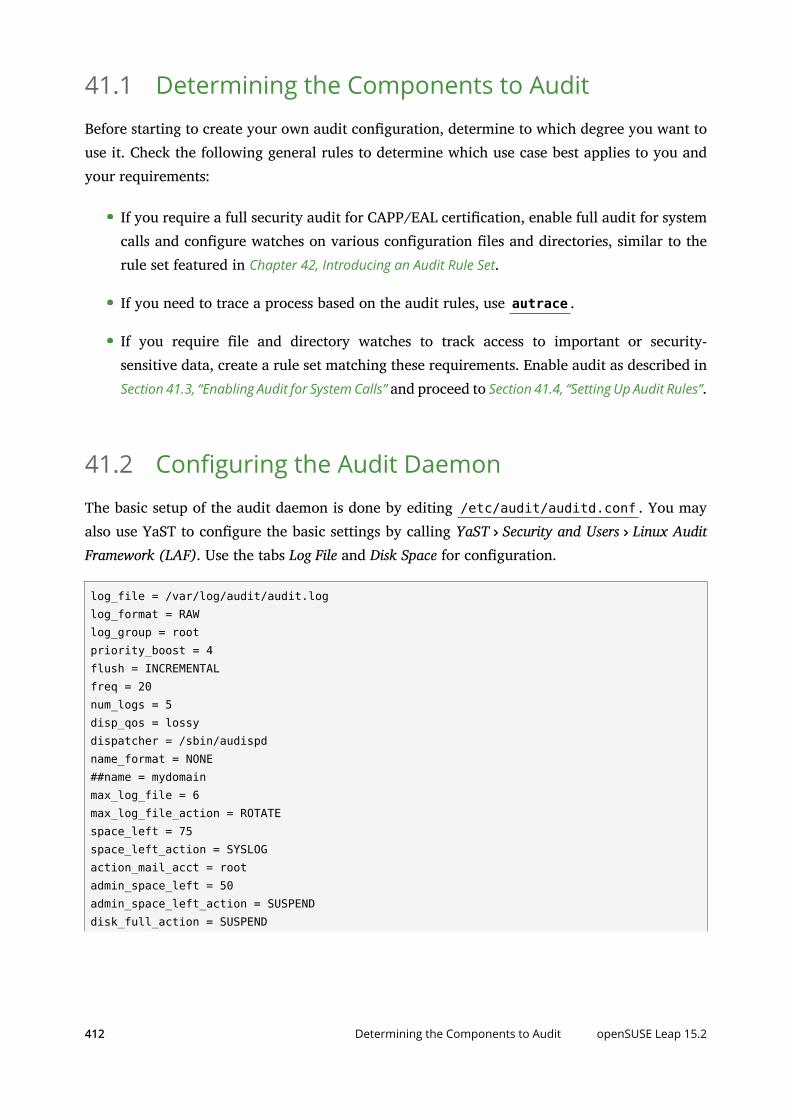
41.1 Determining the Components to AuditBefore starting to create your own audit conguration, determine to which degree you want touse it. Check the following general rules to determine which use case best applies to you andyour requirements:
If you require a full security audit for CAPP/EAL certication, enable full audit for systemcalls and congure watches on various conguration les and directories, similar to therule set featured in Chapter 42, Introducing an Audit Rule Set.
If you need to trace a process based on the audit rules, use autrace .
If you require le and directory watches to track access to important or security-sensitive data, create a rule set matching these requirements. Enable audit as described inSection 41.3, “Enabling Audit for System Calls” and proceed to Section 41.4, “Setting Up Audit Rules”.
41.2 Configuring the Audit DaemonThe basic setup of the audit daemon is done by editing /etc/audit/auditd.conf . You mayalso use YaST to congure the basic settings by calling YaST Security and Users Linux AuditFramework (LAF). Use the tabs Log File and Disk Space for conguration.
log_file = /var/log/audit/audit.loglog_format = RAWlog_group = rootpriority_boost = 4flush = INCREMENTALfreq = 20num_logs = 5disp_qos = lossydispatcher = /sbin/audispdname_format = NONE##name = mydomainmax_log_file = 6max_log_file_action = ROTATEspace_left = 75space_left_action = SYSLOGaction_mail_acct = rootadmin_space_left = 50admin_space_left_action = SUSPENDdisk_full_action = SUSPEND
412 Determining the Components to Audit openSUSE Leap 15.2
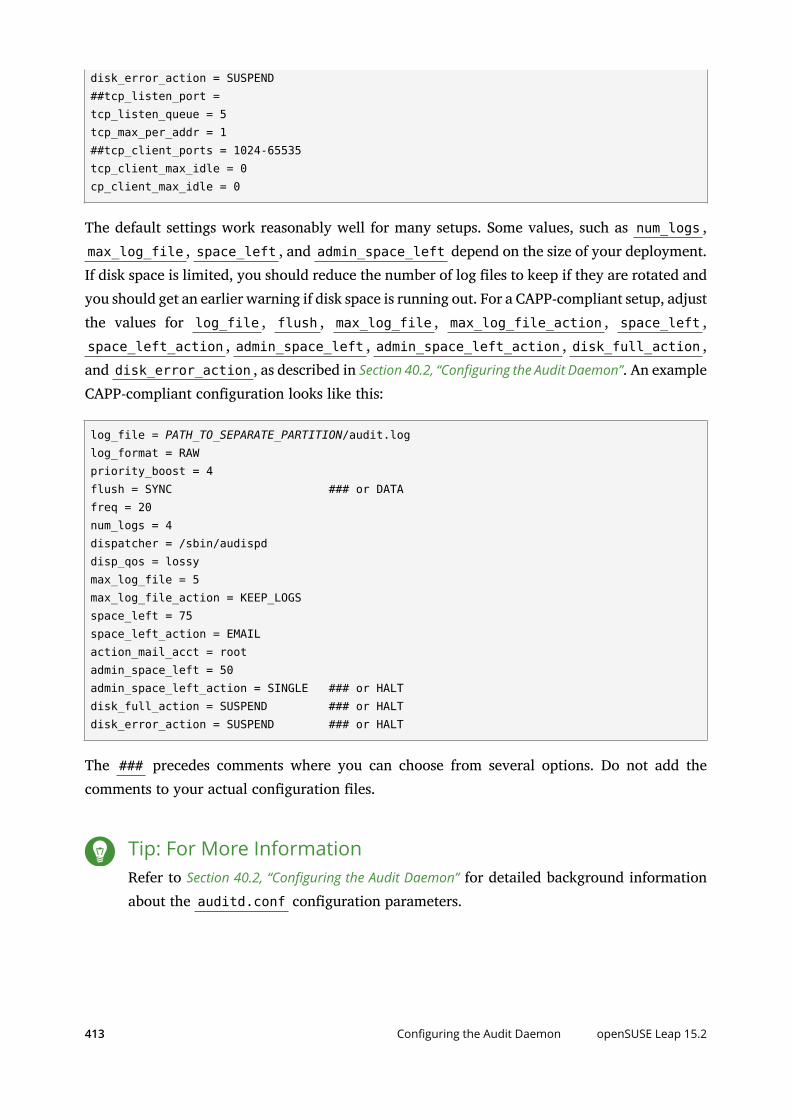
disk_error_action = SUSPEND##tcp_listen_port =tcp_listen_queue = 5tcp_max_per_addr = 1##tcp_client_ports = 1024-65535tcp_client_max_idle = 0cp_client_max_idle = 0
The default settings work reasonably well for many setups. Some values, such as num_logs ,max_log_file , space_left , and admin_space_left depend on the size of your deployment.If disk space is limited, you should reduce the number of log les to keep if they are rotated andyou should get an earlier warning if disk space is running out. For a CAPP-compliant setup, adjustthe values for log_file , flush , max_log_file , max_log_file_action , space_left ,space_left_action , admin_space_left , admin_space_left_action , disk_full_action ,and disk_error_action , as described in Section 40.2, “Configuring the Audit Daemon”. An exampleCAPP-compliant conguration looks like this:
log_file = PATH_TO_SEPARATE_PARTITION/audit.loglog_format = RAWpriority_boost = 4flush = SYNC ### or DATAfreq = 20num_logs = 4dispatcher = /sbin/audispddisp_qos = lossymax_log_file = 5max_log_file_action = KEEP_LOGSspace_left = 75space_left_action = EMAILaction_mail_acct = rootadmin_space_left = 50admin_space_left_action = SINGLE ### or HALTdisk_full_action = SUSPEND ### or HALTdisk_error_action = SUSPEND ### or HALT
The ### precedes comments where you can choose from several options. Do not add thecomments to your actual conguration les.
Tip: For More InformationRefer to Section 40.2, “Configuring the Audit Daemon” for detailed background informationabout the auditd.conf conguration parameters.
413 Configuring the Audit Daemon openSUSE Leap 15.2

41.3 Enabling Audit for System Calls
If the audit framework is not installed, install the audit package. A standard openSUSE Leapsystem does not have auditd running by default. Enable it with:
tux > sudo systemctl enable auditd
There are dierent levels of auditing activity available:
Basic Logging
Out of the box (without any further conguration) auditd logs only events concerning itsown conguration changes to /var/log/audit/audit.log . No events (le access, systemcall, etc.) are generated by the kernel audit component until requested by auditctl .However, other kernel components and modules may log audit events outside of the controlof auditctl and these appear in the audit log. By default, the only module that generatesaudit events is AppArmor.
Advanced Logging with System Call Auditing
To audit system calls and get meaningful le watches, you need to enable audit contextsfor system calls.
As you need system call auditing capabilities even when you are conguring plain le ordirectory watches, you need to enable audit contexts for system calls. To enable audit contextsfor the duration of the current session only, execute auditctl -e 1 as root . To disable thisfeature, execute auditctl -e 0 as root .
The audit contexts are enabled by default. To turn this feature o temporarily, use auditctl-e 0 .
41.4 Setting Up Audit Rules
Using audit rules, determine which aspects of the system should be analyzed by audit. Normallythis includes important databases and security-relevant conguration les. You may also analyzevarious system calls in detail if a broad analysis of your system is required. A very detailedexample conguration that includes most of the rules that are needed in a CAPP compliantenvironment is available in Chapter 42, Introducing an Audit Rule Set.
414 Enabling Audit for System Calls openSUSE Leap 15.2

Audit rules can be passed to the audit daemon on the auditctl command line and by composinga rule set in /etc/audit/audit.rules which is processed whenever the audit daemon isstarted. To customize /etc/audit/audit.rules either edit it directly, or use YaST: Securityand Users Linux Audit Framework (LAF) Rules for 'auditctl'. Rules passed on the command lineare not persistent and need to be re-entered when the audit daemon is restarted.
A simple rule set for very basic auditing on a few important les and directories could looklike this:
# basic audit system parameters-D-b 8192-f 1-e 1
# some file and directory watches with keys-w /var/log/audit/ -k LOG_audit-w /etc/audit/auditd.conf -k CFG_audit_conf -p rxwa-w /etc/audit/audit.rules -k CFG_audit_rules -p rxwa
-w /etc/passwd -k CFG_passwd -p rwxa-w /etc/sysconfig/ -k CFG_sysconfig
# an example system call rule-a entry,always -S umask
### add your own rules
When conguring the basic audit system parameters (such as the backlog parameter -b ) testthese settings with your intended audit rule set to determine whether the backlog size isappropriate for the level of logging activity caused by your audit rule set. If your chosen backlogsize is too small, your system might not be able to handle the audit load and consult the failureag ( -f ) when the backlog limit is exceeded.
Important: Choosing the Failure FlagWhen choosing the failure ag, note that -f 2 tells your system to perform an immediateshutdown without ushing any pending data to disk when the limits of your audit systemare exceeded. Because this shutdown is not a clean shutdown, restrict the use of -f 2to only the most security-conscious environments and use -f 1 (system continues torun, issues a warning and audit stops) for any other setup to avoid loss of data or datacorruption.
415 Setting Up Audit Rules openSUSE Leap 15.2

Directory watches produce less verbose output than separate le watches for the les underthese directories. To get detailed logging for your system conguration in /etc/sysconfig , forexample, add watches for each le. Audit does not support globbing, which means you cannotcreate a rule that says -w /etc/* and watches all les and directories below /etc .
For better identication in the log le, a key has been added to each of the le and directorywatches. Using the key, it is easier to comb the logs for events related to a certain rule. Whencreating keys, distinguish between mere log le watches and conguration le watches byusing an appropriate prex with the key, in this case LOG for a log le watch and CFG for aconguration le watch. Using the le name as part of the key also makes it easier for you toidentify events of this type in the log le.
Another thing to keep in mind when creating le and directory watches is that audit cannot dealwith les that do not exist when the rules are created. Any le that is added to your system whileaudit is already running is not watched unless you extend the rule set to watch this new le.
For more information about creating custom rules, refer to Section 40.4, “Passing Parameters to
the Audit System”.
Important: Changing Audit RulesAfter you change audit rules, always restart the audit daemon with systemctl restartauditd to reread the changed rules.
41.5 Configuring Audit Reports
To avoid having to dig through the raw audit logs to get an impression of what your system iscurrently doing, run custom audit reports at certain intervals. Custom audit reports enable youto focus on areas of interest and get meaningful statistics on the nature and frequency of theevents you are monitoring. To analyze individual events in detail, use the ausearch tool.
416 Configuring Audit Reports openSUSE Leap 15.2

Before setting up audit reporting, consider the following:
What types of events do you want to monitor by generating regular reports? Select theappropriate aureport command lines as described in Section 40.5.2, “Generating Custom Audit
Reports”.
What do you want to do with the audit reports? Decide whether to create graphical chartsfrom the data accumulated or whether it should be transferred into any sort of spreadsheetor database. Set up the aureport command line and further processing similar to theexamples shown in Section 41.6, “Configuring Log Visualization” if you want to visualize yourreports.
When and at which intervals should the reports run? Set up appropriate automatedreporting using cron.
For this example, assume that you are interested in nding out about any attempts to accessyour audit, PAM, and system conguration. Proceed as follows to nd out about le events onyour system:
1. Generate a full summary report of all events and check for any anomalies in the summaryreport, for example, have a look at the “failed syscalls” record, because these might havefailed because of insucient permissions to access a le or a le not being there:
tux > sudo aureport
Summary Report======================Range of time in logs: 03/02/09 14:13:38.225 - 17/02/09 16:30:10.352Selected time for report: 03/02/09 14:13:38 - 17/02/09 16:30:10.352Number of changes in configuration: 24Number of changes to accounts, groups, or roles: 0Number of logins: 9Number of failed logins: 15Number of authentications: 19Number of failed authentications: 578Number of users: 3Number of terminals: 15Number of host names: 4Number of executables: 20Number of files: 279Number of AVC's: 0Number of MAC events: 0Number of failed syscalls: 994
417 Configuring Audit Reports openSUSE Leap 15.2

Number of anomaly events: 0Number of responses to anomaly events: 0Number of crypto events: 0Number of keys: 2Number of process IDs: 1238Number of events: 5435
2. Run a summary report for failed events and check the “les” record for the number offailed le access events:
tux > sudo aureport --failed
Failed Summary Report======================Range of time in logs: 03/02/09 14:13:38.225 - 17/02/09 16:30:10.352Selected time for report: 03/02/09 14:13:38 - 17/02/09 16:30:10.352Number of changes in configuration: 0Number of changes to accounts, groups, or roles: 0Number of logins: 0Number of failed logins: 15Number of authentications: 0Number of failed authentications: 578Number of users: 1Number of terminals: 7Number of host names: 4Number of executables: 12Number of files: 77Number of AVC's: 0Number of MAC events: 0Number of failed syscalls: 994Number of anomaly events: 0Number of responses to anomaly events: 0Number of crypto events: 0Number of keys: 2Number of process IDs: 713Number of events: 1589
3. To list the les that could not be accessed, run a summary report of failed le events:
tux > sudo aureport -f -i --failed --summary
Failed File Summary Report===========================total file===========================80 /var80 spool
418 Configuring Audit Reports openSUSE Leap 15.2

80 cron80 lastrun46 /usr/lib/locale/en_GB.UTF-8/LC_CTYPE45 /usr/lib/locale/locale-archive38 /usr/lib/locale/en_GB.UTF-8/LC_IDENTIFICATION38 /usr/lib/locale/en_GB.UTF-8/LC_MEASUREMENT38 /usr/lib/locale/en_GB.UTF-8/LC_TELEPHONE38 /usr/lib/locale/en_GB.UTF-8/LC_ADDRESS38 /usr/lib/locale/en_GB.UTF-8/LC_NAME38 /usr/lib/locale/en_GB.UTF-8/LC_PAPER38 /usr/lib/locale/en_GB.UTF-8/LC_MESSAGES38 /usr/lib/locale/en_GB.UTF-8/LC_MONETARY38 /usr/lib/locale/en_GB.UTF-8/LC_COLLATE38 /usr/lib/locale/en_GB.UTF-8/LC_TIME38 /usr/lib/locale/en_GB.UTF-8/LC_NUMERIC8 /etc/magic.mgc...
To focus this summary report on a few les or directories of interest only, such as /etc/audit/auditd.conf , /etc/pam.d , and /etc/sysconfig , use a command similar to thefollowing:
tux > sudo aureport -f -i --failed --summary |grep -e "/etc/audit/auditd.conf" -e "/etc/pam.d/" -e "/etc/sysconfig"
1 /etc/sysconfig/displaymanager
4. From the summary report, then proceed to isolate these items of interest from the log andnd out their event IDs for further analysis:
tux > sudo aureport -f -i --failed |grep -e "/etc/audit/auditd.conf" -e "/etc/pam.d/" -e "/etc/sysconfig"
993. 17/02/09 16:47:34 /etc/sysconfig/displaymanager readlink no /bin/vim-normal root 7887994. 17/02/09 16:48:23 /etc/sysconfig/displaymanager getxattr no /bin/vim-normal root 7889
5. Use the event ID to get a detailed record for each item of interest:
tux > sudo ausearch -a 7887 -i----time->Tue Feb 17 16:48:23 2009type=PATH msg=audit(1234885703.090:7889): item=0 name="/etc/sysconfig/displaymanager" inode=369282 dev=08:06 mode=0100644 ouid=0 ogid=0 rdev=00:00type=CWD msg=audit(1234885703.090:7889): cwd="/root"
419 Configuring Audit Reports openSUSE Leap 15.2

type=SYSCALL msg=audit(1234885703.090:7889): arch=c000003e syscall=191 success=no exit=-61 a0=7e1e20 a1=7f90e4cf9187 a2=7fffed5b57d0 a3=84 items=1 ppid=25548 pid=23045 auid=0 uid=0 gid=0 euid=0 suid=0 fsuid=0 egid=0 sgid=0 fsgid=0 tty=pts2 ses=1166 comm="vim" exe="/bin/vim-normal" key=(null)
Tip: Focusing on a Certain Time FrameIf you are interested in events during a particular period of time, trim down the reportsby using start and end dates and times with your aureport commands ( -ts and -te ).For more information, refer to Section 40.5.2, “Generating Custom Audit Reports”.
All steps (except for the last one) can be run automatically and would easily be scriptableand congured as cron jobs. Any of the --failed --summary reports could be transformedeasily into a bar chart that plots les versus failed access attempts. For more information aboutvisualizing audit report data, refer to Section 41.6, “Configuring Log Visualization”.
41.6 Configuring Log Visualization
Using the scripts mkbar and mkgraph you can illustrate your audit statistics with various graphsand charts. As with any other aureport command, the plotting commands are scriptable andcan easily be congured to run as cron jobs.
mkbar and mkgraph were created by Steve Grubb at Red Hat. They are available from http://
people.redhat.com/sgrubb/audit/visualize/ . Because the current version of audit in openSUSELeap does not ship with these scripts, proceed as follows to make them available on your system:
Warning: Downloaded Content Is DangerousUse mkbar and mkgraph at your own risk. Any content downloaded from the Web ispotentially dangerous to your system, even more so when run with root privileges.
1. Download the scripts to root 's ~/bin directory:
tux > sudo wget http://people.redhat.com/sgrubb/audit/visualize/mkbar -O ~/bin/mkbartux > sudo wget http://people.redhat.com/sgrubb/audit/visualize/mkgraph -O ~/bin/mkgraph
420 Configuring Log Visualization openSUSE Leap 15.2

2. Adjust the le permissions to read, write, and execute for root :
tux > sudo chmod 744 ~/bin/mk{bar,graph}
To plot summary reports, such as the ones discussed in Section 41.5, “Configuring Audit Reports”,use the script mkbar . Some example commands could look like the following:
Create a Summary of Events
tux > sudo aureport -e -i --summary | mkbar events
Create a Summary of File Events
tux > sudo aureport -f -i --summary | mkbar files
Create a Summary of Login Events
tux > sudo aureport -l -i --summary | mkbar login
Create a Summary of User Events
tux > sudo aureport -u -i --summary | mkbar users
Create a Summary of System Call Events
tux > sudo aureport -s -i --summary | mkbar syscalls
To create a summary chart of failed events of any of the above event types, add the --failedoption to the respective aureport command. To cover a certain period of time only, use the -ts and -te options on aureport. Any of these commands can be tweaked further by narrowingdown its scope using grep or egrep and regular expressions. See the comments in the mkbarscript for an example. Any of the above commands produces a PNG le containing a bar chartof the requested data.
To illustrate the relationship between dierent kinds of audit objects, such as users and systemcalls, use the script mkgraph . Some example commands could look like the following:
Users versus Executables
tux > sudo LC_ALL=C aureport -u -i | awk '/^[0-9]/ { print $4" "$7 }' | sort | uniq | mkgraph users_vs_exec
Users versus Files
421 Configuring Log Visualization openSUSE Leap 15.2

tux > sudo LC_ALL=C aureport -f -i | awk '/^[0-9]/ { print $8" "$4 }' | sort | uniq | mkgraph users_vs_files
System Calls versus Commands
tux > sudo LC_ALL=C aureport -s -i | awk '/^[0-9]/ { print $4" "$6 }' | sort | uniq | mkgraph syscall_vs_com
System Calls versus Files
tux > sudo LC_ALL=C aureport -s -i | awk '/^[0-9]/ { print $5" "$4 }' | sort | uniq | mkgraph | syscall_vs_file
Graphs can also be combined to illustrate complex relationships. See the comments in themkgraph script for further information and an example. The graphs produced by this script arecreated in PostScript format by default, but you can change the output format by changing theEXT variable in the script from ps to png or jpg .
422 Configuring Log Visualization openSUSE Leap 15.2

42 Introducing an Audit Rule Set
The following example conguration illustrates how audit can be used to monitor your system.It highlights the most important items that need to be audited to cover the list of auditableevents specied by Controlled Access Protection Prole (CAPP).
The example rule set is divided into the following sections:
Basic audit conguration (see Section 42.1, “Adding Basic Audit Configuration Parameters”)
Watches on audit log les and conguration les (see Section 42.2, “Adding Watches on Audit
Log Files and Configuration Files”)
Monitoring operations on le system objects (see Section 42.3, “Monitoring File System
Objects”)
Monitoring security databases (see Section 42.4, “Monitoring Security Configuration Files and
Databases”)
Monitoring miscellaneous system calls (Section 42.5, “Monitoring Miscellaneous System Calls”)
Filtering system call arguments (see Section 42.6, “Filtering System Call Arguments”)
To transform this example into a conguration le to use in your live setup, proceed as follows:
1. Choose the appropriate settings for your setup and adjust them.
2. Adjust the le /etc/audit/audit.rules by adding rules from the examples below orby modifying existing rules.
Note: Adjusting the Level of Audit LoggingDo not copy the example below into your audit setup without adjusting it to your needs.Determine what and to what extent to audit.
The entire audit.rules is a collection of auditctl commands. Every line in this le expandsto a full auditctl command line. The syntax used in the rule set is the same as that of theauditctl command.
423 openSUSE Leap 15.2

42.1 Adding Basic Audit Configuration Parameters
-D 1
-b 8192 2
-f 2 3
1 Delete any preexisting rules before starting to dene new ones.
2 Set the number of buers to take the audit messages. Depending on the level of auditlogging on your system, increase or decrease this gure.
3 Set the failure ag to use when the kernel needs to handle critical errors. Possible valuesare 0 (silent), 1 (printk, print a failure message), and 2 (panic, halt the system).
By emptying the rule queue with the -D option, you make sure that audit does not use anyother rule set than what you are oering it by means of this le. Choosing an appropriate buernumber ( -b ) is vital to avoid having your system fail because of too high an audit load. Choosingthe panic failure ag -f 2 ensures that your audit records are complete even if the system isencountering critical errors. By shutting down the system on a critical error, audit makes surethat no process escapes from its control as it otherwise might if level 1 ( printk ) were chosen.
Important: Choosing the Failure FlagBefore using your audit rule set on a live system, make sure that the setup has beenthoroughly evaluated on test systems using the worst case production workload. It is evenmore critical that you do this when specifying the -f 2 ag, because this instructs thekernel to panic (perform an immediate halt without ushing pending data to disk) if anythresholds are exceeded. Consider the use of the -f 2 ag for only the most security-conscious environments.
42.2 Adding Watches on Audit Log Files andConfiguration Files
Adding watches on your audit conguration les and the log les themselves ensures that youcan track any attempt to tamper with the conguration les or detect any attempted accessesto the log les.
424 Adding Basic Audit Configuration Parameters openSUSE Leap 15.2

Note: Creating Directory and File WatchesCreating watches on a directory is not necessarily sucient if you need events for leaccess. Events on directory access are only triggered when the directory's inode is updatedwith metadata changes. To trigger events on le access, add watches for each le tomonitor.
-w /var/log/audit/ 1
-w /var/log/audit/audit.log
-w /var/log/audit/audit_log.1-w /var/log/audit/audit_log.2-w /var/log/audit/audit_log.3-w /var/log/audit/audit_log.4
-w /etc/audit/auditd.conf -p wa 2
-w /etc/audit/audit.rules -p wa-w /etc/libaudit.conf -p wa
1 Set a watch on the directory where the audit log is located. Trigger an event for any type ofaccess attempt to this directory. If you are using log rotation, add watches for the rotatedlogs as well.
2 Set a watch on an audit conguration le. Log all write and attribute change attempts tothis le.
42.3 Monitoring File System Objects
Auditing system calls helps track your system's activity well beyond the application level. Bytracking le system–related system calls, get an idea of how your applications are using thesesystem calls and determine whether that use is appropriate. By tracking mount and unmountoperations, track the use of external resources (removable media, remote le systems, etc.).
425 Monitoring File System Objects openSUSE Leap 15.2
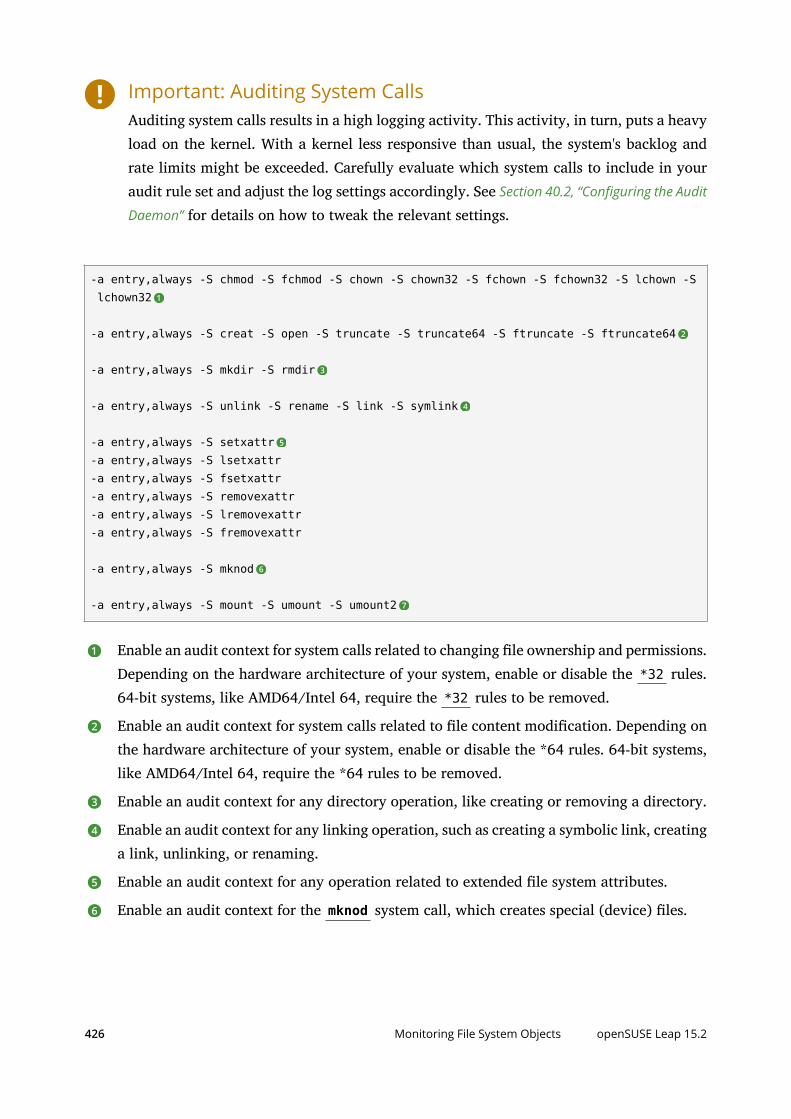
Important: Auditing System CallsAuditing system calls results in a high logging activity. This activity, in turn, puts a heavyload on the kernel. With a kernel less responsive than usual, the system's backlog andrate limits might be exceeded. Carefully evaluate which system calls to include in youraudit rule set and adjust the log settings accordingly. See Section 40.2, “Configuring the Audit
Daemon” for details on how to tweak the relevant settings.
-a entry,always -S chmod -S fchmod -S chown -S chown32 -S fchown -S fchown32 -S lchown -S lchown32 1
-a entry,always -S creat -S open -S truncate -S truncate64 -S ftruncate -S ftruncate64 2
-a entry,always -S mkdir -S rmdir 3
-a entry,always -S unlink -S rename -S link -S symlink 4
-a entry,always -S setxattr 5
-a entry,always -S lsetxattr-a entry,always -S fsetxattr-a entry,always -S removexattr-a entry,always -S lremovexattr-a entry,always -S fremovexattr
-a entry,always -S mknod 6
-a entry,always -S mount -S umount -S umount2 7
1 Enable an audit context for system calls related to changing le ownership and permissions.Depending on the hardware architecture of your system, enable or disable the *32 rules.64-bit systems, like AMD64/Intel 64, require the *32 rules to be removed.
2 Enable an audit context for system calls related to le content modication. Depending onthe hardware architecture of your system, enable or disable the *64 rules. 64-bit systems,like AMD64/Intel 64, require the *64 rules to be removed.
3 Enable an audit context for any directory operation, like creating or removing a directory.
4 Enable an audit context for any linking operation, such as creating a symbolic link, creatinga link, unlinking, or renaming.
5 Enable an audit context for any operation related to extended le system attributes.
6 Enable an audit context for the mknod system call, which creates special (device) les.
426 Monitoring File System Objects openSUSE Leap 15.2

7 Enable an audit context for any mount or umount operation. For the x86 architecture,disable the umount rule. For the Intel 64 architecture, disable the umount2 rule.
42.4 Monitoring Security Configuration Files andDatabasesTo make sure that your system is not made to do undesired things, track any attempts to changethe cron and at congurations or the lists of scheduled jobs. Tracking any write access tothe user, group, password and login databases and logs helps you identify any attempts tomanipulate your system's user database.
Tracking changes to your system conguration (kernel, services, time, etc.) helps you spotany attempts of others to manipulate essential functionality of your system. Changes to thePAM conguration should also be monitored in a secure environment, because changes in theauthentication stack should not be made by anyone other than the administrator, and it shouldbe logged which applications are using PAM and how it is used. The same applies to any otherconguration les related to secure authentication and communication.
1
-w /var/spool/atspool-w /etc/at.allow-w /etc/at.deny
-w /etc/cron.allow -p wa-w /etc/cron.deny -p wa-w /etc/cron.d/ -p wa-w /etc/cron.daily/ -p wa-w /etc/cron.hourly/ -p wa-w /etc/cron.monthly/ -p wa-w /etc/cron.weekly/ -p wa-w /etc/crontab -p wa-w /var/spool/cron/root
2
-w /etc/group -p wa-w /etc/passwd -p wa-w /etc/shadow
-w /etc/login.defs -p wa-w /etc/securetty-w /var/log/lastlog
427 Monitoring Security Configuration Files and Databases openSUSE Leap 15.2

3
-w /etc/hosts -p wa-w /etc/sysconfig/w /etc/init.d/w /etc/ld.so.conf -p waw /etc/localtime -p waw /etc/sysctl.conf -p waw /etc/modprobe.d/w /etc/modprobe.conf.local -p waw /etc/modprobe.conf -p wa
4
w /etc/pam.d/5
-w /etc/aliases -p wa-w /etc/postfix/ -p wa
6
-w /etc/ssh/sshd_config
-w /etc/stunnel/stunnel.conf-w /etc/stunnel/stunnel.pem
-w /etc/vsftpd.ftpusers-w /etc/vsftpd.conf
7
-a exit,always -S sethostname-w /etc/issue -p wa-w /etc/issue.net -p wa
1 Set watches on the at and cron conguration and the scheduled jobs and assign labelsto these events.
2 Set watches on the user, group, password, and login databases and logs and set labels tobetter identify any login-related events, such as failed login attempts.
3 Set a watch and a label on the static host name conguration in /etc/hosts . Trackchanges to the system conguration directory, /etc/sysconfig . Enable per-le watchesif you are interested in le events. Set watches and labels for changes to the bootconguration in the /etc/init.d directory. Enable per-le watches if you are interestedin le events. Set watches and labels for any changes to the linker conguration in/etc/ld.so.conf . Set watches and a label for /etc/localtime . Set watches andlabels for the kernel conguration les /etc/sysctl.conf , /etc/modprobe.d/ , /etc/modprobe.conf.local , and /etc/modprobe.conf .
428 Monitoring Security Configuration Files and Databases openSUSE Leap 15.2

4 Set watches on the PAM conguration directory. If you are interested in particular lesbelow the directory level, add explicit watches to these les as well.
5 Set watches to the postx conguration to log any write attempt or attribute change anduse labels for better tracking in the logs.
6 Set watches and labels on the SSH, stunnel , and vsftpd conguration les.
7 Perform an audit of the sethostname system call and set watches and labels on the systemidentication conguration in /etc/issue and /etc/issue.net .
42.5 Monitoring Miscellaneous System CallsApart from auditing le system related system calls, as described in Section 42.3, “Monitoring
File System Objects”, you can also track various other system calls. Tracking task creation helpsyou understand your applications' behavior. Auditing the umask system call lets you track howprocesses modify creation mask. Tracking any attempts to change the system time helps youidentify anyone or any process trying to manipulate the system time.
1
-a entry,always -S clone -S fork -S vfork
2
-a entry,always -S umask
3
-a entry,always -S adjtimex -S settimeofday
1 Track task creation.
2 Add an audit context to the umask system call.
3 Track attempts to change the system time. adjtimex can be used to skew the time.settimeofday sets the absolute time.
42.6 Filtering System Call ArgumentsIn addition to the system call auditing introduced in Section 42.3, “Monitoring File System Objects”
and Section 42.5, “Monitoring Miscellaneous System Calls”, you can track application behavior to aneven higher degree. Applying lters helps you focus audit on areas of primary interest to you.This section introduces ltering system call arguments for non-multiplexed system calls like
429 Monitoring Miscellaneous System Calls openSUSE Leap 15.2

access and for multiplexed ones like socketcall or ipc. Whether system calls are multiplexeddepends on the hardware architecture used. Both socketcall and ipc are not multiplexed on 64-bit architectures, such as AMD64/Intel 64.
Important: Auditing System CallsAuditing system calls results in high logging activity, which in turn puts a heavy loadon the kernel. With a kernel less responsive than usual, the system's backlog and ratelimits might well be exceeded. Carefully evaluate which system calls to include in youraudit rule set and adjust the log settings accordingly. See Section 40.2, “Configuring the Audit
Daemon” for details on how to tweak the relevant settings.
The access system call checks whether a process would be allowed to read, write or test for theexistence of a le or le system object. Using the -F lter ag, build rules matching specicaccess calls in the format -F a1=ACCESS_MODE . Check /usr/include/fcntl.h for a list ofpossible arguments to the access system call.
-a entry,always -S access -F a1=4 1
-a entry,always -S access -F a1=6 2
-a entry,always -S access -F a1=7 3
1 Audit the access system call, but only if the second argument of the system call ( mode ) is4 ( R_OK ). This rule lters for all access calls testing for sucient read permissions to ale or le system object accessed by a user or process.
2 Audit the access system call, but only if the second argument of the system call ( mode ) is6 , meaning 4 OR 2 , which translates to R_OK OR W_OK . This rule lters for access callstesting for sucient read and write permissions.
3 Audit the access system call, but only if the second argument of the system call ( mode ) is7 , meaning 4 OR 2 OR 1 , which translates to R_OK OR W_OK OR X_OK . This rule ltersfor access calls testing for sucient read, write, and execute permissions.
The socketcall system call is a multiplexed system call. Multiplexed means that there is only onesystem call for all possible calls and that libc passes the actual system call to use as the rstargument ( a0 ). Check the manual page of socketcall for possible system calls and refer to /usr/src/linux/include/linux/net.h for a list of possible argument values and system callnames. Audit supports ltering for specic system calls using a -F a0=SYSCALL_NUMBER .
-a entry,always -S socketcall -F a0=1 -F a1=10 1
430 Filtering System Call Arguments openSUSE Leap 15.2

## Use this line on x86_64, ia64 instead#-a entry,always -S socket -F a0=10
-a entry,always -S socketcall -F a0=5 2
## Use this line on x86_64, ia64 instead#-a entry, always -S accept
1 Audit the socket(PF_INET6) system call. The -F a0=1 lter matches all socket systemcalls and the -F a1=10 lter narrows the matches down to socket system calls carryingthe IPv6 protocol family domain parameter (PF_INET6). Check /usr/include/linux/net.h for the rst argument ( a0 ) and /usr/src/linux/include/linux/socket.h forthe second parameter ( a1 ). 64-bit platforms, like AMD64/Intel 64, do not use multiplexingon socketcall system calls. For these platforms, comment the rule and add the plain systemcall rules with a lter on PF_INET6.
2 Audit the socketcall system call. The lter ag is set to lter for a0=5 as the rst argumentto socketcall, which translates to the accept system call if you check /usr/include/linux/net.h . 64-bit platforms, like AMD64/Intel 64, do not use multiplexing on socketcall systemcalls. For these platforms, comment the rule and add the plain system call rule withoutargument ltering.
The ipc system call is another example of multiplexed system calls. The actual call to invokeis determined by the rst argument passed to the ipc system call. Filtering for these argumentshelps you focus on those IPC calls of interest to you. Check /usr/include/linux/ipc.h forpossible argument values.
1
## msgctl-a entry,always -S ipc -F a0=14## msgget-a entry,always -S ipc -F a0=13## Use these lines on x86_64, ia64 instead#-a entry,always -S msgctl#-a entry,always -S msgget
2
## semctl-a entry,always -S ipc -F a0=3## semget-a entry,always -S ipc -F a0=2## semop-a entry,always -S ipc -F a0=1## semtimedop-a entry,always -S ipc -F a0=4
431 Filtering System Call Arguments openSUSE Leap 15.2

## Use these lines on x86_64, ia64 instead#-a entry,always -S semctl#-a entry,always -S semget#-a entry,always -S semop#-a entry,always -S semtimedop
3
## shmctl-a entry,always -S ipc -F a0=24## shmget-a entry,always -S ipc -F a0=23## Use these lines on x86_64, ia64 instead#-a entry,always -S shmctl#-a entry,always -S shmget
1 Audit system calls related to IPC SYSV message queues. In this case, the a0 values specifythat auditing is added for the msgctl and msgget system calls ( 14 and 13 ). 64-bit platforms,like AMD64/Intel 64, do not use multiplexing on ipc system calls. For these platforms,comment the rst two rules and add the plain system call rules without argument ltering.
2 Audit system calls related to IPC SYSV message semaphores. In this case, the a0 valuesspecify that auditing is added for the semctl, semget, semop, and semtimedop system calls( 3 , 2 , 1 , and 4 ). 64-bit platforms, like AMD64/Intel 64, do not use multiplexing on ipcsystem calls. For these platforms, comment the rst four rules and add the plain systemcall rules without argument ltering.
3 Audit system calls related to IPC SYSV shared memory. In this case, the a0 values specifythat auditing is added for the shmctl and shmget system calls ( 24 , 23 ). 64-bit platforms,like AMD64/Intel 64, do not use multiplexing on ipc system calls. For these platforms,comment the rst two rules and add the plain system call rules without argument ltering.
42.7 Managing Audit Event Records Using Keys
After conguring a few rules generating events and populating the logs, you need to nd away to tell one event from the other. Using the ausearch command, you can lter the logsfor various criteria. Using ausearch -m MESSAGE_TYPE , you can at least lter for events of acertain type. However, to be able to lter for events related to a particular rule, you need toadd a key to this rule in the /etc/audit/audit.rules le. This key is then added to the eventrecord every time the rule logs an event. To retrieve these log entries, simply run ausearch -k YOUR_KEY to get a list of records related to the rule carrying this particular key.
432 Managing Audit Event Records Using Keys openSUSE Leap 15.2
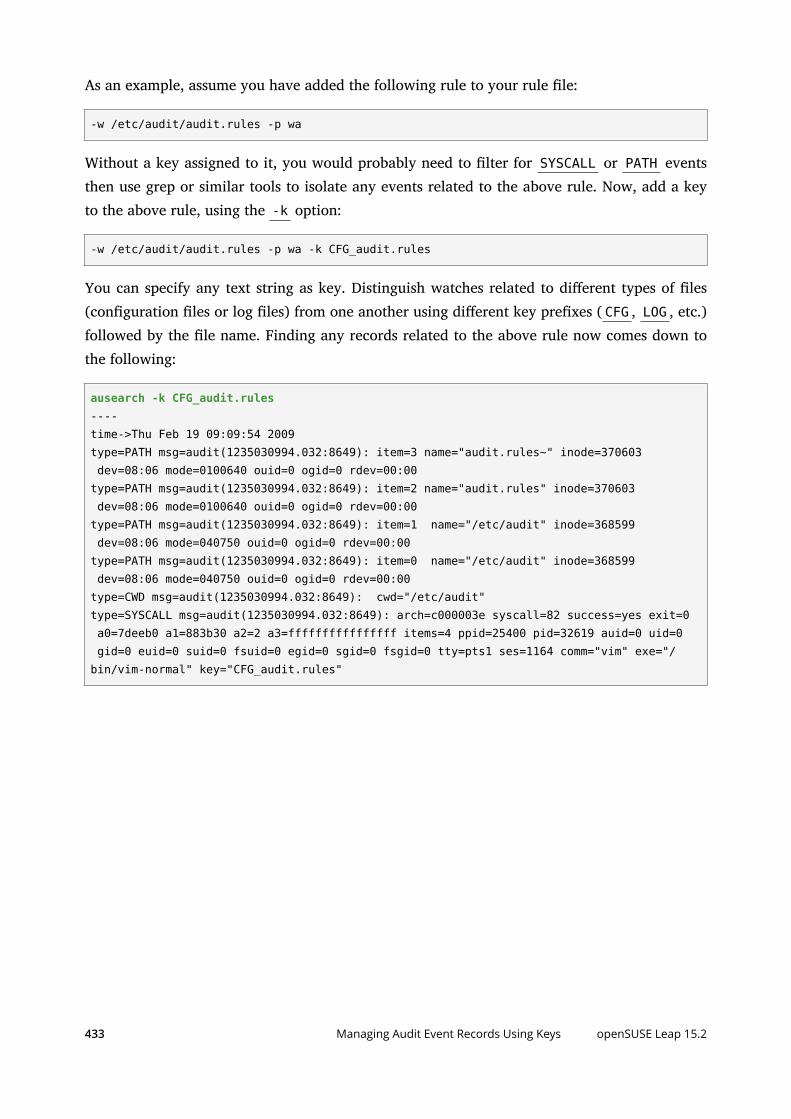
As an example, assume you have added the following rule to your rule le:
-w /etc/audit/audit.rules -p wa
Without a key assigned to it, you would probably need to lter for SYSCALL or PATH eventsthen use grep or similar tools to isolate any events related to the above rule. Now, add a keyto the above rule, using the -k option:
-w /etc/audit/audit.rules -p wa -k CFG_audit.rules
You can specify any text string as key. Distinguish watches related to dierent types of les(conguration les or log les) from one another using dierent key prexes ( CFG , LOG , etc.)followed by the le name. Finding any records related to the above rule now comes down tothe following:
ausearch -k CFG_audit.rules----time->Thu Feb 19 09:09:54 2009type=PATH msg=audit(1235030994.032:8649): item=3 name="audit.rules~" inode=370603 dev=08:06 mode=0100640 ouid=0 ogid=0 rdev=00:00type=PATH msg=audit(1235030994.032:8649): item=2 name="audit.rules" inode=370603 dev=08:06 mode=0100640 ouid=0 ogid=0 rdev=00:00type=PATH msg=audit(1235030994.032:8649): item=1 name="/etc/audit" inode=368599 dev=08:06 mode=040750 ouid=0 ogid=0 rdev=00:00type=PATH msg=audit(1235030994.032:8649): item=0 name="/etc/audit" inode=368599 dev=08:06 mode=040750 ouid=0 ogid=0 rdev=00:00type=CWD msg=audit(1235030994.032:8649): cwd="/etc/audit"type=SYSCALL msg=audit(1235030994.032:8649): arch=c000003e syscall=82 success=yes exit=0 a0=7deeb0 a1=883b30 a2=2 a3=ffffffffffffffff items=4 ppid=25400 pid=32619 auid=0 uid=0 gid=0 euid=0 suid=0 fsuid=0 egid=0 sgid=0 fsgid=0 tty=pts1 ses=1164 comm="vim" exe="/bin/vim-normal" key="CFG_audit.rules"
433 Managing Audit Event Records Using Keys openSUSE Leap 15.2

43 Useful Resources
There are other resources available containing valuable information about the Linux auditframework:
The Audit Manual Pages
There are several man pages installed along with the audit tools that provide valuable andvery detailed information:
auditd(8)
The Linux audit daemon
auditd.conf(5)
The Linux audit daemon conguration le
auditctl(8)
A utility to assist controlling the kernel's audit system
autrace(8)
A program similar to strace
ausearch(8)
A tool to query audit daemon logs
aureport(8)
A tool that produces summary reports of audit daemon logs
audispd.conf(5)
The audit event dispatcher conguration le
audispd(8)
The audit event dispatcher daemon talking to plug-in programs.
http://people.redhat.com/sgrubb/audit/index.html
The home page of the Linux audit project. This site contains several specications relatingto dierent aspects of Linux audit, and a short FAQ.
/usr/share/doc/packages/audit
The audit package itself contains a README with basic design information and sample.rules les for dierent scenarios:
capp.rules : Controlled Access Protection Prole (CAPP)
434 openSUSE Leap 15.2

lspp.rules : Labeled Security Protection Prole (LSPP)nispom.rules : National Industrial Security Program Operating Manual Chapter8(NISPOM)stig.rules : Secure Technical Implementation Guide (STIG)
https://www.commoncriteriaportal.org/
The ocial Web site of the Common Criteria project. Learn all about the Common Criteriasecurity certication initiative and which role audit plays in this framework.
435 openSUSE Leap 15.2
A GNU LicensesThis appendix contains the GNU FreeDocumentation License version 1.2.
GNU Free Documentation License
Copyright (C) 2000, 2001, 2002 Free Software Foundation, Inc. 51 Franklin St, Fifth Floor,Boston, MA 02110-1301 USA. Everyone is permitted to copy and distribute verbatim copiesof this license document, but changing it is not allowed.
0. PREAMBLE
The purpose of this License is to make a manual, textbook, or other functional and usefuldocument "free" in the sense of freedom: to assure everyone the eective freedom to copyand redistribute it, with or without modifying it, either commercially or non-commercially.Secondarily, this License preserves for the author and publisher a way to get credit for theirwork, while not being considered responsible for modications made by others.
This License is a kind of "copyleft", which means that derivative works of the document mustthemselves be free in the same sense. It complements the GNU General Public License, whichis a copyleft license designed for free software.
We have designed this License to use it for manuals for free software, because free softwareneeds free documentation: a free program should come with manuals providing the samefreedoms that the software does. But this License is not limited to software manuals; it canbe used for any textual work, regardless of subject matter or whether it is published as aprinted book. We recommend this License principally for works whose purpose is instructionor reference.
1. APPLICABILITY AND DEFINITIONS
This License applies to any manual or other work, in any medium, that contains a notice placedby the copyright holder saying it can be distributed under the terms of this License. Such anotice grants a world-wide, royalty-free license, unlimited in duration, to use that work underthe conditions stated herein. The "Document", below, refers to any such manual or work. Anymember of the public is a licensee, and is addressed as "you". You accept the license if youcopy, modify or distribute the work in a way requiring permission under copyright law.
A "Modied Version" of the Document means any work containing the Document or a portionof it, either copied verbatim, or with modications and/or translated into another language.
A "Secondary Section" is a named appendix or a front-matter section of the Document thatdeals exclusively with the relationship of the publishers or authors of the Document to theDocument's overall subject (or to related matters) and contains nothing that could fall directlywithin that overall subject. (Thus, if the Document is in part a textbook of mathematics, aSecondary Section may not explain any mathematics.) The relationship could be a matterof historical connection with the subject or with related matters, or of legal, commercial,philosophical, ethical or political position regarding them.
The "Invariant Sections" are certain Secondary Sections whose titles are designated, as beingthose of Invariant Sections, in the notice that says that the Document is released under thisLicense. If a section does not t the above denition of Secondary then it is not allowed to bedesignated as Invariant. The Document may contain zero Invariant Sections. If the Documentdoes not identify any Invariant Sections then there are none.
The "Cover Texts" are certain short passages of text that are listed, as Front-Cover Texts orBack-Cover Texts, in the notice that says that the Document is released under this License. AFront-Cover Text may be at most 5 words, and a Back-Cover Text may be at most 25 words.
A "Transparent" copy of the Document means a machine-readable copy, represented in aformat whose specication is available to the general public, that is suitable for revisingthe document straightforwardly with generic text editors or (for images composed of pixels)generic paint programs or (for drawings) some widely available drawing editor, and thatis suitable for input to text formatters or for automatic translation to a variety of formatssuitable for input to text formatters. A copy made in an otherwise Transparent le formatwhose markup, or absence of markup, has been arranged to thwart or discourage subsequentmodication by readers is not Transparent. An image format is not Transparent if used forany substantial amount of text. A copy that is not "Transparent" is called "Opaque".
Examples of suitable formats for Transparent copies include plain ASCII without markup,Texinfo input format, LaTeX input format, SGML or XML using a publicly available DTD,and standard-conforming simple HTML, PostScript or PDF designed for human modication.Examples of transparent image formats include PNG, XCF and JPG. Opaque formats includeproprietary formats that can be read and edited only by proprietary word processors, SGML or
XML for which the DTD and/or processing tools are not generally available, and the machine-generated HTML, PostScript or PDF produced by some word processors for output purposesonly.
The "Title Page" means, for a printed book, the title page itself, plus such following pages asare needed to hold, legibly, the material this License requires to appear in the title page. Forworks in formats which do not have any title page as such, "Title Page" means the text near themost prominent appearance of the work's title, preceding the beginning of the body of the text.
A section "Entitled XYZ" means a named subunit of the Document whose title either is preciselyXYZ or contains XYZ in parentheses following text that translates XYZ in another language.(Here XYZ stands for a specic section name mentioned below, such as "Acknowledgements","Dedications", "Endorsements", or "History".) To "Preserve the Title" of such a section whenyou modify the Document means that it remains a section "Entitled XYZ" according to thisdenition.
The Document may include Warranty Disclaimers next to the notice which states that thisLicense applies to the Document. These Warranty Disclaimers are considered to be includedby reference in this License, but only as regards disclaiming warranties: any other implicationthat these Warranty Disclaimers may have is void and has no eect on the meaning of thisLicense.
2. VERBATIM COPYING
You may copy and distribute the Document in any medium, either commercially or non-commercially, provided that this License, the copyright notices, and the license notice sayingthis License applies to the Document are reproduced in all copies, and that you add no otherconditions whatsoever to those of this License. You may not use technical measures to obstructor control the reading or further copying of the copies you make or distribute. However, youmay accept compensation in exchange for copies. If you distribute a large enough number ofcopies you must also follow the conditions in section 3.
You may also lend copies, under the same conditions stated above, and you may publiclydisplay copies.
3. COPYING IN QUANTITY
If you publish printed copies (or copies in media that commonly have printed covers) of theDocument, numbering more than 100, and the Document's license notice requires Cover Texts,you must enclose the copies in covers that carry, clearly and legibly, all these Cover Texts:Front-Cover Texts on the front cover, and Back-Cover Texts on the back cover. Both coversmust also clearly and legibly identify you as the publisher of these copies. The front covermust present the full title with all words of the title equally prominent and visible. You mayadd other material on the covers in addition. Copying with changes limited to the covers, aslong as they preserve the title of the Document and satisfy these conditions, can be treatedas verbatim copying in other respects.
If the required texts for either cover are too voluminous to t legibly, you should put therst ones listed (as many as t reasonably) on the actual cover, and continue the rest ontoadjacent pages.
If you publish or distribute Opaque copies of the Document numbering more than 100, youmust either include a machine-readable Transparent copy along with each Opaque copy,or state in or with each Opaque copy a computer-network location from which the generalnetwork-using public has access to download using public-standard network protocols acomplete Transparent copy of the Document, free of added material. If you use the latteroption, you must take reasonably prudent steps, when you begin distribution of Opaque copiesin quantity, to ensure that this Transparent copy will remain thus accessible at the statedlocation until at least one year after the last time you distribute an Opaque copy (directly orthrough your agents or retailers) of that edition to the public.
It is requested, but not required, that you contact the authors of the Document well beforeredistributing any large number of copies, to give them a chance to provide you with anupdated version of the Document.
436 openSUSE Leap 15.2

4. MODIFICATIONS
You may copy and distribute a Modied Version of the Document under the conditions ofsections 2 and 3 above, provided that you release the Modied Version under precisely thisLicense, with the Modied Version lling the role of the Document, thus licensing distributionand modication of the Modied Version to whoever possesses a copy of it. In addition, youmust do these things in the Modied Version:
A. Use in the Title Page (and on the covers, if any) a title distinct from that of theDocument, and from those of previous versions (which should, if there were any,be listed in the History section of the Document). You may use the same title as aprevious version if the original publisher of that version gives permission.
B. List on the Title Page, as authors, one or more persons or entities responsible forauthorship of the modications in the Modied Version, together with at least veof the principal authors of the Document (all of its principal authors, if it has fewerthan ve), unless they release you from this requirement.
C. State on the Title page the name of the publisher of the Modied Version, as thepublisher.
D. Preserve all the copyright notices of the Document.
E. Add an appropriate copyright notice for your modications adjacent to the othercopyright notices.
F. Include, immediately after the copyright notices, a license notice giving the publicpermission to use the Modied Version under the terms of this License, in the formshown in the Addendum below.
G. Preserve in that license notice the full lists of Invariant Sections and required CoverTexts given in the Document's license notice.
H. Include an unaltered copy of this License.
I. Preserve the section Entitled "History", Preserve its Title, and add to it an itemstating at least the title, year, new authors, and publisher of the Modied Versionas given on the Title Page. If there is no section Entitled "History" in the Document,create one stating the title, year, authors, and publisher of the Document as givenon its Title Page, then add an item describing the Modied Version as stated inthe previous sentence.
J. Preserve the network location, if any, given in the Document for public access toa Transparent copy of the Document, and likewise the network locations given inthe Document for previous versions it was based on. These may be placed in the"History" section. You may omit a network location for a work that was publishedat least four years before the Document itself, or if the original publisher of theversion it refers to gives permission.
K. For any section Entitled "Acknowledgements" or "Dedications", Preserve the Titleof the section, and preserve in the section all the substance and tone of each of thecontributor acknowledgements and/or dedications given therein.
L. Preserve all the Invariant Sections of the Document, unaltered in their text andin their titles. Section numbers or the equivalent are not considered part of thesection titles.
M. Delete any section Entitled "Endorsements". Such a section may not be includedin the Modied Version.
N. Do not retitle any existing section to be Entitled "Endorsements" or to conict intitle with any Invariant Section.
O. Preserve any Warranty Disclaimers.
If the Modied Version includes new front-matter sections or appendices that qualify asSecondary Sections and contain no material copied from the Document, you may at youroption designate some or all of these sections as invariant. To do this, add their titles to thelist of Invariant Sections in the Modied Version's license notice. These titles must be distinctfrom any other section titles.
You may add a section Entitled "Endorsements", provided it contains nothing butendorsements of your Modied Version by various parties--for example, statements of peerreview or that the text has been approved by an organization as the authoritative denitionof a standard.
You may add a passage of up to ve words as a Front-Cover Text, and a passage of up to 25words as a Back-Cover Text, to the end of the list of Cover Texts in the Modied Version. Onlyone passage of Front-Cover Text and one of Back-Cover Text may be added by (or througharrangements made by) any one entity. If the Document already includes a cover text for thesame cover, previously added by you or by arrangement made by the same entity you areacting on behalf of, you may not add another; but you may replace the old one, on explicitpermission from the previous publisher that added the old one.
The author(s) and publisher(s) of the Document do not by this License give permission to usetheir names for publicity for or to assert or imply endorsement of any Modied Version.
5. COMBINING DOCUMENTS
You may combine the Document with other documents released under this License, underthe terms dened in section 4 above for modied versions, provided that you include in thecombination all of the Invariant Sections of all of the original documents, unmodied, andlist them all as Invariant Sections of your combined work in its license notice, and that youpreserve all their Warranty Disclaimers.
The combined work need only contain one copy of this License, and multiple identicalInvariant Sections may be replaced with a single copy. If there are multiple Invariant Sectionswith the same name but dierent contents, make the title of each such section unique byadding at the end of it, in parentheses, the name of the original author or publisher of thatsection if known, or else a unique number. Make the same adjustment to the section titles inthe list of Invariant Sections in the license notice of the combined work.
In the combination, you must combine any sections Entitled "History" in the various originaldocuments, forming one section Entitled "History"; likewise combine any sections Entitled"Acknowledgements", and any sections Entitled "Dedications". You must delete all sectionsEntitled "Endorsements".
6. COLLECTIONS OF DOCUMENTS
You may make a collection consisting of the Document and other documents released underthis License, and replace the individual copies of this License in the various documents with asingle copy that is included in the collection, provided that you follow the rules of this Licensefor verbatim copying of each of the documents in all other respects.
You may extract a single document from such a collection, and distribute it individually underthis License, provided you insert a copy of this License into the extracted document, and followthis License in all other respects regarding verbatim copying of that document.
7. AGGREGATION WITH INDEPENDENT WORKS
A compilation of the Document or its derivatives with other separate and independentdocuments or works, in or on a volume of a storage or distribution medium, is called an"aggregate" if the copyright resulting from the compilation is not used to limit the legal rightsof the compilation's users beyond what the individual works permit. When the Document isincluded in an aggregate, this License does not apply to the other works in the aggregatewhich are not themselves derivative works of the Document.
If the Cover Text requirement of section 3 is applicable to these copies of the Document, thenif the Document is less than one half of the entire aggregate, the Document's Cover Textsmay be placed on covers that bracket the Document within the aggregate, or the electronicequivalent of covers if the Document is in electronic form. Otherwise they must appear onprinted covers that bracket the whole aggregate.
8. TRANSLATION
Translation is considered a kind of modication, so you may distribute translations of theDocument under the terms of section 4. Replacing Invariant Sections with translations requiresspecial permission from their copyright holders, but you may include translations of someor all Invariant Sections in addition to the original versions of these Invariant Sections. Youmay include a translation of this License, and all the license notices in the Document, andany Warranty Disclaimers, provided that you also include the original English version of thisLicense and the original versions of those notices and disclaimers. In case of a disagreementbetween the translation and the original version of this License or a notice or disclaimer, theoriginal version will prevail.
If a section in the Document is Entitled "Acknowledgements", "Dedications", or "History", therequirement (section 4) to Preserve its Title (section 1) will typically require changing theactual title.
9. TERMINATION
You may not copy, modify, sublicense, or distribute the Document except as expresslyprovided for under this License. Any other attempt to copy, modify, sublicense or distribute theDocument is void, and will automatically terminate your rights under this License. However,parties who have received copies, or rights, from you under this License will not have theirlicenses terminated so long as such parties remain in full compliance.
437 openSUSE Leap 15.2

10. FUTURE REVISIONS OF THIS LICENSE
The Free Software Foundation may publish new, revised versions of the GNU FreeDocumentation License from time to time. Such new versions will be similar in spirit to thepresent version, but may dier in detail to address new problems or concerns. See http://
www.gnu.org/copyleft/ .
Each version of the License is given a distinguishing version number. If the Document speciesthat a particular numbered version of this License "or any later version" applies to it, you havethe option of following the terms and conditions either of that specied version or of anylater version that has been published (not as a draft) by the Free Software Foundation. If theDocument does not specify a version number of this License, you may choose any version everpublished (not as a draft) by the Free Software Foundation.
ADDENDUM: How to use this License for your documents
Copyright (c) YEAR YOUR NAME.Permission is granted to copy, distribute and/or modify this documentunder the terms of the GNU Free Documentation License, Version 1.2or any later version published by the Free Software Foundation;with no Invariant Sections, no Front-Cover Texts, and no Back-Cover Texts.A copy of the license is included in the section entitled “GNUFree Documentation License”.
If you have Invariant Sections, Front-Cover Texts and Back-Cover Texts, replace the“with...Texts.” line with this:
with the Invariant Sections being LIST THEIR TITLES, with theFront-Cover Texts being LIST, and with the Back-Cover Texts being LIST.
If you have Invariant Sections without Cover Texts, or some other combination of the three,merge those two alternatives to suit the situation.
If your document contains nontrivial examples of program code, we recommend releasingthese examples in parallel under your choice of free software license, such as the GNU GeneralPublic License, to permit their use in free software.
438 openSUSE Leap 15.2