guide to conducting a successful fog test · pdf filehow to conduct a successful fog test . 2...
TRANSCRIPT

1 The world leader in serving science
Scott D Pratt & Dieter Raedler Application Specialist Thermo Fisher Scientific / Temperature Control
How to conduct a successful Fog Test

2
Overview - What is Fog Testing?
• High surface and interior temperatures cause the polymers, textiles and natural materials used in automotive interiors to outgas volatile and semi-volatile organic compounds (VOC and SVOC) at an accelerated rate.
• The SVOCs then condense onto the cooler surface of the windshield potentially creating a visibility and safety problem for the driver.
• Fog Testing is a method to recreate automotive interior outgassing in a timely, measurable and repeatable way.

3
What is Fog Testing? (continued)
• Standards from DIN, ISO and SAE are utilized to rate and compare various materials
• The purpose of the testing is to assist material manufacturers and the companies that use their products in identifying and developing products that outgas SVOC’s at a reduced rate
4
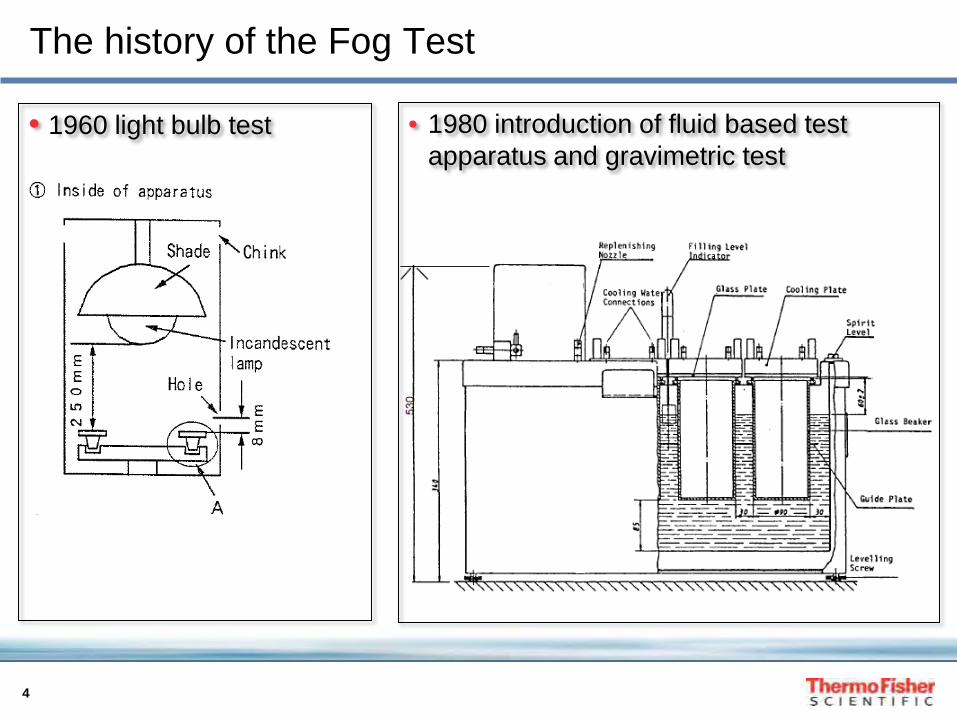
The history of the Fog Test
• 1960 light bulb test
• 1980 introduction of fluid based test apparatus and gravimetric test

5
The history of the Fog Test
• What changes in the automotive industry have driven the need for fog testing and the reduction of SVOC outgassing? • Closed cars (1930’s)
• Open cars had allowed any VOC gasses to escape • Closed cars also increased the interior temperatures
• Vinyl use in interiors (late 1950’s) • As more and more plastics get used in automotive interiors, more
VOC gasses are released
• Air conditioning (1980’s standard equipment on most cars) • With air conditioning more owners drive with their windows up

6
The history of the Fog Test
• Improved sealing (mid 1990’s) • Fewer places for VOC gasses to escape on their own • Improved seals also emit VOC gasses
• Xenon Headlights (2000’s) • Operate at high temperatures that heat surrounding polymers • SVOC’s can coat the inside of the headlight lens reducing and scattering light
output

7
Equipment & Accessories
• A specialized heating bath with a means to hold the required beakers and cooling plates
• A cooling system to keep the cooling plates at the desired temperature
• The required accessories to perform the desired test method
A heated bath, a refrigerated circulator + accessories are required to perform a fog test
8
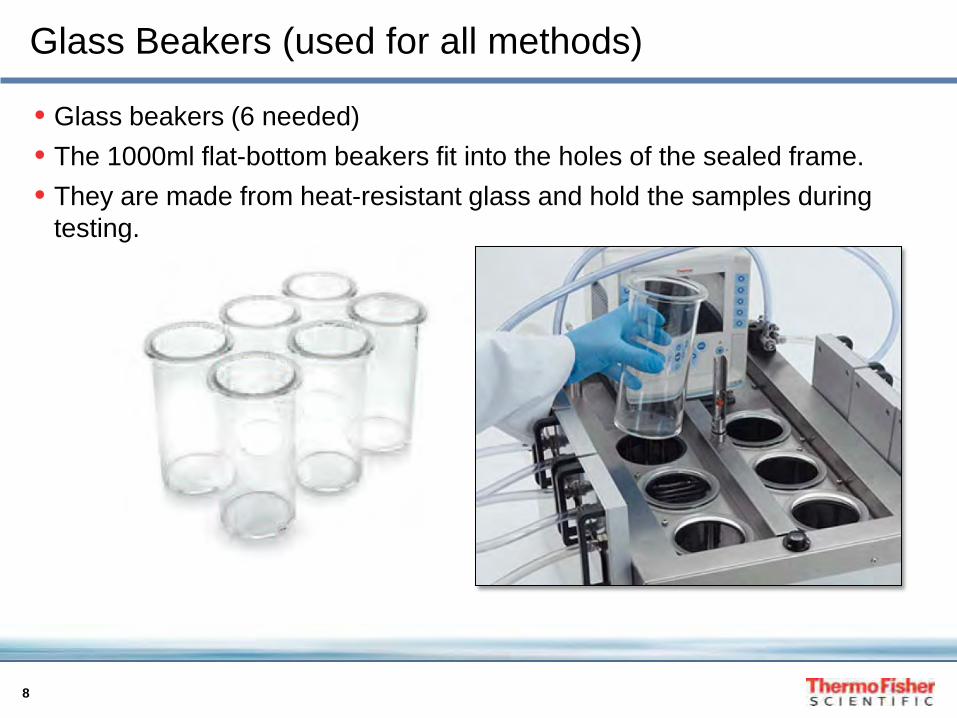
Glass Beakers (used for all methods)
• Glass beakers (6 needed) • The 1000ml flat-bottom beakers fit into the holes of the sealed frame. • They are made from heat-resistant glass and hold the samples during
testing.

9
Beaker sealing (used for all methods)
• Fluoroelastomer sealing rings (6 needed) • These O-rings form a seal between the top of the beakers and the glass
plates so that the VOC vapors released from the sample do not escape from the beaker.
• Note: The sealing rings have a limited life and should be replaced as needed.

10
Beaker sealing (used for all methods)
• Support rings (6 needed) • The support rings are mounted inside the
sealing rings. • This helps stabilize the sealing ring when
placed on top on the beaker.

11
Cooling plates (used for all methods)
• Cooling plates (6 needed) • These are made of a stainless steel top
with an aluminum contact surface • They have an internal passage through
which the temperature controlled water flows
• Their purpose is to maintain the square glass plates or aluminum foil discs at the prescribed cooler temperature causing the VOC vapor to condense onto them

12
Set of Covers (used for all methods)
• Set of covers (1 needed) • Two covers are included in the set and are
used to cover the openings of the temperature controlled bath
• These prevents contamination and/or evaporation of the heat transfer liquid if not using all six beakers and also speeds time to temperature when heating to the fogging set point

13
FOG 150 (used for all methods)
• Heat transfer liquid FOG 150 • (4 x 10 liter containers necessary) • This is used as the heat transfer fluid in
the fogging bath • It is normal for the fluid to vary in color • It is soluble in water and can be used up
to temperatures of 150°C

14
Sample cutter (used for all methods)
• Sample cutter (1 needed) • This device cuts an 80 mm diameter sample of leather, plastic films and
plastic or rubber coated cloth that is placed on to the bottom of the beaker
15
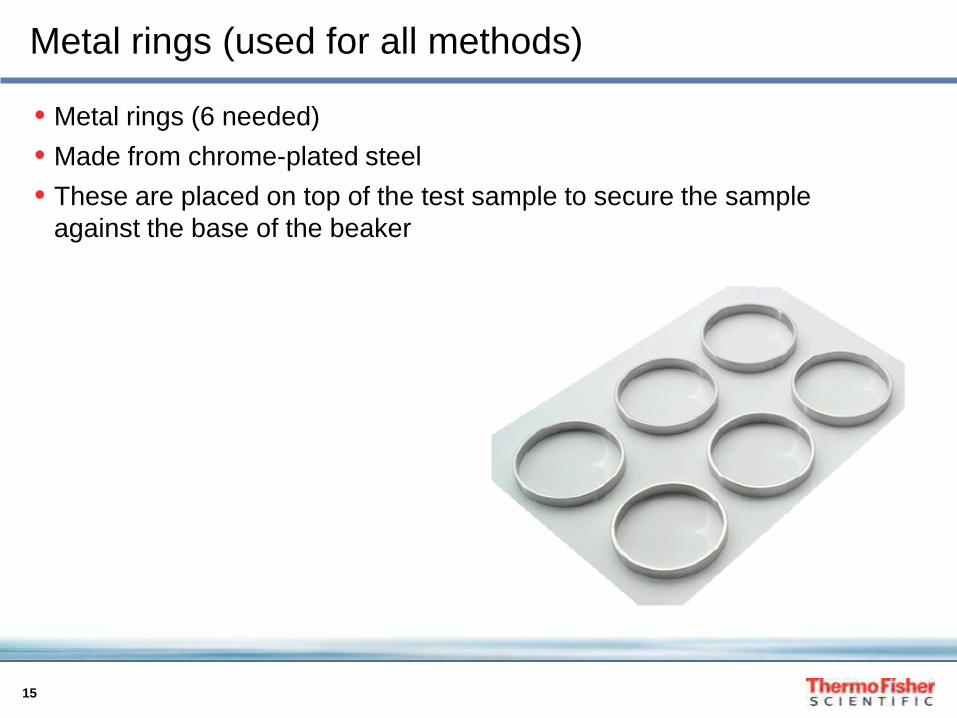
Metal rings (used for all methods)
• Metal rings (6 needed) • Made from chrome-plated steel • These are placed on top of the test sample to secure the sample
against the base of the beaker

16
Reflectometric/Photometric/Fogging/Gloss Methods • A prepared sample is placed in a beaker that is then covered with a glass
plate. For a period of three hours the sample is heated to 100°C, while the glass plate is cooled to 21°C (note that there may be differing temperature requirements depending on the standard used)
• The heat causes the sample to release SVOC gasses that condense on the
cooled glass plate creating a “Fog” (F). The Reflective Index (RI) of the clean glass is known before the test and the fogged glass RI is measured and recorded using a hand held Reflectometer
• Fogging value (Fv) is expressed as a percent of change in the 60° Reflective Index of a glass plate that has been fogged in accordance with the procedures (R1) to a clean glass plate (R2)
• Fv = (R2 x 100)/R1 • DIN specifies the maximum value for Fv in this test at 90% • A perfect value of a glass plate with no fog is 100
NOTE: An alternative method known as the Haze Method uses the same
procedure except that actual light transmittal (corrected for narrow angle scatter) rather than light reflection is measured using a Haze Meter. The Haze method is not the reciprocal of the gloss method, the measurements have no scientific connection to each other. A perfect value with no haze is zero. A measurement of 4-5 is too high (Honda uses 2 as the maximum value)
17
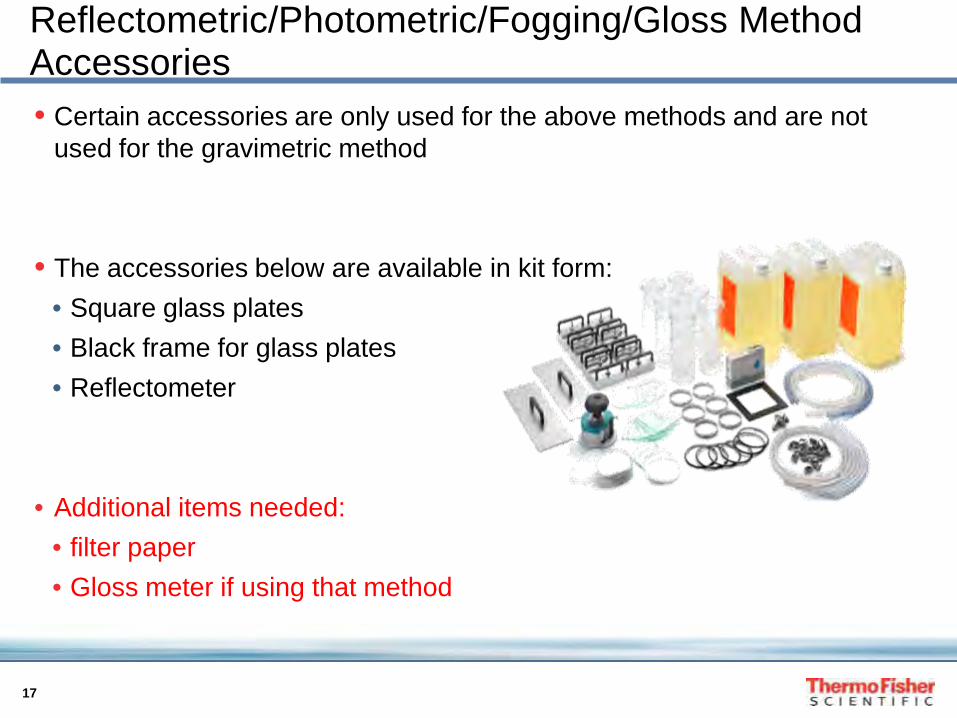
Reflectometric/Photometric/Fogging/Gloss Method Accessories • Certain accessories are only used for the above methods and are not
used for the gravimetric method
• The accessories below are available in kit form: • Square glass plates • Black frame for glass plates • Reflectometer
• Additional items needed: • filter paper • Gloss meter if using that method

18
Reflectometric Method - Square glass plates
• Square glass plates are used to collect the fog sample
• High quality floated glass • “floated” refers to how the glass is
manufactured by floating the hot glass on a pool of tin to create perfectly flat glass
• This leaves a tin coating on one side of the glass that needs to be identified using a UV light with a wavelength of 250 nanometers
• The side that does not have the tin is used to collect the fog

19
Reflectometric Method – Black Frame
• The frame is used to support the reflectometer when measuring the Reflective Index of a glass plate
• It is slightly thicker than the glass plates and prevents the reflectometer from touching the glass and smearing the fog
• It also prevents light from entering the glass plates from the side
20
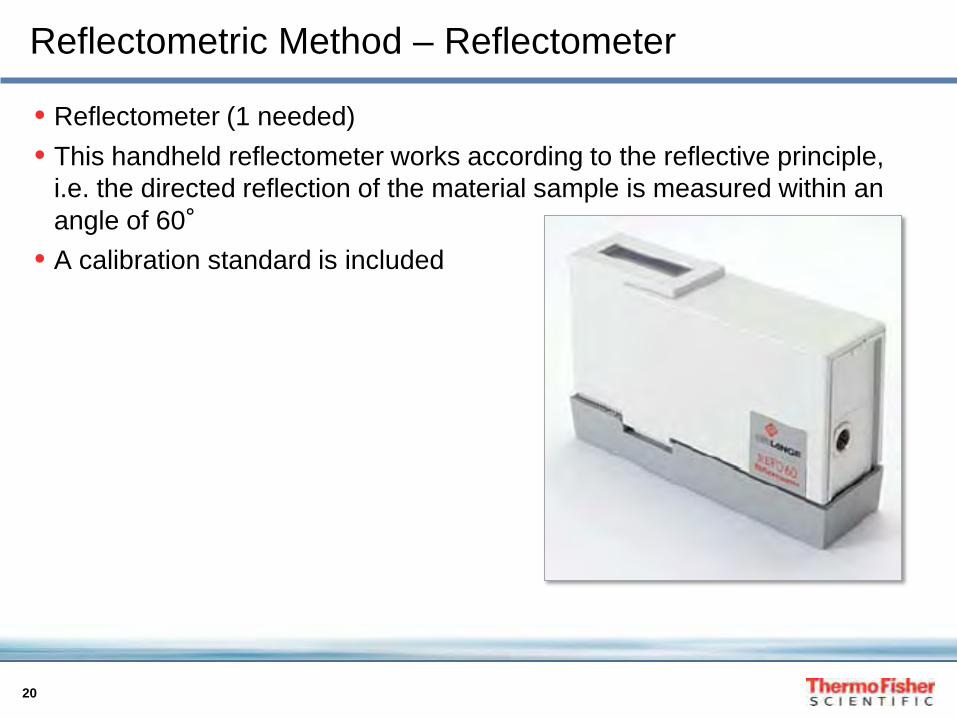
Reflectometric Method – Reflectometer
• Reflectometer (1 needed) • This handheld reflectometer works according to the reflective principle,
i.e. the directed reflection of the material sample is measured within an angle of 60°
• A calibration standard is included

21
Gravimetric Method
• A prepared sample is placed in a beaker that is then covered with an aluminum foil disk. For a period of sixteen hours the sample is heated to 100°C, while the aluminum foil disk is cooled to 21°C (not that there may be temperature variations depending on the standard used)
• The heat causes the sample to release SVOC gasses that condense on the
cooled aluminum foil disk creating a “Fog” (F) that has a measurable mass (m). The amount of fogging condensate is determined by weighing the aluminum foil disk before (m1) and after the test (m2) and subtracting the known mass of the same aluminum foil disk before fogging
• mF = m2 – m1 • mF = the mass of the fog condensate collected during the test (milligrams)
22
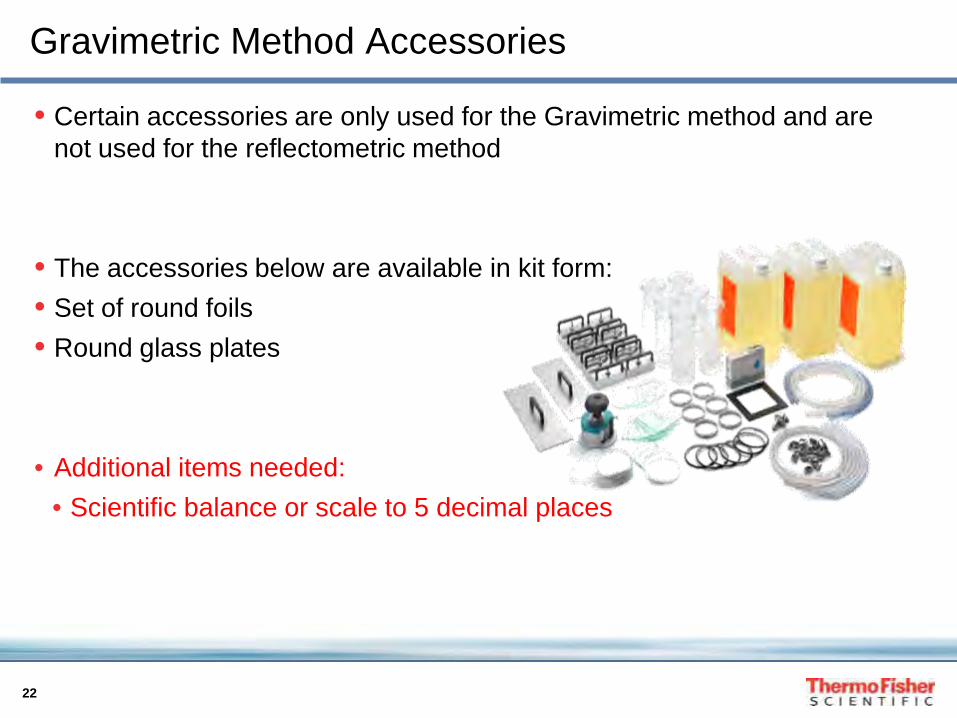
Gravimetric Method Accessories
• Certain accessories are only used for the Gravimetric method and are not used for the reflectometric method
• The accessories below are available in kit form: • Set of round foils • Round glass plates
• Additional items needed: • Scientific balance or scale to 5 decimal places

23
Gravimetric Method – Round Aluminum Foil
• Set of round foils (6 required per test) • During the fogging process the condensation collects on the foil
• The foil must be food grade – other grades may have oil on them
• The correct thickness is 30 micron • Foil from the food market is 15-18 micron • Heavy duty foil is typically about 23 micron
To correctly follow a standard, the correct thickness foil should be utilized
24
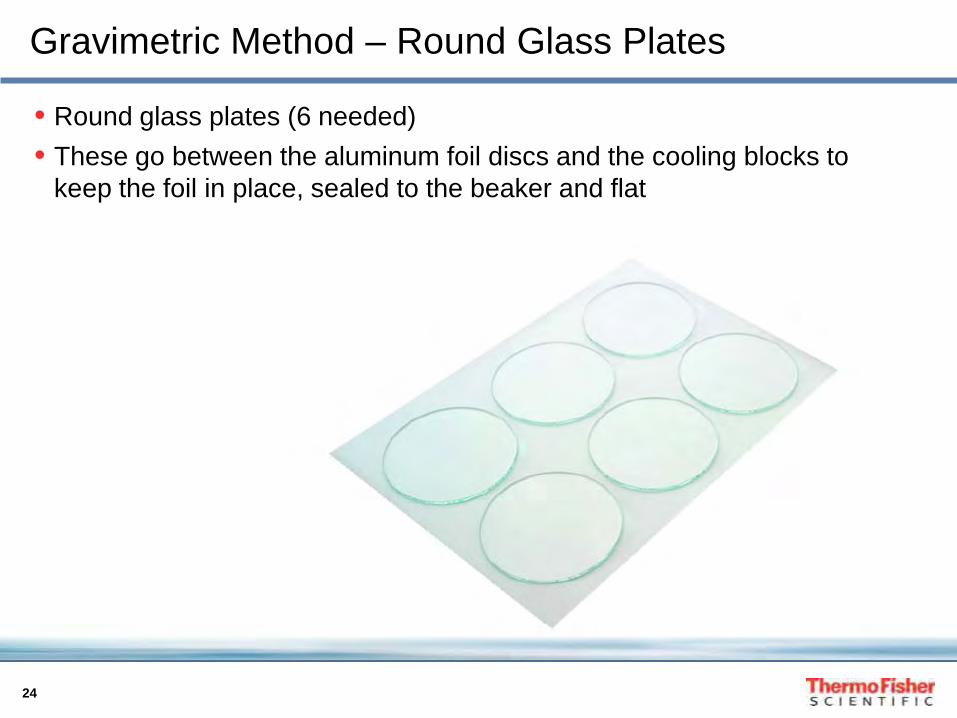
Gravimetric Method – Round Glass Plates
• Round glass plates (6 needed) • These go between the aluminum foil discs and the cooling blocks to
keep the foil in place, sealed to the beaker and flat
25
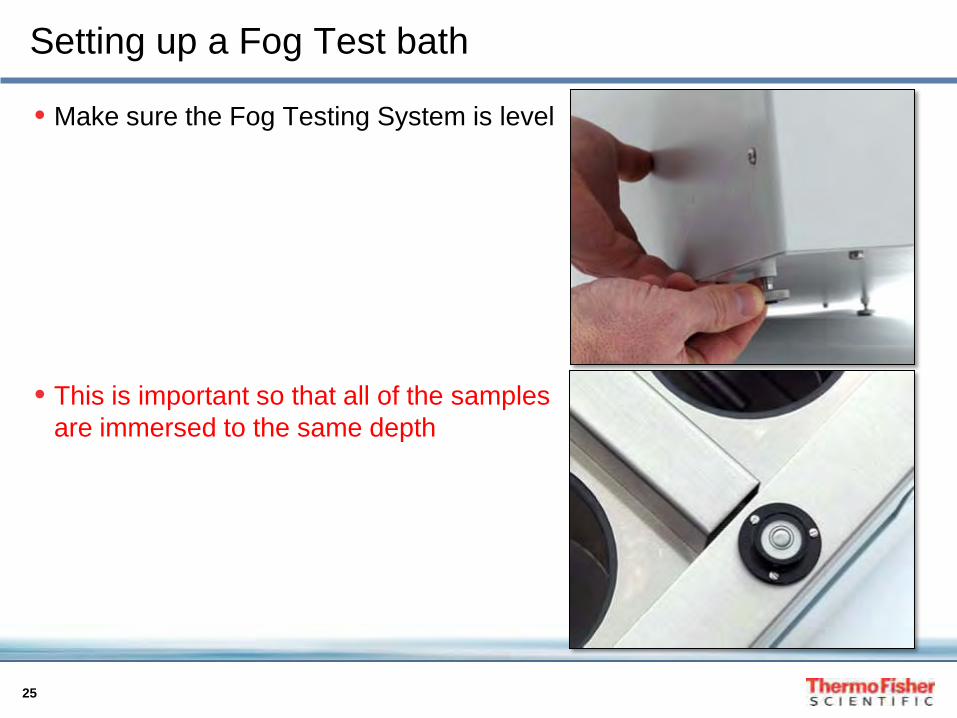
Setting up a Fog Test bath
• Make sure the Fog Testing System is level
• This is important so that all of the samples are immersed to the same depth

26
Setting up a Fog Test bath
• It is important that the Fluid level meets the requirement at temperature • Not doing so can result in a failed test
27
Equipment preparation - glassware
• Glass plates • The non-tinned side is the “business side” to be face down during fog
collection • Should only be used once if using silicon sealing rings
• The silane that is in the silicone rings react with the glass • If the silicone ring is not in the exact same position, those areas that
reacted with the silane will attract the fog causing a false reading that is lower than actual
• Glass plates sealed with flouroelastomer sealing rings can be re-used according to the specification It may not be worth the risk of a false reading by reusing glass plates
regardless of the sealing ring material
28
Equipment preparation - glassware
• Glass beakers • The ground lip can have crystals form on the surface that do not wash off • These crystals create an uneven surface that the fluoroelastomer rings
may not seal to • Leakage due to this leads to fog values that are too high or droplets to
form on the glass plates
Occasionally the ground lip may need to be wet sanded with 600 grit wet/dry sandpaper on a perfectly flat surface to remove the coating and restore a
perfectly flat sealing surface

29
Equipment preparation – glassware
• Glass plates • Glass plates must be washed in a mechanical
glassware washer (laboratory dishwasher) • using a soap that meets the requirements of the
standards • Powdered mechanical dishwasher detergent with no
wetting agents, drying agents or citrus • Do not overfill with detergent
• The washing water must be heated to 66°C or per the requirement in the standard
• Check any water filters often for reduced flow • This is especially important on “green” washers that already use less
water • All incoming water for washing and rinsing must be distilled or deionized

30
Equipment preparation – glassware (continued)
• Set for a vigorous wash with 3 rinse cycles + 1 hour of dry heat in an oven or dry overnight (plates should be dried standing up)
• Only put washed plates in your oven - plates with fog on them will contaminate it
• Drying properly is critical – moisture will ruin your results • Beakers should be washed by hand with regular dishwashing soap and
then mechanically washed and dried the same as above • Only put hand washed beakers in your dishwasher - not doing so will
contaminate your dishwasher • Glassware not used the same day it is washed needs to be washed again • Glassware should only be handled by the edges by gloved hands

31
Equipment preparation – other considerations
• Forceps used to handle samples or the round foils also need to be washed before each use
• Not doing so can contaminate the sample
• Cooling plates must be wiped down with alcohol and dried with cotton cloth (cheese cloth) just prior to placing them onto the glass plates
• Not doing so can cause condensation to collect between the cooling plate and the glass plate
32
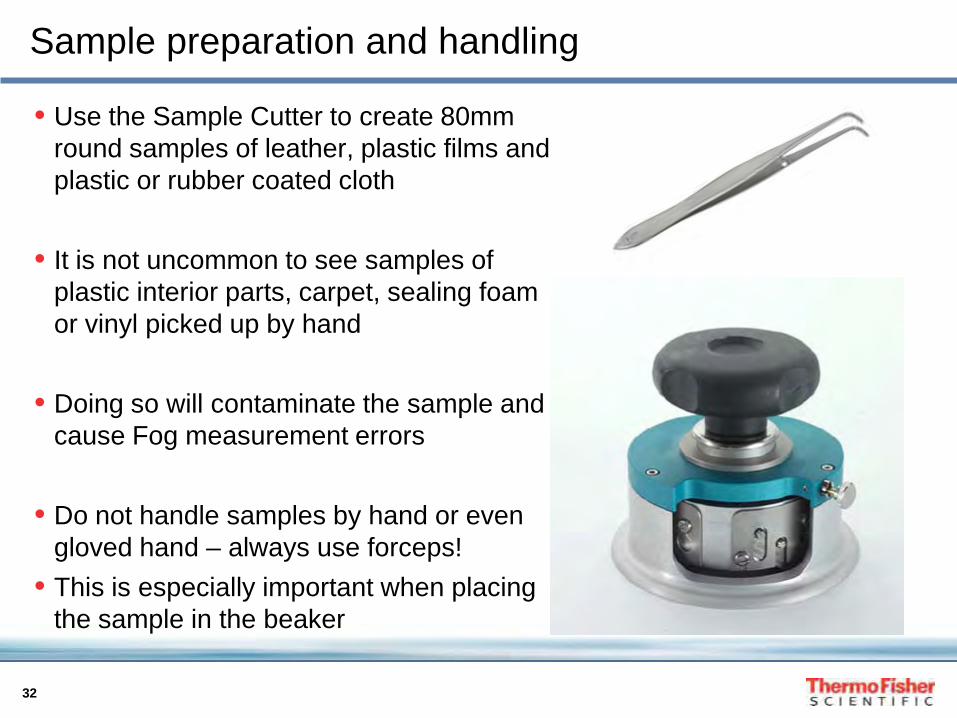
Sample preparation and handling
• Use the Sample Cutter to create 80mm round samples of leather, plastic films and plastic or rubber coated cloth
• It is not uncommon to see samples of plastic interior parts, carpet, sealing foam or vinyl picked up by hand
• Doing so will contaminate the sample and cause Fog measurement errors
• Do not handle samples by hand or even gloved hand – always use forceps!
• This is especially important when placing the sample in the beaker

33
Post fogging procedures - Photometric
• Glass plates should be placed fog side up in a dust proof container at not more that 50% relative humidity for the specified period of time
• The fog forms on the glass plates like a stalactite
• When inverted they flatten out over time to cover the glass plate and give an accurate reading
• Not doing the above will give a variable and inaccurate reading
• Many technicians rotate the reflectometer to make the 4 reading
• Instead the sample should be rotated to allow for easy placement and reading of the reflectometer
• Not doing the above can cause smeared fog to cause an error in reading the Reflective Index

34
Post fogging procedures - Gravimetric
• Use forceps to handle the foil • Turn the fog side of the foil upright immediately after picking up the foil • Not doing so can lead to fog particles falling off of the foil causing an
inaccurate reading • A scale that can read to 5 decimal places is required, you cannot get an
accurate weight with only 4 decimal places
35
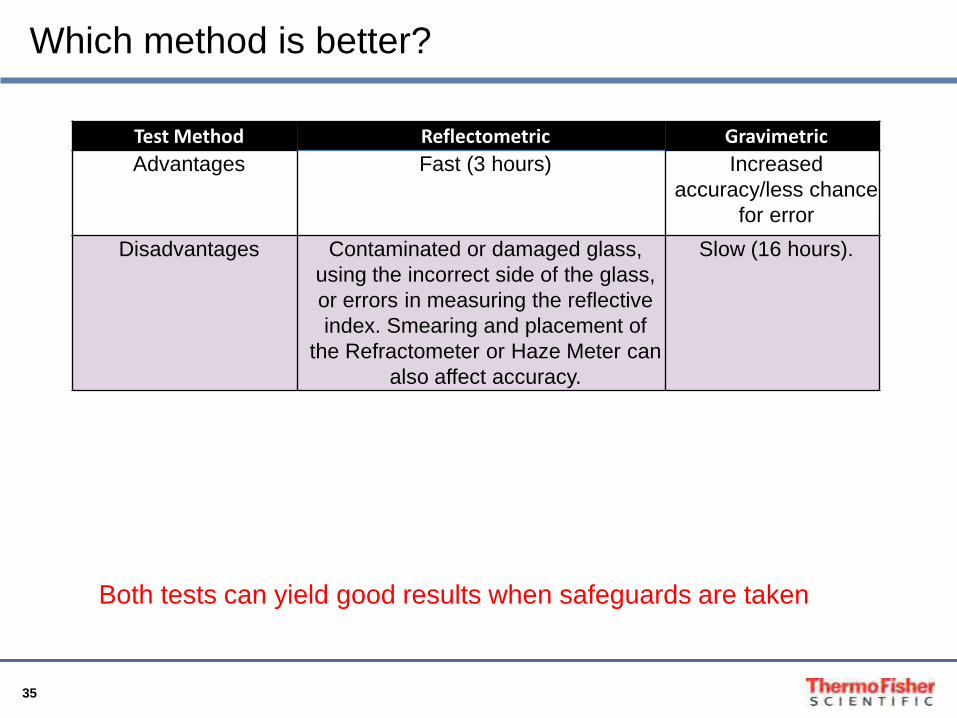
Which method is better?
Both tests can yield good results when safeguards are taken
Test Method Reflectometric Gravimetric Advantages Fast (3 hours) Increased
accuracy/less chance for error
Disadvantages Contaminated or damaged glass, using the incorrect side of the glass, or errors in measuring the reflective index. Smearing and placement of
the Refractometer or Haze Meter can also affect accuracy.
Slow (16 hours).

36
Interpreting results
• It is advisable that glass plates be looked at closely or under a microscope before taking the time to measure the fog
• Below right is an example of poorly manufactured glass where the grinding process was not properly performed and glass shards are shed onto the test surface

37
Interpreting results
• All of the failures on the next few slides are due to: • Poor sample preparation • Poor sealing to the beaker • Contamination
• The droplets indicate a failed test

38
Interpreting results (continued)
• Oily/spotty film indicates a failed test • Spots above 15 micron are not acceptable

39
Interpreting results (continued)
• The two samples below have passed inspection and can reliably be used to measure the amount of fog on them
• Even though the one below contains some spots, they are smaller than 15 micron and are acceptable
40
Interpreting results (continued)
• One safeguard to consider is using one beaker as a control • The control beaker should have 10g (+/- 0.1g) DIPD where the results of
either tests using DIDP are well known. • Diisodecyl phthalate (DIDP) is a commonly used plasticizer used in the
production of plastic and plastic coating to increase flexibility making it ideal as a standard to test against.
• If the control results are not within specification then the results of the remaining tests should be discarded and the test repeated after determining and correcting the likely cause of failure.