guide to integration implementationguide to integration implementation 4110 george road, tampa, fl...
TRANSCRIPT
1
GUIDE TO INTEGRATION IMPLEMENTATION
4110 George Road, Tampa, FL 33634 | 813-463-4740 | [email protected]
Table of Contents
Introduction ................................................................................................................................................ 3
Instructions ................................................................................................................................................. 3
Prerequisites ........................................................................................................................................... 3
High-Level Overview of the Steps in ConnectWise ................................................................................. 3
High-Level Overview of the Steps in N-central ....................................................................................... 4
Configuring an Integrator Login Account in ConnectWise .......................................................................... 4
Configuring the Manage Devices Integration table in ConnectWise .......................................................... 5
Configuring a Managed ID for Companies in ConnectWise ........................................................................ 6
Configuring N-central to Communicate with ConnectWise ........................................................................ 6
Mapping N-central Customers to ConnectWise Customers ....................................................................... 8
Mapping Customers ................................................................................................................................ 8
Disabling Customer Mapping .................................................................................................................. 8
Mapping Device Classes .............................................................................................................................. 8
Adding Device Class Mappings ................................................................................................................ 8
Setting Up Export Device Profiles ............................................................................................................... 9
Adding Export Profiles........................................................................................................................... 10
Enabling or Disabling Automatic Export ............................................................................................... 11
Manually Triggering an Export (Export Now) ........................................................................................ 12
Setting Up Ticketing Recipients ................................................................................................................ 13
Adding a Ticketing Recipient ................................................................................................................. 13

2
GUIDE TO INTEGRATION IMPLEMENTATION
4110 George Road, Tampa, FL 33634 | 813-463-4740 | [email protected]
Setting Up Notifications to Update Ticket Status ..................................................................................... 20
Setting up Billing Profiles .......................................................................................................................... 20
Setting up a Billing Profile ................................................................................................................. 21
Enabling or Disabling a Billing Profile ................................................................................................ 22
Appendix: Mapping N-central Asset Data to Fields in ConnectWise ........................................................ 23
Field Mappings ...................................................................................................................................... 24
3
GUIDE TO INTEGRATION IMPLEMENTATION
4110 George Road, Tampa, FL 33634 | 813-463-4740 | [email protected]
Introduction
This document outlines how to integrate your N-central and ConnectWise systems with one another. Integrating N-central and
ConnectWise provides a wide range of benefits, including:
Automatically generating tickets into ConnectWise
Customizing the Service Board, Status, Priority and other ticket properties
Flexible logic allowing you to control ticket flow and routing
Pushing asset data into ConnectWise as Configurations
Automatically assigning Time Entries to automated N-central actions
Automatically updating Product counts and Agreements for discovered devices
This document is intended for a technical audience, and is current as of August 18th, 2016.
Instructions
Prerequisites
Integrating ConnectWise with N-central requires the following:
An N-central server with a valid SSL certificate
A ConnectWise server with a valid SSL certificate
Successful DNS resolution of both the N-central and ConnectWise servers
High-Level Overview of the Steps in ConnectWise
1. Download and install the ConnectWise Internet Client. The client is free and will allow you to securely connect to your
ConnectWise account.
Browse to www.connectwise.com/install and follow the instructions to download and install the ConnectWise Internet client on the same computer that you use to login to N-central.
2. Configure an Integrator Login Account in ConnectWise.
3. Configure the Manage Devices Integration table in ConnectWise.
4. Configure a Managed ID for Companies in ConnectWise.

4
GUIDE TO INTEGRATION IMPLEMENTATION
4110 George Road, Tampa, FL 33634 | 813-463-4740 | [email protected]
High-Level Overview of the Steps in N-central
After ConnectWise is set up, the next step is to integrate N-central with ConnectWise through the N-central's PSA Configuration
feature.
1. Set up the ConnectWise integration in N-central—Login at the System or SO level and navigate to the appropriate
Service Organization. Under Administration, locate PSA Integration. Follow the steps in Configuring N-central to
Communicate with ConnectWise.
After ConnectWise is integrated with N-central, more menu items appear under PSA Integration in the navigation pane on the left in N-central: Export Devices, Mapping - Customers, Mapping - Device Classes, Ticketing.
2. Map customers—Before devices can be exported to ConnectWise and tickets can be created, customers must be
mapped. Mapping allows you to tie N-central customers to their respective ConnectWise customer.
Under Administration, locate PSA Integration > Mapping - Customers. Follow the steps in Mapping N-central Customers to ConnectWise Customers.
After this is done, the list of available ConnectWise customers is populated automatically from the ConnectWise database.
3. Map device classes. Follow the steps in Mapping Device Classes.
4. Export Devices—Set up an export profile in N-central in order for devices to be exported to ConnectWise for ticketing. In
N-central, under Administration, locate PSA Integration > Export Devices. Follow the steps in Setting Up Export Device
Profiles.
5. Set up a Ticketing Recipient—Ticketing Recipients control how tickets will be created in ConnectWise. In N-central, under
Administration, locate PSA Integration > Ticketing. Follow the steps in Setting Up a ConnectWise Ticketing Recipient.
6. Set up N-central Notifications to update ticket status—You can set up notifications in N-central so that when the status
of a service returns to Normal, ticket status is updated. Follow the steps in Setting Up Notifications and Ticketing Status.
7. (Optionally) creating Billing Profiles. Billing Profiles allow you to update agreements in ConnectWise with accurate device
counts.
Configuring an Integrator Login Account in ConnectWise
In order to successfully communicate with ConnectWise, an Integrator Login account must be created in ConnectWise and it
must be granted access to the required ConnectWise APIs.
1. Start the ConnectWise PSA application.
You must start the actual ConnectWise application. Accessing ConnectWise through a web browser will not provide you with access to the required features.
2. Click Setup > Setup Tables

5
GUIDE TO INTEGRATION IMPLEMENTATION
4110 George Road, Tampa, FL 33634 | 813-463-4740 | [email protected]
3. Type Integrator in the Table column and press Enter.
4. Click Integrator Login.
5. Click New Item.
6. Type a unique User Name and Password to be used for the new Integrator Login account.
This User Name and Password should only be used for integrating with ConnectWise. Credentials required for other purposes should not be used.
7. From the Access Level drop-down menu, select All Records.
8. Configure access for the Integrator Login account to the following APIs:
API NOTES
Service Ticket API Select a default Service Board from the Service Board drop-down menu and type http:// in the
Callback URL field.
Time Entry API Select the Member that will be identified when N-central creates Time Entries and type http:// in the
Callback URL field.
The Member account will be used for any tickets created by N-central. If the specified Member account is configured with Require entry of start and end time selected under Time & Expense/Billing Information, this will prevent N-central from creating a time entry for ConnectWise tickets. To avoid this issue, either a different Member account must be specified or the Require entry of start and end time property must not be selected.
9. Ensure that the following APIs have all been enabled.
Managed Services API
Company API
Reporting API
Configuration API
Product API
10. Click the Save icon.
Configuring the Manage Devices Integration table in ConnectWise 1. Click System > Setup Tables > Managed Devices Integration.
2. Click Add to a new record.
6
GUIDE TO INTEGRATION IMPLEMENTATION
4110 George Road, Tampa, FL 33634 | 813-463-4740 | [email protected]
3. For Name of the integration, type something descriptive, for example: N-central Device Export.
4. For Solution, type N-able.
Configuring a Managed ID for Companies in ConnectWise
In order for ConnectWise to successfully receive and store the device data that N-central will communicate to the ConnectWise
Managed Device API and in order for N-central to successfully create tickets in ConnectWise, you must configure a Managed ID
for each Company in ConnectWise.
1. Click Contacts > Company.
2. Click Search.
3. Select the appropriate Company Name.
4. In the lower-half of the screen, click the icon to navigate to the Management tab.
5. Click the Save icon.
6. Click the New icon to create a new management solution.
7. In the Solution drop-down menu, select N-Able/N-able Integration.
8. Type the Managed ID that will be used for this Company.
The Managed ID is used to map the N-central Customer/Site name to the appropriate company in ConnectWise. For more information, refer to Mapping N-central Customers to ConnectWise Customers.
9. Select the appropriate Device Types from one of the following:
Workstations and Servers
Backup Stats
Servers
Workstations
10. If required, select a Default Agreement based on your network configuration.
11. Click the Save icon.
12. Repeat the procedure described above for each Company that needs to be configured to use the N-central/ConnectWise
integration.
Configuring N-central to Communicate with ConnectWise
After ConnectWise has been configured, you must configure N-central to communicate with ConnectWise.
7
GUIDE TO INTEGRATION IMPLEMENTATION
4110 George Road, Tampa, FL 33634 | 813-463-4740 | [email protected]
You can configure your ConnectWise integration with N-central at either the System or the SO level.
At the SO level, you can define different configurations for each SO which lets any SO administrator modify integration
settings
At the System level, only the Product Administrator can modify the configuration
1. Login to N-central.
2. In the navigation pane, click Administration > PSA Integration > Configure PSA Integration.
3. Select ConnectWise from the Choose your PSA Solution drop-down menu in the PSA Integration screen.
The screen refreshes to show the integration settings for ConnectWise.
4. Under Integration Credentials, configure the credentials that ConnectWise will use to create tickets (these were just
created in Configuring an Integrator Login Account in ConnectWise
a. Type the Network Address of the ConnectWise server with which N-central will communicate.
If you are a Hosted ConnectWise customer, you must include the prefix www in the Network Address of the
ConnectWise server (for example, www.myconnectwise.net). This is required to validate the SSL certificate. Without the prefix, will be unable to connect to the ConnectWise server.
b. Type the Company ID or company name that you received from ConnectWise.
c. Type the User Name for the ConnectWise Integrator account which is the account that N-central will use to communicate with the ConnectWise server.
5. Type the security Password for the ConnectWise Integrator Login Account.
6. Under Ticketing Errors, provide an email address for the Email Recipient.
This account will get notified if N-central cannot generate tickets in ConnectWise. For example, if there is a temporary network outage between N-central and ConnectWise, or if the ConnectWise Integrator Login account password has been changed and N-central has yet not been updated, an email will be sent to this address to alert this person to the issue.
7. Click Save.
N-central will test to see if the credentials and URL are valid.
The Testing connection dialog box will appear while the Network Address credentials are being verified.
When the connection has been successful, you will see a toggle set to ON next to ConnectWise in the Choose Your PSA Solution drop-down, and below that, the version of ConnectWise that you are connected to.
In left pane, more options will appear under PSA integration: Export Devices, Mapping - Customers, Mapping - Devices, Ticketing.
If the integration is configured at the System level, there are fewer options at the SO level. Ticketing is the only integration feature available at the Customer level.

8
GUIDE TO INTEGRATION IMPLEMENTATION
4110 George Road, Tampa, FL 33634 | 813-463-4740 | [email protected]
Mapping N-central Customers to ConnectWise Customers
In order to export data from N-central to ConnectWise, the structure of the N-central data must be mapped to the
corresponding structure of the ConnectWise data. Exporting device data requires mapping N-central Customers or Sites to
ConnectWise companies.
By default, the Managed ID for each Customer or Site in N-central is the same as the N-central name. If a Managed ID using this
name already exists in ConnectWise, it will automatically be mapped to it. If the Managed ID does not exist in ConnectWise, it is
Unmapped until mapping properties have been configured.
To ensure that a Customer/Site appears in the ConnectWise Customer Name - ManagedID drop-down menu, we recommend
that you configure a Managed ID in ConnectWise before attempting to map N-central data to ConnectWise data.
Mapping Customers
1. In the navigation pane, click Administration > PSA Integration > Mapping-Customer.
2. In the Customer Mapping screen, select the ConnectWise Customer Name - ManagedID for each Customer Name to
which it will be mapped.
3. Click Save.
Disabling Customer Mapping
You can disable customer mappings by unmapping them in the UI.
1. In the navigation pane, click Administration > PSA Integration > Mapping - Customers.
2. For each N-central Customer mapping that you would like to disable, select Disable from the drop-down under
ConnectWise Customer Name - ManagedID.
3. Click Save.
Mapping Device Classes
Device Class mapping can be configured in multiple configurations to suit specific requirements and situations.
The Managed Server and Managed Workstation device classes in N-central must be mapped with the Managed Server and
Managed Workstation configuration types in ConnectWise in order to avoid duplicate entries.
Adding Device Class Mappings
1. In the navigation pane, click Administration > PSA Integration > Mapping - Device Classes.
9
GUIDE TO INTEGRATION IMPLEMENTATION
4110 George Road, Tampa, FL 33634 | 813-463-4740 | [email protected]
2. In the Device Class Mapping screen, click Add.
3. Configure the following mapping properties:
Name Identifies the mapping.
Description Provides additional user-defined information about the mapping.
Customers/Sites Select the N-central Customers or Sites to which this mapping will apply.
Click >> to move all of the items from the left column to the right or << to move all of the items from the right column to the left.
N-central Device Class
For each device class, select a ConnectWise Configuration Type to which the exported data will correspond.
Devices classed in N-central as Workstations – Windows should be mapped to the Managed
Workstation Configuration Type and devices classed as Servers – Windows should be mapped to
the Managed Server Configuration Type.
Select Unmapped to prevent N-central from exporting data for that device class.
Select Create New to create a new ConnectWise Configuration Type. You will need to type a Name and click Create for the new configuration type to be added.
4. Click Save.
Setting Up Export Device Profiles
An Export Profile allows you to define settings and targets for device export. After an Export Profile is set up, device information
is automatically exported to ConnectWise using the Export Profiles whenever a device change is detected.
The following device changes will initiate an automatic export using the new profile:
Adding a device
Removing a device
Modifying a device
Modifying device assets
Asset Discovery
Appliance self-registration
You can use the Export Now feature at any time to initiate a complete export of up-to-date device information.

10
GUIDE TO INTEGRATION IMPLEMENTATION
4110 George Road, Tampa, FL 33634 | 813-463-4740 | [email protected]
Contract and billing information will not be updated by data export.
Both the customer to whom the device belongs and the device class must be mapped before any devices can be exported.
Refer to Mapping N-central Customers to ConnectWise Customers and Mapping Device Classes for ConnectWise.
Adding Export Profiles
1. In the navigation pane, click Administration > PSA Integration > Export Devices.
2. Click Add.
3. Configure the following properties of the Profile:
Name Identifies the Profile.
Description Provides additional user-defined information about the Profile.
Settings
Status of Configurations after export
Select the status in ConnectWise after data has been exported from one of the following:
Active
Inactive
When a device is deleted or is no longer managed by N-central
Select how ConnectWise will manage Configurations for devices that no longer exist or are no longer managed in N-central from one of the following:
Delete the Configuration in ConnectWise—This option is not recommended unless you have a good reason to do so, as deleting the device here will cause ticket history for this device to be lost, so you may want to select the second option and choose a status
Set status of the Configuration in ConnectWise to either Active or Inactive
Do nothing—If you choose to Do Nothing, you will have to remember to reconcile your device information in ConnectWise with that in N-central.

11
GUIDE TO INTEGRATION IMPLEMENTATION
4110 George Road, Tampa, FL 33634 | 813-463-4740 | [email protected]
Targets
Device Export Criteria
You can create an export profile that only applies to a specific set of devices by selecting customers, device classes or filters that devices belong to.
All Devices—Data for every device that is managed by N-central will be exported. This is the default.
By Customer—Data for devices associated with selected Customers or Sites will be exported.
By Device Class—Data for devices based on selected classes will be exported.
By Filter—Data for devices grouped by selected Filters will be exported.
Click >> to move all of the items from the left column to the right or << to move all of the items from the right column to the left.
4. Click Save.
The Export Profile is saved. Device information will be exported as device changes occur. The next complete export using this profile will happen at the time of the next Asset Discovery.
5. In order to initiate a complete export using the new Export Profile, in the Actions column for the new Export Profile, click
Export Now.
Enabling or Disabling Automatic Export
Automatic export is enabled by default when an export profile is added. It can be disabled or enabled through the N-central UI.
To disable Automatic Export
To disable Automatic Export
1. In the navigation pane, click Administration > PSA Integration > Export Devices.
2. To disable Automatic Export for individual export profiles:
a. For each export profile, locate the toggle under Automatic Export in the table.
b. Slide the toggle to OFF to disable automatic exporting.
3. To disable Automatic Export for more than one export profile:
a. Select checkboxes beside the name of the export profiles for which you would like to disable automatic export.
12
GUIDE TO INTEGRATION IMPLEMENTATION
4110 George Road, Tampa, FL 33634 | 813-463-4740 | [email protected]
You can select the check box next to the column title Name to select all of the Profiles.
b. Click Disable.
To enable Automatic Export
To enable Automatic Export
1. In the navigation pane, click Administration > PSA Integration > Export Devices.
2. To enable Automatic Export for individual export profiles:
a. For each export profile, locate the toggle under Automatic Export in the table.
b. Slide the toggle to ON to enable automatic exporting.
3. To enable Automatic Export for more than one export profile:
a. Select checkboxes beside the name of the export profiles for which you would like to enable automatic export.
You can select the check box next to the column title Name to select all of the Profiles.
b. Click the Enable button.
Manually Triggering an Export (Export Now)
If you have disabled exports or would like an immediate export, you can manually run an export.
You do not have to enable an export profile to trigger an export.
1. In the navigation pane, click Administration > PSA Integration > Export Devices.
2. To trigger an export for individual profiles:
a. In the Action column for the selected profiles, click Export Now.
3. To trigger a device export for all export profiles, select the checkbox next to the Name column.
a. Click the Export Now button in the top menu.
4. Click Delete.
5. Click OK to confirm the deletion.

13
GUIDE TO INTEGRATION IMPLEMENTATION
4110 George Road, Tampa, FL 33634 | 813-463-4740 | [email protected]
Setting Up Ticketing Recipients
A Ticketing Recipient is collection of settings that acts like a user account in N-central. After a Ticketing Recipient is created, you
can use it to generate tickets in ConnectWise by associating it to Notifications, Self-Healing and Scheduled Tasks.
Adding a Ticketing Recipient
1. In the navigation pane, click Administration > PSA Integration > Ticketing.
2. Click Add.
3. Specify a descriptive Name to identify the Ticketing Recipient, for example, Monitoring Alerts.
4. If required, specify a Description that provides additional user-defined information about the Ticketing Recipient, for
example, “Generate tickets based on monitoring alerts or on servers going down.”
5. Configure the following settings for the Ticketing Recipient.
6. Click Save.
You have to associate this to your Notification Profiles in order for Tickets to be created from these settings. For more
information, refer to Setting Up Notifications in Order to Update Ticket Status on page 1.
SETTINGS
Ticket Details
This tab allows you to configure the following:
What Service Board the ticket should get generated in
What properties the ticket should have
Budgeted Hours
Required Date
Service Board Select the ConnectWise Service Board to which the ticket will be assigned when it is created in
ConnectWise by N-central Notification Profiles.
Status Select the status for the service ticket that will be created.
14
GUIDE TO INTEGRATION IMPLEMENTATION
4110 George Road, Tampa, FL 33634 | 813-463-4740 | [email protected]
Service Type Select the type of service that will be performed for the service ticket.
Service Sub Type Select the sub-category of service that will be performed for the service ticket (as configured in
ConnectWise).
Service Item Select from the list of Service Items associated with the Service Board.
Service Items are used to provide further detail to your main service types and sub types. They can also be
used to create ticket task lists for some of your most common services. Service items allow you to create a
Standard Service Ticket Template to associate with your item that will pull in from a standard lists of tasks
you assign on the template level.
Source Select the origin from which the service ticket will be initiated.
Priority Select the importance of the service ticket that will be created as determined by the severity and impact
of the issue.
Budget Hours Select the number of service hours that will budgeted for the ticket that will be created.
Required Date Select the number of days from the ticket creation that the work for the service ticket is to be completed.
Notifications Settings
This tab allows you to configure the actions when there is a notification:
How ConnectWise will behave when an alert is triggered in N-central

15
GUIDE TO INTEGRATION IMPLEMENTATION
4110 George Road, Tampa, FL 33634 | 813-463-4740 | [email protected]
What happens when N-central detects that an issue has gone back to a Normal state.
How N-central will handle repeat failures
Acknowledgement
Settings Select Acknowledge N-central Alerts when a Ticket is Created allow N-central to automatically
acknowledge subsequent alerts and prevent further notifications.
Updating
ConnectWise Tickets
For Ticket Section select the section of the ticket to append notes to:
The Detail Description section of the ticket.
The Resolution section of the ticket.
Note: When closing a ticket, N-central always writes to the Resolution section.
For When an issue returns to normal:
These settings allow you to determine when and how to change the Ticket status if the issue returns to
Normal.
You may not want N-central to change the ticket status, or you may want N-central to change the status
to a specific status. Additionally, you can tell N-central what status the ticket must be in before it can
make a change to the status.
1. If you do not want N-central to change the ticket status when the issue returns to Normal, select
Do not change the Ticket Status.
2. If you would like N-central to change the status of the ticket to a different status, select Change
the Ticket Status to.
a. Specify the state to which the ticket will be changed.
b. In the Ticket Statuses column, select and move the status that the ticket must already have before it can be changed. This says to N-central, it's okay to go ahead and change the status of the ticket if it is in one of these statuses.

16
GUIDE TO INTEGRATION IMPLEMENTATION
4110 George Road, Tampa, FL 33634 | 813-463-4740 | [email protected]
Handling Repeat
Failures This feature allows you to configure what will happen to a ticket when an issue reoccurs on a device
within a given time period.
The first time a service on a device fails, N-central opens a time window during which the service can
transition between states before another ticket will be generated. Within this time window, N-central will
not generate a new ticket, but instead it will either update the existing ticket or if the ticket has been
closed it will reopen it.
The default number of hours for the time window is 120 hours.
For example, if a CPU service on a device goes Failed and generates a ticket, N-central will allow the
service to transition between Failed and Normal for 120 hours (the default) before a new ticket will be
created.
For Action on repeat failures:
1. If you do not want N-central to reopen tickets after they have been closed within the specified
time window, select Do not reopen tickets.
2. To specify a time period before tickets will be reopened, select Reopen tickets within <specify
hours, the default is 120 > hours of ticket creation.
a. Specify the state to which the ticket will be changed.
b. In the Ticket Statuses column, select and move the status that the ticket must already have before it can be changed. This says to N-central, it's okay to go ahead and change the status of the ticket if it is in one of these statuses.

17
GUIDE TO INTEGRATION IMPLEMENTATION
4110 George Road, Tampa, FL 33634 | 813-463-4740 | [email protected]
Windows Event Log
property This sections allows you to configure how N-central will decide if Windows Event Log issues are duplicates
on particular device and if a ticket should be updated or a new ticket should be opened.
Depending on what sort of event log monitoring you are doing, and what sort of event log entries the
applications on a device perform, matching on ID and Source may be sufficient to determine a duplicate.
All properties are included by default.
Select the properties of a Windows Event Log alert that should be used to determine if an existing ticket is
updated or if a new ticket will be created:
ID
Source
Description
Associated Notification Profiles
This tab allows you to view and set notification profiles and escalation preferences for the Ticketing Recipient. This association of
Ticketing recipient and notifications can also be done within the Notification profile itself.
Filter by Owner Select an SO or Customer/Site to view associated notification profiles.
Primary Notification From the list of N-central notification profiles, select the profile or profiles for the Ticketing Recipient
under Primary Notification. As a result, the first notification triggered will be generated in the PSA. If
required, select and specify the rest of the settings for the notification as it will generated in the PSA.
18
GUIDE TO INTEGRATION IMPLEMENTATION
4110 George Road, Tampa, FL 33634 | 813-463-4740 | [email protected]
Time Entry
This tab allows you to automate the creation of notes and work time added to a ticket. The Time Entry settings will be used by the
PSA to calculate time and billing for the Ticketing Recipient. This is valuable when you are using self-healing tasks automation
policies in N-central. After this is selected, when N-central generates a notification that goes to this ticketing recipient, time will
be automatically logged against the ticket.
Time Entry Select this option to add information about the time spent working on the service ticket that is created.
Work Type Select the category of work to be allocated to the ticket.
Work Role Select the roles of the individual (or individuals) who will work on the ticket.
Hours to Consume Select the number of hours budgeted for working on the ticket.
Notes Type any additional information that you want recorded with the time entry for the ticket.
Append Notes to
Ticket Section Select the section of the service ticket to which notes will be added from one of the following:
Detail Description
Internal Analysis
Resolution
19
GUIDE TO INTEGRATION IMPLEMENTATION
4110 George Road, Tampa, FL 33634 | 813-463-4740 | [email protected]
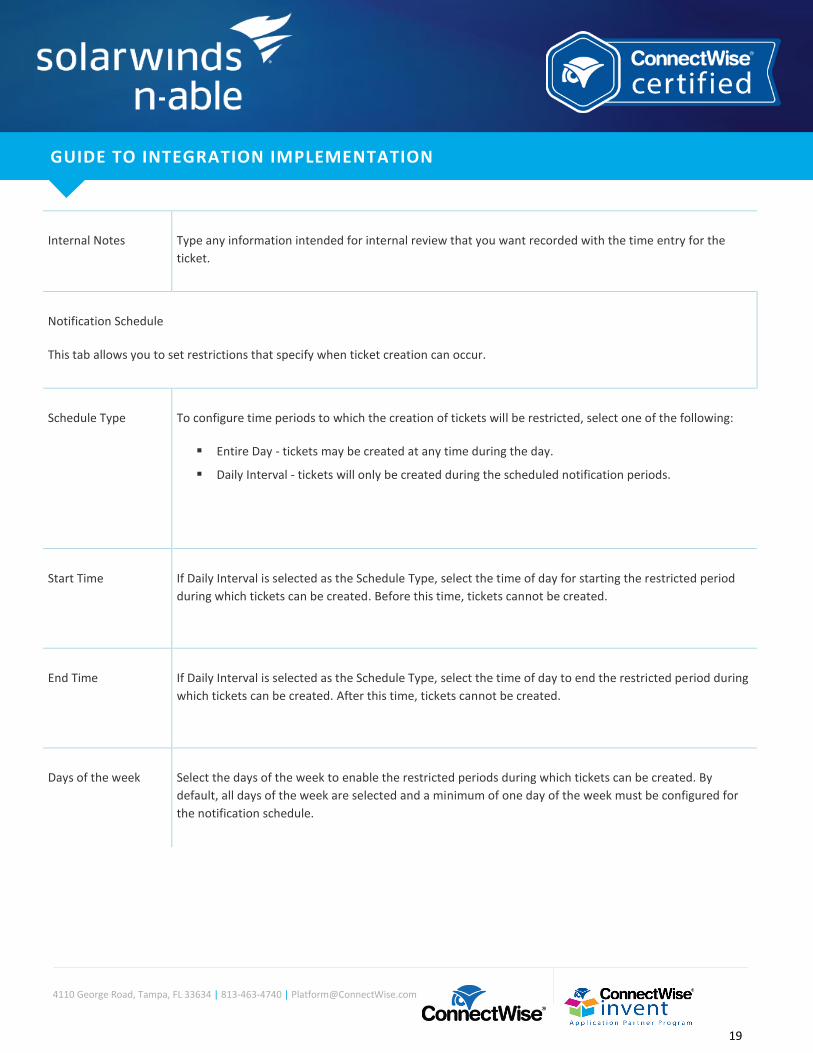
Internal Notes Type any information intended for internal review that you want recorded with the time entry for the
ticket.
Notification Schedule
This tab allows you to set restrictions that specify when ticket creation can occur.
Schedule Type To configure time periods to which the creation of tickets will be restricted, select one of the following:
Entire Day - tickets may be created at any time during the day.
Daily Interval - tickets will only be created during the scheduled notification periods.
Start Time If Daily Interval is selected as the Schedule Type, select the time of day for starting the restricted period
during which tickets can be created. Before this time, tickets cannot be created.
End Time If Daily Interval is selected as the Schedule Type, select the time of day to end the restricted period during
which tickets can be created. After this time, tickets cannot be created.
Days of the week Select the days of the week to enable the restricted periods during which tickets can be created. By
default, all days of the week are selected and a minimum of one day of the week must be configured for
the notification schedule.
20
GUIDE TO INTEGRATION IMPLEMENTATION
4110 George Road, Tampa, FL 33634 | 813-463-4740 | [email protected]
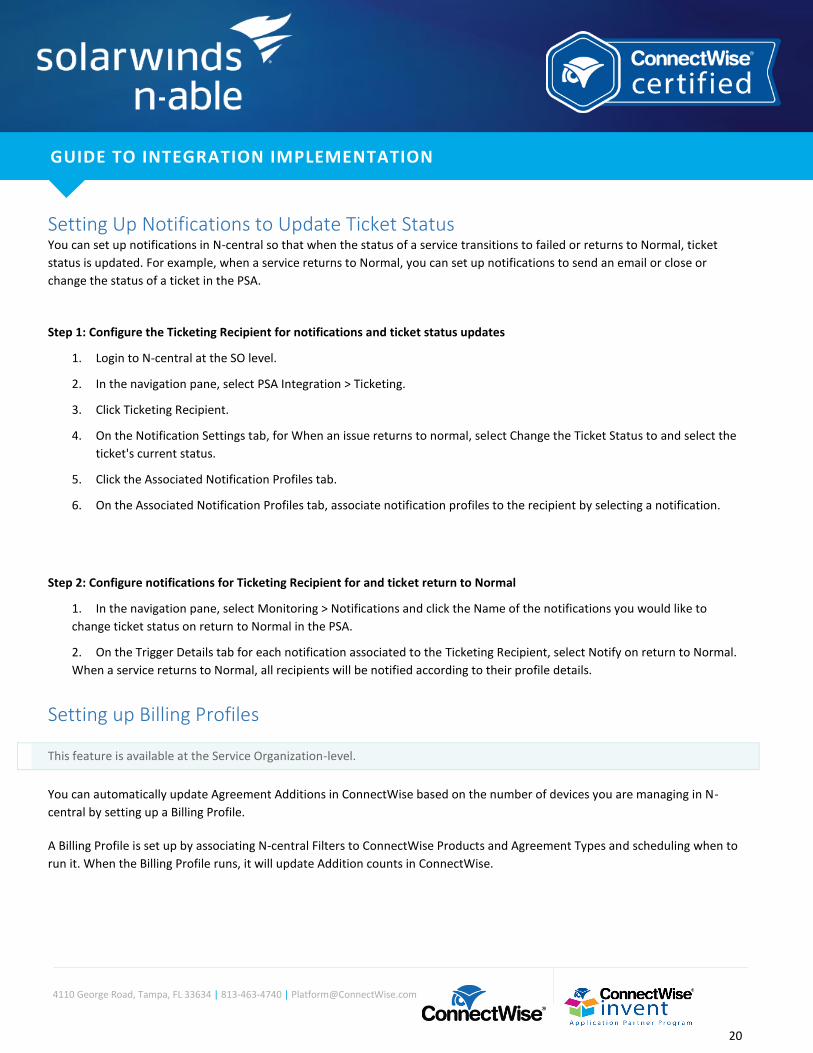
Setting Up Notifications to Update Ticket Status You can set up notifications in N-central so that when the status of a service transitions to failed or returns to Normal, ticket
status is updated. For example, when a service returns to Normal, you can set up notifications to send an email or close or
change the status of a ticket in the PSA.
Step 1: Configure the Ticketing Recipient for notifications and ticket status updates
1. Login to N-central at the SO level.
2. In the navigation pane, select PSA Integration > Ticketing.
3. Click Ticketing Recipient.
4. On the Notification Settings tab, for When an issue returns to normal, select Change the Ticket Status to and select the
ticket's current status.
5. Click the Associated Notification Profiles tab.
6. On the Associated Notification Profiles tab, associate notification profiles to the recipient by selecting a notification.
Step 2: Configure notifications for Ticketing Recipient for and ticket return to Normal
1. In the navigation pane, select Monitoring > Notifications and click the Name of the notifications you would like to
change ticket status on return to Normal in the PSA.
2. On the Trigger Details tab for each notification associated to the Ticketing Recipient, select Notify on return to Normal.
When a service returns to Normal, all recipients will be notified according to their profile details.
Setting up Billing Profiles
This feature is available at the Service Organization-level.
You can automatically update Agreement Additions in ConnectWise based on the number of devices you are managing in N-
central by setting up a Billing Profile.
A Billing Profile is set up by associating N-central Filters to ConnectWise Products and Agreement Types and scheduling when to
run it. When the Billing Profile runs, it will update Addition counts in ConnectWise.

21
GUIDE TO INTEGRATION IMPLEMENTATION
4110 George Road, Tampa, FL 33634 | 813-463-4740 | [email protected]
For example: You might want to update a ConnectWise Agreement and invoice the customer for the number of devices with
Patch enabled. In this case, you would associate the Devices with Patch Management Enabled Filter to the ConnectWise Product
Patch Management. If you selected Last Day of the Month for Push Device counts to ConnectWise N-central will run the Billing
Profile monthly on the last day of every month which will update the Addition counts in ConnectWise.
In addition to updating Addition counts in ConnectWise, the Billing Profile can also provide a Product Addition's Effective Date
and Cancelled date. For more information on ConnectWise Additions, refer to Additions tab - Agreement in ConnectWise
documentation.
Setting up a Billing Profile
1. In the navigation pane, click Administration > PSA Integration > Billing Profiles.
2. Click Add.
3. Type a unique Name to identify the Profile.
4. Type a Description to provide further details on the Profile.
5. In the Customers/Sites column, select the N-central customers or sites to which this Billing Profile will apply.
6. Click > to move the customers or sites to the Selected Customers/Sites column.
Click >> to move all of the items from the left column to the right or << to move all of the items from the right column to the left.
7. On the Mapping tab, for each N-central Filter, select a ConnectWise Product and Agreement Type.
The selected Filters will be associated to the ConnectWise Product Type and Agreement Type.
8. Select the Schedule Days tab.
Note: The calendar for each of the scheduling options in the N-central UI is the current month.
The following are examples of how the scheduling options work:
If today is August 14 and you pick "15" for Push Device counts to ConnectWise, the Agreement Additions in ConnectWise will be updated with device counts starting tomorrow (August 15) and every following month on the 15th.
If today is August 25 and you pick "15" for Push Device counts to ConnectWise, the Agreement Additions in ConnectWise will be updated with device counts starting next month (September 15) and every following month on the 15th.
9. Select the Schedule Days tab.
10. For Push Device counts to PSA, select when you would like N-central to run the Billing Profile and update Addition counts
in ConnectWise.
Select Last day of the month to export billing information to ConnectWise on the final day of each month, starting with the current month.

22
GUIDE TO INTEGRATION IMPLEMENTATION
4110 George Road, Tampa, FL 33634 | 813-463-4740 | [email protected]
Select day of the month to export to ConnectWise on specific days of each month, starting with the current month. If you select a date earlier in the month than today's date (for example, today is August 25 and you pick August 15) the schedule will start next month, that it will start on September 15.
11. Select the Effective Date, which will update the Effective Date on the Additions tab in ConnectWise:
Last day of the month - for devices to begin being associated with a ConnectWise Agreement on the final day of the current month. For example, if today is August 25, the effective date will be August 31.
Select day of the month - for devices to begin being associated with a ConnectWise Agreement on specific day of the month. If you select a date earlier in the month than today's date (for example, today is August 25 and you pick "15") the Effective Date will be the 15th of next month.
12. Select the Product Addition's Cancellation Date, which will update the Cancelled Date on the Additions tab in
ConnectWise:
Last day of the month - for devices to stop being associated with a ConnectWise Agreement on the final day of this month.
Select day of the month - for devices to stop being associated with a ConnectWise Agreement on a specific day of the month. If you select a date earlier in the month than today's date (for example, today is August 25 and you pick "15") the Cancelled Date will be the 15th of next month.
13. Click Save.
Push Device counts to ConnectWise will be impacted by the dates you pick for Product Addition's Effective Date and Product
Addition's Cancellation Date. Select all options in N-central in a way that makes sense for your billing cycle.
N-central and ConnectWise Definitions of Terms
The table below provides the ConnectWise definitions for Effective Date and Cancelled Date.
N-CENTRAL TERM CONNECTWISE
TERM
CONNECTWISE DEFINITION
Product Addition's
Effective Date Effective Date The date that this Product Addition becomes available for invoicing. This
should be set to the first day of the billing month, based on the billing cycle.
Product Addition's
Cancellation Date Cancelled Date The date that this Product Addition is no longer valid. The Addition is no longer
billable after this date. This should be set to the last day of the billing month
based on the billing cycle
Enabling or Disabling a Billing Profile
You can enable or disable Billing Profiles.

23
GUIDE TO INTEGRATION IMPLEMENTATION
4110 George Road, Tampa, FL 33634 | 813-463-4740 | [email protected]
To enable a Billing Profile
To enable a Billing Profile
1. In the navigation pane, click Administration > PSA Integration > Billing Profiles.
2. Select the check box beside the Name of the Billing Profile that you would like to enable.
You can select the check box next to the Name field to select all of the Profiles.
3. Click Enable to activate the Billing Profile so that it will be applied.
4. In the Confirm Enable dialog box, click Enable.
The Status icon will indicate that the Billing Profile is enabled.
To disable a Billing Profile
To disable a Billing Profile
1. In the navigation pane, click Administration > PSA Integration > Billing Profiles.
2. Select the check box beside the Name of the Billing Profile that you would like to disable.
You can select the check box next to the Name field to select all of the Profiles.
3. Click Disable to temporarily deactivate the Billing Profile so that it will not be applied.
4. In the Confirm Disable dialog box, click Disable.
The Status icon will indicate that the Billing Profile is off.
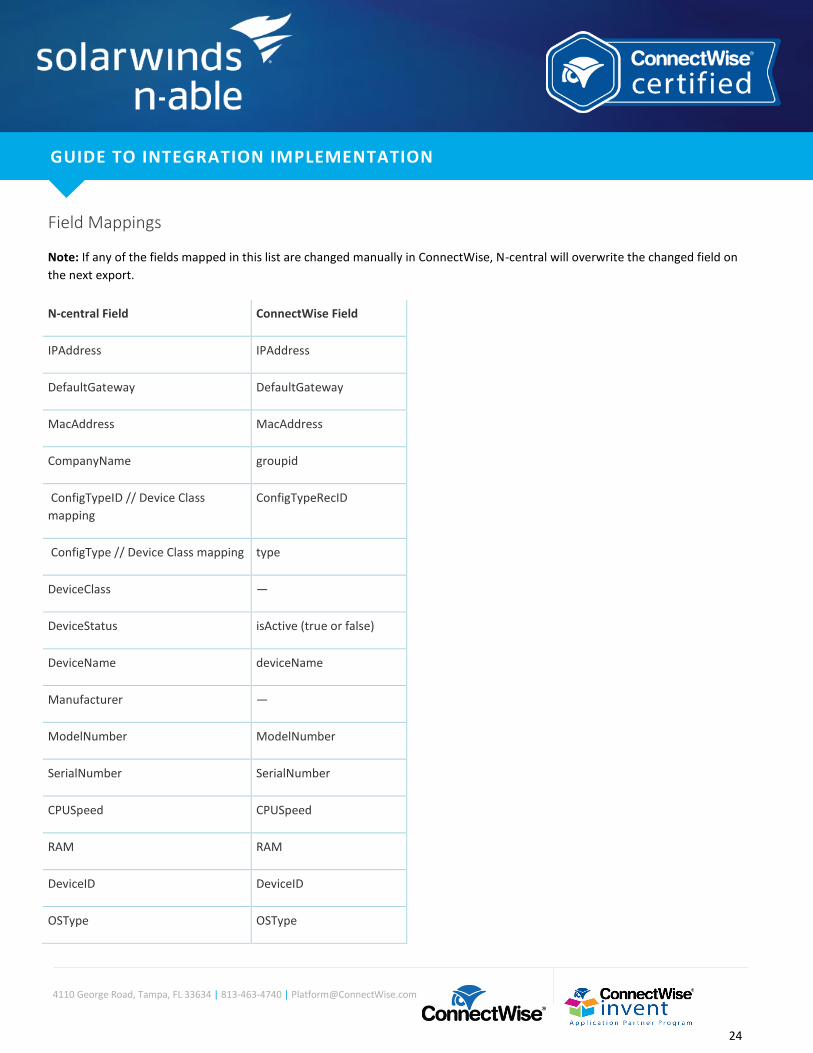
Appendix: Mapping N-central Asset Data to Fields in ConnectWise
The following reference topic provides field mappings for device export in ConnectWise.
Device export triggers include the following actions:
Appliance self-registration
Asset discovery
Add and modify device
Modify device asset details
Miscellaneous device changes
24
GUIDE TO INTEGRATION IMPLEMENTATION
4110 George Road, Tampa, FL 33634 | 813-463-4740 | [email protected]
Field Mappings
Note: If any of the fields mapped in this list are changed manually in ConnectWise, N-central will overwrite the changed field on
the next export.
N-central Field ConnectWise Field
IPAddress IPAddress
DefaultGateway DefaultGateway
MacAddress MacAddress
CompanyName groupid
ConfigTypeID // Device Class
mapping ConfigTypeRecID
ConfigType // Device Class mapping type
DeviceClass —
DeviceStatus isActive (true or false)
DeviceName deviceName
Manufacturer —
ModelNumber ModelNumber
SerialNumber SerialNumber
CPUSpeed CPUSpeed
RAM RAM
DeviceID DeviceID
OSType OSType

25
GUIDE TO INTEGRATION IMPLEMENTATION
4110 George Road, Tampa, FL 33634 | 813-463-4740 | [email protected]
OSInfo OSInfo
LastLoginName LastLoginName
Location —
Createdon —
LocalHardDrives LocalHardDrives
VendorNotes VendorNotes
ManagementLink ManagementLink
AssetTag TagNumber
WarrantyExpiration WarrantyExpiration
PurchaseDate PurchaseDate