guide to the lbaas plugin ver. 1.0.2 for...
TRANSCRIPT

Guide to the LBaaS plugin ver. 1.0.2 for Fuel

Load Balancing plugin for Fuel
LBaaS (LoadBalancingasaService) is currently an advanced service of Neutron that provides load balancing for Neutron multinode environments. It implements HAProxy to provide network load balancing of incoming requests.
In this article we will show you how to create your own cloud with LBaaS (Load Balancer as a Service). We’ve tried to create userfriendly description with helpful screenshots for each step. Using this HowTo you can create a LBaaS cloud by following along with the screenshots (except for plugin installation procedure).
Many systems require load balancing between identical nodes to reduce the load on each node (shared hosting, huge sites, etc.). The load distribution will enable users faster access to the necessary data, since every other request will be sent to the next node in the cluster.
Thus, it is possible to significantly reduce the user’s waiting time for content access. As a result, the user will not look for a faster site or get frustrated with wasted time while waiting for the content to download.
So load balancing allows you, in the literal sense, to be closer to the users.
Requirements
Requirement Version/Comment
Fuel 6.1
OpenStack compatibility 2014.2.2 Juno
Neutron The only networking configuration LBaaS supports.
Limitations
Please note that the current version of the LBaaS plugin for Fuel does not support HA. This means that although the LBaaS plugin can be deployed on an HA configuration of controllers, there is no failover of loadbalanced objects. Additionally, this version of LBaaS does not provide HTTPS termination.
Please do not use the plugin for production deployments.
Installation Guide
You can navigate this document using these links:
a) Download and install LBaaS plugin for Fuel (12)
b) Create a cluster with LBaaS enabled using Fuel (36)
c) StepbyStep configuring, сreating LBaaS cluster via Horizon, using LBaaS plugin (717)
c.1) Create new user and project (79)
c.2) Create a private network for LBaaS cluster, create IP poll, and virtual IP (1013)
c.3) Create a router, configure and manage a floating IP (1415)
c.4) Create an instances, add them into LBaaS cluster as a members (1617)
d) Simple test of the LBaaS cluster (18)
To create your own LBaaS cluster, you need to follow these steps:
1. Install the Fuel Master node. If you do not have Fuel deployed yet, you can deploy a test environment on your local device by following the instructions in the Quick Start Guide.
2. Install LBaaS plugin itself
2.1. Download LBaaS plugin for Fuel from the Fuel Plugins Community Catalog.
2.2. Copy the plugin to the Fuel Master node with secure copy:

# scp lbaas-1.0-1.0.2-1.noarch.rpm root@:<the_Fuel_Master_node_IP_address>:/tmp
2.3. Install LBaaS plugin for Fuel
Run the following commands on the Fuel Master node:
# cd /tmp
# rpm -ivh lbaas-1.0-1.0.2-1.noarch.rpm
# fuel plugins --sync
2.5 Check, that plugin is installed
[root@fuel ~]# fuel plugins --list
DEPRECATIONWARNING:/etc/fuel/client/config.yamlexistsandwillbeusedasthesourceforsettings.Thisbehavioris
deprecated. Please specify the path to your custom settings file in the FUELCLIENT_CUSTOM_SETTINGS environment
variable.
id | name | version | package_version
---|-------|---------|----------------
1 | lbaas | 1.0.2 | 2.0.0
3 Now you can create a new environment.
3.1 Using Fuel UI wizard, enter Name and select Release for your environment.
3.2. As Networking Setup, select Neutron:

3.3 On the Settings tab of the Fuel web UI, scroll the page down and select LBaaS plugin for Neutron checkbox and press Save Settings button.
4. In the Nodes tab of the Fuel web UI, add at least 1 Controller node and the required number of Compute nodes. Configure network interfaces for the nodes (for more information, see User Guide).


5 On the Networks tab, specify your network configuration. Save the changes and run network verification test by pressing Verify Networks button.
Ensure that test has passed. You will see the following message:
If you receive an error, resolve it and rerun the test.

6 Press “Deploy Changes” button to start. And wait till Fuel installs OpenStack. Fuel will install the operating system that was selected at step 3.1.

After the operating system has been installed, Fuel will start to install OpenStack for you.


When OpenStack has been installed, you will see the message on the Fuel web UI with the link to your OpenStack Dashboard (Horizon).
Now you are ready to start using OpenStack. All further steps will be done through the OpenStack Dashboard called Horizon.
7. Click the link to Horizon that has appeared on the Fuel web UI (see the previous step).
Enter admin as User Name and Password. Click Sign In button to continue.
8. Create a new project. In the leftside menu, under Identity option click Projects. When the Projects menu opens, press Create project button. As the general rule, one person should be a superuser in the admin role for all projects and a user with a Member role should be used for general configuration purposes.
In Create Project window, fill in Name and Description fields.

Add Project Members you need using search field.
On the Quota tab, specify maximum quotas for the project. By default, iit already have some quotas, so you can increase or decrease values or leave asis:

Press Create Project button to continue.
9 Add new user for this project.
In the leftside menu, under Identity option click Users. When the Users menu opens, press Create User button.
Fill in all fields in the Create users window. In Primary Project, use the dropdown menu to pick the necessary one (you should select the one created at step 8). Set role to member to admin or _member_.
Press Create User button to continue.

In our sample, we picked lbaasuser1 name for the user.

10 Relogin in to Horizon, using the lbaasuser1 credentials.
11 Create a new network for the instances. It will use private IP addresses.
In the leftside menu, under Project option click Network. When the Networks menu opens, press Create Network button.
When Create Network menu opens, fill in Network Name and Admin State fields. Click Next button.
In Subnet tab of the Create Network window, select Create Subnet checkbox.
Enter Subnet Name, Network Address, IP version and Gateway IP information.

In Subnet Detail tab, select Enable DHCP checkbox.
Enter Allocation Pools, DNS Name Servers and Host Routers information.
Press Create button to continue.
A new network has been created: it appears in the Networks menu.
12 Create a new pool for the Load Balancer. Pool is a logical set of devices, such as web servers, that you group together to receive and process traffic. The load balancing function chooses which member of the pool handles the new requests or connections received on the VIP address. Each VIP has one pool.

In the leftside menu, under Project option click Network. Select Load Balancers option.Project Network LoadBalancers and create a new pool.
In the Load Balancer menu, click Add Pool button.
We will create a pool of IP addresses for the instances to use.
In Add Pool window, fill in the following fields:
Name
Description

Provider haproxy (it is the default option)
Subnet the one we created previously. Note, that LBaaS will work with internal IPs only (see diagram above).
Protocol we selected HTTP here as our very simple example application will be an HTTP server.
Load Balancing Method Round Robin (rotates requests evenly between multiple instances). This is the default load balancing method. Round Robin mode passes each new connection request to the next server in line, eventually distributing connections evenly across the array of machines being load balanced.
Admin State set to UP
Press Add button to continue.
A new pool is now created: it appears on Load Balancer menu.
13 Add a new VIP for the pool.
VIP specifies the virtual IP address and port where client traffic is received. Also defines other details such as the load balancing method to be used, protocol, and so on. This entity is sometimes known in loadbalancing products as a virtual server, vserver, or listener. So, it will be used to access instances from this pool.
In Load Balancer menu, select the required pool (in our case, this is the one we’ve just created). In Action column, click the dropdown menu and select Add VIP option.

In Add VIP window, fill in the following fields:
Pool name
Description
VIP subnet the one created at step 11
Free IP address from the selected subnet pick up any free address
Protocol port
Protocol
Session Persistence in our case, we have no Session Persistence
Connection limit number that sets a connection limit on the VIP or on the pool; beyond this number, the load balancing function will refuse client requests or connections (1 should be picked if the limit is not set)
Admin state set to UP state
Press Add button to continue.

A new virtual IP for the 10.10.10.0/24 subnet is created. You will see it in the VIP column in the table.
You can click the VIP name to see more details.

14 Create a router
We need to create a router to allow IP traffic to access our network.
We will create a gateway port, associate it with the IP from external network (which will be provided automatically), and then create an additional interface and associate it with the gateway IP (10.10.10.254) for our internal network.
In the leftside menu, under Project option click Network. Select Routers option.Press Create Router button.
In Create Router window, specify Router Name. Click Create Router button to finish.
The router will appear in Routers menu.
In Routers menu, select the required router (in our case, this is the one we’ve just created). In Action column, click the dropdown menu and select Set Gateway option.

In Set Gateway window, fill in the following fields:
External Network select your publicfacing external network here
Router Name defined automatically
Router ID assigned automatically
Press Set Gateway button (an IP address will be allocated automatically).
A message will appear in the Routers menu.
14.2 Edit router ports
Click the name of the router.

Click Add Interface button.
In the Add Interface window, specify Subnet (created at step 11) and IP Address (will turn into a gateway Ip address for the selected subnet) information. If we haven’t picked the address, it would be taken from the range automatically.
Press Add Interface button to continue.
14.3 Check your network topology.
In the leftside menu, under Project option click Network. Select Network topology option.

15 In the leftside menu, under Project option click Compute. Select Access & Security option.
15.1 Add keypair
In Create Key Pair window, specify the name and click Create Key Pair button. It will be uploaded to your machine.

The key pair will appear in the Key Pairs tab.
Copy the downloaded key pair into your ~/.ssh/ directory and change permissions to 600:
# cd ~/.ssh
# chmod 600 KEY_NAME.pem
Then you can use it to connect to the instances that were created or will be created using this key pair:
# ssh -i ~/.ssh/KEY_NAME.pem USER@SERVER_IP
15.2 Add floating IP to your LBaaS project.
In the leftside menu, under Project option click Compute. Select Access & Security option. Click Floating IPs tab.
Press Allocate IP to project button.
In Allocate Floating IP window, enter the pool created at step 14.

Press Allocate IP button to finish.
You will see Floating IP in Access & Security menu.
15.3 Now you need to associate it to floating IP from step 13
In Access & Security menu, select the required Floating Ip pool (in our case, this is the one we’ve just created). In Actions column, click the dropdown menu and select Associate option.
In Manage Floating IP Associations window, enter IP Address and Port.
In Access & Security menu, you will see that Floating IP now has Mapped Fixed IP Address and Floating IP Pool.

Now our network topology looks like this:
16 Create 4 instances
In the leftside menu, under Project option click Compute. In the Instances menu, click Launch Instances button.
In Launch Instance window, provide information in Details tab (availability zone, flavor, boot source, boot image, enter instance name and count of instances to create).

Press Launch button to continue.
Wait until instances are created. Their status will change from Build to Active.
17 Add the instances into load balancer members
In the leftside menu, under Project option click Network. In the Network menu, select Load Balancers option.
Select Members tab.
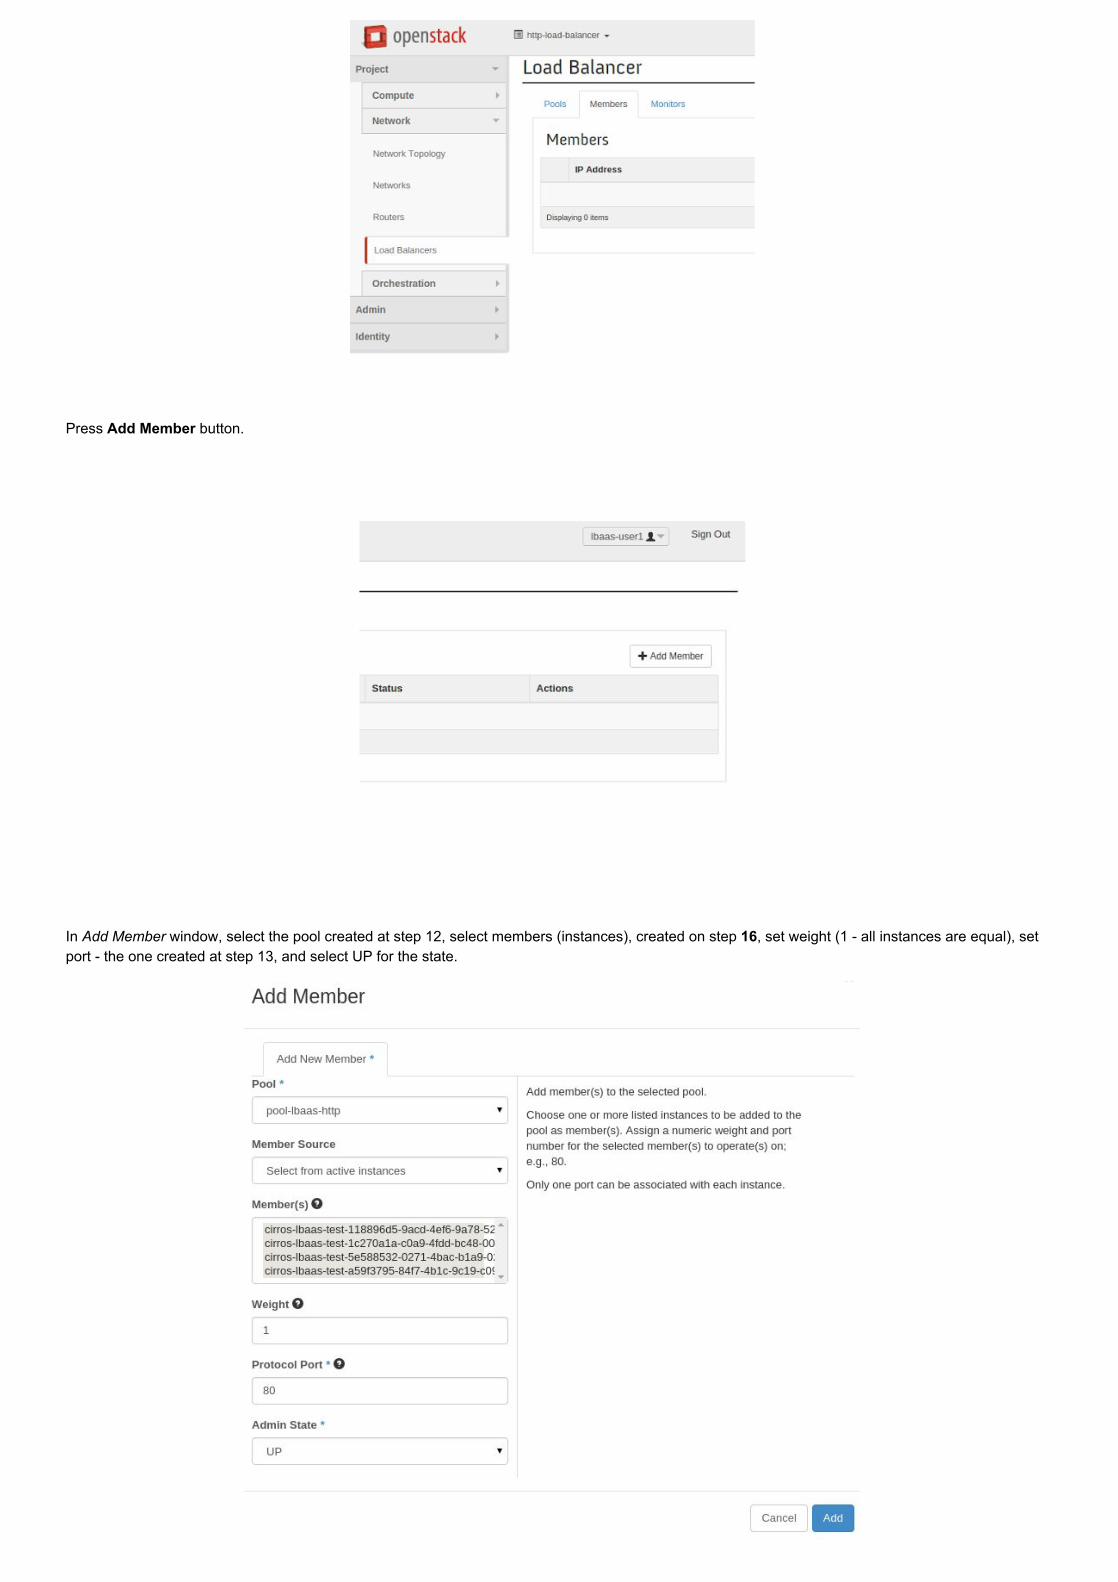
Press Add Member button.
In Add Member window, select the pool created at step 12, select members (instances), created on step 16, set weight (1 all instances are equal), set port the one created at step 13, and select UP for the state.

Press Add button to continue. Now we can see Members of the Pool with their Protocol Port, Weight and the Pool in Active status.
Now you are ready to test your load balancer.
18 Simple test of the load balancer
Log into all your instances via vnc console
Run the following command to create a very simple web server that simply responds to requests with the specified number.
# while true; do echo -e 'HTTP/1.0 200 OK\r\n\r\n<SERVER_NUMBER>' | sudo nc -l -p 80 ; done
replace <SERVER_NUMBER> for server1, server2, etc. of another, but different from server to server.


Test the LBaaS itself with the following command:
# while true; do wget -O - http://172.16.0.131 && sleep 0.5 ; done
You will see that each subsequent access to port 80 on your public IP for the LBaaS will be handled by the next server according to the Round Robin algorithm.

In VNC consoles of the instances, you will see the following:
Congratulations!
You have successfully installed, configured the LBaaS plugin for Fuel and checked that it is working properly. You’ve also improved your skills of creating tenants, networks and configuring LBaaS functionality great job! Hope you enjoyed our plugin.