guide to updating and upgrading big-ip - f5
TRANSCRIPT

F5 Deployment Guide
Guide to Updating and Upgrading BIG-IPKeeping your BIG-IP installations up to date is a critical priority for business owners and operators alike. F5 recommends you keep the software on BIG-IP appliances to at least BIG-IP 14.1 and your BIG-IP Virtual Editions (VEs) to at least BIG-IP 15.1 to optimize the security, performance, and total cost of ownership of your BIG-IP systems.
Keeping your installations up to date involves periodic updates and upgradesUpdates involve moving cross minor versions (such as v14.1.1 to v14.1.2 or v14.1.1.3 to v14.1.1.4). Updates have targeted fixes, security enhancements, and quality updates that are backwards compatible and can be deployed rapidly without much risk.
Upgrades involve moving across major versions of BIG-IP (such as 14.x to v15.x). Major version upgrades usually introduce new functionality and changed behavior so therefore require comprehensive testing, certification, and longer execution cycles.
Both updates and upgrades require upfront planning and systematic execution.
OverviewThis document guides you through the steps to update or upgrade your BIG-IP system. Once you have tested and certified a release of BIG-IP code for deployment, there are six main steps for updating or upgrading your BIG-IP systems:
1. Running prerequisite tasks and checks2. Uploading the image3. Performing the software upgrade4. Rebooting to the new version5. Checking to ensure the update or upgrade was successful6. In some unlikely cases troubleshooting a failed update or upgrade
However, the steps are likely to be nuanced based on deployment environment and deployment configuration. The deployment environment is defined based on whether BIG-IP is installed in BIG-IP systems (such as iSeries), as BIG-IP VE software, in BIG-IP VIPRION, or as BIG-IP on virtual machines offered by major cloud providers (AWS, Azure and Google Cloud Platform).
The update and upgrade processes are almost identical for BIG-IP systems and BIG-IP VE software, however additional steps and variations arise when performing updates or upgrades on VIPRION or in a public cloud environment. The deployment configuration refers to whether BIG-IP is deployed as a standalone instance or a high availably (HA) pair.
You have the choice of using the BIG-IP Configuration utility or the TMOS Shell to perform the update or upgrade. Where applicable, this guide includes procedures for both the Configuration utility and the TMOS shell.
Products and versions
Product Versions
BIG-IP 12.x - 16.x
Deployment Guide version
Last updated
1.1 (see Document Revision History on page 85)
3-12-2021
Note: Make sure you are using the most recent version of this deployment guide, available at https://www.f5.com/pdf/deployment-guides/bigip-update-upgrade-guide.pdf
To provide feedback on this deployment guide or other F5 solution documents, contact us at [email protected].
F5 Deployment Guide Updating or Upgrading the BIG-IP2
ContentsDeployment-Based Navigation Guide 3
General prerequisites and configuration notes 3
Section 1: Overview 4
Reasons to keep your BIG-IP up-to-date 4
Differences between updates and upgrades and why it matters 4
Recommendations for updating or upgrading 5
Section 2: Preparing to Update or Upgrade 7
Choosing a BIG-IP version 7
Preparing to update or upgrade a basic configuration 7
Preparing to update or upgrade an HA configuration 11
Section 3: Updating or upgrading a Standalone or HA Pair of BIG-IP Systems or VEs 14
Section 4: Updating or upgrading BIG-IP on a VIPRION HA Pair 23
Section 5: Updating or upgrading BIG-IP on vCMP-Based Systems 28
Updating or upgrading BIG-IP vCMP on the VIPRION platform 28
Updating or upgrading vCMP systems on platforms other than VIPRION 33
Section 6: Updating or upgrading BIG-IP on Major Cloud Providers 38
Amazon Web Services 38
Google Cloud Platform 43
Microsoft Azure 49
Section 7: Advanced Tools and Automation 71
Updating or upgrading your BIG-IPs with BIG-IQ 71
Automating BIG-IP software update or upgrade with Ansible 74
Section 8: Top 10 recommended practices in keeping your BIG-IP up-to-date 80
Appendix A: Optional Procedures 81
Document Revision History 85

F5 Deployment Guide Updating or Upgrading the BIG-IP3
Deployment-Based Navigation GuideThe sections in this guide use the deployment type as the primary pivot in providing the step-by-step tasks of performing an update or upgrade. Again, the deployment environment is defined based on whether BIG-IP is installed in BIG-IP systems, as BIG-IP VE software, in BIG-IP VIPRION, or as BIG-IP on virtual machines offered by major cloud providers.
You may choose to review each section sequentially or skip to the appropriate section based on your installation as described in the following diagram.
PREPARE
Section
1Overview
Section
2Preparation
RUN UPDATE OR UPGRADE
Section
3Updating or upgradingBIG-IP applicances or VEs in standalone or HAdeployments
Section
4Updating or upgrading BIG-IP on VIPRION HA pair
Section
5Updating or upgradingBIG-IP on vCMP-basedhardware
Section
6Updating or upgradingBIG-IP on major cloudproviders
OPTIMIZE
Section
7Advanced toolsand automation
Section
8Recommended
practices
Appliances
Virtual Edition
VIPRION HA Pair
vCMP on VIPRION
vCMP on other hardware
AWS
GCP
Azure
Figure 1: Deployment-based flow diagram
General notes for this guideThe following are general notes that apply to the entire document.
h Unless specifically noted, performing the procedures in this guide should not have a negative impact on the BIG-IP system. The procedures where there may be a impact are marked with "Impact of Procedure:" and a description.
h There are a number of links to resources on websites that are not owned or controlled by F5. While we do our best to consistently check links, the third-party could remove or change these links without our knowledge.
h For a current list of F5 trademarks and service marks, see http://www.f5.com/about/guidelines-policies/trademarks/. All other product and company names in this document may be trademarks of their respective owners.
h See Section 8: Top 10 recommended practices for keeping your BIG-IP up-to-date on page 80 for advice on keeping your BIG-IP current.
h This guide contains a number of links to F5 Knowledge Base articles that you can visit to get additional information. It may be useful to view this PDF while online so you can access some of this additional information.

F5 Deployment Guide Updating or Upgrading the BIG-IP4
Section 1: OverviewThis section contains an overview of updating and upgrading your BIG-IP.
Reasons to keep your BIG-IP up-to-dateOur latest research on the state of applications showed that 97 percent of organizations are managing what is commonly known as "traditional applications”; those that have a monolithic, client-server, or three-tier architecture. Because they were developed over the last several decades to address the most important IT enablement needs, traditional applications are typically enabling the most mission-critical processes within an organization.
The challenge is that traditional applications tend to be quite brittle because they have been developed in languages that are no longer widely known, traffic patterns to those applications have changed, or the security vulnerabilities in these applications remain unaddressed.
For most organizations, the priority around traditional applications is to maximize operational efficiency and minimize the total cost of ownership. To deliver and protect an older application and get the most out of it, you need a flexible wrapper or a scaffolding with application security and delivery technology that can solve the issues in the application itself.
This is done by integrating application delivery with application security, using programmability around application services to fill the gaps in the application itself, and pushing the boundaries on automation. To make all this work together to its full potential, it is important to invest the time and resources to ensure you are running the latest versions and getting the latest capabilities, and ensure the shielding around those fragile traditional applications do not become as fragile as the traditional application itself.
For business owners
h Reduce TCO by decreasing the cost of monitoring, managing and troubleshooting BIG-IP systems by keeping them up to date and consistent across the full estate.
h Mitigate business disruption risks by ensuring that BIG-IP systems powering mission critical apps have the latest bug fixes, security updates and performance enhancements.
h Increase business agility by driving more automation and consolidating application delivery and application security based on a best of suite approach.
For operators
h Simplify operations by standardizing on a common version across the entire estate of BIG-IP installations and adopting consistent operation models across the enterprise.
h Increase automation and respond to business needs quickly by taking advantage of the improved programmatic interfaces, API enhancements and management tool capabilities.
h Keep systems secure by ensuring the latest security improvements, critical fixes and vulnerability mitigates are deployed.
h Improve application delivery performance and reliability by taking advantage of the bug fixes, performance improvements, scale optimizations and hardware support.
h Get access to new features across application delivery and application security to improve the digital experiences.
F5 Deployment Guide Updating or Upgrading the BIG-IP5
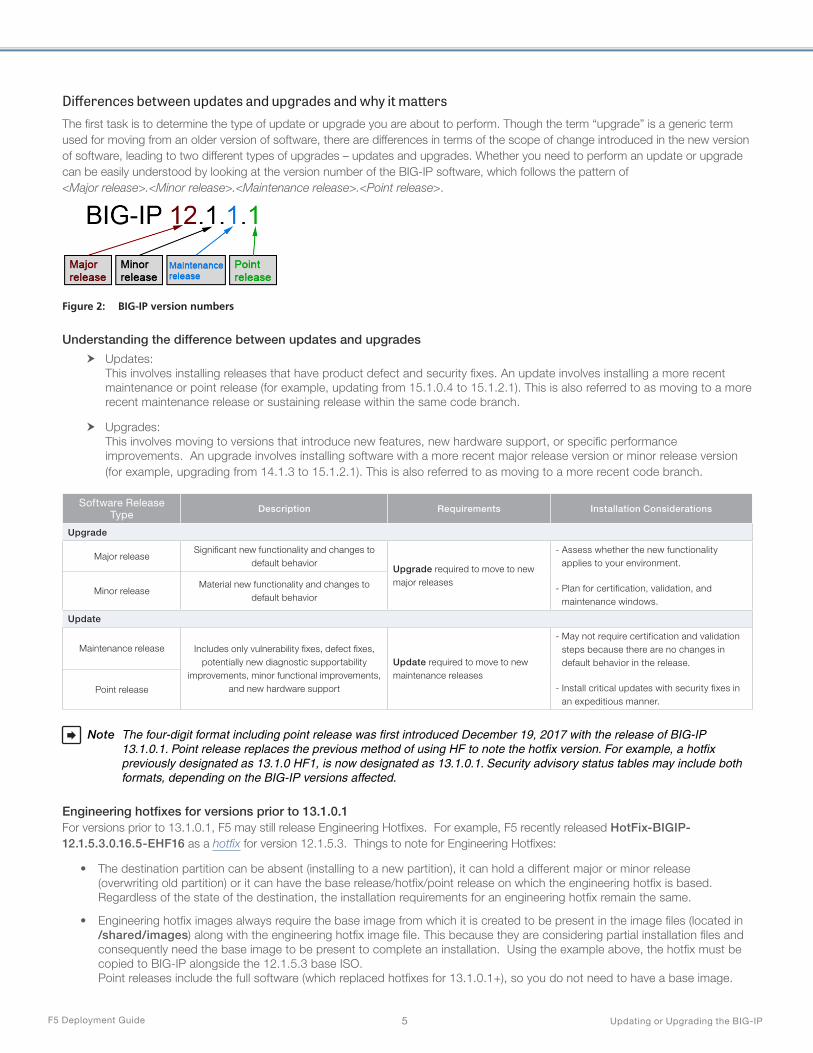
Differences between updates and upgrades and why it mattersThe first task is to determine the type of update or upgrade you are about to perform. Though the term “upgrade” is a generic term used for moving from an older version of software, there are differences in terms of the scope of change introduced in the new version of software, leading to two different types of upgrades – updates and upgrades. Whether you need to perform an update or upgrade can be easily understood by looking at the version number of the BIG-IP software, which follows the pattern of <Major release>.<Minor release>.<Maintenance release>.<Point release>.
Figure 2: BIG-IP version numbers
Understanding the difference between updates and upgrades
h Updates: This involves installing releases that have product defect and security fixes. An update involves installing a more recent maintenance or point release (for example, updating from 15.1.0.4 to 15.1.2.1). This is also referred to as moving to a more recent maintenance release or sustaining release within the same code branch.
h Upgrades: This involves moving to versions that introduce new features, new hardware support, or specific performance improvements. An upgrade involves installing software with a more recent major release version or minor release version (for example, upgrading from 14.1.3 to 15.1.2.1). This is also referred to as moving to a more recent code branch.
Software Release Type
Description Requirements Installation Considerations
Upgrade
Major releaseSignificant new functionality and changes to
default behavior Upgrade required to move to new major releases
- Assess whether the new functionality applies to your environment.
- Plan for certification, validation, and maintenance windows.
Minor releaseMaterial new functionality and changes to
default behavior
Update
Maintenance release Includes only vulnerability fixes, defect fixes, potentially new diagnostic supportability
improvements, minor functional improvements, and new hardware support
Update required to move to new maintenance releases
- May not require certification and validation steps because there are no changes in default behavior in the release.
- Install critical updates with security fixes in an expeditious manner.
Point release
Note The four-digit format including point release was first introduced December 19, 2017 with the release of BIG-IP 13.1.0.1. Point release replaces the previous method of using HF to note the hotfix version. For example, a hotfix previously designated as 13.1.0 HF1, is now designated as 13.1.0.1. Security advisory status tables may include both formats, depending on the BIG-IP versions affected.
Engineering hotfixes for versions prior to 13.1.0.1For versions prior to 13.1.0.1, F5 may still release Engineering Hotfixes. For example, F5 recently released HotFix-BIGIP-12.1.5.3.0.16.5-EHF16 as a hotfix for version 12.1.5.3. Things to note for Engineering Hotfixes:
• The destination partition can be absent (installing to a new partition), it can hold a different major or minor release (overwriting old partition) or it can have the base release/hotfix/point release on which the engineering hotfix is based. Regardless of the state of the destination, the installation requirements for an engineering hotfix remain the same.
• Engineering hotfix images always require the base image from which it is created to be present in the image files (located in /shared/images) along with the engineering hotfix image file. This because they are considering partial installation files and consequently need the base image to be present to complete an installation. Using the example above, the hotfix must be copied to BIG-IP alongside the 12.1.5.3 base ISO. Point releases include the full software (which replaced hotfixes for 13.1.0.1+), so you do not need to have a base image.

F5 Deployment Guide Updating or Upgrading the BIG-IP6
• All other preparation and installation instructions for Engineering Hotfixes are the same as any other release type.
For more information on installing Engineering hotfixes, see K13123: Managing BIG-IP product hotfixes and K55025573: Engineering hotfix installation overview.
Implications of performing an update versus upgrade Understanding whether you are performing an update versus an upgrade helps you prepare better for the installation. If you are performing an upgrade, understand the new functionality delivered in the release and whether it is applicable to you. Based on the assessment, plan for the necessary certification, additional validation and maintenance windows. Updates on the other hand do not introduce changes to default behavior. Hence they may not require the exhaustive validation and certification steps that is needed for an upgrade. Some critical updates are likely to contain security fixes and you are best positioned by installing those updates in a time sensitive manner. Refer to K51812227: Understanding security advisory versioning to determine if a security vulnerability affects or is fixed for a specific F5 product or version. See K4918: Overview of the F5 critical issue hotfix policy for further details on how F5 provides temporary code patches or engineering hotfixes to address issues between normal new Major, Minor, Maintenance, and Point software releases.
F5 recommends that customers continuously update or upgrade their BIG-IP software to take advantage of vulnerability fixes, hardening, and new functionality in the latest released versions.
Recommendations for updating or upgradingIf your priorities are security and sustainability, the best choice is the latest maintenance release of a Long-Term Stability Release version.
• Long-Term Stability Release versions have 1 for their minor release number (x.1.x), and they are not available for a period of time after a major release (x.0.x).
• The latest maintenance release of a Long-Term Stability Release version (x.1.latest) can be between x.1.0 and x.1.n.
We recommend you review K5903: BIG-IP software support policy so that you know:
• Which BIG-IP versions currently have Long-Term Stability Release versions (x.1.x) or only major release versions (x.0.x).
• The latest maintenance release for each Long-Term Stability Release version (x.1.latest) or major release version (x.0.latest).
• The date when each BIG-IP version reaches—or has already reached—End of Software Development (EoSD) and End of Technical Support (EoTS).
We also recommend you review K8986: F5 software lifecycle policy for complete details on the definitions of each release type, and the duration of time that F5 supports major release and Long-Term Stability Release versions.
You must determine which software release best meets the needs of your specific environment. The best practice is to regularly update to the most recent maintenance release and latest point release, if applicable, for each Long-Term Stability Release version. This ensures you have the latest security fixes and maximum stability, as updating to a maintenance or point release will not introduce a change in existing default behavior for that Long-Term Stability Release version.
Note To ensure you have the most advanced features, new protocol support, and security capabilities, F5 recommends that you update or upgrade your BIG-IP appliances to at least BIG-IP 14.1.0 and your BIG-IP VEs to at least BIG-IP 15.1.0. For more information, see the release notes for BIG-IP 14.1.0 and BIG-IP 15.1.0.
You can also refer to F5 iHealth for general update or upgrade suggestions (requires an account). From https://ihealth.f5.com/, click the QKView, then click to Status > Overview if necessary. In the Diagnostic section, look at the Evaluation row. There you see general update and upgrade suggestions.
F5 recommends you review the release notes for the release you select for details about new features, release fixes, behavior changes, and known issues, module combination and memory considerations, and additional user documentation for the release. See https://support.f5.com/csp/knowledge-center/software/BIG-IP and select your product module and version.
Also see Section 8: Top 10 recommended practices for keeping your BIG-IP up-to-date on page 80 for F5 recommended steps for keeping your BIG-IP current.

F5 Deployment Guide Updating or Upgrading the BIG-IP7
Section 2: Preparing to Update or Upgrade
This section describes the steps to take to prepare for an update or upgrade.
Choosing a BIG-IP versionThe first task is to choose a BIG-IP version to update or upgrade.
1. Obtain your BIG-IP platform informationTo update or upgrade your BIG-IP environment, you must know your BIG-IP platform type.
h BIG-IP hardware platforms Hardware platforms have a model name and a platform type. Additionally, you must know if you have a BIG-IP hardware platform, or BIG-IP hardware platform with the Virtual Clustered Multiprocessing (vCMP) module. To determine your BIG-IP model and platform type, see K13144: Determining the BIG-IP model and platform type.
h BIG-IP VE platforms There are two types of BIG-IP Virtual Edition (VE) platforms: cloud type and hypervisor type.
2. Determine the software versionNext, determine the software version(s).
h For BIG-IP hardware platforms Refer to K9476: The F5 hardware/software compatibility matrix. If you are upgrading a vCMP host or guest, to determine the BIG-IP software versions that are compatible between your hosts and guests, refer to K14088: vCMP host and compatible guest version matrix.
h For BIG-IP VE platforms If you have a BIG-IP VE cloud, refer to Cloud platforms: BIG-IP VE supported platforms on clouddocs.f5.com. If you have BIG-IP VE hypervisor, refer to Hypervisors: BIG-IP VE supported platforms on clouddocs.f5.com.
3. Select a software releaseThe next task is to select a release type appropriate for your environment and ensure you review the software lifecycle policy and product release notes. Review Section 1: Overview on page 4 for information on versioning and recommendations. Software releases are available on https://downloads.f5.com/.
4. Review the upgrade path for your BIG-IP software After you select a suitable software release, refer to the following article so that you are aware of the supported BIG-IP upgrade paths: K13845: Overview of supported BIG-IP upgrade paths and an upgrade planning reference.
Preparing to update or upgrade a basic configurationUse this section to learn about the procedures commonly required to prepare for a BIG-IP system update or upgrade.
Successfully updating or upgrading the BIG-IP system requires some planning and preparation, such as checking the current health of the system and backing up the configuration to a safe place on your network. Some steps are optional but recommended to ensure a better experience. Failure to perform these procedures may lead to unexpected down time and extended maintenance windows.
Consider a maintenance window When you cannot guarantee the successful outcome of a future update or upgrade with full confidence, F5 recommends you schedule a maintenance window. The duration of the maintenance window is not necessarily the time when the service is down, it is the time when you cannot guarantee the service to be up as expected.

F5 Deployment Guide Updating or Upgrading the BIG-IP8
Consider the following when determining the duration of the maintenance window:
• The time required to complete the reboot into the new boot location. During this time, the active BIG-IP has no backup. When the active BIG-IP becomes unavailable before the standby completes rebooting, traffic is down until at least one BIG-IP comes up.
• The time required to confirm all the services are running as expected. For example, it is possible that after the failover, your network drops some gratuitous ARP (GARP) announcements and keeps forwarding some IP addresses to the BIG-IP that are no longer active. For more information, refer to K7332: GARPs may be lost after a BIG-IP failover event. The more virtual addresses you configured under the BIG-IP, the more time it usually takes to confirm they all are operational.
• The time required to roll back to the previous boot location. After an update or upgrade, if your applications are not functioning as expected, you may need to restore services before you can begin troubleshooting.
PrerequisitesYou must meet the following prerequisites to use the procedures in this section.
• You have administrative access to the BIG-IP system.
• You have access to the Configuration utility and the command line: (TMOS Shell (tmsh) and the Advanced shell (bash)). For information about accessing TMSH, see K12029: Accessing the TMOS Shell. Note Confirm local admin and root user passwords before you begin in case you have to perform troubleshooting
during the process.
• You installed SSH and secure copy protocol (SCP) client utilities on your local computer to access the BIG-IP system. Linux and Mac OS systems typically already have these utilities installed, but Windows users must install third party tools such as PuTTY and WinSCP. For more information about transferring files, see K175: Transferring files to or from an F5 system.
Downloading a BIG-IP image and matching MD5 checksum file Use the following procedure to download an image and MD5. You can also see K167: Downloading software and firmware from F5 for specific information.
1. Go to https://downloads.f5.com/ (requires an account).
2. From the BIG-IP Product Family, select the appropriate Product Line, such as BIG-IP v16.x.
3. From the drop-down list at the top of the page, ensure the proper version is selected (the latest version appears by default).
4. Click the appropriate release (such as 16.0.1).
5. On the EULA page, click I Accept to accept the end user license agreement.
6. On the Select a Download page, click the appropriate ISO (such as BIGIP-16.0.1-0.0.3.iso) and MD5 (such as BIGIP-16.0.1-0.0.3.iso.md5). The checksum file is a text file that contains the calculated checksum value for the corresponding image file.
7. Click the download location closest to your physical location. The file downloads.
Verify the MD5 checksum of the BIG-IP update or upgrade imageF5 provides several methods of performing image verification of downloaded software. For methods other than MD5 verification, see K24341140: Verifying BIG-IP software images using SIG and PEM files.
This procedure depends on whether you are using a Windows or Mac OS/Linux system.
Windows systems
On Windows 7 and later, use the certutil utility to generate a hash checksum. See certutil for more information on this application.
1. From the Windows Command prompt (cmd), use the cd command to change directories to where you downloaded the BIG-IP update or upgrade image and MD5 checksum file. For example: c:\Users\JohnDoe>cd Desktop.
F5 Deployment Guide Updating or Upgrading the BIG-IP9
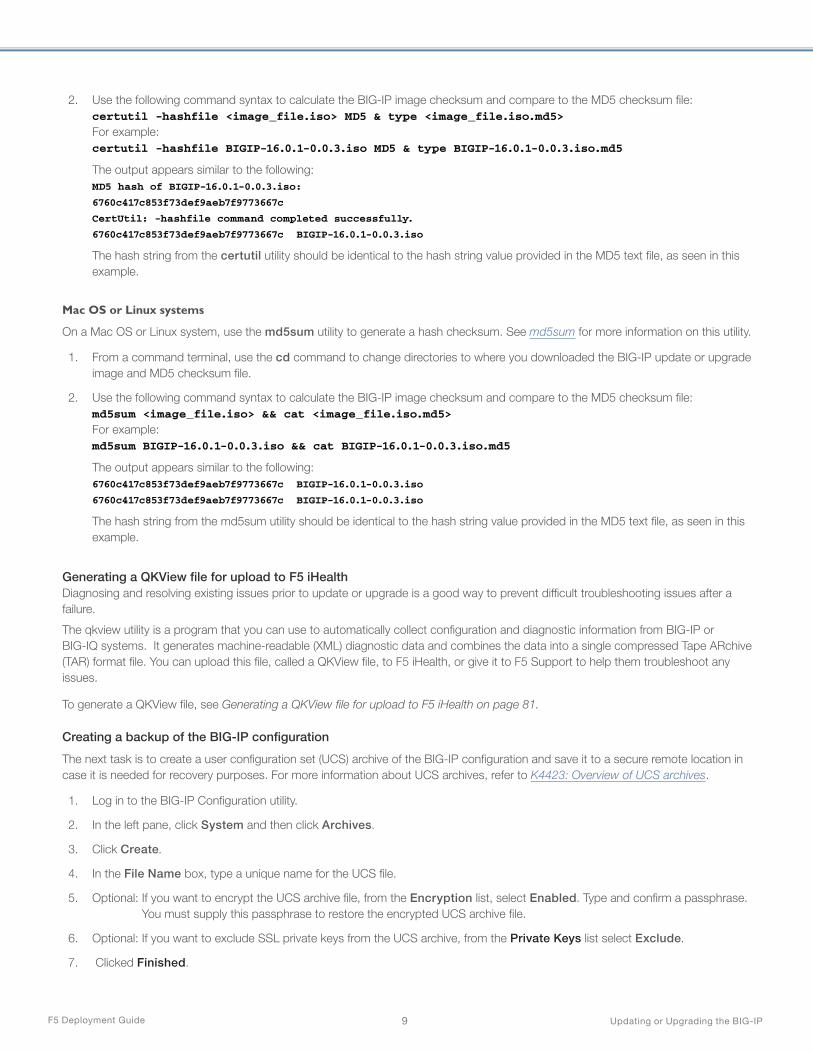
2. Use the following command syntax to calculate the BIG-IP image checksum and compare to the MD5 checksum file: certutil -hashfile <image_file.iso> MD5 & type <image_file.iso.md5> For example: certutil -hashfile BIGIP-16.0.1-0.0.3.iso MD5 & type BIGIP-16.0.1-0.0.3.iso.md5
The output appears similar to the following: MD5 hash of BIGIP-16.0.1-0.0.3.iso:
6760c417c853f73def9aeb7f9773667c
CertUtil: -hashfile command completed successfully.
6760c417c853f73def9aeb7f9773667c BIGIP-16.0.1-0.0.3.iso
The hash string from the certutil utility should be identical to the hash string value provided in the MD5 text file, as seen in this example.
Mac OS or Linux systems
On a Mac OS or Linux system, use the md5sum utility to generate a hash checksum. See md5sum for more information on this utility.
1. From a command terminal, use the cd command to change directories to where you downloaded the BIG-IP update or upgrade image and MD5 checksum file.
2. Use the following command syntax to calculate the BIG-IP image checksum and compare to the MD5 checksum file: md5sum <image_file.iso> && cat <image_file.iso.md5> For example: md5sum BIGIP-16.0.1-0.0.3.iso && cat BIGIP-16.0.1-0.0.3.iso.md5
The output appears similar to the following: 6760c417c853f73def9aeb7f9773667c BIGIP-16.0.1-0.0.3.iso
6760c417c853f73def9aeb7f9773667c BIGIP-16.0.1-0.0.3.iso
The hash string from the md5sum utility should be identical to the hash string value provided in the MD5 text file, as seen in this example.
Generating a QKView file for upload to F5 iHealth Diagnosing and resolving existing issues prior to update or upgrade is a good way to prevent difficult troubleshooting issues after a failure.
The qkview utility is a program that you can use to automatically collect configuration and diagnostic information from BIG-IP or BIG-IQ systems. It generates machine-readable (XML) diagnostic data and combines the data into a single compressed Tape ARchive (TAR) format file. You can upload this file, called a QKView file, to F5 iHealth, or give it to F5 Support to help them troubleshoot any issues.
To generate a QKView file, see Generating a QKView file for upload to F5 iHealth on page 81.
Creating a backup of the BIG-IP configuration
The next task is to create a user configuration set (UCS) archive of the BIG-IP configuration and save it to a secure remote location in case it is needed for recovery purposes. For more information about UCS archives, refer to K4423: Overview of UCS archives.
1. Log in to the BIG-IP Configuration utility.
2. In the left pane, click System and then click Archives.
3. Click Create.
4. In the File Name box, type a unique name for the UCS file.
5. Optional: If you want to encrypt the UCS archive file, from the Encryption list, select Enabled. Type and confirm a passphrase. You must supply this passphrase to restore the encrypted UCS archive file.
6. Optional: If you want to exclude SSL private keys from the UCS archive, from the Private Keys list select Exclude.
7. Clicked Finished.

F5 Deployment Guide Updating or Upgrading the BIG-IP10
8. When the system completes the backup process, examine the status page for any reported errors before proceeding.
9. Click OK to return to the Archive list.
10. Click the name of the UCS file you just created.
11. Click Download: <filename.ucs> to download the UCS file, then save to a secure remote location.
Creating a backup of the root crontab fileThe root user crontab file (/var/spool/cron/root) is not captured in the UCS archive. If you customized the root user crontab file, make a backup of this file so you can add your customization to the new crontab file after you update or upgrade.
For instructions, see Creating a backup of the root crontab file on page 82.
Reactivating the BIG-IP license
BIG-IP license enforcement allows software upgrades for devices with active service contracts and that have a license activation date that is greater than the license check date of a given software release. Reactivating the license ensures the configuration loads after update or upgrade. For example, the license check date built in to BIG-IP 16.0.0 is June 16, 2020, so to upgrade your BIG-IP system to 16.0.0, your BIG-IP license service check date should be June 16, 2020 or later. For more information, see K7727: License activation may be required before a software upgrade for the BIG-IP or Enterprise Manager system.
Verify the service check date of your license using the following procedure.
1. Log in to the command line of the BIG-IP system.
2. Use one of the following commands to view the service check date of your license:
• TMSH tmsh show sys license | grep "Service Check Date"
• Advanced shell: grep "Service check date" bigip.license
3. You see the output similar to the following based on how you ran the command:
• TMSH Service Check Date 2020/06/07
• Advanced shell: Service check date : 20200607
The date format is year-month-day, so this example output is June 7, 2020.
4. Compare the output from step 2 to the license check date for your BIG-IP version based on the License Check Date in K7727: License activation may be required before a software upgrade for the BIG-IP or Enterprise Manager system. If the service check date is earlier than the License Check date, you need to reactivate your license.
Reactivating the system license if necessaryUse the following procedure if your service check date is earlier than the License Check date.
i Important The license reactivation process may reload the configuration and temporarily interrupt traffic processing. F5 recommends performing this procedure during a scheduled maintenance window.
1. Log in to the BIG-IP Configuration utility.
2. From the navigation pane, click System > License > Re-activate.
3. If your system has outbound Internet access, in the Activation Method row, select Automatic. If your system does not have Internet access to the F5 license server, you must use Manual.
4. Click Next, and then follow the instructions (if necessary). For more information about license activation, see K7752: Licensing the BIG-IP system.
F5 Deployment Guide Updating or Upgrading the BIG-IP11
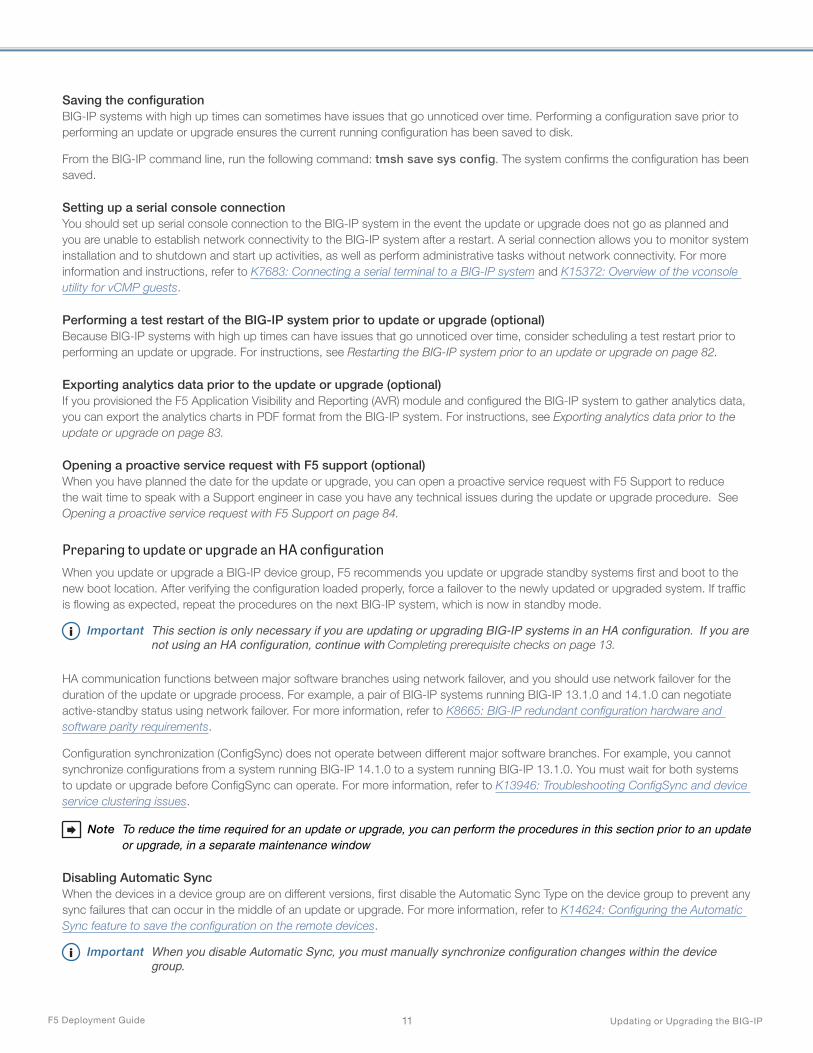
Saving the configurationBIG-IP systems with high up times can sometimes have issues that go unnoticed over time. Performing a configuration save prior to performing an update or upgrade ensures the current running configuration has been saved to disk.
From the BIG-IP command line, run the following command: tmsh save sys config. The system confirms the configuration has been saved.
Setting up a serial console connection You should set up serial console connection to the BIG-IP system in the event the update or upgrade does not go as planned and you are unable to establish network connectivity to the BIG-IP system after a restart. A serial connection allows you to monitor system installation and to shutdown and start up activities, as well as perform administrative tasks without network connectivity. For more information and instructions, refer to K7683: Connecting a serial terminal to a BIG-IP system and K15372: Overview of the vconsole utility for vCMP guests.
Performing a test restart of the BIG-IP system prior to update or upgrade (optional)Because BIG-IP systems with high up times can have issues that go unnoticed over time, consider scheduling a test restart prior to performing an update or upgrade. For instructions, see Restarting the BIG-IP system prior to an update or upgrade on page 82.
Exporting analytics data prior to the update or upgrade (optional)If you provisioned the F5 Application Visibility and Reporting (AVR) module and configured the BIG-IP system to gather analytics data, you can export the analytics charts in PDF format from the BIG-IP system. For instructions, see Exporting analytics data prior to the update or upgrade on page 83.
Opening a proactive service request with F5 support (optional)When you have planned the date for the update or upgrade, you can open a proactive service request with F5 Support to reduce the wait time to speak with a Support engineer in case you have any technical issues during the update or upgrade procedure. See Opening a proactive service request with F5 Support on page 84.
Preparing to update or upgrade an HA configuration When you update or upgrade a BIG-IP device group, F5 recommends you update or upgrade standby systems first and boot to the new boot location. After verifying the configuration loaded properly, force a failover to the newly updated or upgraded system. If traffic is flowing as expected, repeat the procedures on the next BIG-IP system, which is now in standby mode.
i Important This section is only necessary if you are updating or upgrading BIG-IP systems in an HA configuration. If you are not using an HA configuration, continue with Completing prerequisite checks on page 13.
HA communication functions between major software branches using network failover, and you should use network failover for the duration of the update or upgrade process. For example, a pair of BIG-IP systems running BIG-IP 13.1.0 and 14.1.0 can negotiate active-standby status using network failover. For more information, refer to K8665: BIG-IP redundant configuration hardware and software parity requirements.
Configuration synchronization (ConfigSync) does not operate between different major software branches. For example, you cannot synchronize configurations from a system running BIG-IP 14.1.0 to a system running BIG-IP 13.1.0. You must wait for both systems to update or upgrade before ConfigSync can operate. For more information, refer to K13946: Troubleshooting ConfigSync and device service clustering issues.
Note To reduce the time required for an update or upgrade, you can perform the procedures in this section prior to an update or upgrade, in a separate maintenance window
Disabling Automatic Sync When the devices in a device group are on different versions, first disable the Automatic Sync Type on the device group to prevent any sync failures that can occur in the middle of an update or upgrade. For more information, refer to K14624: Configuring the Automatic Sync feature to save the configuration on the remote devices.
i Important When you disable Automatic Sync, you must manually synchronize configuration changes within the device group.
F5 Deployment Guide Updating or Upgrading the BIG-IP12
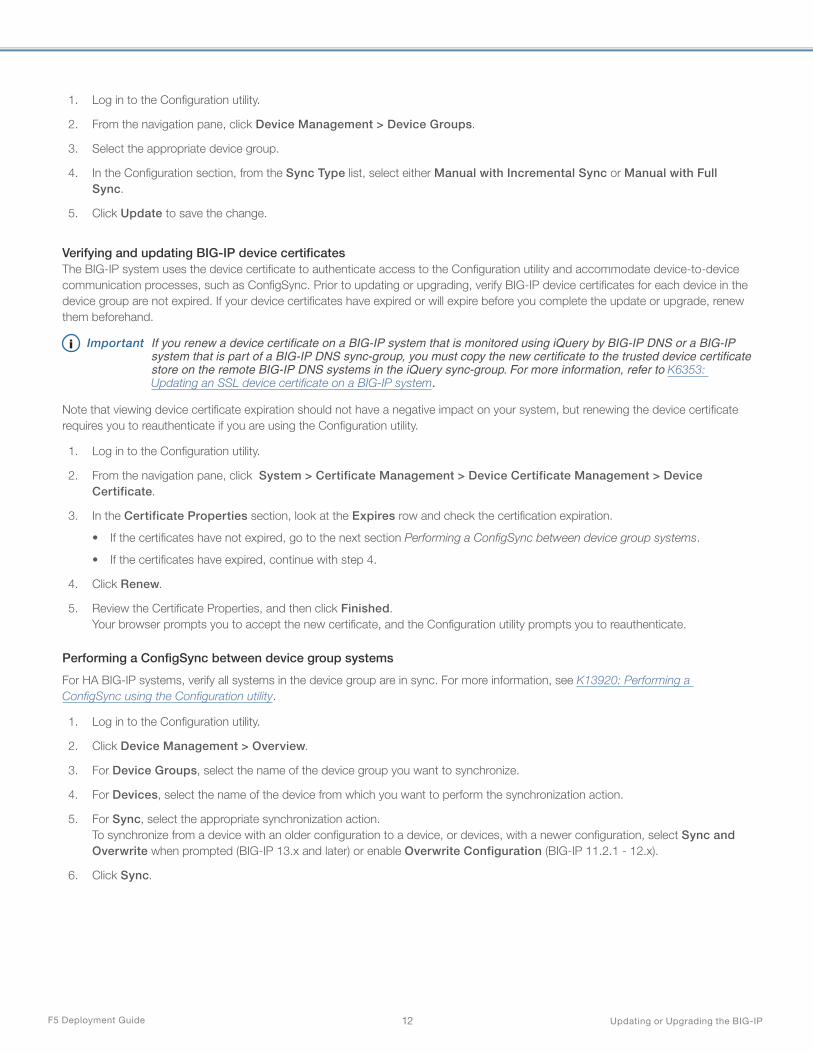
1. Log in to the Configuration utility.
2. From the navigation pane, click Device Management > Device Groups.
3. Select the appropriate device group.
4. In the Configuration section, from the Sync Type list, select either Manual with Incremental Sync or Manual with Full Sync.
5. Click Update to save the change.
Verifying and updating BIG-IP device certificates The BIG-IP system uses the device certificate to authenticate access to the Configuration utility and accommodate device-to-device communication processes, such as ConfigSync. Prior to updating or upgrading, verify BIG-IP device certificates for each device in the device group are not expired. If your device certificates have expired or will expire before you complete the update or upgrade, renew them beforehand.
i Important If you renew a device certificate on a BIG-IP system that is monitored using iQuery by BIG-IP DNS or a BIG-IP system that is part of a BIG-IP DNS sync-group, you must copy the new certificate to the trusted device certificate store on the remote BIG-IP DNS systems in the iQuery sync-group. For more information, refer to K6353: Updating an SSL device certificate on a BIG-IP system.
Note that viewing device certificate expiration should not have a negative impact on your system, but renewing the device certificate requires you to reauthenticate if you are using the Configuration utility.
1. Log in to the Configuration utility.
2. From the navigation pane, click System > Certificate Management > Device Certificate Management > Device Certificate.
3. In the Certificate Properties section, look at the Expires row and check the certification expiration.
• If the certificates have not expired, go to the next section Performing a ConfigSync between device group systems.
• If the certificates have expired, continue with step 4.
4. Click Renew.
5. Review the Certificate Properties, and then click Finished. Your browser prompts you to accept the new certificate, and the Configuration utility prompts you to reauthenticate.
Performing a ConfigSync between device group systems
For HA BIG-IP systems, verify all systems in the device group are in sync. For more information, see K13920: Performing a ConfigSync using the Configuration utility.
1. Log in to the Configuration utility.
2. Click Device Management > Overview.
3. For Device Groups, select the name of the device group you want to synchronize.
4. For Devices, select the name of the device from which you want to perform the synchronization action.
5. For Sync, select the appropriate synchronization action. To synchronize from a device with an older configuration to a device, or devices, with a newer configuration, select Sync and Overwrite when prompted (BIG-IP 13.x and later) or enable Overwrite Configuration (BIG-IP 11.2.1 - 12.x).
6. Click Sync.

F5 Deployment Guide Updating or Upgrading the BIG-IP13
Completing prerequisite checks Before you start your update or upgrade process there are specific tasks and checks you must complete to ensure that usually fall into one of the following categories:
• You are running supported BIG-IP versions
• You have access to key information such as a the device serial number
• Have the needed privileges to perform the update or upgrade and credentials to complete the different activities
• Performed specific preparatory tasks as described in this section
• Ensuring the software that you are updating or upgrading is compatible with the hardware you are running
• Ensure you have the needed licenses
• Reviewing the recommended documentation
Meticulously performing these prerequisite checks avoid surprises during the update or upgrade process itself and sets you up for a smooth and successful experience.
Once you have completed the preparation, continue with the section applicable to your BIG-IP:
• Section 3: Updating or upgrading a Standalone or HA Pair of BIG-IP Systems or VEs on page 14
• Section 4: Updating or upgrading BIG-IP on a VIPRION HA Pair on page 23
• Section 5: Updating or upgrading BIG-IP on vCMP-Based Systems on page 28
• Section 6: Updating or upgrading BIG-IP on Major Cloud Providers on page 38
• Section 7: Advanced Tools and Automation on page 71

F5 Deployment Guide Updating or Upgrading the BIG-IP14
Section 3: Updating or upgrading a Standalone or HA Pair of BIG-IP Systems or VEsThis section contains the procedures for updating or upgrading standalone or HA pairs of BIG-IP systems or Virtual Editions.
While most of the configuration for standalone and HA pairs is identical, there are additional tasks to perform on HA systems, which are clearly marked with HA Configuration.
PrerequisitesThe following are prerequisites for upgrading and updating a standalone or HA pair of BIG-IP systems or VEs.
• You are running BIG-IP 11.6.x or later.
• You have access to the device serial terminal console or virtual serial terminal console for VE systems.
• You have administrative (root) permissions to the BIG-IP system.
• You have followed the relevant procedures in Section 2: Preparing to Update or Upgrade on page 7.
• For TMOS Shell users: You have installed a secure copy (SCP) client utility on your local computer to upload files to the BIG-IP system. Linux and Mac OS systems typically already have SCP utilities installed, but Windows users must install third party utilities such as WinSCP.
• HA Configuration: In BIG-IP HA configurations, you first perform the update or upgrade on the standby system, then failover and test applications, before you switch to the peer BIG-IP systems. You must have access to all associated BIG-IP systems.
Importing and uploading the software imageThe first task is to import and upload the software image you downloaded in Downloading a BIG-IP image and matching MD5 checksum file on page 8.
You can either use TMSH (next) or the Configuration utility (skip to Using the Configuration utility to import and upload the software image on page 15).
Using TMSH to import and upload the software imageSecure copy (SCP) protocol is the preferred method to transfer files to or from an F5 device. SCP securely transfers files between hosts using the SSH protocol for authentication, encryption, and data transfer. For more information about transferring files to or from an F5 system, refer to K175: Transferring files to or from an F5 system.
The procedure depends on whether you are using a Windows system or a Mac OS/Linux system.
Windows systemsThis procedure assumes you are using WinSCP. The WinSCP utility is a third-party software that provides a graphical user interface to transfer files between systems using SCP. For instructions on installing the software, refer to your software vendor documentation.
1. Open the WinSCP utility on your Windows computer.
2. In the Login window, select New Site.
3. From the File Protocol list, select SCP.
4. In the Hostname field, type the management IP address of your BIG-IP system. HA Configuration: If you are using an HA configuration, this is on the standby device.
5. In the User name field, type root.
6. In the Password field, type the BIG-IP root user password.
7. Click the Login button. If this is the first time you have connected to this BIG-IP system, a pop-up window prompts you to continue, with a message similar to the following: Continue connecting to an unknown server and add its host key to a cache?
8. Click Yes to continue.
9. In the left pane, locate the BIG-IP update or upgrade image you downloaded in Downloading a BIG-IP image and matching MD5 checksum file on page 8, and move it to the /shared/images directory of your BIG-IP system on the right pane.
Continue with Performing the software update or upgrade on page 15.

F5 Deployment Guide Updating or Upgrading the BIG-IP15
Mac OS or Linux systems On a Mac OS or Linux system, the SCP utility is typically already installed. If you need to install the SCP utility, refer to your software vendor documentation.
1. Launch a command terminal.
2. Use the SCP utility to upload the BIG-IP update or upgrade image to your BIG-IP system. For example, to upload the BIGIP-16.0.1-0.0.3.iso image, you enter the following command:
scp BIGIP-16.0.1-0.0.3.iso [email protected]:/shared/images/
3. When prompted, enter your BIG-IP root user password. HA Configuration: If you are using an HA configuration, this is on the standby device.
Continue with Performing the software update or upgrade.
Using the Configuration utility to import and upload the software imageUse the following procedure to upload the software image using the BIG-IP Configuration utility.
1. Log in to the Configuration utility with administrative privileges. HA Configuration: If you are using an HA configuration, this is on the standby device.
2. From the navigation pane, click System > Software Management. You see information about the current BIG-IP installed images.
3. In the Available Images section, click the Import button on the right.
4. Click the Choose File button, and then browse to the location you saved the BIG-IP software image from Downloading a BIG-IP image and matching MD5 checksum file on page 8.
5. Click Import. Do NOT leave the page before the import is complete.
Performing the software update or upgrade The update or upgrade process leaves the existing boot location unaffected so you can boot back in to the original volume in the event any issues occur during the process. Therefore, to limit the duration of the maintenance window, you can perform the actual installation during normal operation, and then schedule a separate maintenance window to reboot the BIG-IP system into the newly updated or upgraded software volume. The configuration from the active boot location automatically copies to the new boot location during the process. You cannot install to the current active boot location.
Ensure your system is already booted into the software volume that contains the configuration you are planning to update or upgrade. If the system is not already booted into that volume, restart your system to that software volume before you begin the following procedure. By default, during the process, the BIG-IP system imports the current running configuration from the active volume into the target volume. To prevent the system from importing the configuration during the update or upgrade process, see K13438: Controlling configuration import when performing software installations.
Impact of procedure: If the BIG-IP system serves high volume traffic, we recommend you perform the entire update or upgrade during a maintenance window, to lessen the impact on a busy system.
You can use the Configuration utility (next) or TMSH (skip to Updating or upgrading the software using TMSH on page 16).
Updating or upgrading the software using Configuration utility Use this procedure if you are using the BIG-IP Configuration utility.
1. Log into the Configuration utility.
2. From the navigation pane, click System > Software Management > Image list.
3. Click the check box next to the new image you are installing.
4. Click Install. The Install dialog box opens.

F5 Deployment Guide Updating or Upgrading the BIG-IP16
5. From the Select Disk list, select an available disk.
6. In the Volume set name box, enter a new name, or select an existing volume to overwrite.
Note You can use any combination of lowercase alphanumeric characters (a-z, 0-9) and the hyphen (-). The volume set name can be from 1 to 32 characters in length but cannot be only one 0 (zero) character (for example HD1.0 or MD1.0). For instance, if the HD1 disk is active and you enter Development into Volume set name, the system creates a volume set named HD1.Development and installs the specified software to the new volume set. If the string you enter does not match an existing volume set, the system creates the volume set and installs the software.
7. Click Install. To see the installation progress, in the Installed Images section, see the Install Status column. Continue with Rebooting to the new version on page 17.
Updating or upgrading the software using TMSHUse the following procedure if you are using TMSH.
HA Configuration: During the update or upgrade process on the standby BIG-IP system, the active BIG-IP has no backup. In critical environments, F5 recommends performing the entire update or upgrade during a maintenance window.
1. Log in to the command line of the BIG-IP system. HA Configuration: If you are using an HA configuration, this is on the standby device.
2. Use the following command to view information about the software images that are available for installation on the BIG-IP system: tmsh list sys software image
The output appears similar to the following:
sys software image BIGIP-14.1.0-0.0.116.iso {
build 0.0.116
build-date "Wed Nov 14 18 41 56 PST 2018"
checksum acb4537e37557ada7f60267d5f946387
file-size "2238 MB"
last-modified "Tue Sep 8 08:36:50 2020"
product BIG-IP
verified yes
version 14.1.0
}
sys software image BIGIP-16.0.1-0.0.3.iso {
build 0.0.3
build-date "Tue Jun 23 18 31 26 PDT 2020"
checksum 7d0fe1341f74567946d0e196456b9fa0
file-size "2322 MB"
last-modified "Tue Sep 8 08:37:58 2020"
product BIG-IP
verified yes
version 16.0.0
}
3. Use the following command to view information about the current BIG-IP installed images: tmsh show sys software status
Make a note of the Volume name, such as HD1.1, so you can use it when you install the update or upgrade image.
The output appears similar to the following example: ------------------------------------------------------
Sys::Software Status
Volume Product Version Build Active Status
------------------------------------------------------
HD1.1 BIG-IP 14.1.0 0.0.116 yes complete
F5 Deployment Guide Updating or Upgrading the BIG-IP17
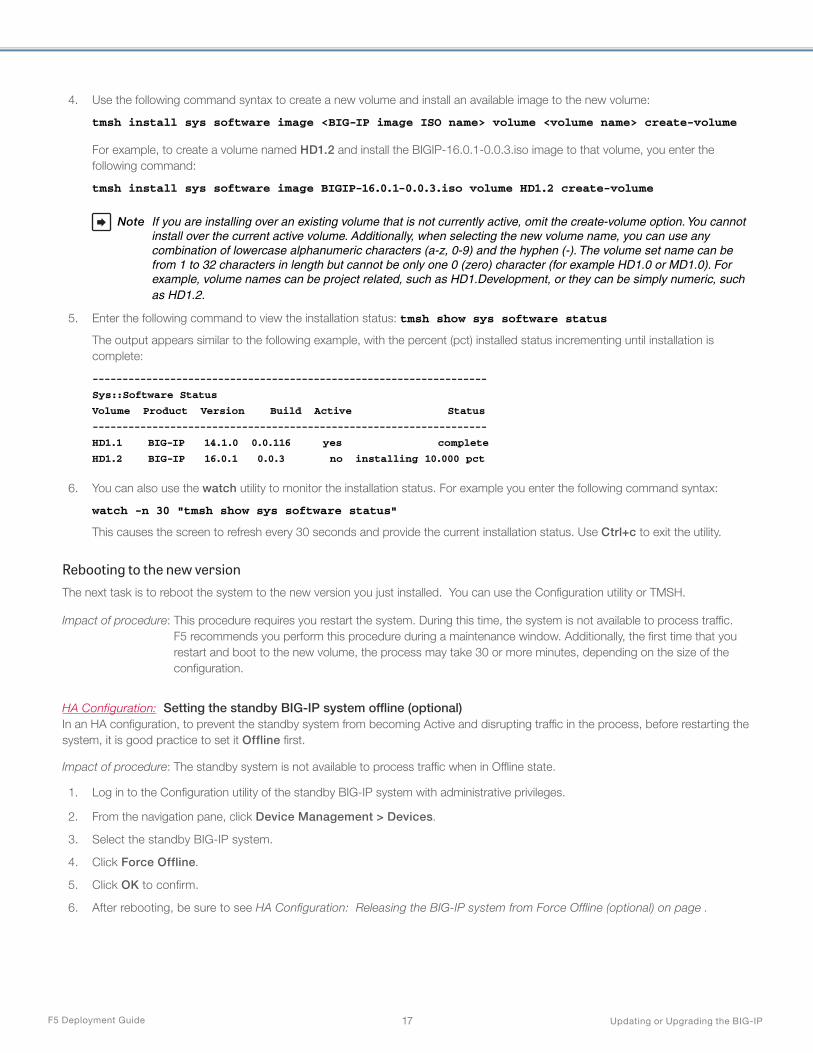
4. Use the following command syntax to create a new volume and install an available image to the new volume:
tmsh install sys software image <BIG-IP image ISO name> volume <volume name> create-volume
For example, to create a volume named HD1.2 and install the BIGIP-16.0.1-0.0.3.iso image to that volume, you enter the following command:
tmsh install sys software image BIGIP-16.0.1-0.0.3.iso volume HD1.2 create-volume
Note If you are installing over an existing volume that is not currently active, omit the create-volume option. You cannot install over the current active volume. Additionally, when selecting the new volume name, you can use any combination of lowercase alphanumeric characters (a-z, 0-9) and the hyphen (-). The volume set name can be from 1 to 32 characters in length but cannot be only one 0 (zero) character (for example HD1.0 or MD1.0). For example, volume names can be project related, such as HD1.Development, or they can be simply numeric, such as HD1.2.
5. Enter the following command to view the installation status: tmsh show sys software status
The output appears similar to the following example, with the percent (pct) installed status incrementing until installation is complete:
------------------------------------------------------------------
Sys::Software Status
Volume Product Version Build Active Status
------------------------------------------------------------------
HD1.1 BIG-IP 14.1.0 0.0.116 yes complete
HD1.2 BIG-IP 16.0.1 0.0.3 no installing 10.000 pct
6. You can also use the watch utility to monitor the installation status. For example you enter the following command syntax:
watch -n 30 "tmsh show sys software status"
This causes the screen to refresh every 30 seconds and provide the current installation status. Use Ctrl+c to exit the utility.
Rebooting to the new version The next task is to reboot the system to the new version you just installed. You can use the Configuration utility or TMSH.
Impact of procedure: This procedure requires you restart the system. During this time, the system is not available to process traffic. F5 recommends you perform this procedure during a maintenance window. Additionally, the first time that you restart and boot to the new volume, the process may take 30 or more minutes, depending on the size of the configuration.
HA Configuration: Setting the standby BIG-IP system offline (optional)In an HA configuration, to prevent the standby system from becoming Active and disrupting traffic in the process, before restarting the system, it is good practice to set it Offline first.
Impact of procedure: The standby system is not available to process traffic when in Offline state.
1. Log in to the Configuration utility of the standby BIG-IP system with administrative privileges.
2. From the navigation pane, click Device Management > Devices.
3. Select the standby BIG-IP system.
4. Click Force Offline.
5. Click OK to confirm.
6. After rebooting, be sure to see HA Configuration: Releasing the BIG-IP system from Force Offline (optional) on page .

F5 Deployment Guide Updating or Upgrading the BIG-IP18
Rebooting to new version using Configuration utility Use this procedure to reboot the BIG-IP to the new version (if you are using TMSH, skip to the following procedure).
1. Log in to the Configuration utility with administrative privileges.
2. From the navigation pane, click System > Software Management > Boot Locations to view the current active BIG-IP boot location.
3. Select the Boot Location of the newly installed software volume. This is the name from step 6 of Updating or upgrading the software using Configuration utility on page 15. For example, HD1.newimage.
4. Click Activate to restart the system and boot to the specified location.
Note If there have been no changes since you performed the update or upgrade, you do not need to set Install Configuration to Yes when activating the new volume. By default, during the update or upgrade process, the BIG-IP system imports the current configuration from the active volume into the target volume. If you have modified the BIG-IP configuration since the update or upgrade was performed, you can set Install Configuration to Yes to update the target volume before rebooting to that volume. For more information, refer to K14704: Installing a configuration when activating a boot location.
5. Click Ok to confirm you want to boot into another volume.
i Important After you click OK, the system immediately begins restarting. All existing connections are dropped, and no traffic passes until the restart completes and the BIG-IP configuration loads.
Continue with Checking for a successful update or upgrade on page 19.
Rebooting to the new version using TMSH Use the following procedure to boot into the new version using TMSH.
1. Log in to the command line of the BIG-IP system.
2. Use the following command to view the current active BIG-IP boot location: tmsh show sys software status
The output appears similar to the following example, where HD1.1 is the current active boot location:
------------------------------------------------------
Sys::Software Status
Volume Product Version Build Active Status
------------------------------------------------------
HD1.1 BIG-IP 14.1.0 0.0.116 yes complete
HD1.2 BIG-IP 16.0.1 0.0.3 no complete
3. Optional: Use the following syntax to copy the configuration from the current active configuration to the new boot location prior to restarting and booting into the new volume.
cpcfg --source=<volume name to copy the configuration from> <newly installed software volume>
Note When you install a new image, the configuration from the current active volume is automatically installed to the new boot location. If no changes have occurred to the configuration since installing the new image, skip this step and proceed to step 4.
For example, to copy the configuration from the active volume HD1.1 to the newly installed volume HD1.2, use the following command: cpcfg --source=HD1.1 HD1.2
The output appears similar to the following example:
info: Getting configuration from HD1.1
info: Copying configuration to HD1.2
info: Applying configuration to HD1.2

F5 Deployment Guide Updating or Upgrading the BIG-IP19
4. Use the following command syntax to restart the system and boot to the updated or upgraded software volume.
tmsh reboot volume <volume name>
For example, to boot to the volume named HD1.2, enter the following command:
tmsh reboot volume HD1.2
You see a message stating the system will reboot momentarily.
i Important After you enter this command, the system immediately begins restarting. All existing connections are dropped, and no traffic passes until the restart completes and the BIG-IP configuration loads.
Checking for a successful update or upgrade Once you have finished with the update or upgrade, the next task is to make sure it was successful.
Checking the update or upgrade using the Configuration utilityUse the following procedure if you are using the BIG-IP Configuration utility (if you are using TMSH, skip to the next procedure).
1. Log in to the Configuration utility of the BIG-IP system. HA Configuration: If you are using an HA configuration, this is on the standby device.
2. Go to various places in the Configuration utility, such as Local Traffic > Network Map, Network > VLANs, to visually confirm the expected configuration objects exist and are in the expected state.
3. Test the different use cases of your client applications to ensure that services are running as expected.
4. Create a QKView file and review iHealth Diagnostics for currently known issues.
a. Go to System > Support to create a QKView diagnostic file.
b. Upload the diagnostic file to iHealth and review. For more information and instructions, see Generating a QKView file for upload to F5 iHealth on page 81.
5. If you are not using an HA configuration, continue with Troubleshooting failures on page 21.
Checking the update or upgrade using the TMSH Use the following procedure if you are using TMSH.
1. Log in to the command line of the BIG-IP system. HA Configuration: If you are using an HA configuration, this is on the standby device.
2. Spot-check configuration objects to visually confirm that the expected configuration exists and is in the expected state.
For example, you can use the following commands to review common configuration elements.
list /ltm virtual <virtual_name>, show /ltm virtual <virtual_name> list /net vlan <vlan_name>
Note tmsh interactive mode provides tab completion for command options. When at the tmsh prompt, select the Tab key to see possible command options. For most objects, you can use the list command to see configured object parameters and the show command to see statistical information for the object. Also, if there are multiple objects of a certain type, such as virtual servers, you can usually specify one of those objects by entering the object name in the command. Leaving off the object name shows all objects of that type.
3. Create a QKView diagnostic file by typing the following command: run /util qkview By default, the qkview utility creates the file /var/tmp/<hostname of the BIG-IP>.qkview.
4. Use your SCP client utility to download the QKView file from your BIG-IP system to your desktop computer, then upload the file to iHealth and review. If you are not using an HA configuration, continue with Troubleshooting failures on page 21.

F5 Deployment Guide Updating or Upgrading the BIG-IP20
HA Configuration: Releasing the BIG-IP system from Force Offline (optional)
Perform this procedure if you had previously set the updated or upgraded system offline in HA Configuration: Setting the standby BIG-IP system offline (optional) on page 17.
Impact of procedure: Depending on your HA configuration and state, releasing the BIG-IP system from Force Offline may result in the system becoming Active. F5 recommends that you perform this procedure during a maintenance window.
1. Log in to the Configuration utility of the active BIG-IP system with administrative privileges.
2. From the navigation pane, click Device Management > Devices.
3. Select the name of the standby BIG-IP system.
4. Click Release Offline.
5. Click OK to confirm.
HA Configuration: Forcing the active BIG-IP to standbyThe next task in an HA configuration is to force the active system to standby, and activate the updated or upgraded system.
If the BIG-IP device has more than one traffic group, all traffic groups fail over to the next available device. On systems with more than one traffic group and more than two BIG-IP systems, you can select the next active BIG-IP system for each traffic group. For more information, refer to K15455872: Forcing an active BIG-IP system into standby mode using tmsh.
Impact of procedure: This procedure interrupts traffic during failover. F5 recommends that you perform this procedure during a maintenance window. If you encounter any problems with the newly updated or upgraded system after failover, you must repeat this procedure on the newly updated or upgraded system to fail back to the previously active system.
Forcing the active BIG-IP to standby using the Configuration utilityUse the following procedure to force the active BIG-IP to standby, and move the updated or upgraded system to the active role (if you are using TMSH, skip to the next procedure).
1. Log in to the Configuration utility of the active BIG-IP system.
2. From the navigation pane, click Device Management > Devices.
3. Hover over the status icon of the devices to determine the active system.
4. Click the name of the active BIG-IP system.
Note You cannot force the active system to standby using the Configuration utility of the standby system.
5. Click the Force to Standby button. This forces the active BIG-IP system into standby mode and moves the updated or upgraded system to the active role.
6. Test client traffic to the updated or upgraded BIG-IP system to confirm the system is processing traffic as expected.
7. Important: After confirming the health of the updated or upgraded system, repeat all of the steps on the peer BIG-IP system.
8. After completing all updates or upgrades and testing, create a new set of UCS archive files to retain backups of the new BIG-IP version configuration. For instructions, see Creating a backup of the BIG-IP configuration on page 9.
Forcing the active BIG-IP to standby using TMSHUse the following procedure to force the active BIG-IP to standby using TMSH.
1. Log in to the command line of the active BIG-IP system.
2. Enter the following command to view the current active BIG-IP system: tmsh show cm failover-status
Note You cannot directly promote the standby system to active; you can only force the active system to standby, while logged into the active system
F5 Deployment Guide Updating or Upgrading the BIG-IP21
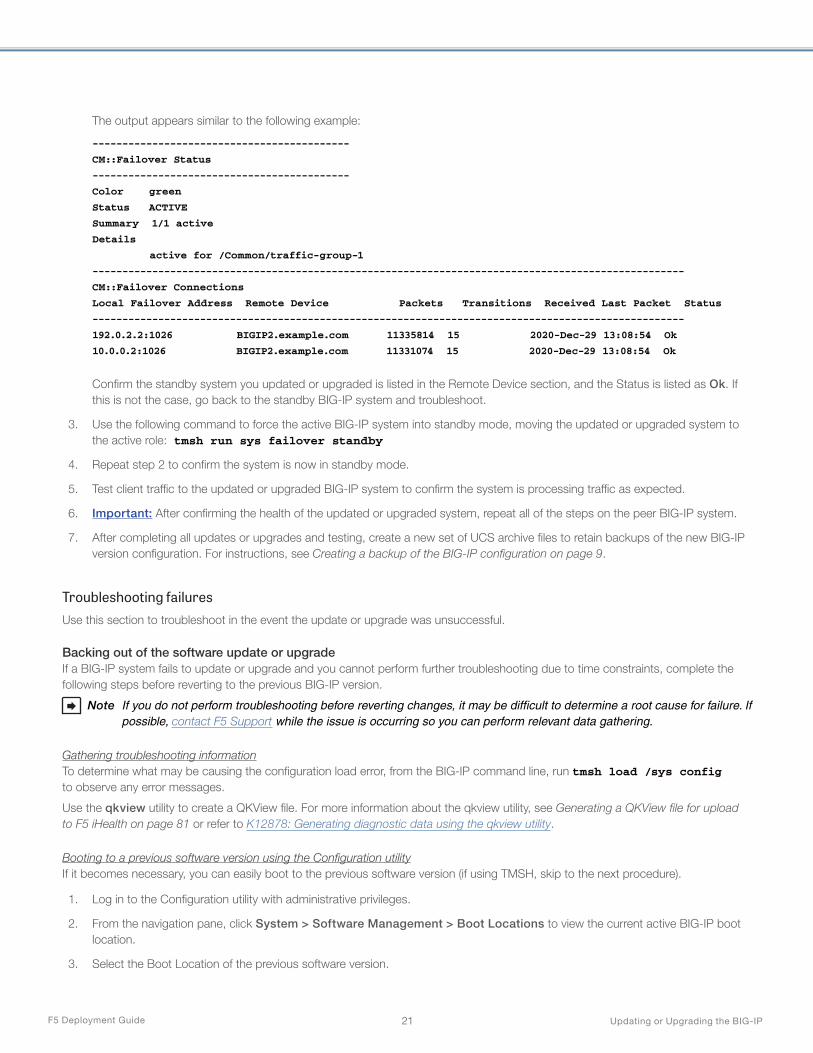
The output appears similar to the following example:
-------------------------------------------
CM::Failover Status
-------------------------------------------
Color green
Status ACTIVE
Summary 1/1 active
Details
active for /Common/traffic-group-1
---------------------------------------------------------------------------------------------------
CM::Failover Connections
Local Failover Address Remote Device Packets Transitions Received Last Packet Status
---------------------------------------------------------------------------------------------------
192.0.2.2:1026 BIGIP2.example.com 11335814 15 2020-Dec-29 13:08:54 Ok
10.0.0.2:1026 BIGIP2.example.com 11331074 15 2020-Dec-29 13:08:54 Ok
Confirm the standby system you updated or upgraded is listed in the Remote Device section, and the Status is listed as Ok. If this is not the case, go back to the standby BIG-IP system and troubleshoot.
3. Use the following command to force the active BIG-IP system into standby mode, moving the updated or upgraded system to the active role: tmsh run sys failover standby
4. Repeat step 2 to confirm the system is now in standby mode.
5. Test client traffic to the updated or upgraded BIG-IP system to confirm the system is processing traffic as expected.
6. Important: After confirming the health of the updated or upgraded system, repeat all of the steps on the peer BIG-IP system.
7. After completing all updates or upgrades and testing, create a new set of UCS archive files to retain backups of the new BIG-IP version configuration. For instructions, see Creating a backup of the BIG-IP configuration on page 9.
Troubleshooting failures Use this section to troubleshoot in the event the update or upgrade was unsuccessful.
Backing out of the software update or upgrade If a BIG-IP system fails to update or upgrade and you cannot perform further troubleshooting due to time constraints, complete the following steps before reverting to the previous BIG-IP version.
Note If you do not perform troubleshooting before reverting changes, it may be difficult to determine a root cause for failure. If possible, contact F5 Support while the issue is occurring so you can perform relevant data gathering.
Gathering troubleshooting informationTo determine what may be causing the configuration load error, from the BIG-IP command line, run tmsh load /sys config to observe any error messages.
Use the qkview utility to create a QKView file. For more information about the qkview utility, see Generating a QKView file for upload to F5 iHealth on page 81 or refer to K12878: Generating diagnostic data using the qkview utility.
Booting to a previous software version using the Configuration utilityIf it becomes necessary, you can easily boot to the previous software version (if using TMSH, skip to the next procedure).
1. Log in to the Configuration utility with administrative privileges.
2. From the navigation pane, click System > Software Management > Boot Locations to view the current active BIG-IP boot location.
3. Select the Boot Location of the previous software version.
F5 Deployment Guide Updating or Upgrading the BIG-IP22
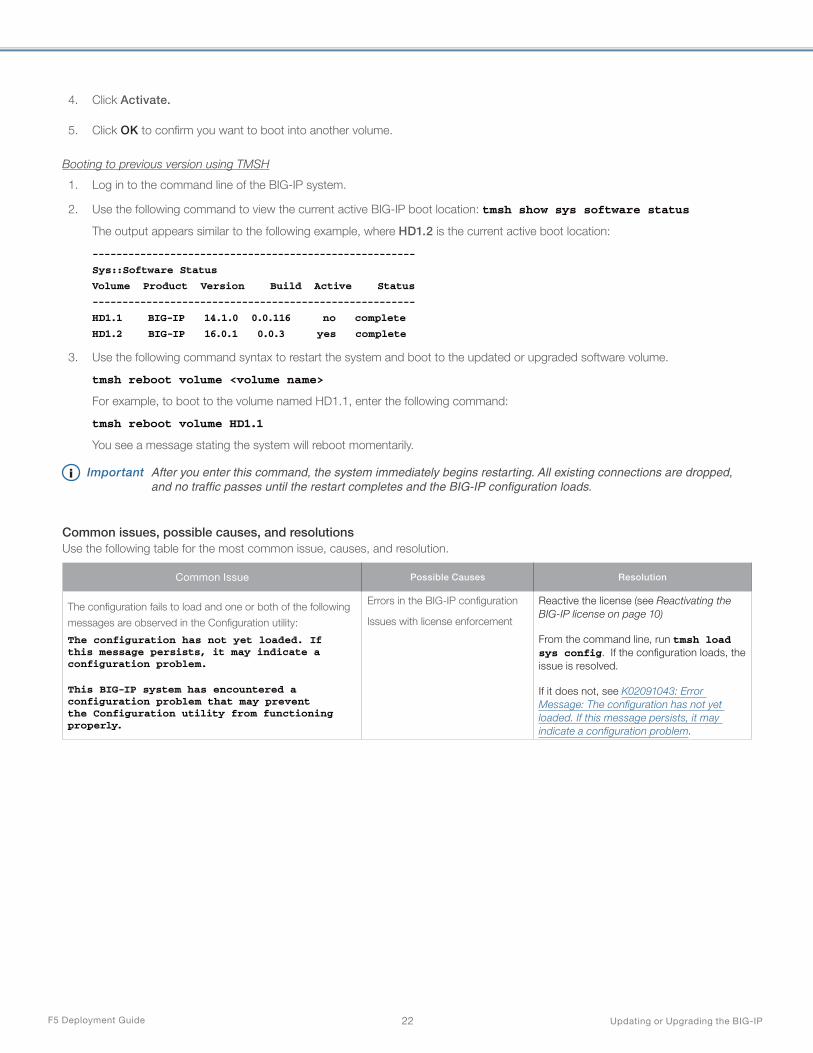
4. Click Activate.
5. Click OK to confirm you want to boot into another volume.
Booting to previous version using TMSH
1. Log in to the command line of the BIG-IP system.
2. Use the following command to view the current active BIG-IP boot location: tmsh show sys software status
The output appears similar to the following example, where HD1.2 is the current active boot location:
------------------------------------------------------
Sys::Software Status
Volume Product Version Build Active Status
------------------------------------------------------
HD1.1 BIG-IP 14.1.0 0.0.116 no complete
HD1.2 BIG-IP 16.0.1 0.0.3 yes complete
3. Use the following command syntax to restart the system and boot to the updated or upgraded software volume.
tmsh reboot volume <volume name>
For example, to boot to the volume named HD1.1, enter the following command:
tmsh reboot volume HD1.1
You see a message stating the system will reboot momentarily.
i Important After you enter this command, the system immediately begins restarting. All existing connections are dropped, and no traffic passes until the restart completes and the BIG-IP configuration loads.
Common issues, possible causes, and resolutions Use the following table for the most common issue, causes, and resolution.
Common Issue Possible Causes Resolution
The configuration fails to load and one or both of the following
messages are observed in the Configuration utility:
The configuration has not yet loaded. If this message persists, it may indicate a configuration problem.
This BIG-IP system has encountered a configuration problem that may prevent the Configuration utility from functioning properly.
Errors in the BIG-IP configuration
Issues with license enforcement
Reactive the license (see Reactivating the BIG-IP license on page 10)
From the command line, run tmsh load sys config. If the configuration loads, the issue is resolved.
If it does not, see K02091043: Error Message: The configuration has not yet loaded. If this message persists, it may indicate a configuration problem.
F5 Deployment Guide Updating or Upgrading the BIG-IP23
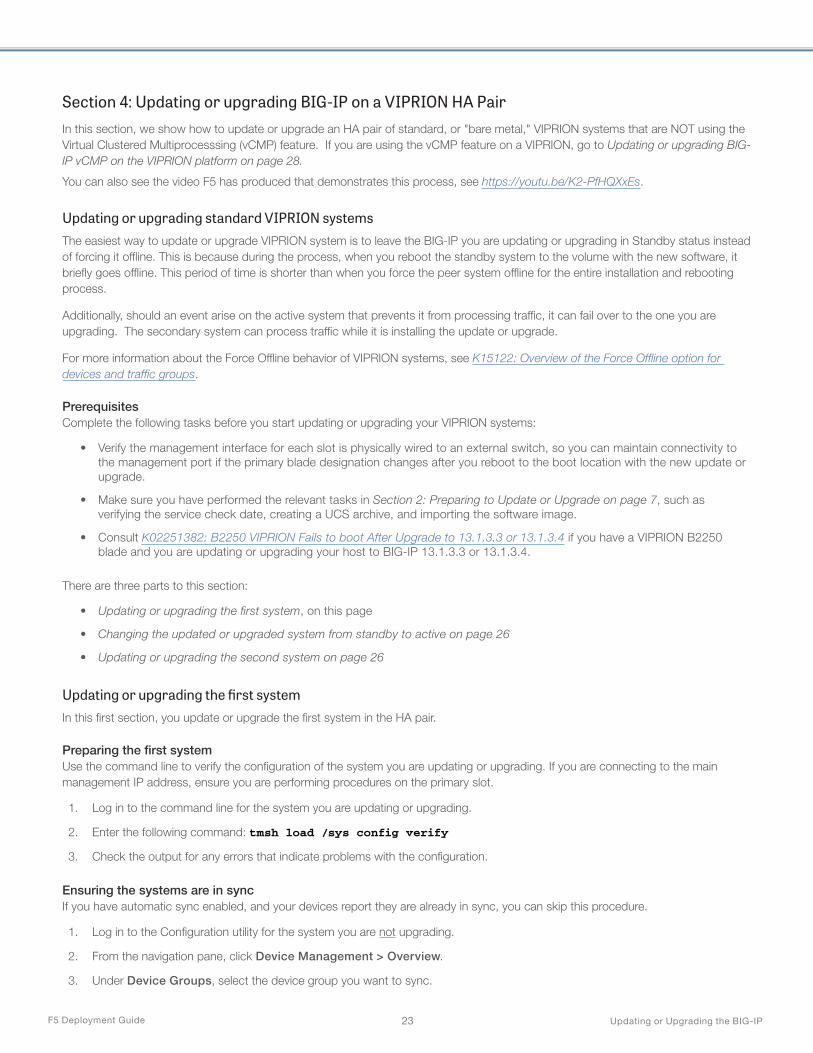
Section 4: Updating or upgrading BIG-IP on a VIPRION HA PairIn this section, we show how to update or upgrade an HA pair of standard, or "bare metal," VIPRION systems that are NOT using the Virtual Clustered Multiprocesssing (vCMP) feature. If you are using the vCMP feature on a VIPRION, go to Updating or upgrading BIG-IP vCMP on the VIPRION platform on page 28.
You can also see the video F5 has produced that demonstrates this process, see https://youtu.be/K2-PfHQXxEs.
Updating or upgrading standard VIPRION systemsThe easiest way to update or upgrade VIPRION system is to leave the BIG-IP you are updating or upgrading in Standby status instead of forcing it offline. This is because during the process, when you reboot the standby system to the volume with the new software, it briefly goes offline. This period of time is shorter than when you force the peer system offline for the entire installation and rebooting process.
Additionally, should an event arise on the active system that prevents it from processing traffic, it can fail over to the one you are upgrading. The secondary system can process traffic while it is installing the update or upgrade.
For more information about the Force Offline behavior of VIPRION systems, see K15122: Overview of the Force Offline option for devices and traffic groups.
PrerequisitesComplete the following tasks before you start updating or upgrading your VIPRION systems:
• Verify the management interface for each slot is physically wired to an external switch, so you can maintain connectivity to the management port if the primary blade designation changes after you reboot to the boot location with the new update or upgrade.
• Make sure you have performed the relevant tasks in Section 2: Preparing to Update or Upgrade on page 7, such as verifying the service check date, creating a UCS archive, and importing the software image.
• Consult K02251382: B2250 VIPRION Fails to boot After Upgrade to 13.1.3.3 or 13.1.3.4 if you have a VIPRION B2250 blade and you are updating or upgrading your host to BIG-IP 13.1.3.3 or 13.1.3.4.
There are three parts to this section:
• Updating or upgrading the first system, on this page
• Changing the updated or upgraded system from standby to active on page 26
• Updating or upgrading the second system on page 26
Updating or upgrading the first systemIn this first section, you update or upgrade the first system in the HA pair.
Preparing the first systemUse the command line to verify the configuration of the system you are updating or upgrading. If you are connecting to the main management IP address, ensure you are performing procedures on the primary slot.
1. Log in to the command line for the system you are updating or upgrading.
2. Enter the following command: tmsh load /sys config verify
3. Check the output for any errors that indicate problems with the configuration.
Ensuring the systems are in sync If you have automatic sync enabled, and your devices report they are already in sync, you can skip this procedure.
1. Log in to the Configuration utility for the system you are not upgrading.
2. From the navigation pane, click Device Management > Overview.
3. Under Device Groups, select the device group you want to sync.

F5 Deployment Guide Updating or Upgrading the BIG-IP24
4. Under Devices, select the device with the most recent changes.
5. Under Sync Options, click Sync Device to Group.
6. Click Sync.
Disabling automatic sync The next task is to disable automatic synchronization.
1. Go to Device Management > Device Groups.
2. Select the device group.
3. Under Configuration, clear the Automatic Sync check box, if it is selected.
4. Click Update.
Ensuring the clusters are enabled and available You can perform this procedure using the Configuration utility or TMSH.
Using the Configuration utility
1. From the navigation pane click System > Clusters.
2. At the bottom of the page, in the Status column, ensure the status for each slot displays as green.
Using TMSH
1. From the command line, enter the following command: tmsh show /sys clu
2. In the output, ensure the following:
• Each address in the Address column is unique.
• Items in the Availability column display available.
• Items in the State column display enabled.
Ensuring the software image is synchronized across all slots The next task is to ensure the software image is synchronized across all slots in the chassis. You should have already imported the image in Importing and uploading the software image on page 14.
1. From the command line, enter the following command: clsh ls -1 /shared/images The system displays each slot.
2. Ensure the ISO file you imported displays under each slot.
Updating or upgrading the first systemNext, you start with the first system. You can perform this procedure using the Configuration utility and monitor the progress of the update or upgrade with the Configuration utility or command line.
Using the Configuration utility to update or upgrade the system.
1. From the navigation pane, go to System > Software Management > Image List.
2. Under Available Images, check the box for the ISO file you imported.
Note We recommend you update or upgrade to a version of BIG-IP that is no earlier than BIG-IP 14.1.2.6
3. Click Install.
4. In the Volume set name box, enter a new name, or select an existing volume to overwrite.
Note You can use any combination of lowercase alphanumeric characters (a-z, 0-9) and the hyphen (-). The volume set name can be from 1 to 32 characters in length but cannot be only one 0 (zero) character (for example HD1.0 or MD1.0). If the string you enter does not match an existing volume set, the system creates the volume set and installs the software.

F5 Deployment Guide Updating or Upgrading the BIG-IP25
5. Click Install.
6. Monitor the status
a. To continue from the Configuration utility:
• Under Installed Images, in the Install Status column, you can watch the overall progress.• To see the installation progress on each blade, in the Install Status column, click Details.
Under Image Installation Status, in the Progress column, you can watch the progress on each blade.
b. To monitor the status from the command line:
• Use the following command: watch "tmsh show sys sof status" In the Status column, you can watch the status on each slot.
• Press Ctrl+C to exit the watch command.
Verifying the update or upgrade After the system finishes the installation, the next task is to verify the system installed the update or upgrade completely and across all slots in the chassis. You can perform this procedure using the Configuration utility or the command line.
Verifying the update or upgrade using the Configuration utility
1. Log in to the Configuration utility for the system you are updating or upgrading.
2. From the navigation pane, click System > Software Management > Image List.
3. Under Installed Images, in the row for the update or upgrade you just installed, under Install Status, ensure the status is complete.
4. To verify the system installed the update or upgrade on all the slots, go to System > Disk Management. Note the tabs at the top of the page and that you are on the Slot 1 page.
5. Click HD1.
6. Under Contained Software Volumes, in the Version column, locate the update or upgrade you just installed.
7. In the same row, under Status, ensure the status is complete.
8. For each additional slot, click Disk Management again, select the tab for the slot, and repeat the previous three steps.
Verifying the update or upgrade using TMSH
1. Log in to the command line for the system you are upgrading.
2. Use the following command: tmsh show /sys sof status
3. In the output, in the Version column, ensure the update or upgrade you installed displays for all slots.
Rebooting to the volume with the update or upgrade Use the following procedure to reboot to the volume with the update or upgrade (the updated or upgraded boot location).
1. From the Configuration utility, click System > Software Management > Boot Locations.
2. Under Boot Locations, click the location that has your new update or upgrade.
3. Click Activate, and then click OK. The system restarts. If you are using a console to connect to each blade and you want to monitor the reboot, you can now establish each connection and log in to the command line.
Verifying the boot locationVerify the boot location is running the new software and functioning properly. You can perform this procedure using the Configuration utility or TMSH.
Verifying the boot location using the Configuration utility
1. Log in to the Configuration utility for the system you are updating or upgrading.
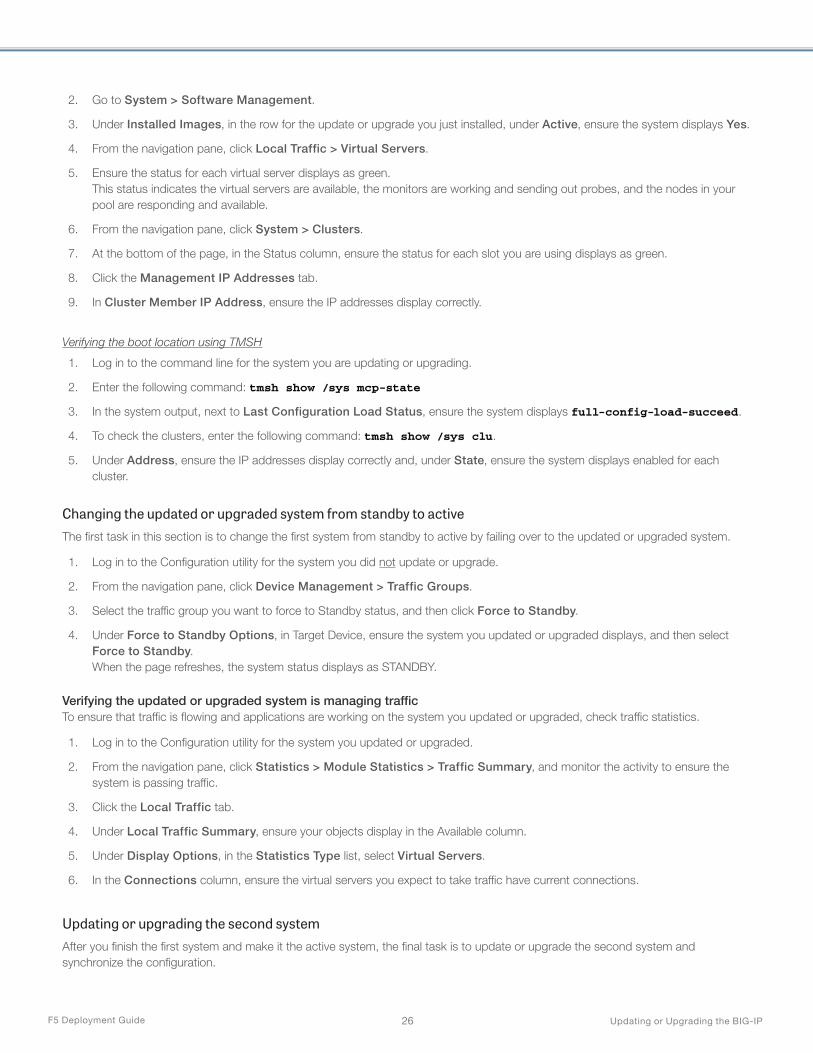
F5 Deployment Guide Updating or Upgrading the BIG-IP26
2. Go to System > Software Management.
3. Under Installed Images, in the row for the update or upgrade you just installed, under Active, ensure the system displays Yes.
4. From the navigation pane, click Local Traffic > Virtual Servers.
5. Ensure the status for each virtual server displays as green. This status indicates the virtual servers are available, the monitors are working and sending out probes, and the nodes in your pool are responding and available.
6. From the navigation pane, click System > Clusters.
7. At the bottom of the page, in the Status column, ensure the status for each slot you are using displays as green.
8. Click the Management IP Addresses tab.
9. In Cluster Member IP Address, ensure the IP addresses display correctly.
Verifying the boot location using TMSH
1. Log in to the command line for the system you are updating or upgrading.
2. Enter the following command: tmsh show /sys mcp-state
3. In the system output, next to Last Configuration Load Status, ensure the system displays full-config-load-succeed.
4. To check the clusters, enter the following command: tmsh show /sys clu.
5. Under Address, ensure the IP addresses display correctly and, under State, ensure the system displays enabled for each cluster.
Changing the updated or upgraded system from standby to activeThe first task in this section is to change the first system from standby to active by failing over to the updated or upgraded system.
1. Log in to the Configuration utility for the system you did not update or upgrade.
2. From the navigation pane, click Device Management > Traffic Groups.
3. Select the traffic group you want to force to Standby status, and then click Force to Standby.
4. Under Force to Standby Options, in Target Device, ensure the system you updated or upgraded displays, and then select Force to Standby. When the page refreshes, the system status displays as STANDBY.
Verifying the updated or upgraded system is managing trafficTo ensure that traffic is flowing and applications are working on the system you updated or upgraded, check traffic statistics.
1. Log in to the Configuration utility for the system you updated or upgraded.
2. From the navigation pane, click Statistics > Module Statistics > Traffic Summary, and monitor the activity to ensure the system is passing traffic.
3. Click the Local Traffic tab.
4. Under Local Traffic Summary, ensure your objects display in the Available column.
5. Under Display Options, in the Statistics Type list, select Virtual Servers.
6. In the Connections column, ensure the virtual servers you expect to take traffic have current connections.
Updating or upgrading the second systemAfter you finish the first system and make it the active system, the final task is to update or upgrade the second system and synchronize the configuration.

F5 Deployment Guide Updating or Upgrading the BIG-IP27
To update or upgrade second system:
1. Return to Updating or upgrading the first system on page 23, and repeat all of the procedures you performed on the second system, except for the following steps:
• Ensuring the systems are in sync
• Disabling automatic sync
Synchronizing the configuration After you complete process on the second system, the next task is to synchronize the configuration. To synchronize the configuration, you push the system configuration with the most recent changes to the group.
1. Log into the Configuration utility for the second system.
2. From the navigation pane, click Device Management > Overview.
3. Click Sync.
Restoring automatic sync If you used the option to automatically sync your systems before the update or upgrade, the final task is to restore the setting.
Note This is only necessary if you used this option previously
1. Click Device Management > Device Groups.
2. Select the device group.
3. Under Configuration, on the Sync Type list, select Automatic with Incremental Sync.
4. Select Update.
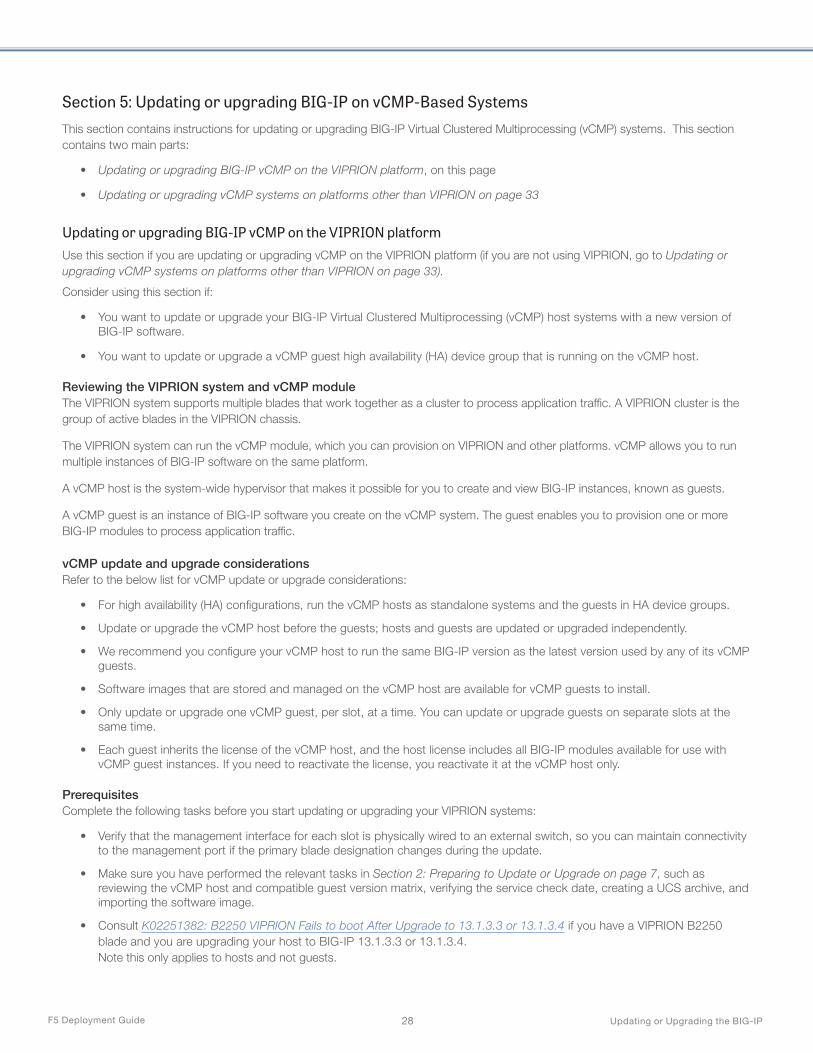
F5 Deployment Guide Updating or Upgrading the BIG-IP28
Section 5: Updating or upgrading BIG-IP on vCMP-Based SystemsThis section contains instructions for updating or upgrading BIG-IP Virtual Clustered Multiprocessing (vCMP) systems. This section contains two main parts:
• Updating or upgrading BIG-IP vCMP on the VIPRION platform, on this page
• Updating or upgrading vCMP systems on platforms other than VIPRION on page 33
Updating or upgrading BIG-IP vCMP on the VIPRION platformUse this section if you are updating or upgrading vCMP on the VIPRION platform (if you are not using VIPRION, go to Updating or upgrading vCMP systems on platforms other than VIPRION on page 33).
Consider using this section if:
• You want to update or upgrade your BIG-IP Virtual Clustered Multiprocessing (vCMP) host systems with a new version of BIG-IP software.
• You want to update or upgrade a vCMP guest high availability (HA) device group that is running on the vCMP host.
Reviewing the VIPRION system and vCMP moduleThe VIPRION system supports multiple blades that work together as a cluster to process application traffic. A VIPRION cluster is the group of active blades in the VIPRION chassis.
The VIPRION system can run the vCMP module, which you can provision on VIPRION and other platforms. vCMP allows you to run multiple instances of BIG-IP software on the same platform.
A vCMP host is the system-wide hypervisor that makes it possible for you to create and view BIG-IP instances, known as guests.
A vCMP guest is an instance of BIG-IP software you create on the vCMP system. The guest enables you to provision one or more BIG-IP modules to process application traffic.
vCMP update and upgrade considerationsRefer to the below list for vCMP update or upgrade considerations:
• For high availability (HA) configurations, run the vCMP hosts as standalone systems and the guests in HA device groups.
• Update or upgrade the vCMP host before the guests; hosts and guests are updated or upgraded independently.
• We recommend you configure your vCMP host to run the same BIG-IP version as the latest version used by any of its vCMP guests.
• Software images that are stored and managed on the vCMP host are available for vCMP guests to install.
• Only update or upgrade one vCMP guest, per slot, at a time. You can update or upgrade guests on separate slots at the same time.
• Each guest inherits the license of the vCMP host, and the host license includes all BIG-IP modules available for use with vCMP guest instances. If you need to reactivate the license, you reactivate it at the vCMP host only.
PrerequisitesComplete the following tasks before you start updating or upgrading your VIPRION systems:
• Verify that the management interface for each slot is physically wired to an external switch, so you can maintain connectivity to the management port if the primary blade designation changes during the update.
• Make sure you have performed the relevant tasks in Section 2: Preparing to Update or Upgrade on page 7, such as reviewing the vCMP host and compatible guest version matrix, verifying the service check date, creating a UCS archive, and importing the software image.
• Consult K02251382: B2250 VIPRION Fails to boot After Upgrade to 13.1.3.3 or 13.1.3.4 if you have a VIPRION B2250 blade and you are upgrading your host to BIG-IP 13.1.3.3 or 13.1.3.4. Note this only applies to hosts and not guests.
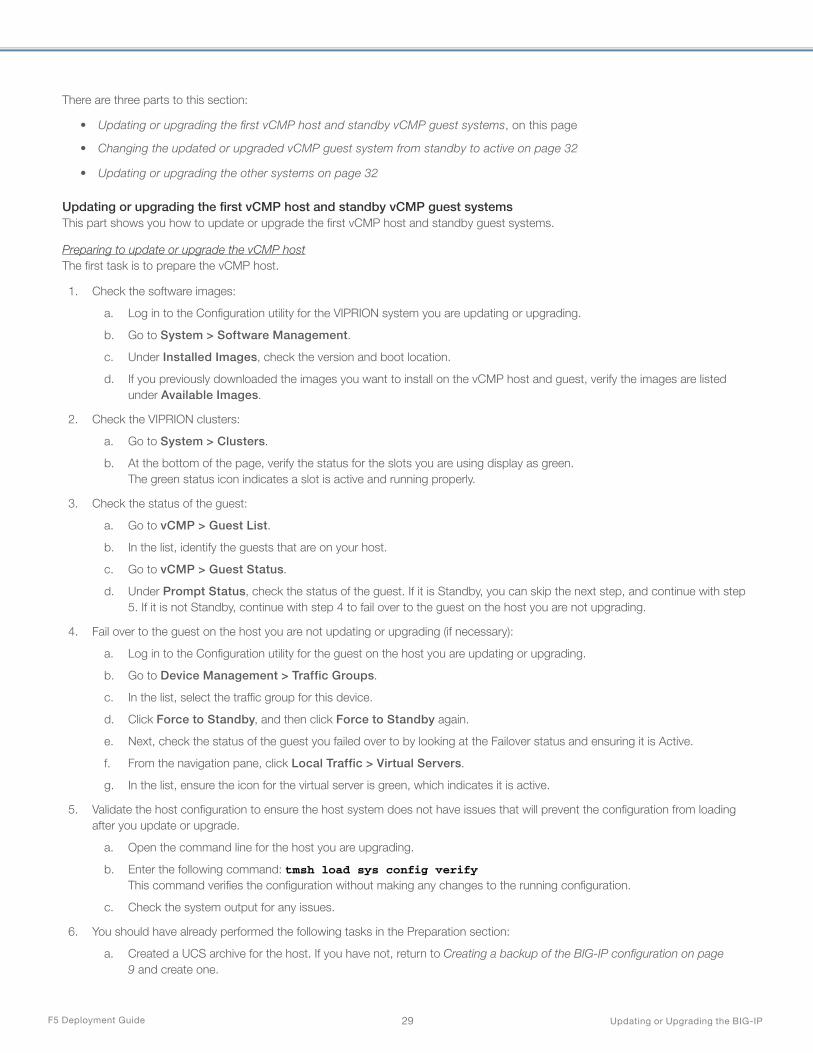
F5 Deployment Guide Updating or Upgrading the BIG-IP29
There are three parts to this section:
• Updating or upgrading the first vCMP host and standby vCMP guest systems, on this page
• Changing the updated or upgraded vCMP guest system from standby to active on page 32
• Updating or upgrading the other systems on page 32
Updating or upgrading the first vCMP host and standby vCMP guest systemsThis part shows you how to update or upgrade the first vCMP host and standby guest systems.
Preparing to update or upgrade the vCMP hostThe first task is to prepare the vCMP host.
1. Check the software images:
a. Log in to the Configuration utility for the VIPRION system you are updating or upgrading.
b. Go to System > Software Management.
c. Under Installed Images, check the version and boot location.
d. If you previously downloaded the images you want to install on the vCMP host and guest, verify the images are listed under Available Images.
2. Check the VIPRION clusters:
a. Go to System > Clusters.
b. At the bottom of the page, verify the status for the slots you are using display as green. The green status icon indicates a slot is active and running properly.
3. Check the status of the guest:
a. Go to vCMP > Guest List.
b. In the list, identify the guests that are on your host.
c. Go to vCMP > Guest Status.
d. Under Prompt Status, check the status of the guest. If it is Standby, you can skip the next step, and continue with step 5. If it is not Standby, continue with step 4 to fail over to the guest on the host you are not upgrading.
4. Fail over to the guest on the host you are not updating or upgrading (if necessary):
a. Log in to the Configuration utility for the guest on the host you are updating or upgrading.
b. Go to Device Management > Traffic Groups.
c. In the list, select the traffic group for this device.
d. Click Force to Standby, and then click Force to Standby again.
e. Next, check the status of the guest you failed over to by looking at the Failover status and ensuring it is Active.
f. From the navigation pane, click Local Traffic > Virtual Servers.
g. In the list, ensure the icon for the virtual server is green, which indicates it is active.
5. Validate the host configuration to ensure the host system does not have issues that will prevent the configuration from loading after you update or upgrade.
a. Open the command line for the host you are upgrading.
b. Enter the following command: tmsh load sys config verify This command verifies the configuration without making any changes to the running configuration.
c. Check the system output for any issues.
6. You should have already performed the following tasks in the Preparation section:
a. Created a UCS archive for the host. If you have not, return to Creating a backup of the BIG-IP configuration on page 9 and create one.

F5 Deployment Guide Updating or Upgrading the BIG-IP30
b. Imported and verified the software image. If you have not, return to Downloading a BIG-IP image and matching MD5 checksum file on page 8
7. Shut down the guest on the host (you already failed over the guest on the host you are upgrading to the guest on the other VIPRION host. Before you update or upgrade, shut down the guest on the host you are upgrading).
a. Go to vCMP > Guest List.
b. In the row for the guest you want to shut down, click the check box, and then click Configure.
c. Click OK.
Updating or upgrading the vCMP hostThe next task is to update or upgrade the vCMP host
1. Install the update or upgrade:
a. From the navigation pane, click System > Software Management > Image List.
b. Under Available Images, click the check box for the software image you want to install, and then click Install.
c. In Volume set name, select an existing volume, or enter a volume name.
Note You can use any combination of lowercase alphanumeric characters (a-z, 0-9) and the hyphen (-). The volume set name can be from 1 to 32 characters in length but cannot be only one 0 (zero) character (for example HD1.0 or MD1.0). If the string you enter does not match an existing volume set, the system creates the volume set and installs the software.
d. Click Install.
e. To monitor the progress of the installation, periodically select the Image List tab to refresh the page. Under Installed Images, in the Install Status column, you can monitor the progress of the installation. When the software finishes installing, Install Status displays as complete. You can see the version and boot location, and that the version is not active.
2. Reboot to the volume running the update or upgrade
a. Go to System > Software Management > Boot Locations.
b. In the list, select the boot location you want.
c. Click Activate and then OK. The system restarts.
3. Check the update or upgrade (after the host restarts, ensure the system is running the update or upgrade and the chassis slots are active and functioning properly).
a. After the host restarts, log in to the Configuration utility.
b. Go to Software Management > Image List.
c. Under Installed Images, in the row for the version you just installed, in the Active column, ensure the update or upgrade you just installed is the active version.
d. Go to System > Clusters > Properties.
e. At the bottom of the page, verify the status for the slots you are using is green.
Preparing to update or upgrade the vCMP guestThe guest on the host may be running a different BIG-IP version and require a different update or upgrade.
1. Deploy the guest before you update or upgrade (before you updated or upgraded the host, you shut down the guest. Now you must restart it by deploying it).
a. Go to vCMP > Guest List.
b. In the row for the guest you want, click the check box, and then click Deploy. You can watch the deployment progress in the Status column. This process can take a few minutes.
c. After the guest finishes deploying, in the Management IP Address column, note the IP address.
d. Go to vCMP > Guest Status.
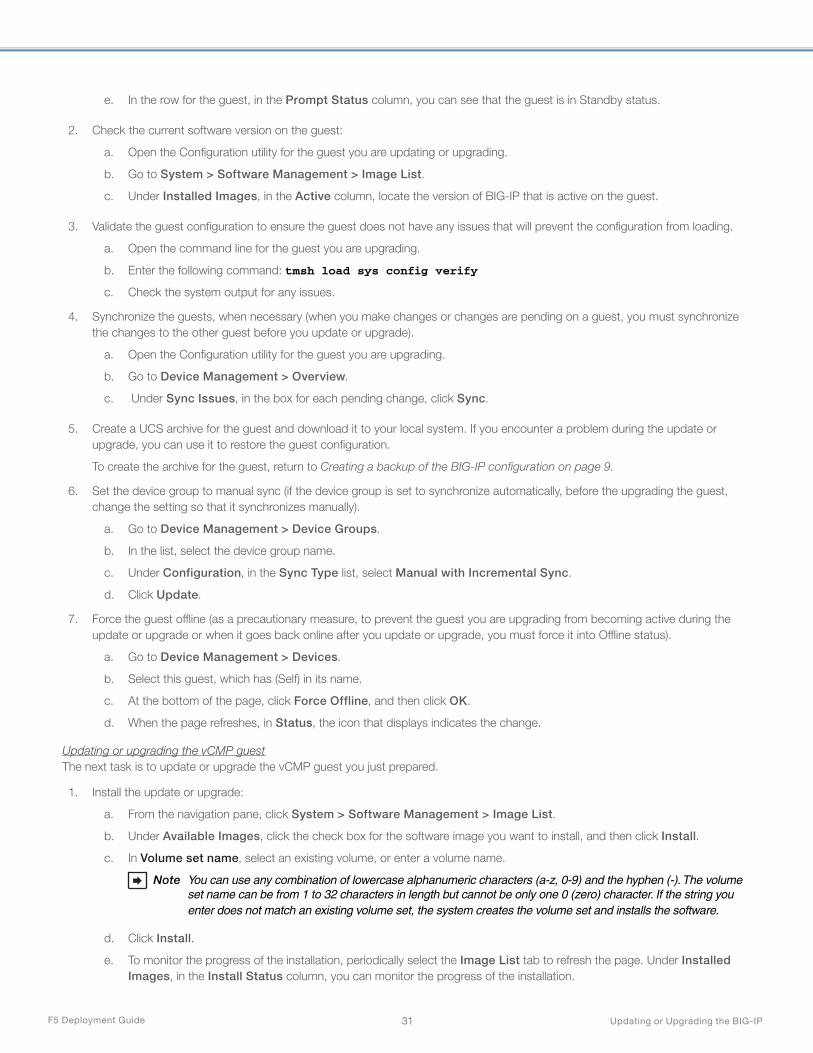
F5 Deployment Guide Updating or Upgrading the BIG-IP31
e. In the row for the guest, in the Prompt Status column, you can see that the guest is in Standby status.
2. Check the current software version on the guest:
a. Open the Configuration utility for the guest you are updating or upgrading.
b. Go to System > Software Management > Image List.
c. Under Installed Images, in the Active column, locate the version of BIG-IP that is active on the guest.
3. Validate the guest configuration to ensure the guest does not have any issues that will prevent the configuration from loading.
a. Open the command line for the guest you are upgrading.
b. Enter the following command: tmsh load sys config verify
c. Check the system output for any issues.
4. Synchronize the guests, when necessary (when you make changes or changes are pending on a guest, you must synchronize the changes to the other guest before you update or upgrade).
a. Open the Configuration utility for the guest you are upgrading.
b. Go to Device Management > Overview.
c. Under Sync Issues, in the box for each pending change, click Sync.
5. Create a UCS archive for the guest and download it to your local system. If you encounter a problem during the update or upgrade, you can use it to restore the guest configuration.
To create the archive for the guest, return to Creating a backup of the BIG-IP configuration on page 9.
6. Set the device group to manual sync (if the device group is set to synchronize automatically, before the upgrading the guest, change the setting so that it synchronizes manually).
a. Go to Device Management > Device Groups.
b. In the list, select the device group name.
c. Under Configuration, in the Sync Type list, select Manual with Incremental Sync.
d. Click Update.
7. Force the guest offline (as a precautionary measure, to prevent the guest you are upgrading from becoming active during the update or upgrade or when it goes back online after you update or upgrade, you must force it into Offline status).
a. Go to Device Management > Devices.
b. Select this guest, which has (Self) in its name.
c. At the bottom of the page, click Force Offline, and then click OK.
d. When the page refreshes, in Status, the icon that displays indicates the change.
Updating or upgrading the vCMP guestThe next task is to update or upgrade the vCMP guest you just prepared.
1. Install the update or upgrade:
a. From the navigation pane, click System > Software Management > Image List.
b. Under Available Images, click the check box for the software image you want to install, and then click Install.
c. In Volume set name, select an existing volume, or enter a volume name.
Note You can use any combination of lowercase alphanumeric characters (a-z, 0-9) and the hyphen (-). The volume set name can be from 1 to 32 characters in length but cannot be only one 0 (zero) character. If the string you enter does not match an existing volume set, the system creates the volume set and installs the software.
d. Click Install.
e. To monitor the progress of the installation, periodically select the Image List tab to refresh the page. Under Installed Images, in the Install Status column, you can monitor the progress of the installation.

F5 Deployment Guide Updating or Upgrading the BIG-IP32
When the software finishes installing, Install Status displays as complete. You can see the version and boot location, and that the version is not active.
2. Reboot to the volume running the update or upgrade:
a. Go to System > Software Management > Boot Locations.
b. In the list, select the boot location you want.
c. Click Activate and then OK. The system restarts.
3. Check the update or upgrade (after the guest restarts, ensure the system is running the update or upgrade).
a. After the guest restarts, log in to the Configuration utility.
b. Go to Software Management > Image List.
c. Under Installed Images, in the row for the version you just installed, in the Active column, ensure the update or upgrade you just installed is the active version.
4. Bring the guest back online (when you bring the guest back online, it is available to load balance traffic).
a. Go to Device Management > Devices.
b. Select this guest, which has (Self) in its name.
c. At the bottom of the page, select Release Offline, and then select OK.
d. When the page refreshes, in Status, the status should display as Standby.
Changing the updated or upgraded vCMP guest system from standby to activeThe next main task is to change the updated or upgraded vCMP guest from standby to active. The guest you did not update or upgrade is active and running the older version of software. Switch the traffic from that guest to the updated or upgraded guest. To do so, on the guest you did not update or upgrade, force the Failover status for the traffic group to Standby.
1. Verify the guest you did not update or upgrade is still passing traffic
a. Open the Configuration utility for the guest you did not update or upgrade.
b. Go to Local Traffic > Virtual Servers.
c. In the row for each virtual server, in the Status column, ensure the icon is green.
2. Failing over to the updated or upgraded system to force the guest you did not update or upgrade to Standby status:
a. Go to Device Management > Traffic Groups.
b. In the list, select the traffic group for this device.
c. At the bottom of the page, select Force to Standby, and then select Force to Standby again.
3. Checking the status of the guest
a. Log in to the Configuration utility for the updated or upgraded guest.
b. Go to Device Management > Traffic Groups.
c. Under Failover Status, ensure the status is Active.
d. Go to Local Traffic > Virtual Servers > Virtual Server List.
e. In the row for each virtual server, in the Status column, ensure the icon is green.
f. To also verify that the virtual server is taking active connections, go to Virtual Servers > Statistics > Virtual Server and in row for each virtual server, in the Bits and Packets columns, check the activity.
Updating or upgrading the other systemsThe final task is to update or upgrade the other BIG-IP systems.
After you finish with the first host and guest, you can repeat the first part of this process, Updating or upgrading the first vCMP host and standby vCMP guest systems on page 29, on the other host and guest.
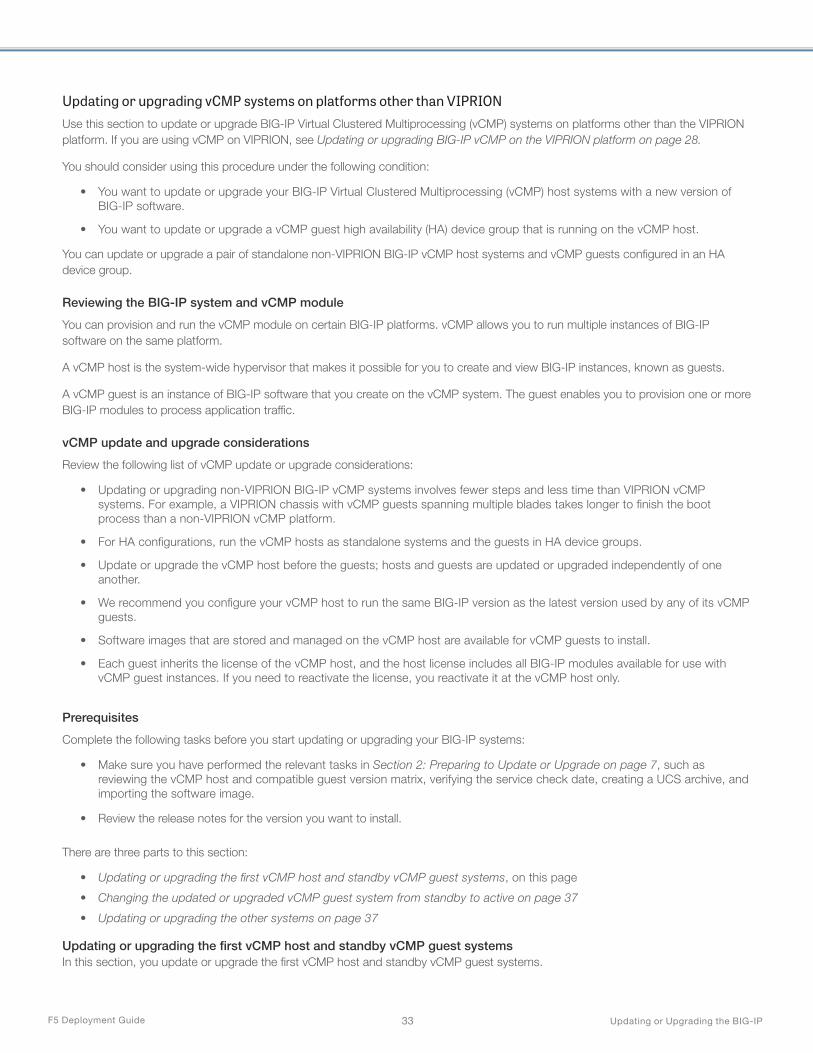
F5 Deployment Guide Updating or Upgrading the BIG-IP33
Updating or upgrading vCMP systems on platforms other than VIPRIONUse this section to update or upgrade BIG-IP Virtual Clustered Multiprocessing (vCMP) systems on platforms other than the VIPRION platform. If you are using vCMP on VIPRION, see Updating or upgrading BIG-IP vCMP on the VIPRION platform on page 28.
You should consider using this procedure under the following condition:
• You want to update or upgrade your BIG-IP Virtual Clustered Multiprocessing (vCMP) host systems with a new version of BIG-IP software.
• You want to update or upgrade a vCMP guest high availability (HA) device group that is running on the vCMP host.
You can update or upgrade a pair of standalone non-VIPRION BIG-IP vCMP host systems and vCMP guests configured in an HA device group.
Reviewing the BIG-IP system and vCMP module
You can provision and run the vCMP module on certain BIG-IP platforms. vCMP allows you to run multiple instances of BIG-IP software on the same platform.
A vCMP host is the system-wide hypervisor that makes it possible for you to create and view BIG-IP instances, known as guests.
A vCMP guest is an instance of BIG-IP software that you create on the vCMP system. The guest enables you to provision one or more BIG-IP modules to process application traffic.
vCMP update and upgrade considerations
Review the following list of vCMP update or upgrade considerations:
• Updating or upgrading non-VIPRION BIG-IP vCMP systems involves fewer steps and less time than VIPRION vCMP systems. For example, a VIPRION chassis with vCMP guests spanning multiple blades takes longer to finish the boot process than a non-VIPRION vCMP platform.
• For HA configurations, run the vCMP hosts as standalone systems and the guests in HA device groups.
• Update or upgrade the vCMP host before the guests; hosts and guests are updated or upgraded independently of one another.
• We recommend you configure your vCMP host to run the same BIG-IP version as the latest version used by any of its vCMP guests.
• Software images that are stored and managed on the vCMP host are available for vCMP guests to install.
• Each guest inherits the license of the vCMP host, and the host license includes all BIG-IP modules available for use with vCMP guest instances. If you need to reactivate the license, you reactivate it at the vCMP host only.
Prerequisites
Complete the following tasks before you start updating or upgrading your BIG-IP systems:
• Make sure you have performed the relevant tasks in Section 2: Preparing to Update or Upgrade on page 7, such as reviewing the vCMP host and compatible guest version matrix, verifying the service check date, creating a UCS archive, and importing the software image.
• Review the release notes for the version you want to install.
There are three parts to this section:
• Updating or upgrading the first vCMP host and standby vCMP guest systems, on this page
• Changing the updated or upgraded vCMP guest system from standby to active on page 37
• Updating or upgrading the other systems on page 37
Updating or upgrading the first vCMP host and standby vCMP guest systemsIn this section, you update or upgrade the first vCMP host and standby vCMP guest systems.

F5 Deployment Guide Updating or Upgrading the BIG-IP34
Preparing to update or upgrade the vCMP hostBefore installing the update or upgrade on the vCMP host, you must prepare the host for the update or upgrade. For example, for HA configurations, the vCMP host runs as a standalone system and the guests run in HA device groups. Make sure to check the vCMP guests on the host you are planning to update or upgrade to ensure they are in Standby status before you update or upgrade the host.
1. Check the status of the guest to ensure it is in Standby status before you update or upgrade. If it is, you can skip the next step. If the guest is active, in the next step, you fail over to the guest on the host you are not updating or upgrading.
a. Go to vCMP > Guest List.
b. In the list, identify the guests that are on your host.
c. Go to vCMP > Guest Status.
d. Under Prompt Status, check the status of the guest. If it is Standby, you can skip the next step, and continue with step 3. If it is not Standby, continue with step 2 to fail over to the guest on the host you are not updating or upgrading.
2. Fail over to the guest on the host you are not updating or upgrading (if necessary):
a. Log in to the Configuration utility for the guest on the host you are upgrading.
b. Go to Device Management > Traffic Groups.
c. In the list, select the traffic group for this device.
d. Click Force to Standby, and then click Force to Standby again.
e. Next, check the status of the guest you failed over to by looking at the Failover status and ensuring it is Active.
f. Go to Device Management > Traffic Groups.
g. Under Failover Status, ensure the status is Active.
h. From the navigation pane, click Local Traffic > Virtual Servers.
i. In the list, ensure the icon for the virtual server is green, which indicates it is active.
3. Validate the host configuration to ensure the host system does not have issues that will prevent the configuration from loading after you update or upgrade.
a. Open the command line for the host you are updating or upgrading.
b. Enter the following command: tmsh load sys config verify This command verifies the configuration without making any changes to the running configuration.
c. Check the system output for any issues.
4. You should have already performed the following tasks in the Preparation section:
a. Created a UCS archive for the host. If you have not, return to Creating a backup of the BIG-IP configuration on page 9 and create one.
b. Imported and verified the software image. If you have not, return to Downloading a BIG-IP image and matching MD5 checksum file on page 8
5. Shut down the guest on the host (you already failed over the guest on the host you are upgrading to the guest on the other VIPRION host. Before you update or upgrade, shut down the guest on the host you are updating or upgrading).
a. Go to vCMP > Guest List.
b. In the row for the guest you want to shut down, click the check box, and then click Configure.
c. Click OK.
Updating or upgrading the vCMP hostThe next task is to update or upgrade the vCMP host.
1. Install the update or upgrade:
a. From the navigation pane, click System > Software Management > Image List.
b. Under Available Images, click the check box for the software image you want to install, and then click Install.
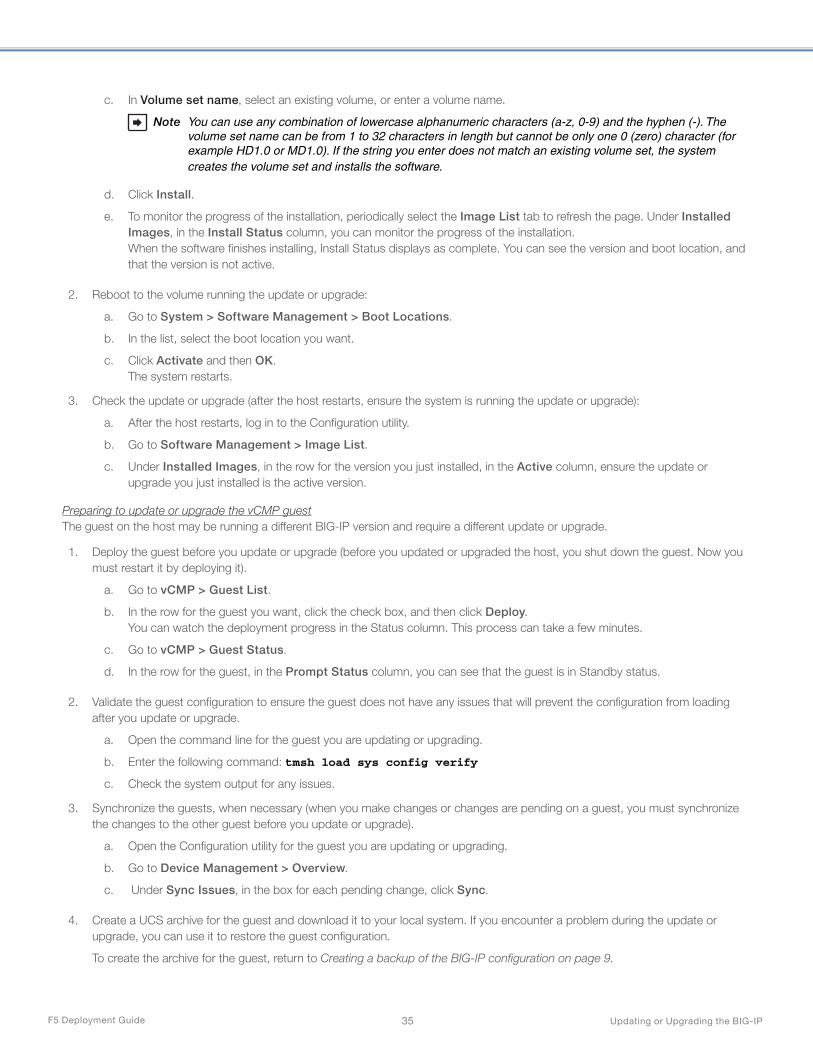
F5 Deployment Guide Updating or Upgrading the BIG-IP35
c. In Volume set name, select an existing volume, or enter a volume name.
Note You can use any combination of lowercase alphanumeric characters (a-z, 0-9) and the hyphen (-). The volume set name can be from 1 to 32 characters in length but cannot be only one 0 (zero) character (for example HD1.0 or MD1.0). If the string you enter does not match an existing volume set, the system creates the volume set and installs the software.
d. Click Install.
e. To monitor the progress of the installation, periodically select the Image List tab to refresh the page. Under Installed Images, in the Install Status column, you can monitor the progress of the installation. When the software finishes installing, Install Status displays as complete. You can see the version and boot location, and that the version is not active.
2. Reboot to the volume running the update or upgrade:
a. Go to System > Software Management > Boot Locations.
b. In the list, select the boot location you want.
c. Click Activate and then OK. The system restarts.
3. Check the update or upgrade (after the host restarts, ensure the system is running the update or upgrade):
a. After the host restarts, log in to the Configuration utility.
b. Go to Software Management > Image List.
c. Under Installed Images, in the row for the version you just installed, in the Active column, ensure the update or upgrade you just installed is the active version.
Preparing to update or upgrade the vCMP guestThe guest on the host may be running a different BIG-IP version and require a different update or upgrade.
1. Deploy the guest before you update or upgrade (before you updated or upgraded the host, you shut down the guest. Now you must restart it by deploying it).
a. Go to vCMP > Guest List.
b. In the row for the guest you want, click the check box, and then click Deploy. You can watch the deployment progress in the Status column. This process can take a few minutes.
c. Go to vCMP > Guest Status.
d. In the row for the guest, in the Prompt Status column, you can see that the guest is in Standby status.
2. Validate the guest configuration to ensure the guest does not have any issues that will prevent the configuration from loading after you update or upgrade.
a. Open the command line for the guest you are updating or upgrading.
b. Enter the following command: tmsh load sys config verify
c. Check the system output for any issues.
3. Synchronize the guests, when necessary (when you make changes or changes are pending on a guest, you must synchronize the changes to the other guest before you update or upgrade).
a. Open the Configuration utility for the guest you are updating or upgrading.
b. Go to Device Management > Overview.
c. Under Sync Issues, in the box for each pending change, click Sync.
4. Create a UCS archive for the guest and download it to your local system. If you encounter a problem during the update or upgrade, you can use it to restore the guest configuration.
To create the archive for the guest, return to Creating a backup of the BIG-IP configuration on page 9.

F5 Deployment Guide Updating or Upgrading the BIG-IP36
5. Set the device group to manual sync (if the device group is set to synchronize automatically, before the updating or upgrading the guest, change the setting so that it synchronizes manually).
a. Go to Device Management > Device Groups.
b. In the list, select the device group name.
c. Under Configuration, in the Sync Type list, select Manual with Incremental Sync.
d. Click Update.
6. Force the guest offline (as a precautionary measure, to prevent the guest you are updating or upgrading from becoming active during the update or upgrade or when it goes back online after you update or upgrade, you must force it into Offline status).
a. Go to Device Management > Devices.
b. Select this guest, which has (Self) in its name.
c. At the bottom of the page, click Force Offline, and then click OK.
d. When the page refreshes, in Status, the icon that displays indicates the change.
Updating or upgrading the vCMP guestThe next task is to update or upgrade the vCMP guest you just prepared.
1. Install the update or upgrade:
a. From the navigation pane, click System > Software Management > Image List.
b. Under Available Images, click the check box for the software image you want to install, and then click Install.
c. In Volume set name, select an existing volume, or enter a volume name.
Note You can use any combination of lowercase alphanumeric characters (a-z, 0-9) and the hyphen (-). The volume set name can be from 1 to 32 characters in length but cannot be only one 0 (zero) character. If the string you enter does not match an existing volume set, the system creates the volume set and installs the software.
d. Click Install.
e. To monitor the progress of the installation, periodically select the Image List tab to refresh the page. Under Installed Images, in the Install Status column, you can monitor the progress of the installation. When the software finishes installing, Install Status displays as complete. You can see the version and boot location, and that the version is not active.
2. Reboot to the volume running the update or upgrade
a. Go to System > Software Management > Boot Locations.
b. In the list, select the boot location you want.
c. Click Activate and then OK. The system restarts.
3. Check the update or upgrade (after the guest restarts, ensure the system is running the update or upgrade).
a. After the guest restarts, log in to the Configuration utility.
b. Go to Software Management > Image List.
c. Under Installed Images, in the row for the version you just installed, in the Active column, ensure the update or upgrade you just installed is the active version.
4. Bring the guest back online (when you bring the guest back online, it is available to load balance traffic).
a. Go to Device Management > Devices.
b. Select this guest, which has (Self) in its name.
c. At the bottom of the page, select Release Offline, and then select OK.
d. When the page refreshes, in Status, the status should display as Standby.

F5 Deployment Guide Updating or Upgrading the BIG-IP37
Changing the updated or upgraded vCMP guest system from standby to activeThe next main task is to change vCMP guest from standby to active.
The guest you did not update or upgrade is active and running the older version of software. Switch the traffic from that guest to the updated or upgraded guest. To do so, on the guest you did not update or upgrade, force the Failover status for the traffic group to Standby. Use the following procedures.
1. Verify the guest you did not update or upgrade is still passing traffic:
a. Open the Configuration utility for the guest you did not update or upgrade.
b. Go to Local Traffic > Virtual Servers.
c. In the row for each virtual server, in the Status column, ensure the icon is green.
2. Fail over to the updated or upgraded system to force the guest you did not update or upgrade to Standby status:
a. Go to Device Management > Traffic Groups.
b. In the list, select the traffic group for this device.
c. At the bottom of the page, select Force to Standby, and then select Force to Standby again.
3. Check the status of the updated or upgraded guest:
a. Log in to the Configuration utility for the updated or upgraded guest.
b. Go to Device Management > Traffic Groups.
c. Under Failover Status, ensure the status is Active.
d. Go to Local Traffic > Virtual Servers > Virtual Server List.
e. In the row for each virtual server, in the Status column, ensure the icon is green.
f. To also verify that the virtual server is taking active connections, go to Virtual Servers > Statistics > Virtual Server and in row for each virtual server, in the Bits and Packets columns, check the activity.
Updating or upgrading the other systemsThe final task is to update or upgrade the other BIG-IP systems.
After you finish upgrading the first host and guest, you can repeat the first part of this process, Updating or upgrading the first vCMP host and standby vCMP guest systems on page 33, on the other host and guest.
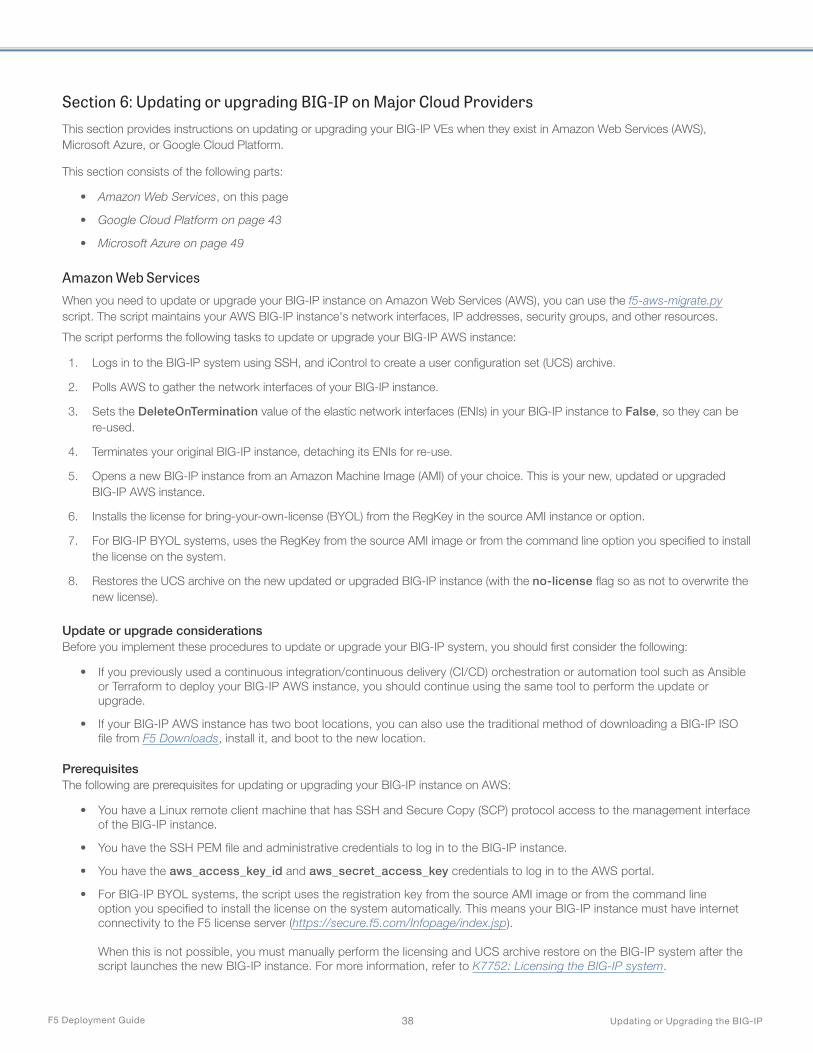
F5 Deployment Guide Updating or Upgrading the BIG-IP38
Section 6: Updating or upgrading BIG-IP on Major Cloud ProvidersThis section provides instructions on updating or upgrading your BIG-IP VEs when they exist in Amazon Web Services (AWS), Microsoft Azure, or Google Cloud Platform.
This section consists of the following parts:
• Amazon Web Services, on this page
• Google Cloud Platform on page 43
• Microsoft Azure on page 49
Amazon Web ServicesWhen you need to update or upgrade your BIG-IP instance on Amazon Web Services (AWS), you can use the f5-aws-migrate.py script. The script maintains your AWS BIG-IP instance's network interfaces, IP addresses, security groups, and other resources.
The script performs the following tasks to update or upgrade your BIG-IP AWS instance:
1. Logs in to the BIG-IP system using SSH, and iControl to create a user configuration set (UCS) archive.
2. Polls AWS to gather the network interfaces of your BIG-IP instance.
3. Sets the DeleteOnTermination value of the elastic network interfaces (ENIs) in your BIG-IP instance to False, so they can be re-used.
4. Terminates your original BIG-IP instance, detaching its ENIs for re-use.
5. Opens a new BIG-IP instance from an Amazon Machine Image (AMI) of your choice. This is your new, updated or upgraded BIG-IP AWS instance.
6. Installs the license for bring-your-own-license (BYOL) from the RegKey in the source AMI instance or option.
7. For BIG-IP BYOL systems, uses the RegKey from the source AMI image or from the command line option you specified to install the license on the system.
8. Restores the UCS archive on the new updated or upgraded BIG-IP instance (with the no-license flag so as not to overwrite the new license).
Update or upgrade considerationsBefore you implement these procedures to update or upgrade your BIG-IP system, you should first consider the following:
• If you previously used a continuous integration/continuous delivery (CI/CD) orchestration or automation tool such as Ansible or Terraform to deploy your BIG-IP AWS instance, you should continue using the same tool to perform the update or upgrade.
• If your BIG-IP AWS instance has two boot locations, you can also use the traditional method of downloading a BIG-IP ISO file from F5 Downloads, install it, and boot to the new location.
PrerequisitesThe following are prerequisites for updating or upgrading your BIG-IP instance on AWS:
• You have a Linux remote client machine that has SSH and Secure Copy (SCP) protocol access to the management interface of the BIG-IP instance.
• You have the SSH PEM file and administrative credentials to log in to the BIG-IP instance.
• You have the aws_access_key_id and aws_secret_access_key credentials to log in to the AWS portal.
• For BIG-IP BYOL systems, the script uses the registration key from the source AMI image or from the command line option you specified to install the license on the system automatically. This means your BIG-IP instance must have internet connectivity to the F5 license server (https://secure.f5.com/Infopage/index.jsp). When this is not possible, you must manually perform the licensing and UCS archive restore on the BIG-IP system after the script launches the new BIG-IP instance. For more information, refer to K7752: Licensing the BIG-IP system.

F5 Deployment Guide Updating or Upgrading the BIG-IP39
• Your remote Linux client machine has the following software installed:
Note You can install each software application by navigating to its website or use your Linux client software management tool to install on your client directly. For example, apt-get install <software> or yum install <software> depending on your Linux distribution.
» Python 2.7 environment: python.org
» AWS command line interface (for testing and troubleshooting): AWS
» BOTO3 (required to run the script): Boto3
» Pexpect (required to run the script in CVE mode using -C or --CVE flags): Pexpect
Preparing for the update or upgradeIn this section, you prepare your system for the update or upgrade.
Creating backupsFirst, create backups of your BIG-IP AWS instance and the BIG-IP configuration.
1. Backup your BIG-IP AWS instance using a tool such as AWS Backup.
2. Ensure you have the UCS archive you created in Creating a backup of the BIG-IP configuration on page 9. If you did not, create one now. Although the f5-aws-migrate.py script generates a backup file and saves it in your local remote directory, we recommend you generate one and save it locally as well.
With these two backups in place, you can easily recover your BIG-IP instance if necessary.
Determining the AMI ID of the image to which you want to update or upgradeThe f5-aws-migrate.py script requires you to provide the AMI ID to launch the new BIG-IP instance.
i Important Providing an invalid or incompatible AMI image to the script results in failure to update or upgrade and you may have to manually perform the update or upgrade by launching the correct instance and associating AWS resources.
1. Log in to the AWS Management Console.
2. Search for marketplace and select AWS Marketplace Subscriptions.
3. Do one of the following:
• In your subscription, in the list of AMI images, if you can find an image you want to update or upgrade to, select the image, and then skip to the next step.
• If you cannot find an image you want to update or upgrade to, perform the steps in Adding an AMI image to your subscription on page 84 section, and then continue to the next step.
4. Click Launch new instance for the AMI image you want to use.
5. Software Version lists the latest version available, if you require a different version, select full AWS Marketplace website.
6. Select the Software Version.
7. Select your Region.
8. Note the AMI ID number at the bottom of the form. You must provide the AMI ID when you run the f5-aws-migrate.py script.
For example, you note the following AMI ID: AMI ID: ami-034ae61881d640103
Installing the f5-aws-migrate.py script and required files on your remote clientThe next task is to install the f5-aws-migrate.py, restore-clean-ucs, and save-clean-ucs files on your remote Linux client machine. These files are all available on the F5 GitHub site (https://github.com/f5devcentral/f5-aws-migrate).
1. Go to f5-aws-migrate on GitHub.
2. Click f5-aws-migrate.py.

F5 Deployment Guide Updating or Upgrading the BIG-IP40
3. Click Raw.
4. Copy the contents, and then paste into an editor on your client machine.
5. Save the file.
6. Repeat steps 1-5 for the restore-clean-ucs and save-clean-ucs files. When you finish, you have three files in the same directory.
Installing your AWS access credentials on the remote clientTo manage resources on your AWS account, you must provide your AWS credentials on your remote client.
1. Go to the hidden AWS directory in your user home directory using the following command: cd ~/.aws
2. Create a file named credentials using the following command: touch credentials
3. Use a text editor to paste your AWS credentials to the file.
For example:
[default]
aws_access_key_id = APOPJOYHFXYCWHKZDJ3Q
aws_secret_access_key = MYsVrwik4ArWSvhgitcqUu6CIDG+Fvg2D5jp9aJ5
4. Create a file named config using the following command: touch config
5. Use a text editor to paste the following text into the file:
[default]
Performing the software update or upgradeThe next task is to perform the software update or upgrade.
Revoking the license on your BIG-IP system, if requiredUse the following guidance to revoke the license on your BIG-IP system so you can reuse it on the new BIG-IP VM.
• If your new (target) BIG-IP instance is pay-as-you-go (PAYG) and does not require a registration key, continue with the next procedure.
• If you are using an F5 BYOL license, you must first revoke your BYOL license for reuse on the new BIG-IP instance. In BIG-IP VE 12.1.3.3 and later, and in BIG-IP 13.1.0.2 and later, you can revoke a BYOL license from a BIG-IP VE system and re-use the license on a different BIG-IP VE system. For more information, refer to K41458656: Reusing a BIG-IP VE license on a different BIG-IP VE system.
Impact of procedure: Revoking the license results in a disruption of services. F5 recommends performing this procedure during a scheduled maintenance window.
1. Record your BIG-IP license key so you can use it to relicense the new BIG-IP.
2. From the BIG-IP command line, use the following command: revoke /sys license You can now install the license on the new BIG-IP VE system.
Running the script to perform the update or upgradeTo start the update or upgrade process, run the f5-aws-migrate.py script by performing the following procedure:
Impact of procedure: Running the script begins the update or upgrade process, resulting in a disruption in services. F5 recommends performing this procedure during a scheduled maintenance window.
To run the script, use the script example in the following table that is appropriate for your update or upgrade and licensing case.
Tip To display the Help menu for a list of options you can include, use the following command: python f5-aws-migrate.py -h.

F5 Deployment Guide Updating or Upgrading the BIG-IP41
When upgrading from and to these types of instances Use this 'f5-aws-migrate.py' script example command syntax:
From PAYG utility instance to a PAYG utility instancepython f5-aws-migrate.py -k /home/john/.ssh/keypair.pem -i i-155b46d2
-m 10.0.0.245 -u admin -p ‘strongpassword’ -d ami-d9ee1ab9 -R us-west-2
--debug-level 1
From BYOL instance to a BYOL instancepython f5-aws-migrate.py -k /home/john/.ssh/keypair.pem -i i-f75d4030 -m
10.0.0.245 -u admin -p ‘strongpassword’ -d ami-5fe81c3f -r ZJQWC-EXJMJ-
HEKVX-KNJTB-LGUCGVZ -R us-west-2 --debug-level 1
From PAYG utility instance to a new BYOL instance
python f5-aws-migrate.py -k /home/john/.ssh/keypair.pem -i i-155b46d2 -m
10.0.0.245 -u admin -p ‘strongpassword’ -d ami-5fe81c3f -r ZJQWC-EXJMJ-
HEKVX-KNJTB-LGUCGVZ -R us-west-2 --debug-level 1
NOTE: You need to use the -r switch to specify your license registration key for the new (updated or upgraded) BIG-IP instance.
From BYOL instance to a new PAYG utility instancepython f5-aws-migrate.py -k /home/john/.ssh/keypair.pem -i i-155b46d2 -m
10.0.0.245 -u admin -p ‘strongpassword’ -d ami-5fe81c3f -r ZJQWC-EXJMJ-
HEKVX-KNJTB-LGUCGVZ -R us-west-2 --debug-level
Troubleshooting failuresThe list at the beginning of Amazon Web Services on page 38 lists the tasks the script performs. Follow the output the system displays to ensure the command completes all of the tasks.
Note It is possible for the system to log errors and then run the script completely
When the script finishes running, the system displays output similar to the following example:
/var/local/ucs/f5-i-0bd6843b0d3629e1a.ucs is loaded.
_____BIG-IP Migration Completed_____
When the script finishes running, it saves the following files in the local directory for verification, backup, and restoration purposes:
• f5-i-<instanceID>-cached-bigip-license: the original BIG-IP license file
• f5-i-<instanceID>-cached-instance.json: json file with information about your BIG-IP AWS instance
• f5-i-<instanceID>-cached-new-instance.json: json file with information about the new BIG-IP instance
• f5-i-0bd6843b0d3629e1a.ucs: UCS archive generated at the beginning of the script run
The following table lists common issues, possible causes, and resolutions.
Common issues Possible causes Resolutions
You are unable to log in to the new (updated or upgraded) BIG-IP instance with your admin credentials
There could be errors in the UCS archive restoration.Log in to the BIG-IP system using your SSH key PEM file and manually restore the UCS archive.Refer to K4423: Overview of UCS archives.
You specified an incompatible AMI ID in the command. For example, when the AMI ID you provided is not a BIG-IP software, you cannot log in to the new BIG-IP instance.
Verify that the -d ami-xxxxx switch you used in the command is correct by referring to Determining the AMI ID of the image to which you want to update or upgrade on page 39. If the AMI ID you used was incorrect, you must perform the update or upgrade manually using either one of the following steps:- Restore the original BIG-IP instance using AWS backup and
perform the update or upgrade again.- Launch a new BIG-IP AWS instance with the correct AMI
image ID and associate the AWS resources to it manually. Restore the UCS archive on the new instance manually.
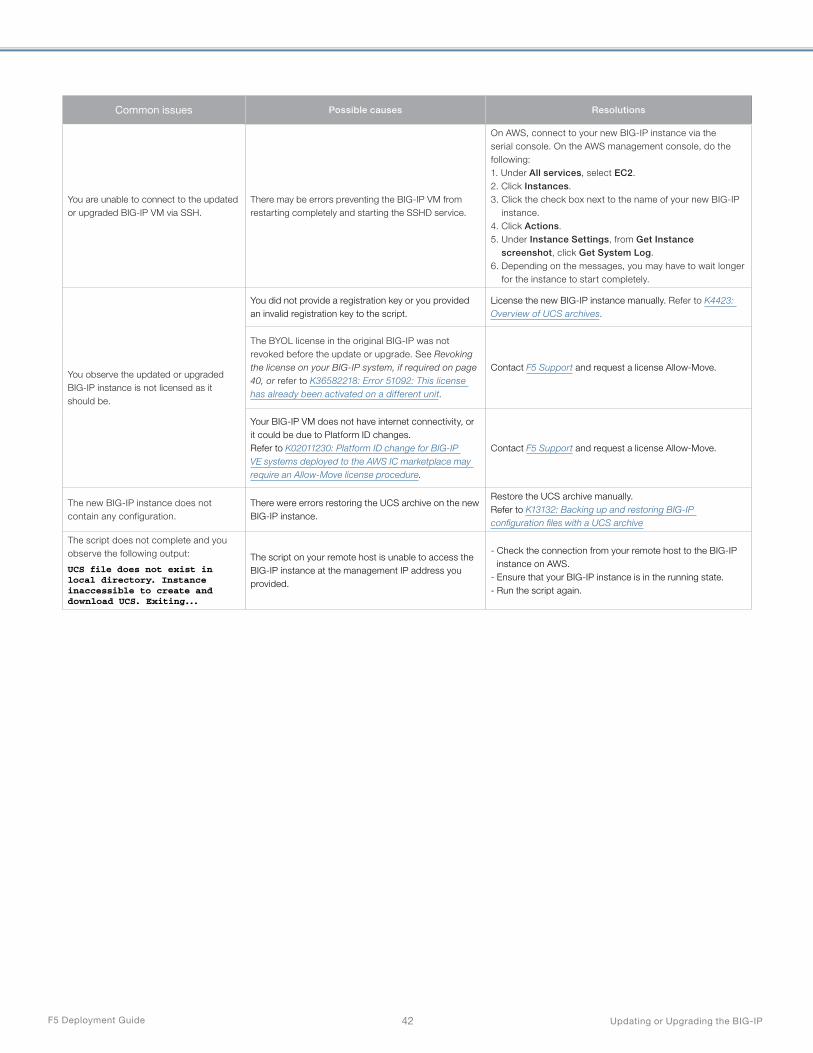
F5 Deployment Guide Updating or Upgrading the BIG-IP42
Common issues Possible causes Resolutions
You are unable to connect to the updated or upgraded BIG-IP VM via SSH.
There may be errors preventing the BIG-IP VM from restarting completely and starting the SSHD service.
On AWS, connect to your new BIG-IP instance via the serial console. On the AWS management console, do the following:1. Under All services, select EC2.2. Click Instances.3. Click the check box next to the name of your new BIG-IP
instance.4. Click Actions.5. Under Instance Settings, from Get Instance
screenshot, click Get System Log.6. Depending on the messages, you may have to wait longer
for the instance to start completely.
You observe the updated or upgraded BIG-IP instance is not licensed as it should be.
You did not provide a registration key or you provided an invalid registration key to the script.
License the new BIG-IP instance manually. Refer to K4423: Overview of UCS archives.
The BYOL license in the original BIG-IP was not revoked before the update or upgrade. See Revoking the license on your BIG-IP system, if required on page 40, or refer to K36582218: Error 51092: This license has already been activated on a different unit.
Contact F5 Support and request a license Allow-Move.
Your BIG-IP VM does not have internet connectivity, or it could be due to Platform ID changes.Refer to K02011230: Platform ID change for BIG-IP VE systems deployed to the AWS IC marketplace may require an Allow-Move license procedure.
Contact F5 Support and request a license Allow-Move.
The new BIG-IP instance does not contain any configuration.
There were errors restoring the UCS archive on the new BIG-IP instance.
Restore the UCS archive manually.Refer to K13132: Backing up and restoring BIG-IP configuration files with a UCS archive
The script does not complete and you observe the following output:
UCS file does not exist in local directory. Instance inaccessible to create and download UCS. Exiting...
The script on your remote host is unable to access the BIG-IP instance at the management IP address you provided.
- Check the connection from your remote host to the BIG-IP instance on AWS.
- Ensure that your BIG-IP instance is in the running state.- Run the script again.

F5 Deployment Guide Updating or Upgrading the BIG-IP43
Google Cloud PlatformThis section contains instructions for updating or upgrading the BIG-IP virtual machine (VM) system on Google Cloud Platform (GCP) using the Terraform tool.
If you are already using Terraform to manage your GCP resources, continue to use your existing Terraform infrastructure to perform the update or upgrade.
Use this section if you want to get started with Terraform, and your primary objective is simply to update or upgrade a set of BIG-IP VMs on GCP with minimal Terraform setup required.
This procedure uses the google_compute_instance Terraform resource to deploy a new, updated or upgraded, BIG-IP VM. After performing the update or upgrade, you can build on the Terraform TF file you created in this procedure to use Terraform to manage more GCP resources.
Important considerations for these proceduresBefore you use Terraform to perform the update or upgrade, you should understand the following:
• The procedures in this chapter do not apply when your BIG-IP virtual machine is an instance in a GCP autoscaling instance group.
• This chapter describes the use of the Terraform tool to manage GCP resources. GCP and Terraform may update or revise their features, and specific steps in this article may change as a result.
• Most of the procedures in this chapter involve editing the Terraform TF file. The modifications you make include the following:
» Define the BIG-IP version to which you want to update or upgrade.
» Remove illegal parameters. The Terraform TF file contains unique IDs of your VM resources, such as IP addresses and virtual machine IDs, which you cannot include in a template file used for deployment.
• The GCP resources for your BIG-IP GCP VM system may go through changes during its uptime. You may need to remove additional parameters not listed in this article that are specific to your environment. These are reported when you run the Terraform plan command. If this occurs, you can remove the offending parameter(s).
Planning the update or upgradeTo plan your update or upgrade, perform the following steps:
• If necessary, review the articles referenced in Section 2: Preparing to Update or Upgrade on page 7:
» K13845: Overview of supported BIG-IP upgrade paths and an upgrade planning reference
» BIG-IP VE Supported Platforms
• After you decide on a supported version, you can get the version string by running the following command on Google Cloud Shell or on a Linux machine with Google SDK installed. gcloud compute images list --project=f5-7626-networks-public
Note the string for later because it is required when editing the Terraform file.
• Verify you have a GCP VM backup and restore plan.
• Review BIG-IP licensing requirements during the update or upgrade process. Depending on the BIG-IP license that you have, refer to one of the following:
» For bring-your-own-license (BYOL) licenses, depending on your BIG-IP version, you need to revoke the license on your BIG-IP system for reuse during the update or upgrade process. For more information, refer to K41458656: Reusing a BIG-IP VE license on a different BIG-IP VE system.
» For pay-as-you-go (PAYG) licenses, depending on your BIG-IP version, you no longer need to reactivate your license. For more information, refer to K82564652: BIG-IP VE PAYG cloud marketplace images no longer require license reactivation when upgrading.
You replace only the BIG-IP VM and its associated disk while reusing the existing GCP resources, such as virtual network, subnets, interfaces, and firewall rules. You do so by doing the following:
1. Import the existing BIG-IP VM configurations to a Terraform TF file.
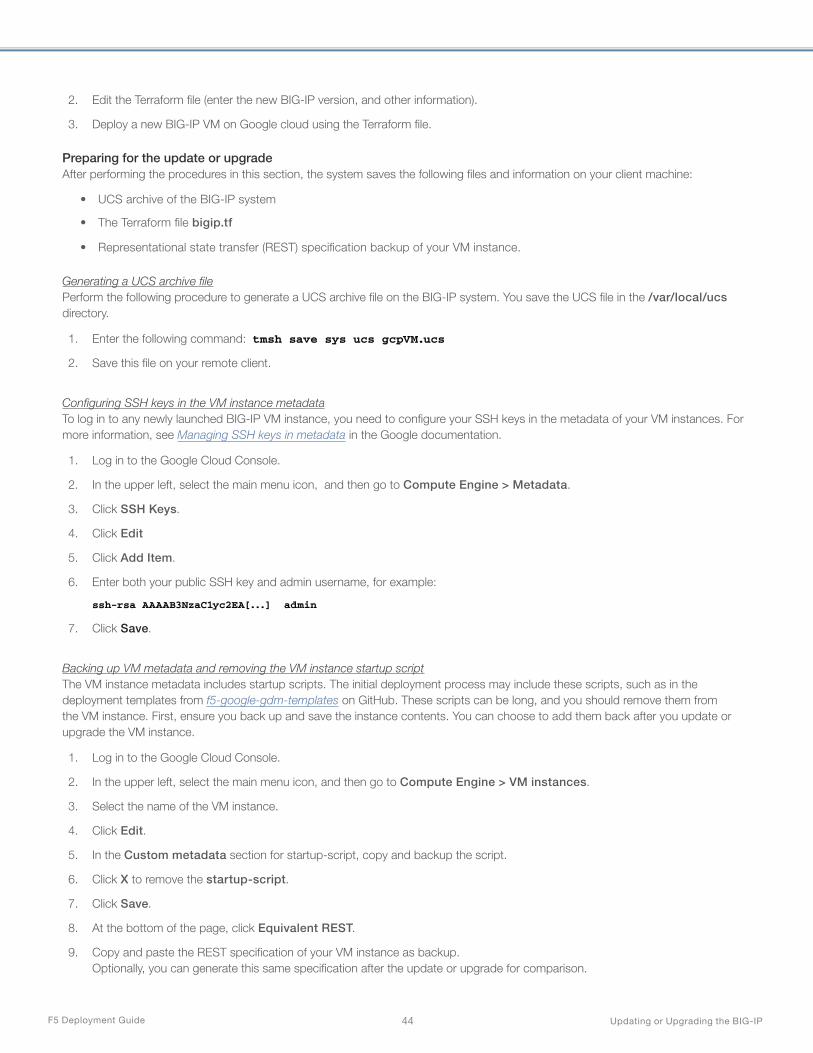
F5 Deployment Guide Updating or Upgrading the BIG-IP44
2. Edit the Terraform file (enter the new BIG-IP version, and other information).
3. Deploy a new BIG-IP VM on Google cloud using the Terraform file.
Preparing for the update or upgradeAfter performing the procedures in this section, the system saves the following files and information on your client machine:
• UCS archive of the BIG-IP system
• The Terraform file bigip.tf
• Representational state transfer (REST) specification backup of your VM instance.
Generating a UCS archive filePerform the following procedure to generate a UCS archive file on the BIG-IP system. You save the UCS file in the /var/local/ucs directory.
1. Enter the following command: tmsh save sys ucs gcpVM.ucs
2. Save this file on your remote client.
Configuring SSH keys in the VM instance metadataTo log in to any newly launched BIG-IP VM instance, you need to configure your SSH keys in the metadata of your VM instances. For more information, see Managing SSH keys in metadata in the Google documentation.
1. Log in to the Google Cloud Console.
2. In the upper left, select the main menu icon, and then go to Compute Engine > Metadata.
3. Click SSH Keys.
4. Click Edit
5. Click Add Item.
6. Enter both your public SSH key and admin username, for example:
ssh-rsa AAAAB3NzaC1yc2EA[...] admin
7. Click Save.
Backing up VM metadata and removing the VM instance startup scriptThe VM instance metadata includes startup scripts. The initial deployment process may include these scripts, such as in the deployment templates from f5-google-gdm-templates on GitHub. These scripts can be long, and you should remove them from the VM instance. First, ensure you back up and save the instance contents. You can choose to add them back after you update or upgrade the VM instance.
1. Log in to the Google Cloud Console.
2. In the upper left, select the main menu icon, and then go to Compute Engine > VM instances.
3. Select the name of the VM instance.
4. Click Edit.
5. In the Custom metadata section for startup-script, copy and backup the script.
6. Click X to remove the startup-script.
7. Click Save.
8. At the bottom of the page, click Equivalent REST.
9. Copy and paste the REST specification of your VM instance as backup. Optionally, you can generate this same specification after the update or upgrade for comparison.
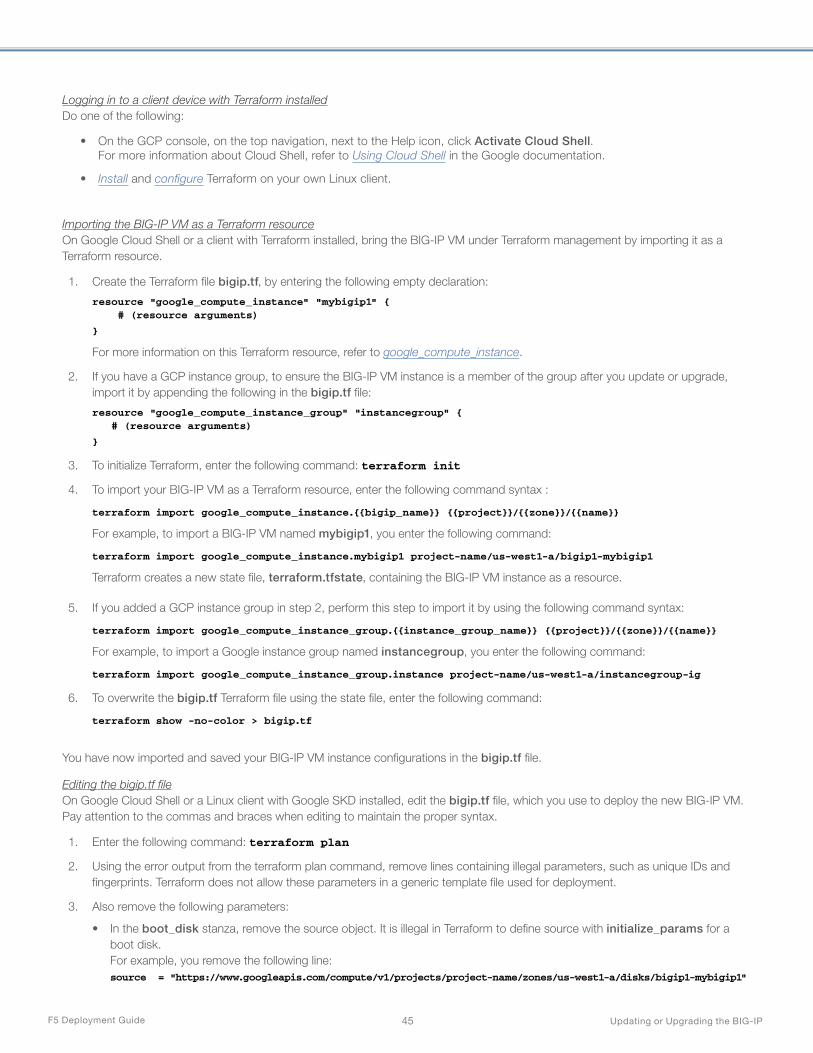
F5 Deployment Guide Updating or Upgrading the BIG-IP45
Logging in to a client device with Terraform installedDo one of the following:
• On the GCP console, on the top navigation, next to the Help icon, click Activate Cloud Shell. For more information about Cloud Shell, refer to Using Cloud Shell in the Google documentation.
• Install and configure Terraform on your own Linux client.
Importing the BIG-IP VM as a Terraform resourceOn Google Cloud Shell or a client with Terraform installed, bring the BIG-IP VM under Terraform management by importing it as a Terraform resource.
1. Create the Terraform file bigip.tf, by entering the following empty declaration:
resource "google_compute_instance" "mybigip1" { # (resource arguments)
}
For more information on this Terraform resource, refer to google_compute_instance.
2. If you have a GCP instance group, to ensure the BIG-IP VM instance is a member of the group after you update or upgrade, import it by appending the following in the bigip.tf file:
resource "google_compute_instance_group" "instancegroup" { # (resource arguments)
}
3. To initialize Terraform, enter the following command: terraform init
4. To import your BIG-IP VM as a Terraform resource, enter the following command syntax :
terraform import google_compute_instance.{{bigip_name}} {{project}}/{{zone}}/{{name}}
For example, to import a BIG-IP VM named mybigip1, you enter the following command:
terraform import google_compute_instance.mybigip1 project-name/us-west1-a/bigip1-mybigip1
Terraform creates a new state file, terraform.tfstate, containing the BIG-IP VM instance as a resource.
5. If you added a GCP instance group in step 2, perform this step to import it by using the following command syntax:
terraform import google_compute_instance_group.{{instance_group_name}} {{project}}/{{zone}}/{{name}}
For example, to import a Google instance group named instancegroup, you enter the following command:
terraform import google_compute_instance_group.instance project-name/us-west1-a/instancegroup-ig
6. To overwrite the bigip.tf Terraform file using the state file, enter the following command:
terraform show -no-color > bigip.tf
You have now imported and saved your BIG-IP VM instance configurations in the bigip.tf file.
Editing the bigip.tf fileOn Google Cloud Shell or a Linux client with Google SKD installed, edit the bigip.tf file, which you use to deploy the new BIG-IP VM. Pay attention to the commas and braces when editing to maintain the proper syntax.
1. Enter the following command: terraform plan
2. Using the error output from the terraform plan command, remove lines containing illegal parameters, such as unique IDs and fingerprints. Terraform does not allow these parameters in a generic template file used for deployment.
3. Also remove the following parameters:
• In the boot_disk stanza, remove the source object. It is illegal in Terraform to define source with initialize_params for a boot disk. For example, you remove the following line: source = "https://www.googleapis.com/compute/v1/projects/project-name/zones/us-west1-a/disks/bigip1-mybigip1"
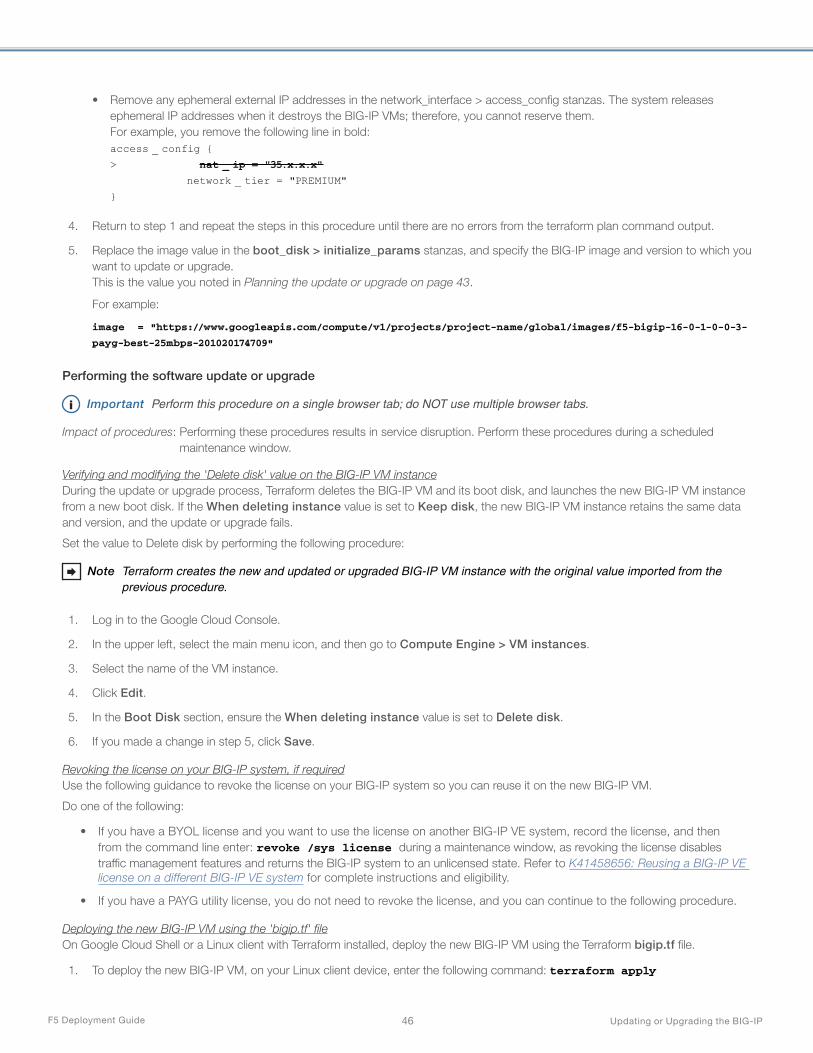
F5 Deployment Guide Updating or Upgrading the BIG-IP46
• Remove any ephemeral external IP addresses in the network_interface > access_config stanzas. The system releases ephemeral IP addresses when it destroys the BIG-IP VMs; therefore, you cannot reserve them. For example, you remove the following line in bold: access _ config {
> nat _ ip = "35.x.x.x"
network _ tier = "PREMIUM"
}
4. Return to step 1 and repeat the steps in this procedure until there are no errors from the terraform plan command output.
5. Replace the image value in the boot_disk > initialize_params stanzas, and specify the BIG-IP image and version to which you want to update or upgrade. This is the value you noted in Planning the update or upgrade on page 43.
For example:
image = "https://www.googleapis.com/compute/v1/projects/project-name/global/images/f5-bigip-16-0-1-0-0-3-
payg-best-25mbps-201020174709"
Performing the software update or upgrade
i Important Perform this procedure on a single browser tab; do NOT use multiple browser tabs.
Impact of procedures: Performing these procedures results in service disruption. Perform these procedures during a scheduled maintenance window.
Verifying and modifying the 'Delete disk' value on the BIG-IP VM instanceDuring the update or upgrade process, Terraform deletes the BIG-IP VM and its boot disk, and launches the new BIG-IP VM instance from a new boot disk. If the When deleting instance value is set to Keep disk, the new BIG-IP VM instance retains the same data and version, and the update or upgrade fails.
Set the value to Delete disk by performing the following procedure:
Note Terraform creates the new and updated or upgraded BIG-IP VM instance with the original value imported from the previous procedure.
1. Log in to the Google Cloud Console.
2. In the upper left, select the main menu icon, and then go to Compute Engine > VM instances.
3. Select the name of the VM instance.
4. Click Edit.
5. In the Boot Disk section, ensure the When deleting instance value is set to Delete disk.
6. If you made a change in step 5, click Save.
Revoking the license on your BIG-IP system, if requiredUse the following guidance to revoke the license on your BIG-IP system so you can reuse it on the new BIG-IP VM.
Do one of the following:
• If you have a BYOL license and you want to use the license on another BIG-IP VE system, record the license, and then from the command line enter: revoke /sys license during a maintenance window, as revoking the license disables traffic management features and returns the BIG-IP system to an unlicensed state. Refer to K41458656: Reusing a BIG-IP VE license on a different BIG-IP VE system for complete instructions and eligibility.
• If you have a PAYG utility license, you do not need to revoke the license, and you can continue to the following procedure.
Deploying the new BIG-IP VM using the 'bigip.tf' fileOn Google Cloud Shell or a Linux client with Terraform installed, deploy the new BIG-IP VM using the Terraform bigip.tf file.
1. To deploy the new BIG-IP VM, on your Linux client device, enter the following command: terraform apply
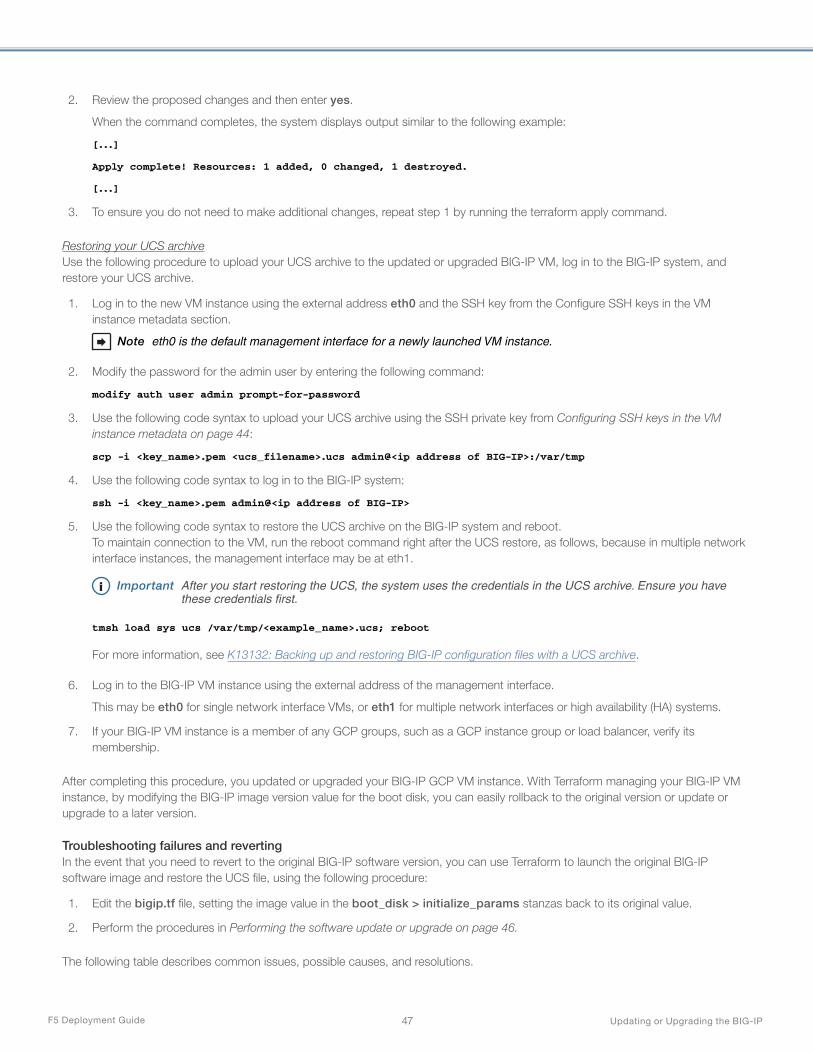
F5 Deployment Guide Updating or Upgrading the BIG-IP47
2. Review the proposed changes and then enter yes.
When the command completes, the system displays output similar to the following example:
[...]
Apply complete! Resources: 1 added, 0 changed, 1 destroyed.
[...]
3. To ensure you do not need to make additional changes, repeat step 1 by running the terraform apply command.
Restoring your UCS archiveUse the following procedure to upload your UCS archive to the updated or upgraded BIG-IP VM, log in to the BIG-IP system, and restore your UCS archive.
1. Log in to the new VM instance using the external address eth0 and the SSH key from the Configure SSH keys in the VM instance metadata section.
Note eth0 is the default management interface for a newly launched VM instance.
2. Modify the password for the admin user by entering the following command:
modify auth user admin prompt-for-password
3. Use the following code syntax to upload your UCS archive using the SSH private key from Configuring SSH keys in the VM instance metadata on page 44:
scp -i <key_name>.pem <ucs_filename>.ucs admin@<ip address of BIG-IP>:/var/tmp
4. Use the following code syntax to log in to the BIG-IP system:
ssh -i <key_name>.pem admin@<ip address of BIG-IP>
5. Use the following code syntax to restore the UCS archive on the BIG-IP system and reboot. To maintain connection to the VM, run the reboot command right after the UCS restore, as follows, because in multiple network interface instances, the management interface may be at eth1.
i Important After you start restoring the UCS, the system uses the credentials in the UCS archive. Ensure you have these credentials first.
tmsh load sys ucs /var/tmp/<example_name>.ucs; reboot
For more information, see K13132: Backing up and restoring BIG-IP configuration files with a UCS archive.
6. Log in to the BIG-IP VM instance using the external address of the management interface.
This may be eth0 for single network interface VMs, or eth1 for multiple network interfaces or high availability (HA) systems.
7. If your BIG-IP VM instance is a member of any GCP groups, such as a GCP instance group or load balancer, verify its membership.
After completing this procedure, you updated or upgraded your BIG-IP GCP VM instance. With Terraform managing your BIG-IP VM instance, by modifying the BIG-IP image version value for the boot disk, you can easily rollback to the original version or update or upgrade to a later version.
Troubleshooting failures and revertingIn the event that you need to revert to the original BIG-IP software version, you can use Terraform to launch the original BIG-IP software image and restore the UCS file, using the following procedure:
1. Edit the bigip.tf file, setting the image value in the boot_disk > initialize_params stanzas back to its original value.
2. Perform the procedures in Performing the software update or upgrade on page 46.
The following table describes common issues, possible causes, and resolutions.

F5 Deployment Guide Updating or Upgrading the BIG-IP48
Common issues Possible causes Resolutions
When you attempt to revoke your BIG-IP system with tmsh revoke sys license, it fails
There could be errors in the UCS archive restoration. On your BIG-IP system, you did not configure DNS to activate.f5.com, or there is no route to the internet.
Contact F5 Support and request a license Allow-Move.
When restoring the UCS archive, license activation fails and you observe the following error:
Unable to grant license key: Error
51092, This license has already been
activated on a different unit.
The BYOL license in the original BIG-IP was not revoked before the update or upgrade. See Revoking the license on your BIG-IP system, if required on page 46, or refer to K36582218: Error 51092: This license has already been activated on a different unit.
Contact F5 Support and request a license Allow-Move.
When you deploy the update or upgraded BIG-IP VM in the Performing the update or upgrade section, you observe errors specific to your environment. For example:
Error: Error waiting for network interface to update: IP '10.1.1.1/28' is already being used by another resource.
This can happen when you have dynamic resources that can float between HA systems, such as Alias IP ranges. The Terraform TF file declaration is not current with the actual status on GCP cloud.
Run the terraform apply command again.If running the command fails, you may have to manually edit the Terraform TF file to move the resource to the active BIG-IP instance.
When you deploy the updated or upgraded BIG-IP VM in the Performing the upgrade section, Terraform reports insufficient disk size, as in the following example:
Error: Error creating instance: googleapi: Error 400: Invalid value for field 'resource.disks[0].initializeParams.diskSizeGb': '76'. Requested disk size cannot be smaller than the image size (82 GB), invalid
The disk size of the original BIG-IP VM instance specified in bigip.tf is smaller than the disk size required by the image you are upgrading to.
In the bigip.tf file, modify the size value of the boot disk to meet the requirements of the new BIG-IP image.
After you restore the UCS archive, you are unable to connect to the updated or upgraded BIG-IP VM via SSH.
This may be due to any one of the following causes:- You did not configure the SSH key in your BIG-IP
VM instance metadata.- K85730674: Unable to access to MGMT Interface
after rebooting in GCP environment.
- Log in to the instance using the console and enter netstat -nr to verify the management IP configurations.
- Perform the procedures in the Configure SSH keys in the VM instance metadata section.
- For K85730674: Unable to access to MGMT Interface after rebooting in GCP environment, perform the recommended actions in the article.
After you restore the UCS archive, the BIG-IP VM boots up with no license activated.
This issue is due to ID 850777: BIG-IP VE deployed on cloud provider may be unable to reach metadata services with static management interface config
For ID 850777, upgrade to the latest BIG-IP version available. You can run the following command to obtain the latest version:gcloud compute images list --project=f5-7626-networks-public
When you try to log in to the updated or upgraded BIG-IP VM for the first time on SSH, you observe the following message:
WARNING: REMOTE HOST IDENTIFICATION HAS CHANGED!
IT IS POSSIBLE THAT SOMEONE IS DOING SOMETHING NASTY!
Someone could be eavesdropping on you right now (man-in-the-middle attack)!
[...]
The SSH ID on the new (updated or upgraded) BIG-IP VM differs from the original one stored in your ~/.ssh/known_hosts file on your client device.
Remove the offending entry in the ~/.ssh/known_hosts file or clear all the existing entries by running the following command on your remote Linux client:> ~/.ssh/known_hosts
You have BIG-IP systems in HA using Cloud Failover Extension (CFE). Failover does not work after the update or upgrade and logs the following in /var/log/restnoded/restnoded.log:
severe: [RestOperationDispatcher] 'shared/cloud-failover/trigger' not found.
severe: [ErrorHandlingModule] RestOperation failed: "/shared/cloud-failover/trigger".
This is due to ID 929213.
Perform the workaround in ID 929213.: The package needs to be uninstalled and installed again for use.
- From GUI, Navigate to iApps -> Package Management LX
- Select the package to uninstall and click Uninstall- Click Import and provide the path of package to
install again.

F5 Deployment Guide Updating or Upgrading the BIG-IP49
Microsoft AzureUse this section to update or upgrade a BIG-IP virtual machine (VM) system on Microsoft Azure.
For Azure, there 3 ways you can perform the update or upgrade:
• Using Azure Portal to deploy an Azure Resource Manager (ARM) template directly, on this page.
• Using Terraform to deploy an ARM template on page 56 If you are already using Terraform to manage your Azure resources, continue to use your existing Terraform infrastructure to perform the update or upgrade.
• Using Ansible to deploy an ARM template on page 63 If you are already using an Ansible inventory to manage your Azure resources, continue to use your existing Ansible infrastructure to perform the update or upgrade.
Using the Azure portal to deploy an ARM template Use the procedures in this section to use the Microsoft Azure portal to deploy an ARM template to update or upgrade the BIG-IP VE.
Important considerations Before you use the Azure ARM template to perform your update or upgrade, you should understand the following:
• This procedure uses the Azure portal ARM template feature. Microsoft may update or revise Azure portal and the template features, and specific steps in this article may change as a result. For more information on ARM templates, see Azure ARM templates in the Microsoft documentation.
• Most of the procedures involve editing the exported template.json file. The modifications you make include the following:
» Define the initial SSH key and username/password to login to the new (updated or upgraded) virtual machine for the first time.
» Define the BIG-IP version to which you want to upgrade.
» Remove illegal parameters. The exported template.json file contains unique IDs of your VM resources, such as the OsDisk, which you cannot include in a template file used for deployment.
» Remove optional parameters that are already defined in the template file, such as storageAccountName and storageAccountKey.
• Azure resources for your BIG-IP Azure VM system may go through changes during its uptime. You may need to remove additional parameters not listed in this procedure that are specific to your environment. These are reported when the deployment fails. If this occurs, you can remove the offending parameter(s) and re-deploy.
Planning the update or upgrade To plan your update or upgrade, perform the following steps:
• If necessary, review the articles referenced in Section 2: Preparing to Update or Upgrade on page 7:
» K13845: Overview of supported BIG-IP upgrade paths and an upgrade planning reference
» BIG-IP VE Supported Platforms
• After deciding on a supported version, you can get the version string from f5-azure-arm-templates on GitHub. Note the string for later because it is required when editing the Azure ARM template.
• Verify you have an Azure VM backup and restore plan. For information, see Backup and restore VE images in the cloud.
Note The UCS archive and ARM template you create in this section enables you to restore your Azure VM.
• Review BIG-IP licensing requirements during the update or upgrade process. Depending on the BIG-IP license that you have, refer to one of the following:
» For bring-your-own-license (BYOL) licenses, depending on your BIG-IP version, you need to revoke the license on your BIG-IP system for reuse during the update or upgrade process. For more information, refer to K41458656: Reusing a BIG-IP VE license on a different BIG-IP VE system.

F5 Deployment Guide Updating or Upgrading the BIG-IP50
» For pay-as-you-go (PAYG) licenses, depending on your BIG-IP version, you no longer need to reactivate your license. For more information, refer to K82564652: BIG-IP VE PAYG cloud marketplace images no longer require license reactivation when upgrading.
• Review the network topology of your BIG-IP VM. To do so, perform the following procedure:
» Go to Home > Virtual machines, and select the name of your BIG-IP VM.
» On your VM blade, under Settings, select Networking.
» Select Topology.
» Identify the BIG-IP VM to update or upgrade and verify it has no dependents.
You replace only the BIG-IP VM and its associated disk while reusing the existing Azure resources, such as virtual network, subnets, interfaces, and security groups. You do so by doing the following:
1. Export a template from the existing BIG-IP VM.
2. Edit the template (entering the new BIG-IP version, credentials, and other information).
3. Deploy a new BIG-IP VM using the template.
Preparing for the update or upgradeAfter performing the procedures in this section, the system saves a UCS archive of the BIG-IP, and an exported template.json file on your client machine:
Generating a UCS archive filePerform the following procedure to generate a UCS archive file. You save the UCS file in the /var/local/ucs directory.
1. Enter the following command: tmsh save sys ucs azureVM.ucs
2. Save this file on your remote client.
Exporting the Azure ARM template Perform the following procedure to export the Azure ARM template of your BIG-IP VM and save it to your client machine.
1. From the Azure Portal, go to Home > Resource Groups, and then select the name of your resource group.
2. Click the check box for your BIG-IP VM.
3. Click the check box next to your BIG-IP VM associated disk.
4. Click the ellipsis icon, and then select Export template.
5. Click Download.
6. Click OK.
You can perform the same procedure after the update or upgrade to compare the differences between the two files, ensuring the required settings are maintained. You can also use this file to deploy your VM if required.
Editing the 'template.json' ARM template Perform the following procedure to edit the template.json ARM template you use to deploy the new BIG-IP VM. To maintain the JSON syntax, pay attention to the commas and braces when editing.
1. Extract and then open the template.json file.
2. Do one of the following, depending on whether you see the following objects in your file:
• If you do not see the three extensions_start_*** objects in the parameter stanza as shown below, skip to the next step.
• If you do see the three extensions_start_*** objects in the parameter stanza as shown below, remove them, as illustrated in the following code syntax. These objects display when you previously deployed your BIG-IP VM from an F5 Azure ARM template.

F5 Deployment Guide Updating or Upgrading the BIG-IP51
"parameters": {
"extensions_start_storageAccountName": {
"type": "SecureString"
},
"extensions_start_storageAccountKey": {
"type": "SecureString"
},
"extensions_start_commandToExecute": {
"type": "SecureString"
},
[...]
}
Note storageAccountName and storageAccountKey are optional. commandToExecute is required, and you specify its value manually in a subsequent step. For more information on VM extensions and protected settings, refer to VM extensions in the Microsoft documentation.
3. Do one of the following:
• If your BIG-IP VM does not have a user-assigned identity, and you therefore do not see the principalID and clientID parameters as shown below, skip to the next step.
• If your BIG-IP VM has a user-assigned identity, remove the lines that contain the principalID and clientID parameters, as illustrated in the following code syntax: "identity": {
"type": "UserAssigned",
"userAssignedIdentities": {
"/subscriptions/xxx-e0b6-445c-b82e-xxxx/resourceGroups/exampleRG/providers/Microsoft.ManagedIdentity/userAssignedIdentities/iamme": {
"principalId": "xxxxx-c635-4180-9a58-xxxxx",
"clientId": "xxxxx-e5f9-4e4a-a208-xxxx"
}
}
},
4. Look for the line that contains version and then replace your current BIG-IP version with the target version. Refer to Planning the update or upgrade on page 49 to retrieve your version.
For example, you update or upgrade your system to BIG-IP 15.1.0.4 by entering the following code syntax:
"version": "15.1.004000"
5. In the resources > properties > storageProfile > osDisk > managedDisk property, remove the line that contains the id parameter.
For example, you remove the id parameter and the comma in the preceding line: "managedDisk": {
storageAccountType": "Premium_LRS",
id": "[resourceId('Microsoft.Compute/disks', concat(parameters('virtualMachines_example_name'), '_OsDisk_1_xxxxxxx3543f19c34bc10db483319'))]"
},
"diskSizeGB": 84
6. If the SSH public key does not display, copy and paste it in to the osProfile > linuxConfiguration stanza.
For example, for the keyData parameter only, you replace its value with the value from your public key.
Note If you do not have an SSH key, create one. On Azure portal, click +Create a resource, enter and select SSH Key, and complete the wizard.
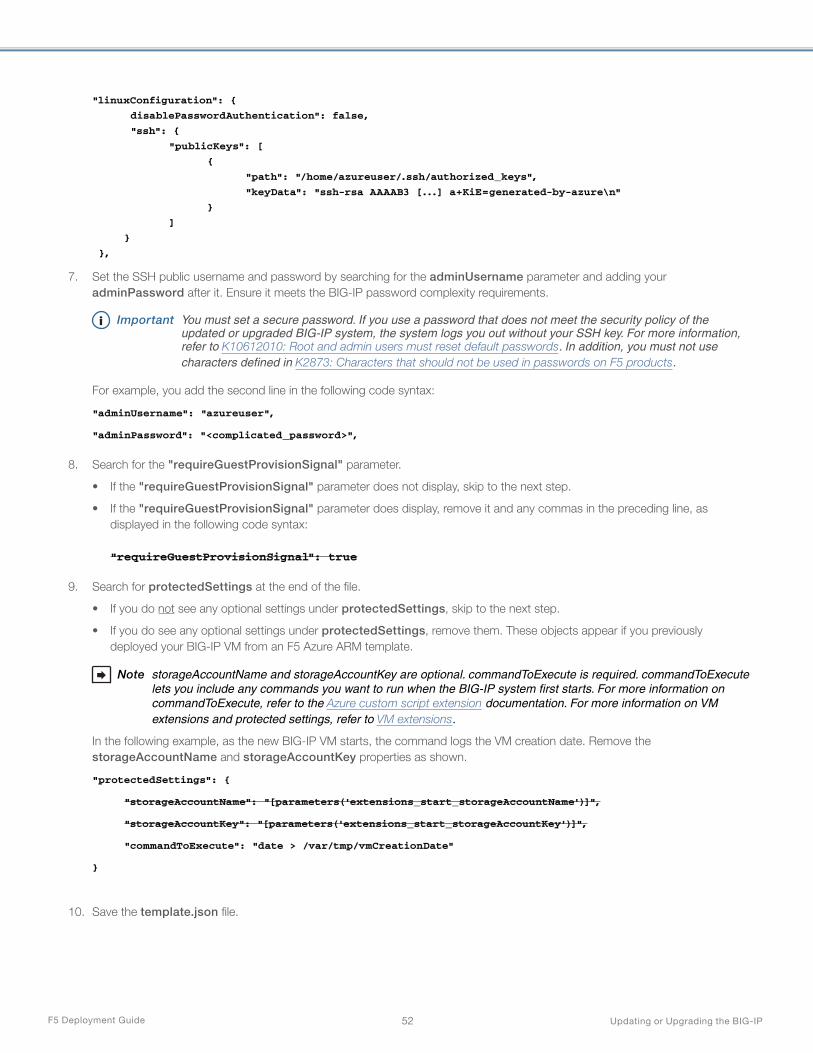
F5 Deployment Guide Updating or Upgrading the BIG-IP52
"linuxConfiguration": {
disablePasswordAuthentication": false,
"ssh": {
"publicKeys": [
{
"path": "/home/azureuser/.ssh/authorized_keys",
"keyData": "ssh-rsa AAAAB3 [...] a+KiE=generated-by-azure\n"
}
]
}
},
7. Set the SSH public username and password by searching for the adminUsername parameter and adding your adminPassword after it. Ensure it meets the BIG-IP password complexity requirements.
i Important You must set a secure password. If you use a password that does not meet the security policy of the updated or upgraded BIG-IP system, the system logs you out without your SSH key. For more information, refer to K10612010: Root and admin users must reset default passwords. In addition, you must not use characters defined in K2873: Characters that should not be used in passwords on F5 products.
For example, you add the second line in the following code syntax:
"adminUsername": "azureuser",
"adminPassword": "<complicated_password>",
8. Search for the "requireGuestProvisionSignal" parameter.
• If the "requireGuestProvisionSignal" parameter does not display, skip to the next step.
• If the "requireGuestProvisionSignal" parameter does display, remove it and any commas in the preceding line, as displayed in the following code syntax: "requireGuestProvisionSignal": true
9. Search for protectedSettings at the end of the file.
• If you do not see any optional settings under protectedSettings, skip to the next step.
• If you do see any optional settings under protectedSettings, remove them. These objects appear if you previously deployed your BIG-IP VM from an F5 Azure ARM template.
Note storageAccountName and storageAccountKey are optional. commandToExecute is required. commandToExecute lets you include any commands you want to run when the BIG-IP system first starts. For more information on commandToExecute, refer to the Azure custom script extension documentation. For more information on VM extensions and protected settings, refer to VM extensions.
In the following example, as the new BIG-IP VM starts, the command logs the VM creation date. Remove the storageAccountName and storageAccountKey properties as shown.
"protectedSettings": {
"storageAccountName": "[parameters('extensions_start_storageAccountName')]",
"storageAccountKey": "[parameters('extensions_start_storageAccountKey')]",
"commandToExecute": "date > /var/tmp/vmCreationDate"
}
10. Save the template.json file.

F5 Deployment Guide Updating or Upgrading the BIG-IP53
Performing the software update or upgrade
i Important Perform this procedure on a single browser tab; do NOT use multiple browser tabs.
Impact of procedures: Performing these procedures results in service disruption. Perform these procedures during a scheduled maintenance window.
Revoking the license on your BIG-IP system, if requiredUse the following guidance to revoke the license on your BIG-IP system so you can reuse it on the new BIG-IP VM.
Do one of the following:
• If you have a BYOL license and you want to use the license on another BIG-IP VE system, record the license, and then from the command line enter: revoke /sys license during a maintenance window, as revoking the license disables traffic management features and returns the BIG-IP system to an unlicensed state. Refer to K41458656: Reusing a BIG-IP VE license on a different BIG-IP VE system for complete instructions and eligibility.
• If you have a PAYG utility license, you do not need to revoke the license, and you can continue to the following procedure.
Deleting the BIG-IP VM and its associated diskBefore you delete your BIG-IP VM and its associated disk, verify you have a backup plan to restore the Azure VM and a UCS file to restore the BIG-IP configurations.
1. From Azure Portal, go to Home > Resource groups, and then select the name of your resource group.
2. Click the check box for the BIG-IP VM, and then click the check box next to its associated disk.
3. Select the ellipsis icon, and then click Delete.
4. Enter Yes to confirm, and then click Delete.
5. Click the bell icon to verify the two objects are deleted.
Deploying the new BIG-IP VM system from the template Next, you deploy the new BIG-IP VM from the template.
1. Click + Create a resource.
2. Search for Template Deployment.
3. Click Create.
4. Click Build your own template in the editor.
5. Click Load file.
6. Select the template.json file you prepared in Preparing for the update or upgrade on page 50.
7. Click Save.
8. Under Resource Group, select the name of your resource group.
9. Review and agree to the terms and conditions.
10. Click Purchase.
11. Click the bell icon, and then select Deployment in progress to verify the operation completes.
12. Depending on how you initially deployed your BIG-IP VM, you may encounter errors. Do one of the following:
• If you do not encounter errors, skip to the next step.
• If you do encounter errors, click the bell icon and then More events in the activity log to identify any illegal parameters, remove them from your template.json file, and then return to step 1 to repeat the deployment.
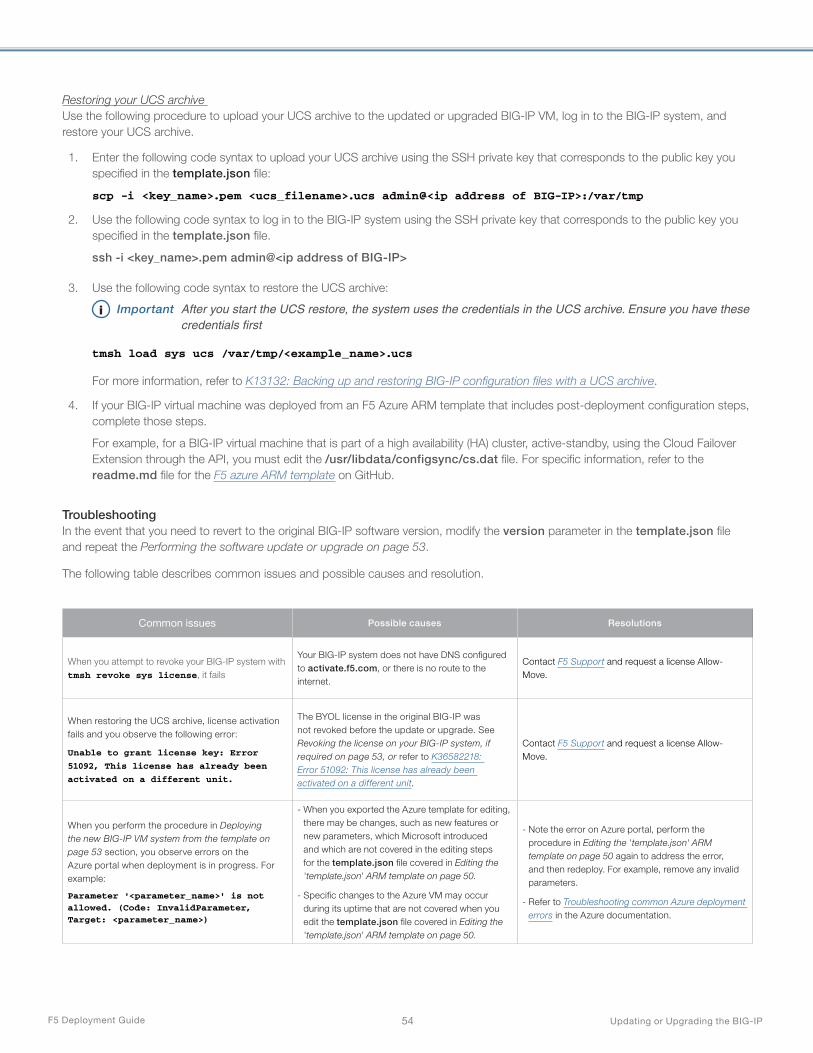
F5 Deployment Guide Updating or Upgrading the BIG-IP54
Restoring your UCS archive Use the following procedure to upload your UCS archive to the updated or upgraded BIG-IP VM, log in to the BIG-IP system, and restore your UCS archive.
1. Enter the following code syntax to upload your UCS archive using the SSH private key that corresponds to the public key you specified in the template.json file:
scp -i <key_name>.pem <ucs_filename>.ucs admin@<ip address of BIG-IP>:/var/tmp
2. Use the following code syntax to log in to the BIG-IP system using the SSH private key that corresponds to the public key you specified in the template.json file.
ssh -i <key_name>.pem admin@<ip address of BIG-IP>
3. Use the following code syntax to restore the UCS archive:
i Important After you start the UCS restore, the system uses the credentials in the UCS archive. Ensure you have these credentials first
tmsh load sys ucs /var/tmp/<example_name>.ucs
For more information, refer to K13132: Backing up and restoring BIG-IP configuration files with a UCS archive.
4. If your BIG-IP virtual machine was deployed from an F5 Azure ARM template that includes post-deployment configuration steps, complete those steps.
For example, for a BIG-IP virtual machine that is part of a high availability (HA) cluster, active-standby, using the Cloud Failover Extension through the API, you must edit the /usr/libdata/configsync/cs.dat file. For specific information, refer to the readme.md file for the F5 azure ARM template on GitHub.
Troubleshooting In the event that you need to revert to the original BIG-IP software version, modify the version parameter in the template.json file and repeat the Performing the software update or upgrade on page 53.
The following table describes common issues and possible causes and resolution.
Common issues Possible causes Resolutions
When you attempt to revoke your BIG-IP system with tmsh revoke sys license, it fails
Your BIG-IP system does not have DNS configured to activate.f5.com, or there is no route to the internet.
Contact F5 Support and request a license Allow-Move.
When restoring the UCS archive, license activation fails and you observe the following error:
Unable to grant license key: Error
51092, This license has already been
activated on a different unit.
The BYOL license in the original BIG-IP was not revoked before the update or upgrade. See Revoking the license on your BIG-IP system, if required on page 53, or refer to K36582218: Error 51092: This license has already been activated on a different unit.
Contact F5 Support and request a license Allow-Move.
When you perform the procedure in Deploying the new BIG-IP VM system from the template on page 53 section, you observe errors on the Azure portal when deployment is in progress. For example:
Parameter '<parameter_name>' is not allowed. (Code: InvalidParameter, Target: <parameter_name>)
- When you exported the Azure template for editing, there may be changes, such as new features or new parameters, which Microsoft introduced and which are not covered in the editing steps for the template.json file covered in Editing the 'template.json' ARM template on page 50.
- Specific changes to the Azure VM may occur during its uptime that are not covered when you edit the template.json file covered in Editing the 'template.json' ARM template on page 50.
- Note the error on Azure portal, perform the procedure in Editing the 'template.json' ARM template on page 50 again to address the error, and then redeploy. For example, remove any invalid parameters.
- Refer to Troubleshooting common Azure deployment errors in the Azure documentation.
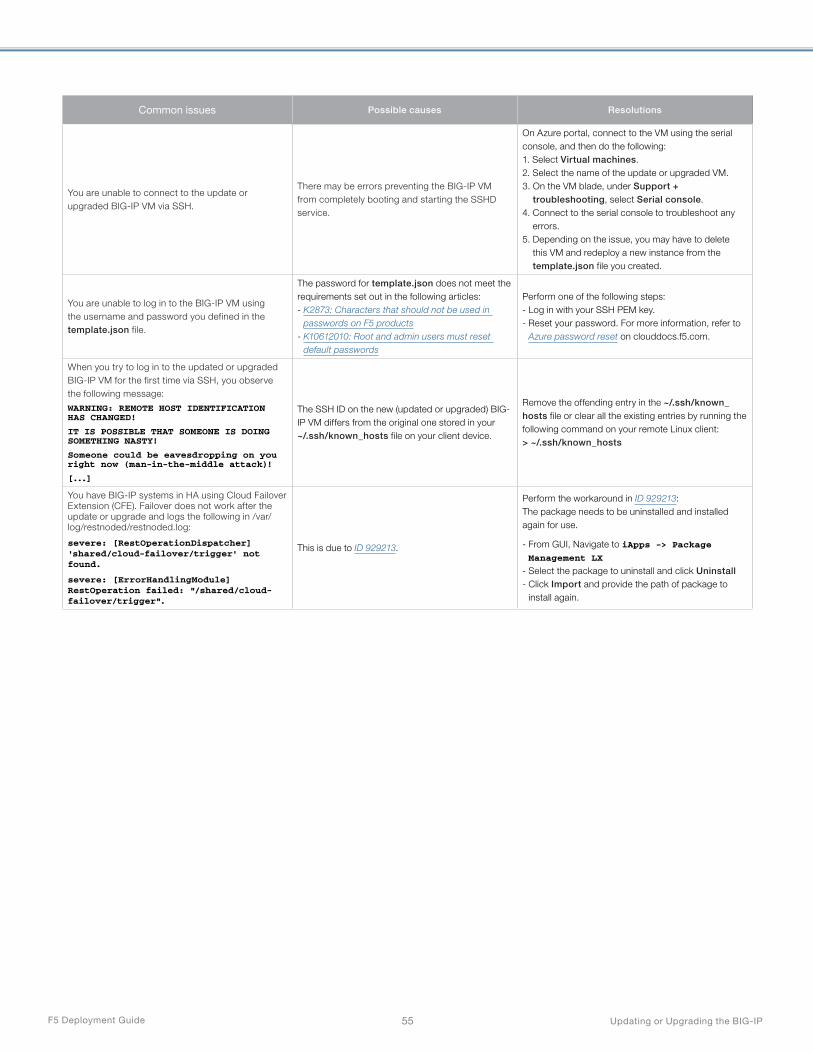
F5 Deployment Guide Updating or Upgrading the BIG-IP55
Common issues Possible causes Resolutions
You are unable to connect to the update or upgraded BIG-IP VM via SSH.
There may be errors preventing the BIG-IP VM from completely booting and starting the SSHD service.
On Azure portal, connect to the VM using the serial console, and then do the following:1. Select Virtual machines.2. Select the name of the update or upgraded VM.3. On the VM blade, under Support +
troubleshooting, select Serial console.4. Connect to the serial console to troubleshoot any
errors.5. Depending on the issue, you may have to delete
this VM and redeploy a new instance from the template.json file you created.
You are unable to log in to the BIG-IP VM using the username and password you defined in the template.json file.
The password for template.json does not meet the requirements set out in the following articles:- K2873: Characters that should not be used in
passwords on F5 products- K10612010: Root and admin users must reset
default passwords
Perform one of the following steps:- Log in with your SSH PEM key.- Reset your password. For more information, refer to
Azure password reset on clouddocs.f5.com.
When you try to log in to the updated or upgraded BIG-IP VM for the first time via SSH, you observe the following message:
WARNING: REMOTE HOST IDENTIFICATION HAS CHANGED!
IT IS POSSIBLE THAT SOMEONE IS DOING SOMETHING NASTY!
Someone could be eavesdropping on you right now (man-in-the-middle attack)!
[...]
The SSH ID on the new (updated or upgraded) BIG-IP VM differs from the original one stored in your ~/.ssh/known_hosts file on your client device.
Remove the offending entry in the ~/.ssh/known_hosts file or clear all the existing entries by running the following command on your remote Linux client:> ~/.ssh/known_hosts
You have BIG-IP systems in HA using Cloud Failover Extension (CFE). Failover does not work after the update or upgrade and logs the following in /var/log/restnoded/restnoded.log:
severe: [RestOperationDispatcher] 'shared/cloud-failover/trigger' not found.
severe: [ErrorHandlingModule] RestOperation failed: "/shared/cloud-failover/trigger".
This is due to ID 929213.
Perform the workaround in ID 929213: The package needs to be uninstalled and installed again for use.
- From GUI, Navigate to iApps -> Package Management LX
- Select the package to uninstall and click Uninstall- Click Import and provide the path of package to
install again.
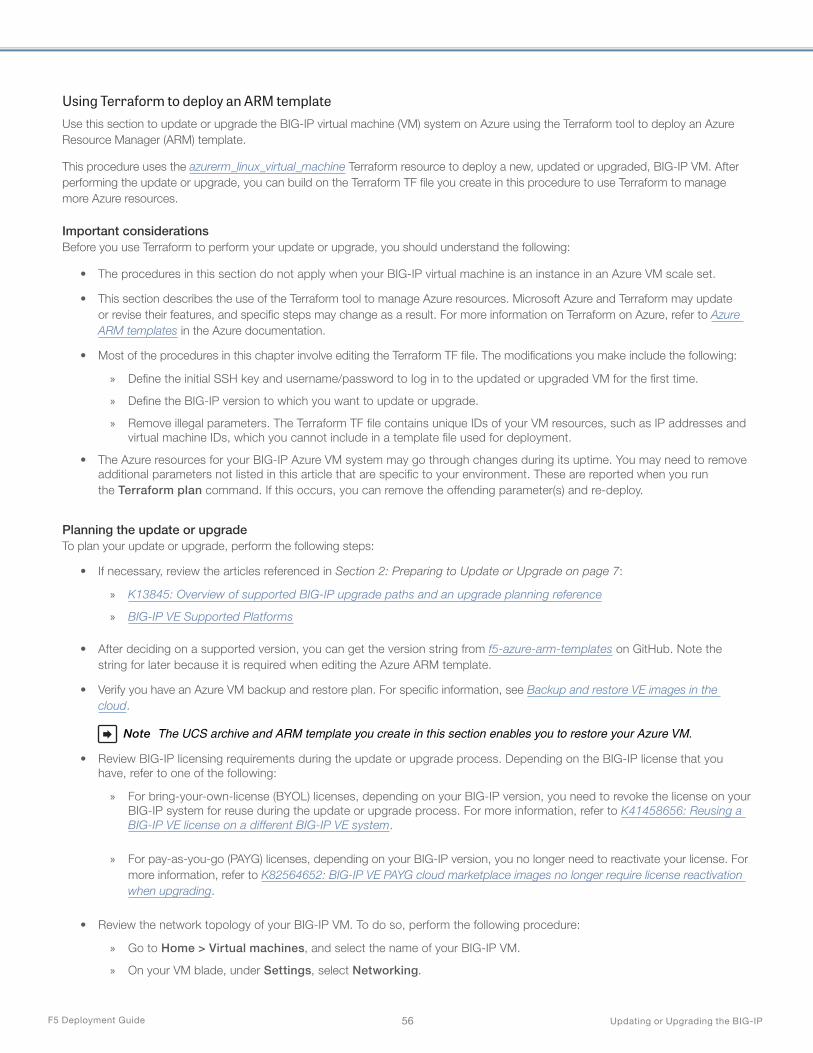
F5 Deployment Guide Updating or Upgrading the BIG-IP56
Using Terraform to deploy an ARM template Use this section to update or upgrade the BIG-IP virtual machine (VM) system on Azure using the Terraform tool to deploy an Azure Resource Manager (ARM) template.
This procedure uses the azurerm_linux_virtual_machine Terraform resource to deploy a new, updated or upgraded, BIG-IP VM. After performing the update or upgrade, you can build on the Terraform TF file you create in this procedure to use Terraform to manage more Azure resources.
Important considerations Before you use Terraform to perform your update or upgrade, you should understand the following:
• The procedures in this section do not apply when your BIG-IP virtual machine is an instance in an Azure VM scale set.
• This section describes the use of the Terraform tool to manage Azure resources. Microsoft Azure and Terraform may update or revise their features, and specific steps may change as a result. For more information on Terraform on Azure, refer to Azure ARM templates in the Azure documentation.
• Most of the procedures in this chapter involve editing the Terraform TF file. The modifications you make include the following:
» Define the initial SSH key and username/password to log in to the updated or upgraded VM for the first time.
» Define the BIG-IP version to which you want to update or upgrade.
» Remove illegal parameters. The Terraform TF file contains unique IDs of your VM resources, such as IP addresses and virtual machine IDs, which you cannot include in a template file used for deployment.
• The Azure resources for your BIG-IP Azure VM system may go through changes during its uptime. You may need to remove additional parameters not listed in this article that are specific to your environment. These are reported when you run the Terraform plan command. If this occurs, you can remove the offending parameter(s) and re-deploy.
Planning the update or upgradeTo plan your update or upgrade, perform the following steps:
• If necessary, review the articles referenced in Section 2: Preparing to Update or Upgrade on page 7:
» K13845: Overview of supported BIG-IP upgrade paths and an upgrade planning reference
» BIG-IP VE Supported Platforms
• After deciding on a supported version, you can get the version string from f5-azure-arm-templates on GitHub. Note the string for later because it is required when editing the Azure ARM template.
• Verify you have an Azure VM backup and restore plan. For specific information, see Backup and restore VE images in the cloud.
Note The UCS archive and ARM template you create in this section enables you to restore your Azure VM.
• Review BIG-IP licensing requirements during the update or upgrade process. Depending on the BIG-IP license that you have, refer to one of the following:
» For bring-your-own-license (BYOL) licenses, depending on your BIG-IP version, you need to revoke the license on your BIG-IP system for reuse during the update or upgrade process. For more information, refer to K41458656: Reusing a BIG-IP VE license on a different BIG-IP VE system.
» For pay-as-you-go (PAYG) licenses, depending on your BIG-IP version, you no longer need to reactivate your license. For more information, refer to K82564652: BIG-IP VE PAYG cloud marketplace images no longer require license reactivation when upgrading.
• Review the network topology of your BIG-IP VM. To do so, perform the following procedure:
» Go to Home > Virtual machines, and select the name of your BIG-IP VM.
» On your VM blade, under Settings, select Networking.

F5 Deployment Guide Updating or Upgrading the BIG-IP57
» Select Topology.
» Identify the BIG-IP VM to update or upgrade and verify it has no dependents.
You replace only the BIG-IP VM and its associated disk while reusing the existing Azure resources, such as virtual network, subnets, interfaces, and security groups. You do so by doing the following:
1. Import the existing BIG-IP VM configurations to a Terraform TF file.
2. Edit the Terraform file (enter the new BIG-IP version, credentials, and other information).
3. Deploying a new BIG-IP VM on Azure cloud using the Terraform file.
Preparing for the update or upgrade After performing the procedures in this section, you will have a UCS archive of the BIG-IP, Terraform files provider.tf and bigip.tf, and a SSH public key file ~/.ssh/id_rsa.pub, all on your client machine.
Generating a UCS archive filePerform the following procedure to generate a UCS archive file. You save the UCS file in the /var/local/ucs directory.
1. Enter the following command: tmsh save sys ucs azureVM.ucs
2. Save this file on your remote client.
Exporting the Azure ARM template Perform the following procedure to export the Azure ARM template of your BIG-IP VM and save it to your client machine.
1. From the Azure Portal, go to Home > Resource Groups, and then select the name of your resource group.
2. Click the check box for your BIG-IP VM.
3. Click the check box next to your BIG-IP VM associated disk.
4. Click the ellipsis icon, and then select Export template.
5. Click Download.
6. Click OK.
You can perform the same procedure after the update or upgrade to compare the differences between the two files, ensuring the required settings are maintained. You can also use this file to deploy your VM if required.
Opening the Azure Cloud Shell Do one of the following:
• On the Azure portal, on the top navigation, next to the bell icon, open Azure Cloud Shell. For information about Cloud shell, see Start Cloud Shell.
• Install and configure Terraform on your own Linux client.
Creating an SSH public key file On Azure Cloud Shell, use your SSH public key in the ~/.ssh/id_rsa.pub file to create an SSH public key file. The system saves this SSH public key on the new (updated or upgraded) BIG-IP VM, which enables you to log in. You must have the associated private key.
This procedure is only necessary if you do not have an SSH key. If you have one, continue with the next procedure.
1. If you do not have an SSH key, on the Azure portal, select +Create a resource, enter and select SSH Key, and complete the wizard.
2. Select { } to open an editor.
3. Enter the following command: $ cat ~/.ssh/id_rsa.pub
The system output appears similar to the following example: ssh-rsa AAAAB3NzaC1yc2EAAAADAQABAAABgQC1 [...] XXpx6AKY9nVnodmPecdeWhBVOXTOUoxyE= generated-by-azure

F5 Deployment Guide Updating or Upgrading the BIG-IP58
Importing the BIG-IP Azure VM as a Terraform resource On Azure Cloud Shell, bring the Terraform resource under Terraform management, and import the BIG-IP Azure VM as a Terraform resource.
1. To open an editor, click { }.
2. To define Azure as a provider, create the Terraform file provider.tf by entering the following declaration:
provider "azurerm" {
features {}
}
3. Create the Terraform file bigip.tf by entering the following empty declaration:
resource "azurerm_linux_virtual_machine" "bigip" {
}
For more information on this Terraform resource, see azurerm_linux_virtual_machine in the Terraform documentation.
4. To initialize Terraform, enter the following command: terraform init
5. To import your BIG-IP VM as a Terraform resource, enter the following command syntax :
terraform import azurerm_linux_virtual_machine.bigip /subscriptions/<subscription id>/
resourceGroups/<resource group>/providers/Microsoft.Compute/virtualMachines/<VM name>
For example, to import a BIG-IP VM named bigipvm001, you enter the following command:
terraform import azurerm_linux_virtual_machine.bigip /subscriptions/xxxx-e0b6-xxxx-b82e-xxxx/
resourceGroups/exampleRG/providers/Microsoft.Compute/virtualMachines/bigipvm001
Terraform creates a new state file, terraform.tfstate, containing the BIG-IP VM as a resource.
6. To overwrite the Terraform file bigip.tf using the state file, enter the following command:
terraform show -no-color > bigip.tf
You imported and saved your BIG-IP VM configurations in bigip.tf.
Editing the 'bigip.tf' file On Azure Cloud Shell, edit the bigip.tf file; you use it to deploy the new BIG-IP VM. Pay attention to the commas and braces when editing to maintain the proper syntax.
1. To open an editor, click { }.
2. Under the admin_username line, add your admin_password as in the following example:
admin_username = "azureuser"
admin_password = "<complicated_password>"
i Important You must set a secure password. If you use a password that does not meet the security policy of the updated or upgraded BIG-IP system, the system logs you out without your SSH key. For more information, refer to K10612010: Root and admin users must reset default passwords. In addition, you must not use characters defined in K2873: Characters that should not be used in passwords on F5 products.
3. Enter the following command: terraform plan
4. Using the error output from the terraform plan command, remove lines containing illegal parameters from bigip.tf.
The following table lists illegal parameters such as unique IDs and IP addresses that are not allowed by Terraform in a generic template file used for deployment. Terraform may display more illegal parameters depending on your environment.

F5 Deployment Guide Updating or Upgrading the BIG-IP59
Illegal Terraform parameters (unique IDs and IP addresses)
Example
idid="/subscriptions/xxxx-e0b6-445c-b82e-xxx/resourceGroups/exampleRG/providers/Microsoft.Compute/
virtualMachines/bigipvm001"
ip address
- private_ip_address="x.x.x.x"
- private_ip_addresses=[ "x.x.x.x", ]
- public_ip_addresses=[x.x.x.x]
virtual machine id virtual_machine_id= "bxxxxx-94e7-400a-927a-xxxxxx
Identity IDs- principal_id="537eb9e3-4ab9-4da3-99da-722aae139082"
- tenant_id="20aab298-91a4-40cf-a457-a4c0b7fc16b0"
managed disk idmanaged_disk_id="/subscriptions/xx-e0b6-xx-xx/resourceGroups/exampleRG/providers/Microsoft.Compute/disks/
bigipvm001_OsDisk_1_xxxx
5. Repeat steps 3 and 4 until there are no more errors from the terraform plan command.
6. To define your SSH public key, copy and paste the following admin_ssh_key stanza above the boot_diagnostics stanza. You will use this key to log in to the updated or upgraded BIG-IP VM.
admin_ssh_key {
public_key = file("~/.ssh/id_rsa.pub")
username = "azureuser"
}
boot_diagnostics {
[...]
}
Note If you receive an error later, use the tab character instead of spaces before the public_key and username parameters.
7. Look for the line that contains version and then replace your current BIG-IP version with the target version. Refer to Planning the update or upgrade on page 56 to retrieve your version.
For example, you update or upgrade your system to BIG-IP 15.1.0.4 by entering the following code syntax:
"version": "15.1.004000"
8. Save the bigip.tf file. You use this file to deploy your new BIG-IP VM.
Performing the software update or upgrade
i Important Perform this procedure on a single browser tab; do NOT use multiple browser tabs.
Impact of procedures: Performing these procedures results in service disruption. Perform these procedures during a scheduled maintenance window.
Revoking the license on your BIG-IP system, if requiredUse the following guidance to revoke the license on your BIG-IP system so you can reuse it on the new BIG-IP VM.
Do one of the following:
• If you have a BYOL license and you want to use the license on another BIG-IP VE system, record the license, and then from the command line enter: revoke /sys license during a maintenance window, as revoking the license disables traffic management features and returns the BIG-IP system to an unlicensed state. Refer to K41458656: Reusing a BIG-IP VE license on a different BIG-IP VE system for complete instructions and eligibility.
• If you have a PAYG utility license, you do not need to revoke the license, and you can continue to the following procedure.
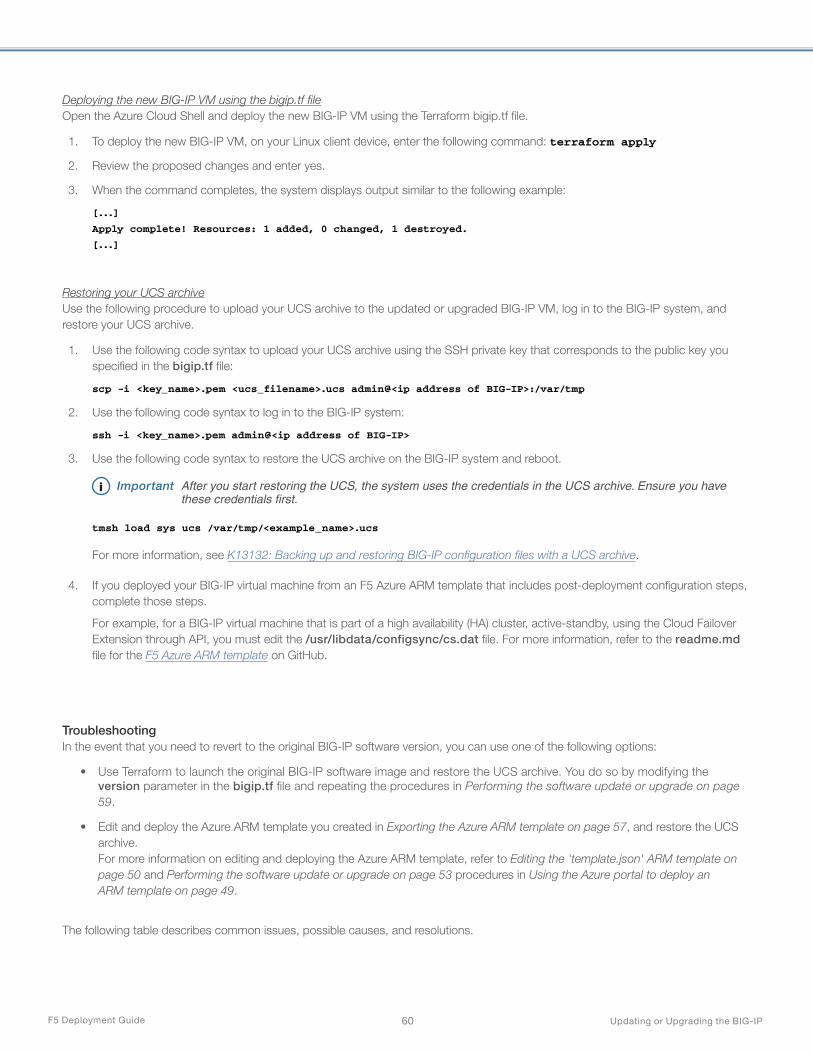
F5 Deployment Guide Updating or Upgrading the BIG-IP60
Deploying the new BIG-IP VM using the bigip.tf fileOpen the Azure Cloud Shell and deploy the new BIG-IP VM using the Terraform bigip.tf file.
1. To deploy the new BIG-IP VM, on your Linux client device, enter the following command: terraform apply
2. Review the proposed changes and enter yes.
3. When the command completes, the system displays output similar to the following example:
[...]
Apply complete! Resources: 1 added, 0 changed, 1 destroyed.
[...]
Restoring your UCS archiveUse the following procedure to upload your UCS archive to the updated or upgraded BIG-IP VM, log in to the BIG-IP system, and restore your UCS archive.
1. Use the following code syntax to upload your UCS archive using the SSH private key that corresponds to the public key you specified in the bigip.tf file:
scp -i <key_name>.pem <ucs_filename>.ucs admin@<ip address of BIG-IP>:/var/tmp
2. Use the following code syntax to log in to the BIG-IP system:
ssh -i <key_name>.pem admin@<ip address of BIG-IP>
3. Use the following code syntax to restore the UCS archive on the BIG-IP system and reboot.
i Important After you start restoring the UCS, the system uses the credentials in the UCS archive. Ensure you have these credentials first.
tmsh load sys ucs /var/tmp/<example_name>.ucs
For more information, see K13132: Backing up and restoring BIG-IP configuration files with a UCS archive.
4. If you deployed your BIG-IP virtual machine from an F5 Azure ARM template that includes post-deployment configuration steps, complete those steps.
For example, for a BIG-IP virtual machine that is part of a high availability (HA) cluster, active-standby, using the Cloud Failover Extension through API, you must edit the /usr/libdata/configsync/cs.dat file. For more information, refer to the readme.md file for the F5 Azure ARM template on GitHub.
TroubleshootingIn the event that you need to revert to the original BIG-IP software version, you can use one of the following options:
• Use Terraform to launch the original BIG-IP software image and restore the UCS archive. You do so by modifying the version parameter in the bigip.tf file and repeating the procedures in Performing the software update or upgrade on page 59.
• Edit and deploy the Azure ARM template you created in Exporting the Azure ARM template on page 57, and restore the UCS archive. For more information on editing and deploying the Azure ARM template, refer to Editing the 'template.json' ARM template on page 50 and Performing the software update or upgrade on page 53 procedures in Using the Azure portal to deploy an ARM template on page 49.
The following table describes common issues, possible causes, and resolutions.

F5 Deployment Guide Updating or Upgrading the BIG-IP61
Common issues Possible causes Resolutions
When you attempt to revoke your BIG-IP system with tmsh revoke sys license, it fails
Your BIG-IP system does not have DNS configured to activate.f5.com or there is no route to the internet.
Contact F5 Support and request a license Allow-Move.
When restoring the UCS archive, license activation fails and you observe the following error:
Unable to grant license key: Error
51092, This license has already been
activated on a different unit.
The BYOL license in the original BIG-IP was not revoked before the update or upgrade. See Revoking the license on your BIG-IP system, if required on page 46, or refer to K36582218: Error 51092: This license has already been activated on a different unit.
Contact F5 Support and request a license Allow-Move.
After running terraform apply, you observe an error similar to the following:
Error: creating Linux Virtual Machine "xxxx" (Resource Group "yyyy"):
compute.VirtualMachinesClient#CreateOrUpdate: Failure sending request: StatusCode=0 -- OriginalError:
autorest/azure: Service returned an error. Status=<nil> Code="OperationNotAllowed"
Message="The specified disk size 78 GB is smaller than the size of the corresponding disk in the VM image: 127 GB. This is not allowed. Please choose equal or greater size or do not specify an explicit size." Target="osDisk.diskSizeGB"
The disk size required for the BIG-IP version you are upgrading to is larger than the current disk size of your BIG-IP VM.
In bigip.tf, edit the disk_size_gb value of the VM's os_disk to meet the new disk size requirements. Run terraform apply again.
When you deploy the updated or upgraded BIG-IP VM in the Performing the upgrade section, you observe errors on the Azure portal when deployment is in progress. For example:
Error: "private_ip_addresses": this field cannot be set.
Error: : invalid or unknown key: id
- When you imported the BIG-IP VM configuration for editing, there may be changes, such as new features or new parameters, which Terraform and Microsoft introduced. These changes are not covered in the Editing the 'bigip.tf' file on page 58.
- Specific changes to the Azure VM occur during its uptime. These changes are not covered when you perform the procedure in Editing the 'bigip.tf' file on page 58.
- Note the error in the Terraform output and edit the bigip.tf file again to address the error, and then redeploy. For example, remove any invalid parameters.
- Refer to azurerm_linux_virtual_machine in the Terraform documentation.
You are unable to connect to the updated or upgraded BIG-IP VM via SSH.
There may be errors preventing the BIG-IP VM from completely booting and starting the SSHD service.
On Azure portal, connect to the VM using the serial console, and then do the following:1. Select Virtual machines.2. Select the name of the updated or upgraded VM.3. On the VM blade, under Support +
troubleshooting, select Serial console.4. Connect to the serial console to troubleshoot any
errors.5. Depending on the issue, you may have to delete
this VM and redeploy a new instance from the template.json file you created.
You are unable to log in to the BIG-IP VM using the username and password you defined in the bigip.tf file.
The password for bigip.tf does not meet the requirements set out in the following articles:- K2873: Characters that should not be used in
passwords on F5 products- K10612010: Root and admin users must reset
default passwords
Perform one of the following steps:- Log in with your SSH PEM key with the following
command syntax: ssh -i <privatekey_name>.pem admin@<IP address>
- Reset your password. For more information, refer to Azure password reset on clouddocs.f5.com.
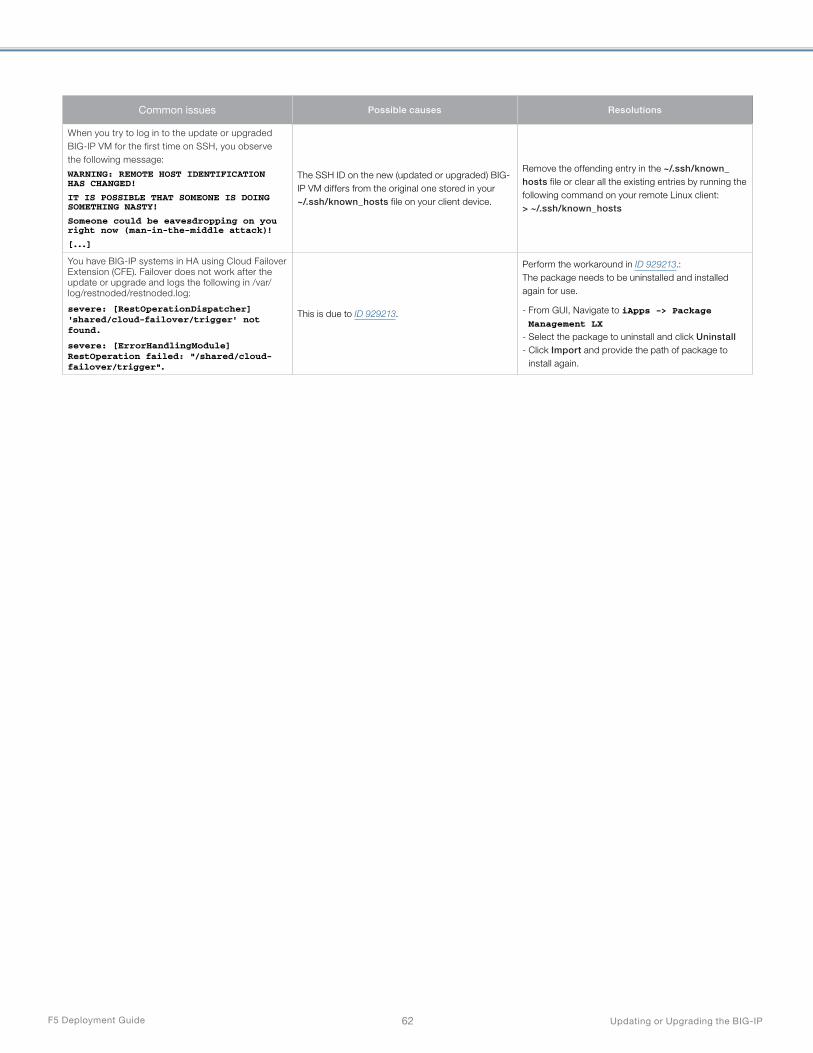
F5 Deployment Guide Updating or Upgrading the BIG-IP62
Common issues Possible causes Resolutions
When you try to log in to the update or upgraded BIG-IP VM for the first time on SSH, you observe the following message:
WARNING: REMOTE HOST IDENTIFICATION HAS CHANGED!
IT IS POSSIBLE THAT SOMEONE IS DOING SOMETHING NASTY!
Someone could be eavesdropping on you right now (man-in-the-middle attack)!
[...]
The SSH ID on the new (updated or upgraded) BIG-IP VM differs from the original one stored in your ~/.ssh/known_hosts file on your client device.
Remove the offending entry in the ~/.ssh/known_hosts file or clear all the existing entries by running the following command on your remote Linux client:> ~/.ssh/known_hosts
You have BIG-IP systems in HA using Cloud Failover Extension (CFE). Failover does not work after the update or upgrade and logs the following in /var/log/restnoded/restnoded.log:
severe: [RestOperationDispatcher] 'shared/cloud-failover/trigger' not found.
severe: [ErrorHandlingModule] RestOperation failed: "/shared/cloud-failover/trigger".
This is due to ID 929213.
Perform the workaround in ID 929213.: The package needs to be uninstalled and installed again for use.
- From GUI, Navigate to iApps -> Package Management LX
- Select the package to uninstall and click Uninstall- Click Import and provide the path of package to
install again.

F5 Deployment Guide Updating or Upgrading the BIG-IP63
Using Ansible to deploy an ARM template Use this chapter to update or upgrade the BIG-IP virtual machine (VM) system using Azure modules for Ansible to deploy an Azure Resource Manager (ARM) template.
If you are already using an Ansible inventory to manage your Azure resources, continue to use your existing Ansible infrastructure to perform the update or upgrade.
This procedure uses the azure_rm_deployment Azure module for Ansible to deploy a new, updated or upgraded, BIG-IP VM from an ARM template. After performing the update or upgrade, you can build on the Ansible playbook you created in this procedure to use Ansible to manage more Azure resources.
Important considerations Before you use the Azure ARM template to perform your update or upgrade, you should understand the following:
• This information in this section does not apply when your BIG-IP virtual machine is an instance in an Azure VM scale set.
• This section uses the Azure portal ARM template feature. Microsoft or Ansible may update or revise Azure portal and the template features, and specific steps in this article may change as a result. For more information on ARM templates, refer to Azure ARM templates in the Azure documentation.
• Most of the procedures involve editing the exported template.json file. The modifications you make include the following:
» Define the initial SSH key and username/password to log in to the updated or upgraded virtual machine for the first time.
» Define the BIG-IP version you want to upgrade to.
» Remove illegal parameters. The exported template.json file contains unique IDs of your VM resources, such as the OsDisk, which you cannot include in a template file used for deployment.
» Remove optional parameters that are already defined in the template file, such as storageAccountName and storageAccountKey.
• The Azure resources for your BIG-IP Azure VM system may go through changes during its uptime. You may need to remove additional parameters not listed in this article that are specific to your environment. These are reported when the deployment fails. If this occurs, you can remove the offending parameter(s) and re-deploy.
Planning the update or upgradeTo plan your update or upgrade, perform the following steps:
• If necessary, review the articles referenced in Section 2: Preparing to Update or Upgrade on page 7:
» K13845: Overview of supported BIG-IP upgrade paths and an upgrade planning reference
» BIG-IP VE Supported Platforms
• After deciding on a supported version, you can get the version string from f5-azure-arm-templates on GitHub. Note the string for later because it is required when editing the Azure ARM template.
• Verify you have an Azure VM backup and restore plan. For specific information, see Backup and restore VE images in the cloud.
Note The UCS archive and ARM template you create in this section enables you to restore your Azure VM.
• Review BIG-IP licensing requirements during the update or upgrade process. Depending on the BIG-IP license that you have, refer to one of the following:
» For bring-your-own-license (BYOL) licenses, depending on your BIG-IP version, you need to revoke the license on your BIG-IP system for reuse during the upgrade process. For more information, refer to K41458656: Reusing a BIG-IP VE license on a different BIG-IP VE system.
» For pay-as-you-go (PAYG) licenses, depending on your BIG-IP version, you no longer need to reactivate your license. For more information, refer to K82564652: BIG-IP VE PAYG cloud marketplace images no longer require license reactivation when upgrading.
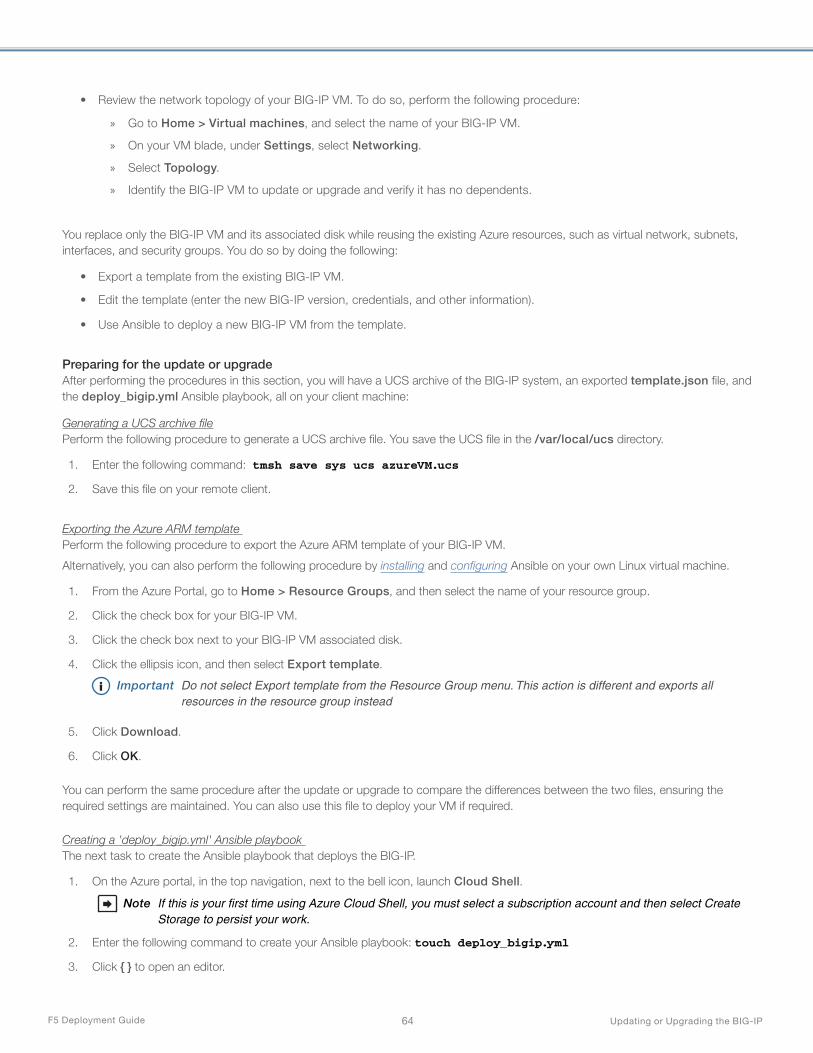
F5 Deployment Guide Updating or Upgrading the BIG-IP64
• Review the network topology of your BIG-IP VM. To do so, perform the following procedure:
» Go to Home > Virtual machines, and select the name of your BIG-IP VM.
» On your VM blade, under Settings, select Networking.
» Select Topology.
» Identify the BIG-IP VM to update or upgrade and verify it has no dependents.
You replace only the BIG-IP VM and its associated disk while reusing the existing Azure resources, such as virtual network, subnets, interfaces, and security groups. You do so by doing the following:
• Export a template from the existing BIG-IP VM.
• Edit the template (enter the new BIG-IP version, credentials, and other information).
• Use Ansible to deploy a new BIG-IP VM from the template.
Preparing for the update or upgrade After performing the procedures in this section, you will have a UCS archive of the BIG-IP system, an exported template.json file, and the deploy_bigip.yml Ansible playbook, all on your client machine:
Generating a UCS archive filePerform the following procedure to generate a UCS archive file. You save the UCS file in the /var/local/ucs directory.
1. Enter the following command: tmsh save sys ucs azureVM.ucs
2. Save this file on your remote client.
Exporting the Azure ARM template Perform the following procedure to export the Azure ARM template of your BIG-IP VM.
Alternatively, you can also perform the following procedure by installing and configuring Ansible on your own Linux virtual machine.
1. From the Azure Portal, go to Home > Resource Groups, and then select the name of your resource group.
2. Click the check box for your BIG-IP VM.
3. Click the check box next to your BIG-IP VM associated disk.
4. Click the ellipsis icon, and then select Export template.
i Important Do not select Export template from the Resource Group menu. This action is different and exports all resources in the resource group instead
5. Click Download.
6. Click OK.
You can perform the same procedure after the update or upgrade to compare the differences between the two files, ensuring the required settings are maintained. You can also use this file to deploy your VM if required.
Creating a 'deploy_bigip.yml' Ansible playbook The next task to create the Ansible playbook that deploys the BIG-IP.
1. On the Azure portal, in the top navigation, next to the bell icon, launch Cloud Shell.
Note If this is your first time using Azure Cloud Shell, you must select a subscription account and then select Create Storage to persist your work.
2. Enter the following command to create your Ansible playbook: touch deploy_bigip.yml
3. Click { } to open an editor.
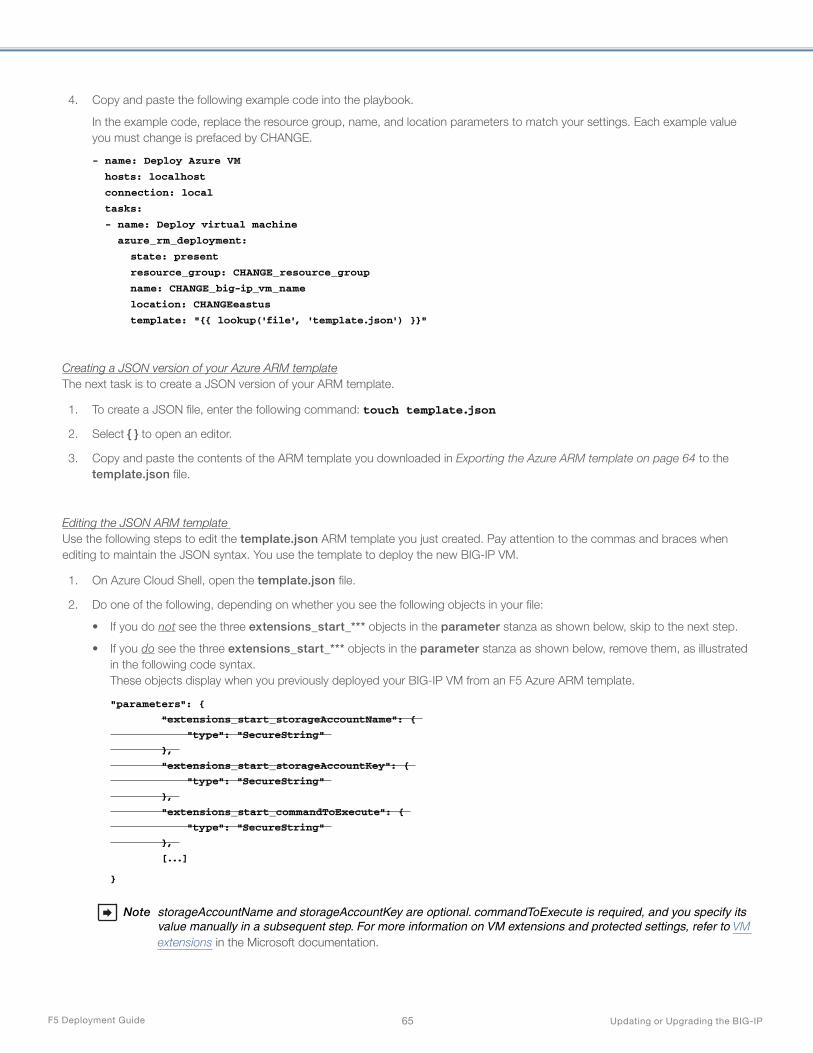
F5 Deployment Guide Updating or Upgrading the BIG-IP65
4. Copy and paste the following example code into the playbook.
In the example code, replace the resource group, name, and location parameters to match your settings. Each example value you must change is prefaced by CHANGE.
- name: Deploy Azure VM
hosts: localhost
connection: local
tasks:
- name: Deploy virtual machine
azure_rm_deployment:
state: present
resource_group: CHANGE_resource_group
name: CHANGE_big-ip_vm_name
location: CHANGEeastus
template: "{{ lookup('file', 'template.json') }}"
Creating a JSON version of your Azure ARM templateThe next task is to create a JSON version of your ARM template.
1. To create a JSON file, enter the following command: touch template.json
2. Select { } to open an editor.
3. Copy and paste the contents of the ARM template you downloaded in Exporting the Azure ARM template on page 64 to the template.json file.
Editing the JSON ARM template Use the following steps to edit the template.json ARM template you just created. Pay attention to the commas and braces when editing to maintain the JSON syntax. You use the template to deploy the new BIG-IP VM.
1. On Azure Cloud Shell, open the template.json file.
2. Do one of the following, depending on whether you see the following objects in your file:
• If you do not see the three extensions_start_*** objects in the parameter stanza as shown below, skip to the next step.
• If you do see the three extensions_start_*** objects in the parameter stanza as shown below, remove them, as illustrated in the following code syntax. These objects display when you previously deployed your BIG-IP VM from an F5 Azure ARM template.
"parameters": {
"extensions_start_storageAccountName": {
"type": "SecureString"
},
"extensions_start_storageAccountKey": {
"type": "SecureString"
},
"extensions_start_commandToExecute": {
"type": "SecureString"
},
[...]
}
Note storageAccountName and storageAccountKey are optional. commandToExecute is required, and you specify its value manually in a subsequent step. For more information on VM extensions and protected settings, refer to VM extensions in the Microsoft documentation.

F5 Deployment Guide Updating or Upgrading the BIG-IP66
3. Do one of the following:
• If your BIG-IP VM does not have a user-assigned identity, and you therefore do not see the principalID and clientID parameters as shown below, skip to the next step.
• If your BIG-IP VM has a user-assigned identity, remove the lines that contain the principalID and clientID parameters, as illustrated in the following code syntax: "identity": {
"type": "UserAssigned",
"userAssignedIdentities": {
"/subscriptions/xxx-e0b6-445c-b82e-xxxx/resourceGroups/exampleRG/providers/Microsoft.ManagedIdentity/userAssignedIdentities/iamme": {
"principalId": "xxxxx-c635-4180-9a58-xxxxx",
"clientId": "xxxxx-e5f9-4e4a-a208-xxxx"
}
}
},
4. Look for the line that contains version and then replace your current BIG-IP version with the target version. Refer to Planning the update or upgrade on page 63 to retrieve your version.
For example, you update or upgrade your system to BIG-IP 15.1.0.4 by entering the following code syntax:
"version": "15.1.004000"
5. In the resources > properties > storageProfile > osDisk > managedDisk property, remove the line that contains the id parameter.
For example, you remove the id parameter and the comma in the preceding line: "managedDisk": {
storageAccountType": "Premium_LRS",
id": "[resourceId('Microsoft.Compute/disks', concat(parameters('virtualMachines_example_name'), '_OsDisk_1_xxxxxxx3543f19c34bc10db483319'))]"
},
"diskSizeGB": 84
6. If the SSH public key does not display, copy and paste it in to the osProfile > linuxConfiguration stanza.
For example, for the keyData parameter only, you replace its value with the value from your public key.
Note If you do not have an SSH key, create one. On Azure portal, click +Create a resource, enter and select SSH Key, and complete the wizard.
"linuxConfiguration": {
disablePasswordAuthentication": false,
"ssh": {
"publicKeys": [
{
"path": "/home/azureuser/.ssh/authorized_keys",
"keyData": "ssh-rsa AAAAB3 [...] a+KiE=generated-by-azure\n"
}
]
}
},
7. Set the SSH public username and password by searching for the adminUsername parameter and adding your adminPassword after it. Ensure it meets the BIG-IP password complexity requirements.
i Important You must set a secure password. If you use a password that does not meet the security policy of the updated or upgraded BIG-IP system, the system logs you out without your SSH key. For more information, refer to K10612010: Root and admin users must reset default passwords. In addition, you must not use characters defined in K2873: Characters that should not be used in passwords on F5 products.

F5 Deployment Guide Updating or Upgrading the BIG-IP67
For example, you add the second line in the following code syntax:
"adminUsername": "azureuser",
"adminPassword": "<complicated_password>",
8. Search for the "requireGuestProvisionSignal" parameter.
• If the "requireGuestProvisionSignal" parameter does not display, skip to the next step.
• If the "requireGuestProvisionSignal" parameter does display, remove it and any commas in the preceding line, as displayed in the following code syntax: "requireGuestProvisionSignal": true
9. Search for protectedSettings at the end of the file.
• If you do not see any optional settings under protectedSettings, skip to the next step.
• If you do see any optional settings under protectedSettings, remove them. These objects appear if you previously deployed your BIG-IP VM from an F5 Azure ARM template.
Note storageAccountName and storageAccountKey are optional. commandToExecute is required. commandToExecute lets you include any commands you want to run when the BIG-IP system first starts. For more information on commandToExecute, refer to the Azure custom script extension documentation. For more information on VM extensions and protected settings, refer to VM extensions.
In the following example, as the new BIG-IP VM starts, the command logs the VM creation date. Remove the storageAccountName and storageAccountKey properties as shown.
"protectedSettings": {
"storageAccountName": "[parameters('extensions_start_storageAccountName')]",
"storageAccountKey": "[parameters('extensions_start_storageAccountKey')]",
"commandToExecute": "date > /var/tmp/vmCreationDate"
}
10. Save the template.json file.
Performing the software update or upgrade
i Important Perform this procedure on a single browser tab; do NOT use multiple browser tabs.
Impact of procedures: Performing these procedures results in service disruption. Perform these procedures during a scheduled maintenance window.
Revoking the license on your BIG-IP system, if requiredUse the following guidance to revoke the license on your BIG-IP system so you can reuse it on the new BIG-IP VM.
Do one of the following:
• If you have a BYOL license and you want to use the license on another BIG-IP VE system, record the license, and then from the command line enter: revoke /sys license during a maintenance window, as revoking the license disables traffic management features and returns the BIG-IP system to an unlicensed state. Refer to K41458656: Reusing a BIG-IP VE license on a different BIG-IP VE system for complete instructions and eligibility.
• If you have a PAYG utility license, you do not need to revoke the license, and you can continue to the following procedure.
Deleting the BIG-IP VM and its associated diskBefore you delete your BIG-IP VM and its associated disk, verify you have a backup plan to restore the Azure VM and a UCS file to restore the BIG-IP configurations.

F5 Deployment Guide Updating or Upgrading the BIG-IP68
1. From Azure Portal, go to Home > Resource groups, and then select the name of your resource group.
2. Click the check box for the BIG-IP VM, and then click the check box next to its associated disk.
3. Select the ellipsis icon, and then click Delete.
4. Enter Yes to confirm, and then click Delete.
5. Click the bell icon to verify the two objects are deleted.
Deploying the new BIG-IP VM system from the template using AnsibleThe next task is to deploy the new BIG-IP from the template using Ansible.
1. On the Azure portal, on the top navigation, next to the bell icon, launch Cloud Shell.
2. To run the Ansible playbook you prepared, enter the following command:
ansible-playbook deploy_bigip.yml
Depending on how you intially deployed your BIG-IP VM, you may encounter errors.
3. To identify illegal parameters, click the bell icon and then More events in the activity log, remove it from your template.json file, and repeat the deployment.
Restoring your UCS archiveUse the following procedure to upload your UCS archive to the updated or upgraded BIG-IP VM, log in to the BIG-IP system, and restore your UCS archive.
1. Enter the following code syntax to upload your UCS archive using the SSH private key that corresponds to the public key you specified in the template.json file:
scp -i <key_name>.pem <ucs_filename>.ucs admin@<ip address of BIG-IP>:/var/tmp
2. Use the following code syntax to log in to the BIG-IP system using the SSH private key that corresponds to the public key you specified in the template.json file.
ssh -i <key_name>.pem admin@<ip address of BIG-IP>
3. Use the following code syntax to restore the UCS archive:
i Important After you start the UCS restore, the system uses the credentials in the UCS archive. Ensure you have these credentials first
tmsh load sys ucs /var/tmp/<example_name>.ucs
For more information, refer to K13132: Backing up and restoring BIG-IP configuration files with a UCS archive.
4. If your BIG-IP virtual machine was deployed from an F5 Azure ARM template that includes post-deployment configuration steps, complete those steps.
For example, for a BIG-IP virtual machine that is part of a high availability (HA) cluster, active-standby, using the Cloud Failover Extension through the API, you must edit the /usr/libdata/configsync/cs.dat file. For specific information, refer to the readme.md file for the F5 azure ARM template on GitHub.
Troubleshooting In the event that you need to revert to the original BIG-IP software version, you can use one of the following options:
• Use Ansible to launch the original BIG-IP software image and restore the UCS archive by modifying the version parameter in the template.json file and repeating the procedure in Performing the software update or upgrade on page 67.
• Edit and deploy the Azure ARM template you created in Exporting the Azure ARM template on page 64, and restore the UCS archive. For more information on editing and deploying the Azure ARM template, refer to the Editing the 'template.json' ARM template on page 50 and Performing the software update or upgrade on page 53 procedures in Using the Azure portal to deploy an ARM template on page 49.

F5 Deployment Guide Updating or Upgrading the BIG-IP69
The following table describes common issues and possible causes and resolution.
Common issues Possible causes Resolutions
When you attempt to revoke your BIG-IP system with tmsh revoke sys license, it fails
Your BIG-IP system does not have DNS configured to activate.f5.com, or there is no route to the internet.
Contact F5 Support and request a license Allow-Move.
When restoring the UCS archive, license activation fails and you observe the following error:
Unable to grant license key: Error
51092, This license has already been
activated on a different unit.
The BYOL license in the original BIG-IP was not revoked before the update or upgrade. See Revoking the license on your BIG-IP system, if required on page 53, or refer to K36582218: Error 51092: This license has already been activated on a different unit.
Contact F5 Support and request a license Allow-Move.
When deploying the BIG-IP VM with the ansible-playbook command, you observe errors from Ansible similar to the following::
"BadRequest", "status_message": {"error": {"code": "InvalidParameter", "message": "The property 'requireGuestProvisionSignal' is not valid because the [...]
- When you exported the Azure template for editing, there may be changes, such as new features or new parameters, which Microsoft introduced and which are not covered in the editing steps for the template.json file covered in Editing the JSON ARM template on page 65.
- Specific changes to the Azure VM may occur during its uptime that are not covered when you edit the template.json file covered in Editing the JSON ARM template on page 65.
- Note the errors from Ansible and remove any illegal parameters from the template.json file to address the error, and then redeploy.
- Refer to Troubleshooting common Azure deployment errors in the Azure documentation.
When deploying the BIG-IP VM with the ansible-playbook command, you observe errors from Ansible similar to the following::
fatal: [localhost]: FAILED! => {"changed": false, "msg": "argument template is of type <type 'str'> and we were unable to convert to dict: unable to evaluate string asdictionary"}
The template.json file you are trying to deploy contains syntax errors. For example, missing or additional commas, braces and so on.
Review the changes you made to template.json to maintain the JSON syntax.
You are unable to connect to the updated or upgraded BIG-IP VM via SSH.
There may be errors preventing the BIG-IP VM from completely booting and starting the SSHD service.
On Azure portal, connect to the VM using the serial console, and then do the following:1. Select Virtual machines.2. Select the name of the updated or upgraded VM.3. On the VM blade, under Support +
troubleshooting, select Serial console.4. Connect to the serial console to troubleshoot any
errors.5. Depending on the issue, you may have to delete
this VM and redeploy a new instance from the template.json file you created.
You are unable to log in to the BIG-IP VM using the username and password you defined in the template.json file.
The password for template.json does not meet the requirements set out in the following articles:- K2873: Characters that should not be used in
passwords on F5 products- K10612010: Root and admin users must reset
default passwords
Perform one of the following steps:- Log in with your SSH PEM key with the following
command syntax: ssh -i <privatekey_name>.pem admin@<IP
address>
- Reset your password. For more information, refer to Azure password reset on clouddocs.f5.com.
When you try to log in to the updated or upgraded BIG-IP VM for the first time via SSH, you observe the following message:
WARNING: REMOTE HOST IDENTIFICATION HAS CHANGED!
IT IS POSSIBLE THAT SOMEONE IS DOING SOMETHING NASTY!
Someone could be eavesdropping on you right now (man-in-the-middle attack)!
[...]
The SSH ID on the new (updated or upgraded) BIG-IP VM differs from the original one stored in your ~/.ssh/known_hosts file on your client device.
Remove the offending entry in the ~/.ssh/known_hosts file or clear all the existing entries by running the following command on your remote Linux client:> ~/.ssh/known_hosts

F5 Deployment Guide Updating or Upgrading the BIG-IP70
Common issues Possible causes Resolutions
You have BIG-IP systems in HA using Cloud Failover Extension (CFE). Failover does not work after the update or upgrade and logs the following in /var/log/restnoded/restnoded.log:
severe: [RestOperationDispatcher] 'shared/cloud-failover/trigger' not found.
severe: [ErrorHandlingModule] RestOperation failed: "/shared/cloud-failover/trigger".
This is due to ID 929213.
Perform the workaround in ID 929213: The package needs to be uninstalled and installed again for use.
- From GUI, Navigate to iApps -> Package Management LX
- Select the package to uninstall and click Uninstall- Click Import and provide the path of package to
install again.

F5 Deployment Guide Updating or Upgrading the BIG-IP71
Section 7: Advanced Tools and AutomationThis section contains advanced tools and automation techniques for updating or upgrading your BIG-IP systems.
Updating or upgrading your BIG-IPs with BIG-IQWhen you use BIG-IQ to centrally manage your BIG-IP systems, you can use the Software Management feature to update or upgrade your managed devices. This feature has the following benefits:
• Copies the software image from the BIG-IQ to all managed BIG-IPs you want to update or upgrade and, after copying the image, you can optionally wait to update or upgrade until a later time.
• Captures the state of certain objects before the update or upgrade so you can compare their states before and after.
• Creates backups pre- and post-update or upgrade.
• Updates or upgrades devices sequentially or concurrently.
The following video F5 video on YouTube demonstrates how to update or upgrade managed BIG-IP devices: How to Upgrade Managed Devices to New Versions of TMOS with BIG-IQ
The following video demonstrates how to re-discover and re-import BIG-IP devices after an update or upgrade (this video is part of separate series, but the same procedure applies to this article): Completing the post-upgrade process: Reimporting devices and services
Uploading the BIG-IP imagePrior to updating or upgrading a managed BIG-IP, you must upload the image to the BIG-IQ system. We assume you have already downloaded the image in Downloading a BIG-IP image and matching MD5 checksum file on page 8.
1. From the BIG-IQ, go to Devices > Software Management > Software Images.
2. Click Upload Image.
3. Click Choose File.
4. Choose the image and then click Open.
5. Click Upload.
Updating or upgrading managed BIG-IP devicesYou can use the Software Management feature to update or upgrade managed BIG-IP devices and perform optional pre- and post-upgrade tasks from the BIG-IQ user interface.
Impact of procedure: During the process, the BIG-IQ system reboots the BIG-IP device, which interrupts traffic processing on an active system. F5 recommends that you perform this procedure during a maintenance window.
1. On the BIG-IQ, go to Devices > Software Management > Software Installations.
2. Click Managed Device Install.
3. From the Software Image list, select the image you uploaded in the previous procedure.
4. In Name, enter a name for the task.
5. Select an installation option. For details about each option, in the upper right, click Help (?).
6. Under Backup Properties, select the options you need, if necessary.
7. Click Add/Remove Devices.
8. Do one of the following:
• Select Device.
• Select Group/Cluster, and then select a Cluster Type.
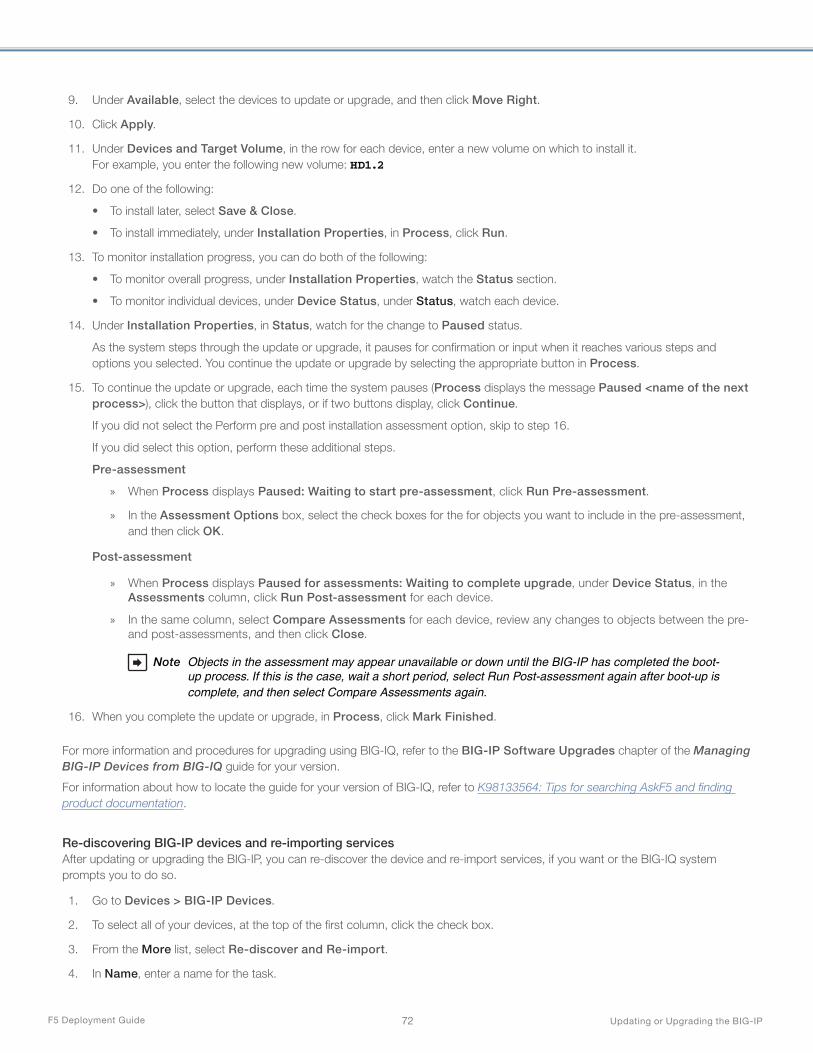
F5 Deployment Guide Updating or Upgrading the BIG-IP72
9. Under Available, select the devices to update or upgrade, and then click Move Right.
10. Click Apply.
11. Under Devices and Target Volume, in the row for each device, enter a new volume on which to install it. For example, you enter the following new volume: HD1.2
12. Do one of the following:
• To install later, select Save & Close.
• To install immediately, under Installation Properties, in Process, click Run.
13. To monitor installation progress, you can do both of the following:
• To monitor overall progress, under Installation Properties, watch the Status section.
• To monitor individual devices, under Device Status, under Status, watch each device.
14. Under Installation Properties, in Status, watch for the change to Paused status.
As the system steps through the update or upgrade, it pauses for confirmation or input when it reaches various steps and options you selected. You continue the update or upgrade by selecting the appropriate button in Process.
15. To continue the update or upgrade, each time the system pauses (Process displays the message Paused <name of the next process>), click the button that displays, or if two buttons display, click Continue.
If you did not select the Perform pre and post installation assessment option, skip to step 16.
If you did select this option, perform these additional steps.
Pre-assessment
» When Process displays Paused: Waiting to start pre-assessment, click Run Pre-assessment.
» In the Assessment Options box, select the check boxes for the for objects you want to include in the pre-assessment, and then click OK.
Post-assessment
» When Process displays Paused for assessments: Waiting to complete upgrade, under Device Status, in the Assessments column, click Run Post-assessment for each device.
» In the same column, select Compare Assessments for each device, review any changes to objects between the pre- and post-assessments, and then click Close.
Note Objects in the assessment may appear unavailable or down until the BIG-IP has completed the boot-up process. If this is the case, wait a short period, select Run Post-assessment again after boot-up is complete, and then select Compare Assessments again.
16. When you complete the update or upgrade, in Process, click Mark Finished.
For more information and procedures for upgrading using BIG-IQ, refer to the BIG-IP Software Upgrades chapter of the Managing BIG-IP Devices from BIG-IQ guide for your version.
For information about how to locate the guide for your version of BIG-IQ, refer to K98133564: Tips for searching AskF5 and finding product documentation.
Re-discovering BIG-IP devices and re-importing servicesAfter updating or upgrading the BIG-IP, you can re-discover the device and re-import services, if you want or the BIG-IQ system prompts you to do so.
1. Go to Devices > BIG-IP Devices.
2. To select all of your devices, at the top of the first column, click the check box.
3. From the More list, select Re-discover and Re-import.
4. In Name, enter a name for the task.

F5 Deployment Guide Updating or Upgrading the BIG-IP73
5. In Shared Object Conflict Resolution Policy, select Use BIG-IP.
6. In Version Object Conflict Resolution Policy, select Create Version.
This option determines how the system resolves importing conflicts. When you select this option, the BIG-IQ system stores a copy of the BIG-IP LTM monitor or profile object that is on the BIG-IP device, which is specific to the software version you are running on your BIG-IP system. Later, when the BIG-IQ system deploys a new configuration, it replaces that object on all the managed BIG-IP devices running that version. For more information, refer to K63557165: Discovering a BIG-IP device with a BIG-IQ system and importing the BIG-IP service configuration.
7. Under Selected, ensure the list contains all the managed devices you want to import.
8. Click Create.
9. In the Services column, you can see the status of your importing task. If you receive an import error in this column, do the following:
• Select the error.
• In Configuration Import, select Re-import.
• Under Name, click the listed objects to see the discrepancies between the devices you already imported in to the BIG-IQ and the device you are importing now.
The system displays the object properties that differ between the BIG-IQ and BIG-IP systems. You have the option to use either the version the BIG-IQ already has or the version on the BIG-IP system you are importing, whichever works best for your environment.
10. In Conflict Resolution, select Device Specific Objects, to see if there are any additional conflicts.
11. Select Continue.
12. Select Resolve.
13. In the upper-left, click Back. Under Device Name and Services, you can see that the system re-imported the devices and services.
This completes the configuration.

F5 Deployment Guide Updating or Upgrading the BIG-IP74
Automating BIG-IP software update or upgrade with AnsibleUse this section to automate a BIG-IP system software update or upgrade with Ansible. The procedures guide you through using an example playbook as the basis for your own custom playbook.
PrerequisitesYou must meet the following prerequisites to use these procedures:
• You are familiar with using Ansible.
• You installed Ansible 2.7 or later on the control machine.
• If you are running Ansible 2.10, you installed the f5networks.f5_modules collection in ~/.ansible/collections, which is a collections directory in your playbooks directory or one specified in collections_paths.
• You installed BIG-IP 12.x or later on the devices in your environment.
• You read the User's Guide section of F5 Modules for Ansible Documentation.
• You installed the Python packages required for each module or filter you want to use on the control machine. For example, the F5 Modules require the f5-sdk package. For more information, refer to Module Index in the Ansible User Guide.
Example playbookThe example playbook (see Example Playbook on page 75) does the following:
• Checks the failover state of a BIG-IP system
• Prepares the BIG-IP system for an update or upgrade
• Uses a custom script to identify an available volume set number to use
• Runs a software update or upgrade
• Boots to the newly updated or upgraded boot location
Creating the playbook and customizing play settingsIn this procedure, you create a playbook using the example playbook as a template. You customize the playbook's settings to meet the needs of your environment.
1. Log in to your control machine.
2. Create a playbook file called upgrade_bigip_software.yml in your playbooks directory.
3. Copy the contents of the example playbook (see Example Playbook on page 75).
4. Save and close the file.
5. If you are copying from a Windows system, use sed or a similar utility to remove any \r control characters that you copied in the file. For example, if you use sed run the following command on your control machine:
sed -i 's/\r$//' upgrade_bigip_software.yml
6. Open the file for editing.
7. Customize the hosts parameter by adding hosts or groups from your environment.
8. In the vars parameter, customize the provider variable by adding your BIG-IP connection details.
Additional information: The example uses group variables from the group to which the hosts belong. The playbook references the provider variable in the provider parameter of the F5 Modules.
You can encrypt BIG-IP passwords for the playbook by placing them in the vault. For more information, refer to K64450989: Using the 'ansible-vault' command to encrypt BIG-IP passwords used in a playbook.
9. You can leave the vars_prompt section as is, or remove it to use another method for including a variable for the BIG-IP software you want to install. For more information, refer to the Using Variables page of the Ansible User Guide.
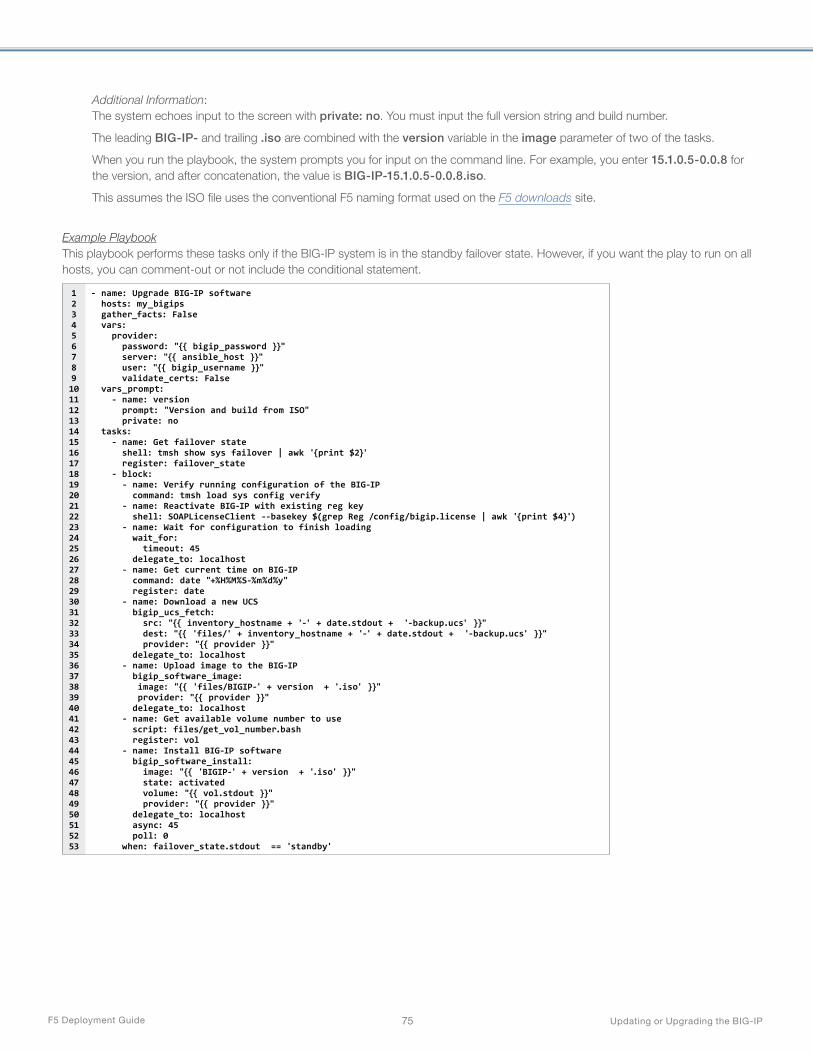
F5 Deployment Guide Updating or Upgrading the BIG-IP75
Additional Information: The system echoes input to the screen with private: no. You must input the full version string and build number.
The leading BIG-IP- and trailing .iso are combined with the version variable in the image parameter of two of the tasks.
When you run the playbook, the system prompts you for input on the command line. For example, you enter 15.1.0.5-0.0.8 for the version, and after concatenation, the value is BIG-IP-15.1.0.5-0.0.8.iso.
This assumes the ISO file uses the conventional F5 naming format used on the F5 downloads site.
Example PlaybookThis playbook performs these tasks only if the BIG-IP system is in the standby failover state. However, if you want the play to run on all hosts, you can comment-out or not include the conditional statement.
1234567891011121314151617181920212223242526272829303132333435363738394041424344454647484950515253
- name: Upgrade BIG-IP software hosts: my_bigips gather_facts: False vars: provider: password: "{{ bigip_password }}" server: "{{ ansible_host }}" user: "{{ bigip_username }}" validate_certs: False vars_prompt: - name: version prompt: "Version and build from ISO" private: no tasks: - name: Get failover state shell: tmsh show sys failover | awk '{print $2}' register: failover_state - block: - name: Verify running configuration of the BIG-IP command: tmsh load sys config verify - name: Reactivate BIG-IP with existing reg key shell: SOAPLicenseClient --basekey $(grep Reg /config/bigip.license | awk '{print $4}') - name: Wait for configuration to finish loading wait_for: timeout: 45 delegate_to: localhost - name: Get current time on BIG-IP command: date "+%H%M%S-%m%d%y" register: date - name: Download a new UCS bigip_ucs_fetch: src: "{{ inventory_hostname + '-' + date.stdout + '-backup.ucs' }}" dest: "{{ 'files/' + inventory_hostname + '-' + date.stdout + '-backup.ucs' }}" provider: "{{ provider }}" delegate_to: localhost - name: Upload image to the BIG-IP bigip_software_image: image: "{{ 'files/BIGIP-' + version + '.iso' }}" provider: "{{ provider }}" delegate_to: localhost - name: Get available volume number to use script: files/get_vol_number.bash register: vol - name: Install BIG-IP software bigip_software_install: image: "{{ 'BIGIP-' + version + '.iso' }}" state: activated volume: "{{ vol.stdout }}" provider: "{{ provider }}" delegate_to: localhost async: 45 poll: 0 when: failover_state.stdout == 'standby'
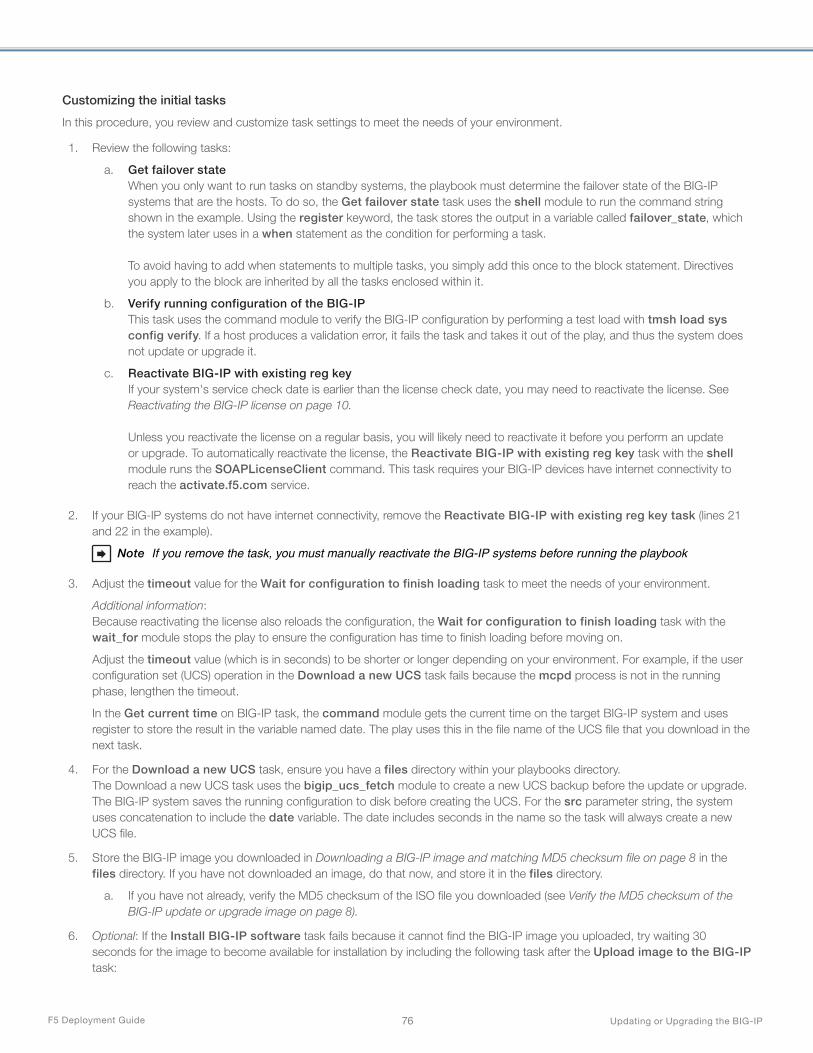
F5 Deployment Guide Updating or Upgrading the BIG-IP76
Customizing the initial tasks
In this procedure, you review and customize task settings to meet the needs of your environment.
1. Review the following tasks:
a. Get failover state When you only want to run tasks on standby systems, the playbook must determine the failover state of the BIG-IP systems that are the hosts. To do so, the Get failover state task uses the shell module to run the command string shown in the example. Using the register keyword, the task stores the output in a variable called failover_state, which the system later uses in a when statement as the condition for performing a task. To avoid having to add when statements to multiple tasks, you simply add this once to the block statement. Directives you apply to the block are inherited by all the tasks enclosed within it.
b. Verify running configuration of the BIG-IP This task uses the command module to verify the BIG-IP configuration by performing a test load with tmsh load sys config verify. If a host produces a validation error, it fails the task and takes it out of the play, and thus the system does not update or upgrade it.
c. Reactivate BIG-IP with existing reg key If your system's service check date is earlier than the license check date, you may need to reactivate the license. See Reactivating the BIG-IP license on page 10. Unless you reactivate the license on a regular basis, you will likely need to reactivate it before you perform an update or upgrade. To automatically reactivate the license, the Reactivate BIG-IP with existing reg key task with the shell module runs the SOAPLicenseClient command. This task requires your BIG-IP devices have internet connectivity to reach the activate.f5.com service.
2. If your BIG-IP systems do not have internet connectivity, remove the Reactivate BIG-IP with existing reg key task (lines 21 and 22 in the example).
Note If you remove the task, you must manually reactivate the BIG-IP systems before running the playbook
3. Adjust the timeout value for the Wait for configuration to finish loading task to meet the needs of your environment.
Additional information: Because reactivating the license also reloads the configuration, the Wait for configuration to finish loading task with the wait_for module stops the play to ensure the configuration has time to finish loading before moving on.
Adjust the timeout value (which is in seconds) to be shorter or longer depending on your environment. For example, if the user configuration set (UCS) operation in the Download a new UCS task fails because the mcpd process is not in the running phase, lengthen the timeout.
In the Get current time on BIG-IP task, the command module gets the current time on the target BIG-IP system and uses register to store the result in the variable named date. The play uses this in the file name of the UCS file that you download in the next task.
4. For the Download a new UCS task, ensure you have a files directory within your playbooks directory. The Download a new UCS task uses the bigip_ucs_fetch module to create a new UCS backup before the update or upgrade. The BIG-IP system saves the running configuration to disk before creating the UCS. For the src parameter string, the system uses concatenation to include the date variable. The date includes seconds in the name so the task will always create a new UCS file.
5. Store the BIG-IP image you downloaded in Downloading a BIG-IP image and matching MD5 checksum file on page 8 in the files directory. If you have not downloaded an image, do that now, and store it in the files directory.
a. If you have not already, verify the MD5 checksum of the ISO file you downloaded (see Verify the MD5 checksum of the BIG-IP update or upgrade image on page 8).
6. Optional: If the Install BIG-IP software task fails because it cannot find the BIG-IP image you uploaded, try waiting 30 seconds for the image to become available for installation by including the following task after the Upload image to the BIG-IP task:
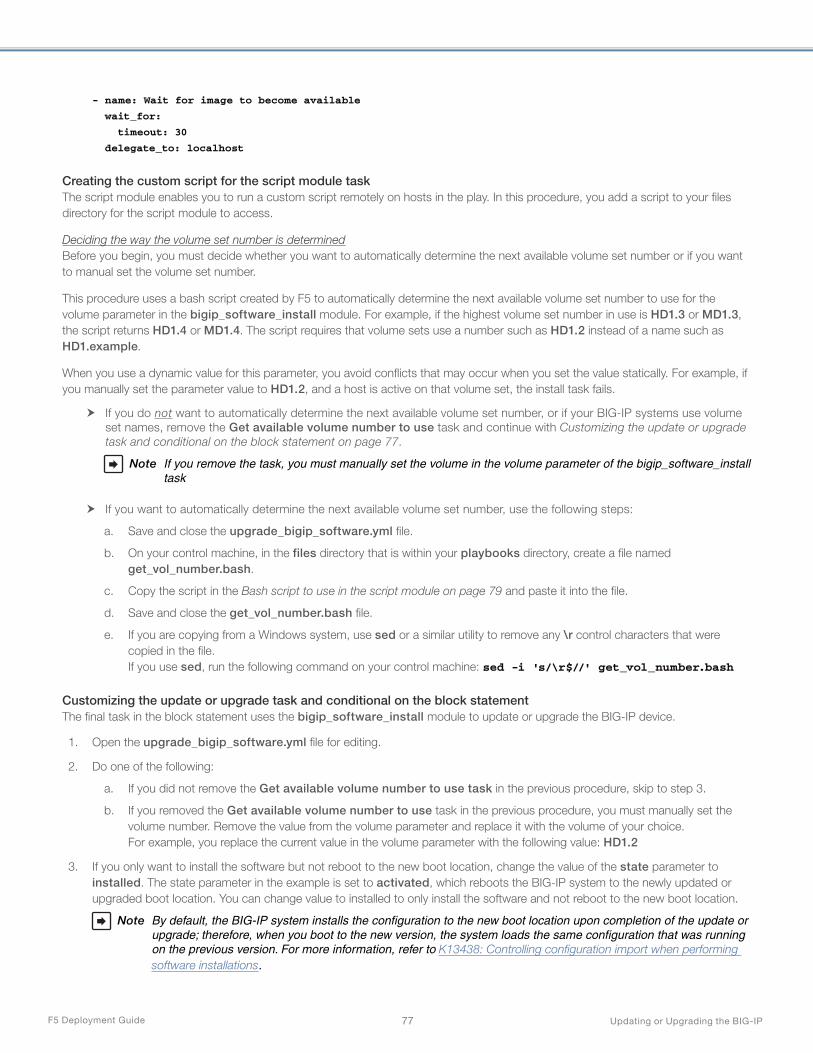
F5 Deployment Guide Updating or Upgrading the BIG-IP77
- name: Wait for image to become available
wait_for:
timeout: 30
delegate_to: localhost
Creating the custom script for the script module taskThe script module enables you to run a custom script remotely on hosts in the play. In this procedure, you add a script to your files directory for the script module to access.
Deciding the way the volume set number is determinedBefore you begin, you must decide whether you want to automatically determine the next available volume set number or if you want to manual set the volume set number.
This procedure uses a bash script created by F5 to automatically determine the next available volume set number to use for the volume parameter in the bigip_software_install module. For example, if the highest volume set number in use is HD1.3 or MD1.3, the script returns HD1.4 or MD1.4. The script requires that volume sets use a number such as HD1.2 instead of a name such as HD1.example.
When you use a dynamic value for this parameter, you avoid conflicts that may occur when you set the value statically. For example, if you manually set the parameter value to HD1.2, and a host is active on that volume set, the install task fails.
h If you do not want to automatically determine the next available volume set number, or if your BIG-IP systems use volume set names, remove the Get available volume number to use task and continue with Customizing the update or upgrade task and conditional on the block statement on page 77.
Note If you remove the task, you must manually set the volume in the volume parameter of the bigip_software_install task
h If you want to automatically determine the next available volume set number, use the following steps:
a. Save and close the upgrade_bigip_software.yml file.
b. On your control machine, in the files directory that is within your playbooks directory, create a file named get_vol_number.bash.
c. Copy the script in the Bash script to use in the script module on page 79 and paste it into the file.
d. Save and close the get_vol_number.bash file.
e. If you are copying from a Windows system, use sed or a similar utility to remove any \r control characters that were copied in the file. If you use sed, run the following command on your control machine: sed -i 's/\r$//' get_vol_number.bash
Customizing the update or upgrade task and conditional on the block statementThe final task in the block statement uses the bigip_software_install module to update or upgrade the BIG-IP device.
1. Open the upgrade_bigip_software.yml file for editing.
2. Do one of the following:
a. If you did not remove the Get available volume number to use task in the previous procedure, skip to step 3.
b. If you removed the Get available volume number to use task in the previous procedure, you must manually set the volume number. Remove the value from the volume parameter and replace it with the volume of your choice. For example, you replace the current value in the volume parameter with the following value: HD1.2
3. If you only want to install the software but not reboot to the new boot location, change the value of the state parameter to installed. The state parameter in the example is set to activated, which reboots the BIG-IP system to the newly updated or upgraded boot location. You can change value to installed to only install the software and not reboot to the new boot location.
Note By default, the BIG-IP system installs the configuration to the new boot location upon completion of the update or upgrade; therefore, when you boot to the new version, the system loads the same configuration that was running on the previous version. For more information, refer to K13438: Controlling configuration import when performing software installations.
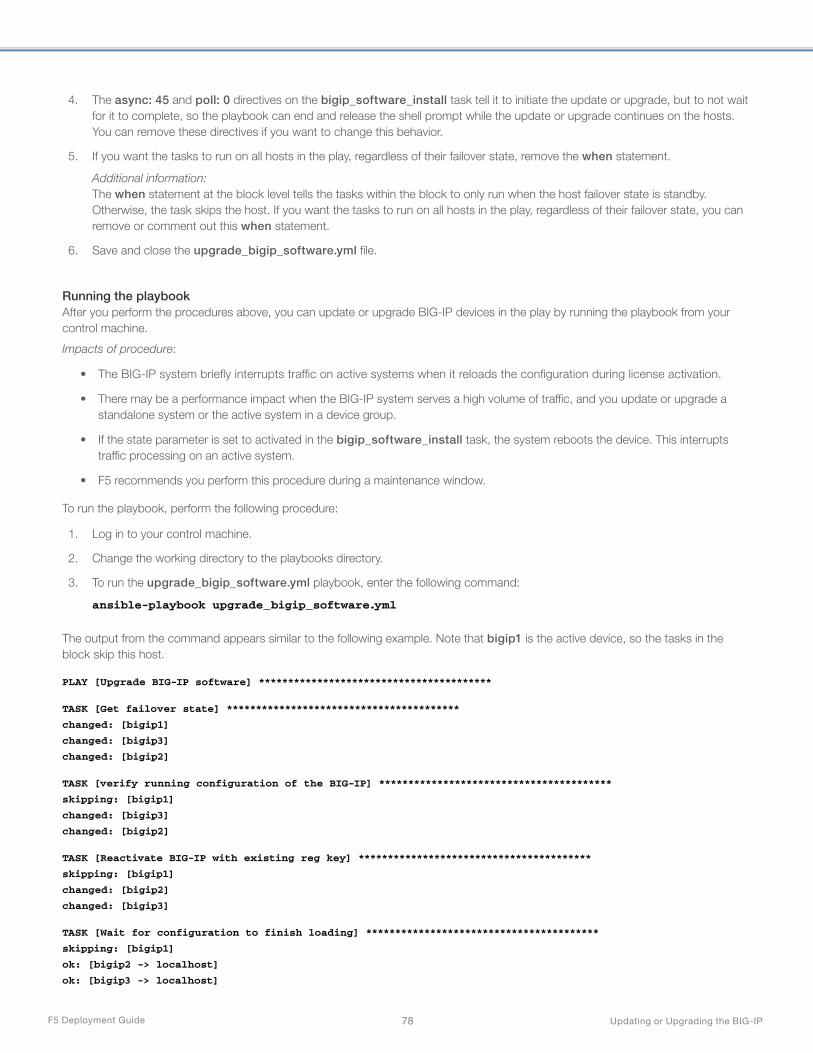
F5 Deployment Guide Updating or Upgrading the BIG-IP78
4. The async: 45 and poll: 0 directives on the bigip_software_install task tell it to initiate the update or upgrade, but to not wait for it to complete, so the playbook can end and release the shell prompt while the update or upgrade continues on the hosts. You can remove these directives if you want to change this behavior.
5. If you want the tasks to run on all hosts in the play, regardless of their failover state, remove the when statement.
Additional information: The when statement at the block level tells the tasks within the block to only run when the host failover state is standby. Otherwise, the task skips the host. If you want the tasks to run on all hosts in the play, regardless of their failover state, you can remove or comment out this when statement.
6. Save and close the upgrade_bigip_software.yml file.
Running the playbookAfter you perform the procedures above, you can update or upgrade BIG-IP devices in the play by running the playbook from your control machine.
Impacts of procedure:
• The BIG-IP system briefly interrupts traffic on active systems when it reloads the configuration during license activation.
• There may be a performance impact when the BIG-IP system serves a high volume of traffic, and you update or upgrade a standalone system or the active system in a device group.
• If the state parameter is set to activated in the bigip_software_install task, the system reboots the device. This interrupts traffic processing on an active system.
• F5 recommends you perform this procedure during a maintenance window.
To run the playbook, perform the following procedure:
1. Log in to your control machine.
2. Change the working directory to the playbooks directory.
3. To run the upgrade_bigip_software.yml playbook, enter the following command:
ansible-playbook upgrade_bigip_software.yml
The output from the command appears similar to the following example. Note that bigip1 is the active device, so the tasks in the block skip this host.
PLAY [Upgrade BIG-IP software] ****************************************
TASK [Get failover state] ****************************************
changed: [bigip1]
changed: [bigip3]
changed: [bigip2]
TASK [verify running configuration of the BIG-IP] ****************************************
skipping: [bigip1]
changed: [bigip3]
changed: [bigip2]
TASK [Reactivate BIG-IP with existing reg key] ****************************************
skipping: [bigip1]
changed: [bigip2]
changed: [bigip3]
TASK [Wait for configuration to finish loading] ****************************************
skipping: [bigip1]
ok: [bigip2 -> localhost]
ok: [bigip3 -> localhost]

F5 Deployment Guide Updating or Upgrading the BIG-IP79
TASK [Get current time on BIG-IP] ****************************************
skipping: [bigip1]
changed: [bigip2]
changed: [bigip3]
TASK [Download a new UCS] ****************************************
skipping: [bigip1]
changed: [bigip2 -> localhost]
changed: [bigip3 -> localhost]
TASK [Upload image to the BIG-IP] ****************************************
skipping: [bigip1]
changed: [bigip2 -> localhost]
changed: [bigip3 -> localhost]
TASK [Get available volume number to use] ****************************************
skipping: [bigip1]
changed: [bigip3]
changed: [bigip2]
TASK [install BIG-IP software] ****************************************
skipping: [bigip1]
changed: [bigip2 -> localhost]
changed: [bigip3 -> localhost]
PLAY RECAP ****************************************
bigip1 : ok=1 changed=1 unreachable=0 failed=0 skipped=8 rescued=0 ignored=0
bigip2 : ok=9 changed=8 unreachable=0 failed=0 skipped=0 rescued=0 ignored=0
bigip3 : ok=9 changed=8 unreachable=0 failed=0 skipped=0 rescued=0 ignored=0
Bash script to use in the script module
1234567891011121314151617181920
#Bash script created by F5#Determines the next available volume set number to use#for a new BIG-IP software installation.#Requires that volume set use a number and not a name.
OLDIFS="$IFS"IFS=$'\n'disk=$(tmsh show sys sof status | awk '/.D[1-9]/{print substr($1,1,4)}' | head -n1)maxvnumber=0for vnumber in $(tmsh show sys sof status | grep complete) do vnumber=${vnumber:4:2} vnumber=${vnumber// /} if (( vnumber > maxvnumber )); then maxvnumber=$vnumber fidonevolume=$disk$((maxvnumber + 1))echo -n $volumeIFS="$OLDIFS"
This completes this section.

F5 Deployment Guide Updating or Upgrading the BIG-IP80
Section 8: Top 10 recommended practices for keeping your BIG-IP up-to-dateReview these top 10 recommended practices for always keeping your BIG-IP up-to-date.
h Invest the time and resources to ensure you are running the latest versions and getting the latest capabilities. You have to make sure you have the highest quality, most secure code, and many of the most advanced value propositions are only accessible on later versions of BIG-IP.
h Standardize on a consistent version across the installed base. A homogenous install base helps drive common operating procedures and reduces management complexity, increases ease of tracking, and reduces time to update or upgrade BIG-IP instances.
h Focus on automation and creating repeatable procedures for performing updates and upgrades of your BIG-IP instances. Use the update and upgrade events to build new capabilities that can be replicated in future events.
h Review the release notes carefully for the software release you select for details about new features, release fixes, behavior changes, and known issues. Ensure you use Bugtracker to understand any known issues with the release you are updating or upgrading to, so you can proactively plan for any mitigations.
h Always make backups before updating or upgrading an existing instance, and store the backed up configurations to a secure location. This creates a snapshot of the current configuration.
h Collaborate closely with application owners and plan to perform testing both before and after the upgrade, to ensure their tests are functional prior to making any changes. Updates are likely to require fewer and targeted sanity checks given that they do not add major functionality or introduce breaking changes.
h Upgrade or update the standby device in an HA pair first, ensure the devices are still in sync, fail over, and then upgrade or update the formerly active unit.
h Leverage the "iHealth Upgrade Advisor" to determine if any configuration modification is needed before/after the update or upgrade. Use the qkview utility to create a QKView diagnostics file, and upload it to F5 iHealth to diagnose the health and proper operation of your BIG-IP system before and after the update or upgrade procedure.
h Perform troubleshooting before reverting to a previous version in the unlikely event of a failure. If you do not perform troubleshooting before reverting changes, it may be difficult to determine a root cause for failure. If possible, contact F5 Support while the issue is occurring so you can perform relevant data gathering, such as creating a new QKView file.
h Open a proactive service request with F5 Support to reduce the wait time to speak with an F5 Support engineer, in case you have any technical issues during the procedure.

F5 Deployment Guide Updating or Upgrading the BIG-IP81
Appendix A: Optional ProceduresThe update or upgrade process contains a number of optional (but recommended) procedures. This appendix contains the optional procedures referenced from the main document.
Generating a QKView file for upload to F5 iHealth Diagnosing and resolving existing issues prior to update or upgrade is a good way to prevent difficult issues after a failed update or upgrade. For more information about the qkview utility, refer to K12878: Generating diagnostic data using the qkview utility.
You can also watch Generating and uploading a QKView file to F5 iHealth on YouTube.
The procedure varies whether you are using BIG-IP 13.0.0 and later, or BIG-IP 12.1.x and earlier.
Generating a QKView file on BIG-IP 13.0 and later
Impact of procedure: The qkview utility runs a large number of commands when collecting information. This behavior may cause an additional performance burden on systems that are already under heavy load.
1. Log in to the Configuration utility.
2. From the navigation pane, click System > Support.
3. Click New Support Snapshot.
4. From the Health Utility list, select Generate QKView.
5. Select any files you want to exclude.
6. Click Start. The process can take a while.
7. When the QKView file generation is complete, to download the output file, click Download.
Generating a QKView file on BIG-IP 12.1.0 and earlier
Impact of procedure: The qkview utility runs a large number of commands when collecting information. This behavior may cause an additional performance burden on systems that are already under heavy load.
1. Log in to the Configuration utility.
2. Go to System > Support.
3. The QKView check box is already selected.
4. Click Start.
5. When prompted, click Download Snapshot File to download the output file.
Uploading your QKView diagnostic file to iHealth and review After you obtain the QKView diagnostic file, upload the file to the iHealth system to diagnose the health and proper operation of your BIG-IP system. For more detailed information, refer to K27404821: Using F5 iHealth to diagnose vulnerabilities.
1. Open a web browser and log in to F5 iHealth.
Note iHealth is free but requires registration. When you select the iHealth link, you are redirected to authenticate or register. For more information, refer to the BIG-IP iHealth Diagnostic Tool page
2. Click Upload.
3. Click Choose.
4. After selecting the QKView file you downloaded, select Upload QKView(s).
Note The iHealth site prompts you when it finishes processing your QKView file. After it finishes, you can move to the next step.
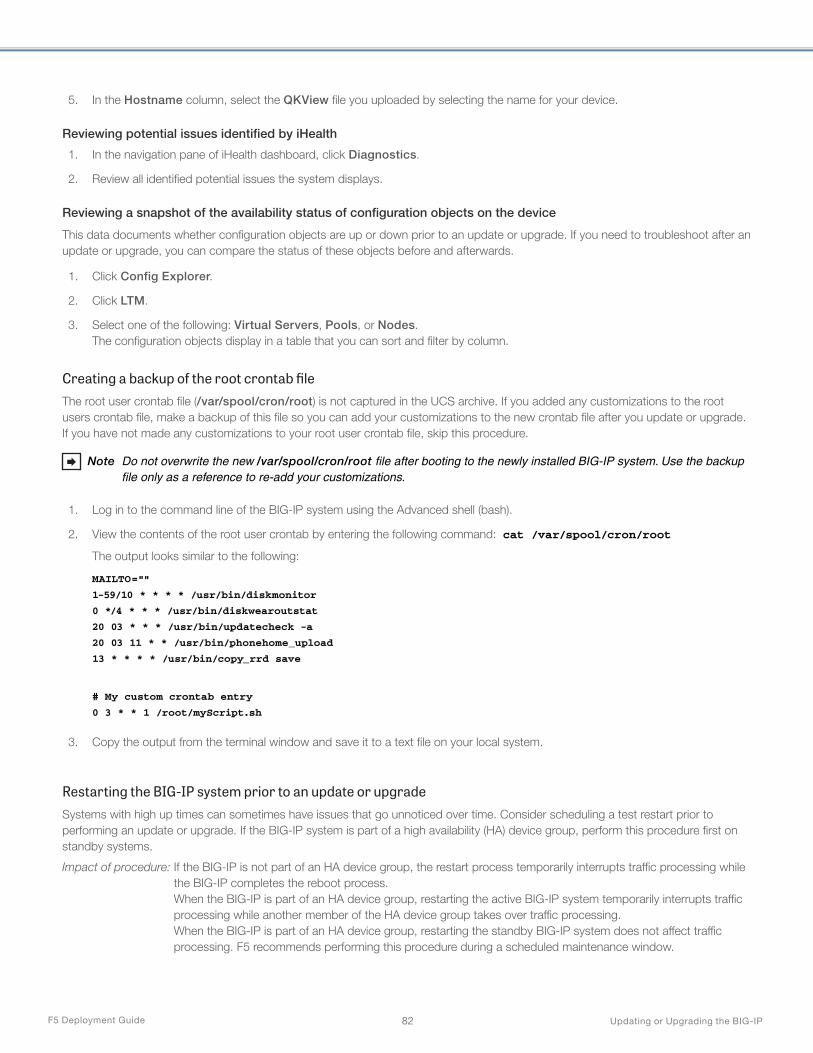
F5 Deployment Guide Updating or Upgrading the BIG-IP82
5. In the Hostname column, select the QKView file you uploaded by selecting the name for your device.
Reviewing potential issues identified by iHealth
1. In the navigation pane of iHealth dashboard, click Diagnostics.
2. Review all identified potential issues the system displays.
Reviewing a snapshot of the availability status of configuration objects on the device
This data documents whether configuration objects are up or down prior to an update or upgrade. If you need to troubleshoot after an update or upgrade, you can compare the status of these objects before and afterwards.
1. Click Config Explorer.
2. Click LTM.
3. Select one of the following: Virtual Servers, Pools, or Nodes. The configuration objects display in a table that you can sort and filter by column.
Creating a backup of the root crontab file The root user crontab file (/var/spool/cron/root) is not captured in the UCS archive. If you added any customizations to the root users crontab file, make a backup of this file so you can add your customizations to the new crontab file after you update or upgrade. If you have not made any customizations to your root user crontab file, skip this procedure.
Note Do not overwrite the new /var/spool/cron/root file after booting to the newly installed BIG-IP system. Use the backup file only as a reference to re-add your customizations.
1. Log in to the command line of the BIG-IP system using the Advanced shell (bash).
2. View the contents of the root user crontab by entering the following command: cat /var/spool/cron/root
The output looks similar to the following:
MAILTO=""
1-59/10 * * * * /usr/bin/diskmonitor
0 */4 * * * /usr/bin/diskwearoutstat
20 03 * * * /usr/bin/updatecheck -a
20 03 11 * * /usr/bin/phonehome_upload
13 * * * * /usr/bin/copy_rrd save
# My custom crontab entry
0 3 * * 1 /root/myScript.sh
3. Copy the output from the terminal window and save it to a text file on your local system.
Restarting the BIG-IP system prior to an update or upgradeSystems with high up times can sometimes have issues that go unnoticed over time. Consider scheduling a test restart prior to performing an update or upgrade. If the BIG-IP system is part of a high availability (HA) device group, perform this procedure first on standby systems.
Impact of procedure: If the BIG-IP is not part of an HA device group, the restart process temporarily interrupts traffic processing while the BIG-IP completes the reboot process. When the BIG-IP is part of an HA device group, restarting the active BIG-IP system temporarily interrupts traffic processing while another member of the HA device group takes over traffic processing. When the BIG-IP is part of an HA device group, restarting the standby BIG-IP system does not affect traffic processing. F5 recommends performing this procedure during a scheduled maintenance window.

F5 Deployment Guide Updating or Upgrading the BIG-IP83
1. Log in to the Configuration utility.
2. Go to System > Configuration > Device > General.
3. In the Operations section, click Reboot.
4. The BIG-IP system prompts with the message Are you sure you want to reboot this device?
5. Click OK to begin the device restart.
6. After restart completes, confirm proper operation of the BIG-IP system.
Exporting analytics data prior to the update or upgradeIf you provisioned the F5 Application Visibility and Reporting (AVR) module and configured the BIG-IP system to gather analytics data, you can export the analytics charts in PDF format from the BIG-IP system. Additionally, if you manage your BIG-IP system using the BIG-IQ system, you can export analytics chart data from the BIG-IQ.
After you complete the update or upgrade, analytics chart data from prior to the update or upgrade is still available on the device for you to examine. However, when you export the charts beforehand, you have a snapshot of multiple metrics you can share with others in your organization who do not have access to the BIG-IP or BIG-IQ systems. If you need to troubleshoot issues after the update or upgrade, you may find it useful to be able to readily compare pre- and post-update or upgrade analytics data.
If you use a third-party tool to gather statistics from the BIG-IP, refer to the vendor's documentation to learn how to export the data.
Exporting analytics data from a BIG-IP system
1. Log in to the Configuration utility.
2. Go to Statistics > Analytics, and then select an analytics data type, such as HTTP or TCP, or a sub-category of a type.
3. At the top of the Overview page, use the time settings to select and filter by a specific time period.
4. In the upper right, select Export.
5. Select the option to save the file on your computer, and then click Export.
For more information, refer to the Examining and Exporting Application Statistics chapter of the BIG-IP Analytics: Implementations guide. For information about how to locate F5 product manuals, refer to K98133564: Tips for searching AskF5 and finding product documentation.
Exporting managed BIG-IP analytics data from a BIG-IQ system
1. Log in to the BIG-IQ interface.
2. Select Monitoring > Dashboards, and then the analytics data you want to see, such as Local Traffic > HTTP (Not every dashboard has the option to export).
3. On the right, in the filters pane, select the appropriate filters and options to display the analytics data you want.
For example, you select BIG-IP Host Names, and then select the managed BIG-IP device you want to update or upgrade.
4. At the top of the page, use the time and Display filters to display the analytics data you want.
5. In the upper right, select Export > Charts with user expanded dimension data.
6. Use the Print box to save the chart as a PDF on your computer. The Print box differs depending on the OS of your computer.
For more information, refer to the Statistics Monitoring Overview chapter of the BIG-IQ: Monitoring and Reports guide. For information about how to locate F5 product manuals, refer to K98133564: Tips for searching AskF5 and finding product documentation.
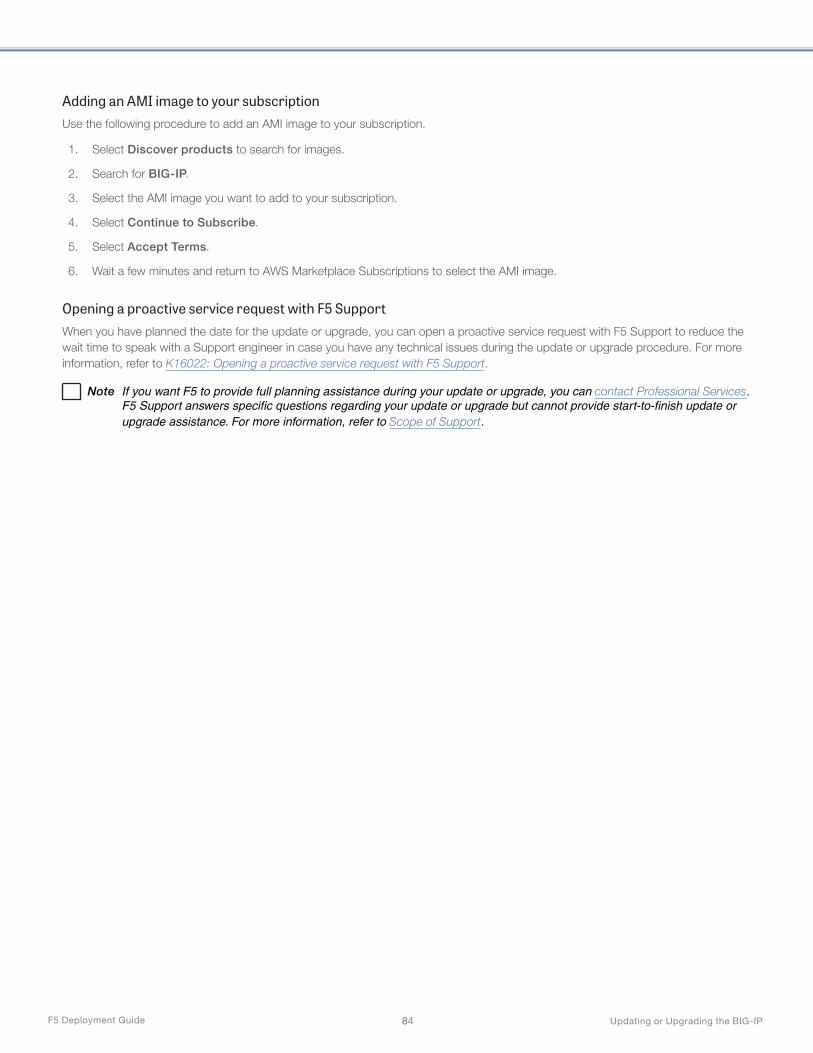
F5 Deployment Guide Updating or Upgrading the BIG-IP84
Adding an AMI image to your subscriptionUse the following procedure to add an AMI image to your subscription.
1. Select Discover products to search for images.
2. Search for BIG-IP.
3. Select the AMI image you want to add to your subscription.
4. Select Continue to Subscribe.
5. Select Accept Terms.
6. Wait a few minutes and return to AWS Marketplace Subscriptions to select the AMI image.
Opening a proactive service request with F5 Support When you have planned the date for the update or upgrade, you can open a proactive service request with F5 Support to reduce the wait time to speak with a Support engineer in case you have any technical issues during the update or upgrade procedure. For more information, refer to K16022: Opening a proactive service request with F5 Support.
Note If you want F5 to provide full planning assistance during your update or upgrade, you can contact Professional Services. F5 Support answers specific questions regarding your update or upgrade but cannot provide start-to-finish update or upgrade assistance. For more information, refer to Scope of Support.

85
F5 Networks, Inc.Corporate [email protected]
F5 Networks, Inc. 801 5th Avenue, Seattle, WA 98104 888-882-4447 www.f5.com
F5 Networks Ltd.Europe/Middle-East/[email protected]
F5 NetworksJapan [email protected]
©2021 F5 Networks, Inc. All rights reserved. F5, F5 Networks, the F5 logo, and IT agility. Your way., are trademarks of F5 Networks, Inc. in the U.S. and in certain other countries. Other F5 trademarks are identified at f5.com. Any other products, services, or company names referenced herein may be trademarks of their respective owners with no endorsement or affiliation, express or implied, claimed by F5. 0412
Document Revision History
Version Description Date
1.0 New guide for upgrading and updating the BIG-IP 03-10-2021
1.1 Added a new section: Engineering hotfixes for versions prior to 13.1.0.1 on page 5 03-12-2021