guidelines for health care providers - angiodynamics 240.pdf · 1. access the port >> grasp...
TRANSCRIPT
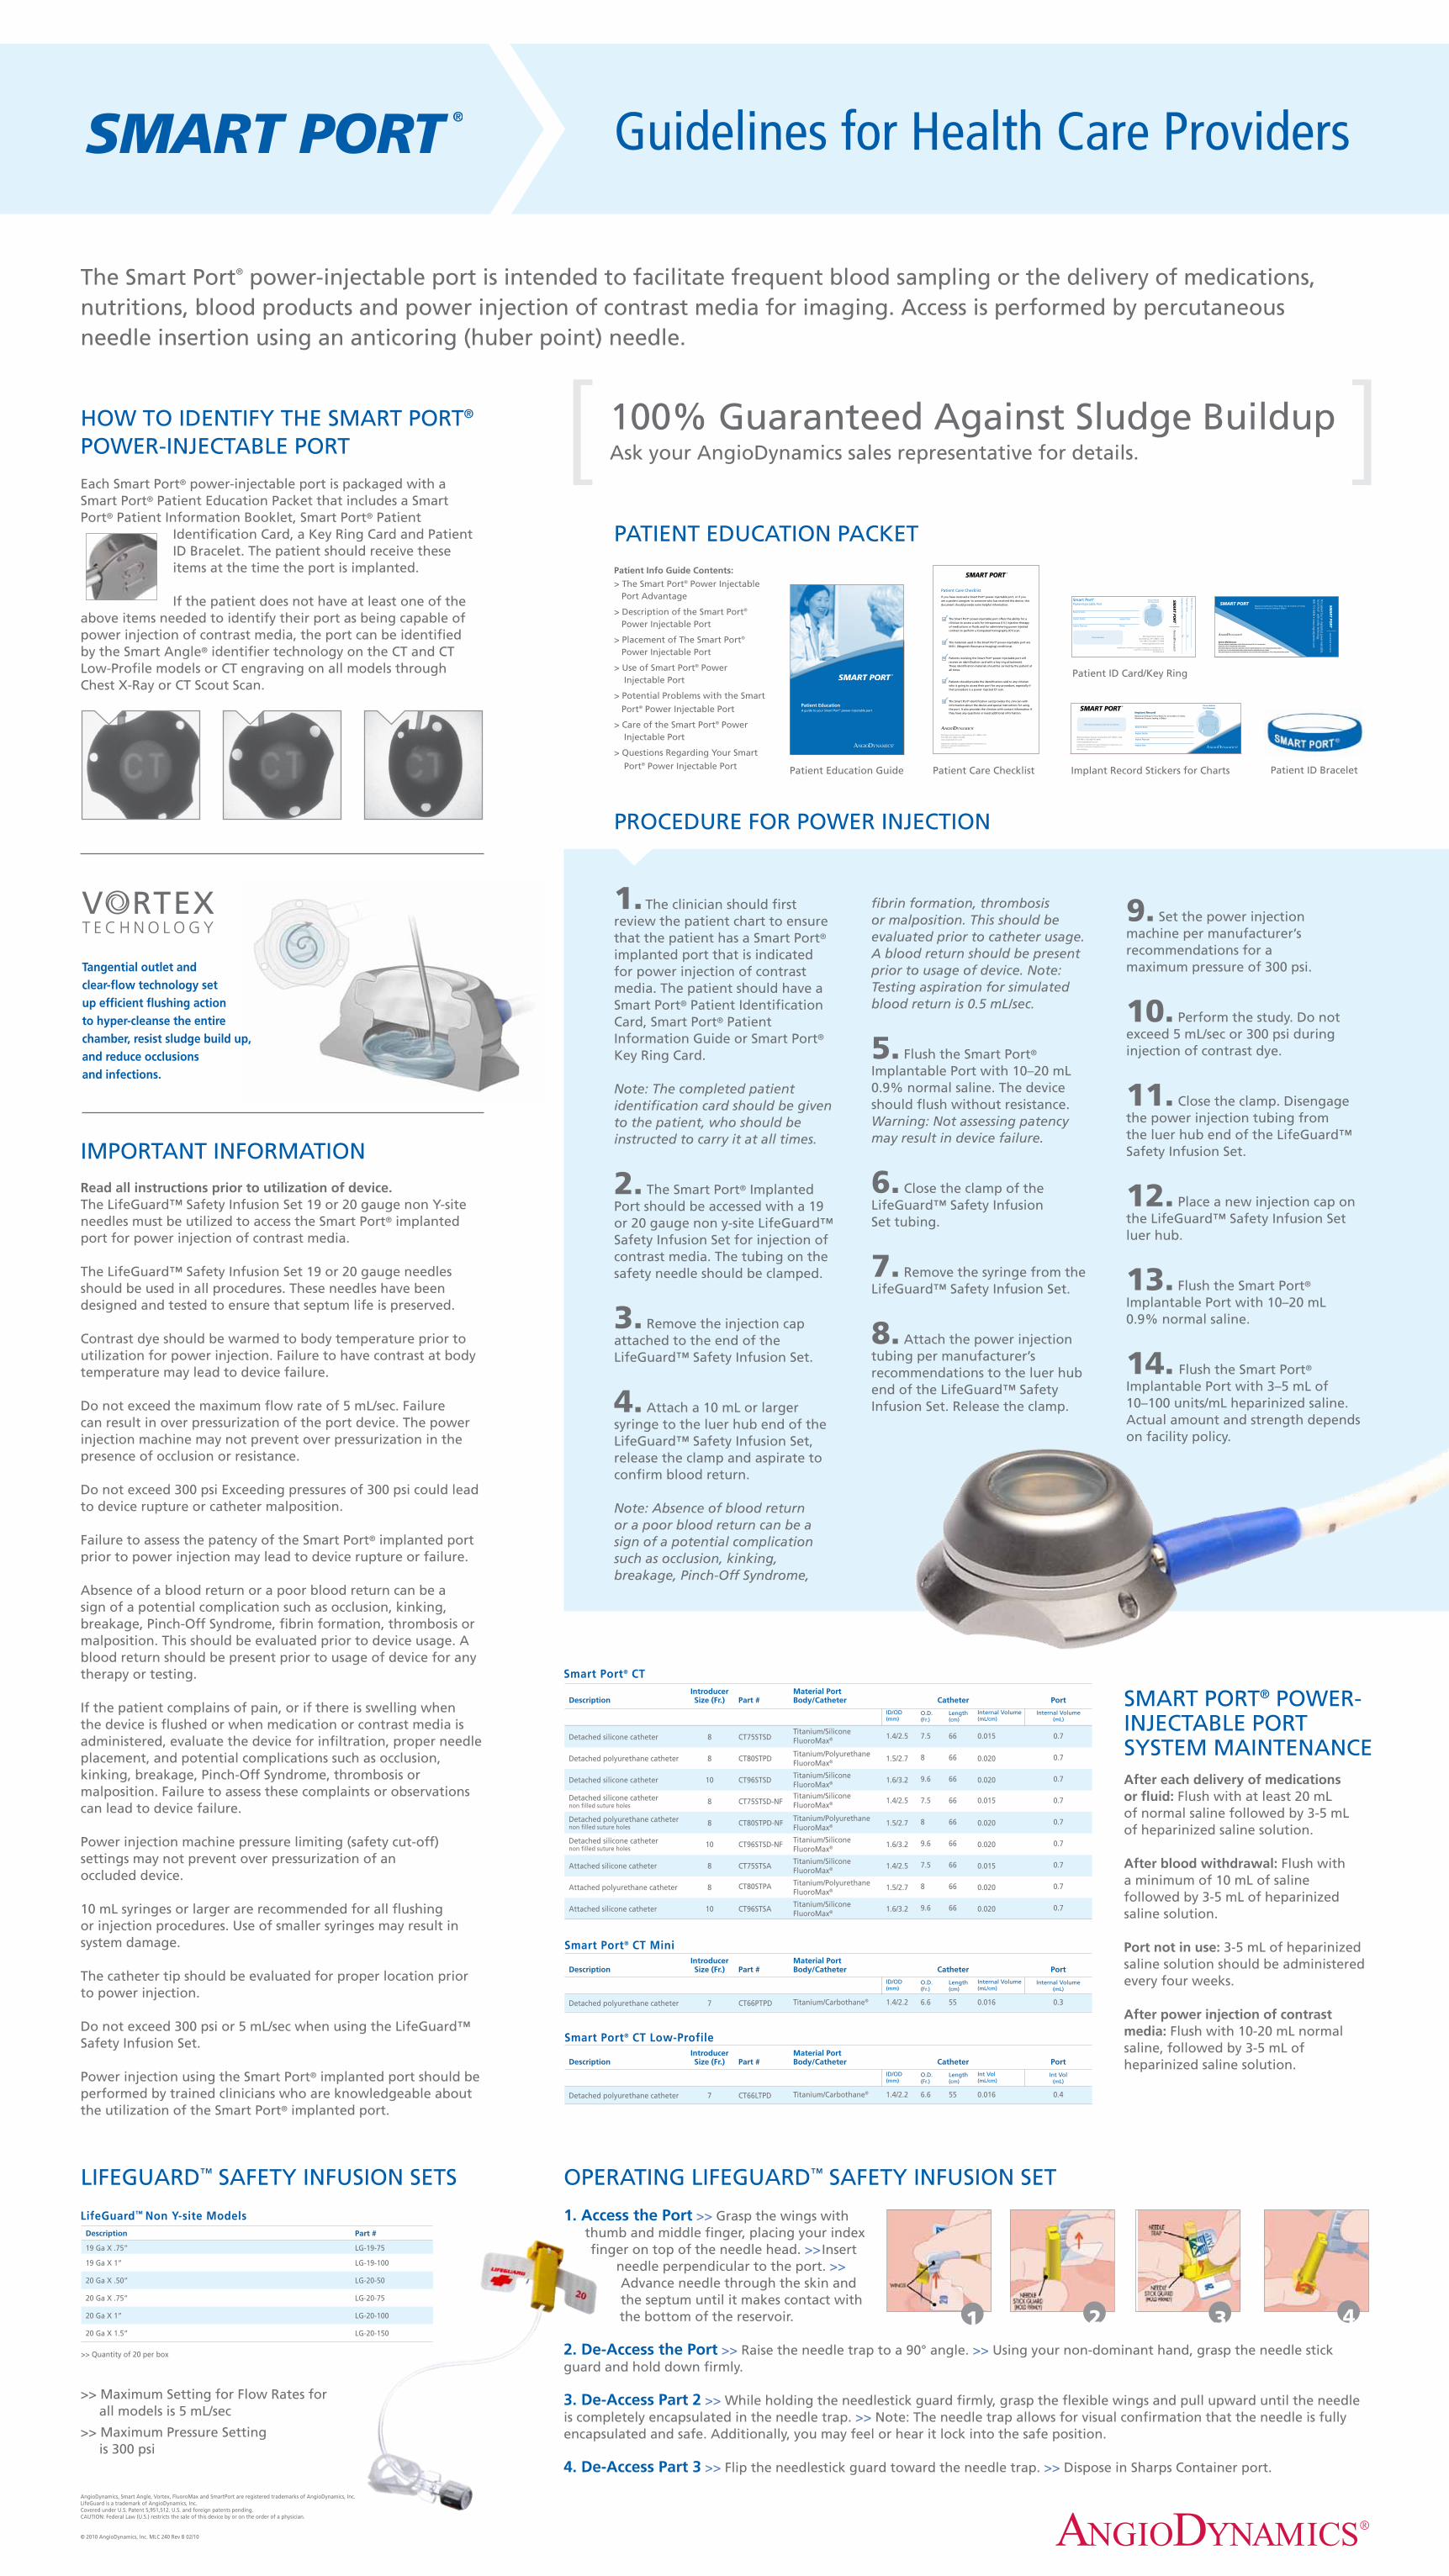
1. Access the Port >> Grasp the wings withthumb and middle finger, placing your index finger on top of the needle head. >>Insert
needle perpendicular to the port. >> Advance needle through the skin and the septum until it makes contact with the bottom of the reservoir.
2. De-Access the Port >> Raise the needle trap to a 90° angle. >> Using your non-dominant hand, grasp the needle stick guard and hold down firmly.
3. De-Access Part 2 >> While holding the needlestick guard firmly, grasp the flexible wings and pull upward until the needle is completely encapsulated in the needle trap. >> Note: The needle trap allows for visual confirmation that the needle is fully encapsulated and safe. Additionally, you may feel or hear it lock into the safe position.
4. De-Access Part 3 >> Flip the needlestick guard toward the needle trap. >> Dispose in Sharps Container port.
Smart Port® CT
DescriptionIntroducer Size (Fr.) Part #
Material Port Body/Catheter Catheter Port
ID/OD (mm)
O.D. (Fr.)
Length (cm)
Internal Volume (mL/cm)
Internal Volume (mL)
Detached silicone catheter 8 CT75STSDTitanium/Silicone FluoroMax® 1.4/2.5 7.5 66 0.015 0.7
Detached polyurethane catheter 8 CT80STPDTitanium/Polyurethane FluoroMax® 1.5/2.7 8 66 0.020 0.7
Detached silicone catheter 10 CT96STSDTitanium/Silicone FluoroMax® 1.6/3.2 9.6 66 0.020 0.7
Detached silicone catheter non filled suture holes 8 CT75STSD-NF
Titanium/Silicone FluoroMax® 1.4/2.5 7.5 66 0.015 0.7
Detached polyurethane catheternon filled suture holes 8 CT80STPD-NF
Titanium/Polyurethane FluoroMax® 1.5/2.7 8 66 0.020 0.7
Detached silicone catheternon filled suture holes 10 CT96STSD-NF
Titanium/Silicone FluoroMax® 1.6/3.2 9.6 66 0.020 0.7
Attached silicone catheter 8 CT75STSATitanium/Silicone FluoroMax® 1.4/2.5 7.5 66 0.015 0.7
Attached polyurethane catheter 8 CT80STPA Titanium/Polyurethane FluoroMax® 1.5/2.7 8 66 0.020 0.7
Attached silicone catheter 10 CT96STSATitanium/Silicone FluoroMax® 1.6/3.2 9.6 66 0.020 0.7
Smart Port® CT Mini
DescriptionIntroducer Size (Fr.) Part #
Material Port Body/Catheter Catheter Port
ID/OD (mm)
O.D. (Fr.)
Length (cm)
Internal Volume (mL/cm)
Internal Volume (mL)
Detached polyurethane catheter 7 CT66PTPD Titanium/Carbothane® 1.4/2.2 6.6 55 0.016 0.3
Smart Port® CT Low-Profile
DescriptionIntroducer Size (Fr.) Part #
Material Port Body/Catheter Catheter Port
ID/OD (mm)
O.D. (Fr.)
Length (cm)
Int Vol (mL/cm)
Int Vol (mL)
Detached polyurethane catheter 7 CT66LTPD Titanium/Carbothane® 1.4/2.2 6.6 55 0.016 0.4
Guidelines for Health Care Providers
The Smart Port® power-injectable port is intended to facilitate frequent blood sampling or the delivery of medications, nutritions, blood products and power injection of contrast media for imaging. Access is performed by percutaneous needle insertion using an anticoring (huber point) needle.
HOW TO IDENTIFY THE SMART PORT® POWER-INJECTABLE PORT Each Smart Port® power-injectable port is packaged with a Smart Port® Patient Education Packet that includes a Smart Port® Patient Information Booklet, Smart Port® Patient
Identification Card, a Key Ring Card and Patient ID Bracelet. The patient should receive these items at the time the port is implanted.
If the patient does not have at least one of the above items needed to identify their port as being capable of power injection of contrast media, the port can be identified by the Smart Angle® identifier technology on the CT and CT Low-Profile models or CT engraving on all models through Chest X-Ray or CT Scout Scan.
1. The clinician should first review the patient chart to ensure that the patient has a Smart Port® implanted port that is indicated for power injection of contrast media. The patient should have a Smart Port® Patient Identification Card, Smart Port® Patient Information Guide or Smart Port® Key Ring Card.
Note: The completed patient identification card should be given to the patient, who should be instructed to carry it at all times.
2. The Smart Port® Implanted Port should be accessed with a 19 or 20 gauge non y-site LifeGuard™ Safety Infusion Set for injection of contrast media. The tubing on the safety needle should be clamped.
3. Remove the injection cap attached to the end of the LifeGuard™ Safety Infusion Set.
4. Attach a 10 mL or larger syringe to the luer hub end of the LifeGuard™ Safety Infusion Set, release the clamp and aspirate to confirm blood return.
Note: Absence of blood return or a poor blood return can be a sign of a potential complication such as occlusion, kinking, breakage, Pinch-Off Syndrome,
IMPORTANT INFORMATION Read all instructions prior to utilization of device.The LifeGuard™ Safety Infusion Set 19 or 20 gauge non Y-site needles must be utilized to access the Smart Port® implanted port for power injection of contrast media.
The LifeGuard™ Safety Infusion Set 19 or 20 gauge needles should be used in all procedures. These needles have been designed and tested to ensure that septum life is preserved.
Contrast dye should be warmed to body temperature prior to utilization for power injection. Failure to have contrast at body temperature may lead to device failure.
Do not exceed the maximum flow rate of 5 mL/sec. Failure can result in over pressurization of the port device. The power injection machine may not prevent over pressurization in the presence of occlusion or resistance.
Do not exceed 300 psi Exceeding pressures of 300 psi could lead to device rupture or catheter malposition.
Failure to assess the patency of the Smart Port® implanted port prior to power injection may lead to device rupture or failure.
Absence of a blood return or a poor blood return can be a sign of a potential complication such as occlusion, kinking, breakage, Pinch-Off Syndrome, fibrin formation, thrombosis or malposition. This should be evaluated prior to device usage. A blood return should be present prior to usage of device for any therapy or testing.
If the patient complains of pain, or if there is swelling when the device is flushed or when medication or contrast media is administered, evaluate the device for infiltration, proper needle placement, and potential complications such as occlusion, kinking, breakage, Pinch-Off Syndrome, thrombosis or malposition. Failure to assess these complaints or observations can lead to device failure.
Power injection machine pressure limiting (safety cut-off) settings may not prevent over pressurization of an occluded device.
10 mL syringes or larger are recommended for all flushing or injection procedures. Use of smaller syringes may result in system damage.
The catheter tip should be evaluated for proper location prior to power injection.
Do not exceed 300 psi or 5 mL/sec when using the LifeGuard™ Safety Infusion Set.
Power injection using the Smart Port® implanted port should be performed by trained clinicians who are knowledgeable about the utilization of the Smart Port® implanted port.
100% Guaranteed Against Sludge BuildupAsk your AngioDynamics sales representative for details.[ [
After each delivery of medications or fluid: Flush with at least 20 mL of normal saline followed by 3-5 mL of heparinized saline solution.
After blood withdrawal: Flush witha minimum of 10 mL of saline followed by 3-5 mL of heparinized saline solution.
Port not in use: 3-5 mL of heparinized saline solution should be administered every four weeks.
After power injection of contrast media: Flush with 10-20 mL normal saline, followed by 3-5 mL of heparinized saline solution.
fibrin formation, thrombosis or malposition. This should be evaluated prior to catheter usage. A blood return should be present prior to usage of device. Note: Testing aspiration for simulated blood return is 0.5 mL/sec.
5. Flush the Smart Port® Implantable Port with 10–20 mL 0.9% normal saline. The device should flush without resistance. Warning: Not assessing patency may result in device failure.
6. Close the clamp of the LifeGuard™ Safety Infusion Set tubing.
7. Remove the syringe from the LifeGuard™ Safety Infusion Set.
8. Attach the power injection tubing per manufacturer’s recommendations to the luer hub end of the LifeGuard™ Safety Infusion Set. Release the clamp.
9. Set the power injection machine per manufacturer’s recommendations for a maximum pressure of 300 psi.
10. Perform the study. Do not exceed 5 mL/sec or 300 psi during injection of contrast dye.
11. Close the clamp. Disengage the power injection tubing from the luer hub end of the LifeGuard™ Safety Infusion Set.
12. Place a new injection cap on the LifeGuard™ Safety Infusion Set luer hub.
13. Flush the Smart Port® Implantable Port with 10–20 mL 0.9% normal saline.
14. Flush the Smart Port® Implantable Port with 3–5 mL of 10–100 units/mL heparinized saline. Actual amount and strength depends on facility policy.
PROCEDURE FOR POWER INJECTION
PATIENT EDUCATION PACKET
Tangential outlet and clear-flow technology set up efficient flushing action to hyper-cleanse the entire chamber, resist sludge build up, and reduce occlusions and infections.
Smart Port® Power-Injectable Port
603 Queensbury Avenue,Queensbury, NY 12804 > USA518-798-1215 | 800-772-6446
www.angiodynamics.com
AngioDynamics and Vortex are registered trademarks of AngioDynamics, Inc. Smart Port is a trademark of AngioDynamics, Inc.
P/N 106990 Rev D
Patient’s Name
Implant Facility Implant Date
PhoneImplant Physician
Please Indicate Port Placement
Patient’s Nam
e
TelPhysician’s N
ame
TelEm
ergency Contact Nam
e
System MaintenanceAfter each delivery of medications or fluid: Flush with at least 20 mL of normal saline,followed by 3-5 mL of heparinized saline solutionAfter blood withdrawal: Flush with a minimum of 10 mL of saline followed by 3-5 mL of heparinized saline solution Port not in use: 3-5 mL of heparinized saline solution should be administered every 4 weeksAfter power injection of contrast media: Flush with 10-20 mL of normal saline, followed by 3-5 mL of heparinized saline solution
This patient has an implanted, pow
er-injectable, Sm
art Port® w
ith vortex technology.800-772-6446 • w
ww
.angiodynamics.com
Maximum Setting for Flow Rates for all models is 5 ml/secMaximum Pressure Setting is 300psi
603 Queensbury Avenue, Queensbury, NY 12804 > USA518-798-1215 | 800-772-6446www.angiodynamics.com
AngioDynamics and Vortex are registered trademarks of AngioDynamics, Inc. Smart Port is a trademark of AngioDynamics, Inc.
P/N 107232 Rev A
Please Indicate Port Placement
Patient’s Name
Implant Facility
Implant Physician
Implant Date
Maximum Setting for Flow Rates for all models is 5 ml/secMaximum Pressure Setting is 300psi
Implant Record
Patient Care Checklist
If you have received a Smart Port® power-injectable port, or if you are a patient caregiver to someone who has received this device, this document should provide some helpful information.
The Smart Port® power-injectable port offers the ability for a clinician to access a vein for intravenous (I.V.) injection therapy of medications or fluids and for administering power injected contrast to perform a Computed Tomography (CT) scan.
The materials used in the Smart Port® power-injectable port are M.R.I. (Magnetic Resonance Imaging) conditional.
Patients receiving the Smart Port® power-injectable port will receive an identification card with a key ring attachment. These identification materials should be carried by the patient at all times.
Patients should provide the identification card to any clinician who is going to access their port for any procedure, especially if that procedure is a power injected CT scan.
The Smart Port® identification card provides the clinician with information about the device and special instructions for using the port. It also provides the clinician with contact information if they have any questions or need additional information.
603 Queensbury Avenue, Queensbury, NY 12804 > USA518-798-1215 | 800-772-6446www.angiodynamics.com
AngioDynamics and Vortex are registered trademarks of AngioDynamics, Inc. Smart Port is a trademark of AngioDynamics, Inc.P/N 106992 Rev C
603 Queensbury Avenue, Queensbury, NY 12804 > USA518-798-1215 | 800-772-6446
www.angiodynamics.com
AngioDynamics and Vortex are registered trademarks of AngioDynamics, Inc. Smart Port is a trademark of AngioDynamics, Inc.
P/N 106995 Rev C
Patient Education A guide to your Smart Port® power-injectable port
Patient Education Guide
Patient Info Guide Contents:
> The Smart Port® Power Injectable Port Advantage
> Description of the Smart Port® Power Injectable Port
> Placement of The Smart Port® Power Injectable Port
> Use of Smart Port® Power Injectable Port
> Potential Problems with the Smart
Port® Power Injectable Port
> Care of the Smart Port® Power Injectable Port
> Questions Regarding Your Smart
Port® Power Injectable Port Patient Care Checklist Implant Record Stickers for Charts
Patient ID Card/Key Ring
Patient ID Bracelet
SMART PORT® POWER-INJECTABLE PORT SYSTEM MAINTENANCE
Guidelines for HealtH Care Providers
The Choice for Power.
With Vortex® TechnologySMART PORT CTTM
The Smart Port™ CT is intended to facilitate frequent blood sampling or the delivery of medications, nutritions, blood products and power injection of contrast media for imaging. Access is performed by percutaneous needle insertion using an anticoring (huber point) needle.
How to Identify the SmartPort™ CT Implantable Port
Each Smart Port™ CT Power Injectable Port is packaged with a Smart Port™ CT Patient Education Packet which includes a Smart Port™ CT Patient Information Booklet, Smart Port™ CT Patient Identification Card, a Key Ring Card and Patient ID Bracelet. The patient should receive these items at the time the port is implanted.
· If the patient does not have at least one of the above items needed to identify their port as being capable of power injec-tion of contrast media, the port can be identified by the Smart Angle™ Technology through Chest X-Ray or CT Scout Scan.
Important Information
· Read all instructions prior to utilization of device.
· The LifeGuard™ Safety Infusion Set 19 or 20 gauge non Y-site needles must be utilized to access the Smart Port™ CT implanted port for power injection of contrast media.
· The LifeGuard™ Safety Infusion Set 19 or 20 gauge needles should be used in all procedures. These needles have been designed and tested to ensure that septum life is preserved.
· Contrast dye should be warmed to body temperature prior to utilization for power injection. Failure to have contrast at body temperature may lead to device failure.
· Do not exceed the maximum flow rate of 5 mL/sec. Failure can result in over pressurization of the port device. The pow-er injection machine may not prevent over pressurization in the presence of occlusion or resistance.
· Do not exceed 300 p.s.i. Exceeding pressures of 300 p.s.i. could lead to device rupture or catheter malposition.
· Failure to assess the patency of the Smart Port™ CT implanted port prior to power injection may lead to device rupture or failure.
· Absence of a blood return or a poor blood return can be a sign of a potential complication such as occlusion, kinking, breakage, Pinch-Off Syndrome, fibrin formation, thrombosis or malposition. This should be evaluated prior to device us-age. A blood return should be present prior to usage of de-vice for any therapy or testing.
· If the patient complains of pain, or if there is swelling when the device is flushed or when medication or contrast media is administered, evaluate the device for infiltration, proper needle placement, and potential complications such as oc-clusion, kinking, breakage, Pinch-Off Syndrome, thrombosis or malposition. Failure to assess these complaints or obser-vations can lead to device failure.
· Power injection machine pressure limiting (safety cut-off) settings may not prevent over pressurization of an occluded device.
· 10 mL syringes or larger are recommended for all flushing or injection procedures. Use of smaller syringes may result in system damage.
· The catheter tip should be evaluated for proper location prior to power injection.
· Do not exceed 300 p.s.i. or 5 mL/sec when using the Life-Guard™ Safety Infusion Set.
· Power injection using the Smart Port™ CT implanted port should be performed by trained clinicians who are knowledgeable about the utilization of the Smart Port™ CT implanted port.
Procedure for Power Injection
1. The clinician should first review the patient chart to ensure that the patient has a Smart Port™ CT implanted port that is indicated for power injection of contrast media. The patient should have a Smart Port™ CT Patient Identification Card, Smart Port™ CT Patient Information Guide, or Smart Port™ CT Key Ring Card.
Note: The completed patient identification card should be given to the patient, who should be instructed to carry it at all times.
2. The Smart Port™ CT Implanted Port should be accessed with a 19 or 20 gauge non y-site LifeGuard™ Safety Infusion Set for injection of contrast media. The tubing on the safety needle should be clamped.
3. Remove the injection cap attached to the end of the Life-Guard™ Safety Infusion Set.
4. Attach a 10 mL or larger syringe to the luer hub end of the LifeGuard™ Safety Infusion Set, release the clamp and aspirate to confirm blood return.
Note: Absence of blood return or a poor blood return can be a sign of a potential complication such as occlusion, kinking, breakage, Pinch-Off Syndrome, fibrin formation,thrombosis or malposition. This should be evaluated prior to catheter usage. A blood return should be present prior to usage of device.
Note: Testing aspiration for simulated blood return is 0.5 mL/sec.
5. Flush the Smart Port™ CT Implantable Port with 10–20 mL 0.9% normal saline. The device should flush without resistance.
Warning: Not assessing patency may result in device failure.
6. Close the clamp of the LifeGuard™ Safety Infusion Set tubing.
7. Remove the syringe from the LifeGuard™ Safety Infusion Set.
8. Attach the power injection tubing per manufacturer’s recom-mendations to the luer hub end of the LifeGuard™ Safety Infu-sion Set. Release the clamp.
9. Set the power injection machine per manufacturer’s recommendations for a maximum pressure of 300 psi.
10. Perform the study. Do not exceed 5 mL/sec or 300 p.s.i. during injection of contrast dye.
11. Close the clamp. Disengage the power injection tubing from the luer hub end of the LifeGuard™ Safety Infusion Set.
12. Place a new injection cap on the LifeGuard™ Safety Infusion Set luer hub.
13. Flush the Smart Port™ CT Implantable Port with 10–20 mL 0.9% normal saline.
14. Flush the Smart Port™ CT Implantable Port with 3–5 mL of 10–100 units/mL heparinized saline.
Actual amount and strength depends on facility policy.
Warnings
· Do not use smaller than a 10 mL syringe. These syringes are recommended for all flushing or injection procedures. Use of smaller syringes may result in system damage.
· Contrast dye should be warmed to body temperature prior to utilization for power injection. Failure to have contrast at body temperature may lead to device failure.
· Do not exceed the maximum flow rate of 5 mL/sec. Failure can result in over pressurization of the port device. Pow-er injection machine may not prevent over pressurization in the presence of occlusion or resistance.
· Do not exceed 300 p.s.i. Exceeding pressures of 300 p.s.i. could lead to device rupture or catheter malposition.
· Failure to assess the patency of the Smart Port™ CT Implanted Port prior to power injection may lead to device rupture or failure.
· Absence of a blood return or a poor blood return can be a sign of a potential complication such as occlusion, kinking, breakage, Pinch-Off Syndrome, fibrin formation, thrombosis or malposition. This should be evaluated prior to device us-age. A blood return should be present prior to usage of de-vice for any therapy or testing.
· If the patient complains of pain, or there is swelling when the device is flushed or when medication or contrast media is administered, evaluate the device for infiltration, proper needle placement, and potential complications such as oc-clusion, kinking, breakage, Pinch-Off Syndrome, thrombosis or malposition. Failure to assess these complaints or obser-vations can lead to device failure.
· Power injection machine pressure limiting (safety cut-off) settings may not prevent over pressurization of an occluded device.
Needles Use of AngioDynamics anti-coring (19 or 20 gauge huber point) needles is recommended for all procedures. These needles have been designed and tested to ensure that septum life is pre-served. Use of AngioDynamics LifeGuard™ Safety Infusion Sets (19 or 20 gauge non y-site) is required for injection of contrast media. Needles are for single use only.
Features:· Power Injectable when used with Smart Port™ CT· Low Profile
· Universal Luer Locks· Soft Wings· Non-Siliconized Needle
· One-Handed Clamps· Available in 19 or 20 Gauge
LifeGuard™ Safety Infusion Sets When used with the Smart Port™ CT Power Injectable Port, the LifeGuard™ Safety Infusion Set is also indicated for power injection of contrast media into the central venous system. For power injection of contract media, only models LG-19-75, LG-19-100, LG-20-50, LG-20-75, LG-20-100, and LG-20-150 may be used at a maxi-mum infusion rate of 5ml/sec.
Clear Information foreverypatient.
Patient Educational Packet
PatientInfoGuideContents:-TheSmartPort™CTPowerInjectablePortAdvantage
-DescriptionoftheSmartPort™CTPowerInjectablePort
-PlacementofTheSmartPort™CTPowerInjectablePort
-UseofSmartPort™CTPowerInjectablePort
-PotentialProblemswiththeSmartPort™CTPowerInjectablePort
-CareoftheSmartPort™CTPowerInjectablePort
-QuestionsRegardingYourSmartPort™CTPowerInjectablePort
PatientCareChecklist
PatientEducationGuide
ImplantRecordStickersforCharts
Patient Record Labels: 6” x 6” perforated to make three 6” x 2” labels-black and PMS 660, blue
AngioDynamics® IncorporatedOne Horizon Way, Manchester, GA 31816 USA 518-798-1215 • 800-772-6446 www.angiodynamics.comSmart PortTM and LifeGuardTM are trademarks of AngioDynamics, IncorporatedVortex® and AngioDynamics® are registered trademarks of AngioDynamics, Incorporated
P/N 106993 Rev. A
Please Indicate Port Placement
Implant Record
Place product identification sticker from unit label here
Angio Dynamics32688———3Lindsay Heineke—BostonP. Kirk
AngioDynamics® IncorporatedOne Horizon Way, Manchester, GA 31816 USA 518-798-1215 • 800-772-6446 www.angiodynamics.comSmart PortTM and LifeGuardTM are trademarks of AngioDynamics, IncorporatedVortex® and AngioDynamics® are registered trademarks of AngioDynamics, Incorporated
P/N 106993 Rev. A
Please Indicate Port Placement
Implant Record
Place product identification sticker from unit label here
Patient’s Name ___________________________________________________
Implant Facility ___________________________________________________
Implant Physician _________________________________________________
Implant Date_____________________________________________________
AngioDynamics® IncorporatedOne Horizon Way, Manchester, GA 31816 USA 518-798-1215 • 800-772-6446 www.angiodynamics.comSmart PortTM and LifeGuardTM are trademarks of AngioDynamics, IncorporatedVortex® and AngioDynamics® are registered trademarks of AngioDynamics, Incorporated
P/N 106993 Rev. A
The LifeGuard™ Safety Infusion Set must be utilized to access the Smart Port™ CT implanted port for power injection.LifeGuard™ Safety Infusion Set 19 Gauge 20 GaugeMaximum Setting for Flow Rates 5 mL/sec 5 mL/secMaximum Pressure Setting 300 p.s.i. 300 p.s.i.
Please Indicate Port Placement
Implant Record
Place product identification sticker from unit label here
Patient’s Name ___________________________________________________
Implant Facility ___________________________________________________
Implant Physician _________________________________________________
Implant Date_____________________________________________________
The LifeGuard™ Safety Infusion Set must be utilized to access the Smart Port™ CT implanted port for power injection.LifeGuard™ Safety Infusion Set 19 Gauge 20 GaugeMaximum Setting for Flow Rates 5 mL/sec 5 mL/secMaximum Pressure Setting 300 p.s.i. 300 p.s.i.
perforated
perforated
2”
6”
6”
EachPacketcontains:PatientIDCard/KeyRing
PatientIDBracelet
100% Guaranteed Against Sludge BuildupAsk your AngioDynamics® sales representative for details.
Smart Port™ CT System Maintenance
After each delivery of medications or fluid: Flush with at least 20 mL of normal saline followed by a 3-5 mL of heparinized saline solution.
After blood withdrawal: Flush with a minimum of 10mL of saline followed by 3-5 mL of heparinized saline solution.
Port not in use: 3-5mL of heparinized saline solution should be administered every 4 weeks.
After power injection of contrast media: Flush with 10-20 mL normal saline, followed by a 3-5 mL heparinized saline solution.
SmartAngle™IdentificationTechnology
ChestX-Ray CTScoutScan
The LifeGuard™ Safety Infusion Set must be utilized to access the Smart Port™ CT implanted port for power injection.
LifeGuard™ Safety Infusion Set 19 Gauge 20 Gauge
Maximum Setting for Flow Rates 5 mL/sec 5 mL/sec
Maximum Pressure Setting 300 p.s.i. 300 p.s.i.
Operating LifeGuard™ Safety Infusion Set
1. Access the Port:
· Grasp the wings with thumb and middle finger, placing your index finger on top of the needle head.
· Insert needle perpendicular to the port.
· Advance needle through the skin and the septum until it makes contact with the bottom of the reservoir.
2. De-Access the Port:
· Raise the needle trap to a 90° angle.
· Using your non-dominant hand, grasp the needle stick guard and hold down firmly.
3. De-Access Part 2
· While holding the needlestick guard firmly, grasp the flexible wings and pull upward until the nee-dle is completely encapsulated in the needle trap. Note: The needle trap allows for visual confirma-tion that the needle is fully encapsulated and safe. Additionally, you may feel or hear it lock into the safe position.
4. De-Access Part 3
· Flip the needlestick guard toward the needle trap.
· Dispose in Sharps Container port.
LifeGuard™ Non Y-site Models Quantity Part Number
19 Ga X .75” 20 per box LG-19-7519 Ga X 1” 20 per box LG-19-10020 Ga X .50” 20 per box LG-20-5020 Ga X .75” 20 per box LG-20-75 20 Ga X 1” 20 per box LG-20-10020 Ga X 1.5” 20 per box LG-20-150
LifeGuard™ Safety Infusion SetOrdering Information
Model # Material Port Body/Catheter Catheter Size Description
CT96STSD Titanium/Silicone FluoroMax® 9.6 Fr. Detached Silicone Catheter
CT75STSD Titanium/Silicone FluoroMax® 7.5 Fr. Detached Silicone Catheter
CT80STPD Titanium/Polyurethane FluoroMax® 8.0 Fr. Detached Polyurethane Catheter
106991 Patient Education Booklet additional copies available
SmartPort™ CT Implantable PortOrdering Information
MLC 240 Rev. A 10/07
1
Guidelines for HealtH Care Providers
The Choice for Power.
With Vortex® TechnologySMART PORT CTTM
The Smart Port™ CT is intended to facilitate frequent blood sampling or the delivery of medications, nutritions, blood products and power injection of contrast media for imaging. Access is performed by percutaneous needle insertion using an anticoring (huber point) needle.
How to Identify the SmartPort™ CT Implantable Port
Each Smart Port™ CT Power Injectable Port is packaged with a Smart Port™ CT Patient Education Packet which includes a Smart Port™ CT Patient Information Booklet, Smart Port™ CT Patient Identification Card, a Key Ring Card and Patient ID Bracelet. The patient should receive these items at the time the port is implanted.
· If the patient does not have at least one of the above items needed to identify their port as being capable of power injec-tion of contrast media, the port can be identified by the Smart Angle™ Technology through Chest X-Ray or CT Scout Scan.
Important Information
· Read all instructions prior to utilization of device.
· The LifeGuard™ Safety Infusion Set 19 or 20 gauge non Y-site needles must be utilized to access the Smart Port™ CT implanted port for power injection of contrast media.
· The LifeGuard™ Safety Infusion Set 19 or 20 gauge needles should be used in all procedures. These needles have been designed and tested to ensure that septum life is preserved.
· Contrast dye should be warmed to body temperature prior to utilization for power injection. Failure to have contrast at body temperature may lead to device failure.
· Do not exceed the maximum flow rate of 5 mL/sec. Failure can result in over pressurization of the port device. The pow-er injection machine may not prevent over pressurization in the presence of occlusion or resistance.
· Do not exceed 300 p.s.i. Exceeding pressures of 300 p.s.i. could lead to device rupture or catheter malposition.
· Failure to assess the patency of the Smart Port™ CT implanted port prior to power injection may lead to device rupture or failure.
· Absence of a blood return or a poor blood return can be a sign of a potential complication such as occlusion, kinking, breakage, Pinch-Off Syndrome, fibrin formation, thrombosis or malposition. This should be evaluated prior to device us-age. A blood return should be present prior to usage of de-vice for any therapy or testing.
· If the patient complains of pain, or if there is swelling when the device is flushed or when medication or contrast media is administered, evaluate the device for infiltration, proper needle placement, and potential complications such as oc-clusion, kinking, breakage, Pinch-Off Syndrome, thrombosis or malposition. Failure to assess these complaints or obser-vations can lead to device failure.
· Power injection machine pressure limiting (safety cut-off) settings may not prevent over pressurization of an occluded device.
· 10 mL syringes or larger are recommended for all flushing or injection procedures. Use of smaller syringes may result in system damage.
· The catheter tip should be evaluated for proper location prior to power injection.
· Do not exceed 300 p.s.i. or 5 mL/sec when using the Life-Guard™ Safety Infusion Set.
· Power injection using the Smart Port™ CT implanted port should be performed by trained clinicians who are knowledgeable about the utilization of the Smart Port™ CT implanted port.
Procedure for Power Injection
1. The clinician should first review the patient chart to ensure that the patient has a Smart Port™ CT implanted port that is indicated for power injection of contrast media. The patient should have a Smart Port™ CT Patient Identification Card, Smart Port™ CT Patient Information Guide, or Smart Port™ CT Key Ring Card.
Note: The completed patient identification card should be given to the patient, who should be instructed to carry it at all times.
2. The Smart Port™ CT Implanted Port should be accessed with a 19 or 20 gauge non y-site LifeGuard™ Safety Infusion Set for injection of contrast media. The tubing on the safety needle should be clamped.
3. Remove the injection cap attached to the end of the Life-Guard™ Safety Infusion Set.
4. Attach a 10 mL or larger syringe to the luer hub end of the LifeGuard™ Safety Infusion Set, release the clamp and aspirate to confirm blood return.
Note: Absence of blood return or a poor blood return can be a sign of a potential complication such as occlusion, kinking, breakage, Pinch-Off Syndrome, fibrin formation,thrombosis or malposition. This should be evaluated prior to catheter usage. A blood return should be present prior to usage of device.
Note: Testing aspiration for simulated blood return is 0.5 mL/sec.
5. Flush the Smart Port™ CT Implantable Port with 10–20 mL 0.9% normal saline. The device should flush without resistance.
Warning: Not assessing patency may result in device failure.
6. Close the clamp of the LifeGuard™ Safety Infusion Set tubing.
7. Remove the syringe from the LifeGuard™ Safety Infusion Set.
8. Attach the power injection tubing per manufacturer’s recom-mendations to the luer hub end of the LifeGuard™ Safety Infu-sion Set. Release the clamp.
9. Set the power injection machine per manufacturer’s recommendations for a maximum pressure of 300 psi.
10. Perform the study. Do not exceed 5 mL/sec or 300 p.s.i. during injection of contrast dye.
11. Close the clamp. Disengage the power injection tubing from the luer hub end of the LifeGuard™ Safety Infusion Set.
12. Place a new injection cap on the LifeGuard™ Safety Infusion Set luer hub.
13. Flush the Smart Port™ CT Implantable Port with 10–20 mL 0.9% normal saline.
14. Flush the Smart Port™ CT Implantable Port with 3–5 mL of 10–100 units/mL heparinized saline.
Actual amount and strength depends on facility policy.
Warnings
· Do not use smaller than a 10 mL syringe. These syringes are recommended for all flushing or injection procedures. Use of smaller syringes may result in system damage.
· Contrast dye should be warmed to body temperature prior to utilization for power injection. Failure to have contrast at body temperature may lead to device failure.
· Do not exceed the maximum flow rate of 5 mL/sec. Failure can result in over pressurization of the port device. Pow-er injection machine may not prevent over pressurization in the presence of occlusion or resistance.
· Do not exceed 300 p.s.i. Exceeding pressures of 300 p.s.i. could lead to device rupture or catheter malposition.
· Failure to assess the patency of the Smart Port™ CT Implanted Port prior to power injection may lead to device rupture or failure.
· Absence of a blood return or a poor blood return can be a sign of a potential complication such as occlusion, kinking, breakage, Pinch-Off Syndrome, fibrin formation, thrombosis or malposition. This should be evaluated prior to device us-age. A blood return should be present prior to usage of de-vice for any therapy or testing.
· If the patient complains of pain, or there is swelling when the device is flushed or when medication or contrast media is administered, evaluate the device for infiltration, proper needle placement, and potential complications such as oc-clusion, kinking, breakage, Pinch-Off Syndrome, thrombosis or malposition. Failure to assess these complaints or obser-vations can lead to device failure.
· Power injection machine pressure limiting (safety cut-off) settings may not prevent over pressurization of an occluded device.
Needles Use of AngioDynamics anti-coring (19 or 20 gauge huber point) needles is recommended for all procedures. These needles have been designed and tested to ensure that septum life is pre-served. Use of AngioDynamics LifeGuard™ Safety Infusion Sets (19 or 20 gauge non y-site) is required for injection of contrast media. Needles are for single use only.
Features:· Power Injectable when used with Smart Port™ CT· Low Profile
· Universal Luer Locks· Soft Wings· Non-Siliconized Needle
· One-Handed Clamps· Available in 19 or 20 Gauge
LifeGuard™ Safety Infusion Sets When used with the Smart Port™ CT Power Injectable Port, the LifeGuard™ Safety Infusion Set is also indicated for power injection of contrast media into the central venous system. For power injection of contract media, only models LG-19-75, LG-19-100, LG-20-50, LG-20-75, LG-20-100, and LG-20-150 may be used at a maxi-mum infusion rate of 5ml/sec.
Clear Information foreverypatient.
Patient Educational Packet
PatientInfoGuideContents:-TheSmartPort™CTPowerInjectablePortAdvantage
-DescriptionoftheSmartPort™CTPowerInjectablePort
-PlacementofTheSmartPort™CTPowerInjectablePort
-UseofSmartPort™CTPowerInjectablePort
-PotentialProblemswiththeSmartPort™CTPowerInjectablePort
-CareoftheSmartPort™CTPowerInjectablePort
-QuestionsRegardingYourSmartPort™CTPowerInjectablePort
PatientCareChecklist
PatientEducationGuide
ImplantRecordStickersforCharts
Patient Record Labels: 6” x 6” perforated to make three 6” x 2” labels-black and PMS 660, blue
AngioDynamics® IncorporatedOne Horizon Way, Manchester, GA 31816 USA 518-798-1215 • 800-772-6446 www.angiodynamics.comSmart PortTM and LifeGuardTM are trademarks of AngioDynamics, IncorporatedVortex® and AngioDynamics® are registered trademarks of AngioDynamics, Incorporated
P/N 106993 Rev. A
Please Indicate Port Placement
Implant Record
Place product identification sticker from unit label here
Angio Dynamics32688———3Lindsay Heineke—BostonP. Kirk
AngioDynamics® IncorporatedOne Horizon Way, Manchester, GA 31816 USA 518-798-1215 • 800-772-6446 www.angiodynamics.comSmart PortTM and LifeGuardTM are trademarks of AngioDynamics, IncorporatedVortex® and AngioDynamics® are registered trademarks of AngioDynamics, Incorporated
P/N 106993 Rev. A
Please Indicate Port Placement
Implant Record
Place product identification sticker from unit label here
Patient’s Name ___________________________________________________
Implant Facility ___________________________________________________
Implant Physician _________________________________________________
Implant Date_____________________________________________________
AngioDynamics® IncorporatedOne Horizon Way, Manchester, GA 31816 USA 518-798-1215 • 800-772-6446 www.angiodynamics.comSmart PortTM and LifeGuardTM are trademarks of AngioDynamics, IncorporatedVortex® and AngioDynamics® are registered trademarks of AngioDynamics, Incorporated
P/N 106993 Rev. A
The LifeGuard™ Safety Infusion Set must be utilized to access the Smart Port™ CT implanted port for power injection.LifeGuard™ Safety Infusion Set 19 Gauge 20 GaugeMaximum Setting for Flow Rates 5 mL/sec 5 mL/secMaximum Pressure Setting 300 p.s.i. 300 p.s.i.
Please Indicate Port Placement
Implant Record
Place product identification sticker from unit label here
Patient’s Name ___________________________________________________
Implant Facility ___________________________________________________
Implant Physician _________________________________________________
Implant Date_____________________________________________________
The LifeGuard™ Safety Infusion Set must be utilized to access the Smart Port™ CT implanted port for power injection.LifeGuard™ Safety Infusion Set 19 Gauge 20 GaugeMaximum Setting for Flow Rates 5 mL/sec 5 mL/secMaximum Pressure Setting 300 p.s.i. 300 p.s.i.
Patient’s Name ___________________________________________________
Implant Facility ___________________________________________________
Implant Physician _________________________________________________
Implant Date_____________________________________________________
The LifeGuard™ Safety Infusion Set must be utilized to access the Smart Port™ CT implanted port for power injection.LifeGuard™ Safety Infusion Set 19 Gauge 20 GaugeMaximum Setting for Flow Rates 5 mL/sec 5 mL/secMaximum Pressure Setting 300 p.s.i. 300 p.s.i.
perforated
perforated
2”
6”
6”
EachPacketcontains:PatientIDCard/KeyRing
PatientIDBracelet
100% Guaranteed Against Sludge BuildupAsk your AngioDynamics® sales representative for details.
Smart Port™ CT System Maintenance
After each delivery of medications or fluid: Flush with at least 20 mL of normal saline followed by a 3-5 mL of heparinized saline solution.
After blood withdrawal: Flush with a minimum of 10mL of saline followed by 3-5 mL of heparinized saline solution.
Port not in use: 3-5mL of heparinized saline solution should be administered every 4 weeks.
After power injection of contrast media: Flush with 10-20 mL normal saline, followed by a 3-5 mL heparinized saline solution.
SmartAngle™IdentificationTechnology
ChestX-Ray CTScoutScan
The LifeGuard™ Safety Infusion Set must be utilized to access the Smart Port™ CT implanted port for power injection.
LifeGuard™ Safety Infusion Set 19 Gauge 20 Gauge
Maximum Setting for Flow Rates 5 mL/sec 5 mL/sec
Maximum Pressure Setting 300 p.s.i. 300 p.s.i.
Operating LifeGuard™ Safety Infusion Set
1. Access the Port:
· Grasp the wings with thumb and middle finger, placing your index finger on top of the needle head.
· Insert needle perpendicular to the port.
· Advance needle through the skin and the septum until it makes contact with the bottom of the reservoir.
2. De-Access the Port:
· Raise the needle trap to a 90° angle.
· Using your non-dominant hand, grasp the needle stick guard and hold down firmly.
3. De-Access Part 2
· While holding the needlestick guard firmly, grasp the flexible wings and pull upward until the nee-dle is completely encapsulated in the needle trap. Note: The needle trap allows for visual confirma-tion that the needle is fully encapsulated and safe. Additionally, you may feel or hear it lock into the safe position.
4. De-Access Part 3
· Flip the needlestick guard toward the needle trap.
· Dispose in Sharps Container port.
LifeGuard™ Non Y-site Models Quantity Part Number
19 Ga X .75” 20 per box LG-19-7519 Ga X 1” 20 per box LG-19-10020 Ga X .50” 20 per box LG-20-5020 Ga X .75” 20 per box LG-20-75 20 Ga X 1” 20 per box LG-20-10020 Ga X 1.5” 20 per box LG-20-150
LifeGuard™ Safety Infusion SetOrdering Information
Model # Material Port Body/Catheter Catheter Size Description
CT96STSD Titanium/Silicone FluoroMax® 9.6 Fr. Detached Silicone Catheter
CT75STSD Titanium/Silicone FluoroMax® 7.5 Fr. Detached Silicone Catheter
CT80STPD Titanium/Polyurethane FluoroMax® 8.0 Fr. Detached Polyurethane Catheter
106991 Patient Education Booklet additional copies available
SmartPort™ CT Implantable PortOrdering Information
MLC 240 Rev. A 10/07
2
Guidelines for HealtH Care Providers
The Choice for Power.
With Vortex® TechnologySMART PORT CTTM
The Smart Port™ CT is intended to facilitate frequent blood sampling or the delivery of medications, nutritions, blood products and power injection of contrast media for imaging. Access is performed by percutaneous needle insertion using an anticoring (huber point) needle.
How to Identify the SmartPort™ CT Implantable Port
Each Smart Port™ CT Power Injectable Port is packaged with a Smart Port™ CT Patient Education Packet which includes a Smart Port™ CT Patient Information Booklet, Smart Port™ CT Patient Identification Card, a Key Ring Card and Patient ID Bracelet. The patient should receive these items at the time the port is implanted.
· If the patient does not have at least one of the above items needed to identify their port as being capable of power injec-tion of contrast media, the port can be identified by the Smart Angle™ Technology through Chest X-Ray or CT Scout Scan.
Important Information
· Read all instructions prior to utilization of device.
· The LifeGuard™ Safety Infusion Set 19 or 20 gauge non Y-site needles must be utilized to access the Smart Port™ CT implanted port for power injection of contrast media.
· The LifeGuard™ Safety Infusion Set 19 or 20 gauge needles should be used in all procedures. These needles have been designed and tested to ensure that septum life is preserved.
· Contrast dye should be warmed to body temperature prior to utilization for power injection. Failure to have contrast at body temperature may lead to device failure.
· Do not exceed the maximum flow rate of 5 mL/sec. Failure can result in over pressurization of the port device. The pow-er injection machine may not prevent over pressurization in the presence of occlusion or resistance.
· Do not exceed 300 p.s.i. Exceeding pressures of 300 p.s.i. could lead to device rupture or catheter malposition.
· Failure to assess the patency of the Smart Port™ CT implanted port prior to power injection may lead to device rupture or failure.
· Absence of a blood return or a poor blood return can be a sign of a potential complication such as occlusion, kinking, breakage, Pinch-Off Syndrome, fibrin formation, thrombosis or malposition. This should be evaluated prior to device us-age. A blood return should be present prior to usage of de-vice for any therapy or testing.
· If the patient complains of pain, or if there is swelling when the device is flushed or when medication or contrast media is administered, evaluate the device for infiltration, proper needle placement, and potential complications such as oc-clusion, kinking, breakage, Pinch-Off Syndrome, thrombosis or malposition. Failure to assess these complaints or obser-vations can lead to device failure.
· Power injection machine pressure limiting (safety cut-off) settings may not prevent over pressurization of an occluded device.
· 10 mL syringes or larger are recommended for all flushing or injection procedures. Use of smaller syringes may result in system damage.
· The catheter tip should be evaluated for proper location prior to power injection.
· Do not exceed 300 p.s.i. or 5 mL/sec when using the Life-Guard™ Safety Infusion Set.
· Power injection using the Smart Port™ CT implanted port should be performed by trained clinicians who are knowledgeable about the utilization of the Smart Port™ CT implanted port.
Procedure for Power Injection
1. The clinician should first review the patient chart to ensure that the patient has a Smart Port™ CT implanted port that is indicated for power injection of contrast media. The patient should have a Smart Port™ CT Patient Identification Card, Smart Port™ CT Patient Information Guide, or Smart Port™ CT Key Ring Card.
Note: The completed patient identification card should be given to the patient, who should be instructed to carry it at all times.
2. The Smart Port™ CT Implanted Port should be accessed with a 19 or 20 gauge non y-site LifeGuard™ Safety Infusion Set for injection of contrast media. The tubing on the safety needle should be clamped.
3. Remove the injection cap attached to the end of the Life-Guard™ Safety Infusion Set.
4. Attach a 10 mL or larger syringe to the luer hub end of the LifeGuard™ Safety Infusion Set, release the clamp and aspirate to confirm blood return.
Note: Absence of blood return or a poor blood return can be a sign of a potential complication such as occlusion, kinking, breakage, Pinch-Off Syndrome, fibrin formation,thrombosis or malposition. This should be evaluated prior to catheter usage. A blood return should be present prior to usage of device.
Note: Testing aspiration for simulated blood return is 0.5 mL/sec.
5. Flush the Smart Port™ CT Implantable Port with 10–20 mL 0.9% normal saline. The device should flush without resistance.
Warning: Not assessing patency may result in device failure.
6. Close the clamp of the LifeGuard™ Safety Infusion Set tubing.
7. Remove the syringe from the LifeGuard™ Safety Infusion Set.
8. Attach the power injection tubing per manufacturer’s recom-mendations to the luer hub end of the LifeGuard™ Safety Infu-sion Set. Release the clamp.
9. Set the power injection machine per manufacturer’s recommendations for a maximum pressure of 300 psi.
10. Perform the study. Do not exceed 5 mL/sec or 300 p.s.i. during injection of contrast dye.
11. Close the clamp. Disengage the power injection tubing from the luer hub end of the LifeGuard™ Safety Infusion Set.
12. Place a new injection cap on the LifeGuard™ Safety Infusion Set luer hub.
13. Flush the Smart Port™ CT Implantable Port with 10–20 mL 0.9% normal saline.
14. Flush the Smart Port™ CT Implantable Port with 3–5 mL of 10–100 units/mL heparinized saline.
Actual amount and strength depends on facility policy.
Warnings
· Do not use smaller than a 10 mL syringe. These syringes are recommended for all flushing or injection procedures. Use of smaller syringes may result in system damage.
· Contrast dye should be warmed to body temperature prior to utilization for power injection. Failure to have contrast at body temperature may lead to device failure.
· Do not exceed the maximum flow rate of 5 mL/sec. Failure can result in over pressurization of the port device. Pow-er injection machine may not prevent over pressurization in the presence of occlusion or resistance.
· Do not exceed 300 p.s.i. Exceeding pressures of 300 p.s.i. could lead to device rupture or catheter malposition.
· Failure to assess the patency of the Smart Port™ CT Implanted Port prior to power injection may lead to device rupture or failure.
· Absence of a blood return or a poor blood return can be a sign of a potential complication such as occlusion, kinking, breakage, Pinch-Off Syndrome, fibrin formation, thrombosis or malposition. This should be evaluated prior to device us-age. A blood return should be present prior to usage of de-vice for any therapy or testing.
· If the patient complains of pain, or there is swelling when the device is flushed or when medication or contrast media is administered, evaluate the device for infiltration, proper needle placement, and potential complications such as oc-clusion, kinking, breakage, Pinch-Off Syndrome, thrombosis or malposition. Failure to assess these complaints or obser-vations can lead to device failure.
· Power injection machine pressure limiting (safety cut-off) settings may not prevent over pressurization of an occluded device.
Needles Use of AngioDynamics anti-coring (19 or 20 gauge huber point) needles is recommended for all procedures. These needles have been designed and tested to ensure that septum life is pre-served. Use of AngioDynamics LifeGuard™ Safety Infusion Sets (19 or 20 gauge non y-site) is required for injection of contrast media. Needles are for single use only.
Features:· Power Injectable when used with Smart Port™ CT· Low Profile
· Universal Luer Locks· Soft Wings· Non-Siliconized Needle
· One-Handed Clamps· Available in 19 or 20 Gauge
LifeGuard™ Safety Infusion Sets When used with the Smart Port™ CT Power Injectable Port, the LifeGuard™ Safety Infusion Set is also indicated for power injection of contrast media into the central venous system. For power injection of contract media, only models LG-19-75, LG-19-100, LG-20-50, LG-20-75, LG-20-100, and LG-20-150 may be used at a maxi-mum infusion rate of 5ml/sec.
Clear Information foreverypatient.
Patient Educational Packet
PatientInfoGuideContents:-TheSmartPort™CTPowerInjectablePortAdvantage
-DescriptionoftheSmartPort™CTPowerInjectablePort
-PlacementofTheSmartPort™CTPowerInjectablePort
-UseofSmartPort™CTPowerInjectablePort
-PotentialProblemswiththeSmartPort™CTPowerInjectablePort
-CareoftheSmartPort™CTPowerInjectablePort
-QuestionsRegardingYourSmartPort™CTPowerInjectablePort
PatientCareChecklist
PatientEducationGuide
ImplantRecordStickersforCharts
Patient Record Labels: 6” x 6” perforated to make three 6” x 2” labels-black and PMS 660, blue
AngioDynamics® IncorporatedOne Horizon Way, Manchester, GA 31816 USA 518-798-1215 • 800-772-6446 www.angiodynamics.comSmart PortTM and LifeGuardTM are trademarks of AngioDynamics, IncorporatedVortex® and AngioDynamics® are registered trademarks of AngioDynamics, Incorporated
P/N 106993 Rev. A
Please Indicate Port Placement
Implant Record
Place product identification sticker from unit label here
Angio Dynamics32688———3Lindsay Heineke—BostonP. Kirk
AngioDynamics® IncorporatedOne Horizon Way, Manchester, GA 31816 USA 518-798-1215 • 800-772-6446 www.angiodynamics.comSmart PortTM and LifeGuardTM are trademarks of AngioDynamics, IncorporatedVortex® and AngioDynamics® are registered trademarks of AngioDynamics, Incorporated
P/N 106993 Rev. A
Please Indicate Port Placement
Implant Record
Place product identification sticker from unit label here
Patient’s Name ___________________________________________________
Implant Facility ___________________________________________________
Implant Physician _________________________________________________
Implant Date_____________________________________________________
AngioDynamics® IncorporatedOne Horizon Way, Manchester, GA 31816 USA 518-798-1215 • 800-772-6446 www.angiodynamics.comSmart PortTM and LifeGuardTM are trademarks of AngioDynamics, IncorporatedVortex® and AngioDynamics® are registered trademarks of AngioDynamics, Incorporated
P/N 106993 Rev. A
The LifeGuard™ Safety Infusion Set must be utilized to access the Smart Port™ CT implanted port for power injection.LifeGuard™ Safety Infusion Set 19 Gauge 20 GaugeMaximum Setting for Flow Rates 5 mL/sec 5 mL/secMaximum Pressure Setting 300 p.s.i. 300 p.s.i.
Please Indicate Port Placement
Implant Record
Place product identification sticker from unit label here
Patient’s Name ___________________________________________________
Implant Facility ___________________________________________________
Implant Physician _________________________________________________
Implant Date_____________________________________________________
The LifeGuard™ Safety Infusion Set must be utilized to access the Smart Port™ CT implanted port for power injection.LifeGuard™ Safety Infusion Set 19 Gauge 20 GaugeMaximum Setting for Flow Rates 5 mL/sec 5 mL/secMaximum Pressure Setting 300 p.s.i. 300 p.s.i.
Patient’s Name ___________________________________________________
Implant Facility ___________________________________________________
Implant Physician _________________________________________________
Implant Date_____________________________________________________
The LifeGuard™ Safety Infusion Set must be utilized to access the Smart Port™ CT implanted port for power injection.LifeGuard™ Safety Infusion Set 19 Gauge 20 GaugeMaximum Setting for Flow Rates 5 mL/sec 5 mL/secMaximum Pressure Setting 300 p.s.i. 300 p.s.i.
perforated
perforated
2”
6”
6”
EachPacketcontains:PatientIDCard/KeyRing
PatientIDBracelet
100% Guaranteed Against Sludge BuildupAsk your AngioDynamics® sales representative for details.
Smart Port™ CT System Maintenance
After each delivery of medications or fluid: Flush with at least 20 mL of normal saline followed by a 3-5 mL of heparinized saline solution.
After blood withdrawal: Flush with a minimum of 10mL of saline followed by 3-5 mL of heparinized saline solution.
Port not in use: 3-5mL of heparinized saline solution should be administered every 4 weeks.
After power injection of contrast media: Flush with 10-20 mL normal saline, followed by a 3-5 mL heparinized saline solution.
SmartAngle™IdentificationTechnology
ChestX-Ray CTScoutScan
The LifeGuard™ Safety Infusion Set must be utilized to access the Smart Port™ CT implanted port for power injection.
LifeGuard™ Safety Infusion Set 19 Gauge 20 Gauge
Maximum Setting for Flow Rates 5 mL/sec 5 mL/sec
Maximum Pressure Setting 300 p.s.i. 300 p.s.i.
Operating LifeGuard™ Safety Infusion Set
1. Access the Port:
· Grasp the wings with thumb and middle finger, placing your index finger on top of the needle head.
· Insert needle perpendicular to the port.
· Advance needle through the skin and the septum until it makes contact with the bottom of the reservoir.
2. De-Access the Port:
· Raise the needle trap to a 90° angle.
· Using your non-dominant hand, grasp the needle stick guard and hold down firmly.
3. De-Access Part 2
· While holding the needlestick guard firmly, grasp the flexible wings and pull upward until the nee-dle is completely encapsulated in the needle trap. Note: The needle trap allows for visual confirma-tion that the needle is fully encapsulated and safe. Additionally, you may feel or hear it lock into the safe position.
4. De-Access Part 3
· Flip the needlestick guard toward the needle trap.
· Dispose in Sharps Container port.
LifeGuard™ Non Y-site Models Quantity Part Number
19 Ga X .75” 20 per box LG-19-7519 Ga X 1” 20 per box LG-19-10020 Ga X .50” 20 per box LG-20-5020 Ga X .75” 20 per box LG-20-75 20 Ga X 1” 20 per box LG-20-10020 Ga X 1.5” 20 per box LG-20-150
LifeGuard™ Safety Infusion SetOrdering Information
Model # Material Port Body/Catheter Catheter Size Description
CT96STSD Titanium/Silicone FluoroMax® 9.6 Fr. Detached Silicone Catheter
CT75STSD Titanium/Silicone FluoroMax® 7.5 Fr. Detached Silicone Catheter
CT80STPD Titanium/Polyurethane FluoroMax® 8.0 Fr. Detached Polyurethane Catheter
106991 Patient Education Booklet additional copies available
SmartPort™ CT Implantable PortOrdering Information
MLC 240 Rev. A 10/07
3
Guidelines for HealtH Care Providers
The Choice for Power.
With Vortex® TechnologySMART PORT CTTM
The Smart Port™ CT is intended to facilitate frequent blood sampling or the delivery of medications, nutritions, blood products and power injection of contrast media for imaging. Access is performed by percutaneous needle insertion using an anticoring (huber point) needle.
How to Identify the SmartPort™ CT Implantable Port
Each Smart Port™ CT Power Injectable Port is packaged with a Smart Port™ CT Patient Education Packet which includes a Smart Port™ CT Patient Information Booklet, Smart Port™ CT Patient Identification Card, a Key Ring Card and Patient ID Bracelet. The patient should receive these items at the time the port is implanted.
· If the patient does not have at least one of the above items needed to identify their port as being capable of power injec-tion of contrast media, the port can be identified by the Smart Angle™ Technology through Chest X-Ray or CT Scout Scan.
Important Information
· Read all instructions prior to utilization of device.
· The LifeGuard™ Safety Infusion Set 19 or 20 gauge non Y-site needles must be utilized to access the Smart Port™ CT implanted port for power injection of contrast media.
· The LifeGuard™ Safety Infusion Set 19 or 20 gauge needles should be used in all procedures. These needles have been designed and tested to ensure that septum life is preserved.
· Contrast dye should be warmed to body temperature prior to utilization for power injection. Failure to have contrast at body temperature may lead to device failure.
· Do not exceed the maximum flow rate of 5 mL/sec. Failure can result in over pressurization of the port device. The pow-er injection machine may not prevent over pressurization in the presence of occlusion or resistance.
· Do not exceed 300 p.s.i. Exceeding pressures of 300 p.s.i. could lead to device rupture or catheter malposition.
· Failure to assess the patency of the Smart Port™ CT implanted port prior to power injection may lead to device rupture or failure.
· Absence of a blood return or a poor blood return can be a sign of a potential complication such as occlusion, kinking, breakage, Pinch-Off Syndrome, fibrin formation, thrombosis or malposition. This should be evaluated prior to device us-age. A blood return should be present prior to usage of de-vice for any therapy or testing.
· If the patient complains of pain, or if there is swelling when the device is flushed or when medication or contrast media is administered, evaluate the device for infiltration, proper needle placement, and potential complications such as oc-clusion, kinking, breakage, Pinch-Off Syndrome, thrombosis or malposition. Failure to assess these complaints or obser-vations can lead to device failure.
· Power injection machine pressure limiting (safety cut-off) settings may not prevent over pressurization of an occluded device.
· 10 mL syringes or larger are recommended for all flushing or injection procedures. Use of smaller syringes may result in system damage.
· The catheter tip should be evaluated for proper location prior to power injection.
· Do not exceed 300 p.s.i. or 5 mL/sec when using the Life-Guard™ Safety Infusion Set.
· Power injection using the Smart Port™ CT implanted port should be performed by trained clinicians who are knowledgeable about the utilization of the Smart Port™ CT implanted port.
Procedure for Power Injection
1. The clinician should first review the patient chart to ensure that the patient has a Smart Port™ CT implanted port that is indicated for power injection of contrast media. The patient should have a Smart Port™ CT Patient Identification Card, Smart Port™ CT Patient Information Guide, or Smart Port™ CT Key Ring Card.
Note: The completed patient identification card should be given to the patient, who should be instructed to carry it at all times.
2. The Smart Port™ CT Implanted Port should be accessed with a 19 or 20 gauge non y-site LifeGuard™ Safety Infusion Set for injection of contrast media. The tubing on the safety needle should be clamped.
3. Remove the injection cap attached to the end of the Life-Guard™ Safety Infusion Set.
4. Attach a 10 mL or larger syringe to the luer hub end of the LifeGuard™ Safety Infusion Set, release the clamp and aspirate to confirm blood return.
Note: Absence of blood return or a poor blood return can be a sign of a potential complication such as occlusion, kinking, breakage, Pinch-Off Syndrome, fibrin formation,thrombosis or malposition. This should be evaluated prior to catheter usage. A blood return should be present prior to usage of device.
Note: Testing aspiration for simulated blood return is 0.5 mL/sec.
5. Flush the Smart Port™ CT Implantable Port with 10–20 mL 0.9% normal saline. The device should flush without resistance.
Warning: Not assessing patency may result in device failure.
6. Close the clamp of the LifeGuard™ Safety Infusion Set tubing.
7. Remove the syringe from the LifeGuard™ Safety Infusion Set.
8. Attach the power injection tubing per manufacturer’s recom-mendations to the luer hub end of the LifeGuard™ Safety Infu-sion Set. Release the clamp.
9. Set the power injection machine per manufacturer’s recommendations for a maximum pressure of 300 psi.
10. Perform the study. Do not exceed 5 mL/sec or 300 p.s.i. during injection of contrast dye.
11. Close the clamp. Disengage the power injection tubing from the luer hub end of the LifeGuard™ Safety Infusion Set.
12. Place a new injection cap on the LifeGuard™ Safety Infusion Set luer hub.
13. Flush the Smart Port™ CT Implantable Port with 10–20 mL 0.9% normal saline.
14. Flush the Smart Port™ CT Implantable Port with 3–5 mL of 10–100 units/mL heparinized saline.
Actual amount and strength depends on facility policy.
Warnings
· Do not use smaller than a 10 mL syringe. These syringes are recommended for all flushing or injection procedures. Use of smaller syringes may result in system damage.
· Contrast dye should be warmed to body temperature prior to utilization for power injection. Failure to have contrast at body temperature may lead to device failure.
· Do not exceed the maximum flow rate of 5 mL/sec. Failure can result in over pressurization of the port device. Pow-er injection machine may not prevent over pressurization in the presence of occlusion or resistance.
· Do not exceed 300 p.s.i. Exceeding pressures of 300 p.s.i. could lead to device rupture or catheter malposition.
· Failure to assess the patency of the Smart Port™ CT Implanted Port prior to power injection may lead to device rupture or failure.
· Absence of a blood return or a poor blood return can be a sign of a potential complication such as occlusion, kinking, breakage, Pinch-Off Syndrome, fibrin formation, thrombosis or malposition. This should be evaluated prior to device us-age. A blood return should be present prior to usage of de-vice for any therapy or testing.
· If the patient complains of pain, or there is swelling when the device is flushed or when medication or contrast media is administered, evaluate the device for infiltration, proper needle placement, and potential complications such as oc-clusion, kinking, breakage, Pinch-Off Syndrome, thrombosis or malposition. Failure to assess these complaints or obser-vations can lead to device failure.
· Power injection machine pressure limiting (safety cut-off) settings may not prevent over pressurization of an occluded device.
Needles Use of AngioDynamics anti-coring (19 or 20 gauge huber point) needles is recommended for all procedures. These needles have been designed and tested to ensure that septum life is pre-served. Use of AngioDynamics LifeGuard™ Safety Infusion Sets (19 or 20 gauge non y-site) is required for injection of contrast media. Needles are for single use only.
Features:· Power Injectable when used with Smart Port™ CT· Low Profile
· Universal Luer Locks· Soft Wings· Non-Siliconized Needle
· One-Handed Clamps· Available in 19 or 20 Gauge
LifeGuard™ Safety Infusion Sets When used with the Smart Port™ CT Power Injectable Port, the LifeGuard™ Safety Infusion Set is also indicated for power injection of contrast media into the central venous system. For power injection of contract media, only models LG-19-75, LG-19-100, LG-20-50, LG-20-75, LG-20-100, and LG-20-150 may be used at a maxi-mum infusion rate of 5ml/sec.
Clear Information foreverypatient.
Patient Educational Packet
PatientInfoGuideContents:-TheSmartPort™CTPowerInjectablePortAdvantage
-DescriptionoftheSmartPort™CTPowerInjectablePort
-PlacementofTheSmartPort™CTPowerInjectablePort
-UseofSmartPort™CTPowerInjectablePort
-PotentialProblemswiththeSmartPort™CTPowerInjectablePort
-CareoftheSmartPort™CTPowerInjectablePort
-QuestionsRegardingYourSmartPort™CTPowerInjectablePort
PatientCareChecklist
PatientEducationGuide
ImplantRecordStickersforCharts
Patient Record Labels: 6” x 6” perforated to make three 6” x 2” labels-black and PMS 660, blue
AngioDynamics® IncorporatedOne Horizon Way, Manchester, GA 31816 USA 518-798-1215 • 800-772-6446 www.angiodynamics.comSmart PortTM and LifeGuardTM are trademarks of AngioDynamics, IncorporatedVortex® and AngioDynamics® are registered trademarks of AngioDynamics, Incorporated
P/N 106993 Rev. A
Please Indicate Port Placement
Implant Record
Place product identification sticker from unit label here
Angio Dynamics32688———3Lindsay Heineke—BostonP. Kirk
AngioDynamics® IncorporatedOne Horizon Way, Manchester, GA 31816 USA 518-798-1215 • 800-772-6446 www.angiodynamics.comSmart PortTM and LifeGuardTM are trademarks of AngioDynamics, IncorporatedVortex® and AngioDynamics® are registered trademarks of AngioDynamics, Incorporated
P/N 106993 Rev. A
Please Indicate Port Placement
Implant Record
Place product identification sticker from unit label here
Patient’s Name ___________________________________________________
Implant Facility ___________________________________________________
Implant Physician _________________________________________________
Implant Date_____________________________________________________
AngioDynamics® IncorporatedOne Horizon Way, Manchester, GA 31816 USA 518-798-1215 • 800-772-6446 www.angiodynamics.comSmart PortTM and LifeGuardTM are trademarks of AngioDynamics, IncorporatedVortex® and AngioDynamics® are registered trademarks of AngioDynamics, Incorporated
P/N 106993 Rev. A
The LifeGuard™ Safety Infusion Set must be utilized to access the Smart Port™ CT implanted port for power injection.LifeGuard™ Safety Infusion Set 19 Gauge 20 GaugeMaximum Setting for Flow Rates 5 mL/sec 5 mL/secMaximum Pressure Setting 300 p.s.i. 300 p.s.i.
Please Indicate Port Placement
Implant Record
Place product identification sticker from unit label here
Patient’s Name ___________________________________________________
Implant Facility ___________________________________________________
Implant Physician _________________________________________________
Implant Date_____________________________________________________
The LifeGuard™ Safety Infusion Set must be utilized to access the Smart Port™ CT implanted port for power injection.LifeGuard™ Safety Infusion Set 19 Gauge 20 GaugeMaximum Setting for Flow Rates 5 mL/sec 5 mL/secMaximum Pressure Setting 300 p.s.i. 300 p.s.i.
Patient’s Name ___________________________________________________
Implant Facility ___________________________________________________
Implant Physician _________________________________________________
Implant Date_____________________________________________________
The LifeGuard™ Safety Infusion Set must be utilized to access the Smart Port™ CT implanted port for power injection.LifeGuard™ Safety Infusion Set 19 Gauge 20 GaugeMaximum Setting for Flow Rates 5 mL/sec 5 mL/secMaximum Pressure Setting 300 p.s.i. 300 p.s.i.
perforated
perforated
2”
6”
6”
EachPacketcontains:PatientIDCard/KeyRing
PatientIDBracelet
100% Guaranteed Against Sludge BuildupAsk your AngioDynamics® sales representative for details.
Smart Port™ CT System Maintenance
After each delivery of medications or fluid: Flush with at least 20 mL of normal saline followed by a 3-5 mL of heparinized saline solution.
After blood withdrawal: Flush with a minimum of 10mL of saline followed by 3-5 mL of heparinized saline solution.
Port not in use: 3-5mL of heparinized saline solution should be administered every 4 weeks.
After power injection of contrast media: Flush with 10-20 mL normal saline, followed by a 3-5 mL heparinized saline solution.
SmartAngle™IdentificationTechnology
ChestX-Ray CTScoutScan
The LifeGuard™ Safety Infusion Set must be utilized to access the Smart Port™ CT implanted port for power injection.
LifeGuard™ Safety Infusion Set 19 Gauge 20 Gauge
Maximum Setting for Flow Rates 5 mL/sec 5 mL/sec
Maximum Pressure Setting 300 p.s.i. 300 p.s.i.
Operating LifeGuard™ Safety Infusion Set
1. Access the Port:
· Grasp the wings with thumb and middle finger, placing your index finger on top of the needle head.
· Insert needle perpendicular to the port.
· Advance needle through the skin and the septum until it makes contact with the bottom of the reservoir.
2. De-Access the Port:
· Raise the needle trap to a 90° angle.
· Using your non-dominant hand, grasp the needle stick guard and hold down firmly.
3. De-Access Part 2
· While holding the needlestick guard firmly, grasp the flexible wings and pull upward until the nee-dle is completely encapsulated in the needle trap. Note: The needle trap allows for visual confirma-tion that the needle is fully encapsulated and safe. Additionally, you may feel or hear it lock into the safe position.
4. De-Access Part 3
· Flip the needlestick guard toward the needle trap.
· Dispose in Sharps Container port.
LifeGuard™ Non Y-site Models Quantity Part Number
19 Ga X .75” 20 per box LG-19-7519 Ga X 1” 20 per box LG-19-10020 Ga X .50” 20 per box LG-20-5020 Ga X .75” 20 per box LG-20-75 20 Ga X 1” 20 per box LG-20-10020 Ga X 1.5” 20 per box LG-20-150
LifeGuard™ Safety Infusion SetOrdering Information
Model # Material Port Body/Catheter Catheter Size Description
CT96STSD Titanium/Silicone FluoroMax® 9.6 Fr. Detached Silicone Catheter
CT75STSD Titanium/Silicone FluoroMax® 7.5 Fr. Detached Silicone Catheter
CT80STPD Titanium/Polyurethane FluoroMax® 8.0 Fr. Detached Polyurethane Catheter
106991 Patient Education Booklet additional copies available
SmartPort™ CT Implantable PortOrdering Information
MLC 240 Rev. A 10/07
4
LifeGuard™ Non Y-site ModelsDescription Part #
19 Ga X .75” LG-19-75
19 Ga X 1” LG-19-100
20 Ga X .50” LG-20-50
20 Ga X .75” LG-20-75
20 Ga X 1” LG-20-100
20 Ga X 1.5” LG-20-150
>> Quantity of 20 per box
>> Maximum Setting for Flow Rates for all models is 5 mL/sec
>> Maximum Pressure Setting is 300 psi
OPERATING LIFEGUARD™ SAFETY INFUSION SETLIFEGUARD™ SAFETY INFUSION SETS
AngioDynamics, Smart Angle, Vortex, FluoroMax and SmartPort are registered trademarks of AngioDynamics, Inc. LifeGuard is a trademark of AngioDynamics, Inc.Covered under U.S. Patent 5,951,512. U.S. and foreign patents pending.CAUTION: Federal Law (U.S.) restricts the sale of this device by or on the order of a physician.
© 2010 AngioDynamics, Inc. MLC 240 Rev B 02/10