guidelines to fill up the application form...
TRANSCRIPT
Guidelines to fill up the Application Form Online
What all do you need to complete the Online application process for Zilla Parishad Under MaldaDistrict Recruitment Application?
As an applicant you would need the following:
1. An E-mail ID for registration and for receiving all future correspondence till theadmission process is over and subsequently, if admitted.
2. A Mobile Number to receive SMS based notifications/communications related to theonline application, Admit card, Entrance Test Result, Admission Counselling etc till theadmission process is over and subsequently, if admitted.
3. Access to facilities of computer with internet connectivity, B/W printer and scanner.4. A recent passport sized colour photograph (for scanning and uploading in "jpg/jpeg/png"
format only. File size of scanned photograph should not be more than 200KB).5. Your signature using Blue/Black pen on white sheet (for scanning and uploading in
"jpg/jpeg/png" format only. File size of scanned photograph should not be more than200KB).
6. Your academic documents (for scanning and uploading in "jpg/jpeg/png" format only. Filesize of scanned photograph should not be more than 200KB).
All applicants should note, that:
1. Take a printout of submitted application for future correspondence.
2. Original certificates issued by competent authority supporting your filled in details will beasked from you ONLY at the time of Recruitment. If data provided in the onlineapplication is not supported by appropriate documents then your application/ claim forRecruitment shall be cancelled, without giving any reason thereof.
Steps to be followed for filling the online application:
Before proceeding to fill up the online application form, please ensure that you have the requireddetails and scanned image files of your (i) recent passport size colour photograph and (ii) signature[as specified at first para no.4 & 5 above], which will be needed at different stages of process. Theentire process of filling online application form can be completed in five stages. The five stagesare:
1. Registration on the Zilla Parishad Under Malda District Recruitment Application Portal(malda.gov.in) for online application process.
2. Select the post of your choice [check eligibility etc].3. If you choose to proceed for the selected post [do it after confirming your eligibility etc],
application form will appear on the screen. Fill up the details in the application form whichwill have following sections:
1. Candidate Details,2. Upload scanned image file of your Photograph and Signature [as specified in first
para no.4 & 5 above],

3. Academic Details,4. Scan Document Details,
4. Final Review of details entered in the Application Form and if they are corrected then'Confirm' the submission.
5. For subsequent applications (after the first post) process of filling up 'Candidate Details','Upload Photo and Signature', Academic Details', 'Document Details', and 'Preview AndConfirm' will not be required. These details will be repeated automatically/ copied for allsubsequent applications.
How to complete Registration on the Zilla Parishad Under Malda DistrictRecruitment Application Portal (malda.gov.in) for Online Application Process?
Step 1: Please click on "Apply for Zilla Parishad Under Malda District RecruitmentApplication" button given on the home page of the Official Website of Malda District(malda.gov.in).
Step 2: On clicking the link, you will be directed to a new page having an Applicant Login Box.Below the login fields there is a link "Make Registration". Please click on this link.
Step 3: When you click the link you will be shown a Registration Form asking for various details.Fields for information which is mandatory is marked with "Red coloured bullets" and are to beessentially filled up. These fields cannot be left blank. Once you fill the details, you can click onthe "Sign up" button at the bottom for completing the registration process.

NOTE: PLEASE NOTE THAT DETAILS SUBMITTED DURING REGISTRATIONCANNOT BE CHANGED LATER. SO MAKE SURE YOU DO NOT MAKE ERRORS INTHE INFORMATION YOU FILL IN THIS FORM.
Step 4: Activation and validation of Registration
1. On successful submission of registration details, you would be shown a confirmationmessage on the screen. You will also receive an e-mail on the e-mail ID provided by youin the Registration Form and a validation code on your registered mobile number. Thisemail will contain an activation link. You need to click on this activation link to confirmand complete your registration process.

Note: This confirmation and activation link e-mail might land up in your "Spam Folder" or"Junk Folder'. So, in case you do not find the registration confirmation e-mail in your "Inbox",please check your "Spam Folder" or "Junk Folder'. If you find the e-mail [email protected] in your "Spam Folder" or "Junk Folder", please report it as "NotSpam" and/or add the same to your contact list so that the subsequent e-mails [email protected] always comes in your Inbox. Always check your "Spam Folder" or"Junk Folder' for e-mails from the Official Website of Malda District (malda.gov.in).
2. Click on this activation link received in the e-mail. You account will not be activated untilyou have clicked on this activation link or click "Enter Activation Code"and enter yourRegister e-mail ID and enter Activation code/ OTP [OTP already send to your registermobile no.] so, do not forget this important step.
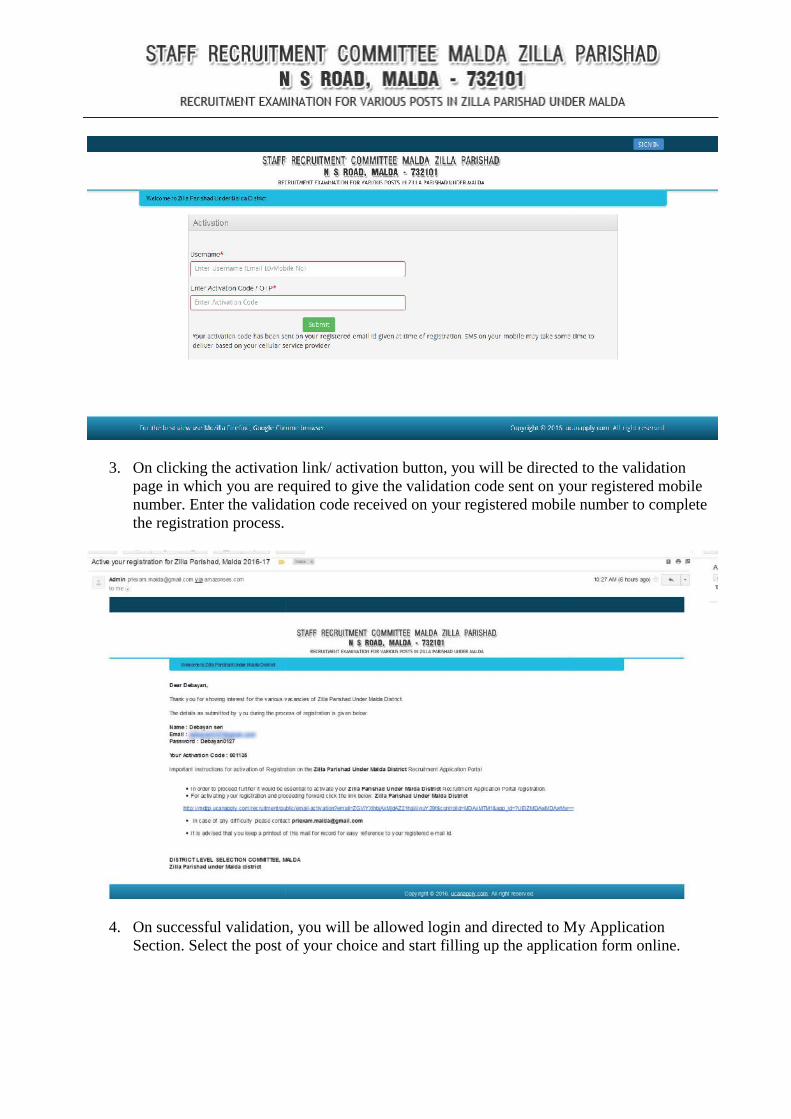
3. On clicking the activation link/ activation button, you will be directed to the validationpage in which you are required to give the validation code sent on your registered mobilenumber. Enter the validation code received on your registered mobile number to completethe registration process.
4. On successful validation, you will be allowed login and directed to My ApplicationSection. Select the post of your choice and start filling up the application form online.

How to select Post for which I want to apply?
Step 1: After activation and validation of your Registration on the Zilla Parishad Under MaldaDistrict Recruitment Application Portal (malda.gov.in), you can login into the programme.
After login you will be able to see Dashboard and click “My Application”
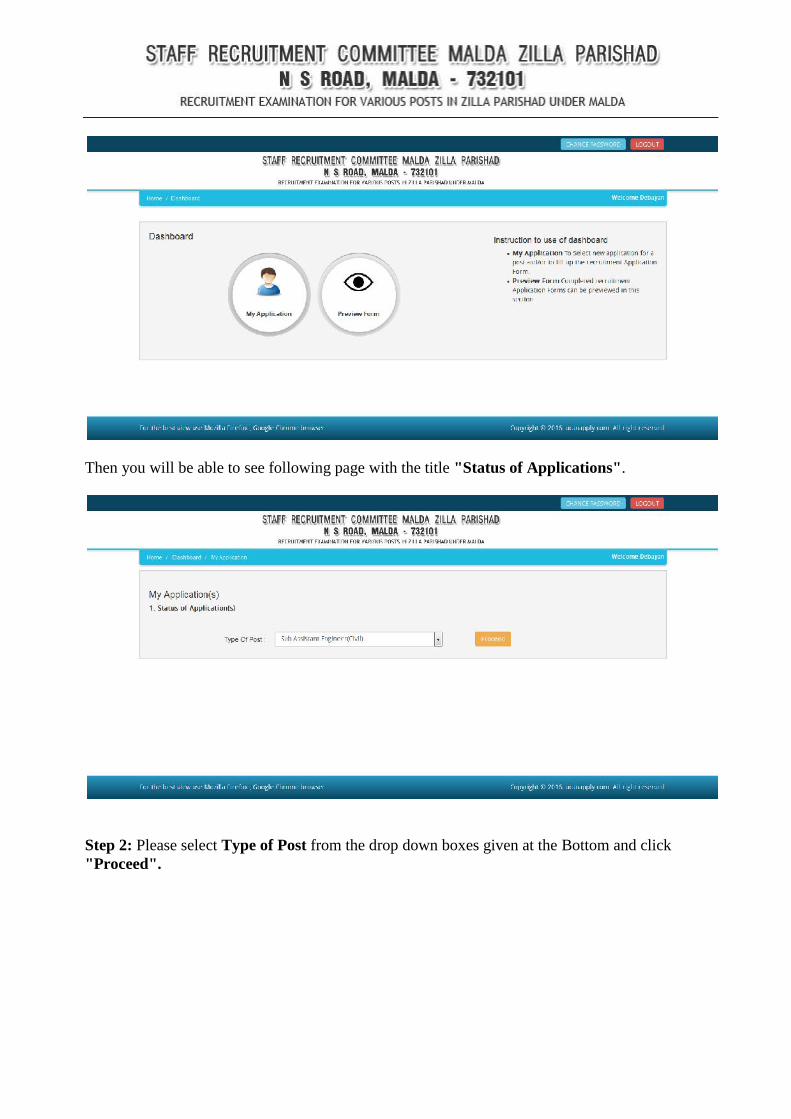
Then you will be able to see following page with the title "Status of Applications".
Step 2: Please select Type of Post from the drop down boxes given at the Bottom and click"Proceed".
Then you will be able to see following page with the title "Status of Applications".
Step 2: Please select Type of Post from the drop down boxes given at the Bottom and click"Proceed".
Then you will be able to see following page with the title "Status of Applications".
Step 2: Please select Type of Post from the drop down boxes given at the Bottom and click"Proceed".
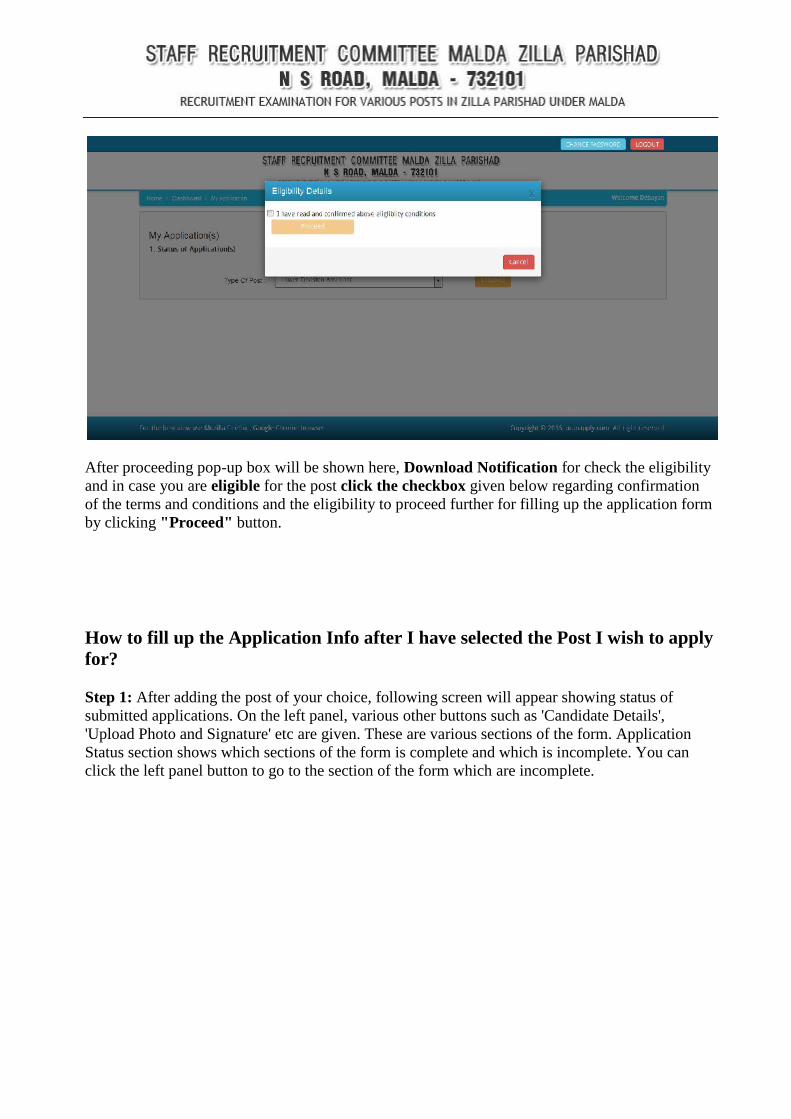
After proceeding pop-up box will be shown here, Download Notification for check the eligibilityand in case you are eligible for the post click the checkbox given below regarding confirmationof the terms and conditions and the eligibility to proceed further for filling up the application formby clicking "Proceed" button.
How to fill up the Application Info after I have selected the Post I wish to applyfor?
Step 1: After adding the post of your choice, following screen will appear showing status ofsubmitted applications. On the left panel, various other buttons such as 'Candidate Details','Upload Photo and Signature' etc are given. These are various sections of the form. ApplicationStatus section shows which sections of the form is complete and which is incomplete. You canclick the left panel button to go to the section of the form which are incomplete.
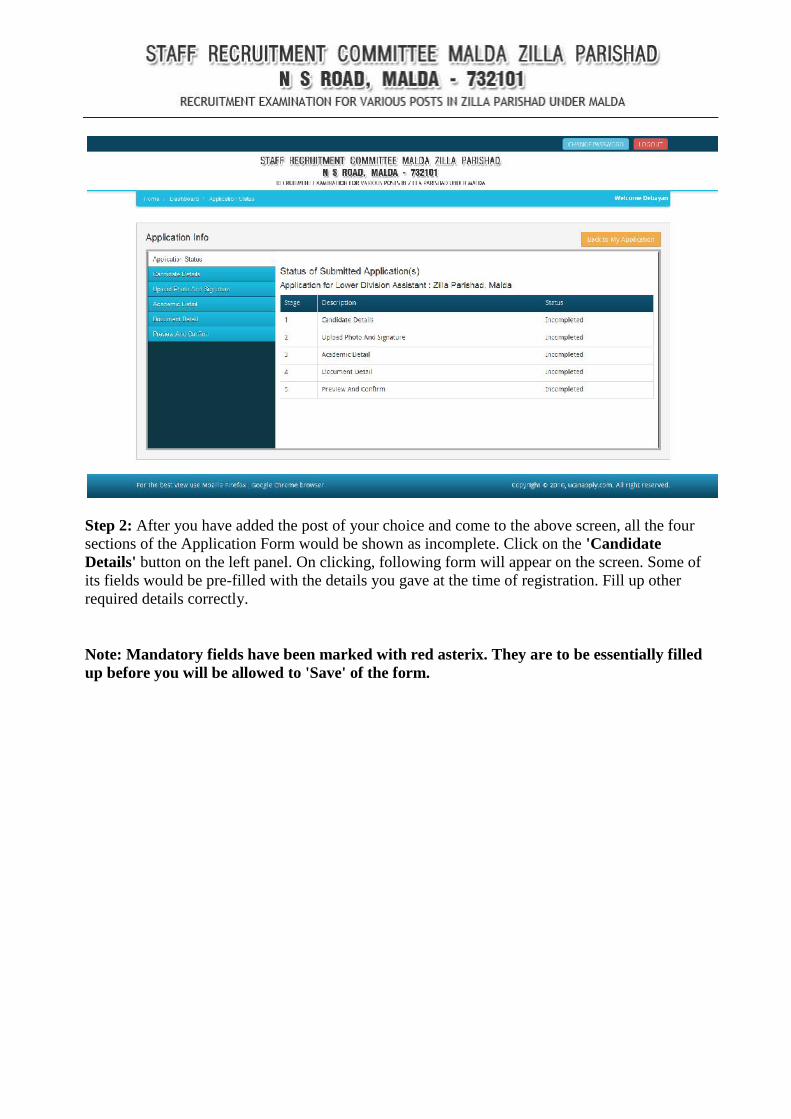
Step 2: After you have added the post of your choice and come to the above screen, all the foursections of the Application Form would be shown as incomplete. Click on the 'CandidateDetails' button on the left panel. On clicking, following form will appear on the screen. Some ofits fields would be pre-filled with the details you gave at the time of registration. Fill up otherrequired details correctly.
Note: Mandatory fields have been marked with red asterix. They are to be essentially filledup before you will be allowed to 'Save' of the form.

Step 3: After you have filled up all the required fields of the 'Candidate Details', Click on the'Save & Continue' button given at the bottom of the page (as shown above).
Step 4: After filling up application click the 'Save & Continue' Buttom given at the bottom.
How to Upload image file (in jpeg format; size limit 200kb) of my scanned photograph andsignature?
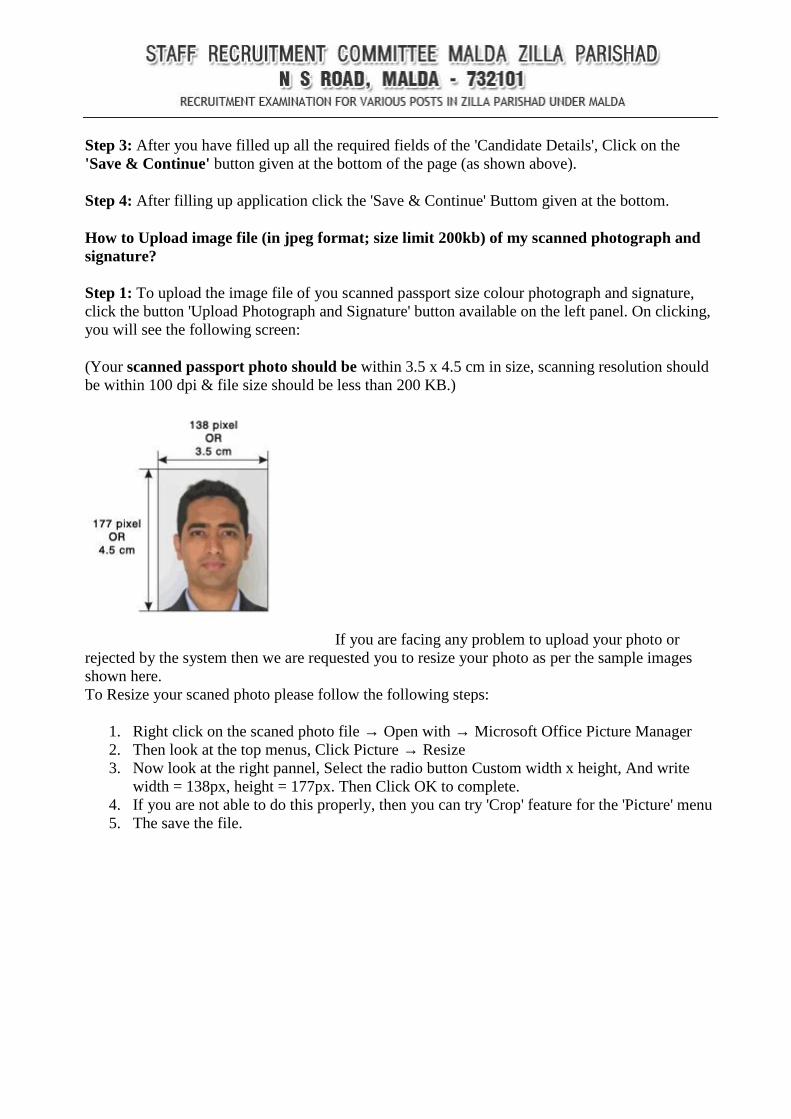
Step 1: To upload the image file of you scanned passport size colour photograph and signature,click the button 'Upload Photograph and Signature' button available on the left panel. On clicking,you will see the following screen:
(Your scanned passport photo should be within 3.5 x 4.5 cm in size, scanning resolution shouldbe within 100 dpi & file size should be less than 200 KB.)
If you are facing any problem to upload your photo orrejected by the system then we are requested you to resize your photo as per the sample imagesshown here.To Resize your scaned photo please follow the following steps:
1. Right click on the scaned photo file → Open with → Microsoft Office Picture Manager2. Then look at the top menus, Click Picture → Resize3. Now look at the right pannel, Select the radio button Custom width x height, And write
width = 138px, height = 177px. Then Click OK to complete.4. If you are not able to do this properly, then you can try 'Crop' feature for the 'Picture' menu5. The save the file.

Step 5: Choose the image file (jpeg format; photo should be within 3.5 x 4.5 cm in size, scanningresolution should be within 100 dpi & file size not more than 200 kb) of your scanned passportsize photograph and signature and click the button 'Upload Photo' and 'Upload Signature' buttongiven below the Box. After you have successfully uploaded the photograph and signature, you willsee the following page:
Step 5: Choose the image file (jpeg format; photo should be within 3.5 x 4.5 cm in size, scanningresolution should be within 100 dpi & file size not more than 200 kb) of your scanned passportsize photograph and signature and click the button 'Upload Photo' and 'Upload Signature' buttongiven below the Box. After you have successfully uploaded the photograph and signature, you willsee the following page:
Step 5: Choose the image file (jpeg format; photo should be within 3.5 x 4.5 cm in size, scanningresolution should be within 100 dpi & file size not more than 200 kb) of your scanned passportsize photograph and signature and click the button 'Upload Photo' and 'Upload Signature' buttongiven below the Box. After you have successfully uploaded the photograph and signature, you willsee the following page:

Step 6: After filling up application click the 'Save & Proceed' Buttom given at the bottom youhave filled up all the required fields of the 'Academic Details', here you add your passedexamination details and Click on the 'Save' button.
After filled all academic details and click 'Save' Button re-confirm all fields no further changeswill be entertained.
Step 7: After filling up application click the 'Save' and 'Ok' Button given at the bottom you havefilled up all the required fields of the 'Document Details', here you add your all requireddocument details and Click on the 'Save & Continue' button.

Upto this stage, you have completed all stages of the Application Form.
Now, click the ‘Save & Continue’ button given at the bottom of the page. This will help you seeentries made in various sections of the Application Form. In case you want to edit some details,you should do so before clicking 'I confirm the above' checkbox and clicking the 'Confirm &Submit' button because once you confirm and submit an application form, it cannot be editedfurther.
For the other subject system will go for Applicant Form View page. Here you can check allinformation which you have entered in your application process. If everything is ok then click thebutton 'I CONFIRM THE ABOVE' & Click 'Confirm & Submit' button.
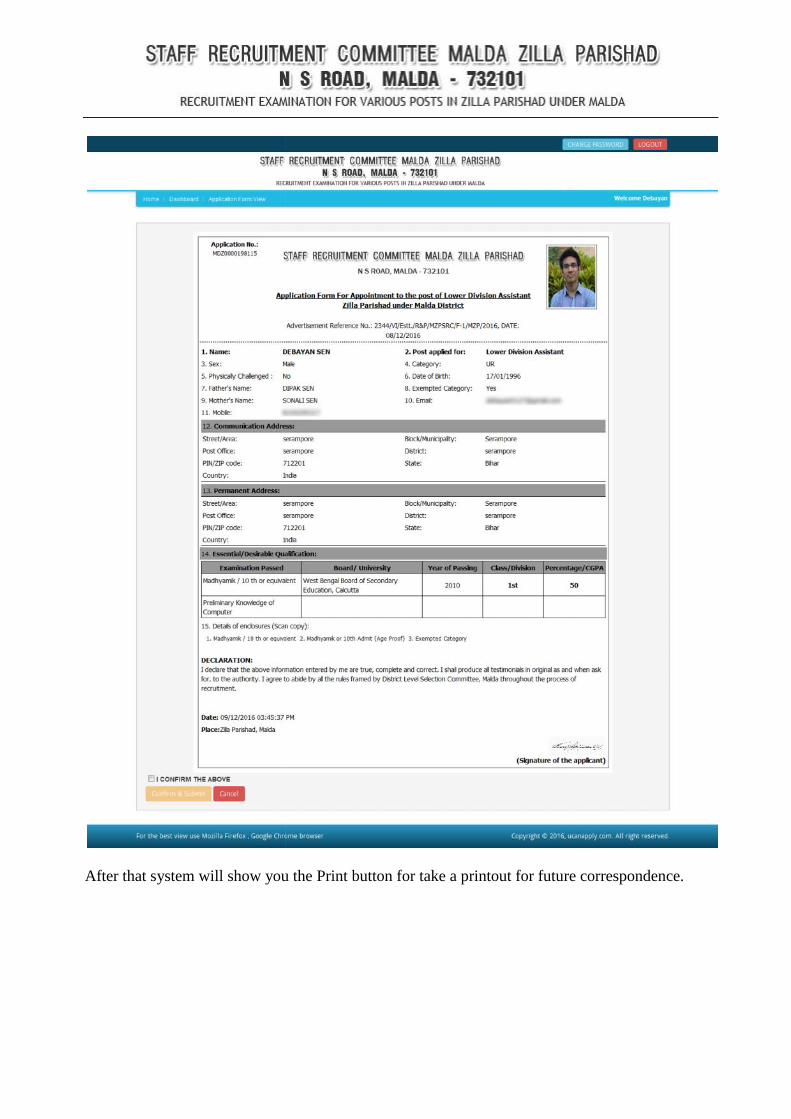
After that system will show you the Print button for take a printout for future correspondence.After that system will show you the Print button for take a printout for future correspondence.After that system will show you the Print button for take a printout for future correspondence.