gujarat rera (ramps & bi)
TRANSCRIPT

Gujarat RERA (RAMPS & BI) User Manual –Registration Management
External Users (V. 0.2)
Contents
1. USER ENROLLMENT ............................................................................ 4
1.1. Enrollment of Users ........................................................................................................................ 4
1.2. Enrollment of Promoter .................................................................................................................. 5
2. PROJECT REGISTRATION ............................................................... 12
2.1. Project Registration background ................................................................................................ 12
3. PROJECT REGISTRATION APPLICATION PROCESS ........................ 13
3.1. Promoter Detail ............................................................................................................................. 15
3.2. Previous Project Detail ................................................................................................................. 17
3.3. Project Detail ................................................................................................................................. 18
3.4. Development details ..................................................................................................................... 19
3.5. Add Professionals ......................................................................................................................... 20
3.6. Upload Documents ....................................................................................................................... 22
3.7. Block Entry .................................................................................................................................... 23
3.8. Map ................................................................................................................................................. 24
3.9. Assign Professional ...................................................................................................................... 26
3.10. Perform Certification ................................................................................................................ 27
3.11. Declaration ................................................................................................................................. 49
3.12. Payment ..................................................................................................................................... 50
3.13. Confirmation .............................................................................................................................. 51
3.14. Print Application ....................................................................................................................... 52
3.15. Print Receipt .............................................................................................................................. 52

1. User Enrollment
1.1. Enrollment of Users
Gujarat RERA has developed the application to enable to various users to enroll themselves
directly through online portal without any dependency on authority or the physical visit to
Gujarat RERA.
With technology, the entire process of user enrollment has been made more effective, more
enabling and at the same time more standardized. The major type of User Enrollments
allowed through portal are below:
• Promoter
• Agent
• Architect
• Engineer
• Chartered Accountants
• Contractor
• Lawyer
• Citizen/ Allottee
Every user who wants to apply for Any Application or in fact wants to reach out to Gujarat
RERA authority for any RERA Related services, has to create User Account with key details
provided based on the nature of a User. This Gujarat RERA account will offer various
online services such as filing project application, alteration, extension, complaint,
quarterly return filing etc or any kind of compliances that are important as per RERA act,
rules, regulations, orders etc as applicable to type of User.
Note: This user account will be very important to receive all alerts, notifications from the
Gujarat RERA authority. Hence, this user account has to be created, operated and
maintained by the Authorized Users keeping all User Credential confidential.
Here we will understand the entire process of different type of user enrollments.
1.2. Enrollment of Promoter
To create a Promoter User account or do login into already created Promoter User Account, has
to follow following steps:
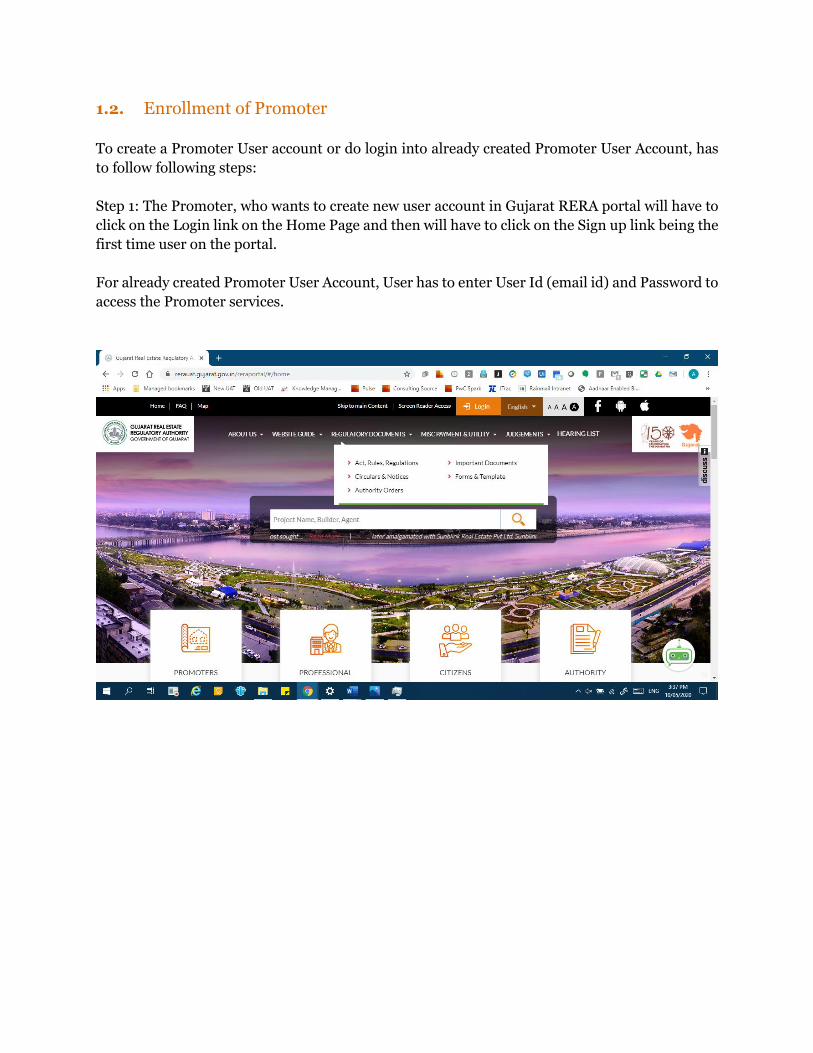
Step 1: The Promoter, who wants to create new user account in Gujarat RERA portal will have to
click on the Login link on the Home Page and then will have to click on the Sign up link being the
first time user on the portal.
For already created Promoter User Account, User has to enter User Id (email id) and Password to
access the Promoter services.


Step 2: The Promoter will be redirected to the page where s/he will have to enter his/her email
address, mobile number and select type as “Promoter”:
Step 3: The Promoter will be redirected to the page where s/he will have to enter the One Time
Passwords (OTPs) received on his/her email address and mobile no:
This step is important to ensure only working email ids and mobile numbers are provided by the
user for official communication. Correct OTP will validate the email id and mobile number.

Step 4: Upon successfully entering OTPs received on respective Email ID and Mobile numbers,
the Promoter will be redirected to the page as depicted below where s/he has to enter his/her
details about the Promoter as an entity.

The Promoter will have to select Promoter Type as appropriate and accordingly the Promoter will
have to provide the necessary details such as Registration No. or CIN Number (in case of
Company) or LLPIN number (in case of Limited Liability Partnership firm), RoF Number (in case
of Partnership Firm), etc as asked on this form.
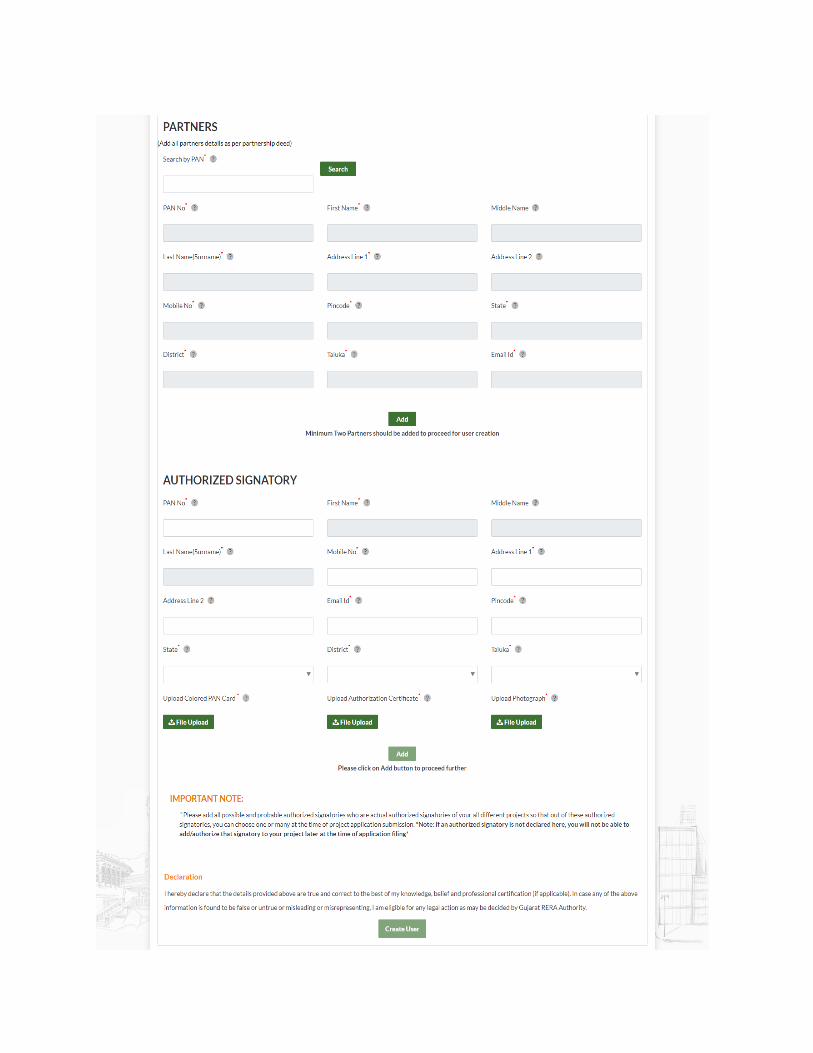
Step 5: Promoter will have to fill all mandatory details (viz. title with Red Asterisk “*”) as
requested in the Enrollment from depicted in Step 4 above and then will have to upload the
requested documents:
Step 6: After filling all details in the screen depicted in Step 4 and uploading all documents as
required, the Promoter will click on “Create User” button. So, the application will be sent to the
concerned official of the Gujarat RERA for necessary verification.
In case of query, User will get query on email and Promoter has to provide clarification/ missing
details on Promoter enrollment details. Once approved, User will get all access credentials on
email for accessing Promoter User account and use the RERA services offered through this
account.
• Important Notes:
- It should be noted that the PAN of the Promoter will be validated through NSDL database
and only correct PAN Numbers will work on this system.
- Different types of Promoter are:
1. Company
2. Individual/Proprietorship Firm
3. Competent Authority/ Government
4. Partnership Firm
5. Limited Liability Partnership Firm (LLP)
6. Trust
7. HUF (Hindu Undivided Family)

8. AOP (Association of Persons
9. BOI (Body of Individuals)
10. AJP (Artificial Judicial Person)
- Please note that the LLP as an entity, will have relevant entities as other LLPs,
Companies or Individuals as Associated Entities. All such entities or individual as per the
legal identity document of LLP (LLP Deed) has to be enrolled first on RERA Portal (one
time) separately and post which their respective entity details will be auto fetched upon
entering the PAN of the associated entity. LLP is having an exceptional and complex
structure of arrangement hence each entities is required to be enrolled as promoter on
the RERA Portal. However, in case of other promoter types (ie. Company, Partnership
Firm, individual etc) , the associated entities will be individuals only whose details can be
auto fetched by entering PAN details only and they are not required to be enrolled as
promoter separately.
- In case of Company the promoter has to be validated by the PAN of Company followed
by format "AAACA1111A".
- In case of Individual/Proprietorship Firm the promoter enrollment has to be validated
by the PAN of the individual followed by format "AAAPA1111A"
- In case of Company Authority/ Government the promoter enrollment has to be validated
by the PAN of the Company Authority/ Government followed by format "AAAGA1111A"
- In case of Partnership Firm the promoter enrollment has to be validated by the PAN of
the Partnership Firm followed by format "AAAFA1111A"
- In case of LLP the promoter enrollment has to be validated by the PAN of the LLP
followed by format "AAAFA1111A"
- In case of TRUST the promoter enrollment has to be validated by the PAN of the TRUST
followed by format "AAATA1111A"
- In case of HUF the promoter enrollment has to be validated by the PAN of the HUF
followed by format "AAAHA1111A"
- In case of AOP the promoter enrollment has to be validated by the PAN of the AOP
followed by format "AAAAA1111A"
- In case of BOI the promoter enrollment has to be validated by the PAN of the BOI
followed by format "AAABA1111A"
- In case of AJP the promoter enrollment has to be validated by the PAN of the AJP
followed by format "AAAJA1111A"

2. Project Registration
2.1. Project Registration background
All commercial and residential real estate projects will have to register except in projects where
• Area of land proposed to be developed does not exceed five hundred square meters • Number of apartments proposed to be developed does not exceed eight inclusive of all
phases • Promoter has received completion certificate for a real estate project prior to
commencement of this Act • For the purpose of renovation or repair or re-development which does not involve
marketing, advertising selling or new allotment of any apartment, plot or building under the real estate project
No promoter shall advertise, market, book, sell or offer for sale, or invite persons to purchase in any manner any plot, apartment or building, as the case may be, in any real estate project or part of it, in any planning area within Gujarat, without registering the real estate project with the Gujarat Real Estate Regulatory Authority(GUJRERA). Promoter of ongoing real estate projects, in which all buildings as per sanctioned plan have not received Completion Certificate, shall also be required to be registered for such phase of the project which consists of buildings not having occupation or completion certificate. If any promoter fails to register as per Act, he shall be liable to a penalty which may extend up to ten per cent of the estimated cost of the real estate project. On continued violation, he shall be punishable with imprisonment for a term which may extend up to three years or with fine which may extend up to a further ten per cent of the estimated cost of the real estate project, or with both. Apart from Registration, the promoters shall be required to provide quarterly updates on the status of the project to the authority.

Page 13 of 52
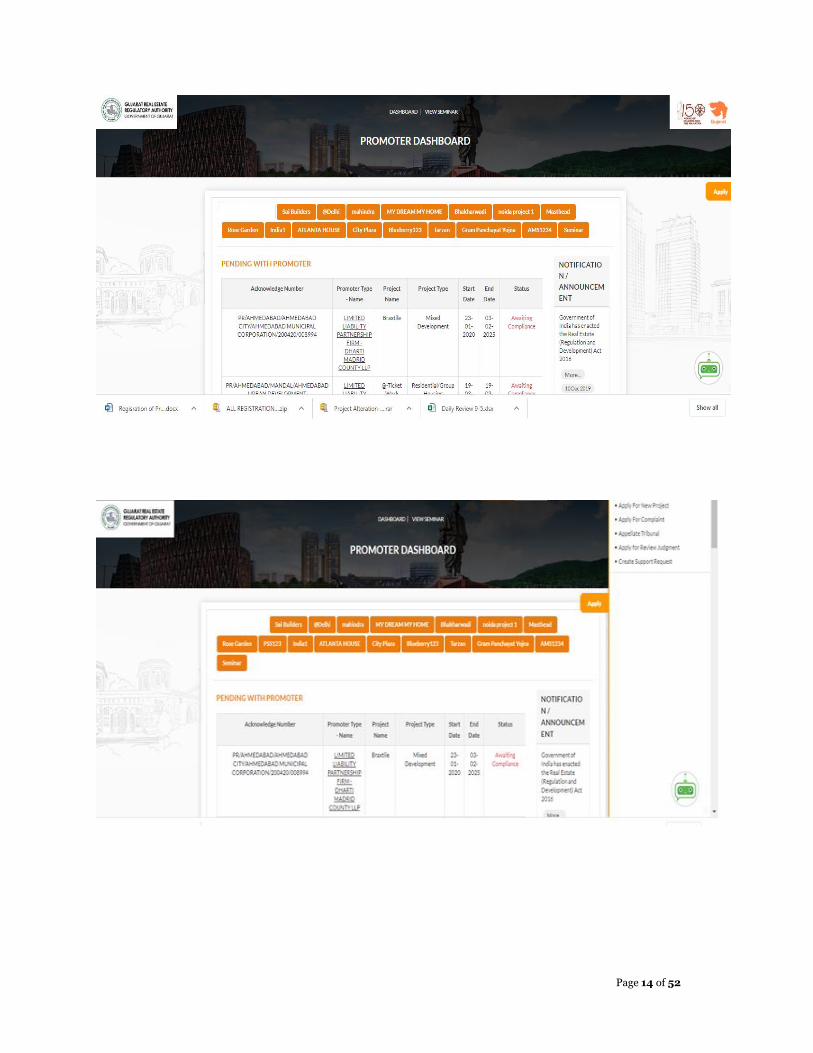
3. Project Registration Application Process
Step 1: The promoter User clicks on the Login link on the Home Page and then enters the Login
ID and Password for accessing the Promoter Dashboard
Step 2: The promoter then clicks on the Apply Button (highlighted in yellow tabs) on the right
side of the Dashboard screen for which Project application is to be initiated.
Page 14 of 52
Page 15 of 52
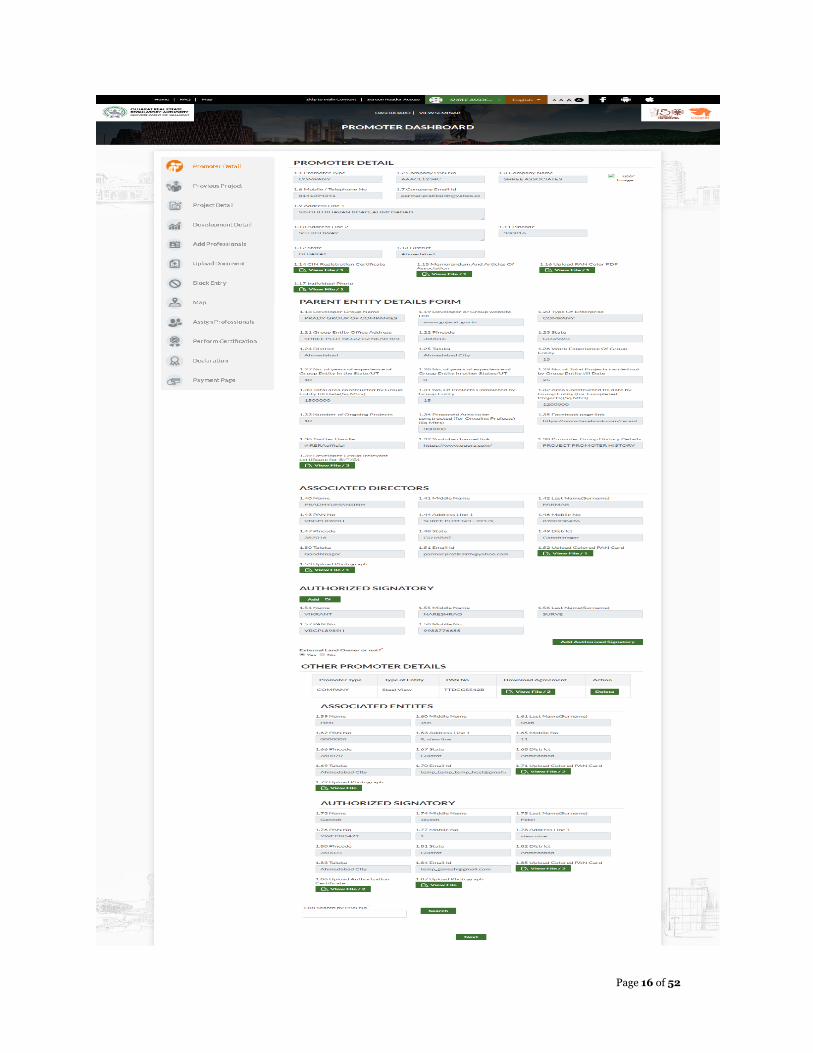
3.1. Promoter Detail
Step 3: The Project application form is open for registration. The First screen of the application
form is the Promoter Detail page. Promoter must select the Radio button (YES/NO) for the
external landowner and if Promoter selects “YES”, then he must enter the PAN No. of the
landowner and click on search button. By clicking on Search Button, all the details associated with
the Landowner will get prefetched. Details like Associated Directors and authorized signatory of
the landowner and then Promoter can click on Next button to proceed to the next page of the
application.
Note: The systemically pre-fetched fields from the Promoter Registration viz. Promoter Name,
Mobile No., Email ID, Pincode, State, District, Taluka, Documents, Parent Entity Details,
Associated Directors and Authorized Signatory are read only and non-editable which cannot be
edited by the applicant.
Page 16 of 52
Page 17 of 52
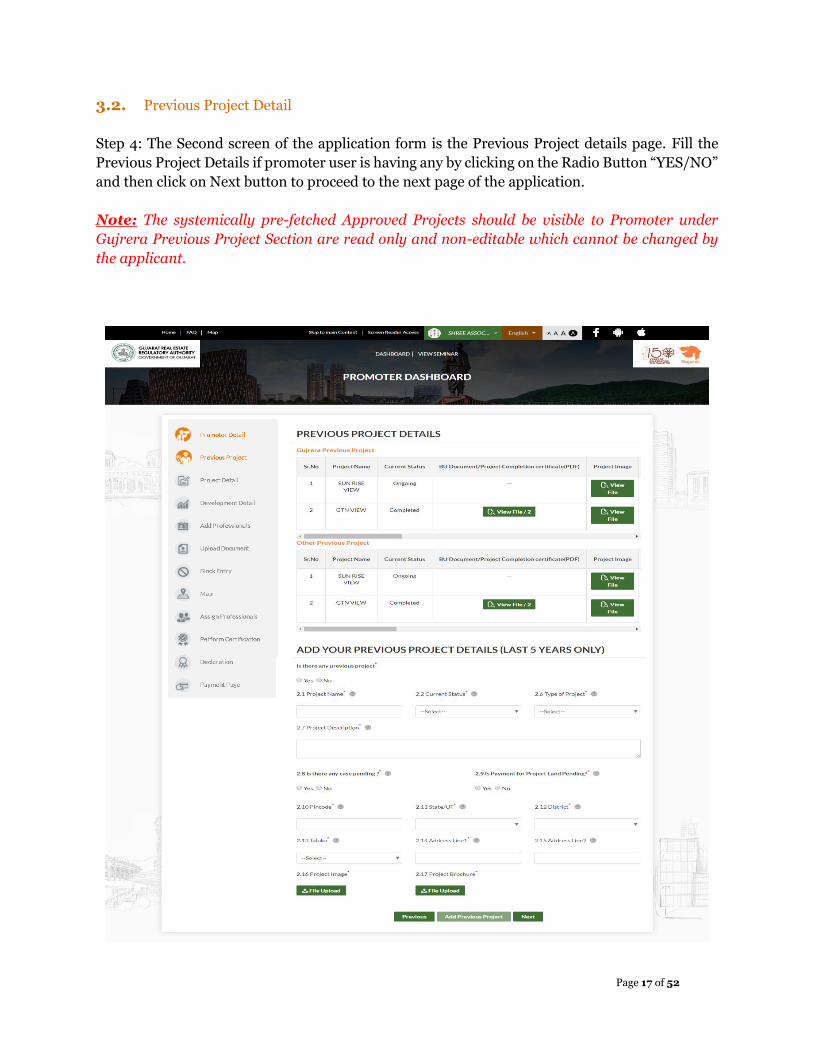
3.2. Previous Project Detail
Step 4: The Second screen of the application form is the Previous Project details page. Fill the
Previous Project Details if promoter user is having any by clicking on the Radio Button “YES/NO”
and then click on Next button to proceed to the next page of the application.
Note: The systemically pre-fetched Approved Projects should be visible to Promoter under
Gujrera Previous Project Section are read only and non-editable which cannot be changed by
the applicant.
Page 18 of 52
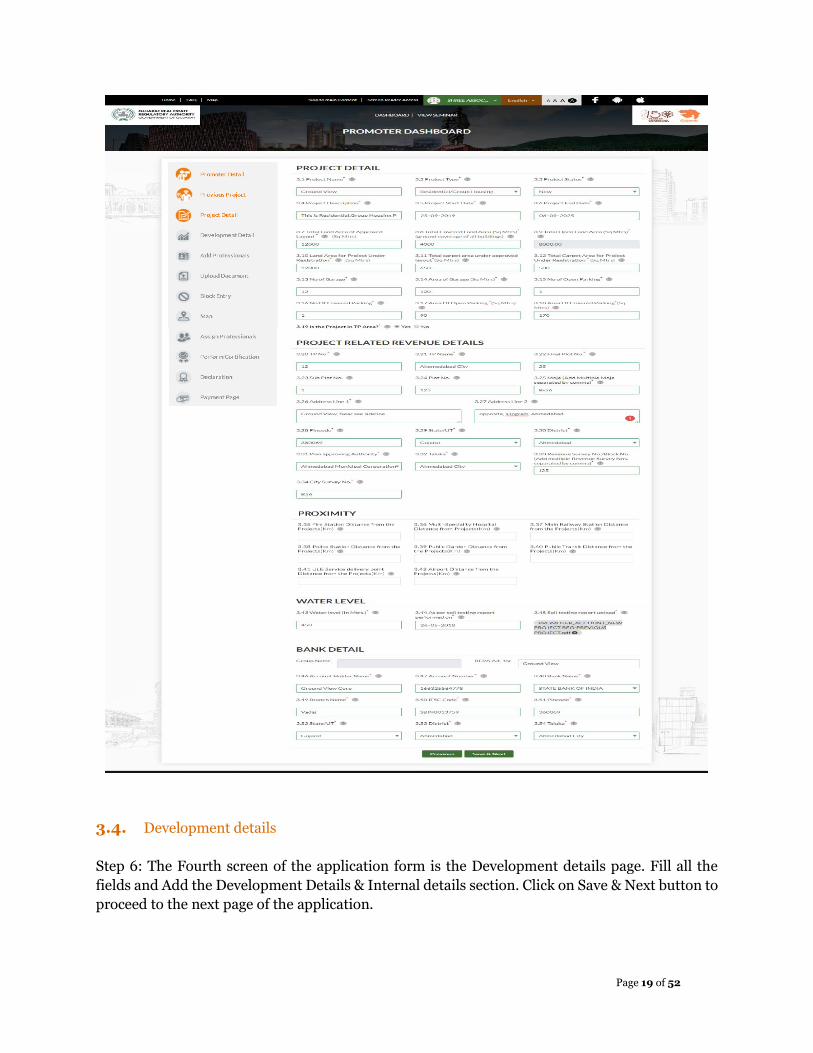
3.3. Project Detail
Step 5: The Third screen of the application form is the Project details page. Fill all the Mandatory
fields related to the Project like Project Details, Project Related Revenue Details and Bank Details.
The Proximity Details section is non-mandatory. Water Level details are systemically prompted
to be filled in only for Projects whose pin-code fall in the “Saline” “Critical” or “Overexploited”
areas. Click on Next button to proceed to the next page of the application.
Page 19 of 52
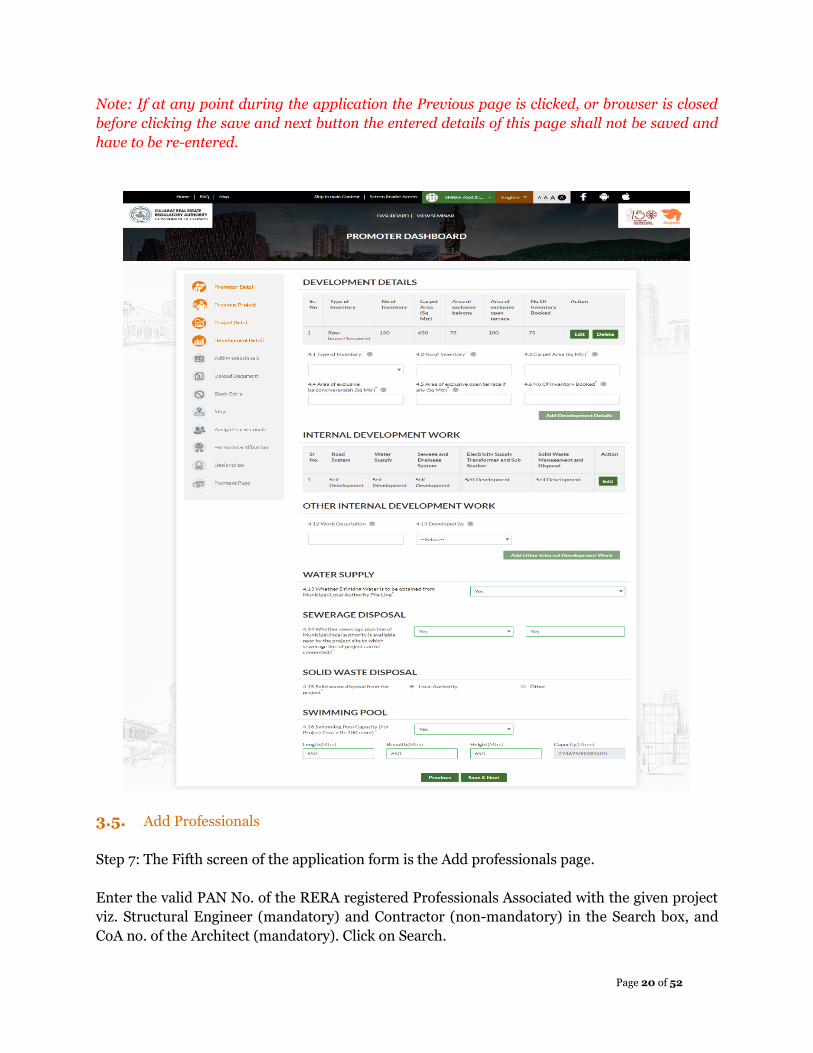
3.4. Development details
Step 6: The Fourth screen of the application form is the Development details page. Fill all the
fields and Add the Development Details & Internal details section. Click on Save & Next button to
proceed to the next page of the application.
Page 20 of 52
Note: If at any point during the application the Previous page is clicked, or browser is closed
before clicking the save and next button the entered details of this page shall not be saved and
have to be re-entered.
3.5. Add Professionals
Step 7: The Fifth screen of the application form is the Add professionals page.
Enter the valid PAN No. of the RERA registered Professionals Associated with the given project
viz. Structural Engineer (mandatory) and Contractor (non-mandatory) in the Search box, and
CoA no. of the Architect (mandatory). Click on Search.

Page 21 of 52
If the CoA No./PAN no. entered is that of a RERA registered professional the relevant KYC details
shall be auto-fetched as provided at the time of Professional Registration.
Click on Add to associate the said professional with the project and view the detail summary for
each before proceeding to the Next page by clicking on Save & Next.
Page 22 of 52
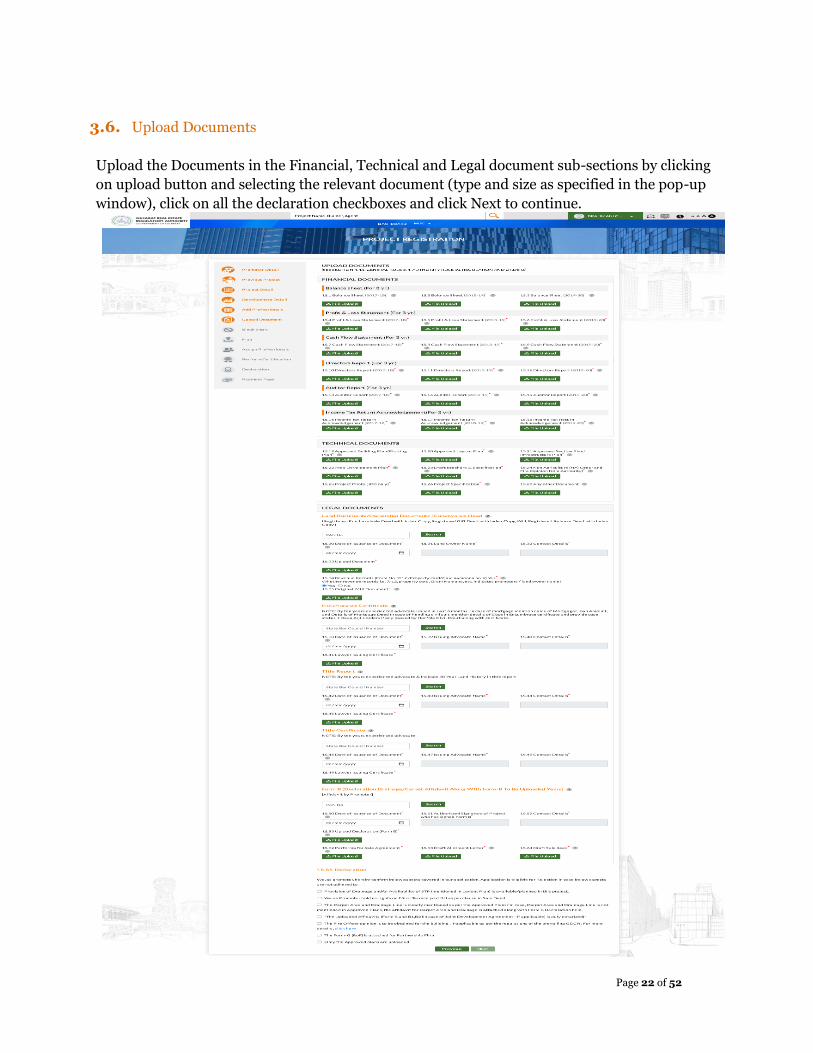
3.6. Upload Documents
Upload the Documents in the Financial, Technical and Legal document sub-sections by clicking
on upload button and selecting the relevant document (type and size as specified in the pop-up
window), click on all the declaration checkboxes and click Next to continue.

Page 23 of 52
3.7. Block Entry
Step 8: The Seventh screen of the application form is the Block Entry page.
Enter the Block Name, Development Start Date, Development End Date, Block-wise
Commencement certificate details, Height of the Block, FSI and Built-up area fields and click on
Add. All the blocks as per the approved Plan must be added in this section before proceeding to
the next section by clicking Next.
Note: Development Start date and End date must be between Project Start Date and End Date.
Commencement Date must be <= Current Date.

Page 24 of 52
3.8. Map
Step 8: The Eighth screen of the application form is the Map page. Fill the latitude and longitude of the project location and then click on search button. By clicking on search button, project location will get directly visible onto the map and then promoter user can mark the boundary on the location.
1. Zoom the map and navigate the project site on the map.

Page 25 of 52
2. Promoter User should double click on one co-ordinate and then double click on nearby boundary point co-ordinate. This will draw a straight line 3. Promoter User can also draw entire Project Boundary (Polygon) as per Gujarat RERA approval granted for the project

Page 26 of 52
3.9. Assign Professional
Step 9: The Ninth screen of the application form is the Assign Professional page. The Certifying
professionals viz. Architect, Engineer & CA for the given Projects must be added and assigned
Form-1,2,3 and MoF (systemically non-mandatory for project value <25 Cr) respectively on this
page.
Enter the valid PAN No. of the RERA registered Professionals Certifying for the given project viz.
Architect, Engineer and Chartered Accountant in the Search box provided for each professional
and click on Search.
If the PAN no. entered is that of a RERA registered professional the relevant KYC details shall be
auto-fetched as provided at the time of Professional Registration.
Click on Add to associate the said professional with the project and view the detail summary for
each. Click on Assign for each professional to assign Form-1,2,3 & MoF (systemically non-
mandatory for project value <25 Cr). The Promoter may Re-assign to the same/other professional
by clicking on Re-Assign.
Note: Only the RERA registered professionals can be assigned Form-1,2 ,3 and MoF for the given
Project.
Means of Finance (systemically non-mandatory for project value <25 Cr) may be assigned to
the same CA certifying Form-3 or some other CA.
(MoF submission is
systemically non-
mandatory for project
value <25 Cr)
Page 27 of 52
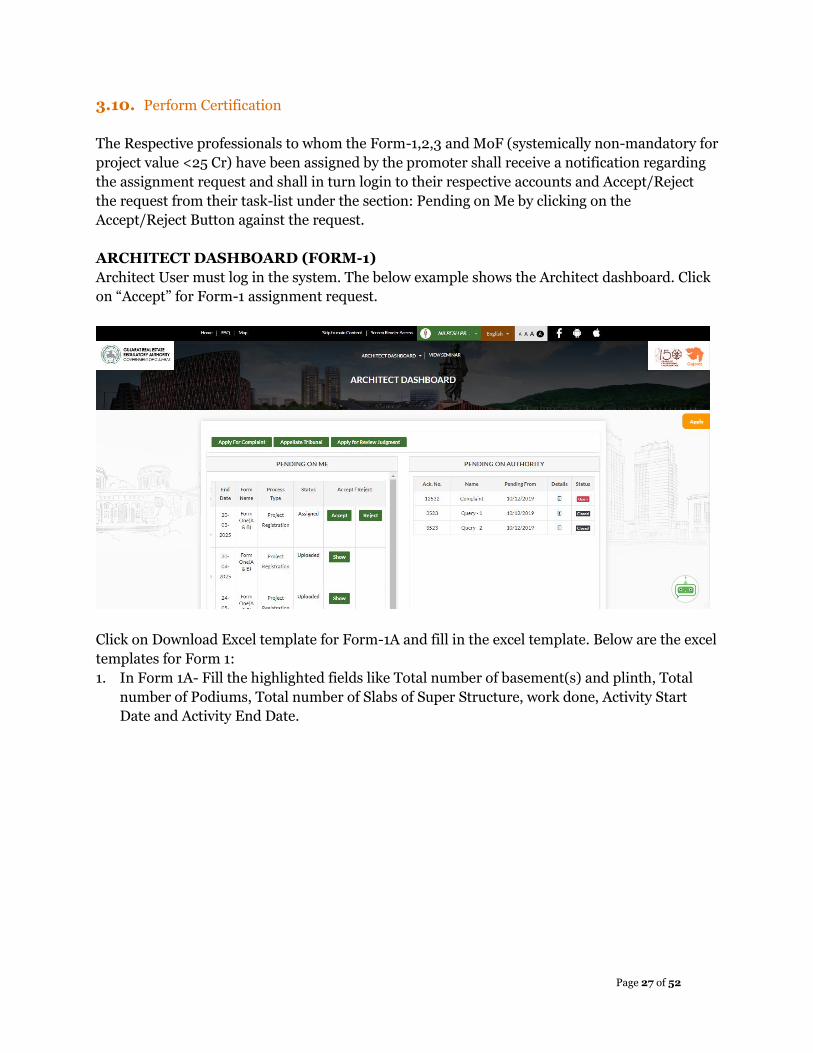
3.10. Perform Certification
The Respective professionals to whom the Form-1,2,3 and MoF (systemically non-mandatory for
project value <25 Cr) have been assigned by the promoter shall receive a notification regarding
the assignment request and shall in turn login to their respective accounts and Accept/Reject
the request from their task-list under the section: Pending on Me by clicking on the
Accept/Reject Button against the request.
ARCHITECT DASHBOARD (FORM-1)
Architect User must log in the system. The below example shows the Architect dashboard. Click
on “Accept” for Form-1 assignment request.
Click on Download Excel template for Form-1A and fill in the excel template. Below are the excel
templates for Form 1:
1. In Form 1A- Fill the highlighted fields like Total number of basement(s) and plinth, Total
number of Podiums, Total number of Slabs of Super Structure, work done, Activity Start
Date and Activity End Date.

Page 28 of 52
2. In Form one(B)- Fill the highlighted fields like Proposed (YES/NO), Work done, Remarks if
any, Activity Start Date and Activity End Date
3. In Form one C- Fill the Other Common areas and Facilities Amenities Details if any
Note: Activity Start Date and Activity End Date should be in between Project Start Date and
Project End Date (Activity Start and End dates can be changed in subsequent QPR filings up to
50% of project duration after which it shall become locked for editing)

Page 29 of 52
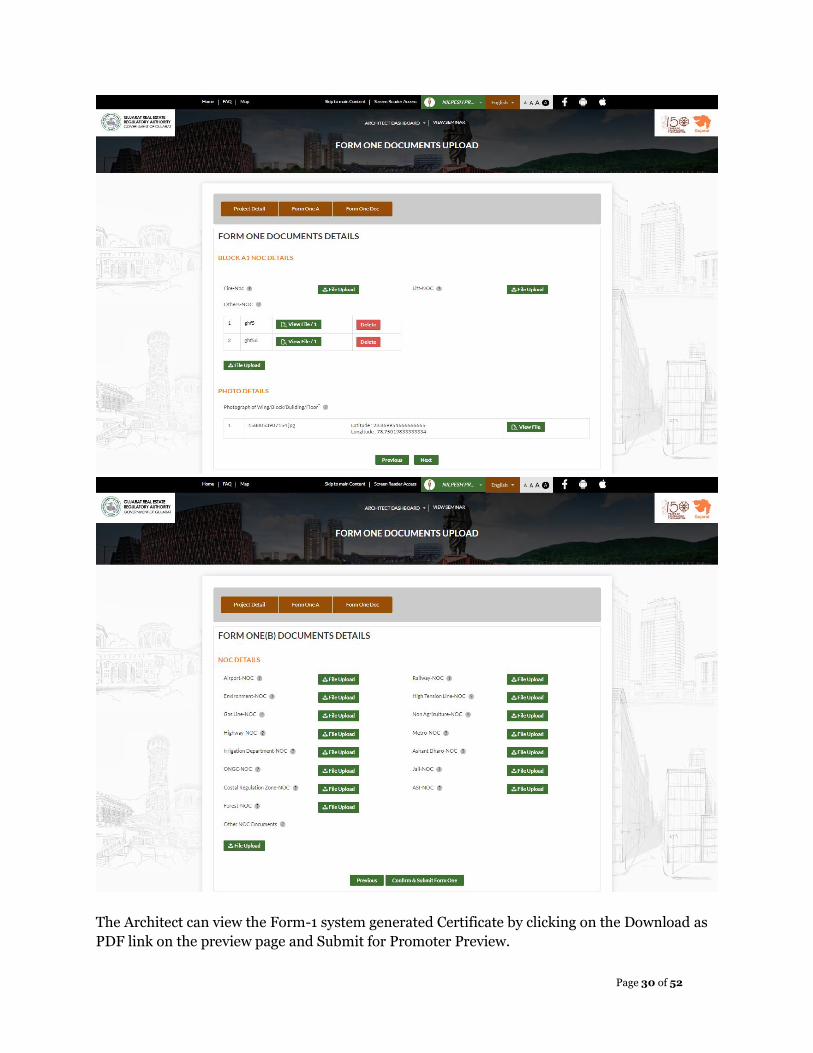
Upon accepting Promoter’s Form-1 assignment request, the architect has to upload the block-
wise photographs from RERA mobile app and submit. Once the photographs have been
uploaded, Click on Upload your Form One A&B excel file button to upload the filled Excel
template and preview.
If all details have been filled correctly, fill the Firm Name and Remark fields and click Next.
Else, make changes in the downloaded file and upload again to proceed.
Upload block-wise NOC documents and Site photographs through Mobile App (refer SOP for
Mobile App photo upload) and click Next to upload NOC for entire project and Click on Confirm
and Submit Form 1.
Page 30 of 52
The Architect can view the Form-1 system generated Certificate by clicking on the Download as
PDF link on the preview page and Submit for Promoter Preview.

Page 31 of 52
Once the Promoter Previews the submission, he may Accept /Reject the submission made by the
Professional. Upon clicking Accept the Promoter proceeds to the form-2 submission.
ENGINEER DASHBOARD(FORM-2)
The Engineer user must Log in the system. The below example shows the Engineer
dashboard. Click on “Accept” for Form-2 assignment request.
Page 32 of 52
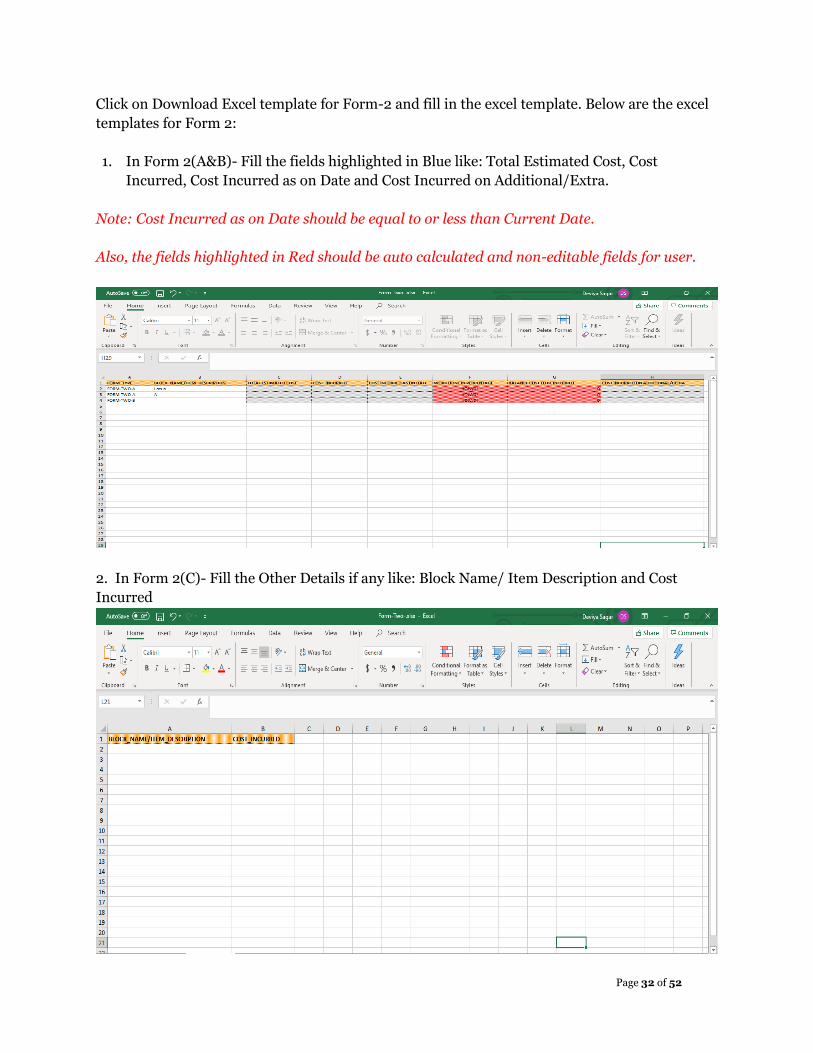
Click on Download Excel template for Form-2 and fill in the excel template. Below are the excel
templates for Form 2:
1. In Form 2(A&B)- Fill the fields highlighted in Blue like: Total Estimated Cost, Cost
Incurred, Cost Incurred as on Date and Cost Incurred on Additional/Extra.
Note: Cost Incurred as on Date should be equal to or less than Current Date.
Also, the fields highlighted in Red should be auto calculated and non-editable fields for user.
2. In Form 2(C)- Fill the Other Details if any like: Block Name/ Item Description and Cost
Incurred
Page 33 of 52
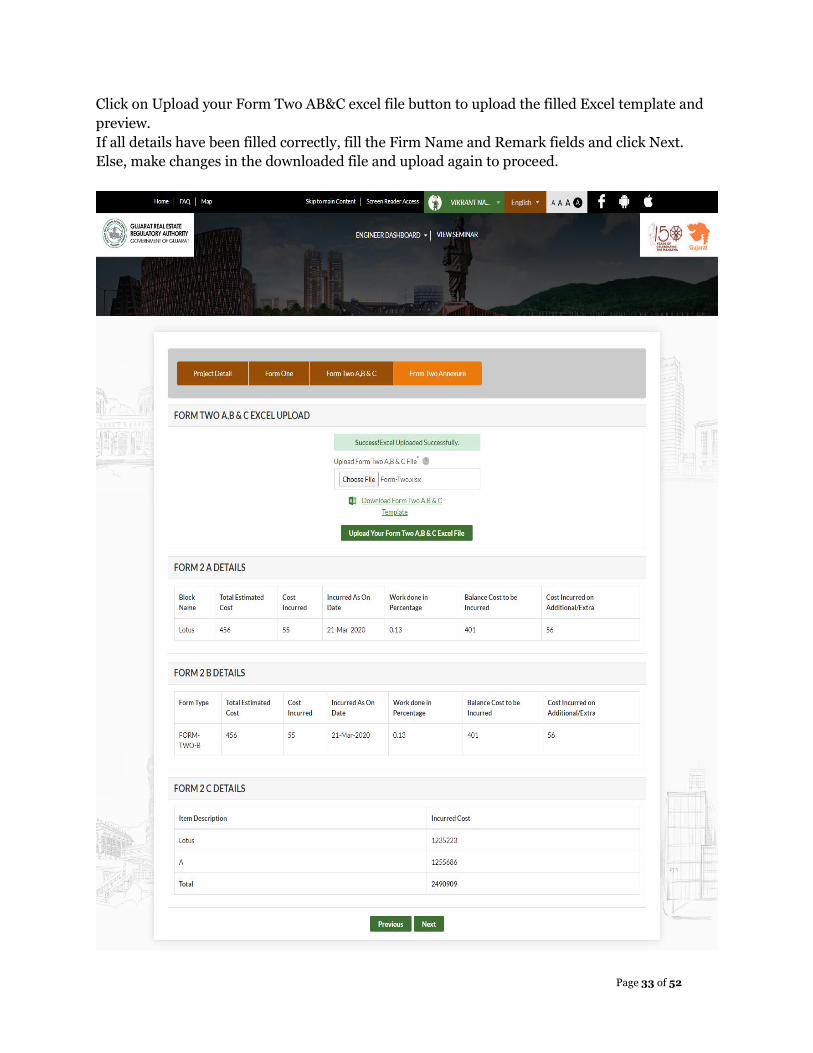
Click on Upload your Form Two AB&C excel file button to upload the filled Excel template and
preview.
If all details have been filled correctly, fill the Firm Name and Remark fields and click Next.
Else, make changes in the downloaded file and upload again to proceed.

Page 34 of 52
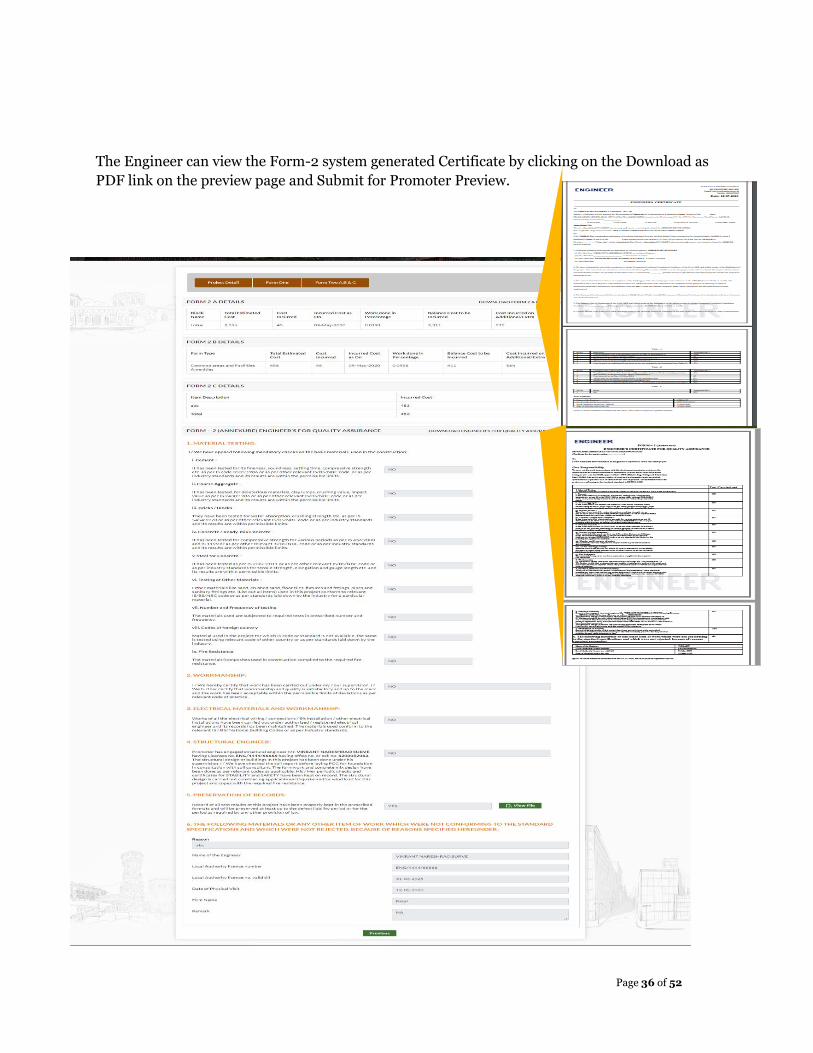
Fill Form 2(Annexure)- Engineer’s Quality for Quality Assurance. The following Details needs to
be filled in the QA form and then after filling the details click on Confirm & Submit button.

Page 35 of 52
Page 36 of 52
The Engineer can view the Form-2 system generated Certificate by clicking on the Download as
PDF link on the preview page and Submit for Promoter Preview.
Page 37 of 52
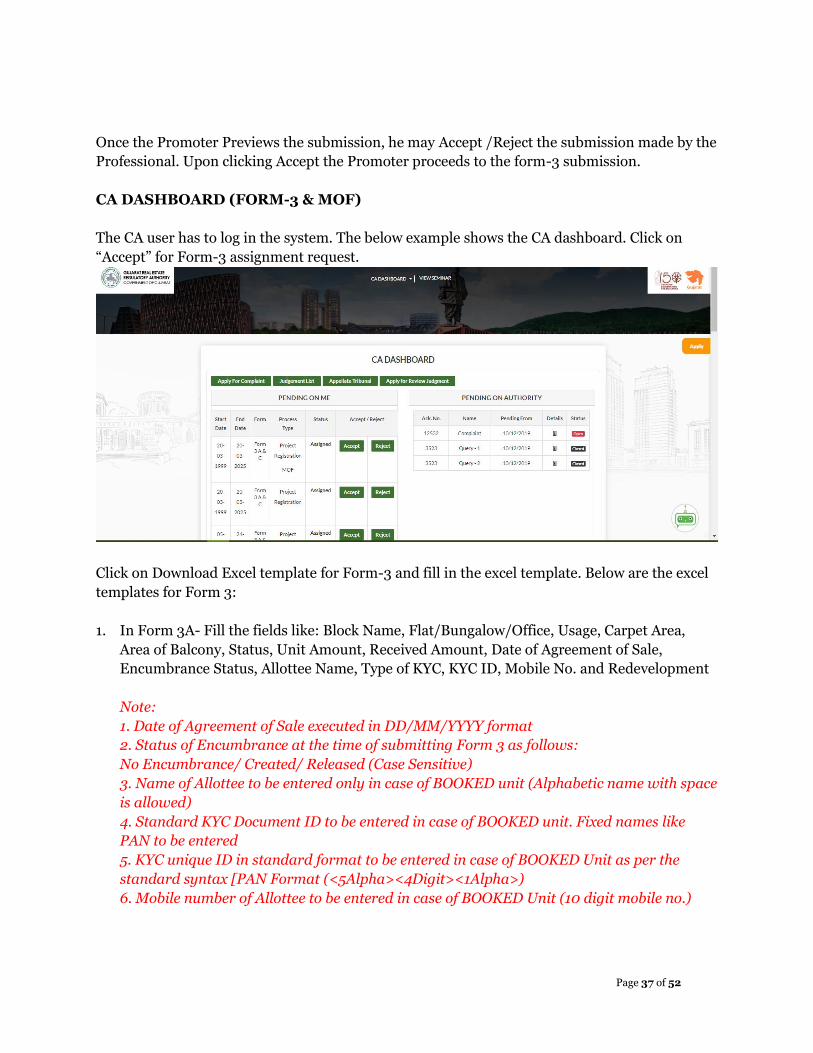
Once the Promoter Previews the submission, he may Accept /Reject the submission made by the
Professional. Upon clicking Accept the Promoter proceeds to the form-3 submission.
CA DASHBOARD (FORM-3 & MOF)
The CA user has to log in the system. The below example shows the CA dashboard. Click on
“Accept” for Form-3 assignment request.
Click on Download Excel template for Form-3 and fill in the excel template. Below are the excel
templates for Form 3:
1. In Form 3A- Fill the fields like: Block Name, Flat/Bungalow/Office, Usage, Carpet Area,
Area of Balcony, Status, Unit Amount, Received Amount, Date of Agreement of Sale,
Encumbrance Status, Allottee Name, Type of KYC, KYC ID, Mobile No. and Redevelopment
Note:
1. Date of Agreement of Sale executed in DD/MM/YYYY format
2. Status of Encumbrance at the time of submitting Form 3 as follows:
No Encumbrance/ Created/ Released (Case Sensitive)
3. Name of Allottee to be entered only in case of BOOKED unit (Alphabetic name with space
is allowed)
4. Standard KYC Document ID to be entered in case of BOOKED unit. Fixed names like
PAN to be entered
5. KYC unique ID in standard format to be entered in case of BOOKED Unit as per the
standard syntax [PAN Format (<5Alpha><4Digit><1Alpha>)
6. Mobile number of Allottee to be entered in case of BOOKED Unit (10 digit mobile no.)

Page 38 of 52
7. Any Unit under Redevelopment would always have Booking status as “BOOKED” and
Redevelopment status as “YES”. No other combination would be allowed in case of
Redevelopment.
2. Fill Booked Status Details like No. of Garages, No. of Covered Parking and No. of Open
Parking

Page 39 of 52
3. After filling Form 3A and Booked Status successfully, CA will be filling the Form 3
(Certificate).
As per the requirement, CA has to fill in all details of CA Certificate in the Form-3 certificate
section.

Page 40 of 52
4. After Filling Form 3Certificate successfully, CA will be filling the Loan and Lender Details.
Note: If there is an Encumbrance reported as “Created” against a unit in Form-3
Annexure, the Details of Project loan and lenders is mandatory to be filled without which
system shall not allow the submission

Page 41 of 52
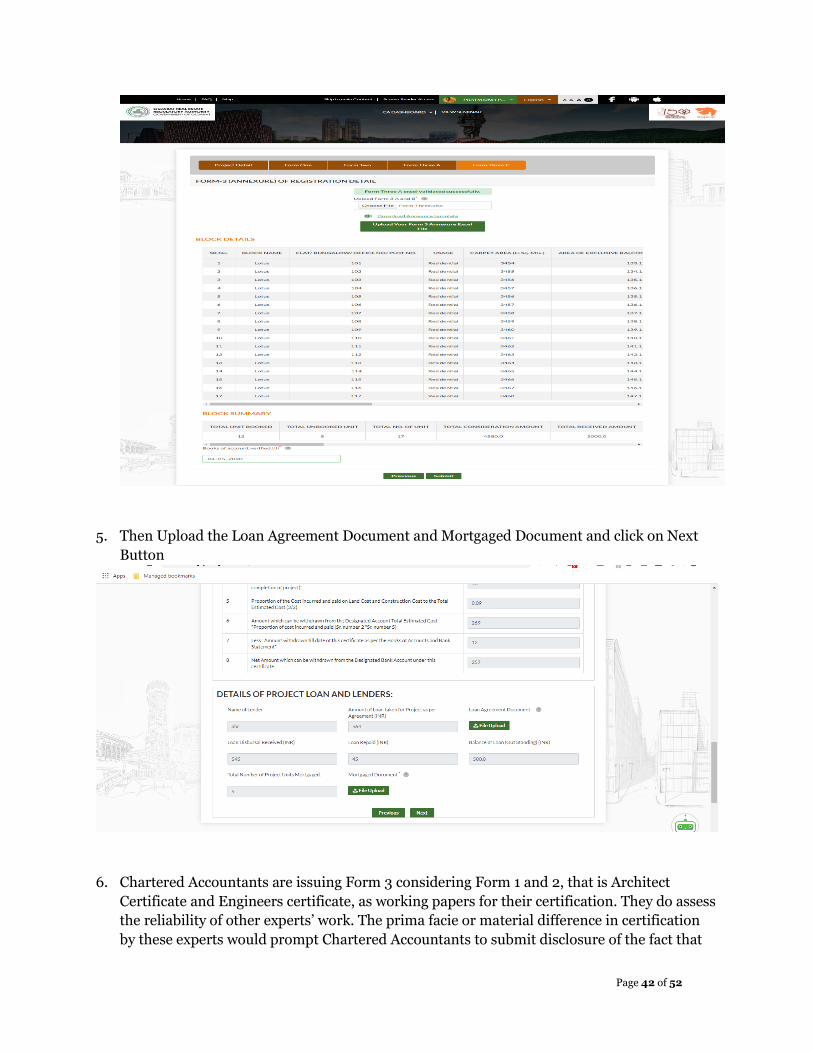
Click on Upload your Form Three Annexure excel file button to upload the filled Excel
template and preview.
If all details have been filled correctly, fill the Books of accounts verified till date and click on
Submit Button. Else, make changes in the downloaded file and upload again to proceed.
Page 42 of 52
5. Then Upload the Loan Agreement Document and Mortgaged Document and click on Next
Button
6. Chartered Accountants are issuing Form 3 considering Form 1 and 2, that is Architect
Certificate and Engineers certificate, as working papers for their certification. They do assess
the reliability of other experts’ work. The prima facie or material difference in certification
by these experts would prompt Chartered Accountants to submit disclosure of the fact that
Page 43 of 52
the Certificates he is relying on are not in coherence. This facility is made available to
Chartered Accountant to report his observations and to enable him to seek and report
necessary clarifications from the promoter.
CA can respond “Yes/ No” to this clause and in case of “No”, CA shall have to enter the
reason/s for the variation. CA may enter one or more reasons in this section as provided by
the promoter.
Note: Fields for Entering UDI Number pre-populated with <2 digit Current year in YY
Format><6 digit CA Number>. A user enterable 10 digit Alpha numeric number as
generated in ICAI website needs to be entered. Due care needs to be taken to avoid typo error
as the same can result into error for other CA.
Fill the CA FRN No. in correct format
CA Designation must be entered (Select from Dropdown)
Notes to Certificate (free text) must be entered by the user prior to Form-3 Certificate
submission.
After filling all the details in Form 3, click on Confirm and submit button

Page 44 of 52
The CA can view the Form-3 system generated Certificate by clicking on the Download as
PDF link on the preview page and Submit for Promoter Preview.

Page 45 of 52
Once the Promoter Previews the submission, he may Accept /Reject the submission made by the
Professional. Upon clicking Accept the Promoter proceeds to the MOF submission.
Means of Finance (systemically non-mandatory for project value <25 Crore, as
entered in Form-3 Certificate):
The below example shows the CA dashboard. Click on “Accept” for MOF assignment request.
CA User has to click on Download MOF Excel template and fill in the excel template. Below are
the excel templates for MOF:
Fill all the details as mentioned in the MOF excel template

Page 46 of 52
Click on Upload your Form 3MoF excel file button to upload the filled Excel template and
preview.
If all details have been filled correctly, fill the UDIN No., CA FRN No., CA Designation and
Notes to Certificate and click on Submit Button. Else, make changes in the downloaded file
and upload again to proceed

Page 47 of 52
Note: Fields for Entering UDI Number pre-populated with <2 digit Current year in YY
Format><6 digit CA Number>. A user enterable 10 digit Alpha numeric number as
generated in ICAI website needs to be entered. Due care needs to be taken to avoid typo error
as the same can result into error for other CA.
Fill the CA FRN No. in correct format
CA Designation must be entered (Select from Dropdown)
Notes to Certificate (free text) must be entered by the user prior to Form-3 Certificate
submission.
After filling all the details in Form 3MOF, click on submit button
The CA can view the Form-3MOF system generated Certificate by clicking on the Download as
PDF link on the preview page and Submit for Promoter Preview.

Page 48 of 52
Once the Promoter Previews the submission, he may Accept /Reject the submission made by the
Professional. Upon clicking Accept the Promoter click next to proceed to the Upload Document
section.

Page 49 of 52
3.11. Declaration
Promoter user must fill all Declarations by Clicking on Radio Button provided on the right side
and after filling all the declarations, click on Next Button for Payment. The applicant shall
proceed to the Payment page only if “Yes” or “Not Applicable” is selected as response for all
points.

Page 50 of 52
3.12. Payment
In promoter user login, The Payment screen shows the system calculated Fees for the given
Project Registration application. Click on all the Terms & Conditions checkboxes and click on
Agree & Pay button to Proceed as shown below:

Page 51 of 52
3.13. Confirmation
The Acknowledgement No. for the Project Registration is generated on the Confirmation page.
Click on Print application and Print Receipt to view the system generated PDF (screenshot
below) for reference. Moreover, the Acknowledgement No. shall also be visible alongside the
application to the promoter in the Dashboard post Login.
Page 52 of 52
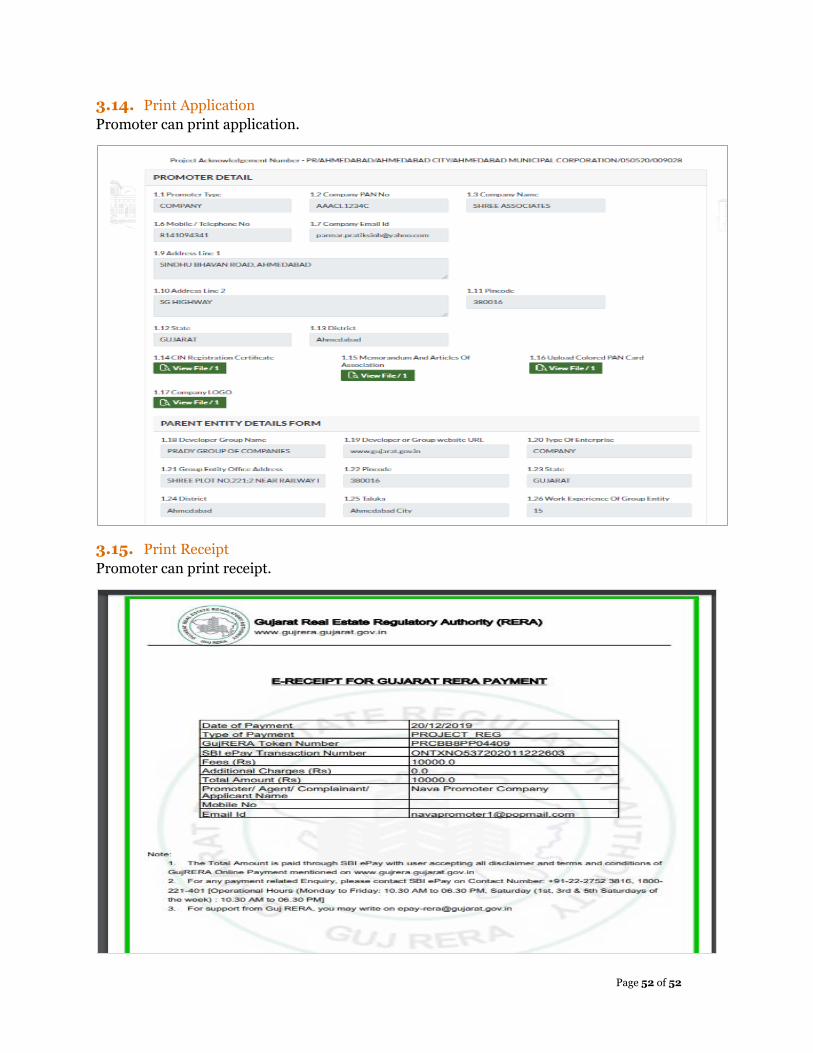
3.14. Print Application
Promoter can print application.
3.15. Print Receipt
Promoter can print receipt.