h 25 - phase one · when using the h 25 on a hasselblad motorized body (i.e. hasselblad elx series...
TRANSCRIPT
H 25
GETTING STA RT E D
Phase One A/SRoskildevej 39DK-2000 FrederiksbergDenmarkTel +45 36 46 01 11Fax +45 36 46 02 22
Phase One U.S.24 Woodbine AveNorthport, NY 11768 USATel +1 631-757-0400Fax +1 631-757-2217
Notice
The name Phase One is a trademark of Phase One A/S.
The names Hasselblad, Mamiya and Rollei are registeredtrademarks of their respective companies.
All specifications are subject to change without notice.
Phase One takes no responsibility for any loss or damagesustained while using their products.
This manual ©2003, Phase One A/S Denmark. All rightsreserved. No part of this manual may be reproduced orcopied in any way without prior written permission ofPhase One.
Printed in Denmark.
Part #: 80035000
Table of Contents
1
1 I n t r o d u c t i o n . . . . . . . . . . . . . . . . . . . . . . . . . . . . . . . . . . . . . . .2
2 Special Phase One H 25 features . . . . . . . . . . . . . . . . . . . . .3
ISO Settings . . . . . . . . . . . . . . . . . . . . . . . . . . . . . . . . . . . . .3
Power Management . . . . . . . . . . . . . . . . . . . . . . . . . . . . . .4
Double exposure protection . . . . . . . . . . . . . . . . . . . . . . .4
IR filter on CCD . . . . . . . . . . . . . . . . . . . . . . . . . . . . . . . . . .4
Large format photography . . . . . . . . . . . . . . . . . . . . . . . .5
3 Getting ready for taking pictures . . . . . . . . . . . . . . . . . . .6
Mounting the viewfinder mask . . . . . . . . . . . . . . . . . . . .6
Mounting the H 25 on a Hasselblad Camera . . . . . . . . .7
Camera body specifics . . . . . . . . . . . . . . . . . . . . . . . . . . . .8
Hasselblad 553 ELX . . . . . . . . . . . . . . . . . . . . . . . . . . . . . .9
Hasselblad 555 ELD . . . . . . . . . . . . . . . . . . . . . . . . . . . . .10
Hasselblad 501 CM and 503 CW . . . . . . . . . . . . . . . . . . .11
Mamiya RZ67 Pro II . . . . . . . . . . . . . . . . . . . . . . . . . . . . . .13
4 Maintenance . . . . . . . . . . . . . . . . . . . . . . . . . . . . . . . . . . . . . .15
Cleaning the IR filter . . . . . . . . . . . . . . . . . . . . . . . . . . . . .15
5 Technical data . . . . . . . . . . . . . . . . . . . . . . . . . . . . . . . . . . . .16
1 Contents
H 25 Getting Started
2
1 Introduction
The Phase One H 25 single shot camera back is designed for
advanced photography applications with a need for
productivity, flexibility and the absolute best in image
quality.
The Phase One H 25 is able to capture large objects and still
reproduce the finest details. The rectangular formatted 22
megapixel CCD allows the Phase One H 25 to generate
image files that can be offset printed as large posters. The
CCD is mounted in Landscape orientation and practically fits
the horizontal area of a Hassleblad camera.
The ability to use the same software as all the Phase One
single shot camera backs and connect to a computer simply
by hot plugging allows the Phase One H 25 to integrate
perfectly with the productive and flexible workflow
appreciated by thousands of studios around the world.
The Phase One H 25 is based on the highly recognized Phase
One technology. This manual ”H 25 - Getting Started” only
describes features and functionality unique to the Phase One
H 25.
For a detailed guide to the application software, please refer
to the Capture One User Guide for Mac and PC.
2 Special H 25Features
The Phase One H 25 can be mounted on a wide range ofcameras including Hasselblad 555 ELD, 553 ELX, 501 CM,503 CW as well as Mamiya RZ67 Pro II and 4” x 5” viewcameras via an optional Phase One adaptor.
ISO Settings
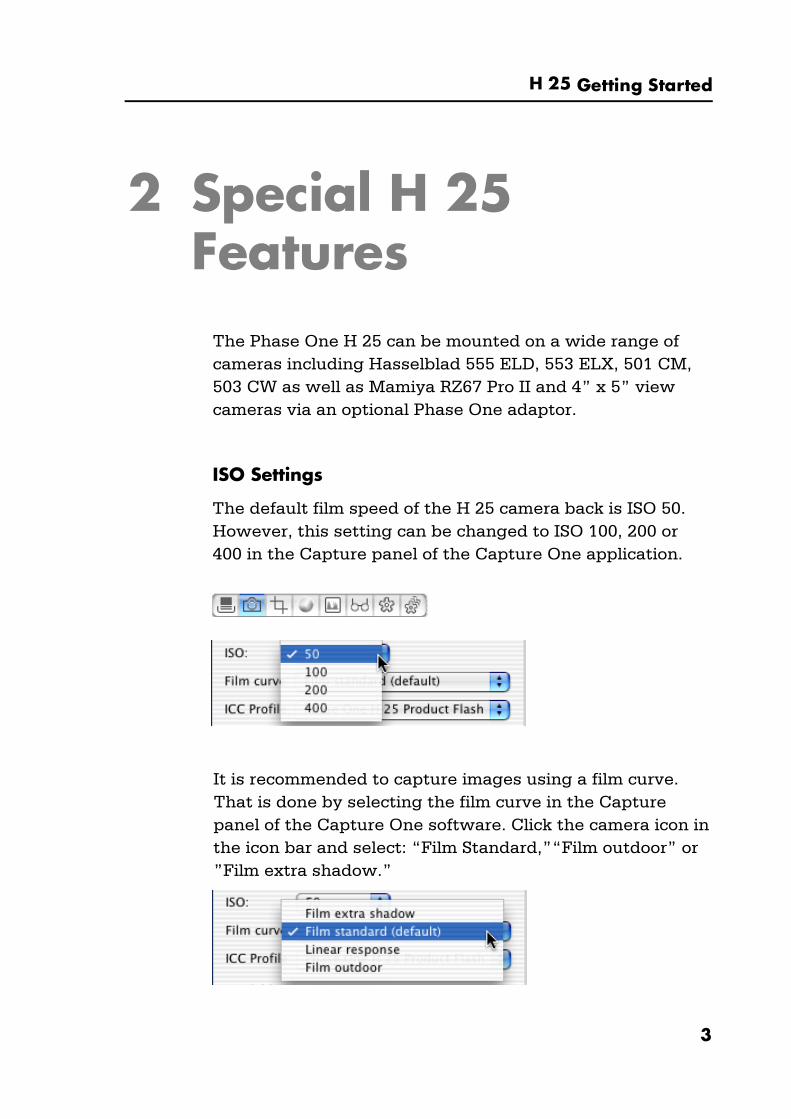
The default film speed of the H 25 camera back is ISO 50.However, this setting can be changed to ISO 100, 200 or400 in the Capture panel of the Capture One application.
It is recommended to capture images using a film curve.That is done by selecting the film curve in the Capturepanel of the Capture One software. Click the camera icon inthe icon bar and select: “Film Standard,”“Film outdoor” or”Film extra shadow.”
H 25 Getting Started
3
H 25 Getting Started
4
Power management
The CCD on the H 25 constantly needs to be cleared fromprevious data before an exposure. This requires somepower consumption. Situations can occur where this is notconvenient (i.e. in connection with Phase One portablesystems where the batteries will get drained too rapidly).On electronically controlled camera bodies the powerconsumption can be drastically reduced by setting the Lowpower or Ultra low power mode inside the Capture OneApplication (Please read the section specific for yourcamera body to learn if you are able to use these settings.).
Double exposure protection
It is not possible to accidentially double expose the imageby capturing one image quickly after another when theH 25 is used on a Hasselblad 555 ELD. The electroniccommunication with the Hasselblad body ensures that theH 25 is ready before allowing release of the next shot. Onother camera bodies not using the electronically interfacefrom the H 25, the user has to wait for the ready beepsignal before releasing the next shot.
IR filter on the CCD
The IR filter (Phase One TG1 Infrared cut-off filter) ispermanently mounted on top of the CCD.
The filter may not be removed for several reasons:
l The focusing of the H 25 camera back will be damaged.
l It is only possible to remount the filter without dust inbetween the filter and the CCD if you have access tospecial clean room facilities.
l The Phase One Product Warranty is terminated.
Large format photography
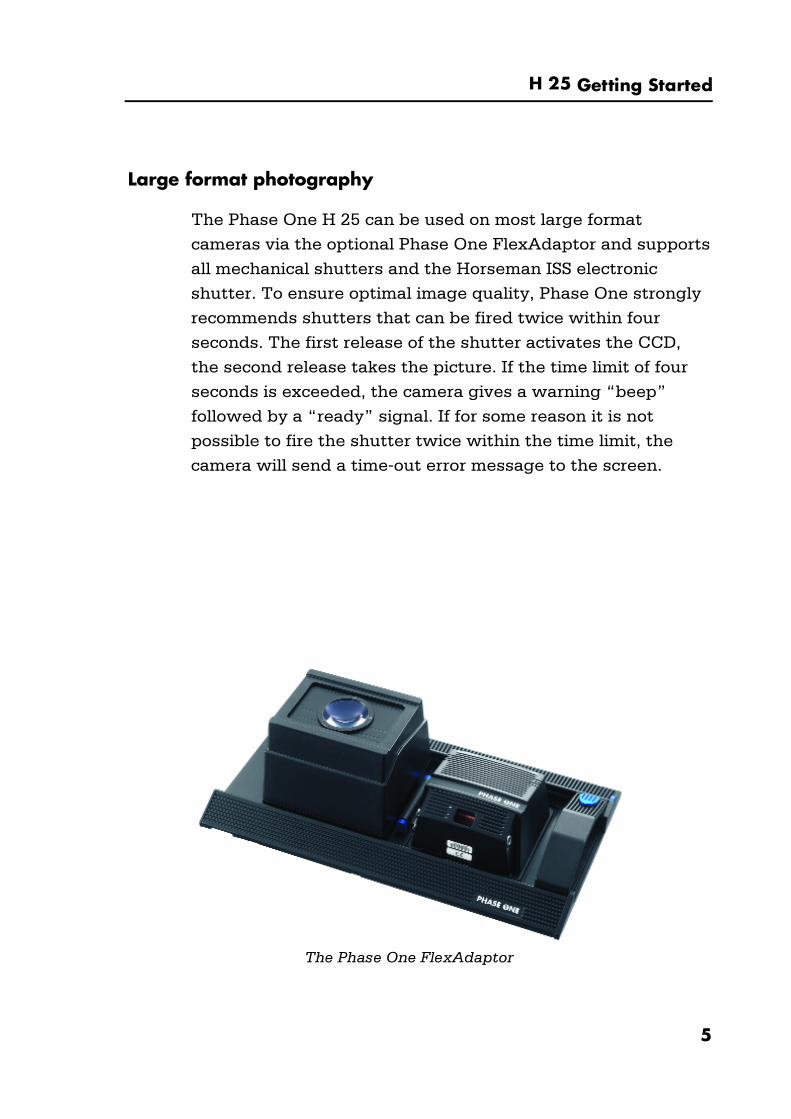
The Phase One H 25 can be used on most large format
cameras via the optional Phase One FlexAdaptor and supports
all mechanical shutters and the Horseman ISS electronic
shutter. To ensure optimal image quality, Phase One strongly
recommends shutters that can be fired twice within four
seconds. The first release of the shutter activates the CCD,
the second release takes the picture. If the time limit of four
seconds is exceeded, the camera gives a warning “beep”
followed by a “ready” signal. If for some reason it is not
possible to fire the shutter twice within the time limit, the
camera will send a time-out error message to the screen.
H 25 Getting Started
5
The Phase One FlexAdaptor
H 25 Getting Started
3 Preparing to take pictures
Mounting the viewfinder mask
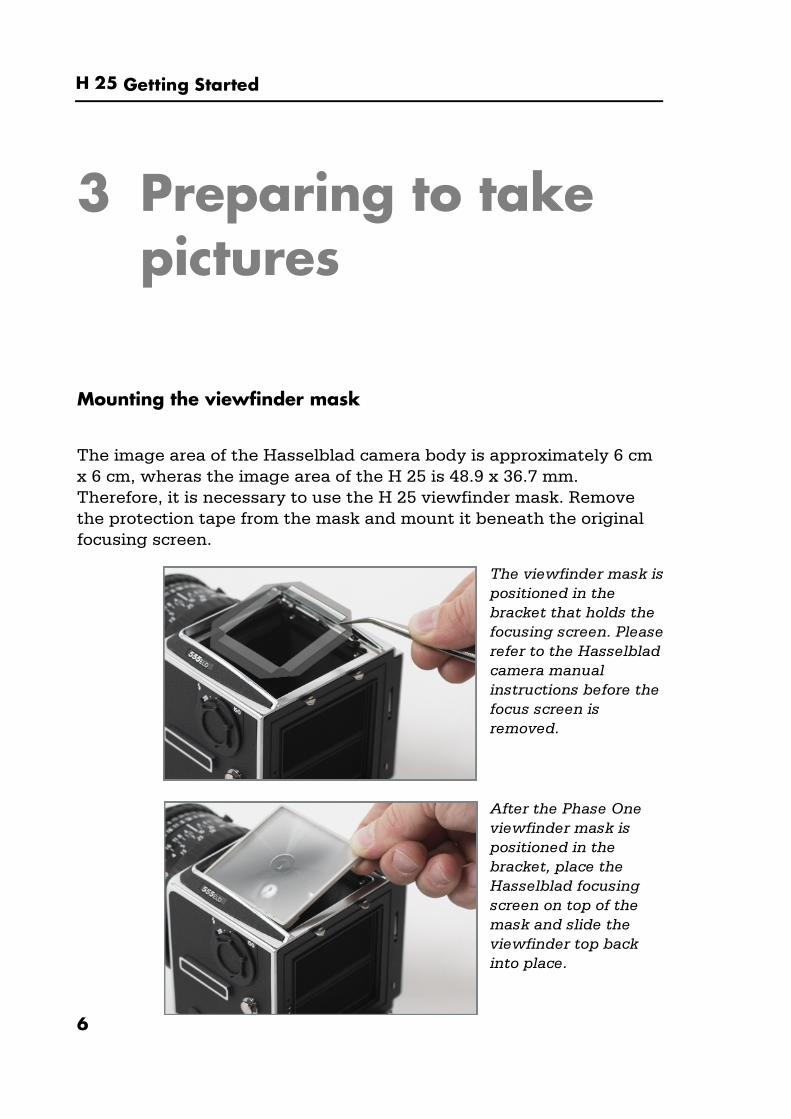
The image area of the Hasselblad camera body is approximately 6 cmx 6 cm, wheras the image area of the H 25 is 48.9 x 36.7 mm.Therefore, it is necessary to use the H 25 viewfinder mask. Removethe protection tape from the mask and mount it beneath the originalfocusing screen.
6
The viewfinder mask ispositioned in thebracket that holds thefocusing screen. Pleaserefer to the Hasselbladcamera manualinstructions before thefocus screen isremoved.
After the Phase Oneviewfinder mask ispositioned in thebracket, place theHasselblad focusingscreen on top of themask and slide theviewfinder top backinto place.

H 25 Getting Started
7
Mounting the H 25 on a Hasselblad camera
The H 25 is fully integrated with the camera body and actsas a true part of the whole camera system.
It is important to ensure that the bottom part of the H 25camera back is pressed well into the locking mechanismbefore the upper locking mechanism is pressed together.
To avoid the H 25 accidentally being released from thecamera body, you can use the enclosed screwdriver to lockthe H 25 locking mechanism on the top of the camera back.
H 25 Getting Started
8
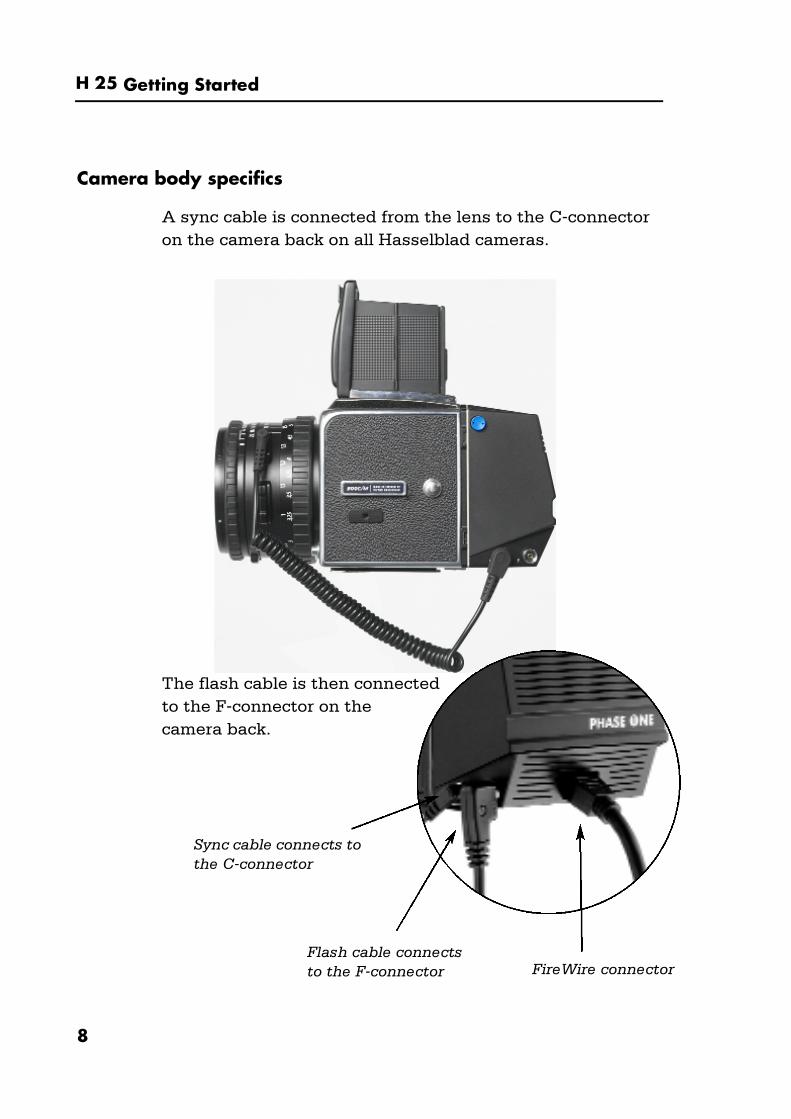
Camera body specifics
A sync cable is connected from the lens to the C-connectoron the camera back on all Hasselblad cameras.
The flash cable is then connectedto the F-connector on thecamera back.
FireWire connectorFlash cable connectsto the F-connector
Sync cable connects tothe C-connector
H 25 Getting Started
9
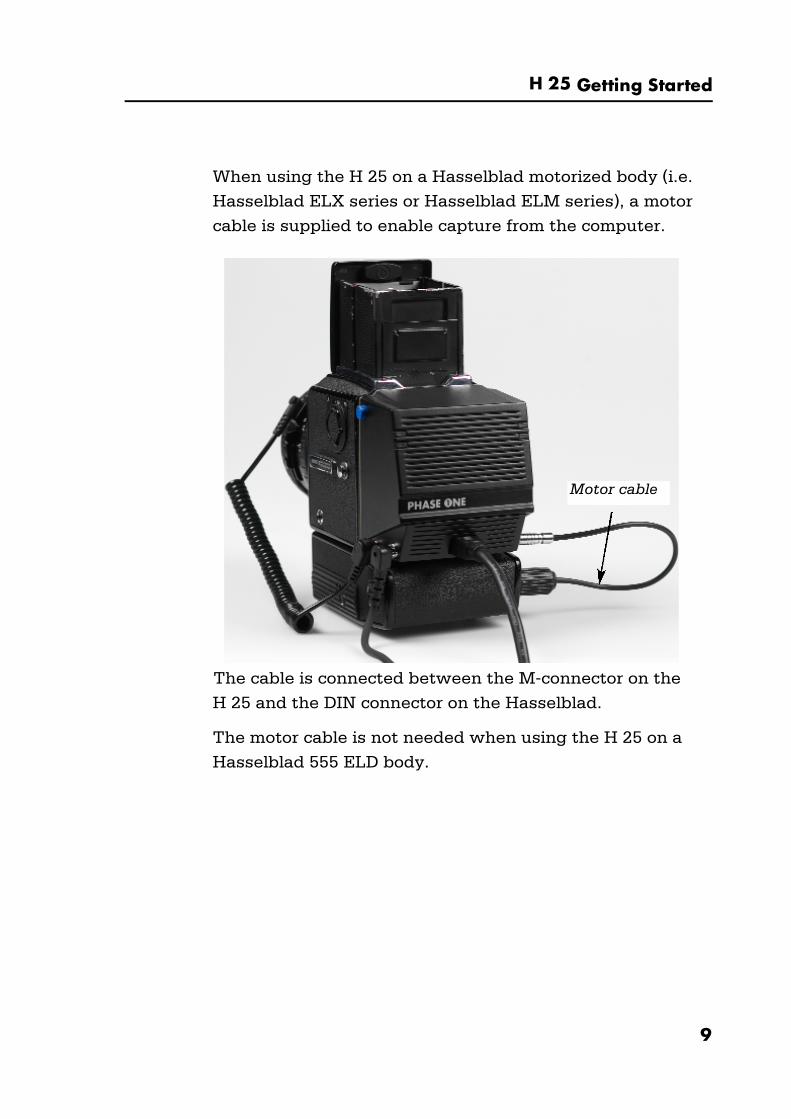
When using the H 25 on a Hasselblad motorized body (i.e.
Hasselblad ELX series or Hasselblad ELM series), a motor
cable is supplied to enable capture from the computer.
The cable is connected between the M-connector on the
H 25 and the DIN connector on the Hasselblad.
The motor cable is not needed when using the H 25 on a
Hasselblad 555 ELD body.
Motor cable
H 25 Getting Started
1 0
Hasselblad 553 ELX
Avoid using A or AS mode.
Please note that the Phase One H 25 should not be
mounted while the camera is set to mirror up (S or RS
modes). Also make sure that the lens is not jammed or
locked open on the “B” setting when connecting the flash
sync cable to the Phase One H 25.
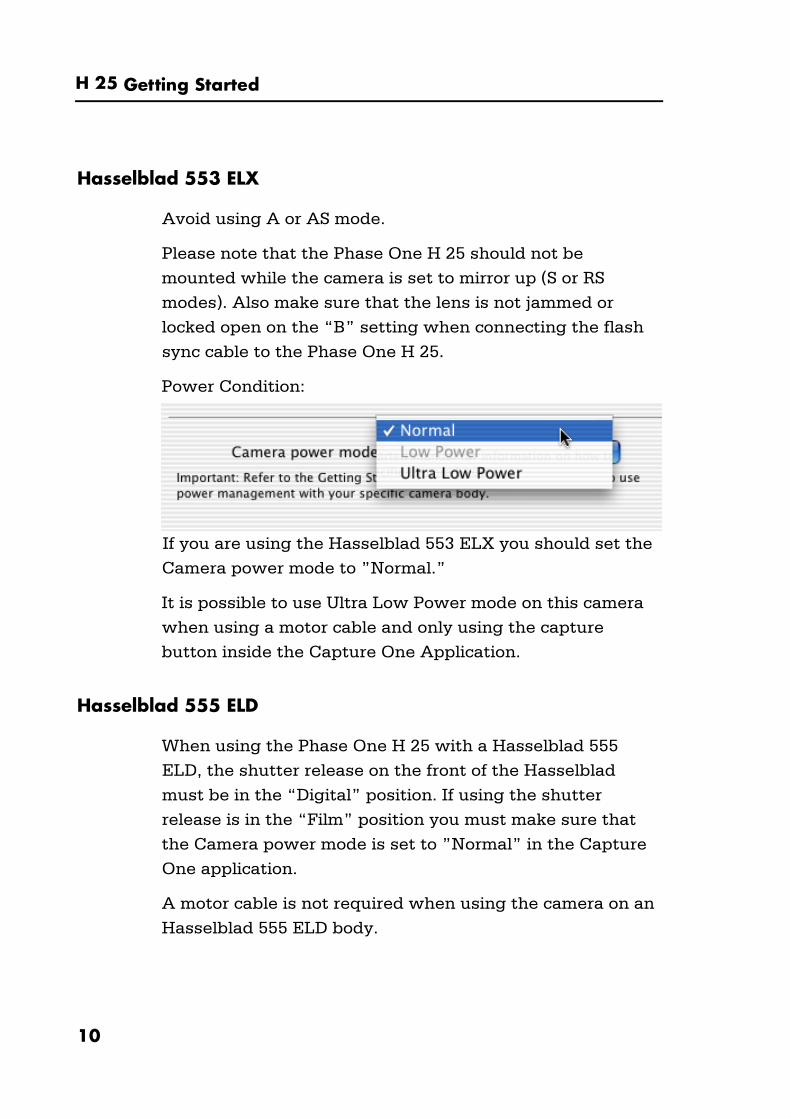
Power Condition:
If you are using the Hasselblad 553 ELX you should set the
Camera power mode to ”Normal.”
It is possible to use Ultra Low Power mode on this camera
when using a motor cable and only using the capture
button inside the Capture One Application.
Hasselblad 555 ELD
When using the Phase One H 25 with a Hasselblad 555
ELD, the shutter release on the front of the Hasselblad
must be in the “Digital” position. If using the shutter
release is in the “Film” position you must make sure that
the Camera power mode is set to ”Normal” in the Capture
One application.
A motor cable is not required when using the camera on an
Hasselblad 555 ELD body.
H 25 Getting Started
11
Please note that the Phase One H 25 should not be
mounted while the camera is set to mirror up (S or RS
modes). Also make sure that the lens is not jammed when
connecting the flash sync cable to the Phase One H 25.
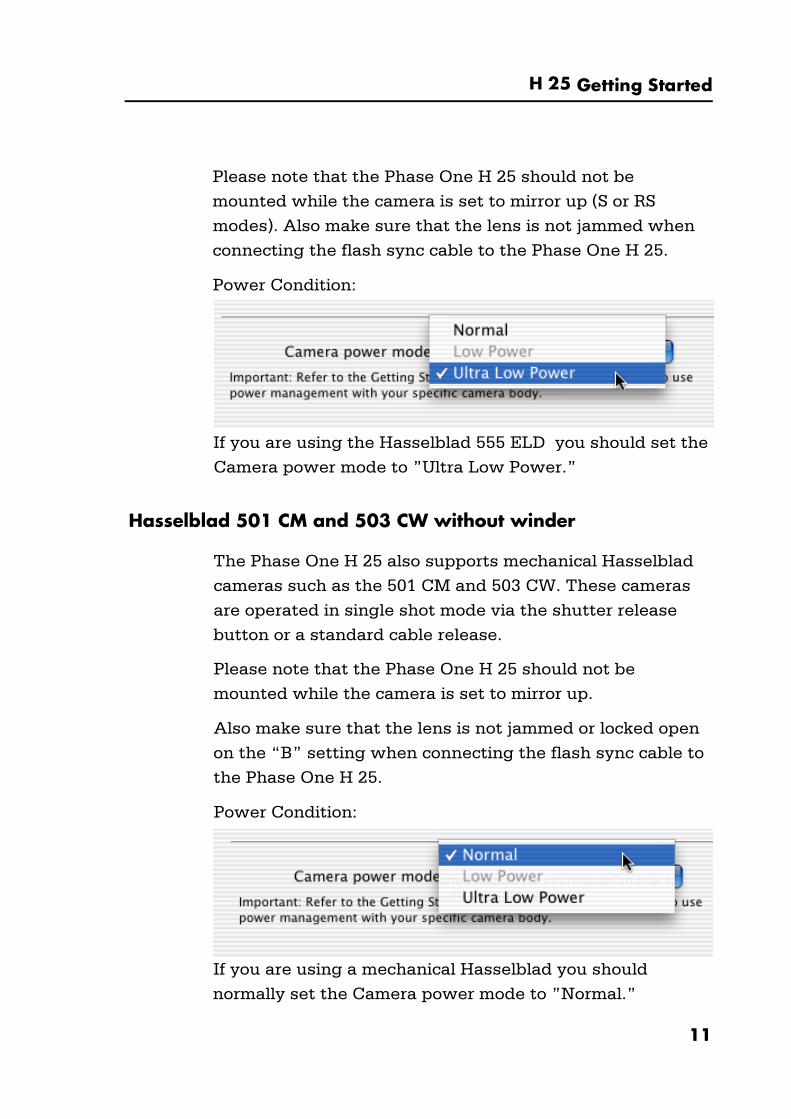
Power Condition:
If you are using the Hasselblad 555 ELD you should set the
Camera power mode to ”Ultra Low Power.”
Hasselblad 501 CM and 503 CW without winder
The Phase One H 25 also supports mechanical Hasselblad
cameras such as the 501 CM and 503 CW. These cameras
are operated in single shot mode via the shutter release
button or a standard cable release.
Please note that the Phase One H 25 should not be
mounted while the camera is set to mirror up.
Also make sure that the lens is not jammed or locked open
on the “B” setting when connecting the flash sync cable to
the Phase One H 25.
Power Condition:
If you are using a mechanical Hasselblad you should
normally set the Camera power mode to ”Normal.”

H 25 Getting Started
1 2
It is possible to use ”Ultra Low Power” mode on
Mechanical cameras, but precautions must be taken not to
trigger too fast and ”Mirror Up” is not supported when
using this setting.
To ensure capture reliability, we recomend that you look at
the green LEDs on the back of the camera back while you
slowly press the mechanical trigger on the camera body.
You can safely press the button all the way in the moment
the LEDs flashes.
Hasselblad 503 CW with Winder CW
If operating in mirror up mode, the mirror up mode has to
be set in the Capture One software. This is done on a Mac
by pressing command + M or on a PC by pressing CTRL + M
on the keyboard.
Please note that the Phase One H 25 should not be
mounted while the camera is set to mirror up.
Also make sure that the lens is not jammed or locked open
on the “B” setting when connecting the flash sync cable to
the Phase One H 25.
Power Condition:
If you are using a 503 CW winder you could set the Camera
power mode to ”Normal.”
H 25 Getting Started
13
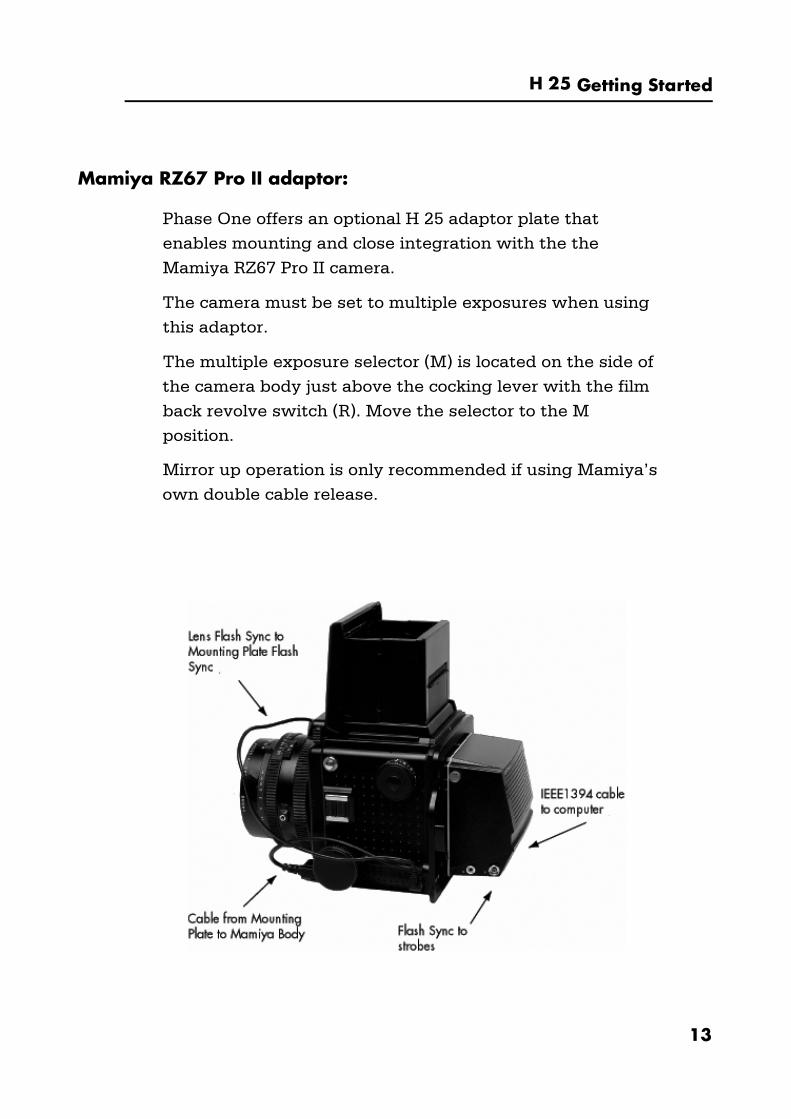
Mamiya RZ67 Pro II adaptor:
Phase One offers an optional H 25 adaptor plate that
enables mounting and close integration with the the
Mamiya RZ67 Pro II camera.
The camera must be set to multiple exposures when using
this adaptor.
The multiple exposure selector (M) is located on the side of
the camera body just above the cocking lever with the film
back revolve switch (R). Move the selector to the M
position.
Mirror up operation is only recommended if using Mamiya’s
own double cable release.
H 25 Getting Started
1 4
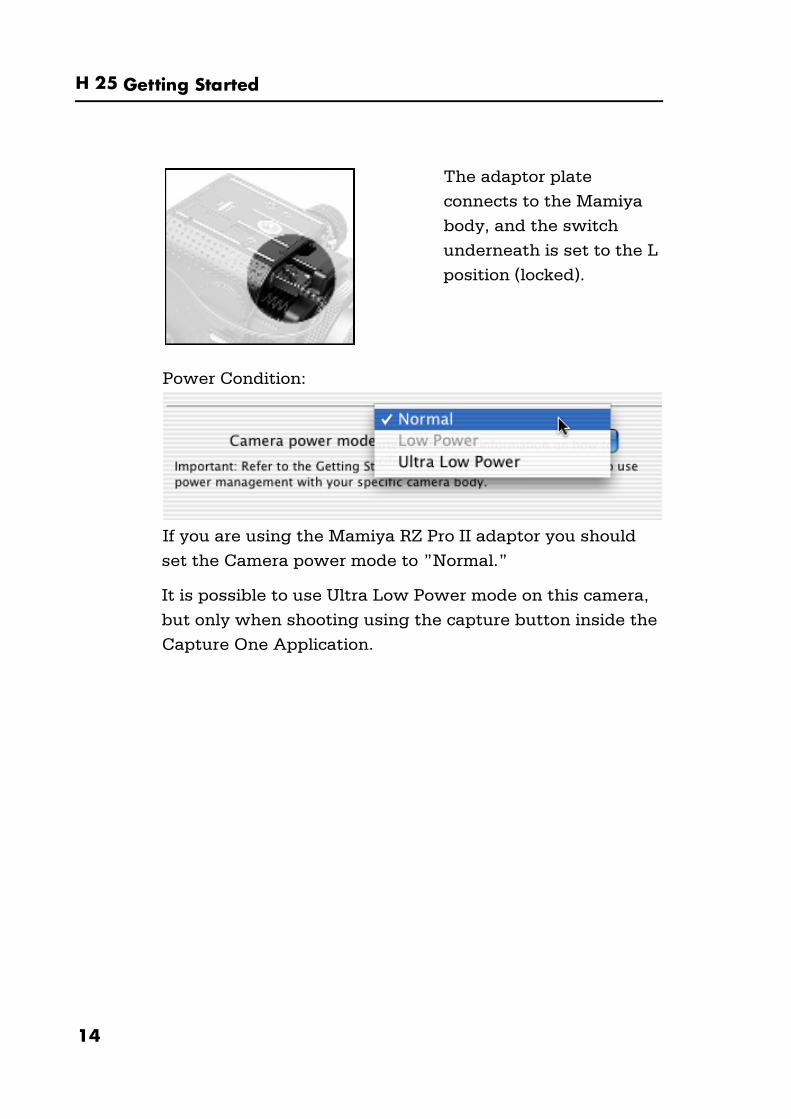
The adaptor plate
connects to the Mamiya
body, and the switch
underneath is set to the L
position (locked).
Power Condition:
If you are using the Mamiya RZ Pro II adaptor you should
set the Camera power mode to ”Normal.”
It is possible to use Ultra Low Power mode on this camera,
but only when shooting using the capture button inside the
Capture One Application.
H 25 Getting Started
15
4 Maintenance
Cleaning the IR filter
When the Phase One H 25 camera back is not attached to a
camera, the camera back must be protected with the
protection plate. However, over time dust may accumulate
on the IR filter. This will degrade the image quality if not
removed.
Please follow the directions included in the CCD cleaning
kit in the H 25 package.

H 25 Getting Started
1 6
5 Technical Data
Phase One H 25 specifications:
Technology: Full Frame CCD
Color filter: Red, Green and Blue
Total pixels: 5,488 x 4,145
Effective pixels: 5,436 x 4,080
Effective size: 48.9 x 36.7 mm
Pixels size: 9 x 9 microns
Imager ratio: 4:3
Imager output: 48 bit (16 bit per color)
Antiblooming: 8 f-stops
Digital image
Color depth: 16 bit per color
Dynamic range: 12 f-stops
Single exposure: 5,436 x 4,080 pixels
24 bit RGB: 65 MB
48 bit RGB: 130 MB
64 bit CMYK: 173 MB
H 25 Getting Started
17
Two exposures: 5,436 x 7,991 pixels (FlexAdaptor)
24 bit RGB: 127 MB
48 bit RGB: 254 MB
64 bit CMYK: 339 MB
Basic sensitivity
ISO range: 50, 100, 200 or 400
System
Exposure time: 60 sec or more to less than 1/10000 sec.
Capture rate: 30 captures per minute
IR filters: Mounted on CCD
Orientation: Automatic rotation
Interface: Direct IEEE 1394/FireWire®
architecture
Power: 8 - 33 Volt DC
Lighting conditions
Flash, tungsten, daylight, fluorescent, HMI
Data format & compression
Extended Phase One format, TIFF-RGB, TIFF-CMYK, JPEG,
HTML
Color Management workflows
RGB, embedded ICC profiles, CMYK
H 25 Getting Started
1 8
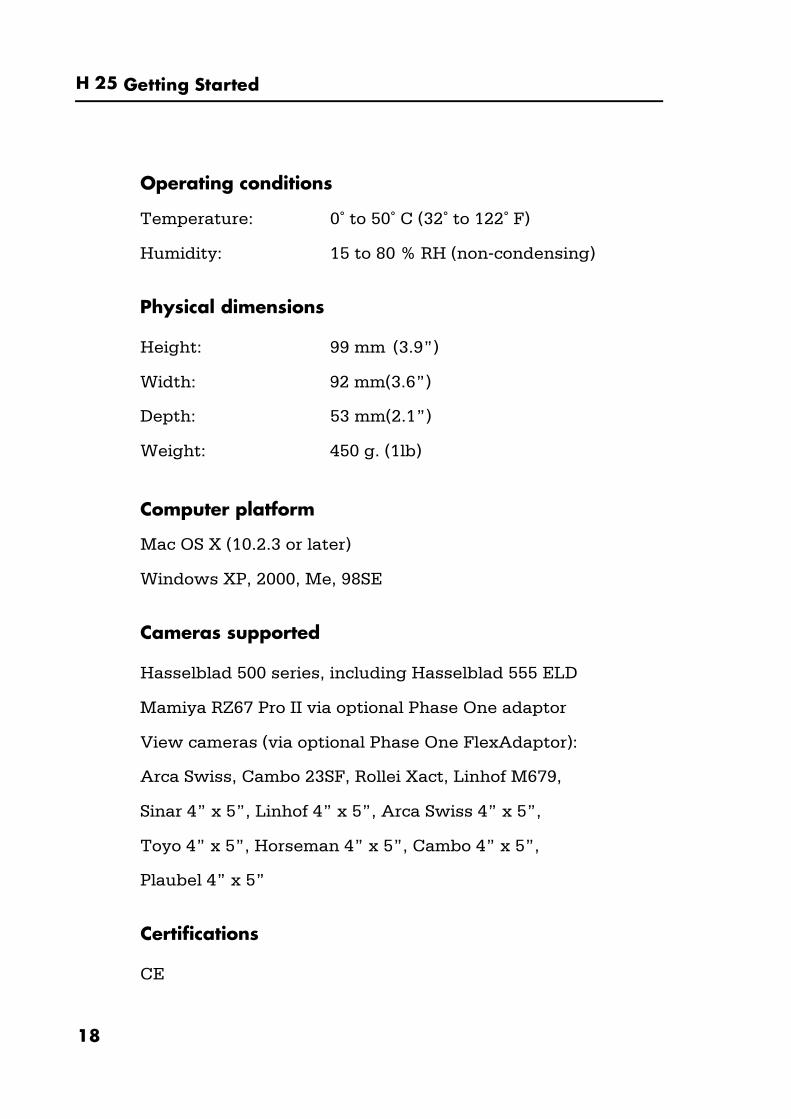
Operating conditions
Temperature: 0˚ to 50˚ C (32˚ to 122˚ F)
Humidity: 15 to 80 % RH (non-condensing)
Physical dimensions
Height: 99 mm (3.9”)
Width: 92 mm(3.6”)
Depth: 53 mm(2.1”)
Weight: 450 g. (1lb)
Computer platform
Mac OS X (10.2.3 or later)
Windows XP, 2000, Me, 98SE
Cameras supported
Hasselblad 500 series, including Hasselblad 555 ELD
Mamiya RZ67 Pro II via optional Phase One adaptor
View cameras (via optional Phase One FlexAdaptor):
Arca Swiss, Cambo 23SF, Rollei Xact, Linhof M679,
Sinar 4” x 5”, Linhof 4” x 5”, Arca Swiss 4” x 5”,
Toyo 4” x 5”, Horseman 4” x 5”, Cambo 4” x 5”,
Plaubel 4” x 5”
Certifications
CE