hacking howto for the linkstation hd-hxxxlan(f)atsuro/hd-hlan/file/hacking linkstation ii.pdf ·...
TRANSCRIPT

V0.7 2005-07-16 http://www.geishuettner.de/docs/Linkstation/
Hacking Howto for the Linkstation HD-HxxxLAN(F)
0. FOREWORD 3
0.1 Intention 3
0.2 Copyright 3
1. HARDWARE 3
1.1 CPU 3
1.2 IDE Controller 4
1.3 USB Controller 4
1.4 NIC 4
1.5 Hard drive 5
1.6 Memory 5
1.7 Flash 5
1.8 AVR 5
1.9 Unknown 5
2. SOFTWARE 5
2.1 Linux 5
2.2 Partitions 5
2.3 Open ports 6
3. HACKING THE BOX 6
3.1 Opening the box 6
3.2 Removing protection 6
3.3 Opening a backdoor 6 3.3.1 Abusing the webserver 7 3.3.2 Amending to init 7 3.3.2 Changing the firmware 8
3.4 Restore protection 10
3.5 Closing the box 11

V0.7 2005-07-16 http://www.geishuettner.de/docs/Linkstation/
4. INSTALLING SOFTWARE 11
4.1 Using a cross toolchain 12
4.2 Installing TelnetD 13
4.3 Using TelnetD 13
5 INSTALLING DEBIAN 13
5.1 Manual installation 13
5.2 Semi-Automatic installation 15
6. MISCELLANEOUS 19
6.1 Making a backup 19
6.2 Compiling kernel modules 19
6.3 Mounting cd images 20
6.4 Upgrading the drive 20
7. LAST WORDS 21
V0.7 2005-07-16 http://www.geishuettner.de/docs/Linkstation/
0. Foreword
0.1 Intention This howto intends to describe what I did in order to hack my Linkstation. You have to decide which way you want to go, there is a “hard way” which involves opening the box and an “easy way” where you can leave your screw driver in the toolbox. Although I used the described steps myself (sometimes multiple times) I can’t guarantee this works for you too. You might loose your warranty for the Linkstation and even make it unusable or kill it’s hardware. You should create a backup of at least the first partition of your Linkstation. Commands and text you have to enter can be found in grey boxes. A dollar sign stands for the prompt your shell will give you.
Some chapters are only there for “historic reasons” and document steps you no longer need to take (the firmware hack is certainly easier than opening the box). Chapter 5.2 can be quite interesting for you if you want convert to a complete debian system.
0.2 Copyright The copyright topic is something I nearly forgot in the first versions of this little how-to. But don’t be afraid, this how-to is now released under the the Creative Commons Licence (CCL). There’s only three things I demand from you:
- you may not mirror this document anywhere without my consent (I want to be sure that I can correct any errors that will be in this document and I can’t correct these when I don’t know where they are stored)
- if you use pieces of information from this document in other documents you need to give credit and link where this information came from
- you may not sell this document anywhere (I don’t think this is worth money but hey, there are strange people outside ;-) and I have seen this happen with fli4l)
1. Hardware
1.1 CPU The Linkstation is equipped with a MIPS IDT32434 processor running at 400MHz. Further info can be found at http://www1.idt.com/pcms/products.taf?catID=58533&genID=79RC32434. Just to give you a feel about how fast this one is a comparison:

V0.7 2005-07-16 http://www.geishuettner.de/docs/Linkstation/
Benchmark Kuro PPC@2661
Linkstation I PPC@2002
Linkstation II MIPS@400
AMD K6@2333
Numeric Sort 0,98 0,56 0,72 1,00String Sort 0,74 0,52 0,51 1,00Bitfield 1,49 0,87 1,07 1,00FP Emulation 1,27 1,05 0,81 1,00 Nbench offers more benchmarks than these but after completing the fourth it got stalled.
1.2 IDE Controller ITE IT8211 http://www.ite.com.tw/product_info/PC/Brief-IT8211_2.asp
1.3 USB Controller NEC 720101 http://www.ee.nec.de/products/usb/usb_datasheet.html http://www.ee.nec.de/cgi-bin/dl/dl.cgi?S16265EJ1V0DS00
1.4 NIC REALTEK 8201CP http://www.realtek.com.tw/products/products1-2.aspx?modelid=2003073 This chip itself needs no driver, see http://www.realtek.com.tw/downloads/phyDesc.aspx If I assume correctly the missing “MAC” is an LF8275 BELTA. I didn’t find much information about this one. Confusingly dmesg tells me that it used the build in nic of the IDT-chip. Although I used a switch which can deliver 100Mbit FDX I didn’t get more than this throughput4 on a low level: Packet size 1k bytes: 9392 KByte/s Tx, 8552 KByte/s Rx. Packet size 2k bytes: 10311 KByte/s Tx, 9724 KByte/s Rx. Packet size 4k bytes: 10895 KByte/s Tx, 10757 KByte/s Rx. Packet size 8k bytes: 11346 KByte/s Tx, 11269 KByte/s Rx. Packet size 16k bytes: 11384 KByte/s Tx, 11259 KByte/s Rx. Packet size 32k bytes: 11370 KByte/s Tx, 11257 KByte/s Rx.
1 Measured by artwallecex 2 Measured by spencilsplodge 3 Reference machine used by nbench (http://www.tux.org/~mayer/linux/bmark.html) 4 measured with netio

V0.7 2005-07-16 http://www.geishuettner.de/docs/Linkstation/
The throughput on a higher level (ftp or samba) is expected to be below this.
1.5 Hard drive SAMSUNG HA250JC I couldn’t resist and ran a benchmark on this one too ;-) bash-2.05a# ./hdparm -tT /dev/had /dev/hda: Timing buffer-cache reads: 128 MB in 1.26 seconds =101.59 MB/sec Timing buffered disk reads: 64 MB in 1.97 seconds = 32.49 MB/sec
1.6 Memory 64MB of memory (36MB free after boot). The chip says Micron MT 46V32MI6-SBC.
1.7 Flash The Flash is split in three parts which can be accessed by /dev/mtd0 through /dev/mtd1. The size of flash seems to be 4MB (at least all three parts summed up amount to something near 4MB) I believe it’s of from Fujitsu and is a model MBM29PL32TM.
1.8 AVR The avr seems to accept at least some of the commands yamasita 5mentioned on his website. I successfully tried those commands that slow down the fan (which by the way is an Adda AD0412LX-G76) and switch leds on and off. echo -n "\\\\" > /dev/ttyS0
The only difference is that the avr is linked to another serial port.
1.9 Unknown I’m not quite sure what the SP100552CDW NASIDT001 CTEX0438 onboard is for. I think it provides under many other things the logic for a serial connector (which is not soldered to the board)
2. Software
2.1 Linux uname tells me Montavista 2.4.20-mipsel-linkstation
2.2 Partitions On a HD-HLAN250 the partitions are set up as follows: Partition File system Size
5 http://www.yamasita.jp/linkstation.en/avr.html

V0.7 2005-07-16 http://www.geishuettner.de/docs/Linkstation/
hda1 EXT3 394MB
hda2 SWAP 271MB
hda3 EXT3 249390MB
2.3 Open ports Port Protocol
21 ftp
80 http
139 netbios
515 printer
548 afpovertcp
22936 (only in em mode)
35586
3. Hacking the box
3.1 Opening the box There already is a very good howto which shows you how to open the box. http://mywebpages.comcast.net/jstewart228368/linkstation/Disassembly.html I stopped before the last step and let the hard drive inside the case. It’s easier to remove the power and data cable and connect the drive to a normal desktop.
3.2 Removing protection Buffalo keeps you from accessing the hard drive. They changed a significant byte and manipulated the kernel. Thus it’s not possible to read the hard drive from your normal desktop pc. But some clever guy (or girl ?) wrote a program called fix_ext2_magic which can be found in the files section of Linkstation_General. http://groups.yahoo.com/group/LinkStation_General/files/ I managed to run the program after booting from a Knoppix livecd. If you take the file from the zip file on my website be sure to do at least a chmod 700 fix_ext2_magic
before using it in this way: ./fix_ext2_magic --fix /dev/hda1 mkdir /mnt/hda1 mount /dev/hda1 /mnt/hda1
3.3 Opening a backdoor There are at least two ways to do this. The first subchapter describes the way I did it first and the second subchapter describes the more clever way.
V0.7 2005-07-16 http://www.geishuettner.de/docs/Linkstation/
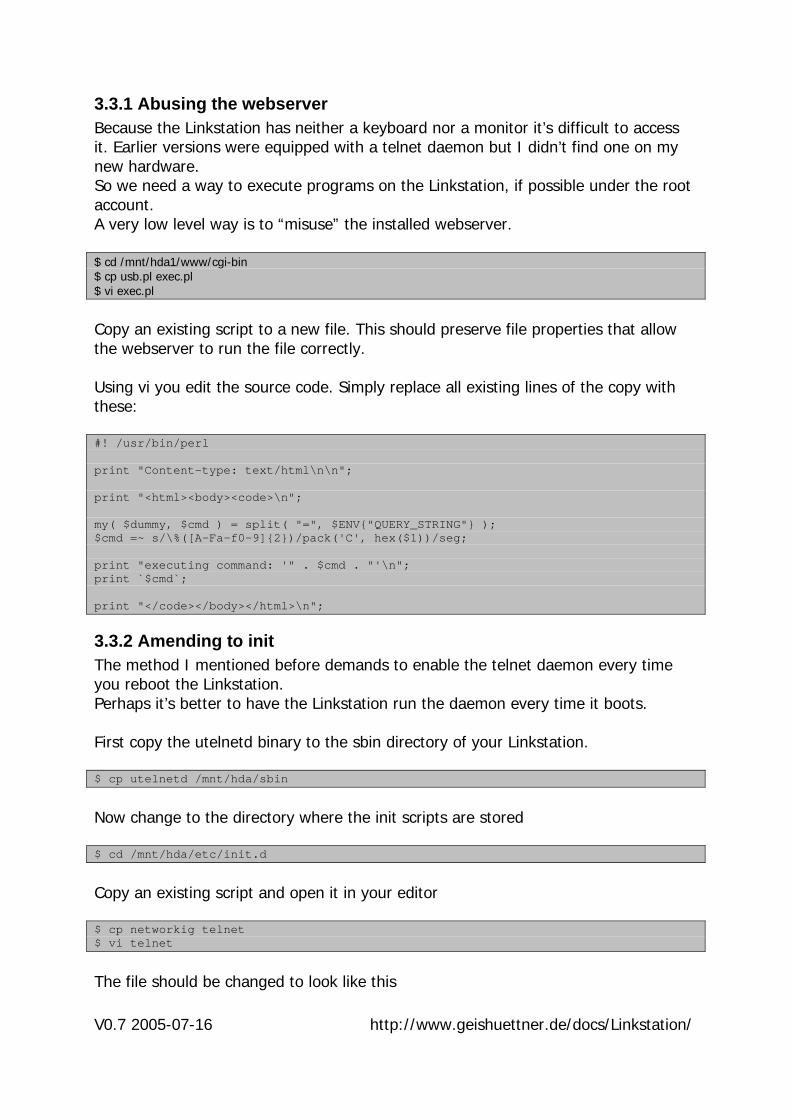
3.3.1 Abusing the webserver Because the Linkstation has neither a keyboard nor a monitor it’s difficult to access it. Earlier versions were equipped with a telnet daemon but I didn’t find one on my new hardware. So we need a way to execute programs on the Linkstation, if possible under the root account. A very low level way is to “misuse” the installed webserver. $ cd /mnt/hda1/www/cgi-bin $ cp usb.pl exec.pl $ vi exec.pl
Copy an existing script to a new file. This should preserve file properties that allow the webserver to run the file correctly. Using vi you edit the source code. Simply replace all existing lines of the copy with these: #! /usr/bin/perl print "Content-type: text/html\n\n"; print "<html><body><code>\n"; my( $dummy, $cmd ) = split( "=", $ENV{"QUERY_STRING"} ); $cmd =~ s/\%([A-Fa-f0-9]{2})/pack('C', hex($1))/seg; print "executing command: '" . $cmd . "'\n"; print `$cmd`; print "</code></body></html>\n";
3.3.2 Amending to init The method I mentioned before demands to enable the telnet daemon every time you reboot the Linkstation. Perhaps it’s better to have the Linkstation run the daemon every time it boots. First copy the utelnetd binary to the sbin directory of your Linkstation. $ cp utelnetd /mnt/hda/sbin
Now change to the directory where the init scripts are stored $ cd /mnt/hda/etc/init.d
Copy an existing script and open it in your editor $ cp networkig telnet $ vi telnet
The file should be changed to look like this

V0.7 2005-07-16 http://www.geishuettner.de/docs/Linkstation/
#/bin/sh /sbin/utelnetd –l /bin/bash & exit 0;
This gives you password-less root access to the Linkstation with all its advantages and risks. Although telnet is still a very insecure protocol you can at least turn on the login procedure by simply changing /bin/bash to /bin/login. Now change to the directory where the rc scripts for the standard runlevel are located $ cd /mnt/hda/etc/rc.d/rc2.d
Create a symbolic link to the telnet startup script $ ln –s ../../init.d/telnet S05telnet
That’s it ! Now the telnet daemon is started every time you reboot.
3.3.2 Changing the firmware I always looked quite envious to those that were able to simply upload a changed or older firmware to their Linkstation I and have telnet access without hassle. As someone posted the hint which program unpacks the firmware and stores it on the harddisk I tried to disassemble that program and find the password. But as I’m no MIPS assembler specialist I had quite some trouble decoding the quite lengthy procedure get_zip_password I found in ls_servd. Because of this I made a second attempt and disassembled ap_servd which is only for Linkstation I. But although the ppc assembler seems to be easier to understand I decided it’s quite time consuming to disassemble that code too, it’s quite lengthy because they inflate the existing 13 bytes to a 42 byte password with a quite huge algorithm. But what I saw was that ap_servd and ls_servd obviously share the same encoded password. That made me hope that I find the password for Linkstation I or that Buffalo perhaps uses the same password on other products: and there I found this interesting article about the Terastation6 which saved me much time in creating the instructions below. I will only show how to update the on-disk part of the firmware, not the part that’s stored in the flash. Not yet ... My next attempt was to take a stock firmware 2.05 and add the telnet daemon to it. Here are the necessary steps: Download firmware 2.05 and store it on a linux system, I used Knoppix once more
6 http://terastation.org/wiki/Firmware_update

V0.7 2005-07-16 http://www.geishuettner.de/docs/Linkstation/
$ wget http://support.hornington.com/buffalo/airstation/LinkStation/HD-HLAN_FW2.05.zip
Unzip the downloaded file and change to the newly created directory $ unzip HD-HLAN_FW2.05.zip $ cd HD-HLAN_FW2.05
You get four files, the most interesting one is the image.dat for which you need a password to extract. As the password is already available freely on the web I wrote it down here as it’s no longer a secret. I hope Buffalo doesn’t change it in the near future. $ unzip image.dat
When asked for a password enter what you can read below. This one worked for 2.04 and 2.05 1NIf_2yUOlRDpYZUVNqboRpMBoZwT4PzoUvOPUp6l
Now create a directory where you can extract the image $ mkdir fw2.05 $ cd fw2.05 $ tar -vxz --numeric-owner -p -f ../tmpimage.tgz
Now you have all the files at your hand and are able to add anything you like ! For starters I recommend you to add the init scripts we used before in 3.3.2. $ cp /[path to binaries]/utelnetd sbin $ chmod 755 sbin/utelnetd
Change [path to binaries] to the directory you extracted the binary files that are available from my website. Now change to the directory the init scripts are stored in. $ cd etc/init.d
Copy an existing init script and change it later $ cp networking telnet $ vi telnet
The file should be changed to look like this #/bin/sh /sbin/utelnetd –l /bin/bash &

V0.7 2005-07-16 http://www.geishuettner.de/docs/Linkstation/
exit 0;
This gives you password-less root access to the Linkstation with all its advantages and risks. Although telnet is still a very insecure protocol you can at least turn on the login procedure by simply changing /bin/bash to /bin/login. Now change to the directory where the rc scripts for the standard runlevel are located $ cd ../rc.d/rc2.d
Create a symbolic link to the telnet startup script $ ln –s ../../init.d/telnet S05telnet
Now change back to the base of the unpacked files - you should be back at fw2.05 – and tar them up again to create a new tmpimage.tgz $ cd ../../.. $ tar -vczf ../tmpimage-new.tgz .
Now once again go one up in the directory hierarchy. $ cd .. $ mv tmpimage.tgz tmpimage-old.tgz $ mv tmpimage-new.tgz tmpimage.tgz $ zip -e image.dat tmpimage.tgz
Enter the password from above twice. Be careful, if you enter a wrong password the Linkstation will not be able to unzip the file. As an eraseall (only for the 300MB system partition) is part of the update process this would leave you with an empty partition. Now you can transfer the files to a windows machine and run the exe file to start the update. Just in case you already updated to the stock 2.05 firmware there is an easy way to trick the updater. Simply edit linkstation_version.txt and change the version to 2.06. This version number never get’s written to the Linkstation it is only compared to the version of the existing Linkstation firmware on the box. Warning: although this is tested you should be careful with what you do. As long these steps are not known to work on many Linkstations other than mine you should create a backup of your system partition. I think there will soon be a chapter 4.4.1 and the possibility to install debian ...
3.4 Restore protection Before you use the hard drive again with the Linkstation you have to change the signature back. I didn’t find a way to use fix_ext2_magic for this, so I made a very small change to the original source and compiled it into a second binary.

V0.7 2005-07-16 http://www.geishuettner.de/docs/Linkstation/
Directly below all the includes I added the two first lines and changed the already existing third #undef EXT2_SUPER_MAGIC #define EXT2_SUPER_MAGIC 0xEF54 #define EXT2_SUPER_MAGIC_BUFFALO 0xEF53
(this is technically not correct because the ext2 super magic is not 0xEF54, but simply swapping the two signatures was a very easy hack – quick and dirty ;-)) $ umount /mnt/hda1 $ ./fix_ext2_magic_back --fix /dev/hda1
It seems to be no problem if you forget to restore this childish protection. I tried because somebody in the forum told us he forgot and the Linkstation didn’t complain. He’s right but it seems that the Linkstation simply restores the protection itself (I once again took the harddisc from the Linkstation and had to run fix_ext2_magic again)
3.5 Closing the box Disconnect the hard drive from your desktop and connect it to the Linkstation. Reinstall the cover if you like. Power on your Linkstation and pray.
4. Installing software In 3.3 you added a backdoor to your Linkstation. This backdoor allows you to run any cmd in a root context. Open a browser on one computer that’s on the same network as your linkstation. For a quick test load the url http://192.168.0.3/cgi-bin/exec.pl?cmd=ls /
(of course you have to replace the ip address with that of your Linkstation) This should give you a listing of the root file system of your Linkstation. Select “view html source code” or something similar from your browsers context menu to get a better display with line feeds. Instead of ls / you can send any valid linux command. If a certain program can not be executed that may because the search path is missing. I had problems calling lspci but adding the directory helped. Normally your browser should replace space and other non-letter characters with their hex representation, so “ “ becomes %20. This make the url a little bit unreadable but before the command is executed the hex code is decoded to the correct character.

V0.7 2005-07-16 http://www.geishuettner.de/docs/Linkstation/
You should not call any interactive programs. They will load but you will not be able to send e.g. a ‘q’ for leaving the program.
4.1 Using a cross toolchain I used a cross toolchain to compile a telnet daemon for the Linkstation. I didn’t succeed in using a binary from existing linux distributions for mips so I decided to build my own. Before I succeeded I tried two other toolchains but had big problems. Finally I made it using the ELDK from denx.de. It’s fast and easy to install. These are the steps I took: installed Fedora Core 3 on a 4GB partition (in Vmware by the way) downloaded an iso of the ELDK from one of the mirrors mentioned at http://www.denx.de/twiki/bin/view/DULG/ELDKAvailability. I used ftp://ftp.sunet.se/pub/Linux/distributions/eldk/3.1.1/mips-linux-x86/iso/mips-2005-03-06.iso installed the eldk as described in 3.4.3 and 3.5 of http://www.denx.de/twiki/bin/view/DULG/ELDK basically this is a $ ./install –d /opt/eldk mips_4KCle
from the cd set up the ELDK as described in 3.5. I used mips_4KCle as the value for CROSS_COMPILE $ export CROSS_COMPILE=mips_4KCle-
told the linker to create statically linked binaries by typing $ export LDFLAGS=-static
downloaded utelnetd from http://www.pengutronix.de/software/utelnetd/utelnetd-0.1.9.tar.gz and untarred
changed the search path $ export PATH=/opt/eldk/usr/mips-linux/bin:$PATH
created the makefile using $ ./configure --host=mips
(you may need to say mips-linkstation-linux-gnu for some software packages and second adding a --prefix=/opt/eldk/usr7 might help) 7 thanks to Simon fort his hint

V0.7 2005-07-16 http://www.geishuettner.de/docs/Linkstation/
built the binary by executing $ make
4.2 Installing TelnetD The binary created in 4.1 has to be transferred to your Linkstation. You can copy it to any drive letter you connected to a share the Linkstation exports. Or you can – as I did – transfer it using the built in ftp server. You could also copy it to the drive at the same time you create the backdoor, but that’s not what I did so I don’t know if this will work (although I think it should) After you copied the file it’s stored beneath /mnt/hda on the Linkstation. You can search for the file using a cmd like “ls /mnt/hda” that you pass to exec.pl. As soon as you know where the file is stored you can make it accessible and run the daemon. Normally the file is stored in a directory that has the same name as the share you copied it to. $ chmod 777 /mnt/hda/[ your directory ]/utelnetd $ chown root /mnt/hda/[ your directory ]/utelnetd $ /mnt/hda/[ your directory ]/utelnetd –p 23 –l /bin/bash -d
(remember to use exec.pl for this)
4.3 Using TelnetD Now connect to your Linkstation using any telnet client within your reach. I recommend putty over the standard windows telnet. Have fun. But keep in mind that telnet itself is a very insecure program and that anybody on your network will be able to telnet to your Linkstation without entering any credentials and will have full root access !
5 Installing Debian
5.1 Manual installation After “some” tries I managed to install a debian system that can be run in a chroot environment. It’s relatively easy to install debian natively on the Linkstation as soon as you have root access to it. Some files you need for bootstrapping the installation but are missing on the Linkstation can be downloaded from my website. I have taken them from the ELDK and they are available in a small tgz file. First you need the deboostrap utility, I downloaded mine from http://ftp.debian.org/debian/pool/main/d/debootstrap/debootstrap_0.2.45-0.2_mipsel.deb. Because this is a .deb file you can’t easily install it to the Linkstation (at least I didn’t know how to). I used Knoppix to download this file and then converted it to a .tgz file using alien and this command: $ alien -t *.deb

V0.7 2005-07-16 http://www.geishuettner.de/docs/Linkstation/
Then I copied the created .tgz file to the Linkstation where I simply untared it: $ tar -xvzf debootstrap.tgz
The files from the .tgz can then be found in ./usr/sbin below the directory you where in when untaring. Before debootstrapping I copied some missing files mentioned above from mipsbins.tgz to /bin. Then I set the environment up with these commands: $ export DEBOOTSTRAP_DIR=/mnt/hda/folder1/usr/lib/debootstrap $ export TERM=linux $ export PATH=$PATH:./:/usr/local/sbin:/usr/sbin:/sbin:/mnt/hda/folder1/usr/sbin
Please note that /mnt/hda/folder1 is the directory where I untarred the debootstrap.tgz in. If you use a different directory please change the commands above accordingly. Now you are ready to start the bootstrap: $ cd ./usr/sbin $ ./debootstrap --arch mipsel sarge /mnt/hda/debinst http://http.us.debian.org/debian
(all on one line) You are not limited to sarge, I successfully began with woody but as soon as this worked switched to sarge. Debootstrap will download all the files it needs from the internet so you need a working connection. At the end of the installation debootstrap will complain about not being able to chroot, but don’t mind. If debootstrap complains about missing files you can find them in a zip on my website. Then I copied some files from the Linkstation’s own directories. $ cp /etc/network/interfaces /mnt/hda/debinst/etc/network $ cp /etc/resolv.conf /mnt/hda/debinst/etc
Now you have the minimum files to chroot $ chroot /mnt/hda/debinst /bin/bash
It’s time to create some more files $ echo BUFFALO>/etc/hostname $ echo 127.0.0.1 BUFFALO > /etc/hosts

V0.7 2005-07-16 http://www.geishuettner.de/docs/Linkstation/
and give the system a /proc mount -t proc proc /proc
Run the menubased installation $ /usr/sbin/base-config
I will not describe this as it is normal debian knowledge which is much better described than I can in debians manuals. Perhaps you might also want to run dselect. After this is completed you have a working debian environment. Every time you want to use it you should run the three export statements and then chroot into it. Voila ! My next step is to complete the debian configuration and then perhaps later have it replace the Buffalo files completely. We will see ...
5.2 Semi-Automatic installation To make the installation of debian from scratch easier I created a script that will (with the aid of some binaries that are missing on the LS2) help you. Basically it does what you can read in the previous chapter but it saves you typing effort. The script is currently in an alpha state but it worked fine for me.
The script creates a basic normal debian installation, no (better: not much) Buffalo specific parts like thttpd or the webinterface. If you already have data stored on the LS2 it will not be deleted but after the installation of debian you will have to configure samba or appletalk to share it again.
You will need some debian knowledge because the installer itself is not automated. But most of the time simply confirming the default value will work. The installation will take about 2 hours but you don’t have to present all the time because large parts of the time will be spent downloading files from the internet. Get the file debil-0.1.tgz from http://www.geishuettner.de/docs/Linkstation and extract it to any directory you like (you should have about 1GB of free space) cd /mnt/hda tar xvzf debil-0.1.tgz
Run the script cd debil-0.1 ./debil.sh
After the basic step1 of the script you will see this screen:

V0.7 2005-07-16 http://www.geishuettner.de/docs/Linkstation/
Configure everything to your liking, especially the passwords. Although this should be clear I want to stress that apt has to be configured to use http:

V0.7 2005-07-16 http://www.geishuettner.de/docs/Linkstation/
When asked what to install I chose the following packages:
At a certain point of the installation you will be asked to type in an address which you will allow to use webmin from. You can enter one or more addresses, separate them with spaces. As you run in vi you have to ESC :wq to save the file and leave. When you are still in the chroot environment you can install more applications you might need. I ran apt-get install hdparm apt-get install mc apt-get install smartmontools apt-get install webmin-apache apt-get install webmin-virtual-server apt-get install webmin-htaccess apt-get install webmin-inetd apt-get install webmin-logrotate apt-get install webmin-proftpd apt-get install webmin-samba apt-get install webmin-smart-status apt-get install webmin-sshd apt-get install webmin-status apt-get install webmin-usermin apt-get install webmin-vgetty
After the installation of the chroot environment you can return to it anytime. Simply run the script again it will determine you already have an installed environment and will bring you into it.

V0.7 2005-07-16 http://www.geishuettner.de/docs/Linkstation/
When you are back to the Buffalo environment and you have set up your chroot environment to your liking you can copy it to hda for later use. cp -dpRvx /mnt/hda/debil-0.1/debinst/* /mnt/hda
Note: I decided to “force” you to use this second step and not write directly to /mnt/hda. But later the script will be reconfigured to directly create the files and directories where they are intended to be. After this is done you should unmount hda3 But before you should copy a program you will need in some minutes. cp /mnt/hda/debil-0.1/swappart_mipsel /tmp cd / umount /dev/hda3 e2fsck /dev/hda3
Running e2fsck is important. The LS2 has a watchdog which will shutdown after 5 minutes of inactivity during boot. If your ext2fs on the big hda3 is in a state that will force a check on reboot you will most certainly exceed these 5 minutes. After you can be sure that hda3 is in a valid state you can “swappart”. /tmp/swappart_mipsel /dev/hda /dev/hda
Be absolutely sure what you type ! Messing up this command could overwrite valuable parts of your drive. Run swappart without parameters to find out how it can be used in a safer way
After you have run swappart your first and third partition will be interchanged. That means the Linkstation will boot from the physical partition 3 (which is now logically hda1) and that you will need to have a working linux system on this partition. You can later switch back to the original Buffalo linux but only if the debian linux is working ! Be prepared to have a (perhaps x86) pc at hand to boot from and fix your Linkstations drive if you messed up. You find a x86 version of swappart on my homepage.
Now shutdown –r now
and pray or go and find your screw driver if your Linkstations case is not already open.

V0.7 2005-07-16 http://www.geishuettner.de/docs/Linkstation/
6. Miscellaneous
6.1 Making a backup Before you start messing with the content of your Linkstations hard disc you should make a backup of at least the first partition. It’s best to copy this backup to a different computer but even if you put it on the third partition of the Linkstation this can help you later on. Simply fire up e.g. Knoppix and do a dd if=/dev/hda1 of=/mnt/hda3/Linkstation_hda1.img
6.2 Compiling kernel modules Some interesting modules are missing from a stock Linkstation. Buffalo provides the GPL sources they used for building the Linkstation and they send them to you on a cd if you pay them 20€. Depending on the bandwidth used I sometimes make the kernel files (the complete package from Buffalo has 180MB) available on my website. Untar the kernel files and copy the .config file I provide on my website. The .config file does not necessarily create a working kernel but it allows you to specify which modules you want to compile. I successfully compiled reiserfs, isofs and loop modules which I also make available on my website. If you want to experiment and try to compile your own modules the provided .config hopefully will help you. It took me quite some time to figure out which parameters have to be set so I recommend you do a make menuconfig
or make config
when you can’t get ncurses to work (as i did) Then do a make dep LD=ld CC=gcc NM=nm OBJDUMP=objdump AR=ar make modules LD=ld CC=gcc NM=nm OBJDUMP=objdump AR=ar
Perhaps you will get an error message then try to insert a make vmlinux LD=ld CC=gcc NM=nm OBJDUMP=objdump AR=ar
between the last two statements.

V0.7 2005-07-16 http://www.geishuettner.de/docs/Linkstation/
6.3 Mounting cd images I own an archive cd of a computer magazine I wanted to make available on my Linkstation. Because there are some 120.000 files on the DVD I didn’t want to copy each of them to the file system. So I decided to create an iso image (6 GB) and copied it to the ext3 file system. Then I did a insmod loop.o insmod isofs.o
to load the modules I need and then mount cdimage.iso /mnt/hda/webfiles/archive –o loop
Et voila ! All the files of the cd are available over a network share.
6.4 Upgrading the drive I will describe here some steps I made when I replaced the internal drive of my Linkstation. I did this because I wanted to keep the original drive while I made my tests to install a full-grown debian. All the steps you can find here are written down from what I remember. Hopefully I didn’t forget any steps. Connect the Linkstations drive to a normal PC (any x86 pc will do, I used an old 200MHz Pentium for this, bios support for big disks doesn’t matter). Boot from a knoppix cd. Copy the first partition of the Linkstation to a place where the data survives a reboot. I assume the Linkstations drive is connected to the first controller and is thus drive hda. Be careful with the dd commands below you could easily overwrite partitions you still need. dd if=/dev/hda1 /mnt/somesafeplace/hda1.bin
You don’t need to do fix_ext2_magic because you can copy the partition at a low level which doesn’t need to interpret what’s on the drive. Shutdown the PC and connect your new drive. Boot Knoppix again. Run fdisk on the first drive sfdisk /dev/hda
Create three partitions: /dev/hda1 with a size of about 400MB, type linux /dev/hda2 with a size of about 300MB, type swap /dev/hda3 consuming the rest of your free space, type linux Restore the image you created before

V0.7 2005-07-16 http://www.geishuettner.de/docs/Linkstation/
dd if=/mnt/somesafeplace/hda1.bin of=/dev/hda1
Create a swap partition mkswap /dev/hda2
Create a file system for your data mke2fs –j /dev/hda3 tune2fs –c0 –i0 /dev/hda3
That’s it ! If you plan to later install debian on your Linkstation you might need more free space on the first partition. In this case create a partition which is big enough (let’s say 2GB) and restore the image. You might also want to make a bigger swap partition. After the image is restored you can fix_ext2_magic –-fix /dev/hda1
(sometimes it’s necessary to run this more than once, especially if e2fsck complains about a invalid structure). Than you get a first partition that has a valid ext2 filesystem. Now do a e2fsck /dev/hda1
just to be sure there are no errors. After this do a resize2fs –f /dev/hda1
which resizes the 400MB image to the maximum size of the partition. I needed to force resize2fs with the –f command because it complained that I didn’t run e2fsck but I did. Now you can put the drive back into the Linkstation, you don’t need to un-fix_ext2_magic, this is something the Linkstation does itself. Perhaps the first boot after these steps will take longer so don’t despair.
7. Last words You can find all the programs you need in an already compiled state on my website at http://www.geishuettner.de/docs/Linkstation/. Other great sources for information about the Linkstation (2) are: http://groups.yahoo.com/group/Linkstation_General http://linkstationwiki.org/