hahaha
DESCRIPTION
ahaha hahahTRANSCRIPT
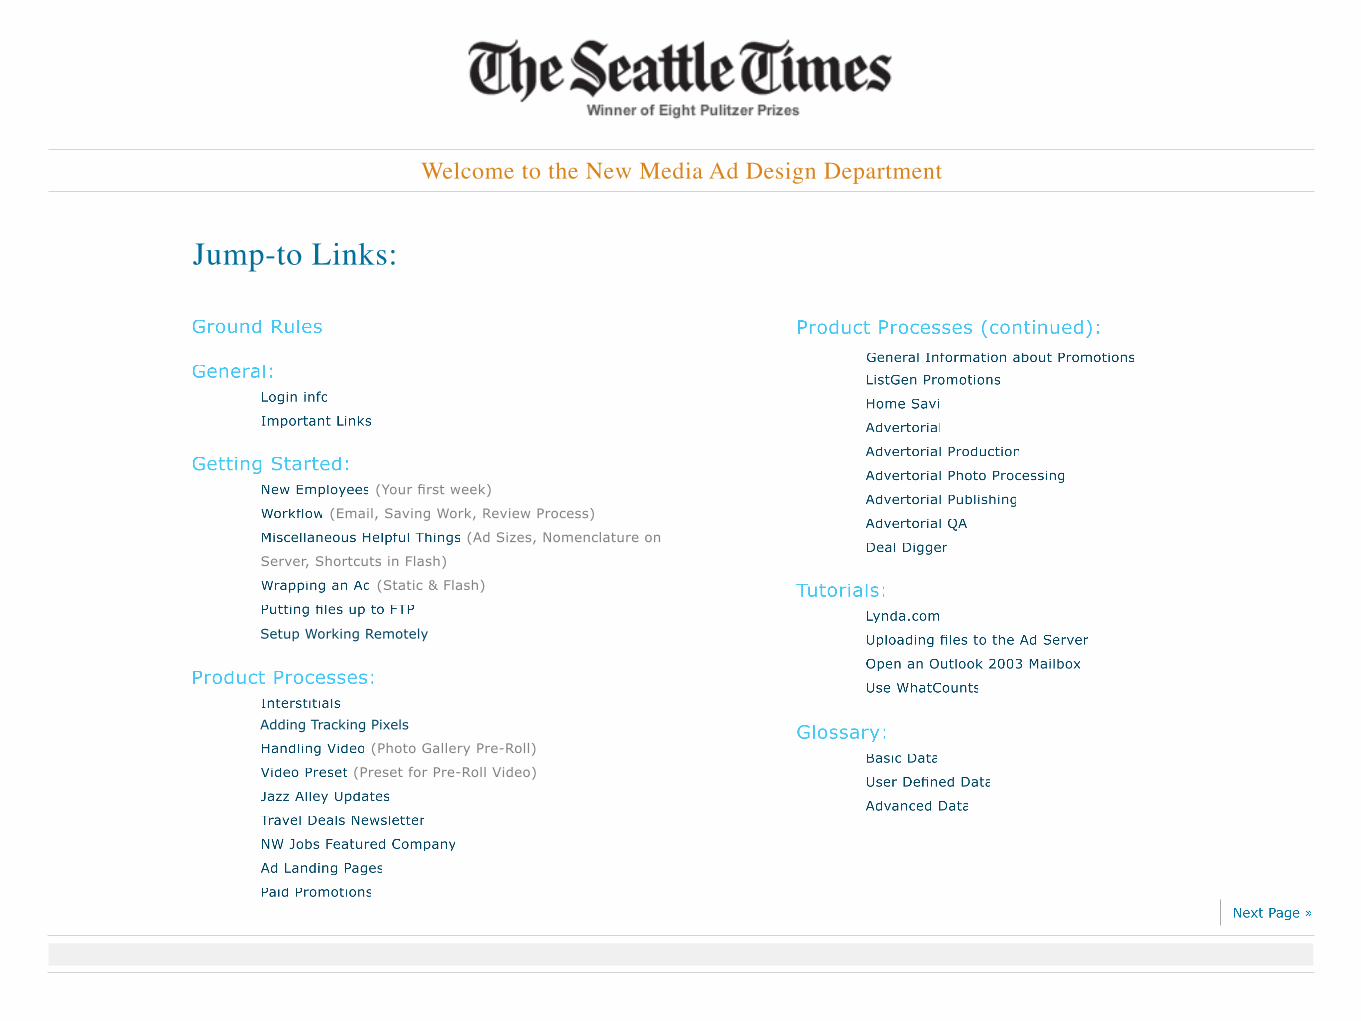
Welcome to the New Media Ad Design Department
Jump-to Links:
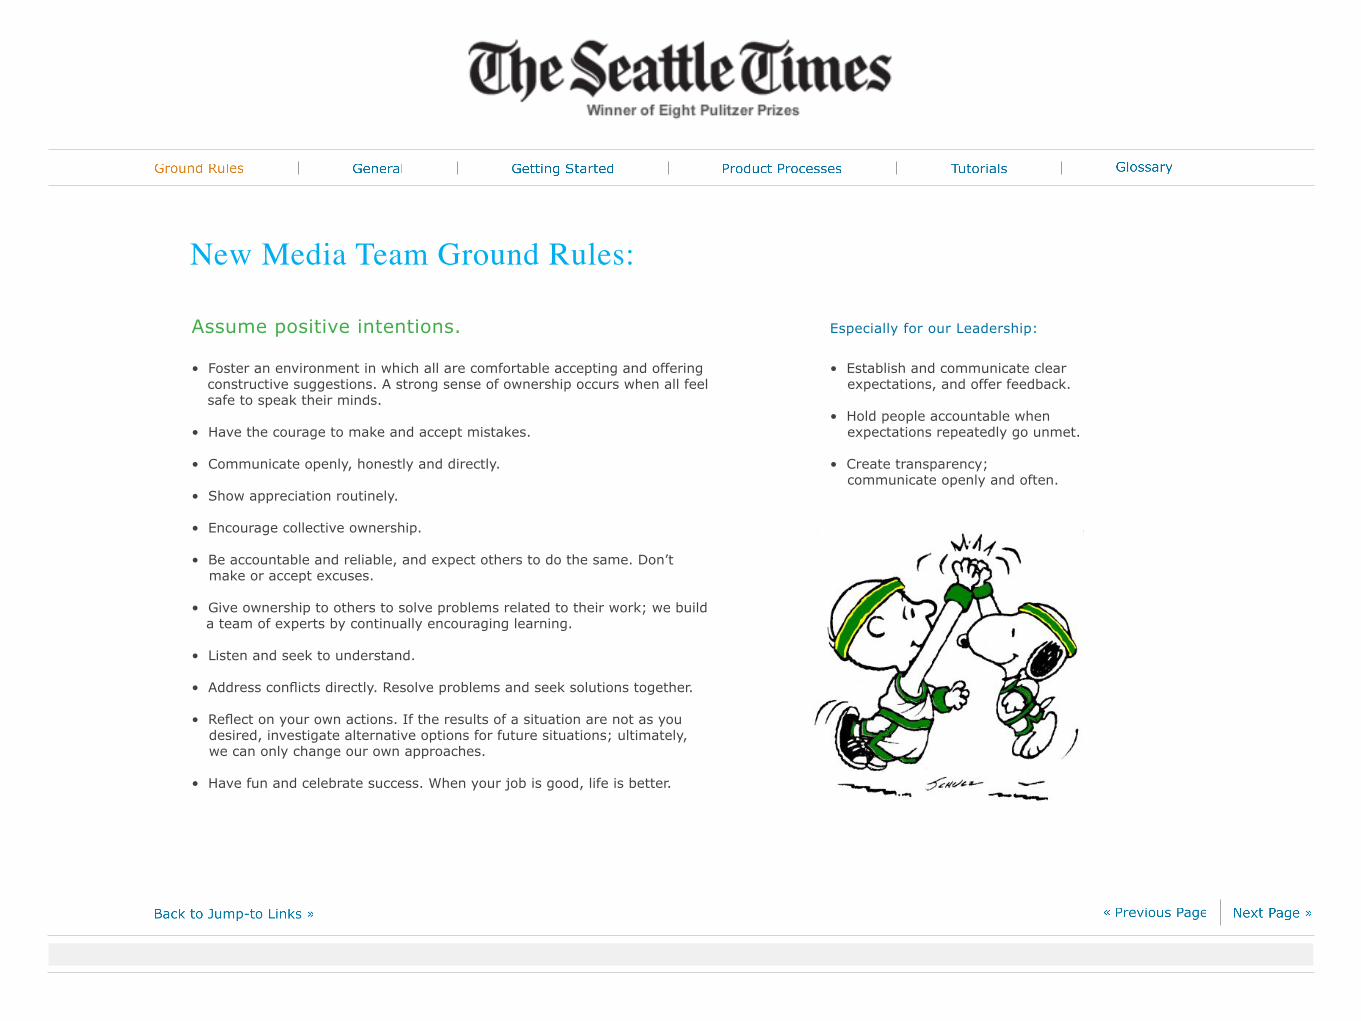
New Media Team Ground Rules:
Assume positive intentions.
• Foster an environment in which all are comfortable accepting and offering constructive suggestions. A strong sense of ownership occurs when all feel safe to speak their minds.
• Have the courage to make and accept mistakes.
• Communicate openly, honestly and directly.
• Show appreciation routinely.
• Encourage collective ownership.
• Be accountable and reliable, and expect others to do the same. Don’t make or accept excuses.
• Give ownership to others to solve problems related to their work; we build a team of experts by continually encouraging learning.
• Listen and seek to understand.
• Address conflicts directly. Resolve problems and seek solutions together.
• Reflect on your own actions. If the results of a situation are not as you desired, investigate alternative options for future situations; ultimately, we can only change our own approaches.
• Have fun and celebrate success. When your job is good, life is better.
Especially for our Leadership:
• Establish and communicate clear expectations, and offer feedback.
• Hold people accountable when expectations repeatedly go unmet.
• Create transparency; communicate openly and often.
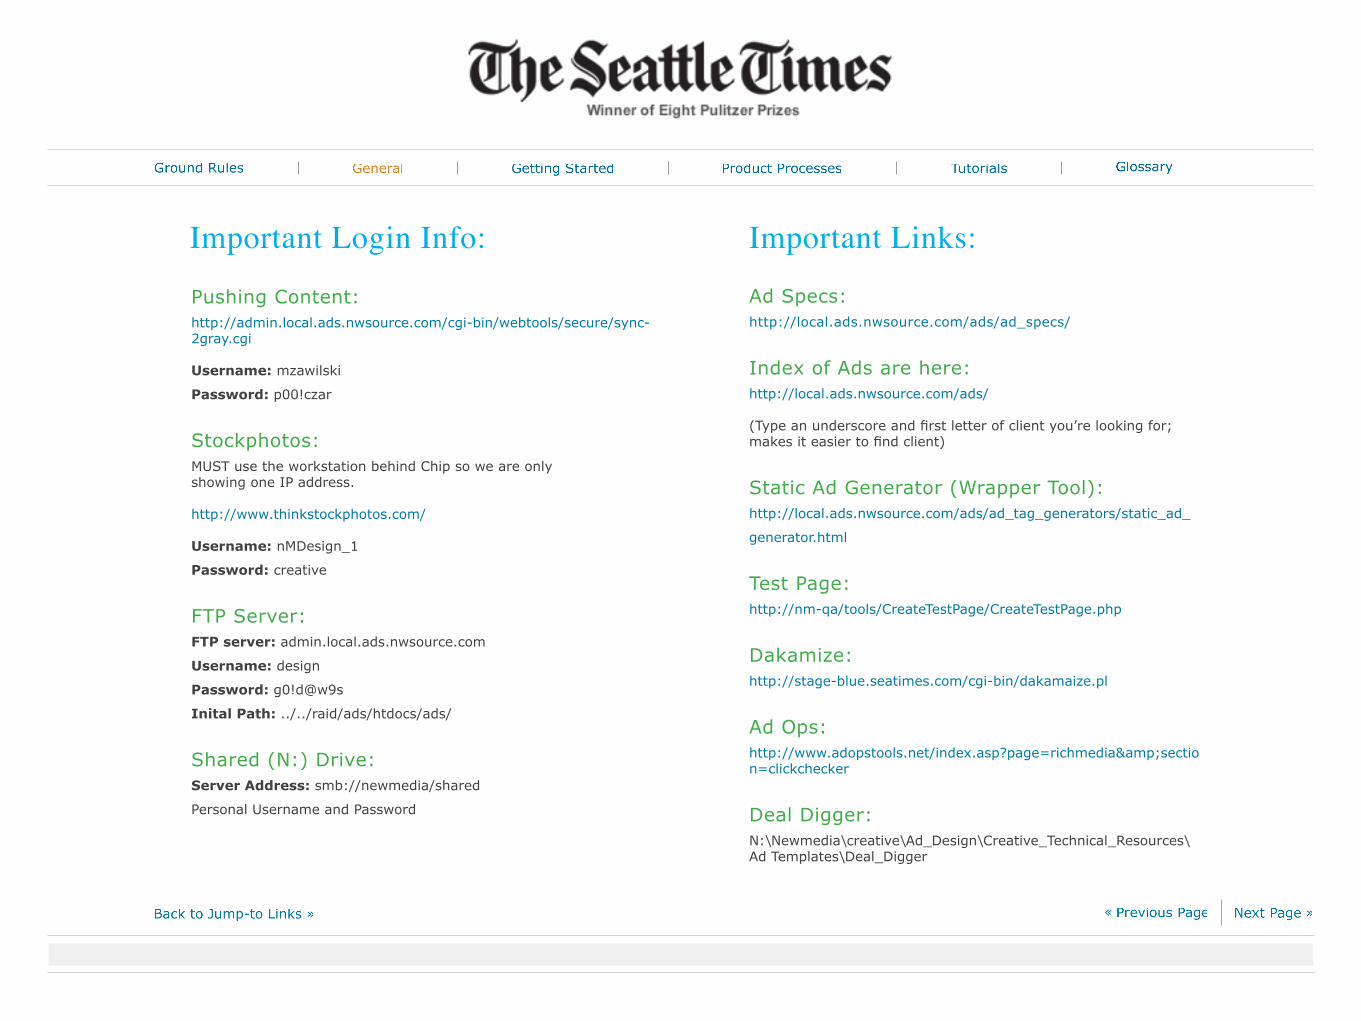
Important Login Info:
Pushing Content: http://admin.local.ads.nwsource.com/cgi-bin/webtools/secure/sync-2gray.cgi
Username: mzawilski
Password: p00!czar
Stockphotos: MUST use the workstation behind Chip so we are only showing one IP address.
http://www.thinkstockphotos.com/
Username: nMDesign_1
Password: creative
FTP Server: FTP server: admin.local.ads.nwsource.com
Username: design
Password: g0!d@w9s
Inital Path: ../../raid/ads/htdocs/ads/
Shared (N:) Drive: Server Address: smb://newmedia/shared
Personal Username and Password
Ad Specs: http://local.ads.nwsource.com/ads/ad_specs/
Index of Ads are here: http://local.ads.nwsource.com/ads/
(Type an underscore and first letter of client you’re looking for; makes it easier to find client)
Static Ad Generator (Wrapper Tool): http://local.ads.nwsource.com/ads/ad_tag_generators/static_ad_
generator.html
Test Page: http://nm-qa/tools/CreateTestPage/CreateTestPage.php
Dakamize: http://stage-blue.seatimes.com/cgi-bin/dakamaize.pl
Ad Ops: http://www.adopstools.net/index.asp?page=richmedia&section=clickchecker
Deal Digger: N:\Newmedia\creative\Ad_Design\Creative_Technical_Resources\Ad Templates\Deal_Digger
Important Links:

New Employees:
Your first week:
• Go to the Security Office in the Fairview building to obtain INDALA badge.
• Orientation with your manager; take tour of the building to find bathrooms, kitchen, etc. and fill out the following documents:
• Tax paperwork I-9 and 1040, show Driver’s License, Birth Certificate, Passport, and/or Social Security Card
• EOP Paper
• Department Checklist
• Direct Deposit
• Emergency Contact Form
• Let your manager know your availability, vacation table and fill out a vacation request form (from New Media Executive Assistant). http://corpmktg.seatimes.com/forms/corp/timeoffdoc.htm
• Set up your voicemail
• Set up your computer with Help Desk. Set new username and password, access Outlook e-mail account, etc. Help Desk will give you an overview of the computer usage. Any technical problems can be reported to Help Desk.
• Fill out the VPN/SSL remote access to the N: Drive by accessing N:\Design\NMDHF_resourcing, if you can contact the Help Desk.
• Fill out the VPN/SSL remote access form: http://corpmktg.sea-times.com/forms/it/RemoteAccessAuthorization.htm and turn it into your manager.
• Review Advertising Design Policies: http://local.ads.nwsource.com/ads/ad_specs/
• Set up your printer. 4600n is the full color printer, 4250dtn is black/white only.
• Go to Start Run, type \\pubprinters and press enter. Double click on the q_new_media_4600n_color, which is the color laser printer near pillar G10. The q_new_media_4250dtn is right by pillar G4. Once you double-click on the printers they will come up as an option when you’re trying to print a document.
• Email the help desk to get a copy a copy of WSFTP (for PC) and Transmit (Mac), if you don’t have a copy installed.
• Mount the mailbox in Outlook to get access to shared folders. You can easily do this by:
1. Open outlook
2. Click on Tools-Account Setting
3. Double Click on the account under the Email Tab
4. Click on More settings, Click on the Advanced Tab
5. Under open additional mailboxes click on the ADD button
6. Type in the mailbox name that you need (EX. – New Media Ad Design)
7. Click Apply and Click OK
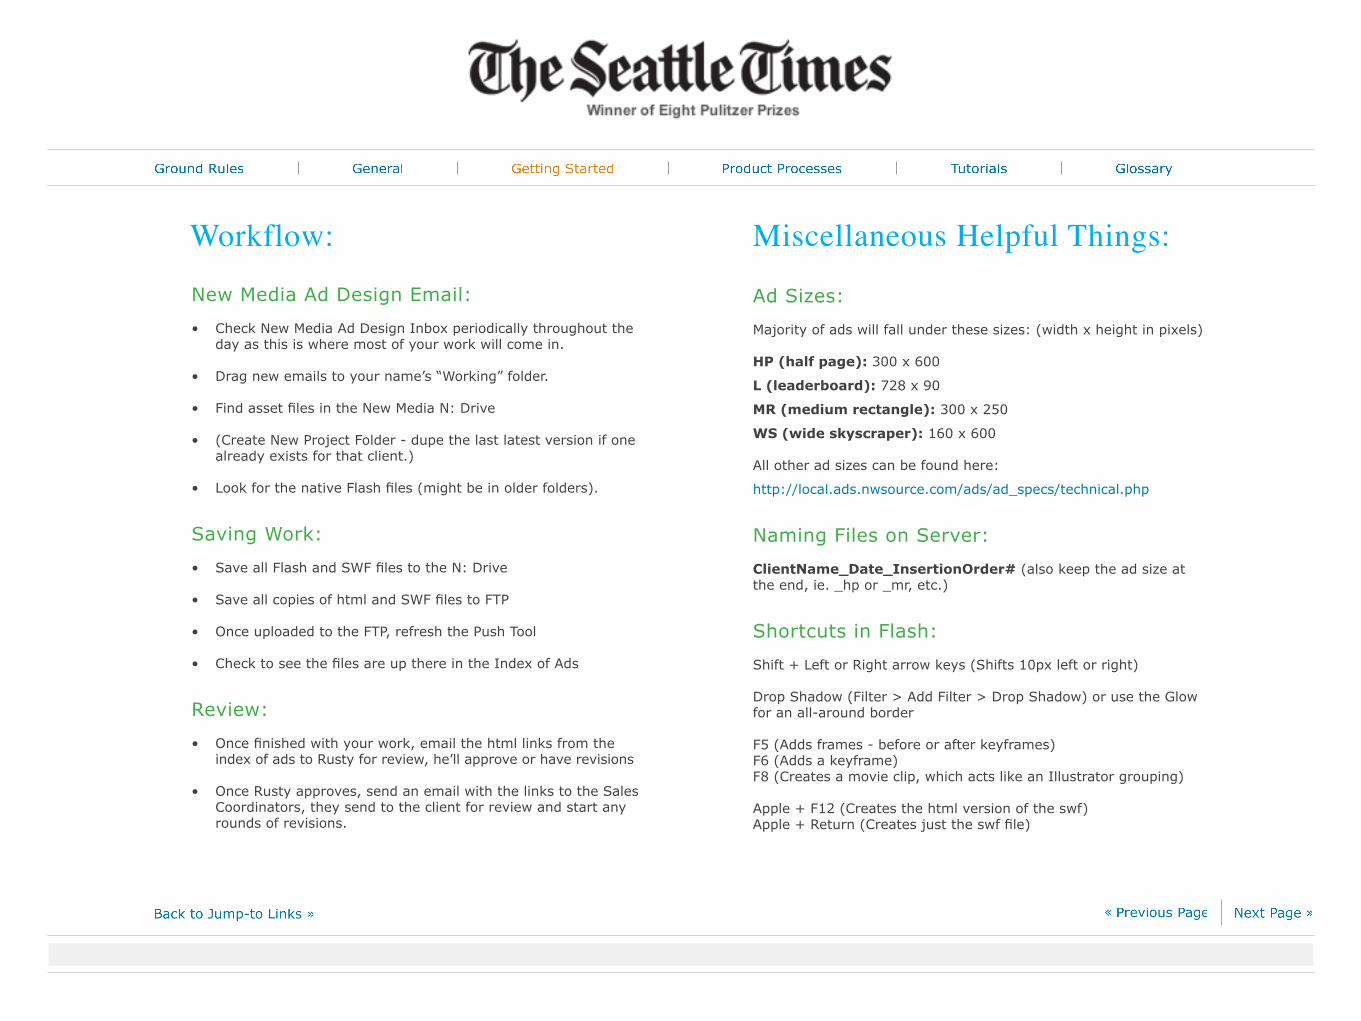
Workflow:
New Media Ad Design Email:
• Check New Media Ad Design Inbox periodically throughout the day as this is where most of your work will come in.
• Drag new emails to your name’s “Working” folder.
• Find asset files in the New Media N: Drive
• (Create New Project Folder - dupe the last latest version if one already exists for that client.)
• Look for the native Flash files (might be in older folders).
Saving Work:
• Save all Flash and SWF files to the N: Drive
• Save all copies of html and SWF files to FTP
• Once uploaded to the FTP, refresh the Push Tool
• Check to see the files are up there in the Index of Ads
Review:
• Once finished with your work, email the html links from the index of ads to Rusty for review, he’ll approve or have revisions
• Once Rusty approves, send an email with the links to the Sales Coordinators, they send to the client for review and start any rounds of revisions.
Ad Sizes:
Majority of ads will fall under these sizes: (width x height in pixels)
HP (half page): 300 x 600
L (leaderboard): 728 x 90
MR (medium rectangle): 300 x 250
WS (wide skyscraper): 160 x 600
All other ad sizes can be found here:
http://local.ads.nwsource.com/ads/ad_specs/technical.php
Naming Files on Server:
ClientName_Date_InsertionOrder# (also keep the ad size at the end, ie. _hp or _mr, etc.)
Shortcuts in Flash:
Shift + Left or Right arrow keys (Shifts 10px left or right)
Drop Shadow (Filter > Add Filter > Drop Shadow) or use the Glow for an all-around border
F5 (Adds frames - before or after keyframes)F6 (Adds a keyframe)F8 (Creates a movie clip, which acts like an Illustrator grouping)
Apple + F12 (Creates the html version of the swf)Apple + Return (Creates just the swf file)
Miscellaneous Helpful Things:
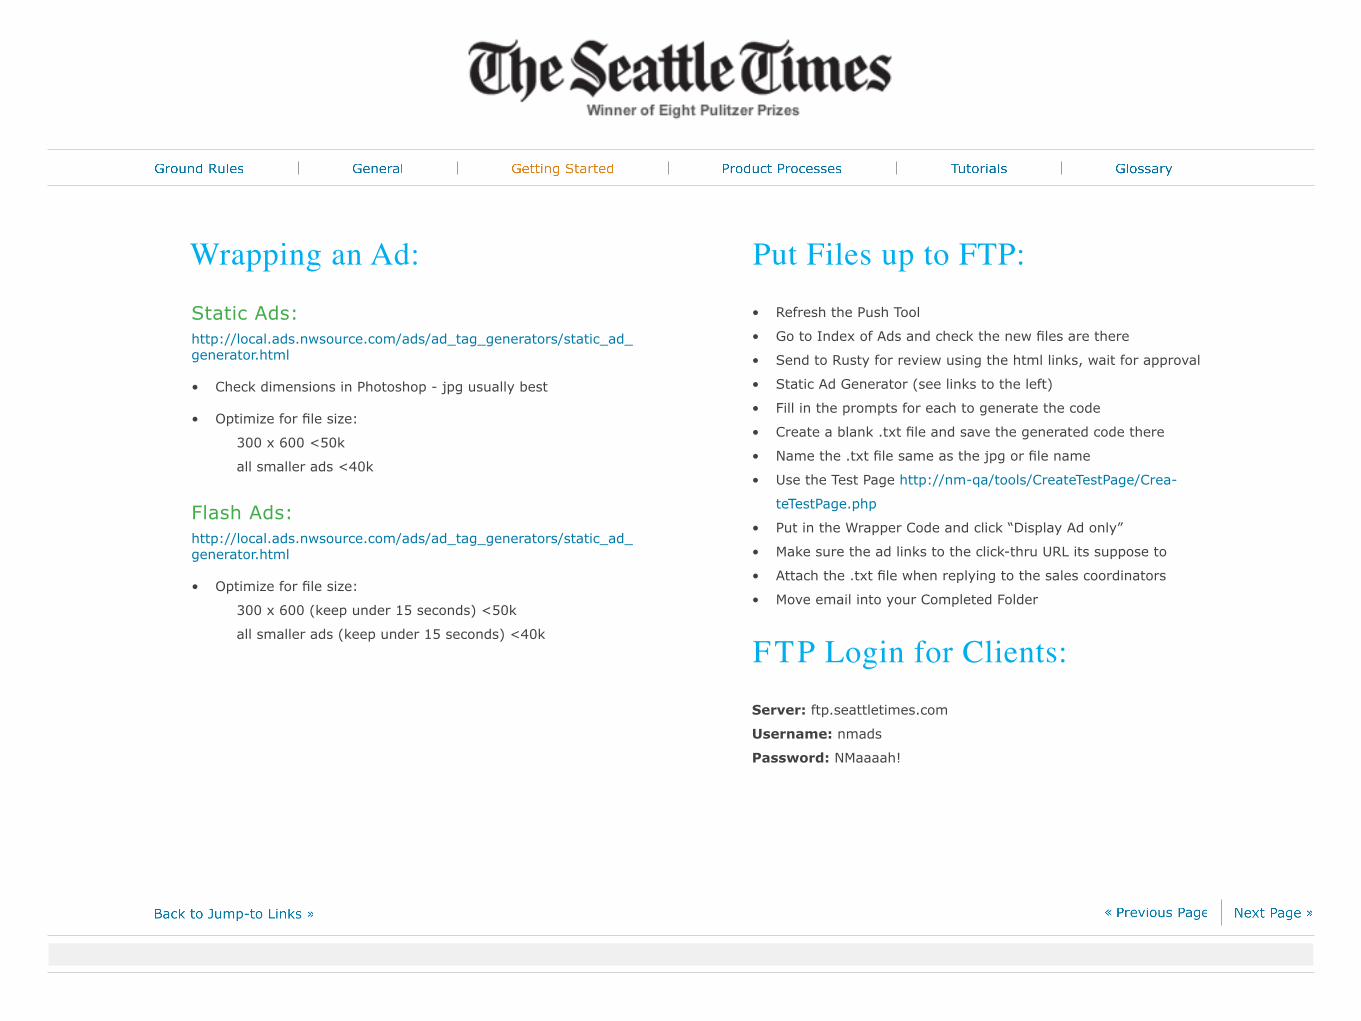
Wrapping an Ad:
Static Ads: http://local.ads.nwsource.com/ads/ad_tag_generators/static_ad_generator.html
• Check dimensions in Photoshop - jpg usually best
• Optimize for file size:
300 x 600 <50k
all smaller ads <40k
Flash Ads: http://local.ads.nwsource.com/ads/ad_tag_generators/static_ad_generator.html
• Optimize for file size:
300 x 600 (keep under 15 seconds) <50k
all smaller ads (keep under 15 seconds) <40k
• Refresh the Push Tool
• Go to Index of Ads and check the new files are there
• Send to Rusty for review using the html links, wait for approval
• Static Ad Generator (see links to the left)
• Fill in the prompts for each to generate the code
• Create a blank .txt file and save the generated code there
• Name the .txt file same as the jpg or file name
• Use the Test Page http://nm-qa/tools/CreateTestPage/Crea-
teTestPage.php
• Put in the Wrapper Code and click “Display Ad only”
• Make sure the ad links to the click-thru URL its suppose to
• Attach the .txt file when replying to the sales coordinators
• Move email into your Completed Folder
Put Files up to FTP:
Server: ftp.seattletimes.com
Username: nmads
Password: NMaaaah!
FTP Login for Clients:
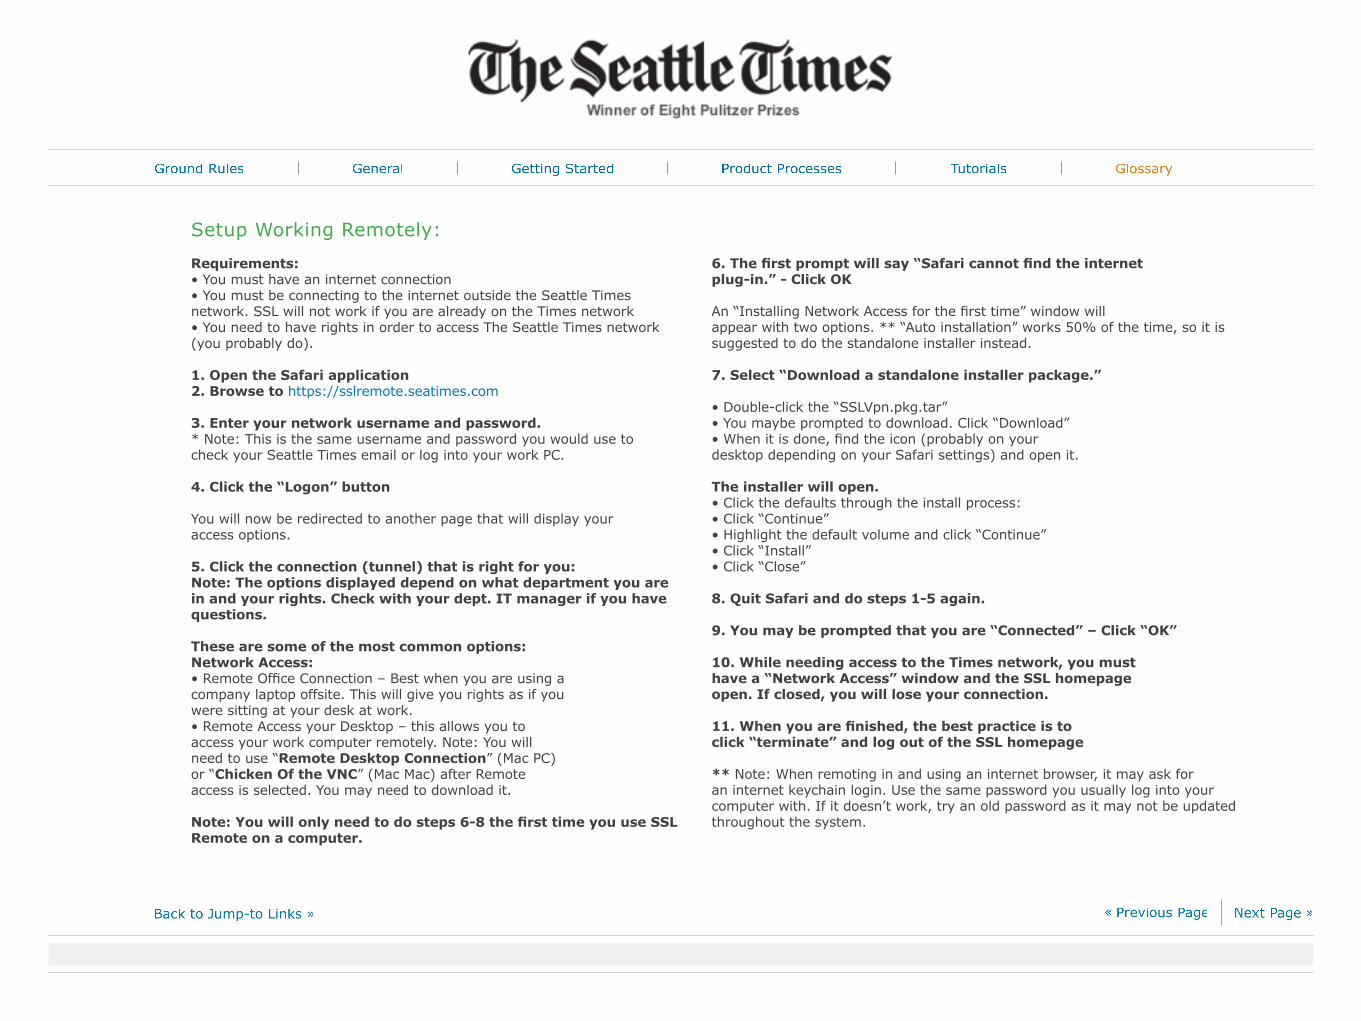
Setup Working Remotely:
Requirements:• You must have an internet connection• You must be connecting to the internet outside the Seattle Times network. SSL will not work if you are already on the Times network• You need to have rights in order to access The Seattle Times network (you probably do).
1. Open the Safari application2. Browse to https://sslremote.seatimes.com
3. Enter your network username and password.* Note: This is the same username and password you would use tocheck your Seattle Times email or log into your work PC.
4. Click the “Logon” button
You will now be redirected to another page that will display youraccess options.
5. Click the connection (tunnel) that is right for you:Note: The options displayed depend on what department you arein and your rights. Check with your dept. IT manager if you havequestions.
These are some of the most common options:Network Access:• Remote Office Connection – Best when you are using acompany laptop offsite. This will give you rights as if youwere sitting at your desk at work.• Remote Access your Desktop – this allows you toaccess your work computer remotely. Note: You willneed to use “Remote Desktop Connection” (Mac PC)or “Chicken Of the VNC” (Mac Mac) after Remoteaccess is selected. You may need to download it.
Note: You will only need to do steps 6-8 the first time you use SSLRemote on a computer.
6. The first prompt will say “Safari cannot find the internetplug-in.” - Click OK
An “Installing Network Access for the first time” window willappear with two options. ** “Auto installation” works 50% of the time, so it is suggested to do the standalone installer instead.
7. Select “Download a standalone installer package.”
• Double-click the “SSLVpn.pkg.tar”• You maybe prompted to download. Click “Download”• When it is done, find the icon (probably on yourdesktop depending on your Safari settings) and open it.
The installer will open.• Click the defaults through the install process:• Click “Continue”• Highlight the default volume and click “Continue”• Click “Install”• Click “Close”
8. Quit Safari and do steps 1-5 again.
9. You may be prompted that you are “Connected” – Click “OK”
10. While needing access to the Times network, you musthave a “Network Access” window and the SSL homepageopen. If closed, you will lose your connection.
11. When you are finished, the best practice is toclick “terminate” and log out of the SSL homepage
** Note: When remoting in and using an internet browser, it may ask for an internet keychain login. Use the same password you usually log into your computer with. If it doesn’t work, try an old password as it may not be updated throughout the system.
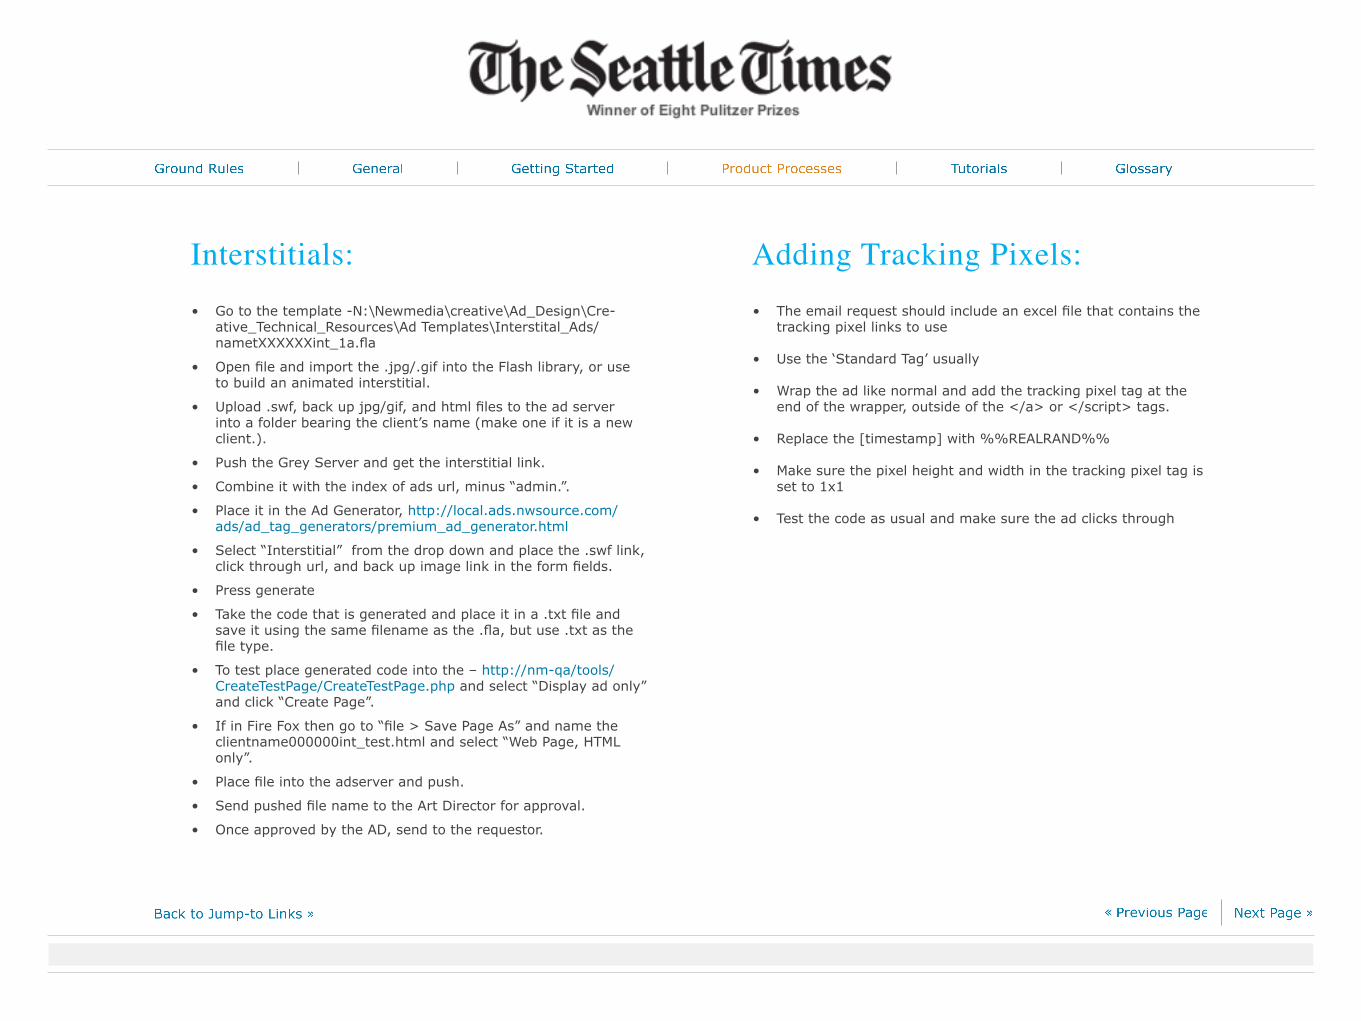
Interstitials:• Go to the template -N:\Newmedia\creative\Ad_Design\Cre-
ative_Technical_Resources\Ad Templates\Interstital_Ads/nametXXXXXXint_1a.fla
• Open file and import the .jpg/.gif into the Flash library, or use to build an animated interstitial.
• Upload .swf, back up jpg/gif, and html files to the ad server into a folder bearing the client’s name (make one if it is a new client.).
• Push the Grey Server and get the interstitial link.
• Combine it with the index of ads url, minus “admin.”.
• Place it in the Ad Generator, http://local.ads.nwsource.com/ads/ad_tag_generators/premium_ad_generator.html
• Select “Interstitial” from the drop down and place the .swf link, click through url, and back up image link in the form fields.
• Press generate
• Take the code that is generated and place it in a .txt file and save it using the same filename as the .fla, but use .txt as the file type.
• To test place generated code into the – http://nm-qa/tools/CreateTestPage/CreateTestPage.php and select “Display ad only” and click “Create Page”.
• If in Fire Fox then go to “file > Save Page As” and name the clientname000000int_test.html and select “Web Page, HTML only”.
• Place file into the adserver and push.
• Send pushed file name to the Art Director for approval.
• Once approved by the AD, send to the requestor.
Adding Tracking Pixels:• The email request should include an excel file that contains the
tracking pixel links to use
• Use the ‘Standard Tag’ usually
• Wrap the ad like normal and add the tracking pixel tag at the end of the wrapper, outside of the </a> or </script> tags.
• Replace the [timestamp] with %%REALRAND%%
• Make sure the pixel height and width in the tracking pixel tag is set to 1x1
• Test the code as usual and make sure the ad clicks through

Handling Video:
Photo Gallery Pre-Roll: Preparing a video for Photo Gallery Pre-Roll
1) open the video file with Adobe Media Encoder
2) Select “Settings...” from the right column
3) Select “Pre-Roll Video from the Preset drop down menu. (see below for instructions on creating a preset if you haven’t already done this)
4) If necessary trim the video length to 30 seconds. (less than 30 seconds is ok if that’s all the content of the video)
(ex: if you want the video to start 10 seconds into the video and end at 40 seconds into the video:
- set time code to 00;00;10;00 and click “Set In Point” next to the time code - set time code to 00;00;40;00 and click “Set Out Point” next to the time code)
5) Make any other custom adjustments if necessary. You may receive videos with different aspect ratios. This is fine as long as the height is scaled to fit in the video player. Any video can NOT have a height of more than 337 pixels.
6) Click “OK” button at the bottom right
7) Click “Start Queue” to process the video
8) Upload you video to the ad server. Files should be placed in ads/video and then a folder for the appropriate company name. You will need to create a new folder if one doesn’t already exist for the client.
(ex: A video ad for Alaska Airlines that is beginning on 12/31/09 would be named: “alaskair123109_400x300.flv”
- This file would be uploaded to :ads/videos/a/alaskaair/1209/ - Push the file live. - Here is the link that you would use in the Flash file:http://local.ads.nwsource.com/ads/videos/a/alaskaair/alaskair123109_400x300.flv)
9) Open photo_gallery_preroll_610x370_template.fla and set the variable “videoSource” equal to your new link.
10) Publish a new swf.
11) Upload this video to the ad server in the same folder as your flv.
12) Push it live.
13) Open “photo_gallery_preroll_code” from the “Ad_Templates” folder
14) If the client provided a backup ad, open “photo_gallery_preroll_with_backup_ad.txt” from the “Ad_Templates” folder (The backup ad’s dimensions are 610x427)
15) If the client did NOT provide a backup ad, open “photo_gallery_preroll_no_backup_ad.txt” from the “Ad_Templates” folder
16) Paste the link to the swf in the variable “swfSrc”
17) Enter the click through url in the variable “clickThroughURL”
18) If using the backup ad template, enter the link to the backup ad in the variable “backupImage”
19) Save the file.
20) Send the new code to the Sales Coordinator.

Video Preset:Preset for Pre-Roll Video: Adobe Media Encoder settingsExport SettingsFormat: flv | f4v
Format Tab at the bottom rightMultiplexing: flv
Video Tab at the bottom rightBasic Video SettingsCodec: On2VP6Resize Video: Frame Width:400Frame Height:300Frame Rate: 15 fps
Bitrate SettingsBitrate Encoding: VBREncoding Passes: TwoBitrate: 380Minimum Bitrate: 80%Maximum Bitrate: 120%Bitrate Variability: 80%Advanced SettingsSet Key Frame DistanceKey Frame Distance: 15
Audio Tab at the bottom rightOutput Channels: StereoBitrate: 96 kbps
When finished with these settings, click “Save Preset” icon (the floppy disk icon at the top right column). Name the preset “Pre-Roll video”. Any time you need to process a video for pre-roll, select “Pre-Roll Video” from the preset drop menu.
How to Update Jazz Alley: 1) All you need to do is open “jazzalleyhp_1a.psd” in the Jazz Alley folder in the Clients folder to make the necessary updates.2) Save the finished ad as” jazzalleyhp_1a.jpg” 3) Upload it to: http://local.ads.nwsource.com/ads/sites/jazzalley/backup_image/jazzalleyhp_1a.jpg And push it live.
How it works:The new Flash ad calls this jpg and loads it into the swf. This jpg is also the backup image in the ad tag.
Travel Deals Newsletter: NOTE: Use templates located at N:\Newmedia\creative\Ad_Design\Creative_Technical_Resources\Ad Templates\Email\Travel_Newsletter\templates.
1) Ad Design receives assets from Sales Coordinators
2) Ads are created/checked. Ads created are sent to Sales Coordinators for client approval. 3rd party ads are checked and, upon approval, placed.
4) After the creative has been checked or approved, then place the images on the ad server, http://local.ads.nwsource.com/ads/sites/traveldeals/ in the month appropriate folder (create one if necessary).
5) Push the ad server and swap out the photos and hyperlinks in the html.
6) Change the publication date.
7) Place on the ad server in the correct folder and push.
8) Go to: http://seattletimes.whatcounts.com/login?r=1 (Realm: seattletimes_nwsource |
Login: [email protected] | Password: email4you)
9) Go to > Content Tab > View Templates > Select Travel Marketplace & Double Click on it > In the Content Box - HTML - erase the old HTML & paste NEW HTML > Make up Subject Line > Hit Update > Go to Tasks tab & go to Test List from dropdown menu > Under List Name, select Travel Marketplace & hit Test List button > In Templates, select Travel Marketplace again > Recipients: [email protected], [email protected], [email protected],[email protected], [email protected], [email protected] > Uncheck Multipart & Plain text boxes > Wait until test progress is complete until you logout > Save the test email for backup and must get an email approving the newsletter before sending it out for real.
10) The actual email blast goes out Wednesdays around 3pm. Once the test email gets approved, log back into WhatCounts. Go to > Tasks Tab > Deploy > List Name: Travel Marketplace Template: Travel Marketplace Format: HTML to everyone > Hit Continue (this sends out the email blast). Check for confirmation in inbox.
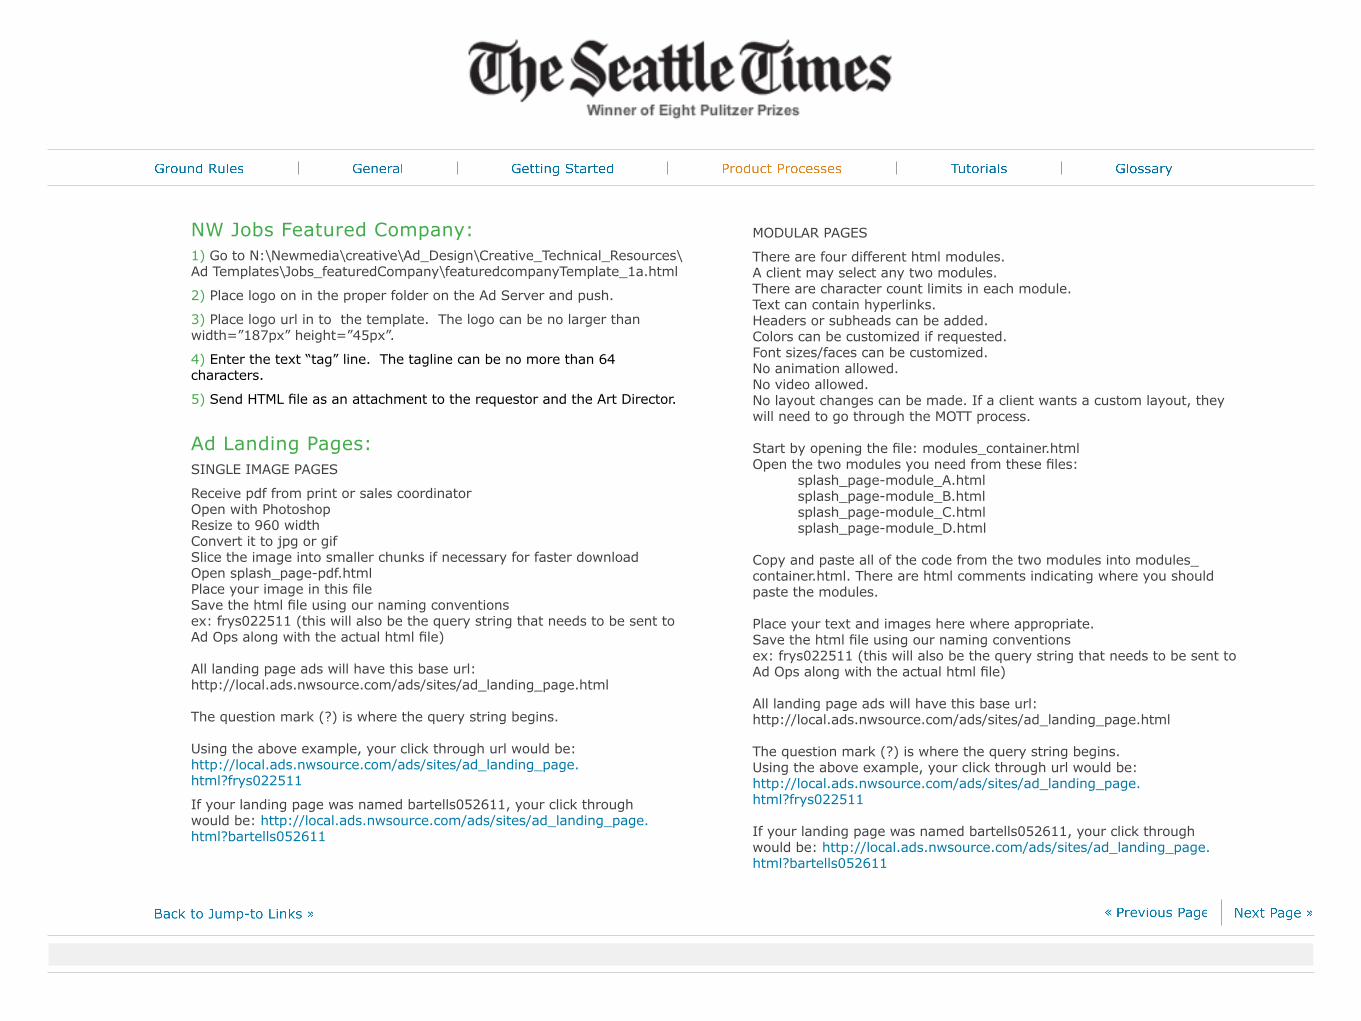
NW Jobs Featured Company: 1) Go to N:\Newmedia\creative\Ad_Design\Creative_Technical_Resources\Ad Templates\Jobs_featuredCompany\featuredcompanyTemplate_1a.html
2) Place logo on in the proper folder on the Ad Server and push.
3) Place logo url in to the template. The logo can be no larger than width=”187px” height=”45px”.
4) Enter the text “tag” line. The tagline can be no more than 64 characters.
5) Send HTML file as an attachment to the requestor and the Art Director.
Ad Landing Pages: SINGLE IMAGE PAGES
Receive pdf from print or sales coordinatorOpen with PhotoshopResize to 960 widthConvert it to jpg or gifSlice the image into smaller chunks if necessary for faster downloadOpen splash_page-pdf.html Place your image in this fileSave the html file using our naming conventionsex: frys022511 (this will also be the query string that needs to be sent to Ad Ops along with the actual html file)
All landing page ads will have this base url:http://local.ads.nwsource.com/ads/sites/ad_landing_page.html
The question mark (?) is where the query string begins.
Using the above example, your click through url would be:http://local.ads.nwsource.com/ads/sites/ad_landing_page.html?frys022511
If your landing page was named bartells052611, your click through would be: http://local.ads.nwsource.com/ads/sites/ad_landing_page.html?bartells052611
MODULAR PAGES
There are four different html modules. A client may select any two modules. There are character count limits in each module. Text can contain hyperlinks.Headers or subheads can be added.Colors can be customized if requested.Font sizes/faces can be customized.No animation allowed. No video allowed.No layout changes can be made. If a client wants a custom layout, they will need to go through the MOTT process.
Start by opening the file: modules_container.htmlOpen the two modules you need from these files:
splash_page-module_A.htmlsplash_page-module_B.htmlsplash_page-module_C.htmlsplash_page-module_D.html
Copy and paste all of the code from the two modules into modules_container.html. There are html comments indicating where you should paste the modules.
Place your text and images here where appropriate.Save the html file using our naming conventionsex: frys022511 (this will also be the query string that needs to be sent to Ad Ops along with the actual html file)
All landing page ads will have this base url:http://local.ads.nwsource.com/ads/sites/ad_landing_page.html
The question mark (?) is where the query string begins.Using the above example, your click through url would be:http://local.ads.nwsource.com/ads/sites/ad_landing_page.html?frys022511
If your landing page was named bartells052611, your click through would be: http://local.ads.nwsource.com/ads/sites/ad_landing_page.html?bartells052611
Paid Promotions:
1) Promotions Coordinator sends designer the first version of marketing plan for review.
Note: Please be sure to review dates and make sure they will work. Give feedback.
Note: Promotions Coordinator creates a folder on DESIGN_DATA/marketing and promotions/contests and promotions and places client delivered assets there.
2) Promotions Coordinator sends final marketing plan along with other worksheets for product build.
3) Design begins on Photoshop mockups.
4) Review initial direction with Art Director for feedback on branding and design.
Note: Files should be saved toDESIGN_DATA/marketing and promotions/contests and promotions/(whatever the content name is)
5) Send Art Director and Promotions Coordinator Photoshop mockup for first review.
6) Promotions Coordinator reviews with stakeholders and supplies designer with feedback.
7) Repeat steps 4 and 5 until design mockups are approved.
8) Design of ads begins. Review initial direction with Art Director for feedback on branding and design.
9) Send Promotions Coordinator mockups for review.
10) Site build begins.
Note: See Operational Worksheet for all build info. Promotions Coordinator should provide this worksheet. Some URLs and all text will be found in Marketing Plan.
11) Please test in users folder. Should not be put in NWS directory yet. The designer building the page should be testing while in build. Be sure to test on multiple platforms and browsers.
12) When testing is complete, place in appropriate nws/contest folder. The operational worksheet should provide the file structure on the server.
13) Push content live for testing.
Note: Be sure to test forms on machine to see if they work. They will not work until live. Since the promos won’t be live you can push early to test the forms. For any technical bugs that can not be worked out in HTML, please contact the Help Desk.
14) Send Promotions Coordinator build once complete.
Note: Promotions Coordinator sends to Ad Ops for unit testing and QA. Unit testing is just a careful run through of the site to make sure everything is functioning correctly. Clicking of all links, checking for typos, etc. This is sort of like a pre QA check.
15) Ad Ops sends link to core team for unit testing. Core teams should be Designer, Project manager/lead.
16) Ad Ops reports all bugs directly to designer. Designer fixes any bugs and tells Ad Ops to re-test. Repeat this step until all bugs have been resolved.
17) Send Promotions Coordinator all final banners and ad elements for scheduling two days prior to launch.

General Information about Promotions:
• Page width = 800
• Site logos need to have a solid background behind the logo area. The rest of the masthead can have texture, pattern or image
• All pages needed are listed in the Operational Worksheet along with their locations/paths
• Final file location is documented in the Operational Worksheet
• Wireframes for content on each page can be found in the Marketing Plan
• Always include alt tag values with images. These should be a short description. EX. Enter button image = “Enter” or Logo image = “NWsource”
• Please use your “users” folder on the nws server to browser test build files. Create a new folder in users and you can work from there
• Move contest files to “contests” directory when they are ready for unit testing and review
• To view design builds: in users folder: stage-purple.nwsource.com:81/nws_working/(enter path) in contests folder: stage-purple,nwsource.com:81/contests/(enter path)
• Pay special attention to the CID found in the Operational Worksheet. This is the number that tells the engine which contest the entry is for
• Contest form will not work until the files are pushed live. Files should not be pushed live until contest is ready for unit testing and QA
• Anything that is pushed live is available via our full site search and we do not want people to be able to access those files until we absolutely have to
• To make files live, use the Salmon tool and choose “nws contests” http://admin-purple.seatimes.com/ Note: You should’ve been supplied a Salmon log-in. If not, see your supervisor.
• When building, always use relative paths.
• HTML templateso For using the most current HTML template, you should use the latest promotion created as a guide. The NWsource and marketplace templates are the same. Please follow detailed instructions in comments of HTML
• Text formattingo Capitalization style is initial cap only EX. “More show details” rather than “ More Show Details”o E-mail is always hyphenatedo Web site is always two words with initial capo Promotion label in Univers bold condensed on right. Does not link
• Navigationo Web site logo always links to home page of product web site EX. NWsource logo links to http://www.nwsource.com/o Main graphic headers/design elements link back to “enter to win” or promotion splash pageo Privacy link always goes to Network privacy pop up (see html template)o Links to other sites and into product sites do not open in new windows
• Links o Links to index pages of sites always have a forward slash at the end EX. http://www.nwsource.com/
• Head Tagso Title tag updated (see Operational Worksheet for text)o All pages need stylesheet declaration (see HTML template for code to include)o All pages need OAS set up tag posted into the head elemento Please see HTML template for code to include, and change values where noted in HTML.
• Network Bar and Footero All page types must have network bar and standard footer esi includes (please see HTML template for code)
• Formso Contest pages only need script pasted into the head element (see above) and form code from template. See HTML templateo Change values per contest where noted in HTMLo Values found in Operational Worksheeto Opt-in text found in Marketing Plano E-mail a friend form (see HTML template for code)o Change values where noted in HTMLo E-mail a friend text area and subject line are in Marketing plan

ListGen Promotions:
1) Promotions Coordinator sends designer the first version of marketing plan for review.
Note: Please be sure to review dates and make sure they will work. Give feedback (Note: Promotions Coordinator creates a folder on DESIGN_DATA/marketing and promotions/contests and promotions and places client delivered assets there).
2) Promotions Coordinator sends final marketing plan along with other worksheets for product build.
3) Design of ads begins. Review initial direction with Art Director for feedback on branding and design. Send Promotions Coordinator mockups for review.
Note: Files should be saved toDESIGN_DATA/marketing and promotions/contests and promotions/(whatever the content name is).
4) Build begins (Note: See Operational Worksheet for all build info. Promotions Coordinator should provide this worksheet. Some URLs and all text will be found in Marketing Plan).
5) Please test in users folder. Should not be put in NWS directory yet. The designer building the page should be testing while in build. Be sure to test on multiple platforms and browsers.
6) When testing is complete, place in appropriate nws/contest folder. The operational worksheet should provide the file structure on the server. Use salmon to push contest live for testing (Note: Be sure to test forms on machine to see if they work. They will not work until live. Since the promos won’t be live you can push early to test the forms).
7) Send Promotions Coordinator build once complete. Promotions Coordinator sends to Ad Ops for unit testing and QA. Unit testing is just a careful run through of the site to make sure everything is functioning correctly. Clicking of all links, checking for typos, etc.
8) Ad Ops sends link to core team for unit testing. Core teams should be Designer, Project manager/Lead.
9) Ad Ops reports all bugs directly to designer. Designer fixes any bugs and tells Ad Ops to re-test. Repeat this step until all bugs have been resolved.
10) Send Promotions Coordinator all final files for scheduling two days prior to launch.
General Info about ListGen Promotions:
• The ListGen Promotion uses the nwsource contest tool, but all creative files are banner ads only. You will need to update several html templates. The image at the top of the 300x600 ad should be 300x350 pixels. In the form, only update the parts that the html comments instruct you to. You can customize any enter buttons, headers, and background colors to go along with the look of the advertiser’s campaign.
• Items to create:
o index.html - 300x600 ad with contest entry form. This page contains an iframe that contains the ad
o form.html - Content that is seen in the iframe of index.html
o thankyou.html - Thank you page that appears when a user successfully submits the entry form
o rules.html – Rules for the contest. This is a popup window that is triggered by clicking the rules link on the 300x600 ad
o email.html – Email a friend and tell them about the contest page. This is a popup window that is triggered by clicking the email a friend link on the 300x600 ad
o email_thanks.html – Thank you page that appears when a user successfully submits the email a friend form
o 300x250 ad - Contains no form functionality. It clicks through to index.html
o 728x90 ad - Contains no form functionality. It clicks through to index.html
Home Savi:
Rightside “Small” module
1) optimize the image and resize to 100x61px
2) place image on the Ad Server in to the correct month’s folder. Create one if need be and push.- http://local.ads.nwsource.com/ads/_h/home_savvi/
3) Set the link in to the Home Savi template. (located here N:\Newmedia\creative\Ad_Design\Creative_Technical_Resources\Ad Templates\Homesavi\templates\homesavvi_121310lsc_1a.html
4) Change the text to the text submitted by marketing.
5) Send HTML file back to the requestor
Leftside “Large” module1) optimize the image and resize to 160x100px
2) place image on the Ad Server in to the correct month’s folder. Create one if need be and push.- http://local.ads.nwsource.com/ads/_h/home_savvi/
3) Set the link in to the Home Savi template. (located here N:\Newmedia\creative\Ad_Design\Creative_Technical_Resources\Ad Templates\Homesavi\templates\homesavvi_121310rsc_1a.html
4) Change the text to the text submitted by marketing.
5) Send HTML file back to the requestor
Advertorial:
Note: Before copy editing, create a personal working folder on Monday for this week’s content in your document folder or on your desktop.
1) Copy /raid/static_pages/nwc/realestate/blog_templates and /raid/static_pages/nwc/realestate/adv_cont_inc folders to this week’s working folder.
2) Grab docs and image files for production from City Living and Floor plan folders at \\marketing\Shared\SharedNewMedia|NewConstruction. Content will¬ be available by 10:15 AM Monday AM.
If you don’t see new content, contact Linda Hughes. Check properties against the NWhomes.com Pricing Sheet & Content Calendar spreadsheet, sent out weekly by Khankham to the shared inbox by 9 AM Monday (or on Friday by noon preceding a Monday holiday), to see which properties should be used for the home page and New Homes page.
The floorplan property, in addition to being placed in the Floor Plan folder, will have FP in the filename. If there isn’t a new home page and/or featured community property for the current week, use one of the properties from the Featured Communities archive, giving preference to the most-recent (within the last three months) properties in the archive.
3) Copy-edit out time-sensitive references, like mentions of the prior weekend’s open houses. Also check that copy follows AP and house style guides and edit any awkward phrases or sentences.
4) Look for locations and places available on NWSource and link to them from property descriptions.
5) Headline used in Movable Type post = property name + neighborhood in parentheses, e.g. Olive 8 (Downtown).
6) Featured Community head + blurb copy used in the upper left module of http://marketplace.nwsource.com/realestate/newhomes needs to be < 190 characters.
7) Find a home copy located in the lower right module of http://marketplace.nwsource.com/realestate/newhomes needs to be < 140 characters.
8) More to explore copy located on http://marketplace.nwsource.com/realestate/newhomes needs to be < 125 characters.

Advertorial Production:
Note: Before production, create a personal working folder on Monday for this week’s content in your document folder or on your desktop.
1) The folder /raid/static_pages/nwc/realestate/adv_cont_inc includes files for the home page featured New Homes spot (featured_newhome.esi), New Homes page featured spot (featured_community.esi) and New Homes page secondary featured spots (more_to_explore.esi).
Slot 1 of the New Homes page features the weekly Floor Plan property. Slot 2 is reserved for the Home Page Featured Property. Slots 3 & 4 are from archives – choose properties that aren’t likely to sell out soon.
2) Each property will have a Movable Type page and a photo gallery HTML popup. Save HTML files for the popup at /raid/static_pages/nwc/realestate/blog_popup/ and the related photos at /raid/static_pages/nwc/realestate/blog_popup/art.
3) Start by editing the Word doc for the article about the property, then open the template “template_featured_new_dev.html” and save as “fnd_(propertyname)_date,” i.e. “fnd_brix_012808.” Add copy from doc, check links and use HTML coding for special characters, e.g. em dashes. Check to see that straight quotation marks are used.
The h4 headline code can be removed from virtually all article HTML files – this will avoid duplication of headlines. Floor plan main pages will use the template_floorplan_.html template and be named fp_theparc_022708.html and floor plan popups will use the fp_.html template and be named floorplan_theparc.html. The header “View this property” in the template should be changed to “View these properties. “Getting there” copy from the word doc can go in the last slot usually reserved for “Special events” – just change the header to “Getting there.” If there is not information in the word doc corresponding to some of the table lines, delete that line.
4) Then create a pop-up page for the photo gallery. Open the template “fnd_.html” and save as fnd_(propertyname).html, i.e. fnd_brix.html. Enter all the property’s 540-pixel-wide photo files (ending in lg.html) in the document, starting with the primary document on top.
The filename for this pop-up will appear in the Movable Type page wherever code for pop-ups, i.e. http://marketplace.nwsource.com/nwc/realestate/blog_popup/fnd_brix.html, appears. Also change the property name and location “City Steps (Tacoma)” to the new property name and location.
5) Log in to Movable Type. If you aren’t at the Featured Communities page, click on the left tab and scroll down to Featured Communities link. Click on the “Create” tab, then “Entry” to create a new Movable Type page. Give it a title using the development name, followed by the neighborhood in parentheses, i.e. Brix (Capitol Hill). Under the Categories header, choose either Featured New Developments or Floor Plan, depending on the type of property. Paste the entire HTML file into the Body field. Pull the first sentence or so from the article copy for the Excerpt field.
Change basename field to date_property name, e.g. 052808_firstgaler. Press Save – you can always edit later. Then press Preview to get an approximation of what the page will look like. Look to see that page components are in the correct places on the page, compared to previously-published pages in New Homes. Double-check the content for typos, correct special characters and attention to AP and Seattle Times style. When you need to return to this page later, press Entries in the left column to get a listing of all recently-created or published pages.
6) Preview pop-up pages on the DEV server at http://dev-cls.nwsource.com:81/realestate/newhomes.
They must be pushed live using Salmon before preview.
Advertorial Photo Processing:
1) Crop photos from the photo files in the property’s folder with a resolution of 72 and should be saved with the Photoshop “save for Web” option with the following file-naming conventions and dimensions:
• fnd_(property name)_lg.jpg = 540px wide (for the pop-up)• fnd_(property name).jpg = 250px wide (article pages)• hp1_(property name).jpg = 168 x 178 (homepage property)• featured_photo_(property name).jpg = 285 x165 (New Homes page featured spot)• fnd_(propertyname)_th.jpg = 100x80 (New Homes page secondary spot)
Note: Use these horizontal dimensions even if the primary image is vertical, choosing the most visually-interesting part of the image.
2) When you are working with floorplan images and thumbnails, save the images as GIF files, otherwise use the same file-naming convention.
3) Save photos for the index page to /raid/static_pages/nwc/realestate/blog_popup/art.
4) Save blog page photos to /raid/static_pages/nwc/realestate/art/newdev_images.
5) After cropping, FTP all photo files to the DEV stage:/raid/static_pages/nwc/realestate/art/newdev_images and /raid/static_pages/nwc/realestate/blog_popup/art.
6) Publish photos using Salmon athttp://stage-cls.nwsource.com/salmon/cfm/index.cfm?c=realestate. Click the button next to realestate art newdevelopment images and press “go upstream.” You’ll see a list of files that are being pushed live until the process is complete. By clicking on the link realestate art newdevelopment images, you can also see the paths where the files will live.
Advertorial Publishing:
1) FTP revised includes back to the adv_cont_inc folder on Madder, (/raid/static_pages/nwc/realestate/adv_cont_inc), but do not push them using the Salmon tool until you’re ready for them to go live. By just pushing them, you will be able to view the NWhomes.com home page and New Homes pages at http://dev-cls.nwsource.com:81/realestate and http://dev-cls.nwsource.com:81/realestate/newhomes before you publish them on Wednesday AM.
2) Publish Movable Type pages - on the Movable Type Featured Communitie directory page, check boxes for all files you want to publish, then use the Publish Entry option in the dropdown menu in the upper right of the page. When done, rebuild the site by clicking Rebuild All Files in the left column – pages will not appear correctly for QA unless you do. Once published, the pages will be viewable at http://blog.marketplace.nwsource.com/realestate-featured-communities. Check the pages to make sure that all links work and all typos have been caught.
3) Check Omniture tags on the pop-up pages using SLACKer tool http://nm-slacker.seatimes.com/cgi-bin/SLAC.pl
4) Preview index and directory pages, Movable Type files and popups on dev server.
Advertorial QA:
1) After building all pages, send “new construction preview” email to New Media Advertising QA. Typically, these should be sent to QA by EOD Monday so that they can fit the QA into their Tuesday schedules. If pages are going to be later than EOD Monday, send an email to New Media Advertising QA giving them a heads-up. Kathy Bowen is the QA manager, if there are questions.
2) Send links to the DEV pageshttp://dev-cls.nwsource.com:81/realestate/http://dev-cls.nwsource.com:81/realestate/newhomes/plus the Movable Type articles using final URL you see when you click through to the respective property pages from http://blog.marketplace.nwsource.com/realestate-featured-communities
3) QA will respond using the bug tool at http://goldenrod.seatimes.com/VIWebDev Email notifications will be sent for any bugs. For Movable Type articles or anything else that’s already published, you can close out the bug report by marking “Fixed” using the dropdown menu on the upper left of the bug tool.
Also send an email to New Media QA to let them know that the fixes have been made. For anything that’s not already live, mark the bug as “Fixed/QA” using the dropdown menu. When all bugs are fixed and approved by QA, they’ll mark status as “Verified QA” and it’s safe to go live with includes.
4) Push includes (hp1.esi, ndcs.esi, ndcp1.esi) on Wednesday before noon, using the Salmon tool after all content is reviewed by New Media QA. Check NWhomes and New Homes index pages.
Deal Digger Stuff:
Hero Template(N: ...creative_technical_resources/Ad Templates/Deal_Digger/Client_XXXXXXh_01A.psd)
1) Deal Digger is requested.2) Image is selected using stock images or provided images3) Build using our in-house templates4) Use the in-house “Hero” size template.Save the working files here (N: ...Ad_Design/Projects/Deal_Digger)5) Send the .jpg/.gif to the requester.
Process as they come in, turnaround is 4 days.
300x250 (MR email ad) Template(N: ...creative_technical_resources/Ad Templates/Deal_Digger/dealdiggerXXXXXXmr.psd)
1) Deal Digger is requested.2) Image is selected using stock images or provided images3) Build using our in-house templates4) 300x250 is placed on the ad server here --> http://local.ads.nwsource.com/ads/_d/dealdigger/300250/dealdigger000000mr.jpg
a) The advertising label must be used and should be in the template b) 300x250 must use this naming convention, NO DEVIATION --> dealdiger000000mr.jpg -- the date will be the day that the deal is going live.
6) “Push” the ad server and send the generated link to the requester.
Assets will be in inbox by 9AM Thursday and due the following Monday EOD.

Lynda.com:
Login info: dclifton / seattle1
Must check with Rusty and Denise Cliffton first to schedule a time to login since there is only one account, only one person can be on at a time.
Uploading Files to the Ad Server:
NOTE- You will need to use an FTP client to upload files to the ad server. Server: admin.local.ads.nwsource.com
User Name: design
Password: g0!d@w9s
Initial Path:../../raid/ads/htdocs/ads/
For NWjobs.com
1) All nwjobs files should be uploaded to:http://admin.local.ads.nwsource.com/ads/RSJ/(first letter in company name)/(company_name)/(MMYY)/
2) All nwjobs logos should be uploaded to:http://admin.local.ads.nwsource.com/ads/RSJ/Logos/(select the appropriate letters for company name)/
For all other network ads:
1) All html, .swf’s, .gif’s or .jpg’s should be uploaded to the folder “ads/(first letter in company name)/(company_name)/(MMYY)/”
EX. An ad for Enso running in February 2010 would go in:ads/_e/enso/0210/
Note: If a client does not have a folder, create a new one (use all lower case letters and do not use any spaces)
2) Upload your files into the client’s folder.
3) In your web browser, go to http://admin.local.ads.nwsource.com/ and click “Click to push ads to front-ends”
4) Wait for the push to finish
5) Go to http://admin.local.ads.nwsource.com/ads/ and add the name of the file you just uploaded. Hit “Enter” (you will see your ad)
6) Remove the word “admin.” from the link and press “Enter” (“admin.” means that only people behind our firewall can see this link. By removing it, this allows users outside of our network to see the ad)
7) Copy this link without the “admin.” and send it to the Sales Coordinator who sent you the Creative Brief
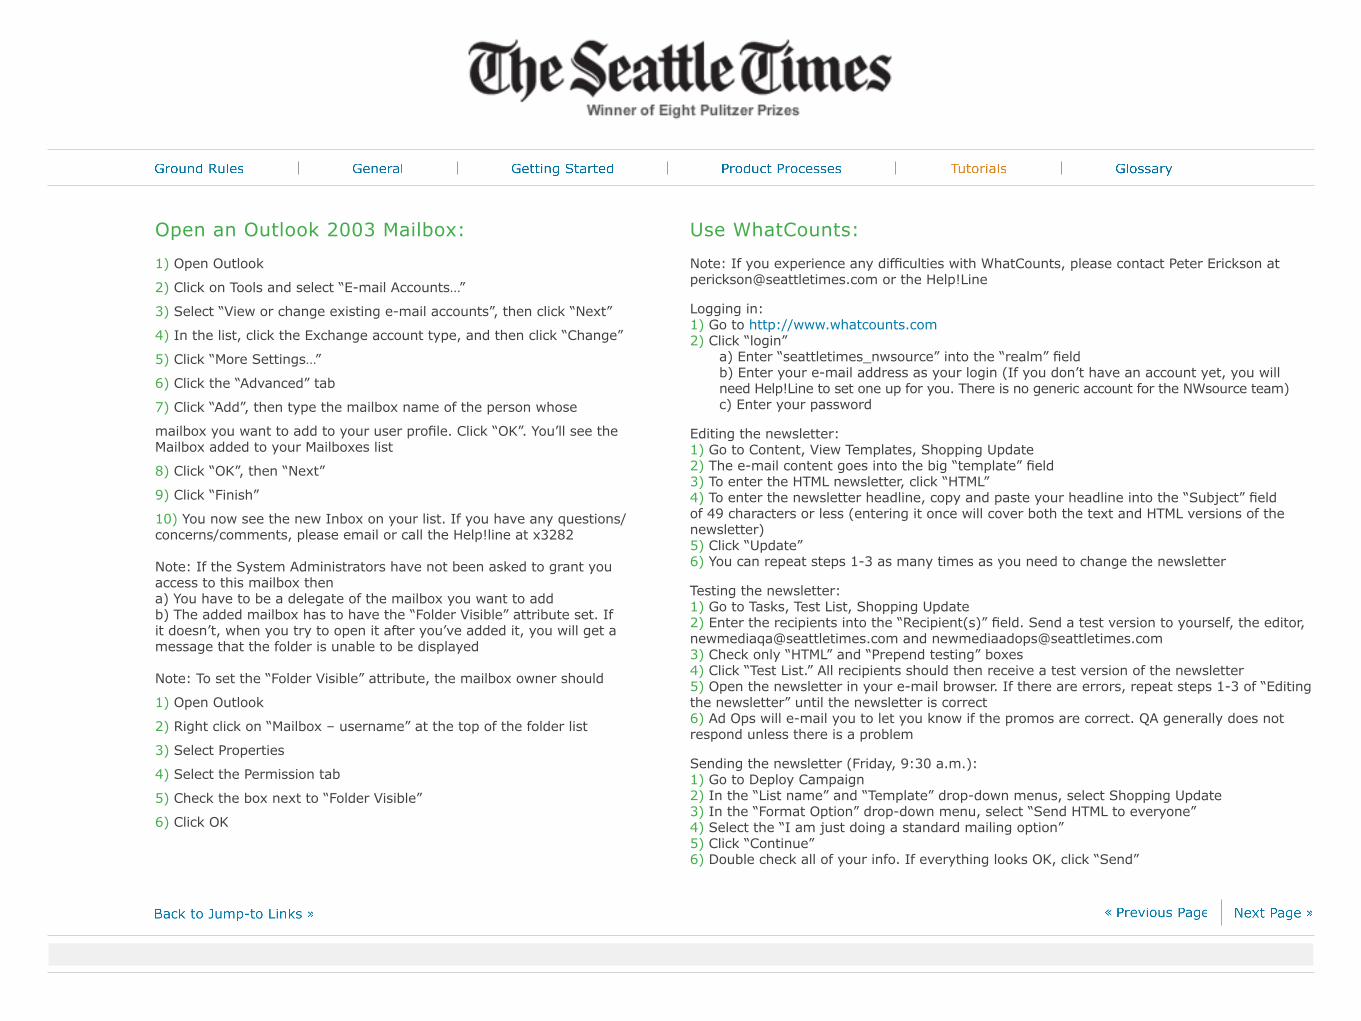
Open an Outlook 2003 Mailbox:
1) Open Outlook
2) Click on Tools and select “E-mail Accounts…”
3) Select “View or change existing e-mail accounts”, then click “Next”
4) In the list, click the Exchange account type, and then click “Change”
5) Click “More Settings…”
6) Click the “Advanced” tab
7) Click “Add”, then type the mailbox name of the person whose
mailbox you want to add to your user profile. Click “OK”. You’ll see the Mailbox added to your Mailboxes list
8) Click “OK”, then “Next”
9) Click “Finish”
10) You now see the new Inbox on your list. If you have any questions/concerns/comments, please email or call the Help!line at x3282
Note: If the System Administrators have not been asked to grant you access to this mailbox thena) You have to be a delegate of the mailbox you want to addb) The added mailbox has to have the “Folder Visible” attribute set. If it doesn’t, when you try to open it after you’ve added it, you will get a message that the folder is unable to be displayed
Note: To set the “Folder Visible” attribute, the mailbox owner should
1) Open Outlook
2) Right click on “Mailbox – username” at the top of the folder list
3) Select Properties
4) Select the Permission tab
5) Check the box next to “Folder Visible”
6) Click OK
Use WhatCounts:
Note: If you experience any difficulties with WhatCounts, please contact Peter Erickson at [email protected] or the Help!Line
Logging in:1) Go to http://www.whatcounts.com2) Click “login”
a) Enter “seattletimes_nwsource” into the “realm” fieldb) Enter your e-mail address as your login (If you don’t have an account yet, you will need Help!Line to set one up for you. There is no generic account for the NWsource team)c) Enter your password
Editing the newsletter:1) Go to Content, View Templates, Shopping Update2) The e-mail content goes into the big “template” field3) To enter the HTML newsletter, click “HTML”4) To enter the newsletter headline, copy and paste your headline into the “Subject” field of 49 characters or less (entering it once will cover both the text and HTML versions of the newsletter)5) Click “Update”6) You can repeat steps 1-3 as many times as you need to change the newsletter
Testing the newsletter:1) Go to Tasks, Test List, Shopping Update2) Enter the recipients into the “Recipient(s)” field. Send a test version to yourself, the editor, [email protected] and [email protected]) Check only “HTML” and “Prepend testing” boxes4) Click “Test List.” All recipients should then receive a test version of the newsletter5) Open the newsletter in your e-mail browser. If there are errors, repeat steps 1-3 of “Editing the newsletter” until the newsletter is correct6) Ad Ops will e-mail you to let you know if the promos are correct. QA generally does not respond unless there is a problem
Sending the newsletter (Friday, 9:30 a.m.):1) Go to Deploy Campaign2) In the “List name” and “Template” drop-down menus, select Shopping Update3) In the “Format Option” drop-down menu, select “Send HTML to everyone”4) Select the “I am just doing a standard mailing option”5) Click “Continue”6) Double check all of your info. If everything looks OK, click “Send”

Basic Data:
Total Impressions (Imps) | Number of times the ad was shown to a visitor, either rich or non-rich.
Total Clicks | Total number of times the ad was clicked, either rich or non-rich. Only one click for an individual impression is counted, i.e. if an individual viewer clicks multiple times during an impression, the total click count will only increase by one.
Total Click Rate | The fraction of all ad impressions that resulted in a click on the banner.
Rich Media Imps | Total number of times a rich media ad was shown to a visitor.
Rich Media Clicks | Total number of clicks on a rich media ad. Only one click for an individual impression is counted, i.e. if an individual viewer clicks multiple times during an impression, the total click count will only increase by one.
Rich Media Click Rate | The fraction of rich media impressions that resulted in a click on the ad
Ad Insertions | Number of times the ad was inserted into a web page. This does not necessarily lead to an impression. A browser may not be compatible, the ad may be capped, or the visitor simply leaves the page before the impression can occur.
Unique Ad Imps | A unique ad impression is counted when a visitor encounters the ad for the first time. A distinction is made when a specific publisher or each publisher is selected. In that case a unique ad impression is counted when a visitor encounters the ad for the first time on that particular publisher even if it was encountered before on another publisher.
Unique Campaign Imps | A unique ad impression is counted when a visitor encounters the campaign for the first time. A distinction is made when a specific publisher or each publisher is selected. In that case a
unique campaign impression is counted when a visitor encounters the campaign for the first time on that particular publisher even if it was encountered before on another publisher.
Average Ad Frequency | Mathematically simply the ratio of total impressions over unique ad impressions. Yields the average number of times a visitor has encountered the ad. Note the distinction for unique ad impressions when a specific publisher or each publisher is selected. In that case a unique ad impression is counted when a visitor encounters the ad for the first time on that particular publisher even if it was encountered before on another publisher. Hence the average ad frequency yields the average number of times a visitor has encountered the ad on that particular publisher.
Average Campaign Frequency | Mathematically simply the ratio of total impressions over unique campaign impressions. Yields the average number of times a visitor has encountered the campaign. Note the distinction for unique campaign impressions when a specific publisher or each publisher is selected. In that case a unique campaign impression is counted when a visitor encounters the campaign for the first time on that particular publisher even if it was encountered before on another publisher. Hence the average campaign frequency yields the average number of times a visitor has encountered the campaign on that particular publisher.
User Defined Data:
Labeled Clicks | Each click-through in an ad has a click label or if not defined the default label _undefined_. This data shows the counts for all individual click labels. Only one count per click label and ad impression is counted. But if a visitor within the same ad impression clicks on different click throughs with different labels, each labeled click is counted (but no more than once per label). At the same time the total clicks increases only by one. This leads to the reporting artifact that the sum of labeled clicks can be higher than the total clicks count.
Labeled Layers | Similar to layer index data, but using the layers label instead of the layer index, making the data much more descriptive.
User Events | Custom events, implemented either using flash or the Track Custom Event effect are shown with this data field.
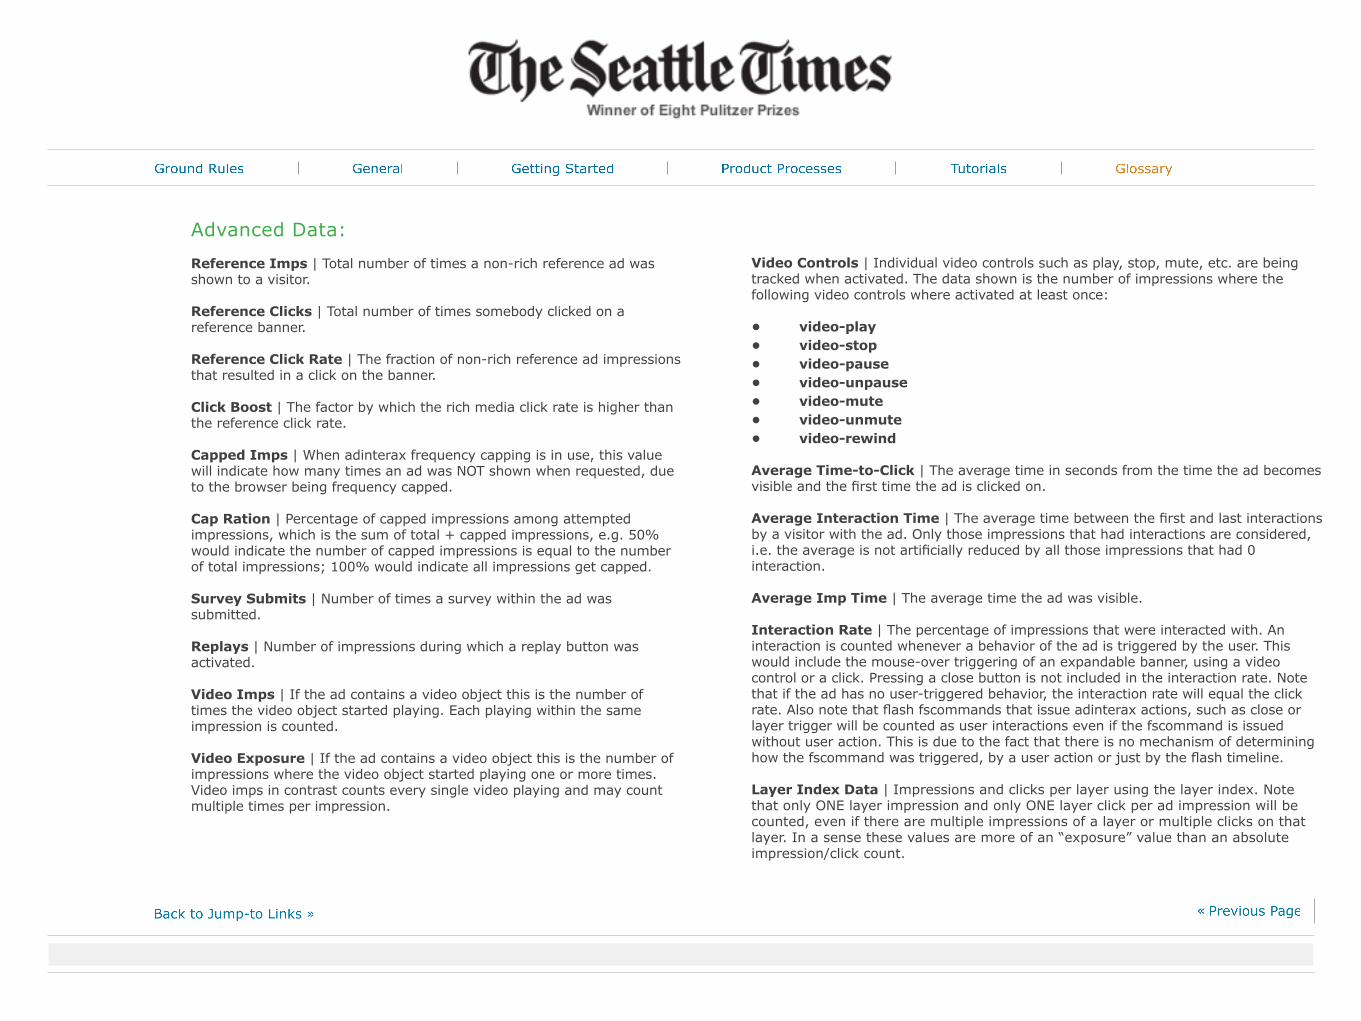
Advanced Data:
Reference Imps | Total number of times a non-rich reference ad was shown to a visitor.
Reference Clicks | Total number of times somebody clicked on a reference banner.
Reference Click Rate | The fraction of non-rich reference ad impressions that resulted in a click on the banner.
Click Boost | The factor by which the rich media click rate is higher than the reference click rate.
Capped Imps | When adinterax frequency capping is in use, this value will indicate how many times an ad was NOT shown when requested, due to the browser being frequency capped.
Cap Ration | Percentage of capped impressions among attempted impressions, which is the sum of total + capped impressions, e.g. 50% would indicate the number of capped impressions is equal to the number of total impressions; 100% would indicate all impressions get capped.
Survey Submits | Number of times a survey within the ad was submitted.
Replays | Number of impressions during which a replay button was activated.
Video Imps | If the ad contains a video object this is the number of times the video object started playing. Each playing within the same impression is counted.
Video Exposure | If the ad contains a video object this is the number of impressions where the video object started playing one or more times. Video imps in contrast counts every single video playing and may count multiple times per impression.
Video Controls | Individual video controls such as play, stop, mute, etc. are being tracked when activated. The data shown is the number of impressions where the following video controls where activated at least once:
• video-play • video-stop • video-pause • video-unpause • video-mute • video-unmute • video-rewind
Average Time-to-Click | The average time in seconds from the time the ad becomes visible and the first time the ad is clicked on.
Average Interaction Time | The average time between the first and last interactions by a visitor with the ad. Only those impressions that had interactions are considered, i.e. the average is not artificially reduced by all those impressions that had 0 interaction.
Average Imp Time | The average time the ad was visible.
Interaction Rate | The percentage of impressions that were interacted with. An interaction is counted whenever a behavior of the ad is triggered by the user. This would include the mouse-over triggering of an expandable banner, using a video control or a click. Pressing a close button is not included in the interaction rate. Note that if the ad has no user-triggered behavior, the interaction rate will equal the click rate. Also note that flash fscommands that issue adinterax actions, such as close or layer trigger will be counted as user interactions even if the fscommand is issued without user action. This is due to the fact that there is no mechanism of determining how the fscommand was triggered, by a user action or just by the flash timeline.
Layer Index Data | Impressions and clicks per layer using the layer index. Note that only ONE layer impression and only ONE layer click per ad impression will be counted, even if there are multiple impressions of a layer or multiple clicks on that layer. In a sense these values are more of an “exposure” value than an absolute impression/click count.