handbook for the ultrastar pro
TRANSCRIPT
Ultrastar PRO handbook Issue 1, September 2020
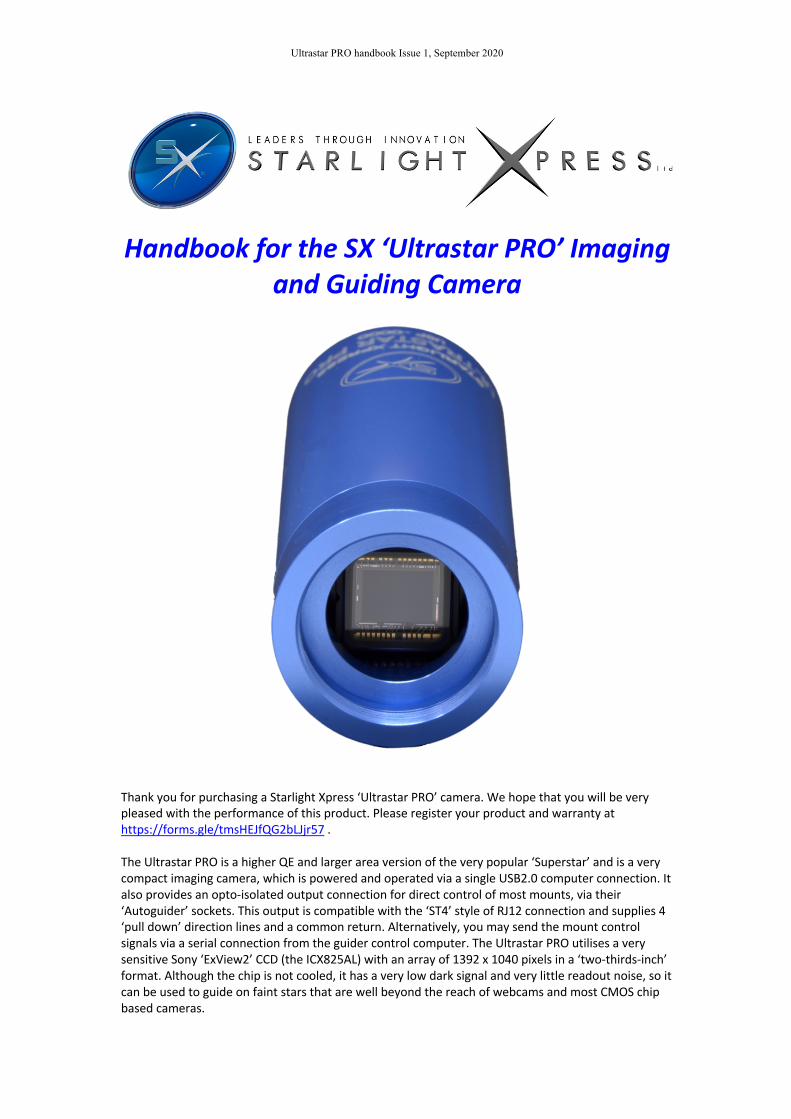
Handbook for the SX ‘Ultrastar PRO’ Imaging and Guiding Camera
Thank you for purchasing a Starlight Xpress ‘Ultrastar PRO’ camera. We hope that you will be very pleased with the performance of this product. Please register your product and warranty at https://forms.gle/tmsHEJfQG2bLJjr57 . The Ultrastar PRO is a higher QE and larger area version of the very popular ‘Superstar’ and is a very compact imaging camera, which is powered and operated via a single USB2.0 computer connection. It also provides an opto-isolated output connection for direct control of most mounts, via their ‘Autoguider’ sockets. This output is compatible with the ‘ST4’ style of RJ12 connection and supplies 4 ‘pull down’ direction lines and a common return. Alternatively, you may send the mount control signals via a serial connection from the guider control computer. The Ultrastar PRO utilises a very sensitive Sony ‘ExView2’ CCD (the ICX825AL) with an array of 1392 x 1040 pixels in a ‘two-thirds-inch’ format. Although the chip is not cooled, it has a very low dark signal and very little readout noise, so it can be used to guide on faint stars that are well beyond the reach of webcams and most CMOS chip based cameras.

Ultrastar PRO handbook Issue 1, September 2020
The Ultrastar PRO specification: CCD - Sony ICX825AL ExView2 monochrome CCD Pixel count - 1392(H) x 1040(V) Pixel size - 6.45 x 6.45uM Optical size - 8.98 x 6.71 mm Read noise - Typically 3.5 electrons QE - Peak QE 75% (yellow light) Gain - 0.3 e/ADU Barrel size - 31.75mm dia. x 85mm long (1.25 inch eyepiece push fit size) Barrel thread - 25.4mm x 0.75mm ‘CS’ mount lens thread Input connection - ‘Mini B’ USB socket for USB2.0 Output connection - Standard RJ12 autoguider socket Output type - Opto-isolated 4 lines (N,S,E & W) pull down with common return line Download rate - Approx. 2 frames per second in binned 1x1 mode Installing the Ultrastar PRO: Before connecting the Ultrastar PRO to your computer, please install the appropriate drivers for your operating system from the USB drive supplied with your camera. The supplied USB stick contains all the drivers and software. To install the drivers:
1. Select the folder for your operating system 2. Double click on the “Install Drivers.exe” 3. Follow the prompts in the installer and click ‘Finish’ at the end of the install.
If you encounter any problems, read the README file on the USB drive or you can download the latest drivers from our web page at https://www.sxccd.com/drivers-downloads. The Ultrastar PRO has two different software packages. One is Ultrastar.exe which is an imaging & autoguiding software package, the other is Starlight Live which is a ‘Live-stacking’ software. Starlight Live allows you to use the Ultrastar PRO as an imaging camera by taking a series of short exposures (typically 10 sec or more) and then automatically stacking the images together to form an equivalent ‘long’ exposure. To install the Ultrastar PRO control software Ultrastar.exe:
1. Double click on the Ultrastar Software folder on the USB drive. 2. Double click on the Setup.exe program 3. Follow the prompts to fully install the software on to your computer. 4. Plug in your Ultrastar PRO camera – (Wait for the Install New Hardware Wizard to complete) 5. Double click on the Ultrastar.exe icon on your Desktop or from your START button on your
computer. 6. The first time you use the software, click on “File” then “Set Program Defaults” You will get a
message, “Warning – No INI File found – Please set defaults” 7. Click “OK” – The Set Program Defaults box will appear. 8. If you are going to be using the RJ12 Autoguider Port on your Ultrastar PRO, select
Autoguider Socket in the “Telescope Guiding Parameters” box at the top of this box. 9. Click on “Save Changes” and you are all set to start using the camera. (The INI file that was
being asked for initially has now been created and you will no longer see the Warning message)

Ultrastar PRO handbook Issue 1, September 2020
To install Starlight Live (‘Live-stacking’) software: 1. Double click on the Starlight Live folder on the USB drive. 2. Double click on the Setup.exe program 3. Follow the prompts to fully install the software on to your computer. 4. Plug in your Ultrastar PRO camera – (Wait for the Install New Hardware Wizard to complete) 5. Double click on the Starlight Live.exe icon on your Desktop or from your START button on
your computer. PHD2 is also supplied on the USB stick. This is an excellent and very simple stand-alone Autoguiding Software. We would highly recommend trying this software as it is highly regarded in the Astro-Imaging community. Other 3rd party software packages such as AstroArt, MaximDL, SkyX and others, all support the Ultrastar PRO either with native drivers or through ASCOM. Our latest driver can be found on our website: https://www.sxccd.com/drivers-downloads
Imaging with the Ultrastar PRO: The Ultrastar PRO makes an excellent imaging camera, especially when used as a ‘Live View’ imager. This method involves stacking many short exposures to achieve a high sensitivity with simple equipment. It is ideal for public outreach events, where the images can be seen ‘developing’ in real time, and for field use where the compact size of the Ultrastar PRO makes for easy transport and setup. The free software ‘Starlight Live’ (previously ‘Lodestar Live’) from Paul Shears, makes Live Viewing very easy and is highly recommended. Starlight Live recognises the Ultrastar PRO automatically and all that you need to do is to open the software and select ‘Live stacking’ and a suitable exposure time.

Ultrastar PRO handbook Issue 1, September 2020
If stars are visible, Starlight Live will use these for registering the images together and the image clarity will steadily improve as the stack develops.
The image brightness and contrast may be manipulated by adjusting the sliders provided.

Ultrastar PRO handbook Issue 1, September 2020
More details can be found in this YouTube video http://youtu.be/bwQvU3Zo_Pg Conventional long-exposure imaging is also perfectly practical with the Ultrastar PRO. The camera is uncooled, but its dark signal is very low and any warm pixels are easily removed by applying hot pixel filters, or by stacking ‘dithered’ images. Conventional dark frame subtraction can also be used. A simple way of using the Ultrastar PRO is to attach a suitable camera lens and ‘piggyback’ it on a driven telescope. You may find it difficult to buy a suitable ‘C’ mount lens, as the Ultrastar PRO chip is too large to be fully illuminated by the cheaper versions that are widely available. You need a lens that is specified for 2/3 inch sensors and these tend to be expensive ‘machine vision’ lenses. A relatively cheap option is to use an SLR lens with a C to T or Pentax thread adaptor tube. The old Asahi 55 mm F1.8 SLR lenses can be bought for as little as 20 pounds on Ebay and work very well with the Ultrastar PRO. The correct focal distance for these lenses is about 45 mm, so you will need a C to lens thread adaptor of about 32 mm overall length to achieve focus. A typical adaptor for a T2 lens is the Kipon KP-LA-C-T2 and there are versions for EOS, OM lenses etc. In this mode, the field is fairly wide and is good for comet and large nebula pictures. It also makes a very nice electronic finder. If you are interested in smaller objects, such as galaxies, planetary nebulae and solar system objects, then a longer focal length is desirable. The Ultrastar PRO may be slid into the 1.25” adaptor of an SCT and will give very nice images with relatively short exposure times. A Barlow lens may be required for imaging the planets.

Ultrastar PRO handbook Issue 1, September 2020
Ultrastar.exe Using the SX software is straightforward. Start Ultrastar.exe and click on the camera icon in the top toolbar (4th one from left). A control panel will open and you can set an exposure time from the list offered. Pressing ‘Take picture’ will give you an image and this can be saved as a FIT file for further processing.
Various image processing functions are available from the menu bar and will be adequate for many general imaging purposes. Many other imaging programs will recognise and work with the Ultrastar PRO. Maxim DL5 and 6 will work, although the camera might appear as an ‘Unknown’ device in earlier versions of this software. However, it will still work correctly.
A 400 second exposure of M27, using an FSQ106. No darks, flats or bias frames used.

Ultrastar PRO handbook Issue 1, September 2020
Guiding with the Ultrastar PRO: For guiding, the Ultrastar PRO is generally used with a separate guide telescope, or via an off-axis guider assembly. It is designed to be inserted into a standard 1.25” focuser tube, but also has a 25.4mm ‘C’ type camera lens thread in the front to allow standard CCTV lenses or adaptors to be attached. Please note that the chip to lens distance is only 12.5mm and so a ‘CS’ to ‘C’ extension will be needed to permit a standard C lens to reach focus. Lenses designed for ‘CS’ mount cameras will focus without an extension tube, but many of these lenses cannot fully illuminate a two thirds inch format CCD, so take care when selecting a lens for this purpose. A typical set up might consist of an inexpensive 80mm F5 refractor ‘piggybacked’ onto an SCT, with the Ultrastar PRO fitted directly into its focus barrel. Many such telescopes are designed to be used with an inverting prism ahead of the eyepiece and so the focuser may be too short when the Ultrastar PRO is inserted directly. In this case, an extension tube may often be made from a cheap Barlow lens assembly with the lens removed.
The focal length of your guide telescope is not especially critical for good guiding, as the guiding software searches for the ‘centroid’ of the guide star image and can resolve shifts of far less than 1 pixel. Using a guide scope with a relatively short focal length (between 300 and 500mm) makes guide star finding very easy and this is a recommended setup for general purpose guiding. The alternative (and more mechanically stable) option, is to use an off-axis guide prism on the main telescope drawtube. SX Ltd offer various assemblies for this purpose, such as our ‘Mini wheel with OAG’, or our ‘Slim OAG + Filter Wheel’. The OAG can also be supplied on its own, with an extension tube to compensate for the thickness of the missing filter wheel. The OAG utilises the C mount thread in the Ultrastar PRO to give a secure attachment.
The control of your telescope mount will depend on what inputs are provided. The Ultrastar PRO output connector supplies 4 pull-down lines and a common return line to simulate an ‘ST4’ style autoguider output. The lines are isolated from the Ultrastar PRO electronics by opto-coupler chips and so there is no risk of damage when connecting the outputs to mounts with unprotected electronics. A standard ‘RJ12’ style output lead is supplied with the Ultrastar PRO and this may be connected to any ST4 compatible autoguider input socket on the mount. It is also possible to guide by using serial data from the computer to an RS232 input on the mount, but this will be covered later and can be less effective than the direct hardware connection. Note that the Ultrastar PRO guide cable is a ‘non reversing’ cable and so is not compatible with some other guider cables, such as the SBIG versions. The preferred guiding mode is generally 2x2 binned, as this gives both fast downloads and high sensitivity. However, if operating with a very short focus ‘scope, or lens, high resolution mode may be best.
Guiding with the Starlight Xpress software
With the Ultrastar PRO connected to the PC and mount, open ‘Ultrastar.exe’ and find the ‘Set program defaults’ menu under the ‘File’ heading. If this is the first run of the software, you will get a warning about the ‘ini file not found’, but ignore this and click on OK. You should now see a screen similar to the one shown below:

Ultrastar PRO handbook Issue 1, September 2020
The settings shown above are generally satisfactory as a starting point, although some will probably need refinement for best results. In the example shown, the ‘autoguider socket’ on the Ultrastar PRO is providing the control signals to the mount, but you might alternatively use the ‘LX200’ mode via the serial port of the computer, if this is preferred. The Guiding Parameters are set to 6 pixels per second, which corresponds to the typical drift rate of a 1000mm focal length guide telescope when the mount is guiding at 0.5x sidereal speed. Longer focal lengths and/or higher guiding rates will require a larger value to be set so as to avoid excessively fast corrections, which can cause erratic guiding or even oscillation of the guiding errors to either side of the guide star. Once the defaults have been set to values which you think will be approximately correct, save the settings and open the ‘View’ menu. In this you will see an option called ‘Max palette stretch’. Open this and check the ‘Activate stretch display’ check box. This will automatically boost the image brightness so that faint guide stars can be easily seen – if necessary, you can adjust the slider for the best results. Now click on the camera icon to open the Ultrastar PRO control dialog, as below: The image box will be empty at this point, but we need a frame to select the guide star from, so use the guiding options to select a suitable exposure time (say 1 second) and press the ‘Start’ button below the image box. A sequence of images will be shown and you can refine the image focus and centring as required. Before attempting to guide, it is wise to check that you have control of the telescope drive via the Ultrastar PRO software. This is easily done by pressing the ‘Move Telescope’ buttons at the lower left of the control box. Check that pressing the arrow buttons causes the star field to drift left, right, up and down, as appropriate. The LED at the back of the Ultrastar PRO should change colour when the buttons are pressed. If all is well, move onto the next step below:

Ultrastar PRO handbook Issue 1, September 2020
Once a good guide star has been found, press the ‘Stop’ button and then the ‘Select guide star’ button. You can now click the mouse arrow on the guide star and a green cross will appear, centred on the star (see above). Don’t select a very bright guide star, as this will result in poor guiding due to saturation of the core pixels in the star image.
Once the guide star is selected, a small box appears with the star coordinates. If they look good, just click on OK. Now click on ‘Start Guiding’:
After a brief delay, the Guiding Info window will open, as above, and you will see the guide star, along with error values and a reticule showing the guide star location with respect to the reference position. If all is well, you should see the guide star location being forced towards the centre position with each successive guide image. However, it is quite likely that it will be pushed away from the correct position, due to an error in the guiding default settings. If this is the case, note the direction of travel, and then reverse the appropriate direction setting in the guiding defaults menu. For example, if the star moves away to the left or right, try reversing the ‘Swap e/w direction’ setting. If guiding works, but is sluggish, try reducing the ‘Rate’ setting in the guider settings, or increase it if the guiding oscillates from one side of the guide star to the other.

Ultrastar PRO handbook Issue 1, September 2020
Guiding with ‘PHD2’
A very simple-to-use guiding program is Stark Labs ‘PHD2’ (http://openphdguiding.org/). I recommend this as a good and simple way to guide with the Ultrastar PRO and I use it myself on most occasions. To guide with PHD2, first press the ‘camera’ icon and select the ‘Starlight SXV’ option for the camera. If you have more than one SX camera connected, then choose ‘Ultrastar’ or ‘SX-825’ from the list.
Next, press the ‘Mount’ button and select ‘On camera’ (this uses the RJ12 cable to feed corrections to the mount). You can also set these as the default by using the ‘Manage Profiles’ selection at the top of the box. Close the settings window when finished. Now press the ‘Loop’ icon and you should see a continuously updating star field. Focus and select the best exposure time, then press ‘Stop’.

Ultrastar PRO handbook Issue 1, September 2020
Click the mouse on a suitable guide star in your last image and then select the ‘Target’ icon. PHD2 will set up a cursor and box on the guide star and proceed to ‘calibrate’ the mount. After about 1 minute of calibration, it will start to guide on the star.

Ultrastar PRO handbook Issue 1, September 2020
Ultrastar PRO maintenance
The Ultrastar PRO head is designed for a long and reliable lifespan and needs very little maintenance to keep it in good working order. The only common issue is with dust particles which collect on the CCD window and can shade areas of the image field. These are best removed with a quick blast of compressed air from a ‘Dust off’ aerosol, or similar air blower. More permanent marks may be removed with a drop of alcohol on a ‘microfibre’ lens cloth.
Dear User,
Thank you for purchasing a Starlight Xpress CCD Imaging camera. We are confident that you will gain much satisfaction from this equipment, but please read carefully the accompanying instruction manual to ensure that you achieve the best performance that is capable of providing.
In the unfortunate instance when the equipment does not perform as expected, may we recommend that you first study the fault finding information supplied. If this does not remedy the problem, then contact Starlight Xpress for further advice. Our message board service on the Starlight Xpress web site will often provide solutions to any problems.
The equipment is covered by a 12-month guarantee covering faulty design, material or workmanship in addition to any statutory Consumer Rights of Purchasers.
CONDITIONS OF GUARANTEE
1) The equipment shall only be used for normal purposes described in the standard operating instructions, and within the relevant safety standards of the country where the equipment is used.
2) Repairs under guarantee will be free of charge providing proof of purchase is produced, and that the equipment is returned to the Service Agent at the Purchaser’s expense and risk, and that the equipment proves to be defective.
3) The guarantee shall not apply to equipment damaged by fire, accident, wear an tear, misuse, unauthorised repairs, or modified in any way whatsoever, or damage suffered in transit to or from the Purchaser.
4) The Purchaser’s sole and exclusive rights under this guarantee is for repair, or at our discretion the replacement of the equipment or any part thereof, and no remedy to consequential loss or damage whatsoever.
5) This guarantee shall not apply to components that have a naturally limited life.
6) Starlight Xpress’s decision in all matters is final, and any faulty component which has been replaced will become the property of Starlight Xpress Ltd.
For further info. or advice, please call:
Mr Michael Hattey,
Starlight Xpress Ltd.,
Unit 3, Brooklands Business Park,
Bottle Lane, Binfield,
Berkshire,
England. RG42 5QX
Tel: 01184026878
e-mail: [email protected]
Web site: http://www.sxccd.com
Please don’t forget to register your Lodestar PRO at https://tforms.gle/tmsHEJfQG2bLJjr57 to initiate your warranty