handbook kendo
TRANSCRIPT

KENDO HANDBOOK


1
The Concept of Kendo The concept of kendo is to discipline the human character through the application of the principles of the katana (sword).
The Purpose of Practicing Kendo The purpose of practicing kendo is:
To mold the mind and body,
To cultivate a vigorous spirit,
And through correct and rigid training,
To strive for improvement in the art of kendo,
To hold in esteem human courtesy and honor,
To associate with others with sincerity,
And to forever pursue the cultivation of oneself.
This will make one be able:
To love one’s country and society,
To contribute to the development of culture,
And to promote peace and prosperity among all peoples.
From the All Japan Kendo Federation
2
About the OSUKC The Oregon State University Kendo Club is a club devoted to the practice of two Japanese sword-based martial arts, kendo and iaido, under the auspices of Obukan Kendo Club, the Pacific Northwest Kendo Federation, the All United States Kendo Federation, and the International Kendo Federation.
OSUKC has its origins in an Experimental College class offered by Hideyuki Naya. In the 1998-99 school year, Naya sensei was a visiting student from Japan, where he studied kendo. In the spring of '99, he offered an introductory kendo class through the experimental college. Among the students were Kevin Harris, Doug Price, Fabio Hirata, and Josh Mater. At the beginning of fall term '99, Naya sensei had returned to Japan, and Josh and Fabio were in Tokyo as exchange students where they both studied kendo, though at different dojo.
Kevin Harris wished to continue practicing kendo, but was now without an instructor. In winter term '00, he gathered a few others who were interested in kendo and began to practice and teach the little that he knew. In February, the OSU Kendo Club was officially formed and recognized by Student Involvement. The five charter club members were Kevin Harris (president), Kent Enfield (vice-president), Doug Price (treasurer), Katie Cunnion (secretary), and Gina Koerner.
Practices that year were held in the racquetball courts in Dixon, which were cramped, hot, very noisy, and occasionally
elicited yells of "Shut up!" from people outside, sometimes decorated with obscenities. In addition to regular practice at Dixon, training was supplemented by trips to Obukan Kendo Club in Tigard, where the new OSUKC was well supported by the dojo as a whole, and by the head instructor, Robert Stroud, in particular.
Beginning in fall term '00, OSUKC was able to rent practice space in the gym of the Women's Building, where it continues to hold practice. Also that term, Fabio Hirata and Josh Mater had returned from Japan where they had attained the ranks of ikkyu and shodan, respectively. Their joining of practice and continued support from Obukan helped OSUKC become a self-sustaining kendo club. For the first four-and-a-half years of its existence, OSUKC was considered a branch campus of Obukan. On September 25th, 2004, it was accepted by the Pacific Northwest Kendo Federation as a probationary status dojo, with Kent Enfield as head instructor and John Hancock, head instructor of Obukan, as advisor.
Though OSUKC is a university organization, it is also open to members of the public who are at least of high school age. The only stipulation is that the club maintains a majority of members from OSU. To date, this has not been a problem.
Club members are allowed and encouraged to also practice at Obukan, particularly during school breaks.

3
Kendo
Kendo is a Japanese martial art based on traditional swordsmanship. Practitioners face each other using flexible bamboo swords while wearing protective gear and try to strike specific locations on their opponents’ bodies.
Kendo is derived from traditional Japanese swordsmanship. Swordsmanship was usually practiced with wooden swords (bokuto), but this is because they are cheap and durable, not because they are safe. A solid blow with a bokuto can easily injure, maim, or even kill. Because of this, the main form of training was the repeated practice of prearranged patterns of attack and defense (kata). But even in kata practice, the participants must be careful not to strike each other in earnest, usually stopping short of the true target.
In order to simulate the unpredictability of a real fight, less realistic but safer equipment was employed. The first development was the fukuro jinai, a piece of bamboo with its end split into a number of pieces and covered in leather, hardened by a coating of lacquer. While not as dangerous as a bokuto, the fukuro jinai is still a stout weapon, capable of inflicting serious injury.
Hence an even safer version was developed, the modern shinai, which consists of four slats of bamboo joined together at the tip and handle. The shinai will flex when struck against a solid object, absorbing much of the power of a blow. However a blow from a shinai is still quite painful and can often leave a welt. So in conjunction with the shinai, protective gear (bogu) was also developed. The bogu of modern kendo protects the head, hands and wrists, chest and abdomen, and the thighs and groin.
With the legal abolishment of the samurai class and rapid modernization (particularly
of the military) of the mid nineteenth century, swordsmanship and martial arts in general were seen as impractical relics of the past and so went into great decline. During this time, some former samurai made their living at gekken, a sort of combination of professional-wrestling-style (staged and flashy) and challenge matches, done with bamboo swords.
One part of society in which what would become kendo was preserved was the police. Martial arts were still seen as useful to the police, so they continued to practice swordsmanship. While swords had become obsolete on the battlefield, they still gave a strong advantage over the general populace. It is the police who are largely responsible for the development of the modern kendo kata in the early twentieth century. To this day, Japanese police dojo are the strongest (and toughest) in the world.
With the defeat of Japan in the Second World War, GHQ restricted the teaching of martial arts, because of their militaristic and nationalistic associations. Again, the police played a strong role in the preservation of kendo.
In 1952, after the ban on martial arts had been lifted, the All Japan Kendo Federation (Zen Nihon Kendo Renmei) was formed, emphasizing the sport-side of kendo, downplaying the militaristic associations

4
and removing some of the rougher aspects of practice.
Prior to the War, kendo was still strongly influenced by individual schools of traditional swordsmanship. Since the war, kendo has become homogenized, and the techniques optimized for competition with shinai, rather than battle with real swords.
Today kendo has a strong sporting component to it, though many, if not most, practitioners feel it is more than just that. Even in North America, tournaments are held regularly, and in Japan, major tournaments draw large crowds and are broadcast on television.
In a kendo match (shiai) two kendoka fight in a square court while three judges determine the validity of strikes and award points. Only strikes to certain locations, all of which are protected by bogu, can earn a point. Also, in order to earn a point, a strike must be done with the correct portion of the sword, with sufficient power, and must
demonstrate the entire body and mind working in unison. The first person to earn two points in the time allowed (usually five minutes) wins the match. Kendo tournaments (taikai) are usually single elimination and divided only by rank and age, not by height, weight, or gender.
When students start studying kendo, the first types of practice encountered are footwork drills and suburi (repeatedly striking an imaginary opponent). After basic footwork and striking comes yakusoku geiko, in which the student strikes an actual target, either someone else’s shinai or a person in bogu. Then comes kirikaeshi, which is essentially a standardized form of continuous yakusoku geiko. After yakusoku geiko comes uchikomi geiko, in which the student responds to openings presented by a partner. Next comes kakari geiko, in which the student must attack continuously.
All of these kinds of practice can be done by a student without bogu. Once the students have become comfortable with these types of practice, they are ready to begin wearing bogu, allowing them to participate in other types of practice, such as waza geiko (practice of specific techniques of both attack and defense), more advanced forms of kakari geiko, and finally jigeiko (free sparring) and competitive matches.
Along with the above types, kendo retains the practice of kata with bokuto.
Iaido Iaido (ee-eye-doh) is a type of Japanese swordsmanship centered around drawing a sword (katana), quickly dispatching one or more adversaries, and returning the sword to its scabbard. While the name iaido is a twentieth century invention, the art itself has been around for some 400 years.
Though older schools of martial arts did (and still do) contain sword-drawing techniques as part of their curriculum, it is a swordsman named Jinsuke Shigenobu who is generally credited as the founder of what became modern iaido. In the second half of the sixteenth century, he founded the
5
Shimmei Muso Ryu school of battojutsu (sword-drawing technique).
Since that time, there have been various branchings and renamings of his school and its descendants. In 1932, Nakayama Hakudo renamed his branch of the art Muso Shinden Ryu Iaido. Eventually, people began to use iaido as the term to describe other battojutsu schools. Today, the two most common iaido schools, both in the USA and Japan, are Muso Shinden Ryu and Muso Jikiden Eishin Ryu. Though these two schools separated in the early 18th century, the curriculum and techniques are nearly identical, with the differences being mostly in minor details.
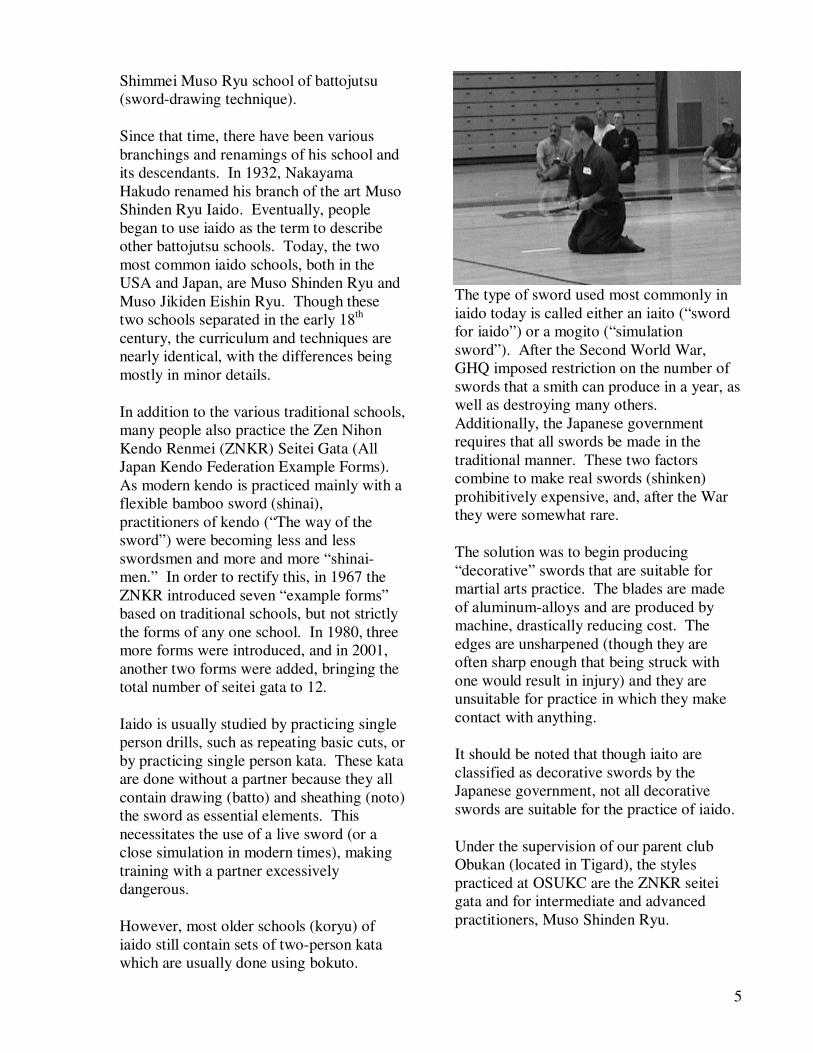
In addition to the various traditional schools, many people also practice the Zen Nihon Kendo Renmei (ZNKR) Seitei Gata (All Japan Kendo Federation Example Forms). As modern kendo is practiced mainly with a flexible bamboo sword (shinai), practitioners of kendo (“The way of the sword”) were becoming less and less swordsmen and more and more “shinai-men.” In order to rectify this, in 1967 the ZNKR introduced seven “example forms” based on traditional schools, but not strictly the forms of any one school. In 1980, three more forms were introduced, and in 2001, another two forms were added, bringing the total number of seitei gata to 12.
Iaido is usually studied by practicing single person drills, such as repeating basic cuts, or by practicing single person kata. These kata are done without a partner because they all contain drawing (batto) and sheathing (noto) the sword as essential elements. This necessitates the use of a live sword (or a close simulation in modern times), making training with a partner excessively dangerous.
However, most older schools (koryu) of iaido still contain sets of two-person kata which are usually done using bokuto.
The type of sword used most commonly in iaido today is called either an iaito (“sword for iaido”) or a mogito (“simulation sword”). After the Second World War, GHQ imposed restriction on the number of swords that a smith can produce in a year, as well as destroying many others. Additionally, the Japanese government requires that all swords be made in the traditional manner. These two factors combine to make real swords (shinken) prohibitively expensive, and, after the War they were somewhat rare.
The solution was to begin producing “decorative” swords that are suitable for martial arts practice. The blades are made of aluminum-alloys and are produced by machine, drastically reducing cost. The edges are unsharpened (though they are often sharp enough that being struck with one would result in injury) and they are unsuitable for practice in which they make contact with anything.
It should be noted that though iaito are classified as decorative swords by the Japanese government, not all decorative swords are suitable for the practice of iaido.
Under the supervision of our parent club Obukan (located in Tigard), the styles practiced at OSUKC are the ZNKR seitei gata and for intermediate and advanced practitioners, Muso Shinden Ryu.

6
Etiquette 1. When entering or leaving the dojo, perform a standing bow towards the shomen (center of the front wall).
2. When entering the dojo, greet the most senior person already present.
3. Be ready to begin when it is time for practice to start: be dressed with appropriate equipment ready.
4. Practice clothes should be neat and clean.
5. Fingernails and toenails should be short and clean.
6. Help with cleaning the dojo before and after practice.
7. Never step over a sword (including shinai and bokuto) or other equipment lying on the ground.
8. Do not use someone else's equipment without permission.
9. Avoid unnecessary talking during practice.
10. Address the instructor as “Sensei” or as “[Last Name]-sensei.”
11. Be alert and attentive during practice.
12. When it is necessary to move about the dojo, do so quickly.
13. When it is necessary to pass in front of someone else, extend your right hand and bow slightly.
14. Never lean on a shinai or bokuto or use it like a cane.
15. Carry shinai in the left hand. Carry bokuto in the right.
16. Bow and say, "Onegaishimasu," when beginning practice with a new partner.
17. Bow and say, "Arigato gozaimashita," or "Domo arigato gozaimashita," when done practicing with someone.
7
Opening and Closing Ceremonies
Opening Ceremony
(Seiretsu) “Line up.” This command should not be necessary. You should be lined up when it is time for class to start.
Seiza “Sit down.”
Mokusô “Meditate.”
(Mokusô o) yame “Stop (meditating).” Stop meditating and return your hands to your thighs.
Shômen ni rei “Bow to the shômen.” Perform zarei to the shomen.
Sensei ni rei “Bow to the instructors.” Zarei, and, while bowed, loudly say, “Onegaishimasu.”
Kiritsu “Stand up.”
Closing Ceremony
Seiretsu
Seiza
(Men to kote o tore) “Take off the men and kote.” Those students wearing kote and men should remove them.
Mokusô
(Mokusô o) yame
Sensei ni rei This time say, “Domo arigato gozaimashita.”
Shômen ni rei
At this point, any closing remarks will be made by the instructors or senior students. Remain in seiza.
Rei “Bow.” Zarei.
Wakare “Break.” Immediately and quickly stand up, proceed to in front of the highest ranked instructor, and sit in seiza. If the instructor if has any personal comments, he or she will make them now. The instructor will initiate a bow; bow lower and longer than the instructor (but not excessively so). If there is more than one instructor, go to the next highest ranked instructor and repeat the same procedure.

8
Seiza
Kendo Basics
Sageto
Sageto is the position used when carrying a sword. Both arms should be down at your sides. Grip the sword just above the guard (on the blade section) with the tip pointing back and the edge up. The sword should be aligned straight forward and back, and allowed to hang naturally at about a 45 degree angle.
Taito
Taito is a position which simulates the sword having been thrust through one’s belt, making it ready to draw and use. It is similar to sageto, but the left fist is raised and the sword held flatter so that it crosses the body just above the left hip, rather than across the left thigh. It is also adjusted so that it is slightly diagonal with the butt of the sword in line with the center of the body. If not wearing kote, put your thumb on the tsuba.
Seiretsu
Seiretsu means “orderly line” in Japanese. It is also the command to form such a line. When class is starting, the command should not be necessary, as practice always starts the same way. The proper way to line up is with the highest ranks closest to the shomen (front wall of the dojo). The instructors will line up with the shomen on their left. The students should line up so it is on their right, so that the two lines are facing each other. Stand in sageto.
Seiza
Seiza is a fairly formal Japanese sitting position. The feet should be tucked under the buttocks, with the heels turned slightly outward. The back should be straight and the chin pulled slightly back. The hands are rested on the mid or upper thighs with the fingers together and the
elbows near the body. Pressing the abdomen forward (but still keeping the back
Sageto
Taito

9
straight and vertical) will take some of the pressure off of the ankles. It is appropriate for women to sit with their knees together or very close. Men should sit with the width of one or two fists between their knees.
To sit down in seiza from a standing position, first assume taito if in sageto. This will prevent the tip of your sword from knocking on the ground when you sit. Slide the left foot back and lower the left knee to the ground, so that it is where the left toes were originally. Keep the bottoms of the toes on the floor; do not put the top of the foot on the floor yet. Slide the right foot back, and put the right knee where the toes of the right foot were. Point the left foot backwards and put the top of the foot on the floor, then do the same with the right. Settle into seiza. During all of this, keep the torso as upright as possible.
To stand up, simply reverse the procedure, raising the right knee then the left.
If you have equipment with you when you sit, sit then put the equipment down. Do not put it down either before or while you are sitting down. There are specific locations for each piece of equipment. Bokuto are placed on your right side, with the edge in towards you. The tsuba should be even with your knees, and the sword should be just far enough away that it is not lying on your hakama. Shinai go in a similar position, but on the left and with the edge facing out. Kote should be placed thumbs together, palms down, with the fists to the right. The back end of the kote should be even with the outside of your right thigh, and they should be far enough forward that you have room to bow. Place them so that they are in line with those of higher ranked students. The men should then rest across the kote so that the top is towards the front.
Mokuso
Mokuso means “silent contemplation.” It starts and ends every practice. In kendo, there is a specific posture taken during mokuso. While in seiza, close your eyes and form a circle with your hands in front of your abdomen, with the thumbs at the top and the fingers at the bottom. The tips of the thumbs should be touching, but the tips of the fingers should overlap slightly, with the left on top of the right. Breathe in through your nose and out through your mouth.
Zarei
Zarei is a seated bow. In kendo, it is performed only during the opening and closing ceremonies. From seiza, slide both hands forward onto the floor (still palms down) and together, so that the tips of the thumbs and index fingers touch, forming a small triangle. Cup the hands slightly,
10
Ashigamae
rather than placing them flat on the floor. Bend forward at the hips, rather than curving the spine. Also avoid bending at the knees, which raises the buttocks into the air. The hands should be placed somewhat in front of the knees, so that if you were to touch your forehead to the ground, your nose would go into the small triangle between your hands. However, in practice do not bow this low. Only bow until the elbows touch the floor.
When bowing to the shomen, you should turn to face it before bowing. At a crowded practice, it may not be feasible to turn this far. When you turn, move your sword with you, but not your men and kote. Remember to move your sword back when you return to your original position.
Whether bowing to the shomen or each other, everyone attending practice should bow down at the same time. However, everyone will rise in order of rank—first the instructors then the students. Simply wait for the person above you to start to rise, then raise yourself.
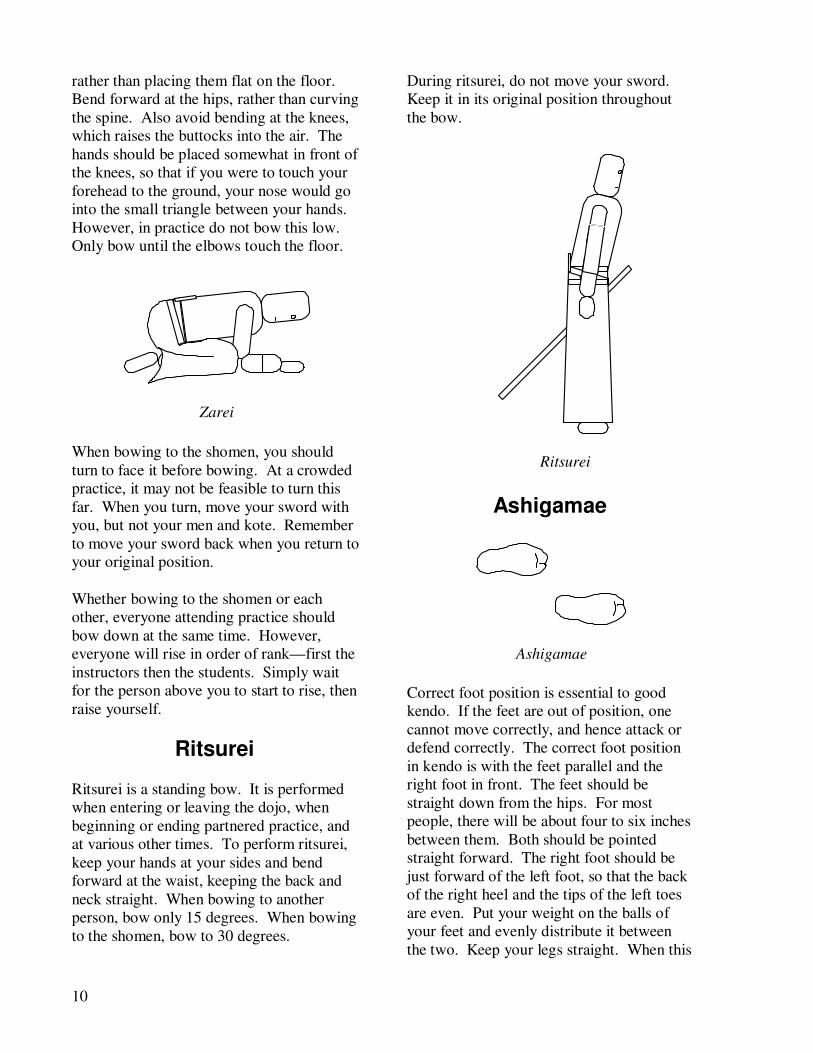
Ritsurei
Ritsurei is a standing bow. It is performed when entering or leaving the dojo, when beginning or ending partnered practice, and at various other times. To perform ritsurei, keep your hands at your sides and bend forward at the waist, keeping the back and neck straight. When bowing to another person, bow only 15 degrees. When bowing to the shomen, bow to 30 degrees.
During ritsurei, do not move your sword. Keep it in its original position throughout the bow.
Ashigamae
Correct foot position is essential to good kendo. If the feet are out of position, one cannot move correctly, and hence attack or defend correctly. The correct foot position in kendo is with the feet parallel and the right foot in front. The feet should be straight down from the hips. For most people, there will be about four to six inches between them. Both should be pointed straight forward. The right foot should be just forward of the left foot, so that the back of the right heel and the tips of the left toes are even. Put your weight on the balls of your feet and evenly distribute it between the two. Keep your legs straight. When this
Zarei
Ritsurei
11
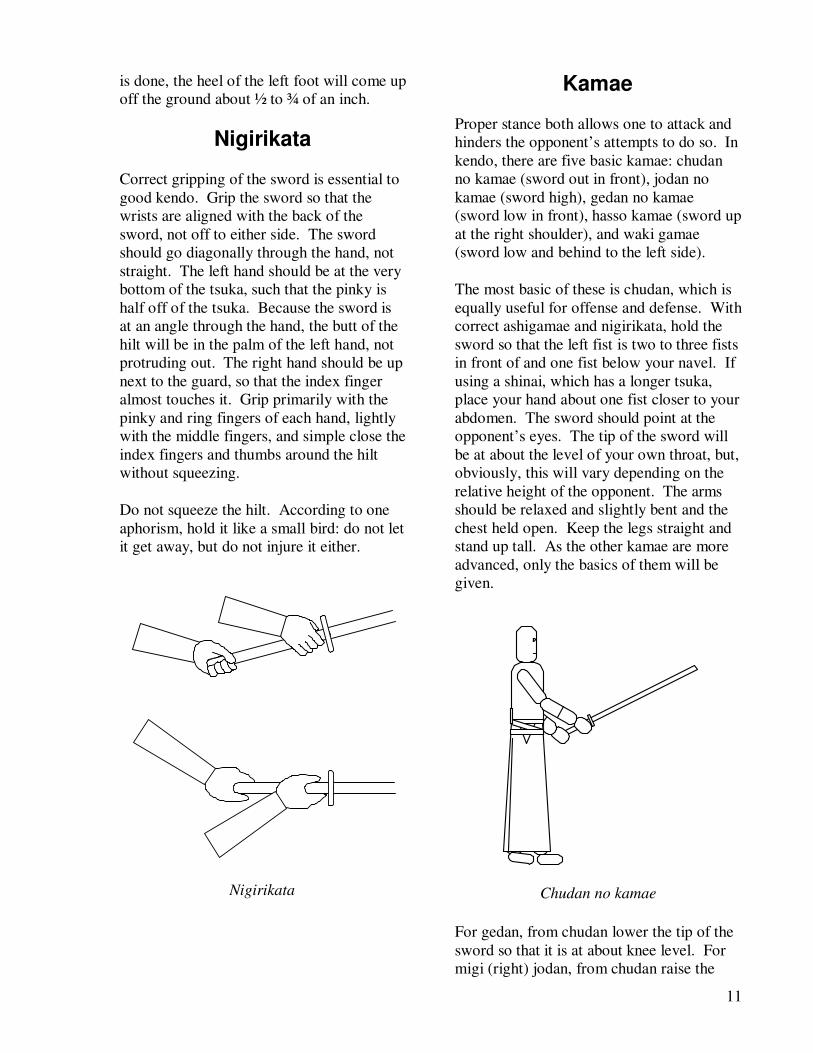
Nigirikata
Chudan no kamae
is done, the heel of the left foot will come up off the ground about ½ to ¾ of an inch.
Nigirikata
Correct gripping of the sword is essential to good kendo. Grip the sword so that the wrists are aligned with the back of the sword, not off to either side. The sword should go diagonally through the hand, not straight. The left hand should be at the very bottom of the tsuka, such that the pinky is half off of the tsuka. Because the sword is at an angle through the hand, the butt of the hilt will be in the palm of the left hand, not protruding out. The right hand should be up next to the guard, so that the index finger almost touches it. Grip primarily with the pinky and ring fingers of each hand, lightly with the middle fingers, and simple close the index fingers and thumbs around the hilt without squeezing.
Do not squeeze the hilt. According to one aphorism, hold it like a small bird: do not let it get away, but do not injure it either.
Kamae
Proper stance both allows one to attack and hinders the opponent’s attempts to do so. In kendo, there are five basic kamae: chudan no kamae (sword out in front), jodan no kamae (sword high), gedan no kamae (sword low in front), hasso kamae (sword up at the right shoulder), and waki gamae (sword low and behind to the left side).
The most basic of these is chudan, which is equally useful for offense and defense. With correct ashigamae and nigirikata, hold the sword so that the left fist is two to three fists in front of and one fist below your navel. If using a shinai, which has a longer tsuka, place your hand about one fist closer to your abdomen. The sword should point at the opponent’s eyes. The tip of the sword will be at about the level of your own throat, but, obviously, this will vary depending on the relative height of the opponent. The arms should be relaxed and slightly bent and the chest held open. Keep the legs straight and stand up tall. As the other kamae are more advanced, only the basics of them will be given.
For gedan, from chudan lower the tip of the sword so that it is at about knee level. For migi (right) jodan, from chudan raise the

12
Gedan
Migi jodan
Hidari jodan
Hasso
Waki
1
1
2
2
2
2 1
1
Okuri ashi
sword above your head, so that your left fist is in front and above your forehead. For hidari (left) jodan, do the same, but move your left foot forward, reversing the normal ashigamae. Hasso is like hidari jodan, except that the left fist is in front of the chest and the guard is even with your mouth. For waki gamae, from chudan keep your left fist where it is, step back with the right, switching foot position, and lower the tip down to the side at about knee level, so that the sword is pointing at the ground behind you.
Ashisabaki
Proper footwork is literally fundamental to good technique in kendo. In general, kendo footwork is of a type called suri ashi, in which both feet remain in contact with the floor while moving. For rapid movement while striking, a type called tobi komi ashi is employed. Tobi komi ashi is essentially suri ashi, except that it is done so quickly and over a large enough distance that the feet do leave the floor.
There are four basic patterns of movement. They are okuri ashi, in which the lead foot moves first, then the trailing foot moves; ayumi ashi, in which the trailing foot moves first, passing the lead foot; tsugi ashi, in
which the trailing foot moves up next to the lead foot which then moves followed by the trailing foot; and hiraki ashi, which is similar to okuri ashi, except that the feet (and hence the body) change their direction.
Okuri ashi is the basic and most often used form of footwork, hiraki ashi is used

13
1
1
1
1
2
2
2
2
2
1
1
2
2
3
1
Hiraki ashi
Ayumi ashi
Tsugi ashi
Sonkyo no ashigamae
primarily during defensive techniques, ayumi ashi is used only when at a great distance from the opponent, and tsugi ashi, though sometimes appropriate, is generally considered bad form.
Sonkyo
Sonkyo is a squatting position used in kendo whenever the sword is drawn or sheathed. While standing in proper ashigamae, turn
both feet outward 45 degrees. Lower yourself straight down, rising onto your toes and the balls of your feet. Keep your back straight and your torso upright.
Te no Uchi
Te no uchi literally refers to the insides of the hands, but in actuality, it refers to a tightening of the grip while striking. At the precise moment the sword makes contact with the target, whether real or imaginary, squeeze tightly with the bottom two fingers of each hand, and try to rotate your wrists inward. This motion helps to both control the blade and adds power to the strike.
Furikata
Proper swinging is another fundament of good kendo. The proper swing allows

14
Suburikata
accuracy, power, and speed, all with a minimum of effort.
When swinging the sword, use the left hand for power and the right for guidance. The left hand should stay directly on the centerline of your body. Use your shoulders and back to lift the sword, not your arms.
Using your arms will result in a shorter reach and exposing yourself to attack.
From chudan no kamae, start by simultaneously sliding the front foot forward and lifting the sword upwards. Continue lifting until you can no longer see your left fist. If you are using the left arm for power,
15
(Sho)men (Migi) kote
(Migi) do
Migi men
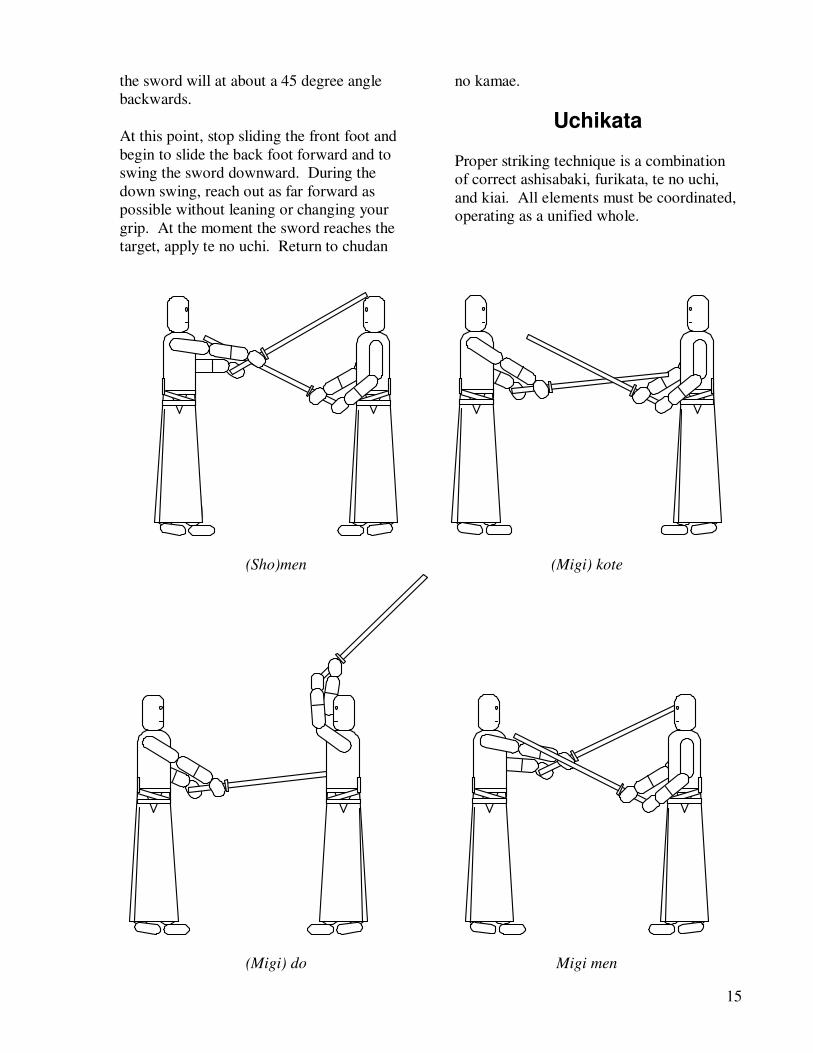
the sword will at about a 45 degree angle backwards.
At this point, stop sliding the front foot and begin to slide the back foot forward and to swing the sword downward. During the down swing, reach out as far forward as possible without leaning or changing your grip. At the moment the sword reaches the target, apply te no uchi. Return to chudan
no kamae.
Uchikata
Proper striking technique is a combination of correct ashisabaki, furikata, te no uchi, and kiai. All elements must be coordinated, operating as a unified whole.

16
Hidari men
Hidari kote
Tsuki
Hidari do
When kiai-ing it is important to contract the abdomen in order to force air out of the lungs. If you use only your chest and throat, your kiai will be weak, and your throat will become sore. Kiai at the moment the sword
contacts the target. The kiai must correspond to the target being struck: “Men!” for the head, “Kote!” for the wrists, “Do!” for the abdomen, and “Tsuki!” when thrusting.

17
There are eight locations on the body that are considered targets: three on the head, the throat, both wrists, and both sides of the abdomen. The center of the head, the right wrist, and the right side of the abdomen are considered the basic cuts.
When striking shomen, raise the sword straight over your head and cut straight down to the center of your opponent’s head.
When striking migi kote, cut as for shomen, but instead of cutting the top of the head, continue downward to the right wrist. Even though it may be counterintuitive, to cut migi kote, cut straight and in the center.
For migi do, raise the sword straight up as in all cuts, but on the downswing, trace an arc with the tip of your sword out to your left and back to the center. Your left hand should come straight down the center as in men and kote. It is your right hand that steers the tip off center. Strike the right side of your opponent’s abdomen cutting downward and inward at 45 degrees. You must turn your hands to that you strike with the edge of your blade and not the flat.
Migi men is a cut to the right top corner of your opponent’s head. It is done in much the same fashion as migi do.
Hidari men is a cut to the left top corner of the head. It is identical to migi men, except that the tip goes out to your right to strike your opponent on the left.
Tsuki, though mechanically simple, is difficult to place accurately, and so is often reserved for those who have earned rank. Extending the tip forward towards the opponents throat, use the hips to drive the tip forwards and slightly upwards into the target.
Hidari kote and hidari do are usually struck when the opponent’s hands are above his shoulders. Hidari kote is nearly identical to
hidari men. Hidari do is similar migi do, but with the obvious reversal of direction.
Waza
Besides the basic attacks, kendo has many various techniques, for both offense and defense.
The offensive techniques, called shikake waza, are used when no opening is apparent.
Debana waza: Striking when the opponent first begins to move to strike. Common examples are debana-kote and debana-men.
Harai waza: Sweeping the opponents sword out of the way in order to make an opening to strike. Examples include harai-men and harai-kote.
Maki waza: Twisting your sword around the opponent’s to move it out of the way and create an opening. Examples are maki-age-kote and maki-otoshi-men.
Katsugi waza: Lifting your sword over your left shoulder as if hoisting a package in order to confuse your opponent and make him change his position. Examples are katsugi-kote and katsugi-men.
Katate waza: Striking with one hand in order to gain extra reach. Examples include katate-tsuki and katate-migi-men.
Jodan waza: Starting waza from jodan no kamae, rather than chudan, in order to gain speed at the cost of defense.
Hiki waza: Striking by moving backwards from a close position.
The defensive techniques, called oji waza, are used to respond to an opponent’s attack and launch a counter attack.

18
Nuki waza: Evading an attack while striking back. Common examples are men-nuki-do and kote-nuki-men.
Suri-age waza: Deflecting an incoming attack by sliding your sword up against your opponent’s. Examples include men-suri-age-kote and kote-suri-age-men.
Kaeshi waza: Parrying an attack on one side then using the energy of the opponent’s attack to counter attack on the other side. Examples include men-kaeshi-do and kote-kaeshi-men.
Uchi-otoshi waza: Striking downwards at the opponent’s blade in order to make it miss. Examples include do-uchi-otoshi-men.
19
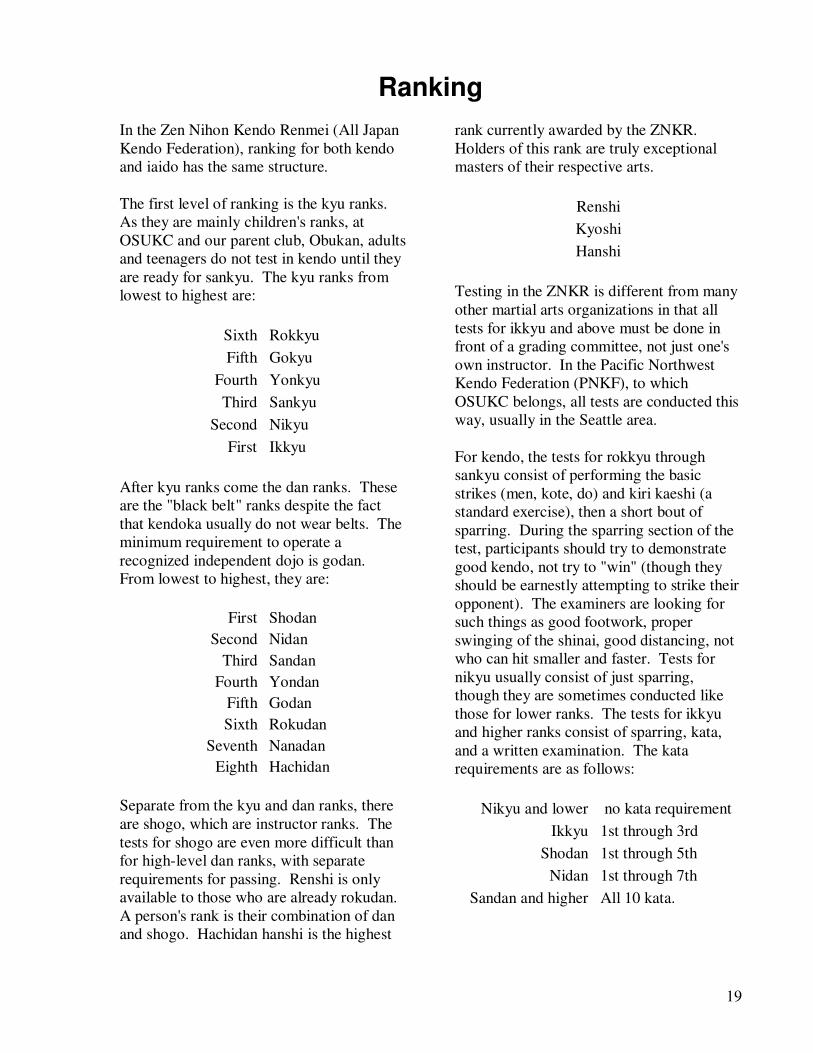
RankingIn the Zen Nihon Kendo Renmei (All Japan Kendo Federation), ranking for both kendo and iaido has the same structure.
The first level of ranking is the kyu ranks. As they are mainly children's ranks, at OSUKC and our parent club, Obukan, adults and teenagers do not test in kendo until they are ready for sankyu. The kyu ranks from lowest to highest are:
Sixth Rokkyu Fifth Gokyu
Fourth Yonkyu Third Sankyu
Second Nikyu First Ikkyu
After kyu ranks come the dan ranks. These are the "black belt" ranks despite the fact that kendoka usually do not wear belts. The minimum requirement to operate a recognized independent dojo is godan. From lowest to highest, they are:
First Shodan Second Nidan
Third Sandan Fourth Yondan
Fifth Godan Sixth Rokudan
Seventh Nanadan Eighth Hachidan
Separate from the kyu and dan ranks, there are shogo, which are instructor ranks. The tests for shogo are even more difficult than for high-level dan ranks, with separate requirements for passing. Renshi is only available to those who are already rokudan. A person's rank is their combination of dan and shogo. Hachidan hanshi is the highest
rank currently awarded by the ZNKR. Holders of this rank are truly exceptional masters of their respective arts.
Renshi Kyoshi Hanshi
Testing in the ZNKR is different from many other martial arts organizations in that all tests for ikkyu and above must be done in front of a grading committee, not just one's own instructor. In the Pacific Northwest Kendo Federation (PNKF), to which OSUKC belongs, all tests are conducted this way, usually in the Seattle area.
For kendo, the tests for rokkyu through sankyu consist of performing the basic strikes (men, kote, do) and kiri kaeshi (a standard exercise), then a short bout of sparring. During the sparring section of the test, participants should try to demonstrate good kendo, not try to "win" (though they should be earnestly attempting to strike their opponent). The examiners are looking for such things as good footwork, proper swinging of the shinai, good distancing, not who can hit smaller and faster. Tests for nikyu usually consist of just sparring, though they are sometimes conducted like those for lower ranks. The tests for ikkyu and higher ranks consist of sparring, kata, and a written examination. The kata requirements are as follows:
Nikyu and lower no kata requirement Ikkyu 1st through 3rd
Shodan 1st through 5th Nidan 1st through 7th
Sandan and higher All 10 kata.
20
1
2
3
4
5
6
7
9
8
10
11
12
1
2
3
4
5
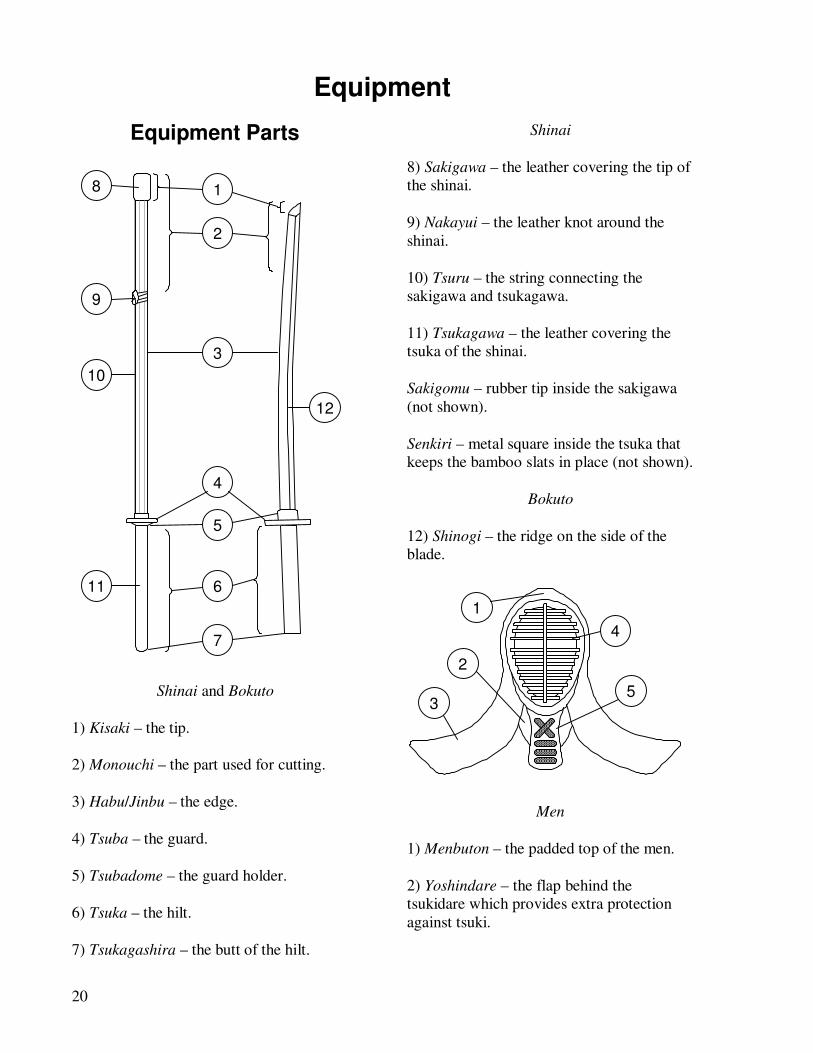
Equipment
Equipment Parts
Shinai and Bokuto
1) Kisaki – the tip.
2) Monouchi – the part used for cutting.
3) Habu/Jinbu – the edge.
4) Tsuba – the guard.
5) Tsubadome – the guard holder.
6) Tsuka – the hilt.
7) Tsukagashira – the butt of the hilt.
Shinai
8) Sakigawa – the leather covering the tip of the shinai.
9) Nakayui – the leather knot around the shinai.
10) Tsuru – the string connecting the sakigawa and tsukagawa.
11) Tsukagawa – the leather covering the tsuka of the shinai.
Sakigomu – rubber tip inside the sakigawa (not shown).
Senkiri – metal square inside the tsuka that keeps the bamboo slats in place (not shown).
Bokuto
12) Shinogi – the ridge on the side of the blade.
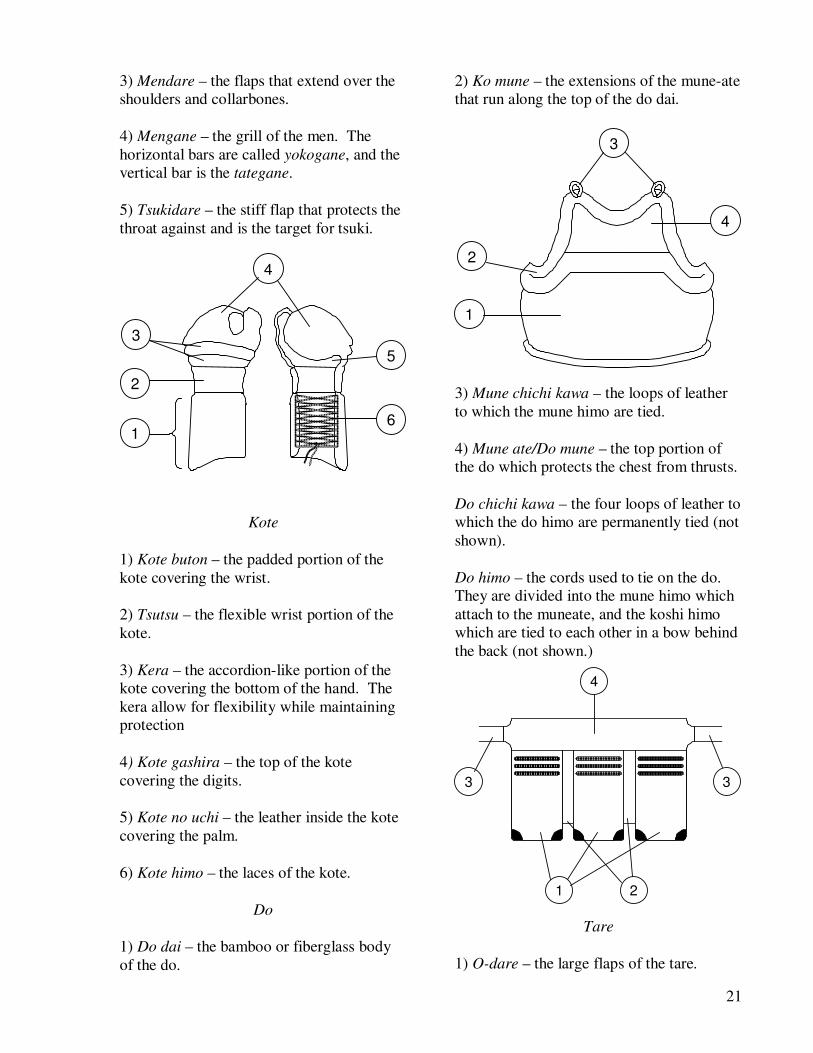
Men
1) Menbuton – the padded top of the men.
2) Yoshindare – the flap behind the tsukidare which provides extra protection against tsuki.
21
1
2
3
4
5
6
1
2
3
4
1
2
3
3
4
3) Mendare – the flaps that extend over the shoulders and collarbones.
4) Mengane – the grill of the men. The horizontal bars are called yokogane, and the vertical bar is the tategane.
5) Tsukidare – the stiff flap that protects the throat against and is the target for tsuki.
Kote
1) Kote buton – the padded portion of the kote covering the wrist.
2) Tsutsu – the flexible wrist portion of the kote.
3) Kera – the accordion-like portion of the kote covering the bottom of the hand. The kera allow for flexibility while maintaining protection
4) Kote gashira – the top of the kote covering the digits.
5) Kote no uchi – the leather inside the kote covering the palm.
6) Kote himo – the laces of the kote.
Do
1) Do dai – the bamboo or fiberglass body of the do.
2) Ko mune – the extensions of the mune-ate that run along the top of the do dai.
3) Mune chichi kawa – the loops of leather to which the mune himo are tied.
4) Mune ate/Do mune – the top portion of the do which protects the chest from thrusts.
Do chichi kawa – the four loops of leather to which the do himo are permanently tied (not shown).
Do himo – the cords used to tie on the do. They are divided into the mune himo which attach to the muneate, and the koshi himo which are tied to each other in a bow behind the back (not shown.)
Tare
1) O-dare – the large flaps of the tare.

22
Munehimo no musubikata
2) Ko-dare – the small flaps of the tare, behind the o-dare
3) Tare-himo/Tare-obi – the straps of the tare.
4) Mae-obi – the wide portion at the top of the tare.
Donning Keikogi and Hakama
The traditional order for donning Japanese clothing is from bottom to top and from left to right, with inside before outside obviously taking precedence.
When putting on the keikogi, make sure to tie the inside and outside ties, located on the left side and right breast respectively, in bows in order to hold the uniform closed during practice.
To put on the hakama, hold the front panel and step into each leg. Hold the top of the front panel across your abdomen just below your navel. Take the front straps around to the back, cross them left over right, bring them back to the front, and cross them left over right again. Where they cross in the front should be about two inches below the top of the front panel. Bring them around to the rear and tie in a bow.
Lift the back panel and insert the small plastic “tongue” behind the knot in the front straps, so that the koshiita rests above the knot. Take the rear straps and bring them around to the front, where the others cross. Tie a half knot in them, but rather than just going around the other rear strap, go around all the straps. Tie the rear straps in a square knot. Bring the remainder of them around to the sides and tuck them into the other straps and sides of the hakama.
Donning Bogu
Wearing and removing of bogu should all be done while seated in seiza.
The first part of the bogu to be put on is the tare. Rest it on your lap with the mae obi up against your abdomen. Wrap the tare obi around back, crossing them, and bring the ends back to the front. Lift up the central odare and tie the obi in a bow. Tuck the ends of the knot underneath the kodare.
Next, put on the do. Hold it in place with your elbow while tying the mune himo. It should be a little higher than where you want to be, as it will drop some after when you release it after tying the himo. First take the left mune himo and cross it over your right shoulder. Tie it to the right mune chichi gawa in the manner shown.
The loop that is left after tightening the knot should be pointing away from the center. Tuck the end of the himo behind the mune ate. Do the same for the left mune himo. Bring the koshi himo around to your back and tie them in a bow. The koshi himo do not need to be tight. They simply keep the do from flipping up.
Next comes the tenugui. Hold it out in front of you by the top corners. Keeping the top edge relatively tight, pull the tenugui over

23
Tenugui no kaburikata
Keikogi no tatamikata
your head, so that what was the top edge now goes around the back of your head. The bottom corners should now hang to the sides of your head. Wrap one of the back corners around front to the other side of your head, keeping the tenugui tight. While holding that corner with a finger or two, wrap the other corner around and tuck it into the fold made by the first corner. Fold the corners that are now in front of your face up over your head. You may have to fold them in half before doing so, so that the tenugui does not stick out the back of your men like a duck’s tail.
Now put on the men. Pull the himo tight and tie them in a bow, making sure that the loops and bows are all the same length. Make sure that the himo wrapping around the sides of the men are next to each other and not twisted.
Finally, put on the kote. Put the left one on first. Avoid pulling on either the bottom of the open end or the tip of the mitten, as doing so repeatedly will eventually stretch and weaken the kote.
Folding the Keikogi
Lay the keikogi out flat with the back down. Fold one half over so that the edge is in the middle of the keikogi. Fold the sleeve back. Repeat for the other side. Fold the keikogi up from the bottom in thirds.

24
Hakama no tatamikata
Tsuru no sakigawa ni musubikata
Folding the Hakama
To fold the hakama, lay it out flat and make sure that the pleats are properly arranged, both front and back. Fold the edges of the hakama over the front, then fold it up in thirds. Turn it over, so that the koshiita is on top. Fold the koshi himo in half, then half again and cross them across the back of the hakama, right over left. Take the left mae himo and loop it around the crossing of the koshi himo, then loop it around the left koshi himo. Repeat for the right mae himo. Tuck the end of the left mae himo through the loop made by the right mae himo. Repeat for the right mae himo.
Tying the Tsuru to the Sakigawa
After looping the end of the tsuru through the sakigawa, tie the tsuru in a knot as shown. A simple square knot will not work. It important to lace the tsuru so that it is on
the outside of the sakigawa to prevent it from tearing out.
Tying the Nakayui
The nakayui prevents the bamboo of the shinai from separating during strikes and keeps large splinters from flying loose. It periodically needs tightening and, hence, retying.
Tie a knot in the tsuru where the nakayui will be located. This helps to prevent the nakayui from sliding along the length of the shinai. Put the end of the nakayui through

25
Nakayui no musubikata
Tsuru no tsukagawa ni musubikata
the small slit in the other end, forming a loop, and slide it over the tsuru. Tighten the loop just above the knot in the tsuru. Wrap the nakayui around the shinai three times. Loop the end of the nakayui underneath the tsuru. Take the end of the nakayui to the other side of the three loops and again tuck it underneath the tsuru, but from the other direction. Slip the end of the nakayui underneath the loop just formed. Repeat the looping and tucking, crossing over the three
loops around the shinai each time, until you have wrapped the nakayui around the tsuru a total of five times. Trim the excess end of the nakayui.
Tying the Tsuru to the Tsukagawa
Tie a slipknot in the tsuru above the leather cord at the end of the tsukagawa. Loop the

26
Unsanded bamboo
Sanded bamboo
end of the tsuru through the leather cord then back through the loop of the slipknot. Pull the tsuru snug. (It does not have to be very tight—just enough that it keeps the sakigawa and tsukagawa in place.) Tuck the tsuru through the bottom cord on the tsukagawa and again pull it snug. Loop the rest of the tsuru tightly around the leather cord and tsuru. Tie the end by tucking back underneath a previous loop.
Shinai Preparation and Maintenance
Shinai do not come quite ready to use. They need to be sanded, oiled, and waxed. They can be used as bought but will not last nearly as long.
Untie the tsuru from the tsukagawa. This should be the only knot that you need to untie. Slip the tsuru, nakayui, and sakigawa off of the shinai in one piece. Remove the sakigomu from the tip of the shinai. Remove the tsukagawa. Before separating the bamboo slats from each other and the senkiri, it is helpful to label them so they are easier to reassemble.
Sand the edges of the bamboo to remove the sharp corners from them. This will allow them to slide past each other more easily and
prevent splinters from forming at dents in the sharp edge. It is not necessary to sand the entire length of the shinai. Only do the top half, where the slats actually move past each other.
Rub oil (preferably light mineral oil, but vegetable oil will work if nothing else is available) into the edges and insides of the slats. This will prevent the bamboo from drying out and hence splintering more easily.
Finally rub wax along the edges of the slats were the slide against each other. This too helps to prevent splintering. Candle wax works well, but avoid using a colored or scented candle.
Reassemble the shinai, and it is ready for use.
Periodically re-oil and, if necessary, re-sand and re-wax the shinai. Also, rotate the entire shinai, so that the same slat is not taking all the impact. This will greatly lengthen the life of the shinai.
Remember to check your shinai for splinters before, during, and after each practice. Damaged shinai should not be used in any circumstances.

27
Competition Competition is a large part of modern kendo, with tournaments ranging from small intra-club events to the World Kendo Championships and All Japan Kendo Championships. However, the action tends to move very quickly, making it difficult to follow, and the rules governing what constitutes a valid point are rather specific, often leading spectators to wonder why a point was or was not awarded.
Shiaijo
A kendo match (shiai) takes place in a court called a shiaijo. It is a rectangle from 9 to 11 meters (30 to 37 feet) on a side, marked by a wide white line. In the exact center of the court is an ‘X’ 30 centimeters (one foot) across, again in thick white. One meter (three feet) on each side of the center is a 30 centimeter line, marking where each kendoka begins and ends the shiai.
Yukodatotsu
In order to earn ippon (one point), a strike must meet several conditions.
It must be made against one of the eight valid targets. (See uchikata in the kendo basics section).
It must be made with the correct portion of the shinai. The strike must be made with the monouchi, the last quarter or so of the blade. This corresponds to the "sweet spot" on a real sword. The strike must also be made with the habu, the edge which is opposite the string on the back of the shinai. As the shinai represents a real sword, striking with the flat or at an off-angle is an invalid strike.
It must be made with correct hasuji. That is, the path of the blade and the direction of the edge must be in line. Simply making
contact with the habu is not enough, the strike must be leading with the habu as well.
It must be accompanied by proper kiai. The kendoka must shout loudly, calling out the name of his target: "Men!" "Kote!" "Do!" or "Tsuki!" This means that the kendoka must hit what he aims at, not accidentally get something.
The next two conditions are probably the most important but least obvious conditions.
The kendoka must demonstrate ki-ken-tai-itchi. That is cooperation of spirit, sword, and body. All three elements of kiai, sword movement, and body movement must make a coordinated whole. Technically, the leading foot landing, the kiai, and the shinai contacting the opponent should all happen at the same time.
The kendoka must also demonstrate strong zanshin, awareness of his opponent and surroundings, particularly after the strike. This is physically demonstrated by quickly moving to a proper distance, if possible. If not possible, the kendoka should keep his tip pointed at the center of his opponent, thwarting any attempt at a counterattack.
There are a few things which keep a strike meeting the above conditions from earning ippon.
Ai-uchi - simultaneous strikes. If both kendoka make otherwise valid strikes simultaneously, then neither is awarded ippon and the match continues without stopping. For purposes of ai-uchi, mune tsuki, thrusting to the upper portion of the do, counts as a valid strike, even though it can not earn ippon.
If the opponent's tip or monouchi is resting on the upper body of the attacker, and the
28
opponent is in good posture, the strike is invalid. One can not move against an opponent's blade to make a strike, as one would be wounding oneself if it were a fight with real swords.
Hansoku
There are various actions which will earn hansoku. Two hansoku earns the other kendoka ippon. Hansoku include, but are not limited to:
Stepping out of bounds. A person is considered to have stepped out of bounds when an entire foot is outside of the line marking the edge of the shiaijo. On the line or only partially out is still in bounds.
Falling down and not trying to protect yourself from the enemy. Falling down is not in and of itself hansoku, but one should attempt to continue the fight.
Dropping the shinai. If you lose your sword in a sword fight, you're at a large disadvantage. Originally, this automatically earned the opponent ippon, as it was assumed he would simply chase you down and kill you, but now is the same as other fouls.
Stalling. Playing the clock is against the rules, as there would be no time limit in a real fight.
Grabbing the shinai anywhere other than the tsuka. Obviously, you can't hold your sword by the blade.
Tripping. Leg sweeping and tripping used to be legal, but, because of the danger involved, is now prohibited. Rumor has it that police dojo still practice leg sweeps, though they obviously do not use them in shiai.
Grabbing. Kendo shiai is supposed to be a sword fight, not a judo match.
Unfair tsubazeriai. When in tsuba zeriai, one cannot hook the other’s shinai, either with one’s own shinai, with the tsuka, or with the elbow. Also, tsuba zeriai should be tsuba to tsuba, not fist to fist.
Unfairly shoving your opponent out of bounds. One can intentionally knock the opponent out of bounds, but it should be a kendo match, not a sumo match.
Coaching. If someone yells advice to one of the contestants, the contestant can be assigned hansoku. The kendoka have to fight the match without any outside help.
The match will be stopped when someone commits hansoku. However, if one strikes before the match is stopped, one can earn ippon. If ippon is earned, the hansoku is not counted. E.g. if you disarm your opponent then strike him, you get ippon, rather than him getting hansoku and you earning ippon the next time he commits a foul.
Shimpan
For each match, there will be three shimpan: one head shimpan, who is the only one who gives verbal instructions to the contestants, and two assistant shimpan, who help determine ippon and hansoku. To earn either ippon or hansoku, at least two of the three shimpan must agree. The shimpan indicate their decisions using red and white flags, corresponding to the red or white ribbon worn by each contestant.
Progression of a match
The two kendoka line up just outside opposite sides of the shiaijo. The enter simultaneously, taking one step forward with the right foot. From here they perform a standing bow to each other, then proceed

29
Neutral. Ippon (for white). Also for
hantei and announcing the winner.
No ippon/hansoku. Abstain
Hansoku (white). Ai hansoku. Matte (suspension of
match). Wakare (separate).
Gogi (conference). Hikiwake (draw).
Shimpan flag signals
to the two white lines that mark their starting positions. Ideally, they should take three steps, but it's more important to get to the line. On the last step, they each draw their shinai and drop into sonkyo.
It is from here that the match begins, upon the head shimpan shouting "Hajime!" ("Begin!") Earlier, the kendoka would attack each other out of sonkyo, springing forward from the squat. These days, the kendoka must stand up before attacking.
30
However, pressing the attack is seen as a virtue in kendo, and whoever stands up first definitely has an advantage. The kendoka must stand before attacking, but they don't have to wait for the other to stand.
Upon the scoring of the first point, the head shimpan will shout, "Men/Kote/Do/Tsuki ari!" announcing the point scored. The two kendoka will return to their respective starting lines, but will remain standing in chudan no kamae. The match resumes when the head shimpan shouts, "Nihonme!" ("The second point!")
If the second point ends the match (the score is 2-0), the kendoka will return to their starting lines, the head shimpan announces "Shobu ari!" ("There is victory and defeat!") and raises one flag to indicate the winner. The two kendoka return to sonkyo, put away their shinai, and back out of the shiaijo.
If the second point ties the match, the match proceeds like after the first point, but the head shimpan announces "Shobu!" ("Victory and defeat!") rather than "Nihonme!"
Upon the third point, the match ends the same way as above.
If time (usually 5 minutes) runs out and the score is tied, either 0-0 or 1-1, one of two things can happen. The first is the shimpan can decide the winner, voting by raising their flags. This is uncommon. The other is that the head referee will announce an extension period, "Encho!" Encho are always sudden death. If at the end of the encho, the score is still the same, the shimpan may decide for an additional encho, but will usually decide the winner. It is common for the encho in semi-final and final matches to be of unspecified length–the two contestants just keep on fighting until someone finally gets ippon.

31
Glossary
Pronunciation guide
The pronunciation rules given here are approximations only, and are only for the romanization system used in this glossary. The most notable differences between the pronunciation rules given here and proper Japanese pronunciation are the r, f, and h.
1) In general, single vowels are pronounced as follows: a is "ah" (like the o in not); e is like as in get; i is like the y in party, o is as in hope, and u is as in blue. However, Japanese vowels tend to be shorter than their English counterparts.
2) Ô and û represent what would be two vowels in Japanese (ou and uu) and are hence long.
3) Y is always consonantal like in yes, not vocular like in day.
4) Syllables are always divided after the vowel and before the consonant. The only exception to this is n, which can be a syllable by itself in Japanese. If n precedes a consonant, the Anglicized pronunciation is to end the syllable on the n. E.g., kendô would be ken-dô in English. (It would be ke-n-do-u in Japanese.) In the case that n ends a syllable and precedes a vowel, a dash or space will separate them (e.g., men-uchi).
5) Short u (not û) and i between unvoiced consonants (ch, f, h, k, s, sh, t, and ts) or following an unvoiced consonant at the end of a phrase are usually "devoiced" and not pronounced. E.g. "shitachi" is pronounced "sh-ta-ch" or "shtach" rather than "shee-tah-chee."
Numbers Ichi one
Ni two San three Shi or Yon four Go five Roku six Nana or Shichi seven Hachi eight Kyû nine Jû ten Hyaku (one) hundred
32
Commonly Used Words Aite opponent, partner Arigatô gozaimashita "thank you"; said after something is done; often proceeded by dômo, in
which case it becomes equivalent to "thank you very much" Arigatô gozaimasu "thank you"; identical to "arigatô gozaimashita," except that it is said
when the action being thanked is either ongoing or will happen in the future.
Ashi foot, leg Ashi gamae foot position Ashi sabaki foot work Ayumi ashi "walking footwork"; footwork in which the feet cross, but remain on
the floor at all times Battô the drawing of a sword Bôgu the protective gear used in kendo Bokutô wooden practice sword; used in kendô primarily for kata Chûdan (no kamae) middle stance; the sword is held in front with the tip at the level of the
throat or chest Dan level, grade. When referring to rank, the dan ranks are above the kyû
ranks Dô abdomen, trunk; the piece of armor that protects the trunk in kendô; a
cut or blow to the abdomen Dôjô a practice hall or room
Dô uchi a cut or blow to the abdomen Enchô overtime period in a kendo match Gedan (no kamae) low stance; the sword is held in front with the tip below the level of the
knees Hajime "begin" Hakama traditional loose, pleated pants of Japan; they are part of the uniform of
kendô Hansoku a penalty incurred during a kendo match Hara belly, gut Hassô (no kamae) a stance in which the sword is held high, but with the hilt held beside
the head, rather than above it Hasuji the line of the cut. The idea that the edge must lead the cut, so that one
is not attempting to cut with the side of the blade Hidari left, the left side Hiraki ashi footwork in which one moves diagonally and simultaneously changes
direction Jigeiko general practice; in kendô, usually refers to sparring practice Jodan (no kamae) high stance; the sword is held above one’s head Kakari geiko continuous attacking practice, practice in which one person
continuously attacks another (usually an instructor or senior student)

33
Kamae stance, position Kata forms; in kendô, practice without bogu using bokutô in which two
kendôka practice prearranged sets of attack and defense Katana a sword, particularly a curved Japanese one Keiko practice, practice session Keikogi practice clothes, the uniform of kendô; often used to refer to just the
jacket like top of the uniform Kendôka practitioner of kendô Kenshi a swordsman or swordswoman; often synonymous with kendôka Kiai a shout or yell to generate power Kirikaeshi a kendô exercise in which one continuously attacks alternating sides of
an opponent (usually the head) while advancing and retreating Kisaki tip (of a sword) Kodachi a short sword; the short bokutô used by shitachi in the last three kendô
kata Koshi hips, waist Kote glove, gauntlet; wrist; a cut or blow to the wrist Kote uchi a cut or blow to the wrist Kyû rank, grade. Kyû ranks are below dan ranks. Men face, side; the helmet used in kendô; a cut or blow to the head Men uchi a cut or blow to the head Migi right, the right side Mokusô quiet contemplation. The period of meditation at the beginning and end
of each practice session Monouchi the part of a sword blade used for cutting; approximately the quarter or
third of a sword blade nearest the tip Motodachi during two-person exercises (such as kirikaeshi or kakari geiko), the
one who receives the strikes of the other. Mune the chest Nakayui the leather thong tied around a shinai about one third of the way from
the tip. It separates the monouchi from the rest of the blade Nihonme “the second (point).” The command to begin fighting for the second
point in a kendo match. Also, the second kata. Nôtô the sheathing of a sword Okuri ashi "sending footwork"; the basic footwork of kendô in which the lead foot
is sent out, and the trailing foot then moves. The feet do not cross Onegaishimasu "please"; said when requesting something; usually said at the beginning
of practice, or when engaging a new partner Otagai ni rei "bow to each other" Rei respect, bow, a command to bow Ritsurei a standing bow Sakigawa the leather covering the tip of a shinai Sayumen the left and right sides of the face or head; cuts or blows to both sides of
the head
34
Seiretsu "line up"; an orderly line Seiza formal seated position with both feet tucked under the buttocks Sensei teacher, instructor; when used as a term of address it is placed after the
addressee (e.g. Jones sensei) Sensei ni rei "bow to the instructors" Shiai match, a competitive bout between kendôka Shiai geiko match practice, practice in which the participants act as if in a
tournament or match; can have referees or be self-refereed Shiaijô a match court. Shimpan a referee during a kendo match Shinai bamboo practice sword Shinken a real sword Shitachi the role in a kendô kata that “wins”; traditionally taken by the student
when practicing with a teacher Shôbu victory and defeat. The command to begin fighting for the third point
in a kendô match. Shôbu ari “there is victory and defeat.” The announcement that a kendô match is
over. Shôgô ranks outside the kyû-dan structure. They are only available to those
with high dan. Shômen front side or wall; the front of the face or head; a cut or blow to the
front or top of the head Shômen ni rei "bow to the shomen" Sonkyo squatting Suburi repeated swinging of a sword against an imaginary target Suri ashi sliding footwork; the general designation for the footwork used in
kendô Taikai a tournament Tachi long sword; the long bokutô used in kendô kata Tare the apron-like piece of equipment that protects the waist, hips, and
thighs in kendô Te no uchi “the inside of the hand(s).” The correct way to grip the sword Tenugui a towel; the towel worn on the head under the men Tobi komi ashi leaping/springing footwork in which the feet leave the floor Tsuba sword guard Tsuba dome a piece of leather or rubber used to hold the tsuba of a bokutô or shinai
in place Tsugi ashi stutter stepping; footwork (usually considered bad) in which the trailing
foot moves next to the lead foot, the lead foot then moves out, then the trailing foot moves
Tsuka the hilt of a sword, the handle of a bokuto or shinai Tsuki a thrust Uchikomi geiko practice in which one person presents openings to another who
responds by striking them

35
Uchitachi the role in a kendô kata that ends up being defeated; uchitachi usually attacks first; traditionally the teacher takes the role of uchitachi
Wakare a command to break or separate Waki (gamae) a stance in which the sword is held alongside the body, pointing to the
rear and downward Waza a technique Yame "stop" Yakusoku geiko practice in which the roles of the participants are prescribed. Yokomen the side of the face or head; a cut or blow to the side of the head Zanshin awareness. Alertness and good posture after a strike Zarei a bow performed from seiza