hatch user guide - embroideryhelp.net · electronic, mechanical, magnetic, manual, or otherwise, or...
TRANSCRIPT

USER GUIDE
DIGITIZE OBJECTS

Hatch User Guide : Digitize Objects 23-Nov-2015 ii
COPYRIGHT
Copyright © 2016. Wilcom Pty Ltd, Wilcom International Pty Ltd. All Rights reserved.
No parts of this publication or the accompanying software may be copied or distributed, transmitted, transcribed, stored in a retrieval system or translated into any human or computer language, in any form or by any means, electronic, mechanical, magnetic, manual, or otherwise, or disclosed to any third party without the express written permission of:
Wilcom Pty Ltd. (A.B.N. 43 001 971 919) Level 3, 1-9 Glebe Point Rd, Glebe Sydney, New South Wales, 2037, Australia PO Box 1094, Broadway, NSW 2007 Phone: +61 2 9578 5100 Fax: +61 2 9578 5108 Email: [email protected] Web: http://www.wilcom.com
TrueView™ and Point & Stitch™ are trademarks of Wilcom Pty Ltd. Portions of the imaging technology of this Product are copyrighted by AccuSoft Corporation. The EPS File Import/Export Converter used in this Product is copyrighted by Access Softek, Inc. All rights reserved.
Wilcom Pty Ltd makes no representation or warranties with respect to the contents of this publication and specifically disclaims any implied warranties of merchantable quality or fitness for any particular purpose. Further, Wilcom Pty Ltd reserves the right to revise this publication and to make changes in it from time to time without obligation of Wilcom Pty Ltd to notify any person or organization of such revisions or changes.
The screen illustrations in this publication are intended as representations, not exact duplicates of screen layouts generated by the software. The samples used to illustrate software features and capabilities may not be exactly duplicable, depending on inclusions provided with your software model or product level. Some artwork for design samples is kindly provided by Digital Art Solutions.
Subject to any warranties implied by law which are incapable of limitation or exclusion, the software is purchased ‘as is’ without any warranty as to its performance, accuracy, freedom from error or to any results generated through its use and without any implied warranty of merchantability or of fitness for any particular purpose for which the software is being acquired. The purchaser relies on its own skill and judgement in selecting the software for its own use and assumes the entire risk as to the results and performance of the software. Wilcom Pty Ltd specifically does not warrant that the software will meet the purchaser’s requirements or operate without interruption or error.

Hatch User Guide : Digitize Objects 23-Nov-2015 iii
CONTENTS
Introduction ................................................................................................................................ 1
Stitch types ................................................................................................................................. 3
Outline stitches .................................................................................................................................... 4
Satin stitch ........................................................................................................................................... 9
Tatami fills .......................................................................................................................................... 13
Embossed fills .................................................................................................................................... 15
Motif stitch ......................................................................................................................................... 19
Cross stitch ......................................................................................................................................... 25
Stipple fills .......................................................................................................................................... 26
Stitch effects ............................................................................................................................. 29
Curved fills ......................................................................................................................................... 29
Feather edge ...................................................................................................................................... 35
Gradient fill ........................................................................................................................................ 37
Input methods ........................................................................................................................... 39
Digitize shapes ................................................................................................................................... 39
Control points .................................................................................................................................... 41
Lines 42
Parallel fills ......................................................................................................................................... 42
Turning fills ......................................................................................................................................... 43
Circles & squares ................................................................................................................................ 43
Switch between runs & fills ............................................................................................................... 44
Join method ....................................................................................................................................... 44
Freehand ................................................................................................................................... 46
Freehand technqiues ......................................................................................................................... 46
Create freehand shapes ..................................................................................................................... 46
Adjust line smoothness ...................................................................................................................... 47
Calligraphic freehand stitching .......................................................................................................... 48
Carving stamps .......................................................................................................................... 49
Carving Stamp docker ........................................................................................................................ 49
Apply pre-defined patterns ................................................................................................................ 49
Use objects as carving stamps ........................................................................................................... 50
Digitize custom splits ......................................................................................................................... 52
Add stamps to a library ...................................................................................................................... 52
Carving stamp appearance ................................................................................................................ 53
Motif stamps ............................................................................................................................. 55
Hatch User Guide : Digitize Objects 23-Nov-2015 iv
Select & insert stamps ....................................................................................................................... 55
Rotate stamps .................................................................................................................................... 56
Scale stamps....................................................................................................................................... 57
Stitch angles .............................................................................................................................. 58
Add stitch angles ................................................................................................................................ 58
Adjust stitch angles ............................................................................................................................ 58
Circle objects ...................................................................................................................................... 59
Cut & fill holes ........................................................................................................................... 60
Remove underlying stitching ............................................................................................................. 60
Digitize holes in objects ..................................................................................................................... 61
Fill holes in objects ............................................................................................................................. 62
Stitch reinforcement ................................................................................................................. 64
Automatic underlay ........................................................................................................................... 64
Underlay settings ............................................................................................................................... 65
Pull compensation ............................................................................................................................. 66
Reinforce outlines .............................................................................................................................. 66
Embroidery connections ............................................................................................................ 68
View connectors ................................................................................................................................ 68
Automatic connectors ........................................................................................................................ 69
Branching ........................................................................................................................................... 70
Create branching ................................................................................................................................ 70
Edit branched objects ........................................................................................................................ 71

Introduction
Hatch User Guide : Digitize Objects 23-Nov-2015 1
INTRODUCTION
In the software, you build designs from basic shapes or ‘embroidery objects’. The process is called ‘digitizing’. Digitizing tools are used in conjunction with stitch types and stitch effects to create embroidery objects. The tools are similar to drawing tools in a graphics application except that the objects you create have stitch properties as well as general properties, as shown.
The Digitize toolbox provides all the digitizing tools necessary to create embroidered shapes. Tools such as the Freehand tools can be used to create designs with a hand-drawn appearance, something which is difficult to achieve through conventional digitizing methods. You can apply different effects to your embroidery objects. Effects such as Feather Edge which is used to create shading effects or imitate fur or other fluffy textures.
Use special tools for cutting holes, removing excess stitching, as well as filling holes. There are also tools for stabilizing large areas as well as reinforcing outlines.
Branching is an advanced feature which lets you digitize similar, overlapping objects – e.g. the fingers of a hand, sections of a custom letter – without having to think about the most efficient stitching sequence and joins.
General functions
Keyboard shortcuts are available for most general functions:
To Press
Create a new design <Ctrl + N>
Open an existing design <Ctrl + O>
Save a design <Ctrl + S>
Print a design <Ctrl + P>
Close the software <Alt + F4>
Show/hide grid <Shift + G>
Show/hide Design Palette <Ctrl + R>
Display thread colors ^ <Alt + T>
Open Lettering docker <A>
Define layout work area ^ <Ctrl + W>

Introduction
Hatch User Guide : Digitize Objects 23-Nov-2015 2
To Press
Show/hide work area <W>
Show/hide Overview window <Shift + V>
Show/hide Resequence docker <Shift + L>
Apply/select satin <Shift + I>
Apply/select tatami <Shift + M>
Apply/select run <Shift + N> then press <Enter>
^ Press <Esc> to close

Stitch types
Hatch User Guide : Digitize Objects 23-Nov-2015 3
STITCH TYPES
The most important object property is stitch type. The software uses object outlines and the associated stitch type to generate stitches. Whenever you reshape, transform or scale an object, stitches are regenerated according to current settings.
Different stitches are suited to different objects. You can change stitch types at any stage. A wide range or fill and line stitch types is available via the Object Properties docker.
The docker provides access to both fill stitches and line stitches. Some types can be used for both purposes. For lines, use the following:

Stitch types
Hatch User Guide : Digitize Objects 23-Nov-2015 4
Line stitch Purpose
Outline stitches
Use to add borders, outlines, and details to shapes. 'Craft' stitches are available to mimic traditional handcraft techniques.
Satin Well-suited to narrow shapes and borders.
Motif Use for decorative outlines.
The docker provides access to the following fill stitch types:
Fill stitch Purpose
Satin Well-suited to narrow shapes. Can also be used for larger shapes with auto split applied to create a more glossy appearance than Tatami.
Tatami Use to fill large, irregular shapes with a solid field of stitching. Consists of rows of run stitches.
Embossed Use to fill large areas with unique artistic effects.
Curved Use to create curved, light and shade effects. Contours follow the shape.
Motif Use in decorative fills. Patterns are repeated in parallel rows to fill a shape.
Cross Stitch Use to fill large areas with low stitch counts. Sometimes combined with appliqué. Cross stitch fills are generated on a universal grid, not just the individual object.
Stipple Use to create textured fills of run stitching which meanders more or less randomly within a border.
Outline stitches
Your embroidery software provides tools for creating outline stitching of varying thicknesses and styles. Digitize outlines with both open and closed shape methods. Lines of varying thickness are typically used to add borders, outlines, and details to shapes. There are tools for creating simple run stitching as well as decorative outlines using motifs. Backstitch is an older-style, adaptable stitch which can be used for delicate outlines. Stemstitch is thicker and can be used to mimic hand-sewn embroidery. Satin lines can be used for stem shapes or thicker borders.
In all cases, digitizing techniques are the same. Most digitizing tools are available. Simply select a digitizing tool, a fill or line method, a stitch type, and click reference points. Press <Enter> to confirm or <Esc> to cancel. Stitch types can be easily swapped. Simply select the object and choose another stitch type.
Simple outlines
Use Object Properties > Line > Single Run to create single rows of stitching for borders or details along a digitized outline.

Stitch types
Hatch User Guide : Digitize Objects 23-Nov-2015 5
Use Object Properties > Line > Triple Run to create a thicker outline for heavier borders or details.
Use Single and Triple Outline tools to digitize lines of simple run stitching. Adjust stitch length, chord gap and stitch repetitions via object properties. Digitize simple runs as you would any other outline stitch.
For both run and triple-run stitches, stitch length can be adjusted via Object Properties to suit the shape. If a line has tight, sharp curves, reduce the length, for example to 1.8 mm, so that the stitches follow the line. To reduce the stitch count for flatter curves, increase the stitch length.
Stitch length 1.7mm Stitch length 2.5mm
Choose between run or triple run for thicker lines...
Mimic hand-made embroidery by using triple run and setting run length to 4.0mm.
Satin outlines
Use Object Properties > Line > Satin to create thicker borders or columns of even thickness.
Use Object Properties > Line > 3D Satin to create raised satin borders – can be used with trapunto for quilting effects.
Satin stitch can be used for outlines. It is well-suited to thicker borders. Adjust stitch density by setting a fixed spacing value, or let auto spacing calculate it for you. Use 3D Satin to create raised

Stitch types
Hatch User Guide : Digitize Objects 23-Nov-2015 6
borders consisting of multiple layers of satin stitching. Stitch settings can be adjusted before or after digitizing.
Motif outlines
Use Object Properties > Line > Motif to create ornamental craftstitch borders. Choose from pattern library.
Motifs are pre-defined design elements, such as hearts, leaves or border patterns, that can be quickly inserted into a design. They generally consist of one or more simple objects, and are stored in a special pattern set. Motif line is a stitch type that creates motif repeats along a digitized line. Choose from a motif library or create your own. Motifs can be scaled, rotated and mirrored in the same way as other objects.
You can use the same motif patterns singly - one-by-one - or in motif fills for open, decorative stitching.
Backstitch outlines
Use Object Properties > Line > Backstitch to create traditional backstitch borders – old, adaptable stitch type used for delicate outlines.
Backstitch is a traditional, adaptable stitch which can be used as a delicate outline. This small, even stitch follows intricate curves well. Backstitch can be used for blackwork and redwork designs. You can specify the exact stitch length, thickness and overlap values as well as the number of strokes.

Stitch types
Hatch User Guide : Digitize Objects 23-Nov-2015 7
Stemstitch outlines
Use Object Properties > Line > Stemstitch to create traditional stemstitch borders or details such as stems and vines.
Stemstitch is a detail stitch. It is used for stems and vines with other decorative stitches, or as an outline for stitches such as satin or motif fills. You can specify various settings including line thickness, spacing, angle, single or triple, and stitch thickness.
Stemstitch can also be used to create heavier stipple fills with stemstitch lines.
Sculptured outlines
Use Object Properties > Line > Sculpture to place a row of 'sculpture' stitches along a digitized line to simulate line stitches used in quilting.

Stitch types
Hatch User Guide : Digitize Objects 23-Nov-2015 8
Zigzag outlines
Use Object Properties > Line > Zigzag for long, narrow columns of slanted, side-by-side stitches in a zigzag pattern.
Blanket outlines
Use Object Properties > Line > Blanket for long, narrow columns with a ‘comb’ effect.
Notes...
The software also provides tools for automatically generating outlines.
Use Backtrack and Repeat to reinforce outlines while specifying the direction of the stitching.

Stitch types
Hatch User Guide : Digitize Objects 23-Nov-2015 9
Satin stitch
Satin stitch can be used for outlines or fills. It is well-suited to borders and thicker outlines. It is also well-suited to narrower shapes where the stitch run the entire width of the column. Satin stitches are almost parallel. Because there are generally no needle penetrations breaking up the fill, satin stitch creates a glossy, high-quality effect. Satin stitch can be used with any of the digitizing tools.
Satin lines
Use Object Properties > Line > Satin to create thicker borders or columns of even thickness.
Use Object Properties > Line > 3D Satin to create raised satin borders – can be used with trapunto for quilting effects.
Use Satin line to create thicker borders. Use 3D Satin line to create raised embroidery designs consisting of multiple layers of satin stitching. Stitch spacing and width can be adjusted before or after digitizing via Object Properties.
Line thickness
Use Select > Reshape to adjust object outlines, stitch angles, start and end points, curves lines, etc.
Satin line width can be controlled either by means of the Width setting in Object Properties, or interactively, using the Reshape tool and dragging the sizing handles. Use the Offset setting if you want your Satin line to overlap the boundary of a filled shape. This will stop gaps from appearing.

Stitch types
Hatch User Guide : Digitize Objects 23-Nov-2015 10
Stitch density
Stitch spacing is the distance in millimeters between two needle penetrations on the same side of a shape. Where it is very narrow, stitches need to be less dense because too many needle penetrations can damage the fabric.
Where a border narrows, stitches are tight, thus requiring fewer stitches to cover the fabric. The Automatic setting adjusts stitch spacing for satin stitches according to outline width. For objects of varying width, Automatic adjusts spacing accordingly.
Stitch types
Hatch User Guide : Digitize Objects 23-Nov-2015 11
Satin fills
Use Object Properties > Fill > Satin to create stitch fills for narrow shapes and thick borders.
Use Object Properties > Fill > 3D Satin to create raised surfaces – can be applied to lettering or used with trapunto for quilting effects.
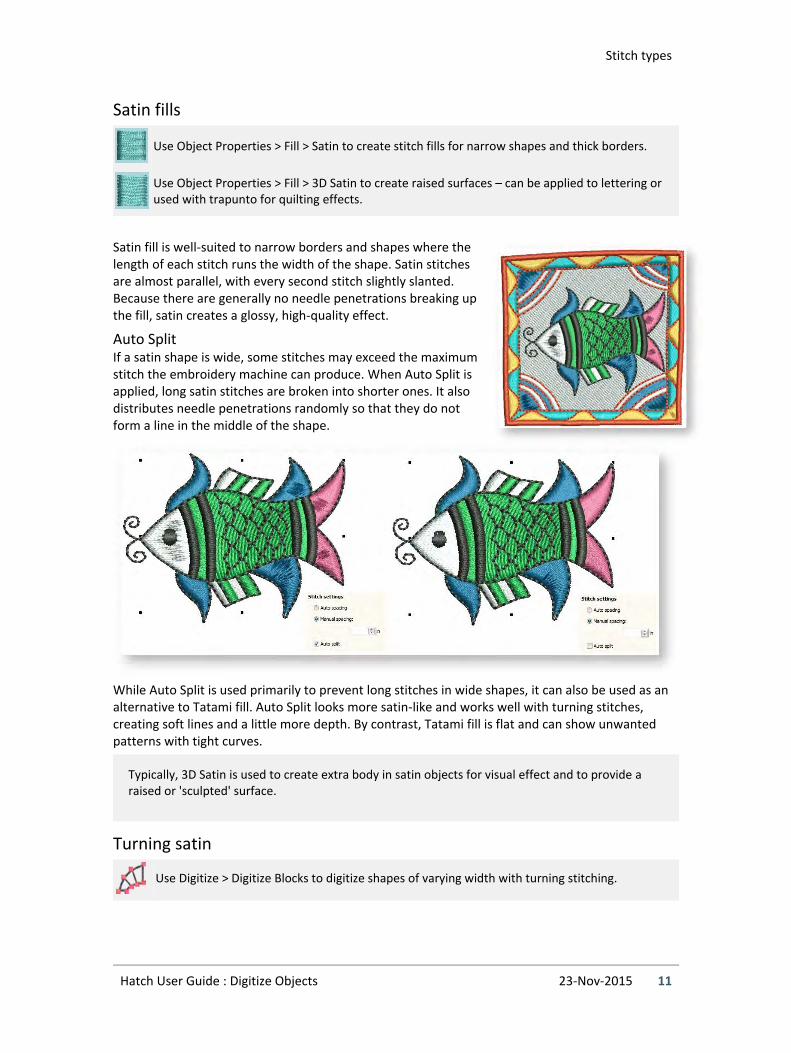
Satin fill is well-suited to narrow borders and shapes where the length of each stitch runs the width of the shape. Satin stitches are almost parallel, with every second stitch slightly slanted. Because there are generally no needle penetrations breaking up the fill, satin creates a glossy, high-quality effect.
Auto Split If a satin shape is wide, some stitches may exceed the maximum stitch the embroidery machine can produce. When Auto Split is applied, long satin stitches are broken into shorter ones. It also distributes needle penetrations randomly so that they do not form a line in the middle of the shape.
While Auto Split is used primarily to prevent long stitches in wide shapes, it can also be used as an alternative to Tatami fill. Auto Split looks more satin-like and works well with turning stitches, creating soft lines and a little more depth. By contrast, Tatami fill is flat and can show unwanted patterns with tight curves.
Typically, 3D Satin is used to create extra body in satin objects for visual effect and to provide a raised or 'sculpted' surface.
Turning satin
Use Digitize > Digitize Blocks to digitize shapes of varying width with turning stitching.

Stitch types
Hatch User Guide : Digitize Objects 23-Nov-2015 12
In addition to normal digitizing tools, the Digitize Blocks tool can be used with Satin to create turning fills of varying width.
Digitize the column by marking points on alternate sides of the column. Click to enter corner points. Right-click to enter curve points.
The control points in a pair do not have to be the same type. For example, one can be a corner point, the other a curve.
If you make a mistake, press <Backspace> to delete the last point. Press <Esc> to undo all new
points. Press <Esc> again to exit digitizing mode.
When you have finished digitizing, either:
o Press <Enter> to keep the last stitch and place the exit point at the last point you digitized, or
o Press <Spacebar> to omit the last stitch and place the exit point on the opposite side of the column.
Calligraphic turning satin
Use Digitize > Digitize Open Line to create a row of run or other outline stitching along a digitized line. Left-click for corner points, right-click for curves.
Use Object Properties > Line > Satin to create thicker borders or columns of even thickness.
Satin lines, both open and closed, include a 'calligraphy' setting which allows you to specify an angle like an italic pen nib. Generally you will use this setting with Digitize Open Line but it can also be applied to Digitize Closed Shape with Line stitching selected.
The same setting can be used with Freehand tools to create more interesting ‘calligraphic’ effects.

Stitch types
Hatch User Guide : Digitize Objects 23-Nov-2015 13
Tatami fills
Tatami fill stitch consists of rows of run stitches and is suitable for filling large, irregular shapes. Stitches are laid in rows going back and forth across the shape. These can be parallel or slightly turning. Stitch offsets in each row eliminate unwelcome split lines. You can control stitch density in tatami fill objects by adjusting the pattern, stitch spacing and length.
Apply Tatami fill
Use Object Properties > Fill > Tatami to create stitch fills for larger, irregular shapes with solid, uniformly flat fields of stitching.
Use Digitize > Digitize Closed Shape to create closed shapes using either outline or fill stitching. Left-click for corner points, right-click for curves.
To preset Tatami fill, open the Object Properties with no objects selected. To edit settings, select a tatami fill object. The Object Properties > Fill tab opens. Select Tatami and choose a suitable pattern from the gallery. Any closed line digitizing tool is available for use.
Tatami patterns are formed by needle penetrations. The default pattern (No. 1) is designed to create a uniformly flat and smooth texture similar to a woven mat. There are many other preset patterns to choose from. Experiment to find the best pattern for your purpose.

Stitch types
Hatch User Guide : Digitize Objects 23-Nov-2015 14
Use Select > Reshape to adjust object outlines, stitch angles, start and end points, curves lines, etc.
Generally default size and spacing will produce the best results, but you may want to change stitch angle.
Tatami fill density
For Tatami fill, stitch density is determined by row spacing. The spacing setting is the distance between two forward rows. To increase density, enter a smaller value. To create a more open fill, enter a larger value.
Stitch length varies slightly in Tatami fill to ensure that small stitches are not generated at the edges of the shape. Increase length for a looser, more glossy appearance.

Stitch types
Hatch User Guide : Digitize Objects 23-Nov-2015 15
Notice that the Travel on Edge setting is activated automatically for spacings larger than 0.9mm. This forces underlying travel stitches to the edges of shapes, preventing them from showing through open stitching.
Embossed fills
Embossed fill is a decorative fill stitch used to fill wide and large areas with patterned stitching while keeping the appearance of a solid field. The pattern is repeated along a grid. You can change grid settings for greater variation.
Apply embossed fill
Use Object Properties > Fill > Embossed to create decorative patterns of needle penetrations while keeping the appearance of solid stitching. Choose from a pattern library.
Use Digitize > Digitize Closed Shape to create closed shapes using either outline or fill stitching. Left-click for corner points, right-click for curves.
To preset Embossed fill, open the Object Properties docker with no objects selected. Any closed line digitizing tool is available for use. Double-click to edit existing objects. The Object Properties > Fill tab opens. Select Embossed Fill. You can choose from many patterns.

Stitch types
Hatch User Guide : Digitize Objects 23-Nov-2015 16
Embossed fill settings
Embossed fill settings can be controlled in a similar way to Motif fill settings, both via the Object Properties docker and interactively on screen. The docker allows you to control pattern size, spacing, and orientation by the same settings as motif fill. It also allows you to control the stitch density via Stitch values.
Pattern size
You can change pattern size to obtain less densely patterned effects. The Size setting doesn't affect spacing between patterns.
Pattern spacing
The Spacing setting determines distance between patterns. You have independent control over horizontal (X) and vertical (Y) spacings. The Spacing field does not affect pattern size.
Stitch types
Hatch User Guide : Digitize Objects 23-Nov-2015 17
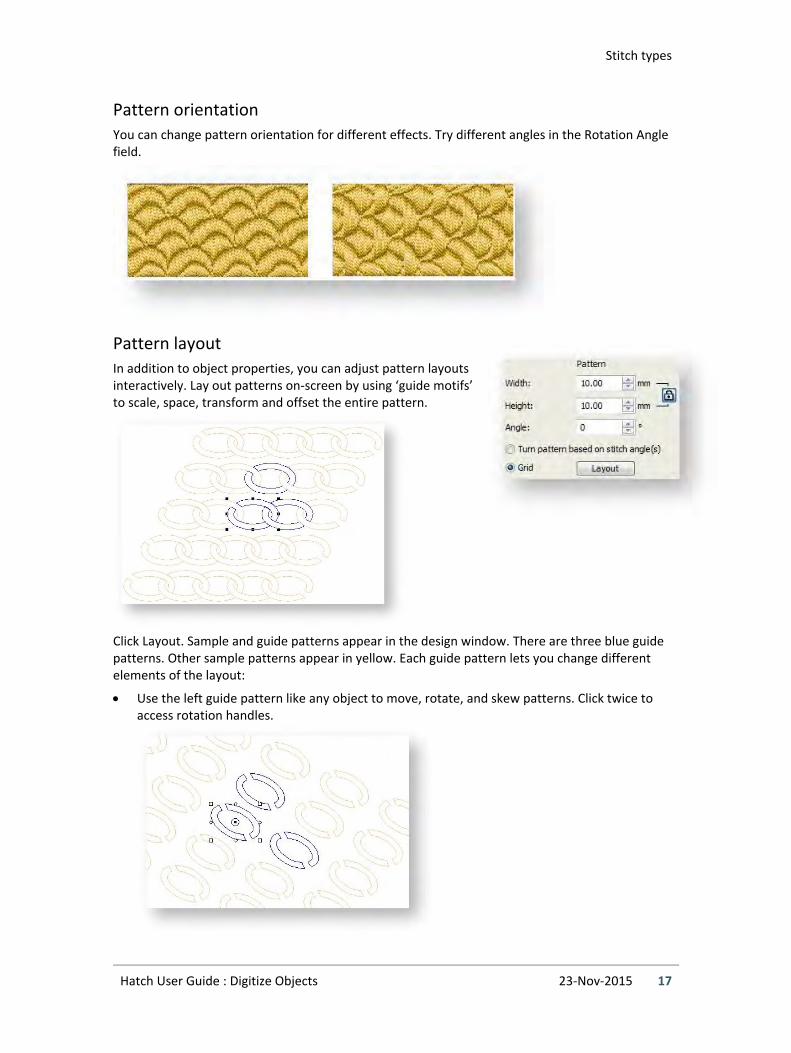
Pattern orientation
You can change pattern orientation for different effects. Try different angles in the Rotation Angle field.
Pattern layout
In addition to object properties, you can adjust pattern layouts interactively. Lay out patterns on-screen by using ‘guide motifs’ to scale, space, transform and offset the entire pattern.
Click Layout. Sample and guide patterns appear in the design window. There are three blue guide patterns. Other sample patterns appear in yellow. Each guide pattern lets you change different elements of the layout:
Use the left guide pattern like any object to move, rotate, and skew patterns. Click twice to access rotation handles.

Stitch types
Hatch User Guide : Digitize Objects 23-Nov-2015 18
Use the top guide pattern to change row spacing and row offset.
Use the right guide pattern to change column spacing.
All guide patterns can be used to adjust pattern scale by dragging sizing handles.
Press <Enter> to confirm changes. All patterns in the fill change accordingly.
Zoom in and adjust selected guides to achieve the effect you require.
Grid orientation
Use Select > Reshape to adjust object outlines, stitch angles, start and end points, curves lines, etc.
Use Edit Objects / Digitize > Add Stitch Angles to add stitch angles to selected closed objects with or without holes.
As an alternative to using the the layout guides to control grid orientation, you can use stitch angle to control pattern orientation.
Where this feature really comes into its own, however, is in combination with multiple stitch angles. When activated, the grid adjusts to orientate itself to the stitch angles defined within the object.
The difference is that embossed fills can be applied to objects with turning stitches creating three dimensional, turning pattern effects which can’t be achieved by embossed fill alone.

Stitch types
Hatch User Guide : Digitize Objects 23-Nov-2015 19
If the object you are working with does not contain turning stitches, you can generally add them with the Add Stitch Angles tool.
Embossed fill & Florentine effect
You can also combine Embossed fill with Radial fill or Florentine in the Effects tab to contour patterns around a digitized guideline.
Motif stitch
Motif stitch can be used for lines or fills. You can create decorative outlines using any pattern from the selection list. You can modify the rotation angle, orientation and scale, and vary the space between patterns. Motifs are repeated in parallel rows to form decorative fills.
Select motif patterns
Use Object Properties > Line > Motif to create ornamental craftstitch borders. Choose from pattern library.

Stitch types
Hatch User Guide : Digitize Objects 23-Nov-2015 20
Use Object Properties > Fill > Motif to create decorative open fill stitching. Choose from a motif library.
Whether you are digitizing motif lines or fills, you have access to the same pattern gallery. Choose a library from the droplist. Note that you can detach the Pattern Gallery from the docker and float it in the design window for easy access. Change a motif at any time by selecting a motif line or fill, or any other line or fill for that matter, and choosing another motif from the gallery. You can even define you own motifs and motif libraries.
Motif runs
Use Object Properties > Line > Motif to create ornamental craftstitch borders. Choose from pattern library.
Use Digitize > Digitize Open Line to create a row of run or other outline stitching along a digitized line. Left-click for corner points, right-click for curves.
Using Motif line in combination with Digitize Open Line or any other line input method. Digitize motif line as you would a normal run line. Left-click for corner points, right-click for curve points.
Press <Enter> to complete.
To use the original size and orientation of the motif press <Enter>.
Stitch types
Hatch User Guide : Digitize Objects 23-Nov-2015 21
To scale the motif, move the pointer until the motif is the required size, click, then press <Enter>.
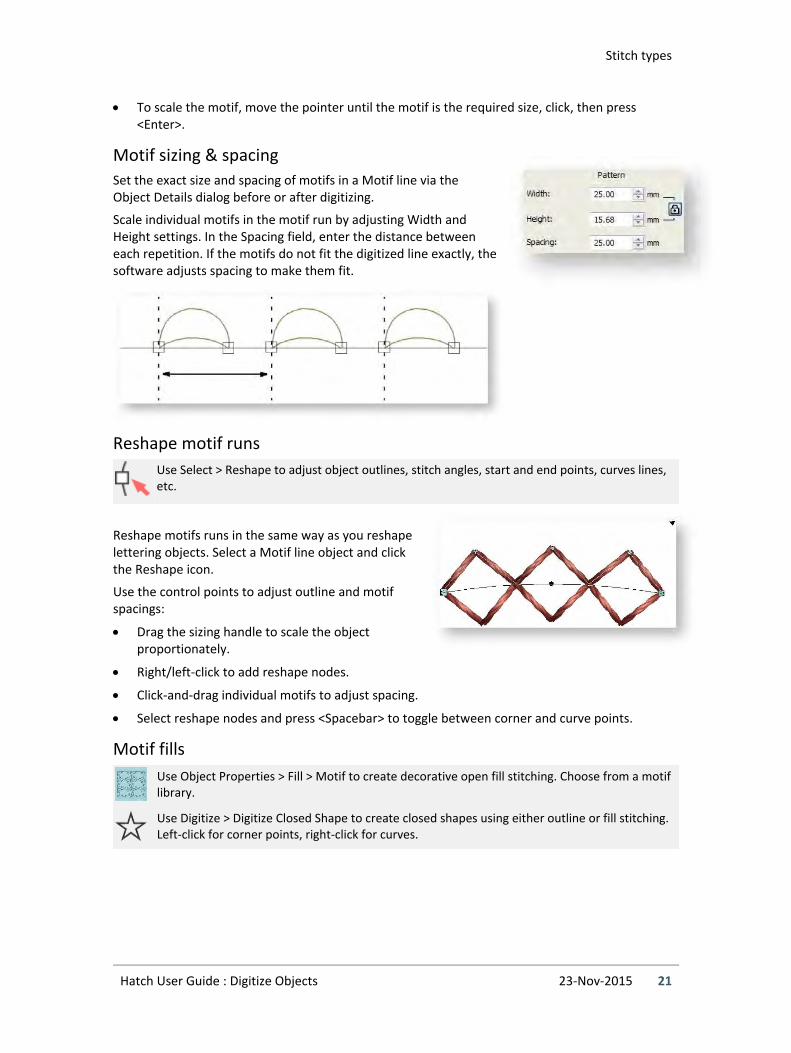
Motif sizing & spacing
Set the exact size and spacing of motifs in a Motif line via the Object Details dialog before or after digitizing.
Scale individual motifs in the motif run by adjusting Width and Height settings. In the Spacing field, enter the distance between each repetition. If the motifs do not fit the digitized line exactly, the software adjusts spacing to make them fit.
Reshape motif runs
Use Select > Reshape to adjust object outlines, stitch angles, start and end points, curves lines, etc.
Reshape motifs runs in the same way as you reshape lettering objects. Select a Motif line object and click the Reshape icon.
Use the control points to adjust outline and motif spacings:
Drag the sizing handle to scale the object proportionately.
Right/left-click to add reshape nodes.
Click-and-drag individual motifs to adjust spacing.
Select reshape nodes and press <Spacebar> to toggle between corner and curve points.
Motif fills
Use Object Properties > Fill > Motif to create decorative open fill stitching. Choose from a motif library.
Use Digitize > Digitize Closed Shape to create closed shapes using either outline or fill stitching. Left-click for corner points, right-click for curves.

Stitch types
Hatch User Guide : Digitize Objects 23-Nov-2015 22
Use Motif fill in combination with Digitize Closed Shape or any available closed shape digitizing method. Digitize motif fills as you would a normal tatami fill. Click to for corner points. Right-click for curve points. Alternatively apply motif fill to existing closed objects. The stitch angle has no effect on layout.
As soon as entry and exit points are entered, motif fill stitches are generated using current settings. Change motifs as you like via the Object Properties dialog.
Blackwork gets its name from the black silk thread traditionally used in this form of embroidery. Use the special Blackwork Fill pattern set to create interesting scrolling or geometric patterns.
Adjust motif pattern settings
You can adjust motif fill size and spacing as you would motif lines. The same controls exist for pattern sizing. Spacing is the distance between each pattern repetition except that in a motif fill, you can control both row and column spacing. By default, column spacing defaults to pattern width, while row spacing defaults to pattern height.
In addition to column and row spacing, motif fills also allow you to specify an orientation for the entire fill using the Angle setting.

Stitch types
Hatch User Guide : Digitize Objects 23-Nov-2015 23
In addition, you can offset one row from another. Hover the cursor over the field to view a graphical representation.
Lay out motif fills interactively
All of the above settings can be adjusted interactively by means of the Layout function. Using ‘guide motifs’, scale, space, transform and offset the entire motif fill directly on screen.
Click the Layout button. Sample and guide motifs appear in the design window. There are three blue guide motifs. Reference motifs appear in yellow. Each guide motif lets you change different layout settings by clicking and dragging. When you change a guide motif, reference motifs update accordingly. Zoom in and adjust selected guide motifs to achieve the effect you require:
Click the middle guide motif to activate rotation handles. Drag handles to rotate or skew motifs.

Stitch types
Hatch User Guide : Digitize Objects 23-Nov-2015 24
Click and drag the top guide motif to adjust column spacing and row offsets.
Use the side guide motif to change row spacing.
All guide motifs can be used to scale motifs or change height and width settings independently. Simply click-and-drag sizing handles.
Press <Enter> to confirm or <Esc> to escape.
Fancy stitches
Apart from the default motif gallery, the software provides a number of specialist or fancy motif fills as well. For example, Blackwork gets its name from the black silk thread traditionally used in this form of embroidery. Early designs tend to be angular, whereas later designs use more diagonal stitches. Blackwork employs just a few simple stitches to create complex designs. It can be used to decorate articles of dress or furnishings such as hankies, table napkins, tablecloths, and doilies.
Candlewicking is a traditional white-on-white embroidery technique, usually done on white linen or cotton fabric with heavy cotton threads. More use of color is becoming popular today. Stitches used are mostly knots, both Colonial and French, as well as stemstitch. Candlewicking can be used to embroider white bedspreads, pillows and clothing. Candlewicking Outline can be used for ornate borders.
Lacework stitch consists of an open square trellis-like pattern which gives objects a lacey look. With Lacework fills you can adjust the layout of the preset patterns. Stitch angle has no effect on the pattern layout.

Stitch types
Hatch User Guide : Digitize Objects 23-Nov-2015 25
Cross stitch
Use Object Properties > Fill > Cross Stitch to create open patterned fills with crosses generated to suit standard grid for entire design.
Cross stitching is a popular technique for filling large areas with low stitch counts. Cross stitch is also sometimes combined with appliqué. Cross Stitch fill is something like Motif fill but is generated differently. Crosses in separate objects line up precisely when using the same fabric count. This is because cross stitch fills are generated on a universal grid, not just referenced to each object. Fractional crosses are generated at object boundaries in order to avoid gaps. Cross Stitch fill uses travel runs under and along the cross stitching. Stitch angle has no effect on pattern layout.
To adjust settings, select and double-click an object. Select Cross Stitch if not already selected.
Cross stitch settings include:

Stitch types
Hatch User Guide : Digitize Objects 23-Nov-2015 26
Setting Purpose
Cross density
Controls the size of cross specified as a counted fabric rather than an actual cross size. Crosses in different objects line up precisely if using the same stitch size.
Threads Sets the number of times – 2, 4 or 6 – thread passes over the same cross in order to make it bulkier.
Stitch style Specifies whether full cross (X), diagonal, or upright (+). Stitch style as no effect on grid alignment if the same stitch size is used.
Floss direction
Controls which way top leg of the cross – i.e. full length stitch – is directed – forward or backward for diagonal full crosses and horizontal or vertical for upright full crosses.
Cross stitch can be perpendicular or diagonal. Note that stitch angle has no effect on the cross stitch grid.
The cross stitch grid is not displayed but you can set the background grid to the cross size to see how the grid is being used.
Stipple fills
Stippling is a method for creating textured fills of run stitching which meanders more or less randomly within a border. It can be applied to closed objects with a single stitch angle. You control stitch density in stipple objects by adjusting stitch length and loop spacing.
Use Object Properties > Fill > Stipple Single Run to create fills made up of run stitches which meander within a border.
Use Object Properties > Fill > Stipple Stemstitch to create heavier stipple run fills with stemstitch outlines.

Stitch types
Hatch User Guide : Digitize Objects 23-Nov-2015 27
Use Object Properties > Fill > Stipple Backstitch to create heavier stipple run fills with backstitch outlines.
Stipple fills are actually made up of a long meandering run stitch. Three types are available - simple, stemstitch, and backstitch. Apply them as you would any other fill type.
Stipple values
The Stipple Values panel helps you control the stippling effect. Adjust Loop Spacing for tighter or more open stitching. Adjust the Inset Step to adjust the margin from the object outline.
Stitch values
Control run stitch settings in the Stitch Values panel. Adjust Stitch Length for smoother or sharper curves. The Run Count defines the number of stitch repetitions – e.g. 1, 3, 5, 7, 9 – and hence stitch bulk. Stemstitch and Backstitch offer further settings.
Stitch types
Hatch User Guide : Digitize Objects 23-Nov-2015 28
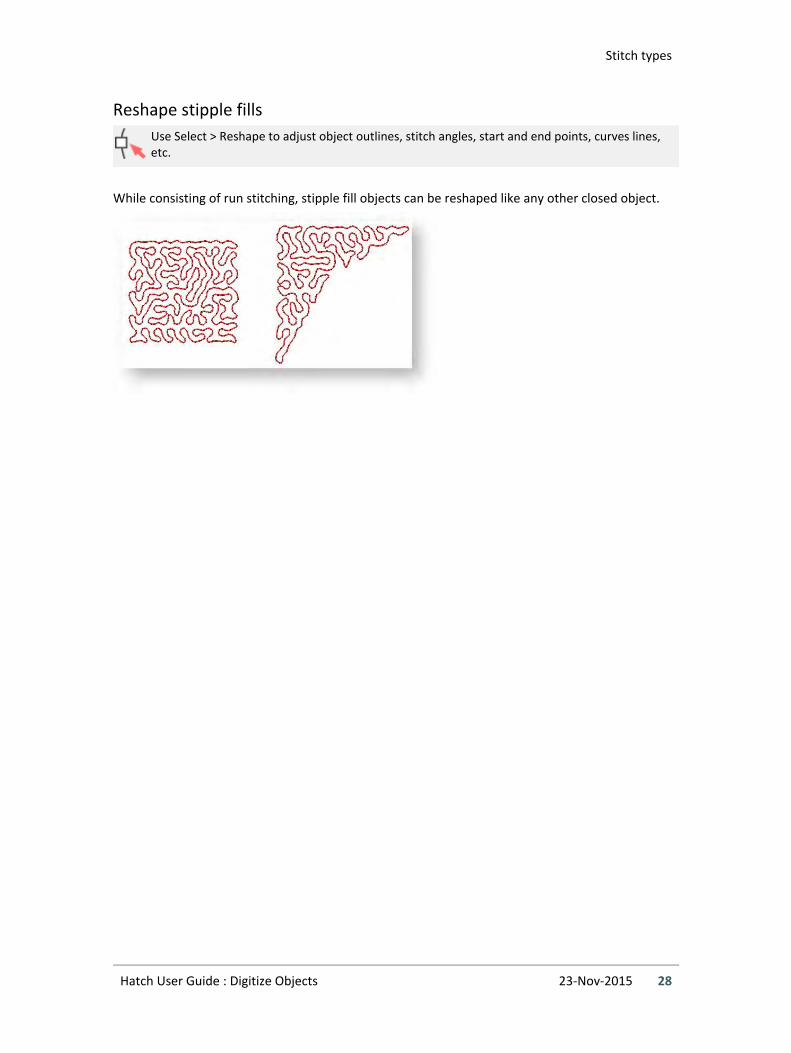
Reshape stipple fills
Use Select > Reshape to adjust object outlines, stitch angles, start and end points, curves lines, etc.
While consisting of run stitching, stipple fill objects can be reshaped like any other closed object.

Stitch effects
Hatch User Guide : Digitize Objects 23-Nov-2015 29
STITCH EFFECTS
In addition to its many stitch types, the software also provides stitch effects to create artistic effects such as textured or contoured fill stitching.
Create interesting curved effects by shaping needle penetrations to follow the contour of digitized lines. Create rough edges, shading effects, or imitate fur and other fluffy textures.
Vary stitch spacing between dense and open fill, producing shading effects which are difficult to achieve manually. Move underlying travel runs to the edges of an object so that they can’t be seen through open stitching.
Curved fills
The software provides several techniques for creating curved stitching. Contour fill follows the contours of a shape, creating a curved, light and shade effect. Ripple fill is achieved by radiating a stitch pattern from a common central point. Florentine effect can be applied to filled objects to create a flowing stitch effect along a digitized line. Radial fill generates radial turning stitching in most fill stitch types.
Contour fills
Use Object Properties > Fill > Contour to create stitching which follows object contours, creating a curved, light-and-shade effect.
Use Digitize > Circle / Oval to quickly digitize circular shapes using current stitch settings.
Use Digitize > Digitize Blocks to digitize shapes of varying width with turning stitching.
Contour is a curved fill stitch type – stitches follow the contours of a shape, creating a curved, light and shade effect. Use it to create a sense of movement in contrast to flatter fills created by satin or tatami stitching. It can be used with Circle or Digitize Blocks input tools.

Stitch effects
Hatch User Guide : Digitize Objects 23-Nov-2015 30
Adjust stitch length for smoother or sharper curves. Adjust stitch spacing for denser or more open stitching.
Stitch angle has little effect on pattern layout, but entry point in circle objects does.
Ripple fills
Use Object Properties > Fill > Ripple to create spiral stitching from the center of any filled object.
Ripple Fill stitch is related to Contour stitch, providing a similar look (with a fixed number of lines and variable spacing) but spiralling out from the center of a filled object. It can be applied to any filled object. Stitch angle has no effect on pattern layout.
Stitch effects
Hatch User Guide : Digitize Objects 23-Nov-2015 31
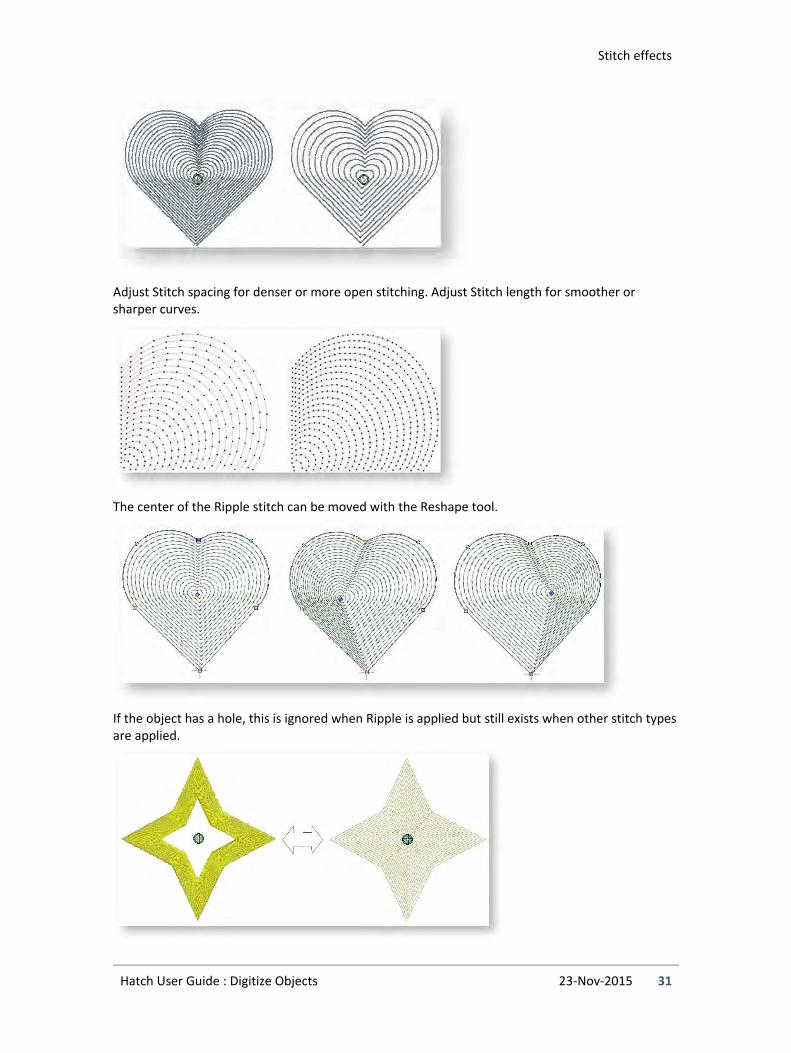
Adjust Stitch spacing for denser or more open stitching. Adjust Stitch length for smoother or sharper curves.
The center of the Ripple stitch can be moved with the Reshape tool.
If the object has a hole, this is ignored when Ripple is applied but still exists when other stitch types are applied.

Stitch effects
Hatch User Guide : Digitize Objects 23-Nov-2015 32
Florentine fills
Florentine effect allows you to contour fill stitches along a digitized guideline. Stitches follow the line but maintain uniform density and needle penetration patterns.
Use smaller stitch lengths – e.g. 4.00 mm or less – for best results. Florentine can be combined with Embossed fill, Motif fill, and other fancy stitches for enhanced effect.
Use the Reshape tool to change the shape of the curve. Press <Enter> to finish.
Florentine fill can be applied together with Embossed fills, Motif fills as well as Tatami patterns. Don’t alter stitch angles after applying Florentine fill as it can displace Embossed fill patterns.

Stitch effects
Hatch User Guide : Digitize Objects 23-Nov-2015 33
Radial fills
Radial fill generates radial turning stitching in several stitch types such as satin and tatami stitch. Use tatami patterns to accentuate the effect. Stitches are generated from the outside edge to the geometric center.
Radial fill is applicable to several object shapes – closed, circle and rectangle. Use the Reshape tool to modify the effect. The hole can be resized either interactively or via object properties. It can relocated by means of the positioning handle at the center.
Unlike Ripple fill, the center of Radial fill can be moved outside the shape or into an included hole to achieve a different effect. Different tatami patterns achieve different effects. It can also be applied together with various fancy fills.
Tips for use… Not all patterns and stitch settings or objects (size specific) are suitable for Radial fill. In particular, if you are using it with larger objects, use one or a combination of the following to avoid bunching at the center:
Increase the size of the hole, move the center into an existing hole in the object, or move it outside the object altogether.
Add Feather Edge to the inside.

Stitch effects
Hatch User Guide : Digitize Objects 23-Nov-2015 34
Use larger stitch spacing – increase by about 20%.
Avoid patterns which add needle penetrations close to the center of the object.
Use Edge Run underlay with smaller objects, to help reduce the number of stitches at the object center.
For fewer problems and a better embroidery result, use an SUK or H/E embroidery needle if your machine can use these needle types.
For best effect, use Radial fill with ring shapes. The size of ring should be about 20% of the outer diameter.
You are not able to directly edit the stitch angles generated by Radial fill. However, you can apply Break Apart to edit the resulting turning angle closed object.
3D Warp
Another way to create curved motif fills is with 3D Warp. Use it to make shapes appear concave or convex.
Using Globe In with 3D Warp gives a concave effect by increasing motif size and spacing around a center point. Globe Out gives a convex effect by decreasing motif size and spacing.
Use the Reshape tool to customize the shape of the 3D Warp envelope. You can apply the effect to an entire object, or to a specific part of the fill.

Stitch effects
Hatch User Guide : Digitize Objects 23-Nov-2015 35
You can generate layers of colored motifs by duplicating an object and applying a different color. For example, after filling a shape with circles, you can create a second layer, offset it, and apply a different color. You can then apply effects such as Globe Out to the whole motif fill.
Feather edge
Use Object Properties > Effects > Feather Edge to create rough edges and shading effects, or imitate fluffy textures.
Use Feather Edge to add rough edges to objects, create shading effects, or imitate fur or other fluffy textures in your design.
Apply Feather Edge to create a rough edge along one or more sides of an object. To apply the effect, select a source object and toggle on the icon. Click the X button to remove the effect. Adjust settings to change the degree of roughness and the Feather Edge margin.
Use the Raggedness slider to select the degree of texture. Use the Max Width setting to control the stitch range within which you want the stitches to fall.

Stitch effects
Hatch User Guide : Digitize Objects 23-Nov-2015 36
You can apply the effect to one side of the object or both.

Stitch effects
Hatch User Guide : Digitize Objects 23-Nov-2015 37
Gradient fill
Use Object Properties > Effects > Gradient Fill to create perspective and shading effects.
The Gradient fill feature varies stitch spacing between dense and open fill, producing gradient and shading effects which are difficult to achieve manually. It provides a simple way to produce variation in a filled pattern and the illusion of depth. It is best used with Tatami fill. When you use it, current settings – including Auto Spacing and Fractional Spacing – are ignored. However, other stitch effects still apply.
Create gradient fills
Gradient fill can be applied to tatami or satin objects. Use any one of the preset profiles.
Apply Travel on Edge to force underlying travel runs to the edges of an object so that they can’t be seen through open stitching. Because of its open stitch, Gradient fill is also best used without Auto Underlay.
Stitch effects
Hatch User Guide : Digitize Objects 23-Nov-2015 38
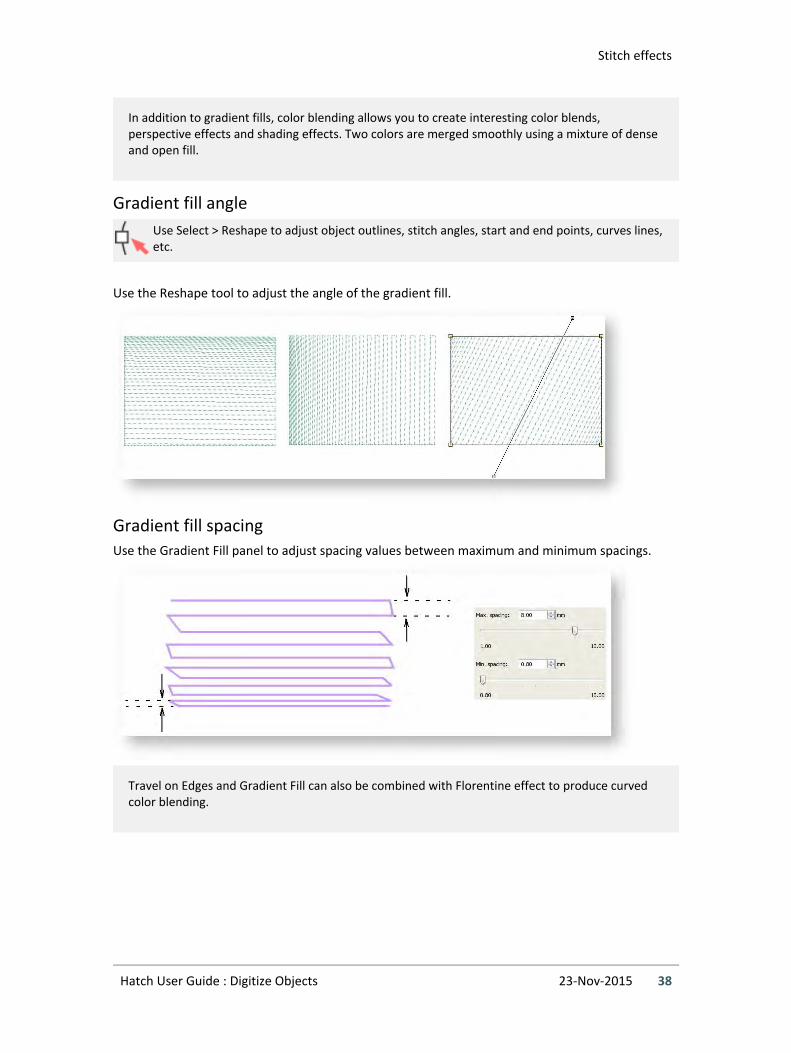
In addition to gradient fills, color blending allows you to create interesting color blends, perspective effects and shading effects. Two colors are merged smoothly using a mixture of dense and open fill.
Gradient fill angle
Use Select > Reshape to adjust object outlines, stitch angles, start and end points, curves lines, etc.
Use the Reshape tool to adjust the angle of the gradient fill.
Gradient fill spacing
Use the Gradient Fill panel to adjust spacing values between maximum and minimum spacings.
Travel on Edges and Gradient Fill can also be combined with Florentine effect to produce curved color blending.

Input methods
Hatch User Guide : Digitize Objects 23-Nov-2015 39
INPUT METHODS
In the software, you build designs from basic shapes or ‘embroidery objects’. Embroidery objects have general properties such as color, size, position, and so on. They also have embroidery properties such as stitch type and density. Properties are defined as you digitize but they can be modified at any stage. The most important property for an embroidery object is its stitch type. Different stitch types are suited to different shapes.
The process of creating embroidery objects on screen is called ‘digitizing’. Embroidery digitizing tools are similar to drawing tools except that the end result are embroidery objects rather than vector objects.
Digitize shapes
Use Digitize > Digitize Open Line to create a row of run or other outline stitching along a digitized line. Left-click for corner points, right-click for curves.
Use Digitize > Digitize Closed Shape to create closed shapes using either outline or fill stitching. Left-click for corner points, right-click for curves.
Use Context > Line to outline closed shapes with the current line stitch type.
Use Context > Fill to fill closed shapes with the current fill stitch type.
Different digitizing tools are suited to different shapes or design elements such as fills, outlines, details. Shapes may be closed or open. If closed, stitching may be comprised of fills or outlines. When you select a tool, different stitch types become available. The Context toolbar also changes to modify what can be done. The input method for all digitizing tools is basically the same. General rules...
For manual digitizing, you will generally want to import artwork as a digitizing backdrop.

Input methods
Hatch User Guide : Digitize Objects 23-Nov-2015 40
Select a digitizing tool from the Digitize toolbox - either open line or closed shape.
Choose an input method - e.g. Open Line or Closed Shape.
Select a suitable stitch type from the Object Properties docker. This can always be modified later.
Important! Choose a 'fill' or 'line' method from the Context toolbar. This will determine
whether the object is digitized as a fill or as an outline.
Create boundaries using left and right mouse clicks to mark reference points - left-clicks for curve points, right-clicks for corners.

Input methods
Hatch User Guide : Digitize Objects 23-Nov-2015 41
Use Standard > Undo to undo previous action.
Use Standard > Redo to redo previously undone action.
Refer to the Status Bar for help. This will often include prompts to guide you.
If you make a mistake, press <Backspace> to delete the last point. Alternatively, use the Undo /
Redo tools on the Standard toolbar.
If you want to change a corner point to curve point, or vice versa, select the point and press <Spacebar>.
Press <Esc> to undo all new points. Press <Esc> again to exit digitizing mode.
To constrain a line to 15° increments, hold down <Ctrl> as you digitize.
Press <Enter> to finish digitizing a line.
Use Auto Scroll to scroll automatically within the design window while digitizing.
Hold down the <Alt> key to temporarily deactivate Auto Scroll.
Use the <Ctrl+Shift+A> key combination to toggle Auto Scroll on/off.
To change settings, double-click an object to open the Object Properties docker. Change line or fill types via the docker.
Control points
The reference points you mark when digitizing a shape become its ‘control points’. These vary slightly with object type. Most points can be added, deleted, or moved. Corner and curve points can be interchanged via the <Spacebar>. Some control points such as entry and exit points cannot be deleted but they can be moved.
Entry point
Exit point

Input methods
Hatch User Guide : Digitize Objects 23-Nov-2015 42
Corner reshape node
Curve reshape node
Control handle
Stitch angle points
Lines
Use Digitize > Digitize Open Line to create a row of run or other outline stitching along a digitized line. Left-click for corner points, right-click for curves.
Use Digitize > Digitize Closed Shape to create closed shapes using either outline or fill stitching. Left-click for corner points, right-click for curves.
The software provides tools for creating outline stitching of varying thicknesses and styles. Digitize outlines with both open and closed shape methods. Lines of varying thickness are typically used to add borders, outlines, and details to shapes.
Parallel fills
Use Digitize > Digitize Closed Shape to create closed shapes using either outline or fill stitching. Left-click for corner points, right-click for curves.
Use the Closed Shape tool to digitize large and complex shapes generally with fixed rather than turning stitch angles. Most shapes can be digitized with this tool. Digitize the boundary in the same way you digitize run lines. Follow the prompts in the status bar to help you digitize. If you make a mistake, press <Backspace> to delete the last reference point, then continue digitizing.

Input methods
Hatch User Guide : Digitize Objects 23-Nov-2015 43
Turning fills
Use Digitize > Digitize Blocks to digitize shapes of varying width with turning stitching.
Use the Digitize Blocks tool to digitize columns of varying width with turning stitches. With this tool, you create the shape by marking reference points on alternate sides of the column. Click to enter corner points. Right-click to enter curve points. Mark a pair of points wherever the outline changes, and wherever you want the stitch angle to change.
Tips…
The control points in a pair do not have to be the same type. For example, one can be a corner point, the other a curve.
If you make a mistake, press <Backspace> to delete the last reference point, then continue digitizing.
Press <Enter> to keep the last stitch and place the exit point at the last reference point you digitized, or
Press <Spacebar> to omit the last stitch and place the exit point on the opposite side of the column.
If you are joining two columns, omit the last stitch on the first column so that the exit point is close to the entry point of the next column.
Circles & squares
Use Digitize > Rectangle / Square to quickly digitize rectangular shapes using current stitch settings.
Use Digitize > Circle / Oval to quickly digitize circular shapes using current stitch settings.
Digitize circles and ovals, squares and rectangles with a few clicks. With the addition of a third reference point, the Circle tool can create oval shapes. Press <Enter> to complete the object. If you only want a circle, press <Enter> twice. When in doubt, follow the prompts.

Input methods
Hatch User Guide : Digitize Objects 23-Nov-2015 44
You can use any fill stitch type.
Switch between runs & fills
Use Digitize > Digitize Closed Shape to create closed shapes using either outline or fill stitching. Left-click for corner points, right-click for curves.
Use Digitize > Digitize Blocks to digitize shapes of varying width with turning stitching.
Use Digitize > Digitize Open Line to create a row of run or other outline stitching along a digitized line. Left-click for corner points, right-click for curves.
You can quickly switch between digitizing closed fills and open lines by means of the <Spacebar> shortcut key. This is useful, for example, when creating travel runs between closed shapes of the same color. You can use the same shortcut key to switch between Digitize Blocks and Open Line.
Join method
When you are digitizing closed objects, the Closest Join method automatically calculates connector points.

Input methods
Hatch User Guide : Digitize Objects 23-Nov-2015 45
This method can be toggled off via the User Interface Settings > General tab available from the Software Settings menu. When deactivated, all newly digitized objects are joined by the 'As Digitized' method. This means that you manually specify entry and exit points while digitizing.
Generally it's good to check entry and exit points before stitching out.

Freehand
Hatch User Guide : Digitize Objects 23-Nov-2015 46
FREEHAND
The Freehand Embroidery feature lets you create designs with a hand-drawn appearance, something which is difficult to achieve through conventional digitizing methods. The aim is to mimic designs formed on an embroidery machine by freehand motion. The difference is that the fabric is secured in an embroidery hoop, allowing the needle to ‘draw’ on the fabric surface, exactly as you have drawn on-screen. The Freehand Embroidery tools can be operated with a mouse or WACOM pen.
Freehand technqiues
Use Digitize > Freehand Open Line to click & drag open lines on screen using current stitch settings for a hand-drawn look.
Use Digitize > Freehand Closed Shape to draw closed shapes on screen using current stitch settings for a hand-drawn look.
Techniques include stitching on top of photographic images or detailed line drawings. For example, use the tools to manually trace a color photo-stitch design. This technique requires accuracy and control of corners, similar to the CorelDRAW® Polyline tool.
Alternatively, designs resembling pencil or charcoal sketches can be quickly digitized. Use the tools to create ‘doodle’ type drawing effects without following detailed artwork – for example, adding to a basic clipart design or decorative text and so on.
Create freehand shapes
As with other digitizing tools, freehand tools can be used in conjunction with all available stitch types. With these tools, however, you draw objects directly on screen. It is thus possible to produce artistic effects similar to free-motion machine embroidery or ‘thread painting’. To create freehand objects, select a Freehand tool. The software displays the stitches as you drag.
Use Freehand Closed Shape to automatically close digitized shapes. Use Freehand Fill tools to fill freehand shapes. Most fill stitch types are available.

Freehand
Hatch User Guide : Digitize Objects 23-Nov-2015 47
To erase a portion of a line, press and hold the Shift key while dragging backward over the line. Alternatively, press Backspace to delete control points. Release the mouse to finish. Or press Esc to cancel input of the object.
Adjust line smoothness
The Freehand Embroidery tools have a special cursor. This is designed to provide a spacing guide as you use the tools. Control the number and spacing of the concentric circles as desired. Adjust ‘smoothness’ of freehand lines by means of the Smoothing control. Specify, as a percentage, how closely smoothed outlines follow the original.
Toggle display of the freehand cursor guide:
Use 'Show Guide' to toggle freehand digitizing guide cursor – provides more control over ‘freehand’ drawing than the default pointer.
Use 'Guide Inner Circle Radius' to define the size of the center circle of the freehand digitizing guide.
Use 'Number of Guide Circles' to set the number of circles in the freehand cursor – if the inner circle radius is 2mm, each additional guide circle is offset by 2mm.
View and edit the control points generated by Freehand Embroidery tools in Reshape mode.
With smoothing Without smoothing
Freehand
Hatch User Guide : Digitize Objects 23-Nov-2015 48
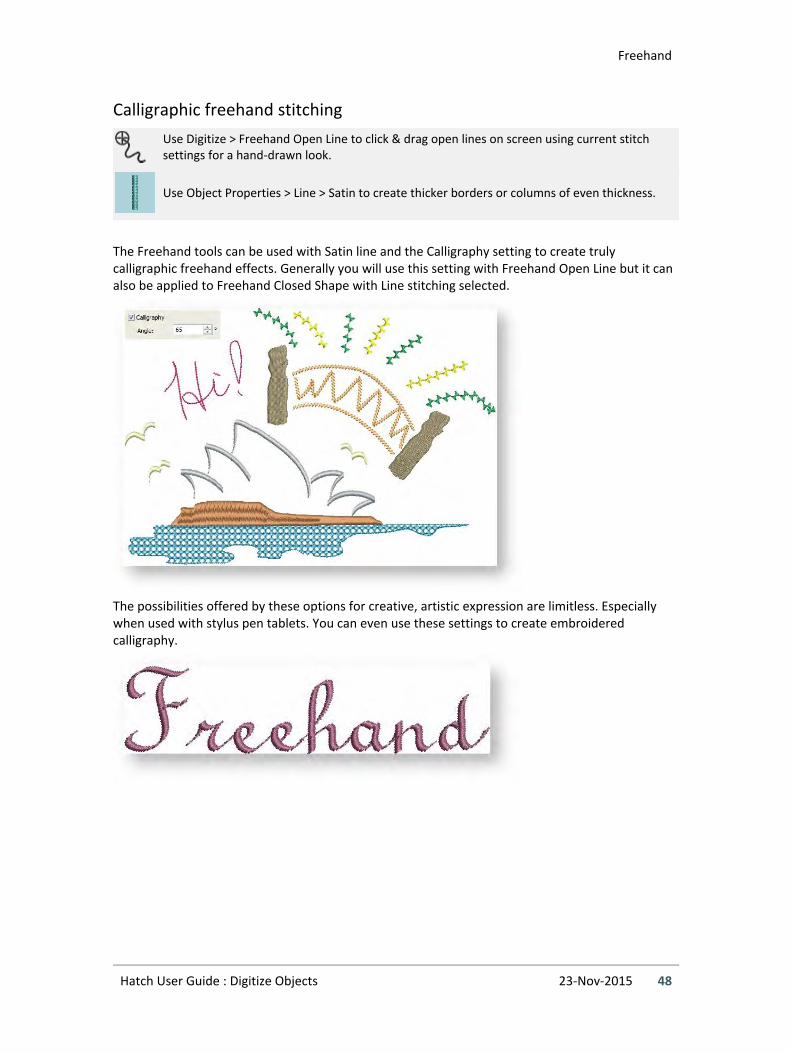
Calligraphic freehand stitching
Use Digitize > Freehand Open Line to click & drag open lines on screen using current stitch settings for a hand-drawn look.
Use Object Properties > Line > Satin to create thicker borders or columns of even thickness.
The Freehand tools can be used with Satin line and the Calligraphy setting to create truly calligraphic freehand effects. Generally you will use this setting with Freehand Open Line but it can also be applied to Freehand Closed Shape with Line stitching selected.
The possibilities offered by these options for creative, artistic expression are limitless. Especially when used with stylus pen tablets. You can even use these settings to create embroidered calligraphy.
Carving stamps
Hatch User Guide : Digitize Objects 23-Nov-2015 49
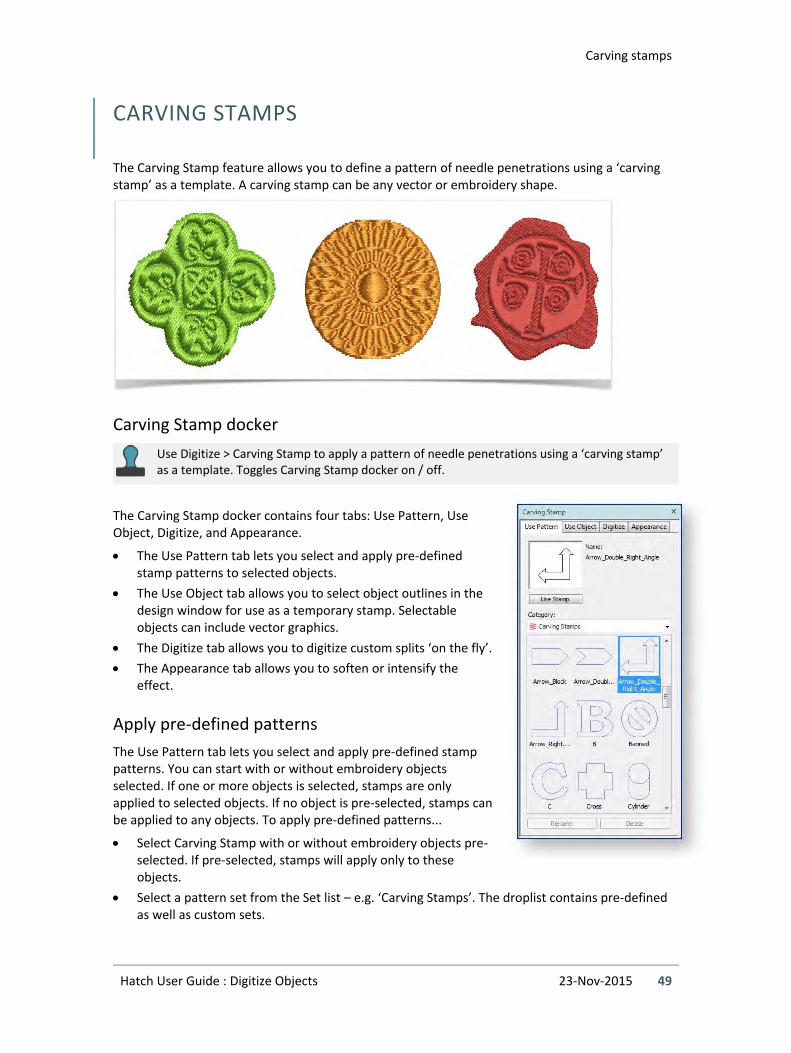
CARVING STAMPS
The Carving Stamp feature allows you to define a pattern of needle penetrations using a ‘carving stamp’ as a template. A carving stamp can be any vector or embroidery shape.
Carving Stamp docker
Use Digitize > Carving Stamp to apply a pattern of needle penetrations using a ‘carving stamp’ as a template. Toggles Carving Stamp docker on / off.
The Carving Stamp docker contains four tabs: Use Pattern, Use Object, Digitize, and Appearance.
The Use Pattern tab lets you select and apply pre-defined stamp patterns to selected objects.
The Use Object tab allows you to select object outlines in the design window for use as a temporary stamp. Selectable objects can include vector graphics.
The Digitize tab allows you to digitize custom splits ‘on the fly’.
The Appearance tab allows you to soften or intensify the effect.
Apply pre-defined patterns
The Use Pattern tab lets you select and apply pre-defined stamp patterns. You can start with or without embroidery objects selected. If one or more objects is selected, stamps are only applied to selected objects. If no object is pre-selected, stamps can be applied to any objects. To apply pre-defined patterns...
Select Carving Stamp with or without embroidery objects pre-selected. If pre-selected, stamps will apply only to these objects.
Select a pattern set from the Set list – e.g. ‘Carving Stamps’. The droplist contains pre-defined as well as custom sets.

Carving stamps
Hatch User Guide : Digitize Objects 23-Nov-2015 50
Select a pattern and click the Use Stamp button.
Move the mouse pointer over the target object/s. Right-click to mirror the stamp. Press Shift to prevent Auto Scroll.
Click to set the anchor point and swivel the pattern to the desired orientation.
Optionally, with the <Shift> key pressed, resize the stamp while moving the mouse pointer.
Click the mouse button.
o If you have pre-selected an object or objects, the stamp pattern is applied only to those objects.
o With no objects pre-selected, the stamp pattern is applied to all underlying objects.
Press <Esc> to exit.
Use objects as carving stamps
The Use Object tab allows you to select object outlines from the design window and apply them directly as stamps or save them to a library for future reference. You can use vector or embroidery objects as a basis for stamps. To use an object as a carving stamp...
Choose an embroidery object or vector object to serve as your stamp.
Click the Carving Stamp icon and select the Use Object tab.
Click the Start Selecting button and click to select or drag a selection marquee.
Hover the mouse over any target object in the design window.
Click the Use Stamp button to apply the selection as a carving stamp.

Carving stamps
Hatch User Guide : Digitize Objects 23-Nov-2015 51
Optionally, click the Add to Library button to add the selection to the library for future
reference.
Notes…
CorelDRAW®, which is part of your software installation, comes with a complete suit of clipart libraries. Many of these can be used as input to the Carving Stamp feature. See your CorelDRAW® documentation for details.
If you want to use a bitmap image, you can convert to vector format in CorelDRAW Graphics using the Bitmaps > Outline Trace command set.
You can also use lettering, embroidery or TrueType, as an input to stamp creation.

Carving stamps
Hatch User Guide : Digitize Objects 23-Nov-2015 52
Digitize custom splits
The Digitize tab allows you to digitize split lines and directly apply in situ or to any applicable objects in the design window. To digitize custom splits...
Select Carving Stamp with or without embroidery objects pre-selected. If pre-selected, stamps will apply only to these objects.
Select the Digitize tab and click the Start Digitizing button. You are prompted to enter a starting point for the stamp outline.
Digitize split lines. Press <Enter> once to complete a boundary. Press <Enter> again to finish.
Click the Stamp button to apply the stamp to selected applicable objects only. Alternatively, use Stamp to apply the stamp to applicable objects with no object/s selected.
Click the Use Stamp button to position the stamp. You are prompted to enter an anchor point as with pre-defined patterns.
Optionally, click the Add to Library button to add the selection to the library for future reference.
Add stamps to a library
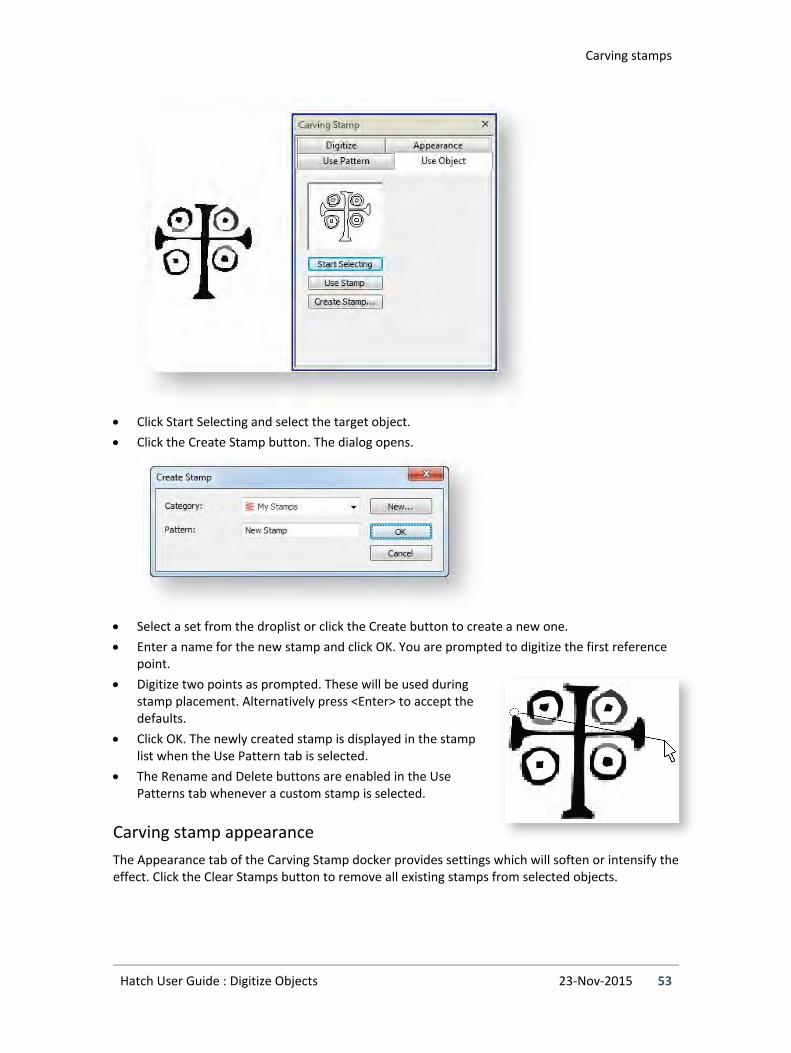
This procedure starts when you click the enabled Create Stamp button either on the Use Object tab or Digitize tab in the Carving Stamp docker. To add a stamp to a library...
Select the Use Object tab.
Carving stamps
Hatch User Guide : Digitize Objects 23-Nov-2015 53
Click Start Selecting and select the target object.
Click the Create Stamp button. The dialog opens.
Select a set from the droplist or click the Create button to create a new one.
Enter a name for the new stamp and click OK. You are prompted to digitize the first reference point.
Digitize two points as prompted. These will be used during stamp placement. Alternatively press <Enter> to accept the defaults.
Click OK. The newly created stamp is displayed in the stamp list when the Use Pattern tab is selected.
The Rename and Delete buttons are enabled in the Use Patterns tab whenever a custom stamp is selected.
Carving stamp appearance
The Appearance tab of the Carving Stamp docker provides settings which will soften or intensify the effect. Click the Clear Stamps button to remove all existing stamps from selected objects.
Carving stamps
Hatch User Guide : Digitize Objects 23-Nov-2015 54
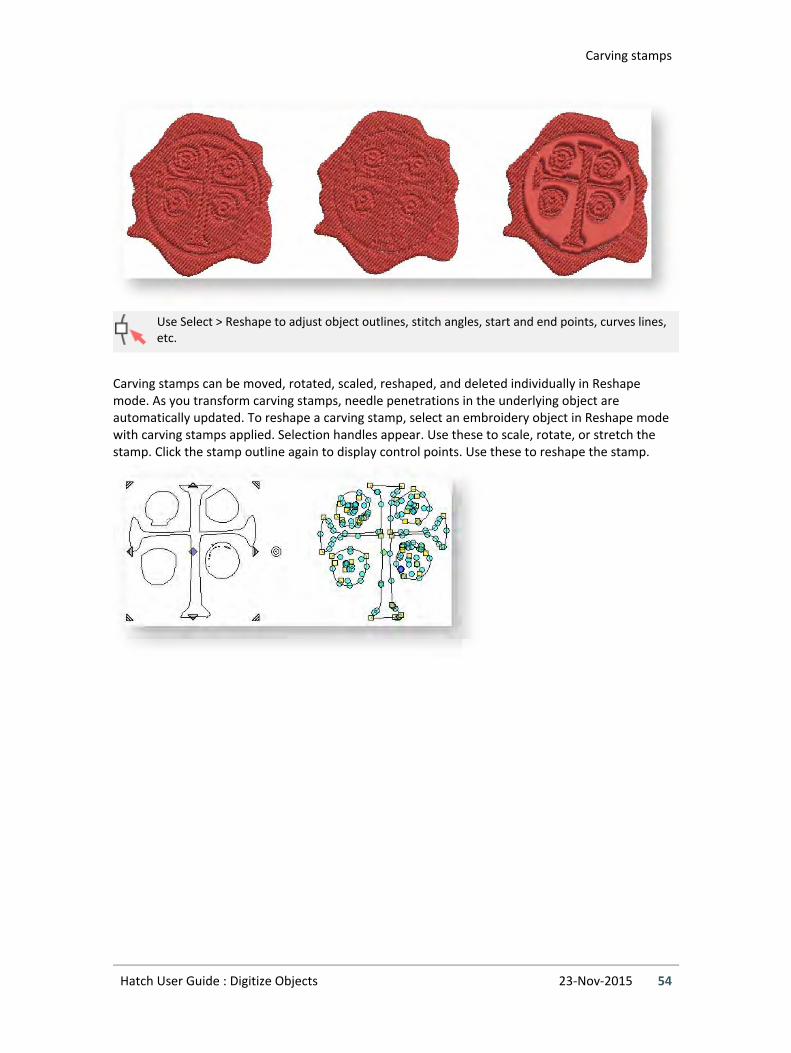
Use Select > Reshape to adjust object outlines, stitch angles, start and end points, curves lines, etc.
Carving stamps can be moved, rotated, scaled, reshaped, and deleted individually in Reshape mode. As you transform carving stamps, needle penetrations in the underlying object are automatically updated. To reshape a carving stamp, select an embroidery object in Reshape mode with carving stamps applied. Selection handles appear. Use these to scale, rotate, or stretch the stamp. Click the stamp outline again to display control points. Use these to reshape the stamp.

Motif stamps
Hatch User Guide : Digitize Objects 23-Nov-2015 55
MOTIF STAMPS
Motif stamps are ready-made design elements, such as hearts, leaves or geometric patterns which are contained in libraries or 'sets'. You can choose any of these patterns to use as 'motif stamps'. There are many to choose from. Once added to your design, stamps can be edited, resized or transformed. You can define your own stamps for individual use or for use in motif runs or fills.
Select & insert stamps
Use Digitize > Motif Stamp to add motifs singly. Rotate, scale, or mirror as you add.
Use them to create decorative effects in your designs. Rotate, scale, or mirror them as you add them or edit them like any other object. If a stamp is comprised of two or more objects, these will be automatically grouped when inserted.
Click the Motif Stamp tool.

Motif stamps
Hatch User Guide : Digitize Objects 23-Nov-2015 56
Select a motif set from the droplist. You can use any motif from any motif set as an embroidery stamp, including user-defined motifs. Select a stamp from the display panel and click OK. Move the pointer and click to mark the anchor.
Move the pointer until the stamp is in the angle you need, then click again to mark the guide.
Press Enter. Repeat to insert the stamp again. Press Esc to finish.
Rotate stamps
Use Select > Select Object to select an object or group. Or drag a selection marquee to select multiple enclosed objects or groups.
You can rotate, flip and scale stamps as you add them to your design using the keyboard and mouse. You can also scale, rotate and flip stamps later just like any other object.
To rotate the stamp, move the pointer until the rotation angle is correct, then click again.

Motif stamps
Hatch User Guide : Digitize Objects 23-Nov-2015 57
Hold down <Ctrl> to constrain rotation angles.
To flip the stamp, right-click.
Alternatively, use the rotation controls in the Context toolbar.
Press <Esc> to finish.
Scale stamps
You can scale stamps interactively as you digitize. Press <Shift>, move the pointer until the stamp outline shows the required size, then click again.
Alternatively set an exact size using the Context toolbar. Enter precise dimensions in mm or as a percentage of the original.

Stitch angles
Hatch User Guide : Digitize Objects 23-Nov-2015 58
STITCH ANGLES
Stitch angle adjustments depend on the type of object you are working with. With filled objects you can set a stitch angle for the entire object. Alternatively, you can add multiple stitch angles with the Add Stitch Angles tool. You can also adjust the stitch angle using the Reshape tool.
Add stitch angles
Use Edit Objects / Digitize > Add Stitch Angles to add stitch angles to selected closed objects with or without holes.
Use Edit Objects > Remove Stitch Angles to remove stitch angles from selected objects with turning stitching.
The stitch angles of all filled objects, with or without holes, are modified in the same way. Multiple stitch angles can be added or subtracted with the Stitch Angles tools.
To add stitch angles, select a closed object with or without turning stitches.
If necessary, click the Remove Stitch Angles tool to return it to the current nominal stitch angle.
Click the Add Stitch Angles icon. Enter stitch angles as prompted. Stitch angles can overlap holes within objects.
Adjust stitch angles
Use Select > Reshape to adjust object outlines, stitch angles, start and end points, curves lines, etc.

Stitch angles
Hatch User Guide : Digitize Objects 23-Nov-2015 59
You can change stitch angles of filled objects using the Reshape tool. To adjust stitch angles, select the filled object and click the Reshape icon.
Select stitch angle nodes and press <Delete> to remove stitch angles.
When you move the mouse pointer over the stitch angle point, a tooltip displays the stitch angle of the selected object.
Click and drag lines as required.
Press <Enter> to apply the changes, then <Esc> to finish.
Note that the nominal stitch angle can also be controlled via Object Properties:
Circle objects
Use Select > Reshape to adjust object outlines, stitch angles, start and end points, curves lines, etc.
You can change the stitch angle of circle objects by moving the stitch entry point.

Cut & fill holes
Hatch User Guide : Digitize Objects 23-Nov-2015 60
CUT & FILL HOLES
The software provides special tools for cutting holes in objects, removing underlying stitching, as well as filling holes. Use them to prevent a build-up of stitches, eliminate areas of unwanted stitching, or create new objects based on the holes in a source object.
Remove underlying stitching
Use Edit Objects > Remove Overlaps to remove unwanted stitching from underlying objects or lettering.
Use the Remove Overlaps tool to remove underlying layers of stitching in overlapping objects. This helps to reduce the stitch count and prevent a build-up of stitches where they are not needed. To remove underlying stitching:
Select one or more ‘cutters’.
Click the Remove Overlaps tool. The stitching overlap is removed. A margin of overlap is automatically calculated between cutter and underlying object/s in order to avoid unsightly gaps.

Cut & fill holes
Hatch User Guide : Digitize Objects 23-Nov-2015 61
Note that you can control the overlap margin via the Embroidery Settings > Overlap tab which can be accessed via the Software Settings menu. Softer fabrics may require more overlap to prevent gaps from forming.
You can use an entire design as a cutter excluding objects, such as borders or details, less than a certain width.
Digitize holes in objects
Use Digitize > Digitize Holes to create holes in selected objects. Any closed object will do.
Use Digitize > Remove Holes to remove holes from selected objects.
Use the Digitize Holes tool to cut holes in objects to eliminate areas of unwanted stitching or for effect. To digitize holes in objects:

Cut & fill holes
Hatch User Guide : Digitize Objects 23-Nov-2015 62
Select any closed object in which you want to cut a hole.
Select the Digitize Holes tool and digitize the shape you want to cut.
Press <Enter> twice to remove stitches from the digitized area.
Use the Remove Holes tool to restore any objects with holes.
Fill holes in objects
Use Digitize > Fill Holes to fill holes in selected objects with current stitch type. Overlap is automatically calculated.
The Fill Holes function does the opposite as Digitize Holes. Use the tool to fill holes in closed objects by creating new objects based on the existing holes.
Select the source object.
Click the tool. You are prompted to enter an overlap or underlap margin:

Cut & fill holes
Hatch User Guide : Digitize Objects 23-Nov-2015 63
Normally, you would choose to overlap generated objects to avoid gaps. But sometimes you may want to deliberately create an underlap as shown.
To cover holes exactly, enter a value of 0.00.
To overlap the filled holes and the original object, enter a positive offset – e.g. 1.00. Overlapping the objects prevents gaps appearing.
To leave a gap between the filled holes and the original object, enter a negative offset – e.g. -1.00.
Hole boundaries are converted to closed objects with the same fill stitch settings, stitch angle, stitch effects and thread color as the source object. Edit as necessary.
Note that you can control the overlap margin via the Embroidery Settings > Overlap tab which can be accessed via the Software Settings menu. Softer fabrics may require more overlap to prevent gaps from forming.

Stitch reinforcement
Hatch User Guide : Digitize Objects 23-Nov-2015 64
STITCH REINFORCEMENT
Embroidery appearance and quality depends a lot on underlay which serves as a foundation for cover stitching. Without an underlay, embroidery lies flat on the underlying fabric which can often show through. New digitizers might be tempted to increase stitch density but it is much more effective to apply an automatic underlay. Although it increases the stitch count, underlay helps to stabilize fabrics and reduce puckering and pulling especially on larger designs. It also provides ‘loft’, raising cover stitches and preventing them from sinking into soft fabrics. It is also used to prepare a napped fabric by flattening it.
Automatic underlay
Use Context > Underlay / Settings to apply or exclude automatic underlays to new or selected objects. Right-click to access settings.
The Underlay tool is a toggle button that allows you to apply automatic underlay to new or selected objects. Underlay is deselected by default.
In addition to the basic underlay stitch types – Center Run, Zigzag, Edge Run, and Tatami – the software also provides a selection of underlay combinations such as Double Zigzag, Center Run + Zigzag, etc. This allows you to apply dual underlays to design objects. Any combination containing Center Run cannot be used with Parallel Fill or Parallel Fill Rectangle objects.
Underlay Type Purpose
Center Run underlay
Use to stabilize narrow columns – e.g. 2-3mm wide. You can't use Center Run with Parallel Fill or Parallel Fill Rectangle objects.

Stitch reinforcement
Hatch User Guide : Digitize Objects 23-Nov-2015 65
Underlay Type Purpose
Edge Run underlay
Use to stabilize somewhat larger shapes such as letters.
Zigzag underlay
Use Zigzag underlay stitching to support wide columns. You can set stitch length properties for Zigzag underlay. The stitch length is the length of each zigzag stitch.
Tatami underlay
Tatami underlay is used to stabilize large, filled shapes. It resembles an extremely open Tatami fill stitch, where rows of stitches are placed across the object to create the support.
Underlay settings
Use Context > Underlay / Settings to apply or exclude automatic underlays to new or selected objects. Right-click to access settings.
The software lets you adjust values to suit different fabrics, lettering appearance and size. Larger areas and stretchy fabrics such as knits and pique generally need more underlay than smaller areas and firm fabrics such as drill or leather. At times, when you want a full design with extra lift under the stitches, a tatami underlay is preferable. On knits, edge run is best. To change underlays, select and double-click a filled object. Go to the Stitching tab and open the Underlay settings. If not already checked, select the Underlay checkbox and make a selection from the droplist.
Underlay stitching has similar settings available as the cover stitch except that default stitch spacing is much more open.
Stitch length: 2.0 mm

Stitch reinforcement
Hatch User Guide : Digitize Objects 23-Nov-2015 66
Stitch length: 4.0 mm
Pull compensation
Use Context > Underlay / Settings to apply or exclude automatic underlays to new or selected objects. Right-click to access settings.
Embroidery stitches tend to pull fabric inwards where the needle penetrates. This can cause fabric to pucker and gaps to appear in the embroidery. Experienced digitizers can manually compensate for pull by overlapping objects as they digitize. Automatic pull compensation, however, counters the pull effect by ‘overstitching’ outlines of filled shapes on the sides where the needle penetrates.
The Auto Fabric you choose applies a calculated amount of pull compensation automatically. However, you can adjust overstitching yourself in the Object Properties dialog. This is handy if you want to override auto fabric settings to compensate for varying degrees of stretch.
Applying underlay stitching, and using appropriate backing and topping when stitching out can also reduce the push-pull effect.
Reinforce outlines
Use Digitize > Backtrack to reinforce an outline, stitching it in the reverse direction to the original. Typically used with open shapes.
Use Digitize > Repeat to duplicate an outline in the same direction. Typically used with closed shapes.
Use Backtrack and Repeat to reinforce outlines while specifying the direction of the stitching. Backtrack stitches in reverse direction to the original. It is typically used to make run stitch outlines thicker without creating unwanted connecting stitches. Repeat duplicates the original stitch direction and is typically used with closed shapes. If you use it with open shapes, a connecting

Stitch reinforcement
Hatch User Guide : Digitize Objects 23-Nov-2015 67
stitch is inserted from the end to the start of the object. This will require trimming. To reinforce outlines...
Select the object (or objects) to reinforce. Both tools are enabled when Single Run Lines, Triple Run Lines, or Satin Lines are selected.
Choose the best tool for the task, depending on whether you have chosen an open or closed object. Generally:
Use Repeat for closed shapes Use Backtrack for open shapes
The object is duplicated and placed on top of the original. It is the same color and is positioned after it in the stitching sequence.
Check that the object has been duplicated by the following means:
o Check the stitch count in the Status Bar.
o Use Stitch Player or travel through the stitches.

Embroidery connections
Hatch User Guide : Digitize Objects 23-Nov-2015 68
EMBROIDERY CONNECTIONS
Connectors link objects in a design. They can be run stitches or jumps. You can use automatic settings to generate connectors, trims and tie-offs, or add them manually. If you prefer to add tie-offs and trims as you digitize, you can turn off automatic connectors altogether.
The software also allows you to create ‘branched objects’. Like-objects are thereby resequenced, connectors minimized, components grouped, and stitches regenerated. Underlay can be applied to all.
View connectors
Use View > Show Design to show or hide design elements. Click to open droplist of view settings.
Use Select > Reshape to adjust object outlines, stitch angles, start and end points, curves lines, etc.
Turn on connectors via the Show Design droplist or press <Shift + C>. The triangle indicates a trim, while a dotted line indicates a jump. In TrueView, jumps do not appear.
When studying connectors, you may find that the distance between consecutive objects is not as close as it could be. To adjust connecting stitches, use Reshape to reset entry and exit points.

Embroidery connections
Hatch User Guide : Digitize Objects 23-Nov-2015 69
The Apply Closest Join feature allows you to (re-)apply closest join to selected objects after editing. The command is enabled when two or more embroidery objects are selected.
Automatic connectors
Use Context > Always Tie-Off & Trim to trim connectors. When it is turned on, the software will decide when to trim.
Use Edit Objects > Object Properties to preset properties or adjust them for selected objects.
The software generates automatic connectors based on Object Properties. You can change connector settings for a whole design or selected objects. Sometimes, for instance, you may want to insert a jump as a connector between embroidery objects. Jumps move the frame from one part of the design to another without needle penetrations. The software inserts Tie-off and Trim functions which command the machine to cut the connecting thread. The easiest way to do so is to select the first object and click Always Tie-Off & Trim.
At other times, you may actually want the software to turn off Trims and Tie-offs for selected objects. For instance, if the connecting run is hidden beneath another object, it is more efficient to use a connecting run rather than a trim and tie-off. You can do this via Object Properties.

Embroidery connections
Hatch User Guide : Digitize Objects 23-Nov-2015 70
Branching
Use Digitize > Branching to automatically sequence selected outlines for efficient stitchout.
Branching is an advanced feature which lets you digitize similar, overlapping objects – e.g. the fingers of a hand, sections of a custom letter – without having to think about the most efficient stitching sequence and joins. Apply the command to join selected objects to form a single compound object. Components are resequenced, connectors minimized, and stitches regenerated. All component objects are grouped and selectable as one.
Create branching
Apply Branching to selected objects. These become a single branched object.
Select the objects to sequence. Note any long connectors between objects.
Click Branching.
Digitize entry and exit points or press <Enter> twice to accept the defaults. Component objects are grouped and share the color of the first.
Travel through the object to check stitching. Note that objects are resequenced, connectors minimized, and stitches regenerated.

Embroidery connections
Hatch User Guide : Digitize Objects 23-Nov-2015 71
When the entry and exit point are the same, there are two layers of outline stitching. If they are different, the path between the entry and exit will have three layers. It is your choice whether to have the extra travel layer or a trim connection to the next object instead.
Branching works with most objects. Branched objects preserve their original settings while sharing the color of the first object in the sequence.
Edit branched objects
Use Edit Objects, Appliqué or Lettering / Monogramming > Break Apart to split composite objects - monograms, appliqués, lettering, etc - into components. Allows each to be edited individually. This tool is also available via Edit menu.
Branched objects remain editable. They can be reshaped. There is only one entry and one exit point, but all component objects have individual reshape points. The object properties of a compound object can be accessed and modified via the Object Properties dialog. If necessary, branched objects can be returned to their component objects using the Break Apart tool.