health care support workers clinical competence
TRANSCRIPT
Lynn Parkin, reviewed August 2015 p:\training\inductions - non clinical\hcsw\induction day 1\induction pack\clinical competence.
20.08.15doc.docx
Health Care Support Workers
Clinical Competence
Edition
2015

Lynn Parkin, reviewed August 2015 p:\training\inductions - non clinical\hcsw\induction day 1\induction pack\clinical competence.
20.08.15doc.docx
FOREWORD BADGER group has an outstanding record of achievement in providing care for patients who present for unscheduled care. One of the key elements of the successful service we provide is the work undertaken by Health Care Support Workers. The initial contact with HCSWs at the Primary Care Centres sets the tone for the whole of the patient experience, and we cannot stress too highly how important it is that you are able to deal with each patient as efficiently and sensitively as possible. This competency document sets out the practical standards of what you are expected to do, and will guide you through each procedure while you are learning the role. Underlying each separate procedure is a basic set of instructions, which covers principles of communication, consent, infection control and accountability. We expect that all HCSWs will adhere to this excellent document as they work, and demonstrate complete familiarity with the contents when they are supervised or appraised. We anticipate that it will assist you in learning about the role, and act as a reference if there are any queries from patients. Finally, we hope you will find that using it makes your role straightforward, so that you can concentrate on giving the patients the best possible service, which will make your part in their care rewarding and enjoyable.

Lynn Parkin, reviewed August 2015 p:\training\inductions - non clinical\hcsw\induction day 1\induction pack\clinical competence.
20.08.15doc.docx
Contents
Introduction to the competency document ..................................................... 1 Framework for Assessment ............................................................................. 2 (1) Blood pressure reading .............................................................................. 4 (2) Temperature Measurement ........................................................................ 6 (3) Pulse/Heart Rate ........................................................................................ 8 (4) Respirations ............................................................................................... 9 (5) Oxygen Saturation Monitoring ................................................................11 (6) Blood glucose monitoring ....................................................................... 13 (7) Urinalysis ................................................................................................ 16 (8) Pregnancy Testing ................................................................................... 18 (9) Peak Flow Test ........................................................................................ 20 (10) Nebulisation .......................................................................................... 23 (11) Cardio Pulmonary Resuscitation (CPR) ............................................... 24 (12) Automatic External Defibrillator (AED) ............................................. 28 (14) Infection Control ................................................................................... 32
A. Hand decontamination ......................................................................... 32 B. Safe disposal of body fluid waste ........................................................ 34 C. Contamination – sharps / splash injuries ............................................. 36 D. Safe disposal of sharps ........................................................................ 38

1
Introduction to the competency document
This document has been approved by the lead nurse within the BADGER team, and is specifically tailored to meet the needs of Health Care Support Workers (HCSWs) at the Primary Care Centres. It provides a framework and record of individual achievements which demonstrate capacity to perform the role successfully, and will be of use for individual HCSWs. Definition of competence “The demonstrated skill of an individual to perform a task according to a defined and measurable standard.”
How to use competences
Competences can be used as an objective measure to assess performance. It is
important that each HCSW acknowledges any limitations or gaps in knowledge and/or
practice and does not work outside of their level of competence. Any gaps should be
made known to the lead nurse so that support can be provided. This is why assessment
and documentation of competence (or achievement) is important.
A competence framework helps to:
Demonstrate that clinical tasks can be performed correctly.
Reduce the risk of inappropriate delegation of work.
Support the organisation to demonstrate that it meets the clinical governance
agenda.
Support a risk management strategy.
Support both the personal and professional development of HCSWs.
Summary
A competence management approach ensures individual members of the HCSW team
are equipped with the necessary skills, knowledge and experience to undertake their
role.

2
Framework for Assessment
The Steinaker & Bell Framework (1979) The assessment of competency using the Steinaker & Bell (1979) model provides a framework based on “experiential learning” (learning through experience, whether it is personal or professional). This developmental model provides a framework which guides the HCSW through from the induction stage through to proficient, independent practice. For clarity, the terms are described more fully below. It is important to recognise that individual HCSWs will move through the levels, and develop at different rates dependent on previous training, and unique experiences which contribute to the overall development of competence. Definition of terms
Stage Taxonomic Level Description Eg: Applications Role of Preceptor
Induction 1. Exposure Consciousness of an experience
I see temperature measurement performed
Motivator
Induction 2. Participation Deciding to become part of an experience
I perform temperature measurement
Catalyst
Induction <3 months
3. Identification Union of the learner with what is to be learned
I competently measure temperature independently
Moderator
6 – 12 months
4. Internalisation
Experience continues to influence lifestyle
Measuring Temperature is now part of my life
Sustainer
12 mths + 5. Dissemination Passes on information to others
Teaches others to measure temperature
Facilitator
Exposure Exposure to new practices and procedures usually takes place at induction. However, due to ongoing improvements and resultant changes in policies and procedures exposure to new practices throughout your career is inevitable. During the exposure stage the HCSW will observe a competent HCSW carry out specific clinical procedures at least three times for each observation to become familiar with the procedure. The HCSW will be able to discuss with the practitioner how and why certain aspects of care were carried out and identify sources and types of information required applying theory to practice. (Steinaker & Bell 1979).

3
Participation The HCSW initially participates in the delivery of care under supervision, with support as required. It is expected that during this stage the HCSW will progress to increased participation with greater confidence and less prompting. He/she shows greater ability to communicate effectively with patients and staff and seeks advice as required. The HCSW demonstrates the ability to interpret patient information (Steinaker & Bell 1979). There may be times/circumstances whereby the HCSW is unable to move onto independent practice (identification level), in all clinical observation areas, due to lack of exposure or the need for further support; this being the case, further supervision can be arranged. Identification The HCSW is able to explain the rationale for nursing action. He/she is able to provide care for patients without direct supervision. The HCSW is able to transfer knowledge to new situations. He /she reports any changes in the condition and/or circumstances of patients to BADGER clinicians. He/she actively seeks advice and support when required and acknowledges limitations in levels of competence. He/she demonstrates the ability to use problem solving skills, analysis and evaluation. (Steinaker & Bell 1979). Internalisation The HCSW is able to participate in all clinical procedures and provides a rationale for decision making. He/she maintains accurate, timely and legible records using the ADASTRA system. He/she displays problem solving skills and is able to apply theory to practice. (Steinaker & Bell 1979). Dissemination The HCSW is able to provide support and clinical supervision to more junior HCSW s. He/she has the ability to teach junior colleagues and can identify improvements in practice. He/she is able to critically analyse, evaluate and apply decision-making skills to practice. (Steinaker & Bell 1979).

4
(1) Blood pressure reading
Objective The HCSW demonstrates understanding of blood pressure measuring equipment and uses the equipment to effectively monitor blood pressure. He/she has an awareness of normal and abnormal blood pressure levels and acts accordingly when levels lie outside of normal values. HCSW documents all results appropriately as soon as they are completed. Background Blood pressure is the pressure that the heart and arteries apply to force blood around the body. The heart is like a pump. The two figures recorded are the systolic and diastolic pressures. In essence, the systolic pressure refers to the highest pressure in the arteries that the heart produces when it contracts and the diastolic pressure is the ‘resting’ lower pressure when the heart relaxes between heart beats. High blood pressure (Hypertension) This is defined as a sustained systolic reading of > 140 mmHg and a sustained diastolic reading of > 90mmHg.(BTS) Please note that single abnormal readings taken do not mean that the patient has hypertension, and care should be taken not to alarm patients.
Low blood pressure (Hypotension) This is defined as a sustained systolic reading of 90mmHg or less and a sustained diastolic reading of 60 mmHg or less. Some patients normally have low blood pressure, and if they do not feel unwell there is no cause for alarm. Pregnant women may also have low blood pressure, particularly in the first 3 months of pregnancy. St Recommended cuff sizes
Indication Width (cm)*
Length (cm)*
BHS Guidelines Bladder Width & Length (cm)*
Arm circ (cm)*
Standard Adult 12 - 13 23 - 13 12 x 26 <33
Large Adult 12 - 16 35 - 40 12 x 40 <50
** Large bladders for arm circumference over 42cm may be required Preparation Explain to the patient what you are going to do. Ensure you have the correct cuff size for the patient (see above). Ideally the patient should be seated for at least 5 minutes, relaxed and not moving or speaking. (The time during which the history is taken can be included, and the patient advised not to speak as soon you are ready to begin the process).
5
Procedure
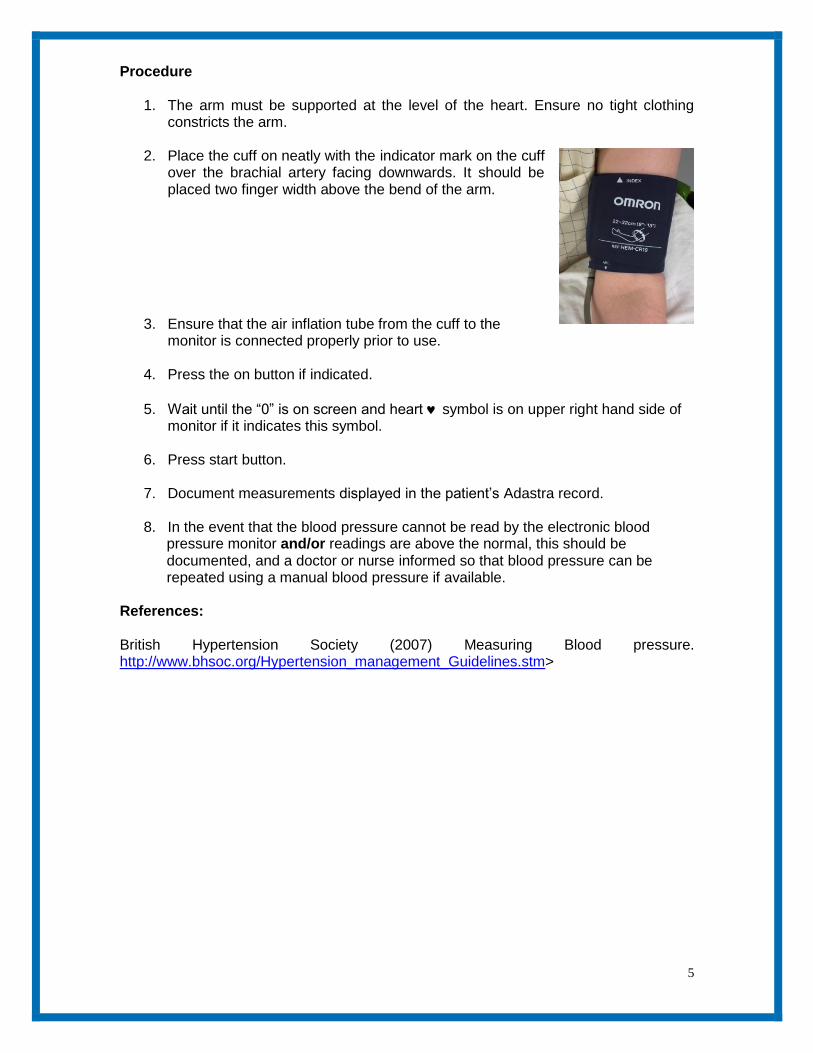
1. The arm must be supported at the level of the heart. Ensure no tight clothing constricts the arm.
2. Place the cuff on neatly with the indicator mark on the cuff
over the brachial artery facing downwards. It should be placed two finger width above the bend of the arm.
3. Ensure that the air inflation tube from the cuff to the monitor is connected properly prior to use.
4. Press the on button if indicated.
5. Wait until the “0” is on screen and heart symbol is on upper right hand side of monitor if it indicates this symbol.
6. Press start button.
7. Document measurements displayed in the patient’s Adastra record.
8. In the event that the blood pressure cannot be read by the electronic blood
pressure monitor and/or readings are above the normal, this should be documented, and a doctor or nurse informed so that blood pressure can be repeated using a manual blood pressure if available.
References: British Hypertension Society (2007) Measuring Blood pressure. http://www.bhsoc.org/Hypertension_management_Guidelines.stm>

6
(2) Temperature Measurement
Objective The HCSW demonstrates an understanding of the equipment required for measuring temperature. He/she has the ability to differentiate between normal and abnormal values for both child and adult, and acts accordingly. He/she documents all results in an accurate and timely manner. Background Body temperature means the measurement of body heat and represents the balance between heat gain and heat loss. Body temperature is controlled in the hypothalamus, in the brain. Temperature measurements are taken to assess deviation from the normal range that may indicate disease, deterioration in condition, infection or reaction to treatment. Normal Readings Body temperature is usually between 36 and 37.5c or in a child 36.3 – 37.2 c
Pyrexia = a rise in body temp to any point between 37 - 40c
Hyperpyrexia = a temp above 40c
Hypothermia = a temp recording below 35c or 36.4c in children
The Tympanic Thermometer Tympanic thermometers sense body heat through infrared energy given off by the tympanic membrane. Ear canal size, presence of wax, operator technique and the patient's position can affect accuracy. Tympanic thermometers should not be used to measure temperature in infants under 4 weeks old. From 4 weeks to five years an infra red thermoscan thermometer should be used (NICE 07) Procedure
1. Check the equipment is in working order.
2. Explain to the patient why temperature is being taken.
3. Place a clean plastic protector over the chosen device.
4. Carefully place the probe at the entrance of the ear canal ensuring a snug fit.
5. Press the start button and wait until the device indicates the reading is complete.
6. Remove the probe and dispose of the plastic probe protector into a yellow clinical
waste bag.

7
7. Document the reading immediately and compare against normal values.
8. Any abnormal readings should be reported to the doctor/nurse on duty.
References: TRIM, J. (2007) Nursing Times Using a Tympanic Thermometer, Vol 97 issue 09, pg 43 NATIONAL INSTITUTE OF CLINICAL EXCELLENCE (2007) Feverish illness in children:.http://www.cks.nhs.uk/feverish_children_risk_assessment/management/quick_answers/scenario_feverish_children_risk_assessment/nice_traffic_light_system_table#-339611 ROYAL COLLEGE OF NURSING (2008) Caring for Children with Fever: RCN good practice guidance for nurses working with infants, children and young people. < http://www.rcn.org.uk/data/assets/pdf_file/0008/184895/003267.pdf>

8
(3) Pulse/Heart Rate
Objective The HCSW demonstrates an understanding of the measurement of pulse /heart rate and when this measurement is required. He/she is aware of the technique/equipment used for measuring pulse/heart rate, and acts appropriately when results lie outside of normal expected ranges. He/she documents all results accurately and in a timely manner. Background As the heart contracts, blood is ejected into the aorta, resulting in a wave of pressure through the arterial blood system. This can be felt as a pulse in places where an artery passes near the skin and over a firm or bony surface of the body: the wrist is the commonly used site in primary care settings. In healthy individuals the pulse should be the same as the heart rate but, for example, in patients with cardiac dysrhythmias such as atrial fibrillation the rates will not be the same. Descriptors which may be used include: regular, irregular, strong or weak. Normal range
Adult 60 to 100 beats per minute Children - age 1 to 8 years 80 to 100 Infants - age 1 to 12 months 100 to 120 Neonates - age 1 to 28 days 120 to 160
A pulse rate over 100bpm in an adult is known as tachycardia. A pulse rate under 50bpm is called bradycardia. Note that children, infants and babies normally have higher pulse rates than adults.
Certain factors can increase the pulse rate e.g. emotion, such as anger or excitability, exercise, drugs, temperature, infection/inflammation. There are also many factors which decrease the pulse rate. Abnormal pulse rates must be documented, and any additional information about factors which may have contributed must be reported to the clinician as they could be clinically significant.

9
The Procedure
1. Explain the procedure to the patient/carer.
2. Identify artery to be used. The radial artery at the wrist is easily accessible and is commonly used to assess pulse in adults. The brachial site (bend of elbow) may be used in children.
3. Using the second or third finger (or both) apply
gentle pressure against the artery site (the thumb should not be used, as the practitioner's own pulse may be felt). Need
Need toNeed
4. Count the pulse rate for exactly one minute (this allows sufficient time to detect rhythm irregularities).
5. If an automated blood pressure monitoring device or oxygen saturations monitor is being used these will automatically measure pulse rate. However, they do not take into account rhythm, pulsations and the pauses between beats providing information about the heart rhythm. This should be smooth and regular.
6. Document the results appropriately, reporting any abnormalities to the clinician
on duty.
References: ROYAL COLLEGE OF NURSING (2007) Standards for assessing, measuring and monitoring vital signs in infants, children and young people- RCN Guide for children`s nurses and nurses working with children and young people. <http://www.rcn.org.uk/_data/assets/pdf_file/0004/114484/003196.pdf
DOUGHTERTY, L., LISTER, S. (2004) The Royal Marsden Hospital Manual of Clinical Nursing Procedures. Oxford: Blackwell.
HINCHCLIFFE, S., M. (1996) Physiology for Nursing Practice. London: Baillière Tindall.
(4) Respirations

10
Objective The HCSW is aware of when and how to assess the respirations of both child and adult patients. He/she is aware of the procedure for reporting any abnormal readings and acts appropriately. Background Respiration is the act of breathing which comprises: Inspiration – air being drawn into the lungs & Expiration – air being breathed out. Respirations are monitored by counting the number of inspirations or expirations over a one minute period. When oxygen saturation monitoring is indicated, respirations also need to be assessed in order to perform a comprehensive picture. Breathing patterns are classified by rate, depth and regularity. Normal Values Descriptors which may be used: normal, shallow, laboured, noisy,
Adult (normal) 12 to 20 breaths per minute Children - age 1 to 8 years 15 to 30 Infants - age 1 to 12 months 25 to 50 Neonates - age 1 to 28 days 40 to 60
Procedure
1. Ensure the patient is rested before carrying out the procedure to ensure
accuracy.
2. Try not to make the patient aware that you are counting their respirations as this may influence the speed of their breathing.
3. Count each respiration for one full minute, by observing the rise and fall of the
chest.
4. Infants below 7 years of age are predominantly abdominal breathers therefore abdominal movements should be counted instead of chest rise and fall.
5. Document your findings in the patient’s notes accurately.
6. Report any problems/results outside average values to the clinician on duty.
References: MOONEY,P.(2007)Respiratory Assessment http://www.nursingtimes.net/nursing-practice-clinical-research/respiratory-assessment/200191.article>

11
(5) Oxygen Saturation Monitoring
Objective The HCSW is aware of when and how to monitor oxygen saturation levels. The HCSW is familiar with the equipment used to monitor oxygen saturations in both child and adult patients. The HCSW acts accordingly when results lie outside normal expected ranges. He/she documents all results accurately and in a timely manner. Background The majority of patients for whom pulse oximetry is used are those who have a respiratory illness. Pulse oximetry is particularly useful in monitoring the child with respiratory illness, when oxygen levels may be reduced due to narrowed airways, (as in asthma) or upper and lower respiratory tract infections. It is vital to detect low oxygen levels and act to correct them because oxygen is essential in enabling each cell in the body to function efficiently. Reduced oxygen levels can cause cell death leading to reduced respiratory drive, respiratory arrest and ultimately cardiac arrest. Normal levels
Adult > 96% on air Child > 96% on air
NB: < 92 % on air, the clinician should prepare to administer oxygen and prepare to
admit to hospital. (NICE 2007) N.B: Poor positioning, movement, hypothermia, anaemia, low battery level, nail varnish/
dirty site/probe can prevent the sensor from picking up a reading. Procedure
1. Explain the procedure to the patient/parent.
2. It is important that the probe and the area that it is going to be placed on are both clean, remove any nail varnish or alternatively use a different site as this may give rise to inaccurate recordings (Whaley and Wong 1999).
3. Before attaching the probe turn on the monitor to determine it is emitting infrared
light. There should be an adequate trace on the machine, the indicator bar signals its strength and needs to be at its highest point.
4. It is important to use the correct size probe for adult/child.
5. The light-emitting part of the probe is placed on the top of the finger and a photo
detector placed directly opposite the light source, on the bottom of the finger. The probe must be placed the right way up on the finger in adults and/or finger/big toe in children.
6. The probe and the lead should be secured with tape in younger children as the
less the probe and lead move the better the recording.

12
7. The light emitted from the probe on the top of the finger has red and infrared light
in it and this can pass directly through to the skin, enabling it to be passed through to the photo detector on the opposite side for interpretation.
8. All results should be documented in Adastra.
9. If levels fall below normal range a clinician should be informed in the first
instance so that appropriate action can be taken.
10. In the event that results cannot be obtained this should be documented, and the clinician informed.
11. If equipment fails, check batteries and report to clinician.
References: ROYAL COLLEGE OF NURSING (2007) Standards for assessing, measuring and monitoring vital signs in infants, children and young people- RCN Guide for children`s nurses and nurses working with children and young people. <http://www.rcn.org.uk/__data/assets/pdf_file/0004/114484/003196.pdf CHANDLER, T. (2000) Oxygen Saturation Monitoring http://nursingstandard.rcnpublishing.co.uk/resources/archive/GetArticleById.asp?ArticleId=706

13
(6) Blood glucose monitoring
Objective The HCSW is aware of when and why blood glucose testing is required. He/she is familiar with the equipment used to monitor blood glucose levels, has an understanding of normal and abnormal blood glucose levels, and acts appropriately when results are outside the normal range. Blood glucose results are documented in Adastra. All waste/used equipment is disposed of in a timely manner in accordance with infection control policy. He/she is aware of the procedure for reporting/replacing faulty/broken equipment. Background Diabetic patients control their condition through diet, oral hypoglycaemic agents (tablets), insulin therapy or a combination of these. Instability in the condition can result from changes in medication, energy expenditure and diet. Acute illness, particularly infection, major surgery and critical illness can cause glucose imbalance. Normal levels Hypoglycemia is described as a blood glucose level that does not meet the metabolic demands of the body, typically less than 2.8 mmol/l. Causes include: malnutrition; Insulin or oral hypoglycemic agent overdose, or insufficient intake of glucose following administration of such agents. Hyperglycemia is described as a high blood glucose level typically, consistently greater than 13.9 mmol/l. Transient hyperglycemia will occur in healthy individuals, for example following a meal. Indications for testing include all unwell patients who have a history of diabetes, and patients who are feeling weak without obvious cause. Preparation - Blood glucose machine - Control solution testing The blood glucose monitor requires testing to ensure accuracy at the commencement of every evening shift and every weekend morning. The results should be entered into the blood glucose control book provided.

14
Procedure (a)
1. Always check expiry date on control solution
2. Gently rock control solution bottle between finger and thumb to mix solution.
3. Insert test strip into blood glucose machine
4. When machine displays a blood droplet on its’ screen, touch and hold the tip of test strip to the droplet of solution, until machine bleeps.
5. Apply one droplet into the end of the test strip.
6. Compare results with levels indicated on test strip bottle.
7. If levels lie outside of range indicated on test strip bottle discard whole bottle of test strips and repeat procedure with new bottle. If results still lie outside of levels inform clinician on duty
Only now is it safe to proceed to blood glucose monitoring Procedure (b)
1. Gather equipment required – gloves, lancet, test strips, glucose monitoring device (Ascensia Contour), gauze/tissue, sharps disposal box;
2. Explain the procedure, and obtain the patient’s informed consent.
3. Ask the patient to wash their hands before blood sampling
4. Wash hands, apply gloves
5. Insert test strip into machine - a droplet of blood will appear in monitor window
6. Load lancet as required and take a blood sample from the side of the finger (not
from finger pad).
7. Dispose of lancet in sharps disposal box;
8. Bleeding may be encouraged by ‘milking’ to form a droplet of blood that is large enough to cover the test pad
9. Apply the blood to the testing strip
10. Wait for machine to countdown before displaying results
11. Dispose of waste appropriately-in the orange clinical waste bins and the sharps
box
12. Wash hands;

15
13. Analyse the reading and document results.
14. Alert the clinician on duty if any problems occur and/or results lie outside normal
levels References NATIONAL SERVICE FRAMEWORK FOR DIABETES (2001), Diabetes http://www.dh.gov.uk/dr_consum_dh/groups/dh_digitalassets/@dh/@en/documents/digitalasset/dh_4058938.pdf. DIABETES UK (2008) Blood glucose measurement <http://www.diabetes.org.uk/Guide-to-diabetes/Newly_diagnosed>

16
(7) Urinalysis
Objective The HCSW is aware of when urinalysis is required, and understands the equipment to be used. He/she is aware of normal and abnormal values and acts accordingly when results are outside of norm. He/she accurately reports and records all relevant results accurately. The HCSW disposes of all used equipment/ samples in an appropriate and timely manner in accordance with infection control policy. Background The specimen collection procedure should be explained to the patient clearly and appropriately, taking into account his or her level of understanding and knowledge of medical language. This helps to ensure that the sample is collected properly: a crucial factor in obtaining accurate results. The patient’s privacy should be maintained at all times during the procedure. The patient should also be given the appropriate container for sample collection. Children may require assistance to hold a clean container. All patients should be offered hand-washing facilities after the sample has been collected. It is useful to observe the urine before testing it with the reagent strip because its colour and odour can indicate disease. Values
Blood – none should be present, presence can be indicative of kidney problems, infection and/or poisoning. (Note that blood in the sample may be menstrual blood).
Protein – can indicate infection and/or kidney problems Ketones – diabetic ketoacidosis, nausea/vomiting/starvation Leucocytes- indicative of urinary tract infection or kidney problems Nitrites – indicative of infection Bilirubin – presence can indicate liver of biliary tract problems Urobilinogen – presence linked to liver and biliary tract problems Specific gravity - normal value 0.001 – 0.035 PH – normal level around 6, 7 - neutral, 0-7 acidic indicative of fever, 7 – 14 alkaline indicative of vomiting or urine infection Glucose – possible diabetes, renal problems and/or increased glucose intake. Testing with reagent strips Always follow the manufacturer’s instructions relating to storage and use of reagent strips. Slight differences might exist between strips from different manufacturers. The strips must be stored in the container provided, and kept dry using the desiccant (drying agent) provided in the storage bottle. Check the expiry date on the bottle before

17
using any strips. Procedure pppppp3. TESTING USING A STR
1. Put on disposable gloves.
2. Dip the strip into the urine. Fluid should be allowed to cover all the reagent areas on the strip. Any excess urine should be wiped off on the edge of the specimen container.
3. Lay the strip flat, on a dry surface, to prevent urine from the reagent areas mixing
together.
4. Observe the reagent area(s) during the recommended reaction time. Manufacturers instructions state the recommended time to be followed (e.g. between 1-2 minutes for protein) and MUST be followed. Changes on the reagent test area after this the recommended time does not have any diagnostic meaning.
5. Use a watch to ensure each reading is taken accurately
6. Compare the colour of reagent areas on the strip with the colour chart provided on the side of the bottle to read the results, once the recommended time has elapsed.
7. All test results should be documented in Adastra at the time of testing.
8. Dispose of the urine in the sluice once testing is complete.
References COOK, R. (1999) Urinalysis: ensuring accurate urine testing. http://nursingstandard.rcnpublishing.co.uk/shared/media/pdfs/Quickref8.pdf> HIGGINS, D. (2008) Patient Assessment Urinalysis - Nursing Times http://www.nursingtimes.net/patient-assessment-urinalysis/993353.article>

18
(8) Pregnancy Testing
Objective The HCSW has an understanding of when and why a pregnancy test is required, is familiar with the pregnancy testing equipment and carries out pregnancy testing in accordance with written instructions. All results are documented accurately. All used equipment is disposed of in adherence with health and safety policies and procedures. Any problems or concerns should be reported to a clinician on duty as soon as possible. Background HCG (Human Chononic Gonadotropin) is a hormone detected in the urine from 7 days after conception. The sudden increase in HCG concentrations is an excellent marker for pregnancy. The test does not distinguish between ectopic and normal pregnancy. An ectopic pregnancy is a complication of pregnancy whereby the fertilised ovum is implanted in tissue other than the uterine wall and is a medical emergency. Indications for testing include missed periods; irregular vaginal bleeding, missed contraceptives, unprotected intercourse and/or unexplained vomiting. Any woman with unexplained abdominal pain and the possibility of an early pregnancy with or without vaginal bleeding should have a pregnancy test. Procedure
1. Explain procedure to patient to obtain informed consent and allay any fears/concerns.
2. Obtain urine sample from patient
3. Put on disposable gloves.
4. Open foil wrapper and remove device
5. Remove cap
6. Dip absorbent sampler up to point x for 15 seconds. Do not immerse any plastic
parts into the urine.
7. Remove sampler from urine and replace cap – Do not turn sampler upside down.
8. Read results after 3 minutes. Results are void after 10 minutes
9. A blue line must appear within 3 minutes to indicate that the test has worked.
Two blue lines equal a positive result
10. Dispose of all used equipment appropriately, urine into sluice room.
11. Document result appropriately

19
References OXFORD SOLUTIONS LTD (2008) General Practice Notebook - Symptoms of early pregnancy. http://www.gpnotebook.co.uk/simplepage.cfm?ID=221577235&linkID=49708&cook=yes THE EARLY PREGNANCY INFORMATION CENTRE (2008) Pregnancy testing http://www.earlypregnancy.org.uk/default.asp
20
(9) Peak Flow Test
Rationale The HCSW is familiar with peak flow testing equipment and is aware of when and how to perform expiratory peak flow measurement. The HCSW acts appropriately when results indicate abnormal values and accurately documents results. Background
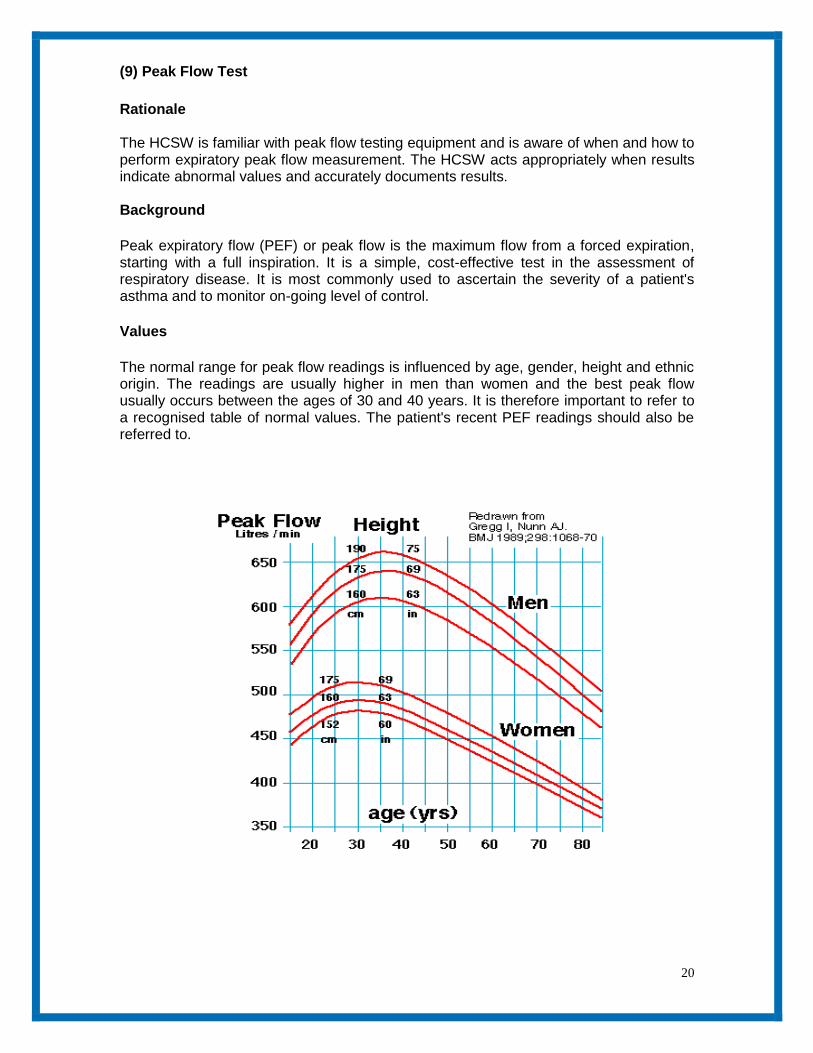
Peak expiratory flow (PEF) or peak flow is the maximum flow from a forced expiration, starting with a full inspiration. It is a simple, cost-effective test in the assessment of respiratory disease. It is most commonly used to ascertain the severity of a patient's asthma and to monitor on-going level of control.
Values
The normal range for peak flow readings is influenced by age, gender, height and ethnic origin. The readings are usually higher in men than women and the best peak flow usually occurs between the ages of 30 and 40 years. It is therefore important to refer to a recognised table of normal values. The patient's recent PEF readings should also be referred to.

21
Equipment required Peak expiratory flow meter & disposable mouthpiece Procedure
1. Explain to the patient how and why the procedure is being carried out.
2. Wash hands
3. Attach a new disposable mouthpiece to the end of the peak flow meter.
4. Set the arrow to the zero mark.
5. Position the patient. This should be the position in which the patient normally undertakes the procedure. However, standing is the most appropriate.
6. Ask the patient to take a deep breath in, and hold the breath.
7. Advise the patient to seal their lips around the mouthpiece and exhale as quickly and forcibly as possible.
8. Note the measurement.
9. Repeat the process twice (if tolerated by the patient) ensuring that the arrow is
reset to the zero mark for each measurement.
10. Dispose of the mouthpiece appropriately into yellow bag and ensure that the
equipment is clean. Wash hands.

22
11. Make a note of the highest value reached and any problems encountered, poor
technique etc.
12. Compare measured values against predicted values on the chart.
13. Report any concerns to clinician on duty.
References HIGGINS, D. (2005) Measuring PEFR - Nursing Times clinical procedures. http://www.nursingtimes.net/nursing-practice-clinical-research/measuring-pefr/203961.article> JEVON (2007) Nursing Times clinical Procedures – Peak flow measurement, Vol 103 no 33 pp 25- 27 Insert picture- Martin

23
(10) Nebulisation
Rationale The HCSW is familiar with nebulizer equipment and aware of when and how to perform nebuliser therapy. All used equipment is disposed of in adherence with health and safety policy/procedures. Background A nebuliser is device which converts a liquid drug into an aerosol solution by means of a compressed gas source. The nebuliser creates a mist of drug particles that is inhaled via a mask or mouthpiece. Bronchodilators are the most common drugs nebulised including Salbutamol but other medications such as Ipatropium are also used. Approximately 12% of the drug nebulised reaches the lungs, which is the reason why higher doses are used for nebulisation compared to an aerosol inhaler. Indications The main indications are delivery of drugs to improve air entry into the lungs for patients with acute exacerbations of asthma or chronic obstructive airways disease (COPD). N.B - Only a doctor or prescribing nurse can authorise the use of drugs to be nebulised.
The drug and dosage needs to be correct for individual patients and can only be authorised by prescribing clinicians.
Procedure
1. Explain the procedure to the patient
2. Ask the clinician available if nebuliser is required, and if so, what drug and dose is required. (Ensure that this is recorded in Adastra records)
3. Check the dose and expiry date of the drug to be nebulised.
4. Ensure the patient is comfortable and in an upright position
5. Plug in nebuliser, and place the compressor near to the patient.
6. Make sure the machine is clean following infection control policy/procedures and
ensure the filter is in place.
7. Assemble the nebuliser.
8. Connect the tubing between the nebuliser and the compressor.
9. Attach the correct sized mask to the nebuliser chamber
10. Unscrew the nebuliser chamber and pour in medication.
11. Ensure the top is securely attached.
12. Switch on the machine

24
13. Assist the patient to apply the mask. The mask can be placed near to the face if causing distress.
14. Remind the patient to breathe through the mask and not to talk
15. Once the mist has stopped switch off machine.
16. Dispose of tubing, mask, chamber and plastic medication vial into a yellow bag
17. Inform clinician when the nebuliser treatment has finished and if any problems
are encountered throughout the procedure.
References BRITISH THORACIC SOCIETY (2008) Nebuliser treatment best practice guideline http://www.brit-thoracic.org.uk/clinical-information/nebuliser-treatment-best-practice/nebuliser-treatment-best-practice-guideline.aspx
NHS Quality Improvements Scotland (2008) British Guidelines on the management of Asthma http://www.sign.ac.uk/guidelines/fulltext/101/index.html
(11) Cardio Pulmonary Resuscitation (CPR)
Objective

25
The HCSW demonstrates understanding of CPR procedure and when it should be implemented. He/she has an awareness of health and safety, infection control privacy and dignity issues when carrying out CPR procedure. HCSW documents events using the appropriate form and contacts relevant individuals as required (see procedure p 30) Background Sudden cardiac arrest is the leading cause of death in Europe affecting approximately 700,000 individuals per year. Many individuals may survive if action is taken immediately by performing early CPR, calling 999 and using an AED. The chance of successful defibrillation declines at a rate of 7 – 10 % with each minute of delay. Basic life support (BLS) will help to maintain the heart in a shock able rhythm but it is not a definitive treatment. Preparation Ensure health and safety and infection control policy is adhered to at all times. Initial CPR training and subsequent yearly updates are essential for remaining competent and up to date on any changes within the area. In the event of a patient collapsing at any of the treatment centres suitably qualified individuals must follow the following procedure. One or two people can perform CPR. Procedure 1. Assess whether it is safe to approach the patient. 2. Is the patient responsive? Gently shake shoulders and ask for a response.
3. If not responsive shout for help. 4. Assess breathing – With hand on the forehead and with fingers under the point of the chin, gently tilt head back then lift to open. Please wear gloves if any body fluids are evident.
5. With ear next to patient’s mouth listen and feel for any breathing at the same time looking towards the patient’s feet - look for chest rise and fall.

26
6. If no breathing evident advise receptionist/clinician to call 999 and commence CPR. 7. With heel of one hand on centre of chest, place other hand on top and at a rate of 120 per minute give 30 chest compressions at a depth of 5 - 6 cms.
Following 30 chest compressions – start ventilation 8. Using Laerdal pocket mask (in back of AED) first attach one way valve. Place mask over patients nose and mouth, pointed end over nose, ensure an adequate seal between mask and face to prevent air from leaking. Breathe slowly into one way valve, as per diagram, allowing lungs to inflate, remove mouth and allow patient to exhale. Perform this twice (2 breaths). One person can perform ventilation, the other chest compressions and change over if become tired.
9. Continue with steps 7 and 8 until advised otherwise by the 999 crew. If the patient begins to breath place in the recovery position (on side) and monitor closely

27

28
(12) Automatic External Defibrillator (AED)
Objective The HCSW demonstrates an understanding of how, when and why the AED is used. The HCSW is aware of any maintenance and housekeeping issues. The HCSW is aware of the process for reporting any problems and concerns. He/she documents all findings in a timely and comprehensive manner (see page 30). Background Defibrillation is the process of shocking the heart by means of an electrical charge. This charge causes the whole heart muscle to contract, with the aim that the natural pacemaker within the heart will re-establish a healthy rhythm. Some AEDs have additional features such as ECG monitoring capabilities. Preparation Ensure that the patient is not lying in any water. If necessary clean up using gloves and towel (in back of machine) before proceeding. If patient has any body piercing allow approx 5cms between piercing and electrode applications. Pacemakers will not affect procedure. If patient has a lot of body hairs remove with razor in back of machine. Scissors are also kept in the back of machine for cutting through clothing, bras etc to expose chest (please do your best to ensure privacy & dignity of patient at all times). Procedure 1. As soon as the AED is opened it will automatically switch on and talk you through the process.
2. Take electrodes from packets and place as directed without delay. Place first electrode above right nipple and second to the left side of left nipple (as diagram). Ensure electrodes are firmly applied. First person should try to continue CPR whist electrodes are being placed!
3. Follow voice prompts – if and when a shock is indicated make sure everyone stands clear and is not touching the patient. Shout “Stand Clear!”

29
4. Press red button to deliver shock 5. Recommence CPR when indicated by machine prompt. 6. The above process should be followed until told otherwise by Paramedic or Doctor. 7 If the casualty starts to breathe normally, place into the recovery position: Leave the electrodes attached. Constantly monitor the casualty. Be prepared to recommence CPR if required

30
CPR /AED Algorithm

31
AED Maintenance and Equipment checking process Daily checks 1. Check daily that the green light is showing on front of the AED machine, indicating that it is working. 2. During clinic hrs place the AED in allocated place for ease of access. 3. Lock AED away in allocated cupboard at the end of every shift. 4. Document and sign in HCSW communication book/daily checking sheet every day to indicate that machine has green light showing. Weekly checks – Every Monday 1. Every Monday fill in Equipment Checking Form indicating AED is fully operational. Forms are in plastic wallets attached inside allocated cupboard door in HCSW rooms. 2. Every 4th Monday this form must be faxed through to Matt Heward at West midlands Ambulance Service (Fax Number on form). Please keep all faxed forms in back of plastic wallet with unused forms, send to Operations/Nurse team at Glover Street every 3 months (March, June, September, December)
AED Use If the AED is used on a patient or if the AED electrode packet is opened but not used please complete an event report form (lkept in back of AED) and send to Glover Street for the attention of Ops/nurse team asap for auditing / support/ replenishment purposes. Trouble shooting If the green light is not displayed, there may be a problem. First check battery is securely attached and electrode wires are inserted correctly. If still no green light or any other concerns, in the first instance call Matt Heward Community Response Manager on 07793040310(South Staffs) or Emma Wilkins community Response manager 7884052285(Birmingham), they will inform the Emergency Operations Centre (01785273382) who will arrange to check the machine. References RESUSCITATION COUNCIL (UK 2007) http://www.resus.org.uk/pages/faqDefib.htm> (accessed 11.1.10)

32
(14) Infection Control
A. Hand decontamination
Objective The HCSW demonstrates the importance of hand decontamination to prevent the spread of infection. He/She is aware of good hand decontamination procedure and the technique and equipment needed for effective hand washing. Background Hand washing is the single most important method of preventing and controlling infection. Hand washing is defined as the process for the removal of soil and transient micro-organisms from the hands (Larson 1995). There are two populations of Micro-Organisms found on the skin. The resident bacteria live in the deeper skin layers; they are not readily transferred and are usually not harmful. Transient micro-Organisms do not normally live on the skin but are both readily acquired and transferred by touch. In clinical settings hands can cause cross infection by transferring these transient Micro-organisms between patients but are easily removed by simple hand decontamination procedures. Procedure Hands should be washed
On entering and leaving a clinical area
Before and after patient contact
On handling human body fluid waste
After visiting the toilet
After coughing/sneezing into hands
When hands are visibly soiled
How to wash your hands Washing hands with soap and water will remove the majority of germs , preventing spread to other people. However, studies have shown that hand-washing techniques are often poor and the most commonly neglected areas are the tips of the fingers, palm of the hand, and thumb. Please refer to hand washing technique steps 1 – 8 www.hpa.org.uk

33
Equipment needed for effective hand washing
Hand wash basin
Liquid soap
Paper towels
Foot operated pedal bin
Use of alcohol hand rub In some cases access to hand wash basins may not be easy and the use of an alcohol hand rub is recommended. This preparation should be rubbed into all areas of the hands, again paying attention to thumbs, fingertips, between the fingers and the backs of the hands until the hands feel dry. Sufficient hand rub must be used to treat all areas of the hands.

34
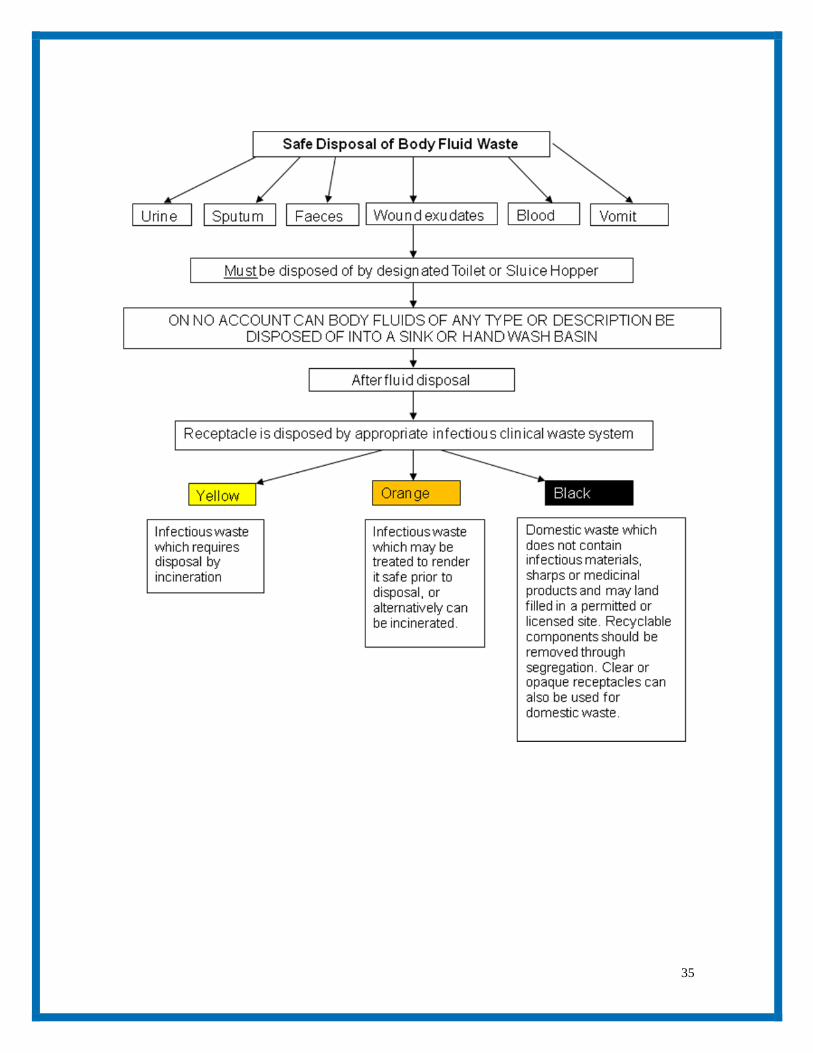
B. Safe disposal of body fluid waste
Objective The HCSW is aware of the process involved in the disposal of body fluid waste. That He/She demonstrates safe practice and disposes of all used samples and receptacles in an appropriate and timely manner as outlined in the infection control procedure CL37. Background Equipment and or surfaces subject to a body fluid/waste spillage should be decontaminated in a safe and timely manner so reducing the impact and risk of cross infection. As part of Badger standards, a named person should be responsible for dealing with spillages and making the area safe. Before starting to clean up the spill, a risk assessment should be carried out before deciding upon the required action and choice of cleaning agents. The staff member undertaking the cleaning procedure will always wear personal protective equipment e.g. disposable gloves, plastic apron etc. Spillages containing blood or body fluids containing blood are potentially dangerous because they could contain pathogens e.g. - Hepatitis B/C or Human Immunodeficiency Virus. Always use freshly prepared cleaning solutions in clean containers and discard the remaining solution after use. Use disposable wipes where possible and discard them into a clinical waste bag whenever possible. Always use a disinfectant when the spill has occurred from a patient with a suspected or known infection. If there is any delay in dealing with a spillage, staff should never leave a public area unattended. Always follow the protocol outlined within the Spillage kits provided at each PCC.
35

36
C. Contamination – sharps / splash injuries
Objective The HCSW recognises and demonstrates the actions required in the event of a splash or sharps injury. Background This is defined as the significant exposure to body fluids (urine, vomit, blood, saliva etc.) to the recipient person via broken skin or mucous membranes. It can occur by penetrating wounds, splashes, bites or scratches. When an Inoculation Injury occurs, it is essential that this be managed rapidly to reduce the risk of acquiring a blood borne virus. The most common viruses to consider are Hepatitis B & C as well as Human Immunodeficiency Virus. The action required will depend on the nature of the exposure to body fluids. Penetrating or scratching injuries need immediate and thorough washing with soap and water followed by drying and covering with a waterproof dressing. Exposure to the eye requires irrigation with copious amounts of water. Oral exposure requires washing out of the mouth with rinsing but not swallowing of the water. Immediate medical advice should then be sought for further management. This might include baseline blood testing of the recipient, advice on post exposure prophylaxis and assessment of the source (where practicable). Needle Stick/ Sharps
Needles should never be re-sheathed. Where this cannot be avoided it must be carried out safely (e.g. mushroom device or single-handed scoop method.
Discard disposable syringes and needles as a single unit.
Sharps must never be carried by hand – if they have to be transported, use a suitable container.
Needles must never be broken or bent.
Never leave sharps lying around

37

38
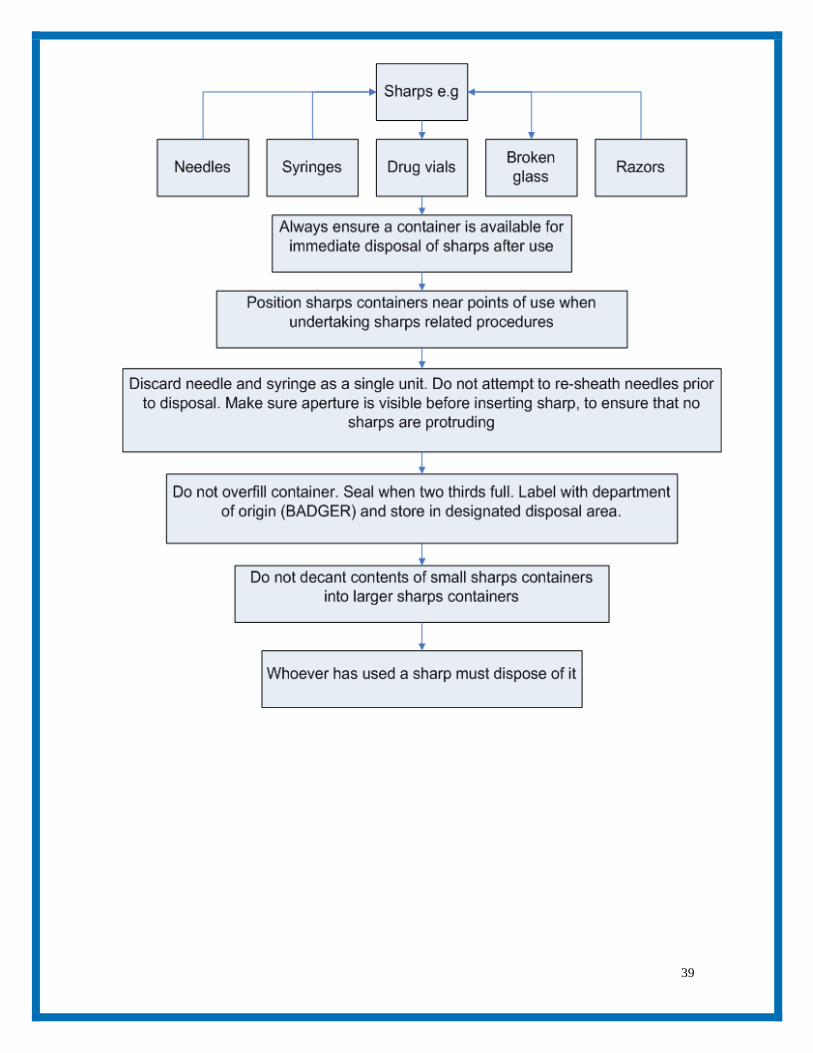
D. Safe disposal of sharps
Objective The HCSW demonstrates awareness and understanding in the correct and safe disposal of sharps. Background It is important that correct use and disposal of sharps is of a high standard to safeguard both staff and patients/carers such that the risk of inoculation injury is minimised. Sharps include any item that may cause a laceration or puncture e.g. needles, stitch cutter, lancets. All disposable sharps must be placed in sharps containers immediately after use and not discarded with other clinical waste. Do not fill above “fill line”. No attempt should be made to retrieve items from a sharps container. The containers must be closed securely and labelled. Sharps must be disposed of in rigid containers conforming to UN3291 and Carriage of Dangerous Goods Regulations. Sharps containers must be placed in a secure area inaccessible to the public. N.B. THESE SECURE AREAS ARE SPECIFIC TO THE INDIVIDUAL PRIMARY CARE CENTRE LOCATIONS AND ARE SPECIFIED WITHIN THE LOCAL PROCEDURAL GUIDANCE.
39