healthstream connect administrator user · pdf file · 2011-08-11healthstream...
TRANSCRIPT

HealthStream Connect Administrator User Guide
HealthStream Learning CenterTM

HealthStream Connect Administrator User Guide Contents
Updated: August 2011 i
Contents Administrator Overview of HealthStream Connect ....................................................... 1
HealthStream Connect Process Overview .......................................................................................... 1 Administrator Access and Privileges.................................................................................................. 3 Navigating HealthStream Connect as an Administrator ...................................................................... 3 Logging into HealthStream Connect as an Administrator .................................................................... 4 Logging Out of HealthStream Connect .............................................................................................. 5 Menu Bar ....................................................................................................................................... 5 Site Map ......................................................................................................................................... 6 Text Sizing ..................................................................................................................................... 6 Keyboard Shortcuts ......................................................................................................................... 7 Using the WYSIWYG Editors ............................................................................................................ 7 Editing Text .................................................................................................................................... 8 Inserting Images ............................................................................................................................ 8 HealthStream Connect Calendar Tool ............................................................................................... 9 Managing Your Administrator Profile .............................................................................................. 10 Managing Your System Preference ................................................................................................. 10 Checking System Requirements ..................................................................................................... 11
Administrator Management ...................................................................................... 12
Adding an Administrator ................................................................................................................ 12 Searching for an Administrator....................................................................................................... 13 Editing an Administrator Record ..................................................................................................... 14 Deleting an Administrator Record ................................................................................................... 15 Adding a Student .......................................................................................................................... 15
Student Management .............................................................................................. 16
Searching for a Student ................................................................................................................. 17 Viewing Student Information ......................................................................................................... 19 Viewing a Student’s Transcript ....................................................................................................... 20 Viewing a Student’s License Information ........................................................................................ 21 Instructing Your Students to Use HealthStream Connect ................................................................. 23 Managing Discipline and License Information .................................................................................. 24
Annotations Management ........................................................................................ 26
Adding an Annotation .................................................................................................................... 26 Searching for an Annotation .......................................................................................................... 29 Editing an Annotation .................................................................................................................... 32 Deleting an Annotation .................................................................................................................. 33 Exporting and Importing Annotations ............................................................................................. 33 Exporting Annotations ................................................................................................................... 34 Importing Annotations .................................................................................................................. 36
HealthStream Connect Administrator User Guide Contents
Updated: August 2011 ii
Reports .................................................................................................................. 37
People Reports ............................................................................................................................. 37
Discipline Listing Report ............................................................................................................ 37
Expiring License Report ............................................................................................................. 38
Student and Group Transcript Report ......................................................................................... 39
Student Listing Report ............................................................................................................... 40
Course Reports ............................................................................................................................. 41
Annotations Report ................................................................................................................... 42
Course Listing Report ................................................................................................................ 43
Expiring Courses Report ............................................................................................................ 43
Education Reports ......................................................................................................................... 44
Course Completion – Schedulable Report .................................................................................... 44
Tools Reports ............................................................................................................................... 46
Department Listing Report ......................................................................................................... 46
Additional Procedures for Creating Reports ..................................................................................... 47
Searching for Courses for a Report ............................................................................................. 47
Searching for Students for a Report ........................................................................................... 47
Note: This guide is updated frequently. If you save or print this document, you should frequently cross-reference the date stamp on any local copies with the most current version posted in the Help system.
About HealthStream Connect Administrator Overview of HealthStream Connect
Updated: August 2011 1
Administrator Overview of HealthStream Connect HealthStream Connect is a professional services engagement between HealthStream and your organization in which we allow your users to access HealthStream-hosted courses from within your primary Learning Management System (LMS). The HealthStream Product Integration team will work closely with your learning and technical team, as well as your LMS vendor, to create a successful integration that enables your organization to schedule, deliver, and track many of HealthStream’s courses seamlessly via your primary LMS.
Benefits to your organization include:
• A proven integration methodology based on an established industry standard that allows you to work with one vendor – HealthStream – to access quality healthcare content from over 30 leading content publishers.
• Facilitates assignment and tracking of HealthStream-hosted courses through your primary LMS using learning industry standard AICC guidelines.
• Unique reports available through the HealthStream Connect platform.
HealthStream Connect Process Overview All communication between HealthStream Connect and the primary LMS are accomplished via AICC standards. For more information about AICC compliance, please visit www.aicc.org.
Implementation
1. The HealthStream Product Integration Manager provides course structure files to the administrator for the contracted courseware.
2. The administrator provides the course structure files to the primary LMS manager/vendor. 3. The primary LMS manager/vendor works with the administrator to setup the courseware via either
the Course Structure File Import method or the URL Launch Method. (These methods are covered in more detail in the Connect Course Implementation Specifications section of this document).
4. The courses are configured and the administrator makes the courses available to students via the primary LMS.
Student Utilization
1. The student accesses the course via the primary LMS. 2. The primary LMS sends a call to HealthStream Connect to start the course session. 3. Behind the scenes, HealthStream Connect requests AICC information from the primary LMS. The
primary LMS sends back the parameters of the course session, including the session ID, the user ID, lessons status, and the AICC_URL to which Connect should report results of the session.
4. If the student is accessing HealthStream Connect courseware for the first time, a user account is created in the Connect site so that the student’s completions can be tracked correctly.
About HealthStream Connect Administrator Overview of HealthStream Connect
Updated: August 2011 2
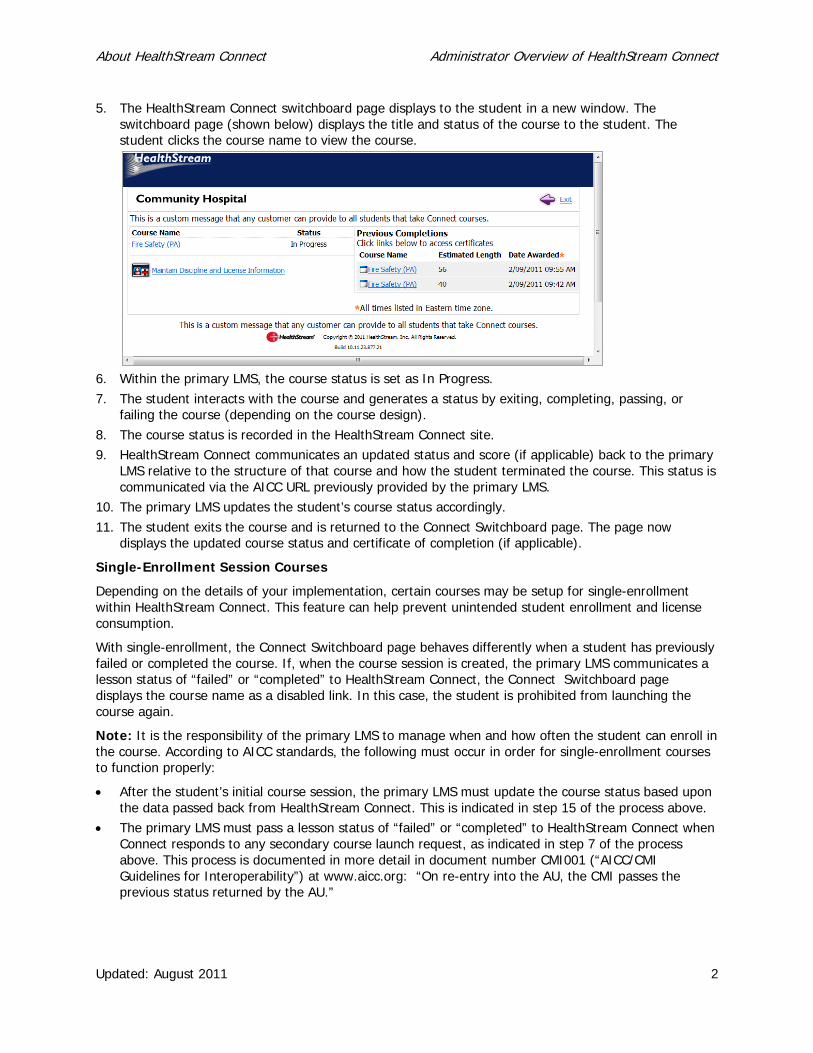
5. The HealthStream Connect switchboard page displays to the student in a new window. The switchboard page (shown below) displays the title and status of the course to the student. The student clicks the course name to view the course.
6. Within the primary LMS, the course status is set as In Progress. 7. The student interacts with the course and generates a status by exiting, completing, passing, or
failing the course (depending on the course design). 8. The course status is recorded in the HealthStream Connect site. 9. HealthStream Connect communicates an updated status and score (if applicable) back to the primary
LMS relative to the structure of that course and how the student terminated the course. This status is communicated via the AICC URL previously provided by the primary LMS.
10. The primary LMS updates the student’s course status accordingly. 11. The student exits the course and is returned to the Connect Switchboard page. The page now
displays the updated course status and certificate of completion (if applicable).
Single-Enrollment Session Courses
Depending on the details of your implementation, certain courses may be setup for single-enrollment within HealthStream Connect. This feature can help prevent unintended student enrollment and license consumption.
With single-enrollment, the Connect Switchboard page behaves differently when a student has previously failed or completed the course. If, when the course session is created, the primary LMS communicates a lesson status of “failed” or “completed” to HealthStream Connect, the Connect Switchboard page displays the course name as a disabled link. In this case, the student is prohibited from launching the course again.
Note: It is the responsibility of the primary LMS to manage when and how often the student can enroll in the course. According to AICC standards, the following must occur in order for single-enrollment courses to function properly:
• After the student’s initial course session, the primary LMS must update the course status based upon the data passed back from HealthStream Connect. This is indicated in step 15 of the process above.
• The primary LMS must pass a lesson status of “failed” or “completed” to HealthStream Connect when Connect responds to any secondary course launch request, as indicated in step 7 of the process above. This process is documented in more detail in document number CMI001 (“AICC/CMI Guidelines for Interoperability”) at www.aicc.org: “On re-entry into the AU, the CMI passes the previous status returned by the AU.”

About HealthStream Connect Administrator Overview of HealthStream Connect
Updated: August 2011 3
Administrator Access and Privileges As a Connect administrator, you will be responsible for many of the day-to-day platform management functions.
You may be able to perform a variety of tasks including:
• Managing students (employees) • Managing other administrators • Managing annotations • Generating reports • Maintaining your administrator account information
Navigating HealthStream Connect as an Administrator Throughout HealthStream Connect you will see special function buttons (for example, Save, Update, Pause, Next, Exit, Logout, etc.). Whenever you make changes or choose to exit the system, be sure to use the special function buttons as opposed to clicking the X in the upper right-hand corner of the page. Using the special function buttons ensures that your work is saved to the system.
About HealthStream Connect Administrator Overview of HealthStream Connect
Updated: August 2011 4
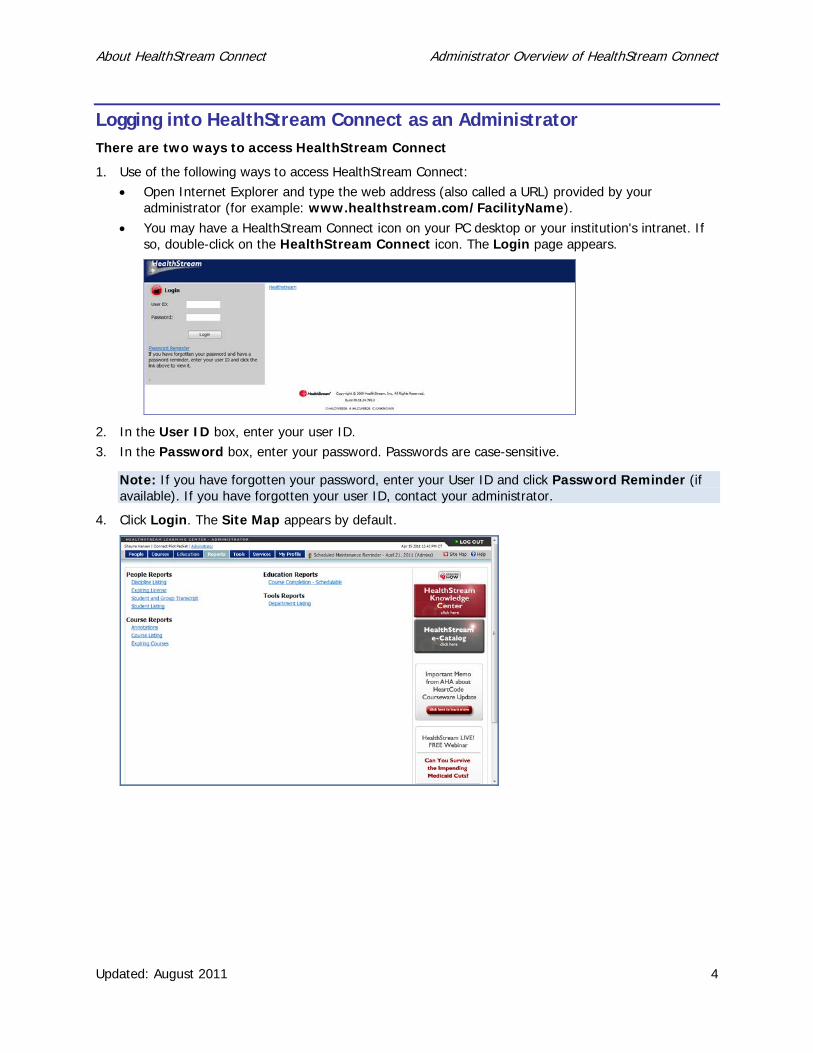
Logging into HealthStream Connect as an Administrator There are two ways to access HealthStream Connect
1. Use of the following ways to access HealthStream Connect: • Open Internet Explorer and type the web address (also called a URL) provided by your
administrator (for example: www.healthstream.com/FacilityName). • You may have a HealthStream Connect icon on your PC desktop or your institution's intranet. If
so, double-click on the HealthStream Connect icon. The Login page appears.
2. In the User ID box, enter your user ID. 3. In the Password box, enter your password. Passwords are case-sensitive.
Note: If you have forgotten your password, enter your User ID and click Password Reminder (if available). If you have forgotten your user ID, contact your administrator.
4. Click Login. The Site Map appears by default.
About HealthStream Connect Administrator Overview of HealthStream Connect
Updated: August 2011 5
Logging Out of HealthStream Connect Click LOG OUT on the right-hand side of the menu bar when you wish to exit the system.
If you do not exit, the system will automatically log you out after a period of time, as determined by your administrator.
Note: Throughout HealthStream Connect you will see special function buttons (or example, Save, Update, Pause, Next, Exit, Logout etc.). Whenever you make changes or choose to exit the system, be sure to use the special function buttons as opposed to clicking the X in the upper right-hand corner of the page. Using the special function buttons ensures that your work is saved to the system.
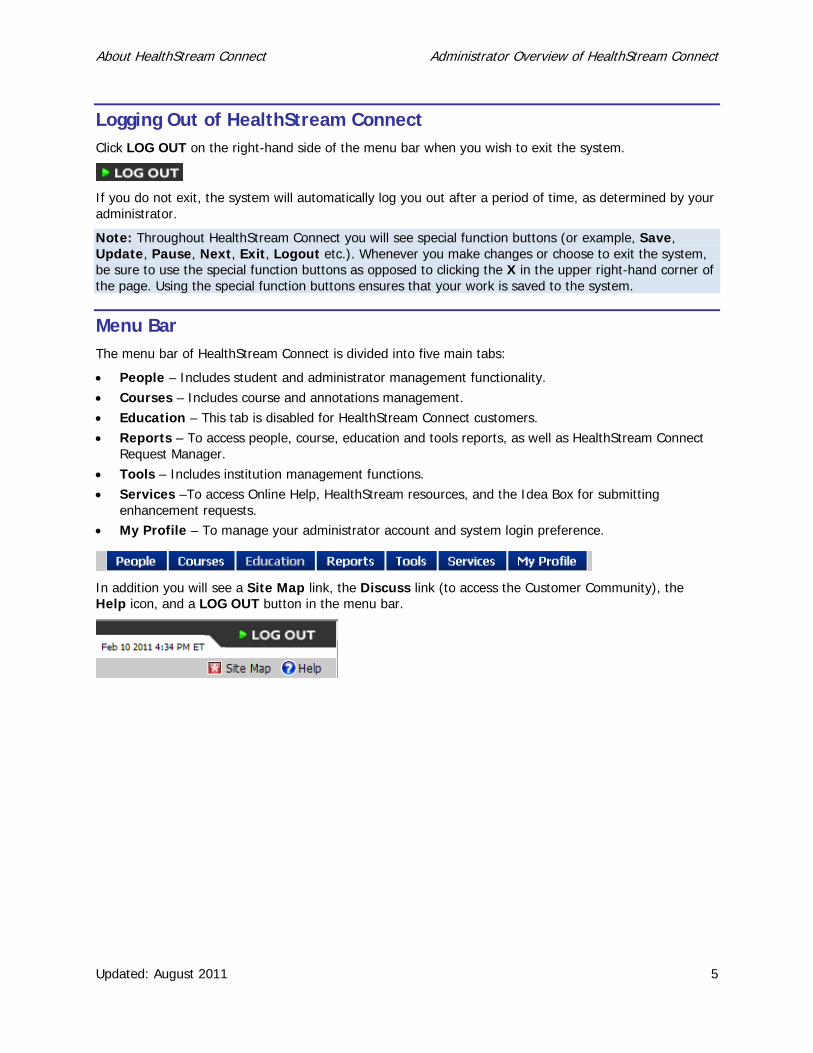
Menu Bar The menu bar of HealthStream Connect is divided into five main tabs:
• People – Includes student and administrator management functionality. • Courses – Includes course and annotations management. • Education – This tab is disabled for HealthStream Connect customers. • Reports – To access people, course, education and tools reports, as well as HealthStream Connect
Request Manager. • Tools – Includes institution management functions. • Services –To access Online Help, HealthStream resources, and the Idea Box for submitting
enhancement requests. • My Profile – To manage your administrator account and system login preference.
In addition you will see a Site Map link, the Discuss link (to access the Customer Community), the Help icon, and a LOG OUT button in the menu bar.
About HealthStream Connect Administrator Overview of HealthStream Connect
Updated: August 2011 6
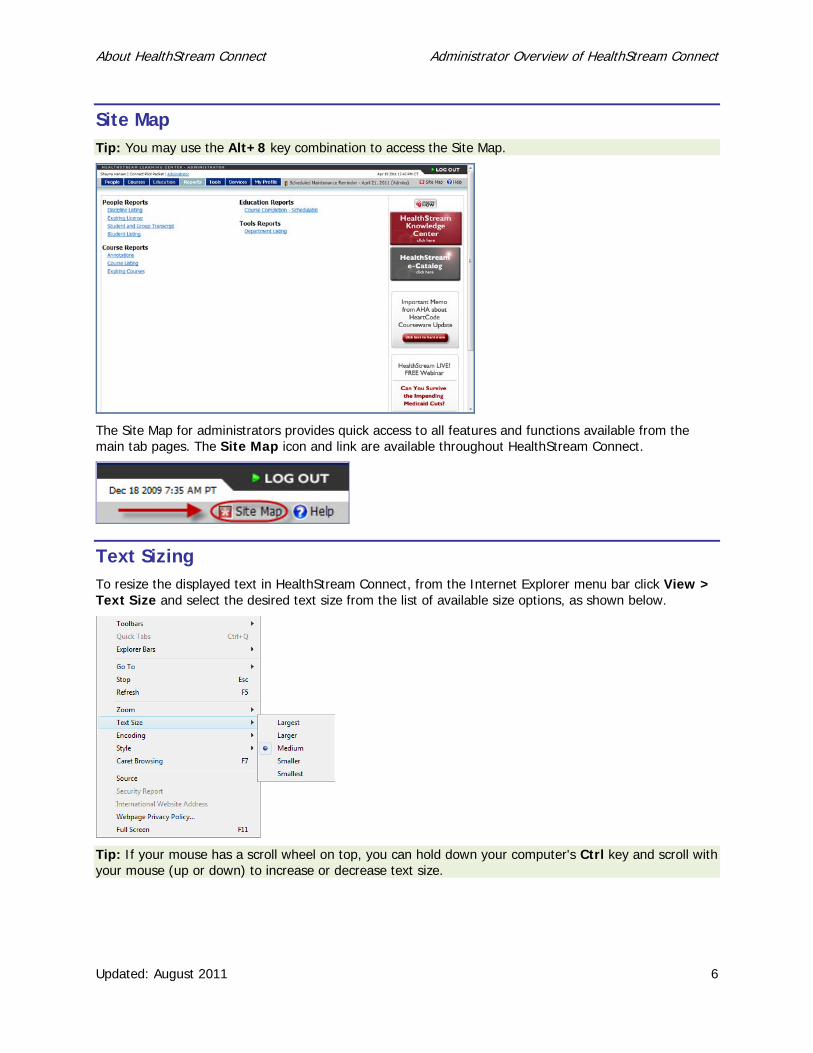
Site Map Tip: You may use the Alt+8 key combination to access the Site Map.
The Site Map for administrators provides quick access to all features and functions available from the main tab pages. The Site Map icon and link are available throughout HealthStream Connect.
Text Sizing To resize the displayed text in HealthStream Connect, from the Internet Explorer menu bar click View > Text Size and select the desired text size from the list of available size options, as shown below.
Tip: If your mouse has a scroll wheel on top, you can hold down your computer's Ctrl key and scroll with your mouse (up or down) to increase or decrease text size.
About HealthStream Connect Administrator Overview of HealthStream Connect
Updated: August 2011 7
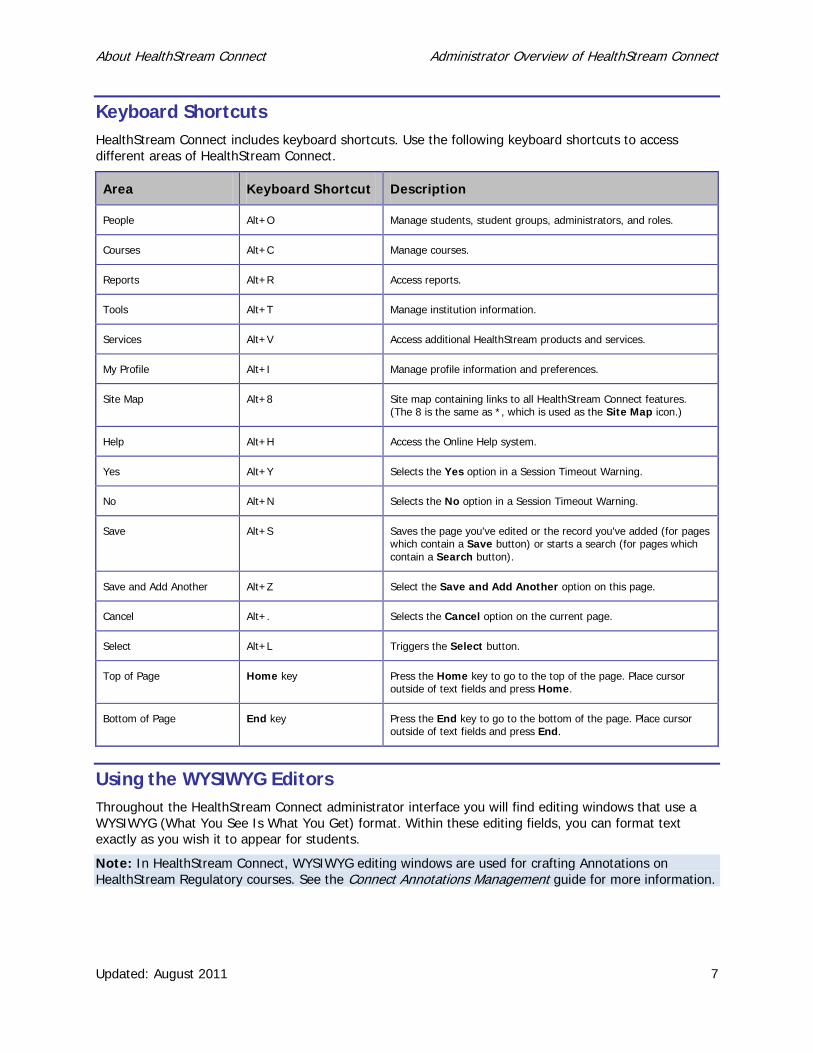
Keyboard Shortcuts HealthStream Connect includes keyboard shortcuts. Use the following keyboard shortcuts to access different areas of HealthStream Connect.
Area Keyboard Shortcut Description
People Alt+O Manage students, student groups, administrators, and roles.
Courses Alt+C Manage courses.
Reports Alt+R Access reports.
Tools Alt+T Manage institution information.
Services Alt+V Access additional HealthStream products and services.
My Profile Alt+I Manage profile information and preferences.
Site Map Alt+8 Site map containing links to all HealthStream Connect features. (The 8 is the same as *, which is used as the Site Map icon.)
Help Alt+H Access the Online Help system.
Yes Alt+Y Selects the Yes option in a Session Timeout Warning.
No Alt+N Selects the No option in a Session Timeout Warning.
Save Alt+S Saves the page you've edited or the record you've added (for pages which contain a Save button) or starts a search (for pages which contain a Search button).
Save and Add Another Alt+Z Select the Save and Add Another option on this page.
Cancel Alt+. Selects the Cancel option on the current page.
Select Alt+L Triggers the Select button.
Top of Page Home key Press the Home key to go to the top of the page. Place cursor outside of text fields and press Home.
Bottom of Page End key Press the End key to go to the bottom of the page. Place cursor outside of text fields and press End.
Using the WYSIWYG Editors Throughout the HealthStream Connect administrator interface you will find editing windows that use a WYSIWYG (What You See Is What You Get) format. Within these editing fields, you can format text exactly as you wish it to appear for students.
Note: In HealthStream Connect, WYSIWYG editing windows are used for crafting Annotations on HealthStream Regulatory courses. See the Connect Annotations Management guide for more information.
About HealthStream Connect Administrator Overview of HealthStream Connect
Updated: August 2011 8
Editing Text To edit text using the WYSIWYG editor
1. Type text into the editing window. 2. Utilize the desired editing tools to format text, including font size, color, bold, justification etc. To edit
specific text, first highlight the text.
Inserting Images Images can be inserted into WYSIWYG fields. Images must be hosted in an images directory on the Internet, such as your organization’s web server. This process allows the images to be viewed by students while also appearing on annotations, assessments and reports (such as Test Question Analysis). HealthStream Connect cannot access files and/or images hosted behind a firewall (e.g. on an intranet, shared network directory, or on a personal computer) therefore, images hosted via any of these sources will not appear. Reports will show the ‘Alt Text’ if used (described below) in place of the image if an image is not accessible by HealthStream Connect.
Note: Supported image formats include JPG, GIF, or PNG graphic. Animated GIFs may be used, but only the first frame will be visible within printed reports. Flash files (.SWF) are not usable at this time.
To add an image
There are two ways to add an image within HealthStream Connect. Once the image is hosted on an Internet web server (details provided within “Image Location” section above), browse to the image using Internet Explorer.
1. Drag & Drop the image or its icon (in a web directory or file folder) from one browser window into the editor in HealthStream Connect, or
2. Copy & Paste the image from a web page into the editor in HealthStream Connect.
To label an image for a report
1. Once an image has been added, right-click on the image. 2. Click Set Image Properties. 3. Enter text next to Image Alt Text (up to 150 characters) and optionally, Long Description
(optional, up to 30,000 characters). This text should simply describe the image. If it is used for a test question, be careful not to reveal the answer to a test question the image represents (e.g. Correct Answer or EKG Strip: Atrial Flutter). When a user’s mouse hovers of the image, the image label now appears.
4. Click OK. The text is embedded in the source code of the item where the image resides.
Note: Please remember to observe copyright permissions when using images other than your own.
About HealthStream Connect Administrator Overview of HealthStream Connect
Updated: August 2011 9
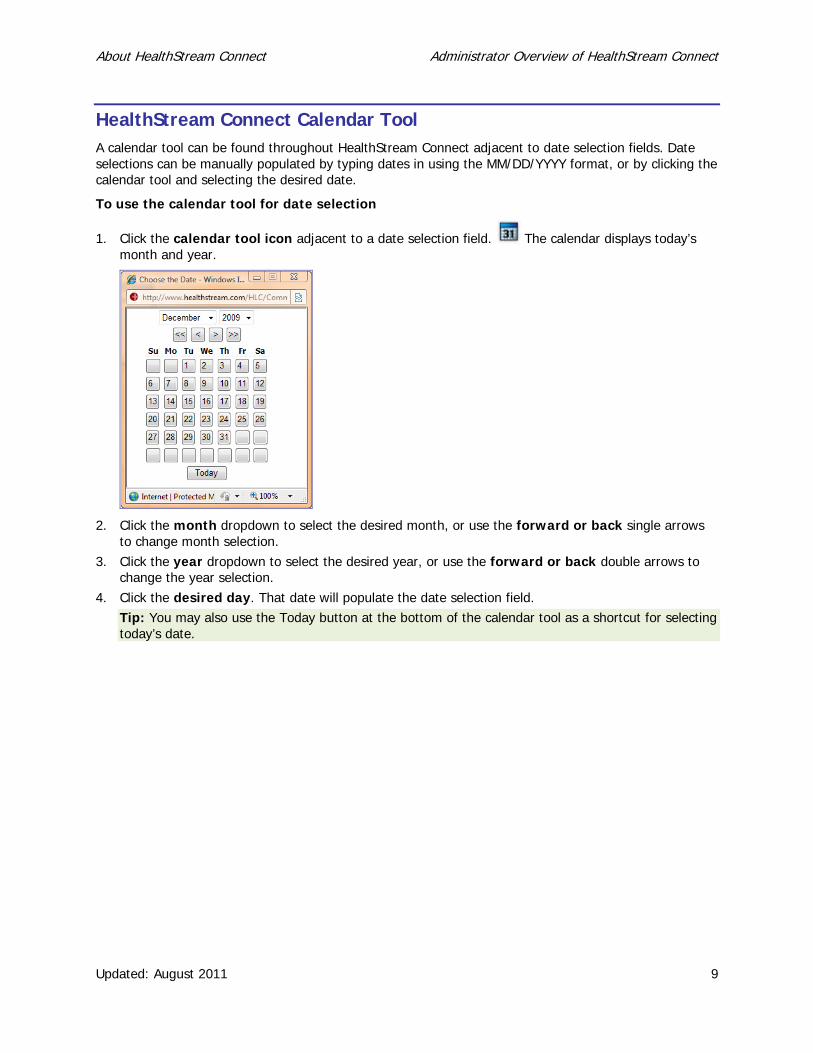
HealthStream Connect Calendar Tool A calendar tool can be found throughout HealthStream Connect adjacent to date selection fields. Date selections can be manually populated by typing dates in using the MM/DD/YYYY format, or by clicking the calendar tool and selecting the desired date.
To use the calendar tool for date selection
1. Click the calendar tool icon adjacent to a date selection field. The calendar displays today’s month and year.
2. Click the month dropdown to select the desired month, or use the forward or back single arrows to change month selection.
3. Click the year dropdown to select the desired year, or use the forward or back double arrows to change the year selection.
4. Click the desired day. That date will populate the date selection field. Tip: You may also use the Today button at the bottom of the calendar tool as a shortcut for selecting today’s date.
About HealthStream Connect Administrator Overview of HealthStream Connect
Updated: August 2011 10
Managing Your Administrator Profile By default, you can manage all administrator account information except your User ID.
To manage your administrator profile
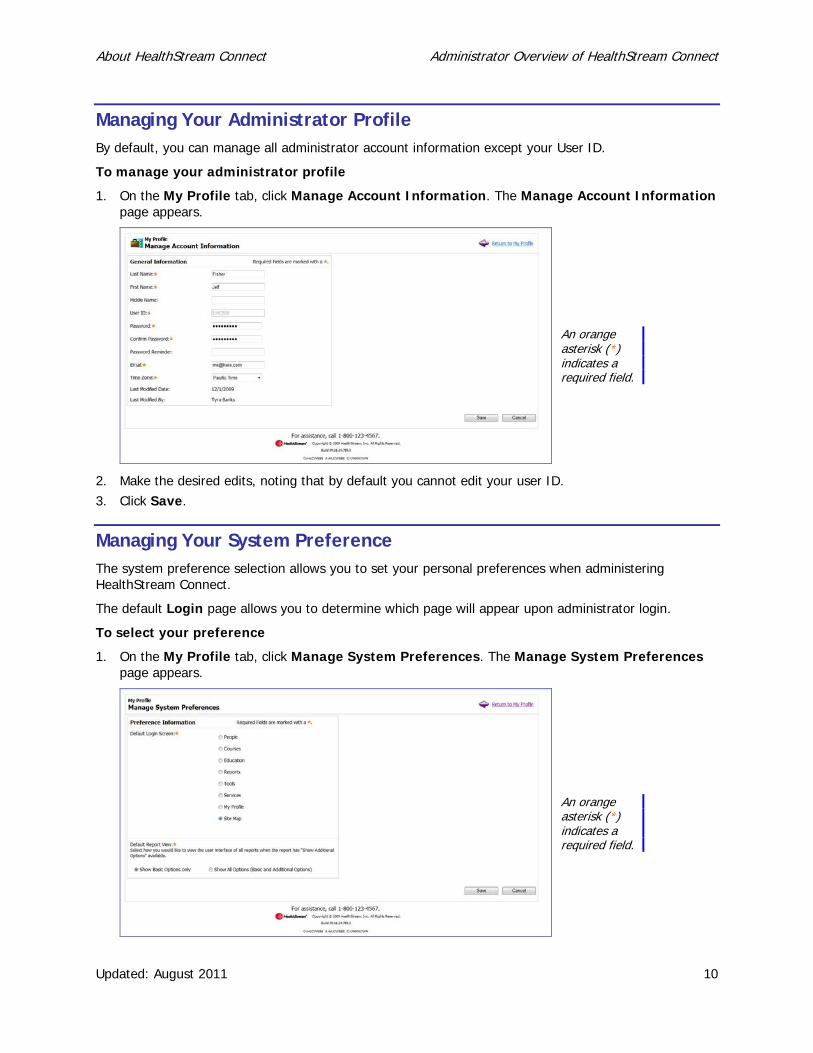
1. On the My Profile tab, click Manage Account Information. The Manage Account Information page appears.
2. Make the desired edits, noting that by default you cannot edit your user ID. 3. Click Save.
Managing Your System Preference The system preference selection allows you to set your personal preferences when administering HealthStream Connect.
The default Login page allows you to determine which page will appear upon administrator login.
To select your preference
1. On the My Profile tab, click Manage System Preferences. The Manage System Preferences page appears.
An orange asterisk (*) indicates a required field.
An orange asterisk (*) indicates a required field.
About HealthStream Connect Administrator Overview of HealthStream Connect
Updated: August 2011 11
2. Click the desired default login page. 3. Click Save.
To select your default report view
1. Click the desired default report view: • Show Basic Options only (default setting) - Only the essential report options are displayed
when the report is selected. • Show All Options (Basic and Additional Options) - All report options are displayed when
the report is selected.
2. Click Save.
Checking System Requirements If you experience problems navigating HealthStream Connect or if the system is not running as expected, contact your HealthStream support service. Your support representative may ask that you perform a system check on the computer you are using to help determine the cause of the problem.
To perform a system check
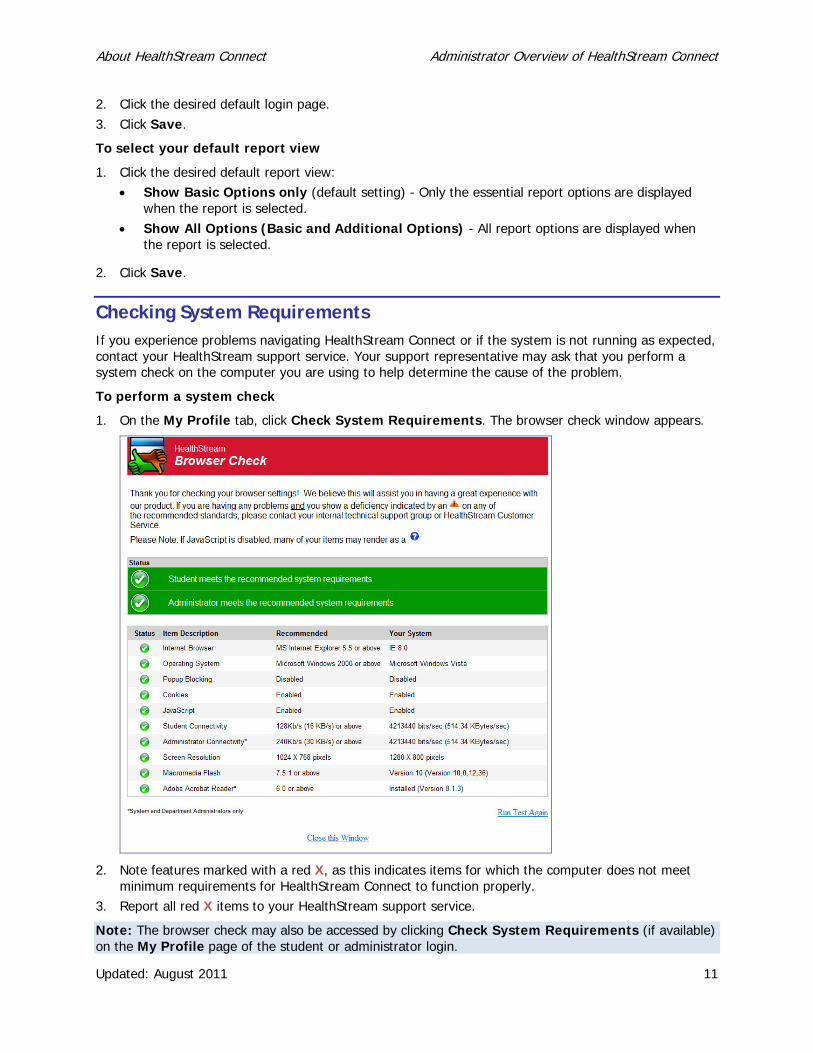
1. On the My Profile tab, click Check System Requirements. The browser check window appears.
2. Note features marked with a red X, as this indicates items for which the computer does not meet minimum requirements for HealthStream Connect to function properly.
3. Report all red X items to your HealthStream support service.
Note: The browser check may also be accessed by clicking Check System Requirements (if available) on the My Profile page of the student or administrator login.
About HealthStream Connect Administrator Management
Updated: August 2011 12
Administrator Management HealthStream Connect offers one administrator role. The Connect administrator has access to all features and functions within the Connect platform, as outlined in the Connect Administrator User Guides.
The following outlines key points related to administrator management within HealthStream Connect:
• Administrators can be given access to the entire institution, or to specified departments or subsidiary affiliations.
• Administrators have access to add and manage other Connect administrators. Administrator management can be enabled for all administrators. However, administrators can only add or manage other administrators at or below their own level of access. Access is defined by enabled features.
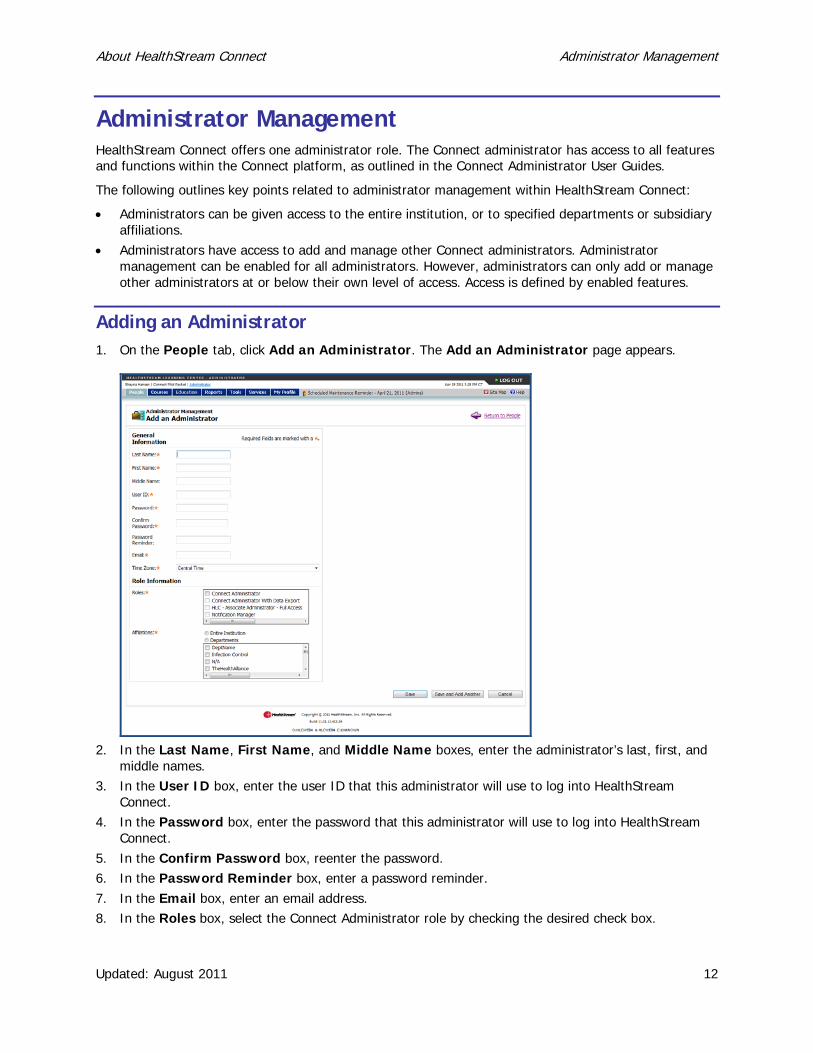
Adding an Administrator 1. On the People tab, click Add an Administrator. The Add an Administrator page appears.
2. In the Last Name, First Name, and Middle Name boxes, enter the administrator’s last, first, and
middle names. 3. In the User ID box, enter the user ID that this administrator will use to log into HealthStream
Connect. 4. In the Password box, enter the password that this administrator will use to log into HealthStream
Connect. 5. In the Confirm Password box, reenter the password. 6. In the Password Reminder box, enter a password reminder. 7. In the Email box, enter an email address. 8. In the Roles box, select the Connect Administrator role by checking the desired check box.
About HealthStream Connect Administrator Management
Updated: August 2011 13
9. In the Affiliation box, select the administrator affiliation; either Institution or Departments. If you select Departments, then select the check boxes next to the desired departments. Note: If you wish to separate administrator access by institution or department, you must work with your Product Integration Manager to import student data into your HealthStream Connect site or manually edit your student records.
10. Click Save.
Searching for an Administrator To search for an administrator
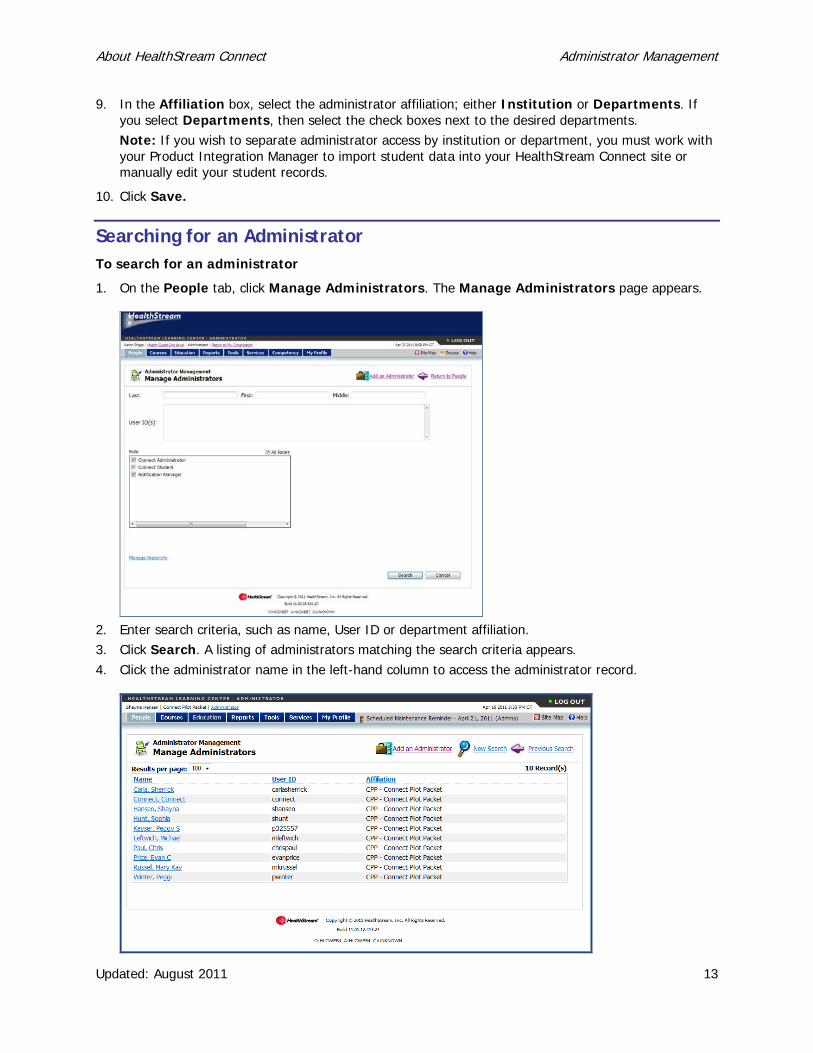
1. On the People tab, click Manage Administrators. The Manage Administrators page appears.
2. Enter search criteria, such as name, User ID or department affiliation. 3. Click Search. A listing of administrators matching the search criteria appears. 4. Click the administrator name in the left-hand column to access the administrator record.
About HealthStream Connect Administrator Management
Updated: August 2011 14
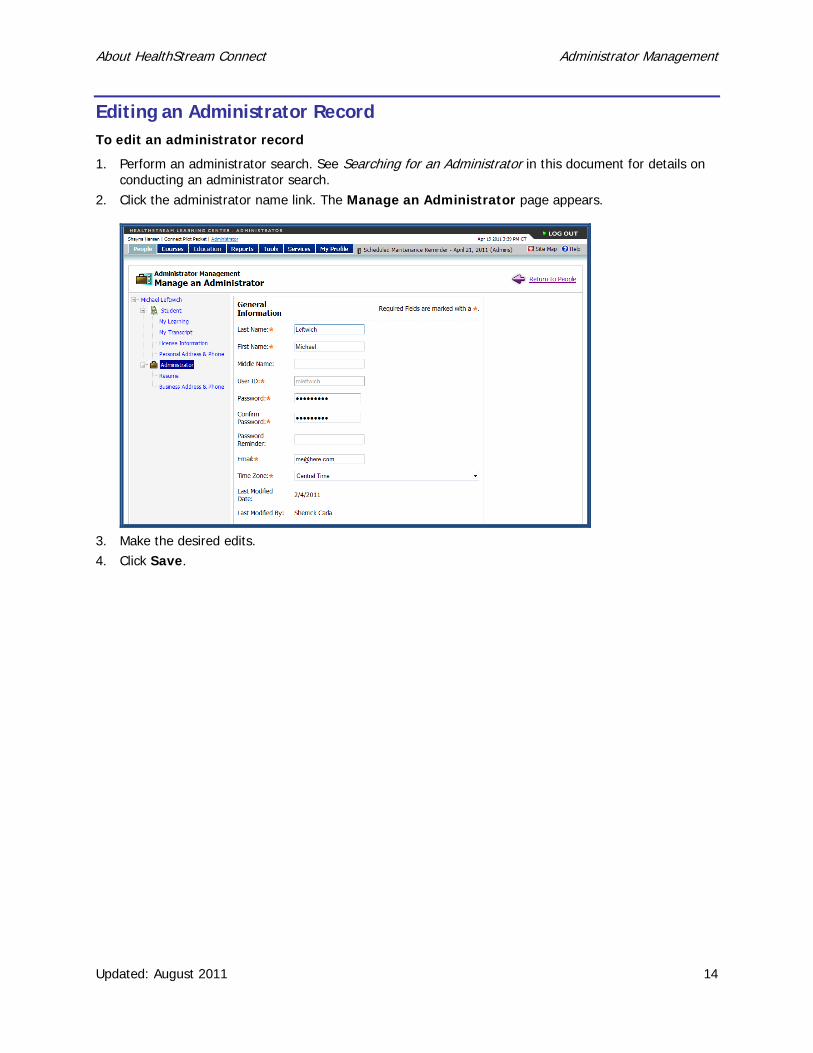
Editing an Administrator Record To edit an administrator record
1. Perform an administrator search. See Searching for an Administrator in this document for details on conducting an administrator search.
2. Click the administrator name link. The Manage an Administrator page appears.
3. Make the desired edits. 4. Click Save.
About HealthStream Connect Administrator Management
Updated: August 2011 15
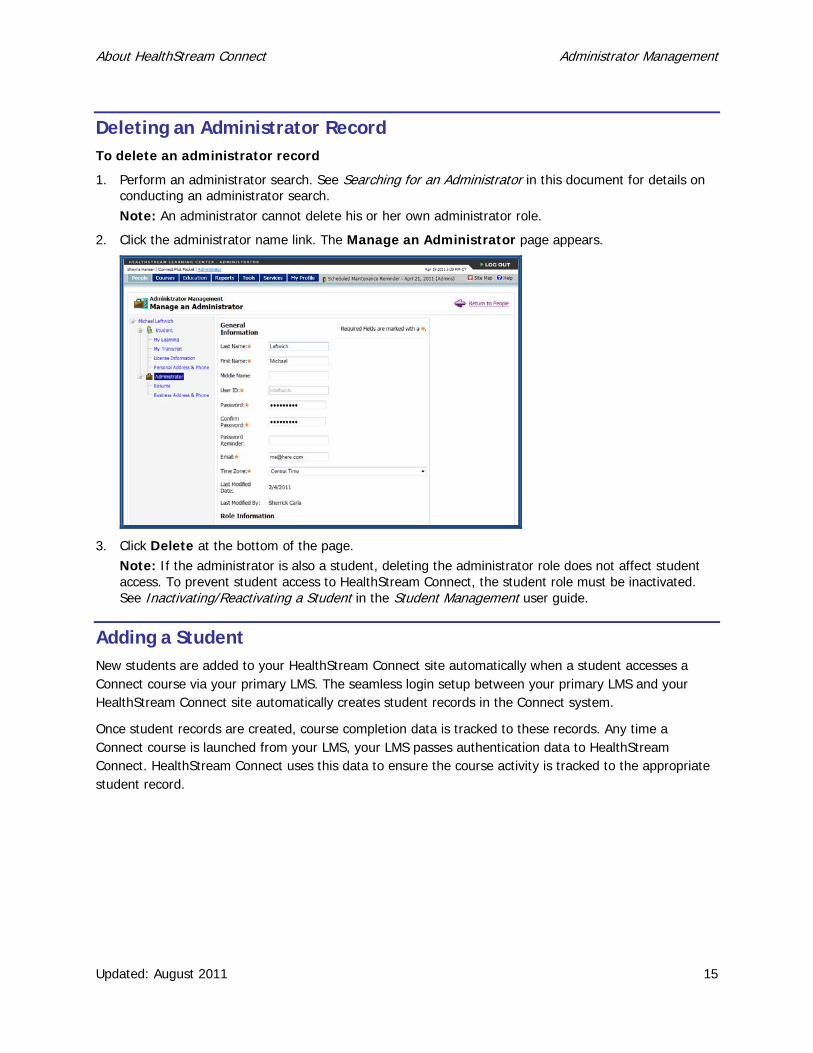
Deleting an Administrator Record To delete an administrator record
1. Perform an administrator search. See Searching for an Administrator in this document for details on conducting an administrator search. Note: An administrator cannot delete his or her own administrator role.
2. Click the administrator name link. The Manage an Administrator page appears.
3. Click Delete at the bottom of the page. Note: If the administrator is also a student, deleting the administrator role does not affect student access. To prevent student access to HealthStream Connect, the student role must be inactivated. See Inactivating/Reactivating a Student in the Student Management user guide.
Adding a Student New students are added to your HealthStream Connect site automatically when a student accesses a Connect course via your primary LMS. The seamless login setup between your primary LMS and your HealthStream Connect site automatically creates student records in the Connect system.
Once student records are created, course completion data is tracked to these records. Any time a Connect course is launched from your LMS, your LMS passes authentication data to HealthStream Connect. HealthStream Connect uses this data to ensure the course activity is tracked to the appropriate student record.
About HealthStream Connect Student Management
Updated: August 2011 16
Student Management While student records are added automatically to HealthStream Connect when theys launch HealthStream Connect courseware from your primary LMS, you may wish to access student records in HealthStream Connect in order to verify the following, if necessary:
• Student completions in Connect match what is being recorded in your primary LMS. • Student records are being created successfully from your primary LMS. • Student Discipline and License Information is recorded correctly in order to issue proper credit for
continuing education courses.
While your HealthStream Connect platform includes access to other functions of student management, these functions are unnecessary and should not be used. These functions include:
• Editing student records Editing student records is unnecessary, as student records are managed automatically by the data passed to HealthStream Connect from your primary LMS.
• Activating and inactivating student records This functionality is unnecessary in HealthStream Connect, as you should manage active and inactive student records through your primary LMS.
• Adding personal address and phone information to a student record While HealthStream Connect can record address and phone information within a student record, this data serves no purpose. Use your primary LMS to record personal demographic data.
• Viewing a student's assignments via the My Learning page In the HealthStream Learning Center, the My Learning page is the primary display of a student’s assigned and elective learning. However, as a HealthStream Connect user, you will make all assignments via your primary LMS. While you can view a student’s My Learning page from the student record, the data here is unnecessary for your purposes.
About HealthStream Connect Student Management
Updated: August 2011 17
Searching for a Student To search for a student
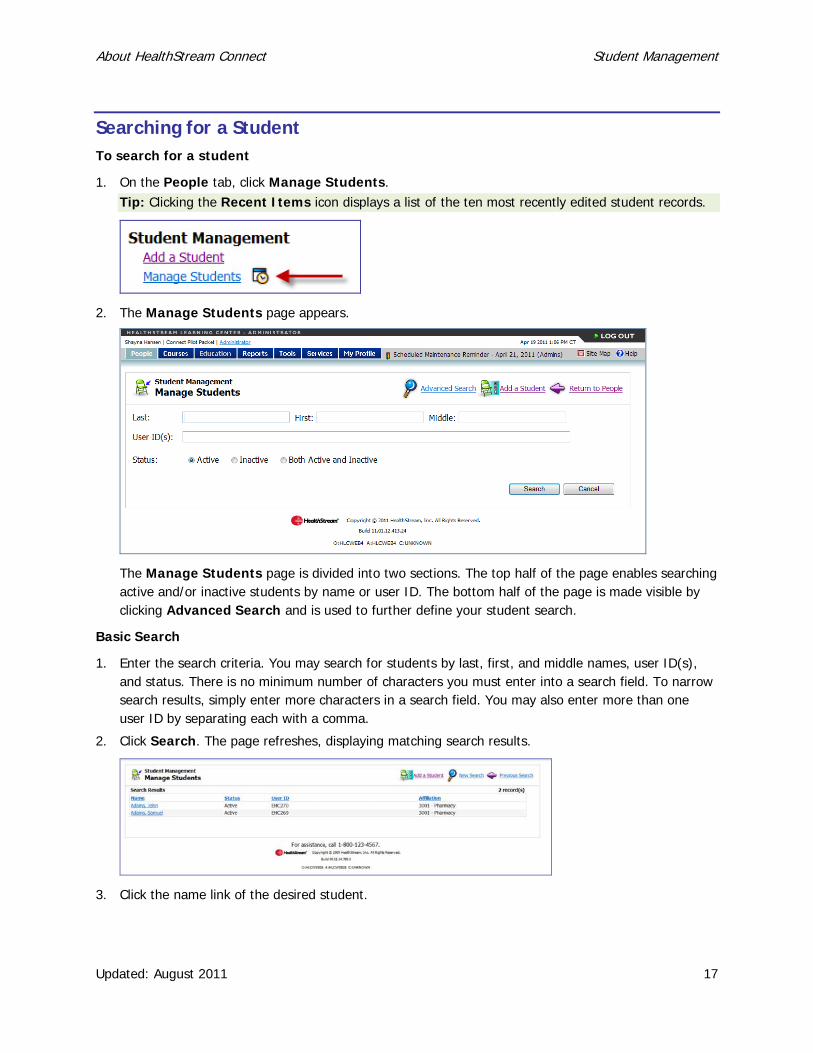
1. On the People tab, click Manage Students. Tip: Clicking the Recent Items icon displays a list of the ten most recently edited student records.
2. The Manage Students page appears.
The Manage Students page is divided into two sections. The top half of the page enables searching active and/or inactive students by name or user ID. The bottom half of the page is made visible by clicking Advanced Search and is used to further define your student search.
Basic Search
1. Enter the search criteria. You may search for students by last, first, and middle names, user ID(s), and status. There is no minimum number of characters you must enter into a search field. To narrow search results, simply enter more characters in a search field. You may also enter more than one user ID by separating each with a comma.
2. Click Search. The page refreshes, displaying matching search results.
3. Click the name link of the desired student.
About HealthStream Connect Student Management
Updated: August 2011 18
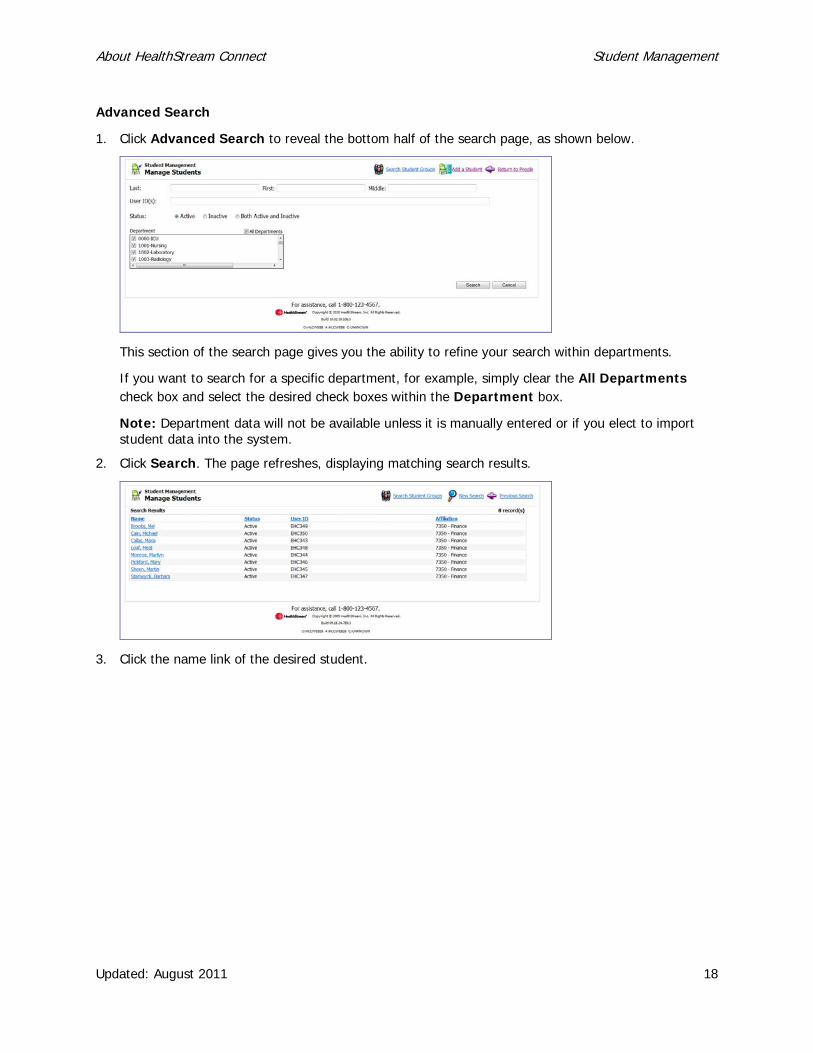
Advanced Search
1. Click Advanced Search to reveal the bottom half of the search page, as shown below.
This section of the search page gives you the ability to refine your search within departments.
If you want to search for a specific department, for example, simply clear the All Departments check box and select the desired check boxes within the Department box.
Note: Department data will not be available unless it is manually entered or if you elect to import student data into the system.
2. Click Search. The page refreshes, displaying matching search results.
3. Click the name link of the desired student.

About HealthStream Connect Student Management
Updated: August 2011 19
Viewing Student Information Administrators can view information about students from the student’s general information page. To access this page, perform a student search.
From the student’s general information page, you can view the following student information:
• Student Courses
• Student Transcript
• Student Personal Address and Phone
About HealthStream Connect Student Management
Updated: August 2011 20
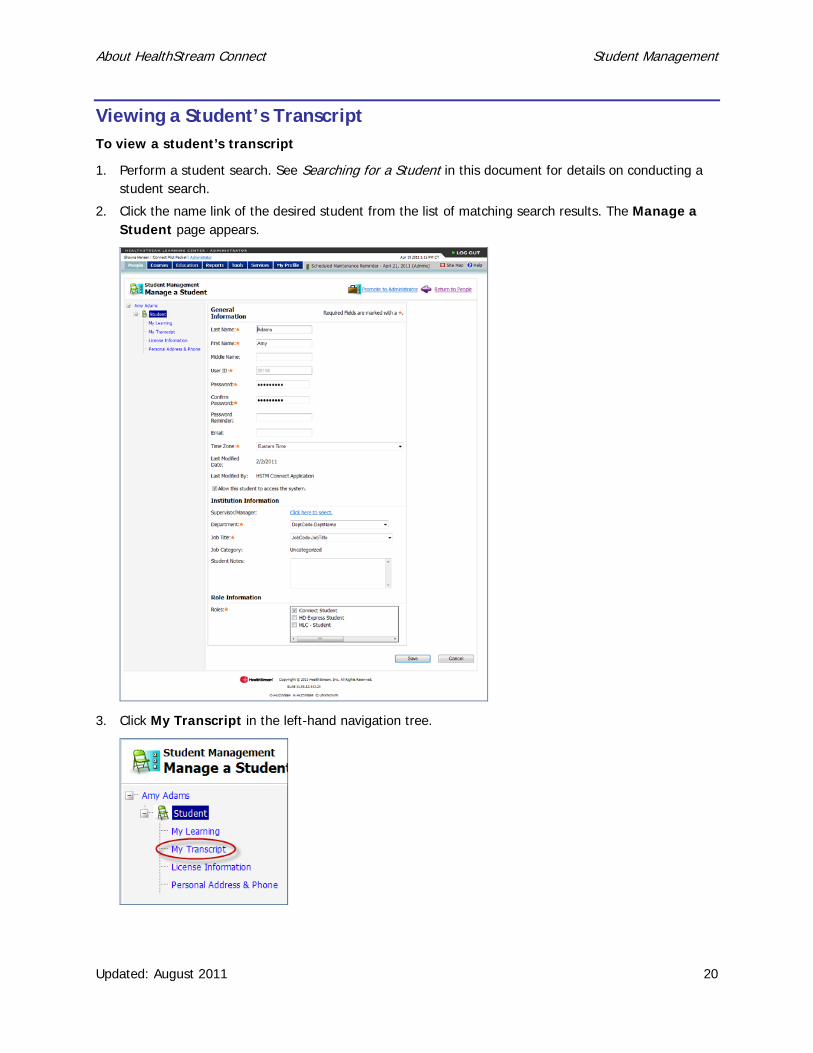
Viewing a Student’s Transcript To view a student’s transcript
1. Perform a student search. See Searching for a Student in this document for details on conducting a student search.
2. Click the name link of the desired student from the list of matching search results. The Manage a Student page appears.
3. Click My Transcript in the left-hand navigation tree.
About HealthStream Connect Student Management
Updated: August 2011 21
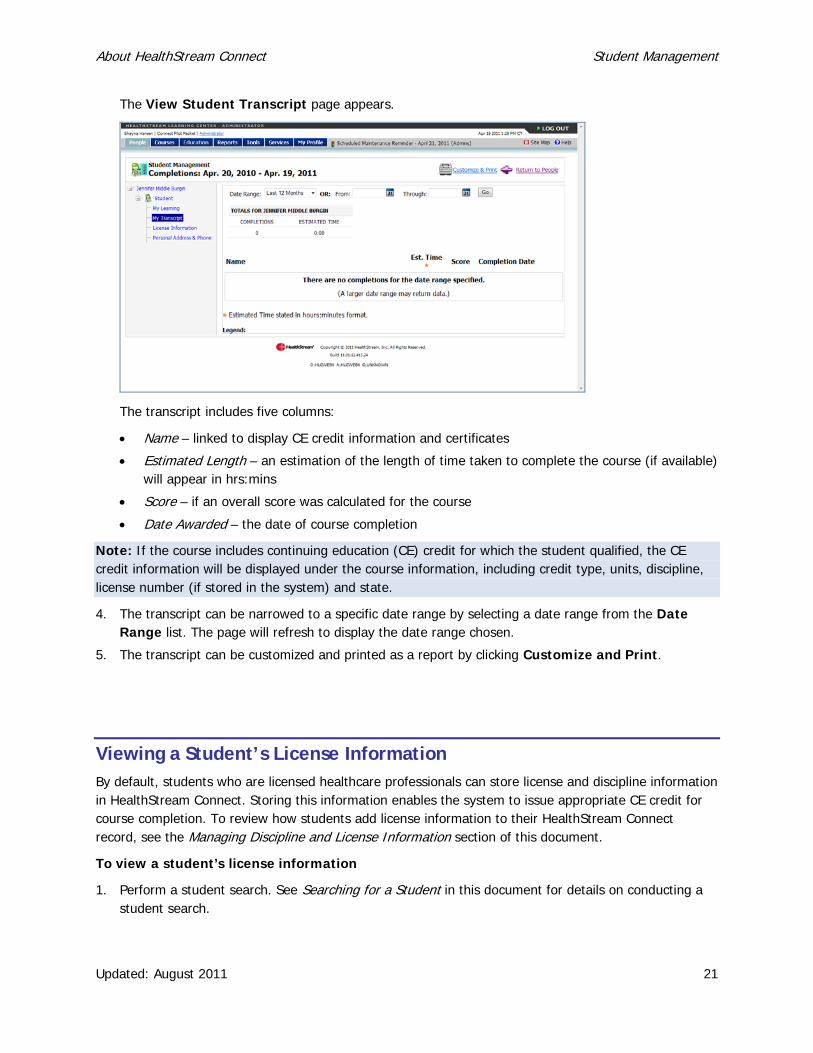
The View Student Transcript page appears.
The transcript includes five columns:
• Name – linked to display CE credit information and certificates
• Estimated Length – an estimation of the length of time taken to complete the course (if available) will appear in hrs:mins
• Score – if an overall score was calculated for the course
• Date Awarded – the date of course completion
Note: If the course includes continuing education (CE) credit for which the student qualified, the CE credit information will be displayed under the course information, including credit type, units, discipline, license number (if stored in the system) and state.
4. The transcript can be narrowed to a specific date range by selecting a date range from the Date Range list. The page will refresh to display the date range chosen.
5. The transcript can be customized and printed as a report by clicking Customize and Print.
Viewing a Student’s License Information By default, students who are licensed healthcare professionals can store license and discipline information in HealthStream Connect. Storing this information enables the system to issue appropriate CE credit for course completion. To review how students add license information to their HealthStream Connect record, see the Managing Discipline and License Information section of this document.
To view a student’s license information
1. Perform a student search. See Searching for a Student in this document for details on conducting a student search.
About HealthStream Connect Student Management
Updated: August 2011 22
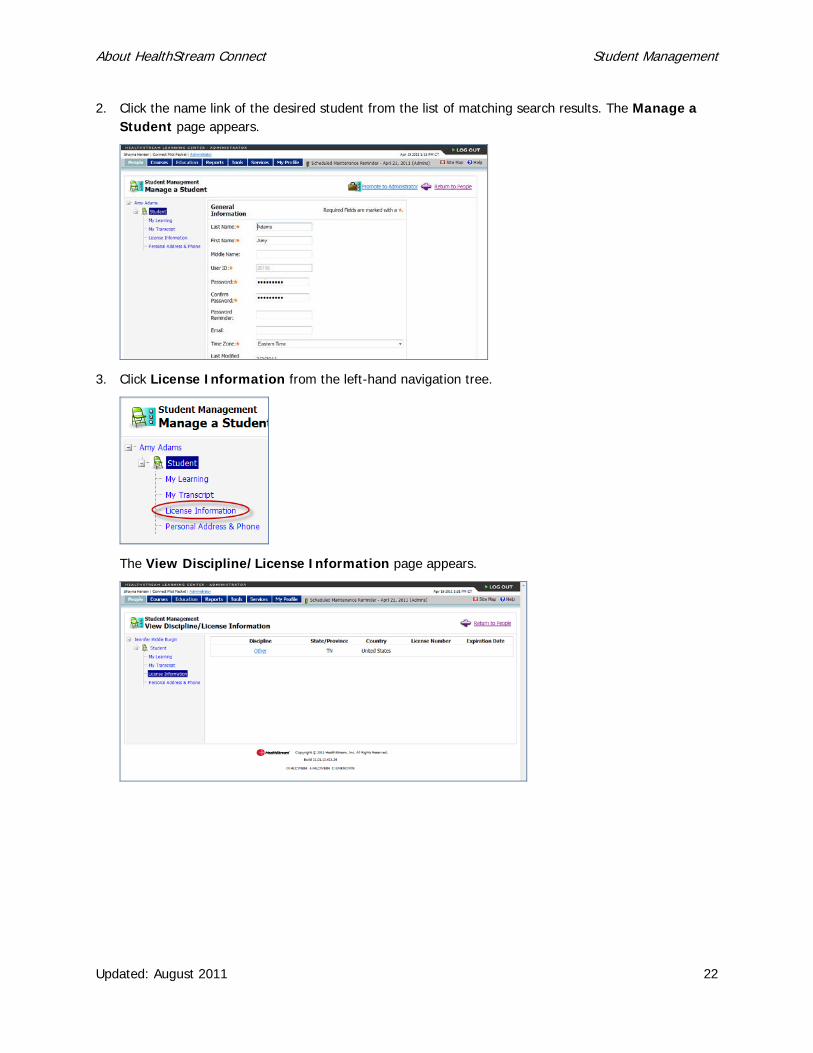
2. Click the name link of the desired student from the list of matching search results. The Manage a Student page appears.
3. Click License Information from the left-hand navigation tree.
The View Discipline/License Information page appears.
About HealthStream Connect Student Management
Updated: August 2011 23
Instructing Your Students to Use HealthStream Connect For students, the change in user experience when using HealthStream Connect is minimal. The process is designed to add only one step to the process they are used to using with your primary LMS.
HealthStream provides a short Web-based tour of Connect functionality that you may provide to students in advance of assigning Connect courses, if you wish. This tool can be accessed at http://www.healthstream.com/content/training_media/connect_switchboard_page.swf.
The process of utilizing HealthStream Connect for students works as follows:
1. The student accesses the assignments you make via your primary LMS. 2. If the student is accessing HealthStream Connect courseware for the first time, a user account is
created in the Connect site. The primary LMS passes basic student data to HealthStream, including the student’s name and user ID.
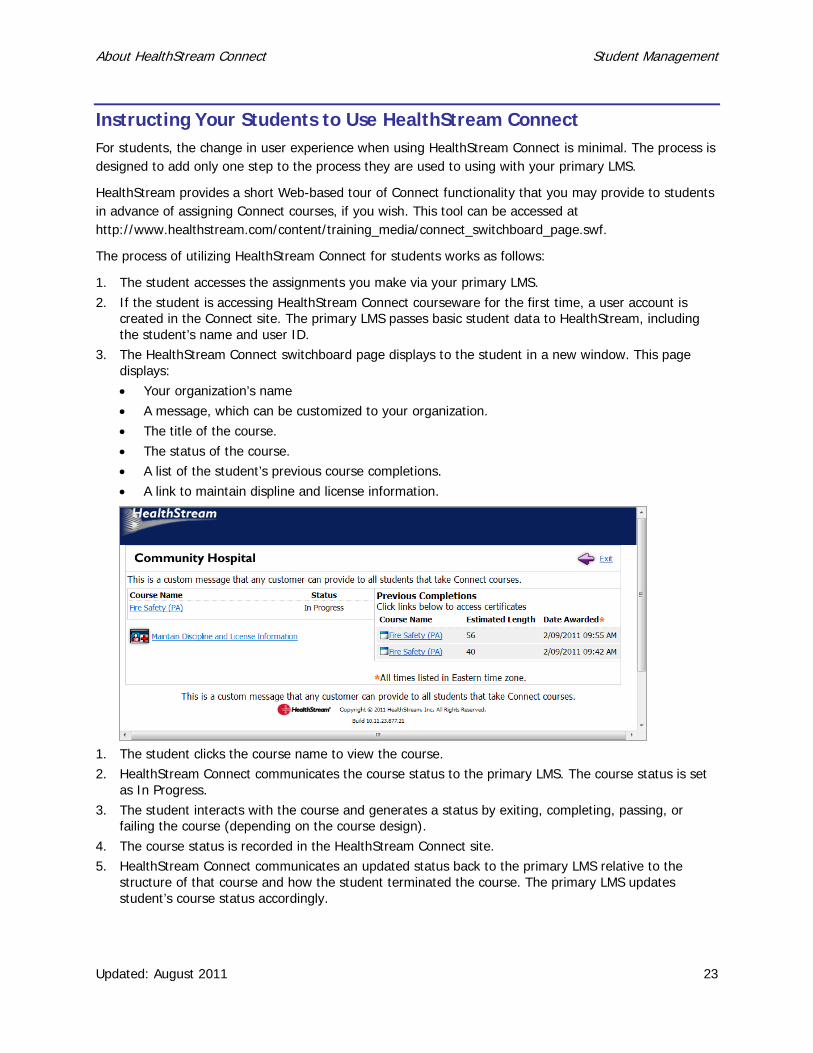
3. The HealthStream Connect switchboard page displays to the student in a new window. This page displays: • Your organization’s name • A message, which can be customized to your organization. • The title of the course. • The status of the course. • A list of the student’s previous course completions. • A link to maintain displine and license information.
1. The student clicks the course name to view the course. 2. HealthStream Connect communicates the course status to the primary LMS. The course status is set
as In Progress. 3. The student interacts with the course and generates a status by exiting, completing, passing, or
failing the course (depending on the course design). 4. The course status is recorded in the HealthStream Connect site. 5. HealthStream Connect communicates an updated status back to the primary LMS relative to the
structure of that course and how the student terminated the course. The primary LMS updates student’s course status accordingly.
About HealthStream Connect Student Management
Updated: August 2011 24
In informing your students to use HealthStream Connect, you may wish to:
• Notify them of the HealthStream Connect switchboard page, which will display in advance of their Connect course. They must click the Course Name on the Switchboard page to begin their course.
• Notify them that they can click the Maintain Discipline and License Information link to store details about their professional licensure status. This information can be used to issue appropriate credit for continuing education courses. Refer to the Managing Discipline and License Information section below.
• Notify them that they can view their previous completions and click any Course Name in this section to access relevant certificates related to their creation.
Managing Discipline and License Information
The Discipline and License Information area allows details about professional licensure status to be stored so that that HealthStream Connect can issue appropriate credit for continuing education courses. Students accessing HealthStream Connect courseware can input and manage information for one or more licenses.
On the Connect Swithchboard page that displays in advance of the Connect Course, the student will click Manage Discipline and License Information to view the Discipline/License Information page.
To add information for a professional license
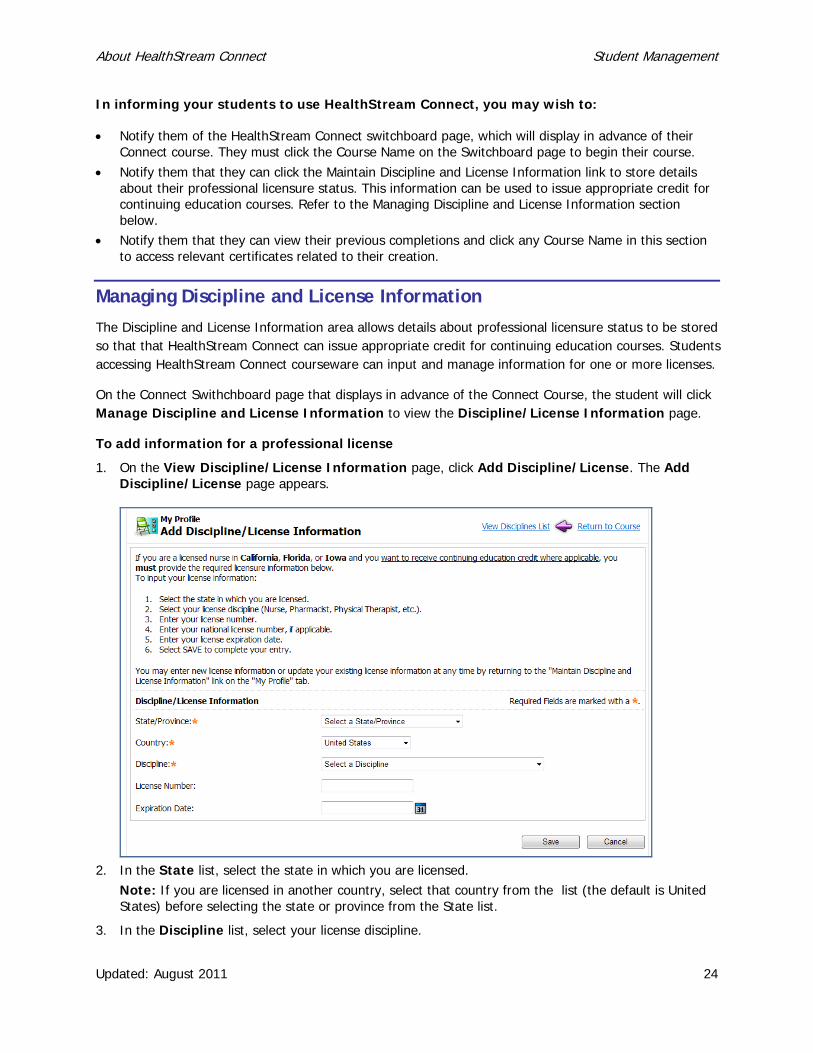
1. On the View Discipline/License Information page, click Add Discipline/License. The Add Discipline/License page appears.
2. In the State list, select the state in which you are licensed.
Note: If you are licensed in another country, select that country from the list (the default is United States) before selecting the state or province from the State list.
3. In the Discipline list, select your license discipline.
About HealthStream Connect Student Management
Updated: August 2011 25
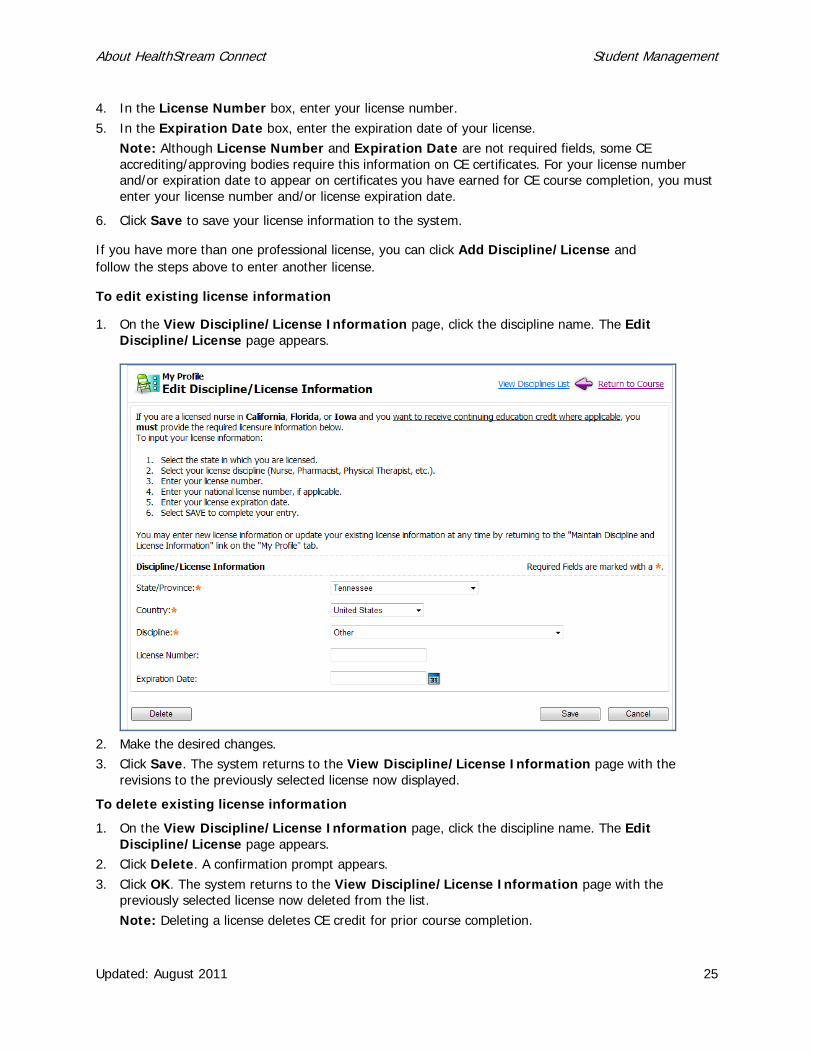
4. In the License Number box, enter your license number. 5. In the Expiration Date box, enter the expiration date of your license.
Note: Although License Number and Expiration Date are not required fields, some CE accrediting/approving bodies require this information on CE certificates. For your license number and/or expiration date to appear on certificates you have earned for CE course completion, you must enter your license number and/or license expiration date.
6. Click Save to save your license information to the system.
If you have more than one professional license, you can click Add Discipline/License and follow the steps above to enter another license.
To edit existing license information
1. On the View Discipline/License Information page, click the discipline name. The Edit Discipline/License page appears.
2. Make the desired changes. 3. Click Save. The system returns to the View Discipline/License Information page with the
revisions to the previously selected license now displayed.
To delete existing license information
1. On the View Discipline/License Information page, click the discipline name. The Edit Discipline/License page appears.
2. Click Delete. A confirmation prompt appears. 3. Click OK. The system returns to the View Discipline/License Information page with the
previously selected license now deleted from the list. Note: Deleting a license deletes CE credit for prior course completion.
About HealthStream Connect Annotations Management
Updated: August 2011 26
Annotations Management Annotations are electronic notes that can be added to pages within HealthStream regulatory course online content. They are used to customize course content by adding institution or department-specific information. Annotations display as a separate pop-up window over the selected online page.
Note: Annotations are only available for use with the HealthStream regulatory courses. If you are not using Connect to assign HealthStream regulatory courses, this guide is not applicable to you.
Adding an Annotation To add an annotation
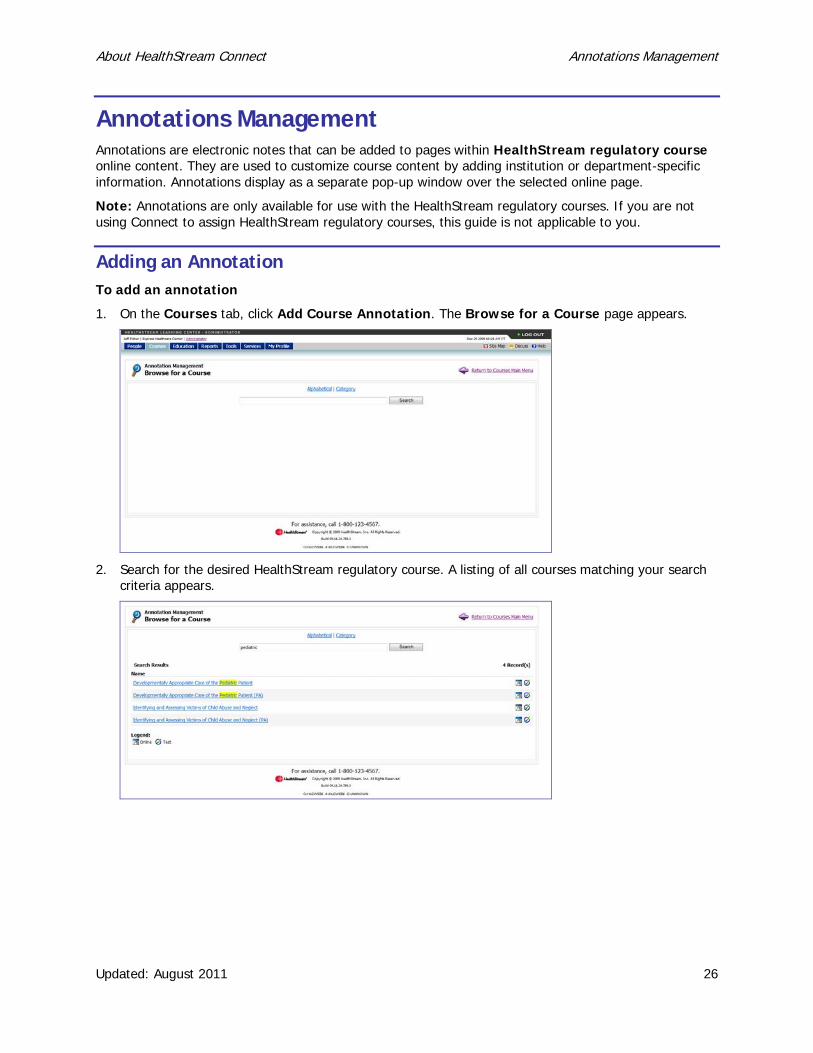
1. On the Courses tab, click Add Course Annotation. The Browse for a Course page appears.
2. Search for the desired HealthStream regulatory course. A listing of all courses matching your search criteria appears.
About HealthStream Connect Annotations Management
Updated: August 2011 27
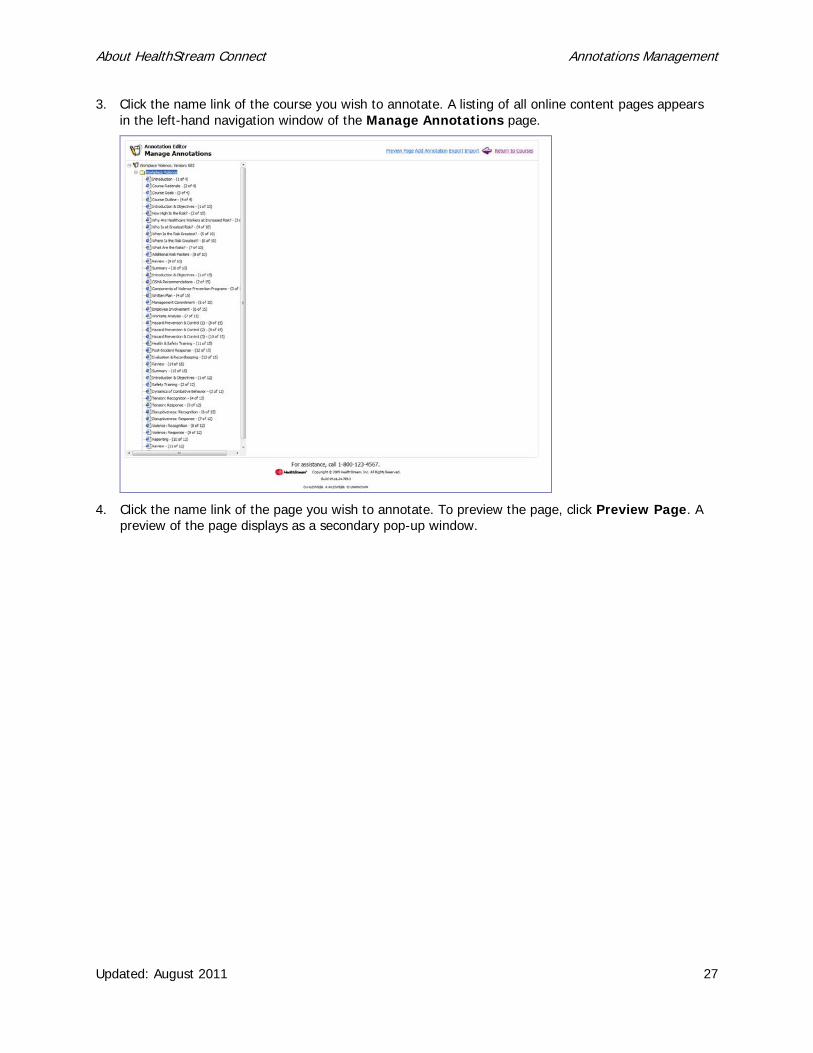
3. Click the name link of the course you wish to annotate. A listing of all online content pages appears in the left-hand navigation window of the Manage Annotations page.
4. Click the name link of the page you wish to annotate. To preview the page, click Preview Page. A preview of the page displays as a secondary pop-up window.
About HealthStream Connect Annotations Management
Updated: August 2011 28
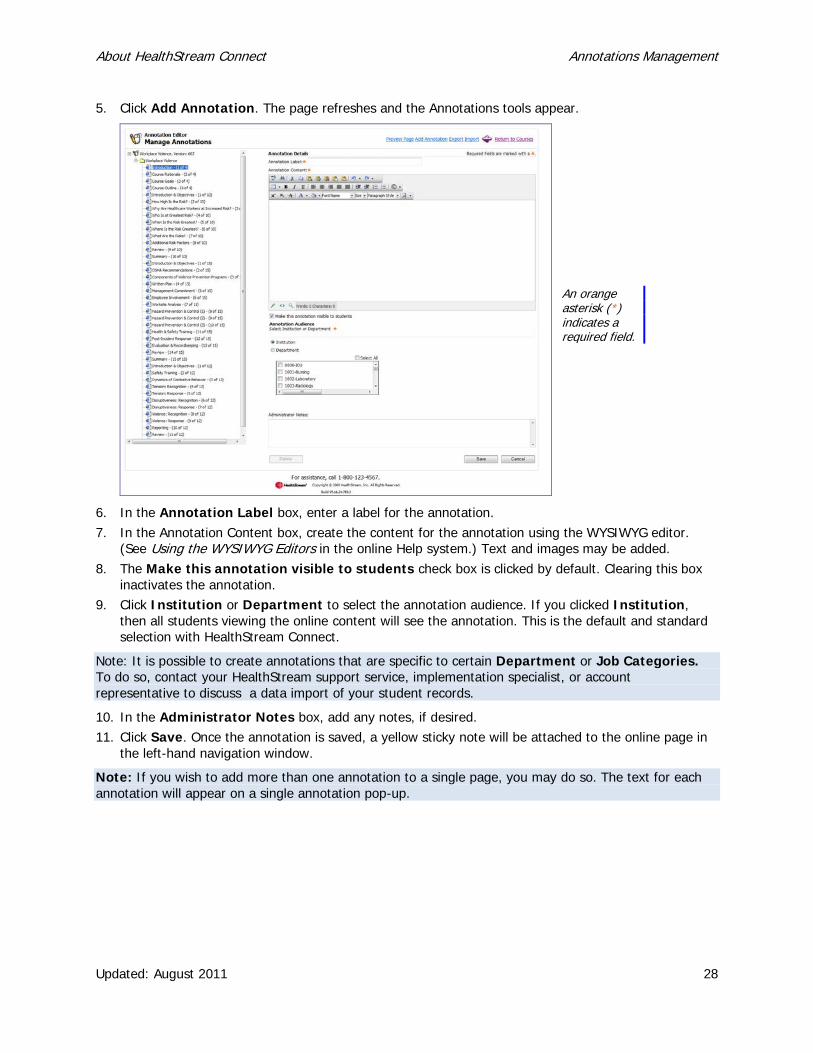
5. Click Add Annotation. The page refreshes and the Annotations tools appear.
6. In the Annotation Label box, enter a label for the annotation. 7. In the Annotation Content box, create the content for the annotation using the WYSIWYG editor.
(See Using the WYSIWYG Editors in the online Help system.) Text and images may be added. 8. The Make this annotation visible to students check box is clicked by default. Clearing this box
inactivates the annotation. 9. Click Institution or Department to select the annotation audience. If you clicked Institution,
then all students viewing the online content will see the annotation. This is the default and standard selection with HealthStream Connect.
Note: It is possible to create annotations that are specific to certain Department or Job Categories. To do so, contact your HealthStream support service, implementation specialist, or account representative to discuss a data import of your student records.
10. In the Administrator Notes box, add any notes, if desired. 11. Click Save. Once the annotation is saved, a yellow sticky note will be attached to the online page in
the left-hand navigation window.
Note: If you wish to add more than one annotation to a single page, you may do so. The text for each annotation will appear on a single annotation pop-up.
An orange asterisk (*) indicates a required field.

About HealthStream Connect Annotations Management
Updated: August 2011 29
Searching for an Annotation To search for an annotation
1. On the Courses tab, click Manage Course Annotations. The Browse for a Course page appears.
2. Search for the course in which the annotation resides. A listing of all courses matching your search criteria appears.
About HealthStream Connect Annotations Management
Updated: August 2011 30
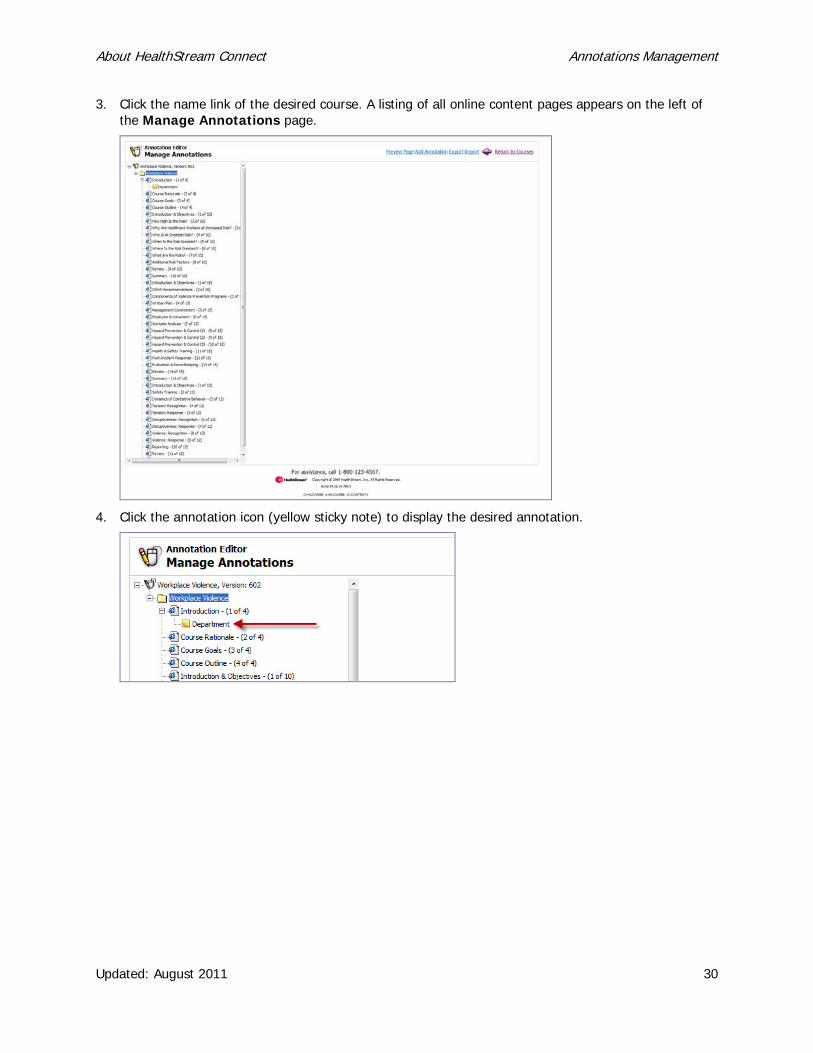
3. Click the name link of the desired course. A listing of all online content pages appears on the left of the Manage Annotations page.
4. Click the annotation icon (yellow sticky note) to display the desired annotation.
About HealthStream Connect Annotations Management
Updated: August 2011 31
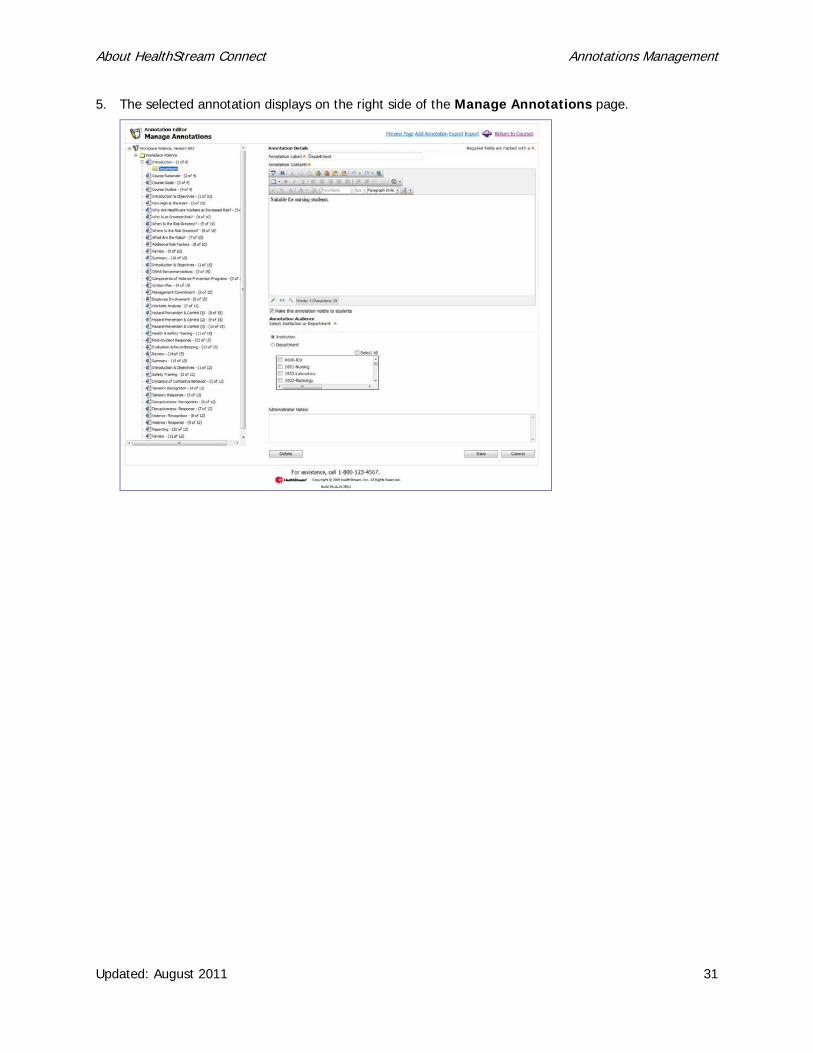
5. The selected annotation displays on the right side of the Manage Annotations page.
About HealthStream Connect Annotations Management
Updated: August 2011 32
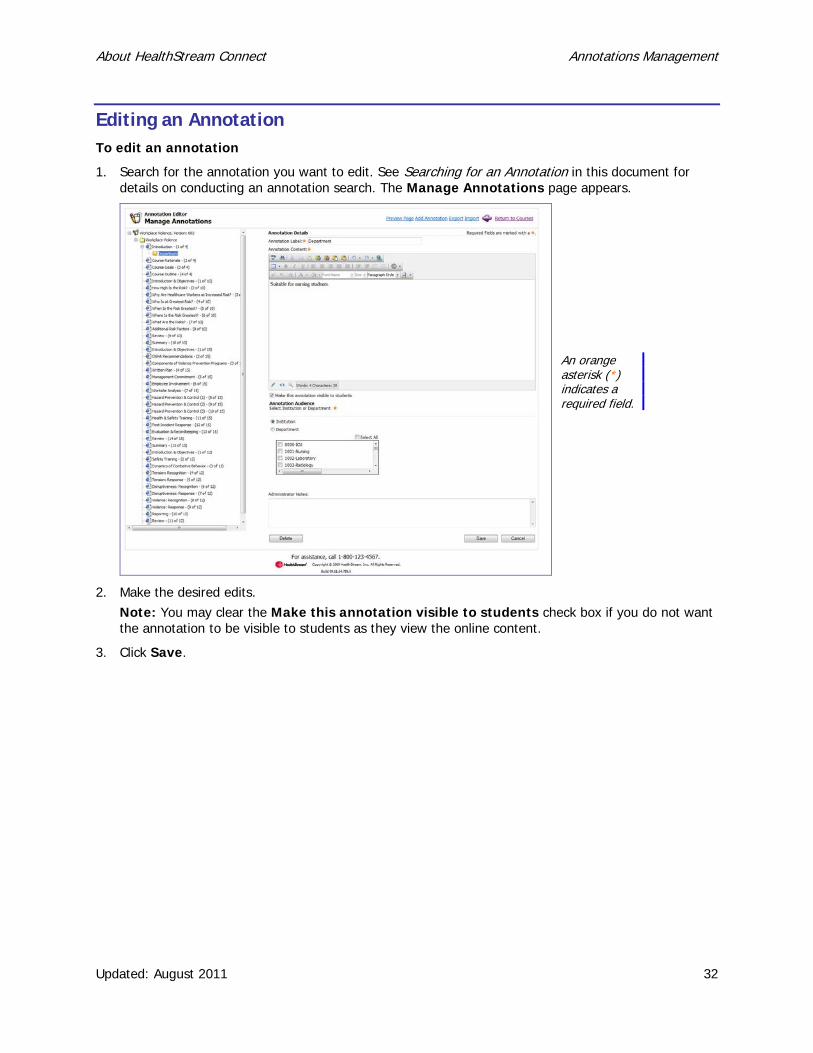
Editing an Annotation To edit an annotation
1. Search for the annotation you want to edit. See Searching for an Annotation in this document for details on conducting an annotation search. The Manage Annotations page appears.
2. Make the desired edits. Note: You may clear the Make this annotation visible to students check box if you do not want the annotation to be visible to students as they view the online content.
3. Click Save.
An orange asterisk (*) indicates a required field.
About HealthStream Connect Annotations Management
Updated: August 2011 33
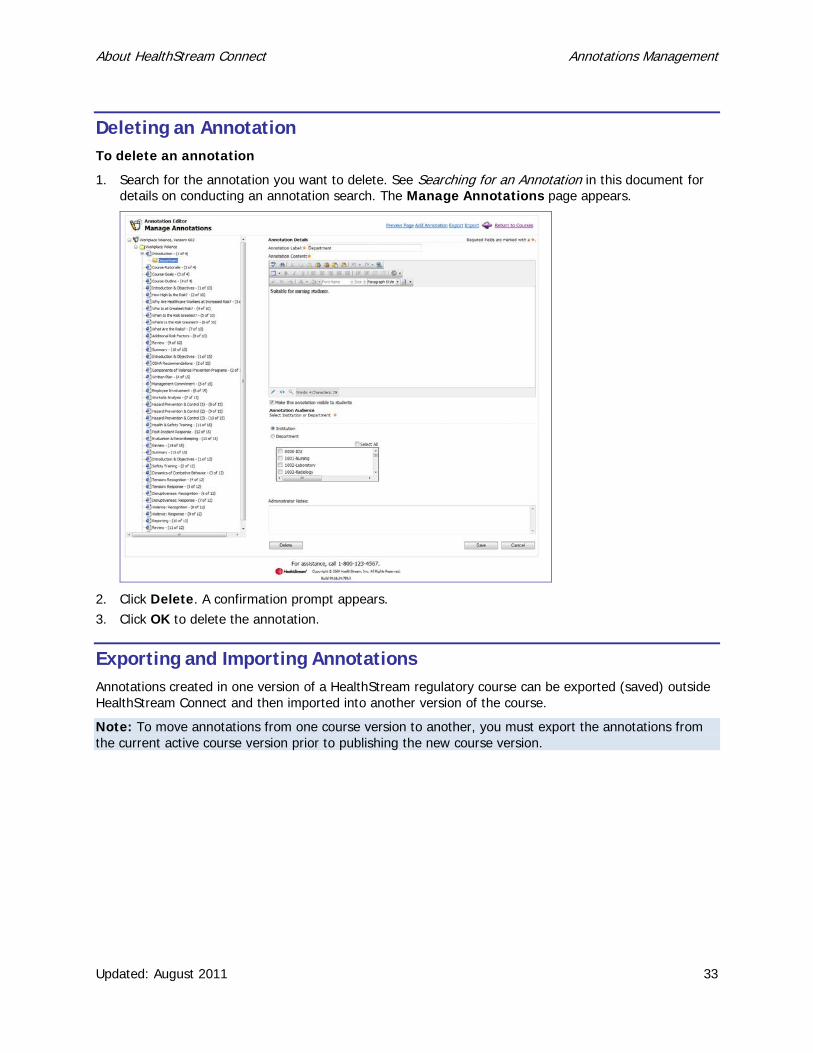
Deleting an Annotation To delete an annotation
1. Search for the annotation you want to delete. See Searching for an Annotation in this document for details on conducting an annotation search. The Manage Annotations page appears.
2. Click Delete. A confirmation prompt appears. 3. Click OK to delete the annotation.
Exporting and Importing Annotations Annotations created in one version of a HealthStream regulatory course can be exported (saved) outside HealthStream Connect and then imported into another version of the course.
Note: To move annotations from one course version to another, you must export the annotations from the current active course version prior to publishing the new course version.
About HealthStream Connect Annotations Management
Updated: August 2011 34
Exporting Annotations To export annotations
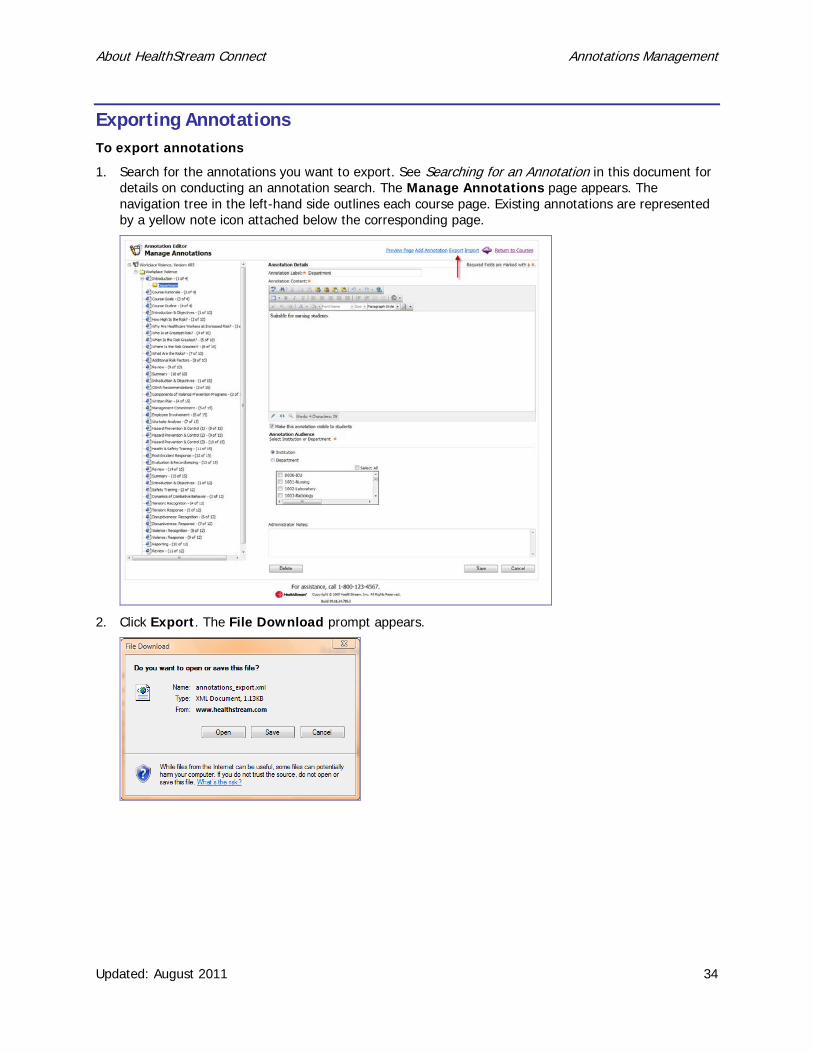
1. Search for the annotations you want to export. See Searching for an Annotation in this document for details on conducting an annotation search. The Manage Annotations page appears. The navigation tree in the left-hand side outlines each course page. Existing annotations are represented by a yellow note icon attached below the corresponding page.
2. Click Export. The File Download prompt appears.
About HealthStream Connect Annotations Management
Updated: August 2011 35
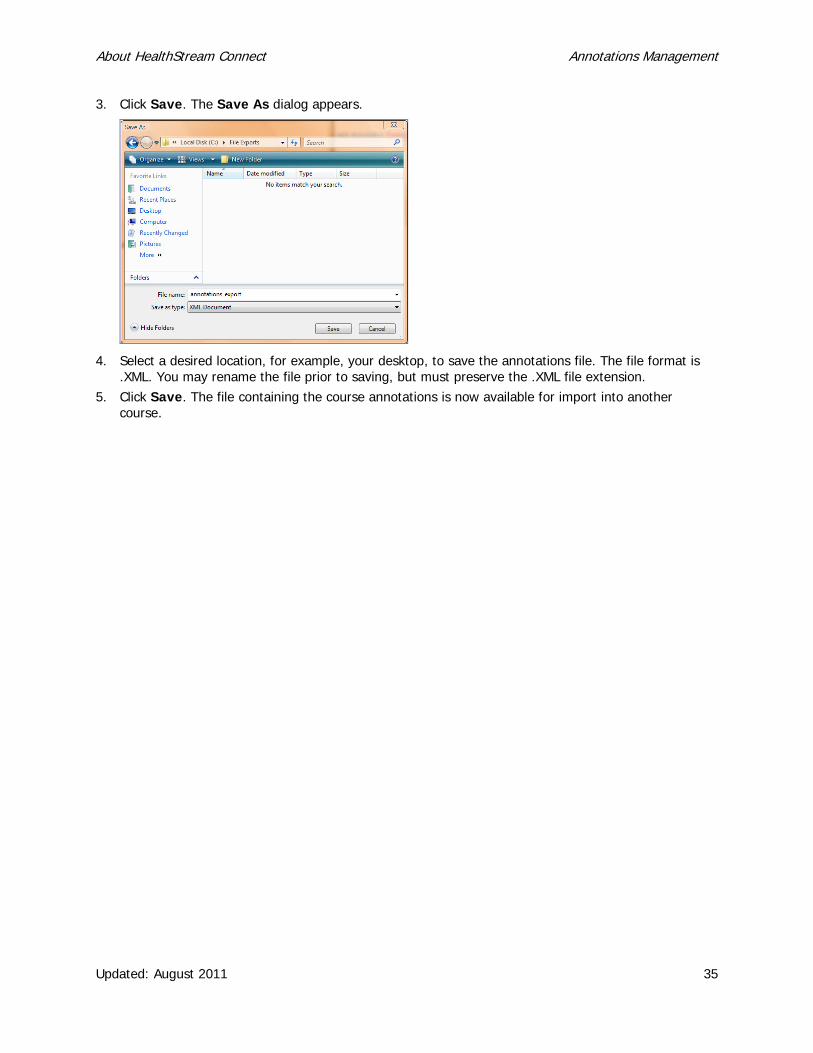
3. Click Save. The Save As dialog appears.
4. Select a desired location, for example, your desktop, to save the annotations file. The file format is .XML. You may rename the file prior to saving, but must preserve the .XML file extension.
5. Click Save. The file containing the course annotations is now available for import into another course.

About HealthStream Connect Annotations Management
Updated: August 2011 36
Importing Annotations Note: In order to import annotations into the new course version, you will first need to publish the new course version to your HLC. (See Publishing Updated Versions of HealthStream Regulatory Courses in the Connect Courses Management user guide.)
To import annotations into another course
1. Search for the course into which you want to import the annotations. See Searching for an Annotation in this document for conducting an annotation search. The Manage Annotations page appears. The navigation tree in the left-hand side outlines each course page.
2. Click Import. The Load Import File page appears.
3. Browse from the file location, for example, your desktop, for the .XML annotations file you wish to import into the course. Once the file is located, the Load Import File page refreshes, displaying the path to the file in the File to import box.
4. Click Load. A report will generate displaying the annotations within the file. 5. Click the annotations to review their contents. 6. Map the annotations to the appropriate new course page by dragging the annotations into place.
Note: Unmapped annotations will not be imported.
7. Click Continue. The Manage Annotations page appears for the new course. From here, you can create additional annotations, change the target audience, and make any other desired annotation edits. Annotations are now visible to students within the annotations’ targeted audience. Note: You may also export annotations and import them into another, unrelated course if desired.
About HealthStream Connect Reports
Updated: August 2011 37
Reports Tip: You may use Alt+R to access Reports via your computer keyboard.
HealthStream Connect offers several reports. These are divided into groups based on the Connect tab they most closely represent. Reports will open in a new window. Several reports allow for scheduling and alternative formats, such as PDF, and Excel.
Report Viewer The Report Viewer appears whenever a report is generated. Using the Report Viewer, you have the following options:
• Save the report locally to your computer or network drive • Print the report Copy the report web address (URL) and share (for example, via email)
People Reports The following reports are available from the People Reports section of the Reports tab:
• Discipline Listing Report • Expiring License Report • Student and Group Transcript Report • Student Listing Report
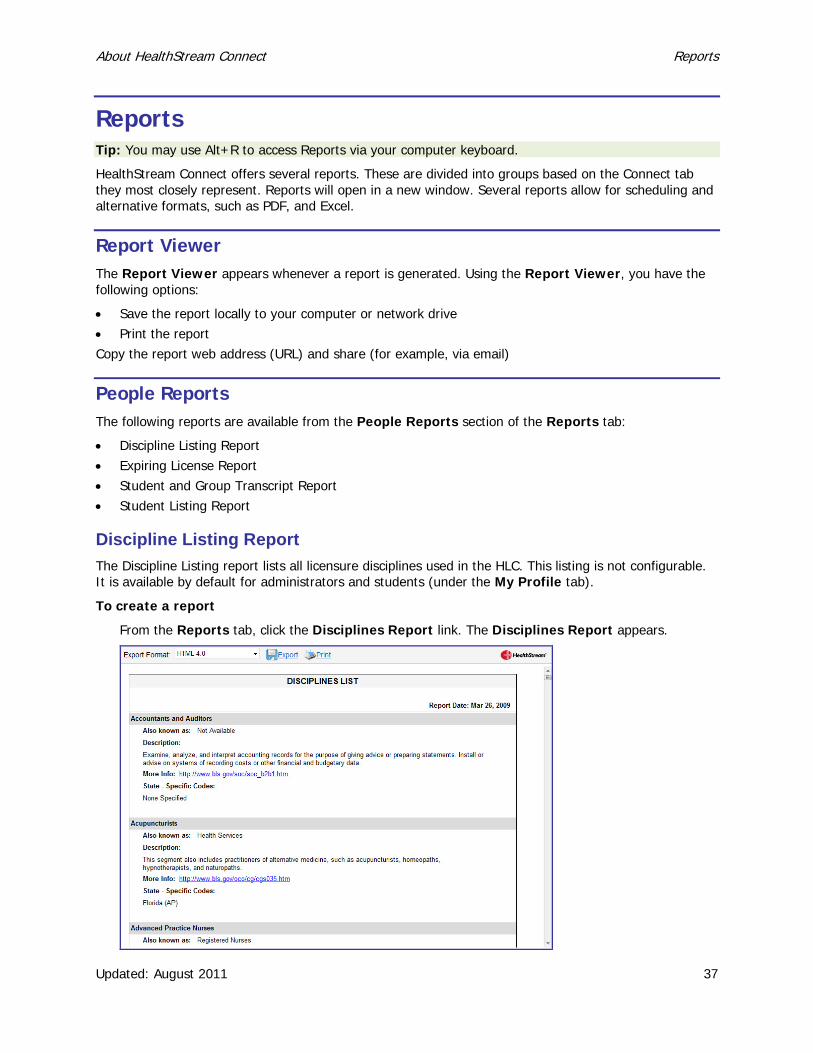
Discipline Listing Report The Discipline Listing report lists all licensure disciplines used in the HLC. This listing is not configurable. It is available by default for administrators and students (under the My Profile tab).
To create a report
From the Reports tab, click the Disciplines Report link. The Disciplines Report appears.
About HealthStream Connect Reports
Updated: August 2011 38
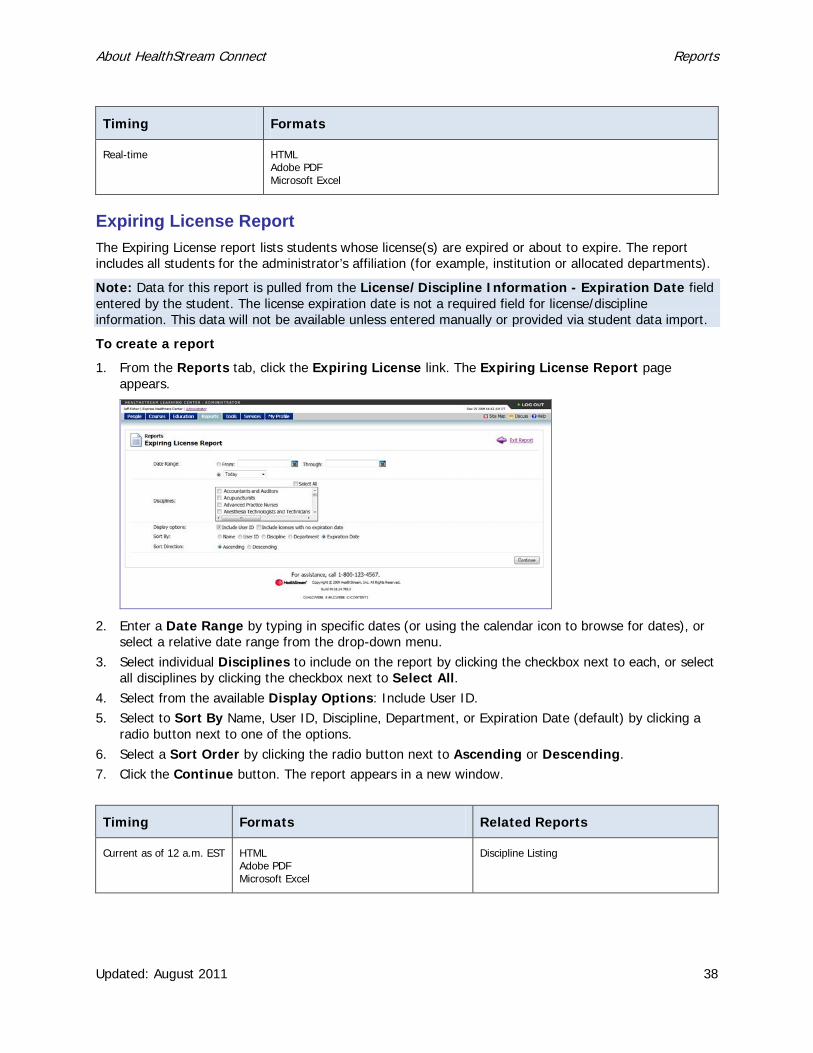
Expiring License Report The Expiring License report lists students whose license(s) are expired or about to expire. The report includes all students for the administrator’s affiliation (for example, institution or allocated departments).
Note: Data for this report is pulled from the License/Discipline Information - Expiration Date field entered by the student. The license expiration date is not a required field for license/discipline information. This data will not be available unless entered manually or provided via student data import.
To create a report
1. From the Reports tab, click the Expiring License link. The Expiring License Report page appears.
2. Enter a Date Range by typing in specific dates (or using the calendar icon to browse for dates), or select a relative date range from the drop-down menu.
3. Select individual Disciplines to include on the report by clicking the checkbox next to each, or select all disciplines by clicking the checkbox next to Select All.
4. Select from the available Display Options: Include User ID. 5. Select to Sort By Name, User ID, Discipline, Department, or Expiration Date (default) by clicking a
radio button next to one of the options. 6. Select a Sort Order by clicking the radio button next to Ascending or Descending. 7. Click the Continue button. The report appears in a new window.
Timing Formats
Real-time HTML Adobe PDF Microsoft Excel
Timing Formats Related Reports
Current as of 12 a.m. EST HTML Adobe PDF Microsoft Excel
Discipline Listing
About HealthStream Connect Reports
Updated: August 2011 39
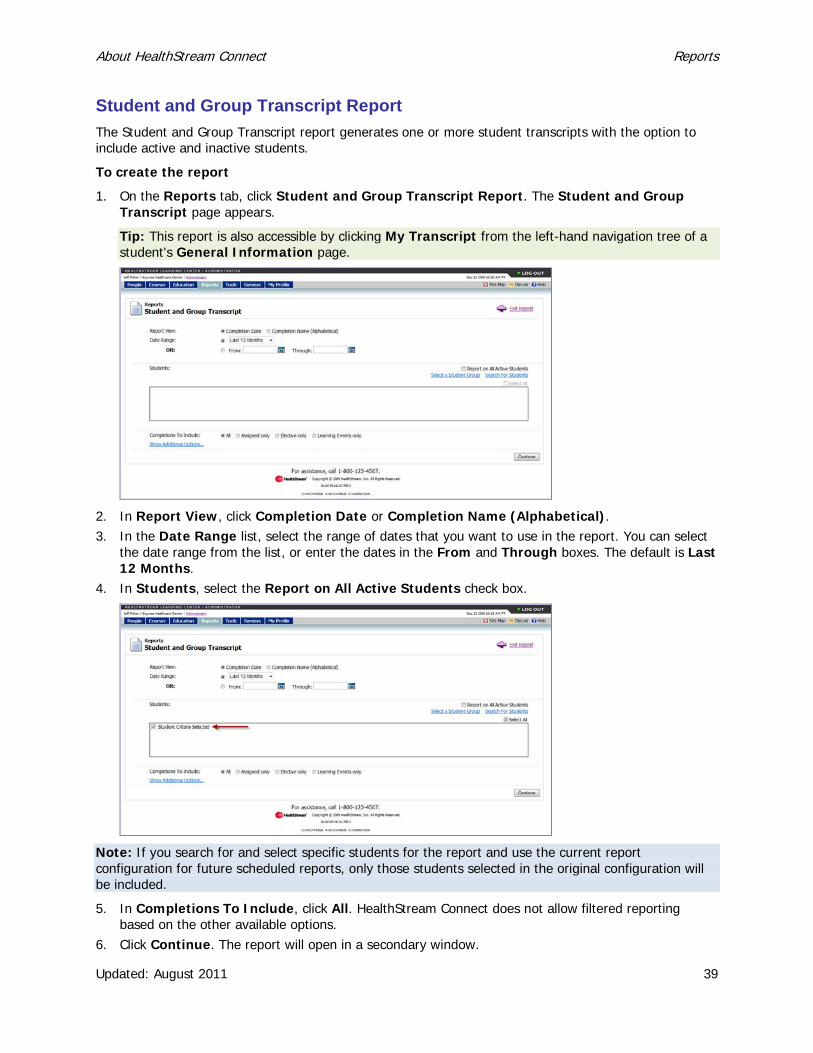
Student and Group Transcript Report The Student and Group Transcript report generates one or more student transcripts with the option to include active and inactive students.
To create the report
1. On the Reports tab, click Student and Group Transcript Report. The Student and Group Transcript page appears.
Tip: This report is also accessible by clicking My Transcript from the left-hand navigation tree of a student's General Information page.
2. In Report View, click Completion Date or Completion Name (Alphabetical). 3. In the Date Range list, select the range of dates that you want to use in the report. You can select
the date range from the list, or enter the dates in the From and Through boxes. The default is Last 12 Months.
4. In Students, select the Report on All Active Students check box.
Note: If you search for and select specific students for the report and use the current report configuration for future scheduled reports, only those students selected in the original configuration will be included.
5. In Completions To Include, click All. HealthStream Connect does not allow filtered reporting based on the other available options.
6. Click Continue. The report will open in a secondary window.
About HealthStream Connect Reports
Updated: August 2011 40
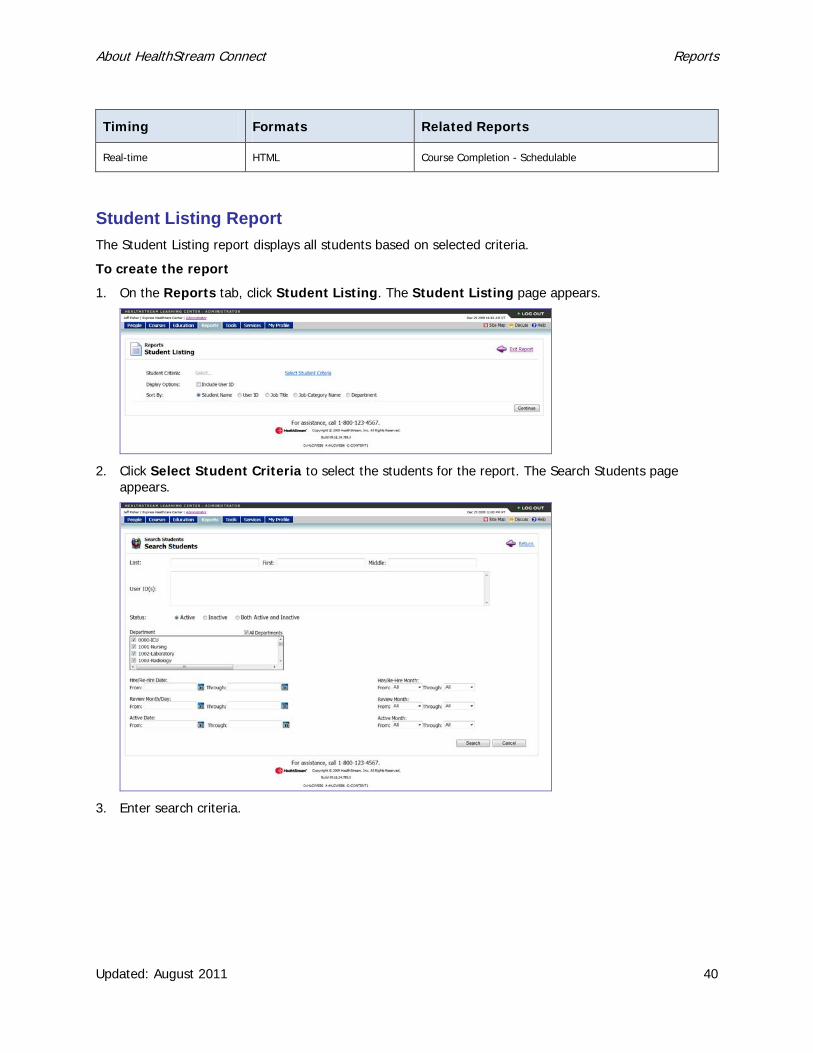
Student Listing Report The Student Listing report displays all students based on selected criteria.
To create the report
1. On the Reports tab, click Student Listing. The Student Listing page appears.
2. Click Select Student Criteria to select the students for the report. The Search Students page appears.
3. Enter search criteria.
Timing Formats Related Reports
Real-time HTML Course Completion - Schedulable
About HealthStream Connect Reports
Updated: August 2011 41
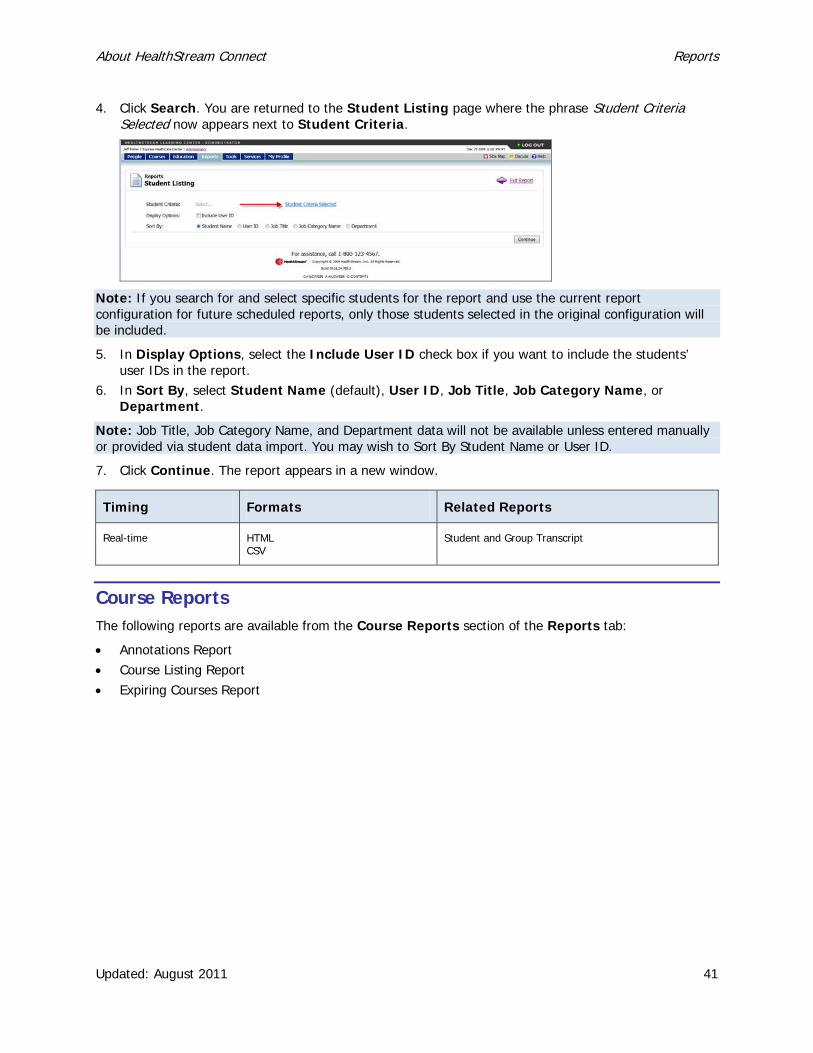
4. Click Search. You are returned to the Student Listing page where the phrase Student Criteria Selected now appears next to Student Criteria.
Note: If you search for and select specific students for the report and use the current report configuration for future scheduled reports, only those students selected in the original configuration will be included.
5. In Display Options, select the Include User ID check box if you want to include the students’ user IDs in the report.
6. In Sort By, select Student Name (default), User ID, Job Title, Job Category Name, or Department.
Note: Job Title, Job Category Name, and Department data will not be available unless entered manually or provided via student data import. You may wish to Sort By Student Name or User ID.
7. Click Continue. The report appears in a new window.
Timing Formats Related Reports
Real-time HTML CSV
Student and Group Transcript
Course Reports The following reports are available from the Course Reports section of the Reports tab:
• Annotations Report • Course Listing Report • Expiring Courses Report

About HealthStream Connect Reports
Updated: August 2011 42
Annotations Report The Annotations report provides a view of annotations for one or more courses. You can view active annotations, inactive annotations, or both. The report shows all annotations whether they’re institution-wide, department-specific or job category specific.
To create the report
1. On the Reports tab, click Annotations. The Course Annotations page appears.
2. Click Select Courses to select one or more courses to appear on the report. Only courses that can be annotated can be selected. See Searching for Courses for a Report in this document. You are returned to the Course Annotations page with the names of the courses that you selected in the Courses box.
3. In Annotations to Include, select Active, Inactive, or Both. 4. Click Continue. The report appears in a new window.
Timing Formats Related Reports
Real-time HTML Course Listing
About HealthStream Connect Reports
Updated: August 2011 43
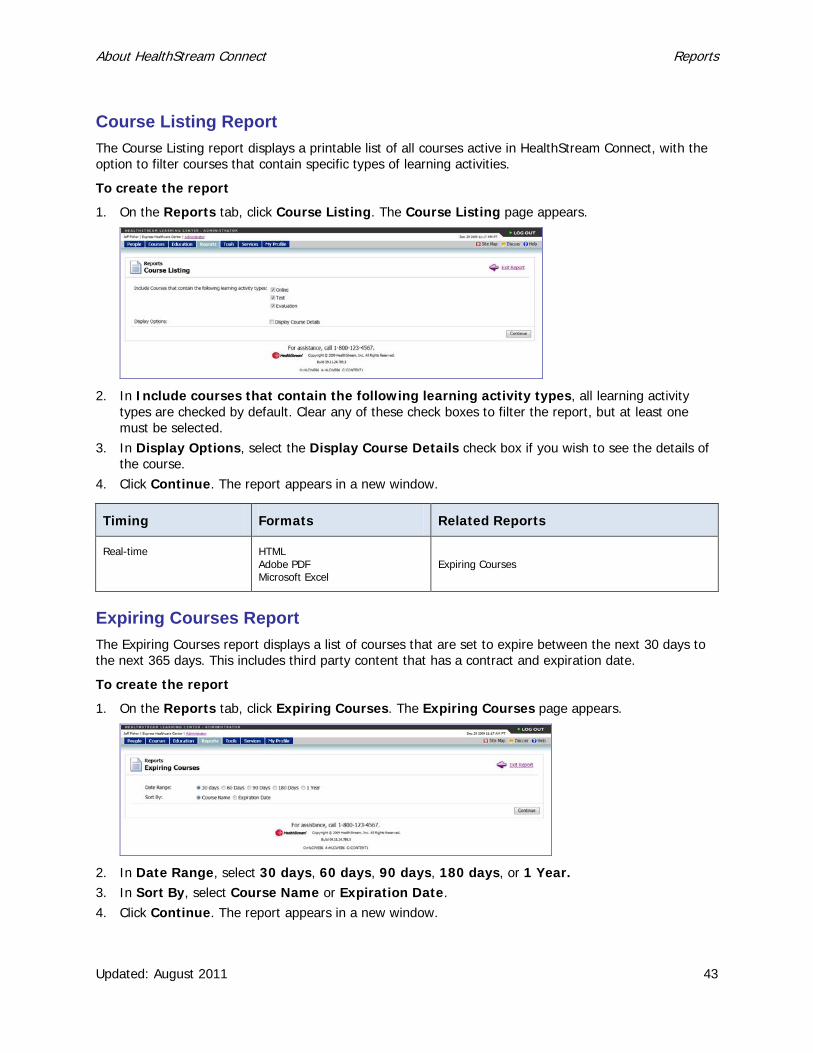
Course Listing Report The Course Listing report displays a printable list of all courses active in HealthStream Connect, with the option to filter courses that contain specific types of learning activities.
To create the report
1. On the Reports tab, click Course Listing. The Course Listing page appears.
2. In Include courses that contain the following learning activity types, all learning activity types are checked by default. Clear any of these check boxes to filter the report, but at least one must be selected.
3. In Display Options, select the Display Course Details check box if you wish to see the details of the course.
4. Click Continue. The report appears in a new window.
Timing Formats Related Reports
Real-time HTML Adobe PDF Microsoft Excel
Expiring Courses
Expiring Courses Report The Expiring Courses report displays a list of courses that are set to expire between the next 30 days to the next 365 days. This includes third party content that has a contract and expiration date.
To create the report
1. On the Reports tab, click Expiring Courses. The Expiring Courses page appears.
2. In Date Range, select 30 days, 60 days, 90 days, 180 days, or 1 Year. 3. In Sort By, select Course Name or Expiration Date. 4. Click Continue. The report appears in a new window.
About HealthStream Connect Reports
Updated: August 2011 44
Timing Formats
Real-time HTML Adobe PDF Microsoft Excel
Education Reports The following report is available from the Education Reports section of the Reports tab:
Course Completion - Schedulable
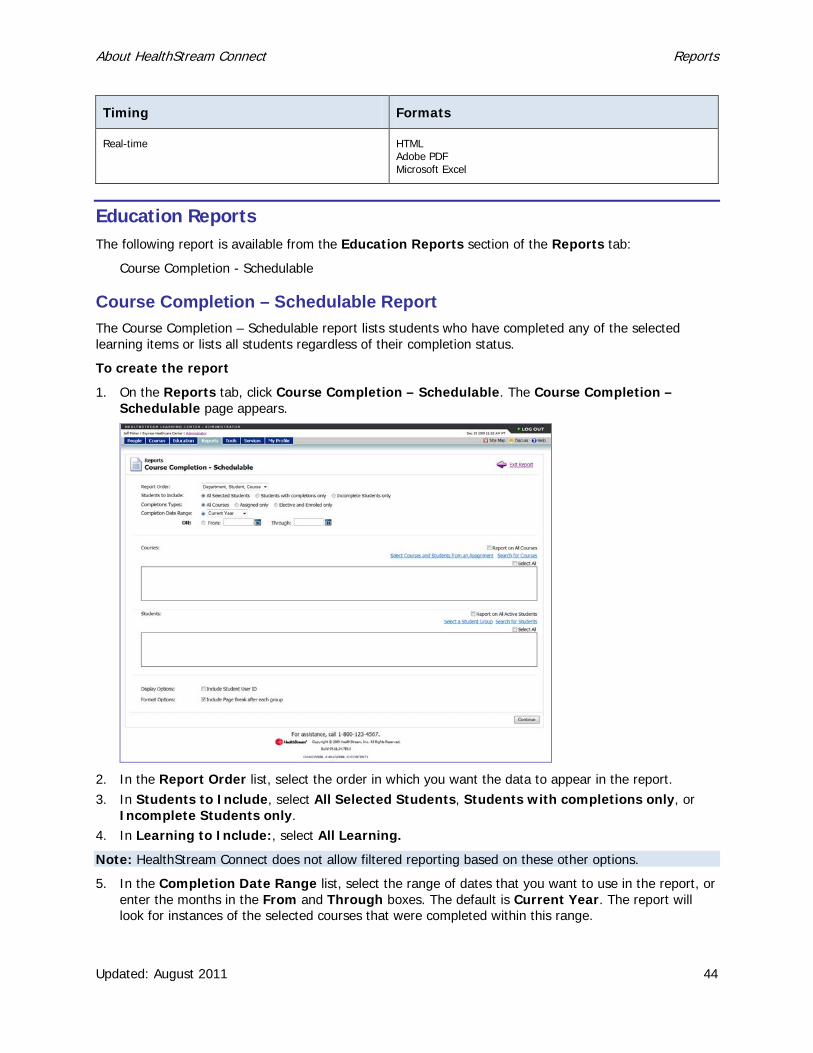
Course Completion – Schedulable Report The Course Completion – Schedulable report lists students who have completed any of the selected learning items or lists all students regardless of their completion status.
To create the report
1. On the Reports tab, click Course Completion – Schedulable. The Course Completion – Schedulable page appears.
2. In the Report Order list, select the order in which you want the data to appear in the report. 3. In Students to Include, select All Selected Students, Students with completions only, or
Incomplete Students only. 4. In Learning to Include:, select All Learning.
Note: HealthStream Connect does not allow filtered reporting based on these other options.
5. In the Completion Date Range list, select the range of dates that you want to use in the report, or enter the months in the From and Through boxes. The default is Current Year. The report will look for instances of the selected courses that were completed within this range.
About HealthStream Connect Reports
Updated: August 2011 45
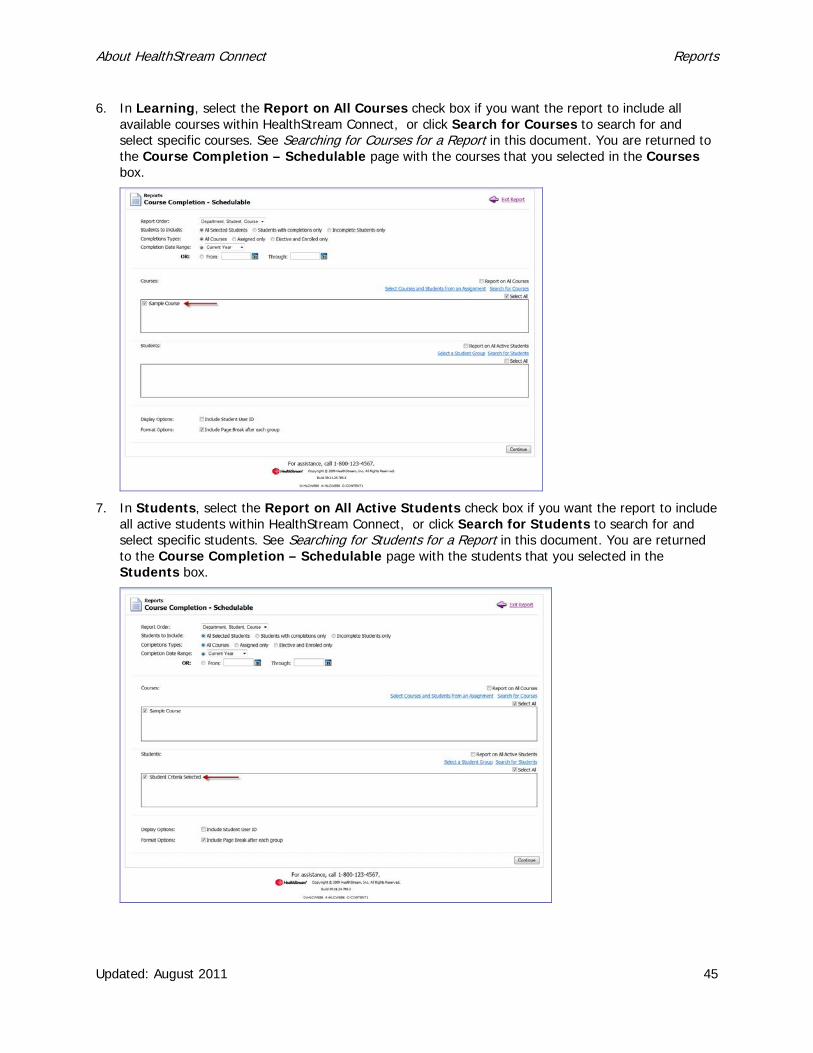
6. In Learning, select the Report on All Courses check box if you want the report to include all available courses within HealthStream Connect, or click Search for Courses to search for and select specific courses. See Searching for Courses for a Report in this document. You are returned to the Course Completion – Schedulable page with the courses that you selected in the Courses box.
7. In Students, select the Report on All Active Students check box if you want the report to include all active students within HealthStream Connect, or click Search for Students to search for and select specific students. See Searching for Students for a Report in this document. You are returned to the Course Completion – Schedulable page with the students that you selected in the Students box.
About HealthStream Connect Reports
Updated: August 2011 46
Note: If you search for and select specific students for the report and use the current report configuration for future scheduled reports, only those students selected in the original configuration will be included.
8. In Display Options, select the Include Student User ID check box if you want to include the user ID in the report.
9. In Format Options, select Include Page Break after each group if you want a page break between groups.
10. Click Continue. The report appears in a new window. Tip: Because the report opens in a new window, after you close the window you can edit your report criteria and create another report.
Timing Export Formats
Current as of 12 a.m. EST HTML Adobe PDF Microsoft Excel
Tools Reports The following report is available from the Tools Reports section of the Reports tab:
Department Listing
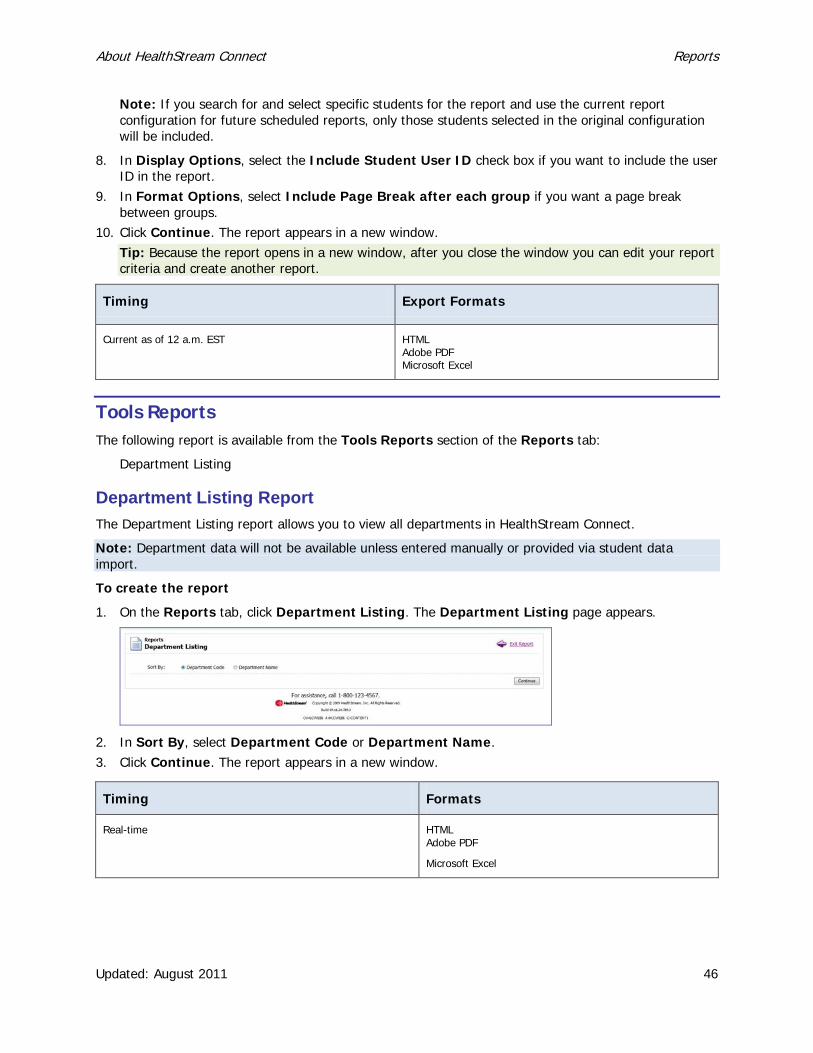
Department Listing Report The Department Listing report allows you to view all departments in HealthStream Connect.
Note: Department data will not be available unless entered manually or provided via student data import.
To create the report
1. On the Reports tab, click Department Listing. The Department Listing page appears.
2. In Sort By, select Department Code or Department Name. 3. Click Continue. The report appears in a new window.
Timing Formats
Real-time HTML Adobe PDF
Microsoft Excel
About HealthStream Connect Reports
Updated: August 2011 47
Additional Procedures for Creating Reports The following section contains procedures that are required by several reports. They are included here to avoid repetition.
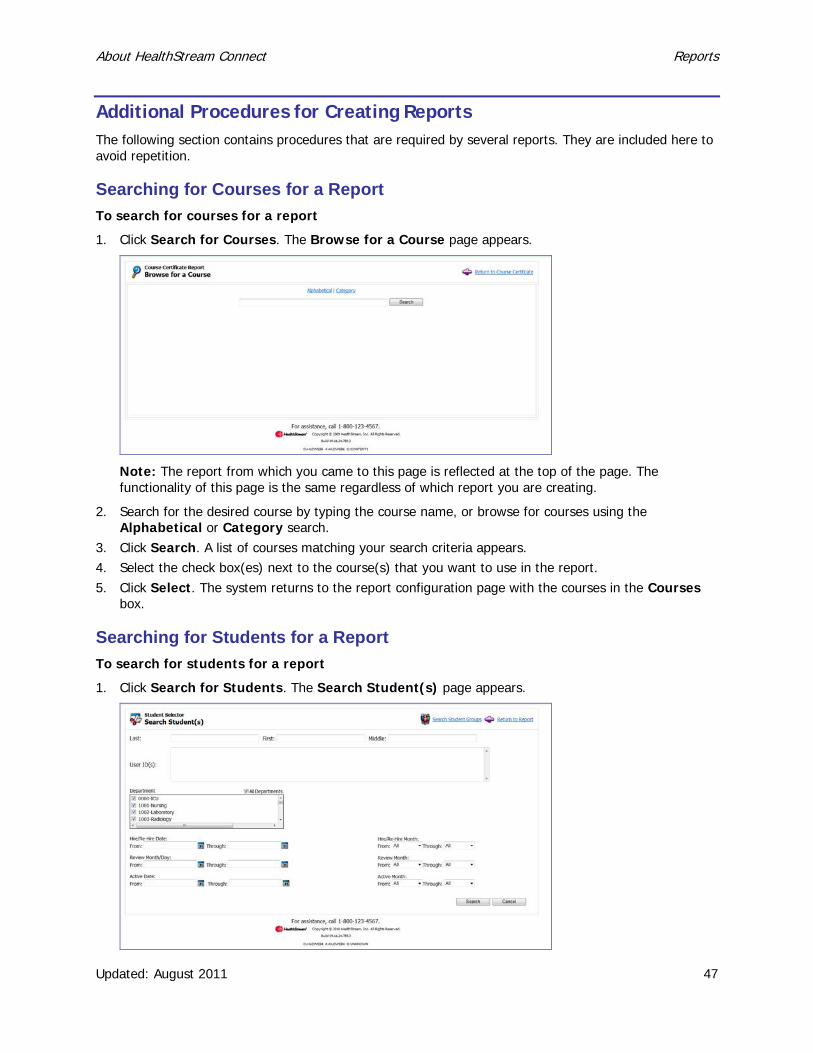
Searching for Courses for a Report To search for courses for a report
1. Click Search for Courses. The Browse for a Course page appears.
Note: The report from which you came to this page is reflected at the top of the page. The functionality of this page is the same regardless of which report you are creating.
2. Search for the desired course by typing the course name, or browse for courses using the Alphabetical or Category search.
3. Click Search. A list of courses matching your search criteria appears. 4. Select the check box(es) next to the course(s) that you want to use in the report. 5. Click Select. The system returns to the report configuration page with the courses in the Courses
box.
Searching for Students for a Report To search for students for a report
1. Click Search for Students. The Search Student(s) page appears.
About HealthStream Connect Reports
Updated: August 2011 48
2. In the Last, First, and Middle boxes, enter the last, first, and middle names of the student that you want to select.
3. In the User ID(s) box, enter the student’s user ID. 4. Select which departments, job titles, and job categories you want to search from the appropriate
sections. 5. Select whether you want to search according to a student’s hire month and date, rehire month and
date, review month or day, or active date or month from the appropriate sections. Note: This data may only be available if it was manually entered or if you elected to import student data into HealthStream Connect. It may be necessary to search students by name or User ID.
6. Click Search. The results appear in the Search Results box. Note: Clicking Search without entering a search term will return all students in the system.
7. In the Search Results box, select the check boxes next to the students that you wish to include. 8. Click Continue. The system returns to the report configuration page with the selected students in
the Students box.