heart potholders
DESCRIPTION
sewing and embroiderie for homeTRANSCRIPT

These quality designs are created and copyright protected by Inspiration Mutz
Embroidery
www.inspirationmutz.com
©Copyright 2014
ITH Heart Potholders is copyrighted by Ursula Lamb. You may not transfer, copy, share, include in other
collections, or sell these designs without written permission from Ursula Lamb. To do so is in direct violation of
national and international copyright laws
Please DO NOT copy these designs for anybody else. That is called sharing and not only against
the law and considered copyright infringement but also unfair towards the designer. Inspiration
Mutz Designs are all manually digitized and involve many hours of planning and work before the
finished product / project can be seen and enjoyed. So, be fair – don’t share.
Please note that I do not work according to certain brands of thread - hence you will not find color
codes or brand names here - rather a description.
‘Machine stop colors’ are only there to make the machine stop to enable you to perform certain
tasks. You can thread any color suitable.
Best Chef
Color Changes
1. Machine Stop Color 1
2. Machine Stop Color 2
3. Machine Stop Color
4. Brown Medium
5. Machine Stop Color 1
6. Machine Stop Color 2
7. Machine Stop Color 1
8. Machine Stop Color 2
9. Machine Stop Color 1
10. Machine Stop Color 2
11. Machine Stop Color 1
12. Machine Stop Color 2
13. Machine Stop Color 1
14. Machine Stop Color 2
15. Machine Stop Color 1
16. Machine Stop Color 2
17. Machine Stop Color
18. Blue Medium
19. Brown Light
20. Beige Soft
21. Machine Stop Color
----------
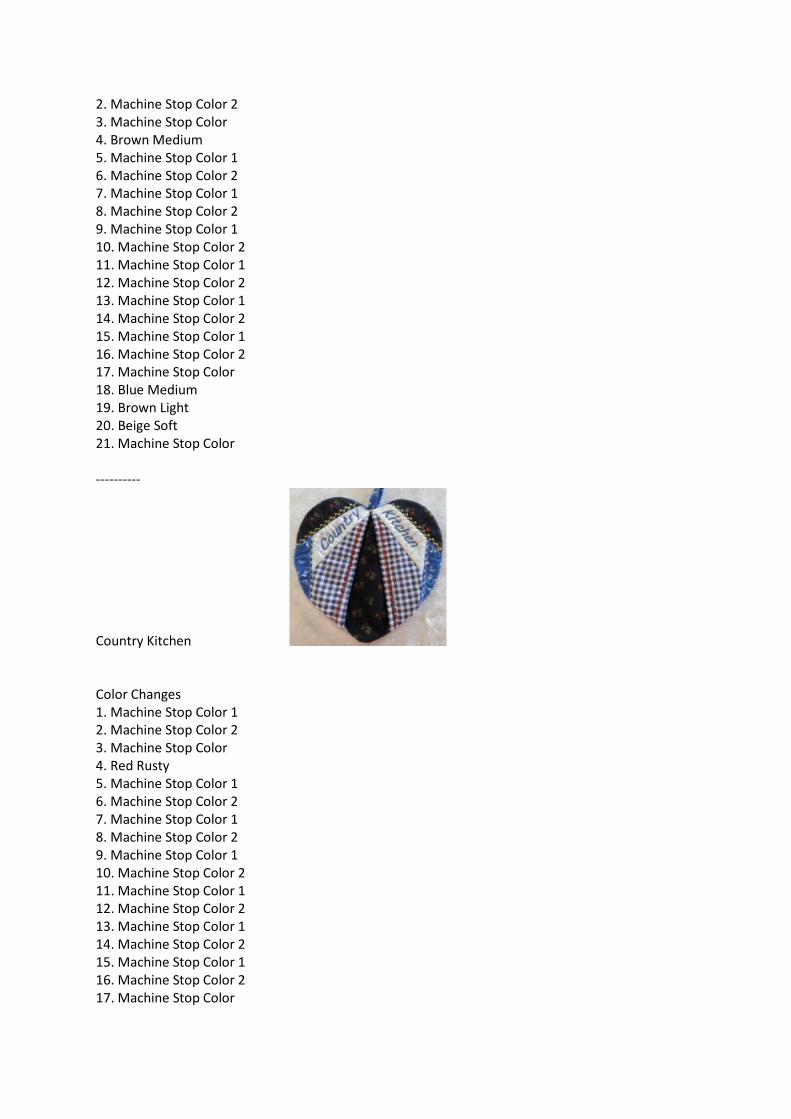
Country Kitchen
Color Changes
1. Machine Stop Color 1
2. Machine Stop Color 2
3. Machine Stop Color
4. Red Rusty
5. Machine Stop Color 1
6. Machine Stop Color 2
7. Machine Stop Color 1
8. Machine Stop Color 2
9. Machine Stop Color 1
10. Machine Stop Color 2
11. Machine Stop Color 1
12. Machine Stop Color 2
13. Machine Stop Color 1
14. Machine Stop Color 2
15. Machine Stop Color 1
16. Machine Stop Color 2
17. Machine Stop Color

18. Blue Medium
19. White
20. Yellow Dark
21. Machine Stop Color
----------
Happy Home
Color Changes
1. Machine Stop Color 1
2. Machine Stop Color 2
3. Machine Stop Color
4. Pink Dusty
5. Machine Stop Color 1
6. Machine Stop Color 2
7. Machine Stop Color 1
8. Machine Stop Color 2
9. Machine Stop Color 1
10. Machine Stop Color 2
11. Machine Stop Color 1
12. Machine Stop Color 2
13. Machine Stop Color 1
14. Machine Stop Color 2
15. Machine Stop Color 1
16. Machine Stop Color 2
17. Machine Stop Color
18. Green Moss
19. Red Rusty
20. Green Light
21. Machine Stop Color
----------
Home Made

Color Changes
1. Machine Stop Color 1
2. Machine Stop Color 2
3. Machine Stop Color
4. White
5. Machine Stop Color 1
6. Machine Stop Color 2
7. Machine Stop Color 1
8. Machine Stop Color 2
9. Machine Stop Color 1
10. Machine Stop Color 2
11. Machine Stop Color 1
12. Machine Stop Color 2
13. Machine Stop Color 1
14. Machine Stop Color 2
15. Machine Stop Color 1
16. Machine Stop Color 2
17. Machine Stop Color
18. Black
19. Red Warm
20. Red Rusty
21. Machine Stop Color
----------
Hot Stuff
Color Changes
1. Machine Stop Color 1
2. Machine Stop Color 2
3. Machine Stop Color
4. Black
5. Machine Stop Color 1
6. Machine Stop Color 2
7. Machine Stop Color 1
8. Machine Stop Color 2
9. Machine Stop Color 1
10. Machine Stop Color 2
11. Machine Stop Color 1
12. Machine Stop Color 2
13. Machine Stop Color 1
14. Machine Stop Color 2
15. Machine Stop Color 1

16. Machine Stop Color 2
17. Machine Stop Color
18. Green Sage
19. Pink Dusty
20. White
21. Machine Stop Color
----------
I Love Cooking
Color Changes
1. Machine Stop Color 1
2. Machine Stop Color 2
3. Machine Stop Color
4. Blue Soft
5. Machine Stop Color 1
6. Machine Stop Color 2
7. Machine Stop Color 1
8. Machine Stop Color 2
9. Machine Stop Color 1
10. Machine Stop Color 2
11. Machine Stop Color 1
12. Machine Stop Color 2
13. Machine Stop Color 1
14. Machine Stop Color 2
15. Machine Stop Color 1
16. Machine Stop Color 2
17. Machine Stop Color
18. Yellow Dark
19. Green Moss
20. Pink Dusty
21. Machine Stop Color
1) Pre-cut your fabric as per the layouts below. 2) Print and cut out the half-heart template shape supplied 3) Fold a piece of low loft (thin) batting in half, pin the template on top and cut out the shape as is – no seam allowance to be added.

Take the 2 pieces of pre-cut fabric (2(2(2(2) ) ) ) fold in half and press. Spray the heart-halves with a tiny bit of 505 and place inside the folded fabric – leaving an even distance to the edge at top and bottom and as close as possible to the fold. Fold over and slightly press with the palm of your hand. VERY tightly hoop a layer of WSS (water soluble stabilizer such as Vilene) and stitch color 1, the placement indicator for the 2 heart halves. Use the sandwiched half you prepared for the left side, accurately place with the folded
edge to meet the indication line. Hold in place and stitch color 2. Repeat procedure with the right side of the prepared half heart shape. Stitch in place with color 3

Stitch color 4 . Stitch color 5 – the indication line for your next piece of pre-cut fabric (3(3(3(3)))) Place fabric wrong side facing you and one long raw edge just covering the indication line and with a small seam allowance to both sides – stitch color 6.

Fold fabric over and finger press – repeat with opposite side (colors 7 and 8) Trim away excess fabric to reduce bulk. Hold fabric down and stitch color 9 – place next pre-cut piece of fabric (4(4(4(4)))) as done before, fold over and stitch in place with color 10. Repeat with opposite side (colors 11 and 12)

Now place your next 2 pieces of pre-cut fabric (5(5(5(5)))) – colors 13 – 16. Stitch color 17 – all placed fabric pieces will now be tacked down. Make sure all fabric lays nice and flat – have a flat article ready (seam pusher works well) for the areas were needle and food could get hooked .

Carry on stitching until last color is next Remove hoop from machine and place on a flat surface – back of hoop facing you: Place 1 piece of pre-cut fabric (lining) (1) (1) (1) (1) and place it wrong side facing you over the back of your hoop – make sure all embroidery is covered – fix with a little 505 spray. Turn hoop around – press inside hoop with fingers to make sure the fabric at the back is not coming off.

Create a loop for the hanger ad place it as shown here (use cello tape to hold in place) or alternatively attached it later with some stitches by hand. Lastly take the 2nd piece of pre-cut fabric (backing) (1)(1)(1)(1) – cut same size from batting or insulated lining (Insul- Bright for example) and fix it to the left side of the fabric with a little 505 spray. Place into hoop with batting side facing you – make sure all embroidery is 100% covered – Hold down and stitch last color. Remove work from hoop and trim away all excess batting/fabric – use a seam pusher for curves. Leave a small seam allowance along the open area.

Turn inside out and stitch the opening closed with a few slip stitches by hand. Rinse out all WSS in warm water – change water several times and leave project in water for some hours – add a little fabric softener if you like. Dry flat. Once dry turn potholder to wrong side – remove all loose thread and finish off by also slipstitching the inner section of the opening closed. Turn back to right side – and your project is done !


Best wishes Ursula
