heirloom tables: 3 designs from one master...
TRANSCRIPT
Plans N O Ww w w . p l a n s n o w . c o m
®
THANK YOU!You have successfully downloaded your FREE PlansNOW.com woodworking plan.
Clear printer memory. If you are unable to print this document, turn off your printer for at least 15seconds and try again.
Get advanced printer help. Visit Adobe Support for instructions in troubleshooting commonprinter problems. www.adobe.com/support/techdocs/150d6.htm
Tips for Trouble-Free Printing
Craftsman Furniture PlansBuild the same distinctive fea-tures from the early1900s.
Bedroom Furniture PlansBeds, dressers, armoires, cribs,cradles, and more!
Workbench PlansSound woodworking starts with asolid workbench.
Shop Jig PlansGet the most from your tools witheasy-to-build shop jigs.
Go to Page 1
Gazebo & Arbor PlansMake outdoor living more enjoy-able this summer!
Outdoor Furniture PlansEasy-to-build projects using aminimum of power tools.
Playhouse & Shed PlansEverything you'll need for a kid'ssummer entertainment.
A Plan for Every Project! See more than 250 Plans at PlansNOW.com
Home Improvement PlansSave hundreds of dollars inremodeling when you DIY.
Visit us at www.PlansNOW.com
>>
From Woodsmith magazineAll rights reserved
page 1 of 18 ©2004 August Home PublishingOne copy for personal use. Other copies prohibited.
Plans N O Ww w w . p l a n s n o w . c o m
®
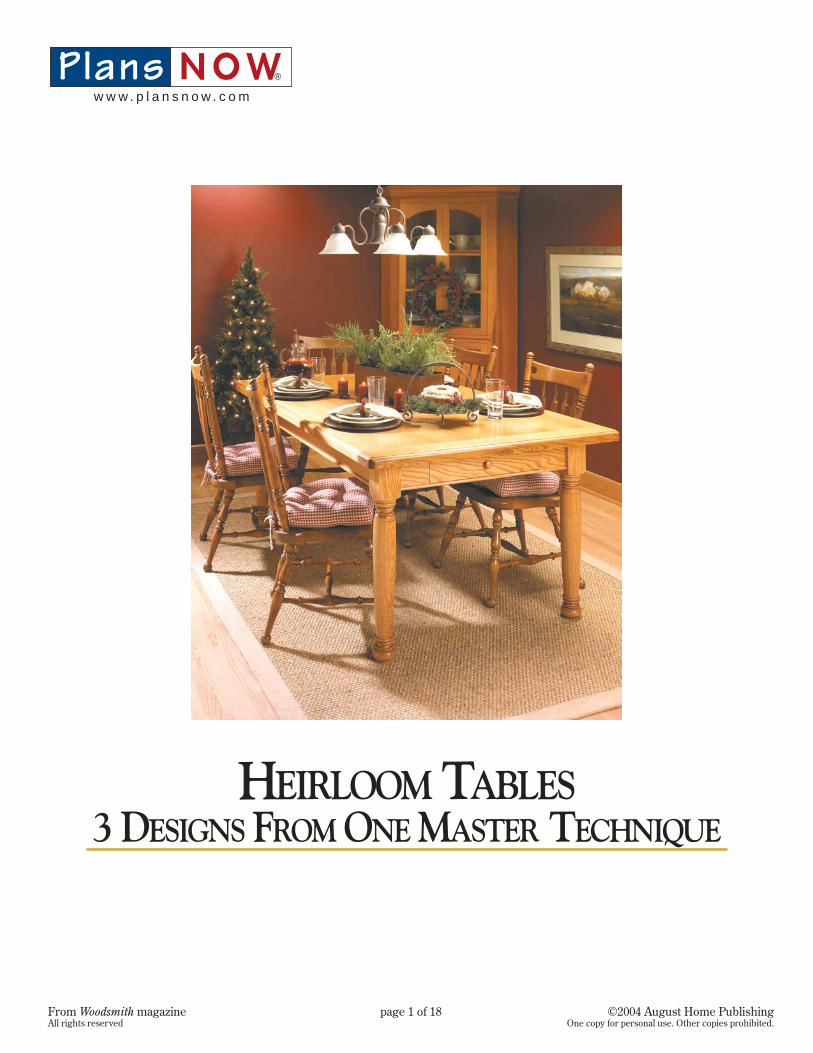
HEIRLOOM TABLES3 DESIGNS FROM ONE MASTER TECHNIQUE
From Woodsmith magazineAll rights reserved
page 2 of 18 ©2004 August Home PublishingOne copy for personal use. Other copies prohibited.
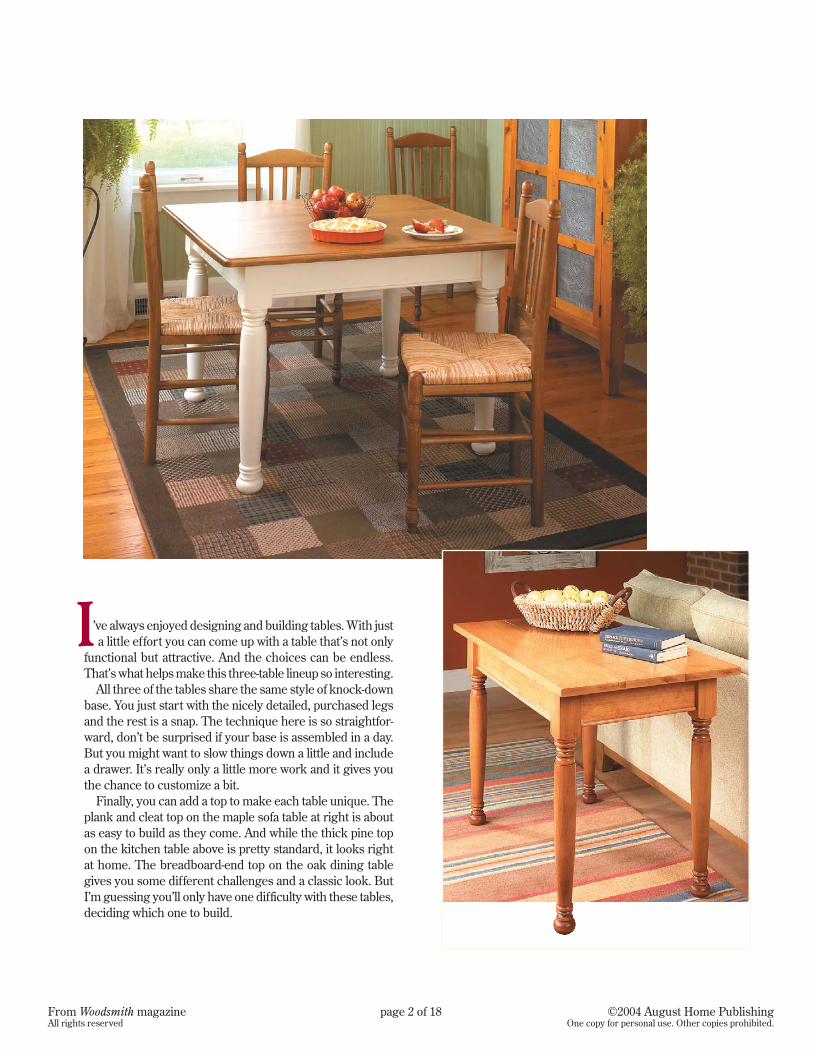
’ve always enjoyed designing and building tables. With justa little effort you can come up with a table that’s not only
functional but attractive. And the choices can be endless.That’s what helps make this three-table lineup so interesting.
All three of the tables share the same style of knock-downbase. You just start with the nicely detailed, purchased legsand the rest is a snap. The technique here is so straightfor-ward, don’t be surprised if your base is assembled in a day.But you might want to slow things down a little and includea drawer. It’s really only a little more work and it gives youthe chance to customize a bit.
Finally, you can add a top to make each table unique. Theplank and cleat top on the maple sofa table at right is aboutas easy to build as they come. And while the thick pine topon the kitchen table above is pretty standard, it looks rightat home. The breadboard-end top on the oak dining tablegives you some different challenges and a classic look. ButI’m guessing you’ll only have one difficulty with these tables,deciding which one to build.
I

From Woodsmith magazineAll rights reserved
page 3 of 18 ©2004 August Home PublishingOne copy for personal use. Other copies prohibited.
1 TECHNIQUE — 3 TABLE BASESOne of the nicest things about theknock-down technique I used forthese tables is that the process is soeasy. And it can be used on just aboutany size or style of table. And as youcan see from the photos on pages 1and 2, the results can’t be beat.
The three tables that I built usingthe knock-down technique have basesthat are all pretty much identical instyle. I just varied the sizes of thebases (and legs) and then I added adetail or two for interest. Before youget started on one of the tables, you’llwant to read over the article on pages
11 and 12. This will give you all thebasics on the knockdown technique,so I won’t get into the constructiondetails of each base. I’ll just try topoint out some of the differences andthe finer points.
THE BASE. Fig. 1 shows the break-down of the base for the maple sofatable. All three of the bases followthis same design. Only the dimen-sions and one minor, but important,detail are different.
DADO POSITION. If you take a closelook at Figs. 1a and 1b, you’ll see thatthe position of the dadoes in the
aprons is different. The reason issimple. I used nice, purchased legsfor all three tables. They weren’texpensive and they look great. (Forinformation on turning the legs, seesources on page 18.) But in order tokeep the legs in scale with the table,I used smaller legs for the sofa table.(The sofa table legs are 23/4" squarewhile the legs for the dining and thekitchen table are 31/2" square.) Ratherthan change the size of the cornerbrackets for the sofa table, it mademore sense to just reposition thedadoes in the aprons.
a.
b.
F
E
D
D
D
F
C
C
B
B
A
A
A
A
END BEADTRIM
SIDE BEADTRIM
CORNERBRACKET
APRONEND
LEGAPRON
SIDE
NOTE: Allfour cornerbrackets are
identical
NOTE: Refer to articleon pages 11 and 12 forinstructions on making
corner brackets
NOTE: For kitchenand dining tabledimensions, see
materials list
NOTE:Turnedlegs can bepurchasedfrommail-ordersupplier,see page 18
NOTE: Beadtrim is
added toapron after
base isassembled
!/2"
1!/4"
Cornerbrackets arefastened toapron withwoodscrews
Chamfer on leg allowseasy installationof hanger bolt
4!/2"
1"
29"
1"-wide dadocaptures tongueon corner bracket
2a.
3a.
1
For information onthe finishes usedon the heirloomtables turn to page15.

From Woodsmith magazineAll rights reserved
page 4 of 18 ©2004 August Home PublishingOne copy for personal use. Other copies prohibited.
The dadoes that hold the cornerbrackets are 1" wide (Fig. 2a). Thismeans you’ll have to make a couple ofpasses with a dado blade to get the fullwidth. You can set the fence for thefirst pass as shown in Fig. 2. And aftereach apron piece is cut with this set-ting, just reposition the fence to endup with a 1"-wide dado.
FASTENER GROOVE. When the timecame to fasten the top to the frame, Iwanted it to be quick and easy. Toprepare for that, I cut a groove aroundthe top, inside edges of the apronpieces (Figs. 3 and 3a) that will holdmetal tabletop fasteners.
WOODSCREWS AND ANCHOR BOLTS. Afteryou’ve made the corner blocks (referto page 12), you’re ready to put it alltogether (Fig. 4). About the only toolsyou’ll need for the assembly are adrill, a screwdriver, and a wrench.The article on pages 11 and 12 gives
you a play by play on this. And you’llfind some tips on installing anchorbolts on page 16. It’s a nice sight whenyou tighten the nuts on the anchorbolts and the legs and the apron closeup tightly.
ADD A BEAD. I thought the apronneeded just a little detail and a simple
way to accomplish this was to add 1/2"bead molding around the bottomedge (Figs. 4 and 4a). You can makethe bead molding with a 1/4" round-over bit in the router table. Then it’sjust a matter of cutting the pieces tofit snug between the legs and gluingthem in place.
BEADTRIM
NOTE: Bead trimis made onrouter table
NOTE: Turn to page16 for tips on installing
hanger bolts
!/2"
Bead trimcut to fitbetween
legs
#8 x 1 "Fh woodscrews
!/2 %/16" x 4" hanger boltw/ nut and washer
NOTE: Pilotholes for
hanger boltsare drilled
in legs
4a.
SOFATABLE
KITCHENTABLE
DININGTABLE
16"
30"
30"
30"
30"
58"
BBCC
F EE
D D D D
F
1" x 6 - 96" Maple (5.4 Bd. Ft.)!/2"
1" x 5" - 36" Maple (1.6 Bd. Ft.)
B B C
C
F
F
E
D D D D
1" x 6 - 96" Pine (5.4 Bd. Ft.)!/2"
1" x 6 - 96" Pine (5.4 Bd. Ft.)!/2"
BC
F E
D D D D
1" x 6 - 96" Red Oak (Two boards @ 5.4 Bd. Ft. each)!/2"
1" x 5" - 36" Red Oak (1.6 Bd. Ft.)
SOFA TABLE BASEA Legs (4) 2#/4 x 2#/4 - 29B Apron Ends (2) 1 x 4!/2 - 16C Apron Sides (2) 1 x 4!/2 - 30D Corner Brackets (4) 1 x 4!/2 - 7!/8
E End Bead Trim (2) !/2 x 1!/4 - 16F Side Bead Trim (2) !/2 x 1!/4 - 30• (16) #8 x 1!/2” Fh Woodscrews• (8) %/ 1 6” x 4” Hanger Bolts w/Nuts &
Washers
KITCHEN TABLE BASEA Legs (4) 3!/2 x 3!/2 - 29B Apron Ends (2) 1 x 4!/2 - 30C Apron Sides (2) 1 x 4!/2 - 30D Corner Brackets (4) 1 x 4!/2 - 7!/8
E End Bead Trim (2) !/2 x 1!/4 - 30F Side Bead Trim (2) !/2 x 1!/4 - 30• (16) #8 x 1!/2” Fh Woodscrews• (8) %/ 1 6” x 4” Hanger Bolts w/Nuts &
Washers
DINING TABLE BASEA Legs (4) 3!/2 x 3!/2 - 29B Apron Ends (2) 1 x 4!/2 - 30C Apron Sides (2) 1 x 4!/2 - 58D Corner Brackets (4) 1 x 4!/2 - 7!/8
E End Bead Trim (2) !/2 x 1!/4 - 30F Side Bead Trim (2) !/2 x 1!/4 - 58• (16) #8 x 1!/2” Fh Woodscrews• (8) %/ 1 6” x 4” Hanger Bolts w/Nuts &
Washers
MATERIALS, SUPPLIES, & CUTTING DIAGRAMS
From Woodsmith magazineAll rights reserved
page 5 of 18 ©2004 August Home PublishingOne copy for personal use. Other copies prohibited.
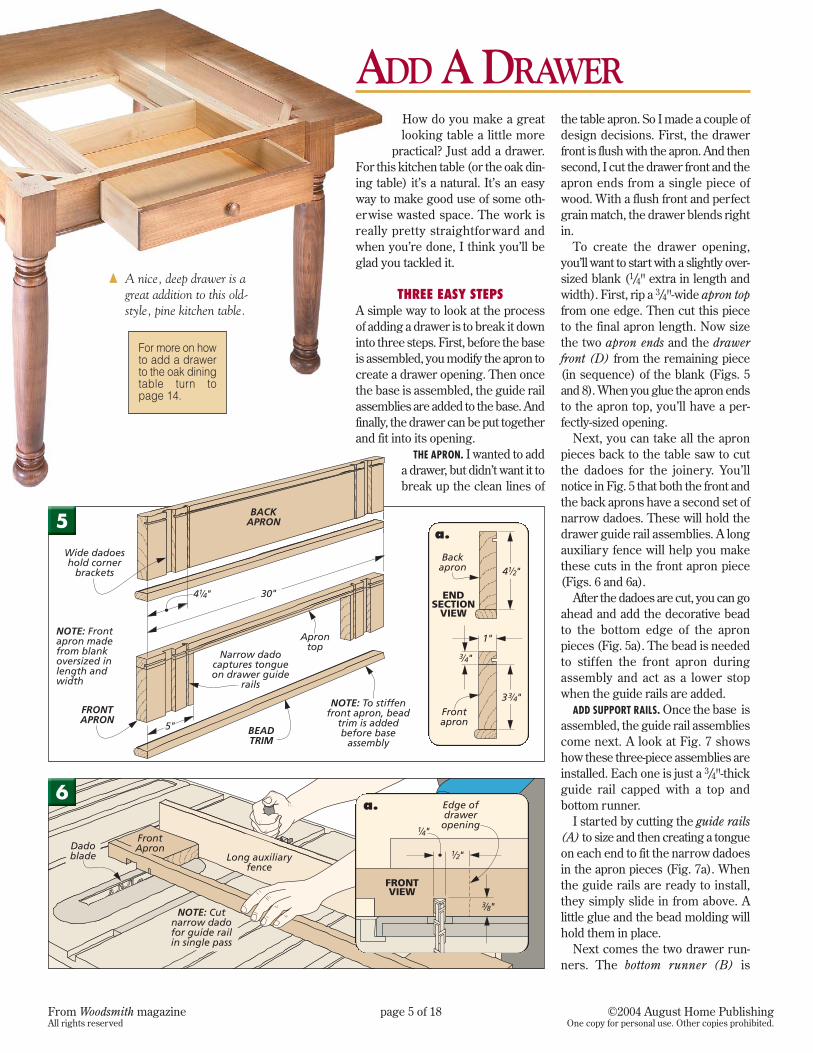
How do you make a greatlooking table a little more
practical? Just add a drawer.For this kitchen table (or the oak din-ing table) it’s a natural. It’s an easyway to make good use of some oth-erwise wasted space. The work isreally pretty straightforward andwhen you’re done, I think you’ll beglad you tackled it.
THREE EASY STEPSA simple way to look at the processof adding a drawer is to break it downinto three steps. First, before the baseis assembled, you modify the apron tocreate a drawer opening. Then oncethe base is assembled, the guide railassemblies are added to the base. Andfinally, the drawer can be put togetherand fit into its opening.
THE APRON. I wanted to adda drawer, but didn’t want it tobreak up the clean lines of
the table apron. So I made a couple ofdesign decisions. First, the drawerfront is flush with the apron. And thensecond, I cut the drawer front and theapron ends from a single piece ofwood. With a flush front and perfectgrain match, the drawer blends rightin.
To create the drawer opening,you’ll want to start with a slightly over-sized blank (1/4" extra in length andwidth). First, rip a 3/4"-wide apron topfrom one edge. Then cut this pieceto the final apron length. Now sizethe two apron ends and the drawerfront (D) from the remaining piece(in sequence) of the blank (Figs. 5and 8). When you glue the apron endsto the apron top, you’ll have a per-fectly-sized opening.
Next, you can take all the apronpieces back to the table saw to cutthe dadoes for the joinery. You’llnotice in Fig. 5 that both the front andthe back aprons have a second set ofnarrow dadoes. These will hold thedrawer guide rail assemblies. A longauxiliary fence will help you makethese cuts in the front apron piece(Figs. 6 and 6a).
After the dadoes are cut, you can goahead and add the decorative beadto the bottom edge of the apronpieces (Fig. 5a). The bead is neededto stiffen the front apron duringassembly and act as a lower stopwhen the guide rails are added.
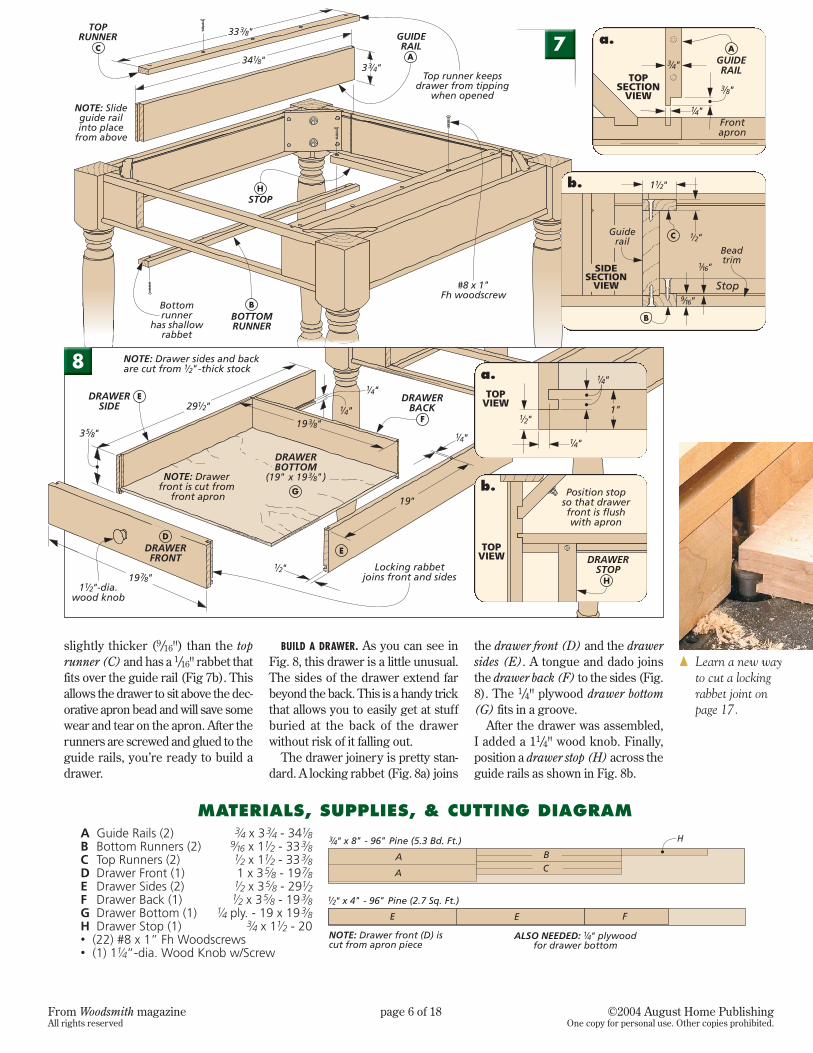
ADD SUPPORT RAILS. Once the base isassembled, the guide rail assembliescome next. A look at Fig. 7 showshow these three-piece assemblies areinstalled. Each one is just a 3/4"-thickguide rail capped with a top andbottom runner.
I started by cutting the guide rails(A) to size and then creating a tongueon each end to fit the narrow dadoesin the apron pieces (Fig. 7a). Whenthe guide rails are ready to install,they simply slide in from above. Alittle glue and the bead molding willhold them in place.
Next comes the two drawer run-ners. The bottom runner (B) is
a.6
5a.
{ A nice, deep drawer is agreat addition to this old-style, pine kitchen table.
For more on howto add a drawerto the oak diningtable turn topage 14.
ADD A DRAWER
From Woodsmith magazineAll rights reserved
page 6 of 18 ©2004 August Home PublishingOne copy for personal use. Other copies prohibited.
slightly thicker (9/16") than the toprunner (C) and has a 1/16" rabbet thatfits over the guide rail (Fig 7b). Thisallows the drawer to sit above the dec-orative apron bead and will save somewear and tear on the apron. After therunners are screwed and glued to theguide rails, you’re ready to build adrawer.
BUILD A DRAWER. As you can see inFig. 8, this drawer is a little unusual.The sides of the drawer extend farbeyond the back. This is a handy trickthat allows you to easily get at stuffburied at the back of the drawerwithout risk of it falling out.
The drawer joinery is pretty stan-dard. A locking rabbet (Fig. 8a) joins
the drawer front (D) and the drawersides (E). A tongue and dado joinsthe drawer back (F) to the sides (Fig.8). The 1/4" plywood drawer bottom(G) fits in a groove.
After the drawer was assembled,I added a 11/4" wood knob. Finally,position a drawer stop (H) across theguide rails as shown in Fig. 8b.
a.
H
C
B
A
GUIDERAIL
STOP
BOTTOMRUNNER
TOPRUNNER
NOTE: Slideguide railinto place
from above
Bottomrunner
has shallowrabbet
Top runner keepsdrawer from tipping
when opened
#8 x 1"Fh woodscrew
34!/8"
33#/8"
3#/4"
8
b.
a.
{ Learn a new wayto cut a lockingrabbet joint onpage 17.
NOTE: Drawer front (D) iscut from apron piece
ALSO NEEDED: plywoodfor drawer bottom
!/4"
A
H
A
E FE
#/4" x 8" - 96" Pine (5.3 Bd. Ft.)
!/2" x 4" - 96" Pine (2.7 Sq. Ft.)
BC
A Guide Rails (2) #/4 x 3#/4 - 34!/8B Bottom Runners (2) (/16 x 1!/2 - 33#/8C Top Runners (2) !/2 x 1!/2 - 33#/8D Drawer Front (1) 1 x 3%/8 - 19&/8E Drawer Sides (2) !/2 x 3%/8 - 29!/2F Drawer Back (1) !/2 x 3%/8 - 19#/8G Drawer Bottom (1) !/4 ply. - 19 x 19#/8H Drawer Stop (1) #/4 x 1!/2 - 20• (22) #8 x 1” Fh Woodscrews• (1) 1!/4”-dia. Wood Knob w/Screw
MATERIALS, SUPPLIES, & CUTTING DIAGRAM
b.
7

From Woodsmith magazineAll rights reserved
page 7 of 18 ©2004 August Home PublishingOne copy for personal use. Other copies prohibited.
One of the most noticeable parts of atable is, of course, the top. An easyway to give a table its own interestinglook is with a top that’s a bit unique.So for each table base, I tried a littledifferent approach to the top.
For the maple sofa table I triedsomething “old” — a top made from
individual boards fastened togetherwith cleats and woodscrews. It’s agreat style and it’s easy to build.
A kitchen table needs a large, func-tional (and easily cleaned) surfacethat will hold up to some heavy use.A top glued up from thick stockinvolves a little bit of work but will
look great on this classic table andstand the test of time.
The breadboard-end top on thedining table has a more elegant look.You might think it would be a chal-lenge. But don’t worry, with a ply-wood center panel and simple joinery,it goes together easily.
I would wager a guess that most of theearliest tabletops weremade with plank andcleat construction.
And that’s one reasonwhy I chose this technique
for the maple sofa table. Iwanted to give this table an old “tav-
ern” look. And I should also mentionthat this type of top is really appealingfrom a building standpoint. It reallydoesn’t require a lot of exacting work.So making this style of tabletop lookgood is an easy job.
THREE PLANKS. A glance at Fig. 9shows how this top goes together.
You can keep the glue bottle on theshelf. All you have here are three wideplanks fastened together with acouple of cleats and woodscrews.
The first task is to cut the threeplanks (A) to size. Why three planksand not two or four? Well, traditionallywide boards were used for this typeof top. It only made sense — the widerthe boards the fewer the numberneeded and the fewer the spacesbetween them. So I used wide stockand the two “joint lines” give the topjust the right look.
SAND AND EASE THE EDGES. Once theplanks are ready, you can pick upsome sandpaper. Since the planks arepre-cut to size and won’t be gluedtogether you can do a lot of thesanding before assembly. I made sureto knock off all the sharp edges andcorners of each plank. I wanted thelook of three individual boards, notone smooth top.
ATTACH THE CLEATS. With the planksprepared, they can be connected tomake a top. The two cleats (B) canbe cut to size from 3/4" stock and thenthe countersunk shank holes arepredrilled (Figs. 9 and 9a). Now justcarefully line up the planks (youmight want to tighten a clamp acrossthem) and position the cleats (Fig.9a). Use the predrilled shankholes todrill some pilot holes in the planksand add the woodscrews. Don’t betempted to glue the planks to thecleats, they need to be able to movewith changes in the humidity.
FASTEN IT TO THE BASE. That’s the longand short of it. Finally I used a handfulof metal tabletop fasteners to hold thetop to the base (Fig. 9b).
3 CLASSIC TABLETOPS
9
a.
b.
Plank And Cleat Top
{ A simple plank andcleat top creates anage-old look.

From Woodsmith magazineAll rights reserved
page 8 of 18 ©2004 August Home PublishingOne copy for personal use. Other copies prohibited.
The base that I built for the pinekitchen table has a solid, old farm-house feel to it. So it needed a top tomatch. The choice was pretty obvi-ous. A solid top, glued up out of thick,pine stock (1"), would look right athome on this frame.
A WIDE GLUEUP IN THREE PARTS. The topthat I built for this table was 44"square. Honestly, it’s one of the widestglueups I’ve ever had to do. So to doa good job of it, I used a couple ofsimple tricks. Fig. 10shows the first. I cut allthe boards needed torough length and then gluedthem into three narrower panels.Smaller glueups are a lot easier tohandle and the process is a bit morerelaxed. You only have one or twojoints at a time to worry about fittingand lining up.
Once the individual sections areready, you can complete the job bygluing them together. But keeping alarge panel flat during this processtakes a little doing. Fig. 11 shows asimple solution. A couple of long, widecauls clamped across the ends of theglueup will keep it perfectly flat whilethe glue dries.
TRIM THE TOP. I was pleased with howmy rough top turned out. After ashort spell with the belt sander, it wasready to be trimmed to size. But notmany table saws will accommodatea panel this size, so I resorted to acircular saw with a shop-made guidefor this job. You can find more on thison page 16.
THE IMPORTANT DETAILS. Once the topis cut to size, the hard part is behindyou. All you have left are a couple ofsimple but important tasks.
A kitchen table is certainly going toget a lot of use and abuse so any sharpedges and corners wouldn’t hold upfor long. You can easily solve thisproblem and add a couple of nicedetails at the same time.
First, I picked up a jigsaw and cuta 1" radius on all four corners of thetop (Fig. 10a). And then after theywere sanded smooth, I used a hand-held router to add a profile to both
the upper and lower edges of the top.The lower edge can simply be easedwith 1/8" roundover. The upper edgegets a classic, ogee profile as shownin Fig. 12a.
Attaching the top is the last step.You should have an even overhangon all four sides of the base (Fig. 10b).And if you work with the table upsidedown, attaching the tabletop fastenersgoes a lot smoother.
A
A
A
NOTE: Top istrimmed to size
after final glueup
NOTE: For moreinformation on trimminglarge panels, see page 16
NOTE: Beginassembling topby gluing boardsinto three panels
1"
10
11 12
b.
a.
a.
A Glued Slab Top> This top,
glued up fromthick pine, is the per-fect match for the solidkitchen table base.
From Woodsmith magazineAll rights reserved
page 9 of 18 ©2004 August Home PublishingOne copy for personal use. Other copies prohibited.
a. b. c.
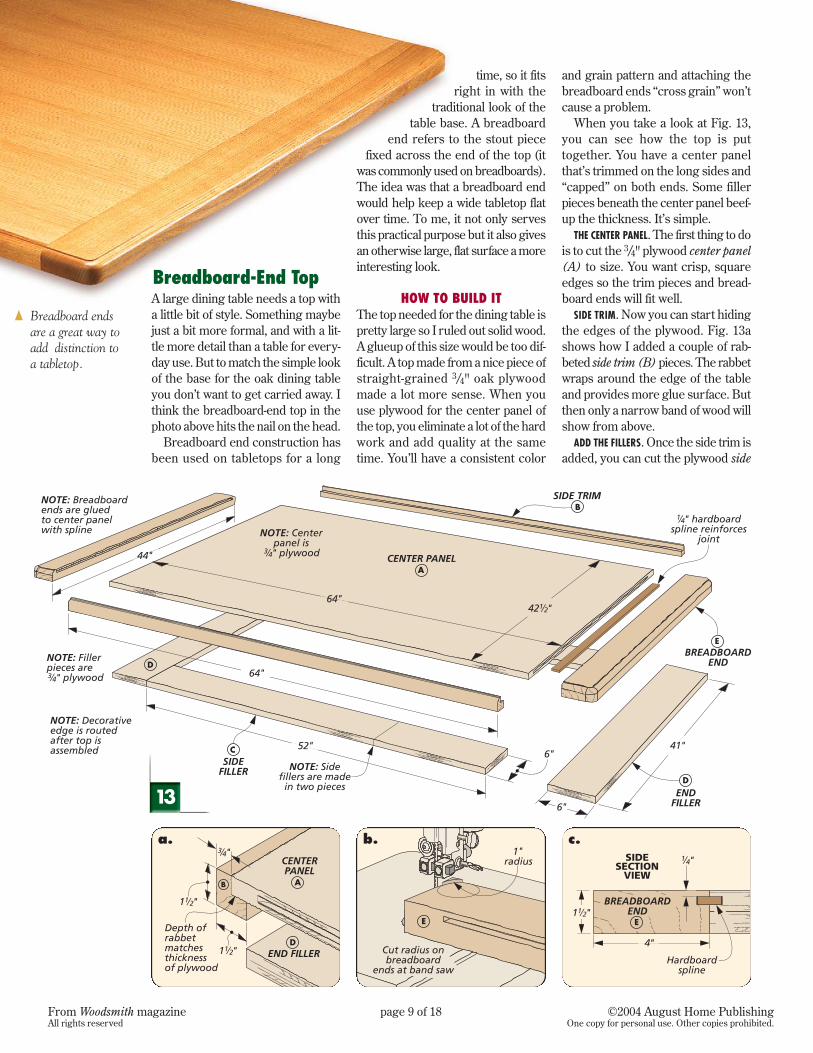
A large dining table needs a top witha little bit of style. Something maybejust a bit more formal, and with a lit-tle more detail than a table for every-day use. But to match the simple lookof the base for the oak dining tableyou don’t want to get carried away. Ithink the breadboard-end top in thephoto above hits the nail on the head.
Breadboard end construction hasbeen used on tabletops for a long
time, so it fitsright in with the
traditional look of thetable base. A breadboard
end refers to the stout piecefixed across the end of the top (it
was commonly used on breadboards).The idea was that a breadboard endwould help keep a wide tabletop flatover time. To me, it not only servesthis practical purpose but it also givesan otherwise large, flat surface a moreinteresting look.
HOW TO BUILD ITThe top needed for the dining table ispretty large so I ruled out solid wood.A glueup of this size would be too dif-ficult. A top made from a nice piece ofstraight-grained 3/4" oak plywoodmade a lot more sense. When youuse plywood for the center panel ofthe top, you eliminate a lot of the hardwork and add quality at the sametime. You’ll have a consistent color
and grain pattern and attaching thebreadboard ends “cross grain” won’tcause a problem.
When you take a look at Fig. 13,you can see how the top is puttogether. You have a center panelthat’s trimmed on the long sides and“capped” on both ends. Some fillerpieces beneath the center panel beef-up the thickness. It’s simple.
THE CENTER PANEL. The first thing to dois to cut the 3/4" plywood center panel(A) to size. You want crisp, squareedges so the trim pieces and bread-board ends will fit well.
SIDE TRIM. Now you can start hidingthe edges of the plywood. Fig. 13ashows how I added a couple of rab-beted side trim (B) pieces. The rabbetwraps around the edge of the tableand provides more glue surface. Butthen only a narrow band of wood willshow from above.
ADD THE FILLERS. Once the side trim isadded, you can cut the plywood side
E
D
D
C
B
ACENTER PANEL
SIDE TRIM
BREADBOARDEND
ENDFILLER
SIDEFILLER
NOTE: Decorativeedge is routedafter top isassembled
NOTE: Fillerpieces are
plywood#/4"
NOTE: Sidefillers are made
in two pieces
NOTE: Centerpanel is
plywood#/4"
NOTE: Breadboardends are gluedto center panelwith spline
44"
52"
64"
64"42!/2"
41"
!/4" hardboardspline reinforces
joint
6"
6"
Breadboard-End Top
13
{ Breadboard endsare a great way toadd distinction toa tabletop.
From Woodsmith magazineAll rights reserved
page 10 of 18 ©2004 August Home PublishingOne copy for personal use. Other copies prohibited.
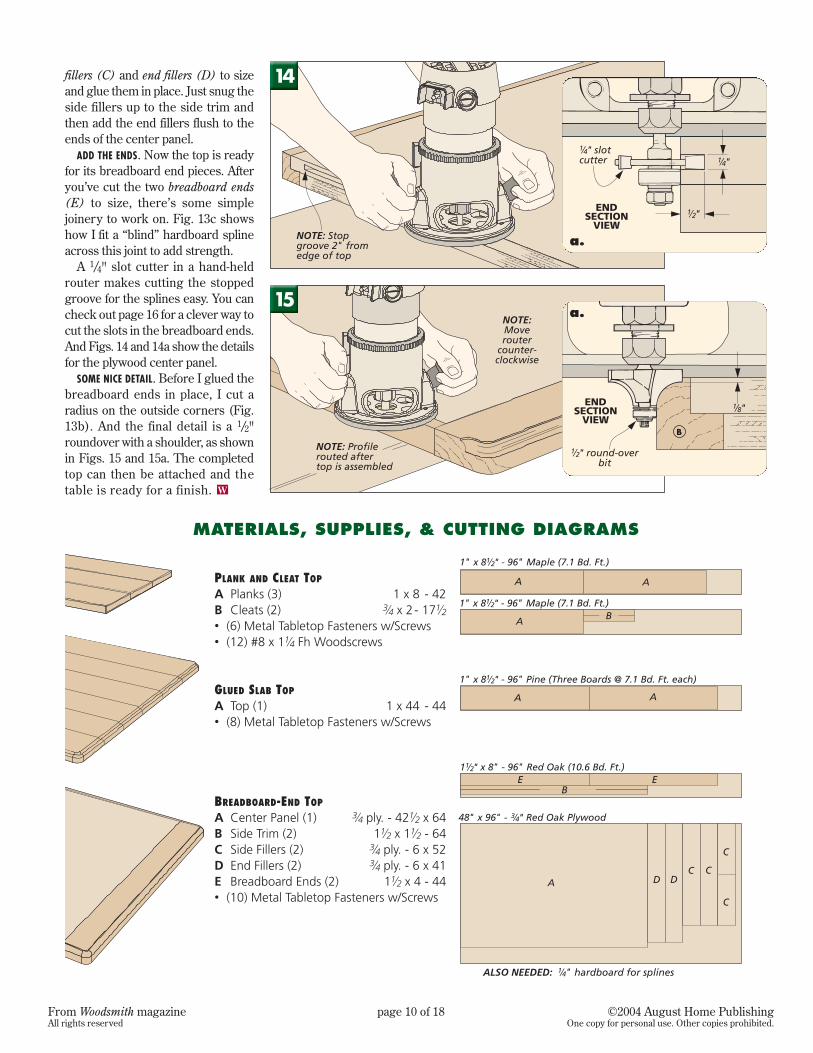
fillers (C) and end fillers (D) to sizeand glue them in place. Just snug theside fillers up to the side trim andthen add the end fillers flush to theends of the center panel.
ADD THE ENDS. Now the top is readyfor its breadboard end pieces. Afteryou’ve cut the two breadboard ends(E) to size, there’s some simplejoinery to work on. Fig. 13c showshow I fit a “blind” hardboard splineacross this joint to add strength.
A 1/4" slot cutter in a hand-heldrouter makes cutting the stoppedgroove for the splines easy. You cancheck out page 16 for a clever way tocut the slots in the breadboard ends.And Figs. 14 and 14a show the detailsfor the plywood center panel.
SOME NICE DETAIL. Before I glued thebreadboard ends in place, I cut aradius on the outside corners (Fig.13b). And the final detail is a 1/2"roundover with a shoulder, as shownin Figs. 15 and 15a. The completedtop can then be attached and thetable is ready for a finish. W
14
a.
15a.
1" x 8 - 96" Maple (7.1 Bd. Ft.)!/2"
1" x 8 - 96" Maple (7.1 Bd. Ft.)!/2"
1" x 8 - 96" Pine (Three Boards @ 7.1 Bd. Ft. each)!/2"
1 x 8" - 96" Red Oak (10.6 Bd. Ft.)!/2"
48" x 96" - Red Oak Plywood#/4"
ALSO NEEDED: !/4" hardboard for splines
A A
A
EE
DDCC
C
C
A
A A
B
B
PLANK AND CLEAT TOP
A Planks (3) 1 x 8 - 42B Cleats (2) #/4 x 2- 17!/2• (6) Metal Tabletop Fasteners w/Screws• (12) #8 x 1!/4 Fh Woodscrews
GLUED SLAB TOP
A Top (1) 1 x 44 - 44• (8) Metal Tabletop Fasteners w/Screws
BREADBOARD-END TOP
A Center Panel (1) #/4 ply. - 42!/2 x 64B Side Trim (2) 1!/2 x 1!/2 - 64C Side Fillers (2) #/4 ply. - 6 x 52D End Fillers (2) #/4 ply. - 6 x 41E Breadboard Ends (2) 1!/2 x 4 - 44• (10) Metal Tabletop Fasteners w/Screws
MATERIALS, SUPPLIES, & CUTTING DIAGRAMS

Chamfer insidecorner of leg
2Dado capturestongue on
corner bracket
#8 x 1 " Fhwoodscrews
!/2
%/16" x 4"hanger bolt
%/16" nutwith washer
NOTE: Corner bracketis made from 1" stock
#/4"
!/2"
1"
a.1
Leg
#/8"
45°
a.
raditional knock-down table con-struction has been around for a
long time. And once you try it, thereasons become obvious. First, it canreally simplify the joinery without sac-rificing strength. Second, it makesthe assembly of the frame a leisurelyprocess and pretty much foolproof.And last but not least, it allows you todisassemble a table into manageablepieces for moving or storage.
HOW IT WORKS At first glance, you’d be hard pressedto tell that a knock-down table wasn’tbuilt with mortise and tenon joinery.
But the key here is that there isn’tany joinery between the legs and theapron. On a traditional knock-downbase, stout, wood corner brackets arefixed between the apron pieces to cre-ate a rigid frame. Hanger boltsinserted into the legs mate with holesin the brackets (Fig. 1). And whenthe nuts are snugged down, the legsand apron are pulled into a tight,square base (Fig. 1a).
THE LEGS. The usual place to startthe joinery of a table base is with thelegs, and in this case it’s an easy job.All you need to do is to chamfer theinside, top corner of each leg as
shown in Figs. 2 and 2a. This servesa couple purposes. It’ll give you clear-ance for the corner brackets and aflat surface in which to install thehanger bolts. That’s it.
THE APRONS. The work on the apronsis almost as easy as the legs. You canget started by cutting them to width.And since you won’t be cutting anytenons on the ends of the aprons,their length will be the distance sep-arating the top ends of the legs. Justmake sure the apron ends are cleanand square.
To give the corner brackets abetter grip on the apron, I cut a wide
T
TRADITIONALTECHNIQUES
KNOCK-DOWNTABLE BASE
From Woodsmith magazineAll rights reserved
page 11 of 18 ©2004 August Home PublishingOne copy for personal use. Other copies prohibited.

From Woodsmith magazineAll rights reserved
page 12 of 18 ©2004 August Home PublishingOne copy for personal use. Other copies prohibited.
dado at each end of the apron pieces.These dadoes capture a 1"-widetongue on the ends of the cornerbrackets. The result is an extremelyrigid base (Fig. 1a).
MAKING THE CORNER BRACKETS. Withthe work completed on the legs andaprons, all you need now are thecorner brackets. And to ensure theframe ends up true and square, youwant all four brackets to be identical.But with a simple step-by-stepprocess, this isn’t difficult.
You can get started by cutting thefour bracket blocks to size from 1"stock (Fig. 3). Next, lay out all thecuts on just one block — your set-uppiece. You’ll use this piece to makeyour initial cuts. A stop block on themiter gauge will make duplicating thecuts in the other pieces a cinch.
FIRST CUT. Fig. 3 shows how to getstarted by cutting the short 45° miteron the outside face. Just sneak up onthe layout line, adjusting the stopblock as you go. When your cut isright on the line, you can flip the pieceend for end to make the opposite cut.Then cut the other pieces.
SECOND CUT. Now reset the stopblock to make the long 45° cut on theinside face using the same steps asbefore (Figs. 4 and 4a).
THE TONGUE. The final two cuts onthe brackets will form a V-notch andcomplete the tongue. Again, using astop block I first cut the inside face ofthe V-notch (Figs. 5 and 5a).
Now to complete the tongue, you’llhave to make the final cut from the
opposite side of the blade. If you takea look at Figs. 6 and 6a you’ll see howI made this cut. The long auxiliaryfence on the miter gauge makes itpossible. Remember that the goal isa snug fitting tongue, so check the fitin the dadoes as you sneak up to thelayout line.
HOLES. One more task and the baseis ready to assemble. Two oversizedholes drilled in each corner bracketwill hold the 5/16" hanger bolts.
ASSEMBLY. At this point you’re readyto put the pieces together. The boxbelow shows the simple steps to theassembly.
3
Cornerbracket
Start V-notchby cuttinginside face
Bladeat 45°
Stopblock
5 6
4
a.
END VIEW
1"
a.END VIEW
45°
a.
a.
EASY UPSIDE-DOWN ASSEMBLY
#8 x 1 "Fh woodscrew
!/2
Cornerbracket
Drill countersunkshank holes
%/16" drill bit
Hold leg tightlyin place to
drill pilot hole
Hanger bolt is"double-nutted"
and installedwith ratchet
1The base can go together corner bycorner. First, a bracket is fastened to
the aprons with woodscrews.3 Finally, the hanger bolts are installed.
Tightening down the nut draws theleg and apron tightly together.
2 Next, the predrilled holes in the cor-ner brackets are used to drill pilot
holes in the legs for the hanger bolts.
From Woodsmith magazineAll rights reserved
page 13 of 18 ©2004 August Home PublishingOne copy for personal use. Other copies prohibited.
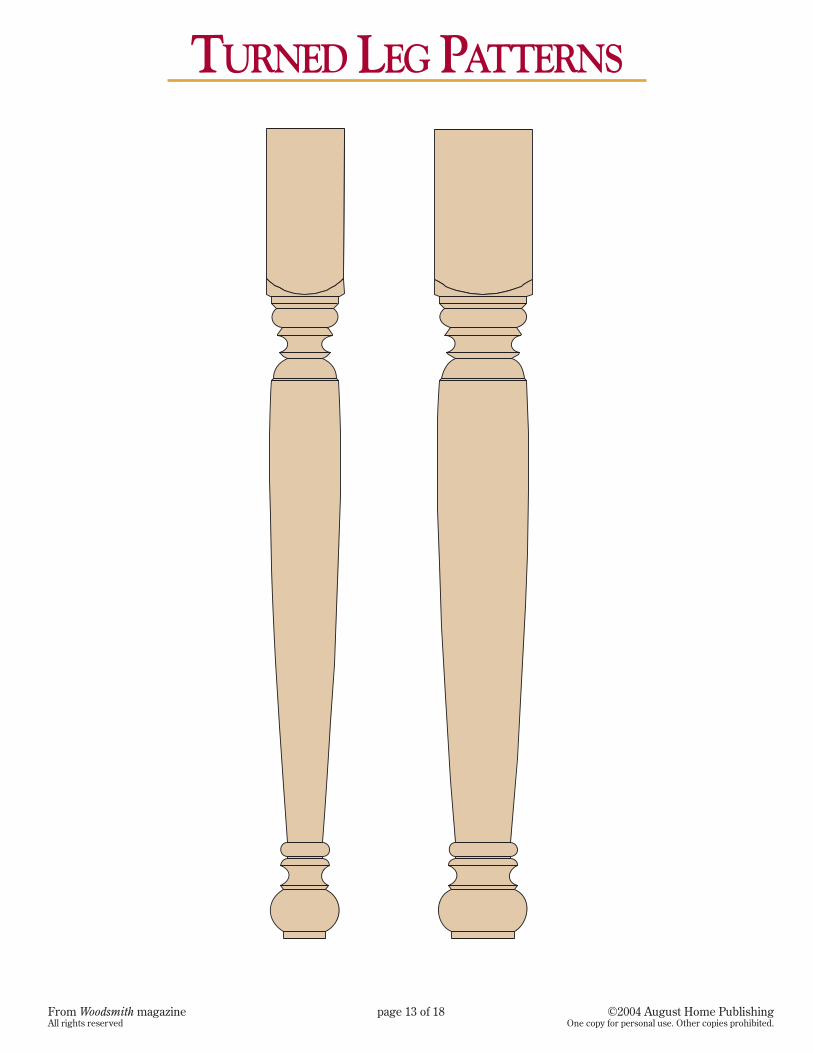
TURNED LEG PATTERNS

From Woodsmith magazineAll rights reserved
page 14 of 18 ©2004 August Home PublishingOne copy for personal use. Other copies prohibited.
DINING TABLE DRAWER OPTIONdding a couple of drawers to theoak dining table will make good
use of some extra space. You’ll havea convenient place to store placemats,linens or even serving utensils.
The process is just like thatdescribed for the pine kitchentable on pages 5 and 6. (You’llwant to read over these pages beforeyou start.) Only the dimensions ofsome of the pieces are different andon this table you’re adding a drawerat both ends. (You can also add adrawer to just one end of the table.)
DRAWER OPENINGS. You’ll begin bymodifying the two apron ends tocreate drawer openings. I startedwith two slightly oversized apronblanks. Then I cut an apron top, twoend pieces and a drawer front fromeach piece. Reassembling the apron
top and two ends will create theopening and the grain of the apronand drawer will appear seamless.
GUIDE RAIL ASSEMBLIES. Once the tablebase is assembled, the pieces for theguide rail assemblies can be cut tosize, joined and added to the base as
shown in Figs. 1 and 1a. BUILD THE DRAWERS. The final step is
to build the two drawers. These areidentical in size and construction tothe drawer in Fig. 8 on page 6. Whenthe drawers are completed, install thetwo stops(Fig 1b). W
NOTE: Guide railassemblies added
after base is assembled
NOTE: Runnersare glued and
screwed toguide rails
NOTE: Drawers areidentical to drawerin Fig.8 on page 6
Guiderail
Toprunner
#8 x 1"woodscrews
Bottomrunner
3 "#/4
20"
Drawerstop
Drawer openingcreated by cutting andreassembling oversized
apron blank
62 "!/8
61 "#/8
a.
b.
A

From Woodsmith magazineAll rights reserved
page 15 of 18 ©2004 August Home PublishingOne copy for personal use. Other copies prohibited.
I wanted to keep the large, oak diningtable, in the photo at right, fairly lightin color. But I also wanted to blendany color variation in the wood andenhance the beautiful figure of theoak. To accomplish this, I turned toa custom-mixed stain that I’ve used onoak a couple times before and hadvery good results with.
I started by taking a trip to an artstore to pick up a small tube of burntumber artist’s color. Back at the shop,I mixed 3 tablespoons of the burntumber pigment to 2 pints of boiledlinseed oil.
Once your stain is well mixed (ittakes quite a bit of stirring to get asmooth mix), it can be applied justlike an oil stain. Wipe or brush it on,let it sit on the surface for a shortwhile, and then thoroughly wipe offany excess with a clean rag.
You want to let the stain dry for agood 24 hours before applying thetopcoat. A dining table needs a prettydurable finish, so I followed the stainwith 3 coats of General Finishes wipingvarnish. This gave me just the rightamount of build with a nice, softsheen.
FINISHING YOUR HEIRLOOM TABLE
The choice of a stain color for themaple sofa table in the photo abovewas pretty easy. I wanted to give itthat rich, aged maple color you findon some classic antiques.
Maple is a wood that can often lookblotchy after staining. Thick gel stainsare a good solutuion to this problem.So after some careful finish sanding,I applied a coat of Bartley CountryMaple Gel Stain. It was the perfectcolor. When the stain was dry, I fol-lowed the same routine — three coatsof General Finishes satin wiping var-nish. The finish is durable but not toothick. W
Oak Dining Table
I tried two different approaches forthe finish on the pine kitchen table —one very traditional and one with amore contemporary feel.
TRADITIONAL. For the traditional ver-sion in the top photo at left, I startedby staining the entire table withBartley Antique Pine Gel Stain. Thearticle on page 23 of Woodsmith No.150 — Antique Pine FinishingSecrets — will give you some helpfulinformation on successfully stainingpine. Again, for a topcoat, I appliedthree coats of General Finishes wipingvarnish.
PAINTED. On the second version(bottom photo at left) I went for alittle bit lighter look and painted thebase with an off-white satin latexpaint. A painted base will tend to“scale down” the appearance of thesolidly built table. This option makesa lot of sense if the table is going intoa smaller space.
Before I brushed on the latex paint,I applied a coat of white pigmentedshellac sealer (there are severalbrands). This will keep any defects(sap pockets, knots) in the pine fromshowing through the paint. The tabletop was finished exactly like the firstversion.
Pine Kitchen Table
Maple Sofa Table
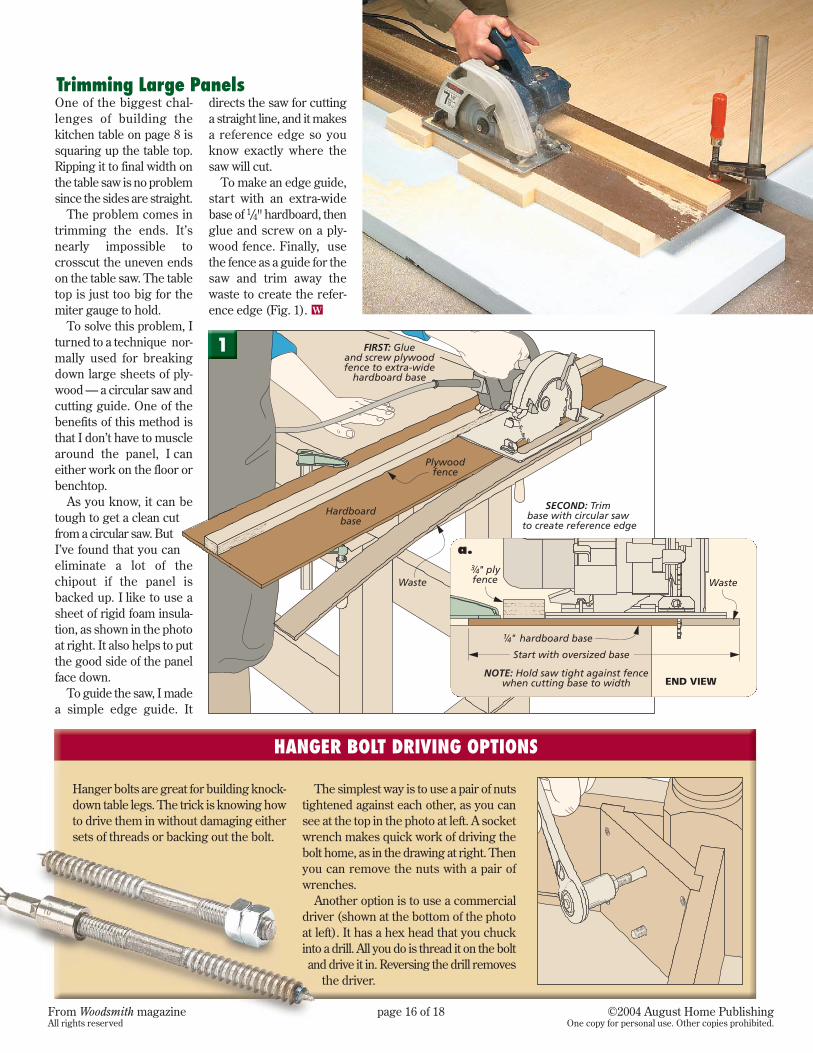
One of the biggest chal-lenges of building thekitchen table on page 8 issquaring up the table top.Ripping it to final width onthe table saw is no problemsince the sides are straight.
The problem comes intrimming the ends. It’snearly impossible tocrosscut the uneven endson the table saw. The tabletop is just too big for themiter gauge to hold.
To solve this problem, Iturned to a technique nor-mally used for breakingdown large sheets of ply-wood — a circular saw andcutting guide. One of thebenefits of this method isthat I don’t have to musclearound the panel, I caneither work on the floor orbenchtop.
As you know, it can betough to get a clean cutfrom a circular saw. ButI’ve found that you caneliminate a lot of thechipout if the panel isbacked up. I like to use asheet of rigid foam insula-tion, as shown in the photoat right. It also helps to putthe good side of the panelface down.
To guide the saw, I madea simple edge guide. It
directs the saw for cuttinga straight line, and it makesa reference edge so youknow exactly where thesaw will cut.
To make an edge guide,start with an extra-widebase of 1/4" hardboard, thenglue and screw on a ply-wood fence. Finally, usethe fence as a guide for thesaw and trim away thewaste to create the refer-ence edge (Fig. 1). W
1
a.
Trimming Large Panels
HANGER BOLT DRIVING OPTIONS
Hanger bolts are great for building knock-down table legs. The trick is knowing howto drive them in without damaging eithersets of threads or backing out the bolt.
The simplest way is to use a pair of nutstightened against each other, as you cansee at the top in the photo at left. A socketwrench makes quick work of driving thebolt home, as in the drawing at right. Thenyou can remove the nuts with a pair ofwrenches.
Another option is to use a commercialdriver (shown at the bottom of the photoat left). It has a hex head that you chuckinto a drill. All you do is thread it on the boltand drive it in. Reversing the drill removes
the driver.
From Woodsmith magazineAll rights reserved
page 16 of 18 ©2004 August Home PublishingOne copy for personal use. Other copies prohibited.

From Woodsmith magazineAll rights reserved
page 17 of 18 ©2004 August Home PublishingOne copy for personal use. Other copies prohibited.
n woodworking it’s easy to get intoa rut. But often there’s a reason.
You tend to stick with what works. That’s why, when I have to build
drawers for a project, more often thannot I’ll return to the trusted lockingrabbet joint for the joinery. It makesa strong drawer and I’ve always likedthe way it looks.
A dado blade on the table saw hasgenerally been my tool of choice tocut this joint. But recently I cameacross a new way to make this joint —with a drawer lock router bit. Itsclever design allows you to cut bothhalves of the joint with a single bit.And I found that it works pretty well.
THE SETUP. The key to using one ofthese bits is the setup. After you havethe bit installed in the router table,the first step is to adjust it to the rightheight. In order for the joint to be atight fit, this is pretty important. Thecutting height of the bit is given by the
manufacturer (mine was 3/8") and itwill only work right when it is set atthis particular height.
Once you’ve zeroed in on the cor-rect height, you won’t have to changeit. Both halves of the joint can be cutusing this same setting. The trick isin how you hold the different piecesas you rout the joint.
FRONT AND BACK. First you want tomake the cut on your front and backdrawer pieces. These pieces arerouted flat as shown in Fig. 1. Just setthe fence to rout the ends to a depththat matches the thickness of thesides, as shown in Fig. 1a. You canprevent chipout with a backer board.
THE SIDES. Now all you have to do isrout a matching cut in the drawersides. But this is a little different.Don’t change the height of the bit butmove the fence forward so that onlythe “tongue” of the bit will cut (Fig.2a). Now you’ll cut the sides with thepieces standing on end.
Just hold the side tightly againstthe fence and make a shallow pass(Fig. 2). Again, using a backer boardis a good idea. You’ll want to sneakup on the depth of the cut, testing thefit as you go. When the side fits flushwith the end of the drawer front,you’re joint is done. W
TALKINGSHOP
A new way to make atried and true joint.
1
a.
2
a.
ONE-BITLOCKINGRABBET
Occasionally a design calls for adrawer with a lipped front as shownin the near photo at left. Kitchencabinets and some furniture stylesoften call for this treatment. Andthe drawer lock bit will easilyaccommodate it. It’s simply a mat-ter of making a deeper cut in thedrawer front. A couple of passeswill be necessary.
LIPPED DRAWERS
I
From Woodsmith magazineAll rights reserved
page 18 of 18 ©2004 August Home PublishingOne copy for personal use. Other copies prohibited.
MAILORDER
SOURCESSimilar projectsupplies may be
ordered from the following companies:
Rockler800-279-4441
rockler.comTabletop Fasteners, Turned Table Legs,
Wood Knobs
Woodsmith Store800-835-5084
Wood Knobs
Amana Tool800-445-0077amanatool.comDrawer Lock Bit
McFeely’s800-443-7937mcfeelys.com
Hanger Bolts, Hanger BoltDriver, Router Bits
Lee Valley800-871-8158leevalley.com
Tabletop Fasteners, Wood Knobs
Whiteside Machine Co.800-225-3982
whitesiderouterbits.comRouter Bit,
Drawer Lock Bit
Woodworker’s Supply800-645-9292
woodworker.comDrawer Lock Bit,
Tabletop Fasteners, Turned Table Legs,
Wood Knobs
WOODSMITH PROJECT SUPPLIESWe now feature hardware from inmany of our new project kits. To order, please useour toll-free order line, see below. It’s open Mondaythrough Friday, from 8 AM to 5 PM Central Time.Before calling, please have your VISA, MasterCard,Discover, or American Express card ready.
If you would prefer to mail in an order, please callthe toll-free phone number below for more infor-mation concerning shipping charges as well asany applicable sales tax.
1-800-444-7527
Heirloom Tables
Drawer Lock Bit
You really won’t need a lotof supplies to build any ofthe three tables from thisplan.
HANGER BOLTS.The 5/16" x4" hanger bolts with nutsand washers are what holdit all together. If you can’tfind this size of hanger boltlocally, they can be ordered
in packages of ten (HB-3140) from McFeely’s. Thisis where I also purchasedthe handy hanger boltdriver (HB-3199).
TURNED LEGS. I decidedagainst turning my ownlegs. It was much easier topurchase them throughRockler. The legs are very
good quality and the priceis reasonable. (If you wantto turn your own legs,check out page 13 for pat-terns.)
You’ll need 31/2"-dia. oaklegs (65943) to build thedining table, 31/2"-dia. pinelegs (65951) for the kitchentable, and I used 23/4"-dia.
maple legs (65967) for thesmaller sofa table.
TABLETOP FASTENERS. Eachtable requires a handful oftabletop fasteners (34215)available from Rockler.
KNOB. You could likelyfind a wood knob for thedrawer locally. If you can’t,give Rockler a try.
The drawer lock bit that Itried out was made byAmana (55387). It alsocomes in a 1/4" shank(55386). Several other man-ufacturers make similar bitsand sources are listed in thecolumn at right.
SOURCES