helix universal server administration guide - realplayer
TRANSCRIPT

HELIX BROADCASTER QUICK START GUIDEHelix™ Broadcaster with Helix™ Universal Server Version 15.0
Revision Date: 23 May 2013

RealNetworks, Inc. PO Box 91123 Seattle, WA 98111-9223 U.S.A.
http://www.real.com http://www.realnetworks.com
©2013 RealNetworks, Inc. All rights reserved.
Information in this document is subject to change without notice. No part of this document may be reproduced or transmitted in any form or by any means, electronic or mechanical, for any purpose, without the express written permission of RealNetworks, Inc.
Printed in the United States of America.
Helix, the Helix Logo, Real, the Real "bubble" (logo), RealJukebox, RealOne, Real-rTV, RealArcade, RealAudio, RealDownload, RealNetworks, RealPix, RealPlayer, RealPresenter, RealProducer, RealProducer Plus, RealPoducer Pro, RealProxy, RealPublisher, RealSites, RealSystem, RealText, RealVideo, Rhapsody, ra/ve, SureStream, The Future is Real, TurboPlay, and Xing are trademarks or registered trademarks of RealNetworks, Inc.
Other product and corporate names may be trademarks or registered trademarks of their respective companies.
Warranty
All warranties are as documented in your Helix Broadcaster EULA .

CONTENTS
iii
INTRODUCTION 1
How this Guide Is Organized.........................................................................................................1Typographical Conventions...........................................................................................................1
CHAPTER 1: HELIX BROADCASTER.................................................................................................................3
Helix Broadcaster .........................................................................................................................3Network Server Input ................................................................................................................3SDI or HDMI Input...................................................................................................................3
Helix Server ..................................................................................................................................3Media Client Delivery................................................................................................................3Stream Repacketization ............................................................................................................4Live Archiving and On-demand Distribution...............................................................................4Stream Splitting and Uploading ................................................................................................5
CHAPTER 2: ENCODER SETUP ........................................................................................................................6
Setting Up the Helix Broadcaster Machine .....................................................................................6Logging into Helix Broadcaster..................................................................................................6Using the Interface....................................................................................................................6Changing the Helix Broadcaster Password .................................................................................7Setting the WAN Network Address ............................................................................................8Setting a LAN Address ..............................................................................................................9
Configuring FTP Access.................................................................................................................9
CHAPTER 3: STREAM ENCODING.................................................................................................................11
Receiving a Network Stream ........................................................................................................11Setting Up Server Input Properties ...........................................................................................11Start Mode.............................................................................................................................12NET Name .............................................................................................................................12Input Protocol........................................................................................................................12Input Type (RTP and UDP Streams).........................................................................................13Input Interface........................................................................................................................13Input Port (RTP and UDP) ......................................................................................................14Remote URI (HTTP, RTSP, and RTMP)....................................................................................14Input Buffer Size .....................................................................................................................14
Encoding with an SDI/HDMI Device............................................................................................14Setting Up the SDI/HDMI Input ..............................................................................................14Start Mode.............................................................................................................................15SDI Name ..............................................................................................................................16Aspect Ratio...........................................................................................................................16Video Mode ...........................................................................................................................16Audio Configuration...............................................................................................................16Audio Rate.............................................................................................................................16Audio Channels......................................................................................................................17HD-SDI Input Bits ..................................................................................................................17Input Buffer Size .....................................................................................................................17

Contents
iv
Creating an Output.................................................................................................................... 17Defining the Stream ............................................................................................................... 17Setting Basic Output Stream Characteristics............................................................................ 18Encoding Video ..................................................................................................................... 22Encoding Audio..................................................................................................................... 26
Using the Service Control Palette ................................................................................................ 28
CHAPTER 4: HELIX SERVER SETUP ............................................................................................................... 29
Accessing Helix Server ................................................................................................................ 29Changing the Helix Server Password........................................................................................ 29Adding a New Administrative User.......................................................................................... 30
Controlling the Helix Server Service ............................................................................................. 31Using the Service Control Palette ............................................................................................ 31Restarting Helix Server............................................................................................................ 32Viewing the Helix Server Statistics Log ..................................................................................... 32
Helix Administrator.................................................................................................................... 32Helix Control Palette.............................................................................................................. 32Accessing Helix Server Online Help.......................................................................................... 33Helix Server Setup Pages......................................................................................................... 34
Helix Server File System .............................................................................................................. 38Configuration File .................................................................................................................. 39Certificate Files ...................................................................................................................... 39
CHAPTER 5: STREAM DELIVERY ................................................................................................................... 40
Bandwidth Constraints .............................................................................................................. 40URL Components ...................................................................................................................... 40
Protocol ................................................................................................................................ 40Address................................................................................................................................. 40Ports ..................................................................................................................................... 41Client Mount Points............................................................................................................... 41Broadcast Mount Points ........................................................................................................ 42Stream Name ........................................................................................................................ 42
Receiving an Encoder Stream ..................................................................................................... 42Monitoring Streams ................................................................................................................... 44Delivering Content to HLS and DASH Clients ............................................................................. 45
Enabling HLS or DASH Segmentation..................................................................................... 45Tips for Streaming to HLS and DASH Clients .......................................................................... 47
Streaming to Flash Players .......................................................................................................... 48 Multi-Rate Content for Flash ................................................................................................. 48Sample Flash Player ............................................................................................................... 48
Streaming to RTSP Clients ......................................................................................................... 49
1
INTRODUCTION
Welcome to Helix™ Broadcaster. This guide explains how to install and run Helix Broadcaster with the embedded Helix Server. It shows you how to configure encoding inputs and write URLs that format the encoded stream for popular media clients.
How this Guide Is OrganizedThis administration guide contains the following chapters and appendixes.
Chapter 1: Helix Broadcaster
This chapter introduces you to Helix Broadcaster features.
Chapter 2: Encoder Setup
You set up Helix Broadcaster by assigning it an IP address and creating administrator passwords as described in this chapter.
Chapter 3: Stream Encoding
This chapter walks you through the process of receiving input from a device such as a camera or another server and defining the features of the H.264/AAC output.
Chapter 4: Helix Server Setup
Helix Server can deliver encoded streams to multiple types of clients. This chapter explains how to set up Helix Server for use.
Chapter 5: Stream Delivery
Using the embedded Helix Server software, you can deliver a live stream to popular types of media clients.
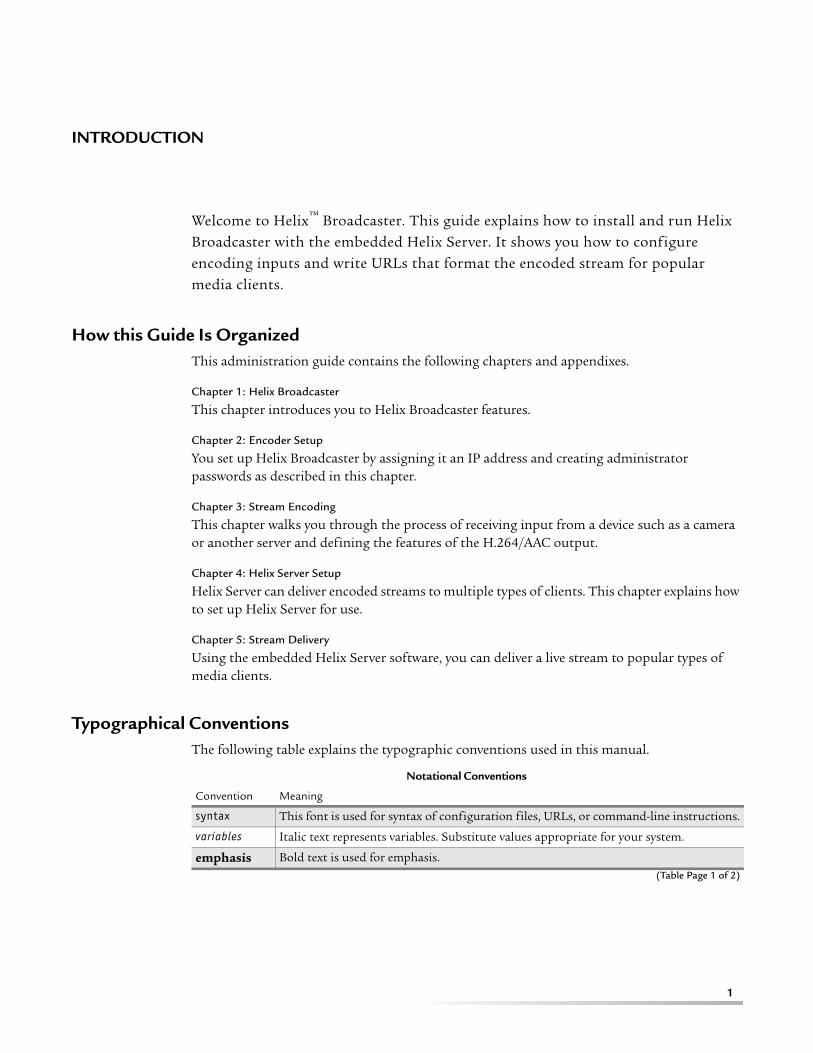
Typographical ConventionsThe following table explains the typographic conventions used in this manual.
Notational Conventions
Convention Meaning
syntax This font is used for syntax of configuration files, URLs, or command-line instructions.
variables Italic text represents variables. Substitute values appropriate for your system.
emphasis Bold text is used for emphasis. (Table Page 1 of 2)

Helix Broadcaster Quick Start Guide Introduction
2
. . . Ellipses indicate nonessential information omitted from examples.
[ ] Square brackets indicate optional material. If you choose to use the material within the brackets, don’t type the brackets themselves. An exception to this is in the basic access log, where statistics generated by the StatsMask variable are enclosed in regular brackets.
Notational Conventions (continued)
Convention Meaning
(Table Page 2 of 2)

3
C H A P T E R
1 Chapter 1: HELIX BROADCASTER
Helix Broadcaster combines a powerful and reliable H.264/AAC encoder with a Helix media server that can deliver live streams to popular clients like iPhones and Flash Player. This chapter covers the major features of the Helix Broadcaster encoder and its integrated Helix Server.
For More Information: For additional background on Helix Broadcaster, refer to http://www.realnetworks.com/helix/helix-broadcaster/.
Helix BroadcasterThe Helix Broadcaster encoder can accept direct input from an SDI or HDMI camera or microphone, encoding the input as H.264/AAC with full control over frame sizes, frame rates, sampling rates, and so on. Helix Broadcaster can also accept input from a variety of network servers, transcoding the input to meet precise output specifications.
Network Server Input
Helix Broadcaster can accept content from a local network or the Internet that is delivered over different transports and control protocols, including UDP, RTP, RTSP, and RTMP.
For More Information: See “Receiving a Network Stream” on page 11.
SDI or HDMI Input
The Helix Broadcaster internal capture card is capable of accepting output from most cameras. The input device can deliver an uncompressed audio/video stream in NTSC, PAL, or HD format. It can also accept input that uses any of the following types of compression.
For More Information: See “Encoding with an SDI/HDMI Device” on page 14.
Helix ServerThe highly configurable Helix Server media server can deliver live streams encoded by Helix Broadcaster or any other network server to popular media clients.
Media Client Delivery
Helix Server can deliver H.264/AAC content to a wide range of popular media players:
video MPEG-1, MPEG-2, MPEG-4, H.264
audio MPEG-1, MPEG-2, MPEG-3, AC3, MPEG-4A (H.264 audio), Ogg-Vorbis

Helix Broadcaster Quick Start Guide CHAPTER 1: Helix Broadcaster
4
• HLS clients such as the Apple iPhone and iPad
To support, HTTP Live Streaming, Helix Server writes the H.264/AAC broadcast stream to a series of MPEG-2 transport files (.ts) that it delivers to HLS clients using HTTP. HLS clients request these transport files using a text-based playlist (.m3u8) that Helix Server generates. Segment encryption and multi-rate streams are supported.
For More Information: See “Delivering Content to HLS and DASH Clients” on page 45
• DASH media clients
Similar to HLS clients, DASH clients request transport segments containing H.264/AAC content using HTTP. For these client types, Helix Server generates an XML-formatted playlist (.mpd). Both the MP4 (.m4s) and the MPEG-2 (.ts) transport stream formats are supported.
For More Information: See “Delivering Content to HLS and DASH Clients” on page 45
• Flash clients
To support embedded Flash clients, Helix Server delivers the H.264/AAC stream using Real-Time Messaging Protocol (RTMP), the same protocol used by Flash Media Server. Single-rate and multi-rate streams are supported.
For More Information: See “Streaming to Flash Players” on page 48
• RTSP clients
Real-Time Streaming Protocol is used by RealPlayer and mobile 3GPP clients to receive H.264/AAC content. Multi-rate streams and rate shifting are supported.
For More Information: See “Streaming to RTSP Clients” on page 49
Stream Repacketization
If H.264/AAC input is generated on a separate server or encoder and does not need to be transcoded to change the bit rate, frame rate, sampling rate, or so on, the input can be ingested directly by Helix Server, bypassing the Helix Broadcaster encoder. Helix Server can then repacketize the content as necessary for delivery to media clients. Streams from Flash Media encoder, MPEG-2 encoders, MPEG-4 encoders, and QuickTime encoders are accepted.
For More Information: After you set up Helix Server as described in Chapter 4, refer to the online help topic Helix Administrator > Broadcasting.
Live Archiving and On-demand Distribution
In addition to delivering live broadcast streams, Helix Server can stream on-demand content to all supported media clients. Commonly, H.264/AAC content is written to an MPEG-4 file. For live H.264/AAC broadcasts generated by Helix Broadcaster or another encoder, Helix Server can archive the streams as MPEG-4 files for on-demand delivery. Using the content caching feature, you can automatically propagate on-demand clips among Helix Servers in your network.

Helix Broadcaster Quick Start Guide CHAPTER 1: Helix Broadcaster
5
For More Information: After you set up Helix Server as described in Chapter 4, refer to the online help. For more about live stream archiving, see the topic Helix Administrator > Broadcasting > Broadcast Archiving.
Stream Splitting and Uploading
Helix Server provides robust methods for propagating a live stream through a network and delivering it to users from edge servers:
• Helix Server to Helix Server
Helix Servercan split a live stream to other Helix Servers, either other Helix Broadcaster encoders or standard Helix Servers running on Windows, Linux, or Solaris. This is often done on a multicast-enabled network to reduce bandwidth consumption.
• Helix Server to Flash Media Server
Using RTMP, Helix Server can deliver a live H.264/AAC stream to Flash Media Server for delivery to Flash clients.
• Helix Server to CDNs
Helix Server supports the upload of live RTMP streams and HLS segments to major content distribution networks, including Akamai.
For More Information: After you set up Helix Server as described in Chapter 4, refer to the online help topic Helix Administrator > Broadcast Distribution.
6
C H A P T E R
2 Chapter 2: ENCODER SETUP
This chapter describes the basic setup procedure for Helix Broadcaster. It explains how to configure the IP addresses and change the default administration password.
Setting Up the Helix Broadcaster MachineHelix Broadcaster includes one wide area network (WAN) Ethernet port and one or more local area network (LAN) ports. Use the WAN port as the primary connection. You can use LAN ports if you require additional Ethernet connections. In the Helix Broadcaster interface, features that require an IP address allow you to select the WAN or a LAN connection.
Tip: The WAN port is designed to be accessible from outside of your organization’s firewall. The LAN ports are typically accessible from inside of the firewall. However, any of the Ethernet connections can be accessed from inside or outside the firewall depending on your network setup and policies.
Logging into Helix Broadcaster
The back of the Helix Broadcaster machine lists the default IP address for the WAN port. Once the machine is connected to your network and powered on, you can log into the Web-based configuration utility from your network using this default address. For example:
http://98.111.12.114
You will be prompted to enter the default administrator name and password:
Using the Interface
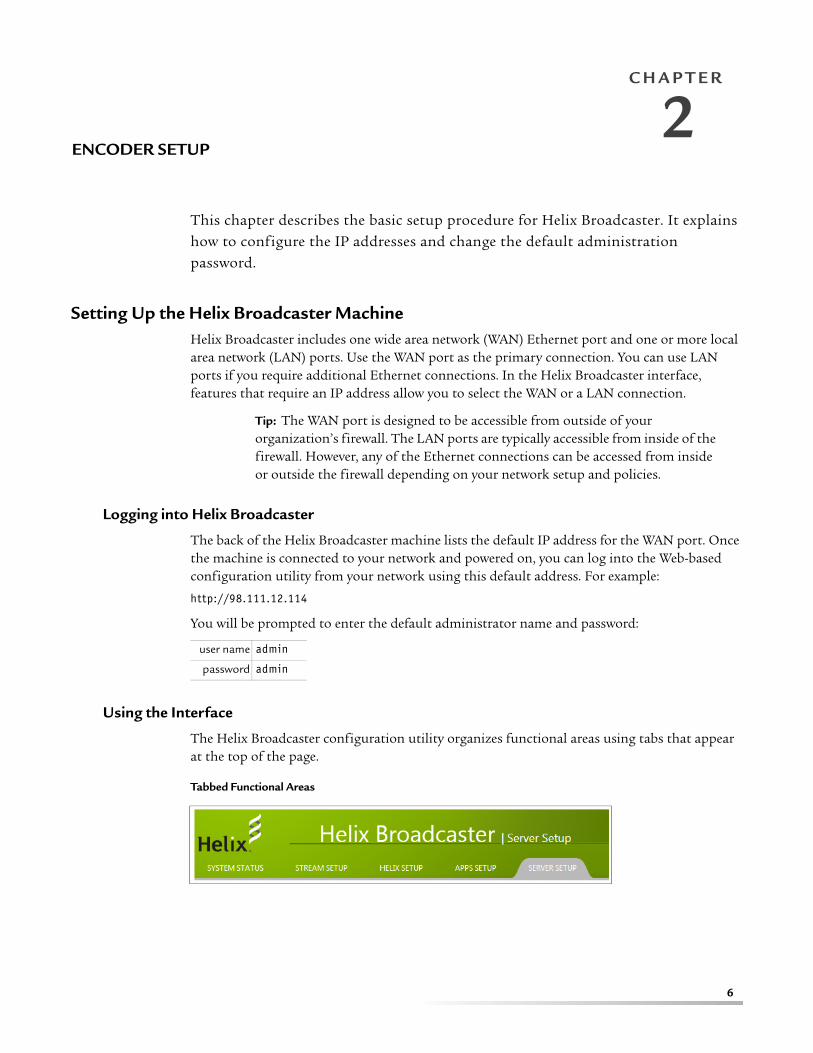
The Helix Broadcaster configuration utility organizes functional areas using tabs that appear at the top of the page.
Tabbed Functional Areas
user name admin
password admin
Helix Broadcaster Quick Start Guide CHAPTER 2: Encoder Setup
7
Click the appropriate tab to manage the various parts of Helix Broadcaster:
Changing the Helix Broadcaster Password
Once you access the Helix Broadcaster interface, change the password for the admin log-in.
➤ To change the default Helix Broadcaster password:
1. Click the Server Setup tab.
2. Click Services Setup in the left-hand menu.
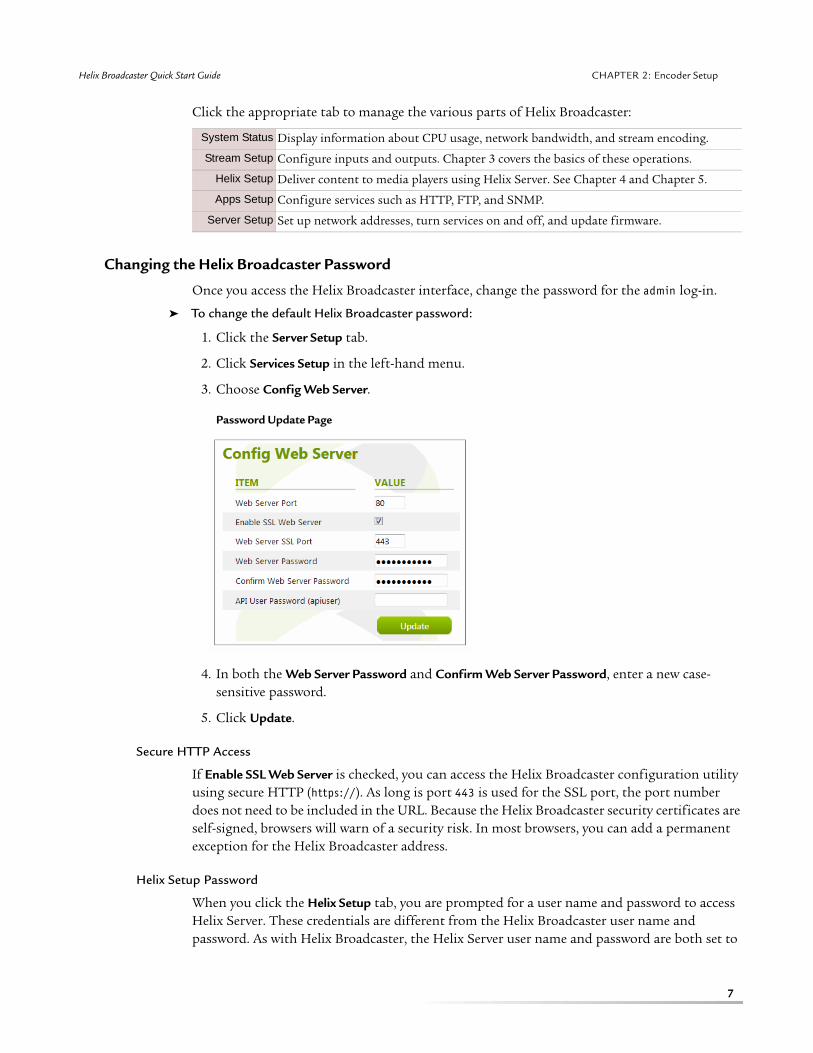
3. Choose Config Web Server.
Password Update Page
4. In both the Web Server Password and Confirm Web Server Password, enter a new case-sensitive password.
5. Click Update.
Secure HTTP Access
If Enable SSL Web Server is checked, you can access the Helix Broadcaster configuration utility using secure HTTP (https://). As long is port 443 is used for the SSL port, the port number does not need to be included in the URL. Because the Helix Broadcaster security certificates are self-signed, browsers will warn of a security risk. In most browsers, you can add a permanent exception for the Helix Broadcaster address.
Helix Setup Password
When you click the Helix Setup tab, you are prompted for a user name and password to access Helix Server. These credentials are different from the Helix Broadcaster user name and password. As with Helix Broadcaster, the Helix Server user name and password are both set to
System Status Display information about CPU usage, network bandwidth, and stream encoding.
Stream Setup Configure inputs and outputs. Chapter 3 covers the basics of these operations.
Helix Setup Deliver content to media players using Helix Server. See Chapter 4 and Chapter 5.
Apps Setup Configure services such as HTTP, FTP, and SNMP.
Server Setup Set up network addresses, turn services on and off, and update firmware.

Helix Broadcaster Quick Start Guide CHAPTER 2: Encoder Setup
8
admin by default. You can change them using the Helix Server interface as described in the section “Changing the Helix Server Password” on page 29.
Setting the WAN Network Address
Once you have logged into Helix Broadcaster, you can change the default IP address for the WAN port.
➤ To set the primary network address:
1. Click the Server Setup tab.
2. Click Network Setup in the left-hand menu.
3. Choose WAN Setup.
WAN Setup Page
4. If your local network is configured for Dynamic Host Configuration Protocol, you can check the Use DHCP box and enter a host name in the Hostname field. In this case, Helix Broadcaster receives its IP address on boot-up from the DHCP server. All URLs used to access Helix Broadcaster (or Helix Server) on the WAN port must use the host name rather than the variable IP address.
5. To set a static IP address, enter the IP version 4 network address in the WAN IP Address fields.
6. Set the WAN net mask, gateway, and DNS server addresses as specified by your network administrator.
7. Click Update.
8. Close your browser window and log back into Helix Broadcaster using the new WAN address and new password.

Helix Broadcaster Quick Start Guide CHAPTER 2: Encoder Setup
9
Setting a LAN Address
For each LAN port you use, you can specify the IP address.
➤ To set a LAN address:
1. Click the Server Setup tab.
2. Click Network Setup in the left-hand menu.
3. Choose one of the LAN #n Setup ports, where n is the number that corresponds to the LAN port you are using.
LAN Setup Page
4. The LAN Name identifies this connection in the Helix Broadcaster interface. It is not a domain name that can be used to access Helix Broadcaster.
5. Set a static IP address by entering the IP version 4 network address in the LAN IP Address fields.
6. Set the LAN net mask as specified by your network administrator. All LAN connections use the same DNS servers as the WAN connection.
7. Click Update.
Configuring FTP AccessRealNetworks recommends configuring Helix Broadcaster for FTP access. This allows you to access the Helix Server file system from a separate machine using a command line or a graphical tool such as WinSCP (http://winscp.net).
➤ To enable FTP access:
1. Click the Apps Setup tab.
2. Click FTP Access in the left-hand menu.
Helix Broadcaster Quick Start Guide CHAPTER 2: Encoder Setup
10
FTP Setup Page
3. Check the Enable FTP Server option.
4. For FTP Username and FTP Password, enter the user name and password required to authenticate FTP access. This can be the same user name and password used to access Helix Broadcaster. For better security, choose a different user name and password.
5. In the FTP Bind IP, choose the Ethernet address (WAN or LAN) that allows FTP access.
6. The standard FTP port value is 21. If you choose a different port, FTP clients must specify the chosen port when logging onto Helix Broadcaster.
7. Click Update.
8. Click the Server Setup tab.
9. Under Services Setup, choose Service Control.
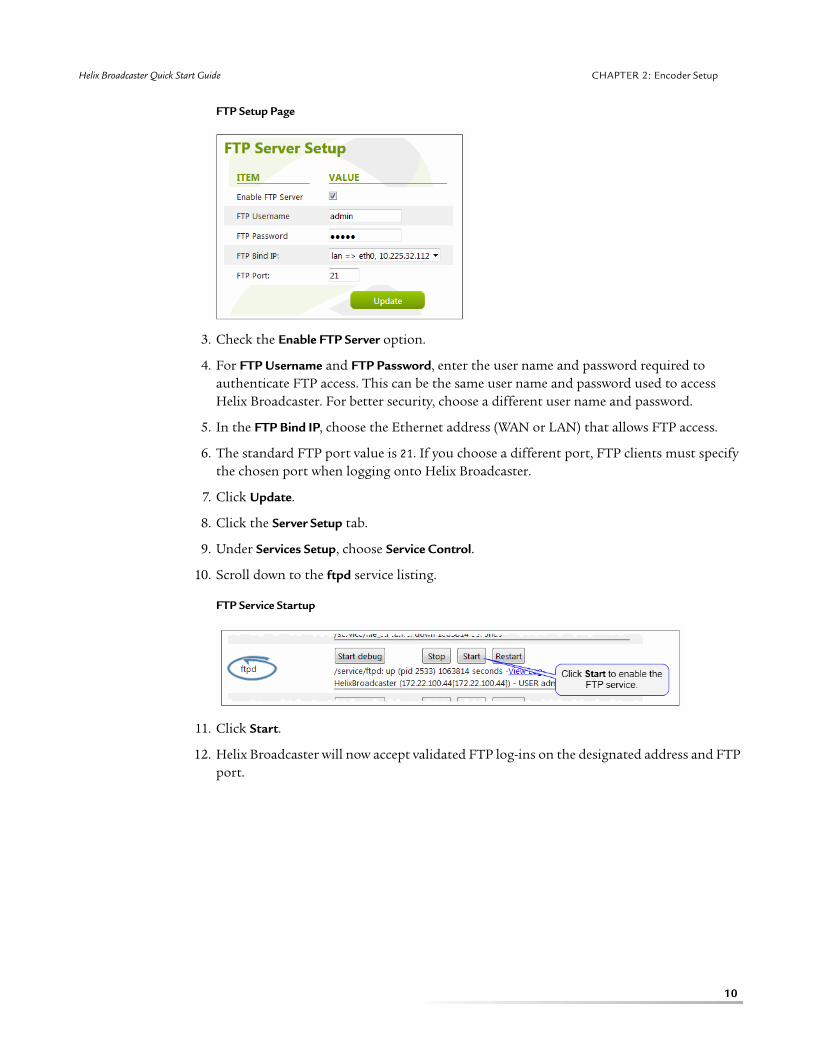
10. Scroll down to the ftpd service listing.
FTP Service Startup
11. Click Start.
12. Helix Broadcaster will now accept validated FTP log-ins on the designated address and FTP port.

11
C H A P T E R
3 Chapter 3: STREAM ENCODING
This chapter describes how to set up and encode a stream from a network server or an input device connected to Helix Broadcaster. Once you capture the input and begin the encoding process, you can use Helix Server to deliver the stream, formatting it for different media clients as described in Chapter 5.
Note: This chapter covers the basic settings for common encoding operations. It does not describe all of the input and output options available through the Helix Broadcaster interface.
Receiving a Network StreamThe following sections explain how to receive input from your local network or from the Internet. The source may be a streaming server, an MPEG-TS encoder, a satellite link, or even an MPEG-4 media file. Once you have set up Helix Broadcaster to receive the input, define the output as described in the section “Creating an Output” on page 17.
Note: To encode from a camera or microphone connected to Helix Broadcaster, refer to “Encoding with an SDI/HDMI Device” on page 14.
Setting Up Server Input Properties
Helix Broadcaster can encode multiple inputs simultaneously. You define each input stream in a NET Setup category (such as Net #1 Setup) under the Stream Setup tab. Under a Net Setup category, click Input Setup to define the stream characteristics.
Sample Network Input

Helix Broadcaster Quick Start Guide CHAPTER 3: Stream Encoding
12
Warning! When you have finished defining the input, click the Update button to save your settings. If you navigate away from the page before updating the information, Helix Broadcaster discards the page data.
Start Mode
The Start Mode option determines when the encoding process begins and ends:
• Manual
If you select Manual, encoding begins when you start the process as described in the section “Using the Service Control Palette” on page 28. Optionally, you can specify when the process ends by entering a number of seconds in Execution Time field. An entry of 3600, for example, stops the encoding process one hour after it starts.
• Always On
With the Always On setting, the encoding process begins when you define the output and start the stream manually. After that, it restarts automatically if it is stopped manually or if Helix Broadcaster is rebooted.
Tip: To shut down an always-on broadcast, change the start mode to Manual, click Update, and shut down the process using the control palette (see page 28).
• Scheduled
If you choose Scheduled, you can enter up to three repeating start and stop times for the encoding. Specify the time in the format hh:mm:ss. The following illustration shows an encoding process set to run from 2:30 to 3:30 p.m on weekdays and from 10 to 11 a.m. on weekends:
• Loop
If the input is a file, you can choose Loop to have Helix Broadcaster loop through the file contents continuously once you manually start the encoding process.
NET Name
For Net Name, define a name that identifies the input. This name is for reference only. It does not affect the output stream name.
Input Protocol
The Input Protocol drop-down defines the type of input stream or file that is acquired. The UDP and RTP methods are push methods in which the remote server delivers the stream to the designated Helix Broadcaster IP address and port. The HTTP, RTSP, and RTMP methods are

Helix Broadcaster Quick Start Guide CHAPTER 3: Stream Encoding
13
pull methods in which Helix Broadcaster requests the stream from the remote server using the designated URI.
Input Type (RTP and UDP Streams)
For a UDP or RTP stream, select Unicast or Multicast as the Input Type depending on the IP address where the stream is directed. If you choose Multicast, enter the multicast address in the range from 224.0.0.0 to 239.255.255.255.
Input Interface
For any type of input stream, use the Input Interface drop-down to choose which Helix Broadcaster IP address receives the stream. The addresses are set on the Server Setup tab under the Network Setup category as described in the section “Configuring FTP Access” on page 9. If the remote server initiates the stream (push mode), it must be configured to send the stream to this address.
Note: Do not use the local setting for network input.
Input Protocols
Protocol Purpose
udp User Datagram Protocol. This option is for a UDP stream that does not use a control protocol such as RTSP. Use it for input from an MPEG-2 TS encoder or a satellite link.
rtp Real-Time Transport Protocol.
rtp with parity FEC Real-Time Transport Protocol with forward error correction as defined in IETF RFC 6015.
http HyperText Transport Protocol. This option is for receiving media from a Web server or any other server that does not support RTSP or RTMP. You can use this option to load an SDP file used to acquire a stream, for example.
rtsp/udp Real-Time Streaming Protocol with User Datagram Protocol. RTSP is a server streaming protocol. When the UDP transport is used, the server can deliver media packets more efficiently than with TCP. However, lost packets are not resent and may cause lapses in the media stream. This option is recommended if the RTSP server is on a local network.
rtsp/tcp Real-Time Streaming Protocol with Transmission Control Protocol. Using the TCP transport with an RTSP server results in greater network overhead, but lost packets can often be redelivered by the network layer. This is recommended if the RTSP server is located on the Internet rather than the local network.
rtsp/http Real-Time Streaming Protocol over HTTP. This is used primarily to work around firewalls that restrict RTSP communications. Because RTSP/HTTP is less efficient for transporting media than RTSP/UDP or RTSP/TCP, it is not recommended if either of the other RTSP options is available.
rtmp/rtmpt/rtmpe/ rtmps/rtmpte/rtmpts
A variation of the Real-Time Messaging Protocol used by Flash Media Servers: rtmp – standard protocol (recommended) rtmpt – RTMP cloaked as HTTP to work around firewalls rtmpe – encrypted RTMP rtmps – secure RTMP rtmpte – encrypted and cloaked RTMP rtmpts – secure and cloaked RTMP

Helix Broadcaster Quick Start Guide CHAPTER 3: Stream Encoding
14
Input Port (RTP and UDP)
For a UDP or RTP stream, set the Helix Broadcaster port that receives the remote server stream in the Input Port field. If the stream is multicasted, select the port on the multicast address where the stream is sent. If the remote server initiates the stream (push mode), it must be configured to send the stream to this port.
Remote URI (HTTP, RTSP, and RTMP)
In the Remote URI field, set the URL where Helix Broadcaster acquires the steam. The URI format is the following, in which a user name and password can be included in the URL if required by the remote server:
protocol://username:password@address/path/stream_or_file_name
For example:
http://192.168.123.1:80/stream.sdp
rtsp://helixbcd:[email protected]:554/test.sdp
rtmp://192.168.123.1:1935/live/myvideo
Input Buffer Size
The input buffer size sets the number of milliseconds of input data that is buffered before it is encoded. The default value is 800 milliseconds. A lower value such as 200 speeds the end-to-end delivery process. A higher value such as 1200 adds more protection against lapses in data delivery by buffering more of the incoming stream before it is encoded.
Warning! Do not set the buffer value below 200.
Encoding with an SDI/HDMI DeviceThe following sections explain how to receive input from a camera or microphone connected to the Helix Broadcaster SDI or HDMI port. Once you have set up the input from the device, define the output as described in the section “Creating an Output” on page 17.
SDI and HDMI Ports
Setting Up the SDI/HDMI Input
Under the Stream Setup tab, click one of the SDI/HDMI Setup categories. Click Input Setup to define the characteristics of the stream coming into Helix Broadcaster from the SDI/HDMI input device.

Helix Broadcaster Quick Start Guide CHAPTER 3: Stream Encoding
15
Sample SDI/HDMI Input
Warning! When you have finished defining the input, click the Update button to save your settings. If you navigate away from the page before updating the information, Helix Broadcaster discards the page data.
Start Mode
The Start Mode option determines when the encoding process begins and ends:
• Manual
If you select Manual, encoding begins when you start the process as described in the section “Using the Service Control Palette” on page 28. Optionally, you can specify a time when the process ends by entering a number of seconds in the Execution Time field. An entry of 3600, for example, stops the encoding process one hour after it starts.
• Always On
With the Always On setting, the encoding process begins when you define the output and start the stream manually. After that, it restarts automatically if it is stopped manually or if Helix Broadcaster is rebooted.
Tip: To shut down an always-on broadcast, change the start mode to Manual, click Update, and shut down the process using the control palette (see page 28).
• Scheduled
If you choose Scheduled, you can enter up to three repeating start and stop times for the encoding. Specify the time in the format hh:mm:ss. The following illustration shows an

Helix Broadcaster Quick Start Guide CHAPTER 3: Stream Encoding
16
encoding process set to run from 2:30 to 3:30 p.m on weekdays and from 10 to 11 a.m. on weekends:
SDI Name
For SDI Name, define a name that identifies the input. This name is for reference only. It does not affect the output stream name.
Aspect Ratio
For Aspect Ratio, choose the aspect ratio of the video captured by the SDI/HDMI device. Choices are:
• 4:3 — standard video
• 16:9 — widescreen, typically 1280x720 or 1920x1080
Video Mode
Under Video Mode, choose the frame size and frame rate of the incoming video. The drop-down lists the common output formats for NTSC, PAL, and HD video.
Audio Configuration
For Audio Configuration, select one of the following:
• Embedded — digital audio embedded in a video track by a camera
• AES/EBU — digital audio output from a microphone
• Analog — analog audio format from a microphone
Audio Rate
With digital audio, the sampling rate indicates the number of samples taken every second when the audio is digitized. Digital input audio has a specific sampling rate, typically within the range of 8,000 to 48,000 Hz, though it may be higher. In the Audio Rate drop-down, select the sampling rate used in the device’s audio output.
Note: This pull-down has no effect on analog audio.
For More Information: You can change the sampling rate in the encoded output as described in the section “Audio Rate” on page 27.

Helix Broadcaster Quick Start Guide CHAPTER 3: Stream Encoding
17
Audio Channels
For Audio Channels, select the number of audio channels that the SDI/HDMI device records. The typical value is 2, indicating stereo sound, although SDI and HDMI inputs may support multiple channels.
Tip: You can lower the number of channels (from 5-channel to stereo, for example) when defining the Helix Broadcaster output. See “Audio Channels” on page 27.
HD-SDI Input Bits
In the HD-SDI Input Bits drop-down, select the color depth (amount of color information per pixel) that the camera captures:
• 8 bits — This is the most common color depth, capturing 8 bits of data for each color of each pixel, resulting in over 16 million colors.
• 10 bits — High-definition cameras may capture 10 bits of color data, resulting in over a billion possible colors.
Input Buffer Size
The input buffer size sets the number of milliseconds of input data that is buffered before it is encoded. The default value is 800 milliseconds. For low-latency encoding and delivery, set a lower value such as 200.
Warning! Do not set the buffer value below 200.
For More Information: For details about low-latency encoding, refer to “Output Format and Buffer Sizes” on page 18.
Creating an OutputFor each input you define, you set up a corresponding output or a set of outputs. You might create different outputs to generate streams with different output ratios, for example. If the input is in a 16:9 widescreen format, for example, you can create one output that preserves the 16:9 ratio and another that converts the stream to a standard 4:3 ratio.
Defining the Stream
To define an output, select your input category (NET Setup or SDI/HDMI Setup) on the Stream Setup tab. Then click New Output. When you have finished defining the output, click the Update button at the bottom of the page to save your settings:
Warning! If you navigate away from the page before updating the information, Helix Broadcaster discards the page data.

Helix Broadcaster Quick Start Guide CHAPTER 3: Stream Encoding
18
Setting Basic Output Stream Characteristics
The top portion of an output page defines the basic stream characteristics. Ensure that the Enabled box is checked to generate the output when the encoding process is started. To disable an output that is currently running, uncheck the Enabled box, click Update at the bottom of the output page, and click Restart on the Service Control palette (see page 28).
Stream Encoding Settings
Stream Name
For the stream name, enter a single word that identifies the stream. This name appears as an entry under the input category once you save the output information. For example, if you are defining an HDMI output named HDMIOutput, the entry Out:HDMIOutput appears in the SDI/HDMI Setup category. You can then edit this output by clicking the stream name entry in the list.
Output in the SDI/HDMI Input List
Note: The name you enter here does not automatically become the stream name used by media clients to request the stream. You set the stream name used in request URLs as described in the section “Receiving an Encoder Stream” on page 42. The output stream name can be the same as or different from the name you define here.
Output Format and Buffer Sizes
For Output Format, choose one of the following:
• UDP with Transport Stream (TS) envelope
This is the standard output created by the encoder and passed to Helix Server for delivery to media clients.
• UDP/RTP with Low Latency Transport Stream (TS) envelope
This output format is identical to the preceding except that it enables the encoder to buffer less of the transport stream before passing it to Helix Server for delivery to media clients. This results in lower end-to-end latency, meaning that media clients are able to display the event stream faster than with a standard-latency stream.

Helix Broadcaster Quick Start Guide CHAPTER 3: Stream Encoding
19
Tip: You can use the low-latency envelope with standard-latency buffering values. You must choose the low-latency option to deliver a low-latency stream, however.
Buffer Sizes for Low Latency
For a standard-latency stream, the buffer default values are typically adequate. For a low-latency stream, set the following buffering values:
• For the SDI/HDMI input, set Input Buffer Size (see page 17) to 200. The default value is 800.
• For each SDI/HDMI output, set Output Buffer Size to 150. You can lower this value if necessary to achieve more latency reduction, but do not set it below 100. The default value is 300.
• For each SDI/HDMI output, set Mux Cache to 150. You can lower this value if necessary to achieve more latency reduction, but do not set it below 100. The default value is 200.
Video Codec Settings for Low Latency
When you define your video streams, choose Constant Bit Rate for the video transcoding method, which is described on page 23. All other necessary video codec options will be set automatically.
Low-Latency Delivery Characteristics
Enabling low-latency delivery results in a lower end-to-end delivery time from the encoder to the media clients. However, many factors can affect how long it takes a media client to render a stream:
• network topography
The distance between the media client and Helix Broadcaster affects how quickly the stream is received by the client.
• media client type
• RTSP and RTMP clients can typically render live broadcasts faster because Helix Server delivers the media in a continuous stream. Each client that joins the broadcast receives a copy of the stream in its current state.
• For HLS and DASH clients, Helix Server writes stream data to individual transport files and constructs a playlist that it sends to each client, updating the playlist as the broadcast continues. For this reason, the first transport file an HLS or DASH client receives may contain stream data that was encoded several seconds earlier.
• media client buffering
All media clients buffer a certain amount of the data stream before rendering and displaying the stream to the user. The buffering may last a few hundred milliseconds to several seconds depending on the media player settings.
Multibitrate Mode
The Multibitrate Mode drop-down allows you to create a single-rate output or combine multiple outputs into a multi-rate stream. Multi-rate streams can be encoded using any number of outputs set to different output bandwidths. Choose one of the following:

Helix Broadcaster Quick Start Guide CHAPTER 3: Stream Encoding
20
• Single bit rate per mux
Choose this option to create a single-rate output. In this case, all other outputs created for this input must be directed toward a different destination IP address or, if the same address is used, a different port on that address.
• Multibitrate – Master Mode
To create a multi-rate stream, set the first output you define as the master mode. This can be any output in the stream (highest bit rate, lowest bit rate, or any rate in between).
• Multibitrate – Member
For a multi-rate stream, set subsequent outputs as members, directing each output to the same destination IP address and port as the master mode. The master stream and each member stream should have different video rates (see page 22) paired to different audio rates (see page 27).
Bandwidths for Rate Shifting
The primary purpose of creating a multi-rate stream is to allow a media player to shift streaming rates based on changing bandwidth availability. When you create a multi-rate stream, chose the audience streaming rates carefully. If rates are too close together, the media player may shift rates continuously, which creates a poor user experience. If rates are too far apart, the media player may not be able to shift rates at points where doing so would be advantageous.
You may need to experiment with settings until you find audiences that work well for your viewers and your targeted network. To start, follow these principles:
• Set the top streaming rate to no more than 90 percent of the network throughput. To target a 500 Kbps maximum network speed, for example, set the highest-rate audience to stream at no more than 450 Kbps (video plus audio). This allows for network and stream overhead.
• Set additional streams at 80 percent multiples to allow the media player can shift to this audience if the network throughput slows. For example, companion streams for a 450 Kbps stream would be approximately 360 Kbps and 288 Kbps.
Video Stream Characteristics for Rate Shifting
For each video stream, the streaming rate and the frame rate may vary. To enable rate-shifting by the media client, all video streams in a multi-rate output must share the following settings:
• video codec (see page 22)
• frame size (see page 23)
• scaling mode (see page 23)
Audio Stream Characteristics for Rate Shifting
For each audio stream, the streaming rate may vary. To enable rate-shifting and a consistent user experience, all audio streams in a multi-rate output must share the following settings:
• audio codec (see page 26)
• sampling rate (see page 27)
• audio channels (see page 27)

Helix Broadcaster Quick Start Guide CHAPTER 3: Stream Encoding
21
• audio gain (see page 27)
• AAC profile (see page 28)
Destination IP
In the Destination field, enter the IP address where the Helix Broadcaster encoder sends the stream:
• 127.0.0.1
To pass the encoder stream only to Helix Server, use this address, which is also called the localhost address. Helix Server can then deliver the stream to media clients, other servers, or to a content distribution network.
• IP version 4 multicast address
On a multicast-enabled network, you can use a multicast address in the range from 224.0.0.0 and 239.255.255.255. Helix Server, along with any other multicast-enabled device on the network, can then receive the stream by listening to the multicast address and port. In the Output Interface drop-down, select which IP address Helix Broadcaster uses to send the data to the multicast address.
Note: Do not use the local setting when multicasting.
Destination Port
The Destination Port field sets the port on the localhost or multicast address where the output stream is delivered:
• If you are defining a multi-rate stream, the outputs that set up a stream bandwidth must use the same port on the localhost or multicast address. For example, a 500 Kbps output and a 300 Kbps output for the same multi-rate stream may both use port 8050.
• If you are creating multiple streams, the outputs for the different streams must use a different port on the localhost or multicast address. For example, a 4:3 output stream may use port 9000 while a 16:9 output stream may use port 9010.
Note: The section “Receiving an Encoder Stream” on page 42 explains how to receive the stream on Helix Server by setting up a stream definition that uses the same address and port values set here.
Multicast Port Values
For multicasting, use an available port on the multicast address as defined by the network administrator.
Localhost Port Values
For delivery to the localhost address of 127.0.0.1, you can use any port value over 1024 and up to 65535 as long as that port is not already in use.
For More Information: For details about Helix Server port use, refer to the online help topic Helix Setup > Helix Administrator > Server Setup > Ports > Server Default Ports.

Helix Broadcaster Quick Start Guide CHAPTER 3: Stream Encoding
22
Encoding Video
The video encoding portion of the output page sets the video format and streaming rate along with optional advanced settings.
Video Encoding Settings
Video Format
The Video Transcoding Format drop-down selects the video format created by the Helix Broadcaster encoder. Choose one of the following:
• H264 Video
Use this to encode the video with the H.264 video codec. If the input video stream is already encoded as H.264, choose this option if you need to change the stream characteristics, such as setting a different streaming speed or changing the output aspect ratio.
Note: Helix Server can deliver only H.264 video to clients. You can choose a different video codec option to multicast the stream to other servers. Helix Server will not be able to deliver this stream to clients, however.
• No Video Transcoding
You can select this option if the input video is already encoded as H.264. Helix Broadcaster will not re-encode the stream, which saves processing power. The stream is passed through as-is, however, and you cannot change characteristics such as streaming speed or aspect ratio. If you choose this option, no other video settings are available.
• Remove Video
When this option is selected, Helix Broadcaster does not encode or pass through any video. This results in an audio-only stream. If you choose this option, no other video settings are available.
Video Bit Rate
For Video Bit Rate, set the streaming bit rate in Kilobits per second (Kbps). The encoded stream’s total streaming speed is the sum of the video bit rate and the audio bit rate. The bit rate you select should be influenced by the streaming network, the client device, and video frame size, video frame rate, and the desired media quality.

Helix Broadcaster Quick Start Guide CHAPTER 3: Stream Encoding
23
Note: For delivery to media clients, Helix Server supports H.264 Levels 1 to 3 with a maximum speed up to 3 Mbps (3.7 Mbps total for video and audio).
For More Information: See also “Audio Bitrate” on page 27.
Video Transcoding Method
For Video Transcoding Method, select one of the following:
• Average Bit Rate
Average bit rate encoding keeps the video streaming rate at the selected bit rate as an overall average. The actual streaming rate may be above or below the selected bit rate at any given time, however. This fluctuation helps to improve quality over constant bit rate encoding. Average bit rate encoding is typically the best choice for a wide range of high-speed networks, such as corporate LANs, DSL, cable, and mobile LTE.
• Constant Bit Rate
Use constant bit rate for low-latency encoding. It keeps the video data more tightly set to the bandwidth target than does average bit rate encoding. The quality may be lower than with average bit rate encoding, but the streaming rate is stable. You may also want to choose this encoding method when streaming a standard-latency stream over networks that have tightly constrained bandwidths, such as 3G mobile networks.
• Variable Bit Rate
Variable bit rate encoding gives more bandwidth to scenes that are hard to compress, making the most visible difference in videos that have fast-moving, high-action scenes. To accommodate variable bit rates, the client network must be able to handle large bandwidth spikes. This is typically acceptable on corporate networks and for cable modem use. It is not advisable for DSL or mobile broadband connections.
Video Output Format
The Video Output Format drop-down sets the frame size of the encoded video. If the frame size is in the same aspect ratio (such as 4:3 or 16:9) as the input video, the video is scaled smaller or larger as necessary to meet the target size. If the aspect ratio is different, the scaling mode determines how the video is resized.
Scaling Mode
If the input and output video streams have a different aspect ratio, the Scaling Mode value determines how the output looks.
Preserve Source
The Preserve Source option preserves the aspect ratio of the input. This overrides the setting of Video Output Format (see page 23) if the input has a different aspect ratio than the selected output ratio.
Stretch
The Stretch value increases or decreases the video size as necessary to fit the output settings. This can cause visible distortion when the input and aspect ratios are different. The following

Helix Broadcaster Quick Start Guide CHAPTER 3: Stream Encoding
24
figure illustrates a 16:9 video changed to a 4:3 aspect ratio, which compresses the video image in its horizontal dimension.
Crop
With the Crop option, the input video stream is cropped as necessary to fit the output size. In the next illustration, the edge of the 16:9 format video are cropped out to fit the 4:3 output size.
Pad
The Pad option preserves the input video’s aspect ratio and adds black bars to the left/right edges (pillarbox) or top/bottom edges (letterbox) depending on the input and output aspect ratios. The following illustration shows top and bottom bands added to a 16:9 format video that is resized to fit in a 4:3 output size.
Framerate Conversion
The video frame rate determines how many visual frames are encoded to display each second. The Framerate Conversion drop-down provides several choices for altering the frame rate in the output. Video streamed over the Internet is typically encoded at a frame rate of 15 to 30 frames per second, although lower-bandwidth videos may be encoded at slower frame rates.
Changing Metadata
The default value, which preserves the input frame rate, is Keep Source Framerate and Metadata. The other options for keeping the source frame rate allow you to change the frame rate

Helix Broadcaster Quick Start Guide CHAPTER 3: Stream Encoding
25
metadata information within the video. If the input metadata is incorrect, you can choose the option for a custom metadata rate and enter the correct value in the Custom Value field.
Downsampling or Upsampling
The downsampling and upsampling values allow you to change the input and output frame rates among those used in film and video production:
Dropping Frames
Helix Broadcaster provides several options to drop frames and achieve a lower frame rate. Dropping frames may make the video appear jerky, however.
Deinterlacing
Deinterlacing removes jaggedness from certain video sources. Typically you can leave this field set to its default value of Auto. In this case Helix Broadcaster automatically deinterlaces the input stream as needed. If you have specific requirements, you can use the drop-down to turn off deinterlacing or choose a specific method of deinterlacing.
Tip: Deinterlacing doubles the video frame rate. For example, it turns 30 frames-per-second NTSC video into a 60 fps output. To drop added frames, select Drop 1 out of every 2 frames in the Framerate Conversion drop-down (see page 24).
What is Deinterlacing?
An NTSC video camera running at 30 frames per second captures the odd-numbered lines of a field in 1/60th of a second and the even-numbered lines in the next 1/60th of a second. It then interlaces the two to create the frame. Because half of the field's lines are captured a fraction of a second later than the other half, fast-moving objects may appear jagged. This is the result of the object advancing slightly within 1/60th of a second. Deinterlacing removes this jaggedness.
Detail of Interlaced Video (left) and Deinterlaced Video (right)
Logo/Watermark Insertion
To add an image as a logo overlay or a watermark to every video frame, change the drop-down for Logo/Watermark Insertion to Enabled and enter the full path and file name of the graphics file (GIF or PNG) to use in the File field. The graphic is overlaid onto the stream at the pixel size encoded into the file.
feature film 24 frames per second
PAL video 25 frames per second
NTSC video 30 frames per second
Helix Broadcaster Quick Start Guide CHAPTER 3: Stream Encoding
26
Note: You can configure Helix Broadcaster to access a Windows/Samba shared network drive by clicking the Server Setup tab and choosing Services Setup > Storage Setup.
Transparency
The Transparency drop-down allows you to set the level of transparency for the image, from invisible to solid in gradations of 10 percent. Alpha channel information in PNG and GIF images is preserved.
Position
The Logo Position drop-down allows you to place the image on the video frame. You can choose one of nine preset positions such as Bottom Right. Select Custom to indicate offset pixel values in the Custom X Pos and Custom Y Pos fields. The offsets insert the defined pixel distance between the image file’s bottom-left corner and the video frame’s bottom-left corner. For example, values of 10 for both the x and y positions place the image 10 pixels to the right of the video’s left side and 10 pixels up from the video’s bottom edge.
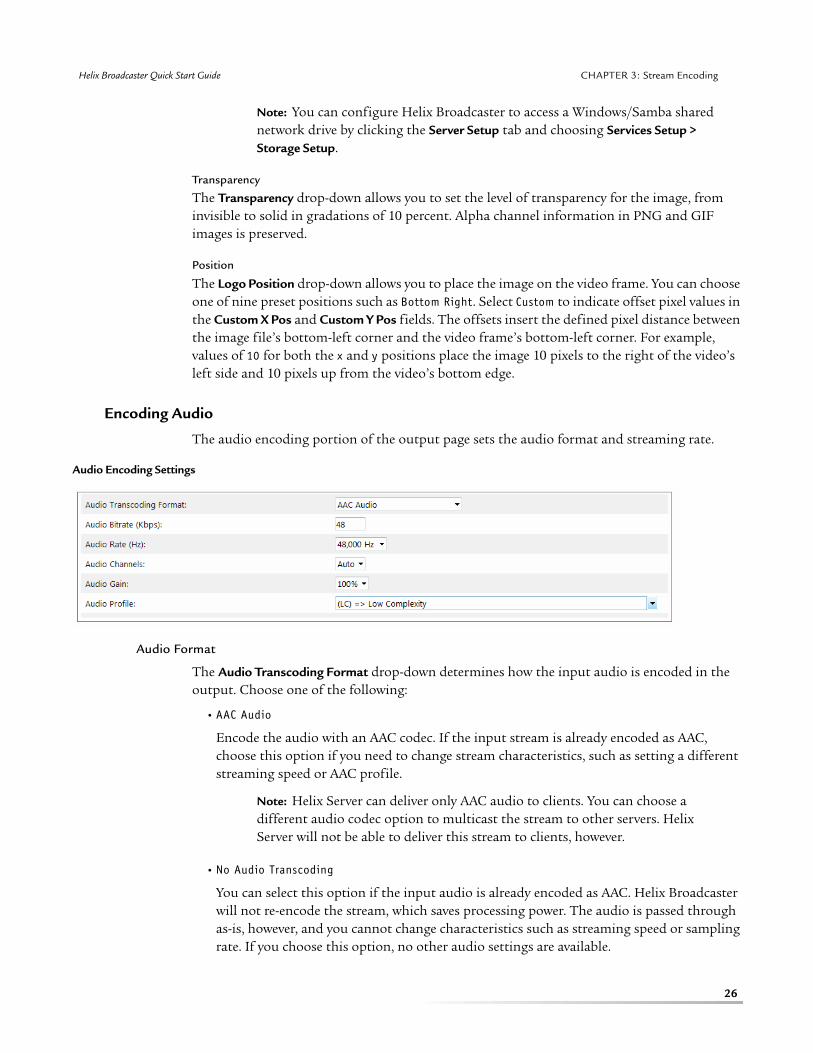
Encoding Audio
The audio encoding portion of the output page sets the audio format and streaming rate.
Audio Encoding Settings
Audio Format
The Audio Transcoding Format drop-down determines how the input audio is encoded in the output. Choose one of the following:
• AAC Audio
Encode the audio with an AAC codec. If the input stream is already encoded as AAC, choose this option if you need to change stream characteristics, such as setting a different streaming speed or AAC profile.
Note: Helix Server can deliver only AAC audio to clients. You can choose a different audio codec option to multicast the stream to other servers. Helix Server will not be able to deliver this stream to clients, however.
• No Audio Transcoding
You can select this option if the input audio is already encoded as AAC. Helix Broadcaster will not re-encode the stream, which saves processing power. The audio is passed through as-is, however, and you cannot change characteristics such as streaming speed or sampling rate. If you choose this option, no other audio settings are available.

Helix Broadcaster Quick Start Guide CHAPTER 3: Stream Encoding
27
• Remove Audio
When this option is selected, Helix Broadcaster does not encode or pass through any audio. This results in a video-only stream. If you choose this option, no other audio settings are available.
Audio Bitrate
For Audio Bitrate, set the audio’s streaming bit rate in Kilobits per second (Kbps). The encoded stream’s total streaming speed is the sum of the audio bit rate and the video bit rate (see page 22). For streaming on modern networks, stereo audio that accompanies a video stream is commonly encoded at any one of the following speeds (Kbps):
24, 28, 32, 40, 48, 56, 64, 80, 96, 128, 160, 192, 224, 256, 320
Tip: At slow streaming speeds, audio may be up to one-half of the video speed. At faster streaming rates, the audio bandwidth typically drops to one-quarter or less of the video speed.
For More Information: For HLS media clients, Apple recommends the inclusion of a low-bandwidth audio track in multi-rate streams. Helix Server constructs this stream automatically as long as one of the video streams contains an audio track encoded at 48 Kbps or less. For details, refer to the online help topic Helix Setup> Media Types > HLS Clients > HLS Basics.
Audio Rate
In the output’s Audio Rate drop-down, select the sampling rate for the encoded audio. If the input audio's sampling rate (see page 16) does not match the sampling rate you choose here, Helix Broadcaster resamples the input when it creates the output.
Tip: If you are streaming to Flash Player, choose 44,100 Hz, which is that player’s preferred sampling rate. Using other rates may introduce audio distortion Most other media players will play a 44.1 kHz stream without complications.
Audio Channels
The Audio Channels drop-down selects the number of audio channels that are recorded. Use the default value of Auto to have Helix Broadcaster select which channels to record based on the input and the output settings. Select 2 if you have multi-channel input that you want to turn to stereo. Select 1 as the value to encode mono audio.
Note: Helix Broadcaster cannot increase the number of channels present in the input. For example, selecting 5 does not increase the number of discrete channels if the input is stereo.
Audio Gain
The Audio Gain drop-down allows you to boost or cut the output audio level, making it louder or softer than the input. The default value of 100 encodes the audio at the same volume as the input. Select a higher value to increase the volume, a lower value to decrease it.

Helix Broadcaster Quick Start Guide CHAPTER 3: Stream Encoding
28
Audio Profile
For AAC audio, you can choose from three versions:
• LC
Advanced Audio Coding Low Complexity (AAC-LC) creates audio content at bit rates starting at 8 Kbps. Most media devices support AAC-LC audio, making it the safest choice for reaching the widest audience.
• HE-AAC
High-efficiency AAC, which is also known as AAC Plus (AAC+), provides Spectral Band Replication (SBR) and more efficient encoding than AAC-LC. It requires more processing power for the media player to decode, however, and may not be supported by all client devices. Choose this option only if you know that your target audience supports AAC Plus.
• HE-AAC v2
Version 2 of High Efficiency AAC, which is also known as Enhanced AAC Plus (EACC+), adds Parametric Stereo for better sound quality. It requires more processing power for the media player to decode, however. Choose it only if you know that your target media players support it.
Using the Service Control PaletteThe Service Control palette appears on the right side of the screen when you navigate the Stream Setup tab. Click the buttons on this palette to start and stop the various encoding processes. When a process is started, a green “on” indicator appears in the palette and next to the stream category in the left-hand menu.
Service Control Palette
Note: The actions of the Service Control palette affect the stream category (such as Net #1 Setup) you have selected in the left-hand menu. Be sure to select the right stream category before starting and stopping a process.
Tip: To see the status of all encoding processes at once, click the System Status tab and choose Stream Status.

29
C H A P T E R
4 Chapter 4: HELIX SERVER SETUP
Helix Server can deliver the encoded live streams to popular media clients as well as transmit them to different servers or content distribution networks. This chapter describes the basic setup required to use the Helix Server component of Helix Broadcaster.
Accessing Helix ServerWhen you click the Helix Setup tab on Helix Broadcaster to access Helix Server, you are prompted for a password that is initially set to these defaults:
Keep the following points in mind about Helix Broadcaster and Helix Server log-in credentials:
• When you log into Helix Broadcaster, you need to supply the Helix Broadcaster user credentials (see page 6). When you access Helix Server by clicking the Helix Setup tab, you must supply the Helix Server credentials. These log-ins are separate even though they are set to the same default values.
• RealNetworks recommends that you set different passwords for Helix Server and Helix Broadcaster.
• Optionally, you can set up multiple user accounts for Helix Server access, assigning each user a different password.
• Helix Server administrative access has an inactivity timeout set to 15 minutes. After the timeout elapses, access to the Helix Server component of Helix Broadcaster requires reauthorization with the Helix Server credentials.
Changing the Helix Server Password
Change the Helix Server administrative password using the following procedure:
1. Click the Helix Setup tab and enter the default Helix Server log-in credentials.
2. Click the Security category.
3. Choose Authentication. This displays a dialog that allows you to create and manage Helix Server users and passwords.
user name admin
password admin

Helix Broadcaster Quick Start Guide CHAPTER 4: Helix Server Setup
30
Helix Server Authentication Dialog
4. In the dialog, highlight the SecureAdmin realm.
5. Click the Change User Password link.
Helix Server Administrator Password Change
6. Enter admin as the user name.
7. Enter a new case-sensitive password in both the New Password and Confirm New Password fields.
8. Click OK.
Adding a New Administrative User
Optionally, you can add a new Helix Server administrator:
1. Display the authentication dialog as shown above.
2. Highlight the SecureAdmin realm.
3. Click Add a User to Realm.
4. In the pop-up, enter the new user account name (single word) and a case-sensitive password.
5. Click OK.
Tip: Click Browse Users in Realm to display all users that have Helix Server administrative access.

Helix Broadcaster Quick Start Guide CHAPTER 4: Helix Server Setup
31
Controlling the Helix Server ServiceOn the Helix Setup tab, the Service Control page allows you to stop and restart the Helix Server process independently of any encoding jobs being performed by Helix Broadcaster.
Helix Server Service Control
1. Ensure that the Enable Helix Server box is checked to enable all Helix Server functions.
2. The Max Memory Allocation fields sets the upper limit on Helix Server memory use. You may want to increase this depending on how much memory your Helix Broadcaster machine provides.
For More Information: For more information about how Helix Server uses memory, refer to the online help topic Server Operation > Memory Allocation.
3. The License field provides the machine ID of the Helix Broadcaster hardware, which is used in generating the Helix Server license file. This is for reference purposes. You may need to supply this ID to a technical support representative if you encounter problems with the Helix Server license.
Note: The machine ID is not the same as the hardware MAC Address.
4. On your first set-up, the Helix Server end-user license agreement (EULA) appears. Click to accept the agreement. Once you have done so, the EULA no longer appears onscreen.
5. Click Update if you make any changes.
Using the Service Control Palette
The Service Control palette displays on the right side of the Service Control page. You can use the Stop and Start buttons to turn the Helix Server service off or on.
Service Control Palette

Helix Broadcaster Quick Start Guide CHAPTER 4: Helix Server Setup
32
Restarting Helix Server
Some configuration changes you make to Helix Server require a server restart. In these cases, the set-up page indicates that a restart is needed by popping up a message when you click Apply. You can restart the server by navigating back to the Service Control page and clicking the Restart button. You can also click the Restart button on the Helix Control palette (see page 32).
Tip: Restarting Helix Server does not affect streams being encoded by Helix Broadcaster. However, it shuts down media player connections. It is therefore best to make configuration changes during periods of low use. A full restart of the Helix Server process typically takes about 20 seconds. Once the streams are available again, media players can typically reconnect to the broadcasts.
For More Information: You can implement a delay feature that causes Helix Server to wait a specified amount of time before shutting down or restarting. Under the Helix Setup tab, click the Setup category and display the Delayed Shutdown page. Click the Help link on the page for setup instructions.
Viewing the Helix Server Statistics Log
Click View Log on the Service Control palette to open a new browser window that displays text output of the Helix Server statistics log. This log file contains general statistics about streams and Helix Server operation, but it does not provide specific information about media player requests. New log entries are created every 60 seconds.
Tip: The generation time for each set of statistics is written to the log on the Server Stats line. For example: Server Stats (23-Apr-2013 23:01:25)
For More Information: For details about the meaning of each log entry, refer to the online help topic RSS Statistics.
Helix AdministratorOther than the Service Control page, the categories and setup pages under the Helix Setup tab allow you to configure Helix Server features. In the Helix Server online help, the browser-based interface for Helix Server is called Helix Administrator.
Note: When you change configuration information on a Helix Server setup page, click Apply at the bottom of the page. If you do not click Apply, Helix Server discards the changes once you navigate to a different page.
Helix Control Palette
The right side of each Helix Server setup page displays a Helix Control palette.

Helix Broadcaster Quick Start Guide CHAPTER 4: Helix Server Setup
33
Helix Control Palette
By clicking the links in this palette, you can display the following pages and features.
Accessing Helix Server Online Help
You can view context-sensitive help for Helix Server by clicking the Help link at the top of any setup page. The HTML-based help system opens in a new browser window. Use the left-hand pane to navigate among topics.
Online Help Feature Areas
The accordion panels at the lower-left corner of the online help allow you to choose between the different functional areas.
Helix Administrator Online Help Functional Areas
Toolbar Buttons
The buttons at the top of the online help toolbar provide access to specific features.
Monitor Server Monitor, a Java-based tool that indicates the server’s incoming and outgoing connections. For details about using Server Monitor, refer to the online help.
Samples Links to sample clips you can play on Helix Server (see page 48).
License Details about the Helix Server license.
Library Documentation resources on the RealNetworks Web site.
Help Online help installed with the server, displayed in a pop-up window (see page 33).
Restart Restart Helix Server without interrupting any encoding processes (see page 32).
Helix Broadcaster Quick Start Guide CHAPTER 4: Helix Server Setup
34
Helix Administrator Online Help Toolbar Buttons
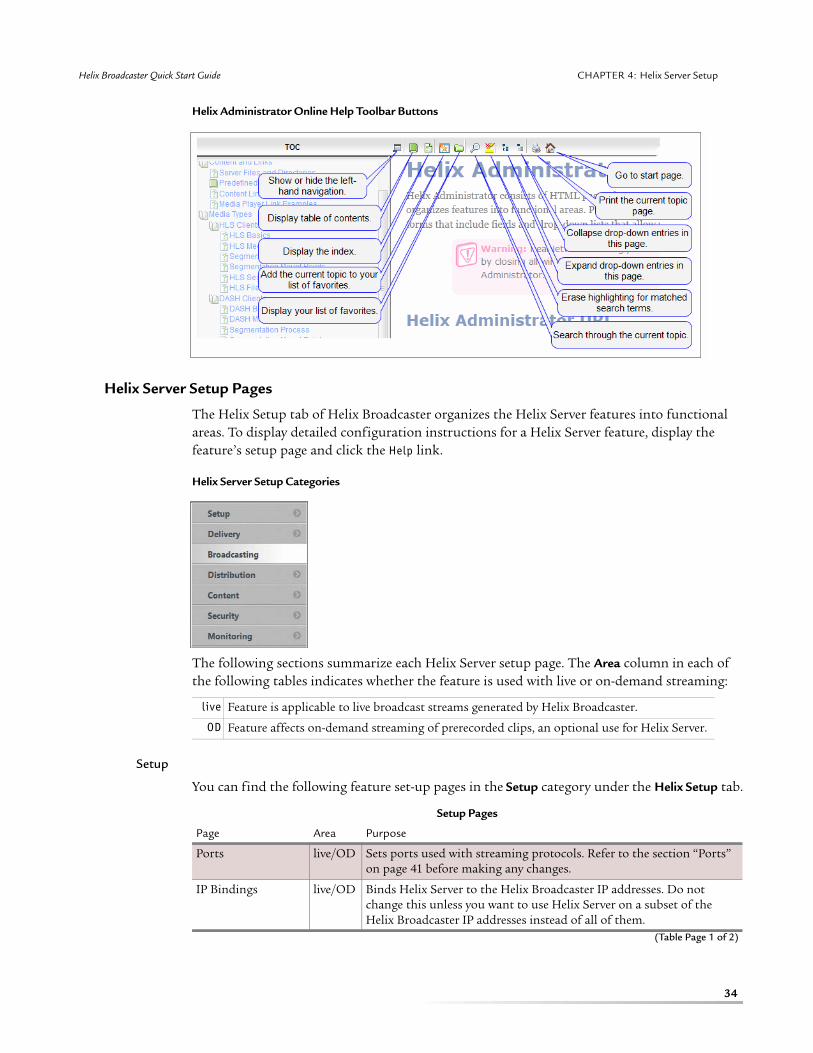
Helix Server Setup Pages
The Helix Setup tab of Helix Broadcaster organizes the Helix Server features into functional areas. To display detailed configuration instructions for a Helix Server feature, display the feature’s setup page and click the Help link.
Helix Server Setup Categories
The following sections summarize each Helix Server setup page. The Area column in each of the following tables indicates whether the feature is used with live or on-demand streaming:
Setup
You can find the following feature set-up pages in the Setup category under the Helix Setup tab.
live Feature is applicable to live broadcast streams generated by Helix Broadcaster.
OD Feature affects on-demand streaming of prerecorded clips, an optional use for Helix Server.
Setup Pages
Page Area Purpose
Ports live/OD Sets ports used with streaming protocols. Refer to the section “Ports” on page 41 before making any changes.
IP Bindings live/OD Binds Helix Server to the Helix Broadcaster IP addresses. Do not change this unless you want to use Helix Server on a subset of the Helix Broadcaster IP addresses instead of all of them.
(Table Page 1 of 2)

Helix Broadcaster Quick Start Guide CHAPTER 4: Helix Server Setup
35
Delivery
The following set-up pages in the Delivery category affect general streaming features and media client support.
MIME Types live/OD Sets the MIME types for HTTP delivery. This typically does not need to be changed.
Mount Points OD Creates new mount points used with on-demand clips. This allows you to stream clips from a shared network directory, for example.
HTTP/HTTPS Delivery
OD Determines which mount points support delivery over HTTP. Helix Server is preconfigured to use HTTP with HLS and DASH broadcasts. You typically need to change this only to allow HTTP delivery of on-demand clips from a certain mount point.
Connection Control live/OD Optionally limits streaming bandwidth used by Helix Server. This is generally not necessary to modify.
Redundant Servers live/OD Redirects RealPlayer (but no other media players) to a secondary server if the RTSP stream fails.
URL Aliases live/OD Shortens long URLs by creating alias strings.
Proxy Cache Dirs live/OD Controls RTSP proxy splitting of live streams and caching of on-demand clips. This is generally not necessary to modify.
Delayed Shutdown live/OD Adds a delay before a Helix Server restart or shutdown.
Setup Pages
Page Area Purpose
(Table Page 2 of 2)
Delivery Pages
Page Area Purpose
HLS Setup live/OD Sets streaming characteristics for HLS media players such as the Apple iPhone and iPad. See “Delivering Content to HLS and DASH Clients” on page 45.
DASH Setup live/OD Defines streaming characteristics for DASH media players. See “Delivering Content to HLS and DASH Clients” on page 45.
RTSP Rate Adaptation
live/OD Sets server-side rate control features used with RTSP-based mobile players. The default settings are typically adequate.
RTSP Fast Channel live Allows RTSP media players to switch between multiple live streams.
Server Playlists live/OD Delivers a series of live or on-demand streams to RTSP or HLS media players.
Stream Bookmarking
OD Sets a starting place in on-demand clips.
Differentiated Svcs live/OD Sets priorities for the RTSP protocol on certain IPv4 networks.

Helix Broadcaster Quick Start Guide CHAPTER 4: Helix Server Setup
36
DRM
The DRM category enables third-party digital rights management technologies to secure different types of media content.
Broadcasting
The Broadcasting pages control basic broadcasting features.
Distribution
The feature set-up pages under Distribution control advanced broadcasting features.
DRM Pages
Page Area Purpose
Verimatrix DRM live/OD Allows HLS media players to use Verimatrix encryption.
BuyDRM live/OD Defines BuyDRM services for use with HLS media players.
Broadcasting Pages
Page Area Purpose
Helix Push Live live Accepts a broadcast stream from a RealNetworks encoder such as Helix Producer. This is typically not used with Helix Broadcaster, which generates its own encoder streams.
RTP Live live Receives a broadcast stream from an RTP-based encoder. You can use this feature to receive the RTP stream directly on Helix Server, bypassing the Helix Broadcaster encoding features. If you need to change the stream’s encoding parameters, use Helix Broadcaster to receive the stream (see “Receiving a Network Stream” on page 11), encode it, and pass it to Helix Server, bypassing the functionality on this page.
Flash Live live Receives a broadcast stream from a Flash encoder. You can use this feature to receive the RTMP stream directly on Helix Server, bypassing the Helix Broadcaster encoding features. If you need to change the stream’s encoding parameters, use Helix Broadcaster to receive the stream (see “Receiving a Network Stream” on page 11), encode it, and pass it to Helix Server, bypassing the functionality on this page.
MPEGTS Live live Allows Helix Server to receive a live stream from the Helix Broadcaster encoder. See “Receiving an Encoder Stream” on page 42.
Windows Media Live
live Receives a broadcast stream from certain versions of Windows Media Encoder.
Broadcast Archiving
live Archives a live H.264/AAC stream as an MPEG-4 file. You can then stream the archive as an on-demand clip. The feature includes HTTP APIs that allow you to control archiving and delete archives that are no longer needed.
Encoder Redundancy
live Allows multiple encoder connections for the same stream. This is not used if Helix Broadcaster generates the live stream.
Distribution Pages
Page Area Purpose
Transmitter live Sends a live stream to another Helix Server or a group of Helix Servers.
Receiver live Receives a live stream from another Helix Server. (Table Page 1 of 2)

Helix Broadcaster Quick Start Guide CHAPTER 4: Helix Server Setup
37
Content
The Content pages define general features of on-demand content viewing and distribution.
Security
Features in the Security section restrict access to Helix Server based on IP address or user name and password authentication.
HLS Push live Uploads the HLS format (segments and playlists) of a live stream to certain content distribution networks.
RTMP Push live Allows Helix Server to use RTMP to push an H.264/AAC stream to another Helix Server or a Flash server, as well as to certain content distribution networks.
Scalable Multicasting
live Multicasts a live stream to RTSP media players on a multicast-enabled network.
Back-Channel Mcasting
live Multicasts a live stream to RealPlayers over RTSP on a multicast-enabled network.
Windows Media Mcasting
live Multicasts live Windows Media to Windows Media Player.
Session Announcement
live Publicizes scalable multicasts.
Distribution Pages (continued)
Page Area Purpose
(Table Page 2 of 2)
Content Pages
Page Area Purpose
Content Caching OD Distributes on-demand content between Helix Servers.
ISP Hosting OD Sets up user-specific areas for on-demand RTSP streaming. This typically does not need to be changed.
Content Browsing live/OD Shows on-demand files available for streaming. You can also use this feature to see which HLS and DASH segments for live broadcasts have been written to disk in the Segment Library area.
View Source live/OD Controls the stream information sent to RealPlayer. This typically does not need to be modified.
Security Pages
Page Area Purpose
Access Control live/OD Limits media player access by blacklisting or whitelisting IP addresses.
User Databases live/OD Defines databases used with authentication.
Authentication live/OD Sets user names and passwords for administrative access to Helix Server (see “Changing the Helix Server Password” on page 29). User name and password authentication can also be used with desktop media players such as RealPlayer and QuickTime Player.
Commerce Rules live/OD Defines rules that restrict access by authenticated media players.
SSL Certificates live/OD Sets the location of certificates used with secure HTTP.

Helix Broadcaster Quick Start Guide CHAPTER 4: Helix Server Setup
38
Monitoring
The Monitoring pages organize the features that allow you to monitor server activity and define reports.
Helix Server File SystemYou can access the Helix Server file system using SSH or FTP from the command line. From Windows, you can use an SSH client such as PuTTY or an FTP client such as WinSCP to view the file system. For FTP access, the FTP service must be running as described in “Configuring FTP Access” on page 9. The following figure illustrates the top level of the Helix Server file system depicted in the WinSCP client.
Helix Server File System
For More Information: For more about the file system organizaton, refer to Server Operation > Server Files and Directories.
Monitoring Pages
Page Area Purpose
Server Monitor live/OD Shows incoming and outgoing connections. See “Monitoring Streams” on page 44.
Basic Logging live/OD Defines the basic access log.
Advanced Logging live/OD Allows you to define client access reports and direct the output to a file or an HTTP/TCP/UDP socket.
SNMP Setup live/OD Defines SNMP monitoring. This feature is available through Helix Broadcaster under the Apps Setup tab.

Helix Broadcaster Quick Start Guide CHAPTER 4: Helix Server Setup
39
Configuration File
The standard configuration file (rmserver.cfg), which typically resides in the top-level Helix Server directory, is stored in an encrypted partition. Direct access to the configuration file is not available through Helix Broadcaster. All configuration changes must be made through the Helix Administrator interface as described in the section “Helix Administrator” on page 32.
Certificate Files
The Certificates directory contains 2048-bit security keys and a certificate signing request (.csr file). A certificate signing authority can use this request file to validate the identity of your server for secure HTTP (HTTPS) transactions and provide you with an officially signed certificate. RealNetworks does not endorse the use of any specific signing authority.
For More Information: You can learn more about the signing process at the Web site of any signing authority, such as http://www.verisign.com/.
Self-Signed Certificates
Until you receive a response from a signing authority, your certificates are self-signed. These certificates will function with HTTPS requests. However, note the following about using self-signed certificates:
• Browsers warn the user that the server is untrusted. Users may then choose to add an exception for the server.
• HTTPS requests for content segmented for HLS and DASH clients do not work with self-signed certificates.
OpenSSL Program
Helix Server generates .pem and .key files using the OpenSSL program provided by the OpenSSL Project. The executable file, openssl.exe, is included in the Bin subdirectory of the main installation directory. This program has many uses, including regenerating the .csr and .pem files without running the installation program.
For More Information: Documentation for the openssl.exe program is available at the OpenSSL Project Web site, http://www.openssl.org/.

40
C H A P T E R
5 Chapter 5: STREAM DELIVERY
Helix Server can deliver a live H.264/AAC stream encoded by Helix Broadcaster to media clients, formatting the content stream as required by the client and using the client’s preferred streaming protocol, whether HTTP, RTMP, or RTSP. This chapter explains how to create URLs that allow you to deliver streams to popular media clients.
Bandwidth ConstraintsIn standard broadcasting (also called unicasting), each client stream uses bandwidth, so you are limited by Helix Broadcaster’s available, outgoing bandwidth. Unicasting from a single Helix Broadcaster is generally suited for light- to medium-volume broadcasts. For events with a large number of viewers, you can use splitting, multicasting, or a combination of the two to deliver a large number of broadcast streams or to conserve outgoing bandwidth.
For More Information: For more about multicasting and splitting, refer to the online help category Helix Administrator > Broadcast Distribution.
URL ComponentsHelix Server determines how to deliver a live stream to a media client based on the format of the request URL. For each client, the encoded data must be H.264/AAC, but the data packaging and delivery protocol may vary based on the client’s requirements. The following is the basic structure of a media request URL:
protocol://address:port/client_mount_point/broadcast_mount_point/stream_name
Protocol
The URL must begin with the protocol designation. A port value is required if Helix Server does not use the default port for the specified protocol.
Address
An IPv4 address or a domain name indicates the network location of Helix Server. If Helix Broadcaster does not have a domain name assigned to it, use one of the IP addresses defined under Server Setup > Network Setup. By default, Helix Server binds to all configured addresses,
http:// HyperText Transfer Protocol for delivering content to HLS and DASH media clients.
https:// Secure Hypertext Transfer Protocol, the encrypted variation of HTTP.
rtmp:// Real-Time Messaging Protocol for Flash clients.
rtsp:// Real-Time Streaming Protocol for RealMedia, 3GPP, and MPEG-4 clients.

Helix Broadcaster Quick Start Guide CHAPTER 5: Stream Delivery
41
using the same protocol ports on each address. Examples in this guide use the following domain name:
rtmp://helixbroadcaster.example.com
An example of an IP address in a URL is:
rtmp://163.112.11.12
If the protocol requires a port value, add the value after the domain name or IP address, separating the two with a colon:
http://helixbroadcaster.example.com:88
–OR–
http://163.112.11.12:88
Tip: When requesting content locally, such as with the Flash sample player (see page 48), you can use the localhost address of 127.0.0.1.
Ports
Protocol port values are defined on Helix Server as the following. With standard port values, the port number does not have to be included with the URL.
Note: Port values are set in the Helix Broadcaster interface on the Setup > Ports page. You can choose different port values, but do not set the HTTP and HTTPS ports to the standard values of 80 and 443, respectively. Ports 80 and 443 are used for other HTTP-based activity in Helix Broadcaster.
Client Mount Points
A client mount point is a virtual path that follows the address. It indicates the type of client requesting the stream. A client mount point is necessary for some (but not all) types of media requests.
HTTP 88 (nonstandard). To request content, clients typically use 80 for the HTTP port, but Helix Server is configured by default to use port 88, which must be specified in the URL after the address.
HTTPS 444 (nonstandard). The default port for secure HTTP is 443, but Helix Server is configured by default to use port 444, which must be specified in the URL after the address.
RTMP 1935 (standard). Helix Server uses the standard port for RTMP, which is 1935. The port value typically does not need to be included in request URLs.
RTSP 554 (standard). Helix Server uses the standard port for RTSP, which is 554. The port value typically does not need to be included in request URLs.
dashgen A /dashgen/ mount point in a URL indicates that the request is being made by a media client that supports Dynamic Adaptive Streaming (DASH) over HTTP. For delivery details, see “Delivering Content to HLS and DASH Clients” on page 45.
flashgen A /flashgen/ mount point is used with an HTTP URL when multi-rate content is delivered to Flash Player. See “Multi-Rate Content for Flash” on page 48.

Helix Broadcaster Quick Start Guide CHAPTER 5: Stream Delivery
42
For More Information: For more about client mount points, refer to the online help topic Content and Links > Predefined Mount Points > Client Mount Points.
Broadcast Mount Points
The broadcast mount point directs the media client to the live stream. Broadcast mount points can also be used to reformat a stream for use with a different streaming protocol.
For More Information: For more about broadcast mount points, refer to the online help topic Content and Links > Predefined Mount Points > Broadcast Mount Points.
Stream Name
The last component in the URL is the stream name, which is defined on Helix Server as explained in the following section. A stream name is usually a single word such as camera.
Receiving an Encoder Stream The following procedure explains how to configure Helix Server to receive a Helix Broadcaster stream. As explained in Chapter 3, Helix Broadcaster can direct the stream to the localhost address (127.0.0.1) or a multicast address.
➤ To configure Helix Server to receive an encoded H.264/AAC stream:
1. Click the Helix Setup tab.
2. Click the Broadcasting category.
3. Choose MPEG2TS Live. The following figure shows the portion of the Helix Server dialog necessary to configure an MPEG-2 transport stream.
m3ugen The M3UGen mount point appears as /m3ugen/ in URLs. It indicates that the request is being made by a media client that supports HTTP Live Streaming (HLS), such as an Apple iPhone or iPad. For delivery details, see “Delivering Content to HLS and DASH Clients” on page 45.
sdpgen A /sdpgen/ mount point can be used with an HTTP URL to deliver content to an RTSP media player. It is useful if a browser makes the request and is not configured to launch an RTSP player when the user clicks an RTSP URL. See “Streaming to RTSP Clients” on page 49.
mptslive All live streams created by Helix Broadcaster and delivered by Helix Server include the /mptslive/ mount point.
rtmplive An /rtmplive/ mount point precedes the /mptslive/ mount point in the URL when the stream is delivered to Flash Player. See “Streaming to Flash Players” on page 48.
rtsplive The /rtsplive/ mount point precedes the /mptslive/ mount point in the URL when the stream is delivered to an RTSP media player. See “Streaming to RTSP Clients” on page 49.
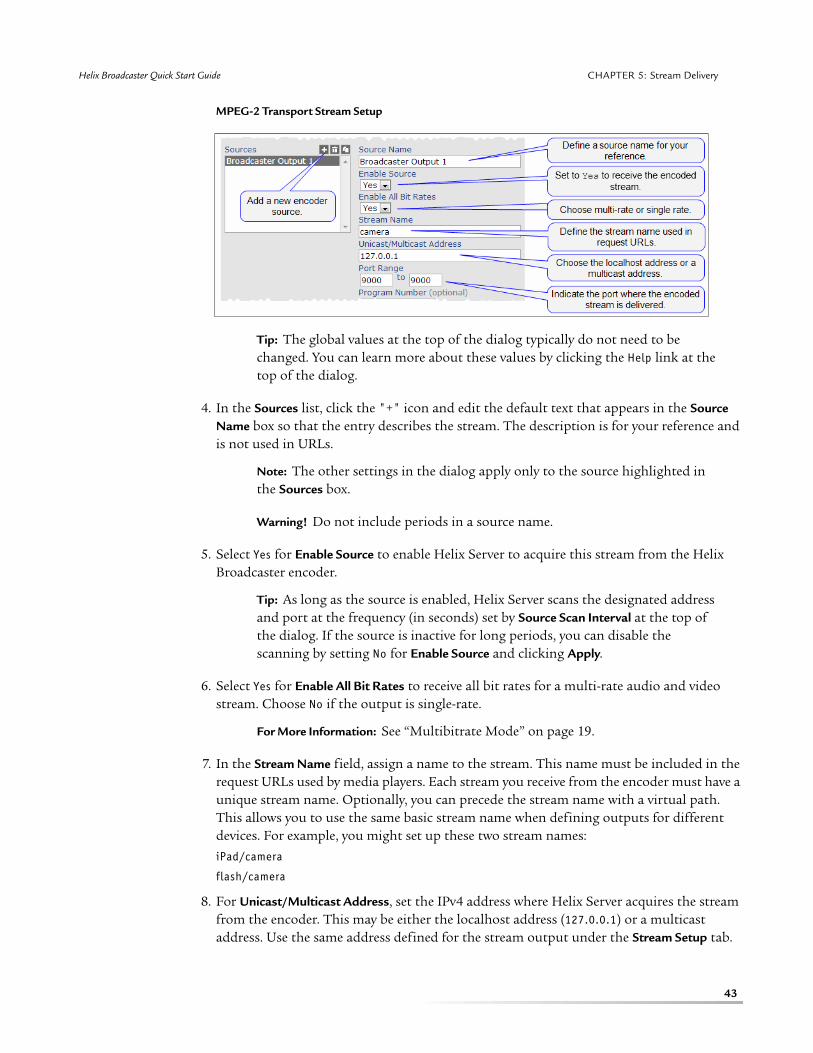
Helix Broadcaster Quick Start Guide CHAPTER 5: Stream Delivery
43
MPEG-2 Transport Stream Setup
Tip: The global values at the top of the dialog typically do not need to be changed. You can learn more about these values by clicking the Help link at the top of the dialog.
4. In the Sources list, click the "+" icon and edit the default text that appears in the Source Name box so that the entry describes the stream. The description is for your reference and is not used in URLs.
Note: The other settings in the dialog apply only to the source highlighted in the Sources box.
Warning! Do not include periods in a source name.
5. Select Yes for Enable Source to enable Helix Server to acquire this stream from the Helix Broadcaster encoder.
Tip: As long as the source is enabled, Helix Server scans the designated address and port at the frequency (in seconds) set by Source Scan Interval at the top of the dialog. If the source is inactive for long periods, you can disable the scanning by setting No for Enable Source and clicking Apply.
6. Select Yes for Enable All Bit Rates to receive all bit rates for a multi-rate audio and video stream. Choose No if the output is single-rate.
For More Information: See “Multibitrate Mode” on page 19.
7. In the Stream Name field, assign a name to the stream. This name must be included in the request URLs used by media players. Each stream you receive from the encoder must have a unique stream name. Optionally, you can precede the stream name with a virtual path. This allows you to use the same basic stream name when defining outputs for different devices. For example, you might set up these two stream names:
iPad/camera
flash/camera
8. For Unicast/Multicast Address, set the IPv4 address where Helix Server acquires the stream from the encoder. This may be either the localhost address (127.0.0.1) or a multicast address. Use the same address defined for the stream output under the Stream Setup tab.

Helix Broadcaster Quick Start Guide CHAPTER 5: Stream Delivery
44
For More Information: See “Destination IP” on page 21 and “Destination Port” on page 21.
9. The Port Range field sets the Helix Server port or multicast port where the Helix Broadcaster encoder delivers stream data. Use the same port defined for the stream output under the Stream Setup tab.
Tip: To monitor a single port, specify the same port value for the starting and ending range, as in 9000-9000.
10. It is not necessary to set the remaining values for the program number, audio and video PIDs, and audio and video bit rates.
11. Click Apply at the bottom of the dialog.
12. Repeat this procedure if you need to define additional streams to acquire from the Helix Broadcaster output.
Note: Once you define the stream and click Apply, Helix Server acquires the stream from the encoder within the time set by the Source Scan Interval field. For information about starting the encoder process to generate the stream, see “Using the Service Control Palette” on page 28.
Monitoring StreamsYou can check if Helix Server is receiving a stream that is being encoded by clicking the Helix Setup tab, clicking Monitoring, and choosing Server Monitor. You can also launch the server monitor in a pop-up browser window by clicking the Monitor link on the Helix Control palette while viewing the Helix Setup tab.
Monitor Link on the Helix Control Palette
Once the Java-based server monitor starts, click the Connections tab at the bottom of the monitor screen. The stream name that you defined in Step 7 on page 43 appears under the Filename column. The /mptslive/ mount point (see page 42) is included to indicate that the encoded H.264/AAC media is in the MPEG-2 transport stream format.

Helix Broadcaster Quick Start Guide CHAPTER 5: Stream Delivery
45
Monitor Link on the Helix Control Palette
Delivering Content to HLS and DASH Clients To deliver an H.264/AAC stream to DASH clients or HLS clients such as an Apple iPhone or iPad, Helix Server creates a playlist and segments the content into a series of transport files, delivering these files to the HLS client using HTTP. The URL for an HLS client request uses a format like the following:
http://helixbroadcaster.example.com:88/m3ugen/mptslive/camera
The URL for a DASH client request uses a similar format:
http://helixbroadcaster.example.com:88/dashgen/mptslive/camera
The /m3ugen/ or /dashgen/ portion of the URL is a client mount point, a virtual path that instructs Helix Server to turn the original clip into the segment files. When the URL request contains one of these client mount points, Helix Server segments the content into MPEG-2 transport files (.ts) for HLS clients or MP4 segments (.m4s) for DASH clients.
Each segment file encodes a portion of the stream, typically enough data to provide 4 to 10 seconds of playback. When requesting the individual transport stream files, the client refers to a playlist file that lists the segments in their playback order. HLS clients receive a text-based .m3u8 text file while DASH clients use an XML-formatted .mpd file.
For More Information: You can learn more about HLS and DASH from the online help topics Media Types > HLS Clients and Media Types > DASH Clients.
Enabling HLS or DASH Segmentation
Helix Server provides many configuration options for HLS and DASH media delivery. The following procedure walks you through the process of verifying the basic stream setup for HLS and DASH clients.

Helix Broadcaster Quick Start Guide CHAPTER 5: Stream Delivery
46
HLS or DASH Setup Screen in Helix Server
➤ To enable encoder streams for HLS or DASH segmentation:
1. Click the Helix Setup tab
2. Click the Delivery category.
3. Choose HLS Setup to configure HLS clients or DASH Setup to configure DASH clients. The preceding illustration shows the HLS setup page. The DASH setup page is nearly identical.
4. In the drop-down for Enable Segmentation, select Yes to allow the segmentation of streaming content into transport files for the media clients.
5. For Server Hostname, enter one of the Helix Broadcaster IP addresses or DNS names. Helix Server inserts this value into playlist URLs if the segment mount point uses absolute paths or encryption.
Tip: Specify just the IP address or host name, as in helixbroadcaster.example.com. Helix Server fills in the protocol and port values depending on whether HTTP or HTTPS is used.
6. Set Send Playlists by HTTPS to Yes to require secure HTTP transactions (HTTPS) for playlist files. A No value transmits playlists by standard HTTP.
Warning! HTTPS delivery works only with officially signed certificates. Self-signed certificates will not function with this feature. If you do not have an officially signed certificate, leave this value set to No until you have obtained one.
7. (HLS only.) If you encrypt HLS segment files, you may want to set Send Encryption Key Files by HTTPS to Yes. This enforces secure HTTP transmission of the key files used to decrypt each segment.
For More Information: For details about encryption methods, refer to the online help topic Media Types > HLS Clients > HLS Segment Encryption.
Helix Broadcaster Quick Start Guide CHAPTER 5: Stream Delivery
47
8. In the Source Paths box, click the /mptslive/ entry to highlight it.
9. Select Yes for Enable Source Path to allow Helix Server to generate segments for the live streams generated by Helix Broadcaster.
10. If you select Yes for Purge Segments On Server Start, all segments created for broadcasts are deleted when Helix Server restarts. This is recommended.
11. In the Destination Mount Point drop-down list, select the /Segments/ content mount point as the place where Helix Broadcaster streams are segmented.
12. Click Apply at the bottom of the page.
For More Information: The other settings in these dialogs affect how HLS or DASH segments are generated. For details about their use, refer to the online help by clicking the Help link at the top of the setup page.
Tips for Streaming to HLS and DASH Clients
Keep the following points in mind when delivering content to HLS or DASH clients. For details about HLS and DASH delivery, refer to the online help category Media Types.
Request URLs use HTTP and a Client Mount Point
Request URLs must always start with the HTTP (http://) or HTTPS (https://) protocol. They must always contain the /m3ugen/ client mount point for HLS clients and the /dashgen/ mount point for DASH clients.
HTTP and HTTPS Use Nonstandard Ports
Helix Server is not configured to use the standard HTTP and HTTPS ports (80 and 443). Instead, HTTP uses port 88 and HTTPS uses port 444. These port numbers must be included in request URLs for HLS and DASH clients as shown in the preceding examples.
Segmentation Occurs on the First Media Request
The segmentation of the live stream starts with the first client request. Additional clients can make requests using the same /m3ugen/ or /dashgen/ URL. If the segmentation process has already started, Helix Server delivers the existing playlist and segments to the media client. That is, separate sets of segments are not created for each client that makes a request using /m3ugen/ or /dashgen/.
Media Segments are Purged on Restart
For each broadcast, only the latest few segments are available on disk. This prevents long or continuous broadcasts from using excessive amounts of disk space. You do not need to delete the existing segments and playlists manually at the end of the broadcast. They will be purged on the next server restart.
The Initial Streaming Speed for HLS Clients is Selectable
You can include a query string parameter in the request URL to select the initial streaming rate for HLS clients. For details, refer to the online help topic Media Types > HLS Clients > HLS Media Requests.
Helix Broadcaster Quick Start Guide CHAPTER 5: Stream Delivery
48
DASH Clients can use MPEG-2 Rather than MP4 Segments
The online help topic Media Types > DASH Clients > DASH Media Requests explains how to request MPEG-2 transport segments (.ts) instead of MP4 segments (.m4s) for DASH clients.
Streaming to Flash PlayersDelivering media to Flash Player does not require any Helix Server setup. You can stream single-rate H.264/AAC live content to Flash Player version 9 and later using an RTMP URL directed toward Helix Server’s RTMP port, which is 1935 by default. The /rtmplive/ mount point in the URL causes Helix Server to format the H.264/AAC stream as if it were generated by a Flash encoder:
rtmp://helixbroadcaster.example.com/rtmplive/mptslive/camera
Multi-Rate Content for Flash
For multi-rate content, the /flashgen/ mount point is included in an HTTP URL (not an RTMP URL) to the content:
http://helixbroadcaster.example.com:88/flashgen/rtmplive/mptslive/camera
The /flashgen/ mount point causes Helix Server to generate a file that lists the multi-rate content as a set of single-rate streams, one for each encoded bandwidth. Using this file, Flash Player chooses the appropriate rate based on its bandwidth conditions. It then requests the media using the RTMP protocol.
Sample Flash Player
Helix Server includes a Flash sample player that you can use to test Flash streaming. On the Helix Setup tab, click the Samples link on the Helix Control palette.
Samples Link on the Helix Control Palette
This launches a new browser page with a samples library. Click the Flash Player link to pop up an embedded Flash Player that you can use to test Flash-compatible content on Helix Server.
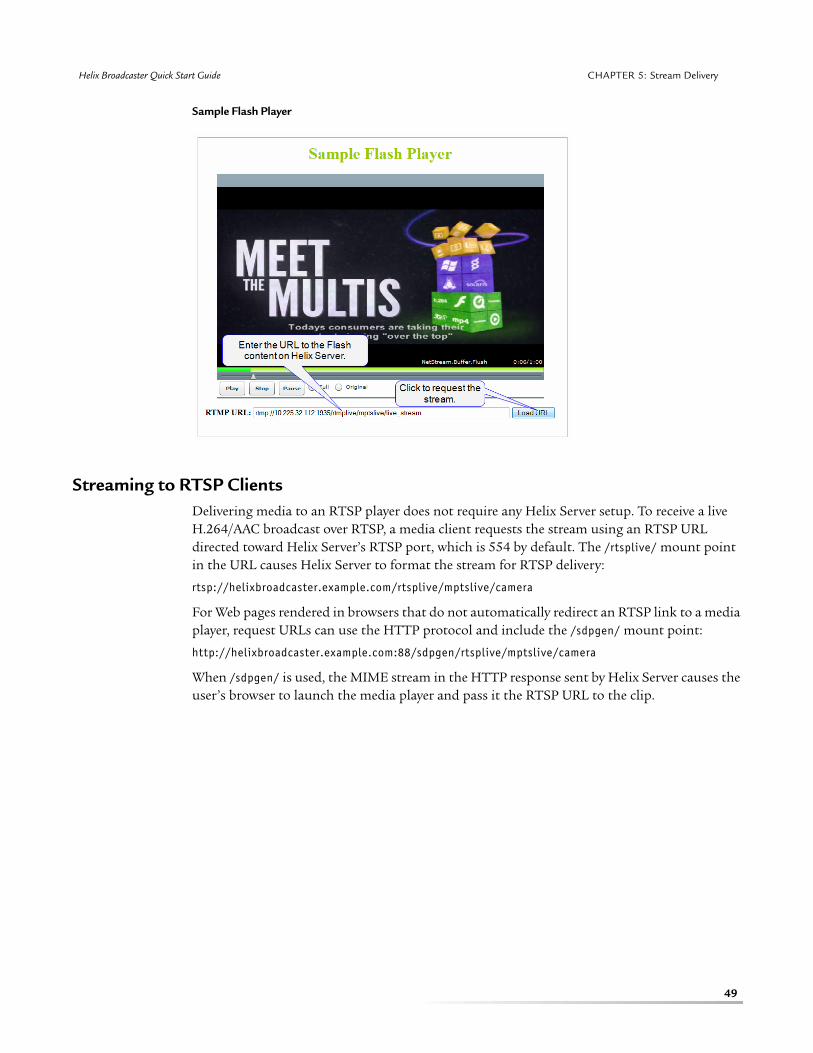
Helix Broadcaster Quick Start Guide CHAPTER 5: Stream Delivery
49
Sample Flash Player
Streaming to RTSP Clients Delivering media to an RTSP player does not require any Helix Server setup. To receive a live H.264/AAC broadcast over RTSP, a media client requests the stream using an RTSP URL directed toward Helix Server’s RTSP port, which is 554 by default. The /rtsplive/ mount point in the URL causes Helix Server to format the stream for RTSP delivery:
rtsp://helixbroadcaster.example.com/rtsplive/mptslive/camera
For Web pages rendered in browsers that do not automatically redirect an RTSP link to a media player, request URLs can use the HTTP protocol and include the /sdpgen/ mount point:
http://helixbroadcaster.example.com:88/sdpgen/rtsplive/mptslive/camera
When /sdpgen/ is used, the MIME stream in the HTTP response sent by Helix Server causes the user’s browser to launch the media player and pass it the RTSP URL to the clip.