hella driving lamps installation instructions - carid · 56a red rouge rojo black noir negro blue...
TRANSCRIPT

FF50/ FF75
Mounting Instructions Driving lamps
Fog lamps
for 55 W onlya
ra 55
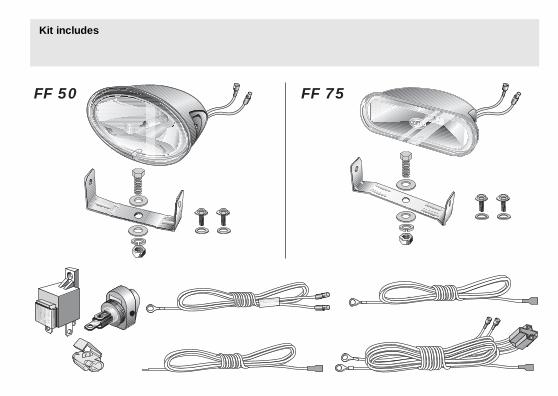
Kit includes
FF 50 FF 75
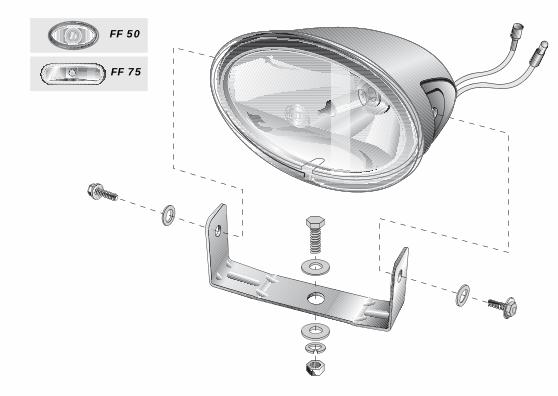
FF 50
FF 75
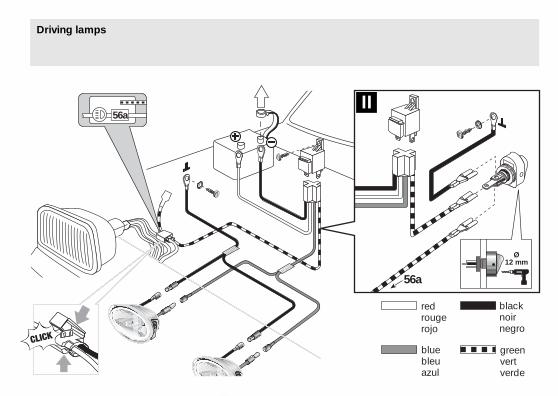
56a
redrougerojo
blacknoirnegro
bluebleuazul
greenvertverde
56a
Ø12 mm
I II
Driving lamps
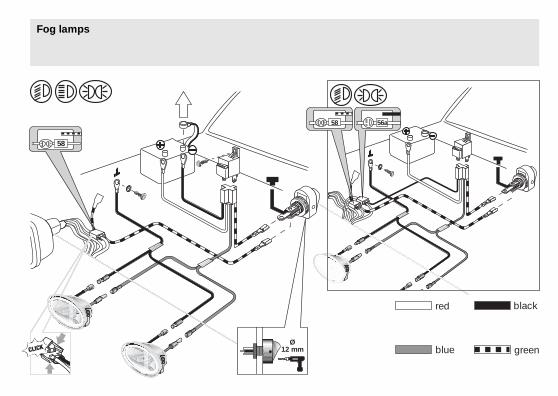
Fog lamps
red black
blue green
56a58
Ø12 mm
58
2
1
3
4
6
7
5

Tools required:
Mounting steps: Please follow instructionscarefully; some of them are legalrequirements:
1.Consult your local stateregulations regarding minimumand maximum height aboveground.
2. Mounting position. Lamps mustbe mounted in such a way that:
• they are at exactly the sameheight
• they are at the same distancefrom the center of the vehicle.
Important:Before fitting the lamps makesure that they do not preventsufficient air reaching theradiator.
• Ruler• Screwdriver for recessed-head screw• Combination pliers
• 8, 14 mm open end or box wrench• Drill with 3, 10 and 12 mm dia. bits
Lamps should not vibrate or extendabove the bonnet and must beattached symmetrically.
Determine mounting position on flatsurface (left illustration) and markmounting points.
Drill pilot hole with 3 mm dia. bitand then bore out to 10 mm.Protect drilled metal parts with rustprotection paint.
Screw lamps to vehicle (use two-point mount if required).
Align lamps and tighten screws
Reconnect earth lead (-) to battery.Check lights, tighten connectionwires securely.
If required, install switch indashboard.
Disconnect earth lead (-) frombattery for safety.
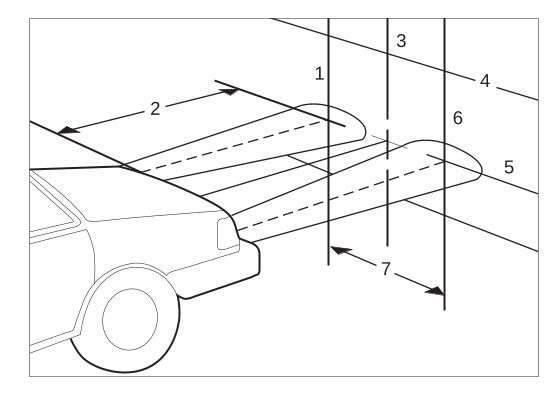
Adjusting the lamps: The correct visual aim is with thetop of the beam 4" below the lampcenter at 25 ft. The lamp shall becentered laterally about a verticalline directly ahead of the lamp.A higher visual aim may be desired,but the top of the beam should notbe higher than the lamp center levelat 25 ft.
1 Vertical centerline ahead of leftheadlamp
2 25 ft.
3 Centre of vehicle
4 Headlamp adjusting screen
5 Height of lamp centers (distancefrom ground to center of lamp)
6 Vertical centerline ahead of rightheadlamp
7 Distance between headlamps
Have the driving lamps adjustedat a workshop or service station.Only properly adjusted lampsprovide optimum illumination.
Install relay with connectionterminals pointing downwards sothat they are protected againstsplashing water.
Electrical connection
Driving lamps:
Fog lamps:
Lay and connect wires according tocircuit diagram.
According to circuit diagram I theauxiliary lamps are switched ontogether with the existing mainbeams.
According to circuit diagram II theauxiliary lamps can be switched onin addition to the main beams with aseparate switch.
Lay and connect wires according tocircuit diagram.