help and tutorials€¦ · add pan & scan tracks to your clips to reframe content. see adjust...
TRANSCRIPT

ADOBE® SPEEDGRADE™ Help and tutorials
February 2013

Contents
Getting Started tutorials 1.................................................................................................................................Basic workflow 2.........................................................................................................................................................................
Quickstart: Color grade a clip 5..................................................................................................................................................
Quickstart: Color grade a sequence 8........................................................................................................................................
Adobe Premiere Pro and SpeedGrade workflows 10.................................................................................................................
Workspace 11...................................................................................................................................................Desktop basics 12......................................................................................................................................................................
Timeline basics 13......................................................................................................................................................................
Playback basics 16.....................................................................................................................................................................
Adjust the display resolution for playback 18..............................................................................................................................
Compare frames with multiple playheads 19..............................................................................................................................
Set up dual displays 21...............................................................................................................................................................
Keyboard shortcuts 22................................................................................................................................................................
Crop the display frame 26...........................................................................................................................................................
Adjust the display aspect ratio 27...............................................................................................................................................
Image analysis tools 28..............................................................................................................................................................
Work with keyframes 30.............................................................................................................................................................
Loading footage 32...........................................................................................................................................Supported file formats 33............................................................................................................................................................
Load footage 34..........................................................................................................................................................................
Conform EDLs 35.......................................................................................................................................................................
Load audio tracks 37..................................................................................................................................................................
Detect scene changes 38...........................................................................................................................................................
Display burn-in information on frames 39...................................................................................................................................
Color grading 40...............................................................................................................................................Quickstart: Color grade a clip 41................................................................................................................................................
Quickstart: Color grade a sequence 44......................................................................................................................................
Balance blacks and whites 46....................................................................................................................................................
Adjust gamma 49........................................................................................................................................................................
Adjust color temperature 51........................................................................................................................................................
Grade a specific tonal range 52..................................................................................................................................................
Apply filters and effects 53..........................................................................................................................................................
Work with masks 54....................................................................................................................................................................
Track a masked object through a shot 55...................................................................................................................................
Adjust the framing of shots with pan and scan 57......................................................................................................................
Grade a specific color range 59..................................................................................................................................................
Managing looks 61............................................................................................................................................Share and reuse looks 62...........................................................................................................................................................
Rendering out 64..............................................................................................................................................Create proxy files for offline editing 65.......................................................................................................................................
Save an EDL 66..........................................................................................................................................................................
Display burn-in information on frames 67...................................................................................................................................

Getting Started tutorials To learn more, view these recommended resources online.
SpeedGrade CS6 FAQtroubleshooting (May. 14, 2012)
What is SpeedGrade?Video2Brain (May. 7, 2012)video-tutorial
What's new in SpeedGrade CS6Patrick Palmer (May. 7, 2012)video-tutorial
Tips and tricks for using SpeedGrade CS6Patrick Palmer (May. 7, 2012)video-tutorial
1

Basic workflow
To the top
To the top
Load footageApply color gradingRender out contentSpecial tools and workflowsRelated topics
The SpeedGrade workflow consists of three steps: load footage, color grade, and render out finished content.
Use the following views to perform the workflow:
Desktop view for loading footageMonitor view for applying color gradingOutput view for rendering out the completed project
Each view is accessible from a tab at the top of the SpeedGrade CS6 application window.
Load footage
1. Locate content in the Desktop view. Use the folder browser on the left side to navigate to the folder containing your content.Thumbnails of the clips appear in the Desktop view.
If you have many clips, you can manage them as follows:
Sort alphabetically.Sort by time code range, resolution, or date modified.Filter to display only certain file types.Search for specific filenames or filename extensions.
2. Add clips to the Timeline by double-clicking or dragging them to the Timeline.
Drag clips by their handles to reposition them on the Timeline.Set in- and out-points and switch between Timeline views as you review or color grade your contentYou can add up to nine separate playheads. See Compare shots with multiple playheads.
3. If you want, load Edit Decision Lists (EDLs) on the Timeline. See Color grade a sequence.
To add an EDL, double-click the EDL in the Desktop view.To add the clips to the EDL, choose Reels in the Timeline panel and click Load from Desktop.
Apply color grading
1. Apply color correction to balance blacks and whites and to match shots. See Color grade a clip.
Apply primary color adjustments to the whole image, the shadows, the midtones, or the highlights.Select color ranges to apply secondary color adjustments.Use the waveform, histogram, and vectorscope to ensure accurate color adjustments, such as balancing blacks andhighlights.
2. Use effects, film-style filters, and masks to design creative looks.
Add new grading layers to build your look.
2

To the top
Apply masks to individual layers, for example to create a vignette.Add unlimited layers and reorder as required. Changes are applied non-destructively.Each layer has its own opacity slider where its influence on the overall look can be adjusted.
3. Animate masks or grades to match movement and changing light in your frames.
Add keyframes to your masks or grading tracks.Adjust masks or grading at keyframe positions.SpeedGrade CS6 animates transitions smoothly between keyframes.
4. Save grades as Look files and apply those looks to footage. To apply a look to footage, select the footage and then click aLook file.
The Look file preserves all the layers and settings of the grade.Click a Look file to apply it to selected footage on the Timeline.Edit existing looks in the Look panel.Export looks as LUTs for use in other applications or devices.
5. While working on a project, save your Timeline, including all clips and grading settings, as a SpeedGrade CS6 project.
Press Ctrl+S (Windows) or Cmd+S (Macintosh) to bring up the Save Timeline As dialog box.
For help and tutorials, see Color grading.
Render out contentRender out content to create digital dailies for review, proxy media for offline editing, or masters for final delivery.
1. Start with the content you want to render on the Timeline and click the Output tab to display the Output panel.
3

To the top
Color spaces
Automatically match cameras
Pan & Scan
Cropping
Dynamic Quality
Aspect ratio
Burn-in
Format defaults for Alexa and RED
Stereoscopic
Scene Detection
Consolidate Reels
Save EDL
Annotations
Audio Tracks
To the top
2. Proceed from the top to the bottom of the panel to apply settings for your render.
Select a location and create a filename for the rendered content.Choose output format and whether to include burn-in information. See Display burn-in information on frames.Choose Online Quality for final masters or Offline Quality for proxies and dailies.
Special tools and workflows
Use Color Space Defaults for different file formats in the Timeline panel.
Automatically calibrate cameras using Macbeth color chart test shots.
Add pan & scan tracks to your clips to reframe content. See Adjust the framing of shots with pan and scan.
Use the Crop tool to resize your frames.
Use Dynamic Quality to accommodate viewing on displays with different resolutions.
Use the Aspect Ratio tool to display anamorphic content in a 1:1 aspect ratio.
Toggle the Burn-in tool to display or hide file information in your frames. See Display burn-in information on frames.
Select Alexa or RED format settings under the Format Default tab in the Timeline panel.
Activate stereo tools by checking the Stereo checkbox in the Timeline Setup panel. See Stereoscopic Workflows in SpeedGradeCS6 (Adobe TV video).
Use Scene Detection to identify scene changes in archived material. See Detect scene changes (Help article) or Using SceneChange Detection in SpeedGrade CS6 (Adobe TV video).
Create copies of the clips used in your project to save active storage space.
Export an EDL from a SpeedGrade CS6 project.
Add annotations to your clips, or to individual frames.
Add audio tracks to your footage from the Desktop.
Related topicsColor grade a clipColor grade a sequence
4

Quickstart: Color grade a clip
To the top
To the top
Select a clipApply a primary color gradeApply a secondary color gradeRender a graded clip
To load an EDL and color grade a sequence, see Color grade a sequence.
Select a clip
1. In SpeedGrade, select a folder that contains video clips using the file browser in the upper-left corner of the user interface.
The Desktop window shows thumbnail versions of the content in the selected folder.
To filter the thumbnails by file type, select All Files in the upper-right corner and then select a file type.
2. Place a clip on the Timeline by double-clicking it on the Desktop.
3. Click the Monitor Tab in the upper-left corner to view the image.
The default display size is 100%. To fit the image in the monitor window, click the Zoom to Fit button below the scopeswindow on the right side of the interface.
Apply a primary color gradeMake basic color changes like temperature, white point, black point, and more, to the entire image. The changes are applied to a primary gradinglayer.
Access the grading controls by clicking the Look tab in the lower left, below the timeline.
Make global changesMake global changes to the image with the sliders at the top of the Look panel.
Global adjustment sliders
To adjust a global setting, do the following:
1. Right-click the triangle icon on the slider and release the click button.
5

To the top
2. Swipe the mouse left or right to change the value.3. Right-click the triangle icon again to accept the setting.
Make changes to specific regionsModify color and luminance values in the image's shadow, midtone, and highlight regions using the color control wheels on the Look panel.
Color control wheels
To adjust the luminance, do the following:
Left-click the triangle icon on a wheel and drag the mouse left or right in a straight line. Don't drag the mouse in a circle. Thefurther left or right you drag, the larger the change.
To adjust the color, do the following:
1. Right-click inside the circle and release the click button.2. Swipe the mouse in any direction to change the value.3. Right-click again to accept the setting.
You can use color sliders instead of control wheels. To access the sliders, press Shift+Enter.
Color sliders
Use the zero (0) key on the numeric keypad to toggle the grade on and off for a quick before and after view. Make sure the NumLock key onyour keyboard is selected.
Apply a secondary color gradeMake targeted adjustments to a specific hue range in the image. The changes are applied to a secondary grading layer.
1. Access the secondary color grading tools by selecting the +S icon in the lower-left corner of the Layers window.
2. Select a hue range as follows:
Select a preset hue option by clicking one of the colored buttons along the top of the Hue selection tool.Sample a hue range by clicking the eyedropper tool with the + icon and then dragging to select a portion of the image inthe Monitor window.
You may have to resize the lower border of the Desktop window to see the eyedropper tools. To resize the window, usethe drag resize tool located at the bottom center of the Timeline.
6

Twitter™ and Facebook posts are not covered under the terms of Creative Commons.
Legal Notices | Online Privacy Policy
To the top
3. View the portion of the image targeted by the hue range selection by selecting an option from the Gray-out menu at upper-right corner of the Look tab.
4. Make adjustments and refinements to the selection using the upper triangles of the sliders. Use the lower triangles of thesliders to adjust fall-off.
5. Make secondary corrections with the Off-set and Gain control wheels in the center of the Look window.
6. Soften and blend secondary corrections using the Denoise and Blur sliders on the right of the Look window.
7. After making secondary corrections, set Gray-out to None.
Render a graded clip
1. Click the Output tab in the upper-right corner to open the Metadata Render Engine.
2. Click the Desktop menu and select a destination folder.
3. Assign a name to the rendered file in the File Name textbox.
4. In Format & Options, select a output file format for the render.
If a desired preset doesn’t exist, create a new one by clicking Other.
5. Click Online Quality in the Render section.
6. Click Render.
7

Quickstart: Color grade a sequence
To the top
To the top
To the top
The workflow for color grading a sequence consists of the following steps:
Load an EDLReconnect the source clips in the reelsCreate a grading clipApply color grades to a grading clipApply a grading clip to additional video clipsRender a graded sequence
Load an EDLEdit Decision Lists (EDLs) are metadata documents used to migrate project timelines from editing tools like Adobe Premiere Pro to post-productiontools like SpeedGrade.
Tip: Before starting, place the source clips and the EDL file in a single folder. This organization makes the process quicker and more efficient.
1. In SpeedGrade, select the folder containing the EDL file with the file browser in the upper-left corner of the user interface.2. Double-click the EDL file to load it.
Tip: If you have too many thumbnails, you can filter them for EDL files by selecting the EDL option from the All Files menu inthe upper-right corner.
SpeedGrade places placeholder thumbnails in the video track and in the Reels panel. The Reels panel is on the Timeline tab on the lower left ofthe screen.
Reconnect the source clips in the reelsThe Reels panel gives an overview of the reels in an EDL. When loading an EDL, SpeedGrade inserts placeholder thumbnails of the source clipsin the Reels panel. Reconnect the source clips to the placeholder thumbnails in the Reels panel as follows.
1. If not already done, display the source clips on the Desktop window by selecting the folder containing the source clips.
2. Filter the thumbnails for the media type of the source clips. Example: QuickTime movies.
3. Click the Timeline tab and then click the Reels panel to view the source clip placeholders.
4. Reconnect the source clips to the thumbnails by clicking Load from Desktop. SpeedGrade reconnects the source clips on theDesktop and the video track.
Create a grading clipWhen color grading a sequence, work in a non-destructive grading clip associated with the video clips in the sequence. Don't grade the videoclips directly. The grading clip can be saved, moved, and applied to multiple video clips. Grading clips are managed in the Timeline in a gradingtrack above the video track.
8

Twitter™ and Facebook posts are not covered under the terms of Creative Commons.
Legal Notices | Online Privacy Policy
To the top
To the top
To the top
To create a grading clip, click the Setup button on the Timeline tab and do one of the following:
To create a series of grading clips in the grading track, click the Extract Grade Clips button in the third column of the Setupwindow.
To create a grading clip for a single video clip, drag the Grading Clip tool into the grading track above the target clip.
To add grading clips for all the video clips in the video track, drag the Grading Clip tool on a video clip in the video track.
Apply color grades to a grading clip1. Select a grading clip in the Timeline, not a video clip.2. Apply color grades to the selected grading clip. For more information on grading, see Color grade a clip.
The grade is applied to all the video clips sharing the grading clip.
Tip: Compare video clips for shot-to-shot color matching by using multiple playheads. For details, see Compare shots with multiple playheads.
Apply a grading clip to additional video clipsYou can apply a single look to additional video clips on the Timeline.
1. Drag the Grading Clip tool from the Timeline tab into the grading track above a video clip.
2. Drag the right side of a grading clip to cover multiple clips.
Render a graded sequence1. Click the Output tab in the upper-right corner to open the Metadata Render Engine.2. Click the Desktop menu and select a destination folder.3. Assign a name to the rendered file in the File Name text box.4. In Format & Options, select an output file format for the render.5. Click Online Quality in the Render tab.6. Click Render.
9

Adobe Premiere Pro and SpeedGrade workflows
Twitter™ and Facebook posts are not covered under the terms of Creative Commons.
Legal Notices | Online Privacy Policy
To the top
To the top
General editing and grading workflowOffline editing and grading workflow
The color grading process is usually the last step in the post-production workflow. If working with high-resolution material or RAW files, you canbegin your workflow by creating smaller proxy files in SpeedGrade for offline editing in Adobe Premiere Pro. After your editing is complete, you canrelink the edits to the source material in SpeedGrade for grading and finishing.
General editing and grading workflow
1. Edit in Adobe Premiere Pro.
2. Send the footage to SpeedGrade as follows:
If working with compressed files, use File > Send to Adobe SpeedGrade. Premiere Pro renders out a DPX sequence andopens it in SpeedGrade.
Note: Because a DPX sequence is created, this option is more suitable for shorter projects where you have picture lockand are ready for finishing.
If working with RAW files or on a larger project, export an EDL. See Export a project as an EDL file in Adobe Premiere ProHelp.
3. Load the material in SpeedGrade and apply color corrections.
4. Render out to your final output file format.
5. Render out a DPX sequence for storage.
You can also import the DPX sequence into Premiere Pro for finishing work such as adding titles and final audio, and thenexporting a final master. Importing an uncompressed DPX sequence preserves quality in the event you want to export fromPremiere Pro again.
Offline editing and grading workflowThe offline workflow is useful when working with high-resolution material or RAW files.
1. Load the source footage into SpeedGrade.2. Apply any basic first-light color corrections.3. Render out proxies. See Create proxy files for offline editing.4. Import the proxies in Premiere Pro and edit the footage.5. From Premiere Pro, export an EDL. See Export a project as an EDL file in Adobe Premiere Pro Help.6. In SpeedGrade, use the EDL to relink the source files. See Conform EDLs - Multiple-clip workflow.7. Apply final color corrections to the full resolution source footage.8. Render out to the file format for your output.
10

Workspace
11
Desktop basics
Twitter™ and Facebook posts are not covered under the terms of Creative Commons.
Legal Notices | Online Privacy Policy
To the top
To the top
To the top
To the top
Show or hide the Desktop viewNavigate to a folderFilter the files in the Desktop viewRefresh the Desktop view
Use the Desktop view to find and load footage. You can navigate to folders with image sequences, movie files, or RAW file formats. Thumbnails ofthe files are displayed in the Desktop view.
Show or hide the Desktop viewPress the D key.
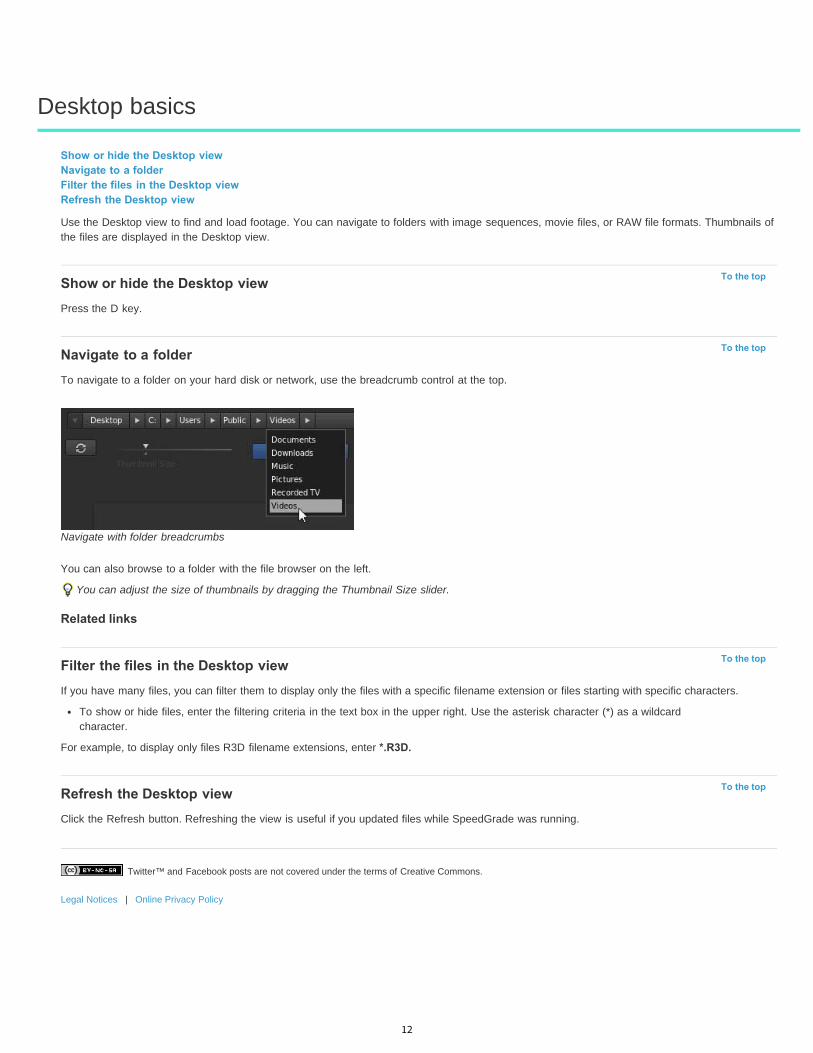
Navigate to a folderTo navigate to a folder on your hard disk or network, use the breadcrumb control at the top.
Navigate with folder breadcrumbs
You can also browse to a folder with the file browser on the left.
You can adjust the size of thumbnails by dragging the Thumbnail Size slider.
Related links
Filter the files in the Desktop viewIf you have many files, you can filter them to display only the files with a specific filename extension or files starting with specific characters.
To show or hide files, enter the filtering criteria in the text box in the upper right. Use the asterisk character (*) as a wildcardcharacter.
For example, to display only files R3D filename extensions, enter *.R3D.
Refresh the Desktop viewClick the Refresh button. Refreshing the view is useful if you updated files while SpeedGrade was running.
12

Timeline basics
To the top
To the top
Footage
Grading
Audio
Pan & scan
To the top
PlayheadTracksManage tracksPlay a part of the TimelineNavigate along the TimelineZoom the TimelineChange the Timeline viewDelete the Timeline
PlayheadThe playhead displays a frame in the Monitor at any given position on the Timeline.
Drag the playhead to move it along the Timeline.
Playhead controller
To view more than one frame at a time, create additional playheads. Multiple playheads are useful for comparing different parts of the same shotor scene. For more information, see Compare frames with multiple playheads.
TracksAdd tracks to the Timeline to generate layers for grading, add audio to the project, or to adjust the framing with pan and scan.
Multiple tracks
You can add the following tracks to the Timeline:
Blue track. To add footage to the timeline, see Select a clip.
Red track. To add a grading track, see Create a grading track.
Solid green track. To add an audio track, open the Desktop, locate the audio file (wav or aiff file), and drag it on the Timeline. Repeat thisprocedure with additional audio files.To change values for sound output, such as the mixing frequency, select Settings > Sound. The Settings menu is on the upper-right corner of theSpeedGrade workspace.
Transparent green track. To add a pan & scan track, see Create a pan and scan track.
Manage tracksYou can manage the tracks on the Timeline with the tools on the left side of each track.
13

To the top
Note:
To the top
To the top
Note:
To the top
Drag, lock, and eye icons
To show or hide the track, click the Eye icon.To lock or unlock the track, click the Lock icon.To delete the track, click the Drag icon and drag the track off the Timeline.
Play a part of the TimelineSpecify the part of the Timeline to play by repositioning in- and out-points. The two points are located above the tracks, at either end of the clip orplaylist.
In-point
In- and out-points in SpeedGrade are not used to edit clips as in Adobe Premiere Pro. They're used to control playback.
Do any of the following to reposition the in- and out-points:
Drag the in- and out-points along the Timeline.Hold Shift to drag both points together.Control-click the in- or out-point to reset it to its default position.Double-click a clip to set the points to the start and end of the clip. Double-click again to set the points to the start and end ofthe Timeline.
You can also double-click the in- or out-point icon and specify a frame number for it.
Navigate along the TimelineIf you have multiple clips or tracks on your Timeline, you can navigate from clip to clip or from track to track. Moving from one track to anotherchanges the selected SpeedGrade panel. For example, moving to a grading track opens the Look panel. Moving to a pan and scan track opensthe Pan & Scan panel.
Related links
Zoom the Timeline1. Select the Master Timeline view from the view menu on the upper-left side of the Timeline.2. Press Ctrl+Scrollwheel.
Zooming works only in the Master or Playhead view of the Timeline. See Change the Timeline view.
Change the Timeline viewSet the Timeline view with the menu on the upper-left side of the Timeline.
Result Windows Mac OS
Go the next clip Ctrl+Shift+Right Arrow Cmd+Shift+Right Arrow
Go to previous clip Ctrl+Shift+Left Arrow Cmd+Shift+Left Arrow
Go to track above Ctrl+Shift+Up Arrow Cmd+Shift+Up Arrow
Go to track below Ctrl+Shift+Down Arrow Cmd+Shift+Down Arrow
14

Twitter™ and Facebook posts are not covered under the terms of Creative Commons.
Legal Notices | Online Privacy Policy
All
In/Out
Selected
Master
Playhead
To the top
Timeline views
Shows all content and playheads on the Timeline.
Shows all content between the in- and out-points.
Shows all content in the selected track.
Keeps the Timeline centered on the Master playhead. On the Timeline, the playhead controller with the orange number box is the Masterplayhead.
Keeps the Timeline centered on the numbered playhead. The number on the playhead controller identifies the playhead.
Delete the TimelineClick the Delete (X) icon on the right side of the Timeline and confirm that you want to delete the Timeline.
15

Playback basics
To the top
Note:
To the top
To the top
Playback shortcutsPlayback controlsPlayback indicatorsChange the base frame rateChange the playback frame rateChange the playback mode
Playback shortcutsClose the Desktop before playback (press D).
Playback controls
Playback controls from left to right:
Go to in pointFrame step backwardsPlay backwardsPausePlay forwardFrame step forwardGo to out point
Playback indicators
The playback indicators on the left side of the Timeline provide the following information, from left to right:
The current base frame rateThe playback frame rateThe disk performance indicatorThe monitor performance indicator
The disk performance indicator turns red when one of the disks or the CPU cannot deliver real-time decoding at the desired playback speed.
The monitor performance indicator turns red when one of the following issues is detected:
Result Keyboard shortcut
Play forward L
Play backward J
Stop playback K
Play/pause Spacebar
Step forward or backward Right or Left Arrow
Increase or decrease frame rate by 1 fps Page Up or Page Down
Change playback mode F6
16

Twitter™ and Facebook posts are not covered under the terms of Creative Commons.
Legal Notices | Online Privacy Policy
To the top
To the top
To the top
An issue with the real-time performance of the grading operations you apply to the clipA sync issue with your display device.
Change the base frame rate1. Select Settings > Playback.2. Enter a new base frame rate.
Note: The Timeline timecode values reflect your base frame rate setting.
Change the playback frame ratePress the Page Up or Page Down key to increase or decrease the frame rate by 1 frame per second.
Change the playback modeSpeedGrade has three playback modes:
Single runPing pongLoop (default)
To switch modes, press F6 or use the Playback Mode button next to the playback controls.
17
Adjust the display resolution for playback
Twitter™ and Facebook posts are not covered under the terms of Creative Commons.
Legal Notices | Online Privacy Policy
Note:
SpeedGrade dynamically adjusts the quality of video to ensure smooth playback on computers with less capable graphic cards or CPUs. Tooptimize performance, you can set the quality settings for the image both during playback and when paused.
Test the performance of your system during playback and then adjust the settings accordingly.
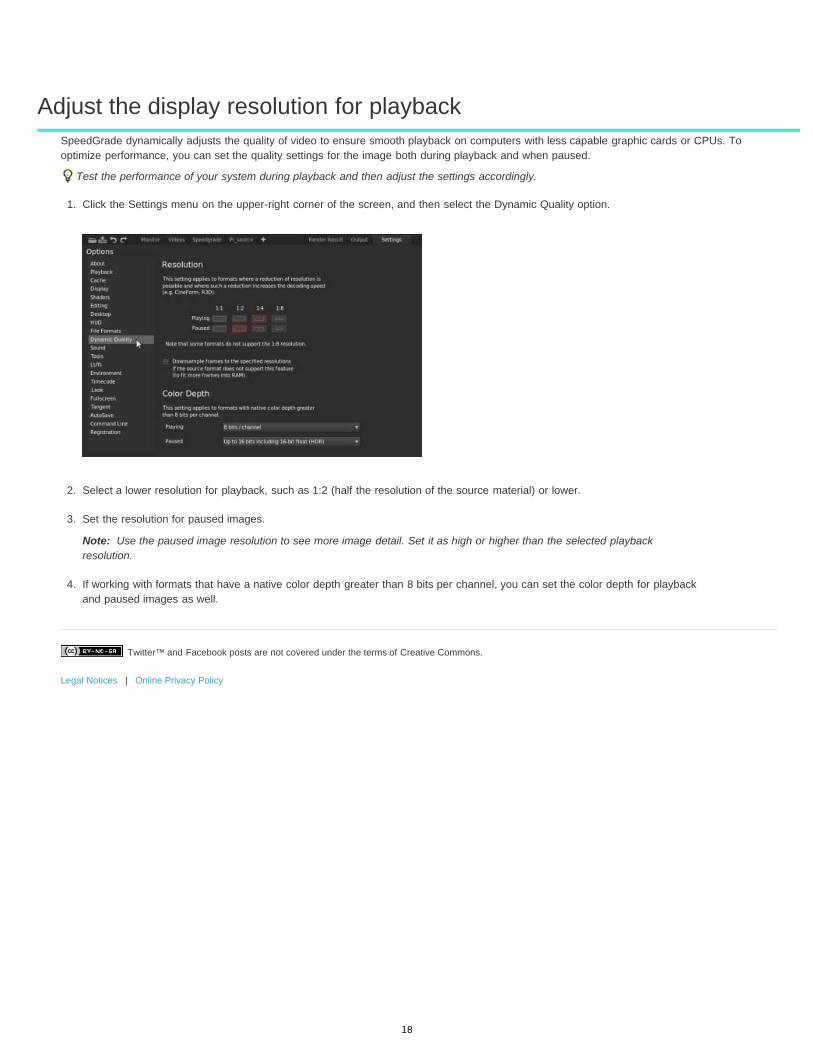
1. Click the Settings menu on the upper-right corner of the screen, and then select the Dynamic Quality option.
2. Select a lower resolution for playback, such as 1:2 (half the resolution of the source material) or lower.
3. Set the resolution for paused images.
Use the paused image resolution to see more image detail. Set it as high or higher than the selected playbackresolution.
4. If working with formats that have a native color depth greater than 8 bits per channel, you can set the color depth for playbackand paused images as well.
18

Compare frames with multiple playheads
To the top
To the top
To the top
To the top
To the top
Create an additional playheadSelect a master playheadAdjust the interval between playheadsDelete a playheadWork in split-screen modeKeyboard shortcuts
Use multiple playheads to compare two or more frames for color matching.
Create an additional playhead
Hold the Control (Windows) or Command (Macintosh) key down and drag the Move Playhead icon anywhere in the Timeline.
The Move Playhead icon is the arrow icon on the right side of the playhead controller.
Make sure a green Plus (+) icon appears on the left side of the playhead controller before dropping the playhead.
Select a master playheadWhen working with multiple playheads, select a master playhead to make grading and other adjustments.
Click the playhead number to make it the master playhead.
The playhead number turns orange to indicate it is active.
Adjust the interval between playheadsClick the Move Playhead icon and position the playhead anywherei on the Timeline.
Delete a playheadClick the Move Playhead icon and drag the playhead off the Timeline.
Note: Make sure the playhead is not the master one. If the number on the left of the playhead controller is orange, then it's themaster playhead. Select another master playhead by clicking the playhead's number, and then delete the inactive playhead.
Work in split-screen modeArrange the screen layout by clicking the View button in the Timeline tab and dragging the icons in the Screen Layout panel.
19

Twitter™ and Facebook posts are not covered under the terms of Creative Commons.
Legal Notices | Online Privacy Policy
To the top
Note:
Up to nine playheads can be viewed at once. When using more than nine playheads, click a number in one of the channels and select a desiredplayhead to view.
Keyboard shortcuts
The default F key assignments must be disabled on Mac OS systems. In System Preferences, select Keyboard, then the KeyboardShortcuts panel. Select Expose & Spaces and deselect the default key assignments.
Result Windows Mac OS
Change the current split-screen mode F9 Cmd+F9
Change the horizontal or verticalorientation of split-screen mode. F10 Cmd+F10
Flip the channel position of the split-screen mode. F11 Cmd+F11
20

Set up dual displays
Twitter™ and Facebook posts are not covered under the terms of Creative Commons.
Legal Notices | Online Privacy Policy
To the top
To the top
Standard dual-monitor setupAdvanced dual-monitor setup
You can use a dual-monitor setup to work with SpeedGrade. The SpeedGrade workspace is displayed on one monitor and the footage isdisplayed on the other.
Standard dual-monitor setupA standard dual-monitor setup uses two monitors connected with two DVI or two DP outputs from your graphics card.
1. Connect the DVI or DP outputs to the two monitors.
Tip: Use a calibrated monitor or projector for the footage monitor.
2. In SpeedGrade, click Settings > Display and adjust the settings under Window Size.
The default values work for two displays with 1920x1080 resolution. SpeedGrade is displayed to the left of the display with thefootage.
3. Select the Enable option.
Advanced dual-monitor setupThe advanced dual monitor setup uses nVidia Quadro SDI technology to allow for real-time 10- and 12-bit output over Single Link or Dual LinkSDI. The nVidia Quadro SDI setup requires a 64-bit Windows 7 system.
1. Connect the DVI or DisplayPort output to the display you want to use for the SpeedGrade workspace.2. Use either a Single Link or Dual Link SDI output from the NVIDIA SDI card to connect with external waveform and other
monitoring devices, and your reference monitor or projector.3. In SpeedGrade, select Settings > Display.4. In the SDI Output section, change signal and format settings according to your desired output format settings.5. Select the Enable option.
FAQ: How many outputs on the nVidia GPU can be used in parallel?
Only two outputs at a time can be used in parallel. The SDI card is routed through the Quadro GPU and thus takes one DVI or DP output. Theother output can be used for the workspace display. The additional DisplayPort is not active in parallel.
Tip: Combining local footage display with a projection setup
To give the operator an accurate local display in parallel to another display or projection system, a signal split on the SDI output is recommended.This is the recommended way to monitor a signal through external waveform and vectorscope devices.
21

Keyboard shortcuts
To the top
To the top
Application shortcutsPlayback shortcutsPan and zoom view shortcutsSplitscreen view shortcutsTimeline and navigation shortcutsIn- and out-point shortcutsGrading shortcutsLook browser shortcutsGray-out shortcutsEditorial shortcutsAnalysis tools shortcutsChannel view shortcutsStereoscopic viewing shortcuts
Application shortcuts
Playback shortcuts
Result Windows Mac OS
Show Help F1 F1
Show or hide grading panels P P
Show or hide Settings window S S
Show Desktop D D
Save Timeline Ctrl+S Cmd+S
Show or hide Render window Ctrl+R Cmd+R
Close application Alt+F4 Cmd+Q
Toggle Fullscreen mode Alt+Enter or F Alt+Enter or F
Show or hide Metadata display M M
Toggle mouse between main and SDIdisplay (Windows) Ctrl+Tab
Reconnect CP200 panels Alt+F12 Alt+F12
Show or hide Dual DVI window (toggle) Shift+Ctrl+Alt+D Shift+Ctrl+Alt+D
Show the Reel browser Ctrl+Alt+R Cmd+Alt+R
Result Windows Mac OS
Play/Pause Space Space
Reverse playback Shift+Space Shift+Space
Step back one frame Left Arrow Left Arrow
Step forward one frame Right Arrow Right Arrow
Decrease playback FPS PgDn PgDn
Increase playback FPS PgUp PgUp
Double frames per second Numpad * Numpad *
Halve frames per second Numpad / Numpad /
Switch between single play, loop, andping-pong playback mode F6 F6
22

To the top
To the top
Note:
To the top
To the top
Pan and zoom view shortcuts
Splitscreen view shortcuts
The default F key assignments must be disabled on Mac OS systems. In System Preferences, select Keyboard, then the KeyboardShortcuts panel. Select Expose & Spaces and deselect the key assignments.
Timeline and navigation shortcuts
In- and out-point shortcuts
Flip sequence when reaching the endpoint (AutoMirror) Ctrl+M Cmd+M
Mirror image horizontally Alt+M Alt+M
Mirror image vertically Shift+M Shift+M
Clear memory (unload all frames) Shift+Ctrl+F5 Shift+Cmd+F5
Reload changed frames from disk F5 F5
Playback forward L L
Playback backward J J
Stop K K
Result Windows Mac OS
Pan up/down Shift+Up/Down Arrow Shift+Up/Down Arrow
Pan left/right Shift+Left/Right Arrow Shift+Left/Right Arrow
Reset pan Shift+Home Shift+Home
Match channel sizes Alt+Home Alt+Home
Zoom in/out Numpad +/- Numpad +/-
Zoom to 100% Shift+Ctrl+Home Shift+Cmd+Home
Zoom to fit Ctrl+Home Cmd+Home
Result Windows Mac OS
Change the splitscreen mode F9 Cmd+F9
Change the vertical/horizontal orientationof the split screen F10 Cmd+F10
Switch the channel positions in the splitscreen F11 Cmd+F11
Result Windows Mac OS
Next/previous clip Ctrl+Right/Left Arrow Cmd+Right/Left Arrow
Select previous clip Shift+Ctrl+Left Arrow Shift+Cmd+Left Arrow
Select next clip Shift+Ctrl+Right Arrow Shift+Cmd+Right Arrow
Select clip below Shift+Ctrl+Down Arrow Shift+Cmd+Down Arrow
Select clip above Shift+Ctrl+Up Arrow Shift+Cmd+Up Arrow
Center master playhead Ctrl+Numpad 0 Ctrl+Numpad 0
Move master playhead to selected clip Alt+Numpad 0 Alt+Numpad 0
Result Windows, Mac OS
23

To the top
To the top
To the top
To the top
Grading shortcuts
Look browser shortcuts
Gray-out shortcuts
Editorial shortcuts
Set in-point at current master playhead position Shift+I
Set out-point at current master playhead position Shift+O
Move master playhead to current in-point I or Home
Move master playhead to current out-point O or End
Reset in- and out-points to default positions Shift+Ctrl+Alt+O
Reload replaced frames on disk Shift+F5
Result Windows Mac OS
Apply previewed preset to the timeline Enter Enter
Reject previewed preset Backspace Backspace
Change color selector mode Shift+Enter Shift+Enter
Reset grading on current clip Shift+Alt+Delete Shift+Alt+Delete
Reset grading on current panel Alt+Delete Alt+Delete
Copy grade from the previous or next 9edits Alt+[Numpad]1 to 9 Alt+[Numpad]1 to 9
Set the Copy Grade Feature to copy fromnext edits Alt+[Numpad] + Alt+[Numpad] +
Set the Copy Grade Feature to copy fromprevious edits Alt+[Numpad] - Alt+[Numpad] -
Copy grade from clip below mouseposition C C
Disable grading (hold down) [Numpad] 0 [Numpad] 0
Disable grading on current panel (holddown) [Numpad] , [Numpad] ,
Navigate layer stack up/down Ctrl+Up/Down Arrow Cmd+Up/Down Arrow
Result Windows, Mac OS
Access Look browser from Grading panel Alt+Down Arrow
Exit Look browser from Grading panel Alt+Up Arrow
Toggle through looks Alt+Left/Right Arrow
Result Windows Mac OS
Turn on gray-out Ctrl+G Cmd+G
Turn on black-out Alt+G Alt+G
Turn on white-out Ctrl+Alt+G Cmd+Alt+G
Turn off gray-out Shift+Alt+G Shift+Alt+G
Result Windows Mac OS
24

Twitter™ and Facebook posts are not covered under the terms of Creative Commons.
Legal Notices | Online Privacy Policy
To the top
To the top
To the top
Analysis tools shortcuts
Channel view shortcuts
Stereoscopic viewing shortcuts
Toggle selected dissolve clip’s direction(bottom-to-top/top-to-bottom) Shift+D Shift+D
Split currently active clip and all clipsdirectly above it at the master playheadposition
Shift+Alt+S Shift+Alt+S
Splits currently active clip at the masterplayhead position Ctrl+Alt+S Cmd+Alt+S
Result Windows, Mac OS
Toggle Histogram H
Toggle Waveform W
Toggle Vectorscope V
Result Windows, Mac OS
Show alpha channel A
Show red channel R
Show green channel G
Show blue channel B
Hide red channel Shift+R
Hide green channel Shift+G
Hide blue channel Shift+B
Result Windows, Mac OS
Right eye Left Alt+R
Left eye Left Alt+L
25

Crop the display frame
Twitter™ and Facebook posts are not covered under the terms of Creative Commons.
Legal Notices | Online Privacy Policy
You can set the display size of your frames by cropping them in the monitor.
Cropping frames in the monitor does not modify the source material. Instead, the frame hides parts of the image. Color corrections are still appliedto the parts of the image hidden by the frame.
If you want to resize the display frame and keep the entire image in the frame, see Adjust the display aspect ratio.
1. With a clip on the Timeline, click the View button on the Timeline panel.
2. In the Display Options section, click the icon on the left side of the Crop menu.
The button toggles the Crop menu.
3. Select a crop preset from the menu.
4. To turn off the crop preset, click the icon again.
26

Adjust the display aspect ratio
Twitter™ and Facebook posts are not covered under the terms of Creative Commons.
Legal Notices | Online Privacy Policy
Note:
You can correctly display anamorphic and other non-square-pixel aspect ratio footage in the Monitor by changing the display aspect ratio.
Changing the display aspect ratio does not modify the source material.
1. With a clip on the Timeline, click the View button on the Timeline panel.
2. In the Display Options section, click the icon on the left side of the Aspect Ratio menu.
The button toggles the Aspect Ratio menu.
3. Change the display aspect ratio by selecting an option from the menu.
4. To switch to the default aspect ratio, click the icon again.
Related links
27

Image analysis tools
To the top
To the top
Waveform panelHistogram panelVectorscope panelChannel viewsChange tool settings
SpeedGrade provides various tools for analyzing your image.
Waveform panelThe Waveform panel shows RGB values.
To display the Waveform panel in the Monitor view, press W.To adjust the size of the panel, use the drag handles.To undock the Waveform panel, click the lock icon.
Histogram panelThe Histogram shows RGB values. The minimum Luma values per channel are displayed as numerical feedback at the bottom. Maximum valuesare displayed at the top. Two horizontal lines indicate the output range. The default range is set to CIN code values (95 - 685).
To display the Histogram in the Monitor view, press H.To adjust the width of the panel, use the drag handle.To undock the Histogram panel, click the lock icon.
28

Twitter™ and Facebook posts are not covered under the terms of Creative Commons.
To the top
To the top
To the top
Vectorscope panelThe Vectorscope panel works in HLS mode.
To activate the Vectorscope in the Monitor view, press V.To adjust the width of the panel, use the drag handle.To undock the Vectorscope panel, click the lock icon.
Channel viewsUse channel views to check specific color channels. For example, you can use it to check for compression artifacts or noise in the RGB channels.
The five most common channel views are available from the toolbar:
Click a channel button to see the channel on the Monitor. L is for Luma. If your image includes an alpha channel, the A buttondisplays its outlines.Click the button again to switch back to normal view.
You can use the following keyboard shortcuts to check channels: R, G, B, A, L. Use the same shortcut to switch back to normal view.
You can display additional channel views from the Timeline tab.
1. Select the Timeline tab, and then select View.2. Select a channel from the Channel View menu under Display Options.
Change tool settingsYou can adjust settings of the Histogram, Vectorscope, and Waveform tools.
Select Settings > Tools.
29
Work with keyframes
To the top
To the top
To the top
Add keyframesWorkflow for creating dissolves between keyframesAutomatically record keyframes when editingMove between keyframesDelete keyframesRelated topics
Use keyframes to transform the state of a grade, mask, or pan-and-scan adjustment over time. A keyframe marks the point in time where youspecify a state, such as the position of a mask. You typically use at least two keyframes—one for the state at the beginning of the change, andone for the new state at the end of the change. You can add as many keyframes as you need on a track. SpeedGrade interpolates the valuesbetween keyframes and creates dissolves between them.
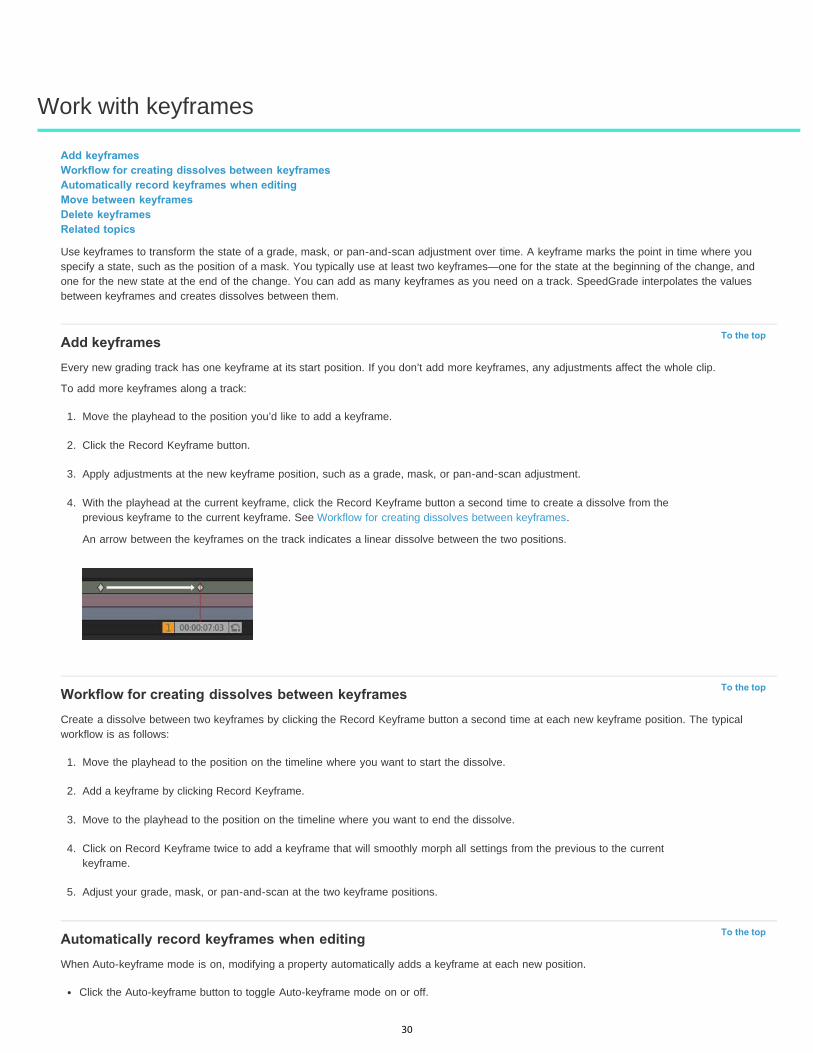
Add keyframesEvery new grading track has one keyframe at its start position. If you don’t add more keyframes, any adjustments affect the whole clip.
To add more keyframes along a track:
1. Move the playhead to the position you’d like to add a keyframe.
2. Click the Record Keyframe button.
3. Apply adjustments at the new keyframe position, such as a grade, mask, or pan-and-scan adjustment.
4. With the playhead at the current keyframe, click the Record Keyframe button a second time to create a dissolve from theprevious keyframe to the current keyframe. See Workflow for creating dissolves between keyframes.
An arrow between the keyframes on the track indicates a linear dissolve between the two positions.
Workflow for creating dissolves between keyframesCreate a dissolve between two keyframes by clicking the Record Keyframe button a second time at each new keyframe position. The typicalworkflow is as follows:
1. Move the playhead to the position on the timeline where you want to start the dissolve.
2. Add a keyframe by clicking Record Keyframe.
3. Move to the playhead to the position on the timeline where you want to end the dissolve.
4. Click on Record Keyframe twice to add a keyframe that will smoothly morph all settings from the previous to the currentkeyframe.
5. Adjust your grade, mask, or pan-and-scan at the two keyframe positions.
Automatically record keyframes when editingWhen Auto-keyframe mode is on, modifying a property automatically adds a keyframe at each new position.
Click the Auto-keyframe button to toggle Auto-keyframe mode on or off.
30
Twitter™ and Facebook posts are not covered under the terms of Creative Commons.
Legal Notices | Online Privacy Policy
To the top
To the top
To the top
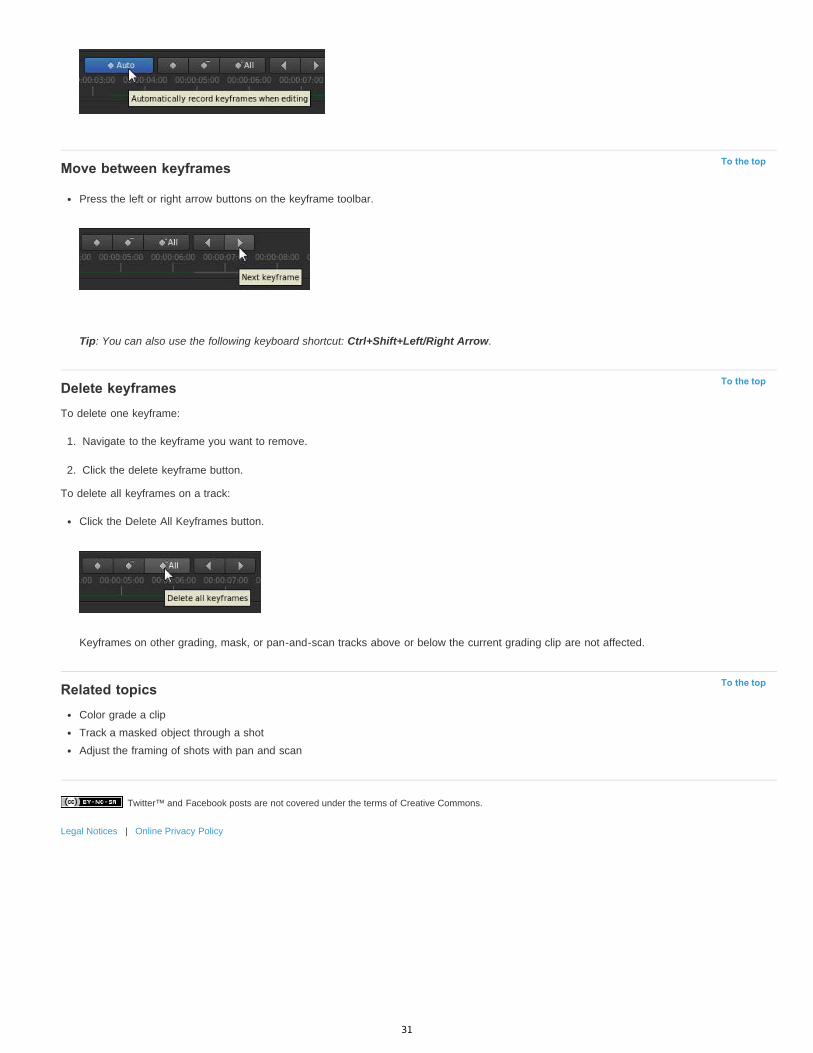
Move between keyframes
Press the left or right arrow buttons on the keyframe toolbar.
Tip: You can also use the following keyboard shortcut: Ctrl+Shift+Left/Right Arrow.
Delete keyframesTo delete one keyframe:
1. Navigate to the keyframe you want to remove.
2. Click the delete keyframe button.
To delete all keyframes on a track:
Click the Delete All Keyframes button.
Keyframes on other grading, mask, or pan-and-scan tracks above or below the current grading clip are not affected.
Related topicsColor grade a clipTrack a masked object through a shotAdjust the framing of shots with pan and scan
31

Loading footage To learn more, view these recommended resources online.
Loading and conforming materialPatrick Palmer (May. 7, 2012)video-tutorial
Using scene change detectionPatrick Palmer (Mar. 23, 2012)video-tutorial
32

Supported file formats
To the top
To the top
To the top
Frame sequence formatsMovie file formatsRAW file formats
Frame sequence formats
Movie file formats
RAW file formatsThe supported RAW formats are read-only.
ARRI Alexa .ariARRI D21 .ariPhantom HD / GOLD / FLEX / 65 (.cine)REDCode RAW (.r3d)Silicon Imaging SI 2K/SI Mini (Uncompressed .siv)Weisscam HS-1/HS-2 RAW (.wcr)Weisscam HS-2 Digimag (.fhg*)
Format Read Write
Cineon Yes Yes
DPX, DPX 2.0 Yes Yes
Targa Yes Yes
JPEG Yes Yes
PNG Yes Yes
TIFF Yes Yes
Pixarlog TIFF Yes No
Floating Point TIFF Yes Yes
Maya IFF Yes Yes
Lightwave IFF Yes Yes
RGB (SGI) Yes Yes
Softimage PIC Yes Yes
Wavefront RLA Yes Yes
Wavefront RPF Yes No
Windows Bitmap Yes Yes
GIF Yes No
Cinema DNG Yes Yes
OpenEXR Yes Yes
Format Read Write
Windows AVI Windows only Windows only
Quicktime Yes Yes
33

Load footage
Twitter™ and Facebook posts are not covered under the terms of Creative Commons.
Legal Notices | Online Privacy Policy
To the top
To the top
To the top
Load itemsLoad multiple items at onceInsert items between clips
Load itemsAdd items to the Timeline as follows.
Navigate to the item in Desktop view, then double-click the thumbnail. You can also drag an item to the Timeline.Repeat the process to add more items. Each item is placed after the last item on the Timeline.
Related links
Load multiple items at onceLoading multiple items at once is useful when loading RAW data for creating dailies to create a virtual lab reel.
1. In Desktop view, browse to the folder with the items you want to add to the Timeline.
2. Click Add All on the lower-right side of the Desktop.
SpeedGrade adds all the files to the Timeline in order of appearance.
Insert items between clips1. Drag the thumbnail from the Desktop view to the position on the Timeline where you’d like to place it.2. When a highlighted red line appears at the desired location, release the mouse button.
34

Conform EDLs
Note:
To the top
To the top
Master-clip workflowMultiple-clip workflowSupported EDL features
Edit Decision Lists (EDLs) are metadata documents used to migrate project timelines from other editing tools.
Timelines created from EDLs in SpeedGrade CS6 adhere to the Sony CMX 3600 standard. SpeedGrade also supports the extended 16-digit EDLto work with ARRIRAW and Red R3D material.
The two most common scenarios for conforming EDLs are as follows:
You have an EDL and one long image sequence or movie file with all the edits baked in. You want to use the EDL to createkeyframes to cut the clip into individual edits. See Master-clip workflow.You have an EDL with online material in several folders or consisting of individual movie files. You want to associate thecorrect online clips according to the Reel ID/filename information available in the EDL. See Multiple-clip workflow.
Before working with EDLs, make sure to set the correct frame rate preset in SpeedGrade. For example, if your project is based on 24 fps,set both your preset for new timelines and your base fps to 24. For instructions, see Playback basics.
Master-clip workflowFollow this workflow if you have one long clip of online material and want to use an EDL to cut it into individual edits.
1. Locate the pre-conformed clip in the Desktop view and drop it on the Timeline.2. Locate the EDL in the Desktop view and drop it on the clip in the Timeline.
SpeedGrade cuts the clip into edits.
Multiple-clip workflow
1. Locate the EDL in the Desktop view and drop it on the Timeline.
SpeedGrade inserts placeholder clips on the Timeline representing all the edits. The clips are red because the reels are notloaded yet.
2. Use the Desktop to locate the footage that represents the reels.
Use the filter options to search subfolders or to treat folders as reels. For example, if all the material is in one folder structure,select the Sequences from Folder + Subtree filter option.
3. Click Load from Desktop to connect the source clips to the placeholder clips.
To prevent reels on the Timeline from being replaced when adding new reels from other locations, select the Don’t ReplaceLoaded Reels checkbox.
4. If your material is in several folders, repeat the process with the other folders.
35

Twitter™ and Facebook posts are not covered under the terms of Creative Commons.
Legal Notices | Online Privacy Policy
To the top
Reel ID
CLIP NAME
Replacements
FLIPS AND FLOPS
M2 (Time Warp)
K (Key)
About footage referencesAn EDL can reference footage with a clip name and reel ID. If the reel ID information is not present, SpeedGrade can use the clip name. If bothare present, SpeedGrade references the reel ID first
Sometimes, the reel ID and clip name information don’t match and the footage can't be associated automatically. In this case, you can dropmaterial manually from the Desktop on the placeholder reels.
DissolvesDissolves between clips according to an EDL are available as A and B layer with a dissolve layer in between. All three layers are generatedautomatically when conforming an EDL.
Supported EDL features
The CMX reel ID is the primary means of identification for a clip. If possible, place reel footage in subfolders with the Reel ID provided inthe 3600 EDL.
SpeedGrade supports the FROM CLIP NAME syntax in a CMX comment. Clip name is the secondary means of identification for aclip. If the Reel ID provided is not found or the Reel ID is AX, the clip name is used.
The syntax REEL AX IS CLIP is supported.
Vertical and horizontal mirroring is supported. The FLIP, FLOP, and FLIP-FLOP comment keywords are evaluated.
M2 speed change/time warp commands are supported. Reverse playback is supported.
Key commands are not supported and result in an error at load time.
36

Load audio tracks
Twitter™ and Facebook posts are not covered under the terms of Creative Commons.
Legal Notices | Online Privacy Policy
1. Open the Desktop view and browse to an audio file (wav or aiff file).
2. Drag the file on the Timeline.
Green tracks represent audio clips.
3. Adjust the position of the audio clip along the Timeline.
4. Enable and disable the audio of a selected track by clicking the speaker icon on the left side of the Timeline.
5. To change values for sound output, such as the mixing frequency, select Settings > Sound.
The Settings menu is on the upper-right corner of the SpeedGrade workspace.
37

Detect scene changes
Twitter™ and Facebook posts are not covered under the terms of Creative Commons.
Legal Notices | Online Privacy Policy
To the top
To the top
To the top
Detect scene changesPrepare the footage for grading or editingSave or export the footage
You can automatically detect scene changes in footage that does not have an EDL, such as archived material. Once SpeedGrade CS6 hasidentified scene changes, you can add keyframes to scene changes, or split your footage up into separate clips.
The workflow consists of the following steps:
1. Detect the scene changes.2. Prepare the footage for grading or editing.3. Save or export the footage.
Detect scene changes
1. Select your footage on the Timeline.
2. Click the Timeline tab and select the Setup panel.
3. Under Tools, click Scene Change Detect.
4. When the scan is complete, you can review the results using the arrow buttons on the left side of the dialog box.
5. If necessary, you can adjust scene detection sensitivity and click Rescan Clip.
Prepare the footage for grading or editingAfter marking your scene changes, prepare the footage for grading or editing as follows:
To separate the footage into individual shots or scenes, click Split into Clips.To flag the scene changes, click Add Keyframes to Clip.
Save or export the footageOnce you split into clips or add keyframes, you can save the scene-detected content as a SpeedGrade CS6 project or create an Edit Decision List(EDL).
In the Setup Panel under the Timeline tab, do one of the following:
To save the content as a SpeedGrade project, click Save IRCP.To export an Edit Decision List, click Save EDL.
38

Display burn-in information on frames
Twitter™ and Facebook posts are not covered under the terms of Creative Commons.
Legal Notices | Online Privacy Policy
To the top
Note:
To the top
Display burn-in information during playbackDisplay burn-in information on the rendered output
You can "burn" (overlay) metadata information on your frames during playback or on the rendered output. For example, selecting the Standardburn-in preset in SpeedGrade superimposes the following information on the footage:
Current frame numberLocation on disk of current sequenceNative time code of current frame (assuming the information exists in the header of the file format you’re using)
Display burn-in information during playback
1. In the Timeline tab, select the View pane.
2. Under Display Options, select a burn-in preset from the Burn In menu.
To toggle the burn-in information on and off during playback, click the Burn-in tool on the lower part of the Monitor screen.
If the burn-in information doesn't appear after clicking the Burn-in tool, click Zoom To Fit tool to make sure you can seethe whole frame.
Display burn-in information on the rendered outputIncluding burn-in information on rendered output can be useful when creating proxy media for offline editing or dailies for review.
When setting the rendering options in the Output panel, select a burn-in preset from the menu.In the Flash Burn-In For text box, set the number of frames to display the burn-in information. The default setting is 0, meaningburn-in information is included on all rendered frames.
39

Color grading To learn more, view these recommended resources online.
Secondary color correctionPatrick Palmer (May. 7, 2012)video-tutorial
Adding impact to your footagePatrick Palmer (Jun. 28, 2012)video-tutorial
Two approaches to structuring your gradePatrick Palmer (May. 7, 2012)video-tutorial
Stereoscopic workflowsPatrick Palmer (May. 7, 2012)video-tutorial
40

Quickstart: Color grade a clip
To the top
To the top
Select a clipApply a primary color gradeApply a secondary color gradeRender a graded clip
To load an EDL and color grade a sequence, see Color grade a sequence.
Select a clip
1. In SpeedGrade, select a folder that contains video clips using the file browser in the upper-left corner of the user interface.
The Desktop window shows thumbnail versions of the content in the selected folder.
To filter the thumbnails by file type, select All Files in the upper-right corner and then select a file type.
2. Place a clip on the Timeline by double-clicking it on the Desktop.
3. Click the Monitor Tab in the upper-left corner to view the image.
The default display size is 100%. To fit the image in the monitor window, click the Zoom to Fit button below the scopeswindow on the right side of the interface.
Apply a primary color gradeMake basic color changes like temperature, white point, black point, and more, to the entire image. The changes are applied to a primary gradinglayer.
Access the grading controls by clicking the Look tab in the lower left, below the timeline.
Make global changesMake global changes to the image with the sliders at the top of the Look panel.
Global adjustment sliders
To adjust a global setting, do the following:
1. Right-click the triangle icon on the slider and release the click button.
41

To the top
2. Swipe the mouse left or right to change the value.3. Right-click the triangle icon again to accept the setting.
Make changes to specific regionsModify color and luminance values in the image's shadow, midtone, and highlight regions using the color control wheels on the Look panel.
Color control wheels
To adjust the luminance, do the following:
Left-click the triangle icon on a wheel and drag the mouse left or right in a straight line. Don't drag the mouse in a circle. Thefurther left or right you drag, the larger the change.
To adjust the color, do the following:
1. Right-click inside the circle and release the click button.2. Swipe the mouse in any direction to change the value.3. Right-click again to accept the setting.
You can use color sliders instead of control wheels. To access the sliders, press Shift+Enter.
Color sliders
Use the zero (0) key on the numeric keypad to toggle the grade on and off for a quick before and after view. Make sure the NumLock key onyour keyboard is selected.
Apply a secondary color gradeMake targeted adjustments to a specific hue range in the image. The changes are applied to a secondary grading layer.
1. Access the secondary color grading tools by selecting the +S icon in the lower-left corner of the Layers window.
2. Select a hue range as follows:
Select a preset hue option by clicking one of the colored buttons along the top of the Hue selection tool.Sample a hue range by clicking the eyedropper tool with the + icon and then dragging to select a portion of the image inthe Monitor window.
You may have to resize the lower border of the Desktop window to see the eyedropper tools. To resize the window, usethe drag resize tool located at the bottom center of the Timeline.
42

Twitter™ and Facebook posts are not covered under the terms of Creative Commons.
Legal Notices | Online Privacy Policy
To the top
3. View the portion of the image targeted by the hue range selection by selecting an option from the Gray-out menu at upper-right corner of the Look tab.
4. Make adjustments and refinements to the selection using the upper triangles of the sliders. Use the lower triangles of thesliders to adjust fall-off.
5. Make secondary corrections with the Off-set and Gain control wheels in the center of the Look window.
6. Soften and blend secondary corrections using the Denoise and Blur sliders on the right of the Look window.
7. After making secondary corrections, set Gray-out to None.
Render a graded clip
1. Click the Output tab in the upper-right corner to open the Metadata Render Engine.
2. Click the Desktop menu and select a destination folder.
3. Assign a name to the rendered file in the File Name textbox.
4. In Format & Options, select a output file format for the render.
If a desired preset doesn’t exist, create a new one by clicking Other.
5. Click Online Quality in the Render section.
6. Click Render.
43

Quickstart: Color grade a sequence
To the top
To the top
To the top
The workflow for color grading a sequence consists of the following steps:
Load an EDLReconnect the source clips in the reelsCreate a grading clipApply color grades to a grading clipApply a grading clip to additional video clipsRender a graded sequence
Load an EDLEdit Decision Lists (EDLs) are metadata documents used to migrate project timelines from editing tools like Adobe Premiere Pro to post-productiontools like SpeedGrade.
Tip: Before starting, place the source clips and the EDL file in a single folder. This organization makes the process quicker and more efficient.
1. In SpeedGrade, select the folder containing the EDL file with the file browser in the upper-left corner of the user interface.2. Double-click the EDL file to load it.
Tip: If you have too many thumbnails, you can filter them for EDL files by selecting the EDL option from the All Files menu inthe upper-right corner.
SpeedGrade places placeholder thumbnails in the video track and in the Reels panel. The Reels panel is on the Timeline tab on the lower left ofthe screen.
Reconnect the source clips in the reelsThe Reels panel gives an overview of the reels in an EDL. When loading an EDL, SpeedGrade inserts placeholder thumbnails of the source clipsin the Reels panel. Reconnect the source clips to the placeholder thumbnails in the Reels panel as follows.
1. If not already done, display the source clips on the Desktop window by selecting the folder containing the source clips.
2. Filter the thumbnails for the media type of the source clips. Example: QuickTime movies.
3. Click the Timeline tab and then click the Reels panel to view the source clip placeholders.
4. Reconnect the source clips to the thumbnails by clicking Load from Desktop. SpeedGrade reconnects the source clips on theDesktop and the video track.
Create a grading clipWhen color grading a sequence, work in a non-destructive grading clip associated with the video clips in the sequence. Don't grade the videoclips directly. The grading clip can be saved, moved, and applied to multiple video clips. Grading clips are managed in the Timeline in a gradingtrack above the video track.
44

Twitter™ and Facebook posts are not covered under the terms of Creative Commons.
Legal Notices | Online Privacy Policy
To the top
To the top
To the top
To create a grading clip, click the Setup button on the Timeline tab and do one of the following:
To create a series of grading clips in the grading track, click the Extract Grade Clips button in the third column of the Setupwindow.
To create a grading clip for a single video clip, drag the Grading Clip tool into the grading track above the target clip.
To add grading clips for all the video clips in the video track, drag the Grading Clip tool on a video clip in the video track.
Apply color grades to a grading clip1. Select a grading clip in the Timeline, not a video clip.2. Apply color grades to the selected grading clip. For more information on grading, see Color grade a clip.
The grade is applied to all the video clips sharing the grading clip.
Tip: Compare video clips for shot-to-shot color matching by using multiple playheads. For details, see Compare shots with multiple playheads.
Apply a grading clip to additional video clipsYou can apply a single look to additional video clips on the Timeline.
1. Drag the Grading Clip tool from the Timeline tab into the grading track above a video clip.
2. Drag the right side of a grading clip to cover multiple clips.
Render a graded sequence1. Click the Output tab in the upper-right corner to open the Metadata Render Engine.2. Click the Desktop menu and select a destination folder.3. Assign a name to the rendered file in the File Name text box.4. In Format & Options, select an output file format for the render.5. Click Online Quality in the Render tab.6. Click Render.
45

Balance blacks and whites
Note:
To the top
Set black balanceSet black levelSet white balanceSet white level
Balancing blacks is the first step in the color correction workflow. Use the Offset color wheel in the Look panel to balance blacks.
Once the blacks look good, move on to balancing the whites. Use the Gain color wheel in the Look panel to balance whites.
You can use RGB sliders instead of the color wheels. Click the Sliders mode button on the upper-left of the coloring tools.
Use the RGB waveform to guide your adjustments. To display the Waveform panel in the Monitor view, press the W key. For more information,see Waveform panel.
Set black balanceIn the Look panel, drag the hue control tool in the center of the Offset color wheel to normalize color levels in shadows.
Offset color wheel
To move the hue control tool, do the following:
1. Right-click inside the wheel and release the click button.2. Swipe the mouse in any direction to change the value.3. Right-click again to accept the setting
ExampleIf the image is tinted yellow in the shadows, push the Offset hue control tool toward blue to balance the black values. The adjustment results inthe following waveform change.
46

To the top
To the top
Before adjusting black balance
After adjusting black balance
Set black levelIn the Look panel, drag the triangle icon on the Offset control wheel until the valleys of the waveform rest on the 0 level of the waveform display.Drag clockwise to raise the valleys or counter-clockwise to lower the valleys.
Offset color wheel
To move the triangle icon on the color wheel, drag it left or right in a straight line. Don't drag in a circle. The further left or right you drag, the largerthe change.
Moving the valleys below the 0 level eliminates details in the shadows.
Example
After lowering black value
Set white balanceIn the Look panel, drag the hue control tool in the center of the Gain color wheel to normalize color levels in shadows.
Gain color wheel
To move the hue control tool, do the following:
1. Right-click inside the wheel and release the click button.2. Swipe the mouse in any direction to change the value.3. Right-click again to accept the setting.
47

Twitter™ and Facebook posts are not covered under the terms of Creative Commons.
Legal Notices | Online Privacy Policy
To the top
Use the RGB waveform as a guide to adjust highlight color values. In the following example, the blue waveform is lower than the red and greenones.
Before adjusting white balance
Pushing the gain hue control tool toward cyan and blue balances out the shadows.
After adjusting white balance
Set white levelIn the Look panel, drag the triangle icon on the Gain control wheel until the peaks of the waveform touch the 100 level of the RGB waveformdisplay. Drag clockwise to lift the peaks or counter-clockwise to lower the peaks.
Gain color wheel
To move the triangle icon on the color wheel, drag it left or right in a straight line. Don't drag in a circle. The further left or right you drag, the largerthe change.
Moving the waveform above the 100 level blows out the whites and eliminates details in the highlights. Example:
After raising white value
48

Adjust gammaGamma is the relative bright and dark value of the image.
Adjust the gamma setting by dragging the triangle icon on the Gamma color wheel in the Look panel. Drag clockwise to lower the gamma settingor counter-clockwise to increase it.
Gamma color wheel
To move the triangle icon on the color wheel, drag it left or right in a straight line. Don't drag in a circle. The further left or right you drag, thelarger the change.
Use the RGB waveform to guide your adjustments. To display the Waveform panel in the Monitor view, press the W key. For more information,see Waveform panel.
If the image appears milky, flat or lacks punch, increase the gamma setting by dragging the triangle icon counter-clockwise.
If the image has punch but lacks shadow detail, lower the gamma setting by dragging the triangle icon clockwise.
Low gamma
Normal gamma
49

Twitter™ and Facebook posts are not covered under the terms of Creative Commons.
Legal Notices | Online Privacy Policy
High gamma
50

Adjust color temperature
Twitter™ and Facebook posts are not covered under the terms of Creative Commons.
Legal Notices | Online Privacy Policy
Adjust the color temperature by dragging the Color Temperature slider in the Look panel.
If the image is too warm, lower the color temperature by dragging the Color Temperature slider to the left.
If the image is too cool, increase the color temperature by dragging the Color Temperature slider tool to the right.
Low temperature
High temperature
51

Grade a specific tonal range
Twitter™ and Facebook posts are not covered under the terms of Creative Commons.
Legal Notices | Online Privacy Policy
You can make color corrections to a specific tonal range, such as the highlights, shadows, or midtones.
1. Select Shadows, Midtones, or Highlights on the upper part of the Look panel.
2. Make color corrections using the color wheels and sliders.
3. Extend or limit the affected tonal range using the slider on the right side of the color wheels.
For example, if grading in the shadows, pushing the slider up extends the changes into the midtone region of the image.Pushing the slider down limits the changes deeper into the shadows.
Tonal range slider
52
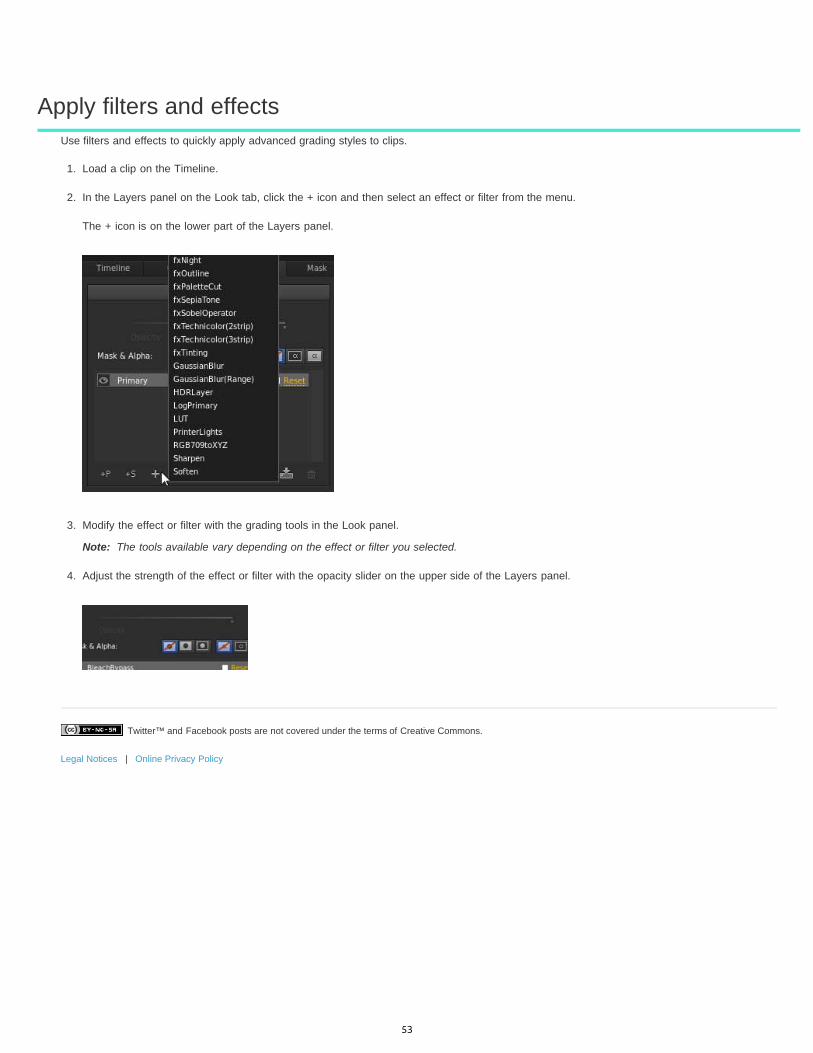
Apply filters and effects
Twitter™ and Facebook posts are not covered under the terms of Creative Commons.
Legal Notices | Online Privacy Policy
Note:
Use filters and effects to quickly apply advanced grading styles to clips.
1. Load a clip on the Timeline.
2. In the Layers panel on the Look tab, click the + icon and then select an effect or filter from the menu.
The + icon is on the lower part of the Layers panel.
3. Modify the effect or filter with the grading tools in the Look panel.
The tools available vary depending on the effect or filter you selected.
4. Adjust the strength of the effect or filter with the opacity slider on the upper side of the Layers panel.
53

Work with masks
Twitter™ and Facebook posts are not covered under the terms of Creative Commons.
Legal Notices | Online Privacy Policy
To the top
To the top
Apply a maskApply additional masks
Apply a maskA mask isolates a region of an image so that you can selectively grade the region. In SpeedGrade, a mask is attached to a grading clip.
1. Add a grading clip to a video clip in the video track. See Create a grading clip.
2. Click the Mask tab and select one of the mask presets.
3. Do any of the following to adjust the location, size, and shape of the mask:
To reposition the center of the mask, drag the center cross-hair.To expand the horizontal size of the mask, drag the horizontal-arrow control to the right or left.To expand the vertical size of the mask, drag the vertical-arrow control up or down.To rotate the mask, drag the rotational control curve up or down.To expand the feather size of the Vignette mask, drag the outer edge feather rectangle control on the lower-left corner ofthe widget.To adjust the angle of the mask, drag the bottom skew control triangle.
4. Specify the region to grade by clicking the Look tab and select one of the following options in the Layers panel on the left:
Apply Grading Layer to the Outside of a Mask (second icon)Apply Grading Layer to the Inside of a Mask (third icon)
5. Grade the region defined by the mask.
For example, drag the Gamma Level control on the outside of the Gamma Control wheel to darken the outside of a mask.
Apply additional masksYou can apply additional masks by adding more grading clips to a video track.
1. Add another grading clip to a video track by dragging the Grading Clip icon to the track. See Create a grading clip.
Assign names to the grading clips to organize mask assignments. Double-click the string “untitled grading” of each gradingclip and specify a name. Example: “Vignette Mask.”
2. In the Mask tab, select the new grading clip and then apply a mask and adjust it. See Apply a mask.
For example, add a circle mask preset and adjust it over a subject's face.
3. In the Look tab, specify whether you want to grade the region inside or outside the mask.
4. Grade the region.
For example, drag the Gain control outer-wheel clockwise to brighten the subject’s face.
5. If desired, apply additional masks by adding grading clips.
54

Track a masked object through a shot
To the top
To the top
Note:
Track the masked object automaticallyControl the movement of a mask manually
Track the masked object automatically1. On the first frame of the track, apply a mask on the target object and grade it.
For instructions, see Apply a mask.
2. In the Mask panel, click the Track Object button.
The button is on the lower-right side of the Mask panel. You might need to scroll the panel down to see it.
The mask automatically tracks the target object through the shot.
See the next section if the following applies:
The mask can't follow the object after clicking the Track Object buttonYou want the tracking to begin or end later in the shot
Control the movement of a mask manuallyUse keyframes to manually control the position of a mask over time. A keyframe marks the point in time where you specify the shape or positionof the mask. You typically use at least two keyframes—one for the position at the beginning of the change, and one for the new position at the endof the change. SpeedGrade animates the transition between the keyframes. For more information, see Work with keyframes.
Keyframes are useful when the target object cannot be followed automatically. You can also use keyframes to change the shape and feather of amask over time.
1. In the Mask panel, do the following:
a. Move the playhead to the position on the timeline where you want the mask to start tracking the object.b. Click the Record Keyframe button to insert a keyframe.
Record keyframe button
You don’t have to insert a starting keyframe if you want the mask to track the target object from the first frame of thetrack. SpeedGrade adds a keyframe to the first frame as soon as you add a grading clip.
2. Apply a mask over the target object at the keyframe, and then grade the mask in the Look panel.
For instructions, see Apply a mask.
3. Insert a second keyframe in the timeline as follows:
a. Switch to the Mask panel and move the playhead to the second position on the timeline where you want the movement ofthe mask to end.
b. Click Record Keyframe.
4. Reposition the mask over the target object at the second keyframe.
5. To create a dissolve between the two keyframes, click the Record Keyframe button a second time on the second position.
SpeedGrade indicates the dissolve with an arrow on the track between the two positions.
55

Twitter™ and Facebook posts are not covered under the terms of Creative Commons.
Legal Notices | Online Privacy Policy
6. If necessary, add more keyframes and adjust the position of the mask at each keyframe.
Related links
56
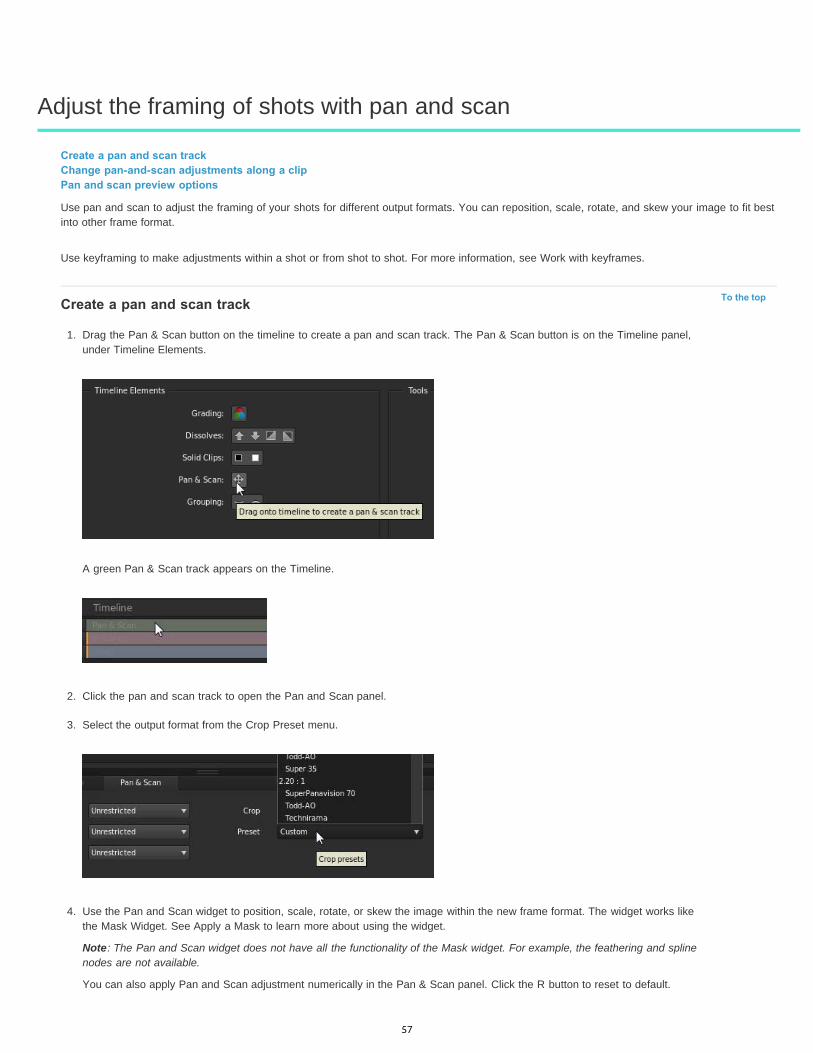
Adjust the framing of shots with pan and scan
To the top
Create a pan and scan trackChange pan-and-scan adjustments along a clipPan and scan preview options
Use pan and scan to adjust the framing of your shots for different output formats. You can reposition, scale, rotate, and skew your image to fit bestinto other frame format.
Use keyframing to make adjustments within a shot or from shot to shot. For more information, see Work with keyframes.
Create a pan and scan track
1. Drag the Pan & Scan button on the timeline to create a pan and scan track. The Pan & Scan button is on the Timeline panel,under Timeline Elements.
A green Pan & Scan track appears on the Timeline.
2. Click the pan and scan track to open the Pan and Scan panel.
3. Select the output format from the Crop Preset menu.
4. Use the Pan and Scan widget to position, scale, rotate, or skew the image within the new frame format. The widget works likethe Mask Widget. See Apply a Mask to learn more about using the widget.
Note: The Pan and Scan widget does not have all the functionality of the Mask widget. For example, the feathering and splinenodes are not available.
You can also apply Pan and Scan adjustment numerically in the Pan & Scan panel. Click the R button to reset to default.
57

Twitter™ and Facebook posts are not covered under the terms of Creative Commons.
Legal Notices | Online Privacy Policy
To the top
To the top
Change pan-and-scan adjustments along a clipThe pan and scan track is a global track along the entire timeline. Any pan-and-scan adjustments affect the whole clip. Use keyframes to changethe adjustments along the clip. For details on using keyframes, see Work with keyframes.
The typical workflow for making pan-and-scan adjustments along a clip consists of the following steps.
1. Create a keyframe at the beginning of the clip.
2. Create another keyframe at any position further along the timeline where the settings should no longer be effective.
3. Create a dissolve from one keyframe to the next by pushing the Record Keyframe button a second time at the secondposition.
4. Adjust the pan-and-scan settings at the two keyframe positions.
Pan and scan preview optionsYou can choose from three different preview options from the Crop Preview menu: Normal (crop), Transparent, and Outline. Select the view thatbest serves your project.
Normal (crop) preview
Transparent preview
Outline preview
58

Grade a specific color range
To the top
Note:
Select and grade a color rangeExample: Isolating skin tones with secondaries
Secondary color corrections are applied to specific color ranges within your images. They let you accent, modify, or tone down parts of an image.
For a video, see Secondary Color Correction by Patrick Palmer.
Select and grade a color range
1. In the Look panel, click the +S icon to add a secondary grading layer.
2. Select a color range to target. Do one of the following to select a range:
a. Choose a preset color range from the range selector.
You may have to scroll down the Look panel to see the range selector.
If none of the six standard colors is a good starting point, click the graybutton on the right side of the selectors to see more options.
You can also deselect the Hue, Lightness, or Saturation options. This is useful for targeting a specific luma zone forgrading. For example, turning off Hue and Saturation gives you a clean lightness key.
59

Twitter™ and Facebook posts are not covered under the terms of Creative Commons.
Legal Notices | Online Privacy Policy
To the top
b. Sample a color range in the image. Click the sample range button (the eyedropper icon with the plus sign), hold down theleft mouse button, and move over the color range you’d like to sample. Release the mouse button when you're done.
3. Use the Grey-out options in the right corner of the Look panel to view the selected region of the image.
4. Expand or restrict the target color range by dragging the Hue, Lightness, and Saturation sliders.
The top sliders moves the entire selected range. The bottom sliders feather the selection.
5. Color correct the target range using the grading tools such as the contrast slider or the Offset color wheel.
Example: Isolating skin tones with secondaries
1. Add a secondary grading layer by clicking the +S button in the Look panel.
2. Sample skin tones by clicking the sample range button (the eyedropper icon with the plus sign), holding down the left mousebutton, and dragging a rectangle across a range of skin in the image.
The range selector sliders display the sampled color values:
3. View the selected region of the image by selecting the Color/Gray option in the Gray-out menu.
4. Adjust the range selection by dragging the Hue, Lightness, and Saturation sliders.
For example, you want to work on a narrower range of skin tones.
5. Smooth out skin blemishes and wrinkles by dragging the Blur slider to the right.
6. Warm up skin tones by dragging the Offset hue control toward yellow.
60

Managing looks To learn more, view these recommended resources online.
Working with LooksPatrick Palmer (May. 7, 2012)video-tutorial
61

Share and reuse looks
To the top
Note:
To the top
To the top
Save a lookShare a lookApply a look in SpeedGradeApply a look in After EffectsApply a look in PhotoshopSave a look for Premiere Pro and third-party applicationsDelete .Look files
SpeedGrade can save color grading information in .Look files for reuse. Because the files are small, you can easily store them or share them withothers.
Save a look
1. Grade some material.
2. In the Look tab, click the Save Look button on the lower right side of the Layers panel.
You can also press Ctrl+P (Windows) or Cmd+P (Macintosh) to save the Look file.
The .Look file appears in the Look browser as a thumbnail. The default location for the files is ../SpeedGrade/settings/looks.
If you get an error that the folder is read-only, close SpeedGrade and then run it as administrator. In Windows, right-click the start icon and select Run as Administrator.
3. If desired, rename the .Look file by clicking the current name and typing a new name.
Share a look1. Locate the .Look file to share. The default location of .Look files is ../SpeedGrade/settings/looks.2. Send the file as an email attachment or move or copy it to a shared folder in the Cloud or on a network.
Apply a look in SpeedGrade1. Select a clip or grading track.2. In the Look browser, navigate to the folder containing the .Look file you want to use. Use the left and right arrow keys to
navigate to more folders.3. Select a .Look file and press Enter to apply it.
You can also drag the .Look file on the Timeline. It appears as a grading clip that you can resize and reposition to apply the look acrossmultiple clips, scenes, or a whole project.
62

Twitter™ and Facebook posts are not covered under the terms of Creative Commons.
Legal Notices | Online Privacy Policy
To the top
To the top
To the top
Note:
Note:
To the top
Apply a look in After EffectsAdobe After Effects supports native .Look files.
1. With footage open in After Effects, select Effect > Utility > Apply Color LUT.2. Select the .Look file from your hard disk.
To blend the look in After Effects, create an adjustment layer above the clip in the Timeline, then apply the look (Effect > Utility > Apply ColorLUT). In the Timeline, select the adjustment layer, then press the T key to bring up the transparency control. Adjust the transparency to blendthe look.
Apply a look in PhotoshopAdobe Photoshop supports native .Look files.
1. With an image open in Photoshop, select Image > Adjustments > Color Lookup.2. In the Color Lookup dialog box, select the Load 3D LUT option.3. Select the .Look file from your hard disk and click OK.
For more control over the look, create a Color Look Up adjustment layer. Select Layer > New Adjustment Layer > Color Lookup, and thenselect the .look file from the contextual menu.
Save a look for Premiere Pro and third-party applicationsYou can export a .Look file with one or more LUT files to use in Adobe Premiere Pro or a third-party application.
LUTs do not include masks or effects such as blur or glow.
1. In the Look browser, mouse over the .Look file. An export icon (E) appears on the right of the thumbnail.2. Click the export icon, select additional files to include, and click Export.
SpeedGrade creates a zip file containing the files.
A LUT is not required if you're sharing a look with After Effects or Photoshop, which support native .Look files. See Share looks.
Delete .Look files1. In the Look browser, mouse over the .Look file. A delete icon (X) appears on the right of the thumbnail.2. Click the delete icon and then confirm the deletion.
63

Rendering out To learn more, view these recommended resources online.
Rendering out your projectPatrick Palmer (May. 7, 2012)video-tutorial
Creating dailiesPatrick Palmer (May. 18, 2012)video-tutorial
64
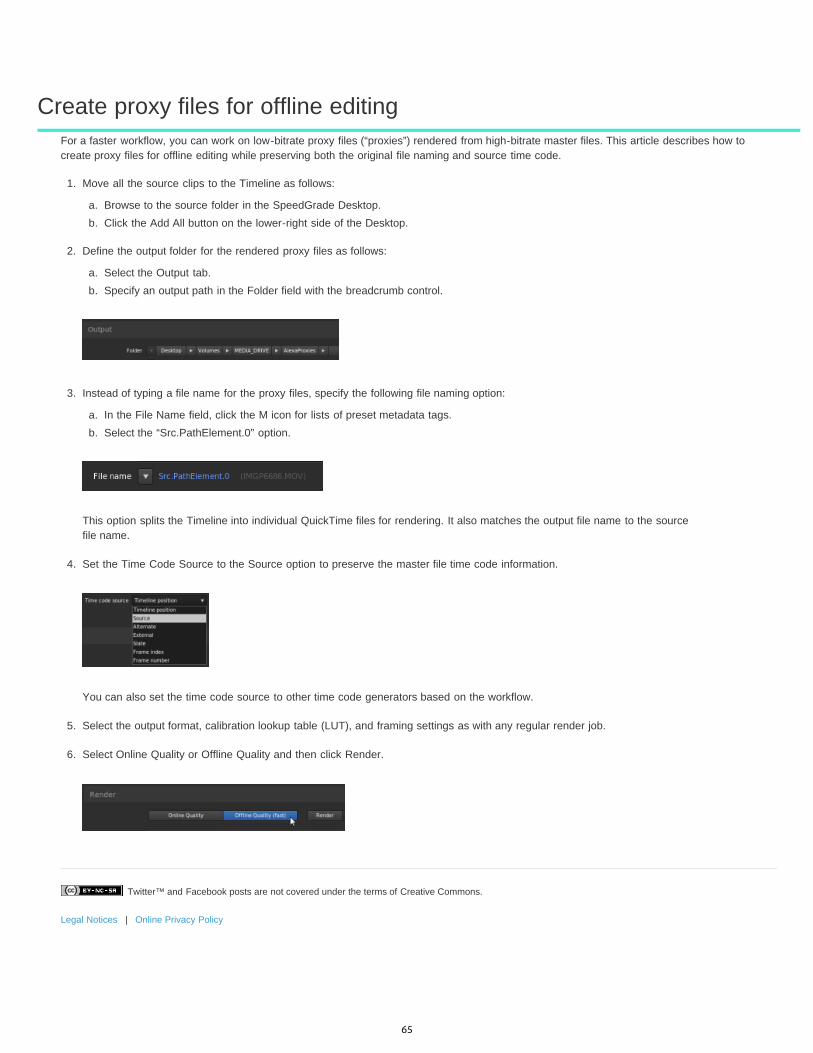
Create proxy files for offline editing
Twitter™ and Facebook posts are not covered under the terms of Creative Commons.
Legal Notices | Online Privacy Policy
For a faster workflow, you can work on low-bitrate proxy files (“proxies”) rendered from high-bitrate master files. This article describes how tocreate proxy files for offline editing while preserving both the original file naming and source time code.
1. Move all the source clips to the Timeline as follows:
a. Browse to the source folder in the SpeedGrade Desktop.b. Click the Add All button on the lower-right side of the Desktop.
2. Define the output folder for the rendered proxy files as follows:
a. Select the Output tab.b. Specify an output path in the Folder field with the breadcrumb control.
3. Instead of typing a file name for the proxy files, specify the following file naming option:
a. In the File Name field, click the M icon for lists of preset metadata tags.b. Select the “Src.PathElement.0” option.
This option splits the Timeline into individual QuickTime files for rendering. It also matches the output file name to the sourcefile name.
4. Set the Time Code Source to the Source option to preserve the master file time code information.
You can also set the time code source to other time code generators based on the workflow.
5. Select the output format, calibration lookup table (LUT), and framing settings as with any regular render job.
6. Select Online Quality or Offline Quality and then click Render.
65

Save an EDL
Twitter™ and Facebook posts are not covered under the terms of Creative Commons.
Legal Notices | Online Privacy Policy
You can export an Edit Decision List (EDL) of assembled clips from the Timeline.
1. With two or more clips on the Timeline, click the Setup button on the Timeline panel.
2. In the Tools panel on the right side of the panel, click Save EDL.
3. Name the EDL, select a folder, and click Save.
66

Display burn-in information on frames
Twitter™ and Facebook posts are not covered under the terms of Creative Commons.
Legal Notices | Online Privacy Policy
To the top
Note:
To the top
Display burn-in information during playbackDisplay burn-in information on the rendered output
You can "burn" (overlay) metadata information on your frames during playback or on the rendered output. For example, selecting the Standardburn-in preset in SpeedGrade superimposes the following information on the footage:
Current frame numberLocation on disk of current sequenceNative time code of current frame (assuming the information exists in the header of the file format you’re using)
Display burn-in information during playback
1. In the Timeline tab, select the View pane.
2. Under Display Options, select a burn-in preset from the Burn In menu.
To toggle the burn-in information on and off during playback, click the Burn-in tool on the lower part of the Monitor screen.
If the burn-in information doesn't appear after clicking the Burn-in tool, click Zoom To Fit tool to make sure you can seethe whole frame.
Display burn-in information on the rendered outputIncluding burn-in information on rendered output can be useful when creating proxy media for offline editing or dailies for review.
When setting the rendering options in the Output panel, select a burn-in preset from the menu.In the Flash Burn-In For text box, set the number of frames to display the burn-in information. The default setting is 0, meaningburn-in information is included on all rendered frames.
67