help desk number: 8007321998 / 9970552672 · format (gif or jpg), ... download admit card – in...
TRANSCRIPT

Help Desk Number: 8007321998 / 9970552672 Before filling the on-line application form, read the information booklet carefully. Also, first ensure your eligibility (educational qualification, age etc.) and other requirements for admission as given in the Instructions. You should be very careful in filling-up the on-line application form. If any lapse is detected during the scrutiny, your candidature will be rejected at any time of admission process or even at a later stage. The processing of application form is based on the information filled by the candidate. Any error committed intentionally or otherwise may result in cancellation of your candidature. Open the registration link through the GPSC website. The Welcome page looks like the below picture. Welcome Page –
To fill the registration form candidate may click on New Users (Showing in the blue color link) or New User (Showing in the Red color link) or Click here to Apply Online (Showing in the Green color button) options.

Click on the link – New Users User registration Step 1 form look like the below picture –
I. Candidate needs to fill the personal details –
1. Write your Full name as it appears in your SSC/SSLC/ 10th class mark sheet. 2. Write your email ID (for example [email protected]). 3. Select the Gender from the drop down list (Male/Female/Others) 4. Write your Mobile number (Beginning without zero ‘0’) compulsorily i.e. only 10 digit number 5. Select the candidate DOB from the calendar.
6. Communication address Write the full present address along with House name and Number, Ward Name/Number, Village/Town; Select the state from the drop down list given, Write the district name, Taluka and Pin code where the communication to you could be made.
II. Login Details –
7. Enter the User Name which will be used further for the next process. 8. Enter the password which will be used further for the next process. 9. Enter the confirmed password as you entered in the password text box. 10. Security question – Enter the question, which will be used when you try to change the Email –id
or Password. (Example – What is your name?) 11. Answer – Answer for the Security question. (Example – My name is XYZ)
III. Photograph and Signature –
12. Upload the candidate photo and signature
Scanned / digital copy of your recent passport size colored photo (Recent photograph dimension can be 150 X 120 pixels) and signature (dimension can be 150 X 60 pixels) in the prescribed format (GIF or JPG), preferred format can be JPG, for better quality. Be very careful while scanning your photo and signature. You should first put your signature in an area of about 2" × 1" on blank paper with a ball point pen. Scan this paper. Cut / select only signature area (2" × 1") and save it as jpg or jpeg (do not upload your signature in A4 size format/ full paper). Also, do not make any mistake in uploading signature and photograph
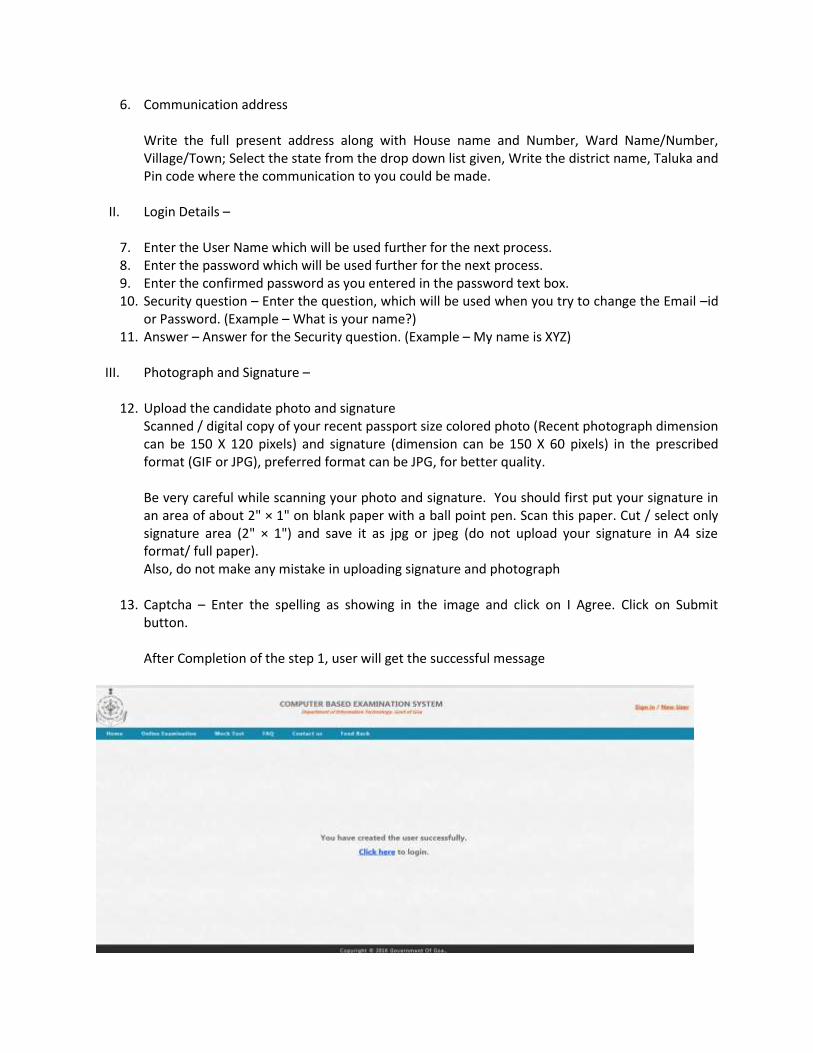
13. Captcha – Enter the spelling as showing in the image and click on I Agree. Click on Submit button. After Completion of the step 1, user will get the successful message

Click on ‘Click here’/Sign In link to go to the Step2 of the registration process.
Enter the User name and password which is created in the user registration Step1. Enter the Captcha and click on Continue button to go to step-2 registration process. Forgot password- If user forgot the password they can click on Forgot password link. The page looks like below picture.

User need to enter the User name which is created in the Step1 registration process. And Click on submit button. After submit the username the page will display the security question which is entered in the step1 registration process.
Enter the security Answer which is entered in the Step – 1 registration process. Enter the captcha and click on Submit button.
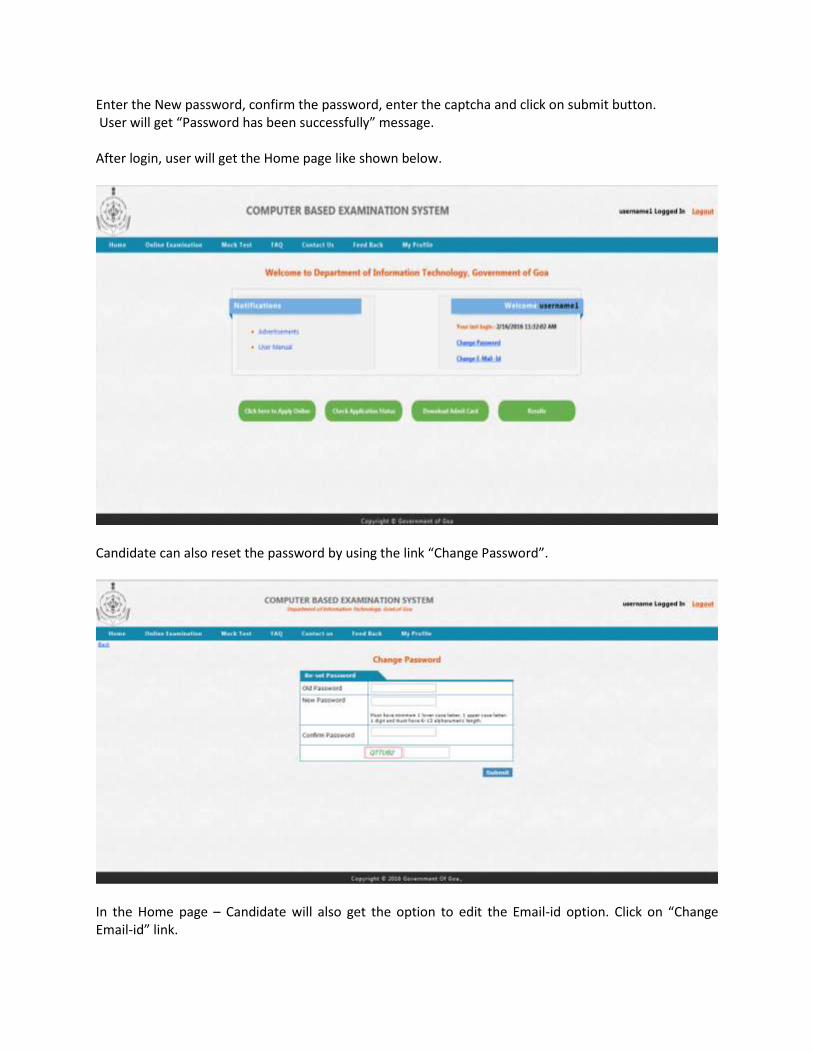
Enter the New password, confirm the password, enter the captcha and click on submit button. User will get “Password has been successfully” message. After login, user will get the Home page like shown below.
Candidate can also reset the password by using the link “Change Password”.
In the Home page – Candidate will also get the option to edit the Email-id option. Click on “Change Email-id” link.

In the Home page – Candidate will also get the option to read the advertisements and User Manual”. Click on Advertisements link to read the advertisement. Click on User Manual link to read the Instructions to fill the online registration form.
In the home page - To go to the Step – 2 Click on “Click here to Apply Online” button.

After clicking on the “Click here to Apply online” button user will get the Advertisement page. There user need to select the advertisement and click on “Click for more details” button.
Choose the post and Click on “Click to Apply” button.

STEP-2 Registration process- Personal Details
14. Write father’s full name.
15. Write Spouse name.
16. DOB – Candidate can able to change his/her DOB by using DOB option in the STEP-2.

17. Category – Select General/SC/ST/OBC from the category drop down list.
18. Differently abled – Select Yes/No option by using radio buttons.
19. Government Servant – Select Yes/No option by using radio buttons.
20. Are you Child of freedom Fighter - Select Yes/No option by using radio buttons
21. Age as per relaxation type selected – By default the page will calculate the Age relaxation
according to the categories. Then it will display the messages according to the conditions.
22. Candidate can able to change the “Gender” option.
23. Nationality – Select the nationality from the dropdown list given.
24. Contact Details – Candidate can able to change the Step-1 contact details in the step-2 registration process. After filling the details in the STEP-2 registration form, click on “NEXT” button. Step-3 Registration process- Educational details

25. Select the Highest degree from the dropdown list given. 26. Enter the Exam passed, Name of Board/University, Subject taken for the examination, Month
and year of passing, Grade, Is Grading in CGPA or Grade or Credit? , Fill the marks, Subject of specialization. If user wants to enter one more row, Candidate can click on “Add more” button. If user done any research work/publications they can click on the check box provided.
27. Enter the experience details – Select Do you have work experience as “Yes” or “No”. If candidate selected as “yes”, Enter the Name of the Institute/University/Industry/Research Center/Organization/Department, Designation, From Date, To date, Nature of appointment, Number of years of service, Nature of duties. If user wants to enter one more row, Candidate can click on “Add more” button. After filling the details in the STEP-3 registration form, click on “NEXT” button. Step-4 Registration process- Other Details
28. Select the languages known from the list given 29. Whether willing to accept the minimum starting Basic/Increment in the scale of pay attached to
– Select Yes/No option 30. What is the period of joining time required by the candidate after getting offer of appointment –
Enter the joining time in the text box given.

31. Any other relevant information, the candidate wishes to furnish in support of his/her suitability to the post – Write the relevant information in the text box given.
32. Has the candidate ever been debarred or disqualified by the GPSC / UPSC or any other State PSC from appearing at its examinations / selections- Select “Yes/No’ option.
33. Has the candidate ever been convicted of a criminal offence and / or imposed upon any major penalty such as dismissal / removal or compulsory retirement from service - Select “Yes/No’ option.
34. Any criminal prosecution / disciplinary action pending against the candidate - Select “Yes/No’ option.
35. Click on the Declaration checkbox I hereby declare that all contents entered in this application are true, complete and correct to the best of my knowledge and belief. I have read the rules and understand that in the event of any information being found false or ineligibility being detected before or after the selection, my application is liable to be rejected. Action can be taken against me by the Commission / Government under applicable rules as amended from time to time. I have read the rules and instructions carefully and hereby undertake to abide by them. I further declare that I fulfill all the eligibility conditions regarding age, educational qualification, reservation etc., wherever applicable, prescribed for the post.
Click on save button to save the details entered in step-4. Candidate can see the uploaded photo and signature in the Step-5. He/she can able to edit the photo and signature in this step.
Click on Confirm and Signature button, It will take the candidate to Application view form.

Application View form –
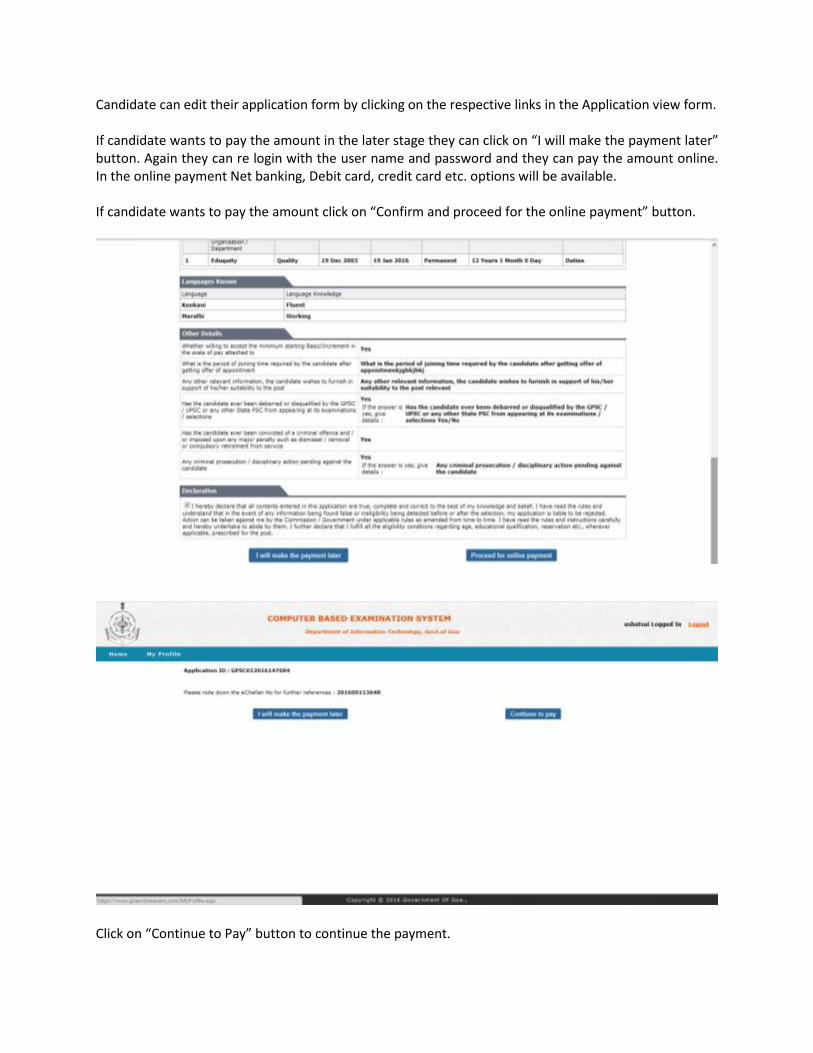
Candidate can edit their application form by clicking on the respective links in the Application view form. If candidate wants to pay the amount in the later stage they can click on “I will make the payment later” button. Again they can re login with the user name and password and they can pay the amount online. In the online payment Net banking, Debit card, credit card etc. options will be available. If candidate wants to pay the amount click on “Confirm and proceed for the online payment” button.
Click on “Continue to Pay” button to continue the payment.

Calculate the sum of two numbers shown in the image and Initiate the payment by clicking on “Initiate payment” button.
Enter the mobile number and Date of birth and click on Confirm button.
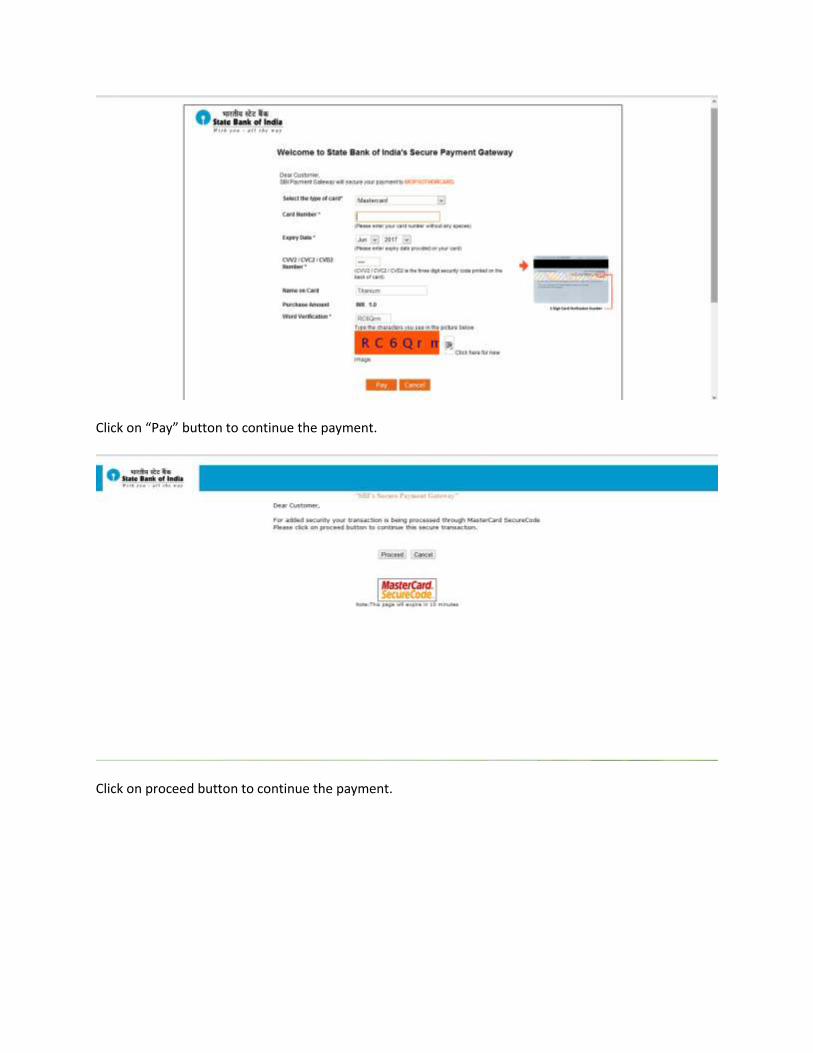
Click on “Pay” button to continue the payment.
Click on proceed button to continue the payment.

Enter the 3D Secure Pincode or OTP Pincode and click on submit button. After paying the amount candidate will get the E-Receipt as shown below:
In the Home page – Candidate can view the “My profile” details by clicking on “My profile” option.

In this option, candidate can able to edit the user profile, photo and signature. But if candidate filled all the information in the online registration, these changed data will not reflect in the Application View form.

In the home page – Candidate can able to check the Application status by clicking on “Check the Application status”. Check Application Status – In the home page, Click on Check application status option to know the status of the application. It will display the login page, User need to enter the created login credentials to check the status of the application. After login the page look like the below picture.

Mock Test - – In the home page, Click on Mock Test option to take the demo test.
Click on “Click for Mock Test” link to take the demo test.

Enter the Email-id and click on Login button. Select the Subject from the drop down list and click on continue button.
Confirm the question paper and click on Confirm button.
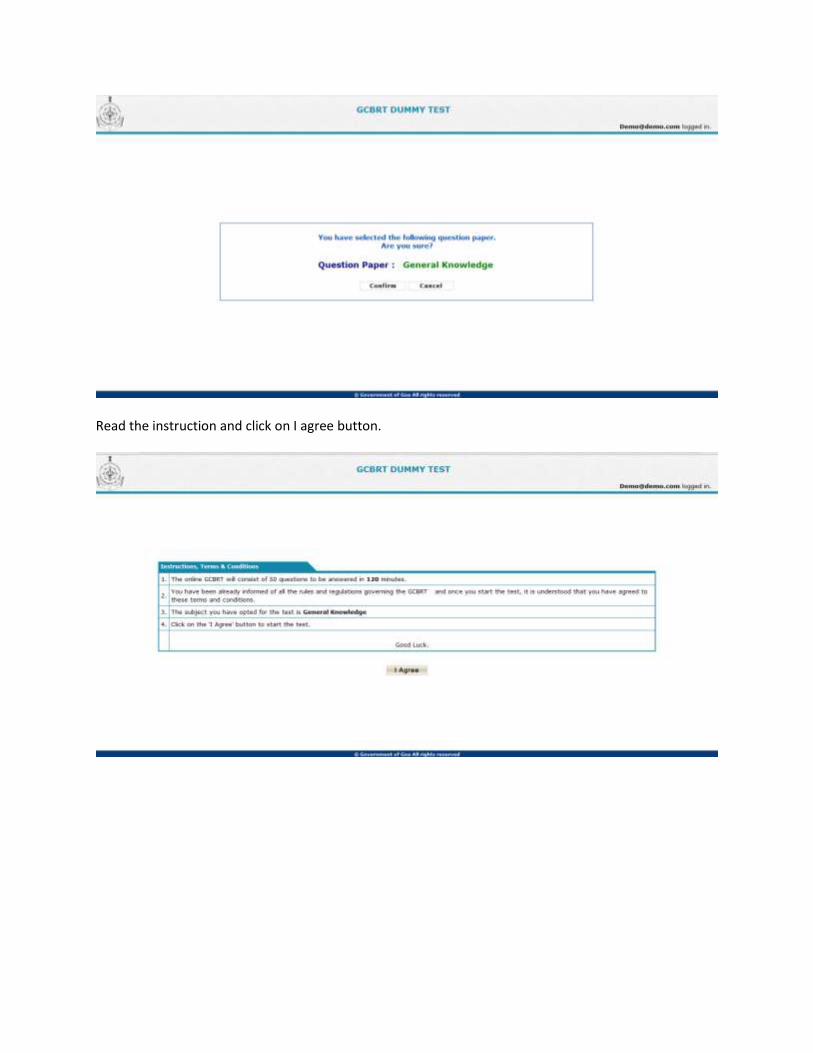
Read the instruction and click on I agree button.

Read the symbols instructions and click on Continue button
Read the instructions and click on “Start the Test” button.

The timer will be displayed at the right side of the screen, Answer the questions. After taking the dummy test click on “I have completed the Test” button.
Download Admit Card – In the Home page, Candidate needs to click on Download Admit card, then candidate will get login page as shown below.
Enter the Application number generated after filling the application form and the Date of birth which is filled in the application form. Check the instructions in the goa website, for the date to download the admit card.