helpful tools and guides - home - casey family … · dreams can be a reality….if youth have a...
TRANSCRIPT

Dreams can be a reality….if youth have a plan.
Get started with the new Casey Life Skills online
youth-centered assessments and planning tools.
Helpful Tools and Guides
This Casey Life Skills (CLS) Help Guide is a comprehensive manual on navigating and
understanding the functionality of the CLS website. It guides users through the registration
process and account administration tasks; shows how to administer assessments and
read/interpret assessment results; and, how to manage a provider‟s history of assessments.
This document is also available in Microsoft Word format that can be used for training purposes.
Click here to access the Word version of this help guide.
There are also three Video Tutorials available on the CLS help page. These are quick guides
approximately five minutes each and can be accessed from the help page by clicking Video
Tutorials on the left side of the page.
For Practice Resources click on the Learn More button on the CLS homepage. You will find
brief overviews and resources that will help practitioners administer the Casey Life Skills
assessments.
2
Youth Page – we recommend you print this out and share it with the youth. It‟s intended
to motivate young people by helping them better understand the tool they will be using.
Provider Page – here you can access two key practice guides:
The Casey Life Skills Practice Guide outlines the six-step practice framework on
how to effectively administer assessments to young people.
The Resources to Inspire Guide is a collection of goals and activities to help you
work with young people to prepare learning plans for teaching life skills

3
Contents*
Overview of Assessments .......................................................................................................... 5
Casey Life Skills Assessment (CLSA) ..................................................................................... 5
Additional assessments .......................................................................................................... 5
Technical Requirements ............................................................................................................ 6
Getting Started ........................................................................................................................... 6
Create Provider/Agency and First Caseworker Account ............................................................. 7
Step1: Create provider profile ................................................................................................. 7
Step 2: Create caseworker account ........................................................................................ 7
Change Provider Profile ............................................................................................................. 9
Manage Access to Provider Information ....................................................................................10
Add caseworker accounts ......................................................................................................10
Send email invitation to co-worker to create account ..........................................................10
Receive email invitation to create account ..........................................................................13
Request account from existing provider/agency..................................................................14
Deactivate (and re-activate) users .........................................................................................16
Change User Profile ..................................................................................................................18
Giving Youth the Assessment ...................................................................................................19
Add youth record ...................................................................................................................19
Find youth record ...................................................................................................................22
Start the assessment .............................................................................................................23
Option 1: Take assessment on caseworker‟s computer ......................................................23
Option 2: Caseworker sends email .....................................................................................23
Option 3: Youth completes printed assessment ..................................................................25
Option 4: Youth logs into his/her own account ....................................................................26
Youth takes assessment ........................................................................................................27
* To reference Casey Life Skills in your publication use this citation: Casey Life Skills (2012).
Casey Family Programs. Seattle, WA.

4
Reading Youth Assessment Results .........................................................................................31
Summary at-a-glance view.....................................................................................................31
Specific skill areas statements ...............................................................................................33
Permanency and Looking Forward statements ......................................................................34
Print Assessment Results .........................................................................................................36
Email Assessment Results ........................................................................................................38
Manage Assessments ...............................................................................................................39
Finish youth assessment .......................................................................................................39
Mark assessment complete ...................................................................................................42
Archive assessments .............................................................................................................44
Youth creates his/her CLS account ...........................................................................................46
Caregiver Assessment ..............................................................................................................50
Start caregiver assessment ....................................................................................................50
Option 1: Caregiver takes assessment on caseworker‟s computer .....................................50
Option 2: Caseworker sends email .....................................................................................51
Caregiver takes assessment ..................................................................................................54
Caregiver Comparison Results .................................................................................................56
Print Caregiver Comparison Report ..........................................................................................57
Email Comparison Report .........................................................................................................59
Finish Caregiver Assessment ....................................................................................................60
Group Data Report ....................................................................................................................60

5
Overview of Assessments
Casey Life Skills Assessment (CLSA)
A free, online youth-centered tool that assesses life skills youth need for their well-being,
confidence and safety as they navigate high school, postsecondary education, employment
and other life milestones.
A measure of youth confidence in their future and their permanent connections to caring
adults.
Designed to be as free as possible from gender, ethnic and cultural biases.
Appropriate for all youth ages 14 to 21 regardless of living circumstances (i.e., in foster
care, with bio-parents, in group homes or other places).
Comprehensive with 113 assessment items categorized within eight areas for skills,
knowledge and awareness. Youth can complete one area at a time or finish the whole
assessment in approximately 30-40 minutes.
Additional assessments
The CLSA is the main assessment, but users can also access 13 other assessments designed
for populations with particular characteristics or circumstances. The complete list is below.
Click here to access brief descriptions of these assessments.
1. Healthy Pregnancy
2. Parenting Infants
3. Parenting Young Children
4. Youth Assessment Level I (elementary ages)
5. Youth Assessment Level II (middle school ages)
6. Gay, Lesbian, Bisexual, Transgender and Questioning Youth
7. Homeless Youth
8. American Indian
9. Education: Upper Elementary School
10. Education: Middle or Junior High School
11. Education: High School
12. Education: Postsecondary or Training
13. Educational Supports

6
Technical Requirements
In order for the CLS website to function properly, it is recommended to use one of these
browsers:
1. Internet Explorer version 8 or higher
2. Mozilla Firefox
3. Google Chrome
Getting Started
The first step is getting started is understanding how the information is structured. A
Provider/Agency is an organization which administers the CLSA. Caseworkers must be
associated with a provider/agency in order to give the assessment and to access youth data.
To do this a provider profile will be created which consists of agency name, address and
phone number. Once this is done, your provider/agency‟s caseworkers can create their own
logins that are associated to the provider/agency profile.
All information (i.e. youth records and reports) is available to any caseworker associated with
a provider/agency. Youth data is associated to the provider, not a specific caseworker. For
example, if a youth takes an assessment with Caseworker A, Caseworker B can still access that
youth‟s assessments.
Note to Provider/Agency: Before you register, we recommend that you assign at least 2 staff
to act as the administrators for your CLS website account. An administrator is responsible for
registering and creating the provider/agency profile, (de)activating caseworker accounts, and
receiving login requests. These tasks can be done by any caseworker but it is good practice
to centralize these administrative tasks.
Note to State Agency: You should have each of your contract providers create their own
provider/agency profile; this will allow each provider/agency to submit reports to state
Independent Living (IL) offices as required.
7
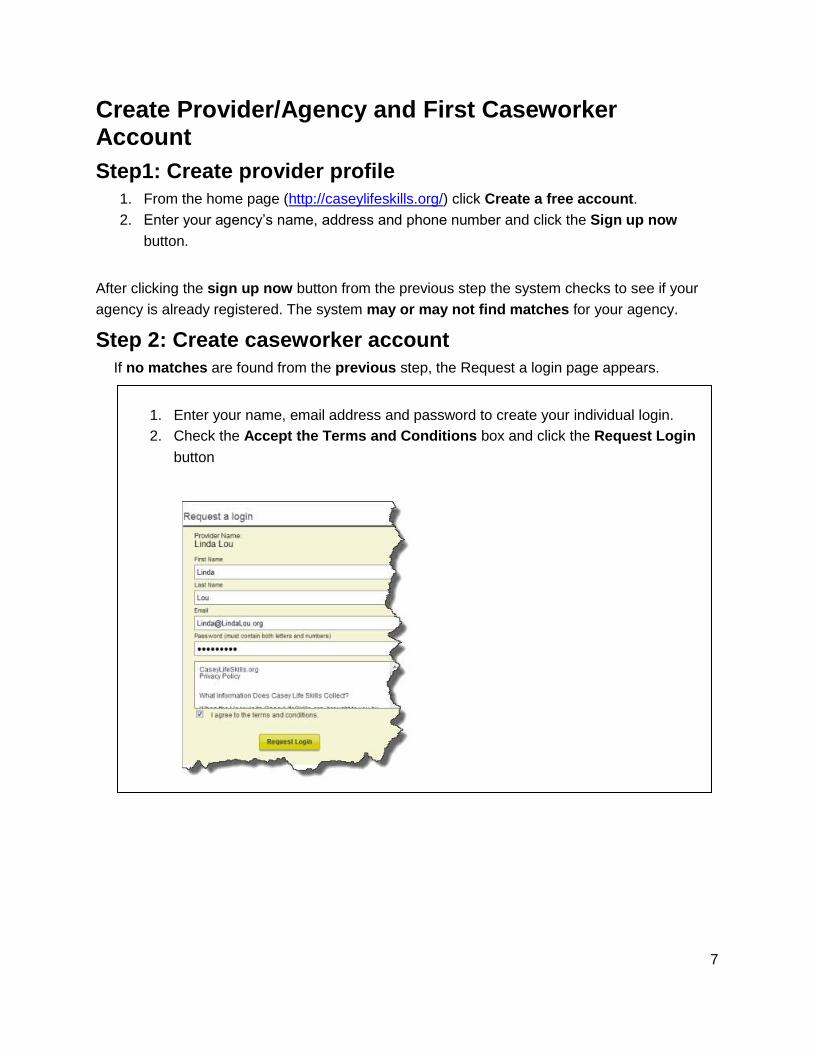
Create Provider/Agency and First Caseworker Account
Step1: Create provider profile
1. From the home page (http://caseylifeskills.org/) click Create a free account.
2. Enter your agency‟s name, address and phone number and click the Sign up now
button.
After clicking the sign up now button from the previous step the system checks to see if your
agency is already registered. The system may or may not find matches for your agency.
Step 2: Create caseworker account
If no matches are found from the previous step, the Request a login page appears.
1. Enter your name, email address and password to create your individual login.
2. Check the Accept the Terms and Conditions box and click the Request Login
button

8
If matches are found, the Potential Matches Found page appears.
1. Review provider list in the potential matches found list. Confirm if your agency is
listed by comparing agency name and mailing addresses.
If your agency does not appear in the list
2. Click My Agency is not listed at the bottom of the page
3. Enter your name, email address and password to create your individual login. The
email address is your unique username and required for logging in. This email
address cannot be used again with a different provider/agency profile.
4. Check the Accept the Terms and Conditions box and click the Request Login
button.
The system will immediately create your account, log you in and display the Find
Youth page. You can begin adding youths to take the assessment or add co-
workers, see Add Caseworker Accounts.

9
If your agency does appear in the list this means someone at your agency already
registered your provider information. See Section Request account from existing
Provider/Agency.
Change Provider Profile
A caseworker can login and update the provider/agency name, address and phone number.
This task can be performed by any caseworker; however, it is recommended that it be done by
the assigned CLS administrator.
1. Click on the arrow to the right of the name in the top navigation bar. Select Provider
Profile.
2. Click on Edit next to the agency name and update the necessary information.

10
3. When you are done, click Save Changes.
Manage Access to Provider Information
As mentioned in the introduction, it is recommend that at least 2 people at your agency be
responsible for inviting caseworkers to create accounts, deactivating accounts and managing
requests from users. Having designated administrators helps centralize these tasks.
Add caseworker accounts
Caseworker accounts are associated with provider profiles; once logged in, caseworkers can
access the youth information associated with your provider.
When a provider profile has been created and there is at least one caseworker account set up,
additional caseworkers can be invited to create their own accounts. Remember that each
account requires a unique username and the username must be in email format. (The email
may be associated with your agency or a personal email account.) The same email address
cannot be used again with a different provider/agency profile.
Send email invitation to co-worker to create account
1. If you are not already logged in, click Sign In in the top right corner of the CLS home
page and login.

11
2. Click the Signed in as dropdown menu and select Provider Profile.
3. Click Invite co-worker. The Invite Co-Worker pop-up should appear.
4. Enter the First Name, Last Name and Email address of the person you want to have
access.
5. If this person is to be one of the administrators, check the Receives Log in Requests
checkbox. This means that he may receive requests from other caseworkers to create
an account that is associated to that provider.

12
6. Click Invite. The CLS system will send this person an email inviting him to create his
account:

13
Receive email invitation to create account
1. Click on the link in your email. The CLS will open to the Request a login page.
2. Complete the form and click Request Login. The email address is your unique
username and required for logging in. This email address cannot be used again with a
different provider/agency profile.
3. The CLS system will log you in and take you to the Find Youth page, where all youth
associated with this provider are listed.

14
Request account from existing provider/agency
If someone clicks on Create a Free Account from the CLS home page to create a
provider/agency record and finds that the provider is already in the system, he may request
a login from the Potential Matches Found page.
1. If you are already on the Potential Matches Found page, skip to Step 3. If not, from
the Home Page, click the Create a Free Account link.
2. Enter your provider/agency information.
3. When the Potential Matches Found page appears, click the checkbox next to your
provider/agency, then click Request user Account.
Note: if the Potential Matches Found page does not appear, your Provider/Agency has
not yet been added to the system. See Create Provider/Agency and first Caseworker
account.
4. Enter your name and email address and select Request Account. Now you have to
wait for an email invitation from an account administrator.
The CLS system will send an email to the administrators for the provider/ agency (users
associated with the agency who have Receives Log in Requests checked in their user
profile) notifying them that you have requested an account.

15
An administrator will send you an email invitation to allow you to create your caseworker
account.
The CLS system will send an email to the account administrators for the provider (users
associated with the agency who have Receives log in requests checked in their user
profile) notifying them that you have requested an account.
If you are an administrator and you receive this email, see Send email invitation to co-
worker to create account.

16
Deactivate (and re-activate) users
Caseworkers can deactivate (and re-activate) caseworker accounts.
To deactivate a caseworker account:
1. Log in to the CLS website.
2. In the upper right, click the arrow next to Signed in as and select Provider Profile.
3. The list of caseworkers for your provider/agency will appear. Locate the caseworker
you wish to de-activate.
There may be more records than can fit on one page. If the caseworker does not
appear on the page, use the Search box or sort the columns by clicking on a column
heading (Number, Last Name, First Name, Email).
4. Click on the caseworker number (CW-###) to open the Edit co-worker page.
5. Uncheck the Active checkbox to deactivate the account.
You can always re-activate the account by checking the Active checkbox again.

17

18
Change User Profile
Any caseworker can change his own profile. To change your email/username or password:
1. Click the arrow to the right of the name in the top navigation bar. Select My Profile.
2. Update your First Name, Last Name, and Email and click Save Changes.
Note: Changing the email address will change the username/email used to log
into the Casey Life Skills website.
3. You can also change the Receives Log in Requests setting. Caseworkers who have this
option checked will receive requests from users who select Request User Account from
the Potential Matches Found page (for more information, see Request account from
existing Provider/Agency).
4. If you need to change your password, enter the Old Password, and then enter the New
Password twice. Remember, your password
a. must have both alpha and numeric characters
b. must and be at least 8 characters long

19
c. never expires
d. Last password remembered, cannot reuse same password twice in a row
e. Password cannot match login name
f. With 10 invalid login attempts, the account is locked for 15 minutes and then the
user can attempt to log in or reset their password without any administrative
assistance
Giving Youth the Assessment
In order for a caseworker to give the youth an assessment the youth must first be added to the
system. Once he is added, the caseworker can easily find the youth record, view the youth‟s
history and start or finish an assessment. Practice Tip: Go to the Practice Guide to see the six-
step framework for administering an assessment to youth.
Add youth record
If a youth has not taken a CLS assessment with your agency, the first step is for the
caseworker to add the youth‟s information. If the youth has taken an assessment with your
agency proceed to Find Youth Record.
To add a youth to your agency:
1. If you are not already logged in, from the CLS Home Page, click the Sign In button in
the upper right corner and enter your email (username) and password. The Find Youth
page will appear.
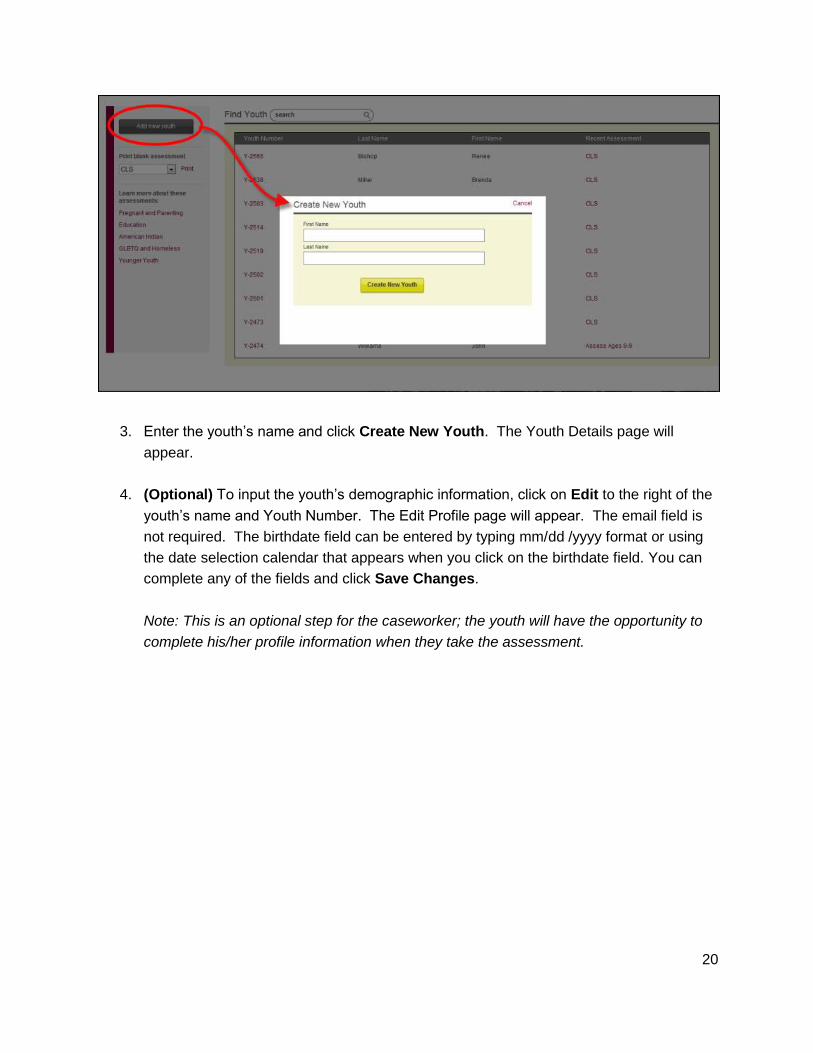
2. Click the Add New Youth button on the left side of the page.
20
3. Enter the youth‟s name and click Create New Youth. The Youth Details page will
appear.
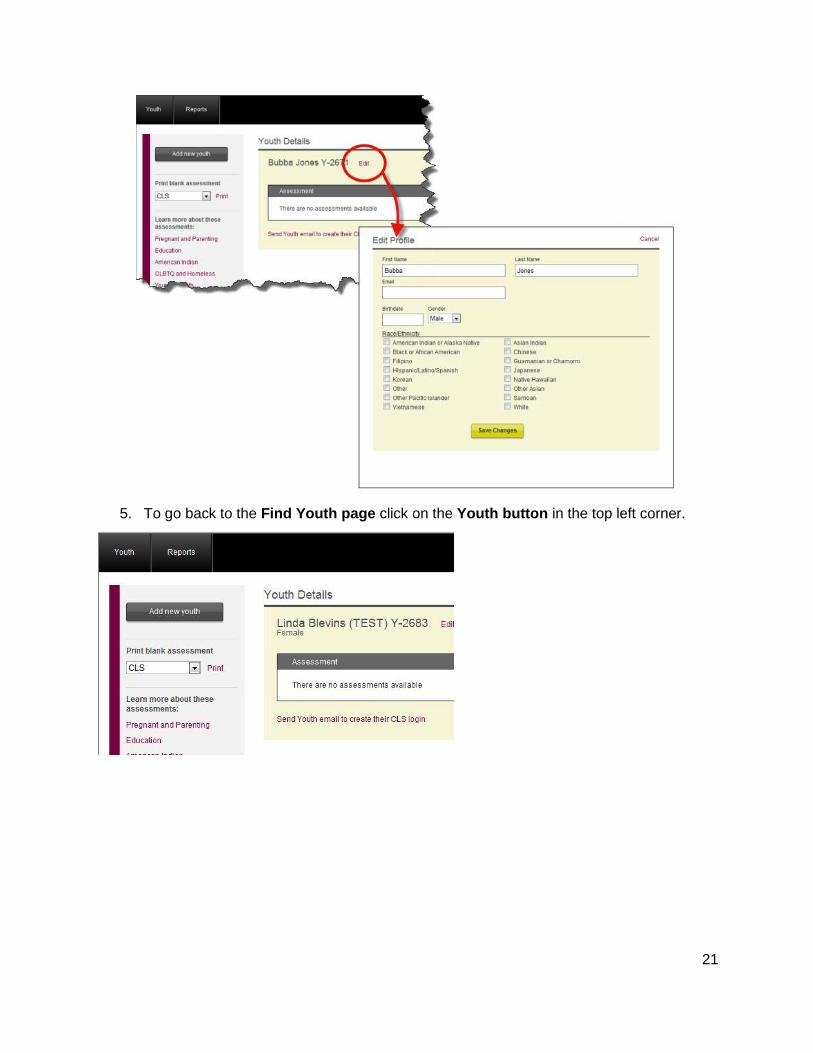
4. (Optional) To input the youth‟s demographic information, click on Edit to the right of the
youth‟s name and Youth Number. The Edit Profile page will appear. The email field is
not required. The birthdate field can be entered by typing mm/dd /yyyy format or using
the date selection calendar that appears when you click on the birthdate field. You can
complete any of the fields and click Save Changes.
Note: This is an optional step for the caseworker; the youth will have the opportunity to
complete his/her profile information when they take the assessment.
21
5. To go back to the Find Youth page click on the Youth button in the top left corner.

22
Find youth record
If a youth has already taken an assessment with your agency and it is time for the youth to take
the assessment again, then the caseworker can login and search for the youth record.
To find a youth‟s record:
1. If you are not already logged in, from the CLS Home Page, click the Sign In button in
the upper right corner and enter your email and password. The Find Youth page will
appear.
2. If the youth you are looking for is not on the page, use one of the following methods:
o Search box: Type the youth‟s name or youth number in the Search box.
Matches will appear as you type in the information and you can click on the result
to open that youth‟s assessment history.
o Column sort: Click on any of the column headings (Youth Number, Last Name,
First Name, and Recent Assessment) to sort the information.
3. Click the Youth Number to open the youth‟s assessment history; or click the Recent
Assessment to view the latest assessment results.

23
Start the assessment
There are four different ways a youth can start taking an assessment.
Option 1. Youth takes assessment on the caseworker‟s computer
Option 2. Caseworker sends youth an email with a link to take the assessment online
Option 3. Caseworker uses printed copy of the assessment
Option 4. Youth uses his/her own account (username and password)
Option 1: Take assessment on caseworker’s computer
The easiest way for youth to take an assessment is for the caseworker to allow the youth to use
the caseworker‟s computer or any computer, i.e. school, local library, agency‟s computer lab.
This is the recommended option for youth taking the assessment for the first time.
1. On the Youth Details page click the Start Now button.
2. Once the caseworker clicks on the start now button the system will
automatically log him/her out of the website and the Terms and Conditions page
appears so the youth can begin his assessment. Proceed to section Youth Takes
Assessment.
Option 2: Caseworker sends email
Another way for a youth to start taking the assessment is to have the caseworker send him an
email that invites him to take the assessment. This approach may work better for older youth
who can be responsible in completing their assessments in a timely manner or youth who have
taken the assessment before.

24
1. On the Youth Details page click the Send via email button. The Send Assessment
email form will appear.
2. Enter the youth‟s email address.
3. (Optional) The Comment box contains a standard announcement; you may edit this
text to include special instructions regarding which assessment to take or the time
frame for when the assessment needs to be done, etc. These comments will appear in
the body of the email.
4. Click Send Email. The youth is sent an email containing a link to the assessment
page. See section Youth Takes Assessment.
5. To go back to the Find Youth page click on the Youth button in the top left corner.

25
Option 3: Youth completes printed assessment
For youth who do not have access to a computer, the caseworker can print out any assessment
to allow the youth to mark their answers on the paper copy.
1. On the left side of the Find Youth page click the dropdown list and select the
assessment to be printed.
2. Click Print. The assessment will open as a PDF in a new window. Print the PDF as you
normally would.
Note: The first two pages of the assessment are Casey Family Programs’ Privacy Policy
and Terms of use. Page three should be the start of the assessment statements.
3. After the youth marks his answers on the printed assessment, you (the caseworker)
should sign in again to the CLS website to enter the youth‟s answers. To do this follow
the same steps as outlined in Option 1: Take assessment on Caseworker‟s computer.

26
Option 4: Youth logs into his/her own account
Any youth that has his own account (username and password) may log in and start or finish an
assessment. The youth must have started at least one assessment using Options 1 or 2
above before they can start or finish an additional assessment using their own account. For
instructions on how to invite a youth to create their own account see section Youth creates
his/her CLS Account.
These actions are to be performed by the Youth.
1. From the CLS home page, click the Sign In button on the upper right corner.
2. Enter your email (username) and password and click Login.
3. Move the cursor to one of the rows in the box and the Start another assessment option
will appear.
4. Click Start another assessment to begin a new assessment. This will be a new
assessment. It will not override any previous assessments taken.
Alternately, the youth can also finish assessments that were started previously by
clicking Finish next to the appropriate assessment.
See Youth Takes Assessment.

27
Youth takes assessment
Once the caseworker has initiated the process to take the assessment the youth can start
answering the statements.
The Terms and Conditions page (below) appears in several instances depending on if:
the caseworker clicks the Start Now button from the Youth Details Page
the youth clicks the link in his email
the youth clicks Start another assessment after signing in to his own account.
The youth should:
1. Select the assessment to take from the dropdown box. The Casey Life Skills
assessment is the default assessment. Be sure the youth knows which assessment
he should take. To read a description of the additional assessments click here.
2. Accept the terms and conditions and click Start Assessment.
3. The My Profile page will appear. The email address is optional (though recommended);
all other fields are required. The birthdate field can be entered by typing mm/dd /yyyy
format or using the date selection calendar that appears when you click on the birthdate
field. Make any updates to the My Profile page and click Save Changes.

28
4. The new assessment will appear.
There are several skill areas that run across the header of the assessment. For
each skill area there is a counter that shows how many statements the youth has
left to answer.
In the example below, the Casey Life Skills Assessment (the default assessment)
has 7 skills areas. The youth is working on the third skill area and 9 of 18
statements have been rated.

29
A youth may choose to complete the entire assessment (which will take
approximately 30-40 minutes), starting with Daily Living, then Self Care and so on,
or he may choose individual skill areas to complete now and come back later to
finish the others.
Note: We recommend that youth take one or two skill areas at a time. This helps
address assessment fatigue and allows the caseworker and youth to build
awareness, skills and abilities in one or two skill areas. Youth can easily come
back and finish the assessment.
An assessment is considered complete if 75% of all the statements in every skill
area are answered. Only completed assessments appear in provider reports. See
the Reports section.
A note about Permanency: In each skill area there are statements that help
assess a youth‟s permanent connections to caring adults. For example in Self
Care this statement appears „I have at least one adult friend or relative who would
visit me if I were in the hospital.‟ These statements will appear in the assessment
results in both the Skill Area and the Permanency area.

30
5. At the bottom of each skill area are Previous and Next navigate buttons. Click Previous
and Next to move between skill areas. Answers are automatically saved each time one
of these is clicked.
6. When the youth is done entering his answers, if not taking the whole assessment at this
time, click Save the Assessment; if completing the last skill area, click Finish
assessment. The assessment results will immediately appear.
If the youth has answered 75% of questions in each skill area then when the
youth clicks save or finish assessment, the assessment is considered complete
and will no longer be editable. Assessments that are not complete however
can be finished at a later time. See section Finish Youth Assessment.

31
Reading Youth Assessment Results
The assessment results appear immediately after the youth clicks Save Assessment or Finish
Assessment. Even if the youth does not complete the entire assessment the results will show
for those areas that are complete. There is a Summary view and a Detail view of the results.
Summary at-a-glance view
Practice Tip: When you are ready to review the assessment results, we strongly recommend
you involve the youth in this step. Give him a copy of his results – it is an excellent way to start
the conversation about his strengths and challenges.
The first page of the assessment results shows an at-a-glance view of how the youth answered
the assessment items.
1. Move the mouse over the bar graph and see the exact percentages of how the youth
responded in each skill area.
2. Any areas in gray will show the percentage of statements the youth did not answer.
3. Click the answer scale in the legend to remove those values from the graph. For
example, to see only those statements answered “No” and “Mostly No”, click all the other

32
values in the legend, and only those will be left. This allows the youth and caseworker to
easily see areas of strength or challenge.
33
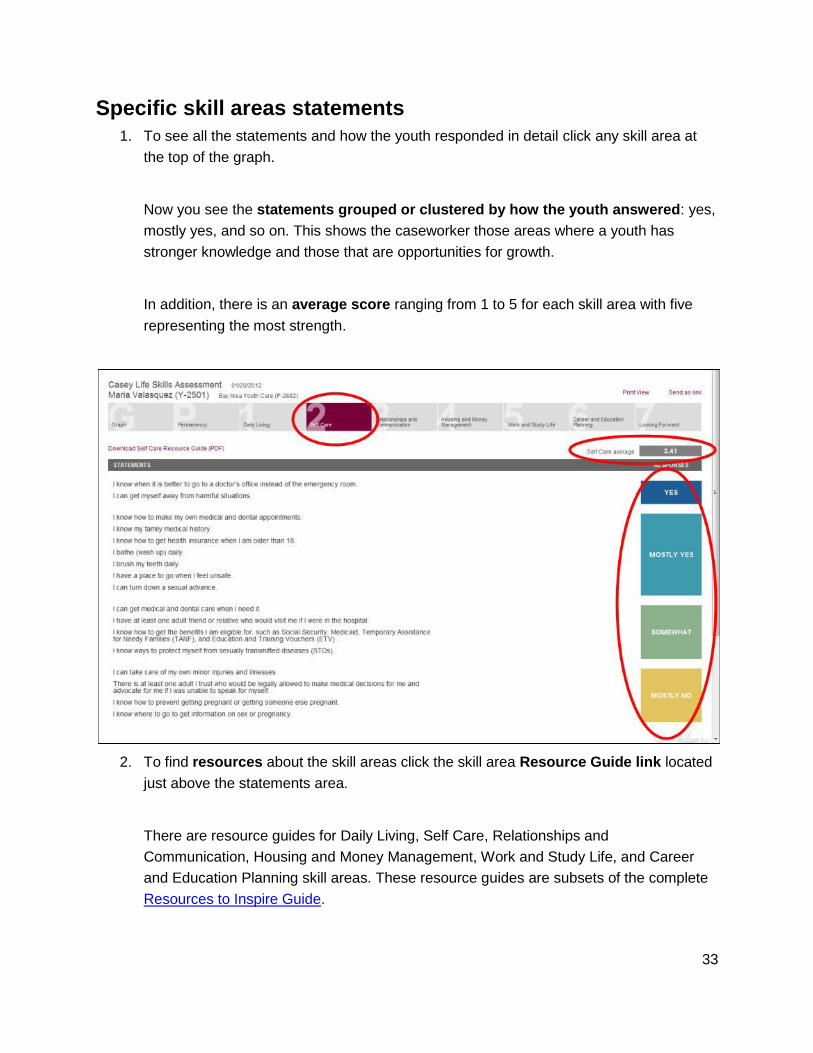
Specific skill areas statements
1. To see all the statements and how the youth responded in detail click any skill area at
the top of the graph.
Now you see the statements grouped or clustered by how the youth answered: yes,
mostly yes, and so on. This shows the caseworker those areas where a youth has
stronger knowledge and those that are opportunities for growth.
In addition, there is an average score ranging from 1 to 5 for each skill area with five
representing the most strength.
2. To find resources about the skill areas click the skill area Resource Guide link located
just above the statements area.
There are resource guides for Daily Living, Self Care, Relationships and
Communication, Housing and Money Management, Work and Study Life, and Career
and Education Planning skill areas. These resource guides are subsets of the complete
Resources to Inspire Guide.

34
Permanency and Looking Forward statements
Measuring a youth‟s Permanent connections is an important aspect of the assessment results.
1. Click Permanency to get an average score and to see how a youth responded to the
permanency statements that are embedded throughout the assessment.

35
2. Click the Looking Forward section to get an average score and see how a youth
responded to these statements.
These statements were designed to assess a young person‟s level of confidence
in his success. This section is not about behavior – it measures a youth‟s internal
feelings and overall readiness. It is designed to give caseworkers more
information about a youth than what is visible or teachable. Read more about
interpreting this section at http://www.casey.org/cls/project/LookingForward.pdf.

36
Print Assessment Results
If you are not signed in follow the steps in the Find Youth Record section.
1. On the Assessment Results page, click on Print View in the upper right. A new
window will open with the printable version of the assessment.
2. Click on Print in the upper right of the Print View window.
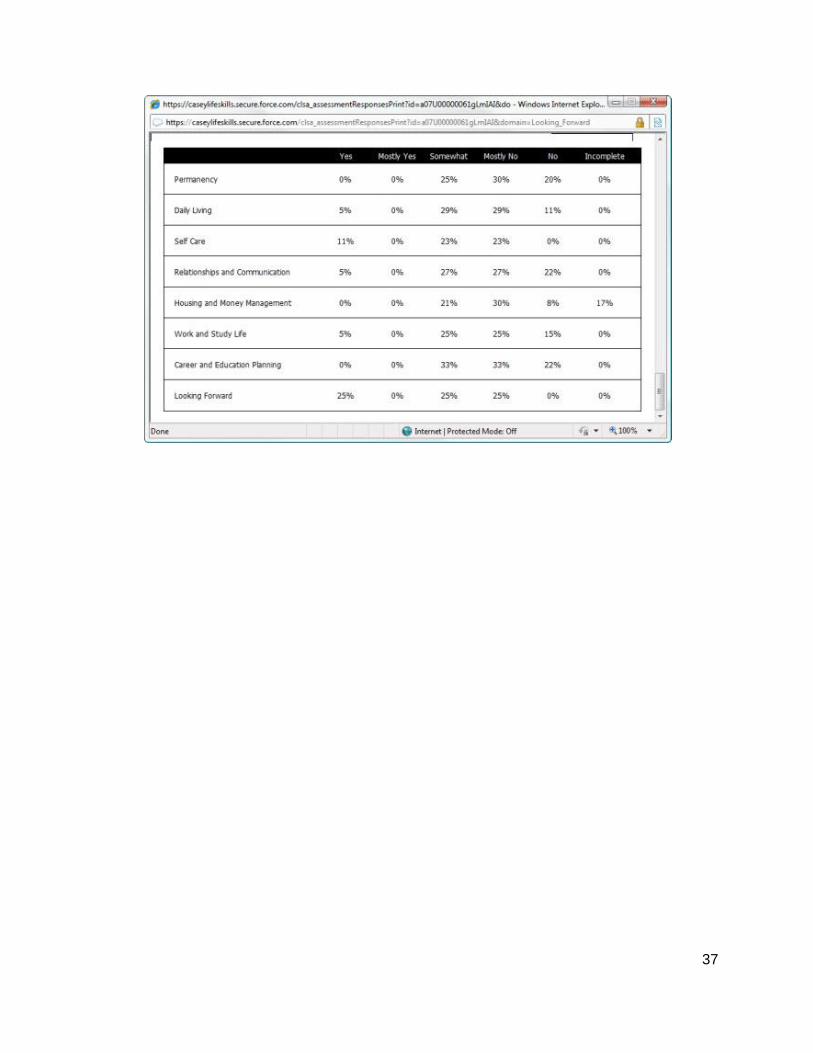
On the last page of the printed results is a table that shows the percentages of how
youth answered for each skill area. This is another summary view that allows
caseworkers to easily recognize areas of strength and areas where more work is
needed.
37

38
Email Assessment Results
Assessment results can be emailed to anyone even if they do not have an account on the CLS
website.
The email includes a link to the results; it will not be an attached file. The results cannot be
saved as a file. They can only be printed or sent in an email as a link.
If you are not signed in follow the steps in the Find Youth Record section.
1. From the Assessment Results page, click Send as a Link. The Send Assessment
email box will appear.
2. Enter the email address. You may also edit (add or delete) the text in the Comment box.
If there is any additional information that you would like to add regarding these
assessment results you can put them in the comments box. These comments will
appear in the body of the email.
3. Click Send Email. Below is an example email the system sends.
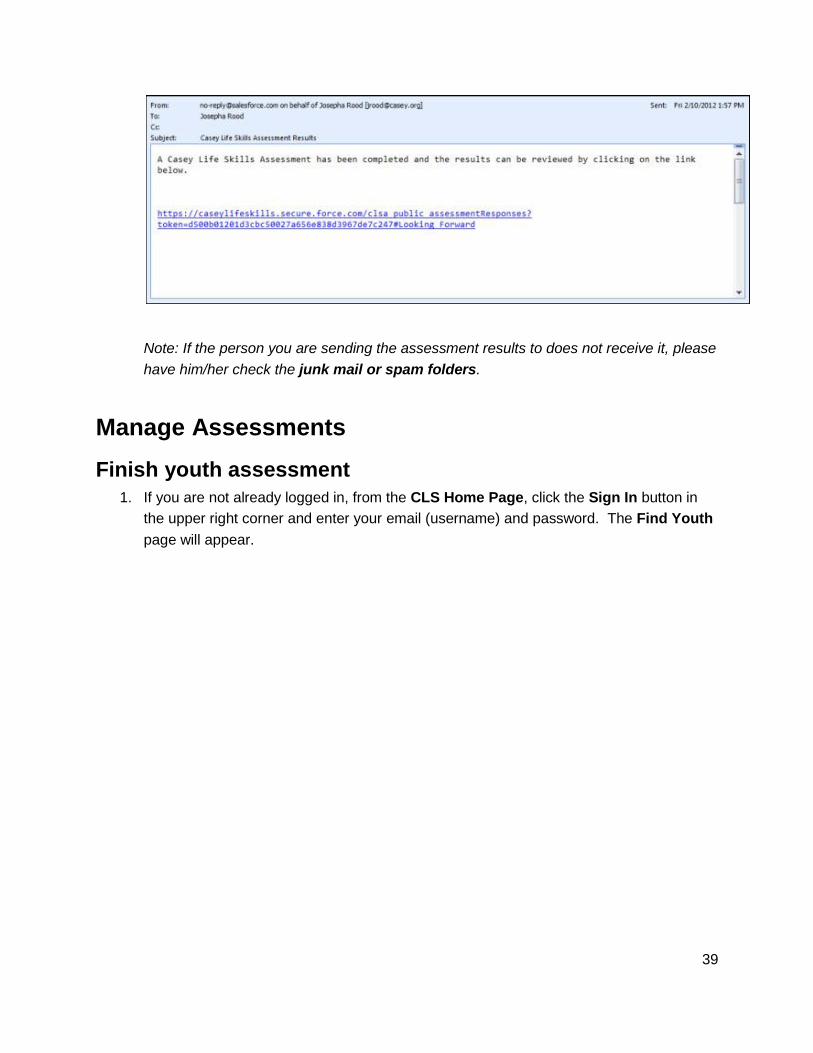
39
Note: If the person you are sending the assessment results to does not receive it, please
have him/her check the junk mail or spam folders.
Manage Assessments
Finish youth assessment
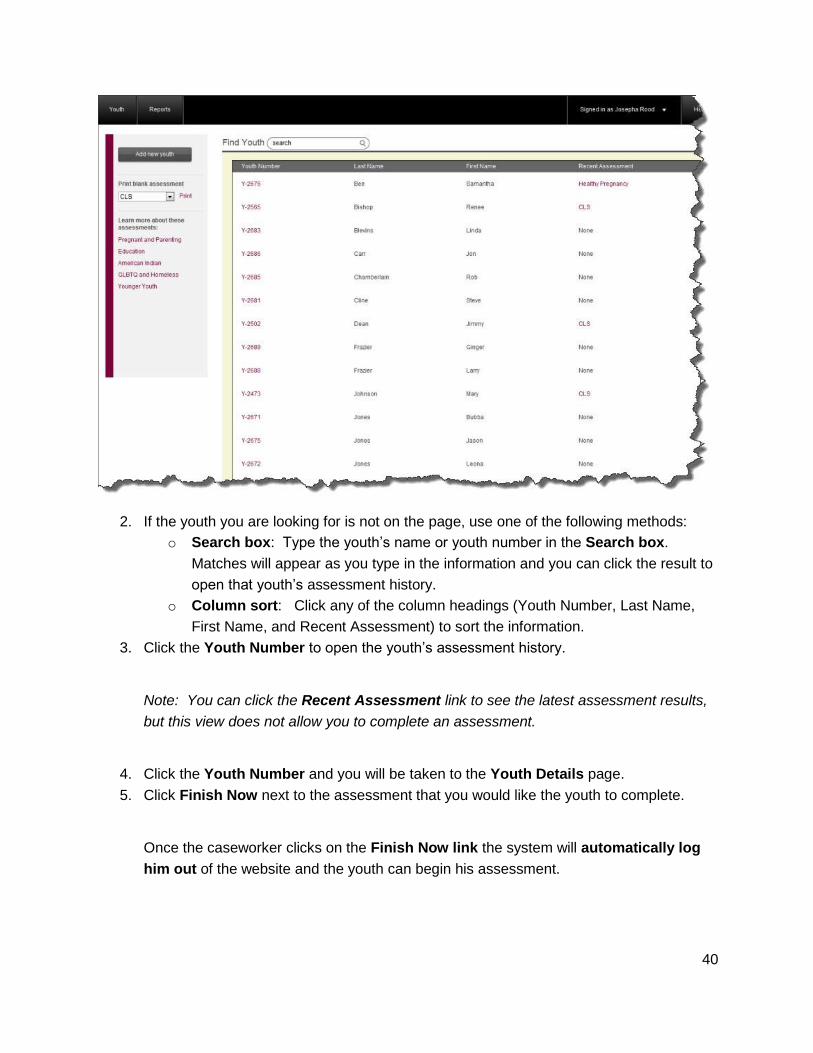
1. If you are not already logged in, from the CLS Home Page, click the Sign In button in
the upper right corner and enter your email (username) and password. The Find Youth
page will appear.
40
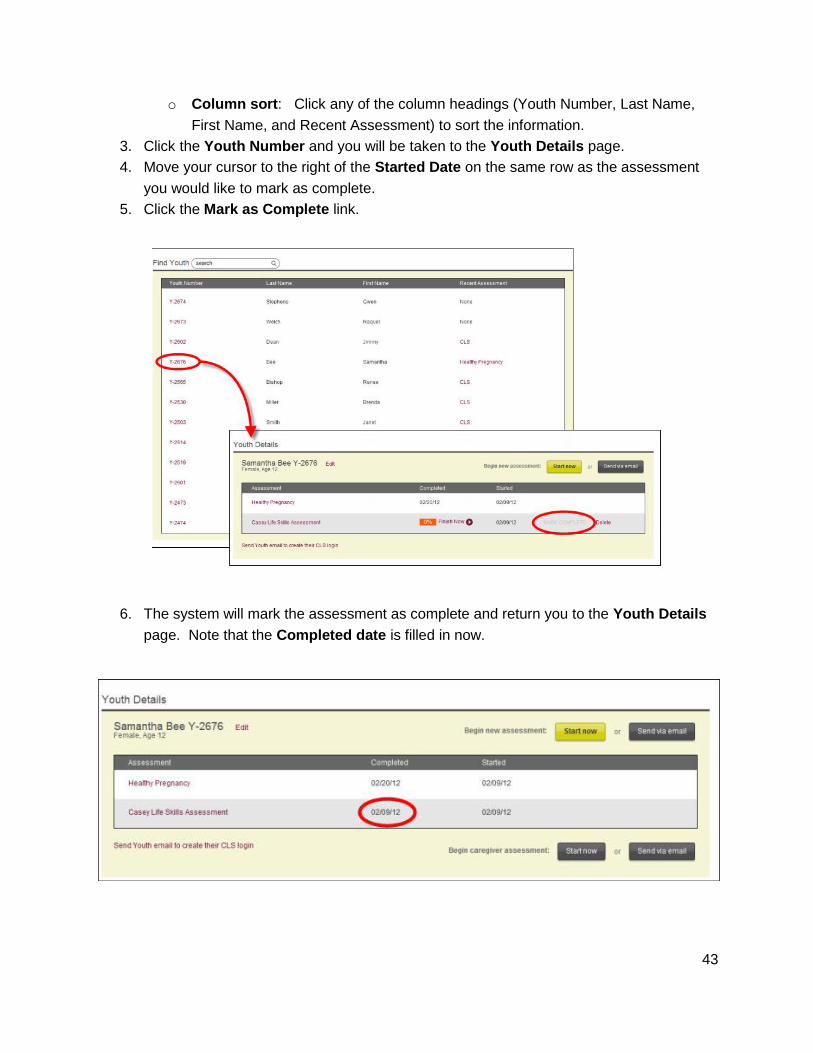
2. If the youth you are looking for is not on the page, use one of the following methods:
o Search box: Type the youth‟s name or youth number in the Search box.
Matches will appear as you type in the information and you can click the result to
open that youth‟s assessment history.
o Column sort: Click any of the column headings (Youth Number, Last Name,
First Name, and Recent Assessment) to sort the information.
3. Click the Youth Number to open the youth‟s assessment history.
Note: You can click the Recent Assessment link to see the latest assessment results,
but this view does not allow you to complete an assessment.
4. Click the Youth Number and you will be taken to the Youth Details page.
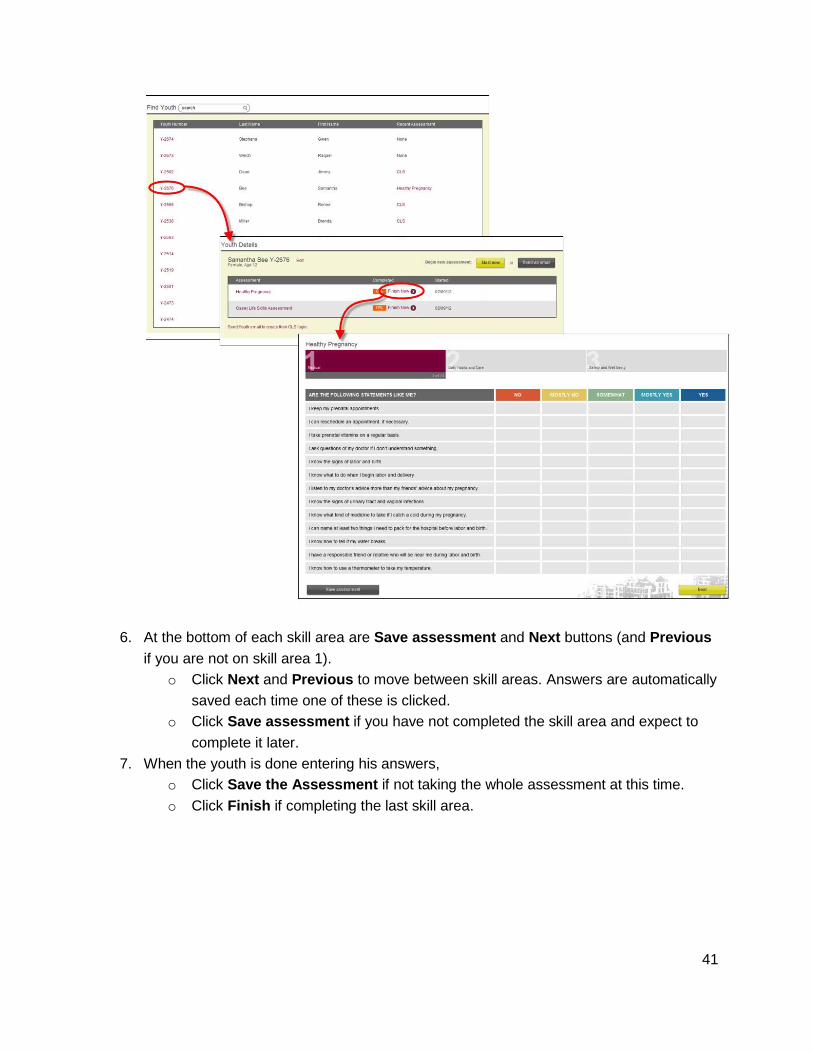
5. Click Finish Now next to the assessment that you would like the youth to complete.
Once the caseworker clicks on the Finish Now link the system will automatically log
him out of the website and the youth can begin his assessment.
41
6. At the bottom of each skill area are Save assessment and Next buttons (and Previous
if you are not on skill area 1).
o Click Next and Previous to move between skill areas. Answers are automatically
saved each time one of these is clicked.
o Click Save assessment if you have not completed the skill area and expect to
complete it later.
7. When the youth is done entering his answers,
o Click Save the Assessment if not taking the whole assessment at this time.
o Click Finish if completing the last skill area.

42
Mark assessment complete
The CLS report will show only those assessments that are complete. A completed assessment
means 75% of all the statements in each skill area have been answered. However, since some
agencies do not use the entire assessment and still need a way to report on assessments
administered, there is the option to manually mark assessments as complete.
Note: Please use caution with this feature, there is no way to reverse this action. Once an
assessment is marked as complete it cannot be edited.
To mark an assessment as complete:
1. If you are not already logged in, from the CLS Home Page, click the Sign In button in
the upper right corner and enter your email (username) and password. The Find Youth
page will appear.
2. If the youth you are looking for is not on the page, use one of the following methods:
o Search box: Type the youth‟s name or youth number in the Search box.
Matches will appear as you type in the information and you can click the result to
open that youth‟s assessment history.
43
o Column sort: Click any of the column headings (Youth Number, Last Name,
First Name, and Recent Assessment) to sort the information.
3. Click the Youth Number and you will be taken to the Youth Details page.
4. Move your cursor to the right of the Started Date on the same row as the assessment
you would like to mark as complete.
5. Click the Mark as Complete link.
6. The system will mark the assessment as complete and return you to the Youth Details
page. Note that the Completed date is filled in now.
44
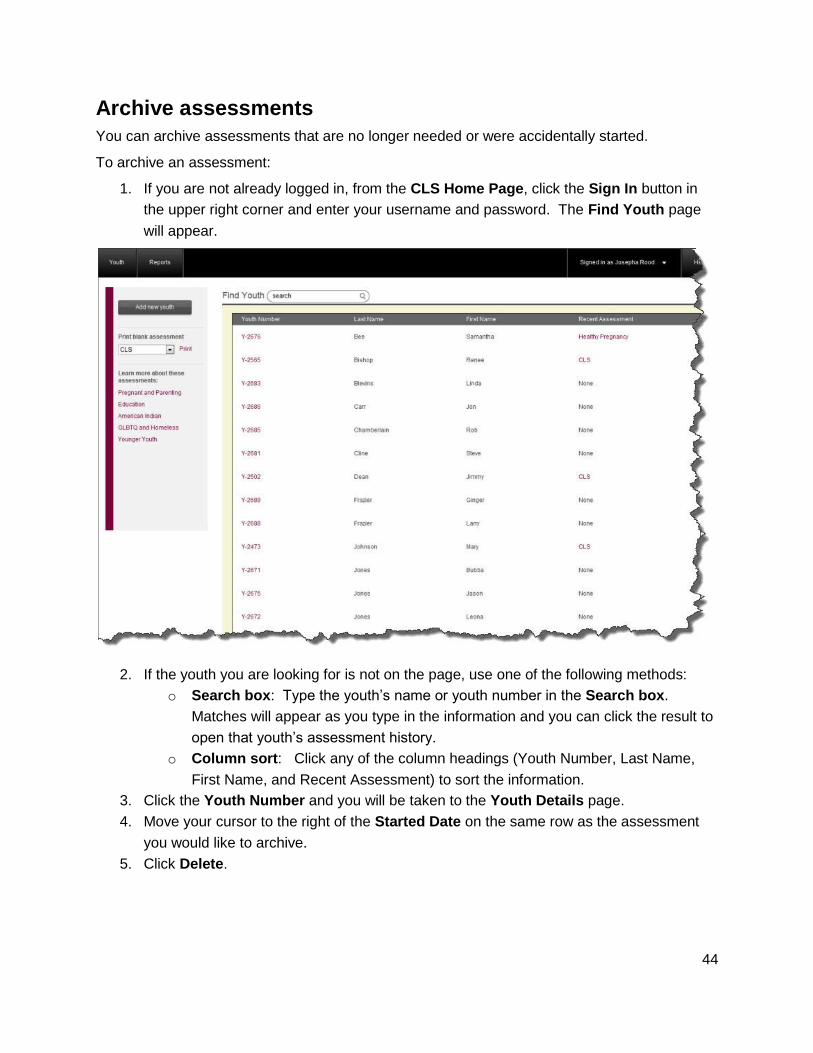
Archive assessments
You can archive assessments that are no longer needed or were accidentally started.
To archive an assessment:
1. If you are not already logged in, from the CLS Home Page, click the Sign In button in
the upper right corner and enter your username and password. The Find Youth page
will appear.
2. If the youth you are looking for is not on the page, use one of the following methods:
o Search box: Type the youth‟s name or youth number in the Search box.
Matches will appear as you type in the information and you can click the result to
open that youth‟s assessment history.
o Column sort: Click any of the column headings (Youth Number, Last Name,
First Name, and Recent Assessment) to sort the information.
3. Click the Youth Number and you will be taken to the Youth Details page.
4. Move your cursor to the right of the Started Date on the same row as the assessment
you would like to archive.
5. Click Delete.

45
6. The Youth Details page will reappear and the assessment you deleted will no longer
appear in the list.

46
To restore a deleted assessment:
1. Click Show Deleted Assessments. All assessments for this Youth will appear. Any
that have been deleted will show a Restore link to the right of the Started date.
2. Click Restore in the row for the assessment you would like to restore.
3. Click Hide Deleted Assessments to hide the remaining deleted assessments.
Youth creates his/her CLS account
To simplify the administration of the assessment and also to allow the youth to have access and
control of his own data, a youth may create a CLS login with a username (email) and password.
With his own account, the youth can sign in and start or complete assessments at home, at the
school computer lab, local library, etc., rather than on the caseworker‟s computer. He can also
share his assessment history with multiple agencies/other caseworkers and avoid needlessly
taking multiple assessments.

47
Note: The caseworker should initiate at least one assessment before inviting the youth to create
his/her account. See Option 1: Take assessment on Caseworker’s computer and Option 2:
Caseworker sends email sections for initiating assessments.
The caseworker must initiate the create login process.
1. If you are not already logged in, from the CLS Home Page, click the Sign In button in
the upper right corner and enter your email (username) and password. The Find Youth
page will appear.
2. If the youth you are looking for is not on the page, use one of the following methods:
a. Search box: Type the youth‟s name or youth number in the Search box.
Matches will appear as you type in the information and you can click the result to
open that youth‟s assessment history.
b. Column sort: Click any of the column headings (Youth Number, Last Name,
First Name, and Recent Assessment) to sort the information.
3. Click the Youth Number and you will be taken to the Youth Details page.
4. Click the Send Youth Email to create their CLS login.
5. Enter the youth‟s email and click Send Email.

48
6. The youth will receive an email inviting him to create an account.
49
7. When the youth clicks the link, he will be prompted to enter his password and accept the
terms and conditions. When he clicks Register, he will automatically be logged in.
See Option 4: Youth logs into his own
account section for what the youth can do
after logging in.
Youth cannot change the email address
associated to his CLS account. If a youth
wants to use a different email address in
the future a new account will need to be
created.
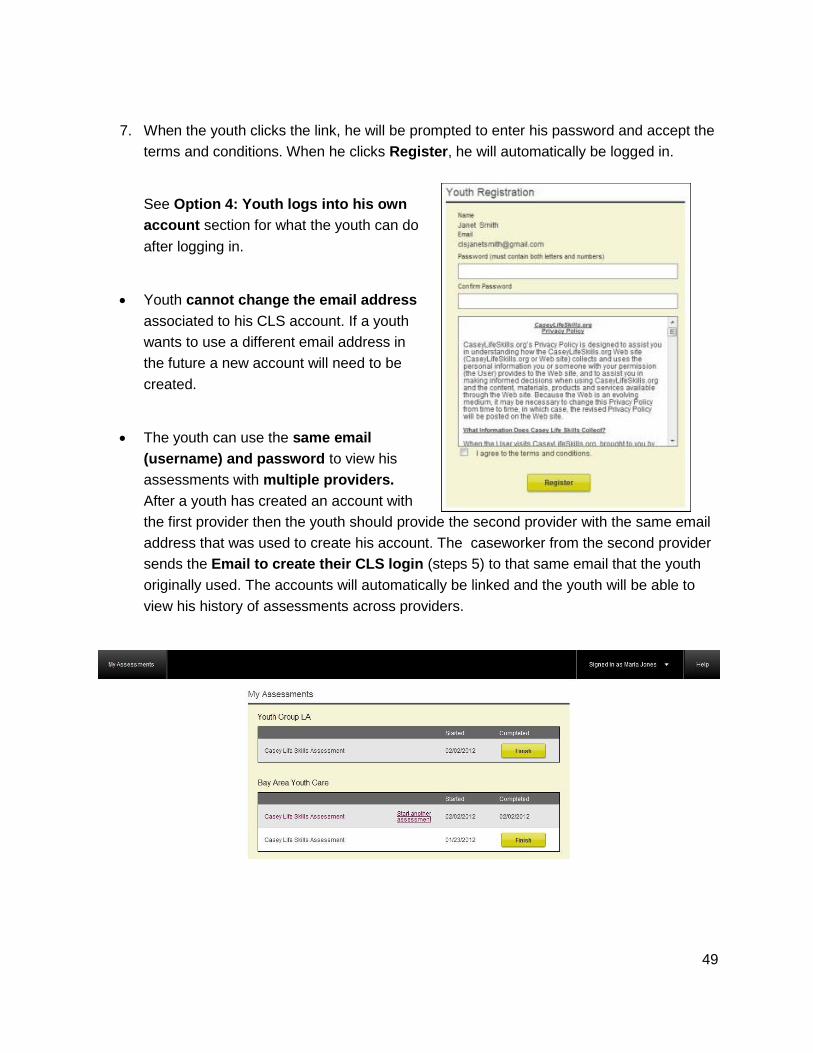
The youth can use the same email
(username) and password to view his
assessments with multiple providers.
After a youth has created an account with
the first provider then the youth should provide the second provider with the same email
address that was used to create his account. The caseworker from the second provider
sends the Email to create their CLS login (steps 5) to that same email that the youth
originally used. The accounts will automatically be linked and the youth will be able to
view his history of assessments across providers.

50
Caregiver Assessment
Once a youth has completed the CLS assessment, a caseworker may invite a caregiver to take
the assessment on behalf of the youth. The caregiver buttons on the Youth Details page will not
appear until a youth has completed at least one CLS assessment. Note: The caregiver option is
only for the Casey Life Skills assessment. There are no caregiver options for the other
assessments.
Start caregiver assessment
Similar to the youth starting the assessment, the caseworker can start a caregiver assessment
in one of three ways:
Option 1. Caregiver takes assessment on caseworker‟s computer.
Option 2. Caseworker sends email with a link to take the assessment online.
Option 3. Caseworker prints out the caregiver assessment.
Option 1: Caregiver takes assessment on caseworker’s computer
1. If you are not already logged in, from the CLS Home Page, click the Sign In button in
the upper right corner and enter your username and password. The Find Youth page
will appear.
2. If the youth you are looking for is not on the page, use one of the following methods:
o Search box: Type the youth‟s name or youth number in the Search box.
Matches will appear as you type in the information and you can click the result to
open that youth‟s assessment history.
o Column sort: Click any of the column headings (Youth Number, Last Name,
First Name, and Recent Assessment) to sort the information.
3. Click the Youth Number and you will be taken to the Youth Details page.
4. In the lower right below the table, next to Begin Caregiver Assessment, click Start
now.

51
This will automatically log the caseworker out of the website so that the caregiver can
take the assessment.
5. The system will open the My Profile page (which consists of only the first and last
name) for the caregiver to complete and click Save Changes.
6. Proceed to Caregiver Takes Assessment section.
Option 2: Caseworker sends email
1. If you are not already logged in, from the CLS Home Page, click the Sign In button in
the upper right corner and enter your email (username) and password. The Find Youth
page will appear.
2. If the youth you are looking for is not on the page, use one of the following methods:
a. Search box: Type the youth‟s name or youth number in the Search box.
Matches will appear as you type in the information and you can click the result to
open that youth‟s assessment history.
52
b. Column sort: Click any of the column headings (Youth Number, Last Name,
First Name, and Recent Assessment) to sort the information.
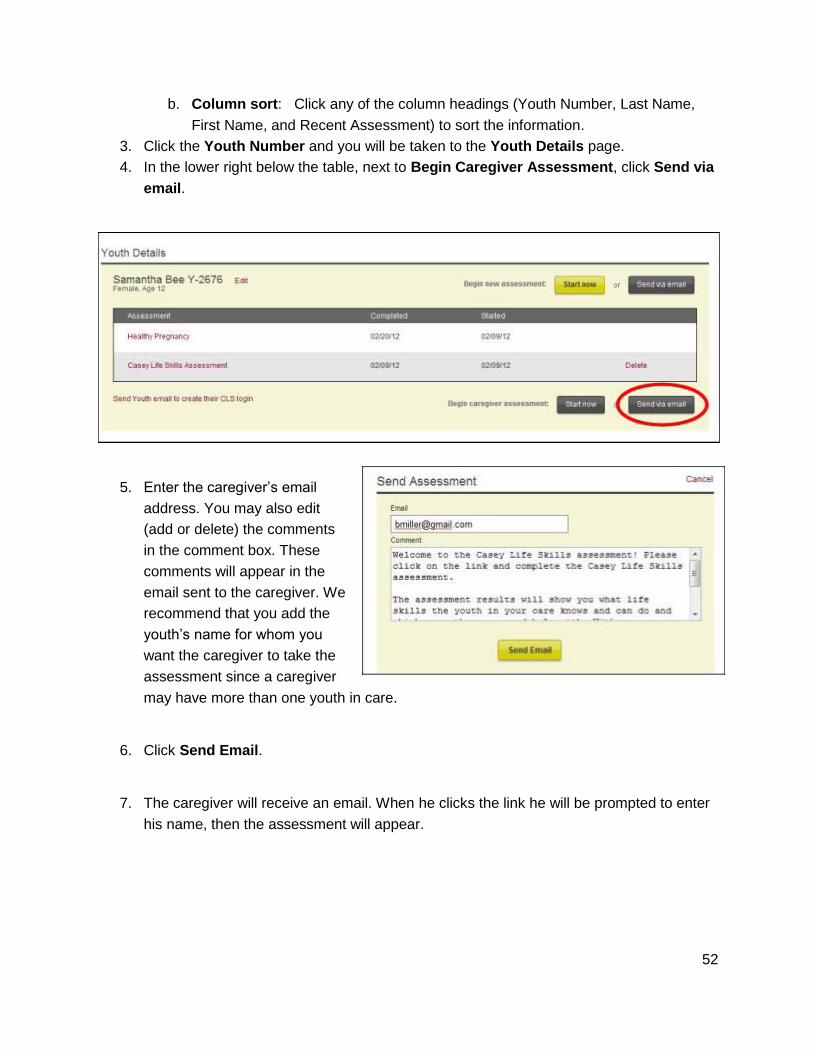
3. Click the Youth Number and you will be taken to the Youth Details page.
4. In the lower right below the table, next to Begin Caregiver Assessment, click Send via
email.
5. Enter the caregiver‟s email
address. You may also edit
(add or delete) the comments
in the comment box. These
comments will appear in the
email sent to the caregiver. We
recommend that you add the
youth‟s name for whom you
want the caregiver to take the
assessment since a caregiver
may have more than one youth in care.
6. Click Send Email.
7. The caregiver will receive an email. When he clicks the link he will be prompted to enter
his name, then the assessment will appear.

53
Option 3: Caregiver completes printed assessment
For caregivers that do not have access to a computer, the caseworker can print out the
caregiver assessment to allow them to mark his answers on a printed copy.
1. If you are not already logged in, from the CLS Home Page, click the Sign In button in
the upper right corner and enter your username and password. The Find Youth page
will appear.
2. On the left side of
the page select the
caregiver
assessment from
the drop down box.
It is located at the
bottom of the list.
3. Click Print.
Note: The first two
pages of the
assessment are
Casey Family
Programs’ Privacy
Policy and Terms
of use. Page three should be the start of the assessment statements.
4. The caseworker can give this printed assessment to the caregiver to complete. Once
complete, when the caseworker is online again, he can enter the answers into the CLS
website, following the steps in Option 1: Caregiver takes assessment on caseworker‟s
computer.

54
Caregiver takes assessment
The page below appears when the caseworker clicks the Start Now button from the youth
details page, or when the caregiver clicks on the link in his/her email. When it appears the
caregiver can start answering the statements.
Note: We recommend the caregiver complete the entire assessment at one time. There is
an option for caregivers to come back and complete an unfinished assessment; however, this
requires a caseworker log into the CLS website and go through the steps outlined in Finish
Caregiver Assessment section.
The assessment is exactly the same as the youth assessment except the statements are
phrased „Youth knows‟ or „Youth can‟ instead of „I know‟ or „I can‟, etc.
1. The caregiver will see the Casey Life Skills Assessment, starting with Daily Living (skill
area 1).

55
2. At the bottom of each skill area are Previous and Next navigation buttons. Click
Previous and Next to move between skill areas. Answers are automatically saved each
time one of these is clicked.
3. When the caregiver is done, if he is not taking the whole assessment at this time (not
recommended), he should click Save the Assessment; if completing the last skill area,
he should click Finish. Links to the caregiver comparison results will be on the Youth
Details page.
Note: More than one caregiver can take the assessment on behalf of a youth; links to all
caregiver reports will be on the Youth Details page.

56
Caregiver Comparison Results
Once a caregiver finishes the assessment, the results appear immediately. The caregiver
assessment results are a comparison to the youth’s answers.
At a Glance: On the left, this bar graph compares the number of each type of answer
given by the caregiver and youth (i.e., „yes‟ answers, „mostly yes‟ answers, etc.) for each
skill area.
Side-by-side comparison: On the right is a comparison of answers for each statement.
An exclamation point means there is significant variation between the youth‟s answer
and the caregiver‟s answer. Click any skill area at the top to view the detailed statements
for each skill area. There is no average score comparison.
Caregivers can print out the results or email it to themselves to keep a copy.
All caregiver comparison reports will appear on the Youth Details page underneath
the youth‟s CLS assessment to which they are being compared. Caseworkers can
access these at any time.

57
Print Caregiver Comparison Report
1. On the Comparison Report page, click Print View in the upper right.
2. Click Print in the upper right of the Print View window.
Note: The print view does not use the color coding that appears on the assessment
result. This may improve readability when printed.

58

59
Email Comparison Report
The caregiver comparison report can be emailed to anyone even if they do not have an
account on the CLS website. The email includes a link to the results; it will not be an attached
file. The results cannot be saved as a file. They can only be printed or sent in an email as a
link.
1. From the Comparison Report page, click Send as a Link in the upper right.
2. Enter the email address. You may also edit (add or delete) the comments in the
comment box. If there is any additional information that you would like to add
regarding these assessment results you can put them in the comments box.
Below is an example email that the recipient will get when they receive the assessment results.
Note: If the person you are sending the assessment results to does not receive it, please have
him/her check the junk mail or spam folders.
60
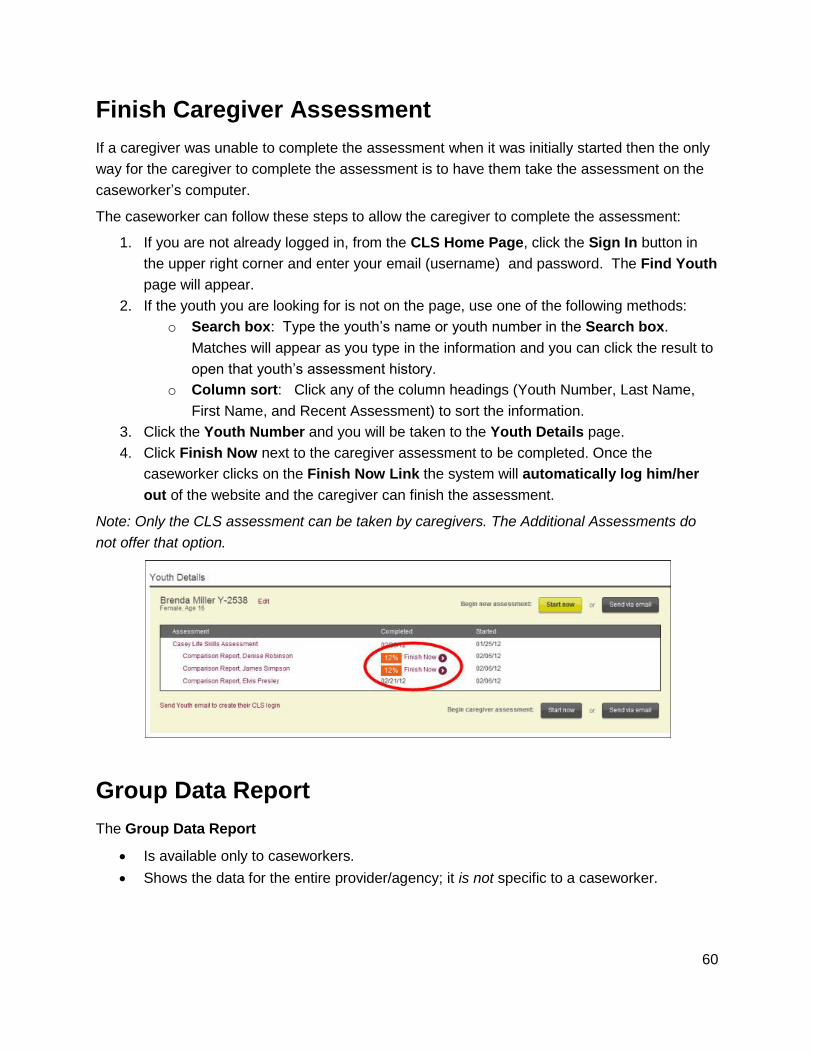
Finish Caregiver Assessment
If a caregiver was unable to complete the assessment when it was initially started then the only
way for the caregiver to complete the assessment is to have them take the assessment on the
caseworker‟s computer.
The caseworker can follow these steps to allow the caregiver to complete the assessment:
1. If you are not already logged in, from the CLS Home Page, click the Sign In button in
the upper right corner and enter your email (username) and password. The Find Youth
page will appear.
2. If the youth you are looking for is not on the page, use one of the following methods:
o Search box: Type the youth‟s name or youth number in the Search box.
Matches will appear as you type in the information and you can click the result to
open that youth‟s assessment history.
o Column sort: Click any of the column headings (Youth Number, Last Name,
First Name, and Recent Assessment) to sort the information.
3. Click the Youth Number and you will be taken to the Youth Details page.
4. Click Finish Now next to the caregiver assessment to be completed. Once the
caseworker clicks on the Finish Now Link the system will automatically log him/her
out of the website and the caregiver can finish the assessment.
Note: Only the CLS assessment can be taken by caregivers. The Additional Assessments do
not offer that option.
Group Data Report
The Group Data Report
Is available only to caseworkers.
Shows the data for the entire provider/agency; it is not specific to a caseworker.

61
Counts only completed assessments. A completed assessment means 75% of all the
statements in each skill area have been answered, or the assessment has been marked
as complete.
Shows data for ages 14 and higher. If you have youth that are under the age of 14
taking any of the assessments, this data will not appear on the report.
To view, print, or export the report:
1. If you are not already logged in, from the CLS Home Page, click the Sign In button in
the upper right corner and enter your email (username) and password. The Find Youth
page will appear.
2. Click Reports in the upper left of the Find Youth page. The report will appear with
these defaults:
a. Type of assessment is CLS
b. Date range is the current month
62
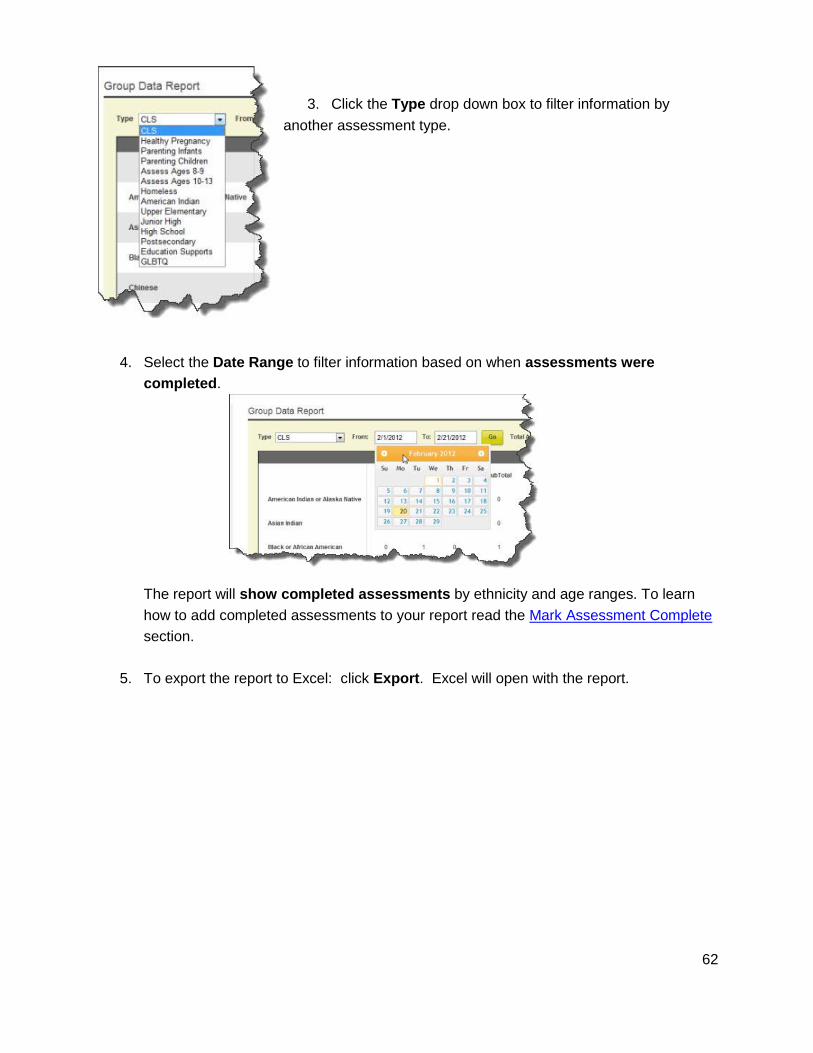
3. Click the Type drop down box to filter information by
another assessment type.
4. Select the Date Range to filter information based on when assessments were
completed.
The report will show completed assessments by ethnicity and age ranges. To learn
how to add completed assessments to your report read the Mark Assessment Complete
section.
5. To export the report to Excel: click Export. Excel will open with the report.

63
6. To print the report:
a. Click Print View; the print view will open in a new window.
b. Click Print from the print view page; your usual print dialogue box should appear.

64
c. Click Print.
We hope the Casey Life Skills Help Guide has been useful as you explore the
website. Contact [email protected] if you have questions.