hitchhiker's guide to demand management - microsoft download
TRANSCRIPT

Hitchhiker's Guide to Demand Management
Project 2010 Case Study
Prepared for
Contoso
Monday, 4 October 2010
Prepared by
Steven Haden
Published by
Project Server Content Publishing

The information contained in this document represents the current view of Microsoft Corporation on the issues discussed as of the date of publication.
Because Microsoft must respond to changing market conditions, it should not be interpreted to be a commitment on the part of Microsoft, and Microsoft
cannot guarantee the accuracy of any information presented after the date of publication.
MICROSOFT MAKES NO WARRANTIES, EXPRESS, IMPLIED OR STATUTORY, AS TO THE INFORMATION IN THIS DOCUMENT.
Complying with all applicable copyright laws is the responsibility of the user. Without limiting the rights under copyright, no part of this document may be
reproduced, stored in or introduced into a retrieval system, or transmitted in any form or by any means (electronic, mechanical, photocopying, recording, or
otherwise), or for any purpose, without the express written permission of Microsoft Corporation.
Microsoft may have patents, patent applications, trademarks, copyrights, or other intellectual property rights covering subject matter in this document.
Except as expressly provided in any written license agreement from Microsoft, the furnishing of this document does not give you any license to these
patents, trademarks, copyrights, or other intellectual property.
The descriptions of other companies’ products in this document, if any, are provided only as a convenience to you. Any such references should not be
considered an endorsement or support by Microsoft. Microsoft cannot guarantee their accuracy, and the products may change over time. Also, the
descriptions are intended as brief highlights to aid understanding, rather than as thorough coverage. For authoritative descriptions of these products, please
consult their respective manufacturers.
© 2010 Microsoft Corporation. All rights reserved.
Microsoft and Windows are either registered trademarks of Microsoft Corporation in the United States and/or other countries.
The names of actual companies and products mentioned herein may be the trademarks of their respective owners.
Page ii

Page iii
Table of Contents
1 Introduction .......................................................................................................................... 1
1.1 Purpose ..................................................................................................................................... 1
1.2 Audience ................................................................................................................................... 1
1.2.1 Reading Guide ..................................................................................................................... 1
1.3 General steps ............................................................................................................................ 1
2 Vision: Case Study for Contoso ............................................................................................... 3
2.1 Introduction .............................................................................................................................. 3
3 Plan/Specify: The Demand Management Process Lifecyle ...................................................... 5
3.1 Introduction .............................................................................................................................. 5
3.2 Overview ................................................................................................................................... 5
3.3 Define the process .................................................................................................................... 6
3.3.1 Phases ................................................................................................................................. 6
3.3.2 Stages .................................................................................................................................. 7
3.3.3 Activities .............................................................................................................................. 9
3.4 The Contoso Sample Project .................................................................................................. 10
3.5 List of the objects to configure/use in Project 2010 .............................................................. 12
4 Build/Create: Workflow Configuration ................................................................................. 14
4.1 Enterprise Project Templates ................................................................................................. 14
4.2 Phase: A Collection of Steps in a Project Life Cycle ................................................................ 14
4.3 Stage: A Step in a Project Life Cycle ....................................................................................... 14
4.4 Project Detail Pages (PDP) in Stages ....................................................................................... 14
4.5 Configuration tasks on Project Server 2010 ........................................................................... 15
4.5.1 Initial Setup ....................................................................................................................... 15
4.5.2 Workflow configuration .................................................................................................... 15
4.6 Configuration Best practices .................................................................................................. 16
4.6.1 Naming conventions to use to distinguish specific workflow objects .............................. 16

Page iv
4.6.2 List of custom fields used in our example ......................................................................... 17
4.7 How to (in Project 2010) ........................................................................................................ 18
4.7.1 Lookup tables and Custom Fields ..................................................................................... 19
4.7.2 Project Detail Pages Creation............................................................................................ 24
4.7.3 Workflow Phases Creation ................................................................................................ 30
4.7.4 Workflow Stages Creation ................................................................................................ 31
4.7.5 Enterprise Project Type Creation ...................................................................................... 34
4.7.6 Workflow Approvals Page ................................................................................................. 35
5 Build/Create Workflow Orchestration .................................................................................. 37
5.1 Workflow Creation, Administration, and Usage Process ....................................................... 37
5.2 Workflow Key concepts .......................................................................................................... 37
5.3 Relations between Project Server Objects and Visual Studio orchestration ......................... 39
5.4 Development Tasks with Visual Studio 2010 ......................................................................... 41
5.5 List of the objects to create in Visual Studio 2010 ................................................................. 41
5.6 How to (In Visual Studio 2010) ............................................................................................... 43
5.6.1 Setting up the toolbox in Visual Studio ............................................................................. 43
5.6.2 Creating a new Project ...................................................................................................... 48
5.6.3 Initial Step ......................................................................................................................... 50
5.6.4 Adding more activities with the designer ......................................................................... 52
5.6.5 Get the GUID from Project Configuration ......................................................................... 72
5.7 Deploy the workflow .............................................................................................................. 73
5.7.1 Using Visual Studio automatic deployment ...................................................................... 73
5.7.2 Using a WSP package ........................................................................................................ 76
5.8 Developing your own custom activity .................................................................................... 78
5.9 Development Best practices and Guide ................................................................................. 82
5.9.1 Best practices .................................................................................................................... 82
5.9.2 Description of Activities in a Nutshell ............................................................................... 83

Page v
5.9.3 Source code of the sample ................................................................................................ 86
6 Deploy: Deployment from Dev to QA/Production ................................................................. 91
6.1 Deployment of the solution on a QA and Production environment ...................................... 91
6.1.1 Using the new 2010 Playbooks ......................................................................................... 91
6.1.2 Solution starter EPT Export Import ................................................................................... 94
7 Debug/Monitor: Troubleshooting Workflows ....................................................................... 96
7.1 Debugging the workflow ........................................................................................................ 96
7.1.1 Copying the PDB of your assembly to the GAC ................................................................. 96
7.1.2 Attaching the debugger .................................................................................................... 96
7.2 Troubleshooting a Workflow .................................................................................................. 97
7.2.1 Check the workflow status page ....................................................................................... 97
7.2.2 View the ULS logs .............................................................................................................. 99
8 References ........................................................................................................................ 100
8.1 General references ............................................................................................................... 100
8.2 References given in this document ...................................................................................... 100
Table of Figures
Figure 1: Contoso Sample Project Process ............................................................................................. 3
Figure 2: Demand management phases and stages ............................................................................... 6
Figure 3: List of phases ............................................................................................................................ 6
Figure 4: List of stages ............................................................................................................................. 7
Figure 5: List of fields for Idea Collection ................................................................................................ 8
Figure 6: List of fields for Lead Approval ................................................................................................ 8
Figure 7: List of fields for Cancelled ........................................................................................................ 8
Figure 8: List of fields for Execution ........................................................................................................ 9
Figure 9: List of fields for Post Mortem .................................................................................................. 9
Figure 10: List of activities ...................................................................................................................... 9
Figure 11: Contoso Sample Project Process (detailed) ......................................................................... 11
Figure 12: List of objects to configure/use in Project Server 2010 ....................................................... 12
Figure 13: Hierarchy of Project Server objects ..................................................................................... 15
Figure 14: IT Workflow phases .............................................................................................................. 16
Figure 15: IT Workflow stages ............................................................................................................... 17
Figure 16: Contoso Sample Project example phases ............................................................................ 17

Page vi
Figure 17: Contoso Sample Project example stages ............................................................................. 17
Figure 18: Contoso list of custom fields ................................................................................................ 18
Figure 19: PWA1 Project Web App ....................................................................................................... 18
Figure 20: List of CF and LT for Contoso sample ................................................................................... 19
Figure 21: Steps to create CF and LT ..................................................................................................... 24
Figure 22: Steps to create PDPs ............................................................................................................ 29
Figure 23: Steps to create phases ......................................................................................................... 31
Figure 24: Steps to create stages .......................................................................................................... 34
Figure 25: Steps to create an EPT ......................................................................................................... 35
Figure 26: The default Project Server Approval form ........................................................................... 36
Figure 27: Different actors for managing a workflow ........................................................................... 37
Figure 28: Project Server Workflow technology building blocks hierarchy .......................................... 38
Figure 29: Project Server workflow services ......................................................................................... 39
Figure 30: Relation between Project Server and Visual Studio objects ................................................ 40
Figure 31: List of Visual Studio objects to create/use ........................................................................... 43
Figure 32: Updating the Visual Studio Toolbox..................................................................................... 43
Figure 33: Steps to update the Visual Studio toolbox for Project Server Activities.............................. 45
Figure 34: Steps to update the Visual Studio toolbox for SharePoint Server Activities ....................... 47
Figure 35: Steps to create a Visual Studio project for Project Server workflows ................................. 50
Figure 36: Steps to insert the initial activities in the Visual Studio project .......................................... 52
Figure 37: Steps to create the workflow in Visual Studio ..................................................................... 71
Figure 38: Finding the GUIDs for the Project Server objects ................................................................ 73
Figure 39: Script to restart the 3 services after the deployment ......................................................... 73
Figure 40: Steps to deploy your workflow using Visual Studio ............................................................. 76
Figure 41: Steps to deploy your workflow using a WSP package ......................................................... 78
Figure 42: Steps to add a custom Activity to our workflow project ..................................................... 82
Figure 43: List of Best Practices ............................................................................................................ 83
Figure 44: Description of Project Server workflow activities ............................................................... 84
Figure 45: Description of SharePoint workflow activities ..................................................................... 84
Figure 46: Description of SharePoint Server (Office Task) workflow activities .................................... 85
Figure 47: Description of Windows workflow activities ....................................................................... 86
Figure 48: Source Code of the workflow .............................................................................................. 90
Figure 49: Steps to Backup/Restore workflow configuration using Playbooks 2010 ........................... 94
Figure 50: Script to copy assembly to the GAC for debugging purposes .............................................. 96
Figure 51: Example showing the use of appcmd to get the w3P process number ............................... 97
Figure 52: Steps to troubleshoot a workflow ....................................................................................... 98

Page 1
1 INTRODUCTION
1.1 Purpose
This document should contain all the required information to get started on implementing a full
Demand Management solution with Microsoft Project 2010.
It assumes that no previous configuration has been defined in a Project Web App instance.
1.2 Audience
The IT Pro
The Developer
The Project Management Office (PMO)
The Business Users
1.2.1 Reading Guide
Chapter IT Pro Developer PMO Business Users
Vision X X
Plan/Specify X X X
Build/Create
Configuration
X X
Build/Create
Orchestration
X
Deploy X X X X
Debug/Monitor X
Use X
1.3 General steps
There are four general steps to perform to create your workflow in Microsoft Project Server 2010
that are detailed in this document:
1. Plan/Vision

Page 2
2. Workflow Configuration: Create objects in Project Server
3. Workflow Orchestration: Create workflow in Visual Studio 2010
4. Deploy
The source code for this sample is available on MSDN Code Gallery at this URL:
http://code.msdn.microsoft.com/PS2010DMSample

Page 3
2 VISION: CASE STUDY FOR CONTOSO
2.1 Introduction
In this chapter we define the demand management process to be used by Contoso.
It is not the goal of this document to describe how to define the demand management process; this
subject is covered by the document Demand Management in Project Server 2010
(http://go.microsoft.com/fwlink/?LinkId=191854).
We use this simple example to model the project process from the Idea collection to its Execution
and a Post Mortem:
Figure 1: Contoso Sample Project Process
The Demand management process used by Contoso starts in the Create phase with collecting
information about this new Idea: a name, a description, a choice to specify if some funding is
required, and a proposed project manager.
If the project requires funding, we enter the Select phase where it will need to be approved by a
Team Lead.
Once it is approved, or if no funding is required, we enter the Manage phase.
The project permissions will be updated to grant the Project manager rights to the specified
proposed project manager. Then the project is executed and the scheduling is done by the project
manager until the project is completed.

Page 4
Once the project is completed, we enter the Finish phase, where information is captured about the
project execution in a post-mortem stage.
This specification can be done using Microsoft Visio and the Cross-Functional Flowchart Template.

Page 5
3 PLAN/SPECIFY: THE DEMAND MANAGEMENT PROCESS
LIFECYLE
3.1 Introduction
The demand management process captures all work proposals in one place, guides the proposals
through a multistage governance process, helps users make decisions about which proposals to
approve, and tracks progress on project execution until the work is completed. A key component
within demand management is the workflow governance model implemented in Project Server.
A governance workflow includes definitions of the life cycle stages through which the project
progresses, such as proposal creation and initial approval. The workflow defines what information is
required or locked in each stage. For example, a workflow can lock budget cost after the project is
approved. A workflow can include necessary manual approval or notification steps and add business
logic to update other LOB systems. For example, a workflow can update an enterprise resource
planning (ERP) system when the proposal budget is approved.
3.2 Overview
In project portfolio management, a project life cycle is a long-running process that spans governance
phases. Typical demand management phases are: create, select, plan, and manage. The planning
and management phases are accomplished by the more familiar project management processes by
using Project Professional and Project Web App. Workflows model the governance processes and
provide a structured way for projects to proceed through the phases. Workflows, along with other
proposal data in project detail pages (PDPs), are captured and integrated within the demand
management feature set, providing a rich and dynamic platform on which customers and partners
can build custom solutions.
Figure 2 shows the four standard phases of demand management and how they fit together. Within
each phase are stages such as Propose idea and Initial review. Each stage can have one or more
associated PDPs in Project Web App. The entire collection of stages represents a single workflow
that can be linked to an enterprise project template (EPT).

Page 6
Figure 2: Demand management phases and stages
3.3 Define the process
We first define the process to be used in terms of Phases/Stages/Activities.
Our recommendation is to use a business modeling tool like Microsoft Visio to first outline the
project processes.
In the Vision chapter, we have defined the Process for our simple project.
We will now refine this vision.
3.3.1 Phases
In our example we have identified the following phases:
Phase name Phase Prefix
Create C
Select S
Manage M
Finished F
Figure 3: List of phases
We use a simple prefix, of one or 2 letters for each phase, that will allow us to use it when referring
to the phase from another context.

Page 7
3.3.2 Stages
For each stage, we define what are the inputs from the stage and the outputs resulting from this
stage.
This will define the list of fields that are to be displayed in the Project Detail Page (PDP). At the same
time (if necessary) we can list the resulting outputs from this stage (like computed fields).
Define the Input and output of each stage Define the required information to capture (fields) in forms Define the state of the fields in each stage (Required, R/W, Read only)
A stage controls the behavior of:
o Visible PDPs
o Read-Only/Required Custom Fields
o Associated Phase
In our example we have defined the following stages:
Stage name Stage Prefix Inputs Outputs
Idea Collection IC Name,
Business Reason,
Needs Funding,
Project Manager
Lead Approval LA Decision,
Justification
Cancelled C N/A
Execution E Planning/Progress
Post Mortem PM Lessons Learned,
On Budget,
Reasons
Figure 4: List of stages
For each stage in our example, we detail the different fields.

Page 8
Idea Collection
Input
Required State Output Format
Name Yes R/W String 255
characters
Description Yes R/W String Multiple
lines
Needs Funding Yes R/W Radio button
Project Manager Yes R/W String 255
characters
Figure 5: List of fields for Idea Collection
Lead Approval
Input
Required State Output Format
Name N/A R String 255
characters
Description N/A R String Multiple
lines
Project Manager N/A R String 255
characters
Decision Yes R/W Choice button
Justification Yes R/W String Multiple
lines
Figure 6: List of fields for Lead Approval
Cancelled Input Required State Output Format
N/A
Figure 7: List of fields for Cancelled
Execution Input Required State Output Format

Page 9
N/A
Figure 8: List of fields for Execution
Post Mortem Input Required State Output Format
Lessons Learned Yes R/W String Multiple
line
On Budget Yes R/W Yes/No Radio Button
Reasons R/W String Multiple
line
Figure 9: List of fields for Post Mortem
3.3.3 Activities
For each stage we define if specific activities are needed.
Some examples of possible activities are:
Define if an approval is needed Define if e-mail messages are sent Define which information on the progress of the workflow is to be communicated to the
users
In our example here are the lists of activities we have identified:
Stage name Activities List Progress information
Idea Collection Needs funding
Approval
Lead Approval Approval
Cancelled Cancelled
Execution E-mail to inform
Project Manager
Update Project
Permission
Post Mortem
Figure 10: List of activities

Page 10
3.4 The Contoso Sample Project
Here is the Visio diagram of the Contoso Sample project Workflow.
This diagram captures the different objects that are present in our workflow solution:
the phases
the stages
the activities
the PDPs visible for each activity and the state: Read-only or R/W.

Page 11
Figure 11: Contoso Sample Project Process (detailed)

Page 12
3.5 List of the objects to configure/use in Project 2010
The following objects are configured and used in Project 2010 for our example:
Objects List
Phases
Create
Select
Manage
Finished
Stages (Linked to the Visual Studio Workflow)
Idea Collection
Lead Approval
Cancelled
Execution
Post Mortem
Custom Fields and Lookup Tables (Linked to the Visual Studio Workflow)
Proposed Project Manager (a Project resource)
Funding Required
On Budget
Reasons
Lessons Learned
Project Detail Pages
Idea Collection (Initial Project Page)
Post Mortem
Default Web Part and Custom Web Parts
Project Fields
Enterprise Project Type
Contoso Sample Project
Workflow Approval page Default Project Server Approval
Figure 12: List of objects to configure/use in Project Server 2010

Page 13
Apart from these workflow-related objects, we need to define some users in the PWA instance.
The workflow uses the members of the Team Lead default Security Group to get the approval on the
project when funding is required. At least one user must be a member of this default security group.

Page 14
4 BUILD/CREATE: WORKFLOW CONFIGURATION
4.1 Enterprise Project Templates
An enterprise project type represents a wrapper that encapsulates phases, stages, a single workflow,
and PDPs. Each EPT represents a single project type. Normally, project types are aligned with
individual departments, for example, marketing projects, IT projects, or HR projects. Using project
types helps to categorize projects within the same organization that have a similar project life cycle.
For a user, the EPTs appear in a drop-down list of project types when the user clicks New Project on
the Ribbon in Project Web App.
4.2 Phase: A Collection of Steps in a Project Life Cycle
A phase represents a collection of stages grouped to identify a common set of activities in the
project life cycle. Examples of phases are project creation, project selection, and project
management (shown as Create, Select, and Manage Phases. Phases do not have any direct technical
effect on the behavior of an EPT. That is, changing the order of phases does not affect how the
system reacts. The primary purpose of demand management phases is to provide a smoother user
experience where users have the option of organizing stages into logical groups.
4.3 Stage: A Step in a Project Life Cycle
A stage represents one step within a project life cycle. A stage is composed of one or more PDPs
linked by common logic or theme. Stages at a user level appear as steps within a project. At each
step, data must be entered, modified, reviewed, or processed.
4.4 Project Detail Pages (PDP) in Stages
A PDP represents a single Web Part Page in Project Web App. PDPs can be used to display or collect
information from the user. You can create PDPs in much the same way you create any Web Part
Page in a SharePoint site, where you can add Web Parts that provide the experience you want. You
can add individual Web Parts from the standard Web Part galleries or create custom Web Parts.
Project Server Web Parts and custom Web Parts used in demand management all contain custom
fields. Web Parts can make calls to the Project Server Interface (PSI), query the Reporting database,
or integrate with external systems. Figure 13 shows the general hierarchy of the parts of demand
management in Project Server 2010.

Page 15
Figure 13: Hierarchy of Project Server objects
4.5 Configuration tasks on Project Server 2010
4.5.1 Initial Setup
After the initial configuration of Project Server 2010, the following step needs to be checked:
To define the Workflow Proxy Setting account.
The Project Server Workflows need to run under the context of a Windows user. However, they do
not run under the context of the user that started the project. Instead, the workflows are run under
the “Workflow Proxy Account”. This means that the user account that you specify as the workflow
proxy account must have the proper rights to execute all of the commands that a Project Server
workflow will need to do.
You can find information on how to set up the Workflow Proxy Account in this article:
http://blogs.technet.com/projectadministration/archive/2009/12/21/how-to-setup-the-workflow-
proxy-account.aspx
4.5.2 Workflow configuration
The following configuration tasks will have to be done on Project Server 2010.
We recommend doing the tasks in this order.
1. Define the list of Lookup Table Values (LTV) 2. Define the list of Custom Fields (CF) 3. Define the list of Project Detail Pages (PDP) 4. Define the list of Workflow Stages 5. Define the list of Workflow Phases 6. Create the Enterprise Project Types (EPT) (without Workflow, if workflow not yet deployed) 7. Define the Permissions for users involved in Workflow.

Page 16
4.6 Configuration Best practices
4.6.1 Naming conventions to use to distinguish specific workflow objects
For each kind of object to be defined in the Workflow configuration, we recommend to use some
specific naming conventions. These conventions will ease the initial configuration of the workflow
and its maintenance.
Workflow Phase: Prefix with a number to force the order in the display
Also, if a Phase is unique for a certain type of Workflow, add an acronym after the number that
defines the uniqueness.
Maybe always use specific phases for each workflow, instead of sharing between several different
workflows
For example, for an IT Workflow:
1-IT Demand Management DM
2-IT Portfolio Selection PS
3-IT Portfolio Planning PP
4-IT Tracking and Remediation TR
Figure 14: IT Workflow phases
Workflow Stages: Use a lowercase letter (s, for example) followed by a number, to force the order of
display and to distinguish from phases. You can also use an acronym after the order letter to attach
to a specific workflow.
s1- IT Idea Collection
s2-IT Lead Approval
s3-IT Idea Cancelled
s4-IT Scheduled
s5- IT Execute
s6- IT Post Mortem

Page 17
Figure 15: IT Workflow stages
In our Simple Project example for the phases:
1-Create CR
2-Select SE
3-Manage MA
4-Finished FI
Figure 16: Contoso Sample Project example phases
In our Simple Project example for the stages:
s1-Idea Collection ic
s2-Lead Approval ap
s3-Cancelled ca
s4-Execution ex
s5-Post Mortem pm
Figure 17: Contoso Sample Project example stages
4.6.2 List of custom fields used in our example
In our Simple Project example we use the following fields:
Project Name (default field)
Description (default field)
Funding Required
Proposed Project Manager
Lessons Learned
On Budget

Page 18
Reasons
Figure 18: Contoso list of custom fields
4.7 How to (in Project 2010)
In this chapter we describe the precise steps involved to create the different objects of our example
using the administrative pages of Project Web App.
1. Custom Field and Lookup table Guids 2. Web Part specific Creation 3. Project Detail Pages (PDP) Creation 4. Workflow Phases Creation 5. Workflow Stages Creation 6. Enterprise Project Type (EPT) Creation
We start from a basic Project Web App instance that is named:
http://project.contoso.com/PWA1
Figure 19: PWA1 Project Web App
This application has only the sample workflow installed, but we will not use any objects from this
sample in our example, apart from the Project Approval form.
You must log on using the Functional Project administrator, to do the configuration.
We need to create the Project Server objects in a bottom up order, following the hierarchy
presented in Figure 13.

Page 19
4.7.1 Lookup tables and Custom Fields
In this chapter we first create the Lookup tables (LT) and then the Custom Fields for our example.
Field name Custom Field (CF) or
Lookup Table (LT)
Type
Funding Required LT LT Text: Value Yes/No
Funding Required CF Project of Type Text Using a
lookup table
Proposed Project
Manager
CF Project of Type Text
Lessons Learned CF Project of Type Text
On Budget LT LT Text: Value
OK/Under/Exceeded
On Budget CF Project of Type Text Using a
lookup table
Reasons CF Project of Type Text
Figure 20: List of CF and LT for Contoso sample
Actions Screen
In Project Web App, after selecting
Settings/Server Settings:
Select
Enterprise Custom Fields and Lookup
Tables

Page 20
Select the “New Lookup Tables” button
Name: Funding required
Type: Text
Code Mask: *
Lookup Table values:
Yes
No
It is important to take a note of the
GUID of the “Yes” value and the
Lookup table itself. These values will be
needed later. You must first Save the
new Lookup table and reopen it.
Select the value Yes in the Lookup
table, and get the value just under the
table.
To create the field “Funding Required”,
select the button “New Field” in the
Enterprise Custom Fields section.
Select "Field” button

Page 21
Name: Funding required
Entity and Type: Project
Text
Custom Attributes:
Lookup Table: Funding Required
Behavior: Select Behavior controlled by
workflow
It is important to take a note of the
GUID of the Custom field.
You must first Save the new Custom
field and reopen it.
For the Custom Field GUID, check the
last field
System Identification Data

Page 22
Name: Proposed Project Manager
Entity and Type: Project Text
Custom Attributes: Single Line of Text
Behavior: Select Behavior controlled by
workflow

Page 23
Name: Lessons Learned
Entity and Type: Project Text
Custom Attributes: Multiple Lines of
Text
Behavior: Select Behavior controlled by
workflow
Lookup table
Name: On Budget
Type: Text
Code Mask: *
Lookup Table values:
OK
Under
Exceeded

Page 24
Name: On Budget
Entity and Type:
Project
Text
Custom Attributes: Single Line of Text
Behavior: Select Behavior controlled by
workflow
Figure 21: Steps to create CF and LT
4.7.2 Project Detail Pages Creation
There are three types of Project Detail Pages that can be created:
New Project: Used for creating a project. This type of PDP is required with an enterprise project template that has a workflow for portfolio analysis.
Workflow Status: Shows the current stage and status for a project proposal. Project: Used for editing project details in a non-workflow enterprise project template, or in
other applications.
It is a good practice to create your own New Project page, so that you can start to enter
directly required information for creating your project.
In our example we are creating the following PDPs:
IdeaCollection PostMortem

Page 25
Actions Screen
In Project Web App, after selecting
Settings/Server Settings:
Select
Project detail Pages in the last section
Select the Documents tab
Select New Document in the ribbon

Page 26
Select a Full Page vertical Page and
name it:
IdeaCollection
We can now add some Web Parts to
this blank page.
Select Add a Web Part
Select Categories: Project Web App
Web Parts: Project Fields
And the button Add
The Project Fields Web Ppart is
displayed.
You have to select some project fields
now to populate the Web Part.
Select from the right top menu: Edit
Web Part

Page 27
Select the Modify button
Select the fields:
Project Name
Description
Funding Required
Proposed Project Manager
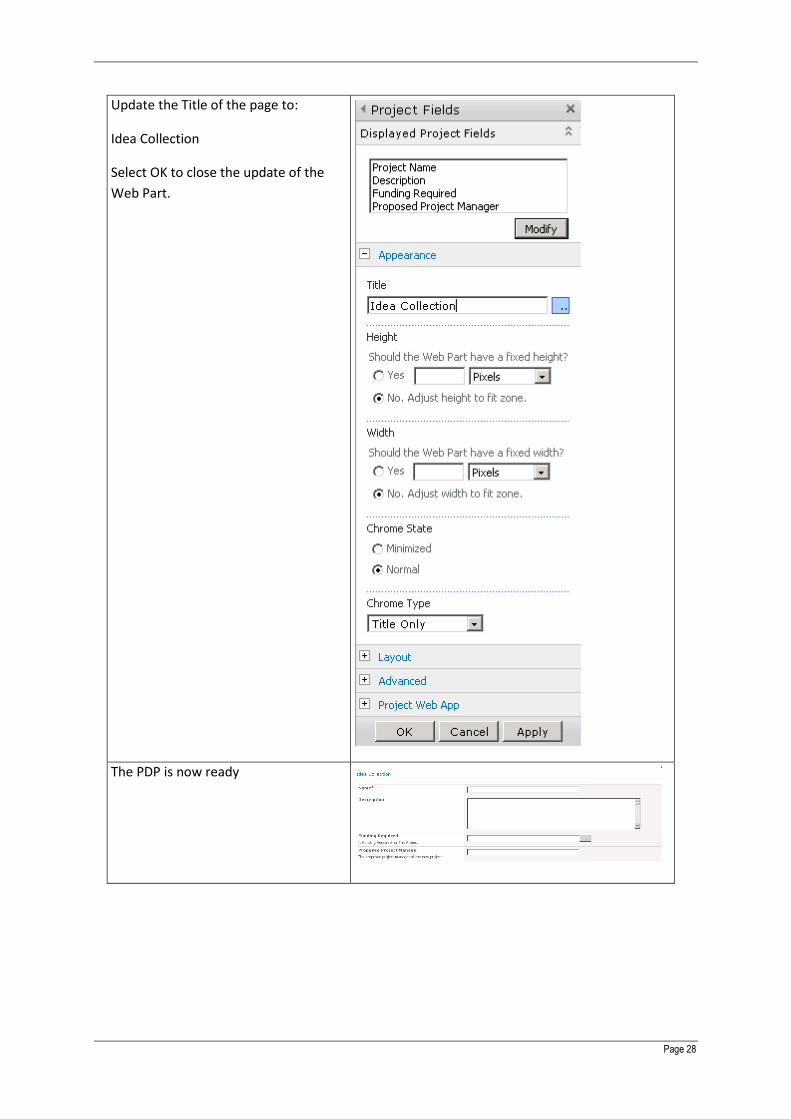
Page 28
Update the Title of the page to:
Idea Collection
Select OK to close the update of the
Web Part.
The PDP is now ready

Page 29
Select the Page Tools tab in the ribbon
And the Stop Editing command
PDP page is now finished
We have to edit the properties of the
page.
Update the Display Name to:
Idea Collection
Select “New Project” for the Page Type.
Do the same for the Post Mortem page
Add these fields:
Lessons Learned
On Budget
Reasons
Figure 22: Steps to create PDPs

Page 30
4.7.3 Workflow Phases Creation
The following phases will be created:
1-Create 2-Select 3-Manage 4-Finished
Actions Screen
In Project Web App, after selecting
Settings/Server Settings:
Select:
Workflow Phases
Select New Workflow Phase
Name : 1-Create
and add a description
Create the following phases:
2-Select
3-Manage

Page 31
4-Finished
Figure 23: Steps to create phases
4.7.4 Workflow Stages Creation
The following five stages are created:
s1-Idea Collection s2-Lead Approval s3-Cancelled s4-Execution s5-Post Mortem
Actions Screen
In Project Web App, after selecting
Settings/Server Settings:
Select
Workflow Phases
Select New Workflow Stage

Page 32
Enter the following
Name: s1- Idea Collection
Description
Workflow phase: 1-Create
Visible Project Detail Pages:
Idea Collection
Project Details The two required fields:
Funding required
Proposed Project Manager
Name: s2- Lead Approval
Description
Workflow phase: 2-Select
Visible Project Detail Pages:
Idea Collection
Project Details
The required field:
Proposed Project Manager
The read-only field:
Funding required
Page 33
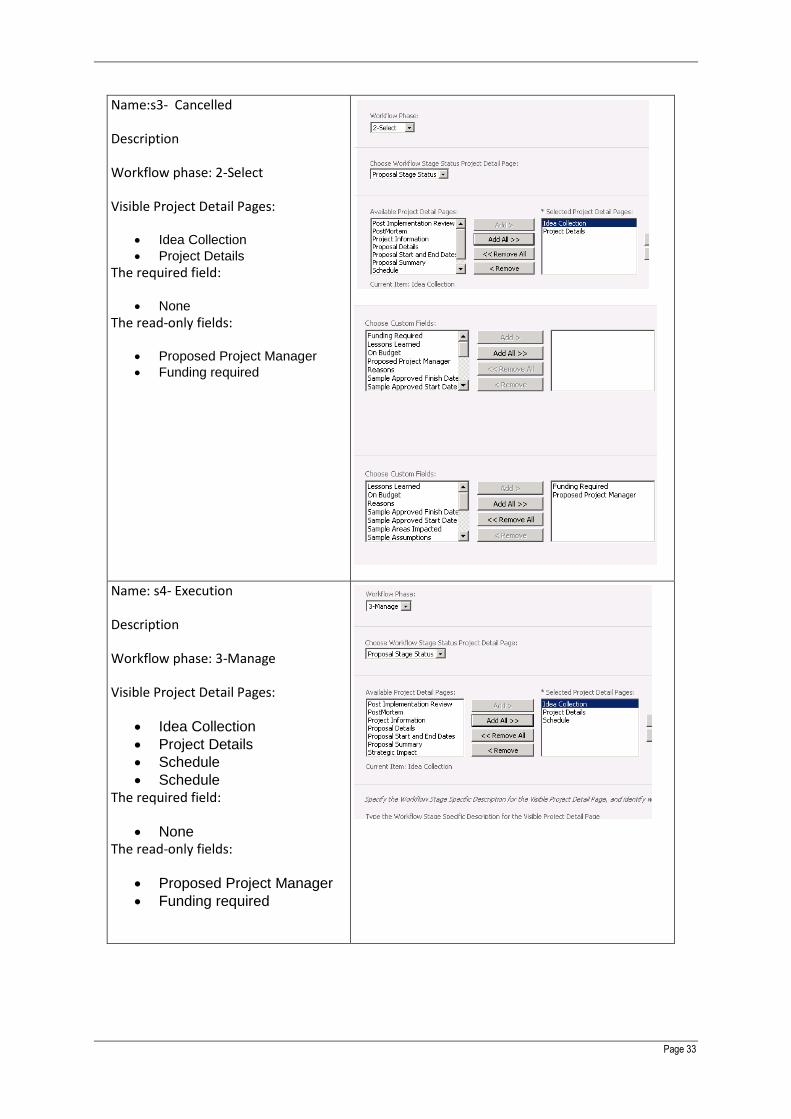
Name:s3- Cancelled
Description
Workflow phase: 2-Select
Visible Project Detail Pages:
Idea Collection
Project Details
The required field:
None
The read-only fields:
Proposed Project Manager
Funding required
Name: s4- Execution
Description
Workflow phase: 3-Manage
Visible Project Detail Pages:
Idea Collection
Project Details
Schedule
Schedule
The required field:
None The read-only fields:
Proposed Project Manager
Funding required

Page 34
Name: s5- Post Mortem
Description
Workflow phase: 4-Finished
Visible Project Detail Pages:
Post Mortem
Idea Collection
Project Details
Schedule
The required fields:
Lessons Learned
On Budget
Reasons The read-only fields:
Proposed Project Manager
Funding required
Result of the stages creation
Figure 24: Steps to create stages
4.7.5 Enterprise Project Type Creation
We create the Enterprise Project Type (EPT): Contoso Project.
Actions Screen
In Project Web App, after selecting
Settings/Server Settings:
In the Workflow and Project Detail
Pages
Select:

Page 35
Enterprise Project Types
Select New Enterprise Project Type
Enter
Name: Contoso Project
Description:
Site Workflow Association: No
workflow
New Project Page: Idea Collection
No need to select Project Detail Pages
If you want to specify an image with
this EPT, you can specify an URL in a
shared document library containing the
image
Figure 25: Steps to create an EPT
In order to be able to choose the Workflow to be associated with this Enterprise Project type, the
workflow needs to have been deployed in the Site Collection of Project Web App (see chapter 6.1).
4.7.6 Workflow Approvals Page
A default Workflow Approvals Web page exists. We use this default page in our example. It
is named Project Server Approval Content Type.

Page 36
Figure 26: The default Project Server Approval form

Page 37
5 BUILD/CREATE WORKFLOW ORCHESTRATION
5.1 Workflow Creation, Administration, and Usage Process
The following diagram shows the different processes involved in the creation, administration, and
usage of project workflow. It also shows the different actors involved.
The Workflow is created in Visual Studio by a developer.
It is deployed in Project Web App instance by a SharePoint administrator.
By the PWA administrator it is associated with a project EPT.
A user then creates a new project and initiates the workflow.
The workflow starts and waits for user input at the different defined stages.
At one point the workflow terminates.
Figure 27: Different actors for managing a workflow
5.2 Workflow Key concepts
The Project 2010 workflows are built from SharePoint 2010 Site Workflows.

Page 38
SharePoint Workflows are built off of Windows Workflow Foundation, which in turn is built off of
Windows .NET Framework 3.5.
Figure 28: Project Server Workflow technology building blocks hierarchy
The workflows are made up of workflow activities that are objects with code within it. The workflow
engine will go for activity to activity and execute the code within each of them.
The project workflows have to be designed using the Workflow Designer of Visual Studio 2010.
By using the new features of Visual Studio 2010, the workflow can be packaged and deployed like
SharePoint Server features.
The workflow services can use different type of activities that are summarized in this diagram:

Page 39
Figure 29: Project Server workflow services
The specific Project workflow activities are listed in chapter 5.9.2. These Project activities are using
internally Project Workflow services that are calling the standard PSI API. If you define your own
custom activities you can also use the Project Server API using PSI.
5.3 Relations between Project Server Objects and Visual Studio
orchestration
The relation between the Project Server objects and the Visual Studio workflow orchestration is
illustrated in this diagram:

Page 40
Figure 30: Relation between Project Server and Visual Studio objects
The Custom Fields (CFs) are user input fields that can be used in Visual Studio code to make a
decision based on the value or to store the value.
The Project Detail Pages (PDPs) are Web Part pages that hold Custom Fields.
The Stages hold one or more PDPs.
The Phases group Stages together.
So from a user perspective, as the user goes from stage to stage he/she is exposed to a different set
of pages, of which we expose different types of information.
And it is the workflow that decides which stages will appear, and in what order, based on the
sequence you have defined with the Visual Studio designer.
In this diagram you see how when you are creating the workflow from within Visual Studio you
reference the different objects that reside within Project Server.
• In this example, we have an activity at the top that points to Stage 1; this tells the workflow
that Stage 1 should be displayed first.
• The following activity does an If/Else logic based off a value found within a CF. And then,
depending on that outcome, we have additional activities that either point to different
stages or terminate the workflow.

Page 41
• So the key point is that you do not set the stage order inside of Project Server. Project Server
has no idea what orders these stages that reside within it should be in. The ordering is
completely dictated by the workflow, and this is the orchestration of the workflow.
5.4 Development Tasks with Visual Studio 2010
Here is the list of all the basics tasks that need to be done to start developing a workflow with Visual
Studio 2010.
Initial steps
Install SharePoint Server 2010, Project 2010, and Visual Studio 2010 on a single server. This is described on TechNet: http://technet.microsoft.com/en-us/library/cc197667.aspx
Configure Visual Studio 2010 for Project 2010 Workflow development. This is described in the Project Server SDK on MSDN: http://msdn.microsoft.com/en-us/library/ee767686.aspx Use.NET Framework 3.5 Must be installed on the same computer as Project Server Developer must have administrative rights on the server computer and SharePoint
farm. Define your activities Toolbox
Add Project Server Workflow activities Add SharePoint Server Workflow activities
Use Visual Studio 2010
Visual Studio 2010 must be started as an administrator Create a project of type Sequential Workflow
The necessary libraries are added as reference to your Visual Studio project. Define variables to store the GUID of Project Server objects like
Custom Fields Lookup Table Values Stage Group or Specific Resources
Define Workflow in Visual Studio 2010 using the Designer tool Use only Sequential Workflow Add activities
Build Deploy on local server Create/Update the EPT in Project Server that uses this workflow Debug/Test your workflow
How to redeploy an updated version => use a script (See chapter 5.7)
Stop services and IIS Update in the GAC Restart services
5.5 List of the objects to create in Visual Studio 2010
The following objects are created in Visual Studio 2010 to define the orchestration of the workflow
for our example.

Page 42
Objects List
Project Workflow SequentialWorkflowActivity
Project Server Activities ProjectSequence
SetProjectStage
OnProjectSubmit
ReadProjectProperty
ReadProjectSecurityGroupMembers
UpdateProjectStageStatus
CompareProjectProperty
SharePoint Server Activities OnWorkflowActivated
OnTaskAssigning
OnTaskProcessStarted
EndTaskProcess
SendEmail
SetTaskField
OfficeTask (Approval)
CheckExitConditions
Workflow Activities IfElseBranchActivity
IfElseActivity
SequenceActivity
CodeActivity
TerminateActivity
Custom activities GrantPermissionsToProject
Variables to store GUID IdeaCollectionStageUid LeadApprovalStageUid CancelledStageUid SelectionStageUid

Page 43
ExecutionStageUid PostMortemStageUid ScheduleProjectUid FundingRequiredUid FundingRequiredYesLTValueUid ProjectManagerUid
Figure 31: List of Visual Studio objects to create/use
These different activities will be detailed in the following chapters.
You can also create some custom Web Parts that you can use in your PDP pages, but this out of the
scope of this document.
5.6 How to (In Visual Studio 2010)
5.6.1 Setting up the toolbox in Visual Studio
You need to add some specific objects to the Toolbox, to ease the development of the Project Server
workflow.
By default the Toolbox has the following tabs:
Figure 32: Updating the Visual Studio Toolbox
In order to design our workflow we have to add two tabs to the Visual Studio Toolbox.
Project Server Workflow Activities SharePoint Server Workflow Activities
This procedure is described in detail in MSDN here: http://msdn.microsoft.com/en-
us/library/ee767686(v=office.14).aspx#pj14_ConfiguringVS2010_ProjectServerTab
Actions Screen

Page 44
- In Visual Studio Solution Explorer, expand the Workflow1 node, and then double-click the Workflow1.cs file to open the Sequential Workflow design view. On the View menu, click Toolbox, and then pin the Toolbox pane open.
- Right-click a blank area in the Toolbox pane, and then click Add Tab. For example, name the tab Project Server – Workflow.
- Right-click under Project Server Workflow and select Choose Items within the newly created tab.
- In the Choose Toolbox Items dialog box, click the System.Workflow Components tab, and then click Browse. Navigate to the Microsoft.Office.Project.Server.Workflow.dll assembly in [Program Files]\Microsoft Office Servers\14.0\Bin, and then click Open.
- The ten specific Project Server Activities highlighted are added to the toolbox tab after you select OK.

Page 45
Figure 33: Steps to update the Visual Studio toolbox for Project Server Activities
Do the same from the SharePoint Server Workflow Activities.
Action Screen
- Create a new tab and name it SharePoint Server Workflow.
- Select the assembly: Microsoft.Office.Workflow.Actions.dll from the Directory [Program Files]\Common Files\Microsoft Shared\Web Server Extensions\14\ISAPI

Page 46
- The specific Office Workflow Activities highlighted are added to the toolbox tab after you select OK.

Page 47
Figure 34: Steps to update the Visual Studio toolbox for SharePoint Server Activities

Page 48
5.6.2 Creating a new Project
To create a new Visual Studio 2010 project so that you can create Project 2010 workflows:
Actions Screen
- Start Visual Studio 2010 connected as an administrator
- Create a new project, choosing the following template:
in Visual C#
SharePoint
2010
Sequential
Workflow
And .Net Framework 3.5
- And selecting a name for the project workflow: here ContosoSampleProjectWorkflow
- This starts the SharePoint Customization Wizard
- Define the server where the workflow will be initially deployed
- Enter the URL: here http://project.contoso.com/PWA1 and select the Validate button
- You must choose Deploy as a farm solution.

Page 49
- A connection to the server is validated.
- Select the Next button.
-
- Enter the name of the workflow (or use the one proposed): Here ContosoSampleProjectWorkflow - Workflow1
- And select Site Workflow.
- Click Next.
- Keep the default proposed values and click Next.
- Note: If you want to define your own custom approval tasks library, you could choose your specific task lists here. By default it uses the default task approval library created with the Project Web App instance.

Page 50
- Click Finish.
- This prepares Visual Studio to use the Workflow designer.
Figure 35: Steps to create a Visual Studio project for Project Server workflows
5.6.3 Initial Step
The first activity you must put in your Project Server workflow is the wrapper ProjectSequence
Activity, which will contain all your workflow activities.
Actions Screen
- Add a Project Sequence activity just

Page 51
-
Bind the necessary properties:
InitiationData
Select the yellow icon to bind the
InitiationData Property to the
workflow.

Page 52
Expand onWorkflowActivated1, then
expand WorkflowProperties,
and then select InitiationData to finish
the binding.
Figure 36: Steps to insert the initial activities in the Visual Studio project
5.6.4 Adding more activities with the designer
Actions Screen
Open the generated Workflow1.cs
source file
Update the Using clause
using Microsoft.Office.Project.Server.Library;
using System.Text;

Page 53
Add a reference to the library:
Microsoft.Office.Workflow.Actions
Add the code to hold the GUID
variables.
Currently the GUID are set to null
value; they will be completed later
#region Variables
//workflow stages used in this workflow
public Guid IdeaCollectionStageUid = new
Guid("00000000-0000-0000-0000-000000000000");
public Guid LeadApprovalStageUid = new
Guid("00000000-0000-0000-0000-000000000000");
public Guid CancelledStageUid = new
Guid("00000000-0000-0000-0000-000000000000");
public Guid ExecutionStageUid = new
Guid("00000000-0000-0000-0000-000000000000");
public Guid PostMortemStageUid = new
Guid("00000000-0000-0000-0000-000000000000");
//Funding Required
public Guid FundingRequiredUid = new
Guid("00000000-0000-0000-0000-000000000000");
public Guid FundingRequiredYesLTValueUid
= new Guid("00000000-0000-0000-0000-
000000000000");
public bool RequiresFundingResult;
//Project Manager
public Guid ProjectManagerUid = new
Guid("00000000-0000-0000-0000-000000000000");
//office task variables
public String officeTaskOutcomes =
"Approved, ;Rejected,";
public bool approvalResult = false;
public Object TaskTitle = new
System.Object();
// this is the Approval ContentTypeID of
the Project Server Approval form
public String
ProjectServerApprovalContentTypeID =
"0x0108010038A52C27344148C9B9214F82C7C02985";
//user group used for approval -
PSSecurityGroup.Team Leads
public Guid TeamLeadGroup = new
System.Guid(PSSecurityGroup.TeamLeads.ToString())
;
public string[] TeamLeads;
//for send email activity
public String[] projectName =
default(System.String[]);
public String[] projectOwnerEmail =
default(System.String[]);

Page 54
public String[] ProjectOwnerDisplayName =
default(System.String[]);
#endregion
Set up the project stage by adding a
SetProjectStage activity.
The SetProjectStage Activity can be
found in Project Server Workflow
Toolbox.
Set up some properties
AlwaysWait: set to True will stop the
workflow at this stage.
The workflow will also stop (even if set
to False) if there are Required Custom
fields that need to be filled in by the
user.

Page 55
StageOrder: Set the order in which the
Workflow is shown on the Workflow
Status Page. We can use the
numbering that was defined in the
stage names.
StageUid: Define the Guid of the
Project stage coming from the Project
Server configuration.
Either using a direct value (only for a
quick test) or Using a local variable
(better for clarity and maintenance)
WorkflowContext: Set the
workflowContext of the activity by
selecting
ProjectSequence1.WorkflowContext
Properties

Page 56
In the designer, add an activity to
create a sequence activity that will
contain a compare activity.
CompareProjectProperties
The SequenceActivity can be found in
the Windows Workflow v3.0 toolbox.
The Compare Activity can be found in
Project Server Workflow Toolbox (that
you added earlier).

Page 57
Fill up the values
Name: CompareFundingRequired
MDPropUI to our variable
FundingRequiredUID
WaitUntilValueisSet to True
WorkflowContext to our
ProjectSequence Workflow context
CodePropertyvalue to
FundingRequiredYesyLTValueUID

Page 58
Add an IfElseActivity from the Windows
Workflow 3.0 Toolbox
Implement a function to test the
condition

Page 59
The Code to add for the function:
IsFundingRequired
#region TestFunding Required
private void IsFundingRequired(object sender,
ConditionalEventArgs e)
{
e.Result = RequiresFundingResult;
}
#endregion
Add a Sequence Activity for the
LeadApproval Stage
setProjectStage for Lead Approval

Page 60
Add an activity
ReadProjectSecurityGroupMembers
from the Project Server Toolbox
Name: IdentifyTeamLeadsForApproval
GroupMembersLoginName =
TeamLeads
SecurityGroupUid=TeamLeadGroup
workflowContext=WorkflowContext
Add an activity
updateProjectStageStatus
from the Project Server Toolbox
so that the user can have an update to
the running workflow.

Page 61
Add an activity ReadProjectProperty
from the Project Server Toolbox
Set the values for:
Name
PropertyValues
PropertyName
Workflowcontext
Add some code for handling workflow
Context and the variable wfContext.
Update the Dispose method and the
default constructor
public Workflow1()
{
wfContext = new
Microsoft.SharePoint.WorkflowActions.WorkflowCont
ext();
InitializeComponent();
}
public SPWorkflowActivationProperties
workflowProperties
{
get;
set;
}
// to manage the workflow Office Tasks
public
Microsoft.SharePoint.WorkflowActions.WorkflowCont
ext wfContext
{
get;
set;
}
protected override void Dispose(bool
disposing)

Page 62
{
base.Dispose(disposing);
if (disposing)
{
wfContext.Dispose();
workflowProperties.Dispose();
}
}
Add an activity, OfficeTask, from the
SharePoint Server Toolbox
for handling the approval of the
project.
Add the three activities from the
SharePoint Server Toolbox :
OnTaskProcessedStarted
OnTaskAssigning
CheckExitConditions
Initialize the different fields for the
Office Task
Name: approvalProcess
__ActivationProperties:
workflowProperties
__Context: wfContext
ContentTypeID:
ProjectServerApprovalContentTypeID
Outcomes: officeTaskOutcomes

Page 63
In the onTaskProcessStarted add a
Code Activity from the Windows
Workflow toolbox and name it:
onTaskStartedBuildApprovers
Initializing the workflow context
objects with the method onWorkflowActivated1_Invoked
private void onWorkflowActivated1_Invoked(object
sender, ExternalDataEventArgs e)
{
wfContext.Initialize(workflowProperties);
}
Bind this method with the Invoked
Handlers in the onWorkflowActivated1
Action
Code for Approval Process:
Method BuildApprovers to assign a task
to all the approvers in the TeamLeads
security group.
Method FormatApprovers to build the
string for the Office Task for each
approver
Method VerifyExitCondition to check
the exit condition for the task
Method IfIdeaNotApproved to get
approval status
#region Approval process
private void BuildApprovers(object
sender, EventArgs e)
{
CodeActivity Sender =
(CodeActivity)sender;
Microsoft.Office.Workflow.Actions.OfficeTask
currentApprover =
((CompositeActivity)Sender.Parent).Parent as
Microsoft.Office.Workflow.Actions.OfficeTask;
currentApprover.AssignedTo =
FormatApprovers(TeamLeads);
TaskTitle = “Review project “ +
projectName[0];
}
private static string
FormatApprovers(string[] list)
{
if (list == null)

Page 64
return String.Empty;
StringBuilder strbuilder = new
StringBuilder(
@”<my:Assignments
xmlns:my=’http://schemas.microsoft.com/office/inf
opath/2003/myXSD’
xmlns:pc=’http://schemas.microsoft.com/office/inf
opath/2007/PartnerControls’>
<my:Assignment>”);
foreach (string s in list)
{
strbuilder.AppendFormat(
@” <my:Assignee>
<Person>
<DisplayName />
<AccountType>User</AccountType>
<AccountId>{0}</AccountId>
</Person>
</my:Assignee>”, s);
}
strbuilder.AppendFormat(
@”
<my:AssignmentType>Parallel</my:AssignmentType>
</my:Assignment>
</my:Assignments>”);
return strbuilder.ToString();
}
private void VerifyExitCondition(object
sender, ConditionalEventArgs e)
{
IfElseBranchActivity Sender =
(IfElseBranchActivity)sender;
Microsoft.Office.Workflow.Actions.OfficeTask
officeTask = Sender.Parent.Parent.Parent as
Microsoft.Office.Workflow.Actions.OfficeTask;
if (officeTask == null)
return;
if
(officeTask.TaskResults[“Approved”] != null)
{
e.Result = true;
approvalResult = true;
}
else
{
e.Result = true;
approvalResult = false;
}
}
private void IfIdeaNotApproved(object
sender, ConditionalEventArgs e)
{
e.Result = !approvalResult; //If
project is approved approvalResult == true =>
Result must be negated
}
#endregion

Page 65
In the onTaskStartedBuildApprovers
activity,
bind the ExecuteCode handler to the
method BuildApprovers
In the OnTaskAssigning1 Action add the
two activities setTaskField to initialize
the task field and the task title
SetTaskField: ProjectUid
Set TaskTitleField: TaskTitle
In the CheckExitConditions activity add
an IfElseActivity
Bind the ifelse condition to the method
VerifyExitCondition
Add an endTaskProcess1 activity to exit
the approval process once the
condition is met.
In our case at least one approver has
answered

Page 66
After the approval process, add an
IfElse Activity and named it
IfElseProjectRejected.
Bind the If condition to the method
IfIdeaNotApproved
Add a Sequence Activity and name it
Cancelled.
Add a SetProjectStage Activity and
name it:
Name: setCancelledStage
stageOrder: 3
StageUid: CancelledStageUid
WorkflowContext: WorkflowContext

Page 67
Add a TerminateActivity from the
Windows Workflow v3.0 Toolbox
Project cancelled so Workflow
isterminated
Update the Error field with an error
Message
After the ifElseActivity and out of the
IfFundingRequired sequence add a
Sequence Activity and name it:
ProjectExecution
when project is Approved either after
approval or if no Funding was required.

Page 68
Add a SetProjectStage activity
Name: setProjectExecutionStage
StageOrder: 4
StageUid: ExecutionStageUid
WorkflowContext
Add the code to handle the Send Email
activity
#region SendEmail
public String[] projectManagerValue =
default(System.String[]);
public
Microsoft.Office.Project.Server.Schema.ResourceDa
taSet ReturnedResourceData = new
Microsoft.Office.Project.Server.Schema.ResourceDa
taSet();
private void SendingEmail(object sender,
EventArgs e)
{
SendEmail email = (SendEmail)sender;
if ((projectName != null) &&
(projectName.Length != 0) && (projectName[0] !=
string.Empty))
{
//fill in email subject if
project name is not empty
email.Subject =
String.Format(“Project {0} has been selected “,
projectName[0]);
email.Body =
String.Format(“You’re listed as PM Owner for the
following project: - <I> {0} </I>.<BR> Please
create the detailed project plan. <BR> {1}
<BR><BR> Thanks, <BR> Workflow Group”,
projectName[0], GetProjectUrl());
}
else
{
email.Subject = string.Empty;
email.Body = string.Empty;
}
if ((ReturnedResourceData != null) &&
(ReturnedResourceData.Resources.Count == 1))

Page 69
{
//send it to
email.To =
ReturnedResourceData.Resources[0].WRES_EMAIL;
}
else
{
email.To = “[email protected]”;
}
}
private string GetProjectUrl()
{
return workflowProperties.WebUrl +
“/projectdrilldown.aspx?projUid=” +
projectSequence1.WorkflowContext.ProjectUid;
}
#endregion
Add ReadProjectProperties to get the
PM name
Name: toReadProjectManager
PropertyValues: projectManagerValue
MdPropUid: ProjectManagerUid
WorkflowContext: WorkflowContext
Add a SendEmail activity from the
SharePoint Workflow toolbox
Name: sendEmailtoPM
CorrelationToken: workflowToken
MethodInvoking: SendingEmail

Page 70
Add an updateProjectStageStatus
activity
Name:
updateProjStageStatusWaitForSubmit
StageUid: ExecutionStageUid
StatusInformation Please hit submit
once project is complete
UpdateProjectStatusField: Waiting for
Input
WorkflowContext: WorkflowContext
Add an OnProjectSubmit activity
Name: onProjectSubmit1
WorkflowContext: WorkflowContext

Page 71
Add a SequenceActivity
PostMortemStage
Add setProjectStage
Name: setPostMortemStage
StageOrder: 5
StageUid : PostMortemStageUid
WorkflowContext
ProjectSequence1.WorkflowContext
At this stage, build your solution.
You should have no errors.
Before deploying it we have to update
the code with the correct GUID
Figure 37: Steps to create the workflow in Visual Studio

Page 72
5.6.5 Get the GUID from Project Configuration
You need to use the GUID of the object defined in the Project Server configuration, when setting
some properties on the Workflow activities in Visual Studio.
We have defined variables that will hold these values.
We need now to get the real Guids
Actions Screen
Getting the stage GUID
Directly by copy pasting the Guid from
the Project Server setting page.
Go to Server Settings\Workflow
Stages\
Open the Stage
2 possibilities:
In the URL
Or by using the System Identification
Data section (at the end of the Stage
page)
In our example we need the GUID for
the 5 stages:
Idea Collection
Lead Approval
Cancelled
Execution
Post Mortem
We can update our code with the
#region Variables //workflow stages used in this workflow new Guid(“00000000-0000-0000-0000-000000000000”); public Guid IdeaCollectionStageUid = new Guid(“0bea837d-e632-45d2-b253-5b3b9f383c86”); public Guid LeadApprovalStageUid = new Guid(“04b334fa-3e9a-49fd-aaad-c710fd8d8198”); public Guid CancelledStageUid = new Guid(“4631c35a-2316-4940-bfd1-eeae9a60b2d8”); public Guid ExecutionStageUid = new Guid(“c363dcc4-94bb-46e7-8477-52042dcd28ee”); public Guid PostMortemStageUid = new Guid(“7d4e4a4f-518a-493d-9d20-1d4360f4fcb1”);

Page 73
correct values.
And for the Custom fields and Lookup
tables
FundingRequired
FundingRequired Yes value
ProjectManager
We can update our code with the
correct values.
Note: you will need to replace the
values with your specific GUID values.
//Funding Required public Guid FundingRequiredUid = new Guid("64d3274c-d242-4e25-9341-828db99b14a9"); public Guid FundingRequiredYesLTValueUid = new Guid("2324b22f-d523-4a87-8263-81e0ce500105"); public bool RequiresFundingResult; //Project Manager public Guid ProjectManagerUid = new Guid("c3d6ec22-0862-43a6-b3a0-91d5c1eb03fb");
Figure 38: Finding the GUIDs for the Project Server objects
At this point we can now test and run our workflow from Project Server after deploying it.
5.7 Deploy the workflow
The following steps are needed to be able to use the workflow in Project Server.
1. Deploy the workflow by using Visual Studio or the WSP package.
2. Restart three separate services.
3. Create a workflow association to the DLL.
4. Associate the workflow to an Enterprise Project Type (EPT).
Here is the script to restart the three services:
Net stop SPTimerV4
Net stop ProjectQueueService14
Iisreset.exe /stop
Iisreset.exe /start
Net start ProjectQueueService14
Net start SPTimerV4
Pause
Figure 39: Script to restart the 3 services after the deployment
5.7.1 Using Visual Studio automatic deployment
Actions Screen
To deploy the workflow using Visual
Studio.
Select the solution
ContosoSampleProjectWorkflow and

Page 74
right-click:
Select Deploy.
This will recompile your solution,
package it, and deploy it in the site
Then you need to restart the three
following processes:
SharePoint Timer
ProjectQueueService
IIS
This can be automated in a simple
batch file like the one presented here.
If you do not recycle these processes,
the latest version will not be used until
these processes are restarted.
Net stop SPTimerV4
Net stop ProjectQueueService14
Iisreset.exe /stop
Iisreset.exe /start
Net start ProjectQueueService14
Net start SPTimerV4
Pause
You then need to check the workflow
association on your SharePoint site:
Go to Site Settings in Project Web App
In the Site Administration section,
select:
Workflow settings

Page 75
You should see your newly deployed
Workflow.
If you click on the workflow
“ContosoSampleProjectWorkflow”, you
will see the settings of this workflow.
You can now make the association with
your EPT.
Go to Project Server settings in PWA in
the Workflow and Project Detail Pages,
Select Enterprise Project Types (EPT)
Select the EPT Contoso Project
You need to associate or re-associate
the newly deployed Workflow with the
EPT.
Select ContosoSampleProjectWorkflow
– Workflow1

Page 76
You are now ready to use your
Workflow.
Figure 40: Steps to deploy your workflow using Visual Studio
5.7.2 Using a WSP package
You have to use a WSP package if you have to deploy the solution on server where you do not have
Visual Studio installed.
Actions Screen
In order to build the WSP package of
the solution, just select the Build menu
Select the solution
ContosoSampleProjectWorkflow and
right-click:
Select Build.
This will compile your solution,
package it, and generate a WSP
package in the bin directory of your
solution.
Take the WSP file
ContosoSampleProjectWorkflow.wsp
and copy it on your target server to the
directory C:\DeployPSS

Page 77
Start an administrator Windows
PowerShell command window.
Use the following Windows PowerShell
commands to add the solution to the
Farm.
Add-SPSolution -LiteralPath C:\DeployPSS\ContosoSampleProjectWorkflow.wsp
Install the solution Install-SPSolution –Identity ContosoSampleProjectWorkflow.wsp –GacDeployment
Enable the feature in the Project Web
App site collection.
Enable-SPFeature -Identity ContosoSampleProjectWorkflow _Feature1 -Url http://project.contoso.com/pwa1
You can verify that the feature is
activated at the Site collection level.
Then, to enable the creation of
workflow instance, go to Site Settings
in Project Web App.
In the Site Administration section,
select:
Workflow settings
Select Add a workflow
Or the workflow if this is a Refresh

Page 78
Select the Workflow that you have just
deployed.
Give it the name that will be visible to
the user of the site.
Go to the EPT and make the association
(see previous chapter).
Figure 41: Steps to deploy your workflow using a WSP package
5.8 Developing your own custom activity
In our example we need a specific Activity to update the permissions of the project so that the
selected Project Manager can act as a Project Manager in Project Server 2010.
The source code for this Activity is part of the samples of the Project Server 2010 SDK, which can be
downloaded here:
http://www.microsoft.com/downloads/details.aspx?FamilyID=46007f25-b44e-4aa6-80ff-
9c0e75835ad9&displaylang=en
To develop you own custom activity, you need to follow the following steps:
1. Create a class library - Workflow - Workflow Activity Library that uses Framework 3.5
To use this custom activity in your own custom workflow:
2. Set a reference to the ActivityLibrary.dll assembly.
3. Add the custom activity to the toolbox.
4. Add the custom activity to you Visual Studio designer view and fill in the properties.

Page 79
5. Build and create the deployment package.
Extra steps to deploy the workflow with your custom activity:
1. Deploy in the GAC your ActivityLibrary.dll assembly:
2. Update the Web.config file of the Project server Web application in the WorkflowServices element to include a reference to the assembly.
To have all the detail steps see the document included in the sample of the Project Server SDK:
Creating and Using a Custom Project Server Workflow Activity.
Action Screen
We will add the custom Activity Project
to our current Visual Studio solution.
Select the menu Add Existing Project
Go to the directory:
C:\Program Files (x86)\Microsoft
SDKs\Project2010SDK\Samples\Workfl
ow\CustomActivityWorkflow\ActivityLi
brary and add the ActivityLibrary
project
Build the project.

Page 80
Add a reference to this Activity library
assembly to the
ContosoSampleProjectWorkflow
project references.
The new activity is now available in the
Toolbox:
In our example, add this activity before
the SendEmailToPM activity.

Page 81
Set up the properties:
Name: grantPMPermissionsToProject
ResourceData: ReturnedResourceData
ResourceName:
projectManagerValue[0]
SaveProjectPermission: True
ViewProjectDetailsPermission: True
ViewProjectSummaryPermission: True
ViewWorkspacePErmssion: True
WorkflowContext: WorkflowContext
Deploy the new solution by using
Visual Studio.
Add the Activity Library .dll assembly in
the GAC
Update the Web.config file of the Web
application that contains the Project
Server application to include the
custom activity.
This line needs to be added in the
<WorkflowServices> section.
If you forget to update the Web.config
file or if the Activiy Library is not
deployed in the GAC, the workflow will
fail to start.
<WorkflowService Assembly="ActivityLibrary, Version=1.0.0.0, Culture=neutral, PublicKeyToken= 829247b93decd642" Class="ActivityLibrary.CustomWorkflowService" />

Page 82
Figure 42: Steps to add a custom Activity to our workflow project
5.9 Development Best practices and Guide
Here are some general best practices that you can follow to ease the maintenance of your
custom Workflow.
5.9.1 Best practices
Context Remarks
Define all your
strings in local
variables so
that you can
reference
these variables
when using the
Workflow
Designer in
Visual Studio.
Using variable to hold constants brings a single point of maintenance to
ease the maintenance. It is also better for preparing the code for
localization.
It makes the code more robust.
Add error
handling code
to handle
specific case or
unexpected
events
You need to add error handling code to your workflow. There are specific
handlers that can be used: Fault and cancel handlers.
These are described in the SDK in this article for example
http://msdn.microsoft.com/en-us/library/dd695716.aspx
Use the Enable
Property in an
Activity, to
temporarily
disable an
activity that is
creating a
problem.
Each workflow activity has an Enabled property. An activity can be easily
disabled by setting this property to False.
How to
redeploy a
new version of
a workflow,
and manage
the currently
running
Use the Skip to stage feature
http://blogs.msdn.com/project_programmability/archive/2010/02/10/how-
to-use-the-skip-to-stage-feature-in-project-server-2010-workflows.aspx

Page 83
workflow:
Caution when
copying or
pasting a GUID
from the PWA
interface
When you do a copy/paste of GUID from the PWA interface, a control
characters is added that may interfere with the real value.
Figure 43: List of Best Practices
5.9.2 Description of Activities in a Nutshell
Description and list of activities you can use (the most used):
Activity Name Project Server Specific
(Microsoft.Office.Project.Server.Workflow)
Purpose
CompareProjectProperty An activity that will compare the value of a
project Custom or intrinsic Field and return
True/False
OnProjectCheckin
An activity that will pause the workflow until a
Project Checkin Event happens for the current
project
OnProjectCommit
An activity that will pause the workflow until a
Project Commit Event happens for the current
project. This event happen when a project is
selected within the Portfolio Analysis feature.
OnProjectSubmit
An activity that will pause the workflow until a
Project Submit Event happens for the current
project
ProjectSequence A wrapper activity that must be the second
activity in the workflow (right after
onWorkflowActivated). All following activities
must be placed within this activity and will
need to inherit the workflow context.
ReadProjectProperty An activity that will return the value of a
Project Custom or intrinsic field
ReadProjectSecurityGroupMembers An activity that will return all of the members
of a particular security group within Project
Server, with or without filtering based on

Page 84
department.
SetProjectStage This activity defines when a stage starts. Stages
that are created within Project Server are
referenced directly by using this activity.
UpdateProjectProperty
An activity used to update an intrinsic or
custom field
UpdateProjectStageStatus Updates the status message for a stage. You
should add the UpdateProjectState activity
only if you want to communicate to the end
user what's going on with the project (for
example - Waiting for Approval, Waiting for
Portfolio)
Figure 44: Description of Project Server workflow activities
Full details can be found here: http://msdn.microsoft.com/en-us/library/ee756398.aspx
Activity Name SharePoint Specific
(Microsoft.SharePoint.WorkflowActions)
Purpose
OnWorkflowActivated Responds to the event that Microsoft
SharePoint Foundation raises when a new
workflow instance is initiated for an item
SendEmail
Creates and sends an e-mail message to the
specified users
Figure 45: Description of SharePoint workflow activities
Full details can be found here: http://msdn.microsoft.com/en-us/library/ms473641.aspx

Page 85
Activity Name SharePoint Server Specific
(Microsoft.Office.Workflow.Actions)
Purpose
Office Task This activity is for the generalized extensible
execution of assigning work to users and
responding to the completion of work in a
repeatable contained way
ForwardTask Creates a copy of the current task and assigns it
to a specified user. Both copies of the task
must be completed for the original task to be
considered complete.
EscalateTask Effectively reassigns a workflow task to the task
owner's manager.
OnTaskAssigning An activity that is executed before a task is
created and sent to a specified user.
OnTaskProcessStarted Executes when a task is first created, but
before the task is assigned to users.
SetTaskField A workflow activity used to assign values to a
specified field for a task item such as
AssignedTo, Title or DueDate.
EndTaskProcess Forcefully ends the task process, regardless of
the completion status of existing tasks. in other
words, it ends tasks that may be incomplete.
CheckExitConditions A sequential workflow activity that contains
conditional logic. This activity must be a direct
child of an OfficeTask activity.
Figure 46: Description of SharePoint Server (Office Task) workflow activities
Full details can be found here: http://msdn.microsoft.com/en-us/library/ee590729.aspx
Activity Name Workflow General
(System.Workflow.Activities)
Purpose
Code Runs the code-beside method associated with

Page 86
an activity
IfElse Activity Conditionally runs one of two or more activities
of type IfElseBranchActivity
IfElseBranchActivity Represents a branch of an IfElseActivity
SequenceActivity Runs a set of child activities according to a
single defined ordering
TerminateActivity Terminates execution of workflow
Figure 47: Description of Windows workflow activities
Full details can be found here: http://msdn.microsoft.com/en-us/library/ms594882.aspx
5.9.3 Source code of the sample
Here is the full code of the sample code:

Page 87
using System;
using System.ComponentModel;
using System.ComponentModel.Design;
using System.Collections;
using System.Drawing;
using System.Linq;
using System.Workflow.ComponentModel.Compiler;
using System.Workflow.ComponentModel.Serialization;
using System.Workflow.ComponentModel;
using System.Workflow.ComponentModel.Design;
using System.Workflow.Runtime;
using System.Workflow.Activities;
using System.Workflow.Activities.Rules;
using Microsoft.SharePoint;
using Microsoft.SharePoint.Workflow;
using Microsoft.SharePoint.WorkflowActions;
using Microsoft.Office.Project.Server.Library;
using System.Text;
using System.Diagnostics; // for launching the debugger Debugger.Break
namespace ContosoSampleProjectWorkflow.Workflow1
{
public sealed partial class Workflow1 : SequentialWorkflowActivity
{
public Workflow1()
{
wfContext = new Microsoft.SharePoint.WorkflowActions.WorkflowContext();
InitializeComponent();
}
public Guid workflowId = default(System.Guid);
public SPWorkflowActivationProperties workflowProperties
{
get;
set;
}
// to manage the workflow Office Tasks
public Microsoft.SharePoint.WorkflowActions.WorkflowContext wfContext
{
get;
set;
}
protected override void Dispose(bool disposing)
{
base.Dispose(disposing);
if (disposing)
{
wfContext.Dispose();
workflowProperties.Dispose();
}
}
private void onWorkflowActivated1_Invoked(object sender, ExternalDataEventArgs e)
{
wfContext.Initialize(workflowProperties);
}

Page 88
#region Variables
//workflow stages used in this workflow new Guid("00000000-0000-0000-0000-
000000000000");
public Guid IdeaCollectionStageUid = new Guid("0bea837d-e632-45d2-b253-5b3b9f383c86");
public Guid LeadApprovalStageUid = new Guid("04b334fa-3e9a-49fd-aaad-c710fd8d8198");
public Guid CancelledStageUid = new Guid("4631c35a-2316-4940-bfd1-eeae9a60b2d8");
public Guid ExecutionStageUid = new Guid("c363dcc4-94bb-46e7-8477-52042dcd28ee");
public Guid PostMortemStageUid = new Guid("7d4e4a4f-518a-493d-9d20-1d4360f4fcb1");
//Funding Required
public Guid FundingRequiredUid = new Guid("64d3274c-d242-4e25-9341-828db99b14a9");
public Guid FundingRequiredYesLTValueUid = new Guid("2324b22f-d523-4a87-8263-
81e0ce500105");
public bool RequiresFundingResult;
//Project Manager
public Guid ProjectManagerUid = new Guid("c3d6ec22-0862-43a6-b3a0-91d5c1eb03fb");
//office task variables
/// This is the string that is bound with the SharePoint OfficeTask activity.
public String officeTaskOutcomes = "Approved, ;Rejected,";
public bool approvalResult = false;
public Object TaskTitle = new System.Object();
// this is the Approval ContentTypeID of the Project Server Approval form
public String ProjectServerApprovalContentTypeID =
"0x0108010038A52C27344148C9B9214F82C7C02985";
//user group used for approval - PSSecurityGroup.Team Leads
public Guid TeamLeadGroup = new System.Guid(PSSecurityGroup.TeamLeads.ToString());
public string[] TeamLeads;
//for send email activity
public String[] projectName = default(System.String[]);
public String[] projectOwnerEmail = default(System.String[]);
public String[] ProjectOwnerDisplayName = default(System.String[]);
#endregion
#region TestFunding Required
private void IsFundingRequired(object sender, ConditionalEventArgs e)
{
e.Result = RequiresFundingResult;
}
#endregion
#region Approval process
private void BuildApprovers(object sender, EventArgs e)
{
CodeActivity Sender = (CodeActivity)sender;
Microsoft.Office.Workflow.Actions.OfficeTask currentApprover =
((CompositeActivity)Sender.Parent).Parent as
Microsoft.Office.Workflow.Actions.OfficeTask;
currentApprover.AssignedTo = FormatApprovers(TeamLeads);
TaskTitle = "Review project " + projectName[0];
}

Page 89
private static string FormatApprovers(string[] list)
{
if (list == null)
return String.Empty;
StringBuilder strbuilder = new StringBuilder(
@"<my:Assignments
xmlns:my='http://schemas.microsoft.com/office/infopath/2003/myXSD'
xmlns:pc='http://schemas.microsoft.com/office/infopath/2007/PartnerControls'>
<my:Assignment>");
foreach (string s in list)
{
strbuilder.AppendFormat(
@" <my:Assignee>
<Person>
<DisplayName />
<AccountType>User</AccountType>
<AccountId>{0}</AccountId>
</Person>
</my:Assignee>", s);
}
strbuilder.AppendFormat(
@" <my:AssignmentType>Parallel</my:AssignmentType>
</my:Assignment>
</my:Assignments>");
return strbuilder.ToString();
}
private void VerifyExitCondition(object sender, ConditionalEventArgs e)
{
IfElseBranchActivity Sender = (IfElseBranchActivity)sender;
Microsoft.Office.Workflow.Actions.OfficeTask officeTask =
Sender.Parent.Parent.Parent as Microsoft.Office.Workflow.Actions.OfficeTask;
if (officeTask == null)
return;
if (officeTask.TaskResults["Approved"] != null)
{
e.Result = true;
approvalResult = true;
}
else
{
e.Result = true;
approvalResult = false;
}
}
private void IfIdeaNotApproved(object sender, ConditionalEventArgs e)
{
e.Result = !approvalResult; //If project is approved approvalResult == true =>
Result must be negated
}
#endregion
#region SendEmail
public String[] projectManagerValue = default(System.String[]);

Page 90
public Microsoft.Office.Project.Server.Schema.ResourceDataSet ReturnedResourceData =
new Microsoft.Office.Project.Server.Schema.ResourceDataSet();
private void SendingEmail(object sender, EventArgs e)
{
SendEmail email = (SendEmail)sender;
if ((projectName != null) && (projectName.Length != 0) && (projectName[0] !=
string.Empty))
{
//fill in email subject if project name is not empty
email.Subject = String.Format("Project {0} has been selected ",
projectName[0]);
email.Body = String.Format("You're listed as PM Owner for the following
project: - <I> {0} </I>.<BR> Please create the detailed project plan. <BR> {1} <BR><BR>
Thanks, <BR> Workflow Group", projectName[0], GetProjectUrl());
}
else
{
email.Subject = string.Empty;
email.Body = string.Empty;
}
if ((ReturnedResourceData != null) && (ReturnedResourceData.Resources.Count == 1))
{
//send it to
email.To = ReturnedResourceData.Resources[0].WRES_EMAIL;
}
else
{
email.To = "[email protected]";
}
}
private string GetProjectUrl()
{
return workflowProperties.WebUrl + "/projectdrilldown.aspx?projUid=" +
projectSequence1.WorkflowContext.ProjectUid;
}
#endregion
}
}
Figure 48: Source Code of the workflow

Page 91
6 DEPLOY: DEPLOYMENT FROM DEV TO QA/PRODUCTION
6.1 Deployment of the solution on a QA and Production environment
Once you have developed your workflow on your development environment, you will want to
deploy it on a QA environment and then a Production environment.
We have already covered how you can deploy a workflow using the WSP package (see 5.7.2
Using a WSP package), but as you have understood now, we also need to create the associated
objects in the Project Server application (Phases, Stages, PDPs, Custom Fields, Lookup tables).
Currently there are two automated solutions available:
1. Playbooks 2010 tool from the Resource kit 2. The Solution starter: EPT Export/Import DMExport/DMImport from Code Gallery
A manual way would be:
To manually create the Project Server objects on each environment To maintain the different values of the GUID of the objects of the different environments in the
variables. The right version of the values would be chosen using conditional compilation that would be triggered by the environment target.
6.1.1 Using the new 2010 Playbooks
A tool called Playbook is available. It has been updated for the 2010 version by adding the
export/import of the workflow objects.
This tool only handles the PWA objects. The workflow needs to be deployed also on the
target system.
Actions Screen
Export the objects
Start Playbooks
Connect to the development Project
Web App site:
http://project.contoso.com/PWA1

Page 92
Select the Backup tab
Enter a file name:
ExportOfWorkflows.xml
Select the Workflow objects
Select the Backup button
10:06:18 : Server URL set to http://project.contoso.com/pwa1 10:06:18 : Initializing Web Services... 10:06:23 : Running application PlaybooksMainForm 10:06:24 : Initializing Settings Tree... 10:10:34 : 10:10:34 : ======================================================================================================================== 10:10:34 : Backing up server settings to ExportOfWorkflows from server http://project.contoso.com/pwa1... 10:10:34 : ======================================================================================================================== 10:10:34 : 10:10:34 : Load settings from server: 10:10:34 : Loading Custom Fields and Lookup Tables... 10:10:36 : Loading Enterprise Project Types... 10:10:36 : Loading Workflow Phases... 10:10:36 : Loading Workflow Stages... 10:10:37 : Loading Project Detail Pages... 10:12:02 : Loading Workflow Proxy User... 10:12:03 : 10:12:03 : Write server settings to XML structure: 10:12:03 : Writing XML data for Custom Fields and Lookup Tables... 10:12:03 : Writing XML data for Enterprise Project Types... 10:12:03 : Writing XML data for Workflow Phases... 10:12:03 : Writing XML data for Workflow Stages... 10:12:03 : Writing XML data for Project Detail Pages... 10:12:03 : Writing XML data for Workflow Proxy User... 10:12:03 : 10:12:03 : Writing Playbook to disk...
On the new environment:
Deploy the workflow solution
Add the Contoso Sample Workflow
Use the steps described in 5.7.2 Using a WSP package to deploy the WSP package and add the workflow to the Site collection.

Page 93
Import the objects in the new
environment using Playbooks.
Connect to the new Project Web App:
http://finweb.contoso.com/PWA2
Select the Restore tab.
Enter the file name:
ExportOfWorkflows.xml
The following objects are going to be
restored
Click the restore button
PlaybooksLogger Started 06/22/2010 10:30:35 10:30:35 : Running application ServerUrlForm 10:31:29 : Server URL set to http://finweb.contoso.com/PWA2 10:31:29 : Initializing Web Services... 10:31:52 : Running application PlaybooksMainForm 10:31:52 : Initializing Settings Tree... 10:34:56 : 10:34:56 : ======================================================================================================================== 10:34:56 : Reading server settings from E:\tools\playbooks\ExportOfWorkflows.xml 10:34:56 : ======================================================================================================================== 10:34:56 : 10:34:56 : 10:34:56 : Read settings from XML data: 10:34:56 : Reading XML data for Custom Fields and Lookup Tables... 10:34:56 : Reading XML data for Enterprise Project Types... 10:34:57 : Reading XML data for Workflow Phases... 10:34:57 : Reading XML data for Workflow Stages... 10:34:57 : Reading XML data for Project Detail Pages... 10:34:57 : Reading XML data for Workflow Proxy User... 10:36:12 : 10:36:12 : ======================================================================================================================== 10:36:12 : Restoring Settings to Server http://finweb.contoso.com/PWA2... 10:36:12 : ======================================================================================================================== 10:36:12 : Restoring Project Detail Pages... 10:36:56 : Updating PDP ID from 55672f8d-c9f9-4864-be7e-bd6a5ff127a5 to 55672f8d-c9f9-4864-be7e-bd6a5ff127a5 10:36:56 : Updating PDP ID from 1f9d8fed-df74-4daf-af94-d327983c05e6 to 1f9d8fed-df74-4daf-af94-d327983c05e6 10:36:56 : Updating PDP ID from cdee4f89-44f6-4bd8-a240-a713c0960c44 to cdee4f89-44f6-4bd8-a240-a713c0960c44 10:36:56 : Updating PDP ID from 60ac4cf5-74f0-4858-97e3-416082396f3b to 60ac4cf5-74f0-4858-97e3-416082396f3b 10:36:56 : Updating PDP ID from 029c1e30-a656-461b-9137-b9e79a6e355c to 029c1e30-a656-461b-9137-b9e79a6e355c 10:36:56 : Updating PDP ID from 852159a7-dab1-4a80-a7b1-d061d290ca6d to 852159a7-dab1-4a80-a7b1-d061d290ca6d 10:36:56 : Updating PDP ID from 0e30384b-9a15-4279-9f7c-cb187a96da19 to 0e30384b-9a15-4279-9f7c-

Page 94
cb187a96da19 10:36:56 : Updating PDP ID from 1292fc75-f992-444c-9a84-c69da35a104f to 1292fc75-f992-444c-9a84-c69da35a104f 10:36:56 : Updating PDP ID from df32b008-02f8-4c79-b6c7-403093f46164 to df32b008-02f8-4c79-b6c7-403093f46164 10:37:29 : Restoring Custom Fields and Lookup Tables... 10:37:30 : Updating lookup table Department... 10:37:30 : Creating lookup table Funding Required... 10:37:30 : Updating lookup table Sample Primary Objective... 10:37:30 : Updating lookup table Cost Type... 10:37:30 : Creating lookup table On Budget... 10:37:30 : Updating lookup table Health... 10:37:30 : Updating lookup table RBS... 10:37:30 : Updating lookup table Sample Areas Impacted... 10:37:37 : Updating Custom Fields... 10:37:42 : Updating custom field Sample Compliance Proposal... 10:37:44 : Updating custom field Sample Approved Start Date... 10:37:44 : Updating custom field Sample Proposal Cost... 10:37:44 : Updating custom field Cost Type... 10:37:45 : Creating custom field Reasons... 10:37:46 : Updating custom field Project Departments... 10:37:46 : Updating custom field Sample Post Implementation Review Date... 10:37:46 : Creating custom field On Budget... 10:37:47 : Updating custom field Health... 10:37:48 : Creating custom field Funding Required... 10:37:49 : Updating custom field Sample Areas Impacted... 10:37:49 : Creating custom field Proposed Project Manager... 10:37:49 : Updating custom field Sample Primary Objectives... 10:37:51 : Updating custom field Flag Status... 10:37:52 : Updating custom field Sample Business Need... 10:37:52 : Updating custom field Sample Proposed Start Date... 10:37:53 : Updating custom field Sample Proposed Finish Date... 10:37:53 : Updating custom field Sample Goals... 10:37:53 : Creating custom field Lessons Learned... 10:37:54 : Updating custom field Resource Departments... 10:37:54 : Updating custom field Sample Post Implementation Review Notes... 10:37:55 : Updating custom field Team Name... 10:37:55 : Updating custom field Sample Approved Finish Date... 10:37:56 : Updating custom field Sample Assumptions... 10:37:57 : Updating custom field RBS... 10:37:58 : Restoring Workflow Phases... 10:38:04 : Restoring Enterprise Project Types... 10:38:06 : Restoring Workflow Stages... 10:38:09 : Restoring Workflow Proxy User... 10:38:11 : Restoring relationships for Custom Fields and Lookup Tables... 10:38:11 : Restore complete! 10:38:11 :
Associate the EPT to the Workflow
Figure 49: Steps to Backup/Restore workflow configuration using Playbooks 2010
This tools exports all the workflows that are present in the PWA instance.
6.1.2 Solution starter EPT Export Import
This solution starter demonstrates how an Enterprise Project Type (EPT) and its related entities can
be exported from one PWA environment and imported back into another. The import is done by
registering a feature corresponding to the EPT and, on feature activation, creating all entities that
support the EPT.
It is composed of the two projects:

Page 95
DMExport project
DMImport project It can be downloaded from the following location:
http://code.msdn.microsoft.com/P2010SolutionStarter

Page 96
7 DEBUG/MONITOR: TROUBLESHOOTING WORKFLOWS
In this chapter we will see how we can Debug a workflow during Development and also how
to troubleshoot a workflow when it is running a workflow.
7.1 Debugging the workflow
In order to be able to debug your workflow you need to do the following:
1. Copy the PDB of your workflow assembly in the GAC 2. Attach the debugger to a specific process (Queue or w3p)
7.1.1 Copying the PDB of your assembly to the GAC
To be able to debug a workflow, you will also need to copy the PDB file of your assembly to the GAC.
You can use a batch file like this one to do that:
Copy
E:\ContosoSampleProjectWorkflow\ContosoSampleProjectWorkflow\bin\Debug\ContosoSampleProjectWor
kflow.pdb C:\Windows\assembly\GAC_MSIL\ContosoSampleProjectWorkflow\1.0.0.0__a66c3f03618a253a
Figure 50: Script to copy assembly to the GAC for debugging purposes
To locate the directory of your assembly in the GAC, use the command line and navigate to the
directory C:\Windows\assembly\GAC_MSIL\YourAssemblyName
You will then find the unique directory of your assembly.
7.1.2 Attaching the debugger
Depending on when you want to debug your workflow you will need to attach the Visual Studio
debugger to different processes:
Queue process
W3P process
You need to attach to the Queue process:
If you create a project
If you restart a workflow from the server settings
You need to Attach to w3p:
If you hit submit
If you restart the workflow through the PDP page. To locate the right w3p process on your server, you can use the IIS command line administrative tool
appcmd that is located in the C:\windows\System32\inetsrv directory:
Appcmd list wp

Page 97
Figure 51: Example showing the use of appcmd to get the w3P process number
In this case the application pool is named projectAppPool1, so the w3P process is 6712.
You can also use the techniques describe in this article to attach the debugger:
http://blogs.msdn.com/b/sharepoint/archive/2007/04/10/debugger-feature-for-sharepoint.aspx
7.2 Troubleshooting a Workflow
For information on how to troubleshoot a workflow, see the following article:
http://blogs.technet.com/b/projectadministration/archive/2009/12/21/how-to-troubleshoot-your-
workflows.aspx
Check the workflow status page
Check the ULS logs
7.2.1 Check the workflow status page
There are two different ways to do this based on your need:
Actions Screen
Check from within the project
Open a project with a failing
workflow
Go to the Stage Status Page.
(This is the very first page from
within a workflow stage.)
From within the workflow status
page, expand the “All Workflow
Stages” section.

Page 98
Click the “Additional Workflow Data” link, which is round at the bottom right.
If your project cannot be opened, you can also get to this page by:
Site Actions, View All Site Content
Click “Site Workflows”
Click the “Show All Workflows” link
Find the workflow that you are concerned about.
Once you have opened the workflow status page, you can investigate the workflow history to see what the workflow was doing before it began to error.
Figure 52: Steps to troubleshoot a workflow

Page 99
7.2.2 View the ULS logs
1. ULS logs can be found in: “C:\Program Files\Common Files\Microsoft Shared\Web Server Extensions\14\LOGS”
o Suggestion: Create a desktop shortcut on the server to this location. 2. Logs will be broken up into pieces. Find the log with a time stamp as close to the time you
are most concerned about, and open it. 3. Some key words to look for when going through the logs are:
o SharePoint Foundation o Startworkflow o Winwf o entering...activity o leaving... activity
4. You can increase the logging level on the following categories from the central administration: http://servername:Port/_admin/metrics.aspx
o Project Server: Project Server Workflow o SharePoint Foundation: Workflow Infrastructure

Page 100
8 REFERENCES
8.1 General references
Title URL Reference
Project 2010 Web site www.microsoft.com/project/2010
Project Server 2010
TechCenter (TechNet)
http://technet.microsoft.com/projectserver
Project 2010 Resource
Center (MSDN®)
http://msdn.microsoft.com/Project
Project 2010 Video content www.microsoft.com/showcase/en/US/channels/microsoftproject
Project 2010 webcasts and
podcasts
www.microsoft.com/events/series/epm.aspx?tab=webcasts
Project 2010 Demo Image:
Download: http://go.microsoft.com/?linkid=9713956
Hosted Virtual Lab: http://go.microsoft.com/?linkid=9713654
Blogs URL Reference
Official Blog of the Product Development
group
http://blogs.msdn.com/project
Project Developer http://blogs.msdn.com/project_programmability
Project IT Pro http://blogs.technet.com/projectadministration
Additional questions? Project 2010 Forums!
http://social.msdn.microsoft.com/Forums/en-
US/category/projectserver2010,projectprofessional2010
8.2 References given in this document
Document/Blo
g
URL

Page 101
Source Code
for the sample
presented
http://code.msdn.microsoft.com/PS2010DMSample
Demand
Management in
Project Server
2010
http://go.microsoft.com/fwlink/?LinkId=191854
How to Setup
the Workflow
Proxy Account
http://blogs.technet.com/projectadministration/archive/2009/12/21/how-to-
setup-the-workflow-proxy-account.aspx
Install
SharePoint
Server 2010,
Project 2010
and Visual
Studio 2010 on
a single server
http://technet.microsoft.com/en-us/library/cc197667.aspx
Configure
Visual Studio
2010 for
Project 2010
Workflow
development in
the Project
Server SDK on
MSDN
http://msdn.microsoft.com/en-us/library/ee767686.aspx
Adding the
Project Server
Activities and
SharePoint
Server
Activities in the
Toolbox
: http://msdn.microsoft.com/en-
us/library/ee767686(v=office.14).aspx#pj14_ConfiguringVS2010_ProjectServerTa
b
Project Server
2010 SDK
http://www.microsoft.com/downloads/details.aspx?FamilyID=46007f25-b44e-
4aa6-80ff-9c0e75835ad9&displaylang=en
Error handling http://msdn.microsoft.com/en-us/library/dd695716.aspx

Page 102
code to in a
workflow
Hot to use the
Skip to stage
feature
http://blogs.msdn.com/project_programmability/archive/2010/02/10/how-to-
use-the-skip-to-stage-feature-in-project-server-2010-workflows.aspx
Description of
Project Server
Workflow
Activities
http://msdn.microsoft.com/en-us/library/ee756398.aspx
Description of
SharePoint
Server
Workflow
Activities
http://msdn.microsoft.com/en-us/library/ms473641.aspx
Description of
SharePoint
Server Office
Task Workflow
Activities
http://msdn.microsoft.com/en-us/library/ee590729.aspx
Description of
Windows
Workflow
Activities
http://msdn.microsoft.com/en-us/library/ms594882.aspx
Solution
starters for
Project Server
2010
http://code.msdn.microsoft.com/P2010SolutionStarter
Debugging
feature for
SharePoint
http://blogs.msdn.com/b/sharepoint/archive/2007/04/10/debugger-feature-for-
sharepoint.aspx
How to
troubleshoot a
workflow
http://blogs.technet.com/b/projectadministration/archive/2009/12/21/how-to-
troubleshoot-your-workflows.aspx

Page 103