home care health related tasks curriculum - new york state
TRANSCRIPT

HOME CARE HEALTH RELATED
TASKS CURRICULUM
NEW YORK STATE DEPARTMENT OF HEALTH 161 Delaware Avenue Delmar, New York 12054 Office of Health Systems Management Division of Home and Community Based Services Bureau of Home Care and Hospice Surveillance and Quality Indicators/Evaluation April 2006; January 2007

2
ACKNOWLEDGEMENTS
We wish to express our gratitude and appreciation to all the people who helped in the development of this revision of the Home Care Health Related Tasks Curriculum. Staff from the New York State Department of Health (NYSDOH):
• Marjorie Brier-Lynch, RN, BSN • Suzanne Broderick, RN, Ph.D • Maureen Duffy, RN, MA • Priscilla Ferry, RN, BS • Rebecca Fuller Gray, RN, MBA • Mary G. Graziano, RN, BS • Kathleen Sherry • Frances Stevens • Margaret Willard, MS • Elaine Zervos, MS, RD, CDN
Representatives from Licensed Home Care Service Agencies (LHCSA):
• Roberta Chapman, RN, BSN, Caregivers • Joyce Donohue, RN, BSN, MSP, Gentiva Health Services • Caroline Kenny, RN, BSN and Joyce Traina, RN, BS,
Metropolitan NY Coordinating Council on Jewish Poverty • Susan Trocchia, RN, People Care • Elizabeth Jaiswal, RN, BSN, Partner’s in Care
Representatives from Certified Home Health Agencies (CHHA):
• Kathleen Marcais, RN, BS, Community Health Center
Molly Williams, Director of Public Policy, New York State Association of Health Care Providers, Inc. Melodie Bell-Cavallino, MS, RD, CDN, FADA; Chair, Nutrition Science Department; Associate Professor; Director Dietetic Internship; Sage Graduate School; The Sage Colleges

3
INTRODUCTION TO HOME CARE HEALTH RELATED
TASKS CURRICULUM ___________________________________________________ The updated Home Care Health Related Tasks Curriculum (HRTC) is a revision of the HRTC that was originally developed in 1989 and revised in 1992 by the State University of New York at Buffalo under contract with the New York State Department of Social Services. This curriculum revision is designed to replace outdated content with current standards. The Home Health Aide Training Program (HHATP) is comprised of both the Home Care Curriculum (HCC) and the HRTC and requires 75 hours to complete. The 75 hours consists of the following: • 40 hours HCC • 35 hours HRTC
19 hours classroom/lab instructional training 16 hours supervised demonstration of skills
♦ 8 hours classroom/lab ♦ 8 hours with a client or patient at home or in an appropriate health
care facility The Home Care Health Related Tasks Curriculum contains standard written tests that must be used in combination with Performance checklists to determine the Home Care Worker’s successful completion of each Unit. A Home Health Aide certificate will be issued to the student upon successful completion of the 75-hour training program. The original Home Care Health Related Tasks Curriculum may be used as an adjunct to the information contained in the revised objectives and outline. Other resources may be used at the discretion of the Registered Professional Nurses supervising the approved Home Health Aide Training Programs. Infection Control The Center for Disease Control (CDC) standard precaution guidelines, especially handwashing and personal protective equipment must be strictly adhered to and is included throughout all units.

4
MANUAL USE
______________________________________________ This manual has been developed in an outline format. Each Unit covers a specific subject and contains: • Objective section including a unit title, minimum time required to complete
objectives, objectives, suggested teaching and evaluation methodologies • Outline section • Evaluation section consisting of test questions with an answer key. The Appendix includes all Procedures. These procedures are to be taught and demonstrated to the student. The student must then demonstrate these skills in the classroom setting, as well as on a client who resides at home or on a patient who resides in an appropriate health care facility. Each individual skill must be demonstrated in the presence of a Registered Nurse who assesses the student’s competency. Required and Optional Procedures:
Each of the procedures in this curriculum has a companion list for evaluation purposes. As a practical matter it may not be possible to evaluate the trainee on every procedure. However, there are certain basic procedures the trainee should be required to demonstrate. It is recommended that the trainee pass the eighteen required procedures. If chosen, the optional procedures should be related to the typical caseload or other needs of the agency. Asterisks on the summary charts and on the individual procedures indicate the eighteen required procedures. The major units in the Home Care Health Related Tasks Curriculum are derived from the Home Health Aide Scope of Tasks which contains the Guide to Home Health Aide Training Competency Evaluation and the Matrix, Permissible and Non-Permissible Activities Home Health Aide Services. The revised objectives and outline must be followed and all material must be covered.

5
TABLE OF CONTENTS
PAGES Acknowledgements 2 Introduction to Health Related Tasks 3 Manual Use 4 Table of Contents 5 Appendix 6 Core Value Statement 7 Unit A. Orientation to Health Related Tasks 8 Unit B. Performing Simple Measurements and Tests 10 Unit C. Complex Modified Diets 12 Unit D. Assisting with a Prescribed Exercise Program 25 Unit E. Assisting with the use of Prescribed Medical
Equipment, Supplies and Devices 28 Unit F. Assisting with Special Skin Care 30 Unit G. Assisting with a Dressing Change 32 Unit H. Assisting with Ostomy Care 34 Appendix 36

6
APPENDIX ______________________________________________ Procedure Checklist: PAGES
* A-1, Proper handwashing 1 * B-1, Cleaning a glass thermometer 2 * B-2, Measuring an oral temperature with a glass thermometer 3
B-3, Measuring an oral temperature with an electronic thermometer 4 B-4, Measuring an axillary with a glass thermometer 5 B-5, Measuring an axillary temperature with an electronic thermometer 6 B-6, Measuring a rectal temperature with a glass thermometer 7 B-7, Measuring a rectal temperature with an electronic thermometer 9
* B-8, Measuring the pulse and respirations 11 * B-9, Measuring blood pressure 12
B-10, Collecting a specimen (routine urine, stool and sputum) 14 * D-1, Transfer to a sitting position 15 * D-2, Helping a client to sit at the side of the bed 16 * D-3, Helping a client to stand 17 * D-4, Assisting with passive range of motion exercises 18 * D-5, Assisting with postural drainage 19
E-1, Assisting with the use of an ace bandage 20 E-2, Assisting with the use of condom catheters 21 E-3, Assisting with cleaning the skin and catheter tubing 22 E-4, Assisting with the emptying of the urinary drainage bag 23 E-5, Assisting with the use of a commercially prepared enema 24 E-6, Assisting with the use of a soap solution enema 26 E-7, Assisting with the use of a douche 28 E-8, Assisting with the use of a commercially prepared douche 30
* E-9, Assisting with the use of the oxygen concentrator 32 * E-10, Assisting with the use of the oxygen tank and liquid oxygen reservoir 34 * E-11, Assisting with the use of the medication nebulizer and air compressor 36
E-12, Assisting with the use of the CPAP machine 38 * F-1, Positioning on the back 39 * F-2, Positioning on the side 40 * G-1, Assisting with changing a clean dressing 41 * H-1, Assisting with changing an ileostomy or colostomy pouch 42
H-2, Assisting with emptying an open-end ileostomy or colostomy pouch 44 H-3, Assisting with cleaning a reusable pouch 45 H-4, Assisting with a colostomy irrigation 46
* H-5, Assisting with routine tracheostomy care 48 *Required procedures

7
CORE VALUE STATEMENT All care given must demonstrate core values. Core values underlie all aspects of care, in all care settings and profoundly influence effectiveness and satisfaction across the full range of performance. All students/candidates must incorporate and demonstrate in their skills and knowledge the understanding and integration of the following core values: (1) the dignity and worth of each client as an individual;
(2) respect for the range of diversity of individuals;
(3) a demonstration of a therapeutic relationship i.e., the value of autonomy and
control, adapting to client’s preferences and routines and limits, maintaining privacy and confidentiality, providing care in a caring, compassionate manner and encouraging individuals to be as independent as possible.
In addition, the impact of the actual setting/environment on the care recipient and the care recipient’s adjustment to care must be understood and responded to throughout the program.

8
Unit A: Orientation to Health Related Tasks TIME: 1.5 hours OBJECTIVES: At the completion of this unit, the student will be able to:
1. Define “health related tasks” 2. Name the seven health related tasks 3. Provide examples of home care clients who require health related tasks 4. Identify the goal of health related tasks 5. Describe the Home Care Worker’s role in assisting with health related
tasks 6. Describe what to observe, record and report when assisting with health
related tasks 7. Identify the Home Care Worker’s own attitudes and feelings about
assisting with health related tasks 8. Define special circumstances tasks
TEACHING METHODOLOGIES: Lectures, reading assignment EVALUATION METHODOLOGIES: Written exam, class participation Demonstration of Procedure: A1, Proper Handwashing

9
Unit A: Orientation to Health Related Tasks OUTLINE:
1. What is a Health Related Task? a. definition
2. Seven health related tasks:
a. Performing simple measurements and tests b. Assisting with the preparation of complex modified diets c. Assisting with a prescribed exercise program d. Assisting with the use of prescribed medical equipment, supplies
and devices e. Assisting with special skin care f. Assisting with a dressing change g. Assisting with Ostomy Care
3. Examples of Home Care clients who need assistance with health related
tasks.
4. Goal of Health Related Tasks a. Maintain, strengthen, improve and safeguard the home and family
life for individuals and family groups. b. The Aide will help the client:
Maintain independence Function at highest level
5. The aide should be acquainted with the agency’s forms and guidelines.
6. Observe, record and report appropriately.
7. Aides’ attitude about assisting the client
a. Establish a successful and appropriate Aide-Client relationship
8. Review of Infection Control and Handwashing Refer to Procedure: A-1, Proper Handwashing
9. Definition and examples of Special Circumstances tasks

10
Unit B: Performing Simple Measurements and Tests TIME: 6.5 hours OBJECTIVES:
At the completion of this unit, the student will be able to:
1. Define the terms: vital signs and TPR. 2. Explain the importance of monitoring vital signs. Demonstrate how to
measure blood pressure, temperature, pulse and respiratory rate accurately.
3. Describe the healthcare worker’s role in obtaining urine, stool and sputum specimens.
4. Identify the Home Care Worker’s attitudes and feelings about performing simple measurements, tests and specimen collections
5. Demonstrate the appropriate use of personal protective equipment in specimen collection.
6. Describe reporting and recording results of vital sign measurements and specimen collection
TEACHING METHODOLOGIES: Lecture, reading assignment EVALUATION METHODOLOGIES: Written exam, class participation Demonstration of Procedures: B-1, Cleaning a glass thermometer; B-2, Measuring an oral temperature with a glass thermometer; B-3, Measuring an oral temperature with an electronic thermometer; B-4, Measuring an axillary with a glass thermometer; B-5, Measuring an axillary temperature with an electronic thermometer B-6, Measuring a rectal temperature with a glass thermometer. B-7, Measuring a rectal temperature with an electronic thermometer B-8, Measuring the pulse and respirations B-9, Measuring Blood Pressure B-10, Collecting a specimen

11
Unit B: Performing Simple Measurements and Tests OUTLINE:
1. Definition of the terms “vital signs”, “BP” and “TPR”
2. Importance of monitoring vital signs a. Indication of client’s medical condition b. Normal ranges for adult vital signs
3. Measuring vital signs
a. Temperature b. Respiratory Rate c. Pulse d. Blood Pressure
4. Obtaining specimens
a. Urine b. Stool c. Sputum
Refer to Procedures: B-1, Cleaning a glass thermometer; B-2, Measuring an oral temperature with a glass thermometer; B-3, Measuring an oral temperature with an electronic thermometer; B-4, Measuring an axillary with a glass thermometer; B-5, Measuring an axillary temperature with an electronic thermometer B-6, Measuring a rectal temperature with a glass thermometer. B-7, Measuring a rectal temperature with an electronic thermometer B-8, Measuring the pulse and respirations B-9, Measuring Blood Pressure B-10, Collecting a specimen
5. Aide’s attitudes and feelings about performing simple measurements,
tests and specimen collections
6. Standard Precautions
7. Observe, record and report

12
Unit C: Complex Modified Diets TOPIC: Digestive System LESSON: Assisting with the Preparation of Complex Modified Diets TIME: 4.5 hours PREFERRED INSTRUCTOR: Registered Dietician OBJECTIVES: At the completion of this unit, the student will be able to:
1. Describe three types of complex modified diets 2. Describe their role in the preparation of complex modified diets 3. Assist a client in meeting specific dietary goals consistent with the
client’s personal and ethnic preferences 4. Identify their attitudes and feelings about assisting with the preparation of
complex modified diets 5. Describe how to plan and prepare meals using the Exchange Lists for
Meal Planning 6. Describe the meal planning process when multiple dietary restrictions
must be met 7. Describe how to measure and mix prescribed supplements 8. Describe how to assist with tube feedings 9. Describe what to observe, record and report when assisting with the
preparation of complex modified diets TEACHING METHODOLOGIES: Lecture, Exchange Lists for Meal Planning Guide,
Discussion, Taste testing of supplements, Demonstrations EVALUATION METHODOLOGIES: Class participation, Oral and written quiz

13
Unit C: Complex Modified Diets OUTLINE: I REVIEW OF MODIFIED DIETS
A. In this unit you will: 1. Learn how to assist a client with the preparation of complex
modified diets
B. In your past experience you learned 1. The Basic Five Food Groups
a. milk and diary products b. meat and meat substitutes c. fruits d. vegetables e. grains f. “others,” such as sugars and fats
2. Characteristics of well planned meals
a. contain a variety of foods from the five food groups b. suit the client’s cultural and personal preferences c. cost no more than client can afford
3. When assisting a client in meal preparation you should
a. Use the basics of good nutrition 1) eat a variety of foods 2) choose foods low in fat, saturated fat, and cholesterol 3) use more lean meats, fish, and poultry 4) use sugar and salt in moderation 5) choose plenty of fruit, vegetable, and grain products
b. avoid frying c. retain the most nutrients possible when cooking, e.g., steam
cook vegetables, bake or broil meats d. avoid convenience foods e. make meals tasty and appetizing, find out how client likes
food seasoned f. serve food attractively g. store food properly for safety and to retain nutrients
4. Modified diets
a. examples include 1) increase or decrease in energy/calories 2) increase or decrease in type of food or nutrient, e.g.,
sodium-restricted diet, high-fiber diet

14
3) change in food consistency or texture
5. In this unit you will learn a. what complex modified diets are b. the reasons why these diets are important c. how to make these diets more enjoyable for the client d. your role in assisting a client with a needed diet e. what the Exchange Lists for Meal Planning is and how to use it
II WHAT IS A COMPLEX MODIFIED DIET?
A. Some illnesses and chronic diseases may require therapeutic diet modifications. Examples:
1. Type 1 and Type 2 Diabetes 2. Heart Disease 3. Kidney and liver disease
B. Three types of complex modified diets
1. Elimination of specific foods (allergy diet, gluten-free diet) 2. Increase or decrease in energy value of diet with measured
amounts of foods (such as weight-reduction diet or high-calorie diet)
3. Combinations of two or more simple modified diets (such as low-salt, high-protein)
4. Added measured supplements 5. Adjustment in the level, ratio, or balance of protein, fat and
carbohydrate (diet for diabetes, ketogenic diet, renal diet, cholesterol-lowering diet)
6. Rearrangement of the number and frequency of meals (diet for diabetes, postgastrectomy diet)
7. Change in the route of delivery of nutrients (enteral or parenteral nutrition)
III YOUR ROLE IN ASSISTING WITH PREPARATION OF COMPLEX MODIFIED DIETS
A. As a Home Care Worker you have already been assisting with
1. Planning meals 2. Making food choices 3. Preparing shopping lists 4. Purchasing food 5. Observing, recording and reporting changes in your client’s eating habits

15
B. Dos 1. Plan meals in cooperation with the client or a family member 2. Prepare shopping lists appropriate for the diet 3. Purchase special foods and foods appropriate to the diet 4. Assemble or set up necessary equipment, utensils, and supplies for
meal preparation procedures 5. Prepare meals 6. Add nutritional supplements 7. Serve meals 8. Clean cooking areas, equipment, and utensils 9. Store uneaten foods properly 10. Observe, record, and report changes and problems
C. Don’ts
1. Never mix medication into foods or liquid IV WHAT YOU SHOULD KNOW
A. What the diet means
B. How the diet works in treating illness
C. How to make the necessary adjustments in planning, shopping, and preparation
D. How best to assist the client to follow the diet
E. How to weigh or measure foods
F. How to encourage independence
G. Note
1. You may only be assigned to assist with only part of the food planning or preparation
2. Study client’s Care Plan for your instructions
H. Case example: Mrs. Bates 1. 70 year old lady living alone 2. Type 2 Diabetes 3. Hypertension 4. High cholesterol level 5. Confused about diets
I. Helping a client understand and accept a diet prescription
1. Client may be confused about diet a. Aide and nurse can assist client to better understand

16
2. Client may feel diet prescription is unfair a. Aide can assist in making mealtime pleasant
J. Recognizing your own feelings about diets
1. Clients on special diets may seem unreasonably cautious and sensitive
2. You may feel food is unappealing 3. Diet prescriptions are an important part of the treatment plan 4. Aide must show patience, interest 5. Make meal time a happy time
V MEAL PLANS FOR PEOPLE WITH DIABETES
A. What is Diabetes (Diabetes Mellitus) 1. Disorder in which foods are not utilized correctly in body
a. carbohydrates, proteins, and fats from foods are broken down into a sugar called glucose
b. glucose enters bloodstream and is carried to cells all through the body for energy and nourishment
c. insulin (hormone) controls the flow of glucose from the bloodstream into the cells
d. in a person with diabetes, not enough insulin (or none) is made in the body to do the job properly
2. Treatment a. no known cure b. meal planning always part of treatment plan c. diet consists of establishing an individualized food and meal
plan that is coordinated with insulin regimen, individual eating habits, and physical activity schedule
d. some people with diabetes take pills to stimulate body to make more insulin, usually Type 2 Diabetes
e. some people with diabetes take shots (injections) of insulin, usually Type 1 Diabetes
3. When insulin is lacking, the body’s cells become undernourished.
Person will a. feel weak b. feel tired c. be constantly hungry d. lose weight e. frequently urinate f. feel extreme thirst
4. Diabetes may cause other health problems
a. skin problems b. poor circulation

17
c. poor eyesight d. low resistance to disease e. higher incidence of heart disease, stroke, and kidney disease
B. Nutrition Therapy for Diabetes
1. Nutrition therapy is individually prescribed to meet the client’s individual needs, no longer called a ‘diabetic diet’
2. Type 1 client with a flexible insulin regimen (3+ injections per day) must only control total carbohydrate content of meals
3. Type 1 client with fixed insulin regimen (uses premixed insulin or does not adjust mealtime insulin doses) must have day-to-day consistency in timing and control amount of carbohydrate eaten at each meal
4. Type 2 client must a. adopt lifestyle strategies that minimize development of other
health problems b. reduce energy intake, monitor carbohydrate servings, limit
saturated fat, and increase physical activity
C. Nutrition Self-Management 1. Client selects appropriate meal planning approach for behavior
and lifestyle changes 2. No single meal-planning approach is more effective than another 3. Individually planned to fit client’s needs based on assessment
data and food and nutrition history information 4. Persons with diabetes use four different interrelated tools to assist
them in meal planning a. Diabetes nutrition guidelines – provide general guidelines for
meal planning 1) The First Step in Diabetes Meal Planning (American
Diabetes Association and American Dietetic Association)
2) Healthy Food Choices (American Diabetes Association and American Dietetic Association)
3) Healthy Eating for People With Diabetes (International Diabetes Center, Minneapolis,Minn.)
4) Eating Healthy With Diabetes Easy Reading Guide (American Diabetes Association and American Dietetic Association)
b. Menu approaches 1) Month of Meals: Classic Cooking, Old-Time Favorites,
Meals in Minutes, Vegetarian Pleasures, and Ethnic Delights (American Diabetes Association)
c. Carbohydrate counting 1) Basic Carbohydrate Counting (American Diabetes
Association and American Dietetic Association)

18
2) Advanced Carbohydrate Counting (American Diabetes Association and American Dietetic Association)
3) My Food Plan (International Diabetes Center, Minneapolis, Minn.) d. Exchange list approaches
1) Exchange Lists for Meal Planning (American Diabetes Association and American Dietetic Association)
D. The Exchange Lists for Meal Planning 1. Exchange lists are groupings of common foods similar to each
other in the amounts of macro-nutrients and calorie content they contain
2. Seven groups are: starch, fruit, milk, vegetable, meat, fats and ‘free’ foods
E. Using the Exchange Lists and Meal Planning Sheets
1. Describe Mrs. Jones and point out her meal planning sheet 2. Decide what Mrs. Jones’ choices might be for breakfast
a. fruit group 1) ½ cup orange juice 2) half a banana 3) one small apple
b. meat group
1) one egg 2) an ounce of cheddar cheese 3) a pork sausage link 4) one tablespoon of peanut butter
c. starch group 1) one bagel 2) two slices of toast 3) one slice of toast and ¾ cup of ready to eat
unsweetened cereal 3. Practice with more examples from meal planning sheet 4. Summarize
a. many choices available b. menu can be very “normal” c. it’s important for clients to have meal planning sheet d. talk to supervising nurse or RD if question or if meal planning
sheet is missing
F. Special concerns of the person with diabetes 1. Events or problems can cause difficulty in managing diabetes 2. Difficulty in regulating eating patterns 3. Insulin reaction – low blood sugar (hypoglycemia), below 70 mg/dl
a. caused by skipping a meal or insulin dosage

19
b. symptoms 1) faint 2) dizzy 3) weak 4) personality change 5) nervousness 6) irritability 7) headaches 8) trembling or shaking 9) sweating 10) blurred vision
c. if condition continues, client may lose consciousness (insulin shock)
d. treatment: person with diabetes must eat some fast source of glucose = 15 gm carbohydrate 1) packs of sugar to equal 1 Tbsp. 2) orange juice, ½ cup 3) glucose tablets 4) cake decorating gel
wait 15 minutes and retest, if blood sugar remains below 70 mg/dl, treat with another 15 gm carbohydrate
repeat testing and treatment until blood glucose returns to normal level
4. High blood sugar (hyperglycemia) a. caused by
1) forgetting to take insulin 2) eating too much or wrong kind of food 3) illness (cold, flu, etc.) 4) fatigue 5) anxiety
b. symptoms 1) labored breathing 2) rapid, shallow breathing 3) loss of appetite 4) possible nausea 5) generalized aches 6) excessive thirst 7) sweet or fruity odor on breath
c. results in loss of consciousness (diabetic ketoacidosis or coma) if high blood sugar is severe
5. For either condition, if client is semi-conscious, call for Emergency help
6. Shopping problems a. people with diabetes may fell they have to buy special foods b. “diabetic” and sugar free foods not necessarily better c. “sugar free” may contain other sugar, though not sucrose

20
d. best advice is to read the ingredients list and Nutrition Fact Label carefully
e. or buy fresh, unprocessed food 7. Cooking tips
a. avoid added fats b. trim fats from meats c. use leaner cuts d. bake, roast, broil, g rill or simmer instead of frying e. avoid coating mixes and bread crumbs
8. Craving for sweet foods a. point out harmful effects b. show them you care
VI WHEN MORE THAN ONE DIET IS BEING USED AT ONE TIME
A. You are familiar with many of the more simple modified diets
B. Frequently clients will have more than one problem requiring a therapeutic diet modification. Examples
1. Low-sodium, high-protein 2. Low cholesterol, low calorie
C. Your role
1. Practice meal planning tips you have already been using 2. Client should have meal planning sheets and perhaps sample
menus 3. May be wise for you and client to list free foods and foods to be
avoided 4. Discuss with your client which favorite foods are permitted 5. Discuss variations on client’s favorite foods
D. Special concerns when more than one diet prescription is being used at
one time 1. Clients feel discouraged 2. Clients are confused 3. Clients feel denied 4. Emphasize positive aspects 5. Take into account personal preferences of your client
VII PREPARING NUTRITIONAL SUPPLEMENTS
A. Done by physician’s orders
B. Done to encourage 1. Weight gain 2. Increase protein intake

21
3. Increase vitamin and mineral intake
C. Comes in two forms 1. Powdered (to be mixed with liquid) 2. Liquid (already prepared)
D. Special concerns when using nutritional supplements
1. Client may have poor appetite 2. Use patience and understanding 3. Make sure client consume at right time 4. Follow instructions exactly 5. Mix or shake thoroughly 6. Encourage client to swallow the entire amount
VIII TUBE FEEDINGS
A. Gastric Gavage 1. Liquid food that goes directly to stomach by tubes, bypassing
mouth and throat 2. Tube may be inserted through nose (naso-gastric or NG) or
through surgically created hole in stomach (gastrostomy or PEG) 3. Food must be liquid or texture of cream soup 4. Food is poured into tube through a funnel 5. Food may be prepared in blender or a commercially made formula
B. Your Role
1. Naso–Gastric Tube a. Dos: tasks you may do
1) assemble necessary equipment 2) position the client properly for feeding 3) hand requested items to the person doing the
feeding 4) dispose of used equipment 5) clean and store reusable equipment and unused
supplies 6) observe, record, and report
b. Don’t s: tasks you are never permitted to do 1) Insert tube 2) add formula to feeding bag 3) irrigate the tube
2. Gastrostomy or Percutaneous Endoscopic Gastrostomy (PEG)
a. Do’s: tasks you may do (under special circumstances) 1) assemble necessary equipment 2) position patient for feeding
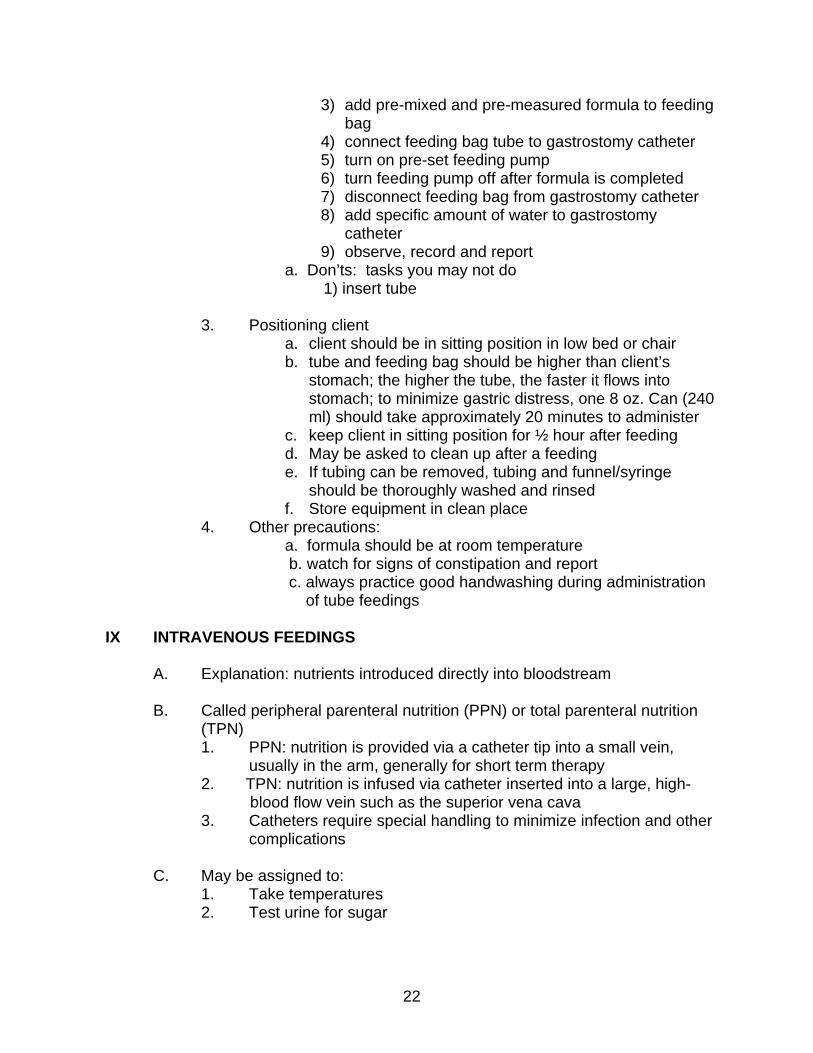
22
3) add pre-mixed and pre-measured formula to feeding bag
4) connect feeding bag tube to gastrostomy catheter 5) turn on pre-set feeding pump 6) turn feeding pump off after formula is completed 7) disconnect feeding bag from gastrostomy catheter 8) add specific amount of water to gastrostomy
catheter 9) observe, record and report
a. Don’ts: tasks you may not do 1) insert tube
3. Positioning client
a. client should be in sitting position in low bed or chair b. tube and feeding bag should be higher than client’s
stomach; the higher the tube, the faster it flows into stomach; to minimize gastric distress, one 8 oz. Can (240 ml) should take approximately 20 minutes to administer
c. keep client in sitting position for ½ hour after feeding d. May be asked to clean up after a feeding e. If tubing can be removed, tubing and funnel/syringe
should be thoroughly washed and rinsed f. Store equipment in clean place
4. Other precautions: a. formula should be at room temperature
b. watch for signs of constipation and report c. always practice good handwashing during administration
of tube feedings IX INTRAVENOUS FEEDINGS
A. Explanation: nutrients introduced directly into bloodstream
B. Called peripheral parenteral nutrition (PPN) or total parenteral nutrition (TPN) 1. PPN: nutrition is provided via a catheter tip into a small vein,
usually in the arm, generally for short term therapy 2. TPN: nutrition is infused via catheter inserted into a large, high- blood flow vein such as the superior vena cava 3. Catheters require special handling to minimize infection and other
complications
C. May be assigned to: 1. Take temperatures 2. Test urine for sugar

23
3. Assemble and store equipment and supplies for sterile dressing change
D. Special circumstances
X OBSERVING, RECORDING, AND REPORTING
A. Diet prescriptions are part of the treatment plan just as medications are 1. Important for client to follow directions 2. Health care team must be kept informed of changes and problems
B. Record according to your agency’s guidelines and your supervisor’s
instructions 1. Changes in client’s eating pattern 2. Eating problems encountered by client 3. Client not following diet prescription
C. Report sudden changes or problems to your supervising nurse
XI SUMMARY
A. A complex modified diet may be 1. An adjustment in the level, ratio, or balance of protein, fat and
carbohydrate (diet for diabetes, ketogenic diet, renal diet, cholesterol-lowering diet)
2. A combination of simple modified diets 3. A diet with an added supplement
B. There are specific activities you can do as part of your role when
assisting with the preparation of complex modified diets
D. There are specific activities you cannot do when assisting with the preparation of complex modified diets
E. It is important to understand your client’s diet prescription and meal plan
and how it works in treating the disease
F. You should encourage your clients to be as independent as possible in their meal planning and preparation
G. Diabetes is a disorder in which foods are not used correctly in the body
H. Careful dietary management, specifically carbohydrate monitoring, is
important in controlling diabetes

24
I. Diabetes nutrition guidelines, menu approaches, carbohydrate counting, and exchange list approaches are tools to make it easier to plan meals for a client with diabetes
J. Meal plans are planned to meet the individual needs of a client
K. You can plan nutritionally balanced meals for a client with diabetes using
a meal plan and exchange lists
L. With careful planning, you can prepare tasty and nutritious meals for a client with more than one simple modified diet
M. It is necessary to measure and mix nutritional food supplements
accurately
N. You will be making certain observations, recording, and reporting when assisting with complex modified diets
25
Unit D: Assisting with a Prescribed Exercise Program TIME: 3.5 hours OBJECTIVES:
At the completion of this unit, the student will be able to:
1. State the benefits of exercise to body systems. 2. Define prescribed exercise program. 3. Describe the HHA’S role in assisting with a prescribed exercise program. 4. Describe the guidelines of correctly using ambulation devices. 5. Demonstrate assisting the client with transfers and walking. 6. Define the terms Active Range of Motion, Passive Range of Motion,
Resistive Range of Motion and Postural Drainage. 7. Demonstrate the aide’s role in assisting the client with active, passive
and resistive range-of-motion exercises. 8. Describe how different disabilities and illnesses may impact your client. 9. Describe what to observe, record and report when assisting with a
prescribed exercise program. 10. Identify how personal feelings and attitudes about exercises can
influence the client. TEACHING METHODOLOGIES: Lecture, reading assignment EVALUATION METHODOLOGIES: Written exam, class participation Demonstrate Procedures: D-1, Transfer to a sitting position; D-2, Helping a client to sit at the side of the bed; D-3, Helping a client to stand; D-4, Assisting with Passive Range of Motion exercises; D-5, Assisting with Postural Drainage.
26
Unit D: Assisting with a Prescribed Exercise Program OUTLINE:
1. Definition and Benefits of a Prescribed Exercise Program a. Muscular System b. Cardiovascular System c. Skin d. Skeletal e. Respiratory System f. Weight Maintenance g. Psychosocial
2. Role of the Home Health Aide with a Prescribed Exercise Program
a. Tasks Permitted b. Tasks Never Permitted
3. Guidelines for Use of Ambulation Devices 4. Guidelines of Assistance with Transfers and Walking
Refer to Procedures: D-1 Transfer to a sitting position; D-2 Helping a client to sit at the side of the bed; D-3 Helping a client to stand; D-5 Assisting with Postural Drainage; XII-14 Helping the Client to walk.
5. Definition of Range-of- Motion
a. Active b. Passive c. Resistive
Refer to Procedure D-4 Assisting with Passive Range of Motion exercises
6. Definition of Postural Drainage
Refer to Procedure D-5 Assisting with Postural Drainage
7. Aides role in assisting in Range of Motion exercises
a. Follow the care plan as to the types of exercises and the number of times each is to be performed
b. Always encourage independence and allow client to do as much as he is able

27
8. Prescribed Exercise Program Can Benefit Clients with Specific Illness and Disabilities
9. Observe, Record and Report problems, changes, pain or refusal
10. Attitudes and feelings of HHA regarding assisting with prescribed
exercise program

28
Unit E: Assisting with the use of Prescribed Medical Equipment Supplies and Devices TIME: 8 hours OBJECTIVES:
At the completion of this unit, the student will be able to:
1. Identify how prescribed medical equipment, supplies and devices are used as they relate to mobility, skin breakdown, elimination and respiratory function.
2. Identify their attitudes and feelings regarding assisting with prescribed medical equipment, supplies and devices and how their attitudes/feelings can affect the patient.
3. Describe their role in assisting with the use of the prescribed medical equipment, supplies, devices and treatments.
4. List the safety precautions that must be followed when assisting a patient with medical equipment, supplies, devices and treatments.
5. Describe what to observe, record and report when assisting a patient with the use of prescribed medical equipment, supplies, and treatments.
6. Describe specific activities that can only be done under special circumstances.
TEACHING METHODOLOGIES: Lecture, reading assignment EVALUATION METHODOLOGIES: Written exam, class participation Demonstration of Procedures: E-1, Assisting with the use of an ace bandage E-2, Assisting with the use of condom catheters; E-3, Assisting with cleaning the skin and catheter tubing; E-4, Assisting with the emptying of the urinary drainage bag. E-5, Assisting with the use of a commercially prepared enema E-6, Assisting with the use of a soap solution enema E-7, Assisting with the use of a douche E-8, Assisting with the use of a commercially prepared douche E-9, Assisting with the use of the oxygen concentrator E-10, Assisting with the use of the oxygen tank and liquid oxygen reservoir E-11, Assisting with the use of the medication nebulizer and air compressor E-12, Assisting with the use of the CPAP machine

29
Unit E: Assisting With the Use of Prescribed Medical Equipment, Supplies and Devices OUTLINE:
1. Types of prescribed equipment, supplies and devices that may be found in the patient’s home
2. Reasons for the prescribed equipment, supplies, devices and treatments
3. Role of health care worker in assisting of use of prescribed equipment,
supplies, devices and treatments
4. Attitudes of health care workers toward working with prescribed medical equipment, supplies, devices and treatments and the impact on patient’s independence
5. Types of equipment and safety precautions when using:
a. Equipment used for mobility b. Equipment used to prevent skin breakdown c. Equipment used to assist with elimination
Refer to Procedures: E-1, Assisting with the use of an ace bandage; E-2, Assisting with the use of condom catheters; E-3, Assisting with cleaning the skin and catheter tubing; E-4, Assisting with the emptying of the urinary drainage bag. E-5, Assisting with the use of a commercially prepared enema E-6, Assisting with the use of a soap solution enema E-7, Assisting with the use of a douche E-8, Assisting with the use of a commercially prepared douche
d. Equipment used to assist with respiratory function
Medication nebulizer Oxygen Equipment CPAP machine Mechanical ventilators
Refer to Procedures: E-9, Assisting with the use of the oxygen concentrator E-10, Assisting with the use of the oxygen tank and liquid oxygen reservoir E-11, Assisting with the use of the medication nebulizer and air compressor E-12, Assisting with the use of the CPAP machine
6. Assisting with equipment, supplies and devices under special
circumstances
7. Observe, record and report

30
Unit F: Assisting with Special Skin Care TIME: 2 hours OBJECTIVES:
At the completion of this unit, the student will be able to:
1. Describe special skin care for stable and unstable skin 2. Describe stasis dermatitis and pressure ulcers and list steps you can
take to prevent 3. Describe role of health care worker in assistance with skin care 4. Describe what to observe, record and report when assisting with special
skin care TEACHING METHODOLOGIES: Lecture, reading assignment EVALUATION METHODOLOGIES: Written exam, class participation Demonstration of Procedures: F-1, Positioning on the back; F-2, Positioning on the side.

31
Unit F: Assisting with Special Skin Care OUTLINE:
1. Review stable and unstable skin
2. Alterations in skin integrity a. Definition, causes, prevention
1. Stasis Dermatitis 2. Pressure Ulcers
3. Role in assistance with skin care
a. Permissible b. Non-permissible
Refer to Procedures: F-1 Positioning on the back F-2 Positioning on the side
4. Observe, Record & Report
32
Unit G: Assisting with a Dressing Change TIME: 1.5 hours OBJECTIVES:
At the end of this unit, the student will be able to:
1. Describe the purpose for dressing and reasons for changing dressings 2. Describe the differences between stable and unstable skin surface 3. Describe the differences between sterile and clean dressing changes
4. List the supplies needed for a dressing change 5. Describe how to meet the client’s needs when assisting with a dressing
change 6. Describe your role in assisting with a dressing change 7. Describe what to observe, record and report when assisting with a
dressing change TEACHING METHODOLOGIES: Lecture, reading assignment EVALUATION METHODOLOGIES: Written exam, class participation Demonstration of Procedures: G-1, Assisting with changing a clean dressing.

33
Unit G: Assisting with a Dressing Change OUTLINE:
1. Purposes for a Dressing and reasons for changing a dressing
2. Define Stable vs. Unstable Surface
3. Sterile vs. Clean Dressings
4. Supplies Needed for Dressing changes
5. Recognize Client’s Needs
6. Health Care Worker’s role in assisting with dressing changes. a. Permissible b. Non-permissible
Refer to Procedure: G-1, Assisting with Changing a Clean Dressing
7. Observing, Recording & Reporting a. Appearance of skin b. Presence of odor c. Presence of drainage

34
Unit H: Assisting With Ostomy Care TIME: 7.5 hours OBJECTIVES:
At the end of this unit, the student will be able to:
1. Define the terms: ileostomy, colostomy, gastrostomy, tracheostomy and urostomy.
2. Describe the effect an ileostomy, colostomy, urostomy, gastrostomy and tracheostomy has on the functioning of the body.
3. Identify equipment used to provide care to a client with an ileostomy, colostomy, gastrostomy, tracheostomy and urostomy.
4. Identify the home care worker’s role in assisting a client with an ileostomy, colostomy, urostomy, gastrostomy or tracheostomy.
5. Describe the care required by a client/ with an ileostomy, colostomy, urostomy, gastrostomy or tracheostomy.
6. Explain how a client may feel about having an ostomy. 7. Describe what to observe, record and report when assisting a patient
with an ostomy. 8. Identify the home care worker’s attitudes and feelings about assisting
with ostomy care. TEACHING METHODOLOGIES: Lecture, reading assignment EVALUATION METHODOLOGIES: Written exam, class participation, Demonstration of Procedures: H-1, Assisting with changing an ileostomy or colostomy pouch; H-2, Assisting with emptying an open-end ileostomy or colostomy pouch; H-3, Assisting with cleaning a reusable pouch; H-4, Assisting with a colostomy irrigation; H-5, Assisting with routine tracheostomy care.

35
Unit H: Assisting With Ostomy Care OUTLINE:
1. Definition and purpose of an ostomy a. Structure and function b. Physical appearance c. Alteration of normal function
2. Describe the effect of an Ostomy on functioning of the body
3. Types of Ostomies
a. Colostomy b. Ileostomy c. Urostomy d. Gastrostomy e. Tracheostomy
4. Identify equipment used to provide care to the client with an Ostomy
5. Role of the Home Care Worker in assisting the client with an Ostomy
Refer to Procedures: • H-1, Assisting with changing an ileostomy or colostomy pouch; • H-2, Assisting with emptying an open-end ileostomy or colostomy pouch; • H-3, Assisting with cleaning a reusable pouch; • H-4, Assisting with a colostomy irrigation; • H-5, Assisting with routine tracheostomy care.
6. Attitudes and feelings of the client with an Ostomy
7. Home Care Worker’s attitudes and feelings about working with clients with ostomies a. Identification of common feelings. b. Verbal and non-verbal expressions of attitudes/feelings c. Seeking support
8. Observe record and report

36
APPENDIX
______________________________________________ Procedure Checklist: PAGES
* A-1, Proper handwashing 1 * B-1, Cleaning a glass thermometer 2 * B-2, Measuring an oral temperature with a glass thermometer 3
B-3, Measuring an oral temperature with an electronic thermometer 4 B-4, Measuring an axillary with a glass thermometer 5 B-5, Measuring an axillary temperature with an electronic thermometer 6 B-6, Measuring a rectal temperature with a glass thermometer 7 B-7, Measuring a rectal temperature with an electronic thermometer 9
* B-8, Measuring the pulse and respirations 11 * B-9, Measuring blood pressure 12
B-10, Collecting a specimen (routine urine, stool and sputum) 14 * D-1, Transfer to a sitting position 15 * D-2, Helping a client to sit at the side of the bed 16 * D-3, Helping a client to stand 17 * D-4, Assisting with passive range of motion exercises 18 * D-5, Assisting with postural drainage 19
E-1, Assisting with the use of an ace bandage 20 E-2, Assisting with the use of condom catheters 21 E-3, Assisting with cleaning the skin and catheter tubing 22 E-4, Assisting with the emptying of the urinary drainage bag 23 E-5, Assisting with the use of a commercially prepared enema 24 E-6, Assisting with the use of a soap solution enema 26 E-7, Assisting with the use of a douche 28 E-8, Assisting with the use of a commercially prepared douche 30
* E-9, Assisting with the use of the oxygen concentrator 32 * E-10, Assisting with the use of the oxygen tank and liquid oxygen reservoir 34 * E-11, Assisting with the use of the medication nebulizer and air compressor 36
E-12, Assisting with the use of the CPAP machine 38 * F-1, Positioning on the back 39 * F-2, Positioning on the side 40 * G-1, Assisting with changing a clean dressing 41 * H-1, Assisting with changing an ileostomy or colostomy pouch 42
H-2, Assisting with emptying an open-end ileostomy or colostomy pouch 44 H-3, Assisting with cleaning a reusable pouch 45 H-4, Assisting with a colostomy irrigation 46
* H-5, Assisting with routine tracheostomy care 48 *Required procedures

1
Required and Optional Procedures:
Each of the procedures in this curriculum has a companion checklist for evaluation purposes. As a practical matter it may not be possible to evaluate the trainee on every procedure. However, there are certain basic procedures the trainee should be required to demonstrate. It is recommended that the trainee pass eighteen required procedures. If chosen, the optional procedures should be related to the typical caseload or other needs of the agency. Asterisks on the summary chart on page one and on the individual procedures that follow indicate the eighteen required procedures. Checklist for Procedure A-1 PROPER HANDWASHING 1. Assembles equipment: soap, paper towels. 2. Uses towel if no paper towels are available. 3. Rolls up sleeves and removes watch and jewelry. 4. Wets hands under warm, running water. 5. Applies a generous amount of soap and lathers hands well. 6. Washes entire surface of hands, between the fingers, around and under the
fingernails, up to and above the wrist, according to current CDC guidelines. 7. Rinses hands thoroughly under warm, running water with hands lower than
wrist. 8. Dries hands using a clean cloth or paper towel. 9. Turns off the tap with paper towel.
Using Alcohol-based hand cleaners in situations where there is no running water or
hands are not visibly soiled.
1. Applies product to one hand (amount determined by product instructions).
2. Rubs hands together, covering all surfaces of hands and fingers until hands are dry.

2
Checklist for Procedure B-1 CLEANING A GLASS THERMOMETER 1. Washes hands. 2. Assembles equipment. 3. Puts on gloves. 4. Holds thermometer firmly at end of stem (not bulb) under cold water, keeping
the bulb lower than stem. 5. Wets gauze, cotton ball, or tissue with soap and water. 6. Wipes down from stem to bulb going from cleanest part to part that has been in
contact with client. 7. Discards gauze, cotton ball, or tissue. 8. Rinses thermometer with clean, wet gauze, cotton ball, or tissue. 9. Discards gauze, cotton ball, or tissue. 10. Wipes thermometer with clean, dry gauze, cotton ball, or tissue or lets
thermometer air dry. 11. Stores thermometer in its case in clean, safe, cool place. 12. Removes and discards gloves. 13. Washes hands.

3
Checklist for Procedure B-2 MEASURING AN ORAL TEMPERATURE WITH A GLASS THERMOMETER 1. Explains procedure to client. 2. Washes hands. 3. Assembles equipment. 4. Put on gloves, as needed. 5. Holds thermometer at stem end (not bulb). 6. Checks thermometer for breaks or chips. 7. Shakes down below 94ºF, if necessary. 8. Wets thermometer with cold water keeping bulb lower than stem. 9. Places bulb end into client’s mouth under the tongue and a little to one side. 10. Tells client to close lips, to breathe through nose, and not to talk or bite down. 11. Leaves thermometer in place for indicated time. 12. Observes for any problems during procedure, such as biting down, difficulty
keeping mouth closed, or difficulty breathing. 13. Removes thermometer and wipes once from stem to bulb with clean tissue. 14. Reads thermometer accurately within a range of plus or minus 0.2 degrees. 15. Records temperature accurately noting it was taken by mouth. 16. Shakes down thermometer below 94ºF or 33ºC. 17. Cleans thermometer correctly. (See Procedure B-1, Cleaning a Glass
Thermometer.) 18. Reports anything unusual observations, such as, temperature above 101ºF or
below 95ºF.

4
Checklist for Procedure B-3 MEASURING AN ORAL TEMPERATURE WITH AN ELECTRONIC THERMOMETER 1. Explains procedure to client. 2. Assembles equipment. 3. Washes hands. 4. Holds thermometer correctly. 5. Turns on thermometer making sure it is working. 6. Places probe covering correctly. 7. Places probe in client’s mouth under the tongue and a little to one side. 8. Tells client to close lips, to breathe through nose, and not to talk or bite down. 9. Leaves thermometer in place until light or sound signals reading is complete. 10. Observes for any problems client has during procedure. 11. Removes thermometer and reads temperature in display window. 12. Discards probe covering. Wipes with appropriate cleanser if soiled. 13. Records temperature accurately, noting it was taken by mouth. 14. Turns off thermometer. 15. Reports any unusual observation, such as, temperature above 101ºF or below
95ºF. 16. Stores thermometer in clean, safe, cool place. 17. Washes hands.
5
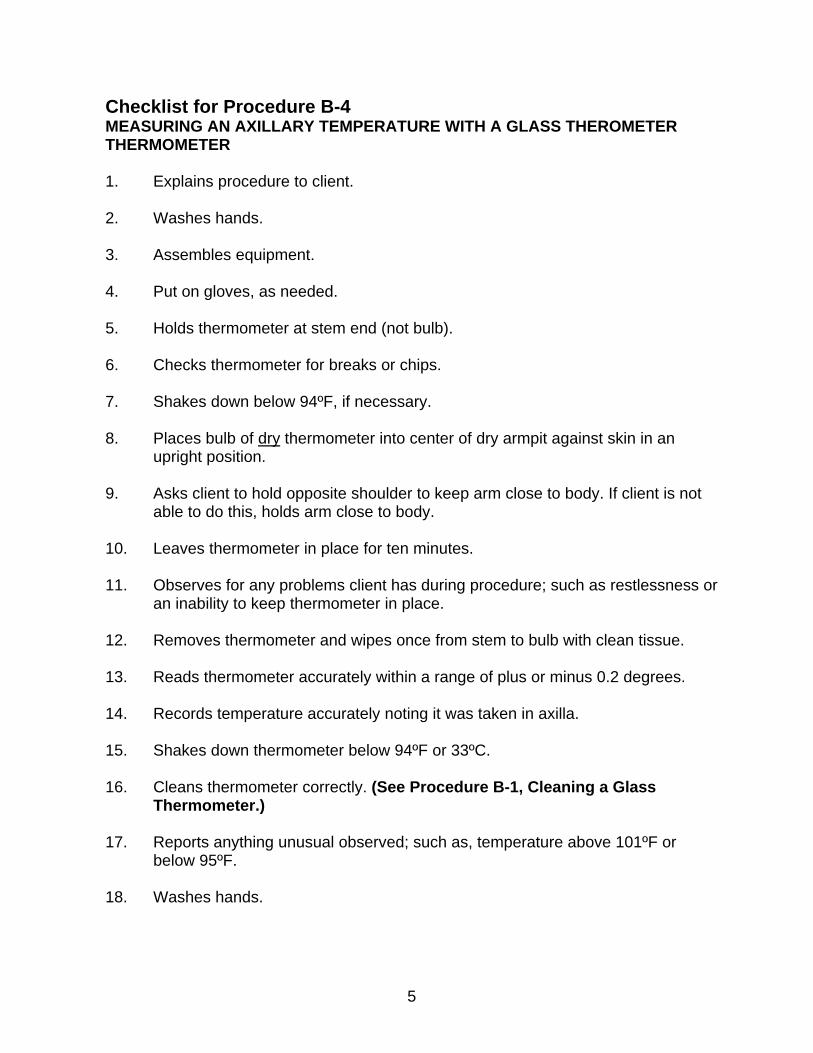
Checklist for Procedure B-4 MEASURING AN AXILLARY TEMPERATURE WITH A GLASS THEROMETER THERMOMETER 1. Explains procedure to client. 2. Washes hands. 3. Assembles equipment. 4. Put on gloves, as needed. 5. Holds thermometer at stem end (not bulb). 6. Checks thermometer for breaks or chips. 7. Shakes down below 94ºF, if necessary. 8. Places bulb of dry thermometer into center of dry armpit against skin in an
upright position. 9. Asks client to hold opposite shoulder to keep arm close to body. If client is not
able to do this, holds arm close to body. 10. Leaves thermometer in place for ten minutes. 11. Observes for any problems client has during procedure; such as restlessness or
an inability to keep thermometer in place. 12. Removes thermometer and wipes once from stem to bulb with clean tissue. 13. Reads thermometer accurately within a range of plus or minus 0.2 degrees. 14. Records temperature accurately noting it was taken in axilla. 15. Shakes down thermometer below 94ºF or 33ºC. 16. Cleans thermometer correctly. (See Procedure B-1, Cleaning a Glass
Thermometer.) 17. Reports anything unusual observed; such as, temperature above 101ºF or
below 95ºF. 18. Washes hands.

6
Checklist for Procedure B-5 MEASURING AN AXILLARY TEMPERATURE WITH AN ELECTRONIC THERMOMETER 1. Explains procedure to client. 2. Washes hands. 3. Assembles equipment. 4. Holds thermometer correctly. 5. Turns on thermometer making sure it is working. 6. Places probe covering correctly. 7. Places probe high up and into center of dry axilla against skin. 8. Asks client to hold opposite shoulder to keep arm close to body. If client is not
able to do this, holds arm close to body. 9. Leaves thermometer in place until light or sound signals reading is complete. 10. Observes for any problems client has during procedure. 11. Removes thermometer and reads temperature in display window. 12. Discards probe covering. Wipes with appropriate cleanser if soiled. 13. Records temperature accurately noting it was taken in axilla. 14. Turns off thermometer. 15. Reports any unusual observation, such as, temperature above 101ºF or below
95ºF. 16. Stores thermometer in clean, safe, cool place. 17. Washes hands.

7
Checklist for Procedure B-6 MEASURING RECTAL TEMPERATURE WITH A GLASS THEROMETER 1. Explains procedure to client. 2. Washes hands. 3. Assembles equipment. 4. Put on gloves. 5. Places small amount of lubricant on tissue. 6. Holds thermometer at stem end (not bulb). 7. Checks thermometer for breaks or chips. 8. Shakes down below 94ºF, if necessary. 9. Lubricates bulb end of thermometer. 10. Positions adult client lying on left side with upper leg bent and forward. Places
child on stomach. 11. Uncovers buttocks area only. 12. Separates buttocks with hand and locates anal opening. 13. inserts bulb gently with other hand one inch into rectum for adults. For children,
inserts bulb one-half inch into rectum. 14. Holds thermometer in place for three minutes. 15. Observes for any problems client has during procedure; such as, discomfort,
desire to move bowels. 16. Gently removes thermometer from rectum. 17. Wipes anal area with tissue to remove excess lubricant. 18. Covers client. 19. Wipes thermometer from stem to bulb with clean, dry tissue and discards wipe
in wastebasket. 20. Reads thermometer accurately within a range of plus or minus 0.2 degrees.

8
21. Shakes down thermometer. 22. Discards soiled tissue in plastic lined wastebasket 23. Cleans thermometer correctly. (See Procedure B-1, Cleaning a Glass
Thermometer.) 24. Removes gloves and washes hands. 25. Records temperature accurately noting it was taken by rectum. 26. Puts away lubricant and stores thermometer in clean, safe, cool place. 27. Reports any unusual observation, such as, temperature reading above 101ºF or
below 95ºF.

9
Checklist for Procedure B-7 MEASURING A RECTAL TEMPERATURE WITH AN ELECTRONIC THERMOMETER 1. Explains procedure to client. 2. Washes hands. 3. Assembles equipment. 4. Put on gloves. 5. Places small amount of lubricant on tissue. 6. Holds thermometer at end opposite pointed end. 7. Turns on thermometer making sure it is working. 8. Places plastic covering on pointed end. 9. Lubricates plastic covering. 10. Positions adult client lying on left side with upper leg bent and forward. 11. Uncovers buttocks area only. 12. Separates buttocks with hand and locates anal opening. 13. Inserts pointed end gently with other hand one inch into rectum for adults. For
children, inserts pointed end one-half inch into rectum. 14. Holds thermometer in place until light or sound signals it is ready. 15. Observes for any problems client has during procedure, such as, discomfort or
desire to move bowels. 16. Gently removes thermometer from rectum. 17. Wipes anal area with tissue to remove excess lubricant. 18. Covers client. 19. Releases and discards plastic covering in plastic lined wastebasket. Wipes with
appropriate cleanser if soiled. 20. Reads temperature in display window.
10
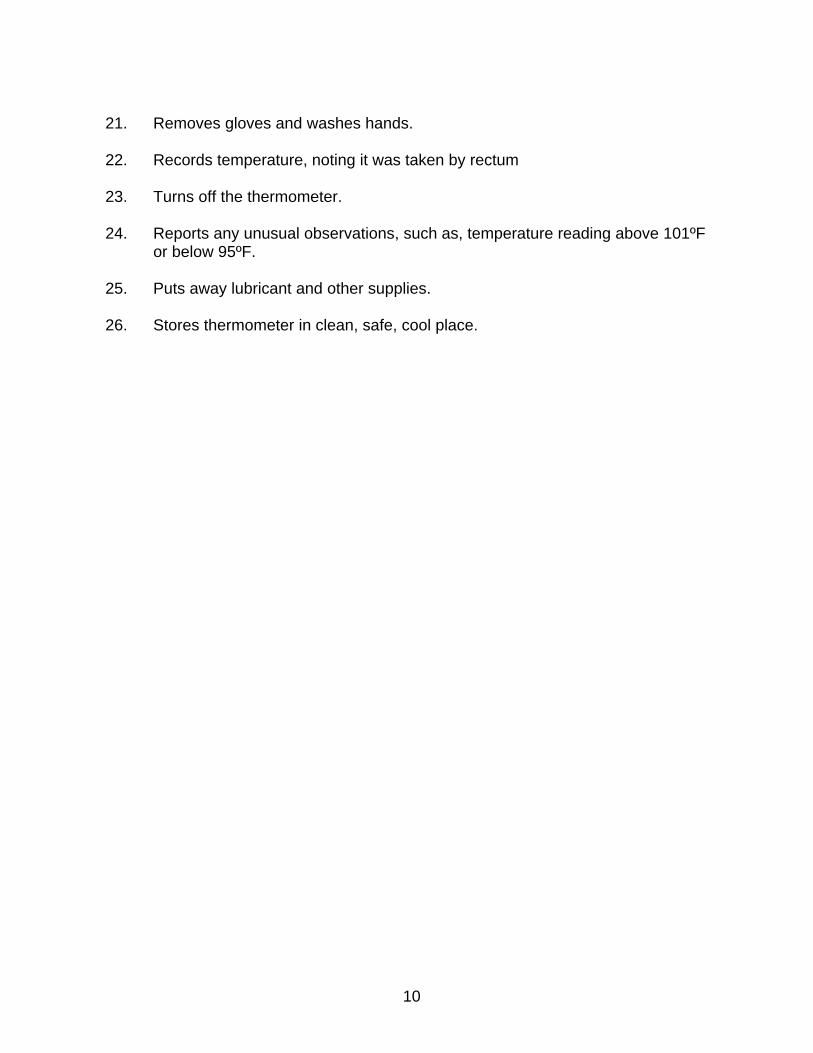
21. Removes gloves and washes hands. 22. Records temperature, noting it was taken by rectum 23. Turns off the thermometer. 24. Reports any unusual observations, such as, temperature reading above 101ºF
or below 95ºF. 25. Puts away lubricant and other supplies. 26. Stores thermometer in clean, safe, cool place.

11
Checklist for Procedure B-8 MEASURING THE PULSE AND RESPIRATIONS 1. Explains procedure to client. 2. Washes hands. 3. Assembles equipment. 4. Locates radial pulse using correct fingers (not thumb). 5. Counts number of pulse beats for one minute. 6. Counts number of pulse beats accurately within range of plus or minus five
beats per minute. 7. After noting the pulse rate, continues to hold client’s wrist (as if taking pulse)
and counts respirations for one minute. Accuracy must be within range of plus or minus two respirations per minute. Records pulse and respirations accurately.
8. Observes and reports any unusual observations, such as, changes in pulse or
respirations from last time they were taken, readings above or below what is normal for client.
9. Washes hands.

12
Checklist for Procedure B-9 MEASURING BLOOD PRESSURE 1. Explains procedure to client. 2. Washes hands. 3. Assembles equipment. 4. Positions client:
• If sitting: with arm to be used slightly bent with palm up resting on a table or arm of a chair. Arm should be level with heart.
• If lying down: on back with arm to the side and palm up. 5. Applies cuff on bare, upper arm with bottom of cuff about one inch above bend
of elbow. The part of cuff where tubes are attached should be placed over brachial artery. Makes sure tubes are not tangled or twisted. Applies cuff evenly and snugly.
6. Finds brachial pulse with middle three fingers. 7. Places earpieces of stethoscope into the ears so they fit downward and
forward. 8. Places end of stethoscope over brachial pulse. Places end lightly on skin. There
should be no space between skin and stethoscope. 9. Tightens valve screw clockwise with right hand if right-handed or with left hand
if left-handed. 10. Inflates cuff to the point indicated by supervising nurse of the Care Plan. 11. Loosens valve screw slightly by turning counter-clockwise. Deflates cuff slowly
and steadily at about 2 to 3 mm Hg per second. Notes point on gauge where hears first tapping sound through stethoscope. This number (systolic reading) must accurate within a range of plus or minus 6 mm Hg.
12. Continues to deflate cuff slowly to point where hears last tapping sound through
stethoscope. This number (diastolic reading) must be accurate within a range of plus or minus 6 mm Hg. Continues to deflate cuff slowly all the way to zero.
13. Removes cuff. 14. Records blood pressure accurately.

13
15. Repeats procedure if not sure about blood pressure reading. Cuff is deflated completely and waits two to three minutes before inflating it again.
16. Observes and reports any unusual observations, such as, inability to get blood
pressure, excessively high or low blood pressure. 17. Stores equipment in a safe place. 18. Washes hands.

14
Checklist for Procedure B-10 COLLECTING A SPECIMEN (ROUTINE URINE, STOOL, and SPUTUM) 1. Explains procedure to client. 2. Washes hands. 3. Assembles equipment. 4. Puts on gloves. 5. Positions client in order to collect specimen. 6. Observes for any problems client has during procedure, such as, pain or
discomfort. 7. Assists client in cleaning self after obtaining specimen. 8. Transfers specimens to appropriate specimen containers. 9. Covers specimen container with tight-fighting lid. If outside of container has
become soiled with specimen, washes it off, and dries it with paper towel. 10. Discards soiled materials appropriately. 11. Washes and dries equipment. 12. Stores equipment in appropriate place. 13. Washes hands. 14. Labels specimen container with client’s name, type of specimen, date and time
of collection. 15. Places labeled specimen in clean paper or plastic bag and stores appropriately. 16. Records what specimen was collected and where specimen was stored or sent. 17. Reports any unusual observations, such as, inability to obtain specimen.

15
Checklist for Procedure D-1 TRANSFER TO SITTING POSITION 1. Explains procedure to client. 2. Washes hands. 3. Puts on gloves, as necessary. 4. Faces head of bed, outer foot forward. 5. Raises head of bed or locks arms with client. 6. Has client bend knees. 7. Pulls client to sitting position by rocking. 8. Places pillows behind head. 9. Checks client for dizziness, weakness, etc. 10. Washes hands. 11. Observes, records and reports any changes in condition or behavior.

16
Checklist for Procedure D-2 HELPING CLIENT TO SIT AT THE SIDE OF THE BED 1. Explains procedure to client. 2. Washes hands 3. Puts on gloves, as necessary. 4. Rolls the client on side facing self. Bends client’s knees. 5. Reaches one arm over to hold client in back of knees. 6. Places other arm under the neck and shoulder area. 7. Positions feet with a wide base of support. 8. On the count of “three” shifts weight to back leg. While doing this, swings the
client’s legs over the edge of the bed while pulling client’s shoulders to a sitting position.
9. Remains in front of the client with both hands on client until sure the client is
able to safely sit alone. 10. Washes hands. 11. Observes, records and reports any changes in condition or behavior.

17
Checklist for Procedure D-3 HELPING A CLIENT TO STAND 1. Explains procedure to client (client is sitting at edge of bed). 2. If necessary, puts bed in lowest position. 3. Washes hands. 4. Puts on gloves, as necessary. 5. Places one foot forward between client’s feet. If the client has a weak knee,
braces knee against client’s knees. 6. Tells client to put strongest foot under self. 7. Bends knee and leans onto forward foot. Places both arms around the client’s
waist. Holds client closely. 8. Tells client to push down on bed with arms and lean forward. On the count of
three, assists client to stand. Assists client by rocking weight to back foot and lifting as reaches three. Supports client until is able to safely stand alone.
9. Washes hands. 10. Observes, records and reports any changes in condition or behavior.
18
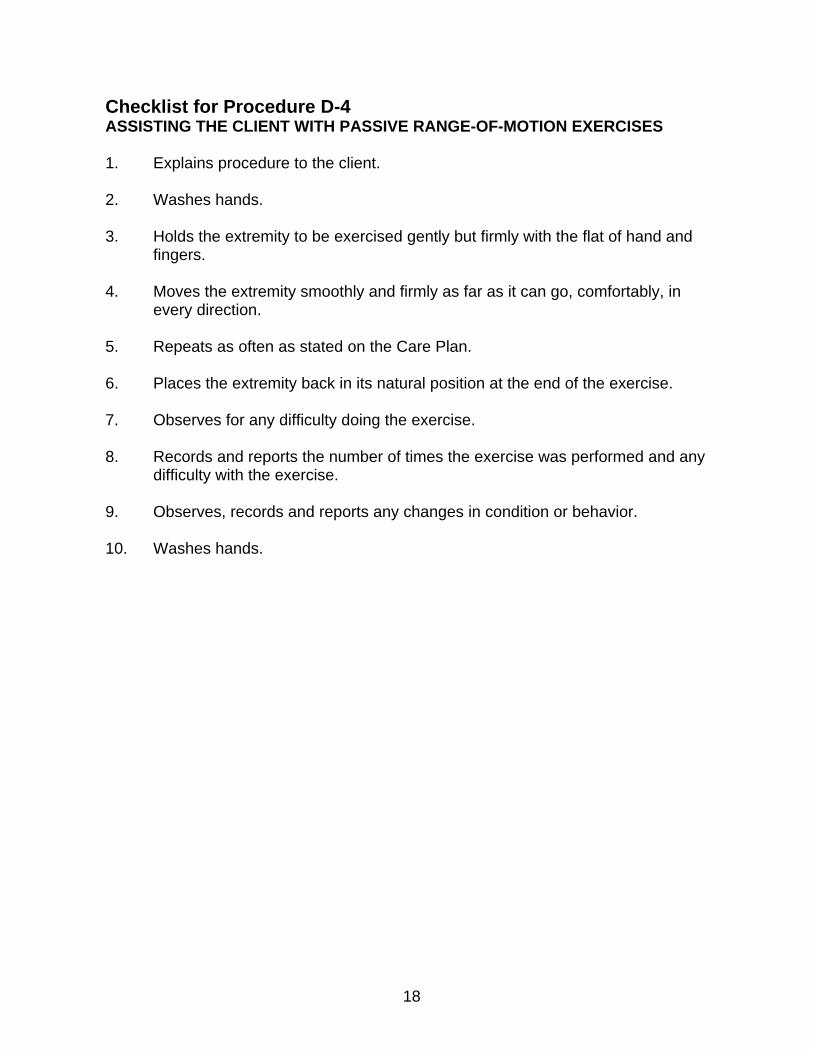
Checklist for Procedure D-4 ASSISTING THE CLIENT WITH PASSIVE RANGE-OF-MOTION EXERCISES 1. Explains procedure to the client. 2. Washes hands. 3. Holds the extremity to be exercised gently but firmly with the flat of hand and
fingers. 4. Moves the extremity smoothly and firmly as far as it can go, comfortably, in
every direction. 5. Repeats as often as stated on the Care Plan. 6. Places the extremity back in its natural position at the end of the exercise. 7. Observes for any difficulty doing the exercise. 8. Records and reports the number of times the exercise was performed and any
difficulty with the exercise. 9. Observes, records and reports any changes in condition or behavior. 10. Washes hands.

19
Checklist for Procedure D-5 ASSISTING WITH POSTURAL DRAINAGE 1. Explains procedure to the client. 2. Washes hands. 3. Assembles equipment. 4. Puts on gloves, as necessary. 5. Assists the client into the position written on the Care Plan. 6. Takes and records client’s pulse and respiratory rate. 7. Claps or vibrates the chest of the client for length of time according to Care
Plan. (DONE BY AIDE UNDER SPECIAL CIRCUMSTANCES) 8. Observes client for any problems during and after the procedure. Stops the
procedure if the client complains of fatigue, feeling faint, is breathing rapidly or has chest pain.
9. Encourages the client to cough up mucous following postural drainage. 10. Disposes of used tissue in appropriate receptacle. 11. Washes hands. 12. Records and reports the position used for postural drainage and the length of
time for the procedure, the color and odor of mucous and any difficulty client had during procedure.

20
Checklist for Procedure E-1 ASSISTING WITH THE USE OF AN ACE BANDAGE 1. Explains the procedure to the client. 2. Washes hands. 3. Assembles equipment. 4. Makes sure area to be wrapped is clean and dry. 5. Positions client to apply the ace bandage. 6. Ace bandage applied. Secures bandage with clip, tape, or safety pin. (DONE
BY AIDE UNDER SPECIAL CIRCUMSTANCES) 7. Assures proper placement of ace bandage. 8. Observes/feels for color changes, swelling, shiny tight skin, sores, dryness of
skin and temperature of exposed area of extremity. 9. Washes hands. 10. Observes, records and reports use of the ace bandage.
21
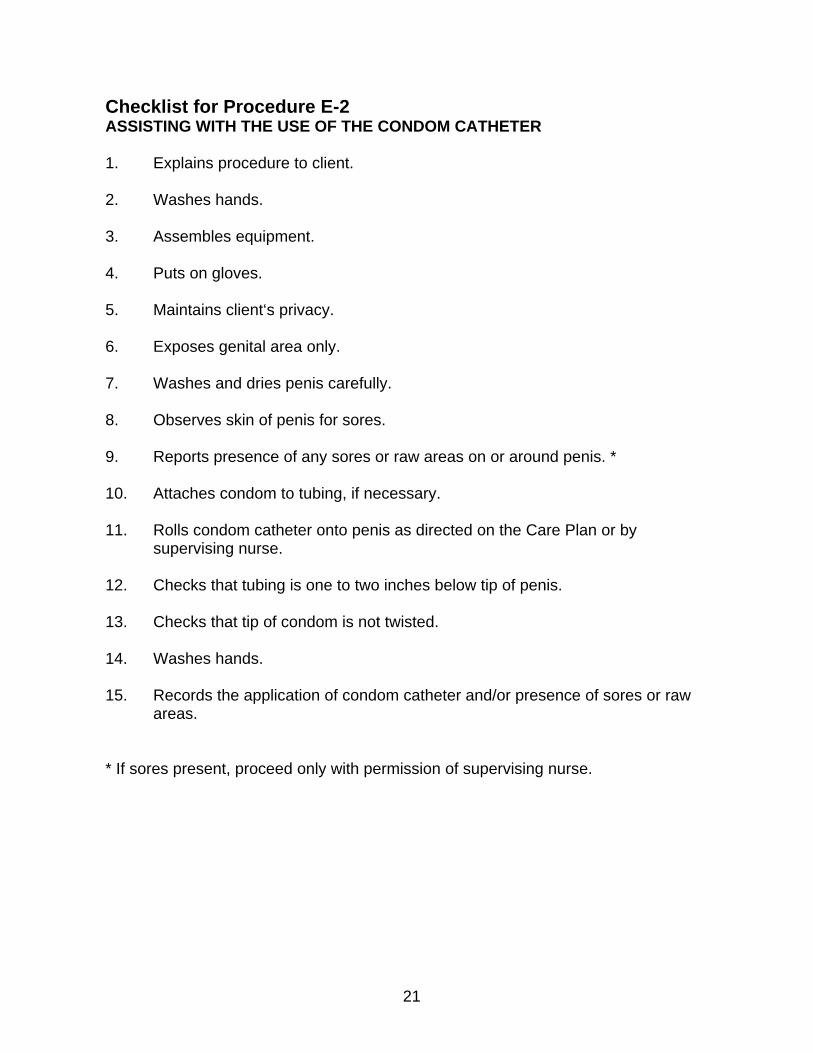
Checklist for Procedure E-2 ASSISTING WITH THE USE OF THE CONDOM CATHETER 1. Explains procedure to client. 2. Washes hands. 3. Assembles equipment. 4. Puts on gloves. 5. Maintains client‘s privacy. 6. Exposes genital area only. 7. Washes and dries penis carefully. 8. Observes skin of penis for sores. 9. Reports presence of any sores or raw areas on or around penis. * 10. Attaches condom to tubing, if necessary. 11. Rolls condom catheter onto penis as directed on the Care Plan or by
supervising nurse. 12. Checks that tubing is one to two inches below tip of penis. 13. Checks that tip of condom is not twisted. 14. Washes hands. 15. Records the application of condom catheter and/or presence of sores or raw
areas. * If sores present, proceed only with permission of supervising nurse.

22
Checklist for Procedure E-3 ASSISTING WITH CLEANING THE SKIN AND CATHETER TUBING 1. Explains procedure to client. 2. Washes hands. 3. Assembles equipment. 4. Puts on gloves. 5. Maintains client’s privacy. 6. Places client on back so that the catheter and urinary opening are exposed. 7. Puts towel or disposable bed protector under client. 8. Washes the genital area gently with soap and water from front to back. Does
not pull on the catheter, but holds with one hand while wiping it with the other. Gently pushes back foreskin on uncircumcised male before cleaning.
9. Observes area around the catheter for sores, crusting, leakage, or bleeding. 10. Dries area with towel. 11. Cleans the catheter tubing as directed by the Care Plan starting with the tubing
nearest to the client. 12. Positions the client so that the catheter and tubing do not pull and are free from
kinks. 13. Tapes tubing to the client as directed on the Care Plan. 14. Disposes of dirty water into the toilet. 15. Discards any disposable equipment. 16. Removes the bed protector or towel. 17. Cleans and stores reusable equipment. 18. Washes hands. 19. Records time catheter care was done. 20. Observes, records and reports any changes in condition or behavior.

23
Checklist for Procedure E-4 ASSISTING WITH THE EMPTYING OF THE URINARY DRAINAGE BAG 1. Explains procedure to client. 2. Washes hands. 3. Assembles equipment. 4. Puts on gloves. 5. Puts measuring pitcher below the drainage bag. 6. Observes condition of tubing: clear or has particles in it. 7. Takes the drainage tube on the bag out of its holder. 8. Unclamps and opens the drainage tube on the bag being careful not to touch
the end of the tube. 9. Drains urine from the bag into a container. 10. Cleans the end of the drainage tube as directed by the Care Plan. 11. Clamps the drainage tube and puts it back into its holder being careful not to
touch the end with hand or anything else. 12. Measures the amount of urine, if directed by the Care Plan. 13. Observes the color of the urine in the tubing, odor of the urine, whether mucus
or blood was present in the urine and condition of the drainage bag. 14. Empties urine into the toilet. 15. Rinses pitcher with cool water. Cleans with soap and brush. 16. Stores clean pitcher. 17. Washes hands. 18. Records amount of urine, if directed by the Care Plan and observations. 19. Reports cloudy, strong smelling or bloody urine. Reports if there is only a small
amount or no urine in the drainage bag when it is scheduled to be drained.

24
Checklist for Procedure E-5 ASSISTING WITH THE USE OF A COMMERCIALLY PREPARED ENEMA 1. Explains procedure to client. 2. Washes hands. 3. Assembles equipment. 4. Puts on gloves 5. Assists client into position directed on the Care Plan. 6. Places waterproof pad under client. 7. Removes air from application tip. 8. Enema is administered slowly. (DONE BY AIDE UNDER SPECIAL
CIRCUMSTANCES ONLY.) 9. Puts the used enema back into the box, tip first. 10. If the client has used an oil retention enema, reminds client to hold the enema
for the time ordered. 11. Helps the client onto bedpan or assists client into bathroom or commode.
Reminds the client not to flush the toilet and checks on results of enema. Observes the enema results for color, amount, and consistency.
12. Assists client to clean self, if indicated. 13. Helps client to wash hands. 14. Removes the waterproof bed protector. 15. Empties and cleans the bedpan or commode container. 16. Disposes of used enema. 17. Washes hands 18. Helps client into a comfortable position. 19. Observes, records and reports the use and results of the enema, including the
amount of stool, whether or not the stool was hard, streaked with red or was

25
very dark and if client had difficulty administering enema or was unable to tolerate the enema because of cramping.
20. Observes, records and reports any changes in condition or behavior.

26
Checklist for Procedure E-6 ASSISTING WITH THE USE OF A SOAP SOLUTION ENEMA 1. Explains procedure to the client. 2. Washes hands. 3. Assemble equipment. 4. Puts on gloves. 5. Prepares the enema:
a. Closes the clamp on the enema tubing. b. Adjusts water flow from the faucet. c. Fills the measuring container with water to the quart mark or as ordered. d. Checks the temperature of the water on wrist. e. Prepares the enema solution as directed by the Care Plan. f. Pours the solution into the enema bag. g. Seals the top of the enema bag. h. Hangs the bag at the height directed by the Care Plan.
6. Positions the client, as directed by the Care Plan. 7. Places the waterproof pad under the client’s buttocks. 8. Places blanket on client so only the rectal area is exposed. 9. Positions bedpan so it is behind client. 10. Positions the enema tubing over the bedpan and opens clamp to allow the
solution to flow through the tubing to remove air. 11. Reclamps the tubing. 12. Lubricates the tip of the enema tubing with the lubricant. 13. The enema is administered. (THE AIDE NEVER DOES THIS STEP.) 14. After the enema has been administered and the tubing has been removed,
wraps the tip of the tubing with paper towels and places inside the enema bag. 15. Helps the client onto a bedpan or assists client to the bathroom or bedside
commode. Reminds the client not to flush. 16. Assists client in cleaning self, if indicated.

27
17. Helps client wash his/her hands. 18. Removes the waterproof bed protector. 19. Discards disposable items. 20. Observes the enema results for amount, color, odor, and consistency. 21. Empties and cleans the bedpan or commode container. 22. Rinses the enema bag and tubing with clear water. Washes the tip of the tubing
with hot, soapy water. Allows to dry; and then, stores. 23. Washes hands. 24. Observes, records and reports the use and results of the enema, including the
amount of stool, whether or not the stool was hard, streaked with red or was very dark and if client had difficulty administering enema or was unable to tolerate the enema because of cramping.
25. Observes, records and reports any changes in condition or behavior.

28
Checklist for Procedure E-7 ASSISTING WITH THE USE OF THE DOUCHE 1. Explains procedure to the client. 2. Washes hands. 3. Assembles equipment. 4. Puts on gloves. 5. Offers the bedpan or suggests the client uses the bathroom to urinate. 6. Empties bedpan, if necessary. 7. Washes hands. 8. Prepares the solution. 9. Warms the douching solution to the temperature directed by the Care Plan. 10. Clamps the tubing and pours solution into the douche bag or container. 11. Positions douche bag tubing over the bedpan and opens clamp to allow solution
to flow through tubing to remove air. 12. Reclamps tubing. 13. Helps client to lie on back. 14. Places waterproof pad under client. 15. Helps client to clean the vaginal area. 16. Washes hands. 17. Positions client to use the douche (on a bedpan, if necessary). 18. Holds the douche bag or container above the vagina at the height indicated in
the Care Plan. 19. The douche is administered. (DONE BY AIDE UNDER SPECIAL
CIRCUMSTANCES.) 20. Observes client for fatigue or pain while douching.

29
21. Clamps the tubing when the douche bag or container is empty. 22. Places the tubing in the douche bag. 23. Helps the client to sit up to allow the rest of the solution to drain out. 24. Helps the client to lie down again. 25. Removes the bedpan, if necessary, and helps the client to dry self with toilet
tissue. 26. Observes returned solution for amount, color, odor, and any material in it, such
as, mucus or particles. 27. Empties the bedpan, if necessary, in the toilet. 28. Removes the waterproof pad. 29. Changes linen, if necessary. 30. Assists client into a comfortable position. 31. Empties and cleans the bedpan, if necessary. 32. Washes hands. 33. Records the amount and type of solution, how client responded (discomfort,
fatigue), the color and odor of the return solution. 34. Reports to supervisor if the return solution appeared bloody or foul smelling;
client appeared tired by the procedure; client complained of pain; or client had difficulty in administering the douche.
35. Observes, records and reports any changes in condition or behavior.

30
Checklist for Procedure E-8 ASSISTING WITH THE USE OF A COMMERCIALLY PREPARED DOUCHE 1. Explains procedure to client. 2. Washes hands. 3. Assembles equipment. 4. Puts on gloves. 5. Offers the bedpan or suggests the client uses the bathroom to urinate. 6. Empties bedpan, if necessary. 7. Washes hands. 8. Warms the douching solution to the temperature directed by the Care Plan. 9. Removes air from application tip. 10. Helps client to lie on back. 11. Places waterproof pad under client. 12. Helps client to clean the vaginal area. 13. Washes hands. 14. Positions the client to use the douche (on bedpan, if necessary). 15. Douche is administered. (DONE BY AIDE UNDER SPECIAL
CIRCUMSTANCES). 16. Observes the client for fatigue or pain while douching. 17. Puts the used douche back into the box, tip first, and discards. 18. Helps the client to sit up to allow the rest of the solution to drain out. 19. Helps the client to lie down again. 20. Removes the bedpan, if necessary, and helps the client to dry self with toilet
tissue.

31
21. Observes the returned solution for amount, color, odor, and any materials in it, such as mucus or particles.
22. Empties the bedpan, if necessary, in the toilet. 23. Removes the waterproof pad. 24. Disposes of waste materials. 25. Changes bed linen, if necessary. 26. Assists client into a comfortable position. 27. Cleans the bedpan, if necessary. 28. Washes hands. 29. Records the amount and type of solution, how client responded to the douche
(fatigue, uncomfortable), color and odor of the return solution. 30. Reports to supervisor if the return solution appeared bloody or foul smelling;
client appeared tired by the procedure; client complained of pain or had difficulty in administering the douche.
31. Observes, records and reports any changes in condition or behavior.

32
Checklist for Procedure E-9 ASSISTING WITH THE USE OF THE OXYGEN CONCENTRATOR 1. Explains procedure to client 2. Washes hands. 3. Assembles equipment. 4. Cleans air filter. 5. Washes humidifying bottle, if used. 6. Checks the humidifying bottle to make sure it has an adequate amount of
distilled water in it, and the bottle is screwed on tightly, if used. 7. Attaches the air tube, if not on, to the humidifying bottle or oxygen concentrator. 8. Takes and records the client’s pulse and respiratory rate. 9. Turns on the switch to the oxygen concentrator. 10. Checks that air is bubbling through the humidifying bottle. 11. Checks that air is flowing through the nasal cannula. 12. Ensures that flow meter is set to appropriate level as noted in the care plan.
(REGULATION OF FLOW METER DONE BY AIDE UNDER SPECIAL CIRCUMSTANCES ONLY.)
13. Assists the client in applying the nasal cannula. 14. Takes and records the client’s pulse and respiratory rate. 15. Turns off the oxygen concentrator. 16. Assists the client in removing the nasal cannula. 17. Washes hands. 18. Observes for difficulty breathing; rapid pulse and respirations; cold, clammy
skin; blue or darkened lips, fingernails, eyelids; client unable to sit still; client does not respond when you call client’s name, has headaches; or complains of no energy.

33
19. Records the use of the oxygen concentrator and observations of the client, and any problems with the oxygen concentrator.
20. Reports to supervisor IMMEDIATELY if client has difficulty breathing; has rapid
pulse and respirations, has cold, clammy skin; has blue or darkened lips, fingernails, and eyelids; is unable to sit still; does not respond when you call client’s name; has headaches; or complains of having no energy.

34
Checklist for Procedure E-10 ASSISTING WITH THE USE OF THE OXYGEN TANK AND LIQUID OXYGEN RESERVOIR 1. Explains procedure to the client. 2. Washes hands. 3. Assembles equipment. 4. Puts on gloves, as necessary. 5. Checks oxygen tank or reservoir gauge to see if there is enough oxygen. Call
supplier if not. 6. Washes humidifying bottle. 7. Checks the humidifying bottle to make sure it has an adequate amount of
distilled water in it, and the bottle is screwed on tightly. 8. Takes and records the client’s pulse and respiratory rate. 9. Turns on the oxygen tank. 10. Ensures that flow meter is set to appropriate level as noted in the care plan.
(REGULATION OF FLOW METER DONE BY AIDE UNDER SPECIAL CIRCUMSTANCES ONLY.)
11. Checks that water in humidifying bottle is bubbling. 12. Checks that air is flowing from the mask or nasal cannula. 13. Assists the client in applying mask or nasal cannula. 14. Cannula: prongs go into nose. 15. Mask: should fit close to face, but not pinch it. 16. Takes and records the client’s pulse and respiratory rate. 17. Turns oxygen tank off 18. Turns the flow meter off. 19. Assists the client in removing the oxygen mask or nasal cannula.

35
20. Washes hands. 21. Observes for difficulty breathing; rapid pulse and respirations; cold, clammy
skin; blue or darkened lips, fingernails, eyelids; client unable to sit still, client does not respond when you call his/her name; has headaches; or complains of no energy.
22. Records the use of the oxygen tank or liquid oxygen reservoir and observations
of the client. 23. Reports to supervisor IMMEDIATELY if client has difficulty breathing; has rapid
pulse and respirations; has cold, clammy skin; has blue or darkened lips, fingernails, and eyelids; is unable to sit still; does not respond when you call his/her name; has headaches; complains of no energy.
.

36
Checklist for Procedure E-11 ASSISTING WITH THE USE OF THE MEDICATION NEBULIZER AND AIR COMPRESSOR 1. Explains the procedure to the client. 2. Washes hands. 3. Assembles equipment. 4. Puts on gloves, as necessary. 5. Attaches air hose to the compressor. 6. Adds saline to nebulizer. 7. Ensures that medication is placed in the nebulizer. (DONE BY AIDE UNDER
SPECIAL CIRCUMSTANCES ONLY.) 8. Puts the top back on the nebulizer; attaches mouthpiece. 9. Attaches air hose to the nebulizer and mouthpiece. 10. Assists patient to a sitting or semi-reclining position if necessary. 11. Takes and records the client’s pulse and respiratory rate. 12. Turns on the compressor and checks for a visible mist from the nebulizer. 13. Reminds the client to breathe in slowly through the mouth so that the
medication is carried deep into the lungs. The client should hold his/her breath a short time; and then, breathe out.
14. Turns off machine while client coughs. Provides tissues for client. Turns
compressor on when client ready. 15. Observes for signs that client is not getting enough oxygen; has rapid pulse and
respirations; difficulty breathing; cold, clammy skin; blue or darkened lips, fingernails, eyelids; client does not respond when you call his/her name. IF THE CLIENT SHOWS ANY OF THESE SIGNS, STOP THE PROCEDURE IMMEDIATELY, AND CALLYOUR SUPERVISOR.
16. Takes client’s pulse and respirations during the use of the medication nebulizer,
and observes for a big increase in pulse rate. 17. Times the treatment.

37
18. Turns off the machine. 19. Takes client’s pulse and respirations and records. 20. Washes the nebulizer and mouthpiece according to directions on the Care Plan. 21. Washes hands. 22. Replaces the medication nebulizer and mouthpiece as needed. 23. Records the use of the medication nebulizer and any of the signs of too little
oxygen. 24. Reports to supervisor any of the signs client is not getting enough oxygen, if
client has an increase in pulse rate, or if client does not use the nebulizer as directed on the Care Plan.

38
Checklist for Procedure E-12 ASSISTING WITH THE USE OF THE CPAP MACHINE 1. Explains procedure to client. 2. Washes hands. 3. Assembles equipment. 4. Puts on gloves, as necessary. 5. Attaches tubing to flow generator. 6. Assembles valve according to directions of supplier and attaches mask. 7. Attaches valve and mask to tubing. 8. Assists client in adjusting mask and head straps. 9. Positions client comfortably in bed. 10. Observes client for snoring or sleep interruptions, need to sit up to breathe. 11. Assists client in removing mask after sleep. 12. Takes tubing, mask, and valve apart to clean according to directors of supplier. 13. Allows pieces to air dry. 14. Washes hands. 15. Observes client for problems, such as runny nose, dry throat, headache, or ear
pain. Observes for daytime sleepiness. 16. Records the use of the CPAP machine and observations of the client and any
problems with CPAP machine. 17. Reports any problems with the CPAP machine and client problems; such as:
runny nose, dry throat, headache, or ear pain; signs of sleep apnea; such as: daytime sleepiness, loud snoring, client complaints of sleep interruption, or needing to sit up to breathe.

39
Checklist for Procedure F-1 POSITIONING ON THE BACK 1. Explains procedure to client. 2. Washes hands. 3. Assembles equipment. 4. Moves the client to center of bed. 5. Turns the client onto back with head and body in-alignment. 6. Places pillow or folded bath blanket under the lower legs from knees to ankles
leaving the heels hanging free. 7. Positions the client’s arms comfortably (to the extent possible) at their side or
folded on top of abdomen. 8. Places pillow, or rolled towels alongside each hip to prevent legs from turning
out. 9. Supports the feet, toes pointed upward, with footboard or pillows at foot of bed. 10. Covers the client making sure weight of bedding is off the feet. 11. Makes the client comfortable and safe. 12. Washes hands. 13. Observes, records and reports any changes in condition or behavior.

40
Checklist for Procedure F-2 POSITIONING ON SIDE 1. Explains procedure to client. 2. Washes hands. 3. Assembles equipment. 4. Moves the client to center of bed. 5. Turns the client onto their side with head and body in-alignment. 6. Places pillow under the head and neck. 7. Places pillow (lengthwise), blanket roll, or towel roll at client’s back, anchoring in
place. 8. Flexes hips and knees slightly. 9. Positions bottom leg comfortably. 10. Positions the entire upper leg and foot on top of pillows, slightly in front of
bottom leg. 11. Pulls the bottom shoulder slightly forward so the body weight is not resting on
the bottom arm. 12. Folds the bottom arm across the chest or places the arm flat on the bed with
elbow bent and palm of hand facing up. 13. Rests the top arm in front of the client on a pillow. 14. Covers the client making sure the weight of bedding is off the feet. 15. Makes the client comfortable and safe. 16. Washes hands. 17. Observes, records and reports any changes in condition or behavior.

41
Checklist for Procedure G-1 ASSISTING WITH CHANGING A CLEAN DRESSING 1. Explains procedure to the client. 2. Washes hands. 3. Assembles equipment. 4. Provides privacy. 5. Assists client to comfortable position. 6. Provides good lighting. 7. Removes clothing over dressing if necessary. 8. Places waste bag near client for disposal of dressing/waste products. 9. Removes wrappings from new dressing. 10. Cuts tape. 11. Puts on gloves. 12. Removes and discards old dressings and used gloves. 13. Washes hands. 14. Puts on new gloves. 15. Cleans skin around wound according to directions on Care Plan. 16. Applies new dressing to wound. 17. Tapes new dressing in place. 18. Removes and discards waste bag. 19. Washes hands. 20. Stores unused/unopened supplies. 21. Observes, records and reports any changes in condition (such as change in the
appearance of the wound) or behavior.

42
Checklist for Procedure H-1 ASSISTING WITH CHANGING AN ILEOSTOMY OR COLOSTOMY POUCH 1. Explains procedure to client. 2. Washes hands. 3. Assembles equipment. 4. Prepares clean pouch system according to client’s routine or directions on Care
Plan. 1. Cuts opening in skin barrier and/or pouch using a pattern. 2. Applies adhesive, cement, or double-faced disc to reusable systems. 3. Adds deodorizer to pouch. 4. Secures bottom of open-end pouch.
5. Puts on gloves. 6. Empties open-end pouch, if necessary. 7. Removes old pouch, faceplate, and/or skin barrier according to client’s routine
or directions on Care Plan. 8. Removes any adhesive on skin with adhesive remover, if indicated by client’s
routine or directions on Care Plan. Does not rub or scrub. 9. Cleans stoma and skin around stoma gently with soft cloth or paper towel, mild
soap, and warm water. Does not rub or scrub. 10. Pats area dry. 11. Observes condition of stoma and skin. Looks for redness, raw skin, bleeding,
discharge, and client complaints of pain or soreness. 12. Covers stoma with gauze square. 13. Applies skin sealant, if used, according to client’s routine or directions on Care
Plan. 14. Prepares and applies skin barrier, if separate from pouch, according to client’s
routine or directions on Care Plan. This may be applied directly to the skin or to the pouch first. Does not apply sealant under skin barrier.
15. Removes paper backing from self-sticking disc/wafer or uses adhesive or
cement to prepare skin and pouch for a seal.

43
16. Removes gauze square covering stoma. 17. Centers faceplate opening over stoma, and presses and seals to skin. Makes
sure air is removed from pouch. 18. Tapes edges of faceplate to skin, if indicated by client’s routine or directions on
Care Plan. 19. Attaches belt, if indicated by client’s routine or directions on Care Plan. 20. Discards soiled supplies and disposable equipment. 21. Cleans and stores reusable supplies and equipment. 22. Washes hands. 23. Records and reports that pouch was changed and any problems; such as,
change in appearance of stoma, bleeding from stoma, irritation or bleeding of skin, change in odor or appearance of stool, client discomfort or pain, leaking or ill-fitting equipment.
24. Observes, records and reports any changes in condition or behavior.

44
Checklist for Procedure H-2 ASSISTING WITH EMPTYING AN OPEN-END ILEOSTOMY OR COLOSTOMY POUCH 1. Explains procedure to client. 2. Washes hands. 3. Assembles equipment. 4. Puts on gloves. 5. Positions client so that pouch can be emptied. 6. Opens bottom of pouch so that contents can drain into container. 7. Flushes emptied pouch with water from squeeze bottle or pitcher. 8. Allows water to drain from pouch. 9. Uses tissue or paper towel to dry outside of pouch. 10. Squeezes pouch to get rid of any air. 11. Closes and fastens end of pouch securely. 12. Cleans and stores reusable equipment. 13. Washes hands. 14. Observes, records, and reports any problems; such as, leaking of pouch,
bloody drainage, or client discomfort or any changes in condition or behavior.

45
Checklist for Procedure H-3 ASSISTING WITH CLEANING A REUSABLE POUCH 1. Explains procedure to client. 2. Washes hands. 3. Assembles equipment. 4. Puts on gloves. 5. Removes buildup of adhesive from face-place by rubbing with finger or using
adhesive remover. 6. Rinses pouch with cold water to remove any stool 7. Washes inside and outside of pouch using detergent or special pouch cleaner. 8. Brushes inside of pouch with appliance brush. 9. Rinses pouch thoroughly. 10. Soaks pouch in container filled with soaking solution for specified period of time. 11. Removes pouch from solution and rinses thoroughly. 12. Hangs pouch up to dry. Separates sides so they are not sticking together or
stuffs with wadded paper towel. 13. Allows pouch to air thoroughly. 14. Powders inside of pouch with talcum powder or cornstarch after it is dry. 15. Stores pouch. 16. Washes hands. 17. Observes, records, and reports any problems; such as, cracked or split
equipment.

46
Checklist for Procedure H-4 ASSISTING WITH COLOSTOMY IRRIGATION 1. Explains procedure to client. 2. Washes hands. 3. Assembles equipment. 4. Puts on gloves. 5. Fills irrigation container with amount, type, and temperature of irrigating solution
specified in Care Plan. 6. Unclamps water flow regulating valve, and allows irrigating solution to run
through tube to get rid of air; then reclamps valve. 7. Assists client into position for irrigation. 8. Hangs or holds filled irrigation water container at height so that bottom is level
with client’s shoulder or as specified in Care Plan. 9. Removes colostomy pouch or dressing and wipes off excess mucus or stool. 10. Centers faceplate or irrigation sleeve over colostomy stoma, and attaches belt
to both sides of faceplate. Belt should be snug, but not tight. 11. Places irrigation sleeve between client’s legs with bottom touching water level in
toilet bowl. 12. Lubricates cone tip or catheter tip. 13. Inserts cone tip or catheter into colostomy stoma. 14. Holds tube in place. Does not apply pressure or move. 15. Regulates flow of irrigation solution using the water flow-regulating valve so that
it meets client’s needs. Client should feel full, but not cramped. 16. Allows solution to flow into colostomy. Clamps tubing before last bit of water
leaves the tube. 17. Observes the client for discomfort, cramps, or pain. If client has cramps, shuts
off flow of water while client takes deep breaths until pain or cramps stop. Discontinues irrigation at client’s request.

47
18. Keeps cone tip or catheter in colostomy stoma momentarily. 19. Removes cone tip or catheter from colostomy stoma. 20. Closes top of irrigation sleeve. 21. Allows time for irrigation fluid and stool to be passed through stoma into
irrigation sleeve and out into the toilet. 22. Closes lower end of sleeve by folding up sleeve bottom and using a closure or
clip. 23. Assists client to move around to enable remaining stool to pass. 24. Removes irrigation sleeve and belt after irrigation process is complete. 25. Cleans stoma and skin around stoma. 26. Applies a clean pouch or gauze dressing. 27. Cleans reusable supplies. 28. Throws away disposable supplies. 29. Washes hands. 30. Observes, records and reports that irrigation was done, any problems; such as,
client having discomfort, cramping or pain; inability to insert cone tip or catheter; client refusing to have irrigation, not enough fluid return and changes in condition or behavior.
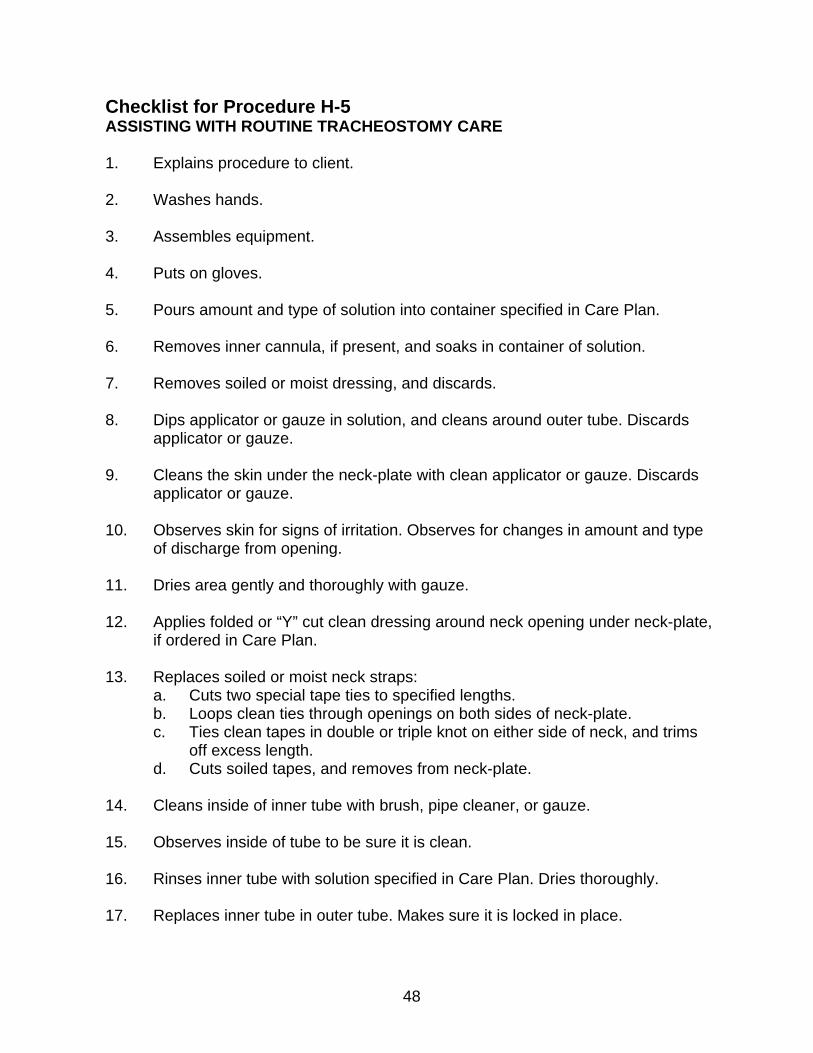
48
Checklist for Procedure H-5 ASSISTING WITH ROUTINE TRACHEOSTOMY CARE 1. Explains procedure to client. 2. Washes hands. 3. Assembles equipment. 4. Puts on gloves. 5. Pours amount and type of solution into container specified in Care Plan. 6. Removes inner cannula, if present, and soaks in container of solution. 7. Removes soiled or moist dressing, and discards. 8. Dips applicator or gauze in solution, and cleans around outer tube. Discards
applicator or gauze. 9. Cleans the skin under the neck-plate with clean applicator or gauze. Discards
applicator or gauze. 10. Observes skin for signs of irritation. Observes for changes in amount and type
of discharge from opening. 11. Dries area gently and thoroughly with gauze. 12. Applies folded or “Y” cut clean dressing around neck opening under neck-plate,
if ordered in Care Plan. 13. Replaces soiled or moist neck straps:
a. Cuts two special tape ties to specified lengths. b. Loops clean ties through openings on both sides of neck-plate. c. Ties clean tapes in double or triple knot on either side of neck, and trims
off excess length. d. Cuts soiled tapes, and removes from neck-plate.
14. Cleans inside of inner tube with brush, pipe cleaner, or gauze. 15. Observes inside of tube to be sure it is clean. 16. Rinses inner tube with solution specified in Care Plan. Dries thoroughly. 17. Replaces inner tube in outer tube. Makes sure it is locked in place.

49
18. Discards soiled materials and solutions. 19. Cleans reusable equipment, and stores properly. 20. Washes hands. 21. Observes, records and reports any problems with tracheostomy, such as
unusual odor, difficulty in replacing inner tuber, or client discomfort and any changes in condition or behavior.